How AI shapes your feed: An explainable social media simulator for the classroom

Post Syndicated from Diana Kirby original https://www.raspberrypi.org/blog/how-ai-shapes-your-feed-an-explainable-social-media-simulator-for-the-classroom/

Social media can have a powerful impact on the way we see and experience the world. What we see in our feeds is not random: it is determined by AI-driven systems that collect vast amounts of data, build user profiles, analyse engagement, and generate recommendations. But while young people are prolific users of social media, studies show that many have little understanding of what is happening ‘under the hood’

Henriikka Vartiainen and Matti Tedre from the University of Eastern Finland
Researchers Henriikka Vartiainen and Matti Tedre.

In our September research seminar, we welcomed back Henriikka Vartiainen and Matti Tedre from the University of Eastern Finland. They introduced Somekone, a social media simulator that is designed to help learners understand some of the fundamental processes behind social media platforms. Their team has been developing AI education materials and tools since 2019, including GenAI Teachable Machine, which they presented at our May research seminar.

Collaboration and co-design

Henriikka explained that the development of the Somekone tool emerged from the team’s long-term collaboration with teachers and schools in Finland. They co-developed the tool with the aim of making concepts like data collection, engagement, profiling, recommendations, filter bubbles, and polarisation visible and explainable for students aged 11 to 13 years old.

Photo of three school pupils together looking at a mobile phone.

A four-phase learning model

Henriikka described the pedagogical model that the team follows in all of their AI education interventions. Their goal is not only to support students to develop their understanding of AI concepts, but also to foster ethical awareness and a sense of agency.

  • Phase 1: Contextualisation and familiarisation
    Students begin by discussing their experiences with social media and their initial ideas about how platforms such as TikTok, YouTube, and Instagram work. This activates students’ prior knowledge and helps connect the learning to their own interests. It also enables teachers to uncover any misconceptions the students may have.
  • Phase 2: Exploration
    Students explore their initial ideas by experimenting with the Somekone tool. They discover how different types of data are collected and combined for profiling in a way that connects these new concepts to their own everyday lives.
  • Phase 3: Design and inquiry
    Students explore the Somekone tool more deeply. Teachers guide them through activities where the students analyse, interpret, and discuss the data they can see in the tool. Importantly, the data they are using has all been gathered from their activity on the platform. Students can see how the likes, follows, and comments they and their classmates make change the images they are shown, and this is all real time.
  • Phase 4: Ethical and societal reflection
    Students reflect on what they have learnt and consider the broader impacts of social media. Teachers encourage them to think critically, question the way social media platforms currently work, and imagine alternatives. At the end of the project, students write letters to decision-makers with their suggestions for how social media could better serve children’s interests.

Inside the simulator

Matti then gave a live demonstration of Somekone. Nothing compares to seeing the tool in action, so do check out the video of his demo here!

Students log on to the tool and are presented with an Instagram-style feed of images. They scroll through the feed and like, share, or comment on images that catch their attention or match their interests. For many students this is a very familiar type of environment, and they really enjoy playing with the app!

Four young people sitting at their desks, on their mobile phones.

However, the unique value of Somekone is that it provides students with a real-time view of the way data is collected from every single user interaction, and demonstrates what is done with that data. It also allows students to experiment with a social media tool in the classroom without any data protection issues, as all of the data is stored locally.

Learners explore:

  • Data collection in real time. Working in pairs, one student browses the image feed, while the other watches a live view of the data that the simulator is collecting every time their partner interacts with or simply pauses on a post.
  • Profile building. Somekone shows how all this data accumulates to build a profile. Students watch their profiles developing based on the way they and their classmates are interacting with their feeds.
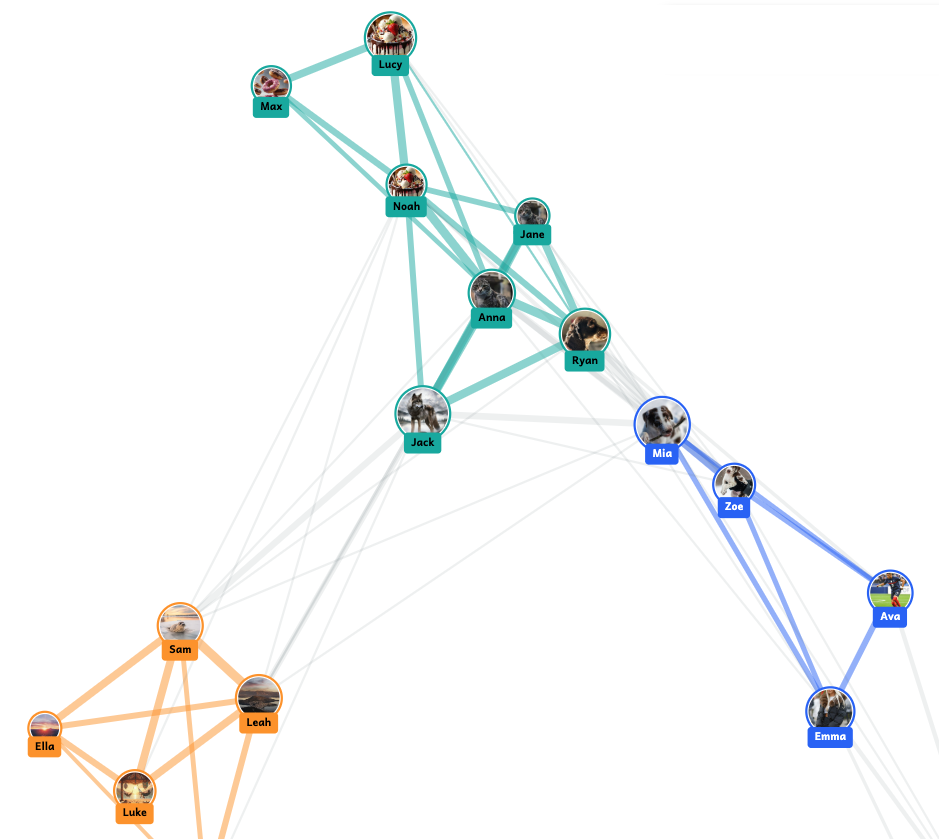
  • Clustering and connections. Students then see how the tool groups profiles to create clusters of users with similar interests. Often friendship groups in the classroom are evident on screen because students sitting next to each other have all chosen to engage with the same things!
The simulator creates clusters of users with similar interests, which update in real time as students interact with posts on their feeds

The simulator creates clusters of users with similar interests, which update in real time as students interact with posts on their feeds

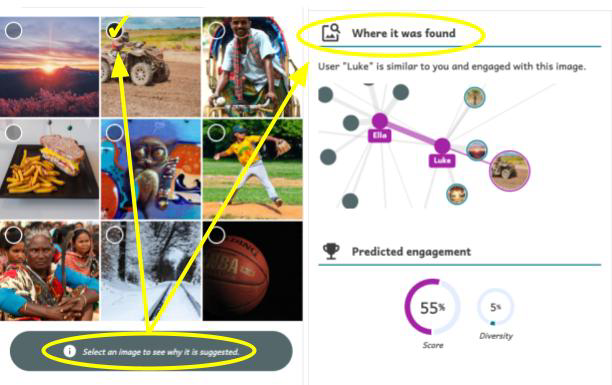
  • Explainable recommendations. A key feature of Somekone is that it provides explanations for why it recommends posts to users. Students learn that recommendations can be based on various things, such as the image’s tag matching the tag on other posts they liked, or the image being popular among other users with similar profiles to theirs. These are the mechanisms that underpin real recommendation systems, but Somekone makes them explicit.
The tool provides an explanation for why each post is recommended

The tool provides an explanation for why each post is recommended

  • Filter bubbles and polarisation. A filter bubble forms when a user only sees social media posts that match their existing interests or beliefs, due to highly personalised recommendation systems. Somekone presents this concept in a visually compelling way through a heatmap showing all the content in the system, with a colour scale indicating which posts are most likely to be shown to a particular user, and which they will never encounter. By comparing different users’ filter bubbles side by side, students start to understand how polarisation can arise. As Matti said: “If our feeds are so different from each other that I never see the pictures that you see and you never see the pictures I see, then […] we don’t even share the same reality”.
Two users’ heatmaps presented side by side, showing their respective filter bubbles

Two users’ heatmaps presented side by side, showing their respective filter bubbles

  • Algorithm settings. A key learning opportunity is that students can adjust the algorithm’s parameters and observe how this changes their feed and their filter bubble. They can choose between personalised or non-personalised recommendations, select how posts are ranked, and decide whether to allow any diversity in the popularity of posts recommended to them. This is key to ‘opening up the box’.

For teachers, the tool has a simple guided interface to make it easy to use in class. There is also a button that teachers can use to pause the app, stopping students from scrolling (much to their dismay!) in order to focus their attention on the teacher when they are explaining concepts.

Evidence of impact

The research team used pre- and post-tests to evaluate what impact the intervention had on students’ understanding of social media mechanisms and on their sense of agency in relation to data. They conducted the post-test a week after the intervention, and then also did a delayed post-test six months later to see whether any changes were sustained. They found:

  • Improved understanding of key concepts. Learners showed statistically significant improvements in identifying different types of data traces and in understanding how data profiling works. They also showed some improvement in grasping recommendation mechanisms.
  • Retention over time. These improvements were generally still evident six months later, particularly in the case of understanding data traces.
  • Stronger sense of agency. The team found that students’ sense of data agency improved after taking part in the intervention. This is really important as students are more likely to want to study a topic further if they have feelings of agency and self-efficacy.

Accessing the tool

The Somekone tool is freely available online — in Finnish, English, German, and French — at somekone.gen-ai.fi. The developer Nick Pope has also made the source code available on GitHub at github.com/knicos/genai-somekone. 

However, the supporting materials and teacher resources are currently only available in Finnish and the underpinning pedagogies relate to the Finnish context.

Join our next seminar

Join us at our next seminar on Tuesday, 11 November from 17:00 to 18:30 GMT to hear Karl-Emil Bilstrup (Copenhagen University) speak about using the micro:bit to explore machine learning practices. We hope to see you there!

To sign up and take part in our research seminars, click below:

You can also view the schedule of our upcoming seminars, and catch up on past seminars on our previous seminars page.

The post How AI shapes your feed: An explainable social media simulator for the classroom appeared first on Raspberry Pi Foundation.

Extract audio from your videos with Cloudflare Stream

Post Syndicated from Pakhi Sinha original https://blog.cloudflare.com/extract-audio-from-your-videos-with-cloudflare-stream/

Cloudflare Stream loves video. But we know not every workflow needs the full picture, and the popularity of podcasts highlights how compelling stand-alone audio can be. For developers, processing a video just to access audio is slow, costly, and complex. 

What makes video so expensive? A video file is a dense stack of high-resolution images, stitched together over time. As such, it is not just “one file” —  it’s a container of high-dimensional data such as frames per second, resolution, codecs. Analyzing video means traversing time resolution frame rate.

Why audio extraction

By comparison, an audio file is far simpler. If an audio file consists of only one channel, it is defined as a single waveform. The technical characteristics of this waveform are defined by the sample rate (the number of audio samples taken per second), and the bit depth (the precision of each sample).

With the rise of computationally intensive AI inference pipelines, many of our customers want to perform downstream workflows that require only analyzing the audio. For example:

  • Power AI and Machine Learning: In addition to translation and transcription, you can feed the audio into Voice-to-Text models for speech recognition or analysis, or AI-powered summaries.

  • Improve content moderation: Analyze the audio within your videos to ensure the content is safe and compliant.

Using video data in such cases is expensive and unnecessary. 

That’s why we’re introducing audio extraction. Through this feature, with just a single API call or click in the dashboard, you can now extract a lightweight M4A audio track from any video.

We’re introducing two flexible methods to extract audio from your videos. 

1. On-the-Fly audio extraction through Media Transformations

Media Transformations is perfect for processing and transforming short-form videos, like social media clips, that you store anywhere you’d like. It works by fetching your media directly from its source, optimizing it at our edge, and delivering it efficiently.

We extended this workflow to include audio. By simply adding mode=audio to the transformation URL, you can now extract audio on-the-fly from a video file stored anywhere.

Once Media Transformations is enabled for your domain, you can extract audio from any source video. You can even clip specific sections by specifying time and duration.

For example:

https://example.com/cdn-cgi/media/mode=audio,time=5s,duration=10s/<SOURCE-VIDEO>

The above request generates a 10 second M4A audio clip from the source video, beginning at the 5-second mark. You can learn more about setup and other options in the Media Transformations documentation. 

2. Audio downloads

You can now download the audio track directly for any content that you manage within Stream. Alongside the ability to generate a downloadable MP4 for offline viewing, you can also now create and store a persistent M4A audio file.

Workers AI demo

Here, you can see a sample piece of code that demonstrates how to use Media Transformations with one of Cloudflare’s own products —  Workers AI. The following code creates a two-step process: first transcribing the video’s audio to English, then translating it into Spanish.

export default {
 async fetch(request, env, ctx) {


   // 1. Use Media Transformations to fetch only the audio track
   const res = await fetch( "https://blog.cloudflare.com/cdn-cgi/media/mode=audio/https://pub-d9fcbc1abcd244c1821f38b99017347f.r2.dev/announcing-audio-mode.mp4" );
   const blob = await res.arrayBuffer();


   // 2. Transcribe the audio to text using Whisper
   const transcript_response = await env.AI.run(
     "@cf/openai/whisper-large-v3-turbo",
     {
       audio: base64Encode(blob), // A base64 encoded string is required by @cf/openai/whisper-large-v3-turbo
     }
   );


   // Check if transcription was successful and text exists
   if (!transcript_response.text) {
       return Response.json({ error: "Failed to transcribe audio." }, { status: 500 });
   }


   // 3. Translate the transcribed text using the M2M100 model
   const translation_response = await env.AI.run(
     '@cf/meta/m2m100-1.2b',
     {
       text: transcript_response.text,
       source_lang: 'en', // The source language (English)
       target_lang: 'es'  // The target language (Spanish)
     }
   );


   // 4. Return both the original transcription and the translation
    return Response.json({
        transcription: transcript_response.text,
        translation: translation_response.translated_text
    });


 }
};


export function base64Encode(buf) {
 let string = '';
 (new Uint8Array(buf)).forEach(
   (byte) => { string += String.fromCharCode(byte) }
 )
 return btoa(string)
}

After running, the worker returns a clean JSON response. Shown below is a snippet of the transcribed and then translated response the worker returned.

Transcription:

{
  "transcription": "I'm excited to announce that Media Transformations from Cloudflare has added audio-only mode. Now you can quickly extract and deliver just the audio from your short form video. And from there, you can transcribe it or summarize it on Worker's AI or run moderation or inference tasks easily.",
  "translation": "Estoy encantado de anunciar que Media Transformations de Cloudflare ha añadido el modo solo de audio. Ahora puede extraer y entregar rápidamente sólo el audio de su vídeo de forma corta. Y desde allí, puede transcribirlo o resumirlo en la IA de Worker o ejecutar tareas de moderación o inferencia fácilmente."
}

Technical details

As a summer intern on the Stream team, I worked on shipping this long-requested feature. My first step was to understand the complex architecture of Stream’s media pipelines.

When a video is processed by Stream, it can follow one of two paths. The first is our video-on-demand (VOD) pipeline, which handles videos directly uploaded to Stream. It generates and stores a set of encoded video segments for adaptive bitrate streaming that can be streamed via HLS/DASH. The other path is our on-the-fly-encoding (or OTFE) pipeline, that drives the Stream Live and Media Transformations service. Instead of pre-processing and storing files, OTFE fetches media from a customer’s own website and performs transformations at the edge.

My project involved extending both of these pipelines to support audio extraction.

OTFE pipeline

The OTFE pipeline is designed for real-time operations. The existing flow was engineered for visual tasks. When a customer with Media Transformations enabled makes a request on their own website, it’s routed to our edge servers, which acts as the entry point. The request is then validated, and per the user’s request, OTFE would fetch the video and generate a resized version or a still-frame thumbnail.

In order to support audio-only extraction, I built upon our existing workflow to add a new mode. This involved:

  1. Extending the validation logic: Specifically for audio, a crucial validation step was to verify that the source video contained an audio track before attempting extraction. This was in addition to pre-existing validation steps that ensure the requested URL was correctly formatted. 

  2. Building a new transformation handler: This was the core of my project. I built a new handler within the OTFE platform that specifically discarded the visual tracks in order to deliver a high-quality M4A file.

VOD pipeline

Similar to my work on OTFE, this project involved extending our current MP4 downloads workflow to audio-only, M4A downloads. This presented a series of interesting technical decisions. 

The typical flow for creating a video download begins with a POST request to our main API layer, which handles authentication and validation, and creates a corresponding database record. Which then enqueues a job in our asynchronous queue where workers perform the processing task. To enable audio downloads for VOD, I introduced new, type-specific API endpoints (POST /downloads/{type}) while preserving the legacy POST /downloads route as an alias for creating downloads of the default, or video, download type. This ensured full backward compatibility.

The core work, of creating a download, is performed by our asynchronous queue. Which included:

  • Adding logic to the consumer to detect the new audio download type

  • Pulling the ffmpeg template we define in our API layer to properly encode the audio stream into a high-quality M4A container

By extending each component of this pipeline– from the API routes to the media processing commands– I was able to deliver a new, highly-requested feature that unlocks audio-centric workflows for our customers!

Dash screenshots

We’re excited to announce that this feature is also available in the Stream dashboard. Simply navigate to any of your videos, and you’ll find the option to download the video or just the audio.


Once the download is ready, you will see the URL for the file, along with the option to disable it.


That’s a wrap

This project addressed a long-standing customer need, providing a simpler way to work with audio from video. I’m truly grateful for this entire journey, from understanding the problem to shipping the solution, and especially for the mentorship and guidance I received from my team along the way. We are excited to see how developers use this new capability to build more efficient and exciting applications on Cloudflare Stream.

You can try the audio extraction feature by uploading a video to Stream or using the API! If you’re interested in tackling these kinds of technical challenges yourself, explore our internship and early talent programs to start your own journey.

Async QUIC and HTTP/3 made easy: tokio-quiche is now open-source

Post Syndicated from Mendes original https://blog.cloudflare.com/async-quic-and-http-3-made-easy-tokio-quiche-is-now-open-source/

A little over 6 years ago, we presented quiche, our open source QUIC implementation written in Rust. Today we’re announcing the open sourcing of tokio-quiche, our battle-tested, asynchronous QUIC library combining both quiche and the Rust Tokio async runtime. Powering Cloudflare’s Proxy B in Apple iCloud Private Relay and our next-generation Oxy-based proxies, tokio-quiche handles millions of HTTP/3 requests per second with low latency and high throughput. tokio-quiche also powers Cloudflare Warp’s MASQUE client, replacing our WireGuard tunnels with QUIC-based tunnels, and the async version of h3i.

quiche was developed as a sans-io library, meaning that it implements the state machine required to handle the QUIC transport protocol while not making any assumptions about how its user intends to perform IO. This means that, with enough elbow grease, anyone can write an IO integration with quiche! This entails connecting or listening on a UDP socket, managing sending and receiving UDP datagrams on that socket while feeding all network information to quiche. Given we need this integration to be async, we’d have to do all this while integrating with an async Rust runtime. tokio-quiche does all of that for you, no grease required.

Lowering the barrier to entry

Originally, tokio-quiche was only used as the core of Oxy’s HTTP/3 server. But the spark to create tokio-quiche as a standalone library was our need for a MASQUE-capable HTTP/3 client. Our Zero Trust and Privacy Teams need MASQUE clients to tunnel data through WARP and our Privacy Proxies respectively, and we wanted to use the same technology to build both the client and server.

We initially open-sourced quiche to share our memory-safe QUIC and HTTP/3 implementation with as many stakeholders as possible. Our focus at the time was a low-level, sans-io design that could integrate into many types of software and be deployed widely. We achieved this goal, with quiche deployed in many different clients and servers. However, integrating sans-io libraries into applications is an error-prone and time-consuming process. Our aim with tokio-quiche is to lower the barrier of entry by providing much of the needed code ourselves.

Cloudflare alone embracing HTTP/3 is not of much use if others wanting to interact with our products and systems don’t also adopt it. Open sourcing tokio-quiche makes integration with our systems more straightforward, and helps propel the industry into the new standard of HTTP. By contributing tokio-quiche back to the Rust ecosystem, we hope to promote the development and usage of HTTP/3, QUIC and new privacy preserving technologies.

tokio-quiche has been used internally for some years now. This gave us time to refine and battle-test it, demonstrating that it can handle millions of RPS. tokio-quiche is not intended to be a standalone HTTP/3 client or server, but implements low-level protocols and allows for higher-level projects in the future. The README contains examples of server and client client event loops.

It’s actors all the way down

Tokio is a wildly popular asynchronous Rust runtime. It efficiently manages, schedules and executes the billions of asynchronous tasks which run on our edge. We use Tokio extensively at Cloudflare, so we decided to tightly integrate quiche with it – thus the name, tokio-quiche. Under the hood, tokio-quiche uses actors to drive different parts of the QUIC and HTTP/3 state machine. Actors are small tasks with internal state that usually use message passing over channels to communicate with the outside world.

The actor model is a great abstraction to use for async-ifying sans-io libraries due to the conceptual similarities between the two. Both actors and sans-io libraries have some kind internal state which they want exclusive access to. They both usually interact with the outside world by sending and receiving  “messages”. quiche’s “messages” are really raw byte buffers which represent incoming and outgoing network data. One of tokio-quiche’s “messages” is the Incoming struct which describes incoming UDP packets. Due to these similarities, async-ifying a sans-io library means: awaiting new messages or IO, translating the messages or IO into something the sans-io library understands, advancing the internal state machine, translating the state machine’s output to a message or IO, and finally sending the message or IO. (For more discussion on actors with Tokio, make sure to take a look at Alice Rhyl’s excellent blog post on the topic.)

The primary actor in tokio-quiche is the IO loop actor, which moves packets between quiche and the socket. Since QUIC is a transport protocol, it can carry any application protocol you want. HTTP/3 is quite common, but DNS over QUIC and the upcoming Media over QUIC are other examples. There’s even an RFC to help you create your own QUIC application! tokio-quiche exposes the ApplicationOverQuic trait to abstract over application protocols. The trait abstracts over quiche’s methods and the underlying I/O, allowing you to focus on your application logic. For example, our HTTP/3 debug and test client, h3i, is powered by a client-focused, non-HTTP/3 ApplicationOverQuic implementation.


Server Architecture Diagram

tokio-quiche ships with an HTTP/3-focused ApplicationOverQuic called H3Driver. H3Driver hooks up quiche’s HTTP/3 module to this IO loop to provide the building blocks for an async HTTP/3 client or server. The driver turns quiche’s raw HTTP/3 events into higher-level events and asynchronous body data streams, allowing you to respond to them in kind. H3Driver is itself generic, exposing ServerH3Driver and ClientH3Driver variants that each stack additional behavior on top of the core driver’s events.


Internal Data Flow

Inside tokio-quiche, we spawn two important tasks that facilitate data movement from a socket to quiche. The first is the InboundPacketRouter, which owns the receiving half of the socket and routes inbound datagrams by their connection ID (DCID) to a per-connection channel. The second task, the IoWorker actor, is the aforementioned IO loop and drives a single quiche Connection. It intersperses quiche calls with ApplicationOverQuic methods, ensuring you can inspect the connection before and after any IO interaction.

More blog posts on the creation of tokio-quiche are coming soon. We’ll discuss actor models and mutexes, UDP GRO and GSO, tokio task coop budgeting, and more.

Next up: more on QUIC and beyond!

tokio-quiche is an important foundation for Cloudflare’s investment into the QUIC and HTTP/3 ecosystem for Tokio – but it is still only a building block with its own complexity. In the future, we plan to release the same easy-to-use HTTP client and server abstractions that power our Oxy proxies and WARP clients today. Stay tuned for more blog posts on QUIC and HTTP/3 at Cloudflare, including an open-source client for customers of our Privacy Proxies and a completely new service that’s handling millions of RPS with tokio-quiche!

For now, check out the tokio-quiche crate on crates.io and its source code on GitHub to build your very own QUIC application. Could be a simple echo server, a DNS-over-QUIC client, a custom VPN, or even a fully-fledged HTTP server. Maybe you will beat us to the punch?

MDR ROI, Proven Outcomes, and What Security Leaders Need to Ask For

Post Syndicated from Rapid7 original https://www.rapid7.com/blog/post/it-mdr-roi-what-security-leaders-need-to-ask-for

Cybersecurity ROI is notoriously difficult to define, but not impossible.

In this Experts on Experts: Commanding Perspectives episode, Craig Adams chats with Steve Edwards, Director of Threat Intelligence & Detection Engineering, about what customers really get from Rapid7 MDR and how to think more clearly about value.

They cut through buzzwords and talk real-world outcomes: visibility, consolidation, faster response, and trust.

What ROI really looks like

As Steve explains, the ROI conversation starts with confidence. Once customers know they can trust the MDR team to cut through noise and take action, the benefits snowball from reduced false positives, to better visibility and smarter spend.

The IDC study highlighted a 422% ROI over three years. But the real signal is what teams can do with the time and clarity they gain.

To bring these numbers into your own context, you can use the Rapid7 MDR ROI Calculator – simply plug in your own parameters and apply IDC’s methodology to estimate your unique return. Try the ROI Calculator!

Telemetry without tradeoffs

Craig and Steve also dig into one of the biggest detection challenges today: partial visibility. Many orgs still pay by the log, creating disincentives for full data ingestion. MDR’s all-in access model helps customers detect threats earlier and act faster, without needing to triage upstream data decisions.

MITRE mapping makes it click

One of the most actionable insights? MITRE mapping. Steve talks about how customers are using visual coverage data to pinpoint gaps and prioritize onboarding new tech, or building compensating controls.

No-cap incident response

They also walk through what happens during the first 24 – 48 hours of an incident, and why having no cap on IR hours means Rapid7 can stay involved from containment to eradication.

Ready to dive in?

Watch the full episode here
Explore Rapid7’s full ROI analysis

⠀

Missed our earlier episodes?
Catch up on Episode 1 with Laura Ellis on agentic AI and system governance [here], Episode 2 with Jon Hencinski on MDR strategy and SOC readiness [here] and Episode 3 with Raj Samani on cybercrime-as-a-service [here]

„Киномания 2025“ – няколко акцента

Post Syndicated from Нева Мичева original https://www.toest.bg/kinomaniya-2025-nyakolko-aktsenta/

„Киномания 2025“ – няколко акцента

От 13 до 30 ноември „Киномания“ се завръща за 39-ти път с 55 филма (повечето нови-новенички плюс няколко грамадни класики, като „Буч Касиди и Сънданс Кид“), интересни гостувания (вж. Валерия Бруни Тедески), изложба (изумителните акварелни възстановки на филмови интериори на Боряна Илиева от Floor Plan Croissant са вече подредени в Дома на киното) и книжна премиера („Скандинавското кино – стилове и мотиви“ на Мирела Василева). Фестивалът ще бъде открит с драмата на Стефан Командарев Made in EU и ще прелее от София в Пловдив, Варна, Бургас и Стара Загора. Предварителният обзор на основните събития няма как да бъде изчерпателен, но тук ще се опитаме да направим извадка от най-апетитното в програмата.

Семейни вариации

Всяко семейство е театрална сцена с все трупата, всеки член от която играе роля, способна да осмисли или обезсмисли останалите. Отношенията са ритуални, репликите – с предистория, а в ключовите пространства тежката символика се боричка за надмощие с явната бутафория… Интересно е как тези изречения важат еднакво за два от най-чаканите филми на фестивала – „Сантиментална стойност“ на Йоаким Триер и „Баща, майка, сестра, брат“ на Джим Джармуш.

„Киномания 2025“ – няколко акцента
Стелан Скарсгард и Ренате Рейнсве в „Сантиментална стойност“

„Сантиментална стойност“ (Гран При от „Кан 2025“) започва с помитащо красива сцена зад кулисите – актрисата с Ибсеново име Нора (Ренате Рейнсве) преживява срив и е готова на всичко, само и само да не излиза пред публиката. Виждаме я в криза и малко по-късно, когато баща ѝ (Стелан Скарсгард), прочут режисьор, се завръща след дълго мълчание за погребението на майката, с която отдавна е разделен. Действието се върти около ставащото с Нора, но имаме възможност да се вгледаме и в личността на сестра ѝ, и в личността на бащата, чиято вина към двете му дъщери е по-сериозна от едното отсъствие. Сложните отношения, които Триер и обичайният му сценарист Ескил Фогт разгръщат на екрана (семейни, но и творчески, понеже това е история за хората на изкуството), се проследяват с удоволствие във всичките им нюанси и препратки; актьорите са един път; камерата на Каспер Туксен създава пиршество за очите.

„Киномания 2025“ – няколко акцента
Александър Скарсгард и Хари Мелинг в Pillion

Апропо, в новото издание на „Киномания“ имаме шанс да видим и работата на двама от седемте синове на Стелан Скарсгард (Скаршгорд в родната им Швеция). В Pillion – пълнометражен дебют на британеца Хари Лайтън – Александър (зарежете разните му тарзани, вампири и викинги и вижте как пунтира Вернер Херцог или играе човеколюбив андроид) e загадъчен почитател на моторите и доминацията, който среща подходящ „адепт“. Ако неравенството ви влудява, а обменът на флуиди между непознати не е сред любимите ви зрелища, първата половина на филма ще ви измъчи. Във втората обаче има развой, който сякаш си струва търпението. Бил Скарсгард, на свой ред, излиза от амплоато си на въображаемо чудовище (клоунът Пениуайз от „То“, граф Орлок от „Носферату“ и пр.) в „Мъртва хватка“ на винаги интересния Гюс Ван Сант и се вживява в образа на прегрял от делнични злополуки американец от 70-те, който взема заложник (случаят е действителен и една снимка от мястото на събитията дори е наградена с „Пулицър“).

„Баща, майка, сестра, брат“ („Златен лъв“ от последната „Мостра“) щеше да е доста сходен със „Сантиментална стойност“, ако не беше фрагментиран и отвлечен по маниера на Уес Андерсън (чиято „Финикийска схема“ е също на фестивала, но може и да се прескочи) – пестеливо играещи кинозвезди с привидно многозначителни реплики на дизайнерски фон… Сглобен е от три етюда от по около половин час, спретнато разпределени между три държави (САЩ, Ирландия, Франция) и свързани помежду си с повторението на дребни детайли – ръчен часовник, рамкирани снимки от отминали времена, прелитащи скейтбордисти. В първата глава героят на Том Уейтс чака необичайно посещение от двете си иначе рядко общуващи пораснали деца – Адам Драйвър (по-кроткия) и Маим Бялик (по-дивата). Във втората част е същото, но със сладки към чая и доза превзетост: майката (Шарлот Рамплинг) посреща дъщерите си Вики Крипс (по-дивата) и Кейт Бланшет (по-кротката). Нищо особено не се случва, загатват се дисбаланси. В третия сегмент брат и сестра близнаци се срещат в опустелия апартамент на загиналите си родители – само при тях се усеща топлота и взаимно познаване. Приятно е за наблюдаване; контрастът между видимото и намекнатото отваря луфт за лични асоциации; цел не се забелязва, както и нещо по-конкретно за помнене.

„Киномания 2025“ – няколко акцента
Кадър от „Лятна книга“

И още за семейството… Прозата на Туве Янсон е привидно простичка, коварно дълбока и съзнателно лишена от сантименталност. Филмът на Чарли Макдауъл по прочутата ѝ „Лятна книга“ е красиво заснет (август на малък финландски остров няма как да изглежда безцветно), но допуска грехове към изискания стил на извора си: скръбта е изведена в типични жестове; парадоксалните, понякога резки маниери на героите са туширани; лиричната музика пресладява. Янсон твърди, че 6-годишната ѝ главна героиня е 1/3 измислица, 1/3 спомен за собственото ѝ детство и 1/3 племенничката ѝ София, а според въпросната племенничка отношенията баба–внучка в книгата са анархични и крайно неконвенционални. Филмът обаче е подреден и очевиден и у бабата (Глен Клоуз) не личи ексцентричната даровитост на майката на Янсон, от която е вдъхновен персонажът. Това е един протяжен, несмел опит за отдаване на почит, макар че не изключвам да привлече нови читатели на финландската писателка. Любопитен факт: първото дете на Чарли (син на актьора Малкълм Макдауъл) и съпругата му Лили Колинс (актриса и дъщеря на Фил Колинс от „Дженезис“), което се роди в началото на тази година, носи името Туве.

Стари любимци и нови открития

Please adore me, казва случайно срещнатата любов в Blue Moon – световноизвестна и обичана песен на почти век, родена от плодотворното сътрудничество на текстописеца Лоренц Харт и композитора Ричард Роджърс (съавтори на още близо 1000 парчета, сред които и My Funny Valentine).

„Киномания 2025“ – няколко акцента
Андрю Скот и Итън Хоук в Blue Moon

Blue Moon на Ричард Линклейтър докосва душата точно като този наивен, отчаян призив: моля, обожавай ме. Бъбривият, невротичен, интелигентен филм концентрира и стилизира финалните месеци на Лоренц Харт в няколко часа срещи и разговори, уж състояли се в един бар след премиерата на „Оклахома!“ – първия от ред мюзикъли, с които Роджърс влиза в ново, много успешно партньорство, от което Харт е изключен. Харт е блестящ, раним, безнадеждно самотен и алкохолизиран – човек, когото всички харесват, но не познават, и който никак не си намира място. В тази си роля Итън Хоук е банализиран физически и все пак неустоим със светкавичните си реакции, чувството си за ритъм, горчивия хумор. Двамата с Линклейтър са фантастичен творчески тандем и Blue Moon е поредното потвърждение. (А на „Киномания“ може да се гледа и „Новата вълна“ – експеримент на Линклейтър от последния „Кан“ с герои Годар, Трюфо, Шаброл и ко.)

„Киномания 2025“ – няколко акцента
Кадър от „Мечти“

Отлично попадение в програмата е и „Мечти“ – втори в кинотрилогията на Даг Йохан Хаугерюд, посветена на желанието и на Осло и включваща още „Секс“ и „Любов“. Премиерите на трите концептуално свързани, но самостоятелни истории се състояха в рамките на една година в Берлин и Кан, като „Мечти“ стана първият норвежки филм, спечелил „Златна мечка“. В него 16-годишната Йохане разказва за първата си любов – към учителката Йохана – в дневник, който година по-късно майка ѝ и баба ѝ четат и обсъждат. Прекрасна палитра, близки планове, много глас зад кадър („… и мама каза, че вярва в любовта, демокрацията и свободата на словото, а баба отговори: „Свободната реч няма да те държи за ръката на смъртното ти ложе!…“), забележително цивилизовани разговори – Хаугерюд е създал пространство, в което на жените ни е добре, поколенията не се мачкат взаимно, а мракът се отпъжда с поезия…

(Внимание: да не се бърка с мексиканския си съименник. И „Мечти“ на Мишел Франко идва от тазгодишното „Берлинале“, където зарадва част от критиците, но е схематично, почти ученическо упражнение по илюстриране на теза: богатите спонсори на изкуството не са ангели, бедните им протежета – също, а в любовния танц помежду им има повече корист, отколкото чувство.)

„Киномания 2025“ – няколко акцента
Кадър от „Гласът на Хинд Ражаб“

И все пак, ако тази есен трябва да гледате само един филм, нека това да е „Гласът на Хинд Ражаб“ на Каутер Бен Хания. Той е корава, но нужна хапка за ума и чувствата, която най-леко се преглъща в компанията на съпреживяващи. В кореспонденцията от Сан Себастиан, в която ви разказахме за „Гласът“, засегнахме и други две заглавия, които са на път към София: „Мода“ на Алис Винокур и „Умри, моя любов“ на Лин Рамзи. Докато първият е обречен случай на киноезично пустословие, във втория има проблясъци и на смисъл, и на страст, макар да е далеч от мощта и умелостта на аржентинската книга, по която е създаден. В следващ текст обсъдихме „Тайният агент“ на талантливия Клебер Мендонса Фильо и се помъчихме да ви опазим от надценения „Сират“ на Оливер Лаше – е, и те ще са на „Киномания“, бидейки сред най-разпалено обсъжданите през годината.

Първата разпродадена прожекция през 2025 г. се оказа на „Без конкуренция“ на Парк Чан-Уук: уволнен технолог в производството на хартия решава да изтреби малкото други незаети експерти от същия ранг, които вижда като пречка пред евентуалното му наемане на работа… Макар да забелязвам някои от чаровете на характерното за корееца повествование, трудно понасям мащаба, в който нормализира насилието. Затова аз лично ще участвам в разпродаването на други прожекции. На „Последният викинг“ например – заради други превъзходни филми на Андерс Томас Йенсен с Николай Ли Кос и Мадс Микелсен (вж. „Ябълките на Адам“ и „Рицари на справедливостта“). Или на „Хамнет“ на Клоуи Джао – заради спомена за кротката сила на нейната „Земя на номади“ и епизода от живота на Шекспир, който си е избрала за тема този път. Или на „Пет секунди“ на Паоло Вирдзи, който вече е правил малки чудеса заедно с Валерия Бруни Тедески в „Човешки капитал“ и „Лудетини“…

Ноември е щедър

на филмови удоволствия в София и – освен предложенията на „Киномания“ – включва и тези на младия, нишов, но отдавна необходим местен фестивал на ужасите It’s Alive, който по Вси светии започна третото си издание с епичния мюзикъл за младоженци, извънземни и луди учени The Rocky Horror Picture Show. (Не ми е известно дали преди прожекцията в Дома на киното въобще е имало други в България, но знам, че в някои страни съществуват зали, специализирани от половин век в смешния култ към него.)

Казано иначе, фестивалната ни есен е истински лукс. За да продължи да я има, е хубаво да подкрепим ентусиастите, които я организират, с повече присъствие в залите и добронамерена обратна връзка. Вярно е, че в културата предлагането по принцип предхожда търсенето. Сега обаче ние, зрителите, сме на ред.

Rigged Poker Games

Post Syndicated from Bruce Schneier original https://www.schneier.com/blog/archives/2025/11/rigged-poker-games.html

The Department of Justice has indicted thirty-one people over the high-tech rigging of high-stakes poker games.

In a typical legitimate poker game, a dealer uses a shuffling machine to shuffle the cards randomly before dealing them to all the players in a particular order. As set forth in the indictment, the rigged games used altered shuffling machines that contained hidden technology allowing the machines to read all the cards in the deck. Because the cards were always dealt in a particular order to the players at the table, the machines could determine which player would have the winning hand. This information was transmitted to an off-site member of the conspiracy, who then transmitted that information via cellphone back to a member of the conspiracy who was playing at the table, referred to as the “Quarterback” or “Driver.” The Quarterback then secretly signaled this information (usually by prearranged signals like touching certain chips or other items on the table) to other co-conspirators playing at the table, who were also participants in the scheme. Collectively, the Quarterback and other players in on the scheme (i.e., the cheating team) used this information to win poker games against unwitting victims, who sometimes lost tens or hundreds of thousands of dollars at a time. The defendants used other cheating technology as well, such as a chip tray analyzer (essentially, a poker chip tray that also secretly read all cards using hidden cameras), an x-ray table that could read cards face down on the table, and special contact lenses or eyeglasses that could read pre-marked cards.

News articles.

Тоест разговаряме – епизод 3

Post Syndicated from Владислав Севов original https://www.toest.bg/toest-razgovaryame-epizod-3/

Тоест разговаряме – епизод 3

Между правилата и усета – къде е съвременният български език? В третия епизод на „Тоест разговаряме“ с Павлина Върбанова обсъдихме нуждата от осъвременяване на езика, растящата дистанция между говоримия и книжовния български, „вечните“ въпроси: пълния и краткия член; дублетите; слятото, полуслятото и разделното писане; ползите и ограниченията на изкуствения интелект при редактиране и коригиране.

Правилата в езика са като другите правила в живота, посочи Павлина – спазването им прави общуването по-лесно и подредено. Будителството днес тя приема не като лозунг, а като стремеж към изява на добрия пример и всекидневна грижа за думите и общуването.

Гледайте целия разговор в нашия YouTube канал:

Може да го чуете и като аудиозапис в SoundCloud:


По време на нашия разговор на живо включихме и много въпроси от публиката, но за съжаление, ограниченото време не ни даде възможност да обхванем всички. Затова помолих Павлина да отговори тук на още един въпрос на зрител:

Защо мъчим учениците с толкова подробни правила по български език, които само редакторите трябва да знаят?

Лесният дежурен отговор на този въпрос е „Защото авторите на учебниците са едни лоши хора, които искат само да натъпчат куп излишни знания в главите на учениците“. По-трудният е дълъг, но ето го накратко. Съставянето на учебниците, които фактически определят обема от знания в съответната област, е сложен процес. В основата му стоят учебните програми за всеки клас по всеки учебен предмет, спускани от МОН (на теория има някакво обсъждане с по-широк кръг специалисти, вкл. и с учители, но на практика то е формално).

В програмата по български език за Х клас например е заложено овладяването на правоговорната, правописната, граматичната, пунктуационната и лексикалната норма, без да се уточнява какъв е обемът от правила за всяка от тези норми. Оттук нататък авторите на учебника трябва да преценят какво да включат. При това трябва да имат предвид, че всеки учебник се одобрява по множество критерии от МОН (също и за практическа приложимост от учителите), за да се използва в училище. Ако си спестят част от правилата, учебникът може да не бъде одобрен.

Признавам, че в резултат на това от учениците се изисква да владеят не една и две тънкости в правописа, граматиката и т.н. Получава се така, че стремейки се да научим децата едва ли не на всичко, ги научаваме на малко. А най-голямото ми опасение е, че при сегашното ръководство на МОН не се вижда никаква светлина в тунела. Грешка – в пещерата.

Преди срещата ви помолихме да отговорите на кратката ни анкета. Ето и резултатите от нея:


Павлина Върбанова е доктор по български език. Автор е на учебници и учебни помагала по български език и на образователната платформа „Как се пише?“, извоювала си доверието на много хора. От създаването на „Тоест“ е езикова редакторка и коректорка на медията, а от началото на 2024 г. води рубриката „Порция език“. Следи отблизо процесите в българския език и промените в неговата книжовна форма. Вярва, че правилата са създадени за хората, а не хората – за правилата.

Следващият епизод на „Тоест разговаряме“ ще бъде с Йовко Ламбрев, ИТ експерт, съосновател на „Тоест“ и водещ на рубриката „Аз, киборгът“. Срещата ще се проведе на живо в YouTube Live на 22 ноември 2025 г., събота, от 16:00 ч.

Тоест разговаряме – епизод 3

В „Тоест разговаряме“ всеки месец ви срещаме с автори, които познавате добре от анализите или от рубриките им в „Тоест“, но този път ще ги видите и чуете в по-личен и непосредствен формат. Във видеоразговорите, предавани на живо, активно участие имате и вие, нашата публика – със своите въпроси, коментари и включване в тематичната анкета. Водещ на поредицата е Владислав Севов, дългогодишен телевизионен журналист и съосновател на „Тоест“.

Тоест разговаряме – епизод 3

„Тоест разговаряме“ е поредица, подкрепена от Институт „Отворено общество – София“ и съфинансирана от Европейския съюз в рамките на проекта Media Resilience. Изразените възгледи и мнения са само и изцяло на техните автори и не отразяват непременно възгледите и мненията на Европейския съюз, на Европейската изпълнителна агенция за образование и култура (EACEA) или на Институт „Отворено общество – София“ (ИООС). Нито Европейският съюз, нито EACEA, нито ИООС могат да бъдат държани отговорни за тях.

Cómo Enviar SMS Internacionales con Números Gratuitos de EE.UU. Usando AWS End User Messaging

Post Syndicated from Bruno Giorgini original https://aws.amazon.com/blogs/messaging-and-targeting/como-enviar-sms-internacionales-con-numeros-gratuitos-de-ee-uu-usando-aws-end-user-messaging/

AWS End User Messaging ahora admite capacidades de SMS internacional para Números Gratuitos de EE.UU. (TFN). Esta nueva función permite a las empresas usar un solo TFN de EE.UU. para enviar mensajes SMS a más de 150 países, simplificando el alcance global. Beneficia principalmente a clientes que necesitan enviar alertas transaccionales unidireccionales—como contraseñas de un solo uso (OTP) o notificaciones de envío—y empresas que quieren crear prototipos rápidamente y probar su estrategia de mensajería en nuevos mercados internacionales sin la complejidad de adquirir números específicos por país.

Esta guía te mostrará los pros y contras de esta función y cómo habilitarla y cuándo usarla versus métodos tradicionales de envío específicos por país.

¿Qué Son los Números Gratuitos Internacionales de EE.UU.?

Un número gratuito internacional de EE.UU. es un TFN (toll-free number) estándar de EE.UU. que ha sido habilitado con la capacidad de enviar mensajes SMS a destinos fuera de Estados Unidos. Esta función es compatible con versiones anteriores, lo que significa que puedes habilitarla en cualquier TFN de EE.UU. nuevo o existente en tu cuenta.

Cómo Habilitar el Envío Internacional

Hay tres formas principales de habilitar esta función para tus Números Gratuitos de EE.UU.:

  • Habilitar el envío internacional al registrar un nuevo número en la consola.
  • Habilitar el envío internacional para un número existente en la consola.
  • Habilitar el envío internacional para un número existente a través del AWS CLI.

1. Habilitar Al Registrar un Nuevo Número Gratuito de EE.UU. (Consola)

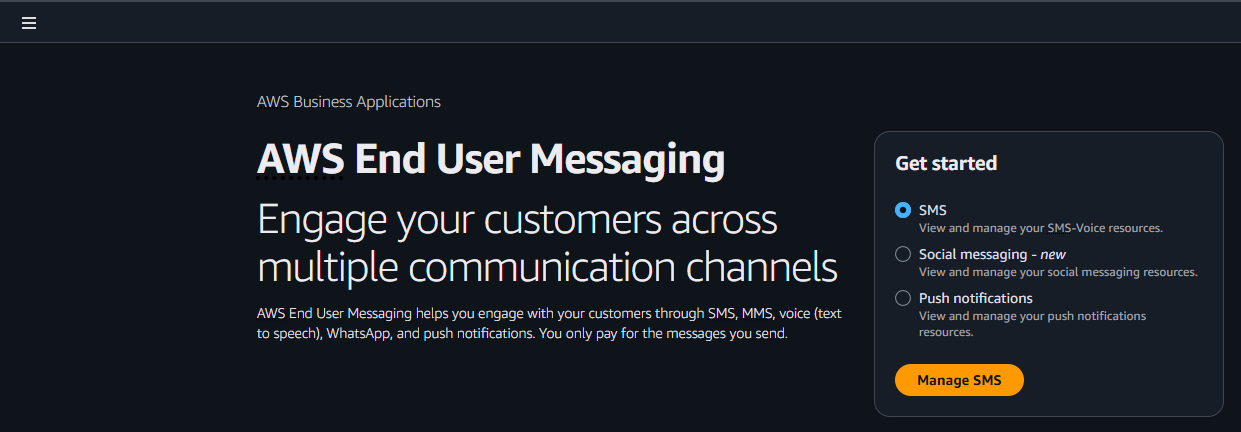
  • Desde la consola de AWS End User Messaging, navega a Administrar SMS
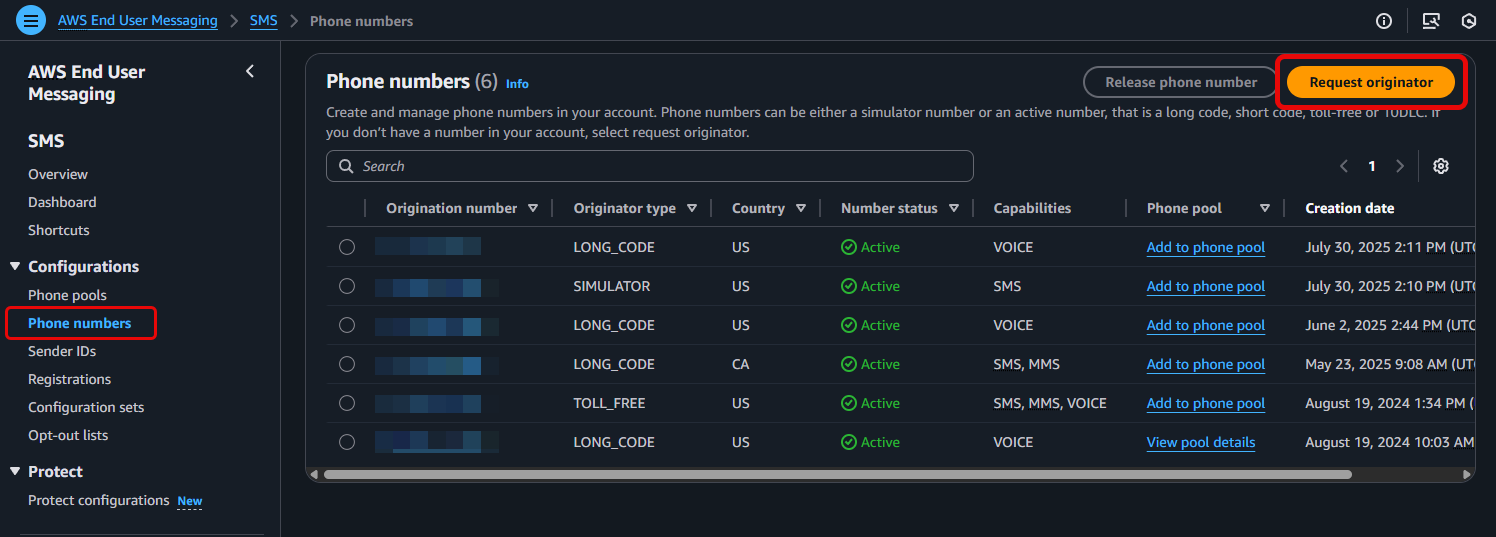
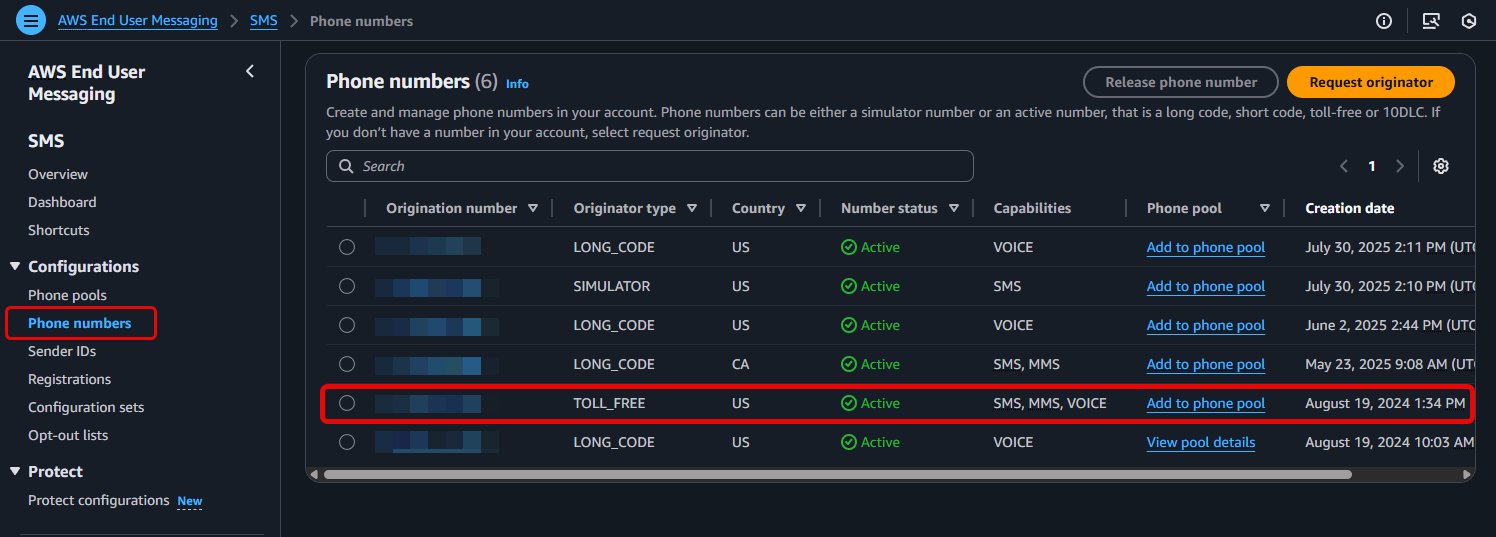
  • Desde la consola de AWS End User Messaging, navega a Configuraciones > Números de teléfono > y selecciona Originador de la solicitud
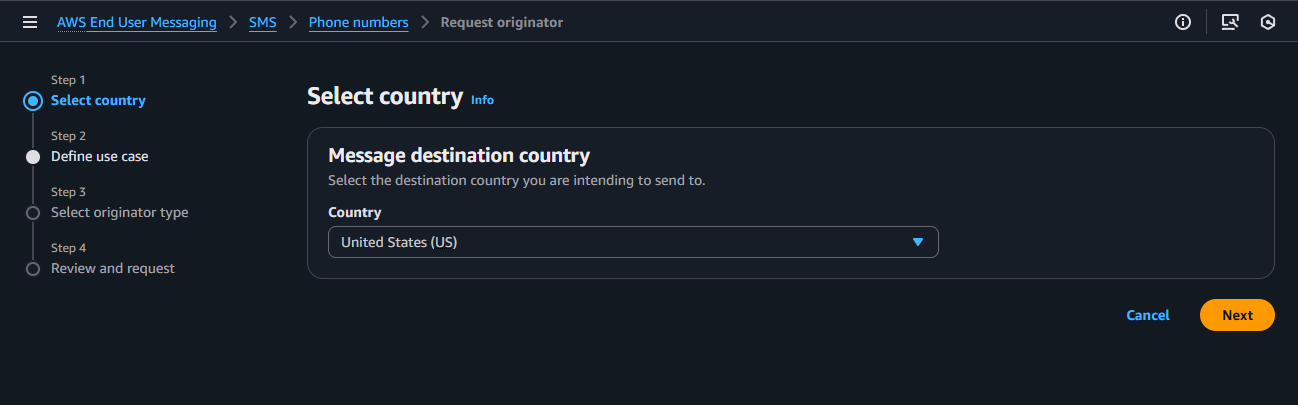
  • Paso 1: Seleccione un país, selecciona Estados Unidos (US) como tu país de destino
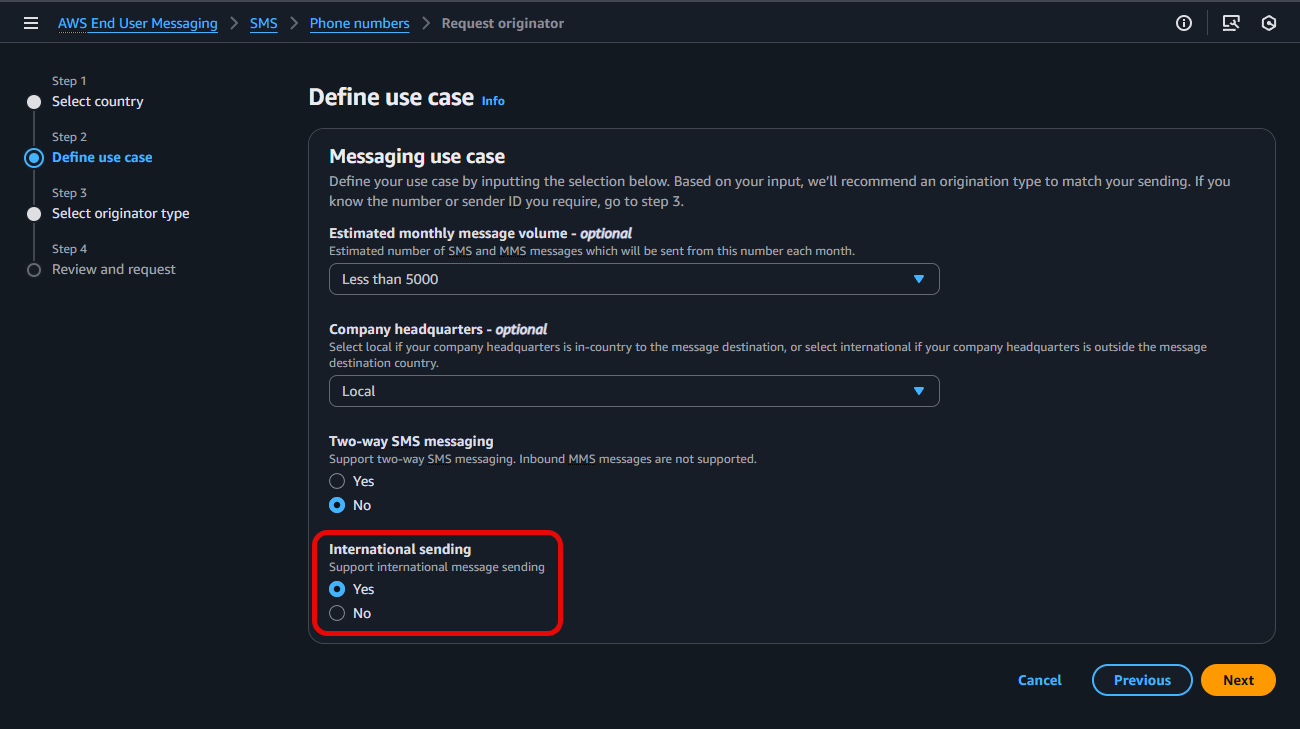
  • En Paso 2: Defina el caso de uso, configura las diversas opciones listadas para tu Caso de uso de mensajería previsto, y selecciona Sí para habilitar el envío Internacional, antes de hacer clic en Siguiente
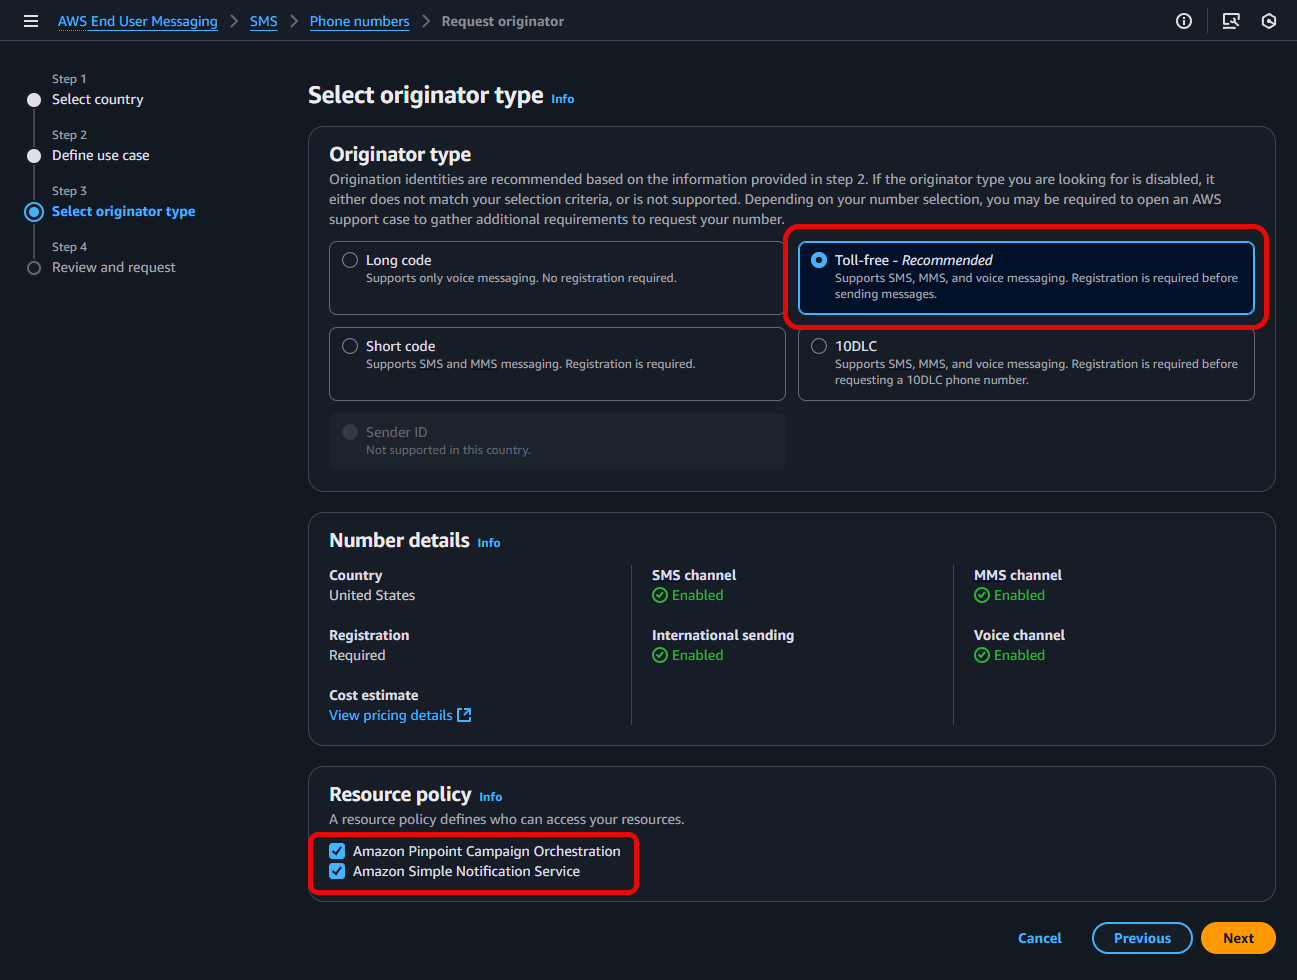
  • Para Paso 3: Seleccionar tipo de originador, selecciona Gratuito, valida tus opciones de Política de recursos, selecciona Siguiente
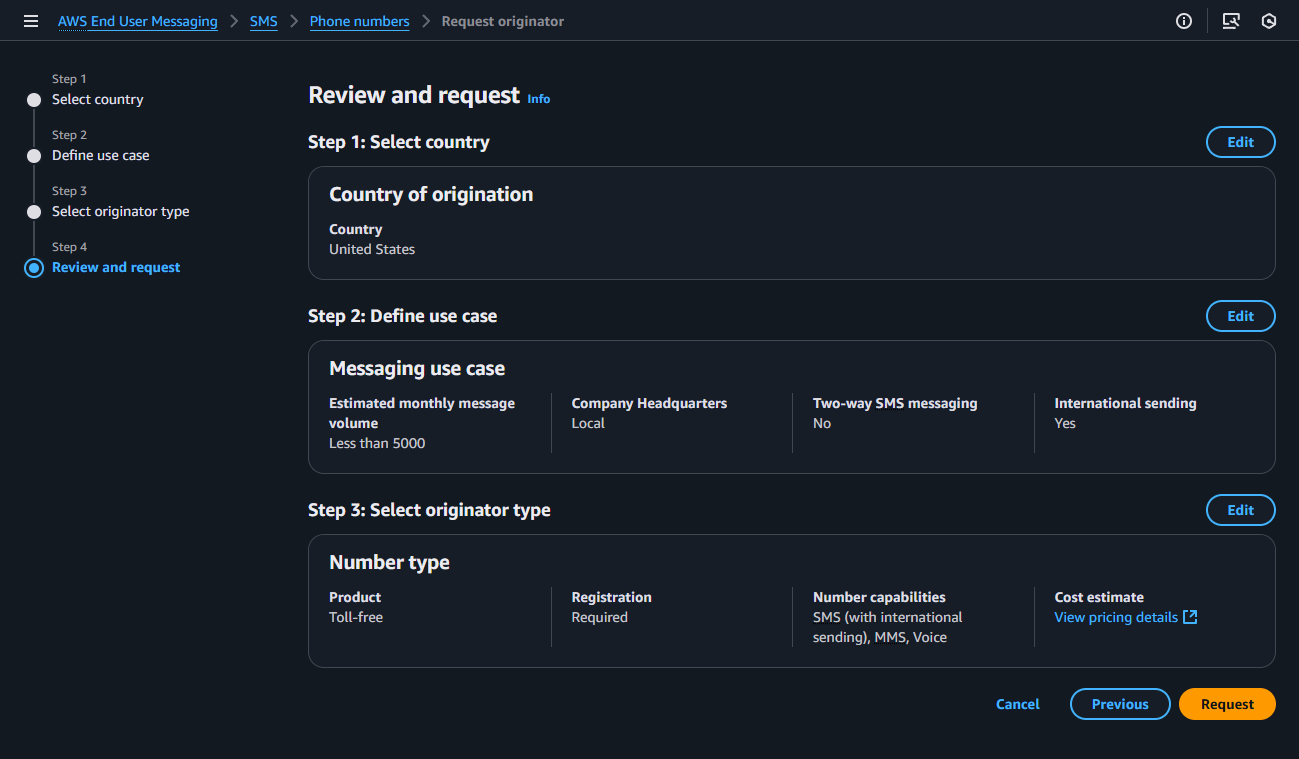
  • En Paso 4: Revisar y solicitar: Verifica que la información que ingresaste sea correcta y selecciona Solicitar. Nota: Las solicitudes de registro de números gratuitos de EE.UU. pueden tomar aproximadamente 15 días hábiles para ser aprobadas.

Para más información, consulta Solicitar un número de teléfono en AWS End User Messaging SMS

2. Habilitar para un Número Gratuito de EE.UU. Existente (Consola o CLI)

Si ya has adquirido un TFN, puedes habilitar la función de envío internacional en cualquier momento.

Usando la Consola de Administración de AWS:

  • Navega a Configuraciones > Números de teléfono > y selecciona un número Gratuito existente
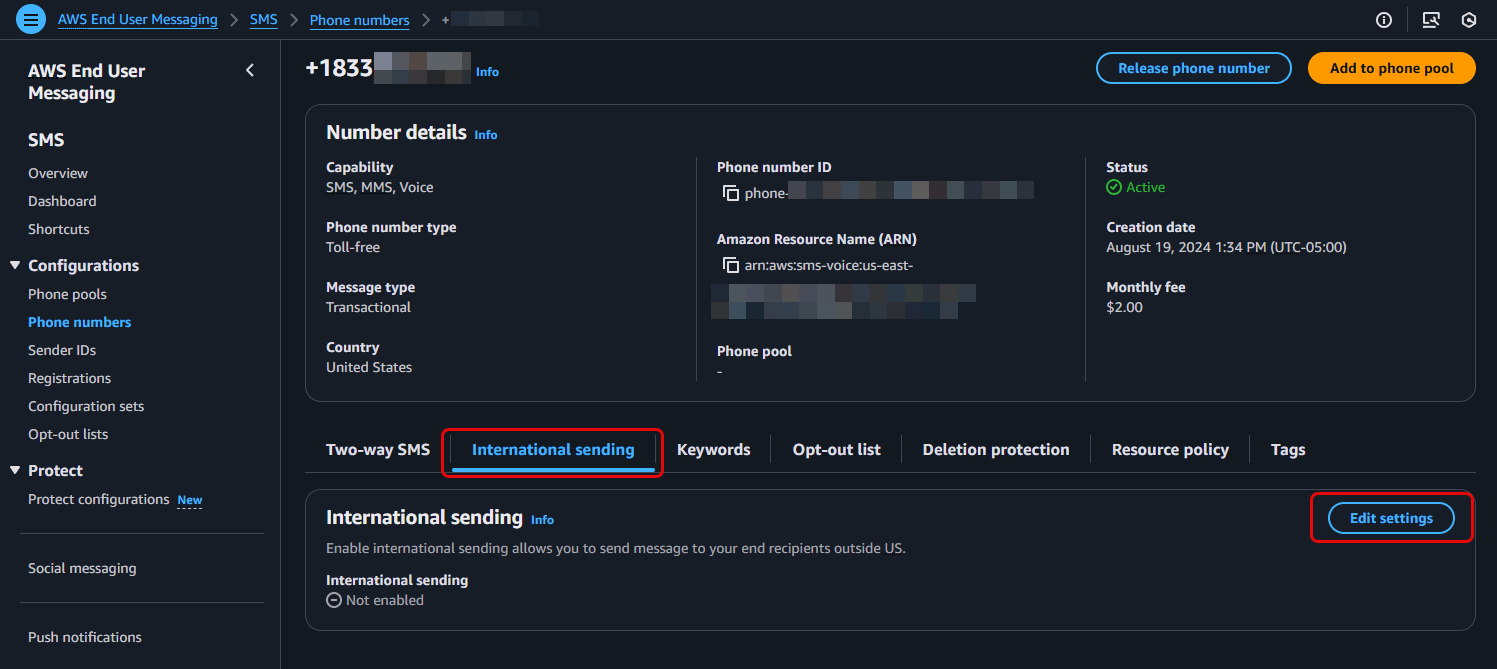
  • Localiza la pestaña Envío internacional y elige Editar configuración
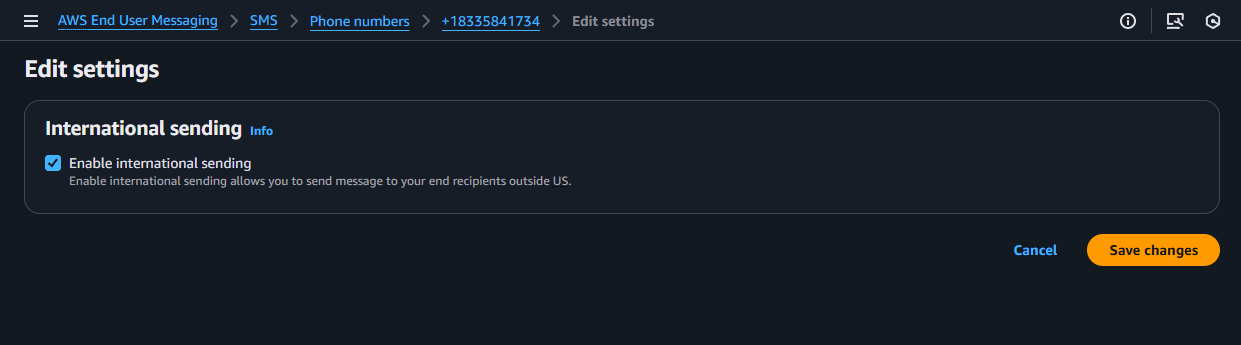
  • Marca la casilla Habilitar envío internacional en los detalles de tu número de teléfono
    • Guardar Cambios

Usando el AWS CLI

El comando update-phone-number te permite modificar las capacidades de un número de teléfono, mientras que el comando describe-phone-numbers te permite verificar su estado.

1. Para Habilitar el Envío Internacional:

Usa el parámetro --international-sending-enabled

aws pinpoint-sms-voice-v2 update-phone-number \
    --phone-number-id "phone-a1b2c3d4e5f67890" \
    --international-sending-enabled \
    --region us-east-1

Nota: Reemplaza "phone-a1b2c3d4e5f67890" con el ID real de tu número de teléfono

2. Para Deshabilitar el Envío Internacional:

Usa el parámetro --no-international-sending-enabled

aws pinpoint-sms-voice-v2 update-phone-number \
    --phone-number-id "phone-a1b2c3d4e5f67890" \
    --no-international-sending-enabled \
    --region us-east-1

Respuesta Esperada (para update-phone-number):

Un comando exitoso devuelve el objeto JSON completo para el número de teléfono. Confirma el cambio verificando que el valor InternationalSendingEnabled sea true

{
    "PhoneNumberArn": "arn:aws:sms-voice:us-east-1:111122223333:phone-number/phone-a1b2c3d4e5f67890",
    "PhoneNumberId": "phone-a1b2c3d4e5f67890",
    "PhoneNumber": "+18005550199",
    "Status": "ACTIVE",
    "IsoCountryCode": "US",
    "MessageType": "TRANSACTIONAL",
    "NumberCapabilities": [
        "SMS"
    ],
    "NumberType": "TOLL_FREE",
    "MonthlyLeasingPrice": "2.00",
    "TwoWayEnabled": true,
    "InternationalSendingEnabled": true,
    "CreatedTimestamp": "2025-08-15T10:30:00.123Z"
}

3. Para Verificar el Estado Actual:

Usa el comando describe-phone-numbers con tu ID de Número de Teléfono para verificar su configuración actual en cualquier momento.

aws pinpoint-sms-voice-v2 describe-phone-numbers \
    --phone-number-ids "phone-a1b2c3d4e5f67890" \
    --region us-east-1

Beneficios y Limitaciones

Esta función ofrece una nueva forma poderosa de llegar a una audiencia global, pero es importante entender dónde destaca y cuáles son sus limitaciones.

Beneficios (Ventajas)

  • Alcance Global con un Solo Número: Envía SMS a más de 150 países usando un solo TFN de EE.UU. existente.
  • Gestión Simplificada: Evita la complejidad operacional y el costo de comprar y gestionar una flota de números de teléfono específicos por país.
  • Prototipado y Pruebas Rápidas: Prueba rápidamente campañas de mensajería en nuevos mercados internacionales antes de comprometerte con el enfoque de mejores prácticas de adquirir números dedicados en el país.
  • Optimización de Costos para Alertas Unidireccionales: Proporciona un método rentable para enviar mensajes transaccionales unidireccionales de alto volumen como OTP, recordatorios de citas y notificaciones de envío globalmente.

Limitaciones y Consideraciones Técnicas

  • SMS Bidireccional Limitado a EE.UU. y Canadá: Las conversaciones SMS bidireccionales confiables solo son compatibles para destinatarios en Estados Unidos y Canadá.
  • Solo Unidireccional para Todos los Otros Países: Para todos los otros destinos, esto es solo unidireccional.
  • Entrega con máximo esfuerzo (no garantizado): El envío fuera de EE.UU. y Canadá es con máximo esfuerzo (no garantizado). El número de teléfono que aparece en el dispositivo del destinatario puede ser reemplazado con un número local o ID de Remitente, por lo que la mensajería bidireccional no funcionará para estos destinos. Para más detalles sobre maximizar la entrega, lee Una Guía para Optimizar la Entrega de SMS y Mejores Prácticas (Inglés).
  • La Exclusión Gestionada No Está Garantizada Internacionalmente: La funcionalidad automática de respuesta STOP no funciona para destinos fuera de EE.UU. y Canadá. Para destinatarios internacionales, debes proporcionar un método alternativo de exclusión.
  • Rendimiento Estándar (3 MPS): Los TFN internacionales tienen un rendimiento predeterminado de 3 Partes de Mensaje Por Segundo (MPS). Para campañas de alto volumen y alto rendimiento, los números específicos por país dedicados (como códigos cortos) son la mejor práctica recomendada.

Entendiendo el Costo

El precio para esta función es directo:

  • Sin Tarifas Mensuales Adicionales: No hay cargo extra por habilitar la capacidad de envío internacional en tu TFN de EE.UU. Solo pagas el arrendamiento mensual estándar por el número mismo.
  • Mensajería de Pago por Uso: Se te factura por cada mensaje SMS saliente a la tarifa estándar por mensaje para el país de destino.

Para una lista completa y actualizada de precios por país, visita la página de Precios de AWS End User Messaging.

Cuándo Usar TFN Internacional vs. Números Específicos por País

Elegir la herramienta correcta depende de tu caso de uso. Aquí hay una comparación simple:

Caso de Uso ¿Usar TFN Internacional? ¿Usar Número Específico por País (Mejor Práctica)?
Probar rápidamente un nuevo mercado Sí. Es la forma más rápida de comenzar. No, este enfoque toma más tiempo para configurar.
Enviar alertas unidireccionales (OTP, notificaciones) Sí. Es una solución simple y rentable. Sí, pero es más complejo si necesitas enviar a muchos países.
Requerir conversaciones bidireccionales Solo para EE.UU. y Canadá. Sí. Este es el enfoque requerido para SMS bidireccional confiable en un país específico.
Garantizar que tu marca/número aparezca consistentemente No, planifica que el ID del Remitente no se preserve, ya que esto no está garantizado internacionalmente. Sí. Esta es la razón principal para usar un número dedicado en el país.
Maximizar la entregabilidad para campañas críticas No, la entrega es “con máximo esfuerzo”. Sí. Un número local proporciona la mayor probabilidad de entrega exitosa.

Consideraciones y Próximos Pasos

Una vez que hayas habilitado tu envío internacional sobre Números Gratuitos de EE.UU., puedes mejorar tu estrategia de mensajería considerando resistencia, monitoreo y escalabilidad. Los siguientes recursos proporcionan mejores prácticas para mejorar tu envío.

Conclusión

El SMS Internacional para Números Gratuitos de EE.UU. es una herramienta estratégica poderosa para empresas que buscan simplificar su mensajería global. Destaca en permitir pruebas rápidas en nuevos mercados y entregar eficientemente alertas transaccionales unidireccionales en todo el mundo desde un solo número.

Sin embargo, no es un reemplazo para la mejor práctica de usar números de teléfono dedicados en el país cuando conversaciones bidireccionales confiables y marca garantizada son críticas para el éxito de tu campaña. Al entender sus beneficios y limitaciones, puedes usar estratégicamente esta función para comenzar rápidamente mientras planificas un movimiento a largo plazo hacia códigos específicos por país para tus mercados más importantes.

Cisco UCS XE9305 3U Edge Server Launched with Intel Xeon 6 SoC

Post Syndicated from Cliff Robinson original https://www.servethehome.com/cisco-ucs-xe9305-3u-edge-server-launched-with-intel-xeon-6-soc/

Cisco launched a really neat new 3U edge server based on the Intel Xeon 6 SoC. The Cisco UCS XE9305 is the company’s next-gen edge platform

The post Cisco UCS XE9305 3U Edge Server Launched with Intel Xeon 6 SoC appeared first on ServeTheHome.

Introducing the Overview of the AWS European Sovereign Cloud whitepaper

Post Syndicated from J.D. Bean original https://aws.amazon.com/blogs/security/introducing-the-overview-of-the-aws-european-sovereign-cloud-whitepaper/

Amazon Web Services (AWS) recently released a new whitepaper, Overview of the AWS European Sovereign Cloud, available in English, German, and French, detailing the planned design and goals of this new infrastructure. The AWS European Sovereign Cloud is a new, independent cloud for Europe, designed to help public sector organizations and customers in highly regulated industries meet their evolving sovereignty and compliance needs. This effort, backed by a €7.8 billion investment in infrastructure, jobs creation, and skills development, will launch its first AWS Region in the State of Brandenburg, Germany by the end of 2025.

This whitepaper provides a broad overview of the AWS European Sovereign Cloud highlighting how AWS is helping customers achieve their sovereignty requirements while benefitting from access to the full power of AWS.

Key aspects covered in the whitepaper include:

  • Infrastructure – Dedicated physical infrastructure with multiple Availability Zones, following the established AWS Regional model approach
  • Logical isolation – Logical separation from existing AWS Regions, with independent billing, account, and identity systems
  • Operational control – Measures to help assure independent operation of the AWS European Sovereign Cloud, including staffing requirements
  • Data sovereignty – Design that helps make sure customer content and customer-created metadata remain within EU boundaries unless customers choose otherwise
  • Corporate governance – A distinct corporate structure under EU law, with EU nationals serving as managing directors and an independent advisory board
  • Approach to law enforcement requests – The technical, operational, and legal measures implemented to help protect customer data and manage law enforcement requests

The whitepaper describes how these elements work together to deliver sovereign control and operational autonomy of our expansive service portfolio to meet Europe’s digital sovereignty needs. The AWS European Sovereign Cloud will be the only fully featured, independently operated sovereign cloud backed by strong technical controls, sovereign assurances, and legal protections designed to meet the needs of European governments and enterprises. Customers and partners using the AWS European Sovereign Cloud will benefit from the full power of AWS including the same service portfolio, security, availability, performance, architecture, APIs, and innovations such as the AWS Nitro System.

We have already made—and will continue to make—new investments in the design, development, and operation of the AWS European Sovereign Cloud. We are building on the strong foundation that has underpinned AWS services for years, including our long standing commitment to customer control over data residency, our design principal of strong regional isolation, our deep European engineering roots, and our more than a decade of experience operating multiple independent clouds for the most critical and restricted workloads.

For more information about the AWS European Sovereign Cloud visit
AWS European Sovereign Cloud.


If you have feedback about this post, submit comments in the Comments section below. If you have questions about this post, contact AWS Support.

J.D. Bean

J.D. is Principal Architect of the AWS European Sovereign Cloud. His interests include security, privacy, and compliance. He is passionate about his work enabling AWS customers’ successful cloud journeys. J.D. holds a Bachelor of Arts from The George Washington University and a Juris Doctor from New York University School of Law.

[$] LWN.net Weekly Edition for November 6, 2025

Post Syndicated from corbet original https://lwn.net/Articles/1044227/

Inside this week’s LWN.net Weekly Edition:

  • Front: Python thread safety; Namespace reference counting; Merigraf; Speeding up short reads; Julia 1.12; systemd security.
  • Briefs: CHERIoT 1.0; Chromium XSLT; Arm KASLR; Bazzite; Devuan 6.0; Incus 6.18; LXQt 2.3.0; Rust 1.91.0; Quotes; …
  • Announcements: Newsletters, conferences, security updates, patches, and more.

Grab’s Mac Cloud Exit supercharges macOS CI/CD

Post Syndicated from Grab Tech original https://engineering.grab.com/mac-cloud-exit

Introduction

In our mission to optimize continuous integration and delivery (CI/CD), we have taken a bold step by relocating our infrastructure from a cloud vendor in the US to a colocation cluster within Southeast Asia, closer to our Git server infrastructure. This change has dramatically improved the performance of our macOS builds, primarily by reducing the network traffic delays associated with distant data centers. By bringing our infrastructure closer to home, we have not only accelerated CI/CD job completion times but also massively slashed operational costs.

Join us as we delve into the Mac Cloud Exit journey and the significant improvements it has brought to our workflows.

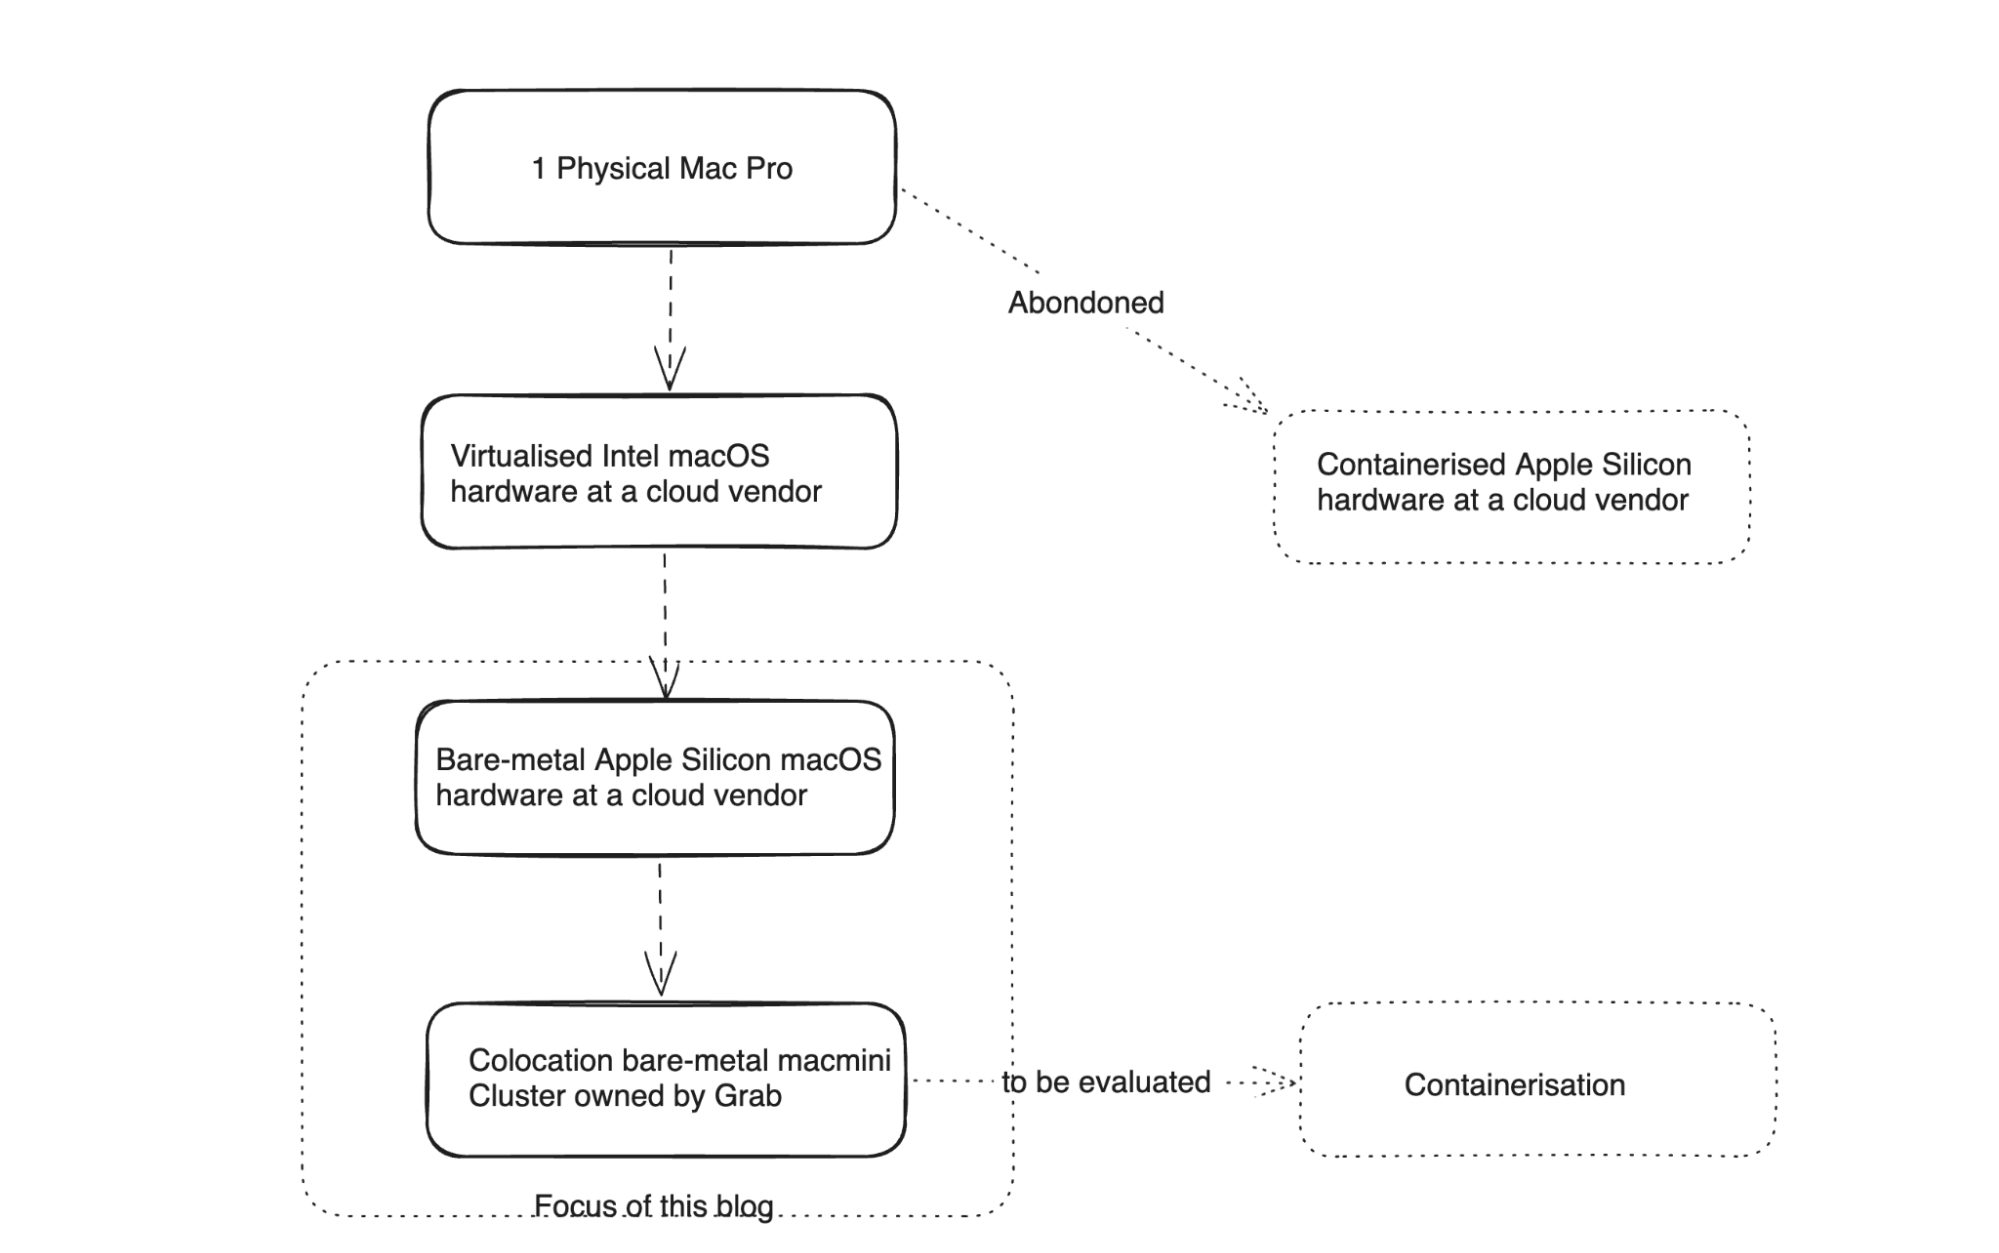
Our macOS CI/CD infrastructure has evolved from 1 Physical Mac Pro running in our office to a cluster of 250 Mac minis fully occupied during peak hours of the day. There were multiple stages in the journey to transition to the current state. The following diagram shows the focus area for this blog post.

Figure 1: Infrastructure transition path

Before and after: Visualizing the evolution

We began our journey with a much simpler setup.

Figure 2: Photo of the setup when we started

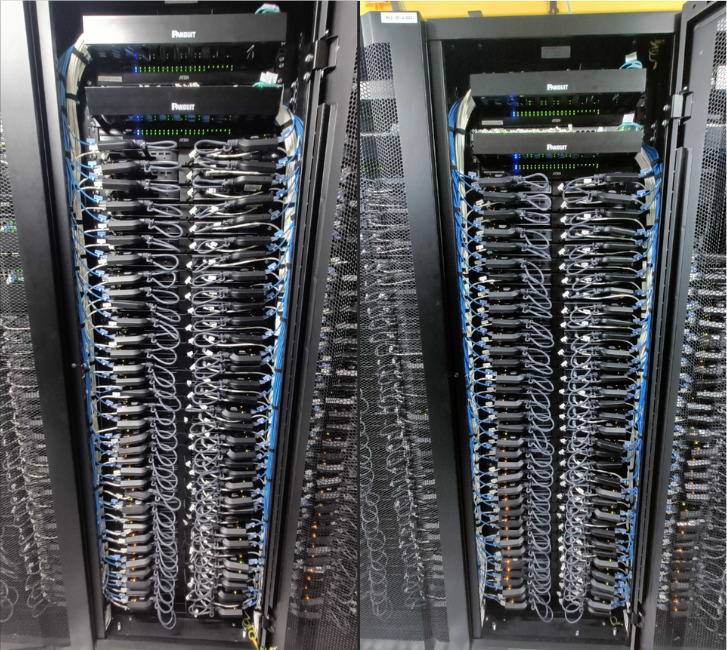
Today, that infrastructure has scaled significantly to meet the growing demands of Grab

Figure 3: Mac mini cluster today

Economy at scale: The rent vs. own equation

At the beginning, it was a no-brainer to rent when our demand for macOS hardware increased from 1 MacPro to 20 times that size. However, when that grew to over 200 machines, the total cost became significant, prompting us to consider:

  1. What is the desired reliability for this cluster?
  2. What would be the total cost of ownership for us to build this cluster ourselves compared to cloud-based options?
  3. What kind of operational leverage would it bring us by controlling end-to-end stack by ourselves?

What is Grab’s scale

At Grab, our iOS build needs have scaled quite significantly, so we went from running some builds on a single Mac Pro to running them on an army of 250+ Mac minis. And so did the cost.

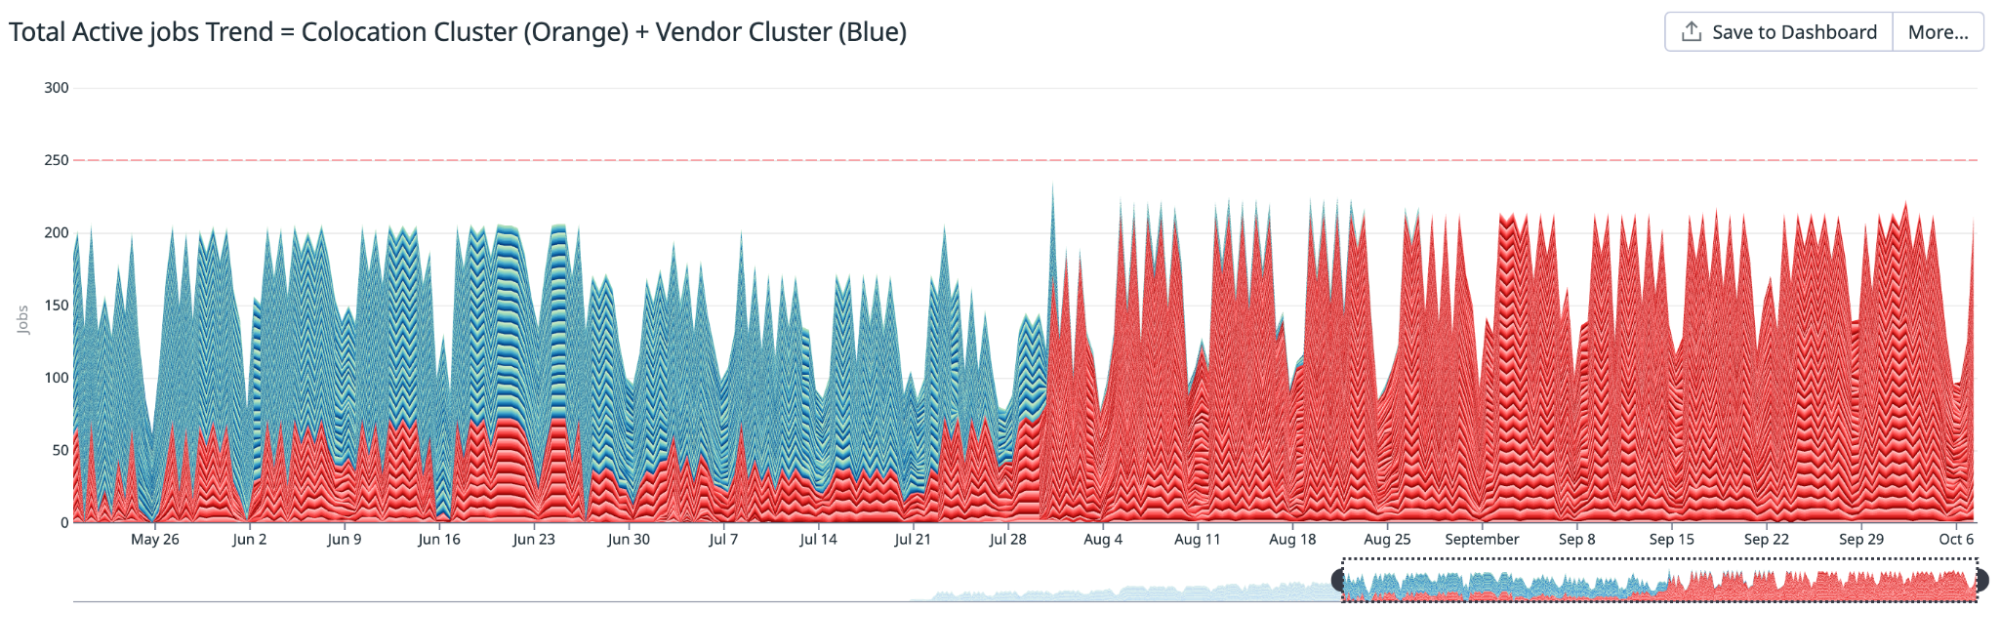
Active jobs trend

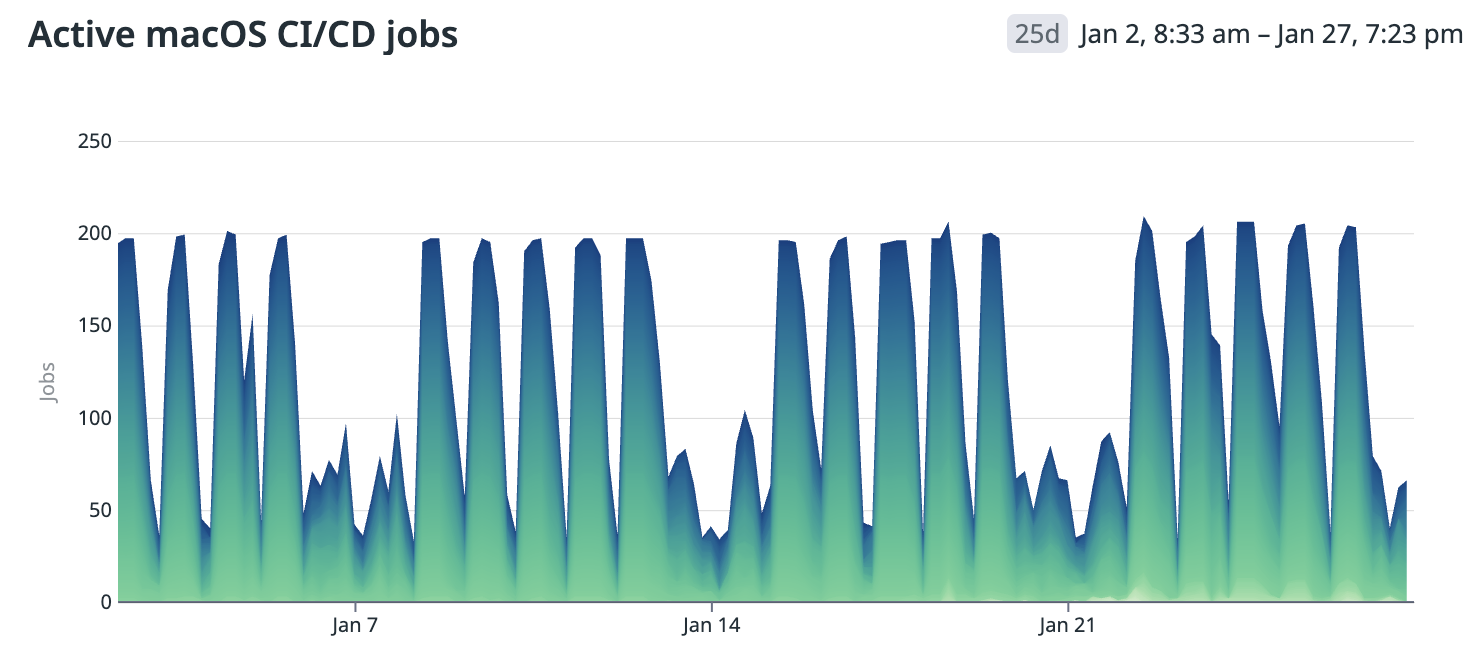
The total number of jobs trend is one of the data points to understand the demand situation. The following chart is a snapshot from our demand curve in 2022. Peak demand often started to exceed the available supply, creating queues for the jobs.

We estimated we would need 200+ machines to comfortably supply for the peak demand and projected a demand for 400+ machines in 2025.

Figure 4: Active macOS CI/CD jobs

What is our workload

We have several iOS apps that share a common macOS compute cluster for their CI/CD workloads.
This includes, but is not limited to:

The workload primarily involves:

  • Building apps
  • Execution of tests

The Evaluation: Cloud vs colocation vs on-prem

We did a comprehensive comparison and total cost of ownership (TCO) estimation to compare many different options, including cloud vendors and colocation in different places.

Cost of macOS compute

The expense of macOS compute is notably higher, particularly in continuous integration (CI) setups, posing challenges for optimal configuration. Several factors contribute to these increased costs:

  • Apple’s restrictive EULA mandates a minimum lease period of 24 hours for macOS instances, which alters the utilization equation.
  • Economies of scale are not favorable for available macOS hardware configurations compared to alternatives. Optimized server hardware designed for racking offers various configurations that reduce operational costs, unlike macOS options such as Mac Mini and Mac Pro.

For instance, although not a direct comparison, the pricing for GitHub Actions build minutes shows macOS is ten times more costly than Linux. This reflects the pricing GitHub can offer after implementing racking optimizations.

Initially, we conducted rough estimations to assess the total cost of ownership differences between cloud, colocation, and on-premises setups. Even with conservative estimates for manpower and engineering costs, colocation or on-premises setups proved more cost-effective at our scale. This cost disparity became even more pronounced when focusing on cloud vendors providing macOS compute physically located in Southeast Asia.

We opted to conduct an in-depth evaluation of the following options:

  • Establishing a macOS cluster at our headquarters in Singapore, which was swiftly dismissed due to scalability and cost concerns making it an unsuitable long-term solution.
  • Colocating in a Southeast Asian country where we have operational presence.

Choice of location

As a Southeast Asian company, we maintain offices in each country where we operate, some of which boast advanced data center infrastructures. We focused our location choices on Singapore and Malaysia, assessing them based on several criteria, including:

  • The maturity of existing data center infrastructure.
  • The proximity of the data centers to our offices, ensuring staff availability for infrastructure setup.
  • The cost and reliability of power.
  • The proximity to our Git servers and the expense of establishing direct network connections.

Eventually we concluded to go ahead with a decision to colocate in a data center in Malaysia which is one of the emerging data center powerhouses in the region with relatively low energy cost compared to Singapore.

Choice of Mac hardware

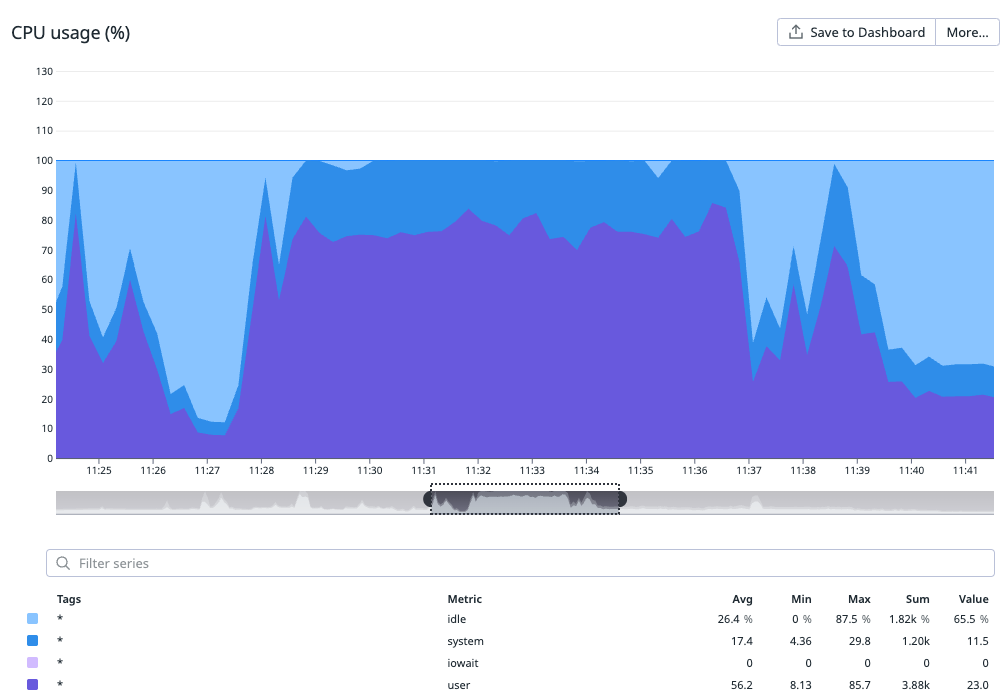
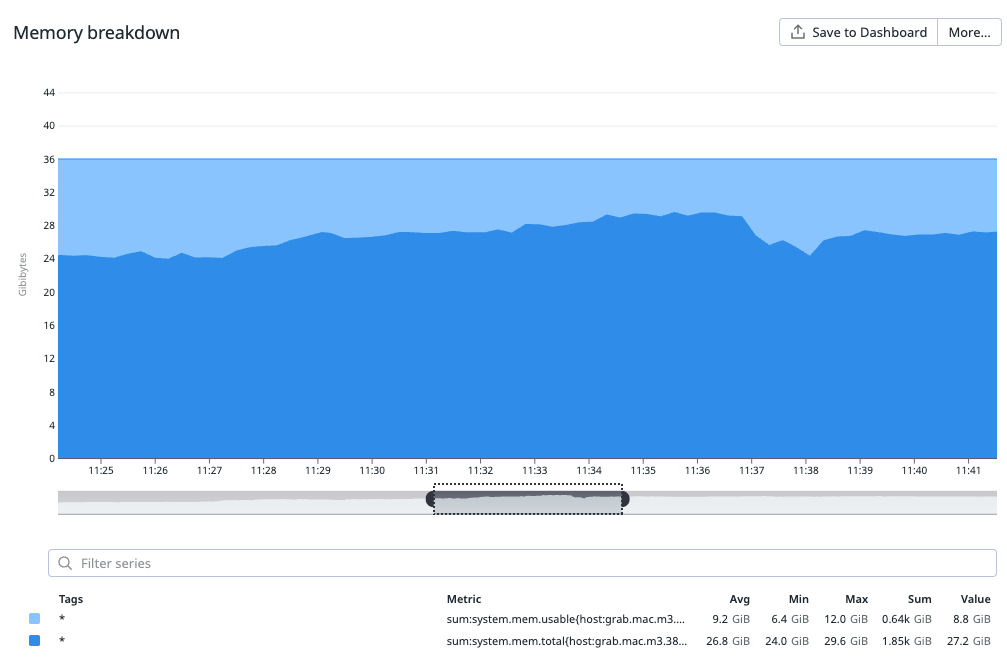
Our choice of hardware model for our build and test workload was guided by a cost-benefit analysis. We decided to use bare-metal setups without virtualization, simplifying migration processes, which may be revisited in the future. We ensured we neither over-specified nor under-specified the bare-metal hardware. We had a clear understanding of the resource consumption of our most demanding workload on a few reference models, as illustrated in the following graphs.

Figure 5: User and System CPU usage during build operation of our largest iOS mobile codebase
Figure 6: Memory Usage during build operation of our largest iOS mobile codebase

Virtualization vs bare-metal

Virtualization offers significant advantages in managing and provisioning clusters, including the flexibility to create ephemeral builds. However, our experience with macOS virtualization has been mixed. While off-the-shelf virtualization solutions provide maintenance benefits, they often come at the cost of performance or stability.

Key points:

  • Improved Utilization: Virtualization can improve resource utilization by consolidating multiple workloads on fewer physical servers, thereby reducing the overall cost.
  • Performance Penalty: However, the performance penalty associated with virtualization can sometimes negate these cost benefits. This is particularly true for macOS virtualization, where we have observed trade-offs in performance or stability.
  • Evolution of Virtualization: The virtualization space has been evolving and making good progress. We may re-evaluate these solutions in the future as they continue to mature and potentially address current performance and stability issues.

Our conclusion was to stick to bare-metal for the time-being as the benefits didn’t justify the downside and cost.

Execution

Progressive Migration

Any disruption to the macOS CI/CD cluster would be hugely disruptive to the company given our scale highlighted above. So, we enabled new cluster partially for part of the workload for a reasonably long period of time and monitored and compared:

  • Job failure rate
  • Jobs performance
  • Reliability

Once we were confident, we made the full switch and terminated vendor contracts at due.

Figure 7: Total active jobs trend

Result

The migration yielded better results overall than our initial conservative estimates.

  • Cost savings: Estimated over 2.4 million USD over three years
  • Performance improvement: Between 20-40% depending on the use case
  • Stability: No compromise

A strategic investment in our mission to drive Southeast Asia forward by onshoring critical Mac infrastructure into the region.

Cost

We anticipate a three-year replacement cycle for our hardware. While some equipment may be utilized beyond this period, it provides a reasonable lifespan for cost estimation purposes.

The lifecycle of networking equipment involves both physical reliability, following the bathtub curve, and technological obsolescence, often necessitating replacement every 3 to 5 years. Mac minis could become outdated after approximately three years, making the opportunity cost of extended use potentially higher than the net replacement cost after benefits.

Importantly, the experience gained during this cycle could significantly reduce the engineering costs associated with future replacements.

Overall, we project total cost of ownership savings of approximately 2.4 million USD over a three-year period compared to our last cloud-based setup rented from a vendor.

Performance

We measured the performance gains in two of ou largest iOS apps at Grab:

Overall gains

The following table summarizes the total time measured before and after the migration for total CI pipeline time and building the app codebase. Measurements are presented in 3 percentiles (p50, p75, p95)

App/Metric   Time (Minutes)    
    p50 p75 p95
CI Pipeline Time Trend for Grab: Taxi Ride, Food Delivery Before 43 54 67
  After 33 42 49
  Gain 23.26% 22.22% 26.87%
App build time Trend for Grab: Taxi Ride, Food Delivery Before 10.7 13.2 17.6
  After 6.45 9 10.8
  Gain 39.72% 31.82% 38.64%
Pipeline time trend for Grab Driver: App for Partners Before 47 50 52
  After 26 31 32
  Gain 44.68% 38.00% 38.46%
App build time trend for Grab Driver: App for Partners Before 10 13 14
  After 6 8 8.5
  Gain 40.00% 38.46% 39.29%

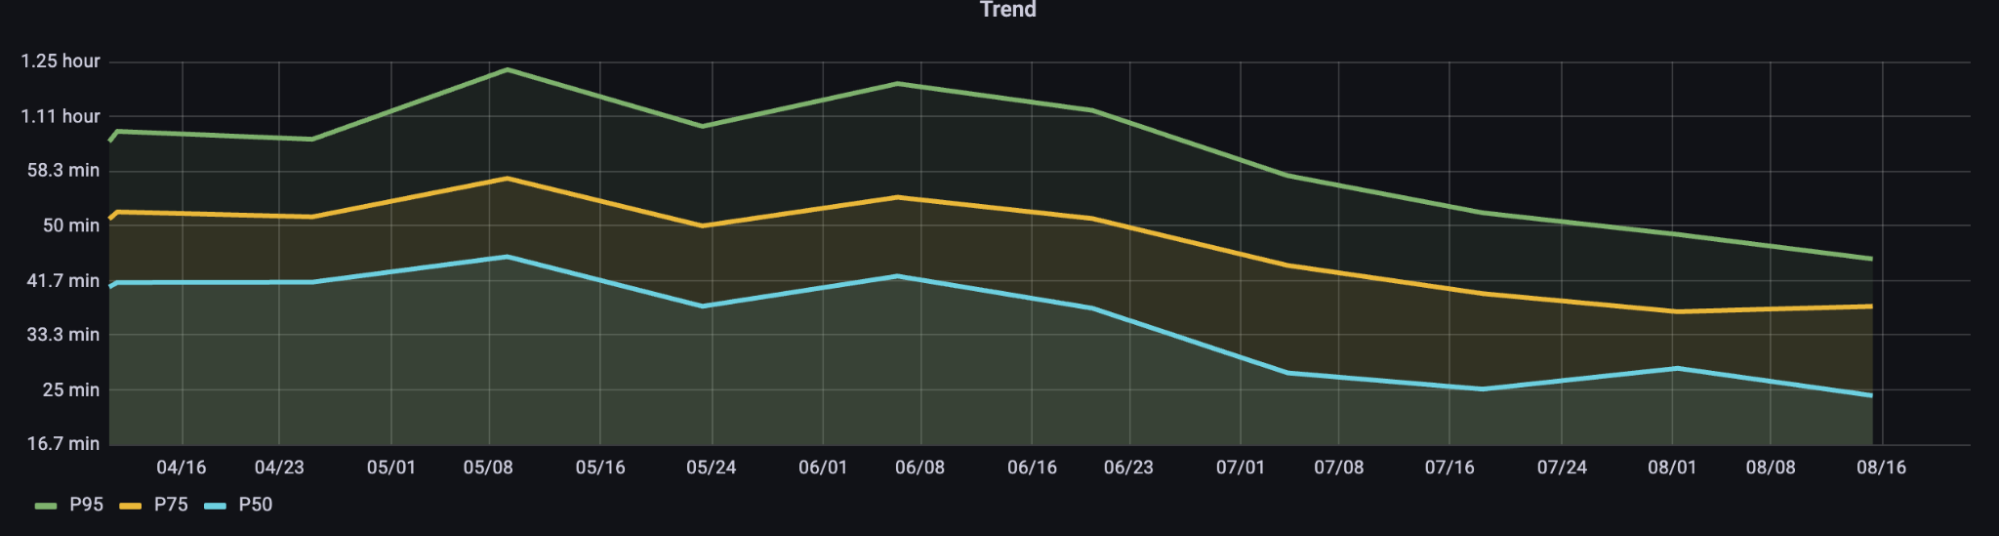
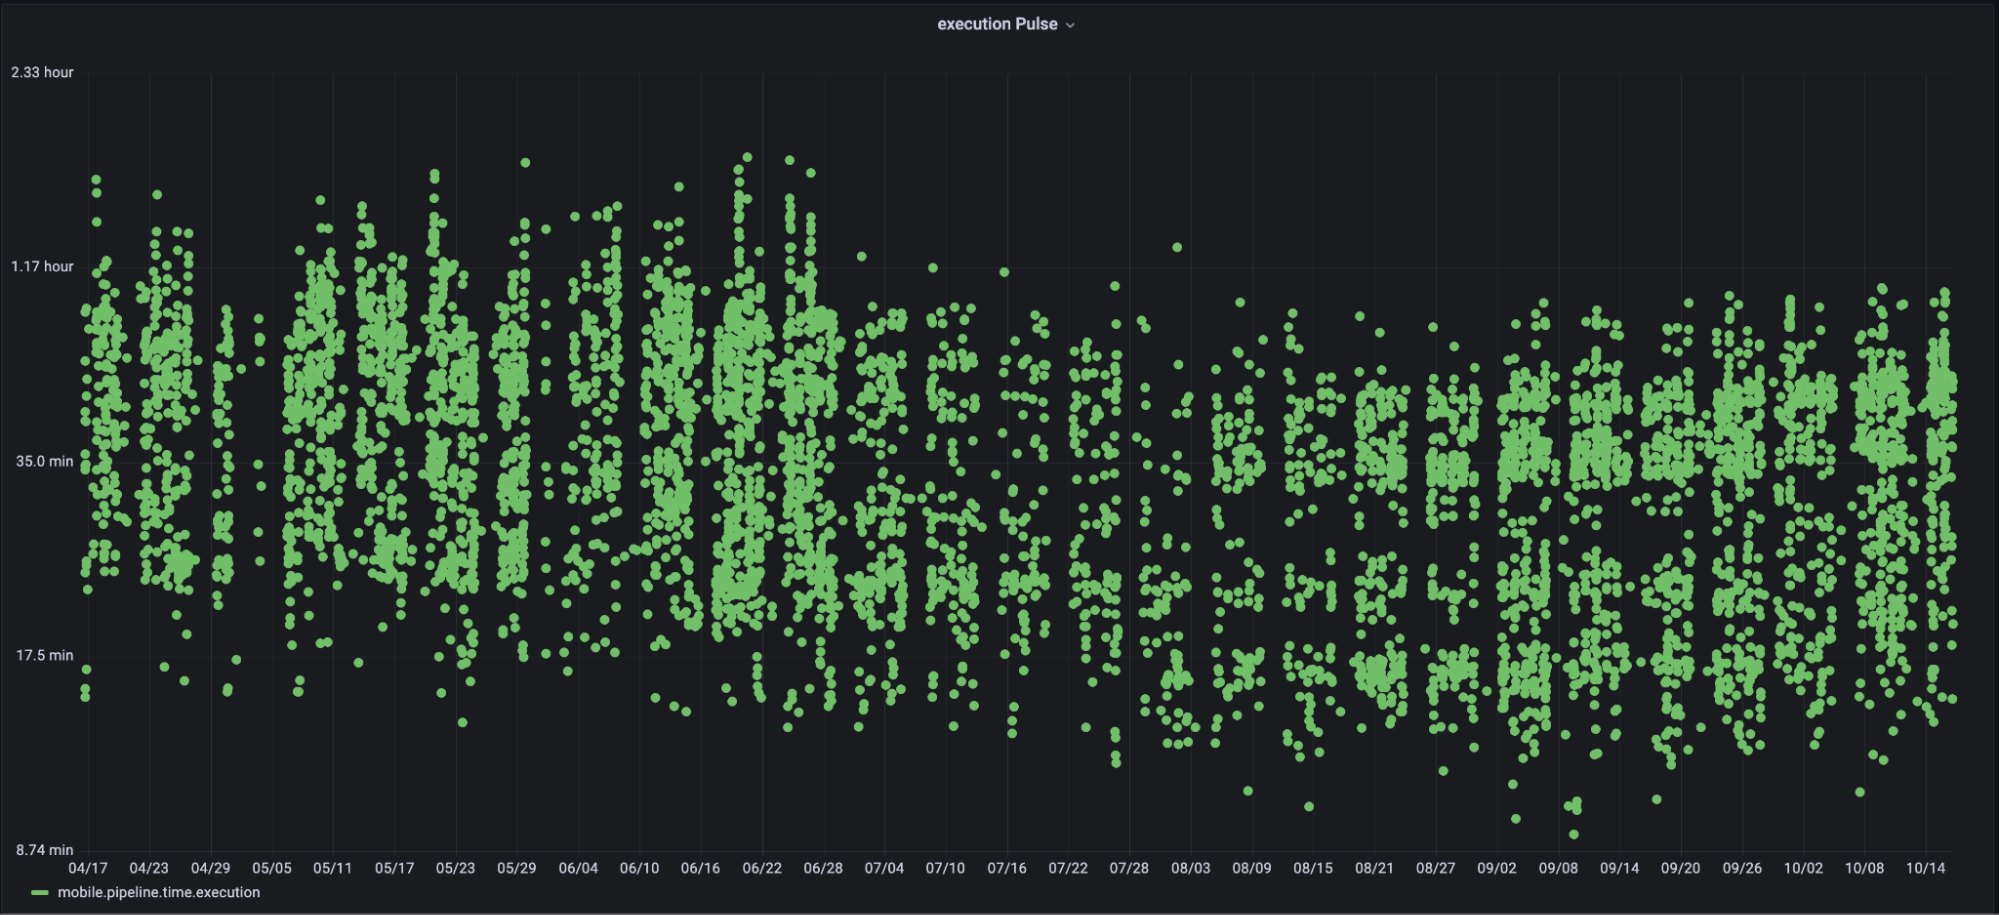
The following trend illustrations show how the performance of various tasks has improved while we progressively migrated to the new colocation setup.

Figure 8: 14 day aggregate percentiles of p50, p75 and p95 for total CI pipeline times for the Taxi Ride, Food Delivery codebase
Figure 9: Pipeline time pulse for the Taxi Ride, Food Delivery codebase
Figure 10: 14 day aggregate percentiles of p50, p75 and p95 for total CI pipeline times for the App for Partners codebase

Stability

We measured overall job failure rates between both clusters for extended periods as a guardrail metric and ensured the stability of the new cluster before shutting down the old one.

Colocation setup and rack configuration

The following table provides an overview of the layout of our new Mac mini cluster.

Component Description Redundancy
Rack We have got four 42RU (600x1200x42RU) racks housing 200+ Mac minis, plus some spare racks to house upcoming scheduled capacity upgrades. Racks have shared resources which have their own redundancy. Generally rack separation does provide some level of redundancy for total compute.
Power 2 power sources power the cluster. Each rack is powered by these 2 power sources. It is 1U, 2-post rack mount. Losing 1 power source will reduce 50% of capacity.
Mac Mini We rack 2 Mac minis in a row on a mounting tray, typically racking 70 minis in one rack in total. Except for the first rack which requires extra rack units (RUs) for core switches and firewalls.  
KVM KVM switches with adaptor for keyboard and mouse emulation when required. N/A
Networking Setup Networking consists of Core Switches, Access Switches, Firewalls, Internet and Direct Connect Links. Mostly active/active redundancy.

Provisioning and configuration

Zero-touch provisioning

Zero-touch provisioning is a streamlined method for setting up and configuring devices with minimal manual intervention. This section outlines the process and benefits of zero-touch provisioning using Jamf for Mac minis.

We have a setup that enables these machines to start accepting jobs once they are racked up and connected (Power and network cables). Here is how it works:

MDM configuration and Automated Device Enrollment (ADE)

ADE, previously known as Device Enrollment Program (DEP), is an Apple service that facilitates automatic enrollment. When a new Mac Mini is acquired and registered in the organization’s ADE account, it is primed for automatic enrollment. Administrators create a PreStage enrollment configuration within Jamf Pro, encompassing account settings (e.g., creating a local admin account, hiding it in Users & Groups, skipping account creation for the user), configuration profiles (defining device settings, security policies, and restrictions), and enrollment packages (including necessary software and scripts).

Device setup: Activation and redirection

Upon powering on and connecting to the internet, the Mac Mini communicates with Apple’s activation servers. The activation servers identify the device as part of the organization’s ADE and redirect it to the Jamf MDM server, ensuring automatic enrollment without user input.

Enrollment and configuration

The Mac Mini enrolls into the Jamf MDM system automatically. Jamf applies predefined configuration profiles to set up the device’s settings, installs required applications based on configured policies, and enforces security policies such as encryption and authentication settings to ensure compliance.

Key benefits of zero-touch provisioning

  • Efficiency: Devices are ready to use right out of the box, reducing the time and effort required by IT staff.
  • Consistency: Ensures that all devices are configured uniformly according to organizational policies.
  • Security: Enforces security policies from the moment the device is first powered on, reducing vulnerabilities.
  • Scalability: Easily manage and configure a large number of devices without manual intervention.

Learnings and insights

Supply chain is as fast as the last essential component you need

The efficiency of a supply chain hinges on the delivery of its final essential component. Despite being a fundamental principle, it’s worth reiterating. Our timely launch was facilitated by a buffer period for unexpected delays. Interestingly, one of the last critical items to arrive was the rack mounting trays. The brief delay underscored the importance of prioritizing and planning for on-time delivery of every essential component, irrespective of its manufacturing simplicity.

Consistently address the question: How will this scale?

From the outset, our goal was to develop a scalable infrastructure. As the cluster expands, tasks such as preparing Mac minis for job acceptance require increasing manual input, which ultimately impacts costs. Hence, zero-touch provisioning becomes essential, as scalability is not merely a desirable feature but a necessity.

Plan and opt in for a power cost structure best suite for your need

Power cost structures

In a colocation setup power costs can be billed in several ways, each with pros and cons:

  • Flat Rate Per Circuit: A fixed monthly fee, predictable but limits flexibility (e.g., can’t exceed 80% without extra circuits).
  • Allocated kW: Commit to a fixed power amount (e.g., 100 kW), potentially cheaper but with penalties for overages.
  • Metered Usage: Pay for actual consumption (kWh), good for variable loads but may still charge for space.
  • All-In Space & Power: Single rate covering both, easy to compare but less flexible for upgrades.

We ultimately opted for an allocated kW commitment, a phased approach based on conservative equipment power ratings and historical usage. We structured this into phases of commitment increases for future capacity growth.

Conclusion

The Mac Cloud Exit wasn’t just a technical migration; it was a strategic move that fundamentally enhanced our engineering efficiency. By onshoring our infrastructure into Southeast Asia, we have achieved $2.4 million USD in projected savings and supercharged our CI pipeline, delivering performance gains of 20-40%. This project proves that taking ownership of our core infrastructure can be a major competitive advantage, allowing us to deliver faster and more reliably for our users across the region.

Join us

Grab is a leading superapp in Southeast Asia, operating across the deliveries, mobility and digital financial services sectors. Serving over 800 cities in eight Southeast Asian countries, Grab enables millions of people everyday to order food or groceries, send packages, hail a ride or taxi, pay for online purchases or access services such as lending and insurance, all through a single app. Grab was founded in 2012 with the mission to drive Southeast Asia forward by creating economic empowerment for everyone. Grab strives to serve a triple bottom line – we aim to simultaneously deliver financial performance for our shareholders and have a positive social impact, which includes economic empowerment for millions of people in the region, while mitigating our environmental footprint.

Powered by technology and driven by heart, our mission is to drive Southeast Asia forward by creating economic empowerment for everyone. If this mission speaks to you, join our team today!

Карта на ИАГ за транспортиране на дървесина

Post Syndicated from Боян Юруков original https://yurukov.net/blog/2025/karta-iag/

Този път ще пиша за карта, която не съм направил аз. Намерих я случайно докато търсих данни на страницата на Изпълнителна агенция по горите. Искам да ги поздравя за нея. Картата показва позволителни билети за транспортиране на дървесина. Отбелязани са като маркери. Като се натиснат се вижда регистрационния номер на камиона и ремаркето, ако има такова и колко кубика дърва може да се пренесат. Като се натисне линка на информацията се отваря страница с още информация като позволително за сеч, направление, собственост, шофьор и снимки на камиона и товара. Местоположението е къде е издаден билета.

Картата към днешна дата съдържа над 3440 билета за превоз. Всички са издадени в рамките на последните два дни – 4-ти и 5-ти ноември 2025-та. Би трябвало да има исторически данни, които да се намират в регистъра на билетите. Това обаче е невъзможно, защото търсейки по регистрационен номер на колите намерени в картата не се откриват дори билетите, които виждаме там.

Виждаме обаче тези за последните два дни – предполага се актуалните към дадения момент. Това би могло да позволи да сверим дали камион пред нас има право да пренася дървесина. За целта би било добре търсачката на регистъра да работи, но сравнително лесно може да се добави търсачка на картата за актуалните билети. В допълнение и сравнително по-лесно би било да се добави бутон за фокусиране на картата върху местоположението на посетителя. Има plugin-и за Leaflet, който използват от ИАГ. Използвам същата библиотека за почти всички мои карти и лесно могат да сверят какво правя. Самата карта обаче не е направена подходящо, за да работи на телефон. Вижда се, но не е удобна. Могат да я подобрят заедно с бутон за подаване на сигнал за камион без разрешение или с товар надвишаващ снимките. По-сложно но далеч по-удобно би било при натискане на маркер за билет да отбележат най-краткия маршрут от мястото на издаване до отбелязаното в него населено място или адрес.

Изброените подобрения на картата са различни по сложност и в някои случаи изискват по-добри познания за работата на библиотеката. Ще направят обаче картата истински полезна за хората чудещи се дали виждат пред себе си незаконна дървесина. Именно за подобно приложение призовавах преди десет години. Тогава написах анализ на позволителните за сеч и описах нуждата от приложение за сигнали. Това не се случи до сега. Опитах сам, но от тогава до сега регистърът продължава да не работи надеждно. Преди анализа си пуснах серия от карти базирани на същите тези разрешителни покриващи България. Миналата година свалих отново данните, но за целия период между 2011 и 2024-та и ги отворих за всички.

Загуба на гори

В първата си статия от март 2025-та споделям интересна карта на базата на Google Earth Engine, която показва загубата на горско покритие в годините между 2000 и 2024-та, местата където то се увеличава и къде загубата е заради пожари. Има много слоеве и данни и призовавам да я разгледате. Има нов адрес като картата в старата ми статия е с данни само до 2019-та.

Горе виждате общата картина за България като се вижда оголване на територия из цялата страна. Тук съм увеличил само загубата на гора над Кресна. В синьо е сеч, в оттенъци на жълто до червено са последните 25 години без настоящата. Над Кресна именно гореше огромния пожар през юли тази година, така че очаквам догодина да е цялото в червено. Виждате в синьо на други места къде са оголвали цели просеки, територии в паркове и прочие.

Тук виждате пък наложени данни за загуба на гори между 2000 и 2024-та в червено, съществуваща гора в зелено и увеличаване на горското покритие между 2000 и 2012-та в синьо. В статиите ми преди 10 години описах подробно трудностите в определяне на горското покритие и някои дефиниции. Тази карта конкретно е на територията около Банско. Виждат се къде какво е сечено за пистите. Тогава глобата беше 1000 лв.

От страницата може да свалите данните за тази промяна на горската покривка и да я използвате за анализ с други данни като защитени територии и разрешителни за строеж. За съжаление, не откривам ГИС система показваща къде точно важи дадено разрешение за строеж – т.н. горски отдели и подотдели. Има географски данни, но част са във формат, който не мога да отработя още, а на други места са неясни. Ще се опитам да измисля нещо. Ако знаете за такава ГИС система или обобщени данни в SHP формат на подотделите в цялата страна, ще се радвам да споделите.

The post Карта на ИАГ за транспортиране на дървесина first appeared on Блогът на Юруков.

Migrating from Open Policy Agent to Amazon Verified Permissions

Post Syndicated from Samuel Folkes original https://aws.amazon.com/blogs/security/migrating-from-open-policy-agent-to-amazon-verified-permissions/

Application authorization is a critical component of modern software systems, determining what actions users can perform on specific resources. Many organizations have adopted Open Policy Agent (OPA) with its Rego policy language to implement fine-grained authorization controls across their applications and infrastructure. While OPA has proven effective for policy-as-code implementations, organizations are increasingly looking for more performant and managed services that reduce operational overhead while maintaining the flexibility and power of policy-based authorization.

Amazon Verified Permissions is a fully managed authorization service that uses the Cedar policy language to help you implement fine-grained permissions for your applications. Cedar is an open source policy language developed by AWS that provides many of the same capabilities as Rego while offering improved performance (42–60 times faster than Rego), straightforward policy authoring, and formal verification capabilities. By migrating from OPA to Verified Permissions, organizations can reduce the operational burden of managing authorization infrastructure while gaining access to a service designed specifically for scalable, secure authorization.

This migration offers several key benefits: reduced infrastructure management overhead, improved policy performance and validation, enhanced security through the AWS managed service model, and seamless integration with other AWS services. Additionally, Cedar’s syntax is designed to be more intuitive than Rego, reducing the effort needed to write, read, and maintain policies.

In this post, we explore the process of migrating from OPA and Rego to Verified Permissions and Cedar, including policy translation strategies, software development and testing approaches, and deployment considerations. We walk through practical examples that demonstrate how to convert common Rego policies to Cedar policies and integrate Verified Permissions into your existing applications.

Solution overview

The migration from OPA to Verified Permissions represents a shift from self-managed authorization infrastructure to a fully managed service. In a typical OPA setup, customers have OPA servers running either as sidecars, standalone services, or embedded libraries that evaluate Rego policies against incoming authorization requests. These servers pull policy bundles from storage systems and maintain their own performance and availability.

With Verified Permissions, AWS manages the entire authorization infrastructure. Applications make API calls to the Verified Permissions service which evaluates Cedar policies stored in managed policy stores. This removes the need to operate and maintain OPA servers, manage policy distribution, or handle service scaling and availability. This shift means that your team can concentrate on authorization logic rather than infrastructure management while gaining the benefits of the scale and reliability provided by AWS.

Understanding the differences: Comparing Rego with Cedar

It’s important to understand the fundamental differences between the Rego and Cedar policy languages before beginning your migration. These differences will shape how you approach translating your existing policies.

Policy structure and philosophy

Rego policies are built around rules that can be evaluated to produce sets of results. Rego uses a logic programming approach where you define conditions that must be satisfied for a rule to be true. Policies often involve complex queries, loops, and comprehensions to examine data structures.

Example Rego policy

package authz
default allow = false

# Rule 1: Allow users with the viewer role to read documents
allow {
	input.action == "read"
	input.resource.type == "document"
	input.user.role == "viewer"
}
# Rule 2: Allow users with the editor role to write documents
allow {
	input.action == "write"
	input.resource.type == "document"
	input.user.role == "editor"
}

Cedar takes a more declarative approach with explicit permit and forbid statements. Each Cedar policy is a standalone authorization decision that clearly states what is being allowed or denied. Cedar policies are designed to be human-readable and straightforward to audit.

Equivalent Cedar policies

// Policy 1: Allow principals with the viewer role to read documents 
permit (
	principal in UserRole::"viewer",
	action == Action::"read",
	resource in ResourceType::"document"
);
// Policy 2: Allow principals with the editor role to write documents
permit (
	principal in UserRole::"editor",
	action == Action::"write",
	resource in ResourceType::"document"
);

Data model differences

One of the most significant differences between the two evaluation engines is how they handle data. Rego works with arbitrary JSON input data, giving users complete flexibility in how they structure authorization requests. Users can access any field in your input data using Rego’s path notation.

Cedar allows for the creation of a defined schema with typed entities. This means that users need to model authorization data as entities with specific types, attributes, and relationships. While this requires more upfront planning, it provides superior validation, runtime performance, and tooling support.

Policy evaluation

Rego and Cedar differ fundamentally in their approaches to policy evaluation. Rego uses a logic programming model and, as a result, policy evaluation functions much like a logic puzzle solver. It starts with a question and searches backward through linked rules to find an answer. This approach allows for flexible policy composition but can often be slower, less predictable, and more difficult to audit.

Cedar, on the other hand, uses a simpler functional evaluation approach. It uses a straightforward evaluation model where each policy is checked independently against the authorization request. Policies use basic conditional logic to produce fast, deterministic allow or deny decisions. A policy either fully matches the authorization request (principal, action, resource, and all conditions), or it doesn’t apply. This is essential for high-performance authorization scenarios where predictable evaluation time and clear audit trails are essential. Cedar policy evaluation follows four core principles:

  • Default deny for access not explicitly granted
  • Forbid overrides permit for handling policy conflicts
  • Order-independent evaluation to prevent bugs
  • Deterministic outcomes for reliable results

Setting up Verified Permissions

Before you can begin migrating your authorization policies, you need to establish the foundational infrastructure in Verified Permissions.

Creating your policy store

To illustrate the migration process, you will use a fictional document management application that uses OPA and Rego for authorization. The first step in migrating to Verified Permissions is creating a policy store. A policy store is a container for your Cedar policies and schema. You can create multiple policy stores for different applications or environments.

When creating a policy store, you choose between two validation modes:

  • STRICT mode: Requires a schema against which policies are validated
  • OFF mode: Allows policies without a schema (useful for initial testing)

For production migrations, STRICT mode is recommended because it provides better validation compared to OFF mode and can enable optimizations that reduce the entity data needed for authorization requests. You can create a policy store through the AWS Management Console, AWS Command Line Interface (AWS CLI), or programmatically using AWS SDKs. The following example uses the AWS CLI:

aws verifiedpermissions create-policy-store \
	--region us-east-1 \
	--validation-settings mode=STRICT \
	--description "Migration from OPA to Amazon Verified Permissions"

If the request is successful, you should see a JSON encoded response that looks like the following:

{
	"policyStoreId": "PSEXAMPLEabcdefg012345",
	"arn": "arn:aws:verifiedpermissions:us-east-1:123456789012:policy-store/PSEXAMPLEabcdefg012345",
	"createdDate": "2025-09-15T10:30:45.123456+00:00",
	"lastUpdatedDate": "2025-09-15T10:30:45.123456+00:00"
}

Make note of the policyStoreId from the response—you will need it for subsequent operations.

Defining your schema

In STRICT mode, Verified Permissions requires a Cedar schema that defines the types of entities in an authorization system. This schema serves several important purposes, including validating policies at creation time, enabling entity slicing performance optimizations, enabling better tooling and IDE support, and documenting your authorization model. The schema should define:

  • Entity types: The kinds of objects in your system (for example, users, roles, documents, and so on.)
  • Attributes: Properties that entities can have (for example, department, classification, and createdDate)
  • Actions: Operations that can be performed (for example, read, write, and delete)
  • Relationships: How entities relate to each other (for example, user belongs to role, document owned by user)

When designing a schema, you should consider how your current OPA input data maps to Cedar entities. For example, if your Rego policies access input.user.department, you will need a User entity type with a department attribute. The following is an example Cedar schema for your document management application:

{
	"MyApp": {
		"entityTypes": {
			"User": {
				"shape": {
					"type": "Record",
					"attributes": {
						"department": {"type": "String"},
						"jobLevel": {"type": "Long"},
						"email": {"type": "String"}
					}
				}
			},
			"Role": {
				"shape": {
					"type": "Record",
					"attributes": {"name": {"type": "String"}}
				}
			},
			"Document": {
				"shape": {
					"type": "Record",
					"attributes": {
						"owner": {"type": "Entity", "name": "User"},
						"classification": {"type": "String"},
						"createdDate": {"type": "String"}
					}
				}
			}
		},
		"actions": {
			"read": {"appliesTo": {"principalTypes": ["User"], "resourceTypes": ["Document"]}},
			"write": {"appliesTo": {"principalTypes": ["User"], "resourceTypes": ["Document"]}},
			"delete": {"appliesTo": {"principalTypes": ["User"], "resourceTypes": ["Document"]}}
		}
	}
}

To apply this schema to the policy store you created earlier using the AWS CLI, you can run the following command:

aws verifiedpermissions put-schema \
	--region us-east-1 \
	--policy-store-id YOUR_POLICY_STORE_ID \
	--definition file://schema.json

Ensure that you replace YOUR_POLICY_STORE_ID with the policyStoreId that was returned when you created your policy store.

You can view the visualized policy schema (shown in Figure 1) in the Verified Permissions console by going to Policy Store and choosing Schema.

Figure 1: Verified Permissions policy schema visualization

Figure 1: Verified Permissions policy schema visualization

Policy migration patterns

With your policy store and schema in place, you can now begin translating your Rego policies into Cedar policies, following common authorization patterns.

Pattern 1: Role-based access control

Role-based access control (RBAC) is one of the most used authorization patterns. In RBAC systems, users are assigned roles, and roles are granted permissions to perform actions on resources.

In your current Rego implementation, you might check if a user has a specific role in their roles array, then allow certain actions based on that role. Your Rego policy might look something like the following:

package rbac

import future.keywords.if
import future.keywords.in

default allow := false

allow if {
	input.user.roles[_] == "admin"
}

allow if {
	input.user.roles[_] == "editor"
	input.action in ["read", "write"]
}

allow if {
	input.user.roles[_] == "viewer"
	input.action == "read"
}

When migrating to Cedar, you will model this using entity relationships where users belong to role entities.

// Admin users can perform any action on any resource
permit (
	principal in MyApp::Role::"admin",
	action,
	resource
);

// Editor users can read and write on every resource
permit (
	principal in MyApp::Role::"editor",
	action in [MyApp::Action::"read", MyApp::Action::"write"],
	resource
);

// Viewer users can only read on every resource
permit (
	principal in MyApp::Role::"viewer",
	action == MyApp::Action::"read",
	resource
);

Migration approach
To successfully migrate your RBAC policies from Rego to Cedar, follow these steps:

  1. Define User and Role entity types in your schema
  2. Create permit policies for each role-action combination
  3. Use the Cedar in operator to check role membership
  4. Consider creating role hierarchies if you have nested roles

Key differences
Understanding the fundamental differences between Rego and Cedar’s approach to RBAC will help you design more effective policies:

  • Cedar uses entity relationships instead of checking array membership
  • Each permission becomes a separate, explicit policy
  • Role hierarchies are modeled through entity parent-child relationships

Pattern 2: Attribute-based access control

Attribute-based access control (ABAC) makes authorization decisions based on attributes of the user, resource, action, and environment. This is often more flexible than RBAC but can be more complex to implement.

In Rego, you would access various attributes from the input data and use them in policy conditions:

package abac

default allow := false
# Anyone can read public documents
allow if {
	input.action == "read"
	input.resource.classification == "public"
}

# Users can read internal documents from their department
allow if {
	input.action == "read"
	input.resource.classification == "internal"
	input.user.department == input.resource.department
}

# Users can write to documents they own
allow if {
	input.action == "write"
	input.resource.owner == input.user.id
}

Cedar handles this through entity attributes and policy conditions using the when and unless clauses.

// Anyone can read public documents. Blank ‘principal’ and ‘resource’ entities are wildcards that match everything
permit (
	principal,
	action == MyApp::Action::"read",
	resource
) when {
	resource.classification == "public"
};

// Users can read internal documents from their department
permit (
	principal,
	action == MyApp::Action::"read",
	resource
) when {
	resource.classification == "internal" &&
	principal.department == resource.department
};

// Users can write to documents they own
permit (
	principal,
	action == MyApp::Action::"write",
	resource
) when {
	resource.owner == principal
};

Migration approach
Migrating ABAC policies requires careful mapping of attributes from your Rego input structure to Cedar’s entity model:

  1. Identify the attributes used in your current policies
  2. Map these attributes to entity attributes in your Cedar schema
  3. Use when clauses in Cedar policies to implement attribute-based conditions
  4. Consider using context for environment-specific attributes (time, IP address, and so on)

Key differences
Cedar’s schema-driven approach to attributes provides several advantages over Rego’s dynamic attribute access:

  • Cedar requires attributes to be defined in the schema
  • Cedar schema validation helps catch attribute access errors at policy creation time
  • Complex attribute logic might need to be split across multiple policies

Pattern 3: Relationship-based access control

Relationship-based access control (ReBAC) grants permissions based on properties of the resource being accessed or relationships between the user and the resource (such as ownership). In Rego, this might be expressed as follows:

package rebac

import future.keywords.if
import future.keywords.in

# Allow document owners to perform any action
allow if {
	input.resource.type == "document"
	input.resource.owner_id == input.user.id
}

# Alternative: checking ownership through a separate ownership data structure
allow if {
	input.resource.type == "document"
	ownership := data.ownerships[input.resource.id]
	ownership.owner_id == input.user.id
}

In the preceding example, ownership is checked by comparing the owner_id attribute on the resource with the user’s ID. You might access this from the input data directly or from a separate data source. In Cedar, relationships are first-class concepts. The resource.owner == principal syntax directly checks if the principal is the owner entity referenced by the resource. This is more natural and type-safe than string comparisons:

permit (
	principal,
	action,
	resource is MyApp::Document
) when {
	resource.owner == principal
};

Migration approach
Converting relationship-based policies requires modeling your data relationships as Cedar entity references:

  1. Model resources as Cedar entities with relevant attributes
  2. Use resource attributes in policy conditions
  3. Model ownership and other relationships through entity references
  4. Use Cedar’s attribute access syntax for resource properties

Pattern 4: Time and context-based access

Many authorization systems need to consider contextual information such as time of day, user location, or request characteristics (IP address, user-agent, and so on). Expressing this in Rego would look like the following example:

package temporal

import future.keywords.if

default allow := false
# Allow read access during business hours (9 AM to 5 PM UTC)
allow if {
	input.action == "read"
	current_hour := time.clock([time.now_ns(), "UTC"])[0]
	current_hour >= 9
	current_hour <= 17
}

In Cedar, the same policy logic can be expressed like the following:

// Allow read access during business hours (9 AM to 5 PM UTC)
permit (
	principal,
	action == MyApp::Action::"read",
	resource
) when {
	context.currentTime.hour >= 9 &&
	context.currentTime.hour <= 17
};

Migration approach
Context-based policies in Cedar use the context parameter passed with each authorization request:

  • Use Cedar’s context feature for environment information
  • Pass time-based information in the authorization request context
  • Create policies with time-based conditions using context attributes
  • Consider caching implications for time-sensitive policies

Application integration changes

After migrating your policies to Cedar, you need to update your application code to integrate with Verified Permissions.

Updating authorization calls

The most significant change in your application code will be replacing OPA API calls with Verified Permissions API calls. Understanding the differences between these systems will help you plan your integration work effectively. The sample code in this section is written in Python.

Request structure changes

When calling OPA, you typically send a single JSON payload containing the authorization data. For example, your current OPA request might look like the following:

opa_request = {
	"input": {
		"user": {
			"id": "user123",
			"department": "engineering",
			"role": "editor"
		},
		"resource": {
			"id": "doc456",
			"type": "document",
			"owner": "user123"
		},
		"action": "read"
	}
}

response = requests.post(
	"http://opa-server:8181/v1/data/authz/allow",
	json=opa_request
)
authorized = response.json()["result"]

Verified Permissions requires a more structured approach where principals, resources, and actions are explicitly typed entities.

import boto3
import json
from typing import Dict, Any, List

class AuthorizationService:
	def __init__(self, policy_store_id: str, region: str = 'us-east-1'):
		self.client = boto3.client('verifiedpermissions', region_name=region)
		self.policy_store_id = policy_store_id
	
	#Check if a principal is authorized to perform an action on a resource.
	def is_authorized(self, principal: Dict[str, Any], action: str,
				resource: Dict[str, Any], context: Dict[str, Any] = None) -> bool:
		try:
			# Convert to Cedar entity format
			principal_entity = self._to_cedar_entity(principal, "User")
			resource_entity = self._to_cedar_entity(resource, "Document")
			action_entity = {"actionType": "MyApp::Action", "actionId": action}

			request = {
				'policyStoreId': self.policy_store_id,
				'principal': principal_entity,
				'action': action_entity,
				'resource': resource_entity
			}

			if context:
				request['context'] = {'contextMap': context}
				
			response = self.client.is_authorized(**request)
			return response['decision'] == 'ALLOW'
		except Exception as e:
			print(f"Authorization error: {e}")
			return False

	def _to_cedar_entity(self, entity_data: Dict[str, Any], entity_type: str) -> Dict[str, Any]:
		# Convert application data to Cedar entity format
		return {
			'entityType': f'MyApp::{entity_type}',
			'entityId': str(entity_data.get('id', '')),
			'attributes': entity_data
		}

The key differences in this new structure are:

  • Entity type declarations: Each entity (principal, resource) must include an entityType that matches your Cedar schema
  • Entity IDs: Every entity requires a unique entityId for identification
  • Action format: Actions are specified with an actionType and actionId rather than as simple strings
  • Separate context: Environmental information like time, IP address, or user agent is passed in a separate context parameter

Response handling changes

OPA returns whatever your Rego policy outputs, which could be a Boolean, a set of allowed actions, or complex nested data structures. Regardless of the policy outputs, Verified Permissions returns a consistent authorization decision structure:

# Amazon Verified Permissions response structure
{
	'decision': 'ALLOW',# or 'DENY'
	'determiningPolicies': [...],# Which policies determined the decision
	'errors': [...]# Errors that occurred during evaluation
}

Your application logic becomes simpler because you need to check for only ALLOW or DENY:

# Example usage

def check_document_access():
	auth_service = AuthorizationService('YOUR_POLICY_STORE_ID')

	# Example principal (user)
	user = {
		'id': 'user123',
		'department': 'engineering',
		'jobLevel': 5,
		'email': '[email protected]'
	}

	# Example resource (document)
	document = {
		'id': 'doc456',
		'owner': 'user123',
		'classification': 'internal',
		'department': 'engineering'
	}

	# Example context
	context = {
		'currentHour': 14,# 2 PM
		'userAgent': 'MyApp/1.0'
	}

	# Check authorization
	can_read = auth_service.is_authorized(user, 'read', document, context)
	can_write = auth_service.is_authorized(user, 'write', document, context)

	print(f"User can read document: {can_read}")
	print(f"User can write document: {can_write}")

Error handling changes

OPA errors typically relate to policy evaluation issues or server connectivity problems. With Verified Permissions, you’ll encounter AWS-specific error types, as shown in the following example:

def is_authorized_with_error_handling(self, principal, action, resource, context=None):
	try:
		principal_entity = self._to_cedar_entity(principal, "User")
		resource_entity = self._to_cedar_entity(resource, "Document")
		action_entity = {"actionType": "MyApp::Action", "actionId": action}

		request = {
			'policyStoreId': self.policy_store_id,
			'principal': principal_entity,
			'action': action_entity,
			'resource': resource_entity
		}

		if context:
			request['context'] = {'contextMap': context}

		response = self.client.is_authorized(**request)
		return response['decision'] == 'ALLOW'
	except ClientError as e:
		error_code = e.response['Error']['Code']

		if error_code == 'ResourceNotFoundException':
			print(f"Policy store not found: {self.policy_store_id}")
		elif error_code == 'ValidationException':
			print(f"Invalid request: {e.response['Error']['Message']}")
		elif error_code == 'ThrottlingException':
			print("Request throttled - consider implementing exponential backoff")
		else:
			print(f"AWS error: {error_code}")

		# Fail closed - deny access on error
		return False

	except BotoCoreError as e:
		print(f"SDK error: {e}")
		return False

	except Exception as e:
		print(f"Unexpected error: {e}")
		return False

It’s important to note that the AWS SDK provides built-in retry logic for transient failures. The following is an example of how you can enable this feature:

# Configure retry behavior
config = Config(
	retries={
		'max_attempts': 3,
		'mode': 'adaptive'# Automatically adjusts retry behavior
	},
	connect_timeout=5,
	read_timeout=10
)

self.client = boto3.client(
	'verifiedpermissions',
	region_name=region,
	config=config
)

Data transformation

Your current authorization data needs to be transformed into Cedar’s entity format. This transformation happens in the _to_cedar_entity method shown in the error handling changes example, but let’s break down what’s involved.

Extracting entity information
Identify which parts of your current OPA input represent the principal, resource, and action. In most OPA implementations, this mapping is straightforward:

# Current OPA structure
opa_input = {
	"user": {...},# This becomes the principal
	"resource": {...},# This becomes the resource
	"action": "read"# This becomes the action
}

# Map to Cedar structure
principal = opa_input["user"]
resource = opa_input["resource"]
action = opa_input["action"]

Adding type information
Cedar requires explicit type declarations for all entities. You’ll need to determine the appropriate entity type based on your schema:

def _determine_entity_type(self, entity_data: Dict[str, Any]) -> str:
	# Determine the Cedar entity type based on entity data. This logic will be specific to your application.
	# Example: determine type based on entity structure or type field
	if 'role' in entity_data:
		return 'User'
	elif 'document_type' in entity_data:
		return 'Document'
	elif 'name' in entity_data and 'member_count' in entity_data:
		return 'Team'
	else:
		raise ValueError(f"Cannot determine entity type for: {entity_data}")

def _to_cedar_entity(self, entity_data: Dict[str, Any], entity_type: str = None) -> Dict[str, Any]:
	# Convert application data to Cedar entity format.
	if entity_type is None:
		entity_type = self._determine_entity_type(entity_data)

	return {
		'entityType': f'MyApp::{entity_type}',
		'entityId': str(entity_data.get('id', '')),
		'attributes': entity_data
	}

Structuring attributes
Cedar attributes must match your schema definition, so you might need to transform attribute names or values. This is also a chance to iterate and improve on naming. The following example demonstrates a code pattern to convert attribute names and values in code.

def _prepare_attributes(self, entity_data: Dict[str, Any], entity_type: str) -> Dict[str, Any]:
	#Prepare entity attributes according to Cedar schema requirements.
	attributes = {}

	if entity_type == 'User':
		# Map OPA field names to Cedar schema field names
		attributes = {
			'department': entity_data.get('dept', entity_data.get('department')),
			'jobLevel': int(entity_data.get('job_level', entity_data.get('jobLevel', 0))),
			'email': entity_data.get('email', entity_data.get('email_address'))
		}
	elif entity_type == 'Document':
		attributes = {
			'classification': entity_data.get('classification','internal'),
			'department': entity_data.get('department'),
			'owner': entity_data.get('owner', entity_data.get('owner_id'))
		}

	# Remove None values
	return {k: v for k, v in attributes.items() if v is not None}

Handling context
Separate environmental information from entity data. Context information should not be part of entity attributes.

def prepare_authorization_request(self, user_data, resource_data, action,
						request_metadata=None):

	# Entity data only includes intrinsic properties
	principal = {
		'id': user_data['id'],
		'department': user_data['department'],
		'jobLevel': user_data['job_level']
	}

	resource = {
		'id': resource_data['id'],
		'classification': resource_data['classification'],
		'owner': resource_data['owner']
	}

	# Context includes environmental and request-specific data
	context = {}
	if request_metadata:
		context = {
			'currentHour': request_metadata.get('hour'),
			'ipAddress': request_metadata.get('ip_address'),
			'userAgent': request_metadata.get('user_agent'),
			'requestTime': request_metadata.get('timestamp')
		}
	return self.is_authorized(principal, action, resource, context)

Testing your migration

The most critical aspect of migration testing is verifying that you have correctly migrated your authorization logic from Rego to Cedar. This requires systematic testing with comprehensive test cases.

Test case development

  1. Inventory current policies: Document your current Rego policies, including their decision logic, input data requirements, and expected outcomes for key test scenarios
  2. Create test scenarios: Develop test cases covering all policy branches and edge cases
  3. Capture current behavior: Run your test cases against OPA to establish baseline results
  4. Test Cedar policies: Run the same test cases against your Cedar policies
  5. Analyze differences: Investigate mismatches and adjust policies accordingly

When testing your policies, start with basic, straightforward policies before tackling complex ones. Test both positive cases (should be allowed) and negative cases (should be denied) and include edge cases and boundary conditions. Additionally, test with real production data (anonymized if necessary) to verify that your policies will work effectively when implemented in production.

It’s also important to compare the performance characteristics of your OPA setup with Verified Permissions across several key metrics. These metrics should include average response time for authorization requests, throughput (requests per second), and error rates under normal and stress conditions. During testing, test from the actual deployment environment used by your application and account for network latency to AWS services.

Finally, you should test the complete integration between your application and Verified Permissions across several critical areas. Your integration testing should cover authentication and AWS credential handling, request/response data transformation, error handling and fallback scenarios, connection pooling and resource management, and logging and monitoring integration to help ensure that the components work together seamlessly.

Deployment strategy

A successful migration from OPA to Verified Permissions requires careful planning and a risk-managed deployment approach that minimizes disruption to your production systems.

Phased migration approach

Rather than switching entirely to Verified Permissions in a single step, implement a phased migration to reduce risk.

  1. Parallel deployment: Deploy Verified Permissions alongside your existing OPA infrastructure and route a small percentage of authorization requests to the new system. Log and compare results between both systems, focusing on non-critical operations initially to minimize risk during the transition process.
  2. Gradual traffic shift: Gradually increase the percentage of requests routed to Verified Permissions while monitoring system performance, error rates, and authorization accuracy. Implement circuit breaker patterns to fall back to OPA if needed and expand to more critical operations as your confidence grows in the reliability and performance of the new system.
  3. Full migration: Route all traffic to Verified Permissions but keep OPA infrastructure running temporarily. Monitor system behavior under full production load and decommission OPA infrastructure after stability is confirmed and you are confident in the performance of the new system.

Feature flag implementation

Use feature flags to control the migration process through various flag types. These include percentage-based rollout to route a specific percentage of requests to the new system, user-based rollout to route specific users or user groups to the new system, operation-based rollout to route specific types of operations to the new system, and environment-based rollout to use different systems in different environments. Feature flags provide several benefits, including instant rollback capability if issues arise, granular control over migration scope, A/B testing of authorization decisions, and safe experimentation with new policies.

Troubleshooting common migration issues

When migrating from Rego to Cedar, you might encounter several common issues. In this section, you’ll find a troubleshooting guide.

Complex Rego logic translation

Some Rego policies use complex logic that doesn’t directly translate to Cedar. For example:

# Complex Rego policy with loops and comprehensions
allow {
	some i # The i variable is used to iterate over the items in the input.user.permissions array
		input.user.permissions[i].resource == input.resource.id
		input.user.permissions[i].actions[_] == input.action # The wildcard _ is used to iterate over the items in the actions array
}

In these scenarios, you should restructure your data model to work better with Cedar’s entity-based approach. For example, Cedar provides the in operator for improved performance and readability, as shown in the following example:

permit (
	principal,
	action,
	resource
) when {
	principal has permission &&
	resource in principal.permission.resources &&
	action in principal.permission.actions
};

Schema validation errors

Cedar requires strict schema compliance. Common errors include:

  • Undefined entity types
  • Missing required attributes
  • Type mismatches

You can use the schema validation tools provided by Verified Permissions to triage these issues.

Best practices and recommendations

Adhering to the following recommendations and best practices will help you build a maintainable, secure, and performant authorization system with Verified Permissions.

Policy design best practices

Well-designed policies are the foundation of a reliable authorization system and directly impact maintainability and security:

  • Schema-first design: Start with a comprehensive schema design before writing policies. A well-designed schema makes policy authoring more maintainable.
  • Basic, explicit policies: Favor multiple basic policies over complex monolithic ones. Cedar’s explicit permit/forbid model works best with clear, straightforward policy statements.
  • Meaningful naming: Use descriptive names for entity types, attributes, and policy descriptions. This improves understandability and maintainability of polices.
  • Documentation: Document your authorization model, including entity relationships, policy intentions, and business rules.

Migration strategy recommendations

Successfully migrating your authorization system requires balancing speed with safety through deliberate, incremental steps:

  • Incremental approach Don’t attempt to migrate everything at once. Start with basic, low-risk policies and gradually move to more complex scenarios.
  • Start in audit mode: Calculate and log the policy decisions for both systems. This will help you to compare results without impacting runtime authorization.
  • Comprehensive testing: Invest heavily in testing during migration. The cost of thorough testing is much less than the cost of authorization failures in production.
  • Parallel operations: Run both systems in parallel during migration to validate policy behavior and build confidence in the new system.
  • Team training: Ensure your team understands Cedar’s policy model and syntax. The conceptual differences from Rego require a learning investment.

Operational excellence

Maintaining a production authorization system requires ongoing attention to operational concerns beyond the initial migration:

  • Version control: Treat policies as code with proper version control, code review, and deployment processes.
  • Monitoring and alerting: Implement comprehensive monitoring from day one. Authorization issues can have significant business impact.
  • Regular audits: Periodically review and audit policies to verify that they still meet business requirements and security standards.
  • Performance optimization: Continuously monitor and optimize performance, particularly around caching strategies and policy efficiency.

Conclusion

Migrating from Open Policy Agent to Amazon Verified Permissions represents a significant step toward reducing operational overhead, improving runtime authorization performance and enhancing governance while maintaining robust authorization capabilities. The migration journey from OPA to Verified Permissions isn’t only about changing technologies, it’s an opportunity to improve your authorization architecture, enhance security practices, and build a more scalable foundation for your application’s access control needs.

Thank you for reading this post. If you have comments or questions about migrating from OPA to Verified Permissions, leave them in the comments section below.

Additional resources

The following links provide resources for further reading on the topics covered in this blog post:


If you have feedback about this post, submit comments in the Comments section below. If you have questions about this post, contact AWS Support.

Samuel Folkes

Samuel Folkes
Samuel is a Senior Security Solutions Architect at Amazon Web Services with more than 18 years of experience in software architecture, networking, and cybersecurity. Prior to AWS, he worked as a software engineer and led engineering teams across multiple industries. Samuel specializes in identity and access management and is passionate about using emerging technologies to drive business value.
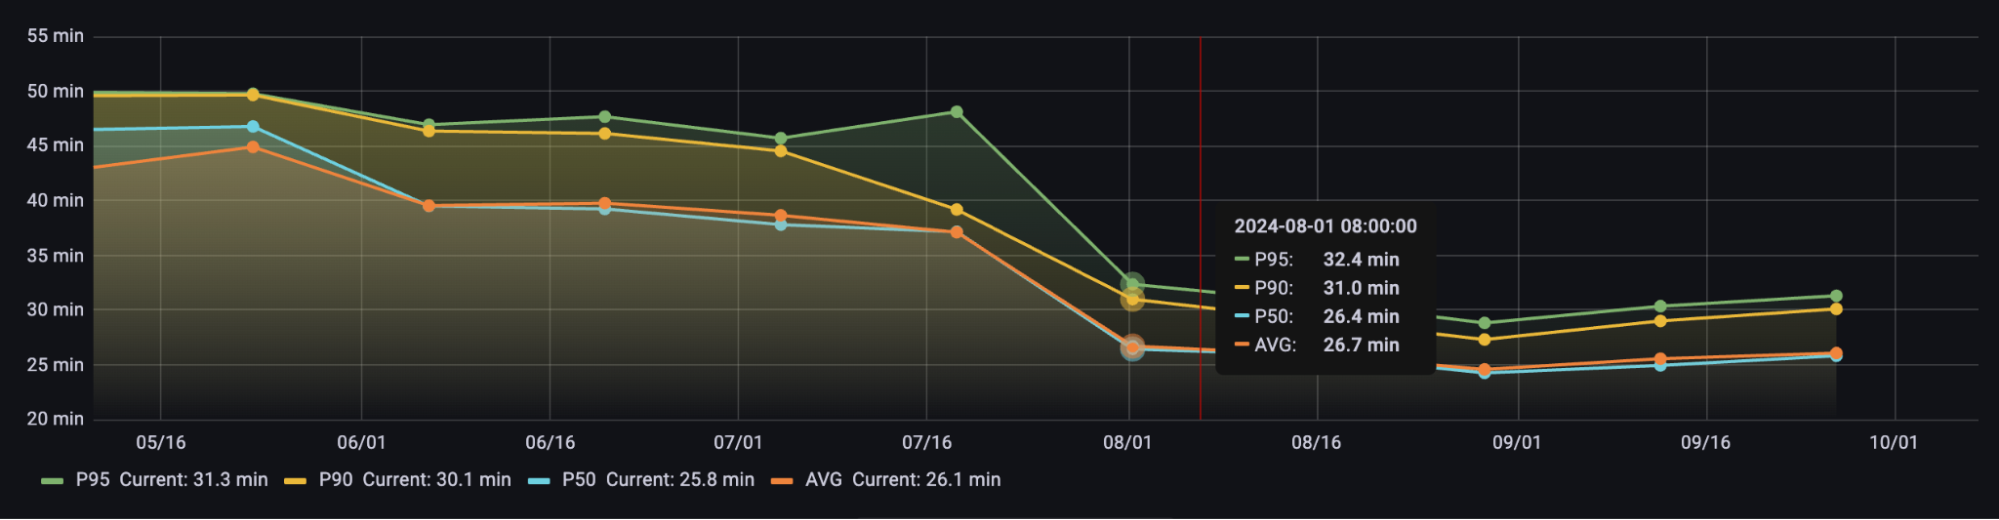
The collective thoughts of the interwebz