Post Syndicated from xkcd.com original https://xkcd.com/2996/

Post Syndicated from xkcd.com original https://xkcd.com/2996/
Post Syndicated from Erik Iwanski original https://aws.amazon.com/blogs/messaging-and-targeting/securing-communications-at-the-edge-with-aws-wickr/
Organizations that are looking to establish secure communication networks at the edge often encounter challenges. The use of disparate collaboration tools on personal and government-issued devices can make it difficult to protect sensitive data and avoid communication gaps.
This blog post highlights four common communication issues that customers encounter when operating in disconnected (or intermittently connected) environments, and how end-to-end encrypted messaging and collaboration service AWS Wickr can help you address them.
Issue 1: Seamless communication—multiple agencies and partners need to collaborate effectively.
Federal, state, and local organizations tend to use different means and mechanisms to communicate both internally and externally with third parties, which often leads to interoperability challenges. They need to seamlessly coordinate and connect with mission partners—including government agencies, military teams, medical professionals, and first responders—even in disconnected environments in order to work together effectively.
Issue 2: Out-of-band communication—teams need a way to ensure that communication is possible when primary channels are down or compromised.
Network disruptions, security events, and system failures can impact communication channels. The use of a separate, secure, out-of-band communication tool that can be used as a backup when primary channels are unavailable or compromised is critical to protecting sensitive information, maintaining business continuity, and coordinating incident response activities.
Issue 3: Data retention—messages and files need to be retained to help meet recordkeeping requirements, and facilitate after-action reports.
Virtually all federal, state, and local government agencies must adhere to various data retention and records management policies, regulations, and laws. Many are subject to Federal Records Act (FRA) and National Archives and Records Administration (NARA) regulations that require them to collect, store, and manage federal records that are created, received, and used in daily operations. For those subject to Freedom of Information Act (FOIA) requests and U.S. Department of Defense (DOD) Instruction 8170.01—which prescribes procedures for the collection, distribution, storage, and processing of DOD information through electronic messaging services—effectively retaining messages is about more than supporting security and compliance; it’s about maintaining public trust.
Issue 4: Security and control—communications must be adequately protected and administrative control must be maintained, no matter the environment.
The transmission of sensitive and mission-critical data through messaging apps and collaboration tools that lack critical encryption and security protocols increases the likelihood of a security incident. Popular consumer messaging apps don’t provide controls that allow for individual devices or accounts to be suspended or removed, increasing the threat of data exposure stemming from a lost or stolen device. Enterprise collaboration apps lack the advanced security provided by end-to-end encryption.
How AWS Wickr can help
AWS Wickr is a secure messaging and collaboration service that protects one-to-one and group messaging, voice and video calling, file sharing, screen sharing, and location sharing with 256-bit encryption.
Wickr combines the security and privacy of end-to-end encryption with the data retention and administrative controls you need to accelerate collaboration, even in disconnected environments.
Wickr provides the following capabilities to help you address common communication challenges:
Communicating at the edge
Wickr is available in two deployment models: cloud-native AWS Wickr and AWS WickrGov, which are available through the AWS Management Console, and self-hosted Wickr Enterprise. Wickr Enterprise offers the same secure collaboration features as AWS Wickr and AWS WickrGov, but can be self-hosted on any private on-premises infrastructure (such as an AWS Outpost or Snowball Edge device), private cloud infrastructure, or in a multi-cloud deployment. Wickr Enterprise can maintain secure communications when internet access (via broadband, mobile, 5G, or satellite) to cloud-based networks fails. You can run Wickr Enterprise without any internet connectivity and it supports architectural resiliency, such as deploying a fully managed network backhaul that is capable of federating with AWS Wickr users when internet connectivity is available.
Figure 1 illustrates a hybrid architecture that combines AWS Wickr and Wickr Enterprise. The Snowball Edge device running Wickr allows disconnected communications at the edge between Wickr Enterprise users. When internet connectivity becomes available, Wickr Enterprise users can federate with AWS Wickr users and send data retention logs to Amazon S3 or any customer-defined storage.

Figure 1: Hybrid of Wickr Enterprise self-hosted on Snowball Edge and AWS Wickr in the Cloud. A hybrid solution federates AWS Wickr in the cloud with a local deployment of Wickr Enterprise for extended resilience and redundancy.
Collaborate with confidence
Securing communications at the edge is critical to protecting sensitive data and maintaining operational resilience. AWS Wickr offers a secure, simple-to-use, reliable solution that can help you address common challenges and collaborate effectively, even in the harshest environments. By choosing the features and deployment options that meet your needs, you can facilitate secure and compliant communications everywhere, and seamlessly collaborate with mission partners.
AWS Wickr has been authorized for Department of Defense Cloud Computing Security Requirements Guide Impact Level 4 and 5 (DoD CC SRG IL4 and IL5) in the AWS GovCloud (US-West) Region. It is also Federal Risk and Authorization Management Program (FedRAMP) authorized at the Moderate impact level in the AWS US East (N. Virginia) Region, FedRamp High authorized in the AWS GovCloud (US-West) Region, and meets compliance programs and standards such as Health Insurance Portability and Accountability Act (HIPAA) eligibility, International Organization for Standardization (ISO) 27001, and System and Organization Controls (SOC) 1,2, and 3.
For more information, please visit the AWS Wickr webpage, or email [email protected].
 Erik Iwanski Erik IwanskiErik is a Principal Worldwide Go-to-Market (GTM) Specialist for Amazon Web Services (AWS) and is based in Montana. He focuses on global customers and leads the global GTM plan for AWS Wickr. Erik has 15-plus years of experience working across industries from national security, federal/SLED sales, healthcare, and technology. He holds a master’s degree in microbiology from California State University Long Beach and a bachelor’s degree in Biological Sciences from the University of California Irvine. |
 Anne Grahn Anne GrahnAnne is a Senior Worldwide Security GTM Specialist at AWS, based in Chicago. She has more than 13 years of experience in the security industry, and focuses on effectively communicating cybersecurity risk. She maintains a Certified Information Systems Security Professional (CISSP) certification. |
Post Syndicated from Adam Barnett original https://blog.rapid7.com/2024/10/08/patch-tuesday-october-2024/

Microsoft is addressing 118 vulnerabilities this October 2024 Patch Tuesday. Microsoft has evidence of in-the-wild exploitation and/or public disclosure for five of the vulnerabilities published today, although it does not rate any of these as critical (yet). Of those five, Microsoft lists two as exploited in the wild, and both of these are now listed on CISA KEV. Microsoft is also patching three further critical remote code execution (RCE) vulnerabilities today. Three browser vulnerabilities have already been published separately this month, and are not included in the total.
Somewhat unusually, we’ll take a look at two of the three critical RCEs published today — CVE-2024-43468 and CVE-2024-43582 — before moving on to the arguably somewhat-less- threatening zero-day vulnerabilities patched today.
Microsoft Configuration Manager receives a patch for the only vulnerability published by Microsoft today with a CVSS base score of 9.8. Although Microsoft doesn’t tag it as either publicly disclosed or exploited-in-the-wild, the advisory for CVE-2024-43468 appears to describe a no-interaction, low complexity, unauthenticated network RCE against Microsoft Configuration Manager. Exploitation is achieved by sending specially-crafted malicious requests, and leads to code execution in the context of the Configuration Manager server or its underlying database. The relevant update is installed within the Configuration Manager console, and requires specific administrator actions that Microsoft describes in detail in a generic series of articles. Further information and several specific required steps are described in KB29166583.
Confusingly, this KB29166583 was first published over a month ago on 2024-09-04, and was then subsequently unpublished and republished on 2024-09-18, all without any mention of CVE-2024-43468, which was published only today and which KB29166583 apparently remediates. Defenders should read the available documentation carefully, and then probably read it again for good measure.
Any RDP Server critical RCE is worth patching quickly. CVE-2024-43582 is a pre-auth critical RCE in the Remote Desktop Protocol Server. Exploitation requires an attacker to send deliberately-malformed packets to a Windows RPC host, and leads to code execution in the context of the RPC service, although what this means in practice may depend on factors including RPC Interface Restriction configuration on the target asset. One silver lining: attack complexity is high, since the attacker must win a race condition to access memory improperly.
Who doesn’t love a good elevation of privilege vulnerability? Weary blue teamers who see the words “publicly disclosed” on a brand-new advisory know the answer. CVE-2024-43583 describes a flaw in Winlogon which gets an attacker all the way to SYSTEM via abuse of a third-party Input Method Editor (IME) during the sign-on process. The supplementary KB5046254 article explains that the 2024-10-08 patches disable non-Microsoft IME during the sign-in process. On that basis, outright removal of third-party IME is a mitigation available to anyone who is not able to apply today’s patches immediately.
Attack surface reduction is always worth considering, and removal of third-party IMEs certainly accomplishes that. Anyone who needs to keep a third-party IME can still do so, but once today’s patches are applied, that third-party IME will be disabled — only in the context of the sign-in process — to prevent exploitation of CVE-2024-43583. Although Microsoft doesn’t quite spell it out, the only reasonable interpretation of the available information is that an asset with no first-party/Microsoft IME installed would remain vulnerable after patching, since otherwise no IME would be available when attempting to sign in. Use of third-party IME is more likely to be a concern in mixed-language or non-English-speaking contexts. The disclosure process around this vulnerability may not have been entirely smooth; back in September, one of the researchers credited with the discovery expressed discontent with MSRC via X-formerly-known-as-Twitter.
CVE-2024-20659 describes a publicly-disclosed security feature bypass in Hyper-V. Microsoft describes exploitation as both less likely and highly complex. An attacker must be both lucky and resourceful, since only UEFI-enabled hypervisors with certain unspecified hardware are vulnerable, and exploitation requires coordination of a number of factors followed by a well-timed reboot. All this after first achieving a foothold on the same network — although in this context, this likely means access to a VM on the target hypervisor, rather than some other location on the same subnet. The prize for successful exploitation is compromise of the hypervisor kernel.
CVE-2024-43573 is an exploited-in-the-wild spoofing vulnerability in MSHTML for which Microsoft is also aware of functional public exploit code; the advisory lists CWE-79 as the weakness, which translates to cross-site scripting (XSS). The advisory is sparse on further detail, although Windows Server 2012/2012 R2 admins who typically install Security Only updates should note that Microsoft is encouraging installation of the Monthly Rollups to ensure remediation in this case. The low CVSSv3 base score of 6.5 reflects the requirement for user interaction and the lack of impact to integrity or availability; a reasonable assumption might be that exploitation leads to improper disclosure of sensitive data, but no other direct effect on the target asset.
Microsoft is most famous for its closed source products, but has cautiously softened its stance on open source considerably in the past quarter century or so. Windows has included components of cURL for almost seven years at this point, along with various other open source components; Microsoft does patch these from time to time, although not always as quickly as defenders might like. Today’s patches for CVE-2024-6197, a publicly-disclosed RCE vulnerability in cURL, continue that trend.
The Microsoft advisory for CVE-2024-6197 clarifies that Windows does not ship libcurl, only the curl command line, but that’s still vulnerable and thus in scope for a fix. Exploitation requires that the user connect to a malicious server controlled by the attacker, and code execution is presumably in the context of the user launching the curl CLI tool on the Windows asset. The cURL project advisory for CVE-2024-6197 was originally published on 2024-07-24, and offers further detail from their perspective. Interestingly, the cURL project describes the most likely outcome of exploitation as a crash, and does not specifically mention RCE, although it is careful not to exclude the possibility of unspecified “more serious results,” which could well mean RCE. Microsoft rates this vulnerability as important, which is on track with the CVSS base score of 8.8.
CVE-2024-43572 rounds out today’s five zero-day vulnerabilities, and describes a low-complexity, no-user-interaction RCE in Microsoft Management Console. Microsoft is aware of both public functional exploit code and in-the-wild exploitation. The vulnerability is exploited when a user downloads and opens a specially-crafted malicious Microsoft Saved Console (MSC) file, so there’s no suggestion here that the Management Console is vulnerable via network attack. Today’s patches prevent untrusted MSC files from being opened, although the advisory does not describe how Windows will know what’s trusted and what isn’t. Microsoft has chosen to map CVE-2024-43572 to CWE-70, which is a very broad category, the use of which is explicitly discouraged by MITRE.
A third critical RCE patched today is hopefully less concerning than its siblings. CVE-2024-43488 is in the Visual Studio Code extension for Arduino, and Microsoft notes that the vulnerability documented by this CVE requires no customer action to resolve. A reasonable question is: what does “no action required” really mean here? Within the advisory, Microsoft both claims to have fully mitigated the vulnerability, and also that there is no plan to fix the vulnerability. As confusing as that all sounds, perhaps the most important takeaway here is that Microsoft is now issuing cloud service CVEs in a stated effort to improve transparency. It’s not clear when the vulnerability was first introduced or when it was remediated, but nevertheless the recent expansion into a whole new class of CVEs is a welcome step by Microsoft.
A sparse advisory for CVE-2024-43503, which is an elevation of privilege vulnerability which leads to SYSTEM. Advisories for similar vulnerabilities typically describe the specific SharePoint privileges required, but this one does not, so a reasonable assumption might be that the requirement here is simply minimal Site Member privileges.
Today sees the end of support for Windows 11 22H2 for Home, Pro, Pro Education, Pro for Workstations, and SE editions, as well as for Windows 11 21H2 for Education, Enterprise, and Enterprise multi-session editions. Server 2012 and Server 2012 R2 pass into Year 2 of ESU. Windows Embedded POSReady — the POS stands for Point-of-Sale — receives its final ESU updates today, and that might just be the last gasp for Windows 7 as a whole. As well as patching today’s critical RCE CVE-2024-43468, Intune admins still using Configuration Manager 2303 should look to upgrade to a newer version immediately, because support ends (somewhat unusually) on Thursday this week.
| CVE | Title | Exploited? | Publicly disclosed? | CVSSv3 base score |
|---|---|---|---|---|
| CVE-2024-43604 | Outlook for Android Elevation of Privilege Vulnerability | No | No | 5.7 |
| CVE | Title | Exploited? | Publicly disclosed? | CVSSv3 base score |
|---|---|---|---|---|
| CVE-2024-38179 | Azure Stack Hyperconverged Infrastructure (HCI) Elevation of Privilege Vulnerability | No | No | 8.8 |
| CVE-2024-43591 | Azure Command Line Integration (CLI) Elevation of Privilege Vulnerability | No | No | 8.7 |
| CVE-2024-38097 | Azure Monitor Agent Elevation of Privilege Vulnerability | No | No | 7.1 |
| CVE-2024-43480 | Azure Service Fabric for Linux Remote Code Execution Vulnerability | No | No | 6.6 |
| CVE | Title | Exploited? | Publicly disclosed? | CVSSv3 base score |
|---|---|---|---|---|
| CVE-2024-9370 | Chromium: CVE-2024-9370 Inappropriate implementation in V8 | No | No | N/A |
| CVE-2024-9369 | Chromium: CVE-2024-9369 Insufficient data validation in Mojo | No | No | N/A |
| CVE-2024-7025 | Chromium: CVE-2024-7025 Integer overflow in Layout | No | No | N/A |
| CVE | Title | Exploited? | Publicly disclosed? | CVSSv3 base score |
|---|---|---|---|---|
| CVE-2024-43488 | Visual Studio Code extension for Arduino Remote Code Execution Vulnerability | No | No | 8.8 |
| CVE-2024-43497 | DeepSpeed Remote Code Execution Vulnerability | No | No | 8.4 |
| CVE-2024-38229 | .NET and Visual Studio Remote Code Execution Vulnerability | No | No | 8.1 |
| CVE-2024-43590 | Visual C++ Redistributable Installer Elevation of Privilege Vulnerability | No | No | 7.8 |
| CVE-2024-43483 | .NET, .NET Framework, and Visual Studio Denial of Service Vulnerability | No | No | 7.5 |
| CVE-2024-43484 | .NET, .NET Framework, and Visual Studio Denial of Service Vulnerability | No | No | 7.5 |
| CVE-2024-43485 | .NET and Visual Studio Denial of Service Vulnerability | No | No | 7.5 |
| CVE-2024-43601 | Visual Studio Code for Linux Remote Code Execution Vulnerability | No | No | 7.1 |
| CVE-2024-43603 | Visual Studio Collector Service Denial of Service Vulnerability | No | No | 5.5 |
| CVE | Title | Exploited? | Publicly disclosed? | CVSSv3 base score |
|---|---|---|---|---|
| CVE-2024-38124 | Windows Netlogon Elevation of Privilege Vulnerability | No | No | 9 |
| CVE-2024-43518 | Windows Telephony Server Remote Code Execution Vulnerability | No | No | 8.8 |
| CVE-2024-43608 | Windows Routing and Remote Access Service (RRAS) Remote Code Execution Vulnerability | No | No | 8.8 |
| CVE-2024-43607 | Windows Routing and Remote Access Service (RRAS) Remote Code Execution Vulnerability | No | No | 8.8 |
| CVE-2024-38265 | Windows Routing and Remote Access Service (RRAS) Remote Code Execution Vulnerability | No | No | 8.8 |
| CVE-2024-43453 | Windows Routing and Remote Access Service (RRAS) Remote Code Execution Vulnerability | No | No | 8.8 |
| CVE-2024-38212 | Windows Routing and Remote Access Service (RRAS) Remote Code Execution Vulnerability | No | No | 8.8 |
| CVE-2024-43549 | Windows Routing and Remote Access Service (RRAS) Remote Code Execution Vulnerability | No | No | 8.8 |
| CVE-2024-43564 | Windows Routing and Remote Access Service (RRAS) Remote Code Execution Vulnerability | No | No | 8.8 |
| CVE-2024-43589 | Windows Routing and Remote Access Service (RRAS) Remote Code Execution Vulnerability | No | No | 8.8 |
| CVE-2024-43592 | Windows Routing and Remote Access Service (RRAS) Remote Code Execution Vulnerability | No | No | 8.8 |
| CVE-2024-43593 | Windows Routing and Remote Access Service (RRAS) Remote Code Execution Vulnerability | No | No | 8.8 |
| CVE-2024-43611 | Windows Routing and Remote Access Service (RRAS) Remote Code Execution Vulnerability | No | No | 8.8 |
| CVE-2024-43532 | Remote Registry Service Elevation of Privilege Vulnerability | No | No | 8.8 |
| CVE-2024-43599 | Remote Desktop Client Remote Code Execution Vulnerability | No | No | 8.8 |
| CVE-2024-43519 | Microsoft WDAC OLE DB provider for SQL Server Remote Code Execution Vulnerability | No | No | 8.8 |
| CVE-2024-43517 | Microsoft ActiveX Data Objects Remote Code Execution Vulnerability | No | No | 8.8 |
| CVE-2024-43583 | Winlogon Elevation of Privilege Vulnerability | No | Yes | 7.8 |
| CVE-2024-38261 | Windows Routing and Remote Access Service (RRAS) Remote Code Execution Vulnerability | No | No | 7.8 |
| CVE-2024-43514 | Windows Resilient File System (ReFS) Elevation of Privilege Vulnerability | No | No | 7.8 |
| CVE-2024-43509 | Windows Graphics Component Elevation of Privilege Vulnerability | No | No | 7.8 |
| CVE-2024-43556 | Windows Graphics Component Elevation of Privilege Vulnerability | No | No | 7.8 |
| CVE-2024-43501 | Windows Common Log File System Driver Elevation of Privilege Vulnerability | No | No | 7.8 |
| CVE-2024-43563 | Windows Ancillary Function Driver for WinSock Elevation of Privilege Vulnerability | No | No | 7.8 |
| CVE-2024-43560 | Microsoft Windows Storage Port Driver Elevation of Privilege Vulnerability | No | No | 7.8 |
| CVE-2024-43572 | Microsoft Management Console Remote Code Execution Vulnerability | Yes | Yes | 7.8 |
| CVE-2024-38262 | Windows Remote Desktop Licensing Service Remote Code Execution Vulnerability | No | No | 7.5 |
| CVE-2024-43545 | Windows Online Certificate Status Protocol (OCSP) Server Denial of Service Vulnerability | No | No | 7.5 |
| CVE-2024-43521 | Windows Hyper-V Denial of Service Vulnerability | No | No | 7.5 |
| CVE-2024-43567 | Windows Hyper-V Denial of Service Vulnerability | No | No | 7.5 |
| CVE-2024-43541 | Microsoft Simple Certificate Enrollment Protocol Denial of Service Vulnerability | No | No | 7.5 |
| CVE-2024-43544 | Microsoft Simple Certificate Enrollment Protocol Denial of Service Vulnerability | No | No | 7.5 |
| CVE-2024-43515 | Internet Small Computer Systems Interface (iSCSI) Denial of Service Vulnerability | No | No | 7.5 |
| CVE-2024-43506 | BranchCache Denial of Service Vulnerability | No | No | 7.5 |
| CVE-2024-38149 | BranchCache Denial of Service Vulnerability | No | No | 7.5 |
| CVE-2024-43550 | Windows Secure Channel Spoofing Vulnerability | No | No | 7.4 |
| CVE-2024-43553 | NT OS Kernel Elevation of Privilege Vulnerability | No | No | 7.4 |
| CVE-2024-43535 | Windows Kernel-Mode Driver Elevation of Privilege Vulnerability | No | No | 7 |
| CVE-2024-37976 | Windows Resume Extensible Firmware Interface Security Feature Bypass Vulnerability | No | No | 6.7 |
| CVE-2024-37982 | Windows Resume Extensible Firmware Interface Security Feature Bypass Vulnerability | No | No | 6.7 |
| CVE-2024-37983 | Windows Resume Extensible Firmware Interface Security Feature Bypass Vulnerability | No | No | 6.7 |
| CVE-2024-37979 | Windows Kernel Elevation of Privilege Vulnerability | No | No | 6.7 |
| CVE-2024-43512 | Windows Standards-Based Storage Management Service Denial of Service Vulnerability | No | No | 6.5 |
| CVE-2024-43573 | Windows MSHTML Platform Spoofing Vulnerability | Yes | Yes | 6.5 |
| CVE-2024-43547 | Windows Kerberos Information Disclosure Vulnerability | No | No | 6.5 |
| CVE-2024-43534 | Windows Graphics Component Information Disclosure Vulnerability | No | No | 6.5 |
| CVE-2024-43570 | Windows Kernel Elevation of Privilege Vulnerability | No | No | 6.4 |
| CVE-2024-43513 | BitLocker Security Feature Bypass Vulnerability | No | No | 6.4 |
| CVE-2024-43520 | Windows Kernel Denial of Service Vulnerability | No | No | 5 |
| CVE-2024-43456 | Windows Remote Desktop Services Tampering Vulnerability | No | No | 4.8 |
| CVE | Title | Exploited? | Publicly disclosed? | CVSSv3 base score |
|---|---|---|---|---|
| CVE-2024-6197 | Open Source Curl Remote Code Execution Vulnerability | No | Yes | 8.8 |
| CVE | Title | Exploited? | Publicly disclosed? | CVSSv3 base score |
|---|---|---|---|---|
| CVE-2024-43503 | Microsoft SharePoint Elevation of Privilege Vulnerability | No | No | 7.8 |
| CVE-2024-43505 | Microsoft Office Visio Remote Code Execution Vulnerability | No | No | 7.8 |
| CVE-2024-43576 | Microsoft Office Remote Code Execution Vulnerability | No | No | 7.8 |
| CVE-2024-43616 | Microsoft Office Remote Code Execution Vulnerability | No | No | 7.8 |
| CVE-2024-43504 | Microsoft Excel Remote Code Execution Vulnerability | No | No | 7.8 |
| CVE-2024-43609 | Microsoft Office Spoofing Vulnerability | No | No | 6.5 |
| CVE | Title | Exploited? | Publicly disclosed? | CVSSv3 base score |
|---|---|---|---|---|
| CVE-2024-43612 | Power BI Report Server Spoofing Vulnerability | No | No | 6.9 |
| CVE-2024-43481 | Power BI Report Server Spoofing Vulnerability | No | No | 6.5 |
| CVE | Title | Exploited? | Publicly disclosed? | CVSSv3 base score |
|---|---|---|---|---|
| CVE-2024-43468 | Microsoft Configuration Manager Remote Code Execution Vulnerability | No | No | 9.8 |
| CVE-2024-43614 | Microsoft Defender for Endpoint for Linux Spoofing Vulnerability | No | No | 5.5 |
| CVE | Title | Exploited? | Publicly disclosed? | CVSSv3 base score |
|---|---|---|---|---|
| CVE-2024-43533 | Remote Desktop Client Remote Code Execution Vulnerability | No | No | 8.8 |
| CVE-2024-43574 | Microsoft Speech Application Programming Interface (SAPI) Remote Code Execution Vulnerability | No | No | 8.3 |
| CVE-2024-43582 | Remote Desktop Protocol Server Remote Code Execution Vulnerability | No | No | 8.1 |
| CVE-2024-30092 | Windows Hyper-V Remote Code Execution Vulnerability | No | No | 8 |
| CVE-2024-43551 | Windows Storage Elevation of Privilege Vulnerability | No | No | 7.8 |
| CVE-2024-43516 | Windows Secure Kernel Mode Elevation of Privilege Vulnerability | No | No | 7.8 |
| CVE-2024-43528 | Windows Secure Kernel Mode Elevation of Privilege Vulnerability | No | No | 7.8 |
| CVE-2024-43527 | Windows Kernel Elevation of Privilege Vulnerability | No | No | 7.8 |
| CVE-2024-43584 | Windows Scripting Engine Security Feature Bypass Vulnerability | No | No | 7.7 |
| CVE-2024-43562 | Windows Network Address Translation (NAT) Denial of Service Vulnerability | No | No | 7.5 |
| CVE-2024-43565 | Windows Network Address Translation (NAT) Denial of Service Vulnerability | No | No | 7.5 |
| CVE-2024-38129 | Windows Kerberos Elevation of Privilege Vulnerability | No | No | 7.5 |
| CVE-2024-43575 | Windows Hyper-V Denial of Service Vulnerability | No | No | 7.5 |
| CVE-2024-38029 | Microsoft OpenSSH for Windows Remote Code Execution Vulnerability | No | No | 7.5 |
| CVE-2024-43552 | Windows Shell Remote Code Execution Vulnerability | No | No | 7.3 |
| CVE-2024-43529 | Windows Print Spooler Elevation of Privilege Vulnerability | No | No | 7.3 |
| CVE-2024-43502 | Windows Kernel Elevation of Privilege Vulnerability | No | No | 7.1 |
| CVE-2024-20659 | Windows Hyper-V Security Feature Bypass Vulnerability | No | Yes | 7.1 |
| CVE-2024-43581 | Microsoft OpenSSH for Windows Remote Code Execution Vulnerability | No | No | 7.1 |
| CVE-2024-43615 | Microsoft OpenSSH for Windows Remote Code Execution Vulnerability | No | No | 7.1 |
| CVE-2024-43522 | Windows Local Security Authority (LSA) Elevation of Privilege Vulnerability | No | No | 7 |
| CVE-2024-43511 | Windows Kernel Elevation of Privilege Vulnerability | No | No | 7 |
| CVE-2024-43525 | Windows Mobile Broadband Driver Remote Code Execution Vulnerability | No | No | 6.8 |
| CVE-2024-43526 | Windows Mobile Broadband Driver Remote Code Execution Vulnerability | No | No | 6.8 |
| CVE-2024-43543 | Windows Mobile Broadband Driver Remote Code Execution Vulnerability | No | No | 6.8 |
| CVE-2024-43523 | Windows Mobile Broadband Driver Remote Code Execution Vulnerability | No | No | 6.8 |
| CVE-2024-43524 | Windows Mobile Broadband Driver Remote Code Execution Vulnerability | No | No | 6.8 |
| CVE-2024-43536 | Windows Mobile Broadband Driver Remote Code Execution Vulnerability | No | No | 6.8 |
| CVE-2024-43537 | Windows Mobile Broadband Driver Denial of Service Vulnerability | No | No | 6.5 |
| CVE-2024-43538 | Windows Mobile Broadband Driver Denial of Service Vulnerability | No | No | 6.5 |
| CVE-2024-43540 | Windows Mobile Broadband Driver Denial of Service Vulnerability | No | No | 6.5 |
| CVE-2024-43542 | Windows Mobile Broadband Driver Denial of Service Vulnerability | No | No | 6.5 |
| CVE-2024-43555 | Windows Mobile Broadband Driver Denial of Service Vulnerability | No | No | 6.5 |
| CVE-2024-43557 | Windows Mobile Broadband Driver Denial of Service Vulnerability | No | No | 6.5 |
| CVE-2024-43558 | Windows Mobile Broadband Driver Denial of Service Vulnerability | No | No | 6.5 |
| CVE-2024-43559 | Windows Mobile Broadband Driver Denial of Service Vulnerability | No | No | 6.5 |
| CVE-2024-43561 | Windows Mobile Broadband Driver Denial of Service Vulnerability | No | No | 6.5 |
| CVE-2024-43546 | Windows Cryptographic Information Disclosure Vulnerability | No | No | 5.6 |
| CVE-2024-43571 | Sudo for Windows Spoofing Vulnerability | No | No | 5.6 |
| CVE-2024-43500 | Windows Resilient File System (ReFS) Information Disclosure Vulnerability | No | No | 5.5 |
| CVE-2024-43554 | Windows Kernel-Mode Driver Information Disclosure Vulnerability | No | No | 5.5 |
| CVE-2024-43508 | Windows Graphics Component Information Disclosure Vulnerability | No | No | 5.5 |
| CVE-2024-43585 | Code Integrity Guard Security Feature Bypass Vulnerability | No | No | 5.5 |
Post Syndicated from The History Guy: History Deserves to Be Remembered original https://www.youtube.com/watch?v=kk4fNyQUJIM
Post Syndicated from jzb original https://lwn.net/Articles/993073/
In the early days of open source, it was a struggle to get companies
to accept the concept and trust its development model.
Now, companies have few qualms about using it, but do tend to take open source and
those who maintain it for granted. The struggle now is to find ways
to compensate producers of the software, sustain the open‑source
commons, and avoid burning out maintainers. The Open Source Pledge project is
an effort to persuade companies to pay maintainers by making it a social
norm. On October 8, the project is launching a marketing campaign to raise
awareness and try to get a larger conversation started around paying
maintainers.
Post Syndicated from John Lee original https://www.servethehome.com/this-is-the-new-astera-labs-scorpio-pcie-switch-targeting-broadcom-in-ai-servers/
This is the new Astera Labs Scorpio PCIe switch designed to displace Broadcom in AI servers connecting CPU, GPU, NIC, and SSDs together
The post This is the New Astera Labs Scorpio PCIe Switch Targeting Broadcom in AI Servers appeared first on ServeTheHome.
Post Syndicated from Crosstalk Solutions original https://www.youtube.com/watch?v=X4W88flGWmA
Post Syndicated from Netflix Technology Blog original https://netflixtechblog.com/introducing-netflix-timeseries-data-abstraction-layer-31552f6326f8
Rajiv Shringi Vinay Chella Kaidan Fullerton Oleksii Tkachuk Joey Lynch
As Netflix continues to expand and diversify into various sectors like Video on Demand and Gaming, the ability to ingest and store vast amounts of temporal data — often reaching petabytes — with millisecond access latency has become increasingly vital. In previous blog posts, we introduced the Key-Value Data Abstraction Layer and the Data Gateway Platform, both of which are integral to Netflix’s data architecture. The Key-Value Abstraction offers a flexible, scalable solution for storing and accessing structured key-value data, while the Data Gateway Platform provides essential infrastructure for protecting, configuring, and deploying the data tier.
Building on these foundational abstractions, we developed the TimeSeries Abstraction — a versatile and scalable solution designed to efficiently store and query large volumes of temporal event data with low millisecond latencies, all in a cost-effective manner across various use cases.
In this post, we will delve into the architecture, design principles, and real-world applications of the TimeSeries Abstraction, demonstrating how it enhances our platform’s ability to manage temporal data at scale.
Note: Contrary to what the name may suggest, this system is not built as a general-purpose time series database. We do not use it for metrics, histograms, timers, or any such near-real time analytics use case. Those use cases are well served by the Netflix Atlas telemetry system. Instead, we focus on addressing the challenge of storing and accessing extremely high-throughput, immutable temporal event data in a low-latency and cost-efficient manner.
At Netflix, temporal data is continuously generated and utilized, whether from user interactions like video-play events, asset impressions, or complex micro-service network activities. Effectively managing this data at scale to extract valuable insights is crucial for ensuring optimal user experiences and system reliability.
However, storing and querying such data presents a unique set of challenges:
The TimeSeries Abstraction was developed to meet these requirements, built around the following core design principles:
Let’s dive into the various aspects of this abstraction.
We follow a unique event data model that encapsulates all the data we want to capture for events, while allowing us to query them efficiently.

Let’s start with the smallest unit of data in the abstraction and work our way up.
The abstraction provides the following APIs to interact with the event data.
{
  "namespace": "my_dataset",
  "events": [
    {
      "timeSeriesId": "profile100",
      "eventTime": "2024-10-03T21:24:23.988Z",
      "eventId": "550e8400-e29b-41d4-a716-446655440000",
      "eventItems": [
        {
          "eventItemKey": "ZGV2aWNlVHlwZQ==",
          "eventItemValue": "aW9z"
        },
        {
          "eventItemKey": "ZGV2aWNlTWV0YWRhdGE=",
          "eventItemValue": "c29tZSBtZXRhZGF0YQ=="
        }
      ]
    },
    {
      "timeSeriesId": "profile100",
      "eventTime": "2024-10-03T21:23:30.000Z",
      "eventId": "123e4567-e89b-12d3-a456-426614174000",
      "eventItems": [
        {
          "eventItemKey": "ZGV2aWNlVHlwZQ==",
          "eventItemValue": "YW5kcm9pZA=="
        }
      ]
    }
  ]
}
ReadEventRecords: Given a combination of a namespace, a timeSeriesId, a timeInterval, and optional eventFilters, this endpoint returns all the matching events, sorted descending by event_time, with low millisecond latency.
{
  "namespace": "my_dataset",
  "timeSeriesId": "profile100",
  "timeInterval": {
    "start": "2024-10-02T21:00:00.000Z",
    "end":   "2024-10-03T21:00:00.000Z"
  },
  "eventFilters": [
    {
      "matchEventItemKey": "ZGV2aWNlVHlwZQ==",
      "matchEventItemValue": "aW9z"
    }
  ],
  "pageSize": 100,
  "totalRecordLimit": 1000
}
SearchEventRecords: Given a search criteria and a time interval, this endpoint returns all the matching events. These use cases are fine with eventually consistent reads.
{
  "namespace": "my_dataset",
  "timeInterval": {
    "start": "2024-10-02T21:00:00.000Z",
    "end": "2024-10-03T21:00:00.000Z"
  },
  "searchQuery": {
    "booleanQuery": {
      "searchQuery": [
        {
          "equals": {
            "eventItemKey": "deviceType",
            "eventItemValue": "aW9z"
          }
        },
        {
          "equals": {
            "eventItemKey": "deviceType",
            "eventItemValue": "YW5kcm9pZA=="
          }
        }
      ],
      "operator": "OR"
    }
  },
  "pageSize": 100,
  "totalRecordLimit": 1000
}
AggregateEventRecords: Given a search criteria and an aggregation mode (e.g. DistinctAggregation) , this endpoint performs the given aggregation within a given time interval. Similar to the Search endpoint, users can tolerate eventual consistency and a potentially higher latency (in seconds).
{
  "namespace": "my_dataset",
  "timeInterval": {
    "start": "2024-10-02T21:00:00.000Z",
    "end": "2024-10-03T21:00:00.000Z"
  },
  "searchQuery": {...some search criteria...},
  "aggregationQuery": {
    "distinct": {
      "eventItemKey": "deviceType",
      "pageSize": 100
    }
  }
}
In the subsequent sections, we will talk about how we interact with this data at the storage layer.
The storage layer for TimeSeries comprises a primary data store and an optional index data store. The primary data store ensures data durability during writes and is used for primary read operations, while the index data store is utilized for search and aggregate operations. At Netflix, Apache Cassandra is the preferred choice for storing durable data in high-throughput scenarios, while Elasticsearch is the preferred data store for indexing. However, similar to our approach with the API, the storage layer is not tightly coupled to these specific data stores. Instead, we define storage API contracts that must be fulfilled, allowing us the flexibility to replace the underlying data stores as needed.
In this section, we will talk about how we leverage Apache Cassandra for TimeSeries use cases.
At Netflix’s scale, the continuous influx of event data can quickly overwhelm traditional databases. Temporal partitioning addresses this challenge by dividing the data into manageable chunks based on time intervals, such as hourly, daily, or monthly windows. This approach enables efficient querying of specific time ranges without the need to scan the entire dataset. It also allows Netflix to archive, compress, or delete older data efficiently, optimizing both storage and query performance. Additionally, this partitioning mitigates the performance issues typically associated with wide partitions in Cassandra. By employing this strategy, we can operate at much higher disk utilization, as it reduces the need to reserve large amounts of disk space for compactions, thereby saving costs.
Here is what it looks like :
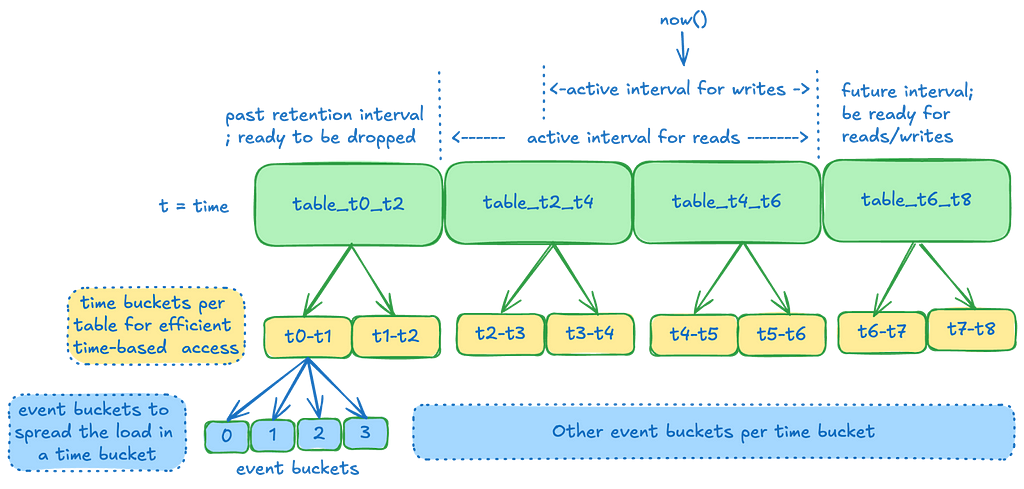
Time Slice: A time slice is the unit of data retention and maps directly to a Cassandra table. We create multiple such time slices, each covering a specific interval of time. An event lands in one of these slices based on the event_time. These slices are joined with no time gaps in between, with operations being start-inclusive and end-exclusive, ensuring that all data lands in one of the slices.
Why not use row-based Time-To-Live (TTL)?
Using TTL on individual events would generate a significant number of tombstones in Cassandra, degrading performance, especially during range scans. By employing discrete time slices and dropping them, we avoid the tombstone issue entirely. The tradeoff is that data may be retained slightly longer than necessary, as an entire table’s time range must fall outside the retention window before it can be dropped. Additionally, TTLs are difficult to adjust later, whereas TimeSeries can extend the dataset retention instantly with a single control plane operation.
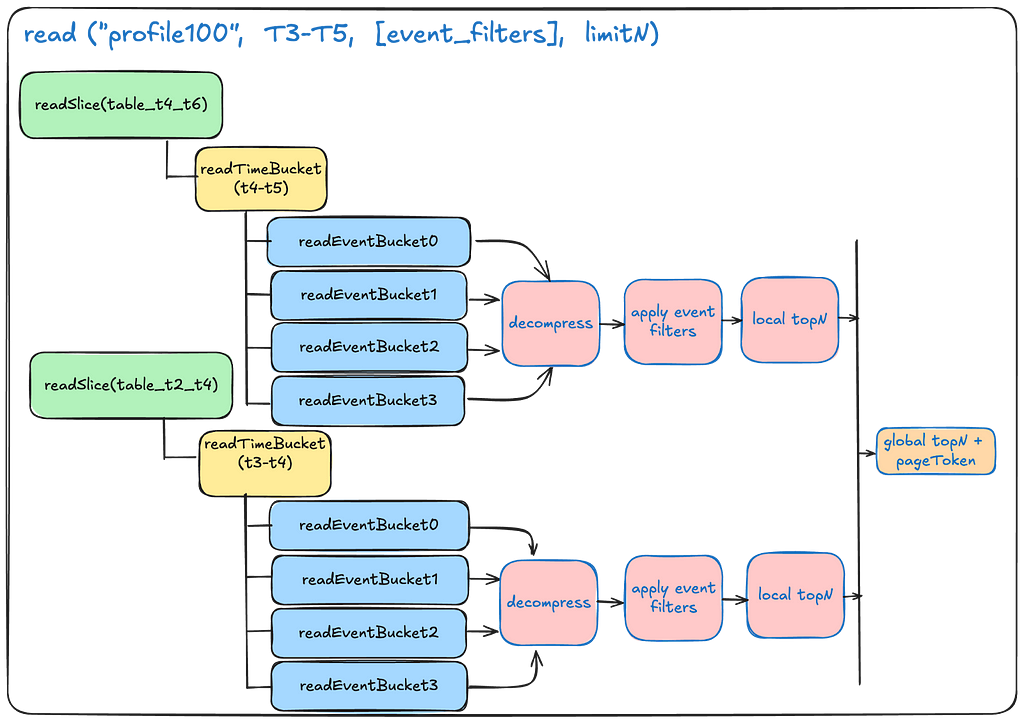
Time Buckets: Within a time slice, data is further partitioned into time buckets. This facilitates effective range scans by allowing us to target specific time buckets for a given query range. The tradeoff is that if a user wants to read the entire range of data over a large time period, we must scan many partitions. We mitigate potential latency by scanning these partitions in parallel and aggregating the data at the end. In most cases, the advantage of targeting smaller data subsets outweighs the read amplification from these scatter-gather operations. Typically, users read a smaller subset of data rather than the entire retention range.
Event Buckets: To manage extremely high-throughput write operations, which may result in a burst of writes for a given time series within a short period, we further divide the time bucket into event buckets. This prevents overloading the same partition for a given time range and also reduces partition sizes further, albeit with a slight increase in read amplification.
Note: With Cassandra 4.x onwards, we notice a substantial improvement in the performance of scanning a range of data in a wide partition. See Future Enhancements at the end to see the Dynamic Event bucketing work that aims to take advantage of this.
We use two kinds of tables
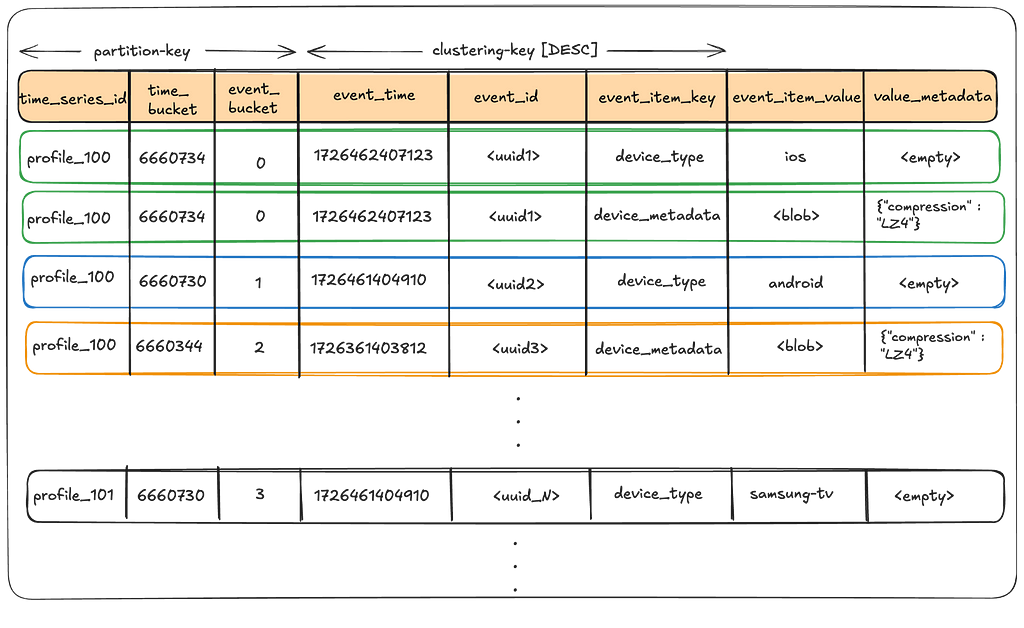
The partition key enables splitting events for a time_series_id over a range of time_bucket(s) and event_bucket(s), thus mitigating hot partitions, while the clustering key allows us to keep data sorted on disk in the order we almost always want to read it. The value_metadata column stores metadata for the event_item_value such as compression.
Writing to the data table:
User writes will land in a given time slice, time bucket, and event bucket as a factor of the event_time attached to the event. This factor is dictated by the control plane configuration of a given namespace.
For example:

Reading from the data table:
The below illustration depicts at a high-level on how we scatter-gather the reads from multiple partitions and join the result set at the end to return the final result.
This table stores the configuration data about the time slices for a given namespace.
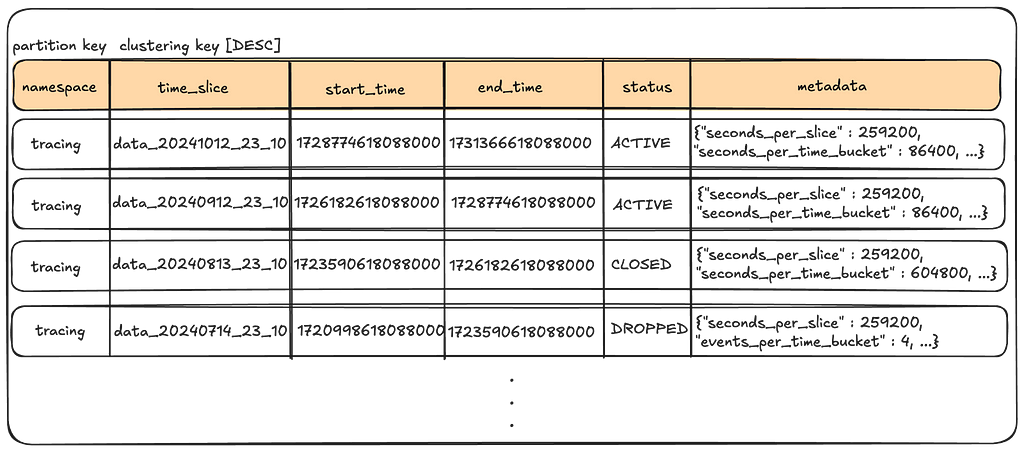
Note the following:
There is a lot more information that can be stored into the metadata column (e.g., compaction settings for the table), but we only show the partition settings here for brevity.
To support secondary access patterns via non-primary key attributes, we index data into Elasticsearch. Users can configure a list of attributes per namespace that they wish to search and/or aggregate data on. The service extracts these fields from events as they stream in, indexing the resultant documents into Elasticsearch. Depending on the throughput, we may use Elasticsearch as a reverse index, retrieving the full data from Cassandra, or we may store the entire source data directly in Elasticsearch.
Note: Again, users are never directly exposed to Elasticsearch, just like they are not directly exposed to Cassandra. Instead, they interact with the Search and Aggregate API endpoints that translate a given query to that needed for the underlying datastore.
In the next section, we will talk about how we configure these data stores for different datasets.
The data plane is responsible for executing the read and write operations, while the control plane configures every aspect of a namespace’s behavior. The data plane communicates with the TimeSeries control stack, which manages this configuration information. In turn, the TimeSeries control stack interacts with a sharded Data Gateway Platform Control Plane that oversees control configurations for all abstractions and namespaces.
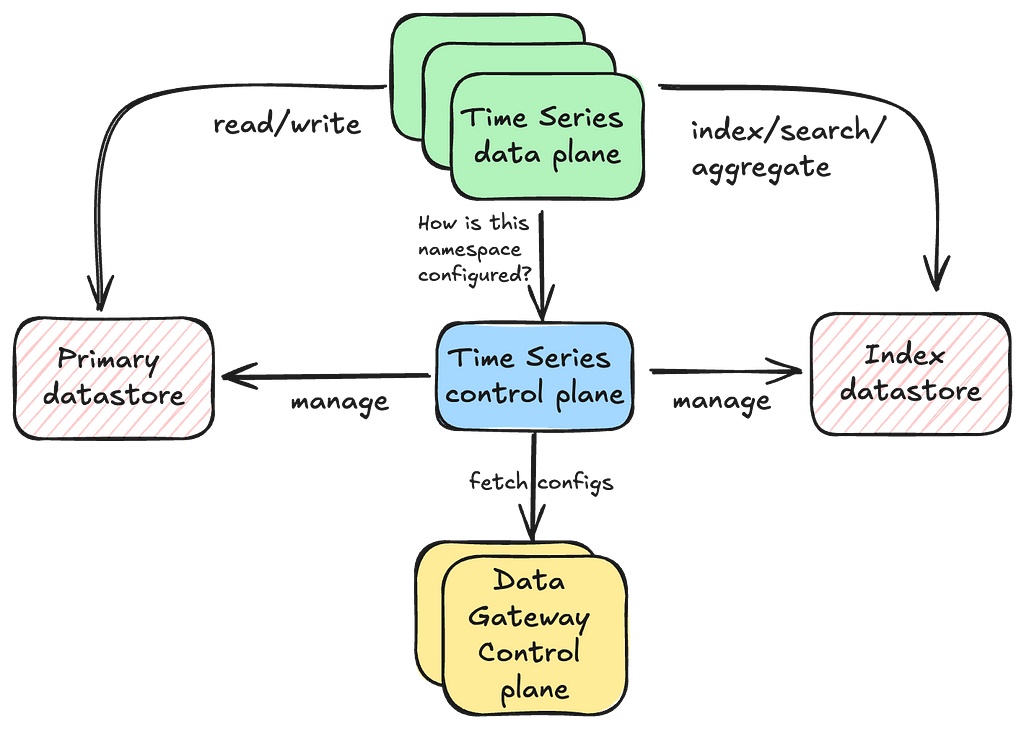
Separating the responsibilities of the data plane and control plane helps maintain the high availability of our data plane, as the control plane takes on tasks that may require some form of schema consensus from the underlying data stores.
The below configuration snippet demonstrates the immense flexibility of the service and how we can tune several things per namespace using our control plane.
"persistence_configuration": [
  {
    "id": "PRIMARY_STORAGE",
    "physical_storage": {
      "type": "CASSANDRA",                  // type of primary storage
      "cluster": "cass_dgw_ts_tracing",     // physical cluster name
      "dataset": "tracing_default"          // maps to the keyspace
    },
    "config": {
      "timePartition": {
        "secondsPerTimeSlice": "129600",    // width of a time slice
        "secondPerTimeBucket": "3600",      // width of a time bucket
        "eventBuckets": 4                   // how many event buckets within
      },
      "queueBuffering": {
        "coalesce": "1s",                   // how long to coalesce writes
        "bufferCapacity": 4194304           // queue capacity in bytes
      },
      "consistencyScope": "LOCAL",          // single-region/multi-region
      "consistencyTarget": "EVENTUAL",      // read/write consistency
      "acceptLimit": "129600s"              // how far back writes are allowed
    },
    "lifecycleConfigs": {
      "lifecycleConfig": [                  // Primary store data retention
        {
          "type": "retention",
          "config": {
            "close_after": "1296000s",      // close for reads/writes
            "delete_after": "1382400s"      // drop time slice
          }
        }
      ]
    }
  },
  {
    "id": "INDEX_STORAGE",
    "physicalStorage": {
      "type": "ELASTICSEARCH",              // type of index storage
      "cluster": "es_dgw_ts_tracing",       // ES cluster name
      "dataset": "tracing_default_useast1"  // base index name
    },
    "config": {
      "timePartition": {
        "secondsPerSlice": "129600"         // width of the index slice
      },
      "consistencyScope": "LOCAL",
      "consistencyTarget": "EVENTUAL",      // how should we read/write data
      "acceptLimit": "129600s",             // how far back writes are allowed
      "indexConfig": {
        "fieldMapping": {                   // fields to extract to index
          "tags.nf.app": "KEYWORD",
          "tags.duration": "INTEGER",
          "tags.enabled": "BOOLEAN"
        },
        "refreshInterval": "60s"            // Index related settings
      }
    },
    "lifecycleConfigs": {
      "lifecycleConfig": [
        {
          "type": "retention",              // Index retention settings
          "config": {
            "close_after": "1296000s",
            "delete_after": "1382400s"
          }
        }
      ]
    }
  }
]
With so many different parameters, we need automated provisioning workflows to deduce the best settings for a given workload. When users want to create their namespaces, they specify a list of workload desires, which the automation translates into concrete infrastructure and related control plane configuration. We highly encourage you to watch this ApacheCon talk, by one of our stunning colleagues Joey Lynch, on how we achieve this. We may go into detail on this subject in one of our future blog posts.
Once the system provisions the initial infrastructure, it then scales in response to the user workload. The next section describes how this is achieved.
Our users may operate with limited information at the time of provisioning their namespaces, resulting in best-effort provisioning estimates. Further, evolving use-cases may introduce new throughput requirements over time. Here’s how we manage this:
So far, we have seen how TimeSeries stores, configures and interacts with event datasets. Let’s see how we apply different techniques to improve the performance of our operations and provide better guarantees.
We prefer to bake in idempotency in all mutation endpoints, so that users can retry or hedge their requests safely. Hedging is when the client sends an identical competing request to the server, if the original request does not come back with a response in an expected amount of time. The client then responds with whichever request completes first. This is done to keep the tail latencies for an application relatively low. This can only be done safely if the mutations are idempotent. For TimeSeries, the combination of event_time, event_id and event_item_key form the idempotency key for a given time_series_id event.
We assign Service Level Objectives (SLO) targets for different endpoints within TimeSeries, as an indication of what we think the performance of those endpoints should be for a given namespace. We can then hedge a request if the response does not come back in that configured amount of time.
"slos": {
  "read": {               // SLOs per endpoint
    "latency": {
      "target": "0.5s",   // hedge around this number
      "max": "1s"         // time-out around this number
    }
  },
  "write": {
    "latency": {
      "target": "0.01s",
      "max": "0.05s"
    }
  }
}
Sometimes, a client may be sensitive to latency and willing to accept a partial result set. A real-world example of this is real-time frequency capping. Precision is not critical in this case, but if the response is delayed, it becomes practically useless to the upstream client. Therefore, the client prefers to work with whatever data has been collected so far rather than timing out while waiting for all the data. The TimeSeries client supports partial returns around SLOs for this purpose. Importantly, we still maintain the latest order of events in this partial fetch.
All reads start with a default fanout factor, scanning 8 partition buckets in parallel. However, if the service layer determines that the time_series dataset is dense — i.e., most reads are satisfied by reading the first few partition buckets — then it dynamically adjusts the fanout factor of future reads in order to reduce the read amplification on the underlying datastore. Conversely, if the dataset is sparse, we may want to increase this limit with a reasonable upper bound.
In most cases, the active range for writing data is smaller than the range for reading data — i.e., we want a range of time to become immutable as soon as possible so that we can apply optimizations on top of it. We control this by having a configurable “acceptLimit” parameter that prevents users from writing events older than this time limit. For example, an accept limit of 4 hours means that users cannot write events older than now() — 4 hours. We sometimes raise this limit for backfilling historical data, but it is tuned back down for regular write operations. Once a range of data becomes immutable, we can safely do things like caching, compressing, and compacting it for reads.
We frequently leverage this service for handling bursty workloads. Rather than overwhelming the underlying datastore with this load all at once, we aim to distribute it more evenly by allowing events to coalesce over short durations (typically seconds). These events accumulate in in-memory queues running on each instance. Dedicated consumers then steadily drain these queues, grouping the events by their partition key, and batching the writes to the underlying datastore.

The queues are tailored to each datastore since their operational characteristics depend on the specific datastore being written to. For instance, the batch size for writing to Cassandra is significantly smaller than that for indexing into Elasticsearch, leading to different drain rates and batch sizes for the associated consumers.
While using in-memory queues does increase JVM garbage collection, we have experienced substantial improvements by transitioning to JDK 21 with ZGC. To illustrate the impact, ZGC has reduced our tail latencies by an impressive 86%:
Because we use in-memory queues, we are prone to losing events in case of an instance crash. As such, these queues are only used for use cases that can tolerate some amount of data loss .e.g. tracing/logging. For use cases that need guaranteed durability and/or read-after-write consistency, these queues are effectively disabled and writes are flushed to the data store almost immediately.
Once a time slice exits the active write window, we can leverage the immutability of the data to optimize it for read performance. This process may involve re-compacting immutable data using optimal compaction strategies, dynamically shrinking and/or splitting shards to optimize system resources, and other similar techniques to ensure fast and reliable performance.
The following section provides a glimpse into the real-world performance of some of our TimeSeries datasets.
The service can write data in the order of low single digit milliseconds

while consistently maintaining stable point-read latencies:
At the time of writing this blog, the service was processing close to 15 million events/second across all the different datasets at peak globally.
The TimeSeries Abstraction plays a vital role across key services at Netflix. Here are some impactful use cases:
and more…
As the use cases evolve, and the need to make the abstraction even more cost effective grows, we aim to make many improvements to the service in the upcoming months. Some of them are:
The TimeSeries Abstraction is a vital component of Netflix’s online data infrastructure, playing a crucial role in supporting both real-time and long-term decision-making. Whether it’s monitoring system performance during high-traffic events or optimizing user engagement through behavior analytics, TimeSeries Abstraction ensures that Netflix operates seamlessly and efficiently on a global scale.
As Netflix continues to innovate and expand into new verticals, the TimeSeries Abstraction will remain a cornerstone of our platform, helping us push the boundaries of what’s possible in streaming and beyond.
Stay tuned for Part 2, where we’ll introduce our Distributed Counter Abstraction, a key element of Netflix’s Composite Abstractions, built on top of the TimeSeries Abstraction.
Special thanks to our stunning colleagues who contributed to TimeSeries Abstraction’s success: Tom DeVoe Mengqing Wang, Kartik Sathyanarayanan, Jordan West, Matt Lehman, Cheng Wang, Chris Lohfink .
![]()
Introducing Netflix TimeSeries Data Abstraction Layer was originally published in Netflix TechBlog on Medium, where people are continuing the conversation by highlighting and responding to this story.
Post Syndicated from Kari Rivas original https://www.backblaze.com/blog/the-fine-print-how-minimum-data-retention-fees-affect-cloud-costs/
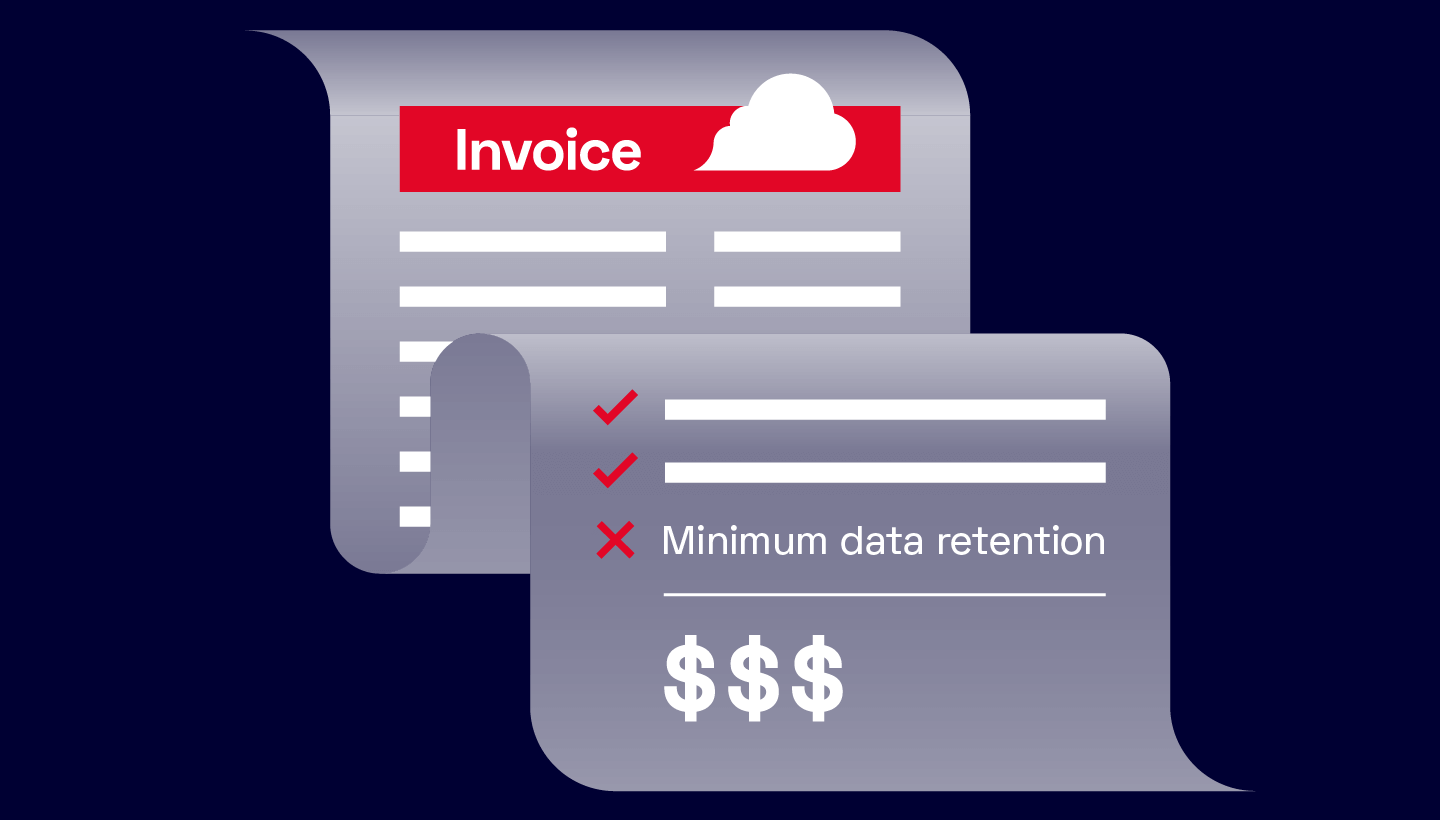
You probably won’t notice a little asterisked footnote tucked at the bottom of the page the first time you read through a cloud storage vendor’s pricing tables. You probably won’t notice it the second or third time either. But you’ll definitely notice it when your bill comes in with charges for data you thought you deleted weeks ago.
That footnote explains an often overlooked challenge to your budget: minimum data retention periods. These policies, used by cloud providers like AWS, Azure, Google Cloud, and Wasabi, can lead to unexpected cost increases and complicated data management strategies.
Today, I’m breaking down cloud storage retention minimums and common scenarios where they directly impact storage budgets and data management policies.
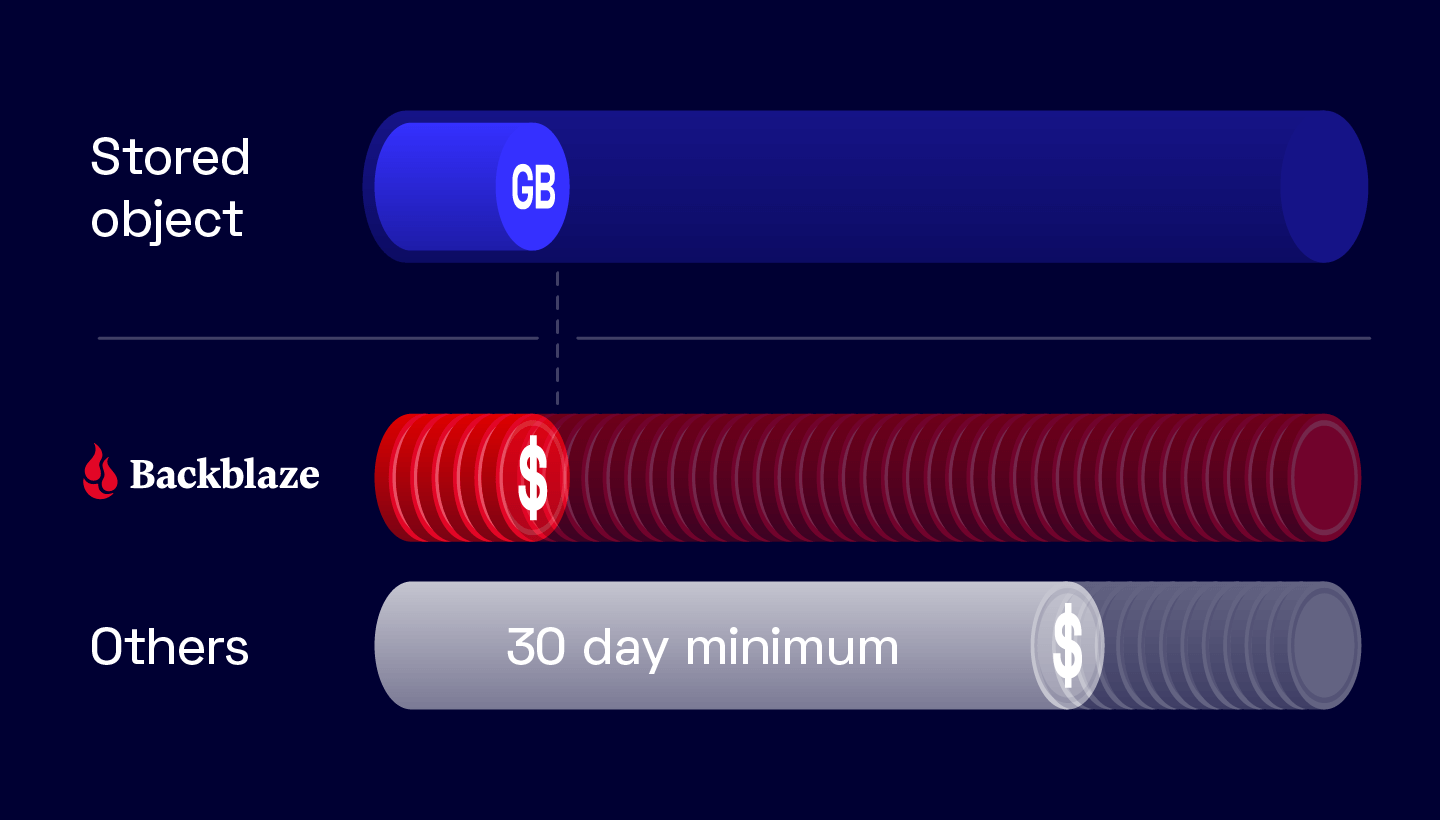
Retention minimums specify the minimum amount of time that data must be stored before it can be deleted, overwritten, or moved to a different storage tier without incurring additional charges.
Cloud storage providers with multiple tiers like AWS or Google Cloud use minimum retention policies to ensure that customers cannot frequently move data between storage tiers to exploit lower-cost storage classes for short-term storage. For cloud providers that have a single class of storage, these policies allow providers to stabilize their resource usage and maintain predictable pricing structures.
Minimum retention periods can vary significantly between providers, and even between different storage tiers offered by the same provider. For example, AWS S3 Standard has no minimum retention period, but S3 Standard-IA has a 30 day minimum, Glacier has a 90 day minimum, and Deep Archive has a 180 day minimum.
Despite their significance, information about these retention periods is often buried in the fine print of service agreements or technical documentation.
Delete fees are a direct consequence of deleting or moving files before the retention minimum is met. Cloud providers charge these fees to ensure that the infrastructure allocated for the data is compensated for the resources it would have otherwise used during the retention period. This fee is typically prorated, representing the remaining days in the retention period that the data was meant to occupy in a storage class.
The terms “delete fees,” “minimum storage duration,” and “minimum retention fees” all refer to a similar policy.
Early deletion fees can be triggered by various actions, not just the obvious deletion of files. Some examples include:
Additionally, in multi-user or multi-team environments, lack of communication about retention policies can lead to unexpected charges. One team might delete or move data without realizing the financial implications for the entire organization.
Minimum data retention periods, particularly in cold storage tiers, can have significant impacts on IT budgets. What may have seemed like a cost-saving storage tier can actually increase expenses when operations require frequent deletions or movements of data before the minimum retention period is over. But even in hot storage, these policies can unexpectedly inflate overall costs.
To illustrate the real-world impact of retention minimums, let’s examine a few common scenarios:
Let’s say you have a 30 day backup strategy for your critical infrastructure, and you opt for Wasabi object storage to save costs vs. AWS. You plan to keep a month’s worth of backups in the cloud and will then replace them with the newer backups.
Wasabi’s minimum retention policy is 90 days for its Pay as You Go storage (and 30 days for its Reserved Capacity Storage).
You store an initial 50TB of backups in Wasabi on Day 1. On Day 31, the older backup is deleted and replaced with the newer backup. So, you incur costs for 30 days of Timed Active Storage (50TB) and 60 days of Timed Deleted Storage (50TB). These charges are incurred every time the backup is replaced.
With Wasabi’s Pay as You Go storage, your monthly bill will look like this:
50TB x $6.99/TB/month x 3 = $1048.50
We multiply by 3 because the 90 day minimum retention policy equals three months’ time. One of those you’ve actually stored for, and the other two are because you’ve replaced your backups with the new ones.
Compare this to Backblaze B2 Cloud Storage, which has no minimum retention policy and costs $6 per TB/month for its Pay as You Go storage:
50TB x $6/TB/month = $300
The minimum retention policy effectively triples the anticipated storage expenses. When scaled across multiple backup sets or extended periods, the impact on the IT budget can be substantial.
Cal Poly Humboldt thought they understood cloud storage provider Wasabi’s pricing, but each month brought unexpected charges for deleted data due to Wasabi’s minimum storage retention policies. This, in turn, caused a chain reaction of calls from the procurement office, buying extra capacity, and then modifying the system to try to avoid further bills. To silence the monthly fire alarms, they switched to Backblaze.
With no retention minimums, Cal Poly Humboldt now knows exactly what their Backblaze costs will be up front. The move was so smooth that they migrated another 100TB from Google’s no-longer-free tier for educational institutions and plan to scale their storage to over a petabyte to back up and safeguard research data.
In application storage use cases, retention minimums can impact cloud spend significantly when the data has a short lifecycle. Applications with high transaction volumes—such as e-commerce, user-generated content applications, or surveillance platforms—frequently upload and delete as part of their daily operations.
For example, most video surveillance platforms may only need 30 days of history for footage that’s been uploaded and processed, so something like a 90-day retention period doesn’t make financial or operational sense. E-commerce customers can also be affected; these businesses have users that frequently upload and delete content to manage storefronts, creating unpredictable data usage patterns. In these cases, you are at the mercy of your end users—if users churn through files quickly you will pay the retention penalties.
Retention minimums also affect video production workflows particularly when you need to make revisions once a project has been archived in cold storage—a common workflow many studios and broadcasting agencies use to get more affordable storage rates for seldom-accessed data.
Whether due to last minute changes in branding, edits to visuals, or adjustments to sound, the project needs to be pulled from storage for further modification. Because the files were moved to colder storage under a 90 day retention policy, accessing and modifying them before that period ends can trigger significant early delete fees.
If you routinely archive files immediately after a project completes anticipating that no further changes will be required, these early delete fees can add up quickly.
Retention minimums can significantly impact your bottom line. These policies, often buried in the fine print, can lead to unexpected costs and complicate data management strategies across various industries.
Understanding the nuances of minimum data retention periods and their associated costs is crucial for developing an effective and economically sound cloud storage strategy. It enables organizations to make more informed decisions, avoid unexpected expenses, and better align their storage choices with their specific data management needs and budget constraints.
The post The Fine Print: How Minimum Data Retention Fees Affect Cloud Costs appeared first on Backblaze Blog | Cloud Storage & Cloud Backup
Post Syndicated from Tim Wilhoit original https://aws.amazon.com/blogs/big-data/access-private-code-repositories-for-installing-python-dependencies-on-amazon-mwaa/
Customers who use Amazon Managed Workflows for Apache Airflow (Amazon MWAA) often need Python dependencies that are hosted in private code repositories. Many customers opt for public network access mode for its ease of use and ability to make outbound Internet requests, all while maintaining secure access. However, private code repositories may not be accessible via the Internet. It’s also a best practice to only install Python dependencies where they are needed. You can use Amazon MWAA startup scripts to selectively install Python dependencies required for running code on workers, while avoiding issues due to web server restrictions.
This post demonstrates a method to selectively install Python dependencies based on the Amazon MWAA component type (web server, scheduler, or worker) from a Git repository only accessible from your virtual private cloud (VPC).
This solution focuses on using a private Git repository to selectively install Python dependencies, although you can use the same pattern demonstrated in this post with private Python package indexes such as AWS CodeArtifact. For more information, refer to Amazon MWAA with AWS CodeArtifact for Python dependencies.
The Amazon MWAA architecture allows you to choose a web server access mode to control whether the web server is accessible from the internet or only from your VPC. You can also control whether your workers, scheduler, and web servers have access to the internet through your customer VPC configuration. In this post, we demonstrate an environment such as the one shown in the following diagram, where the environment is using public network access mode for the web servers, and the Apache Airflow workers and schedulers don’t have a route to the internet from your VPC.

There are up to four potential networking configurations for an Amazon MWAA environment:
We focus on one networking configuration for this post, but the fundamental concepts are applicable for any networking configuration.
The solution we walk through relies on the fact that Amazon MWAA runs a startup script (startup.sh) during startup on every individual Apache Airflow component (worker, scheduler, and web server) before installing requirements (requirements.txt) and initializing the Apache Airflow process. This startup script is used to set an environment variable, which is then referenced in the requirements.txt file to selectively install libraries.
The following steps allow us to accomplish this:
startup.sh) in the Amazon MWAA environment. This script sets the environment variable for selectively installing dependencies.requirements.txt) in the Amazon MWAA environment. This file contains the global dependencies required by all Amazon MWAA components.For this walkthrough, you should have the following prerequisites:
Additionally, we upload a sample Python package to the Git repository:
Create the startup.sh file using the following example code:
Upload startup.sh to the S3 bucket for your Amazon MWAA environment:
Browse the CloudWatch log streams for your workers and view the worker_console log. Notice the startup script is now running and setting the environment variable.

Your requirements file must include a –constraint statement to make sure the packages listed in your requirements are compatible with the version of Apache Airflow you are using. The statement beginning with -r references the environment variable you set in your startup.sh script based on the component type.
The following code is an example of the requirements.txt file:
Upload the requirements.txt file to the Amazon MWAA environment S3 bucket:
For this example, we want to install the Python package scrapy on workers and schedulers from our private Git repository. We also want to install pprintpp on the web server from the public Python packages indexes. To accomplish that, we need to create the following files (we provide example code):
webserver_reqs.txt:worker_reqs.txt:scheduler_reqs.txt:Upload webserver_reqs.txt, scheduler_reqs.txt, and worker_reqs.txt to the DAGs folder for the Amazon MWAA environment:
Get the latest object version for the requirements file:
Update the Amazon MWAA environment to use the new requirements.txt file:
Browse the CloudWatch log streams for your workers and view the requirements_install log. Notice the startup script is now running and setting the environment variable.


In this post, we demonstrated a method to selectively install Python dependencies based on the Amazon MWAA component type (web server, scheduler, or worker) from a Git repository only accessible from your VPC.
We hope this post provided you with a better understanding of how startup scripts and Python dependency management work in an Amazon MWAA environment. You can implement other variations and configurations using the concepts outlined in this post, depending on your specific network setup and requirements.
 Tim Wilhoit is a Sr. Solutions Architect for the Department of Defense at AWS. Tim has over 20 years of enterprise IT experience. His areas of interest are serverless computing and ML/AI. In his spare time, Tim enjoys spending time at the lake and rooting on the Oklahoma State Cowboys. Go Pokes!
Post Syndicated from Matt Granger original https://www.youtube.com/watch?v=ekf50CE1jT4
Post Syndicated from Talks at Google original https://www.youtube.com/watch?v=cDKC9-eldjM
Post Syndicated from Cliff Robinson original https://www.servethehome.com/new-microsoft-azure-nvidia-gb200-systems-shown/
Microsoft Azure NVIDIA GB200 systems are huge, with two thirds of the aisle space being dedicated to cooling the NVIDIA rack
The post New Microsoft Azure NVIDIA GB200 Systems Shown as Two-Thirds Cooling appeared first on ServeTheHome.
Post Syndicated from BeardedTinker original https://www.youtube.com/watch?v=54eUA5EyMqQ
Post Syndicated from The Hook Up original https://www.youtube.com/watch?v=nTlN9Yogzdc
Post Syndicated from daroc original https://lwn.net/Articles/992455/
Alice Ryhl has been working to enable
tracepoints — which are widely used
throughout the kernel — to be seamlessly placed in Rust code as well. She spoke
about her approach at Kangrejos. Her
patch set
enables efficient use of static
tracepoints, but supporting dynamic tracepoints will take some additional effort.
Post Syndicated from corbet original https://lwn.net/Articles/993276/
Security updates have been issued by Debian (kernel), Fedora (webkitgtk), Mageia (cups), Oracle (e2fsprogs, kernel, and kernel-container), Red Hat (buildah, container-tools:rhel8, containernetworking-plugins, git-lfs, go-toolset:rhel8, golang, grafana-pcp, podman, and skopeo), SUSE (Mesa, mozjs115, podofo, and redis7), and Ubuntu (cups and cups-filters).
Post Syndicated from Cheng Wang original https://aws.amazon.com/blogs/security/improve-security-incident-response-times-by-using-aws-service-catalog-to-decentralize-security-notifications/
Many organizations continuously receive security-related findings that highlight resources that aren’t configured according to the organization’s security policies. The findings can come from threat detection services like Amazon GuardDuty, or from cloud security posture management (CSPM) services like AWS Security Hub, or other sources. An important question to ask is: How, and how soon, are your teams notified of these findings?
Often, security-related findings are streamed to a single centralized security team or Security Operations Center (SOC). Although it’s a best practice to capture logs, findings, and metrics in standardized locations, the centralized team might not be the best equipped to make configuration changes in response to an incident. Involving the owners or developers of the impacted applications and resources is key because they have the context required to respond appropriately. Security teams often have manual processes for locating and contacting workload owners, but they might not be up to date on the current owners of a workload. Delays in notifying workload owners can increase the time to resolve a security incident or a resource misconfiguration.
This post outlines a decentralized approach to security notifications, using a self-service mechanism powered by AWS Service Catalog to enhance response times. With this mechanism, workload owners can subscribe to receive near real-time Security Hub notifications for their AWS accounts or workloads through email. The notifications include those from Security Hub product integrations like GuardDuty, AWS Health, Amazon Inspector, and third-party products, as well as notifications of non-compliance with security standards. These notifications can better equip your teams to configure AWS resources properly and reduce the exposure time of unsecured resources.
After you deploy the solution in this post, users in assigned groups can access a least-privilege AWS IAM Identity Center permission set, called SubscribeToSecurityNotifications, for their AWS accounts (Figure 1). The solution can also work with existing permission sets or federated IAM roles without IAM Identity Center.
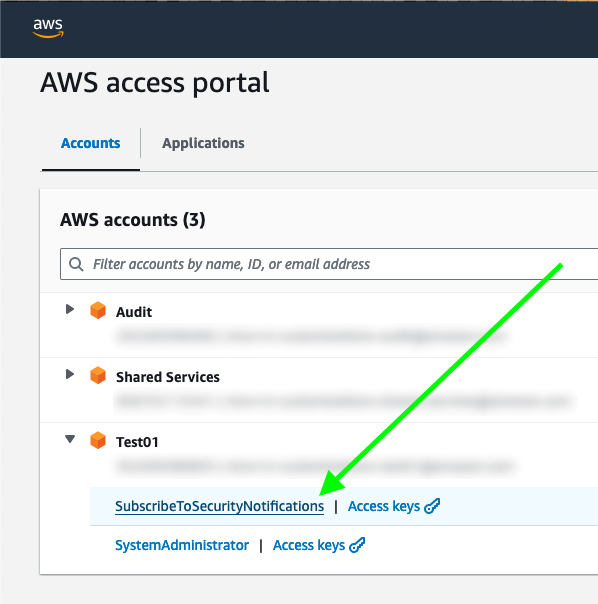
Figure 1: IAM Identity Center portal with the permission set to subscribe to security notifications
After the user chooses SubscribeToSecurityNotifications, they are redirected to an AWS Service Catalog product for subscribing to security notifications and can see instructions on how to proceed (Figure 2).
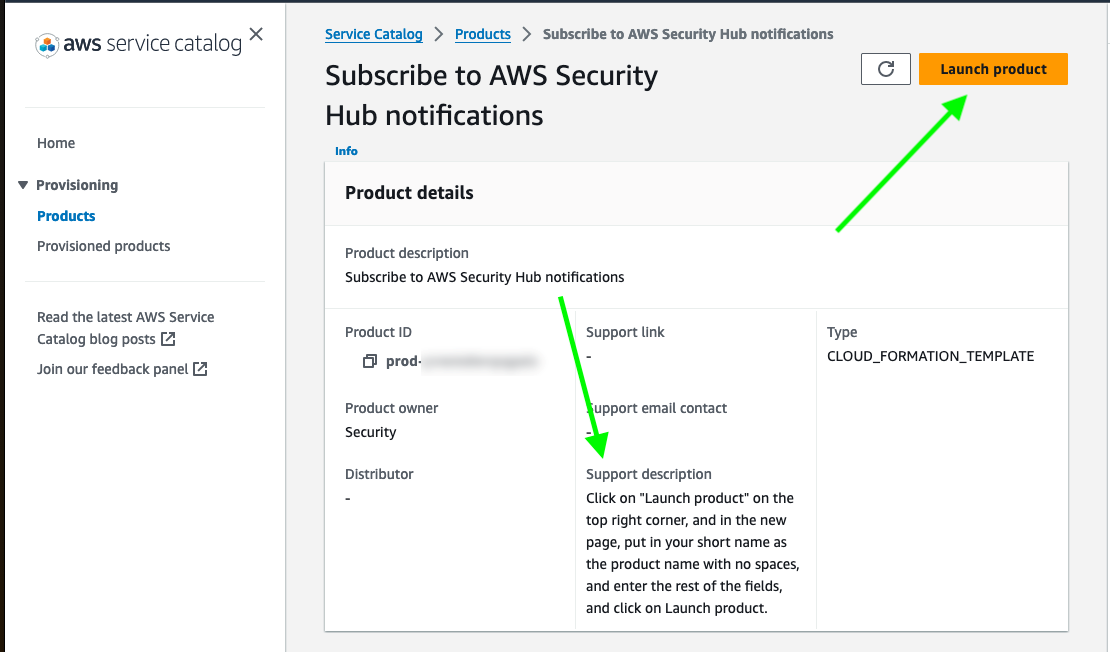
Figure 2: AWS Service Catalog product view
The user can then choose the Launch product utton and enter one or more email addresses and the minimum severity level for notifications (Critical, High, Medium, or Low). If the AWS account has multiple workloads, they can choose to receive only the notifications related to the applications they own by specifying the resource tags. They can also choose to restrict security notifications to include or exclude specific security products (Figure 3).
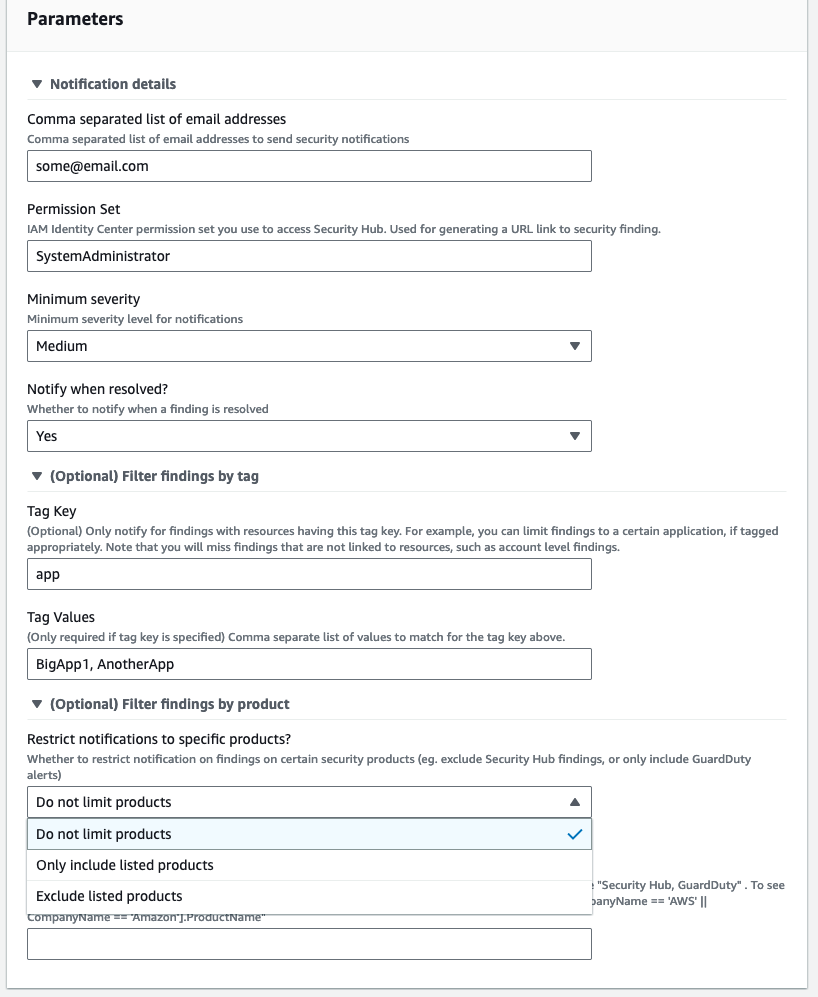
Figure 3: Service Catalog security notifications product parameters
You can update the Service Catalog product configurations after provisioning by doing the following:
For accounts that have multiple applications, each application owner can set up their own notifications by provisioning an additional Service Catalog product. You can use the Filter findings by tag parameters to receive notifications only for a specific application. The example shown in Figure 3 specifies that the user will receive notifications only from resources with the tag key app and the tag value BigApp1 or AnotherApp.
After confirming the subscription, the user starts to receive email notifications for new Security Hub findings in near real-time. Each email contains a summary of the finding in the subject line, the account details, the finding details, recommendations (if any), the list of resources affected with their tags, and an IAM Identity Center shortcut link to the Security Hub finding (Figure 4). The email ends with the raw JSON of the finding.
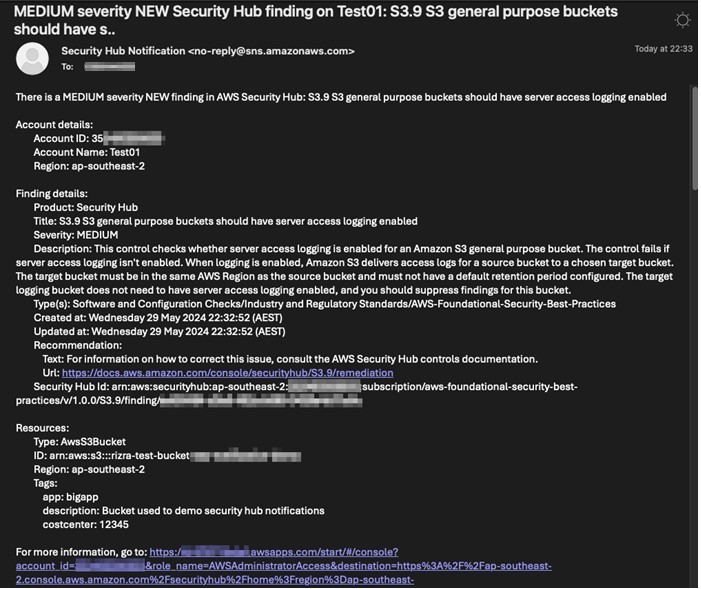
Figure 4: Sample email showing details of the security notification
Choosing the link in the email takes the user directly to the AWS account and the finding in Security Hub, where they can see more details and search for related findings (Figure 5).
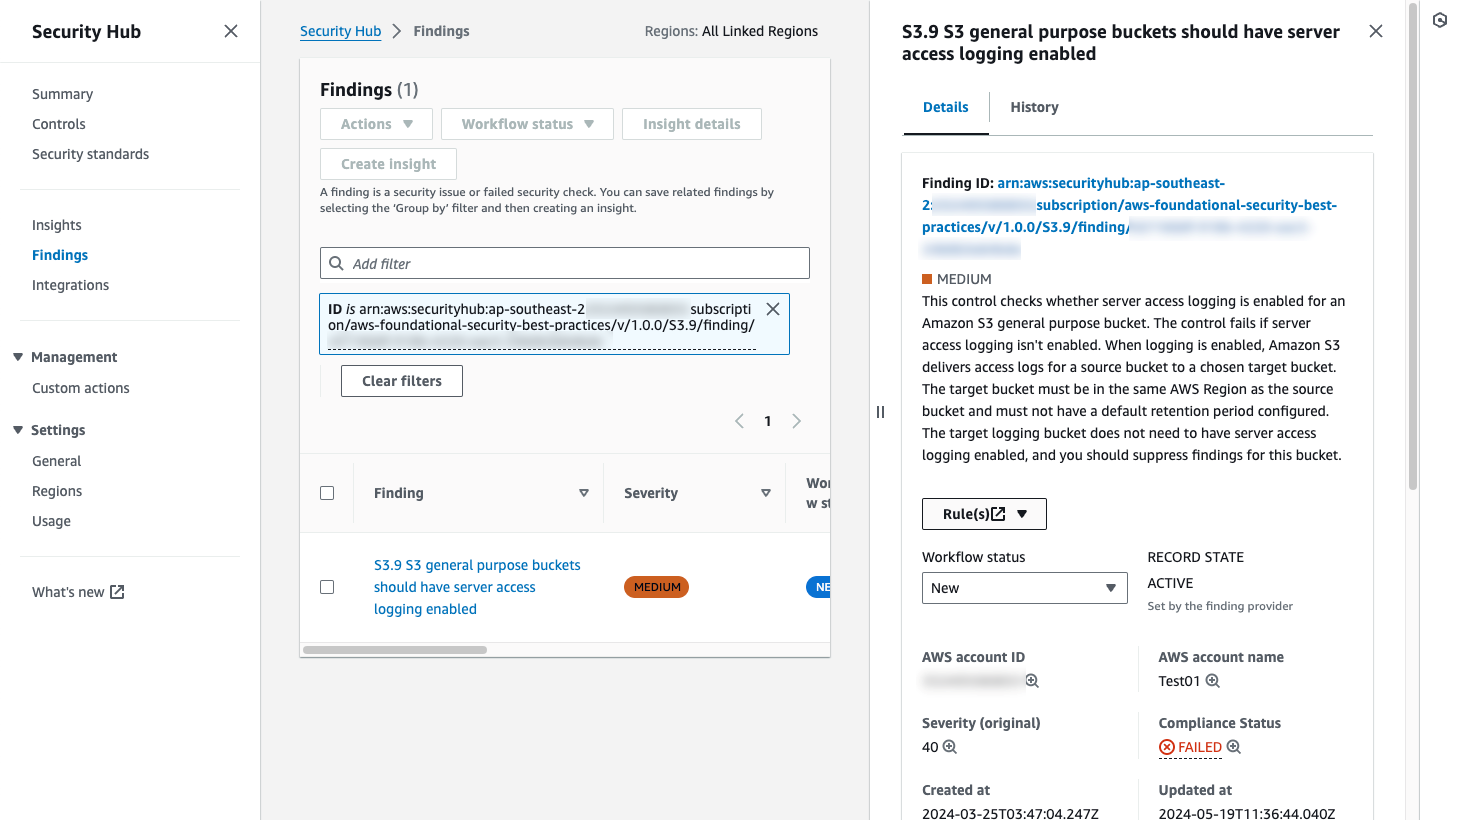
Figure 5: Security Hub finding detail page, linked from the notification email
We’ve provided two deployment options for this solution; a simpler option and one that is more advanced.
Figure 6 shows the simpler deployment option of using the requesting user’s IAM permissions to create the resources required for notifications.
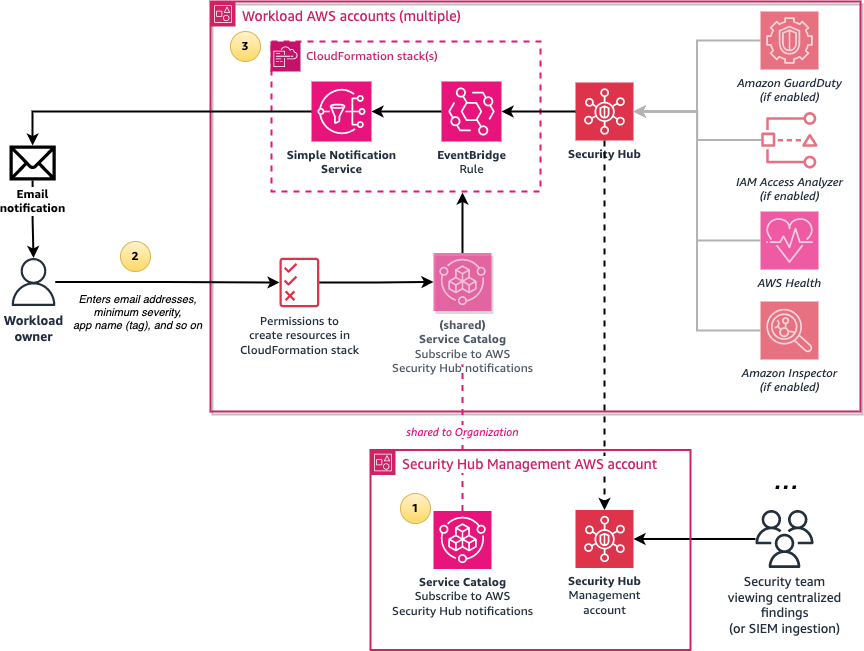
Figure 6: Architecture diagram of the simpler configuration of the solution
The solution involves the following steps:
We also provide a more advanced and recommended deployment option, shown in Figure 7. This option involves using an AWS Lambda function to enhance messages by doing conversions from UTC to your selected time zone, setting the email subject to the finding summary, and including an IAM Identity Center shortcut link to the finding. To not require your users to have permissions for creating Lambda functions and IAM roles, a Service Catalog launch role is used to create resources on behalf of the user, and this role is restricted by using IAM permissions boundaries.

Figure 7: Architecture diagram of the solution when using the calling user’s permissions
The architecture is similar to the previous option, but with the following changes:
The solution installation requires the following:
There are four steps to deploy this solution:
Service Catalog organizations sharing in AWS Organizations must be enabled, and the account that is hosting the solution must be one of the delegated administrators for Service Catalog. This allows the Service Catalog product to be shared to other AWS accounts in the organization.
To enable this configuration, sign in to the AWS Management Console in the management AWS account, launch the AWS CloudShell service, and enter the following commands. Replace the <Account ID> variable with the ID of the account that will host the Service Catalog product.
# Enable AWS Organizations integration in Service Catalog
aws servicecatalog enable-aws-organizations-access

# Nominate the account to be one of the delegated administrators for Service Catalog
aws organizations register-delegated-administrator --account-id <Account ID> --service-principal servicecatalog.amazonaws.comThe following steps create a CloudFormation StackSet to deploy a Service Catalog launch role and permissions boundary across your accounts. This is highly recommended if you plan to enable Lambda formatting, because if you skip this step, only users who have permissions to create IAM roles will be able to subscribe to security notifications.
To deploy IAM roles with StackSets
SecurityHub_notifications_IAM_role_stackset.yaml. Then choose Next.Next, run the included installation script that creates the CloudFormation templates that are required to deploy the Service Catalog product and portfolio.
To run the installation script
git clone https://github.com/aws-samples/improving-security-incident-response-times-by-decentralizing-notifications.git

cd improving-security-incident-response-times-by-decentralizing-notifications

./install.sh
The script will ask for the following information:
IAM_Identity_Center_Permission_Set. If you have federated IAM roles configured, enter IAM role name.IAM_Identity_Center_Permission_Set in the previous step, enter the IAM Identity Center URL subdomain. This is used for creating a shortcut URL link to Security Hub in the email. For example, if your URL looks like this: https://d-abcd1234.awsapps.com/start/#/, then enter d-abcd1234.AWSPowerUserAccess) or IAM role name that users use.The script creates the following CloudFormation stacks:
After the script finishes the installation, it outputs the Service Catalog Product ID, which you will need in the next step. The script then asks whether it should automatically share this Service Catalog portfolio with the entire organization or a specific account, or whether you will configure sharing to specific OUs manually.
(Optional) To manually configure sharing with an OU
To expand this solution across Regions, enable Security Hub cross-Region aggregation. This results in the email notifications coming from the linked Regions that are configured in Security Hub, even though the Service Catalog product is instantiated in a single Region. If cross-Region aggregation isn’t enabled and you want to monitor multiple Regions, you must repeat the preceding steps in all the Regions you are monitoring.
This step requires you to have completed Step 2 (Deploy IAM roles across accounts with CloudFormation StackSets).
If you’re using IAM Identity Center, the following steps create a custom permission set, SubscribeToSecurityNotifications, that provides least-privileged access for users to subscribe to security notifications. The permission set redirects to the Service Catalog page to launch the product.
To provision Identity Center permission sets
SecurityHub_notifications_PermissionSets.yaml. Then choose Next.Next, go to the IAM Identity Center console, select your AWS accounts, and assign access to the SubscribeToSecurityNotifications permission set for your users or groups.
To test the solution, sign in to an AWS account, making sure to sign in with the designated IAM Identity Center permission set or IAM role. Launch the product in Service Catalog to subscribe to Security Hub security notifications.
Wait for a Security Hub notification. For example, if you have the AWS Foundational Security Best Practices (FSBP) standard enabled, creating an S3 bucket with no server access logging enabled should generate a notification within a few minutes.
Keep in mind the following:
To remove unneeded resources after testing the solution, follow these steps:
This solution described in this blog post enables you to set up a self-service standardized mechanism that application or workload owners can use to get security notifications within minutes through email, as opposed to being contacted by a security team later. This can help to improve your security posture by reducing the incident resolution time, which reduces the time that a security issue remains active.
If you have feedback about this post, submit comments in the Comments section below. If you have questions about this post, contact AWS Support.
Post Syndicated from Justin Cichra original https://blog.cloudflare.com/leveraging-kubernetes-virtual-machines-with-kubevirt
Cloudflare runs several multi-tenant Kubernetes clusters across our core data centers. These general-purpose clusters run on bare metal and power our control plane, analytics, and various engineering tools such as build infrastructure and continuous integration.
Kubernetes is a container orchestration platform. It enables software engineers to deploy containerized applications to a cluster of machines. This enables teams to build highly-available software on a scalable and resilient platform.
In this blog post we discuss our Kubernetes architecture, why we needed virtualization, and how we’re using it today.
Multi-tenancy is a concept where one system can share its resources among a wide range of customers. This model allows us to build and manage a small number of general purpose Kubernetes clusters for our internal application teams. Keeping the number of clusters small reduces our operational toil. This model shrinks costs and increases computational efficiency by sharing hardware. Multi-tenancy also allows us to scale more efficiently. Scaling is done at either a cluster or application level. Cluster operators scale the platform by adding more hardware. Teams scale their applications by updating their Kubernetes manifests. They can scale vertically by increasing their resource requests or horizontally by increasing the number of replicas.
All of our Kubernetes clusters are multi-tenant with various components enabled for a secure and resilient platform.
Pods are secured using the latest standards recommended by the Kubernetes project. We use Pod Security Admission (PSA) and Pod Security Standards to ensure all workloads are following best practices. By default, all namespaces use the most restrictive profile, and only a few Kubernetes control plane namespaces are granted privileged access. For additional policies not covered by PSA, we built custom Validating Webhooks on top of the controller-runtime framework. PSA and our custom policies ensure clusters are secure and workloads are isolated.
A select number of teams needed tight integration with the Linux kernel. Examples include Docker daemons for build infrastructure and the ability to simulate servers running the software and configuration of our global network. With our pod security requirements, these workloads are not permitted to interface with the host kernel at a deep level (e.g. no iptables or sysctls). Doing so may disrupt other tenants sharing the node and open additional attack vectors if an application was compromised. A virtualization platform would enable these workloads to interact with their own kernel within a secured Kubernetes cluster.
We considered various different virtualization solutions. Running a separate virtualization platform outside of Kubernetes would have worked, but would not tightly integrate containerized workloads with virtual machines. It would also be an additional operational burden on our team, as backups, alerting, and fleet management would have to exist for both our Kubernetes and virtual machine clusters.
We then looked for solutions that run virtual machines within Kubernetes. Teams could already manually deploy QEMU pods, but this was not an elegant solution. We needed a better way. There were several other options, but KubeVirt was the tool that met the majority of our requirements. Other solutions required a privileged container to run a virtual machine, but KubeVirt did not – this was a crucial requirement in our goal of creating a more secure multi-tenant cluster. KubeVirt also uses a feature of the Kubernetes API called Custom Resource Definitions (CRDs), which extends the Kubernetes API with new objects, increasing the flexibility of Kubernetes beyond its built-in types. For KubeVirt, this includes objects such as VirtualMachine and VirtualMachineInstanceReplicaSet. We felt the use of CRDs would allow KubeVirt to grow as more features were added.
KubeVirt is a virtualization platform that enables users to run virtual machines within Kubernetes. With KubeVirt, virtual machines run alongside containerized workloads on the same platform. Kubernetes primitives such as network policies, configmaps, and services all integrate with virtual machines. KubeVirt scales with our needs and is successfully running hundreds of virtual machines across several clusters. We frequently remediate Kubernetes nodes, so virtual machines and pods are always exercising their startup/shutdown processes.
There are a number of internal projects leveraging virtual machines at Cloudflare. We’ll touch on a few of our more popular use cases:
Kubernetes scalability testing
Development environments
Kernel and iPXE testing
Build pipelines
Our staging clusters are much smaller than our largest production clusters. They also run on bare metal and mirror the configuration we have for each production cluster. This is extremely useful when rolling out new software, operating systems, or kernel changes; however, they miss bugs that only surface at scale. We use KubeVirt to bridge this gap and virtualize Kubernetes clusters with hundreds of nodes and thousands of pods.
The setup process for virtualized clusters differs from our bare metal provisioning steps. For bare metal, we use Salt to provision clusters from start to finish. For our virtualized clusters we use Ansible and kubeadm. Our bare metal staging clusters are responsible for testing and validating our Salt configuration. The virtualized clusters give us a vanilla Kubernetes environment without any Cloudflare customizations. Having a stock environment in addition to our Salt environment helps us isolate bugs down to a Kubernetes change, a kernel change, or a Cloudflare-specific configuration change.
Our virtualized clusters consist of a KubeVirt VirtualMachine object per node. We create three control-plane nodes and any number of worker nodes. Each virtual machine starts out as a vanilla Debian generic cloud image. Using KubeVirt’s cloud-init support, the virtual machine downloads an internal Ansible playbook which installs a recent kernel, cri-o (the container runtime we use), and kubeadm.
- name: Add the Kubernetes gpg key
  apt_key:
    url: https://pkgs.k8s.io/core:/stable:/{{ kube_version }}/deb/Release.key
    keyring: /etc/apt/keyrings/kubernetes-apt-keyring.gpg
    state: present

- name: Add the Kubernetes repository
  shell: echo "deb [signed-by=/etc/apt/keyrings/kubernetes-apt-keyring.gpg] https://pkgs.k8s.io/core:/stable:/{{ kube_version }}/deb/ /" | tee /etc/apt/sources.list.d/kubernetes.list

- name: Add the CRI-O gpg key
  apt_key:
    url: https://pkgs.k8s.io/addons:/cri-o:/{{ crio_version }}/deb/Release.key
    keyring: /etc/apt/keyrings/cri-o-apt-keyring.gpg
    state: present

- name: Add the CRI-O repository
  shell: echo "deb [signed-by=/etc/apt/keyrings/cri-o-apt-keyring.gpg] https://pkgs.k8s.io/addons:/cri-o:/{{ crio_version }}/deb/ /" | tee /etc/apt/sources.list.d/cri-o.list

- name: Install CRI-O and Kubernetes packages
  apt:
    name:
      - cri-o
      - kubelet
      - kubeadm
      - kubectl
    update_cache: yes
    state: present

- name: Enable and start CRI-O service
  service:
    state: started
    enabled: yes
    name: crio.service
Ansible playbook steps to download and install Kubernetes tooling
Once each node has completed its individual playbook, we can initialize and join nodes to the cluster using another playbook that runs kubeadm. From there the cluster can be accessed by logging into a control plane node using kubectl.
When losing 10s or 100s of nodes at once, Kubernetes needs to act quickly to minimize downtime. The sooner it recognizes node failure, the faster it can reroute traffic to healthy pods.
Using Kubernetes in KubeVirt we are able to simulate a large cluster undergoing a network cut and observe how Kubernetes reacts. The KubeVirt Kubernetes cluster allows us to rapidly iterate on configuration changes and code patches.
The following Ansible playbook task simulates a network segmentation failure where only the control-plane nodes remain online.
- name: Disable network interfaces on all workers
  command: ifconfig enp1s0 down
  async: 5
  poll: 0
  ignore_errors: yes
  when: inventory_hostname in groups['kube-node']
An Ansible role which disables the network on all worker nodes simultaneously.
This framework allows us to exercise the code in controller-manager, Kubernetes’s daemon that reconciles the fundamental state of the system (Nodes, Pods, etc). Our simulation platform helped us drastically shorten full traffic recovery time when a large number of Kubernetes nodes become unreachable. We upstreamed our changes to Kubernetes and more controller-manager speed improvements are coming soon.
Compiling code on your laptop can be slow. Perhaps you’re working on a patch for a large open-source project (e.g. V8 or Clickhouse) or need more bandwidth to upload and download containers. With KubeVirt, we enable our developers to rapidly iterate on software development and testing on powerful server hardware. KubeVirt integrates with Kubernetes Persistent Volumes, which enables teams to persist their development environment across restarts.
There are a number of teams at Cloudflare using KubeVirt for a variety of development and testing environments. Most notably is a project called Edge Test Fleet, which emulates a physical server and all the software that runs Cloudflare’s global network. Teams can test their code and configuration changes against the entire software stack without reserving dedicated hardware. Cloudflare uses Salt to provision systems. It can be difficult to iterate and test Salt changes without a complete virtual environment. Edge Test Fleet makes iterating on Salt easier, ensuring states compile and render the right output. With Edge Test Fleet, new developers can better understand how Cloudflare’s global network works without touching staging or production.
Additionally, one Cloudflare team developed a framework that allows users to build and test changes to Clickhouse using a VSCode environment. This framework is generally applicable to all teams requiring a development environment. Once a template environment is provisioned, CSI Volume Cloning can duplicate a golden volume, separating persistent environments for each developer.
apiVersion: v1
kind: PersistentVolumeClaim
name: devspace-jcichra-rootfs
namespace: dev-clickhouse-vms
spec:
  accessModes:
  - ReadWriteOnce
  storageClassName: rook-ceph-nvme
  dataSource:
    kind: PersistentVolumeClaim
    name: dev-rootfs
  resources:
    requests:
      storage: 500Gi
A PersistentVolumeClaim that clones data from another volume using CSI Volume Cloning
Unlike user space software development, when a kernel crashes, the entire system crashes. The kernel team uses KubeVirt for development. KubeVirt gives all kernel engineers, regardless of laptop OS or architecture, the same x86 environment and hypervisor. Virtual machines on server hardware can be scaled up to more cores and memory than on laptops. The Cloudflare kernel team has also found low-level issues which only surface in environments with many CPUs.
To make testing fast and easy, the kernel team serves iPXE images via an nginx Pod and Service adjacent to the virtual machine. A recent kernel and Debian image are copied to the nginx pod via kubectl cp. The iPXE file can then be referenced in the KubeVirt virtual machine definition via the DNS name for the Kubernetes Service.
interfaces:
  name: default
  masquerade: {}
  model: e1000e
  ports:
    - port: 22
      dhcpOptions:
        bootFileName: http://httpboot.u-$K8S_USER.svc.cluster.local/boot.ipxe
When the virtual machine boots, it will get an IP address on the default interface behind NAT due to our masquerade setting. Then it will download boot.ipxe, which describes what additional files should be downloaded to start the system. In this case, the kernel (vmlinuz-amd64), Debian (baseimg-amd64.img) and additional kernel modules (modules-amd64.img) are downloaded.
UEFI iPXE boot connecting and downloading files from nginx pod in user’s namespace
Once the system is booted, a developer can log in to the system for testing:
linux login: root
Password:
Linux linux 6.6.35-cloudflare-2024.6.7 #1 SMP PREEMPT_DYNAMIC Mon Sep 27 00:00:00 UTC 2010 x86_64

The programs included with the Debian GNU/Linux system are free software;
the exact distribution terms for each program are described in the
individual files in /usr/share/doc/*/copyright.

Debian GNU/Linux comes with ABSOLUTELY NO WARRANTY, to the extent
permitted by applicable law.
root@linux:~#
Custom kernels can be copied to the nginx pod via kubectl cp. Restarting the virtual machine will load that new kernel for testing. When a kernel panic occurs, the virtual machine can quickly be restarted with virtctl restart linux and it will go through the iPXE boot process again.
Cloudflare leverages KubeVirt to build a majority of software at Cloudflare. Virtual machines give build system users full control over their pipeline. For example, Debian packages can easily be installed and separate container daemons (such as Docker) can run all within a Kubernetes namespace using the restricted Pod Security Standard. KubeVirt’s VirtualMachineReplicaSet concept allows us to quickly scale up and down the number of build agents to match demand. We can roll out different sets of virtual machines with varying sizes, kernels, and operating systems.
To scale efficiently, we leverage container disks to store our agent virtual machine images. Container disks allow us to store the virtual machine image (for example, a qcow image) in our container registry. This strategy works well when the state in virtual machines is ephemeral. Liveness probes detect unhealthy or broken agents, shutting down the virtual machine and replacing them with a fresh instance. Other automation limits virtual machine uptime, capping it to 3–4 hours to keep build agents fresh.
We’re excited to expand our use of KubeVirt and unlock new capabilities for our internal users. KubeVirt’s Linux ARM64 support will allow us to build ARM64 packages in-cluster and simulate ARM64 systems.
Projects like KubeVirt CDI (Containerized Data Importer) will streamline our user’s virtual machine experience. Instead of users manually building container disks, we can provide a catalog of virtual machine images. It also allows us to copy virtual machine disks between namespaces.
KubeVirt has proven to be a great tool for virtualization in our Kubernetes-first environment. We’ve unlocked the ability to support more workloads with our multi-tenant model. The KubeVirt platform allows us to offer a single compute platform supporting containers and virtual machines. Managing it has been simple, and upgrades have been straightforward and non-disruptive. We’re exploring additional features KubeVirt offers to improve the experience for our users.
Finally, our team is expanding! We’re looking for more people passionate about Kubernetes to join our team and help us push Kubernetes to the next level.
Post Syndicated from Noelle Kagan original https://blog.cloudflare.com/cloudflare-acquires-kivera
We’re excited to announce that Kivera, a cloud security, data protection, and compliance company, has joined Cloudflare. This acquisition extends our SASE portfolio to incorporate inline cloud app controls, empowering Cloudflare One customers with preventative security controls for all their cloud services.
In today’s digital landscape, cloud services and SaaS (software as a service) apps have become indispensable for the daily operation of organizations. At the same time, the amount of data flowing between organizations and their cloud providers has ballooned, increasing the chances of data leakage, compliance issues, and worse, opportunities for attackers. Additionally, many companies — especially at enterprise scale — are working directly with multiple cloud providers for flexibility based on the strengths, resiliency against outages or errors, and cost efficiencies of different clouds.
Security teams that rely on Cloud Security Posture Management (CSPM) or similar tools for monitoring cloud configurations and permissions and Infrastructure as code (IaC) scanning are falling short due to detecting issues only after misconfigurations occur with an overwhelming volume of alerts. The combination of Kivera and Cloudflare One puts preventive controls directly into the deployment process, or ‘inline’, blocking errors before they happen. This offers a proactive approach essential to protecting cloud infrastructure from evolving cyber threats, maintaining data security, and accelerating compliance.
In a significant leap forward in cloud security, the combination of Kivera’s technology and Cloudflare One adds preventive, inline controls to enforce secure configurations for cloud resources. By inspecting cloud API traffic, these new capabilities equip organizations with enhanced visibility and granular controls, allowing for a proactive approach in mitigating risks, managing cloud security posture, and embracing a streamlined DevOps process when deploying cloud infrastructure.
Kivera will add the following capabilities to Cloudflare’s SASE platform:
One-click security: Customers benefit from immediate prevention of the most common cloud breaches caused by misconfigurations, such as accidentally allowing public access or policy inconsistencies.
Enforced cloud tenant control: Companies can easily draw boundaries around their cloud resources and tenants to ensure that sensitive data stays within their organization.
Prevent data exfiltration: Easily set rules to prevent data being sent to unauthorized locations.
Reduce ‘shadow’ cloud infrastructure: Ensure that every interaction between a customer and their cloud provider is in line with preset standards.
Streamline cloud security compliance: Customers can automatically assess and enforce compliance against the most common regulatory frameworks.
Flexible DevOps model: Enforce bespoke controls independent of public cloud setup and deployment tools, minimizing the layers of lock-in between an organization and a cloud provider.
Complementing other cloud security tools: Create a first line of defense for cloud deployment errors, reducing the volume of alerts for customers also using CSPM tools or Cloud Native Application Protection Platforms (CNAPPs).
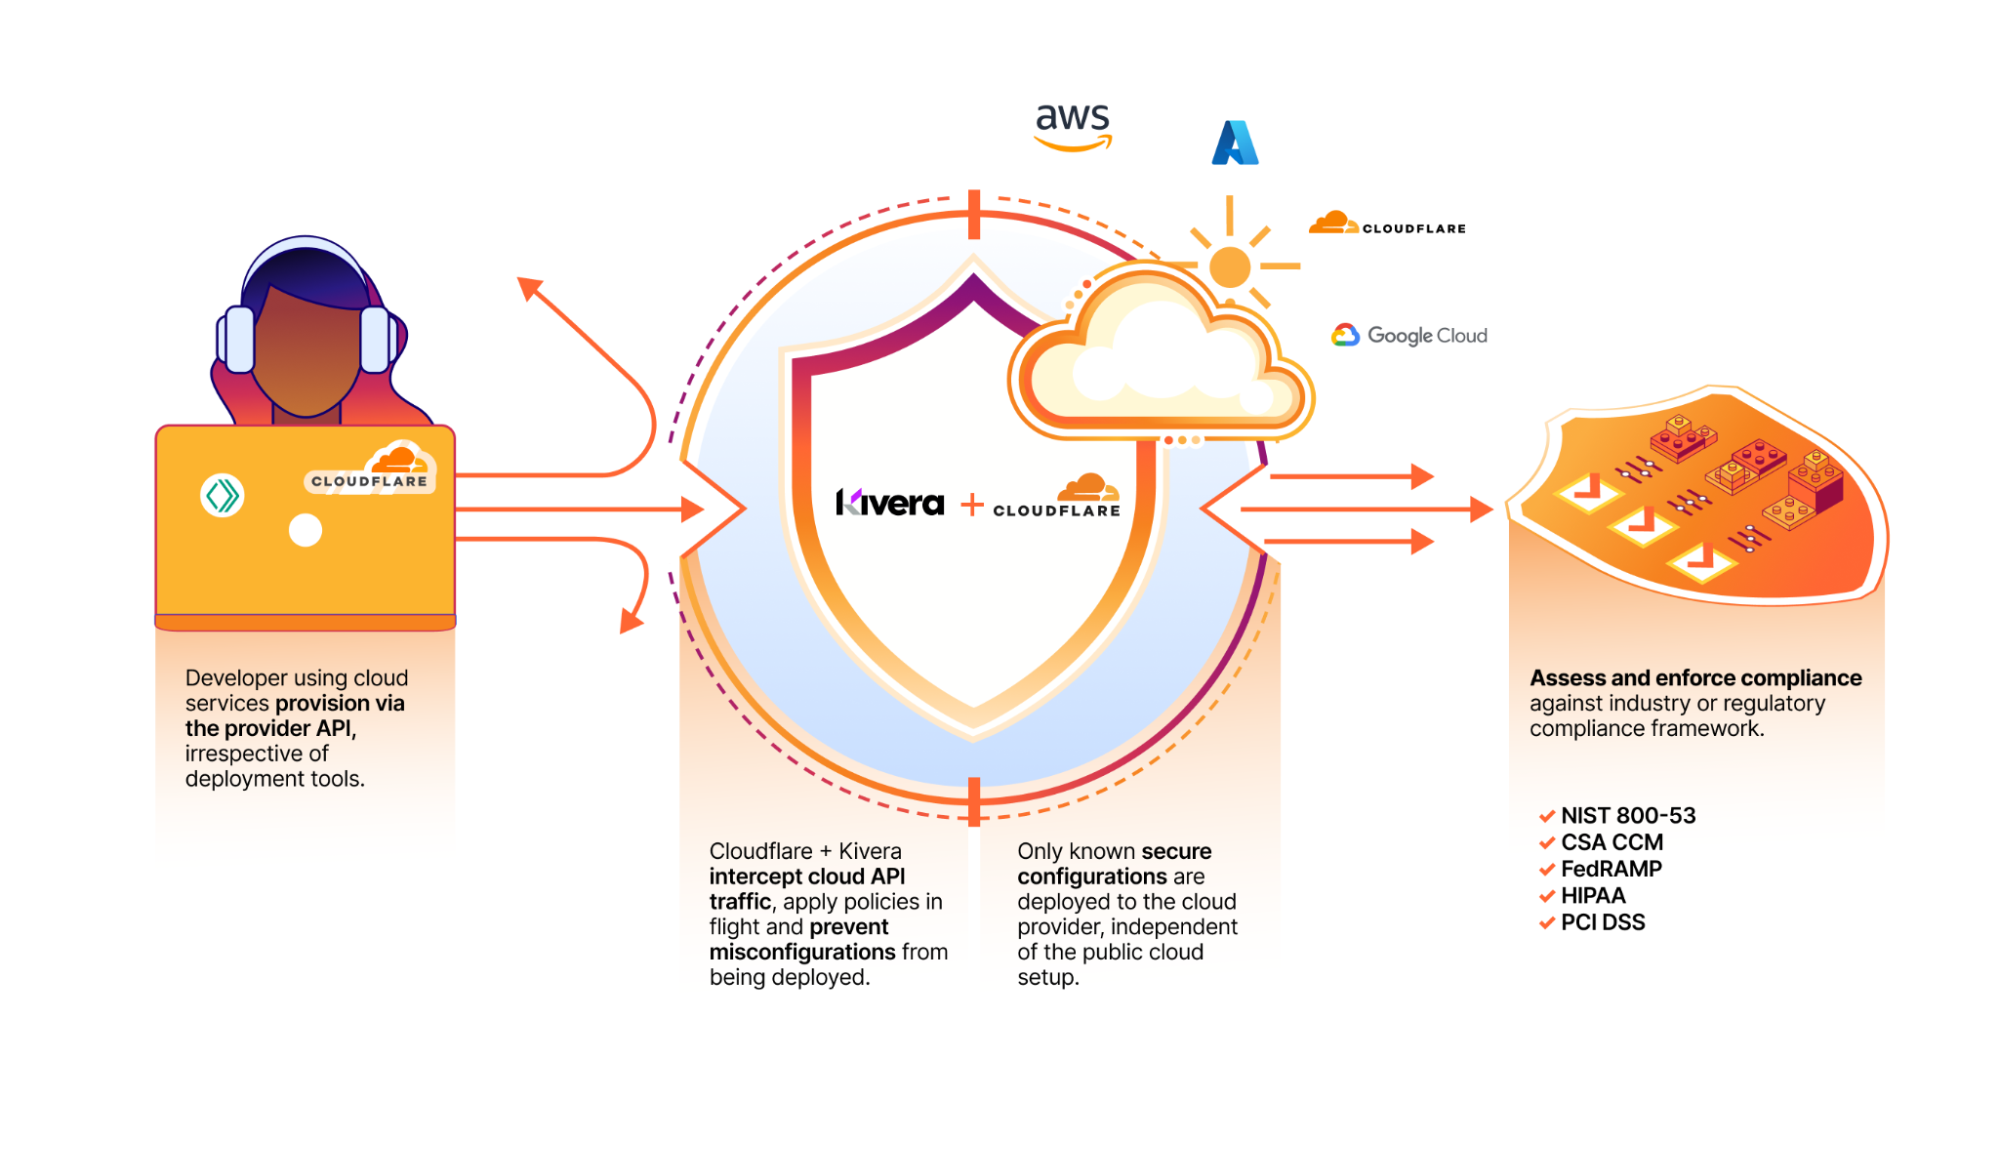
An intelligent proxy that uses a policy-based approach to
enforce secure configuration of cloud resources.
As a SASE platform, Cloudflare One ensures safe access and provides data controls for cloud and SaaS apps. This integration broadens the scope of Cloudflare’s SASE platform beyond user-facing applications to incorporate increased cloud security through proactive configuration management of infrastructure services, beyond what CSPM and CASB solutions provide. With the addition of Kivera to Cloudflare One, customers now have a unified platform for all their inline protections, including cloud control, access management, and threat and data protection. All of these features are available with single-pass inspection, which is 50% faster than Secure Web Gateway (SWG) alternatives.
With the earlier acquisition of BastionZero, a Zero Trust infrastructure access company, Cloudflare One expanded the scope of its VPN replacement solution to cover infrastructure resources as easily as it does apps and networks. Together Kivera and BastionZero enable centralized security management across hybrid IT environments, and provide a modern DevOps-friendly way to help enterprises connect and protect their hybrid infrastructure with Zero Trust best practices.
Beyond its SASE capabilities, Cloudflare One is integral to Cloudflare’s connectivity cloud, enabling organizations to consolidate IT security tools on a single platform. This simplifies secure access to resources, from developer privileged access to technical infrastructure and expanding cloud services. As Forrester echoes, “Cloudflare is a good choice for enterprise prospects seeking a high-performance, low-maintenance, DevOps-oriented solution.”
The cloud has become a prime target for cyberattacks. According to the 2023 Cloud Risk Report, CrowdStrike observed a 95% increase in cloud exploitation from 2021 to 2022, with a staggering 288% jump in cases involving threat actors directly targeting the cloud.
Misconfigurations in cloud infrastructure settings, such as improperly set security parameters and default access controls, provide adversaries with an easy path to infiltrate the cloud. According to the 2023 Thales Global Cloud Security Study, which surveyed nearly 3,000 IT and security professionals from 18 countries, 44% of respondents reported experiencing a data breach, with misconfigurations and human error identified as the leading cause, accounting for 31% of the incidents.
Further, according to GartnerⓇ, “Through 2027, 99% of records compromised in cloud environments will be the result of user misconfigurations and account compromise, not the result of an issue with the cloud provider.”1
Several factors contribute to the rise of cloud misconfigurations:
Rapid adoption of cloud services: Leaders are often driven by the scalability, cost-efficiency, and ability to support remote work and real-time collaboration that cloud services offer. These factors enable rapid adoption of cloud services which can lead to unintentional misconfigurations as IT teams struggle to keep up with the pace and complexity of these services.
Complexity of cloud environments: Cloud infrastructure can be highly complex with multiple services and configurations to manage. For example, AWS alone offers 373 services with 15,617 actions and 140,000+ parameters, making it challenging for IT teams to manage settings accurately.
Decentralized management: In large organizations, cloud infrastructure resources are often managed by multiple teams or departments. Without centralized oversight, inconsistent security policies and configurations can arise, increasing the risk of misconfigurations.
Continuous Integration and Continuous Deployment (CI/CD): CI/CD pipelines promote the ability to rapidly deploy, change and frequently update infrastructure. With this velocity comes the increased risk of misconfigurations when changes are not properly managed and reviewed.
Insufficient training and awareness: Employees may lack the cross-functional skills needed for cloud security, such as understanding networks, identity, and service configurations. This knowledge gap can lead to mistakes and increases the risk of misconfigurations that compromise security.
Threat actors exploit cloud services through various means, including targeting misconfigurations, abusing privileges, and bypassing encryption. Misconfigurations such as exposed storage buckets or improperly secured APIs offer attackers easy access to sensitive data and resources. Privilege abuse occurs when attackers gain unauthorized access through compromised credentials or poorly managed identity and access management (IAM) policies, allowing them to escalate their access and move laterally within the cloud environment. Additionally, unencrypted data enables attackers to intercept and decrypt data in transit or at rest, further compromising the integrity and confidentiality of sensitive information.
Here are some other vulnerabilities that organizations should address:
Unrestricted access to cloud tenants: Allowing unrestricted access exposes cloud platforms to data exfiltration by malicious actors. Limiting access to approved tenants with specific IP addresses and service destinations helps prevent unauthorized access.
Exposed access keys: Exposed access keys can be exploited by unauthorized parties to steal or delete data. Requiring encryption for the access keys and restricting their usage can mitigate this risk.
Excessive account permissions: Granting excessive privileges to cloud accounts increases the potential impact of security breaches. Limiting permissions to necessary operations helps prevent lateral movement and privilege escalation by threat actors.
Inadequate network segmentation: Poorly managed network security groups and insufficient segmentation practices can allow attackers to move freely within cloud environments. Drawing boundaries around your cloud resources and tenants ensures that data stays within your organization.
Improper public access configuration: Incorrectly exposing critical services or storage resources to the internet increases the likelihood of unauthorized access and data compromise. Preventing public access drastically reduces risk.
Shadow cloud infrastructure: Abandoned or neglected cloud instances are often left vulnerable to exploitation, providing attackers with opportunities to access sensitive data left behind. Preventing untagged or unapproved cloud resources to be created can reduce the risk of exposure.
Many organizations turn to CSPM tools to give them more visibility into cloud misconfigurations. These tools often alert teams after an issue occurs, putting security teams in a reactive mode. Remediation efforts require collaboration between security teams and developers to implement changes, which can be time-consuming and resource-intensive. This approach not only delays issue resolution but also exposes companies to compliance and legal risks, while failing to train employees on secure cloud practices. On average, it takes 207 days to identify these breaches and an additional 70 days to contain them.
Addressing the growing threat of cloud misconfigurations requires proactive security measures and continuous monitoring. Organizations must adopt proactive security solutions that not only detect and alert but also prevent misconfigurations from occuring in the first place and enforce best practices. Creating a first line of defense for cloud deployment errors reduces the volume of alerts for customers, especially those also using CSPM tools or CNAPPs.
By implementing these proactive strategies, organizations can safeguard their cloud environments against the evolving landscape of cyber threats, ensuring robust security and compliance while minimizing risks and operational disruptions.
The Kivera product will not be a point solution add-on. We’re making it a core part of our Cloudflare One offering because integrating features from products like our Secure Web Gateway give customers a comprehensive solution that works better together.
We’re excited to welcome Kivera to the Cloudflare team. Through the end of 2024 and into early 2025, Kivera’s team will focus on integrating their preventive inline cloud app controls directly into Cloudflare One. We are looking for early access testers and teams to provide feedback about what they would like to see. If you’d like early access, please join the waitlist.
[1] Source: Outcome-Driven Metrics You Can Use to Evaluate Cloud Security Controls, Gartner, Charlie Winckless, Paul Proctor, Manuel Acosta, 09/28/2023
GARTNER is a registered trademark and service mark of Gartner, Inc. and/or its affiliates in the U.S. and internationally and is used herein with permission. All rights reserved.