Post Syndicated from The Atlantic original https://www.youtube.com/watch?v=120joDZclfo
Ayad Akhtar on Technology and the Future of Art | The Atlantic Festival 2025
Post Syndicated from The Atlantic original https://www.youtube.com/watch?v=-gAcymTUGRI
David Letterman on the Future of Free Speech | The Atlantic Festival 2025
Post Syndicated from The Atlantic original https://www.youtube.com/watch?v=mpAHFlZqIKw
The Guns of Saratoga
Post Syndicated from The History Guy: History Deserves to Be Remembered original https://www.youtube.com/watch?v=ifsFnsSHiNQ
Surveying the Global Spyware Market
Post Syndicated from Bruce Schneier original https://www.schneier.com/blog/archives/2025/09/surveying-the-global-spyware-market.html
The Atlantic Council has published its second annual report: “Mythical Beasts: Diving into the depths of the global spyware market.”
Too much good detail to summarize, but here are two items:
First, the authors found that the number of US-based investors in spyware has notably increased in the past year, when compared with the sample size of the spyware market captured in the first Mythical Beasts project. In the first edition, the United States was the second-largest investor in the spyware market, following Israel. In that edition, twelve investors were observed to be domiciled within the United States—whereas in this second edition, twenty new US-based investors were observed investing in the spyware industry in 2024. This indicates a significant increase of US-based investments in spyware in 2024, catapulting the United States to being the largest investor in this sample of the spyware market. This is significant in scale, as US-based investment from 2023 to 2024 largely outpaced that of other major investing countries observed in the first dataset, including Italy, Israel, and the United Kingdom. It is also significant in the disparity it points to the visible enforcement gap between the flow of US dollars and US policy initiatives. Despite numerous US policy actions, such as the addition of spyware vendors on the Entity List, and the broader global leadership role that the United States has played through imposing sanctions and diplomatic engagement, US investments continue to fund the very entities that US policymakers are making an effort to combat.
Second, the authors elaborated on the central role that resellers and brokers play in the spyware market, while being a notably under-researched set of actors. These entities act as intermediaries, obscuring the connections between vendors, suppliers, and buyers. Oftentimes, intermediaries connect vendors to new regional markets. Their presence in the dataset is almost assuredly underrepresented given the opaque nature of brokers and resellers, making corporate structures and jurisdictional arbitrage more complex and challenging to disentangle. While their uptick in the second edition of the Mythical Beasts project may be the result of a wider, more extensive data-collection effort, there is less reporting on resellers and brokers, and these entities are not systematically understood. As observed in the first report, the activities of these suppliers and brokers represent a critical information gap for advocates of a more effective policy rooted in national security and human rights. These discoveries help bring into sharper focus the state of the spyware market and the wider cyber-proliferation space, and reaffirm the need to research and surface these actors that otherwise undermine the transparency and accountability efforts by state and non-state actors as they relate to the spyware market.
Really good work. Read the whole thing.
The Columnist
Post Syndicated from The Atlantic original https://www.youtube.com/watch?v=X3b9rzeZAGI
Д. Анатомия на властта
Post Syndicated from Емилия Милчева original https://www.toest.bg/d-anatomiya-na-vlastta/

Ако българите допуснат Делян Пеевски да им гради държава с главно Д, значи са слуги, не граждани. Още не е късно да се попречи на „строителя“ и отговорността да го направят пада върху двете политически сили, които го легитимираха и утвърдиха: „Продължаваме промяната“ – „Демократична България“ (ПП–ДБ) и ГЕРБ. На първите не им достигат сили, на вторите – смелост. Но ако ГЕРБ не се осмели, лидерът Бойко Борисов ще бъде тотално обезличен, също и политическите му заслуги.
Как иска Борисов да слезе от сцената?
Досега ГЕРБ успяваше да погълне като боа партньорите си във властта. Не и Пеевски. Олигархолидерът на ДПС – Ново начало къса живо месо от всяка партия, която му падне, включително и от ГЕРБ. С просто око се вижда, че на лидера на ГЕРБ никак не му е лесно, принуден да изпълнява ежедневни поръчения от крепителя на управлението, и при всеки сгоден случай признава, че е в тази коалиция не по своя воля, а заради „стабилността“.
Само преди 7–8 месеца, след осмия поред избор, всички се чудехме как да направим правителство. Аз буквално дадох под наем на това управление партията. Не станах премиер. В ГЕРБ не сме свикнали лидерът ѝ да не е премиер. Трудно ни е, но за да има някаква стабилност, го направихме.
Почти четвърт век във властта прави Борисов най-дълголетния политик, при това в почти непрекъснат възход, и сега рискува силната зависимост от Пеевски да се превърне в епилог на кариерата му. Защото този финал наближава и при три премиерски мандата и поредица от спечелени избори няма его, което да понесе срама, че генералът се е превърнал в пешка.
От друга страна, предизвика ли предсрочни избори, може да пострада от компроматни атаки, затова вероятно ще изчака удобен момент за такъв вот. Председателят на партията, с чийто мандат правителството управлява, обаче не се яви да гласува на петия вот на недоверие – знаково отсъствие, макар че мнозинството се запази със 133 гласа.
Едни протести биха дали основание на Борисов да направи заявка за вот на доверие чрез предсрочни избори или с мотива, че след като ГЕРБ е изпълнил обещанието си да вкара България в еврозоната, гражданите отново трябва да имат думата.
Докато реши как точно да се измъкне от мечешката прегръдка на Пеевски, Борисов ще трябва да изпълнява разпорежданията му и да търпи ироничните забележки на депутати от опозицията, като Ивайло Мирчев например:
Бойко Борисов се е превърнал в рекламен агент на ортака си Главното Д. Колеги от ГЕРБ, усетихте ли как от мандатоносител се превърнахте в компаньонка на Главното Д? Вие сте обикновени пионки на Главното Д, то превзема вашата партия.
Протестните акции на ПП–ДБ
Като политическа акция петият вот на недоверие, внесен от ПП–ДБ с подкрепата на МЕЧ и Алианса за права и свободи (АПС), показа най-странното обединение на опозицията, която е про- и антиевропейска в този парламент. Заедно с вносителите гласуваха и евроскептиците с руски уклон от „Възраждане“ и „Величие“. Като инструмент за влияние обаче вотът се провали. Не бе предаван пряко по БНТ и БНР и остана невидим за гражданите, макар да е за „провала в секторите вътрешна сигурност и правосъдие, задълбочаващ проблема със завладяната държава“.
Слабост на този и на предишните вотове на недоверие е тяхната констативност – всичко казано е добре известно. Истинската роля на опозицията е да разкрие слабите звена, също така да покаже компетентност и готовност да управлява, предлагайки решения и алтернативи.
В деня на гласуване на вота обаче протестна акция на „Продължаваме промяната“ блокира служебния паркинг – „входовете, през които, без да слизат от колите на НСО, Борисов и Пеевски се озовават в пленарна зала и служебни входове на парламента“ (Лена Бориславова). В тениски с надписи „Свобода за Благо!“ депутати от ПП заедно с подалия оставка като съпредседател и като депутат Кирил Петков препречиха пътя заради задържаните техни кметове. Петков обясни и целта на протеста:
Целта ни е да кажем, че през 2025 г. не може да имаме политически затворници в България. Не е нормално четирима души без осъдителна присъда да стоят вече втори месец в ареста с право по един час на ден на слънчева светлина и са хапани от дървеници сигурно по 20 пъти на вечер.
Политическите акции често са пакетирани като зрелище – за да продават емоции и да въздействат. А ПП са заложили на радикалния дизайн. Заради акцията се наложи Пеевски да стигне пеша до работното си място, обграден от гардове, и да избълва куп простащини към лидера на ПП Асен Василев. Но те започнаха преди това, когато Кирил Петков изкрещя:
Ей, дебело прасе!
В екстатично състояние пред входа на парламента лидерът на ДПС крещеше как ще направи държава с главно Д.
А Д-то бе разчетено като монограм.
Един човек не може да направи държава, но един човек с контрол върху правителство, медии и съдебна система може да създаде автокрация. Основите ѝ вече се наливат в България, но не Пеевски ще седне в премиерското кресло, независимо от амбициите му. Разгащеният му език и поведение на „нацепен батка“ може да вдигне адреналина на собствения му електорат, но в същото време показва деградацията на политическия език и култура. Когато един олигарх се държи като мутра, това не е случайност, това е послание – че грубата сила и безнаказаността са върховният закон.
Кой е с г-н Радев?
Към лагера на опозицията неформално се е присъединил още един политик, който няма партия, но има рейтинг. С такъв капитал разполагаше и Борисов преди създаването на ГЕРБ. Дали одобрението на президента Румен Радев е достатъчно да зариби поне 200–300 000 избиратели, които да захранят с гласове партиен проект? Тестът са избори. А за да се стигне до тях, както предупреди и самият Радев, са необходими протести.
Дотогава обаче управляващото мнозинство ще е окастрило доста от правомощията на президента – процес, започнал още с конституционните промени на сглобката (ПП–ДБ, ГЕРБ и ДПС), част от които Конституционният съд запази. Държавният глава вече не може да избира служебното правителство, освен министър-председател измежду председателя на Народното събрание, управителя и подуправителите на БНБ, омбудсмана и неговия заместник, шефа на Сметната палата и неговите заместници.
Сега, заради отказа на президента да подпише указа за назначаване на временно изпълняващия функцията председател на Държавна агенция „Национална сигурност“ (ДАНС) Деньо Денев за постоянно на поста, управляващото мнозинство ще отнеме законодателно правото му да одобрява назначенията на шефове на службите. Впрочем те бяха сменени още при първия служебен кабинет на президента през 2021 г. с негови кадри.
Тази седмица на извънредно заседание на парламентарната Комисия по вътрешен ред и обществена сигурност депутатите приеха промени в трите закона за спецслужбите – за контраразузнаването, за разузнаването и за специалните разузнавателни средства. Така ще бъде предложено да се отнемат правомощията на президента да назначава шефове на ДАНС, Държавна агенция „Разузнаване“ (ДАР) и Държавна агенция „Технически операции“ (ДАТО).
Законодателни промени заради една персона никога не са водили до нищо добро. Схватката за службите, особено за ДАНС, винаги е била ожесточена заради информационните масиви и възможността да се използват за всякакви цели. Понякога и за националната сигурност.
Парадоксалното е, че през 2013 г. законовата възможност назначението на шефа на ДАНС да става с президентски указ бе премахната, за да бъде избран Делян Пеевски за шеф на ДАНС, който беше принуден да се оттегли след протестите #ДАНСwithme. А след година падна и кабинетът, който го предложи. През 2015 г., благодарение на ГЕРБ, президентското одобрение бе възстановено, за да бъде предложено отново да отпадне сега.
Управляващото мнозинство в лицето на ГЕРБ–СДС, ДПС – Ново начало, БСП и „Има такъв народ“ е на път да остави администрацията на президента и без транспорт от Националната служба за охрана (НСО), която е подчинена на президента. Промените, приети на първо четене, бяха предложени от депутата на Пеевски и бивш вътрешен министър Калин Стоянов:
Не съм съгласен тези достойни служители – военизирани, с ранг, с чин, да отварят вратите на множеството хора, незнайно колко, от администрацията на президента или да им пренасят бурканите и зимнината от родните места до София, примерно. […] Не става въпрос за противопоставяне, а за един пропуск, който години наред дава възможност на множество лица да се възползват от привилегии, предвидени за друг кръг от хора. Не виждам какъв е проблемът те да се приравнят на всички останали.
Без право на служебен кабинет и без право да подписва указите за шефовете на службите, на президента ще му останат назначенията на посланици и на членове в няколко ключови регулатора. Партиите систематично ограничават инструментите на държавния глава, който след една година няма да се нарича Румен Радев. Дори детайли като транспорта от НСО се превръщат в политически знак: администрацията на президента е третиранa като второстепенна, лишавана от ресурси и авторитет.
Това не е просто технически дебат, а съзнателно маргинализиране на институцията.
Най-важният извод обаче е, че системата на „взаимни спирачки“ между властите, фундамент на демокрацията, се разпада. Президентът остава със сведени до минимум функции, докато парламентът и управляващата коалиция концентрират все повече контрол върху изпълнителната власт, службите и дори върху символичните механизми на държавността.
Вместо разделение на властите България върви към сгъстяване на властта в един център, което отваря вратата не към стабилност, а към автократичен модел на управление.
Опитите промените да се покажат като принципни позиции само потвърждават, че политическите сили са в схватка за контрола на информацията. Отнемането на екстра като луксозния транспорт, който е за сметка на данъкоплатците, е за назидание.
Като кафкианския „К.“, анонимен и с незавършена история, България също заслужава да бъде обозначена с една-единствена буква – „Д“. Без ясна същност, просто опит за съществуване.
Тоест разговаряме – епизод 1
Post Syndicated from Владислав Севов original https://www.toest.bg/toest-razgovaryame-epizod-1/

В първия епизод на „Тоест разговаряме“ с Донка Дойчева-Попова потърсихме отговор на въпроса дали училището може да е пространство за мислене, а не за принуда и натиск. Обсъдихме промените в училищното образование – забраната на телефоните (между демонизация и реални ползи), новия предмет добродетели и религии (смисъл и липсваща концепция), корекциите в НВО след VII клас (интердисциплинарни задачи по математика, въведени в последния момент). Разговаряхме за реформите „на парче“ и непредвидимостта в системата, ролята на родителските и ученическите съвети, протестите срещу образователните промени. Акцентирахме върху неефективното чуждоезиково обучение и „невидимите деца“ – тези с дислексия и дискалкулия, за които липсват диагностика и специалисти. Говорихме и за смисъла на обучението по изкуства, за нуждата от интердисциплинарност и човечност в клас.
Гледайте целия разговор в нашия YouTube канал:
Може да го чуете и като аудиозапис в SoundCloud:
По време на нашия разговор на живо включихме и много въпроси от публиката, но за съжаление, ограниченото време не ни даде възможност да обхванем всички. Затова помолих Донка да отговори тук на още един, за мен доста важен въпрос на зрител:
Защо се налага децата да ходят на уроци, за да изкарат изпитите след VII клас?
Основната причина е, че учебните програми са препълнени и не оставят достатъчно време за пълно усвояване на материала. Нищо извънредно няма в изпитите след VII клас, просто съотношението учебен материал – време е нереалистично. В същото време познавам много деца, които не ходят на частни уроци и се справят отлично с тези изпити. Това, което е различно при тях, е: едните са имали късмет с изключително адекватен и вдъхновяващ учител, което е направило възможно усвояването на материала. Другата група имат късмет с родители, които са в състояние да помогнат – тоест хора, които отделят нужното време и имат капацитета да обърнат допълнително внимание на децата си. А сега да си представим всички онези деца, мнозинството, които нямат нито едното, нито другото…
Преди срещата ви помолихме да отговорите на кратката ни анкета. Резултатите от нея са повече от красноречиви.
Донка Дойчева-Попова е учебна терапевтка, гражданска активистка и водеща на рубриката „Възможното образование“ в „Тоест“. Завършила е организационна психология и политически науки в Мюнхен и има специализация по дискалкулия в Германия. Работи с деца със специфични образователни затруднения и обучава учители как да преподават математика с емпатия и разбиране. Има дългогодишен опит като преводач и преподавател по немски език с фокус върху ранното езиково обучение. В текстовете си в „Тоест“ обръща внимание на дефицитите в българското образование – и на редките острови на смисъл в него.
Следващата среща на „Тоест разговаряме“ ще бъде с Емилия Милчева, вътрешнополитическата анализаторка на „Тоест“, и ще се проведе на живо в YouTube Live на 11 октомври 2025 г., събота, от 16:00 ч.
В „Тоест разговаряме“ всеки месец ви срещаме с автори, които познавате добре от анализите или от рубриките им в „Тоест“, но този път ще ги видите и чуете в по-личен и непосредствен формат. Във видеоразговорите, предавани на живо, активно участие имате и вие, нашата публика – със своите въпроси, коментари и включване в тематичната анкета. Водещ на поредицата е Владислав Севов, дългогодишен телевизионен журналист и съосновател на „Тоест“.

„Тоест разговаряме“ е поредица, подкрепена от Институт „Отворено общество – София“ и съфинансирана от Европейския съюз в рамките на проекта Media Resilience. Изразените възгледи и мнения са само и изцяло на техните автори и не отразяват непременно възгледите и мненията на Европейския съюз, на Европейската изпълнителна агенция за образование и култура (EACEA) или на Институт „Отворено общество – София“ (ИООС). Нито Европейският съюз, нито EACEA, нито ИООС могат да бъдат държани отговорни за тях.
David Letterman on the Threats to Late-Night Hosts
Post Syndicated from The Atlantic original https://www.youtube.com/watch?v=-lxAJUmjol8
Comic for 2025.09.19 – Edgelord 2
Post Syndicated from Explosm.net original https://explosm.net/comics/edgelord-2
New Cyanide and Happiness Comic
Phase Changes
Post Syndicated from xkcd.com original https://xkcd.com/3144/

Authorizing access to data with RAG implementations
Post Syndicated from Riggs Goodman III original https://aws.amazon.com/blogs/security/authorizing-access-to-data-with-rag-implementations/
Organizations are increasingly using large language models (LLMs) to provide new types of customer interactions through generative AI-powered chatbots, virtual assistants, and intelligent search capabilities. To enhance these interactions, organizations are using Retrieval-Augmented Generation (RAG) to incorporate proprietary data, industry-specific knowledge, and internal documentation to provide more accurate, contextual responses. With RAG, LLMs use an external knowledge base that uses a vector store to incorporate specific knowledge data before generating responses.
Our customers have told us that they’re concerned adding additional context to prompts will lead to leakage of sensitive information to principals (persons or applications) that might exist in some of these tools or to unstructured data within the knowledge base. As mentioned in previous posts (Part 1, Part 2), LLMs should be considered untrusted entities because they do not implement authorization as part of a response. A good mental model for organizations is to assume that any data passed to an LLM as part of a prompt could be returned to the principal. With tools (APIs that an LLM can invoke to interact with external resources), you can pass the identity tokens of the principal to the tool to determine what the principal is permitted to access and actions that are allowed. Capabilities across different vector databases—including metadata filters and syncing identity information between the data source and the knowledge base—support providing better results from the knowledge base and provide a baseline filtering capability. This does not provide for strong authorization capabilities using the data source as the source of truth, which some customers are looking for.
In this blog post, I show you an architecture pattern for providing strong authorization for results returned from knowledge bases with a walkthrough example of this using Amazon S3 Access Grants with Amazon Bedrock Knowledge Bases. I also provide an outline of considerations when implementing similar architecture patterns with other data sources.
RAG usage overview
RAG architectures share similarities with search engines but have key differences. While both use indexed data sources to find relevant information, their approaches to data access differ. Search engines provide links to information sources, requiring users to access the original data source directly based on their permissions. This flow is shown in Figure 1.
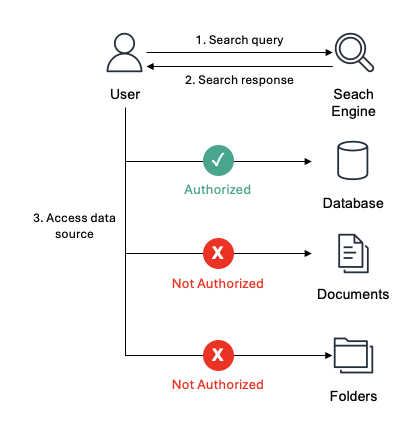
Figure 1: A principal, User in this example, accessing a data source after the search engine returns results
Unlike search engines, RAG implementations return vector database results directly from the LLM, bypassing permission checks at the original data source. While metadata filtering can help control access, it presents two key challenges. First, vector databases only sync periodically, meaning permission changes in the source data aren’t immediately reflected. Second, complex identity permissions—where principals might belong to hundreds of groups—make it difficult to accurately filter results. This makes metadata filtering insufficient for organizations that require stronger authorization controls. This flow is shown in Figure 2.

Figure 2: An application accessing data in a vector database
To implement robust authorization for knowledge base data access, verify permissions directly at the data source rather than relying on intermediate systems. When using the search engine example, access verification occurs when retrieving the actual result from the data source, not during the initial search. For vector databases, the generative AI application validates access rights by sending an authorization request to the data source before retrieving the data. This helps make sure that the data source that maintains the authoritative access control rules determines whether the principal has permission to access specific objects. This real-time authorization check means permission changes are immediately reflected when accessing the data source. This authorization pattern is similar to how AWS Lake Formation manages access to structured data. Lake Formation evaluates permissions when a principal requests access to databases or tables, granting or denying access based on the principal’s defined permissions. You can implement comparable authorization controls for vector database results before providing that context to large language models.
Let’s look at a solution using S3 Access Grants with Amazon Bedrock Knowledge Bases as an example use case.
Solution overview: S3 Access Grants with Bedrock Knowledge Bases
In the following example, you have an ACME organization that wants to create a generative AI chatbot for their employees. There are multiple teams within the organization (Marketing, Sales, HR, and IT) that work on projects throughout the organization. You have five users (the principals accessing the application) with the following group permissions:
- Alice: Marketing Team
- Bob: Sales Team, Project A Team
- Carol: HR Team, Project B Team
- Dave: IT Support, Project C Team
- Eve: Marketing Team
Each principal will have access to their respective project (for example /projects/projectA) or department folders (for example departments/marketing/). Marketing also will have access to everything in the projects folder (/projects/*) unless they are considered highly confidential files. To mark Project B files as highly confidential, you will include a metadata tag for objects within the Project C prefix with classification = ‘highly confidential’. Figure 3 shows the relationship between the principals and access to the different folders within the data source. As an example, only Carol has access to highly confidential data in the Project B folder.

Figure 3: Group permissions for the organization
To authorize access for each principal to the objects within the knowledge base, you will use Amazon S3 Access Grants. You can learn how to set up S3 Access Grants in Part 1 or Part 2 of the blog series.
Within AWS IAM Identity Center, you will add each user to their respective groups. Bob will be added to both the Sales Team group and Project A Team group, similar to what is shown in Figure 3.
Each prefix (projectA/, marketing/) will have a single file that provides a status for the team. In addition, for Project B, you will also add a status.txt.metadata.json file to tag the object as highly confidential, because it’s a HR project. For example, for Project B, the status.txt file looks like the following:
And the metadata.json file is as follows:
After the knowledge base and S3 access grants are configured, you can now test the authorization of knowledge base chunks. The application flow is the following, as shown in Figure 4:
- The user uses their identity provider (IdP) to sign in to the generative AI application (steps 1a, 1b, and 1c).
- The generative AI application exchanges a token with IAM Identity Center and assumes the role on behalf of the user (step 2).
- The generative AI application calls S3 Access Grants to get a list of the grants the user is authorized to access (step 3).
- The user sends a query to the generative AI application (step 4).
- The generative AI application sends a query to knowledge base (step 5).
- The generative AI application reviews chunks from the knowledge base against the scopes the user is authorized to access (step 6).
- Only scopes the user is authorized to will be passed to the LLM for a response (step 7).
- The generative AI application will continue steps 5–7 until you want to get a new list of authorized scopes (repeat step 4) or the token expires (repeat steps 3 and 4).
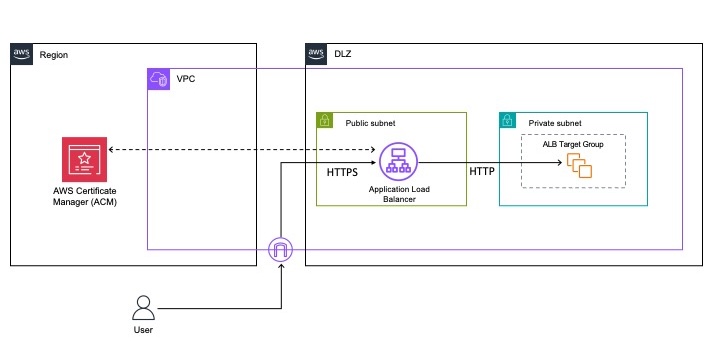
Figure 4: Application flow to authorize data from knowledge bases
The grant scopes are shown in the following table:
| Grant scope | Grant ID |
| s3:// amzn-s3-demo-bucket/departments/sales/* | edbd7575-0ba8-4837-8df1-07fe5d89f973 (sales group) |
| s3:// amzn-s3-demo-bucket/departments/it/* | a8f1d390-10d1-7037-7b27-c9fcf0b04441 (it group) |
| s3:// amzn-s3-demo-bucket/departments/marketing/* | 28f1e3c0-8081-70fe-6b4f-531ae370e7fd (marketing group |
| s3:// amzn-s3-demo-bucket/departments/hr/* | 38f11380-d011-70fb-261b-aa50d7edc1d5 (hr group) |
| s3:// amzn-s3-demo-bucket/projects/projectA/* | c84173b0-b071-70c5-3207-dadc1e6f76a9 (project A group) |
| s3:// amzn-s3-demo-bucket/projects/projectB/* | 2871d3c0-6001-7073-baaf-62717f56b8d0 (project B group) |
| s3:// amzn-s3-demo-bucket/projects/projectC/* | f8a183b0-f001-707b-aa8e-1826ca04595e (project C group) |
| s3:// amzn-s3-demo-bucket/projects/* | 28f1e3c0-8081-70fe-6b4f-531ae370e7fd (marketing group) |
For this example, you can use Bob’s role to demonstrate how chunk authorization works. When you call the knowledge base without performing any data authorization, you receive the following back when asking “What is the status of my project.” With each object within the data source, you also include meta data, in the form of *.metadata.json, which is used by the knowledge base to assign specific key/value pairs to each object. This is where you add the classification for Projects A and C as confidential and Project B as highly confidential, as mentioned previously. You pass this filter as part of the Bedrock knowledge base request, using a RetrievalFilter within the retrievalConfiguration. The following code shows the response from the Bedrock knowledge base:
The data from Project B isn’t included in the output because it’s tagged as highly confidential. Data from Project C is included, which Bob shouldn’t have access to, so let’s step through how to authorize Bob to the correct data.In the following steps and using the provided sample Python code, I will walk through calling each one of the functions shown in the following code block. You can use this code as part of your application to validate permissions for data returned from the Bedrock knowledge base.
Step 1: User uses the IdP to sign in to the generative AI application
When Bob first accesses the generative AI application, the application will redirect him using a single sign-on flow for him to authenticate with their IdP. Bob will receive a signed identity token from the IdP that will validate who Bob is from an identity perspective. An example identity token for Bob is shown in the following example:
Step 2: Token exchange with IAM Identity Center
After Bob is authenticated and passes his token to the generative AI application, the application will exchange the identity token from the IdP with the IAM Identity Center identity token and retrieve temporary credentials on behalf of Bob. You will create a function called assume_role in Python that passes multiple different variables used to allow Bob to assume a role inside AWS:
- client_id: The unique identifier string for the client or application. This value is an application Amazon Resource Name (ARN) that has OAuth grants configured.
- grant_type: OAuth grant type, which for our example will be JWT Bearer.
- role_arn: The ARN of the role to assume.
- role_session_name: An identifier for the assumed role session.
- provider_arn: The context provider ARN from which the trusted context assertion was generated.
- client_assertion: This value specifies the JSON Web Token (JWT) issued by a trusted token issuer.
In the sample Python function, shown in the following example code, you will perform the following steps:
- You open both a boto3 client for
sso-oidc(to create a token with IAM) andsts(to assume the temporary role for Bob). - Next, you will use the
client_id,grant_type, andclient_assertionto callcreate_token_with_iamto create an IAM Identity Center token that is passed back to thetoken_responsevariable. - Within the
token_response, there is ansts:identity_contextthat is needed to assume the role for Bob. - With the
identity_context, you pass the identity context toassume_rolewith therole_arn,role_session_name, andprovider_arnto retrieve temporary credentials for Bob. - Lastly, you return to the application a boto3 client for
s3-controlthat uses Bob’s temporary credentials to validate his authorization with S3 access grants.
Step 3: Retrieve the caller grant scopes
Next, you need to retrieve what Bob is allowed to access in the data source by using S3 Access Grants. In our example, you need to validate the data Bob is authorized to access with the data source, not the S3 object itself. To obtain the prefixes Bob is authorized to access, you will need to do the following in the get_caller_grant_scopes function.
- First, you will pass the
s3controlclient that was returned fromassume_role. in addition to the account for the S3 access grants. - With the temporary role for Bob, you will call
list_caller_access_grants. This will return a list of caller access grants available to Bob. So, for example, when you call this for Bob, you would receive the following response fromlist_caller_access_grants, where you can see he has access to thesalesprefix andprojectAprefix. This is shown in the following example code.
- You add the scopes to an array and return the array back to the application. The code example for this follows. Note: you remove the
*from the access grant, because thechunkURI is the full path, not just the prefix.
At this point, you have a list of the grant scopes that Bob is authorized to access in the data source. This information can now be used to check against chunks that are returned from the knowledge base to authorize access to the data before passing the final prompt with additional context to the LLM.
Step 4: Check caller grant scopes
The last step is to check chunks returned by the knowledge base against the list of the grants Bob has access to. For this, you define check_grant_scopes and pass both the chunks and the scopes Bob is authorized to access. The variable chunks is an array of dictionaries that you will parse, validating it against the list of scopes, shown in the following code example.
- You first loop through each chunk that was passed to the function.
- For each
chunk, you will check to see if the chunk location starts with a given prefix that is in the S3 access grant. - If a match is found, you add it to the chunk, along with the scope found in the S3 access grant, to the list of
echunks. If a match is not found in the scopes, then you add it to thenot_authorizedchunks.
The function will return both the list of authorized chunks and not_authorized chunks to provide visibility into the different chunks Bob was denied access to.
When running the preceding function for Bob and the chunks returned from the knowledge base, you get the following authorized chunks and not authorized chunks as shown in the following example. The authorized chunks are added to the query, which is then passed to the LLM, returning a response.
Solution considerations
When implementing this authorization architecture for RAG implementations, it’s important to understand several key considerations that impact security, performance, and scalability. These considerations help make sure your implementation maintains strong security controls, while optimizing system performance and providing flexibility for different data sources. The following points outline important aspects to evaluate when designing and implementing this authorization pattern:
- For this example, you used S3 Access Grants as the example of how to check for authorization. However, this architecture can be used with your choice of data source, if the URI for the data source is returned from the knowledge base and there is an API that can be called to validate what a principal is authorized to access, like the
get_caller_grant_scopesfunction described previously. - The use of S3 Access Grants provides authorization for a principal to access the data source. Additional access control policies could be applied to each bucket by adding a key/value tag or data source if desired. By doing this, the principal would be denied access to the bucket even though S3 Access Grants provides authorization. To support this functionality, you can add metadata for the vector database to ingest and filter on the query to the knowledge base, as shown in the preceding example.
- Similar to stale data until resync of the knowledge base, the list of authorized scopes can also become stale. It’s up to you to decide how often you refresh the list of authorized scopes (step 3 in Figure 4) and the duration of the
assume roleof the principal (step 2 in Figure 4). - Depending on the chunks the principal is authorized to access and what the knowledge base returns, chunks could be dropped before sending to the LLM. From a security point of view, this is preferred so principals will not get access to chunks they aren’t authorized to. From an architecture point of view, you should optimize the knowledge base query and add additional metadata tags to limit the number of non-authorized chunks returned from the knowledge base. This is one reason to include a
not_authorizedlist as part of thecheck_grant_scopesfunction.
Conclusion
In this post, I showed you an architecture pattern to provide strong authorization for results returned from knowledge bases. You walked through the importance of strong authorization with knowledge bases and how to implement authorization with Amazon S3 Access Grants. Lastly, you walked through code examples of how this would work in practice using Amazon Bedrock Knowledge Bases with S3 Access Grants.
For additional information on generative AI security, take a look at other posts in the AWS Security Blog and AWS blog posts covering generative AI.
If you have feedback about this post, submit comments in the Comments section below. If you have questions about this post, contact AWS Support.
Integrate Tableau and PingFederate with Amazon Redshift using AWS IAM Identity Center
Post Syndicated from Rohit Vashishtha original https://aws.amazon.com/blogs/big-data/integrate-tableau-and-pingfederate-with-amazon-redshift-using-aws-iam-identity-center/
The series of posts on single sign-on to Amazon Redshift with AWS IAM Identity Center (successor to AWS Single Sign-On) integration continues from our prior post.
In this post, we outline a comprehensive guide for setting up single sign-on from Tableau desktop to Amazon Redshift using integration with IAM Identity Center and PingFederate as the identity provider (IdP) with an LDAP based data store, AWS Directory Service for Microsoft Active Directory.
Prerequisites
You should have the following prerequisites:
- A PingFederate account that has an active subscription. You need an admin role to set up the application on PingFederate. If you’re new to PingFederate, you can reach out to Ping Identity Sales.
- A working PingFederate server.
- Amazon Redshift Serverless workgroup or a provisioned Amazon Redshift data warehouse.
- Download and install the latest Redshift ODBC 2.X driver.
- Download and install Tableau Desktop 2024.1 or later
- Install Tableau Server 2023.3.9 or later. For Tableau Server installation, see Install and Configure Tableau Server.
Solution overview
PingFederate instance connects to IAM Identity Center using SAML. The users and groups in PingFederate are synced to IAM Identity Center using an open standard SCIM. After you set up SAML and SCIM, you will be able to enable single sign-on to Amazon Redshift from the AWS Management Console using Amazon Redshift Query Editor v2. This is achieved by creating an Identity Center application in the Amazon Redshift console.
To enable single sign-on to Amazon Redshift from outside of AWS using a third-party client like Tableau, you set up a trusted token issuer token exchange using OIDC standard.
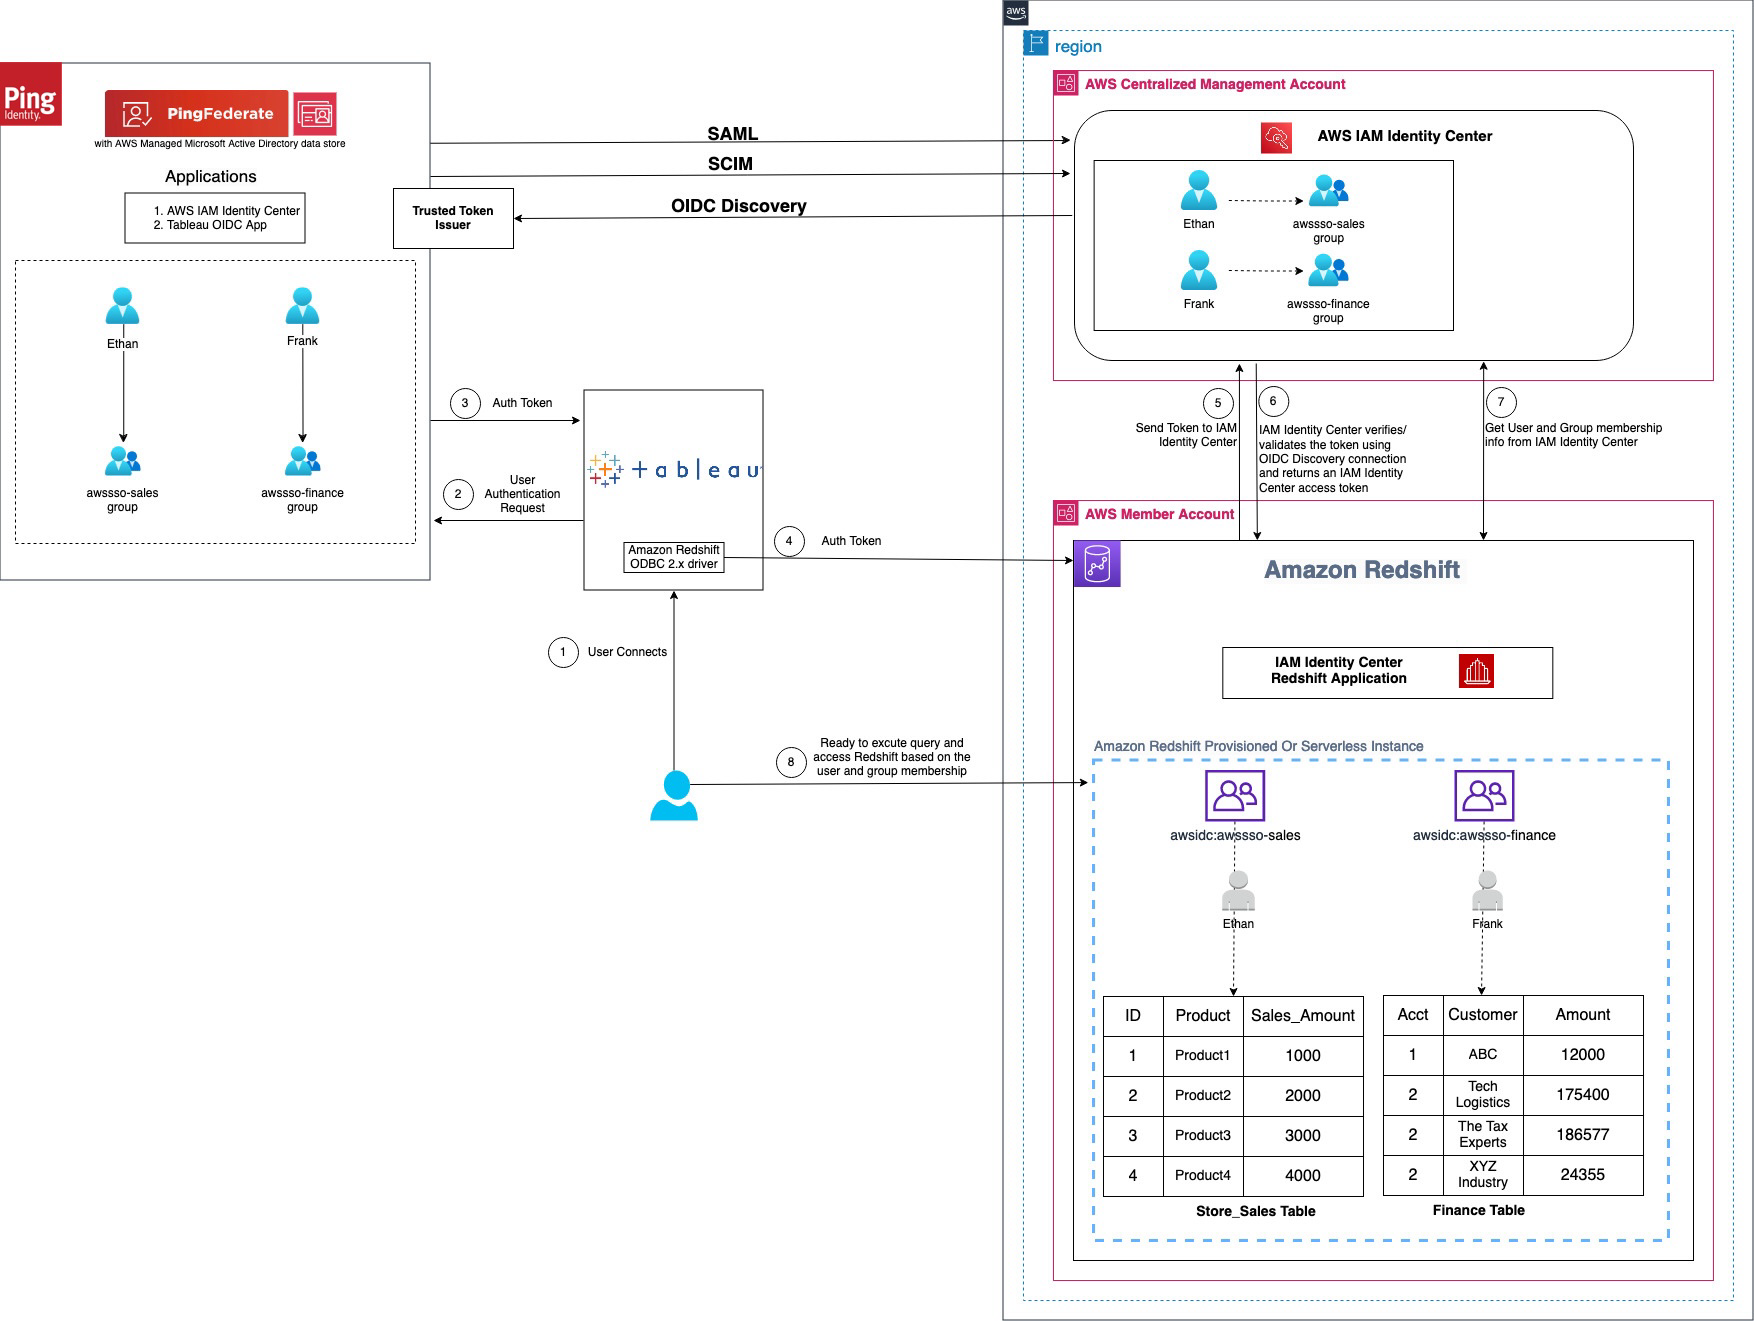
Figure 1 : Solution overview for Tableau integration with Amazon Redshift using IAM Identity Center and Ping Federate
The workflow, shown in the preceding figure, includes the following steps:
- The user configures Tableau to access Amazon Redshift using IAM Identity Center authentication.
- On a user sign-in attempt, Tableau initiates a browser-based OAuth flow and redirects the user to the PingFederate sign in page to enter the sign-in credentials. Password validation is done against the AWS Managed Microsoft AD data store.
- On successful authentication, PingFederate issues an authentication token (ID and access token) to Tableau.
- The Amazon Redshift driver then makes a call to the Amazon Redshift-enabled Identity Center application and forwards the
- Amazon Redshift passes the token to Identity Center and requests an access token.
- Identity Center verifies the token using the OIDC discovery connection to the trusted token issuer and returns an Identity Center-generated access token for the same user. In the preceding figure, trusted token issuer (TTI) is the PingFederate server that Identity Center trusts to provide tokens that third-party applications like Tableau use to call AWS services.
- Amazon Redshift then uses the token to obtain the user and group membership information from Identity Center.
- Tableau user will be able to connect with Amazon Redshift and access data based on the user and group membership returned from Identity Center. The user and group settings in the LDAP-based AWS Managed Microsoft AD data store for PingFederate are propagated to identity center using SCIM protocol for outbound provisioning.
Walkthrough
In this walkthrough, you will use the following steps to build the solution:
- SAML and SCIM set up between PingFederate and IAM Identity Center
- Connect to Amazon Redshift using Query Editor v2
- Configure identity federation from a third-party client
- Create an access token manager and access token mapping
- Create an OIDC policy
- Create an OAuth client
- Set up a PingFederate Authorization Server
- Policy Contract Grant Mapping
- Collect PingFederate information
- Set up a trusted token issuer in IAM Identity Center
- Set up client connections and trusted token issuers in Amazon Redshift
- Configure Tableau OAuth config files for PingFederate to integrate with Amazon Redshift using IAM Identity Center
- Install a Tableau OAuth config file on a client machine for Tableau Desktop
- Install a Tableau OAuth config file for a site on Tableau Server or Tableau Cloud
- Federate to Amazon Redshift from Tableau Desktop using Identity Center
- Federate to Amazon Redshift from Tableau Server using Identity Center authentication
SAML and SCIM set up between PingFederate and IAM Identity Center
IAM Identity Center integration with PingFederate starts with SAML set up followed by SCIM.
- Set up SAML 2.0 for SP Connection of type Browser SSO (single sign-on) in PingFederate.
- Set up SCIM 2.0 for outbound provisioning. It will sync the users and groups created in an LDAP based data store like AWS managed Microsoft AD for PingFederate to the users and groups in IAM Identity Center.
The implementation for the cloud based IdP option PingOne is not in scope of this post and follows steps similar to those described in Integrate IdP with Amazon Redshift Query Editor v2 using AWS IAM Identity Center for seamless Single Sign-On.
Further details of SAML and SCIM set up are as follows.
-
- Install PingFederate Server.
- Set up IAM Identity center integration by following the Ping documentation including the download for Identity Center integration files.
- Deploy the integration files to your PingFederate installation.
- Enable provisioning and configure IdP Browser SSO (SAML connection). (You can implement Browser SSO connection only using IAM Identity Center metadata file.)
- Under System > Server > Protocol Settings > Federation Info
BASE_URLfield, use the publicly accessible fully qualified domain name of the PingFederate server. - Create an LDAP based data store (the name used in this example is
AWSManagedMSAD) because SCIM 2.0 protocol for outbound provisioning only works with LDAP based data stores with PingFederate. If you are using a cloud-based solution like PinOne, you can set up outbound provisioning in PingOne itself. Thus for this writing, we have used AWS Managed Microsoft AD as a data store created using AWS Directory Service. - Create a password credential validator (name used in this example is
awsmanagedmsadpassval) and IdP adapters (name used in this example isawsmanagedmsadadapter) for your data store as applicable. - Create an SP connection of type Browser SSO using the
sp-saml-metadata.xmlfile as explained in creating a provisioning connection.
- Under System > Server > Protocol Settings > Federation Info
- Export SAML metadata from PingFederate.
- Register PingFederate as an IdP in Identity Center.
- Navigate back to the connection saved in step b, and configure outbound provisioning.
- Enable provisioning in IAM Identity Center by following step 1 in the documentation.
- Then, configure provisioning in PingFederate by following step 2 in the documentation.
- Optionally, you can configure and pass user attributes from PingFederate for access control in Identity Center.
Next, connect to Amazon Redshift using its native query editor, Query Editor v2, to validate AWS services’ connectivity using IAM Identity Center.
Connect to Amazon Redshift using Query Editor v2
Complete the Walkthrough section of IAM Identity Center integration with Amazon Redshift, which will set up your Amazon Redshift connectivity with Query Editor v2.
If you need further help with SAML and SCIM set up, and connecting to Amazon Redshift using Query Editor v2, you can also follow step by step guided demo video single sign-on to Amazon Redshift with IAM IDC integration using PingFederate with AWS Managed MSAD Demo
Configure identity federation from a third-party client
Configure identity federation enabled by IAM Identity Center from IdP PingFederate to the service provider Amazon Redshift using an external client like Tableau. The following steps in the PingFederate admin console and Identity Center guide you through the identity federation process.
Create an access token manager and access token mapping
To map PingFederate attributes to OAuth access tokens and OpenID Connect ID (OIDC) tokens, create an access token manager and token mapping. For complete details and set up based on your security needs, see Token mapping in PingFederate, which explains access token management in detail. Complete the following steps to create a token manager.
- In the PingFederate administrative console, go to Applications > OAuth > Access Token Management, and choose Create New Instance.
- In Type tab,
- Enter an Instance Name and Instance ID of your choice, for example
TrustedTokenIssuerMgr. - Select the Type from drop down list as JSON Web Tokens, commonly called JWT.
- Leave Parent instance as None and choose Next.
- Enter an Instance Name and Instance ID of your choice, for example
- In Instance configuration tab,
- Under Certificates, select Add a new row to ‘Certificates’, select the certificate for token manager from the drop-down list, enter a Key ID such as
certkey, and choose Update under Action. You can create a new certificate by navigating to Security > Certificate & Key Management > Signing & Decryption Keys & Certificates > Create New. - Select Use Centralized Signing Key.
- In JWS Algorithm, select RSA using SHA-256.
- Select Enable Token Revocation. Leave everything else as default and choose Next.
- Under Certificates, select Add a new row to ‘Certificates’, select the certificate for token manager from the drop-down list, enter a Key ID such as
- Under Session Validation tab,
- Select Include Session Identifier in Access Token.
- Select Check for valid authentication session.
- Leave other choices as is and choose Next.
- In the Access Token Attribute Contract tab, leave the Subject Attribute Name as the e default and proceed to Extend the Contract to add the following attribute and values.
- Enter
aud, leave multi-value unchecked. Choose Add under Action. - Repeat the same to enter email, exp, iss, sub. When completed, choose Next.
- Enter
- On each of Resource URIs and Access Control tabs, leave as is and choose Next.
- On the Summary tab, review your changes and choose Save. An instance name with the name you provided, like TrustedTokenIssuerMgr appears in Applications > Oauth > Access Token Management.
Figure 2 : Access Token Management Configuration Summary
- Navigate to Applications > OAuth > Access Token Mappings, select the default Context and Access Token Manager, TrustedTokenIssuerMgr that was created in the previous step. Choose Add Mapping.
- Leave Attribute Sources & User Lookup as is and choose Next.
- Under Contract Fulfillment tab,
- For Contract aud, select Text from the Source, and enter the Value as
AWSIdentityCenter. - For Contract email, select Persistent Grant from the Source, and Value as email.
- For Contract exp, select Persistent Grant from the Source, and Value as EXPIRES_AT.
- For Contract iss, select Text from the Source, and enter your base URL as the Value, like
https://yourwebsite.domain.com, the same as in System > Server > Protocol Settings > BASE URL. - For Attribute Contract sub, select Persistent Grant from the Source, and Value as USER_KEY.
- Choose on Next.
- For Contract aud, select Text from the Source, and enter the Value as
- Leave Issuance Criteria as is and choose Next.
- On the Summary tab, review all your changes and choose Save. A new default Context with Access Token Manager if TrustedTokenIssuerMgr appears in Applications > OAuth > Access Token Mappings.
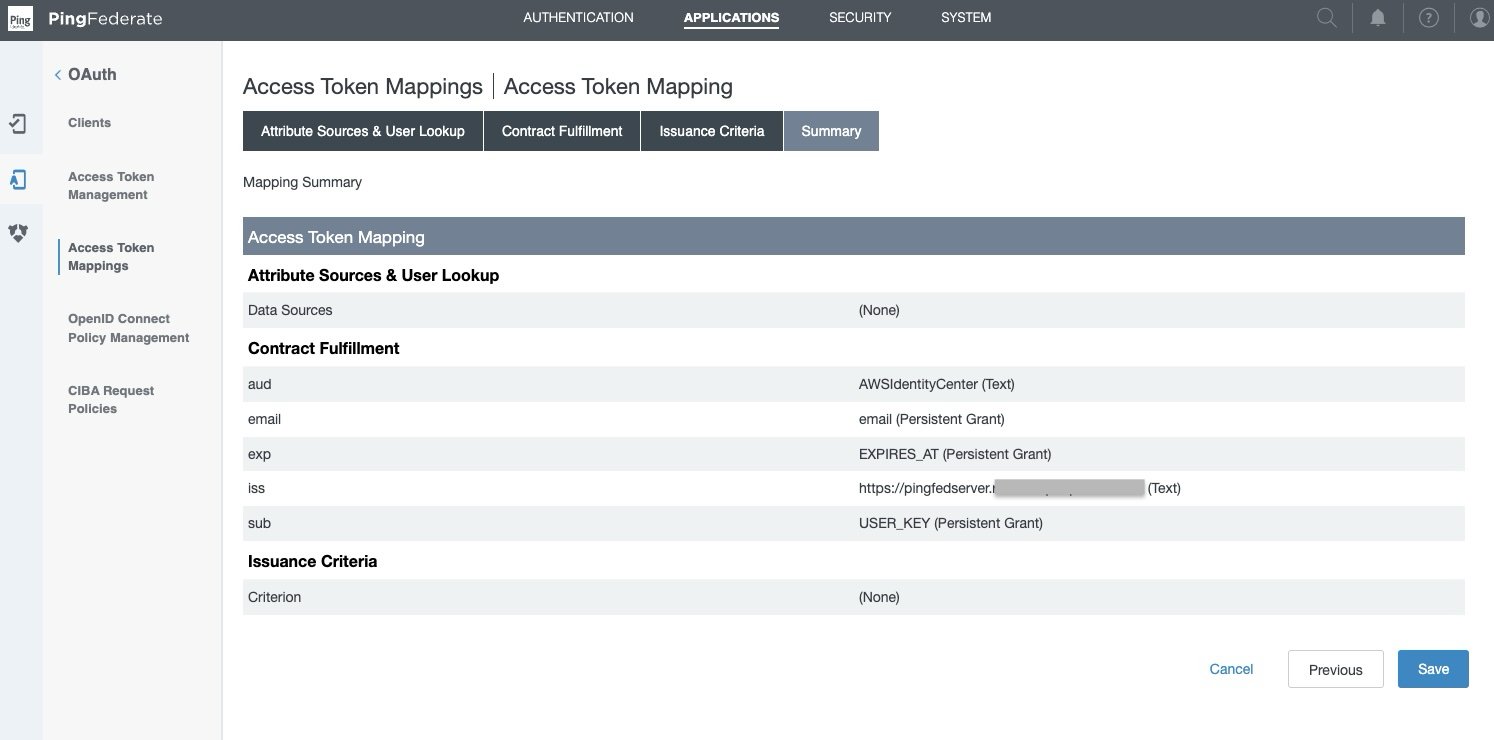
Figure 3: Access Token Mappings Summary
Create an OIDC policy
For complete details and set up based on your security needs, see to Open ID connect (OIDC) policy management in PingFederate. Complete the following steps to set up an OIDC policy.
- In the PingFederate administrative console, go to Applications > OAuth > OpenID Connect Policy Management, and choose Add Policy.
- In the Manage Policy tab,
- Enter the Policy ID and Name of your choice, for example
OIDCPolicy. - Select the Access Token Manager from drop down list created in the previous section—TrustedTokenIssuerMgr.
- Select Include Session Identifier in ID Token
- Select Include User Info in ID Token
- Select Return ID Token on Refresh Grant
- Leave others as is and choose Next.
- Enter the Policy ID and Name of your choice, for example
- In the Attribute Contract tab, keep only the required attributes in extended contract and delete the others.
- Leave the sub attribute under Attribute Contract as is.
- Under Extend the contract, choose delete for all attributes except email. choose Next.
- In the Attribute Scopes tab,
- Select openid from the Scope list.
- Select email from Attributes.
- Choose Add from Actions. Choose Next.
- Leave Attribute Sources & User Lookup as is and choose Next.
- In Contract Fulfillment tab,
- For Attribute Contract email, select Persistent Grant from the Source, and Value as email.
- For Attribute Contract sub, select Persistent Grant from the Source, and Value as USER_KEY.
- Choose Next.
- Leave Issuance Criteria as is and choose Next.
- On the Summary tab, review your changes and choose Save. A policy ID with the name you provided, like OIDCPolicy, appears in Applications > Oauth > OpenID Connect Policy Management.
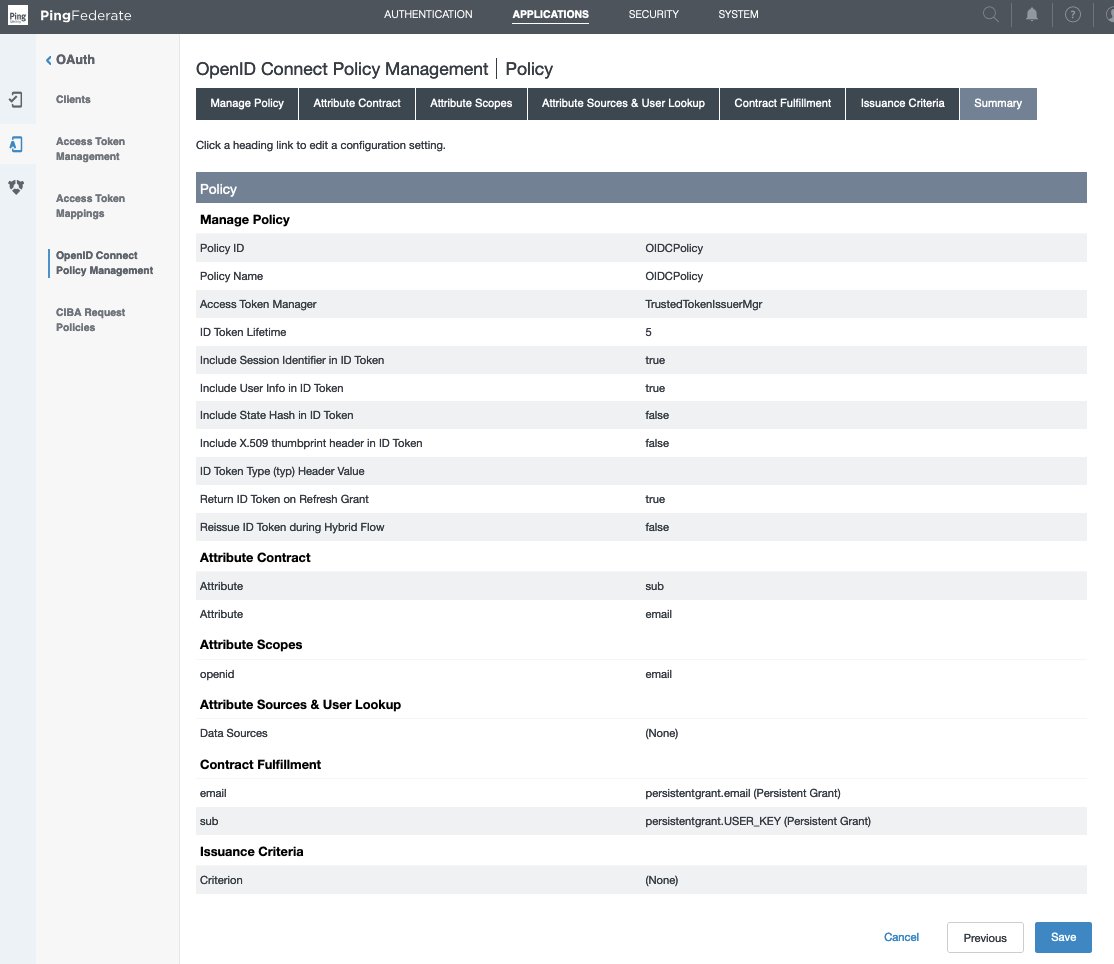
Figure 4 : OpenID Connect Policy Management Summary
Create OAuth client
For complete details and set up based on your security needs, see configure an OAuth client in PingFederate, which explains each field in detail. Complete the following steps to create an OAuth client.
- In the PingFederate administrative console, go to Applications > OAuth > Clients, and choose Add Client.
- In the Client ID field, enter a unique, immutable client ID. We use
tableauredshiftpingfedas the name in this example. - Enter a Name and Description for the client.
- Select a Client Authentication method. You can select from None, Client TLS Certificate, Private Key JWT, or Client Secret. For this scenario, select Client Secret. Choose Generate Secret to create a new one or use select Change secret to create your own.
- Leave Request object signing algorithm set to Allow Any. You can override to use the algorithm of your choice if needed.
- In the Redirect URIs field, add each of the following values.
http://localhost:8080/authorization-code/callbackhttp://localhost:55556/Callbackhttp://localhost:55557/Callbackhttp://localhost:55558/Callbackhttp://localhost/auth/add_oauth_token
- Select Restrict common scopes. Restrict scopes by selecting the checkboxes for email, offline_access, openid, and profile as required.
- In Logo URL, optionally enter the URL for logo you want to display on the User Grant Authorization and Revocation pages.
- In the Allowed Grant Types list, you can choose from a list of authorization options. In this example, select Authorization code. Optionally, you can select Implicit, Refresh Token, and Client Credentials.
- Under Default access token manager, select the access token manager TrustedTokenIssuerMgr created in the earlier section.
- Select the Restrict box for Restrict to default access token manager.
- Customize Persistent grants max lifetime to match your requirements. Set it to 12 hours for this example by using the third radio button.
- For Openid connect, choose your preferred ID token signing algorithm. Select RSA using SHA-256 for this example. Optionally, for Policy you can choose the OIDC policy created in the earlier section.
- Leave the remaining settings as default and choose Save.
Figure 5 : OAuth Client Configuration
The Tableau Desktop redirect URLs should always use localhost. The following example, also use localhost for the Tableau Server hostname to simplify testing in a test environment. For this setup, you should also access the server at localhost in the browser. In a production environment, or Tableau Cloud, you should use the full hostname that your users will use to access Tableau on the web, along with HTTPS. If you already have an environment with HTTPS configured, you can skip the localhost configuration and use the full hostname from the start.
Set up a PingFederate authorization server
For complete details and set up based on your security needs, see PingFederate authorization server settings in PingFederate. Complete the following steps to configure an authorization server.
- In the PingFederate administrative console, go to System > OAuth Settings > Authorization Server Settings, and make following changes.
- Leave the initial configurations as default and scroll down to Persistent Grant Extended Attributes, add Attribute email.
- For OAuth Administrative Web Services Settings, in Password Credential Validator, select awsmanagedmsadpassval that you created in the SAML and SCIM set up section.
- For Persistent Grant Management API,
- In Access Token Manager, select the TrustedTokenIssuerMgr created earlier.
- In Required Scope, select openid.
- Leave remaining the settings as default and choose Save.
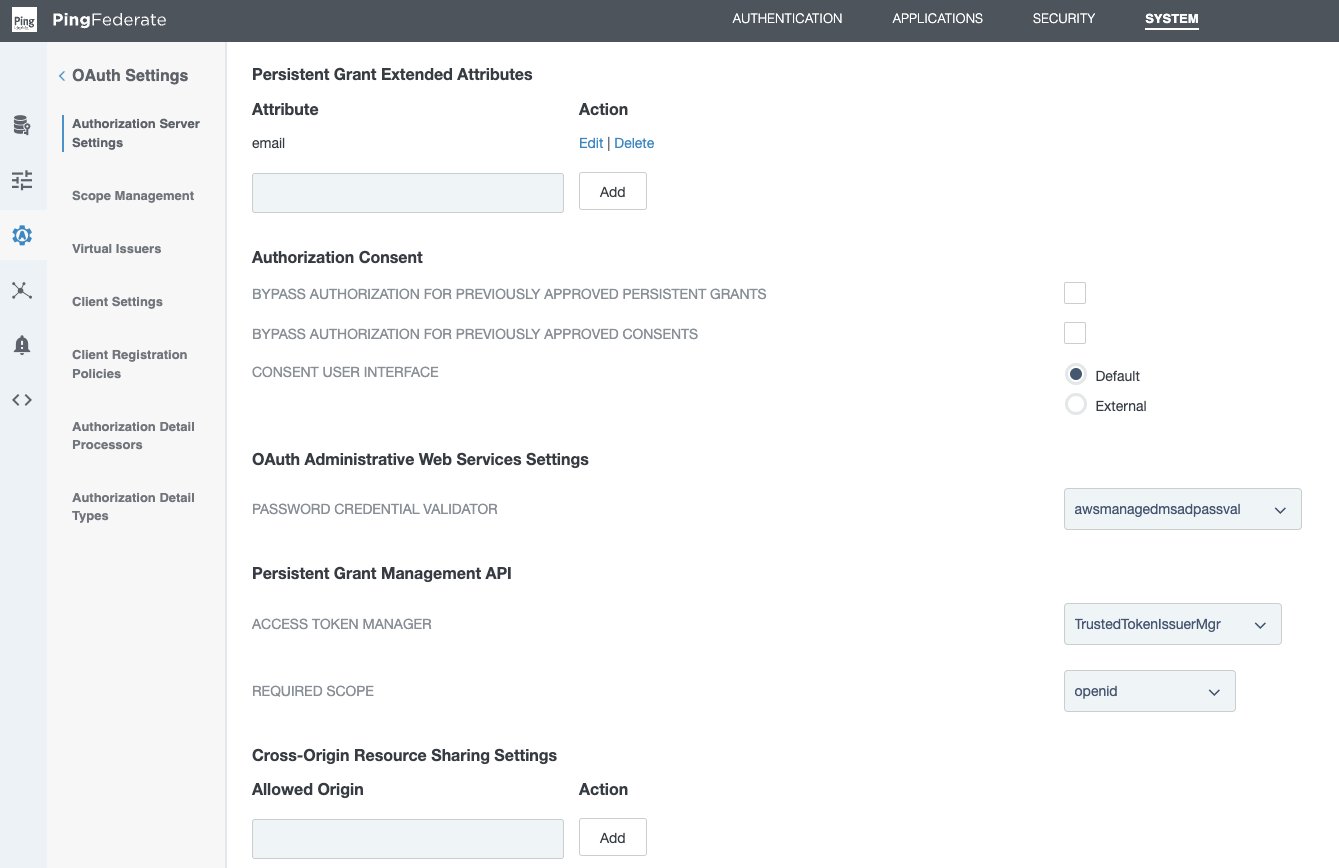
Figure 6 : PingFederate Authorization Server Setting
Policy contract grant mapping
For complete details and set up based on your security needs, see Grant contract mapping in PingFederate. For this illustration, we set up a policy contract grant mapping for authentication in a three-step process.
Step 1: Create a policy contract
- In the PingFederate administrative console, go to Authentication > Policies > Policy Contracts, and choose Create New Contract.
- In Contract Info tab, enter a name. For this example, we use
OIDCPolicyContract. - In Contract Attributes tab, choose Extend the Contract to add email attribute.
- Review and choose Save.
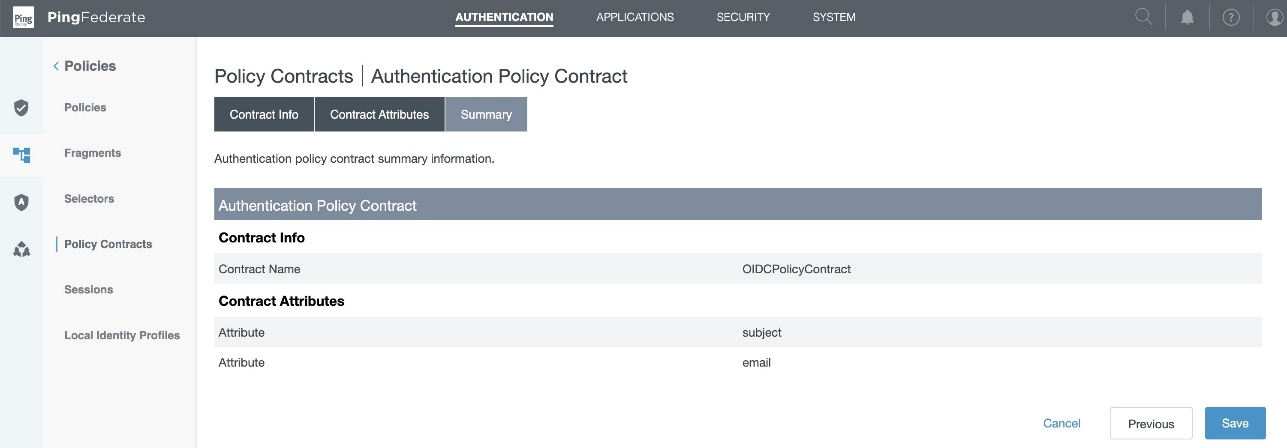
Figure 7 : Policy Contract Summary
Step 2: Add authentication policy
- In the PingFederate administrative console, go to Authentication > Policies > Policies, and choose Add Policy.
- Enter a policy name. In this example, we use
OAuthOIDCPolicy. - In the Policy drop down, select IdP Adapter and select the awsmanagedmsadadapter that you created in the SAML and SCIM set up section.
- Set FAIL to Done and under SUCCESS, select Policy Contracts from the drop-down menu and select the OIDCPolicyContract created in step 1. Choose Done.
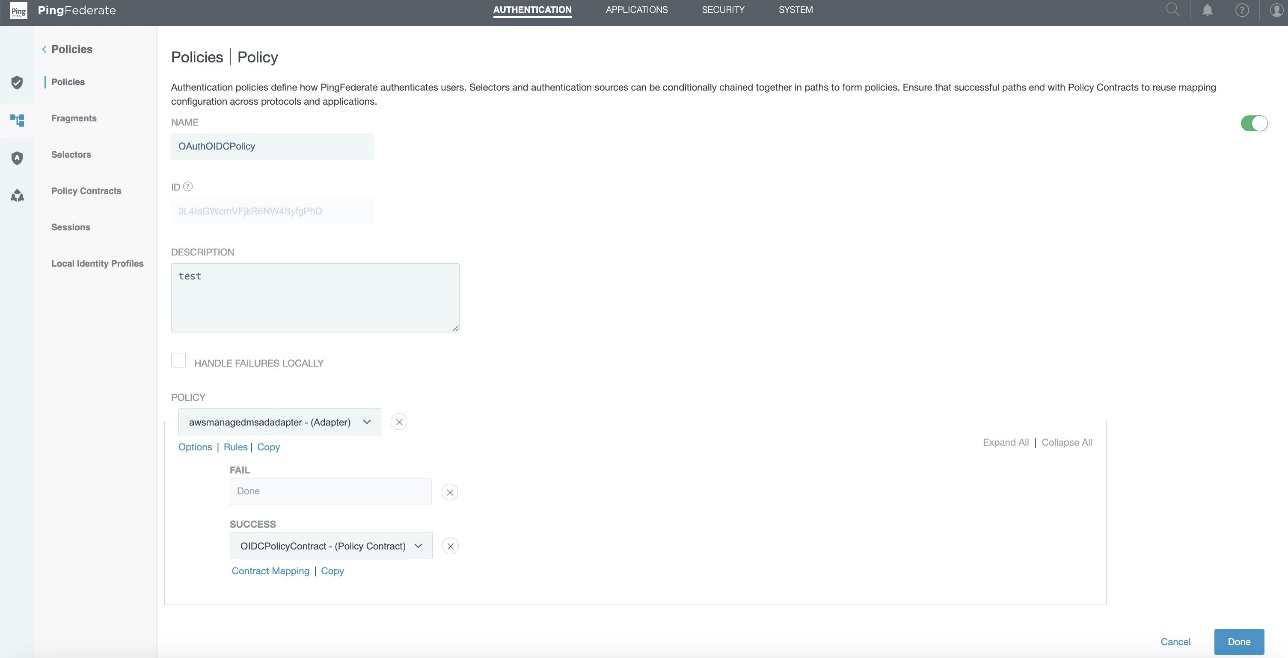
Figure 8 : Authentication Policy Configuration
Step 3: Policy contract grant mapping
- In the PingFederate administrative console, go to Authentication > OAuth > Policy Contract Grant Mapping, and under Mappings, select OIDCPolicyContract created in Step1 and choose Add Mapping.
- On the Attribute Sources & User Lookup tab, choose Next.
- In the Contract Fulfillment tab,
- For Contract USER_KEY, pick Authentication Policy Contract from the Source, and Value as subject.
- For Contract USER_NAME, pick Authentication Policy Contract from the Source, and Value as subject.
- For Contract email, pick Authentication Policy Contract from the Source, and Value as email.
- Choose Next.
- Leave Issuance Criteria as is, review and choose Save.
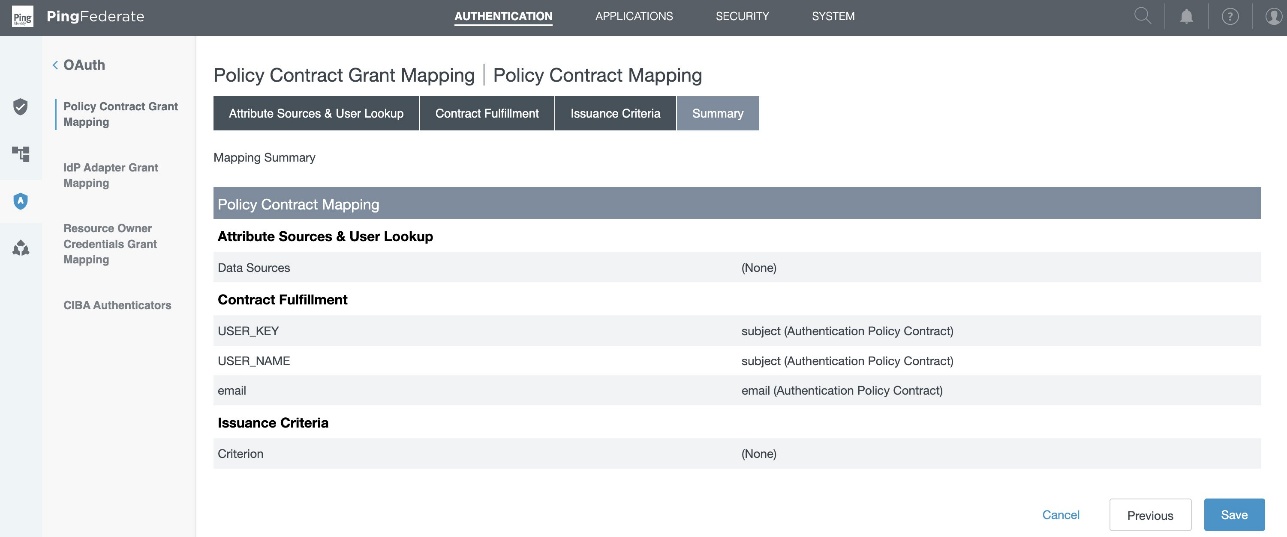
Figure 9 : Policy Contract Grant Mapping Summary
Collect PingFederate information
To configure your PingFederate with IAM Identity Center and Amazon Redshift, collect the following parameters. If you don’t have these parameters, contact your PingFederate admin.
- Issuer URL, auth URL (authUri), and token URL (tokenUri).
You can get these values from the OIDC IdP URL: https://pingfedserver.example.com/.well-known/openid-configuration. Open this URL in a web browser, replacing pingfedserver.example.com with your IdP server name.
The following is an example screenshot of IdP attributes using OIDC IdP URL where:
- The issuer URL corresponds to the issuer
- The auth URL (authUri) corresponds to
authorization_endpoint - The token URL (tokenUri) corresponds to
token_endpoint
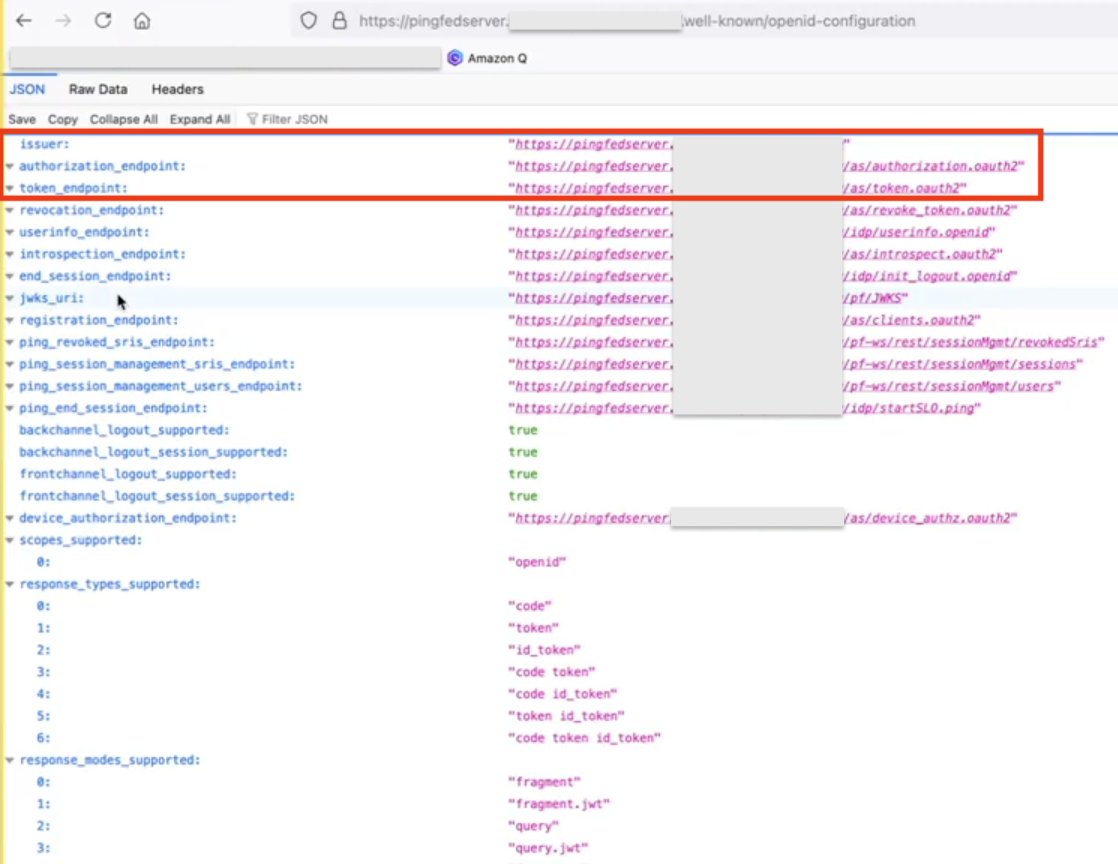
Figure 10 : Screenshot of IdP Attributes
- Audience value
To get the Audience value from PingFederate, sign in as an admin to PingFederate and navigate to the following path to get the audience value that you created during access token mapping creation in PingFederate:
Applications > OAuth > Access Token Mappings > TrustedTokenIssuerMgr → Summary > aud

Figure 11 : Access Token Mapping
Set up a trusted token issuer in IAM Identity Center
Switch from the PingFederate console to the IAM Identity Center console for the AWS side of configuration. Start by adding a trusted token issuer (TTI), which makes it possible to authorize Tableau to make requests on behalf of their users to access data in Amazon Redshift. A TTI is an OAuth 2.0 authorization server that issues tokens to applications that initiate requests (requesting applications). The tokens authorize these applications to initiate requests on behalf of their users to a receiving application (an AWS service). In this step, you create a TTI in the central management account. To create a TTI,
- Open the AWS Management Console and navigate to IAM Identity Center, and then to the Settings page.
- Select the Authentication tab and under Trusted token issuers, choose Create trusted token issuer.
- On the Set up an external IdP to issue trusted tokens page, under Trusted token issuer details, do the following:
- For Issuer URL, enter the OIDC discovery URL of the external IdP that will issue tokens for trusted identity propagation. You can get issuer the URL as mentioned in step 1 of the preceding section Collect PingFederate information.
- For Trusted token issuer name, enter a name to identify this TTI in Identity Center and in the application console.
- Under Map attributes, do the following:
- For the identity provider attribute, select an attribute from the list to map to an attribute in the Identity Center identity store. You can select Email, Object Identifier, Subject, and Other.
- For Identity Center attribute, select the corresponding attribute for the attribute mapping.
- Under Tags (optional), choose Add new tag, enter a value for Key, and optionally for Value. For information about tags, see Tagging AWS IAM Identity Center resources.
The following figure shows the set up for TTI:
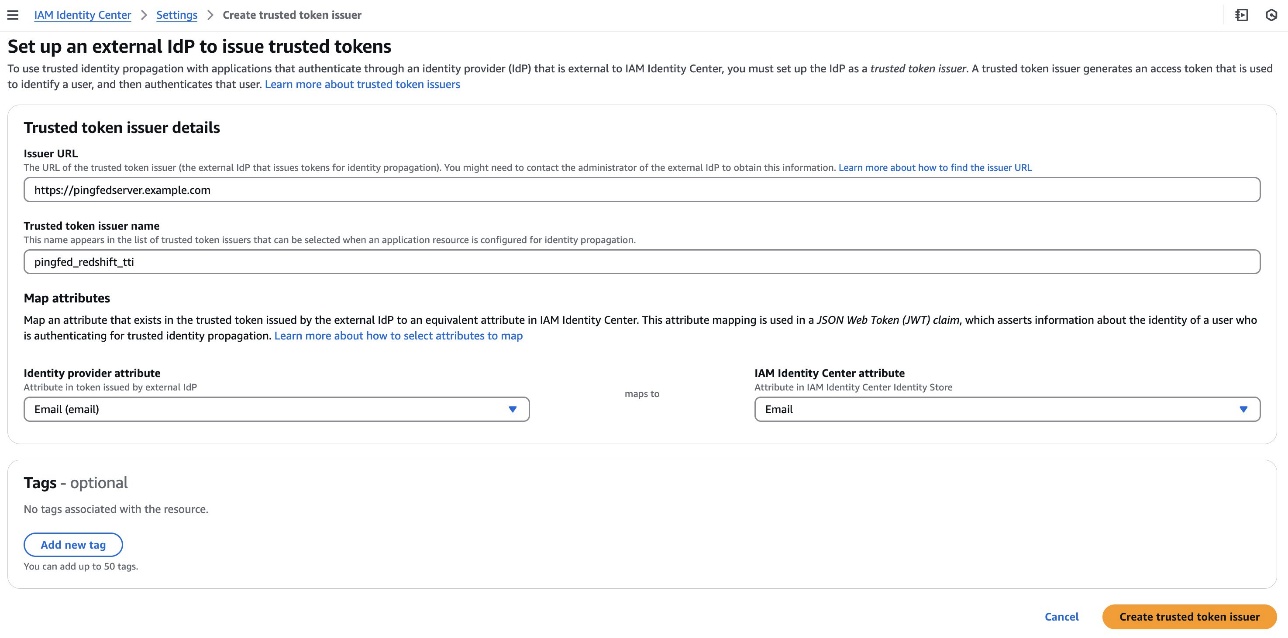
Figure 12 : Configuring Trusted Token Issuer
Set up client connections and trusted token issuers in Amazon Redshift
In this step, the Amazon Redshift applications that exchange externally generated tokens must be configured to use the TTI you created in the previous step. Also, the audience claim (or aud claim) from PingFederate must be specified. In this example, you are configuring the Amazon Redshift application in the member account where the Amazon Redshift cluster or serverless instance exists.
- Select IAM Identity Center connection from the Amazon Redshift console menu.
- Select the Amazon Redshift application that you created as part of the prerequisites.
- Select the Client connections tab and choose Edit.
- Choose Yes under Configure client connections that use third-party IdPs.
- Select the checkbox for Trusted token issuer that you created in the previous section.
- Enter the Aud claim value under Configure selected trusted token issuers. For example,
AWSIdentityCenter. You can get the audience value from the PingFederate path: Applications > OAuth > Access Token Mappings > TrustedTokenIssuerMgr > Summary > aud. - Choose Save.
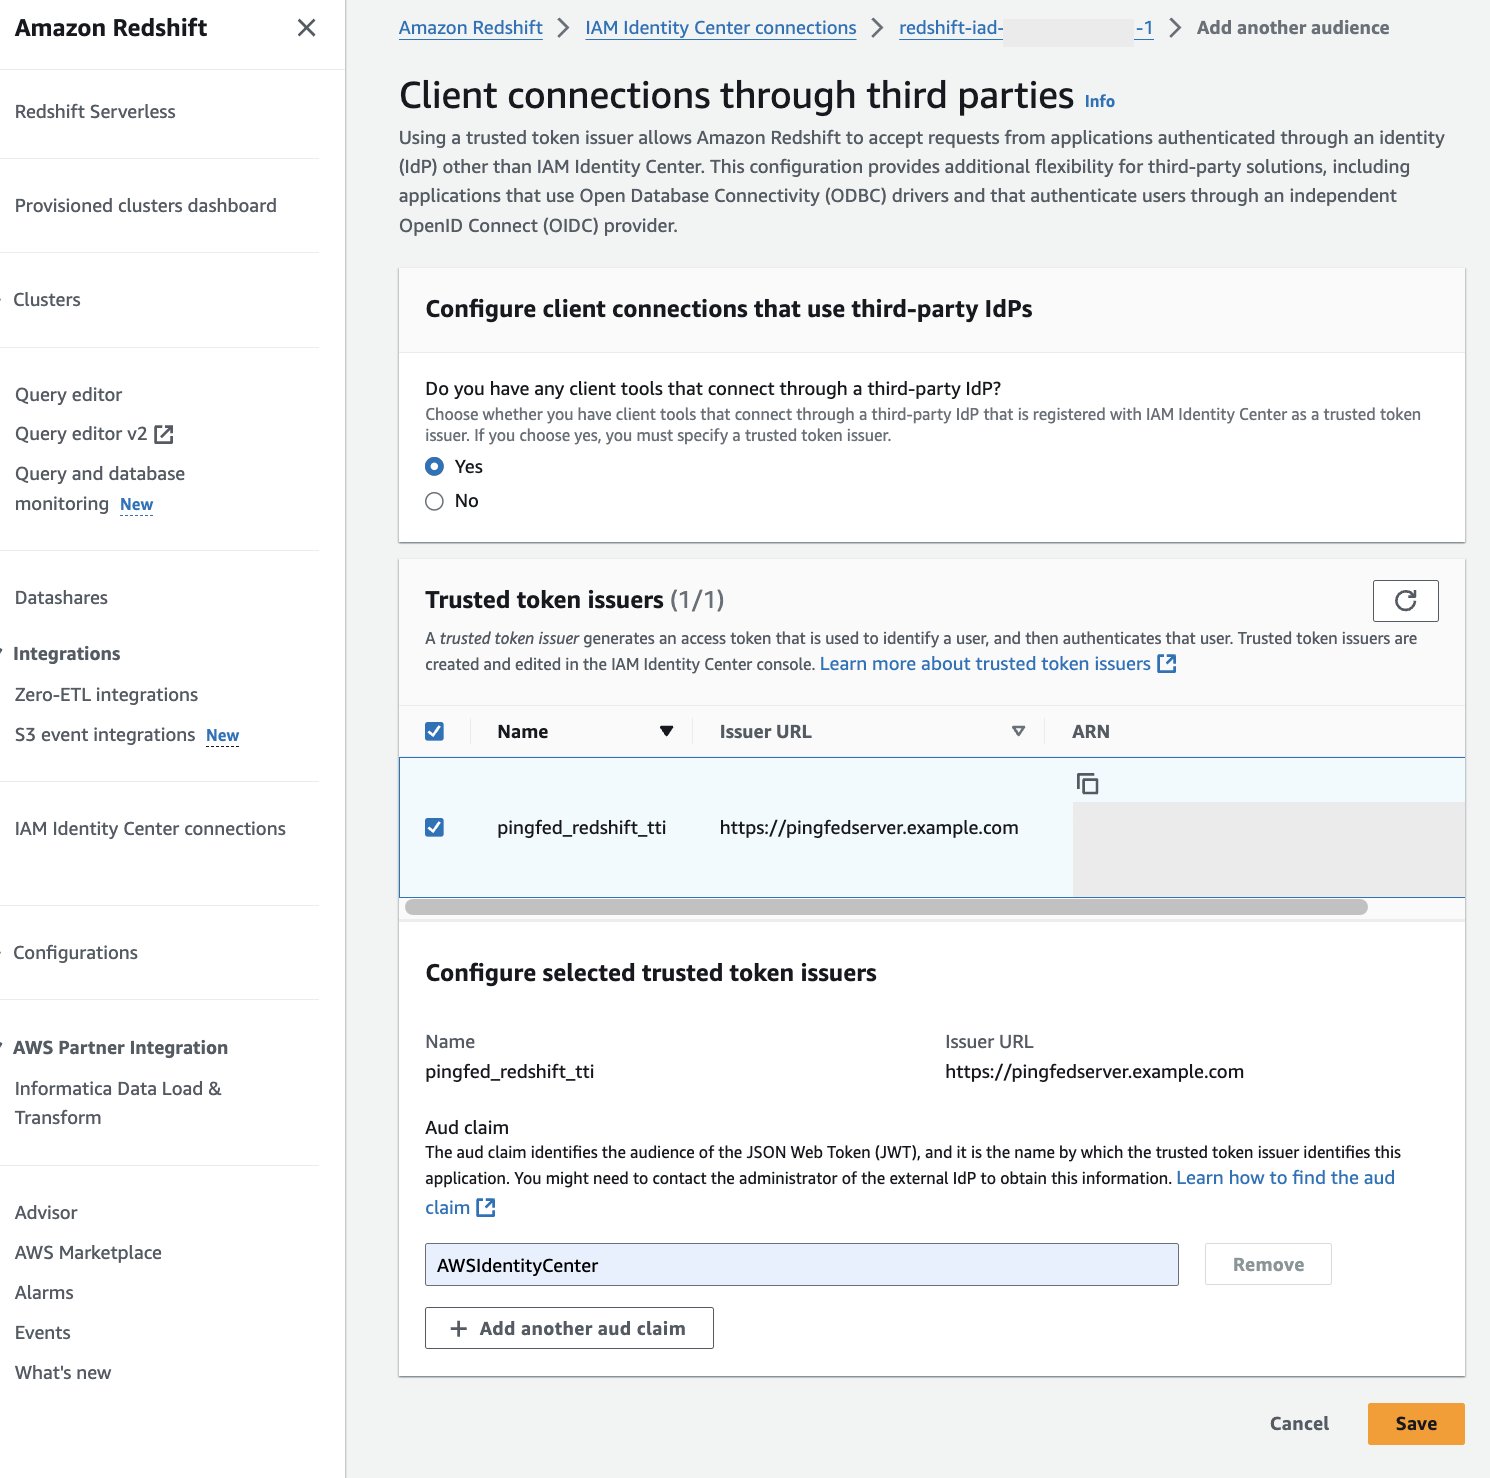
Figure 13 : Configure Audience Value in Amazon Redshift
At this point, your IAM Identity Center, Amazon Redshift, and PingFederate configuration are complete. Next, you need to configure Tableau.
Configure Tableau OAuth config files for PingFederate to integrate with Amazon Redshift using IAM Identity Center
This XML file used in this section will be used for all the Tableau products like Tableau Desktop, Server and Cloud.
To integrate Tableau with Amazon Redshift using IAM Identity Center, you need to use a custom XML file. In this step, you will use the following XML and replace the values starting with a $ sign and highlighted in bold. The rest of the values can be kept as it is or you can modify them based on your specific needs. For detailed information on each of the elements in the file, see the Tableau documentation on GitHub.
You can get authUri and tokenUri as mentioned in step 1 of preceding section, Collect PingFederate information.
The following is the example XML:
Install Tableau OAuth config file on a client machine for Tableau Desktop
After the XML configuration file is created, it should be copied to a specific location to be used by Amazon Redshift Connector from Tableau Desktop. Save the preceding file as .xml and save it under Documents\My Tableau Repository\OAuthConfigs.
Note: Currently this integration is not supported in macOS because the Amazon Redshift ODBC 2.X Driver is not supported yet for MAC.
Install Tableau OAuth config file for a site on Tableau Server or Tableau Cloud
To integrate with Amazon Redshift using IAM Identity Center authentication, you need to install the Tableau OAuth config file in Tableau Server or Tableau Cloud.
- Sign in to the Tableau Server or Tableau Cloud using admin credentials.
- Navigate to Settings.
- Go to OAuth Clients Registry and select Add OAuth Client.
- Choose the following settings:
- Connection type: Select Amazon Redshift.
- OAuth Provider: Select Custom_IdP.
- Client ID: Enter your IdP client ID value.
- Client Secret: Enter your client secret value.
- Redirect URL: Enter the value as
http://localhost/auth/add_oauth_token. In this post, we are using localhost for testing in the local environment. You should ideally use the full hostname with https. - Choose OAuth Config File: Select the XML file that you configured in Configure Tableau Desktop.
- Select Add OAuth Client and choose Save.
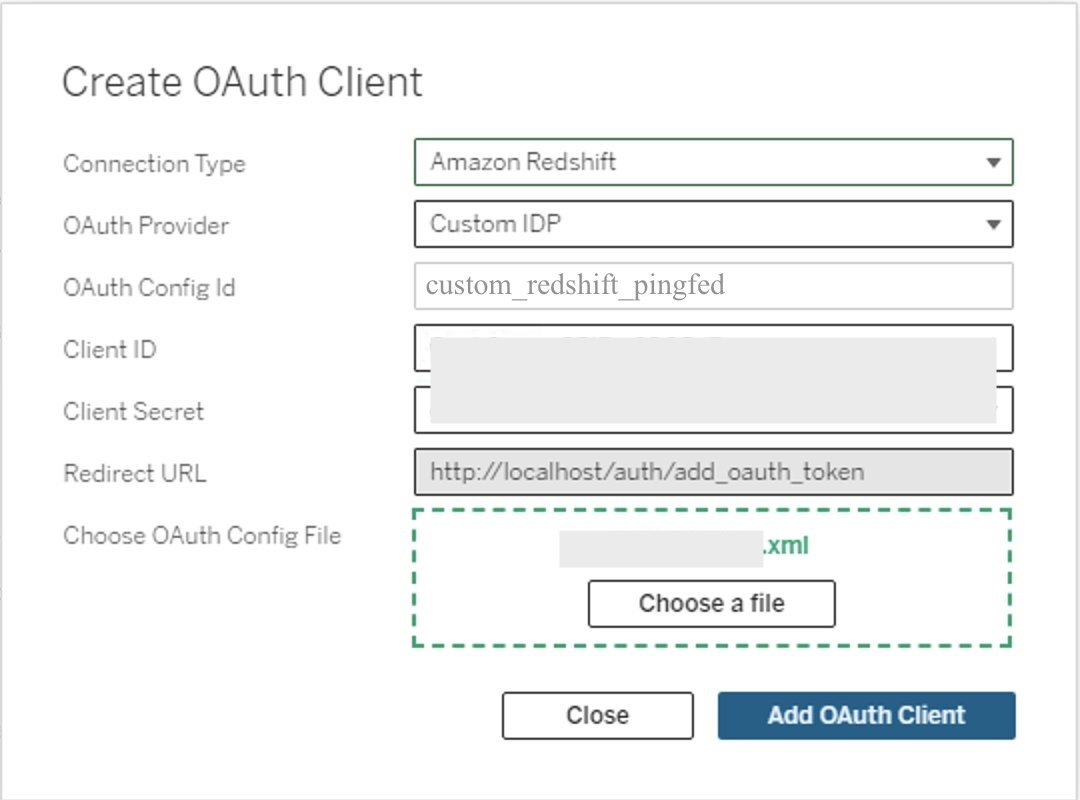
Figure 14: Create an OAuth connection in Tableau Server or Cloud
Federate to Amazon Redshift from Tableau Desktop using IAM Identity Center
Now, you’re ready to connect from Tableau and federated sign-in using IAM Identity Center authentication. In this step, you will create a Tableau Desktop report and publish it to Tableau Server.
- Open Tableau Desktop.
- Choose Amazon Redshift Connector and enter the following values:
- Server: Enter the name of the server that hosts the database and the name of the database you want to connect to.
- Port: Enter
5439. - Database: Enter your database name. In this example, we use
dev. - Authentication: Select OAuth.
- Federation Type: Select Identity Center
- Identity Center Namespace: You can leave this blank.
- OAuth Provider: This value should automatically be pulled from your configured XML. It will be the value from the element
oauthConfigId. - Select checkbox for Require SSL.
- Choose Sign-In.
- A browser pop-up will initiate where you will enter your IdP credentials.
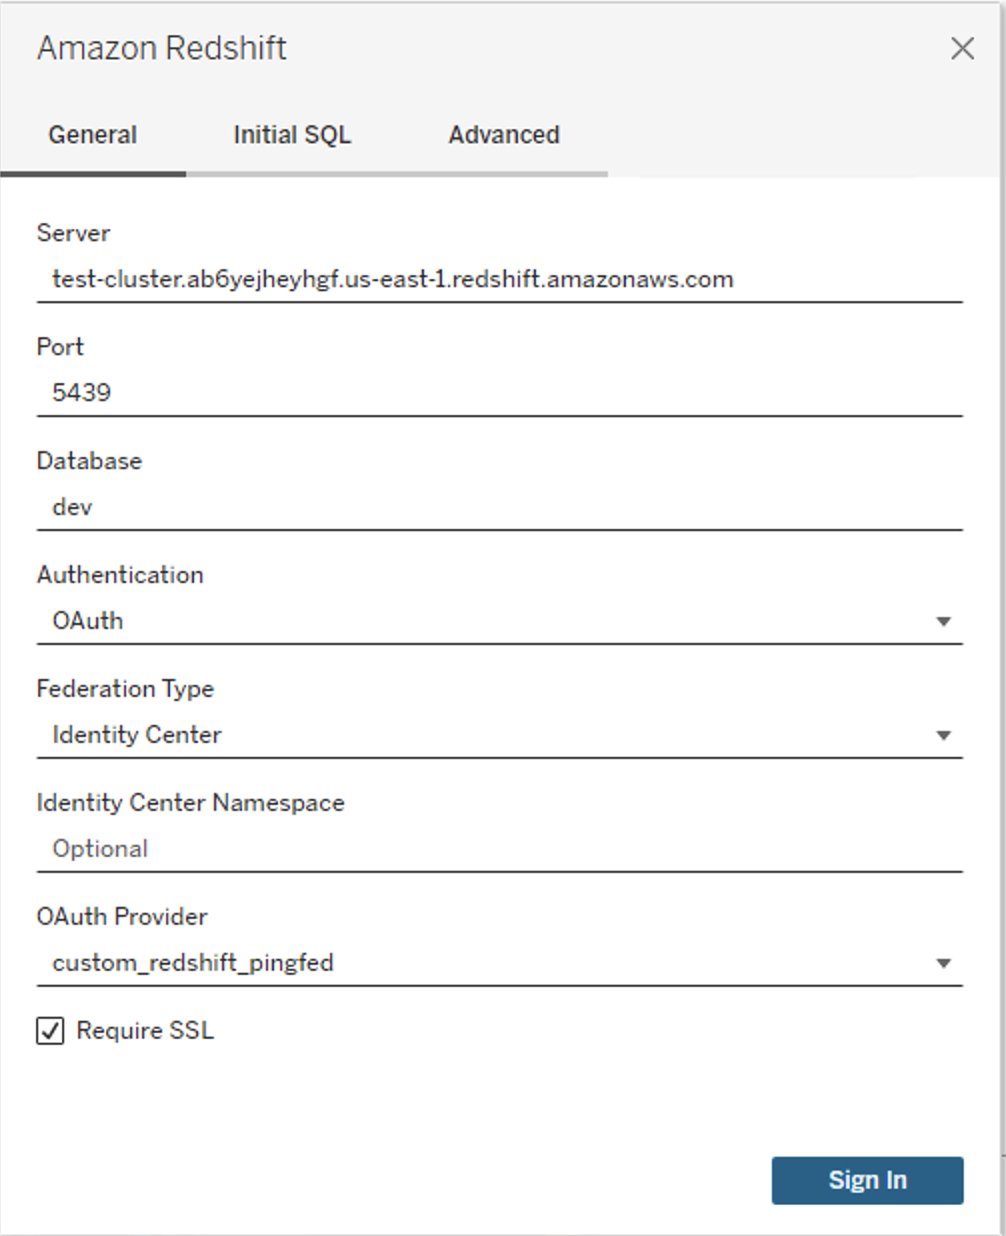
Figure 15: Tableau Desktop OAuth connection
- When authentication is successful, you will see the message Tableau created this window to authenticate. It is now safe to close it.
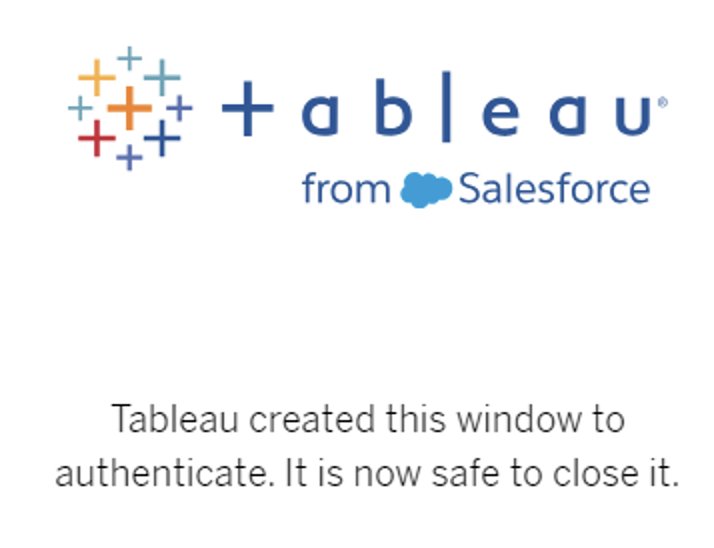
Figure 16: Successful authentication using Tableau
Congratulations! You are signed in using the IAM Identity Center integration with Amazon Redshift and are ready to explore and analyze your data using Tableau Desktop.
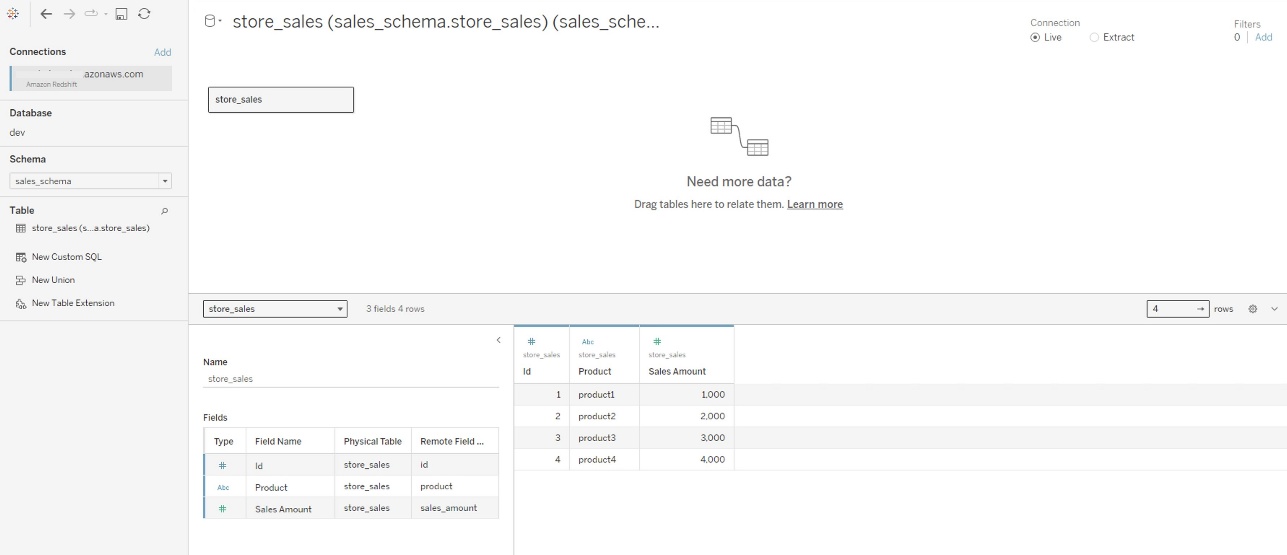
Figure 17: Successful connection using Tableau Desktop
The following is a screenshot from Amazon Redshift system table (sys_query_history) showing that user Ethan from PingFederate is accessing the sales report.

Figure 18: User audit in sys_query_history
Now you can create your own Tableau Report on the desktop version and publish it to your Tableau Server. For the next section, you create and publish a report named Account Level Sales.
Federate to Amazon Redshift from Tableau Server using IAM Identity Center authentication
After you have published the report from Tableau Desktop to Tableau Server, sign in as non-admin user and view the published report using IAM Identity Center authentication.
- Sign in to the Tableau Server site as a non-admin user.
- Navigate to Explore and go to the folder where your published report is stored.
- Select the report and choose Sign In.
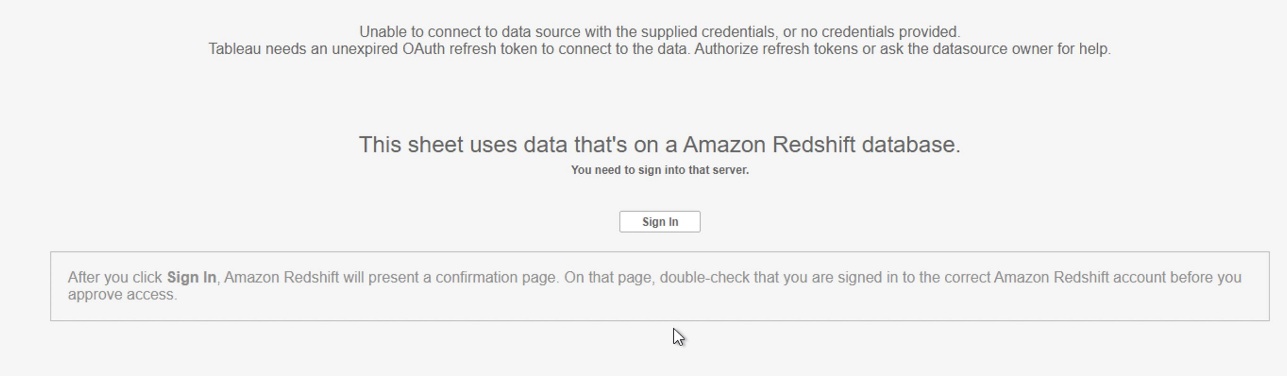
Figure 19: Sign In Prompt on Tableau Cloud/Server
- Enter your PingFederate credentials to the browser pop-up to authenticate.
- After successful authentication, you can access the data and create reports.
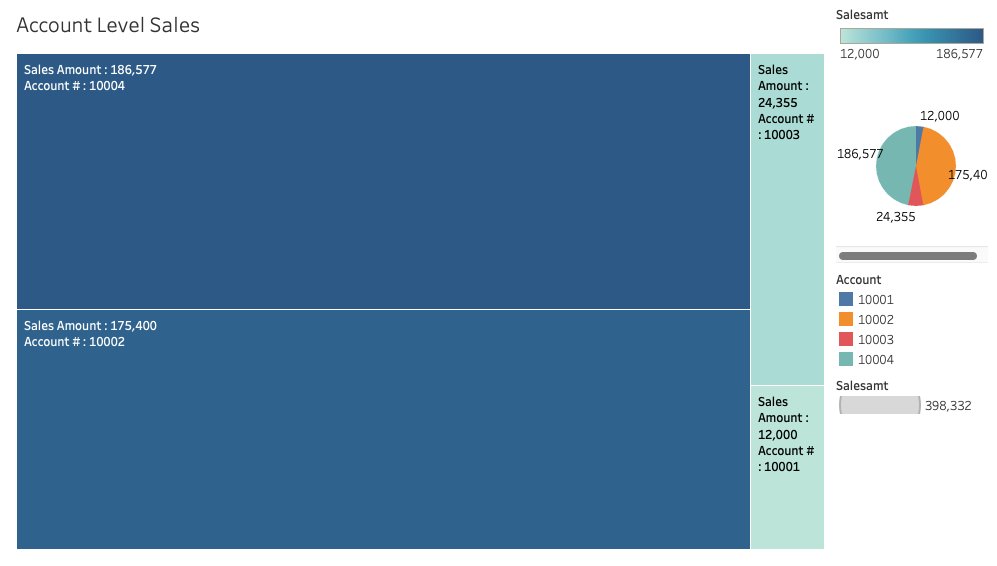
Figure 20: Tableau report
Clean up
Complete the following steps to clean up your resources:
- Delete the IdP applications that you created to integrate with IAM Identity Center.
- Delete Identity Center configuration.
- Delete the Amazon Redshift application and the Amazon Redshift provisioned cluster or Serverless instance that you created for testing.
- Delete the IAM role and IAM policy that you created for Identity Center and Amazon Redshift integration.
- Delete the permission set from Identity Center that you created for Amazon Redshift Query Editor v2 in the management account.
- Clean up resources related to PingFederate.
Conclusion
This post covered streamlining access management for data analytics by using Tableau’s capability to support single sign-on based on the OAuth 2.0 and OIDC protocol. This setup facilitates federated user authentication, where user identities from an external identity provider like PingFederate are trusted and propagated to Amazon Redshift. You walked through the steps to configure Tableau Desktop and Tableau Server to integrate seamlessly with Amazon Redshift using AWS IAM Identity Center for single sign-on. By harnessing this integration of a third-party IdP with IAM Identity Center, analysts can securely access Amazon Redshift data sources within Tableau without managing separate database credentials.
Learn more about Amazon Redshift integration with IAM Identity Center using PingFederate as an identity provider by visiting the following resources.
- Connect Redshift with IAM Identity Center
- IAM Identity Center integration with PingFederate
- Integrate Identity Provider (IdP) with Amazon Redshift Query Editor
- For data lake queries, simplify access management with Amazon Redshift and AWS Lake Formation
About the authors
Qwen models are now available in Amazon Bedrock
Post Syndicated from Danilo Poccia original https://aws.amazon.com/blogs/aws/qwen-models-are-now-available-in-amazon-bedrock/
Today we are adding Qwen models from Alibaba in Amazon Bedrock. With this launch, Amazon Bedrock continues to expand model choice by adding access to Qwen3 open weight foundation models (FMs) in a full managed, serverless way. This release includes four models: Qwen3-Coder-480B-A35B-Instruct, Qwen3-Coder-30B-A3B-Instruct, Qwen3-235B-A22B-Instruct-2507, and Qwen3-32B (Dense). Together, these models feature both mixture-of-experts (MoE) and dense architectures, providing flexible options for different application requirements.
Amazon Bedrock provides access to industry-leading FMs through a unified API without requiring infrastructure management. You can access models from multiple model providers, integrate models into your applications, and scale usage based on workload requirements. With Amazon Bedrock, customer data is never used to train the underlying models. With the addition of Qwen3 models, Amazon Bedrock offers even more options for use cases like:
- Code generation and repository analysis with extended context understanding
- Building agentic workflows that orchestrate multiple tools and APIs for business automation
- Balancing AI costs and performance using hybrid thinking modes for adaptive reasoning
Qwen3 models in Amazon Bedrock
These four Qwen3 models are now available in Amazon Bedrock, each optimized for different performance and cost requirements:
- Qwen3-Coder-480B-A35B-Instruct – This is a mixture-of-experts (MoE) model with 480B total parameters and 35B active parameters. It’s optimized for coding and agentic tasks and achieves strong results in benchmarks such as agentic coding, browser use, and tool use. These capabilities make it suitable for repository-scale code analysis and multistep workflow automation.
- Qwen3-Coder-30B-A3B-Instruct – This is a MoE model with 30B total parameters and 3B active parameters. Specifically optimized for coding tasks and instruction-following scenarios, this model demonstrates strong performance in code generation, analysis, and debugging across multiple programming languages.
- Qwen3-235B-A22B-Instruct-2507 – This is an instruction-tuned MoE model with 235B total parameters and 22B active parameters. It delivers competitive performance across coding, math, and general reasoning tasks, balancing capability with efficiency.
- Qwen3-32B (Dense) – This is a dense model with 32B parameters. It is suitable for real-time or resource-constrained environments such as mobile devices and edge computing deployments where consistent performance is critical.
Architectural and functional features in Qwen3
The Qwen3 models introduce several architectural and functional features:
MoE compared with dense architectures – MoE models such as Qwen3-Coder-480B-A35B, Qwen3-Coder-30B-A3B-Instruct, and Qwen3-235B-A22B-Instruct-2507, activate only part of the parameters for each request, providing high performance with efficient inference. The dense Qwen3-32B activates all parameters, offering more consistent and predictable performance.
Agentic capabilities – Qwen3 models can handle multi-step reasoning and structured planning in one model invocation. They can generate outputs that call external tools or APIs when integrated into an agent framework. The models also maintain extended context across long sessions. In addition, they support tool calling to allow standardized communication with external environments.
Hybrid thinking modes – Qwen3 introduces a hybrid approach to problem-solving, which supports two modes: thinking and non-thinking. The thinking mode applies step-by-step reasoning before delivering the final answer. This is ideal for complex problems that require deeper thought. Whereas the non-thinking mode provides fast and near-instant responses for less complex tasks where speed is more important than depth. This helps developers manage performance and cost trade-offs more effectively.
Long-context handling – The Qwen3-Coder models support extended context windows, with up to 256K tokens natively and up to 1 million tokens with extrapolation methods. This allows the model to process entire repositories, large technical documents, or long conversational histories within a single task.
When to use each model
The four Qwen3 models serve distinct use cases. Qwen3-Coder-480B-A35B-Instruct is designed for complex software engineering scenarios. It’s suited for advanced code generation, long-context processing such as repository-level analysis, and integration with external tools. Qwen3-Coder-30B-A3B-Instruct is particularly effective for tasks such as code completion, refactoring, and answering programming-related queries. If you need versatile performance across multiple domains, Qwen3-235B-A22B-Instruct-2507 offers a balance, delivering strong general-purpose reasoning and instruction-following capabilities while leveraging the efficiency advantages of its MoE architecture. Qwen3-32B (Dense) is appropriate for scenarios where consistent performance, low latency, and cost optimization are important.
Getting started with Qwen models in Amazon Bedrock
To begin using Qwen models, in the Amazon Bedrock console, I choose Model Access from the Configure and learn section of the navigation pane. I then navigate to the Qwen models to request access. In the Chat/Text Playground section of the navigation pane, I can quickly test the new Qwen models with my prompts.
To integrate Qwen3 models into my applications, I can use any AWS SDKs. The AWS SDKs include access to the Amazon Bedrock InvokeModel and Converse API. I can also use these model with any agentic framework that supports Amazon Bedrock and deploy the agents using Amazon Bedrock AgentCore. For example, here’s the Python code of a simple agent with tool access built using Strands Agents:
from strands import Agent
from strands_tools import calculator

agent = Agent(
    model="qwen.qwen3-coder-480b-instruct-v1:0",
    tools=[calculator]
)

agent("Tell me the square root of 42 ^ 9")

with open("function.py", 'r') as f:
    my_function_code = f.read()

agent(f"Help me optimize this Python function for better performance:\n\n{my_function_code}")
Now available
Qwen models are available today in the following AWS Regions:
- Qwen3-Coder-480B-A35B-Instruct is available in the US West (Oregon), Asia Pacific (Mumbai, Tokyo), and Europe (London, Stockholm) Regions.
- Qwen3-Coder-30B-A3B-Instruct, Qwen3-235B-A22B-Instruct-2507, and Qwen3-32B are available in the US East (N. Virginia), US West (Oregon), Asia Pacific (Mumbai, Tokyo), Europe (Ireland, London, Milan, Stockholm), and South America (São Paulo) Regions.
Check the full Region list for future updates. You can start testing and building immediately without infrastructure setup or capacity planning. To learn more, visit the Qwen in Amazon Bedrock product page and the Amazon Bedrock pricing page.
Try Qwen models on the Amazon Bedrock console now, and offer feedback through AWS re:Post for Amazon Bedrock or your typical AWS Support channels.
— Danilo
DeepSeek-V3.1 model now available in Amazon Bedrock
Post Syndicated from Channy Yun (윤석찬) original https://aws.amazon.com/blogs/aws/deepseek-v3-1-now-available-in-amazon-bedrock/
In March, Amazon Web Services (AWS) became the first cloud service provider to deliver DeepSeek-R1 in a serverless way by launching it as a fully managed, generally available model in Amazon Bedrock. Since then, customers have used DeepSeek-R1’s capabilities through Amazon Bedrock to build generative AI applications, benefiting from the Bedrock’s robust guardrails and comprehensive tooling for safe AI deployment.
Today, I am excited to announce DeepSeek-V3.1 is now available as a fully managed foundation model in Amazon Bedrock. DeepSeek-V3.1 is a hybrid open weight model that switches between thinking mode (chain-of-thought reasoning) for detailed step-by-step analysis and non-thinking mode (direct answers) for faster responses.
According to DeepSeek, the thinking mode of DeepSeek-V3.1 achieves comparable answer quality with better results, stronger multi-step reasoning for complex search tasks, and big gains in thinking efficiency compared with DeepSeek-R1-0528.
| Benchmarks | DeepSeek-V3.1 | DeepSeek-R1-0528 |
|---|---|---|
| Browsecomp | 30.0 | 8.9 |
| Browsecomp_zh | 49.2 | 35.7 |
| HLE | 29.8 | 24.8 |
| xbench-DeepSearch | 71.2 | 55.0 |
| Frames | 83.7 | 82.0 |
| SimpleQA | 93.4 | 92.3 |
| Seal0 | 42.6 | 29.7 |
| SWE-bench Verified | 66.0 | 44.6 |
| SWE-bench Multilingual | 54.5 | 30.5 |
| Terminal-Bench | 31.3 | 5.7 |
DeepSeek-V3.1 model performance in tool usage and agent tasks has significantly improved through post-training optimization compared to previous DeepSeek models. DeepSeek-V3.1 also supports over 100 languages with near-native proficiency, including significantly improved capability in low-resource languages lacking large monolingual or parallel corpora. You can build global applications to deliver enhanced accuracy and reduced hallucinations compared to previous DeepSeek models, while maintaining visibility into its decision-making process.
Here are your key use cases using this model:
- Code generation – DeepSeek-V3.1 excels in coding tasks with improvements in software engineering benchmarks and code agent capabilities, making it ideal for automated code generation, debugging, and software engineering workflows. It performs well on coding benchmarks while delivering high-quality results efficiently.
- Agentic AI tools – The model features enhanced tool calling through post-training optimization, making it strong in tool usage and agentic workflows. It supports structured tool calling, code agents, and search agents, positioning it as a solid choice for building autonomous AI systems.
- Enterprise applications – DeepSeek models are integrated into various chat platforms and productivity tools, enhancing user interactions and supporting customer service workflows. The model’s multilingual capabilities and cultural sensitivity make it suitable for global enterprise applications.
As I mentioned in my previous post, when implementing publicly available models, give careful consideration to data privacy requirements when implementing in your production environments, check for bias in output, and monitor your results in terms of data security, responsible AI, and model evaluation.
You can access the enterprise-grade security features of Amazon Bedrock and implement safeguards customized to your application requirements and responsible AI policies with Amazon Bedrock Guardrails. You can also evaluate and compare models to identify the optimal model for your use cases by using Amazon Bedrock model evaluation tools.
Get started with the DeepSeek-V3.1 model in Amazon Bedrock
If you’re new to using the DeepSeek-V3.1 model, go to the Amazon Bedrock console, choose Model access under Bedrock configurations in the left navigation pane. To access the fully managed DeepSeek-V3.1 model, request access for DeepSeek-V3.1 in the DeepSeek section. You’ll then be granted access to the model in Amazon Bedrock.

Next, to test the DeepSeek-V3.1 model in Amazon Bedrock, choose Chat/Text under Playgrounds in the left menu pane. Then choose Select model in the upper left, and select DeepSeek as the category and DeepSeek-V3.1 as the model. Then choose Apply.
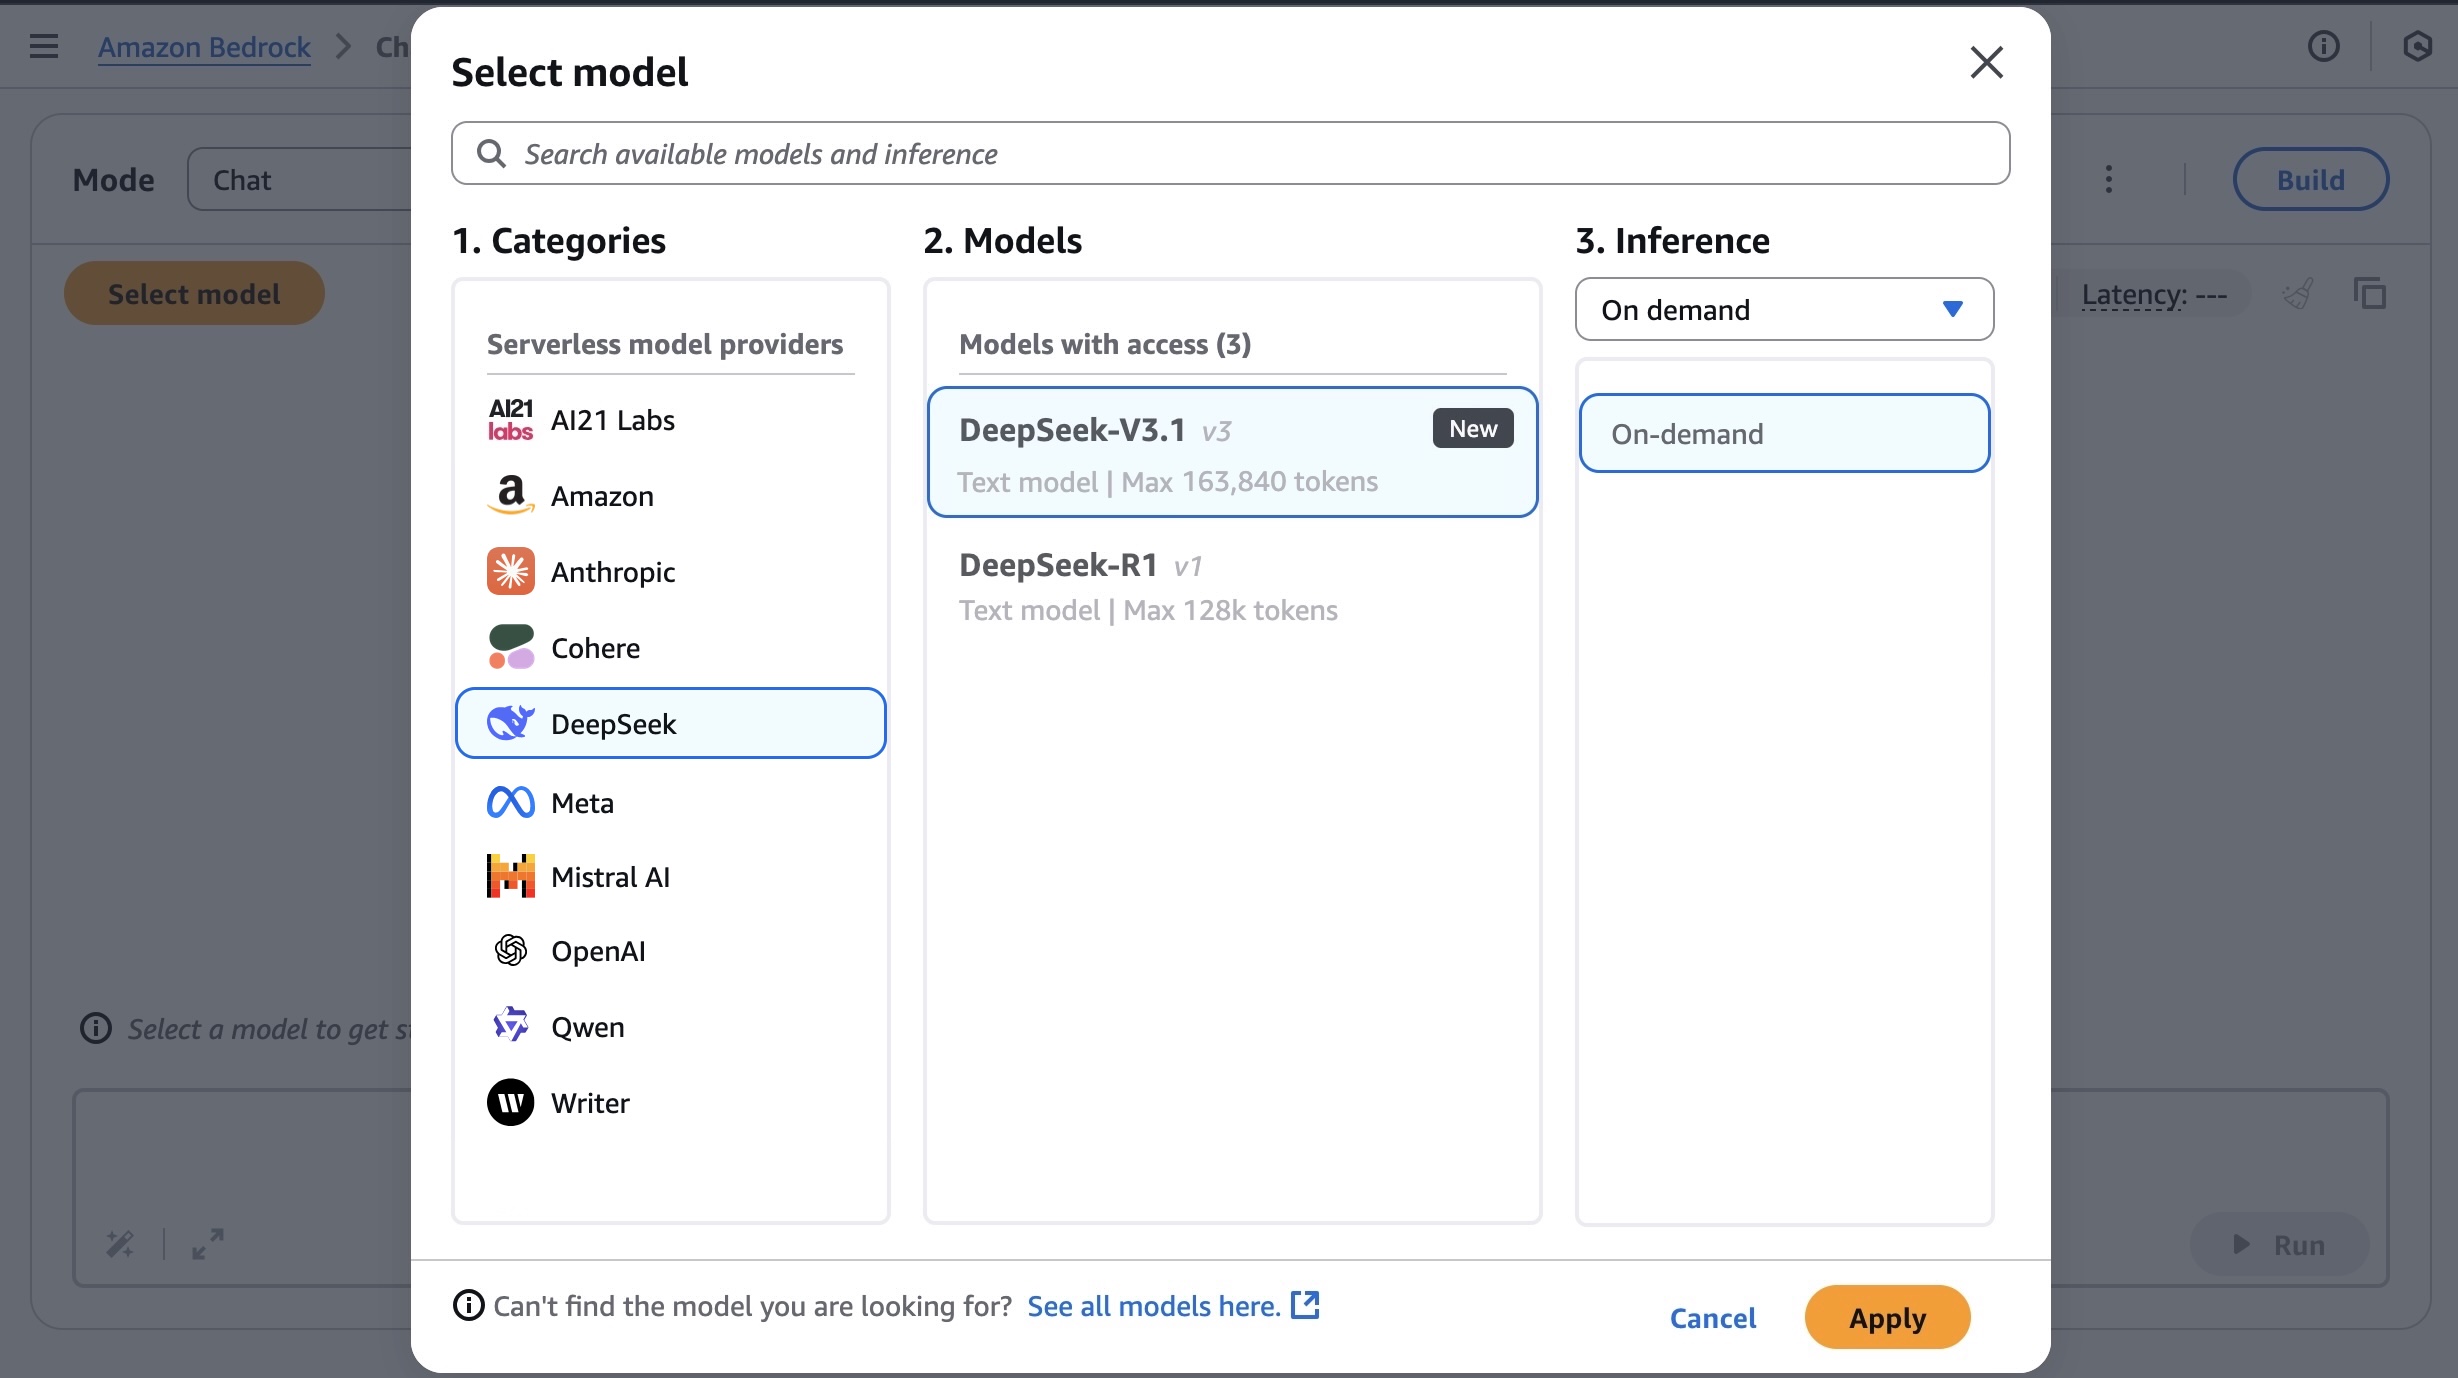
Using the selected DeepSeek-V3.1 model, I run the following prompt example about technical architecture decision.
Outline the high-level architecture for a scalable URL shortener service like bit.ly. Discuss key components like API design, database choice (SQL vs. NoSQL), how the redirect mechanism works, and how you would generate unique short codes.
You can turn the thinking on and off by toggling Model reasoning mode to generate a response’s chain of thought prior to the final conclusion.
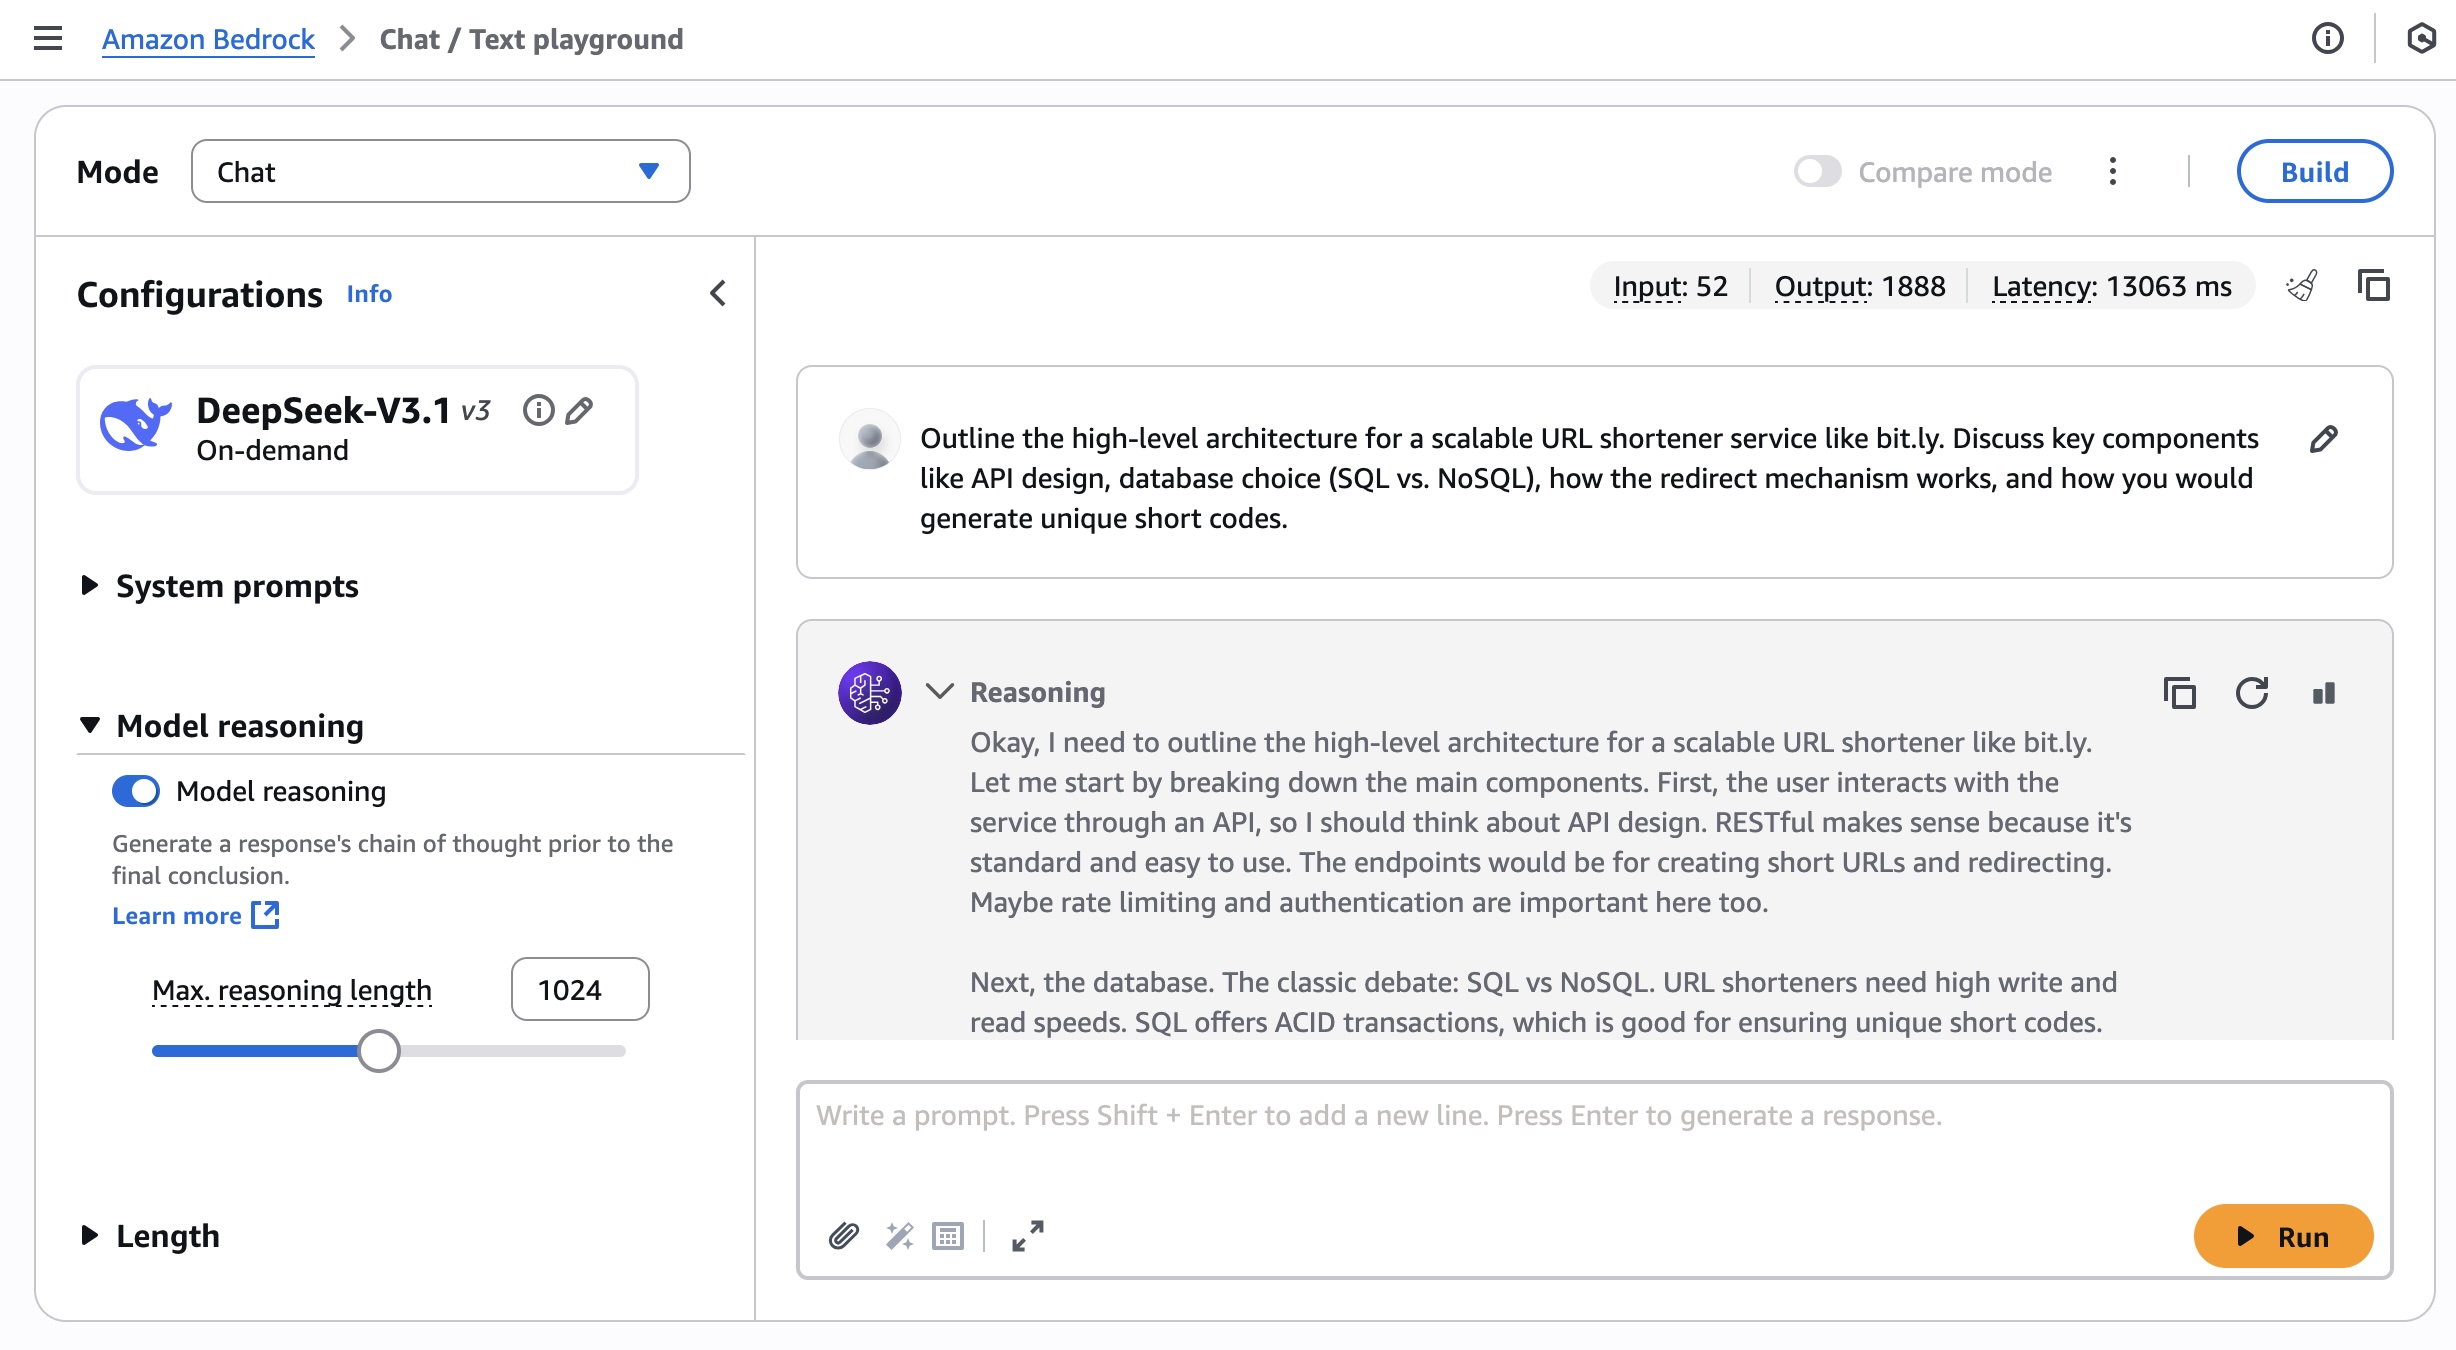
You can also access the model using the AWS Command Line Interface (AWS CLI) and AWS SDK. This model supports both the InvokeModel and Converse API. You can check out a broad range of code examples for multiple use cases and a variety of programming languages.
To learn more, visit DeepSeek model inference parameters and responses in the AWS documentation.
Now available
DeepSeek-V3.1 is now available in the US West (Oregon), Asia Pacific (Tokyo), Asia Pacific (Mumbai), Europe (London), and Europe (Stockholm) AWS Regions. Check the full Region list for future updates. To learn more, check out the DeepSeek in Amazon Bedrock product page and the Amazon Bedrock pricing page.
Give the DeepSeek-V3.1 model a try in the Amazon Bedrock console today and send feedback to AWS re:Post for Amazon Bedrock or through your usual AWS Support contacts.
— Channy
„Стегни се.“ Особености на женското психично здраве
Post Syndicated from Надежда Цекулова original https://www.toest.bg/stegni-se-osobenosti-na-zhenskoto-psihichno-zdrave/

Пандемия. Война. Политическа криза. Институционална криза. Икономическа нестабилност.
В последните години външните предизвикателства към спокойствието и устойчивостта ни нарастват и се натрупват към личните трудности и тревоги, които засягат всеки от нас в различна степен.
Психичното здраве е дълбоко подценяван аспект на здравето ни. Можем ли да бъдем здрави, ако умът и душата ни страдат? Въпросът е риторичен и всички знаем отговора.
Историческата стигма и съвременните предразсъдъци относно женското психично здраве водят до съзнателните ни (а и несъзнателни) убеждения, че за жените е по-присъщо „да не са добре“. Макар все по-често учените да споделят съмнението си, че всъщност става дума за стереотип, данните все още не са оборили стереотипа. Ползата от това е, че ни дава възможност да погледнем женското психично здраве по-детайлно и да търсим решения.
600 000 000 жени
В началото на септември Световната здравна организация (СЗО) публикува доклад с последни обобщени данни за състоянието на психичното здраве на хората навсякъде по света.
Повече от 1 милиард души живеят с психични разстройства. Около 600 млн. от тях са жени.
Разстройствата на настроението от типа на тревожност и депресия са широко разпространени във всички страни и общности, като засягат хора от всички възрасти и нива на доходи.
За нетренираните ни балкански възприятия „разстройство на настроението“ звучи като състояние, което се лекува с чаша вино след работа или в краен случай с уикенд извън града без децата. В действителност, ако имаш депресия, това може да наруши нормалния ти живот колкото и ако ти ампутират крак. Тази група разстройства увеличава разходите за здраве на засегнатите хора и семейства, като същевременно причинява значителни икономически загуби в световен мащаб.
Новите данни са извлечени от два доклада – „Психичното здраве в света днес“ и „Атлас на психичното здраве 2024“. Първият показва, че макар различните психични разстройства да засягат в различна степен мъжете и жените, жените изглеждат по-силно засегнати като цяло. Тревожността и депресивните разстройства са най-често срещаните психични разстройства както сред мъжете, така и сред жените.
В зависимост от начина, по който се проявяват, симптомите на психичните заболявания могат да се разделят на интернализирани или екстернализирани разстройства. Интернализираните се характеризират с мисли и емоции в самия човек, а екстернализацията означава предимно действия във външния свят.
По данни на Европейския институт за равенство между половете жените в Европейския съюз имат трайно по-високи нива на интернализирани разстройства спрямо мъжете – например депресия, тревожност, фобии, суицидни мисли и опити за самоубийство и самонараняване. Мъжете, от друга страна, съобщават за два пъти по-високи нива на екстернализирани разстройства, като злоупотреба с алкохол, ADHD и поведенчески разстройства, както и разстройства, свързани с употребата на наркотици.
Някои от тези констатации обаче в последното десетилетие са поставени под въпрос. Съвременни изследвания установяват, че разстройства, за които се е смятало, че се характеризират с екстернализирани прояви и са дълбоко присъщи на мъжете, всъщност изглеждат по много различен начин при жените и поради това са оставали неразпознати. Такива са например разстройството с дефицит на вниманието (ADHD) и разстройствата от аутистичния спектър (ASD).
Докато момчетата с ADHD обикновено проявяват по-видима хиперактивност и импулсивност, при момичетата по-чести са невниманието, разсеяността и тревожността. При аутизма пък момичетата често проявяват по-добри социални умения, развити чрез имитация и т.нар. masking – съзнателно или несъзнателно прикриване на трудностите чрез имитиране на поведение на връстници. В резултат диагнозата при тях се поставя значително по-късно или изобщо не се поставя, което повишава риска от съпътстващи състояния, като тревожност, депресия и хранителни разстройства.
В различните държави между 12 и 20% от жените някога в живота си са преживявали психично разстройство, като делът на засегнатите е по-висок в страните от Западна Европа в сравнение с Източна.
Причините за тези разлики са комплексни. Все по-често обаче се споменава, че е възможно в някаква степен да се дължат на по-високата склонност на жените в западноевропейските държави да търсят помощ и подкрепа за психичното си здраве в сравнение с мъжете въобще и с жените в останалата част на Европа. Стигмата, културните особености и не на последно място достъпът до квалифицирана помощ вероятно влияят на оценката на дела на засегнатите.
Проучването на глобалната тежест на болестите от 2019 г. сочи, че депресивните разстройства засягат жените в ЕС 1,7 пъти по-често, отколкото мъжете, а тревожността – 2,1 пъти по-често. Най-голяма е разликата обаче при хранителните разстройства – засегнатите жени са три пъти повече. В абсолютен брой това са над 300 000 души. Според други изследвания жените съставляват близо 90% от всички засегнати от хранителни разстройства.
Тревожна е статистиката за посттравматичното стресово разстройство (ПТСР). Изследване, публикувано през 2017 г. в European Journal of Psychotraumatology, показва, че жените изпитват ПТСР два до три пъти по-често от мъжете.
Жените, които в някакъв период от живота си до момента на изследването са имали епизод на ПТСР, са 10 до 12%, в сравнение с 5 до 6% при мъжете.
Тази разлика според проучването се дължи отчасти на факта, че жените и мъжете преживяват различни травми, и то в различни моменти от живота си. Жените например обикновено са изложени на повече междуличностни и силно въздействащи травми, като домашно или сексуално насилие, и то в по-ранна възраст от мъжете. Една на всеки три жени преживява сексуално насилие в живота си.
„Женските“ психични страдания и причините за тях
Психичното здраве има общи измерения за всички хора, но при жените се открояват и някои специфични уязвимости, които науката описва. Част от тях са пряко свързани с биологията – хормоналните цикли, бременността, раждането и менопаузата. Други са резултат от социалната роля на жените, възложена им от обществото и културните традиции. Част от нея са и грижата за другите, икономическата зависимост, насилието и дискриминацията. Тези два пласта – биологичен и социален – често се преплитат.
Сред психичните разстройства, които са характерни почти само за жени, е следродилната депресия – тя засяга 10–20% от майките през първата година след раждането. Състоянието е резултат от резките хормонални промени, но често за отключването ѝ съществено допринасят социалната изолация и липсата на нужната подкрепа.
Подобно на следродилната депресия, предменструалното дисфорично разстройство (premenstrual dysphoric disorder – PMDD) – тежка форма на предменструален синдром – се среща при около 3% от жените в репродуктивна възраст. При някои то е толкова силно, че води до депресивни епизоди и дори до суицидни мисли. Симптоми на по-леко предменструално обостряне имат до 50% от жените.
Биологичните детерминанти обаче не изчерпват факторите, които стават причина за психични страдания при жените. Именно психосоциалните фактори обясняват значителна част от по-високата честота на депресия при жените. Изследвания показват, че жените по-често развиват ниско самочувствие и негативна представа за тялото си, особено в юношеска и ранна зряла възраст – период, когато обичайно се увеличава проявата на депресивни епизоди.
Всички тези фактори показват как социалните роли, културните норми и ежедневният натиск върху жените се превръщат в невидим, но постоянен източник на уязвимост. В същото време обаче жените са по-склонни да създават общности и да се свързват помежду си, както и да търсят помощ – два фактора, които са благоприятни за психичното здраве и са по-рядко срещани при мъжете.
Самоубийства
Самоубийството е една от най-тежките последици от влошеното психично здраве. Според анализ на СЗО само през 2021 г. приблизително 727 000 души сами са отнели живота си. Самоубийството е сред водещите причини за смърт сред младите хора (15–29 г.) във всички страни и във всеки социално-икономически контекст.
Междуполовите разлики обаче са повече от забележими. Данните сочат, че макар в световен мащаб нивото на смъртност от самоубийства сред жените на възраст 15–29 години да е около два пъти по-ниско, отколкото при мъжете, все пак именно те са втората поред причина за смърт в тази възрастова група след състояния, свързани с усложнения при бременност и раждане. Разделението по ниво на доходите показва, че обичайно жените в държави с ниски доходи по-често посягат на живота си, отколкото жените в страни с високи доходи, докато при мъжете е точно обратното. Обяснението на този феномен е свързано както с психичноздравни, така и със социокултурни фактори. В България броят на жените, които сами отнемат живота си, сравнително устойчиво намалява през годините, като през 2023 г. самоубийствата на жени са били 108.
И какво от това?
Логичният въпрос, който можем да си зададем в отговор на всички тези данни, е: какво от това? Какво правят правителствата и обществата, за да подкрепят момичетата, жените, своите дъщери, съпруги и майки? Какво прави всяка една от нас, за да се предпази, и как (и дали) търсим помощ, когато проблемът възникне?
Най-краткият отговор на въпроса „какво от това“, ако задаващият е жена в България, е „Е, нищо“.
По данни от 2022 г. 70% от хората с психични проблеми у нас не получават никаква грижа, а делът на тези, които имат достъп до продължителна подкрепа в общността (модерно позната като „терапия“), е още по-малък. Повечето психиатрични услуги извън 12-те държавни психиатрии се заплащат от джоба на нуждаещите се и са концентрирани в по-големите населени места.
Това, което всеки от нас може да направи, е да отдели внимание на собственото си психично здраве и да бъде подкрепата, от която някой от близките му може да се нуждае.
Когато близките забележат, че една жена се бори с продължителна тъга, тревожност, че се самоизолира, или видят притеснителни промени в личността ѝ, е важно да подхождат с търпение и емпатия, без да омаловажават преживяванията ѝ. Вместо назидания и характерния за нашата култура призив „стегни се“, по-полезно е насърчението да се ползва професионална помощ, да се предложи подкрепа във всекидневието или в дейности, които в момента представляват свръхтежест. Ако се появят признаци на риск от самоубийство, незабавно трябва да се потърси специалист, а жената в риск да не бъде оставяна сама.
Вместо мъдро заключение ето няколко от най-популярните съвети за укрепване на собственото психично здраве:
1. Движение като лекарство
Редовната физическа активност доказано намалява симптомите на депресия и тревожност. Дори 20 минути на ден могат да повишат нивата на „хормоните на щастието“.
2. Връзка с другите
Социалната подкрепа е защѝтен фактор. Разговор с приятелка или общност, в която се чувствате приети, може да има терапевтичен ефект.
3. Здравословен сън и рутина
Опитайте се да заспивате и да ставате по едно и също време. Липсата на сън повишава риска от депресия и тревожност, а регулярният ритъм укрепва психиката.
4. Ограничаване на екранното време
Макар влиянието на преживяванията ни в онлайн среда тепърва да се изследва, вече е установено, че интернет е най-лесното място, където да „се скрием“ от проблемите си, но същевременно и да станем жертва на самоизолация, на онлайн тормоз, на засилено излагане на съдържание, което подсилва мрачните ни мисли. Въведете дигитални паузи, за да се предпазите от негативното влияние.
5. Време за себе си без вина
Дори кратка пауза – чаша чай, медитация или просто тишина – е важна. Жените често се чувстват виновни, когато поставят себе си на първо място, но това е ключово за психичното здраве.
6. Потърсете (или си създайте) група за взаимопомощ
Подкрепата от други жени със сходни преживявания създава усещане за общност и разбиране. Това може да са жени, които като вас са се сблъскали със следродилна депресия или с хранителни разстройства, а може и да са просто най-близките ви приятелки.
7. Малки дози природа
Гледайте „зелено“ и „синьо“. Времето на открито има доказан ефект върху понижаването на стреса и подобряването на настроението.
8. Не пренебрегвайте медицинската помощ и професионалната психологическа подкрепа
Женските психични страдания често са свързани с хормонални промени и фактори на средата, които могат да бъдат променени. Не се срамувайте да потърсите помощ.
„Анатомия на пола: Жена“ разглежда здравето на жените като неразривна част от обществото, историята и културата. В поредицата изследваме как са се променяли нагласите към женското здраве, как медицината е възприемала специфичните потребности на жените и какви процеси са повлияли на достъпа им до качествени здравни грижи. Вглеждаме се в научните открития, но и в културните митове; в официалните политики, но и в личните истории на жени, борещи се за правото си на здраве и достойнство.
Nikon Binocular Comparison – $80 to $6000+!!
Post Syndicated from Matt Granger original https://www.youtube.com/watch?v=8is8gIW_TsE
Home Assistant Radar: See Your Devices on a Cool Retro Map! #shorts
Post Syndicated from BeardedTinker original https://www.youtube.com/shorts/SDO000Jaseo
[$] Extending the time-slice-extension discussion
Post Syndicated from corbet original https://lwn.net/Articles/1038235/
Time-slice extension is a proposed scheduler feature that would allow a
user-space process to request to not be preempted for a short period while
it executes a critical section. It is an idea that has been circulating
for years, but efforts to implement it became
more serious in February of this year. The latest developer to make an
attempt at time-slice extension is Thomas Gleixner, who has posted a new patch set
with a reworked API. Chances are good that this implementation is close to
what will actually be adopted by the kernel.
На второ четене: „Лотарията и други разкази“
Post Syndicated from Стефан Иванов original https://www.toest.bg/na-vtoro-chetene-lotariyata-i-drugi-razkazi/
„Лотарията и други разкази“ от Шърли Джаксън

превод от английски Светлана Комогорова – Комата, София: изд. „Кръг“, 2024
Когато говорим за Шърли Джаксън, не говорим за страшни разкази за Хелоуин. Говорим за драматургия на ежедневната рутинa, в която се вмъква нещо проклето и нямо. Джаксън е авторка, която сменя жанрови маски с фина жестокост. От кратки и студени истории за ритуализираното насилие до романи фантоми. Биографията ѝ и обширното ѝ творчество – стотиците разкази, романи и мемоари, оформят пулса на
писателка, която умее да превръща домашната сцена в химера на общественото.
Няколко тематични ядра се повтарят при нея. Ритуал и конформизъм, домашната уязвимост (особено женската), лицемерието на малката общност и нормализацията на жестокостта чрез език и обичай. Джаксън често приема интонацията на обикновен полифоничен разказвач. И след пазарни и площадни сцени оставя накрая акта на насилие, изпълнен не с демонична ярост, а с банална рутинна точност. Този контраст между тон, който е пригладен и невъзмутим, и съдържание, изпълнено с внезапна и колективна варварщина, е нейната добре смазана естетическа машина.
„Лотарията“, най-известният ѝ разказ, е и най-яркият ѝ лабораторен пример. Как една привидно невинна общност поддържа годишен ритуал, чиято функция е да изтласка вината и да реорганизира социалните йерархии посредством случайност, празничност и бюрократичност. Джаксън не обяснява корена на обичая. Тя го документира клинично с датата, черната кутия, шепота и в това медицинско отстояние лежи шокът. Насилието не е необичайно, то е институция. По този начин текстът пита кога традицията става престъпление и кой плаща цената.
Шърли Джаксън публикува разказа през 1948 г. и предизвиква масова реакция. Читатели ѝ пишат агресивни писма и отказват да повярват, че такова нещо е възможно в цивилизована Америка. Седем десетилетия по-късно ние вече не се възмущаваме от самата идея за колективно убийство в името на традицията. Има много такива филми и книги. По-страшното е, че сме свикнали с ритуала на публичното унищожение. Само инструментите са се сменили. Камъните са заменени от постове, тагове и мемета. От политици и добре платени агитатори.
Черната кутия на Джаксън е станала черният екран на смартфона.
Ритуалът е същият. Събиране на общността, случайно или ритуално избиране на жертва, мобилизиране на ярост, бързо освобождаване на напрежението и връщане към всекидневието.
Ритуалът тук не е само метафора. Той е социална техника. Съвременната критика подчертава как Джаксън използва формата на митичното, за да рефлектира върху правни и политически структури. Публичният ритуал оправдава тълпата и я превръща в съдия. Линчът е легален. Според това виждане лотарията не е аномалия, а възможен модел за всяка общност, която не поставя под въпрос собствените си традиции.
Много от разказите на Джаксън (особено тези със силна битова перспектива) показват как домът, кухнята, прахта по первазите, рутината на грижата се трансформират в заплашителен лабиринт. Авторката често проследява своите героини – съпруги, майки, самотни жени, чиито притеснения (ключ, детско поведение, градински сюжет) издават по-големи фрустрации и кризи. С други думи, страхът идва не отвън, а от вграденото в интериора и в невидимите правила, които задушават. Тази следа от женска призрачност при Джаксън е централна за нейното влияние върху модерната готика и критиката на семейните роли.

Джаксън не е хроникьор на конкретно историческо събитие. Тя е анатом на световната склонност да се институционализира изключването. Да е нормално да си заврян в ъгъла. Това прави текста ѝ глобален и днес. В съвременния свят механизмите, които тя разкрива като бърза и често колективна мобилизация срещу различните, намират своите дигитални и политически версии като онлайн саморазправи и политическо насъскване, прикриващи структурни проблеми.
За българския контекст това е болезнено познато. Малките общности, перверзната публична памет, ретроградната почит към традициите, които могат да превърнат някого в лесен виновник. Механиката е същата. Ако в „Лотарията“ има черна кутия и камъни, в днешна България същите функции изпълняват медиите и социалните мрежи. Всичко това, което закрепва груповата идентичност чрез изключване и зачеркване. Чрез разчовечаване. Тук Джаксън работи като предупреждение. Не да ни уплаши от чудовищата, а да ни накара да огледаме собствените си навици и реакции. Да се усъмним отново в тях.
В българската култура традицията на публичното заклеймяване винаги е имала силен сценичен елемент. Мегданът, хорото, селската клюка, махленският съд и „какво ще кажат хората“. Днес тези механики ги има и онлайн. Фейсбук групите, форумите, телевизионните студиа често играят ролята на площад, където общността се пречиства, избирайки поредния виновник, който няма особена вина, но жертва е нужна. Ако не се посочи виновен, редът няма да бъде възстановен за зрители и участници.
Четенето на Джаксън е политическо упражнение. Упражнение по социална диагностика и естетическо удоволствие, защото тя умее да превръща най-баналния живот в морално местопрестъпление. Нейният метод е не във вика, а в свидетелството. Разказите ѝ не са проповеди, а документи. За нас, съвременните български читатели, задачата е да се научим да разпознаваме ритуалите, които приемаме за нормални, и да питаме кой печели от тях и кого изключват.
Четенето на Джаксън е акт на автоантропология. Ние четем себе си. Нейните малки села и предградия са прототип на нашите дигитални села, квартали и балони. Тя ни предупреждава, че най-страшните ужаси не са отвъдни, а съвсем тукашни. Те са банални, институционализирани и изпълнени с учтива усмивка.
Да четем Джаксън е да признаем, че нашият ритуал не е по-различен. Само инструментите са сменени.
Следването на традициите в България може да е вредно днес, защото често традицията се възприема не като живо наследство, което се променя, а като вкаменен закон. Вместо да бъде източник на смисъл и общност, тя лесно се превръща в алиби за бездействие, защото така се прави открай време и така може да се оправдае всяка несправедливост. В българския контекст това е особено болезнено.
Когато едно общество е в голяма криза на доверието и липса на вяра в бъдещето, то често се вкопчва в миналото. И не за да го разбере, а за да избяга от настоящето. Така традицията се използва за легитимиране на дискриминациите, за запазване на неравенствата, за поддържането на патриархални и авторитарни модели, които спират развитието на обществото. България днес има нужда повече от живи, отворени и творчески ритуали, а не от музейни навици, които ни карат да повтаряме собственото си безсилие и грешки.
Активните дарители на „Тоест“ получават постоянна отстъпка в размер нa 20% от коричната цена на всички заглавия от каталога на издателство „Кръг“, както и на няколко други български издателства в рамките на партньорската програма Читателски клуб „Тоест“. За повече информация прочетете на toest.bg/club.
Никой от нас не чете единствено най-новите книги. Тогава защо само за тях се пише? „На второ четене“ е рубрика, в която отваряме списъците с книги, публикувани преди поне година, четем ги и препоръчваме любимите си от тях. Рубриката е част от партньорската програма Читателски клуб „Тоест“. Изборът на заглавия обаче е единствено на авторите – Стефан Иванов и Антония Апостолова, които биха ви препоръчали тези книги и ако имаше как веднъж на две седмици да се разходите с тях в книжарницата.