Monitoring AWS Cost Explorer with Zabbix

Post Syndicated from evgenii.gordymov original https://blog.zabbix.com/monitoring-aws-cost-explorer-with-zabbix/26159/

Cloud-based service platforms are becoming increasingly popular, and one of the most widely adopted is Amazon Web Services (AWS). Like many cloud services, AWS charges a user fee, which has led many users to look for a breakdown of which specific services they are being charged for. Fortunately, Zabbix has an AWS Cost Explorer over HTTP template that’s ready to run right out of the box and provides a list of daily and monthly maintenance costs.

Why monitor AWS costs?

While AWS cost data is stored for 12 months, Zabbix allows data to be stored for up to 25 years (see Keep lost resources period). The Keep lost resources period is a vital parameter for storing data longer than 12 months since the cost data removed from AWS will result in the discovered items becoming lost. Therefore, if we want to keep our cost data for a period longer than 12 months, Keep lost resources period parameter needs to be adjusted accordingly.

In addition, Zabbix can show fees charged for unavailable services, such as test deployments for a cluster in the us-east-1 region.

Preparing to monitor in a few easy steps

I recommend visiting zabbix.com/integrations/aws for any sources referred to in this tutorial. You can also find a link to all Zabbix templates there. For the most part, we will follow the steps outlined in the readme.

The AWS Cost Explorer by HTTP template can use key-based and role-based authorization. Set the following macros  {$AWS.AUTH_TYPE}, possible values: role_base, access_key (using by default).

If you are using access key-based authorization, be sure set the following macros {$AWS.ACCESS.KEY.ID}, {$AWS.SECRET.ACCESS.KEY}.

Create or use an existing access key, which you can get from Identity and Access Management (IAM).

Accessing the IAM Console:
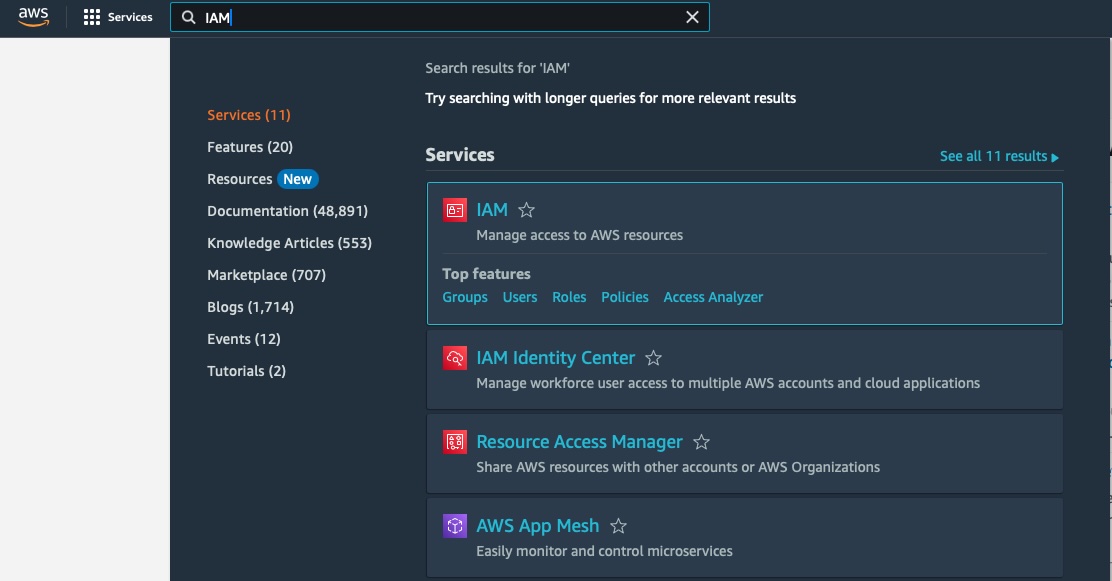
  • Log in to your AWS Management Console.Navigate to the IAM service.
  • Next, go to the Users tab and select the required user.
Creating a access key for monitoring:
  • After that, go to the Security credentials tab.
  • Select Create access key.

Add the following required permissions to your Zabbix IAM policy in order to collect metrics.

Defining Permissions through IAM Policies:
  • Access the “Policies” section within IAM.
  • Click on “Create Policy”.
  • Select the JSON tab to define policy permissions.
  • Provide a meaningful name and description for the policy.
  • Structure the policy document based on the permissions needed for the AWS Cost Explorer by HTTP template.
{ "Version": "2012-10-17", "Statement": [ { "Action": [ "ce:GetDimensionValues", "ce:GetCostAndUsage" ], "Effect": "Allow", "Resource": "*" } ] }

Attaching Policies to the User:
  •  Go back to the “Users” section within IAM.
  •  Click on “Add Permissions”.

– Search for and select the policy created in the previous step.

– Review the attached policies to ensure they align with the intended permissions for the user.

Creating a host in Zabbix

Now, let’s create a host that will represent the metrics available via the Cost Explorer API:

  • Create a Host Group in which to put hosts related to AWS. For this example, let’s create one that we’ll call AWS Cloud.
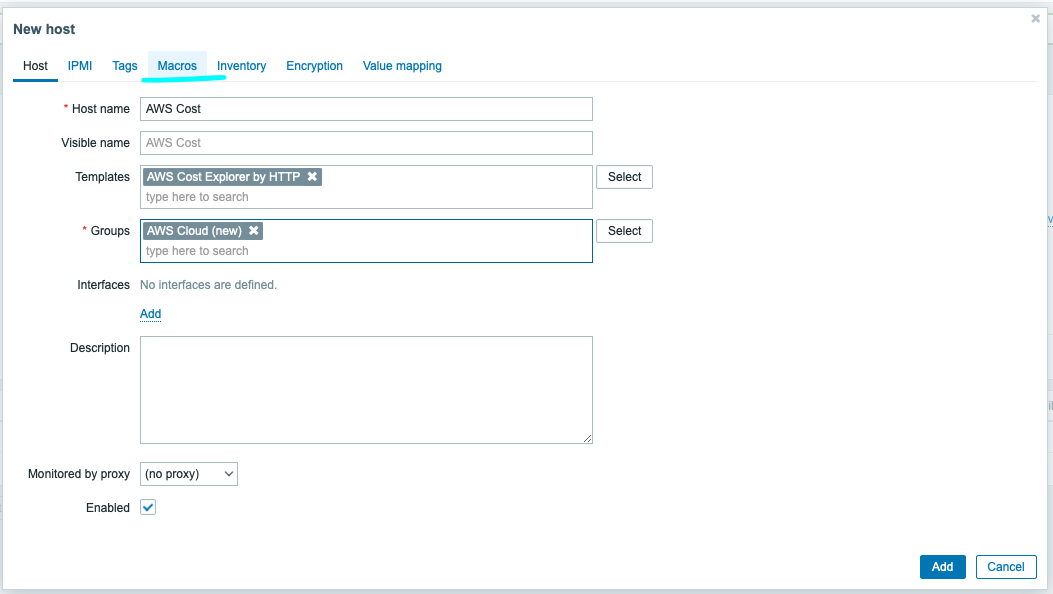
  • Head to the host page under Configuration and click Create host. Give this host the name AWS Cost. We’ll also assign this host to the AWS Cloud group we created and attach the AWS Cost Explorer template by HTTP.
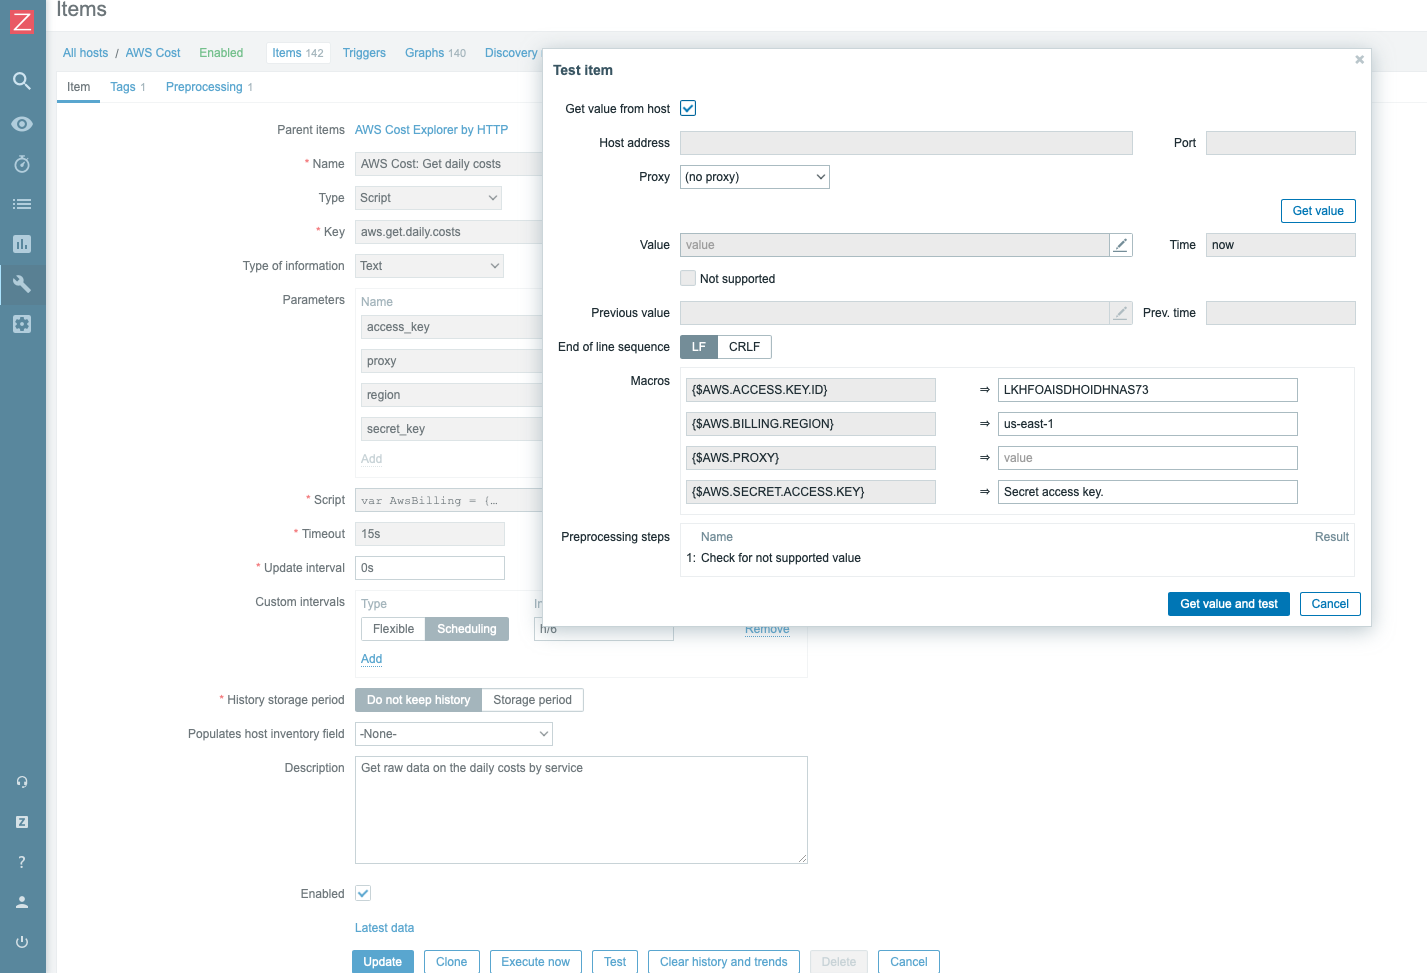
  • Click the Macros tab and select Inherited and host macros. In this case, we need to change the first two macros. The first, {$AWS.ACCESS.KEY.ID}, should be set to the received access key ID. For the second, {$AWS.SECRET.ACCESS.KEY}, the secret access key should be set to the previously retrieved value from the Security credentials tab.
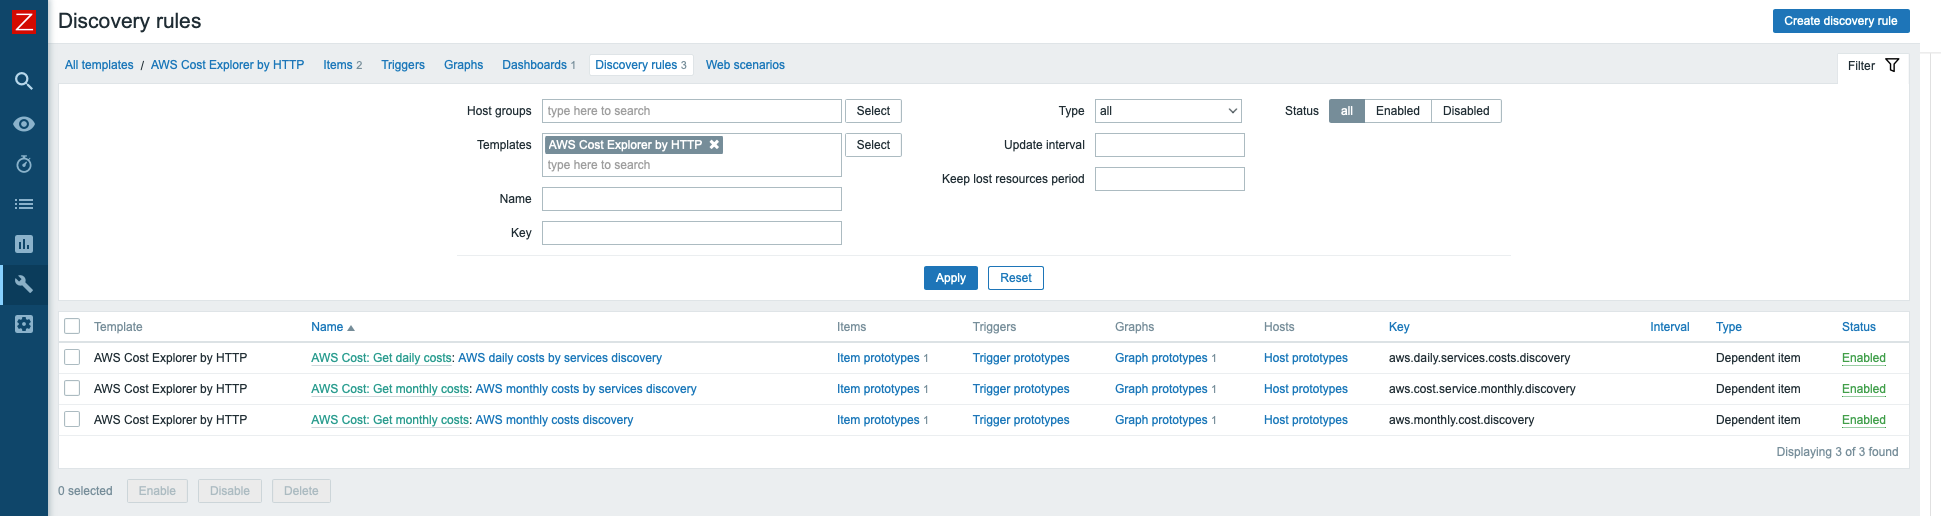
  • Click Add. The AWS Cost Explorer template has three low-level discovery rules that use master items. The low-level discovery rules will start discovering resources only after the master item has collected the required data.

    The best practice is to always test such items for data. Don’t forget to fill in the required macros!

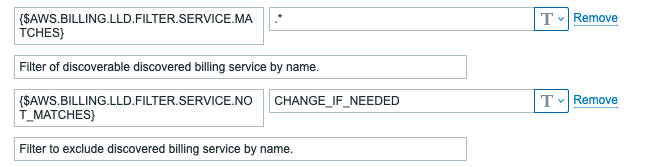
    In AWS daily costs by services and AWS monthly costs by services discovery you can filter by service, which can be specified in macros.
  • Let’s execute the master items to collect the required data on-demand. Choose both items to get data and click Execute now.

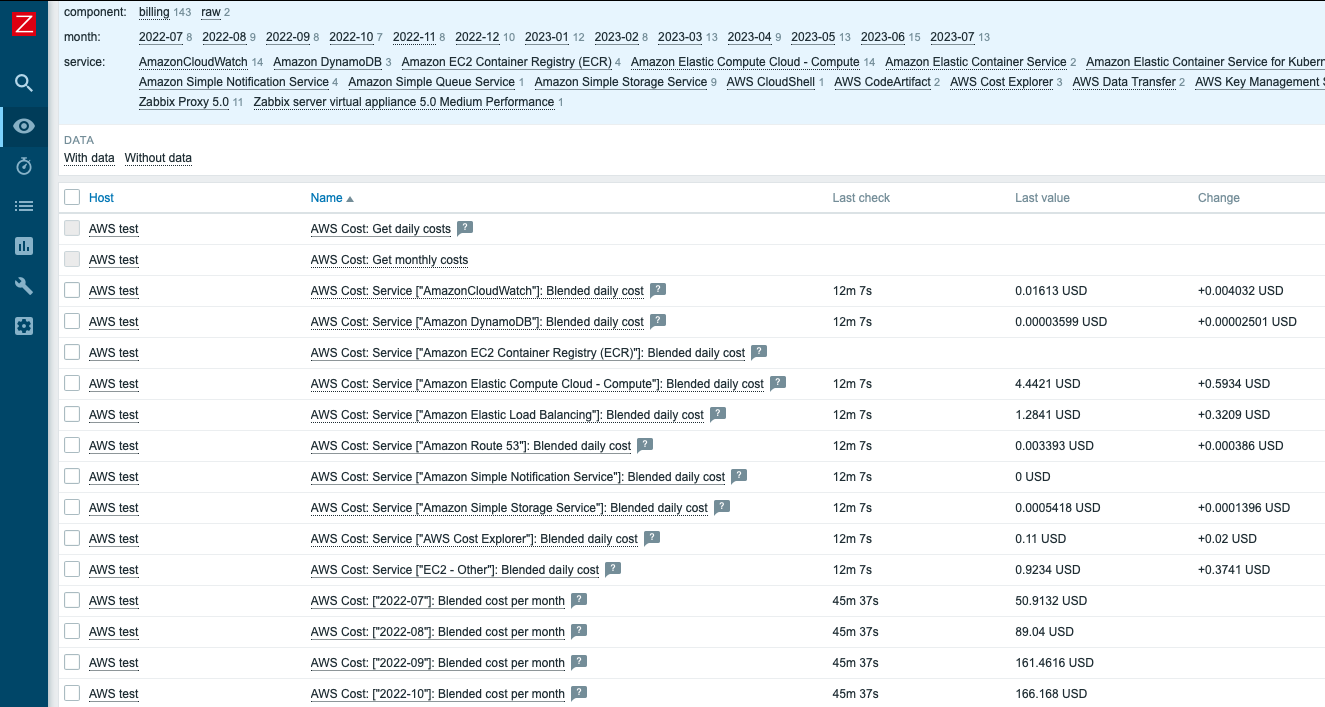
    In a few minutes, you should receive cost metrics by services for 12 months plus the current month, as well as by day. If you want the information to be stored longer, remember to change the Keep lost resources period in the LLD rule, as it’s set to 30 days by default.
Good luck!

The post Monitoring AWS Cost Explorer with Zabbix appeared first on Zabbix Blog.

New Windows/Linux Firmware Attack

Post Syndicated from Bruce Schneier original https://www.schneier.com/blog/archives/2023/12/new-windows-linux-firmware-attack.html

Interesting attack based on malicious pre-OS logo images:

LogoFAIL is a constellation of two dozen newly discovered vulnerabilities that have lurked for years, if not decades, in Unified Extensible Firmware Interfaces responsible for booting modern devices that run Windows or Linux….

The vulnerabilities are the subject of a coordinated mass disclosure released Wednesday. The participating companies comprise nearly the entirety of the x64 and ARM CPU ecosystem, starting with UEFI suppliers AMI, Insyde, and Phoenix (sometimes still called IBVs or independent BIOS vendors); device manufacturers such as Lenovo, Dell, and HP; and the makers of the CPUs that go inside the devices, usually Intel, AMD or designers of ARM CPUs….

As its name suggests, LogoFAIL involves logos, specifically those of the hardware seller that are displayed on the device screen early in the boot process, while the UEFI is still running. Image parsers in UEFIs from all three major IBVs are riddled with roughly a dozen critical vulnerabilities that have gone unnoticed until now. By replacing the legitimate logo images with identical-looking ones that have been specially crafted to exploit these bugs, LogoFAIL makes it possible to execute malicious code at the most sensitive stage of the boot process, which is known as DXE, short for Driver Execution Environment.

“Once arbitrary code execution is achieved during the DXE phase, it’s game over for platform security,” researchers from Binarly, the security firm that discovered the vulnerabilities, wrote in a whitepaper. “From this stage, we have full control over the memory and the disk of the target device, thus including the operating system that will be started.”

From there, LogoFAIL can deliver a second-stage payload that drops an executable onto the hard drive before the main OS has even started.

Details.

It’s an interesting vulnerability. Corporate buyers want the ability to display their own logos, and not the logos of the hardware makers. So the ability has to be in the BIOS, which means that the vulnerabilities aren’t being protected by any of the OS’s defenses. And the BIOS makers probably pulled some random graphics library off the Internet and never gave it a moment’s thought after that.

AI isn’t just robots: How to talk to young children about AI

Post Syndicated from Sway Grantham original https://www.raspberrypi.org/blog/how-to-talk-to-young-children-about-ai/

Young children have a unique perspective on the world they live in. They often seem oblivious to what’s going on around them, but then they will ask a question that makes you realise they did get some insight from a news story or a conversation they overheard. This happened to me with a class of ten-year-olds when one boy asked, with complete sincerity and curiosity, “And is that when the zombie apocalypse happened?” He had unknowingly conflated the Great Plague with television depictions of zombies taking over the world.

Child with tablet.
Photo by Patricia Prudente.

How to talk to young people about AI

Absorbing media and assimilating it into your existing knowledge is a challenge, and this is a concern when the media is full of big, scary headlines about artificial intelligence (AI) taking over the world, stealing jobs, and being sentient. As teachers and parents, you don’t need to know all the details about AI to answer young people’s questions, but you can avoid accidentally introducing alternate conceptions. This article offers some top tips to help you point those inquisitive minds in the right direction.

Child with tablet.
Photo by Kelly Sikkema.

AI is not a person

Technology companies like to anthropomorphise their products and give them friendly names. Why? Because it makes their products seem more endearing and less scary, and makes you more likely to include them in your lives. However, when you think of AI as a human with a name who needs you to say ‘please’ or is ‘there to help you’, you start to make presumptions about how it works, what it ‘knows’, and its morality. This changes what we ask, how much we trust an AI device’s responses, and how we behave when using the device. The device, though, does not ‘see’ or ‘know’ anything; instead, it uses lots of data to make predictions. Think of word association: if I say “bread”, I predict that a lot of people in the UK will think “butter”. Here, I’ve used the data I’ve collected from years of living in this country to predict a reasonable answer. This is all AI devices are doing. 

Child with phone.
Photo by bruce mars.

[AI] does not ‘see’ or ‘know’ anything; instead, it uses lots of data to make predictions.

When talking to young children about AI, try to avoid using pronouns such as ‘she’ or ‘he’. Where possible, avoid giving devices human names, and instead call them “computer”, to reinforce the idea that humans and computers are very different. Let’s imagine that a child in your class says, “Alexa told me a joke at the weekend — she’s funny!” You could respond, “I love using computers to find new jokes! What was it?” This is just a micro-conversation, but with it, you are helping to surreptitiously challenge the child’s perception of Alexa and the role of AI in it.

Where possible, avoid giving devices human names, and instead call them ‘computer’, to reinforce the idea that humans and computers are very different.

Another good approach is to remember to keep your emotions separate from computers, so as not to give them human-like characteristics: don’t say that the computer ‘hates’ you, or is ‘deliberately ignoring’ you, and remember that it’s only ‘helpful’ because it was told to be. Language is important, and we need to continually practise avoiding anthropomorphism.

AI isn’t just robots (actually, it rarely is)

The media plays a huge role in what we imagine when we talk about AI. For the media, the challenge is how to make lines of code and data inside a computer look exciting and recognisable to their audiences. The answer? Robots! When learners hear about AI taking over the world, it’s easy for them to imagine robots like those you’d find in a Marvel movie. Yet the majority of AI exists within systems they’re already aware of and are using — you might just need to help draw their attention to it.

Even better than just calling out uses of AI: try to have conversations about when things go wrong and AI systems suggest silly options.

For example, when using a word processor, you can highlight to learners that the software sometimes predicts what word you want to type next, and that this is an example of the computer using AI. When learners are using streaming services for music or TV and the service predicts something that they might want to watch or listen to next, point out that this is using AI technology. When they see their parents planning a route using a satnav, explain that the satnav system uses data and AI to plan the best route.

Even better than just calling out uses of AI: try to have conversations about when things go wrong and AI systems suggest silly options. This is a great way to build young people’s critical thinking around the use of computers. AI systems don’t always know best, because they’re just making predictions, and predictions can always be wrong.

AI complements humans

There’s a delicate balance between acknowledging the limitations of AI and portraying it as a problematic tool that we shouldn’t use. AI offers us great opportunities to improve the way we work, to get us started on a creative project, or to complete mundane tasks. However, it is just a tool, and tools complement the range of skills that humans already have. For example, if you gave an AI chatbot app the prompt, ‘Write a setting description using these four phrases: dark, scary, forest, fairy tale’, the first output from the app probably wouldn’t make much sense. As a human, though, you’d probably have to do far less work to edit the output than if you had had to write the setting description from scratch. Now, say you had the perfect example of a setting description, but you wanted 29 more examples, a different version for each learner in your class. This is where AI can help: completing a repetitive task and saving time for humans. 

Child with phone.
Photo by zhenzhong liu.

To help children understand how AI and humans complement each other, ask them the question, ‘What can’t a computer do?’ Answers that I have received before include, ‘Give me a hug’, ‘Make me laugh’, and ‘Paint a picture’, and these are all true. Can Alexa tell you a joke that makes you laugh? Yes — but a human created that joke. The computer is just the way in which it is being shared. Even with AI ‘creating’ new artwork, it is really only using data from something that someone else created. Humans are required. 

Overall, we must remember that young children are part of a world that uses AI, and that it is likely to be ever more present in the future. We need to ensure that they know how to use AI responsibly, by minimising their alternate conceptions. With our youngest learners, this means taking care with the language you choose and the examples you use, and explaining AI’s role as a tool.

To help children understand how AI and humans complement each other, ask them the question, ‘What can’t a computer do?’

These simple approaches are the first steps to empowering children to go on to harness this technology. They also pave the way for you to simply introduce the core concepts of AI in later computing lessons without first having to untangle a web of alternate conceptions.


This article also appears in issue 22 of Hello World, which is all about teaching and AI. Download your free PDF copy now.

If you’re an educator, you can use our free Experience AI Lessons to teach your learners the basics of how AI works, whatever your subject area.

The post AI isn’t just robots: How to talk to young children about AI appeared first on Raspberry Pi Foundation.

Living our Values and Leveraging Diverse Skill Sets: How Jonathan Atwood Built a Successful Career as a Customer Advisor at Rapid7

Post Syndicated from Rapid7 original https://blog.rapid7.com/2023/12/11/living-our-values-and-leveraging-diverse-skill-sets-how-jonathan-atwood-built-a-successful-career-as-a-customer-advisor-at-rapid7/

Living our Values and Leveraging Diverse Skill Sets: How Jonathan Atwood Built a Successful Career as a Customer Advisor at Rapid7

At Rapid7, our Customer Advisors play a pivotal role at ensuring our customers understand their threat landscape – and feel confident in their security programs. By collaborating across various internal teams, strengthening customer relationships, and proactively seeking solutions and advocating for customer needs, Customer Advisors have a direct impact on the fortunes of our business. To do this successfully requires a clear understanding of Rapid7’s core values and associated behaviors as well as an equal balance of strong technical knowledge and exceptional customer relationship skills.

Jonathan: “You need to create a strong relationship with customers to fully understand their needs and their business. You also have to be able to talk in detail about very technical scenarios. This requires having some experience or education in the cybersecurity field as well as the ability to relay information to our engineers and developers. Customers are extremely aware of the potential risks a security event may pose to their businesses, so it’s important their questions are answered in detail. This enables a clear understanding of what is happening in their environments.”

In addition to presenting and reviewing activity reports, Customer Advisors like Jonathan take a proactive approach to providing guidance and advice on all aspects of a customer’s security ecosystem.

Jonathan: “I may be asked to advise on reviewing the results of a recent Pen test, break down a bug or issue with a particular piece of code, or speak up if there is a storage container system they are using that I wouldn’t agree with or recommend”.

Jonathan also notes that the requirements for each customer can also vary depending on industry or field, based on specific security frameworks that may be in place that govern how they do business. Understanding these requirements helps provide additional guidance and shape recommendations for the unique needs of individual customers.

Jonathan: “HIPAA is a common example of a security framework. So if I have a customer who is in the medical field, I’m also thinking of the regulations in place for protecting patient health information and how to best advise them based on those specific requirements.”

While the role is dynamic and requires a wide range of skills to be successful, Jonathan says it’s the ability to see the impact of his work that he finds most rewarding.

Jonathan: “I’ve always had an aspiration to help people. In this role, I can feel the impact my work has on the customer as well as internally at Rapid7. When I have provided the right guidance and solutions and they are happy with our services, that leads to customer renewals and helps you feel like you’re contributing directly to the success of the business.”

The responsibility for cultivating relationships isn’t limited to external customers. For Jonathan, building internal relationships helps him drive positive impact in his role and for his own development and growth.

Jonathan: “Collaboration is a huge part of Rapid7’s culture. You should never be afraid of reaching out to ask a question or to raise your hand if you need help. Any time I’ve reached out to someone with a question – whether it was big or small, in a team chat or a 1:1 conversation, everyone has always been willing to jump in and help.

“We talk a lot about our values as a company, and when it comes to those Rapid7 core values like Advocating for Customers, Challenging Convention, and Impacting Together, we all understand that having these conversations helps get us to the best possible outcome. Additionally, the events the company hosts to  bring people from different teams together are helpful in understanding how different teams operate and how you might eventually partner together in the future.”

An emphasis on collaboration and a deep dive of Rapid7’s core values are key elements of a new hire’s global onboarding program. The current program combines a mix of company education (culture, values, benefits processes, etc.) with programs specific to each person’s role or team.

Jonathan: “Once hired, I would recommend fully taking advantage of the first few weeks of onboarding. A lot of content is self paced, and it sets a good foundation of how to be successful at Rapid7 as well as imparts information about our products and services. I also recommend new Customer Advisors become certified for Insight IDR. As an employee, you can take the test for free, and it gives you a great foundation to build on. This is also a great time to shadow some calls to get familiar with some common topics and questions that might come up.”

Throughout onboarding and beyond, Jonathan also states the importance of being eager to learn (reflected in Rapid7’s “Never Done” core value).

Jonathan: “For new hires in this role, come in with an open mind and be ready to learn and ask questions. This is a very complex role, and it can be stressful at times due to the nature of our industry. The more you recognize and seek the experience and feedback of those around you, the more successful you will be. Take advantage of opportunities to learn and grow throughout your time here – not just as a new hire.”

Rapid7 is continuing to grow teams in locations around the world. Learn more about career opportunities or browse all open jobs.

Bottomley: Solving the Looming Developer Liability Problem

Post Syndicated from corbet original https://lwn.net/Articles/954528/

James Bottomley writes
that open-source developers are increasingly likely to be held liable for
flaws in their code and suggests a solution:

Indemnification means one party, in particular circumstances,
agreeing to be on the hook for the legal responsibilities of
another party. This is actually a well known way not of avoiding
liability but transferring it to where it belongs. As such, it’s
easily sellable in the court of public opinion: we’re not looking
to avoid liability, merely trying to make sure it lands on those
who are making all the money from the code.

Next-Gen Broadcom PCIe Switches to Support AMD Infinity Fabric XGMI to Counter NVIDIA NVLink

Post Syndicated from Patrick Kennedy original https://www.servethehome.com/next-gen-broadcom-pcie-switches-to-support-amd-infinity-fabric-xgmi-to-counter-nvidia-nvlink/

Broadcom said it will support AMD XGMI or Infinity Fabric on its next-gen PCIe switches and we expect XGMI NICs in a big counter to NVIDIA

The post Next-Gen Broadcom PCIe Switches to Support AMD Infinity Fabric XGMI to Counter NVIDIA NVLink appeared first on ServeTheHome.

[$] Some recent and notable changes to Rust

Post Syndicated from corbet original https://lwn.net/Articles/954033/

The Rust project makes incremental releases every six
weeks, a fact that makes it easy to overlook some of the
interesting changes coming to the language, such as new
ABIs, better debugger support, asynchronous traits, and
support for C strings.
The end of the year provides an opportunity to look back
over the past several months of updates, and to look
forward to what to expect in 2024.

Blue/Green Deployments with Amazon ECS using Amazon CodeCatalyst

Post Syndicated from Hareesh Iyer original https://aws.amazon.com/blogs/devops/blue-green-deployments-with-amazon-ecs-using-amazon-codecatalyst/

Amazon CodeCatalyst is a modern software development service that empowers teams to deliver software on AWS easily and quickly. Amazon CodeCatalyst provides one place where you can plan, code, and build, test, and deploy your container applications with continuous integration/continuous delivery (CI/CD) tools.

In this post, we will walk-through how you can configure Blue/Green and canary deployments for your container workloads within Amazon CodeCatalyst.

Pre-requisites 

To follow along with the instructions, you’ll need:

  • An AWS account. If you don’t have one, you can create a new AWS account.
  • An Amazon Elastic Container Service (Amazon ECS) service using the Blue/Green deployment type. If you don’t have one, follow the Amazon ECS tutorial and complete steps 1-5.
  • An Amazon Elastic Container Registry (Amazon ECR) repository named codecatalyst-ecs-image-repo. Follow the Amazon ECR user guide to create one.
  • An Amazon CodeCatalyst space, with an empty Amazon CodeCatalyst project named codecatalyst-ecs-project and an Amazon CodeCatalyst environment called codecatalyst-ecs-environment. Follow the Amazon CodeCatalyst tutorial to set these up.
  • Follow the Amazon CodeCatalyst user guide to associate your account to the environment.

Walkthrough 

Now that you have setup an Amazon ECS cluster and configured Amazon CodeCatalyst to perform deployments, you can configure Blue/Green deployment for your workload. Here are the high-level steps:

  • Collect details of the Amazon ECS environment that you created in the prerequisites step.
  • Add source files for the containerized application to Amazon CodeCatalyst.
  • Create Amazon CodeCatalyst Workflow.
  • Validate the setup.

Step 1: Collect details from your ECS service and Amazon CodeCatalyst role

In this step, you will collect information from your prerequisites that will be used in the Blue/Green Amazon CodeCatalyst configuration further down this post.

If you followed the prerequisites tutorial, below are AWS CLI commands to extract values that are used in this post. You can run this on your local workstation or with AWS CloudShell in the same region you created your Amazon ECS cluster.

ECSCLUSTER='tutorial-bluegreen-cluster'
ECSSERVICE='service-bluegreen'

ECSCLUSTERARN=$(aws ecs describe-clusters --clusters $ECSCLUSTER --query 'clusters[*].clusterArn' --output text)
ECSSERVICENAME=$(aws ecs describe-services --services $ECSSERVICE --cluster $ECSCLUSTER  --query 'services[*].serviceName' --output text)
TASKDEFARN=$(aws ecs describe-services --services $ECSSERVICE --cluster $ECSCLUSTER  --query 'services[*].taskDefinition' --output text)
TASKROLE=$(aws ecs describe-task-definition --task-definition tutorial-task-def --query 'taskDefinition.executionRoleArn' --output text)
ACCOUNT=$(aws sts get-caller-identity --query "Account" --output text)

echo Account_ID value: $ACCOUNT
echo EcsRegionName value: $AWS_DEFAULT_REGION
echo EcsClusterArn value: $ECSCLUSTERARN
echo EcsServiceName value: $ECSSERVICENAME
echo TaskDefinitionArn value: $TASKDEFARN
echo TaskExecutionRoleArn value: $TASKROLE

Note down the values of Account_ID, EcsRegionName, EcsClusterArn, EcsServiceName, TaskDefinitionArn and TaskExecutionRoleArn. You will need these values in later steps.

Step 2: Add Amazon IAM roles to Amazon CodeCatalyst

In this step, you will create a role called CodeCatalystWorkflowDevelopmentRole-spacename to provide Amazon CodeCatalyst service permissions to build and deploy applications. This role is only recommended for use with development accounts and uses the AdministratorAccess AWS managed policy, giving it full access to create new policies and resources in this AWS account.

  • In Amazon CodeCatalyst, navigate to your space. Choose the Settings tab.
  • In the Navigation page, select AWS accounts. A list of account connections appears. Choose the account connection that represents the AWS account where you created your build and deploy roles.
  • Choose Manage roles from AWS management console.
  • The Add IAM role to Amazon CodeCatalyst space page appears. You might need to sign in to access the page.
  • Choose Create CodeCatalyst development administrator role in IAM. This option creates a service role that contains the permissions policy and trust policy for the development role.
  • Note down the role name. Choose Create development role.

Step 3: Create Amazon CodeCatalyst source repository

In this step, you will create a source repository in CodeCatalyst. This repository stores the tutorial’s source files, such as the task definition file.

  • In Amazon CodeCatalyst, navigate to your project.
  • In the navigation pane, choose Code, and then choose Source repositories.
  • Choose Add repository, and then choose Create repository.
  •  In Repository name, enter:

codecatalyst-advanced-deployment

  • Choose Create.

Step 4: Create Amazon CodeCatalyst Dev Environment

In this step, you will create a Amazon CodeCatalyst Dev environment to work on the sample application code and configuration in the codecatalyst-advanced-deployment repository. Learn more about Amazon CodeCatalyst dev environments in Amazon CodeCatalyst user guide.

  • In Amazon CodeCatalyst, navigate to your project.
  • In the navigation pane, choose Code, and then choose Source repositories.
  • Choose the source repository for which you want to create a dev environment.
  • Choose Create Dev Environment.
  • Choose AWS Cloud9 from the drop-down menu.
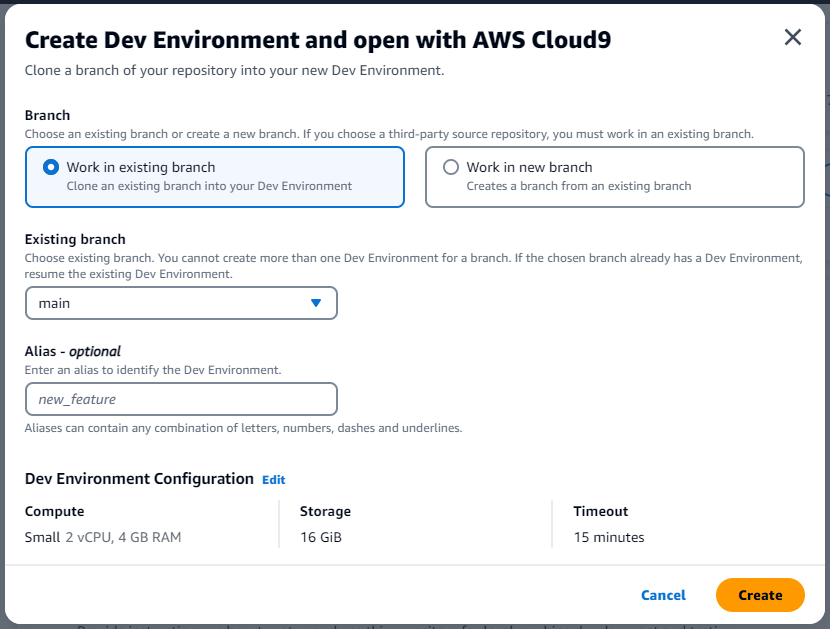
  • In Create Dev Environment and open with AWS Cloud9 page (Figure 1), choose Create to create a Cloud9 development environment.

Create Dev Environment in Amazon CodeCatalyst

Figure 1: Create Dev Environment in Amazon CodeCatalyst

AWS Cloud9 IDE opens on a new browser tab. Stay in AWS Cloud9 window to continue with Step 5.

Step 5: Add Source files to Amazon CodeCatalyst source repository

In this step, you will add source files from a sample application from GitHub to Amazon CodeCatalyst repository. You will be using this application to configure and test blue-green deployments.

  • On the menu bar at the top of the AWS Cloud9 IDE, choose Window, New Terminal or use an existing terminal window.
  • Download the Github project as a zip file, un-compress it and move it to your project folder by running the below commands in the terminal.

cd codecatalyst-advanced-deployment
wget -O SampleApp.zip https://github.com/build-on-aws/automate-web-app-amazon-ecs-cdk-codecatalyst/zipball/main/
unzip SampleApp.zip
mv build-on-aws-automate-web-app-amazon-ecs-cdk-codecatalyst-*/SampleApp/* .
rm -rf build-on-aws-automate-web-app-amazon-ecs-cdk-codecatalyst-*
rm SampleApp.zip

  • Update the task definition file for the sample application. Open task.json in the current directory. Find and replace “<arn:aws:iam::<account_ID>:role/AppRole> with the value collected from step 1: <TaskExecutionRoleArn>.
  • Amazon CodeCatalyst works with AWS CodeDeploy to perform Blue/Green deployments on Amazon ECS. You will create an Application Specification file, which will be used by CodeDeploy to manage the deployment. Create a file named appspec.yaml inside the codecatalyst-advanced-deployment directory. Update the <TaskDefinitionArn> with value from Step 1.
version: 0.0
Resources:
  - TargetService:
      Type: AWS::ECS::Service
      Properties:
        TaskDefinition: "<TaskDefinitionArn>"
        LoadBalancerInfo:
          ContainerName: "MyContainer"
          ContainerPort: 80
        PlatformVersion: "LATEST"
  • Commit the changes to Amazon CodeCatalyst repository by following the below commands. Update <your_email> and <your_name> with your email and name.

git config user.email "<your_email>"
git config user.name "<your_name>"
git add .
git commit -m "Initial commit"
git push

Step 6: Create Amazon CodeCatalyst Workflow

In this step, you will create the Amazon CodeCatalyst workflow which will automatically build your source code when changes are made. A workflow is an automated procedure that describes how to build, test, and deploy your code as part of a continuous integration and continuous delivery (CI/CD) system. A workflow defines a series of steps, or actions, to take during a workflow run.

  • In the navigation pane, choose CI/CD, and then choose Workflows.
  • Choose Create workflow. Select codecatalyst-advanced-deployment from the Source repository dropdown.
  • Choose main in the branch. Select Create (Figure 2). The workflow definition file appears in the Amazon CodeCatalyst console’s YAML editor.
    Create workflow page in Amazon CodeCatalyst

    Figure 2: Create workflow page in Amazon CodeCatalyst

  • Update the workflow by replacing the contents in the YAML editor with the below. Replace <Account_ID> with your AWS account ID. Replace <EcsRegionName>, <EcsClusterArn>, <EcsServiceName> with values from Step 1. Replace <CodeCatalyst-Dev-Admin-Role> with the Role Name from Step 3.
Name: BuildAndDeployToECS
SchemaVersion: "1.0"

# Set automatic triggers on code push.
Triggers:
  - Type: Push
    Branches:
      - main

Actions:
  Build_application:
    Identifier: aws/build@v1
    Inputs:
      Sources:
        - WorkflowSource
      Variables:
        - Name: region
          Value: <EcsRegionName>
        - Name: registry
          Value: <Account_ID>.dkr.ecr.<EcsRegionName>.amazonaws.com
        - Name: image
          Value: codecatalyst-ecs-image-repo
    Outputs:
      AutoDiscoverReports:
        Enabled: false
      Variables:
        - IMAGE
    Compute:
      Type: EC2
    Environment:
      Connections:
        - Role: <CodeCatalystPreviewDevelopmentAdministrator role>
          Name: "<Account_ID>"
      Name: codecatalyst-ecs-environment
    Configuration:
      Steps:
        - Run: export account=`aws sts get-caller-identity --output text | awk '{ print $1 }'`
        - Run: aws ecr get-login-password --region ${region} | docker login --username AWS --password-stdin ${registry}
        - Run: docker build -t appimage .
        - Run: docker tag appimage ${registry}/${image}:${WorkflowSource.CommitId}
        - Run: docker push --all-tags ${registry}/${image}
        - Run: export IMAGE=${registry}/${image}:${WorkflowSource.CommitId}
  RenderAmazonECStaskdefinition:
    Identifier: aws/ecs-render-task-definition@v1
    Configuration:
      image: ${Build_application.IMAGE}
      container-name: MyContainer
      task-definition: task.json
    Outputs:
      Artifacts:
        - Name: TaskDefinition
          Files:
            - task-definition*
    DependsOn:
      - Build_application
    Inputs:
      Sources:
        - WorkflowSource
  DeploytoAmazonECS:
    Identifier: aws/ecs-deploy@v1
    Configuration:
      task-definition: /artifacts/DeploytoAmazonECS/TaskDefinition/${RenderAmazonECStaskdefinition.task-definition}
      service: <EcsServiceName>
      cluster: <EcsClusterArn>
      region: <EcsRegionName>
      codedeploy-appspec: appspec.yaml
      codedeploy-application: tutorial-bluegreen-app
      codedeploy-deployment-group: tutorial-bluegreen-dg
      codedeploy-deployment-description: "Blue-green deployment for sample app"
    Compute:
      Type: EC2
      Fleet: Linux.x86-64.Large
    Environment:
      Connections:
        - Role: <CodeCatalyst-Dev-Admin-Role>
        # Add account id within quotes. Eg: "12345678"
          Name: "<Account_ID>"
      Name: codecatalyst-ecs-environment
    DependsOn:
      - RenderAmazonECStaskdefinition
    Inputs:
      Artifacts:
        - TaskDefinition
      Sources:
        - WorkflowSource

The workflow above does the following:

  • Whenever a code change is pushed to the repository, a Build action is triggered. The Build action builds a container image and pushes the image to the Amazon ECR repository created in Step 1.
  • Once the Build stage is complete, the Amazon ECS task definition is updated with the new ECR repository image.
  • The DeploytoECS action then deploys the new image to Amazon ECS using Blue/Green Approach.

To confirm everything was configured correctly, choose the Validate button. It should add a green banner with The workflow definition is valid at the top.

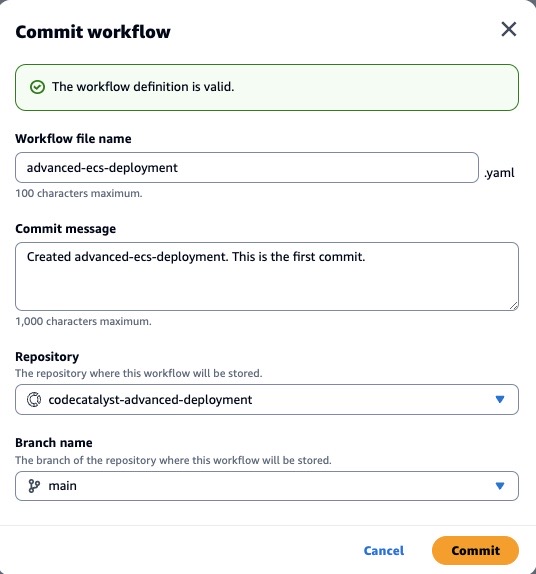
Select Commit to add the workflow to the repository (Figure 3)

Commit Workflow page in Amazon CodeCatalyst
Figure 3: Commit workflow page in Amazon CodeCatalyst

The workflow file is stored in a ~/.codecatalyst/workflows/ folder in the root of your source repository. The file can have a .yml or .yaml extension.

Let’s review our work, using the load balancer’s URL that you created during prerequisites, paste it into your browser. Your page should look similar to (Figure 4).

Sample Application (Blue Version)
Figure 4: Sample Application (Blue version)

Step 7: Validate the setup

To validate the setup, you will make a small change to the sample application.

  • Open Amazon CodeCatalyst dev environment that you created in Step 4.
  • Update your local copy of the repository. In the terminal run the command below.

git pull

  • In the terminal, navigate to /templates folder. Open index.html and search for “Las Vegas”. Replace the word with “New York”. Save the file.
  • Commit the change to the repository using the commands below.

git add .
git commit -m "Updating the city to New York"
git push

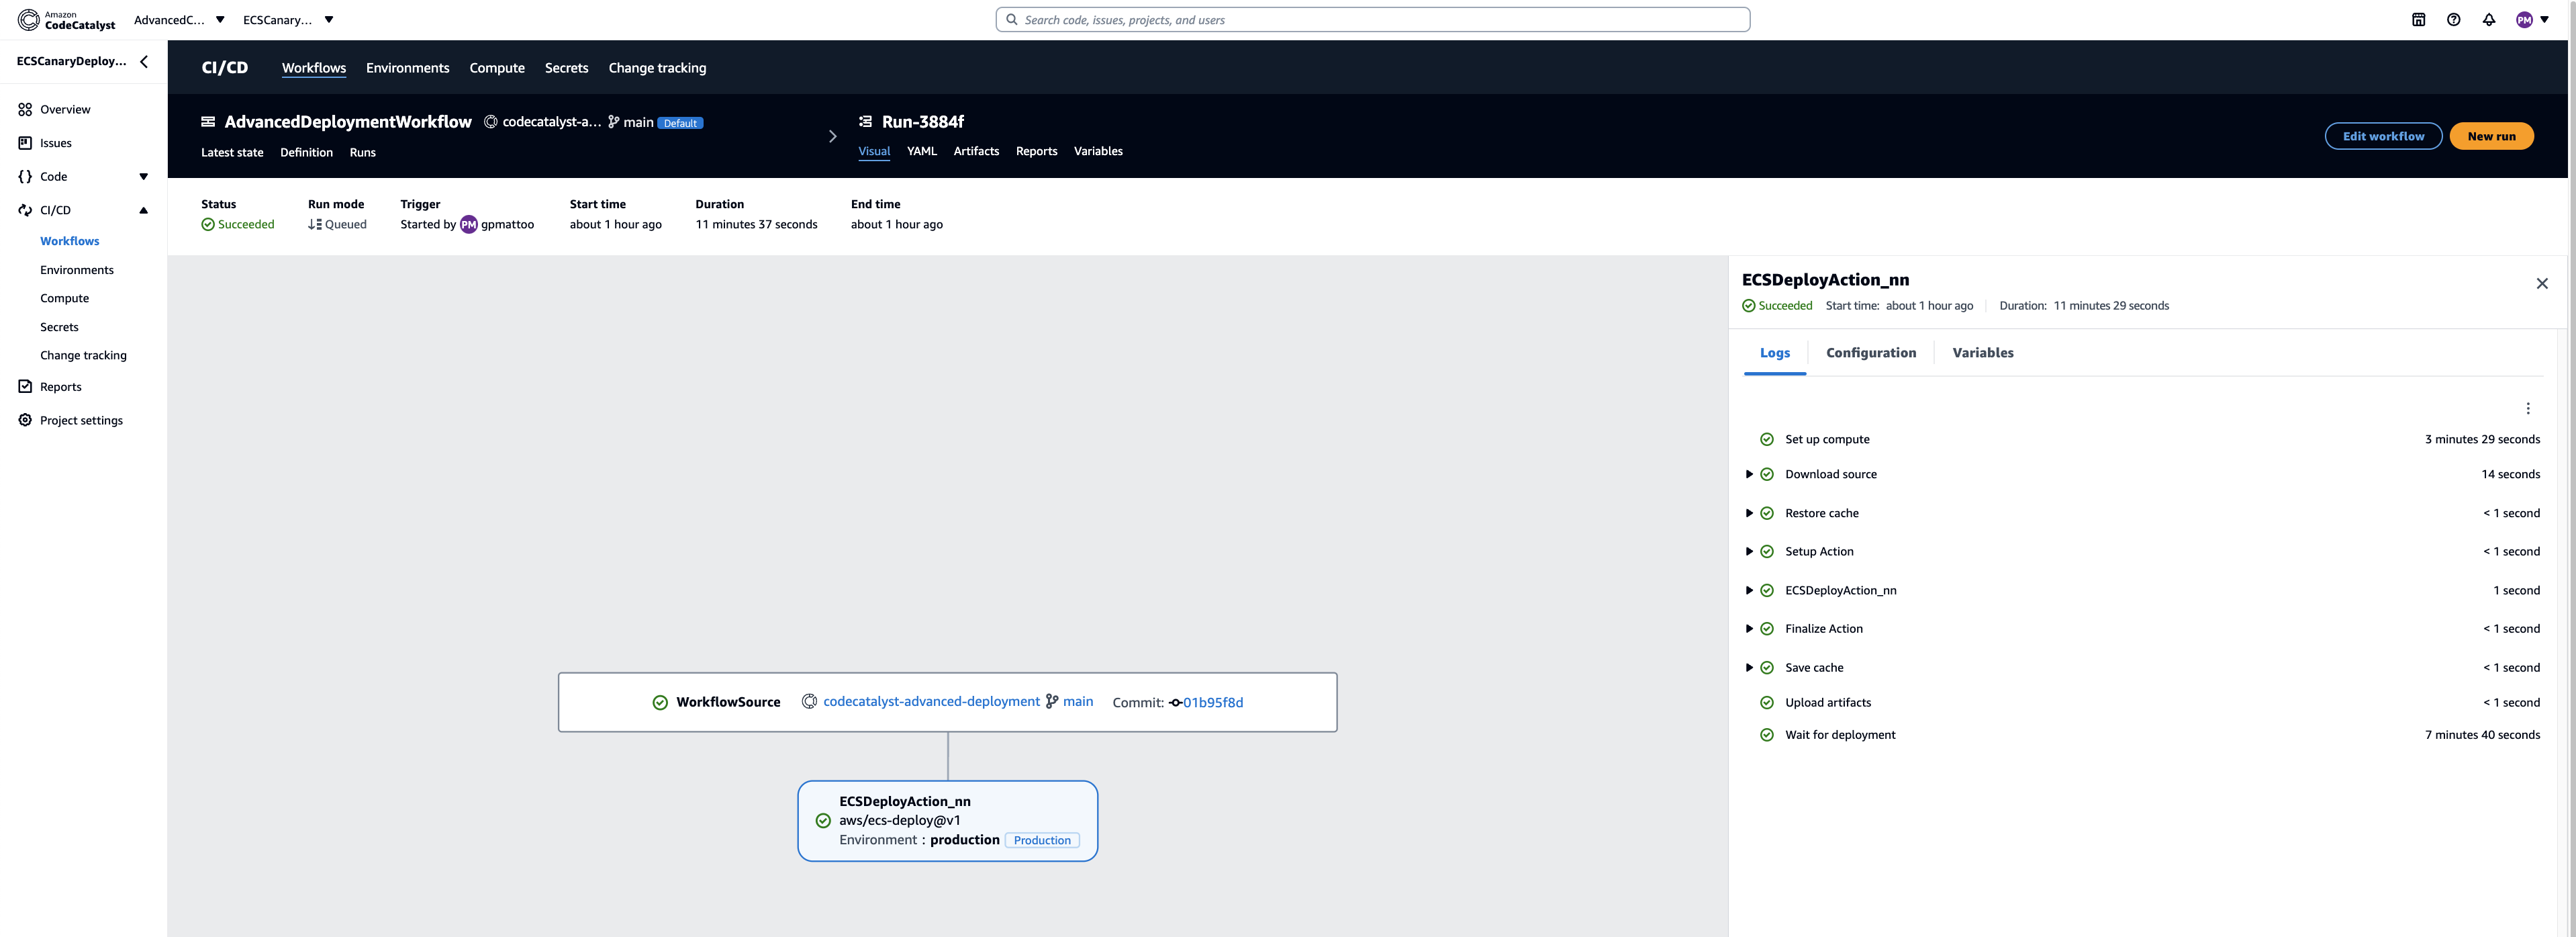
After the change is committed, the workflow should start running automatically. You can monitor of the workflow run in Amazon CodeCatalyst console (Figure 5)
Blue/Green Deployment Progress on Amazon CodeCatalyst

Figure 5: Blue/Green Deployment Progress on Amazon CodeCatalyst

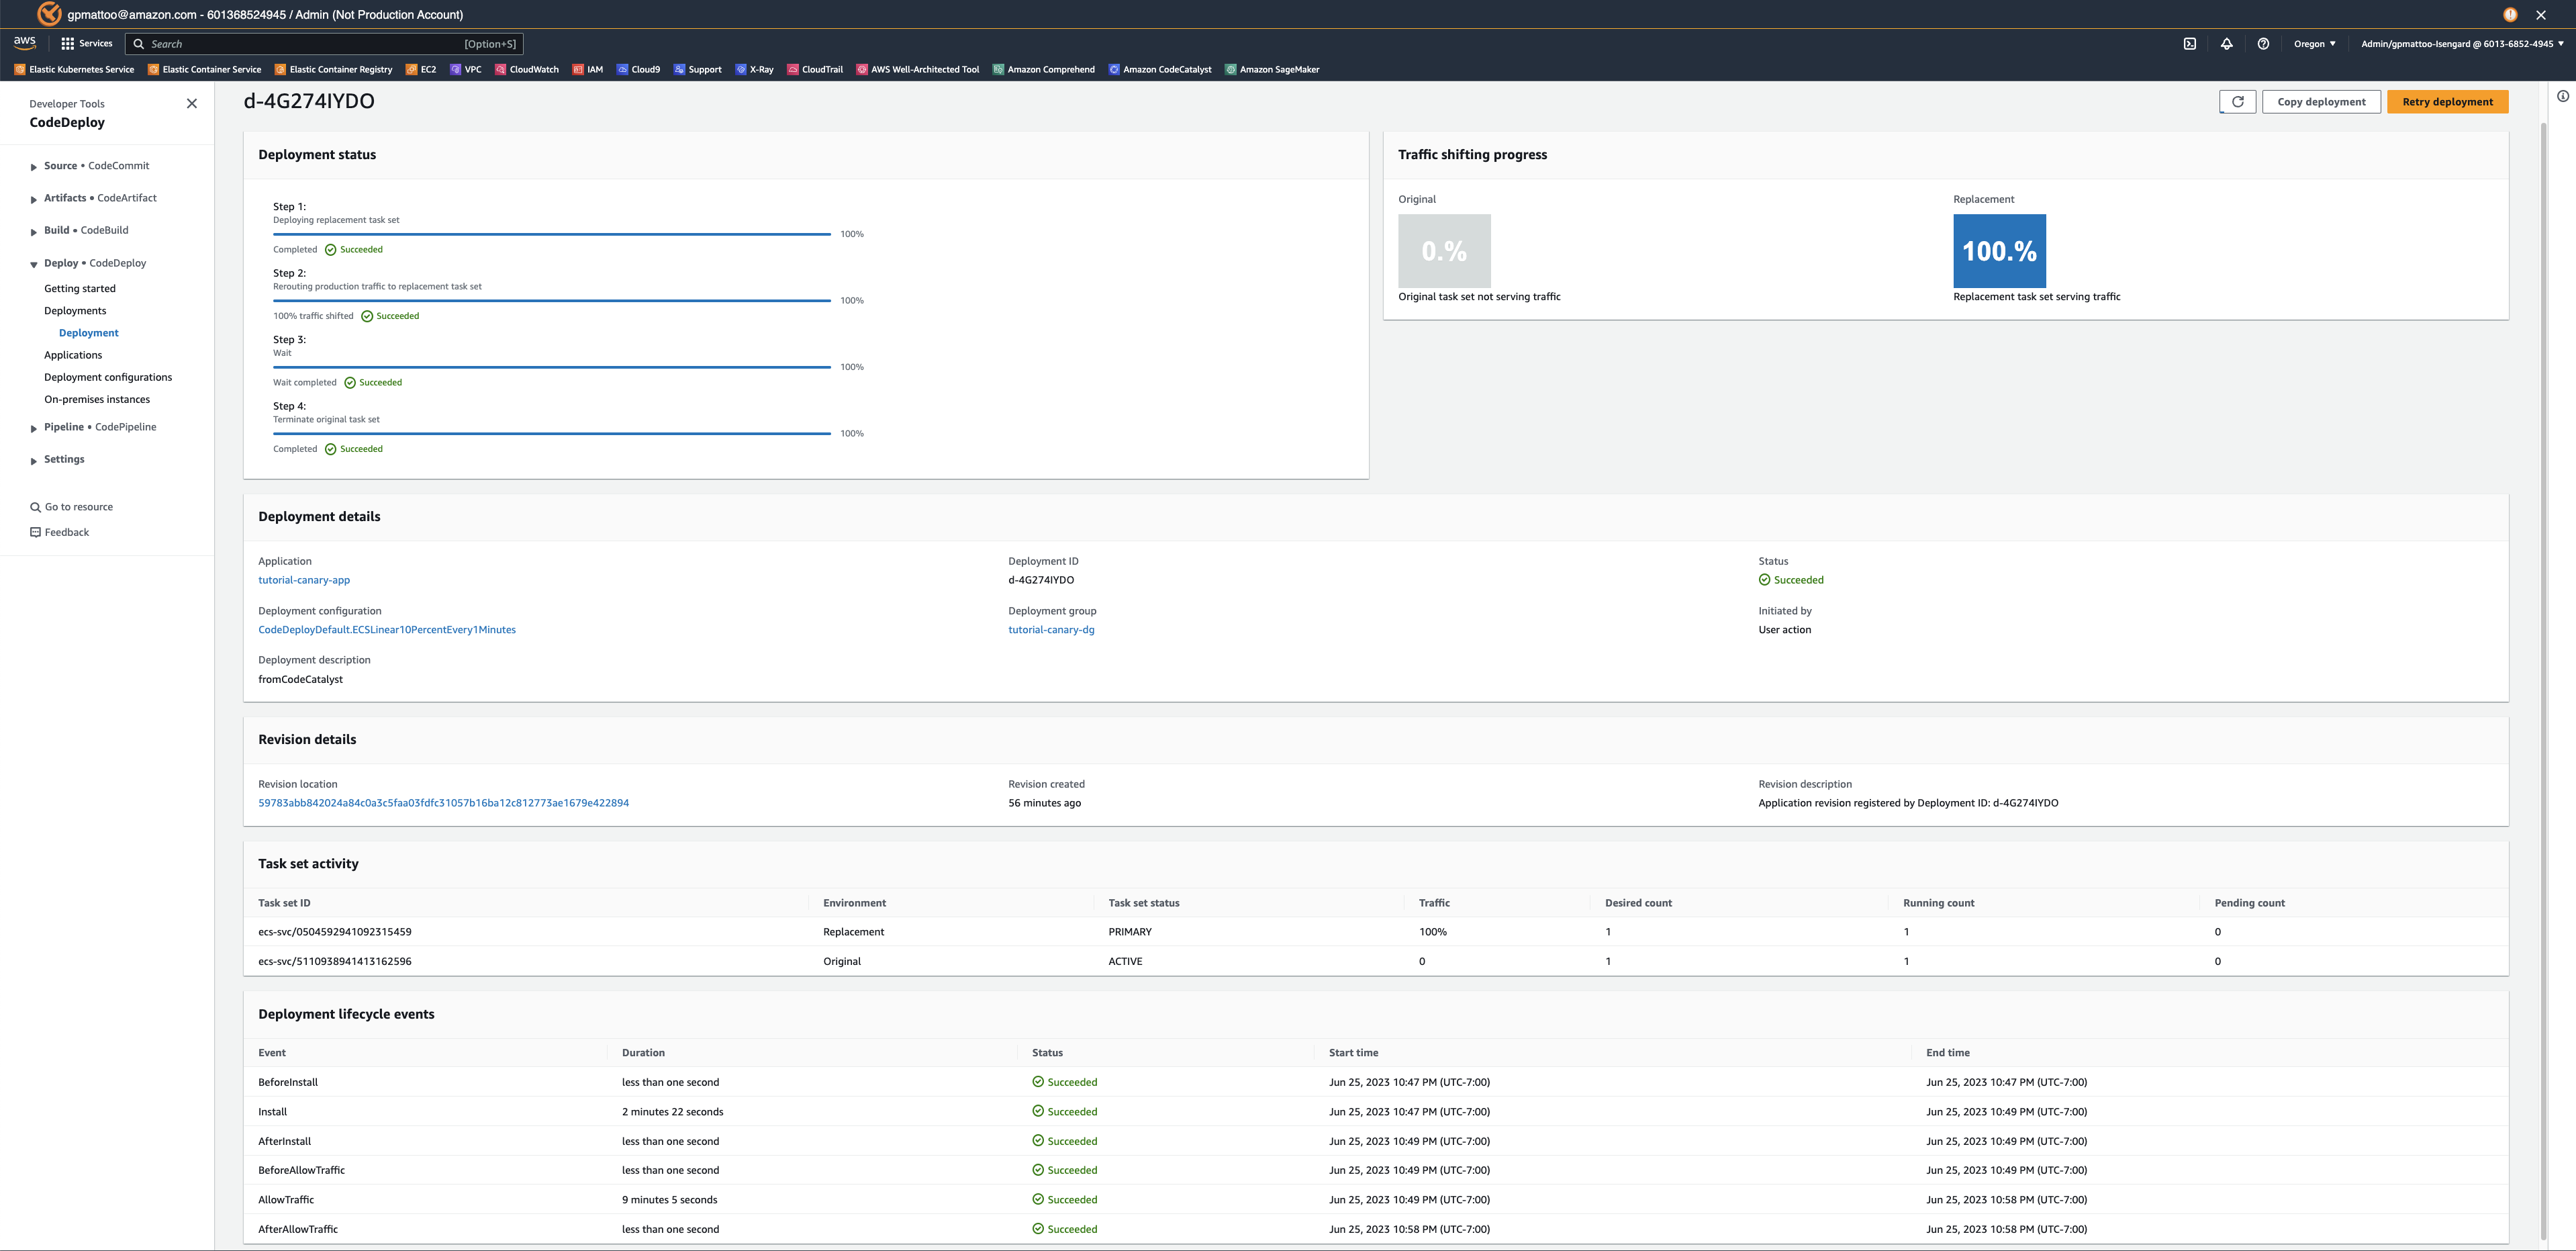
You can also see the deployment status on the AWS CodeDeploy deployment page (Figure 6)

  • Going back to the AWS console.
  • In the upper left search bar, type in “CodeDeploy”.
  • In the left hand menu, select Deployments.

Blue/Green Deployment Progress on AWS CodeDeploy
Figure 6: Blue/Green Deployment Progress on AWS CodeDeploy

Let’s review our update, using the load balancer’s URL that you created during pre-requisites, paste it into your browser. Your page should look similar to (Figure 7).
Sample Application (Green version)

Figure 7: Sample Application (Green version)

Cleanup

If you have been following along with this workflow, you should delete the resources you deployed so you do not continue to incur charges.

  • Delete the Amazon ECS service and Amazon ECS cluster from AWS console.
  • Manually delete Amazon CodeCatalyst dev environment, source repository and project from your CodeCatalyst Space.
  • Delete the AWS CodeDeploy application through console or CLI.

Conclusion

In this post, we demonstrated how you can configure Blue/Green deployments for your container workloads using Amazon CodeCatalyst workflows. The same approach can be used to configure Canary deployments as well. Learn more about AWS CodeDeploy configuration for advanced container deployments in AWS CodeDeploy user guide.

William Cardoso

William Cardoso is a Solutions Architect at Amazon Web Services based in South Florida area. He has 20+ years of experience in designing and developing enterprise systems. He leverages his real world experience in IT operations to work with AWS customers providing architectural and best practice recommendations for new and existing solutions. Outside of work, William enjoys woodworking, walking and cooking for friends and family.

Piyush Mattoo

Piyush Mattoo is a Solution Architect for enterprises at Amazon Web Services. He is a software technology leader with over 15 years of experience building scalable and distributed software systems that require a combination of broad T-shaped skills across multiple technologies. He has an educational background in Computer Science with a Masters degree in Computer and Information Science from University of Massachusetts. He is based out of Southern California and current interests include outdoor camping and nature walks.

Hareesh Iyer

Hareesh Iyer is a Senior Solutions Architect at AWS. He helps customers build scalable, secure, resilient and cost-efficient architectures on AWS. He is passionate about cloud-native patterns, containers and microservices.

Kernel prepatch 6.7-rc5

Post Syndicated from corbet original https://lwn.net/Articles/954469/

The 6.7-rc5 kernel prepatch is out for
testing.

Nothing looks particularly scary, which is good, because if it had
been, I wouldn’t have had the capacity to deal with it last week.

Let’s hope it stays that way even as I am getting better. Because the
holidays are almost upon us, and I’m woefully underprepared.

Електронното бъдеще е възможно, но не е неизбежно

Post Syndicated from Bozho original https://blog.bozho.net/blog/4180

С редица законодателни промени в последните месеци беше даден нов тласък на електронното управление. Разбира се, както се е доказвало многократно през годините, обнародването на един хубав текст в Държавен вестник не означава, че той ще бъде реализиран на практика, поради което предстои сериозна работа в изпълнителната власт.

Измененията в Закона за електронното управление бяха изготвени в Министерството на електронното управление (МЕУ) в предходното редовно правителство и приети през септември. В тях има редица подобрения, които изискват от администрацията сериозна работа.

Едно от тези изменения е приравняването на служебните справки по електронен път на удостоверенията, които администрацията изисква от гражданите. Задължението за администрацията да събира по служебен път информация, с която държавата вече разполага, е в Закона за електронното управление от 2009 г. За съжаление, практиката е, че администрациите цитират специалните закони, по които работят, и казват, че те се прилагат, а там по инерция законодателят е сложил изискване на удостоверения. За да не трябва да променяме цялата нормативна уредба, с измененията в закона се приравнява служебната справка на удостоверенията, изисквани по специалните закони. В допълнение се въвежда забрана за това в подзаконов акт да се предвижда изискване на удостоверения, както и гаранции за сигурността на служебното събиране, като по този начин удостоверенията, на които гражданите и бизнесът са куриери, най-накрая трябва да отпаднат. Това ще се случи, след като изпълнителната власт преправи наредбите си в съответствие със закона, за което Министерството на електронното управление е поело ангажимент.

Друга важна промяна е отпадането на изискването за квалифициран електронен подпис при заявяване на електронни услуги от физически лица. Електронният подпис е сигурен, но много неудобен и това през годините е било бариера пред използването на наличните е-услуги. С изменението вече няма да се изисква заявленията да бъдат подписвани, което ще позволи заявяване след идентификация по множество различни начини – вкл. с бъдещата електронна идентификация, с ПИК и др. Това означава надграждане на системи, така че те да позволят по-широко използване, но този процес вече започва.

Със същите изменения се предвижда догодина всички регистри, които държавата води, да станат електронни. За целта се създава централизирана система за управление на регистри, така че да не се налага всеки регистър да се електронизира поотделно с отделна обществена поръчка, а разходите за бюджета да станат непосилни. Централизираната система ще позволява създаването на нов регистър с няколко клика. Всички тетрадки, екселски таблици и остарели информационни системи ще могат да бъдат мигрирани към съвременна система, която да е достатъчно защитена, да се грижи за резервните копия, за връзките с други регистри, за публикуване на отворени данни, за проследимост на действията в тях – все неща, които една екселска таблица не може да предостави.

Споменавайки електронната идентификация, трябва да дадем повече детайли – след като процедурата за нови лични документи на МВР беше обединена с процедурата за електронна идентификация, общата такава „заби“ в съда в Люксембург. Това наложи Министерството на електронното управление през 2022 г. да възложи изграждане на мобилно приложение за електронна идентификация, какъвто е правилният подход от няколко години насам. За съжаление, през лятото на 2022 г. МВР не даде достъп на министерството до данни, необходими за функционирането на приложението. Едва в края на 2022 г. съдът на Европейския съюз и съответно Върховният административен съд позволиха сключването на договор от страна на МВР. В момента МВР изпълнява своя проект, подготвен през 2016 г., като Министерството на електронното управление опитва да му предостави вече изграденото по мобилното приложение през изминалата година, за да могат гражданите да получат електронна идентичност в мобилните си устройства дори без нужда от смяна на личните си карти. Когато такова приложение е налично, в комбинация с отпадането на изискването за подпис всеки гражданин ще може да ползва всички налични електронни услуги.

На следващо място през септември бяха приети измененията в Кодекса на труда, с които се предвижда отпадане на трудовата книжка. Данните от нея ще се въвеждат в регистър в НАП, който ще бъде базиран на настоящия регистър на трудовите договори. НАП има срок до юни 2025 г. да направи бизнес анализа, да измени подзаконовата уредба и да надгради регистъра. Когато това се случи, трудовите книжки ще се ползват само при пенсиониране, и то само от служители, които имат стаж през миналото хилядолетие. Причината за това е, че масовото дигитализиране на старите хартиени трудови книжки, в които има доста грешки и злоупотреби, и за които отговорността е на служителите, е почти непосилна задача за реализиране в мащаб. Важното е, че избраният подход ще позволи трудовата книжка да отпадне от ежедневието и на бизнеса, и на служителите.

Други важни промени, които ще бъдат усетени от гражданите, са измененията в Закона за движението по пътищата. Те отварят път за електронно връчване, получаване на известия по имейл или sms за издадени електронни фишове, както и възможност за плащането им с карта онлайн още преди да бъдат връчени официално. Всички тези мерки ще позволят на добросъвестните водачи да си плащат глобите. Отпадането на синия талон от своя страна освен символно значение на скъсване с хартиеното минало прави възможно изцяло електронен процес по административно наказване по Закона за движението по пътищата – нещо, което синият талон спираше заради нуждата да бъде отнет и съответно върнат.

Не можем да пропуснем и измененията в Закона за достъп до обществена информация – на пръв поглед скучно транспониране на европейска директива, но на практика въвеждащ задължения за всички администрации да поддържат отворени данни в реално време чрез програмни интерфейси. Макар досега да имаше такива текстове, те бяха в наредба и тя рядко се спазваше. Оттук нататък липсата на такива интерфейси ще може да бъде санкционирана, а ползата от тях е безпрецедентна прозрачност. Един пример – данните за всички плащания на държавата през системата СЕБРА, които отворихме еднократно през 2022 г., сега ще трябва да бъдат достъпни в реално време.

По Плана за възстановяване и устойчивост (ПВУ) също предстоят важни проекти и мерки. Вече описахме напредъка по една от тях – за дигитализация на всички регистри. Първият голям проект е за дигитализация на хартиените архиви на имотния регистър, регистъра на населението и кадастъра. Там за разлика от трудовите книжки хартиените документи се съхраняват от администрацията по определен ред и подлежат на систематично привеждане в цифров вид заедно с необходимите метаданни. Това ще позволи най-накрая да имаме истински имотен регистър, да не трябва да заявяваме удостоверение за наследници по постоянен адрес (защото наследниците се установяват и чрез „ровене“ в хартиените картони за гражданска регистрация), ще бъдат усетени и много други ползи.

Вторият голям проект по ПВУ е осигуряването на високоскоростна свързаност за всички региони в страната. Мрежата на Министерството на електронното управление ще достигне до всички 265 общини, а телекомите и интернет доставчиците ще осигурят покритие с висока скорост на слабо населените места. Така например в пощенските клонове ще могат да бъдат предоставяни административни услуги, като пощите ще бъдат в ролята на посредник (отново изменение, прието с промените в Закона за електронното управление). За съжаление, поради забавяне, натрупано при служебния кабинет, големият проект за дигитализация на пощите отпадна от ПВУ, но не отпада и възможността те да предоставят услуги, за да не трябва хората в малките населени места да ходят до областния град, за да ползват административни услуги.

Продължава да има нужда от подобрения в много закони, но основната работа е свършена в последните месеци. Сега предстои изпълнителната власт и администрацията да използват политическата подкрепа, която има за тези мерки, за да може след две години да имаме променена държава – по-електронна, по-ефективна, по-удобна за гражданите и бизнеса, по-сигурна и по-защитена от корупционни практики.

За да изпълни всичко това обаче, държавата трябва да организира по-добре възлагането на софтуер и други информационни и комуникационни технологии. Това е важна точка в програмата на правителството, без която изброените мерки могат да се окажат затлачени от безкрайни процедури, недобросъвестни изпълнителни, липса на вътрешен капацитет за управление на проекти, саботаж и административно безвремие. В програмата на правителството е включена промяна на начина, по който държавата ползва ИТ, като би трябвало тази промяна да намери своето законово изражение догодина.

Електронното бъдеще е възможно, но не е неизбежно – нужна е сериозна работа и активна политическа подкрепа, иначе има риск добрите намерения, макар и обнародвани в Държавен вестник, да не постигнат желания резултат.

(Статията е написана специално за сп. Мениджър)

Материалът Електронното бъдеще е възможно, но не е неизбежно е публикуван за пръв път на БЛОГодаря.

Facebook Enables Messenger End-to-End Encryption by Default

Post Syndicated from Bruce Schneier original https://www.schneier.com/blog/archives/2023/12/facebook-enables-messenger-end-to-end-encryption-by-default.html

It’s happened. Details here, and tech details here (for messages in transit) and here (for messages in storage)

Rollout to everyone will take months, but it’s a good day for both privacy and security.

Slashdot thread.

The collective thoughts of the interwebz