Post Syndicated from original https://xkcd.com/2708/

Post Syndicated from original https://xkcd.com/2708/
Post Syndicated from original https://lwn.net/Articles/917147/
Over on the Collabora blog, Adrian Ratiu writes about the addition of the kernel’s Rust code to the KernelCI automated kernel testing project. The blog post looks at what it took to add the support and on some plans for future additions, as well.
An interesting challenge for the rustc docker builds was the fact that the standard Rust method of installing toolchains is via curl https://sh.rustup.rs | sh which might be ok-ish for individual local development, but is a particularly bad idea in an automated CI system. Rustup itself does not (yet) do any signature verifications for its downloads.
Distros like Debian do not ship the version required by the kernel (v1.62), nor even rustup in some cases, and it’s unlikely the distro maintainers will keep the versions in sync with the mainline kernel which likely will become a moving target. Thankfully the Rust project provides standalone installers together with GPG signatures which are very useful for CI.
Post Syndicated from Drew Burton original https://blog.rapid7.com/2022/12/06/iso-27001-certification-what-it-is-and-why-it-matters/

Did you know that Rapid7 information security management system (ISMS) is ISO 27001 certified? This certification validates that our security strategy and processes meet very high standards. It underscores our commitment to corporate and customer data security.
ISO 27001 is an internationally recognized standard for information security management published by the International Standards Organization (ISO). It details requirements for establishing, implementing, maintaining and continually improving an ISMS.
ISO 27001 is focused on risk management and taking a holistic approach to security. Unlike some standards and frameworks, ISO 27001 does not require the implementation of specific technical controls. Instead, it provides a framework and checklist of controls that can be used to develop and maintain a comprehensive ISMS.
It is one of more than ten published standards in the ISO 27000 family. It is the only standard among them that an organization can be certified against.
To become ISO 27001 certified, an organization must:
Then, the ISMS must be audited by a third party. This is a rigorous process, which determines whether the organization has implemented applicable best practices as defined in the standard. Certified organizations must undergo annual audits to maintain compliance. Rapid7’s ISMS was audited by Schellman.
Rapid7 is committed to helping our customers reduce risk to their organizations. ISO 27001 certification is one way that we demonstrate that commitment. It is worth noting that certification is not a legal requirement, rather, it is proof that an organization’s security strategy and processes meet very high standards. Rapid7 believes that maintaining the highest standards of information security for ourselves and our clients is essential.
As noted above, ISO 27001 provides a framework to meet those standards. That framework is based on three guiding principles to help organizations build their security strategy and develop effective policies and controls: Confidentiality, Integrity, and Availability.
Rapid7’s security strategy reflects these principles. Our platform and products are designed to fit securely into your environment and your data is accessible when you need it—with full visibility into where it lives, who has access to it, and how it is used. When you partner with Rapid7, your data stays safe. Period.
For more information about the policies and procedures Rapid7 has in place to keep our data, platform, and products secure, visit the Trust section of our website.
Post Syndicated from The Atlantic original https://www.youtube.com/watch?v=JPVYTBloZGM
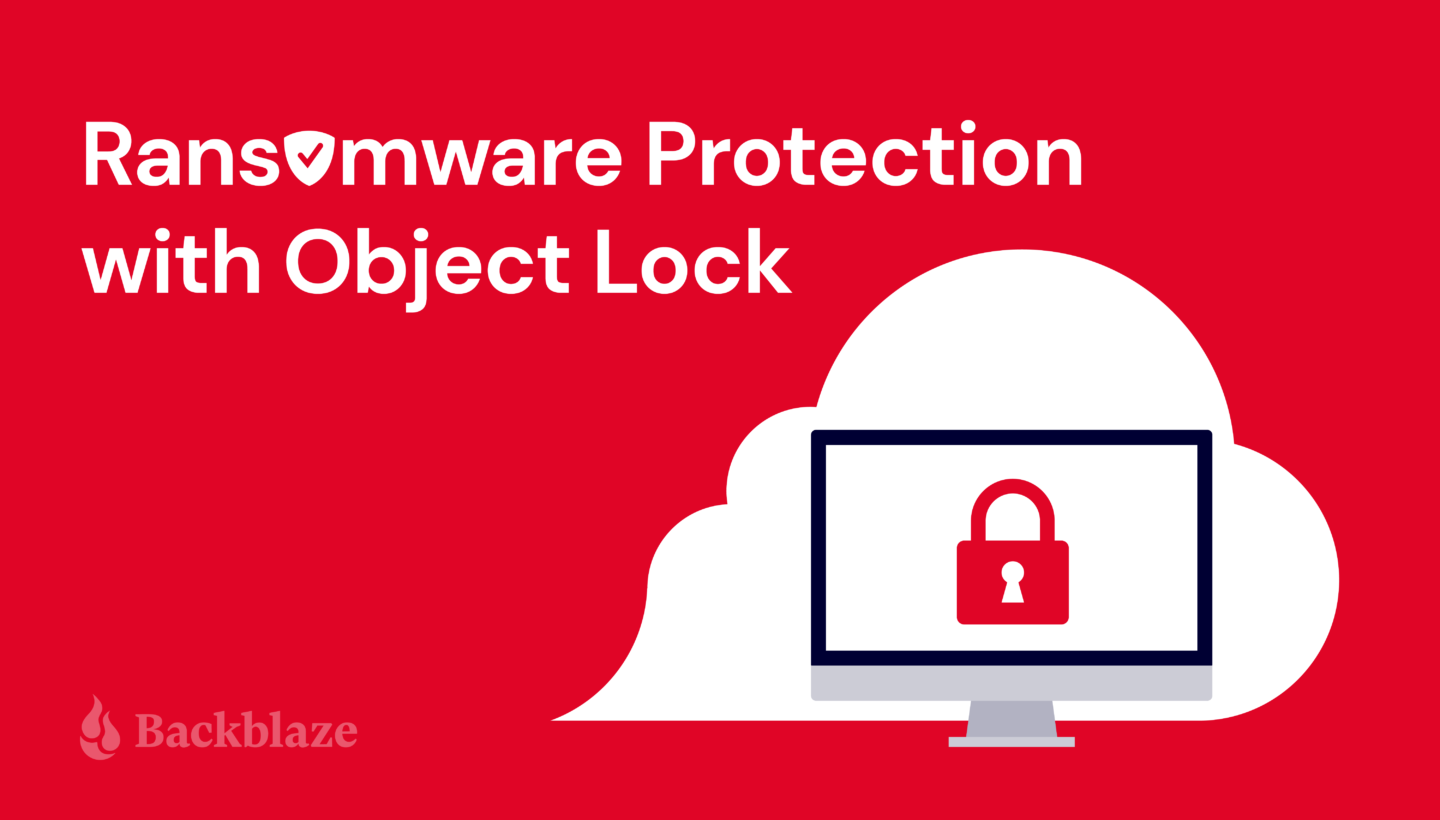
Post Syndicated from Molly Clancy original https://backblaze.com/blog/object-lock-101-protecting-data-from-ransomware/
2023 was a record-breaking year for ransomware, with threat actors targeting higher ed institutions, schools, governments, and hospitals, amongst other targets. And, a study by cybersecurity firm Sophos found that 94% of organizations hit by ransomware in the past year said that the cybercriminals attempted to compromise their backups during the attack.
If your backups are compromised, you lose one of the strongest cards in your hand when it comes to recovery. But with advances in backup protection like Object Lock, you can add one more layer of defense between cybercriminals and your business data.
In this post, we’ll explain:
This post is a part of our ongoing series on ransomware. Take a look at our other posts for more information on how businesses can defend themselves against a ransomware attack, the latest patterns in ransomware attacks, and more.

Object Lock is a powerful backup protection tool that prevents a file from being altered or deleted until a given date. When you set the lock, you can specify the length of time an object should be locked. Any attempts to manipulate, copy, encrypt, change, or delete the file will be rejected during that time. (NOTE: At Backblaze, the Object Lock feature was previously referred to as “File Lock,” and you may see the term from time to time in documentation. They are one and the same.)

An object is a discrete unit of data that includes both the information itself—a file, image, video, or any other digital content—and its metadata. Objects are typically stored in object storage systems (hey, that’s us!), where each object is uniquely identified and accessed via a unique address.
Object Lock allows you to store data using a write once, read many (WORM) model. You write the data to a storage medium, then it can only be read after that for a defined period of time. No one can change it, including the data owner, the cloud provider storing the data, or whoever set the Object Lock.
Enabling Object Lock is a one-time operation. Once it is enabled on a bucket (either a new or existing bucket), you can assign Object Lock settings on specific files, but you can’t disable it. There are a two different Object Lock modes:
Object Lock Legal Hold is a feature that also prevents data from being changed or deleted, but the lock does not have a defined retention period—it can be turned on and off at any time.
For more information on how compliance mode, governance mode, and Object Lock Legal Hold work, check out Digging Deeper into Object Lock or our Tech Docs. They’re both required reading if you want to avoid accidentally locking your data for 100 years, a very safe but impractical way to store your data. Remember, once you set a lock in compliance mode, even the cloud provider is unable to unlock or delete data in response to a support request.
Object Lock creates a virtual air gap for your data. The term comes from the world of LTO tape. When backups are written to tape, the tapes are then physically removed from the network, creating a physical gap of air between backups and production systems. In the event of a ransomware attack, you can just pull the tapes from the previous day to restore systems.
Object Lock does the same thing, but it all happens in the cloud. Instead of physically isolating data, Object Lock virtually isolates the data.
In object storage, immutability is a characteristic of an object that cannot be modified or changed. It is different from Object Lock in that Object Lock is a function that allows you to create immutable or unchangeable objects. Immutability is the characteristic you want to achieve, and Object Lock is the way you achieve it.
Veeam, a backup software provider, offers immutability as a feature to protect your data. The immutability feature in Veeam works hand in hand with the Object Lock functionality offered by cloud providers like Backblaze. If you’re using a cloud storage provider to store your Veeam backups and they support Object Lock (which we think all providers should, not that we’re biased), you can configure Veeam to save your backups to a storage bucket with Object Lock enabled. As a certified Veeam Ready-Object and Veeam Ready-Object with Immutability partner, utilizing this feature with Backblaze is as simple as checking a box in your settings (and in your Veeam settings too, of course).
For a step-by-step guide on how to back up Veeam to Backblaze B2 Cloud Storage with Object Lock functionality, check out the video below.
Object Lock works with many Backblaze B2 integrations in addition to Veeam, including MSP360, Commvault, Rubrik, and more. You can also enable Object Lock using the Backblaze S3 Compatible API, the B2 Native API, the Backblaze B2 SDKs, and the CLI.
With cyber threats becoming increasingly sophisticated, the ability to store data with immutability provides an essential layer of protection. Even if your system falls victim to an attack, the original data remains recoverable, minimizing the impact on business operations and reputation. Even you can’t edit or delete your data.
There’s no added cost to use Object Lock with Backblaze B2 beyond what you would pay to store the data anyway. (But other cloud providers charge for API calls related to Object Lock, so if you ever need to renew an Object Lock on a file, you may get charged for that call. Your Object Locks can renew fairly often based on the immutability settings in your software, so be sure to ask when comparing cloud storage providers).
Finally, data security experts strongly recommend using Object Lock to protect your critical backups. Not only is it recommended, but in some industries Object Lock is necessary to maintain data protection standards required by compliance agencies. One other thing to consider: Many companies are adopting cyber insurance, and often those companies require immutable backups for you to be fully covered.
The question really isn’t, “Why should you use Object Lock?” but rather “Why aren’t you using Object Lock?”

The immutability achieved by Object Lock is useful for protecting against ransomware, but there are some additional use cases that make it valuable to businesses as well.
To summarize, here are a few key points to remember about Object Lock:
Ransomware attacks can be disruptive, but your story doesn’t have to end with you feeling forced into a ransom payment against your better judgment or facing extended downtime. As cybercriminals become bolder and more advanced, creating immutable, air-gapped backups using Object Lock functionality puts a manageable recovery in closer reach.
Have questions about Object Lock functionality and ransomware? Let us know in the comments.
The post Object Lock 101: Protecting Data From Ransomware appeared first on Backblaze Blog | Cloud Storage & Cloud Backup
Post Syndicated from Talks at Google original https://www.youtube.com/watch?v=wVndAEY5w6I
Post Syndicated from Aditya Ravikumar original https://aws.amazon.com/blogs/big-data/enable-federation-to-amazon-quicksight-with-automatic-provisioning-of-users-between-aws-iam-identity-center-and-microsoft-azure-ad/
Organizations are working towards centralizing their identity and access strategy across all their applications, including on-premises, third-party, and applications on AWS. Many organizations use identity providers (IdPs) based on OIDC or SAML-based protocols like Microsoft Azure Active Directory (Azure AD) and manage user authentication along with authorization centrally. This authorizes users to access Amazon QuickSight assets-analyses, dashboards, folders, and datasets-through centrally managed Azure AD and AWS IAM Identity Center (successor to AWS Single Sign-On).
IAM Identity Center is an authentication process that allows users to sign into multiple applications with a single set of usernames and passwords. IAM Identity Center makes it easy to centrally manage access to multiple AWS accounts and business applications. It provides your workforce with single sign-on (SSO) access to all assigned accounts and applications from one place.
In this post, we walk you through the steps required to configure federated SSO along with automated email sync between QuickSight and Azure AD via IAM Identity Center. We also demonstrate ways System for Cross-domain Identity Management (SCIM) keeps your IAM Identity Center identities in sync with identities from your IdP.
The following is the reference architecture for configuring IAM Identity Center with Azure AD for automated federation to QuickSight and the AWS Management Console.

The following are the steps involved to set up federated SSO from Azure to QuickSight:
To complete this walkthrough, you must have the following prerequisites:
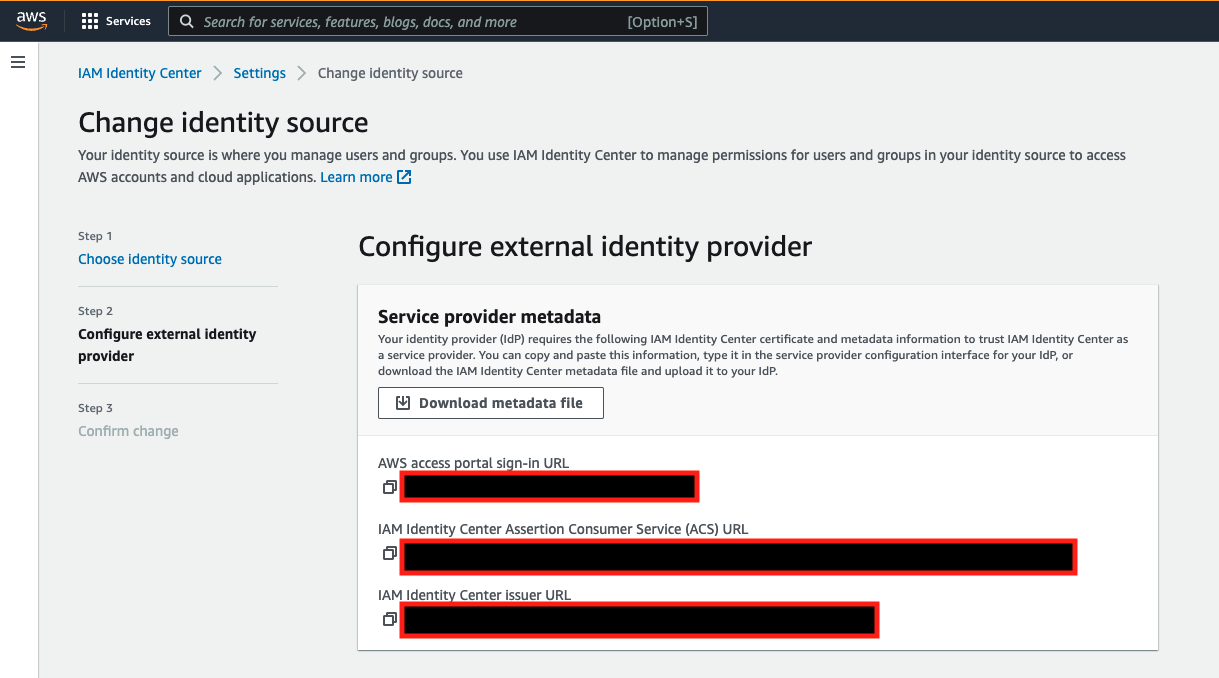
To configure Azure as an IdP, complete the following steps:


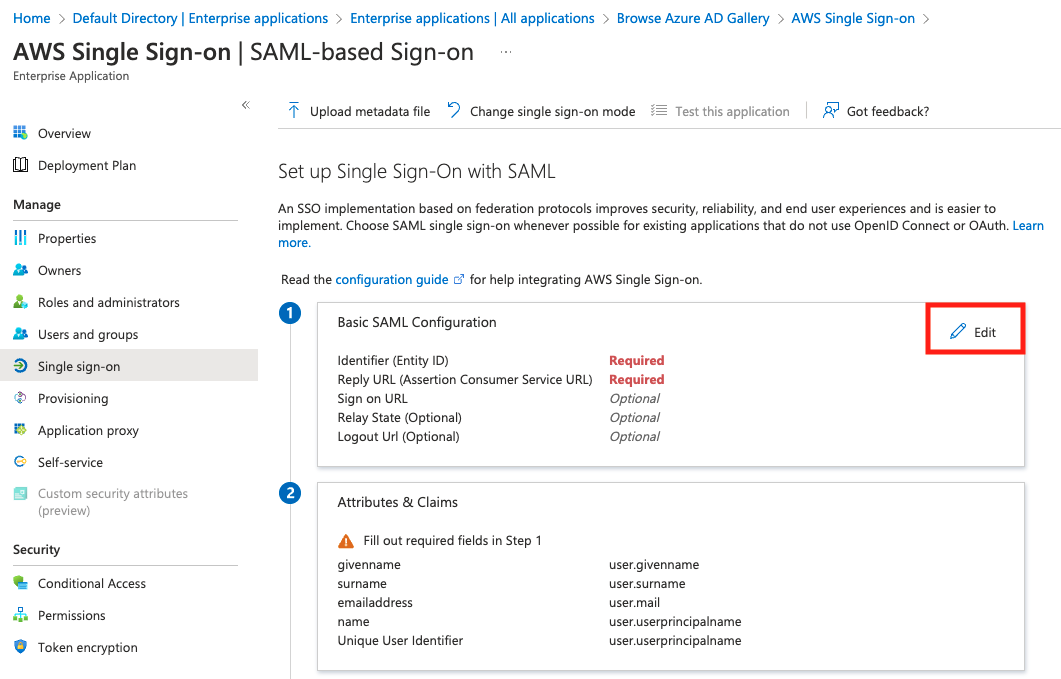
To register an IAM Identity Center application in Azure AD, complete the following steps:


To configure your application, complete the following steps:


We use this XML document in later steps when setting up the SAML provider in IAM and in IAM Identity Center.


IAM Identity Center supports System for Cross-domain Identity Management (SCIM) v2.0 standard. SCIM keeps your IAM Identity Center identities in sync with external IdPs. This includes any provisioning, updates, and deprovisioning of users between IdP and IAM Identity Center. To enable SCIM, complete the following steps:

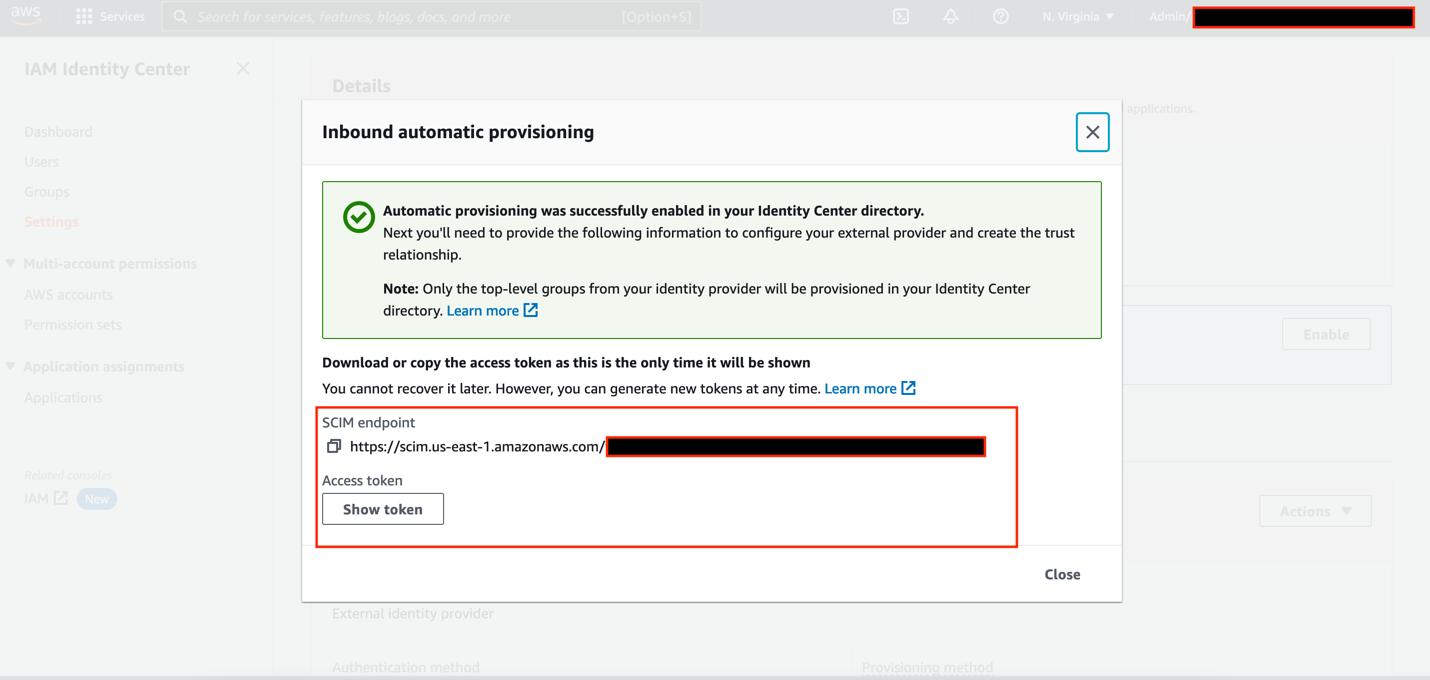


Make sure the user profile has valid information under First name, Last name, and Email attribute. This is the key value for email sync with QuickSight.

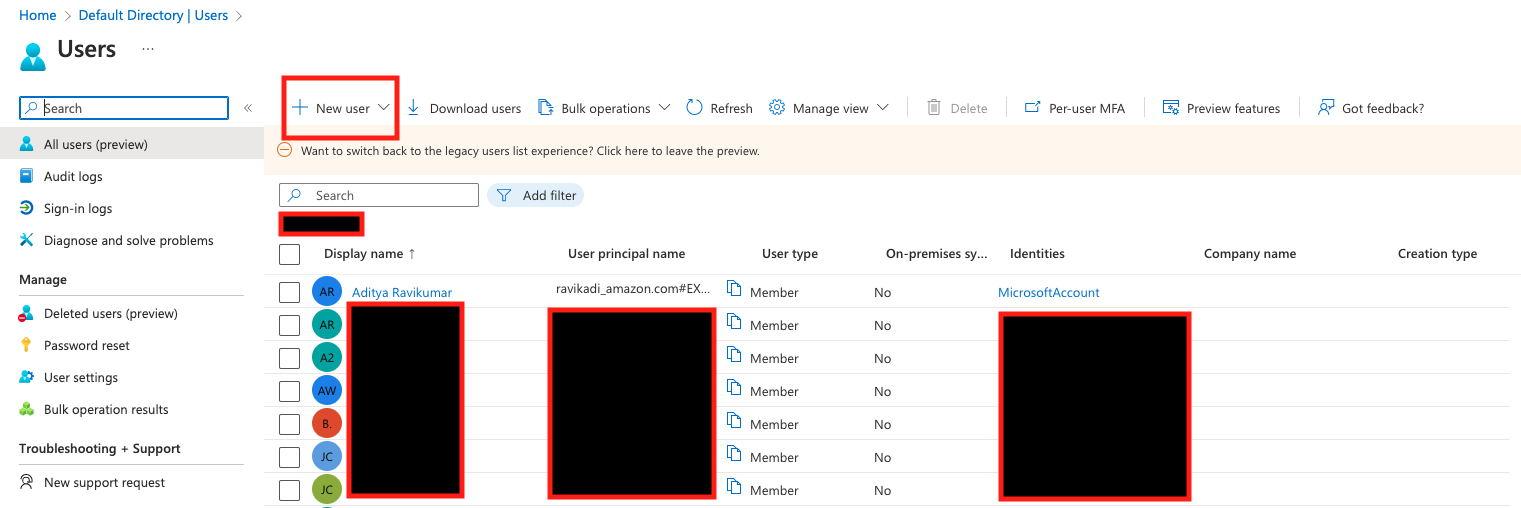
On the IAM Identity Center console, under Users, you can now see all the users provisioned from Azure AD.

Complete the following steps to enable email syncing for federated users:


Complete the following steps to create a custom SAML 2.0 application in IAM Identity Center.

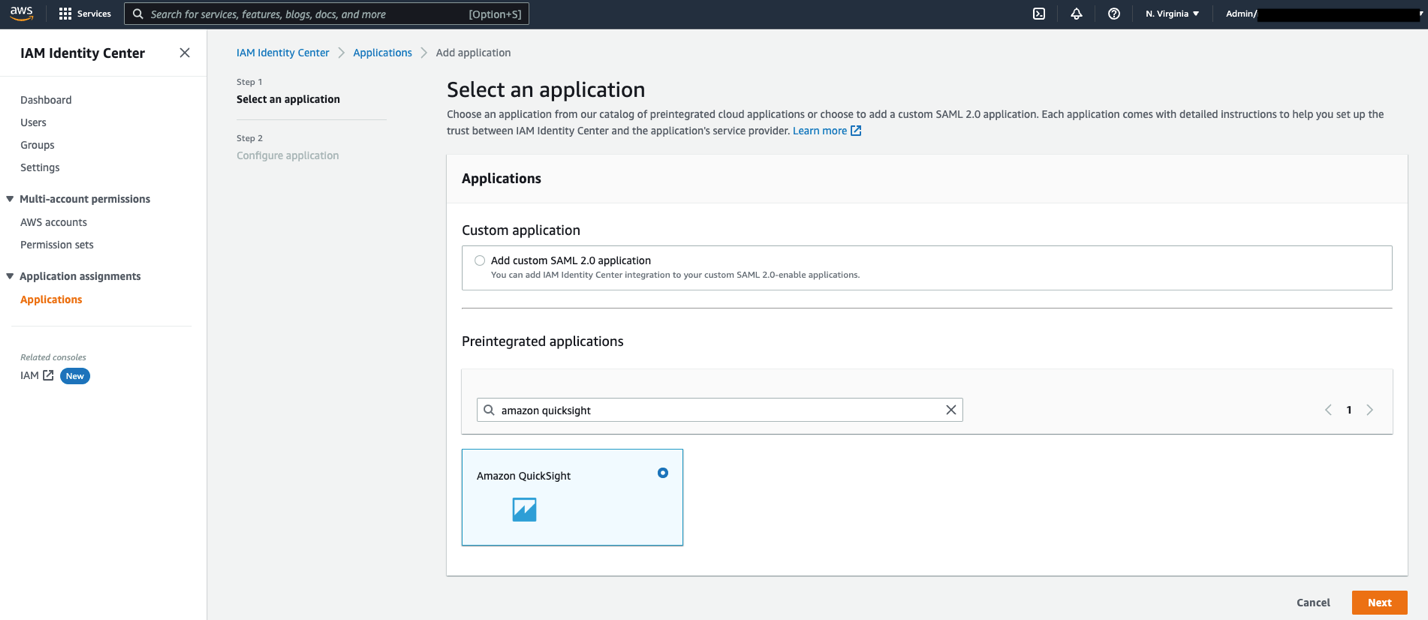
Amazon QuickSight.https://quicksight.aws.amazon.com. https://signin.aws.amazon.com/saml.urn:amazon:webservices.
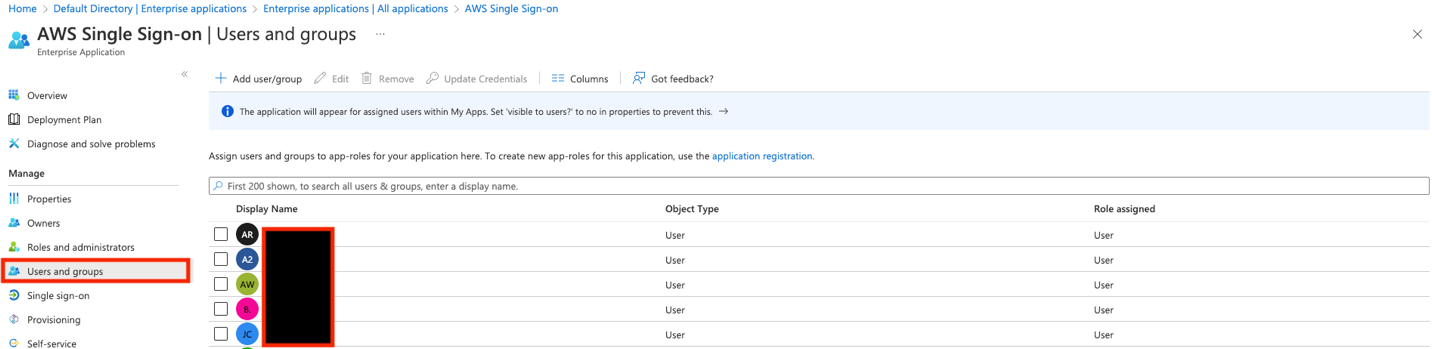
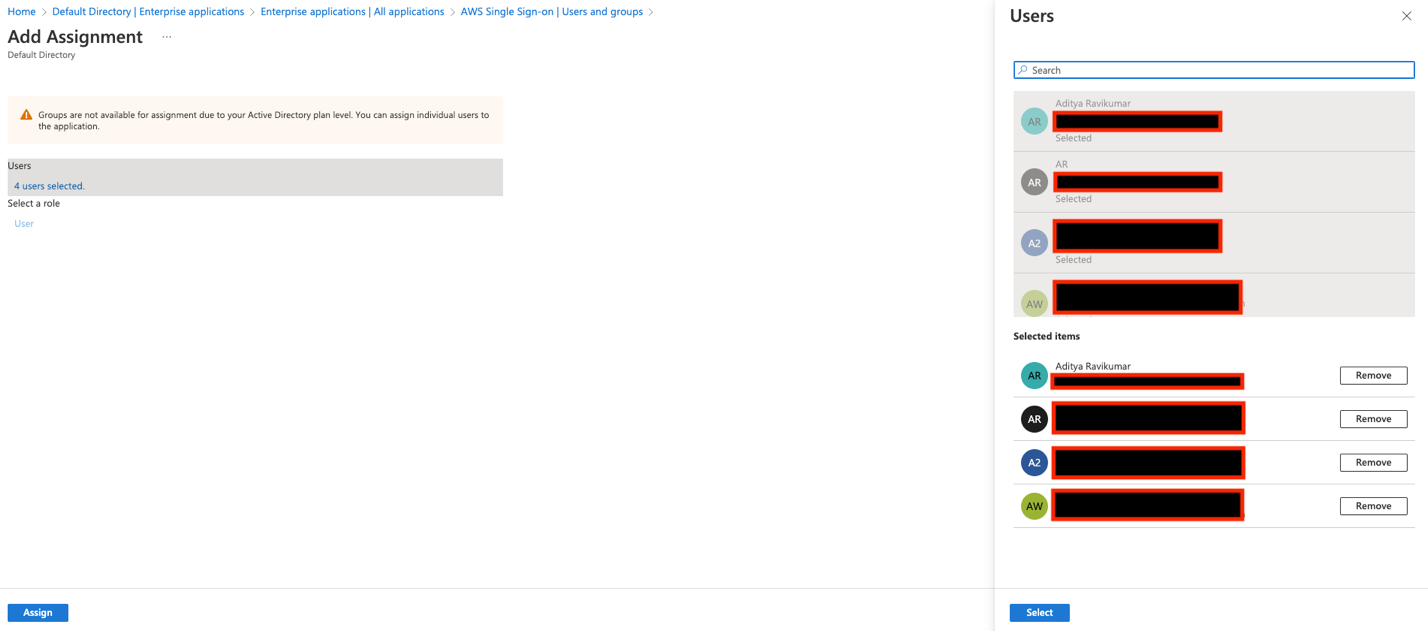
You can now assign your users to this application, so that the application appears in their IAM Identity Center portal after login.


Complete the following steps to configure IAM Identity Center as your SAML IdP:
IAM_Identity_Center.
arn:aws:iam::<AccountID>:saml-provider/IAM_Identity_Center).You will use this ARN while configuring claims rules later in this post.
In this step, you create three IAM policies for different role permissions in QuickSight:
QuickSight-Federated-AdminQuickSight-Federated-AuthorQuickSight-Federated-ReaderUse the following steps to set up QuickSight-Federated-Admin policy. This policy grants admin privileges in QuickSight to the federated user:
Ignore the “Missing ARN Region: Add a Region to the quicksight resource ARN” error and continue. Optionally, you could also add a specific AWS region in the ARN.
QuickSight-Federated-Admin.QuickSight-Federated-Author policy using the following JSON code to grant author privileges in QuickSight to the federated user:
Ignore the “Missing ARN Region: Add a Region to the quicksight resource ARN” error and continue. Optionally, you could also add a specific AWS region in the ARN.
QuickSight-Federated-Reader policy using the following JSON code to grant reader privileges in QuickSight to the federated user:
Ignore the “Missing ARN Region: Add a Region to the quicksight resource ARN” error and continue. Optionally, you could also add a specific AWS region in the ARN.
Next, create roles that your Azure AD and IAM Identity Center users assume when federating into QuickSight. The following steps set up the admin role:
IAM_Identity_Center).https://signin.aws.amazon.com/saml is selected.
QuickSight-Federated-Admin IAM policy you created earlier.QuickSight-Admin-Role.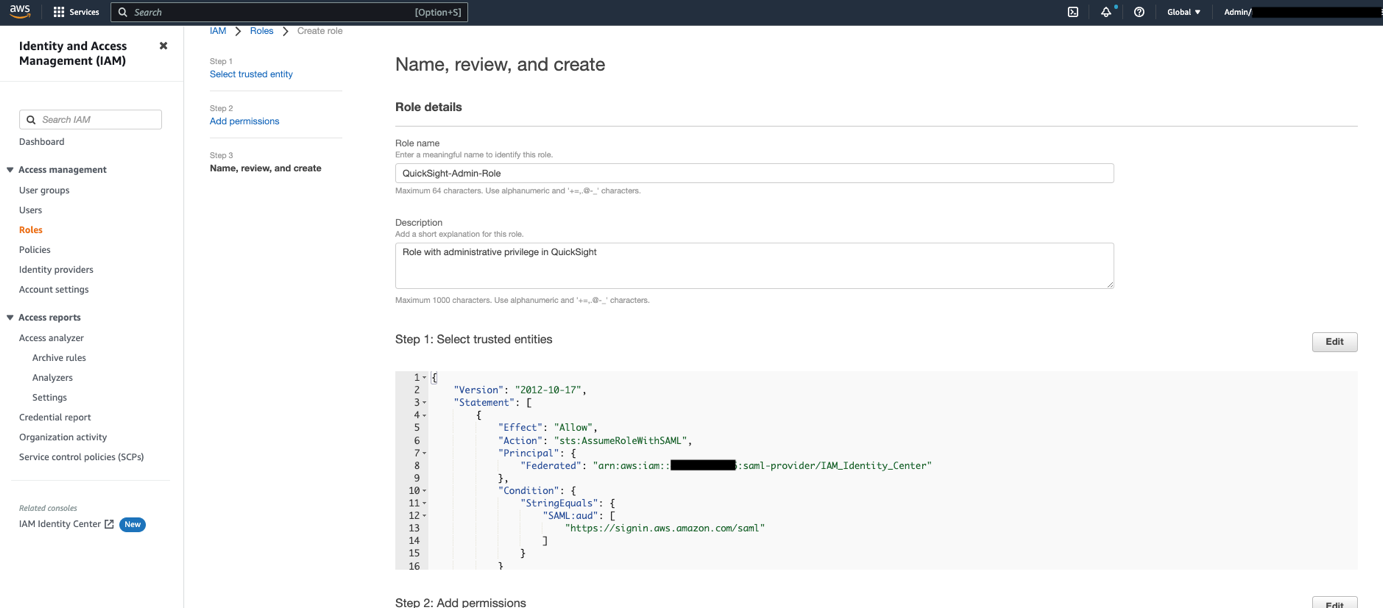
QuickSight-Admin-Role role you created to open the role’s properties.
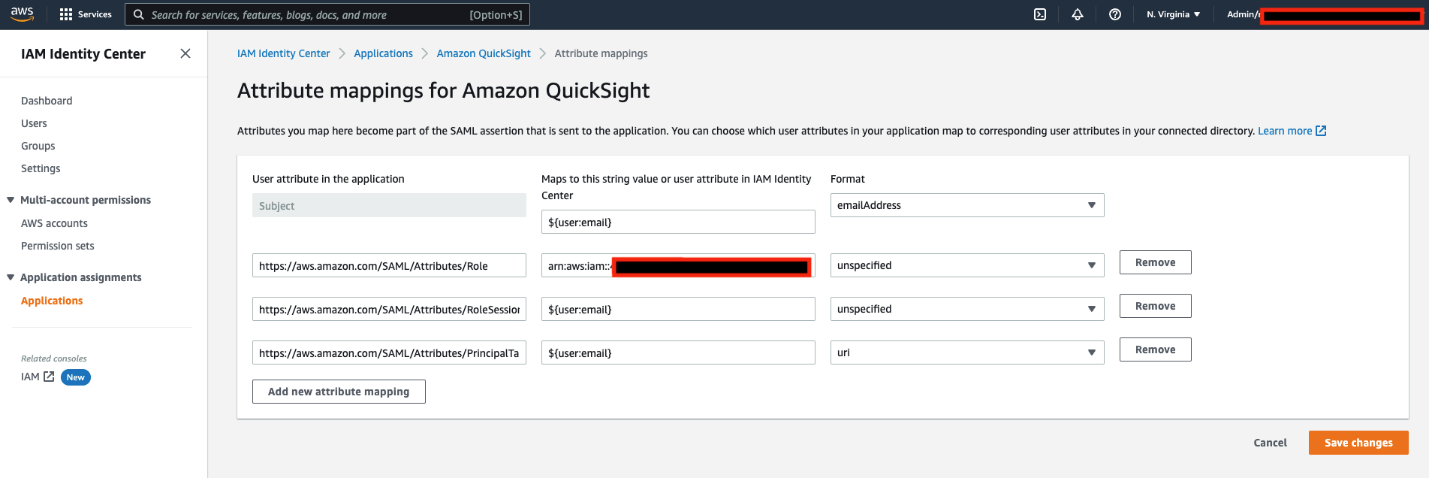
QuickSight-Author-Role and QuickSight-Reader-Role. Attach the QuickSight-Federated-Author and QuickSight-Federated-Reader policies to their respectively roles.The final step is to configure the attribute mappings in IAM Identity Center. The attributes you map here become part of the SAML assertion that is sent to the QuickSight application. You can choose which user attributes in your application map to corresponding user attributes in your connected directory. For more information, refer to Attribute mappings.

Amazon QuickSight application you created earlier.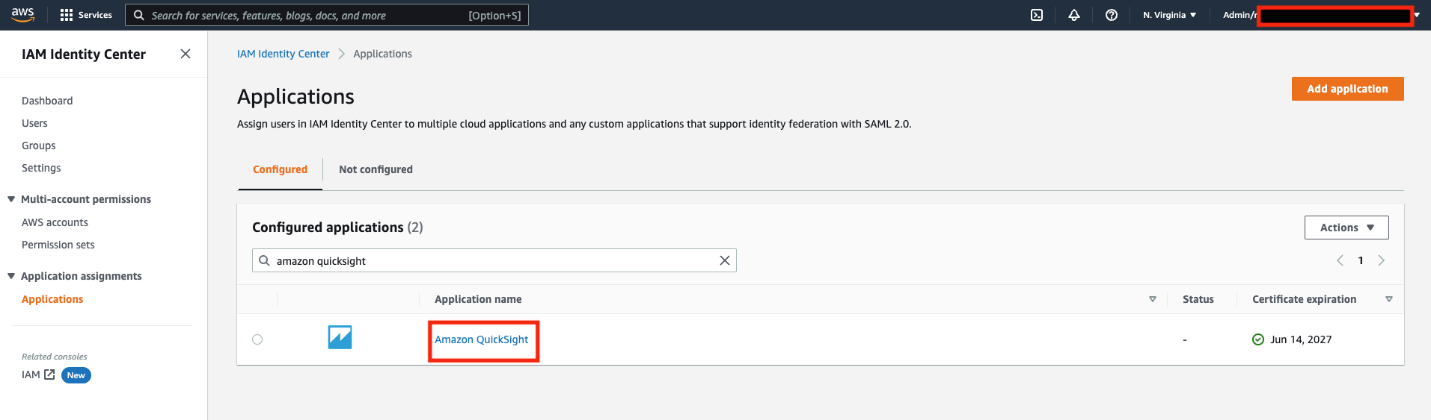
| User attribute in the application | Maps to this string value or user attribute in IAM Identity Center | Format |
Subject |
${user:email} |
emailAddress |
https://aws.amazon.com/SAML/Attributes/Role |
arn:aws:iam:: <YourAWSAccount ID>:saml-provider/IAM_Identity_Center, arn:aws:iam:: <YourAWSAccount ID>:role/QuickSight-Admin-Role |
unspecified |
https://aws.amazon.com/SAML/Attributes/RoleSessionName |
${user:email} |
unspecified |
https://aws.amazon.com/SAML/Attributes/PrincipalTag:Email |
${user:email} |
url |
On the IAM Identity Center console, note down the user portal URL available on the Settings page. We suggest you log out of your AWS account first, or open an incognito browser window. Navigate to the user portal URL, sign in with the credentials of an AD user, and choose your QuickSight application.


You’re automatically redirected to the QuickSight console.


This post provided step-by-step instructions to configure federated SSO with Azure AD as IdP through IAM Identity Center. We also discussed how SCIM keeps your IAM Identity Center identities in sync with identities from your IdP. This includes any provisioning, updating, and deprovisioning of users between your IdP and IAM Identity Center.
If you have any questions or feedback, please leave a comment.
For additional discussions and help getting answers to your questions, check out the QuickSight Community.
 Aditya Ravikumar is a Solutions Architect at Amazon Web Services. He is based in Seattle, USA. Aditya’s core interests include software development, databases, data analytics and machine learning. He works with AWS customers/partners to provide guidance and technical assistance to transform their business through innovative use of cloud technologies.
 Srikanth Baheti is a Specialized World Wide Sr. Solution Architect for Amazon QuickSight. He started his career as a consultant and worked for multiple private and government organizations. Later he worked for PerkinElmer Health and Sciences & eResearch Technology Inc, where he was responsible for designing and developing high traffic web applications, highly scalable and maintainable data pipelines for reporting platforms using AWS services and Serverless computing.
 Raji Sivasubramaniam is a Sr. Solutions Architect at AWS, focusing on Analytics. Raji is specialized in architecting end-to-end Enterprise Data Management, Business Intelligence and Analytics solutions for Fortune 500 and Fortune 100 companies across the globe. She has in-depth experience in integrated healthcare data and analytics with wide variety of healthcare datasets including managed market, physician targeting and patient analytics.
Post Syndicated from Dina Durutlic original https://blog.rapid7.com/2022/12/06/get-your-head-in-the-cloud-s/

Many organizations are in the midst of adopting the cloud faster than ever before; it’s arguably mission critical for their success and longevity. Just look at initiatives like digital transformation or even the digital twin which aims to bridge the gap between the physical and the digital by leveraging IoT. Organizations are realizing the endless possibilities that the cloud provides — such as optimization of their processes, data accessibility, and unlocked collaboration & innovation. By definition, the cloud enables integrated data continuity, and by 2025, the world will store 200 zettabytes of data, according to Cybersecurity Ventures. A huge percentage of that data will be in the cloud.
However, the promise of the cloud isn’t just lucrative for companies, it opens up new opportunities for attackers. Many threats that impact a cloud environment are not contained there. They can either originate elsewhere or start in the cloud, but can move depending on the motive of the attacker. As organizations continue to go beyond on-prem, security teams need support.
The resource and bandwidth constraints that teams face have been well documented across the industry, so we won’t rehash that here. But it is important to emphasize it when it pertains to priorities around cloud security. In order to stay ahead of evolving threats, security teams need to prioritize cloud detection and response. Automation is a means to do just that.
Automation provides a way to cut down the time it would take to address malicious activity, especially when compared to a manual approach. It can also enable more effective and efficient communication with important stakeholders who may have a hand to play in alert validation and response.
At Rapid7, we’re constantly innovating new ways to inject highly customizable automation into our cloud offerings, all with the aim of making your team — and by extension, your cloud security — stronger and more efficient.
Rapid7 provides security professionals with the centralized monitoring, comprehensive context, and automation necessary to confidently take action against threats. One of the primary challenges security teams face when responding to threats in the cloud is being able to answer simple questions like:
Some of these questions can be answered with data, but some may require stakeholders outside the security team to weigh in, such as the Cloud Infrastructure or DevOps team. The traditional process of engaging these teams might mean that you spend precious time locating or opening a new channel in your ChatOps platform, and copying & pasting alert data alongside a manually-typed message asking for help. This works, but can quickly become inefficient and untenable with higher alert volumes. Rapid7 offers customers a solution to this challenge; what if that process could be automated?
Instead of forcing customers to manually pass data back and forth, Rapid7’s solutions provide a way to orchestrate the routing of cloud threat detections to the right communication channel, after gathering as much context as possible regarding the associated cloud resources automatically. This way, those responsible for responding to these threats can jump right into decision-making with all the data they need in a centralized place.
Despite the security challenges, the future is very much still going to be in the cloud. As security professionals, we work to ensure that cloud operations are as secure as they can be, while providing tools and workflows that make the work your security team does day in and day out more efficient and effective. Automation is just such an innovation. Request a demo of our Cloud Risk Complete and Threat Complete offerings to learn how Rapid7 can help your organization today!
Post Syndicated from original https://lwn.net/Articles/917096/
The kernel’s page cache holds pages from files in RAM, allowing those
pages to be accessed without expensive trips to persistent storage.
Applications are normally entirely unaware of the page cache’s operation;
it speeds things up and that is all that matters. Some applications,
though, can benefit from knowledge about how much of a given file is
present in the page cache at any given time; the proposed
cachestat() system call from Nhat Pham is the latest in a long
series of attempts to make that information available.
Post Syndicated from The History Guy: History Deserves to Be Remembered original https://www.youtube.com/watch?v=rYbhnjqxFiY
Post Syndicated from Bruce Schneier original https://www.schneier.com/blog/archives/2022/12/crywiper-data-wiper-targeting-russian-sites.html
Kaspersky is reporting on a data wiper masquerading as ransomware that is targeting local Russian government networks.
The Trojan corrupts any data that’s not vital for the functioning of the operating system. It doesn’t affect files with extensions .exe, .dll, .lnk, .sys or .msi, and ignores several system folders in the C:\Windows directory. The malware focuses on databases, archives, and user documents.
So far, our experts have seen only pinpoint attacks on targets in the Russian Federation. However, as usual, no one can guarantee that the same code won’t be used against other targets.
Nothing leading to an attribution.
News article.
Slashdot thread.
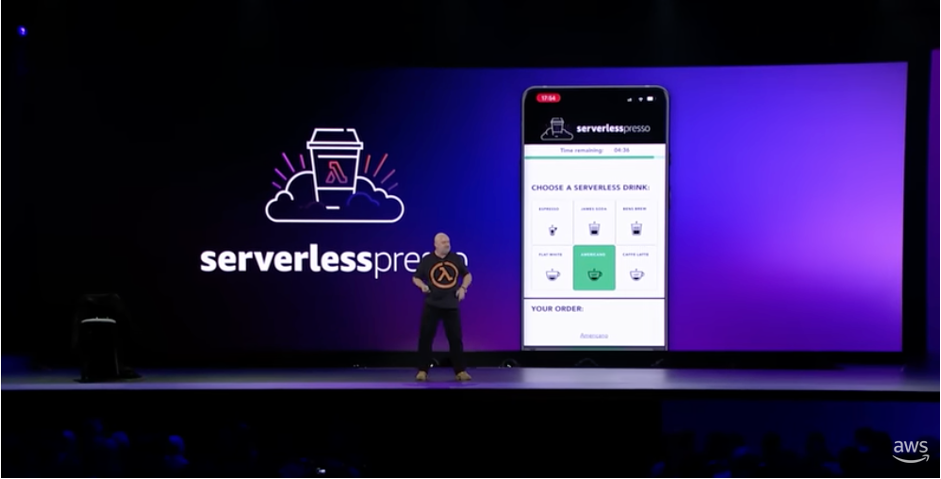
Post Syndicated from Benjamin Smith original https://aws.amazon.com/blogs/compute/introducing-serverlesspresso-extensions/
Today the Serverless DA team is launching Serverlesspresso Extensions, a new program that lets you contribute to Serverlesspresso. The best extensions will be added to the Serverlesspresso application running in production and featured on the AWS Compute Blog.

Serverlesspresso is a multi-tenant event-driven serverless application for a pop-up coffee bar that allows you to order from your phone. In 2022, Serverlesspresso processed over 20,000 orders at technology events around the world. At this year’s re:Invent, it featured in the keynote of Amazon CTO, Dr Werner Vogels. It was showcased as an example of an event-driven application that can be easily evolved.
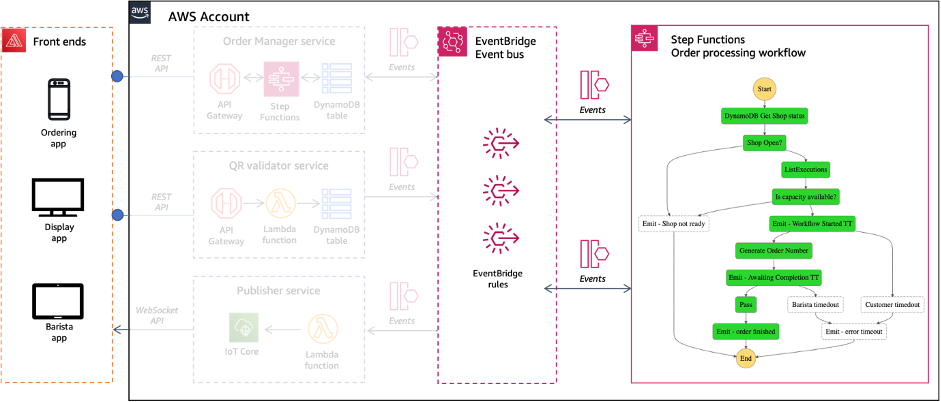
The architecture comprises several serverless apps and has been open-source and freely available since it was launched at re:Invent 2021.
Extensibility is the ability to add new functionality to an existing piece of software without modifying the core code already in place. Extensions for web browsers are an example of how useful extensibility can be. The core web browser code is not changed or affected when third parties write extensions, but end users can gain new, rich functionality not envisioned or intended by the original browser authors.
In many production business applications extensibility can help you keep up with the pace of your users requests. It allows you to create new and useful functionality without having to rearchitect the core, original part of your code. Choosing an architectural style that supports this concept can help you retain flexibility as your users needs change.
Serverlesspresso is built on an event-driven architecture (EDA). This is an architecture style that uses events to decouple an application’s components. Event-driven architecture offers an effective way to create loosely coupled communication between microservices. This makes it a good architectural choice when you are designing workloads that will require extensibility.
Loosely coupled microservices are able to scale and fail independently, increasing the resilience of the application. Development teams can build and release features for their team’s microservice quickly, without needing to worry about the behavior of other microservices in the application. In addition, new features can be added on top of existing events without making changes to the rest of the application.
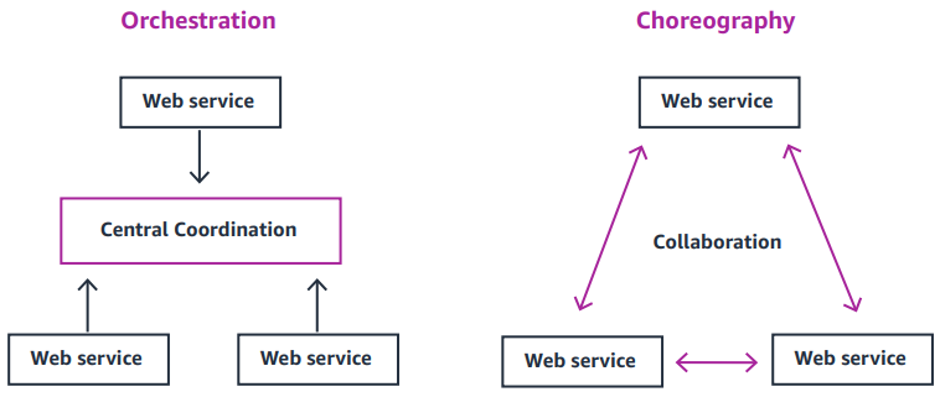
Choreography and orchestration are two different models for how distributed services can communicate with one another. In orchestration, communication is more tightly controlled. A central service coordinates the interaction and order in which services are invoked.
Choreography achieves communication without tight control. Events flow between services without any centralized coordination. Many applications, including Serverlesspresso use both choreography and orchestration for different use cases. Event buses such as Amazon EventBridge can be used for choreography, and workflow orchestration services like AWS Step Functions can help build for orchestration.
New functional requirements come up all the time in production applications. We can address new requirements for an event driven application by creating new rules for events in the Event Bus. These rules can add new functionality to the application without having any impact to the existing application stack.
This section shows how to build an extension for Serverlesspresso that adds new functionality while remaining decoupled from the core application. Anyone can contribute an extension to Serverlesspresso. Use the Serverlesspresso extensions GitHub repository to host your extension:

Additional guidance can be found in the repository’s PUBLISHING.md file.
Event decoupling introduces a new set of challenges. Finding events and their schema can be a difficult process. Developers must coordinate with the team responsible for publishing an event, or look through documentation to find its schema, and then manually create an object for the event in order to use it in their code.
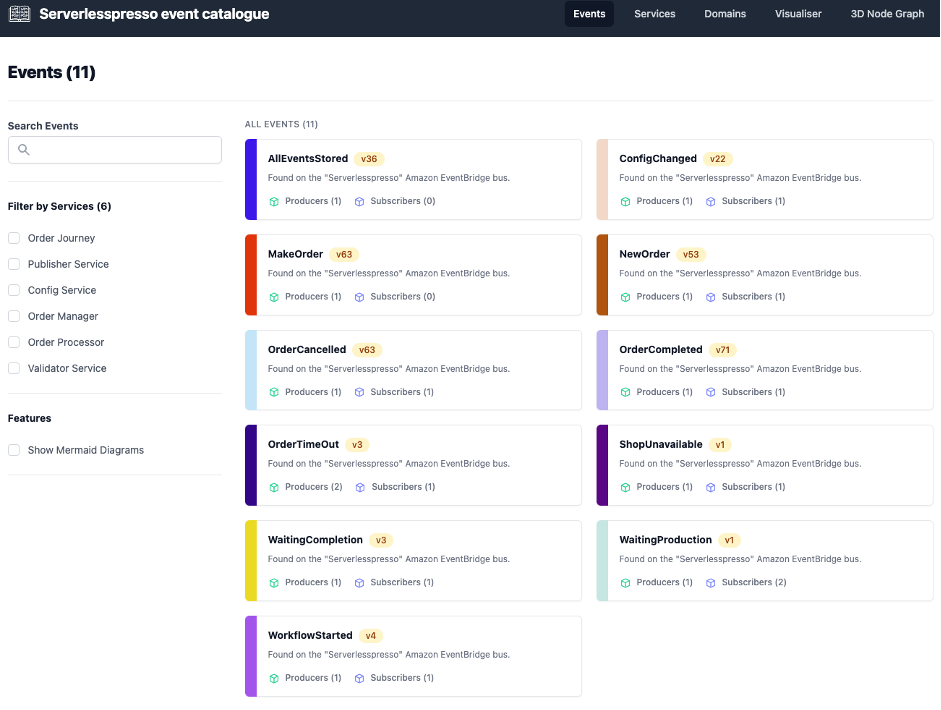
The Amazon EventBridge schema registry helps solve this challenge. It automatically finds events and their structure, or schema, and stores them in a shared central location. For serverlesspresso Extensions, we have created the Serverlesspresso events catalog, and filled it with events from the EventBridge schema registry. Here, all Serverlesspresso events have been documented to help you understand how to use them in your extensions. This includes the services that produce and consumer the event as well as example schemes for each event.
The event player is a Step Functions workflow that simulates 15 minutes of operation at the Serverlesspresso bar. It does this by replaying an array of realistic events. Use the event player to generate Serverlesspresso events, when building and testing your extensions. Each event is emitted onto an event bus named Serverlesspresso.
git clone https://github.com/aws-samples/serverless-coffee.gitcd extensibility/EventPlayersam build && sam deploy --guidedThis deploys a Step Functions workflow and a custom event bus called “Serverlesspresso”
Running the events player
The player takes approximately 15 minutes to complete.
Extensions will be reviewed by the Serverless DA team within 14 days of submission. When submitting your extension, your extension will become part of the open source offering and is covered by the existing license in the repo. It may be used by any customer under the same license. For additional guidance and ideas to help build your Serverlesspresso extensions, use the following resources:
You can now build extensions for Serverlesspresso, and potentially be featured on the AWS Compute Blog by submitting a Serverlesspresso extension. The best extensions will be added to Serverlesspresso in production.
Some demo extensions have been built and documented at https://github.com/aws-samples/serverless-coffee/tree/main/extensions. You can download and install these extensions to see how they are constructed before creating your own.
Visit the Serverless Workflows Collection to browse the many deployable workflows to help build your serverless applications.
Post Syndicated from original https://lwn.net/Articles/917080/
Security updates have been issued by Ubuntu (binutils and ca-certificates).
Post Syndicated from original https://lwn.net/Articles/917052/
Alison Chaiken provides an
overview of Linux ABI concerns on opensource.com.
Understanding the stable ABI is a bit subtle. Consider that, while
most of sysfs is stable ABI, the debug interfaces are guaranteed to
be unstable since they expose kernel internals to userspace. In
general, Linus Torvalds has pronounced that by “don’t break
userspace,” he means to protect ordinary users who “just want it to
work” rather than system programmers and kernel engineers, who
should be able to read the kernel documentation and source code to
figure out what has changed between releases.
Post Syndicated from Crosstalk Solutions original https://www.youtube.com/watch?v=lgtwA-N3eH0
Post Syndicated from original https://yurukov.net/blog/2022/nsi-ethical-distribution/
След излизането на първите данни на НСИ имаше, разбира се, много възгласи колко се е стопила нацията за последните 10 години. Намаление наистина има и то за съжаление е закономерно с процесите започнали още в края на 70-те задълбочени през 90-те и чиито ефекти виждаме ясно днес. Променената възрастова структура на хората имащи деца, многото деца родени и предимно оставащи в чужбина и повишената смъртност през пандемията влошават това положение.
Разбира се, има и много неразбиране на материята, което видяхме излязло на ярък гръмогласен парад през последните месеци. То включва теми като емиграция, раждаемост, смъртност и особено влиянието на сексуалното здраве, образование и абортите.
Затова надали може да се учудим на апокалиптичните сензационни заглавия. Това, което не видяхме обаче, са гръмките заглавия след като миналата седмица НСИ пусна данните за етническото разпределение от преброяването през 2021-ва. Вместо това се потвърди наблюдение базирано на данните от определени райони, което повтарям от години
С години се спекулираше много, включително колко коректен е въпроса и дори дали трябва да се позволява на хората да посочват какви са етнически – някои настояваха, че преброителите трябва да ги преценяват на око на какви им изглеждат с аргумента „ма то си е ясно“. Обсъждал съм нашироко в коментари тук абсурдността на тези и други твърдения. Трудно се говори по темата без да се зачекнат тезите така любими на по-крайно националистически настроените, но сериозно исторически необвързани наши сънародници. Затова искам да ви кажа, защо тези данни са всъщност също толкова тревожни, колкото и голяма част от резултатите от преброяването.
Това, което видяхме и което медиите единодушно решиха, че не си струва, защото не е скандална сензация, е че всъщност двете най-големи малцинствени групи в България намаляват. Наистина, цялото население намалява, но при етническите турци и роми това е много по-силно изразено. Докато при етническите българи намалението е – 9.6%, при определилите за етнически турци то е 13.6%, а при ромите е почти двойно – 18%. Така апокалиптичните прогнози през годините за „претопяване“ всъщност е с обратен знак – делът на ромското население е паднал с 8.5%, а на етническите българи се е увеличил.
Именно това обяснявам от години и срещам почти винаги насмешка – че емиграцията особено сред ромското население е значително по-голяма. Причините са както икономически, така социални, дискриминационни и дори корекционни. Немалко градове и села в страната ефективно са под контрола на местни феодали защитавани от прокуратура и политически сделки. Това важи с особена сила в Родопите. Сегрегацията и сериозната дискриминация на ромите специално пък създава реални пречки да се реализират. Това, както и особено силно изразената бедност в някои региони прави емиграцията единствен избор.
Докато един или повече от тези аргументи важи за повечето български граждани, вече имаме ясни данни доказващи нещо наблюдавано отдавна. Може би най-добре беше илюстрирано от човек, който срещнах докато бях доброволец при изборната секция във Франкфурт преди години. Заговорихме се докато чакаме за трудностите в Германия и отношението към чужденците като цяло. Беше от ромски произход и е работел като строител в България. Сподели, че „и в България се отнасят с мен като циганин, и в Германия се отнасят с мен като с циганин, но ми дават поне шанс да работя нещо смислено“. Към онзи момент имаше строителна фирма, осигуряваше хляб на 10 семейства и си плащаше данъците в Германия.
Примерите са най-шарени, също както емиграцията ни. Нагледал съм се на премного, но предпочитам да говоря за този феномен с данни. Факт е, че както при бежанците, пропускаме голям шанс да приобщим и да работим с всякакви общности и култури. Всичко това е заради някаква дълбока озлобеност и криворазбран модел за хомогенност, който не е съществувал до преди 3 поколения.
Затова нека не говорим по темата демография с емоции и усещания на база кой какво видял в коридор на болница или по някоя улица, а разбиране, че светът е доста по-сложен и шарен. Също и че сами си го причиняваме всичко това и не ни помага никак.
The post Стопяващата се (драма за претопяването на българската) нация first appeared on Блогът на Юруков.
Post Syndicated from Naranjan Goklani original https://aws.amazon.com/blogs/security/renewal-of-aws-cybergrx-assessment-to-enhance-customers-third-party-due-diligence-process/

Amazon Web Services (AWS) is pleased to announce renewal of the AWS CyberGRX cyber risk assessment report. This third-party validated report helps customers perform effective cloud supplier due diligence on AWS and enhances their third-party risk management process.
With the increase in adoption of cloud products and services across multiple sectors and industries, AWS has become a critical component of customers’ third-party environments. Regulated customers are held to high standards by regulators and auditors when it comes to exercising effective due diligence on third parties.
Many customers use third-party cyber risk management (TPCRM) services such as CyberGRX to better manage risks from their evolving third-party environments and to drive operational efficiencies. To help with such efforts, AWS has completed the CyberGRX assessment of its security posture. CyberGRX security analysts perform the assessment and validate the results annually.
The CyberGRX assessment applies a dynamic approach to third-party risk assessment. This approach integrates advanced analytics, threat intelligence, and sophisticated risk models with vendors’ responses to provide an in-depth view of how a vendor’s security controls help protect against potential threats.
Vendor profiles are continuously updated as the risk level of cloud service providers changes, or as AWS updates its security posture and controls. This approach eliminates outdated static spreadsheets for third-party risk assessments, in which the risk matrices are not updated in near real time.
In addition, AWS customers can use the CyberGRX Framework Mapper to map AWS assessment controls and responses to well-known industry standards and frameworks, such as National Institute of Standards and Technology (NIST) 800-53, NIST Cybersecurity Framework, International Organization for Standardization (ISO) 27001, Payment Card Industry Data Security Standard (PCI DSS), and U.S. Health Insurance Portability and Assessment Act (HIPAA). This mapping can reduce customers’ third-party supplier due-diligence burden.
Customers can access the AWS CyberGRX report at no additional cost. Customers can request access to the report by completing an access request form, available on the AWS CyberGRX page.
As always, we value your feedback and questions. Reach out to the AWS Compliance team through the Contact Us page. If you have feedback about this post, submit comments in the Comments section below. To learn more about our other compliance and security programs, see AWS Compliance Programs.
Want more AWS Security news? Follow us on Twitter.
Post Syndicated from The Atlantic original https://www.youtube.com/watch?v=lne_YRHN8jM
Post Syndicated from Ashutosh Dubey original https://aws.amazon.com/blogs/architecture/email-delta-cost-usage-report-in-a-multi-account-organization-using-aws-lambda/
AWS Organizations gives customers the ability to consolidate their billing across accounts. This reduces billing complexity and centralizes cost reporting to a single account. These reports and cost information are available only to users with billing access to the primary AWS account.
In many cases, there are members of senior leadership or finance decision makers who don’t have access to AWS accounts, and therefore depend on individuals or additional custom processes to share billing information. This task becomes specifically complicated when there is a complex account organization structure in place.
In such cases, you can email cost reports periodically and automatically to these groups or individuals using AWS Lambda. In this blog post, you’ll learn how to send automated emails for AWS billing usage and consumption drifts from previous days.
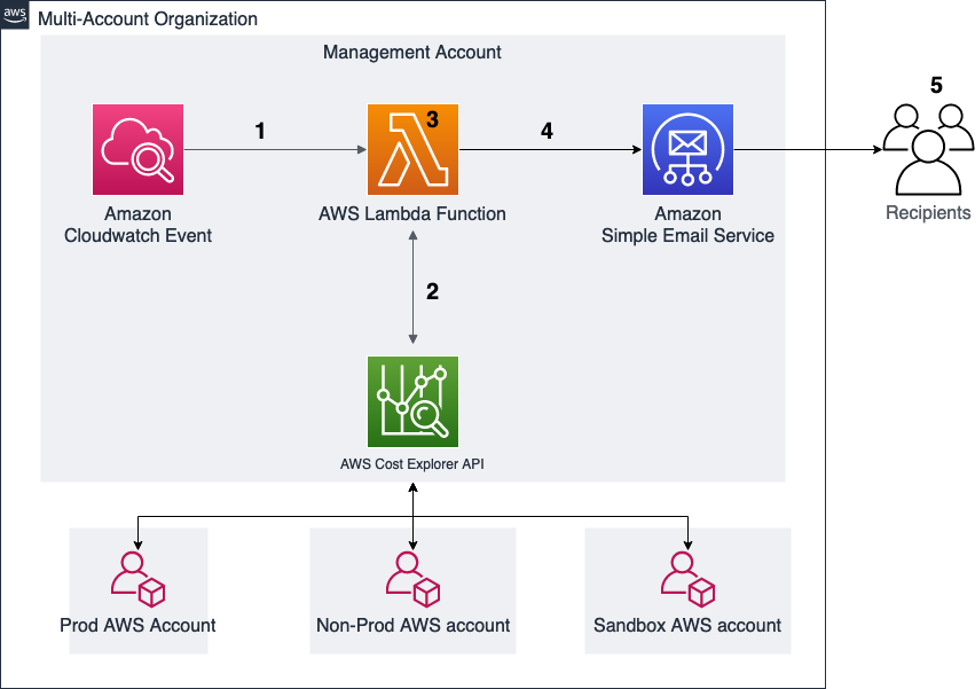
Figure 1. Account structure and architecture diagram
AWS provides the Cost Explorer API to enable you to programmatically query data for cost and usage of AWS services. This solution uses a Lambda function to query aggregated data from the API, format that data and send it to a defined list of recipients.
For this walkthrough, you should have the following prerequisites:

Figure 2. Account IDs in AWS Lambda
def send_report_email” in the template. The subject variable controls the subject line of the email. This can be modified to something meaningful to the recipients.After these changes are made according to your requirements, you can deploy the CloudFormation template:
SchduleExpression, use a valid Cron expression for when you would like the report sent. Choose Next.18 11 * * ? *You will now need to make a few modifications to the created resources.
daily-services-usage-lambdarole”DailyServicesUsage function.aws-portal for Billing, Usage, PaymentMethods, and ViewBilling are enabled. If the Resource summary does not show these permissions, the IAM role is likely not correct. Go back to the IAM console and confirm that you updated the correct role with billing access.
Figure 3. Lambda role permissions
Next, you will create a few Amazon SES identities for the email addresses that were provided as environment variables for the sender and recipients:
The email IDs included will receive an email for the confirmation. Once confirmed, the status shows as verified in the Verified Identities tab of the SES console. The verified email IDs will start receiving the email with the cost reports.
Amazon EventBridge (CloudWatch) event configuration
To configure events:
Figure 4 shows that the highlighted rule is configured to run the Lambda function every 24 hours.

Figure 4. EventBridge rule
From: [email protected] (the email ID mentioned as “sender”)
Sent: Tuesday, April 12, 2022 1:43 PM
To: [email protected] (the email ID mentioned as “receiver”)
Subject: AWS Daily Cost Report for Selected Accounts (the subject of email as set in the Lambda function)
Figure 5 shows the first part of the cost report. It provides the cost summary and delta of the cost variance percentage compare to the previous day. You can also see the trend based on the last seven days from the same table. This helps in understanding a pattern around cost and usage.
This summary is broken down per account, and then totaled, in order to help you understand the accounts contributing to the cost changes. The daily change percentages are also color coded to highlight significant variations.

Figure 5. AWS Daily Cost Report email body part 1
The second part of the report in the email provides the service-related cost breakup for each account configured in the Account dictionary section of the function. This is a further drilldown report; you will get these for all configured accounts.

Figure 6. AWS Daily Cost Report email body part 2
The blog demonstrates how you can automatically and seamlessly share your AWS accounts’ billing and change information with your leadership and finance teams daily (or on any schedule you choose). While the solution was designed for accounts that are part of an organization in the service AWS organizations, it could also be deployed in a standalone account without making any changes. This allows information sharing without the need to provide account access to the recipients, and avoids any dependency on other manual processes. As a next step, you can also store these reports in Amazon Simple Storage Service (Amazon S3), generate a historical trend summary for consumption, and continue making informed decisions.
Post Syndicated from Marshall Jones original https://aws.amazon.com/blogs/security/how-to-investigate-and-take-action-on-security-issues-in-amazon-eks-clusters-with-amazon-detective-part-2/
In part 1 of this of this two-part series, How to detect security issues in Amazon EKS cluster using Amazon GuardDuty, we walked through a real-world observed security issue in an Amazon Elastic Kubernetes Service (Amazon EKS) cluster and saw how Amazon GuardDuty detected each phase by following MITRE ATT&CK tactics.
In this blog post, we’ll walk you through investigative techniques to use with Amazon Detective, paired with the GuardDuty EKS and malware findings from the security issue. After we have identified impacted resources through our investigation, we’ll provide example remediation tactics and preventative controls to address and help prevent security issues in EKS clusters.
Amazon Detective can help you investigate security issues and related resources in your account. Detective provides EKS coverage that you can enable within your accounts. When this coverage is enabled, Detective can help investigate and remediate potentially unauthorized EKS activity that results from misconfiguration of the control plane nodes or application. Although GuardDuty is not a prerequisite to enable Detective, it is recommended that you enable GuardDuty to enhance the visualization capabilities in Detective with GuardDuty findings.
You must have the following services enabled in your AWS account to generate and investigate findings associated with EKS security events in a similar manner as outlined in this blog. If you do not have GuardDuty enabled, you can still investigate with Detective, but in a limited capacity.
In the five phases we walked through in part 1, we discussed GuardDuty findings and MITRE ATT&CK tactics that can help you detect and understand each phase of the unauthorized activity, from the initial misconfiguration to the impact on our application when the EKS cluster is used for crypto mining.
The next recommended step is to investigate the EKS cluster and any associated resources. Amazon Detective can help you to investigate whether there was any other related unauthorized activity in the environment. We will walk through Detective capabilities for visualizing and gathering important information to effectively respond to the security issue. If you’re interested in creating detailed incident response playbooks for your security team to follow in your own environment, refer to these sample AWS incident response playbooks.
Depending on your scenario, there are various resources you can use to start your investigation, such as Security Hub findings, GuardDuty findings, related Kubernetes subjects, or an AWS account’s AWS CloudTrail activity. For our walkthrough, we’ll start our investigation from the GuardDuty finding and use the EKS cluster resource to pivot to the Detective console, as shown in Figure 7. Although we initially focus on the EKS cluster, you could start from any entities that are supported in the Detective behavior graph structure in the Amazon Detective User Guide. For example, we could start directly with the Kubernetes subject system:anonymous and find activity associated with the anonymous user.

Figure 7: Example Detective popup from GuardDuty finding for EKS cluster
We’ll now go over the information that you would need to gather from Detective in order to investigate the example security issue.
To investigate EKS cluster findings with Detective

Figure 8: Detective summary page for EKS cluster metadata details

Figure 9: Detective summary page for EKS container metadata details

Figure 10: Example Detective summary of security findings associated with the EKS cluster

Figure 11: Example Detective summary page for Kubernetes API activity on the EKS cluster

Figure 12: Example Detective summary for newly observed Kubernetes API calls from the EKS cluster

Figure 13: Example Detective results page from a query against IP addresses associated with the EKS cluster

Figure 14: Example Detective results page for specific IP address and associated metadata details
In summary, we began our investigation with a GuardDuty finding about an anonymous API request that was successful in using system:anonymous on one of our EKS clusters. We then used Detective to investigate and visualize activity associated with that EKS cluster, such as volume of successful or unsuccessful API requests, where and when those actions were attempted and other security findings associated with the resource. Once we have completed the investigation, we can confirm scope and impact of the security event and start moving towards taking action.
In this section, we will focus on how to remediate the security issue in our example. Your actions will vary based on your organization and the resources affected. It’s important to note that these actions will impact the EKS cluster and associated workloads, and should accordingly be performed by or coordinated with the cluster operator.
Before you take action on the EKS cluster, you will need to preserve forensic artifacts and evidence for the impacted EKS resources. The order of operations for these actions matters, because you want to get all the data from forensic artifacts in order to determine the overall impact to the resources affected. If you quarantine resources before you capture forensic artifacts, there is a risk that running processes will be interrupted or that the malware attempts to destroy resources that are valuable to a forensics investigation, to cover its tracks.
To preserve forensic evidence
Now that you have the forensic evidence, you can start to quarantine your EKS resources to restrict unauthorized network communication. The main objective is to prevent the affected EKS pods from communicating with internal resources or exfiltrating data externally.
To quarantine EKS resources
Depending on existing inbound and outbound rules on the security group, the connections will either be tracked or untracked. Applying an isolation security group will drop untracked connections. For tracked connections, new connections with the host will not be allowed from the isolation security group, but existing tracked connections will not be interrupted.
Important: This action will affect all containers running on the host.
Important: This action will affect all subnets using the network ACL and all resources within those subnets.
At this point, the affected EKS resources are quarantined, but the cluster is still configured to allow anonymous, unauthenticated access. You will need to remove all unauthorized permissions that were created or added.
To remove unauthorized permissions
Note: Removing IAM policies or attaching IAM policies to restrict permissions will affect the resources that are using the IAM role.
The actions taken so far primarily target the EKS resource, but based on our Detective investigation, there are other actions you might need to take. Because secrets were involved that could be used outside of the EKS cluster, those secrets will need to be rotated wherever they are referenced. Detective will also suggest additional areas where you can investigate and remediate additional unauthorized activity in your AWS account.
It is important that your team go through game days or run-throughs for investigating and responding to different scenarios in order to make sure the team is prepared. You can run through the EKS security workshop to get your security team more familiar with remediation for EKS.
For more information about responding to EKS cluster related security issues, refer to GuardDuty EKS remediation in the GuardDuty User Guide and the EKS Best Practices Guide.
This section covers several preventative controls that you can use to protect EKS clusters.
To help prevent external access to your EKS clusters, limit the exposure of your API server. You can achieve that in two ways:
To help prevent an EKS cluster user from granting any type of access to anonymous or unauthenticated users, you can set up a ValidatingAdmissionWebhook. This is a special type of Kubernetes admission controller that can be configured in the Kubernetes API. (To learn how to build serverless admission webhooks, see the blog post Building serverless admission webhooks for Kubernetes with AWS SAM.)
The ValidatingAdmissionWebhook will deny a Kubernetes API request that matches all of the following checks:
Now that you have set controls to prevent external access to the EKS cluster and prevent granting access to anonymous users, you can focus on preventing the deployment of potentially malicious images.
Malicious container images can have different origins, including:
You can address these sources of malicious images by doing the following:
Note: These criteria can vary based on your use case and internal security and compliance standards.
The above controls will help prevent the deployment of a vulnerable, unauthorized, or potentially malicious container image.
To prevent lateral movement inside the cluster, it is recommended to use network policies, as follows:
It’s important to note that you could use security groups for the same purpose, but pod security groups should only be used if the cluster is compromised and when you want to control the traffic between a pod and a resource that resides in the VPC, not inter-pod traffic.
In this section, we’ve reviewed different preventative controls that could have helped mitigate our example security incident. With the first preventative control, we could have prevented external actors from connecting to the API server. The second control could have prevented granting access to anonymous users. The third control could have prevented the deployment of an unauthorized or vulnerable container image. Finally, the fourth control could have helped limit the impact of the deployed vulnerable images to only the pods where the images were deployed, making it harder to laterally move to other pods in the cluster.
In this post, we walked you through how to investigate an EKS cluster related security issue with Amazon Detective. We also provided some recommended remediation and preventative controls to put in place for the EKS cluster specific security issues. When pairing GuardDuty’s ability for continuous threat detection and monitoring with Detective’s organization and visualization capabilities, you enable your security team to conduct faster and more effective investigation. By providing the security team the ability quickly view an organized set of data associated with security events within your AWS account, you reduce the overall Mean Time to Respond (MTTR).
Now that you understand the investigative capabilities with Detective, it’s time to try things out! It is important that you provide a mechanism for your security team to practice detection, investigation, and remediation techniques using security incident response simulations. By periodically running simulations, your security team will be prepared to quickly respond to possible security events. You can find more detailed incident response playbooks that can assist you in preparing for events in your environment, see these sample AWS incident response playbooks.
If you have feedback about this post, submit comments in the Comments section below. If you have questions about this post, start a thread on Amazon GuardDuty re:Post.
Want more AWS Security news? Follow us on Twitter.