Around the world, organizations are evaluating and embracing artificial intelligence (AI) and machine learning (ML) to drive innovation and efficiency. From accelerating research and enhancing customer experiences to optimizing business processes, improving patient outcomes, and enriching public services, the transformative potential of AI is being realized across sectors. Although using emerging technologies helps drive positive outcomes, leaders worldwide must balance these benefits with the need to maintain security, compliance, and resilience. Many organizations, including those in the public sector and regulated industries, are investing in generative AI applications powered by large language models (LLMs) and other foundation models (FMs) because these applications can transform and scale their work and provide better experiences for customers. Beyond computing power, unlocking this AI potential resides in the AI applications that organizations can create based on a variety of AI/ML development services, models, and data sources. Organizations must navigate the complexity of building AI applications in light of existing and emerging regulatory regimes while verifying that their AI applications and related data are secure, protected, and resilient to risks and threats.
AWS offers a wide range of AI/ML services and capabilities, built on our sovereign-by-design foundation, that are making it simpler for our customers to meet their digital sovereignty needs while getting the security, control, compliance, and resilience that they need. For example, Amazon Bedrock is a fully managed service that offers a choice of high-performing FMs from leading AI companies such as AI21 Labs, Anthropic, Cohere, Meta, Mistral AI, and Stability AI through a single API, along with a broad set of capabilities to build generative AI applications with security, privacy, and responsible AI. Amazon SageMaker provides tools and infrastructure to build, train, and deploy ML models at scale while supporting responsible AI with governance controls and access to pretrained models.
Innovating securely across the AI lifecycle
Security is and always has been our top priority at AWS. AWS customers benefit from our ongoing investment in data centers, networks, custom hardware, and secure software services, built to satisfy the requirements of the most security-sensitive organizations, including the government, healthcare, and financial services. We have always believed that it is essential that customers have control over their data and its location. That’s why we architected the AWS Cloud to be secure and sovereign-by-design from day one. We remain committed to giving our customers more control and choice so that they can use the full power of AWS while meeting their unique digital sovereignty needs.
As organizations develop and implement generative AI, they want to make sure that their data and applications are secured across the AI lifecycle, including data preparation, training, and inferencing. To help ensure the confidentiality and integrity of customer data, all of our Nitro-based Amazon Elastic Compute Cloud (Amazon EC2) instances that run ML accelerators such as AWS Inferentia and AWS Trainium, and graphics processing units (GPUs) such as P4, P5, G5, and G6, are backed by the industry-leading security capabilities of the AWS Nitro System. By design, there is no mechanism for anyone at AWS to access Nitro EC2 instances that customers use to run their workloads. The NCC Group, an independent cybersecurity firm, has validated the design of the Nitro System.
We take a secure approach to generative AI and make it practical for our customers to secure their generative AI workloads across the generative AI stack so that they can focus on building and scaling. All AWS services—including generative AI services—support encryption, and we continue to innovate and invest in controls and encryption features that allow our customers to encrypt everything everywhere.
For example, Amazon Bedrock uses encryption to protect data in transit and at rest, and data remains in the AWS Region where Amazon Bedrock is being used. Customer data, such as prompts, completions, custom models, and data used for fine-tuning or continued pre-training, is not used for Amazon Bedrock service improvement and is never shared with third-party model providers. When customers fine-tune a model in Amazon Bedrock, the data is never exposed to the public internet, never leaves the AWS network, is securely transferred through a customer’s virtual private cloud (VPN), and is encrypted in transit and at rest.
SageMaker protects ML model artifacts and other system artifacts by encrypting data in transit and at rest. Amazon Bedrock and SageMaker integrate with AWS Key Management Service (AWS KMS) so that customers can securely manage cryptographic keys. AWS KMS is designed so that no one—not even AWS employees—can retrieve plaintext keys from the service.
Developing responsibly
The responsible development and use of AI is a priority for AWS. We believe that AI should take a people-centric approach that makes AI safe, fair, secure, and robust. We are committed to supporting customers with responsible AI and helping them build fairer and more transparent AI applications to foster trust, meet regulatory requirements, and use AI to benefit their business and stakeholders. AWS is the first major cloud service provider to announce ISO/IEC 42001 accredited certification for AI services, covering Amazon Bedrock, Amazon Q Business, Amazon Textract, and Amazon Transcribe. ISO/IEC 42001 is an international management system standard that outlines requirements and controls for organizations to promote the responsible development and use of AI systems.
We take responsible AI from theory into practice by providing the necessary tools, guidance, and resources, including Amazon Bedrock Guardrails to help implement safeguards tailored to customer generative AI applications and aligned with their responsible AI policies, or Model Evaluation on Amazon Bedrock to evaluate, compare, and select the best FMs for specific use cases based on custom metrics, such as accuracy, robustness, and toxicity. Additionally, Amazon SageMaker Model Monitor automatically detects and alerts customers of inaccurate predictions from deployed models. We continue to publish AI Service Cards to enhance transparency by providing a single place to find information on the intended use cases and limitations, responsible AI design choices, and performance optimization best practices for our AI services and models.
Building resilience
Resilience plays a pivotal role in the development of any workload, and AI/ML workloads are no different. Customers need to know that their workloads in the cloud will continue to operate in the face of natural disasters, network disruptions, or disruptions due to geopolitical crises. AWS delivers the highest network availability of any cloud provider and is the only cloud provider to offer three or more Availability Zones (AZs) in all Regions, providing more redundancy. Understanding and prioritizing resilience is crucial for generative AI workloads to meet organizational availability and business continuity requirements. We have published guidance on designing generative AI workloads for resilience. To enable higher throughput and enhanced resilience during periods of peak demands in Amazon Bedrock, customers can use cross-region inference to distribute traffic across multiple Regions. For customers with specific European Union data sovereignty requirements, we are launching the AWS European Sovereign Cloud in 2025 to offer an additional layer of control and resilience.
Supporting choice and flexibility
It’s important that customers have access to diverse AI technologies, while having the freedom to choose the right solutions to meet their needs. AWS provides more diversity, choice, and flexibility so that customers can select the AI solution that best aligns with their specific requirements, whether that’s using open-source models, proprietary solutions, or their own custom AI models. For example, we understand the importance of open-source AI in fostering transparency, collaboration, and rapid innovation. Open-source models enable scrutiny of vulnerabilities, drive security improvements, and support research on AI safety. Amazon SageMaker JumpStart provides pretrained, open-source models for a wide range of common use cases. To provide practitioners and developers with the guidance and tools that they need to create secure-by-design AI systems, we are a founding member of the open-source initiative Coalition for Secure AI (CoSAI).
Also, our commitment to portability and interoperability helps ensure that customers can move easily between environments. For customers changing IT providers, we’ve taken concrete steps to lower costs, and AWS is actively engaged in efforts to facilitate switching between cloud providers, including through our support of the Cloud Infrastructure Service Providers in Europe (CISPE)Cloud Switching Framework, which lays out guidance to assist providers and customers in the switching process. This gives organizations the flexibility to adapt their cloud and AI strategies as their needs evolve.
We remain committed to providing customers with a choice of diverse AI technologies, along with secure and compliant ways to build their AI applications throughout the development lifecycle. Through this approach, customers can enhance the security, compliance, and resilience of their systems.
If you have feedback about this post, submit comments in the Comments section below. If you have questions about this post, contact AWS Support.
Developing secure products and services is imperative for organizations that are looking to strengthen operational resilience and build customer trust. However, system design often prioritizes performance, functionality, and user experience over security. This approach can lead to vulnerabilities across the supply chain.
As security threats continue to evolve, the concept of Secure by Design (SbD) is gaining importance in the effort to mitigate vulnerabilities early, minimize risks, and recognize security as a core business requirement. We’re excited to share a whitepaper we recently authored with SANS Institute called Building Security from the Ground up with Secure by Design, which addresses SbD strategy and explores the effects of SbD implementations.
The whitepaper contains context and analysis that can help you take a proactive approach to product development that facilitates foundational security. Key considerations include the following:
Integrating SbD into the software development lifecycle (SDLC)
Supporting SbD with automation
Reinforcing defense-in-depth
Applying SbD to artificial intelligence (AI)
Identifying threats in the design phase with threat modeling
Using SbD to simplify compliance with requirements and standards
Planning for the short and long term
Establishing a culture of security
While the journey to a Secure by Design approach is an iterative process that is different for every organization, the whitepaper details five key action items that can help set you on the right path. We encourage you to download the whitepaper and gain insight into how you can build secure products with a multi-layered strategy that meaningfully improves your technical and business outcomes. We look forward to your feedback and to continuing the journey together.
January 30, 2025: This post was republished to make the instructions clearer and compatible with OCSF 1.1.
Customers often require multiple log sources across their AWS environment to empower their teams to respond and investigate security events. In part one of this two-part blog post, I show you how you can use Amazon OpenSearch Service to ingest logs collected by Amazon Security Lake to facilitate near real-time monitoring.
Many customers use Security Lake to automatically centralize security data from Amazon Web Services (AWS) environments, software as a service (SaaS) providers, on-premises workloads, and cloud sources into a purpose-built data lake in their AWS environment. OpenSearch Service is a managed service that customers can use to deploy, operate, and scale OpenSearch clusters in the AWS Cloud. It natively integrates with Security Lake to enable customers to perform interactive log analytics and searches across large datasets, create enterprise visualization and dashboards, and perform analysis across disparate applications and logs. With Amazon OpenSearch Security Analytics, customers can also gain visibility into the security posture of their organization’s infrastructure, monitor for anomalous activity, detect potential security threats in near real time, and initiate alerts to pre-configured destinations.
Without using Amazon OpenSearch Service, customers would need to build, deploy and manage infrastructure for an analytics solution, such as an ELK stack.
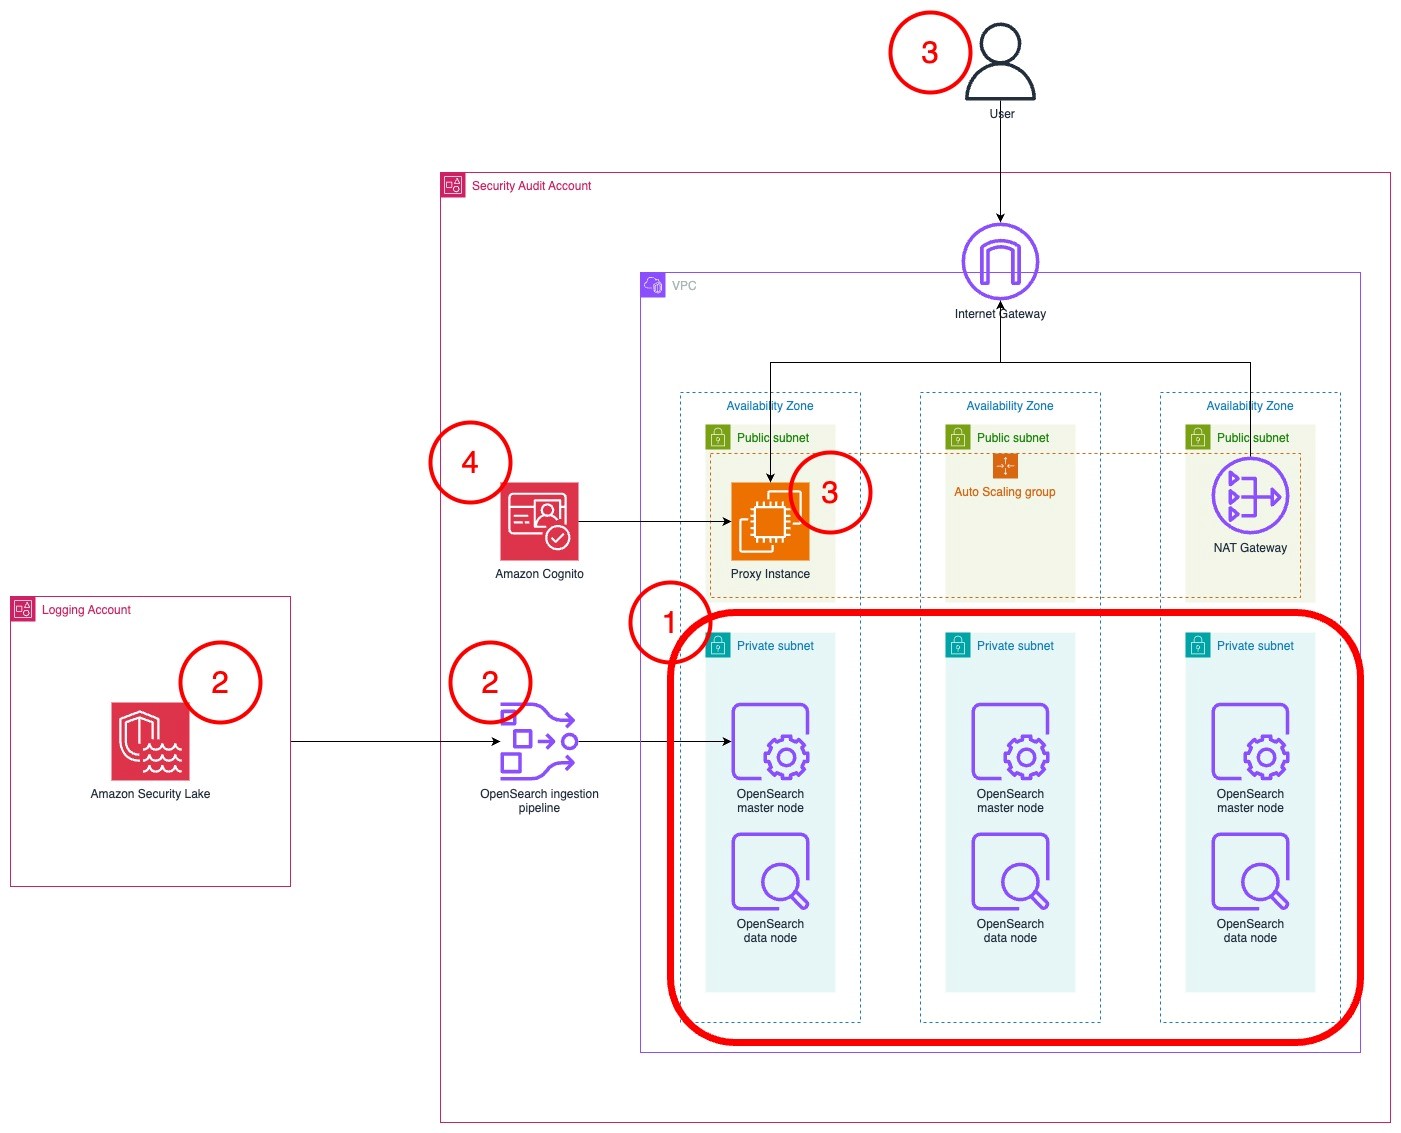
The architecture diagram in Figure 1 shows the completed architecture of the solution.
The OpenSearch Service cluster is deployed within a virtual private cloud (VPC) across three Availability Zones for high availability.
The OpenSearch Service cluster ingests logs from Security Lake using an OpenSearch Ingestion pipeline.
The cluster is accessed by end users through a public-facing proxy hosted on an Amazon EC2 instance.
To reduce costs, the template doesn’t deploy a dead letter queue (DLQ) for the OpenSearch Ingestion pipeline. You can add one later if you want.
Instead of a public facing proxy, you can deploy a VPN to access your cluster.
Authentication to the cluster is managed with Amazon Cognito.
Figure 1: Solution architecture
Planning the deployment
This section will help you plan your OpenSearch service deployment, including what nodes you should choose, the amount of storage to allocate, and where to deploy the cluster.
Deciding instances for the OpenSearch Service master and data nodes
First, determine what instance type to use for the master and data nodes. If your workload generates less than 100 GB of Security Lake logs per day, we recommend using three m6g.large.search master nodes and three r6g.large.search data nodes. You can start small and scale up or scale out later. For more information about deciding the size and number of instances, see Get started with Amazon OpenSearch Service. Note the instance types that you have selected on a text editor because you will use this as an input for the AWS CloudFormation template that you will deploy later.
Configuring storage
To optimize your storage costs, you need to plan your data strategy. In this architecture, Security Lake is used for long-term log storage. Because Security Lake uses Amazon Simple Storage Service (Amazon S3), you can optimize long-term storage costs. You can configure OpenSearch Service to ingest priority logs based on the recent data that you can use for near-real time detection and alerting. Your team can query logs in Security Lake using its Zero-ETL integration with OpenSearch Service to analyze older logs.
Therefore, Security Lake should serve as your primary long-term log storage, with OpenSearch Service storing only the most recent logs.
The number of days of logs in OpenSearch Service will depend on how many days’ worth of data you need to investigate at a given time. I recommend storing 15 days of data in OpenSearch Service. This allows you to react to and investigate the most immediate security events while optimizing storage costs for older logs.
The next step is to determine the volume of logs generated by Security Lake.
Sign in to the Security Lake delegated administrator account.
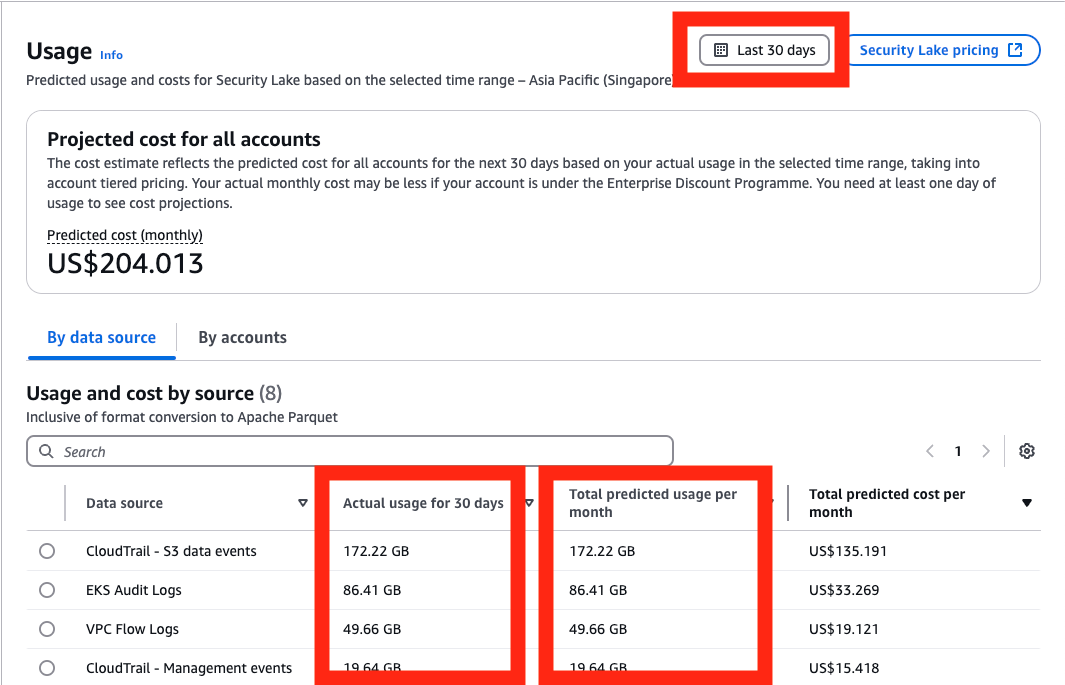
Go to the AWS Management Console for Security Lake. Choose Usage in the navigation pane.
On the Usage screen, select Last 30 days as the range of usage.
Add the total Actual usage for the last 30 days for the data sources that you intend to send to OpenSearch. If you have used Security Lake for less than 30 days, you can use the Total predicted usage per month. Divide this figure by 30 to get the daily data volume.
Figure 2: Select range of usage
To determine the total storage needed, multiply the data generated by Security Lake per day by the retention period you chose, then by 1.1 to account for the indexes, then multiply that number by 1.15 for overhead storage. For more information about calculating storage, see Get started with Amazon OpenSearch Service.
To determine the amount of Amazon Elastic Block Store (Amazon EBS) storage that you need per node, take the total amount of storage and divide it by the number of nodes that you have. Round that number up to the nearest whole number. You can increase the amount of storage after deployment when you have a better understanding of your workload. Make a note of this number in a text editor because you’ll use it as an input in the CloudFormation template later.
Example 1: 10 GB of Security Lake logs generated per day, stored for 30 days in OpenSearch Service in three nodes
10 GB of Security Lake logs stored for 30 days = 10 GB * 30 = 300 GB
Account for additional space for indexes and overhead space = 300 GB * 1.1 * 1.15 = 379.5 GB
Divide the storage required across three nodes, rounded up = 379.5/3 ≈ 127 GB per node
You would need 127 GB per node in OpenSearch Service
Example 2: 200 GB of Security Lake logs generated per day, stored for 15 days in OpenSearch Service across six nodes
200 GB of Security Lake logs stored for 15 days = 200 GB * 15 = 3000 GB
Account for additional space for indexes and overhead space = 3000 GB * 1.1 * 1.15 = 3795 GB
Divide the storage required across three nodes, rounded up = 3795/6 ≈ 633 GB per node
You would need 633 GB per node in OpenSearch Service
Where to deploy the cluster?
If you have an AWS Control Tower deployment or have a deployment modelled after the AWS Security Reference Architecture (AWS SRA), Security Lake should be deployed in the Log Archive account. Because security best practices recommend that the Log Archive account should not be frequently accessed, the OpenSearch Service cluster should be deployed into your Audit account or Security Tooling account.
You need to deploy your Security Lake subscriber in the same Region as your Security Lake roll-up Region. If you have more than one roll-up Region, choose the Region that collects logs from the Regions you want to monitor.
Your cluster needs to be deployed in the same Region as your Security Lake subscriber be able to access data.
Setting up the Security Lake subscriber
Before deploying the solution, create a Security Lake subscriber in your Security Lake roll-up Region so that OpenSearch Service can access data from Amazon Security Lake.
Access the Security Lake console in your Log Archive account.
Choose Subscribers in the navigation pane.
Choose Create subscriber.
On the Create subscriber page, enter a name, such as OpenSearch-subscriber.
Under Data Access, select Under S3 notification type, select SQS queue.
Under Subscriber credentials, enter the AWS account ID for the account you plan to deploy the OpenSearch cluster to, which should be your Security Tooling
Enter OpenSearchIngestion-<AWS account ID> under External ID.
Figure 3: Configuring the Security Lake subscriber
Leave All log and event sources selected and choose Create.
After the subscriber has been created, you will need to collect information to facilitate the deployment.
To gather necessary information:
Select the subscriber that you just created.
Derive the S3 bucket name from the S3 bucket ARN and store it in a text editor. The Amazon Resource Name (ARN) is formatted as arn:aws:s3:::<bucket name>. The bucket name should look like aws-security-data-lake-<region>-xxxxx.
Figure 4: Derive the S3 bucket name from the Subscriber details page
Go to the Amazon Simple Queue Service (Amazon SQS) console and select the SQS queue created as part of the Security Lake subscriber. It should look like AmazonSecurityLake-xxxxxxxxx-Main-Queue. Note the queue’s ARN and URL in your text editor.
Figure 5: Relevant details from the SQS queue
Deploy the solution
To deploy the solution in your Security Tooling account, use a CloudFormation template. This template deploys the OpenSearch Service cluster, OpenSearch Ingestion pipeline, and an AWS Lambda function to initialize the cluster.
To deploy the OpenSearch cluster:
To deploy the CloudFormation template that builds the OpenSearch service cluster, select the Launch Stack button.
In the CloudFormation console, make sure that you are in the correct AWS account. You should be in your Security Tooling account. Also make sure that you have selected the same Region as your Security Lake subscriber.
Enter a name for your stack. A name like os-stack-<day>-<month> can help you keep track of deployments.
Enter the instance types and Amazon EBS volume size that you noted earlier.
Enter the IP address range that you want to allow to access the proxy’s security group. You should limit this to your corporate IP range. You can set it as 0.0.0/0 if you want to expose it to the public internet.
Fill in the details of the Security Lake bucket and the subscriber Amazon SQS queue ARN, URL, and Region.
Figure 6: Add stack parameters
Check the acknowledgements in the Capabilities section.
Choose Create stack to begin deploying the resources.
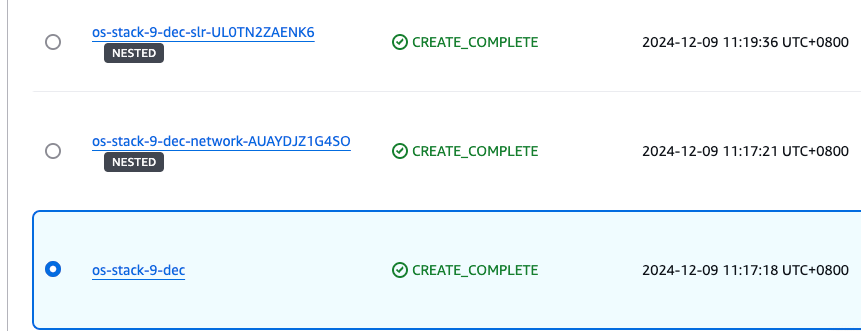
It will take 20–30 minutes to deploy the multiple nested templates. Wait for the main stack (not the nested ones) to achieve the CREATE_COMPLETE status before proceeding to the next step.
Note: If you encounter failures while deployment, you can download the CloudFormation file here and select Preserve successfully provisioned resources under Stack failure options while deploying. This will allow you to troubleshoot the stack deployment.
Go to the Outputs pane of the main CloudFormation stack. Save the DashboardsProxyURL, OpenSearchInitRoleARN, and PipelineRole values in a text editor to refer to later.
Figure 7: The stacks in the CREATE_COMPLETE state with the outputs panel shown
Open the DashboardsProxyURL value in a new tab.
Note: Because the proxy relies on a self-signed certificate, you will get an insecure certificate warning. You can safely ignore this warning and proceed. For a production workload, you should issue a trusted private certificate from your internal public key infrastructure or use AWS Private Certificate Authority.
You will be presented with the Amazon Cognito sign-in page. Use administrator as the username.
Access Secrets Manager to find the password. Select the secret that was created as part of the stack.
Figure 8: The Cognito password in Secrets Manager
Choose Retrieve secret value to get the password.
Figure 9: Retrieve the secret value
After signing in, you will be prompted to change your password and will be redirected to the OpenSearch dashboard.
If you see a pop-up that states Start by adding your own data, select Explore on my own. On the next page, Introducing new OpenSearch Dashboards look & feel, choose Dismiss.
If you see a pop-up that states Select your tenant, select Global, and then choose Confirm.
Figure 10: Select and confirm your tenant
To initialize the OpenSearch cluster:
Choose the menu icon (three stacked horizontal lines) on the top left and select Security under the Management section.
Figure 11: Navigating to the Security page in the OpenSearch console
Select Roles. On the Roles page, search for the all_access role and select it.
Select Mapped users, and then select Manage mapping.
On the Map user screen, choose Add another backend role. Paste the value for the OpenSearchInitRoleARN from the list of CloudFormation outputs. Choose Map.
Figure 12: Mapping the role on the Security page in the OpenSearch console
Leave this tab open and return to the AWS Management console. Go to the AWS Lambda console and select the function named xxxxxx-OS_INIT.
In the function screen, choose Test, and then Create new test event.
Figure 13: Creating the test event in the Lambda console
Choose Invoke. The function should run for about 30 seconds. The execution results should show the component templates that have been created. This Lambda function creates the component and index templates to ingest Open Cybersecurity Framework (OCSF) formatted data, a set of indices and aliases that correspond with the OCSF classes generated by Security Lake, and a rollover policy that will rollover the index daily or if it becomes larger than 40 GB.
Figure 14: Invoking the Lambda function in the Lambda console
To set up the pipeline
Return to the Map user page on the OpenSearch console.
Choose Add another backend role. Paste the value of the PipelineRole from the CloudFormation template output. Choose This will allow the OpenSearch Ingestion to write to the cluster.
Figure 15: Mapping the OpenSearch Ingestion role
Access the Amazon S3 console in the Log Archive account where Security Lake is hosted.
Select the Security Lake bucket in your roll-up Region. It should look like aws-security-data-lake-region-xxxxxxxxxx.
Choose Permissions, then Edit under Bucket policy.
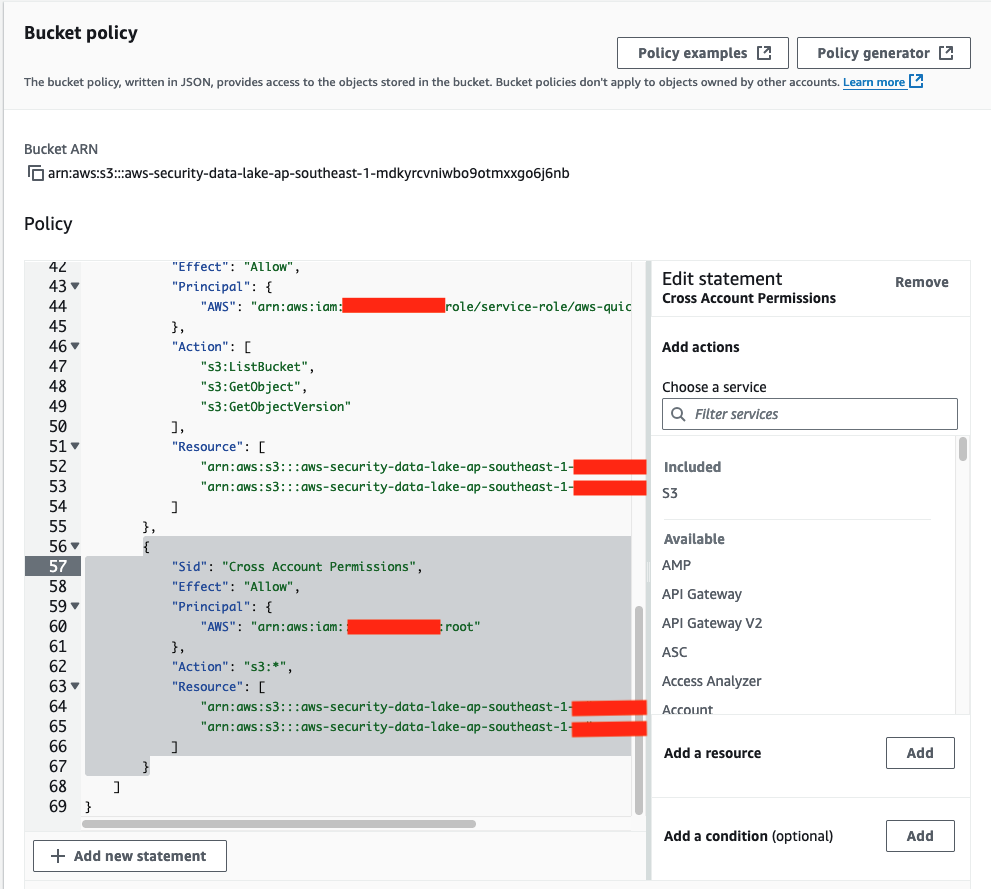
Add this policy to the end of the existing bucket policy. Replace the Principal with the ARN of the PipelineRole and the name of your Security Lake bucket in the Resource section.
{
            "Sid": "Cross Account Permissions",
            "Effect": "Allow",
            "Principal": {
                "AWS": "<Pipeline role ARN>"
            },
            "Action": "s3:*",
            "Resource": [
                "arn:aws:s3:::<Security Lake bucket name>/*",
                "arn:aws:s3:::<Security Lake bucket name>"
            ]
        }
Figure 16: The modified S3 bucket access policy
Choose Save changes.
To upload the index patterns and dashboards
Download the Security-lake-objects.ndjson file by right-clicking on this link and selecting Save link as.
Access the Dashboards Management page through the navigation menu.
Choose Saved objects in the navigation pane.
On the Saved Objects page, choose Import on the right side of the screen.
Figure 17: Import saved objects
Choose Import and select the Security-lake-objects.ndjson file that you downloaded previously.
Leave Create new objects with unique IDs selected and choose Import.
You can now view the ingested logs on the Discover page and visualizations on the Dashboards page, which you can find on the navigation bar.
Figure 18: The Discover page displaying ingested logs
Clean up
To avoid unwanted charges, delete the main CloudFormation template, named os-stack-<day>-<month> (not the nested stacks).
Figure 19: Select the main stack in the CloudFormation console
Modify the Security Lake bucket policy in the logging account to remove the section you added that trusted the PipelineRole. Be careful not to modify the rest of the policy because it could impact the functioning of Security Lake and other subscribers.
Figure 20: The S3 bucket policy with the relevant sections that needed to be deleted
Conclusion
In this post, you learned how to plan an OpenSearch deployment with Amazon OpenSearch Service to ingest logs from Amazon Security Lake. With this solution, you’re able to aggregate and manage logs with Security Lake and visualize and monitor those logs with OpenSearch Service. After deployment, monitor the OpenSearch Service metrics to determine if you need to scale this up or out for improved performance. In part 2, I will show you how to set up the Security Analytics detector to generate alerts to security findings in near-real time.
If you have feedback about this post, submit comments in the Comments section below. If you have questions about this post, contact AWS Support.
AWS Security Hub is a cloud security posture management (CSPM) service that performs security best practice checks across your Amazon Web Services (AWS) accounts and AWS Regions, aggregates alerts, and enables automated remediation. Security Hub is designed to simplify and streamline the management of security-related data from various AWS services and third-party tools. It provides a holistic view of your organization’s security state that you can use to prioritize and respond to security alerts efficiently.
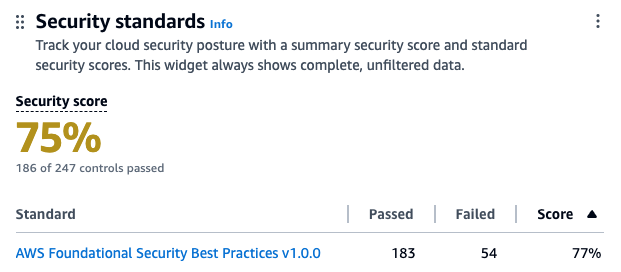
Security Hub assigns a security score to your environment, which is calculated based on passed and failed controls. A control is a safeguard or countermeasure prescribed for an information system or an organization that’s designed to protect the confidentiality, integrity, and availability of the system and to meet a set of defined security requirements. You can use the security score as a mechanism to baseline the accounts. The score is displayed as a percentage rounded up or down to the nearest whole number.
In this blog post, we review the top four mechanisms that you can use to improve your security score, review the five controls in Security Hub that most often fail, and provide recommendations on how to remediate them. This can help you reduce the number of failed controls, thus improving your security score for the accounts.
What is the security score?
Security scores represent the proportion of passed controls to enabled controls. The score is displayed as a percentage rounded to the nearest whole number. It’s a measure of how well your AWS accounts are aligned with security best practices and compliance standards. The security score is dynamic and changes based on the evolving state of your AWS environment. As you address and remediate findings associated with controls, your security score can improve. Similarly, changes in your environment or the introduction of new Security Hub findings will affect the score.
Each check is a point-in-time evaluation of a rule against a single resource that results in a compliance status of PASSED, FAILED, WARNING, or NOT_AVAILBLE. A control is considered passed when the compliance status of all underlying checks for resources are PASSED or if the FAILED checks have a workflow status of SUPPRESSED. You can view the security score through the Security Hub console summary page—as shown in figure 1—to quickly gain insights into your security posture. The dashboard provides visual representations and details of specific findings contributing to the score. For more information about how scores are calculated, see determining security scores.
Figure. 1 Security Hub dashboard
How to improve the security score?
You can improve your security score in four ways:
Remediating failed controls: After the resources responsible for failed checks in a control are configured with compliant settings and the check is repeated, Security Hub marks the compliance status of the checks as PASSED and the workflow status as RESOLVED. This increases the number of passed controls, thus improving the score.
Suppressing findings associated with failed controls: When calculating the control status, Security Hub ignores findings in the ARCHIVED state as well as findings with a workflow status of SUPPRESSED, which will affect security scores. So if you suppress all failed findings for a control, the control status becomes passed.
If you determine that a Security Hub finding for a resource is an accepted risk, you can manually set the workflow status of the finding to SUPPRESSED from the Security Hub console or using the BatchUpdateFindings API. Suppression doesn’t stop new findings from being generated, but you can set up an automation rule to suppress all future new and updated findings that meet the filtering criteria.
Disabling controls that aren’t relevant: Security Hub provides flexibility by allowing administrators to customize and configure security controls. This includes the ability to disable specific controls or adjust settings to help align with organizational security policies. When a control is disabled, security checks are no longer performed and no additional findings are generated. Existing findings are set to ARCHIVED and the control is excluded from the security score calculations.
Use central configuration in Security Hub to tailor the security controls to help align with your organization’s specific requirements. You can fine-tune your security controls, focus on relevant issues, and improve the accuracy and relevance of your security score. Introducing new central configuration capabilities in AWS Security Hub provides an overview and the benefits of central configuration.
Suppression should be used when you want to tune control findings from specific resources whereas controls should be disabled only when the control is no longer relevant for your AWS environment.
Customize parameter values to fine tune controls: Some Security Hub controls use parameters that affect how the control is evaluated. Typically, these controls are evaluated against the default parameter values that Security Hub defines. However, for a subset of these controls, you can customize the parameter values. When you customize a parameter value for a control, Security Hub starts evaluating the control against the value that you specify. If the resource underlying the control satisfies the custom value, Security Hub generates a PASSED finding.
We will use these mechanisms to address the most commonly failed controls in the following sections.
Identifying the most commonly failed controls in Security Hub
You can use the AWS Management Console to identify the most commonly failed controls across your accounts in AWS Organizations:
Sign in to the delegated administrator account and open the Security Hub console.
On the navigation pain, choose Controls.
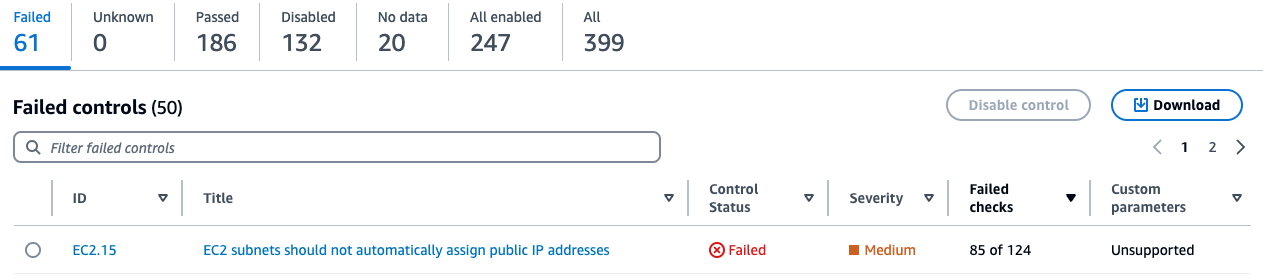
Here, you will see the status of your controls sorted by the severity of the failed controls. You will also see the associated number of failed checks with the failed controls in the Failed checks column on this page. A check is performed for each resource. If a column says 85 out of 124 for a control, it means 85 resources out of 124 failed the check for that control. You can sort this column in descending order to identify failed controls that have the most resources as shown in Figure 2.
Figure 2: Security Hub control status page
Addressing the most commonly failed controls
In this section we address remediation strategies for the most used Security Hub controls that have Critical and High severity and have a high failure rate amongst AWS customers. We review five such controls and provide recommended best practices, default settings for the resource type at deployment, guardrails, and compensating controls where applicable.
AutoScaling.3: Auto Scaling group launch configuration
An Auto Scaling group in AWS is a service that automatically adjusts the number of Amazon Elastic Compute Cloud (Amazon EC2) instances in a fleet based on user-defined policies, making sure that the desired number of instances are available to handle varying levels of application demand. A launch configuration is a blueprint that defines the configuration of the EC2 instances to be launched by the Auto Scaling group. The AutoScaling.3 control checks whether Instance Metadata Service Version 2 (IMDSv2) is enabled on the instances launched by EC2 Auto Scaling groups using launch configurations. The control fails if the Instance Metadata Service (IMDS) version isn’t included in the launch configuration, or if both Instance Metadata Service Version 1 (IMDSv1) and IMDSv2 are included. AutoScaling.3 aligns with best practice SEC06-BP02 Reduce attack surface of the well architected framework.
The IMDS is a service on Amazon EC2 that provides metadata about EC2 instances, such as instance ID, public IP address, AWS Identity and Access Management (IAM) role information, and user data such as scripts during launch. IMDS also provides credentials for the IAM role attached to the EC2 instance, which can be used by threat actors for privilege escalation. The existing instance metadata service (IMDSv1) is fully secure, and AWS will continue to support it. If your organization strategy involves using IMDSv1, then consider disabling AutoScaling.3 and EC2.8 Security Hub controls. EC2.8 is a similar control, but checks the IMDS configuration for each EC2 instance instead of the launch configuration.
IMDSv2 adds protection for four types of vulnerabilities that could be used to access the IMDS, including misconfigured or open website application firewalls, misconfigured or open reverse proxies, unpatched service-side request forgery (SSRF) vulnerabilities, and misconfigured or open layer 3 firewalls and network address translation. It does so by requiring the use of a session token using a PUT request when requesting instance metadata and using a Time to Live (TTL) default of 1 so the token cannot travel outside the EC2 instance. For more information on protections added by IMDSv2, see Add defense in depth against open firewalls, reverse proxies, and SSRF vulnerabilities with enhancements to the EC2 Instance Metadata Service.
The Autoscaling.3 control creates a failed check finding for every Amazon EC2 launch configuration that is out of compliance. An Auto Scaling group is associated with one launch configuration at a time. You cannot modify a launch configuration after you create it. To change the launch configuration for an Auto Scaling group, use an existing launch configuration as the basis for a new launch configuration with IMDSv2 enabled and then delete the old launch configuration. After you delete the launch configuration that’s out of compliance, Security Hub will automatically update the finding state to ARCHIVED. It’s recommended to use Amazon EC2 launch templates, which is a successor to launch configurations because you cannot create launch configurations with new EC2 instances released after December 31, 2022. See Migrate your Auto Scaling groups to launch templates for more information.
Amazon has taken a series of steps to make IMDSv2 the default. For example, Amazon Linux 2023 uses IMDSv2 by default for launches. You can also set the default instance metadata version at the account level to IMDSv2 for each Region. When an instance is launched, the instance metadata version is automatically set to the account level value. If you’re using the account-level setting to require the use of IMDSv2 outside of launch configuration, then consider using the central Security Hub configuration to disable AutoScaling.3 for these accounts. See the Sample Security Hub central configuration policy section for an example policy.
EC2.18: Security group configuration
AWS security groups act as virtual stateful firewalls for your EC2 instances to control inbound and outbound traffic and should follow the principle of least privileged access. In the Well-Architected Framework security pillar recommendation SEC05-BP01 Create network layers, it’s best practice to not use overly permissive or unrestricted (0.0.0.0/0) security groups because it exposes resources to misuse and abuse. By default, the EC2.18 control checks whether a security group permits unrestricted incoming TCP traffic on ports except for the allowlisted ports 80 and 443. It also checks if unrestricted UDP traffic is allowed on a port. For example, the check will fail if your security group has an inbound rule with unrestricted traffic to port 22. This control allows custom control parameters that can be used to edit the list of authorized ports for which unrestricted traffic is allowed. If you don’t expect any security groups in your organization to have unrestricted access on any port, then you can edit the control parameters and remove all ports from being allowlisted. You can use a central configuration policy as shown in Sample Security Hub central configuration policy to update the parameter across multiple accounts and Regions. Alternately, you can also add authorized ports to the list of ports you want to allowlist for the check to pass.
EC2.18 checks the rules in the security groups in accounts, whether the security groups are in use or not. You can use AWS Firewall Manager to identify and delete unused security groups in your organization using usage audit security group policies. Deleting unused security groups that have failed the checks will change the finding state of associated findings to ARCHIVED and exclude them from security score calculation. Deleting unused resources also aligns with SUS02-BP03 of the sustainability pillar of the Well-Architected Framework. You can create a Firewall Manager usage audit security group policy through the firewall manager using the following steps:
To configure Firewall Manager:
Sign in to the Firewall Manager administrator account and open the Firewall Manager console.
In the navigation pane, select Security policies.
Choose Create policy.
On Choose policy type and Region:
For Region, select the AWS Region the policy is meant for.
For Policy type, select Security group.
For Security group policy type, select Auditing and cleanup of unused and redundant security groups.
Choose Next.
On Describe policy:
Enter a Policy name and description.
For Policy rules, select Security groups within this policy scope must be used by at least one resource.
You can optionally specify how many minutes a security group can exist unused before it’s considered noncompliant, up to 525,600 minutes (365 days). You can use this setting to allow yourself time to associate new security groups with resources.
For Policy action, we recommend starting by selecting Identify resources that don’t comply with the policy rules, but don’t auto remediate. This allows you to assess the effects of your new policy before you apply it. When you’re satisfied that the changes are what you want, edit the policy and change the policy action by selecting Auto remediate any noncompliant resources.
Choose Next.
On Define policy scope:
For AWS accounts this policy applies to, select one of the three options as appropriate.
For Resource type, select Security Group.
For Resources, you can narrow the scope of the policy using tagging, by either including or excluding resources with the tags that you specify. You can use inclusion or exclusion, but not both.
Choose Next.
Review the policy settings to be sure they’re what you want, and then choose Create policy.
Firewall manager is a Regional service so these policies must be created in each Region you have services in.
You can also set up guardrails for security groups using Firewall Manager policies to remediate new or updated security groups that allow unrestricted access. You can create a Firewall Manager content audit security group policy through the Firewall Manager console:
To create a Firewall Manager security group policy:
Sign in to the Firewall Manager administrator account.
Open the Firewall Manager console.
In the navigation pane, select Security policies.
Choose Create policy.
On Choose policy type and Region:
For Region, select a Region.
For Policy type, select Security group.
For Security group policy type, select Auditing and enforcement of security group rules.
Choose Next.
On Describe policy:
Enter a Policy name and description.
For Policy rule options, select configure managed audit policy rules.
Configure the following options under Policy rules.
For the Security group rules to audit, select Inbound rules from the drop down.
Select Audit overly permissive security group rules.
Select Rule allows all traffic.
For Policy action, we recommend starting by selecting Identify resources that don’t comply with the policy rules, but don’t auto remediate. This allows you to assess the effects of your new policy before you apply it. When you’re satisfied that the changes are what you want, edit the policy and change the policy action by selecting Auto remediate any noncompliant resources.
Choose Next.
On Define policy scope:
For AWS accounts this policy applies to, select one of the three options as appropriate.
For Resource type, select Security Group.
For Resources, you can narrow the scope of the policy using tagging, by either including or excluding resources with the tags that you specify. You can use inclusion or exclusion, but not both.
Choose Next.
Review the policy settings to be sure they’re what you want, and then choose Create policy.
For use cases such as a bastion host where you might have unrestricted inbound access to port 22 (SSH), EC2.18 will fail. A bastion host is a server whose purpose is to provide access to a private network from an external network, such as the internet. In this scenario, you might want to suppress findings associated with the bastion host security groups instead of disabling the control. You can create a Security Hub automation rule in the Security Hub delegated administrator account based on a tag or resource ID to set the workflow status of future findings to SUPPRESSED. Note that an automation rule applies only in the Region in which it’s created. To apply a rule in multiple Regions, the delegated administrator must create the rule in each Region.
To create an automation rule:
Sign in to the delegated administrator account and open the Security Hub console.
In the navigation pane, select Automations, and then choose Create rule.
Enter a Rule Name and Rule Description.
For Rule Type, select Create custom rule.
In the Rule section, provide a unique rule name and a description for your rule.
For Criteria, use the Key, Operator, and Value drop down menus to select your rule criteria. Use the following fields in the criteria section:
Add key ProductName with operator Equals and enter the value Security Hub.
Add key WorkFlowStatus with operator Equals and enter the value NEW.
Add key ComplianceSecurityControlId with operator Equals and enter the value EC2.18.
Add key ResourceId with operator Equals and enter the Amazon Resource Name (ARN) of the bastion host security group as the value.
For Automated action:
Choose the drop down under Workflow Status and select SUPPRESSED.
Under Note, enter text such as EC2.18 exception.
For Rule status, select Enabled.
Choose Create rule.
This automation rule will set the workflow status of all future updated and new findings to SUPPRESSED.
IAM.6: Hardware MFA configuration for the root user
When you first create an AWS account, you begin with a single identity that has complete access to the AWS services and resources in the account. This identity is called the AWS account root user and is accessed by signing in with the email address and password that you used to create the account.
The root user has administrator level access to your AWS accounts, which requires that you apply several layers of security controls to protect this account. In this section, we walk you through:
What to do when the root account isn’t required on your Organizations member accounts and what to do when the root user is required.
We recommend using a layered approach and applying multiple best practices to secure your root account across these scenarios.
AWS root user best practices include recommendations from SEC02-BP01, which recommends multi-factor authentication (MFA) for the root user be enabled. IAM.6 checks whether your AWS account is enabled to use a hardware MFA device to sign in with root user credentials. The control fails if MFA isn’t enabled or if any virtual MFA devices are permitted for signing in with root user credentials. A finding is generated for every account that doesn’t meet compliance. To remediate, see General steps for enabling MFA devices, which describes how to set up and use MFA with a root account. Remember that the root account should be used only when absolutely necessary and is only required for a subset of tasks. As a best practice, for other tasks we recommend signing in to your AWS accounts using federation, which provides temporary access keys by assuming an IAM role instead of using long-lived static credentials.
The Organizations management account deploys universal security guardrails, and you can configure additional services that will affect the member accounts in the organization. So, you should restrict who can sign in and administer the root user in your management account and is why you should apply hardware MFA as an added layer of security.
Many customers manage hundreds of AWS accounts across their organization and managing hardware MFA devices for each root account can be a challenge. While it’s a best practice to use MFA, an alternative approach might be necessary. This includes mapping out and identifying the most critical AWS accounts. This analysis should be done carefully—consider if this is a production environment, what type of data is present, and the overall criticality of the workloads running in that account.
This subset of your most critical AWS accounts should be configured with MFA. For other accounts, consider that in most cases the root account isn’t required and you can disable the use of the root account across the Organizations member accounts using Organizations service control policies (SCP). The following is an example:
If you’re using AWS Control Tower, use the disallow actions as a root user guardrail. If you’re using an SCP for organizations or the AWS Control Tower guardrail to restrict root use in member accounts, consider disabling the IAM.6 control in those member accounts. However, do not disable IAM.6 in the management account. See the Sample Security Hub central configuration policy section for an example policy.
If root account use is required within a member account, confirmed as a valid root-user-task, then perform the following steps:
Another consideration and best practice is to make sure that all AWS accounts have updated contact information, including the email attached to the root user. This is important for several reasons. For example, you must have access to the email associated with the root user to reset the root user’s password. See how to update the email address associated with the root user. AWS uses account contact information to notify and communicate with the AWS account administrators on several important topics including security, operations, and billing related information. Consider using an email distribution list to make sure these email addresses are mapped to a common internal mailbox restricted to your cloud or security team. See how to update your AWS primary and secondary account contact details.
EC2.2: Default security groups configuration
Each Amazon Virtual Private Cloud (Amazon VPC) comes with a default security group. We recommend that you create security groups for EC2 instances or groups of instances instead of using the default security group. If you don’t specify a security group when you launch an instance, the service associates the instance with the default security group for the VPC. In addition, the default security group cannot be deleted because it’s the default security group assigned to an EC2 instance if another security group is not created or assigned.
The default security group allows outbound and inbound traffic from network interfaces (and their associated instances) that are assigned to the same security group. EC2.2 checks whether the default security group of a VPC allows inbound or outbound traffic, and the control fails if the security group allows inbound or outbound traffic. This control doesn’t check if the default security group is in use. A finding is generated for each default VPC security group that’s out of compliance. The default security group doesn’t adhere to least privilege and therefore the following steps are recommended. If no EC2 instance is attached to the default security group, delete the inbound and outbound rules of the default security group. However, if you’re not certain that the default security group is in use, use the following AWS Command Line Interface (AWS CLI) command across each account and Region. If the command returns a list of EC2 instance IDs, then the default security group is in use by these instances. If it returns an empty list, then the default security group isn’t used in that account. Use the ‐‐region option to change Regions.
For these instances, replace the default security group with a new security group using similar rules and work with the owners of those EC2 instances to determine a least privilege security group and ruleset that could be applied. After the instances are moved to the replacement security group, you can remove the inbound and outbound rules of the default security group. You can use an AWS Config rule in each account and Region to remove the inbound and outbound rules of the default security group.
Under the Resource ID Parameter dropdown, select GroupId.
Under Parameter, enter the ARN of the automation service role you copied in step 1.
Choose Save.
It’s important to verify that changes and configurations are clearly communicated to all users of an environment. We recommend that you take the opportunity to update your company’s central cloud security requirements and governance guidance and notify users in advance of the pending change.
ECS.5: ECS container access configuration
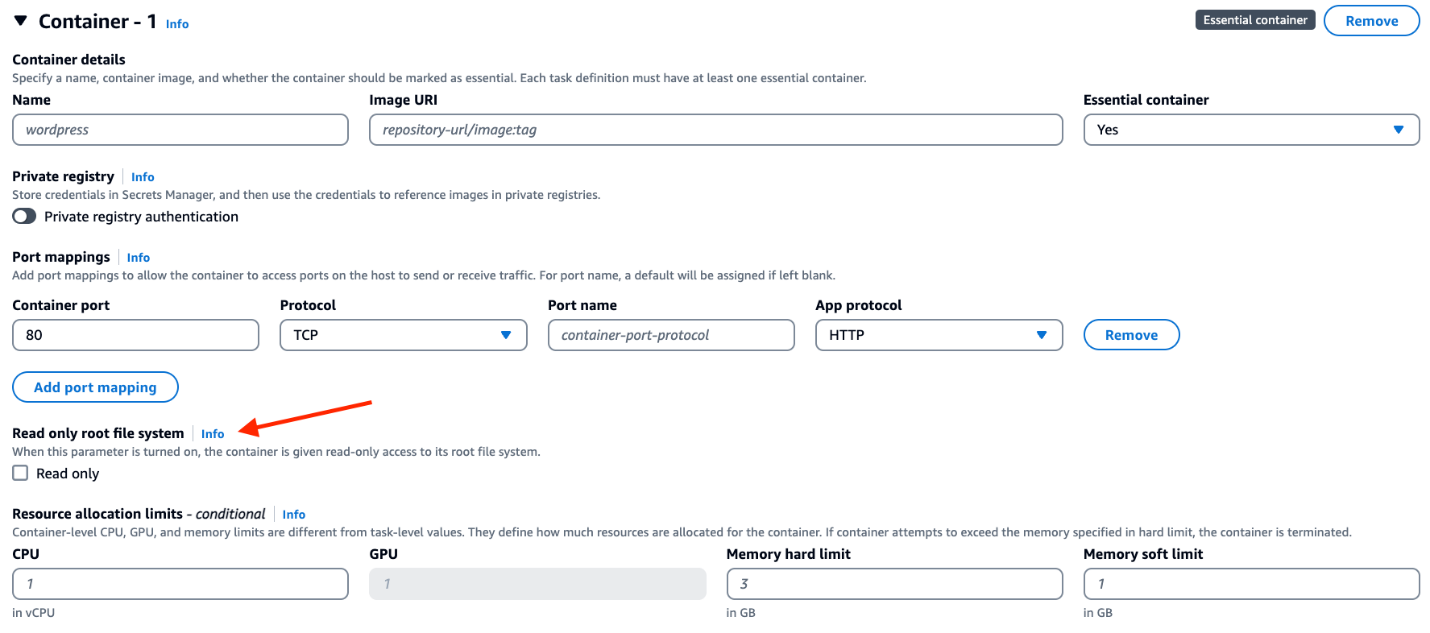
An Amazon Elastic Container Service (Amazon ECS) task definition is a blueprint for running Docker containers within an ECS cluster. It defines various parameters required for launching containers, such as Docker image, CPU and memory requirements, networking configuration, container dependencies, environment variables, and data volumes. An ECS task definition is to containers is what a launch configuration is to EC2 instances. ECS.5 is a control related to ECS and ensures that the ECS task definition has read-only access to mounted root filesystem enabled. This control is important and great for defense in depth because it helps prevent containers from making changes to the container’s root file system, prevents privilege escalation if a container is compromised, and can improve security and stability. This control fails if the readonlyRootFilesystem parameter doesn’t exist or is set to false in the ECS task definition JSON.
If you’re using the console to create the task definition, then you must select the read-only box against the root file system parameter in the console as show in Figure 3. If you are using JSON for task definition, then the parameter readonlyRootFilesystem must be set to true and supplied with the container definition or updated in order for this check to pass. This control creates a failed check finding for every ECS task definition that is out of compliance.
Figure 3: Using the ECS console to set readonlyRootFilesystem to true
Follow the steps in the remediation section of the control user guide to fix the resources identified by the control. Consider using infrastructure as code (IaC) tools such as AWS CloudFormation to define your task definitions as code, with the read-only root filesystem set to true to help prevent accidental misconfigurations. If you use continuous integration and delivery (CI/CD) to create your container task definitions, then consider adding a check that looks for the existence of the readonlyRootFilesystem parameter in the task definition and that its set to true.
If this is expected behavior for certain task definitions, you can use Security Hub automation rules to suppress the findings by matching on the ComplianceSecurityControlID and ResourceId filters in the criteria section.
To create the automation rule:
Sign in to the delegated administrator account and open the Security Hub console.
In the navigation pane, select Automations.
Choose Create rule. For Rule Type, select Create custom rule.
Enter a Rule Name and Rule Description.
In the Rule section, enter a unique rule name and a description for your rule.
For Criteria, use the Key, Operator, and Value drop down menus to specify your rule criteria. Use the following fields in the criteria section:
Add key ProductName with operator Equals and enter the value Security Hub.
Add key WorkFlowStatus with operator Equals and enter the value NEW.
Add key ComplianceSecurityControlId with operator Equals and enter the value ECS.5.
Add key ResourceId with operator Equals and enter the ARN of the ECS task definition as the value.
For Automated action,
Choose the dropdown under Workflow Status and select SUPPRESSED.
Under note, enter a description such as ECS.5 exception.
For Rule status, select Enabled
Choose Create rule.
Sample Security Hub central configuration policy
In this section, we cover a sample policy for the controls reviewed in this post using central configuration. To use central configuration, you must integrate Security Hub with Organizations and designate a home Region. The home Region is also your Security Hub aggregation Region, which receives findings, insights, and other data from linked Regions. If you use the Security Hub console, these prerequisites are included in the opt-in workflow for central configuration. Remember that an account or OU can only be associated with one configuration policy at a given time as to not have conflicting configurations. The policy should also provide complete specifications of settings applied to that account. Review the policy considerations document to understand how central configuration policies work. Follow the steps in the Start using central configuration to get started.
If you want to disable controls and update parameters as described in this post, then you must create two policies in the Security Hub delegated administrator account home Region. One policy applies to the management account and another policy applies to the member accounts.
First, create a policy to disable IAM.6, Autoscaling.3, and update the ports for the EC2.18 control to identify security groups with unrestricted access on the ports. Apply this policy to all member accounts. Use the Exclude organization units or accounts section to enter the account ID of the AWS management account.
To create a policy to disable IAM.6, Autoscaling.3 and update the ports:
Open the Security Hub console in the Security Hub delegated administrator account home Region.
In the navigation pane, select Configuration and then the Policies tab. Then, choose Create policy. If you already have an existing policy that applies to all member accounts, then select the policy and choose Edit.
For Controls, select Disable specific controls.
For Controls to disable, select IAM.6 and AutoScaling.3.
Select Customize controls parameters.
From the Select a Control dropdown, select EC2.18.
Edit the cell under List of authorized TCP ports, and add ports that are allow listed for unrestricted access. If no ports should be allow listed for unrestricted access then delete the text in the cell.
For Accounts, select All accounts.
Choose Exclude organizational units or accounts and enter the account ID of the management account.
For Policy details, enter a policy name and description.
Choose Next.
On the Review and apply page, review your configuration policy details. Choose Create policy and apply.
Create another policy in the Security Hub delegated administrator account home Region to disable Autoscaling.3 and update the ports for the EC2.18 control to fail the check for security groups with unrestricted access on any port. Apply this policy to the management account. Use the Specific accounts option for the Accounts section and then the Enter organization unit or accounts tab to enter the account ID of the management account.
To disable Autoscaling.3 and update the ports:
Open the AWS Security Hub console in the Security Hub delegated administrator account home Region.
In the navigation pane, select Configuration and the Policies tab.
Choose Create policy. If you already have an existing policy that applies to the management account only, then select the policy and choose Edit.
For Controls, choose Disable specific controls.
For Controls to disable, select AutoScaling.3.
Select Customize controls parameters.
From the Select a Control dropdown, select EC2.18.
Edit the cell under List of authorized TCP ports and add ports that are allow listed for unrestricted access. If no ports should be allow listed for unrestricted access then delete the text in the cell.
For Accounts, select Specific accounts.
Select the Enter Organization units or accounts tab and enter the Account ID of the management account.
For Policy details, enter a policy name and description.
Choose Next.
On the Review and apply page, review your configuration policy details. Choose Create policy and apply.
Conclusion
In this post, we reviewed the importance of the Security Hub security score and the four methods that you can use to improve your score. The methods include remediation of non-complaint resources, managing controls using Security Hub central configuration, suppressing findings using Security Hub automation rules, and using custom parameters to customize controls. You saw ways to address the five most commonly failed controls across Security Hub customers, including remediation strategies and guardrails for each of these controls.
If you have feedback about this post, submit comments in the Comments section below. If you have questions about this post, contact AWS Support.
AI-TRiSM – Trust, Risk and Security Management in the Age of AI
Co-authored by Lara Sunday and Pojan Shahrivar
As artificial intelligence (AI) and machine learning (ML) technologies continue to advance and proliferate, organizations across industries are investing heavily in these transformative capabilities. According to Gartner, by 2027, spending on AI software will grow to $297.9 billion at a compound annual growth rate of 19.1%. Generative AI (GenAI) software spend will rise from 8% of AI software in 2023 to 35% by 2027.
With the promise of enhanced efficiency, personalization, and innovation, organizations are increasingly turning to cloud environments to develop and deploy these powerful AI and ML technologies. However, this rapid innovation also introduces new security risks and challenges that must be addressed proactively to protect valuable data, intellectual property, and maintain the trust of customers and stakeholders.
Benefits of Cloud Environments for AI Development
Cloud platforms offer unparalleled scalability, allowing organizations to easily scale their computing resources up or down to meet the demanding requirements of training and deploying complex AI models.
“The ability to spin up and down resources on-demand has been a game-changer for our AI development efforts,” says Stuart Millar, Principal AI Engineer at Rapid7. “We can quickly provision the necessary compute power during peak training periods, then scale back down to optimize costs when those resources are no longer needed.”
Cloud environments also provide a cost-effective way to develop AI models, with usage-based pricing models that avoid large upfront investments in hardware and infrastructure. Additionally, major cloud providers offer access to cutting-edge AI hardware and pre-built tools and services, such as Amazon SageMaker, Azure Machine Learning, and Google Cloud AI Platform, which can accelerate development and deployment cycles.
Challenges and Risks of Cloud-Based AI Development
While the cloud offers numerous advantages for AI development, it also introduces unique challenges that organizations must navigate. Limited visibility into complex data flows and model updates can create blind spots for security teams, leaving them unable to effectively monitor for potential threats or anomalies.
In their AI Threat Landscape Report, HiddenLayer highlighted that 98% of all the companies surveyed identified that elements of their AI models were crucial to their business success, and 77% identified breaches to their AI in the past year. Additionally, multi-cloud and hybrid deployments bring monitoring, governance, and reporting challenges, making it difficult to assess AI/ML risk in context across different cloud environments.
New Attack Vectors and Risk Types
Developing AI in the cloud also exposes organizations to new attack vectors and risk types that traditional security tools may not be equipped to detect or mitigate. Some examples include:
Prompt Injection (LLM01): Imagine a large language model used for generating marketing copy. An attacker could craft a special prompt that tricks the model into generating harmful or offensive content, damaging the company’s brand and reputation.
Training Data Poisoning (LLM03, ML02): Adversaries can tamper with training data to compromise the integrity and reliability of cloud-based AI models. In the case of an AI model used for image recognition in a security surveillance system, poisoned training data containing mislabeled images could cause the model to generate incorrect classifications, potentially missing critical threats.
Model Theft (LLM10, ML05): Unauthorized access to proprietary AI models deployed in the cloud poses risks to intellectual property and competitive advantage. If a competitor were to steal a model trained on a company’s sensitive data, they could potentially replicate its functionality and gain valuable insights.
Supply Chain Vulnerabilities (LLM05, ML06): Compromised libraries, datasets, or services used in cloud AI development pipelines can lead to widespread security breaches. A malicious actor might introduce a vulnerability into a widely used open-source library for AI, which could then be exploited to gain access to AI models deployed by multiple organizations.
Developing Best Practices for Securing AI Development
To address these challenges and risks, organizations need to develop and implement best practices and standards tailored to their specific business needs, striking the right balance between enabling innovation and introducing risk.
While guidelines like NCSC Secure AI System Development and The Open Standard for Responsible AI provide a valuable starting point, organizations must also develop their own customized best practices that align with their unique business requirements, risk appetite, and AI/ML use cases. For instance, a financial institution developing AI models for fraud detection might prioritize best practices around data governance and model explainability to ensure compliance with regulations and maintain transparency in decision-making processes.
Key considerations when developing these best practices include:
Ensuring secure data handling and governance throughout the AI lifecycle
Implementing robust access controls and identity management for AI/ML resources
Validating and monitoring AI models for potential biases, vulnerabilities, or anomalies
Establishing incident response and remediation processes for AI-specific threats
Maintaining transparency and explainability to understand and audit AI model behavior
Rapid7’s Approach to Securing AI Development
“At Rapid7, our InsightCloudSec solution offers real-time visibility into AI/ML resources running across major cloud providers, allowing security teams to continuously monitor for potential risks or misconfigurations,” says Aniket Menon, VP, Product Management. “Visibility is the foundation for effective security in any environment, and that’s especially true in the complex world of AI development. Without a clear view into your AI/ML assets and activities, you’re essentially operating blind, leaving your organization vulnerable to a range of threats.”
Here at Rapid7 our AI TRiSM (Trust, Risk, and Security Management) framework empowers our teams. The framework provides us with confidence not only in our operations but also in driving innovation. In their recent blog outlining the company’s AI principles, Laura Ellis and Sabeen Malik shared how Rapid7 tackles and addresses AI challenges. Centering on transparency, fairness, safety, security, privacy, and accountability, these principles are not just guidelines; they are integral to how Rapid7 builds, deploys, and manages AI systems.
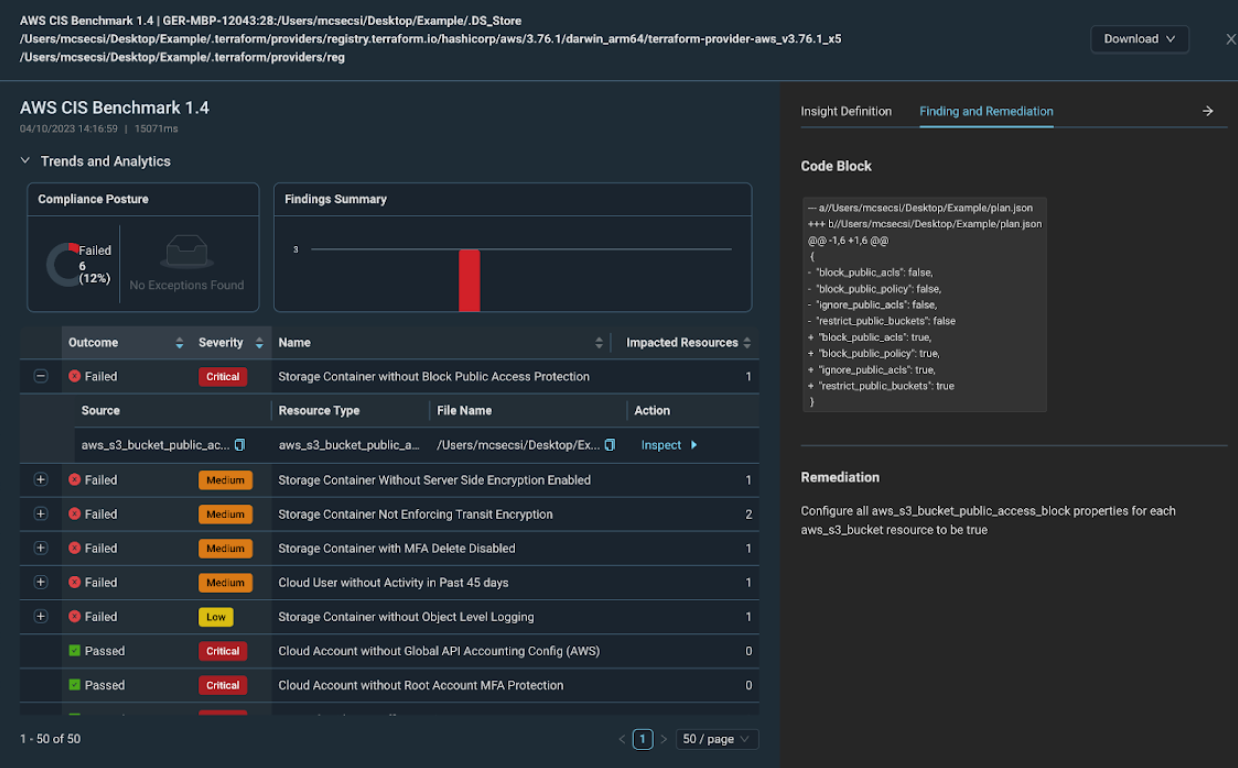
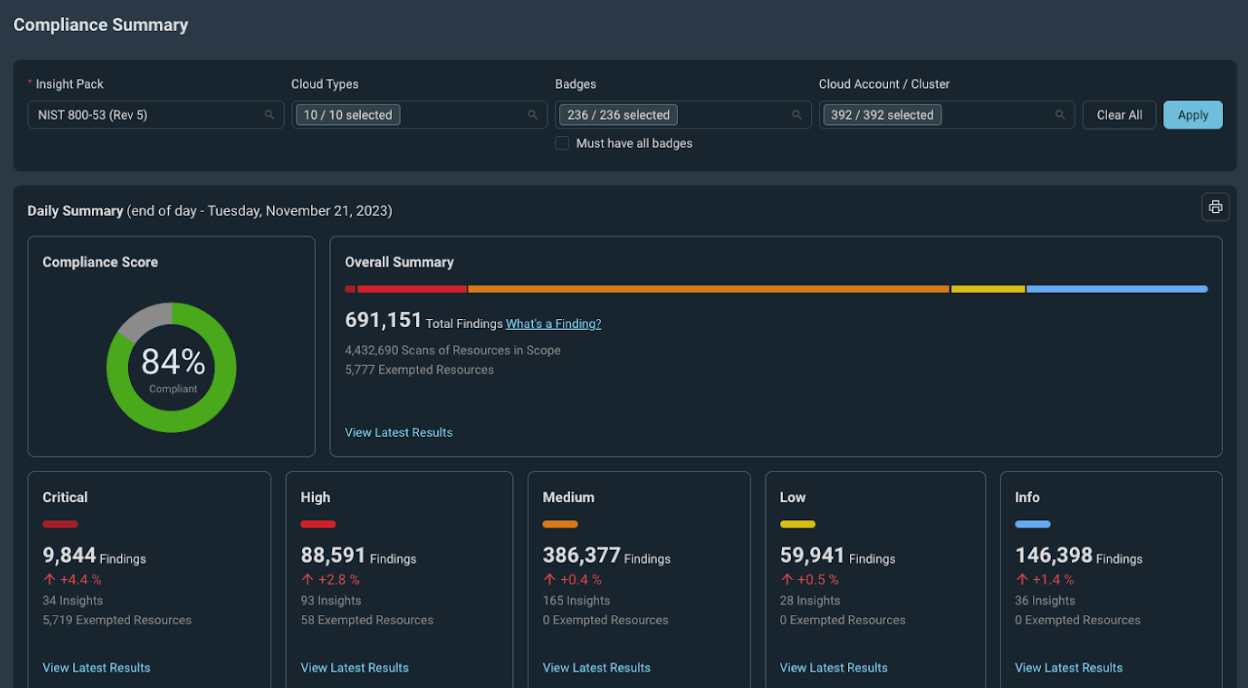
Security and compliance are two key InsightCloudSec capabilities. Compliance Packs are out-of-the-box collections of related Insights focused on industry requirements and standards for all of your resources. Compliance packs may focus on security, costs, governance, or combinations of these across a variety of frameworks, e.g., HIPAA, PCI DSS, GDPR, etc.
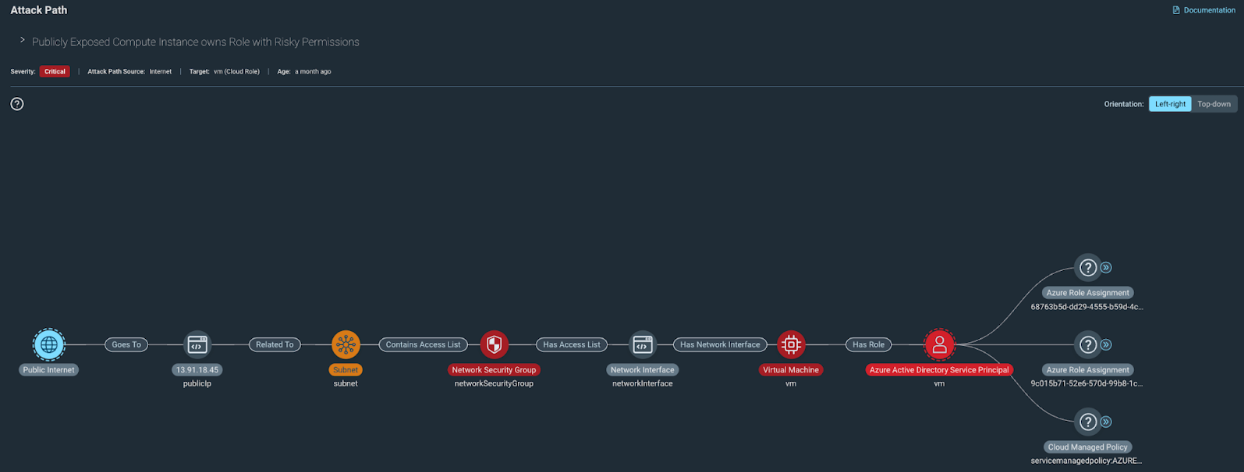
Last year Rapid7 launched the Rapid7 AI/ML Security Best Practices compliance pack, the pack allows for real-time and continuous visibility into AI/ML resources running across your clouds with support for GenAI services across AWS, Azure and GCP. To empower you to assess this data in the context of your organizational requirements and priorities, you can then automatically prioritize AI/ML-related risk with Layered Context based on exploitability and potential business impact.
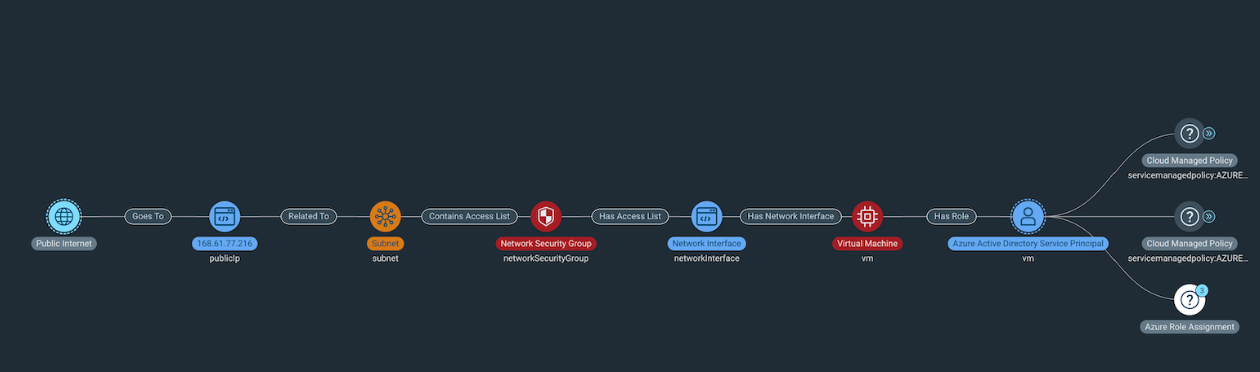
You can also leverage Identity Analysis in InsightCloudSec to collect and present the actions executed by a given user or role within a certain time period. These logged actions are collected and analyzed, providing you with a view across your organization of who can access AI/ML resources and automatically rightsize in accordance with the least privilege access (LPA) concept. This enables you to strategically inform your policies moving forward. Native automation allows you to then act on your assessments to alert on compliance drift, remediate AI/ML risk, and enact prevention mechanisms.
Rapid7’s Continued Dedication to AI Innovation
As an inaugural signer of the CISA Secure by Design Pledge, and through our partnership with Queen’s University Belfast Centre for Secure Information Technologies (CSIT), Rapid7 remains dedicated to collaborating with industry leaders and academic institutions to stay ahead of emerging threats and develop cutting-edge solutions for securing AI development.
As the adoption of AI and ML capabilities continues to accelerate, it’s imperative that organizations have the knowledge and tools to make informed decisions and build with confidence. By implementing robust best practices and leveraging advanced security tools like InsightCloudSec, organizations can harness the power of AI while mitigating the associated risks and ensuring their valuable data and intellectual property remain protected.
To learn more about how Rapid7 can help your organization develop and implement best practices for securing AI development, visit our website to request a demo.
Gartner, Forecast Analysis: Artificial Intelligence Software, 2023-2027, Worldwide, Alys Woodward, et al, 07 November 2023
RSA Conference 2024 drew 650 speakers, 600 exhibitors, and thousands of security practitioners from across the globe to the Moscone Center in San Francisco, California from May 6 through 9.
The keynote lineup was diverse, with 33 presentations featuring speakers ranging from WarGames actor Matthew Broderick, to public and private-sector luminaries such as Cybersecurity and Infrastructure Security Agency (CISA) Director Jen Easterly, U.S. Secretary of State Antony Blinken, security technologist Bruce Schneier, and cryptography experts Tal Rabin, Whitfield Diffie, and Adi Shamir.
Topics aligned with this year’s conference theme, “The art of possible,” and focused on actions we can take to revolutionize technology through innovation, while fortifying our defenses against an evolving threat landscape.
This post highlights three themes that caught our attention: artificial intelligence (AI) security, the Secure by Design approach to building products and services, and Chief Information Security Officer (CISO) collaboration.
AI security
Organizations in all industries have started building generative AI applications using large language models (LLMs) and other foundation models (FMs) to enhance customer experiences, transform operations, improve employee productivity, and create new revenue channels. So it’s not surprising that AI dominated conversations. Over 100 sessions touched on the topic, and the desire of attendees to understand AI technology and learn how to balance its risks and opportunities was clear.
“Discussions of artificial intelligence often swirl with mysticism regarding how an AI system functions. The reality is far more simple: AI is a type of software system.” — CISA
FMs and the applications built around them are often used with highly sensitive business data such as personal data, compliance data, operational data, and financial information to optimize the model’s output. As we explore the advantages of generative AI, protecting highly sensitive data and investments is a top priority. However, many organizations aren’t paying enough attention to security.
A joint generative AI security report released by Amazon Web Services (AWS) and the IBM Institute for Business Value during the conference found that 82% of business leaders view secure and trustworthy AI as essential for their operations, but only 24% are actively securing generative AI models and embedding security processes in AI development. In fact, nearly 70% say innovation takes precedence over security, despite concerns over threats and vulnerabilities (detailed in Figure 1).
Figure 1: Generative AI adoption concerns, Source: IBM Security
Because data and model weights—the numerical values models learn and adjust as they train—are incredibly valuable, organizations need them to stay protected, secure, and private, whether that means restricting access from an organization’s own administrators, customers, or cloud service provider, or protecting data from vulnerabilities in software running in the organization’s own environment.
There is no silver AI-security bullet, but as the report points out, there are proactive steps you can take to start protecting your organization and leveraging AI technology to improve your security posture:
Establish a governance, risk, and compliance (GRC) foundation. Trust in gen AI starts with new security governance models (Figure 2) that integrate and embed GRC capabilities into your AI initiatives, and include policies, processes, and controls that are aligned with your business objectives.
Figure 2: Updating governance, risk, and compliance models, Source: IBM Security
Strengthen your security culture. When we think of securing AI, it’s natural to focus on technical measures that can help protect the business. But organizations are made up of people—not technology. Educating employees at all levels of the organization can help avoid preventable harms such as prompt-based risks and unapproved tool use, and foster a resilient culture of cybersecurity that supports effective risk mitigation, incident detection and response, and continuous collaboration.
“You’ve got to understand early on that security can’t be effective if you’re running it like a project or a program. You really have to run it as an operational imperative—a core function of the business. That’s when magic can happen.” — Hart Rossman, Global Services Security Vice President at AWS
Engage with partners. Developing and securing AI solutions requires resources and skills that many organizations lack. Partners can provide you with comprehensive security support—whether that’s informing and advising you about generative AI, or augmenting your delivery and support capabilities. This can help make your engineers and your security controls more effective.
While many organizations purchase security products or solutions with embedded generative AI capabilities, nearly two-thirds, as detailed in Figure 3, report that their generative AI security capabilities come through some type of partner.
Figure 3: Most security gen AI capabilities are coming from third-party products or partners, Source: IBM Security
Tens of thousands of customers are using AWS, for example, to experiment and move transformative generative AI applications into production. AWS provides AI-powered tools and services, a Generative AI Innovation Center program, and an extensive network of AWS partners that have demonstrated expertise delivering machine learning (ML) and generative AI solutions. These resources can support your teams with hands-on help developing solutions mapped to your requirements, and a broader collection of knowledge they can use to help you make the nuanced decisions required for effective security.
Building secure software was a popular and related focus at the conference. Insecure design is ranked as the number four critical web application security concern on the Open Web Application Security Project (OWASP) Top 10.
The concept known as Secure by Design is gaining importance in the effort to mitigate vulnerabilities early, minimize risks, and recognize security as a core business requirement. Secure by Design builds off of security models such as Zero Trust, and aims to reduce the burden of cybersecurity and break the cycle of constantly creating and applying updates by developing products that are foundationally secure.
More than 60 technology companies—including AWS—signed CISA’s Secure by Design Pledge during RSA Conference as part of a collaborative push to put security first when designing products and services.
The pledge demonstrates a commitment to making measurable progress towards seven goals within a year:
Broaden the use of multi-factor authentication (MFA)
Reduce default passwords
Enable a significant reduction in the prevalence of one or more vulnerability classes
Increase the installation of security patches by customers
Publish a vulnerability disclosure policy (VDP)
Demonstrate transparency in vulnerability reporting
Strengthen the ability of customers to gather evidence of cybersecurity intrusions affecting products
“From day one, we have pioneered secure by design and secure by default practices in the cloud, so AWS is designed to be the most secure place for customers to run their workloads. We are committed to continuing to help organizations around the world elevate their security posture, and we look forward to collaborating with CISA and other stakeholders to further grow and promote security by design and default practices.” — Chris Betz, CISO at AWS
The need for security by design applies to AI like any other software system. To protect users and data, we need to build security into ML and AI with a Secure by Design approach that considers these technologies to be part of a larger software system, and weaves security into the AI pipeline.
Since models tend to have very high privileges and access to data, integrating an AI bill of materials (AI/ML BOM) and Cryptography Bill of Materials (CBOM) into BOM processes can help you catalog security-relevant information, and gain visibility into model components and data sources. Additionally, frameworks and standards such as the AI RMF 1.0, the HITRUST AI Assurance Program, and ISO/IEC 42001 can facilitate the incorporation of trustworthiness considerations into the design, development, and use of AI systems.
CISO collaboration
In the RSA Conference keynote session CISO Confidential: What Separates The Best From The Rest, Trellix CEO Bryan Palma and CISO Harold Rivas noted that there are approximately 32,000 global CISOs today—4 times more than 10 years ago. The challenges they face include staffing shortages, liability concerns, and a rapidly evolving threat landscape. According to research conducted by the Information Systems Security Association (ISSA), nearly half of organizations (46%) report that their cybersecurity team is understaffed, and more than 80% of CISOs recently surveyed by Trellix have experienced an increase in cybersecurity threats over the past six months. When asked what would most improve their organizations’ abilities to defend against these threats, their top answer was industry peers sharing insights and best practices.
Building trusted relationships with peers and technology partners can help you gain the knowledge you need to effectively communicate the story of risk to your board of directors, keep up with technology, and build success as a CISO.
AWS CISO Circles provide a forum for cybersecurity executives from organizations of all sizes and industries to share their challenges, insights, and best practices. CISOs come together in locations around the world to discuss the biggest security topics of the moment. With NDAs in place and the Chatham House Rule in effect, security leaders can feel free to speak their minds, ask questions, and get feedback from peers through candid conversations facilitated by AWS Security leaders.
“When it comes to security, community unlocks possibilities. CISO Circles give us an opportunity to deeply lean into CISOs’ concerns, and the topics that resonate with them. Chatham House Rule gives security leaders the confidence they need to speak openly and honestly with each other, and build a global community of knowledge-sharing and support.” — Clarke Rodgers, Director of Enterprise Strategy at AWS
At RSA Conference, CISO Circle attendees discussed the challenges of adopting generative AI. When asked whether CISOs or the business own generative AI risk for the organization, the consensus was that security can help with policies and recommendations, but the business should own the risk and decisions about how and when to use the technology. Some attendees noted that they took initial responsibility for generative AI risk, before transitioning ownership to an advisory board or committee comprised of leaders from their HR, legal, IT, finance, privacy, and compliance and ethics teams over time. Several CISOs expressed the belief that quickly taking ownership of generative AI risk before shepherding it to the right owner gave them a valuable opportunity to earn trust with their boards and executive peers, and to demonstrate business leadership during a time of uncertainty.
Embrace the art of possible
There are many more RSA Conference highlights on a wide range of additional topics, including post-quantum cryptography developments, identity and access management, data perimeters, threat modeling, cybersecurity budgets, and cyber insurance trends. If there’s one key takeaway, it’s that we should never underestimate what is possible from threat actors or defenders. By harnessing AI’s potential while addressing its risks, building foundationally secure products and services, and developing meaningful collaboration, we can collectively strengthen security and establish cyber resilience.
Join us to learn more about cloud security in the age of generative AI at AWS re:Inforce 2024 June 10–12 in Pennsylvania. Register today with the code SECBLOfnakb to receive a limited time $150 USD discount, while supplies last.
If you have feedback about this post, submit comments in the Comments section below. If you have questions about this post, contact AWS Support.
Want more AWS Security news? Follow us on Twitter.
Imagine the following scenario: You’re about to enjoy a strategic duel on chess.com or dive into an intense battle in Fortnite, but as you log in, you find your hard-earned achievements, ranks, and reputation have vanished into thin air. This is not just a hypothetical scenario but a real possibility in today’s cloud gaming landscape, where a single security breach can undo years of dedication and achievement.
Cloud gaming, powered by giants like AWS, is transforming the gaming industry, offering unparalleled accessibility and dynamic gaming experiences. Yet, with this technological leap forward comes an increase in cyber threats. The gaming world has already witnessed significant security breaches, such as the GTA5 code theft and Activision’s consistent data challenges, highlighting the lurking dangers in this digital arena.
In such a scenario, securing cloud-based games isn’t just an additional feature; it’s an absolute necessity. As we examine the intricate world of cloud gaming, the role of comprehensive security solutions becomes increasingly vital. In the subsequent sections, we will explore how Rapid7’s InsightCloudSeccan be instrumental in securing cloud infrastructure and CI/CD processes in game development, thereby safeguarding the integrity and continuity of our virtual gaming experiences.
Challenges in Cloud-Based Game Development
Picture this: You’re a game developer, immersed in creating the next big title in cloud gaming. Your team is buzzing with creativity, coding, and testing. But then, out of the blue, you’re hit by a cyberattack, much like the one that rocked CD Projekt Red in 2021. Imagine the chaos – months of hard work (e.g. Cyberpunk 2077 or The Witcher 3) locked up by ransomware, with all sorts of confidential data floating in the wrong hands. This scenario is far from fiction in today’s digital gaming landscape.
What Does This Kind of Attack Really Mean for a Game Development Team?
The Network Weak Spot: It’s like leaving the back door open while you focus on the front; hackers can sneak in through network gaps we never knew existed. That’s what might have happened with CD Projekt Red. A more fortified network could have been their digital moat.
When Data Gets Held Hostage: It’s one thing to secure your castle, but what about safeguarding the treasures inside? The CD Projekt Red incident showed us how vital it is to keep our game codes and internal documents under lock and key, digitally speaking.
A Safety Net Missing: Imagine if CD Projekt Red had a robust backup system. Even after the attack, they could have bounced back quicker, minimizing the damage. It’s like having a safety net when you’re walking a tightrope. You hope you won’t need it, but you’ll be glad it’s there if you do.
This is where a solution like Rapid7’s InsightCloudSeccomes into play. It’s not just about building higher walls; it’s about smarter, more responsive defense systems. Think of it as having a digital watchdog that’s always on guard, sniffing out threats, and barking alarms at the first sign of trouble.
With tools that watch over your cloud infrastructure, monitor every digital move in real time, and keep your compliance game strong, you’re not just creating games; you’re also playing the ultimate game of digital security – and winning.
Navigating Cloud Security in Game Development: An Artful Approach
In the realm of cloud-based game development, mastering AWS services’ security nuances transcends mere technical skill – it’s akin to painting a masterpiece. Let’s embark on a journey through the essential AWS services like EC2, S3, Lambda, CloudFront, and RDS, with a keen focus on their security features – our guardians in the digital expanse.
Consider Amazon EC2 as the infrastructure’s backbone, hosting the very servers that breathe life into games. Here, Security Groups act as discerning gatekeepers, meticulously managing who gets in and out. They’re not just gatekeepers but wise ones, remembering allowed visitors and ensuring a seamless yet secure flow of traffic.
Amazon S3 stands as our digital vault, safeguarding data with precision-crafted bucket policies. These policies aren’t just rules; they’re declarations of trust, dictating who can glimpse or alter the stored treasures. History is littered with tales of those who faltered, so precision here is paramount.
Lambda functionsemerge as the silent virtuosos of serverless architecture, empowering game backends with their scalable might. Yet, their power is wielded judiciously, guided by the principle of least privilege through meticulously assigned roles and permissions, minimizing the shadow of vulnerability.
Amazon CloudFront, our swift courier, ensures game content flies across the globe securely and at breakneck speed. Coupled with AWS Shield (Advanced), it stands as a bulwark against DDoS onslaughts, guaranteeing that game delivery remains both rapid and impregnable.
Amazon RDS, the fortress for player data, automates the mundane yet crucial tasks – backups, patches, scaling – freeing developers to craft experiences. It whispers secrets only to those meant to hear, guarding data with robust encryption, both at rest and in transit.
Visibility and vigilance form the bedrock of our security ethos. With tools like AWS CloudTrail and CloudWatch, our gaze extends across every corner of our domain, ever watchful for anomalies, ready to act with precision and alacrity.
Encryption serves as our silent sentinel, a protective veil over data, whether nestled in S3’s embrace or traversing the vastness to and from EC2 and RDS. It’s our unwavering shield against the curious and the malevolent alike.
In weaving the security measures of these AWS services into the fabric of game development, we engage not in mere procedure but in the creation of a secure tapestry that envelops every facet of the development journey. In the vibrant, ever-evolving landscape of game creation, fortifying our cloud infrastructure with a security-first mindset is not just a technical endeavor – it’s a strategic masterpiece, ensuring our games are not only a source of joy but bastions of privacy and security in the cloud.
Automated Cloud Security with InsightCloudSec
When it comes to deploying a game in the cloud, understanding and implementing automated security is paramount. This is where Rapid7’s InsightCloudSec takes center stage, revolutionizing how game developers secure their cloud environments with a focus on automation and real-time monitoring.
Data Harvesting Strategies
InsightCloudSec differentiates itself through its innovative approach to data collection and analysis, employing two primary methods: API harvesting and Event Driven Harvesting (EDH). Initially, InsightCloudSec utilizes the API method, where it directly calls cloud provider APIs to gather essential platform information. This process enables InsightCloudSec to populate its platform with critical data, which is then unified into a cohesive dataset. For example, disparate storage solutions from AWS, Azure, and GCP are consolidated under a generic “Storage” category, while compute instances are unified as “Instances.” This normalization allows for the creation of universal compliance packs that can be applied across multiple cloud environments, enhancing the platform’s efficiency and coverage.
However, the real game-changer is Rapid7’s implementation of EDH. Unlike the traditional API pull method, EDH leverages serverless functions within the customer’s cloud environment to ingest security event data and configuration changes in real-time. This data is then pushed to the InsightCloudSec platform, significantly reducing costs and increasing the speed of data acquisition. For AWS environments, this means event information can be updated in near real-time, within 60 seconds, and within 2-3 minutes for Azure and GCP. This rapid update capability is a stark contrast to the hourly or daily updates provided by other cloud security platforms, setting InsightCloudSec apart as a leader in real-time cloud security monitoring.
Automated Remediation with InsightCloudSec Bots
The integration of near-to-real-time event information through Event Driven Harvesting (EDH) with InsightCloudSec’s advanced bot automation features equips developers with a formidable toolset for safeguarding cloud environments. This unique combination not only flags vulnerable configurations but also facilitates automatic remediation within minutes, a critical capability for maintaining a pristine cloud ecosystem. InsightCloudSec’s bots go beyond mere detection; they proactively manage misconfigurations and vulnerabilities across virtual machines and containers, ensuring the cloud space is both secure and compliant.
The versatility of these bots is remarkable. Developers have the flexibility to define the scope of the bot’s actions, allowing changes to be applied across one or multiple accounts. This granular control ensures that automated security measures are aligned with the specific needs and architecture of the cloud environment.
Moreover, the timing of these interventions can be finely tuned. Whether responding to a set schedule or reacting to specific events – such as the creation, modification, or deletion of resources – the bots are adept at addressing security concerns at the most opportune moments. This responsiveness is especially beneficial in dynamic cloud environments where changes are frequent and the security landscape is constantly evolving.
The actions undertaken by InsightCloudSec’s bots are diverse and impactful. According to the extensive list of sample bots provided by Rapid7, these automated guardians can, for example:
Automatically tag resources lacking proper identification, ensuring that all elements within the cloud are categorized and easily manageable
Enforce compliance by identifying and rectifying resources that do not adhere to established security policies, such as unencrypted databases or improperly configured networks
Remediate exposed resources by adjusting security group settings to prevent unauthorized access, a crucial step in safeguarding sensitive data
Monitor and manage excessive permissions, scaling back unnecessary access rights to adhere to the principle of least privilege, thereby reducing the risk of internal and external threats
And much more…
This automation, powered by InsightCloudSec, transforms cloud security from a reactive task to a proactive, streamlined process.
By harnessing the power of EDH for real-time data harvesting and leveraging the sophisticated capabilities of bots for immediate action, developers can ensure that their cloud environments are not just reactively protected but are also preemptively fortified against potential vulnerabilities and misconfigurations. This shift towards automated, intelligent cloud security management empowers developers to focus on innovation and development, confident in the knowledge that their infrastructure is secure, compliant, and optimized for the challenges of modern cloud computing.
Infrastructure as Code (IaC) Enhanced: Introducing mimInsightCloudSec
In the dynamic arena of cloud security, particularly in the bustling sphere of game development, the wisdom of “an ounce of prevention is worth a pound of cure” holds unprecedented significance. This is where the role of Infrastructure as Code (IaC) becomes pivotal, and Rapid7’s innovative tool, mimInsightCloudSec, elevates this approach to new heights.
mimInsightCloudSec, a cutting-edge component of the InsightCloudSec platform, is specifically designed to integrate seamlessly into any development pipeline, whether you prefer working with executable binaries or thrive in a containerized ecosystem. Its versatility allows it to be a perfect fit for various deployment strategies, making it an indispensable tool for developers aiming to embed security directly into their infrastructure deployment process.
The primary goal of mimInsightCloudSec is to identify vulnerabilities before the infrastructure is even created, thus embodying the proactive stance on security. This foresight is crucial in the realm of game development, where the stakes are high, and the digital landscape is constantly shifting. By catching vulnerabilities at this nascent stage, developers can ensure that their games are built on a foundation of security, devoid of the common pitfalls that could jeopardize their work in the future.
Figure 2: Shift Left – Infrastructure as Code (IaC) Security
Upon completion of its analysis, mimInsightCloudSec presents its findings in a variety of formats suitable for any team’s needs, including HTML, SARIF, and XML. This flexibility ensures that the results are not just comprehensive but also accessible, allowing teams to swiftly understand and address any identified issues. Moreover, these results are pushed to the InsightCloudSec platform, where they contribute to a broader overview of the security posture, offering actionable insights into potential misconfigurations.
But the capabilities of the InsightCloudSec platform extend even further. Within this sophisticated environment, developers can craft custom configurations, tailoring the security checks to fit the unique requirements of their projects. This feature is particularly valuable for teams looking to go beyond standard security measures, aiming instead for a level of infrastructure hardening that is both rigorous and bespoke. These custom configurations empower developers to establish a static level of security that is robust, nuanced, and perfectly aligned with the specific needs of their game-development projects.
By leveraging mimInsightCloudSec within the InsightCloudSec ecosystem, game developers not only can anticipate and mitigate vulnerabilities before they manifest but also refine their cloud infrastructure with precision-tailored security measures. This proactive and customized approach ensures that the gaming experiences they craft are not only immersive and engaging but also built on a secure, resilient digital foundation.
Figure 3: Misconfigurations and recommended remediations in the InsightCloudSec platform
In summary, Rapid7’s InsightCloudSec offers a comprehensive and automated approach to cloud security, crucial for the dynamic environment of game development. By leveraging both API harvesting and innovative Event Driven Harvesting – along with robust support for Infrastructure as Code – InsightCloudSec ensures that game developers can focus on what they do best: creating engaging and immersive gaming experiences with the knowledge that their cloud infrastructure is secure, compliant, and optimized for performance.
In a forthcoming blog post, we’ll explore the unique security challenges that arise when operating a game in the cloud. We’ll also demonstrate how InsightCloudSec can offer automated solutions to effortlessly maintain a robust security posture.
You can use Amazon Security Lake to simplify log data collection and retention for Amazon Web Services (AWS) and non-AWS data sources. To make sure that you get the most out of your implementation requires proper planning.
In this post, we will show you how to plan and implement a proof of concept (POC) for Security Lake to help you determine the functionality and value of Security Lake in your environment, so that your team can confidently design and implement in production. We will walk you through the following steps:
Understand the functionality and value of Security Lake
Determine success criteria for the POC
Define your Security Lake configuration
Prepare for deployment
Enable Security Lake
Validate deployment
Understand the functionality of Security Lake
Figure 1 summarizes the main features of Security Lake and the context of how to use it:
Figure 1: Overview of Security Lake functionality
As shown in the figure, Security Lake ingests and normalizes logs from data sources such as AWS services, AWS Partner sources, and custom sources. Security Lake also manages the lifecycle, orchestration, and subscribers. Subscribers can be AWS services, such as Amazon Athena, or AWS Partner subscribers.
There are four primary functions that Security Lake provides:
Centralize visibility to your data from AWS environments, SaaS providers, on-premises, and other cloud data sources — You can collect log sources from AWS services such as AWS CloudTrail management events, Amazon Simple Storage Service (Amazon S3) data events, AWS Lambda data events, Amazon Route 53 Resolver logs, VPC Flow Logs, and AWS Security Hub findings, in addition to log sources from on-premises, other cloud services, SaaS applications, and custom sources. Security Lake automatically aggregates the security data across AWS Regions and accounts.
Normalize your security data to an open standard — Security Lake normalizes log sources in a common schema, the Open Security Schema Framework (OCSF), and stores them in compressed parquet files.
Use your preferred analytics tools to analyze your security data — You can use AWS tools, such as Athena and Amazon OpenSearch Service, or you can utilize external security tools to analyze the data in Security Lake.
Optimize and manage your security data for more efficient storage and query — Security Lake manages the lifecycle of your data with customizable retention settings with automated storage tiering to help provide more cost-effective storage.
Determine success criteria
By establishing success criteria, you can assess whether Security Lake has helped address the challenges that you are facing. Some example success criteria include:
I need to centrally set up and store AWS logs across my organization in AWS Organizations for multiple log sources.
I need to more efficiently collect VPC Flow Logs in my organization and analyze them in my security information and event management (SIEM) solution.
I want to use OpenSearch Service to replace my on-premises SIEM.
I want to collect AWS log sources and custom sources for machine learning with Amazon Sagemaker.
I need to establish a dashboard in Amazon QuickSight to visualize my Security Hub findings and a custom log source data.
Review your success criteria to make sure that your goals are realistic given your timeframe and potential constraints that are specific to your organization. For example, do you have full control over the creation of AWS services that are deployed in an organization? Do you have resources that can dedicate time to implement and test? Is this time convenient for relevant stakeholders to evaluate the service?
The timeframe of your POC will depend on your answers to these questions.
Important: Security Lake has a 15-day free trial per account that you use from the time that you enable Security Lake. This is the best way to estimate the costs for each Region throughout the trial, which is an important consideration when you configure your POC.
Define your Security Lake configuration
After you establish your success criteria, you should define your desired Security Lake configuration. Some important decisions include the following:
Determine AWS log sources — Decide which AWS log sources to collect. For information about the available options, see Collecting data from AWS services.
Determine third-party log sources — Decide if you want to include non-AWS service logs as sources in your POC. For more information about your options, see Third-party integrations with Security Lake; the integrations listed as “Source” can send logs to Security Lake.
Note: You can add third-party integrations after the POC or in a second phase of the POC. Pre-planning will be required to make sure that you can get these set up during the 15-day free trial. Third-party integrations usually take more time to set up than AWS service logs.
Select a delegated administrator – Identify which account will serve as the delegated administrator. Make sure that you have the appropriate permissions from the organization admin account to identify and enable the account that will be your Security Lake delegated administrator. This account will be the location for the S3 buckets with your security data and where you centrally configure Security Lake. The AWS Security Reference Architecture (AWS SRA) recommends that you use the AWS logging account for this purpose. In addition, make sure to review Important considerations for delegated Security Lake administrators.
Select accounts in scope — Define which accounts to collect data from. To get the most realistic estimate of the cost of Security Lake, enable all accounts across your organization during the free trial.
Determine analytics tool — Determine if you want to use native AWS analytics tools, such as Athena and OpenSearch Service, or an existing SIEM, where the SIEM is a subscriber to Security Lake.
Define log retention and Regions — Define your log retention requirements and Regional restrictions or considerations.
Prepare for deployment
After you determine your success criteria and your Security Lake configuration, you should have an idea of your stakeholders, desired state, and timeframe. Now you need to prepare for deployment. In this step, you should complete as much as possible before you deploy Security Lake. The following are some steps to take:
Create a project plan and timeline so that everyone involved understands what success look like and what the scope and timeline is.
Define the relevant stakeholders and consumers of the Security Lake data. Some common stakeholders include security operations center (SOC) analysts, incident responders, security engineers, cloud engineers, finance, and others.
Define who is responsible, accountable, consulted, and informed during the deployment. Make sure that team members understand their roles.
Consider other technical prerequisites that you need to accomplish. For example, if you need roles in addition to what Security Lake creates for custom extract, transform, and load (ETL) pipelines for custom sources, can you work with the team in charge of that process before the POC?
Enable Security Lake
The next step is to enable Security Lake in your environment and configure your sources and subscribers.
Deploy Security Lake across the Regions, accounts, and AWS log sources that you previously defined.
Configure custom sources that are in scope for your POC.
Configure analytics tools in scope for your POC.
Validate deployment
The final step is to confirm that you have configured Security Lake and additional components, validate that everything is working as intended, and evaluate the solution against your success criteria.
Validate log collection — Verify that you are collecting the log sources that you configured. To do this, check the S3 buckets in the delegated administrator account for the logs.
Validate analytics tool — Verify that you can analyze the log sources in your analytics tool of choice. If you don’t want to configure additional analytics tooling, you can use Athena, which is configured when you set up Security Lake. For sample Athena queries, see Amazon Security Lake Example Queries on GitHub and Security Lake queries in the documentation.
Obtain a cost estimate — In the Security Lake console, you can review a usage page to verify that the cost of Security Lake in your environment aligns with your expectations and budgets.
Assess success criteria — Determine if you achieved the success criteria that you defined at the beginning of the project.
Next steps
Next steps will largely depend on whether you decide to move forward with Security Lake.
Determine if you have the approval and budget to use Security Lake.
Expand to other data sources that can help you provide more security outcomes for your business.
Configure S3 lifecycle policies to efficiently store logs long term based on your requirements.
Let other teams know that they can subscribe to Security Lake to use the log data for their own purposes. For example, a development team that gets access to CloudTrail through Security Lake can analyze the logs to understand the permissions needed for an application.
Conclusion
In this blog post, we showed you how to plan and implement a Security Lake POC. You learned how to do so through phases, including defining success criteria, configuring Security Lake, and validating that Security Lake meets your business needs.
As a customer, this guide will help you run a successful proof of value (POV) with Security Lake. It guides you in assessing the value and factors to consider when deciding to implement the current features.
Cloud environments differ in a number of ways from more traditional on-prem environments. From the immense scale and compounding complexity to the rate of change, the cloud creates a host of challenges for security teams to navigate and grapple with. By definition, anything running in the cloud has the potential to be made publicly available, either directly or indirectly. The interconnected nature of these environments is such that when one account, resource, or service is compromised, it can be fairly easy for a bad actor to move laterally across your environment and/or grant themselves the permissions to wreak havoc. These avenues for lateral movement or privilege escalation are often referred to as attack paths.
Having a solution in place that can clearly and dynamically detect and depict these attack paths is critical to helping teams not only understand where risks exist across their environment but arguably more importantly how they are most likely to be exploited and what that means for an organization – particularly with respect to protecting high-value assets.
Detect and Remediate Attack Paths With InsightCloudSec
Attack Path Analysis in InsightCloudSec enables Rapid7 customers to see their cloud environments from the perspective of an attacker. It visualizes the various ways an attacker could gain access, move between resources, and compromise the cloud environment. Attack Paths are high fidelity signals in our risk prioritization model that focuses on identifying toxic combinations that lead to real business impact.
Since Rapid7 initially launched Attack Path Analysis, we’ve continued to roll out incremental updates to the feature, primarily in the form of expanded attack path coverage across each of the major cloud service providers (CSPs). In our most recent InsightCloudSec release (12.12.2023), we’ve continued this momentum, announcing additional attack paths as well as some exciting updates around how we visualize risk across paths and the potential blast radius should a compromised resource within an existing attack path be exploited. In this post, we’ll dive into an example of one of our recently added attack paths for Microsoft Azure along with a bit more detail about the new risk visualizations. So with that, let’s jump right in.
Expanding Coverage With New Attack Paths
First, on the coverage side of things we’ve added seven new paths in recent releases across AWS and Azure. Our AWS coverage was extended to support ECS across all of our AWS Attack Paths, and we also introduced 3 new Azure Attack paths. In the interest of brevity, we won’t cover each of them, but we do have an ever-developing list of supported attack paths you can access here on the docs page. As an example, however, let’s dive into one of the new paths we released for Azure, which identifies the presence of attack paths targeting publicly exposed instances that also have attached privileged roles.
This type of attack path is concerning for a couple of reasons: First and foremost, an attacker could use the publicly exposed instance as an inroad to your cloud environment due to the fact that it’s publicly accessible, gaining access to sensitive data on the resource itself or accessing data the resource in question has indirect access to. Secondly, since the attached role is capable of escalating privileges, an attacker could then leverage the resource to assign themselves admin permissions which could in turn be used to open up new attack vectors.
Because this could have wide-reaching ramifications should it be exploited, we’ve assigned this a critical severity. That means we’ll want to work to resolve this as fast as possible any time this path shows up across our cloud environments, maybe even automating the process of closing down public access or adjusting the resource permissions to limit the potential for lateral movement or privilege escalation. Speaking of paths with widespread impact should they be exploited, that brings me to some other exciting updates we’ve rolled out to Attack Path Analysis.
Clearly Visualizing Risk Severity and Potential Blast Radius
As I mentioned earlier, along with expanded coverage, we’ve also updated Attack Path Analysis to make it clearer for users where your riskiest assets lie across a given attack path and to clearly show the potential blast radius of an exploitation.
To make it easier to understand the overall riskiness of an attack path and where its choke points are, we’ve added a new security view that visualizes the risk of each resource along a given path. This new view makes it very easy for security teams to immediately understand which specific resources present the highest risk and where they should be focusing their remediation efforts to block potential attackers in their tracks.
In addition to this new security-focused view, we’ve also extended Attack Path Analysis to show a potential blast radius by displaying a graph-based topology map that helps clearly outline the various ways resources across your environment – and specifically within an attack path – interconnect with one another.
This topology map not only makes it easier for security teams to quickly hone in on what needs their attention first during an investigation, but also where a bad actor could move next. Additionally, this view helps security teams and leaders in communicating risk across the organization, particularly when engaging with non-technical stakeholders that find it difficult to understand why exactly a compromised resource presents a potentially larger risk to the business.
We will continue to expand on our existing Attack Path Analysis capabilities in the future, so be sure to keep an eye out for additional paths being added in the coming months as well as a continued effort to enable security teams to more quickly analyze cloud risk with the context needed to effectively detect, communicate, prioritize, and respond.
On November 6th, the National Institute of Standards and Technology (NIST) issued an update to SP 800-53, a NIST-curated catalog of controls that organizations can implement to effectively manage security and privacy risk. In this blog we’ll cover the new and updated controls within patch release 5.1.1, as well as review how Rapid7 InsightCloudSec helps security teams implement and continuously enforce them across their organizations. Let’s dive right in.
Updates to NIST SP 800-53 Compliance Pack: What You Need to Know About Revision 5.1.1
Unlike the large revision that occurred a few years back when Revision 5 was released – which brought with it nearly 270 control updates in aggregate – this update doesn’t have quite the far-reaching implications. That said, there are a few changes to be aware of. Release 5.1.1 added one new control with three supporting control enhancements, along with some minor grammar and formatting structure changes to other existing controls. Organizations are not mandated to implement the new control and have the option to defer implementation until SP 800-53 Release 6.0.0 is issued, however there is no defined timeline for when 6.0.0 will be released.
While there is no mandate at this time, the team here at Rapid7 generally advises our customers to adopt new patch releases immediately to ensure alignment with the most up-to-date best practices and that your team is covered for emerging attack vectors. In this case, we recommend adopting 5.1.1 primarily to ensure you’re effectively implementing encryption and authentication controls across your environment.
The newly-added control is Identification and Authentication (or IA-13) which states that organizations should “Employ identity providers and authorization servers to manage user, device, and non-person entity (NPE) identities, attributes, and access rights supporting authentication and authorization decisions.”
IA-13 has been broken down by NIST into three supporting control enhancements:
IA-13 (01) – Cryptographic keys that protect access tokens are generated, managed, and protected from disclosure and misuse.
IA-13 (02) – The source and integrity of identity assertions and access tokens are verified before granting access to system and information resources.
IA-13 (03) – Assertions and access tokens are continuously refreshed, time-restricted, audience-restrained and revoked when necessary and after a defined period of non-use.
So, what does all that mean? Put simply, organizations should implement controls to effectively track and manage user and system entity permissions to ensure only authorized users are permitted access to corporate systems or data. This includes the proper use of encryption, hygiene and lifecycle management for access tokens.
This is, of course, a much needed and community-requested addition that speaks to the growing awareness and criticality of implementing checks and guardrails to mitigate identity-related risk. A key component of this equation is implementing a solution that can help you detect areas of your cloud environment that haven’t fully implemented these controls. This can be a particularly challenging thing to manage in a cloud environment, given its democratized nature, the sheer volume of identities and permissions that need to be managed and the ease with which improper allocation of permissions and privileges can occur.
Implement and Continuously Enforce NIST SP 800-53 Rev. 5 with InsightCloudSec
InsightCloudSec allows security teams to establish and continuously measure compliance against organizational policies, whether they’re based on service provider best practices, a common industry framework, or a custom pack tailored to specific business needs.
A compliance pack within InsightCloudSec is a set of checks that can be used to continuously assess your cloud environments for compliance with a given regulatory framework, or industry or provider best practices. The platform comes out of the box with 40+ compliance packs, including a dedicated pack for NIST SP 800-53 Rev. 5.1.1, which now provides an additional 14 insights that align to the newly-added IA-13.
The dedicated pack provides 367 Insights checking against 128 NIST SP 800-53 Rev. 5.1.1 requirements that assess your multi cloud environment for compliance with the controls outlined by NIST. With extensive support for various resource types across all major cloud service providers (CSPs), security teams can confidently implement and continuously enforce compliance with SP 800-53 Rev 5.1.1.
InsightCloudSec continuously assesses your entire multi-cloud environment for compliance with one or more compliance packs and detects noncompliant resources within minutes after they are created or an unapproved change is made. If you so choose, you can make use of the platform’s native, no-code automation to contact the resource owner, or even remediate the issue—either via deletion or by adjusting the configuration or permissions—without any human intervention.
For more information about how to use InsightCloudSec to implement and enforce compliance standards like those outlined in NIST SP 800-53 Rev. 5.1.1, be sure to check out the docs page! For more on our cloud identity and access management capabilities, we’ve got some additional information on that here.
Digital transformation has created immense opportunity to generate new revenue streams, better engage with customers and drive operational efficiency. A decades-long transition to cloud as the de-facto delivery model of choice has delivered undeniable value to the business landscape. But any change in operating model brings new challenges too.
The speed, scale and complexity of modern IT environments results in security teams being tasked with analyzing mountains of data to keep pace with the ever-expanding threat landscape. This dynamic puts security analysts on their heels, constantly reacting to incoming threat signals from tools that weren’t purpose-built to solve hybrid environments, creating coverage gaps and a need to swivel-chair between a multitude of point solutions. Making matters worse? Attackers have increasingly looked to weaponize AI technologies to launch sophisticated attacks, benefiting from increased scale, easy access to AI-generated malware packages, as well as more effective social engineering and phishing using generative AI.
To combat these challenges, we need to equip our security teams with modern solutions leveraging AI to cut through the noise and boost signals that matter. Our AI algorithms alleviate alert and action fatigue by delivering visibility across your IT environment and intelligently prioritizing the most important risk signals.
Rapid7 Has Been an AI Innovator for Decades
There has been a groundswell of development and corresponding interest in generative AI, particularly in the last few years as mainstream adoption of large language models (LLMs) grows. Most notably OpenAI’s ChatGPT – has brought AI to the forefront of people’s minds. This buzz has resulted in a number of vendors in the security space launching their own intelligent assistants and working to incorporate AI/ML into their respective solutions to keep pace.
From our perspective, this is great news and a huge step forward in the data & AI space. Rapid7 is also accelerating investment, but we’re certainly not starting from scratch. In fact, Rapid7 was a pioneer in AI development for security use cases, starting all the way back to our earliest days with our VM Expert System in the early 2000’s.
Built on decades of risk analysis and continuously trained by our expert SOC team, Rapid7 AI enables your team to focus on what matters most by proactively shrinking your attack surface and intelligently re-balancing the scales between signal and noise.
With visibility across your hybrid attack surface, the Insight Platform enables proactive prevention, leveraging a proprietary AI-based detection engine to spot threats faster than ever and automatically prioritize the signals that matter most based on likelihood of exploitation and potential business impact. Based on learnings from your own environment and security operations over time, the platform will intelligently recommend updates to detection rule settings in an effort to reduce excess noise and eliminate false positives.
By integrating our AI capabilities into the Rapid7 platform, customers benefit from:
World class threat efficacy, with AI-driven detection of anomalous activity. With a vast amount of legitimate activity occurring across customer environments, our AI algorithms validate if activity is actually malicious, allowing teams to spot unknown threats faster than ever.
Help to cut through the noise, by identifying the signals that matter most. Our AI algorithms automatically prioritize risks and threats, intelligently, suppressing benign alerts to eliminate the noise so analysts can focus on what matters most.
The confidence that they’re taking action on AI-generated insights they can trust, built on decades of risk and threat analysis and trained by a team of recognized innovators in AI-driven security.
Recent Innovations in AI-driven Threat Detection
We’ve recently announced two new AI/ML-powered threat detection capabilities aimed at enabling teams to detect unknown threats across a customer’s environment faster than ever before without introducing excess noise.
Cloud Anomaly Detection Cloud Anomaly Detection is an AI-powered, agentless detection capability designed to detect and prioritize anomalous activity within an organization’s own cloud environment. The proprietary AI engine goes beyond simply detecting suspicious behavior; it automatically suppresses benign signals to reduce noise, eliminate false positives, and enable teams to focus on investigating highly-probable active threats. For more information on Cloud Anomaly Detection, check out the launch blog here.
Intelligent Kerberoasting Detection We’ve expanded existing AI-driven detections for attack types such as data exfiltration, phishing and credential theft to include intelligent detection, validation and prioritization of Kerberoasting attacks. The platform goes beyond traditional tactics for detecting Kerberoasting by applying a deep understanding of typical user activity across the organization. With this context, SOC teams can respond with confidence knowing the signals they are receiving are actually indicative of a Kerberoasting attack.
Rapid7 continues to explore and invest in ways we can leverage AI/ML to better-equip our customers to defend their organizations against the ever-expanding threat landscape. Keep an eye out in the near-future for additional innovations to come out in this space.
For now, be sure to stop by the Rapid7 booth (#1270) at AWS Re:Invent, where we’ll be showcasing Cloud Anomaly Detection and talk to us about how your team is thinking about utilizing AI.
Layered Context introduced a consolidated view of all security risks insightCloudSec collects from the various layers of a cloud environment. This enabled our customers to go from visibility into individual security risks on a resource, to understanding all of the risks that impacted that resource and the overall risk of that resource.
For example: let’s take a cloud resource that has a port left open to the public.
With this level of detail it is pretty challenging to identify the risk level, because we don’t know enough about the resource in question, or even if it was supposed to be opened to the public or not. It’s not that this isn’t risky, we just need to know more to evaluate just how risky it is. As we add more context, we start to get a clearer picture: the environment the resource is running in, if it is connected to a business critical application, does it have any known vulnerabilities, are there identities with elevated permissions associated with the resource, etc.
By layering together all of this context, customers are able to effectively understand the actual risk associated with each and every one of their resources – in real-time. This is of course helpful information to have in one consolidated view, but even still it can be difficult to sift through potentially thousands of resources and prioritize the work that needs to be done to secure each one. To that end, we are excited to introduce a new risk score in Layered Context, which analyzes all the signals and context we know about a given cloud resource and automatically assigns a score and a severity, making it easy for our customers to understand the riskiest resources they should focus on.
Prioritizing Risk By Focusing on Toxic Combinations
Much like Layered Context itself, the new risk score combines a variety of risk signals, assigning a higher risk score to resources that suffer from toxic combinations, or multiple risk vectors that compound to present an increased likelihood or impact of compromise.
The risk score takes into account:
Business Criticality, with an understanding of what applications the resource is associated with such as a crown-jewel or revenue generating app
Public Accessibility, both from a network perspective as well as via user permissions (more on that in a second)
Potential Attack Paths, to understand how a bad actor could move laterally across your inter-connected environment
Identity-related risk, including excessive and/or unused permissions and privileges
Misconfigurations, including whether or not the resource is in compliance with organizational standards
Threats to factor in any malicious behavior that has been detected
And of course, Vulnerabilities, using Rapid7’s Active Risk model which consumes data on exploitability and active exploitation in the wild
By identifying these toxic combinations, we can ensure the riskiest resources are given the highest priority. Each resource is assigned a score and a severity, making it easy for our customers to see where the riskiest resources exist in their environment and where to focus.
A Clear Understanding of How We Calculate Risk
Alongside our risk score, we are introducing a new view to breakdown all of the reasons why a resource has been scored accordingly. This will give an overview of the most important information our customers need to know that clearly summarizes the factors that influenced the risk scoring. Reducing the time required to understand why a resource is risky, meaning security teams can focus on remediating the risks.
A Bit More on How we Determine Public Accessibility
As mentioned previously, the basis of much of our risk calculation in cloud resources stems from a simple question: “is this resource publicly accessible?” This is a critical detail in determining relative risk, but can be very difficult to ascertain given the complex and ephemeral nature of cloud environments. To address this, we’ve invested significant time and effort to ensure we’re assessing public accessibility as accurately as possible but also explaining why we’ve determined it that way, so it’s much easier to take remediation action. This determination can easily be viewed on a per resource basis from the Layered Context page.
We have lots of exciting releases coming up in the next few months, alongside Risk scoring we are also extending our Attack Path Analysis feature to show the Blast Radius of an Attack with improved topology visualizations. This will give our customers not only the visibility into how an attacker could exploit a given resource but also the potential for lateral movement between interconnected resources. Additionally, we’ll be updating the way we validate and show proof of public accessibility. Should a resource be publicly accessible, you will be able to easily view the proof details which will show exactly which combination of configurations is resulting in the resource being publicly accessible.
The new risk scoring capabilities in Layered Context will be on display at AWS Re:Invent next week. Be sure to stop by booth #1270 to see it in action!
AWS Secrets Manager is a service that helps you manage, retrieve, and rotate database credentials, application credentials, OAuth tokens, API keys, and other secrets throughout their lifecycles. You can use Secrets Manager to help remove hard-coded credentials in application source code. Storing the credentials in Secrets Manager helps avoid unintended or inadvertent access by anyone who can inspect your application’s source code, configuration, or components. You can replace hard-coded credentials with a runtime call to the Secrets Manager service to retrieve credentials dynamically when you need them.
In this blog post, we introduce a new Secrets Manager API call, BatchGetSecretValue, and walk you through how you can use it to retrieve multiple Secretes Manager secrets.
New API — BatchGetSecretValue
Previously, if you had an application that used Secrets Manager and needed to retrieve multiple secrets, you had to write custom code to first identify the list of needed secrets by making a ListSecrets call, and then call GetSecretValue on each individual secret. Now, you don’t need to run ListSecrets and loop. The new BatchGetSecretValue API reduces code complexity when retrieving secrets, reduces latency by running bulk retrievals, and reduces the risk of reaching Secrets Manager service quotas.
Security considerations
Though you can use this feature to retrieve multiple secrets in one API call, the access controls for Secrets Manager secrets remain unchanged. This means AWS Identity and Access Management (IAM) principals need the same permissions as if they were to retrieve each of the secrets individually. If secrets are retrieved using filters, principals must have both permissions for list-secrets and get-secret-value on secrets that are applicable. This helps protect secret metadata from inadvertently being exposed. Resource policies on secrets serve as another access control mechanism, and AWS principals must be explicitly granted permissions to access individual secrets if they’re accessing secrets from a different AWS account (see Cross-account access for more information). Later in this post, we provide some examples of how you can restrict permissions of this API call through an IAM policy or a resource policy.
Solution overview
In the following sections, you will configure an AWS Lambda function to use the BatchGetSecretValue API to retrieve multiple secrets at once. You also will implement attribute based access control (ABAC) for Secrets Manager secrets, and demonstrate the access control mechanisms of Secrets Manager. In following along with this example, you will incur costs for the Secrets Manager secrets that you create, and the Lambda function invocations that are made. See the Secrets Manager Pricing and Lambda Pricing pages for more details.
Prerequisites
To follow along with this walk-through, you need:
Five resources that require an application secret to interact with, such as databases or a third-party API key.
Create an IAM role to be used as a Lambda execution role.
Create a Lambda function.
Step 1: Create secrets
First, create multiple secrets with the same resource tag key-value pair using the AWS CLI. The resource tag will be used for ABAC. These secrets might look different depending on the resources that you decide to use in your environment. You can also manually create these secrets in the Secrets Manager console if you prefer.
Run the following commands in the AWS CLI, replacing the secret-string values with the credentials of the resources that you will be accessing:
aws secretsmanager create-secret --name MyTestSecret1 --description "My first test secret created with the CLI for resource 1." --secret-string "{\"user\":\"username\",\"password\":\"EXAMPLE-PASSWORD-1\"}" --tags "[{\"Key\":\"app\",\"Value\":\"app1\"},{\"Key\":\"environment\",\"Value\":\"production\"}]"
aws secretsmanager create-secret --name MyTestSecret2 --description "My second test secret created with the CLI for resource 2." --secret-string "{\"user\":\"username\",\"password\":\"EXAMPLE-PASSWORD-2\"}" --tags "[{\"Key\":\"app\",\"Value\":\"app1\"},{\"Key\":\"environment\",\"Value\":\"production\"}]"
aws secretsmanager create-secret --name MyTestSecret3 --description "My third test secret created with the CLI for resource 3." --secret-string "{\"user\":\"username\",\"password\":\"EXAMPLE-PASSWORD-3\"}" --tags "[{\"Key\":\"app\",\"Value\":\"app1\"},{\"Key\":\"environment\",\"Value\":\"production\"}]"
aws secretsmanager create-secret --name MyTestSecret4 --description "My fourth test secret created with the CLI for resource 4." --secret-string "{\"user\":\"username\",\"password\":\"EXAMPLE-PASSWORD-4 \"}" --tags "[{\"Key\":\"app\",\"Value\":\"app1\"},{\"Key\":\"environment\",\"Value\":\"production\"}]"
aws secretsmanager create-secret --name MyTestSecret5 --description "My fifth test secret created with the CLI for resource 5." --secret-string "{\"user\":\"username\",\"password\":\"EXAMPLE-PASSWORD-5\"}" --tags "[{\"Key\":\"app\",\"Value\":\"app1\"},{\"Key\":\"environment\",\"Value\":\"production\"}]"
Next, create a secret with a different resource tag value for the app key, but the same environment key-value pair. This will allow you to demonstrate that the BatchGetSecretValue call will fail when an IAM principal doesn’t have permissions to retrieve and list the secrets in a given filter.
Create a secret with a different tag, replacing the secret-string values with credentials of the resources that you will be accessing.
aws secretsmanager create-secret --name MyTestSecret6 --description "My test secret created with the CLI." --secret-string "{\"user\":\"username\",\"password\":\"EXAMPLE-PASSWORD-6\"}" --tags "[{\"Key\":\"app\",\"Value\":\"app2\"},{\"Key\":\"environment\",\"Value\":\"production\"}]"
Step 2: Create an execution role for your Lambda function
In this example, create a Lambda execution role that only has permissions to retrieve secrets that are tagged with the app:app1 resource tag.
Select change default execution role and attach the execution role you just created.
Choose Create Function.
Figure 1: create a Lambda function to access secrets
In the Code tab, copy and paste the following code:
import json
import boto3
from botocore.exceptions import ClientError
import urllib.request
import json

session = boto3.session.Session()
# Create a Secrets Manager client
client = session.client(
        service_name='secretsmanager'
    )


def lambda_handler(event, context):

     application_secrets = client.batch_get_secret_value(Filters =[
        {
        'Key':'tag-key',
        'Values':[event["TagKey"]]
        },
        {
        'Key':'tag-value',
        'Values':[event["TagValue"]]
        }
        ])


    ### RESOURCE 1 CONNECTION ###
    try:
        print("TESTING CONNECTION TO RESOURCE 1")
        resource_1_secret = application_secrets["SecretValues"][0]
        ## IMPLEMENT RESOURCE CONNECTION HERE

        print("SUCCESFULLY CONNECTED TO RESOURCE 1")

    except Exception as e:
        print("Failed to connect to resource 1")
        return e

    ### RESOURCE 2 CONNECTION ###
    try:
        print("TESTING CONNECTION TO RESOURCE 2")
        resource_2_secret = application_secrets["SecretValues"][1]
        ## IMPLEMENT RESOURCE CONNECTION HERE

        print("SUCCESFULLY CONNECTED TO RESOURCE 2")

    except Exception as e:
        print("Failed to connect to resource 2",)
        return e


    ### RESOURCE 3 CONNECTION ###
    try:
        print("TESTING CONNECTION TO RESOURCE 3")
        resource_3_secret = application_secrets["SecretValues"][2]
        ## IMPLEMENT RESOURCE CONNECTION HERE

        print("SUCCESFULLY CONNECTED TO DB 3")

    except Exception as e:
        print("Failed to connect to resource 3")
        return e

    ### RESOURCE 4 CONNECTION ###
    try:
        print("TESTING CONNECTION TO RESOURCE 4")
        resource_4_secret = application_secrets["SecretValues"][3]
        ## IMPLEMENT RESOURCE CONNECTION HERE

        print("SUCCESFULLY CONNECTED TO RESOURCE 4")

    except Exception as e:
        print("Failed to connect to resource 4")
        return e

    ### RESOURCE 5 CONNECTION ###
    try:
        print("TESTING ACCESS TO RESOURCE 5")
        resource_5_secret = application_secrets["SecretValues"][4]
        ## IMPLEMENT RESOURCE CONNECTION HERE

        print("SUCCESFULLY CONNECTED TO RESOURCE 5")

    except Exception as e:
        print("Failed to connect to resource 5")
        return e

    return {
        'statusCode': 200,
        'body': json.dumps('Successfully Completed all Connections!')
    }
You need to configure connections to the resources that you’re using for this example. The code in this example doesn’t create database or resource connections to prioritize flexibility for readers. Add code to connect to your resources after the “## IMPLEMENT RESOURCE CONNECTION HERE” comments.
Choose Deploy.
Step 4: Configure the test event to initiate your Lambda function
Above the code source, choose Test and then Configure test event.
In the Event JSON, replace the JSON with the following:
{
"TagKey": "app",
“TagValue”:”app1”
}
Enter a Name for your event.
Choose Save.
Step 5: Invoke the Lambda function
Invoke the Lambda by choosing Test.
Step 6: Review the function output
Review the response and function logs to see the new feature in action. Your function logs should show successful connections to the five resources that you specified earlier, as shown in Figure 2.
Figure 2: Review the function output
Step 7: Test a different input to validate IAM controls
In the Event JSON window, replace the JSON with the following:
You should now see an error message from Secrets Manager in the logs similar to the following:
User: arn:aws:iam::123456789012:user/JohnDoe is not authorized to perform:
secretsmanager:GetSecretValue because no resource-based policy allows the secretsmanager:GetSecretValue action
As you can see, you were able to retrieve the appropriate secrets based on the resource tag. You will also note that when the Lambda function tried to retrieve secrets for a resource tag that it didn’t have access to, Secrets Manager denied the request.
How to restrict use of BatchGetSecretValue for certain IAM principals
When dealing with sensitive resources such as secrets, it’s recommended that you adhere to the principle of least privilege. Service control policies, IAM policies, and resource policies can help you do this. Below, we discuss three policies that illustrate this:
Policy 1: IAM ABAC policy for Secrets Manager
This policy denies requests to get a secret if the principal doesn’t share the same project tag as the secret that the principal is trying to retrieve. Note that the effectiveness of this policy is dependent on correctly applied resource tags and principal tags. If you want to take a deeper dive into ABAC with Secrets Manager, see Scale your authorization needs for Secrets Manager using ABAC with IAM Identity Center.
Policy 3: Restrict actions to specified principals
Finally, let’s take a look at an example resource policy from our data perimeters policy examples. This resource policy restricts Secrets Manager actions to the principals that are in the organization that this secret is a part of, except for AWS service accounts.
In this blog post, we introduced the BatchGetSecretValue API, which you can use to improve operational excellence, performance efficiency, and reduce costs when using Secrets Manager. We looked at how you can use the API call in a Lambda function to retrieve multiple secrets that have the same resource tag and showed an example of an IAM policy to restrict access to this API.
At Amazon Web Services (AWS), we are committed to providing continued assurance to our customers through assessments, certifications, and attestations that support the adoption of current and new AWS services and features. We are pleased to announce the availability of the 2023 Canadian Centre for Cyber Security (CCCS) assessment summary report for AWS. With this assessment, a total of 150 AWS services and features are assessed in the Canada (Central) Region, including 20 additional AWS services and features. The assessment report is available for review and download on demand through AWS Artifact.
The full list of services in scope for the CCCS assessment is available on the Services in Scope page. The 20 new services and features are the following:
The CCCS is Canada’s authoritative source of cyber security expert guidance for the Canadian government, industry, and the general public. Public and commercial sector organizations across Canada rely on CCCS’s rigorous Cloud Service Provider (CSP) IT Security (ITS) assessment in their decision to use CSP services. In addition, CCCS’s ITS assessment process is a mandatory requirement for AWS to provide cloud services to Canadian federal government departments and agencies.
The CCCS cloud service provider information technology security assessment process determines if the Government of Canada (GC) ITS requirements for the CCCS Medium cloud security profile (previously referred to as GC’s PROTECTED B/Medium Integrity/Medium Availability [PBMM] profile) are met as described in ITSG-33 (IT security risk management: A lifecycle approach, Annex 3 – Security control catalogue). As of November 2023, 150 AWS services in the Canada (Central) Region have been assessed by CCCS and meet the requirements for the Medium cloud security profile. Meeting the Medium cloud security profile is required to host workloads that are classified up to and including Medium categorization. On a periodic basis, CCCS assesses new or previously unassessed services and re-assesses the AWS services that were previously assessed to verify that they continue to meet the GC’s requirements. CCCS prioritizes the assessment of new AWS services based on their availability in Canada, and customer demand for the AWS services. The full list of AWS services that have been assessed by CCCS is available on our Services in Scope for CCCS Assessment page.
To learn more about the CCCS assessment or our other compliance and security programs, visit AWS Compliance Programs. As always, we value your feedback and questions; reach out to the AWS Compliance team through the Contact Us page.
If you have feedback about this post, submit comments in the Comments section below. If you have questions about this post, contact AWS Support.
Want more AWS Security news? Follow us on Twitter.
The rapid pace of technological change and the attendant rise of cyber threats in both speed and number leave most organizations at a disadvantage.
Historically, many firms faced this challenge simply by purchasing more technology in the hopes that the latest threat protection software would keep their data safe. But those days have come to an end. Not only have budgets come under increased scrutiny, but the sheer number of tools in most environments has become a handicap as well: Tools don’t always work well together and the expertise required to manage them remains in short supply. According to some analysts, the current complexity and diversity of tech environments also hampers visibility into vulnerability risks, at least in part because data must be obtained from disparate systems or laboriously exported into spreadsheets and data analytics platforms to fine tune and understand relevant risks.
For organizations looking for a unified perspective of risk across their cloud and on-prem environments, prioritizing risk, eliminating repetitive manual work, maintaining complete risk visibility, and consolidating point solutions will enable them to meet cyber threats with speed and success.
Not all Threats are Created Equally
You’ll hear companies claim to stop all threats everywhere all the time, but such claims are neither true nor practical – anyone who follows the news even casually knows that the threats keep coming. The key is to understand which threats pose the largest risks and mitigate those first. Tools like Rapid7’s InsightVM analyze enterprise-wide asset and vulnerability data to identify the actions that will have the largest impact on risk reduction in a given organization. Instead of thousand-page lists of individual patches to apply, organizations can make informed, up-to-the-minute decisions on how to allocate resources for maximum risk reduction.
InsightVM also offers live dashboards that update whenever new data is discovered, allowing teams to track the attack surface and risk as they change. Dashboard views can even be customized for different technical teams or stakeholders as organizational perimeters expand into the cloud and beyond. Other approaches, such as cloud risk management, allow organizations to manage, prioritize, and act on risks within the large scale of modern multi-cloud environments and on-prem footprints by helping them understand the potential impact of a particular risk and its likelihood of exploitation.
You Can’t Protect What You Can’t See
In addition to trying to tackle every imaginable risk, maintaining maximum visibility into attack-surface risk is the only way organizations can hope to minimize security gaps while managing the many containers, cloud services, and virtual devices that are often spun up and down without direct involvement from the security team.
While InsightVM integrates directly with dynamic infrastructure to give full visibility into the risks posed by these assets, solutions like Executive Risk View provide complete visibility into hybrid-environment risk by ingesting data with purpose-built collection mechanisms – regardless of whether work is running on-premises or in the cloud.
Executive Risk View also aggregates and normalizes disparate risk assessments from on-premises and cloud environments for a unified, interactive dashboard that brings clarity to discovered vulnerabilities and the risks each represents so that security teams can prioritize remediation actions and share insights cross functionally. Insight into how vulnerabilities translate into business risk – and which of them are most likely to be targeted by attackers – means teams can quickly and effectively address the risks that pose the most significant danger.
Simplify the Stack
Prioritization, automation, and visibility are all foundational elements of unified risk protection, but if organizations rely on multiple vendors to manage them, they will continue to lose efficiencies and battle tool proliferation. Cloud Risk Complete offers all of these solutions from one comprehensive platform and single subscription model. This means organizations can secure hybrid environments from development to production; detect and address risk across endpoints, cloud workloads, and traditional infrastructure; and perform dynamic application security testing to remediate application risk – all with a single subscription.
Learn more about the ways Rapid7 can help increase your security posture.
In the rapidly evolving landscape of cloud computing, the adoption of multi-cloud environments has become a prevailing trend. Organizations increasingly turn to multiple cloud providers to harness diverse features, prevent vendor lock-in, and optimize costs. The multi-cloud approach offers unparalleled agility, scalability, and flexibility, but it has its complexities and CISOs need your support.
In the final episode of the Cloud Security Webinar Series, Rapid7’s Chief Security Officer Jaya Baloo and other experts share their thoughts on the cloud strategies to support security leaders as they move into 2024 and beyond.
These webinars can now be viewed on-demand, giving security professionals greater insight into how to safeguard their cloud environments and set themselves up for success. A summary of the key discussion points are listed below.
Nurturing Comprehension and Collaboration
Multi-cloud environments present a complex tapestry woven with equal parts opportunity and complexity. Governance, security, and cost optimization are paramount concerns often exacerbated by the absence of centralized visibility and with the threat of misconfigurations and potential compliance issues looming in the background.
So, in the face of these challenges, collaborative unity among security teams becomes not just a nicety but a necessity. It is through the sharing of knowledge and experiences that the security community effectively grapples with these evolving challenges.
Striving for Collective Success
There are several simple strategies security teams can adopt to support a more robust defense:
Centralized visibility: Embrace cloud management tools to unveil a comprehensive view of the multi-cloud landscapes. In doing so, we foster collaboration and unity. This provides a single pane of glass for security teams to gain comprehensive insights into their digital assets, compliance status, and ongoing security threats.
Automation: Leveraging automation is key to efficiently managing multi-cloud landscapes. Automate asset discovery, security policy enforcement, and threat response. Automation not only streamlines these processes but also reduces the risk of human error.
Security governance framework: Develop a comprehensive security governance framework that encompasses all aspects of multi-cloud security, including identity and access management, data protection, and threat detection. This framework should be flexible enough to accommodate the nuances of each cloud platform.
Resource optimization: Regularly evaluate resource utilization across different cloud providers. Ensure that resources are allocated efficiently to minimize costs. Implement scaling and resource allocation strategies to adapt to changing workload requirements.
Enhanced staff training: Invest in the skills and knowledge of security and IT teams, along with opportunities for cross-training and knowledge sharing.
As organizations continue to embrace multi-cloud environments, mastering the complexities of diverse cloud platforms is crucial for enhanced security, governance, and cost optimization. By gaining a deep understanding of the multi-cloud landscape, addressing key challenges head-on, and implementing efficient management strategies, security professionals can navigate the intricate web of multi-cloud and ensure seamless operations in the cloud-native era.
Cultivating Unity for a More Resilient Future
The evolving nature of cybersecurity demands organizations stand together to share experiences, strategies, and best practices. By cultivating unity and empathy across the security community and the wider business, organizations can collectively navigate the shifting threat landscape more easily.
Customers using Amazon Web Services (AWS) can use a range of native and third-party tools to build workloads based on their specific use cases. Logs and metrics are foundational components in building effective insights into the health of your IT environment. In a distributed and agile AWS environment, customers need a centralized and holistic solution to visualize the health and security posture of their infrastructure.
You can effectively categorize the members of the teams involved using the following roles:
Executive stakeholder: Owns and operates with their support staff and has total financial and risk accountability.
Data custodian: Aggregates related data sources while managing cost, access, and compliance.
Operator or analyst: Uses security tooling to monitor, assess, and respond to related events such as service disruptions.
In this blog post, we focus on the data custodian role. We show you how you can visualize metrics and logs centrally with Amazon QuickSight irrespective of the service or tool generating them. We use Amazon Simple Storage Service (Amazon S3) for storage, AWS Glue for cataloguing, and Amazon Athena for querying the data and creating structured query language (SQL) views for QuickSight to consume.
Target architecture
This post guides you towards building a target architecture in line with the AWS Well-Architected Framework. The tiered and multi-account target architecture, shown in Figure 1, uses account-level isolation to separate responsibilities across the various roles identified above and makes access management more defined and specific to those roles. The workload accounts generate the telemetry around the applications and infrastructure. The data custodian account is where the data lake is deployed and collects the telemetry. The operator account is where the queries and visualizations are created.
Throughout the post, I mention AWS services that reduce the operational overhead in one or more stages of the architecture.
Figure 1: Data visualization architecture
Ingestion
Irrespective of the technology choices, applications and infrastructure configurations should generate metrics and logs that report on resource health and security. The format of the logs depends on which tool and which part of the stack is generating the logs. For example, the format of log data generated by application code can capture bespoke and additional metadata deemed useful from a workload perspective as compared to access logs generated by proxies or load balancers. For more information on types of logs and effective logging strategies, see Logging strategies for security incident response.
Amazon S3 is a scalable, highly available, durable, and secure object storage that you will use as the storage layer. To build a solution that captures events agnostic of the source, you must forward data as a stream to the S3 bucket. Based on the architecture, there are multiple tools you can use to capture and stream data into S3 buckets. Some tools support integration with S3 and directly stream data to S3. Resources like servers and virtual machines need forwarding agents such as Amazon Kinesis Agent, Amazon CloudWatch agent, or Fluent Bit.
Amazon Kinesis Data Streams provides a scalable data streaming environment. Using on-demand capacity mode eliminates the need for capacity provisioning and capacity management for streaming workloads. For log data and metric collection, you should use on-demand capacity mode, because log data generation can be unpredictable depending on the requests that are being handled by the environment. Amazon Kinesis Data Firehose can convert the format of your input data from JSON to Apache Parquet before storing the data in Amazon S3. Parquet is naturally compressed, and using Parquet native partitioning and compression allows for faster queries compared to JSON formatted objects.
Amazon Security Lake is a fully managed security data lake service. You can use Security Lake to automatically centralize security data from AWS environments, SaaS providers, on-premises, and third-party sources into a purpose-built data lake that’s stored in your AWS account. Using Security Lake reduces the operational effort involved in building a scalable data lake, as the service automates the configuration and orchestration for the data lake with Lake Formation. Security Lake automatically transforms logs into a standard schema—the Open Cybersecurity Schema Framework (OCSF) — and parses them into a standard directory structure, which allows for faster queries. For more information, see How to visualize Amazon Security Lake findings with Amazon QuickSight.
You can start with basic queries and visualizations as described in Query logs in S3 with Athena and Create a QuickSight visualization. Depending on the nature and origin of the logs and metrics that you want to query, you can use the examples published in Running SQL queries using Amazon Athena. To build custom analytics, you can create views with Athena. Views in Athena are logical tables that you can use to query a subset of data. Views help you to hide complexity and minimize maintenance when querying large tables. Use views as a source for new datasets to build specific health analytics and dashboards.
You can also use Amazon QuickSight Q to get started on your analytics journey. Powered by machine learning, Q uses natural language processing to provide insights into the datasets. After the dataset is configured, you can use Q to give you suggestions for questions to ask about the data. Q understands business language and generates results based on relevant phrases detected in the questions. For more information, see Working with Amazon QuickSight Q topics.
Conclusion
Logs and metrics offer insights into the health of your applications and infrastructure. It’s essential to build visibility into the health of your IT environment so that you can understand what good health looks like and identify outliers in your data. These outliers can be used to identify thresholds and feed into your incident response workflow to help identify security issues. This post helps you build out a scalable centralized visualization environment irrespective of the source of log and metric data.
This post is part 1 of a series that helps you dive deeper into the security analytics use case. In part 2, How to visualize Amazon Security Lake findings with Amazon QuickSight, you will learn how you can use Security Lake to reduce the operational overhead involved in building a scalable data lake and centralizing log data from SaaS providers, on-premises, AWS, and third-party sources into a purpose-built data lake. You will also learn how you can integrate Athena with Security Lake and create visualizations with QuickSight of the data and events captured by Security Lake.
Over the past decade, cloud computing has evolved into a cornerstone of modern business operations. Its flexibility, scalability, and efficiency have reshaped industries and brought unprecedented opportunities.
However, this transformation has come with challenges—most notably those associated with cloud security. Our new cloud security webinar series will explore the dynamic landscape of cloud security, unveiling key trends, pinpointing critical challenges, and providing actionable insights tailored to security professionals.
In Commanding Cloud Strategies, the first webinar of the series, Rapid7’s Chief Security Officer Jaya Baloo and other experts will share their thoughts on the cloud challenges that security leaders face and offer insights on how to overcome them.
Please register for the first episode of our Cloud Security Series here to find out what our security experts think are the top strategies to overcome these challenges and considerations.
Armed with the knowledge and insights provided in part-one, security professionals will be better equipped to safeguard their cloud environments and data assets in the modern digital landscape.
To learn more, check out the webinar abstract below.
Commanding Cloud Strategies Webinar Abstract
In the ever-evolving world of cloud security, staying ahead of the curve is paramount. Over the past ten years, several trends have emerged, shaping how organizations safeguard their digital assets.
The shift towards a shared responsibility model, greater emphasis on automation and orchestration, and a growing focus on identity and access management (IAM) are among the defining trends.
Cloud Security Challenges
Data Privacy and Compliance: Ensuring data protection and regulatory compliance within cloud environments is a persistent challenge. As data becomes more mobile and diverse, maintaining compliance becomes increasingly complex.
Evolving Threat Landscape: The threat landscape is in constant flux, with cyberattacks targeting cloud infrastructure and applications growing in sophistication. Security professionals must adapt to this ever-changing landscape to keep their organizations safe.
Considerations in Cloud Security
Scalable Security Architecture: Large enterprises must design security architectures that are both scalable and flexible to adapt to evolving cloud infrastructure and workload needs. The ability to scale security measures efficiently is crucial.
Identity and Access Management (IAM): Given the intricate web of user roles and permissions in large organizations, effective IAM is essential. Organizations should prioritize IAM solutions that streamline access while maintaining security.
Understanding Risk
Understanding cybersecurity risk is at the heart of cloud security. Effective risk assessment and mitigation involve evaluating internal and external tactics that could compromise an organization’s digital assets and information security. Our security experts will delve into this critical domain’s core challenges and considerations in the session.
Challenges in Understanding Risk
Complexity of Cloud Ecosystems: Successful organizations often operate intricate cloud ecosystems with numerous interconnected services and platforms. Navigating this complexity while assessing risk can be daunting.
Lack of Skilled Cybersecurity Personnel: The need for more skilled cybersecurity professionals capable of analyzing and managing cloud security risks is a widespread challenge. Organizations must find and retain the right talent to stay secure.
Considerations for Understanding Risk
Risk Assessment and Prioritization: Organizations should prioritize the identification and assessment of cloud security risks based on their potential impact and likelihood. Effective risk assessment tools and threat modelling can help in this regard.
Continuous Monitoring and Response: Establishing a robust, real-time monitoring system is essential. It allows organizations to continuously assess cloud environments for security incidents and respond promptly to emerging threats. Integrating Security Information and Event Management (SIEM) and DevSecOps practices can enhance this capability.
Threat Intelligence
In cloud security, threat intelligence is pivotal in staying one step ahead of potential threats and vulnerabilities. Effective threat intelligence involves collecting, analyzing, and disseminating timely information to protect cloud environments and data assets proactively.
Challenges in Threat Intelligence
Data Overload and False Positives: Organizations generate vast amounts of security data, including threat intelligence feeds. Managing this data can lead to data overload and false positives, causing alert fatigue.
Integration and Compatibility: Integrating threat intelligence feeds into existing security infrastructure can be complex, as different sources may use varying formats and standards.
Considerations in Threat Intelligence
Customization and Contextualization: To make threat intelligence actionable, organizations should customize it to their specific cloud environments, industry, and business context. Tailored alerting rules and threat-hunting workflows can enhance effectiveness.
Sharing and Collaboration: Collaborating with industry peers, Information Sharing and Analysis Centers (ISACs), and government agencies for threat intelligence sharing can provide valuable insights into emerging threats specific to the industry.
Security Capabilities
Cloud security capabilities encompass the ability to comprehend evolving risks, establish benchmark standards, and take immediate, informed actions to safeguard cloud environments and data assets effectively. The final topic in the webinar will explore the core challenges and considerations in building robust security capabilities.
Challenges in Security Capabilities
Resource Allocation and Prioritization: Allocating resources effectively across vast cloud environments can be challenging, leading to difficulties prioritizing security efforts and ensuring critical areas receive the necessary attention and investment.
Complexity of Hybrid and Multi-Cloud Environments: Managing security capabilities becomes particularly challenging when organizations operate in hybrid or multi-cloud environments. Ensuring consistent security practices and policies across different platforms and providers requires specialized expertise.
Considerations in Security Capabilities
Integrated Security Ecosystem: Organizations should strive to create an integrated security ecosystem that combines various security tools, technologies, and processes to provide a comprehensive view of their cloud environment.
Scalability and Elasticity: Cloud security capabilities should be designed to scale and adapt to the organization’s evolving cloud infrastructure and workloads. This includes automated resource scaling and continuous security testing.
Vulnerability findings in a cloud environment can come from a variety of tools and scans depending on the underlying technology you’re using. Without processes in place to handle these findings, they can begin to mount, often leading to thousands to tens of thousands of findings in a short amount of time. We’re excited to announce the Building a scalable vulnerability management program on AWS guide, which includes how you can build a structured vulnerability management program, operationalize tooling, and scale your processes to handle a large number of findings from diverse sources.
Building a scalable vulnerability management program on AWS focuses on the fundamentals of building a cloud vulnerability management program, including traditional software and network vulnerabilities and cloud configuration risks. The guide covers how to build a successful and scalable vulnerability management program on AWS through preparation, enabling and configuring tools, triaging findings, and reporting.
Targeted outcomes
This guide can help you and your organization with the following:
Develop policies to streamline vulnerability management and maintain accountability.
Establish mechanisms to extend the responsibility of security to your application teams.
Configure relevant AWS services according to best practices for scalable vulnerability management.
Identify patterns for routing security findings to support a shared responsibility model.
Establish mechanisms to report on and iterate on your vulnerability management program.
Improve security finding visibility and help improve overall security posture.
Using the new guide
We encourage you to read the entire guide before taking action or building a list of changes to implement. After you read the guide, assess your current state compared to the action items and check off the items that you’ve already completed in the Next steps table. This will help you assess the current state of your AWS vulnerability management program. Then, plan short-term and long-term roadmaps based on your gaps, desired state, resources, and business needs. Building a cloud vulnerability management program often involves iteration, so you should prioritize key items and regularly revisit your backlog to keep up with technology changes and your business requirements.
We greatly value feedback and contributions from our community. To share your thoughts and insights about the guide, your experience using it, and what you want to see in future versions, select Provide feedback at the bottom of any page in the guide and complete the form.
If you have feedback about this post, submit comments in the Comments section below. If you have questions about this post, contact AWS Support.
Want more AWS Security news? Follow us on Twitter.
In today’s ever-evolving cybersecurity landscape, detecting and responding to cyber threats is paramount for organizations in cloud environments. At the same time, investigating cyber threat alerts can be arduous due to the time-consuming and complex process of data collection. To tackle this pain point, Rapid7 developed a new Cloud Resource Enrichment API that streamlines data retrieval from various cloud resources. The API empowers security analysts to swiftly respond to cyber threats and improve incident response time.
Identifying the Need for a Unified API
Protecting cloud resources from cyber attacks is a growing challenge. Security analysts must grapple with gathering relevant data spread across multiple systems and APIs, leading to incident response inefficiencies. Presented with this challenge, we recognized a pressing need for a unified API that collects all relevant data types related to a cloud resource during a cyber threat action. This API streamlines data access, enabling analysts to piece together a comprehensive view of incidents rapidly, enhancing cybersecurity operations.
Defining the Vision and Scope
Our development team worked closely with security analysts to tailor the API’s functionalities to meet real-world needs. Defining the API’s scope involved meticulous prioritization of features, striking the right balance between usability and data abundance. By involving analysts from the outset, we laid a solid foundation for the API’s success.
The Development Journey
Adopting agile methodologies, our team iteratively developed the API, adapting and fine-tuning as we progressed. The iterative development process played a vital role in ensuring the API’s success. By breaking down the project into smaller, manageable tasks, we could focus on specific features, implement them efficiently, and gather feedback from early prototypes. With a comprehensive design phase, we defined the API’s architecture and capabilities based on insights from security analysts. Regular meetings and feedback gathering facilitated continuous improvements, streamlining the data retrieval process.
The API utilizes RESTful API design principles for data integration and communication between cloud systems. It collects the following types of data:
Harvested cloud resource properties (image, IP, network interfaces, region, cloud organization and account, security groups, and much, much more)
Permissions data (permissions on the resource, permissions of the resource)
Application context (tagging made by the client in the cloud environment)
Each data type required collaboration with a different team which is responsible for collecting and processing the data. This resulted in a feature that involved developers from 6 different teams! Regular meetings and continuous communication with the development team and the product manager, allowed us to incorporate suggestions and make iterative improvements to the API’s design and functionality.
Conclusion
The development journey of our Cloud Resource Enrichment API has been both challenging and rewarding. With a user-centric approach, we have crafted a powerful tool that empowers security teams to respond effectively to cyber threats. As we continue to enhance the API, we remain committed to fortifying organizations’ cyber defenses and elevating incident response capabilities. Together, we can better equip security analysts to face the ever-changing cyber war with confidence.
The collective thoughts of the interwebz
Manage Consent
To provide the best experiences, we use technologies like cookies to store and/or access device information. Consenting to these technologies will allow us to process data such as browsing behavior or unique IDs on this site. Not consenting or withdrawing consent, may adversely affect certain features and functions.
Functional
Always active
The technical storage or access is strictly necessary for the legitimate purpose of enabling the use of a specific service explicitly requested by the subscriber or user, or for the sole purpose of carrying out the transmission of a communication over an electronic communications network.
Preferences
The technical storage or access is necessary for the legitimate purpose of storing preferences that are not requested by the subscriber or user.
Statistics
The technical storage or access that is used exclusively for statistical purposes.The technical storage or access that is used exclusively for anonymous statistical purposes. Without a subpoena, voluntary compliance on the part of your Internet Service Provider, or additional records from a third party, information stored or retrieved for this purpose alone cannot usually be used to identify you.
Marketing
The technical storage or access is required to create user profiles to send advertising, or to track the user on a website or across several websites for similar marketing purposes.