Tag Archives: Elastic Load Balancing

Build Next-Generation Microservices with .NET 5 and gRPC on AWS

Post Syndicated from Matt Cline original https://aws.amazon.com/blogs/devops/next-generation-microservices-dotnet-grpc/

Modern architectures use multiple microservices in conjunction to drive customer experiences. At re:Invent 2015, AWS senior project manager Rob Brigham described Amazon’s architecture of many single-purpose microservices – including ones that render the “Buy” button, calculate tax at checkout, and hundreds more.

Microservices commonly communicate with JSON over HTTP/1.1. These technologies are ubiquitous and human-readable, but they aren’t optimized for communication between dozens or hundreds of microservices.

Next-generation Web technologies, including gRPC and HTTP/2, significantly improve communication speed and efficiency between microservices. AWS offers the most compelling experience for builders implementing microservices. Moreover, the addition of HTTP/2 and gRPC support in Application Load Balancer (ALB) provides an end-to-end solution for next-generation microservices. ALBs can inspect and route gRPC calls, enabling features like health checks, access logs, and gRPC-specific metrics.

This post demonstrates .NET microservices communicating with gRPC via Application Load Balancers. The microservices run on AWS Graviton2 instances, utilizing a custom-built 64-bit Arm processor to deliver up to 40% better price/performance than x86.

Architecture Overview

Modern Tacos is a new restaurant offering delivery. Customers place orders via mobile app, then they receive real-time status updates as their order is prepared and delivered.

The tutorial includes two microservices: “Submit Order” and “Track Order”. The Submit Order service receives orders from the app, then it calls the Track Order service to initiate order tracking. The Track Order service provides streaming updates to the app as the order is prepared and delivered.

Each microservice is deployed in an Amazon EC2 Auto Scaling group. Each group is behind an ALB that routes gRPC traffic to instances in the group.

Shows the communication flow of gRPC traffic from users through an ALB to EC2 instances.
This architecture is simplified to focus on ALB and gRPC functionality. Microservices are often deployed in
containers for elastic scaling, improved reliability, and efficient resource utilization. ALB, gRPC, and .NET all work equally effectively in these architectures.

Comparing gRPC and JSON for microservices

Microservices typically communicate by sending JSON data over HTTP. As a text-based format, JSON is readable, flexible, and widely compatible. However, JSON also has significant weaknesses as a data interchange format. JSON’s flexibility makes enforcing a strict API specification difficult — clients can send arbitrary or invalid data, so developers must write rigorous data validation code. Additionally, performance can suffer at scale due to JSON’s relatively high bandwidth and parsing requirements. These factors also impact performance in constrained environments, such as smartphones and IoT devices. gRPC addresses all of these issues.

gRPC is an open-source framework designed to efficiently connect services. Instead of JSON, gRPC sends messages via a compact binary format called Protocol Buffers, or protobuf. Although protobuf messages are not human-readable, they utilize less network bandwidth and are faster to encode and decode. Operating at scale, these small differences multiply to a significant performance gain.

gRPC APIs define a strict contract that is automatically enforced for all messages. Based on this contract, gRPC implementations generate client and server code libraries in multiple programming languages. This allows developers to use higher-level constructs to call services, rather than programming against “raw” HTTP requests.

gRPC also benefits from being built on HTTP/2, a major revision of the HTTP protocol. In addition to the foundational performance and efficiency improvements from HTTP/2, gRPC utilizes the new protocol to support bi-directional streaming data. Implementing real-time streaming prior to gRPC typically required a completely separate protocol (such as WebSockets) that might not be supported by every client.

gRPC for .NET developers

Several recent updates have made gRPC more useful to .NET developers. .NET 5 includes significant performance improvements to gRPC, and AWS has broad support for .NET 5. In May 2021, the .NET team announced their focus on a gRPC implementation written entirely in C#, called “grpc-dotnet”, which follows C# conventions very closely.

Instead of working with JSON, dynamic objects, or strings, C# developers calling a gRPC service use a strongly-typed client, automatically generated from the protobuf specification. This obviates much of the boilerplate validation required by JSON APIs, and it enables developers to use rich data structures. Additionally, the generated code enables full IntelliSense support in Visual Studio.

For example, the “Submit Order” microservice executes this code in order to call the “Track Order” microservice:

using var channel = GrpcChannel.ForAddress("https://track-order.example.com");

var trackOrderClient = new TrackOrder.Protos.TrackOrder.TrackOrderClient(channel);

var reply = await trackOrderClient.StartTrackingOrderAsync(new TrackOrder.Protos.Order
{
    DeliverTo = "Address",
    LastUpdated = Timestamp.FromDateTime(DateTime.UtcNow),
    OrderId = order.OrderId,
    PlacedOn = order.PlacedOn,
    Status = TrackOrder.Protos.OrderStatus.Placed
});

This code calls the StartTrackingOrderAsync method on the Track Order client, which looks just like a local method call. The method intakes a data structure that supports rich data types like DateTime and enumerations, instead of the loosely-typed JSON. The methods and data structures are defined by the Track Order service’s protobuf specification, and the .NET gRPC tools automatically generate the client and data structure classes without requiring any developer effort.

Configuring ALB for gRPC

To make gRPC calls to targets behind an ALB, create a load balancer target group and select gRPC as the protocol version. You can do this through the AWS Management Console, AWS Command Line Interface (CLI), AWS CloudFormation, or AWS Cloud Development Kit (CDK).

Screenshot of the AWS Management Console, showing how to configure a load balancer's target group for gRPC communication.

This CDK code creates a gRPC target group:

var targetGroup = new ApplicationTargetGroup(this, "TargetGroup", new ApplicationTargetGroupProps
{
    Protocol = ApplicationProtocol.HTTPS,
    ProtocolVersion = ApplicationProtocolVersion.GRPC,
    Vpc = vpc,
    Targets = new IApplicationLoadBalancerTarget {...}
});

gRPC requests work with target groups utilizing HTTP/2, but the gRPC protocol enables additional features including health checks, request count metrics, access logs that differentiate gRPC requests, and gRPC-specific response headers. gRPC also works with native ALB features like stickiness, multiple load balancing algorithms, and TLS termination.

Deploy the Tutorial

The sample provisions AWS resources via the AWS Cloud Development Kit (CDK). The CDK code is provided in C# so that .NET developers can use a familiar language.

The solution deployment steps include:

  • Configuring a domain name in Route 53.
  • Deploying the microservices.
  • Running the mobile app on AWS Device Farm.

The source code is available on GitHub.

Prerequisites

For this tutorial, you should have these prerequisites:

Configure the environment variables needed by the CDK. In the sample commands below, replace AWS_ACCOUNT_ID with your numeric AWS account ID. Replace AWS_REGION with the name of the region where you will deploy the sample, such as us-east-1 or us-west-2.

If you’re using a *nix shell such as Bash, run these commands:

export CDK_DEFAULT_ACCOUNT=AWS_ACCOUNT_ID
export CDK_DEFAULT_REGION=AWS_REGION

If you’re using PowerShell, run these commands:

$Env:CDK_DEFAULT_ACCOUNT="AWS_ACCOUNT_ID"
$Env:CDK_DEFAULT_REGION="AWS_REGION"
Set-DefaultAWSRegion -Region AWS_REGION

Throughout this tutorial, replace RED TEXT with the appropriate value.

Save the directory path where you cloned the GitHub repository. In the sample commands below, replace EXAMPLE_DIRECTORY with this path.

In your terminal or PowerShell, run these commands:

cd EXAMPLE_DIRECTORY/src/ModernTacoShop/Common/cdk
cdk bootstrap --context domain-name=PARENT_DOMAIN_NAME
cdk deploy --context domain-name=PARENT_DOMAIN_NAME

The CDK output includes the name of the S3 bucket that will store deployment packages. Save the name of this bucket. In the sample commands below, replace SHARED_BUCKET_NAME with this name.

Deploy the Track Order microservice

Compile the Track Order microservice for the Arm microarchitecture utilized by AWS Graviton2 processors. The TrackOrder.csproj file includes a target that automatically packages the compiled microservice into a ZIP file. You will upload this ZIP file to S3 for use by CodeDeploy. Next, you will utilize the CDK to deploy the microservice’s AWS infrastructure, and then install the microservice on the EC2 instance via CodeDeploy.

The CDK stack deploys these resources:

  • An Amazon EC2 Auto Scaling group.
  • An Application Load Balancer (ALB) using gRPC, targeting the Auto Scaling group and configured with microservice health checks.
  • A subdomain for the microservice, targeting the ALB.
  • A DynamoDB table used by the microservice.
  • CodeDeploy infrastructure to deploy the microservice to the Auto Scaling group.

If you’re using the AWS CLI, run these commands:

cd EXAMPLE_DIRECTORY/src/ModernTacoShop/TrackOrder/src/
dotnet publish --runtime linux-arm64 --self-contained
aws s3 cp ./bin/TrackOrder.zip s3://SHARED_BUCKET_NAME
etag=$(aws s3api head-object --bucket SHARED_BUCKET_NAME \
    --key TrackOrder.zip --query ETag --output text)
cd ../cdk
cdk deploy

The CDK output includes the name of the CodeDeploy deployment group. Use this name to run the next command:

aws deploy create-deployment --application-name ModernTacoShop-TrackOrder \
    --deployment-group-name TRACK_ORDER_DEPLOYMENT_GROUP_NAME \
    --s3-location bucket=SHARED_BUCKET_NAME,bundleType=zip,key=TrackOrder.zip,etag=$etag \
    --file-exists-behavior OVERWRITE

If you’re using PowerShell, run these commands:

cd EXAMPLE_DIRECTORY/src/ModernTacoShop/TrackOrder/src/
dotnet publish --runtime linux-arm64 --self-contained
Write-S3Object -BucketName SHARED_BUCKET_NAME `
    -Key TrackOrder.zip `
    -File ./bin/TrackOrder.zip
Get-S3ObjectMetadata -BucketName SHARED_BUCKET_NAME `
    -Key TrackOrder.zip `
    -Select ETag `
    -OutVariable etag
cd ../cdk
cdk deploy

The CDK output includes the name of the CodeDeploy deployment group. Use this name to run the next command:

New-CDDeployment -ApplicationName ModernTacoShop-TrackOrder `
    -DeploymentGroupName TRACK_ORDER_DEPLOYMENT_GROUP_NAME `
    -S3Location_Bucket SHARED_BUCKET_NAME `
    -S3Location_BundleType zip `
    -S3Location_Key TrackOrder.zip `
    -S3Location_ETag $etag[0] `
    -RevisionType S3 `
    -FileExistsBehavior OVERWRITE

Deploy the Submit Order microservice

The steps to deploy the Submit Order microservice are identical to the Track Order microservice. See that section for details.

If you’re using the AWS CLI, run these commands:

cd EXAMPLE_DIRECTORY/src/ModernTacoShop/SubmitOrder/src/
dotnet publish --runtime linux-arm64 --self-contained
aws s3 cp ./bin/SubmitOrder.zip s3://SHARED_BUCKET_NAME
etag=$(aws s3api head-object --bucket SHARED_BUCKET_NAME \
    --key SubmitOrder.zip --query ETag --output text)
cd ../cdk
cdk deploy

The CDK output includes the name of the CodeDeploy deployment group. Use this name to run the next command:

aws deploy create-deployment --application-name ModernTacoShop-SubmitOrder \
    --deployment-group-name SUBMIT_ORDER_DEPLOYMENT_GROUP_NAME \
    --s3-location bucket=SHARED_BUCKET_NAME,bundleType=zip,key=SubmitOrder.zip,etag=$etag \
    --file-exists-behavior OVERWRITE

If you’re using PowerShell, run these commands:

cd EXAMPLE_DIRECTORY/src/ModernTacoShop/SubmitOrder/src/
dotnet publish --runtime linux-arm64 --self-contained
Write-S3Object -BucketName SHARED_BUCKET_NAME `
    -Key SubmitOrder.zip `
    -File ./bin/SubmitOrder.zip
Get-S3ObjectMetadata -BucketName SHARED_BUCKET_NAME `
    -Key SubmitOrder.zip `
    -Select ETag `
    -OutVariable etag
cd ../cdk
cdk deploy

The CDK output includes the name of the CodeDeploy deployment group. Use this name to run the next command:

New-CDDeployment -ApplicationName ModernTacoShop-SubmitOrder `
    -DeploymentGroupName SUBMIT_ORDER_DEPLOYMENT_GROUP_NAME `
    -S3Location_Bucket SHARED_BUCKET_NAME `
    -S3Location_BundleType zip `
    -S3Location_Key SubmitOrder.zip `
    -S3Location_ETag $etag[0] `
    -RevisionType S3 `
    -FileExistsBehavior OVERWRITE

Data flow diagram

Architecture diagram showing the complete data flow of the sample gRPC microservices application.
  1. The app submits an order via gRPC.
  2. The Submit Order ALB routes the gRPC call to an instance.
  3. The Submit Order instance stores order data.
  4. The Submit Order instance calls the Track Order service via gRPC.
  5. The Track Order ALB routes the gRPC call to an instance.
  6. The Track Order instance stores tracking data.
  7. The app calls the Track Order service, which streams the order’s location during delivery.

Test the microservices

Once the CodeDeploy deployments have completed, test both microservices.

First, check the load balancers’ status. Go to Target Groups in the AWS Management Console, which will list one target group for each microservice. Click each target group, then click “Targets” in the lower details pane. Every EC2 instance in the target group should have a “healthy” status.

Next, verify each microservice via gRPCurl. This tool lets you invoke gRPC services from the command line. Install gRPCurl using the instructions, and then test each microservice:

grpcurl submit-order.PARENT_DOMAIN_NAME:443 modern_taco_shop.SubmitOrder/HealthCheck
grpcurl track-order.PARENT_DOMAIN_NAME:443 modern_taco_shop.TrackOrder/HealthCheck

If a service is healthy, it will return an empty JSON object.

Run the mobile app

You will run a pre-compiled version of the app on AWS Device Farm, which lets you test on a real device without managing any infrastructure. Alternatively, compile your own version via the AndroidApp.FrontEnd project within the solution located at EXAMPLE_DIRECTORY/src/ModernTacoShop/AndroidApp/AndroidApp.sln.

Go to Device Farm in the AWS Management Console. Under “Mobile device testing projects”, click “Create a new project”. Enter “ModernTacoShop” as the project name, and click “Create Project”. In the ModernTacoShop project, click the “Remote access” tab, then click “Start a new session”. Under “Choose a device”, select the Google Pixel 3a running OS version 10, and click “Confirm and start session”.

Screenshot of the AWS Device Farm showing a Google Pixel 3a.

Once the session begins, click “Upload” in the “Install applications” section. Unzip and upload the APK file located at EXAMPLE_DIRECTORY/src/ModernTacoShop/AndroidApp/com.example.modern_tacos.grpc_tacos.apk.zip, or upload an APK that you created.

Screenshot of the gRPC microservices demo Android app, showing the map that displays streaming location data.

Screenshot of the gRPC microservices demo Android app, on the order preparation screen.

Once the app has uploaded, drag up from the bottom of the device screen in order to reach the “All apps” screen. Click the ModernTacos app to launch it.

Once the app launches, enter the parent domain name in the “Domain Name” field. Click the “+” and “-“ buttons next to each type of taco in order to create your order, then click “Submit Order”. The order status will initially display as “Preparing”, and will switch to “InTransit” after about 30 seconds. The Track Order service will stream a random route to the app, updating with new position data every 5 seconds. After approximately 2 minutes, the order status will change to “Delivered” and the streaming updates will stop.

Once you’ve run a successful test, click “Stop session” in the console.

Cleaning up

To avoid incurring charges, use the cdk destroy command to delete the stacks in the reverse order that you deployed them.

You can also delete the resources via CloudFormation in the AWS Management Console.

In addition to deleting the stacks, you must delete the Route 53 hosted zone and the Device Farm project.

Conclusion

This post demonstrated multiple next-generation technologies for microservices, including end-to-end HTTP/2 and gRPC communication over Application Load Balancer, AWS Graviton2 processors, and .NET 5. These technologies enable builders to create microservices applications with new levels of performance and efficiency.

Matt Cline

Matt Cline

Matt Cline is a Solutions Architect at Amazon Web Services, supporting customers in his home city of Pittsburgh PA. With a background as a full-stack developer and architect, Matt is passionate about helping customers deliver top-quality applications on AWS. Outside of work, Matt builds (and occasionally finishes) scale models and enjoys running a tabletop role-playing game for his friends.

Ulili Nhaga

Ulili Nhaga

Ulili Nhaga is a Cloud Application Architect at Amazon Web Services in San Diego, California. He helps customers modernize, architect, and build highly scalable cloud-native applications on AWS. Outside of work, Ulili loves playing soccer, cycling, Brazilian BBQ, and enjoying time on the beach.

Configuring private integrations with Amazon API Gateway HTTP APIs

Post Syndicated from Eric Johnson original https://aws.amazon.com/blogs/compute/configuring-private-integrations-with-amazon-api-gateway-http-apis/

This post was written by Michael Hume – AWS Solutions Architect Public Sector UKIR.

Customers often want to use Amazon API Gateway REST APIs to send requests to private resources. This feature is useful for building secure architectures using Amazon EC2 instances or container-based services on Amazon ECS or Amazon EKS, which reside within a VPC.

Private integration is possible for REST APIs by using Network Load Balancers (NLB). However, there may be a requirement for private integration with an Application Load Balancer (ALB) or AWS Cloud Map. This capability is built into Amazon API Gateway HTTP APIs, providing customers with three target options and greater flexibility.

You can configure HTTP APIs with a private integration as the front door or entry point to an application. This enables HTTPS resources within an Amazon VPC to be accessed by clients outside of the VPC. This architecture also provides an application with additional HTTP API features such as throttling, cross-origin resource sharing (CORS), and authorization. These features are then managed by the service instead of an application.

HTTP APIs and Application Load Balancers

In the following architecture, an HTTP APIs endpoint is deployed between the client and private backend resources.

HTTP APIs to ALB example

HTTP APIs to ALB example

A VPC link encapsulates connections between API Gateway and targeted VPC resources. HTTP APIs private integration methods only allow access via a VPC link to private subnets. When a VPC link is created, API Gateway creates and manages the elastic network interfaces in a user account. VPC links are shared across different routes and APIs.

Application Load Balancers can support containerized applications. This allows ECS to select an unused port when scheduling a task and then registers that task with a target group and port. For private integrations, an internal load balancer routes a request to targets using private IP addresses to resources that reside within private subnets. As the Application Load Balancer receives a request from an HTTP APIs endpoint, it looks up the listener rule to identify a protocol and port. A target group then forwards requests to an Amazon ECS cluster, with resources on underlying EC2 instances. Targets are added and removed automatically as traffic to an application changes over time. This increases the availability of an application and provides efficient use of an ECS cluster.

Configuration with an ALB

To configure a private integration with an Application Load Balancer.

  1. Create an HTTP APIs endpoint, choose a route and method, and attach an integration to a route using a private resource.

    Attach integration to route

    Attach integration to route

  2. Provide a target service to send the request to an ALB/NLB.

    Integration details

    Integration details

  3. Add both the load balancer and listener’s Amazon Resource Names (ARNs), together with a VPC link.

    Load balancer settings

    Load balancer settings

HTTP APIs and AWS Cloud Map

Modern applications connect to a broader range of resources. This can become complex to manage as network locations dynamically change based on automatic scaling, versioning, and service disruptions. Its challenging, as each service must quickly find the infrastructure location of the resources it needs. Efficient service discovery of any dynamically changing resources is important for application availability.

If an application scales to hundreds or even thousands of services, then a load balancer may not be appropriate. In this case, HTTP APIs private integration with AWS Cloud Map maybe a better choice. AWS Cloud Map is a resource discovery service that provides a dynamic map of the cloud. It does this by registering application resources such as databases, queues, microservices, and other resources with custom names.

For server-side service discovery, if an application uses a load balancer, it must know the load balancer’s endpoint. This endpoint is used as a proxy, which adds additional latency. As AWS Cloud Map provides client-side service discovery, you can replace the load balancer with a service registry. Now, connections are routed directly to backend resources, instead of being proxied. This involves fewer components, making deployments safer and with less management, and reducing complexity.

Configuration with AWS Cloud Map

HTTP APIs to AWS CloudMap example

HTTP APIs to AWS CloudMap example

In this architecture, the Amazon ECS service has been configured to use Amazon ECS Service Discovery. Service discovery uses the AWS Cloud Map API and Amazon Route 53 to create a namespace. This is a logical name for a group of services. It also creates a service, which is a logical group of resources or instances. In this example, it’s a group of ECS clusters. This allows the service to be discoverable via DNS. These resources work together, to provide a service.

Service discovery configuration

Service discovery configuration

To configure a private integration with AWS Cloud Map:

  1. Create an HTTP API, choose a route and method, and attach an integration to a route using a private resource. This is as shown previously for an Application Load Balancer.
  2. Provide a target service to send requests to resources registered with AWS Cloud Map.

    Target service configuration

    Target service configuration

  3. Add both the namespace, service and VPC link.

    Namespace and VPC configuration

    Namespace and VPC configuration

Deployment

To build the solution in this blog, see the AWS CloudFormation templates in the GitHub repository and, the instructions in the README.md file.

Conclusion

This post discusses the benefits of using API Gateway’s HTTP APIs to access private resources that reside within a VPC, and how HTTP APIs provides three different private integration targets for different use cases.

If a load balancer is required, the application operates at layer 7 (HTTP, HTTPS), requires flexible application management and registering of AWS Lambda functions as targets, then use an Application Load Balancer. However, if the application operates at layer 4 (TCP, UDP, TLS), uses non-HTTP protocols, requires extreme performance and a static IP, then use a Network Load Balancer.

As HTTP APIs private integration methods to both an ALB and NLB only allow access via a VPC link. This enhances security, as resources are isolated within private subnets with no direct access from the internet.

If a service does not need a load balancer, then HTTP APIs provide further private integration flexibility with AWS Cloud Map, which automatically registers resources in a service registry. AWS Cloud Map enables filtering by providing attributes when service discovery is enabled. These can then be used as HTTP APIs integration settings to specify query parameters and filter specific resources.

For more information, watch Happy Little APIs (S2E1): Private integrations with HTTP API.

Introducing AWS Gateway Load Balancer – Easy Deployment, Scalability, and High Availability for Partner Appliances

Post Syndicated from Channy Yun original https://aws.amazon.com/blogs/aws/introducing-aws-gateway-load-balancer-easy-deployment-scalability-and-high-availability-for-partner-appliances/

Last year, we launched Virtual Private Cloud (VPC) Ingress Routing to allow routing of all incoming and outgoing traffic to/from an Internet Gateway (IGW) or Virtual Private Gateway (VGW) to the Elastic Network Interface of a specific Amazon Elastic Compute Cloud (EC2) instance. With VPC Ingress Routing, you can now configure your VPC to send all […]

Architecting for Reliable Scalability

Post Syndicated from Marwan Al Shawi original https://aws.amazon.com/blogs/architecture/architecting-for-reliable-scalability/

Cloud solutions architects should ideally “build today with tomorrow in mind,” meaning their solutions need to cater to current scale requirements as well as the anticipated growth of the solution. This growth can be either the organic growth of a solution or it could be related to a merger and acquisition type of scenario, where its size is increased dramatically within a short period of time.

Still, when a solution scales, many architects experience added complexity to the overall architecture in terms of its manageability, performance, security, etc. By architecting your solution or application to scale reliably, you can avoid the introduction of additional complexity, degraded performance, or reduced security as a result of scaling.

Generally, a solution or service’s reliability is influenced by its up time, performance, security, manageability, etc. In order to achieve reliability in the context of scale, take into consideration the following primary design principals.

Modularity

Modularity aims to break a complex component or solution into smaller parts that are less complicated and easier to scale, secure, and manage.

Monolithic architecture vs. modular architecture

Figure 1: Monolithic architecture vs. modular architecture

Modular design is commonly used in modern application developments. where an application’s software is constructed of multiple and loosely coupled building blocks (functions). These functions collectively integrate through pre-defined common interfaces or APIs to form the desired application functionality (commonly referred to as microservices architecture).


Scalable modular applications

Figure 2: Scalable modular applications

For more details about building highly scalable and reliable workloads using a microservices architecture, refer to Design Your Workload Service Architecture.

This design principle can also be applied to different components of the solution’s architecture. For example, when building a cloud solution on a single Amazon VPC, it may reach certain scaling limits and make it harder to introduce changes at scale due to the higher level of dependencies. This single complex VPC can be divided into multiple smaller and simpler VPCs. The architecture based on multiple VPCs can vary. For example, the VPCs can be divided based on a service or application building block, a specific function of the application, or on organizational functions like a VPC for various departments. This principle can also be leveraged at a regional level for very high scale global architectures. You can make the architecture modular at a global level by distributing the multiple VPCs across different AWS Regions to achieve global scale (facilitated by AWS Global Infrastructure).

In addition, modularity promotes separation of concerns by having well-defined boundaries among the different components of the architecture. As a result, each component can be managed, secured, and scaled independently. Also, it helps you avoid what is commonly known as “fate sharing,” where a vertically scaled server hosts a monolithic application, and any failure to this server will impact the entire application.

Horizontal scaling

Horizontal scaling, commonly referred to as scale-out, is the capability to automatically add systems/instances in a distributed manner in order to handle an increase in load. Examples of this increase in load could be the increase of number of sessions to a web application. With horizontal scaling, the load is distributed across multiple instances. By distributing these instances across Availability Zones, horizontal scaling not only increases performance, but also improves the overall reliability.

In order for the application to work seamlessly in a scale-out distributed manner, the application needs to be designed to support a stateless scaling model, where the application’s state information is stored and requested independently from the application’s instances. This makes the on-demand horizontal scaling easier to achieve and manage.

This principle can be complemented with a modularity design principle, in which the scaling model can be applied to certain component(s) or microservice(s) of the application stack. For example, only scale-out Amazon Elastic Cloud Compute (EC2) front-end web instances that reside behind an Elastic Load Balancing (ELB) layer with auto-scaling groups. In contrast, this elastic horizontal scalability might be very difficult to achieve for a monolithic type of application.

Leverage the content delivery network

Leveraging Amazon CloudFront and its edge locations as part of the solution architecture can enable your application or service to scale rapidly and reliably at a global level, without adding any complexity to the solution. The integration of a CDN can take different forms depending on the solution use case.

For example, CloudFront played an important role to enable the scale required throughout Amazon Prime Day 2020 by serving up web and streamed content to a worldwide audience, which handled over 280 million HTTP requests per minute.

Go serverless where possible

As discussed earlier in this post, modular architectures based on microservices reduce the complexity of the individual component or microservice. At scale it may introduce a different type of complexity related to the number of these independent components (microservices). This is where serverless services can help to reduce such complexity reliably and at scale. With this design model you no longer have to provision, manually scale, maintain servers, operating systems, or runtimes to run your applications.

For example, you may consider using a microservices architecture to modernize an application at the same time to simplify the architecture at scale using Amazon Elastic Kubernetes Service (EKS) with AWS Fargate.

Example of a serverless microservices architecture

Figure 3: Example of a serverless microservices architecture

In addition, an event-driven serverless capability like AWS Lambda is key in today’s modern scalable cloud solutions, as it handles running and scaling your code reliably and efficiently. See How to Design Your Serverless Apps for Massive Scale and 10 Things Serverless Architects Should Know for more information.

Secure by design

To avoid any major changes at a later stage to accommodate security requirements, it’s essential that security is taken into consideration as part of the initial solution design. For example, if the cloud project is new or small, and you don’t consider security properly at the initial stages, once the solution starts to scale, redesigning the entire cloud project from scratch to accommodate security best practices is usually not a simple option, which may lead to consider suboptimal security solutions that may impact the desired scale to be achieved. By leveraging CDN as part of the solution architecture (as discussed above), using Amazon CloudFront, you can minimize the impact of distributed denial of service (DDoS) attacks as well as perform application layer filtering at the edge. Also, when considering serverless services and the Shared Responsibility Model, from a security lens you can delegate a considerable part of the application stack to AWS so that you can focus on building applications. See The Shared Responsibility Model for AWS Lambda.

Design with security in mind by incorporating the necessary security services as part of the initial cloud solution. This will allow you to add more security capabilities and features as the solution grows, without the need to make major changes to the design.

Design for failure

The reliability of a service or solution in the cloud depends on multiple factors, the primary of which is resiliency. This design principle becomes even more critical at scale because the failure impact magnitude typically will be higher. Therefore, to achieve a reliable scalability, it is essential to design a resilient solution, capable of recovering from infrastructure or service disruptions. This principle involves designing the overall solution in such a way that even if one or more of its components fail, the solution is still be capable of providing an acceptable level of its expected function(s). See AWS Well-Architected Framework – Reliability Pillar for more information.

Conclusion

Designing for scale alone is not enough. Reliable scalability should be always the targeted architectural attribute. The design principles discussed in this blog act as the foundational pillars to support it, and ideally should be combined with adopting a DevOps model.

New – Application Load Balancer Support for End-to-End HTTP/2 and gRPC

Post Syndicated from Danilo Poccia original https://aws.amazon.com/blogs/aws/new-application-load-balancer-support-for-end-to-end-http-2-and-grpc/

Thanks to its efficiency and support for numerous programming languages, gRPC is a popular choice for microservice integrations and client-server communications. gRPC is a high performance remote procedure call (RPC) framework using HTTP/2 for transport and Protocol Buffers to describe the interface. To make it easier to use gRPC with your applications, Application Load Balancer (ALB) […]

Mercado Libre: How to Block Malicious Traffic in a Dynamic Environment

Post Syndicated from Gaston Ansaldo original https://aws.amazon.com/blogs/architecture/mercado-libre-how-to-block-malicious-traffic-in-a-dynamic-environment/

Blog post contributors: Pablo Garbossa and Federico Alliani of Mercado Libre

Introduction

Mercado Libre (MELI) is the leading e-commerce and FinTech company in Latin America. We have a presence in 18 countries across Latin America, and our mission is to democratize commerce and payments to impact the development of the region.

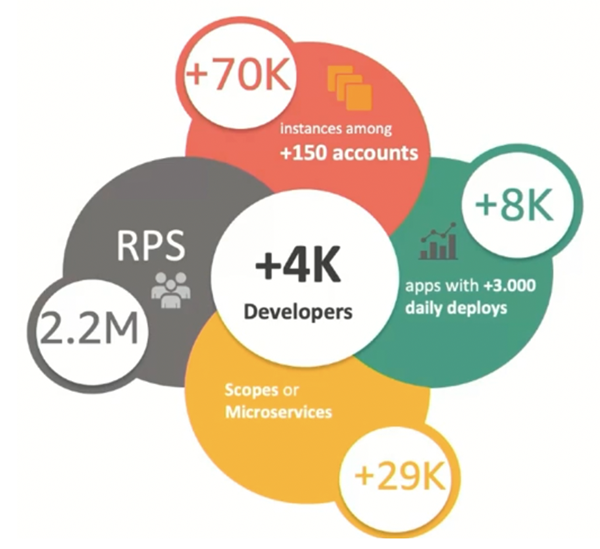
We manage an ecosystem of more than 8,000 custom-built applications that process an average of 2.2 million requests per second. To support the demand, we run between 50,000 to 80,000 Amazon Elastic Cloud Compute (EC2) instances, and our infrastructure scales in and out according to the time of the day, thanks to the elasticity of the AWS cloud and its auto scaling features.

Mercado Libre

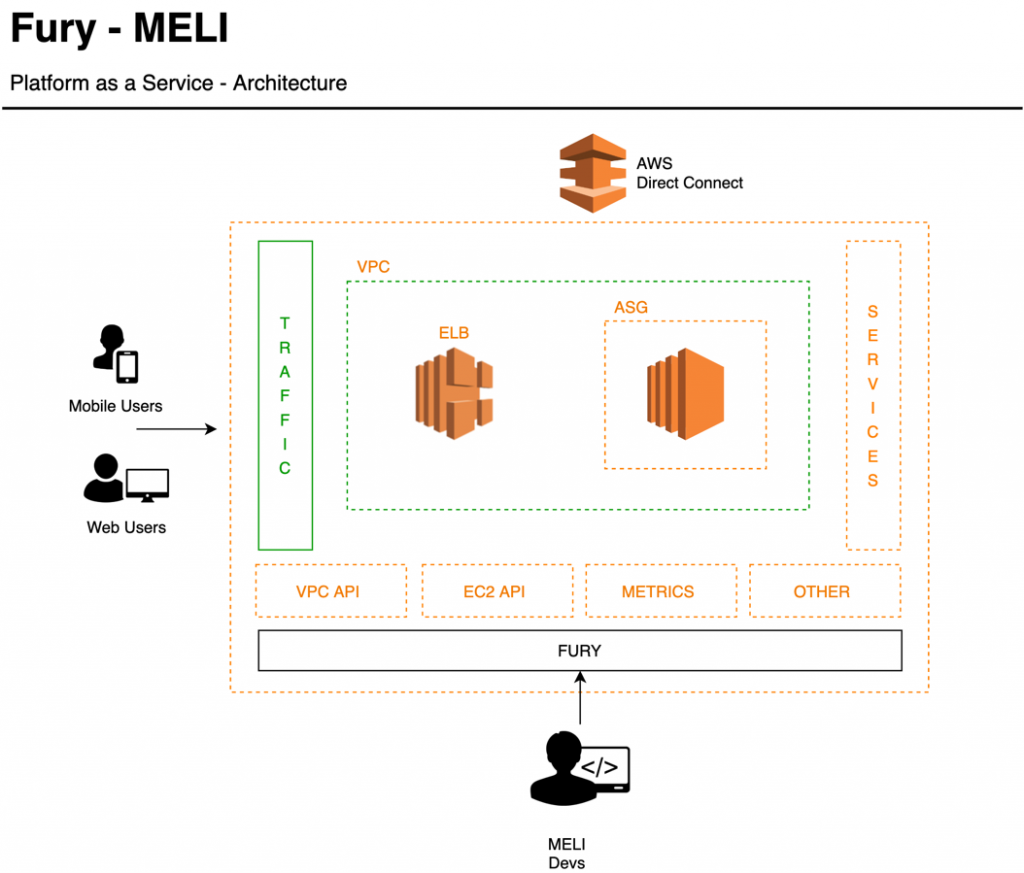
As a company, we expect our developers to devote their time and energy building the apps and features that our customers demand, without having to worry about the underlying infrastructure that the apps are built upon. To achieve this separation of concerns, we built Fury, our platform as a service (PaaS) that provides an abstraction layer between our developers and the infrastructure. Each time a developer deploys a brand new application or a new version of an existing one, Fury takes care of creating all the required components such as Amazon Virtual Private Cloud (VPC), Amazon Elastic Load Balancing (ELB), Amazon EC2 Auto Scaling group (ASG), and EC2) instances. Fury also manages a per-application Git repository, CI/CD pipeline with different deployment strategies, such like blue-green and rolling upgrades, and transparent application logs and metrics collection.

Fury- MELI PaaS

For those of us on the Cloud Security team, Fury represents an opportunity to enforce critical security controls across our stack in a way that’s transparent to our developers. For instance, we can dictate what Amazon Machine Images (AMIs) are vetted for use in production (such as those that align with the Center for Internet Security benchmarks). If needed, we can apply security patches across all of our fleet from a centralized location in a very scalable fashion.

But there are also other attack vectors that every organization that has a presence on the public internet is exposed to. The AWS recent Threat Landscape Report shows a 23% YoY increase in the total number of Denial of Service (DoS) events. It’s evident that organizations need to be prepared to quickly react under these circumstances.

The variety and the number of attacks are increasing, testing the resilience of all types of organizations. This is why we started working on a solution that allows us to contain application DoS attacks, and complements our perimeter security strategy, which is based on services such as AWS Shield and AWS Web Application Firewall (WAF). In this article, we will walk you through the solution we built to automatically detect and block these events.

The strategy we implemented for our solution, Network Behavior Anomaly Detection (NBAD), consists of four stages that we repeatedly execute:

  1. Analyze the execution context of our applications, like CPU and memory usage
  2. Learn their behavior
  3. Detect anomalies, gather relevant information and process it
  4. Respond automatically

Step 1: Establish a baseline for each application

End user traffic enters through different AWS CloudFront distributions that route to multiple Elastic Load Balancers (ELBs). Behind the ELBs, we operate a fleet of NGINX servers from where we connect back to the myriad of applications that our developers create via Fury.

MELI Architecture - nomaly detection project-step 1

Step 1: MELI Architecture – Anomaly detection project

We collect logs and metrics for each application that we ship to Amazon Simple Storage Service (S3) and Datadog. We then partition these logs using AWS Glue to make them available for consumption via Amazon Athena. On average, we send 3 terabytes (TB) of log files in parquet format to S3.

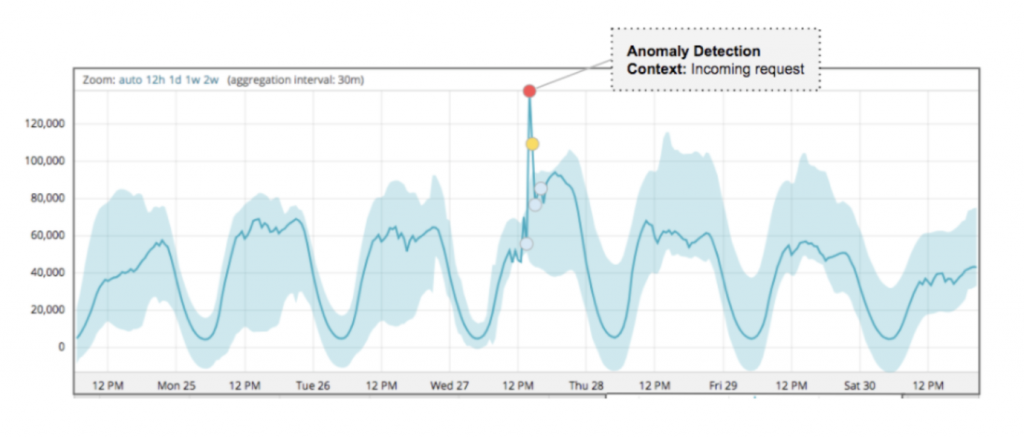
Based on this information, we developed processes that we complement with commercial solutions, such as Datadog’s Anomaly Detection, which allows us to learn the normal behavior or baseline of our applications and project expected adaptive growth thresholds for each one of them.

Anomaly detection

Step 2: Anomaly detection

When any of our apps receives a number of requests that fall outside the limits set by our anomaly detection algorithms, an Amazon Simple Notification Service (SNS) event is emitted, which triggers a workflow in the Anomaly Analyzer, a custom-built component of this solution.

Upon receiving such an event, the Anomaly Analyzer starts composing the so-called event context. In parallel, the Data Extractor retrieves vital insights via Athena from the log files stored in S3.

The output of this process is used as the input for the data enrichment process. This is responsible for consulting different threat intelligence sources that are used to further augment the analysis and determine if the event is an actual incident or not.

At this point, we build the context that will allow us not only to have greater certainty in calculating the score, but it will also help us validate and act quicker. This context includes:

  • Application’s owner
  • Affected business metrics
  • Error handling statistics of our applications
  • Reputation of IP addresses and associated users
  • Use of unexpected URL parameters
  • Distribution by origin of the traffic that generated the event (cloud providers, geolocation, etc.)
  • Known behavior patterns of vulnerability discovery or exploitation
Step 2: MELI Architecture - Anomaly detection project

Step 2: MELI Architecture – Anomaly detection project

Step 3: Incident response

Once we reconstruct the context of the event, we calculate a score for each “suspicious actor” involved.

Step 3: MELI Architecture - Anomaly detection project

Step 3: MELI Architecture – Anomaly detection project

Based on these analysis results we carry out a series of verifications in order to rule out false positives. Finally, we execute different actions based on the following criteria:

Manual review

If the outcome of the automatic analysis results in a medium risk scoring, we activate a manual review process:

  1. We send a report to the application’s owners with a summary of the context. Based on their understanding of the business, they can activate the Incident Response Team (IRT) on-call and/or provide feedback that allows us to improve our automatic rules.
  2. In parallel, our threat analysis team receives and processes the event. They are equipped with tools that allow them to add IP addresses, user-agents, referrers, or regular expressions into Amazon WAF to carry out temporary blocking of “bad actors” in situations where the attack is in progress.

Automatic response

If the analysis results in a high risk score, an automatic containment process is triggered. The event is sent to our block API, which is responsible for adding a temporary rule designed to mitigate the attack in progress. Behind the scenes, our block API leverages AWS WAF to create IPSets. We reference these IPsets from our custom rule groups in our web ACLs, in order to block IPs that source the malicious traffic. We found many benefits in the new release of AWS WAF, like support for Amazon Managed Rules, larger capacity units per web ACL as well as an easier to use API.

Conclusion

By leveraging the AWS platform and its powerful APIs, and together with the AWS WAF service team and solutions architects, we were able to build an automated incident response solution that is able to identify and block malicious actors with minimal operator intervention. Since launching the solution, we have reduced YoY application downtime over 92% even when the time under attack increased over 10x. This has had a positive impact on our users and therefore, on our business.

Not only was our downtime drastically reduced, but we also cut the number of manual interventions during this type of incident by 65%.

We plan to iterate over this solution to further reduce false positives in our detection mechanisms as well as the time to respond to external threats.

About the authors

Pablo Garbossa is an Information Security Manager at Mercado Libre. His main duties include ensuring security in the software development life cycle and managing security in MELI’s cloud environment. Pablo is also an active member of the Open Web Application Security Project® (OWASP) Buenos Aires chapter, a nonprofit foundation that works to improve the security of software.

Federico Alliani is a Security Engineer on the Mercado Libre Monitoring team. Federico and his team are in charge of protecting the site against different types of attacks. He loves to dive deep into big architectures to drive performance, scale operational efficiency, and increase the speed of detection and response to security events.