Some real numbers about the cost of AI components.
The AI tech stack and some of the industry solutions that have been built to serve it.
And, uncertainty.
Defining AI: Complexity and Cost Implications
While ChatGPT, DALL-E, and the like may be the most buzz-worthy of recent advancements, AI has already been a part of our daily lives for several years now. In addition to generative AI models, examples include virtual assistants like Siri and Google Home, fraud detection algorithms in banks, facial recognition software, URL threat analysis services, and so on.
That brings us to the first challenge when it comes to understanding the cost of AI: The type of AI you’re training—and how complex a problem you want it to solve—has a huge impact on the computing resources needed and the cost, both in the training and in the implementation phases. AI tasks are hungry in all ways: they need a lot of processing power, storage capacity, and specialized hardware. As you scale up or down in the complexity of the task you’re doing, there’s a huge range in the types of tools you need and their costs.
To understand the cost of AI, several other factors come into play as well, including:
Latency requirements: How fast does the AI need to make decisions? (e.g. that split second before a self-driving car slams on the brakes.)
Scope: Is the AI solving broad-based or limited questions? (e.g. the best way to organize this library vs. how many times is the word “cat” in this article.)
Actual human labor: How much oversight does it need? (e.g. does a human identify the cat in cat photos, or does the AI algorithm identify them?)
Adding data: When, how, and what quantity new data will need to be ingested to update information over time?
This is by no means an exhaustive list, but it gives you an idea of the considerations that can affect the kind of AI you’re building and, thus, what it might cost.
The Big Three AI Cost Drivers: Hardware, Storage, and Processing Power
In simple terms, you can break down the cost of running an AI to a few main components: hardware, storage, and processing power. That’s a little bit simplistic, and you’ll see some of these lines blur and expand as we get into the details of each category. But, for our purposes today, this is a good place to start to understand how much it costs to ask a bot to create a squirrel holding a cool guitar.
Still not quite there on the guitar. Or the squirrel. How much could this really cost?
First Things First: Hardware Costs
Running an AI takes specialized processors that can handle complex processing queries. We’re early in the game when it comes to picking a “winner” for specialized processors, but these days, the most common processor is a graphical processing unit (GPU), with Nvidia’s hardware and platform as an industry favorite and front-runner.
Google offers folks the ability to rent their TPUs through the cloud starting at $1.20 per chip hour for on-demand service (less if you commit to a contract). Meanwhile, Intel released a sub-$100 USB stick with a full NPU that can plug into your personal laptop, and folks have created their own models at home with the help of open sourced developer toolkits. Here’s a guide to using them if you want to get in the game yourself.
Clearly, the spectrum for chips is vast—from under $100 to millions—and the landscape for chip producers is changing often, as is the strategy for monetizing those chips—which leads us to our next section.
Using Third Parties: Specialized Problems = Specialized Service Providers
Building AI is a challenge with so many moving parts that, in a business use case, you eventually confront the question of whether it’s more efficient to outsource it. It’s true of storage, and it’s definitely true of AI processing. You can already see one way Google answered that question above: create a network populated by their TPUs, then sell access.
Other companies specialize in broader or narrower parts of the AI creation and processing chain. Just to name a few, diverse companies: there’s Hugging Face, Inflection AI, CoreWeave, and Vultr. Those companies have a wide array of product offerings and resources from open source communities like Hugging Face that provide a menu of models, datasets, no-code tools, and (frankly) rad developer experiments to bare metal servers like Vultr that enhance your compute resources. How resources are offered also exist on a spectrum, including proprietary company resources (i.e. Nvidia’s platform), open source communities (looking at you, Hugging Face), or a mix of the two.
This means that, whichever piece of the AI tech stack you’re considering, you have a high degree of flexibility when you’re deciding where and how much you want to customize and where and how to implement an out-of-the box solution.
Ballparking an estimate of what any of that costs would be so dependent on the particular model you want to build and the third-party solutions you choose that it doesn’t make sense to do so here. But, it suffices to say that there’s a pretty narrow field of folks who have the infrastructure capacity, the datasets, and the business need to create their own network. Usually it comes back to any combination of the following: whether you have existing infrastructure to leverage or are building from scratch, if you’re going to sell the solution to others, what control over research or dataset you have or want, how important privacy is and how you’re incorporating it into your products, how fast you need the model to make decisions, and so on.
Welcome to the Spotlight, Storage
And, hey, with all that, let’s not forget storage. At the most basic level of consideration, AI uses a ton of data. How much? Going knowledge says at least an order of magnitude more examples than the problem presented to train an AI model. That means you want 10 times more examples than parameters.
Parameters and Hyperparameters
The easiest way to think of parameters is to think of them as factors that control how an AI makes a decision. More parameters = more accuracy. And, just like our other AI terms, the term can be somewhat inconsistently applied. Here’s what ChatGPT has to say for itself:
That 10x number is just the amount of data you store for the initial training model—clearly the thing learns and grows, because we’re talking about AI.
Preserving both your initial training algorithm and your datasets can be incredibly useful, too. As we talked about before, the more complex an AI, the higher the likelihood that your model will surprise you. And, as many folks have pointed out, deciding whether to leverage an already-trained model or to build your own doesn’t have to be an either/or—oftentimes the best option is to fine-tune an existing model to your narrower purpose. In both cases, having your original training model stored can help you roll back and identify the changes over time.
The size of the dataset absolutely affects costs and processing times. The best example is that ChatGPT, everyone’s favorite model, has been rocking GPT-3 (or 3.5) instead of GPT-4 on the general public release because GPT-4, which works from a much larger, updated dataset than GPT-3, is too expensive to release to the wider public. It also returns results much more slowly than GPT-3.5, which means that our current love of instantaneous search results and image generation would need an adjustment.
And all of that is true because GPT-4 was updated with more information (by volume), more up-to-date information, and the model was given more parameters to take into account for responses. So, it has to both access more data per query and use more complex reasoning to make decisions. That said, it also reportedly has much better results.
Storage and Cost
What are the real numbers to store, say, a primary copy of an AI dataset? Well, it’s hard to estimate, but we can ballpark that, if you’re training a large AI model, you’re going to have at a minimum tens of gigabytes of data and, at a maximum, petabytes. OpenAI considers the size of its training database proprietary information, and we’ve found sources that cite that number as anywhere from 17GB to 570GB to 45TB of text data.
That’s not actually a ton of data, and, even taking the highest number, it would only cost $225 per month to store that data in Backblaze B2 (45TB * $5/TB/mo), for argument’s sake. But let’s say you’re training an AI on video to, say, make a robot vacuum that can navigate your room or recognize and identify human movement. Your training dataset could easily reach into petabyte scale (for reference, one petabyte would cost $5,000 per month in Backblaze B2). Some research shows that dataset size is trending up over time, though other folks point out that bigger is not always better.
On the other hand, if you’re the guy with the Intel Neural Compute stick we mentioned above and a Raspberry Pi, you’re talking the cost of the ~$100 AI processor, ~$50 for the Raspberry Pi, and any incidentals. You can choose to add external hard drives, network attached storage (NAS) devices, or even servers as you scale up.
Storage and Speed
Keep in mind that, in the above example, we’re only considering the cost of storing the primary dataset, and that’s not very accurate when thinking about how you’d be using your dataset. You’d also have to consider temporary storage for when you’re actually training the AI as your primary dataset is transformed by your AI algorithm, and nearly always you’re splitting your primary dataset into discrete parts and feeding those to your AI algorithm in stages—so each of those subsets would also be stored separately. And, in addition to needing a lot of storage, where you physically locate that storage makes a huge difference to how quickly tasks can be accomplished. In many cases, the difference is a matter of seconds, but there are some tasks that just can’t handle that delay—think of tasks like self-driving cars.
For huge data ingest periods such as training, you’re often talking about a compute process that’s assisted by powerful, and often specialized, supercomputers, with repeated passes over the same dataset. Having your data physically close to those supercomputers saves you huge amounts of time, which is pretty incredible when you consider that it breaks down to as little as milliseconds per task.
One way this problem is being solved is via caching, or creating temporary storage on the same chips (or motherboards) as the processor completing the task. Another solution is to keep the whole processing and storage cluster on-premises (at least while training), as you can see in the Microsoft-OpenAI setup or as you’ll often see in universities. And, unsurprisingly, you’ll also see edge computing solutions which endeavor to locate data physically close to the end user.
While there can be benefits to on-premises or co-located storage, having a way to quickly add more storage (and release it if no longer needed), means cloud storage is a powerful tool for a holistic AI storage architecture—and can help control costs.
And, as always, effective backup strategies require at least one off-site storage copy, and the easiest way to achieve that is via cloud storage. So, any way you slice it, you’re likely going to have cloud storage touch some part of your AI tech stack.
What Hardware, Processing, and Storage Have in Common: You Have to Power Them
Here’s the short version: any time you add complex compute + large amounts of data, you’re talking about a ton of money and a ton of power to keep everything running.
Fortunately for us, other folks have done the work of figuring out how much this all costs. This excellent article from SemiAnalysis goes deep on the total cost of powering searches and running generative AI models. The Washington Post cites Dylan Patel (also of SemiAnalysis) as estimating that a single chat with ChatGPT could cost up to 1,000 times as much as a simple Google search. Those costs include everything we’ve talked about above—the capital expenditures, data storage, and processing.
Consider this: Google spent several years putting off publicizing a frank accounting of their power usage. When they released numbers in 2011, they said that they use enough electricity to power 200,000 homes. And that was in 2011. There are widely varying claims for how much a single search costs, but even the most conservative say .03 Wh of energy. There are approximately 8.5 billion Google searches per day. (That’s just an incremental cost by the way—as in, how much does a single search cost in extra resources on top of how much the system that powers it costs.)
Power is a huge cost in operating data centers, even when you’re only talking about pure storage. One of the biggest single expenses that affects power usage is cooling systems. With high-compute workloads, and particularly with GPUs, the amount of work the processor is doing generates a ton more heat—which means more money in cooling costs, and more power consumed.
So, to Sum Up
When we’re talking about how much an AI costs, it’s not just about any single line item cost. If you decide to build and run your own models on-premises, you’re talking about huge capital expenditure and ongoing costs in data centers with high compute loads. If you want to build and train a model on your own USB stick and personal computer, that’s a different set of cost concerns.
And, if you’re talking about querying a generative AI from the comfort of your own computer, you’re still using a comparatively high amount of power somewhere down the line. We may spread that power cost across our national and international infrastructures, but it’s important to remember that it’s coming from somewhere—and that the bill comes due, somewhere along the way.
Welcome to the 2023 Mid-Year SSD Edition of the Backblaze Drive Stats review. This report is based on data from the solid state drives (SSDs) we use as storage server boot drives on our Backblaze Cloud Storage platform. In this environment, the drives do much more than boot the storage servers. They also store log files and temporary files produced by the storage server. Each day a boot drive will read, write, and delete files depending on the activity of the storage server itself.
We will review the quarterly and lifetime failure rates for these drives, and along the way we’ll offer observations and insights to the data presented. In addition, we’ll take a first look at the average age at which our SSDs fail, and examine how well SSD failure rates fit the ubiquitous bathtub curve.
Mid-Year SSD Results by Quarter
As of June 30, 2023, there were 3,144 SSDs in our storage servers. This compares to 2,558 SSDs we reported in our 2022 SSD annual report. We’ll start by presenting and discussing the quarterly data from each of the last two quarters (Q1 2022 and Q2 2023).
Notes and Observations
Data is by quarter: The data used in each table is specific to that quarter. That is, the number of drive failures and drive days are inclusive of the specified quarter, Q1 or Q2. The drive counts are as of the last day of each quarter.
Drives added: Since our last SSD report, ending in Q4 2022, we added 238 SSD drives to our collection. Of that total, the Crucial (model: CT250MX500SSD1) led the way with 110 new drives added, followed by 62 new WDC drives (model: WD Blue SA510 2.5) and 44 Seagate drives (model: ZA250NM1000).
Really high annualized failure rates (AFR): Some of the failure rates, that is AFR, seem crazy high. How could the Seagate model SSDSCKKB240GZR have an annualized failure rate over 800%? In that case, in Q1, we started with two drives and one failed shortly after being installed. Hence, the high AFR. In Q2, the remaining drive did not fail and the AFR was 0%. Which AFR is useful? In this case neither, we just don’t have enough data to get decent results. For any given drive model, we like to see at least 100 drives and 10,000 drive days in a given quarter as a minimum before we begin to consider the calculated AFR to be “reasonable.” We include all of the drive models for completeness, so keep an eye on drive count and drive days before you look at the AFR with a critical eye.
Quarterly Annualized Failures Rates Over Time
The data in any given quarter can be volatile with factors like drive age and the randomness of failures factoring in to skew the AFR up or down. For Q1, the AFR was 0.96% and, for Q2, the AFR was 1.05%. The chart below shows how these quarterly failure rates relate to previous quarters over the last three years.
As you can see, the AFR fluctuates between 0.36% and 1.72%, so what’s the value of quarterly rates? Well, they are useful as the proverbial canary in a coal mine. For example, the AFR in Q1 2021 (0.58%) jumped 1.51% in Q2 2021, then to 1.72% in Q3 2021. A subsequent investigation showed one drive model was the primary cause of the rise and that model was removed from service.
It happens from time to time that a given drive model is not compatible with our environment, and we will moderate or even remove that drive’s effect on the system as a whole. While not as critical as data drives in managing our system’s durability, we still need to keep boot drives in operation to collect the drive/server/vault data they capture each day.
How Backblaze Uses the Data Internally
As you’ve seen in our SSD and HDD Drive Stats reports, we produce quarterly, annual, and lifetime charts and tables based on the data we collect. What you don’t see is that every day we produce similar charts and tables for internal consumption. While typically we produce one chart for each drive model, in the example below we’ve combined several SSD models into one chart.
The “Recent” period we use internally is 60 days. This differs from our public facing reports which are quarterly. In either case, charts like the one above allow us to quickly see trends requiring further investigation. For example, in our chart above, the recent results of the Micron SSDs indicate a deeper dive into the data behind the charts might be necessary.
By collecting, storing, and constantly analyzing the Drive Stats data we can be proactive in maintaining our durability and availability goals. Without our Drive Stats data, we would be inclined to over-provision our systems as we would be blind to the randomness of drive failures which would directly impact those goals.
A First Look at More SSD Stats
Over the years in our quarterly Hard Drive Stats reports, we’ve examined additional metrics beyond quarterly and lifetime failure rates. Many of these metrics can be applied to SSDs as well. Below we’ll take a first look at two of these: the average age of failure for SSDs and how well SSD failures correspond to the bathtub curve. In both cases, the datasets are small, but are a good starting point as the number of SSDs we monitor continues to increase.
The Average Age of Failure for SSDs
Previously, we calculated the average age at which a hard drive in our system fails. In our initial calculations that turned out to be about two years and seven months. That was a good baseline, but further analysis was required as many of the drive models used in the calculations were still in service and hence some number of them could fail, potentially affecting the average.
We are going to apply the same calculations to our collection of failed SSDs and establish a baseline we can work from going forward. Our first step was to determine the SMART_9_RAW value (power-on-hours or POH) for the 63 failed SSD drives we have to date. That’s not a great dataset size, but it gave us a starting point. Once we collected that information, we computed that the average age of failure for our collection of failed SSDs is 14 months. Given that the average age of the entire fleet of our SSDs is just 25 months, what should we expect to happen as the average age of the SSDs still in operation increases? The table below looks at three drive models which have a reasonable amount of data.
Good Drives
Failed Drives
MFG
Model
Count
Avg Age
Count
Avg Age
Crucial
CT250MX500SSD1
598
11 months
9
7 months
Seagate
ZA250CM10003
1,114
28 months
14
11 months
Seagate
ZA250CM10002
547
40 months
17
25 months
As we can see in the table, the average age of the failed drives increases as the average age of drives in operation (good drives) increases. In other words, it is reasonable to expect that the average age of SSD failures will increase as the entire fleet gets older.
Is There a Bathtub Curve for SSD Failures?
Previously we’ve graphed our hard drive failures over time to determine their fit to the classic bathtub curve used in reliability engineering. Below, we used our SSD data to determine how well our SSD failures fit the bathtub curve.
While the actual curve (blue line) produced by the SSD failures over each quarter is a bit “lumpy”, the trend line (second order polynomial) does have a definite bathtub curve look to it. The trend line is about a 70% match to the data, so we can’t be too confident of the curve at this point, but for the limited amount of data we have, it is surprising to see how the occurrences of SSD failures are on a path to conform to the tried-and-true bathtub curve.
SSD Lifetime Annualized Failure Rates
As of June 30, 2023, there were 3,144 SSDs in our storage servers. The table below is based on the lifetime data for the drive models which were active as of the end of Q2 2023.
Notes and Observations
Lifetime AFR: The lifetime data is cumulative from Q4 2018 through Q2 2023. For this period, the lifetime AFR for all of our SSDs was 0.90%. That was up slightly from 0.89% at the end of Q4 2022, but down from a year ago, Q2 2022, at 1.08%.
High failure rates?: As we noted with the quarterly stats, we like to have at least 100 drives and over 10,000 drive days to give us some level of confidence in the AFR numbers. If we apply that metric to our lifetime data, we get the following table.
Applying our modest criteria to the list eliminated those drive models with crazy high failure rates. This is not a statistics trick; we just removed those models which did not have enough data to make the calculated AFR reliable. It is possible the drive models we removed will continue to have high failure rates. It is also just as likely their failure rates will fall into a more normal range. If this technique seems a bit blunt to you, then confidence intervals may be what you are looking for.
Confidence intervals: In general, the more data you have and the more consistent that data is, the more confident you are in the predictions based on that data. We calculate confidence intervals at 95% certainty.
For SSDs, we like to see a confidence interval of 1.0% or less between the low and the high values before we are comfortable with the calculated AFR. If we apply this metric to our lifetime SSD data we get the following table.
This doesn’t mean the failure rates for the drive models with a confidence interval greater than 1.0% are wrong; it just means we’d like to get more data to be sure.
Regardless of the technique you use, both are meant to help clarify the data presented in the tables throughout this report.
The SSD Stats Data
The data collected and analyzed for this review is available on our Drive Stats Data page. You’ll find SSD and HDD data in the same files and you’ll have to use the model number to locate the drives you want, as there is no field to designate a drive as SSD or HDD. You can download and use this data for free for your own purpose. All we ask are three things: 1) you cite Backblaze as the source if you use the data, 2) you accept that you are solely responsible for how you use the data, and 3) you do not sell this data to anyone—it is free.
Good luck and let us know if you find anything interesting.
Rclone v1.64.0, released last week, includes a new implementation of multithreaded data transfers, promising much faster data transfer of large files between cloud storage services.
Does it deliver? Should you upgrade? Read on to find out!
Multithreading to Boost File Transfer Performance
Something of a Swiss Army Knife for cloud storage, rclone can copy files, synchronize directories, and even mount remote storage as a local filesystem. Previous versions of rclone were able to take advantage of multithreading to accelerate the transfer of “large” files (by default at least 256MB), but the benefits were limited.
When transferring files from a storage system to Backblaze B2, rclone would read chunks of the file into memory in a single reader thread, starting a set of multiple writer threads to simultaneously write those chunks to Backblaze B2. When the source storage was a local disk (the common case) as opposed to remote storage such as Backblaze B2, this worked really well—the operation of moving files from local disk to Backblaze B2 was quite fast. However, when the source was another remote storage—say, transferring from Amazon S3 to Backblaze B2, or even Backblaze B2 to Backblaze B2—data chunks were read into memory by that single reader thread at about the same rate as they could be written to the destination, meaning that all but one of the writer threads were idle.
What’s the Big Deal About Rclone v1.64.0?
Rclone v1.64.0 completely refactors multithreaded transfers. Now rclone starts a single set of threads, each of which both reads a chunk of data from the source service into memory, and then writes that chunk to the destination service, iterating through a subset of chunks until the transfer is complete. The threads transfer their chunks of data in parallel, and each transfer is independent of the others. This architecture is both simpler and much, much faster.
Show Me the Numbers!
How much faster? I spun up a virtual machine (VM) via our compute partner, Vultr, and downloaded both rclone v1.64.0 and the preceding version, v1.63.1. As a quick test, I used Rclone’s copyto command to copy 1GB and 10GB files from Amazon S3 to Backblaze B2, like this:
Note that I made no attempt to “tune” rclone for my environment by setting the chunk size or number of threads. I was interested in the out of the box performance. I used the --no-check-dest flag so that rclone would overwrite the destination file each time, rather than detecting that the files were the same and skipping the copy.
I ran each copyto operation three times, then calculated the average time. Here are the results; all times are in seconds:
Rclone version
1GB
10GB
1.63.1
52.87
725.04
1.64.0
18.64
240.45
As you can see, the difference is significant! The new rclone transferred both files around three times faster than the previous version.
So, copying individual large files is much faster with the latest version of rclone. How about migrating a whole bucket containing a variety of file sizes from Amazon S3 to Backblaze B2, which is a more typical operation for a new Backblaze customer? I used rclone’s copy command to transfer the contents of an Amazon S3 bucket—2.8GB of data, comprising 35 files ranging in size from 990 bytes to 412MB—to a Backblaze B2 Bucket:
Much to my dismay, this command failed, returning errors related to the files being corrupted in transfer, for example:
2023/09/18 16:00:37 ERROR : tpcds-benchmark/catalog_sales/20221122_161347_00795_djagr_3a042953-d0a2-4b8d-8c4e-6a88df245253: corrupted on transfer: sizes differ 244695498 vs 0
Rclone was reporting that the transferred files in the destination bucket contained zero bytes, and deleting them to avoid the use of corrupt data.
After some investigation, I discovered that the files were actually being transferred successfully, but a bug in rclone 1.64.0 caused the app to incorrectly interpret some successful transfers as corrupted, and thus delete the transferred file from the destination.
I was able to use the --ignore-size flag to workaround the bug by disabling the file size check so I could continue with my testing:
A Word of Caution to Control Your Transaction Fees
Note the use of the --fast-list flag. By default, rclone’s method of reading the contents of cloud storage buckets minimizes memory usage at the expense of making a “list files” call for every subdirectory being processed. Backblaze B2’s list files API, b2_list_file_names, is a class C transaction, priced at $0.004 per 1,000 with 2,500 free per day. This doesn’t sound like a lot of money, but using rclone with large file hierarchies can generate a huge number of transactions. Backblaze B2 customers have either hit their configured caps or incurred significant transaction charges on their account when using rclone without the --fast-list flag.
We recommend you always use --fast-list with rclone if at all possible. You can set an environment variable so you don’t have to include the flag in every command:
export RCLONE_FAST_LIST=1
Again, I performed the copy operation three times, and averaged the results:
Rclone version
2.8GB tree
1.63.1
56.92
1.64.0
42.47
Since the bucket contains both large and small files, we see a lesser, but still significant, improvement in performance with rclone v1.64.0—it’s about 33% faster than the previous version with this set of files.
So, Should I Upgrade to the Latest Rclone?
As outlined above, rclone v1.64.0 contains a bug that can cause copy (and presumably also sync) operations to fail. If you want to upgrade to v1.64.0 now, you’ll have to use the --ignore-size workaround. If you don’t want to use the workaround, it’s probably best to hold off until rclone releases v1.64.1, when the bug fix will likely be deployed—I’ll come back and update this blog entry when I’ve tested it!
A while back, I received a frantic phone call from a long time friend who teaches ninth grade English. Now, don’t get me wrong, this friend, let’s call her Alex, is a tech-savvy person. She has more apps on her smartphone than I knew existed, but she had never used an external hard drive before.
Her school district had given them out to help make remote learning easier on teachers, but she was nervous about using it incorrectly, breaking it, or even just being able to find it on her computer. And she was a little embarrassed because it seemed like something everyone else already knew how to use.
If you’ve ever felt a bit lost when it comes to hard drives, don’t worry—you’re not alone. If you’re one of many folks who’ve asked themselves, “What is this thing?” and “How will it be helpful to me?” and “What if I break it?” then I’m here to walk you through everything I walked Alex through. Lots of folks have the same questions, and we’ll answer them in this guide for setting up and protecting your new hard drive.
A Guide to Setting Up Your First External Hard Drive
Getting Started
While it might seem like a no-brainer, the first step for setting up your hard drive is to plug it into your computer. Small, external, portable hard drives typically have one cord that plugs into your computer so you can transfer data. It also powers the hard drive. Some models may have another cord for added power—if so, you’ll want to plug in both.
Finding Your Hard Drive on Your Computer
On a Mac, locating your connected external drive is straightforward. Open Finder, which you can access by clicking the default Finder icon in your applications Dock, using Command + Space bar to search for Finder, or pressing Shift + Command + C. Once in Finder, your drives should appear either immediately or in the left-hand navigation column under “Locations.” Click on the specific drive you want to access to view its contents.
For Windows computers, the steps may vary depending on your Windows version. In general, you can find your drives in File Explorer by clicking on Computer or This PC in the left-hand navigation bar of a File Explorer window. If you’re unsure how to open File Explorer, look for it in your Start Menu, or try clicking on your desktop and pressing Windows Key + E together. Once you’ve located your drives, simply click on the one you wish to explore to access its contents.
Saving Files to Your External Hard Drive
External hard drives are a breeze to use. Once you’ve plugged them in and found them on your computer, you can simply copy files onto the hard drive by clicking and dragging them into the Finder or File Explorer window. This creates a copy on your hard drive, while leaving the original on your computer or laptop.
External Hard Drive Best Practices
Once you know how to use your external hard drive, there are a number of things you can do to maintain it and keep it organized. Your hard drive will fail eventually (more on that later), but there are things you can do to keep it working as long as possible. And there are things you can do to make sure you can easily find what you’re looking for.
1. Keep Your Drive Clean
Maintaining the cleanliness of your external hard drive involves two essential steps: caring for the hard drive itself and keeping the surrounding computer area tidy. The biggest priority is to ensure that both your hard drive and its immediate environment remain free from dust. A dust-free environment contributes to unimpeded airflow within your device, reducing the risk of overheating. If your hard drive has already been exposed to a dusty environment, compressed air is the most effective cleaning tool to remove it.
To effectively use compressed air, first identify key areas for cleaning. Look for the fan vent, inspect the USB ports, and examine other spots on the external hard drive that may accumulate dust over time. Then, simply blast those areas with the compressed air to remove some of the built up dust. (Bonus: it’s super fun.)
Lastly, it’s crucial to maintain an uncluttered area around your external hard drive to facilitate optimal airflow. Take the time to relocate any objects that might obstruct the airflow, such as books, papers, and other potential obstructions. This simple step can significantly enhance the longevity and performance of your external hard drive.
2. Keep Your Operating System Up to Date
The second best practice has more to do with your computer or laptop than your hard drive, but that’s what your hard drive connects to—so it’s important to keep it working, too.
We have all hit “remind me later” on an update dialog from our computer at some point in our lives, but updating your operating system (OS) will ensure that your computer is secure, that your system can run better, and that hard drives are able to properly connect to your files. Updating your OS can vary depending on what kind of computer you have. The best place to look for how to update your OS is in your system’s preferences.
Depending on the age of your computer, however, you should reach out to your local IT person before updating. Some older computers are not able to run, or run very poorly, on newer systems.
3. Know What’s On Your External Hard Drive
External hard drives are simple: you plug them in, they appear on your computer, and you can simply click and drag your files onto them to copy the files onto the hard drive. If you’re a more advanced user, you may have set up your external hard drive so that there are files that only exist on that device. Either way, it’s important to monitor what’s on your external hard drive and minimize digital clutter, just like you would with your computer or laptop. You can do this by periodically checking your drive to make sure your files are up to date and still needed.
4. Delete Duplicates
When you’re reviewing the contents of your external hard drive, keep in mind the significance of deleting duplicates. There are times when we unintentionally generate multiple copies of a project or document or save several versions of the same file, especially when finalizing edits. Removing redundant duplicates not only contributes to a speedier hard drive performance but also creates room for additional files. You can either manually inspect your files for duplications or use specialized applications designed to detect and delete duplicate files residing on your drive.
Protecting Your Data on an External Hard Drive
3-2-1 Backup
Implementing a 3-2-1 backup strategy means maintaining a minimum of three complete copies of your data. Two of these copies should reside locally but on distinct types of media, such as an external hard drive. The third copy must be stored offsite, away from your primary location. For instance, if you have your files on your computer and an external hard drive (which should be stored separately from your computer when not in use), you should maintain one additional copy stored independently, beyond the confines of your home. This is where the cloud comes in.
There are several cloud-based services that will back up your computer and your attached drives. We’re partial to our own, of course, and, here’s our guide to making sure your external hard drives are backed up. And, with Backblaze’s Forever Version History, you’ll always have a copy of your hard drive data, updated from the most recent time you plugged it in.
Prepare for a Drive Failure
The only truth about computer hardware is that it will fail eventually. We know a little bit about that. Most hard drive manufacturer warranties span only three to five years, and budget-friendly drives often have even shorter lifespans. These time frames don’t factor in variables like physical wear and tear, specific make or model, or storage conditions.
When using an external hard drive, you have to prepare for the day that it fails. Fortunately, there are several methods to monitor your external hard drive’s health, with telltale signs that it’s approaching the end of its service life. These signs may include unusual clicking or screeching sounds, sluggish performance, and frequent errors when attempting to access folders on the drive. You can also manually assess your drives’ status directly from your computer.
How to Find Out if Your Drive Is Failing
For a Windows computer, you’ll use a simple command prompt that will tell your computer where to look and what to check. Just right-click the Start menu on your computer, select Run, and type “cmd” or type “cmd” into the search bar. In the Command Line window that opens, copy and paste wmic diskdrive get status and hit enter. This command will run and it will return “Pred Fail” if your drive is not performing, or “OK” if the drive is performing well.
For a Mac computer, you can monitor the status of your external hard drive by opening Disk Utility. You can find it by going to Applications and then Utilities. Next, you will click on the drive you would like to test to see how it’s performing. Click the View button in the toolbar, then select Show SMART Status. This will display the SMART status of your hard drive as either “Verified” (healthy) or “Failing” (indicating a potential problem). Disk Utility will not detect or repair all problems that a disk may have, but it can give you a general picture.
Note: The process for running these diagnostics may vary slightly depending on your OS and the specific utility you use.
How to Run SMART Diagnostics on Your Hard Drive
Running SMART (Self-Monitoring, Analysis, and Reporting Technology) diagnostics on your hard drive is a smart (see what we did there?) way to assess its health and predict potential issues. SMART diagnostics provide valuable insights into your drive’s performance and can help you detect problems before they lead to data loss. You can use third-party software utilities like CrystalDiskInfo or HDDScan to access more detailed SMART data and view drive health in a user-friendly interface. Download and install one of these tools, then launch it and select your hard drive to view its SMART attributes and health status.
In Conclusion
Starting out with an external hard drive is exactly like starting out with any piece of technology you might own. The more you educate yourself on the ins and outs of taking care of it, the better it will run for you. But if something bad were to happen, you should always have a backup plan (we suggest Backblaze, but you probably already know that) to protect your new piece of equipment.
External Hard Drive FAQs
1. How do I find a hard drive on my computer?
On a Mac, open Finder. Once in Finder, your drives should appear either immediately or in the left-hand navigation column under “Locations.” For Windows computers, the steps may vary depending on your Windows version. In general, you can find your drives in File Explorer by clicking on Computer or This PC in the left-hand navigation bar of a File Explorer window.
2. How do I save files to a hard drive?
Once you’ve plugged in your hard drive and found it on your computer, you can simply copy files onto the hard drive by clicking and dragging them into the Finder or File Explorer window. This creates a copy on your hard drive, while leaving the original on your computer or laptop.
3. How do I keep my hard drive maintained?
Keeping your drive clean and dust-free is the best way to maintain it. This involves two essential steps: caring for the hard drive itself and keeping the surrounding computer area tidy. The biggest priority is to ensure that both your hard drive and its immediate environment remain free from dust. A dust-free environment contributes to unimpeded airflow within your device, reducing the risk of overheating. If your hard drive has already been exposed to a dusty environment, compressed air is the most effective cleaning tool to remove it.
4. How do I know if my hard drive is failing?
There are several telltale signs that your hard drive is approaching the end of its service life. These signs may include unusual clicking or screeching sounds, sluggish performance, and frequent errors when attempting to access folders on the drive. You can also manually assess your drives’ status directly from your computer.
Get ready. The release of Backblaze Computer Backup 9.0 is rolling out now through the end of September.
Backblaze Computer Backup 9.0 is available today in early access, and restoring your files is about to get a whole lot easier.
What’s New in Backblaze Computer Backup 9.0?
Whether you’re a longtime user or just getting started with Backblaze, version 9.0 provides you with an unparalleled backup and restore solution. With our latest release, you get our most requested feature: a dedicated restore app for both macOS and Windows clients that makes the process of restoring your data even more intuitive, seamless, and streamlined than before. The new version also comes with essential bug fixes and performance improvements to keep your back up experience ahead of the curve for both security and speed.
Backblaze Restore App: macOS and Windows Highlights
Whether you’re using our macOS or Windows clients, you can now recover your important data with even more ease.
The restore app sign in screen.Your library of files in the restore app. What it looks like when you prepare a restore. A handy Restore Log so you can track your progress.Check out some of the things you can expect to see from the restore app.
Here’s a peek into some of the new features we have in store with our new Restore Client App:
Simplified restore initiation process. When you’ve lost important files, the last thing you want is a demanding process sitting between you and restoring your data. With the restore app, you authenticate your Backblaze account and initiate the restore directly from your desktop. Once authenticated, you can browse your file tree and kick off the restore process immediately.
No limits for restore size. There are no limits to restore sizes inside of the restore app. Conserving disk space is important and you shouldn’t have to worry about downloading a .zip and having enough additional space to unzip it as well.
If you’re interested in a comprehensive tutorial on how to use the new restore app, we’re here to guide you. Let us walk you through the process.
We’re excited that our version 9.0 release compliments your already robust methods of accessing your data. To access your backup from anywhere, you can log in to www.backblaze.com to initiate a restore and use our iOS and Android apps to access your files on the go.
Backblaze v9.0 Is Available in Early Access Today: September 13, 2023
We will be taking feedback and slowly auto-updating all users in the coming weeks, but if you can’t wait and want to download the early access release now on your Mac or PC:
Go to: https://www.backblaze.com/status/backup-beta
Select your operating system and download the v9.0 app.
Install the early access release on your computer.
Please note, since this is in early access you might hit some bugs. Please reach out to our Support Team if you have any questions or if you want to give feedback—we always like to know how things are going.
This year, we’re celebrating 10 years of Drive Stats—that’s 10 years of collecting the data and sharing the reports with all of you. While there’s some internal debate about who first suggested publishing the failure rates of drives, we all agree that Drive Stats has had impact well beyond our expectations. As of today, Drive Stats is still one of the only public datasets about drive usage, has been cited 150+ times by Google Scholar, and always sparks lively conversation, whether it’s at a conference, in the comments section, or in one of the quarterly Backblaze Engineering Week presentations.
This article is based on a presentation I gave during Backblaze’s internal Engineering Week, and is the result of a deep dive into managing and improving the architecture of our Drive Stats datasets. So, without further ado, let’s dive down the Drive Stats rabbit hole together.
More to Come
This article is part of a series on the nuts and bolts of Drive Stats. Up next, we’ll highlight some improvements we’ve made to the Drive Stats code, and we’ll link to them here. Stay tuned!
A “Simple” Ask
When I started at Backblaze in 2020, one of the first things I was asked to do was to “clean up Drive Stats.” It had not not been ignored per se, which is to say that things still worked, but it took forever and the teams that had worked on it previously were engaged in other projects. While we were confident that we had good data, running a report took about two and a half hours, plus lots of manual labor put in by Andy Klein to scrub and validate drives in the dataset.
On top of all that, the host on which we stored the data kept running out of space. But, each time we tried to migrate the data, something went wrong. When I started a fresh attempt at moving our dataset between hosts for this project, then ran the report, it ran for weeks (literally).
Trying to diagnose the root cause of the issue was challenging due to the amount of history surrounding the codebase. There was some code documentation, but not a ton of practical knowledge. In short, I had my work cut out for me.
Drive Stats Data Architecture
Let’s start with the origin of the data. The podstats generator runs on every Backblaze Storage Pod, what we call any host that holds customer data, every few minutes. It’s a legacy C++ program that collects SMART stats and a few other attributes, then converts them into an .xml file (“podstats”). Those are then pushed to a central host in each data center and bundled. Once the data leaves these central hosts, it has entered the domain of what we will call Drive Stats. This is a program that knows how to populate various types of data, within arbitrary time bounds based on the underlying podstats .xml files. When we run our daily reports, the lowest level of data are the raw podstats. When we run a “standard” report, it looks for the last 60 days or so of podstats. If you’re missing any part of the data, Drive Stats will download the necessary podstats .xml files.
Now let’s go into a little more detail: when you’re gathering stats about drives, you’re running a set of modules with dependencies to other modules, forming a data dependency tree. Each time a module “runs”, it takes information, modifies it, and writes it to a disk. As you run each module, the data will be transformed sequentially. And, once a quarter, we run a special module that collects all the attributes for our Drive Stats reports, collecting data all the way down the tree.
There’s a registry that catalogs each module, what their dependencies are, and their function signatures. Each module knows how its own data should be aggregated, such as per day, per day per cluster, global, data range, and so on. The “module type” will determine how the data is eventually stored on disk. Here’s a truncated diagram of the whole system, to give you an idea of what the logic looks like:
Let’s take model_hack_table as an example. This is a global module, and it’s a reference table that includes drives that might be exceptions in the data center. (So, any of the reasons Andy might identify in a report for why a drive isn’t included in our data, including testing out a new drive and so on.)
The green drive_stats module takes in the json_podstats file, references the model names of exceptions in model_hack_table, then cross references that information against all the drives that we have, and finally assigns them the serial number, brand name, and model number. At that point, it can do things like get the drive count by data center.
Similarly, pod_drives looks up the host file in our Ansible configuration to find out which Pods we have in which data centers. It then does attributions with a reference table so we know how many drives are in each data center.
As you move down through the module layers, the logic gets more and more specialized. When you run a module, the first thing the module does is check in with the previous module to make sure the data exists and is current. It caches the data to disk at every step, and fills out the logic tree step by step. So for example, drive_stats, being a “per-day” module, will write out a file such as /data/drive_stats/2023-01-01.json.gz when it finishes processing. This lets future modules read that file to avoid repeating work.
This work-deduplication process saves us a lot of time overall—but it also turned out to be the root cause of our weeks-long process when we were migrating Drive Stats to our new host.
Cache Invalidation Is Always Treacherous
We have to go into slightly more detail to understand what was happening. The dependency resolution process is as follows:
Before any module can run, it checks for a dependency.
For any dependency it finds, it checks modification times.
The module has to be at least as old as the dependency, and the dependency has to be at least as old as the target data. If one of those conditions isn’t met, the data is recalculated.
Any modules that get recalculated will trigger a rebuild of the whole branch of the logic tree.
When we moved the Drive Stats data and modules, I kept the modification time of the data (using rsync) because I knew in vague terms that Drive Stats used that for its caching. However, when Ansible copied the source code during the migration, it reset the modification time of the code for all source files. Since the freshly copied source files were younger than the dependencies, that meant the entire dataset was recalculating—and that represents terabytes of raw data dating back to 2013, which took weeks.
Note that Git doesn’t preserve mod times and it doesn’t save source files, which is part of the reason this problem exists. Because the data doesn’t exist at all in Git, there’s no way to clone-while-preserving-date. Any time you do a code update or deploy, you run the risk of this same weeks-long process being triggered. However, this code has been stable for so long, tweaks to it wouldn’t invalidate the underlying base modules, and things more or less worked fine.
To add to the complication, lots of modules weren’t in their own source files. Instead, they were grouped together by function. A drive_days module might also be with a drive_days_by_model, drive_days_by_brand, drive_days_by_size, and so on, meaning that changing any of these modules would invalidate all of the other ones in the same file.
This may sound straightforward, but with all the logical dependencies in the various Drive Stats modules, you’re looking at pretty complex code. This was a poorly understood legacy system, so the invalidation logic was implemented somewhat differently for each module type, and in slightly different terms, making it a very unappealing problem to resolve.
Now to Solve
The good news is that, once identified, the solution was fairly intuitive. We decided to set an explicit version for each module, and save it to disk with the files containing its data. In Linux, there is something called an “extended attribute,” which is a small bit of space the filesystem preserves for metadata about the stored file—perfect for our uses. We now write a JSON object containing all of the dependent versions for each module. Here it is:
To you, it’s just version code pinned in Linux’s extended attributes. To me, it’s beautiful.
Now we will have two sets of versions, one stored on the files written to disk, and another set in the source code itself. So whenever a module is attempting to resolve whether or not it is out of date, it can check the versions on disk and see if they are compatible with the versions in source code. Additionally, since we are using semantic versioning, this means that we can do non-invalidating minor version bumps and still know exactly which code wrote a given file. Nice!
The one downside is that you have to manually specify to preserve extended attributes when using many Unix tools such as rsync (otherwise the version numbers don’t get copied). We chose the new default behavior in the presence of missing extended attributes to be for the module to print a warning and assume it’s current. We had a bunch of warnings the first time the system ran, but we haven’t seen them since. This way if we move the dataset and forget to preserve all the versions, we won’t invalidate the entire dataset by accident—awesome!
Wrapping It All Up
One of the coolest parts about this exploration was finding how many parts of this process still worked, and worked well. The C++ went untouched; the XML parser is still the best tool for the job; the logic of the modules and caching protocols weren’t fundamentally changed and had some excellent benefits for the system at large. We’re lucky at Backblaze that we’ve had many talented people work on our code over the years. Cheers to institutional knowledge.
That’s even more impressive when you think of how Drive Stats started—it was a somewhat off-the-cuff request. “Wouldn’t it be nice if we could monitor what these different drives are doing?” Of course, we knew it would have a positive impact on how we could monitor, use, and buy drives internally, but sharing that information is really what showed us how powerful this information could be for the industry and our community. These days we monitor more than 240,000 drives and have over 21.1 million days of data.
This journey isn’t over, by the way—stay tuned for parts two and three where we talk about improvements we made and some future plans we have for Drive Stats data. As always, feel free to sound off in the comments.
The terms NAS and SAN can be confusing—the technology is similar and, making matters worse, the acronyms are the reverse of each other. NAS stands for network attached storage and SAN stands for storage area network. They were both developed to solve the problem of making stored data available to many users at once. But, they couldn’t be more different in how they achieve that goal.
The TL/DR:
NAS is a single storage device that serves files over ethernet and is relatively inexpensive. NAS devices are easier for a home user or small business to set up.
A SAN is a tightly coupled network of multiple devices that is more expensive and complex to set up and manage. A SAN is better suited for larger businesses and requires administration by IT staff.
Read on and we’ll dissect the nuances of NAS and SANs to help you make informed decisions about which solution best suits your storage needs.
Check Out Our New Technical Documentation Portal
When you’re working on a storage project, you need to be able to find instructions about the tools you’re using quickly. And, it helps if those instructions are easy to use, easy to understand, and easy to share. Our Technical Documentation Portal has been completely overhauled to deliver on-demand content in a user-friendly way so you can find the information you need. Check out the NAS section, including all of our Integration Guides.
Basic Definitions: What Is NAS?
NAS is a device or devices with a large data storage capacity that provides file-based data storage services to other devices on a network. Usually, they also have a client or web portal interface that’s easy to navigate, as well as services like QNAP’s Hybrid Backup Sync or Synology’s Hyper Backup to help manage your files. In other words, NAS is synonymous with user-friendly file sharing.
NAS with eight drive bays for 3.5″ disk drives.
At its core, NAS operates as a standalone device connected to a network, offering shared access to files and folders. NAS volumes appear to the user as network-mounted volumes. The files to be served are typically contained on one or more hard drives in the system, often arranged in RAID arrays. Generally, the more drive bays available within the NAS, the larger and more flexible storage options you have.
Key Characteristics of NAS:
File-Level Access: NAS provides file-level access, ideal for environments where collaborative work and content sharing are paramount.
Simplicity: NAS solutions offer straightforward setups and intuitive interfaces, making them accessible to users with varying levels of technical expertise.
Scalability: While NAS devices can be expanded by adding more drives, there may be limitations in terms of performance and scalability for large-scale enterprise use.
How NAS Works
The NAS device itself is a network node—much like computers and other TCP/IP devices, all of which maintain their own IP address—and the NAS file service uses the ethernet network to send and receive files. This system employs protocols like network file system (NFS) and server message block (SMB), enabling seamless data exchange between multiple users.
The NAS system and clients connect via your local network—all file service occurs via ethernet.
Benefits of NAS
NAS devices are designed to be easy to manage, making them a popular choice for home users, small businesses, and departments seeking straightforward centralized storage. They offer an easy way for multiple users in multiple locations to access data, which is valuable when users are collaborating on projects or need to share information.
For individual home users, if you’re currently using external hard drives or direct attached storage, which can be vulnerable to drive failure, upgrading to a NAS ensures your data is better protected.
For small business or departments, installing NAS is typically driven by the desire to share files locally and remotely, have files available 24/7, achieve data redundancy, have the ability to replace and upgrade hard drives in the system, and most importantly, support integrations with cloud storage that provide a location for necessary automatic data backups.
NAS offers robust access controls and security mechanisms to facilitate collaborative efforts. Moreover, it empowers non-technical individuals to oversee and manage data access through an embedded web server. Its built-in redundancy, often achieved through RAID configurations, ensures solid data resilience. This technology merges multiple drives into a cohesive unit, mimicking a single, expansive volume capable of withstanding the failure of a subset of its constituent drives.
Summary of NAS Benefits:
Relatively inexpensive.
A self-contained solution.
Easy administration.
Remote data availability and 24/7 access.
Wide array of systems and sizes to choose from.
Drive failure-tolerant storage volumes.
Automatic backups to other devices and the cloud.
Limitations of NAS
The weaknesses of NAS primarily revolve around scalability and performance. If more users need access, the server might struggle to keep pace. If you overprovisioned your NAS, you may be able to add storage. But sooner or later you’ll need to upgrade to a more powerful system with a bigger on-board processor, more memory, and faster and larger network connections.
Another drawback ties back to ethernet’s inherent nature. Ethernet divides data into packets, forwarding them to their destination. Yet, depending on network traffic or other issues, potential delays or disorder in packet transmission can hinder file availability until all packets arrive and are put back in order.
Although minor latency (slowness) is not usually noticed by users for small files, in data-intensive domains like video production, where large files are at play, even milliseconds of latency can disrupt operations, particularly video editing workflows.
Basic Definitions: What Is a SAN?
On the other end of the spectrum, SANs are engineered for high-performance and mission-critical applications. They function by connecting multiple storage devices, such as disk arrays or tape libraries, to a dedicated network that is separate from the main local area network (LAN). This isolation ensures that storage traffic doesn’t interfere with regular network traffic, leading to optimized performance and data availability.
Unlike NAS, a SAN operates at the block level, allowing servers to access storage blocks directly. This architecture is optimized for data-intensive tasks like database management and virtualization or video editing, where low latency and consistent high-speed access are essential.
Key Characteristics of SANs:
Block-Level Access: SANs provide direct access to storage blocks, which is advantageous for applications requiring fast, low-latency data retrieval.
Performance: SANs are designed to meet the rigorous demands of enterprise-level applications, ensuring reliable and high-speed data access.
Scalability: SANs offer greater scalability by connecting multiple storage devices, making them suitable for businesses with expanding storage needs.
How Does a SAN Work?
A SAN is built from a combination of servers and storage over a high speed, low latency interconnect that allows direct Fibre Channel (FC) connections from the client to the storage volume to provide the fastest possible performance. The SAN may also require a separate, private ethernet network between the server and clients to keep the file request traffic out of the FC network for even more performance.
By joining together the clients, SAN server, and storage on a FC network, the SAN volumes appear and perform as if it were a directly connected hard drive. Storage traffic over FC avoids the TCP/IP packetization and latency issues, as well as any LAN congestion, ensuring the highest access speed available for media and mission critical stored data.
The SAN management server, storage arrays, and clients all connect via a FC network—all file serving occurs over Fibre Channel.
Benefits of a SAN
Because it’s considerably more complex and expensive than NAS, a SAN is typically used by businesses versus individuals and typically requires administration by an IT staff.
The primary strength of a SAN is that it allows simultaneous shared access to shared storage that becomes faster with the addition of storage controllers. SANs are optimized for data-intensive applications. For example, hundreds of video editors can simultaneously access tens of GB per second of storage simultaneously without straining the network.
SANs can be easily expanded by adding more storage devices, making them suitable for growing storage needs. Storage resources can be efficiently managed and allocated from a central location. SANs also typically include redundancy and fault tolerance mechanisms to ensure data integrity and availability.
Summary of a SAN’s Benefits:
Extremely fast data access with low latency.
Relieves stress on a local area network.
Can be scaled up to the limits of the interconnect.
Operating system level (“native”) access to files.
Often the only solution for demanding applications requiring concurrent shared access.
Limitations of a SAN
The challenge of a SAN can be summed up in its cost and administration requirements—having to dedicate and maintain both a separate ethernet network for metadata file requests and implement a FC network can be a considerable investment. That being said, a SAN is often the only way to provide very fast data access for a large number of users that also can scale to supporting hundreds of users at the same time.
The Main Differences Between NAS and SANs
NAS
SAN
Use case
Often used in homes and small to medium sized businesses.
Often used in professional and enterprise environments.
Cost
Less expensive.
More expensive.
Ease of administration
Easier to manage.
Requires more IT administration.
How data is accessed
Data accessed as if it were a network-attached drive.
Servers access data as if it were a local hard drive.
Speed
Speed is dependent on local TCP/IP ethernet network, typically 1GbE to 10GbE but can be up to 25GbE or even 40GbE connections, and affected by the number of other users accessing the storage at the same time. Generally slower throughput and higher latency due to the nature of ethernet packetization, waiting for the file server, and latency in general.
High speed using Fibre Channel, most commonly available in 16 Gb/s to 32 Gb/s however newer standards can go up to 128 Gb/s. FC can be delivered via high speed ethernet such as 10Gbit or 40Gbit+ networks using protocols such as FCoE and iSCSI.
Network connection
SMB/CIFS, NFS, SFTP, and WebDAV.
Fibre Channel, iSCSI, FCoE.
Scalability
Lower-end not highly scalable; high-end NAS scale to petabytes using clusters or scale-out nodes.
Can add more storage controllers, or expanded storage arrays allowing SAN admins to scale performance, storage, or both.
Networking method
Simply connects to your existing ethernet network.
Simply connects to your existing ethernet network.
Simply connects to your existing ethernet network.
Entry level systems often have a single point of failure, e.g. power supply.
Fault tolerant network and systems with redundant functionality.
Limitations
Subject to general ethernet issues.
Behavior is more predictable in controlled, dedicated environments.
Choosing the Right Solution
When considering a NAS device or a SAN, you might find it helpful to think of it this way: NAS is simple to set up, easy to administer, and great for general purpose applications. Meanwhile, a SAN can be more challenging to set up and administer, but it’s often the only way to make shared storage available for mission critical and high performance applications.
The choice between a NAS device and a SAN hinges on understanding your unique storage requirements and workloads. NAS is an excellent choice for environments prioritizing collaborative sharing and simple management. In contrast, a SAN shines when performance and scalability are top priorities, particularly for businesses dealing with data-heavy applications.
Ultimately, the decision should factor in aspects such as budget, anticipated growth, workload demands, and the expertise of your IT team. Striking the right balance between ease of use, performance, and scalability will help ensure your chosen storage solution aligns seamlessly with your goals.
Are You Using NAS, a SAN, or Both?
If you are using a NAS device or a SAN, we’d love to hear from you about what you’re using and how you’re using them in the comments.
Over the years, the film industry has witnessed constant transformation, from the introduction of sound and color to the digital revolution, 4K, and ultra high definition (UHD). However, a groundbreaking change is now underway, as cloud technology merges with media and entertainment (M&E) workflows, reshaping the way content is created, stored, and shared.
What’s helping to drive this transformation? APIs, or application programming interfaces. For any post facility, indie filmmaker/creator, or media team, understanding what APIs are is the first step in using them to embrace the flexibility, efficiency, and speed of the cloud.
Check Out Our New Technical Documentation Portal
When you’re working on a media project, you need to be able to find instructions about the tools you’re using quickly. And, it helps if those instructions are easy to use, easy to understand, and easy to share. Our Technical Documentation Portal has been completely overhauled to deliver on-demand content in a user-friendly way so you can find the information you need. Check out the API overview page to get you started, then dig into the implementation with the full documentation for our S3 Compatible, Backblaze, and Partner APIs.
From Tape to Digital: A Digital File Revolution
The journey towards the cloud transformation in the M&E industry started with the shift from traditional tape and film to digital formats. This revolutionary transition converted traditional media into digital entities, moving them from workstations to servers, shuttle drives, and shared storage systems. Simultaneously, the proliferation of email and cloud-hosted applications like Gmail, Dropbox, and Office 365 laid the groundwork for a cloud-centric future.
Seamless Collaboration With API-Driven Tools
As time went on, applications began communicating effortlessly with one another, facilitating tasks such as creating calendar invites in Gmail through Zoom and the ability to start Zoom meetings with a command in Slack. These integrations were made possible by APIs that allow applications to interact and share data effectively.
What Are APIs?
APIs are sets of rules and protocols that enable different software applications to communicate and interact with each other, allowing you to access specific functionalities or data from one application to be used in another. APIs facilitate seamless integration between diverse systems, enhancing workflows and promoting interoperability.
Most of us in the film industry are familiar with a GUI, a graphical user interface. It’s how we use applications day in and day out—literally the screens on our programs and computers. But a lot of the tasks we execute via a GUI (like saving files, reading files, and moving files) really are pieces of executable code hidden from us behind a nice button. Think of APIs as another method to execute those same pieces of code, but with code. Code executing code. (Let’s not get into the Skynet complex, and this isn’t AI either.)
Grinding the Gears: A Metaphor for APIs
An easy way to think about APIs is to think of them as gears. Each application has a gear. If we adjust the two gears to talk we simply align them to each other allowing their APIs to establish communication.
Once communications are established, you can start to do some cool stuff. For example, you can migrate a Frame.io archive to a Backblaze B2 Bucket. Or you could use the iconik API to move a file we want to edit with into our Lucidlink filespace, then remove it as soon as we finish our project.
Check out a video about the solution here:
The MovieLabs 2030 Vision and Cloud Integration
As the industry embraced cloud technology, the need for standardization became apparent. Organizations like the Institute of Electrical and Electronics Engineers (IEEE) and the Society of Motion Picture and Television Engineers (SMPTE) worked diligently to establish technical unity across vendors and technologies. However, implementation of these standards lacked persistence. To address this void, the Movie Picture Association (MPA) established MovieLabs, an organization dedicated to researching, testing, and developing new guidelines, processes, and tooling to drive improvements on how content is created. One such set of guidelines is the MovieLabs 2030 Vision.
Core Principles of the MovieLabs 2030 Vision
The MovieLabs 2030 Vision outlines 10 core principles that are aspirational for the film industry to accomplish by 2030. These core principles set the stage with a high importance on cloud technology and interoperability. Interoperability boils down to the ability to use various tools but have them share resources—which is where APIs come in. APIs help make tools interoperable and able to share resources. It’s a key functionality, and it’s how many cloud tools work together today.
MovieLab’s 2030 Vision aspirational principles.
The Future Is Here: Cloud Technology at Its Peak
Cloud technology grants us instant access to digital documents and the ability to carry our entire lives in our pockets. With the right tools, our data is securely synced, backed up, and accessible across devices, from smartphones to laptops and even TVs.
Although cloud technology has revolutionized various industries, the media and entertainment sector lagged behind, relying on cumbersome shuttle drives and expensive file systems for our massive files. The COVID pandemic, however, acted as a catalyst for change, pushing the industry to seriously consider the benefits of cloud integration.
Breaking Down Silos With APIs
In a post-pandemic world, many popular media and entertainment applications are built in the cloud, the same as other software as a service (SaaS) applications like Zoom, Slack, or Outlook. Which is great! But many of these tools are designed to best operate in their own ecosystem, meaning once the files are in their systems, it’s not easy to take them out. This may sound familiar if you are an iPhone user faced with migrating to an Android or vice versa. (But who would do that? )
With each of these applications working in their own ecosystem, the result is their own dedicated storage and usage costs which can vary greatly across tools. So many productions end up with projects and project files locked in various different environments creating storage silos—the opposite of centralized interoperability.
APIs not only foster interoperability in cloud-based business applications, but also empower filmmaking cloud tools like Frame.io, iconik, and Backblaze the ability to send, receive, and delete files (the POST, GET, PUT, and DELETE commands) data from other programs, enabling more dynamic and advanced workflows, such as sending files to colorists or reviewing edits for picture lock.
Customized Workflows and Automation
APIs offer the flexibility to tailor workflows to specific needs, whether within a single company or for vendor-specific processes. The automation possibilities are virtually limitless, facilitating seamless integration between cloud tools and storage solutions.
The Road Ahead for Media and Entertainment
The Movie Labs 2030 Vision offers a glimpse into a future defined by cloud tools and automation. Principally, that cloud technology with open and extensible storage exists and is available today.
So for any post facility, indie filmmaker/creator, or media team still driving around shuttle drives while James Cameron is shooting Avatar in New Zealand and editing it in Santa Monica, the future is here and within reach. You can get started today with all the power and flexibility of the cloud without the Avatar budget.
If you do any kind of video streaming, encoding and storing your data is one of your main challenges. Encoding videos in various formats and resolutions for different devices and platforms can be a resource-intensive task, and setting up and maintaining on-premises encoding infrastructure can be expensive.
Today, we’re excited to announce an expanded partnership with Qencode, a media services platform that enables users to build powerful video solutions, including solutions to the challenges of transcoding, live streaming, and media storage. The expanded partnership embeds the Backblaze Partner API within the Qencode platform, making it frictionless for users to add cloud storage to their media production workflows.
What Is Qencode?
Qencode is a media services platform founded in 2017 that assists with digital video transformation. The Qencode API provides developers within the over-the-top (OTT), broadcasting, and media & entertainment sectors with scalable and robust APIs for:
Video transcoding
Live streaming
Content delivery
Media storage
Artificial intelligence
Qencode + Backblaze
Recognizing the growing demand for integrated and efficient cloud storage within media production, Qencode and Backblaze built an alliance which creates a new paradigm for cutting-edge video APIs fortified by a reliable and efficient cloud storage solution. This integration empowers flexible workflows consisting of uploading, transcoding, storing, and delivering video content for media and OTT companies of all sizes. By integrating the platforms, this partnership provides top-tier features while simplifying the complexities and reducing the risks often associated with innovation.
We want to set new standards for value in an industry that is fragmented and complex. By merging Qencode’s advanced video processing capabilities with Backblaze’s reliable cloud storage, we’re addressing a critical industry need for seamless integration and efficiency. Integrating Backblaze’s Partner API takes our platform to the next level, providing users with a single, streamlined interface for all their video and media needs.
Murad Mordukhay, CEO of Qencode
Qencode + Backblaze Use Cases
The easy-to-use interface and affordability make Qencode an ideal choice for businesses who need video processing at scale without compromising spend or flexibility. Qencode enables businesses of all sizes to customize and control a complete end-to-end solution, from sign-on to billing, which includes seamless access to Backblaze storage through the Qencode software as a service (SaaS) platform.
Simplifying the User Experience
Expanding this partnership with Qencode takes our API technology a step further in making cloud storage more accessible to businesses whose mission is to simplify user experience. We are excited to work with a specialist like Qencode to bring a simple and low cost storage solution to businesses who need it the most.
Editor’s note: Since it was published in 2019, this post has been updated in 2021 and 2023 with the latest information to help you take advantage of SSDs.
Solid-state drives (SSDs) have become the norm for most laptops and desktops, replacing the older hard disk drives (HDDs) that had been in use for decades previously. If your computer still relies on an HDD, it might be time to consider upgrading to an SSD for improved performance.
Upgrading to an SSD can give your computer a significant speed and responsiveness boost, especially if your machine is more than a few years old. However, before taking the plunge, it’s essential to weigh practical considerations. Let’s take a closer look at SSDs and the factors you should consider.
What Is an SSD?
An SSD is a type of data storage device used in computers and other electronic devices. Unlike traditional HDDs, which use spinning disks and mechanical read/write heads to store and retrieve data, SSDs rely on NAND-based flash memory to store information. This flash memory is similar to the kind used in USB drives and memory cards, but it’s optimized for higher performance and reliability.
Refresher: What Is NAND?
NAND stands for “Not And.” It’s a type of logic gate used in digital circuits, specifically in memory and storage devices. In the context of NAND-based flash memory used in SSDs, the term NAND refers to the electronic structure of the memory cells that store data. The name NAND comes from its logical operation, which is the complement of the AND operation. NAND flash memory is a type of non-volatile storage, meaning it retains data even when the power is turned off, which makes it well-suited for use with things like SSDs and other data storage devices. That’s different from the regular RAM in your computer, which is reset when you turn off or restart the computer.
Compared to HDDs, SSDs are more shock resistant (due to their lack of moving parts) and are less likely to be affected by magnetic fields. They also offer faster data access times, quicker boot-up and application load times, and better overall responsiveness.
Because of their speed and efficiency, SSDs have become the preferred choice for many computing applications, ranging from laptops and desktops to servers and data centers. They are especially useful in situations where speed and reliability are crucial, such as in gaming, content creation, and tasks involving large data transfers. Despite typically offering less storage capacity compared to HDDs of similar cost, SSD performance benefits often outweigh the storage trade-off, making them a popular choice.
Depending on the task at hand, SSDs can be up to 10 times faster than their HDD counterparts. Replacing your hard drive with an SSD is one of the best things you can do to dramatically improve the performance of your older computer.
Samsung 870 QVO SATA III 2.5″ SSD 1TB.
Without any moving parts, SSDs operate more quietly, more efficiently, and with fewer breakable things than hard drives that have spinning platters. Read and write speeds for SSDs are much better than hard drives, resulting in noticeably faster operations.
For you, that means less time waiting for stuff to happen. An SSD is worth looking into if you’re frequently seeing a spinning wheel cursor on your computer screen. Modern operating systems rely more on virtual memory management, utilizing temporary swap files that are written to the disk. A faster SSD minimizes the performance impact caused by this process.
If you have just one drive in your laptop or desktop, you could replace an HDD or small SSD with a 1TB SSD for less than $40. For those dealing with substantial amounts of data, concentrating on replacing the drive that houses your operating system and applications can yield a significant speed boost. Put your working data on additional internal or external hard drives, and you’re ready to tackle a mountain of photos, videos, or supersized databases. Just be sure to implement a backup plan to make sure you keep a copy of that data safe on additional local drives, network attached drives, or in the cloud.
Are There Any Reasons Not to Upgrade to an SSD?
If SSDs are so much better than hard drives, why aren’t all drives SSDs? The two biggest reasons are cost and capacity. SSDs are more expensive than hard drives. A 1TB SSD or HDD now cost about the same, $30–$50, with HDDs being slightly less, maybe around $25.
That’s not much of a difference, but as drive capacity gets larger, the cost differential gets increasingly larger. For example, an 8TB HDD drive runs $120–$180, while 8TB SSDs start at around $350. In short, while upgrading the 1TB internal hard drive on your computer to an SSD is cost effective, the same may not be true for replacing larger capacity drives, like those used in external drives, unless the increased speed is worth the increased cost.
Whether your computer can use an SSD is another question. It all depends on the computer’s age and how it was designed. Let’s take a look at that question next.
How Do You Upgrade to an SSD?
Does your computer use a regular off-the-shelf SATA HDD? If so, you can upgrade it with an SSD.
SSDs are compatible with both Macs and PCs. All current Mac laptops come with SSDs. Both iMacs and Mac Pros come with SSDs as well. Around 2010, Apple started moving to only SSD storage on most of its devices. That said, some Mac desktop computers continued to offer the option of both SSD and HDD storage until 2020, a setup they called a Fusion Drive.
Note that as of November 2021, Apple does not offer any Macs with a Fusion Drive. Basically, if you bought your device before 2010 or you have a desktop computer from 2021 or earlier, there’s a chance you may be using an HDD.
Determine Your Disk Type in a Mac
To determine what kind of drive your Mac uses, click on the Apple menu and select About This Mac.
Avoid the pitfall of selecting the Storage tab in the top menu. What you’ll find is that the default name of your drive is “Macintosh HD” which is confusing, given that they’re referring to the internal storage of the computer as a hard drive when (in most cases), your drive is an SSD. While you can find information about your drive on this screen, we prefer the method that provides maximum clarity.
So, on the Overview screen, click System Report. Bonus: You’ll also see what type of processor you have and your macOS version (which will be useful later).
Once there, select the Storage tab, then the volume name you want to identify. You should see a line called Medium Type, which will tell you what kind of drive you have.
Determine Your Disk Type in a PC
To determine your disk type in a Windows PC, first open the Task Manager in Windows:
Right-click the Start button and click Run. In the Run Command window, type dfrgui and click OK.
On the next screen, the type of drive will be listed under the Media Type column.
Can I Upgrade to a Better SSD?
Even if your computer already has an SSD, you may be able to upgrade it with a larger, faster SSD model. Besides SATA-based hard drive replacements, some later model PCs can be upgraded with M.2 SSDs, which look more like RAM chips than hard drives.
Some Apple laptops made before 2016 that already shipped with SSDs can be upgraded with larger ones. However, you will need to upgrade to a Mac-specific SSD. Check Other World Computing and Transcend to find ones designed to work. Apple laptop models made after 2016 have SSDs soldered to the motherboard, so you’re stuck with what you have.
M.2 SSD.
How to Install an SSD
If you’re comfortable tinkering with your computer’s guts, upgrading it with an SSD is a pretty common do-it-yourself project. Many companies offer hassle-free plug-and-play SSD replacements. Check out Amazon or NewEgg and you’ll have an embarrassment of riches. The choice is yours: Samsung, SanDisk, Crucial, and Toshiba are all popular SSD makers. There are many others, too.
However, if computer hardware isn’t your forte, it might not be worth the effort to learn from scratch. SSD upgrades are such a common aftermarket improvement most independent computer repair and service specialists will take on the task if you’re willing to pay them. Some throw in a data transfer if you’re lucky, or a skilled negotiator. Ask your friends and colleagues for recommendations. You can also hit up services like Angi to find someone.
If you are DIY inclined, YouTube has tons of walkthroughs like this one for desktop PCs, this one for laptops, and this one aimed at Mac users.
HDD/SSD to 3.5″ drive bay adapter.
Many SSDs replace 2.5 inch HDDs. Those are the same drives you find in laptop computers and even small desktop models. Have a desktop computer that uses a 3.5 inch hard drive? You may need to use a 2.5 inch to 3.5 inch mounting adapter.
A Word on SSD Compatibility
Beyond the drive size, it’s a good idea to check to see if the SSD you want to buy is compatible with your laptop or desktop, especially if your system is older than a couple of years. Here are articles from Tom’s Hardware and ShareUs which can help with that.
How to Migrate to an SSD
Buying a replacement SSD is the first step. Moving your data onto the SSD is the next step. To achieve this, you need two essential components: cloning software and an external drive case, sled, or enclosure. These tools enable you to connect your SSD to your computer through its USB port or another data transfer interface.
Cloning software creates an exact replica of your internal hard drive’s data. Once this data is successfully migrated to the SSD, you can then insert the new drive into your computer. I prefer to clone a hard drive onto an SSD whenever possible. When executed correctly, a cloned SSD retains its bootable capabilities, providing a true plug-and-play experience. Just copying files between the two drives instead may not copy all the data you need to get the computer to boot with the new drive.
How to Clone a Hard Drive to an SSD
When you buy a new SSD or even a fresh hard drive, it’s unlikely that the operating system you need will be pre-installed. Cloning your existing hard drive fixes that. However, there are instances where this may not be feasible. For example, maybe you’ve installed the SSD in a computer that previously had a bad hard drive. If so, you can do what’s called a clean install and start fresh. Different operating system providers offer distinct guidelines for this procedure. Here’s a link to Microsoft’s clean install procedure, and Apple’s clean install instructions.
As we said at the outset, SSDs tend to come at a higher cost per gigabyte compared to traditional hard drives. You may not be able to afford as large an SSD as your current drive, so make sure your data will fit on your new drive. If it won’t, you might have to pare down first. Additionally, it’s wise to leave some room for expansion. The last thing you want to do is immediately max out your new, fast drive.
Now that you’ve successfully cloned your drive and integrated the SSD into your system, what do you do with the old drive? If it’s still functional, repurposing the external drive chassis utilized during migration is a practical option. It can continue to serve as a standalone external drive or become part of a disk array, such as a network attached storage (NAS) device. You can use it for local back up—something we strongly recommend doing—in addition to using cloud back up like Backblaze. Or, just use it for extra storage needs, like for your photos or music.
Make Sure to Back Up
SSD upgrades are commonplace, but that doesn’t mean things don’t go wrong that can stop you dead in your tracks. If your computer is working fine before the SSD upgrade, make sure you have a complete backup of your computer to restore from in the event something goes wrong.
More Questions About SSDs?
You might enjoy reading other posts in our SSD 101 series.
Over the coming months, Backblaze will make big updates and upgrades to both our products—B2 Cloud Storage and Computer Backup. Considering the volume of new stuff on the horizon, I’m dropping into the blog today to explain what’s happening, when, and why for our customers as well as any others who are considering adopting our services. Here’s what’s new.
B2 Cloud Storage Updates
Price, Egress, and Product Upgrades
Meeting and exceeding customers’ needs for building applications, protecting data, supporting media workflows, and more is the top priority for B2 Cloud Storage. To further these efforts, we’ll be implementing the following updates:
Price Changes
Storage Price: Effective October 3, 2023, we are increasing the monthly pay-as-you-go storage rate from $5/TB to $6/TB. The price of B2 Reserve will not change.
Free Egress: Also effective October 3, we’re making egress free (i.e. free download of data) for all B2 Cloud Storage customers—both pay-as-you-go and B2 Reserve—up to three times the amount of data you store with us, with any additional egress priced at just $0.01/GB. Because supporting an open cloud environment is central to our mission, expanding free egress to all customers so they can move data when and where they prefer is a key next step.
Backblaze B2 Upgrades
From Object Lock for ransomware protection, to Cloud Replication for redundancy, to more data centers to support data location needs, Backblaze has consistently improved B2 Cloud Storage. Stay tuned for more this fall, when we’ll announce upload performance upgrades, expanded integrations, and more partnerships.
Things That Aren’t Changing
Storage pricing on committed contracts, B2 Reserve pricing, and unlimited free egress between Backblaze B2 and many leading content delivery network (CDN) and compute partners are all not changing.
Why the Changes for B2 Cloud Storage?
1. Continuing to provide the best cloud storage.
I am excited that B2 Cloud Storage continues to be the best high-quality and low-cost alternative to traditional cloud providers like AWS for businesses of all sizes. After seven years in service with no price increases, the bar was very high for considering any change to our pricing. We invest in making Backblaze B2 a better cloud storage provider every day. A price increase enables us to continue doing so into the future.
2. Advancing the freedom of customers’ data.
We’ve heard from customers that one of the greatest benefits of B2 Cloud Storage is freedom—freedom from complexity, runaway bills, and data lock-in. We wanted to double down on these benefits and further empower our customers to leverage the open cloud to use their data how and where they wish. Making egress free supports all these benefits for our customers.
Backblaze Computer Backup
Price, Version History, Version 9.0, and Admin Upgrades
To expand our ability to provide astonishingly easy computer backup that is as reliable as it is trustworthy and affordable, we’re instituting the following updates to Backblaze Computer Backup and sharing some upcoming product upgrades:
Computer Backup Pricing: Effective October 3, new purchases and renewals will be $9/month, $99/year, and $189 for two-year subscription plans, and Forever Version History pricing will be $0.006/GB.
Free One Year Extended Version History: Also effective October 3, all Computer Backup licenses may add One Year Extended Version History, previously a $2 per month expense, for free. Being able to recover deleted or altered files up to a year later saves Computer Backup users from huge headaches, and now this benefit is available to all subscribers. Starting October 3, log in to your account and select One Year of Extended Version History for free.
Version 9.0: In September, the release of Version 9.0 will go live. Among some improvements to performance and usability, this release includes a highly requested new local restore experience for end users. We’ll share all the details with you in September when Version 9.0 goes live.
Groups Administration Upgrades: In addition to Version 9.0, we’ve got an exciting roadmap of upgrades to our Groups functionality aimed at serving our growing and evolving customer base. For those who need to manage everything from two to two thousand workstations, we’re excited to offer more peace of mind and control with expanded tools built for the enterprise at a price still ahead of the competition.
Why the Change for Computer Backup?
Since launching Computer Backup in 2008, we’ve stayed committed to a product that backs up all your data automatically to the cloud for a flat rate. Over the following 15 years, the average amount of data stored per user has grown tremendously, and our investments to build out our storage cloud to support that growth has increased to keep pace.
At the same time, we’ve continued to invest in improving the product—as we have been recently with the upcoming release of Version 9.0, in our active development of new Group administration features, and in the free addition of optional One Year Extended Version history for all users. And, we still have more to do to ensure our product consistently lives up to its promise.
To continue offering unlimited backup, innovating, and adding value to the best computer backup service, we need to align our pricing with our costs.
Thank You
We understand how valuable your data is to your business and your life, and the trust you place in Backlaze every day is not lost on me. We are deeply committed to our mission of making storing, using, and protecting that data astonishingly easy, and the updates I’ve shared today are a big step forward in ensuring we can do so for the long haul. So, in closing, I’ll say thank you for entrusting us with your precious data—we’re honored to serve you.
FAQ: B2 Cloud Storage
Am I affected by this B2 Cloud Storage pricing update?
Maybe. This update applies to B2 Cloud Storage pay-as-you-go customers—those who pay variable monthly amounts based on their actual consumption of the service—who have not entered into committed contracts for one or more years.
When will I, as an existing B2 Cloud Storage pay-as-you-go customer, see this update in my monthly bill?
The updated pricing is effective October 3, 2023, so you will see it applied starting from this date to bills sent after this date.
How does Backblaze measure monthly average storage and free egress?
Backblaze measures pay-as-you-go customers’ usage in byte hours. The monthly storage average is based on the byte hours. As of October 3, 2023, monthly egress up to three times your average is free; any monthly egress above this 3x average is priced at $0.01 per GB.
Will Backblaze continue to offer unlimited free egress to CDN and compute partners?
Yes. This change has no impact on the unlimited free egress that Backblaze offers through leading CDN and compute partners including Fastly, Cloudflare, CacheFly, bunny.net, and Vultr.
How can I switch from pay-as-you-go B2 Cloud Storage to a B2 Reserve annual capacity bundle plan?
B2 Reserve bundles start at 20TB. You can explore B2 Reserve with our Sales Team here to discuss making a switch.
Is Backblaze still much more affordable than other cloud providers like AWS?
Yes. Backblaze remains highly affordable compared to other cloud storage providers. The service also remains roughly one-fifth the cost of AWS S3 for the combination of hot storage and egress, with the exact difference varying based on usage. For example, if you store 10TB in the U.S. West and also egress 10% of it in a month, your pricing from Backblaze and AWS is as follows:
In this instance, Backblaze is 17% or about one-fifth the cost of AWS S3.
What sort of improvements do you plan alongside the increase in pricing?
Beyond including free egress for all customers, we have a number of other upgrades and improvements in the pipeline. We’ll be announcing them in the coming months, but they include improvements to the upload experience, features to expand use cases for application storage customers, new integrations, and more partnerships.
Is Backlaze making any other updates to B2 Cloud Storage pricing, such as adding a minimum storage duration fee?
No. This is the extent of the update effective October 3, 2023. We also continue to believe that minimum storage duration fees as levied by some vendors run counter to the interests of many customers.
When was your last price increase?
This is the only price increase we have had since we launched B2 Cloud Storage in 2015.
FAQ: Computer Backup
What are the new prices?
Monthly licenses will be $9, yearly licenses will be $99, and two-year licenses will be $189. One Year Extended Version History will be available for free to those who wish to enable it. The $2 per month charge for Forever Version History will be removed while the incremental rate for when a file has been changed, modified, or deleted over a year ago will be $0.006/GB/month.
When are prices changing?
October 3, 2023 at 00:00 UTC is when the price increase will go into effect for new purchases and renewals. Existing contracts and licenses will be honored for their duration, and any prorated purchases after that time will be prorated at the new rate.
How does Extended Version History work?
Extended Version History allows you to “go back in time” further to retrieve earlier versions of your data. By default that setting is set to 30 days. With this update, you can choose to keep versions up to one year old for free.
What is a version?
When an individual file is changed, updated, edited, or deleted, without the file name changing, a new version is created.
When will the One Year Extended Version History option be included with my license?
On October 3, 2023, we’ll be removing the charge for selecting One Year Extended Version History. Any changes made to that setting ahead of that date will result in a prorated charge to the payment method on file.
I do not have One Year Extended Version History. Do I need to do anything to get it?
Yes. We will not be changing anyone’s settings on their behalf, so please see below for instructions on how to change your version history settings to one year. Note: making changes to this setting before October 3 will result in a prorated charge, as noted above.
How do I add One Year Extended Version History to my account or to my Group’s backups?
For individual Backblaze users: simply log in to your Backblaze account and navigate to the Overview page. From there you’ll see a list of all your computers and their selected Version History. To make a change, press the Update button next to the computer you wish to add One Year Extended Version History for.
For Group admins: simply log in to your Backblaze account and navigate to the Groups Management page. From there, you’ll see a list of all of the Groups you manage and their selected Version History. To make a change, press the Update button next to the Group you wish to enable One Year Extended Version History for, and all computers within it will be enabled.
Can I still use Forever Version History?
Yes. Forever Version History is still available. The prior $2 per month charge will be removed, and only files changed, deleted, or modified over a year ago will be charged at the incremental $0.006/GB/month.
I already have One Year Extended Version History on my account. Will my price go up?
It depends on your payment plan. If you are on a monthly plan with One Year Extended Version History, you will not see an increase. However, anyone on a yearly plan will see an increase from $94 to $99, and for two-year licenses, your price will increase from $178 to $189.
You probably invested in a network attached storage (NAS) device to centralize your storage, manage data more efficiently, and implement on-site backups. So, keeping that data safe is important to you. Unfortunately, as NAS devices have risen in popularity, cybercriminals have taken notice.
Recent high-profile ransomware campaigns have targeted vast numbers of NAS devices worldwide. These malicious attacks can lock away users’ NAS data, holding it hostage until a ransom is paid—or the user risks losing all their data.
If you are a NAS user, learning how to secure your NAS device against ransomware attacks is critical if you want to protect your data. In this guide, you’ll learn why NAS devices are attractive targets for ransomware and how to safeguard your NAS device from ransomware attacks. Let’s get started.
What Is Ransomware?
To begin, let’s quickly understand what ransomware actually is. Ransomware is a type of malicious software or malware that infiltrates systems and encrypts files. Upon successful infection, ransomware denies users access to their files or systems, effectively holding data hostage.
Its name derives from its primary purpose—to demand a “ransom” from the victim in exchange for restoring access to their data. Ransomware actors often threaten to delete, sell, or leak data if the ransom is not paid.
Ransomware threat messages often imitate law enforcement agencies, claiming that the user violated laws and must pay a fine. Other times, it’s a blunt threat—pay or lose your data forever. This manipulative strategy preys on fears and urgency, often pressuring the unprepared victims into paying the ransom.
The consequences of a ransomware attack can be severe. The most immediate impact is data loss, which can be catastrophic if the encrypted files contain sensitive or critical information. There’s also the financial loss from the ransom payment itself which can range from a few hundred dollars to several million dollars.
Moreover, an attack can cause significant operational downtime, with systems unavailable while the malware is removed and data is restored. For businesses, especially the unprepared, the downtime can be disastrous, leading to substantial revenue loss.
Cybersecurity Ventures expects that by 2031, businesses will fall victim to a ransomware attack every other second. Source.
However, the damage doesn’t stop there. The reputational damage caused by a ransomware attack can make customers, partners, and stakeholders lose trust in a business that falls victim to such an attack, especially if it results in a data breach.
As you can see, ransomware is not just malicious code that disrupts your business, it can cause significant harm on multiple fronts. Therefore, it’s important to understand the basics of ransomware as the first step in building a robust defense strategy for your NAS device.
Types of Ransomware
While the modus operandi of ransomware—to deny access to users’ data and demand ransom—remains relatively constant, there are multiple ransomware variants, each with unique characteristics.
Some of the most common types of ransomware include:
Locker Ransomware
Locker ransomware takes an all-or-nothing approach. It locks users out of their entire system, preventing them from accessing any files, applications, or even the operating system itself.
The only thing the users can access is a ransomware note, demanding payment in exchange for restoring access to their system.
Crypto Ransomware
As its name suggests, crypto ransomware encrypts the users’ files and makes them inaccessible. This type of ransomware does not lock the entire system, but rather targets specific file types such as documents, spreadsheets, and multimedia files. The victims can still use their system but cannot access or open the encrypted files without the encryption key.
Ransomware as a Service (RaaS)
RaaS represents a new business model in the dark world of cybercrime. It is essentially a cloud-based platform where ransomware developers sell or rent their ransomware codes to other cybercriminals, who then distribute and manage the ransomware attacks. The ransomware developers receive a cut of the ransom payments.
Leakware
Leakware steals sensitive or confidential information and threatens to publicize them if ransom is not paid. This type of ransomware is particularly damaging as even if the ransom is paid and the data is not leaked, the mere fact that the data was accessed can have significant legal and reputational implications.
Only 4% of victims who paid ransoms actually got all of their data back. Source.
Scareware
Scareware uses social engineering to trick victims into believing that their system is infected with viruses or other malware. They scare people into visiting spoofed or infected websites or downloading malicious software (malware). While not as directly damaging as other forms of ransomware, scareware can be used as the gateway to a more intricate cyberattack and may not be an attack in and of itself.
Can Ransomware Attack NAS?
Yes, ransomware can and frequently does target NAS devices. These storage solutions, while highly effective and efficient, have certain characteristics that make them attractive to cybercriminals.
Let’s explore some of these reasons in more detail below.
Centralized Storage
NAS devices act as centralized storage locations with all data stored in one place. This makes them an attractive target for ransomware attacks. By infiltrating a single NAS device, bad actors can gain access to a significant amount of company data, maximizing the impact of their attack and the potential ransom.
Security Vulnerabilities
Unlike traditional PCs or servers, NAS devices often lack robust security measures. Most NAS systems may not have an antivirus installed, leaving them exposed to various forms of malware including ransomware. Additionally, outdated firmware can further weaken the device’s defenses, offering potential loopholes for attackers to exploit.
Always Online
NAS devices are designed to be continuously online, allowing for convenient and seamless data access. However, this also means they are constantly exposed to the internet, making them a target for online threats around the clock.
Default Configuration Settings
NAS devices, like many other hardware devices, often come with default configurations that prioritize ease of access over security. For example, they may have simple, easy-to-guess default passwords or open access permissions for all users. Not changing these default settings can leave the devices vulnerable to attacks.
Risk Factors: The Human Element
NAS devices are an easy-to-use, accessible way to expand on-site storage and manage data, making them attractive for people without an IT background to use. However, novice users, and even many of your smartest power users, may not know to follow key best practices to prevent ransomware. As humans, all of us are vulnerable to error. In addition to NAS devices having some unique characteristics that make them prime targets for cybercriminals, you can’t discount the human element in ransomware protection. Understanding the following risks can help you shore up your defenses:
Lack of User Awareness
There is often a lack of awareness among NAS users about the potential security risks associated with these devices. Most users may not realize the importance of regularly updating their NAS systems or implementing security measures. This can result in NAS devices being unprotected, making them easy prey for ransomware attacks.
Insufficient Backup Practices
While NAS devices provide local data storage, it has to be noted that they are not a full 3-2-1 backup solution. Data on NAS devices needs to be backed up off-site to protect against hardware failures, theft, natural disasters, and ransomware attacks. If users don’t have an off-site backup, they risk losing all their data or paying a huge ransom to get access to their NAS data.
Lack of Regular Audits
Conducting regular security checks and audits can help identify and rectify any potential vulnerabilities. But, most NAS users take regular security audits as an afterthought and let security gaps go unnoticed and unaddressed.
Uncontrolled User Access
In some organizations, NAS devices may be accessed by numerous employees, some of whom may not be trained in security best practices. This can increase the chances of ransomware attacks via tactics like phishing emails.
Up to 70% of phishing emails are opened by the recipient. Source.
Neglected Software Updates
NAS device manufacturers often release software updates that include patches for security vulnerabilities. If users neglect to regularly update the software on their NAS devices, they can leave the devices exposed to ransomware attacks that exploit those vulnerabilities.
How Do I Protect My NAS From Ransomware?
Now that you understand the NAS devices vulnerabilities and threats that expose them to ransomware attacks, let’s take a look at some of the practical measures that you can take to protect your NAS from these attacks.
Update regularly: One of the most straightforward yet effective measures you can take is to keep your NAS devices’ applications up-to-date. This includes applying patches, firmware, and operating system updates as soon as they’re available and released by your NAS device manufacturer or backup application provider. These updates often contain security enhancements and fixes for vulnerabilities that could otherwise be exploited by ransomware.
Use strong credentials: Make sure all user accounts, especially admin accounts, are protected by strong, unique passwords. Strong credentials are a simple but effective way to avoid falling victim to brute force attacks that use a trial and error method to crack passwords.
Disable default admin accounts: Like we discussed above, most NAS devices come with default admin accounts with well-known usernames and passwords, making them easy targets for attackers. It’s a good idea to disable all these default accounts or change their credentials.
Limit access to NAS: Most businesses provide wide open access to all their users to access NAS data. However, chances are that not every user needs access to every file on your NAS. Limiting access based on user roles and responsibilities can minimize the potential impact in case of a ransomware attack.
Create different user access levels: Along the same lines of limiting access, consider creating different levels of user access. This can prevent a ransomware infection from spreading if a user with a lower level of access falls victim to an attack.
Block suspicious IP addresses: Consider utilizing network security tools to monitor and block IP addresses that have made multiple failed login attempts and/or seem suspicious. This can help prevent brute force attacks.
Implement a firewall and intrusion detection system: Firewalls can prevent unauthorized access to your NAS, while intrusion detection systems can alert you to any potential security breaches. Both can be crucial ways of defense against ransomware.
Adopt the 3-2-1 backup rule with Object Lock: Like we discussed above, NAS devices offer a centralized storage solution that is local, fast, and easy to share. However, NAS is not a backup solution as it doesn’t protect your data from theft, natural disasters, or hardware failures. Therefore, it’s essential to implement a 3-2-1 backup strategy, where three copies of your data is stored on two different types of storage with one copy stored off-site. This can ensure that you have a secure and uninfected backup even if your NAS is hit by ransomware. The Object Lock feature, available with cloud storage providers such as Backblaze, prevents data from being deleted, ensuring your backup remains intact even in the event of a ransomware attack.
The Role of Cybersecurity Training
While technical measures are a crucial part of NAS ransomware protection, they are only as effective as the people who use them. Human error is often cited as one of the leading causes of successful cyber-attacks, including ransomware.
This is where cybersecurity training comes in, playing an important role in helping individuals identify and avoid threats.
Studies have shown that in 93% of cases, an external attacker can breach an organizations network perimeter and gain access to local network resources. Source.
So, what kind of training can you do to help your staff avoid threats?
Identification training: Provide staff members with the knowledge and tools they need to recognize potential threats. This includes identifying suspicious emails, websites, or software, and understanding the dangers of clicking on unverified links or downloading unknown attachments, and also knowing how to handle and report a suspected threat when one arises.
Understanding human attack vendors: Cybercriminals often target individuals within an organization, exploiting common human weaknesses such as lack of awareness or curiosity. By understanding how these attacks work, employees can be better equipped to avoid falling victim to them.
Preventing attacks: Ultimately, the goal of cyber security training is to prevent attacks. By training staff on how to recognize and respond to potential threats, businesses can drastically reduce their risk of a successful ransomware attack. This not only helps the company’s data but also its reputation and financial well-being.
Also, it is important to remember that cybersecurity training should not be a one-time event. Cyber threats are constantly evolving, so regular training is necessary to ensure that staff members are aware of the latest threats and the best practices for dealing with them.
Protecting Your NAS Data From Threats
Ransomware is an ever evolving threat in our digital world and NAS devices are no exception. With the rising popularity of NAS devices among businesses, cybercriminals have been targeting NAS devices with high profile ransomware campaigns.
Having a comprehensive understanding of the basics of ransomware to recognize why NAS devices are attractive targets is the first step toward protecting your NAS devices from these attacks. By keeping systems and applications updated, enforcing robust credentials, limiting access, employing proactive network security measures, and backing up data, you can create a strong defense line against ransomware attacks.
Additionally, investing in regular cybersecurity training for all users can significantly decrease the risk of an attack being successful due to human error. Remember, cybersecurity is not a one-time effort but a continuous process of learning, adapting, and implementing best practices. Stay informed about the latest NAS ransomware types and tactics, maintain regular audits of your NAS devices, and continuously reevaluate and improve your security measures.
Every step you take towards better security not only protects your NAS data, but sends a strong message to cybercriminals and contributes towards a safer digital ecosystem for all.
Backblaze is happy to announce that Chris Opat has joined our team as senior vice president of cloud operations. Chris will oversee the strategy and operations of the Backblaze global cloud storage platform.
What Chris Brings to Backblaze
Chris expands the company’s leadership by bringing his impressive cloud and infrastructure knowledge with more than 25 years of industry experience.
Previously, Chris served as senior vice president leading platform engineering and operations at StackPath, a specialized provider in edge technology and content delivery. He also held leadership roles at CyrusOne, CompuCom, Cloudreach, and Bear Stearns/JPMorgan. Chris earned his Bachelor of Science degree in television and digital media production from Ithaca College.
Backblaze CEO, Gleb Budman, shared that Chris is a forward-thinking cloud leader with a proven track record of leading teams that are clever and bold in solving problems and creating best-in-class experiences for customers. His expertise and approach will be pivotal as more customers move to an open cloud ecosystem and will help advance Backblaze’s cloud strategy as we continue to grow.
Chris’ Role as SVP of Cloud Operations
As SVP of Cloud Operations, Chris oversees cloud strategy, platform engineering, and technology infrastructure, enabling Backblaze to further scale capacity and improve performance to meet larger-sized customers’ needs, as we continue to see success in moving up-market.
Chris says of his new role at Backblaze:
Backblaze’s vision and mission resonate with me. I’m proud to be joining a company that is supporting customers and advocating for an open cloud ecosystem. I’m looking forward to working with the amazing team at Backblaze as we continue to scale with our customers and accelerate growth.
This post was originally published in 2017 and updated in 2019 and 2023 to share the latest information on cloud storage tiering.
Temperature, specifically a range from cold to hot, is a common way to describe different levels of data storage. It’s possible these terms originated based on where data was historically stored. Hot data was stored close to the heat of the spinning drives and CPUs. Cold data was stored on drives or tape away from the warmer data center, likely tucked away on a shelf somewhere.
Today, they’re used to describe how easily you can access your data. Hot storage is for data you need fast or access frequently. Cold storage is typically used for data you rarely need. The terms are used by most data storage providers to describe their tiered storage plans. However, there are no industry standard definitions for what hot and cold mean, which makes comparing services across different storage providers challenging.
It’s a common misconception that hot storage means expensive storage and that cold storage means slower, less expensive storage. Today, we’ll explain why these terms may no longer be serving you when it comes to anticipating storage cost and performance.
Defining Hot Storage
Hot storage serves as the go-to destination for frequently accessed and mission-critical data that demands swift retrieval. Think of it as the fast lane of data storage, tailored for scenarios where time is of the essence. Industries relying on real-time data processing and rapid response times, such as video editing, web content, and application development, find hot storage to be indispensable.
To achieve the necessary rapid data access, hot storage is often housed in hybrid or tiered storage environments. The hotter the service, the more it embraces cutting-edge technologies, including the latest drives, fastest transport protocols, and geographical proximity to clients or multiple regions. However, the resource-intensive nature of hot storage warrants a premium, and leading cloud data storage providers like Microsoft’s Azure Hot Blobs and AWS S3 reflect this reality.
Data stored in the hottest tier might use solid-state drives (SSDs), which are optimized for lower latency and higher transactional rates compared to traditional hard drives. In other cases, hard disk drives are more suitable for environments where the drives are heavily accessed due to their higher durability standing up to intensive read/write cycles.
Regardless of the storage medium, hot data workloads necessitate fast and consistent response times, making them ideal for tasks like capturing telemetry data, messaging, and data transformation.
Defining Cold Storage
On the opposite end of the data storage spectrum lies cold storage, catering to information accessed infrequently and without the urgency of hot data. Cold storage houses data that might remain dormant for extended periods, months, years, decades, or maybe forever. Practical examples might include old projects or records mandated for financial, legal, HR, or other business record-keeping requirements.
Cold cloud storage systems prioritize durability and cost-effectiveness over real-time data manipulation capabilities. Services like Amazon Glacier and Google Coldline take this approach, offering slower retrieval and response times than their hot storage counterparts. Lower performing and less expensive storage environments, both on-premises and in the cloud, commonly host cold data.
Linear Tape Open (LTO or Tape) has historically been a popular storage medium for cold data, though manual retrieval from storage racks renders it relatively slow. To access data from LTO, the tapes must be physically retrieved from storage racks and mounted in a tape reading machine, making it one of the slowest, therefore coldest, methods of storing data.
While cold cloud storage systems generally boast lower overall costs than warm or hot storage, they may incur higher per-operation expenses. Accessing data from cold storage demands patience and thoughtful planning, as the response times are intentionally sluggish.
With the landscape of data storage continually evolving, the definition of cold storage has also expanded. In modern contexts, cold storage might describe completely offline data storage, wherein information resides outside the cloud and remains disconnected from any network. This isolation, also described as air gapped, is crucial for safeguarding sensitive data. However, today, data can be virtually air-gapped using technology like Object Lock.
Traditional Views of Cold and Hot Data Storage
Cold
Hot
Access Speed
Slow
Fast
Access Frequency
Seldom or Never
Frequent
Data Volume
Low
High
Storage Media
Slower drives, LTO, offline
Faster drives, durable drives, SSDs
Cost
Lower
Higher
What Is Hot Cloud Storage?
Today there are new players in data storage, who, through innovation and efficiency, are able to offer cloud storage at the cost of cold storage, but with the performance and availability of hot storage.
The concept of organizing data by temperature has long been employed by diversified cloud providers like Amazon, Microsoft, and Google to describe their tiered storage services and set pricing accordingly. But, today, in a cloud landscape defined by the open, multi-cloud internet, customers have come to realize the value and benefits they can get from moving away from those diversified providers.
A wave of independent cloud providers are disrupting the traditional notions of cloud storage temperatures, offering cloud storage that’s as cost-effective as cold storage, yet delivering the speed and availability associated with hot storage. If you’re familiar with Backblaze B2 Cloud Storage, you know where we’re going with this.
Backblaze B2 falls into this category. We can compete on price with LTO and other traditionally cold storage services, but can be used for applications that are usually reserved for hot storage, such as media management, workflow collaboration, websites, and data retrieval.
The newfound efficiency of this model has prompted customers to rethink their storage strategies, opting to migrate entirely from cumbersome cold storage and archival systems.
What Temperature Is Your Cloud Storage?
When it comes to choosing the right storage temperature for your cloud data, organizations must carefully consider their unique needs. Ensuring that storage costs align with actual requirements is key to maintaining a healthy bottom line. The ongoing evolution of cloud storage services, driven by efficiency, technology, and innovation, further amplifies the need for tailored storage solutions.
Still have questions that aren’t answered here? Join the discussion in the comments.
Are you confident that your backup strategy has you covered? If not, it’s time to confront the reality that your backup strategy might not be as strong as you think. And even if you’re feeling great about it, it can never hurt to poke holes in your strategy to see where you need to shore up your defenses.
Whether you’re a small business owner wearing many hats (including the responsibility for backing up your company’s data) or a seasoned IT professional, you know that protecting your data is a top priority. The industry standard is the 3-2-1 backup strategy, which states you should have three copies of your data on two different kinds of media with at least one copy off-site or in the cloud. But a lot has changed since that standard was introduced.
In this post, we’ll identify several ways your 3-2-1 strategy (and your backups in general) could fail. These are common mistakes that even professional IT teams can make. While 3-2-1 is a great place to start, especially if you’re not currently following that approach, it can now be considered table stakes.
For larger businesses or any business wanting to fail proof its backups, read on to learn how you can plug the gaps in your 3-2-1 strategy and better secure your data from ransomware and other disasters.
Join the Webinar
There’s more to learn about how to shore up your data protection strategy. Join Backblaze on Thursday, August 10 at 10 a.m. PT/noon CT/5 p.m. UTC for a 30-minute webinar on “10 Common Data Protection Mistakes.”
Let’s start with a quick review of the 3-2-1 strategy.
The 3-2-1 Backup Strategy
A 3-2-1 strategy means having at least three total copies of your data, two of which are local but on different media, and at least one off-site copy or in the cloud. For instance, a business may keep a local copy of its data on a server at the main office, a second copy of its data on a NAS device in the same location, and a third copy of its data in the public cloud, such as Backblaze B2 Cloud Storage. Hence, there are three copies of its data with two local copies on different media (the server and NAS) and one copy stored off-site in the cloud.
The 3-2-1 rule originated in 2005 when Peter Krogh, a photographer, writer, and consultant, introduced it in his book, “The DAM Book: Digital Asset Management for Photographers.” As this rule was developed almost 20 years ago, you can imagine that it may be outdated in some regards. Consider that 2005 was the year YouTube was founded. Let’s face it, a lot has changed since 2005, and today the 3-2-1 strategy is just the starting point. In fact, even if you’re faithfully following the 3-2-1 rule, there may still be some gaps in your data protection strategy.
While backups to external hard drives, tape, and other recordable media (CDs, DVDs, and SD cards) were common two decades ago, those modalities are now considered legacy storage. The public cloud was a relatively new innovation in 2005, so, at first, 3-2-1 did not even consider the possibilities of cloud storage.
Arguably, the entire concept of “media” in 3-2-1 (as in having two local copies of your data on two different kinds of media) may not make sense in today’s modern IT environment. And, while an on-premises copy of your data typically offers the fastest Recovery Time Objective (RTO), having two local copies of your data will not protect against the multitude of potential natural disasters like fire, floods, tornados, and earthquakes.
The “2” part of the 3-2-1 equation may make sense for consumers and sole proprietors (e.g., photographers, graphic designers, etc.) who are prone to hardware failure and for whom having a second copy of data on a NAS device or external hard drive is an easy solution, but enterprises have more complex infrastructures.
Enterprises may be better served by having more than one off-site copy, in case of an on-premises data disaster. This can be easily automated with a cloud replication tool which allows you to store your data in different regions. (Backblaze offers Cloud Replication for this purpose.) Replicating your data across regions provides geographical separation from your production environment and added redundancy. The bottom line is that 3-2-1 is a good starting point for configuring your backup strategy, but it should not be taken as a one-size-fits-all approach.
The 3-2-1-1-0 Strategy
Some companies in the data protection space, like Veeam, have updated 3-2-1 with the 3-2-1-1-0 approach. This particular definition stipulates that you:
Maintain at least three copies of business data.
Store data on at least two different types of storage media.
Keep one copy of the backups in an off-site location.
Keep one copy of the media offline or air gapped.
Ensure all recoverability solutions have zero errors.
The 3-2-1-1-0 approach addresses two important weaknesses of 3-2-1. First, 3-2-1 doesn’t address the prevalence of ransomware. Even if you follow 3-2-1 with fidelity, your data could still be vulnerable to a ransomware attack. The 3-2-1-1-0 rule covers this by requiring one copy to be offline or air gapped. With Object Lock, your data can be made immutable, which is considered a virtual air gap, thus fulfilling the 3-2-1-1-0 rule.
Second, 3-2-1 does not consider disaster recovery (DR) needs. While backups are one part of your disaster recovery plan, your DR plan needs to consider many more factors. The “0” in 3-2-1-1-0 captures an important aspect of DR planning, which is that you must test your backups and ensure you can recover from them without error. Ultimately, you should architect your backup strategy to support your DR plan and the potential need for a recovery, rather than trying to abide by any particular backup rule.
Additional Gaps in Your Backup Strategy
As you can tell by now, there are many shades of gray when it comes to 3-2-1, and these varying interpretations can create areas of weakness in a business’ data protection plan. Review your own plan for the following seven common mistakes and close the gaps in your strategy by implementing the suggested best practices.
1. Using Sync Functionality Instead of Backing Up
You may be following 3-2-1, but if copies of your data are stored on a sync service like Google Drive, Dropbox, or OneDrive, you’re not fully protected. Syncing your data does not allow you to recover from previous versions with the level of granularity that a backup offers.
Best Practice: Instead, ensure you have three copies of your data protected by true backup functionality.
2. Counting Production Data as a Backup
Some interpret the production data to be one of the three copies of data or one of the two different media types.
Best Practice: It’s open to interpretation, but you may want to consider having three copies of data in addition to your production data for the best protection.
3. Using a Storage Appliance That’s Vulnerable to Ransomware
Many on-premises storage systems now support immutability, so it’s a good time to reevaluate your local storage.
Best Practice: New features in popular backup software like Veeam even enable NAS devices to be protected from ransomware. Learn more about Veeam support for NAS immutability and how to orchestrate end-to-end immutability for impenetrable backups.
4. Not Backing Up Your SaaS Data
It’s a mistake to think your Microsoft 365, Google Workspace, and other software as a service (SaaS) data is protected because it’s already hosted in the cloud. SaaS providers operate under a “shared responsibility model,” meaning they may not back up your data as often as you’d like or provide effective means to recovery.
Best Practice: Be sure to back up your SaaS data to the cloud to ensure complete coverage of the 3-2-1 rule.
5. Relying On Off-Site Legacy Storage
It’s always a good idea to have at least one copy of your data on-site for the fastest RTO. But if you’re relying on legacy storage, like tape, to fulfill the off-site requirement of the 3-2-1 strategy, you probably know how expensive and time-consuming it can be. And sometimes that expense and timesuck means your off-site backups are not updated as often as they should be, which leads to mistakes.
Best Practice: Replace your off-site storage with cloud storage to modernize your architecture and prevent gaps in your backups. Backblaze B2 is one-fifth of the cost of AWS, so it’s easily affordable to migrate off tape and other legacy storage systems.
6. No Plan for Affected Infrastructure
Faithfully following 3-2-1 will get you nowhere if you don’t have the infrastructure to restore your backups. If your infrastructure is destroyed or disrupted, you need a way to ensure business continuity in the face of data disaster.
Best Practice: Be sure your disaster recovery plan outlines how you will access your DR documentation and implement the plan even if your environment is down. Using a tool like Cloud Instant Business Recovery (Cloud IBR), which offers an on-demand, automated solution that allows Veeam users to stand up bare metal servers in the cloud, allows you to immediately begin recovering data while rebuilding infrastructure.
7. Keeping Your Off-Site Copy Down the Street
The 3-2-1 policy states that one copy of your data be kept off-site, and some companies maintain a DR site for that exact purpose. However, if your DR facility is in the same local area as your main office, you have a big gap in your data protection strategy.
Best Practice: Ideally, you should have an off-site copy of your data stored in a public cloud data center far from your data production site, to protect against regional natural disasters.
Telco Adopts Cloud for Geographic Separation
AcenTek’s existing storage scheme covered the 3-2-1 basics, but their off-site copy was no further away than their own data center. In the case of a large natural disaster, their one off-site copy could be vulnerable to destruction, leaving them without a path to recovery. With Backblaze B2, AcenTek has an additional layer of resilience for its backup data by storing it in a secure, immutable cloud storage platform across the country from their headquarters in Minnesota.
Modernize Your Backup Strategy
The 3-2-1 strategy is a great starting point for small businesses that need to develop a backup plan, but larger mid-market and enterprise organizations must think about business continuity more holistically.
Backblaze B2 Cloud Storage makes it easy to modernize your backup strategy by sending data backups and archives straight to the cloud—without the expense and complexity of many public cloud services.
At one-fifth of the price of AWS, Backblaze B2 is an affordable, time-saving alternative to the hyperscalers, LTO, and traditional DR sites. Get started today or contact Sales for more information on Backblaze B2 Reserve, Backblaze’s all-inclusive capacity-based pricing that includes premium support and no egress fees. The intricacies of operations, data management, and potential risks demand a more advanced approach to ensure uninterrupted operations. By leveraging cloud storage, you can create a robust, cost-effective, and flexible backup strategy that you can easily customize to your business needs.
Interested in learning more about backup, business continuity, and disaster recovery best practices? Check out the free Backblaze resources below.
At the end of Q2 2023, Backblaze was monitoring 245,757 hard drives and SSDs in our data centers around the world. Of that number, 4,460 are boot drives, with 3,144 being SSDs and 1,316 being HDDs. The failure rates for the SSDs are analyzed in the SSD Edition: 2022 Drive Stats review.
Today, we’ll focus on the 241,297 data drives under management as we review their quarterly and lifetime failure rates as of the end of Q2 2023. Along the way, we’ll share our observations and insights on the data presented, tell you about some additional data fields we are now including and more.
Q2 2023 Hard Drive Failure Rates
At the end of Q2 2023, we were managing 241,297 hard drives used to store data. For our review, we removed 357 drives from consideration as they were used for testing purposes or drive models which did not have at least 60 drives. This leaves us with 240,940 hard drives grouped into 31 different models. The table below reviews the annualized failure rate (AFR) for those drive models for Q2 2023.
Notes and Observations on the Q2 2023 Drive Stats
Zero Failures: There were six drive models with zero failures in Q2 2023 as shown in the table below.
The table is sorted by the number of drive days each model accumulated during the quarter. In general a drive model should have at least 50,000 drive days in the quarter to be statistically relevant. The top three drives all meet that criteria, and having zero failures in a quarter is not surprising given the lifetime AFR for the three drives ranges from 0.13% to 0.45%. None of the bottom three drives has accumulated 50,000 drive days in the quarter, but the two Seagate drives are off to a good start. And, it is always good to see the 4TB Toshiba (model: MD04ABA400V), with eight plus years of service, post zero failures for the quarter.
The Oldest Drive? The drive model with the oldest average age is still the 6TB Seagate (model: ST6000DX000) at 98.3 months (8.2 years), with the oldest drive of this cohort being 104 months (8.7 years) old.
The oldest operational data drive in the fleet is a 4TB Seagate (model: ST4000DM000) at 105.2 months (8.8 years). That is quite impressive, especially in a data center environment, but the winner for the oldest operational drive in our fleet is actually a boot drive: a WDC 500GB drive (model: WD5000BPKT) with 122 months (10.2 years) of continuous service.
Upward AFR: The AFR for Q2 2023 was 2.28%, up from 1.54% in Q1 2023. While quarterly AFR numbers can be volatile, they can also be useful in identifying trends which need further investigation. In this case, the rise was expected as the age of our fleet continues to increase. But was that the real reason?
Digging in, we start with the annualized failure rates and average age of our drives grouped by drive size, as shown in the table below.
For our purpose, we’ll define a drive as old when it is five years old or more. Why? That’s the warranty period of the drives we are purchasing today. Of course, the 4TB and 6TB drives, and some of the 8TB drives, came with only two year warranties, but for consistency we’ll stick with five years as the point at which we label a drive as “old”.
Using our definition for old drives eliminates the 12TB, 14TB and 16TB drives. This leaves us with the chart below of the Quarterly AFR over the last three years for each cohort of older drives, the 4TB, 6TB, 8TB, and 10TB models.
Interestingly, the oldest drives, the 4TB and 6TB drives, are holding their own. Yes, there has been an increase over the last year or so, but given their age, they are doing well.
On the other hand, the 8TB and 10TB drives, with an average of five and six years of service respectively, require further attention. We’ll look at the lifetime data later on in this report to see if our conclusions are justified.
What’s New in the Drive Stats Data?
For the past 10 years, we’ve been capturing and storing the drive stats data and since 2015 we’ve open sourced the data files that we used to create the Drive Stats reports. From time to time, new SMART attribute pairs have been added to the schema as we install new drive models which report new sets of SMART attributes. This quarter we decided to capture and store some additional data fields about the drives and the environment they operate in, and we’ve added them to the publicly available Drive Stats files that we publish each quarter.
The New Data Fields
Beginning with the Q2 2023 Drive Stats data, there are three new data fields populated in each drive record.
Vault_id: All data drives are members of a Backblaze Vault. Each vault consists of either 900 or 1,200 hard drives divided evenly across 20 storage servers. The vault is a numeric value starting at 1,000.
Pod_id: There are 20 storage servers in each Backblaze Vault. The Pod_id is a numeric field with values from 0 to 19 assigned to one of the 20 storage servers.
Is_legacy_format: Currently 0, but will be useful over the coming quarters as more fields are added.
The new schema is as follows:
date
serial_number
model
capacity_bytes
failure
vault_id
pod_id
is_legacy_format
smart_1_normalized
smart_1_raw
Remaining SMART value pairs (as reported by each drive model)
Occasionally, our readers would ask if we had any additional information we could provide with regards to where a drive lived, and, more importantly, where it died. The newly-added data fields above are part of the internal drive data we collect each day, but they were not included in the Drive Stats data that we use to create the Drive Stats reports. With the help of David from our Infrastructure Software team, these fields will now be available in the Drive Stats data.
How Can We Use the Vault and Pod Information?
First a caveat: We have exactly one quarter’s worth of this new data. While it was tempting to create charts and tables, we want to see a couple of quarters worth of data to understand it better. Look for an initial analysis later on in the year.
That said, what this data gives us is the storage server and the vault of every drive. Working backwards, we should be able to ask questions like: “Are certain storage servers more prone to drive failure?” or, “Do certain drive models work better or worse in certain storage servers?” In addition, we hope to add data elements like storage server type and data center to the mix in order to provide additional insights into our multi-exabyte cloud storage platform.
Over the years, we have leveraged our Drive Stats data internally to improve our operational efficiency and durability. Providing these new data elements to everyone via our Drive Stats reports and data downloads is just the right thing to do.
There’s a New Drive in Town
If you do decide to download our Drive Stats data for Q2 2023, there’s a surprise inside—a new drive model. There are only four of these drives, so they’d be easy to miss, and they are not listed on any of the tables and charts we publish as they are considered “test” drives at the moment. But, if you are looking at the data, search for model “WDC WUH722222ALE6L4” and you’ll find our newly installed 22TB WDC drives. They went into testing in late Q2 and are being put through their paces as we speak. Stay tuned. (Psst, as of 7/28, none had failed.)
Lifetime Hard Drive Failure Rates
As of June 30, 2023, we were tracking 241,297 hard drives used to store customer data. For our lifetime analysis, we removed 357 drives that were only used for testing purposes or did not have at least 60 drives represented in the full dataset. This leaves us with 240,940 hard drives grouped into 31 different models to analyze for the lifetime table below.
Notes and Observations About the Lifetime Stats
The Lifetime AFR also rises. The lifetime annualized failure rate for all the drives listed above is 1.45%. That is an increase of 0.05% from the previous quarter of 1.40%. Earlier in this report by examining the Q2 2023 data, we identified the 8TB and 10TB drives as primary suspects in the increasing rate. Let’s see if we can confirm that by examining the change in the lifetime AFR rates of the different drives grouped by size.
The red line is our baseline as it is the difference from Q1 to Q2 (0.05%) of the lifetime AFR for all drives. Drives above the red line support the increase, drives below the line subtract from the increase. The primary drives (by size) which are “driving” the increased lifetime annualized failure rate are the 8TB and 10TB drives. This confirms what we found earlier. Given there are relatively few 10TB drives (1,124) versus 8TB drives (24,891), let’s dig deeper into the 8TB drives models.
The Lifetime AFR for all 8TB drives jumped from 1.42% in Q1 to 1.59% in Q2. An increase of 12%. There are six 8TB drive models in operation, but three of these models comprise 99.5% of the drive failures for the 8TB drive cohort, so we’ll focus on them. They are listed below.
For all three models, the increase of the lifetime annualized failure rate from Q1 to Q2 is 10% or more which is statistically similar to the 12% increase for all of the 8TB drive models. If you had to select one drive model to focus on for migration, any of the three would be a good candidate. But, the Seagate drives, model ST8000DM002, are on average nearly a year older than the other drive models in question.
Not quite a lifetime? The table above analyzes data for the period of April 20, 2013 through June 30, 2023, or 10 years, 2 months and 10 days. As noted earlier, the oldest drive we have is 10 years and 2 months old, give or take a day or two. It would seem we need to change our table header, but not quite yet. A drive that was installed anytime in Q2 2013 and is still operational today would report drive days as part of the lifetime data for that model. Once all the drives installed in Q2 2013 are gone, we can change the start date on our tables and charts accordingly.
A Word About Drive Failure
Are we worried about the increase in drive failure rates? Of course we’d like to see them lower, but the inescapable reality of the cloud storage business is that drives fail. Over the years, we have seen a wide range of failure rates across different manufacturers, drive models, and drive sizes. If you are not prepared for that, you will fail. As part of our preparation, we use our drive stats data as one of the many inputs into understanding our environment so we can adjust when and as we need.
So, are we worried about the increase in drive failure rates? No, but we are not arrogant either. We’ll continue to monitor our systems, take action where needed, and share what we can with you along the way.
The Hard Drive Stats Data
The complete data set used to create the information used in this review is available on our Hard Drive Stats Data webpage. You can download and use this data for free for your own purpose. All we ask are three things: 1) you cite Backblaze as the source if you use the data, 2) you accept that you are solely responsible for how you use the data, and 3) you do not sell this data to anyone; it is free.
If you want the tables and charts used in this report, you can download the .zip file from Backblaze B2 Cloud Storage which contains an MS Excel spreadsheet with a tab for each of the tables or charts..
Good luck and let us know if you find anything interesting.
It’s no secret that artificial intelligence (AI) is driving innovation, particularly when it comes to processing data at scale. Machine learning (ML) and deep learning (DL) algorithms, designed to solve complex problems and self-learn over time, are exploding the possibilities of what computers are capable of.
It’s no secret that artificial intelligence (AI) is driving innovation, particularly when it comes to processing data at scale. Machine learning (ML) and deep learning (DL) algorithms, designed to solve complex problems and self-learn over time, are exploding the possibilities of what computers are capable of.
As the problems we ask computers to solve get more complex, there’s also an unavoidable, explosive growth in the number of processes they run. This growth has led to the rise of specialized processors and a whole host of new acronyms.
Joining the ranks of central processing units (CPUs), which you may already be familiar with, are neural processing units (NPUs), graphics processing units (GPUs), and tensile processing units (TPUs).
So, let’s dig in to understand how some of these specialized processors work, and how they’re different from each other. If you’re still with me after that, stick around for an IT history lesson. I’ll get into some of the more technical concepts about the combination of hardware and software developments in the last 100 or so years.
Central Processing Unit (CPU): The OG
Think of the CPU as the general of your computer. There are two main parts of a CPU, an arithmetic-logic unit (ALU) and a control unit. An ALU allows arithmetic (add, subtract, etc.) and logic (AND, OR, NOT, etc.) operations to be carried out. The control unit controls the ALU, memory, and IO functions, which tells them how to respond to the program that’s just been read from the memory.
The best way to track what the CPU does is to think of it as an input/output flow. The CPU will take the request (input), access the memory of the computer for instructions on how to perform that task, delegate the execution to either its own ALUs or another specialized processor, take all that data back into its control unit, then take a single, unified action (output).
For a visual, this is the the circuitry map for an ALU from 1970:
From our good friends at Texas Instruments: the combinational logic circuitry of the 74181 integrated circuit, an early four-bit ALU. Image source.
But, more importantly, here’s a logic map about what a CPU does:
CPUs have gotten more powerful over the years as we’ve moved from single-core processors to multicore processors. Basically, there are several ALUs executing tasks that are being managed by the CPU’s control unit, and they perform tasks in parallel. That means that it works well in combination with specialized AI processors like GPUs.
The Rise of Specialized Processors
When a computer is given a task, the first thing the processor has to do is communicate with the memory, including program memory (ROM)—designed for more fixed tasks like startup—and data memory (RAM)—designed for things that change more often like loading applications, editing a document, and browsing the internet. The thing that allows these elements to talk is called the bus, and it can only access one of the two types of memory at one time.
In the past, processors ran more slowly than memory access, but that’s changed as processors have gotten more sophisticated. Now, when CPUs are asked to do a bunch of processes on large amounts of data, the CPU ends up waiting for memory access because of traffic on the bus. In addition to slower processing, it also uses a ton of energy. Folks in computing call this the Von Neumann bottleneck, and as compute tasks like those for AI have become more complex, we’ve had to work out ways to solve this problem.
One option is to create chips that are optimized to specific tasks. Specialized chips are designed to solve the processing difficulties machine learning algorithms present to CPUs. In the race to create the best AI processor, big players like Google, IBM, Microsoft, and Nvidia have solved this with specialized processors that can execute more logical queries (and thus more complex logic). They achieve this in a few different ways. So, let’s talk about what that looks like: What are GPUs, TPUs, and NPUs?
Graphics Processing Unit (GPU)
GPUs started out as specialized graphics processors and are often conflated with graphics cards (which have a bit more hardware to them). GPUs were designed to support massive amounts of parallel processing, and they work in tandem with CPUs, either fully integrated on the main motherboard, or, for heavier loads, on their own dedicated piece of hardware. They also use a ton of energy and thus generate heat.
GPUs have long been used in gaming, and it wasn’t until the 2000s that folks started using them for general computing—thanks to Nvidia. Nvidia certainly designs chips, of course, but they also introduced a proprietary platform called CUDA that allows programmers to have direct access to a GPU’s virtual instruction set and parallel computational elements. This means that you can set up compute kernels, or clusters of processors that work together and are ideally suited to specific tasks, without taxing the rest of your resources. Here’s a great diagram that shows the workflow:
This made GPUs wildly applicable for machine learning tasks, and they benefited from the fact that they leveraged existing, well-known processes. What we mean by that is: oftentimes when you’re researching solutions, the solution that wins is not always the “best” one based on pure execution. If you’re introducing something that has to (for example) fundamentally change consumer behavior, or that requires everyone to relearn a skill, you’re going to have resistance to adoption. So, GPUs playing nice with existing systems, programming languages, etc. aided wide adoption. They’re not quite plug-and-play, but you get the gist.
As time has gone on, there are now also open source platforms that support GPUs that are supported by heavy-hitting industry players (including Nvidia). The largest of these is OpenCL. And, folks have added tensor cores, which this article does a fabulous job of explaining.
Tensor Processing Unit (TPU)
Great news: the TL:DR of this acronym boils down to: It’s Google’s proprietary AI processor. They started using them in their own data centers in 2015, released them to the public in 2016, and there are some commercially available models. They run on ASICs (hard-etched chips I’ll talk more about later) and Google’s TensorFlow software.
Compared with GPUs, they’re specifically designed to have slightly lower precision, which makes sense given that this makes them more flexible to different types of workloads. I think Google themselves sum it up best:
If it’s raining outside, you probably don’t need to know exactly how many droplets of water are falling per second—you just wonder whether it’s raining lightly or heavily. Similarly, neural network predictions often don’t require the precision of floating point calculations with 32-bit or even 16-bit numbers. With some effort, you may be able to use 8-bit integers to calculate a neural network prediction and still maintain the appropriate level of accuracy.
GPUs, on the other hand, were originally designed for graphics processing and rendering, which relies on each point’s relationship to each other to create a readable image—if you have less accuracy in those points, you amplify that in their vectors, and then you end up with Playstation 2 Spyro instead of Playstation 4 Spyro.
Another important design choice that deviates from CPUs and GPUs is that TPUs are designed around a systolic array. Systolic arrays create a network of processors that are each computing a partial task, then sending it along to the next node until you reach the end of the line. Each node is usually fixed and identical, but the program that runs between them is programmable. It’s called a data processing unit (DPU).
Neural processing unit (NPU)
“NPU” is sometimes used as the category name for all specialized AI processors, but it’s more often specifically applied to those designed for mobile devices. Just for confusion’s sake, note that Samsung also refers to its proprietary chipsets as NPU.
NPUs contain all the necessary information to complete AI processing, and they run on a principle of synaptic weight. Synaptic weight is a term adapted from biology which describes the strength of connection between two neurons. Simply put, in our bodies if two neurons find themselves sharing information more often, the connection between them becomes literally stronger, making it easier for energy to pass between them. At the end of the day, that makes it easier for you to do something. (Wow, the science between habit forming makes a lot more sense now.) Many neural networks mimic this.
When we say AI algorithms learn, this is one of the ways—they track likely possibilities over time, and give more weight to that connected node. The impact is huge when it comes to power consumption. Parallel processing runs each task next to each other, but isn’t great at accounting for the completion of tasks, especially as your architecture scales and processing units might be more separate.
Quick Refresh: Neural Networks and Decision Making in Computers
As we discuss in AI 101, when you’re thinking about the process of making a decision, what you see is that you’re actually making many decisions in a series, and often the things you’re considering before you reach your final decision affect the eventual outcome. Since computers are designed on a strict binary, they’re not “naturally” suited to contextualizing information in order to make better decisions. Neural networks are the solution. They’re based on matrix math, and they look like this:
Basically, you’re asking a computer to have each potential decision check in with all the other possibilities, to weigh the outcome, and to learn from their own experience and sensory information. That all translates to more calculations being run at one time.
Recapping the Key Differences
That was a lot. Here’s a summary:
Functionality: GPUs were developed for graphics rendering, while TPUs and NPUs are purpose-built for AI/ML workloads.
Parallelism: GPUs are made for parallel processing, ideal for training complex neural networks. TPUs take this specialization further, focusing on tensor operations to achieve higher speeds and energy efficiencies.
Customization: TPUs and NPUs are more specialized and customized for AI tasks, while GPUs offer a more general-purpose approach suitable for various compute workloads.
Use Cases: GPUs are commonly used in data centers and workstations for AI research and training. TPUs are extensively utilized in Google’s cloud infrastructure, and NPUs are prevalent in AI-enabled devices like smartphones and Internet of Things (IoT) gadgets.
Availability: GPUs are widely available from various manufacturers and accessible to researchers, developers, and hobbyists. TPUs are exclusive to Google Cloud services, and NPUs are integrated into specific devices.
Do the Differences Matter?
The definitions of the different processors start to sound pretty similar after a while. A multicore processor combines multiple ALUs under a central control unit. A GPU combines more ALUs under a specialized processor. A TPU combines multiple compute nodes under a DPU, which is analogous to a CPU.
At the end of the day, there’s some nuance about the different design choices between processors, but their impact is truly seen at scale versus at the consumer level. Specialized processors can handle larger datasets more efficiently, which translates to faster processing using less electrical power (though our net power usage may go up as we use AI tools more).
It’s also important to note that these are new and changing terms in a new and changing landscape. Google’s TPU was announced in 2015, just eight years ago. I can’t count the amount of conversations I’ve had that end in a hyperbolic impression of what AI is going to do for/to the world, and that’s largely because people think that there’s no limit to what it is.
But, the innovations that make AI possible were created by real people. (Though, maybe AIs will start coding themselves, who knows.) And, chips that power AI are real things—a piece of silicon that comes from the ground and is processed in a lab. Wrapping our heads around what those physical realities are, what challenges we had to overcome, and how they were solved, can help us understand how we can use these tools more effectively—and do more cool stuff in the future.
Bonus Content: A Bit of a History of the Hardware
Which brings me to our history lesson. In order to more deeply understand our topic today, you have to know a little bit about how computers are physically built. The most fundamental language of computers is binary code, represented as a series of 0s and 1s. Those values correspond to whether a circuit is closed or open, respectively. When a circuit is closed, you cannot push power through it. When it’s open, you can. Transistors regulate current flow, generate electrical signals, and act as a switch or gate. You can connect lots of transistors with circuitry to create an integrated circuit chip.
The combination of open and closed patterns of transistors can be read by your computer. As you add more transistors, you’re able to express more and more numbers in binary code. You can see how this influences the basic foundations of computing in how we measure bits and bytes. Eight transistors store one byte of data: two possibilities for each of the eight transistors, and then every possible combination of those possibilities (2^8) = 256 possible combinations of open/closed gates (bits), so 8 bits = one byte, which can represent any number between 0 and 255.
Transistors combining to create logic. You need a bunch of these to run a program. Image source.
Improvements in reducing transistor size and increasing transistor density on a single chip has led to improvements in capacity, speed, and power consumption, largely due to our ability to purify semiconductor materials, leverage more sophisticated tools like chemical etching, and improve clean room technology. That all started with the integrated circuit chip.
Integrated circuit chips were invented around 1958, fueled by the discoveries of a few different people who solved different challenges nearly simultaneously. Jack Kilby of Texas Instruments created a hybrid integrated circuit measuring about 7/16” by 1/16” (11.1 mm by 1.6 mm). Robert Noyce (eventual co-founder of Intel) went on to create the first monolithic integrated circuit chip (so, all circuits held on the same chip) and it was around the same size. Here’s a blown-up version of it, held by Noyce:
Note those first chips only held about 60 transistors. Current chips can have billions of transistors etched onto the same microchip, and are even smaller. Here’s an example of what a integrated circuit looks like when it’s exposed:
And, that, folks, is one of the reasons you can now have a whole computer in your pocket in the guise of a smartphone. As you can imagine, something the size of a modern laptop or rack-mounted server can combine more of these elements more effectively. Hence, the rise of AI.
One More Acronym: What are FGPAs?
So far, I’ve described fixed, physical points on a chip, but chip performance is also affected by software. Software represents the logic and instructions for how all these things work together. So, when you create a chip, you have two options: you either know what software you’re going to run and create a customized chip that supports that, or you get a chip that acts like a blank slate and can be reprogrammed based on what you need.
The first method is called application-specific integrated circuits (ASIC). However, just like any proprietary build in manufacturing, you need to build them at scale for them to be profitable, and they’re slower to produce. Both CPUs and GPUs typically run on hard-etched chips like this.
Reprogrammable chips are known as field-programmable gate arrays (FPGA). They’re flexible and come with a variety of standard interfaces for developers. That means they’re incredibly valuable for AI applications, and particularly deep learning algorithms—as things rapidly advance, FPGAs can be continuously reprogrammed with multiple functions on the same chip, which lets developers test, iterate, and deliver them to market quickly. This flexibility is most notable in that you can also reprogram things like the input/output (IO) interface, so you can reduce latency and overcome bottlenecks. For that reason, folks will often compare the efficacy of the whole class of ASIC-based processors (CPUs, GPUs, NPUs, TPUs) to FPGAs, which, of course, has also led to hybrid solutions.
Summing It All Up: Chip Technology is Rad
Improvements in materials science and microchip construction laid the foundation for providing the processing capacity required by AI, and big players in the industry (Nvidia, Intel, Google, Microsoft, etc.) have leveraged those chips to create specialized processors.
Simultaneously, software has allowed many processing cores to be networked in order to control and distribute processing loads for increased speeds. All that has led us to the rise in specialized chips that enable the massive demands of AI.
Hopefully you have a better understanding of the different chipsets out there, how they work, and the difference between them. Still have questions? Let us know in the comments.
This post has been updated since it was originally published.
Your faithful Mac has served you well for years, but it’s time to upgrade. Whether you’re selling it, giving it to a friend, donating it, or recycling it, you first need to make sure all of your personal data is wiped clean.
In this guide, we’ll take you through the process step-by-step, from backing up your files to encrypting your data, so you can make sure your private information stays private.
Before you do anything else, back up
Once you wipe your Mac, you won’t be able to access the data from your drive. Before you get started, you’ll want to make sure any important data on your hard drive has been backed up. Apple has a built-in backup utility called Time Machine backup software.
While Time Machine is a good start, it doesn’t fulfill all of the requirements of a 3-2-1 backup strategy: When you set up Time Machine backups, you choose a backup disk (an external drive or network attached storage (NAS) device) that you can save your backups to. Under the 3-2-1 backup rule (three backups, on two media types, with one off-site), that means you’d still need an off-site copy of your data, preferably saved in the cloud. Ideally, you’d pair Time Machine with a product like Backblaze Computer Backup for maximum flexibility. Note that even though backups run nearly continuously with Backblaze Computer Backup, we recommend hitting the manual backup button before you wipe your Mac to ensure you’ve got the most recent information.
Mac operating systems (OSes) and processing chips: Figuring out what you have
The process for wiping your Mac depends on a couple things:
What OS version you’re rocking
What kind of processing chip you have
Fortunately, Apple has only made it easier to wipe your computer as the years and operating systems have rolled out. If you’re using macOS Monterey or later with an Apple-based processor chip, it’s very simple—you have the option to wipe your Mac from the System Settings.
What macOS do I have?
You can see your current OS in the About This Mac screen (from the Apple menu in the upper-left corner of your screen, choose About This Mac), and below is a list of all OS releases you can compare against. You can also check out the Apple Help article on the topic.
What kind of processing chip do I have in my Mac?
The second variable you need to know is what kind of processing chip you have in your Mac—an Apple-based chip (Apple M-series) or an Intel chip.
In November 2020, Apple launched its first Macs equipped with M1 chips, replacing the Intel-based processors of the past. The evolution of the M-series Apple chips has been notable largely for performance enhancements, but given that (at the time of publishing) this was four years ago, there’s a good chance that many users will have an Intel processor.
To see what kind of chip you have, follow the same instructions as above—go to your Apple menu and select About This Mac. If you have an M-series chip, you’ll see that listed as marked in the screenshot below.
If you have an Intel-based Mac, you will see Processor, followed by the name of an Intel processor.
How to wipe your Mac
Okay, so now that you know your operating system and processing chip, we can get to the actual how-to of how to wipe your Mac. The steps will be slightly different based on each of the above variables. Let’s dig in.
Wipe a Mac with an Apple chip and a recent macOS update
If you have macOS Monterey or later with an Apple chip, then you’re going to wipe your Mac using the Erase All Content and Settings function. (You might also see this called the Erase Assistant in Apple’s Help articles.) This will delete all your data, including iCloud and Apple logins, Apple wallet information, Bluetooth pairings, fingerprint sensor profiles, and Find My Mac settings, as well as resetting your Mac to factory settings. Here’s how you find it.
If you have macOS Ventura or Sonoma:
Select the Apple menu.
Choose System Settings.
Click General in the sidebar.
Click Transfer or Reset on the right.
If you have macOS Monterey:
Select the Apple Menu.
Choose System Preferences.
Once the System Preferences window is open, select the dropdown menu in your top navigation bar. Then, select Erase All Content and Settings.
Once you’ve reached this point, then the steps will be the same for each process. Here’s what to expect.
You’ll be prompted to log in with your administrator credentials.
Next, you will be reminded to back up via Time Machine. Remember that if you choose this option, you’ll want to back up to an external device—because, of course, you’re about to get rid of all the data stored on this computer.
Click Continue to allow all your settings, data, accounts, etc. to be removed.
If you’re asked to sign out of Apple ID, enter your Apple password and hit Continue.
Click Erase all Content & Settings to confirm.
Your Mac will automatically restart. If you have an accessory like a Bluetooth keyboard, you’ll be prompted to reconnect that device.
Select a WiFi network or attach a network cable.
After joining a network, your Mac activates. Click Restart.
After your device has restarted, a setup assistant will launch (just like when you first got your Mac).
It’ll be pretty clear if you don’t meet the conditions to erase your drive using this method because you won’t see Erase All Content and Settings on the System Settings we showed you above. So, here are instructions for the other methods.
How to wipe a Mac with an Apple chip using Disk Utility
Disk Utility is exactly what it sounds like: a Mac system application that helps you to manage your various storage volumes. You’d use it to manage storage if you have additional storage volumes, like a NAS or external hard drive; to set up a partition on your drive; to create a disk image (basically, a backup); or to simply give your disks a check up if they’re acting funky.
You can access Disk Utility at any time by selecting Finder > Go > Utilities, but you can also trigger Disk Utility on startup as outlined below.
Turn on your Mac and continue to press and hold the power button until the startup options window comes up. Click Options, then click Continue.
You may be prompted to log in with either your administrative password or your Apple ID.
When the Utilities window appears, select Disk Utility and hit Continue.
If you’d previously added other drives to your startup disk, click the delete volume button (–) to erase them.
Then, choose Macintosh HD in the sidebar.
Click the Erase button, then select a file system format and enter a name for it. For Macs with an M1 chip, your option for a file system format is only Apple File System (APFS).
Click Erase or, if it’s an option, Erase Volume Group. You may be asked for your Apple ID at this point.
You’ll be prompted to confirm your choice, then your computer will restart.
Just as in the other steps, when the computer restarts, it will attempt to activate by connecting to WiFi or asking you to attach a network cable.
After it activates, select Exit to Recovery Utilities.
Once it’s done, the Mac’s hard drive will be clean as a whistle and ready for its next adventure: a fresh installation of the macOS, being donated to a relative or a local charity, or just sent to an e-waste facility. Of course, you can still drill a hole in your disk or smash it with a sledgehammer if it makes you happy, but now you know how to wipe the data from your old computer with much less ruckus.
How to wipe a Mac with an Intel Processor using Disk Utility
Last but not least, let’s talk about how to wipe an Intel-based Mac.
Starting with your Mac turned off, press the power button, then immediately hold down the command (⌘) and R keys and wait until the Apple logo appears. This will launch macOS Recovery.
You may be prompted to log in with an administrator account password.
When the Recovery window appears, select Disk Utility.
In the sidebar, choose Macintosh HD.
Click the Erase button, then select a file system format and enter a name for it. Your options for a file system format include APFS, which is the file system used by macOS 10.13 or later, and macOS Extended, which is the file system used by macOS 10.12 or earlier.
Click Erase or Erase Volume Group. You may be prompted to provide your Apple ID.
If you previously used Disk Utility to add other storage volumes, you can erase them individually using the process above.
When you’ve deleted all your drives, quit Disk Utility to return to the utilities window. You may also choose to restart your computer at this point.
Do you still need to know what kind of drive you have?
Wiping your Mac used to depend on what kind of drive you had—a hard disk drive (HDD) or solid state drive (SSD). As we’ve outlined above, today, the process depends on your OS and the type of chip you have. But some of you may have very old Macs you want to get rid of. Here we’ll talk a bit about HDDs vs SSDs and the impact that has on how you erase your computer.
Around 2010, Apple started moving to only SSD storage in many of its devices. That said, some Mac desktop computers continued to offer the option of both SSD and HDD storage until 2020, a setup they called a Fusion Drive. The Fusion Drive is not to be confused with flash storage, a term that refers to the internal storage that holds your readily available and most accessed data at lower power settings.
Note that as of November 2021, Apple does not offer any Macs with a Fusion Drive. Basically, if you bought your device before 2010 or you have a desktop computer from 2021 or earlier, there’s a chance you may be using an HDD.
To determine what kind of drive your Mac uses, click on the Apple menu and select About This Mac.
Avoid the pitfall of selecting the Storage tab in the top menu. What you’ll find is that the default name of your drive is “Macintosh HD” which is confusing, given that they’re referring to the internal storage of the computer as a hard drive when (in most cases), your drive is an SSD. While you can find information about your drive on this screen, we prefer the method that provides maximum clarity.
So, on the Overview screen, click System Report. Bonus: You’ll also see what type of processor you have and your macOS version (which will be useful later).
Once there, select the Storage tab, then the volume name you want to identify. You should see a line called Medium Type, which will tell you what kind of drive you have.
Securely erasing drives: Questions and considerations
Some of you drive experts out there might remember that there is some nuance to security when it comes to erasing drives, and that there are differences in erasing HDDs versus SSDs. Without detouring into why and how that’s the case, just know that on Fusion Drives or Intel-based Macs, you may see additional security options you can enable when erasing HDDs.
There are four options in the “Security Options” slider. “Fastest” is quick but insecure—data could potentially be rebuilt using a file recovery app. Moving that slider to the right introduces progressively more secure erasing. Disk Utility’s most secure level erases the information used to access the files on your disk, then writes zeros across the disk surface seven times to help remove any trace of what was there. This setting conforms to the DoD 5220.22-M specification. Bear in mind that the more secure method you select, the longer it will take. The most secure methods can add hours to the process. For peace of mind, we suggest choosing the most secure option to erase your hard drive. You can always start the process in the evening and let it run overnight.
After the process is complete, restart your Mac and see if you can find any data. A quick inspection is not foolproof, but it can provide some peace of mind that the process finished without an interruption.
Securely erasing SSDs and why not to
If your Mac comes equipped with an SSD, Apple’s Disk Utility software won’t actually let you zero the drive. Sounds strange, right? Apple’s online Knowledge Base explains that secure erase options are not available in Disk Utility for SSDs.
Fortunately, you are not restricted to using the standard erasure option to protect yourself. Instead, you can use FileVault, a capability built into the operating system.
Encrypting your computer with FileVault
FileVault is an excellent option to protect all of the data on a Mac SSD with encryption. FileVault is whole-disk encryption for the Mac. With FileVault engaged, you need a password to access the information on your hard drive. Even without it, your data is encrypted and it would be very difficult for anybody else to access.
Before you use FileVault, there is a crucial downside. If you lose your password or the encryption key, your data may be gone for good!
When you first set up a new Mac, you’re given the option of turning FileVault on. If you don’t do it then, you can turn on FileVault at any time by clicking on your Mac’s System Preferences, clicking on Security & Privacy, and selecting the FileVault tab. Be warned, however, that the initial encryption process can take hours, as will decryption if you ever need to turn FileVault off.
With FileVault turned on, you can restart your Mac into its Recovery System following the directions above and erase your hard drive using Disk Utility, once you’ve unlocked it (by selecting the disk, clicking the File menu, and clicking Unlock). That deletes the FileVault key, which means any data on the drive is useless.
Nowadays, most Macs manage disk encryption through the T2 chip and its Secure Enclave, which is entirely separate from the main computer itself. This is why FileVault has no CPU overhead—it’s all handled by the T2 chip. Although FileVault doesn’t impact the performance of most modern Macs, we’d suggest only using it if your Mac has an SSD, not a conventional HDD.
Securely erasing free space on your SSD
If you don’t want to take Apple’s word for it, if you’re not using FileVault, or if you just want to, there is a way to securely erase free space on your SSD. It’s a little more involved, but it works. Before we get into the nitty-gritty, let me state for the record that this really isn’t necessary to do, which is why Apple’s made it so hard to do.
To delete all data from an SSD on an Apple computer, use Apple’s Terminal app. Terminal provides you with command line interface (CLI) access to the OS X operating system. Terminal lives in the Utilities folder, but you can access Terminal from the Mac’s Recovery System. Once your Mac has booted into the Recovery partition, click the Utilities menu and launch Terminal.
From a Terminal command line, type the following:
diskutil secureErase freespace VALUE /Volumes/DRIVE
That tells your Mac to securely erase the free space on your SSD. You’ll need to change value to a number between 0 and 4. Zero is a single-pass run of zeroes, 1 is a single-pass run of random numbers, 2 is a seven-pass erase, 3 is a 35-pass erase. Finally, level 4 is a three-pass erase with random fills plus a final zero fill. drive should be changed to the name of your hard drive. To run a seven-pass erase of your SSD drive in JohnB-MacBook, you would enter the following:
Note that while Mac’s Terminal typically uses forward slashes ( / ), if you have a space in the name of your hard drive, you’ll see a backslash ( \ ) to indicate that break in syntax. (So “Macintosh HD” becomes /Macintosh\ HD.) For example, to run a 35-pass erase on a hard drive called Macintosh HD, enter the following:
diskutil secureErase freespace 3 /Volumes/Macintosh\ HD
If you’re like the majority of computer users, you’ve never opened your Terminal application—and that’s probably a good thing. If you’re providing the proper instructions, a CLI lets you directly edit the guts of your computer. If you’re not providing the proper instructions, things will just error out, and likely you won’t know why.
In conclusion, in most cases, it’s simple to wipe your Mac hard drive
All this to say: Apple has made specific choices about designing products for folks who aren’t computer experts, and in most cases, you won’t need to break out the CLI knowledge to securely erase your hard drive. While Mac sometimes limits how customizable you can get on your device (i.e. it’s super hard to zero out an SSD), it’s usually for good reason—in this case, it’s to preserve the health of your drive in the long term. So, if you personally are planning to reuse the device you’re wiping, or if you’re not being targeted in a real-life James Bond movie, in most instances, it’s a less-than-ten step process to securely wipe your Mac and send it on to a new, shiny future.
FAQ
1. How do I wipe a Mac computer?
Wiping all data from your Mac depends on what macOS you’re using and what kind of processing chip you have. For Macs using macOS Monterey or later, you can use the Erase All Content and Settings function. This will delete all your data, including iCloud and Apple logins, Apple wallet information, Bluetooth pairings, fingerprint sensor profiles, and Find My Mac settings, as well as resetting your Mac to factory settings.
2. How do I wipe a Mac with an Intel processing chip?
To wipe a Mac with an Intel processing chip, you need to use Disk Utility, a Mac system application that helps you to manage your various storage volumes. You can access Disk Utility by selecting Finder > Go > Utilities. Choose Macintosh HD in the sidebar, click the Erase button, then select a file system format and enter a name for it. Your options for a file system format include Apple File System (APFS), which is the file system used by macOS 10.13 or later, and macOS Extended, which is the file system used by macOS 10.12 or earlier. Then click Erase or, if it’s an option, Erase Volume Group.
3. How do I encrypt data on my Mac?
FileVault is an excellent option to protect all of the data on a Mac SSD with encryption. FileVault is whole-disk encryption for the Mac. With FileVault engaged, you need a password to access the information on your hard drive. Even without it, your data is encrypted and it would be very difficult for anybody else to access.
This post has been updated since it was originally published. Unfortunately, ransomware continues to proliferate. We’ve updated the post to reflect the current state of ransomware and to help individuals and businesses protect their data.
Ransomware is one of the biggest cybersecurity threats that businesses and organizations face today. Cybercriminals use these malicious attacks to encrypt an organization’s data and systems, holding them hostage and demanding a ransom for the encryption key. In the best case scenario, you can quickly restore from backups, but it’s a harrowing experience even when you’re well prepared. That’s why it makes sense to assume it’s not a question of if, but when, and plan accordingly.
With attacks becoming increasingly sophisticated and widespread, it’s crucial for businesses to have a comprehensive plan for ransomware prevention and recovery. In this guide, we’ll cover best practices for recovering your data and systems in the event of an attack, as well as proactive measures to strengthen your defenses against ransomware.
This post is a part of our ongoing coverage of ransomware. Take a look at our other posts for more information on how businesses can defend themselves against a ransomware attack, and more.
The statistics paint a cautionary picture—ransomware attacks are only getting more common. According to a 2023 Ransomware Market Report, global ransomware costs are predicted to reach $265 billion annually by 2031, up from $20 billion in 2021.
After a brief downturn in both incidents and payments in 2022, ransomware surged back in 2023. Ransomware complaints rose to over 2,825, marking an 18% increase from the previous year. And payments exceeded $1 billion, a 96% increase from the previous year, representing the highest number ever observed. What’s more, 59% of organizations were hit by ransomware in the last year, according to Sophos’ State of Ransomware 2024 report.
Cyber criminals are continuously evolving their strategies, with the FBI noting new trends such as deploying multiple ransomware variants against the same victim and employing data destruction tactics to intensify pressure on victims to negotiate.
Ransomware by the numbers
According to the Coveware Q1 2024 Quarterly Report, the ransomware landscape saw some notable shifts in ransom demand tactics. The report states that in the first quarter of 2024, the average ransom payment continued a downward trajectory, decreasing by 32% from Q4 2023 to $381,980. However, the median ransom payment increased by 25% to $250,000.
Coveware analysts suggest this divergence is driven by fewer companies paying exorbitant ransoms, which has a compounding effect on lowering the average payment amount. Concurrently, many ransomware groups are deliberately setting more reasonable initial ransom demands, aiming to keep victims engaged in negotiations rather than deterring them outright with astronomical figures. This new approach of “reasonably” priced ransoms is an intentional tactic to increase the likelihood of victims paying.
The same Coveware report provides insights into the widespread impact of ransomware across various industries. Healthcare emerged as the most targeted sector at 18.7%, followed closely by professional services at 17.8%. The public sector, including government and educational institutions, was also heavily impacted at 11.2%.
Other notable industries affected were consumer services (10.3%), retail (5.6%), financial services, and food & staples retail (both 4.7%). The data illustrates that ransomware is a pervasive threat cutting across diverse sectors, from critical infrastructure like healthcare to consumer businesses and technology firms.
No industry seems immune, as even traditionally less digitized fields like materials (6.5%), capital goods (2.8%), and automobile manufacturing (3.7%) suffered attacks. This underscores the need for robust cybersecurity measures and ransomware readiness plans across diverse organizations, regardless of their primary domain of operations.
Ransomware also remains a significant threat across businesses of all sizes. However, small and medium sized businesses (SMBs) continue to bear the brunt of these attacks. A staggering 71.8% of impacted companies had between 11 and 1,000 employees, clearly demonstrating SMBs as a prime target for cybercriminals deploying ransomware.
While no organization is immune, the data highlights SMBs’ vulnerability, likely due to limited cybersecurity resources and staffing compared to larger enterprises. This highlights the critical need for SMBs to prioritize ransomware preparedness and implement robust security measures proportionate to the risks they face.
Simultaneously, the following chart indicates that ransomware groups are also setting their sights on major corporations, with 1.9% of impacted companies having over 100,000 employees. No sector can afford to be complacent about the pervasive ransomware threat landscape.
Ransomware as a service (Raas)
Ransomware as a service (RaaS) has emerged as a game changer in the world of cybercrime, revolutionizing the ransomware landscape and amplifying the scale and reach of malicious attacks. The RaaS business model allows even novice cybercriminals to access and deploy ransomware with relative ease, leading to a surge in the frequency and sophistication of ransomware attacks worldwide.
Traditionally, ransomware attacks required a high level of technical expertise and resources, limiting their prevalence to skilled cybercriminals or organized cybercrime groups. However, the advent of RaaS platforms has lowered the barrier to entry, making ransomware accessible to a broader range of individuals with nefarious intent. These platforms provide aspiring cybercriminals with ready-made ransomware toolkits, complete with user-friendly interfaces, step-by-step instructions, and even customer support. In essence, RaaS operates on a subscription or profit sharing model, allowing criminals to distribute ransomware and share the ransom payments with the RaaS operators.
The rise of RaaS has led to a proliferation of ransomware attacks, with cybercriminals exploiting the anonymity of the dark web to collaborate, share resources, and launch large scale campaigns. The RaaS model not only facilitates the distribution of ransomware, but it also provides criminals with analytics dashboards to track the performance of their campaigns, enabling them to optimize their strategies for maximum profit.
New strains and increased complexity
One of the most significant impacts of RaaS is the exponential growth in the number and variety of ransomware strains. RaaS platforms continuously evolve and introduce new ransomware variants, making it increasingly challenging for cybersecurity experts to develop effective countermeasures. The availability of these diverse strains allows cybercriminals to target different industries, geographical regions, and vulnerabilities, maximizing their chances of success.
The profitability of RaaS has attracted a new breed of cybercriminals, leading to an underground economy where specialized roles have emerged. Ransomware developers create and sell their malicious code on RaaS platforms, while affiliates or “distributors” spread the ransomware through various means, such as phishing emails, exploit kits, or compromised websites. This division of labor allows criminals to focus on their specific expertise, while RaaS operators facilitate the monetization process and collect a share of the ransoms.
Ransomware commoditization
The impact of RaaS extends beyond the immediate financial and operational consequences for targeted entities. The widespread availability of ransomware toolkits has also resulted in a phenomenon known as “ransomware commoditization,” where cybercriminals compete to offer their services at lower costs or even engage in price wars. This competition drives innovation and the continuous evolution of ransomware, making it a persistent and ever-evolving threat.
To combat the growing influence of RaaS, organizations and individuals require a multilayered approach to cybersecurity. Furthermore, organizations should prioritize data backups and develop comprehensive incident response plans to ensure quick recovery in the event of a ransomware attack. Regularly testing backup restoration processes is essential to maintain business continuity and minimize the impact of potential ransomware incidents.
RaaS has profoundly transformed the ransomware landscape, democratizing access to malicious tools and fueling the rise of cybercrime. The ease of use, scalability, and profitability of RaaS platforms have contributed to a surge in ransomware attacks across industries and geographic locations.
By staying vigilant and adopting robust cybersecurity measures, organizations can better protect themselves against the evolving threat posed by RaaS and ensure resilience in the face of potential ransomware incidents.
How does ransomware work?
A ransomware attack starts when a machine on your network becomes infected with malware. Cybercriminals have a variety of methods for infecting your machine, whether it’s an attachment in an email, a link sent via spam, or even through sophisticated social engineering campaigns. As users become more savvy to these attack vectors, cybercriminals’ strategies evolve. Once that malicious file has been loaded onto an endpoint, it spreads to the network, locking every file it can access behind strong encryption controlled by cybercriminals.
Types of ransomware, in addition to the traditional encryption model, include:
Non-encrypting ransomware or lock screens, which restrict access to files and data, but do not encrypt them.
Ransomware that encrypts a drive’s master boot record (MBR) or Microsoft’s NTFS, which prevents victims’ computers from being booted up in a live operating system (OS) environment.
Leakware or extortionware, which steals compromising or damaging data that the attackers then threaten to release if ransom is not paid. This type is on the rise—In 2023, 91% of ransomware attacks involved some sort of data exfiltration.
Mobile device ransomware which infects cell phones through drive-by downloads or fake apps.
What happens during a typical attack?
Threat actors have a lot of tools at their disposal to infiltrate systems, gather reconnaissance, and execute their mission. In cybersecurity parlance, these are called tactics, techniques, and procedures (TTPs). Without digging into too much detail, the typical lifecycle of a ransomware attack is as follows:
Initial compromise: Ransomware gains entry through various means such as exploiting known software vulnerabilities, using phishing emails or even physical media like thumb drives, brute-force attacks, and others. It then installs itself on a single endpoint or network device, granting the attacker remote access.
Secure key exchange: Once installed, the ransomware communicates with the perpetrator’s central command and control server, triggering the generation of cryptographic keys required to lock the system securely.
Encryption: With the cryptographic lock established, the ransomware initiates the encryption process, targeting files both locally and across the network, rendering them inaccessible without the decryption keys.
Extortion: Having gained secure and impenetrable access to your files, the ransomware displays an explanation of the next steps, including the ransom amount, instructions for payment, and the consequences of noncompliance.
Recovery options: At this stage, the victim can attempt to remove infected files and systems, restore from a clean backup, or some may consider paying the ransom.
It’s never advised to pay the ransom. According to Veeam’s 2024 Ransomware Trends Report, one in three organizations could not recover their data after paying the ransom. There’s no guarantee the decryption keys will work, and paying the ransom only further incentivizes cybercriminals to continue their attacks.
Who gets attacked?
Data has shown that ransomware attacks target firms of all sizes, and no business—from SMBs to large corporations—is immune. Attacks are on the rise in every sector and in every size of business. That said, small to medium-sized businesses are particularly vulnerable, as they may not have the resources needed to shore up their defenses and are often viewed as “easy targets” by cybercriminals.
Recent attacks where cybercriminals leaked sensitive photos of patients in a medical facility prove that no organization is out of bounds and no victim is off-limits. These attempts indicate that organizations which often have weaker controls and out-of-date or unsophisticated IT systems should take extra precautions to protect themselves and their data (especially their backup data!).
According to Veeam’s report, backup repositories are a prime target for bad actors. In fact, backup repositories are targeted in 96% of attacks, with bad actors successfully affecting the backup repositories in 76% of cases.
The U.S. consistently ranks highest in ransomware attacks, followed by the U.K. and Germany. Windows computers are the main targets, but ransomware strains exist for Macintosh and Linux, as well.
The unfortunate truth is that ransomware has become so widespread that most companies will certainly experience some degree of a ransomware or malware attack. The best they can do is be prepared and understand the best ways to minimize the impact of ransomware.
Backup repositories are targeted in 96% of attacks.
How to combat ransomware
So, you’ve been attacked by ransomware. Depending on your industry and legal requirements (which are ever-changing), you may be obligated to report the attack immediately. Otherwise, your footing should be one of damage control. What should you do next?
Isolate the infection. Swiftly isolate the infected endpoint from the rest of your network and any shared storage to halt the spread of the ransomware.
Identify the infection. With numerous ransomware strains in existence, it’s crucial to accurately identify the specific type you’re dealing with. Conduct scans of messages, files, and utilize identification tools to gain a clearer understanding of the infection.
Report the incident. While legal obligations may vary, it is advisable to report the attack to the relevant authorities. Their involvement can provide invaluable support and coordination for countermeasures.
Evaluate your options. Assess the available courses of action to address the infection. Consider the most suitable approach based on your specific circumstances.
Restore and rebuild. Utilize secure backups, trusted program sources, and reliable software to restore the infected systems or set up a new system from scratch.
1. Isolate the infection
Depending on the strain of ransomware you’ve been hit with, you may have little time to react. Fast-moving strains can spread from a single endpoint across networks, locking up your data as it goes, before you even have a chance to contain it.
The first step, even if you just suspect that one computer may be infected, is to isolate it from other endpoints and storage devices on your network. Disable Wi-Fi, disable Bluetooth, and unplug the machine from both any local area network (LAN) or storage device it might be connected to. This not only contains the spread but also keeps the ransomware from communicating with the attackers.
Know that you may be dealing with more than just one “patient zero.” The ransomware could have entered your system through multiple vectors, particularly if someone has observed your patterns before they attacked your company. It may already be laying dormant on another system. Until you can confirm, treat every connected and networked machine as a potential host to ransomware.
2. Identify the infection
Just as there are bad guys spreading ransomware, there are good guys helping you fight it. Sites like ID Ransomware and the No More Ransom! Project help identify which strain you’re dealing with. And knowing what type of ransomware you’ve been infected with will help you understand how it propagates, what types of files it typically targets, and what options, if any, you have for removal and disinfection. You’ll also get more information if you report the attack to the authorities (which you really should).
3. Report to the authorities
It’s understood that sometimes it may not be in your business’s best interest to report the incident. Maybe you don’t want the attack to be public knowledge. Maybe the potential downside of involving the authorities (lost productivity during investigation, etc.) outweighs the amount of the ransom. But reporting the attack is how you help everyone avoid becoming victimized and help combat the spread and efficacy of ransomware attacks in the future. With every attack reported, the authorities get a clearer picture of who is behind attacks, how they gain access to your system, and what can be done to stop them.
The good news is, you have options. The bad news is that the most obvious option, paying up, is a terrible idea.
Simply giving into cybercriminals’ demands may seem attractive to some, especially in those previously mentioned situations where paying the ransom is less expensive than the potential loss of productivity. Cybercriminals are counting on this.
However, paying the ransom only encourages attackers to strike other businesses or individuals like you. Paying the ransom not only fosters a criminal environment but also leads to civil penalties—and you might not even get your data back.
The other option is to try and remove it, or to start over.
5. Restore and rebuild—or start fresh
There are several sites and software packages that can potentially remove the ransomware from your system, including the No More Ransom! Project. Other options can be found, as well.
Whether you can successfully and completely remove an infection is up for debate. A working decryptor doesn’t exist for every known ransomware. The nature of the beast is that every time a good guy comes up with a decryptor, a bad guy writes new ransomware. To be safe, you’ll want to follow up by either restoring your system or starting over entirely.
Why starting over using your backups is the better idea
The surest way to confirm ransomware has been removed from a system is by doing a complete wipe of all storage devices and reinstalling everything from scratch. Formatting the hard disks in your system will ensure that no remnants of the ransomware remain.
To effectively combat the ransomware that has infiltrated your systems, it is crucial to determine the precise date of infection by examining file dates, messages, and any other pertinent information. Keep in mind that the ransomware may have been dormant within your system before becoming active and initiating significant alterations. By identifying and studying the specific characteristics of the ransomware that targeted your systems, you can gain valuable insights into its functionality, enabling you to devise the most effective strategy for restoring your systems to their optimal state.
A concerning 63% of organizations hastily restore directly back into compromised production environments without adequate scanning during recovery, risking re-introduction of the threat.
Select a backup or backups that were made prior to the date of the initial ransomware infection. If you’ve been following a sound backup strategy, you should have copies of all your documents, media, and important files right up to the time of the infection. With both local and off-site backups, you should be able to use backup copies that you know weren’t connected to your network after the time of attack, and hence, protected from infection. However, it is recommended to use a secure quarantine environment for testing before bringing production systems back online to ensure there is no dormant ransomware present in the data before restoring to production systems.
How Object Lock protects your backups
Object Lock functionality for backups allows you to store objects using a write once, read many (WORM) model, meaning that after it’s written, data cannot be modified. Using Object Lock, no one can encrypt, tamper with, or delete your protected data for a specified period of time, creating a solid line of defense against ransomware attacks.
Object Lock creates a virtual air gap for your data. The term “air gap” comes from the world of LTO tape. When backups are written to tape, the tapes are then physically removed from the network, creating a literal gap of air between backups and production systems. In the event of a ransomware attack, you could just pull the tapes from the previous day to restore systems. Object Lock does the same thing, but it all happens in the cloud. Instead of physically isolating data, Object Lock virtually isolates the data.
Object Lock is valuable in a few different use cases:
To replace an LTO tape system: Most folks looking to migrate from tape are concerned about maintaining the security of the air gap that tape provides. With Object Lock, you can create a backup that’s just as secure as air-gapped tape without the need for expensive physical infrastructure.
To protect and retain sensitive data: If you work in an industry that has strong compliance requirements—for instance, if you’re subject to HIPAA regulations or if you need to retain and protect data for legal reasons—Object Lock allows you to easily set appropriate retention periods to support regulatory compliance.
As part of a disaster recovery (DR) and business continuity plan: The last thing you want to worry about in the event you are attacked by ransomware is whether your backups are safe. Being able to restore systems from backups stored with Object Lock can help you minimize downtime and interruptions, comply with cyber insurance requirements, and achieve recovery time objectives (RTO) easier. By making critical data immutable, you can quickly and confidently restore uninfected data from your backups, deploy them, and return to business without interruption.
Ransomware attacks can be incredibly disruptive. By adopting the practice of creating immutable, air-gapped backups using Object Lock functionality, you can significantly increase your chances of achieving a successful recovery. This approach brings you one step closer to regaining control over your data and mitigating the impact of ransomware attacks.
So, why not just run a system restore?
While it might be tempting to rely solely on a system restore point to restore your system’s functionality, it is not the best solution for eliminating the underlying virus or ransomware responsible for the initial problem. Malicious software tends to hide within various components of a system, making it impossible for system restore to eradicate all instances.
Another critical concern is that ransomware has the capability to infect and encrypt local backups. If a computer is infected with ransomware, there is a high likelihood that your local backup solution will also suffer from data encryption, just like everything else on the system.
With a good backup solution that is isolated from your local computers, you can easily obtain the files you need to get your system working again. This will also give you the flexibility to determine which files to restore from a particular date and how to obtain the files you need to restore your system.
Initial compromise TTPs: Human attack vectors
Often, the weak link in your security protocol is the ever-elusive X factor of human error. Cybercriminals know this and exploit it through social engineering. In the context of information security, social engineering is the use of deception to manipulate individuals into divulging confidential or personal information that may be used for fraudulent purposes. In other words, the weakest point in your system is usually somewhere between the keyboard and the chair.
Common human attack vectors include:
1. Phishing
Phishing uses seemingly legitimate emails to trick people into clicking on a link or opening an attachment, unwittingly delivering the malicious payload. The email might be sent to one person or many within an organization, but sometimes the emails are targeted to help them seem more credible. This targeting takes a little more time on the attackers’ part, but the research into individual targets can make their email seem even more legitimate, not to mention the assistance of generative AI models like ChatGPT. They might disguise their email address to look like the message is coming from someone the sender knows, or they might tailor the subject line to look relevant to the victim’s job. This highly personalized method is called “spear phishing.”
2. SMSishing
As the name implies, SMSishing uses text messages to get recipients to navigate to a site or enter personal information on their device. Common approaches use authentication messages or messages that appear to be from a financial or other service provider. Even more insidiously, some SMSishing ransomware variants attempt to propagate themselves by sending themselves to all contacts in the device’s contact list.
3. Vishing
In a similar manner to email and SMS, vishing uses voicemail to deceive the victim, leaving a message with instructions to call a seemingly legitimate number which is actually spoofed. Upon calling the number, the victim is coerced into following a set of instructions which are ostensibly to fix some kind of problem. In reality, they are being tricked into installing ransomware on their own computer. Like so many other methods of phishing, vishing has become increasingly sophisticated with the spread of AI, with recent, successful deepfakes leveraging vishing to duplicate the voices of company higher-ups—to the tune of $25 million. And like spear phishing, it has become highly targeted.
4. Social media
Social media can be a powerful vehicle to convince a victim to open a downloaded image from a social media site or take some other compromising action. The carrier might be music, video, or other active content that, once opened, infects the user’s system.
5. Instant Messaging
Between them, IM services like WhatsApp, Facebook Messenger, Telegram, and Snapchat have more than four billion users, making them an attractive channel for ransomware attacks. These messages can seem to come from trusted contacts and contain links or attachments that infect your machine and sometimes propagate across your contact list, furthering the spread.
Ransomware is more about manipulating vulnerabilities in human psychology than the adversary’s technological sophistication.”
—James Scott, Institute for Critical Infrastructure Technology
Initial compromise TTPs: Machine attack vectors
The other type of attack vector is machine to machine. Humans are involved to some extent, as they might facilitate the attack by visiting a website or using a computer, but the attack process is automated and doesn’t require any explicit human cooperation to invade your computer or network.
1. Drive-by
The drive-by vector is particularly malicious, since all a victim needs to do is visit a website carrying malware within the code of an image or active content. As the name implies, all you need to do is cruise by and you’re a victim.
2. Known system vulnerabilities
Cybercriminals learn the vulnerabilities of specific systems and exploit those vulnerabilities to break in and install ransomware on the machine. This happens most often to systems that are not patched with the latest security releases.
3. Malvertising
Malvertising is like drive-by, but uses ads to deliver malware. These ads might be placed on search engines or popular social media sites in order to reach a large audience. A common host for malvertising is adults-only sites.
4. Network propagation
Once a piece of ransomware is on your system, it can scan for file shares and accessible computers and spread itself across the network or shared system. Companies without adequate security might have their company file server and other network shares infected as well. From there, the malware will propagate as far as it can until it runs out of accessible systems or meets security barriers.
5. Propagation through shared services
Online services such as file sharing or syncing services can be used to propagate ransomware. If the ransomware ends up in a shared folder on a home machine, the infection can be transferred to an office or to other connected machines. If the service is set to automatically sync when files are added or changed, as many file sharing services are, then a malicious virus can be widely propagated in just milliseconds.
It’s important to be careful and consider the settings you use for systems that automatically sync, and to be cautious about sharing files with others unless you know exactly where they came from.
Prevention best practices
Security experts suggest several precautionary measures for preventing a ransomware attack.
Use antivirus and antimalware software or other security policies to block known payloads from launching.
Make frequent, comprehensive backups of all important files and isolate them from local and open networks.
Immutable backup options such as Object Lock offer users a way to maintain truly air-gapped backups. The data is fixed, unchangeable, and cannot be deleted within the time frame set by the end user.
Keep offline data backups stored in locations that are air gapped or inaccessible from any potentially infected computer, such as on disconnected external storage drives or in the cloud, which prevents the ransomware from accessing them.
Keep your security up-to-date through trusted vendors of your OS and applications. Remember to patch early and patch often to close known vulnerabilities in operating systems, browsers, and web plugins.
Consider deploying security software to protect endpoints, email servers, and network systems from infection.
Segment your networks to keep critical computers isolated and to prevent the spread of ransomware in case of an attack. Turn off unneeded network shares.
Operate on the principle of least privilege. Turn off admin rights for users who don’t require them. Give users the lowest system permissions they need to do their work.
Restrict write permissions on file servers as much as possible.
Educate yourself and your employees in best practices to keep ransomware out of your systems. Update everyone on the latest email phishing scams and human engineering aimed at turning victims into abettors.
It’s clear that the best way to respond to a ransomware attack is to avoid having one in the first place. Other than that, making sure your valuable data is backed up and unreachable to a ransomware infection will ensure that your downtime and data loss will be minimal if you ever fall prey to an attack.
Have you endured a ransomware attack or have a strategy to keep you from becoming a victim? Please let us know in the comments.
Ransomware FAQS
What is a ransomware attack?
A ransomware attack is a type of cyberattack where cybercriminals or groups gain access to a computer system or network and encrypt valuable files or data, making them inaccessible to the owner. The attackers then demand a ransom, usually in the form of cryptocurrency, in exchange for providing the decryption key to unlock the files. Attackers may also extort victims by exfiltrating and threatening to leak sensitive data. Ransomware attacks can cause significant financial losses, operational disruptions, and potential data breaches if the ransom is not paid or effective countermeasures are not implemented.
How do I prevent ransomware attacks?
Preventing ransomware requires a proactive approach to cybersecurity and cyber resilience. Implement robust security measures, including regularly updating software and operating systems, utilizing strong and unique passwords, and deploying reputable antivirus and antimalware software. Train employees about how to identify phishing and social engineering tactics. Regularly back up critical data to cloud storage, implement tools like Object Lock to create immutability, and test your restoration processes. Lastly, stay informed about the latest threats and security best practices to fortify your defenses against ransomware.
How does ransomware work?
Ransomware gains entry through various means such as phishing emails, physical media like thumb drives, or alternative methods. It then installs itself on one or more endpoints or network devices, granting the attacker access. Once installed, the ransomware communicates with the perpetrator’s central command and control server, triggering the generation of cryptographic keys required to lock the system securely. With the cryptographic lock established, the ransomware initiates the encryption process, targeting files both locally and across the network, and renders them inaccessible without the decryption keys.
How does ransomware spread?
Common ransomware attack vectors include malicious email attachments or links, where users unknowingly download or execute the ransomware payload. It can also spread through exploit kits that target vulnerabilities in software or operating systems. Ransomware may propagate through compromised websites, drive-by downloads, or via malicious ads. Additionally, attackers can utilize brute force attacks to gain unauthorized access to systems and deploy ransomware.
How do I recover from a ransomware attack?
First, contain the infection. Isolate the infected endpoint from the rest of your network and any shared storage. Next, identify the infection. With numerous ransomware strains in existence, it’s crucial to accurately identify the specific type you’re dealing with. Conduct scans of messages, files, and utilize identification tools to gain a clearer understanding of the infection. Report the incident. While legal obligations may vary, it is advisable to report the attack to the relevant authorities. Their involvement can provide invaluable support and coordination for countermeasures. Then, assess the available courses of action to address the infection. If you have a solid backup strategy in place, you can utilize secure backups to restore and rebuild your environment.
Have you ever had that nagging feeling that you are forgetting something important? It’s like when you were back in school and sat down to take a test, only to realize you studied the wrong material. Worrying about your business data can feel like that. Are you fully protected? Are you doing all you can to ensure your data is backed up, safe, and easily restorable?
If you aren’t backing up your Microsoft 365 data, you could be leaving yourself unprepared and exposed. It’s a common misconception that data stored in software as a service (SaaS) products like Microsoft 365 is already backed up because it’s in a cloud application. But, anyone who’s tried to restore an entire company’s Microsoft 365 instance can tell you that’s not the case.
In this post, you’ll get a better understanding of how your Microsoft 365 data is stored and how to back it up so you can reliably and quickly restore it should you ever need to.
What Is Microsoft 365?
More than one million companies worldwide use Microsoft 365 (formerly Office 365). Microsoft 365 is a cloud-based productivity platform that includes a suite of popular applications like Outlook, Teams, Word, Excel, PowerPoint, Access, OneDrive, Publisher, SharePoint, and others.
Chances are that if you’re using Microsoft 365, you use it daily for all your business operations and rely heavily on the information stored within the cloud. But have you ever checked out the backup policies in Microsoft 365?
If you are not backing up your Microsoft 365 data, you have a gap in your backup strategy which may put your business at risk. If you suffer a malware or ransomware attack, natural disaster, or even accidental deletion by an employee, you could lose that data. In addition, it may cost you a lot of time and money trying to restore from Microsoft after a data emergency.
Why You Need to Back Up M365
You might assume that, because it’s in the cloud, your SaaS data is backed up automatically for you. In reality, SaaS companies and products like Microsoft 365 operate on a shared responsibility model, meaning they back up the data and infrastructure to maintain uptime, not to help you in the event you need to restore. Practically speaking, that means that they may not back up your data as often as you would like or archive it for as long as you need. Microsoft does not concern itself with fully protecting your files. Most importantly, they may not offer a timely recovery option if you lose the data, which is critical to getting your business back online in the event of an outage.
The bottom line is that Microsoft’s top priority is to keep its own services running. They replicate data and have redundancy safeguards in place to ensure you can access your data through the platform reliably, but they do not assume responsibility for their users’ data.
All this to say, you are ultimately responsible for backing up your data and files in Microsoft 365.
M365 Native Backup Tools
But wait—what about Microsoft 365’s native backup tools? If you are relying on native backup support for your crucial business data, let’s talk about why that may not be the best way to make sure your data is protected.
Retention Period and Storage Costs
First, there are default settings within Microsoft 365 that dictate how long items are retained in the Recycle Bin and Deleted Items folders. You can tweak those settings for a longer retention period, but there is also a storage limit, so you might run out of space quickly. To keep your data longer, you must upgrade your license type and purchase additional storage, which could quickly become costly. Additionally, if an employee accidentally or purposefully deletes items from the trash bin, the item may be gone forever.
Replication Is Not a Backup
Microsoft replicates data as part of its responsibility, but this doesn’t help you meet the requirements of a solid 3-2-1 strategy, where there are three copies of your data, one of which is off-site. So Microsoft doesn’t fully protect you and doesn’t support compliance standards that call for immutability. When Microsoft replicates data, they’re only making a second copy, and that copy is designed to be in sync with your production data. This means that an item gets corrupted and then replicated, the archive version is also corrupted, and you could lose crucial data. You can’t bank on M365’s replication to protect you.
Sync Is Not a Backup
Similarly, syncing is not backup protection and could end up hurting you. Syncing is designed to have a single copy of a file always up-to-date with changes you or other users have made on different devices. For example, if you use OneDrive as your cloud backup service, the bad news is that OneDrive will sync corrupted files overwriting your healthy ones. Essentially, if a file is deleted or infected, it will be infected or deleted on all synchronized devices. In contrast, a true backup allows you to restore from a specific point in time and provides access to previous versions of data, which can be useful in case of a ransomware attack or deletion.
Back Up Frequency and Control
Lastly, one of the biggest drawbacks of relying on Microsoft’s built-in backup tools is that you lack the ability to dial in your backup system the way you may want or need. There are several rules to follow in order to be able to recover or restore files in Microsoft 365. For instance, it’s strongly recommended that you save your documents in the cloud, both for syncing purposes and to enable things like Version History. But, if you delete an online-only file, it doesn’t go to your Recycle Bin, which means there’s no way to recover it.
And, there are limits to the maximum numbers of versions saved when using Version History, the period of time a file is recoverable for, and so on. Some of the recovery periods even change depending on file type. For example, you can’t restore email after 30 days, but if you have an enterprise-level account, other file types are stored in your Recycle Bin or trash for up to 93 days.
Backups may not be created as often as you like, and the recovery process isn’t quick or easy. For example, Microsoft backs up your data every 12 hours and retains it for 14 days. If you need to restore files, you must contact Microsoft Support, and they will perform a “full restore,” overwriting everything, not just the specific information you need. The recovery process probably won’t meet your recovery time objective (RTO) requirements.
Compliance and Cyber Insurance
Many people want more control over their backups than what Microsoft offers, especially for mission-critical business data. In addition to having clarity and control over the backup and recovery process, data storage and backups are often an essential element in supporting compliance needs, particularly if your business stores personal identifiable information (PII). Different industries and regions will have different standards that need to be enforced, so it’s always a good idea to have your legal or compliance team involved in the conversation.
Similarly, with the increasing frequency of ransomware attacks, many businesses are adding cyber insurance. Cyber insurance provides protection for a variety of things, including legal fees, expenditure related to breaches, court-ordered judgments, and forensic post-break review expenses. As a result, they often have stipulations about how and when you’re backing up to mitigate the fallout of business downtime.
Backing Up M365 With a Third Party Tool to the Cloud
Instead of the native Microsoft 365 backup tool, you could use one of the many popular backup applications that provide Microsoft 365 backup support. Options include:
Note that some of these applications include Microsoft 365 protection with their standard license, but it’s an optional add-on module with others. Be sure to check licensing and pricing before choosing an option.
One thing to keep in mind with these tools: if you store on-premises, the backup data they generate can be vulnerable to local disasters like fire or earthquakes and to cyberattacks. For example, if you keep backups on network attached storage (NAS) that doesn’t tier to the cloud, then your data would not be fully protected
Backing your data up to the cloud puts a copy off-site and geographically distant from your production data, so it’s better protected from things like natural disasters. When you’re choosing a cloud storage provider, make sure you check out where they store their data—if their data center is just down the road, then you’ll want to pick a different region.
Backblaze B2 + Microsoft 365
Backblaze B2 Cloud Storage is reliable, affordable, and secure backup cloud storage, and it integrates seamlessly with the third party applications listed above for backing up Microsoft 365. Some of the benefits of using Backblaze B2 include:
Retain your files as long as you want and back up as often as you’d like: Backblaze B2 is one-fifth of the cost of other cloud providers.
Restore data immediately: Backblaze B2 is always-hot so you never have to wait for cold storage delays.
Start backing up your Microsoft 365 data to Backblaze B2 today.
Protect Your M365 Data for Peace of Mind
Whether you are a business professional or an IT director, your goal is to protect your company data. Backing up your Microsoft 365 data to the cloud satisfies your RTO goals and better protects you against various threats.
Relying on Microsoft 365 native tools is inefficient and slow, which means you could blow your RTO targets. Backing up to the cloud allows you to meet retention requirements, ensuring that you retain the data you need for as long as required without destroying your operational budget.
Your business-critical data is too important to trust to a native backup tool that doesn’t meet your needs. In the event of a catastrophic situation, you need complete control and quick access to all your files from a specific point in time. Backing your Microsoft 365 data up to the cloud gives you more control, more freedom, and better protection.
To provide the best experiences, we use technologies like cookies to store and/or access device information. Consenting to these technologies will allow us to process data such as browsing behavior or unique IDs on this site. Not consenting or withdrawing consent, may adversely affect certain features and functions.
Functional
Always active
The technical storage or access is strictly necessary for the legitimate purpose of enabling the use of a specific service explicitly requested by the subscriber or user, or for the sole purpose of carrying out the transmission of a communication over an electronic communications network.
Preferences
The technical storage or access is necessary for the legitimate purpose of storing preferences that are not requested by the subscriber or user.
Statistics
The technical storage or access that is used exclusively for statistical purposes.The technical storage or access that is used exclusively for anonymous statistical purposes. Without a subpoena, voluntary compliance on the part of your Internet Service Provider, or additional records from a third party, information stored or retrieved for this purpose alone cannot usually be used to identify you.
Marketing
The technical storage or access is required to create user profiles to send advertising, or to track the user on a website or across several websites for similar marketing purposes.


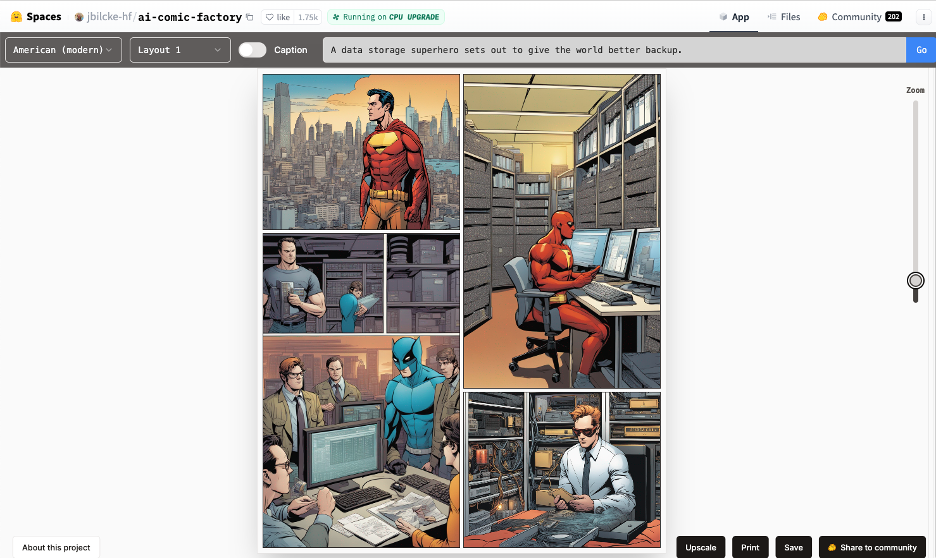
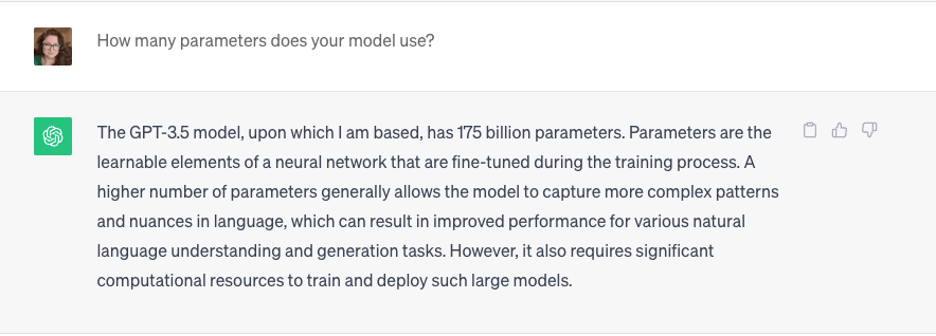


 )
) 


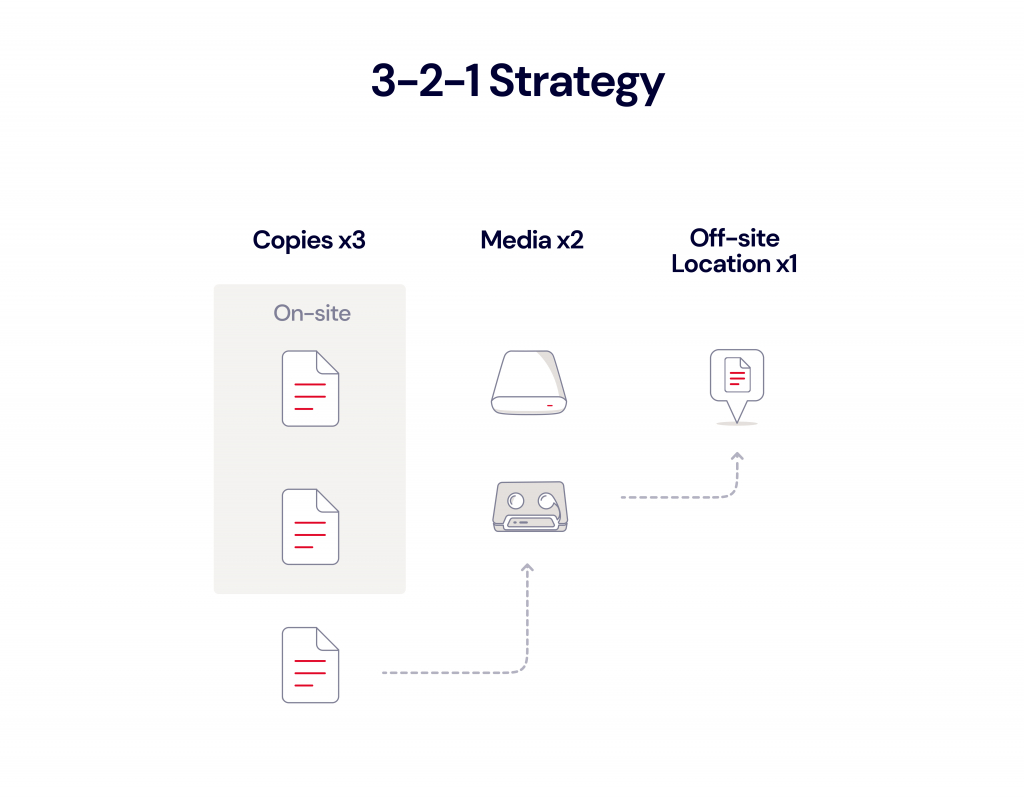
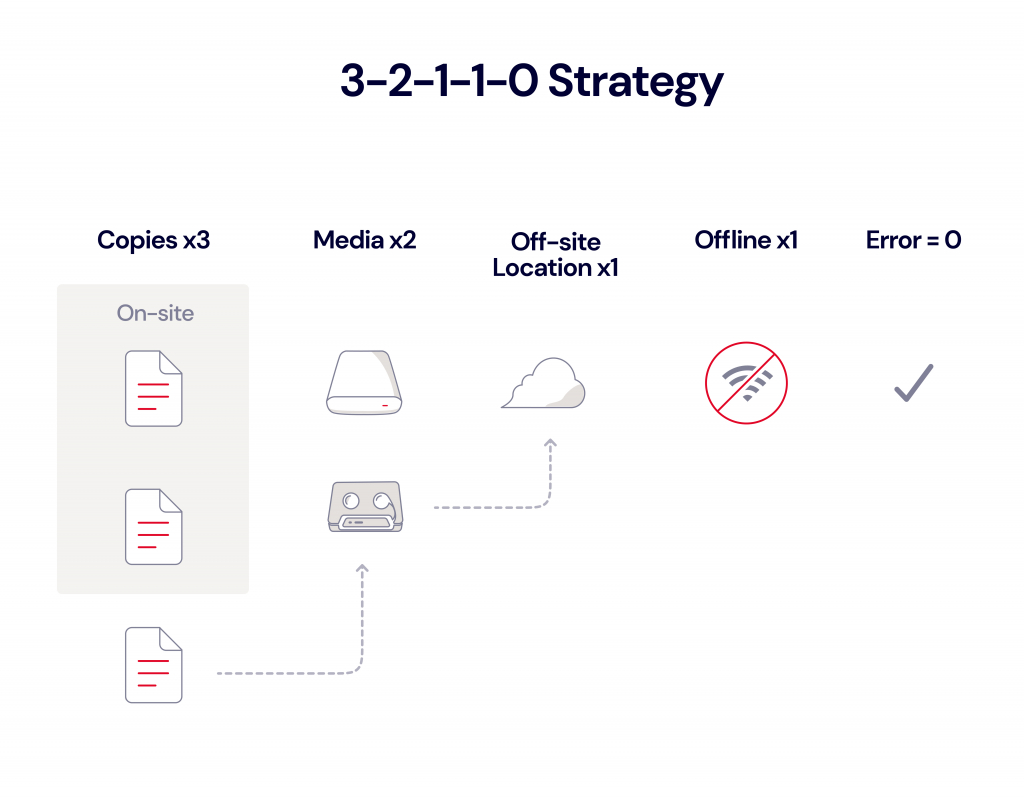

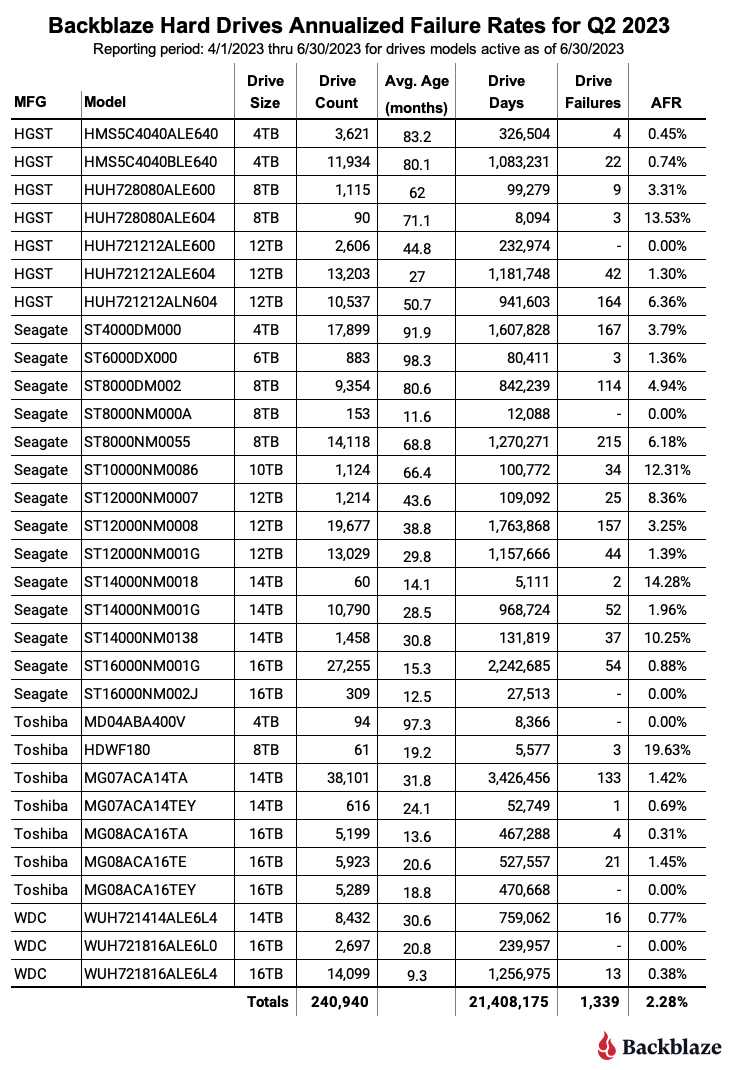
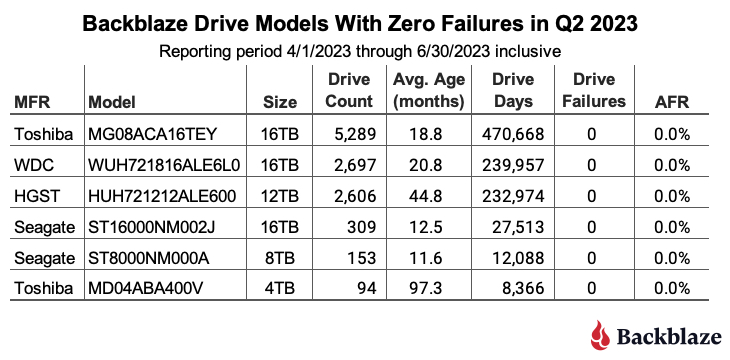
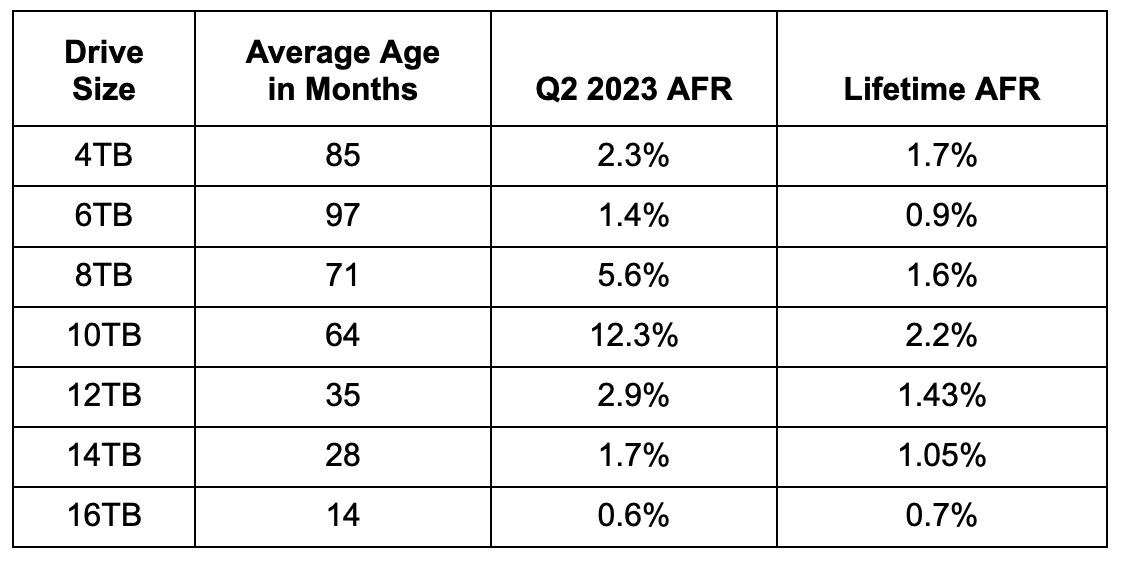
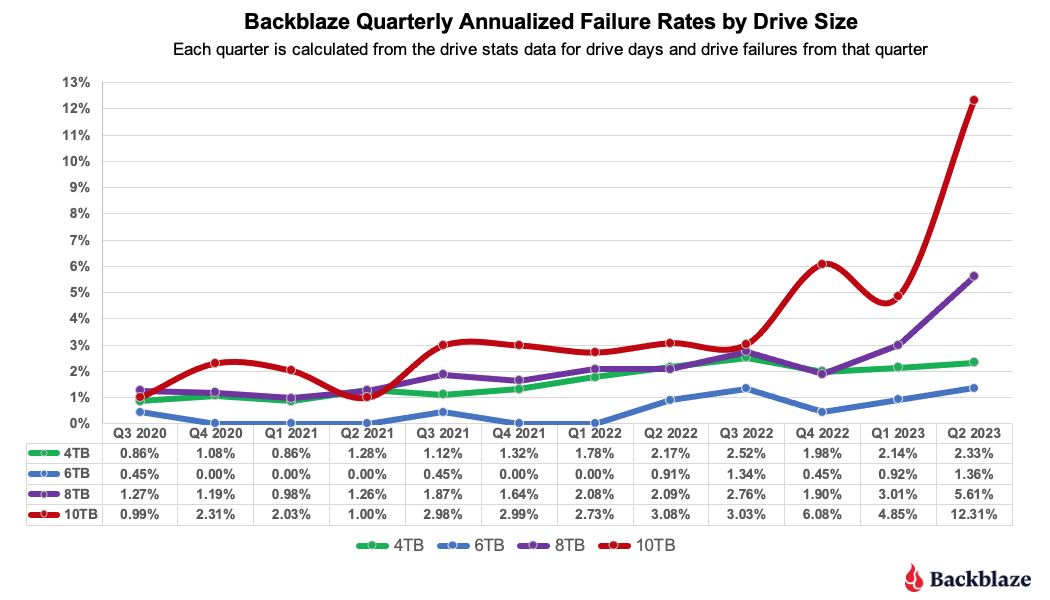
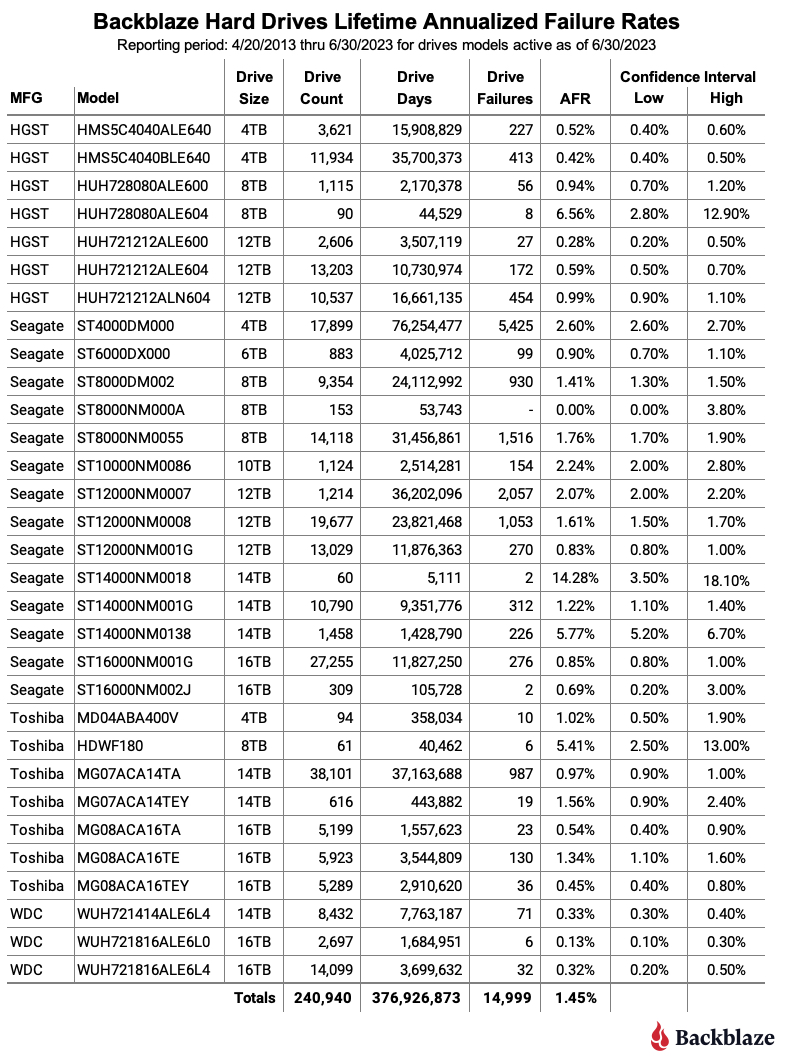
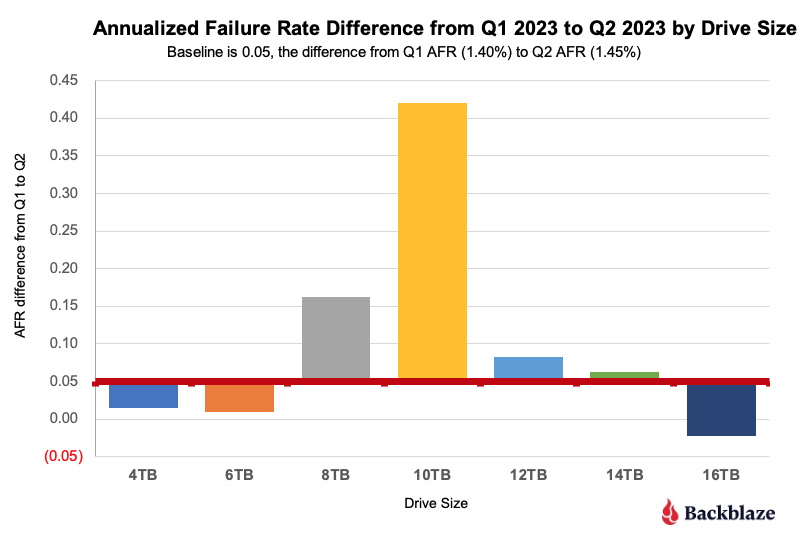
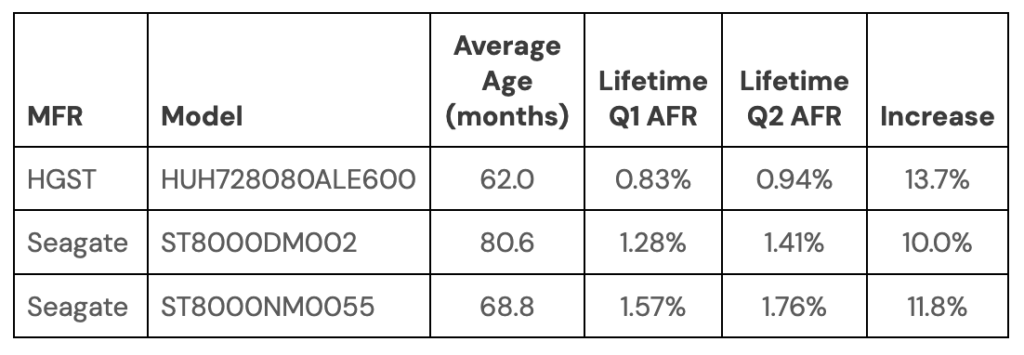


.PNG)