Tag Archives: news

Now Open – AWS Asia Pacific (Jakarta) Region

Post Syndicated from Jeff Barr original https://aws.amazon.com/blogs/aws/now-open-aws-asia-pacific-jakarta-region/

The AWS Region in Jakarta, Indonesia, is now open and you can start using it today. The official name is Asia Pacific (Jakarta) and the API name is ap-southeast-3. The AWS Asia Pacific (Jakarta) Region is the tenth active AWS Region in Asia Pacific and mainland China along with Beijing, Hong Kong, Mumbai, Ningxia, Osaka, Seoul, Singapore, Sydney, and, Tokyo. With this launch, AWS now spans 84 Availability Zones within 26 geographic regions around the world. We have also announced plans for 24 more Availability Zones and eight more AWS Regions in Australia, Canada, India, Israel, New Zealand, Spain, Switzerland, and the United Arab Emirates.

Instances and Services
Applications running in this 3-AZ region can use C5, C5d, I3, I3en, M5, M5d, R5, R5d, and T3 instances, and can use a long list of AWS services including Amazon API Gateway, Application Auto Scaling, AWS Certificate Manager (ACM), AWS CloudFormation, Amazon CloudFront, AWS CloudTrail, Amazon CloudWatch, CloudWatch Events, Amazon CloudWatch Logs, AWS CodeDeploy, AWS Config, AWS Database Migration Service, AWS Direct Connect, Amazon DynamoDB, EC2 Auto Scaling, Amazon Elastic Block Store (EBS), Amazon Elastic Compute Cloud (Amazon EC2), Amazon Elastic Container Registry, Amazon Elastic Container Service (Amazon ECS), Application Load Balancers (Classic, Network, and Application), Amazon EMR, Amazon ElastiCache, Amazon Elasticsearch Service, Amazon Glacier, AWS Identity and Access Management (IAM), Amazon Kinesis Data Streams, AWS Key Management Service (KMS), AWS Lambda, AWS Marketplace, AWS Organizations, AWS Personal Health Dashboard, Amazon Redshift, Amazon Relational Database Service (RDS), Amazon Aurora, Amazon Route 53 (including Private DNS for VPCs), Amazon Simple Notification Service (SNS), Amazon Simple Queue Service (SQS), Amazon Simple Storage Service (Amazon S3), Amazon Simple Workflow Service (SWF), AWS Step Functions, AWS Support API, AWS Systems Manager, AWS Trusted Advisor, Amazon Virtual Private Cloud (VPC), and VM Import/Export.

Using the Asia Pacific (Jakarta) Region
As is the case with all of the newer AWS Regions, you need to explicitly enable this one in order to be able to create and manage resources within it. To learn how to do this, read Using the Asia Pacific (Hong Kong) Region in my post, Now Open – AWS Asia Pacific (Hong Kong) Region.

Connectivity, Edge Locations, and Latency
Jakarta is already home to a Amazon CloudFront edge location that was opened earlier this year, along with two brand-new AWS Direct Connect locations. In addition to this in-country infrastructure, there are more than sixty other edge locations and multiple regional edge caches in Asia, as detailed on the AWS Global Infrastructure page.

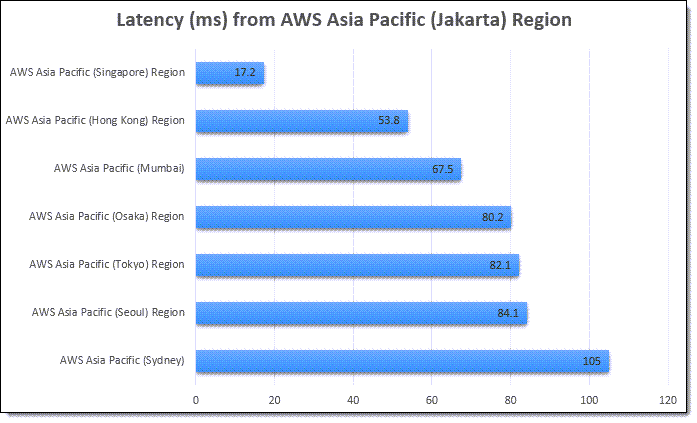
The region offers low-latency connections to other AWS regions in the area. Here are the latest numbers:

Many AWS services give you options to replicate your data across multiple AWS regions. You can replicate S3 buckets to multiple destinations (and use Multi-Region Access Points so your users access the closest one), copy EC2 AMIs between regions, set up cross-region Amazon Aurora Read Replicas, replicate container images, and more. You can set up Amazon DynamoDB Global Tables that span any desired regions, and you can set up inter-region VPC peering. To learn more about how to build applications that span regions, be sure to check out our Multi-Region Application Architecture solution.

AWS in Indonesia
With this launch we are making a long-term commitment to growing our business in Indonesia, and expect to create an average of 24,700 jobs annually over the next 15 years. This includes the direct AWS supply chain (construction, facility maintenance, electricity, and telecommunications) along with the growth that this drives in the broader Indonesian economy.

We have been investing in Southeast Asia and Indonesia for many years. The first AWS office in Jakarta opened in 2018 to help support our customers, and now employs developer advocates, solutions architects, account managers, and partner managers, with hiring for other roles now underway.

Back in 2019 we announced a goal to train and empower hundreds of thousands of Indonesians with proficiency in cloud services by 2025. In collaboration with the Indonesian government and with the help of both AWS partners and educational institutions, we have already trained over 200,000 people. We are doing this through multiple routes and programs including:

Laptops for Builders – This is a free program that teaches high school and vocational student in Bahasa, Indonesia about cloud fundamentals.

Scholarship Programs – Working closely with tech-education startup Dicoding, we are offering a free scholarship program for up to 100,000 cloud and back-end developers.

AWS Training & Certification – Attendees are gaining new skills and certifications in areas such as AWS Cloud fundamentals, big data, security, and machine learning, with several training options available.

AWS Customers in Indonesia
We have many amazing customers in Indonesia! Here are a few success stories:

Traveloka is a lifestyle superapp with a focus on Indonesia, Thailand, Vietnam, Singapore, Malaysia, the Philippines, and Australia. They offer customers in those countries an end-to-end solution that spans travel, local services, and financial services, all powered by AWS. The company was born in the cloud, and counts on AWS to let them build apps quickly and with high scalability. The Traveloka app has been downloaded over 60 million times, making it the most popular travel and lifestyle booking app in Southeast Asia.

Halodoc is an Indonesian digital health startup. They are currently running a digital reservation program to help Indonesian citizens to book and receive their COVID-19 vaccinations, while also providing the government with easier monitoring and evaluation of the vaccine rollout. During the pandemic, they have also helped to provide testing and telemedicine services, all powered by a digital platform that runs on AWS and that allows them to scale in real-time according to market demand.

Under the national movement of Learning Freedom (“Merdeka Belajar”), the Indonesian government is working to allow students to access educational resources from anywhere and at any time. Simak Online allows 300,000 students from 430 schools across Jakarta to access their learning materials and assignments, complete homework, take examples, and participate in online forum discussions. Previously hosted on-premises, Simak Online moved to AWS shortly before COVID-19 broke out in Indonesia. Before the move, they could support exams at just 50 schools simultaneously. Thanks to AWS, they can now scale up and down as needed and can support the national movement and allow students to learn online and on-demand.

A translated version of this post is available on the AWS Indonesia Blog.

— Jeff;

Zabbix NOT AFFECTED by the Log4j exploit

Post Syndicated from Arturs Lontons original https://blog.zabbix.com/zabbix-not-affected-by-the-log4j-exploit/17873/

A newly revealed vulnerability impacting Apache Log4j 2 versions 2.0 to 2.14.1 was disclosed on GitHub on 9 December 2021 and registered as CVE-2021-44228 with the highest severity rating. Log4j is an open-source, Java-based logging utility widely used by enterprise applications and cloud services. By utilizing this vulnerability, a remote attacker could take control of the affected system.

Zabbix is aware of this vulnerability, has completed verification, and can conclude that the only product where we use Java is Zabbix Java Gateway, which does not utilize the log4j library, thereby is not impacted by this vulnerability.

For customers, who use the log4j library with other Java applications, here are some proactive measures, which they can take to reduce the risk posed by CVE-2021-44228:

  • Upgrade to Apache log4j-2.1.50.rc2, as all prior 2.x versions are vulnerable.
  • For Log4j version 2.10.0 or later, block JNDI from making requests to untrusted servers by setting the configuration value log4j2.formatMsgNoLookups to “TRUE” to prevent LDAP and other queries.
  • Default both com.sun.jndi.rmi.object.trustURLCodebase and com.sun.jndi.cosnaming.object.trustURLCodebase to “FALSE” to prevent Remote Code Execution attacks in Java 8u121.

New – FreeRTOS Extended Maintenance Plan for Up to 10 Years

Post Syndicated from Channy Yun original https://aws.amazon.com/blogs/aws/new-freertos-extended-maintenance-plan-for-up-to-10-years/

Last AWS re:Invent 2020, we announced FreeRTOS Long Term Support (LTS) that offers a more stable foundation than standard releases, as manufacturers deploy and later update devices in the field. FreeRTOS is an open source, real-time operating system for microcontrollers that makes small, low-power edge devices easy to program, deploy, secure, connect, and manage.

In 2021, FreeRTOS LTS released 202012.01 to include AWS IoT Over-the-Air (OTA) update, AWS IoT Device Defender, and AWS IoT Jobs libraries that provides feature stability, security patches, and critical bug fixes for the next two years.

Today, I am happy to announce FreeRTOS Extended Maintenance Plan (EMP), which allows embedded developers to receive critical bug fixes and security patches on their chosen FreeRTOS LTS version for up to 10 years beyond the expiry of the initial LTS period. FreeRTOS EMP lets developers improve device security (or helps keep devices secure) for years, save on operating system upgrade costs, and reduce the risks associated with patching their devices.

FreeRTOS EMP applies to libraries covered by FreeRTOS LTS. Therefore, developers have device lifecycles longer than the LTS period of 2 years and can continue using a version that provides feature stability, security patches, and critical bug fixes, all without having to plan a costly version upgrade.

Here are main features of FreeRTOS EMP:

Features Description Why is it important?
Feature stability Get FreeRTOS libraries that maintain the same set of features for years Save upgrade costs by using a stable FreeRTOS codebase for their product lifecycle
API stability Get FreeRTOS libraries that have stable APIs for years
Critical fixes Receive security patches and critical bug* fixes on your chosen FreeRTOS libraries Security patches help keep their IoT devices secure for the product lifecycle
Notification of patches Receive timely notification upcoming patches Timely awareness of security patches helps proactively plan the deployment of patches
Flexible subscription plan Extend maintenance by a year or longer Continue to renew their annual subscription for a longer period to keep the same version for the entire device lifecycle, or for a shorter period to buy time before upgrading to the latest FreeRTOS version.

* A critical bug is a defect determined by AWS to impact the functionality of the affected library and has no reasonable workaround.

Getting Started with FreeRTOS EMP
To get started, subscribe to the plan using your AWS account, and renew the subscription annually or for a longer period to either cover their product lifecycle or until you are ready to transition to a new FreeRTOS LTS release.

Before the end of the current LTS period, you will be able to use your AWS account to complete the FreeRTOS EMP registration on the FreeRTOS console, review and agree to the associated terms and conditions, select the LTS version, and buy an annual subscription. You will then gain access to the private repository where you’ll receive .zip files containing a git repo with chosen libraries, patches, and related notifications.
Under NDA, AWS will notify you via official AWS Security channels of an upcoming patch and its timelines (if AWS is reasonably able to do so and deems it appropriate). Patches will be sent to your private repository within three business days of successfully implementing and getting AWS Security approval for our mitigation.

AWS will provide technical support for FreeRTOS EMP customers via separate subscriptions to AWS Support. AWS Support is not included in FreeRTOS EMP subscriptions. You can track issues such as AWS accounts, billing, and bugs, or get access to technical experts such as patch integration issues based on your AWS Support plan.

Available Now
FreeRTOS EMP will be available for the current and all previous FreeRTOS LTS releases. Subscriptions can be renewed annually for up to 10 years from the end of the chosen LTS version’s support period. For example, a subscription for FreeRTOS 202012.01 LTS, whose LTS period ends March 2023, may be renewed annually for up to 10 years (i.e., March 2033).

You can find more information on the FreeRTOS feature page. Please send us feedback on the forum of FreeRTOS or AWS Support.

Sign up to get periodic updates on when and how you can subscribe to FreeRTOS EMP.

— Channy

AWS re:Post – A Reimagined Q&A Experience for the AWS Community

Post Syndicated from Steve Roberts original https://aws.amazon.com/blogs/aws/aws-repost-a-reimagined-qa-experience-for-the-aws-community/

The internet is an excellent resource for well-intentioned guidance and answers. However, it can sometimes be hard to tell if what you’re reading is, in fact, advice you should follow. Also, some users have a preference toward using a single, trusted online community rather than the open internet to provide them with reliable, vetted, and up-to-date answers to their questions.

Today, I’m happy to announce AWS re:Post, a new, question and answer (Q&A) service, part of the AWS Free Tier, that is driven by the community of AWS customers, partners, and employees. AWS re:Post is an AWS-managed Q&A service offering crowd-sourced, expert-reviewed answers to your technical questions about AWS that replaces the original AWS Forums. Community members can earn reputation points to build up their community expert status by providing accepted answers and reviewing answers from other users, helping to continually expand the availability of public knowledge across all AWS services.

AWS re:Post home page

You’ll find AWS re:Post to be an ideal resource when:

  • You are building an application using AWS, and you have a technical question about an AWS service or best practices.
  • You are learning about AWS or preparing for an AWS certification, and you have a question on an AWS service.
  • Your team is debating issues related to design, development, deployment, or operations on AWS.
  • You’d like to share your AWS expertise with the community and build a reputation as a community expert.

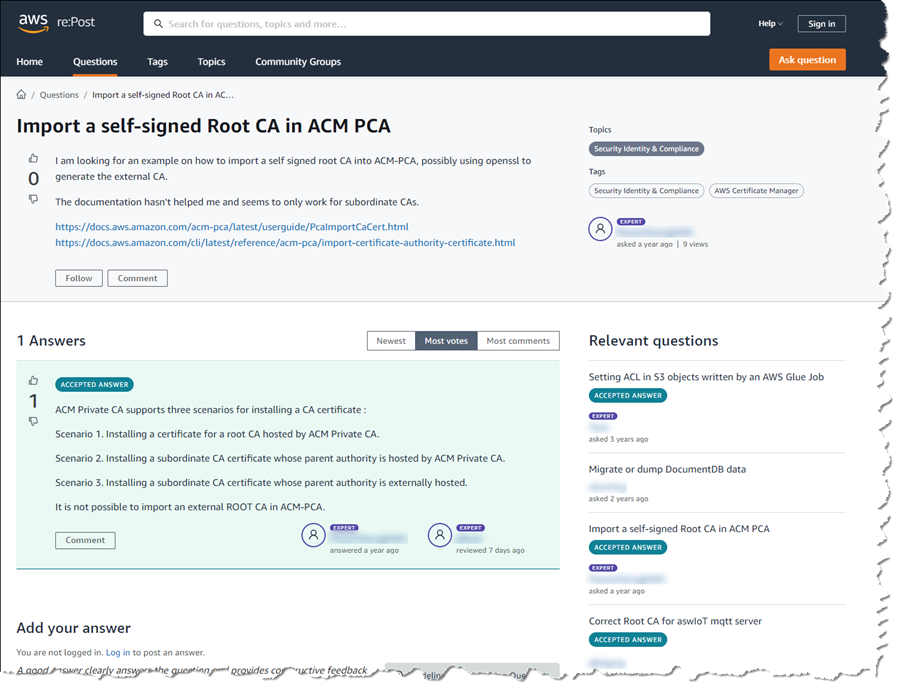
Example of a question and answer in AWS re:Post

There is no requirement to sign in to AWS re:Post to browse the content. For users who do choose to sign in, using their AWS account, there is the opportunity to create a profile, post questions and answers, and interact with the community. Profiles enable users to link their AWS certifications through Credly and to indicate interests in specific AWS technology domains, services, and experts. AWS re:Post automatically shares new questions with these community experts based on their areas of expertise, improving the accuracy of responses as well as encouraging responses for unanswered questions. An opt-in email is also available to receive email notifications to help users stay informed.

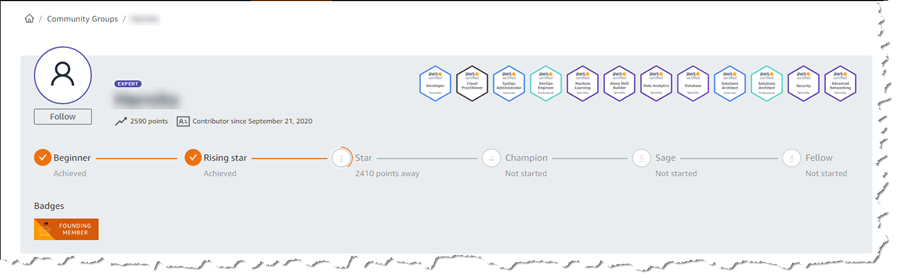
User profile in the re:Post community

Over the last four years, AWS re:Post has been used internally by AWS employees helping customers with their cloud journeys. Today, that same trusted technical guidance becomes available to the entire AWS community. Additionally, all active users from the previous AWS Forums have been migrated onto AWS re:Post, as well as the most-viewed content.

Questions from AWS Premium Support customers that do not receive a response from the community are passed on to AWS Support engineers. If the question is related to a customer-specific workload, AWS support will open a support case to take the conversation into a private setting. Note, however, that AWS re:Post is not intended to be used for questions that are time-sensitive or involve any proprietary information, such as customer account details, personally identifiable information, or AWS account resource data.

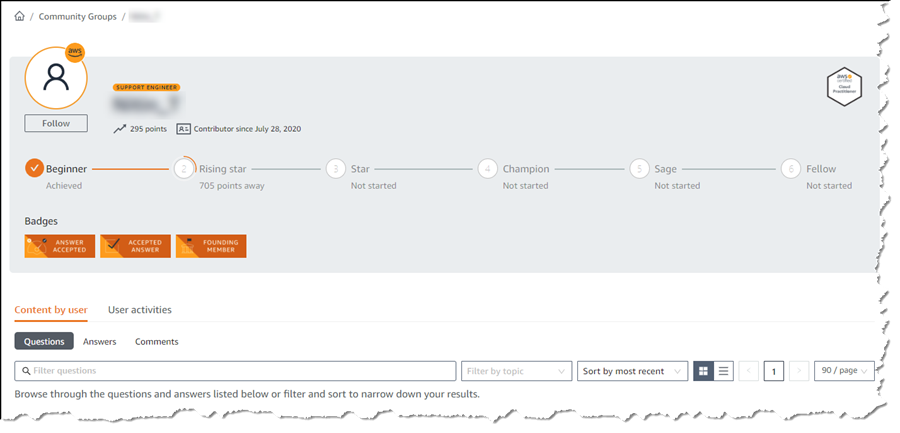
AWS Support Engineer presence on re:Post

Have Questions? Need Answers? Try AWS re:Post Today
If you have a technical question about an AWS service or product or are eager to get started on your journey to becoming a recognized community expert, I invite you to get started with AWS re:Post today!

Announcing General Availability of Construct Hub and AWS Cloud Development Kit Version 2

Post Syndicated from Steve Roberts original https://aws.amazon.com/blogs/aws/announcing-general-availability-of-construct-hub-and-aws-cloud-development-kit-version-2/

Today, I’m happy to announce that both the Construct Hub and AWS Cloud Development Kit (AWS CDK) version 2 are now generally available (GA).

The AWS CDK is an open-source framework that simplifies working with cloud resources using familiar programming languages: C#, TypeScript, Java, Python, and Go (in developer preview). Within their applications, developers create and configure cloud resources using reusable types called constructs, which they use just as they would any other types in their chosen language. It’s also possible to write custom constructs, which can then be shared across your teams and organization.

With the new releases generally available today, defining your cloud resources using the CDK is now even more simple and convenient, and the Construct Hub enables sharing of open-source construct libraries within the wider cloud development community.

Construct Hub home page

AWS Cloud Development Kit (AWS CDK) Version 2
Version 2 of the AWS CDK focuses on productivity improvements for developers working with CDK projects. The individual packages (libraries) used in version 1 to distribute and consume the constructs available for each AWS service have been consolidated into a single monolithic package. This simplifies dependency management in your CDK applications and when publishing construct libraries. It also makes working with CDK projects that reference constructs from multiple services more convenient, especially when those services have peer dependencies (for example, an Amazon Simple Storage Service (Amazon S3) bucket that needs to be configured with an AWS Key Management Service (KMS) key).

Version 1 of the CDK contained some APIs that were experimental. Over time, some of these were marked as deprecated in favor of other preferred approaches based on community experience and feedback. The deprecated APIs have been removed in version 2 to aid clarity for developers working with construct properties and methods. Additionally, the CDK team has adopted a new release process for creating and releasing experimental constructs without needing to include them in the monolithic GA package. From version 2 onwards, the monolithic CDK package will contain only stable APIs that customers can always rely on. Experimental APIs will be shipped in separate packages, making it easier for the team and community to revise them and ensure customers don’t incur the accidental breaking changes that caused some issues in version 1.

You can read about all the changes in version 2 of the AWS CDK, and how you can update your CDK applications to use it, in the Developer Guide.

Construct Hub
The Construct Hub is a single home where the open-source community, AWS, and cloud technology providers can discover and share construct libraries for all CDKs. The most popular CDKs today are AWS CDK, which generates AWS CloudFormation templates; cdk8s, which generates Kubernetes manifests; and cdktf, which generates Terraform JSON files. Anyone can create a CDK, and we are open to adding other construct-based tools as they evolve!

As of this post’s publication, the Construct Hub contains over 700 CDK libraries, including core AWS CDK modules, to help customers build their cloud applications using their preferred programming languages, for their preferred use case, and with their preferred provisioning engine (CloudFormation, Terraform, or Kubernetes). For example, there are 99 libraries for working with containers, 210 libraries for serverless development, 53 libraries for websites, 65 libraries for integrations with cloud services providers like Datadog, Logz.io, Cloudflare, Snyk, and more, and dozens of additional libraries which integrate with Slack, Twitter, GitLab, Grafana, Prometheus, WordPress, Next.js, and more. Many of these were created by the open-source community.

Anyone can contribute construct libraries to the Construct Hub. New libraries that you wish to share need to be published to the npm public registry and tagged. The Construct Hub will automatically detect the published libraries and make them visible and discoverable to consumers on the hub. Consumers can search and filter for construct libraries for familiar technologies, third-party integrations, AWS services, and use cases such as compliance, monitoring, websites, containers, serverless, and more. Filters are available for publisher, language, CDK type, and keywords. In the screenshot below, I’m searching the hub for .NET and TypeScript libraries related to databases and Kubernetes across all CDKs. I could also filter to a specific CDK or a CDK version.

Searching across publishers

Publishers determine which programming languages should be supported by their packages. Construct Hub then automatically generates API references for all the supported languages and transliterates all code samples the authors provide to those supported languages. The screenshots below show an example of language-specific API documentation for the cdk-spa-deploy construct library, which you can use to deploy a single-page web application (SPA). First, the documentation for .NET developers working with the library:

Generated sample code and documentation for a .NET construct library

The second image below shows the generated documentation for the same construct library, but this time for TypeScript developers:

Generated sample code and documentation for the same library in TypeScript

All construct libraries published to the Construct Hub must be open-source. This enables users to exercise their good judgment and perform due diligence to verify that the libraries meet their security and compliance needs, just as they would with any other third-party package source consumed in their applications. Issues with a published construct library can be raised on the library’s GitHub repository using convenient links accessible from the hub entry for the library.

The Construct Hub employs a trust-through-transparency model. Users can report libraries for abuse by clicking the ‘Report abuse’ link in the hub, which will engage AWS Support teams to investigate the issue and remove the offending packages from Construct Hub listings if problems are found. Users can also send us feedback by clicking a ‘Provide feedback to Construct Hub’ link, which allows them to open an issue on our GitHub repository. And last but not least, they can click ‘Provide feedback to publisher’, which redirects to the repository the publisher provided with the package.

Feedback links in the Construct Hub

Just like the AWS CDK, the Construct Hub is open-source, built as a construct, and is, in fact, itself available on the Construct Hub! If you’re interested, you can see how the CDK team uses the CDK to develop the hub in their GitHub repository.

Construct Hub - on the Construct Hub!

Get Started with the AWS CDK Version 2 and the Construct Hub, Today
If you’ve built CDK applications to define your cloud infrastructure using version 1 of the AWS Cloud Development Kit (AWS CDK), then I encourage you to take a look at the documented changes for version 2 and see how the new version can help simplify your project setup going forward. And, if you’re interested in sharing new constructs with the wider community, please get involved with the Construct Hub.

— Steve

New – Site-to-Site Connectivity with AWS Direct Connect SiteLink

Post Syndicated from Sébastien Stormacq original https://aws.amazon.com/blogs/aws/new-site-to-site-connectivity-with-aws-direct-connect-sitelink/

We are launching AWS Direct Connect SiteLink, a new capability of AWS Direct Connect that lets you create connections between your on-premises networks through the AWS global network backbone.

Until today, when you needed direct connectivity between your data centers or branch offices, you had to rely on public internet or expensive and hard-to-deploy fixed networks. These are geographically constrained and can be tied to long-term contracts. This rigidity becomes a pain point as you expand your businesses globally. In turn, you’re required to create custom workarounds to interconnect networks from different providers, which increases your operating costs.

Starting today, you may connect your sites through Direct Connect locations, without sending your traffic through an AWS Region. We have 108 Direct Connect locations available in 32 countries as I am writing this post, located across Africa, Americas, Asia-Pacific, Europe, and the Middle East. Traffic flows from one Direct Connect location to another following the shortest possible path. You no longer need to connect through the closest AWS Region and manage and configure an AWS Transit Gateway for site-to-site network connectivity.

You can take advantage of Direct Connect’s reliability and global footprint to build a network that grows with your business, with no long-term contracts, flexible pay-as-you-go pricing, and a wide range of port-speeds, from 50 Mbps to 100 Gbps. SiteLink also integrates with other AWS services, letting you reach your VPCs, other AWS services, and your on-premises networks from your Direct Connect connections.

When talking about network topology, a small diagram is always more descriptive than long phrases.

The following diagram shows the way that you use Direct Connect today. Direct Connect is currently optimized to let you reach your AWS Resources running in any Region as quickly as possible. Sending data from one Direct Connect location to another is not possible.

Once you connect your locations (NY1, AM3, Paris, and TY2 in the diagram) to a Direct Connect gateway, those connections can reach any AWS Region (except the two AWS China Regions). No peering between Regions is necessary, because Direct Connect gateways are global resources.

Site-to-site connectivity without SiteLink

The following diagram shows how you connect multiple sites using SiteLink. The data flows between Direct Connect locations without going through an AWS Region.

Site-to-site connectivity with SiteLink

How to Get Started?
Configuring these connections is very similar to what you do today. The first step is to connect my network to Direct Connect locations. After that, SiteLink can be enabled or disabled in minutes.

Using the AWS Management Console, I navigate to the Direct Connect section, and I select Create virtual interface to create a virtual interface. Under the Additional Settings section, I make sure the SiteLink switch is turned on. Obviously, I repeat this on another virtual interface, once per site, to connect.

SiteLink - enable sitelink for VIF

I have access to similar monitoring dashboards and metrics published to CloudWatch. I select my virtual interface, and then navigate to the Monitoring tab (hopefully your ViF will have more data available than mine that was created just for this post).

SiteLink VIF Monitoring

Availability and Pricing
You can connect your on-premises networks or branch offices to any of our Direct Connect locations available today, except in China.

Pricing is pay-as-you-go, with no commitment or recurring fees. In addition to existing Direct Connect charges, your monthly bill will include a price-per-hour for SiteLink virtual interfaces, as well as the cost of SiteLink data transfer. Check the pricing page to get the details.

Go ahead an start connecting your on-premises locations together with Direct Connect SiteLink!

— seb

Network Address Management and Auditing at Scale with Amazon VPC IP Address Manager

Post Syndicated from Steve Roberts original https://aws.amazon.com/blogs/aws/network-address-management-and-auditing-at-scale-with-amazon-vpc-ip-address-manager/

Managing, monitoring, and auditing IP address allocation for at-scale networks, as the growth in cloud workloads and connected devices continues at a rapid pace, is a complex, time-consuming, and potentially error-prone task. Traditionally, network administrators have resorted to using combinations of spreadsheets, home-grown tools, and scripts to track address assignments across multiple accounts, virtual private clouds (VPCs), and Regions. Manually updating spreadsheets when application development teams request IP address assignments takes time, and care, to avoid errors. Errors which, should they go unnoticed, can lead to address conflicts and subsequent downtime, causing serious operational and business issues. In turn, the time taken to make these updates, sometimes several days, causes delays in onboarding new applications or expanding existing applications, impacting the velocity of development teams. The need to keep those home-grown tools and scripts up-to-date and error-free also results in taking staff hours away from more strategic and business-impacting projects.

Today, I’m happy to announce Amazon VPC IP Address Manager, a new feature that provides network administrators with an automated IP management workflow. IPAM makes it easier for network administrators to organize, assign, monitor, and audit IP addresses in at-scale networks, lowering the management and monitoring burden and eliminating the manual processes that can lead to delays and unintended errors.

Amazon VPC IP Address Manager dashboard homepage

Introducing Amazon VPC IP Address Manager
IPAM enables management and auditing of IP address assignments across an organization’s accounts, Amazon Virtual Private Cloud (VPC)‘s, and AWS Regions, using a single operational dashboard. From this centralized view, you can manage your IP addresses across AWS.

In each Region in which you have resources needing IP addresses, you create a regional pool. Pools are collections of CIDRs and help you to organize your IP space. Unused address space from your top-level pools can be used to fill your regional pools. Further, if you have applications or environments with different security needs, you can create additional pools. For example, you could create different pools for ‘dev’ and ‘prod’ environments if they are subject to different connectivity requirements. The screenshots below illustrate the process of creating a global pool and, from it, three regional pools. Although my example stops after configuring regional pools, in production, you would continue subdividing the regional pools further as needed.

Creating the global IPAM pool

Next, I configure a set of regional pools. Below, I’m creating a regional pool for my US East (N. Virginia) Region resources, scoped within my global pool.

Creating a regional pool, step 1

As part of configuring a regional pool, I must specify the CIDRs to provision from the global pool and can optionally enable automatic discovery of resources and rules for allocation.

Configuring a regional pool

After repeating the process of creating and configuring regional pools for my two remaining Regions, US East (Ohio) and Europe (Ireland) in this example, this is my final pool hierarchy. As I noted above, this hierarchy ends at a regional set of pools but could be subdivided further.

IPAM pool hierarchy

Once the IPAM pools have been configured, development teams and resources needing new IP address assignments are able to make use of an automated, self-service process, unblocking the developers, and eliminating errors from using manual processes that can lead to connectivity issues. To govern IP address assignments, you can make use of automated and simple business rules. With IPAM‘s self-service model, developers can now directly create resources and receive IP addresses based on business rules in seconds, removing the delays in onboarding applications and improving the velocity of the development team. In the screenshot below, I’m referencing my pools to set the address ranges to be used when creating a new VPC.

Assigning address ranges for a new VPC from IPAM pools

You can also share your IPAM with your organization, created using AWS Organizations, and AWS Resource Access Manager (RAM). When you share your IPAM, you gain fully automated CIDR allocation to your Amazon VPCs across member accounts in your organization and Regions.

For network administrators, IPAM provides observability and auditing capabilities, helping to speed up troubleshooting, and providing oversight and monitoring of the used and unused addresses across an organization’s global network address pool using a single dashboard. For each assigned address, IPAM tracks critical information, for example, the AWS account, the VPC, routing, and the security domain, eliminating the bookkeeping work that burdens administrators. Having used IPAM to eliminate IP assignment errors, customers can use IPAM to monitor assigned addresses and receive alerts when potential issues are detected – for example, depleting IP addresses that can stall their network’s growth or overlapping IP addresses that can result in erroneous routing. You can proactively act on those alerts and fix issues before they can become major outages.

The screenshot below illustrates monitoring pool utilization across a set of VPCs.

Monitoring an IPAM pool

Utilization of address space within a pool can also be monitored. You can add Amazon CloudWatch Alarms that you can configure to trigger at your chosen utilization percentage value so that you can take proactive action before the address space is exhausted.

Monitoring pool utilization with alarms

Overlapping address spaces are another headache that network administrators need to manage, usually discovered after the fact during an outage. IPAM can help lower the burden here, too, providing a view of resources that warns of overlapping address ranges.

Detecting overlapping address spaces

To further help troubleshoot network issues and audits of network security and routing policies, network administrators can also take advantage of the current and historical data that IPAM makes available to gain usage insights.

IPAM historical insights

IPAM works with any VPC resource where an IP address needs to be assigned, including public and private addresses and Elastic IP Addresses (EIP), and also supports bring your own IP (BYOIP) for both IPv4 and IPv6 addresses.

Start managing and auditing your IP addresses at scale today
Amazon VPC IP Address Manager is available today in all commercial AWS Regions. Get started today, first creating your IPAM for all Regions and accounts, then creating your pools, and finally setting application policy. Then, you can take advantage of IPAM to automate IP address assignment, monitor, troubleshoot, and audit your network addresses assignments.

For those of you with existing VPCs, after you create IPAM it will start monitoring, without any action on your part, to create an inventory of all your VPCs and EIPs. Once you create pools, IPAM will then backfill your VPCs into the pool. This means you can create VPCs today, using your existing workflow, and use IPAM for monitoring and audit only. Later on, you can switch your workflow to IPAM-based automated VPC assignment.

— Steve

New – Amazon VPC Network Access Analyzer

Post Syndicated from Jeff Barr original https://aws.amazon.com/blogs/aws/new-amazon-vpc-network-access-analyzer/

If you are a member of your organization’s networking, cloud operations, or security teams, you are going to love this new feature. The new Amazon VPC Network Access Analyzer helps you identify network configurations that lead to unintended network access. As you will see in a moment, it will point out ways that you can improve your security posture while still letting you and your organization be agile and flexible. In contrast to manual checking of network configurations, which is error prone and hard to scale, this tool lets you analyze your AWS networks of any size and complexity.

Introducing Network Access Analyzer
Network Access Analyzer takes advantage of our automated reasoning technology that already powers AWS IAM Access Analyzer, Amazon VPC Reachability Analyzer, Amazon Inspector Network Reachability, and other provable security tools.

This new tool uses Network Access Scopes to specify the desired connectivity between your AWS resources. You can get started with a set of Amazon-created scopes, and then either copy & customize them, or create your own from scratch. The scopes are high-level and independent of any particular network architecture or configuration, and can be thought of as a language for specifying the proper level of access & connectivity for your network. You can, for example, create a scope to verify that all web apps use a firewall to access Internet resources, or to indicate that AWS resources used by your Finance team are separate, distinct, and unreachable from the resources used by your Development team.

To evaluate your network against a particular scope, you select it and initiate an analysis. It runs for a few minutes and then generates a set of findings, each of which indicates an unexpected network path between the AWS resources defined in the scope. You can analyze the findings, adjust your configuration or modify the scope in response to the findings, and re-run the analysis, all in just a few minutes.

The analysis process examines a very wide range of AWS resources including Security Groups, CIDR blocks, prefix lists, Elastic Network Interfaces, EC2 instances, Load Balancers, VPC, VPC subnets, VPC endpoints, VPC endpoint services, Transit Gateways, NAT Gateways, Internet Gateways, VPN Gateways, Peering Connections, and Network Firewalls. Your scopes can use Resource Groups to reference all resources that are tagged in a particular way.

Using Network Access Analyzer
To get started, I open the VPC Console, find the Network Analysis section on the left-side navigation, and click Network Access Analyzer:

I can see all of my scopes. Initially, I have four, all created by Amazon and ready to use:

To conduct an analysis, I select a scope (AWS-VPC-Ingress (Amazon created)) and click Analyze. The scope’s description reads:

“Identify ingress paths into your VPCs from Internet Gateways, Peering Connections, VPC Service Endpoints, VPN and Transit Gateways.”

The analysis runs for a couple of minutes and displays the findings as soon as it is done:

There’s a lot of very useful information here! The spectrum chart provides an overview of the resources that are in the findings. I can hover my mouse over any of the segments to learn more, or click on one in order to filter the findings and show only those that reference a particular resource or resource type:

For example, I click VPC Peering Connections and I can see all of the findings that reference the VPC peering connection:

As you can see, the Path details highlight the VPC peering connection in the path! The next step is to examine the findings, decide which ones are expected, and to add them to the scope so that they are excluded from future findings (more on that in a bit).

Inside a Network Access Scope
Let’s take a quick look inside of the Network Access Scope that I used above, and then build another scope from scratch using the visual builder. Each scope is represented in JSON format, and indicates what is considered in-scope (acceptable) traffic between sources and destinations:

{
          "networkInsightsAccessScopeId": "nis-070dc1d37ca315e86",
          "matchPaths": [
                    {
                              "source": {
                                        "resourceStatement": {
                                                  "resources": [],
                                                  "resourceTypes": [
                                                            "AWS::EC2::InternetGateway",
                                                            "AWS::EC2::VPCPeeringConnection",
                                                            "AWS::EC2::VPCEndpointService",
                                                            "AWS::EC2::TransitGatewayAttachment",
                                                            "AWS::EC2::VPNGateway"
                                                  ]
                                        }
                              },
                              "destination": {
                                        "resourceStatement": {
                                                  "resources": [],
                                                  "resourceTypes": [
                                                            "AWS::EC2::NetworkInterface"
                                                  ]
                                        }
                              }
                    }
          ],
          "excludePaths": []
}

The matchPaths element contains source and destination elements. Each of these elements, in turn, identifies AWS resource types and specific resources. While not shown here, scopes can also contain source and destination IP addresses, ports, prefix lists, and traffic types (TCP or UDP). The excludePaths can contain resource types, specific resources, and so forth. I could, for example, define sources and destinations that match all Internet Gateway ingress traffic, but exclude traffic that flows through a Load Balancer, or I could exclude SSH traffic destined for my bastion instances.

Building a Network Access Scope
I can build a new scope in three ways. I can Duplicate and modify an existing one, I can start from scratch and use the visual builder, or I can write my own JSON and use either the CLI or the API to create a scope. I click Create Network Access Scope to use the builder:

I can start with one of five predefined templates, or I can build my own:

I enter a name and a description:

Then I define the source and destinations by resource type, id, traffic type, and so forth:

I have many options for matching the traffic type. This allows me to create scopes for very specific purposes:

I can use a similar interface to add any optional exclusions.

Things to Know
This is a very powerful tool and one that I think you are going to love. Here are a couple of things to know about it:

Pricing – You pay $0.002 for each Elastic Network Interface (ENI) analyzed as part of an assessment.

Regions – Network Access Analyzer is available in the US East (N. Virginia), US East (Ohio), US West (N. California), US West (Oregon), Africa (Cape Town), Asia Pacific (Hong Kong), Asia Pacific (Mumbai), Asia Pacific (Seoul), Asia Pacific (Singapore), Asia Pacific (Sydney), Asia Pacific (Tokyo), Canada (Central), Europe (Frankfurt), Europe (Ireland), Europe (London), Europe (Milan), Europe (Paris), Europe (Stockholm), South America (São Paulo), and Middle East (Bahrain) Regions.

In the Works – We have lots of additional features on the product roadmap including support for AWS Organizations, the ability to run your analyses on a regular schedule, and support for IPv6 address ranges and resources.

— Jeff;

AWS Shield Advanced Update – Automatic Application Layer DDoS Mitigation

Post Syndicated from Channy Yun original https://aws.amazon.com/blogs/aws/aws-shield-advanced-update-automatic-application-layer-ddos-mitigation/

In 2016, we launched AWS Shield, a managed Distributed Denial of Service (DDoS) protection service that safeguards applications running on AWS. AWS Shield provides always-on detection and automatic inline mitigations that minimize application downtime and latency without needing to contact AWS Support.

There are two tiers of AWS Shield: Standard and Advanced. All AWS customers benefit from the automatic network layer protections of AWS Shield Standard and at no cost. AWS Shield Standard defends against the most common, frequently occurring network and transport layer (Layer 3 and 4) DDoS attacks to maximize the availability of AWS services.

For customized protection against sophisticated (Layer 3 to 7) threats targeting your applications, you can subscribe to AWS Shield Advanced. AWS Shield Advanced provides more sensitive detection and tailored mitigations against large and complex DDoS attacks, near real-time visibility into attacks, and integration with AWS WAF, a web application firewall for defense against Layer 7 attacks. AWS Shield Advanced also gives you 24-7 access to the AWS Shield Response Team (SRT) and cost protection against scaling costs stemming from DDoS attacks.

AWS Shield Advanced establishes a traffic baseline for each protected resource. Significant deviations from this baseline are flagged as DDoS events and trigger alerts through Amazon CloudWatch. However, mitigating these events still requires manually crafting an AWS WAF rule that isolates the malicious traffic, deploying it through the AWS WAF console or API, and evaluating the rule’s effectiveness. AWS Shield Advanced customers can utilize the SRT to create such AWS WAF rules or rely on their own expertise, but the process is time-consuming, which increases the time it takes to mitigate a DDoS attack and prevent availability impact to applications.

Today, we are announcing Automatic Application Layer DDoS Mitigation for AWS Shield Advanced. This is a new set of capabilities included for all Shield Advanced customers that automatically mitigate malicious web traffic that threatens to impact application availability. This feature automatically creates, tests, and deploys AWS WAF rules to mitigate layer 7 DDoS events on behalf of customers.

Enabling Automatic Application Layer DDoS Mitigation
Visit the AWS Shield console to get started with automatic application layer DDoS mitigation. To get the benefits of Shield Advanced, you must subscribe to an annual subscription.

After you subscribe to AWS Shield Advanced, you specify the resources that you want to protect, configure a layer 7 DDoS mitigation, AWS SRT supports, and a dashboard in CloudWatch to monitor DDoS events. To learn more, see Getting started with AWS Shield Advanced in the AWS documentation.

To enable Shield Advanced automatic application layer DDoS mitigation, select your layer 7 AWS resources (e.g. CloudFront), and choose Configure protections from the drop down list.

Next, in Edit protection, choose if you would like to enable automatic mitigation of layer 7 events and select if whether WAF rules should be created in Count or Block mode in Automatic response. Placing WAF rules in Count mode allows you to observe how resource traffic would be affected before deploying them in Block mode. Please note that a WebACL must be associated with a Shield protected resource in order to enable automatic layer 7 mitigation.

Mitigation actions can be changed to count or block mode at any time. Navigate to the Events tab of the console to view detected DDoS events, and select a detected event to see detection, mitigation, and top contributor metrics.

How to Mitigate Application Layer DDoS Automatically
When you want to protect layer 7 resources, such as CloudFront distributions, AWS Shield Advanced will establish a 30-day traffic baseline into each protected resource.

When automatic mitigation is enabled, only then will we create a Shield managed rule group in which AWS Shield Advanced will create AWS WAF rules in response to DDoS events.

Traffic that significantly deviates from the established baseline will be flagged as a potential DDoS event. After an event is detected, Shield Advanced will attempt to identify a signature based on offending request patterns. If a signature is identified, WAF rules will be created to mitigate traffic with that signature.

Once rules are confirmed to be safe, they will be added to the Shield-managed rule group, and customers can choose whether the rules are deployed in count or block mode. Customers can also create CloudWatch alerts based on when requests are being blocked or counted.

Customers can change the action that automatic mitigation takes (count or block) or disable it entirely at any time. Shield Advanced will automatically remove AWS WAF rules after it has determined that an event has fully subsided. To learn more, see Shield Advanced automatic application layer DDoS mitigation in the AWS Shield Developer Guide.

Available Now
Automatic Application Layer DDoS Mitigation is now available in all AWS regions where AWS Shield Advanced is available, and it can be enabled at no additional cost.

You can send feedback to the AWS forum for AWS Shield or through your usual AWS Support contacts.

— Channy

Announcing Amazon SageMaker Ground Truth Plus

Post Syndicated from Sean M. Tracey original https://aws.amazon.com/blogs/aws/announcing-amazon-sagemaker-ground-truth-plus/

Today, we’re pleased to announce the latest service in the Amazon SageMaker suite that will make labeling datasets easier than ever before. Ground Truth Plus is a turn-key service that uses an expert workforce to deliver high-quality training datasets fast, and reduces costs by up to 40 percent.

The Challenges of Machine Learning Model Creation
One of the biggest challenges in building and training machine learning (ML) models is sourcing enough high-quality, labeled data at scale to feed into and train those models so that they can make an accurate prediction.

On the face of it, labeling data might seem like a fairly straightforward task…

  • Step 1: Get data
  • Step 2: Label it

…but this is far from the reality.

Even before you have labelers begin annotations, you need a custom labeling workflow and user interface specific to your project so that you get a high-quality dataset. This relies on a combination of robust tooling and skilled workers, and the effort spent can be significant.

Once the data labeling workflow and user interface has been constructed, a workforce to use those systems must be organized and trained – and this is all before a single point of data has been labeled!

Finally, once the labeling systems have been built, the workflows designed, and the workforce trained and deployed, the process of passing data through that system must be monitored and checked to ensure a consistent, high-quality output. After enough data has been passed through and labeled by the system, you have arrived at the point you’ve been trying to get to all along: you finally have enough data to train the ML model.

Each of these steps represents a significant investment in time, costs, and energy. You could be spending these resources building ML models instead of labeling and managing data, and using Ground Truth Plus can help free you up to do just that.

Introducing Amazon SageMaker Ground Truth Plus
Amazon SageMaker Ground Truth Plus enables you to easily create high-quality training datasets without having to build labeling applications and manage the labeling workforce on your own. Which means you don’t even need to have deep ML expertise or extensive knowledge of workflow design and quality management. You simply provide data along with labeling requirements and Ground Truth Plus sets up the data labeling workflows and manages them on your behalf in accordance with your requirements.

For example, if you need medical experts to label radiology images, you can specify that in the guidelines you provide to Ground Truth Plus. The service will then automatically select labelers trained in radiology to label your data, and from there an expert workforce that is trained on a variety of ML tasks will start labeling the data. Ground Truth Plus brings ML-powered automation to data labeling, which increases the quality of the output dataset and decreases the data labeling costs.

Amazon SageMaker Ground Truth Plus uses a multi-step labeling workflow including ML techniques for active learning, pre-labeling, and machine validation. This reduces the time required to label datasets for a variety of use cases including computer vision and natural language processing. Finally, Ground Truth Plus provides transparency into data labeling operations and quality management through interactive dashboards and user interfaces. This lets you monitor the progress of training datasets across multiple projects, track project metrics such as daily throughput, inspect labels for quality, and provide feedback on the labeled data.

How Does It Work?
A SageMaker Ground Truth Plus screenshot showing the request formFirst, let’s head to the new Ground Truth Plus console and fill out a form outlining the requirements for the data labeling project. Following that, our team of AWS Experts will schedule a call to discuss your data labeling project.

After the call, you simply upload data in an Amazon Simple Storage Service (Amazon S3) bucket for labeling.

Once the data has been uploaded, our experts will set-up the data labeling workflow per your requirements and create a team of labelers with the expertise necessary to label your data effectively. This helps make sure that you have the best people possible working on your projects.

These expert labelers use the Ground Truth Plus tools we’ve built to label these datasets quickly and effectively.

Initially, labelers will annotate the data you’ve uploaded, much like the following example image that we’ve uploaded from the CBCL StreetScenes dataset. However, as the labelers start to submit examples of labeled data, something cool begins happening: our ML systems kick in and start to pre-label the images on behalf of the expert workforce!

An example of the raw dataset used to demonstrate Amazon SageMaker Ground Truth Plus functionality

As more and more data is labeled by the expert workforce, the ML model becomes better at pre-labeling those images. This means that there’s less need for a human to spend as much time creating each individual label for every object of interest in a dataset. Less time spent on labeling means lower costs for you, and it also means a quicker turnaround in creating a dataset that can be used for training a model – all without sacrificing quality.

A screenshot showing one of the labelling interfaces for SageMaker Ground Truth Plus

As the process continues, these ML models will also start to highlight potential areas of interest that the labeling workforce may have missed or incorrectly labeled through machine validation (indicated below by the purple box). Once an area of interest has been highlighted, a human labeler can view and either confirm or delete the suggestion that the model has made. This iteratively improves the pre-labeling and machine validation stages, further reducing the time needed by a labeler to manually label the data, and ensures a high-quality output throughout the process.

A screenshot showing one of the labelling interfaces filed in my a machine learning model for SageMaker Ground Truth Plus

While this is all going on, you can monitor the progress and output of the project using the Ground Truth Plus Project Portal. Within this portal, you can track the amount of data labeled on a day-by-day basis, and make sure that the project is progressing at an acceptable rate.

A screenshot showing the metrics dashboard enabling users to track the progress of their labelling jobs in SageMaker Ground Truth Plus

With each batch of images uploaded and labeled, you can decide whether to accept them or send them back for relabeling if something has been missed.

Finally, when the labeling process has completed, you can retrieve the labeled data from a secure S3 bucket and get to the business of training models.

Find out more
Today, Amazon SageMaker Ground Truth Plus is available in the N. Virginia (us-east-1) region.

To learn more:

New – Amazon RDS Custom for SQL Server Is Generally Available

Post Syndicated from Channy Yun original https://aws.amazon.com/blogs/aws/new-amazon-rds-custom-for-sql-server-is-generally-available/

On October 26, 2021, we launched Amazon RDS Custom for Oracle, a managed database service for applications that require customization of the underlying operating system and database environment. RDS Custom lets you access and customize your database server host and operating system, for example, by applying special patches and changing the database software settings to support third-party applications that require privileged access.

Today, I am happy to announce the general availability of Amazon RDS Custom for SQL Server to support applications that have dependencies on specific configurations and third-party applications that require customizations in corporate, e-commerce, and content management systems, such as Microsoft SharePoint.

With RDS Custom for SQL Server, you can enable features that require elevated privileges like SQL Common Language Runtime (CLR), install specific drivers to enable heterogenous linked servers, or have more than 100 databases per instance.

Through the time-saving benefits of a managed service, RDS Custom for SQL Server frees you up to focus on more business-impacting, strategic activities. The use of automating backups and other operational tasks let you rest easy, knowing your data is safe and ready to be recovered if needed.

Getting Started with RDS Custom for SQL Server
Get started by creating a DB instance of RDS Custom for SQL Server from an orderable engine version offered by RDS Custom. You can optionally access the server host to customize your software via AWS Systems Manager or a remote desktop client. Your application connects to the RDS Custom DB instance endpoint.

Before creating and connecting your custom DB instance for SQL Server, make sure that you meet some prerequisites, such as configuring the AWS Identity and Access Management (IAM) role and Amazon Virtual Private Cloud  (Amazon VPC).

Choose Create database in the Databases menu to create your custom DB instance for SQL Server in the RDS Console. When you choose a database creation method, select Standard create. You can set Engine options to Microsoft SQL Server and choose Amazon RDS Custom in the database management type.

For Edition, choose the DB engine edition that you want to use in the choices of Enterprise, Standard, and Web with the Version of default SQL Server 2019.

For Settings, enter your favorite unique name for the DB instance identifier and your master username and password. By default, the new instance uses an automatically generated password for the master user.

In DB instance size, choose a DB instance class optimized to each DB engine edition.

SQL Server edition RDS Custom support
Enterprise Edition db.r5.xlarge – db.r5.24xlarge
db.m5.xlarge – db.m5.24xlarge
Standard Edition db.r5.large – db.r5.24xlarge
db.m5.large – db.m5.24xlarge
Web Edition db.r5.large – db.r5.4xlarge
db.m5.large – db.m5.4xlarge

See Settings for DB instances in the Amazon RDS User Guide to learn more about the remaining settings. Choose Create database. After creating the DB instance, the details for the new RDS Custom DB instance appear on the RDS console.

Alternatively, you can create an RDS Custom DB instance by using the create-db-instance command in the AWS Command Line Interface (AWS CLI).

$ aws rds create-db-instance \
	--engine custom-sqlserver-se \
	--engine-version 15.00.4073.23.v1 \
	--db-instance-identifier channy-custom-db \
	--db-instance-class db.m5.xlarge \
	--allocated-storage 20 \
	--db-subnet-group mydbsubnetgroup \
	--master-username myuser \
	--master-user-password mypassword \
	--backup-retention-period 3 \
	--no-multi-az \
	--port 8200 \
	--kms-key-id mykmskey \
	--custom-iam-instance-profile AWSRDSCustomInstanceProfile

After you create your RDS Custom DB instance, you can connect to it using AWS Systems Manager Session Manager or an RDP client. Make sure that the Amazon VPC security group associated with your DB instance permits inbound connections on port 3389 for TCP to allow RDP connections.

You need the key pair associated with the instance to connect to the custom DB instance via RDP. RDS Custom creates the key pair for you. The pair name uses the prefix do-not-delete-rds-custom-DBInstanceIdentifier. AWS Secrets Manager stores your private key as a secret. Choose the secret that has the same name as your key pair and retrieve the secret value to decrypt the password later.

In the EC2 console, look for the name of your EC2 instance, and then choose the instance ID associated with your DB instance ID, for example, channy-custom-db-*. Select your custom DB instance, and then choose Connect. On the Connect to instance page, choose the RDP client tab, and then choose Get password with your private key as a secret.

When you connect an RDP client with a downloaded remote desktop file and decrypted password, you can log in to the Windows Server and customize your SQL Server.

You can use AWS Systems Manager Session Manager to start a session with an instance in your account. After the session is started, you can run PowerShell commands as you would for any other connection type. See Connect to your Windows instance in the Amazon EC2 User Guide for more information.

Things to Know
Here are a couple of things to keep in mind about managing your DB instance:

Pausing RDS Custom Automation: RDS Custom for SQL Server automatically provides monitoring and instance recovery for your RDS Custom DB instance. If you need to customize the instance, then pause RDS Custom automation for a specified period. The pause makes sure that your customizations don’t interfere with RDS Custom automation. To pause or resume RDS Custom automation, you can set RDS Custom automation mode to Paused with the pause duration that you want (in minutes, default 60 minutes to 1,440 minutes maximum).

High Availability (HA): To support replication between RDS Custom for SQL Server instances, you can configure HA with Always On Availability Groups (AGs). We recommend that you set up the primary DB instance to synchronously replicate data to the standby instances in different Availability Zones (AZs) to be resilient to AZ failures. Moreover, you can migrate data by configuring HA for your on-premises instance and then failing over or switching over to the RDS Custom standby database.

Custom DB Management: Just like Amazon RDS, RDS Custom for SQL Server creates automated backups taking a snapshot of an Amazon RDS DB instance. Incremental snapshots are used to restore DB instances to a specific point in time. Furthermore, all changes and customizations to the underlying operating system are automatically logged for audit purposes using Systems Manager and AWS CloudTrail. See Troubleshooting an Amazon RDS Custom for DB instance in the Amazon RDS User Guide to learn more.

Available Now
Amazon RDS Custom for SQL Server is now available in the US East (Ohio), US East (N. Virginia), US West (Oregon), Asia Pacific (Singapore), Asia Pacific (Sydney), Asia Pacific (Tokyo), EU (Frankfurt), EU (Ireland), and EU (Stockholm) Regions.

Look at the product page and documentation of Amazon RDS Custom to learn more. Please send us feedback either in the AWS forum for Amazon RDS or through your usual AWS support contacts.

— Channy

Enhanced Amazon S3 Integration for Amazon FSx for Lustre

Post Syndicated from Sébastien Stormacq original https://aws.amazon.com/blogs/aws/enhanced-amazon-s3-integration-for-amazon-fsx-for-lustre/

Today, we are announcing two additional capabilities of Amazon FSx for Lustre. First, a full bi-directional synchronization of your file systems with Amazon Simple Storage Service (Amazon S3), including deleted files and objects. Second, the ability to synchronize your file systems with multiple S3 buckets or prefixes.

Lustre is a large scale, distributed parallel file system powering the workloads of most of the largest supercomputers. It is popular among AWS customers for high-performance computing workloads, such as meteorology, life-science, and engineering simulations. It is also used in media and entertainment, as well as the financial services industry.

I had my first hands-on Lustre file systems when I was working for Sun Microsystems. I was a pre-sales engineer and worked on some deals to sell multimillion-dollar compute and storage infrastructure to financial services companies. Back then, having access to a Lustre file system was a luxury. It required expensive compute, storage, and network hardware. We had to wait weeks for delivery. Furthermore, it required days to install and configure a cluster.

Fast forward to 2021, I may create a petabyte-scale Lustre cluster and attach the file system to compute resources running in the AWS cloud, on-demand, and only pay for what I use. There is no need to know about Storage Area Networks (SAN), Fiber Channel (FC) fabric, and other underlying technologies.

Modern applications use different storage options for different workloads. It is common to use S3 object storage for data transformation, preparation, or import/export tasks. Other workloads may require POSIX file-systems to access the data. FSx for Lustre lets you synchronize objects stored on S3 with the Lustre file system to meet these requirements.

When you link your S3 bucket to your file system, FSx for Lustre transparently presents S3 objects as files and lets you to write results back to S3.

Full Bi-Directional Synchronization with Multiple S3 Buckets
If your workloads require a fast, POSIX-compliant file system access to your S3 buckets, then you can use FSx for Lustre to link your S3 buckets to a file system and keep data synchronized between the file system and S3 in both directions. However, until today, there were a couple limitations. First, you had to manually configure a task to export data back from FSx for Lustre to S3. Second, deleted files on S3 were not automatically deleted from the file system. And third, an FSx for Lustre file system was synchronized with one S3 bucket only. We are addressing these three challenges with this launch.

Starting today, when you configure an automatic export policy for your data repository association, files on your FSx for Lustre file system are automatically exported to your data repository on S3. Next, deleted objects on S3 are now deleted from the FSx for Lustre file system. The opposite is also available: deleting files on FSx for Lustre triggers the deletion of corresponding objects on S3. Finally, you may now synchronize your FSx for Lustre file system with multiple S3 buckets. Each bucket has a different path at the root of your Lustre file system. For example your S3 bucket logs may be mapped to /fsx/logs and your other financial_data bucket may be mapped to /fsx/finance.

These new capabilities are useful when you must concurrently process data in S3 buckets using both a file-based and an object-based workflow, as well as share results in near real time between these workflows. For example, an application that accesses file data can do so by using an FSx for Lustre file system linked to your S3 bucket, while another application running on Amazon EMR may process the same files from S3.

Moreover, you may link multiple S3 buckets or prefixes to a single FSx for Lustre file system, thereby enabling a unified view across multiple datasets. Now you can create a single FSx for Lustre file system and easily link multiple S3 data repositories (S3 buckets or prefixes). This is convenient when you use multiple S3 buckets or prefixes to organize and manage access to your data lake, access files from a public S3 bucket (such as these hundreds of public datasets) and write job outputs to a different S3 bucket, or when you want to use a larger FSx for Lustre file system linked to multiple S3 datasets to achieve greater scale-out performance.

How It Works
Let’s create an FSx for Lustre file system and attach it to an Amazon Elastic Compute Cloud (Amazon EC2) instance. I make sure that the file system and instance are in the same VPC subnet to minimize data transfer costs. The file system security group must authorize access from the instance.

I open the AWS Management Console, navigate to FSx, and select Create file system. Then, I select Amazon FSx for Lustre. I am not going through all of the options to create a file system here, you can refer to the documentation to learn how to create a file system. I make sure that Import data from and export data to S3 is selected.

Lustre - enable S3 synchronizationIt takes a few minutes to create the file system. Once the status is ✅ Available, I navigate to the Data repository tab, and then select Create data repository association.

I choose a Data Repository path (my source S3 bucket) and a file system path (where in the file system that bucket will be imported).

FsX Lustre Data repository

Then, I choose the Import policy and Export policy. I may synchronize the creation of file/objects, their updates, and when they are deleted. I select Create.

FsX Lustre Data repository import policies

When I use automatic import, I also make sure to provide an S3 bucket in the same AWS Region as the FSx for Lustre cluster. FSx for Lustre supports linking to an S3 bucket in a different AWS Region for automatic export and all other capabilities.

Using the console, I see the list of Data repository associations. I wait for the import task status to become ✅ Succeeded. If I link the file system to an S3 bucket with a large number of objects, then I may choose to skip Importing metadata from repository while creating the data repository association, and then load metadata from selected prefixes in my S3 buckets that are required for my workload using an Import task.

FsX for lustre - meta data repository tasks

I create an EC2 instance in the same VPC subnet. Furthermore, I make sure that the FSx for Lustre cluster security group authorizes ingress traffic from the EC2 instance. I use SSH to connect to the instance, and then type the following commands (commands are prefixed with the $ sign that is part of my shell prompt).

# check kernel version, minimum version 4.14.104-95.84 is required 
$ uname -r
4.14.252-195.483.amzn2.aarch64

# install lustre client 
$ sudo amazon-linux-extras install -y lustre2.10
Installing lustre-client
...
Installed:
  lustre-client.aarch64 0:2.10.8-5.amzn2                                                                                                                        

Complete!

# create a mount point 
$ sudo mkdir /fsx

# mount the file system 
$ sudo mount -t lustre -o noatime,flock fs-00...9d.fsx.us-east-1.amazonaws.com@tcp:/ny345bmv /fsx

# verify mount succeeded
$ mount 
...
172.0.0.0@tcp:/ny345bmv on /fsx type lustre (rw,noatime,flock,lazystatfs)

Then, I verify that the file system contains the S3 objects, and I create a new file using the touch command.

Fsx Lustre - check file system

I switch to the AWS Console, under S3 and then my bucket name, and I verify that the file has been synchronized.

Fsx Lustre - check s3

Using the console, I delete the file from S3. And, unsurprisingly, after a few seconds, the file is also deleted from the FSx file system.

Fsx Lustre - check file systems - deleted

Pricing and Availability
These new capabilities are available at no additional cost on Amazon FSx for Lustre file systems. Automatic export and multiple repositories are only available on Persistent 2 file systems in US East (N. Virginia), US East (Ohio), US West (Oregon), Canada (Central), Asia Pacific (Tokyo), Europe (Frankfurt), and Europe (Ireland). Automatic import with support for deleted and moved objects in S3 is available on file systems created after July 23, 2020 in all regions where FSx for Lustre is available.

You can configure your file system to automatically import S3 updates by using the AWS Management Console, the AWS Command Line Interface (CLI), and AWS SDKs.

Learn more about using S3 data repositories with Amazon FSx for Lustre file systems.

One More Thing
One more thing while you are reading. Today, we also launched the next generation of FSx for Lustre file systems. FSx for Lustre next-gen file systems are built on AWS Graviton processors. They are designed to provide you with up to 5x higher throughput per terabyte (up to 1 GB/s per terabyte) and reduce your cost of throughput by up to 60% as compared to previous generation file systems. Give it a try today!

— seb

PS : my colleague Michael recorded a demo video to show you the enhanced S3 integration for FSx for Lustre in action. Check it out today.

New – Offline Tape Migration Using AWS Snowball Edge

Post Syndicated from Jeff Barr original https://aws.amazon.com/blogs/aws/new-offline-tape-migration-using-aws-snowball-edge/

Over the years, we have given you a succession of increasingly powerful tools to help you migrate your data to the AWS Cloud. Starting with AWS Import/Export back in 2009, followed by Snowball in 2015, Snowmobile and Snowball Edge in 2016, and Snowcone in 2020, each new device has given you additional features to simplify and expedite the migration process. All of the devices are designed to operate in environments that suffer from network constraints such as limited bandwidth, high connections costs, or high latency.

Offline Tape Migration
Today, we are taking another step forward by making it easier for you to migrate data stored offline on physical tapes. You can get rid of your large and expensive storage facility, send your tape robots out to pasture, and eliminate all of the time & effort involved in moving archived data to new formats and mediums every few years, all while retaining your existing tape-centric backup & recovery utilities and workflows.

This launch brings a tape migration capability to AWS Snowball Edge devices, and allows you to migrate up to 80 TB of data per device, making it suitable for your petabyte-scale migration efforts. Tapes can be stored in the Amazon S3 Glacier Flexible Retrieval or Amazon S3 Glacier Deep Archive storage classes, and then accessed from on-premises and cloud-based backup and recovery utilities.

Back in 2013 I showed you how to Create a Virtual Tape Library Using the AWS Storage Gateway. Today’s launch builds on that capability in two different ways. First, you create a Virtual Tape Library (VTL) on a Snowball Edge and copy your physical tapes to it. Second, after your tapes are in the cloud, you create a VTL on a Storage Gateway and use it to access your virtual tapes.

Getting Started
To get started, I open the Snow Family Console and create a new job. Then I select Import virtual tapes into AWS Storage Gateway and click Next:

Then I go through the remainder of the ordering sequence (enter my shipping address, name my job, choose a KMS key, and set up notification preferences), and place my order. I can track the status of the job in the console:

When my device arrives I tell the somewhat perplexed delivery person about data transfer, carry it down to my basement office, and ask Luna to check it out:

Back in the Snow Family console, I download the manifest file and copy the unlock code:

I connect the Snowball Edge to my “corporate” network:

Then I install AWS OpsHub for Snow Family on my laptop, power on the Snowball Edge, and wait for it to obtain & display an IP address:

I launch OpsHub, sign in, and accept the default name for my device:

I confirm that OpsHub has access to my device, and that the device is unlocked:

I view the list of services running on the device, and note that Tape Gateway is not running:

Before I start Tape Gateway, I create a Virtual Network Interface (VNI):

And then I start the Tape Gateway service on the Snow device:

Now that the service is running on the device, I am ready to create the Storage Gateway. I click Open Storage Gateway console from within OpsHub:

I select Snowball Edge as my host platform:

Then I give my gateway a name (MyTapeGateway), select my backup application (Veeam Backup & Replication in this case), and click Activate Gateway:

Then I configure CloudWatch logging:

And finally, I review the settings and click Finish to activate my new gateway:

The activation process takes a few minutes, just enough time to take Luna for a quick walk. When I return, the console shows that the gateway is activated and running, and I am all set:

Creating Tapes
The next step is to create some virtual tapes. I click Create tapes and enter the requested information, including the pool (Deep Archive or Glacier), and click Create tapes:

The next step is to copy data from my physical tapes to the Snowball Edge. I don’t have a data center and I don’t have any tapes, so I can’t show you how to do this part. The data is stored on the device, and my Internet connection is used only for management traffic between the Snowball Edge device and AWS. To learn more about this part of the process, check out our new animated explainer.

After I have copied the desired tapes to the device, I prepare it for shipment to AWS. I make sure that all of the virtual tapes in the Storage Gateway Console have the status In Transit to VTS (Virtual Tape Shelf), and then I power down the device.

The display on the device updates to show the shipping address, and I wait for the shipping company to pick up the device.

When the device arrives at AWS, the virtual tapes are imported, stored in the S3 storage class associated with the pool that I chose earlier, and can be accessed by retrieving them using an online tape gateway. The gateway can be deployed as a virtual machine or a hardware appliance.

Now Available
You can use AWS Snowball Edge for offline tape migration in the US East (N. Virginia), US East (Ohio), US West (Oregon), US West (N. California), Europe (Ireland), Europe (Frankfurt), Europe (London), Asia Pacific (Sydney) Regions. Start migrating petabytes of your physical tape data to AWS, today!

— Jeff;

Preview – AWS Backup Adds Support for Amazon S3

Post Syndicated from Sébastien Stormacq original https://aws.amazon.com/blogs/aws/preview-aws-backup-adds-support-for-amazon-s3/

Starting today, you can preview AWS Backup for Amazon Simple Storage Service (Amazon S3).

AWS Backup is a fully managed, policy-based service that lets you to centralize and automate the backup and restore of your applications spanning across 12 AWS services: Amazon Elastic Compute Cloud (Amazon EC2) instances, Amazon Elastic Block Store (EBS) volumes, Amazon Relational Database Service (RDS) databases (including Amazon Aurora clusters), Amazon DynamoDB tables, Amazon Neptune databases, Amazon DocumentDB (with MongoDB compatibility) databases, Amazon Elastic File System (Amazon EFS) file systems, Amazon FSx for Lustre file systems, Amazon FSx for Windows File Server file systems, AWS Storage Gateway volumes, and now Amazon S3 (in preview).

Modern workloads and systems are leveraging different storage options for different functionalities. In the 21st century, it is normal to build applications relying on non-relational and relational databases, shared file storage, and object storage, just to name of few. When operating and managing these applications, you told us that you wanted centralized protection and provable compliance for application data stored in S3 alongside other AWS services for storage, compute, and databases.

I can see three benefits when integrating Amazon Simple Storage Service (Amazon S3) with your data protection policies in AWS Backup.

First, it lets you centrally manage your applications backups: AWS Backup provides an automated solution to centrally configure backup policies, thereby helping you simplify backup lifecycle management. This also makes it easy to ensure that your application data across AWS services (including S3) is centrally backed up.

Second, it lets you easily restore your data: AWS Backup provides a single-click-restore experience for your S3 data. This lets you perform point-in-time restores of your S3 buckets and objects to a new or existing S3 bucket.

Finally, it improves backup compliance: AWS Backup provides built-in dashboards that let you to track backup and restore operations for S3.

AWS Backup for S3 (Preview) lets you create continuous point-in-time backups along with periodic backups of S3 buckets, including object data, object tags, access control lists (ACLs), and user-defined metadata. The first backup is a full snapshot, while subsequent backups are incremental. If there is a data disruption event, then you choose a backup from the backup vault, and restore an S3 bucket (or individual S3 objects) to a new or existing S3 bucket. AWS Backup is integrated with AWS Organizations, which let you use a single policy across AWS accounts (within your Organizations) to automate backup creation and backup access management.

Furthermore, you can turn on AWS Backup Vault Lock to enable delete protection of the data that you protect with AWS Backup, and thereby improving protection of your immutable backups from accidental deletion or malicious re-encryption.

How to Get Started
AWS Backup works with versioned S3 buckets. Before you get started, turn on S3 Versioning on your buckets to backup.

I must enable S3 in AWS Backup Settings when I use this feature for the first time. Using the AWS Management Console, I navigate to AWS Backup, then select Settings and Configure resources. I enable S3, and select Confirm. This is a one-time operation.

AWS Backup - optin S3

For this demo, I already have an existing backup plan, and I want to add an S3 bucket to this plan. If you want to create a new backup plan, then you can refer to AWS Backup‘s technical documentation.

To start including my S3 objects in my backup plan, I open the AWS Management Console, navigate to Backup plans, and select Assign resources.

AWS Backup Add Resources

I give a name to my Resource assignment. I select Include specific resources types, then I select S3 as Resource type and one or several S3 Bucket names. When I am done, I select Assign resources.

Alternatively, I may use tags or resource IDs to assign S3 resources.

If you have thousands of S3 buckets, I recommend using tags to assign the S3 buckets to a backup plan. AWS Backup matches the tags in S3 buckets to the ones assigned to the backup plan, and it centrally backs up the S3 resources along with other AWS services that your application uses.

The other options are not different from what you know already.

AWS Backup - backup plan for S3

The Bucket names list in the previous screenshot only shows the S3 buckets in the same Region.

Alternatively, I may also create on-demand backups. I navigate to the Protected resources section, and select Create on-demand backup.

I select S3 as the Resource type, and select the Bucket name. As per usual, I choose a Backup Window, a Retention period, a Backup vault, and an IAM role. Then, I select Create on-demand backup.

AWS Backup - on-demand backup for S3After a while, depending on the size of my bucket, the backup is ✅ Completed.

AWS Backup for S3 - Backup completed

All of the backups are encrypted and stored securely in a backup vault that I selected in the backup plan.

A backup vault (or backup storage vault) is an encrypted logical construct in my AWS account that stores and organizes my backups (recovery points). I may create new backup vaults in every AWS Region where AWS Backup is available. I may enable AWS Backup Vault Lock (delete-protection capability) on the backup vault to avoid accidental deletions and prevent malicious actors from re-encrypting my data. AWS Backup stores my continuous backups and periodic snapshots in the backup vault of my preference, and it lets me browse and restore as per my requirements.

How to Restore Objects
Let’s try to restore this backup.

The restore operation is very flexible. I may restore entire S3 buckets or individual S3 objects. I may restore the backups to the source S3 bucket, or to another existing bucket. Furthermore, I may create a new S3 bucket during restore. The S3 buckets must have Versioning enabled. Also, I may change the encryption key during restore.

I navigate to Backup vaults to restore the S3 bucket I just backed up. In the Backups section, I select the Recovery point ID that I want to restore, and I select Restore from the Actions menu.

AWS Backup for S3 - restore

Before starting the restore, I may select a few options:

  • The Restore time: I may restore my continuous backup to a point-in-time in the last 35 days, while I can restore my periodic backups to their original state.
  • The Restore type: I may choose to restore the entire bucket or a subset of objects within it.
  • The Restore destination: I may choose to restore on the same bucket, on another one, or create a new bucket during restore.
  • The Restored object encryption: this lets me select the key I want to use to encrypt the restored objects in the bucket.

I select Restore backup to start the restore.

AWS Backup for S3 - restore optionsI can monitor the progress in the Jobs section, under the Restore jobs tab.

AWS Backup S3 - restore Jobs

When the status turns green to ✅ Completed, my objects are ready to use!

Generally, the most comprehensive data-protection strategies include regular testing and validation of your restore procedures before you need them. Testing your restores also helps to prepare and maintain recovery runbooks. In turn, that ensures operational readiness during a disaster recovery exercise, or an actual data loss scenario.

Availability and Pricing
The preview is available in the US West (Oregon) Region only.

During the preview, there are no charges for creating and storing backups. You will pay the AWS charges for underlying resources, such as S3 storage, API usage, and versioning.

Send us an email at [email protected] including your AWS account ID to register for the preview.

Go ahead and apply to the preview program today.

— seb

New – Simplify Access Management for Data Stored in Amazon S3

Post Syndicated from Marcia Villalba original https://aws.amazon.com/blogs/aws/new-simplify-access-management-for-data-stored-in-amazon-s3/

Today, we are introducing a couple new features that simplify access management for data stored in Amazon Simple Storage Service (Amazon S3). First, we are introducing a new Amazon S3 Object Ownership setting that lets you disable access control lists (ACLs) to simplify access management for data stored in Amazon S3. Second, the Amazon S3 console policy editor now reports security warnings, errors, and suggestions powered by IAM Access Analyzer as you author your S3 policies.

Since launching 15 years ago, Amazon S3 buckets have been private by default. At first, the only way to grant access to objects was using ACLs. In 2011, AWS Identity and Access Management (IAM) was announced, which allowed the use of policies to define permissions and control access to buckets and objects in Amazon S3. Nowadays, you have several ways to control access to your data in Amazon S3, including IAM policies, S3 bucket policies, S3 Access Points policies, S3 Block Public Access, and ACLs.

ACLs are an access control mechanism in which each bucket and object has an ACL attached to it. ACLs define which AWS accounts or groups are granted access as well as the type of access. When an object is created, the ownership of it belongs to the creator.  This ownership information is embedded in the object ACL. When you upload an object to a bucket owned by another AWS account, and you want the bucket owner to access the object, then permissions need to be granted in the ACL. In many cases, ACLs and other kinds of policies are used within the same bucket.

The new Amazon S3 Object Ownership setting, Bucket owner enforced, lets you disable all of the ACLs associated with a bucket and the objects in it. When you apply this bucket-level setting, all of the objects in the bucket become owned by the AWS account that created the bucket, and ACLs are no longer used to grant access. Once applied, ownership changes automatically, and applications that write data to the bucket no longer need to specify any ACL. As a result, access to your data is based on policies. This simplifies access management for data stored in Amazon S3.

With this launch, when creating a new bucket in the Amazon S3 console, you can choose whether ACLs are enabled or disabled. In the Amazon S3 console, when you create a bucket, the default selection is that ACLs are disabled. If you wish to keep ACLs enabled, you can choose other configurations for Object Ownership, specifically:

  • Bucket owner preferred: All new objects written to this bucket with the bucket-owner-full-controlled canned ACL will be owned by the bucket owner. ACLs are still used for access control.
  • Object writer: The object writer remains the object owner. ACLs are still used for access control.

Options for object ownership

For existing buckets, you can view and manage this setting in the Permissions tab.

Before enabling the Bucket owner enforced setting for Object Ownership on an existing bucket, you must migrate access granted to other AWS accounts from the bucket ACL to the bucket policy. Otherwise, you will receive an error when enabling the setting. This helps you ensure applications writing data to your bucket are uninterrupted. Make sure to test your applications after you migrate the access.

Policy validation in the Amazon S3 console
We are also introducing policy validation in the Amazon S3 console to help you out when writing resource-based policies for Amazon S3. This simplifies authoring access control policies for Amazon S3 buckets and access points with over 100 actionable policy checks powered by IAM Access Analyzer.

To access policy validation in the Amazon S3 console, first go to the detail page for a bucket. Then, go to the Permissions tab and edit the bucket policy.

Accessing the IAM Policy Validation in S3 consoleWhen you start writing your policy, you see that, as you type, different findings appear at the bottom of the screen. Policy checks from IAM Access Analyzer are designed to validate your policies and report security warnings, errors, and suggestions as findings based on their impact to help you make your policy more secure.

You can also perform these checks and validations using the IAM Access Analyzer’s ValidatePolicy API.

Example of policy suggestion

Availability
Amazon S3 Object Ownership is available at no additional cost in all AWS Regions, excluding the AWS China Regions and AWS GovCloud Regions. IAM Access Analyzer policy validation in the Amazon S3 console is available at no additional cost in all AWS Regions, including the AWS China Regions and AWS GovCloud Regions.

Get started with Amazon S3 Object Ownership through the Amazon S3 console, AWS Command Line Interface (CLI), Amazon S3 REST API, AWS SDKs, or AWS CloudFormation. Learn more about this feature on the documentation page.

And to learn more and get started with policy validation in the Amazon S3 console, see the Access Analyzer policy validation documentation.

— Marcia

New for AWS Backup – Support for VMware and VMware Cloud on AWS

Post Syndicated from Danilo Poccia original https://aws.amazon.com/blogs/aws/new-for-aws-backup-support-for-vmware-and-vmware-cloud-on-aws/

Today, I am happy to announce AWS Backup support for VMware, a new capability that enables you to centralize and automate data protection of virtual machines (VMs) running on VMware on premises and VMware CloudTM on AWS. You can now use a single, centrally managed policy in AWS Backup to protect these VMware environments together with 12 AWS compute, storage, and database services already supported by AWS Backup. You can then use AWS Backup to restore VMware workloads to on-premises data centers and VMware Cloud on AWS.

While doing so, AWS Backup Audit Manager lets you consistently demonstrate compliance by monitoring backup, copy, and restore operations and generating auditor-ready reports to satisfy your data governance and regulatory requirements.

Let’s see how this works in practice.

Using AWS Backup Support for VMware
There are three steps to back up VMware virtual machines (VMs) with AWS Backup:

  1. Create a gateway to connect AWS Backup to your hypervisor.
  2. Connect to your hypervisor through the gateway.
  3. Assign virtual machines managed by your hypervisor to a backup plan.

AWS Back Support for VMware diagram

On the left pane of the AWS Backup console, there is a new External resources section. There, I choose Gateways and then Create gateway. This AWS Backup gateway helps with discovery of the on-premises VMware environment and acts as a cloud gateway to send and receive data.

I download the Open Virtualization Format (OVF) file of the AWS Backup gateway and follow the instructions to deploy the gateway using the VMware vSphere client. I am using an internal test and development VMware environment for this walkthrough.

VMware vCenter screenshot.

After deploying the gateway in my VMware environment, I come back to the AWS Backup console. I write a name for the gateway (for simplicity, I use the same name of the gateway VM) and the IP address of the gateway VM. Optionally, I can add tags to help organize and track my setup. I go on and create the gateway.

Console screenshot.

Now, I choose Add hypervisor. I write a name for the hypervisor and the IP address of the VMware vCenter server host.

Console screenshot.

I enter the username and password of a service account that I created for AWS Backup on the Active Directory domain. The username should include the domain (for example, username@domain). Then, I choose the encryption key to protect the service account credentials. If I don’t choose my own AWS Key Management Service (KMS) key, AWS Backup encrypts the username and password using a key that AWS owns and manages.

Console screenshot.

I select the gateway to connect to the hypervisor and choose Test gateway connection. This test helps ensure that the gateway can communicate with the hypervisor before I complete the configuration. Optionally, I can add tags to help organize and track my setup. I go on and add the hypervisor.

Console screenshot.

After a few minutes, the hypervisor is online, and I see the VMs managed by vCenter in the AWS Backup console. I can now use these virtual machines as resources in my backup plans in the same way as the other AWS compute, storage, and database resources supported by AWS Backup.

Console screenshot.

I create a new backup plan and start with a template. The rules of the template enforce daily backups with five weeks of retention and monthly backups with one year of retention. I can customize these rules based on my requirements.

Console screenshot.

Then, I choose to assign resources to the backup plan, and I select three VMs.

Console screenshot.

If you need, you can create an on-demand backup in the Protected resources section of the console. For example, here I am starting the on-demand backup for one of the VMs.

Console screenshot.

When a backup is complete, VMs are added to the list of the protected resources, and I can initiate a restore.

Console screenshot.

I select the backup and choose Restore. Then, I enter the restore location, which can be the same VMware environment I used for the backup or another (for example, on VMware Cloud on AWS). Below, I specify name, path, compute resource name, and datastore to use for the restore. Then, I choose Restore backup.

Console screenshot.

I monitor the status of my backup and restore jobs from the AWS Backup console. To monitor backup and restore metrics over a period of time, I can use Amazon CloudWatch metrics, logs, and alarms. I can also send events to Amazon EventBridge to receive notifications once a job completes or fails.

Availability and Pricing
AWS Backup support for VMware is available in the US East (N. Virginia, Ohio), US West (N. California, Oregon), GovCloud (US-East, US-West), Canada (Central), Europe (Frankfurt, Ireland, London, Milan, Paris, Stockholm), South America (São Paulo), Asia Pacific (Hong Kong, Mumbai, Seoul, Singapore, Sydney, Tokyo, Osaka), Middle East (Bahrain), and Africa (Cape Town) Regions. Please see the AWS Regional Services List for more information.

AWS Backup supports VMware ESXi 6.7.x and 7.0.x VMs running on NFS, VMFS, and VSAN data stores on premises and in VMware Cloud on AWS. In addition, AWS Backup supports both SCSI Hot-Add and Network Block Device (NBD) transport modes for copying data from source VMs to AWS.

With AWS Backup support for VMware, you pay using the same dimensions that AWS Backup uses today: backup storage, restore, and cross-region data transfer. For more information, see the AWS Backup pricing page.

Your VM backups are stored in a backup vault. All backups stored and managed by AWS Backup are replicated to 3 Availability Zones (AZs) in the Region and designed for 99.999999999 percent (11 9s) durability and 99.99 percent (4 9s) of service availability.

AWS Backup supports first full, then incremental-forever, backups of VMs that you can create on-demand or via a schedule configured in your backup plan. AWS Backup always does full restores even though backups are stored as incremental, enabling you to benefit from storage efficiency cost savings while easily performing restores.

Centrally protect your VMware environments and your AWS compute, storage, and database resources with AWS Backup.

— Danilo

New – Amazon FSx for OpenZFS

Post Syndicated from Jeff Barr original https://aws.amazon.com/blogs/aws/new-amazon-fsx-for-openzfs/

Last month, my colleague Bill Vass said that we are “slowly adding additional file systems” to Amazon FSx. I’d question Bill’s definition of slow, given that his team has launched Amazon FSx for Lustre, Amazon FSx for Windows File Server, and Amazon FSx for NetApp ONTAP in less than three years.

Amazon FSx for OpenZFS
Today I am happy to announce Amazon FSx for OpenZFS, the newest addition to the Amazon FSx family. Just like the other members of the family, this new addition lets you use a popular file system without having to deal with hardware provisioning, software configuration, patching, backups, and the like. You can create a file system in minutes and begin to enjoy the benefits of OpenZFS right away: transparent compression, continuous integrity verification, snapshots, and copy-on-write. Even better, you get all of these benefits without having to develop the specialized expertise that has traditionally been needed to set up and administer OpenZFS.

FSx for OpenZFS is powered by the AWS Graviton family processors and AWS SRD (Scalable Reliable Datagram) Networking, and can deliver up to 1 million IOPS with latencies of 100-200 microseconds, along with up to 4 GB/second of uncompressed throughput, up to 12 GB/second of compressed throughput, and up to 12.5 GB/second throughput to cached data. FSx for OpenZFS supports the OpenZFS Adaptive Replacement Cache (ARC) and uses memory in the file server to provide faster performance. It also supports advanced NFS performance features such as session trunking and NFS delegation, allowing you to get very high throughput and IOPS from a single client, while still safely caching frequently accessed data on the client side.

FSx for OpenZFS volumes can be accessed from cloud or on-premises Linux, MacOS, and Windows clients via industry-standard NFS protocols (v3, v4, v4.1, and v4.2). Cloud clients can be Amazon Elastic Compute Cloud (Amazon EC2) instances, Amazon Elastic Container Service (Amazon ECS) and Amazon Elastic Kubernetes Service (EKS) clusters, Amazon WorkSpaces virtual desktops, and VMware Cloud on AWS. Your data is stored in encrypted form and replicated within an AWS Availability Zone, with components replaced automatically and transparently as necessary.

You can use FSx for OpenZFS to address your highly demanding machine learning, EDA (Electronic Design Automation), media processing, financial analytics, code repository, DevOps, and web content management workloads. With performance that is close to local storage, FSx for OpenZFS is great for these and other latency-sensitive workloads that manipulate and sequentially access many small files. Finally, because you can create, mount, use, and delete file systems as needed, you can now use OpenZFS in a dynamic, agile fashion.

Using Amazon FSx for OpenZFS
I can create an OpenZFS file system using the AWS Management Console, CLI, APIs, or AWS CloudFormation. From the FSx Console I click Create file system and choose Amazon FSx for OpenZFS:

I can choose Quick create (and use recommended best-practice configurations), or Standard create (and set all of the configuration options myself). I’ll take the easy route and use the recommended best practices to get started. I enter a name (Jeff-OpenZFS) select the amount of SSD storage that I need, choose a VPC & subnet, and click Next:

The console shows me that I can edit many of the attributes of my file system later if necessary. I review the settings and click Create file system:

My file system is ready within a minute or two, and I click Attach to get the proper commands to mount it to my client:

To be more precise, I am mounting the root volume (/fsx) of my file system. Once it is mounted, I can use it as I would any other file system. After I add some files to it, I can use the Action menu in the console to create a backup:

I can restore the backup to a new file system:

As I noted earlier, each file system can deliver up to 4 gigabytes per second of throughput for uncompressed data. I can look at total throughput and other metrics in the console:

I can set throughput capacity of each volume when I create it, and then change it later if necessary:

Changes take effect within minutes. The file system remains active and mounted while the change is put into effect, but some operations may pause momentarily:

A single OpenZFS file system can contain multiple volumes, each with separate quotas (overall volume storage, per-user storage, and per-group storage) and compression settings. When I use the quick create option a root volume named fsx is created for me; I can click Create volume to create more volumes at any time:

The new volume exists within the namespace hierarchy of the parent, and can be mounted separately or accessed from the parent.

Things to Know
Here are a couple of quick facts and to wrap up this post:

Pricing – Pricing is based on the provisioned storage capacity, throughput, and IOPS.

Regions – Amazon FSx for OpenZFS is available in the US East (N. Virginia), US East (Ohio), US West (Oregon), Europe (Ireland), Canada (Central), Asia Pacific (Tokyo), and Europe (Frankfurt) Regions.

In the Works – We are working on additional features including storage scaling, IOPS scaling, a high availability option and another storage class.

Now Available
Amazon FSx for OpenZFS is available now and you can start using it today!

— Jeff;

AWS Nitro SSD – High Performance Storage for your I/O-Intensive Applications

Post Syndicated from Jeff Barr original https://aws.amazon.com/blogs/aws/aws-nitro-ssd-high-performance-storage-for-your-i-o-intensive-applications/

We love to solve difficult problems for our customers! As you have seen through the years, innovation at AWS takes many forms, and encompasses both hardware and software.

One of my favorite examples of customer-driven innovation is AWS Nitro System, which I first wrote about back in mid-2018. In that post I told you how Nitro System would allow us to innovate more quickly than ever, with the goal of creating instances that would run even more types of workloads. I also shared the basic building blocks, as they existed at that time, including Nitro Cards to accelerate and offload network and storage I/O, the Nitro Security Chip to monitor and protect hardware resources, and the Nitro Hypervisor to manage memory and CPU allocation with very low overhead.

Today I would like to tell you about one more building block!

AWS Nitro SSD
For decades, traditional hard drives (sometimes jokingly referred to as spinning rust) were the primary block storage devices. Today, while spinning rust still has its place, most high-performance storage is based on more modern Solid State Drives (SSD). Open up an SSD and you will find lots of flash memory and a firmware-driven processor that manages access to the memory and supports higher-level functions such as block mapping, encryption, caching, wear leveling, and so forth.

The scale of the AWS Cloud and the range of customer use cases that it supports gives us some valuable insights into the ways that today’s applications, database engines, and operating systems make use of block storage. As a result, after delivering several generations of EC2 instances we saw an opportunity to do better. Our goal was to allow I/O-intensive workloads (relational databases, NoSQL databases, data warehouses, search engines, and analytics engines to name a few) to run faster and with more predictable performance.

Today I would like to tell you about the AWS Nitro SSD. The first generation of these devices were used to power io2 Block Express EBS volumes, and allow us to give you EBS volumes with lots of IOPS, plenty of throughput, and a maximum volume size of 64 TiB. The Im4gn and Is4gen instances that I wrote about earlier today make use of the second generation of AWS Nitro SSDs, as will many future EC2 instances, including the I4i instances that we preannounced today.

The AWS Nitro SSDs are designed to be installed and to operate at cloud scale. While this sounds like a simple exercise in manufacturing and installing more devices, the reality is a lot more complex and a lot more interesting. As I noted earlier, the firmware inside of each device is responsible for implementing many lower-level functions. As our customers push the devices to their limits, they expect us to be able to diagnose and resolve any performance inconsistencies they observe. Building our own devices allows us to design in operational telemetry and diagnostics, along with mechanisms that enable us to install firmware updates at cloud scale & at cloud speed. Taking this even further, we developed our own code to manage the instance-level storage in order to further improve the reliability and debug-ability, and to deliver consistent performance.

On the performance side, our deep understanding of cloud workloads led us to engineer the devices so that they can deliver maximum performance under a sustained, continuous load. SSDs are built from fast, dense flash memory. Due to the characteristics of this semiconductor memory, each cell can only be written, erased, and then rewritten a limited number of times. In order to make the devices last as long as possible, the firmware is responsible for a process known as wear leveling. I don’t understand the details, but I assume that this includes some sort of mapping from logical block numbers to physical cells in a way that evens out the number of cycles over time. There’s some housekeeping (a form of garbage collection) involved in this process, and garden-variety SSDs can slow down (creating latency spikes) at unpredictable times when dealing with a barrage of writes. We also took advantage of our database expertise and built a very sophisticated, power-fail-safe journal-based database into the SSD firmware.

The second generation of AWS Nitro SSDs were designed to avoid latency spikes and deliver great I/O performance on real-world workloads. Our benchmarks show instances that use the AWS Nitro SSDs, such as the new Im4gn and Is4gen, deliver 75% lower latency variability than I3 instances, giving you more consistent performance.

Putting all of this together, there’s a very tight, rapidly rotating flywheel in action here because the team that builds the Nitro SSDs is part of the AWS storage team, and also has operational responsibilities. Like all teams at AWS, they watch the metrics day-in and day-out, and can efficiently deploy new firmware using a CI/CD model.

Join the Team
As is always the case, there’s always more innovation ahead, and we have some awesome positions on the teams that design the AWS Nitro SSDs. For example:

— Jeff;

New Storage-Optimized Amazon EC2 Instances (Im4gn and Is4gen) Powered by AWS Graviton2 Processors

Post Syndicated from Jeff Barr original https://aws.amazon.com/blogs/aws/new-storage-optimized-amazon-ec2-instances-im4gn-and-is4gen-powered-by-aws-graviton2-processors/

EC2 storage-optimized instances are designed to deliver high disk I/O performance, and plenty of storage. Our customers use them to host high-performance real-time databases, distributed file systems, data warehouses, key-value stores, and more. Over the years we have released multiple generations of storage-optimized instances including the HS1 (2012) , D2 (2015), I2 (2013) , I3 (2017), I3en (2019), and D3/D3en (2020).

As I look back on all of these launches, it is interesting to see how we continue to provide an ever-increasing set of options that make each successive generation an even better fit for the diverse (and also ever-increasing) needs of our customers. HS1 instances were available in just one size, D2 and I2 in four, I3 in six, and I3en in eight. These instances give our customers the freedom to choose the size that best meets their current needs while also giving them room to scale up or down if those needs happen to change.

Im4gn and Is4gen
Today I am happy to introduce the two newest families of storage-optimized instances, Im4gn and Is4gen, powered by Graviton2 processors. Both instances offer up to 30 TB of NVMe storage using AWS Nitro SSD devices that are custom-built by AWS. As part of our drive to innovate on behalf of our customers, we turned our attention to storage and designed devices that were optimized to support high-speed access to large amounts of data. The AWS Nitro SSDs reduce I/O latency by up to 60% and also reduce latency variability by up to 75% when compared to the third generation of storage-optimized instances. As a result you get faster and more predictable performance for your I/O-intensive EC2 workloads.

Im4gn instances are a great fit for applications that require large amounts of dense SSD storage and high compute performance, but are not especially memory intensive such as social games, session storage, chatbots, and search engines. Here are the specs:

Instance Name vCPUs
Memory Local NVMe Storage
(AWS Nitro SSD)
Read Throughput
(128 KB Blocks)
EBS-Optimized Bandwidth Network Bandwidth
im4gn.large 2 8 GiB 937 GB 250 MB/s Up to 9.5 Gbps Up to 25 Gbps
im4gn.xlarge 4 16 GiB 1.875 TB 500 MB/s Up to 9.5 Gbps Up to 25 Gbps
im4gn.2xlarge 8 32 GiB 3.75 TB 1 GB/s Up to 9.5 Gbps Up to 25 Gbps
im4gn.4xlarge 16 64 GiB 7.5 TB 2 GB/s 9.5 Gbps 25 Gbps
im4gn.8xlarge 32 128 GiB 15 TB
(2 x 7.5 TB)
4 GB/s 19 Gbps 50 Gbps
im4gn.16xlarge 64 256 GiB 30 TB
(4 x 7.5 TB)
8 GB/s 38 Gbps 100 Gbps

Im4gn instances provide up to 40% better price performance and up to 44% lower cost per TB of storage compared to I3 instances. The new instances are available in the AWS US West (Oregon), US East (Ohio), US East (N. Virginia), and Europe (Ireland) Regions as On-Demand, Spot, Savings Plan, and Reserved instances.

Is4gen instances are a great fit for applications that do large amounts of random I/O to large amounts of SSD storage. This includes shared file systems, stream processing, social media monitoring, and streaming platforms, all of which can use the increased storage density to retain more data locally. Here are the specs:

Instance Name vCPUs
Memory Local NVMe Storage
(AWS Nitro SSD)
Read Throughput
(128 KB Blocks)
EBS-Optimized Bandwidth Network Bandwidth
is4gen.medium 1 6 GiB 937 GB 250 MB/s Up to 9.5 Gbps Up to 25 Gbps
is4gen.large 2 12 GiB 1.875 TB 500 MB/s Up to 9.5 Gbps Up to 25 Gbps
is4gen.xlarge 4 24 GiB 3.75 TB 1 GB/s Up to 9.5 Gbps Up to 25 Gbps
is4gen.2xlarge 8 48 GiB 7.5 TB 2 GB /s Up to 9.5 Gbps Up to 25 Gbps
is4gen.4xlarge 16 96 GiB 15 TB
(2 x 7.5 TB)
4 GB/s 9.5 Gbps 25 Gbps
is4gen.8xlarge 32 192 GiB 30 TB
(4 x 7.5 TB)
8 GB/s 19 Gbps 50 Gbps

Is4gen instances provide 15% lower cost per TB of storage and up to 48% better compute performance compared to I3en instances. The new instances are available in the AWS US West (Oregon), US East (Ohio), US East (N. Virginia), and Europe (Ireland) Regions as On-Demand, Spot, Savings Plan, and Reserved instances.

Available Now
As I never get tired of saying, these new instances are available now and you can start using them today. You can use Amazon Linux 2, Ubuntu 18.04.05 (and newer), Red Hat Enterprise Linux 8.0, and SUSE Enterprise Server 15 (and newer) AMIs, along with the container-optimized ECS and EKS AMIs. Learn more about the Im4gn and Is4gen instances.

— Jeff;

PS – As of this launch twelve EC2 instance types are now powered by Graviton2 processors! To learn more, visit the Graviton2 page.

Machine Learning-Powered Amazon Connect, Now With Call Summarization

Post Syndicated from Sébastien Stormacq original https://aws.amazon.com/blogs/aws/machine-learning-powered-amazon-connect-now-with-call-summarization/

At AWS our mission is to make machine learning (ML) accessible to data scientists, developers, and business users. To help businesses easily leverage the power of ML, we create purpose-built solutions that embed ML and deep learning technologies directly into a business process to address real customer needs, rather than leaving companies to sort it out on their own.

One place where we have seen ML have an impact is within the contact center—the place you receive and respond to customer inquiries and issues. Because of the growing role of customer experience (CX) and the increase in contact less commerce via phone or email, contact centers are essentials to maintaining the human connections that businesses depend on. However, analog or outdated methods make it difficult to address every customer need in an effective way that delivers timely resolutions, delivers great experiences, and fosters customer loyalty.

Embedding AWS ML technologies into a cloud contact center solution helps decrease the friction of calls, chats, and other engagements. It also makes it possible to automate outdated processes.

Amazon Connect is an easy-to-use, cloud-based, ML-powered contact center service that helps companies of any size deliver superior customer service at a lower cost.

Let me take three examples with Voice ID, Wisdom, and Contact Lens.

Amazon Connect Voice ID
ML capabilities might help streamline customer experience for authentication. Instead of asking customers to repeat their email address and their mother’s maiden name several times, ML-powered voice identification can establish a digital voice print associated with each customer’s unique voice. Then, it can recognize it at the beginning of each subsequent call. Voice identification provides a confidence score that may be used to automate authentication workflows.

Amazon Connect Wisdom
ML might also help search the vast documentation and knowledge base to find the most relevant answers to the questions raised by the customer. ML helps resolve customer issues faster and better.

Contact Lens for Amazon Connect
ML technologies also shine at analyzing the tone and content of a conversation, capturing customer sentiment in the moment, and learning from it. ML can help transcribe calls, track customer sentiment, detect common issues and customer trends, or even pinpoint discrepancies.

At just about the same time last year, I announced the addition of real-time capabilities for Contact Lens. This lets supervisors identify when to assist an agent on live calls so that they can provide guidance via chat or have the agent transfer the call. Last September, we added support for eight new languages, ending up with a total of 21 languages for post-call analytics and 12 languages for both post-call and real-time analytics.

Contact Lens Adds Call Summarization
But we didn’t stop there. Today, I am pleased to announce the addition of a new capability that helps you improve customer experience and agent and supervisor productivity by automatically summarizing the important aspects of each customer call.

You told us that keeping notes of customer conversations is time consuming, especially, for agents that must take notes during the call and import them manually in your CRM tool afterward. In the end, this is more time for us, the customers, waiting in queue for an agent to become available. Likewise, using automatically generated call transcripts doesn’t save time for supervisors. It is time consuming for supervisors to read these full call transcripts to understand what happened during customer conversations.

How it Works
Starting today, Contact Lens has added a summary of the key moments in a conversation. It is enabled by default, and there is no additional configuration step. You may toggle the Show transcript summary button to show or hide the summary when you don’t need it.

Contac Lens - Show Transcript Summary - Toggle button

Once a call is analyzed, the summary is available on the contact detail page.

Contact Lens identifies and summarizes the sections corresponding to Issue (e.g., lost package), Outcome (e.g., customer refund), and Action item (e.g., send a follow-up mail confirming the refund was processed). A manager can quickly see where there’s an action to send a customer a follow-up email and take action to ensure it happens.

Contact Lens Call Summary Example

The call summary is also available in JSON format. Contact Lens uploads these in the S3 bucket of your choice. Having access to the JSON file lets you import the summaries programmatically in your CRM or other tools.

... redacted for brevity ...

"IssuesDetected": [
{
   "CharacterOffsets": {
      "BeginOffsetChar": 31,
      "EndOffsetChar": 73
   },
   "Text": "I would like to cancel my subscription"
}
]
...
"ActionItemsDetected": [
 {
   "CharacterOffsets": {
      "BeginOffsetChar": 32,
      "EndOffsetChar": 116
   },
   "Text": "I will send you an email with details"
 }
 ]

Availability and Pricing
Call summarization by Contact Lens is available in all AWS Regions where Contact Lens is available today. We support post-call analytics in the US West (Oregon), US East (N. Virginia), Canada (Central), Europe (London), Europe (Frankfurt), Asia Pacific (Singapore), Asia Pacific (Seoul), Asia Pacific (Tokyo), and Asia Pacific (Sydney) regions. We support real-time analytics in the US West (Oregon), US East (N. Virginia), Canada (Central), Europe (London), Europe (Frankfurt), Asia Pacific (Seoul), Asia Pacific (Tokyo), and Asia Pacific (Sydney) regions.

Call summary comes at no additional cost on top of the usual charges for Contact Lens. This is why we choose to enable it by default. Contact Lens is charged $0.015 per minute of voice conversation analyzed. Most of our Contact Lens customers analyze millions of conversation minutes per month. The price is $0.0125 per minute when you analyze more than 5 millions minutes per month.

If you do not have Contact Lens enabled on your call center, go ahead and start using it today.

— seb