Cloudflare Zaraz adds support for server-side rendering of X and Instagram embeds

Post Syndicated from Yair Dovrat original https://blog.cloudflare.com/zaraz-supports-server-side-rendering-of-embeds


We are thrilled to announce Cloudflare Zaraz support of server-side rendering of embeds, featuring two Managed Components: X and Instagram. You can now use Cloudflare Zaraz to effortlessly embed posts from X or Instagram on your website in a performant, privacy-preserving, and secure way. Many traditional tag managers or customer data platforms rely heavily on third-party JavaScript and cookies to embed content, leading to concerns about privacy and performance. In contrast, we designed our solution to work without loading any third-party JavaScript or cookies, and furthermore to completely eliminate communication between the browser and third-party servers.

Starting today, you can use Cloudflare Zaraz not only for server-side data reporting to conventional marketing and analytics tools but also for server-side content rendering on your website. We are excited to pave the way with tools that enhance security, protect user privacy, and improve performance. Take a look at it:

Embed social media content without sacrificing security and speed

Since social media platforms emerged, we have become more and more familiar with seeing posts being embedded on websites, from showcasing user testimonials on product pages to featuring posts from reporters and politicians in news articles or blogs. Traditionally, this process has involved integrating HTML and JavaScript code provided by the social media platform. While this method was quite convenient and simple to implement, it also introduces significant drawbacks in terms of security, privacy, and performance.

Instagram’s interface to copy HTML embed code

One of the primary concerns with using the embed scripts from these platforms is privacy. Today, there’s simply no way to embed social media content on your website without letting social media platforms collect data on your users. Very often this is done via cookies, but it is not the only way in which social media platforms collect information on your end users. More often than not, traditional embed scripts capture sensitive information from the browser and include it in the requests sent to their endpoints, and often even to other third-party endpoints. Even if they don’t explicitly collect private information, the very request made from the browser to fetch the remote JavaScript resource can potentially expose sensitive user information, such as the IP address or User Agent. This practice has already led to GDPR compliance issues in Europe with other tools, as seen in the case with Google Fonts, and poses a similar future risk with any other third-party tool, including embeds.

Security is another big risk embed scripts pose. By embedding these external scripts, websites essentially place their trust in the security of these third-party platforms. A single vulnerability in any of their dependency libraries could compromise user safety on a massive scale.

In contrast to traditional social media platform code snippets, Zaraz’s method of embedding X and Instagram posts does not load any third-party JavaScript on the client side. And not only that, by leveraging different Managed Component APIs (see code walkthrough below), Zaraz is fetching and caching all the content on the server side, and serving everything from your own domain. This means that there’s simply no direct communication between the end user’s browser and the third-party endpoint, which gives you much greater control over what information is shared with the external platform, if any.

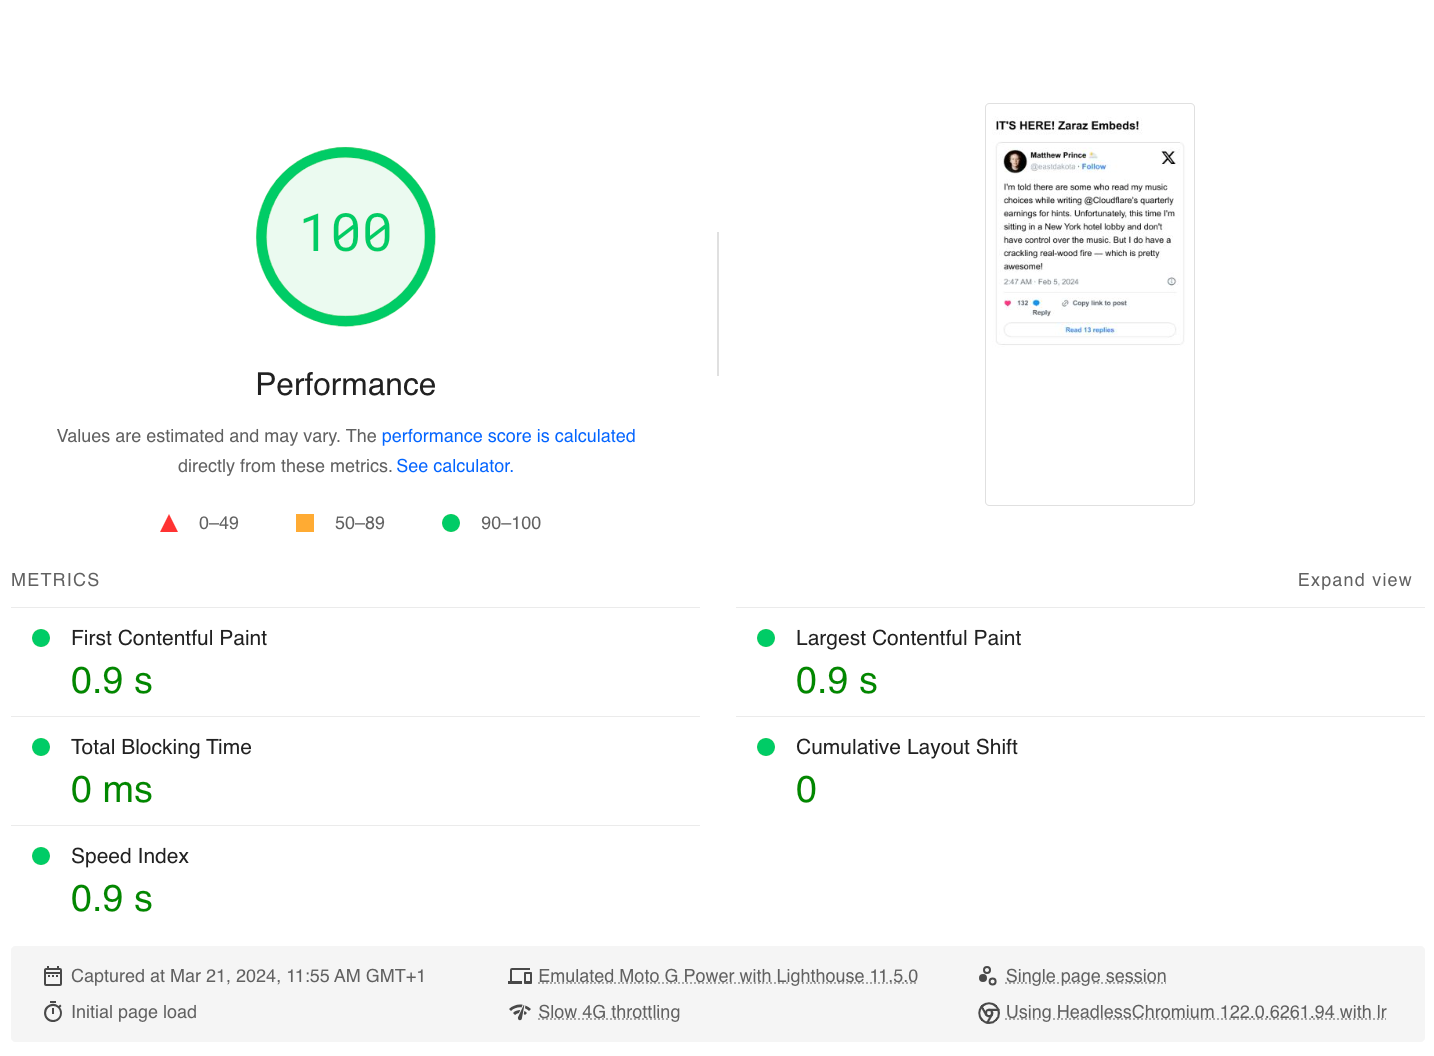
Zaraz, running entirely on Cloudflare Workers, and with its ability to inject HTML before web content is served, also has performance advantages. Below, you can see the perfect 100 score that our X embed has received from Google PageSpeed Insights, and our ability to reach 0ms Total Blocking Time with only one request and a minimal transfer size of 12.1 KiB. To showcase the new feature, we’ve put together two identical HTML pages that are loading this tweet. One is embedding the tweet using Zaraz, the other embeds the code snippet provided by X. We then ran the Google PageSpeed Insights tests on the pages, loaded from the exact same environment.

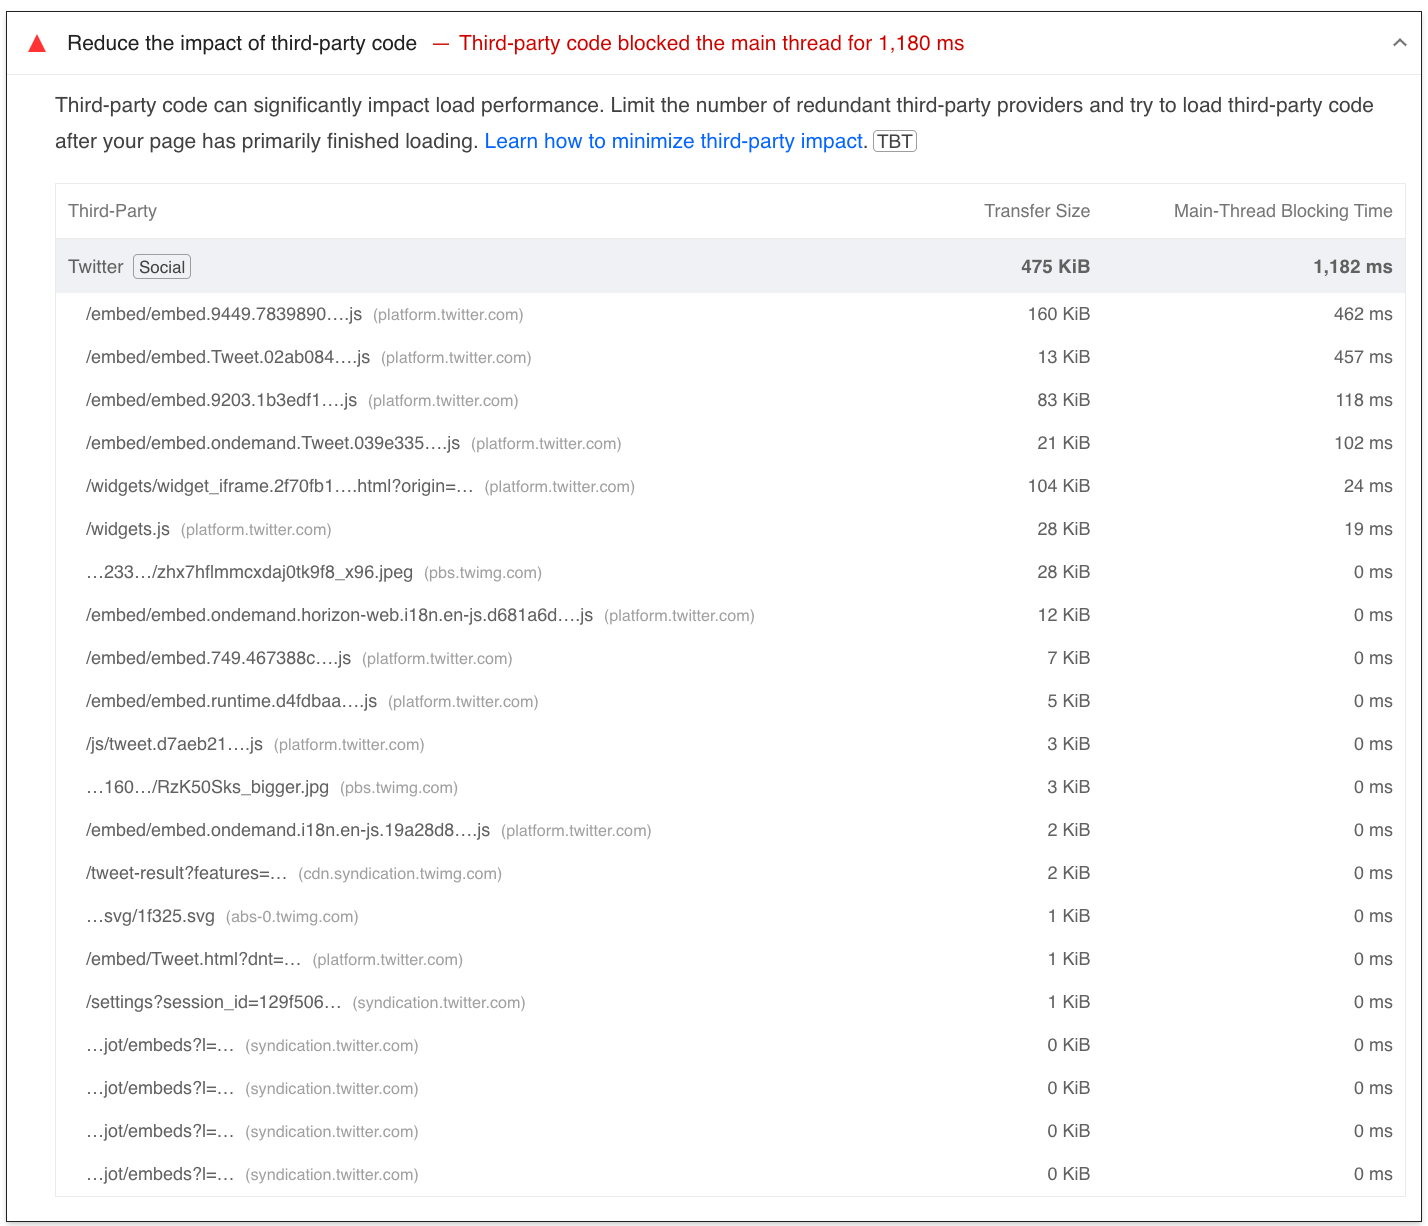
In comparison, the traditional way of embedding social media posts introduces a significant performance hit. Below are the results of the traditional embed code we tested: a 27-point decrease in the performance score, multiple requests with transfer size of 475 KiB, and 1,010 ms of Total Blocking Time (more than a second just to render this tweet!).

By processing content server-side, we completely eliminate the need for cookies or third-party scripts on the client’s browser, we prevent direct communication between the browser and the third-party server, and we provide a significantly faster user experience. So how does it work? Let’s dive into the code.

Using and building embeds

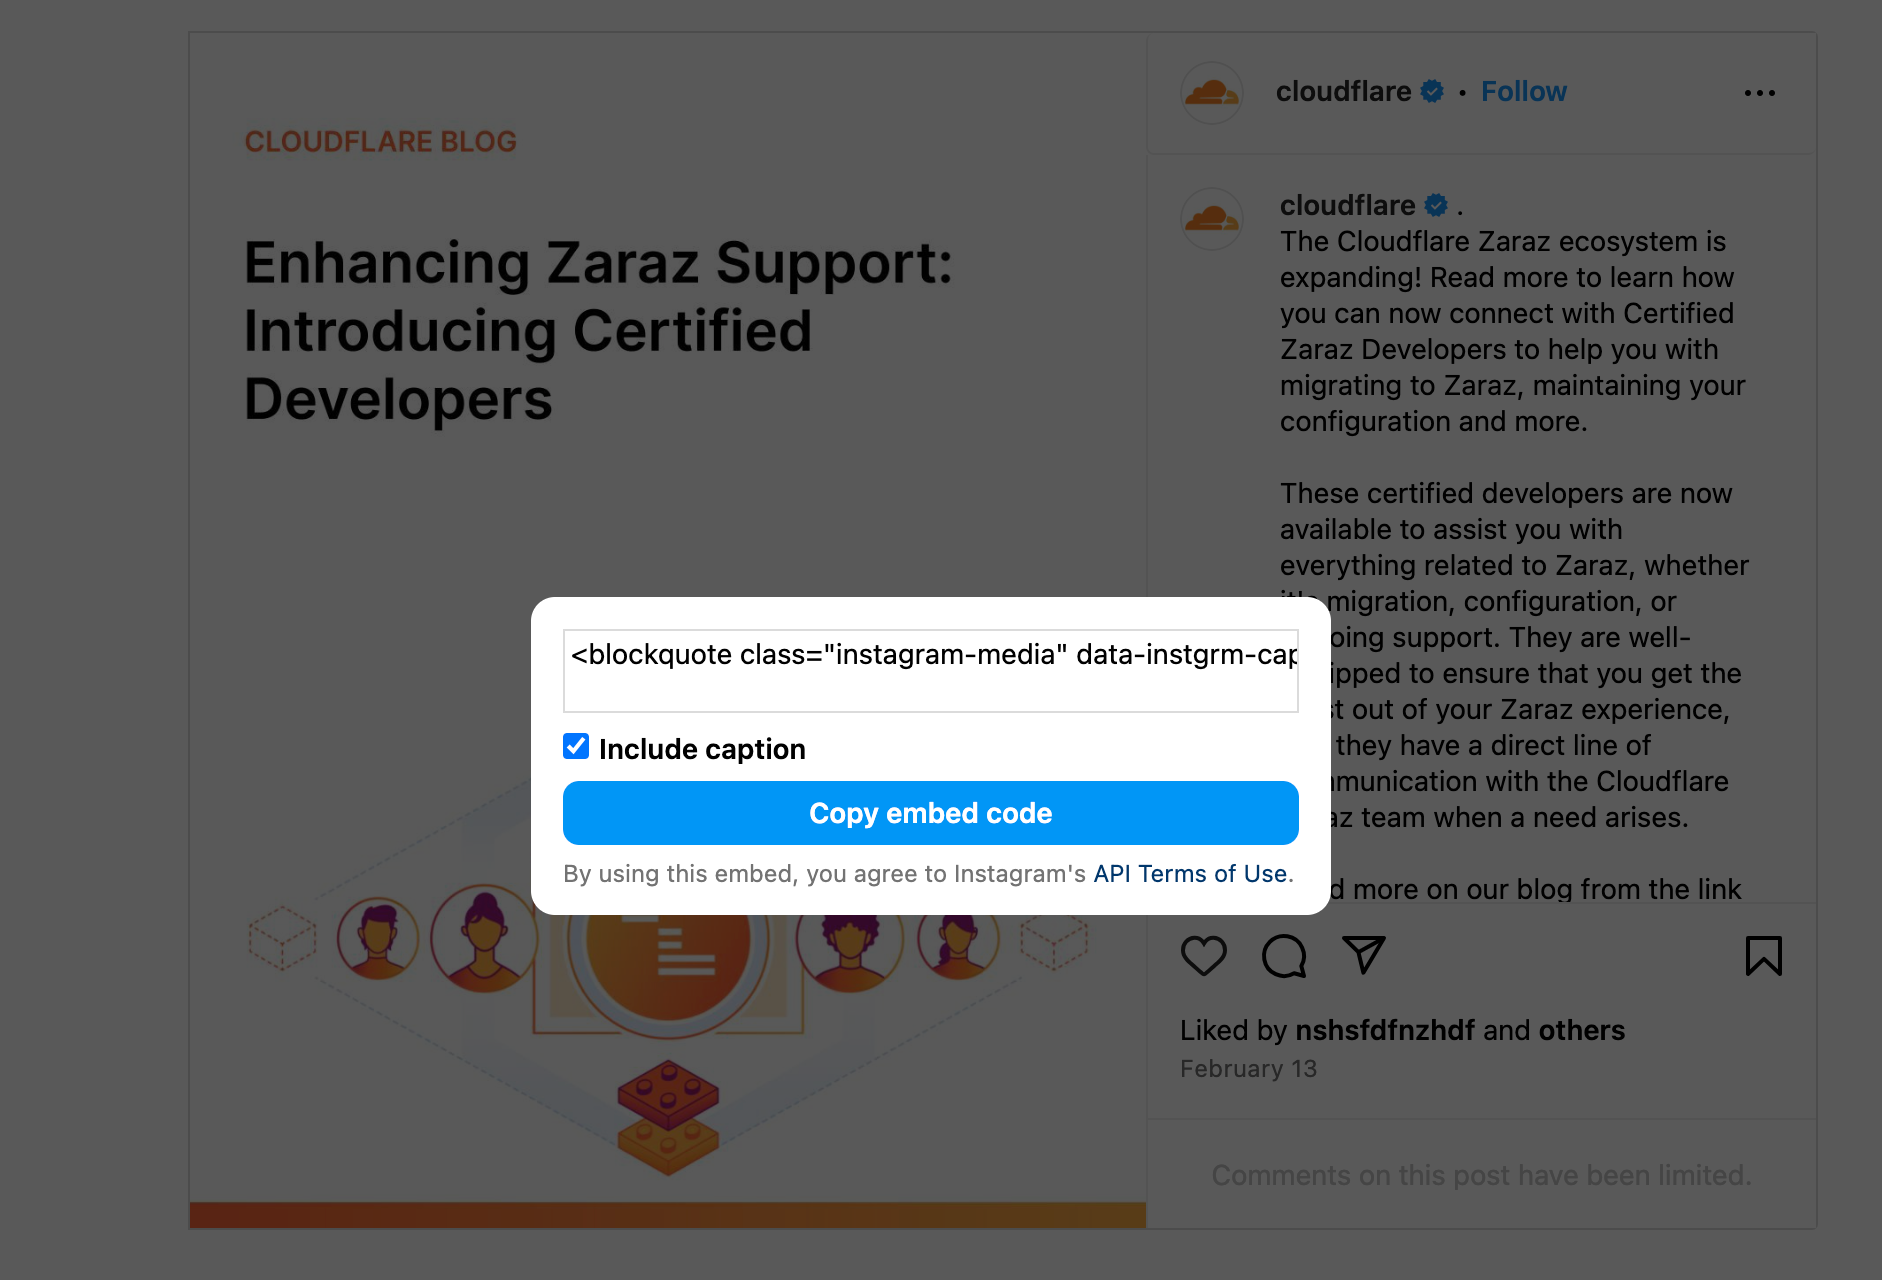
The X and Instagram Managed Components we’ve built are open source and available on GitHub. We took a different approach with each tool to showcase different methods for fetching content and generating the embed’s HTML and CSS. The X embed is requesting JSON from X’s endpoint, and is distributing the information received inside a templated HTML post we’ve written. The HTML template mimics the looks of the original post. The Instagram embed is requesting the actual post’s HTML generated by Instagram, manipulating it so that it doesn’t include any scripts, and routing all the images and CSS through your own domain. We outline and showcase the different processes below.

How to embed posts using Cloudflare Zaraz

Loading an embed with Cloudflare Zaraz is simple: instead of loading the Embed JavaScript provided by X or Instagram, you simply add a placeholder element to your HTML.

For X:

<twitter-post tweet-id="1754336034228171055"></twitter-post>

* Make sure to replace the tweet-id with the number shown in the embedded tweet’s URL.

For Instagram:

<instagram-post
  post-url="https://www.instagram.com/p/Ct_qa1ZtmiW/"
  captions="true">
</instagram-post>

* Make sure to replace the post-url with the URL of the desired post. When `captions` is set to true, the embed will include the post’s captions.

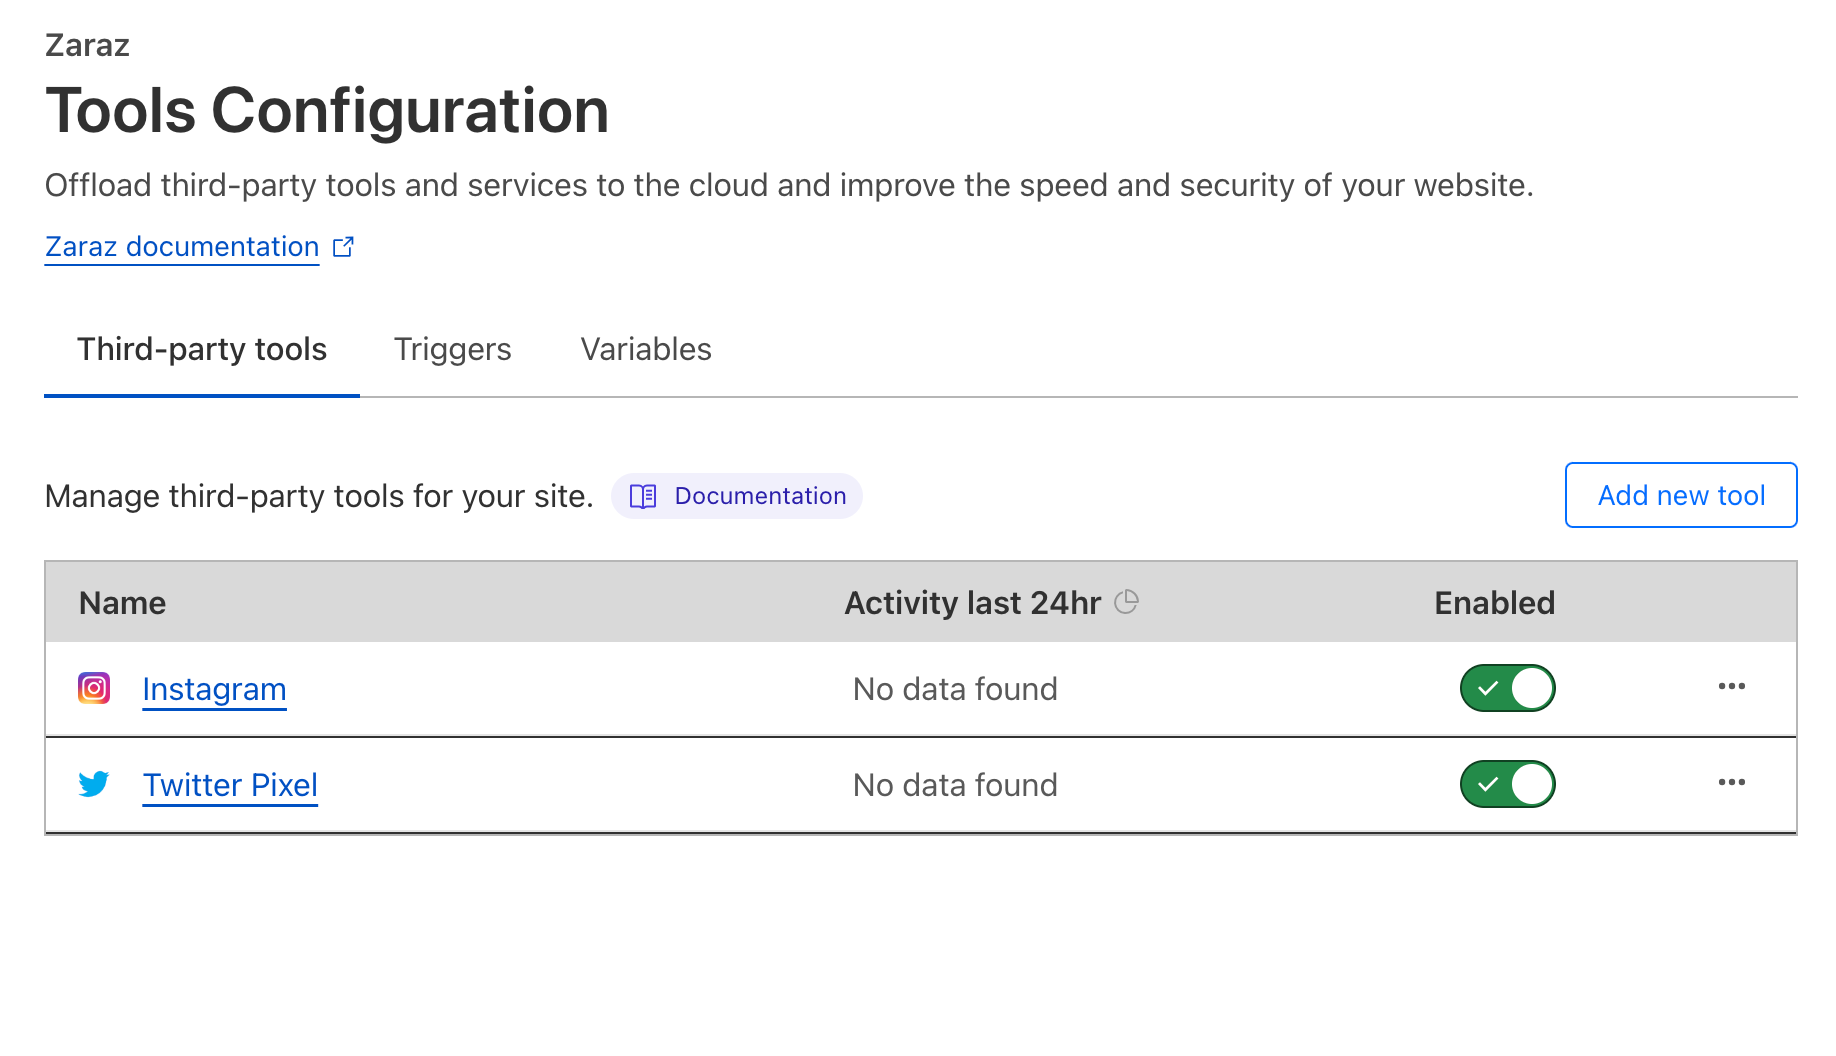
Once you’ve added the HTML to your page, activate the corresponding tools in your Cloudflare Zaraz dashboard. Click “Add new tools” to add X and Instagram. This is how your screen should look when you finish setting up your tools:

Cloudflare Zaraz will then detect placeholder elements in your HTML and replace them with the embedded social media content.

Walkthrough of the X post embed

The X Managed Component is registering the following embed:

manager.registerEmbed("post", async ({ parameters, client }) => {
  // embed's logic goes here
});

Zaraz detects the placeholder element <twitter-post>, and picks up all the parameters included as HTML attributes of that element and sends them inside an object, together with the client, as the first argument of the manager.registerEmbed() function. The manager.registerEmbed() callback will return HTML. To generate the HTML, we use generic HTML and CSS templates we’ve written to construct the post. Those templates contain placeholder variables to be filled with the relevant tweet data later on.

We use Mustache, a library for rendering templates, to replace the placeholder variables spread across the HTML template. Wherever Mustache detects {{text}}, {{name}}, {{username}}, and the like in the HTML, it will replace their content with the relevant values we pass to it, like so:

//using Mustache to search for and replace placeholder variables in the post template with the tweet's content 
    const output = mustache.render(post, {
      text,
      name: user.name,
      username: user.screen_name,
      picture: 'data:image/jpeg;base64,' + profileImage,
      datetime,
      likes: numberFormatter(favorite_count, 1),
      replies: numberFormatter(conversation_count, 1),
      heartIcon,
      commentIcon,
      linkIcon,
      tweetId,
      xIcon,
      tooltipIcon,
      retweetUrl,
    })

Most of the values of the variables we pass to Mustache, which contain the specific post data, are being fetched from one of X’s endpoints. This is done with a server-side fetch request. The response, containing a JSON file with all the post’s data, is then populated into the corresponding variables as shown above.

Zaraz is also caching the JSON for better performance. This is done with the Managed Components manager.useCache() method, which takes 3 arguments: name, function and expiry. Here, the function argument is using manager.fetch() to send a fetch request from the server.

(...)

// grabs the tweet-id from the parameters argument
    const tweetId = parameters['tweet-id'] 

(...)

const tweetResponse = await manager.useCache(
      'tweet_' + tweetId,
      async () => {
        const res = await manager.fetch(       `https://cdn.syndication.twimg.com/tweet-result?id=${tweetId}&token=${randomToken}`,
          {
            headers: {
              Accept: 'application/json',
              'User-Agent': client?.userAgent || prefixedUA,
            },
          }
        )
        if (!res) {
          throw new Error('Failed to fetch tweet data.')
        }
        return await res.text()
      },
      600 // cache the Tweet for 10 minutes
    )

It is important to mention that all images populated in the post template, like the profile picture, are fetched server-side and cached using manager.set():

// first, we check if profile image is already cached
let profileImage = await manager.get('profileImage_' + user.screen_name)

// if not, we fetch the image server-side and cache it using `manager.set()`

    if (!profileImage) {
      const res = await manager.fetch(user.profile_image_url_https, {
        headers: {
          Accept: 'image/jpeg,image/png,image/*,*/*;q=0.8',
          'User-Agent': client?.userAgent || prefixedUA,
        },
        method: 'GET',
      })
      if (res) {
        const imageBuffer = await res.arrayBuffer()

        profileImage = base64Encode(imageBuffer)
        await manager.set('profileImage_' + user.screen_name, profileImage)
      }
    }

Once the post’s HTML is ready, with all the relevant content fetched and rendered, the Managed Component returns the HTML content to Zaraz. Zaraz will then use it to replace the  <twitter-post> placeholder element. Because this all happens on Cloudflare, the response to the end-user’s browser will already contain the embed code.

Walkthrough of the Instagram post embed

The Instagram post embed is built around Instagram’s own generated HTML. In contrast to the X example, which uses JSON data to populate an HTML template, this approach involves tweaking Instagram’s HTML to meet our privacy and safety requirements.

We want the Instagram embed to work without requiring direct communication between the browser and any of Instagram’s endpoints. This is done by fetching CSS content server-side, caching it, and finally serving it together with the output HTML, avoiding any network request from the browser to fetch CSS content. We also set up a route server on the customer’s own domain, from which the Managed Components serve all images. Setting up a route endpoint with Managed Components is fairly straightforward:

manager.route('/image/', async request => {
// logic to fetch and cache all images
});

After setting up routes, we fetch the HTML content of the specific Instagram post, server-side, using the manager.fetch() method. We then manipulate the HTML to fit it to the specific website and cache it using manager.useCache(). Amongst other things, changes to the HTML include setting image src and srcset attributes to serve images from your own routes, to avoid requesting images from Instagram’s endpoint (and by so doing, potentially revealing sensitive user information). As mentioned above, we also remove all scripts and stylesheet links, as we prefetch and cache all CSS content from stylesheet links server-side, in order to serve CSS and spare the browser a few additional network requests, improving privacy and performance.

The HTML manipulation is done using the Cheerio library. This is how, for example, we adjust the `src` attribute of images to redirect through our route:

$('img[src*="scontent.cdninstagram.com"]').each((i, el) => {
        const img = $(el)
        const src = img.attr('src')!
        const newSrc = src.replace(
          /^https:\/\/scontent.cdninstagram.com\/(.*)$/,
          (_match, path) =>
            `${hostName(client)}${imgRoute}?q=` + encodeURIComponent(path)
        )
        img.attr('src', newSrc) 

This implementation effectively prevents any direct communication from the browser to Instagram servers, safeguarding sensitive user information such as IP addresses.

What is currently supported and what’s next for embeds

Currently, our X embed supports text tweets and the Instagram embed supports image posts. We are working to broaden our support to other media types. Beyond these improvements, we aim to extend the application of our embeds across an even broader range of tools. We invite our users and partners to collaborate with us on the Managed Component open source project, in adding support for more tools that can be rendered entirely server-side. We believe that this is the way to create a safer and faster web for everyone, and we hope that what we are launching today will inspire the community to build even better solutions together with us!

Start using embeds now by adding X and Instagram in your Zaraz dashboard.

Обикновени хора при необикновени обстоятелства

Post Syndicated from Еми Барух original https://www.toest.bg/obiknoveni-hora-pri-neobiknoveni-obstoyatelstva/

Картина първа. Кфар Аза

Чаша от дома на Ливнат Куц

Обикновени хора при необикновени обстоятелства

Кфар Аза е единият от двата най-брутално пострадали кибуца от терористите на „Хамас“. Последните къщи са на 2 км от границата с Газа.

Тук са живели най-младите жертви, много от които са били убити, а къщите им – подпалени. Това е едно от най-тъжните места в кибуца.

Сиван Елкабетс и Наор Хасиди са били на по 23 години. Живели са 7 години заедно. Два дни след погрома майката на Сиван отива в онова, което е останало от къщата ѝ. И започва да снима: шкафа, петната от кръв, книгите, дрехите, леглото, плюшената кукла. Закачва снимките на верандата и поставя отпред надпис: „Това се нарича изложба. Тук действителността надхвърля всяко въображение.“

Обикновени хора при необикновени обстоятелства
Снимка: Еми Барух

Движа се между развалини. От време на време се чуват изстрели. Това не прави впечатление на никого.

Видимите последици от погрома са толкова ярки, че са превърнали тази територия в място на мрачно поклонение. 

Скъсаните сенници, тръстиковите щори, парцаливите пердета се поклащат от време на време. Стряскащо е нещо да мърда под тези мъртви покриви.

Сред развалините се мотаят кучета.

„Това не са нашите кучета – ми казва моят водач. – Нашите бяха избити при първия рейд. Тези дойдоха след това от Газа. Сега живеят тук.“

В Израел във всяко жилище, във всяка сграда, във всяка къща има защитена стая – изолирано помещение, изградено от стоманобетон, със специално удебелени запечатани прозорци и укрепен вход, който може да защити хората от взрив на ракети. Такива има и в Кфар Аза. Но много от тях са без врати, защото предназначението им е да пазят от бомби. Никой не е допускал, че жива сила ще се появи на прага им. 

Именно описанието на откритото от специалните отряди ZAKA в стаите убежища попълва най-мрачните страници в докладите на разследващите.

ZAKA е най-голямата израелска неправителствена организация, занимаваща се с търсене и спасяване на хора при различни инциденти и катаклизми. Те са на разположение денонощно и работят в тясна връзка с всички спешни служби и специални сили. Оперират в Израел, но са вземали участие в спасяването на хора след терористични атаки в целия свят (Истанбул, Момбаса, Таба).

Парамедиците в организацията са обучени и да прибират грижливо останките от мъртвите, включително тяхната кръв, за да може починалият, макар и отишъл си от неестествена смърт, да бъде погребан в съответствие с еврейския религиозен закон. Повечето членове на организацията са ортодоксални евреи, които работят като доброволци.

Седмици наред те е трябвало да ровят земята, да стържат стените, да лъскат повърхностите, да претърсват околността, да изрязват тъканите, за да премахнат всяка капка кръв, полепнала, проникнала, попила в територията на престъплението. 

Показват ми тези следи: дупки, ямки, процепи; остъргани стени, изрязани дюшеци, замазани подове. И се питам: какво, като кръвта я няма?…

Обитателите на Кфар Аза са евакуирани. Техните къщи зеят разхвърляни, клюмнали, потънали в прах. Стоят като съхнещи вътрешности на предишен живот. 

Останките от някогашното селище са се превърнали в мемориал на ужаса, на трагедията, потопила неговите обитатели.

На някои веранди е поставен надпис с молба към посетителите да не снимат вътре. Но не всички са достатъчно чувствителни към факта, че газят личното пространство на наранени хора. 

Има нещо притеснително и воайорско в това обикаляне между къщи, в които следите от предишния живот са толкова подробни, а той е поставен на пауза.

Кфар Аза привлича посетители. И екипите, които описват и съхраняват документи за това местопрестъпление, бързат. Нирит Шалев-Халифа, която ръководи отдела за визуална история в Яд Бен-Цви, изследователска и образователна институция, базирана в Йерусалим, се опасява, че „тук ще се развие сувенирна индустрия и е възможно важни предмети да изчезнат“.

Нямаше я наоколо, за да я питам какво събират хората, когато посещават такова място? Къде съхраняват „сувенира“ и как го обозначават: „Чаша от дома на Ливнат Куц, станал жертва на варварите от „Хамас“?

Продължаваме нататък.

Към останките от фестивала „Супернова“.

Картина втора. „Супернова“ 

Бягай, Дин, бягай!

От кибуц Урим помня парка с разпилените в зеленината къщички, големия басейн със странна форма, една просторна трапезария, в която ядох най-вкусния хумус на света, и дървеното бунгало за тийнейджърите, които си живееха там, далече от родителските погледи, в тази защитена територия на юношеството. Беше феноменално откритие за мен, пристигнала от комунистическа България на гости на Изи – един от българските евреи – основатели на кибуца, от голямата някога кюстендилска фамилия Барух. 

Кибуц Урим е основан на 6 октомври. Това е ден, в който се празнува.

На 6 октомври, на 12 километра от кибуц Урим, 76 години по-късно отново се празнува. Започва тържество на „Приятели, любов и безкрайна свобода“ – „Супернова“ рейв парти, което ще се окаже най-кървавото рейв парти в историята на рейв партитата.

Следваща сутрин ще започне най-голямата терористична атака в историята на Израел.

* * *

На 7 октомври 2023 г. в 6:29 сутринта се чуват първите ракети от ивицата Газа, насочени към околните населени места. Под прикритието на ракетния обстрел въоръжени мъже от „Хамас“ пробиват барикадите на границата и нахлуват в Израел. Втурват се през земеделските площи по шосе 232 към паркинга до кибуц Ре’им, където е организиран рейв фестивалът.

Терористите блокират пътя от север и от юг. Нахлуват между хората и започват касапницата. Над 3500 души са обкръжени от три страни. Тежковъоръжените мъже откриват стрелба по хората. 

Преследват бягащите с часове, пресичат пътя на колите, подпалват ги заедно с хората в тях, стрелят с бойни оръжия, хвърлят гранати в бомбоубежищата, избивайки всички потърсили спасение зад бетонните стени. И не питат евреи ли са, тайландци ли са, друзи ли са, или унгарци. 

* * *

Дин Теслер е застанал до снимката на своя най-близък приятел Бар Куперщайн. Гледа над главите ни. Зад него има стойки с още много снимки. И пилони със знамена.

Обикновени хора при необикновени обстоятелства
„Супернова“. Снимка: Еми Барух

Мястото е равно. Сухо. Прашно.

Прилича на гробище без надгробни плочи. 

Дин се чуди как да започне: 

Не снимайте мен. Снимайте тези, които вече ги няма.

Прави пауза.

Вие виждали ли сте онзи видеоклип с хората от Нова, които тичат в полето? Клипът, който стана вайръл? Ако сте го гледали, значи сте видели и моя приятел. Бар Куперщайн…

Прави пауза. 

Бар е парамедик. С него бяхме охрана на партито. Аз съм този, който го извика тук, за да изкараме малко пари през уикенда.

Прави пауза.

Било е 6:30 сутринта. Звукът от първите ракети се е смесвал с бийта на електронната музика. Дори не са разбрали, че това не е част от диджей сета. Докато някой не е изключил колоните.

Когато видяхме, че от Ре’им идват ранени, потеглихме веднага натам. Повечето бяха в тежко състояние, простреляни в краката, в стомаха, кървяха отвсякъде. Бар започна веднага да ми казва какво да правим – вземаше клони от земята, сваляше дрехите на ранените и правеше турникет. Правехме турникет след турникет, може би 20 или 30 пъти. Качвахме ранените на атевето и ги докарвахме обратно тук. 

Сочи празното пространство зад себе си. И продължава:

Не беше най-умното решение. Трябваше да ги закараме до Патиш. Но тогава не знаехме това, което знаем сега. Докарвахме ги до линейката и се връщахме за нови ранени.

Тогава се задават джиповете, които се носят към тях от Бе’ери

… И започна стрелбата. Бар ми изкрещя: „Върни се към партито!“ И двамата бяхме охрана на „Нова“, но нямахме оръжие. Беше около 8:30 – 8:40 и аз побягнах насам. Той реши да остане и това беше последният път, когато го видях.

Стреляше се отвсякъде. Започнах да изпращам местоположението ни на приятели с молба за помощ. Един от тях написа: „Там, където сте, има много, много терористи, трябва да избягате.“

Събрах група от десетина души и започнахме да бягаме към реката. Придвижвахме се на прибежки: от храст на храст, от прикритие до прикритие, от скривалище в скривалище. Стреляха по нас през цялото време.

След час – час и половина ни пресрещна друга въоръжена банда. Беше съвсем близо, може би на 50–60 метра. И пред очите ми хората от моята група започнаха да падат един след друг.

Продължавах да тичам, бях останал сам, чувах как куршумите свистят на метри от мен, и бягах, и бягах, и бягах…

Не помня колко време мина, преди да стигна до два кактусови храста. Скочих в единия и се скрих. 

Стоях там до 7 вечерта, най-дългите девет часа в моя живот. 

Всяка секунда беше като цяла вечност. 

Изпращах на приятели есемеси, опитвайки се да обясня къде съм, без да знам къде съм. Продължавах да чувам стрелбата, виковете на хората, колите, моторите, крясъците „Аллах акбар!“. 

В един следобед видях зад мен сянка на терорист. Помислих, че това е краят. И направих последното видео в моя живот. Разплаках се, изпратих есемес на по-големия ми брат. Написах му, че го обичам и че ще умра. Същото написах и на майка ми и в два часа и двайсет и четири минути – това никога няма да го забравя – батерията на телефона ми умря.

Малко след това видях трима терористи да доближават моя храст. Приех смъртта. Затворих очи. Знаех, че ще ме убият. Достатъчно беше да погледнат наляво и да ме видят между листата. По някакво чудо това не стана. 

Изгубих представа за времето. Нямах вода. Започнах да халюцинирам. Щом затворех очи, виждах плачещи хора, които търсят помощ. Виждах терористи. Усещах миризма на изгоряло, бях убеден, че бълнувам. Казвах си: „Дийн, намериха те и ще те изгорят жив.“ Чудех се дали да се оставя да ме изгорят жив, или да изляза от храстите и да се бия с тях.

Трябва да е било пет-шест следобед, когато чух: „Полицията е, полицията е!“ Говореха на иврит. Но не беше възможно полицията да вика „Ние сме полицията“, когато терористите стрелят наоколо. Не трябваше да мърдам и не мърдах. 

Започна да мръква, ставаше все по-тъмно. Чух шум от хеликоптер. Излязох и започнах да викам за помощ, но той отмина. 

Стана съвсем тъмно. Не можех да стоя повече в храстите.

Бях напълно изгубен, не знаех къде съм, нямах телефон. 

Започнах да се моля, както не го бях правил никога дотогава.

И побягнах отново. Предпочитах да умра по пътя, но да не стоя повече там.

Тичах, тичах, тичах и това, което виждах около мен, бяха безжизнени тела, запалени коли, смазани хора… 

После в далечината просветнаха фарове. Развиках се: „Помогнете! Помогнете!“ Не знаех на кого викам. Не знаех дали не са терористи.

Отговориха: „Ние сме ЦАХАЛ, ние сме IDF.“ Всъщност можеха да ме убият.

Виках: „Не стреляйте, аз съм охранител от „Нова“.

Доближиха ме двама командири от IDF, дадоха ми вода. Дадоха ми телефон, обадих се на майка ми: „Мамо, аз съм жив.“ 

Обадих се на приятели. 

Войникът ме попита искам ли да се върна, откъдето бях дошъл, и да търсим още оцелели.

Когато приближих моето скривалище, видях, че близкият храст е почти напълно изгорял. Значи не бях халюцинирал. 

Не намерихме нито един жив човек.

Тогава усетих страх. Помолих ги да ме изведат оттам. Отидохме до бензиностанцията в Урим, където вече беше дошла армията.

* * *

На 7 октомври „Хамас“ публикува видеото, на което се вижда Бар Куперщайн, легнал по корем, с ръка зад гърба. Оттогава за него не се знае нищо.

* * *

При тази атака на „Хамас“ са осакатени, обезглавени, изнасилени, изгорени, заклани и застреляни 364 от присъстващите – гости, организатори, персонал, полицейска охрана и медицински екип. Отвлечени са 40 души.

* * *

„Няма победа, без заложниците да бъдат върнати!“ Този вик обвинение скандират от улица „Каплан“ до Площада на заложниците. Протестите са срещу премиера Нетаняху, обвинен в умишлен бойкот на преговорите. Вече девет месеца.

Картина трета. Места убежища

Всеки път, когато чуя сирените, вече съм подредила обувките до вратата.

Орна Гранот и Ая Бар Хаим ме чакат в едно кафене преди поредния протест на „Каплан“. Носят знамена и други протестни атрибути. 

Орна Гранот е изследователка и преподавателка, ръководи библиотеката за илюстрации в Израелския музей в Йерусалим. Мястото, в което най-често може да я намерите, е отделението за деца, където има „суперкниги, илюстрирани от български художници“. 

Орна е куратор на всички изложби в библиотеката. А книгите са подредени не по автори или по заглавие, а според това кой е художникът им.

Със себе си е довела Ая Бар Хаим – приятелка на дъщеря ѝ Нога, защото… „Нали ще си говорим за места убежища“, ми казва по телефона, без да обяснява повече.

В Израелския музей в Йерусалим Орна Гранот отговаря за колекцията от книги от цял свят.

Когато всичко това започна, най-важните екземпляри бяха взети и прибрани долу в скривалище. Но постепенно започнахме отново да работим. И беше много вълнуващо за мен, когато видях родители и деца да се връщат. Защото отвън ти се струва, че всичко се е променило, но когато те влизат в библиотеката и виждат, че нещата са си същите, това за тях става място убежище. И ти дава усещането за смисъл на това, което правиш.

Ая Бар Хаим е 16-годишна ученичка, членува в „Лийд“ – организация, чиято мисия е да открива и развива лидерския потенциал на тийнейджъри. 

След 7 октомври заедно с приятелите си тя създава мрежа за търсене на места убежища за тези, които са загубили всичко след терористичната атака на „Хамас“.

Обикновени хора при необикновени обстоятелства
Ая и Орна. Снимка: Еми Барух

Орна Гранот: Събудихме се от сирените. Бяхме в шок. Имам братовчедка, с която съм израснала. Казва се Ясмин. Тя живее в кибуц Урим, а брат ѝ е в Нир Оз, на по-малко от 7 км от границата.

В 10:10 на 7 октомври ѝ писах:

Скъпа Ясмин, надявам се че си ОК. Добре дошла си у нас и ако мога да направя нещо, казвай. Прегръдки.

В 10:13 тя отговори:

Не, не сме ОК.

После ми препрати съобщение от брат си:

„Яси, застреляха Шахар, застреляха цялото семейството.“ 

И продължи:

Мисля, че брат ми, жена му и всички там са убити.

Следващото съобщение е:

Изгарят къщите, навсякъде са.

Писах ѝ един или два пъти: 

Къде са децата?

Тя отговори: 

Подпалили са къщата им. Те са в убежището. 

И така, още в десет сутринта разбрах какво се случва. Братовчед ми и неговото семейство са били в защитената стая. Братът на жена му, майка ѝ и цялото семейство са били убити. Братовчед ми е държал вратата на защитената стая. Не знаехме дали могат да излязат. Вечерта поделение от армията е стигнало до Нир Оз и ги е спасило. 

Около четвърт от всички жители на Нир Оз са били убити, отвлечени или тежко ранени. Тези, които са оцелели, няма къде да се върнат.

Чувствахме се безпомощни, бяхме потресени.

Още на следващия ден дъщеря ми Нога започна да работи с Ая в една спонтанно организирана група за помощ. В стаята си имаше дъска, през цялото време беше на телефона и попълваше формуляри. Като я попитах какво става, тя каза: „Помагам на хората да си намерят дом.“

Ая Бар Хаим: Събудихме се от сирените. Започнахме да слушаме новините, но не знаехме нищо. Тогава писах в WhatsApp групата на организацията „Лийд“ и започнах да събирам хора, които искат да помагат. Не знаехме с какво можем да сме полезни, нито какво се случва в този момент. 

Беше ранният следобед на 7 октомври. Армията още не беше стигнала до кибуците. 

Разпространихме две форми за попълване в Google – за хората, които искат да помагат, и за хората, които имат нужда от помощ. Вечерта получихме стотици отговори. 

Предлагахме да приготвяме храна, да гледаме деца, да помагаме на възрастни, но бързо разбрахме, че онова, от което се нуждаеха повечето, беше да намерят безопасно място, място убежище, където да отседнат.

Започнахме да събираме информация за конкретните нужди, както и информация от хора, които разполагаха с места за настаняване – хотели, къщи, апартаменти на собственици извън страната, готови да ги предоставят на пострадалите. Нашата работа беше да свържем едните с другите. Първата седмица успяхме да помогнем на около 300 семейства.

Така инициативата започна и стана вайръл. 

През първия месец не ходихме на училище. Бяхме постоянно на телефона и разменяхме информация. В края на всеки ден провеждахме онлайн срещи, за да научаваме какво се случва. После продължихме на смени, редувахме се. Разбрахме, че ни е нужна помощ. Правихме това в продължение на пет месеца.

Орна Гранот: Те бяха готови да дадат всичко от себе си и да стигнат до онези, които имат нужда от тях. В тази организация ги бяха обучили да откриват проблема, да намират решение, да изследват терена, да са в състояние да действат, когато не знаят какво ще им сервира следващият ден. Да работят в условия на несигурност.

Кметството ги потърси, армията ги потърси. Искаха от тях да помогнат за обучението на децата от кибуците, защото имаше много мобилизирани учители резервисти, но нямаше къде да се организира това.

Ая Бар Хаим: Човек трябва да си даде сметка, че когато помага на някого, има ограничени ресурси, които може да използва, че енергията му също е лимитирана. Невинаги можеш да отговориш на очакванията. И често пъти трябва да си кажеш: това е най-доброто, което мога да направя. И да си ОК с това, а не да истеризираш.

Орна Гранот: Преди всичко си даваш сметка какво представлява Израел извън твоята комфортна зона. Налага ти се да говориш с религиозни, с хора, които не са родени тук, с руски емигранти… А е и фрустриращо. 

Помня как Нога ми казваше почти истерично: „Не мога никъде да намеря място за едни хора – пет деца и котка, и куче…“ Защото с течение на времето от SOS вариант за спешен подслон хората започват да си дават сметка, че трябва да намерят нещо по-трайно. А когато търсиш по-дългосрочно решение, си много по-изискващ, не може да се местиш постоянно. 

Най-удивителното за мен беше, че хората, които пишеха и звъняха, не знаеха с кого говорят, търсеха в отчаяние място убежище и не знаеха, че тези, които се опитват да помогнат, са деца, че тази отговорност лежи на плещите на тийнейджъри.

Ая Бар Хаим: В началото на март затворихме оперативната стая. Сега ходим само на училище. 

Орна Гранот: Всеки път, когато чуя сирените, вече съм подредила обувките до вратата. Защото трябва да отидем в защитената стая. И аз имам тази вманиаченост – да организирам обувките. Това е моят механизъм да знам, че имам контрол върху момента. Може би е дребно и смешно, но подреждането на обувките е моето място убежище.

* * *

Тръгваме за протеста. Преди да се разделим, Орна ще каже:

Ако днешните 17–18 годишни имат енергия да се заемат с невъзможни задачи като това да намерят места убежища за всички пострадали, дори без някой да го е искал от тях, може би все пак има надежда.

Помогнете ни да научим какви са читателските ви възприятия и отношението ви към „Тоест“, като попълните нашата анкета.

Израел и Палестина – нито да говориш, нито да мълчиш

Post Syndicated from Светла Енчева original https://www.toest.bg/izrael-i-palestina-nito-da-govorish-nito-da-mulchish/

Израел и Палестина – нито да говориш, нито да мълчиш

Тъй като всичко казано по темата за Израел и Палестина може да има негативни последствия, започвам с уговорката, че тази статия изразява личните ми позиции. А не тези на редакторите на „Тоест“, които може да не са съгласни както с мен, така и помежду си. Затова моля авторите на бъдещи критики да ги насочват лично към мен.

Защо е тази статия

Напоследък „Тоест“ е обект на остри критики заради няколко статии, свързани с темата за Израел и Палестина. Редакцията е обвинявана в ционизъм, псевдолиберализъм, защита на геноцида, както и че ѝ се плаща да подкрепя позициите на Израел. Повод за критиките са най-вече анализът на Искрен Иванов за политиката на Бенямин Нетаняху и поредицата от материали на Еми Барух, от които към момента на написване на настоящия текст са публикувани два: интервю с писателя Етгар Керет и репортажът „Раната Израел“.

Към това се добавят и упреци заради липсата на реакция от редакцията във връзка с публикуването на отворено писмо до организаторите на „София прайд“, осъждащо присъствието на представители на Посолството на Израел и на еврейската организация „Шалом“ на прайда.

Атаките срещу „Тоест“ не се случват във вакуум. Те са малка част от проявите на крайно изострените отношения между произраелските и пропалестинските лагери – далеч не само в България. Това е конфликт, който взема неочаквани имиджови жертви освен физическите.

Така например през май т.г. „Шалом“ отне на главната редакторка на „Маргиналия“ Юлиана Методиева наградата „Шофар“ за противодействие на антисемитизма, ксенофобията и езика на омразата, връчена на редакцията на правозащитния сайт през 2018 г. През последната седмица пък същата организация плюс още няколко изпратиха писмо до собственика на „Икономедиа“ по повод повтаряната от години шега на журналистката от „Капитал“ Полина Паунова, че иска да се ожени за богат възрастен евреин. Тази шега те определиха като проява на антисемитизъм.

В сегашната крайно напрегната ситуация най-безопасно е човек да си мълчи, въпреки че може да бъде обвиняван и за мълчанието си. Ала колкото повече умерените гласове мълчат, толкова повече се чува само крещенето на радикалните. Докато в един момент буквално не почнем да се избиваме с доскорошни приятели и съюзници. Затова се връщам към думите на Стивън Хокинг: „Всичко, от което имаме нужда, е да се уверим, че продължаваме да говорим.“ Колкото и да е трудно и колкото и неприятни да са последствията.

Всичко ли е контекстът?

„Контекстът е всичко“, обича да повтаря южноафриканският комик Тревър Ноа. Един от примерите, които той дава в тази връзка, е как едно и също изречение може да бъде или да не бъде проява на расизъм – зависи кой и защо го казва. Изречението е „Африка спечели Световната купа“. То се отнася до факта, че доста от играчите в националния отбор на Франция, който спечели Световното първенство по футбол през 2018 г., са от африкански произход. Когато това изречение се изрича от бели националисти, то е расизъм. Но казано от хора с африкански произход е проява на радост и гордост.

Има ли обаче контекстът граници? Участниците в разговор с Еми Барух за влиянието на снимките от войните върху въображението споделят различни позиции. Философът и писател Тодор Тодоров изглежда съгласен със Славой Жижек, който твърди, „че осъжда терористичната атака, но има някаква история преди нея, има контекст“. „Понякога има опасност контекстуализацията да релативизира престъпленията“, смята обаче поетът и културолог Кирил Василев. Тази позиция, изглежда, се споделя и от самата Еми Барух, която критикува „контекстуализацията и релативизацията на неизмеримото страдание на хиляди невинни хора“.

Да контекстуализираме, без да релативизираме, не е лесна задача. Още повече, че неизбежно стоим на една или друга ценностна позиция, която се опитваме да оправдаем. Моралната тежест на престъпленията може да се релативизира както от пропалестински, така и от произраелски позиции. Но пък без контекст изобщо не е ясно за какво говорим. Трудното е, реконструирайки контекста, да се опитваме да отделяме фактите от оценките.

Упражнение по контекстуализиране

Нека започнем с няколко цитата извън контекста, за да видим после какво е неговото значение:

Женевската конвенция постановява, че когато окупираш една територия, си отговорен за хората, които живеят там. Ако ние сме окупирали тази земя [Палестина – б.м., С.Е.] и не доставяме достатъчно хуманитарна помощ или ако твърдим, че това не е наша отговорност, от гледна точка на закона извършваме престъпление.

Как мога да бъда човек, който подкрепя липсата на достатъчно храна в Газа, как мога да подкрепям бомбардировките, които костват огромен брой невинни жертви?

„Множеството от улица „Каплан“ е нарицателно за онази колективна енергия, в която е концентриран ураган от непоносимост към религиозната мегаломания на фанатичните екстремисти в коалицията на премиера Нетаняху. Две имена предизвикват яростно освиркване – Бен-Гвир и Смотрич. Известни със своята агресивна и расистка реторика, и двамата са ревностни поддръжници на идеята за завръщане на еврейските заселници в Газа и за разселване на палестинското население.

Тези цитати, взети сами по себе си, няма защо да не се харесат на пропалестинските читатели, а някои от произраелските може да се подразнят от съдържанието им. Но, изненада – първите два са от интервюто на Еми Барух с писателя Етгар Керет, а третият – от репортажа ѝ „Раната Израел“. Все статии, заради които „Тоест“ получи упреци в „ционизъм“ и т.н.

Ето как контекстът променя всичко. Изглежда, самият факт, че определени публикации показват вътрешни гледни точки за Израел, предизвиква гняв у определена група читатели, независимо колко критични към политиката на Израел са статиите. Щом не се крещи за „геноцид“, желанието за разбиране секва.

Същата липса на желание за разбиране се наблюдава и по отношение на статията на Искрен Иванов, която представлява анализ на политиката на Израел, без да ѝ дава морални оценки. Що се отнася до споменатото по-горе отворено писмо – в „Тоест“ няма практика да се публикуват отворени писма.

Второ упражнение по контекстуализиране… и една прахосмукачка

Преминавам към другите два примера, които споменах в началото – отнемането на наградата на Юлиана Методиева и отвореното писмо срещу Полина Паунова.

Абсурдът с отнемането на наградата на Юлиана Методиева е двоен. По-малкият абсурд е, че редом с нея от наградата си е лишен заради антисемитизъм и вече бившият журналист от БНР Петър Волгин, който стана евродепутат от листата на националистическата партия „Възраждане“. Антиизраелските позиции на Волгин са следствие от проруските му. Що се отнася до Методиева, тя е дългогодишна правозащитничка, която не може да остане безразлична пред големия брой цивилни жертви сред палестинското население. Така както не остават безразлични и множество правозащитни организации.

По-големият абсурд е, че точно Юлиана Методиева беше съдена в продължение на близо четири години от вече покойния бивш легионер Дянко Марков, който се обидил от определението „антисемит“ в отворено писмо, публикувано в „Маргиналия“. Въпреки че от трибуната на Великото народно събрание е нарекъл евреите „враждебно население“, оправдавайки депортацията им.

Методиева беше съдена първо редом с екипа на „Маргиналия“ (част от който бях и аз), после и лично – заради статията ѝ „Внимавайте с антисемитите, могат да ви осъдят“. В този контекст получи и наскоро отнетата ѝ награда от „Шалом“. Съдът я оправда окончателно в края на 2018 г.

Що се отнася до Полина Паунова, шегата ѝ как иска да се омъжи за богат евреин в преклонна старост би могла да се интерпретира като проява на лош вкус, ако не беше специфичният контекст на възникването ѝ. А той е, че журналистите, критични към властта (сред които е и Паунова), представителите на неправителствени организации, правозащитниците и гражданските активисти от дълги години са упреквани, че са „соросоиди“. Тези упреци идват от хора, които къде със скрит, къде с явен антисемитски патос демонизират личността на основателя на „Отворено общество“ Джордж Сорос.

Шегата на Паунова прилича на заигравка тъкмо с тези обвинения в „соросоидство“ и в този смисъл е имплицитна критика на антисемитизма. Щом така и така я упрекват във връзки със Сорос, който е богат възрастен евреин, тя казва, че иска да намери такъв, който действително да я направи богата (понеже Сорос не го е направил). Преди години и аз се бях пошегувала в подобен дух – че Сорос ми е купил прахосмукачка.

Препъникамъни и неподходящи компании

Крайните пропалестински и произраелски позиции в България, слепи за контекстите, не са изолирано явление – такива има на глобално равнище. Те са впрочем и сред факторите, разклащащи устоите на европейската идентичност. Която след Втората световна война е изградена върху един основен принцип: никога повече.

Из градовете на почти цяла Германия човек може да се натъкне на т.нар. Stolpersteine, или „препъникамъни“. Това са павета с месингово покритие, върху които е гравирана информация за убити евреи. Всяко паве съдържа името само на един загинал човек. Такива „препъникамъни“, каквито вече има над 100 000, са поставени в трийсетина страни, но огромната част от тях е в Германия. И както си върви, човек се натъква на някой от тях и се сепва: „Никога повече.“

Израел и Палестина – нито да говориш, нито да мълчиш

Това отказват да разберат радикалните пропалестински гласове, които упрекват Германия и други западни държави, че не прекъсват дипломатическите си отношения с Израел. Някои от тях дори отричат правото на съществуване на Държавата Израел. В тази компания някои са по чисто правозащитни съображения. Други са мюсюлмани или имат приятели мюсюлмани, затова е обяснимо, че преобладаващо срещат и подкрепят такива позиции. Много от тях познават жертви на конфликта или техни близки. Трети, четвърти и пети са проруски, леви и/или анархисти, някои от които винаги са говорили срещу Израел и за „геноцида“ в Газа дори когато е нямало и намек за геноцид. Някои са си откровени антисемити. Да не забравяме и ислямските терористи.

От другия лагер също има правозащитни гласове на хора, борещи се систематично срещу антисемитизма. Както и евреи и техни приятели, които са познати или близки на жертви на терора на „Хамас“. Но и хора, които безкритично оправдават всички действия на Държавата Израел и наричат „антисемитизъм“ всяка критика срещу нея, дори от своите съмишленици. Има и такива, които подкрепят евреите, защото мразят арабите и изобщо мюсюлманите. И крайни консерватори (и еврейски, и американски, че и някои европейски), и религиозни фанатици (и еврейски, и християнски).

И сред двата лагера има типажи, в чиято компания едва ли бихте искали да бъдете. Но ще ви причислят към някоя от тези компании (или и към двете) дори ако се опитате да изкажете умерено мнение. А вие ще се чудите кога – и дали – отново ще бъдете рамо до рамо с доскорошните си приятели и съюзници. Особено ако сред тях има и евреи, и араби. И каква форма ще е придобил светът ви след тази поредна криза.

Отсъстващата мъдрост. И едно стихотворение.

В тези времена много ми липсват мъдрите думи на Емил Коен. Ще ми се да знам какво би казал той, който хем се идентифицираше с еврейския си произход, хем не свеждаше човешките права до групите, към които самият той принадлежи.

Не смея да гадая и какво би казал Марин Бодаков. Изпитвам силно желание да го попитам, но уви. Сещам се за едно негово стихотворение, с което ще завърша. Не за да оправдавам с авторитета на Бодаков всичко, което написах по-горе и за което отговорна съм само аз. А за утешение за онези, които също като мен не знаят дали в тази ситуация е по-правилно да говорят, или да мълчат.

Мимоходом манифест

Толкова войни,
в които враждуващите те призовават
да застанеш на тяхна страна,
да се въоръжиш с тяхната обида,
да приемеш страховете им като свои.
Толкова много мръсни войни,
в които няма добри герои –
само праведници, на които едва насмогваш.
Толкова срамни, фалшиви войни,
колкото всички умели опити да те отклонят
от твоята мъничка смешна война,
от шрапнелите на лютичето и мунициите на минзухара,
да забравиш, че стреляш единствено срещу небето –
и никога срещу хора.

Да забравиш защо крачиш приведен към фара,
след като нямаш кораб.

Помогнете ни да научим какви са читателските ви възприятия и отношението ви към „Тоест“, като попълните нашата анкета.

Monitor data events in Amazon S3 Express One Zone with AWS CloudTrail

Post Syndicated from Elizabeth Fuentes original https://aws.amazon.com/blogs/aws/monitor-data-events-in-amazon-s3-express-one-zone-with-aws-cloudtrail/

In a News Blog post for re:Invent 2023, we introduced you to Amazon S3 Express One Zone, a high-performance, single-Availability Zone (AZ) storage class purpose-built to deliver consistent single-digit millisecond data access for your most frequently accessed data and latency-sensitive applications. It is well-suited for demanding applications and is designed to deliver up to 10x better performance than S3 Standard. S3 Express One Zone uses S3 directory buckets to store objects in a single AZ.

Starting today, S3 Express One Zone supports AWS CloudTrail data event logging, allowing you to monitor all object-level operations like PutObject, GetObject, and DeleteObject, in addition to bucket-level actions like CreateBucket and DeleteBucket that were already supported. This enables auditing for governance and compliance, and can help you take advantage of S3 Express One Zone’s 50% lower requests costs compared to the S3 Standard storage class.

Using this new capability, you can quickly determine which S3 Express One Zone objects were created, read, updated, or deleted, and identify the source of the API calls. If you detect unauthorized S3 Express One Zone object access, you can take immediate action to restrict access. Additionally, you can use the CloudTrail integration with Amazon EventBridge to create rule-based workflows that are triggered by data events.

Using CloudTrail data event logging for Amazon S3 Express One Zone
I start in the Amazon S3 console. Following the steps to create a directory bucket, I create an S3 bucket and choose Directory as the bucket type and apne1-az4 as the Availability Zone. In Base Name, I enter s3express-one-zone-cloudtrail and a suffix that includes Availability Zone ID of the Availability Zone is automatically added to create the final name. Finally, I select the checkbox to acknowledge that Data is stored in a single Availability Zone and choose Create bucket.

To enable data event logging for S3 Express One Zone, I go to the CloudTrail console. I enter the name and create the CloudTrail trail responsible for tracking the events of my S3 directory bucket.

In Step 2: Choose log events, I select Data events with Advanced event selectors are enabled selected.

For Data event type, I choose S3 Express. I can choose Log all events as the Log selector template to manage data events for all S3 directory buckets.

However, I want the event data store to log events only for my S3 directory bucket s3express-one-zone-cloudtrail--apne1-az4--x-s3. In this case, I choose Custom as the Log selector template and indicate the ARN of my directory bucket. Learn more in the documentation on filtering data events by using advanced event selectors.

Finish up with Step 3: review and create. Now, you have logging with CloudTrail enabled.

CloudTrail data event logging for S3 Express One Zone in action:
Using the S3 console, I upload and download a file to my S3 directory bucket.

Using AWS CLI, I send Put_Object and Get_Object.

$ aws s3api put-object --bucket s3express-one-zone-cloudtrail--apne1-az4--x-s3 \
  --key cloudtrail_test  \ 
--body cloudtrail_test.txt
$ aws s3api get-object --bucket s3express-one-zone-cloudtrail--apne1-az4--x-s3 \ 
--key cloudtrail_test response.txt

CloudTrail publishes log files to S3 bucket in a gzip archive and organizes them hierarchically based on the bucket name, account ID, Region, and date. Using the AWS CLI, I list the bucket associated with my Trail and retrieve the log files for the date when I did the test.

$ aws s3 ls s3://aws-cloudtrail-logs-MY-ACCOUNT-ID-3b49f368/AWSLogs/MY-ACCOUNT-ID/CloudTrail/ap-northeast-1/2024/07/01/

I get the following four files name, two from the console tests and two from the CLI tests:

2024-07-05 20:44:16 317 MY-ACCOUNT-ID_CloudTrail_ap-northeast-1_20240705T2044Z_lzCPfDRSf9OdkdC1.json.gz
2024-07-05 20:47:36 387 MY-ACCOUNT-ID_CloudTrail_ap-northeast-1_20240705T2047Z_95RwiqAHCIrM9rcl.json.gz
2024-07-05 21:37:48 373 MY-ACCOUNT-ID_CloudTrail_ap-northeast-1_20240705T2137Z_Xk17zhf0cTY0N5bH.json.gz
2024-07-05 21:42:44 314 MY-ACCOUNT-ID_CloudTrail_ap-northeast-1_20240705T21415Z_dhyTsSb3ZeAhU6hR.json.gz

Let’s search for the PutObject event among these files. When I open the first file, I can see the PutObject event type. If you recall, I just made two uploads, once via the S3 console in a browser and once using the CLI. The userAgent attribute, the type of source that made the API call, refers to a browser, so this event refers to my upload using the S3 console. Learn more about CloudTrail events in the documentation on understanding CloudTrail events.

{...},
"eventTime": "2024-07-05T20:44:16Z",
"eventSource": "s3express.amazonaws.com",
"eventName": "PutObject",
"awsRegion": "ap-northeast-1",
"sourceIPAddress": "MY-IP",
"userAgent": "Mozilla/5.0 (Macintosh; Intel Mac OS X 10_15_7) AppleWebKit/537.36 (KHTML, like Gecko) Chrome/125.0.0.0 Safari/537.36",
"requestParameters": {
...
},
"responseElements": {...},
"additionalEventData": {...},
...
"resources": [
{
"type": "AWS::S3Express::Object",
"ARN": "arn:aws:s3express:ap-northeast-1:MY-ACCOUNT-ID:bucket/s3express-one-zone-cloudtrail--apne1-az4--x-s3/cloudtrail_example.png"
},
{
"accountId": "MY-ACCOUNT-ID",
"type": "AWS::S3Express::DirectoryBucket",
"ARN": "arn:aws:s3express:ap-northeast-1:MY-ACCOUNT-ID:bucket/s3express-one-zone-cloudtrail--apne1-az4--x-s3"
}
],
{...}

Now, when I review the third file for the event corresponding to the PutObject command sent using AWS CLI, I see that there is a small difference in the userAgent attribute. In this case, it refers to the AWS CLI.

{...},
"eventTime": "2024-07-05T21:37:19Z",
"eventSource": "s3express.amazonaws.com",
"eventName": "PutObject",
"awsRegion": "ap-northeast-1",
"sourceIPAddress": "MY-IP",
"userAgent": "aws-cli/2.17.9 md/awscrt#0.20.11 ua/2.0 os/linux#5.10.218-208.862.amzn2.x86_64 md/arch#x86_64 lang/python#3.11.8 md/pyimpl#CPython cfg/retry-mode#standard md/installer#exe md/distrib#amzn.2 md/prompt#off md/command#s3api.put-object",
"requestParameters": {
...
},
"responseElements": {...},
"additionalEventData": {...},
...
"resources": [
{
"type": "AWS::S3Express::Object",
"ARN": "arn:aws:s3express:ap-northeast-1:MY-ACCOUNT-ID:bucket/s3express-one-zone-cloudtrail--apne1-az4--x-s3/cloudtrail_example.png"
},
{
"accountId": "MY-ACCOUNT-ID",
"type": "AWS::S3Express::DirectoryBucket",
"ARN": "arn:aws:s3express:ap-northeast-1:MY-ACCOUNT-ID:bucket/s3express-one-zone-cloudtrail--apne1-az4--x-s3"
}
],
{...}

Now, let’s look at the GetObject event in the second file. I can see that the event type is GetObject and that the userAgent refers to a browser, so this event refers to my download using the S3 console.

{...},
"eventTime": "2024-07-05T20:47:41Z",
"eventSource": "s3express.amazonaws.com",
"eventName": "GetObject",
"awsRegion": "ap-northeast-1",
"sourceIPAddress": "MY-IP",
"userAgent": "Mozilla/5.0 (Macintosh; Intel Mac OS X 10_15_7) AppleWebKit/537.36 (KHTML, like Gecko) Chrome/125.0.0.0 Safari/537.36",
"requestParameters": {
...
},
"responseElements": {...},
"additionalEventData": {...},
...
"resources": [
{
"type": "AWS::S3Express::Object",
"ARN": "arn:aws:s3express:ap-northeast-1:MY-ACCOUNT-ID:bucket/s3express-one-zone-cloudtrail--apne1-az4--x-s3/cloudtrail_example.png"
},
{
"accountId": "MY-ACCOUNT-ID",
"type": "AWS::S3Express::DirectoryBucket",
"ARN": "arn:aws:s3express:ap-northeast-1:MY-ACCOUNT-ID:bucket/s3express-one-zone-cloudtrail--apne1-az4--x-s3"
}
],
{...}

And finally, let me show the event in the fourth file, with details of the GetObject command that I sent from the AWS CLI. I can see that the eventName and userAgent are as expected.

{...},
"eventTime": "2024-07-05T21:42:04Z",
"eventSource": "s3express.amazonaws.com",
"eventName": "GetObject",
"awsRegion": "ap-northeast-1",
"sourceIPAddress": "MY-IP",
"userAgent": "aws-cli/2.17.9 md/awscrt#0.20.11 ua/2.0 os/linux#5.10.218-208.862.amzn2.x86_64 md/arch#x86_64 lang/python#3.11.8 md/pyimpl#CPython cfg/retry-mode#standard md/installer#exe md/distrib#amzn.2 md/prompt#off md/command#s3api.put-object",
"requestParameters": {
...
},
"responseElements": {...},
"additionalEventData": {...},
...
"resources": [
{
"type": "AWS::S3Express::Object",
"ARN": "arn:aws:s3express:ap-northeast-1:MY-ACCOUNT-ID:bucket/s3express-one-zone-cloudtrail--apne1-az4--x-s3/cloudtrail_example.png"
},
{
"accountId": "MY-ACCOUNT-ID",
"type": "AWS::S3Express::DirectoryBucket",
"ARN": "arn:aws:s3express:ap-northeast-1:MY-ACCOUNT-ID:bucket/s3express-one-zone-cloudtrail--apne1-az4--x-s3"
}
],
{...}

Things to know

Getting started – You can enable CloudTrail data event logging for S3 Express One Zone using the CloudTrail console, CLI, or SDKs.

Regions – CloudTrail data event logging is available in all AWS Regions where S3 Express One Zone is currently available.

Activity logging – With CloudTrail data event logging for S3 Express One Zone, you can object-level activity, such as PutObjectGetObject , and DeleteObject, as well as bucket-level activity, such as CreateBucket and DeleteBucket.

Pricing – As with S3 storage classes, you pay for logging S3 Express One Zone data events in CloudTrail based on the number of events logged and the period during which you retain the logs. For more information, see the AWS CloudTrail Pricing page.

You can enable CloudTrail data event logging for S3 Express One Zone to simplify governance and compliance for your high-performance storage. To learn more about this new capability, visit the S3 User Guide.

Eli.

Top Announcements of the AWS Summit in New York, 2024

Post Syndicated from AWS News Blog Team original https://aws.amazon.com/blogs/aws/top-announcements-of-the-aws-summit-in-new-york-2024-2/

Get ready for the excitement of the AWS Summit in New York City, one of our biggest annual events that takes place tomorrow, Wed., July 10, 2024. In-person space is full, but you can still register to watch the keynote, where Dr. Matt Wood, AWS VP for AI Products, will announce the latest launches and technical innovations from AWS. Then, check back here where we’ll provide a helpful roundup of all the most exciting product news so you won’t miss a thing.

Register here to watch the keynote livestream.

(This post was last updated: 2:45 p.m. PST, July 9, 2024.)


AWS announcements from July 9, 2024

Integrate your data and collaborate using data preparation in AWS Glue Studio
With AWS Glue’s new visual interface, data teams can collaboratively build ETL pipelines, bridging the gap between analysts and engineers through an intuitive, shareable canvas.

Accelerate query performance with Apache Iceberg statistics on the AWS Glue Data Catalog

Post Syndicated from Sotaro Hikita original https://aws.amazon.com/blogs/big-data/accelerate-query-performance-with-apache-iceberg-statistics-on-the-aws-glue-data-catalog/

Today, we are pleased to announce a new capability for the AWS Glue Data Catalog: generating column-level aggregation statistics for Apache Iceberg tables to accelerate queries. These statistics are utilized by cost-based optimizer (CBO) in Amazon Redshift Spectrum, resulting in improved query performance and potential cost savings.

Apache Iceberg is an open table format that provides the capability of ACID transactions on your data lakes. It’s designed to process large analytics datasets and is efficient for even small row-level operations. It also enables useful features such as time-travel, schema evolution, hidden partitioning, and more.

AWS has invested in service integration with Iceberg to enable Iceberg workloads based on customer feedback. One example is the AWS Glue Data Catalog. The Data Catalog is a centralized repository that stores metadata about your organization’s datasets, making the data visible, searchable, and queryable for users. The Data Catalog supports Iceberg tables and tracks the table’s current metadata. It also allows automatic compaction of individual small files produced by each transactional write on tables into a few large files for faster read and scan operations.

In 2023, the Data Catalog announced support for column-level statistics for non-Iceberg tables. That feature collects table statistics used by the query engine’s CBO. Now, the Data Catalog expands this support to Iceberg tables. The Iceberg table’s column statistics that the Data Catalog generates are based on Puffin Spec and stored on Amazon Simple Storage Service (Amazon S3) with other table data. This way, various engines supporting Iceberg can utilize and update them.

This post demonstrates how column-level statistics for Iceberg tables work with Redshift Spectrum. Furthermore, we showcase the performance benefit of the Iceberg column statistics with the TPC-DS dataset.

How Iceberg table’s column statistics works

AWS Glue Data Catalog generates table column statistics using the Theta Sketch algorithm on Apache DataSketches to estimate the number of distinct values (NDV) and stores them in Puffin file.

For SQL planners, NDV is an important statistic to optimize query planning. There are a few scenarios where NDV statistics can potentially optimize query performance. For example, when joining two tables on a column, the optimizer can use the NDV to estimate the selectivity of the join. If one table has a low NDV for the join column compared to the other table, the optimizer may choose to use a broadcast join instead of a shuffle join, reducing data movement and improving query performance. Moreover, when there are more than two tables to be joined, the optimizer can estimate the output size of each join and plan the efficient join order. Furthermore, NDV can be used for various optimizations such as group by, distinct, and count query.

However, calculating NDV continuously with 100% accuracy requires O(N) space complexity. Instead, Theta Sketch is an efficient algorithm that allows you to estimate the NDV in a dataset without needing to store all the distinct values on memory and storage. The key idea behind Theta Sketch is to hash the data into a range between 0–1, and then select only a small portion of the hashed values based on a threshold (denoted as θ). By analyzing this small subset of data, the Theta Sketch algorithm can provide an accurate estimate of the NDV in the original dataset.

Iceberg’s Puffin file is designed to store information such as indexes and statistics as a blob type. One of the representative blob types that can be stored is apache-datasketches-theta-v1, which is serialized values for estimating the NDV using the Theta Sketch algorithm. Puffin files are linked to a snapshot-id on Iceberg’s metadata and are utilized by the query engine’s CBO to optimize query plans.

Leverage Iceberg column statistics through Amazon Redshift

To demonstrate the performance benefit of this capability, we employ the industry-standard TPC-DS 3 TB dataset. We compare the query performance with and without Iceberg column statistics for the tables by running queries in Redshift Spectrum. We have included the queries used in this post, and we recommend trying your own queries by following the workflow.

The following is the overall steps:

  1. Run AWS Glue Job that extracts TPS-DS dataset from Public Amazon S3 bucket and saves them as an Iceberg table in your S3 bucket. AWS Glue Data Catalog stores those tables’ metadata location. Query these tables using Amazon Redshift Spectrum.
  2. Generate column statistics: Employ the enhanced capabilities of AWS Glue Data Catalog to generate column statistics for each tables. It generates puffin files storing Theta Sketch.
  3. Query with Amazon Redshift Spectrum: Evaluate the performance benefit of column statistics on query performance by utilizing Amazon Redshift Spectrum to run queries on the dataset.

The following diagram illustrates the architecture.

To try this new capability, we complete the following steps:

  1. Set up resources with AWS CloudFormation.
  2. Run an AWS Glue job to create Iceberg tables for the 3TB TPC-DS dataset in your S3 bucket. The Data Catalog stores those tables’ metadata location.
  3. Run queries on Redshift Spectrum and note the query duration.
  4. Generate Iceberg column statistics for Data Catalog tables.
  5. Run queries on Redshift Spectrum and compare the query duration with the previous run.
  6. Optionally, schedule AWS Glue column statistics jobs using AWS Lambda and an Amazon EventBridge

Set up resources with AWS CloudFormation

This post includes a CloudFormation template for a quick setup. You can review and customize it to suit your needs. Note that this CloudFormation template requires a region with at least 3 Availability Zones. The template generates the following resources:

  • A virtual private cloud (VPC), public subnet, private subnets, and route tables
  • An Amazon Redshift Serverless workgroup and namespace
  • An S3 bucket to store the TPC-DS dataset, column statistics, job scripts, and so on
  • Data Catalog databases
  • An AWS Glue job to extract the TPS-DS dataset from the public S3 bucket and save the data as an Iceberg table in your S3 bucket
  • AWS Identity and Access Management (AWS IAM) roles and policies
  • A Lambda function and EventBridge schedule to run the AWS Glue column statistics on a schedule

To launch the CloudFormation stack, complete the following steps:

  1. Sign in to the AWS CloudFormation console.
  2. Choose Launch Stack.
  3. Choose Next.
  4. Leave the parameters as default or make appropriate changes based on your requirements, then choose Next.
  5. Review the details on the final page and select I acknowledge that AWS CloudFormation might create IAM resources.
  6. Choose Create.

This stack can take around 10 minutes to complete, after which you can view the deployed stack on the AWS CloudFormation console.

Run an AWS Glue job to create Iceberg tables for the 3TB TPC-DS dataset

When the CloudFormation stack creation is complete, run the AWS Glue job to create Iceberg tables for the TPC-DS dataset. This AWS Glue job extracts the TPC-DS dataset from the public S3 bucket and transforms the data into Iceberg tables. Those tables are loaded into your S3 bucket and registered to the Data Catalog.

To run the AWS Glue job, complete the following steps:

  1. On the AWS Glue console, choose ETL jobs in the navigation pane.
  2. Choose InitialDataLoadJob-<your-stack-name>.
  3. Choose Run.

This AWS Glue job can take around 30 minutes to complete. The process is complete when the job processing status shows as Succeeded.

The AWS Glue job creates tables storing the TPC-DS dataset in two identical databases: tpcdsdbnostats and tpcdsdbwithstats. The tables in tpcdsdbnostats will have no generated statistics, and we use them as reference. We generate statistics on tables in tpcdsdbwithstats. Confirm the creation of those two databases and underlying tables on the AWS Glue console. At this time, those databases hold the same data and there are no statistics generated on the tables.

Run queries on Redshift Spectrum without statistics

In the previous steps, you set up a Redshift Serverless workgroup with the given RPU (128 by default), prepared the TPC-DS 3TB dataset in your S3 bucket, and created Iceberg tables (which currently don’t have statistics).

To run your query in Amazon Redshift, complete the following steps:

  1. Download the Amazon Redshift queries.
  2. In the Redshift query editor v2, run the queries listed in the Redshift Query for tables without column statistics section in the downloaded file redshift-tpcds-sample.sql.
  3. Note the query runtime of each query.

Generate Iceberg column statistics

To generate statistics on the Data Catalog tables, complete the following steps:

  1. On the AWS Glue console, choose Databases under Data Catalog in the navigation pane.
  2. Choose the tpcdsdbwithstats database to view all available tables.
  3. Select any of these tables (for example, call_center).
  4. Go to Column statistics – new and choose Generate statistics.
  5. Keep the default options:
    1. For Choose columns, select Table (All columns).
    2. For Row sampling options, select All rows.
    3. For IAM role, choose AWSGluestats-blog-<your-stack-name>.
  6. Choose Generate statistics.

You’ll be able to see status of the statistics generation run as shown in the following screenshot.

After you generate the Iceberg table column statistics, you should be able to see detailed column statistics for that table.

Following the statistics generation, you will find an <id>.stat file in the AWS Glue table’s underlying data location in Amazon S3. This file is a Puffin file that stores the Theta Sketch data structure. Query engines can use this Theta Sketch algorithm to efficiently estimate the NDV when operating on the table, which helps optimize query performance.

Reiterate the previous steps to generate statistics for all tables, such as catalog_sales, catalog_returns, warehouse, item, date_dim, store_sales, customer, customer_address, web_sales, time_dim, ship_mode, web_site, and web_returns. Alternatively, you can manually run the Lambda function that instructs AWS Glue to generate column statistics for all tables. We discuss the details of this function later in this post.

After you generate statistics for all tables, you can assess the query performance for each query.

Run queries on Redshift Spectrum with statistics

In the previous steps, you set up a Redshift Serverless workgroup with the given RPU (128 by default), prepared the TPC-DS 3TB dataset in your S3 bucket, and created Iceberg tables with column statistics.

To run the provided query using Redshift Spectrum on the statistics tables, complete the following steps:

  1. In the Redshift query editor v2, run the queries listed in Redshift Query for tables with column statistics section in the downloaded file redshift-tpcds-sample.sql.
  2. Note the query runtime of each query.

With Redshift Serverless 128 RPU and the TPC-DS 3TB dataset, we conducted sample runs for 10 selected TPC-DS queries where NDV information was expected to be beneficial. We ran each query 10 times. The results shown in the following table are sorted by the percentage of the performance improvement for the queries with column statistics.

TPC-DS 3T Queries Without Column Statistics With Column Statistics Performance Improvement (%)
Query 16 305.0284 51.7807 489.1
Query 75 398.0643 110.8366 259.1
Query 78 169.8358 52.8951 221.1
Query 95 35.2996 11.1047 217.9
Query 94 160.52 57.0321 181.5
Query 68 14.6517 7.4745 96
Query 4 217.8954 121.996 78.6
Query 72 123.8698 76.215 62.5
Query 29 22.0769 14.8697 48.5
Query 25 43.2164 32.8602 31.5

The results demonstrated clear performance benefits ranging from 31.5–489.1%.

To dive deep, let’s explore query 16, which showed the highest performance benefit:

TPC-DS Query 16:

select
   count(distinct cs_order_number) as "order count"
  ,sum(cs_ext_ship_cost) as "total shipping cost"
  ,sum(cs_net_profit) as "total net profit"
from
   "awsdatacatalog"."tpcdsdbwithstats"."catalog_sales" cs1
  ,"awsdatacatalog"."tpcdsdbwithstats"."date_dim"
  ,"awsdatacatalog"."tpcdsdbwithstats"."customer_address"
  ,"awsdatacatalog"."tpcdsdbwithstats"."call_center"
where
    d_date between '2000-2-01' 
    and dateadd(day, 60, cast('2000-2-01' as date))
    and cs1.cs_ship_date_sk = d_date_sk
    and cs1.cs_ship_addr_sk = ca_address_sk
    and ca_state = 'AL'
    and cs1.cs_call_center_sk = cc_call_center_sk
    and cc_county in ('Dauphin County','Levy County','Luce County','Jackson County',
                    'Daviess County')
and exists (select *
            from "awsdatacatalog"."tpcdsdbwithstats"."catalog_sales" cs2
            where cs1.cs_order_number = cs2.cs_order_number
            and cs1.cs_warehouse_sk <> cs2.cs_warehouse_sk)
and not exists(select *
               from "awsdatacatalog"."tpcdsdbwithstats"."catalog_returns" cr1
               where cs1.cs_order_number = cr1.cr_order_number)
order by count(distinct cs_order_number)
limit 100;

You can compare the difference between the query plans with and without column statistics with the ANALYZE query.

The following screenshot shows the results without column statistics.

The following screenshot shows the results with column statistics.

You can observe some notable differences as a result of using column statistics. At a high level, the overall estimated cost of the query is significantly reduced, from 20633217995813352.00 to 331727324110.36.

The two query plans chose different join strategies.

The following is one line included in the query plan without column statistics:

XN Hash Join DS_DIST_BOTH (cost45365031.50 rows=10764790749 width=44)
" Outer Dist Key: ""outer"".cs_order_number"
Inner Dist Key: volt_tt_61c54ae740984.cs_order_number
" Hash Cond: ((""outer"".cs_order_number = ""inner"".cs_order_number) AND (""outer"".cs_warehouse_sk = ""inner"".cs_warehouse_sk))"

The following is the corresponding line in the query plan with column statistics:

XN Hash Join DS_BCAST_INNER (cost=307193250965.64..327130154786.68 rows=17509398 width=32)
" Hash Cond: ((""outer"".cs_order_number = ""inner"".cs_order_number) AND (""outer"".cs_warehouse_sk = ""inner"".cs_warehouse_sk))"

The query plan for the table without column statistics used DS_DIST_BOTH when joining large tables, whereas the query plan for the table with column statistics chose DS_BCAST_INNER. The join order has also changed based on the column statistics. Those join strategy and join order changes are mainly driven by more accurate join cardinality estimations, which are possible with column statistics, and result in a more optimized query plan.

Schedule AWS Glue column statistics Runs

Maintaining up-to-date column statistics is crucial for optimal query performance. This section guides you through automating the process of generating Iceberg table column statistics using Lambda and EventBridge Scheduler. This automation keeps your column statistics up to date without manual intervention.

The required Lambda function and EventBridge schedule are already created through the CloudFormation template. The Lambda function is used to invoke the AWS Glue column statistics run. First, complete the following steps to explore how the Lambda function is configured:

  1. On the Lambda console, choose Functions in the navigation pane.
  2. Open the function GlueTableStatisticsFunctionv1.

For a clearer understanding of the Lambda function, we recommend reviewing the code in the Code section and examining the environment variables under Configuration.

As shown in the following code snippet, the Lambda function invokes the start_column_statistics_task_run API through the AWS SDK for Python (Boto3) library.

Next, complete the following steps to explore how the EventBridge schedule is configured:

  1. On the EventBridge console, choose Schedules under Scheduler in the navigation pane.
  2. Locate the schedule created by the CloudFormation console.

This page is where you manage and configure the schedules for your events. As shown in the following screenshot, the schedule is configured to invoke the Lambda function daily at a specific time—in this case, 08:27 PM UTC. This makes sure the AWS Glue column statistics runs on a regular and predictable basis.

Clean up

When you have finished all the above steps, remember to clean up all the AWS resources you created using AWS CloudFormation:

  1. Delete the CloudFormation stack.
  2. Delete S3 bucket storing the Iceberg table for the TPC-DS dataset and the AWS Glue job script.

Conclusion

This post introduced a new feature in the Data Catalog that enables you to create Iceberg table column-level statistics. The Iceberg table stores Theta Sketch, which can be used to estimate NDV efficiently in a Puffin file. The Redshift Spectrum CBO can use that to optimize the query plan, resulting in improved query performance and potential cost savings.

Try out this new feature in the Data Catalog to generate column-level statistics and improve query performance, and let us know your feedback in the comments section. Visit the AWS Glue Catalog documentation to learn more.


About the Authors

Sotaro Hikita is a Solutions Architect. He supports customers in a wide range of industries, especially the financial industry, to build better solutions. He is particularly passionate about big data technologies and open source software.

Noritaka Sekiyama is a Principal Big Data Architect on the AWS Glue team. He is responsible for building software artifacts to help customers. In his spare time, he enjoys cycling with his new road bike.

Kyle Duong is a Senior Software Development Engineer on the AWS Glue and AWS Lake Formation team. He is passionate about building big data technologies and distributed systems.

Kalaiselvi Kamaraj is a Senior Software Development Engineer with Amazon. She has worked on several projects within the Amazon Redshift query processing team and currently focusing on performance-related projects for Redshift data lakes.

Sandeep Adwankar is a Senior Product Manager at AWS. Based in the California Bay Area, he works with customers around the globe to translate business and technical requirements into products that enable customers to improve how they manage, secure, and access data.

Integrate your data and collaborate using data preparation in AWS Glue Studio

Post Syndicated from Veliswa Boya original https://aws.amazon.com/blogs/aws/integrate-your-data-and-collaborate-using-data-preparation-in-aws-glue-studio/

Today, we announce the general availability of data preparation authoring in AWS Glue Studio Visual ETL. This is a new no-code data preparation user experience for business users and data analysts with a spreadsheet-style UI that runs data integration jobs at scale on AWS Glue for Spark. The new visual data preparation experience makes it easier for data analysts and data scientists to clean and transform data to prepare it for analytics and machine learning (ML). Within this new experience, you can choose from hundreds of pre-built transformations to automate data preparation tasks, all without the need to write any code.

Business analysts can now collaborate with data engineers to build data integration jobs. Data engineers can use the Glue Studio visual flow-based view to define connections to the data and set the ordering of the data flow process. Business analysts can use the data preparation experience to define the data transformation and output. Additionally, you can import your existing AWS Glue DataBrew data cleansing and preparation “recipes” to the new AWS Glue data preparation experience. This way, you can continue to author them directly in AWS Glue Studio and then scale up recipes to process petabytes of data at the lower price point for AWS Glue jobs.

Visual ETL prerequisites (environment setup)
The visual ETL needs an AWSGlueConsoleFullAccess IAM managed policy attached to the users and roles that will access AWS Glue.


This policy grants these users and roles full access to AWS Glue and read access to Amazon Simple Storage Service (Amazon S3) resources.

Advanced visual ETL flows
Once the appropriate AWS Identity and Access Management (IAM) role permissions have been defined, author the visual ETL using AWS Glue Studio.

Extract
Create an Amazon S3 node by selecting the Amazon S3 node from the list of Sources.


Select the newly created node and browse for an S3 dataset. Once the file has been uploaded successfully, choose Infer schema to configure the source node and the visual interface will show the preview of the data contained in the .csv file.

Earlier I created an S3 bucket in the same Region as the AWS Glue visual ETL and uploaded a .csv file visual ETL conference data.csv containing the data that I will be visualizing.

It’s important to set up the role permissions as detailed in the previous step to grant AWS Glue access to read the S3 bucket. Without performing this step, you’ll get an error that ultimately prevents you from seeing the data preview.

Transform
After the node has been configured, add a Data Preparation Recipe and start a data preview session. Starting this session typically takes about 2 – 3 minutes.


Once the data preview session is ready, choose Author Recipe to start an authoring session and add transformations once the data frame is complete. During the authoring session, you can view the data, apply transformation steps, and view the transformed data interactively. You can undo, redo, and reorder the steps. You can visualize the data type of the column and the statistical properties of each column.


You can start applying transformation steps to your data such as changing formats from lowercase to uppercase, changing the sort order, and more, by choosing Add step. All your data preparation steps will be tracked in the recipe.
I wanted a view of conferences that will be hosted in South Africa, so I created two recipes to filter by condition where the Location column has values equal to “South Africa”, and the Comments column contains a value.


Load
Once you’ve prepared your data interactively, you can share your work with data engineers who can extend it with more advanced visual ETL flows and custom code to seamlessly integrate it into their production data pipelines.

Now available
The AWS Glue data preparation authoring experience is now publicly available in all commercial AWS Regions where AWS Data Brew is available. To learn more, visit AWS Glue.

For more information, visit the AWS Glue Developer Guide and send feedback to AWS re:Post for AWS Glue or through your usual AWS support contacts.

— Veliswa

[$] A new API for tree-in-dcache filesystems

Post Syndicated from jake original https://lwn.net/Articles/980558/

There are a number of kernel filesystems that store their directory entries
directly in the directory-entry cache (dcache) without having any permanent
storage for those objects. It started out as a “neat hack” for ramfs,
Al Viro said, at the start of his filesystem-track session at
the
2024 Linux Storage,
Filesystem, Memory Management, and BPF Summit
. Unfortunately, as the use
of this technique has grown into other filesystems, there has been a lot of
scope creep that has gotten out of control. He wanted to discuss some new
infrastructure that he is working on to try to clean some of that up.

Patch Tuesday – July 2024

Post Syndicated from Greg Wiseman original https://blog.rapid7.com/2024/07/09/patch-tuesday-july-2024/

Patch Tuesday - July 2024

Microsoft is addressing 139 vulnerabilities this July 2024 Patch Tuesday, which is on the high side in terms of typical CVE counts. They’ve also republished details for 4 CVEs issued by other vendors that affect Microsoft products. Microsoft has evidence of in-the-wild exploitation for 2 of the vulnerabilities published today. At time of writing, none of the vulnerabilities patched today are listed in CISA’s Known Exploited Vulnerabilities catalog, though we can expect CVE-2024-38080 and CVE-2024-38112 to appear there in short order. Microsoft is also patching 5 critical remote code execution (RCE) vulnerabilities today.

Windows Hyper-V: zero-day EoP

CVE-2024-38080 is an elevation of privilege (EoP) vulnerability affecting Microsoft’s Hyper-V virtualization functionality. Successful exploitation will give an attacker SYSTEM-level privileges. Only more recent editions of Windows are affected; Windows 11 since version 21H2 and Windows Server 2022 (including Server Core).

Windows MSHTML Platform: zero-day Spoofing

The other vulnerability seen exploited in the wild this month is CVE-2024-38112, a Spoofing vulnerability affecting Microsoft’s MSHTML browser engine which can be found on all versions of Windows, including Server editions. User interaction is required for exploitation – for example, a threat actor would need to send the victim a malicious file and convince them to open it. Microsoft is characteristically cagey about what exactly can be spoofed here, though they do indicate that the associated Common Weakness Enumeration (CWE) is CWE-668: Exposure of Resource to Wrong Sphere, which is defined as providing unintended actors with inappropriate access to a resource.

SharePoint: critical post-auth RCE

Similar to a vulnerability seen in May, CVE-2024-38023 is a SharePoint vulnerability that could allow an authenticated attacker with Site Owner permissions or higher to upload a specially crafted file to a SharePoint Server, then craft malicious API requests to trigger deserialization of the file’s parameters, thus enabling them to achieve remote code execution in the context of the SharePoint Server. The CVSS base score of 7.2 reflects the requirement of Site Owner privileges or higher to exploit the vulnerability.

Windows Imaging: critical RCE

All supported versions of Windows (and almost certainly unsupported versions as well) are vulnerable to CVE-2024-38060, a flaw in the Windows Imaging Component related to TIFF (Tagged Image File Format) image processing that could allow an attacker to execute arbitrary code on a system. The example scenario Microsoft provides is simply of an authenticated attacker uploading a specially crafted TIFF image to a server in order to exploit this.

Remote Desktop Licensing Service: multiple critical RCEs

Three critical CVEs related to the Windows Remote Desktop Licensing Service were patched this month. CVE-2024-38074, CVE-2024-38076, and CVE-2024-38077. All three of these carry a CVSS 3.1 base score of 9.8 – if you rely on the Remote Desktop licensing service, best get patching immediately. As a mitigation, consider disabling the service entirely until there is an opportunity to apply the update.

SQL Server

Microsoft has patched a host of CVEs affecting SQL Server, all with a CVSS 3.1 base score of 8.8 and allowing RCE. These specifically affect the OLE DB Provider, so not only do SQL Server instances need to be updated, but client code running vulnerable versions of the connection driver will also need to be addressed. For example, an attacker could use social engineering tactics to dupe an authenticated user into attempting to connect to a SQL Server database configured to return malicious data, allowing arbitrary code execution on the client.

Lifecycle update

Also in SQL Server news this month, Microsoft SQL Server 2014 moves past the end of extended support. From this point onward, Microsoft only guarantees to provide SQL Server 2014 security updates to customers who pay for the Extended Security Updates program.

Summary charts

Patch Tuesday - July 2024

Summary tables

Azure vulnerabilities

CVE Title Exploited? Publicly disclosed? CVSSv3 base score
CVE-2024-38092 Azure CycleCloud Elevation of Privilege Vulnerability No No 8.8
CVE-2024-35261 Azure Network Watcher VM Extension Elevation of Privilege Vulnerability No No 7.8
CVE-2024-35266 Azure DevOps Server Spoofing Vulnerability No No 7.6
CVE-2024-35267 Azure DevOps Server Spoofing Vulnerability No No 7.6
CVE-2024-38086 Azure Kinect SDK Remote Code Execution Vulnerability No No 6.4

Developer Tools vulnerabilities

CVE Title Exploited? Publicly disclosed? CVSSv3 base score
CVE-2024-35264 .NET and Visual Studio Remote Code Execution Vulnerability No Yes 8.1
CVE-2024-38095 .NET and Visual Studio Denial of Service Vulnerability No No 7.5
CVE-2024-30105 .NET Core and Visual Studio Denial of Service Vulnerability No No 7.5
CVE-2024-38081 .NET, .NET Framework, and Visual Studio Elevation of Privilege Vulnerability No No 7.3

ESU Windows vulnerabilities

CVE Title Exploited? Publicly disclosed? CVSSv3 base score
CVE-2024-38077 Windows Remote Desktop Licensing Service Remote Code Execution Vulnerability No No 9.8
CVE-2024-38074 Windows Remote Desktop Licensing Service Remote Code Execution Vulnerability No No 9.8
CVE-2024-38053 Windows Layer-2 Bridge Network Driver Remote Code Execution Vulnerability No No 8.8
CVE-2024-38060 Windows Imaging Component Remote Code Execution Vulnerability No No 8.8
CVE-2024-38104 Windows Fax Service Remote Code Execution Vulnerability No No 8.8
CVE-2024-28899 Secure Boot Security Feature Bypass Vulnerability No No 8.8
CVE-2024-37973 Secure Boot Security Feature Bypass Vulnerability No No 8.4
CVE-2024-37984 Secure Boot Security Feature Bypass Vulnerability No No 8.4
CVE-2024-37969 Secure Boot Security Feature Bypass Vulnerability No No 8
CVE-2024-37970 Secure Boot Security Feature Bypass Vulnerability No No 8
CVE-2024-37974 Secure Boot Security Feature Bypass Vulnerability No No 8
CVE-2024-37986 Secure Boot Security Feature Bypass Vulnerability No No 8
CVE-2024-37987 Secure Boot Security Feature Bypass Vulnerability No No 8
CVE-2024-37971 Secure Boot Security Feature Bypass Vulnerability No No 8
CVE-2024-37972 Secure Boot Security Feature Bypass Vulnerability No No 8
CVE-2024-37975 Secure Boot Security Feature Bypass Vulnerability No No 8
CVE-2024-37988 Secure Boot Security Feature Bypass Vulnerability No No 8
CVE-2024-37989 Secure Boot Security Feature Bypass Vulnerability No No 8
CVE-2024-38010 Secure Boot Security Feature Bypass Vulnerability No No 8
CVE-2024-38011 Secure Boot Security Feature Bypass Vulnerability No No 8
CVE-2024-38050 Windows Workstation Service Elevation of Privilege Vulnerability No No 7.8
CVE-2024-38066 Windows Win32k Elevation of Privilege Vulnerability No No 7.8
CVE-2024-30079 Windows Remote Access Connection Manager Elevation of Privilege Vulnerability No No 7.8
CVE-2024-38070 Windows LockDown Policy (WLDP) Security Feature Bypass Vulnerability No No 7.8
CVE-2024-38051 Windows Graphics Component Remote Code Execution Vulnerability No No 7.8
CVE-2024-38085 Windows Graphics Component Elevation of Privilege Vulnerability No No 7.8
CVE-2024-38079 Windows Graphics Component Elevation of Privilege Vulnerability No No 7.8
CVE-2024-38034 Windows Filtering Platform Elevation of Privilege Vulnerability No No 7.8
CVE-2024-38054 Kernel Streaming WOW Thunk Service Driver Elevation of Privilege Vulnerability No No 7.8
CVE-2024-38052 Kernel Streaming WOW Thunk Service Driver Elevation of Privilege Vulnerability No No 7.8
CVE-2024-38057 Kernel Streaming WOW Thunk Service Driver Elevation of Privilege Vulnerability No No 7.8
CVE-2024-39684 Github: CVE-2024-39684 TenCent RapidJSON Elevation of Privilege Vulnerability No No 7.8
CVE-2024-38064 Windows TCP/IP Information Disclosure Vulnerability No No 7.5
CVE-2024-38071 Windows Remote Desktop Licensing Service Denial of Service Vulnerability No No 7.5
CVE-2024-38073 Windows Remote Desktop Licensing Service Denial of Service Vulnerability No No 7.5
CVE-2024-38015 Windows Remote Desktop Gateway (RD Gateway) Denial of Service Vulnerability No No 7.5
CVE-2024-38031 Windows Online Certificate Status Protocol (OCSP) Server Denial of Service Vulnerability No No 7.5
CVE-2024-38067 Windows Online Certificate Status Protocol (OCSP) Server Denial of Service Vulnerability No No 7.5
CVE-2024-38068 Windows Online Certificate Status Protocol (OCSP) Server Denial of Service Vulnerability No No 7.5
CVE-2024-38112 Windows MSHTML Platform Spoofing Vulnerability Yes No 7.5
CVE-2024-30098 Windows Cryptographic Services Security Feature Bypass Vulnerability No No 7.5
CVE-2024-38091 Microsoft WS-Discovery Denial of Service Vulnerability No No 7.5
CVE-2024-38061 DCOM Remote Cross-Session Activation Elevation of Privilege Vulnerability No No 7.5
CVE-2024-3596 CERT/CC: CVE-2024-3596 RADIUS Protocol Spoofing Vulnerability No No 7.5
CVE-2024-38033 PowerShell Elevation of Privilege Vulnerability No No 7.3
CVE-2024-38025 Microsoft Windows Performance Data Helper Library Remote Code Execution Vulnerability No No 7.2
CVE-2024-38019 Microsoft Windows Performance Data Helper Library Remote Code Execution Vulnerability No No 7.2
CVE-2024-38028 Microsoft Windows Performance Data Helper Library Remote Code Execution Vulnerability No No 7.2
CVE-2024-38044 DHCP Server Service Remote Code Execution Vulnerability No No 7.2
CVE-2024-30081 Windows NTLM Spoofing Vulnerability No No 7.1
CVE-2024-38022 Windows Image Acquisition Elevation of Privilege Vulnerability No No 7
CVE-2024-38065 Secure Boot Security Feature Bypass Vulnerability No No 6.8
CVE-2024-38058 BitLocker Security Feature Bypass Vulnerability No No 6.8
CVE-2024-38013 Microsoft Windows Server Backup Elevation of Privilege Vulnerability No No 6.7
CVE-2024-38049 Windows Distributed Transaction Coordinator Remote Code Execution Vulnerability No No 6.6
CVE-2024-38030 Windows Themes Spoofing Vulnerability No No 6.5
CVE-2024-38048 Windows Network Driver Interface Specification (NDIS) Denial of Service Vulnerability No No 6.5
CVE-2024-38027 Windows Line Printer Daemon Service Denial of Service Vulnerability No No 6.5
CVE-2024-38102 Windows Layer-2 Bridge Network Driver Denial of Service Vulnerability No No 6.5
CVE-2024-38101 Windows Layer-2 Bridge Network Driver Denial of Service Vulnerability No No 6.5
CVE-2024-38105 Windows Layer-2 Bridge Network Driver Denial of Service Vulnerability No No 6.5
CVE-2024-38099 Windows Remote Desktop Licensing Service Denial of Service Vulnerability No No 5.9
CVE-2024-38055 Microsoft Windows Codecs Library Information Disclosure Vulnerability No No 5.5
CVE-2024-38056 Microsoft Windows Codecs Library Information Disclosure Vulnerability No No 5.5
CVE-2024-38017 Microsoft Message Queuing Information Disclosure Vulnerability No No 5.5
CVE-2024-35270 Windows iSCSI Service Denial of Service Vulnerability No No 5.3
CVE-2024-30071 Windows Remote Access Connection Manager Information Disclosure Vulnerability No No 4.7

Microsoft Dynamics vulnerabilities

CVE Title Exploited? Publicly disclosed? CVSSv3 base score
CVE-2024-30061 Microsoft Dynamics 365 (On-Premises) Information Disclosure Vulnerability No No 7.3

Microsoft Office vulnerabilities

CVE Title Exploited? Publicly disclosed? CVSSv3 base score
CVE-2024-38021 Microsoft Office Remote Code Execution Vulnerability No No 8.8
CVE-2024-32987 Microsoft SharePoint Server Information Disclosure Vulnerability No No 7.5
CVE-2024-38023 Microsoft SharePoint Server Remote Code Execution Vulnerability No No 7.2
CVE-2024-38024 Microsoft SharePoint Server Remote Code Execution Vulnerability No No 7.2
CVE-2024-38094 Microsoft SharePoint Remote Code Execution Vulnerability No No 7.2
CVE-2024-38020 Microsoft Outlook Spoofing Vulnerability No No 6.5

SQL Server vulnerabilities

CVE Title Exploited? Publicly disclosed? CVSSv3 base score
CVE-2024-38088 SQL Server Native Client OLE DB Provider Remote Code Execution Vulnerability No No 8.8
CVE-2024-38087 SQL Server Native Client OLE DB Provider Remote Code Execution Vulnerability No No 8.8
CVE-2024-21332 SQL Server Native Client OLE DB Provider Remote Code Execution Vulnerability No No 8.8
CVE-2024-21333 SQL Server Native Client OLE DB Provider Remote Code Execution Vulnerability No No 8.8
CVE-2024-21335 SQL Server Native Client OLE DB Provider Remote Code Execution Vulnerability No No 8.8
CVE-2024-21373 SQL Server Native Client OLE DB Provider Remote Code Execution Vulnerability No No 8.8
CVE-2024-21398 SQL Server Native Client OLE DB Provider Remote Code Execution Vulnerability No No 8.8
CVE-2024-21414 SQL Server Native Client OLE DB Provider Remote Code Execution Vulnerability No No 8.8
CVE-2024-21415 SQL Server Native Client OLE DB Provider Remote Code Execution Vulnerability No No 8.8
CVE-2024-21428 SQL Server Native Client OLE DB Provider Remote Code Execution Vulnerability No No 8.8
CVE-2024-37318 SQL Server Native Client OLE DB Provider Remote Code Execution Vulnerability No No 8.8
CVE-2024-37332 SQL Server Native Client OLE DB Provider Remote Code Execution Vulnerability No No 8.8
CVE-2024-37331 SQL Server Native Client OLE DB Provider Remote Code Execution Vulnerability No No 8.8
CVE-2024-35271 SQL Server Native Client OLE DB Provider Remote Code Execution Vulnerability No No 8.8
CVE-2024-35272 SQL Server Native Client OLE DB Provider Remote Code Execution Vulnerability No No 8.8
CVE-2024-20701 SQL Server Native Client OLE DB Provider Remote Code Execution Vulnerability No No 8.8
CVE-2024-21303 SQL Server Native Client OLE DB Provider Remote Code Execution Vulnerability No No 8.8
CVE-2024-21308 SQL Server Native Client OLE DB Provider Remote Code Execution Vulnerability No No 8.8
CVE-2024-21317 SQL Server Native Client OLE DB Provider Remote Code Execution Vulnerability No No 8.8
CVE-2024-21331 SQL Server Native Client OLE DB Provider Remote Code Execution Vulnerability No No 8.8
CVE-2024-21425 SQL Server Native Client OLE DB Provider Remote Code Execution Vulnerability No No 8.8
CVE-2024-37319 SQL Server Native Client OLE DB Provider Remote Code Execution Vulnerability No No 8.8
CVE-2024-37320 SQL Server Native Client OLE DB Provider Remote Code Execution Vulnerability No No 8.8
CVE-2024-37321 SQL Server Native Client OLE DB Provider Remote Code Execution Vulnerability No No 8.8
CVE-2024-37322 SQL Server Native Client OLE DB Provider Remote Code Execution Vulnerability No No 8.8
CVE-2024-37323 SQL Server Native Client OLE DB Provider Remote Code Execution Vulnerability No No 8.8
CVE-2024-37324 SQL Server Native Client OLE DB Provider Remote Code Execution Vulnerability No No 8.8
CVE-2024-21449 SQL Server Native Client OLE DB Provider Remote Code Execution Vulnerability No No 8.8
CVE-2024-37326 SQL Server Native Client OLE DB Provider Remote Code Execution Vulnerability No No 8.8
CVE-2024-37327 SQL Server Native Client OLE DB Provider Remote Code Execution Vulnerability No No 8.8
CVE-2024-37328 SQL Server Native Client OLE DB Provider Remote Code Execution Vulnerability No No 8.8
CVE-2024-37329 SQL Server Native Client OLE DB Provider Remote Code Execution Vulnerability No No 8.8
CVE-2024-37330 SQL Server Native Client OLE DB Provider Remote Code Execution Vulnerability No No 8.8
CVE-2024-37333 SQL Server Native Client OLE DB Provider Remote Code Execution Vulnerability No No 8.8
CVE-2024-37336 SQL Server Native Client OLE DB Provider Remote Code Execution Vulnerability No No 8.8
CVE-2024-28928 SQL Server Native Client OLE DB Provider Remote Code Execution Vulnerability No No 8.8
CVE-2024-35256 SQL Server Native Client OLE DB Provider Remote Code Execution Vulnerability No No 8.8
CVE-2024-37334 Microsoft OLE DB Driver for SQL Server Remote Code Execution Vulnerability No No 8.8

System Center vulnerabilities

CVE Title Exploited? Publicly disclosed? CVSSv3 base score
CVE-2024-38089 Microsoft Defender for IoT Elevation of Privilege Vulnerability No No 9.1

Windows vulnerabilities

CVE Title Exploited? Publicly disclosed? CVSSv3 base score
CVE-2024-38076 Windows Remote Desktop Licensing Service Remote Code Execution Vulnerability No No 9.8
CVE-2024-21417 Windows Text Services Framework Elevation of Privilege Vulnerability No No 8.8
CVE-2024-30013 Windows MultiPoint Services Remote Code Execution Vulnerability No No 8.8
CVE-2024-37981 Secure Boot Security Feature Bypass Vulnerability No No 8
CVE-2024-37977 Secure Boot Security Feature Bypass Vulnerability No No 8
CVE-2024-37978 Secure Boot Security Feature Bypass Vulnerability No No 8
CVE-2024-38062 Windows Kernel-Mode Driver Elevation of Privilege Vulnerability No No 7.8
CVE-2024-38080 Windows Hyper-V Elevation of Privilege Vulnerability Yes No 7.8
CVE-2024-38100 Windows File Explorer Elevation of Privilege Vulnerability No No 7.8
CVE-2024-38059 Win32k Elevation of Privilege Vulnerability No No 7.8
CVE-2024-38043 PowerShell Elevation of Privilege Vulnerability No No 7.8
CVE-2024-38047 PowerShell Elevation of Privilege Vulnerability No No 7.8
CVE-2024-38517 Github: CVE-2024-38517 TenCent RapidJSON Elevation of Privilege Vulnerability No No 7.8
CVE-2024-38078 Xbox Wireless Adapter Remote Code Execution Vulnerability No No 7.5
CVE-2024-38072 Windows Remote Desktop Licensing Service Denial of Service Vulnerability No No 7.5
CVE-2024-38032 Microsoft Xbox Remote Code Execution Vulnerability No No 7.1
CVE-2024-38069 Windows Enroll Engine Security Feature Bypass Vulnerability No No 7
CVE-2024-26184 Secure Boot Security Feature Bypass Vulnerability No No 6.8
CVE-2024-37985 Arm: CVE-2024-37985 Systematic Identification and Characterization of Proprietary Prefetchers No Yes 5.9
CVE-2024-38041 Windows Kernel Information Disclosure Vulnerability No No 5.5

Introducing Amazon MWAA support for Apache Airflow version 2.9.2

Post Syndicated from Hernan Garcia original https://aws.amazon.com/blogs/big-data/introducing-amazon-mwaa-support-for-apache-airflow-version-2-9-2/

Amazon Managed Workflows for Apache Airflow (Amazon MWAA) is a managed orchestration service for Apache Airflow that significantly improves security and availability, and reduces infrastructure management overhead when setting up and operating end-to-end data pipelines in the cloud.

Today, we are announcing the availability of Apache Airflow version 2.9.2 environments on Amazon MWAA. Apache Airflow 2.9.2 introduces several notable enhancements, such as new API endpoints for improved dataset management, advanced scheduling options including conditional expressions for dataset dependencies, the combination of dataset and time-based schedules, and custom names in dynamic task mapping for better readability of your DAGs.

In this post, we walk you through some of these new features and capabilities, how you can use them, and how you can set up or upgrade your Amazon MWAA environments to Airflow 2.9.2.

With each new version release, the Apache Airflow community is innovating to make Airflow more data-aware, enabling you to build reactive, event-driven workflows that can accommodate changes in datasets, either between Airflow environments or in external systems. Let’s go through some of these new capabilities.

Logical operators and conditional expressions for DAG scheduling

Prior to the introduction of this capability, users faced significant limitations when working with complex scheduling scenarios involving multiple datasets. Airflow’s scheduling capabilities were restricted to logical AND combinations of datasets, meaning that a DAG run would only be created after all specified datasets were updated since the last run. This rigid approach posed challenges for workflows that required more nuanced triggering conditions, such as running a DAG when any one of several datasets was updated or when specific combinations of dataset updates occurred.

With the release of Airflow 2.9.2, you can now use logical operators (AND and OR) and conditional expressions to define intricate scheduling conditions based on dataset updates. This feature allows for granular control over workflow triggers, enabling DAGs to be scheduled whenever a specific dataset or combination of datasets is updated.

For example, in the financial services industry, a risk management process might need to be run whenever trading data from any regional market is refreshed, or when both trading and regulatory updates are available. The new scheduling capabilities available in Amazon MWAA allow you to express such complex logic using simple expressions. The following diagram illustrates the dependency we need to establish.

The following DAG code contains the logical operations to implement these dependencies:

from airflow.decorators import dag, task
from airflow.datasets import Dataset
from pendulum import datetime

trading_data_asia = Dataset("s3://trading/asia/data.parquet")
trading_data_europe = Dataset("s3://trading/europe/data.parquet")
trading_data_americas = Dataset("s3://trading/americas/data.parquet")
regulatory_updates = Dataset("s3://regulators/updates.json")

@dag(
    dag_id='risk_management_trading_data',
    start_date=datetime(2023, 5, 1),
    schedule=((trading_data_asia | trading_data_europe | trading_data_americas) & regulatory_updates),
    catchup=False
)
def risk_management_pipeline():
    @task
    def risk_analysis():
        # Task for risk analysis
        ...

    @task
    def reporting():
        # Task for reporting
        ...

    @task
    def notifications():
        # Task for notifications
        ...

    analysis = risk_analysis()
    report = reporting()
    notify = notifications()

risk_management_pipeline()

To learn more about this feature, refer to Logical operators for datasets in the Airflow documentation.

Combining dataset and time-based schedules

With Airflow 2.9.2 environments, Amazon MWAA now has a more comprehensive scheduling mechanism that combines the flexibility of data-driven execution with the consistency of time-based schedules.

Consider a scenario where your team is responsible for managing a data pipeline that generates daily sales reports. This pipeline relies on data from multiple sources. Although it’s essential to generate these sales reports on a daily basis to provide timely insights to business stakeholders, you also need to make sure the reports are up to date and reflect important data changes as soon as possible. For instance, if there’s a significant influx of orders during a promotional campaign, or if inventory levels change unexpectedly, the report should incorporate these updates to maintain relevance.

Relying solely on time-based scheduling for this type of data pipeline could lead to potential issues such as outdated information and infrastructure resource wastage.

The DatasetOrTimeSchedule feature introduced in Airflow 2.9 adds the capability to combine conditional dataset expressions with time-based schedules. This means that your workflow can be invoked not only at predefined intervals but also whenever there are updates to the specified datasets, with the specific dependency relationship among them. The following diagram illustrates how you can use this capability to accommodate such scenarios.

See the following DAG code for an example implementation:

from airflow.decorators import dag, task
from airflow.timetables.datasets import DatasetOrTimeSchedule
from airflow.timetables.trigger import CronTriggerTimetable
from airflow.datasets import Dataset
from datetime import datetime

# Define datasets
orders_dataset = Dataset("s3://path/to/orders/data")
inventory_dataset = Dataset("s3://path/to/inventory/data")
customer_dataset = Dataset("s3://path/to/customer/data")

# Combine datasets using logical operators
combined_dataset = (orders_dataset & inventory_dataset) | customer_dataset

@dag(
    dag_id="dataset_time_scheduling",
    start_date=datetime(2024, 1, 1),
    schedule=DatasetOrTimeSchedule(
        timetable=CronTriggerTimetable("0 0 * * *", timezone="UTC"),  # Daily at midnight
        datasets=combined_dataset
    ),
    catchup=False,
)
def dataset_time_scheduling_pipeline():
    @task
    def process_orders():
        # Task logic for processing orders
        pass

    @task
    def update_inventory():
        # Task logic for updating inventory
        pass

    @task
    def update_customer_data():
        # Task logic for updating customer data
        pass

    orders_task = process_orders()
    inventory_task = update_inventory()
    customer_task = update_customer_data()

dataset_time_scheduling_pipeline()

In the example, the DAG will be run under two conditions:

  • When the time-based schedule is met (daily at midnight UTC)
  • When the combined dataset condition is met, when there are updates to both orders and inventory data, or when there are updates to customer data, regardless of the other datasets

This flexibility enables you to create sophisticated scheduling rules that cater to the unique requirements of your data pipelines, so they run when necessary and incorporate the latest data updates from multiple sources.

For more details on data-aware scheduling, refer to Data-aware scheduling in the Airflow documentation.

Dataset event REST API endpoints

Prior to the introduction of this feature, making your Airflow environment aware of changes to datasets in external systems was a challenge—there was no option to mark a dataset as externally updated. With the new dataset event endpoints feature, you can programmatically initiate dataset-related events. The REST API has endpoints to create, list, and delete dataset events.

This capability enables external systems and applications to seamlessly integrate and interact with your Amazon MWAA environment. It significantly improves your ability to expand your data pipeline’s capacity for dynamic data management.

As an example, running the following code from an external system allows you to invoke a dataset event in the target Amazon MWAA environment. This event could then be handled by downstream processes or workflows, enabling greater connectivity and responsiveness in data-driven workflows that rely on timely data updates and interactions.

curl -X POST <https://{web_server_host_name}>/api/v1/datasets/events \
   -H 'Content-Type: application/json' \
   -d '{"dataset_uri": "s3://bucket_name/bucket_key", "extra": { }}'

The following diagram illustrates how the different components in the scenario interact with each other.

To get more details on how to use the Airflow REST API in Amazon MWAA, refer to Introducing Amazon MWAA support for the Airflow REST API and web server auto scaling. To learn more about the dataset event REST API endpoints, refer to Dataset UI Enhancements in the Airflow documentation.

Airflow 2.9.2 also includes features to ease the operation and monitoring of your environments. Let’s explore some of these new capabilities.

Dag auto-pausing

Customers are using Amazon MWAA to build complex data pipelines with multiple interconnected tasks and dependencies. When one of these pipelines encounters an issue or failure, it can result in a cascade of unnecessary and redundant task runs, leading to wasted resources. This problem is particularly prevalent in scenarios where pipelines run at frequent intervals, such as hourly or daily. A common scenario is a critical pipeline that starts failing during the evening, and due to the failure, it continues to run and fails repeatedly until someone manually intervenes the next morning. This can result in dozens of unnecessary tasks, consuming valuable compute resources and potentially causing data corruption or inconsistencies.

The DAG auto-pausing feature aims to address this challenge by introducing two new configuration parameters:

  • max_consecutive_failed_dag_runs_per_dag – This is a global Airflow configuration setting. It allows you to specify the maximum number of consecutive failed DAG runs before the DAG is automatically paused.
  • max_consecutive_failed_dag_runs – This is a DAG-level argument. It overrides the previous global configuration, allowing you to set a custom threshold for each DAG.

In the following code example, we define a DAG with a single PythonOperator. The failing_task is designed to fail by raising a ValueError. The key configuration for DAG auto-pausing is the max_consecutive_failed_dag_runs parameter set in the DAG object. By setting max_consecutive_failed_dag_runs=3, we’re instructing Airflow to automatically pause the DAG after it fails three consecutive times.

from airflow.decorators import dag, task
from datetime import datetime, timedelta

@task
def failing_task():
    raise ValueError("This task is designed to fail")

@dag(
    dag_id="auto_pause",
    start_date=datetime(2023, 1, 1),
    schedule_interval=timedelta(minutes=1),  # Run every minute
    catchup=False,
    max_consecutive_failed_dag_runs=3,  # Set the maximum number of consecutive failed DAG runs
)
def example_dag_with_auto_pause():
    failing_task_instance = failing_task()

example_dag_with_auto_pause()

With this parameter, you can now configure your Airflow DAGs to automatically pause after a specified number of consecutive failures.

To learn more, refer to DAG Auto-pausing in the Airflow documentation.

CLI support for bulk pause and resume of DAGs

As the number of DAGs in your environment grows, managing them becomes increasingly challenging. Whether for upgrading or migrating environments, or other operational activities, you may need to pause or resume multiple DAGs. This process can become a daunting cyclical endeavor because you need to navigate through the Airflow UI, manually pausing or resuming DAGs one at a time. These manual activities are time consuming and increase the risk of human error that can result in missteps and lead to data inconsistencies or pipeline disruptions. The previous CLI commands for pausing and resuming DAGs could only handle one DAG at a time, making it inefficient.

Airflow 2.9.2 improves these CLI commands by adding the capability to treat DAG IDs as regular expressions, allowing you to pause or resume multiple DAGs with a single command. This new feature eliminates the need for repetitive manual intervention or individual DAG operations, significantly reducing the risk of human error, providing reliability and consistency in your data pipelines.

As an example, to pause all DAGs generating daily liquidity reporting using Amazon Redshift as a data source, you can use the following CLI command with a regular expression:

airflow dags pause —treat-dag-id-as-regex -y "^(redshift|daily_liquidity_reporting)"

Custom names for Dynamic Task Mapping

Dynamic Task Mapping was added in Airflow 2.3. This powerful feature allows workflows to create tasks dynamically at runtime based on data. Instead of relying on the DAG author to predict the number of tasks needed in advance, the scheduler can generate the appropriate number of copies of a task based on the output of a previous task. Of course, with great powers comes great responsibilities. By default, dynamically mapped tasks were assigned numeric indexes as names. In complex workflows involving high numbers of mapped tasks, it becomes increasingly challenging to pinpoint the specific tasks that require attention, leading to potential delays and inefficiencies in managing and maintaining your data workflows.

Airflow 2.9 introduces the map_index_template parameter, a highly requested feature that addresses the challenge of task identification in Dynamic Task Mapping. With this capability, you can now provide custom names for your dynamically mapped tasks, enhancing visibility and manageability within the Airflow UI.

See the following example:

from airflow.decorators import dag
from airflow.operators.python import PythonOperator
from datetime import datetime, timedelta

def process_data(data):
    # Perform data processing logic here
    print(f"Processing data: {data}")

@dag(
    dag_id="custom_task_mapping_example",
    start_date=datetime(2023, 1, 1),
    schedule_interval=None,
    catchup=False,
)
def custom_task_mapping_example():
    mapped_processes = PythonOperator.partial(
        task_id="process_data_source",
        python_callable=process_data,
        map_index_template="Processing source={{ task.op_args[0] }}",
    ).expand(op_args=[["source_a"], ["source_b"], ["source_c"]])

custom_task_mapping_example()

The key aspect in the code is the map_index_template parameter specified in the PythonOperator.partial call. This Jinja template instructs Airflow to use the values of the ops_args environment variable as the map index for each dynamically mapped task instance. In the Airflow UI, you will see three task instances with the indexes source_a, source_b, and source_c, making it straightforward to identify and track the tasks associated with each data source. In case of failures, this capability improves monitoring and troubleshooting.

The map_index_template feature goes beyond simple template rendering, offering dynamic injection capabilities into the rendering context. This functionality unlocks greater levels of flexibility and customization when naming dynamically mapped tasks.

Refer to Named mapping in the Airflow documentation to learn more about named mapping.

TaskFlow decorator for Bash commands

Writing complex Bash commands and scripts using the traditional Airflow BashOperator may bring challenges in areas such as code consistency, task dependencies definition, and dynamic command generation. The new @task.bash decorator addresses these challenges, allowing you to define Bash statements using Python functions, making the code more readable and maintainable. It seamlessly integrates with Airflow’s TaskFlow API, enabling you to define dependencies between tasks and create complex workflows. You can also use Airflow’s scheduling and monitoring capabilities while maintaining a consistent coding style.

The following sample code showcases how the @task.bash decorator simplifies the integration of Bash commands into DAGs, while using the full capabilities of Python for dynamic command generation and data processing:

from airflow.decorators import dag, task
from datetime import datetime, timedelta

default_args = {
    'owner': 'airflow',
    'retries': 1,
    'retry_delay': timedelta(minutes=5),
}

# Sample customer data
customer_data = """
id,name,age,city
1,John Doe,35,New York
2,Jane Smith,42,Los Angeles
3,Michael Johnson,28,Chicago
4,Emily Williams,31,Houston
5,David Brown,47,Phoenix
"""

# Sample order data
order_data = """
order_id,customer_id,product,quantity,price
101,1,Product A,2,19.99
102,2,Product B,1,29.99
103,3,Product A,3,19.99
104,4,Product C,2,14.99
105,5,Product B,1,29.99
"""

@dag(
    dag_id='task-bash-customer_order_analysis',
    default_args=default_args,
    start_date=datetime(2023, 1, 1),
    schedule_interval=timedelta(days=1),
    catchup=False,
)
def customer_order_analysis_dag():
    @task.bash
    def clean_data():
        # Clean customer data
        customer_cleaning_commands = """
            echo '{}' > cleaned_customers.csv
            cat cleaned_customers.csv | sed 's/,/;/g' > cleaned_customers.csv
            cat cleaned_customers.csv | awk 'NR > 1' > cleaned_customers.csv
        """.format(customer_data)

        # Clean order data
        order_cleaning_commands = """
            echo '{}' > cleaned_orders.csv
            cat cleaned_orders.csv | sed 's/,/;/g' > cleaned_orders.csv
            cat cleaned_orders.csv | awk 'NR > 1' > cleaned_orders.csv
        """.format(order_data)

        return customer_cleaning_commands + "\n" + order_cleaning_commands

    @task.bash
    def transform_data(cleaned_customers, cleaned_orders):
        # Transform customer data
        customer_transform_commands = """
            cat {cleaned_customers} | awk -F';' '{{printf "%s,%s,%s\\n", $1, $2, $3}}' > transformed_customers.csv
        """.format(cleaned_customers=cleaned_customers)

        # Transform order data
        order_transform_commands = """
            cat {cleaned_orders} | awk -F';' '{{printf "%s,%s,%s,%s,%s\\n", $1, $2, $3, $4, $5}}' > transformed_orders.csv
        """.format(cleaned_orders=cleaned_orders)

        return customer_transform_commands + "\n" + order_transform_commands

    @task.bash
    def analyze_data(transformed_customers, transformed_orders):
        analysis_commands = """
            # Calculate total revenue
            total_revenue=$(awk -F',' '{{sum += $5 * $4}} END {{printf "%.2f", sum}}' {transformed_orders})
            echo "Total revenue: $total_revenue"

            # Find customers with multiple orders
            customers_with_multiple_orders=$(
                awk -F',' '{{orders[$2]++}} END {{for (c in orders) if (orders[c] > 1) printf "%s,", c}}' {transformed_orders}
            )
            echo "Customers with multiple orders: $customers_with_multiple_orders"

            # Find most popular product
            popular_product=$(
                awk -F',' '{{products[$3]++}} END {{max=0; for (p in products) if (products[p] > max) {{max=products[p]; popular=p}}}} END {{print popular}}'
            {transformed_orders})
            echo "Most popular product: $popular_product"
        """.format(transformed_customers=transformed_customers, transformed_orders=transformed_orders)

        return analysis_commands

    cleaned_data = clean_data()
    transformed_data = transform_data(cleaned_data, cleaned_data)
    analysis_results = analyze_data(transformed_data, transformed_data)

customer_order_analysis_dag()

You can learn more about the @task.bash decorator in the Airflow documentation.

Set up a new Airflow 2.9.2 environment in Amazon MWAA

You can initiate the setup in your account and preferred AWS Region using the AWS Management Console, API, or AWS Command Line Interface (AWS CLI). If you’re adopting infrastructure as code (IaC), you can automate the setup using AWS CloudFormation, the AWS Cloud Development Kit (AWS CDK), or Terraform scripts.

Upon successful creation of an Airflow 2.9 environment in Amazon MWAA, certain packages are automatically installed on the scheduler and worker nodes. For a complete list of installed packages and their versions, refer to Apache Airflow provider packages installed on Amazon MWAA environments. You can install additional packages using a requirements file.

Upgrade from older versions of Airflow to version 2.9.2

You can take advantage of these latest capabilities by upgrading your older Airflow version 2.x-based environments to version 2.9 using in-place version upgrades. To learn more about in-place version upgrades, refer to Upgrading the Apache Airflow version or Introducing in-place version upgrades with Amazon MWAA.

Conclusion

In this post, we announced the availability of Apache Airflow 2.9 environments in Amazon MWAA. We discussed how some of the latest features added in the release enable you to design more reactive, event-driven workflows, such as DAG scheduling based on the result of logical operations, and the availability of endpoints in the REST API to programmatically create dataset events. We also provided some sample code to show the implementation in Amazon MWAA.

For the complete list of changes, refer to Airflow’s release notes. For additional details and code examples on Amazon MWAA, visit the Amazon MWAA User Guide and the Amazon MWAA examples GitHub repo.

Apache, Apache Airflow, and Airflow are either registered trademarks or trademarks of the Apache Software Foundation in the United States and/or other countries.


About the authors

Hernan Garcia is a Senior Solutions Architect at AWS, based out of Amsterdam, working with enterprises in the Financial Services Industry. He specializes in application modernization and supports customers in the adoption of serverless technologies.

Parnab Basak is a Solutions Architect and a Serverless Specialist at AWS. He specializes in creating new solutions that are cloud native using modern software development practices like serverless, DevOps, and analytics. Parnab works closely in the analytics and integration services space helping customers adopt AWS services for their workflow orchestration needs.

AWS Graviton4-based Amazon EC2 R8g instances: best price performance in Amazon EC2

Post Syndicated from Esra Kayabali original https://aws.amazon.com/blogs/aws/aws-graviton4-based-amazon-ec2-r8g-instances-best-price-performance-in-amazon-ec2/

Today, I am very excited to announce that the new AWS Graviton4-based Amazon Elastic Compute Cloud (Amazon EC2) R8g instances, that have been available in preview since re:Invent 2023, are now generally available to all. AWS offers more than 150 different AWS Graviton-powered Amazon EC2 instance types globally at scale, has built more than 2 million Graviton processors, and has more than 50,000 customers using AWS Graviton-based instances to achieve the best price performance for their applications.

AWS Graviton4 is the most powerful and energy efficient processor we have ever designed for a broad range of workloads running on Amazon EC2. Like all the other AWS Graviton processors, AWS Graviton4 uses a 64-bit Arm instruction set architecture. AWS Graviton4-based Amazon EC2 R8g instances deliver up to 30% better performance than AWS Graviton3-based Amazon EC2 R7g instances. This helps you to improve performance of your most demanding workloads such as high-performance databases, in-memory caches, and real time big data analytics.

Since the preview announcement at re:Invent 2023, over 100 customers, including Epic Games, SmugMug, Honeycomb, SAP, and ClickHouse have tested their workloads on AWS Graviton4-based R8g instances and observed significant performance improvement over comparable instances. SmugMug achieved 20-40% performance improvements using AWS Graviton4-based instances compared to AWS Graviton3-based instances for their image and data compression operations. Epic Games found AWS Graviton4 instances to be the fastest EC2 instances they have ever tested and Honeycomb.io achieved more than double the throughput per vCPU compared to the non-Graviton based instances that they used four years ago.

Let’s look at some of the improvements that we have made available in our new instances. R8g instances offer larger instance sizes with up to 3x more vCPUs (up to 48xl), 3x the memory (up to 1.5TB), 75% more memory bandwidth, and 2x more L2 cache over R7g instances. This helps you to process larger amounts of data, scale up your workloads, improve time to results, and lower your TCO. R8g instances also offer up to 50 Gbps network bandwidth and up to 40 Gbps EBS bandwidth compared to up to 30 Gbps network bandwidth and up to 20 Gbps EBS bandwidth on Graviton3-based instances.

R8g instances are the first Graviton instances to offer two bare metal sizes (metal-24xl and metal-48xl). You can right size your instances and deploy workloads that benefit from direct access to physical resources. Here are the specs for R8g instances:

Instance Size vCPUs
Memory
Network Bandwidth
EBS Bandwidth
r8g.medium 1 8 GiB up to 12.5 Gbps up to 10 Gbps
r8g.large 2 16 GiB up to 12.5 Gbps up to 10 Gbps
r8g.xlarge 4 32 GiB up to 12.5 Gbps up to 10 Gbps
r8g.2xlarge 8 64 GiB up to 15 Gbps up to 10 Gbps
r8g.4xlarge 16 128 GiB up to 15 Gbps up to 10 Gbps
r8g.8xlarge 32 256 GiB 15 Gbps 10 Gbps
r8g.12xlarge 48 384 GiB 22.5 Gbps 15 Gbps
r8g.16xlarge 64 512 GiB 30 Gbps 20 Gbps
r8g.24xlarge 96 768 GiB 40 Gbps 30 Gbps
r8g.48xlarge 192 1,536 GiB 50 Gbps 40 Gbps
r8g.metal-24xl 96 768 GiB 40 Gbps 30 Gbps
r8g.metal-48xl 192 1,536 GiB 50 Gbps 40 Gbps

If you are looking for more energy-efficient compute options to help you reduce your carbon footprint and achieve your sustainability goals, R8g instances provide the best energy efficiency for memory-intensive workloads in EC2. Additionally, these instances are built on the AWS Nitro System, which offloads CPU virtualization, storage, and networking functions to dedicated hardware and software to enhance the performance and security of your workloads. The Graviton4 processors offer you enhanced security by fully encrypting all high-speed physical hardware interfaces.

R8g instances are ideal for all Linux-based workloads including containerized and micro-services-based applications built using Amazon Elastic Kubernetes Service (Amazon EKS), Amazon Elastic Container Service (Amazon ECS), Amazon Elastic Container Registry (Amazon ECR), Kubernetes, and Docker, and as well as applications written in popular programming languages such as C/C++, Rust, Go, Java, Python, .NET Core, Node.js, Ruby, and PHP. AWS Graviton4 processors are up to 30% faster for web applications, 40% faster for databases, and 45% faster for large Java applications than AWS Graviton3 processors. To learn more, visit the AWS Graviton Technical Guide.

Check out the collection of Graviton resources to help you start migrating your applications to Graviton instance types. You can also visit the AWS Graviton Fast Start program to begin your Graviton adoption journey.

Now available
R8g instances are available today in the US East (N. Virginia), US East (Ohio), US West (Oregon), and Europe (Frankfurt) AWS Regions.

You can purchase R8g instances as Reserved Instances, On-Demand, Spot Instances, and via Savings Plans. For further information, visit Amazon EC2 pricing.

To learn more about Graviton-based instances, visit AWS Graviton Processors or the Amazon EC2 R8g Instances.

— Esra

Разследване на Валя Ахчиева: Боклукът и границата

Post Syndicated from Екип на Биволъ original https://bivol.bg/boklukat-i-granicata.html

вторник 9 юли 2024


Местните хора в Странджа са дълбоко свързани със своята планина. И я обичат. И искат да я пазят. Само така мога да си обясня риска, който е поел един човек,…

Exploring the challenges in creating an accessible sortable list (drag-and-drop)

Post Syndicated from Kendall Gassner original https://github.blog/engineering/user-experience/exploring-the-challenges-in-creating-an-accessible-sortable-list-drag-and-drop/

Drag-and-drop is a highly interactive and visual interface. We often use drag-and-drop to perform tasks like uploading files, reordering browser bookmarks, or even moving a card in solitaire. It can be hard to imagine completing most of these tasks without a mouse and even harder without using a screen or visual aid. This is why the Accessibility team at GitHub considers drag-and-drop a “high-risk pattern,” often leading to accessibility barriers and a lack of effective solutions in the industry.

Recently, our team worked to develop a solution for a more accessible sortable list, which we refer to as ‘one-dimensional drag-and-drop.’ In our first step toward making drag-and-drop more accessible, we scoped our efforts to explore moving items along a single axis.

An example of a sortable to do list. This list has  7 items all of which are in a single column. One of the the items is hovering over the list to indicate it is being dragged to another position.

Based on our findings, here are some of the challenges we faced and how we solved them:

Challenge: Screen readers use arrow keys to navigate through content

One of the very first challenges we faced involved setting up an interaction model for moving an item through keyboard navigation. We chose to use arrow keys as we wanted keyboard operation to feel natural for a visual keyboard user. However, this choice posed a problem for users who relied on screen readers to navigate throughout a webpage.

To note: Arrow keys are commonly used by screen readers to help users navigate through content, like reading text or navigating between cells in a table. Consequently, when we tested drag-and-drop with screen reader users, the users were unable to use the arrow keys to move the item as intended. The arrow keys ignored drag-and-drop actions and performed typical screen reader navigation instead.

In order to override these key bindings we used role='application'.

Take note: I cannot talk about using role='application' without also providing a warning. role='application' should almost never be used. It is important to use role='application' sparingly and to scope it to the smallest possible element. The role='application' attribute alters how a screen reader operates, making it treat the element and its contents as a single application.

Considering the mentioned caution, we applied the role to the drag-and-drop trigger to restrict the scope of the DOM impacted by role='application'. Additionally, we exclusively added role='application' to the DOM when a user activates drag-and-drop. We remove role='application' when the user completes or cancels out of drag-and-drop. By employing role='application', we are able to override or reassign the screen reader’s arrow commands to correspond with our drag-and-drop commands.

Remember, even if implemented thoughtfully, it’s crucial to rely on feedback from daily screen reader users to ensure you have implemented role='application' correctly. Their feedback and experience should be the determining factor in assessing whether or not using role='application' is truly accessible and necessary.

Challenge: NVDA simulates mouse events when a user presses Enter or Space

Another challenge we faced was determining whether a mouse or keyboard event was triggered when an NVDA screen reader user activated drag-and-drop.

When a user uses a mouse to drag-and-drop items, the expectation is that releasing the mouse button (triggering an onMouseUp event) will finalize the drag-and-drop operation. Whereas, when operating drag-and-drop via the keyboard, Enter or Escape is used to finalize the drag-and-drop operation.

To note: When a user activates a button with the Enter or Space key while using NVDA, the screen reader simulates an onMouseDown and onMouseUp event rather than an onKeyDown event.

Because most NVDA users rely on keyboard operations to operate drag-and-drop instead of a mouse, we had to find a way to make sure our code ignored the onMouseUp event triggered by an NVDA Enter or Space key press.

We accomplished this by using two HTML elements to separate keyboard and mouse functionality:
1. A Primer Icon button to handle keyboard interactions.
2. An invisible overlay to capture mouse interactions.

A screenshot of the drag-and-drop trigger. Added to the screenshot are two informational text boxes the first explains the purpose of the invisible overlay, stating:  "An empty <div> overlays the iconButton to handle mouse events. This is neither focusable nor visible to keyboard users. Associated event handlers: onMouseDown". The second text box explains the purpose of the visible iconButton, stating: "The iconButton can only be activated by keyboard users. This is not clickable for mouse users. Associated event handlers: onMouseDown, onKeyDown.

Challenge: Announcing movements in rapid succession

Once we had our keyboard operations working, our next big obstacle was announcing movements to users, in particular announcing rapid movements of a selected item.

To prepare for external user testing we tested our announcements ourselves with screen readers. Because we are not native screen reader users, we moved items slowly throughout the page and the announcements sounded great. However, users typically move items rapidly to complete tasks quickly, so our screen reader testing did not reflect how users would actually interact with our feature.

To note: It was not until user testing that we discovered that when a user moved an item in rapid succession the aria-live announcements would lag or sometimes announce movements that were no longer relevant. This would disorient users, leading to confusion about the item’s current position.

To solve this problem, we added a small debounce to our move announcements. We tested various debounce speeds with users and landed on 100ms to ensure that we did not slow down a user’s ability to interact with drag-and-drop. Additionally, we used aria-live='assertive' to ensure that stale positional announcements are interrupted by the new positional announcement.

export const debounceAnnouncement = debounce((announcement: string) => {
  announce(announcement, {assertive: true})
}, 100)

Take note: aria-live='assertive' is reserved for time-sensitive or critical notifications. aria-live='assertive' interrupts any ongoing announcements the screen reader is making and can be disruptive for users. Use aria-live='assertive' sparingly and test with screen reader users to ensure your feature implores it correctly.

Challenge: First-time user experience of a new pattern

To note: During user testing we discovered that some of our users found it difficult to operate drag-and-drop with a keyboard. Oftentimes, drag-and-drop is not keyboard accessible or screen reader accessible. As a result, users with disabilities might not have had the opportunity to use drag-and-drop before, making the operations unfamiliar to them.

This problem was particularly challenging to solve because we wanted to make sure our instruction set was easy to find but not a constant distraction for users who frequently use the drag-and-drop functionality.

To address this, we added a dialog with a set of instructions that would open when a user activated drag-and-drop via the keyboard. This dialog has a “don’t show this again” checkbox preference for users who feel like they have a good grasp on the interaction and no longer want a reminder.

A screenshot of the instruction dialog. The dialog contains a table with three rows. Each row contains two columns the first column is the movement and the second column is the keyboard command. At the bottom is the

Challenge: Moving items with voice control in a scrollable container

One of the final big challenges we faced was operating drag-and-drop using voice control assistive technology. We found that using voice control to drag-and-drop items in a non-scrollable list was straightforward, but when the list became scrollable it was nearly impossible to move an item from the top of the list to the bottom.

To note: Voice control displays an overlay of numbers next to interactive items on the screen when requested. These numbers are references to items a user can interact with. For example, if a user says, “Click item 5” and item 5 is a button on a web page the assistive technology will then click the button. These number references dynamically update as the user scrolls through the webpage. Because references are updated as a user scrolls, scrolling the page while dragging an item via a numerical reference will cause the item to be dropped.

We found it critical to support two modes of operation in order to ensure that voice control users are able to sort items in a list. The first mode of operation, traditional drag-and-drop, has been discussed previously. The second mode is a move dialog.

The move dialog is a form that allows users to move items in a list without having to use traditional drag-and-drop:

A screenshot of the Move Dialog. At the top of the dialog is a span specifying  the item being moved. Followed by a form to move items then a preview of the movement.

The form includes two input fields: action and position.
The action field specifies the movement or direction of the operation, for example, “move item before” or “move item after.” And the position specifies the location of where the item should be moved.

Below the input fields we show a preview of where an item will be moved based on the input values. This preview is announced using aria-live and provides a way for users to preview their movements before finalizing them.

During our testing we found that the move dialog was the preferred mode of operation for several of our users who do not use voice control assistive technology. Our users felt more confident when using the move dialog to move items and we were delighted to find that our accessibility feature provided unexpected benefits to a wide range of users.

In Summary, creating an accessible drag-and-drop pattern is challenging and it is important to leverage feedback and consider a diverse range of user needs. If you are working to create an accessible drag-and-drop, we hope our journey helps you understand the nuances and pitfalls of this complex pattern.

A big thanks to my colleagues, Alexis Lucio, Matt Pence, Hussam Ghazzi, and Aarya BC, for their hard work in making drag-and-drop more accessible. Your dedication and expertise have been invaluable. I am excited about the progress we made and what we will achieve in the future!

Lastly, if you are interested in testing the future of drag-and-drop with us, consider joining our Customer Research Panel.

The post Exploring the challenges in creating an accessible sortable list (drag-and-drop) appeared first on The GitHub Blog.

Strategies for achieving least privilege at scale – Part 2

Post Syndicated from Joshua Du Lac original https://aws.amazon.com/blogs/security/strategies-for-achieving-least-privilege-at-scale-part-2/

In this post, we continue with our recommendations for achieving least privilege at scale with AWS Identity and Access Management (IAM). In Part 1 of this two-part series, we described the first five of nine strategies for implementing least privilege in IAM at scale. We also looked at a few mental models that can assist you to scale your approach. In this post, Part 2, we’ll continue to look at the remaining four strategies and related mental models for scaling least privilege across your organization.

6. Empower developers to author application policies

If you’re the only developer working in your cloud environment, then you naturally write your own IAM policies. However, a common trend we’ve seen within organizations that are scaling up their cloud usage is that a centralized security, identity, or cloud team administrator will step in to help developers write customized IAM policies on behalf of the development teams. This may be due to variety of reasons, including unfamiliarity with the policy language or a fear of creating potential security risk by granting excess privileges. Centralized creation of IAM policies might work well for a while, but as the team or business grows, this practice often becomes a bottleneck, as indicated in Figure 1.

Figure 1: Bottleneck in a centralized policy authoring process

Figure 1: Bottleneck in a centralized policy authoring process

This mental model is known as the theory of constraints. With this model in mind, you should be keen to search for constraints, or bottlenecks, faced by your team or organization, identify the root cause, and solve for the constraint. That might sound obvious, but when you’re moving at a fast pace, the constraint might not appear until agility is already impaired. As your organization grows, a process that worked years ago might no longer be effective today.

A software developer generally understands the intent of the applications they build, and to some extent the permissions required. At the same time, the centralized cloud, identity, or security teams tend to feel they are the experts at safely authoring policies, but lack a deep knowledge of the application’s code. The goal here is to enable developers to write the policies in order to mitigate bottlenecks.

The question is, how do you equip developers with the right tools and skills to confidently and safely create the required policies for their applications? A simple way to start is by investing in training. AWS offers a variety of formal training options and ramp-up guides that can help your team gain a deeper understanding of AWS services, including IAM. However, even self-hosting a small hackathon or workshop session in your organization can drive improved outcomes. Consider the following four workshops as simple options for self-hosting a learning series with your teams.

As a next step, you can help your teams along the way by setting up processes that foster collaboration and improve quality. For example, peer reviews are highly recommended, and we’ll cover this later. Additionally, administrators can use AWS native tools such as permissions boundaries and IAM Access Analyzer policy generation to help your developers begin to author their own policies more safely.

Let’s look at permissions boundaries first. An IAM permissions boundary should generally be used to delegate the responsibility of policy creation to your development team. You can set up the developer’s IAM role so that they can create new roles only if the new role has a specific permissions boundary attached to it, and that permissions boundary allows you (as an administrator) to set the maximum permissions that can be granted by the developer. This restriction is implemented by a condition on the developer’s identity-based policy, requiring that specific actions—such as iam:CreateRole or iam:CreatePolicy—are allowed only if a specified permissions boundary is attached.

In this way, when a developer creates an IAM role or policy to grant an application some set of required permissions, they are required to add the specified permissions boundary that will “bound” the maximum permissions available to that application. So even if the policy that the developer creates—such as for their AWS Lambda function—is not sufficiently fine-grained, the permissions boundary helps the organization’s cloud administrators make sure that the Lambda function’s policy is not greater than a maximum set of predefined permissions. So with permissions boundaries, your development team can be allowed to create new roles and policies (with constraints) without administrators creating a manual bottleneck.

Another tool developers can use is IAM Access Analyzer policy generation. IAM Access Analyzer reviews your CloudTrail logs and autogenerates an IAM policy based on your access activity over a specified time range. This greatly simplifies the process of writing granular IAM policies that allow end users access to AWS services.

A classic use case for IAM Access Analyzer policy generation is to generate an IAM policy within the test environment. This provides a good starting point to help identify the needed permissions and refine your policy for the production environment. For example, IAM Access Analyzer can’t identify the production resources used, so it adds resource placeholders for you to modify and add the specific Amazon Resource Names (ARNs) your application team needs. However, not every policy needs to be customized, and the next strategy will focus on reusing some policies.

7. Maintain well-written policies

Strategies seven and eight focus on processes. The first process we’ll focus on is to maintain well-written policies. To begin, not every policy needs to be a work of art. There is some wisdom in reusing well-written policies across your accounts, because that can be an effective way to scale permissions management. There are three steps to approach this task:

  1. Identify your use cases
  2. Create policy templates
  3. Maintain repositories of policy templates

For example, if you were new to AWS and using a new account, we would recommend that you use AWS managed policies as a reference to get started. However, the permissions in these policies might not fit how you intend to use the cloud as time progresses. Eventually, you would want to identify the repetitive or common use cases in your own accounts and create common policies or templates for those situations.

When creating templates, you must understand who or what the template is for. One thing to note here is that the developer’s needs tend to be different from the application’s needs. When a developer is working with resources in your accounts, they often need to create or delete resources—for example, creating and deleting Amazon Simple Storage Service (Amazon S3) buckets for the application to use.

Conversely, a software application generally needs to read or write data—in this example, to read and write objects to the S3 bucket that was created by the developer. Notice that the developer’s permissions needs (to create the bucket) are different than the application’s needs (reading objects in the bucket). Because these are different access patterns, you’ll need to create different policy templates tailored to the different use cases and entities.

Figure 2 highlights this issue further. Out of the set of all possible AWS services and API actions, there are a set of permissions that are relevant for your developers (or more likely, their DevOps build and delivery tools) and there’s a set of permissions that are relevant for the software applications that they are building. Those two sets may have some overlap, but they are not identical.

Figure 2: Visualizing intersecting sets of permissions by use case

Figure 2: Visualizing intersecting sets of permissions by use case

When discussing policy reuse, you’re likely already thinking about common policies in your accounts, such as default federation permissions for team members or automation that runs routine security audits across multiple accounts in your organization. Many of these policies could be considered default policies that are common across your accounts and generally do not vary. Likewise, permissions boundary policies (which we discussed earlier) can have commonality across accounts with low amounts of variation. There’s value in reusing both of these sets of policies. However, reusing policies too broadly could cause challenges if variation is needed—to make a change to a “reusable policy,” you would have to modify every instance of that policy, even if it’s only needed by one application.

You might find that you have relatively common resource policies that multiple teams need (such as an S3 bucket policy), but with slight variations. This is where you might find it useful to create a repeatable template that abides by your organization’s security policies, and make it available for your teams to copy. We call it a template here, because the teams might need to change a few elements, such as the Principals that they authorize to access the resource. The policies for the applications (such as the policy a developer creates to attach to an Amazon Elastic Compute Cloud (Amazon EC2) instance role) are generally more bespoke or customized and might not be appropriate in a template.

Figure 3 illustrates that some policies have low amounts of variation while others are more bespoke.

Figure 3: Identifying bespoke versus common policy types

Figure 3: Identifying bespoke versus common policy types

Regardless of whether you choose to reuse a policy or turn it into a template, an important step is to store these reusable policies and templates securely in a repository (in this case, AWS CodeCommit). Many customers use infrastructure-as-code modules to make it simple for development teams to input their customizations and generate IAM policies that fit their security policies in a programmatic way. Some customers document these policies and templates directly in the repository while others use internal wikis accompanied with other relevant information. You’ll need to decide which process works best for your organization. Whatever mechanism you choose, make it accessible and searchable by your teams.

8. Peer review and validate policies

We mentioned in Part 1 that least privilege is a journey and having a feedback loop is a critical part. You can implement feedback through human review, or you can automate the review and validate the findings. This is equally as important for the core default policies as it is for the customized, bespoke policies.

Let’s start with some automated tools you can use. One great tool that we recommend is using AWS IAM Access Analyzer policy validation and custom policy checks. Policy validation helps you while you’re authoring your policy to set secure and functional policies. The feature is available through APIs and the AWS Management Console. IAM Access Analyzer validates your policy against IAM policy grammar and AWS best practices. You can view policy validation check findings that include security warnings, errors, general warnings, and suggestions for your policy.

Let’s review some of the finding categories.

Finding type Description
Security Includes warnings if your policy allows access that AWS considers a security risk because the access is overly permissive.
Errors Includes errors if your policy includes lines that prevent the policy from functioning.
Warning Includes warnings if your policy doesn’t conform to best practices, but the issues are not security risks.
Suggestions Includes suggestions if AWS recommends improvements that don’t impact the permissions of the policy.

Custom policy checks are a new IAM Access Analyzer capability that helps security teams accurately and proactively identify critical permissions in their policies. You can use this to check against a reference policy (that is, determine if an updated policy grants new access compared to an existing version of the policy) or check against a list of IAM actions (that is, verify that specific IAM actions are not allowed by your policy). Custom policy checks use automated reasoning, a form of static analysis, to provide a higher level of security assurance in the cloud.

One technique that can help you with both peer reviews and automation is the use of infrastructure-as-code. By this, we mean you can write and deploy your IAM policies as AWS CloudFormation templates (CFTs) or AWS Cloud Development Kit (AWS CDK) applications. You can use a software version control system with your templates so that you know exactly what changes were made, and then test and deploy your default policies across multiple accounts, such as by using AWS CloudFormation StackSets.

In Figure 4, you’ll see a typical development workflow. This is a simplified version of a CI/CD pipeline with three stages: a commit stage, a validation stage, and a deploy stage. In the diagram, the developer’s code (including IAM policies) is checked across multiple steps.

Figure 4: A pipeline with a policy validation step

Figure 4: A pipeline with a policy validation step

In the commit stage, if your developers are authoring policies, you can quickly incorporate peer reviews at the time they commit to the source code, and this creates some accountability within a team to author least privilege policies. Additionally, you can use automation by introducing IAM Access Analyzer policy validation in a validation stage, so that the work can only proceed if there are no security findings detected. To learn more about how to deploy this architecture in your accounts, see this blog post. For a Terraform version of this process, we encourage you to check out this GitHub repository.

9. Remove excess privileges over time

Our final strategy focuses on existing permissions and how to remove excess privileges over time. You can determine which privileges are excessive by analyzing the data on which permissions are granted and determining what’s used and what’s not used. Even if you’re developing new policies, you might later discover that some permissions that you enabled were unused, and you can remove that access later. This means that you don’t have to be 100% perfect when you create a policy today, but can rather improve your policies over time. To help with this, we’ll quickly review three recommendations:

  1. Restrict unused permissions by using service control policies (SCPs)
  2. Remove unused identities
  3. Remove unused services and actions from policies

First, as discussed in Part 1 of this series, SCPs are a broad guardrail type of control that can deny permissions across your AWS Organizations organization, a set of your AWS accounts, or a single account. You can start by identifying services that are not used by your teams, despite being allowed by these SCPs. You might also want to identify services that your organization doesn’t intend to use. In those cases, you might consider restricting that access, so that you retain access only to the services that are actually required in your accounts. If you’re interested in doing this, we’d recommend that you review the Refining permissions in AWS using last accessed information topic in the IAM documentation to get started.

Second, you can focus your attention more narrowly to identify unused IAM roles, unused access keys for IAM users, and unused passwords for IAM users either at an account-specific level or the organization-wide level. To do this, you can use IAM Access Analyzer’s Unused Access Analyzer capability.

Third, the same Unused Access Analyzer capability also enables you to go a step further to identify permissions that are granted but not actually used, with the goal of removing unused permissions. IAM Access Analyzer creates findings for the unused permissions. If the granted access is required and intentional, then you can archive the finding and create an archive rule to automatically archive similar findings. However, if the granted access is not required, you can modify or remove the policy that grants the unintended access. The following screenshot shows an example of the dashboard for IAM Access Analyzer’s unused access findings.

Figure 5: Screenshot of IAM Access Analyzer dashboard

Figure 5: Screenshot of IAM Access Analyzer dashboard

When we talk to customers, we often hear that the principle of least privilege is great in principle, but they would rather focus on having just enough privilege. One mental model that’s relevant here is the 80/20 rule (also known as the Pareto principle), which states that 80% of your outcome comes from 20% of your input (or effort). The flip side is that the remaining 20% of outcome will require 80% of the effort—which means that there are diminishing returns for additional effort. Figure 6 shows how the Pareto principle relates to the concept of least privilege, on a scale from maximum privilege to perfect least privilege.

Figure 6: Applying the Pareto principle (80/20 rule) to the concept of least privilege

Figure 6: Applying the Pareto principle (80/20 rule) to the concept of least privilege

The application of the 80/20 rule to permissions management—such as refining existing permissions—is to identify what your acceptable risk threshold is and to recognize that as you perform additional effort to eliminate that risk, you might produce only diminishing returns. However, in pursuit of least privilege, you’ll still want to work toward that remaining 20%, while being pragmatic about the remainder of the effort.

Remember that least privilege is a journey. Two ways to be pragmatic along this journey are to use feedback loops as you refine your permissions, and to prioritize. For example, focus on what is sensitive to your accounts and your team. Restrict access to production identities first before moving to environments with less risk, such as development or testing. Prioritize reviewing permissions for roles or resources that enable external, cross-account access before moving to the roles that are used in less sensitive areas. Then move on to the next priority for your organization.

Conclusion

Thank you for taking the time to read this two-part series. In these two blog posts, we described nine strategies for implementing least privilege in IAM at scale. Across these nine strategies, we introduced some mental models, tools, and capabilities that can assist you to scale your approach. Let’s consider some of the key takeaways that you can use in your journey of setting, verifying, and refining permissions.

Cloud administrators and developers will set permissions, and can use identity-based policies or resource-based policies to grant access. Administrators can also use multiple accounts as boundaries, and set additional guardrails by using service control policies, permissions boundaries, block public access, VPC endpoint policies, and data perimeters. When cloud administrators or developers create new policies, they can use IAM Access Analyzer’s policy generation capability to generate new policies to grant permissions.

Cloud administrators and developers will then verify permissions. For this task, they can use both IAM Access Analyzer’s policy validation and peer review to determine if the permissions that were set have issues or security risks. These tools can be leveraged in a CI/CD pipeline too, before the permissions are set. IAM Access Analyzer’s custom policy checks can be used to detect nonconformant updates to policies.

To both verify existing permissions and refine permissions over time, cloud administrators and developers can use IAM Access Analyzer’s external access analyzers to identify resources that were shared with external entities. They can also use either IAM Access Advisor’s last accessed information or IAM Access Analyzer’s unused access analyzer to find unused access. In short, if you’re looking for a next step to streamline your journey toward least privilege, be sure to check out IAM Access Analyzer.

 
If you have feedback about this post, submit comments in the Comments section below. If you have questions about this post, contact AWS Support.

Author photo

Josh Du Lac
Josh leads Security & Networking Solutions Architecture at AWS. He and his team advise hundreds of startup, enterprise, and global organizations how to accelerate their journey to the cloud while improving their security along the way. Josh holds a Masters in Cybersecurity and an MBA. Outside of work, Josh enjoys searching for the best tacos in Texas and practicing his handstands.

Emeka Enekwizu

Emeka Enekwizu
Emeka is a Senior Solutions Architect at AWS. He is dedicated to assisting customers through every phase of their cloud adoption and enjoys unpacking security concepts into practical nuggets. Emeka holds CISSP and CCSP certifications and loves playing soccer in his spare time.

Strategies for achieving least privilege at scale – Part 1

Post Syndicated from Joshua Du Lac original https://aws.amazon.com/blogs/security/strategies-for-achieving-least-privilege-at-scale-part-1/

Least privilege is an important security topic for Amazon Web Services (AWS) customers. In previous blog posts, we’ve provided tactical advice on how to write least privilege policies, which we would encourage you to review. You might feel comfortable writing a few least privilege policies for yourself, but to scale this up to thousands of developers or hundreds of AWS accounts requires strategy to minimize the total effort needed across an organization.

At re:Inforce 2022, we recommended nine strategies for achieving least privilege at scale. Although the strategies we recommend remain the same, this blog series serves as an update, with a deeper discussion of some of the strategies. In this series, we focus only on AWS Identity and Access Management (IAM), not application or infrastructure identities. We’ll review least privilege in AWS, then dive into each of the nine strategies, and finally review some key takeaways. This blog post, Part 1, covers the first five strategies, while Part 2 of the series covers the remaining four.

Overview of least privilege

The principle of least privilege refers to the concept that you should grant users and systems the narrowest set of privileges needed to complete required tasks. This is the ideal, but it’s not so simple when change is constant—your staff or users change, systems change, and new technologies become available. AWS is continually adding new services or features, and individuals on your team might want to adopt them. If the policies assigned to those users were perfectly least privilege, then you would need to update permissions constantly as the users ask for more or different access. For many, applying the narrowest set of permissions could be too restrictive. The irony is that perfect least privilege can cause maximum effort.

We want to find a more pragmatic approach. To start, you should first recognize that there is some tension between two competing goals—between things you don’t want and things you do want, as indicated in Figure 1. For example, you don’t want expensive resources created, but you do want freedom for your builders to choose their own resources.

Figure 1: Tension between two competing goals

Figure 1: Tension between two competing goals

There’s a natural tension between competing goals when you’re thinking about least privilege, and you have a number of controls that you can adjust to securely enable agility. I’ve spoken with hundreds of customers about this topic, and many focus primarily on writing near-perfect permission policies assigned to their builders or machines, attempting to brute force their way to least privilege.

However, that approach isn’t very effective. So where should you start? To answer this, we’re going to break this question down into three components: strategies, tools, and mental models. The first two may be clear to you, but you might be wondering, “What is a mental model”? Mental models help us conceptualize something complex as something relatively simpler, though naturally this leaves some information out of the simpler model.

Teams

Teams generally differ based on the size of the organization. We recognize that each customer is unique, and that customer needs vary across enterprises, government agencies, startups, and so on. If you feel the following example descriptions don’t apply to you today, or that your organization is too small for this many teams to co-exist, then keep in mind that the scenarios might be more applicable in the future as your organization continues to grow. Before we can consider least privilege, let’s consider some common scenarios.

Customers who operate in the cloud tend to have teams that fall into one of two categories: decentralized and centralized. Decentralized teams might be developers or groups of developers, operators, or contractors working in your cloud environment. Centralized teams often consist of administrators. Examples include a cloud environment team, an infrastructure team, the security team, the network team, or the identity team.

Scenarios

To achieve least privilege in an organization effectively, teams must collaborate. Let’s consider three common scenarios:

  1. Creating default roles and policies (for teams and monitoring)
  2. Creating roles and policies for applications
  3. Verifying and refining existing permissions

The first scenario focuses on the baseline set of roles and permissions that are necessary to start using AWS. Centralized teams (such as a cloud environmentteam or identity and access management team) commonly create these initial default roles and policies that you deploy by using your account factory, IAM Identity Center, or through AWS Control Tower. These default permissions typically enable federation for builders or enable some automation, such as tools for monitoring or deployments.

The second scenario is to create roles and policies for applications. After foundational access and permissions are established, the next step is for your builders to use the cloud to build. Decentralized teams (software developers, operators, or contractors) use the roles and policies from the first scenario to then create systems, software, or applications that need their own permissions to perform useful functions. These teams often need to create new roles and policies for their software to interact with databases, Amazon Simple Storage Service (Amazon S3), Amazon Simple Queue Service (Amazon SQS) queues, and other resources.

Lastly, the third scenario is to verify and refine existing permissions, a task that both sets of teams should be responsible for.

Journeys

At AWS, we often say that least privilege is a journey, because change is a constant. Your builders may change, systems may change, you may swap which services you use, and the services you use may add new features that your teams want to adopt, in order to enable faster or more efficient ways of working. Therefore, what you consider least privilege today may be considered insufficient by your users tomorrow.

This journey is made up of a lifecycle of setting, verifying, and refining permissions. Cloud administrators and developers will set permissions, they will then verify permissions, and then they refine those permissions over time, and the cycle repeats as illustrated in Figure 2. This produces feedback loops of continuous improvement, which add up to the journey to least privilege.

Figure 2: Least privilege is a journey

Figure 2: Least privilege is a journey

Strategies for implementing least privilege

The following sections will dive into nine strategies for implementing least privilege at scale:

Part 1 (this post):

  1. (Plan) Begin with coarse-grained controls
  2. (Plan) Use accounts as strong boundaries around resources
  3. (Plan) Prioritize short-term credentials
  4. (Policy) Enforce broad security invariants
  5. (Policy) Identify the right tool for the job

Part 2:

  1. (Policy) Empower developers to author application policies
  2. (Process) Maintain well-written policies
  3. (Process) Peer-review and validate policies
  4. (Process) Remove excess privileges over time

To provide some logical structure, the strategies can be grouped into three categories—plan, policy, and process. Plan is where you consider your goals and the outcomes that you want to achieve and then design your cloud environment to simplify those outcomes. Policy focuses on the fact that you will need to implement some of those goals in either the IAM policy language or as code (such as infrastructure-as-code). The Process category will look at an iterative approach to continuous improvement. Let’s begin.

1. Begin with coarse-grained controls

Most systems have relationships, and these relationships can be visualized. For example, AWS accounts relationships can be visualized as a hierarchy, with an organization’s management account and groups of AWS accounts within that hierarchy, and principals and policies within those accounts, as shown in Figure 3.

Figure 3: Icicle diagram representing an account hierarchy

Figure 3: Icicle diagram representing an account hierarchy

When discussing least privilege, it’s tempting to put excessive focus on the policies at the bottom of the hierarchy, but you should reverse that thinking if you want to implement least privilege at scale. Instead, this strategy focuses on coarse-grained controls, which refer to a top-level, broader set of controls. Examples of these broad controls include multi-account strategy, service control policies, blocking public access, and data perimeters.

Before you implement coarse-grained controls, you must consider which controls will achieve the outcomes you desire. After the relevant coarse-grained controls are in place, you can tailor the permissions down the hierarchy by using more fine-grained controls along the way. The next strategy reviews the first coarse-grained control we recommend.

2. Use accounts as strong boundaries around resources

Although you can start with a single AWS account, we encourage customers to adopt a multi-account strategy. As customers continue to use the cloud, they often need explicit security boundaries, the ability to control limits, and billing separation. The isolation designed into an AWS account can help you meet these needs.

Customers can group individual accounts into different assortments (organizational units) by using AWS Organizations. Some customers might choose to align this grouping by environment (for example: Dev, Pre-Production, Test, Production) or by business units, cost center, or some other option. You can choose how you want to construct your organization, and AWS has provided prescriptive guidance to assist customers when they adopt a multi-account strategy.

Similarly, you can use this approach for grouping security controls. As you layer in preventative or detective controls, you can choose which groups of accounts to apply them to. When you think of how to group these accounts, consider where you want to apply your security controls that could affect permissions.

AWS accounts give you strong boundaries between accounts (and the entities that exist in those accounts). As shown in Figure 4, by default these principals and resources cannot cross their account boundary (represented by the red dotted line on the left).

Figure 4: Account hierarchy and account boundaries

Figure 4: Account hierarchy and account boundaries

In order for these accounts to communicate with each other, you need to explicitly enable access by adding narrow permissions. For use cases such as cross-account resource sharing, or cross-VPC networking, or cross-account role assumptions, you would need to explicitly enable the required access by creating the necessary permissions. Then you could review those permissions by using IAM Access Analyzer.

One type of analyzer within IAM Access Analyzer, external access, helps you identify resources (such as S3 buckets, IAM roles, SQS queues, and more) in your organization or accounts that are shared with an external entity. This helps you identify if there’s potential for unintended access that could be a security risk to your organization. Although you could use IAM Access Analyzer (external access) with a single account, we recommend using it at the organization level. You can configure an access analyzer for your entire organization by setting the organization as the zone of trust, to identify access allowed from outside your organization.

To get started, you create the analyzer and it begins analyzing permissions. The analysis may produce findings, which you can review for intended and unintended access. You can archive the intended access findings, but you’ll want to act quickly on the unintended access to mitigate security risks.

In summary, you should use accounts as strong boundaries around resources, and use IAM Access Analyzer to help validate your assumptions and find unintended access permissions in an automated way across the account boundaries.

3. Prioritize short-term credentials

When it comes to access control, shorter is better. Compared to long-term access keys or passwords that could be stored in plaintext or mistakenly shared, a short-term credential is requested dynamically by using strong identities. Because the credentials are being requested dynamically, they are temporary and automatically expire. Therefore, you don’t have to explicitly revoke or rotate the credentials, nor embed them within your application.

In the context of IAM, when we’re discussing short-term credentials, we’re effectively talking about IAM roles. We can split the applicable use cases of short-term credentials into two categories—short-term credentials for builders and short-term credentials for applications.

Builders (human users) typically interact with the AWS Cloud in one of two ways; either through the AWS Management Console or programmatically through the AWS CLI. For console access, you can use direct federation from your identity provider to individual AWS accounts or something more centralized through IAM Identity Center. For programmatic builder access, you can get short-term credentials into your AWS account through IAM Identity Center using the AWS CLI.

Applications created by builders need their own permissions, too. Typically, when we consider short-term credentials for applications, we’re thinking of capabilities such as IAM roles for Amazon Elastic Compute Cloud (Amazon EC2), IAM roles for Amazon Elastic Container Service (Amazon ECS) tasks, or AWS Lambda execution roles. You can also use IAM Roles Anywhere to obtain temporary security credentials for workloads and applications that run outside of AWS. Use cases that require cross-account access can also use IAM roles for granting short-term credentials.

However, organizations might still have long-term secrets, like database credentials, that need to be stored somewhere. You can store these secrets with AWS Secrets Manager, which will encrypt the secret by using an AWS KMS encryption key. Further, you can configure automatic rotation of that secret to help reduce the risk of those long-term secrets.

4. Enforce broad security invariants

Security invariants are essentially conditions that should always be true. For example, let’s assume an organization has identified some core security conditions that they want enforced:

  1. Block access for the AWS account root user
  2. Disable access to unused AWS Regions
  3. Prevent the disabling of AWS logging and monitoring services (AWS CloudTrail or Amazon CloudWatch)

You can enable these conditions by using service control policies (SCPs) at the organization level for groups of accounts using an organizational unit (OU), or for individual member accounts.

Notice these words—block, disable, and prevent. If you’re considering these actions in the context of all users or all principals except for the administrators, that’s where you’ll begin to implement broad security invariants, generally by using service control policies. However, a common challenge for customers is identifying what conditions to apply and the scope. This depends on what services you use, the size of your organization, the number of teams you have, and how your organization uses the AWS Cloud.

Some actions have inherently greater risk, while others may have nominal risk or are more easily reversible. One mental model that has helped customers to consider these issues is an XY graph, as illustrated in the example in Figure 5.

Figure 5: Using an XY graph for analyzing potential risk versus frequency of use

Figure 5: Using an XY graph for analyzing potential risk versus frequency of use

The X-axis in this graph represents the potential risk associated with using a service functionality within a particular account or environment, while the Y-axis represents the frequency of use of that service functionality. In this representative example, the top-left part of the graph covers actions that occur frequently and are relatively safe—for example, read-only actions.

The functionality in the bottom-right section is where you want to focus your time. Consider this for yourself—if you were to create a similar graph for your environment—what are the actions you would consider to be high-risk, with an expected low or rare usage within your environment? For example, if you enable CloudTrail for logging, you want to make sure that someone doesn’t invoke the CloudTrail StopLogging API operation or delete the CloudTrail logs. Another high-risk, low-usage example could include restricting AWS Direct Connect or network configuration changes to only your network administrators.

Over time, you can use the mental model of the XY graph to decide when to use preventative guardrails for actions that should never happen, versus conditional or alternative guardrails for situational use cases. You could also move from preventative to detective security controls, while accounting for factors such as the user persona and the environment type (production, development, or testing). Finally, you could consider doing this exercise broadly at the service level before thinking of it in a more fine-grained way, feature-by-feature.

However, not all controls need to be custom to your organization. To get started quickly, here are some examples of documented SCPs as well as AWS Control Tower guardrail references. You can adopt those or tailor them to fit your environment as needed.

5. Identify the right tools for the job

You can think of IAM as a toolbox that offers many tools that provide different types of value. We can group these tools into two broad categories: guardrails and grants.

Guardrails are the set of tools that help you restrict or deny access to your accounts. At a high level, they help you figure out the boundary for the set of permissions that you want to retain. SCPs are a great example of guardrails, because they enable you to restrict the scope of actions that principals in your account or your organization can take. Permissions boundaries are another great example, because they enable you to safely delegate the creation of new principals (roles or users) and permissions by setting maximum permissions on the new identity.

Although guardrails help you restrict access, they don’t inherently grant any permissions. To grant permissions, you use either an identity-based policy or resource-based policy. Identity policies are attached to principals (roles or users), while resource-based policies are applied to specific resources, such as an S3 bucket.

A common question is how to decide when to use an identity policy versus a resource policy to grant permissions. IAM, in a nutshell, seeks to answer the question: who can access what? Can you spot the nuance in the following policy examples?

Policies attached to principals

{
      "Effect": "Allow",
      "Action": "x",
      "Resource": "y",
      "Condition": "z"
    }

Policies attached to resources

{
      "Effect": "Allow",
      "Principal": "w",
      "Action": "x",
      "Resource": "y",
      "Condition": "z"
    }

You likely noticed the difference here is that with identity-based (principal) policies, the principal is implicit (that is, the principal of the policy is the entity to which the policy is applied), while in a resource-based policy, the principal must be explicit (that is, the principal has to be specified in the policy). A resource-based policy can enable cross-account access to resources (or even make a resource effectively public), but the identity-based policies likewise need to allow the access to that cross-account resource. Identity-based policies with sufficient permissions can then access resources that are “shared.” In essence, both the principal and the resource need to be granted sufficient permissions.

When thinking about grants, you can address the “who” angle by focusing on the identity-based policies, or the “what” angle by focusing on resource-based policies. For additional reading on this topic, see this blog post. For information about how guardrails and grants are evaluated, review the policy evaluation logic documentation.

Lastly, if you’d like a detailed walkthrough on choosing the right tool for the job, we encourage you to read the IAM policy types: How and when to use them blog post.

Conclusion

This blog post walked through the first five (of nine) strategies for achieving least privilege at scale. For the remaining four strategies, see Part 2 of this series.

 
If you have feedback about this post, submit comments in the Comments section below. If you have questions about this post, contact AWS Support.

Author photo

Josh Du Lac
Josh leads Security & Networking Solutions Architecture at AWS. He and his team advise hundreds of startup, enterprise, and global organizations how to accelerate their journey to the cloud while improving their security along the way. Josh holds a Masters in Cybersecurity and an MBA. Outside of work, Josh enjoys searching for the best tacos in Texas and practicing his handstands.

Emeka Enekwizu

Emeka Enekwizu
Emeka is a Senior Solutions Architect at AWS. He is dedicated to assisting customers through every phase of their cloud adoption and enjoys unpacking security concepts into practical nuggets. Emeka holds CISSP and CCSP certifications and loves playing soccer in his spare time.