The world’s leading venture capitalist firms commit $1.25 BILLION to back startups built on Cloudflare Workers

Post Syndicated from Mia Wang original https://blog.cloudflare.com/workers-launchpad/

The world’s leading venture capitalist firms commit $1.25 BILLION to back startups built on Cloudflare Workers

The world’s leading venture capitalist firms commit $1.25 BILLION to back startups built on Cloudflare Workers

From our earliest days, Cloudflare has stood for helping build a better Internet that’s accessible to all. It’s core to our mission that anyone who wants to start building on the Internet should be able to do so easily, and without the barriers of prohibitively expensive or difficult to use infrastructure.

Nowhere is this philosophy more important – and more impactful to the Internet – than with our developer platform, Cloudflare Workers. Workers is, quite simply, where developers and entrepreneurs start on Day 1. It’s a full developer platform that includes cloud storage; website hosting; SQL databases; and of course, the industry’s leading serverless product. The platform’s ease-of-use and accessible pricing (all the way down to free) are critical in advancing our mission. For startups, this translates into fast, easy deployment and iteration, that scales seamlessly with predictable, transparent and cost-effective pricing. Building a great business from scratch is hard enough – we ought to know! – and so we’re aiming to take all the complexity out of your application infrastructure.

Announcing the Workers Launchpad funding program

Today, we’re taking things a step further and making it easier for startups to build the business of their dreams. We’re announcing a $1.25 billion Workers Launchpad funding program in partnership with some of the world’s leading venture capital firms. Any startup built on Workers can apply. As is the case with the Workers Platform itself, we’ve tried to make applying dead simple: it should take you less than five minutes to submit your application through the Workers Launchpad portal.

How does it work? The only requirement for being eligible for the funding program is that you’ve built your core infrastructure on Workers. If you’re new to Cloudflare and Cloudflare Workers, check out our Startup Plan to get started. We hope these resources will be helpful to all startups and help level the playing field, no matter where in the world you might be.

Once you submit your application, it will be reviewed by our Launchpad team, several of whom are former entrepreneurs and venture capital folks themselves. They’ll match promising applicants with our VC partners who have the most expertise in your space (more on them below). Every quarter, we’ll announce the winners of our Launchpad program. Winners, our “Workers Founders”, will be guaranteed the opportunity to pitch the VC partner(s) that we’ve determined would be a good match for your business. It’s a win-win all around. VCs get the opportunity to invest in businesses they know are being built on a forward-looking, world-class, development platform. Entrepreneurs get connected to world-class VCs. And for the first class of winners, we’ll have a few added perks that we describe in more detail below.

Who are the VCs that you might get a chance to pitch to?

When we approached our friends in the venture community with our vision for the Workers Launchpad, we received incredibly positive feedback and excitement. Many have seen firsthand the competitive advantages of building on Workers through their own portfolio companies. Moreover, Cloudflare is home to one of the largest developer communities on Earth with approximately 20% of the world’s websites on our network. As such, we can play a unique role in matching great entrepreneurs with great VCs to further not only the Workers platform, but also the Internet ecosystem, for everyone.

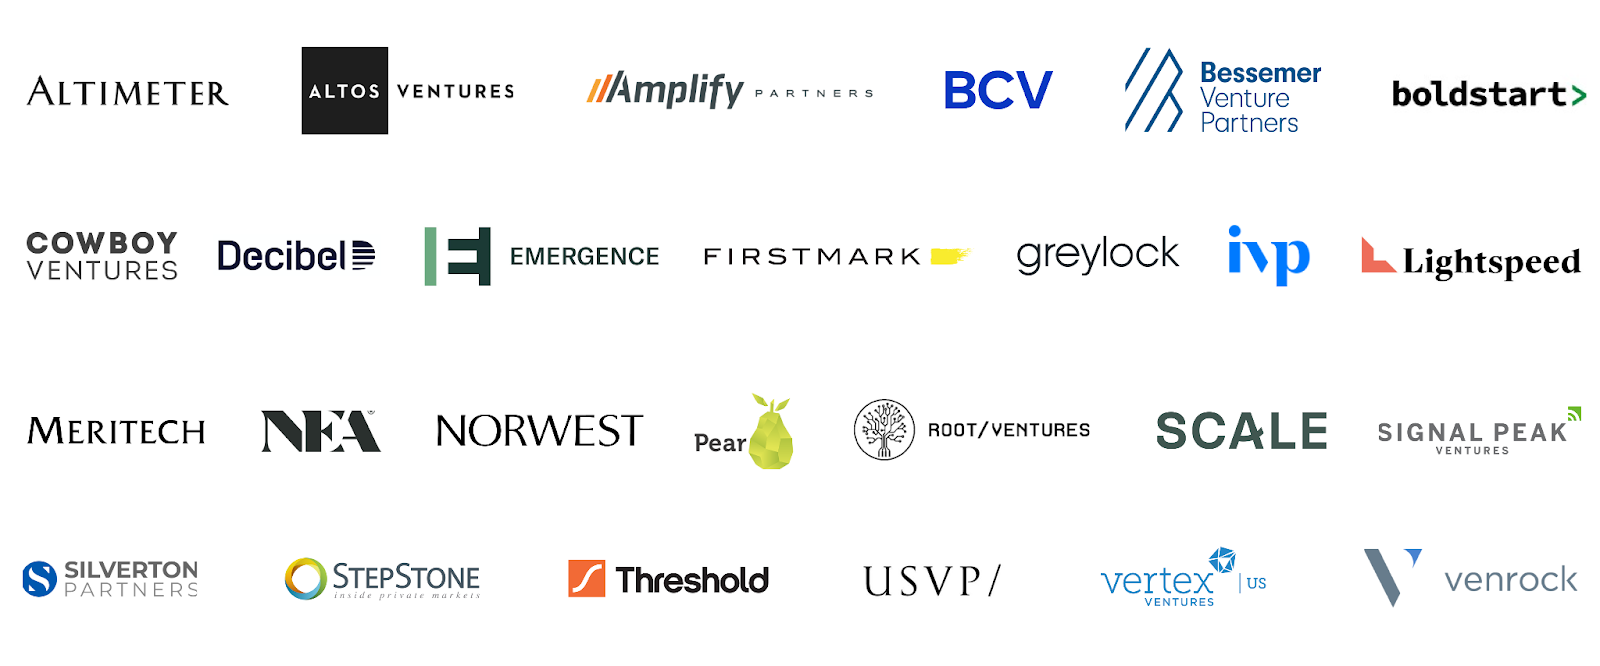
We’re honored to announce a world-class group of VC Launch Partners supporting this program and the ecosystem of Workers-based startups:

The world’s leading venture capitalist firms commit $1.25 BILLION to back startups built on Cloudflare Workers

More on why we’re doing this

So why are we doing this? The simple answer is we’re proud of our Workers Developer Platform and think that everyone should be using it. Entrepreneurs who develop on Workers can ship faster; more easily and cost-effectively; and in a way that future proofs your infrastructure:

Speed. Development velocity isn’t just a convenience for an entrepreneur. It’s a massive competitive advantage. In fact, development velocity is one of Cloudflare’s competitive advantages – we’re able to develop quickly because we build on Workers. When you develop on Workers, you don’t need to spend time configuring DNS records, maintaining certificates, scaling up clusters, or building complex deployment pipelines. Focus on developing your application, and Cloudflare will handle the rest.

Ease of use. Startup teams and founders are some of the busiest people on earth. You shouldn’t have to think about – or make complicated decisions about – IT infrastructure. Questions like: “Which availability zone should I choose?”, or “Will I be able to scale up my infrastructure in time for our next viral marketing campaign?” shouldn’t have to cross your mind! And on the Workers Platform, they don’t. The code you and your team writes automatically deploys quickly and consistently across Cloudflare’s global network in 275+ cities in over 100 countries. Cloudflare securely and scalably connects your users to your applications, regardless of where those applications are hosted or how many users suddenly sign up for your product. Developers can easily manage globally distributed applications with a programmable network that easily connects to whatever services they need to talk to.

Future-proofing your infrastructure and your wallet. Cloudflare’s massive global network – that’s distributed across 275+ cities in over 100 countries – is able to scale with your business, no matter how large it grows to become. We also help you remain compliant with local laws and regulations as you expand around the world, with capabilities like Workers’ Jurisdictional Restrictions for Durable Objects. You can sleep soundly at night instead of worrying about how to level up your infrastructure in the midst of shifting regulations, and equally importantly, knowing that you will not wake up to any surprise bills. Many of us have had the experience of being charged unexpected and / or exorbitant fees from our cloud providers. For example, providers will often make it easy and free to onboard your application or data, but charge exorbitant rates when you want to move them out (i.e. egress fees). Cloudflare will never charge for egress. Our pricing is simple, and we constantly aim to be the low-cost provider, no matter how large your business grows to be.

The world’s leading venture capitalist firms commit $1.25 BILLION to back startups built on Cloudflare Workers

Dogfooding our own product

We’re excited about Workers not only because we’ve built our own infrastructure on it, but also because we’re seeing the incredible things others have built on it. In fact, we acquired a company built entirely on Workers at the end of last year, an Isareli start-up named Zaraz, which secures and accelerates third party web tools. Workers allowed Zaraz to replace the multiple network requests of each tool running on a website with one single request, effectively streamlining a messy web of extensions into a single lightweight application. This acquisition opened our eyes to the power of the global community that’s built on our platform, and left us motivated to help startups built on Workers find the funding, mentorship, and support needed to grow.

But wait, there’s more!

To make it even easier for startups to take advantage of all the benefits that Workers has to offer, applicants to the Workers Launchpad program who have raised less than $3 million in total external funding will automatically have the option to receive Cloudflare’s Startup Plan. This plan includes all the elements of Cloudflare’s Pro and Business Plans ($2,400 annual value) plus higher tiers of our Stream video product, our Teams Zero Trust security suite and the Workers platform. To make sure the full range of our developer platform is accessible to startups, we recently more than tripled the number of products available in this plan, which now includes email security, R2, Pages, KV, and many others.

Furthermore, all startups that apply by October 31, 2022, will be eligible to be selected for the Winter 2022 class of Workers Founders, which will unlock additional support, mentorship, and marketing opportunities. Being selected as a Workers Founder will get you a chance to practice your pitch with investors, engage with leaders from Cloudflare, and get advice on how to build a successful business from topics like recruiting to marketing, sales, and beyond during a virtual Workers Founders Bootcamp Week. The program will culminate in a virtual Demo Day, so you can show the world what you’ve been building. We’re leaning in to help promising entrepreneurs join us in our mission to help build a better Internet.

Helping make the Internet better for all

Accessibility and ease of use are core to everything we do at Cloudflare. We will always make our products and platforms so easy to use that even the smallest business or hobbyist can easily use them. We hope the Workers Launchpad funding program encourages entrepreneurs from all around the world, and from all backgrounds, to start building on Workers, and makes it easier for you to find the funding you need to build the business of your dreams.

Head to the Workers Launchpad page to apply and join the Cloudflare Developer Discord to engage with the Workers community. If you’re a VC that is interested in supporting the program, reach out to [email protected].

Cloudflare is not providing any funding or making any funding decisions, and there is no guarantee that any particular company will receive funding through the program. All funding decisions will be made by the venture capital firms that participate in the program. Cloudflare is not a registered broker-dealer, investment adviser, or other similar intermediary.

Introducing workerd: the Open Source Workers runtime

Post Syndicated from Kenton Varda original https://blog.cloudflare.com/workerd-open-source-workers-runtime/

Introducing workerd: the Open Source Workers runtime

Introducing workerd: the Open Source Workers runtime

Today I’m proud to introduce the first beta release of workerd, the JavaScript/Wasm runtime based on the same code that powers Cloudflare Workers. workerd is Open Source under the Apache License version 2.0.

workerd shares most of its code with the runtime that powers Cloudflare Workers, but with some changes designed to make it more portable to other environments. The name “workerd” (pronounced “worker dee”) comes from the Unix tradition of naming servers with a “-d” suffix standing for “daemon”. The name is not capitalized because it is a program name, which are traditionally lower-case in Unix-like environments.

What it’s for

Self-hosting Workers

workerd can be used to self-host applications that you’d otherwise run on Cloudflare Workers. It is intended to be a production-ready web server for this purpose. workerd has been designed to be unopinionated about hosting environments, so that it should fit nicely into whatever server/VM/container hosting and orchestration system you prefer. It’s just a web server.

Workers has always been based on standardized APIs, so that code is not locked into Cloudflare, and we work closely with other runtimes to promote compatibility. workerd provides another option to ensure that applications built on Workers can run anywhere, by leveraging the same underlying code to get exact, “bug-for-bug” compatibility.

Local development and testing

workerd is also designed to facilitate realistic local testing of Workers. Up until now, this has been achieved using Miniflare, which simulated the Workers API within a Node.js environment. Miniflare has worked well, but in a number of cases its behavior did not exactly match Workers running on Cloudflare. With the release of workerd, Miniflare and the Wrangler CLI tool will now be able to provide a more accurate simulation by leveraging the same runtime code we use in production.

Programmable proxies

workerd can act as an application host, a proxy, or both. It supports both forward and reverse proxy modes. In all cases, JavaScript code can be used to intercept and process requests and responses before forwarding them on. Traditional web servers and proxies have used bespoke configuration languages with quirks that are hard to master. Programming proxies in JavaScript instead provides more power while making the configuration easier to write and understand.

What it is

workerd is not just another way to run JavaScript and Wasm. Our runtime is uniquely designed in a number of ways.

Server-first

Many non-browser JavaScript and Wasm runtimes are designed to be general-purpose: you can use them to build command-line apps, local GUI apps, servers, or anything in between. workerd is not. It specifically focuses on servers, in particular (for now, at least) HTTP servers.

This means in particular that workerd-based applications are event-driven at the top level. Applications do not open listen sockets and accept connections from them; instead, the runtime pushes events to the application. It may seem like a minor difference, but this basic change in perspective directly enables many of the features below.

Web standard APIs

Wherever possible, Workers (and workerd in particular) offers the same standard APIs found in web browsers, such as Fetch, URL, WebCrypto, and others. This means that code built on workerd is more likely to be portable to browsers as well as to other standards-based runtimes. When Workers launched five years ago, it was unusual for a non-browser to offer web APIs, but we are pleased to see that the broader JavaScript ecosystem is now converging on them.

Nanoservices

workerd is a nanoservice runtime. What does that mean?

Microservices have become popular over the last decade as a way to split monolithic servers into smaller components that could be maintained and deployed independently. For example, a company that offers several web applications with a common user authentication flow might have a separate team that maintains the authentication logic. In a monolithic model, the authentication logic might have been offered to the application teams as a library. However, this could be frustrating for the maintainers of that logic, as making any change might require waiting for every application team to deploy an update to their respective server. By splitting the authentication logic into a separate server that all the others talk to, the authentication team is able to deploy changes on their own schedule.

However, microservices have a cost. What was previously a fast library call instead now requires communicating over a network. In addition to added overhead, this communication requires configuration and administration to ensure security and reliability. These costs become greater as the codebase is split into more and more services. Eventually, the costs outweigh the benefits.

Nanoservices are a new model that achieve the benefits of independent deployment with overhead closer to that of library calls. With workerd, many Workers can be configured to run in the same process. Each Worker runs in a separate “isolate”, which gives the appearance of running independently of the others: each isolate loads separate code and has its own global scope. However, when one Worker explicitly sends a request to another Worker, the destination Worker actually runs in the same thread with zero latency. So, it performs more like a function call.

With nanoservices, teams can now break their code into many more independently-deployed pieces without worrying about the overhead.

(Some in the industry prefer to call nanoservices “functions”, implying that each individual function making up an application could be its own service. I feel, however, that this puts too much emphasis on syntax rather than logical functionality. That said, it is the same concept.)

To really make nanoservices work well, we had to minimize the baseline overhead of each service. This required designing workerd very differently from most other runtimes, so that common resources could be shared between services as much as possible. First, as mentioned, we run many nanoservices within a single process, to share basic process overhead and minimize context switching costs. A second big architectural difference between workerd and other runtimes is how it handles built-in APIs. Many runtimes implement significant portions of their built-in APIs in JavaScript, which must then be loaded separately into each isolate. workerd does not; all the APIs are implemented in native code, so that all isolates may share the same copy of that code. These design choices would be difficult to retrofit into another runtime, and indeed these needs are exactly why we chose to build a custom runtime for Workers from the start.

Homogeneous deployment

In a typical microservices model, you might deploy different microservices to containers running across a cluster of machines, connected over a local network. You might manually choose how many containers to dedicate to each service, or you might configure some form of auto-scaling based on resource usage.

workerd offers an alternative model: Every machine runs every service.

workerd’s nanoservices are much lighter-weight than typical containers. As a result, it’s entirely reasonable to run a very large number of them – hundreds, maybe thousands – on a single server. This in turn means that you can simply deploy every service to every machine in your fleet.

Homogeneous deployment means that you don’t have to worry about scaling individual services. Instead, you can simply load balance requests across the entire cluster, and scale the cluster as needed. Overall, this can greatly reduce the amount of administration work needed.

Cloudflare itself has used the homogeneous model on our network since the beginning. Every one of Cloudflare’s edge servers runs our entire software stack, so any server can answer any kind of request on its own. We’ve found it works incredibly well. This is why services on Cloudflare – including ones that use Workers – are able to go from no traffic at all to millions of requests per second instantly without trouble.

Capability bindings: cleaner configuration and SSRF safety

workerd takes a different approach to most runtimes – indeed, to most software development platforms – in how an application accesses external resources.

Most development platforms start from assuming that the application can talk to the whole world. It is up to the application to figure out exactly what it wants to talk to, and name it in some global namespace, such as using a URL. So, an application server that wants to talk to the authentication microservice might use code like this:

// Traditional approach without capability bindings.
fetch("https://auth-service.internal-network.example.com/api", {
  method: "POST",
  body: JSON.stringify(authRequest),
  headers: { "Authorization": env.AUTH_SERVICE_TOKEN }
});

In workerd, we do things differently. An application starts out with no ability to talk to the rest of the world, and must be configured with specific capability bindings that provide it access to specific external resources. So, an application which needs to be able to talk to the authentication service would be configured with a binding called authService, and the code would look something like this:

// Capability-based approach. Hostname doesn't matter; all
// requests to AUTH_SERVICE.fetch() go to the auth service.
env.AUTH_SERVICE.fetch("https://auth/api", {
 method: "POST",
 body: JSON.stringify(authRequest),
});

This may at first appear to be a trivial difference. In both cases, we have to use configuration to control access to external services. In the traditional approach, we’d provide access tokens (and probably the service’s hostname) as environment variables. In the new approach, the environment goes a bit further to provide a full-fledged object. Is this just syntax sugar?

It turns out, this slight change has huge advantages:

First, we can now restrict the global fetch() function to accept only publicly-routable URLs. This makes applications totally immune to SSRF attacks! You cannot trick an application into accessing an internal service unintentionally if the code to access internal services is explicitly different. (In fact, the global fetch() is itself backed by a binding, which can be configured. workerd defaults to connecting it to the public internet, but you can also override it to permit private addresses if you want, or to route to a specific proxy service, or to be blocked entirely.)

With that done, we now have an interesting property: All internal services which an application uses must be configurable. This means:

  • You can easily see a complete list of the internal services an application talks to, without reading all the code.
  • You can always replace these services with mocks for testing purposes.
  • You can always configure an application to authenticate itself differently (e.g. client certificates) or use a different back end, without changing code.

The receiving end of a binding benefits, too. Take the authentication service example, above. The auth service may be another Worker running in workerd as a nanoservice. In this case, the auth service does not need to be bound to any actual network address. Instead, it may be made available strictly to other Workers through their bindings. In this case, the authentication service doesn’t necessarily need to verify that a request received came from an allowed client – because only allowed clients are able to send requests to it in the first place.

Overall, capability bindings allow simpler code that is secure by default, more composable, easier to test, and easier to understand and maintain.

Always backwards compatible

Cloudflare Workers has a hard rule against ever breaking a live Worker running in production. This same dedication to backwards compatibility extends to workerd.

workerd shares Workers’ compatibility date system to manage breaking changes. Every Worker must be configured with a “compatibility date”. The runtime then ensures that the API behaves exactly as it did on that date. At your leisure, you may check the documentation to see if new breaking changes are introduced at a future date, and update your code for them. Most such changes are minor and most code won’t require any changes. However, you are never obliged to update. Old dates will continue to be supported by newer versions of workerd. It is always safe to update workerd itself without updating your code.

What it’s not

To avoid misleading or disappointing anyone, I need to take a moment to call out what workerd is not.

workerd is not a Secure Sandbox

It’s important to note that workerd is not, on its own, a secure way to run possibly-malicious code. If you wish to run code you don’t trust using workerd, you must enclose it in an additional sandboxing layer, such as a virtual machine configured for sandboxing.

workerd itself is designed such that a Worker should not be able to access any external resources to which it hasn’t been granted a capability. However, a complete sandbox solution not only must be designed to restrict access, but also must account for the possibility of bugs – both in software and in hardware. workerd on its own is not sufficient to protect against hardware bugs like Spectre, nor can it adequately defend against the possibility of vulnerabilities in V8 or in workerd’s own code.

The Cloudflare Workers service uses the same code found in workerd, but adds many additional layers of security on top to harden against such bugs. I described some of these in a past blog post. However, these measures are closely tied to our particular environment. For example, we rely on build automation to push V8 patches to production immediately upon becoming available; we separate customers according to risk profile; we rely on non-portable kernel features and assumptions about the host system to enforce security and resource limits. All of this is very specific to our environment, and cannot be packaged up in a reusable way.

workerd is not an independent project

workerd is the core of Cloudflare Workers, a fast-moving project developed by a dedicated team at Cloudflare. We are not throwing code over the wall to forget about, nor are we expecting volunteers to do our jobs for us. workerd’s GitHub repository will be the canonical source used by Cloudflare Workers and our team will be doing much of their work directly in this repository. Just like V8 is developed primarily by the Chrome team for use in Chrome, workerd will be developed primarily by the Cloudflare Workers team for use in Cloudflare Workers.

This means we cannot promise that external contributions will sit on a level playing field with internal ones. Code reviews take time, and work that is needed for Cloudflare Workers will take priority. We also cannot promise we will accept every feature contribution. Even if the code is already written, reviews and maintenance have a cost. Within Cloudflare, we have a product management team who carefully evaluates what features we should and shouldn’t offer, and plenty of ideas generated internally ultimately don’t make the cut.

If you want to contribute a big new feature to workerd, your best bet is to talk to us before you write code, by raising an issue on GitHub early to get input. That way, you can find out if we’re likely to accept a PR before you write it. We also might be able to give hints on how best to implement.

It’s also important to note that while workerd’s internal interfaces may sometimes appear clean and reusable, we cannot make any guarantee that those interfaces won’t completely change on a whim. If you are trying to build on top of workerd internals, you will need to be prepared either to accept a fair amount of churn, or pin to a specific version.

workerd is not an off-the-shelf edge compute platform

As hinted above, the full Cloudflare Workers service involves a lot of technology beyond workerd itself, including additional security, deployment mechanisms, orchestration, and so much more. workerd itself is a portion of our runtime codebase, which is itself a small (albeit critical) piece of the overall Cloudflare Workers service.

We are pleased, though, that this means it is possible for us to release this code under a permissive Open Source license.

Try the Beta

As of this blog post, workerd is in beta. If you want to try it out,

Build real-time video and audio apps on the world’s most interconnected network

Post Syndicated from Zaid Farooqui original https://blog.cloudflare.com/announcing-cloudflare-calls/

Build real-time video and audio apps on the world’s most interconnected network

Build real-time video and audio apps on the world’s most interconnected network

In the last two years, there has been a rapid rise in real-time apps that help groups of people get together virtually with near-zero latency. User expectations have also increased: your users expect real-time video and audio features to work flawlessly. We found that developers building real-time apps want to spend less time building and maintaining low-level infrastructure. Developers also told us they want to spend more time building features that truly make their idea special.

So today, we are announcing a new product that lets developers build real-time audio/video apps. Cloudflare Calls exposes a set of APIs that allows you to build things like:

  • A video conferencing app with a custom UI
  • An interactive conversation where the moderators can invite select audience members “on stage” as speakers
  • A privacy-first group workout app where only the instructor can view all the participants while the participants can only view the instructor
  • Remote ‘fireside chats’ where one or multiple people can have a video call with an audience of 10,000+ people in real time (<100ms delay)

The protocol that makes all these possible is WebRTC. And Cloudflare Calls is the product that abstracts away the complexity by turning the Cloudflare network into a “super peer,” helping you build reliable and secure real-time experiences.

What is WebRTC?

WebRTC is a peer-to-peer protocol that enables two or more users’ devices to talk to each other directly and without leaving the browser. In a native implementation, peer-to-peer typically works well for 1:1 calls with only two participants. But as you add additional participants, it is common for participants to experience reliability issues, including video freezes and participants getting out of sync. Why? Because as the number of participants increases, the coordination overhead between users’ devices also increases. Each participant needs to send media to each other participant, increasing the data consumption from each computer exponentially.

A selective forwarding unit (SFU) solves this problem. An SFU is a system that connects users with each other in real-time apps by intelligently managing and routing video and audio data between the participants. Apps that use an SFU reduce the data capacity required from each user because each user doesn’t have to send data to every other user. SFUs are required parts of a real-time application when the applications need to determine who is currently speaking or when they want to send appropriate resolution video when WebRTC simulcast is used.

Beyond SFUs

The centralized nature of an SFU is also its weakness. A centralized WebRTC server needs a region, which means that it will be slow in most parts of the world for most users while being fast for only a few select regions.

Typically, SFUs are built on public clouds. They consume a lot of bandwidth by both receiving and sending high resolution media to many devices. And they come with significant devops overhead requiring your team to manually configure regions and scalability.

We realized that merely offering an SFU-as-a-service wouldn’t solve the problem of cost and bandwidth efficiency.

Biggest WebRTC server in the world

When you are on a five-person video call powered by a classic WebRTC implementation, each person’s device talks directly with each other. In WebRTC parlance, each of the five participants is called a peer. And the reliability of the five-person call will only be as good as the reliability of the person (or peer) with the weakest Internet connection.

We built Calls with a simple premise: “What if Cloudflare could act as a WebRTC peer?”.  Calls is a “super peer” or a “giant server that spans the whole world” allows applications to be built beyond the limitations of the lowest common denominator peer or a centralized SFU. Developers can focus on the strength of their app instead of trying to compensate for the weaknesses of the weakest peer in a p2p topology.

Calls does not use the traditional SFU topology where every participant connects to a centralized server in a single location. Instead, each participant connects to their local Cloudflare data center. When another participant wants to retrieve that media, the datacenter that homes that original media stream is found and the tracks are forwarded between datacenters automatically. If two participants are physically close their media does not travel around the world to a centralized region, instead they use the same datacenter, greatly reducing latency and improving reliability.

Calls is a configurable, global, regionless WebRTC server that is the size of Cloudflare’s ever-growing network. The WebRTC protocol enables peers to send and receive media tracks. When you are on a video call, your computer is typically sending two tracks: one that contains the audio of you speaking and another that contains the video stream from your camera. Calls implements the WebRTC RTCPeerConnection API across the Cloudflare Network where users can push media tracks. Calls also exposes an API where other media tracks can be requested within the same Peer Connection context.

Build real-time video and audio apps on the world’s most interconnected network

Cloudflare Calls will be a good solution if you operate your own WebRTC server such as Janus or MediaSoup. Cloudflare Calls can also replace existing deployments of Janus or MediaSoup, especially in cases where you have clients connecting globally to a single, centralized deployment.

Region: Earth

Building and maintaining your own real-time infrastructure comes with unique architecture and scaling challenges. It requires you to answer and constantly revise your answers to thorny questions such as “which regions do we support?”, “how many users do we need to justify spinning up more infrastructure in yet another cloud region?”, “how do we scale for unplanned spikes in usage?” and “how do we not lose money during low-usage hours of our infrastructure?” when you run your own WebRTC server infrastructure.

Cloudflare Calls eliminates the need to answer these questions. Calls uses anycast for every connection, so every packet is always routed to the closest Cloudflare location. It is global by nature: your users are automatically served from a location close to them. Calls scales with your use and your team doesn’t have to build its own auto-scaling logic.

Calls runs on every Cloudflare location and every single Cloudflare server. Because the Cloudflare network is within 10 milliseconds of 90% of the world’s population, it does not add any noticeable latency.

Answer “where’s the problem?”, only faster

When we talk to customers with existing WebRTC workloads, there is one consistent theme: customers wish it was easier to troubleshoot issues. When a group of people are talking over a video call, the stakes are much higher when users experience issues. When a web page fails to load, it is common for users to simply retry after a few minutes. When a video call is disruptive, it is often the end of the call.

Cloudflare Calls’ focus on observability will help customers get to the bottom of the issues faster. Because Calls is built on Cloudflare’s infrastructure, we have end-to-end visibility from all layers of the OSI model.

Calls provides a server side view of the WebRTC Statistics API, so you can drill into issues each Peer Connection and the flow of media within without depending only on data sent from clients. We chose this because the Statistics API is a standardized place developers are used to getting information about their experience. It is the same API available in browsers, and you might already be using it today to gain insight into the performance of your WebRTC connections.

Privacy and security at the core

Calls eliminates the need for participants to share information such as their IP address with each other. Let’s say you are building an app that connects therapists and patients via video calls. With a traditional WebRTC implementation, both the patient and therapist’s devices would talk directly with each other, leading to exposure of potentially sensitive data such as the IP address. Exposure of information such as the IP address can leave your users vulnerable to denial-of-service attacks.

When using Calls, you are still using WebRTC, but the individual participants are connecting to the Cloudflare network. If four people are on a video call powered by Cloudflare Calls, each of the four participants’ devices will be talking only with the Cloudflare network. To your end users, the experience will feel just like a peer-to-peer call, only with added security and privacy upside.

Finally, all video and audio traffic that passes through Cloudflare Calls is encrypted by default. Calls leverages existing Cloudflare products including Argo to route the video and audio content in a secure and efficient manner. Calls API enables granular controls that cannot be implemented with vanilla WebRTC alone. When you build using Calls, you are only limited by your imagination; not the technology.

What’s next

We’re releasing Cloudflare Calls in closed beta today. To try out Cloudflare Calls, request an invitation and check your inbox in coming weeks.
Calls will be free during the beta period. We’re looking to work with early customers who want to take Calls from beta to generally available with us. If you are building a real-time video app today, having challenges scaling traditional WebRTC infrastructure, or just have a great idea you want to explore, leave a comment when you are requesting an invitation, and we’ll reach out.

Dynamic URL redirects: 301 to the future

Post Syndicated from Sam Marsh original https://blog.cloudflare.com/dynamic-redirect-rules/

Dynamic URL redirects: 301 to the future

Dynamic URL redirects: 301 to the future

The Internet is a dynamic place. Websites are constantly changing as technologies and business practices evolve. What was front-page news is quickly moved into a sub-directory. To ensure website visitors continue to see the correct webpage even if it has been moved, administrators often implement URL redirects.

A URL redirect is a mapping from one location on the Internet to another, effectively telling the visitor’s browser that the location of the page has changed, and where they can now find it. This is achieved by providing a virtual ‘link’ between the content’s original and new location.

URL Redirects have typically been implemented as Page Rules within Cloudflare, however Page Rules only match on the URL, rather than other elements such as the visitor’s source country or preferred language. This limitation meant customers with a need for more dynamic URL redirects had to implement alternative solutions such Cloudflare Workers to achieve their goals.

To simplify the management of these more complex use cases we have created Dynamic Redirects. With Dynamic Redirects, users can redirect visitors to another webpage or website based upon hundreds of options such as the visitor’s country of origin or language, without having to write a single line of code.

More than a URL

For nine years users were limited to 125 URL redirects per zone. This limitation meant those with a need for more URL redirects had to implement alternative solutions such Cloudflare Workers to achieve their goals.

In December 2021, we launched Bulk Redirects, allowing up to 100,000 URL redirects per account at the time. In April 2022 we increased this maximum number to over six million URL redirects per account. However, there is still a gap in the ‘URL redirect’ product unfulfilled. Until now.

Bulk Redirects, much like the ‘Forwarding URL’ Page Rule, are prescriptive URL redirects. You tell us what URL to look for, and where to redirect the user to when they visit it. We can support this use case at a huge scale.

If a visitor asks for.. Redirect them to…
https://www.cloudflare.com/r2-storage https://www.cloudflare.com/products/r2
https://www.cloudflare.com/apishield https://www.cloudflare.com/products/api-gateway
https://www.cloudflare.com/welcome-center https://developers.cloudflare.com/fundamentals/get-started/

That’s a simple concept to understand, however user needs have evolved. What if a user wanted to redirect visitors to a localized version of the requested page based on their preferred language? What if a user wanted to redirect visitors to their local subsidiary on the website? Or direct them to an optimized site when they visit from a mobile device? Suddenly, this well understood concept doesn’t work – and they have to deploy code in Workers to solve what is actually a common problem. And common problems deserve to be productized.

This is where Dynamic Redirects can help. The new product provides the same consistent user interface as Transform Rules, Custom Rules, Bulk Redirects, etc. and provides a new action allowing for the target URL to be dynamically created, much like the dynamic rewrite action offered in Transform Rules.

This dynamic action frees the user from having to define explicitly what the target URL should look like, and instead provides them with a full gamut of fields and functions to custom generate the target URL based upon the parameters of the request. For example, rather than redirecting all traffic for www.example.com/shop to www.example.com/en/shop, users can conceptually redirect the traffic to www.example.com/{PREFERRED_LANGUAGE}/shop (not actual syntax!). With this, traffic from a browser with a preferred language of French will be redirected to www.example.com/fr/shop, likewise those with a preferred language of German will be redirected to www.example.com/de/shop.

Dynamic URL redirects: 301 to the future

The other big difference between Dynamic Redirects and  Page Rules is in the filtering. Page Rules are limited to filtering on a URL, or a URL with asterisks as wildcards. Dynamic Redirects is built atop our lightning-fast Rulesets Engine, which also runs products such as Transform Rules, Custom Rules (WAF), Bulk Redirects and API Shield.

Due to this, Dynamic Redirects offers almost the entire suite of Ruleset Engine fields for use in filtering; from http.request.full_uri for the whole URL, to ip.geoip.country (where is the visitor located) and http.request.accepted_languages[] (the language preferred by the visitor). The possibilities are endless.

Users can also now use logical operators such as ‘OR’. Where previously, if a user wanted to redirect five distinct URLs to the same URL they would need to deploy five Page Rules. Today, they can simply use an ‘OR’ to consolidate this use case into just one Dynamic Redirect rule:

# URL Destination URL
1 https:/www.cloudflare.com/partners/integrations/ www.cloudflare.com/partners/
2 https:/www.cloudflare.com/partners/become-a-partner/ www.cloudflare.com/partners/
3 https:/www.cloudflare.com/partners/digital-agency/ www.cloudflare.com/partners/
4 https:/www.cloudflare.com/partners/technology-integrator/ www.cloudflare.com/partners/
5 https:/www.cloudflare.com/partners/view-partners/ www.cloudflare.com/partners/

# Expression Destination URL
1 (http.request.full_uri eq “https:/www.cloudflare.com/partners/integrations/”) or (http.request.full_uri eq “https:/www.cloudflare.com/partners/become-a-partner/”) or (http.request.full_uri eq “https:/www.cloudflare.com/partners/digital-agency/”) or (http.request.full_uri eq “https:/www.cloudflare.com/partners/technology-integrator/”) or (http.request.full_uri eq “https:/www.cloudflare.com/partners/view-partners/”) www.cloudflare.com/partners/

We can further simplify this use case in the future by adding hostname lists, allowing users to add URLs to a list and reference it from within the rule expression, similar to IP Lists. This allows an expression like (http.request.full_uri in $vanity_urls), for example.

A dedicated quota, just for U(RL)

Page Rules are used to set everything from configuration and caching behaviour to header modification and also URL redirection (Forwarding URL). This means that users tend to run out of available rules quickly.

To address this, we’re matching the Page Rule quota in each of the four new products that are being announced today. This means where in Page Rules an Enterprise customer would get 125 Page Rules to share amongst the aforementioned functions, in Dynamic Redirects they have 125 rules just for redirects. This number can be increased for Enterprise customers, also.

We’re also increasing the quota for free plans; where today free plans get three Page Rules, they will now get 10 rules for dynamic redirects, along with each of the other three products (cache, origin, config rules). That’s a net increase of 37 additional rules!

Plan Page Rules Dynamic Redirects
Enterprise 125 125+
Business 50 50
Pro 20 25
Free 3 10

Users can now get more out of their Cloudflare setup, being more specific about when traffic is redirected, optimizing cache and adjusting which settings are and aren’t applied – without having to trade off between these areas due to a limit in rules quota.

Localized redirects

One of the examples covered earlier is being able to redirect visitors to localized content depending on their preferred language.

This can be done by analyzing the ‘Accept-Language’ header sent by the browser, which is stored as an array in the field http.request.accepted_languages[]. This field is an array of the values received by Cloudflare within the Accept-Language HTTP request header, sorted in descending weight order. This header is calculated based on the preferences set by the visitor in the ‘Language’ section of their web browser.

For example, if the visitors browser sends an ‘Accept-Language’ header containing “Accept-Language: fr-CH, fr;q=0.8, en;q=0.9, de;q=0.7, *;q=0.5”, then the field http.request.accepted_languages[0] would contain “en”, with http.request.accepted_languages[1] containing “fr” and so forth.

With this information, we can create a dynamic redirect using the action:

Dynamic URL redirects: 301 to the future

With this rule in place, traffic from visitors with a preferred language of English (en) will be redirected to www.example.com/en/shop. The rule can be duplicated for other languages also, ensuring those with a preferred language of French (fr) will be redirected to www.example.com/fr/shop.

There are so many use cases for Dynamic Redirects we couldn’t fit them all in this blog.

Other possible use cases include mobile redirects, redirects based on cookies, redirects to different endpoints based on request headers for live testing. The potential list is huge, and we can’t wait to hear what you come up with. Try it today!

Build your next startup on Cloudflare with our comprehensive Startup Plan, v2.0

Post Syndicated from Jade Q. Wang original https://blog.cloudflare.com/startup-program-v2/

Build your next startup on Cloudflare with our comprehensive Startup Plan, v2.0

Build your next startup on Cloudflare with our comprehensive Startup Plan, v2.0

Starting a business is hard. And we know that the first few years of your business are crucial to your success.

Cloudflare’s Startup Plan is here to help.

Last year, we piloted a program to a select group of startups for free, with a selection of products that are very high leverage for young startups, early in their product development, like Workers, Stream, and Zero Trust.

Over the past year, startup founders repeatedly wrote into [email protected], and most of these emails followed one of 2 patterns:

  1. A startup would like to request additional products that are not a part of the startup plan, often Workers KV, Pages, Cloudflare for SaaS, R2, Argo, etc.
  2. A startup that is not a part of any accelerator program but would like to get on the startup plan.

Based on this feedback, we are thrilled to announce that today we will be increasing the scope of the program to also include popularly requested products! Beyond that, we’re also super excited to be broadening the eligibility criteria, so more startups can qualify for the plan.

What does the Cloudflare Startup Plan include?

There’s a lot of additional value that’s in the latest version of the plan. Here’s how things have evolved from v1.0:

Product Description v1.0 v2.0*
Content Delivery Network (CDN) Cloudflare’s CDN is a distributed network of servers that provides several advantages for a website. By caching website content, Cloudflare helps improve page load speeds, reduce bandwidth usage, and reduce CPU usage on the server.
Web Application Firewall (WAF) Cloudflare WAF protects a customer’s Internet properties from common vulnerabilities like SQL injection attacks, cross-site scripting, and cross-site forgery requests, with no changes to its existing infrastructure.
DNS Cloudflare DNS is an enterprise-grade authoritative DNS service that offers the fastest response time, unparalleled redundancy, and advanced security with built-in DDoS mitigation and DNSSEC.
Advanced DDoS Protection Cloudflare DDoS protection secures websites, applications, and entire networks while ensuring the performance of legitimate traffic is not compromised.
Page Rules Page Rules allows you to conditionally change zone settings such as security level or rocket loader settings. It is also how cache settings are configured for traffic passing through the zone.
Workers Cloudflare Workers allows developers to augment existing applications or create entirely new ones through a lightweight execution environment without configuring or maintaining infrastructure.
Stream Cloudflare Stream provides out-of-the-box video infrastructure that handles storage, encoding, and delivery. Using the Stream API, customers can build video functionality affordably and with minimal engineering effort.
Zero Trust Cloudflare Zero Trust replaces legacy security perimeters with our global edge, making the Internet faster and safer for teams around the world.
R2 Cloudflare R2 Storage allows developers to store large amounts of unstructured data without the costly egress bandwidth fees associated with typical cloud storage services.

Pages Cloudflare Pages allows frontend developers to quickly and easily build, collaborate on, and deploy websites.
Workers KV Workers KV is a global, low-latency, key-value data store. It supports high read volumes with low-latency, making it possible to build highly dynamic APIs and websites which respond as quickly as a cached static file would.
Workers Unbound Workers Unbound is a serverless platform for compute-intensive workloads, supporting up to 30s CPU time (GA), and 15 minute cron triggers (beta).
Cloudflare for SaaS Offers the benefits of Cloudflare’s SSL management to SaaS company’s customers. Allows SaaS customers to use their custom vanity domains while maintaining a branded customer experience, improved SEO rankings, and all the perks of dedicated certificates.

Advanced Certificate Manager (ACM) Advanced Certificate Manager is a flexible and customizable way to issue and manage certificates in Cloudflare. Customers use Advanced Certificate Manager when they want something more customizable than Universal SSL but still want the convenience of SSL certificate issuance and renewal.

Image Resizing Resize images for a variety of device types and connections from a single-source master image. Images can be manipulated by dimensions, compression ratios, and format (WebP conversion where supported). It is a feature of Speed→Optimization on the Dashboard.
Images Cloudflare Images lets you set up an image pipeline in minutes. Build a scalable image pipeline to store, resize, optimize and deliver images in a fast and secure manner.
Argo Smart Routing Argo Smart Routing improves Internet performance by intelligently routing end users through less congested and more reliable paths over the Internet using our network.
Spectrum DDoS protection, firewalling features and performance benefits for any TCP or UDP based application (such as gaming, FTP, email etc.)
Load Balancing Improve application performance and availability by steering traffic away from unhealthy origin servers and dynamically distributing it to the most available and responsive server pools.
Rate Limiting Protect your site or API from malicious traffic by blocking client IP addresses that hit a URL pattern and exceed a threshold you define.
Waiting Room Cloudflare Waiting Room allows organizations to route excess users to a custom-branded waiting room, helping preserve customer experience and protect origin servers from being overwhelmed with requests.
Area 1 Email Security Comprehensive email security solution to eliminate the risk from phishing, which is the root cause of damage in 95% of all cybersecurity incidents. Configuration with Google and Microsoft in 5 minutes.

*Product-specific usage limits apply

With the expanded product basket, the Startup Plan v2.0 provides four times the value of the original program. As an added bonus when new Cloudflare products are in beta, participants on the Startup Plan are welcome to share their use case and potentially receive early access.

How to join the Cloudflare Startup Program

Eligibility criteria for startups new to the program

To be eligible for the Startup Plan, your startup must be at an early stage (i.e. raised less than $3 million) and enrolled or recently graduated from a participating accelerator program.

If you are a founder in a participating accelerator program, navigate to the Cloudflare perk from your program’s vendor perk page and follow the instructions there. Those instructions will lead you to this plan page where you can select your program from the list.

If your accelerator program is not on the list, please email us at [email protected] and include the details of your perk manager. We’ll get in touch with them directly.

What if I’m already on the V1 Startup Plan? Can I get access to the products on the V2 plan?

Yes! Startups currently on the Startup Plan will automatically have the additional products added to your accounts in the coming weeks, no action required. This upgrade will apply for the remainder of the year that your company is on the Startup Plan.

If you have any questions about making the most of your plan, drop a line to [email protected] with any questions.

Special Eligibility: Referral Program, Alumni Program, Workers Launchpad

Over our years at Cloudflare, we have had the privilege of working with some remarkable technologists who have gone on to work on extraordinary projects after their time at Cloudflare. Moreover, there are startup founders who interface with teams at Cloudflare, whether through participation in the Cloudflare Community or because they were former coworkers elsewhere.

These startups are now also eligible:

  • Workers Launchpad funding program: If you are building on Cloudflare Workers, simultaneously apply for the Workers Launchpad funding program here, which will make you eligible for introductions to leading investors, additional mentorship opportunities, and other perks.
  • Referral Program: “Referred by (include details in comments)” is now an option in the Select Accelerator dropdown menu on the Startup Plan landing page. Please include the email address of your contact at Cloudflare in the comments field. Your account will be upgraded once your contact validates the referral.
  • Alumni Program: “Cloudflare Alumni” is now also an option in the Select Accelerator dropdown menu.

Questions about the program? Drop us a line at [email protected], and we’ll be in touch.

D1: our quest to simplify databases

Post Syndicated from Nevi Shah original https://blog.cloudflare.com/whats-new-with-d1/

D1: our quest to simplify databases

D1: our quest to simplify databases

When we announced D1 in May of this year, we knew it would be the start of something new – our first SQL database with Cloudflare Workers. Prior to D1 we’ve announced storage options like KV (key-value store), Durable Objects (single location, strongly consistent data storage) and R2 (blob storage). But the question always remained “How can I store and query relational data without latency concerns and an easy API?”

The long awaited “Cloudflare Database” was the true missing piece to build your application entirely on Cloudflare’s global network, going from a blank canvas in VSCode to a full stack application in seconds. Compatible with the popular SQLite API, D1 empowers developers to build out their databases without getting bogged down by complexity and having to manage every underlying layer.

Since our launch announcement in May and private beta in June, we’ve made great strides in building out our vision of a serverless database. With D1 still in private beta but an open beta on the horizon, we’re excited to show and tell our journey of building D1 and what’s to come.

The D1 Experience

We knew from Cloudflare Workers feedback that using Wrangler as the mechanism to create and deploy applications is loved and preferred by many. That’s why when Wrangler 2.0 was announced this past May alongside D1, we took advantage of the new and improved CLI for every part of the experience from data creation to every update and iteration. Let’s take a quick look on how to get set up in a few easy steps.

Create your database

With the latest version of Wrangler installed, you can create an initialized empty database with a quick

npx wrangler d1 create my_database_name

To get your database up and running! Now it’s time to add your data.

Bootstrap it

It wouldn’t be the “Cloudflare way” if you had to sit through an agonizingly long process to get set up. So we made it easy and painless to bring your existing data from an old database and bootstrap your new D1 database.  You can run

wrangler d1 execute my_database-name --file ./filename.sql

and pass through an existing SQLite .sql file of your choice. Your database is now ready for action.

Develop & Test Locally

With all the improvements we’ve made to Wrangler since version 2 launched a few months ago, we’re pleased to report that D1 has full remote & local wrangler dev support:

D1: our quest to simplify databases

When running wrangler dev -–local -–persist, an SQLite file will be created inside .wrangler/state. You can then use a local GUI program for managing it, like SQLiteFlow (https://www.sqliteflow.com/) or Beekeeper (https://www.beekeeperstudio.io/).

Or you can simply use SQLite directly with the SQLite command line by running sqlite3 .wrangler/state/d1/DB.sqlite3:

D1: our quest to simplify databases

Automatic backups & one-click restore

No matter how much you test your changes, sometimes things don’t always go according to plan. But with Wrangler you can create a backup of your data, view your list of backups or restore your database from an existing backup. In fact, during the beta, we’re taking backups of your data every hour automatically and storing them in R2, so you will have the option to rollback if needed.

D1: our quest to simplify databases

And the best part – if you want to use a production snapshot for local development or to reproduce a bug, simply copy it into the .wrangler/state directory and wrangler dev –-local –-persist will pick it up!

Let’s download a D1 backup to our local disk. It’s SQLite compatible.

D1: our quest to simplify databases

Now let’s run our D1 worker locally, from the backup.

D1: our quest to simplify databases

Create and Manage from the dashboard

However, we realize that CLIs are not everyone’s jam. In fact, we believe databases should be accessible to every kind of developer – even those without much database experience! D1 is available right from the Cloudflare dashboard giving you near total command parity with Wrangler in just a few clicks. Bootstrapping your database, creating tables, updating your database, viewing tables and triggering backups are all accessible right at your fingertips.

D1: our quest to simplify databases

Changes made in the UI are instantly available to your Worker — no deploy required!

We’ve told you about some of the improvements we’ve landed since we first announced D1, but as always, we also wanted to give you a small taste (with some technical details) of what’s ahead. One really important functionality of a database is transactions — something D1 wouldn’t be complete without.

Sneak peek: how we’re bringing JavaScript transactions to D1

With D1, we strive to present a dramatically simplified interface to creating and querying relational data, which for the most part is a good thing. But simplification occasionally introduces drawbacks, where a use-case is no longer easily supported without introducing some new concepts. D1 transactions are one example.

Transactions are a unique challenge

You don’t need to specify where a Cloudflare Worker or a D1 database run—they simply run everywhere they need to. For Workers, that is as close as possible to the users that are hitting your site right this second. For D1 today, we don’t try to run a copy in every location worldwide, but dynamically manage the number and location of read-only replicas based on how many queries your database is getting, and from where. However, for queries that make changes to a database (which we generally call “writes” for short), they all have to travel back to the single Primary D1 instance to do their work, to ensure consistency.

But what if you need to do a series of updates at once? While you can send multiple SQL queries with .batch() (which does in fact use database transactions under the hood), it’s likely that, at some point, you’ll want to interleave database queries & JS code in a single unit of work.

This is exactly what database transactions were invented for, but if you try running BEGIN TRANSACTION in D1 you’ll get an error. Let’s talk about why that is.

Why native transactions don’t work
The problem arises from SQL statements and JavaScript code running in dramatically different places—your SQL executes inside your D1 database (primary for writes, nearest replica for reads), but your Worker is running near the user, which might be on the other side of the world. And because D1 is built on SQLite, only one write transaction can be open at once. Meaning that, if we permitted BEGIN TRANSACTION, any one Worker request, anywhere in the world, could effectively block your whole database! This is a quite dangerous thing to allow:

  • A Worker could start a transaction then crash due to a software bug, without calling ROLLBACK. The primary would be blocked, waiting for more commands from a Worker that would never come (until, probably, some timeout).
  • Even without bugs or crashes, transactions that require multiple round-trips between JavaScript and SQL could end up blocking your whole system for multiple seconds, dramatically limiting how high an application built with Workers & D1 could scale.

But allowing a developer to define transactions that mix both SQL and JavaScript makes building applications with Workers & D1 so much more flexible and powerful. We need a new solution (or, in our case, a new version of an old solution).

A way forward: stored procedures
Stored procedures are snippets of code that are uploaded to the database, to be executed directly next to the data. Which, at first blush, sounds exactly like what we want.

However, in practice, stored procedures in traditional databases are notoriously frustrating to work with, as anyone who’s developed a system making heavy use of them will tell you:

  • They’re often written in a different language to the rest of your application. They’re usually written in (a specific dialect of) SQL or an embedded language like Tcl/Perl/Python. And while it’s technically possible to write them in JavaScript (using an embedded V8 engine), they run in such a different environment to your application code it still requires significant context-switching to maintain them.
  • Having both application code and in-database code affects every part of the development lifecycle, from authoring, testing, deployment, rollbacks and debugging. But because stored procedures are usually introduced to solve a specific problem, not as a general purpose application layer, they’re often managed completely manually. You can end up with them being written once, added to the database, then never changed for fear of breaking something.

With D1, we can do better.

The point of a stored procedure was to execute directly next to the data—uploading the code and executing it inside the database was simply a means to that end. But we’re using Workers, a global JavaScript execution platform, can we use them to solve this problem?

It turns out, absolutely! But here we have a few options of exactly how to make it work, and we’re working with our private beta users to find the right API. In this section, I’d like to share with you our current leading proposal, and invite you all to give us your feedback.

When you connect a Worker project to a D1 database, you add the section like the following to your wrangler.toml:

[[ d1_databases ]]
# What binding name to use (e.g. env.DB):
binding = "DB"
# The name of the DB (used for wrangler d1 commands):
database_name = "my-d1-database"
# The D1's ID for deployment:
database_id = "48a4224e-...3b09"
# Which D1 to use for `wrangler dev`:
# (can be the same as the previous line)
preview_database_id = "48a4224e-...3b09"

# NEW: adding "procedures", pointing to a new JS file:
procedures = "./src/db/procedures.js"

That D1 Procedures file would contain the following (note the new db.transaction() API, that is only available within a file like this):

export default class Procedures {
  constructor(db, env, ctx) {
    this.db = db
  }

  // any methods you define here are available on env.DB.Procedures
  // inside your Worker
  async Checkout(cartId: number) {
    // Inside a Procedure, we have a new db.transaction() API
    const result = await this.db.transaction(async (txn) => {
      
      // Transaction has begun: we know the user can't add anything to
      // their cart while these actions are in progress.
      const [cart, user] = Helpers.loadCartAndUser(cartId)

      // We can update the DB first, knowing that if any of the later steps
      // fail, all these changes will be undone.
      await this.db
        .prepare(`UPDATE cart SET status = ?1 WHERE cart_id = ?2`)
        .bind('purchased', cartId)
        .run()
      const newBalance = user.balance - cart.total_cost
      await this.db
        .prepare(`UPDATE user SET balance = ?1 WHERE user_id = ?2`)
        // Note: the DB may have a CHECK to guarantee 'user.balance' can not
        // be negative. In that case, this statement may fail, an exception
        // will be thrown, and the transaction will be rolled back.
        .bind(newBalance, cart.user_id)
        .run()

      // Once all the DB changes have been applied, attempt the payment:
      const { ok, details } = await PaymentAPI.processPayment(
        user.payment_method_id,
        cart.total_cost
      )
      if (!ok) {
        // If we throw an Exception, the transaction will be rolled back
        // and result.error will be populated:
        // throw new PaymentFailedError(details)
        
        // Alternatively, we can do both of those steps explicitly
        await txn.rollback()
        // The transaction is rolled back, our DB is now as it was when we
        // started. We can either move on and try something new, or just exit.
        return { error: new PaymentFailedError(details) }
      }

      // This is implicitly called when the .transaction() block finishes,
      // but you can explicitly call it too (potentially committing multiple
      // times in a single db.transaction() block).
      await txn.commit()

      // Anything we return here will be returned by the 
      // db.transaction() block
      return {
        amount_charged: cart.total_cost,
        remaining_balance: newBalance,
      }
    })

    if (result.error) {
      // Our db.transaction block returned an error or threw an exception.
    }

    // We're still in the Procedure, but the Transaction is complete and
    // the DB is available for other writes. We can either do more work
    // here (start another transaction?) or return a response to our Worker.
    return result
  }
}

And in your Worker, your DB binding now has a “Procedures” property with your function names available:

const { error, amount_charged, remaining_balance } =
  await env.DB.Procedures.Checkout(params.cartId)

if (error) {
  // Something went wrong, `error` has details
} else {
  // Display `amount_charged` and `remaining_balance` to the user.
}

Multiple Procedures can be triggered at one time, but only one db.transaction() function can be active at once: any other write queries or other transaction blocks will be queued, but all read queries will continue to hit local replicas and run as normal. This API gives you the ability to ensure consistency when it’s essential but with the minimal impact on total overall performance worldwide.

Request for feedback

As with all our products, feedback from our users drives the roadmap and development. While the D1 API is in beta testing today, we’re still seeking feedback on the specifics. However, we’re pleased that it solves both the problems with transactions that are specific to D1 and the problems with stored procedures described earlier:

  • Code is executing as close as possible to the database, removing network latency while a transaction is open.
  • Any exceptions or cancellations of a transaction cause an instant rollback—there is no way to accidentally leave one open and block the whole D1 instance.
  • The code is in the same language as the rest of your Worker code, in the exact same dialect (e.g. same TypeScript config as it’s part of the same build).
  • It’s deployed seamlessly as part of your Worker. If two Workers bind to the same D1 instance but define different procedures, they’ll only see their own code. If you want to share code between projects or databases, extract a library as you would with any other shared code.
  • In local development and test, the procedure works just like it does in production, but without the network call, allowing seamless testing and debugging as if it was a local function.
  • Because procedures and the Worker that define them are treated as a single unit, rolling back to an earlier version never causes a skew between the code in the database and the code in the Worker.

The D1 ecosystem: contributions from the community

We’ve told you about what we’ve been up to and what’s ahead, but one of the unique things about this project is all the contributions from our users. One of our favorite parts of private betas is not only getting feedback and feature requests, but also seeing what ideas and projects come to fruition. While sometimes this means personal projects, with D1, we’re seeing some incredible contributions to the D1 ecosystem. Needless to say, the work on D1 hasn’t just been coming from within the D1 team, but also from the wider community and other developers at Cloudflare. Users have been showing off their D1 additions within our Discord private beta channel and giving others the opportunity to use them as well. We wanted to take a moment to highlight them.

workers-qb

Dealing with raw SQL syntax is powerful (and using the D1 .bind() API, safe against SQL injections) but it can be a little clumsy. On the other hand, most existing query builders assume direct access to the underlying DB, and so aren’t suitable to use with D1. So Cloudflare developer Gabriel Massadas designed a small, zero-dependency query builder called workers-qb:

import { D1QB } from 'workers-qb'
const qb = new D1QB(env.DB)

const fetched = await qb.fetchOne({
    tableName: "employees",
    fields: "count(*) as count",
    where: {
      conditions: "active = ?1",
      params: [true]
    },
})

Check out the project homepage for more information: https://workers-qb.massadas.com/.

D1 console

While you can interact with D1 through both Wrangler and the dashboard, Cloudflare Community champion, Isaac McFadyen created the very first D1 console where you can quickly execute a series of queries right through your terminal. With the D1 console, you don’t need to spend time writing the various Wrangler commands we’ve created – just execute your queries.

This includes all bells and whistles you would expect from a modern database console including multiline input, command history, validation for things D1 may not yet support, and ability to save your Cloudflare credentials for later use.

Check out the full project on GitHub or NPM for more information.

Miniflare test Integration

The Miniflare project, which powers Wrangler’s local development experience, also provides fully-fledged test environments for popular JavaScript test runners, Jest and Vitest. With this comes the concept of Isolated Storage, allowing each test to run independently, so that changes made in one don’t affect the others. Brendan Coll, creator of Miniflare, guided the D1 test implementation to give the same benefits:

import Worker from ‘../src/index.ts’
const { DB } = getMiniflareBindings();

beforeAll(async () => {
  // Your D1 starts completely empty, so first you must create tables
  // or restore from a schema.sql file.
  await DB.exec(`CREATE TABLE entries (id INTEGER PRIMARY KEY, value TEXT)`);
});

// Each describe block & each test gets its own view of the data.
describe(‘with an empty DB’, () => {
  it(‘should report 0 entries’, async () => {
    await Worker.fetch(...)
  })
  it(‘should allow new entries’, async () => {
    await Worker.fetch(...)
  })
])

// Use beforeAll & beforeEach inside describe blocks to set up particular DB states for a set of tests
describe(‘with two entries in the DB’, () => {
  beforeEach(async () => {
    await DB.prepare(`INSERT INTO entries (value) VALUES (?), (?)`)
            .bind(‘aaa’, ‘bbb’)
            .run()
  })
  // Now, all tests will run with a DB with those two values
  it(‘should report 2 entries’, async () => {
    await Worker.fetch(...)
  })
  it(‘should not allow duplicate entries’, async () => {
    await Worker.fetch(...)
  })
])

All the databases for tests are run in-memory, so these are lightning fast. And fast, reliable testing is a big part of building maintainable real-world apps, so we’re thrilled to extend that to D1.

Want access to the private beta?

Feeling inspired?

We love to see what our beta users build or want to build especially when our products are at an early stage. As we march toward an open beta, we’ll be looking specifically for your feedback. We are slowly letting more folks into the beta, but if you haven’t received your “golden ticket” yet with access, sign up here! Once you’ve been invited in, you’ll receive an official welcome email.

As always, happy building!

Introducing Cache Rules: precision caching at your fingertips

Post Syndicated from Alex Krivit original https://blog.cloudflare.com/introducing-cache-rules/

Introducing Cache Rules: precision caching at your fingertips

Introducing Cache Rules: precision caching at your fingertips

Ten years ago, in 2012, we released a product that put “a powerful new set of tools” in the hands of Cloudflare customers, allowing website owners to control how Cloudflare would cache, apply security controls, manipulate headers, implement redirects, and more on any page of their website. This product is called Page Rules and since its introduction, it has grown substantially in terms of popularity and functionality.

Page Rules are a common choice for customers that want to have fine-grained control over how Cloudflare should cache their content. There are more than 3.5 million caching Page Rules currently deployed that help websites customize their content. We have spent the last ten years learning how customers use those rules to cache content, and it’s clear the time is ripe for evolving rules-based caching on Cloudflare. This evolution will allow for greater flexibility in caching different types of content through additional rule configurability, while providing more visibility into when and how different rules interact across Cloudflare’s ecosystem.

Today, we’ve announced that Page Rules will be re-imagined into four product-specific rule sets: Origin Rules, Cache Rules, Configuration Rules, and Redirect Rules.

In this blog we’re going to discuss Cache Rules, and how we’re applying ten years of product iteration and learning from Page Rules to give you the tools and options to best optimize your cache.

Activating Page Rules, then and now

Adding a Page Rule is very simple: users either make an API call or navigate to the dashboard, enter a full or wildcard URL pattern (e.g. example.com/images/scr1.png or example.com/images/scr*), and tell us which actions to perform when we see that pattern. For example a Page Rule could tell browsers– keep a copy of the response longer via “Browser Cache TTL”, or tell our cache that via “Edge Cache TTL”. Low effort, high impact. All this is accomplished without fighting origin configuration or writing a single line of code.

Under the hood, a lot is happening to make that rule scale: we turn every rule condition into regexes, matching them against the tens of millions of requests per second across 275+ data centers globally. The compute necessary to process and apply new values on the fly across the globe is immense and corresponds directly to the number of rules we are able to offer to users. By moving cache actions from Page Rules to Cache Rules we can allow for users to not only set more rules, but also to trigger these rules more precisely.

More than a URL

Users of Page Rules are limited to specific URLs or URL patterns to define how browsers or Cloudflare cache their websites files. Cache Rules allows users to set caching behavior on additional criteria, such as the HTTP request headers or the requested file type. Users can continue to match on the requested URL also, as used in our Page Rules example earlier. With Cache Rules, users can now define this behavior on one or more fields available.

For example, if a user wanted to specify cache behavior for all image/png content-types, it’s now as simple as pushing a few buttons in the UI or writing a small expression in the API. Cache Rules give users precise control over when and how Cloudflare and browsers cache their content. Cache Rules allow for rules to be triggered on request header values that can be simply defined like

any(http.request.headers["content-type"][*] == "image/png")

Which triggers the Cache Rule to be applied to all image/png media types. Additionally, users may also leverage other request headers like cookie values, user-agents, or hostnames.

As a plus, these matching criteria can be stacked and configured with operators like AND and OR, providing additional simplicity in building complex rules from many discrete blocks, e.g. if you would like to target both image/png AND image/jpeg.

For the full list of fields available conditionals you can apply Cache Rules to, please refer to the Cache Rules documentation.

Introducing Cache Rules: precision caching at your fingertips

Visibility into how and when Rules are applied

Our current offerings of Page Rules, Workers, and Transform Rules can all manipulate caching functionality for our users’ content. Often, there is some trial and error required to make sure that the confluence of several rules and/or Workers are behaving in an expected manner.

As part of upgrading Page Rules we have separated it into four new products:

  1. Origin Rues
  2. Cache Rules
  3. Configuration Rules
  4. Redirect Rules

This gives users a better understanding into how and when different parts of the Cloudflare stack are activated, reducing the spin-up and debug time. We will also be providing additional visibility in the dashboard for when rules are activated as they go through Cloudflare. As a sneak peek please see:

Introducing Cache Rules: precision caching at your fingertips

Our users may take advantage of this strict precedence by chaining the results of one product into another. For example, the output of URL rewrites in Transform Rules will feed into the actions of Cache Rules, and the output of Cache Rules will feed into IP Access Rules, and so on.

In the future, we plan to increase this visibility further to allow for inputs and outputs across the rules products to be observed so that the modifications made on our network can be observed before the rule is even deployed.

Cache Rules. What are they? Are they improved? Let’s find out!

To start, Cache Rules will have all the caching functionality currently available in Page Rules. Users will be able to:

  • Tell Cloudflare to cache an asset or not,
  • Alter how long Cloudflare should cache an asset,
  • Alter how long a browser should cache an asset,
  • Define a custom cache key for an asset,
  • Configure how Cloudflare serves stale, revalidates, or otherwise uses header values to direct cache freshness and content continuity,

And so much more.

Cache Rules are intuitive and work similarly to our other ruleset engine-based products announced today: API or UI conditionals for URL or request headers are evaluated, and if matching, Cloudflare and browser caching options are configured on behalf of the user. For all the different options available, see our Cache Rules documentation.

Under the hood, Cache Rules apply targeted rule applications so that additional rules can be supported per user and across the whole engine. What this means for our users is that by consuming less CPU for rule evaluations, we’re able to support more rules per user. For specifics on how many additional Cache Rules you’ll be able to use, please see the Future of Rules Blog.

Introducing Cache Rules: precision caching at your fingertips

How can you use Cache Rules today?

Cache Rules are available today in beta and can be configured via the API, Terraform, or UI in the Caching tab of the dashboard. We welcome you to try the functionality and provide us feedback for how they are working or what additional features you’d like to see via community posts, or however else you generally get our attention 🙂.

If you have Page Rules implemented for caching on the same path, Cache Rules will take precedence by design. For our more patient users, we plan on releasing a one-click migration tool for Page Rules in the near future.

What’s in store for the future of Cache Rules?

In addition to granular control and increased visibility, the new rules products also opens the door to more complex features that can recommend rules to help customers achieve better cache hit ratios and reduce their egress costs, adding additional caching actions and visibility, so you can see precisely how Cache Rules will alter headers that Cloudflare uses to cache content, and allowing customers to run experiments with different rule configurations and see the outcome firsthand. These possibilities represent the tip of the iceberg for the next iteration of how customers will use rules on Cloudflare.

Try it out!

We look forward to you trying Cache Rules and providing feedback on what you’d like to see us build next.

WebRTC live streaming to unlimited viewers, with sub-second latency

Post Syndicated from Kyle Boutette original https://blog.cloudflare.com/webrtc-whip-whep-cloudflare-stream/

WebRTC live streaming to unlimited viewers, with sub-second latency

WebRTC live streaming to unlimited viewers, with sub-second latency

Creators and broadcasters expect to be able to go live from anywhere, on any device. Viewers expect “live” to mean “real-time”. The protocols that power most live streams are unable to meet these growing expectations.

In talking to developers building live streaming into their apps and websites, we’ve heard near universal frustration with the limitations of existing live streaming technologies. Developers in 2022 rightly expect to be able to deliver low latency to viewers, broadcast reliably, and use web standards rather than old protocols that date back to the era of Flash.

Today, we’re excited to announce in open beta that Cloudflare Stream now supports live video streaming over WebRTC, with sub-second latency, to unlimited concurrent viewers. This is a new feature of Cloudflare Stream, and you can start using it right now in the Cloudflare Dashboard — read the docs to get started.

WebRTC with Cloudflare Stream leapfrogs existing tools and protocols, exclusively uses open standards with zero dependency on a specific SDK, and empowers any developer to build both low latency live streaming and playback into their website or app.

The status quo of streaming live video is broken

The status quo of streaming live video has high latency, depends on archaic protocols and is incompatible with the way developers build apps and websites. A reasonable person’s expectations of what the Internet should be able to deliver in 2022 are simply unmet by the dominant set of protocols carried over from past eras.

Viewers increasingly expect “live” to mean “real-time”. People want to place bets on sports broadcasts in real-time, interact and ask questions to presenters in real-time, and never feel behind their friends at a live event.

In practice, the HLS and DASH standards used to deliver video have 10+ seconds of latency. LL-HLS and LL-DASH bring this down to closer to 5 seconds, but only as a hack on top of the existing protocol that delivers segments of video in individual HTTP requests. Sending mini video clips over TCP simply cannot deliver video in real-time. HLS and DASH are here to stay, but aren’t the future of real-time live video.

Creators and broadcasters expect to be able to go live from anywhere, on any device.

In practice, people creating live content are stuck with a limited set of native apps, and can’t go live using RTMP from a web browser. Because it’s built on top of TCP, the RTMP broadcasting protocol struggles under even the slightest network disruption, making it a poor or often unworkable option when broadcasting from mobile networks. RTMP, originally built for use with Adobe Flash Player, was last updated in 2012, and while Stream supports the newer SRT protocol, creators need an option that works natively on the web and can more easily be integrated in native apps.

Developers expect to be able to build using standard APIs that are built into web browsers and native apps.

In practice, RTMP can’t be used from a web browser, and creating a native app that supports RTMP broadcasting typically requires diving into lower-level programming languages like C and Rust. Only those with expertise in both live video protocols and these languages have full access to the tools needed to create novel live streaming client applications.

We’re solving this by using new open WebRTC standards: WHIP and WHEP

WebRTC is the real-time communications protocol, supported across all web browsers, that powers video calling services like Zoom and Google Meet. Since inception it’s been designed for real-time, ultra low-latency communications.

While WebRTC is well established, for most of its history it’s lacked standards for:

  • Ingestion — how broadcasters should send media content (akin to RTMP today)
  • Egress — how viewers request and receive media content (akin to DASH or HLS today)

As a result, developers have had to implement this on their own, and client applications on both sides are often tightly coupled to provider-specific implementations. Developers we talk to often express frustration, having sunk months of engineering work into building around a specific vendor’s SDK, unable to switch without a significant rewrite of their client apps.

At Cloudflare, our mission is broader — we’re helping to build a better Internet. Today we’re launching not just a new feature of Cloudflare Stream, but a vote of confidence in new WebRTC standards for both ingestion and egress. We think you should be able to start using Stream without feeling locked into an SDK or implementation specific to Cloudflare, and we’re committed to using open standards whenever possible.

For ingestion, WHIP is an IETF draft on the Standards Track, with many applications already successfully using it in production. For delivery (egress), WHEP is an IETF draft with broad agreement. Combined, they provide a standardized end-to-end way to broadcast one-to-many over WebRTC at scale.

Cloudflare Stream is the first cloud service to let you both broadcast using WHIP and playback using WHEP — no vendor-specific SDK needed. Here’s how it works:

WebRTC live streaming to unlimited viewers, with sub-second latency

Cloudflare Stream is already built on top of the Cloudflare developer platform, using Workers and Durable Objects running on Cloudflare’s global network, within 50ms of 95% of the world’s Internet-connected population.

Our WebRTC implementation extends this to relay WebRTC video through our network. Broadcasters stream video using WHIP to the point of presence closest to their location, which tells the Durable Object where the live stream can be found. Viewers request streaming video from the point of presence closest to them, which asks the Durable Object where to find the stream, and video is routed through Cloudflare’s network, all with sub-second latency.

Using Durable Objects, we achieve this with zero centralized state. And just like the rest of Cloudflare Stream, you never have to think about regions, both in terms of pricing and product development.

While existing ultra low-latency streaming providers charge significantly more to stream over WebRTC, because Stream runs on Cloudflare’s global network, we’re able to offer WebRTC streaming at the same price as delivering video over HLS or DASH. We don’t think you should be penalized with higher pricing when choosing which technology to rely on to stream live video. Once generally available, WebRTC streaming will cost $1 per 1000 minutes of video delivered, just like the rest of Stream.

What does sub-second latency let you build?

Ultra low latency unlocks interactivity within your website or app, removing the time delay between creators, in-person attendees, and those watching remotely.

Developers we talk to are building everything from live sports betting, to live auctions, to live viewer Q&A and even real-time collaboration in video post-production. Even streams without in-app interactivity can benefit from real-time — no sports fan wants to get a text from their friend at the game that ruins the moment, before they’ve had a chance to watch the final play. Whether you’re bringing an existing app or have a new idea in mind, we’re excited to see what you build.

If you can write JavaScript, you can let your users go live from their browser

While hobbyist and professional creators might take the time to download and learn how to use an application like OBS Studio, most Internet users won’t get past this friction of new tools, and copying RTMP keys from one tool to another. To empower more people to go live, they need to be able to broadcast from within your website or app, just by enabling access to the camera and microphone.

Cloudflare Stream with WebRTC lets you build live streaming into your app as a front-end developer, without any special knowledge of video protocols. And our approach, using the WHIP and WHEP open standards, means you can do this with zero dependencies, with 100% your code that you control.

Go live from a web browser with just a few lines of code

You can go live right now, from your web browser, by creating a live input in the Cloudflare Stream dashboard, and pasting a URL into the example linked below.

Read the docs or run the example code below in your browser using Stackbltiz.

<video id="input-video" autoplay autoplay muted></video>

import WHIPClient from "./WHIPClient.js";

const url = "<WEBRTC_URL_FROM_YOUR_LIVE_INPUT>";
const videoElement = document.getElementById("input-video");
const client = new WHIPClient(url, videoElement);

This example uses an example WHIP client, written in just 100 lines of Javascript, using APIs that are native to web browsers, with zero dependencies. But because WHIP is an open standard, you can use any WHIP client you choose. Support for WHIP is growing across the video streaming industry — it has recently been added to Gstreamer, and one of the authors of the WHIP specification has written a Javascript client implementation. We intend to support the full WHIP specification, including supporting Trickle ICE for fast NAT traversal.

Play a live stream in a browser, with sub-second latency, no SDK required

Once you’ve started streaming, copy the playback URL from the live input you just created, and paste it into the example linked below.

Read the docs or run the example code below in your browser using Stackbltiz.

<video id="playback" controls autoplay muted></video>

import WHEPClient from './WHEPClient.js';
const url = "<WEBRTC_PLAYBACK_URL_FROM_YOUR_LIVE_INPUT>";
const videoElement = document.getElementById("playback");
const client = new WHEPClient(url, videoElement);

Just like the WHIP example before, this one uses an example WHEP client we’ve written that has zero dependencies. WHEP is an earlier IETF draft than WHIP, published in July of this year, but adoption is moving quickly. People in the community have already written open-source client implementations in both Javascript, C, with more to come.

Start experimenting with real-time live video, in open beta today

WebRTC streaming is in open beta today, ready for you to use as an integrated feature of Cloudflare Stream. Once Generally Available, WebRTC streaming will be priced like the rest of Cloudflare Stream, based on minutes of video delivered and minutes stored.

Read the docs to get started.

Where to? Introducing Origin Rules

Post Syndicated from Matt Bullock original https://blog.cloudflare.com/origin-rules/

Where to? Introducing Origin Rules

Host headers are key

Where to? Introducing Origin Rules

The host header of an HTTP request tells the receiving server (‘origin’) which website or application a client wants to access.

When an origin receives an HTTP request, it checks the value of this ‘host’ header to see if it is responsible for that traffic. If it finds a match the request will be routed appropriately and the correct data will be returned to the visitor. If it doesn’t find a match, it will return an error telling the visitor it doesn’t have an application or website that matches what they are asking for.

In simple setups this is often not an issue. All requests for example.com are sent to the same origin, which sees the host header example.com and returns the relevant files. However, not all setups are as straightforward. SaaS (Software-as-a-Service) platforms use host headers to route visitors to the correct instance or S3-compatible bucket.

To ensure the correct content is still loaded, the host header must equal the name of this instance or bucket to allow the receiving origin to route it correctly. This means at some point in the traffic flow, the host header must be changed to match the instance or bucket name, before being sent to the SaaS platform.

Another common issue is when web applications on an origin are listening on a non-standard port, e.g. 8001.  Requests sent via HTTPS will by default arrive on port 443. To ensure the traffic isn’t subsequently sent to port 443 on the origin the traffic must be intercepted and have the destination port changed to 8001. This ensures the origin is receiving traffic where it expects it. Previously this would be done as a Cloudflare Worker, Cloudflare Spectrum application or by running a dedicated application on the origin.

Both of these scenarios require customers to write and maintain code to intercept HTTP requests and parse them to ensure they go to the correct origin location, the correct port on that origin, and with the correct host header. This is a burden for administrators to maintain, particularly as legacy applications are migrated away from on-premise and into SaaS.

Cloudflare users want more control on where their traffic goes to – when it goes there – and what it looks like when it arrives. And they want this to be simple to set up and maintain.

To meet those demands we are today announcing Origin Rules, a new product which allows for overriding the host header, the Server Name Indication (SNI), destination port and DNS resolution of matching HTTP requests.

Origin Rules is now the one-stop destination for users who want to change which origin traffic goes to, when this should happen, and what that traffic looks like when it arrives – all without ever having to write a single line of code.

One hostname, many origins

Setting up your service on Cloudflare is very simple. You tell us your domain name, example.com, and where traffic should be sent to when we receive requests that match it. Often this is an IP address. You can also create subdomains, e.g. shop.example.com, and follow the same pattern.

This allows for the web server running www.example.com to live on the IP address 98.51.100.12, and the web server responsible for running shop.example.com to live on a different IP address, e.g. 203.0.113.34. When Cloudflare receives a request for shop.example.com, we send that traffic to the web server at 203.0.113.34 with the host header shop.example.com.

Where to? Introducing Origin Rules

As most web servers commonly serve multiple websites, this host header is used to ensure the correct content is loaded. The web server looks at the request it receives, checks the host header, and tries to match it against websites it’s been told to serve. If it finds a match, it will route this request to the corresponding website’s configuration and the correct files are returned to the visitor.

This has been a foundational principle of the Internet for many years now. Unsurprisingly however, new solutions emerge and user needs evolve.

We have heard from users who want to be able to send different URLs to different origins, such as a SaaS provider for their ecommerce platform and a SaaS provider for their support desk. To achieve this, user’s could, and do, decide to run and manage their own reverse proxy running at this IP address to act as a router. This allows a user to send all traffic for example.com to a single IP address, and let the reverse proxy determine where it goes next:

    location ~ ^/shop { 
        proxy_set_header   Host $http_host;
        proxy_pass         "https://203.0.113.34/$1";
    }

This reverse proxy would detect the traffic sent with the host header example.com with a URI path starting with /shop, and send those matching HTTP requests to the correct SaaS application.

This is potentially a complex system to maintain, however, and as it is an ‘extra hop’, there is an increase in latency as requests first go through Cloudflare, to the origin server, then back to the SaaS provider – who may also be on Cloudflare. In a world rapidly migrating away from on-premise software to SaaS platforms, running your own server to do this specific function goes against the grain.

Users therefore want a way to tell Cloudflare – ‘for all traffic to www.example.com, send it to 98.51.100.12. BUT, if you see any traffic to www.example.com/shop, send it to 203.0.113.34’. This is what we call a resolve override. It is essentially a DNS override.

With a resolve override in place, HTTP requests to www.example.com/shop are now correctly sent by Cloudflare to 203.0.113.34 as requested. And they fail. The web server says it doesn’t know what to do with the HTTP request. This is because the host header is still www.example.com, and the web server does not have any knowledge of that website.

Where to? Introducing Origin Rules

To fix this, we need to make sure these requests are sent to 203.0.113.34 with a host header of shop.example.com. This is what is known as a host header override. Now, requests to www.example.com/shop are not only correctly routed to 203.0.113.34, but the host header is changed to one that the ecommerce software is expecting – and thus the request is correctly routed, and the visitors sees the correct content.

Where to? Introducing Origin Rules

The management of these selective overrides, and other overrides, is achieved via Origin Rules.

Origin Rules allow users to route HTTP traffic to different destinations and override certain request characteristics based on a number of criteria such as the visitor’s country, IP address or HTTP request headers.

Route on more than a URL

Origin Rules is built on top of our ruleset engine. This gives users the ability to perform routing decisions based on many fields including the requested URL, and also the visitors country, specific request headers, and more.

Using a combination of one or more of these available fields, users can ensure traffic is routed to specific backends, only when specific criteria are met such as host, URI path, visitor’s country, and HTTP request headers.

Historically, host header override and resolve override were achieved with the setting of a Page Rule.

Where to? Introducing Origin Rules

Page Rules is the ‘If This Then That’ of Cloudflare. Where the ‘If…’ is a URL, and the ‘Then That’ is changing how we handle traffic to specific parts of a ‘zone’. It allows users to selectively change how traffic is handled, or in this case, where traffic is sent. It is very well adopted, with over one million Page Rules in the past three months alone.

Page Rules, however, are limited to performing actions based upon the requested URL. This means if users want to change the backend a HTTP request goes to, they need to make that decision based on the URL alone. This can be challenging for users who may want to perform this decision-making on more nuanced aspects, like the user agent of the visitor or on the presence of a specific cookie.

With Origin Rules, users can perform host header override, resolve override, destination port override and SNI overrides – based on any number of criteria – not only the requested URL. This unlocks a number of interesting use cases.

Example use case: integration with cloud storage endpoints

One such use case is using a cloud storage provider as a backend for static assets, such as images. Enterprise zones can use a combination of host header override and resolve override actions to override the destination of outgoing HTTP requests. This allows for all traffic to example.net to be sent to 98.51.100.12, but requests to example.net/*.jpg be sent to a publicly accessible S3-compatible bucket.

Where to? Introducing Origin Rules

To do this, the user would create an Origin Rule setting the resolve override value to be a DNS record on their own zone, pointing to the S3 provider’s URL. This ensures that requests matching the pattern are routed to the S3 URL. However, when the cloud storage provider receives the request it will drop it – as it does not know how to route requests for the host example.net. Therefore, users also need to deploy a host header override, changing this value to match the bucket name – e.g. bucket.example.net.

Combined, this ensures requests matching the pattern correctly reach the cloud storage provider – with a host header it can use to correctly route the request to the correct bucket.

Origin Rules also enable new use cases. For example, a user can use Origin Rules to A/B test different cloud providers prior to a cut over. This is possible by using the field http.request.cookies and routing traffic to a new, test bucket or cloud provider based on the presence of a specific cookie on the request.

Users with multiple storage regions can also use the ip.geoip.country field within a filter expression to route users to the closest storage instance, reducing latency and time to load for these requests.

Destination port override

Cloudflare listens on 13 ports; seven ports for HTTP, six ports for HTTPS. This means if a request is sent to a URL with the destination port of 443, as is standard for HTTPS, it will be sent to the origin server with a destination port of 443. The same 1:1 mapping applies to the other twelve ports.

But what if a user wanted to change that mapping? For example, when the backend origin server is listening on port 8001. In this scenario, an intermediate service is required to listen for requests on port 443 and create a sub-request with the destination port set to 8001.

Historically this was done on the origin server itself – with a reverse proxy server listening for requests on 443 and other ports and proxying those requests to another port.

Apache
 <VirtualHost *:*>
        ProxyPreserveHost On
        ProxyPass / http://0.0.0.0:8001/
        ProxyPassReverse / http://0.0.0.0:8001/
        ServerName example.com
    </VirtualHost>

NGINX
server {
  listen 443;
  server_name example.com;
    location / {
      proxy_pass http://0.0.0.0:8001;
    }
}

More recently, users have deployed Cloudflare Workers to perform this service, modifying the destination port before HTTP requests ever reach their servers.

Origin Rules simplifies destination port modifications, letting users change the destination port via a simple rules experience without ever having to write a single line of code or configuration:

Where to? Introducing Origin Rules

This destination port modification can also be triggered on almost any field available in the ruleset engine, also, allowing users to change which port to send requests to based on URL, URI path, the presence of HTTP request header and more.

Server Name Indication

Server Name Indication (SNI) is an addition to the TLS encryption protocol. It enables a client device to specify the domain name it is trying to reach in the first step of the TLS handshake, preventing common “name mismatch” errors. Customers using Cloudflare for SaaS may have millions of hostnames pointing to Cloudflare. However, the origin that these requests are sent to may not have an individual certificate for each of the hostnames.

Users today have the option of doing this on a per custom hostname basis using custom origins in SSL for SaaS, however for Enterprise customers not using this setup it was an impossible task.

Enterprise users can use Origin Rules to override the value of the SNI, providing it matches any other zone in their account. This removes the need for users to manage multiple certificates on the origin or choose not to encrypt connections from Cloudflare to the origin.

Try it now

Origin Rules are available to use now via API, Terraform, and our dashboard. Further details can be found on our Developers Docs. Currently, destination port rewriting is available for all our customers as part of Origin Rules. Resolve Override, Host Header Override and SNI overrides are available to our Enterprise users.

Introducing Configuration Rules

Post Syndicated from Matt Bullock original https://blog.cloudflare.com/configuration-rules/

Introducing Configuration Rules

A powerful new set of tools

Introducing Configuration Rules

In 2012, we introduced Page Rules to the world, announcing:

“Page Rules is a powerful new set of tools that allows you to control how CloudFlare works on your site on a page-by-page basis.”

Ten years later, and with all F’s lowercase, we are excited to introduce Configuration Rules — a Page Rules successor and a much improved way of controlling Cloudflare features and settings. With Configuration Rules, users can selectively turn on/off features which would typically be applied to every HTTP request going through the zone. They can do this based on URLs – and more, such as cookies or country of origin.

Configuration Rules opens up a wide range of use cases for our users that previously were impossible without writing custom code in a Cloudflare Worker. Such use cases as A/B testing configuration or only enabling features for a set of file extensions are now made possible thanks to the rich filtering capabilities of the product.

Configuration Rules are available for use immediately across all plan levels.

Turn it on, but only when…

As each HTTP request enters a Cloudflare zone we apply a configuration. This configuration tells the Cloudflare server handling the HTTP request which features the HTTP request should ‘go’ through, and with what settings/options. This is defined by the user, typically via the dashboard.

The issue arises when users want to enable these features, such as Polish as Auto Minify, only on a subset of the traffic to their website. For example, users may want to disable Email Obfuscation but only for a specific page on their website so that contact information is shown correctly to visitors. To do this, they can deploy a Configuration Rule.

Introducing Configuration Rules

Configuration Rules lets users selectively enable or disable features based on one or more ruleset engine fields.

Currently, there are 16 available actions within Configuration Rules. These actions range from Disable Apps, Disable Railgun and Disable Zaraz to Auto Minify, Polish and Mirage.

These actions effectively ‘override’ the corresponding zone-wide setting for matching traffic. For example, Rocket Loader may be enabled for the zone example.com:

Introducing Configuration Rules

If the user, however, does not want Rocket Loader to be enabled on their checkout page due to an issue it causes with a specific JavaScript element, they could create a Configuration Rule to selectively disable Rocket Loader:

Introducing Configuration Rules

This interplay between zone level settings and Configuration Rules allows users to selectively enable features, allowing them to test Rocket Loader on staging.example.com prior to flipping the zone-level toggle.

With Configuration Rules, users also have access to various other non-URL related fields. For example, users could use the ip.geoip.country field to ensure that visitors for specific countries always have the ‘Security Level’ set to ‘I’m under attack’.

Historically, these configuration overrides were achieved with the setting of a Page Rule.

Page Rules is the ‘If This Then That’ of Cloudflare. Where the ‘If…’ is a URL, and the ‘Then That’ is changing how we handle traffic to specific parts of a ‘zone’. It allows users to selectively change how traffic is handled, and in this case specifically, which settings are and aren’t applied. It is very well adopted, with over one million Page Rules in the past three months alone.

Page Rules, however, are limited to performing actions based upon the requested URL. This means if users want to disable Rocket Loader for certain traffic, they need to make that decision based on the URL alone. This can be challenging for users who may want to perform this decision-making on more nuanced aspects, like the user agent of the visitor or on the presence of a specific cookie.

For example, users might want to set the ‘Security Level’ to ‘I’m under attack’ when the HTTP request originates in certain countries. This is where Configuration Rules help.

Use case: A/B testing

A/B testing is the term used to describe the comparison of two versions of a single website or application. It allows users to create a copy of their current website (‘A’), change it (‘B’) and compare the difference.

In a Cloudflare context, users might want to A/B test the effect of features such as Mirage or Polish prior to enabling them for all traffic to the website. With Page Rules, this was impractical. Users would have to create Page Rules matching on specific URI query strings and A/B test by appending those query strings to every HTTP request.

Introducing Configuration Rules

With Configuration Rules, this task is much simpler. Leveraging one or more fields, users can filter on other parameters of a HTTP request to define which features and products to enable.

For example, by using the expression any(http.request.cookies["app"][*] == "test") a user can ensure that Auto Minify, Mirage and Polish are enabled only when this cookie is present on the HTTP request. This allows comparison testing to happen before enabling these products either globally, or on a wider set of traffic. All without impacting existing production traffic.

Introducing Configuration Rules

Use case: augmenting URLs

Configuration Rules can be used to augment existing requirements, also. One example given in ‘The Future of Page Rules’ blog is increasing the Security Level to ‘High’ for visitors trying to access the contact page of a website, to reduce the number of malicious visitors to that page.

In Page Rules, this would be done by simply specifying the contact page URL and specifying the security level, e.g. URL: example.com/contact*. This ensures that any “visitors that exhibit threatening behavior within the last 14 days” are served with a challenge prior to having that page load.

Configuration Rules can take this use case and augment it with additional fields, such as whether the source IP address is in a Cloudflare Managed IP List. This allows users to be more specific about when the security level is changed to ‘High’, such as only when the request also is marged as coming from an open HTTP and SOCKS proxy endpoints, which are frequently used to launch attacks and hide attackers identity:

Introducing Configuration Rules

This reduces the chance of a false positive, and a genuine visitor to the contact form being served with a challenge.

Try it now

Configuration Rules are available now via API, UI, and Terraform for all Cloudflare plans! We are excited to see how you will use them in conjunction with all our new rules releases from this week.

The future of Page Rules

Post Syndicated from Sam Marsh original https://blog.cloudflare.com/future-of-page-rules/

The future of Page Rules

The future of Page Rules

Page Rules is one of our most well-used products. Adopted by millions of users, it is used for configuring everything from cache to security levels. It is the ‘If This Then That’ of Cloudflare. Where the ‘If…’ is a URL, and the ‘Then That’ is changing how we handle traffic to specific parts of a ‘zone’. But it’s not without its limitations.

Page Rules can only trigger on a URL or URL pattern. There is a maximum of 125 Page Rules per zone. Page Rules are also tricky to debug. Even the idea of a “Page” sounds rather old-fashioned now.

We’re replacing Page Rules with four new dedicated products, offering increased rules quota, more functionality, and better granularity. These products are available immediately for testing. Page Rules is not going away yet, but we do anticipate being able to formally begin the end-of-life process soon.

Why change?

In the 10 years since it launched, Page Rules has become a well established product, and a very well adopted one. One million Page Rules have been deployed in the past three months alone.

Page Rules are used to tune how long files should be cached. Page Rules are used to override zone-wide settings for certain URLs. Page Rules are used to create simple URL redirects. Page Rules are used to selectively add/remove HTTP headers. Page Rules is a multitool of a product.

The future of Page Rules
Photo by Andrey Matveev on Unsplash

Like multitools and other generalist products, Page Rules does a good job at many things, but is not best-of-breed at anything. This is the trade-off of generalism. As we have grown as a company our customers have rightfully demanded more. Filtering on URL-alone is no longer sufficient; users are demanding more – and today we are delivering.

Over the last two years we have been working on the future of Page Rules and distilling hundreds of pieces of feedback into common themes, such as:

  1. I need more than 125 Page Rules
  2. I need to be able to trigger Page Rules on more than just the URL
  3. I need to be able to use regular expressions in my Page Rules
  4. It’s hard for me to understand how different Page Rules interact one another
  5. Page Rules is hard to debug
  6. I want more actions in Page Rules

Analyzing these themes we came to the conclusion that the best thing for Page Rules was to disassemble it and create new discrete products, each of which could be best-of-breed for their relevant areas. This dissolution would also provide better clarity regarding interoperation (cache vs configuration vs …), and make debugging simpler.

Today, we announce those new products:

1. Cache Rules: A dedicated product for setting and tuning ‘everything caching’.

2. Configuration Rules: A dedicated product for setting and selectively enabling, disabling and overriding zone-wide settings.

3. Dynamic Redirects: Like ‘Forwarding URL’ but turned up to 11. Redirect based on the visitors country, their preferred language, their device type, use regular expressions (plan level dependant) and more.

4. Origin Rules: A dedicated product for ‘where does this traffic go where it leaves Cloudflare’. Not only have we added host header and resolve override into this new product (ENT only), we’ve also productized another common Workers use case by enabling customers to selectively override the destination port. We’ve also added the ability to override the Server Name Indication (SNI).

All four of these products are available for use now via the dashboard, API and Terraform – and sitting alongside Transform Rules provide the replacement suite of products that will eventually enable an Page Rules end-of-life announcement.

We have dedicated blogs for each of these product launches with more information on what they offer and problems they address.

Order of execution

One of the main benefits of this new product suite is clarity.

Page Rules is a black box, where traffic goes in, ‘things happen’, and traffic comes out. It’s hard to debug the interplay between cache, configuration, header modification etc and it can vary from zone to zone as it’s entirely user defined.

By having discrete, separate areas per ‘function’, it makes visualizing the flow of a HTTP request much easier:

The future of Page Rules

Rather than a single lozenge of Page Rules, we now have visibility that Origin Rules will run first, then Cache Rules, then Configuration Rules, and finally Dynamic Redirects. This means we will modify host headers first, before tuning cache settings. And we will tune the cache parameters before we modify which settings are enabled for the specific traffic.

We have integrated these new products into the Traffic Sequence dashboard element also.

(For zones using both Page Rules and this new suite of products: The new products will take precedence over Page Rules. This means that Page Rules will be overridden if a conflict occurs).

I need more than 125 Page Rules

One of the limitations of Page Rules was how each Page Rule was stored and executed on our backend architecture. We are unable to offer more than 125 Page Rules per zone before we begin to see a performance hit – latency on HTTP requests begins to increase as evaluating them vs the Page Rules takes longer and longer. To combat this limitation users moved simple workloads to Workers, or split the zone into multiple sub domains, each with a 125 Page Rules quota. Neither of these are ideal for the customer.

To combat this limitation we have built all of the replacement products atop our lightning-fast Rulesets Engine, which also runs products such as Transform Rules, Custom Rules (WAF), Bulk Redirects and API Shield.

This allows us to offer much more quota to customers, as this engine is built to scale well beyond 125 rules per product. The table below summarizes the before and after impact of these new products, showing the default rules quota per plan:

Plan Page Rules Origin Rules Cache Rules Config Rules Dynamic Redirects
Enterprise 125 125+ 125+ 125+ 125+
Business 50 50 50 50 50
Pro 20 25 25 25 25
Free 3 10 10 10 10

Additional rules cannot be purchased for these new products.

This means zone’s on the Enterprise plan now have a minimum of 500 rules to use where before they had 125 via Page Rules. For Enterprises the quota for the new products is negotiable. Pro plan zones go from 20 Page Rules to 100.  Combined with the fine-grained control that the ruleset engine offers, these changes allow customers to customize their zone’s traffic to the finest of margins.

The other benefit from building all of these products on the Rulesets Engine is extensibility. Currently there are over 30 products that are built and running on the Rulesets Engine. Each of these products is essentially a logical bucket called a ‘phase’ which contains a single ruleset scoped to that product. Each phase is restricted to specific actions and fields, for example the field cf.bot_management.score is unavailable in http_request_transform as we have not calculated the bot score at the time we perform URL rewrites. Also, only the rewrite action is permitted. Whereas in Origin Rules (http_request_origin) we only allow the action route

When we create new capabilities for a product that is built atop the Rulesets Engine it is trivially simple for us to extend that new capability to other products at a later date.

For example, we added a new ‘field’, http.request.accepted_languages to Transform Rules earlier in the year. Until recently this was only available in Transform Rules. However, as both products are built on the Rulesets Engine it was trivial to enable this feature for Dynamic Redirects. This allows customers to perform URL redirects based on the visitor’s language preference, and the cost to us from an engineering perspective is negligible as the field is already implemented.

This also means in the future should a new field be created for Cache Rules due to a customer request, e.g. http.request.super_cool_field, in a matter of clicks we can enable this field for any of the other 30 products rather than have to duplicate effort across multiple platforms.

Simply put, the more products we build on top of the Rulesets Engine, the faster we can move and the more functionality we can put into users hands.

A single user experience

The most important benefit of all is consistency. Each of these products has a consistent and predictable API. A consistent and predictable Terraform configuration, and a consistent and predictable user experience in the dashboard. The ruleset engine allows us to keep everything the same except for the ‘action’. The filtering stays the same, the API stays the same, the UI stays (largely) the same, the only change is the ‘…then’, the action section of the rule.

This ensures that as a user when you are clicking around the dashboard setting up a new zone you aren’t having to learn each individual product’s page and how to navigate it. The only part you need to learn is what makes that product unique, its actions:

The future of Page Rules

Finally, when we add a new product, extending the Terraform provider to support it is trivial. That consistent experience has been a north star for us during this project and will continue to be in the future.

Try it them now

We are replacing Page Rules with a new suite of products, each built to be best-of-breed and put more power into the hands of our users.

Read more about the new products in each of their dedicated blogs. Then, try them for yourself!

Cloudflare Queues: globally distributed queues without the egress fees

Post Syndicated from Ashcon Partovi original https://blog.cloudflare.com/introducing-cloudflare-queues/

Cloudflare Queues: globally distributed queues without the egress fees

Cloudflare Queues: globally distributed queues without the egress fees

Developers continue to build more complex applications on Cloudflare’s Developer Platform. We started with Workers, which brought compute, then introduced KV, Durable Objects, R2, and soon D1, which enabled persistence. Now, as we enable developers to build larger, more sophisticated, and more reliable applications, it’s time to unlock another foundational building block: messaging.

Thus, we’re excited to announce the private beta of Cloudflare Queues, a global message queuing service that allows applications to reliably send and receive messages using Cloudflare Workers. It offers at-least once message delivery, supports batching of messages, and charges no bandwidth egress fees. Let’s queue up the details.

What is a Queue?

Queues enable developers to send and receive messages with a guarantee of delivery. Think of it like the postal service for the Internet. You give it a message, then it handles all the hard work to ensure the message gets delivered in a timely manner. Unlike the real postal service, where it’s possible for a message to get lost, Queues provide a guarantee that each message is delivered at-least once; no matter what. This lets you focus on your application, rather than worry about the chaos of transactions, retries, and backoffs to prevent data loss.

Queues also allow you to scale your application to process large volumes of data. Imagine a million people send you a package in the mail, at the same time. Instead of a million postal workers suddenly showing up at your front door, you would want them to aggregate your mail into batches, then ask you when you’re ready to receive each batch. This lets you decouple and spread load among services that have different throughput characteristics.

How does it work?

Queues are integrated into the fabric of the Cloudflare Workers runtime, with simple APIs that make it easy to send and receive messages. First, you’ll want to send messages to the Queue. You can do this by defining a Worker, referred to as a “producer,” which has a binding to the Queue.

In the example below, a Worker catches JavaScript exceptions and sends them to a Queue. You might notice that any object can be sent to the Queue, including an error. That’s because messages are encoded using the standard structuredClone() algorithm.

export default {
  async fetch(request: Request, env: Environment) {
     try {
       return await doRequest(request);
     } catch (error) {
       await env.ERROR_QUEUE.send(error);
       return new Response(error.stack, { status: 500 });
     }
  }
}

Second, you’ll want to process messages in the Queue. You can do this by defining a Worker, referred to as the “consumer,” which will receive messages from the Queue. To facilitate this, there is a new type of event handler, named “queue,” which receives the messages sent to the consumer.

This Worker is configured to receive messages from the previous example. It appends the stack trace of each Error to a log file, then saves it to an R2 bucket.

export default {
  async queue(batch: MessageBatch<Error>, env: Environment) {
     let logs = "";
     for (const message of batch.messages) {
        logs += message.body.stack;
     }
     await env.ERROR_BUCKET.put(`errors/${Date.now()}.log`, logs);
  }
}

Configuration is also easy. You can change the message batch size, message retries, delivery wait time, and dead-letter queue. Here’s a snippet of the wrangler.toml configuration when deploying with wrangler, our command-line interface

name = "my-producer"
[queues]
producers = [{ queue = "errors", binding = "ERROR_QUEUE" }]
# ---
name = "my-consumer"
[queues]
consumers = [{ queue = "errors", max_batch_size = 100, max_retries = 3 }]

Above are two different wrangler.tomls, one for a producer and another for a consumer. It is also possible for a producer and consumer to be implemented by the same Worker. To see the full list of options and examples, see the documentation.

What can you build with it?

You can use Cloudflare Queues to defer tasks and guarantee they get processed, decouple load among different services, batch events and process them together, and send messages from Worker to Worker.

To demonstrate, we’ve put together a demo application that you can run on your local machine using wrangler. It shows how Queues can batch messages and handle failures in your code, here’s a preview of it in action:

In addition to batching, here are other examples of what you can build with Queues:

  • Off-load tasks from the critical path of a Workers request.
  • Guarantee messages get delivered to a service that talks HTTP.
  • Transform, filter, and fan-out messages to multiple Queues.

Cloudflare Queues gives you the flexibility to decide where to route messages. Instead of static configuration files that define routing keys and patterns, you can use JavaScript to define custom logic for how you filter and fan-out to multiple Queues. In the next example, you can distribute work to different Queues based on the attributes of a user.

export default {
  async queue(batch: MessageBatch, env: Environment) {
    for (const message of batch.messages) {
      const user = message.body;
      if (isEUResident(user)) {
        await env.EU_QUEUE.send(user);
      }
      if (isForgotten(user)) {
        await env.DELETION_QUEUE.send(user);
      }
    }
  }
}

We will also support integrations with Cloudflare products, like R2. For example, you might configure an R2 bucket to send lifecycle events to a Queue or archive messages to a R2 bucket for long-term storage.

How much does it cost?

Cloudflare Queues has a simple, transparent pricing model that’s easy to predict. It costs $0.40 per million operations, which is defined for every 64 KB chunk of data that is written, read, or deleted. There are also no egregious bandwidth fees for data in or out — unlike Amazon’s SQS or Google’s Pub/Sub.

To effectively deliver a message, it usually takes three operations: one write, one read, and one acknowledgement. You can estimate your usage by considering the cost of messages delivered, which is $1.20 per million. (calculated as 3 x \$0.40)

When can I try it?

You can register to join the waitlist as we work towards a beta launch. You’ll have an opportunity to try it out, for free. Once it’s ready, we’ll launch an open beta for everyone to try.

In the meantime, you can read the documentation to view our code samples, see which features will be supported, and learn what you can build. If you’re in our developer Discord, you stay up-to-date by joining the #queues-beta channel. If you’re an Enterprise customer, reach out to your account team to schedule a session with our Product team.

We’re excited to see what you build with Cloudflare Queues. Let the queuing begin!

New Report on IoT Security

Post Syndicated from Bruce Schneier original https://www.schneier.com/blog/archives/2022/09/new-report-on-iot-security.html

The Atlantic Council has published a report on securing the Internet of Things: “Security in the Billions: Toward a Multinational Strategy to Better Secure the IoT Ecosystem.” The report examines the regulatory approaches taken by four countries—the US, the UK, Australia, and Singapore—to secure home, medical, and networking/telecommunications devices. The report recommends that regulators should 1) enforce minimum security standards for manufacturers of IoT devices, 2) incentivize higher levels of security through public contracting, and 3) try to align IoT standards internationally (for example, international guidance on handling connected devices that stop receiving security updates).

This report looks to existing security initiatives as much as possible—both to leverage existing work and to avoid counterproductively suggesting an entirely new approach to IoT security—while recommending changes and introducing more cohesion and coordination to regulatory approaches to IoT cybersecurity. It walks through the current state of risk in the ecosystem, analyzes challenges with the current policy model, and describes a synthesized IoT security framework. The report then lays out nine recommendations for government and industry actors to enhance IoT security, broken into three recommendation sets: setting a baseline of minimally acceptable security (or “Tier 1”), incentivizing above the baseline (or “Tier 2” and above), and pursuing international alignment on standards and implementation across the entire IoT product lifecycle (from design to sunsetting). It also includes implementation guidance for the United States, Australia, UK, and Singapore, providing a clearer roadmap for countries to operationalize the recommendations in their specific jurisdictions—and push towards a stronger, more cohesive multinational approach to securing the IoT worldwide.

Note: One of the authors of this report was a student of mine at Harvard Kennedy School, and did this work with the Atlantic Council under my supervision.

AWS Week In Review — September 26, 2022

Post Syndicated from Sébastien Stormacq original https://aws.amazon.com/blogs/aws/aws-week-in-review-september-26-2022/

It looks like my travel schedule is coupled with this Week In Review series of blog posts. This week, I am traveling to Fort-de-France in the French Caribbean islands to meet our customers and partners. I enjoy the travel time when I am offline. It gives me the opportunity to reflect on the past or plan for the future.

Last Week’s Launches
Here are some of the launches that caught my eye last week:

Amazon SageMaker Autopilothas added a new Ensemble training mode powered by AutoGluon that is 8X faster than the current Hyper parameter Optimization Mode and supports a wide range of algorithms, including LightGBM, CatBoost, XGBoost, Random Forest, Extra Trees, linear models, and neural networks based on PyTorch and FastAI.

AWS Outposts and Amazon EKSYou can now deploy both the worker nodes and the Kubernetes control plane on an Outposts rack. This allows you to maximize your application availability in case of temporary network disconnection on premises. The Kubernetes control plane continues to manage the worker nodes, and no pod eviction happens when on-premises network connectivity is reestablished.

Amazon Corretto 19 – Corretto is a no-cost, multiplatform, production-ready distribution of OpenJDK. Corretto is distributed by Amazon under an open source license. This version supports the latest OpenJDK feature release and is available on Linux, Windows, and macOS. You can download Corretto 19 from our downloads page.

Amazon CloudWatch Evidently – Evidently is a fully-managed service that makes it easier to introduce experiments and launches in your application code. Evidently adds support for Client Side Evaluations (CSE) for AWS Lambda, powered by AWS AppConfig. Evidently CSE allows application developers to generate feature evaluations in single-digit milliseconds from within their own Lambda functions. Check the client-side evaluation documentation to learn more.

Amazon S3 on AWS OutpostsS3 on Outposts now supports object versioning. Versioning helps you to locally preserve, retrieve, and restore each version of every object stored in your buckets. Versioning objects makes it easier to recover from both unintended user actions and application failures.

Amazon PollyAmazon Polly is a service that turns text into lifelike speech. This week, we announced the general availability of Hiujin, Amazon Polly’s first Cantonese-speaking neural text-to-speech (NTTS) voice. With this launch, the Amazon Polly portfolio now includes 96 voices across 34 languages and language variants.

X in Y – We launched existing AWS services in additional Regions:

Other AWS News
Introducing the Smart City Competency program – The AWS Smart City Competency provides best-in-class partner recommendations to our customers and the broader market. With the AWS Smart City Competency, you can quickly and confidently identify AWS Partners to help you address Smart City focused challenges.

An update to IAM role trust policy behavior – This is potentially a breaking change. AWS Identity and Access Management (IAM) is changing an aspect of how role trust policy evaluation behaves when a role assumes itself. Previously, roles implicitly trusted themselves. AWS is changing role assumption behavior to always require self-referential role trust policy grants. This change improves consistency and visibility with regard to role behavior and privileges. This blog post shares the details and explains how to evaluate if your roles are impacted by this change and what to modify. According to our data, only 0.0001 percent of roles are impacted. We notified by email the account owners.

Amazon Music Unifies Music QueuingThe Amazon Music team published a blog post to explain how they created a unified music queue across devices. They used AWS AppSync and AWS Amplify to build a robust solution that scales to millions of music lovers.

Upcoming AWS Events
Check your calendar and sign up for an AWS event in your Region and language:

AWS re:Invent – Learn the latest from AWS and get energized by the community present in Las Vegas, Nevada. Registrations are open for re:Invent 2022 which will be held from Monday, November 28 to Friday, December 2.

AWS Summits – Come together to connect, collaborate, and learn about AWS. Registration is open for the following in-person AWS Summits: Bogotá (October 4), and Singapore (October 6).

Natural Language Processing (NLP) Summit – The AWS NLP Summit 2022 will host over 25 sessions focusing on the latest trends, hottest research, and innovative applications leveraging NLP capabilities on AWS. It is happening at our UK headquarters in London, October 5–6, and you can register now.

AWS Innovate for every app – This regional online conference is designed to inspire and educate executives and IT professionals about AWS. It offers dozens of technical sessions in eight languages (English, Spanish, French, German, Italian, Japanese, Korean, and Indonesian). Register today: Americas, September 28; Europe, Middle-East, and Africa, October 6; Asia Pacific & Japan, October 20.

AWS Innovate for every app

AWS Community DaysAWS Community Day events are community-led conferences to share and learn with one another. In September, the AWS community in the US will run events in Arlington, Virginia (September 30). In Europe, Community Day events will be held in October. Join us in Amersfoort, Netherlands (October 3), Warsaw, Poland (October 14), and Dresden, Germany (October 19).

AWS Tour du Cloud – The AWS Team in France has prepared a roadshow to meet customers and partners with a one-day free conference in seven cities across the country (Aix en Provence, Lille, Toulouse, Bordeaux, Strasbourg, Nantes, and Lyon), and in Fort-de-France, Martinique. Tour du Cloud France

AWS Fest – This third-party event will feature AWS influencers, community heroes, industry leaders, and AWS customers, all sharing AWS optimization secrets (this week on Wednesday, September). You can register for AWS Fest here.

Stay Informed
That is my selection for this week! To better keep up with all of this news, please check out the following resources:

— seb
This post is part of our Week in Review series. Check back each week for a quick roundup of interesting news and announcements from AWS!

[$] Supporting CHERI capabilities in GCC and glibc

Post Syndicated from original https://lwn.net/Articles/909265/

The CHERI
architecture
is the product of a research program to extend common
CPU architectures
in a way that prevents many types of memory-related bugs (and
vulnerabilities). At the 2022 GNU Tools Cauldron,
Alex Coplan and Szabolcs Nagy described the work that has been done to
bring GCC and the GNU C Library (glibc) to this architecture. CHERI is a fundamentally
different approach to how memory is accessed, and supporting it properly is anything
but a trivial task.

Automate ETL jobs between Amazon RDS for SQL Server and Azure Managed SQL using AWS Glue Studio

Post Syndicated from Daniel Maldonado original https://aws.amazon.com/blogs/big-data/automate-etl-jobs-between-amazon-rds-for-sql-server-and-azure-managed-sql-using-aws-glue-studio/

Nowadays many customers are following a multi-cloud strategy. They might choose to use various cloud-managed services, such as Amazon Relational Database Service (Amazon RDS) for SQL Server and Azure SQL Managed Instances, to perform data analytics tasks, but still use traditional extract, transform, and load (ETL) tools to integrate and process the data. However, traditional ETL tools may require you to develop custom scripts, which makes ETL automation difficult.

In this post, I show you how to automate ETL jobs between Amazon RDS for SQL Server and Azure SQL Managed Instances using AWS Glue Studio, which is part of AWS Glue, a fully managed serverless integration service. AWS Glue Studio has a graphical interface that makes it easy to create, run, and monitor ETL jobs, and you can create a schedule to run your jobs at specific times.

Solution overview

To move data from one database to another, there are different services available either on-premise or in the cloud, varied by bandwidth limits, ongoing changes (CDC), schema and table modifications, and other features. Beyond that, we need to apply advanced data transformations, monitor, and automate the ETL jobs. This is where AWS Glue Studio can help us facilitate these activities.

As shown in the following diagram, we use AWS Glue Studio as the middleware to pull data from the source database (in this case an Azure SQL Managed Instance), then create and automate the ETL job using one of the pre-built transformations in AWS Glue Studio. Finally, we load the data to the target database (in this case an RDS for SQL Server instance).

The solution workflow consists of the following steps:

  1. Create connections for the source and target databases.
  2. Create and run AWS Glue crawlers.
  3. Create and run an ETL job that transforms the data and loads it from source to target.
  4. Schedule the ETL job to run automatically.
  5. Monitor the ETL job.

Prerequisites

Complete the following prerequisite steps:

  1. Install SQL Server Management Studio (SSMS) or an equivalent client tool.
  2. Set up a VPN connection between Amazon Virtual Private Cloud (Amazon VPC) and the Azure private subnet.
  3. Create a security group for AWS Glue ENI in your VPC.
  4. Create an AWS Identity and Access Management (IAM) role for AWS Glue. For instructions, refer to Setting up IAM permissions for AWS Glue.
  5. Open the appropriate firewall ports in the Azure private subnet.
  6. Create a source database table (Azure SQL Managed Instance). You can deploy the Azure database instance using the following QuickStart. For testing purposes, I import the public AdventureWorks sample database and use the dbo.Employee table. See the following code:
    #Query table
    SELECT * FROM [AdventureWorksLT2019].[dbo].[Employee]

  7. Create the target database table (Amazon RDS for SQL Server). To deploy the RDS instance, refer to Create and Connect to a Microsoft SQL Server Database with Amazon RDS. You can create an empty database and table with the following statements. This is the table where the data coming from Azure will be stored.
#Create database
CREATE DATABASE AdventureWorksonRDS;
#Create table
CREATE TABLE Employee
(EmpID INT NOT NULL,
EmpName VARCHAR(50) NOT NULL,
Designation VARCHAR(50) NULL,
Department VARCHAR(50) NULL,
JoiningDate DATETIME NULL,
CONSTRAINT [PK_Employee] PRIMARY KEY CLUSTERED (EmpID)

#Query table
SELECT * FROM [AdventureWorksonRDS].[dbo].[Employee]

Create connections

The first step is to populate our AWS Glue Data Catalog with the schema information coming from our source and target data sources.

To do that, we first create connections. A connection is a Data Catalog object that stores connection information for a particular data store. Connections store login credentials, URI strings, VPC information, and more. Creating connections in the Data Catalog saves the effort of having to specify the connection details every time you create a crawler or job.

Create a connection for Azure SQL Managed Instance

To create the connection to our source database, complete the following steps:

  1. On the AWS Glue console, choose AWS Glue Studio.
  2. In the navigation pane of the AWS Glue Studio console, choose Connectors.
  3. Choose Create connection.
  4. For Name, enter AzureSQLManaged.
  5. For Connection type, choose JDBC.
  6. For JDBC URL, use the SQL Server syntax jdbc:protocol://host:port;database=db_name.

You can find the host and database name on the Azure SQL Managed Instance service console, on the Overview page.For this specific example, we use the following information for our Azure SQL Instance:

    • Protocolsqlserver
    • Hostadi-qa-sql-managed-instance-test.public.xxxxxxxxxxxx.database.windows.net
    • Port3342
    • Database nameAdventureWorksLT2019

Enter your user name and password.
Choose Create connection.

Create a connection for Amazon RDS for SQL Server

To create a connection for our target data source, complete the following steps:

  1. On the AWS Glue Studio console, choose Connectors in the navigation pane.
  2. Choose Create connection.
  3. For Name, enter AWSRDSforSQL.
  4. For Connection type, choose Amazon RDS.
  5. For Database engine, choose Microsoft SQL Server.
  6. For Database instances, choose your RDS DB instance.
  7. For Database name, enter AdventureWorksonRDS.
  8. Enter your user name and password.
  9. Choose Create connection.

You can now see the two connections created in the Connections section.

Create and run AWS Glue crawlers

You can use a crawler to populate the AWS Glue Data Catalog with tables. This is the most common method used by most AWS Glue users. A crawler can crawl multiple data stores in a single run. Upon completion, it updates the Data Catalog with the tables it found. The ETL jobs that you define in AWS Glue use these Data Catalog tables as sources and targets.

Create a crawler for Azure SQL Managed Instance

To create a crawler for our source database, complete the following steps:

  1. On the AWS Glue console, choose Crawlers in the navigation pane.
  2. Choose Create crawler.
  3. If the data hasn’t been mapped into an AWS Glue table, select Not yet and choose Add a data source.
  4. For Data source¸ choose JDBC.
  5. For Connection, choose AzureSQLManaged.
  6. For Include path, specify the path of the database including the schema: AdventureWorksLT2019/dbo/%.
  7. Choose Add a JDBC data source.                                                                                     
  8. Choose Next.
  9. Choose the IAM role created as part of the prerequisites and choose Next.
  10. Choose Add database to create the target database in the AWS Glue Data Catalog.
  11. For Name, enter azuresqlmanaged_db.
  12. Choose Create database.
  13. For Target database, choose azuresqlmanaged_db.
  14. Choose Next.
  15. Review if everything looks correct and choose Create crawler.

Create a crawler for Amazon RDS for SQL Server

Repeat the crawler creation steps to create the crawler for the target RDS for SQL Server database, using the following information:

  • Crawler name AmazonRDSSQL_Crawler
  • Data source – JDBC
  • Connection AWSRDSforSQL
  • Include path AdventureWorksonRDS/dbo/%
  • IAM role AWSGlueServiceRoleDefault
  • Database name amazonrdssql_db

Run the crawlers

Now it’s time to run the crawlers.

  1. On the AWS Glue console, choose Crawlers in the navigation pane.
  2. Select the crawlers you created and choose Run.
  3. When the crawler is complete, choose Databases in the navigation pane. Here you can find the databases discovered by the crawler.
  4. Choose Tables in the navigation pane and explore the tables discovered by the crawler that correctly identified the data type as SQL Server.
  5. Choose the table adventureworkslt2019_dbo_employee and review the schema created for the data source.

Create and run an ETL job

Now that we have crawled our source and target databases, and we have the data in the AWS Glue Data Catalog, we can create an ETL job to load and transform this data.

  1. On the AWS Glue Studio console, choose Jobs in the navigation pane.
  2. Select Visual with a blank canvas to use a visual interface to create our ETL jobs.
  3. Choose Create.
  4. On the Source menu, choose AWS Glue Data Catalog.
  5. On the Data source properties tab, specify the database and table (for this post, azuresqlmanaged_db and adventureworkslt2019_dbo_employee).
  6. On the Transform menu, choose Apply mapping to map the source fields to the target database.
  7. On the Transform tab, you can see the data fields to be loaded, and you even can drop some of them if needed.
  8. On the Target menu, choose AWS Glue Data Catalog.
  9. On the Data target properties tab, choose the database and table where you want to load the transformed data (for this post, amazonrdssql_db and adventureworksrds_dbo_employee).
  10. On the Job details tab, for Name, enter ETL_Azure_to_AWS.
  11. For IAM Role, choose the appropriate role.
  12. Choose Save.
  13. Choose Run to run the job.

If the ETL job ran successfully, it should map the data from the source database (Azure SQL) to the target database (Amazon RDS for SQL). To confirm it, you can connect to the target database using SQL Server Management Studio (SSMS), and query the empty database/table AdventureWorksonRDS/dbo.Employee. It should have the data coming from the Azure SQL Managed Instance.

#Query table
SELECT * FROM [AdventureWorksonRDS].[dbo].[Employee]

Schedule your ETL job

In AWS Glue Studio, you can create a schedule to have your jobs run at specific times. This will reimport the full dataset and reference the use of bookmarks to do incremental loads. You can schedule your ETL jobs on an hourly, daily, weekly, monthly, or custom basis, depending on your needs. To schedule a job, complete the following steps:

  1. On the AWS Glue Studio, navigate to the job you created.
  2. On the Schedules tab, choose Create schedule.
  3. For Name, enter a name (for example, dbo_employee_daily_load).
  4. Choose your preferred frequency, start hour, and minute of the hour. For this post, we schedule it daily at 3:00 UTC.
  5. For Description, enter an optional description.
  6. Choose Create schedule.

Confirm on the Schedules tab that the schedule was created and activated successfully.

You have now automated your ETL job to run at your desired frequency.

Monitor your ETL job

The job monitoring dashboard provides an overall summary of the job runs, with totals for the jobs with a status of Running, Canceled, Success, or Failed.

The Runs tab shows the jobs for the specified date range and filters. You can filter the jobs on additional criteria, such as status, worker type, job type, and job name.

Conclusion

In this post, I went through the steps to automate ETL jobs using AWS Glue Studio, which is a user-friendly graphical interface to perform data integration tasks such as discovering and extracting data from various sources; enriching, cleaning, normalizing, and combining data; and loading and organizing data in databases, data warehouses, and data lakes. You can easily find and access this data using the AWS Glue Data Catalog. Data engineers and ETL developers can visually create, run, and monitor ETL workflows with a few clicks in AWS Glue Studio.


About the author

Daniel Maldonado is an AWS Solutions Architect, specializing in Microsoft workloads and big data technologies, and focused on helping customers migrate their applications and data to AWS. Daniel has over 13 years of experience working with information technologies and enjoys helping clients reap the benefits of running their workloads in the cloud.

How Facteus improved Quantamatics performance by adopting Amazon Aurora Serverless and Amazon EKS

Post Syndicated from Aishwarya Subramaniam original https://aws.amazon.com/blogs/architecture/how-facteus-improved-quantamatics-performance-by-adopting-amazon-aurora-serverless-and-amazon-eks/

Facteus Inc. is a leading provider of actionable insights from sensitive transaction data. Facteus safely transforms raw financial transaction data from legacy technologies into actionable information, without compromising data privacy, through its innovative synthetic data process. Quantamatics is one of Facteus’ core product offering.

Quantamatics accelerates the time it takes a user to go from raw alternative data to insights, by providing a cloud-based, turnkey research platform that handles data from ingestion to analysis. This platform saves the analysts, data researchers, and data scientists time by doing all the preparation and normalization efforts prior to working with the data for insight discovery. The provided cloud environment also allows for easy and flexible analysis of both provided and external data sources. Quantamatics is a SaaS offering with a subscription model that provides access to both the research platform and the associated Facteus datasets.

In June 2021, Facteus re-architected their monolithic Quantamatics application to use microservices. This blog will contrast the before and after states from a performance and management perspective as they migrated from Snowflake to Amazon Aurora Serverless v2 (Postgres) and from Amazon Elastic Compute Cloud (Amazon EC2) to Amazon Elastic Kubernetes Service (Amazon EKS).

A great place to start when evaluating existing workloads for fault tolerance and reliability is the AWS Well-Architected Framework. The Well-Architected Framework is designed to help cloud architects build secure, high-performing, resilient, and efficient infrastructure for their applications. Based on six pillars—operational excellence, security, reliability, performance efficiency, cost optimization, and sustainability—the Framework provides a consistent approach for customers to evaluate architectures, and implement designs that will scale over time.

The AWS Well-Architected Tool,  available at no charge in the AWS Management Console, lets you create self-assessments to identify and correct gaps in your current architecture. Adhering to Well-Architected principles, Facteus adopted managed services, such as Amazon EKS and Amazon Aurora Serverless, as they reduce efforts on provisioning, configuring, scaling, backing up, and so on. Additionally, using managed services helps to save on the overall costs of maintaining the services.

Facteus’ architecture overview

Before

Users can access Quantamatics for their research either through a Jupyter notebook or a Microsoft Excel plugin. Facteus used EC2 instances to directly host the underlying JupyterHub deployments and AWS Elastic Beanstalk to deploy APIs.

The legacy architecture, while cloud-based, had multiple issues that made it ineffective from a maintenance, scalability, and cost perspective (as demonstrated in Figure 1):

  • JupyterHub does not currently support high availability (HA) natively. This meant an EC2 failover would require relatively long unavailability while a replacement EC2 node spun up or potentially double the cost to keep an idle node on standby.
    • Also, with the EC2 instances being specialized, portions of each EC2 instance will remain unused, resulting in unnecessary costs compared to more modern solutions such as Amazon EKS, which can pool and divide up instances in a more granular fashion.
    • Finally, as the EC2 instances were standalone, solutions would need to be set up to both monitor application health and perform the appropriate actions in case of an outage.
  • Although Elastic Beanstalk was a great way to deploy API instances in an HA and scalable way, to completely modernize and remain consistent throughout application to a microservice-based architecture, Facteus migrated their Elastic Beanstalk instances as well, to better utilize the pooled resources.
Cloud-based legacy architecture

Figure 1. Cloud-based legacy architecture

Quantamatics requires a Data Warehouse solution to constantly run behind an API to allow for acceptable request and response times. While Snowflake is a great data warehousing and big data querying solution, Facteus found it expensive for their deployment. The queries that the Quantamatics APIs run are typically not computationally expensive but do end up returning relatively large amounts of data. This makes transferring the results back to the API over the internet a potential bottleneck.

To address these bottlenecks, Facteus re-architected their application into an Amazon EKS based one, backed with Aurora Serverless v2 (Postgres).

The new architecture resolves the previous problems in two ways (Figure 2):

  • By using Aurora Serverless v2 (Postgres) to store and query the datasets used by the API within the same VPC instead of Snowflake, it kept the query run time relatively the same but drastically decreased both the transfer time and the associated costs due to the locality of the database as well as the cost and scalability of Aurora Serverless v2.
  • By switching to Amazon EKS, the underlying EC2 nodes could easily be pooled and more thoroughly utilized across the various deployments, thus reducing costs. Additionally, as the deployments were now containerized, an outage would result in the quick relocation of those containerized apps (pods) to nodes with capacity, thus reducing downtime and cost.
    • As a side benefit with the move to managed nodes on Amazon EKS, this completely removed the node patching overhead, as Amazon EKS safely handles the patching of the underlying nodes with a single command.
    • Amazon EKS monitors and restarts pods automatically, which eliminated the need to set up and manage a solution that monitors pod health and takes the appropriate actions upon failures.
Contemporary architecture with Amazon EKS and Aurora Serverless v2 (Postgres)

Figure 2. Contemporary architecture with Amazon EKS and Aurora Serverless v2 (Postgres)

Auto scaling with Amazon EKS and Aurora Serverless

  • Amazon EKS helped to greatly reduce the overhead of setting up and managing the auto scaling of Quantamatics in two ways:
    • User compute environments could be spun up as isolated pods, with Amazon EKS spinning nodes up and down automatically based on demand.
    • API instances could also be automatically spun up and down based on network throughput metrics queried by Amazon EKS to handle the requests made by users in a timely fashion.
  • Aurora Serverless v2
    • With Aurora Serverless v2, the needed compute capacity of the database automatically scales based on load generated by the corresponding API requests. This both reduced the cost as the load varies heavily throughout the day, reducing the management overhead of handling spinning up and down of read replicas if other solutions were used instead.

Snowflake vs. Aurora Serverless V2 (Postgres) – Quantamatics query performance and cost comparison

The following steps were performed to migrate data from Snowflake to Aurora Serverless v2:

  • Use the Snowflake COPY INTO <location> command to copy the data from the Snowflake database table into one or more files in an S3 bucket.
  • Create tables in Aurora Serverless. Use the create_s3_uri function to load variables.
  • Use the aws_s3.table_import_from_s3 function to import the data file from an Amazon S3 file name prefix.
  • Verify that the information was loaded.

This blog post describes importing data from Amazon S3 to Amazon Aurora PostgreSQL.

Testing strategy: Run the corresponding CLI database utility for each database (snowsql vs psql) from within the VPC. Run the same query on each dataset. Return and write the results as CSV to a local file.
Data set size: ~178,000,000 rows
Result set size: ~418,000 rows

Data source Configuration Results
Snowflake Snowflake: Medium Warehouse (running), AWS based in same Region as APIs

  • Cost: ~$0.01 per query based on credit usage
  • 21.99 seconds run time
  • 3.36 seconds run time, 18.63 seconds transfer time
Aurora Serverless V2(Postgres) Idling on four Aurora Compute Units (ACU)

  • Cost: ~$0.24 an hour
  • Tables and indexes tuned for Quantamatics use cases
  • 7.00 seconds run time
  • 3.58 seconds run time, 3.42 seconds transfer time

Conclusion

The customer was able to achieve similar run times for the given dataset and query, but faster transfer speeds from Aurora Serverless due to the locality of the database. They also realized up to ~40x runtime cost savings by using Aurora Serverless—1,000 queries in Aurora Serverless vs. ~24 queries in Snowflake for the same cost.

Note: These results are specific to Quantamatics use cases where queries are fixed and well-known, and relatively limited in terms of complexity. This allowed the tables and database in Aurora Serverless v2 to be tuned for those specific purposes.

AWS recommends customers review their workloads using the AWS Well-Architected Tool to help ensure that their workloads are performant, secure, and cost-optimized. Well-Architected Framework Reviews are excellent opportunities to work together with your AWS account team and key stakeholders to discuss how modern infrastructure can help you win in the market.

The collective thoughts of the interwebz