Reinforcement Learning for Budget Constrained Recommendations

Post Syndicated from Netflix Technology Blog original https://netflixtechblog.com/reinforcement-learning-for-budget-constrained-recommendations-6cbc5263a32a

by Ehtsham Elahi
with
James McInerney, Nathan Kallus, Dario Garcia Garcia and Justin Basilico

Introduction

This writeup is about using reinforcement learning to construct an optimal list of recommendations when the user has a finite time budget to make a decision from the list of recommendations. Working within the time budget introduces an extra resource constraint for the recommender system. It is similar to many other decision problems (for e.g. in economics and operations research) where the entity making the decision has to find tradeoffs in the face of finite resources and multiple (possibly conflicting) objectives. Although time is the most important and finite resource, we think that it is an often ignored aspect of recommendation problems.

In addition to relevance of the recommendations, time budget also determines whether users will accept a recommendation or abandon their search. Consider the scenario that a user comes to the Netflix homepage looking for something to watch. The Netflix homepage provides a large number of recommendations and the user has to evaluate them to choose what to play. The evaluation process may include trying to recognize the show from its box art, watching trailers, reading its synopsis or in some cases reading reviews for the show on some external website. This evaluation process incurs a cost that can be measured in units of time. Different shows will require different amounts of evaluation time. If it’s a popular show like Stranger Things then the user may already be aware of it and may incur very little cost before choosing to play it. Given the limited time budget, the recommendation model should construct a slate of recommendations by considering both the relevance of the items to the user and their evaluation cost. Balancing both of these aspects can be difficult as a highly relevant item may have a much higher evaluation cost and it may not fit within the user’s time budget. Having a successful slate therefore depends on the user’s time budget, relevance of each item as well as their evaluation cost. The goal for the recommendation algorithm therefore is to construct slates that have a higher chance of engagement from the user with a finite time budget. It is important to point out that the user’s time budget, like their preferences, may not be directly observable and the recommender system may have to learn that in addition to the user’s latent preferences.

A typical slate recommender system

We are interested in settings where the user is presented with a slate of recommendations. Many recommender systems rely on a bandit style approach to slate construction. A bandit recommender system constructing a slate of K items may look like the following:

A bandit style recommender system for slate construction

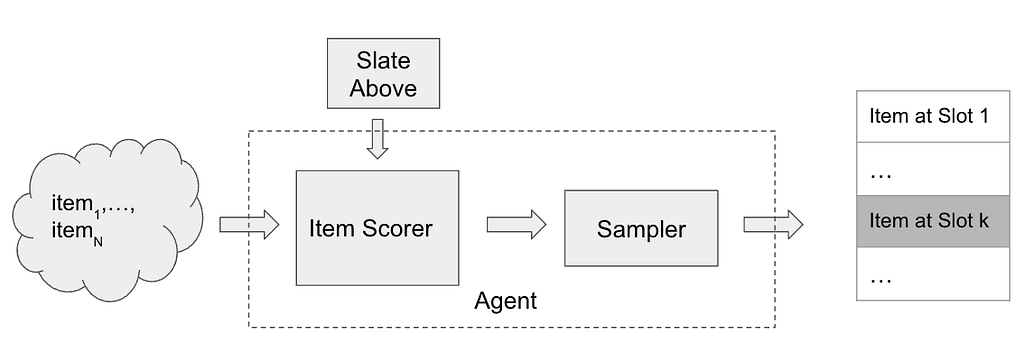
To insert an element at slot k in the slate, the item scorer scores all of the available N items and may make use of the slate constructed so far (slate above) as additional context. The scores are then passed through a sampler (e.g. Epsilon-Greedy) to select an item from the available items. The item scorer and the sampling step are the main components of the recommender system.

Problem formulation

Let’s make the problem of budget constrained recommendations more concrete by considering the following (simplified) setting. The recommender system presents a one dimensional slate (a list) of K items and the user examines the slate sequentially from top to bottom.

A user with a fixed time budget evaluating a slate of recommendations with K items. Item 2 gets the click/response from the user. The item shaded in red falls outside of the user’s time budget.

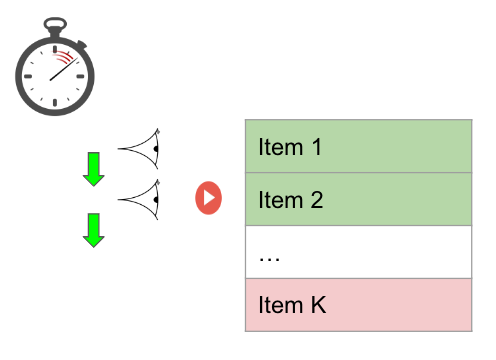
The user has a time budget which is some positive real valued number. Let’s assume that each item has two features, relevance (a scalar, higher value of relevance means that the item is more relevant) and cost (measured in a unit of time). Evaluating each recommendation consumes from the user’s time budget and the user can no longer browse the slate once the time budget has exhausted. For each item examined, the user makes a probabilistic decision to consume the recommendation by flipping a coin with probability of success proportional to the relevance of the video. Since we want to model the user’s probability of consumption using the relevance feature, it is helpful to think of relevance as a probability directly (between 0 and 1). Clearly the probability to choose something from the slate of recommendations is dependent not only on the relevance of the items but also on the number of items the user is able to examine. A recommendation system trying to maximize the user’s engagement with the slate needs to pack in as many relevant items as possible within the user budget, by making a trade-off between relevance and cost.

Connection with the 0/1 Knapsack problem

Let’s look at it from another perspective. Consider the following definitions for the slate recommendation problem described above

Clearly the abandonment probability is small if the items are highly relevant (high relevance) or the list is long (since the abandonment probability is a product of probabilities). The abandonment option is sometimes referred to as the null choice/arm in bandit literature.

This problem has clear connections with the 0/1 Knapsack problem in theoretical computer science. The goal is to find the subset of items with the highest total utility such that the total cost of the subset is not greater than the user budget. If β_i and c_i are the utility and cost of the i-th item and u is the user budget, then the budget constrained recommendations can be formulated as

0/1 Knapsack formulation for Budget constrained recommendations

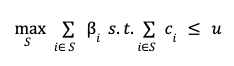
There is an additional requirement that optimal subset S be sorted in descending order according to the relevance of items in the subset.

The 0/1 Knapsack problem is a well studied problem and is known to be NP-Complete. There are many approximate solutions to the 0/1 Knapsack problem. In this writeup, we propose to model the budget constrained recommendation problem as a Markov Decision process and use algorithms from reinforcement learning (RL) to find a solution. It will become clear that the RL based solution to budget constrained recommendation problems fits well within the recommender system architecture for slate construction. To begin, we first model the budget constrained recommendation problem as a Markov Decision Process.

Budget constrained recommendations as a Markov Decision Process

In a Markov decision process, the key component is the state evolution of the environment as a function of the current state and the action taken by the agent. In the MDP formulation of this problem, the agent is the recommender system and the environment is the user interacting with the recommender system. The agent constructs a slate of K items by repeatedly selecting actions it deems appropriate at each slot in the slate. The state of the environment/user is characterized by the available time budget and the items examined in the slate at a particular step in the slate browsing process. Specifically, the following table defines the Markov Decision Process for the budget constrained recommendation problem,

Markov Decision Process for Budget constrained recommendations

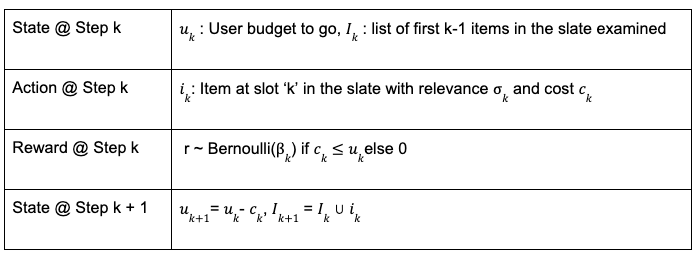
In real world recommender systems, the user budget may not be observable. This problem can be solved by computing an estimate of the user budget from historical data (e.g. how long the user scrolled before abandoning in the historical data logs). In this writeup, we assume that the recommender system/agent has access to the user budget for sake of simplicity.

The slate generation task above is an episodic task i-e the recommender agent is tasked with choosing K items in the slate. The user provides feedback by choosing one or zero items from the slate. This can be viewed as a binary reward r per item in the slate. Let π be the recommender policy generating the slate and γ be the reward discount factor, we can then define the discounted return for each state, action pair as,

State, Action Value function estimation

The reinforcement learning algorithm we employ is based on estimating this return using a model. Specifically, we use Temporal Difference learning TD(0) to estimate the value function. Temporal difference learning uses Bellman’s equation to define the value function of current state and action in terms of value function of future state and action.

Bellman’s equation for state, action value function

Based on this Bellman’s equation, a squared loss for TD-Learning is,

Loss Function for TD(0) Learning

The loss function can be minimized using semi-gradient based methods. Once we have a model for q, we can use that as the item scorer in the above slate recommender system architecture. If the discount factor γ =0, the return for each (state, action) pair is simply the immediate user feedback r. Therefore q with γ = 0 corresponds to an item scorer for a contextual bandit agent whereas for γ > 0, the recommender corresponds to a (value function based) RL agent. Therefore simply using the model for the value function as the item scorer in the above system architecture makes it very easy to use an RL based solution.

Budget constrained Recommendation Simulation

As in other applications of RL, we find simulations to be a helpful tool for studying this problem. Below we describe the generative process for the simulation data,

Generative model for simulated data

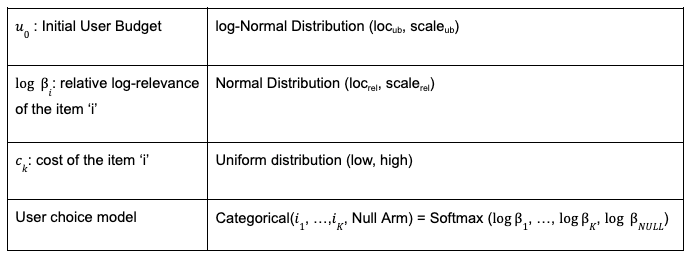
Note that, instead of sampling the per-item Bernoulli, we can alternatively sample once from a categorical distribution with relative relevances for items and a fixed weight for the null arm. The above generative process for simulated data depends on many hyper-parameters (loc, scale etc.). Each setting of these hyper-parameters results in a different simulated dataset and it’s easy to realize many simulated datasets in parallel. For the experiments below, we fix the hyper-parameters for the cost and relevance distributions and sweep over the initial user budget distribution’s location parameter. The attached notebook contains the exact settings of the hyper-parameters used for the simulations.

Metric

A slate recommendation algorithm generates slates and then the user model is used to predict the success/failure of each slate. Given the simulation data, we can train various recommendation algorithms and compare their performance using a simple metric as the average number of successes of the generated slates (referred to as play-rate below). In addition to play-rate, we look at the effective-slate-size as well, which we define to be the number of items in the slate that fit the user’s time budget. As mentioned earlier, one of the ways play-rate can be improved is by constructing larger effective slates (with relevant items of-course) so looking at this metric helps understand the mechanism of the recommendation algorithms.

On-policy learning results

Given the flexibility of working in the simulation setting, we can learn to construct optimal slates in an on-policy manner. For this, we start with some initial random model for the value function, generate slates from it, get user feedback (using the user model) and then update the value function model using the feedback and keep repeating this loop until the value function model converges. This is known as the SARSA algorithm.

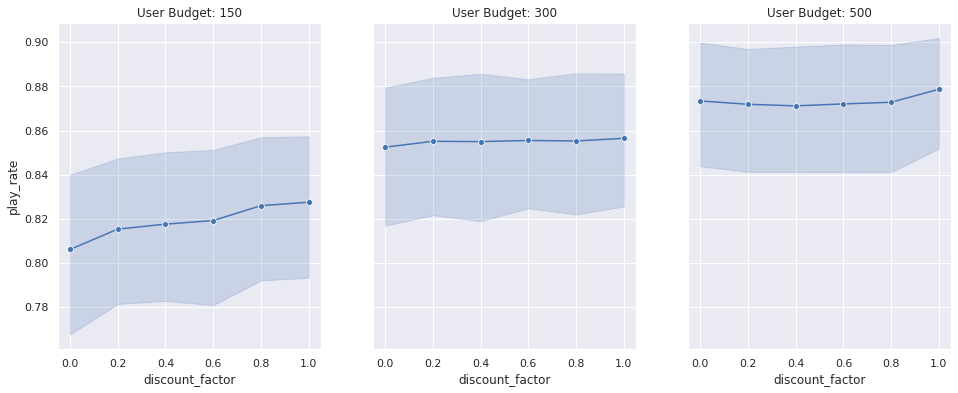
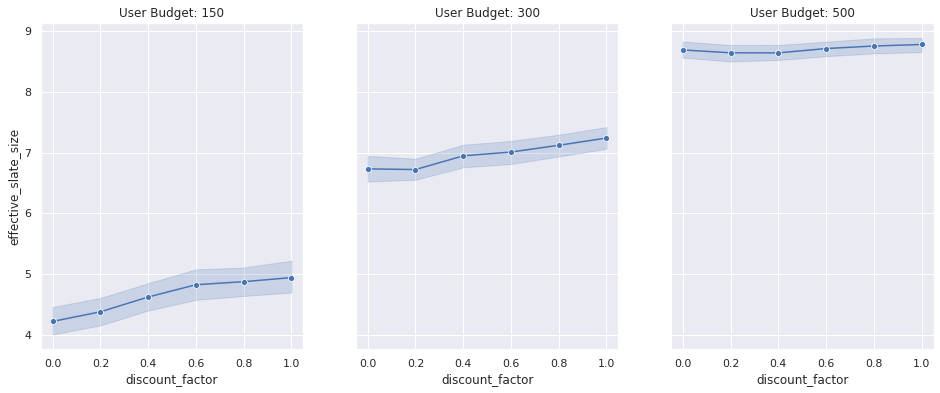
The following set of results show how the learned recommender policies behave in terms of metric of success, play-rate for different settings of the user budget distributions’s location parameter and the discount factor. In addition to the play rate, we also show the effective slate size, average number of items that fit within the user budget. While the play rate changes are statistically insignificant (the shaded areas are the 95% confidence intervals estimated using bootstrapping simulations 100 times), we see a clear trend in the increase in the effective slate size (γ > 0) compared to the contextual bandit (γ= 0)

Play-Rate and Effective slate sizes for different User Budget distributions. The user budget distribution’s location is on the same scale of the item cost and we are looking for changes in the metrics as we make changes to the user budget distribution

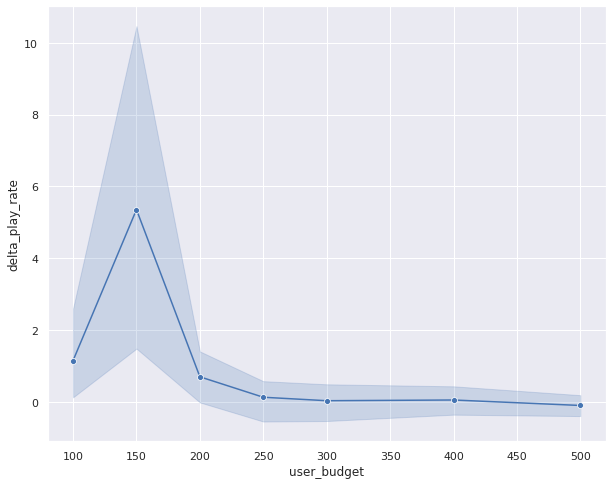
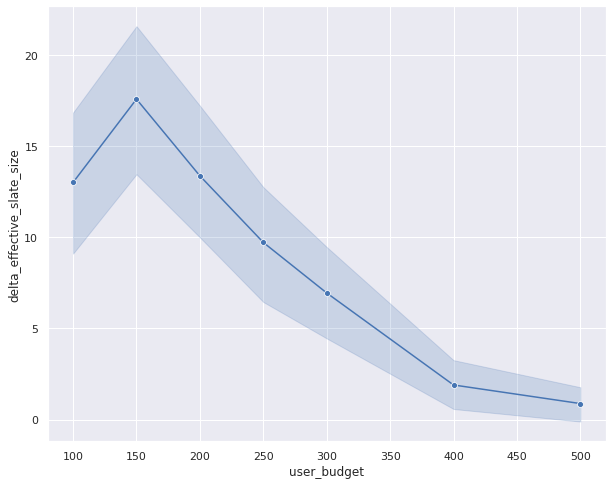
We can actually get a more statistically sensitive result by comparing the result of the contextual bandit with an RL model for each simulation setting (similar to a paired comparison in paired t-test). Below we show the change in play rate (delta play rate) between any RL model (shown with γ = 0.8 below as an example) and a contextual bandit (γ = 0). We compare the change in this metric for different user budget distributions. By performing this paired comparison, we see a statistically significant lift in play rate for small to medium budget user budget ranges. This makes intuitive sense as we would expect both approaches to work equally well when the user budget is too large (therefore the item’s cost is irrelevant) and the RL algorithm only outperforms the contextual bandit when the user budget is limited and finding the trade-off between relevance and cost is important. The increase in the effective slate size is even more dramatic. This result clearly shows that the RL agent is performing better by minimizing the abandonment probability by packing more items within the user budget.

Paired comparison between RL and Contextual bandit. For limited user budget settings, we see statistically significant lift in play rate for the RL algorithm.

Off-policy learning results

So far the results have shown that in the budget constrained setting, reinforcement learning outperforms contextual bandit. These results have been for the on-policy learning setting which is very easy to simulate but difficult to execute in realistic recommender settings. In a realistic recommender, we have data generated by a different policy (called a behavior policy) and we want to learn a new and better policy from this data (called the target policy). This is called the off-policy setting. Q-Learning is one well known technique that allows us to learn optimal value function in an off-policy setting. The loss function for Q-Learning is very similar to the TD(0) loss except that it uses Bellman’s optimality equation instead

Loss function for Q-Learning

This loss can again be minimized using semi-gradient techniques. We estimate the optimal value function using Q-Learning and compare its performance with the optimal policy learned using the on-policy SARSA setup. For this, we generate slates using Q-Learning based optimal value function model and compare the play-rate with the slates generated using the optimal policy learned with SARSA. Below is result of the paired comparison between SARSA and Q-Learning,

Paired comparison between Q-Learning and SARSA. Play rates are similar between the two approaches but effective slate sizes are very different.

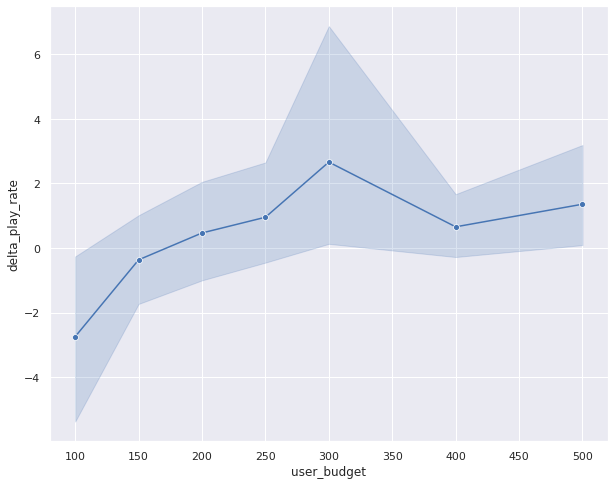
In this result, the change in the play-rate between on-policy and off-policy models is close to zero (see the error bars crossing the zero-axis). This is a favorable result as this shows that Q-Learning results in similar performance as the on-policy algorithm. However, the effective slate size is quite different between Q-Learning and SARSA. Q-Learning seems to be generating very large effective slate sizes without much difference in the play rate. This is an intriguing result and needs a little more investigation to fully uncover. We hope to spend more time understanding this result in future.

Conclusion:

To conclude, in this writeup we presented the budget constrained recommendation problem and showed that in order to generate slates with higher chances of success, a recommender system has to balance both the relevance and cost of items so that more of the slate fits within the user’s time budget. We showed that the problem of budget constrained recommendation can be modeled as a Markov Decision Process and we can find a solution to optimal slate construction under budget constraints using reinforcement learning based methods. We showed that the RL outperforms contextual bandits in this problem setting. Moreover, we compared the performance of On-policy and Off-policy approaches and found the results to be comparable in terms of metrics of success.

Code

Github repo


Reinforcement Learning for Budget Constrained Recommendations was originally published in Netflix TechBlog on Medium, where people are continuing the conversation by highlighting and responding to this story.

How Fresenius Medical Care aims to save dialysis patient lives using real-time predictive analytics on AWS

Post Syndicated from Kanti Singh original https://aws.amazon.com/blogs/big-data/how-fresenius-medical-care-aims-to-save-dialysis-patient-lives-using-real-time-predictive-analytics-on-aws/

This post is co-written by Kanti Singh, Director of Data & Analytics at Fresenius Medical Care.

Fresenius Medical Care is the world’s leading provider of kidney care products and services, and operates more than 2,600 dialysis centers in the US alone. The company provides comprehensive solutions for people living with chronic kidney disease and related conditions, with a mission to improve the quality of life of every patient, every day, by transforming healthcare through research, innovation, and compassion. Data analysis that leads to timely interventions is critical to this mission, and essential to reduce hospitalizations and prevent adverse events.

In this post, we walk you through the solution architecture, performance considerations, and how a research partnership with AWS around medical complexity led to an automated solution that helped deliver alerts for potential adverse events.

Why Fresenius Medical Care chose AWS

The Fresenius Medical Care technical team chose AWS as their preferred cloud platform for two key reasons.

First, we determined that AWS IoT Core was more mature than other solutions and would likely face fewer issues with deployment and certificates. As an organization, we wanted to go with a cloud platform that had a proven track record and established technical solutions and services in the IoT and data analytics space. This included Amazon Athena, which is an easy-to-use serverless service that you can use to run queries on data stored in Amazon Simple Storage Service (Amazon S3) for analysis.

Another factor that played a major role in our decision was the fact that AWS offered the largest set of serverless services for analytics than any other cloud provider. We ultimately determined that AWS innovations met the company’s current needs as well as positioned the company for the future as we worked to expand our predictive capabilities.

Solution overview

We needed to develop a near-real-time analytics solution that would collect dynamic dialysis machine data every 10 seconds during hemodialysis treatment in near-real time and personalize it to predict every 30 minutes if a patient is at a health risk for intradialytic hypotension (IDH) within the next 15–75 minutes. This solution needed to scale to all our dialysis centers nationwide, with each location sending 10 MBps of treatment data at peak times.

The complexities that needed to be managed in the solution included handling high throughput data, a low-latency time-sensitive solution of 10 seconds from data origination to reporting and notification, a highly available solution, and a cost-effective solution with on-demand scaling up or down based on data volume.

Fresenius Medical Care partnered with AWS on this mission and developed an architecture that met our technical and business requirements. Core components in the architecture included Amazon Kinesis Data Streams, Amazon Kinesis Data Analytics, and Amazon SageMaker. We chose Kinesis Data Streams and Kinesis Data Analytics primarily because they’re serverless and highly available (99.9%), offer very high throughput, and are easy to scale. We chose SageMaker due to its unique capability that allows ease of building, training, and running machine learning (ML) models at scale.

The following diagram illustrates the architecture.

The solution consists of the following key components:

  1. Data collection
  2. Data ingestion and aggregation
  3. Data lake storage
  4. ML Inference and operational analytics

Let’s discuss each stage in the workflow in more detail.

Data collection

Dialysis machines located in Fresenius Medical Care centers help patients in the treatment of end-stage renal disease by performing hemodialysis. The dialysis machines provide immediate access to all treatment and clinical trending data across the fleet of hemodialysis machines in all centers in the US.

These machines transmit a data payload every 10 seconds to Kafka brokers located in Fresenius Medical Care’s on-premises data center for use by several applications.

Data ingestion and aggregation

We use a Kinesis-Kafka connector hosted on self-managed Amazon Elastic Compute Cloud (Amazon EC2) instances to ingest data from a Kafka topic in near-real time into Kinesis Data Streams.

We use AWS Lambda to read the data points and filter the datasets accordingly to Kinesis Data Analytics. Upon reaching the batch size threshold, Lambda sends the data to Kinesis Data Analytics for instream analytics.

We chose Kinesis Data Analytics due to the ease-of-use it provides for SQL-based stream analytics. By using SQL with KDA (KDA Studio/Flink SQL), we can create dynamic features based on machine interval data arriving in real time. This data is joined with the patient demographic, historical clinical, treatment, and laboratory data (enriched with Amazon S3 data) to create the complete set of features required for a downstream ML model.

Data lake storage

Amazon Kinesis Data Firehose was the simplest way to consistently load streaming data to build a raw data lake in Amazon S3. Kinesis Data Firehose micro-batches data into 128 MB file sizes and delivers streaming data to Amazon S3.

Clinical datasets are required to enrich stream data sourced from on-premises data warehouses via AWS Glue Spark jobs on a nightly basis. The AWS Glue jobs extract patient demographic, historical clinical, treatment, and laboratory data from the data warehouse to Amazon S3 and transform machine data from JSON to Parquet format for better storage and retrieval costs in Amazon S3. AWS Glue also helps build the static features for the intradialytic hypotension (IDH) ML model, which are required for downstream ML inference.

ML Inference and Operational analytics

Lambda batches the stream data from Kinesis Data Analytics that has all the features required for IDH ML model inference.

SageMaker, a fully managed service, trains and deploys the IDH predictive model. The deployed ML model provides a SageMaker endpoint that is used by Lambda for ML inference.

Amazon OpenSearch Service helps store the IDH inference results it received from Lambda. The results are then used for visualization through Kibana, which displays a personalized health prediction dashboard visual for each patient undergoing treatment and is available in near-real time for the care team to provide intervention proactively.

Observability and traceability for failures

Because this solution offers the potential for life-saving interventions, it’s considered business critical. The following key measures are taken to proactively monitor the AWS jobs in Fresenius Medical Care’s VPC account:

  • For AWS Glue jobs that have failures and errors in Lambda functions, an immediate email and Amazon CloudWatch alert is sent to the Data Ops team for resolution.
  • CloudWatch alarms are also generated for Amazon OpenSearch Service whenever there are blocks on writes or the cluster is overloaded with shard capacity, CPU utilization, or other issues, as recommended by AWS.
  • Kinesis Data Analytics and Kinesis Data Streams generate data quality alerts on data rejections or empty results.
  • Data quality alerts are also generated whenever data quality rules on data points are mismatched. To check mismatched data, we use quality rule comparison and sanity checks between message payloads in the stream with data loaded in the data lake.

These systematic and automated monitoring and alerting mechanisms help our team stay one step ahead to ensure that systems are running smoothly and successfully, and any unforeseen problems can be resolved as quickly as possible before it causes any adverse impact on users of the system.

AWS partnership

After Fresenius Medical Care took advantage of the AWS Data Lab to create a working prototype within one week, expert Solutions Architects from AWS became trusted advisors, helping our team with prescriptive guidance from ideation to production. The AWS team helped with both solution-based and service-specific best practices, helped resolve key blockers in every phase from development through production, and performed architecture reviews to ensure the solution was robust and resilient to business needs.

Solution results

This solution allows Fresenius Medical Care to better personalize care to patients undergoing dialysis treatment with a proactive intervention by clinicians at the point of care that has the potential to save patient lives. The following are some of the key benefits due to this solution:

  • Cloud computing resources enable the development, analysis, and integration of real-time predictive IDH that can be easily and seamlessly scaled as needed to reach additional clinics.
  • The use of our tool may be particularly useful in institutions facing staff shortages and, possibly, during home dialysis. Additionally, it may provide insights on strategies to prevent and manage IDH.
  • The solution enables modern and innovative solutions that improve patient care by providing world-class research and data-driven insights.

This solution has been proven to scale to an acceptable performance level of 6,000 messages per second, translating to 19 MB/sec with 60,000/sec concurrent Lambda invocations. The ability to adapt by scaling up and down every component in the architecture with ease kept costs very low, which wouldn’t have been possible elsewhere.

Conclusion

Successful implementation of this solution led to a think big approach in modernizing several legacy data assets and has set Fresenius Medical Care on the path of building an enterprise unified data analytics platform on AWS using Amazon S3, AWS Glue, Amazon EMR, and AWS Lake Formation. The unified data analytics platform offers robust data security and data sharing for multi-tenants in various geographies across the US. Similar to Fresenius, you can accelerate time to market by using the right tool for the job, using the broad and deep variety of AWS analytic native services.


About the authors

Kanti Singh is a Director of Data & Analytics at Fresenius Medical Care, leading the big data platform, architecture, and the engineering team. She loves to explore new technologies and how to leverage them to solve complex business problems. In her free time, she loves traveling, dancing, and spending time with family.

Harsha Tadiparthi is a Specialist Principal Solutions Architect specialized in analytics at Amazon Web Services. He enjoys solving complex customer problems in databases and analytics, and delivering successful outcomes. Outside of work, he loves to spend time with his family, watch movies, and travel whenever possible.

New – AWS Support App in Slack to Manage Support Cases

Post Syndicated from Channy Yun original https://aws.amazon.com/blogs/aws/new-aws-support-app-in-slack-to-manage-support-cases/

ChatOps speeds up software development and operations by enabling DevOps teams to use chat clients and chatbots to communicate and run tasks. DevOps engineers have increasingly moved their monitoring, system management, continuous integration (CI), and continuous delivery (CD) workflows to chat applications in order to streamline activities in a single place and enable better collaboration within organizations.

For example, AWS Chatbot enables ChatOps for AWS to monitor and respond to operational events. AWS Chatbot processes AWS service notifications from Amazon Simple Notification Service (Amazon SNS) and forwards them to your Slack channel or Amazon Chime chat rooms so teams can analyze and act on them immediately, regardless of location. However, AWS Support customers had to switch applications from Slack to the AWS Support Center console to access and engage with AWS Support, moving them away from critical operation channels where essential group communications take place.

Today we are announcing the new AWS Support App, which enables you to directly manage your technical, billing, and account support cases, increase service quotas in Slack, and initiate a live chat with AWS Support engineers in Slack channels. You can then search for, respond to, and participate in group chats with AWS Support engineers to resolve support cases from your Slack channels.

With the AWS Support App in Slack, you can integrate AWS Support into your team workflows to improve collaboration. When creating, updating, or monitoring a support case status, your team members keep up to date in real time. They can also easily search previous cases to find recommendations and solutions and instantly share those details with all team members without having to switch applications.

Configuring the AWS Support App in Slack
The AWS Support App in Slack is now available to all customers with Business, Enterprise On-ramp, or Enterprise Support at no additional charge. If you have a Basic or Developer plan, you can upgrade your support plan.

For connecting your Slack workspace and channel for your organization, you should have access to add apps to your Slack workspace and an AWS Identity and Access Management (IAM) user or role with the required permissions. To learn more, see examples of IAM policies to manage access.

To get started with the AWS Support App in Slack, visit the AWS Support Center console and choose Authorize workspace.

When prompted to give permissions to access your Slack workspace, you can select your workspace to connect and choose Allow.

Now you can see your workspace on the Slack configuration page. To add more workspaces, choose Add workspace and repeat this step. You can add up to five workspaces to your account.

After you authorize your Slack workspace, you can add your Slack channels by choosing Add channel. You can add up to 20 channels for a single account. A single Slack channel can have up to 100 AWS accounts.

Choose the workspace name that you previously authorized, the Slack channel ID included in the channel link and the value that looks like C01234A5BCD where you invited the AWS Support App by /invite @awssupport command, the IAM role that you created for the AWS Support App.

You can also set notifications for how to get notified about cases and choose at least one of the options in New and reopened cases, Case correspondences, or Resolved cases for notification types. If you select High-severity cases, you can get notified for only cases that affect a production system or higher by the severity levels.

After adding a new channel, you can now open the Slack channel and manage support cases and live chats with AWS Support engineers.

Managing Support Cases in the Slack Channel
After you add your Slack workspace and channel, you can create, search, resolve, and reopen your support case in your Slack channel.

In your Slack channel, when you enter /awssupport create-case command, you can create a support case to specify the subject, description, issue type, service, category, severity, and contact method — either email and Slack notifications or live chat in Slack.

If you choose Live chat in Slack, you can enter the names of other members. AWS Support App will create a new chat channel for the created support case and will automatically add you, the members that you specified, and AWS Support engineers.

After reviewing the information you provided, you can create a support case. You can also choose Share to channel to share the search results with the channel.

In your Slack channel, when you enter the /awssupport search-case command, you can search support cases for a specific AWS account, data range, and case status, such as open or resolved.

You can choose See details to see more information about a case. When you see details for a support case, you can resolve or reopen specific support cases directly.

Initiating Live Chat Sessions with AWS Support Engineers
If you chose the live chat option when you created your case, the AWS Support App creates a chat channel for you and an AWS Support engineer. You can use this chat channel to communicate with a support engineer and any others that you invited to the live chat.

To join a live chat session with AWS Support, navigate to the channel name that the AWS Support App created for you. The live channel name contains your support case ID, such as awscase-1234567890. Anyone who joins your live chat channel can view details about this specific support case. We strongly recommend that you only add users that require access to your support cases.

When a support engineer joins the channel, you can chat with a support engineer about your support case and upload any file attachments to the channel. The AWS Support App automatically saves your files and chat log to your case correspondence.

To stop chatting with the support agent, choose End chat or enter the /awssupport endchat command. The support agent will leave the channel and the AWS Support App will stop recording the live chat. You can find the chat history attached to the case correspondence for this support case. If the issue has been resolved, you can choose Resolve case from the pinned message to show the case details in the chat channel or enter the /awssupport resolve command.

When you manage support cases or join live chats for your account in the Slack channel, you can view the case correspondences to determine whether the case has been updated in the Slack channel. You can also audit the Support API calls the application made on behalf of users via logs in AWS CloudTrail. To learn more, see Logging AWS Support API calls using AWS CloudTrail.

Requesting Service Quota Increases
In your Slack channel, when you enter the /awssupport service-quota-increase command, you can request to increase the service quota for a specific AWS account, AWS Region, service name, quota name, and requested value for the quota increase.

Now Available
The AWS Support App in Slack is now available to all customers with Business, Enterprise On-ramp, or Enterprise Support at no additional charge. If you have a Basic or Developer plan, you can upgrade your support plan. To learn more, see Manage support cases with the AWS Support App or contact your usual AWS Support contacts.

Channy

Removing complexity to improve business performance: How Bridgewater Associates built a scalable, secure, Spark-based research service on AWS

Post Syndicated from Sergei Dubinin original https://aws.amazon.com/blogs/big-data/removing-complexity-to-improve-business-performance-how-bridgewater-associates-built-a-scalable-secure-spark-based-research-service-on-aws/

This is a guest post co-written by Sergei Dubinin, Oleksandr Ierenkov, Illia Popov and Joel Thompson, from Bridgewater.

Bridgewater’s core mission is to understand how the world works by analyzing the drivers of markets and turning that understanding into high-quality portfolios and investment advice for our clients. Within Bridgewater Technology, we strive to make our researchers as productive as possible at what they do best: building the fundamental understanding of global markets. This means eliminating the need to deal with underlying IT infrastructure, and focusing on building and improving their investment ideas.

In this post, we examine our proprietary service in four dimensions. We talk about our business challenges, how we met our high security bar, how we can scale to meet the demands of the business, and how we do all of this in a cost-effective manner.

Challenge

Our researchers’ demand for compute required to develop and test their investment logic is constantly growing. This consistent and aggressive growth in compute capacity was a driving force behind our initial decision to move to the public cloud.

Utilizing the scale of the AWS Cloud has allowed us to generate investment signals and views of the world that would have been impossible to do on premises. When we first moved this analytical workload to AWS, we built on Amazon Elastic Compute Cloud (Amazon EC2) along with other services such as Elastic Load Balancing, AWS Auto Scaling, and Amazon Simple Storage Service (Amazon S3) to provide core functionality. A short time later, we moved to the AWS Nitro System, completing jobs 20% faster—allowing our research teams to iterate more quickly on their investment ideas.

The next step in our evolution started 2 years ago when we adopted Apache Spark as the underlying compute engine for our investment logic execution service. This helped streamline our analytics pipeline, removing duplication and decoupling many of the plugins we were developing for our researchers. Rather than run Apache Spark ourselves, we chose Amazon EMR as a hosted Spark platform. However, we soon discovered that Amazon EMR on EC2 wasn’t a good fit for the way we wanted to use it. For example, we can’t predict when a researcher will submit a job, so to avoid having our researchers wait for a brand new EMR cluster to be created and bootstrapped, we used long-lived EMR clusters, which forced many different jobs to run on the same cluster. However, because a single EMR cluster can only exist in a single Availability Zone, our cluster was limited to only being able to launch instances in that Availability Zone. At the significant scale that we were operating at, individual Availability Zones started running out of our desired instance capacity to meet our needs. Although we could launch many different clusters across different Availability Zones, that would leave us handling job scheduling at a high level, which was the whole point of using Amazon EMR and Spark. Furthermore, to be as cost-efficient as possible, we wanted to continuously scale the number of nodes in the cluster based on demand, and as a result, we would churn through thousands of nodes a day. This constant churning of nodes caused job failures and additional operational overhead for our teams.

We brought these concerns to AWS, who took the lead in pushing these issues to resolution. AWS partnered closely with us to understand our use cases and the impact of job failures, and tirelessly worked with us to solve these challenges. Working with the Amazon EMR team, we narrowed down the problem to our aggressive scaling patterns, which the service could not handle at that time. Over the course of just a few months, the Amazon EMR team made several service improvements in the scaling mechanism to meet our needs and the needs of many other AWS customers.

While working closely with the Amazon EMR team on these issues, the AWS team informed us of the development of Amazon EMR on EKS, a managed service that would enable us to run Spark workloads on Amazon Elastic Kubernetes Service (Amazon EKS). Amazon EKS is a strategic platform for us across various business units at Bridgewater, and after doing a proof of concept of our workload using EMR on EKS, it became clear that this was a better fit for our use case and more aligned with our strategic direction. After migrating to EMR on EKS, we can now take advantage of capacity in multiple Availability Zones and improve our resiliency to EMR cluster issues or broader service events, while still meeting our high security bar.

Security

Another important aspect of our service is ensuring it maintains the appropriate security posture. Among other concerns, Bridgewater strictly compartmentalizes access to different investment ideas, and we must defend against the possibility of a malicious insider attempting to steal our intellectual property or otherwise harm Bridgewater. To balance the trade-offs between speed and security, we designed security controls to defend against potentially malicious jobs, while enabling our researchers to quickly iterate on their code. This is made more complicated by the design of Spark’s Kubernetes backend. The Spark driver, which in our case is running arbitrary and untrusted code, has to be given Kubernetes role-based access control (RBAC) permissions to create Kubernetes Pods. The ability to create Pods is very powerful and can lead to privilege escalation.

Our first layer of isolation is to run each job in its own Kubernetes namespace (and, therefore, in its own EMR on EKS virtual cluster). A namespace and virtual cluster are created when the job is ready to be submitted, and they’re deleted when that job is finished. This prevents one job from interfering directly with another job, but there are still other vectors to defend against. For example, Spark drivers should not be creating Pods with containers that run as root or source their images from unapproved repositories. We first investigated PodSecurityPolicies for this purpose. However, they couldn’t solve all of our use cases (such as restricting where container images can be pulled from), and they are currently being deprecated and will eventually be removed. Instead, we turned to Open Policy Agent (OPA) Gatekeeper, which provides a flexible approach for writing policies in code that can do more complex authorization decisions and allows us to implement our desired suite of controls. We also worked with the AWS Service Team to add further defense in depth, such as ensuring that all Pods created by EMR on EKS dropped all Linux capabilities, which we could then enforce with Gatekeeper.

The following diagram illustrates how we can maintain the required job separation within our research service.

Scaling

One of the largest motivations of our evolution to Spark on Amazon EMR and then on EMR on EKS was improving the efficiency of our resource utilization by aggressively scaling based on demand. Our fundamental cause-and-effect understanding of markets and economies is powered by our systematic, high-performance compute Spark grid. We run simulations at a constantly increasing scale and need an architecture that can scale up and meet our foreseeable business needs for the next several years.

Our platform runs two types of jobs: ad hoc interactive and scheduled batch. Each type of job brings its own scaling complexities, and both benefited from the evolution to EMR on EKS. Ad hoc jobs can be submitted at any time throughout business hours, and the simulation determines how much compute capacity is needed. For example, a particular job may need one EC2 instance or 100 EC2 instances. This can translate to hundreds of EC2 instances needing to be spun up or down within a few minutes. The scheduled batch jobs run periodically throughout the day with predetermined simulations and similarly translates to hundreds of EC2 instances spinning up or down. In total, scaling up and down by many hundreds of EC2 instances in a few minutes is common, and we needed a solution that could meet those business requirements.

For this specific problem, we needed a solution that was able to handle aggressive scaling events on the order of hundreds of EC2 instances per minute. Additionally, when operating at this scale, it’s important to both diversify instance types and spread jobs across Availability Zones. EMR on EKS empowers us to run fully-managed Spark jobs on an EKS cluster that spans multiple Availability Zones and provides the option to choose a heterogeneous set of instance types for Amazon EKS. Spanning a single EKS cluster across Availability Zones enables us to utilize compute capacity across the entire Region, thereby increasing instance diversity and availability for this workload. Because Spark jobs are running within containers on Amazon EKS, we can easily swap out instance types within the EKS cluster or run different instance types within the same cluster. As a result of these capabilities, we’re able to regularly scale our production service to approximately 1,600 EC2 instances totaling 25,000 cores at peak, running 3,000 jobs per day.

Finally, in late 2021, we conducted some scaling tests to see what the realistic limits of our service are. We are happy to share that we were able to scale our service to three times our normal daily size in terms of compute and simulations run. This exercise has validated that we will be able to meet the increase in business demand without committing additional engineering resources to do so.

Cost management

In addition to significantly increasing our ability to scale, we also were able to design the solution to be extremely cost effective. Prior to EMR on EKS, we had two options for Spark jobs: either self-managed on Amazon EC2 or using Amazon EMR on EC2. Self-managing on Amazon EC2 meant that we needed to manage the complexities of scheduling jobs on nodes, manage the Spark clusters themselves, and develop a separate application to provision and stop EC2 instances as Spark jobs ran to scale the workloads. Amazon EMR on EC2 provides a managed service to run Spark workloads on Amazon EC2. However, for customers like us who need to operate in multiple Availability Zones and already have a technology footprint on Kubernetes, EMR on EKS made more sense.

Moving to EMR on EKS enables us to scale dynamically as jobs are submitted, generating huge cost savings. Simulation capacity is right-sized within the range of a few minutes; something that is not possible with another solution. Additionally, our investment in Amazon EC2 Compute Savings Plans provides us with the savings and flexibility to meet our needs; we just need to specify how many compute hours we’re committed to in a particular Region and AWS handles the rest. You can read more about the cost benefits of EMR on EKS in Amazon EMR on Amazon EKS provides up to 61% lower costs and up to 68% performance improvement for Spark workloads.

The future

Although we’re currently meeting our key users’ needs, we have prioritized several improvements to our service for the future. First, we plan on replacing the Kubernetes Cluster Autoscaler with Karpenter. Given our aggressive and frequent compute scaling, we have found that some jobs can be unexpectedly stopped using the Cluster Autoscaler. We experience this about six times a day. We expect Karpenter will greatly diminish the occurrence of this failure mode. To learn more about Karpenter, check out Introducing Karpenter – An Open-Source High-Performance Kubernetes Cluster Autoscaler.

Second, we’re moving several complementary services that are currently running on EC2 to EKS. This will increase our ability to deploy meaningful improvements for our business and increase resiliency to service events.

Finally, we are making longer term efforts to improve our resiliency to regional service events. We are exploring broadening our operations to other AWS Regions, which would allow us to increase our service availability as well as maintain our burst capacity.

Conclusion

Working closely with AWS teams, we were able to develop a scalable, secure, and cost-optimized service on AWS that allows our researchers to generate larger and more complex investment ideas without worrying about IT infrastructure. Our service runs our Spark-based simulations across multiple Availability Zones at near-full utilization without having to worry about building or maintaining a scheduling platform. Finally, we are able to meet and surpass our security benchmarks by creating job separation using native AWS constructs at scale. This has given us tremendous confidence that our mission-critical data is safe in the AWS Cloud.

Through this close partnership with AWS, Bridgewater is poised to anticipate and meet the rigorous demands of our researchers for years to come; something that was not possible in our old data centers or with our prior architecture. Our President and CTO, Igor Tsyganskiy, recently spoke with AWS at length on this partnership. For the video of this discussion, check out Merging Business and Tech – Bridgewater’s Guide to Drive Agility.

Acknowledgements

  • Igor Tsyganskiy, President and Chief Technology Officer, Bridgewater
  • Aaron Linsky, Sr. Product Manager, Bridgewater
  • Gopinathan Kannan, Sr. Mgr. Engineering, Amazon Web Services
  • Vaibhav Sabharwal, Sr. Customer Solutions Manager, Amazon Web Services
  • Joseph Marques, Senior Principal Engineer, Amazon Web Services
  • David Brown, VP EC2, Amazon Web Services

About the authors

Sergei Dubinin is an Engineering Manager with Bridgewater. He is passionate about building big data processing systems that are suitable for a secure, stable, and performant use in production.

Oleksandr Ierenkov is a Solution Architect for EPAM Systems. He has focused on helping Bridgewater migrate in-house distributed systems to microservices on Kubernetes and various AWS-managed services with a focus on operational efficiency. Oleksandr is basically the same name as Alexander, only Ukrainian.

Anthony Pasquariello is a Senior Solutions Architect at AWS based in New York City. He specializes in modernization and security for our advanced enterprise customers. Anthony enjoys writing and speaking about all things cloud. He’s pursuing an MBA, and received his MS and BS in Electrical & Computer Engineering.

Illia Popov is a Tech Lead for EPAM Systems. Illia has been working with Bridgewater since 2018 and was active in planning and implementing the migration to EMR on EKS. He is excited to continue delivering value to Bridgewater by adapting managed services in close cooperation with AWS.

Peter Sideris is a Sr. Technical Account Manager at AWS. He works with some of our largest and most complex customers to ensure their success in the AWS Cloud. Peter enjoys his family, marine reef keeping, and volunteers his time to the Boy Scouts of America in several capacities.

Joel Thompson is an Architect at Bridgewater Associates, where he has worked in a variety of technology roles over the past 13 years, including building some of the earliest foundations of AWS adoption at Bridgewater. He is passionate about solving complicated problems to securely deliver value to the business. Outside of work, Joel is an avid skier, helped co-found the fwd:cloudsec cloud security conference, and enjoys traveling to spend time with friends and family.

Expanded eligibility for the free MFA security key program

Post Syndicated from CJ Moses original https://aws.amazon.com/blogs/security/expanded-eligibility-for-the-free-mfa-security-key-program/

Since the broad launch of our multi-factor authentication (MFA) security key program, customers have been enthusiastic about the program and how they will use it to improve their organizations’ security posture. Given the level of interest, we’re expanding eligibility for the program to allow more US-based AWS account root users and payer accounts to take advantage of the offer. Previously, eligibility required that US-based root users and payer accounts spend a minimum of $100 per month over the past 3 months. Now, we are expanding eligibility to US-based root users and payer accounts who have spent a minimum of $300 over the past 3 months. If you are a US-based customer who meets the expanded eligibility requirements, we encourage you to place an order for your free security key. As a reminder, you can use the following steps to order your free key.

To order your free security key

  1. Confirm your eligibility at the ordering portal. You will be prompted to sign in if you haven’t already. Sign in with your AWS account root user or payer account credentials.
  2. Choose your free security key from the available options.
  3. Provide your email address for order confirmation and your shipping address.
  4. Place your order.

MFA as a core security best practice is one of the key messages emphasized at the recent AWS re:Inforce conference. Using MFA is one of the simplest ways for anyone, personally or professionally, to help improve their security online. For example, if credentials become compromised on GitHub, users have an extra layer of protection if MFA is enabled. Or, if your login details are compromised for your bank account, MFA acts a second factor to protect your account.

If you’re not eligible for a free security key at this time, but would still like a security key, check out our MFA recommendations. These are available for purchase from many sellers, including Amazon. For more information about the MFA program, see our Free MFA Security Key page.

 
If you have feedback about this post, submit comments in the Comments section below. If you have questions about this post, contact AWS Support.

Want more AWS Security news? Follow us on Twitter.

CJ Moses

CJ Moses

CJ is the Chief Information Security Officer (CISO) at AWS, where he leads product design and security engineering. His mission is to deliver the economic and security benefits of cloud computing to business and government customers. Previously, CJ led the technical analysis of computer and network intrusion efforts at the U.S. Federal Bureau of Investigation Cyber Division. He also served as a Special Agent with the U.S. Air Force Office of Special Investigations (AFOSI). CJ led several computer intrusion investigations seen as foundational to the information security industry today.

[$] From late-bound arguments to deferred computation, part 2

Post Syndicated from original https://lwn.net/Articles/904900/

Discussion on PEP 671 (“Syntax
for late-bound function argument defaults”) has been going on—in fits and
starts—since it was introduced last
October
. The idea is to provide a way
to specify the default for a function argument that is evaluated in the
scope of the function
call, which will allow more concise, and visible, defaults. But there has
been a persistent complaint that what the
language needs is a more-general
deferred computation feature; late-bound defaults would simply fall out as
one specific user of the feature. The arrival of a proposal for deferred
computation did not really
accomplish that goal, however.

Cybersecurity Analysts: Job Stress Is Bad, but Boredom Is Kryptonite

Post Syndicated from Amy Hunt original https://blog.rapid7.com/2022/08/24/cybersecurity-analysts-job-stress-is-bad-but-boredom-is-kryptonite/

Cybersecurity Analysts: Job Stress Is Bad, but Boredom Is Kryptonite

Years ago, “airline pilot” used to be a high-stress profession. Imagine being in personal control of equipment worth millions hurtling through the sky on an irregular schedule with the lives of all the passengers in your hands.

But today on any given flight, autopilot is engaged almost 90% of the time. (The FAA requires it on long-haul flights or anytime the aircraft is over 28,000 feet.) There are vast stretches of time where the problem isn’t stress – it’s highly trained, intelligent people just waiting to perhaps be needed if something goes wrong.

Of course, automation has made air travel much safer. But over-reliance on it is now considered an emerging risk for pilots. The concerns? Loss of situational awareness, and difficulty taking over quickly and deftly when something fails. FAA scientist Kathy Abbott believes automation has made pilot error more likely if they “abdicate too much responsibility to the automated systems.” This year, the FAA rewrote its guidance, now encouraging pilots to spend more time actually flying and keeping their skills sharp.

What you want at any job is “flow”

Repetitive tasks can be a big part of a cybersecurity analyst’s day. But when you combine monotony (which often leads to boredom) with the need for attentiveness, it’s kryptonite. One neuroscientific study proved chronic boredom affects “judgment, goal-directed planning, risk assessment, attention focus, distraction suppression, and intentional control over emotional responses.”

The goal is total and happy immersion in a task that challenges you but is within your abilities. When you have that, you’re “in the zone.” And you’re not even tempted to multi-task (which isn’t really a thing).

Combine InsightConnect and InsightIDR, and you can find yourself “in the zone” for incident response:

  • Response playbooks are automatically triggered from InsightIDR investigations and alerts.
  • Alerts are prioritized, and false alerts are wiped away.
  • Alerts and investigations are automatically enriched: no more manually checking IP’s, DNS names, hashes, etc.
  • Pathways to PagerDuty, Slack, Microsoft Teams, JIRA, and ServiceNow are already set up for you and tickets are created automatically for alerts.

According to Rapid7‘s Detection and Response Practice Advisor Jeffrey Gardner, the coolest example of InsightIDR’s automaticity is its baselining capability.

“Humans are built to notice patterns, but we can only process so much so quickly,” Gardner says. “Machine learning lets us take in infinitely more data than a human would ever be able to process and find interesting or anomalous activity that would otherwise be missed.” InsightIDR can look at user/system activity and immediately notify you when things appear awry.

The robots are not coming for your job – surely not yours. But humans and machines are already collaborating, and we need to be very thoughtful about exactly, precisely how.

Like inattentive commercial pilots, Tesla drivers using Autopilot don’t much look at the road even though they’re required to, and they remain wholly responsible for everything the vehicle does. Teslas are also being hacked, started, and driven off.  A 19-year-old took 25 Teslas. We’re designing our jobs – and life on earth, too.

Additional reading:

NEVER MISS A BLOG

Get the latest stories, expertise, and news about security today.

The future of NGINX

Post Syndicated from original https://lwn.net/Articles/905855/

This
blog post
on the NGINX corporate site describes the plans for this web
server project in the coming year.

For the core NGINX Open Source software, we continue to add new
features and functionality and to support more operating system
platforms. Two critical capabilities for security and scalability
of web applications and traffic, HTTP3 and QUIC, are coming in the
next version we ship.

Let’s Architect! Architecting for the edge

Post Syndicated from Luca Mezzalira original https://aws.amazon.com/blogs/architecture/lets-architect-architecting-for-the-edge/

Edge computing comprises elements of geography and networking and brings computing closer to the end users of the application.

For example, using a content delivery network (CDN) such as AWS CloudFront can help video streaming providers reduce latency for distributing their material by taking advantage of caching at the edge. Another example might look like an Internet of Things (IoT) solution that helps a company run business logic in remote areas or with low latency.

IoT is a challenging field because there are multiple aspects to consider as architects, like hardware, protocols, networking, and software. All of these aspects must be designed to interact together and be fault tolerant.

In this edition of Let’s Architect!, we share resources that are helpful for teams that are approaching or expanding their workloads for edge computing We cover macro topics such as security, best practices for IoT, patterns for machine learning (ML), and scenarios with strict latency requirements.

Build Machine Learning at the edge applications

In Let’s Architect! Architecting for Machine Learning, we touched on some of the most relevant aspects to consider while putting ML into production. However, in many scenarios, you may also have specific constraints like latency or a lack of connectivity that require you to design a deployment at the edge.

This blog post considers a solution based on ML applied to agriculture, where a reliable connection to the Internet is not always available. You can learn from this scenario, which includes information from model training to deployment, to design your ML workflows for the edge. The solution uses Amazon SageMaker in the cloud to explore, train, package, and deploy the model to AWS IoT Greengrass, which is used for inference at the edge.

 High-level architecture of the components that reside on the farm and how they interact with the cloud environment

High-level architecture of the components that reside on the farm and how they interact with the cloud environment

Security at the edge

Security is one of the fundamental pillars described in the AWS Well-Architected Framework. In all organizations, security is a major concern both for the business and the technical stakeholders. It impacts the products they are building and the perception that customers have.

We covered security in Let’s Architect! Architecting for Security, but we didn’t focus specifically on edge technologies. This whitepaper shows approaches for implementing a security strategy at the edge, with a focus on describing how AWS services can be used. You can learn how to secure workloads designed for content delivery, as well as how to implement network protection to defend against DDoS attacks and protect your IoT solutions.

The AWS Well-Architected Tool is designed to help you review the state of your applications and workloads. It provides a central place for architectural best practices and guidance

The AWS Well-Architected Tool is designed to help you review the state of your applications and workloads. It provides a central place for architectural best practices and guidance

AWS Outposts High Availability Design and Architecture Considerations

AWS Outposts allows companies to run some AWS services on-premises, which may be crucial to comply with strict data residency or low latency requirements. With Outposts, you can deploy servers and racks from AWS directly into your data center.

This whitepaper introduces architectural patterns, anti-patterns, and recommended practices for building highly available systems based on Outposts. You will learn how to manage your Outposts capacity and use networking and data center facility services to set up highly available solutions. Moreover, you can learn from mental models that AWS engineers adopted to consider the different failure modes and the corresponding mitigations, and apply the same models to your architectural challenges.

An Outpost deployed in a customer data center and connected back to its anchor Availability Zone and parent Region

An Outpost deployed in a customer data center and connected back to its anchor Availability Zone and parent Region

AWS IoT Lens

The AWS Well-Architected Lenses are designed for specific industry or technology scenarios. When approaching the IoT domain, the AWS IoT Lens is a key resource to learn the best practices to adopt for IoT. This whitepaper breaks down the IoT workloads into the different subdomains (for example, communication, ingestion) and maps the AWS services for IoT with each specific challenge in the corresponding subdomain.

As architects and developers, we tend to automate and reduce the risk of human errors, so the IoT Lens Checklist is a great resource to review your workloads by following a structured approach.

Workload context checklist from the IoT Lens Checklist

Workload context checklist from the IoT Lens Checklist

See you next time!

Thanks for joining our discussion on architecting for the edge! See you in two weeks when we talk about database architectures on AWS.

Other posts in this series

Looking for more architecture content?

AWS Architecture Center provides reference architecture diagrams, vetted architecture solutions, Well-Architected best practices, patterns, icons, and more!

A peer instruction approach for engaging girls in the Computing classroom: Study results

Post Syndicated from Katharine Childs original https://www.raspberrypi.org/blog/gender-balance-in-computing-peer-instruction-approach-engaging-girls/

Today, we are publishing the third report of our findings from our Gender Balance in Computing research programme. This report shares the outcomes from the Peer Instruction project, which is the last in our set of three interventions that has explored teaching approaches to engage more girls in computing.

In a computing classroom, a smiling girl raises her hand.

The premise of the teaching approach research is that the way Computing is taught may not always match the teaching approaches to which girls are most likely to respond positively [1]. As with the Storytelling project and the Pair Programming project, this project aimed to find new contexts and approaches to help increase the number of girls choosing to study and work in computing. 

What is peer instruction? 

Peer instruction is a structured, collaborative teaching approach. It has been shown to be an effective pedagogy for novice programmers and those studying computer science at a university level because the interactive, cooperative activities help learners to perceive the topics as less stressful and less difficult [2]. 

Multiple-choice questions (MCQs) and peer conversations about the question answers are at the core of the peer instruction approach. Through talking to each other about MCQs, pupils can deepen their understanding about why a particular concept or fact is correct, and correct any misconceptions.

A diagram showing The five stages of the peer instruction teaching approach covered in a computing lesson: based on a misconception focused multiple-choice question, stage 1 is solo response, stage 2 is peer discussion, stage 3 is peer response, stage 4 is sharing results, stage 5 is class discussion. Optional steps are pre-instruction and follow-up multiple-choice question.
The five stages of the peer instruction teaching approach covered in a Computing lesson.

In England, the Computing curriculum at Key Stage 3 (ages 11–14) introduces learners to some new concepts, such as data representation, and moves learners to text-based programming languages. Towards the end of this Key Stage, learners will make choices about the subjects that they go onto study for GCSEs. These choices are influenced by learners’ attitudes towards the subject, and so we decided to trial whether the peer instruction teaching approach might lead to more positive attitudes towards Computing among girls.

The Peer Instruction intervention

The initial pilot of this trial ran from January to March 2020 with 15 secondary schools. We then used teacher feedback to develop resources to use in a full randomised controlled trial which ran from October 2021 to February 2022 in more than 60 secondary schools in England. Due to the COVID-19 pandemic, we changed our original plan to run face-to-face training and instead developed an online course to train teachers in the peer instruction approach. After taking part in the training, the teachers delivered 12 weeks of Computing lessons in data representation and Python programming. The two six-week units of work covered computing concepts for Key Stage 3 learners such as: 

  • Understanding how numbers can be represented in binary format
  • Understanding how data of various types can be represented and manipulated digitally in the form of binary digits
  • Using a text-based programming language to solve a variety of computational problems 

The study was run as a randomised controlled trial where participating schools were randomly divided into two groups. Schools in the treatment group used the peer instruction resources, and schools in the control group taught their normal Computing lessons. The independent evaluators from the Behavioural Insights Team used pupil surveys to measure the impact of the resources and supported this with lesson observations and teacher interviews to better understand the  themes emerging from the data. 

“I think peer instruction lessons are actually better than the normal lessons because you can ask other people around you to help more.”

– Female pupil who took part in the peer instruction lessons (report, p. 45)

Findings from the evaluation

The outcome measures of the peer instruction approach evaluation were quantitative data obtained from Year 8 pupils (aged 12 to 13) via pre- and post-surveys about the pupils’ stated intent to select Computer Science as a GCSE subject, and attitudes towards Computing as captured by the Student Computer Science Attitude Survey (SCSAS). When compared with the control group, the treatment group did not show a statistically significant increase in stated intent or positive attitudes towards Computing. This is a really valuable finding to help us build our understanding of what works in computing education. 

The evaluation report contains some useful suggestions on how peer instruction methods could be improved in the secondary classroom: 

  • Emphasise the importance of the stages of the peer instruction approach throughout the supporting materials. Our support for teachers changed from an in-person training day in stage one to an online course in stage two, and this impacted how much we could model the peer instruction steps that involve pupil discussion. This teaching approach differs from the traditional approach of asking learners to put their hands up to answer questions, and we believe that face-to-face training for teachers would be the best way to explore stage two of peer instruction. The importance of the discussion steps in peer instruction were further emphasised in the report: “The interviewed girls similarly reported that they preferred working in a group (as opposed to answering questions individually) as they were able to hear from people who had different ideas to them and check their answers.” So the discussion steps in peer instruction need careful thought when being delivered.
  • It may be useful to combine the peer instruction approach with other strategies. Although only a small number of girls taking part were interviewed, their feedback about the peer instruction lessons was very positive. The evaluation suggests that a multi-faceted approach to addressing gender balance is needed, given that the lack of girls in computing is indicative of a substantive societal issue, which decades of initiatives and research have attempted to address. The evaluators suggested that combining this pedagogy with other strategies, such as linking Computing to real-world problem-solving (another topic we explored in the Gender Balance in Computing programme), may have a cumulatively positive effect. 

“Year 8 is too late” 

At the start of both the Pair Programming and Peer Instruction projects, pupils were asked the same set of questions about their attitudes towards Computing via the Student Computer Science Attitude Survey (SCSAS). The mean scores from the survey results suggest that there is a small gender gap in attitudes at primary school. Boys feel slightly more confident and interested in Computing than girls. By secondary school, this gap has widened, as shown in the graph below:

Graph of the SCSAS scores to show the differences between boys’ and girls’ mean scores (out of 4) when asked about their attitudes towards computing at Year 4/6 and at year 8. Boys state a more positive attitude on average, and the difference between girls' and boys' attitudes in larger in Year 8.
Graph of the SCSAS scores to show the differences between boys’ and girls’ mean scores (out of 4) when asked about their attitudes towards Computing at Year 4/6 and at year 8.

In both projects, pupils were also asked about their intentions to continue studying Computing. In the Pair Programming project, the participating pupils (in Year 4/6) were asked whether they wanted to study Computing in the future, whereas the Year 8 pupils taking part in the Peer Instruction project were asked whether they intended to choose Computer Science as a GCSE subject. We cannot compare these two sets of answers directly, but there is general indication that as girls progress through stages of education, they begin to decide that Computing is not a subject for them. The independent evaluators commented that “it is striking that the gap between genders widens to such an extent over this 2- to 4-year time period, and that the overall proportions of pupils intending to continue to study Computing decreases to such an extent” (p. 15 of the report).  

“These findings show a clear difference in attitudes towards learning Computing between primary and secondary learners. It really makes the adage ‘Year 8 is too late’ very true, and it is important to think carefully about what happens between Year 6 and Year 8 to make sure that Computing is a subject which engages all learners.”

– Sue Sentance, Chief Learning Officer, Raspberry Pi Foundation

Want to find out more about peer instruction?  

  • Download our Big Book of Computing Pedagogy (available as a free online download) and find out more about peer instruction on pages 56 and 57.
  • Read the evaluation report of the peer instruction intervention.
  • Try the free training course on peer instruction used in this project. This course links to our research materials used by teachers as part of the intervention. 

We are very grateful to all the schools, pupils, and teachers who took part in this project. If you would like to stay up-to-date with the Gender Balance in Computing programme, you can sign up to our newsletter. We will also share reports on the other projects within the programme that have explored: 

  • Pupils’ sense of belonging in Computing 
  • The links between non-formal and formal Computing 
  • The impact of using Computing to solve real-world problems

[1] Goode, J., Estrella, R., & Margolis, J. (2008). Lost in Translation: Gender and High School Computer Science. In Cohoon, J, & Aspray, W. (Eds.) Women and Information Technology. Cambridge, MA: The MIT Press. https://doi.org/https://doi.org/10.7551/mitpress/7272.003.0005

[2] Herman, G. L., & Azad, S. (2020, February). A comparison of peer instruction and collaborative problem solving in a computer architecture course. In Proceedings of the 51st ACM Technical Symposium on Computer Science Education. Association for Computing Machinery, New York, NY, USA. pp. 461–467. https://dl.acm.org/doi/10.1145/3328778.3366819

The post A peer instruction approach for engaging girls in the Computing classroom: Study results appeared first on Raspberry Pi.

The Lack Of Native MFA For Active Directory Is A Big Sin For Microsoft

Post Syndicated from Bozho original https://techblog.bozho.net/the-lack-of-native-mfa-for-active-directory-is-a-big-sin-for-microsoft/

Active Directory is dominant in the enterprise world (as well as the public sector). From my observation, the majority of organization rely on Active Directory for their user accounts. While that may be changing in recent years with more advanced and cloud IAM and directory solutions, the landscape in the last two decades is a domination of Microsoft’s Active Directory.

As a result of that dominance, many cyber attacks rely on exploiting some aspects of Active Directory. Whether it would be weaknesses of Kerberos, “pass the ticket”, golden ticket, etc. Standard attacks like password spraying, credential stuffing and other brute forcing also apply, especially if the Exchange web access is enabled. Last, but not least, simply browsing the active directory once authenticated with a compromised account, provides important information for further exploitation (finding other accounts, finding abandoned, but not disabled accounts, finding passwords in description fields, etc).

Basically, having access an authentication endpoint which interfaces the Active Directory allows attackers to gain access and then do lateral movement.

What is the most recommended measures for preventing authentication attacks? Multi-factor authentication. And the sad reality is that Microsoft doesn’t offer native MFA for Active Directory.

Yes, there are things like Microsoft Hello for Business, but that can’t be used in web and email context – it is tied to the Windows machine. And yes, there are third-party options. But they incur additional cost, and are complex to setup and manage. We all know the power of defaults and built-in features in security – it should be readily available and simple in order to have wide adoption.

What Microsoft should have done is introduce standard, TOTP-based MFA and enforce it through native second-factor screens in Windows, Exchange web access, Outlook and others. Yes, that would require Kerberos upgrades, but it is completely feasible. Ideally, it should be enabled by a single click, which would prompt users to enroll their smart phone apps (Google Authenticator, Microsoft Authenticator, Authy or other) on their next successful login. Of course, there may be users without smartphones, and so the option to not enroll for MFA may be available to certain less-privileged AD groups.

By not doing that, Microsoft exposes all on-premise AD deployments to all sorts of authentication attacks mentioned above. And for me that’s a big sin.

Microsoft would say, of course, that their Azure AD supports many MFA options and is great and modern and secure and everything. And that’s true, if you want to chose to migrate to Azure and use Office365. And pay for subscription vs just the Windows Server license. It’s not a secret that Microsoft’s business model is shifting towards cloud, subscription services. And there’s nothing wrong with that. But leaving on-prem users with no good option for proper MFA across services, including email, is irresponsible.

The post The Lack Of Native MFA For Active Directory Is A Big Sin For Microsoft appeared first on Bozho's tech blog.

Mudge Files Whistleblower Complaint against Twitter

Post Syndicated from Bruce Schneier original https://www.schneier.com/blog/archives/2022/08/mudge-files-whistleblower-complaint-against-twitter.html

Peiter Zatko, aka Mudge, has filed a whistleblower complaint with the SEC against Twitter, claiming that they violated an eleven-year-old FTC settlement by having lousy security. And he should know; he was Twitter’s chief security officer until he was fired in January.

The Washington Post has the scoop (with documents) and companion backgrounder. This CNN story is also comprehensive.

EDITED TO ADD: Another news article. Slashdot thread.

EDITED TO ADD (9/2): More info.

How to export AWS Security Hub findings to CSV format

Post Syndicated from Andy Robinson original https://aws.amazon.com/blogs/security/how-to-export-aws-security-hub-findings-to-csv-format/

AWS Security Hub is a central dashboard for security, risk management, and compliance findings from AWS Audit Manager, AWS Firewall Manager, Amazon GuardDuty, IAM Access Analyzer, Amazon Inspector, and many other AWS and third-party services. You can use the insights from Security Hub to get an understanding of your compliance posture across multiple AWS accounts. It is not unusual for a single AWS account to have more than a thousand Security Hub findings. Multi-account and multi-Region environments may have tens or hundreds of thousands of findings. With so many findings, it is important for you to get a summary of the most important ones. Navigating through duplicate findings, false positives, and benign positives can take time.

In this post, we demonstrate how to export those findings to comma separated values (CSV) formatted files in an Amazon Simple Storage Service (Amazon S3) bucket. You can analyze those files by using a spreadsheet, database applications, or other tools. You can use the CSV formatted files to change a set of status and workflow values to align with your organizational requirements, and update many or all findings at once in Security Hub.

The solution described in this post, called CSV Manager for Security Hub, uses an AWS Lambda function to export findings to a CSV object in an S3 bucket, and another Lambda function to update Security Hub findings by modifying selected values in the downloaded CSV file from an S3 bucket. You use an Amazon EventBridge scheduled rule to perform periodic exports (for example, once a week). CSV Manager for Security Hub also has an update function that allows you to update the workflow, customer-specific notation, and other customer-updatable values for many or all findings at once. If you’ve set up a Region aggregator in Security Hub, you should configure the primary CSV Manager for Security Hub stack to export findings only from the aggregator Region. However, you may configure other CSV Manager for Security Hub stacks that export findings from specific Regions or from all applicable Regions in specific accounts. This allows application and account owners to view their own Security Hub findings without having access to other findings for the organization.

How it works

CSV Manager for Security Hub has two main features:

  • Export Security Hub findings to a CSV object in an S3 bucket
  • Update Security Hub findings from a CSV object in an S3 bucket

Overview of the export function

The overview of the export function CsvExporter is shown in Figure 1.

Figure 1: Architecture diagram of the export function

Figure 1: Architecture diagram of the export function

Figure 1 shows the following numbered steps:

  1. In the AWS Management Console, you invoke the CsvExporter Lambda function with a test event.
  2. The export function calls the Security Hub GetFindings API action and gets a list of findings to export from Security Hub.
  3. The export function converts the most important fields to identify and sort findings to a 37-column CSV format (which includes 12 updatable columns) and writes to an S3 bucket.

Overview of the update function

To update existing Security Hub findings that you previously exported, you can use the update function CsvUpdater to modify the respective rows and columns of the CSV file you exported, as shown in Figure 2. There are 12 modifiable columns out of 37 (any changes to other columns are ignored), which are described in more detail in Step 3: View or update findings in the CSV file later in this post.

Figure 2: Architecture diagram of the update function

Figure 2 shows the following numbered steps:

Figure 2 shows the following numbered steps:

  1. You download the CSV file that the CsvExporter function generated from the S3 bucket and update as needed.
  2. You upload the CSV file that contains your updates to the S3 bucket.
  3. In the AWS Management Console, you invoke the CsvUpdater Lambda function with a test event containing the URI of the CSV file.
  4. CsvUpdater reads the updated CSV file from the S3 bucket.
  5. CsvUpdater identifies the minimum set of updates and invokes the Security Hub BatchUpdateFindings API action.

Step 1: Use the CloudFormation template to deploy the solution

You can set up and use CSV Manager for Security Hub by using either AWS CloudFormation or the AWS Cloud Development Kit (AWS CDK).

To deploy the solution (AWS CDK)

You can find the latest code in the aws-security-hub-csv-manager GitHub repository, where you can also contribute to the sample code. The following commands show how to deploy the solution by using the AWS CDK. First, the AWS CDK initializes your environment and uploads the AWS Lambda assets to an S3 bucket. Then, you deploy the solution to your account by using the following commands. Replace <INSERT_AWS_ACCOUNT> with your account number, and replace <INSERT_REGION> with the AWS Region that you want the solution deployed to, for example us-east-1.

cdk bootstrap aws://<INSERT_AWS_ACCOUNT>/<INSERT_REGION>
cdk deploy

To deploy the solution (CloudFormation)

  1. Choose the following Launch Stack button to open the AWS CloudFormation console pre-loaded with the template for this solution:

    Launch Stack

  2. In the Parameters section, as shown in Figure 3, enter your values.
    Figure 3: CloudFormation template variables

    Figure 3: CloudFormation template variables

    1. For What folder for CSV Manager for Security Hub Lambda code, leave the default Code. For What folder for CSV Manager for Security Hub exports, leave the default Findings.

      These are the folders within the S3 bucket that the CSV Manager for Security Hub CloudFormation template creates to store the Lambda code, as well as where the findings are exported by the Lambda function.

    2. For Frequency, for this solution you can leave the default value cron(0 8 ? * SUN *). This default causes automatic exports to occur every Sunday at 8:00 AM local time using an EventBridge scheduled rule. For more information about how to update this value to meet your needs, see Schedule Expressions for Rules in the Amazon CloudWatch Events User Guide.
    3. The values you enter for the Regions field depend on whether you have configured an aggregation Region in Security Hub.
      • If you have configured an aggregation Region, enter only that Region code, for example eu-north-1, as shown in Figure 3.
      • If you haven’t configured an aggregation Region, enter a comma-separated list of Regions in which you have enabled Security Hub, for example us-east-1, eu-west-1, eu-west-2.
      • If you would like to export findings from all Regions where Security Hub is enabled, leave the Regions field blank. Regions where Security Hub is not enabled will generate a message and will be skipped.
  3. Choose Next.

The CloudFormation stack deploys the necessary resources, including an EventBridge scheduling rule, AWS System Managers Automation documents, an S3 bucket, and Lambda functions for exporting and updating Security Hub findings.

After you deploy the CloudFormation stack

After you create the CSV Manager for Security Hub stack, you can do the following:

  1. Perform the export function to write some or all Security Hub findings to a CSV file by following the instructions in Step 2: Export Security Hub findings to a CSV file later in this post.
  2. Perform a bulk update of Security Hub findings by following the instructions in Step 3: View or update findings in the CSV file later in this post. You can make changes to one or more of the 12 updatable columns of the CSV file, and perform the update function to update some or all Security Hub findings.

Step 2: Export Security Hub findings to a CSV file

You can export Security Hub findings from the AWS Lambda console. To do this, you create a test event and invoke the CsvExporter Lambda function. CsvExporter exports all Security Hub findings from all applicable Regions to a single CSV file in the S3 bucket for CSV Manager for Security Hub.

To export Security Hub findings to a CSV file

  1. In the AWS Lambda console, find the CsvExporter Lambda function and select it.
  2. On the Code tab, choose the down arrow at the right of the Test button, as shown in Figure 4, and select Configure test event.
    Figure 4: The down arrow at the right of the Test button

    Figure 4: The down arrow at the right of the Test button

  3. To create an empty test event, on the Configure test event page, do the following:
    1. Choose Create a new event.
    2. Enter an event name; in this example we used testEvent.
    3. For Template, leave the default hello-world.
    4. For Event JSON, enter the JSON object {} as shown in Figure 5.
    Figure 5: Creating an empty test event

    Figure 5: Creating an empty test event

  4. Choose Save to save the empty test event.
  5. To invoke the Lambda function, choose the Test button, as shown in Figure 6.
    Figure 6: Test button to invoke the Lambda function

    Figure 6: Test button to invoke the Lambda function

  6. On the Execution Results tab, note the following details, which you will need for the next step.
    {
    "message": "Export succeeded", 
    "bucket": DOC-EXAMPLE-BUCKET,
    "exportKey”: DOC-EXAMPLE-OBJECT,
    "resultCode": 200
    }

  7. Locate the CSV object that matches the value of “exportKey” (in this example, DOC-EXAMPLE-OBJECT) in the S3 bucket that matches the value of “bucket” (in this example, DOC-EXAMPLE-BUCKET).

Now you can view or update the findings in the CSV file, as described in the next section.

Step 3: (Optional) Using filters to limit CSV results

In your test event, you can specify any filter that is accepted by the GetFindings API action. You do this by adding a filter key to your test event. The filter key can either contain the word HighActive (which is a predefined filter configured as a default for selecting active high-severity and critical findings, as shown in Figure 8), or a JSON filter object.

Figure 8 depicts an example JSON filter that performs the same filtering as the HighActive predefined filter.

To use filters to limit CSV results

  1. In the AWS Lambda console, find the CsvExporter Lambda function and select it.
  2. On the Code tab, choose the down arrow at the right of the Test button, as shown in Figure 7, and select Configure test event.
    Figure 7: The down arrow at the right of the Test button

    Figure 7: The down arrow at the right of the Test button

  3. To create a test event containing a filter, on the Configure test event page, do the following:
    1. Choose Create a new event.
    2. Enter an event name; in this example we used filterEvent.
    3. For Template, select testEvent,
    4. For Event JSON, enter the following JSON object, as shown in Figure 8.
      {
         "SeverityLabel":[
            {
               "Value":"CRITICAL",
               "Comparison":"EQUALS"
            },
            {
               "Value":"HIGH",
               "Comparison":"EQUALS"
            }
         ],
         "RecordState":[
            {
               "Comparison":"EQUALS",
               "Value":"ACTIVE"
            }
         ]
      }

      Figure 8: Test button to invoke the Lambda function

      Figure 8: Test button to invoke the Lambda function

    5. Choose Save.
  4. To invoke the Lambda function, choose the Test button as shown in Figure 9.
    Figure 9: Test button to invoke the Lambda function

    Figure 9: Test button to invoke the Lambda function

  5. On the Execution Results tab, note the following details, which you will need for the next step.
    {
    "message": "Export succeeded", 
    "bucket": DOC-EXAMPLE-BUCKET,
    "exportKey": DOC-EXAMPLE-OBJECT,
    "resultCode": 200
    }

  6. Locate the CSV object that matches the value of “exportKey” (in this example, DOC-EXAMPLE-OBJECT) in the S3 bucket that matches the value of “bucket” (in this example, DOC-EXAMPLE-BUCKET).

The results in this CSV file should be a filtered set of Security Hub findings according to the filter you specified above. You can now proceed to step 4 if you want to view or update findings.

Step 4: View or update findings in the CSV file

You can use any program that allows you to view or edit CSV files, such as Microsoft Excel. The first row in the CSV file are the column names. These column names correspond to fields in the JSON objects that are returned by the GetFindings API action.

Warning: Do not modify the first two columns, Id (column A) or ProductArn (column B). If you modify these columns, Security Hub will not be able to locate the finding to update, and any other changes to that finding will be discarded.

You can locally modify any of the columns in the CSV file, but only 12 columns out of 37 columns will actually be updated if you use CsvUpdater to update Security Hub findings. The following are the 12 columns you can update. These correspond to columns C through N in the CSV file.

Column name Spreadsheet column Description
Criticality C An integer value between 0 and 100.
Confidence D An integer value between 0 and 100.
NoteText E Any text you wish
NoteUpdatedBy F Automatically updated with your AWS principal user ID.
CustomerOwner* G Information identifying the owner of this finding (for example, email address).
CustomerIssue* H A Jira issue or another identifier tracking a specific issue.
CustomerTicket* I A ticket number or other trouble/problem tracking identification.
ProductSeverity** J A floating-point number from 0.0 to 99.9.
NormalizedSeverity** K An integer between 0 and 100.
SeverityLabel L One of the following:

  • INFORMATIONAL
  • LOW
  • MEDIUM
  • HIGH
  • HIGH
  • CRITICAL
VerificationState M One of the following:

  • UNKNOWN — Finding has not been verified yet.
  • TRUE_POSITIVE — This is a valid finding and should be treated as a risk.
  • FALSE_POSITIVE — This an incorrect finding and should be ignored or suppressed.
  • BENIGN_POSITIVE — This is a valid finding, but the risk is not applicable or has been accepted, transferred, or mitigated.
Workflow N One of the following:

  • NEW — This is a new finding that has not been reviewed.
  • NOTIFIED — The responsible party or parties have been notified of this finding.
  • RESOLVED — The finding has been resolved.
  • SUPPRESSED — A false or benign finding has been suppressed so that it does not appear as a current finding in Security Hub.

* These columns are stored inside the UserDefinedFields field of the updated findings. The column names imply a certain kind of information, but you can put any information you wish.

** These columns are stored inside the Severity field of the updated findings. These values have a fixed format and will be rejected if they do not meet that format.

Columns with fixed text values (L, M, N) in the previous table can be specified in mixed case and without underscores—they will be converted to all uppercase and underscores added in the CsvUpdater Lambda function. For example, “false positive” will be converted to “FALSE_POSITIVE”.

Step 5: Create a test event and update Security Hub by using the CSV file

If you want to update Security Hub findings, make your changes to columns C through N as described in the previous table. After you make your changes in the CSV file, you can update the findings in Security Hub by using the CSV file and the CsvUpdater Lambda function.

Use the following procedure to create a test event and run the CsvUpdater Lambda function.

To create a test event and run the CsvUpdater Lambda function

  1. In the AWS Lambda console, find the CsvUpdater Lambda function and select it.
  2. On the Code tab, choose the down arrow to the right of the Test button, as shown in Figure 10, and select Configure test event.
    Figure 10: The down arrow to the right of the Test button

    Figure 10: The down arrow to the right of the Test button

  3. To create a test event as shown in Figure 11, on the Configure test event page, do the following:
    1. Choose Create a new event.
    2. Enter an event name; in this example we used testEvent.
    3. For Template, leave the default hello-world.
    4. For Event JSON, enter the following:
      {
      "input": <s3ObjectUri>,
      "primaryRegion": <aggregationRegionName>
      }

      Replace <s3ObjectUri> with the full URI of the S3 object where the updated CSV file is located.

      Replace <aggregationRegionName> with your Security Hub aggregation Region, or the primary Region in which you initially enabled Security Hub.

      Figure 11: Create and save a test event for the CsvUpdater Lambda function

      Figure 11: Create and save a test event for the CsvUpdater Lambda function

  4. Choose Save.
  5. Choose the Test button, as shown in Figure 12, to invoke the Lambda function.
    Figure 12: Test button to invoke the Lambda function

    Figure 12: Test button to invoke the Lambda function

  6. To verify that the Lambda function ran successfully, on the Execution Results tab, review the results for “message”: “Success”, as shown in the following example. Note that the results may be thousands of lines long.
    {
    "message": "Success",
    "details": {
    "processed": [{"Id": arn:aws:securityhub:us-east-1: 111122223333:subscription/cis-aws-foundations-benchmark/v/1.2.0/1.7/finding/6d543b22-6a3d-405c-ae7f-224469bde7d2, "ProductArn": arn:aws:securityhub:us-east-1::product/aws/securityhub}, … ],
    "unprocessed": [],
    "message": "Updated succeeded",
    "success": true
    },
    "input": s3://DOC-EXAMPLE-BUCKET/DOC-EXAMPLE-OBJECT,
    "resultCode": 200
    }

    The processed array lists every successfully updated finding by Id and ProductArn.

    If any of the findings were not successfully updated, their Id and ProductArn appear in the unprocessed array. In the previous example, no findings were unprocessed.

    The value s3://DOC-EXAMPLE-BUCKET/DOC-EXAMPLE-OBJECT is the URI of the S3 object from which your updates were read.

Cleaning up

To avoid incurring future charges, first delete the CloudFormation stack that you deployed in Step 1: Use the CloudFormation template to deploy the solution. Next, you need to manually delete the S3 bucket deployed with the stack. For instructions, see Deleting a bucket in the Amazon Simple Storage Service User Guide.

Conclusion

In this post, we showed you how you can export Security Hub findings to a CSV file in an S3 bucket and update the exported findings by using CSV Manager for Security Hub. We showed you how you can automate this process by using AWS Lambda, Amazon S3, and AWS Systems Manager. Full documentation for CSV Manager for Security Hub is available in the aws-security-hub-csv-manager GitHub repository. You can also investigate other ways to manage Security Hub findings by checking out our blog posts about Security Hub integration with Amazon OpenSearch Service, Amazon QuickSight, Slack, PagerDuty, Jira, or ServiceNow.

If you have feedback about this post, submit comments in the Comments section below. If you have questions about this post, start a new thread on the Security Hub re:Post. To learn more or get started, visit AWS Security Hub.

Want more AWS Security news? Follow us on Twitter.

Andy Robinson

Andy Robinson

Andy wrote CSV Manager for Security Hub in response to requests from several customers. He is an AWS Professional Services Senior Security Consultant with over 30 years of security, software product management, and software design experience. Andy is also a pilot, scuba instructor, martial arts instructor, ham radio enthusiast, and photographer.

Murat Eksi

Murat Eksi

Murat is a full-stack technologist at AWS Professional Services. He has worked with various industries, including finance, sports, media, gaming, manufacturing, and automotive, to accelerate their business outcomes through application development, security, IoT, analytics, devops and infrastructure. Outside of work, he loves traveling around the world, learning new languages while setting up local events for entrepreneurs and business owners in Stockholm, or taking flight lessons.

Shikhar Mishra

Shikhar Mishra

Shikhar is a Senior Solutions Architect at Amazon Web Services. He is a cloud security enthusiast and enjoys helping customers design secure, reliable, and cost-effective solutions on AWS.

Rohan Raizada

Rohan Raizada

Rohan is a Solutions Architect for Amazon Web Services. He works with enterprises of all sizes with their cloud adoption to build scalable and secure solutions using AWS. During his free time, he likes to spend time with family and go cycling outdoors.

Jonathan Nguyen

Jonathan Nguyen

Jonathan is a Shared Delivery Team Senior Security Consultant at AWS. His background is in AWS Security with a focus on threat detection and incident response. Today, he helps enterprise customers develop a comprehensive security strategy and deploy security solutions at scale, and he trains customers on AWS Security best practices.

The collective thoughts of the interwebz