The Electronic Frontier Foundation warns
against Manifest V3, a set of changes coming to a Chrome browser near
you.
Manifest V3, or Mv3 for short, is outright harmful to privacy
efforts. It will restrict the capabilities of web
extensions—especially those that are designed to monitor, modify,
and compute alongside the conversation your browser has with the
websites you visit. Under the new specifications, extensions like
these– like some privacy-protective tracker blockers– will have
greatly reduced capabilities.
“People that write Ring 0 code and write it badly are a danger to society.” – Mickey Shkatov
There is no security boundary between an administrator and the Windows kernel, according to the Microsoft Security Servicing Criteria for Windows. In our analysis of CVE-2021-21551, a write-what-where vulnerability (see CWE-123) in a Dell driver, we found that Dell’s update didn’t fix the write-what-where condition but only limited access to administrative users. According to Microsoft’s definition of security boundaries, Dell’s fix removed the security issue. However, the partially fixed driver can still help attackers.
There’s an attack technique called Bring Your Own Vulnerable Driver (BYOVD). In this attack, an adversary with administrative privileges installs a legitimately signed driver on the victim system. The legitimate driver has a vulnerability that the attacker exploits to gain ring 0 access. Access to ring 0 allows the attacker to subvert or disable security mechanisms and allows them to hide deeper in the system.
Known usage in the wild
BYOVD is a common technique used by advanced adversaries and opportunistic attackers alike. To illustrate this, the following table is a non-exhaustive list of well-known advisories/malware that use the BYOVD tactic, the associated vulnerable driver, and the associated vulnerability where applicable or known.
We believe that attacks or exploits that are actually used in the wild are, practically by definition, worthwhile for attackers. The table above illustrates that BYOVD is a valuable technique. Given these bad drivers’ wide use in the wild, it would be beneficial for the security community to identify exploitable drivers and minimize or block their use.
Use cases
Those unfamiliar with BYOVD are probably wondering why these attackers are doing this. By far, the number one reason adversaries are using BYOVD is to bypass Windows Driver Signature Enforcement (DSE). DSE ensures that only signed kernel drivers can be loaded. By installing and exploiting a vulnerable driver, attackers can load their own unsigned malicious drivers.
There are a number of open-source exploits that demonstrate loading unsigned drivers via BYOVD. These four are some of the most well-known:
Stryker (using cpuz141.sys with CVE-2017-15303 and process explorer)
Each of these tools is authored by the same individual, hfiref0x. Stryker, DSEFix, and TDL are all deprecated or in read-only mode. Notably Stryker and DSEFix run afoul of PatchGuard and are no longer suitable for most situations. KDU, a tool that supports more than 14 different vulnerable drivers as the “provider,” is the unsigned driver loader of choice.
The Dell drivers discussed below should be able to facilitate these types of attacks. Connor McGarrdemonstrated Dell’s dbutil_2_3.sys (which is vulnerable to CVE-2021-21551) can be used to execute attacker code in kernel mode. Because the write-what-where condition persists in the follow-on drivers, dbutildrv2.sys 2.5 and 2.7, Dell has delivered three unique signed drivers that can execute attacker code in kernel mode.
The previously mentioned attacks largely focused on executing code in kernel mode. However, BYOVD also enables a simpler data-oriented attack that allows the attacker to subvert LSA protection.
LSA protection prevents non-protected processes from reading the memory of, or injecting code into, Windows’ Local Security Authority Subsystem Service (lsass.exe). That means tools like Mimikatz can’t dump the memory contents of lsass.exe in order to retrieve Windows account credentials. However, an attacker with ring 0 access can reach into the lsass.exe EPROCESS struct and simply mask out the LSA protection. Once masked out, the attacker is free to dump lsass.exe’s memory. There are a couple of good open-source implementations of this: mimidrv (a signed driver that is part of mimikatz) and PPLKiller (uses RTCore64.sys).
Exploitation using the Dell drivers
We’ve developed a Metasploit module that implements the LSA protection attack using the new Dell drivers (dbutildrv2.sys 2.5 and 2.7). An attacker with escalated privileges can use the module to enable or disable process protection on arbitrary PID. The following proof-of-concept video demonstrates unprotecting lsass.exe and dumping memory from metasploit.
While old drivers like vboxdrv.sys / CVE-2008-3431 are finally becoming obsolete — 13 years is a pretty good run for any vulnerability — the Dell drivers are appearing in time to take their place. And the likelihood of the Dell drivers being blacklisted is low. The drivers are used for updating firmware across a large number of products. Preventing users from updating their computers’ firmware via driver blacklist is a non-starter.
While conducting this research, Rapid7 did reach out to Dell about this issue. They stated the following:
After careful consideration with the product team, we have categorized this issue as a weakness and not a vulnerability due to the privilege level required to carry out an attack. This is in alignment with the guidance provided in the Windows Driver Model. We are not planning on releasing a security advisory or issuing a CVE on this.
Other exploitation in the wild
Of course, we are not the first to use the Dell drivers in a malicious manner. As we noted in our AttackerKB analysis, dbutil_2_3.sys can be found associated with malware on VirusTotal. The newer versions of the driver, dbutildrv2.sys version 2.5 and 2.7, haven’t appeared to be used maliciously yet. However, we do note a fair amount of other activity associated with BYOVD-related drivers that haven’t yet been mentioned in this write up:
The point is that this is a fairly active and perhaps under-reported technique. It seems only the most well-known vulnerable drivers are flagged by AV. Even a well-known driver like the gdrv.sys isn’t flagged.
vboxdrv.sys vs. gdrive.sys
At what point should these legitimate drivers be flagged by AV? I posit that once a driver is distributed via Discord, it might be time to start flagging it as badware.
Detection and mitigation guidance
Perhaps the best way to protect your systems is to utilize Microsoft’s driver block rules. The list is full of known bad drivers and, if used correctly, will allow you to block the driver from being loaded. Of course, this only protects you from known vulnerable drivers that Microsoft adds to this list, but it’s better than nothing. The Dell drivers are not currently in the list, but Dell has indicated they are working with Microsoft to add dbutil_2_3.sys. However, as discussed earlier, the newer versions are unlikely to ever get added. Detecting the Dell drivers through your preferred EDR solution might be an alternative solution. The SHA-1 hashes are:
dbutil_2_3.sys
c948ae14761095e4d76b55d9de86412258be7afd
dbutildrv2.sys (2.5)
90a76945fd2fa45fab2b7bcfdaf6563595f94891
dbutildrv2.sys (2.7)
b03b1996a40bfea72e4584b82f6b845c503a9748
If you are able to enable Hypervisor-Protected Code Integrity (HVCI) then you should absolutely do so. And, of course, you should have secure boot enabled at the very least.
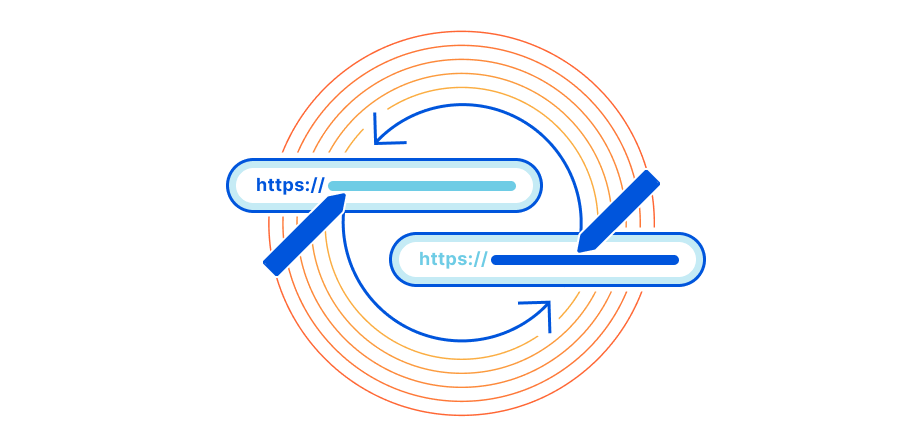
The Internet is a dynamic place. Websites are constantly changing as technologies and business practices evolve. What was front-page news is quickly moved into a sub-directory. To ensure website visitors continue to see the correct webpage even if it has been moved, administrators often implement URL redirects.
A URL redirect is a mapping from one location on the Internet to another, effectively telling the visitor’s browser that the location of the page has changed, and where they can now find it. This is achieved by providing a virtual ‘link’ between the content’s original and new location.
URL Redirects have typically been implemented as Page Rules within Cloudflare, up to a maximum of 125 URL redirects per zone. This limitation meant customers with a need for more URL redirects had to implement alternative solutions such Cloudflare Workers to achieve their goals.
To simplify the management and implementation of URL redirects at scale we have created Bulk Redirects. Bulk Redirects is a new product that allows an administrator to upload and enable hundreds of thousands of URL redirects within minutes, without having to write a single line of code.
We’ve moved!
Mail forwarding is a product offered by postal services such as USPS and Royal Mail that allows you to continue to receive letters and parcels even if they are sent to an address where you no longer reside.
The postal services achieve this by effectively maintaining a register of your new location and your old location. This allows the systems to detect ‘this letter is for Sam Marsh at address A, but he now lives at address B, therefore send the mail there’.
This problem can be solved by manually updating my bank, online shops, etc. and having them send the parcels and letters directly to my new address. However, that assumes I know of every person and business who has my address. And it also relies on those people to remember I moved address and make updates on their side. For example, Grandma Marsh might have forgotten about my new address — I’ve moved a lot — and she may send my birthday card to my old address. Or all those Christmas cards from people who I don’t speak with regularly. Those will go to my old address also. To solve this, I can use mail forwarding to ensure I still receive my cards and other mail, even though I no longer live at that address.
URL redirects are the Internet equivalent of mail forwarding.
With this technology, our sales and marketing teams can use the vanity URL all across the Internet, safe in the knowledge that should the backend systems change they won’t need to go to all the places this URL has been posted and update it. Instead, the intermediary system that handles the URL redirects can be updated. One location. Not thousands.
Why use URL redirects?
URL redirects are used to solve a number of use cases. One such common use case is to use URL redirects to force all visitors to connect to the website over a secure HTTPS connection, instead of via plain HTTP, to improve security. It’s such a common use case we created a toggle in the Cloudflare dashboard, “Always use HTTPS”, which redirects all HTTP requests to HTTPS when enabled.
URL redirects are also used for vanity domains and hyperlinks. In these scenarios, URL redirects are deployed to provide a mapping of short, user-friendly URLs to long, server-friendly URLs. Not only are shorter URLs more memorable, but they are better scoring from an SEO perspective. According to Backlinko, ‘Excessively long URLs may hurt a page’s search engine visibility. In fact, several industry studies have found that short URLs tend to have a slight edge in Google’s search results.’.
Another use case is where a company may have a local domain for each of their markets, which they want to redirect back to the main website, e.g., redirect www.example.fr and www.example.de to www.example.com/eu/fr and www.example.com/eu/de, respectively.
This also covers company acquisition, where a company is acquired and the acquiring company wants to redirect hyperlinks to the relevant pages on their own website, e.g., redirect www.example.com to www.companyB.com/portfolio/example.
Finally, one of the most common use cases for URL redirects is to maintain uptime during a website migration. As companies migrate their websites from one platform to another, or one domain to another, URL redirects ensure visitors continue to see the correct content. Without these URL redirects, hyperlinks in emails, blogs, marketing brochures, etc. would fail to load, potentially costing the business revenue in lost sales and brand damage. For example, www.example.com/products/golf/product-goes-here would redirect to the new website at products.example.com/golf/product-goes-here.
How are URL redirects implemented today?
Ensuring these URL redirects are executed correctly is often the job of the reverse proxy — a server which sits between the client and the origin whose job is, amongst many others, to re-route received traffic to the correct destination.
For example, when using NGINX, a popular web server, the administrator would have a line in the config similar to the one below to implement a URL redirect:
Historically, these web servers were located physically within a company’s data center. Administrators then had full control over the URLs received, and could create the redirect rules as and when needed.
As the world rapidly migrates on-premise applications and solutions to the cloud, administrators can find themselves in a situation where they can no longer do what they previously could. Not being responsible for the origin has a number of benefits, but it also comes with drawbacks such as lack of ‘control’. Previously, an administrator could quickly add a few config lines to the web server in front of their ecommerce platform. Moving to an online hosted platform makes this much more difficult to do.
As such, administrators have moved to platforms like Cloudflare where functionality such as URL redirects can be implemented in the cloud without the need to have administrator access to the origin.
The first way to implement a URL Redirect in Cloudflare is via a Forwarding URLPage Rule. Users can create a Page Rule which matches on a specific URL and redirects matching traffic to another specific URL, along with a status code — either a permanent redirect (301) or a temporary redirect (302):
Another method is to use Cloudflare Workers to implement URL redirects, either individually or as a map. For example, the code below is used to create a URL redirect map which runs when the Worker is invoked:
This snippet is taken from the Cloudflare Workers examples library and can be used to scale beyond the 125 URL redirect limit of Page Rules. However, it does require the administrator to be comfortable working with code and correctly configuring their Cloudflare Workers.
Introducing: Bulk Redirects
Speaking with Cloudflare users about URL redirects and their experience with our product offerings, “Give me a product which lets me upload thousands of URL redirects to Cloudflare via a GUI” was a very common request. Customers we interviewed typically wanted a simple way to upload a list of ‘from,to,response code’ without having to write a single line of code. And that’s what we are announcing today.
Bulk Redirects is now available for all Cloudflare plans. It is an account/organization-level product capable of supporting hundreds of thousands of URL redirects, all configured via the dashboard without having to write a single line of code.
The system is implemented in two parts. The first part is the Bulk Redirect List. This is effectively the redirect map, or ‘edge dictionary’, where users can upload their URL redirects:
Each URL redirect within the list contains three main elements. The first two elements are Source URL (the URL we are looking for) and TargetURL (the URL we are going to redirect matching traffic to).
There is also the Status code. This is the ‘type’ of redirect. In addition to 301 (Moved Permanently) and 302 (Moved Temporarily) redirects, we have added support for the newer 307 (Temporary Redirect) and 308 (Permanent Redirect) redirect status codes.
We have added support for specifying destination ports within the Target URL field also, allowing URL redirects to non-standard ports, e.g., “Target URL: www.example.com:8443”.
If you have many URL redirects, you can upload them via a CSV file.
There are also four additional parameters available for each individual URL redirect.
Firstly, we have added two options to replace the ambiguity and confusion caused by the use of asterisks as wildcards. Take this source URL as an example: *.example.com/a/b. Would you expect www.example.com/a/b to match? How about example.com/a/b, or www.example.com/path*? Asterisks used as wildcards cause confusion and misunderstanding, and also increase the cost of implementation and maintenance from an engineering perspective. Therefore, we are not implementing them in Bulk Redirects.
Instead, we have added two discrete options: Include subdomains and Subpath matching. The Include subdomains option, once enabled, will match all subdomains to the left of the domain portion of the URL as well as the domain specified. For example, if there is a URL redirect with a source URL of example.com/a then traffic to b.example.com/a and c.b.example.com/a will also be redirected.
The Subpath matching option focuses on the opposite end of the URL. If this option is enabled, the redirect applies to the URL as well as all its subpaths. For example, if we have a URL redirect on www.example.com/foo with subpath matching enabled, we will match on that specific URL as well as all subpaths, e.g., www.example.com/foo/a, www.example.com/foo/a/, ` www.example.com/foo/a/b/c`, etc., but not www.example.com/foobar.
These options provide a tremendous amount of flexibility and granularity for each URL redirect. However, for most use cases only the source URL, target URL, and status code options will need to be set.
Secondly, we have added two options relating to retaining portions of the original HTTP request: Preserve path suffix and Preserve query string. If subpath matching is enabled, Preserve path suffix can be used to copy the URI path from the originally requested URL and add it to the destination URL. For example, if there is a URL redirect of Source URL: example.co.uk, Target URL: www.example.com/a, then requests to example.co.uk/target will be redirected to www.example.com/a/target with both options enabled. Preserve query string can be used independently of the other options, and carries forward the URI query from the originally requested URL to the new URL.
Lists by themselves do not provide any redirection, they are simply the ‘lookup table’. To enable them we need to reference them via a Bulk Redirect Rule.
The rules themselves are very simple. By default, the user experience is to provide a name for the rule, a description, and select the Bulk Redirect List that should be invoked.
For users who require more granularity and control there are additional settings available under the Advanced options toggle. Within this section there are two editable sections: Expression and Key.
The first field, Expression,specifies the conditions that must be met in order for the rule to run. By default, all URL redirects of the specified list will apply.
The second field, Key, is closely related to the expression. The key is used in combination with the specified list to select the URL redirect to apply. The field used for the key should always be the same as the field used in the expression, i.e., the key should be http.request.full_uri if the field in the expression is http.request.full_uri, or conversely, the key should be raw.http.request.full_uri if the field in the expression is raw.http.request.full_uri.
There are two main use cases for modifying these settings. Firstly, users can edit these options to increase specificity in the trigger, e.g., ip.src.country == "GB" and http.request.full_uri in $redirect_list. This is useful for ensuring Bulk Redirect Lists are only applied when a visitor comes from specific countries, subnets, or ASNs — or also only applying a URL redirect list if the visitor is a verified bot, or the bot score is >35.
Secondly, users can edit these options to amend the URL being matched and used as a lookup in the given list, i.e., the user may choose to have URL redirects in their list(s) specifically for URLs that would be normalized, e.g., URLs containing specific percent-encoding. To ensure these URL redirects still trigger, the settings in Advanced options should be used to edit the expression and key to use the raw.http.request.full_uri field instead.
Automating via the API
Another way to manage bulk redirects is via our API. Customers wishing to automate the addition of bulk redirects can use the API to either simply add URL redirects to an existing list, or automate the entire workflow — creating a list, adding URL redirects to the list, and enabling the list via a new redirect rule.
There are three main calls when creating bulk redirects via the API:
Create the redirect list
Load with URL redirects
Enable via a rule (You will also need to create the ruleset if doing this for the first time).
For step 1, first create a mass redirect list via the API call:
curl --location --request POST 'https://api.cloudflare.com/client/v4/accounts/<ACCOUNT_ID>/rules/lists' \
--header 'X-Auth-Email: <EMAIL_ADDRESS>' \
--header 'Content-Type: application/json' \
--header 'X-Auth-Key: <API_KEY>' \
--data-raw '{
 "name": "my_redirect_list_2",
 "description": "My redirect list 2",
 "kind": "redirect"
}'
Capture the value of “id”, as this is the list id we will then add URL redirects to.
Next, in step 2 we will add URL redirects to our newly created list by executing a POST call to the id we captured previously – with our URL redirects in the body:
In step 3 we enable this list by creating a new mass redirect rule within the mass redirect account-level ruleset.
Note, if this is the first time you are creating a redirect rule you will need to use a different API call to create the ruleset. See the documentation here for more details. All subsequent updates to the rulesets are made by calls similar to below.
Firstly, we need to find our account-level rulesets id. To do this we need to get a list of all account-level rulesets and look for the ruleset with the phase http_request_redirect:
{
   "result": [
       {
           "id": "efb7b8c949ac4650a09736fc376e9aee",
           "name": "Cloudflare Managed Ruleset",
           "description": "Created by the Cloudflare security team, this ruleset is designed to provide fast and effective protection for all your applications. It is frequently updated to cover new vulnerabilities and reduce false positives.",
           "source": "firewall_managed",
           "kind": "managed",
           "version": "34",
           "last_updated": "2021-10-25T18:33:27.512161Z",
           "phase": "http_request_firewall_managed"
       },
       {
           "id": "4814384a9e5d4991b9815dcfc25d2f1f",
           "name": "Cloudflare OWASP Core Ruleset",
           "description": "Cloudflare's implementation of the Open Web Application Security Project (OWASP) ModSecurity Core Rule Set. We routinely monitor for updates from OWASP based on the latest version available from the official code repository",
           "source": "firewall_managed",
           "kind": "managed",
           "version": "33",
           "last_updated": "2021-10-25T18:33:29.023088Z",
           "phase": "http_request_firewall_managed"
       },
       {
           "id": "5ff4477e596448749d67da859230ac3d",
           "name": "My redirect ruleset",
           "description": "",
           "kind": "root",
           "version": "1",
           "last_updated": "2021-12-04T06:32:58.058744Z",
           "phase": "http_request_redirect"
       }
   ],
   "success": true,
   "errors": [],
   "messages": []
}
Our redirect ruleset is at the bottom of the output. Next we will add our new bulk redirect rule to this ruleset:
With those API calls executed, our new list is created, loaded with URL redirects and enabled by the bulk redirect rule. Visitors to the URLs specified in our list will now be redirected appropriately.
Account-level benefits
One of the driving forces behind this product is the desire to make life easier for those customers with a large number of zones on Cloudflare. For these customers, URL redirects are a pain point when using Page Rules, as they need to navigate into each zone and configure URL redirects one at a time. This doesn’t scale very well.
Bulk Redirects add real value for customers in this situation. Instead of having to navigate into 400 zones and create one or two Page Rules for each, an administrator can now create and upload a single Bulk Redirect List, which contains all the URL redirects for the zones under management.
This means that if the customer simply wants 399 of those 400 zones to redirect to the “primary zone”, they can create a bulk redirect list with 399 entries, all pointing to example.com, and enable the Subpath matching and Include subdomains options on each. This vastly simplifies the management of the estate.
The same premise also applies to SSL for SaaS customers. For example, if example.com has 20 custom hostnames in their zone, customers can now create a Bulk Redirect List and Rule for each custom hostname, grouping each customer’s URL redirects into their own logical buckets.
Bulk Redirects is a game changer for companies with a large number of zones and customers under management.
Allowances
Bulk Redirects are available for all accounts. The packaging model for Bulk Redirects closely resembles that of “IP Lists”. Accounts are entitled to a set number of Edge Rules (from which “Bulk Redirect Rules” draws down), Bulk Redirect Lists, and URL Redirects depending on the highest Cloudflare plan within their account.
Feature
Enterprise
Business
Pro
Free
Edge Rules (for use of Bulk Redirect Rules)
50+
15
15
15
Bulk Redirect Lists
25+
5
5
5
URL Redirects
10,000+
500
500
20
For example, an account with ten zones, all on the Free plan, would be entitled to 15 Edge Rules, 5 Bulk Redirect Lists, and 20 URL Redirects that can be stored within those lists.
An account with one Pro zone and 2 Free plan zones would be entitled to 15 Edge Rules, 5 Bulk Redirect Lists, and 500 URL Redirects that can be stored within those lists.
Enterprise customers have a default of 10,000 URL Redirects to be used across 25 lists. However, these numbers are negotiable on enquiry.
Planned enhancements
We intend to make a number of incremental improvements to the product in the coming months, specifically to the list experience to allow for the editing of URL redirects and also for searching within lists.
In the near future we intend to bring to market a product to fulfill the other common request for URL redirects, and deliver ‘Dynamic URL Redirects’. Whilst Bulk Redirects supports hundreds of thousands of URL redirects, those URL redirects are relatively prescriptive — from a.com/b to b.com/a, for example. There is still a requirement for supporting more complex, rich URL redirects, e.g., device-specific URL redirects, country-specific URL redirects, URL redirects that allow regular expressions in their target URL, and so forth. We aspire to offer a full range of functionality to support as many use cases as possible.
Try it now
Bulk Redirects can be used to improve operations, simplify complex configurations, and ease website management, amongst many other use cases. Try out Bulk Redirects yourself today.
NSO Group’s descent into Internet pariah status continues. Its Pegasus spyware was used against nine US State Department employees. We don’t know which NSO Group customer trained the spyware on the US. But the company does:
NSO Group said in a statement on Thursday that it did not have any indication their tools were used but canceled access for the relevant customers and would investigate based on the Reuters inquiry.
“If our investigation shall show these actions indeed happened with NSO’s tools, such customer will be terminated permanently and legal actions will take place,” said an NSO spokesperson, who added that NSO will also “cooperate with any relevant government authority and present the full information we will have.”
A newly revealed vulnerability impacting Apache Log4j 2 versions 2.0 to 2.14.1 was disclosed on GitHub on 9 December 2021 and registered as CVE-2021-44228 with the highest severity rating. Log4j is an open-source, Java-based logging utility widely used by enterprise applications and cloud services. By utilizing this vulnerability, a remote attacker could take control of the affected system.
Zabbix is aware of this vulnerability, has completed verification, and can conclude that the only product where we use Java is Zabbix Java Gateway, which does not utilize the log4j library, thereby is not impacted by this vulnerability.
For customers, who use the log4j library with other Java applications, here are some proactive measures, which they can take to reduce the risk posed by CVE-2021-44228:
Upgrade to Apache log4j-2.1.50.rc2, as all prior 2.x versions are vulnerable.
For Log4j version 2.10.0 or later, block JNDI from making requests to untrusted servers by setting the configuration value log4j2.formatMsgNoLookups to “TRUE” to prevent LDAP and other queries.
Default both com.sun.jndi.rmi.object.trustURLCodebase and com.sun.jndi.cosnaming.object.trustURLCodebase to “FALSE” to prevent Remote Code Execution attacks in Java 8u121.
This post is written by Suranjan Choudhury Senior Manager SA and Anil Sharma, Apps Modernization SA.
This blog looks at ActiveMQ topologies that customers can evaluate when planning hybrid deployment architectures spanning AWS Regions and customer data centers, using a network of brokers. A network of brokers can have brokers on-premises and Amazon MQ brokers on AWS.
Distributing broker nodes across AWS and on-premises allows for messaging infrastructure to scale, provide higher performance, and improve reliability. This post also explains a topology spanning two Regions and demonstrates how to deploy on AWS.
A network of brokers is composed of multiple simultaneously active single-instance brokers or active/standby brokers. A network of brokers provides a large-scale messaging fabric in which multiple brokers are networked together. It allows a system to survive the failure of a broker. It also allows distributed messaging. Applications on remote, disparate networks can exchange messages with each other. A network of brokers helps to scale the overall broker throughput in your network, providing increased availability and performance.
Types of ActiveMQ topologies
Network of brokers can be configured in a variety of topologies – for example, mesh, concentrator, and hub and spoke. The topology depends on requirements such as security and network policies, reliability, scaling and throughput, and management and operational overheads. You can configure individual brokers to operate as a single broker or in an active/standby configuration.
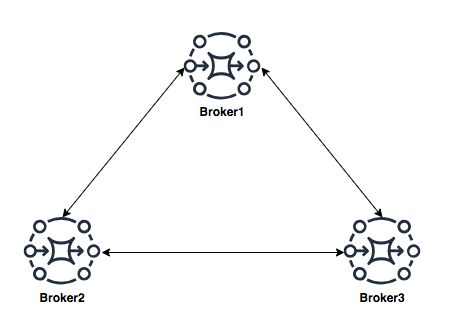
Mesh topology
A mesh topology provides multiple brokers that are all connected to each other. This example connects three single-instance brokers, but you can configure more brokers as a mesh. The mesh topology needs subnet security group rules to be opened for allowing brokers in internal subnets to communicate with brokers in external subnets.
For scaling, it’s simpler to add new brokers for incrementing overall broker capacity. The mesh topology by design offers higher reliability with no single point of failure. Operationally, adding or deleting of nodes requires broker re-configuration and restarting the broker service.
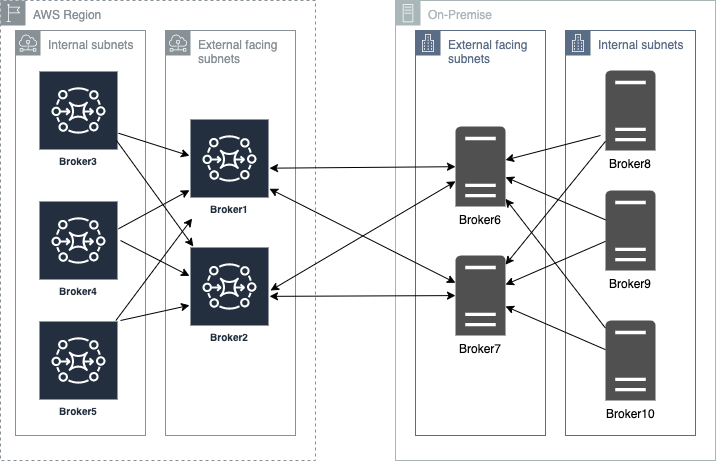
Concentrator topology
In a concentrator topology, you deploy brokers in two (or more) layers to funnel incoming connections into a smaller collection of services. This topology allows segmenting brokers into internal and external subnets without any additional security group changes. If additional capacity is needed, you can add new brokers without needing to update other brokers’ configurations. The concentrator topology provides higher reliability with alternate paths for each broker. This enables hybrid deployments with lower operational overheads.
Hub and spoke topology
A hub and spoke topology preserves messages if there is disruption to any broker on a spoke. Messages are forwarded throughout and only the central Broker1 is critical to the network’s operation. Subnet security group rules must be opened to allow brokers in internal subnets to communicate with brokers in external subnets.
Adding brokers for scalability is constrained by the hub’s capacity. Hubs are a single point of failure and should be configured as active-standby to increase reliability. In this topology, depending on the location of the hub, there may be increased bandwidth needs and latency challenges.
Using a concentrator topology for large-scale hybrid deployments
When planning deployments spanning AWS and customer data centers, the starting point is the concentrator topology. The brokers are deployed in tiers such that brokers in each tier connect to fewer brokers at the next tier. This allows you to funnel connections and messages from a large number of producers to a smaller number of brokers. This concentrates messages at fewer subscribers:
Deploying ActiveMQ brokers across Regions and on-premises
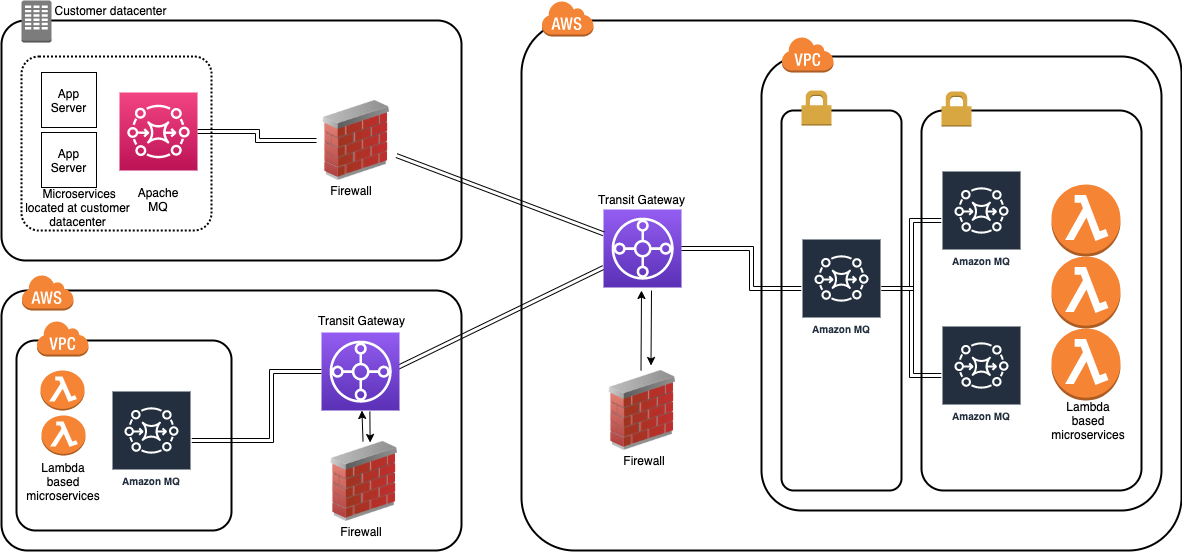
When placing brokers on-premises and in the AWS Cloud in a hybrid network of broker topologies, security and network routing are key. The following diagram shows a typical hybrid topology:
Amazon MQ brokers on premises are placed behind a firewall. They can communicate to Amazon MQ brokers through an IPsec tunnel terminating on the on-premises firewall. On the AWS side, this tunnel terminates on an AWS Transit Gateway (TGW). The TGW routes all network traffic to a firewall in AWS in a service VPC.
The firewall inspects the network traffic and routes all inspected traffic sent back to the transit gateway. The TGW, based on routing configured, sends the traffic to the Amazon MQ broker in the application VPC. This broker concentrates messages from Amazon MQ brokers hosted on AWS. The on premises brokers and the AWS brokers form a hybrid network of brokers that spans AWS and customer data center. This allows applications and services to communicate securely. This architecture exposes only the concentrating broker to receive and send messages to the broker on premises. The applications are protected from outside, non-validated network traffic.
This blog shows how to create a cross-Region network of brokers. This topology removes multiple brokers in the internal subnet. However, in a production environment, you have multiple brokers’ internal subnets catering to multiple producers and consumers. This topology spans an AWS Region and an on-premises customer data center represented in a second AWS Region:
Best practices for configuring network of brokers
Client-side failover
In a network of brokers, failover transport configures a reconnect mechanism on top of the transport protocols. The configuration allows you to specify multiple URIs to connect to. An additional configuration using the randomize transport option allows for random selection of the URI when re-establishing a connection.
The example Lambda functions provided in this blog use the following configuration:
Dynamic failover allows a broker to receive a list of all other brokers in the network. It can use the configuration to update producer and consumer clients with this list. The clients can update to rebalance connections to these brokers.
In the broker configuration in this blog, the following configuration is set up:
TTL values allow messages to traverse through the network. There are two TTL values – messageTTL and consumerTTL. Another way is to set up the network TTL, which sets both the message and consumer TTL.
The duplex option allows for creating a bidirectional path between two brokers for sending and receiving messages. This blog uses the following configuration:
In the example Lambda function, a pooled connection factory object is created to optimize connections to broker:
// Create a conn factory

final ActiveMQSslConnectionFactory connFacty = new ActiveMQSslConnectionFactory(failoverURI);
connFacty.setConnectResponseTimeout(10000);
return connFacty;

// Create a pooled conn factory

final PooledConnectionFactory pooledConnFacty = new PooledConnectionFactory();
pooledConnFacty.setMaxConnections(10);
pooledConnFacty.setConnectionFactory(connFacty);
return pooledConnFacty;
Create the network of brokers in the first Region. Navigate to the CloudFormation console and choose Create stack:
Provide the parameters for the network configuration section:
In the Amazon MQ configuration section, configure the following parameters. Ensure that these two parameter values are the same in both Regions.
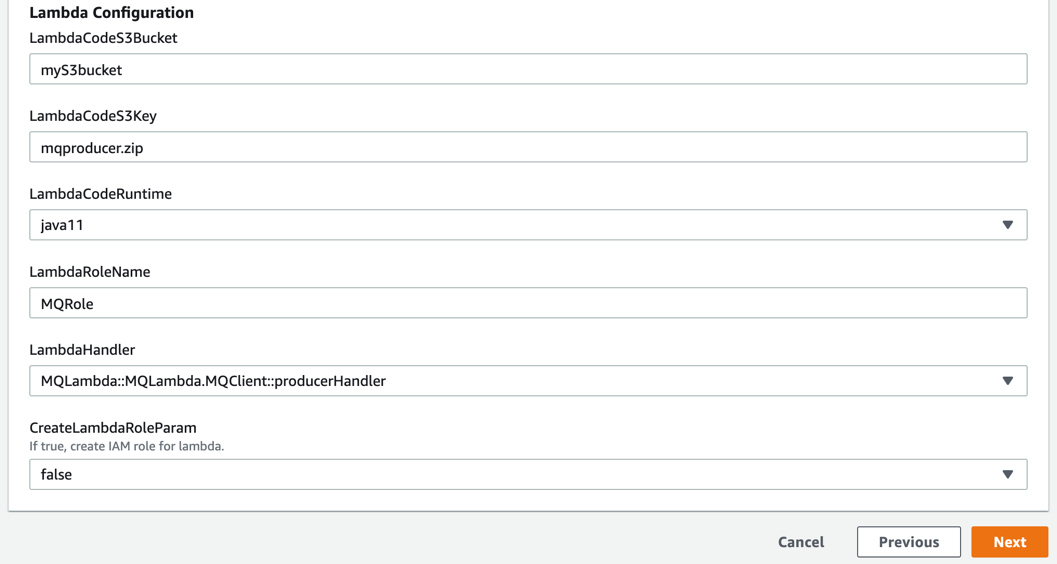
Configure the following in the Lambda configuration section. Deploy mqproducer and mqconsumer in two separate Regions:
Create the network of brokers in the second Region. Repeat step 2 to create the network of brokers in the second Region. Ensure that the VPC CIDR in region2 is different than the one in region1. Ensure that the user name and password are the same as in the first Region.
Complete VPC peering and updating route tables:
Follow the steps here to complete VPC peering between the two VPCs.
Configure the network of brokers and create network connectors:
In region1, choose Broker3. In the Connections section, copy the endpoint for the openwire protocol.
In region2 on broker3, set up the network of brokers using the networkConnector configuration element.
Edit the configuration revision and add a new NetworkConnector within the NetworkConnectors section. Replace the uri with the URI for the broker3 in region1.
This blog explains the choices when designing a cross-Region or a hybrid network of brokers architecture that spans AWS and your data centers. The example starts with a concentrator topology and enhances that with a cross-Region design to help address network routing and network security requirements.
The blog provides a template that you can modify to suit specific network and distributed application scenarios. It also covers best practices when architecting and designing failover strategies for a network of brokers or when developing producers and consumers client applications.
The Lambda functions used as producer and consumer applications demonstrate best practices in designing and developing ActiveMQ clients. This includes storing and retrieving parameters, such as passwords from the AWS Systems Manager.
For more serverless learning resources, visit Serverless Land.
Каскета най-после реши да се появи отново и да отправи гръмко обвинение. Откакто Бойко не е на власт, „инструментът в ръцете на Господ“ поразреди медийните си изяви и зае изчаквателна…
Do give it a good testing – with the holidays coming up, things are
probably going to slow down both on the development and testing front,
and as a result I expect that I will also extend the rc series by
another week not because it’s necessarily needed (too early to tell,
but doesn’t feel that way), but simply because nobody will want to
open the next merge window immediately in the new year.
For those who have not yet seen it, this
advisory from Apache describes a nasty vulnerability in the widely used
Log4j package.
Apache Log4j2 <=2.14.1 JNDI features used in configuration, log
messages, and parameters do not protect against attacker controlled
LDAP and other JNDI related endpoints. An attacker who can control
log messages or log message parameters can execute arbitrary code
loaded from LDAP servers when message lookup substitution is
enabled. From log4j 2.15.0, this behavior has been disabled by
default.
Updating this package is, of course, necessary, but that will only help so
much; it is bundled into a lot of other deployed products.
For more information see this
Ars Technica article or, for desperate cases, the Logout4Shell
utility.
В понеделник ще бъда предложен на Народното събрание за министър на електронното управление.
Отговорността и очакванията са огромни, а задачите – неизброими.
Ще започнем с електронната идентификация, с отпадането на удостоверения и с оптимизираме и електронизиране на ключови процеси. Ще трябва паралелно с това да създадем и министерство.
Целта е да премахнем бюрокрацията и да спестим време и нерви на гражданите и бизнеса.
GZDoom is the fanciest way to play Doom. Unfortunately, it has also historically been difficult to recommend to newcomers, because its default settings are… questionable.
Conspicuously, for over a decade, it defaulted to traditional Doom movement keys (no WASD) and no mouselook. I am overjoyed to discover that this is no longer the case, and it plays like a god damn FPS out of the box, but there are still a few twiddles that need twiddling. Mostly the texture filtering. Christ, the texture filtering.
Anyway GZDoom has a lot of options, so here is a handy list of the important ones. There are fewer than I expected, which is good.
Note that the routes given to the various settings are for the full options menu. Out of the box, GZDoom shows a reduced options menu, because it has a lot of options. You can get to the full menu from Full options menu near the bottom, and from there turn off the simple menu (if you want). If you get lost, you can also use the option search.
Also, virtually every setting in GZDoom takes effect instantly, even while the menu is still visible. (That’s why there are no screenshots here! Just try stuff out yourself.) It remembers where your cursor was, too, so you can exit the menu to try stuff out, then bring it back up and mash Enter a few times to get back to where you were.
By default, GZDoom uses linear upscaling on all sprites and textures, turning them into a blurry mess. This is objectively ludicrous, since the sprites and textures are pixel art.
None restores the crispy aesthetic that God intended — and when I say God, I of course mean John Carmack. No, wait, maybe I mean Adrian Carmack?
The “linear mipmap” bit means that GZDoom will still use linear downscaling, so that distant textures still somewhat resemble the actual texture and do not simply collapse into a pixel of arbitrary color. If you find this objectionable, you may of course simply set it to None.
GZDoom defaults to rendering spectres (the harder-to-see variants of the pink demons) with a sort of translucent effect, which is easier to see, which sort of defeats the purpose of making them harder to see.
This will emulate the appearance of the original game, scaled up to big chunky pixels. I actually prefer Smooth fuzz, which fits better at high resolutions and still looks like a rendering error, but pretty much anything is better than the Shadow default.
For testing purposes, it may help to pop open the console with the backtick key (top left) and type summon spectre to… well, summon a spectre.
And if all you want is something that looks kinda like Doom, you’re done! Feel free to stop reading here.
I just feel better with a little symbol in the middle of the screen. I’m holding all my guns at chest height, for some reason, so the sights on those are useless.
By default the crosshair is humongous, though, hence the scaling.
Speaking of which, fix the HUD scale.
HUD options > Scaling options > User interface scale: 3
The automatic setting is okay (and better than it used to be), but still leaves some things like pickup messages and the console as microscopic. I play in a 1080p window on a 1440p monitor, and this seems nice for me. Adjust as desired.
Use the alternative HUD.
HUD options > Alternative HUD > Enable alternative HUD: On
You’ll need to press + until the status bar disappears to actually see it.
The alternative HUD shows you everything you need to know about the state of the game, while consuming minimal space and still letting you see the weapon sprites in their full glory. It also shows you a count of kills and secrets, so you have some idea of the progress you’ve made. And it tells you a few things that you had to keep track of yourself in vanilla Doom, like what color of armor you have and whether you have the berserk fist.
(This replaces a stock fullscreen-with-info HUD that didn’t exist in vanilla Doom, but which only shows you health, armor, keys, and ammo for your current weapon. Note that if you play a WAD that heavily alters the game, there’s a chance it will add custom stuff to the stock HUD, and that stuff will not appear on the alternative HUD. It’s explicitly not moddable.)
Doom has static lighting that affects the walls and floor equally, so the transition from wall to floor/ceiling is pretty flat. A little AO helps that stand out, even if ambient occlusion is a fake idea.
Fix fake contrast.
Display options > Use fake contrast: Smooth
“Fake contrast” refers to a clever trick in the Doom engine wherein horizontal (as seen on the automap) walls draw darker than the room, and vertical walls draw lighter. In rectangular rooms, this helps avoid the “flat” feeling mentioned previously.
Unfortunately, with complex geometry — as you see frequently in modern maps, but also occasionally in the original ones — this can backfire. I’ve been fooled into thinking one particular wall in a curved hallway is a secret, just because it happened to be vertical and appeared lighter than its neighbors. Meanwhile, rooms at a slant don’t benefit at all.
Smooth preserves the effect, but gradually transitions between the original effect for orthogonal walls and normal lighting for walls at a 45° angle. (That is, a wall at a 22.5° angle will have half the fake contrast effect.)
The default particles are linear filtered, which looks awful, but I don’t think anything uses particles by default so you’d never notice. You can also set them to Square, but I think having a single pixel floating in the air looks a bit silly.
Adding particles to blood splatters and bullet puffs just looks nice. I replace the rocket trails entirely because the original Doom rocket cloud is just kinda big and clumsy and ugly.
Enable dynamic lighting.
This is on by default… sort of. GZDoom needs to be able to find the lights.pk3 and brightmaps.pk3 files bundled with it, but if it runs at all, it probably knows where they are.
So all you have to do is check Load lights and Load brightmaps in the little dialog you get when launching the game.
Probably. See, for some reason, those checkboxes are only there on Windows — in fact, I didn’t know they existed at all until two minutes ago. Even though they set a config setting, they aren’t accessible via the options menu. So if that doesn’t work for you for whatever reason, try popping open the console and doing:
autoloadlights true

autoloadbrightmaps true
Then restart the game. Glowing objects should now cast (fairly subtle!) light on nearby walls. You can see this immediately in Doom II’s first map — there should be a green glow on the floor underneath the armor bonus in the far right corner of the room. Or for a more dramatic demonstration, IDKFA and fire a rocket.
It’s just a nice touch. And unlike many attempts to add dynamic lighting to Doom, it’s not so over-the-top as to be distracting.
At the other end of the scale, there are those who want an experience as close as possible to vanilla Doom. Those people might just want to use a port closer to vanilla, like a PRBoom variant or even Chocolate Doom, but GZDoom is willing to do its best:
Quantize light levels.
Display options > Hardware renderer > Banded SW lightmode: On
Doom maps support light levels from 0 to 255, but in practice, Doom only understood… 16, I think? That’s because it was a paletted game, and it needed a colormap telling it how to darken each color while still sticking to the palette. The game only shipped with 15 such mappings, probably because 255 of them would have been ludicrous, and thus there are only 16 light levels in practice.
GZDoom’s hardware renderer isn’t bound by a palette, so it happily supports all 256 light levels. If you can’t stand this, well, it can simulate 16 for you.
Disable the hardware renderer altogether.
Set video mode > Render mode: True color SW renderer
If the very notion of accelerated rendering offends you, the original core of Doom’s renderer is still in there, just waiting for you. All you need do is turn it on. Note that this will severely restrict your ability to mouselook and will draw without vertical perspective, as the Doom renderer was designed around drawing vertical lines.
What’s that? Even true color is too much? You need the paletted glory that was the best a 386 could do? Well, Doom software renderer is also an option.
Disable mouselook.
Mouse options > Always mouselook: Off
Doom didn’t support looking up and down. Why should you?
Despite the name, this still allows you to look around horizontally. I guess technically that’s turning, not looking. Also, moving the mouse up and down will now move you (slowly) forwards or backwards.
Disable WASD.
Customize controls > Preferred keyboard layout: Classic ZDoom, then Reset to defaults
Okay now you have gone too far. This restores the very keyboard bindings I wanted to rally against — arrow keys to move, turning by default, Alt to strafe…
Disable teleporter zoom.
Display options > Teleporter zoom: Off
GZDoom does a brief zoom-in effect on your field of view after (non-silent) teleporting. Looks sick. If you hate it, here’s how to turn it off.
Restore the vanilla lite-amp goggles.
Display options > Hardware renderer > Enhanced night vision mode: Off
In vanilla Doom, the lite-amp goggles simply make the entire world render as fullbright, which looks fucking terrible. GZDoom defaults to a “night vision goggles” sort of effect that also highlights objects, but if you really can’t stand that, this twiddle is here for you.
Enable randomized pitch on sound effects.
Sound options > Randomize pitches: On
For the very ornery, I believe this behavior was in the original release of Doom but (accidentally?) broken in Doom 1.2 and all later versions. It’s really weird, but it’s the intended behavior, I guess!
Restore Doom’s automap colors.
Automap options > Map color set: Traditional Doom
This will change the automap back to its red-and-yellow-on-black glory.
It will also remove the colors that tell you where locked doors and the exit are. You might argue that those are cheating. I argue that they are the entire point of a map.
You can also turn off the automap’s monster and secret counts here if you truly wish to be as lost as possible.
Twiddle with compatibility settings.
Compatibility options > Compatibility mode: ?
You might want Doom (strict) for the closest vanilla experience that GZDoom can provide. Might. The most notable effects are:
Monsters will wake up when seeing a player with a blur sphere. By default, they usually won’t, a behavior inherited from Hexen.
Arch-viles can resurrect crushed corpses as “ghosts” that cannot be shot, only harmed by splash damage from rockets.
Pain elementals will be unable to spawn new lost souls if there are at least 21 already present in the level.
Monsters can’t be knocked off of high ledges.
You will be unable to crowdsurf, meaning you will be blocked both by imps at the foot of a cliff below you, and by cacodemons flying above you.
You can also toggle these on or off individually at your leisure.
Building a corporate network is hard. We want to enable IT teams to focus on exploring and deploying cutting edge technologies to make employees happier and more productive — not figuring out how to add 100 Mbps of capacity on the third floor of a branch office building.
And yet, as we speak to CIOs and IT teams, we consistently hear of the challenge required to manage organization connectivity. Today, we’re sharing more about how we’re solving connectivity challenges for CIOs and IT teams. There are three parts to our approach: we’re making our network more valuable in terms of the benefit you get from connecting to us; we’re expanding our reach, so we can offer connectivity in more places; and we’re further reducing our provisioning times, so there’s no more need to plan six months in advance.
Making Interconnection Valuable
Cloudflare delivers security, reliability, and performance products as a service, all from our global network. We’ve spent the past week talking about new releases and enhanced functionality — if you haven’t yet, please check out some exciting posts on how to replace your hardware firewall, managing third party tools in the cloud, and protecting your web pages from malicious scripting. By interconnecting with us, you get access to all these new products and features with zero additional latency and super easy configuration. This includes, for example, leveraging private paths from Cloudflare’s Magic Transit to your datacenters, completely bypassing the public Internet. It also includes the ability to leverage our private backbone and global network, to gain dramatic performance improvements throughout your network. You can read more examples about how interconnection gives you faster, more secure access to our products which improve your Internet experience in our Cloudflare Network Interconnect blog.
But it’s not just all the products and features you gain access to. Cloudflare has over 28 million Internet properties that rely on it to protect and accelerate their Internet presence. Every time a new property connects to our network, our network becomes more useful. Our free customers or consumers who use 1.1.1.1 provide us unparalleled vision into the Internet to improve our network performance. Similarly, as we expand our surface area on the Internet, it helps us improve our threat detection; it’s like an immune system that learns as it gets exposed to more pathogens. Each customer we make faster and more secure helps others in turn. We have a vast network of customers, including the titans of ecommerce, banking, ERP and CRM systems, and other cloud services. It’s only continuing to grow — and that will be to your advantage.
Making Interconnection Available Everywhere
Building corporate networks requires diverse types of locations to connect to each other: data centers, remote workers, branches in various locations, factories, and more. To accommodate the diversity and geographic spread of modern networks, Cloudflare offers many interconnection options, from our 250 locations around the world to 1000 new interconnection locations that will be enabled over the next year as a part of Cloudflare for Offices.
Connecting data centers to Cloudflare
You can interconnect with Cloudflare in over 250 locations around the world. Check out our peeringDB page to learn more about where you can connect with us.
We also have several Interconnect Partners who provide even more locations for interconnection. If you already have datacenter presence in these locations, interconnection with Cloudflare becomes even easier. Go to our partnership page to learn more about how to get connected through one of our partners.
Connecting your branch offices
A refresher on our Birthday Week post: Cloudflare for Offices is our initiative to bring Cloudflare’s presence to office buildings and multi-homed dwellings. Simply put, Cloudflare is coming to an office near you. That means that by plugging into Cloudflare you get direct, private, performant access to all Cloudflare services, particularly Cloudflare One. With Cloudflare for Offices, your Gateway queries never traverse the public Internet before Cloudflare, your private network built on Magic WAN is even more private, and Argo for Packets makes your offices faster than before. Cloudflare for Offices is the ultimate on-ramp for all on-premise traffic.
If we’re going to 1000 new locations, there has to be a method to the madness! The process for selecting new locations includes a number of factors. Our goal for each location is to allow the most customers to interconnect with us, while also leveraging our network partners to get connected as fast as possible.
What does a building need to have?
We want to offer reliable, turnkey connectivity to our zero trust security and other services customers connect to our network to consume.
When we evaluate any building, it has to meet the following criteria:
It must be connected to the Internet with one or more telecom partners. Working with existing providers reduces overhead and time to provision. Plugging into our network to get protected doesn’t work if we have to lay fiber for three months.
It must be multi-tenant and in a large metro area. Eventually we want to go everywhere, even to buildings with only one tenant. But as we’re starting from zero, we want to go to the places where we can have the most impact immediately. That means looking at buildings that are large, have a large number of potential or active customers, and have large population counts.
However, once we’ve chosen the building, the journey is far from over. Getting connected in a building has a host of challenges beyond just choosing a connectivity partner to the building. After the building is selected, Cloudflare works with building operators and network providers to provide connectivity to tenants in the building. Regardless of how we get to your office, we want to make it as easy as possible to get connected. And our expansion into 1000 more buildings means we’re on the path to being everywhere.
Once a building is provisioned for connectivity, you have to get connected. We’ve been working to provide a one-stop solution for all your office and datacenter connectivity that will look the same, regardless of location.
Getting Interconnection Done Quickly
Interconnection should be easy, and should just involve plugging in and getting connected. Cloudflare has been hard at work since the release of Cloudflare Network Interconnect thinking through the best ways to streamline connectivity to make provisioning an interconnection as seamless as plugging in a cable. With Cloudflare for Offices expanding its reach as we detailed above, this will be easy: users who are connecting via offices are using pre-established connectivity through partners.
But for customers who aren’t in a building covered by Cloudflare for Offices, or who use Cloudflare Network Interconnect, it’s not that simple. Provisioning network connectivity has traditionally been a time-consuming process for everyone involved. Customers need to deal with datacenter providers, receive letters of authorization (or LOAs for short), contract remote hands to plug in cables, read light levels, and that’s before software gets involved. This process has typically taken weeks in the industry, and Cloudflare has spent a lot of time shrinking that down. We don’t want weeks, we want minutes, and we’re excited that we are finally getting there.
There are three main initiatives we are pursuing to get this done: automating BGP configurations, streamlining cross-connect provisioning, and improving uptime. Let’s dive into each of those.
Instant BGP session turnup
When you provision a CNI, you’re essentially creating a brand new road between your neighborhood and the Cloudflare neighborhood. If the cross-connected cable is the paving of the actual street, BGP sessions are the street signs and map applications that tell everyone the new road is up. Establishing a BGP session is critical to using a CNI because it lets traffic going through Cloudflare and through your network know that a new private path exists between the two networks.
But when you pave a new road, you update the street signs in parallel to building the road. So why shouldn’t you do the same with interconnection? Cloudflare is now provisioning BGP sessions once the cross-connects are ordered so that the session is up and ready for you to configure. This cuts down on lots of back-and-forth and also parallelizes critical work to reduce overall provisioning time.
Cross-connect provisioning and Interconnect partners
Building the road itself takes a lot of time, and provisioning cross-connects can run into similar issues if we’re following the metaphor. Although we all wish robots could manage cross-connects in every data center, we still rely on booking time with humans and filling out purchase orders, completing methods of procedure (or MOP) to tell them what to do, and hoping that nobody bumps any cables or is accidentally clumsy during the maintenance. Imagine trying to plug your cables into one of these.
To fix this and reduce complexity, Cloudflare is standardizing connectivity in our datacenters to make it easy for humans to know where things get plugged in. We’re also better utilizing things like patch panels, which allow operators to interconnect with us without having to go in cages. This reduces time and complexity because operators are less likely to bump into things in cages, causing outages.
In addition, we also have our Interconnect Partners, which leverage existing connectivity with Cloudflare to provide virtual interconnection. Our list of partners is ever growing, and they’re super excited to work with us and you to give you the best, fastest, most secure connectivity experience possible.
“Megaport’s participation in Cloudflare Network Interconnect as an Interconnection Platform Partner helps make connectivity easier for our mutual customers. Reducing the time it takes for customers to go live with new Virtual Cross Connects and Megaport Cloud Routers helps them realize the promise of software-defined networking.” – Peter Gallagher, Head of Channel, Megaport
“Console Connect and Cloudflare are continuing our partnership as part of Cloudflare’s Network Interconnect program, helping our mutual customers enhance the performance and control of their network through Software-Defined Interconnection®. As more and more customers move from physical to virtual connectivity, our partnership will help shorten onboarding times and make interconnecting easier than ever before.” – Michael Glynn, VP of Digital Automated Innovation, Console Connect.
Improving connection resilience uptime
One customer quote that always resonates is, “I love using your services and products, but if you’re not up, then that doesn’t matter.” In the arena of interconnectivity, that is never more true. To that end, Cloudflare is excited to announce Bidirectional Forwarding Detection (or BFD) support on physical CNI links. BFD is a networking protocol that constantly monitors links and BGP sessions down to the second by sending a constant stream of traffic across the session. If a small number of those packets does not make it to the other side of the session, that session is considered down. This solution is useful for CNI customers who cannot tolerate any amount of packet loss during the session. If you’re a CNI customer, or even just a Cloudflare customer who has a low-loss requirement, CNI with BFD is a great solution to ensure that quick decisions are made with regard to your CNI to ensure your traffic always gets through.
Get connected today
Cloudflare is always trying to push the boundaries of what’s possible. We built a better path through the Internet with Argo, took on edge computing with Workers, and showed that zero trust networking could be done in the cloud with Cloudflare One. Pushing the boundaries of improving connectivity is the next step in Cloudflare’s journey to help build a better Internet. There are hard problems for people to solve on the Internet, like how to best protect what belongs to you. Figuring out how to get connected and protected should be fast and easy. With Cloudflare for Offices and CNI, we want to make it that easy.
If you are interested in CNI or Cloudflare for Offices, visit our landing page or reach out to your account team to get plugged in today!
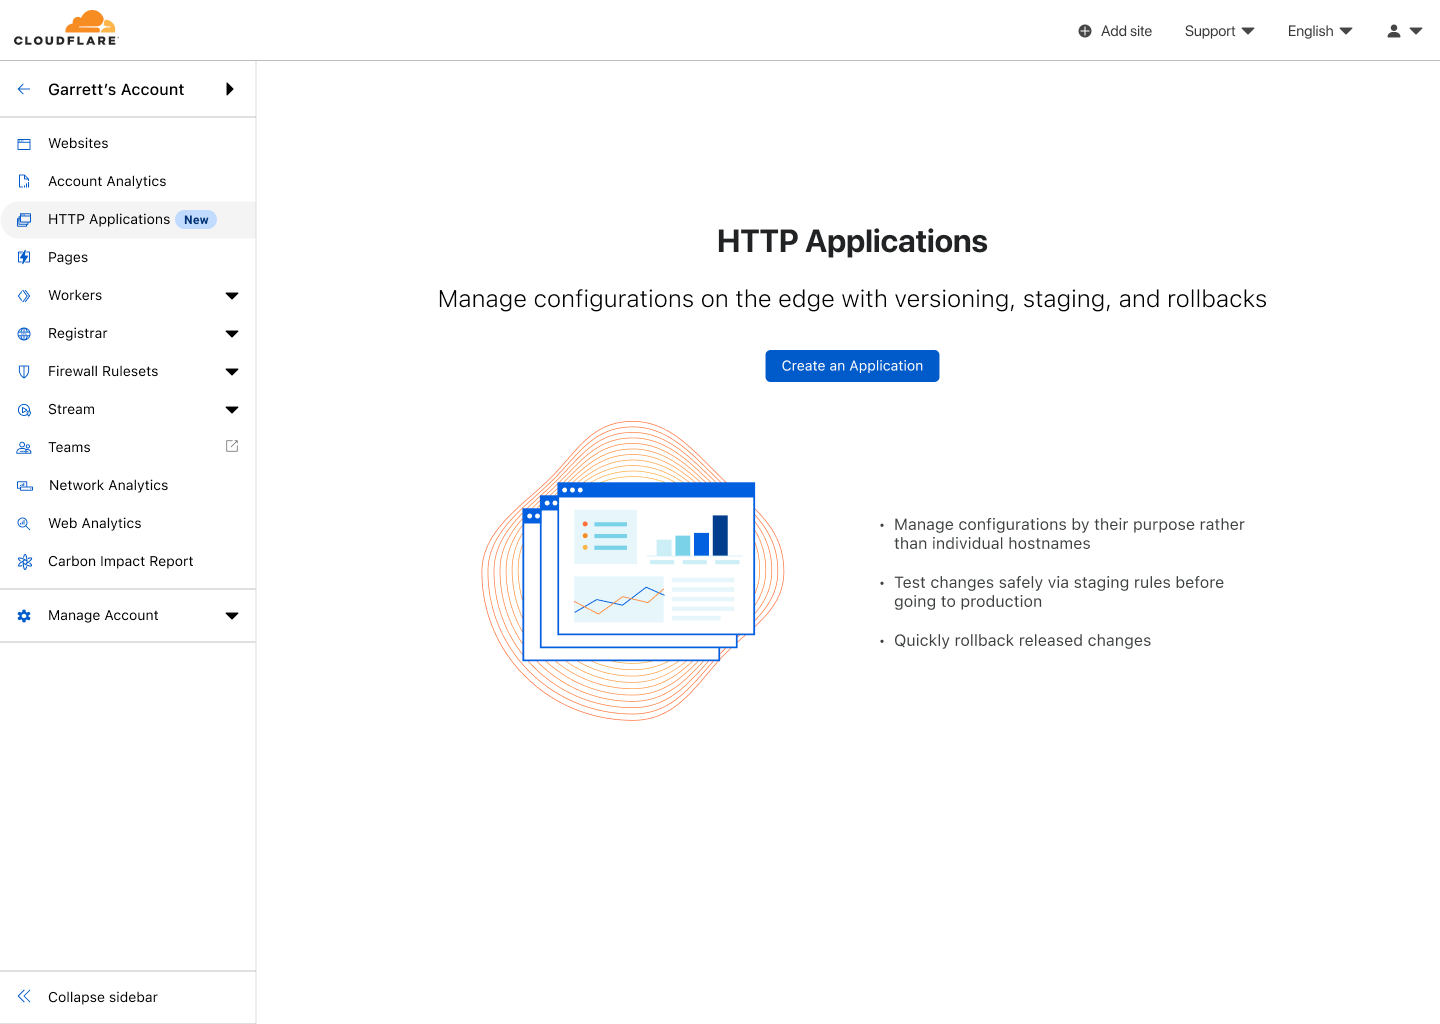
Today, we are announcing a closed beta of HTTP Applications: a new way to safely test and deploy changes to your HTTP traffic. HTTP Applications introduce versioning of configuration and the ability to control when changes rollout to HTTP traffic on Cloudflare’s global edge network. Enterprise customers looking for greater control should reach out to their Customer Success Manager to get access.
Issues Encountered in Managing Configurations
Since the very first days of Cloudflare, management of websites and web applications has been done through what we called a Zone, which comes from the concept of a DNS Zone. While this model has served customers well over the years, it does create difficulties in managing edge configuration, namely:
Manual effort is required by customers to setup a staging environment.
Risk of drift in configuration between production and staging.
In software development, you want to test changes in a safe environment to validate them before they go to production or affect live traffic. In many common software development lifecycles, this means deploying changes to a staging or pre-production environment for testing and validation. The most common way customers do this today on Cloudflare is through the use of two Zones denoted by the hostnames of those zones, for example: one for staging named staging.example.com and one for production named example.com. This solves the core problem, as it provides insulation of changes. Errors in the staging zone will not affect production traffic.
However, in order to apply to production, changes that have been successfully verified in staging, the customer must manually copy those changes — or build an automation through the use of Cloudflare’s Terraform Provider. For many, this follows a manual ‘change request’ process in which a ticket is logged with the changes to be made. Then, someone (often a different person) picks up the ticket and must accurately reproduce the same changes based on manually provided instructions. This is an error-prone process; and an error in this process can lead to an outage, depending on the change involved. Additionally, a drift in the configuration between staging and production configurations could lead to further complications.
We want to provide customers with safety and reliability in managing their services on Cloudflare. In order to solve the aforementioned problems, we are announcing HTTP Applications along with Routing Rules.
HTTP Applications
HTTP Applications are a way to manage edge configuration by use case, rather than by hostname. Each HTTP Application has a purpose, whether that is handling the configuration of your marketing website or an internal application. Each HTTP Application consists of versions of configurations where each version represents a snapshot of settings for managing traffic — page rules, firewall rules, cache settings, etc. Each version of configuration inside of the HTTP Application is independent of the others, but when a new version is created, it is initialized as a copy of the version that preceded it.
Routing Rules
Unlike zones, each version of an HTTP Application is independent of any specific hostname. So if versions are not tied to a hostname, like zones, then how do you decide which version of an HTTP Application will affect a specific set of traffic? The answer is Routing Rules. With Routing Rules, you get to decide which version of an HTTP Application is applied to which traffic, aka hostnames. Routing Rules are powered by Cloudflare’s Ruleset Engine and rely on the use of conditional “if then” rules to map hostnames controlled in your Cloudflare account to a version of configuration. As an example, if a request’s hostname matches `www.example.com`, then apply version 2 of my Marketing HTTP Application. When this rule executes at our edge, instead of applying the regular zone configuration of www.example.com, the edge will instead use the configuration defined in version 2 of the HTTP Application.
Routing Rules supports two kinds of rules — staging rules and production rules. Both take a list of hostnames, as described, but when creating a staging rule, we additionally apply a filter such that the rule will only execute when traffic is sent to specific IPs at our edge. This means that you can safely test changes by sending traffic to www.example.com at the staging IPs while customers are unaffected. Even better, once you have validated your changes with the creation of a production routing rule, the exact same configuration will be applied in production for all your customers.
But that’s enough talk — let’s see it in action!
Using HTTP Applications to safely test and deploy a change
For this walkthrough, I am going to play the role of an existing customer. I have an existing zone serving customers and I want to make some changes to transform rules such that I can rewrite my assets location. However, I am not very good with regex and making a mistake will likely break the site for all of my customers! Instead of making the change directly in the zone, we are going to use HTTP Applications and Routing Rules to make, test and roll out the change.
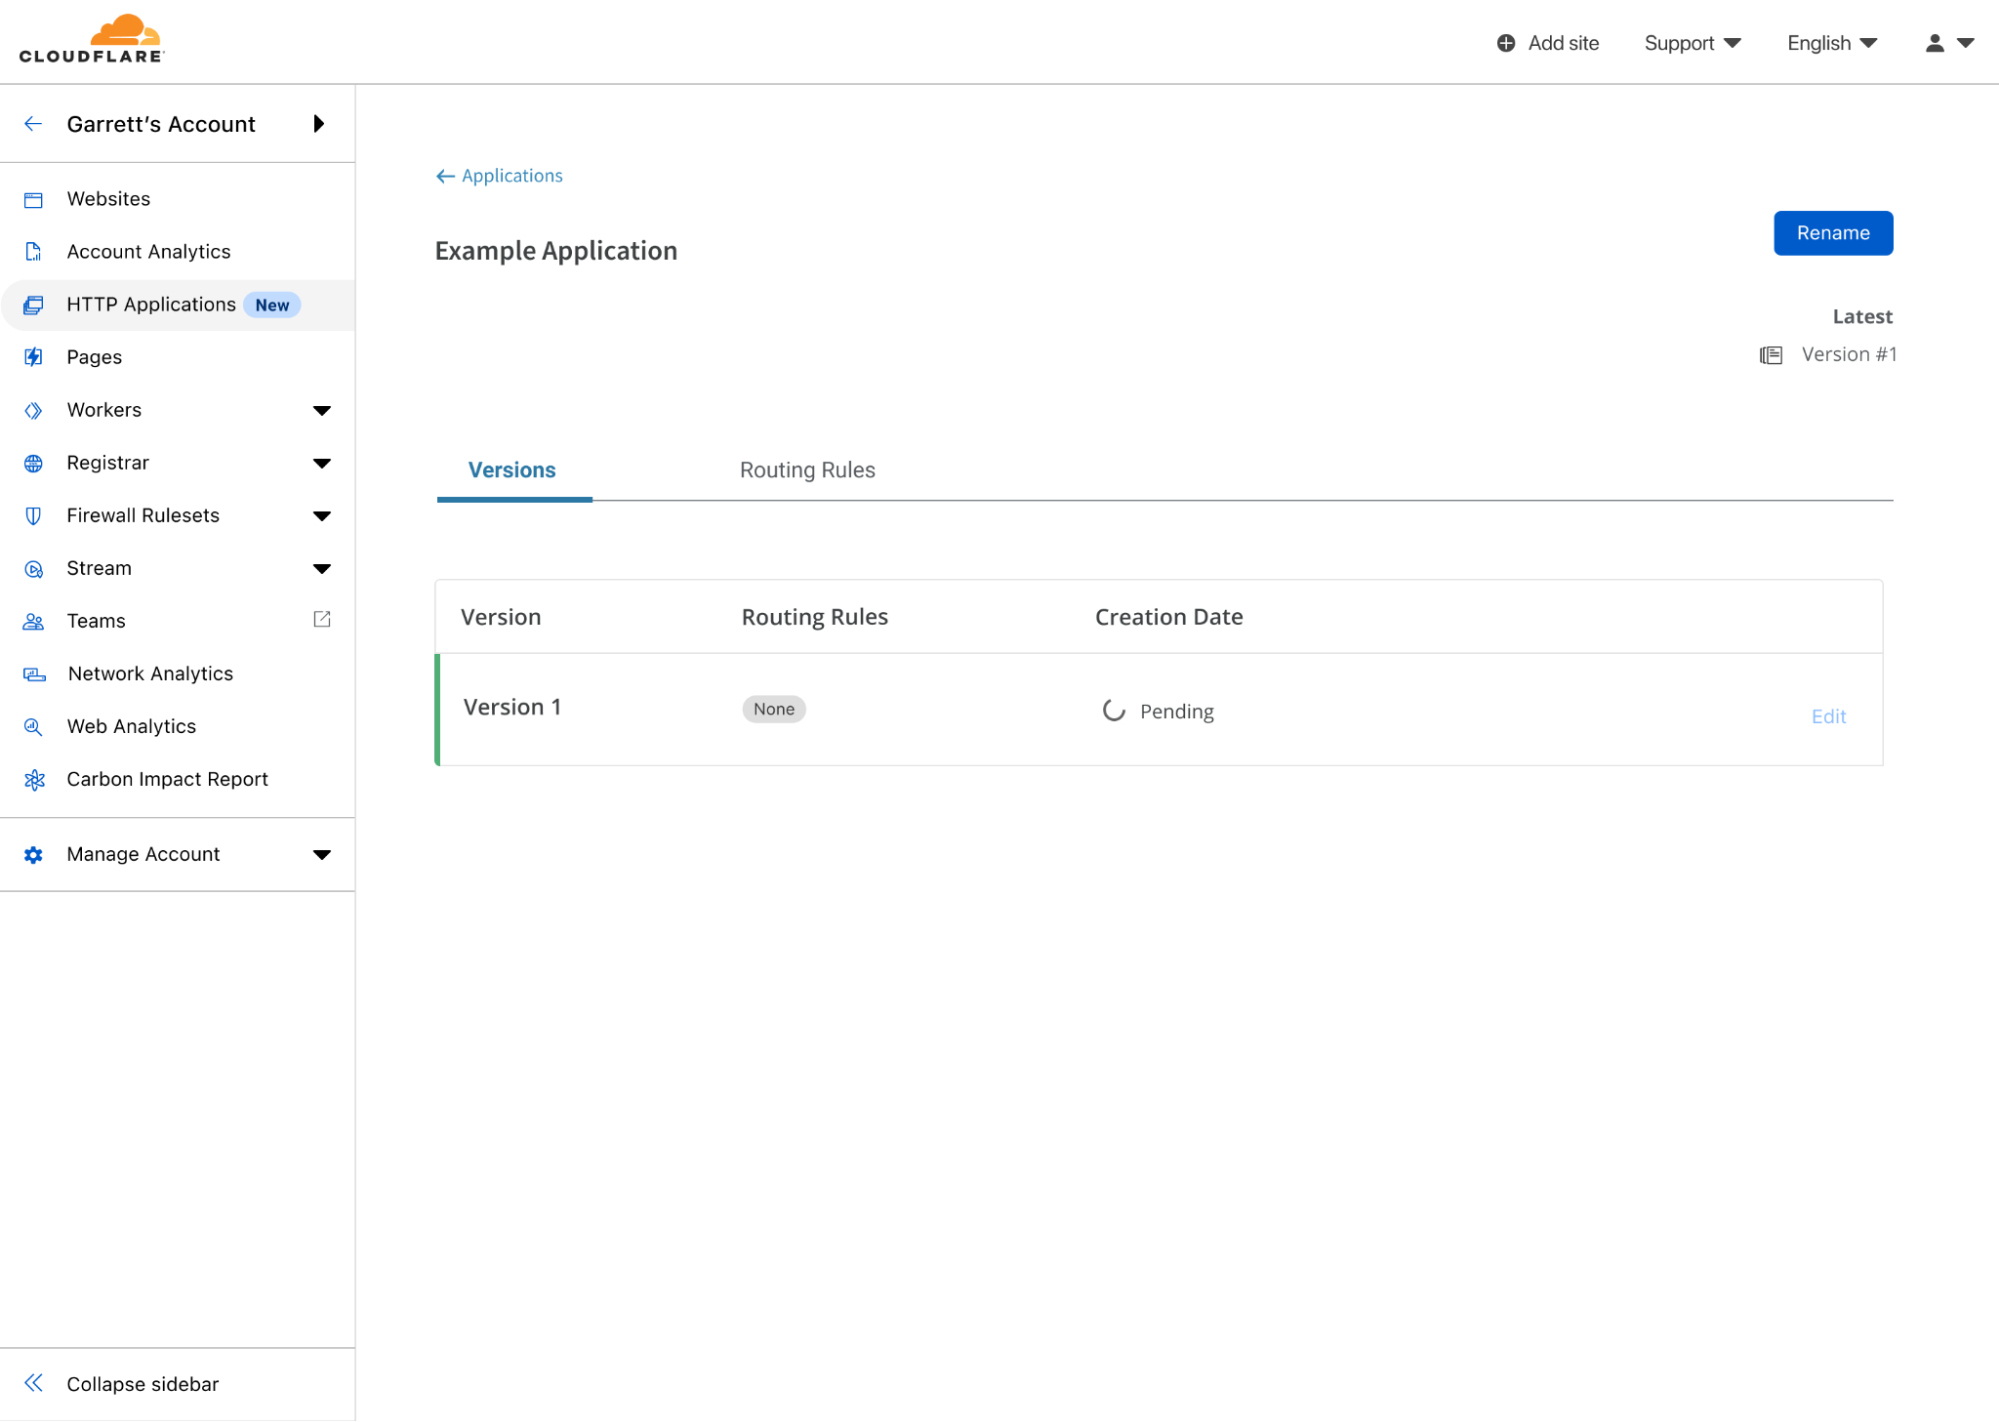
First, I log into the Cloudflare Dashboard. After selecting my account, I see HTTP Applications available in the sidebar. Upon selecting that, I am given the option to create my first HTTP Application.
The Cloudflare Dashboard showing the empty state page for HTTP Applications
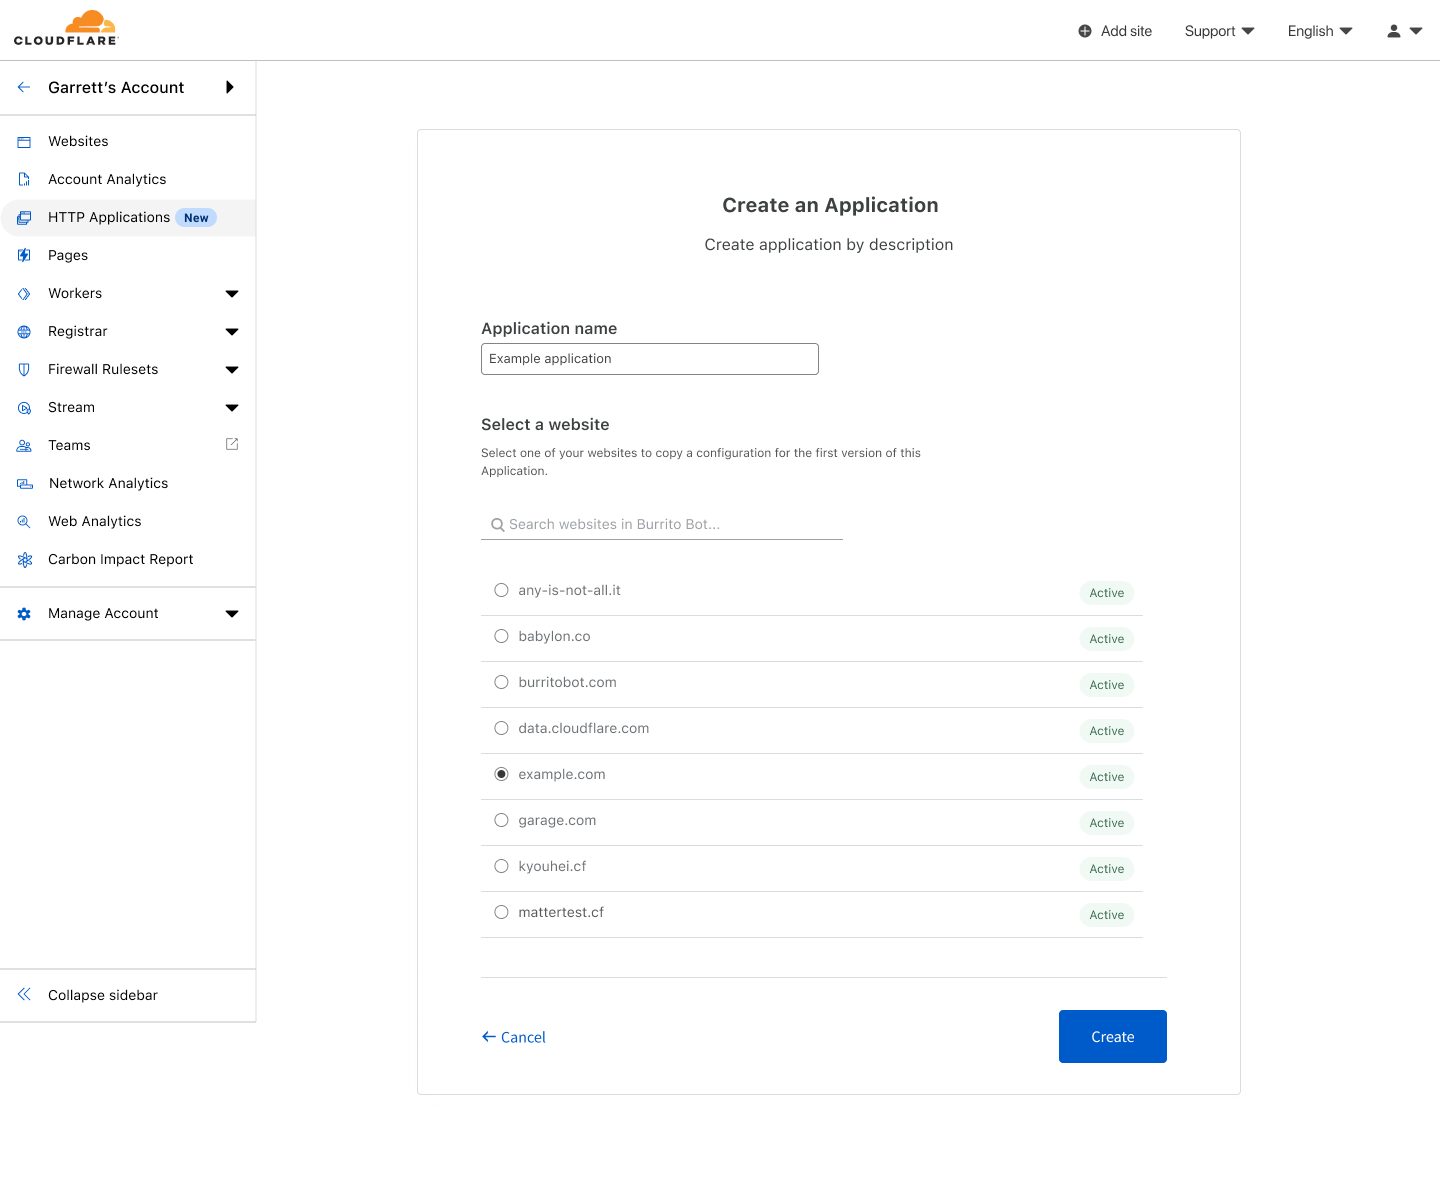
To create my first HTTP Application, I need to give it a name and select a pre-existing zone, in this case example.com. Cloudflare will use that zone to initialize the configuration of the HTTP Application’s first version. By copying over the existing settings from the zone, I have a safe copy to work from, and I don’t need to rebuild the configuration manually.
The “Create an Application” screen showing that an HTTP Application will be created named “Example Application” and initialized from example.com.
After selecting create, I have my first HTTP Application! Now, the first version is in the process of being created. Behind the scenes, Cloudflare will take the existing configuration of example.com and copy it to Version 1 of this HTTP Application. Once successfully copied, I can begin making edits to the configuration.
The Version list of the Example Application, showing Version 1 being created.
I can make edits to this version, just like I would with any zone. There are two important distinctions, however. First: any change I make right now will not affect any live traffic at Cloudflare’s edge, because we have not yet created any routing rules to send traffic to this version’s configuration. Second: we don’t allow everything associated with a zone to be controlled via an HTTP Application, namely: DNS records, SSL Certificates, Spectrum, or Load Balancing.
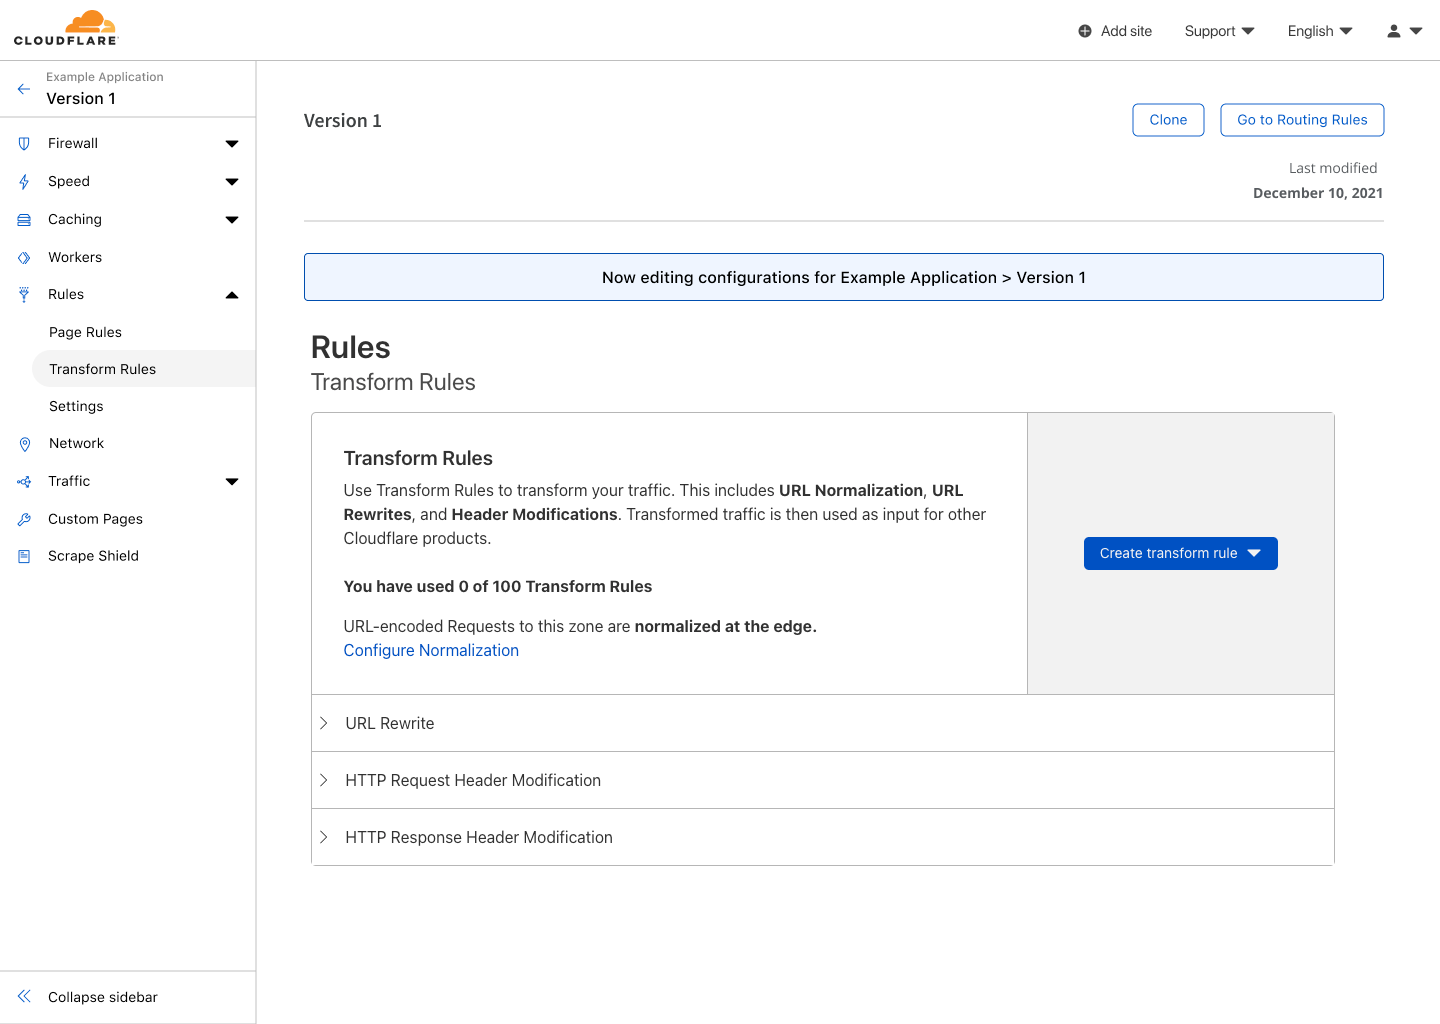
Transform rules of Version 1 showing no rules have been created.
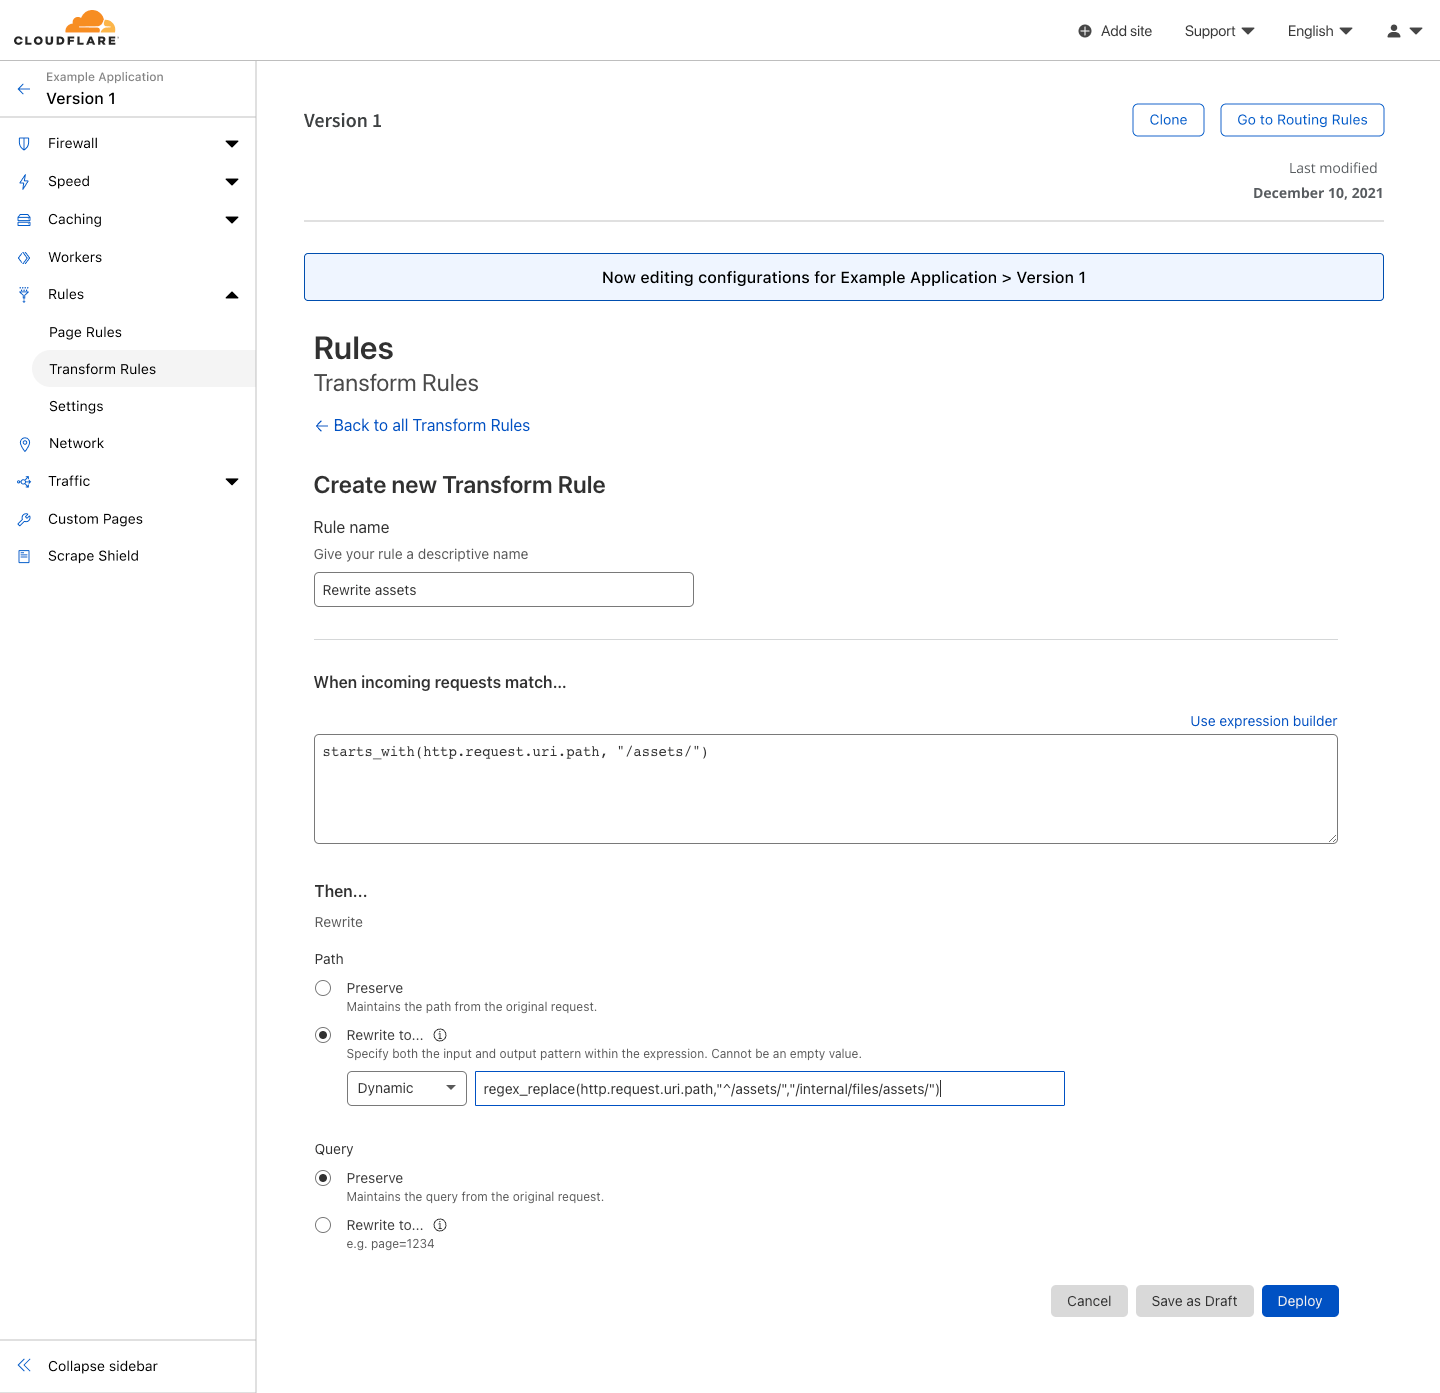
In the Rules section under Transform Rules, I create a new rule to rewrite the path of assets to their correct location. For any request to example.com/assets/*, we will rewrite the path to be example.com/internal/files/assets/*.
Creating a transform rule for Version 1 named “Rewrite Assets”. This rule replaces the path for requests starting with “/assets/*” with “internal/files/assets/*”.Transform rules of Version 1 showing a new rule named “Rewrite Assets” has been created.
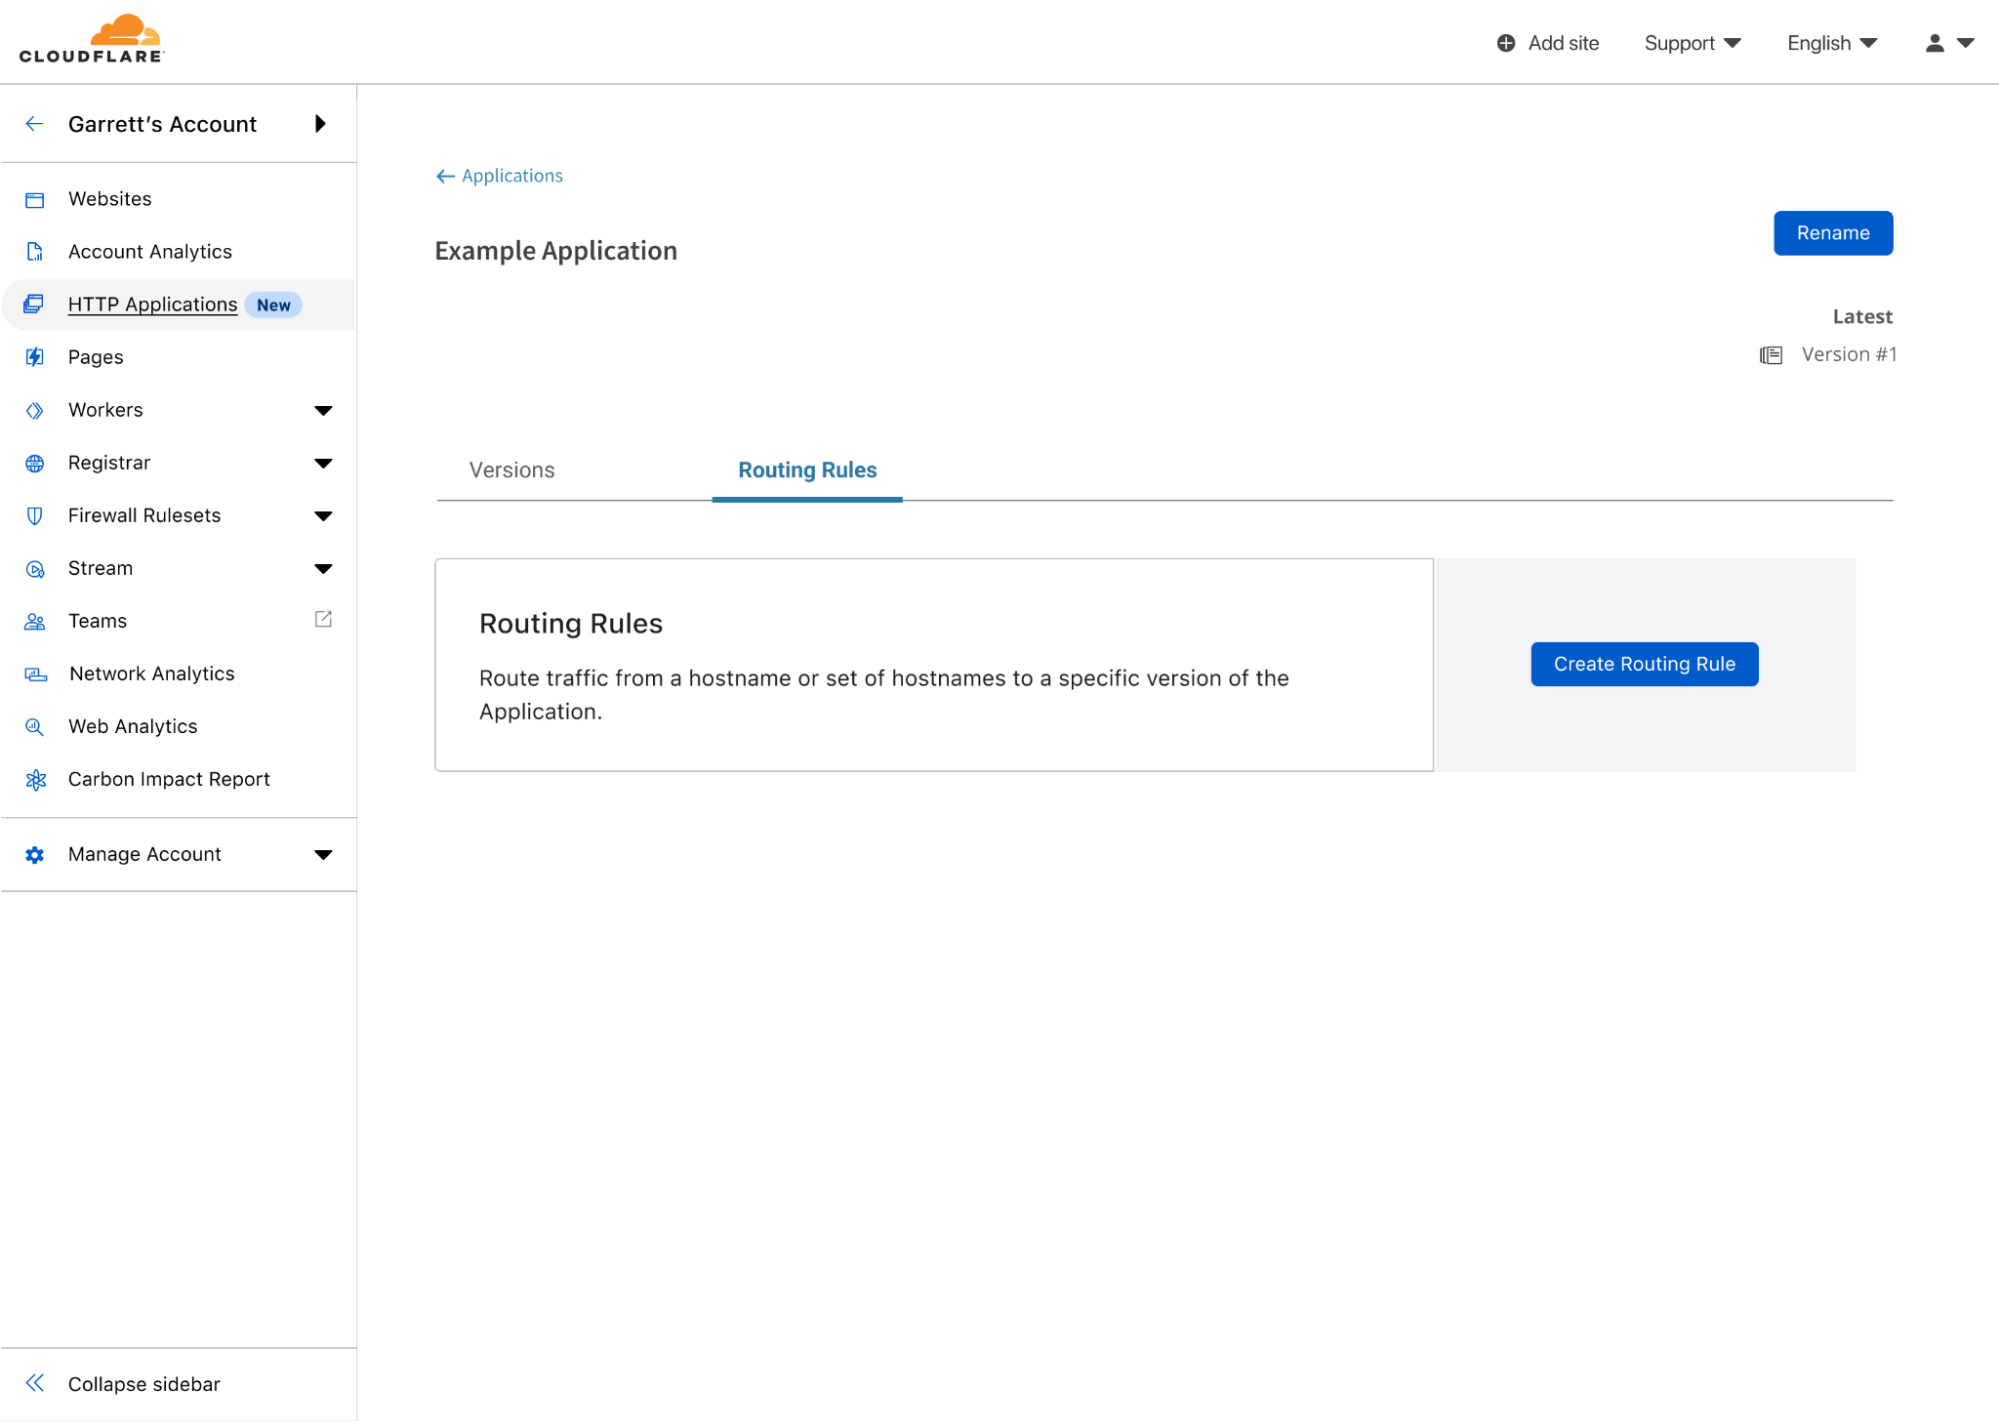
At this point, I have made my change, but now I want to test it. To do that, I can leave the version editing section and head over to Routing Rules for this HTTP Application. Here I can create rules that will allow my existing traffic to be routed through this version’s configuration.
An empty list of Routing Rules for the Example Application.
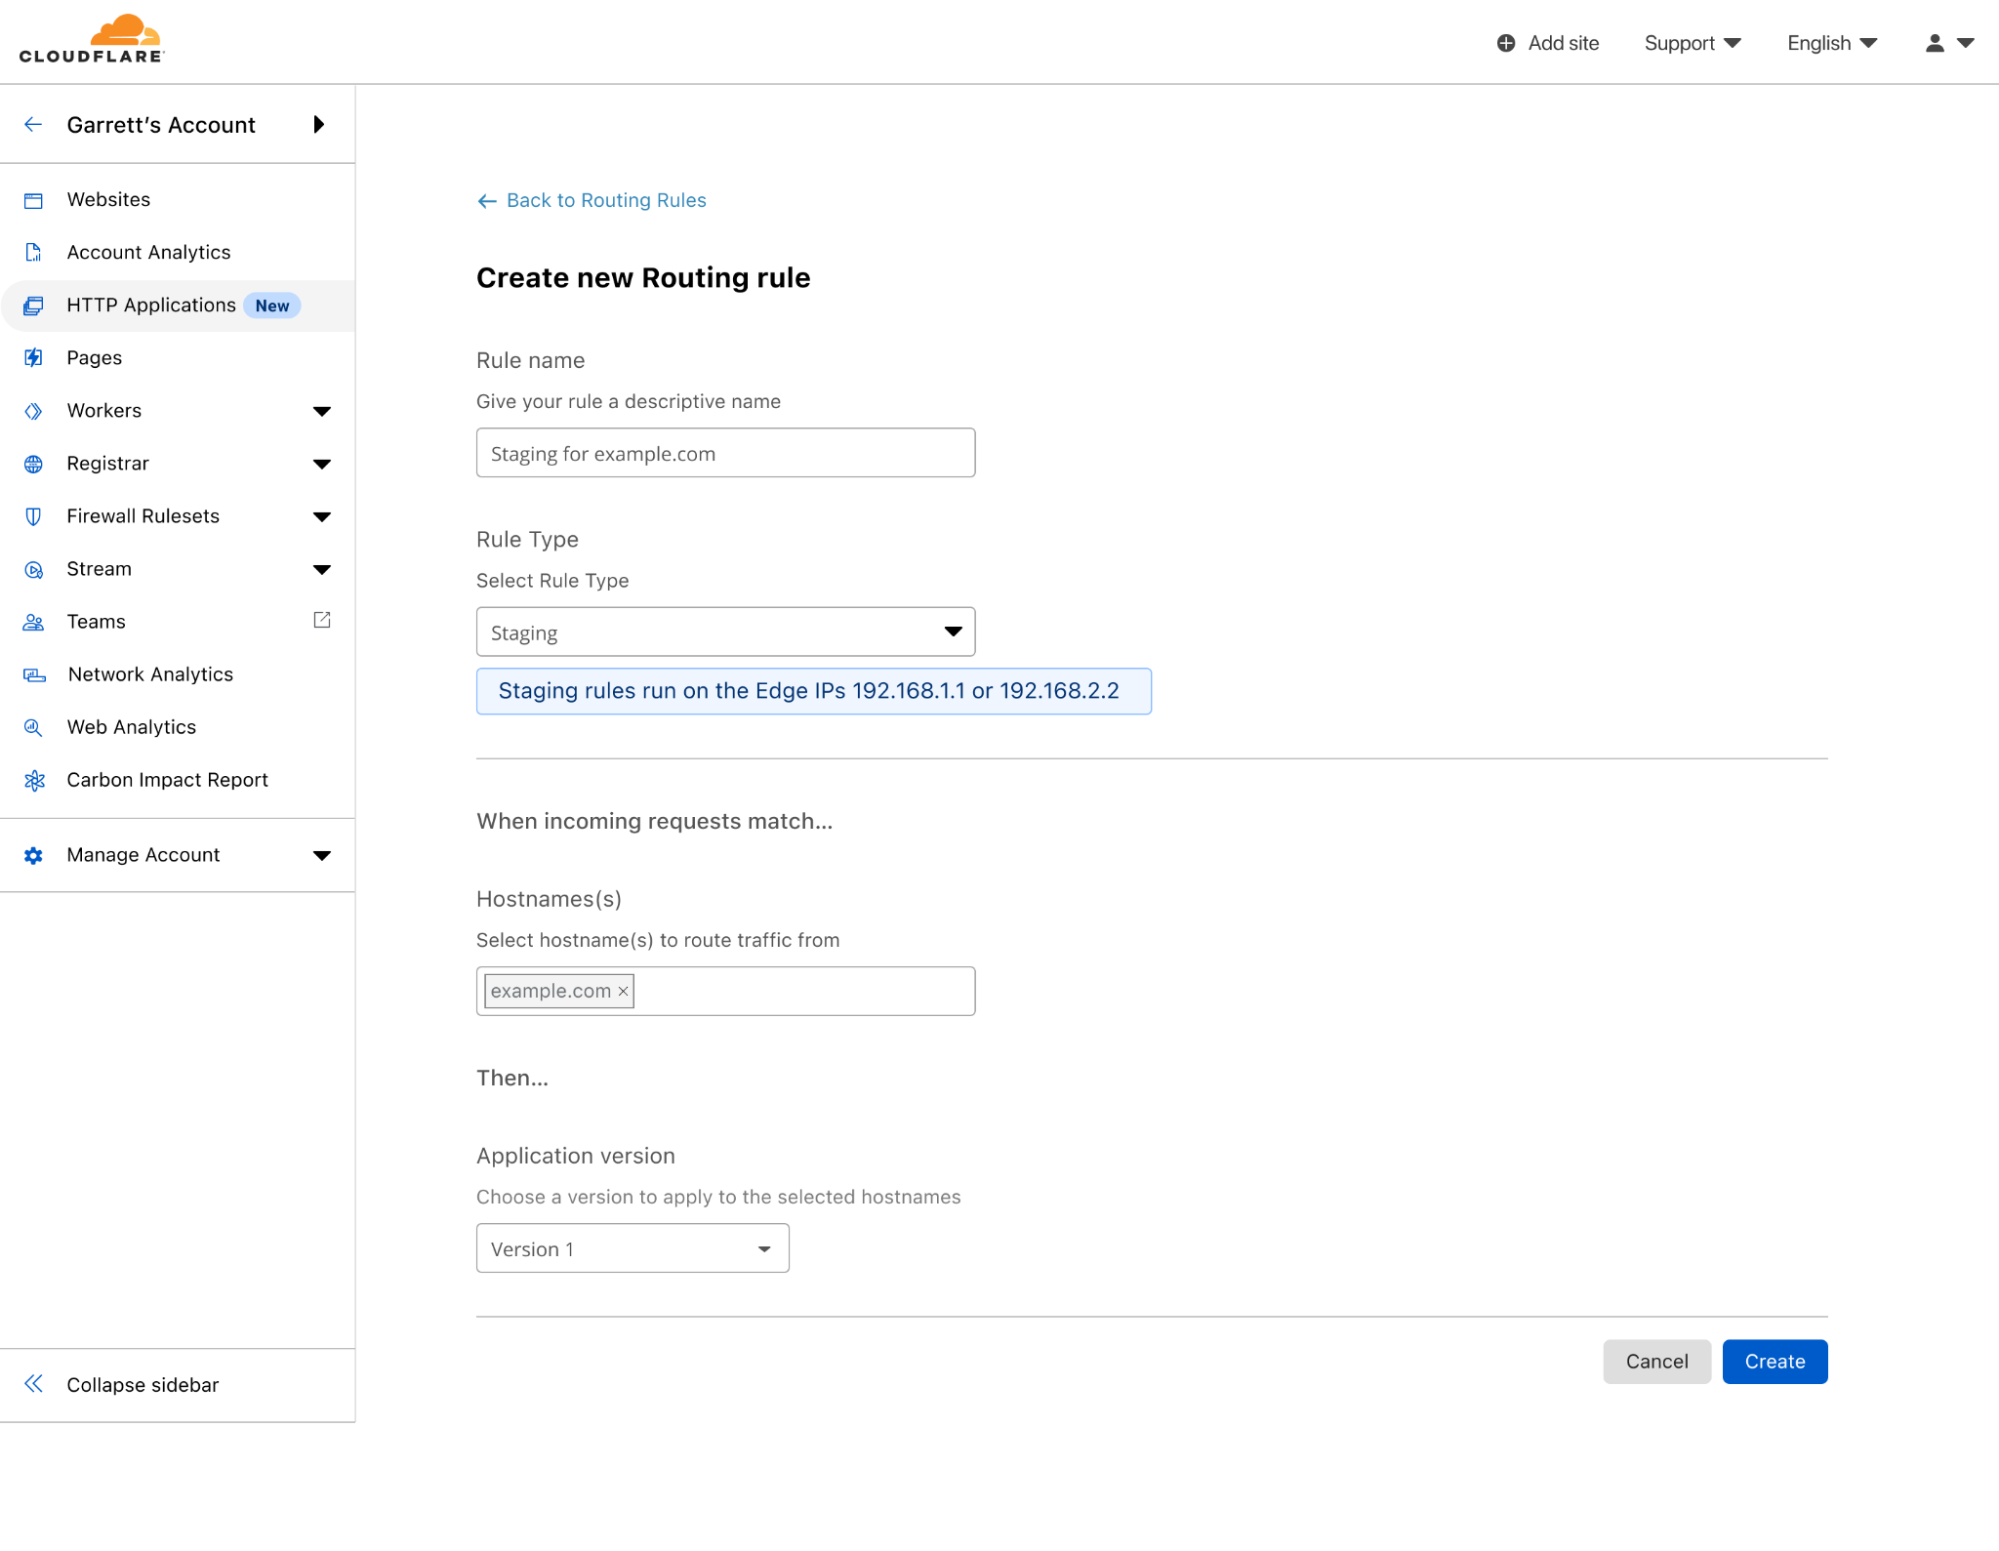
I will create a staging rule, as I want to be the only one testing these changes without affecting any customers. Note, that when creating a staging rule, the IPs that can be used to test this version will be shown in the rule creation screen.
Creating a staging Routing Rule that will match when requests match example.com and the edge IP is 192.168.1.1 or 192.168.2.2 and apply the configuration of Version 1
After creating the rule, I can configure my computer to send requests to those IPs for example.com. Rackspace has a comprehensive guide for how to change your local machine’s host file to do this. Now, when I visit example.com, the new transform rule is executed, but for everyone else visiting the site, nothing has changed.
Routing Rules for the Example Application showing one rule for staging has been created.
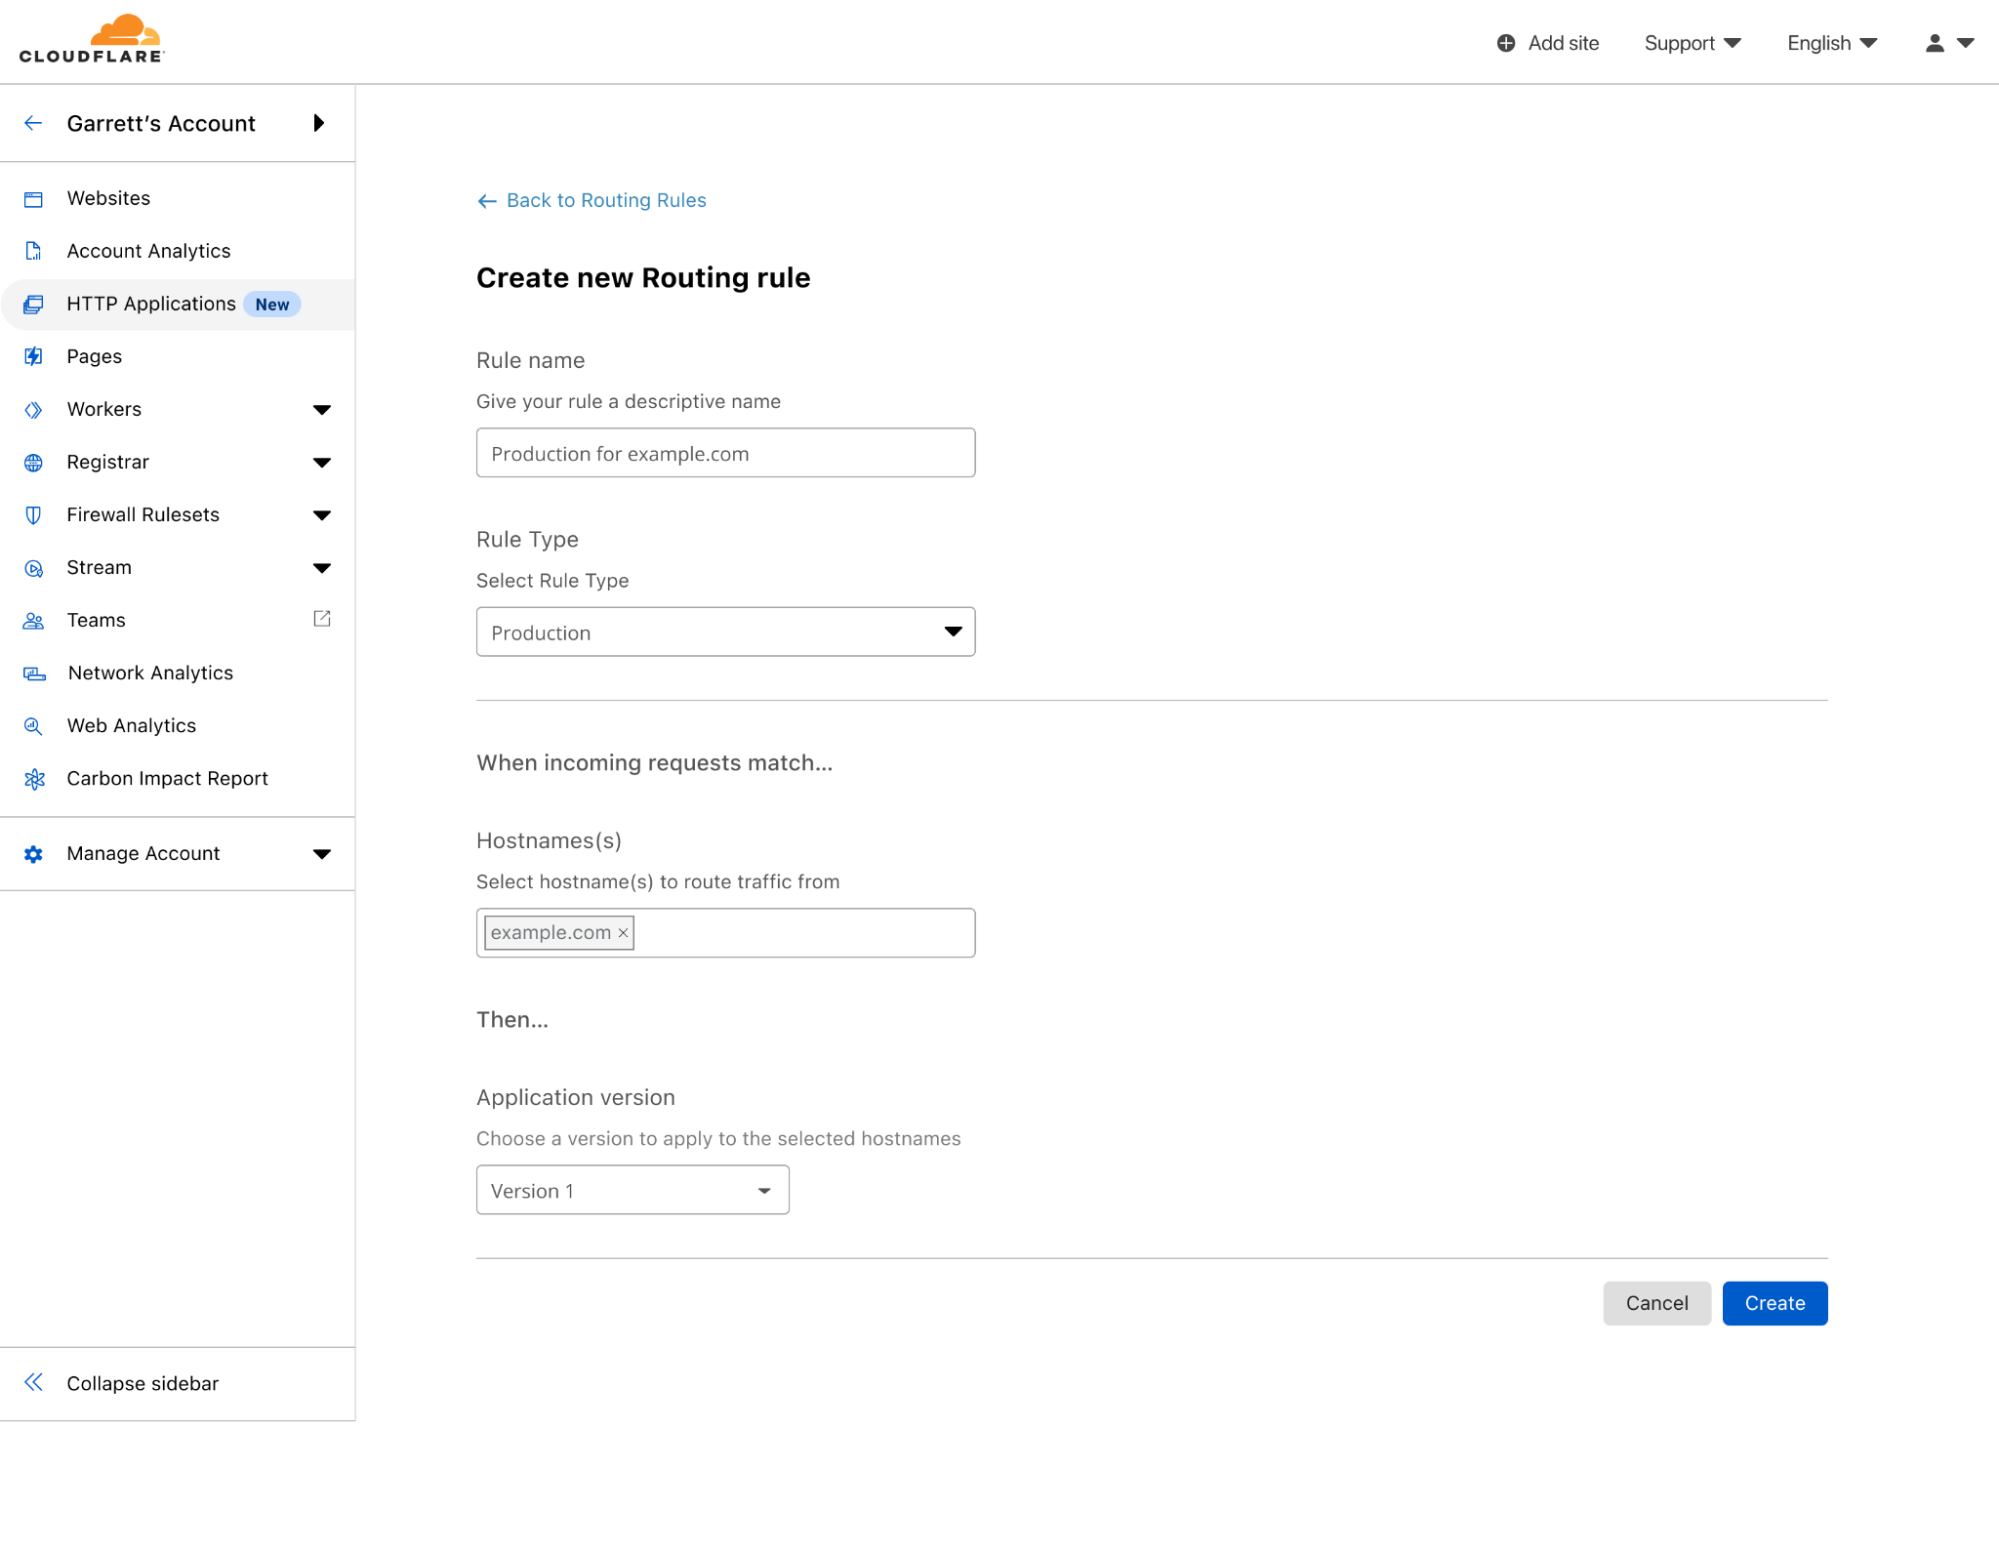
Once I’m confident that my changes work, I can create a production Routing Rule that will apply these changes for all traffic to example.com — and I am done!
Routing Rule creation screen showing the creation of a production rule that will apply Version 1 when requests match example.com
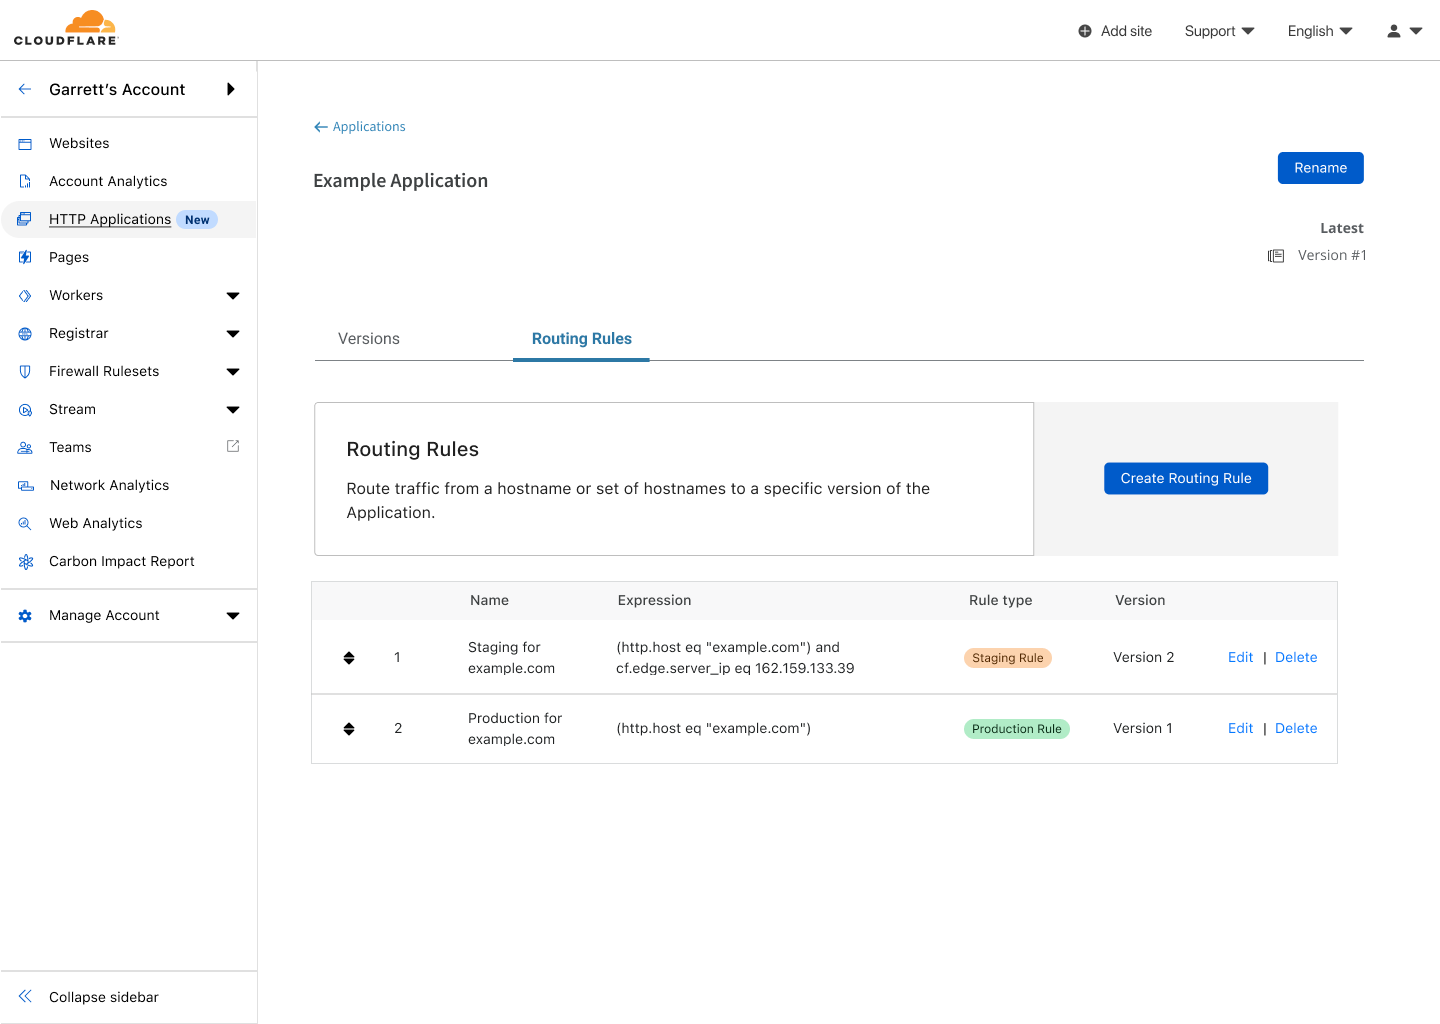
Once updated, the path to assets for my site will be rewritten for all requests to example.com.
Routing Rules for the Example Application showing both a staging and production rule for Version 1.
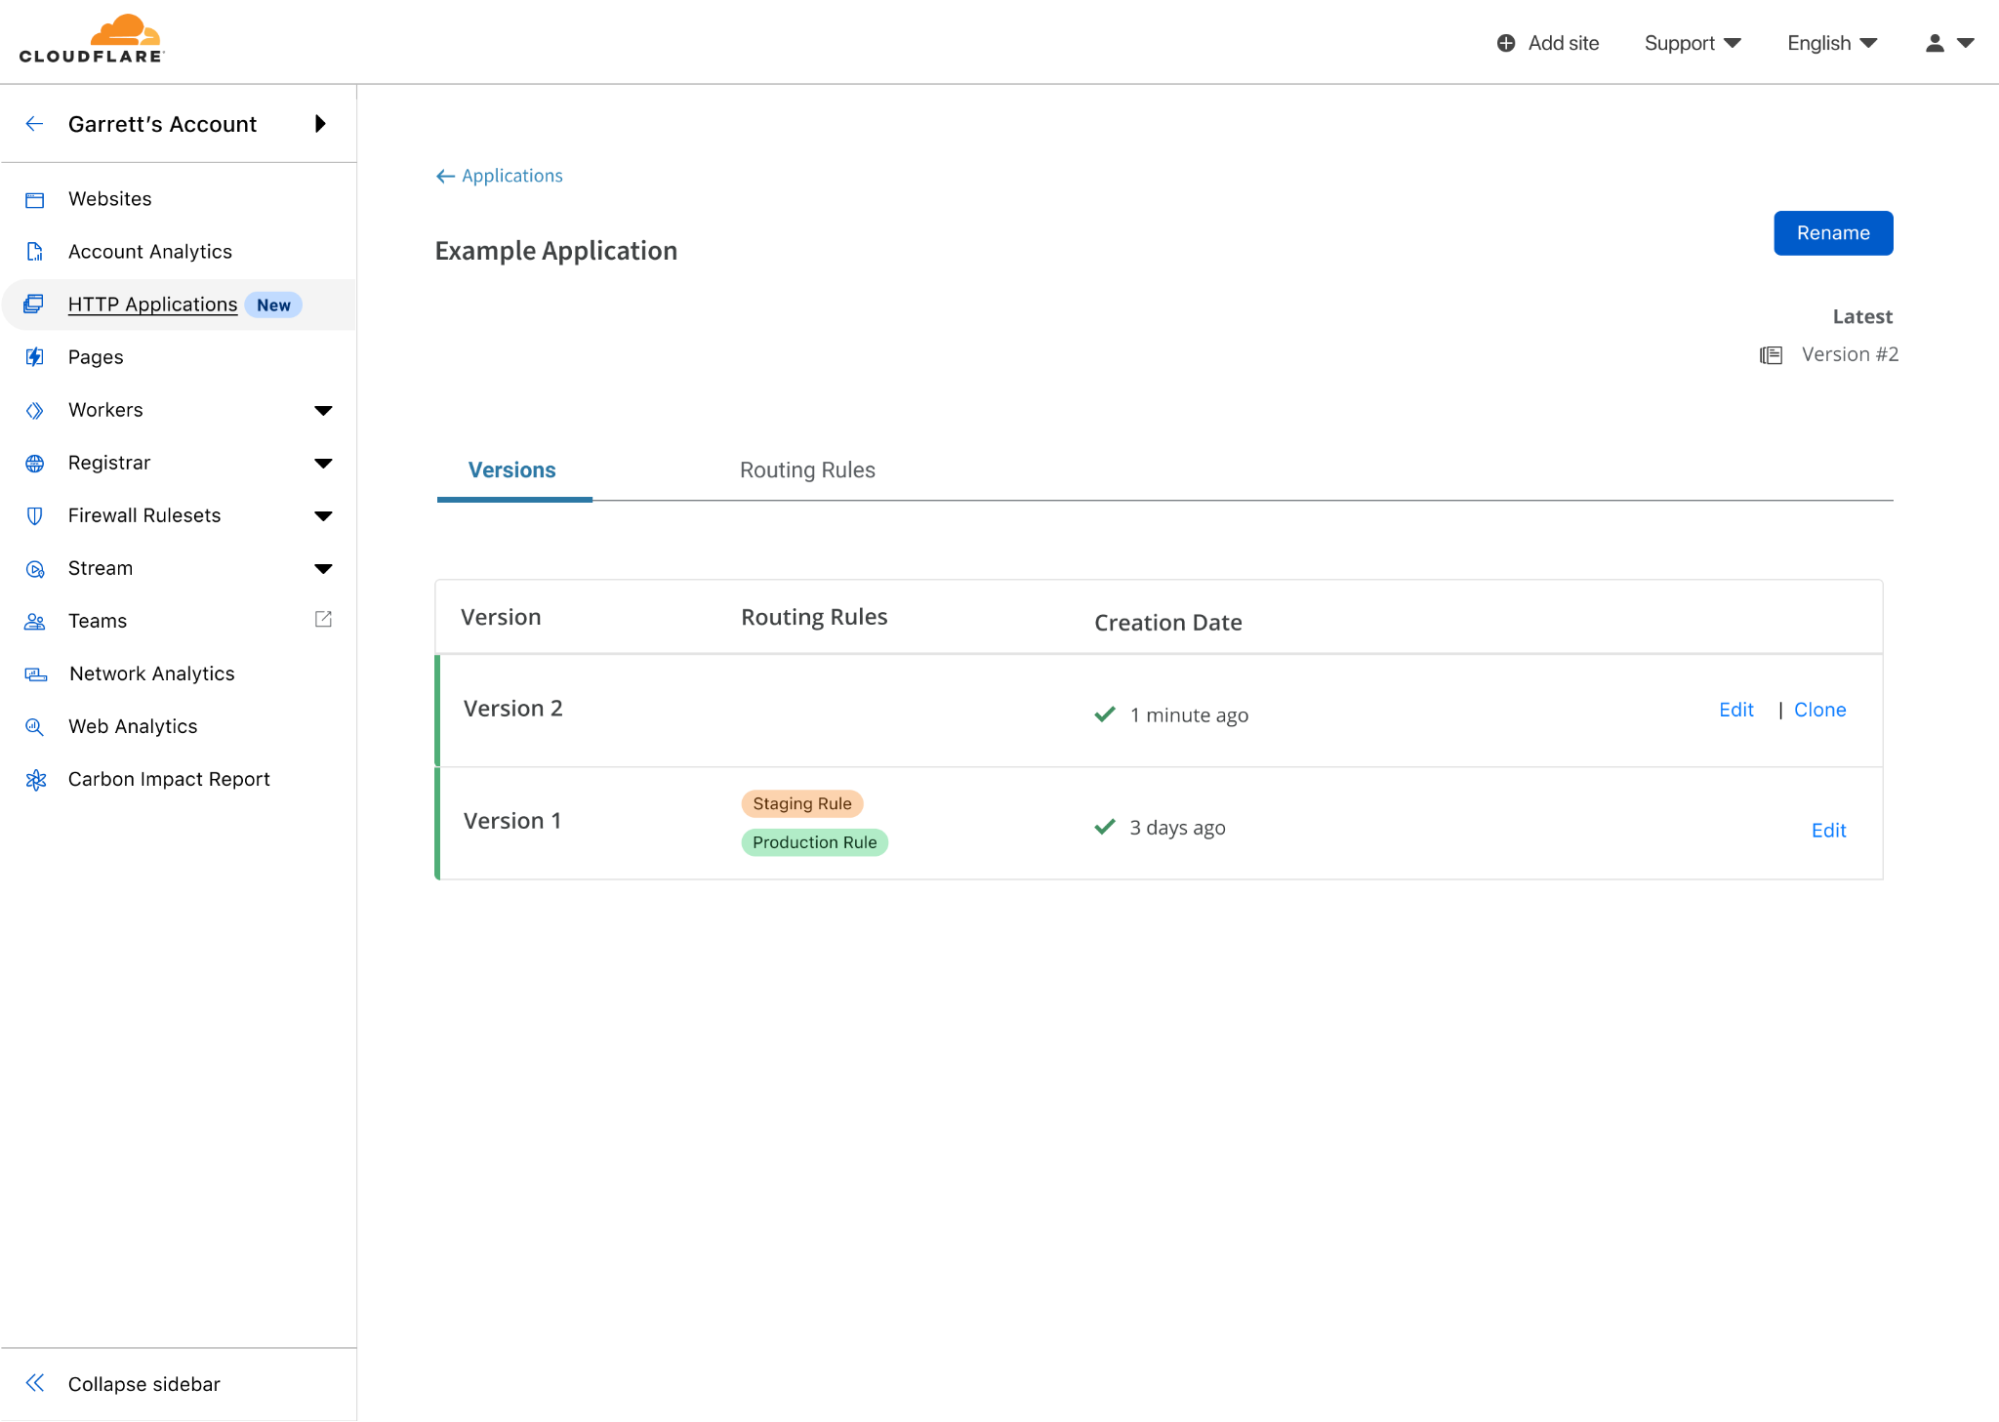
What happens next? When I am ready to make another set of changes, I can go to my HTTP Application and clone Version 1 to create Version 2. Initially, Version 2 will exactly match the configuration of Version 1 but since it has no matching Routing Rules, it won’t be applied to any traffic.
The list of versions for the Example Application showing Version 1 being applied to staging and production, and Version 2 ready to edit, but not being used anywhere.
I can now safely edit Version 2, like I did previously with Version 1. This time I want to make some changes to firewall rules, so that I can prevent some potentially malicious traffic from accessing my site. Making the changes in Version 2 will not modify any traffic at the edge until I update my staging Routing Rule to use Version 2. This allows me to make changes with confidence, and then safely test them.
The list of routing rules for the Example Application showing Version 2 being used for staging, while Version 1 is still used in production.
After validating this new set of changes, I can push Version 2 to all traffic by updating the production Routing Rule to use Version 2. The same process can be done for each subsequent set of changes I want to make.
HTTP Applications Now Available in Closed Beta
With the power of HTTP Applications and Routing Rules, customers now have greater control over how and when configuration changes are made. This alleviates the concern of making a bad change that might break your site. This capability is available in a closed beta for enterprise customers, but if you are interested, reach out to your Cloudflare account team to learn about how to get access!
Back in 2019, we blogged about our brand new Notification center as a centralized hub for configuring notifications on your account. Since then, we’ve talked a lot about new types of notifications you can set up, but not as much about updates to the notification platform itself. So what’s new with Notifications?
Why we care about notifications
We know that notifications are incredibly important to our customers. Cloudflare sits in between your Internet property and the rest of the world. When something goes wrong, you want to know right away because it could have a huge impact on your end users. However, you don’t want to have to sit on the Cloudflare Dashboard all day, pressing refresh on analytics pages over and over just to make sure that you don’t miss anything important. This is where Notifications come in. Instead of requiring you to actively monitor your Internet properties, you want Cloudflare to be able to directly inform you when something might be going wrong.
So we have all of these super great notifications, but how do we actually inform you of an event? The classic answer is “we email you.” All of our customers have the ability to configure notifications to send to the email addresses of their choosing.
However, email isn’t always the optimal choice. What happens when an email gets sent to spam, or filtered out into another folder that you rarely check? What if you’re a person who never cleans out their inbox and has four thousand unread emails that can drown out new important emails that come in? You want a way for notifications to go directly to the messaging platform that you check the most, whether that’s Slack or Microsoft Teams or Discord or something else entirely. For customers on our Professional, Business, and Enterprise plans, this is where webhooks come in.
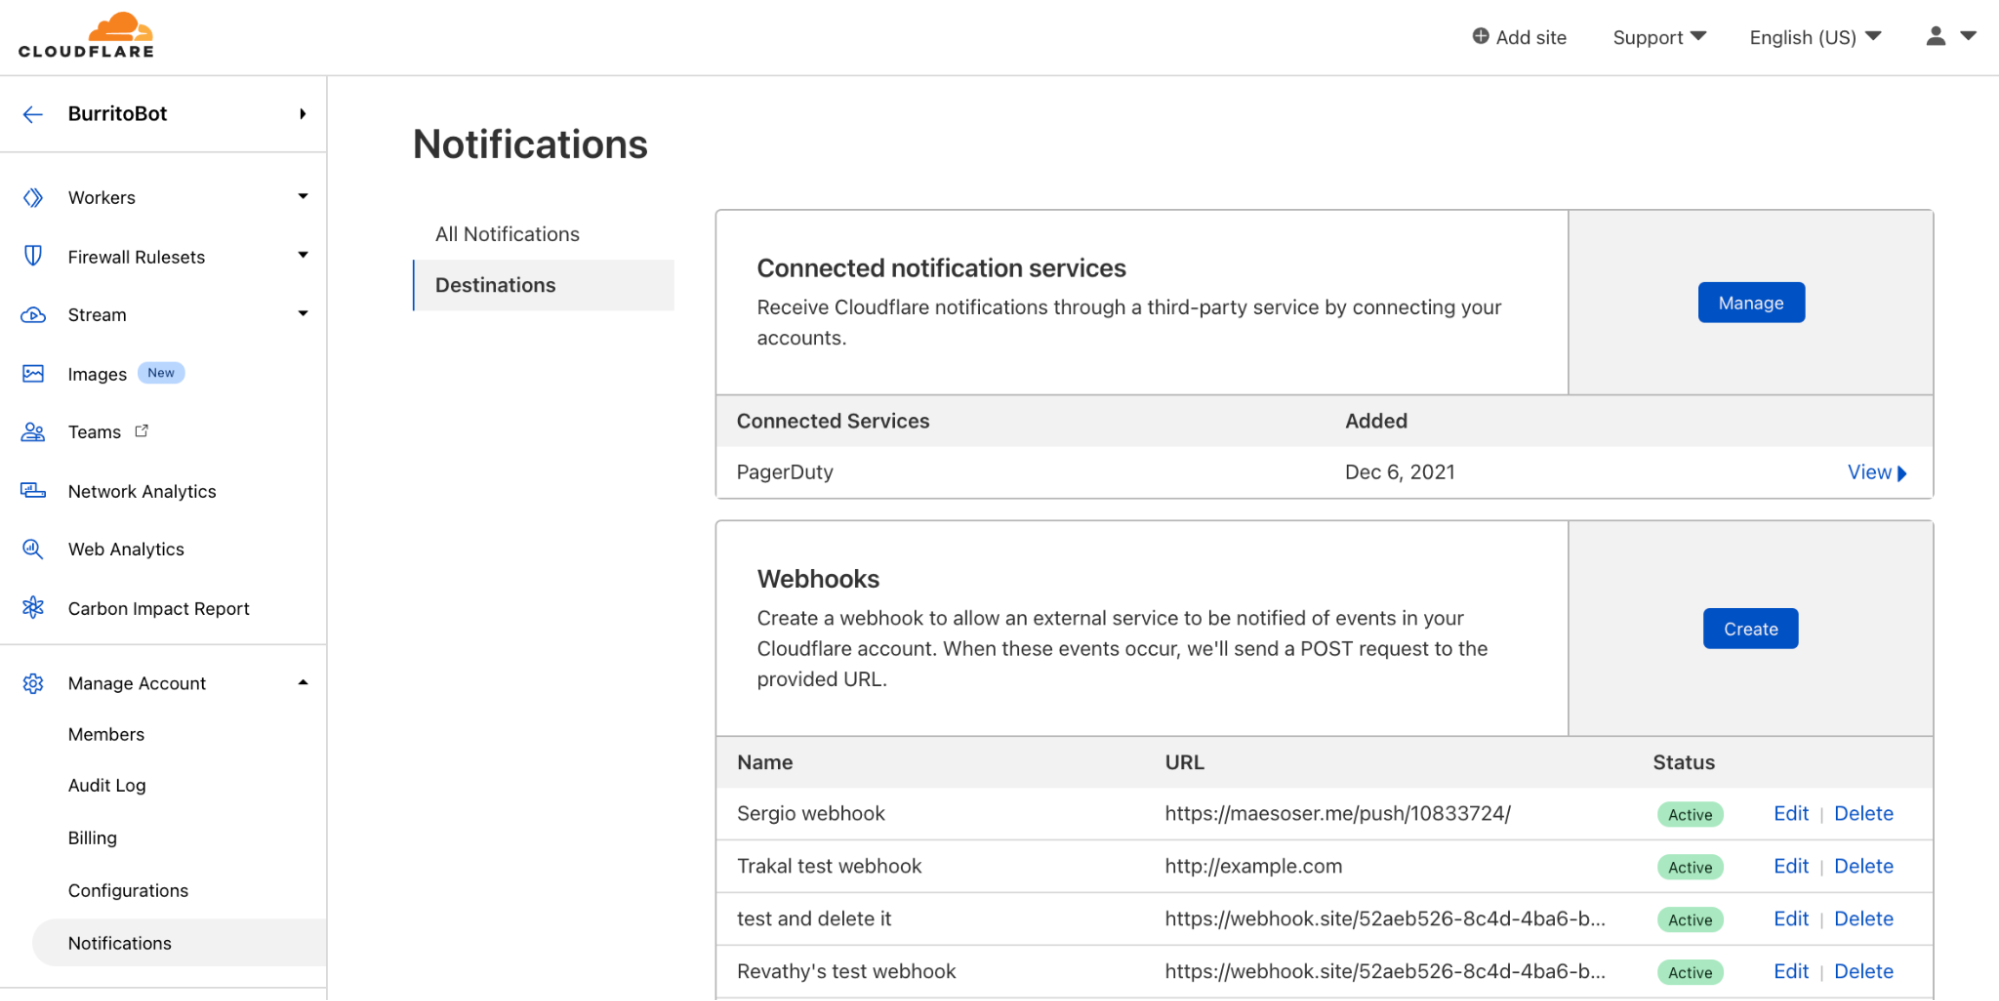
Webhooks are incredibly powerful! They’re a type of API with a simple, standardized behavior. They allow one service (Cloudflare) to send events directly to another service. This destination service can be nearly anything: messaging platforms, data management systems, workflow automation systems, or even your own internal APIs.
While Cloudflare has had first class support for webhooking into Slack, Microsoft Teams, Google Chat, and customer’s own APIs for a while, we’ve recently added support for DataDog, Discord, OpsGenie, and Splunk as well. You can read about how to set up each of those types of webhooks in our Cloudflare Development Docs.
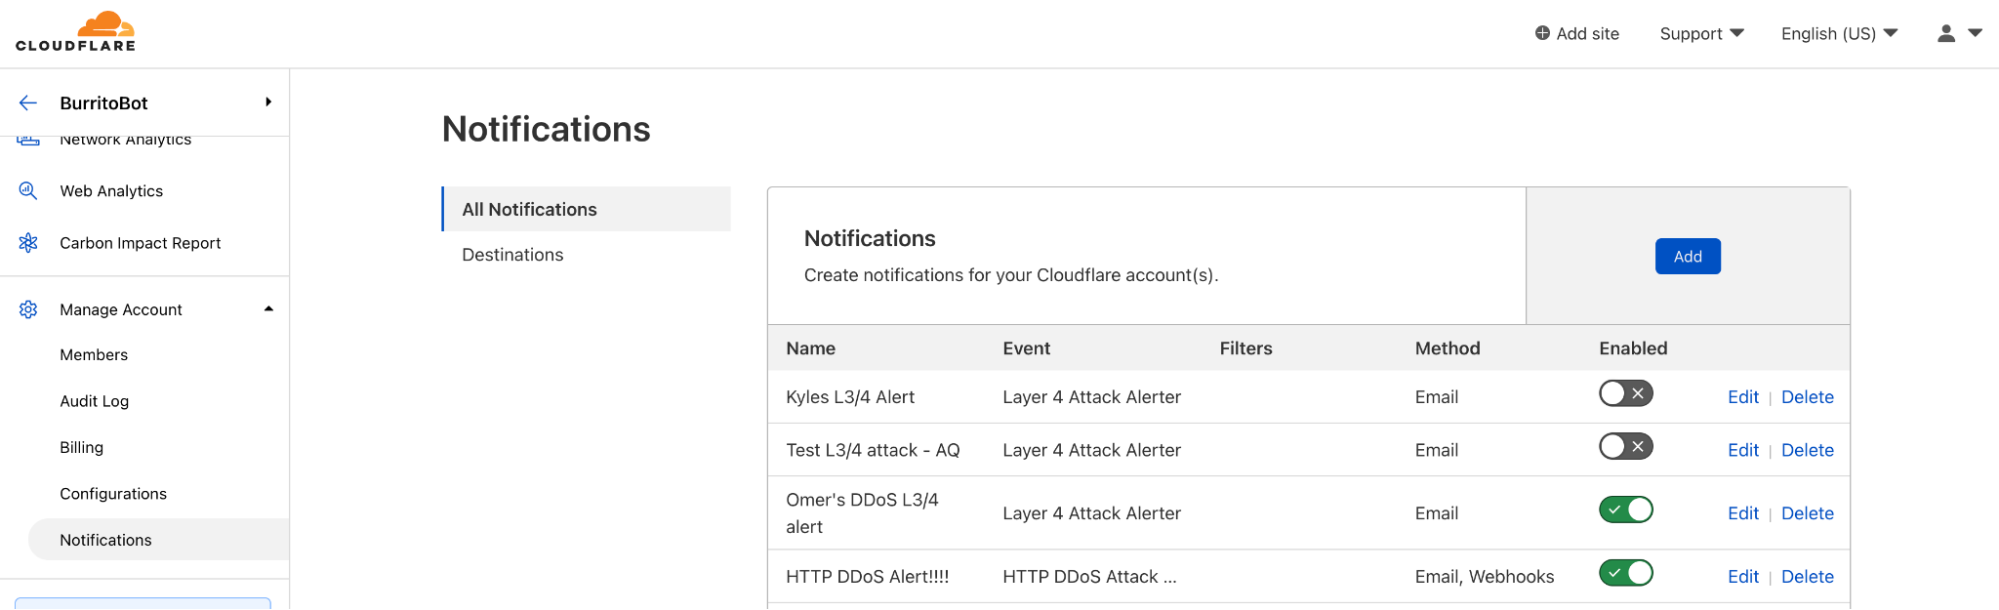
Because webhooks are so versatile, more and more customers are using them! The number of webhooks configured within Cloudflare’s notification system doubles, on average, every three months. Customers can configure webhooks in the Notifications tab in the dashboard.
Those who forget history are doomed to repeat it
Webhooks are cool, but they still leave room for error. What happens when you receive a notification but accidentally delete it? Or when someone new starts at your company, but you forget to update the notification settings to send to the new employee?
Before now, Cloudflare notifications were entirely point in time. We sent you a notification via your preferred method, and we no longer had any visibility into that notification. If that notification gets lost on your end, we don’t have any way to help recover the information it contained.
Notification history fixes that exact issue. Users are able to see a log of the notifications that were sent, when they were sent, and who they were sent to. Customers on Free, Professional, or Business plans are able to see notification history for the past 30 days. Customers on Enterprise plans are able to see notification history for the past 90 days.
Right now, notification history is only available via API, but stay tuned for updates about viewing directly in the Cloudflare Dashboard!
The collective thoughts of the interwebz
Manage Consent
To provide the best experiences, we use technologies like cookies to store and/or access device information. Consenting to these technologies will allow us to process data such as browsing behavior or unique IDs on this site. Not consenting or withdrawing consent, may adversely affect certain features and functions.
Functional
Always active
The technical storage or access is strictly necessary for the legitimate purpose of enabling the use of a specific service explicitly requested by the subscriber or user, or for the sole purpose of carrying out the transmission of a communication over an electronic communications network.
Preferences
The technical storage or access is necessary for the legitimate purpose of storing preferences that are not requested by the subscriber or user.
Statistics
The technical storage or access that is used exclusively for statistical purposes.The technical storage or access that is used exclusively for anonymous statistical purposes. Without a subpoena, voluntary compliance on the part of your Internet Service Provider, or additional records from a third party, information stored or retrieved for this purpose alone cannot usually be used to identify you.
Marketing
The technical storage or access is required to create user profiles to send advertising, or to track the user on a website or across several websites for similar marketing purposes.