Post Syndicated from KyungYong Shim original https://aws.amazon.com/blogs/compute/serverless-strategies-for-streaming-llm-responses/
Modern generative AI applications often need to stream large language model (LLM) outputs to users in real-time. Instead of waiting for a complete response, streaming delivers partial results as they become available, which significantly improves the user experience for chat interfaces and long-running AI tasks. This post compares three serverless approaches to handle Amazon Bedrock LLM streaming on Amazon Web Services (AWS), which helps you choose the best fit for your application.
- AWS Lambda function URLs with response streaming
- Amazon API Gateway WebSocket APIs
- AWS AppSync GraphQL subscriptions
We cover how each option works, the implementation details, authentication with Amazon Cognito, and when to choose one over the others.
Lambda function URLs with response streaming
AWS Lambda function URLs provide a direct HTTP(S) endpoint to invoke your Lambda function. Response streaming allows your function to send incremental chunks of data back to the caller without buffering the entire response. This approach is ideal for forwarding the Amazon Bedrock streamed output, providing a faster user experience. Streaming is supported in Node.js 18+. In Node.js, you wrap your handler with awslambda.streamifyResponse(), which provides a stream to write data to, and which sends it immediately to the HTTP response.
Architecture
The following figure shows the architecture.
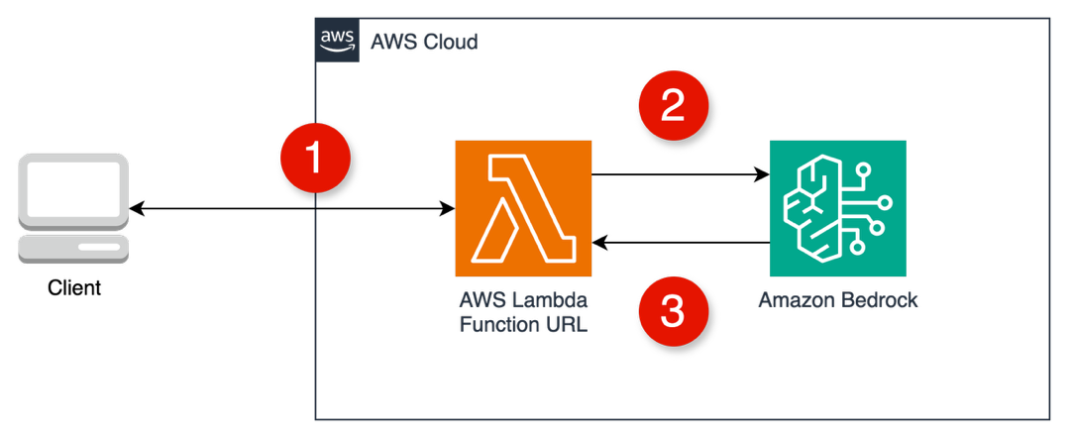
- The client makes a
fetch()call to the Lambda function URL. - Lambda invokes
InvokeModelWithResponseStreamusing the AWS SDK for JavaScript. - As tokens arrive from Amazon Bedrock, they are written to the response stream.
Implementation steps
- Create a streaming Lambda function: Use a Node.js 18+ or later runtime (necessary for native streaming). Install the AWS SDK to call Amazon Bedrock. In the handler code, wrap the function with
awslambda.streamifyResponseand stream the model output. For example, in Node.js you might do the following: - This code snippet uses the Amazon Bedrock SDK’s async iterable to read the event stream of tokens and writes each to the responseStream.
- Configure the Lambda role: the execution role must allow the Amazon Bedrock invocation (such as
bedrock:InvokeModelWithResponseStreamon the LLM model Amazon Resource Name (ARN)).
Authentication with Amazon Cognito
Lambda function URLs can be set to “None” (public) or “AWS_IAM”. Native Cognito User Pool token authentication isn’t supported, thus you need to implement a solution.
- JWT verification in Lambda: Allow public access and verify a valid JWT from Amazon Cognito in the request header within your Lambda code. This necessitates development effort.
- IAM authorization with Amazon Cognito identity: Use AWS credentials obtained from Amazon Cognito. A more complex setup, especially for web apps, is potentially overkill for a single function.
Pros and cons of Lambda function URLs
Pros:
- Clarity: No API Gateway or other services are needed, which minimizes operational overhead.
- Low latency, high throughput: The response is delivered directly from Lambda to the client. This yields excellent Time To First Byte (TTFB) performance, with no intermediate buffering.
- Direct implementation: For Node.js developers, enabling streaming is as direct as a wrapper and writing to a stream. This is ideal for quick prototypes or single function microservices.
- Lower cost for low concurrent usage: You pay only for Lambda execution time. There’s no persistent connection cost, which is the same as with WebSocket or AWS AppSync. If invocations are infrequent or short, then this could be cost-efficient.
Cons:
- Limited runtime support: Native streaming is only supported in Node.js.
- No built-in user pool auth: Unlike API Gateway or AWS AppSync, Lambda URLs don’t directly support Amazon Cognito user pool authorizers. You must handle auth either through AWS Identity and Access Management (IAM) or manual token validation, adding some development effort and potential security pitfalls if done incorrectly.
- Error handling complexity: Streaming makes error propagation trickier. If an error occurs mid-stream, then you need to decide how to inform the client.
API Gateway WebSocket for streaming
API Gateway WebSocket APIs establish persistent, stateful connections between clients and your backend. This is ideal for real-time applications needing server-initiated messages. The client connects once, sends a prompt to Amazon Bedrock through the WebSocket, and the server pushes the streamed response back over the same connection.
Architecture
The following figure shows the architecture.
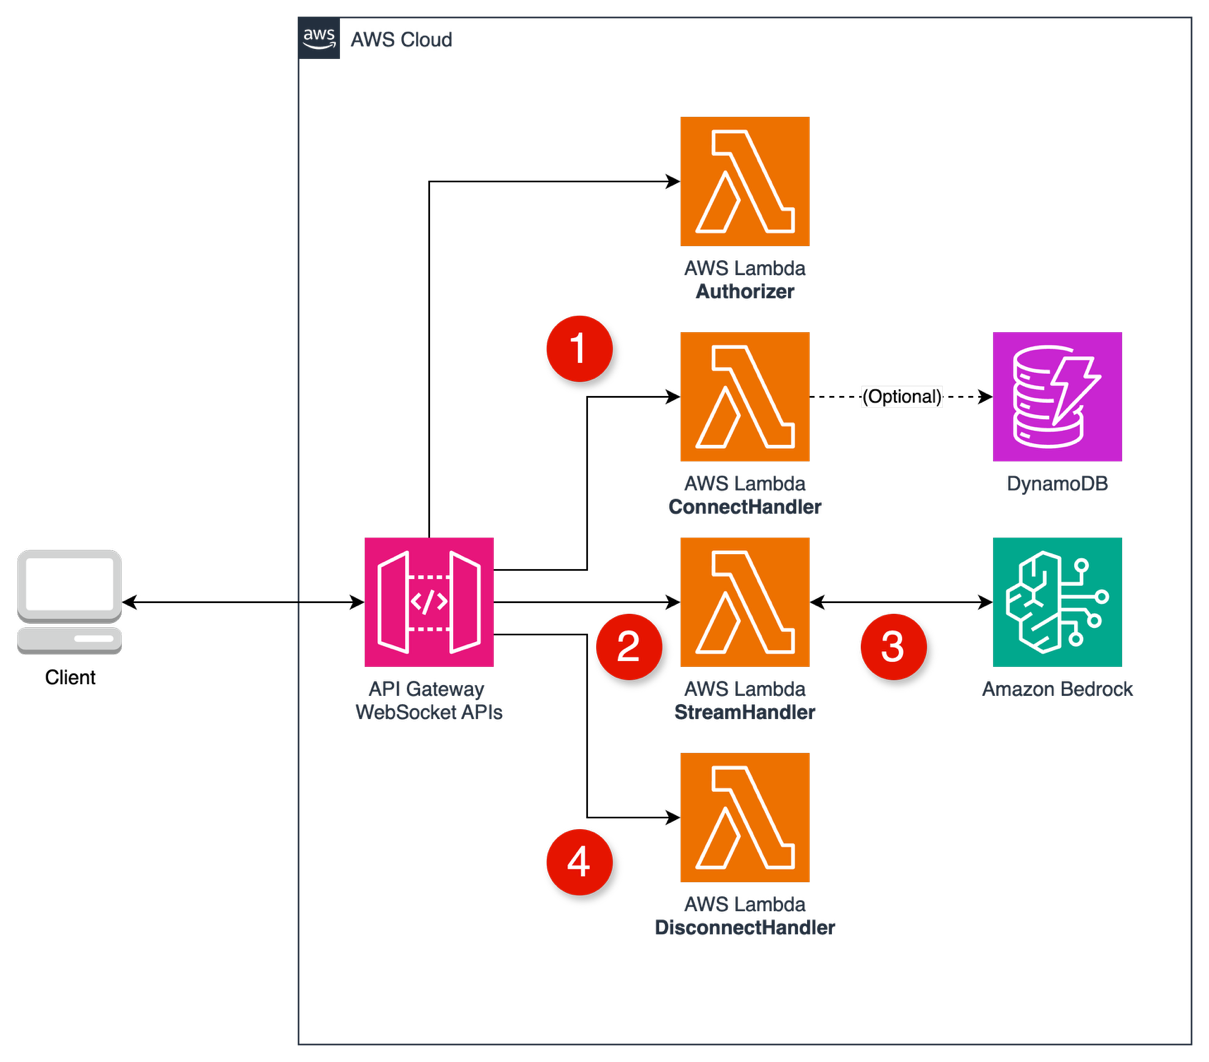
- Client connects through the WebSocket URL and store
connectionId. - Client sends a prompt through a custom route to the LLMHandler.
- Lambda as LLMHandler invokes Amazon Bedrock and streams back through WebSocket.
- Client disconnects through the DisconnectHandler and removes
connectionId.
Implementation steps
- Create a WebSocket API in API Gateway with routes
- $connect: Connected to ConnectHandler Lambda.
- $disconnect: Connected to DisconnectHandler Lambda.
- $stream: All messages go to StreamHandler Lambda.
- Create Lambda Authorizer
- Receives the connection request with token in query string.
- Validates the JWT token against Amazon Cognito.
- Returns Allow/Deny policy for the connection.
- Create Connection Handler
- Connection Lambda runs after successful authorization.
- Receives the new connection’s unique connectionId.
- Store connection info in Amazon DynamoDB (optional).
- Returns 200 status to complete the connection.
- Create Disconnect Handler
- Disconnect Lambda is triggered automatically when clients disconnect.
- Receives the terminated connection’s connectionId.
- Cleans up any stored connection data.
- Returns 200 status
- Create LLM Handler
-
- Receives messages sent to the
streamroute. - Extracts prompt from the message body.
- Calls Amazon Bedrock model with streaming response.
- Streams tokens back to the client using the connection ID.
def lambda_handler(event, context):
    # Extract connectionId and domain details for sending responses
    connection_id = event["requestContext"]["connectionId"]
    domain = event["requestContext"]["domainName"]
    stage = event["requestContext"]["stage"]

    # Parse message body to get the prompt
    body = json.loads(event.get("body", "{}"))
    prompt = body.get("prompt", "")

    # Create API Gateway management client for sending responses
    api_client = boto3.client(
        'apigatewaymanagementapi',
        endpoint_url=f'https://{domain}/{stage}'
    )

    # Call Amazon Bedrock with streaming response
    response = bedrock_client.invoke_model_with_response_stream(...)

    # Stream tokens back to client
    for chunk in response["body"]:
        # Extract token from chunk
        token = process_chunk(chunk)

        # Send token directly back through the WebSocket
        api_client.post_to_connection(
            ConnectionId=connection_id,
            Data=json.dumps({"token": token, "isComplete": False})
        )

    # Send completion message
    api_client.post_to_connection(
        ConnectionId=connection_id,
        Data=json.dumps({"token": "", "isComplete": True})
    )

    return {"statusCode": 200}
- Receives messages sent to the
-
Authentication with Amazon Cognito
Securing a WebSocket API with Amazon Cognito needs a bit more work. API Gateway WebSocket doesn’t have a built-in Amazon Cognito User Pool authorizer:
- Lambda authorizer with JWT authentication: API Gateway invokes your Lambda authorizer upon connection, validating the Amazon Cognito JWT (passed as a query parameter). The Lambda generates an IAM policy granting access and returns it.
- IAM authentication for WebSockets: Clients sign requests with SigV4 using AWS credentials from an Amazon Cognito Identity Pool. API Gateway evaluates the request against IAM policies.
Pros and cons of API Gateway WebSocket APIs
Pros:
- Bidirectional real-time communication: WebSockets are ideal for applications where the server needs to push data such as the LLM’s response without explicit requests.
- Persistent connection for multi-turn conversations: After the initial handshake, the same connection can be reused for subsequent prompts and responses, avoiding repeated setup latency. This is great for a chat UI where the user asks multiple questions in one session.
- Scalability: API Gateway is a managed service that can handle 500 connections/second and 10,000 requests/second across APIs, which can be increased by request.
Cons:
- Higher development complexity: When compared to the clarity of a direct Lambda URL, a WebSocket API involves multiple Lambdas and coordination to manage the connection state.
- Custom auth implementation: There is no built-in Amazon Cognito user pool integration, thus you must implement a Lambda authorizer.
- Timeout management: The API Gateway integration timeout is 29 s, thus your Lambda function should return the response promptly.
AWS AppSync GraphQL subscription
AWS AppSync is a fully managed GraphQL service that streamlines building real-time APIs. It handles WebSocket connections and client fan-out automatically. Clients subscribe to a GraphQL subscription, and a Lambda resolver pushes the Amazon Bedrock streamed tokens back.
Architecture
The following figure shows the architecture.
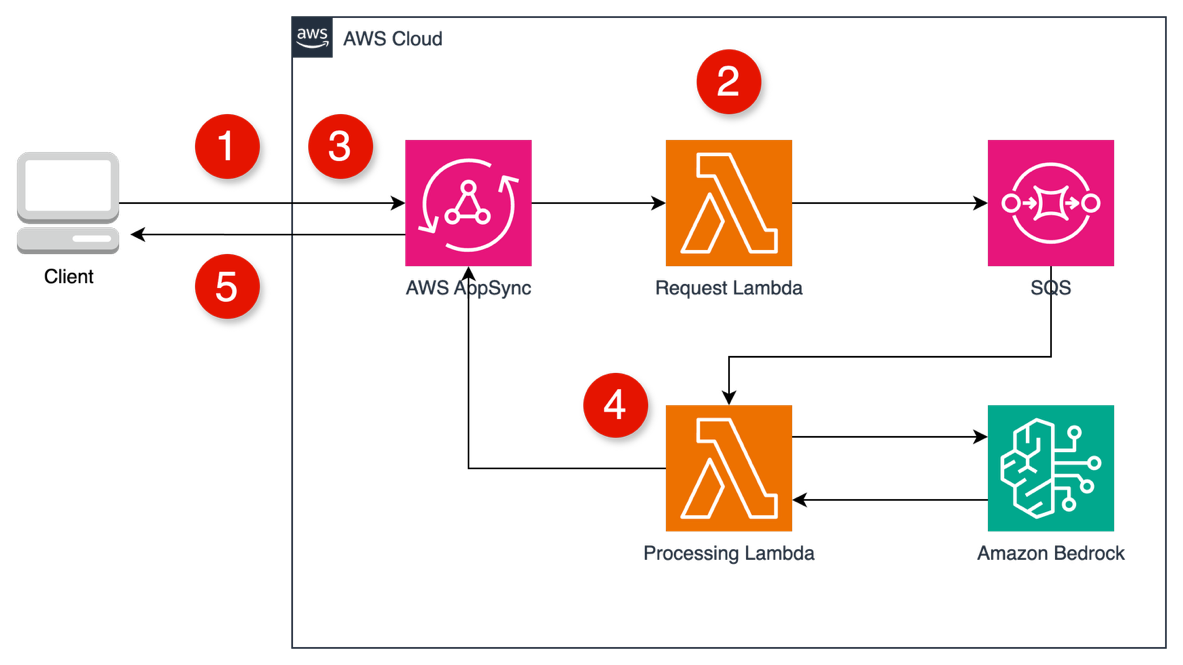
- Client calls a
startStreammutation. AppSync invokes the Request Lambda. - The Request Lambda immediately returns a unique
sessionIdand sends the processing task to an Amazon Simple Queue Service (Amazon SQS) queue. - Client uses the
sessionIdto subscribe to anonTokenReceivedGraphQL subscription. - The Processing Lambda (triggered by Amazon SQS) invokes Amazon Bedrock and, for each token, calls a
publishTokenmutation in AWS AppSync. - AWS AppSync automatically pushes the token to all clients subscribed with the matching
sessionId.
Implementation steps
- Design the GraphQL Schema: define types and operations.
- Create the Request Handler (Request Lambda)
- Receives the GraphQL mutation with the prompt.
- Generates a unique session ID.
- Sends the prompt and session ID to the SQS queue.
- Returns the session ID to the client immediately.
- Create the Processing Handler (Processing Lambda)
- It is triggered by Amazon SQS messages.
- It calls Amazon Bedrock with streaming enabled.
- For each token generated, it calls the AppSync
publishTokenmutation.
- Configure GraphQL Resolvers
- StartStream resolver: Connect to the Request Lambda.
- PublishToken resolver: Trigger subscription with a NONE data source.
- Client subscription setup
- Make a
startStreammutation. - Subscribe to receive tokens.
- Make a
Authentication with Amazon Cognito
AWS AppSync integrates seamlessly with Amazon Cognito User Pools. Setting the API’s auth mode to Amazon Cognito User Pool needs a valid JWT for every GraphQL operation. This is the most developer-friendly option for authentication. AWS AppSync handles the handshake and token refresh.
Pros and cons of AWS AppSync subscriptions
Pros:
- Fully managed real-time protocol: You don’t deal with raw WebSockets or connection IDs at all. AWS AppSync automatically establishes and maintains a secure WebSocket for subscriptions (no need for a connect or disconnect Lambda).
- Streamlined authentication: Built-in support for Amazon Cognito User Pool tokens means that you can secure the API without writing custom authorizers.
Cons:
- Potential overhead and complexity: For a direct case (one prompt—one stream), introducing GraphQL and AWS AppSync might be seen as over-engineering if your app doesn’t use GraphQL for other use cases.
- 30-second resolver limit: AWS AppSync has a 30-second limit for mutation resolvers, thus you need to design the initial request to start the process and immediately return, relying on a subscription to stream the results progressively to avoid blocking the user.
Conclusion
The Amazon Bedrock streaming interface unlocks fluid, low-latency LLM experiences. You can use the right AWS serverless architecture to deliver streamed responses in a secure, scalable, and cost-effective way.
- Lambda function URLs with streaming: Direct, single-user applications and prototypes.
- API Gateway WebSocket: Multi-turn conversations, collaborative applications.
- AppSync: Complex applications already using GraphQL.
Each method is serverless, production-ready, and fully integrated with Amazon Cognito for secure access control. AWS provides the flexibility to design high-quality AI user experiences at scale.
Refer to GitHub sample source code for more details.
Comparative table
| Feature | LAMBDA FUNCTION URLS | API GATEWAY WEBSOCKET APIs | APPSYNC GRAPHQL SUBSCRIPTIONS |
| Complexity | Lowest | Medium | High |
| Real-time focus | Limited | Strong | Strong |
| Authentication | Needs custom logic | Needs custom logic | Built-in Amazon Cognito support |
| Scalability | Good | Good | Excellent |
| GraphQL support | None | None | Native |
| Use cases | Q&A | Chatbots, real-time apps | Complex apps, multi-user scenarios |
| Cost | Pay per invocation | Connection time and Lambda execution | Request/connection-based pricing |