[$] What constitutes disclosure of a kernel vulnerability?

Post Syndicated from original https://lwn.net/Articles/896829/

Opinions differ on the best way to disclose security vulnerabilities, but
there is a general consensus in our community that vulnerabilities
should, indeed, be
made public at some point. What happens between the discovery of a
vulnerability and its disclosure can be more controversial. A recent
discussion on the handling of kernel vulnerabilities has led to change in
the policies of the linux-distros mailing list — all based on the question
of what constitutes “disclosure”.

[$] When constitutes disclosure of a kernel vulnerability?

Post Syndicated from original https://lwn.net/Articles/896829/

Opinions differ on the best way to disclose security vulnerabilities, but
there is a general consensus in our community that vulnerabilities
should, indeed, be
made public at some point. What happens between the discovery of a
vulnerability and its disclosure can be more controversial. A recent
discussion on the handling of kernel vulnerabilities has led to change in
the policies of the linux-distros mailing list — all based on the question
of what constitutes “disclosure”.

Security updates for Friday

Post Syndicated from original https://lwn.net/Articles/897016/

Security updates have been issued by Debian (cifs-utils, debian-security-support, and pypdf2), Fedora (fapolicyd, mariadb, openssl, and qt5-qtbase), Oracle (firefox, maven:3.5, maven:3.6, postgresql:10, postgresql:12, and postgresql:13), Red Hat (.NET 6.0, firefox, gzip, java-1.8.0-openjdk, java-11-openjdk, java-17-openjdk, pcs, rsync, subversion, thunderbird, and zlib), Scientific Linux (thunderbird), Slackware (mozilla), SUSE (firefox, hdf5, suse-hpc, kernel-firmware, libarchive, patch, php8, and redis), and Ubuntu (cifs-utils and vim).

Cybersecurity Is More Than a Checklist: Joel Yonts on Tech’s Unfair Disadvantage

Post Syndicated from Peter Scott original https://blog.rapid7.com/2022/06/03/cybersecurity-is-more-than-a-checklist-joel-yonts-on-techs-unfair-disadvantage/

Cybersecurity Is More Than a Checklist: Joel Yonts on Tech’s Unfair Disadvantage

Breaches caused by misconfigurations are alarmingly common. Over a third of all cyberattacks in 2020 were the result of firewall, cloud, and server misconfigurations. The tech industry is at the highest risk of bad actors taking advantage of these preventable vulnerabilities, with the information sector falling victim to a majority of 2021’s breaches caused by misconfigurations. One such instance is the Android app data leak, which compromised over 100 million users’ data.

As organizations mature and innovate, so do malicious actors – and many of them target tech companies’ public cloud infrastructure. In today’s world of rapid development, companies must prioritize the protection of their infrastructure with a mix of people, processes, and technology.

Achieving this means going beyond tactical security approaches and instilling organization-wide commitment. While checklists can be a helpful tool, security has to go beyond that; it should be a mission rather than a to-do list to set aside when complete. Neglecting to fulfill that mission can cause serious financial and reputational damage.

When it comes to strengthening their security postures, tech companies must address an industry-specific set of challenges. Recently, we were fortunate to sit down with Joel Yonts, Chief Research Officer and Strategist at Malicious Streams and CEO at Secure Robotics.ai. A seasoned security executive with over 25 years of experience, Yonts’s expertise in enterprise security, digital forensics, artificial intelligence, and robotic and IoT systems gives him a nuanced, data-driven perspective.

Read our Q&A below to get his insights on today’s best practices in security for tech companies.

Can you tell us what you do in your roles as Chief Research Officer and Strategist at Malicious Streams and CEO at Secure Robotics?

Malicious Streams delivers holistic cybersecurity strategies. The most complex things that I deal with are people – researching, listening, and observing how people work at all levels to determine how I can connect them.

I am a fractional CISO for several multinational organizations. I also build cybersecurity programs, do cyber maturity assessments, and build cybersecurity strategies in emerging areas.

In true Joel fashion, however, I needed more research time than I was getting in those roles. So, I spun up Secure Robotics.ai as a side company to Malicious Streams. Secure Robotics focuses on cyber protection for intelligent machines.

There’s a technology and capability gap right now: Technology adoption has outpaced cybersecurity. There are areas where we can’t protect these intelligent machines properly. I’m focused on developing practices and capabilities like digital forensics to better secure artificial intelligence systems.

How do you think about the tech adoption/security maturity gap? How do you address it?

This is one of the things that I talk about often: In cybersecurity, things move fast. The attacker-defender cycle is nonstop — as one side innovates, the other side does too. It’s a zero-sum game, a head-to-head competition. Every time a company innovates and creates some new technology or security tool, I always ask, “How are the attackers going to innovate to address that?”

For example, if you’ve got a new technology that improves network security, you can project that cybercriminals might subvert that by attacking the host. They might go upstream or downstream from there. Once you accept that, you can start thinking through those patterns and plan for early detection and prevention in those new areas.

In other words, if you don’t think a couple of moves ahead in cybersecurity, you will lose. The attackers can mobilize and deploy technology far faster than companies can. Anticipation is very important for long-term security.

When you’re working with companies on their cybersecurity strategies, how do you decide what to prioritize?

One of the biggest problems that I deal with in cybersecurity is priorities. Everybody’s got them. But many organizations have far too many, and this creates a problem when it comes to focusing resources. We need to wrangle them down to just a few of the highest-risk and greatest-value items for us to be successful.

We’ve seen the collapse of the castle walls around corporate networks. I’ve heard it said that the internet has become the new corporate network, and it’s such a true statement.

A corporate solution isn’t one monolithic server in a data center anymore. It is a cloud solution connected to seven SaaS solutions and three other cloud environments. This network of technologies may communicate across the product network or through the open internet. This requires different security approaches than in the past.

Another big priority that I see is identity and access management (IAM). Regretfully, I still see a lot of companies struggling with multi-factor authentication. There are still people working to catch up because there are some complexities associated with IAM, but it’s a high-risk area and should be a priority. IAM is a foundation in security that is expected to be in place. Incidents here are likely to create additional brand damage and draw regulators’ attention.

Another big challenge is cyber insurance. Rates are skyrocketing — double or triple what they used to be. Often, your rate will depend on how well you can prove the maturity of your cyber program. One of the questions they’re likely to ask is, “Do you use multi-factor authentication?” Every cyber insurance company will ask that question because it’s such an effective control. If you answer their questions wrong, it could cost you millions of dollars in higher premiums.

What have been the most valuable developments in cybersecurity in recent years?

The first thing that jumps to mind is EDR technology. We obviously want to solve cybersecurity challenges much earlier in the process. But EDR is instrumental in the detection and response phases.

EDR products can catch an attacker in an environment very quickly, even if they’re using stealthy technologies. These days, attackers don’t deploy a bunch of new tools when they break into an environment; they just use the tools you already have against you. But even in those scenarios, EDR has been a massive game-changer.

The most significant advancement in cybersecurity hasn’t been improving vulnerability detection but improving vulnerability management. If you find one security flaw in a company, that’s manageable. But what if you find 700,000 flaws in a company? How do you sort through that in a meaningful way so you can prioritize, communicate, take action, and maintain an audit trail? That’s where I’ve seen a lot of innovation recently.

We’ve been in the cloud now for a while. Many companies are still doing cloud security wrong in many ways, but I think that the move to cloud security posture management and the adoption of multi-cloud tools for visibility and control have been significant steps in the right direction.

What challenges do tech companies face that other companies don’t necessarily wrestle with?

One of the big ones is the level of forgiveness from users. Whether you’re selling a piece of technology or a security service, if you have a breach or a major vulnerability, there’s a lot less forgiveness than if you’re a retailer with the same issue. The high expectations mean you have to be more diligent to keep your customers happy.

Fair or not, people think, “I need technology companies to help solve my problems, not add to my problems.” When a retailer or manufacturer has a public cybersecurity issue, you don’t hear people saying they won’t do business with that company. But with tech companies that have security issues — sometimes with a very skilled attacker that any company would struggle to defend against — I hear a lot of people saying they will take their business elsewhere. So that’s a definite challenge for them.  

Are there any specific threats that are a bigger risk for tech companies?

Supply chain risk is a significant threat for tech companies. Making decisions about where you’re going to source parts of your products and services, what you’re going to source, and how you’re going to source them — all of that is incredibly difficult from a security perspective, even down to the hardware level. Detecting threats on that level is just monumentally difficult.

For technology companies, embracing new technologies is part of their DNA, but it also brings more security challenges. For example, what does it mean to secure serverless environments? Containers? Those are technologies that have been adopted fast because of their value propositions, but not every company has figured out how to handle asset management, detection, and response for them.

Manage Your Cloud Security Posture

Learn More About InsightCloudSec

The other challenge is rapid adoption of intelligent machines. For example, I just released a paper on chatbots. They’re valuable, offering efficiency and improving some aspects of customer experience. But a lot of the time they sit outside the cybersecurity program.

In this recent paper, I released a couple of proof-of-concept attacks where I trojanized a chatbot and skimmed credit cards with it. I duplicated a standard interface where someone checking on a product order could enter the information and see the real-time status of their purchase. I was able to compromise the chatbot interface and inject a couple of new fields so that, instead of just asking for the name and order, it asks for the credit card and zip code you used to place the order. In my trojanized version, it then stores that in a slot in the chatbot memory and never goes inside the company. It sits on the outside. Then when I, as an “attacker,” come and give it a specific order number, it dumps all the cards I skimmed out through the chat interface in an encoded format.

That’s a white-hat example, obviously, but attackers are out there figuring this out. Tech companies need to be seriously considering how they will secure chatbots and other intelligent machines they leverage.

What advice would you give tech companies looking for security solutions?

Don’t start with the technology – that is the very first thing. Technology companies may be the most guilty of doing this because technology is their business. But it’s not the way to go.

Instead, start by trying to understand and define the problem. You need to understand what it is you’re trying to protect, how you’re going to protect it, and what it looks like if it is not protected. Otherwise, you might decide to adopt a huge range of technologies — fantastic, big, monolithic solutions — and then find that there are massive gaps between them. They’re not connected. You need to make sure that you have an interlocking set of strategies to protect the entire attack surface area. Because guess what? If you have chinks in your armor, the attacker will probe and exploit those weaknesses.

For more insights on how to navigate the future of cloud security as a technology company, visit our hub page.

Additional reading:

NEVER MISS A BLOG

Get the latest stories, expertise, and news about security today.

What’s Up, Home? – Use the Zabbix, Luke

Post Syndicated from Janne Pikkarainen original https://blog.zabbix.com/whats-up-home-use-the-zabbix-luke/20953/

Welcome to my weekly blog about how I monitor my home with Zabbix. Like Batman, I have a casual day job as a monitoring tech lead, and by night I tinker around with my home Zabbix. (Except that Batman does not do monitoring, or who knows.)

Anyone using Zabbix knows how it can gather data from just about anywhere, and it can send its alerts to just about anything — pager systems like PagerDuty or OpsGenie, ticketing systems like Jira, e-mail, SMS, etc. Integrating with those takes minutes, is officially supported, very well documented, and would not make sense at home. But, what if at home I would like to show any possible alerts in a completely different way?

Zabbix, meet Star Wars

So, if I want to integrate my Zabbix with a screen saver, how would that work? And how long would that take? Is it even possible?

My friend, in the case of the good old xscreensaver you have many, many options. For its text-based screen saver modules, you can feed it a text file, or an URL from where it downloads the text to show on the screen. Making xscreensaver contents dynamic is easy.

For Zabbix, to make it send its alerts as text, you have many options. At least:

  1. Configure an action that runs whatever command to save the alert to a text file; even echo would do
  2. Let your Other System fetch the alerts over Zabbix API
  3. Let your Other System fetch the alerts directly from the Zabbix database
  4. Send out your alerts as e-mails and let your Other System parse those e-mails
  5. Configure a new custom media type to do something
  6. Use Zabbix real-time export functionality
Internals of my xscreensaver showcase

For this exercise, I decided to use the sixth option: Zabbix real-time export functionality.

What’s that, you ask?

It makes Zabbix save history, trends and/or triggers to JSON files, which any 3rd party program can then parse and utilize. Enabling it happens in practice by commenting out three lines in the Zabbix server config file, altering the path where you want the JSON files to be created, deciding the maximum size of the created files, and what kind of events you want to export. Restart the Zabbix server process, done.

My Zabbix is now running on Raspberry Pi 4. Then, I have a FreeBSD laptop for anything nerdy I want to do, and the FreeBSD laptop has xscreensaver for this demonstration.

So, my FreeBSD laptop does rsync the JSON files from Zabbix server every minute, extracts the event host name and trigger name using jq, and saves the output to text file. Surround that with header and footer text files, and you are done.

Now every time I don’t touch my FreeBSD laptop in a while, it turns on its screensaver and shows me the recent Zabbix alerts. Zabbix, meet Star Wars.

For now, the alert format shown on scroller is not perfect, but it works and took three or four lines of bash in total to accomplish. That’s easy, and in total took maybe 15 minutes to implement to its current stage.

Other news about my home monitoring project
  • My facial cream usage monitoring is going great! I have not missed applying my facial cream even once — I mean, I have received alerts from Zabbix, but each and every time I have then proceeded to apply the cream and my wife has received zero alerts so far. Good boy, me! (Read more about this project next week!)
  • As the trains stopping at our station are not always reliable (they can be either very late or canceled), I now have a live map showing the real-time status of the trains we are interested in. This part actually does not have anything to do with Zabbix at the moment, it’s Grafana and its GraphQL plugin querying data from an official train traffic open data system.
  • Zabbix 6.0 gained a new official weather template, so I now have a local weather dashboard as well provided by Zabbix.
  • I made a “home status shown as emojis” dashboard to make monitoring fun(?) and interesting(?) for the whole family — now our home status can be observed from our living room TV easily.

Some screenshots are below:

I have been working at Forcepoint since 2014 and never get bored of showing the alerts in new ways. — Janne Pikkarainen

The post What’s Up, Home? – Use the Zabbix, Luke appeared first on Zabbix Blog.

Cloudflare customers are protected from the Atlassian Confluence CVE-2022-26134

Post Syndicated from Reid Tatoris original https://blog.cloudflare.com/cloudflare-customers-are-protected-from-the-atlassian-confluence-cve-2022-26134/

Cloudflare customers are protected from the Atlassian Confluence CVE-2022-26134

Cloudflare customers are protected from the Atlassian Confluence CVE-2022-26134

On June 02, 2022 Atlassian released a security advisory for their Confluence Server and Data Center applications, highlighting a critical severity unauthenticated remote code execution vulnerability. The vulnerability is as CVE-2022-26134 and affects Confluence Server version 7.18.0 and all Confluence Data Center versions >= 7.4.0.

No patch is available yet but Cloudflare customers using either WAF or Access are already protected.

Our own Confluence nodes are protected by both WAF and Access, and at the time of writing, we have found no evidence that our Confluence instance was exploited.

Cloudflare reviewed the security advisory, conducted our own analysis, and prepared a WAF mitigation rule via an emergency release. The rule, once tested, was deployed on June 2, 2022, at 23:38 UTC with a default action of BLOCK and the following IDs:

  • 100531 (for our legacy WAF)
  • 408cff2b  (for our new WAF)

All customers using the Cloudflare WAF to protect their self-hosted Confluence applications have automatically been protected since the new rule was deployed.

Customers who have deployed Cloudflare Access in front of their Confluence applications were protected from external exploitation attempts even before the emergency release. Access verifies every request made to a Confluence application to ensure it is coming from an authenticated user. Any unauthenticated users attempting this exploit would have been blocked by Cloudflare before they could reach the Confluence server.

Customers not yet using zero trust rules to protect access to their applications can follow these instructions to enable Access now in a few minutes.

Timeline of Events

2022-06-02 at 20:00 UTC Atlassian publishes security advisory
2022-06-02 at 23:38 UTC Cloudflare publishes WAF rule to target CVE 2022-26134

When will a patch be available?

Atlassian has not confirmed when a patch will be available, but as noted above, Cloudflare customers protecting their Confluence applications with Cloudflare WAF and Access are protected. We will update this post as soon as new information is available, and we also recommend following the Atlassian security advisory.

Running AWS Lambda functions on AWS Outposts using AWS IoT Greengrass

Post Syndicated from Sheila Busser original https://aws.amazon.com/blogs/compute/running-aws-lambda-functions-on-aws-outposts-using-aws-iot-greengrass/

This blog post is written by Adam Imeson, Sr. Hybrid Edge Specialist Solution Architect.

Today, AWS customers can deploy serverless applications in AWS Regions using a variety of AWS services. Customers can also use AWS Outposts to deploy fully managed AWS infrastructure at virtually any datacenter, colocation space, or on-premises facility.

AWS Outposts extends the cloud by bringing AWS services to customers’ premises to support their hybrid and edge workloads. This post will describe how to deploy Lambda functions on an Outpost using AWS IoT Greengrass.

Consider a customer who has built an application that runs in an AWS Region and depends on AWS Lambda. This customer has a business need to enter a new geographic market, but the nearest AWS Region is not close enough to meet application latency or data residency requirements. AWS Outposts can help this customer extend AWS infrastructure and services to their desired geographic region. This blog post will explain how a customer can move their Lambda-dependent application to an Outpost.

Overview

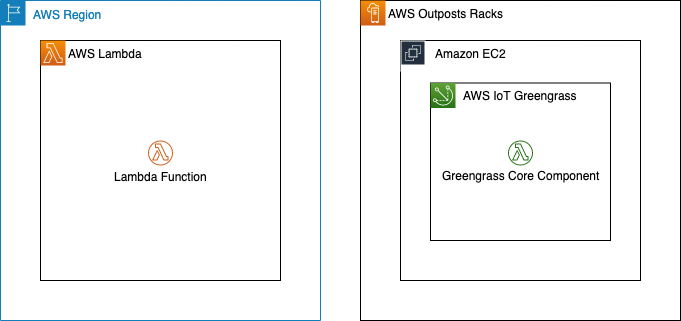
In this walkthrough you will create a Lambda function that can run on AWS IoT Greengrass and deploy it on an Outpost. This architecture results in an AWS-native Lambda function running on the Outpost.

Architecture overview - Lambda functions on AWS Outposts

Deploying Lambda functions on Outposts rack

Prerequisites: Building a VPC

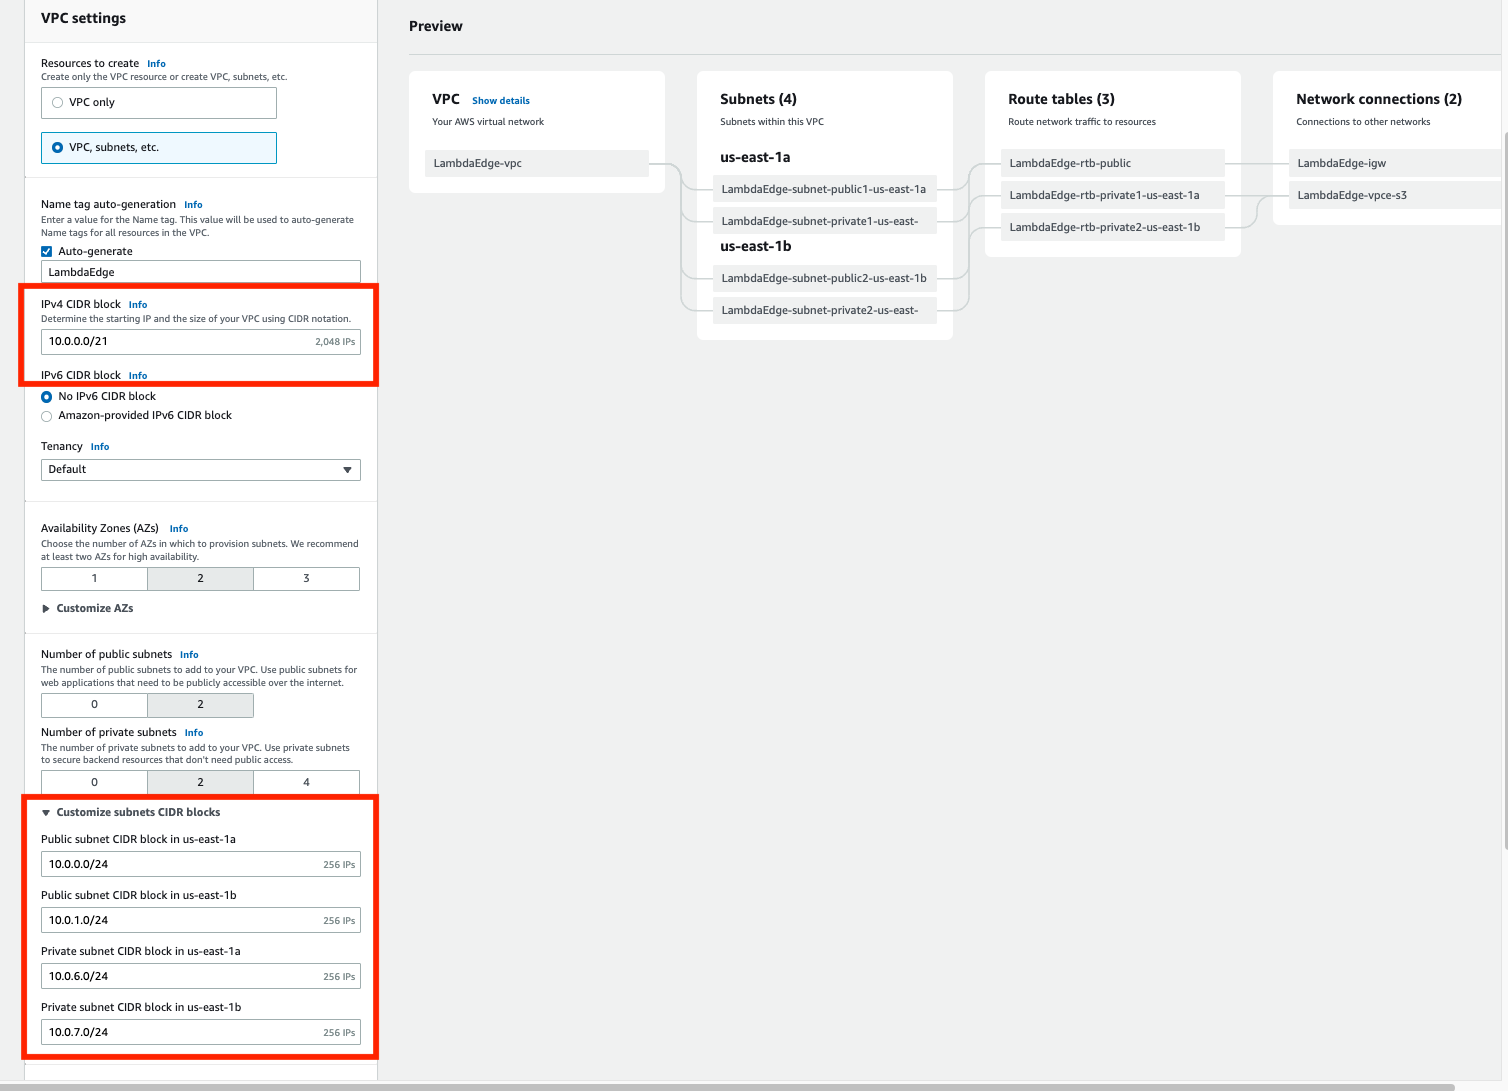
To get started, build a VPC in the same Region as your Outpost. You can do this with the create VPC option in the AWS console. The workflow allows you to set up a VPC with public and private subnets, an internet gateway, and NAT gateways as necessary. Do not consume all of the available IP space in the VPC with your subnets in this step, because you will still need to create Outposts subnets after this.

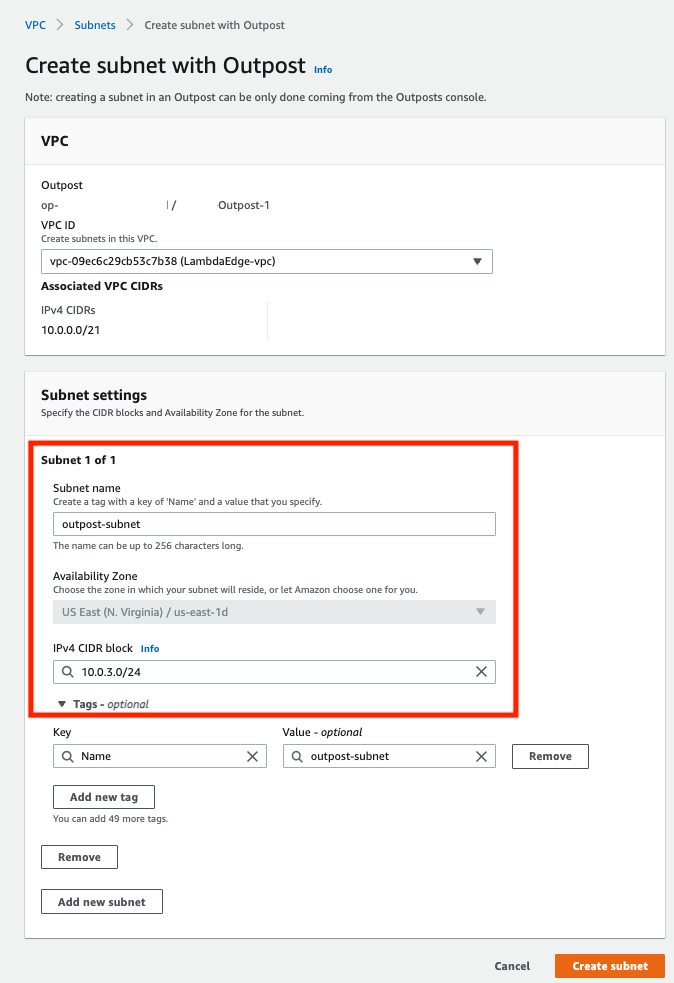
Now, build a subnet on your Outpost. You can do this by selecting your Outpost in the Outposts console and choosing Create Subnet in the drop-down Actions menu in the top right.

Confirm subnet details

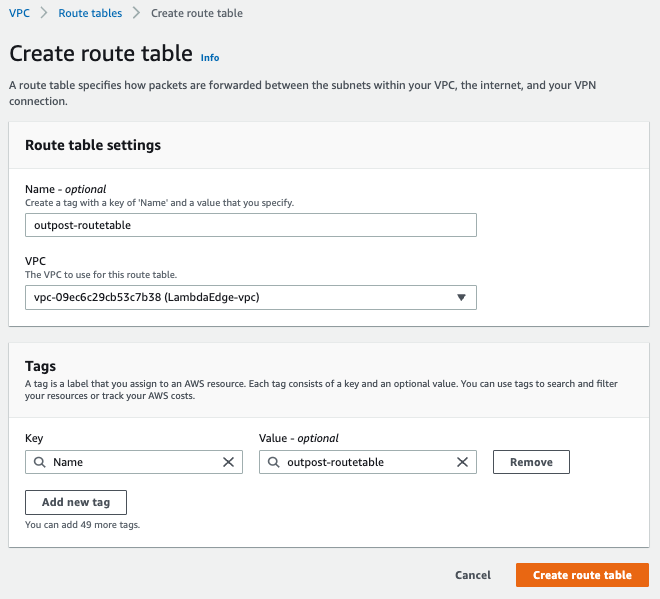
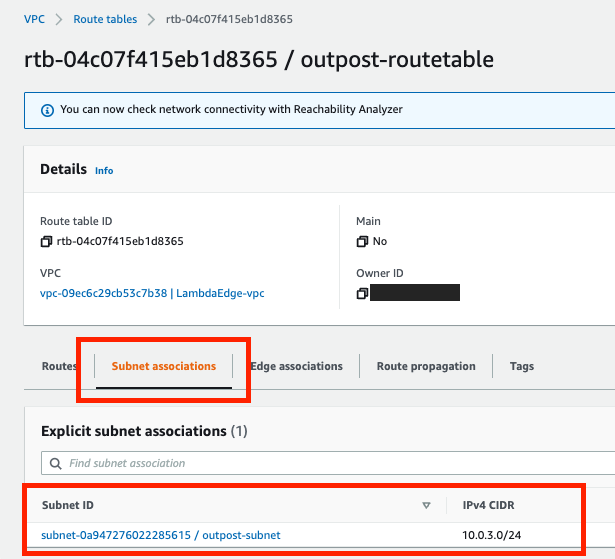
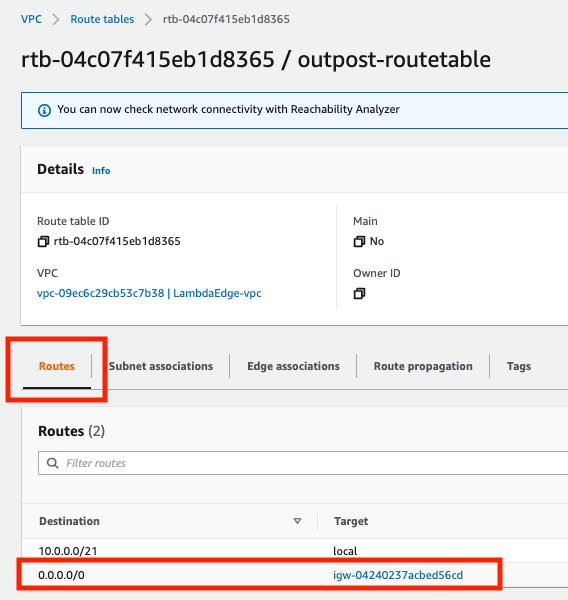
Choose the VPC you just created and select a CIDR range for your new subnet that doesn’t overlap with the other subnets that are already in the VPC. Once you’ve created the subnet, you need to create a new subnet route table and associate it with your new subnet. Go into the subnet route tables section of the VPC console and create a new route table. Associate the route table with your new subnet. Add a 0.0.0.0/0 route pointing at your VPC’s internet gateway. This sets the subnet up as a public subnet, which for the purposes of this post will make it easier to access the instance you are about to build for Greengrass Core. Depending on your requirements, it may make more sense to set up a private subnet on your Outpost instead. You can also add a route pointing at your Outpost’s local gateway here. Although you won’t be using the local gateway during this walkthrough, adding a route to the local gateway makes it possible to trigger your Outpost-hosted Lambda function with on-premises traffic.

Create a new route table

Associate the route table with the new subnet

Add a 0.0.0.0/0 route pointing at your VPC’s internet gateway

Setup: Launching an instance to run Greengrass Core

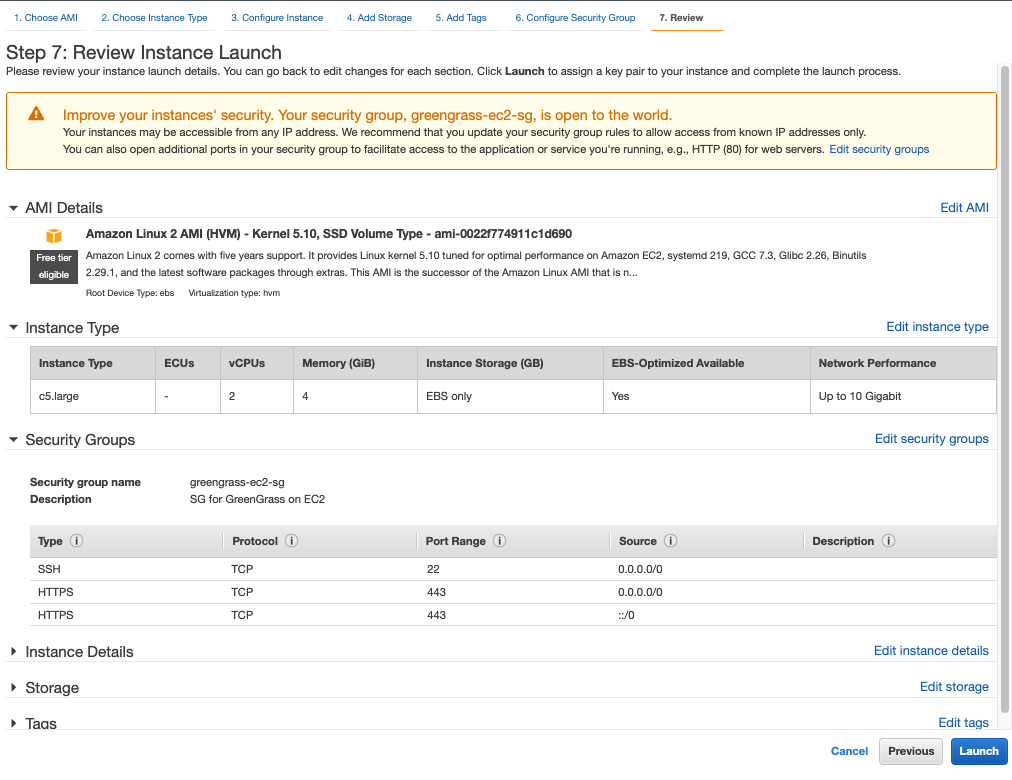
Create a new EC2 instance in your Outpost subnet. As long as your Outpost has capacity for your desired instance type, this operation will proceed the same way as any other EC2 instance launch. You can check your Outpost’s capacity in the Outposts console or in Amazon CloudWatch:

I used a c5.large instance running Amazon Linux 2 with 20 GiB of Amazon EBS storage for this walkthough. You can pick a different instance size or a different operating system in accordance with your application’s needs and the AWS IoT Greengrass documentation. For the purposes of this tutorial, we assign a public IP address to the EC2 instance on creation.

Step 1: Installing the AWS IoT Greengrass Core software

Once your EC2 instance is up and running, you will need to install the AWS IoT Greengrass Core software on the instance. Follow the AWS IoT Greengrass documentation to do this. You will need to do the following:

  1. Ensure that your EC2 instance has appropriate AWS permissions to make AWS API calls. You can do this by attaching an instance profile to the instance, or by providing AWS credentials directly to the instance as environment variables, as in the Greengrass documentation.
  2. Log in to your instance.
  3. Install OpenJDK 11. For Amazon Linux 2, you can use sudo amazon-linux-extras install java-openjdk11 to do this.
  4. Create the default system user and group that runs components on the device, with
    sudo useradd —system —create-home ggc_user
    sudo groupadd —system ggc_group
  5. Edit the /etc/sudoers file with sudo visudosuch that the entry for the root user looks like root ALL=(ALL:ALL) ALL
  6. Enable cgroups and enable and mount the memory and devices cgroups. In Amazon Linux 2, you can do this with the grubby utility as follows:
    sudo grubby --args="cgroup_enable=memory cgroup_memory=1 systemd.unified_cgroup_hierarchy=0" --update-kernel /boot/vmlinuz-$(uname -r)
  7. Type sudo reboot to reboot your instance with the cgroup boot parameters enabled.
  8. Log back in to your instance once it has rebooted.
  9. Use this command to download the AWS IoT Greengrass Core software to the instance:
    curl -s https://d2s8p88vqu9w66.cloudfront.net/releases/greengrass-nucleus-latest.zip > greengrass-nucleus-latest.zip
  10. Unzip the AWS IoT Greengrass Core software:
    unzip greengrass-nucleus-latest.zip -d GreengrassInstaller && rm greengrass-nucleus-latest.zip
  11. Run the following command to launch the installer. Replace each argument with appropriate values for your particular deployment, particularly the aws-region and thing-name arguments.
    sudo -E java -Droot="/greengrass/v2" -Dlog.store=FILE \
    -jar ./GreengrassInstaller/lib/Greengrass.jar \
    --aws-region region \
    --thing-name MyGreengrassCore \
    --thing-group-name MyGreengrassCoreGroup \
    --thing-policy-name GreengrassV2IoTThingPolicy \
    --tes-role-name GreengrassV2TokenExchangeRole \
    --tes-role-alias-name GreengrassCoreTokenExchangeRoleAlias \
    --component-default-user ggc_user:ggc_group \
    --provision true \
    --setup-system-service true \
    --deploy-dev-tools true
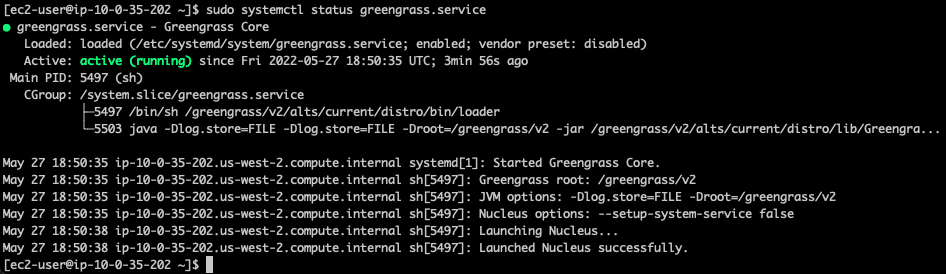
  12. You have now installed the AWS IoT Greengrass Core software on your EC2 instance. If you type sudo systemctl status greengrass.service then you should see output similar to this:

Step 2: Building and deploying a Lambda function

Now build a Lambda function and deploy it to the new Greengrass Core instance. You can find example local Lambda functions in the aws-greengrass-lambda-functions GitHub repository. This example will use the Hello World Python 3 function from that repo.

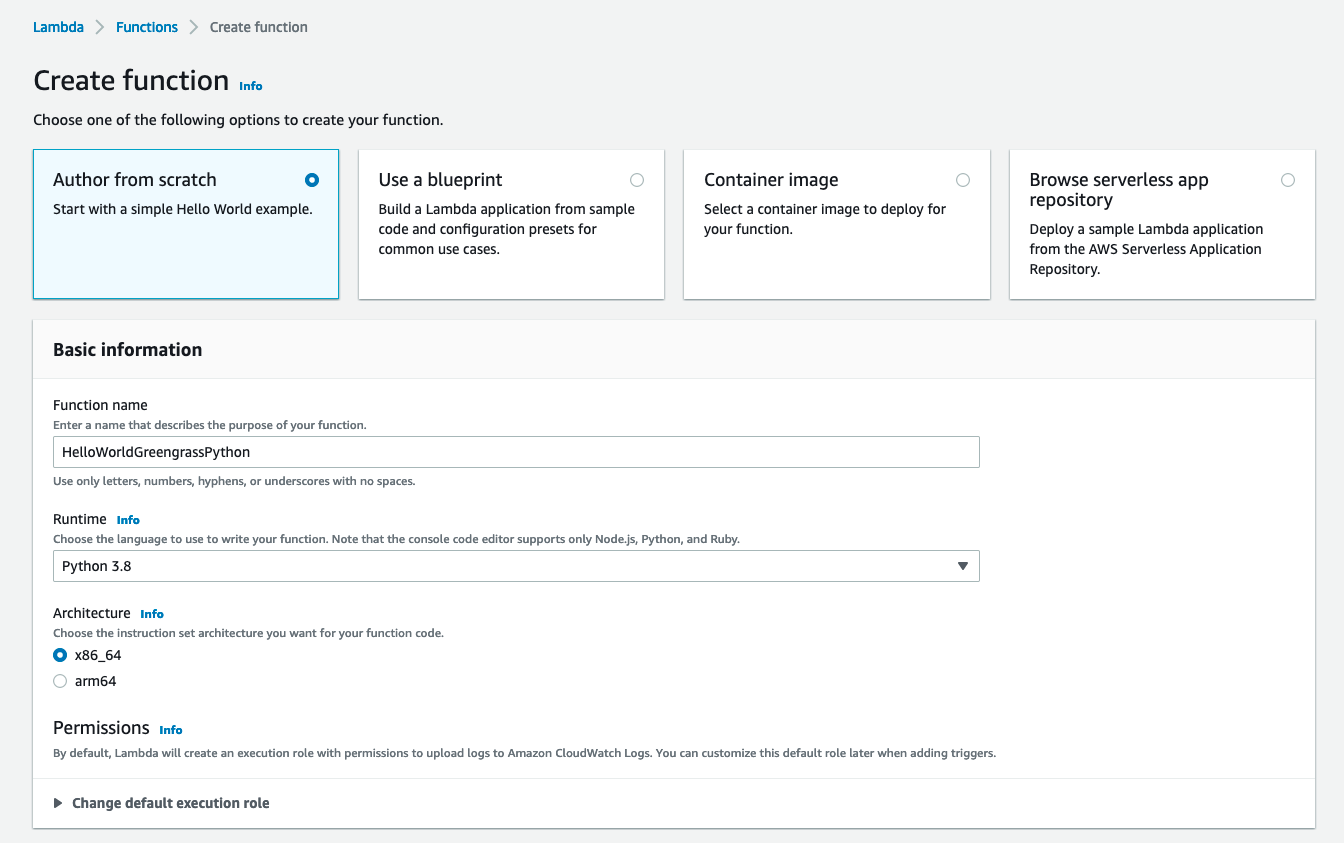
  1. Create the Lambda function. Go to the Lambda console, choose Create function, and select the Python 3.8 runtime:

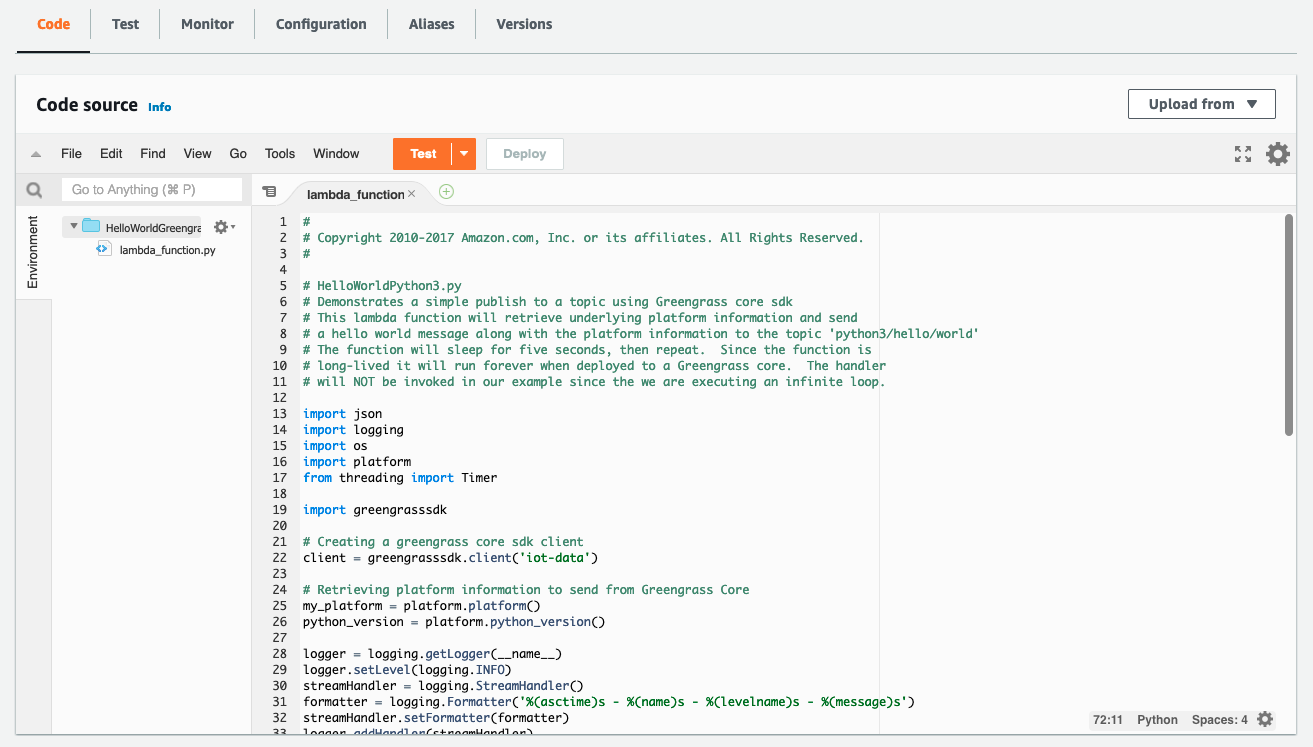
  1. Choose Create function at the bottom of the page. Once your new function has been created, copy the code from the Hello World Python 3 example into your function:

  1. Choose Deploy to deploy your new function’s code.
  2. In the top right, choose Actions and select Publish new version. For this particular function, you would need to create a deployment package with the AWS IoT Greengrass SDK for the function to work on the device. I’ve omitted this step for brevity as it is not a main focus of this post. Please reference the Lambda documentation on deployment packages and the Python-specific deployment package docs if you want to pursue this option.

  1. Go to the AWS IoT Greengrass console and choose Components in the left-side pop-in menu.
  2. On the Components page, choose Create component, and then Import Lambda function. If you prefer to do this programmatically, see the relevant AWS IoT Greengrass documentation or AWS CloudFormation documentation.
  3. Choose your new Lambda function from the drop-down.

Create component

  1. Scroll to the bottom and choose Create component.
  2. Go to the Core devices menu in the left-side nav bar and select your Greengrass Core device. This is the Greengrass Core EC2 instance you set up earlier. Make a note of the core device’s name.

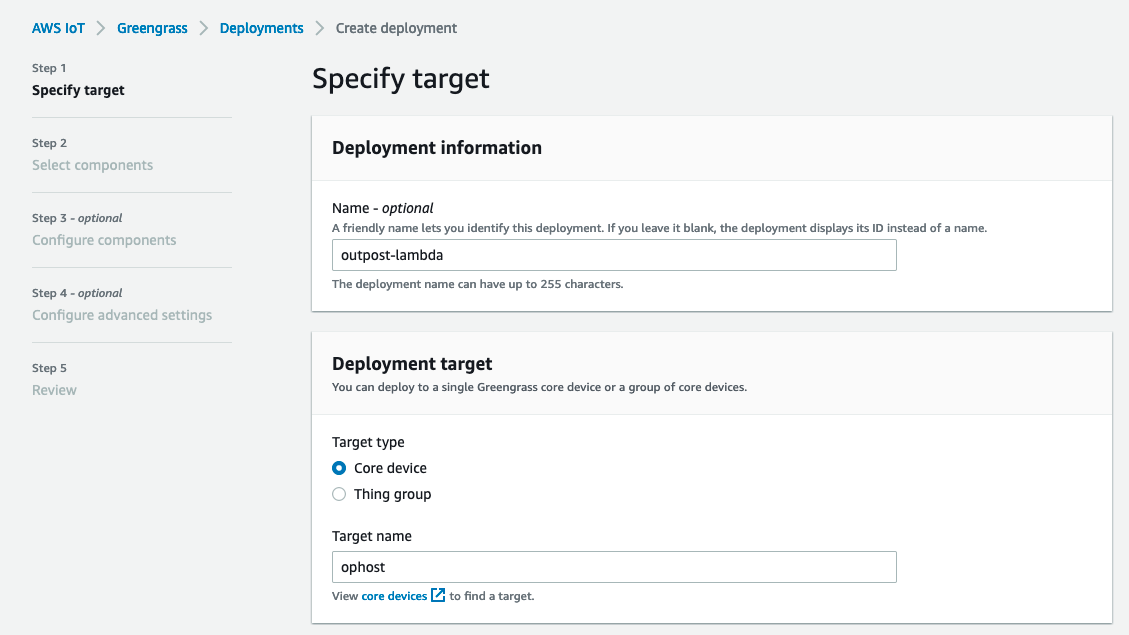
  1. Use the left-side nav bar to go to the Deployments menu. Choose Create to create a new deployment, which will place your Lambda function on your Outpost-hosted core device.
  2. Give the deployment a name and select Core device, providing the name of your core device. Choose Next.

  1. Select your Lambda function and choose Next.

  1. Choose Next again, on both the Configure components and Configure advanced settings On the last page, choose Deploy.

You should see a green message at the top of the screen indicating that your configuration is now being deployed.

Clean up

  1. Delete the Lambda function you created.
  2. Terminate the Greengrass Core EC2 instance.
  3. Delete the VPC.

Conclusion

Many customers use AWS Outposts to expand applications into new geographies. Some customers want to run Lambda-based applications on Outposts. This blog post shows how to use AWS IoT Greengrass to build Lambda functions which run locally on Outposts.

To learn more about Outposts, please contact your AWS representative and visit the Outposts homepage and documentation.

Active Exploitation of Confluence CVE-2022-26134

Post Syndicated from Rapid7 original https://blog.rapid7.com/2022/06/02/active-exploitation-of-confluence-cve-2022-26134/

Active Exploitation of Confluence CVE-2022-26134

On June 2, 2022, Atlassian published a security advisory for CVE-2022-26134, a critical unauthenticated remote code execution vulnerability in Confluence Server and Confluence Data Center. The vulnerability is unpatched as of June 2 and is being exploited in the wild.

Affected versions include Confluence Server version 7.18.0. According to Atlassian’s advisory, subsequent testing indicates that versions of Confluence Server and Data Center >= 7.4.0 are potentially vulnerable. There may also be other vulnerable versions not yet tested.

Security firm Volexity has in-depth analysis of attacks they have observed targeting CVE-2022-26134, including indicators of compromise and hunting rules.

Mitigation guidance

In the absence of a patch, organizations should restrict or disable Confluence Server and Confluence Data Center instances on an emergency basis. They should also consider implementing IP address safelisting rules to restrict access to Confluence.

For those unable to apply safelist IP rules to their Confluence server installations, consider adding WAF protection. Based on the details published so far, which admittedly are sparse, we recommend adding Java Deserialization rules that defend against RCE injection vulnerabilities, such as CVE-2021-26084. You can find an example here.

Rapid7 customers

We are investigating options for a vulnerability check to allow InsightVM and Nexpose customers to assess their exposure to CVE-2022-26134. We will update this blog as new information becomes available.

NEVER MISS A BLOG

Get the latest stories, expertise, and news about security today.

Remotely Controlling Touchscreens

Post Syndicated from Bruce Schneier original https://www.schneier.com/blog/archives/2022/06/remotely-controlling-touchscreens.html

Researchers have demonstrated controlling touchscreens at a distance, at least in a laboratory setting:

The core idea is to take advantage of the electromagnetic signals to execute basic touch events such as taps and swipes into targeted locations of the touchscreen with the goal of taking over remote control and manipulating the underlying device.

The attack, which works from a distance of up to 40mm, hinges on the fact that capacitive touchscreens are sensitive to EMI, leveraging it to inject electromagnetic signals into transparent electrodes that are built into the touchscreen so as to register them as touch events.

The experimental setup involves an electrostatic gun to generate a strong pulse signal that’s then sent to an antenna to transmit an electromagnetic field to the phone’s touchscreen, thereby causing the electrodes ­ which act as antennas themselves ­ to pick up the EMI.

Paper: “GhostTouch: Targeted Attacks on Touchscreens without Physical Touch“:

Abstract: Capacitive touchscreens have become the primary human-machine interface for personal devices such as smartphones and tablets. In this paper, we present GhostTouch, the first active contactless attack against capacitive touchscreens. GhostTouch uses electromagnetic interference (EMI) to inject fake touch points into a touchscreen without the need to physically touch it. By tuning the parameters of the electromagnetic signal and adjusting the antenna, we can inject two types of basic touch events, taps and swipes, into targeted locations of the touchscreen and control them to manipulate the underlying device. We successfully launch the GhostTouch attacks on nine smartphone models. We can inject targeted taps continuously with a standard deviation of as low as 14.6 x 19.2 pixels from the target area, a delay of less than 0.5s and a distance of up to 40mm. We show the real-world impact of the GhostTouch attacks in a few proof-of-concept scenarios, including answering an eavesdropping phone call, pressing the button, swiping up to unlock, and entering a password. Finally, we discuss potential hardware and software countermeasures to mitigate the attack.

AWS CSA Consensus Assessment Initiative Questionnaire version 4 now available

Post Syndicated from Sonali Vaidya original https://aws.amazon.com/blogs/security/aws-csa-consensus-assessment-initiative-questionnaire-version-4-now-available/

Amazon Web Services (AWS) has published an updated version of the AWS Cloud Security Alliance (CSA) Consensus Assessment Initiative Questionnaire (CAIQ). The questionnaire has been completed using the current CSA CAIQ standard, v4.0.2 (06.07.2021 update), and is now available for download.

The CSA is a not-for-profit organization dedicated to “defining and raising awareness of best practices to help ensure a secure cloud computing environment.” For more information, see the Cloud Security Alliance website. A wide range of industry security practitioners, corporations, and associations participate in CSA.

What is CSA CAIQ and how can you use it?

The CSA Consensus Assessments Initiative Questionnaire provides a set of questions that CSA anticipates a cloud consumer or a cloud auditor would ask of a cloud provider. The AWS CSA CAIQ provides the AWS control implementation descriptions for a series of cloud-specific security questions based on the Cloud Controls Matrix (CCM). The AWS CSA CAIQ also reflects the AWS customer responsibilities according to the shared responsibility model, which can help customers comply with the CSA CCM.

At AWS, we’re committed to helping you achieve and maintain the highest standards of security and compliance. We value your feedback and questions. You can contact the AWS HITRUST team at AWS Compliance Contact Us. If you have feedback about this post, submit comments in the Comments section below.

 
If you have feedback about this post, submit comments in the Comments section below. If you have questions about this post, contact AWS Support.

Want more AWS Security news? Follow us on Twitter.

Author

Sonali Vaidya

Sonali leads multiple AWS global compliance programs, including HITRUST, ISO 27001, ISO 27017, ISO 27018, ISO 27701, ISO 9001, and CSA STAR. Sonali has over 20 years of experience in information security and privacy management and holds multiple certifications such as CISSP, C-GDPR|P, CCSK, CEH, CISA, PCIP, ISO 27001, and ISO 22301 Lead Auditor.

Mozilla releases a machine-translation plugin

Post Syndicated from original https://lwn.net/Articles/896934/

Mozilla has announced
the release of a translation plugin for Firefox as part of the Project Bergamot initiative.

The ultimate goal of this consortium was to build a set of neural
machine translation tools that would enable Mozilla to develop a
website translation add-on that operates locally, i.e. the engines,
language models and in-page translation algorithms would need to
reside and be executed entirely in the user’s computer, so none of
the data would be sent to the cloud, making it entirely private.

Introducing the newest AWS Heroes – June 2022

Post Syndicated from Ross Barich original https://aws.amazon.com/blogs/aws/introducing-the-newest-aws-heroes-june-2022/

AWS Heroes are some of the worlds most active and vocal leaders in AWS communities, recognized for their unwavering focus on sharing insights and technical knowledge with others. Heroes have a variety of contributions to community learning: they host events, meetups, and workshops, author blogs, contribute to open source projects, speak at conferences, and more. You can view some of their prominent content in the AWS Heroes Content Library.

Today we are thrilled to introduce to the world the latest cohort of AWS Heroes:

Adam Bien – Munich, Germany

DevTools Hero Adam Bien is an independent Architect, Consultant, Developer, Trainer, conference speaker, and podcaster. Adam started with Java since JDK 1.0 and still enjoys writing serverless Java, often in Amazon Corretto. He also codes live on YouTube. Adam uses CDK in greenfield serverless Java applications, as well as to help his clients migrate their on-premise Java applications to the AWS cloud. He likes to apply Java’s pragmatic patterns and best practices to serverless runtimes, especially AWS Lambda and AWS Fargate. High productivity, reduction of complexity, and cost effectiveness are his main focuses.

Adam Elmore – Nixa, USA

DevTools Hero Adam Elmore is an independent cloud consultant who helps startups build products on AWS. He’s also the host of AWS FM, a podcast with guests from around the AWS community, and the creator of the AWS Community on Twitter. Adam is passionate about open source and has made a handful of contributions to the AWS CDK over the years. In 2020 he created Ness, an open source CLI tool for deploying web sites and apps to AWS. Previously, Adam co-founded StatMuse—a Disney backed startup building technology that answers sports questions—and served as CTO for five years.

Brooke Jamieson – Brisbane, Australia

Machine Learning Hero Brooke Jamieson is the Head of Enablement – AI/ML and Data at Blackbook.ai, and is an international conference speaker. Brooke specializes in researching & developing technically robust solutions that help “non-data people” harness the power of Artificial Intelligence and Machine Learning for their industry. Outside of their ‘day job’, Brooke is a dedicated member of the AWS Community and is a regular speaker at local user groups, global events, and guest lectures at multiple Australian Universities. They also make entry-level cloud career and technical content on TikTok, to reach broad audiences and diverse groups wanting to transition to careers in AI/ML and Cloud. Brooke is an Advisory Board member of Women in Digital, and strives to promote STEM pathways to young people in regional Australia & members of the LGBTIQA+ community.

Chao Cai – Beijing, China

Community Hero Chao Cai has 15 years of world-class experience in software development, including more than 10 years as a software architect. He is currently the VP and Chief Architect at Mobvista Inc. Chao is passionate about sharing his knowledge and experience to the community. His WeChat public account has more than 4,000 followers and over 34,000 engineers have taken his online courses. Chao is a respected leader in the China tech community. He is invited as the speaker to the global tech conferences, such as, QCon and ArchSummit each year. As an active advocate for AWS, Chao is also a regular speaker at AWS tech events.

Cyril Bandolo – Douala, Cameroon

Machine Learning Hero Cyril Bandolo is a data scientist working as a Senior Manager Data Analytics at Yoomee Mobile. Cyril has a natural talent and passion for teaching and transferring knowledge in his machine learning blog, where he focuses on building and deploying end-to-end machine learning projects on AWS. On his YouTube channel, he recently launched a weekly live hands-on series called “Sagemaker Saturdays” during which, every weekend he walks the viewers through end-to-end machine learning projects with Sagemaker Studio Lab and Sagemaker Studio. Cyril is always trying to encounter and apply new machine learning solutions to make lives better and help move the bottom line.

Kristi Perreault – Denver, USA

Serverless Hero Kristi Perreault is a Principal Software Engineer at Liberty Mutual Insurance, where her focus is serverless first development, and enterprise enablement. She holds an M.S. in Electrical & Computer Engineering specializing in cloud computing & IoT, and is very passionate about promoting women in technology. She organizes the Serverless Denver user group as part of ServerlessDays, co-organizes CDK Day, and writes extensively about serverless and diversity on her dev.to and Medium blog sites. You’ll find her speaking about embracing and scaling serverless first initiatives on dozens of podcasts, webinars, conferences, and meetups both virtually and on stage.

Sanchit Jain – Mumbai, India

Community Hero Sanchit Jain is the AWS Analytics Practice Lead and a certified expert specializing in AWS Cloud at Quantiphi Inc. He is also the AWS User Group Mumbai Lead and actively contributes to the AWS community by delivering sessions at AWS User Groups, AWS Community Days, and various educational institutes. He also shares his knowledge by publishing blogs about AWS services, architectures, and best practices. Recently, Sanchit hosted an AWS Solution Architect Certification Bootcamp, which spanned over two months, with 7500+ viewers. He also delivered a session recently at AWS Summit India 2022 on Building a data lake with AWS Lake Formation.

Shigeru Oda – Saitama, Japan

Community Hero Shigeru Oda is an expert system engineer at NSD CO., LTD. Since 2020 he has run 25 events with the JAWS-UG Beginners Chapter (about 4200 registered members). In September 2020 he promoted the 24-hour online event JAWS SONIC 2020 & MIDNIGHT JAWS 2020, which was attended by about 1500 people. In March 2021, he promoted JAWS DAYS 2021 as a steering member, which was attended by about 4,000 people. And in November 2021, he promoted JAWS PANKRATION 2021, a second 24-hour online event, providing 900 AWS users in Japan, as well as around the world with an opportunity to learn beyond the language barrier of English and Japanese through simultaneous interpretation. He received the AWS Samurai 2021 Award for these activities.

Yasunori Kirimoto – Sapporo, Japan

DevTools Hero Yasunori Kirimoto is currently the Co-Founder and CTO of MIERUNE Inc. and owner of dayjournal. He specializes in the field of GIS (Geographic Information System) and FOSS4G (Free Open Source Software for GeoSpatial). Yasunori’s work includes contributions to the Amazon Location Service samples on GitHub and open source projects such as AWS Amplify and AWS CDK. He has also published numerous blog posts on AWS CloudFormation and other AWS architectures. When he’s not acting as a bridge between AWS and the location-based information field, he engages with the open-source community and enjoys participating in venture projects to gain a broader understanding of technology.


If you’d like to learn more about the new Heroes, or connect with a Hero near you, please visit the AWS Heroes website or browse the AWS Heroes Content Library.

— Ross

Automate your validated dataset deployment using Amazon QuickSight and AWS CloudFormation

Post Syndicated from Jeremy Winters original https://aws.amazon.com/blogs/big-data/automate-your-validated-dataset-deployment-using-amazon-quicksight-and-aws-cloudformation/

A lot of the power behind business intelligence (BI) and data visualization tools such as Amazon QuickSight comes from the ability to work interactively with data through a GUI. Report authors create dashboards using GUI-based tools, then in just a few clicks can share the dashboards with business users and decision-makers. This workflow empowers authors to create and manage the QuickSight resources and dashboards they’re responsible for providing.

Developer productivity is a great benefit of UI-based development, but enterprise customers often need to consider additional factors in their BI implementation:

  • Promoting objects through environments (development, testing, production, and so on)
  • Scaling for hundreds of authors and thousands of users
  • Implementing data security, such as row-level and column-level rules to filter the data elements visible to specific users
  • Regulatory requirements, processes, and compliance controls.

Approaches such as source control-backed CI/CD pipelines allow you to address compliance requirements and security gates with automation. For example, a hypothetical build pipeline for a Java Springboot application may enable developers to build and deploy freely to a dev environment, but the code must pass tests and vulnerability scans before being considered for promotion to upper environments. A human approval step then takes place before the code is released into production. Processes such as this provide quality, consistency, auditability, and accountability for the code being released.

The QuickSight API provides functionality for automation pipelines. Pipeline developers can use the API to migrate QuickSight resources from one environment to another. The API calls that facilitate handling QuickSight datasets enables inspection of the JSON representation of the dataset definition.

This post presents an example of how a QuickSight administrator can automate data resource management and security validation through use of the QuickSight API and AWS CloudFormation.

Solution overview

The model implements security rules that rely on naming conventions for tables and columns as an integral part of the security model. Instead of relying on naming conventions, you may want to use a lookup table or similar approach to store the relationships between data tables and security tables.

We guide you through the following steps:

  1. Create relational database tables to be secured.
  2. Create a QuickSight dataset in your dev account.
  3. Generate a CloudFormation template using a Python script that allows you to enforce row-level and column-level security in each environment. You can customize this script to the needs of your organization.
  4. Use the generated CloudFormation template to deploy through dev, test, and prod using your change management process.

You can use AWS CloudFormation to manage several types of QuickSight resources, but dataset resources are a critical junction for security, so they are our focus in this post.

To implement data security rules in a large organization, controls must be in place to agree upon and implement the rules from a process perspective. This post dives deep into using code to validate security aspects of your QuickSight deployment, but data security requires more than code. The approaches put forward are intended as a part of a larger change management process, much of which is based around human review and approval.

In addition to having a change management process in place, we suggest managing your AWS resources using a CI/CD pipeline. The nature of change management and CI/CD processes can vary greatly, and are outside the scope of this post.

Prerequisites

This post assumes a basic command of the following:

We don’t go into the broader picture of integrating into a full CI/CD process, so an understanding of CI/CD is helpful, but not required.

Security rules for your organization

Before we can write a script to confirm security rules have been applied correctly, we need to know what the security rules actually are. This means we need to determine the following:

  • What – What is the data we are trying to secure? Which fields in the database are sensitive? Which field values will be used to filter access?
  • Who – Who are the users and groups that should be provided access to the data and fields we have identified?

In concrete terms, we need to match identities (users and groups) to actual data values (used in row-level security) and sensitive fields (for column-level security). Identities such as users and groups typically correlate to entities in external systems such as Active Directory, but you can use native QuickSight users and groups.

For this post, we define the following rules that indicate the relationship between database objects (tables and fields) and how they should be secured. Keep in mind that these example rules may not apply to every organization. Security should be developed to match your requirements and processes.

  • Any field name with _sensitive appended to it is identified as containing sensitive data. For example, a column named salary_usd_sensitive should be restricted. For our scenario, we say that the user should be a member of the QuickSight restricted group in order to access sensitive fields. No other groups are allowed access to these fields.
  • For a given table, a companion table with _rls appended to the name contains the row-level security rules used to secure the table. In this model, the row-level security rules for the employees table are found in the employees_rls table.
  • Row-level security rules must be sourced 100% from the underlying data store. This means that you can’t upload rules via the QuickSight console, or use custom SQL in QuickSight to create the rules. Rules can be provided as views (if supported by the underlying data store) as long as the view definition is managed using a change management process.
  • The dataset name should match the name of the underlying database table.

These rules rely on a well-structured change management process for the database. If users and developers have access to change database objects in production, the rules won’t carry much weight. For examples of automated schema management using open-source CI/CD tooling, refer to Deploy, track, and roll back RDS database code changes using open source tools Liquibase and Jenkins and How to Integrate Amazon RDS Schema Changes into CI/CD Pipelines with GitLab and Liquibase.

From the QuickSight perspective, our database becomes the source of the “what” and “who” we discussed earlier. QuickSight doesn’t own the security rules, it merely implements the rules as defined in the database.

Security rule management with database objects

For this post, we source data from a Postgres database using a read-only user created for QuickSight.

First, we create our schema and a data table with a few rows inserted:

create schema if not exists ledger;

--the table we are securing
drop table if exists ledger.transactions;
create table if not exists ledger.transactions (
    txn_id integer,
    txn_type varchar(100),
    txn_desc varchar(100),
    txn_amt float,
    department varchar(100),
    discount_sensitive float
);

insert into ledger.transactions (
    txn_id,
    txn_type,
    txn_desc,
    txn_amt,
    department,
    discount_sensitive
) 
values
(1, 'expense', 'commission', -1000.00, 'field sales', 0.0),
(2, 'revenue', 'widgets',  15000.00, 'field sales', 1000.00),
(3, 'revenue', 'interest', 1000.00, 'corporate', 0.0),
(4, 'expense', 'taxes', -1234.00, 'corporate', 0.0),
(5, 'revenue', 'doodads', 1000.00, 'field sales', 100.0)
;

Note the field discount_sensitive. In our security model, any field name with _sensitive appended to it is identified as containing sensitive data. This information is used later when we implement column-level security. In our example, we have the luxury of using naming conventions to tag the sensitive fields, but that isn’t always possible. Other options could involve the use of SQL comments, or creating a table that provides a lookup for sensitive fields. Which method you choose depends upon your data and requirements, and should be supported by a change management process.

Row-level security table

The following SQL creates a table containing the row-level security rules for the ledger.transactions table, then inserts rules that match the example discussed earlier:

drop table if exists ledger.transactions_rls;
create table ledger.transactions_rls (
    groupname varchar(100),
    department varchar(1000)
);


insert into ledger.transactions_rls (groupname, department) 
values
('restricted', null), --null indicates all values
('anybody', 'field sales');

For more information about how to restrict access to a dataset using row-level security, refer to Using row-level security (RLS) with user-based rules to restrict access to a dataset

These rules match the specified QuickSight user groups to values in the department field of the transactions table.

Our last step in Postgres is to create a user that has read-only access to our tables. All end-user or SPICE refresh queries from QuickSight are run using this user. See the following code:

drop role if exists qs_user;
create role qs_user login password 'GETABETTERPASSSWORD';
grant connect on database quicksight TO qs_user;
grant usage on schema ledger to qs_user;
grant select on ledger.transactions to qs_user;
grant select on ledger.transactions_rls to qs_user;

Create user groups

Our security model provides permissions based on group membership. Although QuickSight allows for these groups to be sourced from external systems such as Active Directory, our example uses native QuickSight groups.

We create our groups using the following AWS Command Line Interface (AWS CLI) commands. Take note of the restricted group we’re creating; this is the group we use to grant access to sensitive data columns.

aws quicksight create-group \
--aws-account-id YOUR_AWS_ACCOUNT_ID_HERE \
--namespace default \
--group-name restricted

aws quicksight create-group \
--aws-account-id YOUR_AWS_ACCOUNT_ID_HERE \
--namespace default \
--group-name anybody

You can also add a user to your group with the following code:

aws quicksight create-group-membership \
--aws-account-id YOUR_AWS_ACCOUNT_ID_HERE \
--namespace default \
--group-name anybody \
--member-name [email protected]

The Python script

Now that we have set up our database and groups, we switch focus to the Python script used for the following actions:

  • Extracting the definition of a manually created dataset using the QuickSight API
  • Ensuring that the dataset definition meets security standards
  • Restructuring the dataset definition into the format of a CloudFormation template
  • Writing the CloudFormation template to a JSON file

In the header of the script, you can see the following variables, which you should set to values in your own AWS environment:

# Parameters for the source data set
region_name = 'AWS_REGION_NAME'
aws_account_id = "AWS_ACCOUNT_ID"
source_data_set_id = "ID_FOR_THE_SOURCE_DATA_SET"

# Parameters are used when creating the cloudformation template
target_data_set_name = "DATA_SET_DISPLAY_NAME"
target_data_set_id = "NEW_DATA_SET_ID"
template_file_name = "dataset.json"

QuickSight datasets have a name and an ID. The name is displayed in the QuickSight UI, and the ID is used to reference the dataset behind the scenes. The ID must be unique for a given account and Region, which is why QuickSight uses UUIDs by default, but you can use any unique string.

Create the datasets

You can use the QuickSight GUI or Public API to create a dataset for the transactions_rls and transactions tables. For instructions, refer to Creating a dataset from a database. Connect to the database, create the datasets, then apply transactions_rls as the row-level security for the transactions dataset. You can use the following list-data-sets AWS CLI call to verify that your tables were created successfully:

$ aws quicksight list-data-sets --aws-account-id YOURACCOUNT            
{
    "DataSetSummaries": [
       {
            "Arn": "arn:aws:quicksight:us-west-2:YOURACCOUNT:dataset/<ID>",
            "DataSetId": "<ID>",
            "Name": "transactions",
            "CreatedTime": "2021-09-15T15:41:56.716000-07:00",
            "LastUpdatedTime": "2021-09-15T16:38:03.658000-07:00",
            "ImportMode": "SPICE",
            "RowLevelPermissionDataSet": {
                "Namespace": "default",
                "Arn": "arn:aws:quicksight:us-west-2: YOURACCOUNT:dataset/<RLS_ID>",
                "PermissionPolicy": "GRANT_ACCESS",
                "FormatVersion": "VERSION_1",
                "Status": "ENABLED"
            },
            "RowLevelPermissionTagConfigurationApplied": false,
            "ColumnLevelPermissionRulesApplied": true
        },
        {
            "Arn": "arn:aws:quicksight:us-west-2: YOURACCOUNT:dataset/<RLS_ID>",
            "DataSetId": "<RLS_ID>",
            "Name": "transactions_rls",
            "CreatedTime": "2021-09-15T15:42:37.313000-07:00",
            "LastUpdatedTime": "2021-09-15T15:42:37.520000-07:00",
            "ImportMode": "SPICE",
            "RowLevelPermissionTagConfigurationApplied": false,
            "ColumnLevelPermissionRulesApplied": false
        }
    ]
}

Script overview

Our script is based around the describe_data_set method of the Boto3 QuickSight client. This method returns a Python dictionary containing all the attributes associated with a dataset resource. Our script analyzes these dictionaries, then coerces them into the structure required for dataset creation using AWS CloudFormation. The structure of the describe_data_set method and the AWS::QuickSight::DataSet CloudFormation resource are very similar, but not quite identical.

The following are the top-level fields in the response for the Boto3 QuickSight client describe_data_set method:

{
    'DataSet': {
        'Arn': 'string',
        'DataSetId': 'string',
        'Name': 'string',
        'CreatedTime': datetime(2015, 1, 1),
        'LastUpdatedTime': datetime(2015, 1, 1),
        'PhysicalTableMap': {},
        'LogicalTableMap': {...},
        'OutputColumns': [...],
        'ImportMode': 'SPICE'|'DIRECT_QUERY',
        'ConsumedSpiceCapacityInBytes': 123,
        'ColumnGroups': [...],
        'FieldFolders': {...},
        'RowLevelPermissionDataSet': {...},
        'ColumnLevelPermissionRules': [...]
    },
    'RequestId': 'string',
    'Status': 123
}

Our script converts the response from the API to the structure required for creating a dataset using AWS CloudFormation.

The following are the top-level fields in the AWS::QuickSight::DataSet CloudFormation resource:

{
  "Type" : "AWS::QuickSight::DataSet",
  "Properties" : {
      "AwsAccountId" : String,
      "ColumnGroups" : [ ColumnGroup, ... ],
      "ColumnLevelPermissionRules" : [ ColumnLevelPermissionRule, ... ],
      "DataSetId" : String,
      "FieldFolders" : {Key : Value, ...},
      "ImportMode" : String,
      "IngestionWaitPolicy" : IngestionWaitPolicy,
      "LogicalTableMap" : {Key : Value, ...},
      "Name" : String,
      "Permissions" : [ ResourcePermission, ... ],
      "PhysicalTableMap" : {Key : Value, ...},
      "RowLevelPermissionDataSet" : RowLevelPermissionDataSet,
      "Tags" : [ Tag, ... ]
    }
}

The key differences between both JSON structures are as follows:

  • describe_data_set contains Arn, CreatedTime, and LastUpdatedTime, which are useful fields but only relevant to an existing resource
  • AWS CloudFormation requires AwsAccountId when creating the resource
  • AWS CloudFormation accepts tags for the dataset, but describe_data_set doesn’t provide them
  • The AWS CloudFormation Permissions property allows for assigning AWS Identity and Access Management (IAM) permissions at the time of creation

Our script is able to selectively choose the top-level properties we want from the describe_data_set response, then add the fields that AWS CloudFormation requires for resource creation.

Validate security

Before the script creates the CloudFormation template, it performs validations to ensure that our dataset conforms to the defined security rules.

The following is the snippet from our script that performs validation for row-level security:

if 'RowLevelPermissionDataSet' in describe_response['DataSet']:
    if describe_response['DataSet']['RowLevelPermissionDataSet'] is None:
        raise Exception("row level permissions must be applied!")
    else:
        # now we look up the rls data set so that we can confirm that it conforms to our rules
        rls_dataset_id = describe_response['DataSet']['RowLevelPermissionDataSet']['Arn'].split('/')[-1]
        rls_response = client.describe_data_set(
            AwsAccountId = aws_account_id,
            DataSetId = rls_dataset_id
        )
        
        rls_table_map = rls_response['DataSet']['PhysicalTableMap']

        # rls table must not be custom SQL
        if 'CustomSql' in rls_table_map[list(rls_table_map.keys())[0]]:
            raise Exception("RLS data set can not contain custom SQL!")

        # confirm that the database table name is what we expect it to be 
        if rls_response['DataSet']['Name'] != describe_response['DataSet']['Name'] + '_rls':
            raise Exception("RLS data set name must match pattern tablename_rls!")

The steps in the code are as follows:

  1. Ensure that any row-level security is applied (this is the bare minimum).
  2. Look up the dataset that contains the row-level security rules using another Boto3 call.
  3. Confirm that the row-level security dataset is not custom SQL.
  4. Confirm that the name of the table is as expected, with _rls appended to the name of the table being secured.

The use of custom SQL for sourcing row-level security rules isn’t secure in our case, because a QuickSight developer could use SQL to alter the underlying rules. Because of this, our model requires that a physical table from the dataset is used as the row-level security rule source. Of course, it’s possible to use a view in the database to provide the rules. A view is okay because the definition (in our scenario) is governed by a change management process, as opposed to the custom SQL, which the QuickSight developer can create.

The rules being implemented for your specific organization will be different. You may need to connect to a database directly from your Python script in order to validate the dataset was created in a secure manner. Regardless of your actual rules, the describe_data_set API method provides you the details you need to begin validation of the dataset.

Column-level security

Our model for column-level security indicates that any database field name that ends in _sensitive should only be accessible to members of a QuickSight group named restricted. Instead of validating that the dataset has the column-level security rules applied correctly, we simply enforce the rules directly in two steps:

  1. Identify the sensitive fields.
  2. Create a dictionary and add it to our dataset with the key ColumnLevelPermissionRules.

To identify the sensitive fields, we create a list and iterate through the input columns of the physical table:

sensitive_fields = []
input_columns = physical_table_map[list(physical_table_map.keys())[0]]["RelationalTable"]["InputColumns"]
for input_column in input_columns:
    field_name = input_column['Name']
    if field_name[-10:len(field_name)] == '_sensitive':
        sensitive_fields.append(field_name)

The result is a list of sensitive fields. We can then take this list and integrate it into the dataset through the use of a dictionary:

if len(sensitive_fields) > 0:
    data_set["ColumnLevelPermissionRules"] = [
        {
            "Principals": [
                {"Ref": "RestrictedUserGroupArn"}
            ],
            "ColumnNames": sensitive_fields
        }
    ]

Instead of specifying a specific principal, we reference the CloudFormation template parameter RestrictedUserGroupArn. The ARN for the restricted group is likely to vary, especially if you’re deploying to another AWS account. Using a template parameter allows us to specify the ARN at the time of dataset creation in the new environment.

Access to the dataset QuickSight resources

The Permissions structure is added to the definition for each dataset:

"Permissions": [
    {
        "Principal": {
            "Ref": "QuickSightAdminPrincipal"
        },
        "Actions": [
            "quicksight:DescribeDataSet",
            "quicksight:DescribeDataSetPermissions",
            "quicksight:PassDataSet",
            "quicksight:DescribeIngestion",
            "quicksight:ListIngestions",
            "quicksight:UpdateDataSet",
            "quicksight:DeleteDataSet",
            "quicksight:CreateIngestion",
            "quicksight:CancelIngestion",
            "quicksight:UpdateDataSetPermissions"
        ]
    }
]

A value for the QuickSightAdminPrincipal CloudFormation template parameter is provided at the time of stack creation. The preceding structure provides the principal access to manage the QuickSight dataset resource itself. Note that this is not the same as data access (though an admin user could manually remove the row-level security rules). Row-level and column-level security rules indicate whether a given user has access to specific data, whereas these permissions allow for actions on the definition of the dataset, such as the following:

  • Updating or deleting the dataset
  • Changing the security permissions
  • Initiating and monitoring SPICE refreshes

End-users don’t require this access in order to use a dashboard created from the dataset.

Run the script

Our script requires you to specify the dataset ID, which is not the same as the dataset name. To determine the ID, use the AWS CLI list-data-sets command.

To set the script parameters, you can edit the following lines to match your environment:

# parameters for the source data set
region_name = 'us-west-2'
aws_account_id = "<YOUR_ACCOUNT_ID>"
source_data_set_id = "<SOURCE_DATA_SET_ID>"

# parameters for the target data set
target_data_set_name = "DATA_SET_PRESENTATION_NAME"
target_data_set_id = "NEW_DATA_SET_ID"

The following snippet runs the Python script:

$ quicksight_security % python3 data_set_to_cf.py                                                       
row level security validated!
the following sensitive fields were found: ['discount_sensitive']
cloudformation template written to dataset.json
cli-input-json file written to params.json

CloudFormation template

Now that the security rules have been validated, our script can generate the CloudFormation template. The describe_response_to_cf_data_set method accepts a describe_data_set response as input (along with a few other parameters) and returns a dictionary that reflects the structure of an AWS::QuickSight::DataSet CloudFormation resource. Our code uses this method once for the primary dataset, and again for the _rls rules. This method handles selecting values from the response, prunes some unnecessary items (such as empty tag lists), and replaces a few values with CloudFormation references. These references allow us to provide parameter values to the template, such as QuickSight principals and the data source ARN.

You can view the template using the cat command:

$ quicksight_security % cat dataset.json 
{
    "AWSTemplateFormatVersion": "2010-09-09",
    "Description": "Creates a QuickSight Data Set",
    "Parameters": {
        "DataSourceArn": {
            "Type": "String",
            "Description": "ARN for Postgres data source resource"
        },
        "QuickSightOwnerPrincipal": {
            "Type": "String",
            "Description": "ARN for a QuickSight principal who will be granted API access to the datasets"
        },
        "RestrictedUserGroupArn": {
            "Type": "String",
            "Description": "ARN for a QuickSight principal who will be granted access to sensitive fields"
        }
    },
    "Resources": {
        "NewDataSet": {
            "Type": "AWS::QuickSight::DataSet",
            "Properties": {
                "DataSetId": "NEW_DATA_SET_ID",
                "Name": "DATA_SET_PRESENTATION_NAME",
                "AwsAccountId": {
                    "Ref": "AWS::AccountId"
                },
                "Permissions": [
                    {
                        "Principal": {
                            "Ref": "QuickSightAdminPrincipal"
                        },
                        "Actions": [
                            "quicksight:DescribeDataSet",
                            "quicksight:DescribeDataSetPermissions",
                            "quicksight:PassDataSet",
                            "quicksight:DescribeIngestion",
                            "quicksight:ListIngestions",
                            "quicksight:UpdateDataSet",
                            "quicksight:DeleteDataSet",
                            "quicksight:CreateIngestion",
                            "quicksight:CancelIngestion",
                            "quicksight:UpdateDataSetPermissions"
                        ]
                    }
                ],
                "FieldFolders": {},
                "ImportMode": "DIRECT_QUERY",
                "LogicalTableMap": {
                    "e2305db4-2c79-4ac4-aff5-224b8c809767": {
                        "Alias": "transactions",
                        "DataTransforms": [
                            {
                                "ProjectOperation": {
                                    "ProjectedColumns": [
                                        "txn_id",
                                        "txn_type",
                                        "txn_desc",
                                        "txn_amt",
                                        "department",
                                        "discount_sensitive"
                                    ]
                                }
                            }
                        ],
                        "Source": {
                            "PhysicalTableId": "someguid-2c79-4ac4-aff5-224b8c809767"
                        }
                    }
                },
                "PhysicalTableMap": {
                    "e2305db4-2c79-4ac4-aff5-224b8c809767": {
                        "RelationalTable": {
                            "DataSourceArn": {
                                "Ref": "DataSourceArn"
                            },
                            "Schema": "ledger",
                            "Name": "transactions",
                            "InputColumns": [
                                {
                                    "Name": "txn_id",
                                    "Type": "INTEGER"
                                },
                                {
                                    "Name": "txn_type",
                                    "Type": "STRING"
                                },
                                {
                                    "Name": "txn_desc",
                                    "Type": "STRING"
                                },
                                {
                                    "Name": "txn_amt",
                                    "Type": "DECIMAL"
                                },
                                {
                                    "Name": "department",
                                    "Type": "STRING"
                                },
                                {
                                    "Name": "discount_sensitive",
                                    "Type": "DECIMAL"
                                }
                            ]
                        }
                    }
                },
                "RowLevelPermissionDataSet": {
                    "Namespace": "default",
                    "Arn": {
                        "Fn::GetAtt": [
                            "NewDataSetRLS",
                            "Arn"
                        ]
                    },
                    "PermissionPolicy": "GRANT_ACCESS",
                    "FormatVersion": "VERSION_1"
                },
                "ColumnLevelPermissionRules": [
                    {
                        "Principals": [
                            {
                                "Ref": "RestrictedUserGroupArn"
                            }
                        ],
                        "ColumnNames": [
                            "discount_sensitive"
                        ]
                    }
                ]
            }
        },
        "NewDataSetRLS": {
            "Type": "AWS::QuickSight::DataSet",
            "Properties": {
                "DataSetId": "NEW_DATA_SET_ID_rls",
                "Name": "DATA_SET_PRESENTATION_NAME_rls",
                "AwsAccountId": {
                    "Ref": "AWS::AccountId"
                },
                "Permissions": [
                    {
                        "Principal": {
                            "Ref": "QuickSightAdminPrincipal"
                        },
                        "Actions": [
                            "quicksight:DescribeDataSet",
                            "quicksight:DescribeDataSetPermissions",
                            "quicksight:PassDataSet",
                            "quicksight:DescribeIngestion",
                            "quicksight:ListIngestions",
                            "quicksight:UpdateDataSet",
                            "quicksight:DeleteDataSet",
                            "quicksight:CreateIngestion",
                            "quicksight:CancelIngestion",
                            "quicksight:UpdateDataSetPermissions"
                        ]
                    }
                ],
                "FieldFolders": {},
                "ImportMode": "SPICE",
                "LogicalTableMap": {
                    "someguid-51d7-43c4-9f8c-c60a286b0507": {
                        "Alias": "transactions_rls",
                        "DataTransforms": [
                            {
                                "ProjectOperation": {
                                    "ProjectedColumns": [
                                        "groupname",
                                        "department"
                                    ]
                                }
                            }
                        ],
                        "Source": {
                            "PhysicalTableId": "someguid-51d7-43c4-9f8c-c60a286b0507"
                        }
                    }
                },
                "PhysicalTableMap": {
                    "someguid-51d7-43c4-9f8c-c60a286b0507": {
                        "RelationalTable": {
                            "DataSourceArn": {
                                "Ref": "DataSourceArn"
                            },
                            "Schema": "ledger",
                            "Name": "transactions_rls",
                            "InputColumns": [
                                {
                                    "Name": "groupname",
                                    "Type": "STRING"
                                },
                                {
                                    "Name": "department",
                                    "Type": "STRING"
                                }
                            ]
                        }
                    }
                }
            }
        }
    }
}

You can deploy this template directly into AWS via the CloudFormation console. You are required to provide the following parameters:

  • DataSourceArn – A QuickSight dataset is a reference to a table or other database object. In order for this object to be accessed, we need to specify a QuickSight data source resource that facilitates the connection.
  • QuickSightAdminPrincipal – The IAM principal allowing access to the data source resource via AWS API calls. You can exclude the IAM permissions from this script and template if your existing security policies automatically provide access to the appropriate users and groups.
  • RestrictedUserGroupArn – The ARN of the QuickSight group that is granted access to the sensitive columns.

You can also deploy the template using the AWS CLI. Although it’s possible to pass in all the parameters directly via the command line, you may find it a bit clunky when entering long values. To simplify this, our script generates a params.json file structured to capture all the parameters required by the template:

{
    "Parameters": [
        {
            "ParameterKey": "DataSourceArn",
            "ParameterValue": "YOUR_DATA_SOURCE_ARN_HERE"
        },
        {
            "ParameterKey": "QuickSightAdminPrincipal",
            "ParameterValue": "YOUR_ADMIN_GROUP_PRINCIPAL_HERE"
        },
        {
            "ParameterKey": "RestrictedUserGroupArn",
            "ParameterValue": "YOUR_RESTRICTED_USER_GROUP_ARN_HERE"
        }
    ]
}

Use the following command to build the stack, with params.json as input:

aws cloudformation create-stack \
--stack-name SecuredDataSet \
--template-body file://dataset.json \
--cli-input-json file://params.json

You can use the AWS CloudFormation console to monitor the stack progress. When the creation is complete, you should see your new dataset in QuickSight!

Conclusion

Though the functionality is relatively new, I consider the API and AWS CloudFormation capabilities to be one of QuickSight’s biggest strengths. Automated validation and enforcement of security rules allows for scale and better security. Being able to manage dataset definitions using AWS CloudFormation provides repeatability, and all of this sets you up for automation. The API and AWS CloudFormation provide tooling to customize QuickSight to suit your workflow, bringing BI into your organization’s cloud management strategy.

If you are looking for related information about dashboard management and migration in QuickSight, refer to Migrate Amazon QuickSight across AWS accounts.


About the Author

Jeremy Winters is an Architect in the AWS Data Lab, where he helps customers design and build data applications to meet their business needs. Prior to AWS, Jeremy built cloud and data applications for consulting customers across a variety of industries.

Trigger an AWS Glue DataBrew job based on an event generated from another DataBrew job

Post Syndicated from Nipun Chagari original https://aws.amazon.com/blogs/big-data/trigger-an-aws-glue-databrew-job-based-on-an-event-generated-from-another-databrew-job/

Organizations today have continuous incoming data, and analyzing this data in a timely fashion is becoming a common requirement for data analytics and machine learning (ML) use cases. As part of this, you need clean data in order to gain insights that can enable enterprises to get the most out of their data for business growth and profitability. You can now use AWS Glue DataBrew, a visual data preparation tool that makes it easy to transform and prepare datasets for analytics and ML workloads.

As we build these data analytics pipelines, we can decouple the jobs by building event-driven analytics and ML workflow pipelines. In this post, we walk through how to trigger a DataBrew job automatically on an event generated from another DataBrew job using Amazon EventBridge and AWS Step Functions.

Overview of solution

The following diagram illustrates the architecture of the solution. We use AWS CloudFormation to deploy an EventBridge rule, an Amazon Simple Queue Service (Amazon SQS) queue, and Step Functions resources to trigger the second DataBrew job.

The steps in this solution are as follows:

  1. Import your dataset to Amazon Simple Storage Service (Amazon S3).
  2. DataBrew queries the data from Amazon S3 by creating a recipe and performing transformations.
  3. The first DataBrew recipe job writes the output to an S3 bucket.
  4. When the first recipe job is complete, it triggers an EventBridge event.
  5. A Step Functions state machine is invoked based on the event, which in turn invokes the second DataBrew recipe job for further processing.
  6. The event is delivered to the dead-letter queue if the rule in EventBridge can’t invoke the state machine successfully.
  7. DataBrew queries data from an S3 bucket by creating a recipe and performing transformations.
  8. The second DataBrew recipe job writes the output to the same S3 bucket.

Prerequisites

To use this solution, you need the following prerequisites:

Load the dataset into Amazon S3

For this post, we use the Credit Card customers sample dataset from Kaggle. This data consists of 10,000 customers, including their age, salary, marital status, credit card limit, credit card category, and more. Download the sample dataset and follow the instructions. We recommend creating all your resources in the same account and Region.

Create a DataBrew project

To create a DataBrew project, complete the following steps:

  1. On the DataBrew console, choose Projects and choose Create project.
  2. For Project name, enter marketing-campaign-project-1.
  3. For Select a dataset, select New dataset.
  4. Under Data lake/data store, choose Amazon S3.
  5. For Enter your source from S3, enter the S3 path of the sample dataset.
  6. Select the dataset CSV file.
  7. Under Permissions, for Role name, choose an existing IAM role created during the prerequisites or create a new role.
  8. For New IAM role suffix, enter a suffix.
  9. Choose Create project.

After the project is opened, a DataBrew interactive session is created. DataBrew retrieves sample data based on your sampling configuration selection.

Create the DataBrew jobs

Now we can create the recipe jobs.

  1. On the DataBrew console, in the navigation pane, choose Projects.
  2. On the Projects page, select the project marketing-campaign-project-1.
  3. Choose Open project and choose Add step.
  4. In this step, we choose Delete to drop the unnecessary columns from our dataset that aren’t required for this exercise.

You can choose from over 250 built-in functions to merge, pivot, and transpose the data without writing code.

  1. Select the columns to delete and choose Apply.
  2. Choose Create job.
  3. For Job name, enter marketing-campaign-job1.
  4. Under Job output settings¸ for File type, choose your final storage format (for this post, we choose CSV).
  5. For S3 location, enter your final S3 output bucket path.
  6. Under Settings, for File output storage, select Replace output files for each job run.
  7. Choose Save.
  8. Under Permissions, for Role name¸ choose an existing role created during the prerequisites or create a new role.
  9. Choose Create job.

Now we repeat the same steps to create another DataBrew project and DataBrew job.

  1. For this post, I named the second project marketing-campaign-project2 and named the job marketing-campaign-job2.
  2. When you create the new project, this time use the job1 output file location as the new dataset.
  3. For this job, we deselect Unknown and Uneducated in the Education_Level column.

Deploy your resources using CloudFormation

For a quick start of this solution, we deploy the resources with a CloudFormation stack. The stack creates the EventBridge rule, SQS queue, and Step Functions state machine in your account to trigger the second DataBrew job when the first job runs successfully.

  1. Choose Launch Stack:
  2. For DataBrew source job name, enter marketing-campaign-job1.
  3. For DataBrew target job name, enter marketing-campaign-job2.
  4. For both IAM role configurations, make the following choice:
    1. If you choose Create a new Role, the stack automatically creates a role for you.
    2. If you choose Attach an existing IAM role, you must populate the IAM role ARN manually in the following field or else the stack creation fails.
  5. Choose Next.
  6. Select the two acknowledgement check boxes.
  7. Choose Create stack.

Test the solution

To test the solution, complete the following steps:

  1. On the DataBrew console, choose Jobs.
  2. Select the job marketing-campaign-job1 and choose Run job.

This action automatically triggers the second job, marketing-campaign-job2, via EventBridge and Step Functions.

  1. When both jobs are complete, open the output link for marketing-campaign-job2.

You’re redirected to the Amazon S3 console to access the output file.

In this solution, we created a workflow that required minimal code. The first job triggers the second job, and both jobs deliver the transformed data files to Amazon S3.

Clean up

To avoid incurring future charges, delete all the resources created during this walkthrough:

  • IAM roles
  • DataBrew projects and their associated recipe jobs
  • S3 bucket
  • CloudFormation stack

Conclusion

In this post, we walked through how to use DataBrew along with EventBridge and Step Functions to run a DataBrew job that automatically triggers another DataBrew job. We encourage you to use this pattern for event-driven pipelines where you can build sequence jobs to run multiple jobs in conjunction with other jobs.


About the Authors

Nipun Chagari is a Senior Solutions Architect at AWS, where he helps customers build highly available, scalable, and resilient applications on the AWS Cloud. He is passionate about helping customers adopt serverless technology to meet their business objectives.

Prarthana Angadi is a Software Development Engineer II at AWS, where she has been expanding what is possible with code in order to make life more efficient for AWS customers.

Extending PowerShell on AWS Lambda with other services

Post Syndicated from Julian Wood original https://aws.amazon.com/blogs/compute/extending-powershell-on-aws-lambda-with-other-services/

This post expands on the functionality introduced with the PowerShell custom runtime for AWS Lambda. The previous blog explains how the custom runtime approach makes it easier to run Lambda functions written in PowerShell.

You can add additional functionality to your PowerShell serverless applications by importing PowerShell modules, which are shareable packages of code. Build your own modules or import from the wide variety of existing vendor modules to manage your infrastructure and applications.

You can also take advantage of the event-driven nature of Lambda, which allows you to run Lambda functions in response to events. Events can include an object being uploaded to Amazon S3, a message placed on an Amazon SQS queue, a scheduled task using Amazon EventBridge, or an HTTP request from Amazon API Gateway. Lambda functions support event triggers from over 200 AWS services and software as a service (SaaS) applications.

Adding PowerShell modules

You can add PowerShell modules from a number of locations. These can include modules from the AWS Tools for PowerShell, from the PowerShell Gallery, or your own custom modules. Lambda functions access these PowerShell modules within specific folders within the Lambda runtime environment.

You can include PowerShell modules via Lambda layers, within your function code package, or container image. When using .zip archive functions, you can use layers to package and share modules to use with your functions. Layers reduce the size of uploaded deployment archives and can make it faster to deploy your code. You can attach up to five layers to your function, one of which must be the PowerShell custom runtime layer. You can include multiple modules per layer.

The custom runtime configures PowerShell’s PSModulePath environment variable, which contains the list of folder locations to search to find modules. The runtime searches the folders in the following order:

1. User supplied modules as part of function package

You can include PowerShell modules inside the published Lambda function package in a /modules subfolder.

2. User supplied modules as part of Lambda layers

You can publish Lambda layers that include PowerShell modules in a /modules subfolder. This allows you to share modules across functions and accounts. Lambda extracts layers to /opt within the Lambda runtime environment so the modules are located in /opt/modules. This is the preferred solution to use modules with multiple functions.

3. Default/user supplied modules supplied with PowerShell

You can also include additional default modules and add them within a /modules folder within the PowerShell custom runtime layer.

For example, the following function includes four Lambda layers. One layer includes the custom runtime. Three additional layers include further PowerShell modules; the AWS Tools for PowerShell, your own custom modules, and third-party modules. You can also include additional modules with your function code.

Lambda layers

Lambda layers

Within your PowerShell code, you can load modules during the function initialization (init) phase. This initializes the modules before the handler function runs, which speeds up subsequent warm-start invocations.

Adding modules from the AWS Tools for PowerShell

This post shows how to use the AWS Tools for PowerShell to manage your AWS services and resources. The tools are packaged as a set of PowerShell modules that are built on the functionality exposed by the AWS SDK for .NET. You can follow similar packaging steps to add other modules to your functions.

The AWS Tools for PowerShell are available as three distinct packages:

The AWS.Tools package is the preferred modularized version, which allows you to load only the modules for the services you want to use. This reduces package size and function memory usage. The AWS.Tools cmdlets support auto-importing modules without having to call Import-Module first. However, specifically importing the modules during the function init phase is more efficient and can reduce subsequent invoke duration. The AWS.Tools.Common module is required and provides cmdlets for configuration and authentication that are not service specific.

The accompanying GitHub repository contains the code for the custom runtime, along with a number of example applications. There are also module build instructions for adding a number of common PowerShell modules as Lambda layers, including AWS.Tools.

Building an event-driven PowerShell function

The repository contains an example of an event-driven demo application that you can build using serverless services.

A clothing printing company must manage its t-shirt size and color inventory. The printers store t-shirt orders for each day in a CSV file. The inventory service is one service that must receive the CSV file. It parses the file and, for each order, records the details to manage stock deliveries.

The stores upload the files to S3. This automatically invokes a PowerShell Lambda function, which is configured to respond to the S3 ObjectCreated event. The Lambda function receives the S3 object location as part of the $LambdaInput event object. It uses the AWS Tools for PowerShell to download the file from S3. It parses the contents and, for each line in the CSV file, sends the individual order details as an event to an EventBridge event bus.

In this example, there is a single rule to log the event to Amazon CloudWatch Logs to show the received event. However, you could route each order, depending on the order details, to different targets. For example, you can send different color combinations to SQS queues, which the dyeing service can use to order dyes. You could send particular size combinations to another Lambda function that manages cloth orders.

Example event-driven application

Example event-driven application

The previous blog post shows how to use the AWS Serverless Application Model (AWS SAM) to build a Lambda layer, which includes only the AWS.Tools.Common module to run Get-AWSRegion. To build a PowerShell application to process objects from S3 and send events to EventBridge, you can extend this functionality by also including the AWS.Tools.S3 and AWS.Tools.EventBridge modules in a Lambda layer.
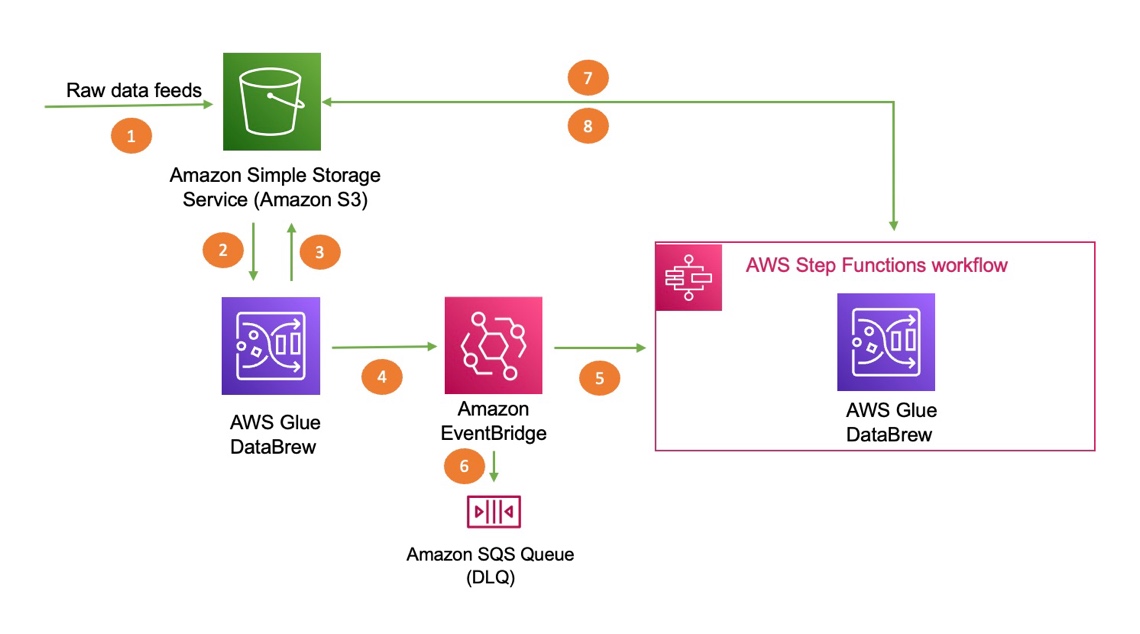
Lambda layers, including S3 and EventBridge

Lambda layers, including S3 and EventBridge

Building the AWS Tools for PowerShell layer

You could choose to add these modules and rebuild the existing layer. However, the example in this post creates a new Lambda layer to show how you can have different layers for different module combinations of AWS.Tools. The example also adds the Lambda layer Amazon Resource Name (ARN) to AWS Systems Manager Parameter Store to track deployed layers. This allows you to reference them more easily in infrastructure as code tools.

The repository includes build scripts for both Windows and non-Windows developers. Windows does not natively support Makefiles. When using Windows, you can use either Windows Subsystem for Linux (WSL), Docker Desktop, or native PowerShell.

When using Linux, macOS, WSL, or Docker, the Makefile builds the Lambda layers. After downloading the modules, it also extracts the additional AWS.Tools.S3 and AWS.Tools.EventBridge modules.

# Download AWSToolsLayer module binaries
curl -L -o $(ARTIFACTS_DIR)/AWS.Tools.zip https://sdk-for-net.amazonwebservices.com/ps/v4/latest/AWS.Tools.zip
mkdir -p $(ARTIFACTS_DIR)/modules

# Extract select AWS.Tools modules (AWS.Tools.Common required)
unzip $(ARTIFACTS_DIR)/AWS.Tools.zip 'AWS.Tools.Common/**/*' -d $(ARTIFACTS_DIR)/modules/
unzip $(ARTIFACTS_DIR)/AWS.Tools.zip 'AWS.Tools.S3/**/*' -d $(ARTIFACTS_DIR)/modules/
unzip $(ARTIFACTS_DIR)/AWS.Tools.zip 'AWS.Tools.EventBridge/**/*' -d $(ARTIFACTS_DIR)/modules/

When using native PowerShell on Windows to build the layer, the build-AWSToolsLayer.ps1 script performs the same file copy functionality as the Makefile. You can use this option for Windows without WSL or Docker.

### Extract entire AWS.Tools modules to stage area but only move over select modules
…
Move-Item "$PSScriptRoot\stage\AWS.Tools.Common" "$PSScriptRoot\modules\" -Force
Move-Item "$PSScriptRoot\stage\AWS.Tools.S3" "$PSScriptRoot\modules\" -Force
Move-Item "$PSScriptRoot\stage\AWS.Tools.EventBridge" "$PSScriptRoot\modules\" -Force

The Lambda function code imports the required modules in the function init phase.

Import-Module "AWS.Tools.Common"
Import-Module "AWS.Tools.S3"
Import-Module "AWS.Tools.EventBridge"

For other combinations of AWS.Tools, amend the example build-AWSToolsLayer.ps1 scripts to add the modules you require. You can use a similar download and copy process, or PowerShell’s Save-Module to build layers for modules from other locations.

Building and deploying the event-driven serverless application

Follow the instructions in the GitHub repository to build and deploy the application.

The demo application uses AWS SAM to deploy the following resources:

  1. PowerShell custom runtime.
  2. Additional Lambda layer containing the AWS.Tools.Common, AWS.Tools.S3, and AWS.Tools.EventBridge modules from AWS Tools for PowerShell. The layer ARN is stored in Parameter Store.
  3. S3 bucket to store CSV files.
  4. Lambda function triggered by S3 upload.
  5. Custom EventBridge event bus and rule to send events to CloudWatch Logs.

Testing the event-driven application

Use the AWS CLI or AWS Tools for PowerShell to copy the sample CSV file to S3. Replace BUCKET_NAME with your S3 SourceBucket Name from the AWS SAM outputs.

AWS CLI

aws s3 cp .\test.csv s3://BUCKET_NAME

AWS Tools for PowerShell

Write-S3Object -BucketName BUCKET_NAME -File .\test.csv

The S3 file copy action generates an S3 notification event. This invokes the PowerShell Lambda function, passing the S3 file location details as part of the function $LambdaInput event object.

The function downloads the S3 CSV file, parses the contents, and sends the individual lines to EventBridge, which logs the events to CloudWatch Logs.

Navigate to the CloudWatch Logs group /aws/events/demo-s3-lambda-eventbridge.

You can see the individual orders logged from the CSV file.

EventBridge logs showing CSV lines

EventBridge logs showing CSV lines

Conclusion

You can extend PowerShell Lambda applications to provide additional functionality.

This post shows how to import your own or vendor PowerShell modules and explains how to build Lambda layers for the AWS Tools for PowerShell.

You can also take advantage of the event-driven nature of Lambda to run Lambda functions in response to events. The demo application shows how a clothing printing company builds a PowerShell serverless application to manage its t-shirt size and color inventory.

See the accompanying GitHub repository, which contains the code for the custom runtime, along with additional installation options and additional examples.

Start running PowerShell on Lambda today.

For more serverless learning resources, visit Serverless Land.

The collective thoughts of the interwebz