New and Updated AWS Well-Architected Lenses

Post Syndicated from Channy Yun original https://aws.amazon.com/blogs/aws/new-and-updated-aws-well-architected-lenses/

Since 2015, the AWS Well-Architected Framework has been helping AWS customers and partners improve their cloud architectures. The framework consists of design principles, questions, and best practices across multiple pillars: Operational Excellence, Security, Reliability, Performance Efficiency, and Cost Optimization. At AWS re:Invent 2021, we introduced a new Sustainability Pillar to help organizations learn, measure, and improve their workloads using environmental best practices for cloud computing.

In 2017, we introduced AWS Well-Architected Lenses and extended the best practice guidance to specific industry and technology domains, such as serverless, high performance computing (HPC), internet of things (IoT), software as a service (SaaS), foundational technical review (FTR), and financial services. Use the applicable Lenses together with the pillars of the AWS Well-Architected Framework to fully evaluate your workloads.

In 2021, we added four new lenses for various technologies and industries at the request of our customers. If you are planning a new workload for the new year, check out the new and updated Lenses to help guide you through the implementation of AWS best practices.

New AWS Well-Architected Lenses

Streaming Media Lens (September 29, 2021)
The Streaming Media Lens helps customers apply best practices in the design, delivery, and maintenance of their cloud-based streaming media workloads. Whether you’ve just started designing a greenfield video application on AWS or are looking to migrate an existing workload, this Lens provides perspective on best practices and can spark new ideas. To learn more about best practices for architecting and improving your streaming media workloads on AWS, see the Streaming Media Lens documentation.

SAP Lens (October 29, 2021)
The SAP Lens is a collection of customer-proven design principles and best practices for ensuring SAP workloads on AWS are well-architected. The SAP Lens is based on insights that AWS has gathered from customers, AWS Partners, and the SAP Specialist Architect community. The Lens is designed to help you adopt a cloud-native approach to running SAP. To learn more, see the SAP Lens documentation.

Games Industry Lens (November 19, 2021)
The Games Industry Lens helps customers review and improve cloud-based architecture for game development, deployment, operations of gaming platforms, and to support massive player scale. The Lens presents common games deployment scenarios and identifies key elements to ensure your platforms are in accordance with the best practices of AWS Well-Architected Framework. Learn the best practices for designing, architecting, and deploying your games workloads on AWS in the Games Industry Lens documentation.

Hybrid Networking Lens (November 22, 2021)
The Hybrid Networking Lens provides best practices and strategies to use when designing hybrid networking architectures. This Lens supports a broad spectrum of use cases and helps set you up for success in building hybrid networking architectures and integrating your on-premises data center with AWS operations. It outlines three areas to consider when designing hybrid network connectivity for your workload: data layer, monitoring and configuration management, and security. To learn more, see the Hybrid Networking Lens documentation.

Updated AWS Well-Architected Lens

Machine Learning Lens (October 13, 2021)
The Machine Learning (ML) Lens introduces a set of established and repeatable best practices across the ML lifecycle phases. You can apply this guidance and architectural principles when designing your ML workloads or after your workloads have entered production as part of continuous improvement. The Lens includes guidance and resources on implementing the best practices on AWS. To learn more, see the ML Lens documentation.

Data Analytics Lens (October 29, 2021)
The Data Analytics Lens is a collection of customer-proven best practices for designing well-architected analytics workloads. It contains insights that AWS has gathered from real-world case studies and helps you learn the key design elements of well-architected analytics workloads, along with recommendations for improvement. For more information about building your own data analytics workload, see the Data Analytics Lens whitepaper.

Management and Governance Lens (December 17, 2021)
The Management and Governance Lens (M&G Lens) provides clear guidance to help you prepare your environment, regardless of your stage of cloud adoption, with a focus on eight different functions. Those functions are controls and guardrails, network connectivity, identity management, security management, monitoring and observability, cloud financial management, service management, and sourcing and distribution. To learn more, see the M&G Lens documentation.

To get started with your favorite lenses, visit the AWS Well-Architected page. You can learn, measure, and build using architectural best practices and tools.

To review your workloads using the AWS Well-Architected Framework, we recommend using the AWS Well-Architected Tool, a self-service tool designed to help you review AWS workloads at any time, without the need for an AWS Solutions Architect.

It provides a mechanism for regularly evaluating your workloads, identifying high-risk issues, and recording your improvements applying your favorite Lenses. You can also leverage Custom Lenses to record and track progress towards your organization’s internal best practices.

If you want to train these best practices, AWS Well-Architected Labs provides codes and documentation in the format of hands-on labs to help you learn, measure, and build using architectural best practices categorized into levels. Also, you can access an ecosystem of hundreds of members in the AWS Well-Architected Partner Program in your area to help analyze and review your applications.

You can refer to the AWS Architecture Center, a collection of reference architecture patterns, vetted architecture solutions, and best practices. If you’re new to AWS, use the Architect Learning Plan to learn how to design applications and systems on AWS. Build technical skills as you progress along the path toward AWS Certification.

This is My Architecture is a video series that showcases innovative architectural solutions on AWS by customers and partners. We would love to hear more from you, especially about your success stories in building your applications on AWS Well-Architected Framework. Please share with your account team to introduce your stories.

– Channy

[$] Python finally offloads some batteries

Post Syndicated from original https://lwn.net/Articles/888043/

Python has often been touted as a “batteries included” language because of
its rich standard library
that provides access to numerous utility modules and is distributed with
the language itself. But those libraries need maintenance, of course, and
that is provided by the Python core development team. Over the years, it
has become clear that some of the modules are not really being maintained
any longer and they probably are not really needed by most Python
users—either because better alternatives exist or because they address
extremely niche use cases. A long-running project to start the removal of those
modules has recently been approved.

Get to know the first AWS Heroes of 2022!

Post Syndicated from Ross Barich original https://aws.amazon.com/blogs/aws/get-to-know-the-first-aws-heroes-of-2022/

The AWS Heroes program is a worldwide initiative which acknowledges individuals who have truly gone above and beyond to share knowledge in technical communities. AWS Heroes share knowledge by hosting events, Meetups, workshops, and study groups, or by authoring blogs, creating videos, speaking at conferences, or contributing to open source projects. You can see some of the Heroes’ work in the AWS Heroes Content Library.

Today we are excited to introduce the first new Heroes of 2022, including the first Hero based in the Czech Republic:

Albert Suwandhi – Medan, Indonesia

Community Hero Albert Suwandhi is an academic and IT Professional, and an AWS Champion Authorized Instructor who delivers AWS classroom training courses to AWS users and customers. He strongly believes in the power of community: he joined AWS User Group Indonesia, Medan chapter in 2019 and has since organized and delivered several sharing sessions. He has also been featured in number of tech talks, and his areas of cloud computing interest are cloud architecture and security. He enjoys helping people to realize the true potential of cloud computing and he runs a YouTube channel, which provides tutorials and tips & tricks related to AWS.

Dipali Kulshrestha – Delhi, India

Community Hero Dipali Kulshrestha is Vice President of Data Engineering at Natwest Group where she is an AWS trainer & mentor, conducting Cloud Practitioner and Solution Architect workshops every quarter. She is also an AWS Delhi User Group leader, hosts monthly immersive learning sessions on different AWS concepts, and is an active speaker at AWS community events. Dipali released a DevOps with AWS course on LinkedIn Learning, attended by 12000+ learners. She also created an AWS re:Skill series for containers on AWS. Dipali is huge advocate of diversity & inclusion of women in tech, and was recently featured in AWS India’s campaign called Developers of AWS and in a Tech Gig interview about cloud upskilling.

Faizal Khan – Hyderabad, India

Community Hero Faizal Khan is a tech entrepreneur, currently Founder & CEO at Ecomm.in and Xite Logic. He is an ardent contributor to the AWS community. As organizer of the AWS Hyderabad User Group, he helps organize AWS hackathons, AWS Meetups, re:Invent recaps, webinars, and AWS certification bootcamps. He is also a speaker at many events covering Networking, IoT, Storage, and Compute. His VPC masterclass on YouTube has garnered about half a million views. He was a core organizing member and host for the AWS Community Day South Asia 2021 Online, which attracted over 24K viewers. In addition, he built an AWS Q&A discussion forum for the community.

Filip Pyrek – Brno, Czech Republic

Serverless Hero Filip Pyrek is Serverless Architect at Purple Technology. At the age of 23 Filip is one of the youngest AWS Heroes. He started his serverless journey back in 2016 when he was 17 years old. He is helping grow the serverless community in Czech Republic and Slovakia by organizing Serverless Brno meetups, contributing to local podcasts, writing serverless blog posts in Czech language, and doing other evangelization activities. He is in touch with a community of maintainers and developers of serverless tooling projects and provides them with feedback, feature requests, and open-source contributions in order to continuously improve the serverless ecosystem.

Karolina Boboli – Warsaw, Poland

Community Hero Karolina Boboli works as an AWS Cloud Architect and Consultant. She has experience in cloud security, cloud governance, cost management, landing zones, serverless, and IoT. She created an online course “AWS in practice – your first project” about infrastructure as code. In 2019 she founded a vibrant cloud community – swiatchmury.pl – a Slack for cloud professionals focused on AWS – which she runs on a daily basis. The goal of the community is to have a friendly place to ask questions, inspire each other, and simply be together. From time to time she gives talks in AWS UG Poland and organizes her own webinars.

Masaya Arai – Kanagawa, Japan

Container Hero Masaya Arai is an 11x certified Tech Lead working for Nomura Research Institute (NRI). He is the central organizer of the JAWS-UG Container chapter (about 3000 registered members), an AWS user group in Japan, and he regularly contributes to activities in the AWS user community. Masaya wrote a commercial magazine called “AWS Container Guide + Hands-on”, which became a best-selling cloud-related book on amazon.co.jp, and published more than 10,000 copies. He focuses on promoting development of AWS container technologies through a wide variety of activities such as blogs, public presentations, contributing to magazines, and writing books. He truly enjoys sharing his knowledge and experience with others.

Mayank Pandey – Bengaluru, India

Community Hero Mayank Pandey is a cloud architect & teacher, helping both small and large organizations in their cloud adoption journey. He holds Professional & Specialty AWS Certifications and handles assignments including security & cost optimization on AWS, and cloud-native applications. Mayank is passionate about teaching and has done several classroom and online trainings. He is an active member of AWS community and contributes with hands-on demos and video tutorials to the YouTube channel – KnowledgeIndia. The YouTube channel has 65,000 subscribers and 150+ videos on various AWS topics.

Niv Yungelson – Tel Aviv, Israel

Community Hero Niv Yungelson works at Melio as the DevOps Team Lead. She is co-leader of the AWS Israel User Group, one of the biggest AWS User Groups in the world. As a community leader, she organizes Meetups and ensures they include underrepresented groups in the technology industry. She achieves this by both collaborating with other User Groups and experimenting with new initiatives. Niv also volunteers as an instructor in OpsSchool, which is a non-profit program meant to gather industry leaders to contribute together, train new DevOps engineers, and help the community continue the cycle of good deeds. She is active in tech user groups, forums, and Meetups, and is committed to sharing her knowledge and experience at any given opportunity.


If you’d like to learn more about the new Heroes, or connect with a Hero near you, please visit the AWS Heroes website or browse the AWS Heroes Content Library.

— Ross;

Build a cost-effective extension to your Elasticsearch cluster with Amazon OpenSearch Service

Post Syndicated from Alexandre Levret original https://aws.amazon.com/blogs/big-data/build-a-cost-effective-extension-to-your-elasticsearch-cluster-with-amazon-opensearch-service/

During the past year, we’ve seen customers running self-managed Elasticsearch clusters on AWS who were running out of compute and storage capacity because of the non-elasticity of their clusters. They adopted Amazon OpenSearch Service (Successor To Amazon Elasticsearch Service) to benefit from better flexibility for their logs and enhanced retention periods.

In this post, we discuss how to build a cost-effective extension to your Elasticsearch cluster with Amazon OpenSearch Service to extend the retention time of your data.

In May 2021, we published the blog post Introducing Cold Storage for Amazon OpenSearch Service, which explained how to reduce your overall cost. Cold storage separates compute and storage costs when you detach indices from the domain. You benefit from a better overall storage-to-compute ratio. Cold storage can reduce your data retention cost by up to 90% per GB versus storing the same data in the Hot tier. You can automate your data lifecycle management and move your data between the three tiers (Hot, UltraWarm, and Cold) thanks to Index State Management.

AWS Professional Services teams worked with one customer to add an OpenSearch Service domain as a second target for their logs. This customer was only able to keep their indices for 8 days on their existing self-managed Elasticsearch cluster. Because of legal and security requirements, they needed to retain data up to 6 months. The solution was to use an Elasticsearch cluster (running 7.10 version) on Amazon OpenSearch Service as an extension of their existing Elasticsearch cluster. This gave their internal application teams an additional Kibana dashboard to visualize their indices for more than 8 days. This extension uses the UltraWarm tier to provide warm access to their data. Then, they move data to the Cold storage tier when they’re not actively using it to remove compute resources and for cost-effectiveness.

Building this solution as an extension to their existing self-managed cluster gave them 172 extra days of access to their logs (21.5 times the data retention length) at an incremental cost of 15%.

Demystifying Index State Management

Index State Management (ISM) enables you to create a policy to automate index management within different tiers in an OpenSearch Service domain.

As of February 2022, three tiers are available in Amazon OpenSearch Service: Hot, UltraWarm, and Cold.

The default Hot tier is for active writing and low-latency analytics. UltraWarm is for read-only data up to three petabytes at one-tenth of the Hot tier cost, and Cold is for unlimited long-term archival. Although Hot storage is used for indexing and provides the fastest access, UltraWarm complements the Hot storage tier by providing less expensive storage for older and less-frequently accessed data. This is done while maintaining the same interactive analytics experience. Rather than attached storage, UltraWarm nodes use Amazon Simple Storage Service (Amazon S3) and a sophisticated caching solution to improve performance.

ISM helps you from a cost-effective perspective—when you don’t need to access your data after a certain period but you still need to keep them because of legal requirements, for instance, to automate the transition of your data within those tiers. Those operations are based on index age, size, and other conditions.

Also, the order of transition needs to be respected from Hot to UltraWarm to Cold, and from Cold to UltraWarm to Hot—you can’t change this order.

Solution overview

Our solution enables you to extend the retention time for your data. We show you how to add a second Cold OpenSearch Service domain to your existing self-managed Hot deployment. You use Elasticsearch snapshots to move data from the Hot cluster to the Cold domain. You use ISM policies applied to these indices, with different retention periods before their deletion, from 14–180 days.

In addition to that, you add 9 recommended alarms for Amazon OpenSearch Service in Amazon CloudWatch via an AWS CloudFormation template to enhance your ability to monitor your stack. Those recommended alarms notify you, through an Amazon Simple Notification Service (Amazon SNS) topic, on key metrics you should monitor, like ClusterStatus, FreeStorageSpace, CPUUtilization, and JVMMemoryPressure.

The following diagram illustrates the solution architecture:

The diagram contains the following components in our solution for extending your self-managed Elasticsearch cluster with Amazon OpenSearch Service (available on GitHub):

  1. Snapshots repository
    1. You run an AWS Lambda function one time to register your S3 bucket (snapshots-bucket in the diagram) as a snapshots repository for your OpenSearch Service domain.
  2. ISM policies
    1. You run a Lambda function one time to create six ISM policies that automate the migration of your indices from the Hot tier to UltraWarm and from UltraWarm to Cold storage, as soon as they are restored within the domain, with different retention periods (14, 21, 35, 60, 90, and 180 days before deletion).
  3. Index migration
    1. You use an Amazon EventBridge rule to trigger automatically—once a day— a Lambda function (RestoreIndices in the diagram).
    2. This function parses the latest snapshots that have been pushed by the Elasticsearch cluster.
    3. When the function finds a new index that doesn’t exist yet in the OpenSearch Service domain, it initiates a restore operation and attaches an ISM policy (created during step 2.1).
  4. Free UltraWarm cache
    1. You use an EventBridge rule to trigger automatically – once a day – an AWS Lambda function (MoveToCold in the diagram).
    2. This function checks for indices that have been warm accessed and moves them back to the Cold tier in order to free UltraWarm nodes caches.
  5. Alerting
    1. You use CloudWatch to create 9 alarms based on Amazon OpenSearch Service CloudWatch metrics.
    2. CloudWatch redirects alarms to an SNS topic.
    3. You receive notifications from the SNS topic, which sends emails as soon as an alarm is raised.

Prerequisites

Complete the following prerequisite steps:

  1. Deploy a self-managed Elasticsearch cluster (running on premises or in AWS) that pushes snapshots periodically to an S3 bucket (ideally once a day).
  2. Deploy an OpenSearch Service domain (running OpenSearch 1.1 version) and enable UltraWarm and Cold options.
  3. Deploy a proxy server (NGINX on the architecture diagram) in a public subnet that allows access to dashboards for your OpenSearch Service domains, hosted within a VPC.
  4. To automate multiple mechanisms in this solution, create an AWS Identity and Access Management (IAM) role for our different Lambda functions. Use the following IAM policy:
{
    "Version": "2012-10-17",
    "Statement": [
        {
            "Action": "logs:CreateLogGroup",
            "Resource": "arn:aws:logs:us-east-1:123456789012:log-group:*",
            "Effect": "Allow"
        },
        {
            "Action": [
                "logs:CreateLogStream",
                "logs:PutLogEvents"
            ],
            "Resource": "arn:aws:logs:us-east-1:123456789012:log-group:/aws/lambda/*:*",
            "Effect": "Allow"
        },
        {
            "Action": "iam:PassRole",
            "Resource": "arn:aws:iam::123456789012:role/snapshotsRole",
            "Effect": "Allow"
        },
        {
            "Action": [
                "es:ESHttpPut",
                "es:ESHttpGet",
                "es:ESHttpPost"
            ],
            "Resource": "arn:aws:es:us-east-1:123456789012:domain/my-test-domain/*",
            "Effect": "Allow"
        }
    ]
}

This policy allows our Lambda functions to send PUT, GET and POST requests to our OpenSearch Service domain, register their logs in CloudWatch Logs, and pass an IAM role used to access the S3 bucket that stores snapshots.

  1. Additionally, edit the trust relationship to be assumed by Lambda:
    {
      "Version": "2012-10-17",
      "Statement": [
        {
          "Effect": "Allow",
          "Principal": {
            "Service": "lambda.amazonaws.com"
          },
          "Action": "sts:AssumeRole"
        }
      ]
    }

You use this IAM role for the Lambda functions you create.

You also need to configure OpenSearch’s security plugin to assign permissions for traffic Lambda sends to OpenSearch.

  1. Sign in to your Cold domain’s Kibana dashboard and in the Security section, choose Roles.

Here you can find existing and predefined Kibana roles.

  1. Select the all_access role and choose Mapped users.
  2. Choose Manage mapping to edit the mapped users.
  3. Enter the ARN of the IAM role you just created as a new backend role on this Kibana role.

In the following sections, we walk you through the steps to set up each component in the solution architecture.

Snapshots repository

To migrate your logs from the Hot cluster to the Cold domain, you register your S3 bucket that stores logs in the form of snapshots (from the Elasticsearch cluster) as a snapshots repository for your OpenSearch Service domain.

  1. Create an IAM role (for this post, we use SnapshotsRole for the role name) to give permissions to the Cold domain to access your S3 bucket that stores snapshots from your Elasticsearch cluster. Use the following IAM policy for this role:
    {
      "Version": "2012-10-17",
      "Statement": [{
          "Action": [
            "s3:ListBucket"
          ],
          "Effect": "Allow",
          "Resource": [
            "arn:aws:s3:::s3-bucket-name"
          ]
        },
        {
          "Action": [
            "s3:GetObject",
            "s3:PutObject",
            "s3:DeleteObject"
          ],
          "Effect": "Allow",
          "Resource": [
            "arn:aws:s3:::s3-bucket-name/*"
          ]
        }
      ]
    }

  2. Edit the trust relationship to be used from Amazon OpenSearch Service:
    {
      "Version": "2012-10-17",
      "Statement": [{
        "Sid": "",
        "Effect": "Allow",
        "Principal": {
          "Service": "es.amazonaws.com"
        },
        "Action": "sts:AssumeRole"
      }]
      
    }

  3. Create the Lambda function that is responsible for registering this S3 bucket as the snapshots repository.

On the GitHub repository, you can find the files needed to build this part. See the lambda-functions/register-snapshots-repository.py Python file to create the Lambda function.

  1. Choose Test on the Lambda console to run the function.

You only to run it once. It registers the S3 bucket as a new snapshots repository for your OpenSearch Service domain.

  1. Verify the snapshots repository by navigating to the Kibana dashboard of the Cold domain on the Dev Tools tab and running the following command:
    GET _snapshots/myelasticsearch-snapshots-repository (replace with your repository name)

You can also achieve this step from an Amazon Elastic Compute Cloud (Amazon EC2) instance (instead of a Lambda function) because it only has to be run once, with an instance profile IAM role attached to the EC2 instance.

Index State Management policies

You use Index State Management to automate the transition of your indices between storage tiers in Amazon OpenSearch Service. To use ISM, you create policies (small JSON documents that define a state automaton) and attach these policies to the indices in your domain. ISM policies specify states with actions and transitions that enable you to move and delete indices. You can use the functions/create-indexstatemanagement-policy.py Lambda code to create six ISM policies that automate transition within tiers and delete your Cold indices after 14, 21, 35, 60, 90, and 180 days. You use the IAM role you created earlier, and run that function once to create the policies in your domain.

Navigate to Kibana in your OpenSearch Service domain and choose Index Management. On the State management policies page, verify that you can see your ISM policies.

Index migration

To migrate your data from the Hot cluster to the Cold domain, you use the functions/restore-indices.py code to create a Lambda function (RestoreIndices) and the cfn-templates/event-bridge-lambda-function.yaml CloudFormation template to create its trigger, which is an EventBridge rule (scheduled once a day at 12 AM). Your indices are migrated to the Cold domain thanks to the Lambda function that parses indices within your snapshots repository, and initiates restore operations for each new index that doesn’t exist in the Cold domain. As soon as the index is restored in the domain, the Lambda function attaches an ISM policy to it, based on its index pattern to determine its retention period.

Python code looks for an application name structured in exactly three letters (for example, aws). If your logs have a different index pattern, you need to update relevant code lines (trigramme = index [5:8]).

Free UltraWarm cache

To free cache your UltraWarm nodes from the Cold domain, you use the functions/move-to-Cold.py code to create a Lambda function (MoveToCold) and the cfn-templates/event-bridge-lambda-function.yaml CloudFormation template to create its trigger, which is an EventBridge rule (change its schedule to avoid operating in parallel with the previous rule). Your indices that are in UltraWarm tier for warm access are moved to Cold storage to free the nodes cache to prepare the next index migration and for cost-effectiveness.

Alerting

To get alerted via email when the Cold domain requires your attention, you use the cfn-templates/alarms.yaml CloudFormation template to create an SNS topic that receives notifications when one of the 9 CloudWatch alarms have been raised, based on the Amazon OpenSearch Service metrics. Those alarms come from the recommended CloudWatch alarms for Amazon OpenSearch Service.

Conclusion

In this post, we covered a solution to enable an OpenSearch domain as an extension to your existing self-managed Elasticsearch cluster, in order to extend the retention period of applications logs in a serverless and cost-effective way.

If you’re interested in going deeper into Amazon OpenSearch Service and AWS Analytics capabilities in general, you can get help and join discussions on our forums.


About the Authors

Alexandre Levret is a Professional Services consultant within Amazon Web Services (AWS) dedicated to the public sector in Europe. He aims to build, innovate and inspire his multiple customers which face challenges that cloud computing can help them to resolve.

Breaking RSA through Insufficiently Random Primes

Post Syndicated from Bruce Schneier original https://www.schneier.com/blog/archives/2022/03/breaking-rsa-through-insufficiently-random-primes.html

Basically, the SafeZone library doesn’t sufficiently randomize the two prime numbers it used to generate RSA keys. They’re too close to each other, which makes them vulnerable to recovery.

There aren’t many weak keys out there, but there are some:

So far, Böck has identified only a handful of keys in the wild that are vulnerable to the factorization attack. Some of the keys are from printers from two manufacturers, Canon and Fujifilm (originally branded as Fuji Xerox). Printer users can use the keys to generate a Certificate Signing Request. The creation date for the all the weak keys was 2020 or later. The weak Canon keys are tracked as CVE-2022-26351.

Böck also found four vulnerable PGP keys, typically used to encrypt email, on SKS PGP key servers. A user ID tied to the keys implied they were created for testing, so he doesn’t believe they’re in active use.

Mainframe offloading and modernization: Using mainframe data to build cloud native services with AWS

Post Syndicated from Malathi Pinnamaneni original https://aws.amazon.com/blogs/architecture/mainframe-offloading-and-modernization-using-mainframe-data-to-build-cloud-native-services-with-aws/

Many companies in the financial services and insurance industries rely on mainframes for their most business-critical applications and data. But mainframe workloads typically lack agility. This is one reason that organizations struggle to innovate, iterate, and pivot quickly to develop new applications or release new capabilities. Unlocking this mainframe data can be the first step in your modernization journey.

In this blog post, we will discuss some typical offloading patterns. Whether your goal is developing new applications using mainframe data or modernizing with the Strangler Fig Application pattern, you might want some guidance on how to begin.

Refactoring mainframe applications to the cloud

Refactoring mainframe applications to cloud-native services on AWS is a common industry pattern and a long-term goal for many companies to remain competitive. But this takes an investment of time, money, and organizational change management to realize the full benefits. We see customers start their modernization journey by offloading data from the mainframe to AWS to reduce risks and create new capabilities.

The mainframe data offloading patterns that we will discuss in this post use software services that facilitate data replication to Amazon Web Services (AWS):

  • File-based data synchronization
  • Change data capture
  • Event-sourced replication

Once data is liberated from the mainframe, you can develop new agile applications for deeper insights using analytics and machine learning (ML). You could create a microservices-based, or voice-based mobile application. For example, if a bank could access their historical mainframe data to analyze customer behavior, they could develop a new solution based on profiles to use for loan recommendations.

The patterns we illustrate can be used as a reference to begin your modernization efforts with reduced risk. The long-term goal is to rewrite the mainframe applications and modernize them workload by workload.

Solution overview: Mainframe offloading and modernization

This figure shows the flow of data being replicated from mainframe using integration services and consumed in AWS

Figure 1. Mainframe offloading and modernization conceptual flow

Mainframe modernization: Architecture reference patterns

File-based batch integration

Modernization scenarios often require replicating files to AWS, or synchronizing between on-premises and AWS. Use cases include:

  • Analyzing current and historical data to enhance business analytics
  • Providing data for further processing on downstream or upstream dependent systems. This is necessary for exchanging data between applications running on the mainframe and applications running on AWS
This diagram shows a file-based integration pattern on how data can be replicated to AWS for interactive data analytics

Figure 2. File-based batch ingestion pattern for interactive data analytics

File-based batch integration – Batch ingestion for interactive data analytics (Figure 2)

  1. Data ingestion. In this example, we show how data can be ingested to Amazon S3 using AWS Transfer Family Services or AWS DataSync. Mainframe data is typically encoded in extended binary-coded decimal interchange code (EBCDIC) format. Prescriptive guidance exists to convert EBCDIC to ASCII format.
  2. Data transformation. Before moving data to AWS data stores, transformation of the data may be necessary to use it for analytics. AWS analytics services like AWS Glue and AWS Lambda can be used to transform the data. For large volume processing, use Apache Spark on AWS Elastic Map Reduce (Amazon EMR), or a custom Spring Boot application running on Amazon EC2 to perform these transformations. This process can be orchestrated using AWS Step Functions or AWS Data Pipeline.
  3. Data store. Data is transformed into a consumable format that can be stored in Amazon S3.
  4. Data consumption. You can use AWS analytics services like Amazon Athena for interactive ad-hoc query access, Amazon QuickSight for analytics, and Amazon Redshift for complex reporting and aggregations.
This diagram shows a file-based integration pattern on how data can be replicated to AWS for further processing by downstream systems

Figure 3. File upload to operational data stores for further processing

File-based batch integration – File upload to operational data stores for further processing (Figure 3)

  1. Using AWS File Transfer Services, upload CSV files to Amazon S3.
  2. Once the files are uploaded, S3’s event notification can invoke AWS Lambda function to load to Amazon Aurora. For low latency data access requirements, you can use a scalable serverless import pattern with AWS Lambda and Amazon SQS to load into Amazon DynamoDB.
  3. Once the data is in data stores, it can be consumed for further processing.

Transactional replication-based integration (Figure 4)

Several modernization scenarios require continuous near-real-time replication of relational data to keep a copy of the data in the cloud. Change Data Capture (CDC) for near-real-time transactional replication works by capturing change log activity to drive changes in the target dataset. Use cases include:

  • Command Query Responsibility Segregation (CQRS) architectures that use AWS to service all read-only and retrieve functions
  • On-premises systems with tightly coupled applications that require a phased modernization
  • Real-time operational analytics
This diagram shows a transaction-based replication (CDC) integration pattern on how data can be replicated to AWS for building reporting and read-only functions

Figure 4. Transactional replication (CDC) pattern

  1. Partner CDC tools in the AWS Marketplace can be used to manage real-time data movement between the mainframe and AWS.
  2. You can use a fan-out pattern to read once from the mainframe to reduce processing requirements and replicate data to multiple data stores based on your requirements:
    • For low latency requirements, replicate to Amazon Kinesis Data Streams and use AWS Lambda to store in Amazon DynamoDB.
    • For critical business functionality with complex logic, use Amazon Aurora or Amazon Relational Database Service (RDS) as targets.
    • To build data lake or use as an intermediary for ETL processing, customers can replicate to S3 as target.
  3. Once the data is in AWS, customers can build agile microservices for read-only functions.

Message-oriented middleware (event sourcing) integration (Figure 5)

With message-oriented middleware (MOM) systems like IBM MQ on mainframe, several modernization scenarios require integrating with cloud-based streaming and messaging services. These act as a buffer to keep your data in sync. Use cases include:

  • Consume data from AWS data stores to enable new communication channels. Examples of new channels can be mobile or voice-based applications and can be innovations based on ML
  • Migrate the producer (senders) and consumer (receivers) applications communicating with on-premises MOM platforms to AWS with an end goal to retire on-premises MOM platform
This diagram shows an event-sourcing integration reference pattern for customers using middleware systems like IBM MQ on-premises with AWS services

Figure 5. Event-sourcing integration pattern

  1. Mainframe transactions from IBM MQ can be read using a connector or a bridge solution. They can then be published to Amazon MQ queues or Amazon Managed Streaming for Apache Kakfa (MSK) topics.
  2. Once the data is published to the queue or topic, consumers encoded in AWS Lambda functions or Amazon compute services can process, map, transform, or filter the messages. They can store the data in Amazon RDS, Amazon ElastiCache, S3, or DynamoDB.
  3. Now that the data resides in AWS, you can build new cloud-native applications and do the following:

Conclusion

Mainframe offloading and modernization using AWS services enables you to reduce cost, modernize your architectures, and integrate your mainframe and cloud-native technologies. You’ll be able to inform your business decisions with improved analytics, and create new opportunities for innovation and the development of modern applications.

More posts for Women’s History Month!

Other ways to participate

Ingest data from Snowflake to Amazon S3 using AWS Glue Marketplace Connectors

Post Syndicated from Sindhu Achuthan original https://aws.amazon.com/blogs/big-data/ingest-data-from-snowflake-to-amazon-s3-using-aws-glue-marketplace-connectors/

In today’s complex business landscape, organizations are challenged to consume from variety of sources and keep up with data that pours in all through the day. There is a demand to design applications that enables data to be portable across cloud platforms and give them the ability to derive insights from one or more data sources to remain competitive. In this post, we demonstrate how AWS Glue integration with Snowflake has simplified the process of connecting to Snowflake and applying data transformations without writing a single line of code. With AWS Glue Studio, you can now use a simple visual interface to compose jobs for migrations that move and integrate data. It enables you to subscribe to a Snowflake connector in AWS Marketplace, query Snowflake tables and save the data in Amazon Simple Storage Service (Amazon S3) as Parquet format.

If you choose to bring your own custom connector or prefer a different connector from AWS Marketplace, follow the steps in this blog Performing data transformations using Snowflake and AWS Glue. In this post, we use the new AWS Glue Connector for Snowflake to seamlessly connect with Snowflake without the need to install JDBC drivers. To validate the data ingested, we use Amazon Redshift Spectrum to create an external table and query the data in Amazon S3. With Amazon Redshift Spectrum, you can efficiently query and retrieve data from files in Amazon S3 without having to load the data into Amazon Redshift tables.

Solution Overview

Let’s take a look at the architecture diagram on how AWS Glue connects to Snowflake for data ingestion.

Prerequisites

Before you start, make sure you have the following:

  1. An account in Snowflake, specifically a service account that has permissions to tables to be queried.
  2. AWS Identity and Access Management (IAM) permissions in place to create AWS Glue and Amazon Redshift service roles and policies. To configure, follow the instructions in Setting up IAM Permissions for AWS Glue and Create an IAM role for Amazon Redshift.
  3. Amazon Redshift Serverless endpoint. If you do not have it configured, follow the instructions in Amazon Redshift Serverless Analytics.

Configure the Amazon S3 VPC Endpoint

As a first step, we configure an Amazon S3 VPC Endpoint to enable AWS Glue to use a private IP address to access Amazon S3 with no exposure to the public internet. Complete the following steps.

  1. Open the Amazon VPC console.
  2. In the left navigation pane, choose Endpoints.
  3. Choose Create Endpoint, and follow the steps to create an Amazon S3 VPC endpoint of type Gateway.

Next, we create a secret using AWS Secrets Manager

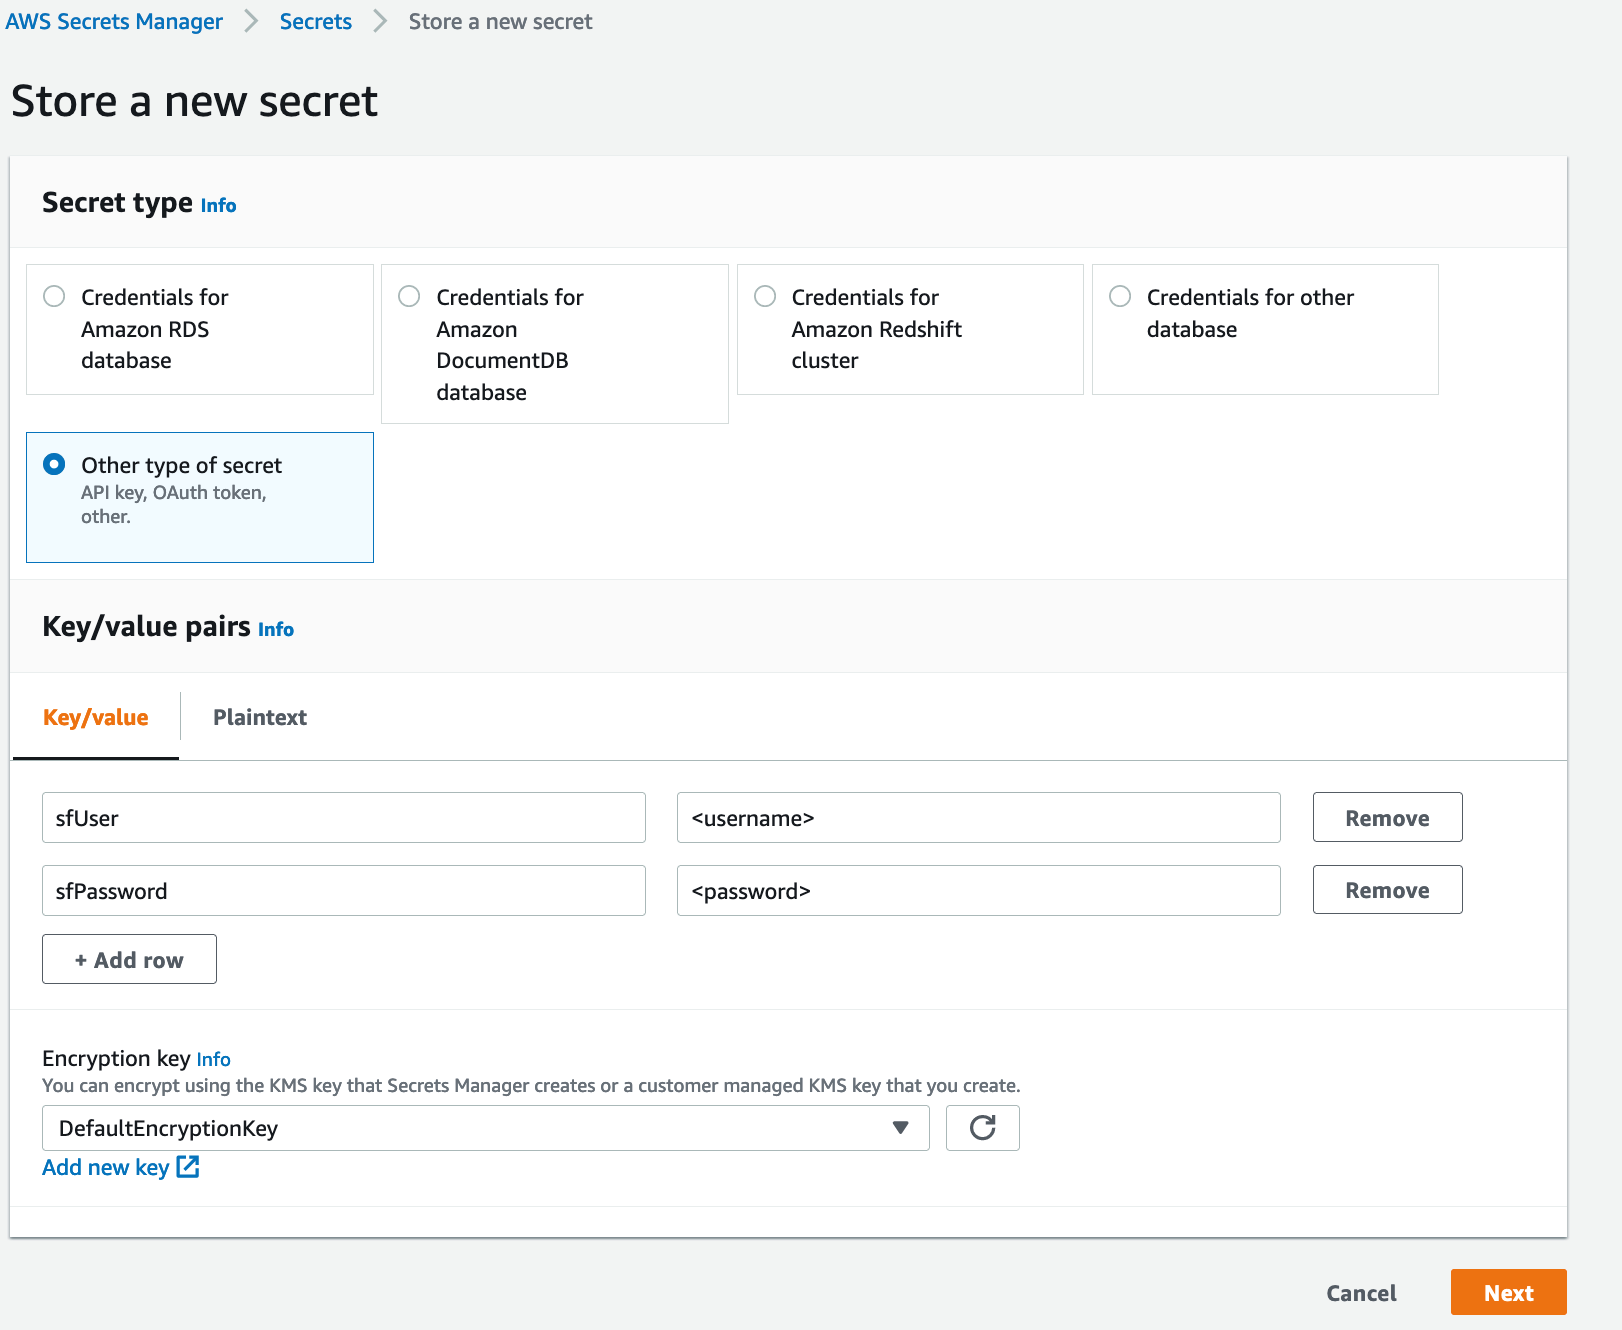
  1. On AWS Secrets Manager console, choose Store a new secret.
  2. For Secret type, select Other type of secret.
  3. Enter a key as sfUser and the value as your Snowflake user name.
  4. Enter a key as sfPassword and the value as your Snowflake user password.
  5. Choose Next.
  6. Name the secret snowflake_credentials and follow through the rest of the steps to store the secret.

Subscribe to AWS Marketplace Snowflake Connector

To subscribe to the connector, follow the steps and activate Snowflake Connector for AWS Glue. This native connector simplifies the process of connecting AWS Glue jobs to extract data from Snowflake

  1. Navigate to the Snowflake Connector for AWS Glue in AWS Marketplace.
  2. Choose Continue to Subscribe.
  3. Review the terms and conditions, pricing, and other details.
  4. Choose Continue to Configuration.
  5. For Delivery Method, choose your delivery method.
  6. For Software version, choose your software version
  7. Choose Continue to Launch.
  8. Under Usage instructions, choose Activate the Glue connector in AWS Glue Studio. You’re redirected to AWS Glue Studio.
  9. For Name, enter a name for your connection (for example, snowflake_s3_glue_connection).
  10. Optionally, choose a VPC, subnet, and security group.
  11. For AWS Secret, choose snowflake_credentials.
  12. Choose Create connection.

A message appears that the connection was successfully created, and the connection is now visible on the AWS Glue Studio console.

Configure AWS Glue for Snowflake JDBC connectivity

Next, we configure a AWS Glue job by following the steps below to extract data.

  1. On the AWS Glue console, choose AWS Glue Studio on the left navigation pane.
  2. On the AWS Glue Studio console, choose Jobs on the left navigation pane.
  3. Create a job with “Visual with source and target” and choose the Snowflake connector for AWS Glue 3.0 as the source and Amazon S3 as the target.
  4. Enter a name for the job.
  5. Under job details, select an IAM role.
  6. Create a new IAM role if you don’t have already with required AWS Glue and AWS Secrets Manager policies.
  7. Under Visual, Choose the Data source – Connection node and choose the connection you created.
  8. In connection options, create a key value pair with query as shown below. Note that CUSTOMER table in SNOWFLAKE_SAMPLE_DATA database is considered for this migration. This table gets preloaded (1.5M rows) when you install Snowflake Schema.

    key value
    query SELECT
    C_CUSTKEY,
    C_NAME,
    C_ADDRESS,
    C_NATIONKEY,
    C_PHONE,
    C_ACCTBAL,
    C_MKTSEGMENT,
    C_COMMENT
    FROM
    SNOWFLAKE_SAMPLE_DATA.TPCH_SF1.CUSTOMER
    sfUrl MXA94638.us-east-1.snowflakecomputing.com
    sfDatabase SNOWFLAKE_SAMPLE_DATA
    sfWarehouse COMPUTE_WH

  9. In the Output schema section, specify the source schema as key-value pairs as shown below.
  10. Choose the Transform-ApplyMapping node to view the following transform details.

  11. Choose the Data target properties – S3 node and enter S3 bucket details as shown below.
  12. Choose Save.

After you save the job, the following script is generated. It assumes the account information and credentials are stored in AWS Secrets Manager as described earlier.

import sys
from awsglue.transforms import *
from awsglue.utils import getResolvedOptions
from pyspark.context import SparkContext
from awsglue.context import GlueContext
from awsglue.job import Job

args = getResolvedOptions(sys.argv, ["JOB_NAME"])
sc = SparkContext()
glueContext = GlueContext(sc)
spark = glueContext.spark_session
job = Job(glueContext)
job.init(args["JOB_NAME"], args)

# Script generated for node Snowflake Connector for AWS Glue 3.0
SnowflakeConnectorforAWSGlue30_node1 = glueContext.create_dynamic_frame.from_options(
    connection_type="marketplace.spark",
    connection_options={
        "query": "SELECT C_CUSTKEY,C_NAME,C_ADDRESS,C_NATIONKEY,C_PHONE,C_ACCTBAL,C_MKTSEGMENT,C_COMMENT FROM SNOWFLAKE_SAMPLE_DATA.TPCH_SF1.CUSTOMER",
        "sfUrl": "MXA94638.us-east-1.snowflakecomputing.com",
        "sfDatabase": "SNOWFLAKE_SAMPLE_DATA",
        "sfWarehouse": "COMPUTE_WH",
        "connectionName": "snowflake_s3_glue_connection",
    },
    transformation_ctx="SnowflakeConnectorforAWSGlue30_node1",
)

# Script generated for node ApplyMapping
ApplyMapping_node2 = ApplyMapping.apply(
    frame=SnowflakeConnectorforAWSGlue30_node1,
    mappings=[
        ("C_CUSTKEY", "decimal", "C_CUSTKEY", "decimal"),
        ("C_NAME", "string", "C_NAME", "string"),
        ("C_ADDRESS", "string", "C_ADDRESS", "string"),
        ("C_NATIONKEY", "decimal", "C_NATIONKEY", "decimal"),
        ("C_PHONE", "string", "C_PHONE", "string"),
        ("C_ACCTBAL", "decimal", "C_ACCTBAL", "decimal"),
        ("C_MKTSEGMENT", "string", "C_MKTSEGMENT", "string"),
        ("C_COMMENT", "string", "C_COMMENT", "string"),
    ],
    transformation_ctx="ApplyMapping_node2",
)

# Script generated for node S3 bucket
S3bucket_node3 = glueContext.write_dynamic_frame.from_options(
    frame=ApplyMapping_node2,
    connection_type="s3",
    format="glueparquet",
    connection_options={"path": "s3://sf-redshift-po/test/", "partitionKeys": []},
    format_options={"compression": "snappy"},
    transformation_ctx="S3bucket_node3",
)

job.commit()
  1. Choose Run to run the job.

After the job completes successfully, the run status should change to Succeeded.

The following screenshot shows that the data was written to Amazon S3.

Query Amazon S3 data using Amazon Redshift Spectrum

Let’s query the data in Amazon Redshift Spectrum

  1. On the Amazon Redshift console, choose the AWS Region.
  2. In the left navigation pane, choose Query Editor.
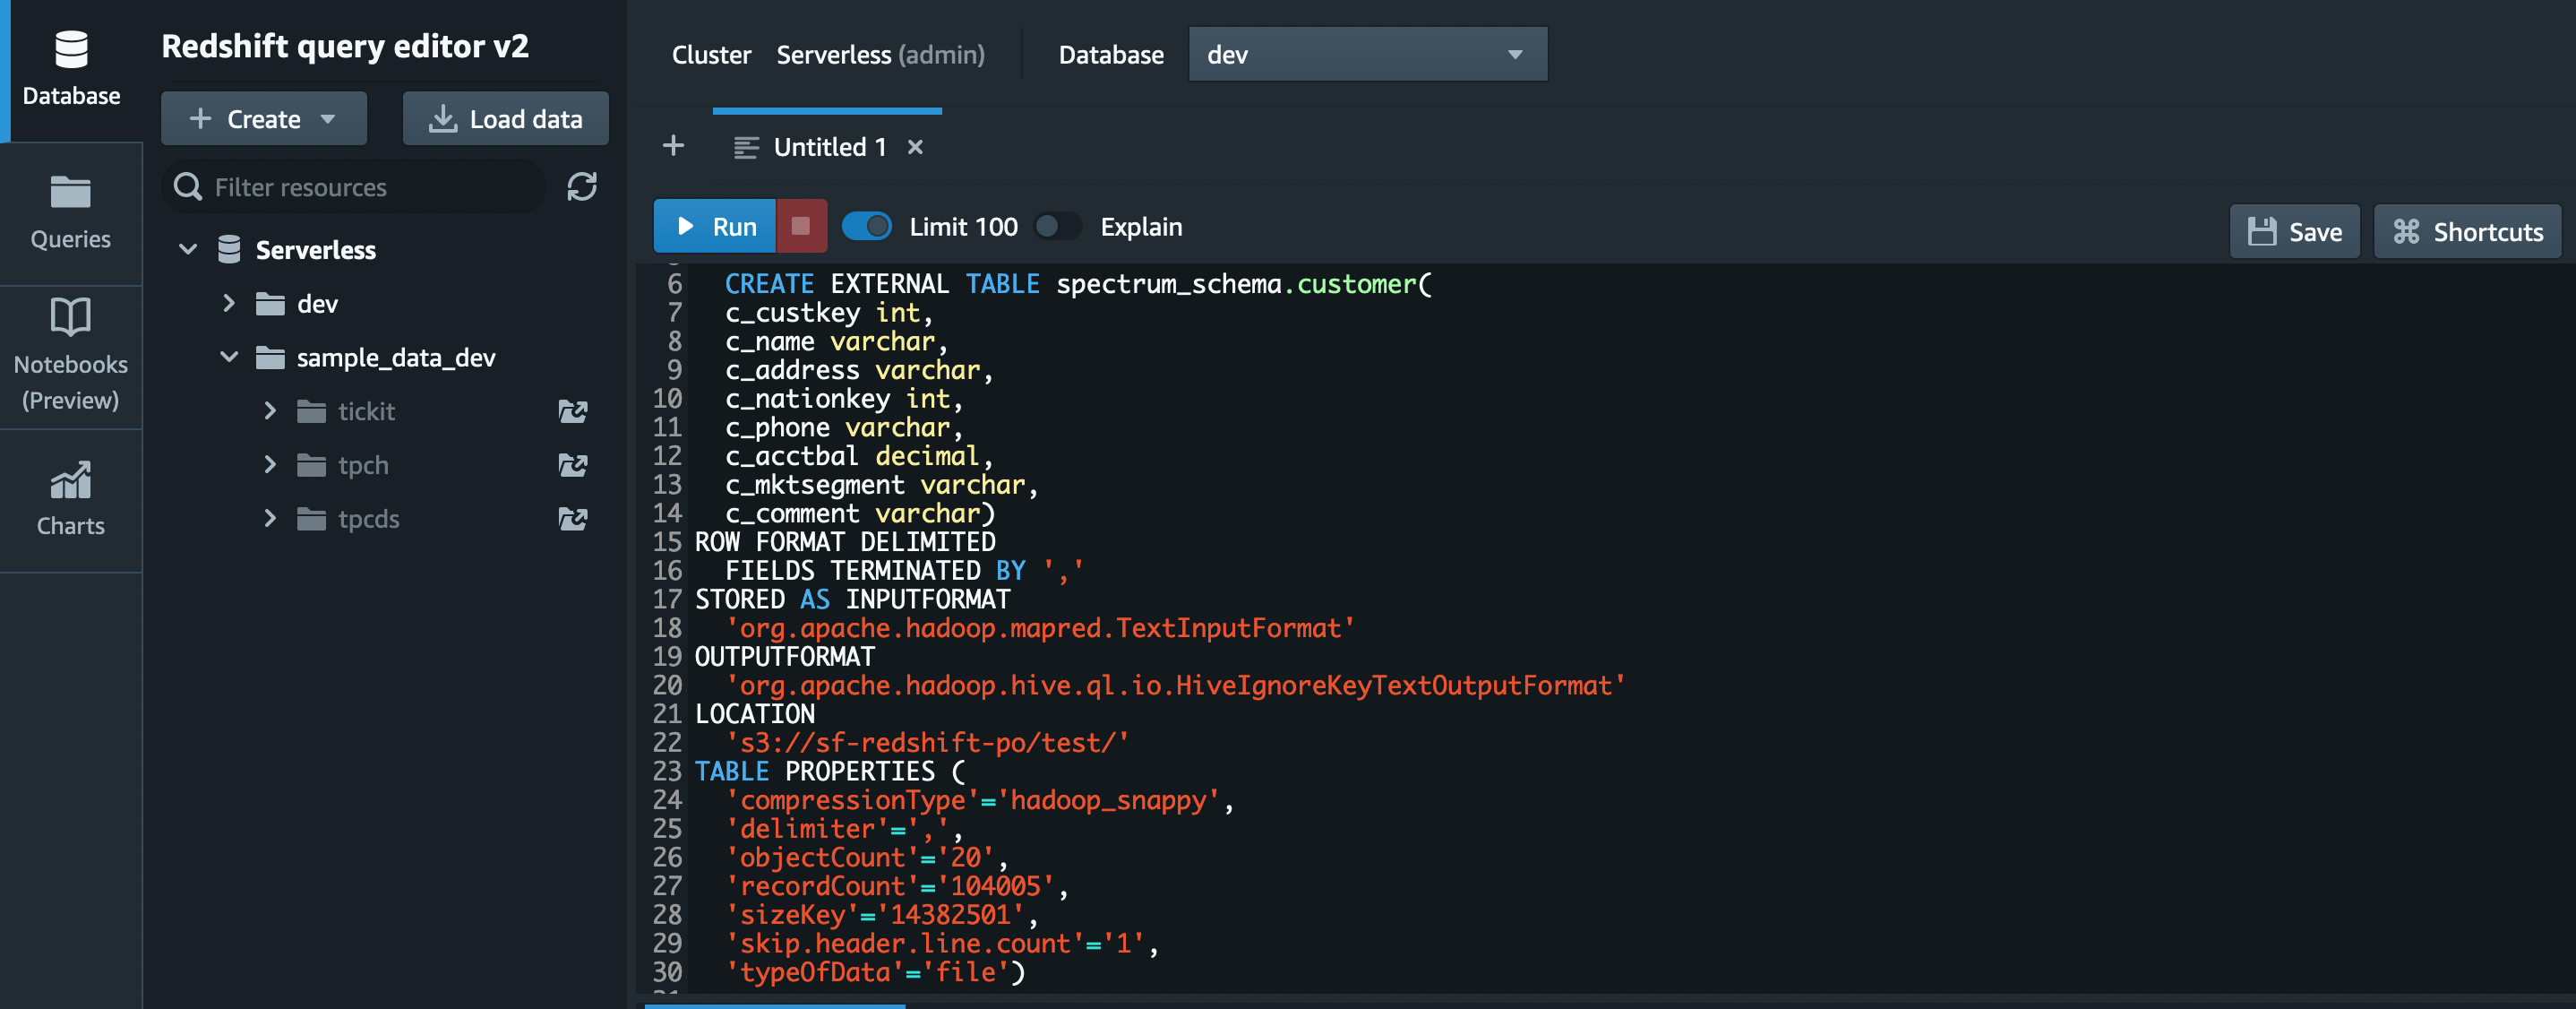
  3. Run the create external table DDL given below.
    CREATE EXTERNAL TABLE "spectrum_schema"."customer"
    (c_custkey   decimal(10,2),
    c_name       varchar(256),
    c_address    varchar(256),
    c_nationkey  decimal(10,2),
    c_phone      varchar(256),
    c_acctbal    decimal(10,2),
    c_mktsegment varchar(256),
    c_comment    varchar(256))
    stored as parquet
    location 's3://sf-redshift-po/test'; 

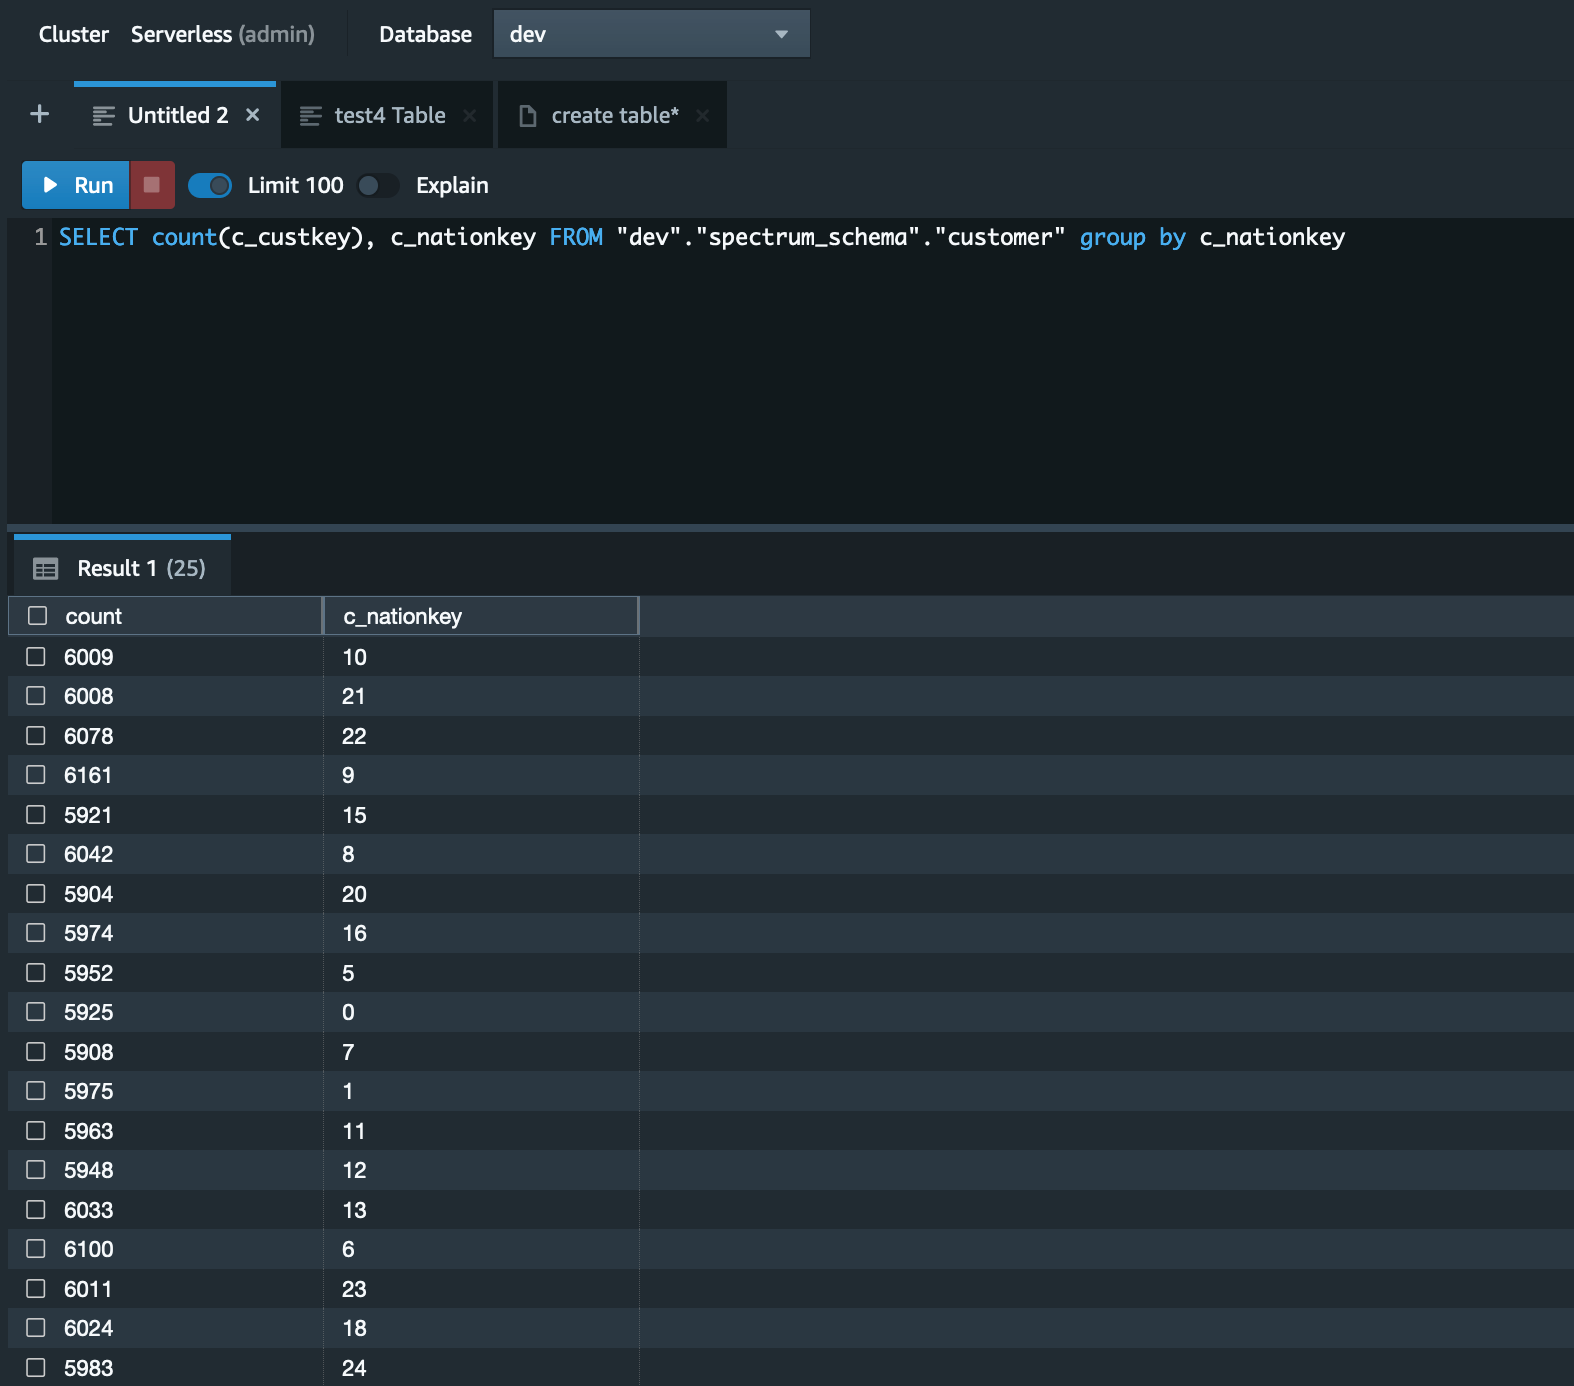
  1. Run the select query on the CUSTOMER table.
SELECT count(c_custkey), c_nationkey FROM "dev"."spectrum_schema"."customer" group by c_nationkey

Considerations

The AWS Glue crawler doesn’t work directly with Snowflake. This is a native capability that you can use for other AWS data sources that are joined or connected in the AWS Glue ETL job. Instead, you can define connections in the script as shown earlier in this post.

The Snowflake source tables covered in this post only focus on structured data types and therefore semi-structured or unstructured data types in Snowflake (binary, varbinary, and variant) are out of scope. However, you could use AWS Glue functions such as relationalize to flatten nested schema data into semi-normalized structures, or you could use Amazon Redshift Spectrum to support these data types.

Conclusion

In this post, we learnt how to define Snowflake connection parameters in AWS Glue, connect to Snowflake from AWS Glue using the AWS native connector for Snowflake, migrate to Amazon S3 and use Redshift Spectrum to query data in Amazon S3 to meet your business needs.

We welcome any thoughts or questions in the comments section below


About the Authors

Sindhu Achuthan is a Data Architect with Global Financial Services at Amazon Web Services. She works with customers to provide architectural guidance for analytics solutions on Amazon Glue, Amazon Redshift, AWS Lambda, and other services. Outside work, she is a DIYer, likes to go on long trails, and do yoga.

Shayon Sanyal is a Sr. Solutions Architect specializing in databases at AWS. His day job allows him to help AWS customers design scalable, secure, performant and robust database architectures on the cloud. Outside work, you can find him hiking, traveling or training for the next half-marathon.

Security updates for Wednesday

Post Syndicated from original https://lwn.net/Articles/888093/

Security updates have been issued by Debian (openssl and python-scrapy), openSUSE (chrony, expat, java-1_8_0-openj9, libqt5-qtbase, openssl-1_0_0, php7, and rust, rust1.58, rust1.59), Oracle (389-ds:1.4, httpd:2.4, libarchive, libxml2, and vim), Red Hat (389-ds:1.4, glibc, httpd:2.4, kpatch-patch, libarchive, libxml2, vim, and virt:rhel and virt-devel:rhel), SUSE (chrony, compat-openssl098, expat, libqt5-qtbase, openssl, openssl-1_0_0, openssl-1_1, openssl1, php7, rust, rust1.58, rust1.59, and squid3), and Ubuntu (libreoffice, netkit-rsh, openssl, openssl, openssl1.0, tar, and tcpdump).

The VM Lifecycle: How We Got Here, and Where We’re Going

Post Syndicated from Devin Krugly original https://blog.rapid7.com/2022/03/16/the-vm-lifecycle-how-we-got-here-and-where-were-going/

The VM Lifecycle: How We Got Here, and Where We’re Going

Written in collaboration with Joel Ashman

The immutable truth that vulnerability management (VM) programs have long adhered to is that successful programs should follow a consistent lifecycle. This concept is simply a series of phases or steps that have a logical sequence and are repeated according to an organization’s VM program cadence.

A lifecycle gives a VM program a central illustrative model, defining the high-level series of activities that must be performed to reduce attack surface risk — the ultimate goal of any VM program. This type of model provides a uniform set of expectations for all stakeholders, who are often cross-functional and geographically dispersed. It can also be used as a diagnostic tool to identify bottlenecks, inefficiencies, or gaps (more on that later).

There are many lifecycle model prototypes in circulation, and they are generally comparable and iterative in nature. They break large-bucket activities into four, five, or six phases of work which describe the effort needed to prepare and scan for vulnerabilities or configuration weaknesses, assess or analyze, distribute, and ultimately address those findings through remediation or another risk treatment plan (i.e. exceptions, retire a server, etc).

While any one specific lifecycle will (and should) vary by organization and the specific tools in use, there are some fundamental steps or phases that remain consistent. This educational series will focus on introducing those fundamental building blocks, followed by practical demonstrations on how best to leverage Rapid7 solutions and services to accelerate your program.

In this first installment of a multipart blog and webinar series, we will explore the concept of a VM program lifecycle and provide practical guidance and definition for what many consider the first of the iterative VM lifecycle phases – often referred to as “discover”, “understand,” or even “planning.”

A (very) brief history of the VM lifecycle

But let’s return to the lifecycle concept for just a moment.

Having just a couple of small variables in my life flip the other way, I could have ended up a forensic historian or anthropologist. Those interests have paid dividends time and time again: to understand where you want to go, you have to understand how you got here.

The need for vulnerability management has existed since long before it had a title. It falls under what could be argued is the most important cybersecurity discipline: security hygiene. If you want nice teeth, you have to have good dental hygiene (identify cavities and perform regular maintenance). Similarly, organizations that require secure digital infrastructure must regularly assess and identify weaknesses (vulnerabilities, defects, improper configs) and then address those weaknesses through updates or other mitigation.

Two key points about how we got here:

  1. We all know the evolution of a few worms and viruses in ARPANET in the 1970s, to the much more intentionally crafted viruses targeting operating systems of the 1980s, to today’s this-ware or that-ware that have malintent baked right into the very fibers of their assembly language. In computing, the potential for misuse in the form of vulnerabilities has been with us from the start.
  2. A subtle but countervailing force has slowly but surely crept forward to stem, reflect, contain, and now often eradicate the intentions of bad actors. We the Defenders, the Protectors, the Stewards of Vulnerability Management will not be dissuaded from our obligation to manage cyber risk: to safeguard secrets, to shield corporate data, and to protect the networks that allow us to share pictures of the animals living in our homes and purchase large quantities of toilet paper online. Let’s not forget the prevention of abuse of individual identity — stopping those thieves from taking vacation savings, using those funds for their own vacation, and posting pictures on a Caribbean island from their Instagram account (true story).

We are keen to meet and overcome the challenges of modern attackers and modern infrastructure and applications (with all its containers and microservices), both now and into the bright and hopefully still shiny future.

We have met this call and at times faltered, but we have never been discouraged — and a key element that has supported us Protectors has been the lifecycle artifact. A conceptual model that conveys the continuous nature of the management of vulnerability risk and provides steadfast guidance for all stakeholders.

The lifecycle holds true

Vulnerability risk management is a team sport. It is only through careful, judicious, and sometimes aggravatingly laborious detail that a full lifecycle successfully completes. This may entail the same conversation happening no less than 5 to 8 times with the same audience. Even if the last time you said, “I didn’t ever want to have this conversation ever again.” Amidst all the chaos and confusion, the VM lifecycle is an immutable truth. Its methods may evolve and its technology take a dramatically different approach, but it will remain true.

The compendium to this blog is a webinar, which you can watch here. Both are the first in our series to freshen up perceptions and maybe introduce a few new concepts by exploring the various phases and activities that are fundamental pillars for a strong VM program and its execution. In addition, we have created a worksheet as a guide to facilitate efficient collection of information to build a VM stakeholder map. You can access the worksheet and download it here.

Join me for the next in the series to dive deeper into the initial stages or phases, or whatever preferred term you use, of the VM lifecycle.

Additional reading:

NEVER MISS A BLOG

Get the latest stories, expertise, and news about security today.

Implementing mutual TLS for Java-based AWS Lambda functions

Post Syndicated from Julian Wood original https://aws.amazon.com/blogs/compute/implementing-mutual-tls-for-java-based-aws-lambda-functions-2/

This post is written by Dhiraj Mahapatro, Senior Specialist SA, Serverless and Christian Mueller, Principal Solutions Architect

Modern secure applications establish network connections to other services through HTTPS. This ensures that the application connects to the right party and encrypts the data before sending it over the network.

You might not want unauthenticated users to connect to your service as a service provider. One solution to this requirement is to use mutual TLS (Transport Layer Security). Mutual TLS (or mTLS) is a common security mechanism that uses client certificates to add an authentication layer. This allows the service provider to verify the client’s identity cryptographically.

The purpose of mutual TLS in serverless

mTLS refers to two parties authenticating each other at the same time when establishing a connection. By default, the TLS protocol only proves the identity of the server to a client using X.509 certificates. With mTLS, a client must prove its identity to the server to communicate. This helps support a zero-trust policy to protect against adversaries like man-in-the-middle attacks.

mTLS is often used in business-to-business (B2B) applications and microservices, where interservice communication needs mutual authentication of parties. In Java, you see the following error when the server expects a certificate, but the client does not provide one:

PKIX path building failed: sun.security.provider.certpath.SunCertPathBuilderException: unable to find valid certification path to requested target

This blog post explains multiple ways to implement a Java-based AWS Lambda function that uses mTLS to authenticate with a third-party internal or external service. The sample application and this post explain the advantages and tradeoffs of each approach.

The KeyStore and TrustStore in Java

The TrustStore is used to store certificate public keys from a certificate authority (CA) or trusted servers. A client can verify the public certificate presented by the server in a TLS connection. A KeyStore stores private key and identity certificates that a specific application uses to prove the client’s identity.

The stores contain opposite certificates. The TrustStore holds the identification certificates that identify others, while the KeyStore holds the identification certificates that identify itself.

Overview

To start, you create certificates. For brevity, this sample application uses a script that uses OpenSSL and Java’s keytool for self-signed certificates from a CA. You store the generated keys in Java KeyStore and TrustStore. However, the best practice for creating and maintaining certificates and private CA is to use AWS Certificate Manager and AWS Certificate Manager Private Certificate Authority.

You can find the details of the script in the README file.

The following diagram shows the use of KeyStore and TrustStore in the client Lambda function, and the server running on Fargate.

KeyStore and TrustStore

KeyStore and TrustStore

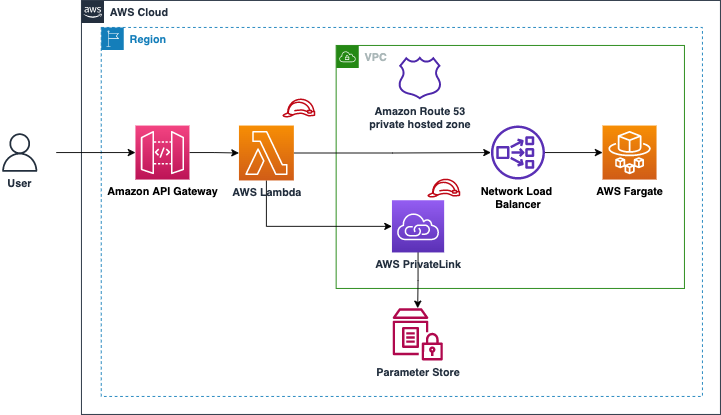
The demo application contains several Lambda functions. The Lambda functions act as clients to services provided by Fargate behind an Amazon Network Load Balancer (NLB) running in a private Amazon VPC. Amazon Route 53 private hosted zones are used to resolve selected hostnames. You attach the Lambda functions to this VPC to resolve the hostnames for the NLB. To learn more, read how AWS Lambda uses Hyperplane elastic network interfaces to work with custom VPC.

The following examples refer to portions of InfrastructureStack.java and the implementation in the corresponding Lambda functions.

Providing a client certificate in a Lambda function artifact

The first option is to provide the KeyStore and TrustStore in a Lambda functions’ .zip artifact. You provide specific Java environment variables within the Lambda configuration to instruct the JVM to load and trust your provided Keystore and TrustStore. The JVM uses these settings instead of the Java Runtime Environment’s (JRE) default settings (use a stronger password for your use case):

"-Djavax.net.ssl.keyStore=./client_keystore_1.jks -Djavax.net.ssl.keyStorePassword=secret -Djavax.net.ssl.trustStore=./client_truststore.jks -Djavax.net.ssl.trustStorePassword=secret"

The JRE uses this KeyStore and TrustStore to build a default SSLContext. The HttpClient uses this default SSLContext to create a TLS connection to the backend service running on Fargate.

The following architecture diagram shows the sample implementation. It consists of an Amazon API Gateway endpoint with a Lambda proxy integration that calls a backend Fargate service running behind an NLB.

Providing a client certificate in a Lambda function artifact

Providing a client certificate in a Lambda function artifact

This is a basic approach for a prototype. However, it has a few shortcomings related to security and separation of duties. The KeyStore contains the private key, and the password is exposed to the source code management (SCM) system, which is a security concern. Also, it is the Lambda function owner’s responsibility to update the certificate before its expiration. You can address these concerns about separation of duties with the following approach.

Providing the client certificate in a Lambda layer

In this approach, you separate the responsibility between two entities. The Lambda function owner and the KeyStore and TrustStore owner.

The KeyStore and TrustStore owner provides the certificates securely to the function developer who may be working in a separate AWS environment. For simplicity, the demo application uses the same AWS account.

The KeyStore and TrustStore owner achieves this by using AWS Lambda layers. The KeyStore and TrustStore owner packages and uploads the certificates as a Lambda layer and only allows access to authorized functions. The Lambda function owner does not access the KeyStore or manage its lifecycle. The KeyStore and TrustStore owner’s responsibility is to release a new version of this layer when necessary and inform users.

Providing the client certificate in a Lambda layer

Providing the client certificate in a Lambda layer

The KeyStore and TrustStore are extracted under the path /opt as part of including a Lambda layer. The Lambda function can now use the layer as:

Function lambdaLayerFunction = new Function(this, "LambdaLayerFunction", FunctionProps.builder()
  .functionName("lambda-layer")
  .handler("com.amazon.aws.example.AppClient::handleRequest")
  .runtime(Runtime.JAVA_11)
  .architecture(ARM_64)
  .layers(singletonList(lambdaLayerForService1cert))
  .vpc(vpc)
  .code(Code.fromAsset("../software/2-lambda-using-separate-layer/target/lambda-using-separate-layer.jar"))
  .memorySize(1024)
  .environment(Map.of(
    "BACKEND_SERVICE_1_HOST_NAME", BACKEND_SERVICE_1_HOST_NAME,
    "JAVA_TOOL_OPTIONS", "-Djavax.net.ssl.keyStore=/opt/client_keystore_1.jks -Djavax.net.ssl.keyStorePassword=secret -Djavax.net.ssl.trustStore=/opt/client_truststore.jks -Djavax.net.ssl.trustStorePassword=secret"
  ))
  .timeout(Duration.seconds(10))
  .logRetention(RetentionDays.ONE_WEEK)
  .build());

The KeyStore and TrustStore passwords are still supplied as environment variables and stored in the SCM system, which is against best practices. You can address this with the next approach.

Storing passwords securely in AWS Systems Manager Parameter Store

AWS Systems Manager Parameter Store provides secure, hierarchical storage for configuration data and secret management. You can use Parameter Store to store the KeyStore and TrustStore passwords instead of environment variables. The Lambda function uses an IAM policy to access Parameter Store and gets the passwords as a secure string during the Lambda initialization phase.

With this approach, you build a custom SSLContext after retrieving the KeyStore and TrustStore passwords from the Parameter Store. Once you create SSLContext, provide that to the HttpClient you use to connect with the backend service:

HttpClient client = HttpClient.newBuilder()
  .version(HttpClient.Version.HTTP_2)
  .connectTimeout(Duration.ofSeconds(5))
  .sslContext(sslContext)
  .build();

You can also use a VPC interface endpoint for AWS Systems Manager to keep the traffic from your Lambda function to Parameter Store internal to AWS. The following diagram shows the interaction between AWS Lambda and Parameter Store.

Storing passwords securely in AWS Systems Manager Parameter Store

Storing passwords securely in AWS Systems Manager Parameter Store

This approach works for Lambda functions interacting with a single backend service requiring mTLS. However, it is common in a modern microservices architecture to integrate with multiple backend services. Sometimes, these services require a client to assume different identities by using different KeyStores. The next approach explains how to handle the multiple services scenario.

Providing multiple client certificates in Lambda layers

You can provide multiple KeyStore and TrustStore pairs within multiple Lambda layers. All layers attached to a function are merged when provisioning the function. Ensure your KeyStore and TrustStore names are unique. A Lambda function can use up to five Lambda layers.

Similar to the previous approach, you load multiple KeyStores and TrustStores to construct multiple SSLContext objects. You abstract the common logic to create an SSLContext object in another Lambda layer. Now, the Lambda function calling two different backend services uses 3 Lambda layers:

  • Lambda layer for backend service 1 (under /opt)
  • Lambda layer for backend service 2 (under /opt)
  • Lambda layer for the SSL utility that takes the KeyStore, TrustStore, and their passwords to return an SSLContext object

SSL utility Lambda layer provides the getSSLContext default method in a Java interface. The Lambda function implements this interface. Now, you create a dedicated HTTP client per service.

The following diagram shows your final architecture:

Providing multiple client certificates in Lambda layers

Providing multiple client certificates in Lambda layers

Prerequisites

To run the sample application, you need:

  1. CDK v2
  2. Java 11
  3. AWS CLI
  4. Docker
  5. jq

To build and provision the stack:

  1. Clone the git repository.
  2. git clone https://github.com/aws-samples/serverless-mutual-tls.git
    cd serverless-mutual-tls
  3. Create the two root CA’s, client, and server certificates.
  4. ./scripts/1-create-certificates.sh
  5. Build and package all examples.
  6. ./scripts/2-build_and_package-functions.sh
  7. Provision the AWS infrastructure (make sure that Docker is running).
  8. ./scripts/3-provision-infrastructure.sh

Verification

Verify that the API endpoints are working and using mTLS by running these commands from the base directory:

export API_ENDPOINT=$(cat infrastructure/target/outputs.json | jq -r '.LambdaMutualTLS.apiendpoint')

To see the error when mTLS is not used in the Lambda function, run:

curl -i $API_ENDPOINT/lambda-no-mtls

The preceding curl command responds with an HTTP status code 500 and plain body as:

PKIX path building failed: sun.security.provider.certpath.SunCertPathBuilderException: unable to find valid certification path to requested target

For successful usage of mTLS as shown in the previous use cases, run:

curl -i $API_ENDPOINT/lambda-only
curl -i $API_ENDPOINT/lambda-layer
curl -i $API_ENDPOINT/lambda-parameter-store
curl -i $API_ENDPOINT/lambda-multiple-certificates

The last curl command responds with an HTTP status code 200 and body as:

[
 {"hello": "from backend service 1"}, 
 {"hello": "from backend service 2"}
]

Additional security

You can add additional controls via Java environment variables. Compliance standards like PCI DSS in financial services require customers to exercise more control over the underlying negotiated protocol and ciphers.

Some of the useful Java environment variables to troubleshoot SSL/TLS connectivity issues in a Lambda function are:

-Djavax.net.debug=all
-Djavax.net.debug=ssl,handshake
-Djavax.net.debug=ssl:handshake:verbose:keymanager:trustmanager
-Djavax.net.debug=ssl:record:plaintext

You can enforce a specific minimum version of TLS (for example, v1.3) to meet regulatory requirements:

-Dhttps.protocols=TLSv1.3

Alternatively, programmatically construct your SSLContext inside the Lambda function:

SSLContext sslContext = SSLContext.getInstance("TLSv1.3");

You can also use the following Java environment variable to limit the use of weak cipher suites or unapproved algorithms, and explicitly provide the supported cipher suites:

-Dhttps.cipherSuites=TLS_ECDHE_ECDSA_WITH_AES_128_GCM_SHA256,TLS_ECDHE_ECDSA_WITH_AES_256_GCM_SHA384,TLS_ECDHE_ECDSA_WITH_AES_128_CBC_SHA,TLS_ECDHE_ECDSA_WITH_AES_256_CBC_SHA,TLS_ECDHE_ECDSA_WITH_AES_128_CBC_SHA256,TLS_ECDHE_ECDSA_WITH_AES_256_CBC_SHA384,TLS_ECDHE_RSA_WITH_AES_128_GCM_SHA256,TLS_ECDHE_RSA_WITH_AES_256_GCM_SHA384,TLS_ECDHE_RSA_WITH_AES_128_CBC_SHA,TLS_ECDHE_RSA_WITH_AES_256_CBC_SHA,TLS_ECDHE_RSA_WITH_AES_128_CBC_SHA256,TLS_ECDHE_RSA_WITH_AES_256_CBC_SHA384,TLS_DHE_RSA_WITH_AES_128_GCM_SHA256,TLS_DHE_RSA_WITH_AES_256_GCM_SHA384,TLS_DHE_RSA_WITH_AES_128_CBC_SHA,TLS_DHE_RSA_WITH_AES_256_CBC_SHA,TLS_DHE_RSA_WITH_AES_128_CBC_SHA256,TLS_DHE_RSA_WITH_AES_256_CBC_SHA256

You achieve the same programmatically with the following code snippet:

httpClient = HttpClient.newBuilder()
  .version(HttpClient.Version.HTTP_2)
  .connectTimeout(Duration.ofSeconds(5))
  .sslContext(sslContext)
  .sslParameters(new SSLParameters(new String[]{
    "TLS_ECDHE_ECDSA_WITH_AES_128_GCM_SHA256",
    "TLS_ECDHE_ECDSA_WITH_AES_256_GCM_SHA384",
    "TLS_ECDHE_ECDSA_WITH_AES_128_CBC_SHA",
    ………
  }))
  .build();

Cleaning up

The stack creates a custom VPC and other related resources. Clean up after usage to avoid the ongoing cost of running these services. To clean up the infrastructure and the self-generated certificates, run:

./scripts/4-delete-certificates.sh
./scripts/5-deprovision-infrastructure.sh

Conclusion

mTLS in Java using KeyStore and TrustStore is a well-established approach for using client certificates to add an authentication layer. This blog highlights the four approaches that you can take to implement mTLS using Java-based Lambda functions.

Each approach addresses the separation of concerns required while implementing mTLS with additional security features. Use an approach that suits your needs, organizational security best practices, and enterprise requirements. Refer to the demo application for additional details.

For more serverless learning resources, visit Serverless Land.

Announcing the Cloudflare API Gateway

Post Syndicated from Ben Solomon original https://blog.cloudflare.com/api-gateway/

Announcing the Cloudflare API Gateway

Announcing the Cloudflare API Gateway

Over the past decade, the Internet has experienced a tectonic shift. It used to be composed of static websites: with text, images, and the occasional embedded movie. But the Internet has grown enormously. We now rely on API-driven applications to help with almost every aspect of life. Rather than just download files, we are able to engage with apps by exchanging rich data. We track workouts and send the results to the cloud. We use smart locks and all kinds of IoT devices. And we interact with our friends online.

This is all wonderful, but it comes with an explosion of complexity on the back end. Why? Developers need to manage APIs in order to support this functionality. They need to monitor and authenticate every single request. And because these tasks are so difficult, they’re usually outsourced to an API gateway provider.

Unfortunately, today’s gateways leave a lot to be desired. First: they’re not cheap. Then there’s the performance impact. And finally, there’s a data and privacy risk, since more than 50% of traffic reaches APIs (and is presumably sent through a third party gateway). What a mess.

Today we’re announcing the Cloudflare API Gateway. We’re going to completely replace your existing gateway at a fraction of the cost. And our solution uses the technology behind Workers, Bot Management, Access, and Transform Rules to provide the most advanced API toolset on the market.

What is API Gateway?

In short, it’s a package of features that will do everything for your APIs. We break it down into three categories:

Security
These are the products we have already blogged about. Tools like Discovery, Schema Validation, Abuse Detection, and more. We’ve spent a lot of time applying our security expertise to the world of APIs.

Management & Monitoring
These are the foundational tools that keep your APIs in order. Some examples: analytics, routing, and authentication. We are already able to do these things with existing products like Cloudflare Access, and more features are on the way.

Everything Else
These are the small (but crucial) items that keep everything running. Cloudflare already offers SSL/TLS termination, load balancing, and proxy services that can run by default.

Today’s blog post describes each feature in detail. We’re excited to announce that all the security features are now generally available, so let’s start by discussing those.

Discovery

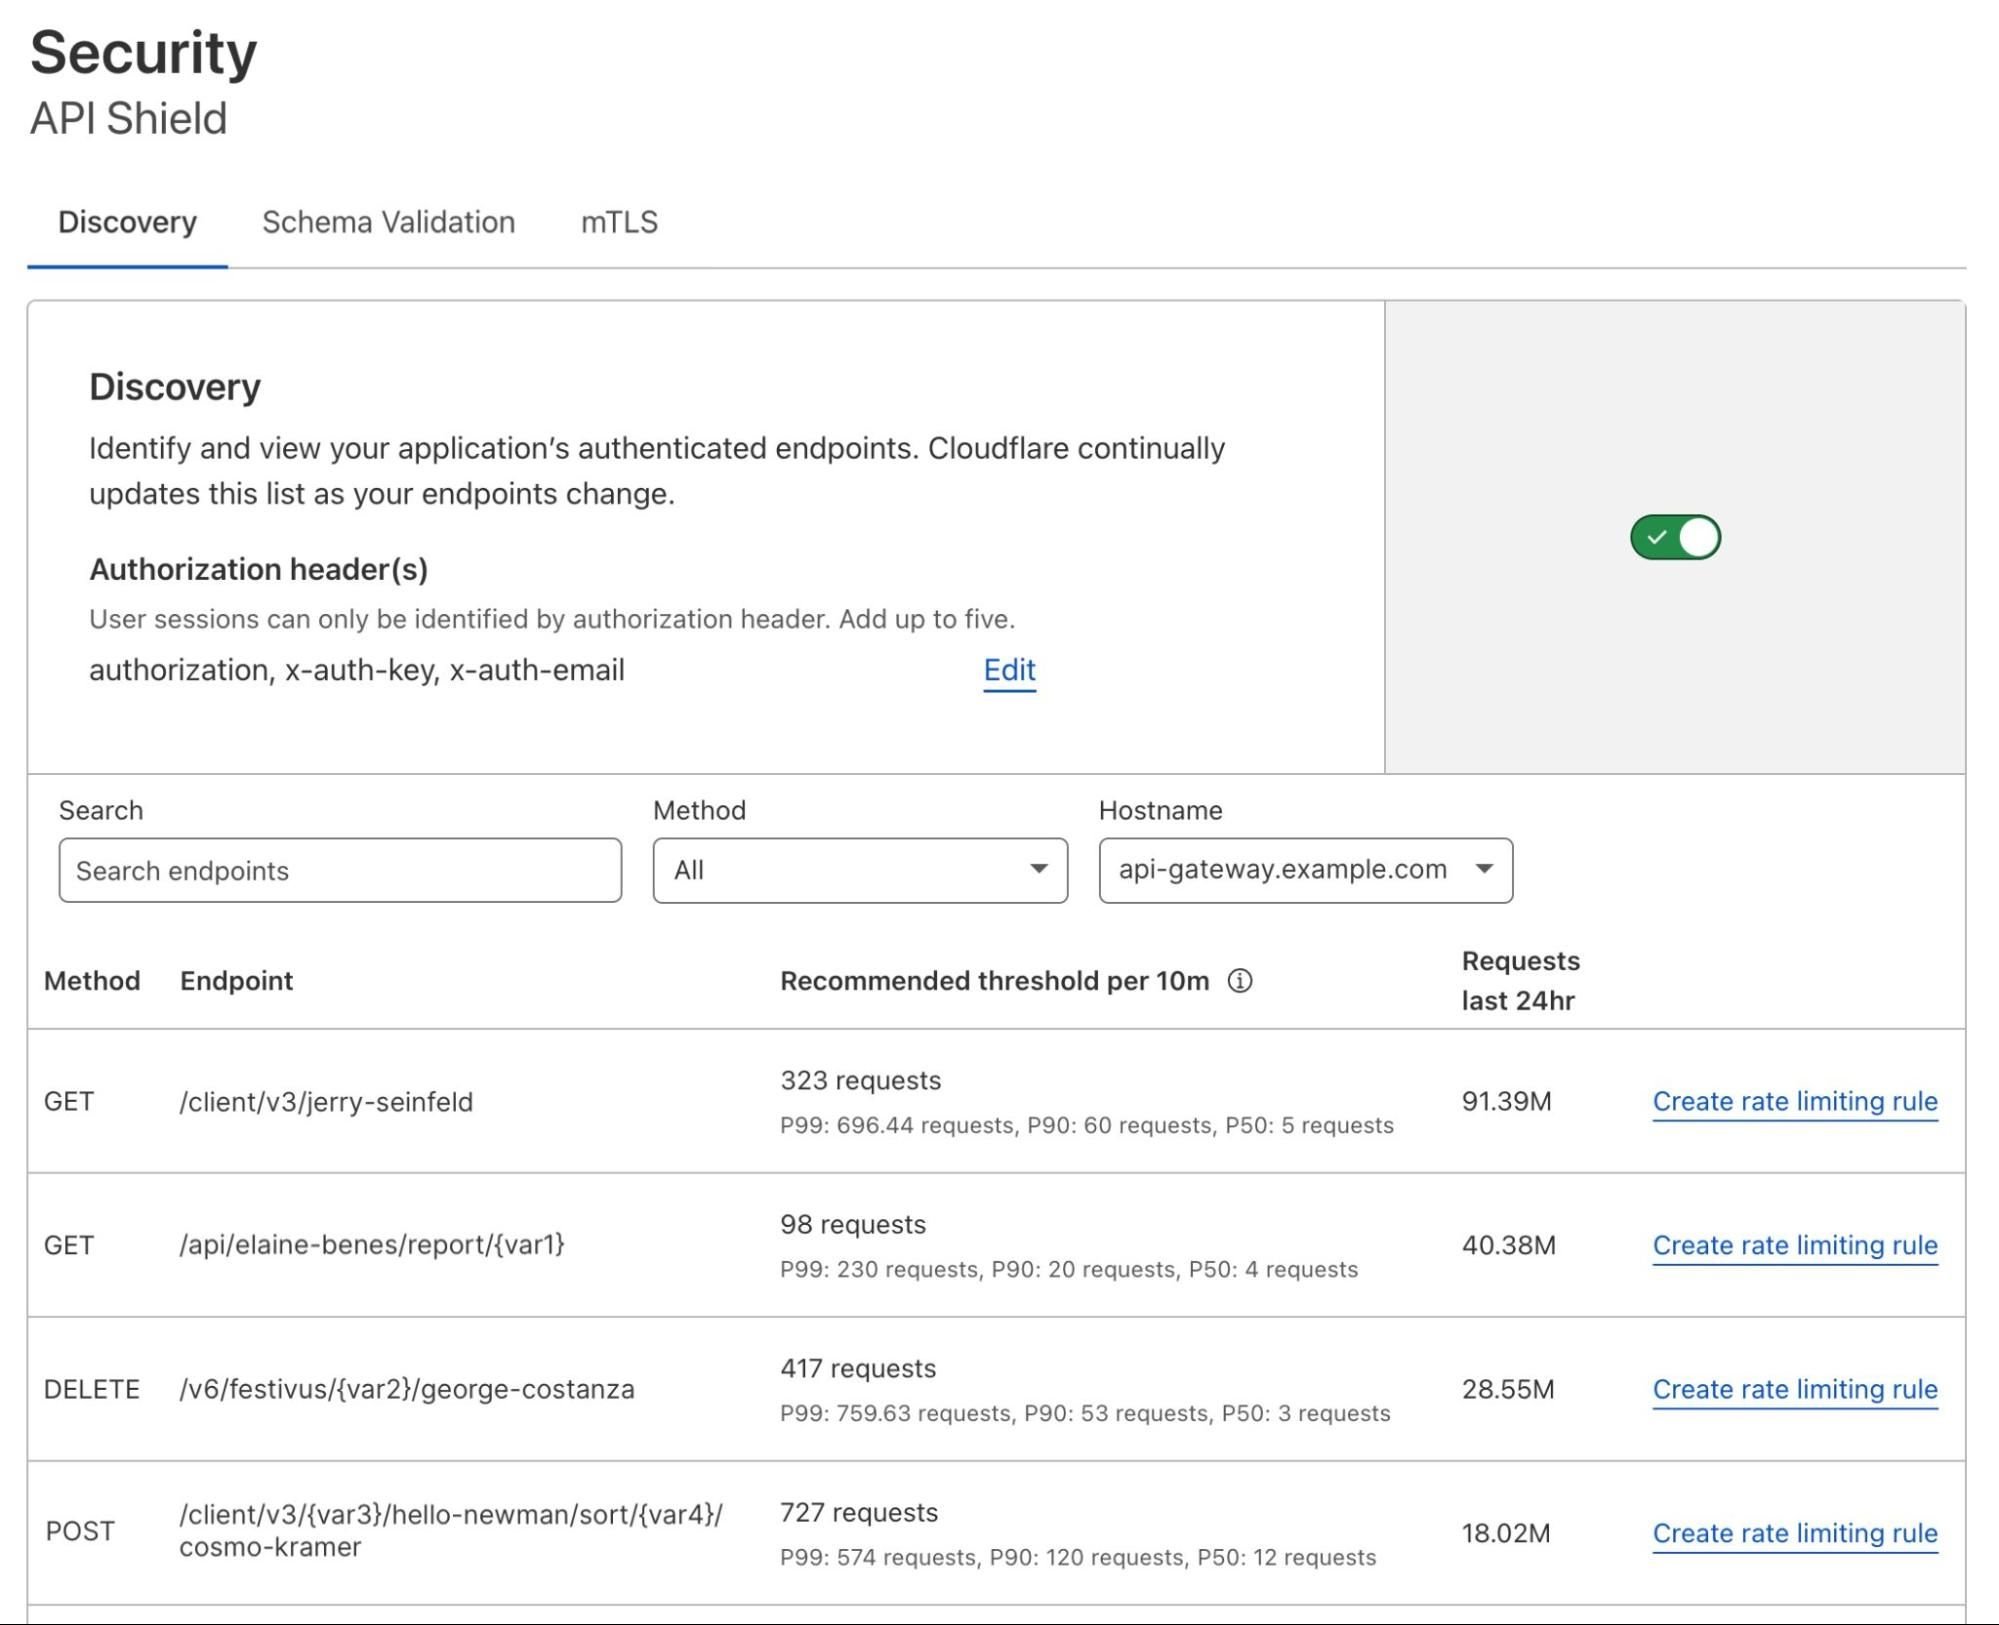
Our customers are eager to protect their APIs. Unfortunately, they don’t always have these endpoints documented—or worse, they think everything is documented, but have unknowingly lost or modified endpoints. These hidden endpoints are sometimes called shadow APIs. We need to begin our journey with an exhaustive (and accurate) picture of API surface area.

That’s where Discovery comes in. Head to the Cloudflare dashboard, select the Security tab, then choose “API Shield.” Activate the feature and tell us how you want to identify your API traffic. Most users provide a header (available today), but we can also use the request body or cookie (available soon).

Announcing the Cloudflare API Gateway

We provide an exhaustive list of your API endpoints. Cloudflare lists each method, path, and additional metadata to help you understand your surface area. We even collapse endpoints that include variables (e.g., /account/217) to become generally applicable (e.g., /account/{var1}).

Discovery is a powerful countermeasure to entropy. Our customers often expect to find 30 endpoints, but are surprised to learn they have over 100 active endpoints.

Schema Validation

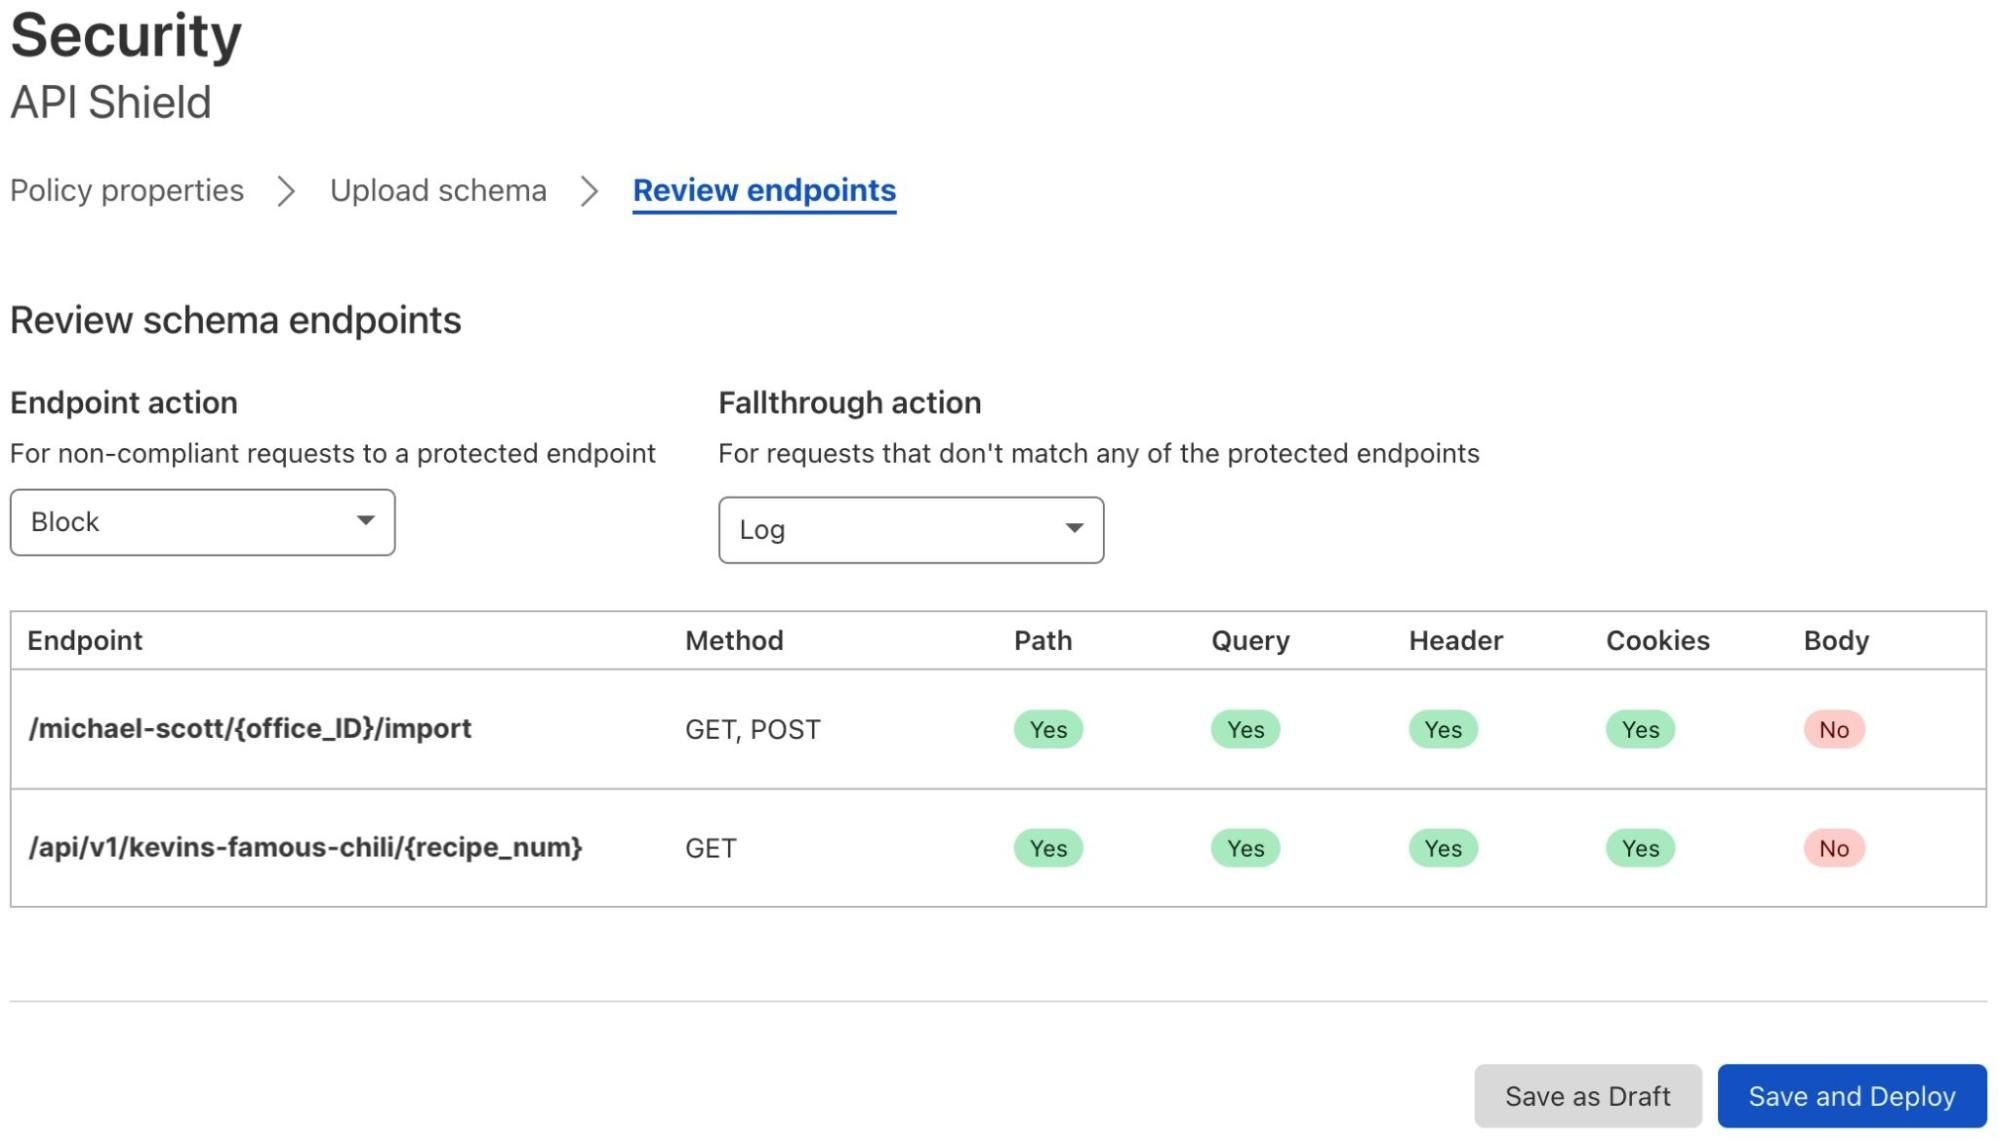
Perhaps you already have a schema for your API endpoints. A schema is like a template: it provides the paths, methods, and additional data you expect API requests to include. Many developers follow the OpenAPI standard to generate (and maintain) a schema.

To harden your security, we can validate incoming traffic against this schema. This is a great way to stop basic attacks. Cloudflare will turn away nonconforming requests, discarding nonsense traffic that ignored the dress code. Simply upload your schema to the dashboard, select the actions you want to take, and deploy:

Announcing the Cloudflare API Gateway

Schema Validation has already vetted traffic for some of the world’s largest crypto sites, delivery services, and payment platforms. It’s available now, and we’ll add body validation soon.

Abuse Detection

A robust security approach will use Schema Validation and Discovery in tandem, ensuring traffic matches the expected format. But what about abusive traffic that makes it through?

As Cloudflare discovers new API endpoints, we actually suggest rate limits for each one. That’s the role of Abuse Detection, and it opens the door to a more sophisticated kind of security.

Consider an API endpoint that returns weather updates. Specifically, the endpoint will return “yes” if it is likely to snow in the next hour, and “no” otherwise. Our algorithm might detect that the average user requests this data once every 10 minutes. A small group of scrapers, however, makes 37 requests per 10 minutes. Cloudflare automatically recommends a threshold in between, weighted to provide normal users with some breathing room. This would prevent abusive scraping services from fetching the weather too often.

Announcing the Cloudflare API Gateway

We provide the option to create a rule using our new Advanced Rate Limiting engine. You can use cookies, headers, and more to tune thresholds. We’ve been using Abuse Detection to protect api.cloudflare.com for months now.

Our favorite part of this feature: it relies on the machine learning approach we use for Bot Management. Just another way our products can feed into (and benefit from) each other.

Abuse Detection is available now. If you’re interested in Sequential Abuse Detection, which we use to flag anomalous request flows, check out our previous blog post. The sequential piece is in early access, and we’re continuing to tune it before an official launch.

mTLS

Mutual TLS takes security to a new level. You can use certificates to validate incoming traffic as it reaches your APIs—which is especially useful for mobile and IoT devices. Moreover, this is an excellent positive security model that can (and should) be adopted for most device ecosystems.

Announcing the Cloudflare API Gateway

As an example, let’s return to our weather API. Perhaps this service includes a second endpoint that receives the current temperature from a thermometer. But there’s a problem: anyone can make fake requests, providing inaccurate readings to the endpoint. To prevent this, use mTLS to install a client certificate on the legitimate thermometer, then let Cloudflare validate that certificate. Any other requests will be turned away. Problem solved!

We already offer a set of free certificates to every Cloudflare customer. That will continue. But starting today, API Gateway customers get unlimited certificates by default.

Authentication

Many modern APIs require authentication. In fact, authentication unlocks all sorts of capabilities—it allows sessions (with login), personal data exchange, and infrastructure efficiency. And of course, Cloudflare protects authenticated traffic as it passes through our network.

But with API Gateway, Cloudflare plays a more active role in authenticating traffic, helping to issue and validate the following:

  • API keys
  • JSON web tokens (JWT)
  • OAuth 2.0 tokens

Using access control lists, we help you manage different user groups with varying permissions. And this matters—because your current provider is introducing tons of latency and unnecessary data exchange. If a request has to go somewhere outside the Cloudflare ecosystem, it’s traveling farther than it needs to:

Announcing the Cloudflare API Gateway

Cloudflare can authenticate on our global network and handle requests in a fraction of the time. This kind of technology is difficult to implement, but we felt it was too important to ignore. How did we build it so quickly? Cloudflare Access. We took our experience working with identity providers and, once again, ported it over to the world of APIs. Our gateway includes unlimited authentication and token exchange. These features will be available soon.

Routing & Management

Let’s talk briefly about microservices. Modern applications are behemoths, so developers break them up into smaller chunks called “microservices.”

Consider an application that helps you book a hotel room. It might use a microservice to fetch available dates, another to fetch prices, and still another to fetch room types. Perhaps a different team manages each microservice, but they all need to be available from a single public entry point:

Announcing the Cloudflare API Gateway

That single entry point—traditionally managed by an API gateway—is responsible for routing each request to the right microservice. Many of our customers have been paying standalone services to do this for years. That’s no longer necessary. We’ve built on our Transform Rules product to dynamically re-write and re-route at our edge. It’s easy to configure, fast to deploy, and natively built into API Gateway. Cloudflare can now be your API’s single point of entry.

That’s just the tip of the iceberg. API Gateway can actually replace your microservices through an integration with our Workers product. How? Consider writing a Worker that performs some action; perhaps return hotel prices, which are stored with Durable Objects on our network. With API Gateway, requests arrive at our network, are routed to the correct microservice with Transform Rules, and then are fully served with Workers (still on our network!). These Workers may contact your origin for additional information, where necessary.

Announcing the Cloudflare API Gateway

Workers are faster, cheaper, and simpler than microservice alternatives. This integration will be available soon.

API Analytics

Customers tell us that seeing API traffic is sometimes more important than even acting on it. In fact, this trend isn’t specific to APIs. We published another blog today that explores how one customer uses our bot intelligence to passively log information about threats.

Announcing the Cloudflare API Gateway

With API Analytics, we’ve drawn on our other products to show useful data in real time. You can view popular endpoints, filter by ML-driven insights, see histograms of abuse thresholds, and capture trends.

API Analytics will be available soon. When this happens, you’ll also be able to export custom reports and share insights within your organization.

Logging, Quota Management, and More

All of our established features, like caching, load balancing, and log integrations work natively with API Gateway. These shouldn’t be overlooked as primitive gateway features; they’re essential. And because Cloudflare performs all of these functions in the same place, you get the latency benefits without having to do a thing.

We are also expanding our Enterprise Logs functionality to perform real-time logging. If you choose to authenticate on Cloudflare’s network, you can view detailed logs of each user who has accessed an API. Similarly, we keep track of each request’s lifespan as it is received, validated, routed, and responded to. Everything is logged.

Finally, we are building Quota Management, a feature that counts API requests over a longer period of time (like a month) and allows you to manage thresholds for your users. We’ve also launched Advanced Rate Limiting to help with more sophisticated cases (including body inspection for GraphQL).

Conclusion

Our API security features—Discovery, Schema Validation, Abuse Detection, and mTLS—are available now! We call these features API Shield because they form the shield that protects the remaining gateway functions. Enterprise customers can ask their account teams for access today.

Many of the other portions of API Gateway are now in early access. According to Gartner®, “by 2025, less than 50% of enterprise APIs will be managed, as explosive growth in APIs surpasses the capabilities of API management tools.” Our goal is to offer an affordable gateway that will fight this trend. If you have a specific feature you want to test, let your account team know, so we can onboard you as soon as possible.

Source: Gartner, “Predicts 2022: APIs Demand Improved Security and Management”, Shameen Pillai, Jeremy D’Hoinne, John Santoro, Mark O’Neill, Sham Gill, 6 December 2021. GARTNER is a registered trademark and service mark of Gartner, Inc. and/or its affiliates in the U.S. and internationally and is used herein with permission. All rights reserved.

Envoy Media: using Cloudflare’s Bot Management & ML

Post Syndicated from Ryan Marlow (Guest Blogger) original https://blog.cloudflare.com/envoy-media-machine-learning-bot-management/

Envoy Media: using Cloudflare's Bot Management & ML

This is a guest post by Ryan Marlow, CTO, and Michael Taggart, Co-founder of Envoy Media Group.

Envoy Media: using Cloudflare's Bot Management & ML

My name is Ryan Marlow, and I’m the CTO of Envoy Media Group. I’m excited to share a story with you about Envoy, Cloudflare, and how we use Bot Management to monitor automated traffic.

Background

Envoy Media Group is a digital marketing and lead generation company. The aim of our work is simple: we use marketing to connect customers with financial services. For people who are experiencing a particular financial challenge, Envoy provides informative videos, money management tools, and other resources. Along the way, we bring customers through an online experience, so we can better understand their needs and educate them on their options. With that information, we check our database of highly vetted partners to see which programs may be useful, and then match them up with the best company to serve them.

As you can imagine, it’s important for us to responsibly match engaged customers to the right financial services. Envoy develops its own brands that guide customers throughout the process. We spend our own advertising dollars, work purely on a performance basis, and choose partners we know will do right by customers. Envoy serves as a trusted guide to help customers get their financial lives back on track.

A bit of technical detail

We often say that Envoy offers a “sophisticated online experience.” This is not your average lead generation engine. We’ve built our own multichannel marketing platform called Revstr, which handles content management, marketing automation, and business intelligence. Envoy has an in-house technology team that develops and maintains Revstr’s multi-million line PHP application, cloud computing services, and infrastructure. With Revstr’s systems, we are able to A/B test any combination of designs with any set of business rules. As a result, Envoy shows the right experience to the right customer every time, and even adapts to the responses of each individual.

Revstr tracks each aspect of the customer’s progress through our pages and forms. It also integrates with advertising platforms, client companies’ CRM systems, and third-party marketing tools. Revstr creates a 360° view of our performance and the customer’s experience. All this information goes into our proprietary data warehouse and is served to the business team. This warehouse also provides data — already cleaned, normalized, and labeled — to our machine learning pipeline. Where needed, we can perform quick and easy testing, training, and deployment of ML models. Both our business team and our marketing automation rely heavily on guidance from these reports and models. And that’s where Cloudflare comes into the picture…

Why we care about automated traffic

One of our key challenges is evaluating the quality of our traffic. Bad actors are always advancing and proliferating. Importantly: any fake traffic to our sites has a direct impact on our business, including wasted resources in advertising, UX optimization, and customer service.

In our world of digital marketing, especially in the industries we compete in, each click is costly and must be treated like a precious commodity. The saying goes that “he or she who is able to spend the most for a click wins.” We spend our own money on those clicks and are only paid when we deliver real leads who consistently convert to enrollments for our clients.

Any money spent on illegitimate clicks will hurt our bottom line — and bots tend to be the lead culprits. Bots hurt our standing in auctions and reduce our ability to buy. The media buyers on our business team are always watching statistics on the cost, quantity, engagement, and conversion rates of our ad traffic. They look for anomalies that might represent fraudulent clicks to ensure we trim out any wasted spend.

Cloudflare offers Bot Management, which spots the exact traffic we need to look out for.

How we use Cloudflare’s Bot Score to filter out bad traffic

We solved our problem by using Cloudflare. For each request that reaches Envoy, Cloudflare calculates a “bot score” that ranges from 1 (automated) to 99 (human). It’s generated using a number of sophisticated methods, including machine learning. Because Cloudflare sees traffic from millions of requests every second, they have an enormous training set to work with. The bot scores are incredibly accurate. By leveraging the bot score to evaluate the legitimacy of an ad click and switching experiences accordingly, we can make the most of every click we pay for.

Because of the high cost of a click, we cannot afford to completely block that click even if Cloudflare indicates it might be a bot. Instead, we ingest the bot score as a custom header and use it as an input to our rules engine. For example, we can put much longer, more qualifying forms in front of traffic that looks suspicious, and render more streamlined forms to higher scoring visitors. In an extreme case, we can even require suspect visitors to contact us by phone instead of completing an online form. This allows us to convert leads which may have a more dubious origin but still prove to be legitimate, while maintaining a pleasant experience for the best leads.

We also pull the bot score into our data warehouse and provide it to our marketing team. Over the long term, if they see that any ad campaign or traffic source has a low average bot score, we can reduce or eliminate spend on that traffic source, seek refunds from providers, and refocus our efforts on more profitable segments.

Using the Bot Score to predict conversion rate

Envoy also leverages the bot score by integrating it into our ML models. For most lead generation companies, it would be sufficient to track lead volume and profit margins. For Envoy, it’s part of our DNA to go beyond making a sale and really assess the lifetime value of those leads for our clients. So we turn to machine learning. We use ML to predict the lifetime value of new visitors based on known data about past leads, and then pass that signal on to our advertising vendors. By skewing the conversion value higher for leads with a better predicted lifetime value, we can influence those pay-per click (PPC) platforms’ own smart bidding algorithms to search for the best qualified leads.

One of the models we use in this process does a prediction of backend conversion rate — how likely a given lead is to become an enrollment for the client company. When we added the bot score and behavioral metrics to this model, we saw a significant increase in its accuracy. When we can better predict conversion rate, we get better leads. This accuracy boost is a force multiplier for our whole platform; it makes an impact not only in media management but also in form design, lead delivery integrations, and email automation.

Why is Bot Score so valuable for Envoy Media?

At Envoy, we take pride in being analytical and data driven. Here are some of the insights we found by combining Cloudflare’s Bot Score with our own internal data:

1. When we added bot score along with behavioral metrics to our conversion rate prediction ML model, its precision increased by 15%. Getting even a 1% improvement in such a carefully tuned model is difficult; a 15% improvement is a huge win.

2. Bot score is included in 76 different reports used by our media buying and UX optimization teams, and in 9 different ML models. It is now a standard component of all new UX reports.

3. Because bot score is so accurate and because bot score is now broadly available within our organization, it is driving organizational performance in ways that we didn’t expect. For example, here is a testimonial from our UX Optimization Team:

I use bot score in PPC search reports. Before I had access to the bot score our PPC reports were muddied with automated traffic – one day conversion rates are 11%, the next day they are at 5%. That is no way to run a business! I spent a lot of time investigating to understand and justify these differences – and many times there just wasn’t a satisfactory answer, and we had to throw the analysis out. Today I have access to bot score data, and it prevents data dilution and gives me a much higher degree of confidence in my analysis.

Thank You and More to Come!

Thanks to the Cloudflare team for giving us the opportunity to share our story. We’re constantly innovating and hope that we can share more of our developments with you in the future.

Announcing Friendly Bots

Post Syndicated from Ben Solomon original https://blog.cloudflare.com/friendly-bots/

Announcing Friendly Bots

Announcing Friendly Bots

When someone mentions bots on the Internet, what’s your first reaction?

It’s probably negative. Most of us conjure up memories of CAPTCHAs, stolen passwords, or some other pain caused by bad bots.

But the truth is, there are plenty of well-behaved bots on the Internet. These include Google’s search crawler and Stripe’s payment bot. At Cloudflare, we manually “verify” good bots, so they don’t get blocked. Our customers can choose to allowlist any bot that is verified. Unfortunately, new bots are popping up faster than we can verify them. So today we’re announcing a solution: Friendly Bots.

Let’s begin with some background.

How does a bot get verified?

We often find good bots via our public form. Anyone can submit a bot, but we prefer that bot operators complete the form to provide us with the information we need. We ask for some standard bits of information: your bot’s name, its public documentation, and its user agent (or regex). Then, we ask for information that will help us validate your bot. There are four common methods:

IP list
Send us a list of IP addresses used by your bot. This doesn’t have to be a static list — you can give us a dynamic page that changes — just provide us with the URL, and we’ll fetch updates every day. These IPs must be publicly documented and exclusive to your bot. If you provide a shared IP address (like one used by a proxy service), our systems will detect risk and refuse to cooperate. We want to avoid accidentally allowing other traffic.

rDNS
This one is fun. You’ve heard of DNS: the phone book of the Internet, which helps map domain names to IP addresses. rDNS works in the reverse, allowing us to take an IP address and deduce the domain name associated with it.

In other words: give us a hostname suffix, and in many cases we’ll be able to validate your bot’s identity!

User agent + ASN validation
In some cases, we can verify bots that consistently come from the same network (known as an “ASN”) with the same user agent. Note that we can’t always do this — traffic becomes easier to spoof — but we’re often confident enough to use this as a validation method.

Machine learning
This is the most flashy method. Cloudflare sees 32+ million requests every second, and we’ve been able to feed those requests into a model that can accurately profile good bots. If the previous validation methods don’t work for you, there’s a good chance we can use ML to spot your bot. But we need enough traffic (thousands of requests) to detect a usable pattern.

Announcing Friendly Bots

We usually approve Verified Bot requests within a few weeks, after taking some time to quality test and ensure everything is safe. But as mentioned before, we often have to reserve this process for trusted partners and larger bots, even though plenty of our users still need their bots allowlisted.

What if my bot isn’t a huge global service?

We keep our ears open (and our eyes on Twitter), so we know that folks want their own “personal” version of Verified Bots.

For example: let’s say you built your own monitoring service that crawls a few of your personal websites. It doesn’t make sense for us to verify this bot, because it doesn’t meet any of our criteria:

  1. Serve the broader Internet.
  2. Objectively demonstrate good behavior.
  3. Comply with Internet standards like robots.txt.

It’s your bot (and to you, it might be good!), but our other users might feel differently. Imagine if someone else’s bot could waltz into your infrastructure at any time!

Here’s another case. Perhaps Cloudflare has labeled a particular proxy as automated, possibly because a mix of humans and bots use the proxy to access the Internet. You may want to allow this traffic on your site without affecting other Cloudflare customers.

Lastly, if you work at a startup, your company may run automated services that haven’t reached the scale we require. But you still need a way to allowlist these services.

Announcing Friendly Bots

The bots described above, especially common services, are not bad. They deserve to sit in a state between bad and verified. They’re friendly.

And we’ve come up with a really cool way to help you manage them.

Our new feature, Friendly Bots, allows you to instantly auto-validate any traffic with the help of IP lists, rDNS, and more.

Announcing Friendly Bots

Here’s how it works: in the Cloudflare dashboard, tell us about your bot. You can point us toward a public IP list, give us a hostname suffix, or even select other methods like machine learning. Cloudflare’s anycast network allows us to run all of these mechanisms at each one of our data centers. This means you’ll have performant, secure, and scalable bot verification.

Build a collection of Friendly Bots and share them between your sites, creating custom policies that allow, rate limit, or log this type of traffic. You may just want to keep tabs on a particular bot; that’s fine. The response options are flexible and directly integrate with our Workers platform.

Announcing Friendly Bots

In the past, we’ve struggled to verify bots that did not crawl the web at a large scale. Why? Our system relies on a cache of verified traffic, ensuring that certain IPs or other data have widely shown good behavior on the Internet. This means that bots were sometimes difficult to verify if they did not make thousands of requests to Cloudflare. With Friendly Bots, we’ve eliminated that requirement, introducing a new, dynamic cache that optimizes for fun-sized projects.

The downstream benefits

Friendly Bots will streamline your dashboard experience. But there are a few hidden, downstream benefits we want to highlight:

Easier verification
Admittedly, it’s challenging to keep up with all the good bots on the Internet. In order to verify a bot, we’ve relied on manual submissions that may come weeks, or even months after a good bot is created. Friendly Bots will change all of that. If we notice many of our customers allowlisting a particular bot — say, a certain IP address or hostname suffix, our systems will automatically queue that bot for verification. We can intelligently use your Friendly Bots to help the rest of Cloudflare’s customers.

Instant feedback
In the past, users have been confused by the verification process. Do I need to provide documentation for my IPs? What about my user agent: can it change over time? If any piece of the validation data was broken, it could take us weeks to identify and fix.

That’s no longer the case. With Friendly Bots, we perform validation almost instantly. So if something isn’t right — perhaps your rDNS validation uses the wrong hostname — you’ll know immediately because the bot won’t be allowlisted. No more waiting to hear from our support team.

Better sourcing
Previously, we required bot operators (e.g., Google) to submit verification data themselves. If there was a bot you wanted to verify, but did not own, you were out of luck.

Friendly Bots eliminates this dependency on bot operators. Anyone who can find identifying information can register a bot on their site.

No arbitration
If a scraper shows up to your site, is that a good thing? To some, yes, because it’s exposure. To others, no, because that scraper may take data. This is a question we’ve carefully considered with every Verified Bots submission to date.

Now: it’s your choice to make. Friendly Bots puts the control in your hands, allowing you to categorize bots at a domain level. We’ll continue to verify bots at a global level (when behavior is objectively good).

Cloudflare Radar

Here’s a fun bonus: in addition to today’s Friendly Bots announcement, we’re also making some changes to Cloudflare Radar.

Beginning immediately, you can see a list of many Verified Bots in Radar. This is exciting; we’ve never published a detailed list like this before.

Announcing Friendly Bots

All data is updated in real time. As we verify new bots, they will appear here in the Radar module.

We’re also beginning to add specific Verified Bots to our Logs product. You’ll see them as Bot Tags, so a request might include the string “pinterest” if it came from Pinterest’s bot.

What’s next?

Our team is excited to launch Friendly Bots soon. We anticipate the impact will radiate throughout Bot Management, reducing false positives, improving crawl-ability, and generally stabilizing sites.

Announcing Friendly Bots

If you have Bot Management and want to give this new feature a try, please tell your account team (and we’ll be sure to include you in the early access period). You can also continue to tell us about bots that should be verified.

Introducing Advanced Rate Limiting

Post Syndicated from Daniele Molteni original https://blog.cloudflare.com/advanced-rate-limiting/

Introducing Advanced Rate Limiting

Introducing Advanced Rate Limiting

Still relying solely on IP firewalling? It’s time to change that.

While the IP address might still be one of the core technologies allowing networks to function, its value for security is long gone. IPs are rarely static; nowadays, mobile operators use carrier-grade network address translation (CGNAT) to share the same IP amongst thousands of individual devices or users. Bots then carry out distributed attacks with low request volume from different IPs to elude throttling. Furthermore, many countries consider IP addresses to be personal data, and it would be a great advancement for privacy if a replacement could be found for elements of security that currently rely on IP addresses to function. A product that is affected by this trend is rate limiting.

Rate limiting is designed to stop requests from overloading a server. It relies on rules. A rate limiting rule is defined by a filter (which typically is a path, like /login) and the maximum number of requests allowed from each user over a period of time. When this threshold is exceeded, an action is triggered (usually a block) for subsequent requests from the same user for a period of time (known as a timeout). Traditional throttling solutions bucket together requests with the same IP since they follow the logic “requests from the same IP equals requests from the same user”. However, we hear from customers how not effective it is to use IP-based rate limiting to protect traffic, especially for authenticated APIs.

We are excited to launch Advanced Rate Limiting, a leap forward for throttling technologies. It allows counting requests based on virtually any characteristics of the HTTP request, regardless of its source IP. Rate Limiting is a great defense against brute force, scraping, or targeted DDoS attacks. Consequences of these attacks include leaking of sensitive data, account takeover or exhausting back-end resources. Keeping the rate of requests under control is especially crucial for APIs where each call can trigger costly computation on the server origin.

A step-change innovation for throttling

Advanced Rate Limiting is now part of the Web Application Firewall (WAF). It’s integrated with Firewall Rules and allows counting requests based on characteristics other than IP.

With Advanced Rate Limiting, you can:

  1. Define the rule filter using all HTTP request characteristics, such as URI, method, headers, cookies and body fields. Customers on a Bot Management plan get access to the bot score dynamic field too. You can also use two characteristics of the HTTP response to trigger rate limiting: status code and response headers.
  2. Choose to count requests based on: IP, country, header, cookie, AS Number (ASN), value of a query parameter, or value of a JSON body field. You can use any of these fields individually or by combining them, so that requests are bucketed when these values are the same. It can also set the threshold as the maximum complexity your origin can handle, rather than the maximum number of requests you want to allow.
  3. Use it on all your traffic. As an Enterprise customer, Rate Limiting could be bought on a portion of your total traffic. With Advanced Rate Limiting, you can use the product on all of your traffic without having to worry about caps. Finally, Advanced Rate Limiting is available on the entire Cloudflare network, including in China.

Designed to integrate with your application

In this section, we discuss a few common use cases for using Advanced Rate Limiting to protect your web or API traffic. You can mix and match all these configurations to better suit your security needs and your application. All these use cases can be achieved via dashboard, API and Terraform.

Use case – Protect web traffic with more granular rules

Flexible filters. You can now write rate limiting rules using all the fields of the HTTP request. For example, you can trigger a rule for requests with specific headers (such as User Agent) or throttle traffic from bots sharing the same ASN.

Introducing Advanced Rate Limiting

Separate mitigation expression. You can now separate the mitigation expression from the counting expression. This allows you to define on what part of your website you want to block users once the threshold is reached, and what conditions the request (and response) needs to meet in order to increase the counter. For example, you can count requests to your /login endpoint and then block the same user on the whole site. This is especially useful when you want to include response fields in your counting expression, for example, by counting only requests that return a specific response code but then block a larger portion of traffic.

Introducing Advanced Rate Limiting

Use dynamic fields. Customers can now combine Rate Limiting with rules detecting known vulnerabilities, such as WAF machine learning score. For example, you can block eyeballs after a number of consecutive requests flagged as SQLi have hit your site. Another use case is to trigger a throttling rule only for requests likely originated from bots (by using the bot score in the rule filter) or after a number of login attempts with stolen credentials have been performed (link). You can also use the JA3 fingerprint as a counting dimension, so that you leverage our Bot Machine Learning algorithm to bucket traffic from bots with the same fingerprint.

Introducing Advanced Rate Limiting

Use case – Protect APIs by integrating Rate Limiting with your application

Count requests based on session ID. API traffic is often authenticated, and the session can be tracked with a cookie, header (such as x-api-key) or query value. Advanced Rate Limiting allows you to define where the ID is in the request and track the number of requests relative to the same session, regardless of the IP. This can be an effective way to fend off distributed bot attacks that scrape sensitive data, such as product prices or airline passenger data.

Introducing Advanced Rate Limiting

Trigger rule based on a request body content. The rule filter gives access to the raw body and the JSON-parsed body. You can count requests where a body JSON field has a specific value using the function lookup_json_field() available in the rule filter. This can be useful for GraphQL APIs, where different calls (or mutations) can be performed through the same endpoint but specifying different operations in the request body.

Introducing Advanced Rate Limiting

Rate Limiting based on complexity (coming soon in beta). Some API calls are more complex to serve than others, so counting on the number of requests doesn’t really reflect the actual cost to serve. GraphQL APIs are an example: each call complexity can vary widely based on how much processing the server needs to carry out to serve the request. Your origin can estimate the complexity of each request and return it along with the response, and rate limiting can increment the counter by the complexity estimate provided by the origin. You can then set a complexity threshold in the rule and, when it’s exceeded, subsequent requests will trigger an action, such as block.

Packaging

Advanced Rate Limiting is generally available for Enterprise customers on the new Advanced plan. See below for more details on what’s included in each plan. Reach out to your Cloudflare account team or Customer Success Manager (CSM) to learn more. If you are a Pro or Biz customer, you won’t be able to use Advanced Rate Limiting, but we are planning to give some advantages to Pro and Biz plans as well.

Enterprise Core Enterprise Advanced
Available request fields in filter Selected standard fields:
URL
Method
Headers
Source IP
All standard fields
Body fields
Account takeover fields
Dynamic fields (including Bot Score*)
Available response fields in counting filter Response code
Response Headers
Response code
Response Headers
Counting characteristics IP IP
IP with NAT awareness
ASN
Country
Headers
Cookie
Query
JA3*
Complexity No Yes
Maximum sampling period 10 minutes 1 hour

*requires Bot Management plan

What’s next for Rate Limiting

In the coming months, we are going to collect feedback from our customers to decide what additional features we should include in Advanced Rate Limiting. We have already a few ideas we are exploring, including automatically profiling your traffic and recommending thresholds for your rules.

Да се движиш като луноход. За интеграцията на украинските бежанци в България

Post Syndicated from Светла Енчева original https://toest.bg/za-integratsiyata-na-ukrainskite-bezhantsi-v-bulgaria/

В края на миналата работна седмица Ан Фам, главната редакторка на „Тоест“, ми предложи тема за статия – нещо, което тя прави много рядко и само по сериозен повод. Идеята беше да свърша нещо полезно: да опиша на понятен език какви конкретни стъпки да предприемат бежанците от Украйна, за да могат да се ползват от различни права в страната ни. Тъй като от 2009 г. се занимавам с проблемите на миграцията у нас, логично е да мога да се ориентирам къде да потърся информация и кого да попитам, в случай че такава не е налична. Започвайки да проучвам темата обаче, бързо установих, че на този етап от такава статия все още няма смисъл. Защото

за което липсва информация, липсва и процедура.

Българското правителство бързо успя да създаде сайт и гореща телефонна линия, посредством които е достъпна практически цялата налична информация за устройването на живота на украинските бежанци у нас. Ключовата дума тук е „налична“. България, както и останалите страни от ЕС, е поела ангажимента да предостави на бягащите от руската агресия статут на временна закрила. За разлика от другите форми на бежански или хуманитарен статут, този се дава моментално, веднага след което получилите го придобиват почти всички права, които имат и българските граждани, с малки изключения – като например избирателното право.

Към настоящия момент сайтът на правителството съдържа информация, да речем, за правото на украинците на спешна медицинска помощ, както и за болниците, които по своя инициатива безвъзмездно лекуват граждани на тази страна. Притежаващите статут на временна закрила имат право не само на спешна помощ, а и на личен лекар. Само че докато пиша настоящата статия, приемните пунктове за регистрация на бежанците не работят. Дано скоро след публикуването ѝ тази информация вече да не е актуална. Ала по-сериозният проблем е в

невъзможността на бюрократичната машина да действа бързо и адекватно.

Тук трябва да признаем, че за бавните реакции на държавната администрация правителството има най-малка вина. То прави каквото му е по силите. В сформирания от него кризисен щаб влизат и експерти като Красимира Величкова от Българския дарителски форум, която много добре знае как се организира спешна подкрепа за хора в нужда. За разлика от предишни правителства, настоящото демонстрира и принципно желание да се помогне на търсещите убежище (че този факт е свързан и с техния профил, е друга тема).

По думите на премиера Кирил Петков, докато всекидневно в страната ни влизат между 2000 и 3000 бежанци от Украйна, „Агенцията за бежанците в момента може да обработва по 30 човека на ден. […] Предишният модел беше – дайте да ги вкараме в едни лагери, да ги заключим и ще го мислим във времето, ще си обработваме по 30 човека на ден“. Принципът

„дайте да ги вкараме в едни лагери, да ги заключим“

е водещ в работата на институциите с търсещите убежище десетилетия наред. Тази нагласа не може да се промени от днес за утре. А проблемът далеч не се изчерпва със забавената регистрация – тя е само началото му.

При регистрирането със статут на временна закрила всеки от бягащите от войната украинци ще получи личен номер на чужденец. Той представлява еквивалентът за чужденци на ЕГН за българските граждани. В България човек без номер е на практика никой, независимо от гражданството – системите на институциите не са пригодени да работят с хора без индивидуален номер. Затова и поне половината от украинските бежанци не се задържат в България: тук те не могат да получат веднага лечение на хроничните си заболявания и изобщо – никаква институционална подкрепа. Когато се сдобият със заветния номер и имат адресна регистрация, вече ще имат шанса

институциите ни да ги обслужват бавно, но пък… на български.

Представете си например всички процедури, през които човек трябва да мине, за да получи свидетелство от ТЕЛК или протокол за безплатно лечение от Здравната каса. Представете си и как към присъщата тромавост, с която институциите работят с местните граждани, изведнъж се добавят десетки хиляди чужденци, чиито проблеми изискват спешно решение, защото нямат средства за оцеляване.

Въпросът опира не само до способността на институциите ни, а до самия им принцип на функциониране. Още от времето на социализма битуващата нагласа на институциите е, че хората са тяхна функция, а не обратното. Поради което „ще чакате“ и „тук не е информация“. Отвъд институционалната култура

България се самоидентифицира като страна на емиграция, не и на имиграция.

С други думи, общественият ни живот е организиран около идеята, че у нас няма чужденци. А доколкото има, те са длъжни да се напаснат към нас, а не ние да се променяме заради тях. Затова интегрирането на десетки (или стотици) хиляди украинци у нас е задача с много неизвестни и с немного големи изгледи за успех.

Да вземем образованието, защото то е едно от основните средства за социална интеграция. Засега едва стотина украински деца искат да учат у нас. Според ресорния министър Николай Денков образователната ни система трябва да има готовността да поеме до 100 000 деца и младежи от Украйна. Да допуснем, че за тях се намерят места в училищата и детските градини. Първата задача е тези деца да научат български, защото образователната ни система няма капацитет да работи с ученици, които не владеят езика ни достатъчно добре.

Образованието ни не е способно да интегрира дори децата с българско гражданство, които имат друг майчин език.

Свеждането на интеграцията до брой места в училище е същото като свеждането на лечението от COVID-19 до брой свободни легла. И в двата случая свободните бройки не са достатъчни, ако няма квалифицирани специалисти. Тъй като България не е имигрантска страна, преподаването на български език на чужденци е бутикова, а не масова дейност.

За да преподаваш качествено български като чужд език, е нужна определена квалификация – не само езикова, а и дидактическа. Допълнителни умения са необходими, за да можеш да го преподаваш на деца. И още умения – да работиш ефективно с тийнейджъри. В България няма обучени специалисти, които да научат на български 100 000 деца и младежи. Единственият вариант е тази работа да се върши от доброволци и ентусиасти, които ще се справят… както могат. Ала дори украинските деца да научат български,

образователната ни система е нечувствителна към тяхната съдба и идентичност.

Училищното ни образование е организирано около идеята, че в България се учат само етнически българчета. То не се интересува с какво ученици от Украйна, Сирия или някоя друга държава могат да бъдат ценни и да обогатят светогледа на българските си връстници. Като всички ученици те се възприемат не като субекти, а като обекти на въздействие. Само че чужденците са „по-трудни“ обекти.

В българското училище няма значение колко знае едно дете за Днепър, ако не може да разкаже за Искър. Няма значение дали бомба е унищожила дома му, ако не знае за Баташкото клане. Нито дали помни Майдана, ако не може да отговори кога е било Априлското въстание. След като семействата им са избягали, защото не искат да приемат руска идентичност, украинските деца ще трябва да учат „Аз съм българче“ и колко трябва да сме благодарни на Русия, че ни е освободила.

И все пак за първи път в най-новата ни история България проявява желание да интегрира бежанци.

Че бежанците са от Украйна, а не от Близкия изток или Африка, е друг въпрос. Настоящите усилия да се помогне създават прецедент да заработят процедури, които биха могли да се прилагат и в други случаи. Ситуацията може да се обобщи с думите на Кирил Петков, с които описва състоянието на системата за гражданска защита у нас: „Ние се движим като луноходи, опитвайки се да изградим структури и координации, които не съществуват.“

Докато необходимите „структури и координации“ не заработят, украинските бежанци у нас ще оцеляват най-вече благодарение на доброволци и на спорадични успехи на публичните институции. А за да заживеят те пълноценно у нас, трябва и ние да проумеем, че не може хем да искаме да съжителстваме с представители на други култури, пък били те славянски и православни, хем да си останем същите.

Заглавна снимка: Входът на варненския доброволчески Център за подкрепа на бежанци от войната в Украйна в първите дни от откриването му. Стопкадър от репортаж на БТА

Източник

The collective thoughts of the interwebz