Designing centralized and distributed network connectivity patterns for Amazon OpenSearch Serverless – Part 2

Post Syndicated from Ankush Goyal original https://aws.amazon.com/blogs/big-data/designing-centralized-and-distributed-network-connectivity-patterns-for-amazon-opensearch-serverless-part-2/

This post is Part 2 of our two-part series on hybrid multi-account access patterns for Amazon OpenSearch Serverless. In Part 1, we explored a centralized architecture where a single account hosts multiple OpenSearch Serverless collections and a shared VPC endpoint. This approach works well when a single business unit or team manages collections on behalf of the organization.

However, many enterprises have multiple business units that need independent ownership of their OpenSearch Serverless infrastructure. When each business unit wants to manage their own collections, security policies, and VPC endpoints within their own AWS accounts, the centralized model from Part 1 no longer fits.

In this post, we address this multi-business unit scenario by introducing a pattern where the central networking account manages a custom private hosted zone (PHZ) with CNAME records pointing to each business unit’s VPC endpoint. This approach maintains centralized DNS management and connectivity while giving each business unit full autonomy over their collections and infrastructure.

The challenge with multiple business units

When multiple business units independently manage their own OpenSearch Serverless collections in separate AWS accounts, each account has its own VPC endpoint with its own private hosted zones. These private hosted zones only work within their respective VPCs, creating DNS fragmentation across the organization. Consumers in spoke accounts and on-premises environments can’t resolve collection endpoints in other accounts without additional DNS configuration.

Managing individual PHZ associations for each consumer VPC doesn’t scale, and asking each business unit to coordinate DNS with every consumer creates operational overhead. You need a network architecture that gives each team autonomy while keeping DNS management and connectivity centralized.

Solution overview

This architecture solves the problem by centralizing DNS management in the networking account while leaving collection and VPC endpoint ownership with each business unit. The networking account maintains a custom PHZ with CNAME records that map each collection endpoint to the regional DNS name of its corresponding VPC endpoint. This custom PHZ is associated with a Route 53 Profile and shared through AWS Resource Access Manager (AWS RAM) to spoke accounts. On-premises DNS resolution flows through the Route 53 Resolver inbound endpoint in the central networking VPC, which uses the same custom PHZ.

We cover two complementary patterns: Pattern 1 for on-premises access to collections across multiple business unit accounts, and Pattern 2 for spoke account access to those same collections. Both patterns rely on the centralized custom PHZ managed by your networking team.

Pattern 1: On-premises access to OpenSearch Serverless collections across multiple business unit accounts

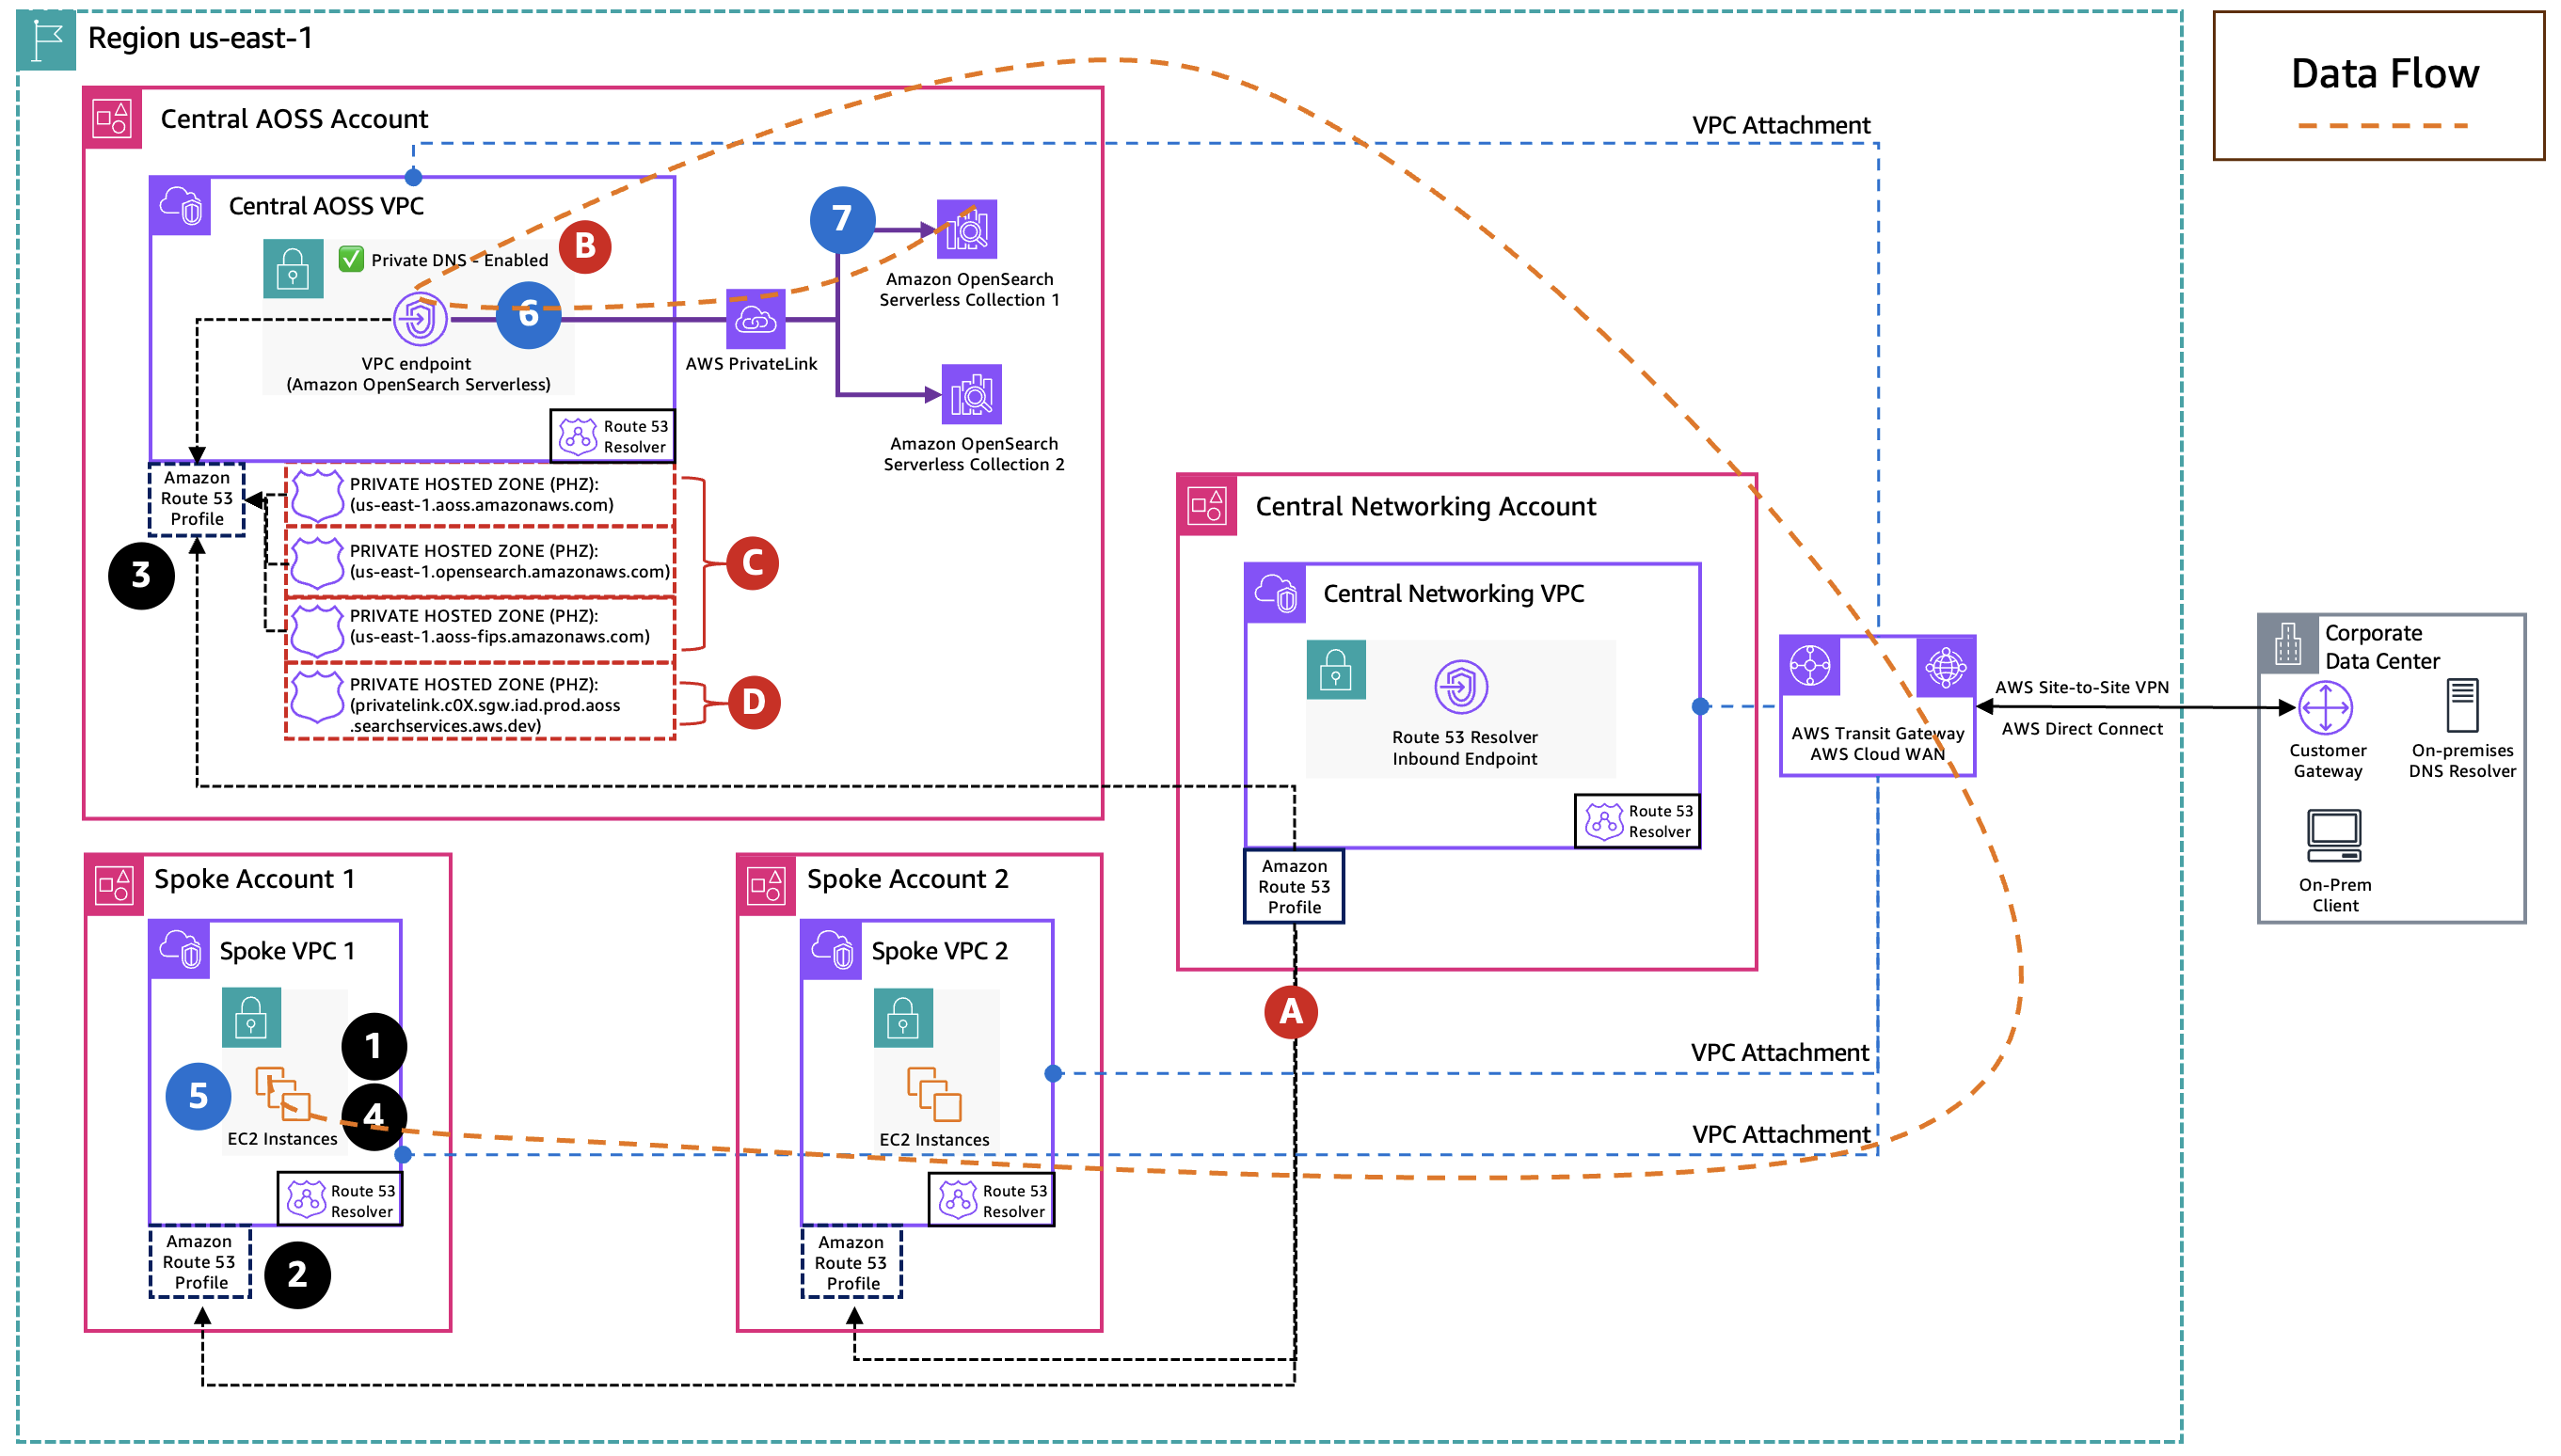
With this pattern, your on-premises clients can privately access OpenSearch Serverless collections hosted across multiple business unit accounts, each with its own VPC endpoint. The following diagram illustrates this multi-business-unit architecture. It shows how on-premises DNS queries are resolved through the custom PHZ in the central networking account and routed to the correct business unit’s VPC endpoint through AWS PrivateLink.
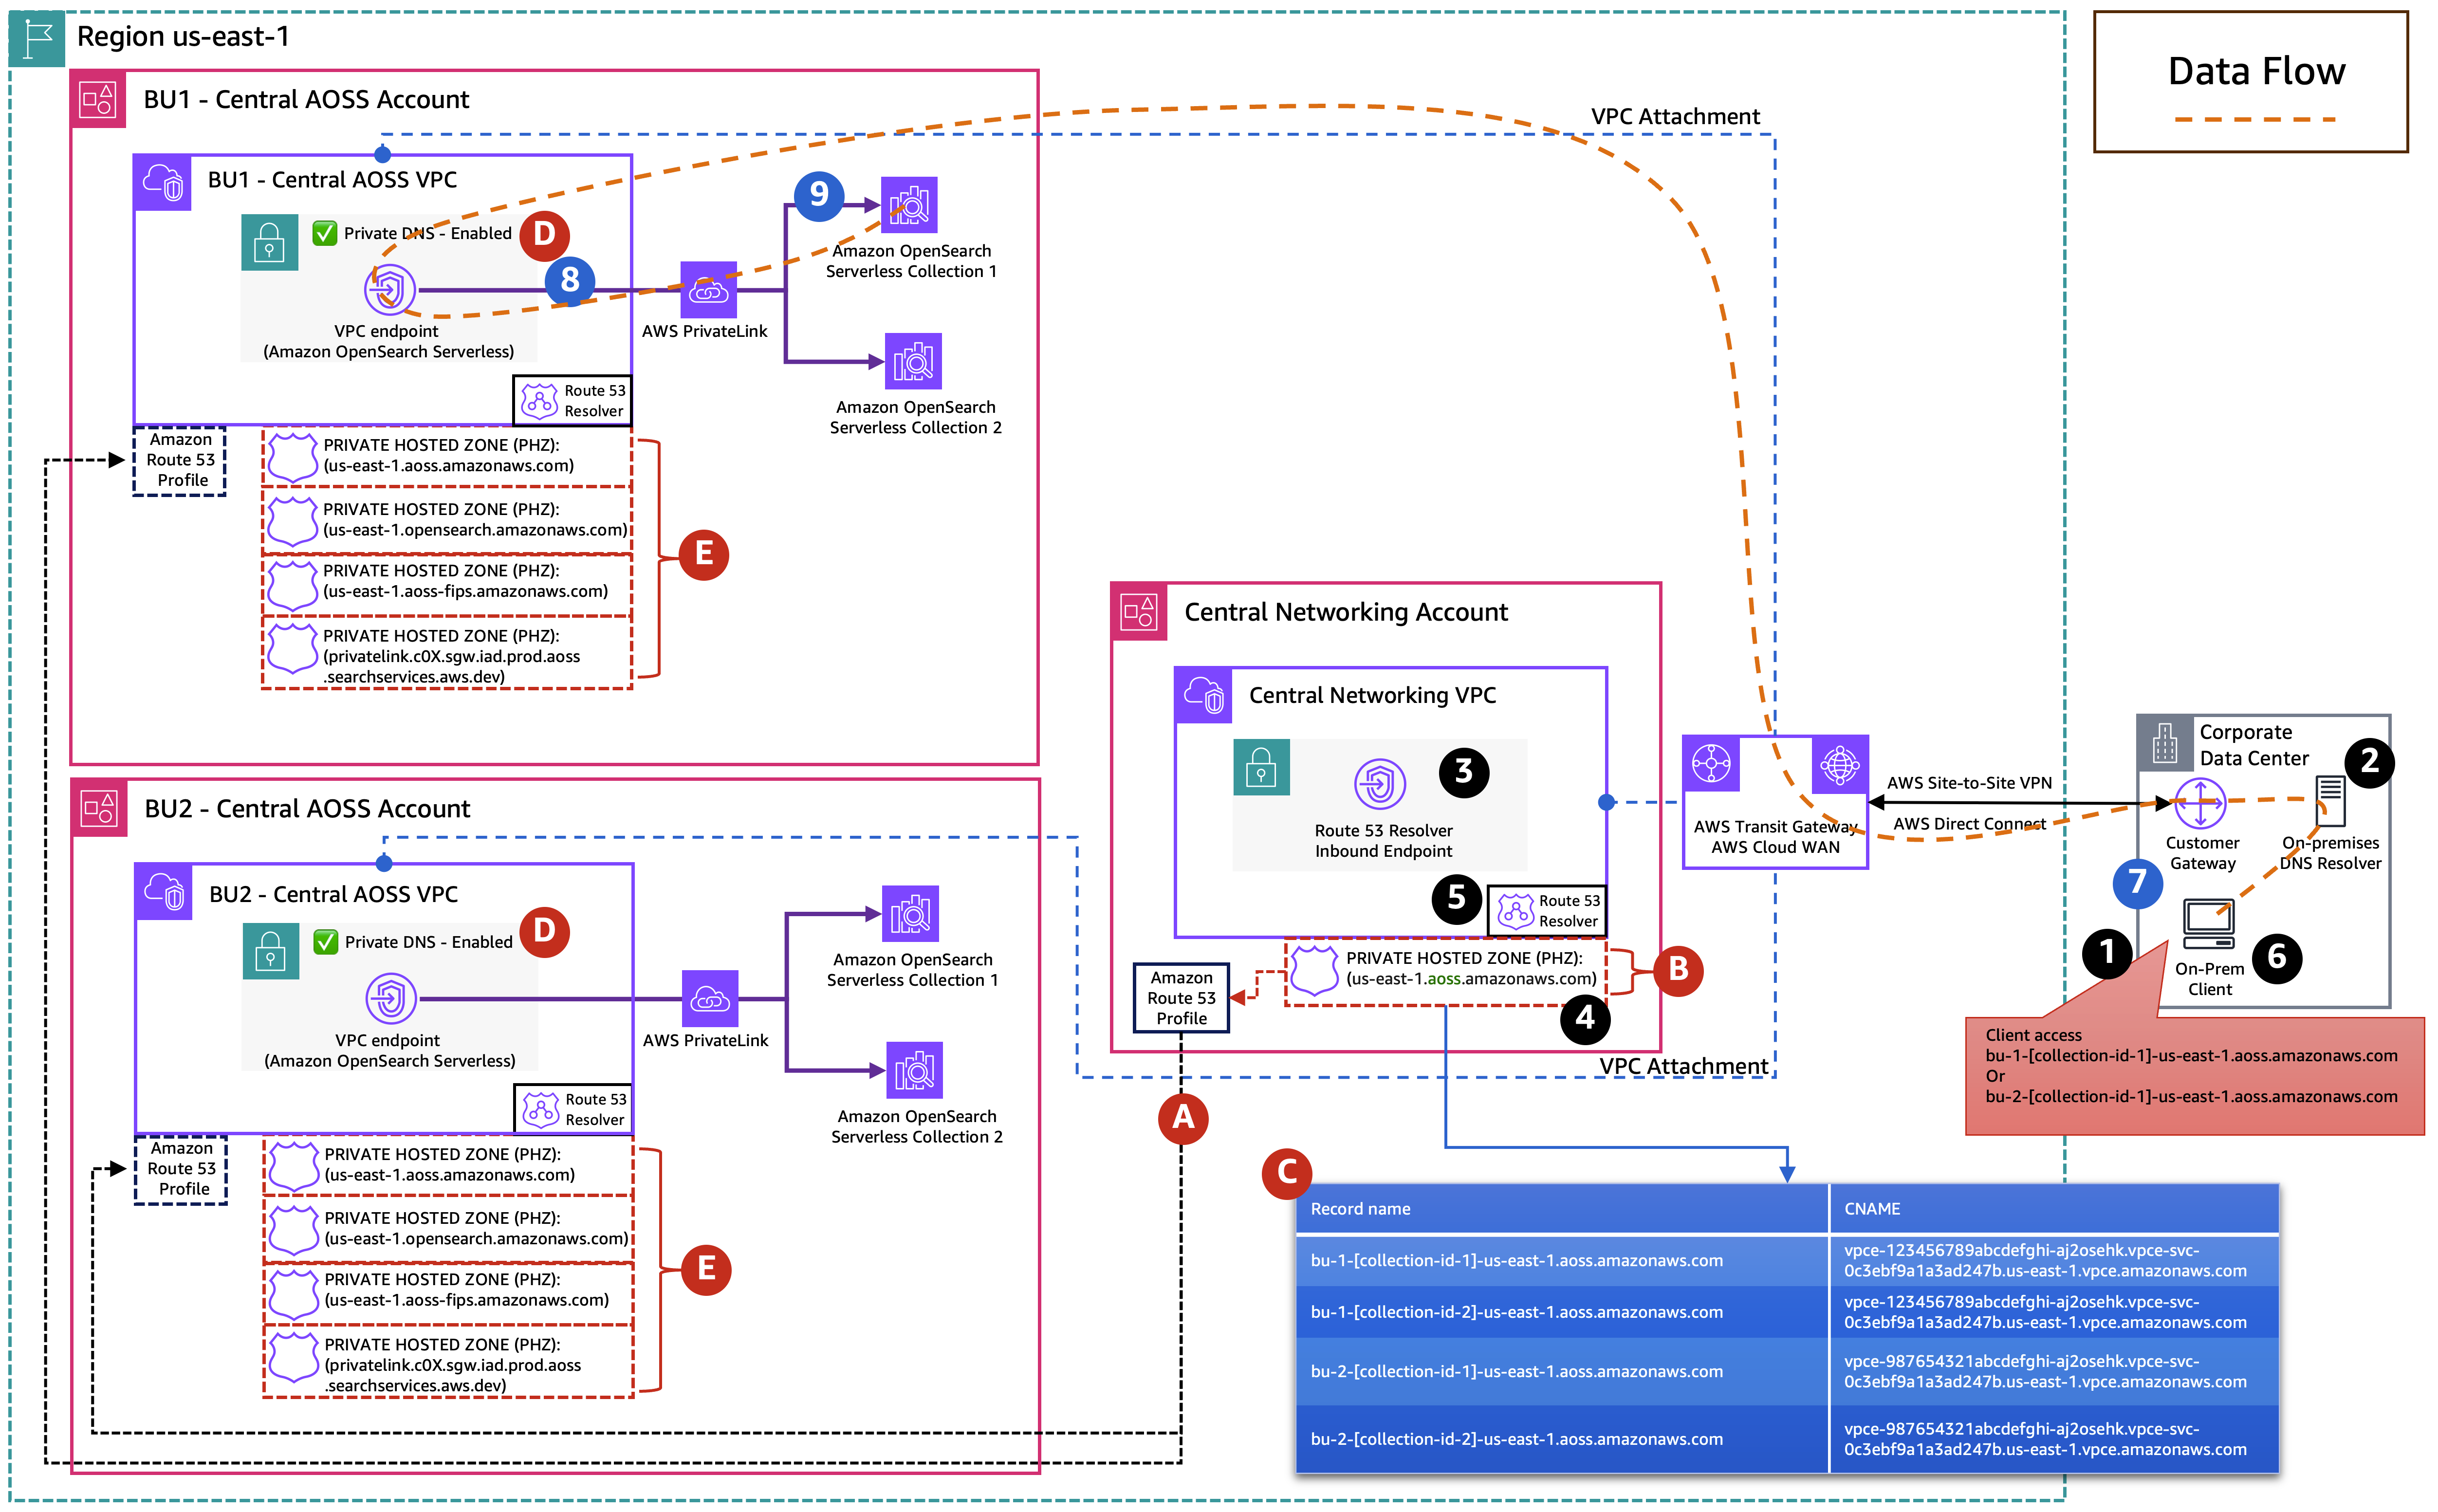
(A) The Route 53 Profiles are created in the central networking account and shared through AWS Resource Access Manager (AWS RAM) with the central OpenSearch Serverless account.

(B) The central networking account has a custom PHZ with domain us-east-1.aoss.amazonaws.com and associated with central networking account VPC and with Route 53 Profiles.

(C) This PHZ contains CNAME records pointing to each business unit’s VPC endpoints.

(D) Each business unit account has Private DNS enabled on its VPC endpoint.

(E) This automatically creates the following PHZs during VPC endpoint creation and associates them with the business unit’s VPC, so DNS resolution works locally within that VPC without depending on the Route 53 Profiles.

  • us-east-1.aoss.amazonaws.com
  • us-east-1.opensearch.amazonaws.com
  • us-east-1.aoss-fips.amazonaws.com
  • privatelink.c0X.sgw.iad.prod.aoss.searchservices.aws.dev

DNS resolution flow

  1. Your on-premises client initiates a request to bu-1-collection-id-1.us-east-1.aoss.amazonaws.com.
  2. The on-premises DNS resolver has a conditional forwarder for us-east-1.aoss.amazonaws.com and forwards the query over AWS Direct Connect or AWS Site-to-Site VPN to the Route 53 Resolver inbound endpoint IPs in the central networking VPC.
  3. The inbound Resolver endpoint passes the query to the Route 53 VPC Resolver in the central networking VPC.
  4. The VPC Resolver finds the custom PHZ (bu-1-collection-id-1.us-east-1.aoss.amazonaws.com) associated with the central networking VPC. The CNAME record for bu-1-collection-id-1.us-east-1.aoss.amazonaws.com resolves to the regional DNS name of BU1’s VPC endpoint (for example, vpce-1234567890abcdefghi.a2oselk.vpce-svc-0c3ebf9a1a3ad247b.us-east-1.vpce.amazonaws.com).
  5. The VPC Resolver then resolves the VPC endpoint regional DNS name to its elastic network interfaces (ENIs) private IP addresses.
  6. The traffic reaches BU1’s VPC endpoint elastic network interfaces (ENIs) through private network connectivity because the on-premises client connects over AWS Direct Connect or AWS Site-to-Site VPN through AWS Transit Gateway or AWS Cloud WAN.

Data flow

  1. Your on-premises client sends an HTTPS request to the resolved IP address with the TLS Server Name Indication (SNI) header set to bu-1-collection-id-1.us-east-1.aoss.amazonaws.com, over AWS Direct Connect or AWS Site-to-Site VPN through AWS Transit Gateway or AWS Cloud WAN.
  2. Traffic reaches the VPC endpoint ENIs in BU1’s OpenSearch Serverless VPC.
  3. The VPC endpoint forwards the request to the OpenSearch Serverless service, which inspects the hostname and routes to BU1 Collection 1.

To access a collection in BU2, your client follows the same flow using bu-2-collection-id-1.us-east-1.aoss.amazonaws.com. The custom PHZ contains a separate CNAME record pointing to BU2’s VPC endpoint, and the OpenSearch Serverless service routes to the correct collection based on the hostname.

Pattern 2: Spoke account access to OpenSearch Serverless collections across multiple business unit accounts

While Pattern 1 addresses on-premises access, you might also need to provide access from compute resources and distributed applications in spoke accounts to OpenSearch Serverless collections across multiple business unit accounts. With this pattern, compute resources in spoke account VPCs can privately access OpenSearch Serverless collections across multiple business unit accounts through the centralized private hosted zone (PHZ) in the networking account.

In the following example, we use an Amazon Elastic Compute Cloud (Amazon EC2) instance as a compute resource to illustrate the pattern. However, the same approach applies to any compute resource within the spoke VPC. The following diagram illustrates this multi-business-unit, multi-spoke architecture, showing how spoke VPCs resolve DNS through the shared Route 53 Profile and custom PHZ, then route traffic to the correct business unit’s OpenSearch Serverless collections through AWS PrivateLink.
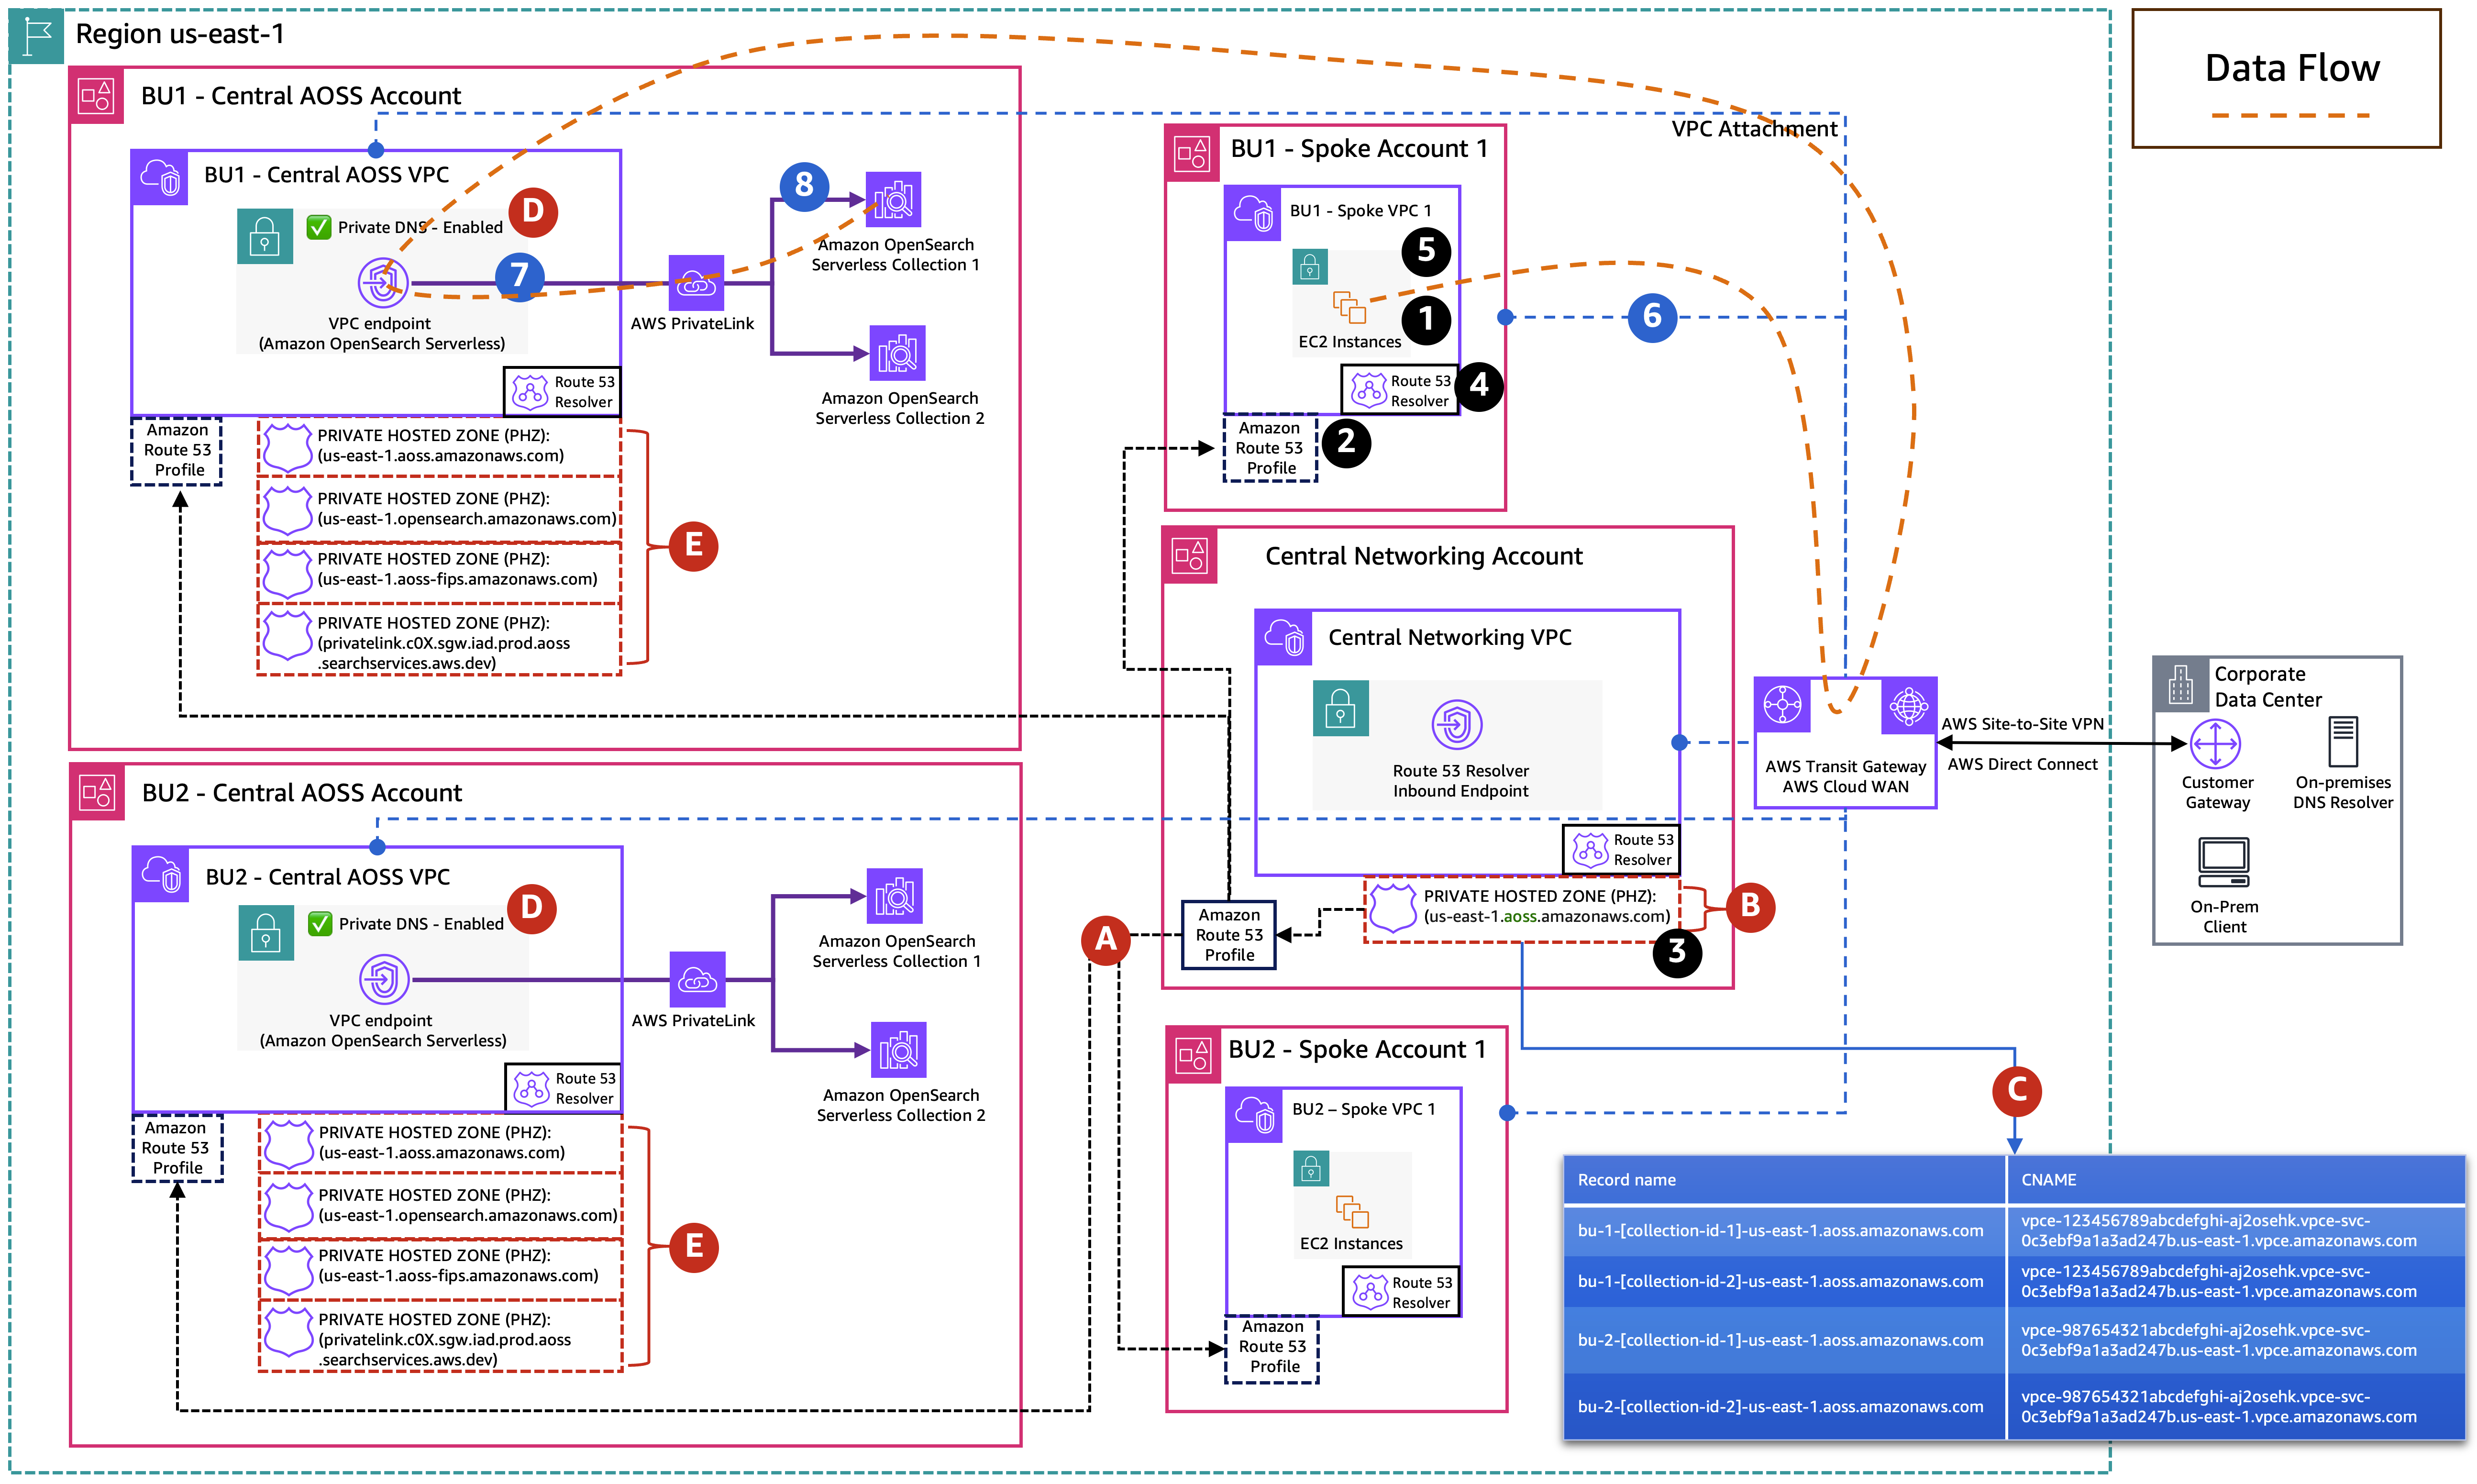
(A) The Route 53 Profiles, created in the central networking account, are shared through AWS RAM with all spoke accounts and with the central OpenSearch Serverless account.

(B) The central networking account has a custom PHZ with domain us-east-1.aoss.amazonaws.com and associated with central networking account VPC and with Route 53 Profiles.

(C) This PHZ contains CNAME records pointing to each business unit’s VPC endpoints.

(D) Each business unit account has Private DNS enabled on its VPC endpoint.

(E) This automatically creates the following PHZs during VPC endpoint creation and associates them with the business unit’s VPC, so DNS resolution works locally within that VPC without depending on the Route 53 Profiles.

  • us-east-1.aoss.amazonaws.com
  • us-east-1.opensearch.amazonaws.com
  • us-east-1.aoss-fips.amazonaws.com
  • privatelink.c0X.sgw.iad.prod.aoss.searchservices.aws.dev

DNS resolution flow

  1. An Amazon EC2 instance in BU1 Spoke VPC 1 initiates a request to bu-1-collection-id-1.us-east-1.aoss.amazonaws.com and sends a DNS query to the Route 53 VPC Resolver.
  2. The VPC Resolver finds the Route 53 Profiles associated with the spoke VPC.
  3. The Profiles reference the custom PHZ (us-east-1.aoss.amazonaws.com) managed in the central networking account. The CNAME record for bu-1-collection-id-1.us-east-1.aoss.amazonaws.com resolves to the regional DNS name of BU1’s VPC endpoint.
  4. The VPC Resolver then resolves the VPC endpoint regional DNS name to its elastic network interfaces (ENIs) private IP addresses.
  5. Traffic reaches the VPC endpoint ENIs through private network connectivity because the spoke VPC connects to BU1’s VPC through AWS Transit Gateway or AWS Cloud WAN.

Data flow

  1. Your Amazon EC2 instance sends an HTTPS request to the resolved IP address with the TLS SNI header set to bu-1-collection-id-1.us-east-1.aoss.amazonaws.com, routed through AWS Transit Gateway or AWS Cloud WAN to BU1’s OpenSearch Serverless VPC.
  2. The request arrives at the VPC endpoint ENIs in BU1’s OpenSearch Serverless VPC.
  3. The VPC endpoint forwards the request to the OpenSearch Serverless service, which inspects the hostname and routes to BU1 Collection 1.

To access a collection in BU2, the same flow applies using bu-2-collection-id-1.us-east-1.aoss.amazonaws.com. The custom PHZ resolves to BU2’s VPC endpoint, and routes traffic through the transit gateway to BU2’s VPC. The same applies to resources in other spoke accounts with the Route 53 Profiles associated.

Custom PHZ record structure

The custom PHZ in the central networking account uses the domain us-east-1.aoss.amazonaws.com and contains CNAME records that map each collection endpoint to the regional DNS name of its corresponding VPC endpoint. Note that collections within the same business unit account share the same VPC endpoint, so their CNAME records point to the same regional DNS name. Collections in different business unit accounts point to different VPC endpoints.

Custom PHZ management

Unlike Part 1, where the auto-created PHZs from the VPC endpoint handle DNS resolution, this pattern requires your networking team to manually maintain the custom PHZ. When a business unit adds a new collection, the networking team must add a corresponding CNAME record to the custom PHZ.

Cost considerations

The architecture patterns described in this post use several AWS services that can contribute to your overall costs, including Amazon Route 53 (hosted zones, DNS queries, and Resolver endpoints), and Route 53 Profiles. We recommend reviewing the official AWS pricing pages for the most current rates:

For a full cost estimate tailored to your workload, use the AWS Pricing Calculator.

Conclusion

In this post, we showed how you can give on-premises clients and spoke account resources private access to OpenSearch Serverless collections distributed across multiple business unit accounts. By centralizing DNS management through a custom PHZ in the networking account and sharing it through Route 53 Profiles, you avoid coordinating PHZ associations across accounts while giving each business unit full ownership of their collections and VPC endpoints.

Combined with Part 1, you now have two architectural approaches for hybrid multi-account access to OpenSearch Serverless: a centralized model where one account owns all collections and a shared VPC endpoint, and a distributed model where multiple business units each manage their own collections and VPC endpoints. Choose the centralized model when a single team manages collections on behalf of the organization. Choose the distributed model when business units need independent ownership of their OpenSearch Serverless infrastructure.

For additional details, refer to the Amazon OpenSearch Serverless VPC endpoint documentation and Route 53 Profiles documentation.
About the authors

Ankush Goyal

Ankush Goyal

Ankush is a Senior Technical Account Manager at AWS Enterprise Support, specializing in helping customers in the travel and hospitality industries optimize their cloud infrastructure. With over 20 years of IT experience, he focuses on leveraging AWS networking services to drive operational efficiency and cloud adoption. Ankush is passionate about delivering impactful solutions and enabling clients to streamline their cloud operations.

author name

Salman Ahmed

Salman is a Senior Technical Account Manager at AWS. He specializes in guiding customers through the design, implementation, and support of AWS solutions. Combining his networking expertise with a drive to explore new technologies, he helps organizations successfully navigate their cloud journey. Outside of work, he enjoys photography, traveling, and watching his favorite sports teams.

Designing centralized and distributed network connectivity patterns for Amazon OpenSearch Serverless – Part 1

Post Syndicated from Ankush Goyal original https://aws.amazon.com/blogs/big-data/designing-centralized-and-distributed-network-connectivity-patterns-for-amazon-opensearch-serverless-part-1/

Amazon OpenSearch Serverless is a fully managed, serverless option for Amazon OpenSearch Service that removes the operational complexity of provisioning, configuring, and tuning OpenSearch clusters. When you run OpenSearch Serverless collections in a central account and need secure, private access from both on-premises environments and multiple AWS accounts, network architecture becomes critical. In this post, we explore two patterns to help you achieve this connectivity securely.

Solution overview

Working with customers implementing OpenSearch Serverless, we published blog posts addressing various network connectivity patterns to meet their evolving requirements:

In this post, we build on those patterns to address an additional enterprise requirement. When you manage many OpenSearch Serverless collections centrally but need access from multiple accounts and on-premises, you face several key challenges:

  • Coordinating VPC endpoints across accounts: managing endpoint provisioning and lifecycle across many consumer accounts adds operational overhead
  • Managing DNS configurations for each consumer: each new account or on-premises environment requires its own DNS setup, increasing complexity
  • Separating networking responsibilities from application ownership: without clear boundaries, networking and application teams become tightly coupled, slowing down both

This architecture solves these challenges with a clear separation of responsibilities. The central networking account shares Route 53 Profiles to manage DNS propagation across spoke accounts. The OpenSearch Serverless account owner maintains full control over their VPC endpoint and the associated private hosted zones (PHZs). Application owners retain autonomy over DNS configuration and collection management.

A single VPC endpoint handles multiple OpenSearch Serverless collections in an AWS Region, which reduces complexity and cost. Your networking team manages connectivity infrastructure while your application teams independently manage their OpenSearch Serverless collections, data access policies, and collection-specific DNS configurations. This gives you connectivity from on-premises networks (through AWS Direct Connect or AWS Site-to-Site VPN) and from compute resources across multiple AWS accounts through a unified network path.

This separation means that your network administrators and application teams can work independently. The result is a governance model that scales with your organization. We cover two complementary patterns that together give you complete hybrid access coverage, Pattern 1 for on-premises access and Pattern 2 for multi-account access, both using centralized interface VPC endpoints and Route 53 Profiles.

Before proceeding, you should be familiar with OpenSearch Serverless interface VPC endpoint DNS resolution. When creating an OpenSearch Serverless interface VPC endpoint, AWS automatically provisions four private hosted zones. The zones are three visible private hosted zones (for collections, dashboards, and FIPS endpoints) and one hidden internal private hosted zone that work together to resolve collection endpoints to private IP addresses. For more details on this DNS resolution mechanism, customers can review our previous blog post.

Pattern 1: Accessing multiple OpenSearch Serverless collections from on-premises through a centralized VPC endpoint and Route 53 Profiles in a multi-account architecture

The architecture spans three components:

  • A central OpenSearch Serverless account that hosts the collections and interface VPC endpoint.
  • A central networking account that owns the Route 53 Profiles and Inbound Resolver.
  • An on-premises environment connected using AWS Direct Connect or AWS Site-to-Site VPN.

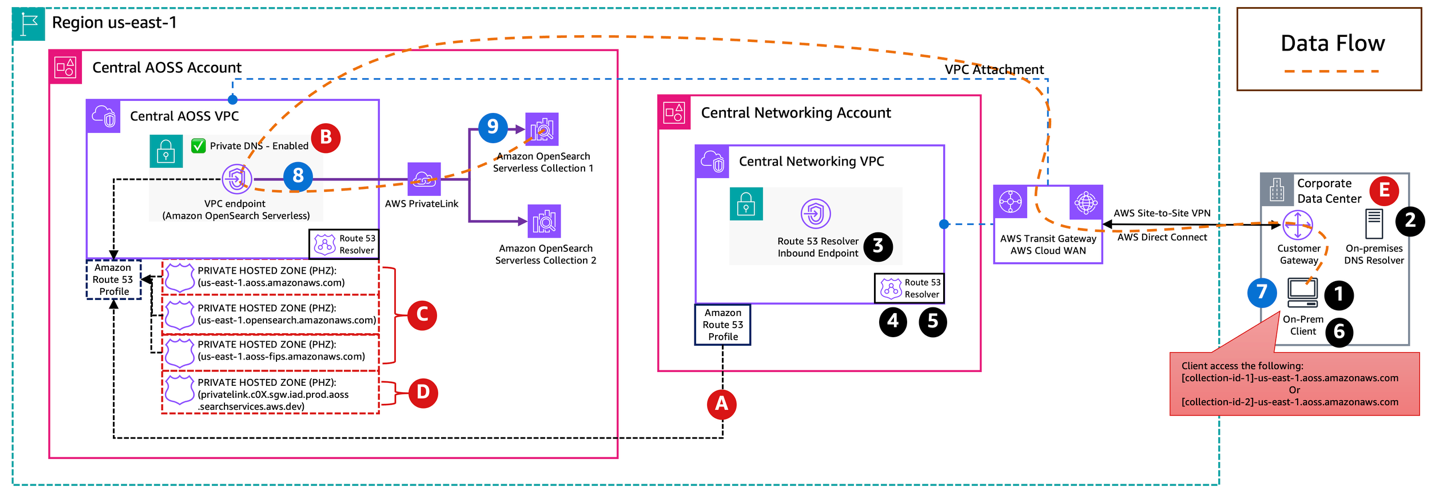
The following diagram illustrates the architecture across these three components. It shows how DNS queries from on-premises clients are resolved through the Route 53 Profile and Inbound Resolver, and how data traffic reaches the OpenSearch Serverless collections using AWS PrivateLink.

(A) The Route 53 Profiles are created in the central networking account and shared through AWS Resource Access Manager (AWS RAM) with the central OpenSearch Serverless account. The central OpenSearch Serverless account associates the PHZs and interface VPC endpoint association with the shared Route 53 Profiles because that’s needed for end-to-end private DNS resolution.

(B) The central AOSS VPC contains an interface VPC endpoint for OpenSearch Serverless with Private DNS enabled. There are four Private Hosted Zones (PHZs):

  • us-east-1.aoss.amazonaws.com
  • us-east-1.opensearch.amazonaws.com
  • us-east-1.aoss-fips.amazonaws.com
  • privatelink.c0X.sgw.iad.prod.aoss.searchservices.aws.dev

(C) The first three PHZs must be manually associated with the Route 53 Profile.

(D) The fourth is automatically associated when the VPC endpoint is associated with the profile.

(E) On the on-premises side, the DNS resolver is configured with conditional forwarding for us-east-1.aoss.amazonaws.com, directing queries to the Route 53 Resolver Inbound Endpoint in the central networking account.

DNS resolution flow

  1. Your on-premises client initiates a request to collection-id-1.us-east-1.aoss.amazonaws.com.
  2. The on-premises DNS resolver has a conditional forwarder for us-east-1.aoss.amazonaws.com and forwards the query over AWS Direct Connect or AWS Site-to-Site VPN to the Route 53 Resolver inbound endpoint IPs in the central networking VPC.
  3. The inbound resolver receives the query and passes it to the Route 53 VPC Resolver.
  4. The VPC Resolver checks the Route 53 Profiles associated with the central networking VPC. The Profiles provide access to the visible and hidden PHZs from the central OpenSearch Serverless VPC.
  5. The VPC Resolver uses the visible PHZ to match the wildcard CNAME *.us-east-1.aoss.amazonaws.com to the interface VPC endpoint (VPCE) DNS name. It then uses the hidden PHZ to resolve the VPCE DNS name to the private elastic network interface (ENI) IP addresses of the interface VPC endpoint in the central OpenSearch Serverless VPC.
  6. The private ENI IP addresses are returned through the inbound resolver endpoint to the on-premises DNS resolver and back to the on-premises client.

Data flow

  1. The on-premises client sends an HTTPS request to the resolved private ENI IP address with the TLS Server Name Indication (SNI) header set to collection-id-1.us-east-1.aoss.amazonaws.com, over AWS Direct Connect or AWS Site-to-Site VPN through AWS Transit Gateway or AWS Cloud WAN.
  2. Traffic reaches the interface VPC endpoint ENIs in the central OpenSearch Serverless VPC.
  3. The interface VPC endpoint forwards the request to the OpenSearch Serverless service, which routes to Collection 1.

To access Collection 2, the client follows the same flow using collection-id-2.us-east-1.aoss.amazonaws.com. The wildcard DNS resolves to the same interface VPC endpoint, and the OpenSearch Serverless service routes to the correct collection based on the hostname.

Pattern 2: Accessing multiple OpenSearch Serverless collections from spoke accounts using a centralized VPC endpoint and Route 53 Profiles

While Pattern 1 addresses on-premises access, you might also need to provide access from compute resources and distributed applications across multiple AWS accounts. With this pattern, any compute resource running within spoke account VPCs can privately access multiple OpenSearch Serverless collections hosted in a central OpenSearch Serverless VPC through a single shared interface VPC endpoint.

In the following example, we use an Amazon Elastic Compute Cloud (Amazon EC2) instance as a compute resource to illustrate the pattern. However, the same approach applies to any compute resource within the spoke VPC.

The following diagram illustrates this multi-account architecture, showing how spoke account VPCs resolve DNS and route data traffic to the central OpenSearch Serverless collections through the shared Route 53 Profile and AWS PrivateLink, alongside the on-premises access path from Pattern 1.

(A) The Route 53 Profiles, created in the central networking account, are shared via AWS RAM with both the OpenSearch Serverless account and the spoke accounts. The OpenSearch Serverless account associates its interface VPC endpoint and private hosted zones (PHZs) with the Profiles, while each spoke account associates the Profiles with its VPC. Spoke VPCs get full DNS resolution for OpenSearch Serverless collection endpoints without requiring their own interface VPC endpoints, PHZs, or manual DNS configuration.

(B) The central AOSS VPC contains an interface VPC endpoint for OpenSearch Serverless with Private DNS enabled. There are four Private Hosted Zones (PHZs):

  • us-east-1.aoss.amazonaws.com
  • us-east-1.opensearch.amazonaws.com
  • us-east-1.aoss-fips.amazonaws.com
  • privatelink.c0X.sgw.iad.prod.aoss.searchservices.aws.dev

(C) The first three PHZs must be manually associated with the Route 53 Profile.

(D) The fourth is automatically associated when the VPC endpoint is associated with the profile.

DNS resolution flow

  1. An Amazon EC2 instance in Spoke VPC 1 initiates a request to collection-id-1.us-east-1.aoss.amazonaws.com and sends a DNS query to the Route 53 VPC Resolver.
  2. The VPC Resolver finds the Route 53 Profiles associated with the spoke VPC, which carries the PHZs from the central OpenSearch Serverless account.
  3. The visible PHZ matches the wildcard CNAME *.us-east-1.aoss.amazonaws.com to the VPCE DNS name. The hidden PHZ resolves the VPCE DNS name to the private ENI IP addresses of the interface VPC endpoint in the central OpenSearch Serverless VPC.
  4. Route 53 returns the private ENI IP addresses to the Amazon EC2 instance.

Data flow

  1. Your Amazon EC2 instance sends an HTTPS request to the resolved private ENI IP address with the TLS SNI header set to collection-id-1.us-east-1.aoss.amazonaws.com. This is routed through AWS Transit Gateway or AWS Cloud WAN to the central OpenSearch Serverless VPC.
  2. The request arrives at the interface VPC endpoint ENIs in the central OpenSearch Serverless VPC.
  3. The interface VPC endpoint forwards the request to the OpenSearch Serverless service, which routes to Collection 1.

To access Collection 2, the same flow applies using collection-id-2.us-east-1.aoss.amazonaws.com. The same applies to resources in Spoke Account 2 or other spoke accounts with the Route 53 Profiles associated.

AWS RAM Permission Configuration for Resource Association

When the central networking account shares the Route 53 Profiles through AWS RAM, the default AWS managed permissions policy (AWSRAMPermissionRoute53ProfileAllowAssociationActions) only grants actions for associating and disassociating the Profile with VPCs, viewing Profiles details, and listing associations. It does not include the route53profiles:AssociateResourceToProfile or route53profiles:DisassociateResourceFromProfile actions required for the OpenSearch Serverless account to associate its interface VPC endpoint and PHZs with the shared Profiles.

To enable this, the central networking account must create a custom managed permission in AWS RAM with the following actions:

  • route53profiles:AssociateProfile
  • route53profiles:AssociateResourceToProfile
  • route53profiles:DisassociateProfile
  • route53profiles:DisassociateResourceFromProfile
  • route53profiles:GetProfile
  • route53profiles:GetProfileResourceAssociation
  • route53profiles:ListProfileAssociations
  • route53profiles:ListProfileResourceAssociations
  • route53profiles:ListProfiles

This custom permission must be attached to the RAM resource share before the central OpenSearch Serverless account can associate its PHZs and interface VPC endpoint with the Profiles.

Cost considerations

The architecture patterns described in this post use several AWS services that may contribute to your overall costs, including Amazon Route 53 (hosted zones, DNS queries, and Resolver endpoints), and Route 53 Profiles. We recommend reviewing the official AWS pricing pages for the most current rates:

For a full cost estimate tailored to your workload, use the AWS Pricing Calculator.

Conclusion

In this post, we showed how organizations can provide secure, private access to multiple OpenSearch Serverless collections from both on-premises environments and distributed AWS accounts using a single centralized interface VPC endpoint and Route 53 Profiles. This architecture centralizes OpenSearch Serverless collections and network infrastructure in a dedicated account, using Route 53 Profiles to propagate DNS across accounts. This eliminates per-account VPC endpoints, manual PHZ associations, and custom DNS configuration in spoke accounts.

This pattern is a good fit when a single team or business unit manages OpenSearch Serverless collections centrally. However, many enterprises have business units that need to independently manage their own OpenSearch Serverless collections in separate AWS accounts, each with their own interface VPC endpoints, security policies, and collection lifecycle. In Part 2, we explore how the architecture changes to support this distributed ownership model, where each business unit runs OpenSearch Serverless in their own account while still relying on centralized network connectivity and DNS management through Route 53 Profiles. We will cover how DNS resolution and the Route 53 Profiles configuration adapt when interface VPC endpoints and collections are spread across multiple accounts.

For additional details, refer to the OpenSearch Serverless VPC endpoint documentation and Route 53 Profiles documentation.


About the authors

Ankush Goyal

Ankush Goyal

Ankush is a Senior Technical Account Manager at AWS Enterprise Support, specializing in helping customers in the travel and hospitality industries optimize their cloud infrastructure. With over 20 years of IT experience, he focuses on leveraging AWS networking services to drive operational efficiency and cloud adoption. Ankush is passionate about delivering impactful solutions and enabling clients to streamline their cloud operations.

author name

Salman Ahmed

Salman is a Senior Technical Account Manager at AWS. He specializes in guiding customers through the design, implementation, and support of AWS solutions. Combining his networking expertise with a drive to explore new technologies, he helps organizations successfully navigate their cloud journey. Outside of work, he enjoys photography, traveling, and watching his favorite sports teams.

New Whitepaper: Exploiting Cellular-based IoT Devices

Post Syndicated from Deral Heiland original https://www.rapid7.com/blog/post/tr-new-whitepaper-exploiting-cellular-based-iot-devices

Rapid7 has released a whitepaper titled “The Weaponization of Cellular Based IoT Technology,” by Deral Heiland, principal security researcher, IoT, at Rapid7, and Carlota Bindner, lead product security researcher at Thermo Fisher Scientific. The paper examines how attackers with physical access can exploit cellular modules in Internet of Things (IoT) devices to move into cloud and backend environments, exfiltrate data, and conceal command channels within expected device traffic. Heiland presented their findings at the RSAC 2026 conference in San Francisco.

The research focuses on how these attacks work in practice. It details how interchip communications such as USB and universal asynchronous receiver-transmitter (UART) can be observed and manipulated. It also shows how hardware modifications can replace a device host, allowing an external system to assume control of the cellular module. The authors developed proof-of-concept tools, including a TCP port scanner using AT commands, an S3 bucket enumerator, a SOCKS5 proxy that routes traffic through the cellular module, and a Metasploit proxy module. These examples demonstrate how attackers can take advantage of trusted relationships between devices and connected services.

The findings highlight consistent risks across tested devices. Cellular modules often expose multiple interfaces, and unused UART or USB paths can provide direct access. With targeted printed circuit board modifications, an attacker can reroute traffic through the cellular interface. Many modules accept AT commands that support raw sockets, HTTP requests, and TCP tunnels, which can enable reconnaissance and lateral movement. All cellular devices the researchers examined lacked tamper protections and most did not encrypt sensitive data before transmission, increasing exposure in environments that use private access point names (APNs).

Organizations should treat cellular-enabled devices as privileged entry points into their networks as well as their critical data storage and management environments. This includes disabling or removing unused interchip interfaces, enforcing end-to-end encryption before data is transmitted through the cellular modules, and applying monitoring and outbound controls within APN architectures. Hardware-level security testing should be part of standard product security practices.To read the whitepaper, click here.

Building a Scalable Messaging API with AWS End User Messaging and SES

Post Syndicated from Tyler Holmes original https://aws.amazon.com/blogs/messaging-and-targeting/building-a-scalable-messaging-api-with-aws-end-user-messaging-and-ses/

Modern applications often need to send notifications across multiple channels either through email and/or SMS. However, building a reliable messaging system that manages templates, handles failures gracefully, scales, and maintains security can be challenging. Following this guide, you’ll learn how to build a template manager and messaging API using API Gateway with JWT authentication for secure access, Amazon SQS for reliable message queuing, AWS Lambda for serverless processing, AWS End User Messaging for SMS, and Amazon Simple Email Service (SES) for email.

Architecture overview

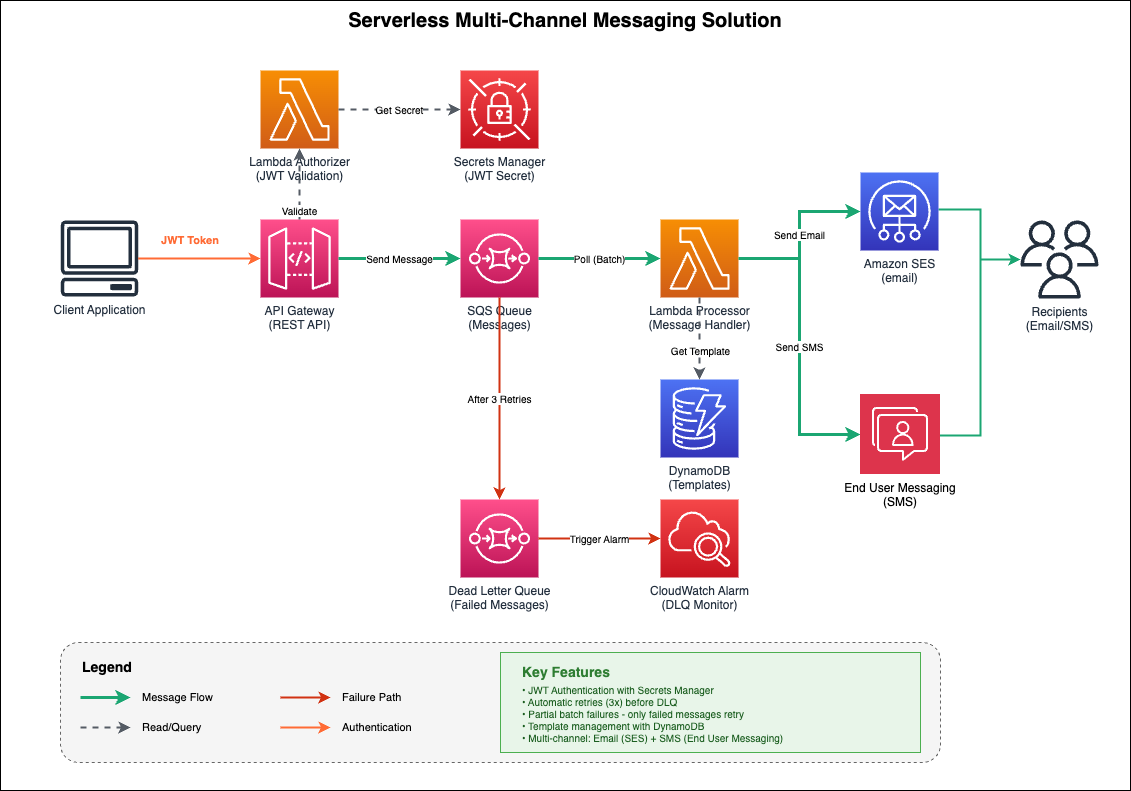
You deploy a decoupled architecture that separates message ingestion from processing, providing resilience and scalability.

Fig. 1 Message Template Manager Architecture

Fig. 1 Message Template Manager Architecture

Architecture flow

  1. Client Application sends authenticated requests with JWT tokens
  2. API Gateway validates requests using a Lambda Authorizer
  3. Lambda Authorizer retrieves the JWT secret from AWS Secrets Manager and validates the token
  4. API Gateway sends validated messages to the SQS Queue
  5. Lambda Processor polls messages from SQS in batches
  6. Lambda Processor retrieves message templates from DynamoDB (if needed)
  7. Lambda Processor sends emails through Amazon SES and SMS through AWS End User Messaging
  8. Failed messages (after 3 retries) move to the Dead Letter Queue
  9. CloudWatch Alarm triggers when messages arrive in the DLQ

If a message fails processing after three attempts, it moves to a Dead Letter Queue (DLQ) where it’s preserved for 14 days, and a CloudWatch alarm notifies you of the failure.

Key features

With this architecture, you get several important capabilities:

  • JWT Authentication: Secure API access using JSON Web Tokens stored in AWS Secrets Manager
  • Automatic Retries: Failed messages retry up to three times before moving to the DLQ
  • Partial Batch Failures: Only failed messages retry, not the entire batch
  • Template Management: Store reusable message templates in Amazon DynamoDB
  • Multi-Channel Support: Send email through Amazon SES and SMS through AWS End User Messaging
  • Configuration Set Support: Track delivery metrics and route events with per-message or deployment-level configuration sets
  • Monitoring: CloudWatch alarms alert you when messages fail

Implementation details

1. API Gateway with JWT authorization

The API Gateway uses a Lambda authorizer to validate JWT tokens before allowing requests through:

def lambda_handler(event, context):
    token = event.get('authorizationToken', '').replace('Bearer ', '')
    try:
        # Retrieve secret from AWS Secrets Manager
        jwt_secret = get_jwt_secret()
        
        # Validate JWT token
        payload = jwt.decode(
            token,
            jwt_secret,
            algorithms=['HS256'],
            issuer='messaging-api'
        )
        
        # Generate IAM policy to allow request
        return generate_policy(payload.get('sub'), 'Allow', event['methodArn'])
    except jwt.ExpiredSignatureError:
        raise Exception('Unauthorized: Token expired')
    except jwt.InvalidTokenError:
        raise Exception('Unauthorized: Invalid token')

The JWT secret is stored securely in AWS Secrets Manager and cached in the Lambda execution environment for performance.

2. SQS queue configuration

The SAM template defines two queues with appropriate settings:

MessagesQueue:
  Type: AWS::SQS::Queue
  Properties:
    QueueName: MessagesQueue
    VisibilityTimeout: 300  # 5 minutes
    MessageRetentionPeriod: 345600  # 4 days
    RedrivePolicy:
      deadLetterTargetArn: !GetAtt MessagesDeadLetterQueue.Arn
      maxReceiveCount: 3

MessagesDeadLetterQueue:
  Type: AWS::SQS::Queue
  Properties:
    QueueName: MessagesDeadLetterQueue
    MessageRetentionPeriod: 1209600  # 14 days

The visibility timeout of 5 minutes prevents duplicate processing while giving the Lambda function enough time to complete. Messages that fail three times automatically move to the DLQ.

3. Lambda message processor

The Lambda function processes messages from SQS and sends them through the appropriate channel:

def lambda_handler(event, context):
    failed_messages = []
    
    for record in event['Records']:
        message_id = record['messageId']
        try:
            message = json.loads(record['body'])
            
            # Process email if configured
            if 'EmailMessage' in message:
                send_emails(message)
            
            # Process SMS if configured
            if 'SMSMessage' in message:
                send_sms_messages(message)
                
        except Exception as e:
            print(f"Error processing message {message_id}: {str(e)}")
            failed_messages.append({"itemIdentifier": message_id})
    
    # Return failed messages for automatic retry
    return {"batchItemFailures": failed_messages}

Configuration Sets for tracking and analytics:

Configuration Sets enable you to track delivery metrics, monitor costs, and route events to analytics pipelines. You can set defaults at deployment time and override them per-message:

  • Deployment-level defaults: Set SMSConfigurationSet parameter during deployment to apply to all messages
  • Per-message override: Include ConfigurationSetName in the SMSMessage payload to use different tracking for specific messages

This flexibility lets you separate analytics by message type, campaign, or priority without requiring redeployment.

4. Template management with DynamoDB

Message templates are stored in DynamoDB for reusability:

def get_email_template_from_dynamodb(template_name, substitutions):
    response = templates_table.get_item(Key={'TemplateName': template_name})
    
    if 'Item' not in response:
        return build_default_email(), "Account Alert"
    
    template_body = response['Item']['MessageBody']
    subject = response['Item'].get('Subject', 'Notification')
    
    # Replace {variable} placeholders with actual values
    rendered_body = replace_variables(template_body, substitutions)
    rendered_subject = replace_variables(subject, substitutions)
    
    return rendered_body, rendered_subject

You can update message content without redeploying code.

Template size considerations:

DynamoDB has a 400 KB limit per item, which includes all attribute names and values. For message templates, this means:

  • Typical email templates (5-20 KB) fit comfortably
  • SMS templates (< 1 KB) have no practical constraints

If you need to store templates larger than 400 KB, consider storing them in Amazon S3 and referencing the S3 object key in DynamoDB. This hybrid approach provides unlimited template size while maintaining fast lookups.

Prerequisites

Before deploying this solution, ensure you have the following:

  • AWS End User Messaging SMS configured with a phone pool or origination identity for SMS sending
  • Amazon SES configured with verified email identities (sender and recipient for sandbox mode)
  • IAM permissions to create Lambda functions, API Gateway, SQS queues, DynamoDB tables, and Secrets Manager secrets
  • Python 3.9 or later installed locally
  • AWS SAM CLI installed (version 1.0 or later)
  • AWS CLI installed and configured with your credentials
  • An active AWS account with appropriate permissions

Deployment

You use AWS SAM for infrastructure as code. Deploy with these commands:

sam build
sam deploy --guided

During deployment, you’ll set a JWT secret that’s stored in AWS Secrets Manager. Use a strong, random secret for production:

python -c "import secrets; print(secrets.token_urlsafe(32))"

Usage example

Once deployed, send messages by making authenticated API requests:

curl -X POST "https://your-api-endpoint/dev/" \
  -H "Content-Type: application/json" \
  -H "Authorization: Bearer YOUR_JWT_TOKEN" \
  -d '{
    "TraceId": "12345",
    "EmailMessage": {
      "FromAddress": "[email protected]",
      "Subject": "Low Balance Alert",
      "ConfigurationSetName": "email-analytics",
      "Substitutions": {
        "productName": "CHEQUING",
        "membershipNumber": "****5493",
        "accountBalance": "100.00"
      }
    },
    "SMSMessage": {
      "MessageType": "TRANSACTIONAL",
      "OriginationNumber": "your-pool-id",
      "TemplateName": "alert-template",
      "ConfigurationSetName": "sms-analytics"
    },
    "Addresses": {
      "[email protected]": {
        "ChannelType": "EMAIL"
      },
      "+16048621234": {
        "ChannelType": "SMS",
        "Substitutions": {
          "productName": "CHEQUING",
          "membershipNumber": "****7303",
          "accountBalance": "100.00"
        }
      }
    }
  }'

Using Configuration Sets:

The example above shows optional ConfigurationSetName parameters for both email and SMS. These enable:

  • Delivery tracking: Monitor delivery rates, failures, and bounce metrics
  • Cost monitoring: Track spending per campaign or message type
  • Event routing: Send delivery events to CloudWatch, Kinesis, or SNS for analytics
  • Segmented metrics: Separate analytics by use case, priority, or customer segment

If you don’t specify a ConfigurationSetName in the request, the system uses the deployment-level default (if configured).

Monitoring and operations

CloudWatch alarms

The solution includes a CloudWatch alarm that triggers when messages arrive in the DLQ:

DLQAlarm:
  Type: AWS::CloudWatch::Alarm
  Properties:
    AlarmName: !Sub ${AWS::StackName}-DLQ-Messages
    MetricName: ApproximateNumberOfMessagesVisible
    Namespace: AWS/SQS
    Statistic: Sum
    Period: 300
    EvaluationPeriods: 1
    Threshold: 1
    ComparisonOperator: GreaterThanOrEqualToThreshold

Handling failed messages

When messages fail, you can inspect them in the DLQ and redrive them back to the main queue after fixing the issue:

# Check DLQ depth
aws sqs get-queue-attributes \
  --queue-url YOUR_DLQ_URL \
  --attribute-names ApproximateNumberOfMessages

# Redrive messages from DLQ to main queue
aws sqs start-message-move-task \
  --source-arn YOUR_DLQ_ARN \
  --destination-arn YOUR_MAIN_QUEUE_ARN

Viewing logs

Lambda automatically logs to CloudWatch Logs:

aws logs tail /aws/lambda/MessageProcessor --follow

Cost considerations

For 1 million messages per month estimated costs are:

Service Usage Cost
API Gateway 1M requests $3.50
Amazon SQS 1M messages $0.40
AWS Lambda 1M invocations (128MB, 1s avg) $2.50
Amazon SES 1M emails $100.00
AWS End User Messaging SMS 1M SMS $ Varies based on destination

Note: The serverless architecture means you only pay for what you use, with no minimum fees or upfront costs.

Security best practices

This solution follows several security best practices:

  1. JWT Authentication: All API requests require valid JWT tokens
  2. Secrets Manager: JWT secrets are stored encrypted in AWS Secrets Manager
  3. IAM Least Privilege: Each Lambda function has only the permissions it needs
  4. HTTPS Only: API Gateway enforces HTTPS for all requests
  5. Token Caching: Authorization decisions are cached for 5 minutes to reduce latency

Clean up

To avoid incurring ongoing charges, delete the resources created by this solution when you no longer need them:

  1. If you configured AWS End User Messaging phone pools or origination identities for this solution, remove them from the End User Messaging console
  2. If you created Amazon SES email identities specifically for this solution, remove them from the SES console
  3. Verify that all resources (Lambda functions, API Gateway, SQS queues, DynamoDB table, Secrets Manager secret) have been removed in the AWS Management Console
  4. Delete the CloudFormation stack by running: sam delete --stack-name <your-stack-name>

Conclusion

With this architecture, you can build a production-ready messaging API using AWS serverless services. The decoupled design gives you resilience through automatic retries and dead letter queues, while the serverless approach eliminates infrastructure management and scales automatically.

The complete solution is deployable through AWS SAM and includes:

  • JWT authentication with AWS Secrets Manager
  • Multi-channel messaging (email and SMS)
  • Template management with DynamoDB
  • Configuration Set support for tracking and analytics
  • Comprehensive monitoring and alerting
  • Automatic retry and failure handling

You can extend this architecture by adding more channels (push notifications, webhooks), implementing message scheduling, or integrating with Amazon EventBridge for event-driven workflows.

Additional resources

The complete source code for this solution is available in the accompanying GitHub repository, including SAM templates, Lambda functions, and deployment scripts.


About the authors

Enhancing auto scaling resilience by tracking worker utilization metrics

Post Syndicated from Brian Moore original https://aws.amazon.com/blogs/compute/enhancing-auto-scaling-resilience-by-tracking-worker-utilization-metrics/

A resilient auto scaling policy requires metrics that correlate with application utilization, which may not be tied to system resources. Traditionally, auto scaling policies track system resource such as CPU utilization. These metrics are easily available, but they only work when resource consumption correlates with worker capacity. Factors such as high variance in request processing time, mixed instance types, or natural changes in application behavior over time can break this assumption.

Worker utilization tracking offers an alternative approach. Using a combination of total worker slots, work in flight, and work waiting in the backlog, a utilization value can be calculated for use in an auto scaling policy. This approach remains accurate across fleets with mixed instance types, applications with variable latencies, and requires no changes as your application evolves.

The limitations of resource-based scaling

Traditional auto scaling policies track system resource metrics like CPU utilization, assuming a direct correlation between resource consumption and available application capacity. Consider an application that reads messages from Amazon Simple Queue Service (SQS), processes them, and writes results to Amazon DynamoDB. If this application uses a fixed-size thread pool to process messages, such as 10 worker threads, the application reaches maximum capacity when all threads are busy, regardless of CPU utilization.

In our example, each worker spends most of its time waiting for DynamoDB responses rather than consuming CPU. All 10 threads become occupied handling requests, but CPU utilization stays low. From the perspective of the auto scaling policy, the fleet looks like it has enough capacity because plenty of CPU headroom remains. Meanwhile, new messages accumulate in the SQS queue because no workers are available to process them.

For queue-based workloads, AWS provides guidance to scale based on an acceptable backlog per worker. This is a calculated target based on your application’s average processing latency (queue delay). This works well when processing times are consistent, but breaks down if an application has variable latency characteristics.

Consider an image processing application that initially handles thumbnails taking 500 ms each. Using the traditional guidance with a target latency of 5 seconds you calculate an acceptable backlog of 10 messages per worker and deploy your scaling policy. Over time, the application evolves to also process 4K photos which take 2 seconds each. Eventually 4K photos are 50% of your traffic and total latency for queued messages has increased to 12.5 seconds, 2.5x more than your initial target.

The scaling policy is no longer fit for its intended purpose because your original latency assumptions no longer reflect reality. To keep this type of scaling effective you must also remember to update your scaling policies as your application behavior evolves.

A shift to using mixed instance types in your application can lead to additional complexity when using traditional resource-based scaling policies. Different instance types may handle the same workload at different CPU levels leading to an unbalanced average that misrepresents your actual application health. By changing your mental model to consider how much work your application can accept instead of how much of a system resource is available you can improve your scaling rules and better model your application’s capacity.

Understanding worker utilization

Worker utilization measures the ratio of active work to available processing capacity. To calculate it, divide total work by total workers.

We use an SQS-based processing application as an example to demonstrate how worker utilization operates, but this approach can also be applied to other applications where work units and worker capacity are measurable. In our example application total work consists of messages waiting to be processed plus messages currently being processed. Amazon CloudWatch provides these values through the ApproximateNumberOfMessagesVisible metric (messages waiting in the queue) and the ApproximateNumberOfMessagesNotVisible metric (messages currently being processed or in flight). Each host in your application should publish the number of available workers as a custom CloudWatch metric with at least a 1-minute period. For Java thread pools or Python multiprocessing pools, this represents the pool or process count. The formula works regardless of the metric period. Using the shortest period possible allows more responsive target tracking and enables Fast Target Tracking if your application has sub-minute data points.

To derive the formula, we can use the following CloudWatch Metric Math expressions:

  • totalWork = FILL(backlog, REPEAT) + FILL(inFlight, REPEAT)
  • utilizationRatio = totalWork / workers

Where:

  • backlog = ApproximateNumberOfMessagesVisible with the Maximum statistic.
  • inFlight = ApproximateNumberOfMessagesNotVisible with the Maximum statistic.
  • workers = Your custom TotalWorkers metric with the Sum statistic.

Putting the components together the final expression for your target tracking scaling policy uses the following formula:

IF(FILL(workers, 0) > 0, utilizationRatio, IF(totalWork > 0, 1, 0))

The FILL function uses last known values if SQS metrics are delayed, and the IF statement handles the case where you have no traffic and your fleet scales to zero instances. When there are no available workers, the formula metric reports 1 to indicate that the workers are fully saturated. This prevents the application from getting stuck at zero capacity and not being able to respond to any requests.

In this formula, a value of 1 or higher represents full or over saturation, where all workers are busy with no spare capacity, like running at 100% CPU. Values below 1 indicate available capacity for your application to process more work.

For applications without a measurable backlog metric, you can track worker utilization using only the in-flight work. This approach works for APIs or other synchronous workloads where work arrives and is immediately assigned to workers rather than queuing. In these cases, the formula becomes:

IF(FILL (workers, 0) > 0, utilizationRatio, IF(FILL(inFlight, 0) > 0, 1, 0))

In this scenario the utilization ratio is calculated as follows:

  • utilizationRatio = FILL(inFlight, REPEAT) / workers

The definitions of workers and inFlight remain the same for this formula. The primary difference is that the ratio directly tracks workers available and does not consider the backlog as an option.

How worker utilization prevents outages

Worker utilization-based scaling works for any application that can define available workers and total work. When the ratio of total work to available workers exceeds your threshold, the system scales out. This approach measures whether workers are available to handle the workload and treats application bottlenecks consistently. Whether workers are waiting on network I/O, performing CPU-intensive calculations, or experiencing another bottleneck doesn’t matter; the only question is whether total work exceeds available worker capacity. Any situation causing messages to accumulate on the queue increases the utilization ratio and triggers scale-out.

Implementing worker utilization scaling

To set up worker utilization-based auto scaling, identify metrics to use in the formula discussed earlier. First, identify a metric to track the amount of work being worked on. For SQS-based processing, AWS provides this metric. Second, implement a custom metric from your application representing the total workers. Optionally you can also identify a metric to track the available backlog of work.

Using CloudWatch metric math, you calculate the utilization metric and use it in a target tracking scaling policy. Here is an example AWS CloudFormation snippet showing the metric math configuration for a Amazon EC2 Auto Scaling group. This snippet shows only the scaling policy configuration and is only an example, before using in production fully test with your application. Your complete template also needs IAM roles with appropriate permissions for SQS, DynamoDB, and CloudWatch access.

ScalingPolicy: 
  Type: AWS::AutoScaling::ScalingPolicy 
  Properties: 
    AutoScalingGroupName: !Ref AutoScalingGroup 
    PolicyType: TargetTrackingScaling 
    TargetTrackingConfiguration: 
      TargetValue: 0.7 
      CustomizedMetricSpecification: 
        Metrics: 
          - Id: backlog 
            MetricStat: 
            Metric: 
              Namespace: AWS/SQS 
              MetricName: ApproximateNumberOfMessagesVisible 
              Dimensions: 
                - Name: QueueName 
                  Value: !GetAtt ProcessingQueue.QueueName 
              Stat: Maximum 
          - Id: inFlight 
            MetricStat: 
            Metric: 
              Namespace: AWS/SQS 
              MetricName: ApproximateNumberOfMessagesNotVisible 
              Dimensions: 
                - Name: QueueName 
                  Value: !GetAtt ProcessingQueue.QueueName 
              Stat: Maximum 
          - Id: workers 
            MetricStat: 
            Metric: 
              Namespace: YourApp 
              MetricName: TotalWorkers 
            Stat: Sum 
          - Id: totalWork 
            Expression: FILL(backlog, REPEAT) + FILL(inFlight, REPEAT) 
          - Id: utilizationRatio 
            Expression: totalWork / workers 
          - Id: utilization 
            Expression: IF(FILL(workers, 0) > 0, utilizationRatio, IF(totalWork > 0, 1, 0)) 
            ReturnData: true

This approach also works for Amazon ECS services using AWS Application Auto Scaling. The metric math configuration remains the same, but you create an AWS::ApplicationAutoScaling::ScalingPolicy resource instead, adapting the parameters accordingly.

Choosing a target utilization

Since the worker utilization metric directly tracks the available capacity of your application, the target utilization value you choose reflects your organization’s balance between cost efficiency and availability. Lower target values provide more headroom for traffic spikes and faster response to load changes but result in higher infrastructure costs due to lower utilization. Higher target values maximize cost efficiency by keeping workers busy but leave less headroom for sudden traffic increases.

When choosing a target consider traffic patterns, acceptable latency during scale-out events, and cost sensitivity. Applications with unpredictable traffic spikes may benefit from lower targets, while an application with predictable load can safely use higher targets. Start with a moderate value like 0.7 and adjust based on observed behavior and your business requirements. If you previously tracked a resource utilization metric such as CPU, consider starting with the same target.

Monitoring resource utilization for cost optimization

While worker utilization drives scaling decisions, CPU and latency should be regularly evaluated to ensure cost-effective operations. Resource-based metrics can identify host resizing opportunities to better match your application requirements. If no scale-in happens when CPU utilization is consistently low, you are likely running instances that are too large for your workload. By using worker utilization in an auto scaling policy, you can switch to a different instance type without adjusting the auto scaling policy. The formula automatically adapts as you add different instance types or update the capacity per worker.

Conversely, if CPU utilization is consistently high while worker utilization remains at your target, your instances might be undersized. Upgrading to larger instance types can improve per-worker throughput, allowing each worker to process tasks faster. Changes to your auto scaling policy are not needed in this situation either. As messages are processed faster, they spend less time in the in-flight state, and the utilization ratio naturally adjusts.

This approach manages application availability independent of instance size, while resource utilization guides cost optimization. Each can be optimized independently without complex coordination.

Conclusion

Worker utilization-based auto scaling reduces the operational burden of continuously validating your scaling rules as application requirements and infrastructure change. By tracking the ratio of work to workers, your auto scaling policies automatically respond to capacity constraints based on available work. The approach works across workloads with discrete processing units and remains effective when you modify instance configurations or application worker pool sizes.

Implementation requires identifying a metric for available work, publishing a custom metric representing total workers, and using CloudWatch metric math in a target tracking scaling policy. This setup provides resilience that scaling based solely on resource metrics cannot achieve, while maintaining the flexibility to optimize costs and change your instance size without impacting system availability.

To get started:

  1. Identify an application in your environment that uses a worker pool.
  2. Instrument the application to publish worker count metrics.
  3. Configure a scaling policy tracking worker utilization.
  4. Monitor how the system responds to traffic changes and capacity events.

Learn more

To learn more about auto scaling and monitoring, see the following resources:

Rapid7 Completes BSI C5 Type 2 Examination: Stronger Cloud Security for DACH Organizations

Post Syndicated from Georgeta Toth original https://www.rapid7.com/blog/post/cds-rapid7-completes-bsi-c5-type-2-examination-stronger-cloud-security-dach-organizations

If you’re a security leader operating in Germany, Austria, or Switzerland, you already know that compliance isn’t a checkbox. It’s a competitive differentiator. Rapid7 has completed BSI C5 Type 2 attestation for the Rapid7 Command Platform, including Threat Command, and it’s a milestone worth unpacking.

This isn’t just a badge on a webpage. It’s proof that our security controls work, not just on paper, but in practice, over time.

What is BSI C5 and why does it matter?

The Cloud Computing Compliance Criteria Catalogue (C5) was developed by Germany’s Federal Office for Information Security (BSI). It sets some of the most rigorous cloud security standards in the world, covering everything from data protection to operational transparency.

A Type 2 attestation is the gold standard within that framework. Unlike a point-in-time audit, Type 2 validates that security controls aren’t just well-designed, but that they’re actively working consistently over a sustained period. It’s the difference between a security promise and a security proof.

For organizations in the DACH region, C5 is more than a nice-to-have. It’s a procurement requirement for German federal agencies, critical infrastructure operators, healthcare institutions, and financial services firms. If you’re operating in any of these sectors, your cloud providers need to meet this bar. Rapid7 now does.

BSI C5 Type 2 and your cloud security strategy

Whether you’re evaluating security vendors, managing compliance obligations, or looking to strengthen your organization’s risk posture, the question is the same: How do you know your cloud security provider actually does what it says?

BSI C5 Type 2 attestation answers that question. It’s independent, rigorous, and sustained over time. While rooted in German regulatory requirements, C5 is increasingly recognized as a benchmark for secure cloud operations across Europe. It’s one of the clearest signals that a cloud provider has the operational maturity to handle sensitive environments.

The Rapid7 Command Platform unifies exposure management with detection and response, giving security teams clear visibility across their attack surface. Threat Command extends that protection further, identifying and helping remediate threats across the clear, deep, and dark web. Both are now independently validated against one of the world’s toughest cloud security frameworks.

Why independent validation of security controls matters

Trusting a security vendor shouldn’t require a leap of faith. Independent validation exists so you have the evidence to make that call with confidence. This attestation reflects our continued investment in meeting the highest security standards for customers across Germany and the wider European market. Rapid7 has achieved a milestone that speaks directly to the conversations had every day with public sector and enterprise organizations who need more than a promise. 

They need proof that a security provider’s controls have been tested, verified, and proven to hold up over time. That’s the kind of assurance that matters when the stakes are high.

Ready to see the Command Platform in action? Visit Rapid7.com for a free trial.

[$] A PHP license change is imminent

Post Syndicated from jzb original https://lwn.net/Articles/1063993/

PHP’s licensing has been a source of confusion for some time. The project is,
currently, using two licenses that cover different parts of the code base: PHP v3.01 for the
bulk of the code and Zend v2.0 for code
in the Zend directory. Much has changed
since the project settled on those licenses in 2006, and the need for custom
licensing seems to have passed. An effort to simplify PHP’s licensing, led by
Ben Ramsey, is underway; if successful, the existing licenses will be deprecated
and replaced by the BSD
three-clause
license. The PHP community is now voting on the license
update RFC
through April 4, 2026.

Down: Debunking zswap and zram myths

Post Syndicated from corbet original https://lwn.net/Articles/1064478/

Chris Down has posted a
detailed look
at how the kernel’s zswap and zram subsystems work — and
how they differ.

Most people think of zswap and zram simply as two different
flavours of the same thing: compressed swap. At a surface level,
that’s correct – both compress pages that would otherwise end up on
disk – but they make fundamentally different bets about how the
kernel should handle memory pressure, and picking the wrong one for
your situation can actively make things worse than having no swap
at all

Krita 5.3.0 and 6.0.0 released

Post Syndicated from jzb original https://lwn.net/Articles/1064477/

The Krita project has announced
the release of Krita 5.3.0 and 6.0.0:

Krita 5.3/6.0 is the result of many years of work by the Krita
developers. Some features have been rewritten from the ground up,
others make their first appearance.

Enjoy the completely new text feature: on canvas editing, full
opentype support, text flowing into shapes. It is now easier than ever
to create vector-based panels for comic pages. Tools got extended: for
instance, the fill tool now can close gaps. The liquify mode of the
transform tool is much faster. There are new filters: a propagate
colors filter and a reset transparent filter. Support for HDR painting
has been improved. The recorder docker can now work in real
time. There is improved support for file formats, like support for
text objects in PSD files. And much, much, much more!

According to the announcement, the versions are almost functionally
identical. However, the 6.0.0 release is the first based on Qt 6;
it has more Wayland functionality but is considered experimental. It
cautions that users should stick to 5.3.0 for real work. See
the release
notes
for a full list of changes.

Security updates for Tuesday

Post Syndicated from jzb original https://lwn.net/Articles/1064474/

Security updates have been issued by Debian (strongswan and vlc), Fedora (cmake, giflib, and python-diskcache), SUSE (curl, docker-stable, freeciv, freerdp, freerdp2, freetype2, go1.25-openssl, go1.26-openssl, GraphicsMagick, gvfs, harfbuzz, kernel, lemon, libpng16, librsvg, libsodium, libsoup, net-snmp, protobuf, python-Authlib, python-maturin, python-tornado6, python310, python311-pypdf, python311-PyPDF2, python314, python39, rust-keylime, strongswan, systemd, ucode-intel, util-linux, and vim), and Ubuntu (gvfs, linux-aws-6.8, linux-azure, linux-azure, linux-azure-4.15, linux-azure-fips, linux-hwe-5.4, linux-ibm, linux-intel-iot-realtime, linux-nvidia-tegra-igx, linux-realtime-6.17, pyopenssl, rust-sized-chunks, strongswan, systemd, and tiff).

Sandboxing AI agents, 100x faster

Post Syndicated from Kenton Varda original https://blog.cloudflare.com/dynamic-workers/

Last September we introduced Code Mode, the idea that agents should perform tasks not by making tool calls, but instead by writing code that calls APIs. We’ve shown that simply converting an MCP server into a TypeScript API can cut token usage by 81%. We demonstrated that Code Mode can also operate behind an MCP server instead of in front of it, creating the new Cloudflare MCP server that exposes the entire Cloudflare API with just two tools and under 1,000 tokens.

But if an agent (or an MCP server) is going to execute code generated on-the-fly by AI to perform tasks, that code needs to run somewhere, and that somewhere needs to be secure. You can’t just eval() AI-generated code directly in your app: a malicious user could trivially prompt the AI to inject vulnerabilities.

You need a sandbox: a place to execute code that is isolated from your application and from the rest of the world, except for the specific capabilities the code is meant to access.

Sandboxing is a hot topic in the AI industry. For this task, most people are reaching for containers. Using a Linux-based container, you can start up any sort of code execution environment you want. Cloudflare even offers our container runtime and our Sandbox SDK for this purpose.

But containers are expensive and slow to start, taking hundreds of milliseconds to boot and hundreds of megabytes of memory to run. You probably need to keep them warm to avoid delays, and you may be tempted to reuse existing containers for multiple tasks, compromising the security.

If we want to support consumer-scale agents, where every end user has an agent (or many!) and every agent writes code, containers are not enough. We need something lighter.

And we have it.

Dynamic Worker Loader: a lean sandbox

Tucked into our Code Mode post in September was the announcement of a new, experimental feature: the Dynamic Worker Loader API. This API allows a Cloudflare Worker to instantiate a new Worker, in its own sandbox, with code specified at runtime, all on the fly.

Dynamic Worker Loader is now in open beta, available to all paid Workers users.

Read the docs for full details, but here’s what it looks like:

// Have your LLM generate code like this.
let agentCode: string = `
  export default {
    async myAgent(param, env, ctx) {
      // ...
    }
  }
`;

// Get RPC stubs representing APIs the agent should be able
// to access. (This can be any Workers RPC API you define.)
let chatRoomRpcStub = ...;

// Load a worker to run the code, using the worker loader
// binding.
let worker = env.LOADER.load({
  // Specify the code.
  compatibilityDate: "2026-03-01",
  mainModule: "agent.js",
  modules: { "agent.js": agentCode },

  // Give agent access to the chat room API.
  env: { CHAT_ROOM: chatRoomRpcStub },

  // Block internet access. (You can also intercept it.)
  globalOutbound: null,
});

// Call RPC methods exported by the agent code.
await worker.getEntrypoint().myAgent(param);

That’s it.

100x faster

Dynamic Workers use the same underlying sandboxing mechanism that the entire Cloudflare Workers platform has been built on since its launch, eight years ago: isolates. An isolate is an instance of the V8 JavaScript execution engine, the same engine used by Google Chrome. They are how Workers work.

An isolate takes a few milliseconds to start and uses a few megabytes of memory. That’s around 100x faster and 10x-100x more memory efficient than a typical container.

That means that if you want to start a new isolate for every user request, on-demand, to run one snippet of code, then throw it away, you can.

Unlimited scalability

Many container-based sandbox providers impose limits on global concurrent sandboxes and rate of sandbox creation. Dynamic Worker Loader has no such limits. It doesn’t need to, because it is simply an API to the same technology that has powered our platform all along, which has always allowed Workers to seamlessly scale to millions of requests per second.

Want to handle a million requests per second, where every single request loads a separate Dynamic Worker sandbox, all running concurrently? No problem!

Zero latency

One-off Dynamic Workers usually run on the same machine — the same thread, even — as the Worker that created them. No need to communicate around the world to find a warm sandbox. Isolates are so lightweight that we can just run them wherever the request landed. Dynamic Workers are supported in every one of Cloudflare’s hundreds of locations around the world.

It’s all JavaScript

The only catch, vs. containers, is that your agent needs to write JavaScript.

Technically, Workers (including dynamic ones) can use Python and WebAssembly, but for small snippets of code — like that written on-demand by an agent — JavaScript will load and run much faster.

We humans tend to have strong preferences on programming languages, and while many love JavaScript, others might prefer Python, Rust, or countless others.

But we aren’t talking about humans here. We’re talking about AI. AI will write any language you want it to. LLMs are experts in every major language. Their training data in JavaScript is immense.

JavaScript, by its nature on the web, is designed to be sandboxed. It is the correct language for the job.

Tools defined in TypeScript

If we want our agent to be able to do anything useful, it needs to talk to external APIs. How do we tell it about the APIs it has access to?

MCP defines schemas for flat tool calls, but not programming APIs. OpenAPI offers a way to express REST APIs, but it is verbose, both in the schema itself and the code you’d have to write to call it.

For APIs exposed to JavaScript, there is a single, obvious answer: TypeScript.

Agents know TypeScript. TypeScript is designed to be concise. With very few tokens, you can give your agent a precise understanding of your API.

// Interface to interact with a chat room.
interface ChatRoom {
  // Get the last `limit` messages of the chat log.
  getHistory(limit: number): Promise<Message[]>;

  // Subscribe to new messages. Dispose the returned object
  // to unsubscribe.
  subscribe(callback: (msg: Message) => void): Promise<Disposable>;

  // Post a message to chat.
  post(text: string): Promise<void>;
}

type Message = {
  author: string;
  time: Date;
  text: string;
}

Compare this with the equivalent OpenAPI spec (which is so long you have to scroll to see it all):

openapi: 3.1.0
info:
  title: ChatRoom API
  description: >
    Interface to interact with a chat room.
  version: 1.0.0

paths:
  /messages:
    get:
      operationId: getHistory
      summary: Get recent chat history
      description: Returns the last `limit` messages from the chat log, newest first.
      parameters:
        - name: limit
          in: query
          required: true
          schema:
            type: integer
            minimum: 1
      responses:
        "200":
          description: A list of messages.
          content:
            application/json:
              schema:
                type: array
                items:
                  $ref: "#/components/schemas/Message"

    post:
      operationId: postMessage
      summary: Post a message to the chat room
      requestBody:
        required: true
        content:
          application/json:
            schema:
              type: object
              required:
                - text
              properties:
                text:
                  type: string
      responses:
        "204":
          description: Message posted successfully.

  /messages/stream:
    get:
      operationId: subscribeMessages
      summary: Subscribe to new messages via SSE
      description: >
        Opens a Server-Sent Events stream. Each event carries a JSON-encoded
        Message object. The client unsubscribes by closing the connection.
      responses:
        "200":
          description: An SSE stream of new messages.
          content:
            text/event-stream:
              schema:
                description: >
                  Each SSE `data` field contains a JSON-encoded Message object.
                $ref: "#/components/schemas/Message"

components:
  schemas:
    Message:
      type: object
      required:
        - author
        - time
        - text
      properties:
        author:
          type: string
        time:
          type: string
          format: date-time
        text:
          type: string

We think the TypeScript API is better. It’s fewer tokens and much easier to understand (for both agents and humans).

Dynamic Worker Loader makes it easy to implement a TypeScript API like this in your own Worker and then pass it in to the Dynamic Worker either as a method parameter or in the env object. The Workers Runtime will automatically set up a Cap’n Web RPC bridge between the sandbox and your harness code, so that the agent can invoke your API across the security boundary without ever realizing that it isn’t using a local library.

That means your agent can write code like this:

// Thinking: The user asked me to summarize recent chat messages from Alice.
// I will filter the recent message history in code so that I only have to
// read the relevant messages.
let history = await env.CHAT_ROOM.getHistory(1000);
return history.filter(msg => msg.author == "alice");

HTTP filtering and credential injection

If you prefer to give your agents HTTP APIs, that’s fully supported. Using the globalOutbound option to the worker loader API, you can register a callback to be invoked on every HTTP request, in which you can inspect the request, rewrite it, inject auth keys, respond to it directly, block it, or anything else you might like.

For example, you can use this to implement credential injection (token injection): When the agent makes an HTTP request to a service that requires authorization, you add credentials to the request on the way out. This way, the agent itself never knows the secret credentials, and therefore cannot leak them.

Using a plain HTTP interface may be desirable when an agent is talking to a well-known API that is in its training set, or when you want your agent to use a library that is built on a REST API (the library can run inside the agent’s sandbox).

With that said, in the absence of a compatibility requirement, TypeScript RPC interfaces are better than HTTP:

  • As shown above, a TypeScript interface requires far fewer tokens to describe than an HTTP interface.

  • The agent can write code to call TypeScript interfaces using far fewer tokens than equivalent HTTP.

  • With TypeScript interfaces, since you are defining your own wrapper interface anyway, it is easier to narrow the interface to expose exactly the capabilities that you want to provide to your agent, both for simplicity and security. With HTTP, you are more likely implementing filtering of requests made against some existing API. This is hard, because your proxy must fully interpret the meaning of every API call in order to properly decide whether to allow it, and HTTP requests are complicated, with many headers and other parameters that could all be meaningful. It ends up being easier to just write a TypeScript wrapper that only implements the functions you want to allow.

Battle-hardened security

Hardening an isolate-based sandbox is tricky, as it is a more complicated attack surface than hardware virtual machines. Although all sandboxing mechanisms have bugs, security bugs in V8 are more common than security bugs in typical hypervisors. When using isolates to sandbox possibly-malicious code, it’s important to have additional layers of defense-in-depth. Google Chrome, for example, implemented strict process isolation for this reason, but it is not the only possible solution.

We have nearly a decade of experience securing our isolate-based platform. Our systems automatically deploy V8 security patches to production within hours — faster than Chrome itself. Our security architecture features a custom second-layer sandbox with dynamic cordoning of tenants based on risk assessments. We’ve extended the V8 sandbox itself to leverage hardware features like MPK. We’ve teamed up with (and hired) leading researchers to develop novel defenses against Spectre. We also have systems that scan code for malicious patterns and automatically block them or apply additional layers of sandboxing. And much more.

When you use Dynamic Workers on Cloudflare, you get all of this automatically.

Helper libraries

We’ve built a number of libraries that you might find useful when working with Dynamic Workers:

Code Mode

@cloudflare/codemode simplifies running model-generated code against AI tools using Dynamic Workers. At its core is DynamicWorkerExecutor(), which constructs a purpose-built sandbox with code normalisation to handle common formatting errors, and direct access to a globalOutbound fetcher for controlling fetch() behaviour inside the sandbox — set it to null for full isolation, or pass a Fetcher binding to route, intercept or enrich outbound requests from the sandbox.

const executor = new DynamicWorkerExecutor({
  loader: env.LOADER,
  globalOutbound: null, // fully isolated 
});

const codemode = createCodeTool({
  tools: myTools,
  executor,
});

return generateText({
  model,
  messages,
  tools: { codemode },
});

The Code Mode SDK also provides two server-side utility functions. codeMcpServer({ server, executor }) wraps an existing MCP Server, replacing its tool surface with a single code() tool. openApiMcpServer({ spec, executor, request }) goes further: given an OpenAPI spec and an executor, it builds a complete MCP Server with search() and execute() tools as used by the Cloudflare MCP Server, and better suited to larger APIs.

In both cases, the code generated by the model runs inside Dynamic Workers, with calls to external services made over RPC bindings passed to the executor.

Learn more about the library and how to use it.

Bundling

Dynamic Workers expect pre-bundled modules. @cloudflare/worker-bundler handles that for you: give it source files and a package.json, and it resolves npm dependencies from the registry, bundles everything with esbuild, and returns the module map the Worker Loader expects.

import { createWorker } from "@cloudflare/worker-bundler";

const worker = env.LOADER.get("my-worker", async () => {
  const { mainModule, modules } = await createWorker({
    files: {
      "src/index.ts": `
        import { Hono } from 'hono';
        import { cors } from 'hono/cors';

        const app = new Hono();
        app.use('*', cors());
        app.get('/', (c) => c.text('Hello from Hono!'));
        app.get('/json', (c) => c.json({ message: 'It works!' }));

        export default app;
      `,
      "package.json": JSON.stringify({
        dependencies: { hono: "^4.0.0" }
      })
    }
  });

  return { mainModule, modules, compatibilityDate: "2026-01-01" };
});

await worker.getEntrypoint().fetch(request);

It also supports full-stack apps via createApp — bundle a server Worker, client-side JavaScript, and static assets together, with built-in asset serving that handles content types, ETags, and SPA routing.

Learn more about the library and how to use it.

File manipulation

@cloudflare/shell gives your agent a virtual filesystem inside a Dynamic Worker. Agent code calls typed methods on a state object — read, write, search, replace, diff, glob, JSON query/update, archive — with structured inputs and outputs instead of string parsing.

Storage is backed by a durable Workspace (SQLite + R2), so files persist across executions. Coarse operations like searchFiles, replaceInFiles, and planEdits minimize RPC round-trips — the agent issues one call instead of looping over individual files. Batch writes are transactional by default: if any write fails, earlier writes roll back automatically.

import { Workspace } from "@cloudflare/shell";
import { stateTools } from "@cloudflare/shell/workers";
import { DynamicWorkerExecutor, resolveProvider } from "@cloudflare/codemode";

const workspace = new Workspace({
  sql: this.ctx.storage.sql, // Works with any DO's SqlStorage, D1, or custom SQL backend
  r2: this.env.MY_BUCKET, // large files spill to R2 automatically
  name: () => this.name   // lazy — resolved when needed, not at construction
});

// Code runs in an isolated Worker sandbox with no network access
const executor = new DynamicWorkerExecutor({ loader: env.LOADER });

// The LLM writes this code; `state.*` calls dispatch back to the host via RPC
const result = await executor.execute(
  `async () => {
    // Search across all TypeScript files for a pattern
    const hits = await state.searchFiles("src/**/*.ts", "answer");
    // Plan multiple edits as a single transaction
    const plan = await state.planEdits([
      { kind: "replace", path: "/src/app.ts",
        search: "42", replacement: "43" },
      { kind: "writeJson", path: "/src/config.json",
        value: { version: 2 } }
    ]);
    // Apply atomically — rolls back on failure
    return await state.applyEditPlan(plan);
  }`,
  [resolveProvider(stateTools(workspace))]
);

The package also ships prebuilt TypeScript type declarations and a system prompt template, so you can drop the full state API into your LLM context in a handful of tokens.

Learn more about the library and how to use it.

How are people using it?

Code Mode

Developers want their agents to write and execute code against tool APIs, rather than making sequential tool calls one at a time. With Dynamic Workers, the LLM generates a single TypeScript function that chains multiple API calls together, runs it in a Dynamic Worker, and returns the final result back to the agent. As a result, only the output, and not every intermediate step, ends up in the context window. This cuts both latency and token usage, and produces better results, especially when the tool surface is large.

Our own Cloudflare MCP server is built exactly this way: it exposes the entire Cloudflare API through just two tools — search and execute — in under 1,000 tokens, because the agent writes code against a typed API instead of navigating hundreds of individual tool definitions.

Building custom automations 

Developers are using Dynamic Workers to let agents build custom automations on the fly. Zite, for example, is building an app platform where users interact through a chat interface — the LLM writes TypeScript behind the scenes to build CRUD apps, connect to services like Stripe, Airtable, and Google Calendar, and run backend logic, all without the user ever seeing a line of code. Every automation runs in its own Dynamic Worker, with access to only the specific services and libraries that the endpoint needs.

“To enable server-side code for Zite’s LLM-generated apps, we needed an execution layer that was instant, isolated, and secure. Cloudflare’s Dynamic Workers hit the mark on all three, and out-performed all of the other platforms we benchmarked for speed and library support. The NodeJS compatible runtime supported all of Zite’s workflows, allowing hundreds of third party integrations, without sacrificing on startup time. Zite now services millions of execution requests daily thanks to Dynamic Workers.”

— Antony Toron, CTO and Co-Founder, Zite 

Running AI-generated applications

Developers are building platforms that generate full applications from AI — either for their customers or for internal teams building prototypes. With Dynamic Workers, each app can be spun up on demand, then put back into cold storage until it’s invoked again. Fast startup times make it easy to preview changes during active development. Platforms can also block or intercept any network requests the generated code makes, keeping AI-generated apps safe to run.

Pricing

Dynamically-loaded Workers are priced at $0.002 per unique Worker loaded per day (as of this post’s publication), in addition to the usual CPU time and invocation pricing of regular Workers.

For AI-generated “code mode” use cases, where every Worker is a unique one-off, this means the price is $0.002 per Worker loaded (plus CPU and invocations). This cost is typically negligible compared to the inference costs to generate the code.

During the beta period, the $0.002 charge is waived. As pricing is subject to change, please always check our Dynamic Workers pricing for the most current information. 

Get Started

If you’re on the Workers Paid plan, you can start using Dynamic Workers today. 

Dynamic Workers Starter

Use this “hello world” starter to get a Worker deployed that can load and execute Dynamic Workers. 

Dynamic Workers Playground

You can also deploy the Dynamic Workers Playground, where you’ll be able to write or import code, bundle it at runtime with @cloudflare/worker-bundler, execute it through a Dynamic Worker, see real-time responses and execution logs.


Dynamic Workers are fast, scalable, and lightweight. Find us on Discord if you have any questions. We’d love to see what you build!


Първите три години. Защо младите учители не се задържат в системата?

Post Syndicated from original https://www.toest.bg/purvite-tri-godini-zashcho-mladite-uchiteli-ne-se-zadurzhat-v-sistemata/

Първите три години. Защо младите учители не се задържат в системата?

Проучване на Сметната палата за качеството на образованието в България за периода 2019–2023 г. сочи, че 34% от новоназначените учители напускат в рамките на първите три години, а близо половината от завършилите педагогически специалности не се реализират в професията си. Въпреки това интересът към тези специалности е висок, а учителските заплати са нараснали с 60% в изследвания период.

За истински мотивираните учители обаче само заплатата не е достатъчна, за да останат на работа. Преподавателите в училищата днес имат нужда от качествени политики за подкрепа и професионално израстване, но преди това е важно да бъдат подготвени за срещата си с образователната система. Такъв е основният извод, до който стигнах, опитвайки се да разбера парадокса на масовото напускане – въпреки интереса и повишаващите се възнаграждения.

Университетът vs. реалната работна среда

Станимира Паскова и Цветомира Антонова започват учителската си кариера преди 20 години в две различни училища, но срещат един и същ проблем – университетът не ги е подготвил достатъчно добре за реалната училищна среда.

Станимира се среща с професията за първи път през 2002 г. в отдалечено селско училище, в което е единствената с майчин български език сред колегите и учениците си. Езиковата бариера обаче се оказва непреодолима: 

Аз бях много разочарована, че толкова се бях старала да се представя по възможно най-добрия начин, така както ме бяха подготвили в университета, но се оказа, че това тотално не върши работа за моите деца. И всъщност те са ме слушали учтиво, без да ме разбират, защото аз съм говорила на някакъв чужд език за тях. 

След тази първа година Станимира започва да посещава различни обучения за учители, докато през 2013 г. открива програмата „Нов път в преподаването“, разработена от „Заедно в час“.

Цветомира започва учителския си път през 2004 г. в София с голям ентусиазъм. Чувства се много добре подготвена академично, но днес е категорична, че методическата подготовка в университета не е била модерна и адекватна за времето си. Тя обаче се сблъсква и с друг характерен за учителите проблем –

„бърнаут“.

На петата година вече се чувствах много смазана и от системата. Имах усещането, че трудът ми отива на вятъра и че усилията, които влагам, са много по-големи от резултатите, които виждам, 

разказва Цветомира и допълва, че все още не се обръща достатъчно внимание на емоционалното прегаряне, което е причина много млади учители да напуснат професията. Самата тя прекъсва преподавателската си дейност за няколко години, докато през 2013 г. любопитството ѝ не я среща с програмата „Нов път в преподаването“.

Ръководителката на програмата Жаклин Мисирян-Дойчева определи в разговор с „Тоест“ бърнаута като синдром. За някои учители проблемът се корени в невъзможността за ефективно управление на времето. За други е в трудностите да се справят с клас от 26 деца, част от които не посещават часовете или не говорят български език.

Жаклин също е на мнение, че университетите не подготвят бъдещите учители за реалните предизвикателства в професията, сред които са

агресията и ниската мотивация,

които присъстват във всяка класна стая. За преодоляване на тези проблеми е важно ученикът да бъде поставен в центъра и да се вземат предвид неговите нужди и емоции.

Според Станимира решението за справяне с агресията е и в дома, затова е важно да се работи и с родителите. Тя смята, че като учителка на „Заедно в час“ в с. Караджово (Пловдив) е успяла да изгради доверие у учениците си и техните родители чрез посещения в домовете им и на местата, които са важни за конкретната общност, за да им покаже уважение, грижа и заинтересованост: 

Всяко едно детенце е индивидуално, така че колкото по-добре го познаваш, колкото по-добре изградиш връзки с него, толкова по-добре се чувства и то. То вече идва със съвсем друга нагласа в твоята класна стая.

Важно за мотивацията в клас е и оценяването. Ако учителят успява да забележи, уважи и оцени различните личности в класа, те ще работят по-добре и концентрацията ще се подобри. За поставянето на оценка обаче е нужно да имаш ясни критерии, категорична е Цветомира, за която обученията на „Заедно в час“ по отношение на оценяването, планирането и развиването на емоционалната интелигентност са били от изключителна полза.

Политиките на МОН за задържане на учителите

През 2016 г. педагогиката е включена в списъка на Министерството на образованието и науката (МОН) с приоритетни направления. Това означава, че студентите, приети по държавна поръчка в специалностите от това направление, не плащат такси за обучението си. От МОН уточниха за „Тоест“, че нарастването на учителските заплати е „ключов фактор за нарастване престижа на учителската професия и за привличане и задържане на новоназначените учители“. Към момента педагогиката все още е приоритетно направление с голям интерес от страна на студентите, макар част от специалностите в това направление да бяха извадени от списъка с приоритетните.

На теория в резултат на тези стимули би следвало днес в България да има достатъчен брой учители за нуждите на системата. Според Люба Йорданова, старши специалист в отдел „Стратегически партньорства“ на „Заедно в час“ обаче, една от предпоставките това да не става е в липсващите критерии за подбор. Тя обобщи ситуацията така: много от студентите в педагогически специалности следват висше образование заради дипломата, а не за да станат учители. Но дори голяма част от тези, които започват работа по специалността, напускат в първите три години заради недостатъчна подготовка в университета, липса на ефективно наставничество и други фактори. И това води до недостиг на качествени учители.

Критериите за подбор на квалифицирани учители са важни, категорична е и Жаклин, тъй като „ние не сме в позицията на хора, които трябва да губим времето на децата“.

Как се измерва качеството на образованието?

Освен липсващите критерии на подбор, демотивиращо за преподавателите може да се окаже и отсъствието на правна рамка, свързана с качеството на образованието. Оценките от външно оценяване и държавните зрелостни изпити все още са индикатор за състоянието на образованието, въпреки че според международното изследване PISA, което се провежда с 15-годишни ученици, голяма част от тях не притежават базови умения. Резултатите от държавните изпити не могат да измерят качеството на образованието в училищата, тъй като много деца посещават частни уроци, което пък поставя учениците от семейства с по-ниски финансови възможности в по-неблагоприятна ситуация спрямо връстниците им. Не се вижда и кои от училищата, където се работи с деца от уязвими групи, с ученици с майчин език, различен от българския, със специални потребности и т.н., са отбелязали напредък.

Заедно с приемането на Закона за предучилищно и училищно образование през 2016 г. влиза в сила и Наредба №16 от 8 декември същата година – за управлението на качеството в институциите, която утвърждава държавния образователен стандарт. Тя е отменена в края на 2017 г., когато образователен министър е Красимир Вълчев, и едва през септември 2025 г. започва обществено обсъждане на нов документ на мястото на стария. След приключване на обсъждането той не е гласуван. 

На въпрос на „Тоест“ какви са мотивите за отмяна на наредбата, бившият министър на образованието Красимир Вълчев отговори, че тя не е била оценена като „достатъчно ефективна“. Според него наредбата е произвеждала само „формализъм, а не реална отговорност в управлението на качеството“, тоест писане на стратегически документи, които да се показват по време на проверки, без да има реално съществуваща система. 

Макар Вълчев да оценява новата проектонаредба като много по-добра, той каза, че е предпочел да разполага с повече време за работа по нея. Категоричен е обаче, че трябва да има такава наредба и да се създаде култура на управление на качеството.

Как да задържим учителите?

През 2021 г. Световната банка представя резултатите от проучване по поръчка на МОН за нуждите на образователната система. Сред препоръките, изработени на основата на анализа, е създаването на пилотна програма за въвеждане в учителската професия на начинаещи учители чрез наставничество и подкрепа за професионално израстване. Изследването установява текучество на кадри,

като в периода 2015–2018 г. напусналите след третата година учители са близо 75%.

Настоящата практика за наставничество и подкрепа на новоназначените учители не се документира добре, а „системата се нуждае от изграждане на капацитет и постепенно въвеждане на рамкова програма за въвеждане в професията“, пише в доклада върху проучването.

На въпрос на „Тоест“ във връзка с установената от Световната банка потребност от подкрепа за новоназначените учители от МОН отговориха, че 

се провежда задължителната въвеждаща квалификация, която се изразява в обучения на новоназначени учители в предучилищното образование и чрез ментори, които са професионалисти с богата експертиза както в преподаването, така и в управлението и обучението на педагогически специалисти. 

От пресцентъра на Министерството допълват, че през 2025 г. са проведени 76 майсторски класа в рамките на Националната програма „Квалификация на педагогическите специалисти“. Те са били в три направления: подходи за формиращо оценяване и преподаване в контекста на националното външно оценяване и държавните зрелостни изпити, повишаване на четивната грамотност на учениците и обучения за местни модели за повишаване на резултатите и качеството на подготовка на учениците.

Обученията на практика

Цветомира потвърди, че е посещавала обучения, организирани от МОН, 

които уж адресират някакви проблеми, примерно свързани с агресия, с насилие […] но всъщност как протичат обученията – в 4-звезден хотел, със спа, с „Бяла роза“ и това е основният акцент – учителките да си починат за три дни.

В споменатия доклад на Световната банка се повдига и въпросът за липсата на добра подготовка още в университета. В него се прави следният извод:

… университетите не приоритизират достатъчно практическото обучение в училищна среда, организирано в тясно партньорство с базови училища.

Базовите училища в България не са „представителна извадка на всички типове училища в страната“, категорична е Люба Йорданова, и добавя: 

Учебните заведения нямат достатъчно стимули да приемат студенти по педагогика. Те трябва да отделят поне един старши или главен учител за наставник на стажантите, бюрокрацията по време на стажовете също не е малка. Хоспитирането (практическите наблюдения на студентите) трябва да започне още в първи или втори курс, а не както е в момента – в трети и четвърти. Важно е също студентите да имат възможността да практикуват както в училища в големи населени места и с високи резултати, така и в такива в малки населени места и изправени пред различни предизвикателства.

В частната езикова школа в Пловдив, в която преподава Станимира, стажуват и млади учители, но от разказите им за университета не е останала с впечатлението, че нещо драстично се е променило от времето, когато тя е била студентка.

„Нов път в преподаването“

Програмата, разработена от „Заедно в час“, се възобновява след прекъсване през 2022 г. Насочена е към педагози с до 5 години опит в професията и предлага подкрепа и наставничество в рамките на две години. Подборът е внимателен, „за да сме сигурни, че в програмата влизат високомотивирани кандидати“, казва Жаклин. Фокусът е върху подкрепата за учители, работещи с деца от уязвими групи или в по-малки населени места, където учениците нямат същите образователни възможности като връстниците си от по-големите градове. Тази година са обхванати град София и областта заедно с Враца, Пазарджик, Пловдив, Стара Загора и Бургас, като целта е да се достигне до малките населени места.

За Станимира програмата е била ценна с оказаната подкрепа от координатор, който посещава учителите регулярно, дискутира с тях казуси от ежедневието им, наблюдава учебните им часове и предоставя конструктивна обратна връзка. Според нея програмата предоставя пълна методическа подкрепа, достъп до ресурси от най-високо качество и непрекъснати надграждащи обучения. 

Всъщност никога не си бях представяла как изглеждам отстрани, какво се случва, дали децата ме харесват, дали не ме харесват, дали се справям добре, къде са ми били силните страни в часа, къде мога да направя нещата по друг начин – това е безценна информация за един учител и се отразява на работата ти веднага, още в следващия час […] Посещенията на координатора нямат нищо общо с посещенията на директора, защото по-старото поколение учители свързва посещението преди всичко с налагането на някакви санкции. Влизат, гледат те, осъждат те по някакъв начин,

разказва тя.

Програмата е успяла да уцели „в десетката“ на потребностите на Цветомира да бъде добър учител. Въпреки подкрепата на нейните по-опитни колеги в началото на кариерата ѝ, „Нов път в преподаването“ успява да ѝ помогне да развие преподавателската си методология, да бъде полезна на учениците си и удовлетворена от работата си. 

Станимира и Цветомира говориха с много любов за професията си. И двете обаче продължават да са учителки заради вътрешната си мотивация, любопитство и желание за развитие, а не защото държавата е успяла да ги мотивира. В тази връзка политиката на МОН за повишаване на възнагражденията не е изиграла особена роля за кариерното развитие на двете учителки. Истинската подкрепа за педагозите и адекватните отговори на техните нужди все още идват от неправителствения сектор. Грижата за учителите обаче е важна и за качеството на образованието, а то би трябвало да е национална политика. 

The collective thoughts of the interwebz