Post Syndicated from The History Guy: History Deserves to Be Remembered original https://www.youtube.com/watch?v=EZauXHI4zNY
Planet Definitions
Post Syndicated from xkcd.com original https://xkcd.com/3063/

Accelerate analytics and AI innovation with the next generation of Amazon SageMaker
Post Syndicated from G2 Krishnamoorthy original https://aws.amazon.com/blogs/big-data/accelerate-analytics-and-ai-innovation-with-the-next-generation-of-amazon-sagemaker/
At AWS re:Invent 2024, we announced the next generation of Amazon SageMaker, the center for all your data, analytics, and AI. Amazon SageMaker brings together widely adopted AWS machine learning (ML) and analytics capabilities and addresses the challenges of harnessing organizational data for analytics and AI through unified access to tools and data with governance built in. It enables teams to securely find, prepare, and collaborate on data assets and build analytics and AI applications through a single experience, accelerating the path from data to value.
At the core of the next generation of Amazon SageMaker is Amazon SageMaker Unified Studio, a single data and AI development environment where you can find and access your organization’s data and act on it using the best tool for the job across virtually any use case. We are excited to announce the general availability of SageMaker Unified Studio.

In this post, we explore the benefits of SageMaker Unified Studio and how to get started.
Benefits of SageMaker Unified Studio
SageMaker Unified Studio brings together the functionality and tools from existing AWS Analytics and AI/ML services, including Amazon EMR, AWS Glue, Amazon Athena, Amazon Redshift, Amazon Bedrock, and Amazon SageMaker AI. From within the unified studio, you can discover data and AI assets from across your organization, then work together in projects to securely build and share analytics and AI artifacts, including data, models, and generative AI applications. Governance features including fine-grained access control are built into SageMaker Unified Studio using Amazon SageMaker Catalog to help you meet enterprise security requirements across your entire data estate.
Unified access to your data is provided by Amazon SageMaker Lakehouse, a unified, open, and secure data lakehouse built on Apache Iceberg open standards. Whether your data is stored in Amazon Simple Storage Service (Amazon S3) data lakes, Redshift data warehouses, or third-party and federated data sources, you can access it from one place and use it with Iceberg-compatible engines and tools. In addition, SageMaker Lakehouse now integrates with Amazon S3 Tables, the first cloud object store with native Apache Iceberg support, so you can use SageMaker Lakehouse to create, query, and process S3 Tables efficiently using various analytics engines in SageMaker Unified Studio as well as Iceberg-compatible engines like Apache Spark and PyIceberg.
Capabilities from Amazon Bedrock are now generally available in SageMaker Unified Studio, allowing you to rapidly prototype, customize, and share generative AI applications in a governed environment. Users have an intuitive interface to access high-performing foundation models (FMs) in Amazon Bedrock, including the Amazon Nova model series, and the ability to create Agents, Flows, Knowledge Bases, and Guardrails with a few clicks.
Amazon Q Developer, the most capable generative AI assistant for software development, can be used within SageMaker Unified Studio to streamline tasks across the data and AI development lifecycle, including code authoring, SQL generation, data discovery, and troubleshooting.
A new integrated way of working
The general availability of SageMaker Unified Studio represents another meaningful step in our journey to offer our customers a streamlined way to work with their data, whether for analytics or AI. Many of our customers have told us that you are building data-driven applications to guide business decisions, improve agility, and drive innovation, but that these applications are complex to build because they require collaboration across teams and the integration of data and tools. Not only is it time consuming for users to learn multiple development experiences, but because data, code, and other development artifacts are stored separately, it is challenging for users to understand how they interact with each other and to use them cohesively. Configuring and governing access is also a cumbersome manual process. To overcome these hurdles, many organizations are building bespoke integrations between services, tools, and homegrown access management systems. However, what you need is the flexibility to adopt the best services for your use case while empowering your data teams with a unified development experience.
“When we build data-driven applications for our customers, we want a unified platform where the technologies work together in an integrated way. Amazon SageMaker Unified Studio streamlines our solution delivery processes through comprehensive analytics capabilities, a unified studio experience, and a lakehouse that integrates data management across data warehouses and data lakes. Amazon SageMaker Unified Studio reduces the time-to-value for our customers’ data projects by up to 40%, helping us with our mission to accelerate our customers’ digital transformation journey.”
—Akihiro Suzue, Head of Solutions Sector, NTT DATA; Yuji Shono, Senior Manager, Apps & Data Technology Department, NTT DATA; Yuki Saito, Manager, Digital Success Solutions Division, NTT DATA
Millions of organizations trust AWS and utilize our comprehensive set of purpose-built analytics, AI/ML, and generative AI capabilities to power data-driven applications without compromising on performance, scale, or cost. Our goal for the next generation of Amazon SageMaker, including SageMaker Unified Studio, is to make data and AI workers more productive by providing access to all your data and tools in a single development environment.
Building from a single data and AI development environment
Let’s explore a common business challenge: increasing revenue through better lead generation. Consider an organization implementing an intelligent digital assistant on their website to engage with customers—a process that traditionally requires multiple tools and data sources. With SageMaker Unified Studio, this entire process can now be carried out within a single data and AI development environment.

First, the data team uses the generative AI playground within SageMaker Unified Studio to quickly evaluate and select the best model for their customer interactions. They then create a project to house the tools and resources necessary for their use case and use Amazon Bedrock within the project to build and deploy a sophisticated virtual assistant that quickly begins qualifying leads through their website.
To identify the most promising opportunities, the team develops a segmentation strategy. The data engineer asks Amazon Q Developer to identify datasets that contain lead data and uses zero-ETL integrations to bring the data into SageMaker Lakehouse. The data analyst then discovers it and creates a comprehensive view of their market. They use the SQL query editor to build out marketing segments, which they then write back to SageMaker Lakehouse, where they are available to other team members.
Finally, the data scientist accesses the same dataset, which they use to train and deploy an automated lead scoring model using tools available from SageMaker AI. During the model development phase, they use Amazon Q Developer’s inline code authoring and troubleshooting capabilities to efficiently write error free-code in their JupyterLab notebook. The final model provides sales teams with the highest-value opportunities, which they can visualize in a business intelligence dashboard and take action on immediately.
Reducing time-to-value in a unified environment
What is remarkable about this example is that entire process happens in one integrated environment. Without SageMaker Unified Studio, the team would have had to work with multiple data sources, tools, and services, spending time learning multiple development environments, creating resources shares, and manually configuring access controls. The data engineer and data analyst would have worked in various data warehouses, data lakes, and analytics tools, the data scientist would have worked in an ML studio and notebook environment, and the application builder in a generative AI tool. Now, they’re able to build and collaborate with their data and tools available in one experience, dramatically reducing time-to-value.
That’s why we’re so excited about the next generation of Amazon SageMaker and the general availability of SageMaker Unified Studio. We believe that by putting everything you need for analytics and AI in one place, you can solve complex end-to-end problems more efficiently and get to innovative outcomes faster than ever before.
Getting started with SageMaker Unified Studio
To learn more, check out the following resources:
About the authors
 G2 Krishnamoorthy is VP of Analytics, leading AWS data lake services, data integration, Amazon OpenSearch Service, and Amazon QuickSight. Prior to his current role, G2 built and ran the Analytics and ML Platform at Facebook/Meta, and built various parts of the SQL Server database, Azure Analytics, and Azure ML at Microsoft.
 Rahul Pathak is VP of Relational Database Engines, leading Amazon Aurora, Amazon Redshift, and Amazon QLDB. Prior to his current role, he was VP of Analytics at AWS, where he worked across the entire AWS database portfolio. He has co-founded two companies, one focused on digital media analytics and the other on IP-geolocation.
Collaborate and build faster with Amazon SageMaker Unified Studio, now generally available
Post Syndicated from Donnie Prakoso original https://aws.amazon.com/blogs/aws/collaborate-and-build-faster-with-amazon-sagemaker-unified-studio-now-generally-available/
Today, we’re announcing the general availability of Amazon SageMaker Unified Studio, a single data and AI development environment where you can find and access all of the data in your organization and act on it using the best tool for the job across virtually any use case. Introduced as preview during AWS re:Invent 2024, my colleague, Antje, summarized it as:
SageMaker Unified Studio (preview) is a single data and AI development environment. It brings together functionality and tools from the range of standalone “studios,” query editors, and visual tools that we have today in Amazon Athena, Amazon EMR, AWS Glue, Amazon Redshift, Amazon Managed Workflows for Apache Airflow (Amazon MWAA), and the existing SageMaker Studio.
Here’s a video to see Amazon SageMaker Unified Studio in action:
SageMaker Unified Studio breaks down silos in data and tools, giving data engineers, data scientists, data analysts, ML developers and other data practitioners a single development experience. This saves development time and simplifies access control management so data practitioners can focus on what really matters to them—building data products and AI applications.
This post focuses on several important announcements that we’re excited to share:
- New capabilities for Amazon Bedrock in SageMaker Unified Studio — The integration now supports new foundation models (FMs), including Anthropic’s Claude 3.7 Sonnet and DeepSeek-R1, enables data sourcing from Amazon Simple Storage Service (Amazon S3) folders within projects for knowledge base creation, extends guardrail functionality to flows, and provides a streamlined user management interface for domain administrators to manage model governance across multiple Amazon Web Service (AWS) accounts.
- Amazon Q Developer is now generally available in SageMaker Unified Studio — Amazon Q Developer, the most capable generative AI assistant for software development, streamlines development in Amazon SageMaker Unified Studio by providing natural language, conversational interfaces that simplify tasks like writing SQL queries, building ETL jobs, troubleshooting, and generating real-time code suggestions.
To get started, go to the Amazon SageMaker console and create a SageMaker Unified Studio domain. To learn more, visit Create an Amazon SageMaker Unified Studio domain in the AWS documentation.
New capabilities for Amazon Bedrock in SageMaker Unified Studio
The capabilities of Amazon Bedrock within Amazon SageMaker Unified Studio offer a governed collaborative environment for developers to rapidly create and customize generative AI applications. This intuitive interface caters to developers of all skill levels, providing seamless access to the high-performance FMs offered in Amazon Bedrock and advanced customization tools for collaborative development of tailored generative AI applications.
Since the preview launch, several new FMs have become available in Amazon Bedrock and are fully integrated with SageMaker Unified Studio, including Anthropic’s Claude 3.7 Sonnet and DeepSeek-R1. These models can be used for building generative AI apps and chatting in the playground in SageMaker Unified Studio.
Here’s how you can choose Anthropic’s Claude 3.7 Sonnet on the model selection in your project.

You can also source data or documents from S3 folders within your project and select specific FMs when creating knowledge bases.

During preview, we introduced Amazon Bedrock Guardrails to help you implement safeguards for your Amazon Bedrock application based on your use cases and responsible AI policies. Now, Amazon Bedrock Guardrails is extended to Amazon Bedrock Flows with this general availability release.

Additionally, we have streamlined generative AI setup for associated accounts with a new user management interface in SageMaker Unified Studio, making it straightforward for domain administrators to grant associated account admins access to model governance projects. This enhancement eliminates the need for command line operations, streamlining the process of configuring generative AI capabilities across multiple AWS accounts.
These new features eliminate barriers between data, tools, and builders in the generative AI development process. You and your team will gain a unified development experience by incorporating the powerful generative AI capabilities of Amazon Bedrock — all within the same workspace.
Amazon Q Developer is now generally available in SageMaker Unified Studio
Amazon Q Developer is now generally available in Amazon SageMaker Unified Studio, providing data professionals with generative AI–powered assistance across the entire data and AI development lifecycle.
Amazon Q Developer integrates with the full suite of AWS analytics and AI/ML tools and services within SageMaker Unified Studio, including data processing, SQL analytics, machine learning model development, and generative AI application development, to accelerate collaboration and help teams build data and AI products faster. To get started, you can select Amazon Q Developer icon.

For new users of SageMaker Unified Studio, Amazon Q Developer serves as an invaluable onboarding assistant. It can explain core concepts such as domains and projects, provide guidance on setting up environments, and answer your questions.

Amazon Q Developer helps you discover and understand data using powerful natural language interactions with SageMaker Catalog. What makes this implementation particularly powerful is how Amazon Q Developer combines broad knowledge of AWS analytics and AI/ML services with the user’s context to provide personalized guidance.
You can chat about your data assets through a conversational interface, asking questions such as “Show all payment related datasets” without needing to navigate complex metadata structures.

Amazon Q Developer offers SQL query generation through its integration with the built-in query editor available in SageMaker Unified Studio. Data professionals of varying skill levels can now express their analytical needs in natural language, receiving properly formatted SQL queries in return.
For example, you can ask, “Analyze payment method preferences by age group and region” and Amazon Q Developer will generate the appropriate SQL with proper joins across multiple tables.

Additionally, Amazon Q Developer is also available to assist with troubleshooting and generating real-time code suggestions in SageMaker Unified Studio Jupyter notebooks, as well as building ETL jobs.
Now available
- Availability — Amazon SageMaker Unified Studio is now available in the following AWS Regions: US East (N. Virginia, Ohio), US West (Oregon), Asia Pacific (Seoul, Singapore, Sydney, Tokyo), Canada (Central), Europe (Frankfurt, Ireland, London), South America (São Paulo). Learn more about the availability of these capabilities on supported Region documentation page.
- Amazon Q Developer subscription — The free tier of Amazon Q Developer is available by default in SageMaker Unified Studio, requiring no additional setup or configuration. If you already have Amazon Q Developer Pro Tier subscriptions, you can use those enhanced capabilities within the SageMaker Unified Studio environment. For more information, visit the documentation page.
- Amazon Bedrock capabilities — To learn more about the capabilities of Amazon Bedrock in Amazon SageMaker Unified Studio, refer to this documentation page.
Start building with Amazon SageMaker Unified Studio today. For more information, visit the Amazon SageMaker Unified Studio page.
Happy building!
— How is the News Blog doing? Take this 1 minute survey! (This survey is hosted by an external company. AWS handles your information as described in the AWS Privacy Notice. AWS will own the data gathered via this survey and will not share the information collected with survey respondents.)
Amazon S3 Tables integration with Amazon SageMaker Lakehouse is now generally available
Post Syndicated from Channy Yun (윤석찬) original https://aws.amazon.com/blogs/aws/amazon-s3-tables-integration-with-amazon-sagemaker-lakehouse-is-now-generally-available/
At re:Invent 2024, we launched Amazon S3 Tables, the first cloud object store with built-in Apache Iceberg support to streamline storing tabular data at scale, and Amazon SageMaker Lakehouse to simplify analytics and AI with a unified, open, and secure data lakehouse. We also previewed S3 Tables integration with Amazon Web Services (AWS) analytics services for you to stream, query, and visualize S3 Tables data using Amazon Athena, Amazon Data Firehose, Amazon EMR, AWS Glue, Amazon Redshift, and Amazon QuickSight.
Our customers wanted to simplify the management and optimization of their Apache Iceberg storage, which led to the development of S3 Tables. They were simultaneously working to break down data silos that impede analytics collaboration and insight generation using the SageMaker Lakehouse. When paired with S3 Tables and SageMaker Lakehouse in addition to built-in integration with AWS analytics services, they can gain a comprehensive platform unifying access to multiple data sources enabling both analytics and machine learning (ML) workflows.
Today, we’re announcing the general availability of Amazon S3 Tables integration with Amazon SageMaker Lakehouse to provide unified S3 Tables data access across various analytics engines and tools. You can access SageMaker Lakehouse from Amazon SageMaker Unified Studio, a single data and AI development environment that brings together functionality and tools from AWS analytics and AI/ML services. All S3 tables data integrated with SageMaker Lakehouse can be queried from SageMaker Unified Studio and engines such as Amazon Athena, Amazon EMR, Amazon Redshift, and Apache Iceberg-compatible engines like Apache Spark or PyIceberg.
With this integration, you can simplify building secure analytic workflows where you can read and write to S3 Tables and join with data in Amazon Redshift data warehouses and third-party and federated data sources, such as Amazon DynamoDB or PostgreSQL.

You can also centrally set up and manage fine-grained access permissions on the data in S3 Tables along with other data in the SageMaker Lakehouse and consistently apply them across all analytics and query engines.
S3 Tables integration with SageMaker Lakehouse in action
To get started, go to the Amazon S3 console and choose Table buckets from the navigation pane and select Enable integration to access table buckets from AWS analytics services.

Now you can create your table bucket to integrate with SageMaker Lakehouse. To learn more, visit Getting started with S3 Tables in the AWS documentation.
1. Create a table with Amazon Athena in the Amazon S3 console
You can create a table, populate it with data, and query it directly from the Amazon S3 console using Amazon Athena with just a few steps. Select a table bucket and select Create table with Athena, or you can select an existing table and select Query table with Athena.

When you want to create a table with Athena, you should first specify a namespace for your table. The namespace in an S3 table bucket is equivalent to a database in AWS Glue, and you use the table namespace as the database in your Athena queries.

Choose a namespace and select Create table with Athena. It goes to the Query editor in the Athena console. You can create a table in your S3 table bucket or query data in the table.

2. Query with SageMaker Lakehouse in the SageMaker Unified Studio
Now you can access unified data across S3 data lakes, Redshift data warehouses, third-party and federated data sources in SageMaker Lakehouse directly from SageMaker Unified Studio.
To get started, go to the SageMaker console and create a SageMaker Unified Studio domain and project using a sample project profile: Data Analytics and AI-ML model development. To learn more, visit Create an Amazon SageMaker Unified Studio domain in the AWS documentation.
After the project is created, navigate to the project overview and scroll down to project details to note down the project role Amazon Resource Name (ARN).

Go to the AWS Lake Formation console and grant permissions for AWS Identity and Access Management (IAM) users and roles. In the in the Principals section, select the <project role ARN> noted in the previous paragraph. Choose Named Data Catalog resources in the LF-Tags or catalog resources section and select the table bucket name you created for Catalogs. To learn more, visit Overview of Lake Formation permissions in the AWS documentation.

When you return to SageMaker Unified Studio, you can see your table bucket project under Lakehouse in the Data menu in the left navigation pane of project page. When you choose Actions, you can select how to query your table bucket data in Amazon Athena, Amazon Redshift, or JupyterLab Notebook.

When you choose Query with Athena, it automatically goes to Query Editor to run data query language (DQL) and data manipulation language (DML) queries on S3 tables using Athena.
Here is a sample query using Athena:
select * from "s3tablecatalog/s3tables-integblog-bucket”.”proddb"."customer" limit 10;
To query with Amazon Redshift, you should set up Amazon Redshift Serverless compute resources for data query analysis. And then you choose Query with Redshift and run SQL in the Query Editor. If you want to use JupyterLab Notebook, you should create a new JupyterLab space in Amazon EMR Serverless.
3. Join data from other sources with S3 Tables data
With S3 Tables data now available in SageMaker Lakehouse, you can join it with data from data warehouses, online transaction processing (OLTP) sources like relational or non-relational database, Iceberg tables, and other third party sources to gain more comprehensive and deeper insights.
For example, you can add connections to data sources such as Amazon DocumentDB, Amazon DynamoDB, Amazon Redshift, PostgreSQL, MySQL, Google BigQuery, or Snowflake and combine data using SQL without extract, transform, and load (ETL) scripts.

Now you can run the SQL query in the Query editor to join the data in the S3 Tables with the data in the DynamoDB.
Here is a sample query to join between Athena and DynamoDB:
select * from "s3tablescatalog/s3tables-integblog-bucket"."blogdb"."customer",
              "dynamodb1"."default"."customer_ddb" where cust_id=pid limit 10;
To learn more about this integration, visit Amazon S3 Tables integration with Amazon SageMaker Lakehouse in the AWS documentation.
Now available
S3 Tables integration with SageMaker Lakehouse is now generally available in all AWS Regions where S3 Tables are available. To learn more, visit the S3 Tables product page and the SageMaker Lakehouse page.
Give S3 Tables a try in the SageMaker Unified Studio today and send feedback to AWS re:Post for Amazon S3 and AWS re:Post for Amazon SageMaker or through your usual AWS Support contacts.
In the annual celebration of the launch of Amazon S3, we will introduce more awesome launches for Amazon S3 and Amazon SageMaker. To learn more, join the AWS Pi Day event on March 14.
— Channy
—
How is the News Blog doing? Take this 1 minute survey!
(This survey is hosted by an external company. AWS handles your information as described in the AWS Privacy Notice. AWS will own the data gathered via this survey and will not share the information collected with survey respondents.)
Announcing end-of-support for Amazon Kinesis Client Library 1.x and Amazon Kinesis Producer Library 0.x effective January 30, 2026
Post Syndicated from Minu Hong original https://aws.amazon.com/blogs/big-data/announcing-end-of-support-for-amazon-kinesis-client-library-1-x-and-amazon-kinesis-producer-library-0-x-effective-january-30-2026/
Amazon Kinesis Client Library (KCL) 1.x and Amazon Kinesis Producer Library (KPL) 0.x will reach end-of-support on January 30, 2026. Accordingly, these versions will enter maintenance mode on April 17, 2025. During maintenance mode, AWS will provide updates only for critical bug fixes and security issues. Major versions in maintenance mode will not receive updates for new features or feature enhancements.
KCL is a software library that simplifies building applications to process streaming data from Amazon Kinesis Data Streams. KCL handles complex tasks such as load balancing across multiple consumer workers, responding to worker failures, checkpointing processed records, and adapting to throughput changes.
KPL is a software library that helps developers write producer applications to achieve high throughput data into Kinesis Data Streams. KPL manages record batching, aggregation, and retry logic to maximize throughput and optimize resource usage while simplifying the producer application development process.
The following table outlines the level of support for each phase of the major version lifecycle of KCL and KPL.
| Major versions | Version Lifecycle Phase | Start Date | End Date | Support Level |
| KCL 1.x | General Availability | 12/19/2013 | 4/16/2025 | During this phase, the major version is fully supported. AWS provides regular minor and patch version releases that include support for new features or API updates for Kinesis Data Streams, as well as bug and security fixes. |
| KPL 0.x | General Availability | 6/2/2015 | 4/16/2025 | During this phase, the major version is fully supported. AWS provides regular minor and patch version releases that include support for new features or API updates for Kinesis Data Streams, as well as bug and security fixes. |
| KCL 1.x, KPL 0.x | Maintenance mode | 4/17/2025 | 1/29/2026 | AWS is limiting patch version releases to address critical bug fixes and security issues only. The major version will not receive updates for new features or APIs of Kinesis Data Streams. |
| KCL 1.x, KPL 0.x | End-of-support | 1/30/2026 | N/A | The major version will no longer receive updates or releases. Previously published releases will continue to be available through public package managers and the code will remain on GitHub. |
Impact on non-Java KCL Libraries
The maintenance mode and end-of-support dates apply to the following non-Java KCL 1.x libraries:
- KCL for Python version 1.x
- KCL for Node.js version 0.x
- KCL for .NET version 1.x
- KCL for Ruby version 1.x
Migrating from KCL 1.x or KPL 0.x
If you’re using KCL 1.x or KPL 0.x, we recommend migrating to the latest versions (KCL 3.x and KPL 1.x). When migrating from KCL 1.x to 3.x, you will need to update interfaces and security credential providers in your application. For migrations from KPL 0.x to 1.x, you can upgrade your current KPL application without any change in your data processing logic. To learn more, refer to the following resources:
- Use Kinesis Client Library explains the overview, benefits, implementation guide, and troubleshooting information about KCL
- Migrating from KCL 1.x to KCL 3.x describes step-by-step instructions for migrating from KCL 1.x to 3.x
- Develop producers using the Amazon Kinesis Producer Library (KPL) explains the overview, benefits, implementation guide, and troubleshooting information about KPL
- Migrate from KPL 0.x to KPL 1.x describes step-by-step instructions for migrating from KPL 0.x to 1.x.
Summary
KCL 1.x and KPL 0.x will reach end-of-support on January 30, 2026 and enter maintenance mode on April 17, 2025. If you need assistance or have feedback, reach out to AWS support. You can also open an issue in the KCL GitHub repository or KPL GitHub repository.
About the author
 Minu Hong is a Senior Product Manager for Amazon Kinesis Data Streams at AWS. He is passionate about understanding customer challenges around streaming data and developing optimized solutions for them. Outside of work, Minu enjoys traveling, playing tennis, skiing, and cooking.
SmallRig x Potato Jet TRIBEX Tripod REVIEW
Post Syndicated from Matt Granger original https://www.youtube.com/watch?v=IYLZSRp8INs
Deploy real-time analytics with StarTree for managed Apache Pinot on AWS
Post Syndicated from Raj Ramasubbu original https://aws.amazon.com/blogs/big-data/deploy-real-time-analytics-with-startree-for-managed-apache-pinot-on-aws/
This post is cowritten with Mayank Shrivastava and Barkha Herman from StarTree.
Building a low-latency, high-concurrency, real-time online analytical processing (OLAP) solution has been previously explored on the AWS Big Data Blog, where we walked through how to build a real-time analytics solution with Apache Pinot on AWS, in which streaming sources, such as Amazon Managed Streaming for Apache Kafka (Amazon MSK) and Amazon Kinesis Data Streams, produce events that are ingested and processed in real time within Apache Pinot.
However, this approach requires self-management of the infrastructure required to run Pinot, as well as a number of manual processes to run in production. StarTree is a managed alternative that offers similar benefits for real-time analytics use cases.
In this post, we introduce StarTree as a managed solution on AWS for teams seeking the advantages of Pinot. We highlight the key distinctions between open-source Pinot and StarTree, and provide valuable insights for organizations considering a more streamlined approach to their real-time analytics infrastructure.
By examining these aspects, you can make an informed decision between open source Pinot and StarTree for your specific real-time analytics needs.
StarTree overview
One of the founders of Apache Pinot, Kishore Gopalakrishna, launched StarTree to equip organizations globally with the power of real-time data and build a fully managed platform for real-time analytics. Handling over 1 billion queries per week and ingesting over 1 million events per second, StarTree Cloud removes the burden of infrastructure management so companies can focus on delivering real-time insights to end-users.
Open source Pinot requires in-house expertise that can challenge well-established technical teams to provision hardware, configure environments, tune performance, maintain security, adhere to data governance requirements, manage software updates, and constantly monitor for system issues. Organizations interested in decreasing their time to value with a managed Pinot solution can take advantage of the expertise of StarTree’s team to accelerate setup, deploy an architecture ready for scale, and offload infrastructure maintenance.
Improving security with SOC 2, SSO, and RBAC
Critical enterprise security features can be challenging to implement in open source Pinot environments. With StarTree’s managed Pinot, role-based access control (RBAC) simplifies administration for Pinot and allows organizations to assign and monitor user access based on roles to enforce secure and efficient access to sensitive data. StarTree Cloud provides enterprise-grade security with SOC 2 compliance, enhanced encryption, and single sign-on (SSO) capabilities.
Using automated data ingestion at scale
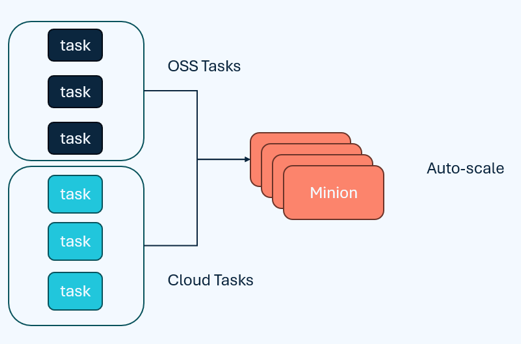
The minion task framework is a native component of Pinot to offload computationally intensive tasks away from the other Pinot components to conserve resources for low-latency queries and support real-time stream ingestion. StarTree can handle larger volumes of data efficiently with highly scalable implementations of minion tasks and a minion auto scaling feature that eliminates unnecessary infrastructure costs during idle times, as seen in the below figure.
StarTree’s automatic data ingestion framework is ideal for enterprise workloads because it improves scalability and reduces the data maintenance complexity often found in open source Pinot deployments. StarTree supports a large number of managed connectors, which are used to maintain metadata about the source and ingest data seamlessly into the platform. The data is then modelled to help you organize and structure the data fetched from the selected data source into Pinot tables. Indexes are then configured to optimize query performance, as per the flow in the diagram below.

Tiered storage for real-time query processing
With open source Pinot, tiered storage can be used for deep storage like Amazon Simple Storage Service (Amazon S3) for backup but not query processing, because storage is tightly coupled with compute and requires manual configuration of tenants with different storage speeds and server specifications. In the following diagram, an Amazon S3 tier is defined for the data to be moved from tightly coupled SSD to cloud storage when the data is 30 days old.

On the other hand, StarTree transitions less-frequently accessed data to cost-effective storage like Amazon S3, while maintaining quick access to frequently accessed data. StarTree’s tiered storage enables automation for real-time query processing with index pinning, prefetching, and intelligent data movement between hot and cold storage, optimizing both performance and cost. StarTree’s sophisticated approach to tiered storage is highly flexible and reduces replication overhead by keeping a single copy in cloud storage, which prevents the limitations of compressed deep store copies, as you can see in the below diagram

Improving scalability with off-heap upserts
Companies like Amberdata benefit from StarTree’s upsert support to routinely upsert 350,000 events per second, with peak workloads reaching 1 million upserts per second. StarTree Cloud enhanced upsert functionality boosts efficiency, usability, and scalability through the implementation of off-heap upserts. Behind the scenes, Pinot servers manage specific upsert metadata to determine if a newly inserted record’s primary key was previously encountered and identifies the current segment holding it. As shown below, StarTree Cloud moves this off-heap, enabling a scalable cache of metadata as the on-heap memory restrictions are removed

Customer success stories using Pinot with StarTree for real-time analytics
The following customers highlight their success using Pinot for StarTree:
- Sovrn provides down-to-the-second, real-time data for their customers with StarTree’s managed Pinot as an adtech solution provider for web publishers, down from what was previously a 24- to 48-hour turnaround time for producing reports.
- Amberdata, a blockchain and crypto market intelligence company, uses StarTree for real-time analytics to improve query performance, reduce SLA times, and lower infrastructure costs. Joanes Espanol, CTO and Co-Founder of Amberdata, shared about their experience with StarTree’s managed Pinot, “We are now in the subseconds to milliseconds range, and the higher query concurrency means we can serve more customers faster. We’ve been able to reduce our infrastructure costs and reduce our dependencies on older technologies.”
- Nubank identifies anomalies across massive datasets instantly with StarTree to power observability and anomaly detection in their customer-facing applications, enabling real-time monitoring and customer insights at scale.
Flexible deployment options for StarTree Cloud
StarTree offers multiple deployment options, including a StarTree hosted software as a service (SaaS) or customer hosted SaaS. StarTree hosted SaaS is ideal for organizations interested in fully offloading the operational burden of infrastructure management, scaling, performance tuning, and security from their team so they can focus on analytics. StarTree’s customer hosted SaaS provides flexibility for customers interested in deploying the solution within their AWS environment or other platform of choice. This is suitable for organizations who require higher infrastructure management controls in their perimeter but still want the operational ease of a managed service.
Self-managed Pinot or StarTree
Pinot can deliver value for real-time analytics scenarios with different deployment methods. The choice of deployment method will come down to organizational priorities and trade-offs. Teams with the capability and willingness to manage open source software on a commodity infrastructure at scale might opt to deploy self-managed Pinot on AWS. Teams interested in reducing time troubleshooting performance bottlenecks, optimizing resource usage, and minimizing downtime can use StarTree’s managed service.
Conclusion
In this post, we presented StarTree as a managed solution on AWS for teams seeking the advantages of Apache Pinot. Like Pinot, StarTree addresses the need for a low-latency, high-concurrency, real-time online analytical processing (OLAP) solution. In addition, StarTree offers a managed experience for real-time and batch Pinot workloads, offering enhanced security, automated data ingestion, tiered storage, and off-heap upserts. These features improve security, scalability, and manageablity for organizations looking to run Pinot in production.
Developers interested in learning more about managed Pinot can deploy real-time analytics with StarTree to test it out or join a session with StarTree’s head of product. StarTree is an AWS ISVA partner and is available on AWS Marketplace.
About the Authors
 Raj Ramasubbu is a Senior Analytics Specialist Solutions Architect focused on big data and analytics and AI/ML with Amazon Web Services. He helps customers architect and build highly scalable, performant, and secure cloud-based solutions on AWS. Raj provided technical expertise and leadership in building data engineering, big data analytics, business intelligence, and data science solutions for over 18 years prior to joining AWS. He helped customers in various industry verticals like healthcare, medical devices, life science, retail, asset management, car insurance, residential REIT, agriculture, title insurance, supply chain, document management, and real estate.
 Francisco Morillo is a Streaming Solutions Architect at AWS. Francisco works with AWS customers, helping them design real-time analytics architectures using AWS services, supporting Amazon Managed Streaming for Apache Kafka (Amazon MSK) and Amazon Managed Service for Apache Flink.
 Ismail Makhlouf is a Senior Specialist Solutions Architect for Data Analytics at AWS. Ismail focuses on architecting solutions for organizations across their end-to-end data analytics estate, including batch and real-time streaming, big data, data warehousing, and data lake workloads. He primarily partners with airlines, manufacturers, and retail organizations to support them to achieve their business objectives with well-architected data platforms.
 Renee Berry is a Senior Partner Development Manager with the AWS Global Startup Program, working with venture backed startups partnering with AWS to scale their growth.
 Mayank Shrivastava is a founding engineer of Apache Pinot and a PMC member for the project. He is currently a Fellow at StarTree Inc., where he also heads their Center of Excellence.
 Barkha Herman is a technologist and developer advocate who founded WiTVoices and South Florida Women in Tech. She fosters inclusive tech communities.
Secure cloud innovation starts at re:Inforce 2025
Post Syndicated from Chris Betz original https://aws.amazon.com/blogs/security/secure-cloud-innovation-starts-at-reinforce-2025/
Every day, I talk with security leaders who are navigating a critical balancing act. On one side, their organizations are moving faster than ever, adopting transformative technologies like generative AI and expanding their cloud footprint. On the other, they’re working to maintain strong security controls and visibility across an increasingly complex landscape. We all know that adding more tools and controls isn’t sustainable. We need a different approach to security at scale.
re:Inforce 2025: Your roadmap to security that powers innovation
This is what shaped our vision for AWS re:Inforce 2025. When done right, security at scale becomes a business accelerator, helping organizations move faster and more confidently in the cloud. This is more than just a philosophy; it’s a practical reality I’ve seen proven time and again by our customers, and it’s what we want to help every organization achieve.
At re:Inforce, we’ll share a vision for simplifying security at scale that’s deeply rooted in our experiences supporting millions of customers worldwide. We’ll explore how organizations are building inherently resilient applications that can withstand modern threats while accelerating innovation. I’m particularly excited to showcase real customer examples and architectural patterns that demonstrate how security better enables your business goals.
An environment built for learning cloud security
There’s a reason we created re:Inforce as a dedicated in-person security event. While I love our broader AWS events, security practitioners need space to dive deep into implementation details, ask tough questions, and work through complex scenarios. At re:Inforce, you can grab a whiteboard with the engineers who built our security services, collaborate with security partners, and schedule personal time with our leaders to tackle your specific security needs. It’s the kind of environment where real learning happens.
We’ve designed multiple learning paths to meet you wherever you are in your security journey. With over 250 technical sessions, you’ll find content that matches your needs – whether you’re looking to automate security controls, align development and security teams, or transform your security operations. You’ll find interactive workshops where you’ll build solutions in real-time, small-group technical deep-dives, hands-on labs where you can test new approaches, and solution-building sessions with AWS experts. Best of all, 70% of our content is at advanced or expert level, making sure you get the detailed implementation guidance you need.
I invite you to join us for three days that will transform how you think about and implement security in the cloud. Registration is now open, and I encourage you to secure your spot early—based on previous years, spots will fill up quickly. Join us to explore how simplified, scalable cloud security can fuel your organization’s future. Register today with the code SECBLObhZzr9 to receive a limited time $300 USD discount, while supplies last.
If you have feedback about this post, submit comments in the Comments section below.
How to Register for a United States (US) SMS Short Code with AWS End User Messaging
Post Syndicated from Tyler Holmes original https://aws.amazon.com/blogs/messaging-and-targeting/how-to-register-for-a-united-states-us-sms-short-code-with-aws-end-user-messaging/
Obtaining and using SMS short codes in the United States requires a thorough understanding of the detailed application process and strict requirements set forth by mobile carriers. This comprehensive guide walks through the step-by-step procedure for registering a US SMS short code from AWS End User Messaging, which provides SMS capabilities to all AWS services.
This guide covers the process from initial creation of a support case, the short code application form with all necessary details and documentation, and the multi-stage provisioning process involving carrier review and approvals. Particular emphasis is placed on establishing compliant opt-in workflows, crafting SMS-specific terms and privacy policies, and preparing the required message templates – all of which are closely scrutinized by the carriers.
While the application process may be time-consuming, the benefits of using a short code, include:
- High throughput – They start out at 100 messages per second
- Ability to scale to thousands of messages per second
- Higher deliverability rates – Because of the increased upfront scrutiny in the registration process they have less issues with filtering and blocking. Critical use cases such as One-Time Password(OTP)/Two-Factor Authentication(2FA) are use cases that, even if you don’t need the high throughput, you may want to consider using a US short code to deliver them in the US
- Short codes investigate issues before blocking through proactive audits, while other registered originator types such as toll-free or 10DLC block/filter first and investigate later when issues arise
- Easy for customers to remember and identify – Short codes are 5-6 digit numbers, which is easier for recipients to remember than 10+ and lends credibility and trust to your message
The US Short Code Application Process
Step 1: Create a Case in AWS Support Center
Currently short codes are only available by opening a case. The first step to register a short code is to open a short code request case in the AWS Support Center, providing detailed information about your use case and opt-in policies. A request must be opened for each country in which you want a short code. Each country has their own registration process and requirements so if you are registering for other countries besides the US having a case for each allows for much easier tracking and updating as there are communications going back and forth between you, the customer, support, and any downstream clarifications that may come back.
NOTE: If you require a HIPAA eligible Short Code for your use case please respond to the case with explicit confirmation that you require a HIPAA eligible Short Code. We will provide you a unique form for this use case
Along with attaching the correct form Support will request that you confirm that you understand the pricing, billing, and time frame of this request so make sure that you respond to the case, don’t just start on the application.
Step 2: Complete the Short Code Application
We will walk through the US Short Code application in detail below. Make sure that everything you submit is 100% correct to your knowledge, as any missing information or information that needs to be corrected extends the time it takes to receive your short code.
NOTE: Application forms are occasionally revised to clarify or add to existing information. By the time you read this post, the form that you receive might differ slightly from the form that we review in this post.
The first section of the US Short Code form contains basic information about your company.
Company Information
Most of the fields in the first section are straightforward but the key thing to make sure you have a good understanding of is, who owns the relationship with the recipients? The company that owns the opt-in data and controls the message(not just the delivery) is the company that needs to have their information submitted.
IMPORTANT: If you are a SaaS/mutli-tenant/service provider, providing SMS capabilities to YOUR customers or a business within a larger portfolio make sure that you are clear on that. It does not matter WHERE the opt-in is happening, it matters who owns the data and the clear relationship between that entity and the recipient. The company that owns that relationship is the company who’s information needs to be used.
There are a few fields in this section that people ask how they will be used:
Primary Contact name, email address, phone number
These contact details will be used during the Company vetting/validation step we will discuss later in this post. It would also be used to contact you if there is ever an audit of your short code.
Customer Care Information
The customer care contact points are required to be actively monitored.
Customer Care URL
The URL of a page where your customers can go to find information about contacting your Customer Support team.
Customer Care Email
The Carriers require you to provide an email address that customers can contact if they have questions about your short code messaging program. This address should be a shared mailbox or distribution list (such as [email protected]) rather than an individual person’s email address and must match the domain of the Company URL in the Company Information section above.
Customer Care Phone Number
Like the support email address, customers should be able to call this phone number to get support for your short code messaging program. The phone number doesn’t have to be a toll-free number, but it does have to be a US-based phone number.
Short Code Service Information
AWS Region
The AWS Region that you use AWS End User Messaging in. If you’re not sure, check with the person or team within your organization that is responsible for managing your AWS accounts.
IMPORTANT: Short codes can only be used in the region that they are requested in and cannot be moved. Short codes can be shared to other accounts via Resource Access Management but they must be in the same region. All resource billing, such as the shortcode monthly leasing fee, will still run through the managing account but the cost for SMS volume will be charged to the sending account.
Short Code Option
In the US you have the option of either a 5-6 digit random code or a “vanity” code that you can specify. These vanity codes are numeric only, take longer to procure, and come with a higher cost. You can check if your preferred vanity code is available at: https://www.usshortcodes.com/find-short-code
Short Code Use Case
Mobile Carriers need to know how you plan to use your short code, and how you will interact with users. It is very important to be clear and concise in this section. Humans are reviewing these so make sure that everything you write can be understood without any prior knowledge of your company or your use case.
Company Overview
Provide a short description of the products/services that your Company provides to its customers. This should concisely answer the question, “Who are you and what do you do?”
Service Name
A name or phrase that identifies your messages as being from you. Service names typically are a recognizable form of your company or brand name. It can be a shortened version as long as it is something that your recipients would recognize as coming from you.
- For example, if Example Corp. wants a short code for sending account-related notifications, they could use a service name like “Example Corp.” The Carriers require you to put this service name at the beginning of each message. Keep in mind that SMS has a limit of 160 characters so you do want to keep this short.
- A message might look like this:
“Example Corp. – This is an account notification for your account #[XXXXXX].”
Message Type(s)
You can choose more than one message type but keep in mind that for each message type that you select you will need to provide examples of those types of messages later in the form and you also need to collect consent for each one. We recommend to not mix promotional and transactional type messages on a single code but at the time of publication this is acceptable by the carriers.
Message Examples
You need to provide at least ONE message example for each of the message types you chose above. Carriers will review these examples during the approval process. These are only examples and will not be the only messages you will be able to send but they should represent all of the types of messages that you plan on sending. If you need more room it is fine to add more examples. Remember you do NOT need to include every message you plan on sending, as long as you have a representative sample of all message types.
- Requirements:
- Include your service name in every message sample
- Ideally each message is 160 characters or less to reduce your costs. Any message over 160 characters is broken into message parts in 160 character chunks and each message part is charged. 161 characters would be two message parts
- If your message uses only characters in the GSM 03.38 character set, also known as the GSM 7-bit alphabet, it can contain up to 160 characters. If your message contains any characters that are outside the GSM 03.38 character set, it can have up to 70 characters. When you send an SMS message, AWS End User Messaging SMS automatically determines the most efficient encoding to use. We provide a tool in the AWS console to check your messages.
- If your messages will include variables, it’s fine to use either placeholder values or variables.
- For example, both of the following are acceptable: “Hello John. Your one-time password is 654321” and “Hello [first_name]. Your one-time password is [otp code] .”
- Do not use unbranded link shorteners i.e., “bit.ly/yourlink”
- If you have to use a shortener make sure that it is branded and that there are not multiple redirects. Also make sure to provide examples of the branded shortened domain so that it is on file with the carriers
- Include an example of all of the message types you are registering for
- If you plan on sending in languages other than English, include those versions
- Read them all and make sure that they are clearly a part of the message type/use case that you are registering for
- If you plan on sending Multimedia Messages(MMS) make sure you include at least one example
Multimedia message sample (MMS)
MMS capabilities must be requested at the time the short code is requested. If you intend to send MMS messages make sure you check the box and include a message example in the section above
Will you use your short code for any of the following?
Selecting “Sweepstakes or contest” or “Debt Collection” will require more documentation. For example, official sweepstakes rules and terms would be requested if that was your use case. If neither of these apply then select “N/A”
NOTE: Debt collection in particular is highly regulated. If you are a 3rd party debt collector you will not be able to get a short code.
Per-user message frequency
This is an estimate but will be used later in some of the message templates so be sure to have this correct. Will you be sending out 1 message per day? Week? Month? Programs like Two Factor Authentication(2FA) or One-Time Password (OTP) are examples of “message frequency varies” or “1 message per login”.
Carrier requirements for user sign-ups
The core requirement for communicating with SMS is explicit consent – end users must have the option to consent to receive your messages, know exactly what the program will include, and are able to opt-out or ask for help at any time. There are no exceptions to this regardless of the use case or your business type. As a reminder, Carriers make their own rules which will override things like FCC exemptions.
The Carriers pay extra attention to the information provided in the following section, so be thorough and follow the guidelines provided. An in-depth review of how to build a compliant SMS opt-in process can be found here.
How the User will opt-in
There are lots of compliant ways to capture an opt-in. Choose the option that applies to your use case. It’s fine to choose more than one option. However, you must provide mockups of the opt-in workflows for all of the options that you select. Be prepared to provide a verbal script for any opt-in processes where the user does not have the written call-to-action and SMS disclosures in front of them to read. Examples include:
- Sending a keyword to your short code
- Website or mobile app
- Over the phone/In-Person
- Paper forms
- Other – Which you will need to explain in detail. As long as you can be compliant, it should be accepted
User Experience Flow
This is one of the most comprehensive parts of the form and where many customers tend to receive a lot of feedback because there are several things that MUST be included in this section and there are no exceptions. Below you will find a list of the required components and descriptions of each. Keep in mind that these can be written or verbal opt-ins but this does not change the below requirements. Keep this concise, only detailing the opt-in process and nothing else.
- The Opt-in location must include the following:
- Program (brand) name
- A call-to-action phrase like “To receive SMS account notifications from [SERVICE NAME], enter your mobile number below”
- You must expressly collect consent for each use case(s) that you detailed above. A single checkbox for all use cases will not be approved.
- For example, If you are sending account notifications and OTP you must have two separate statements such as:
- “To receive SMS One Time Password notifications from [SERVICE NAME], check this box and enter your mobile number below.”
- “To receive SMS account notifications from [SERVICE NAME], check this box and enter your mobile number below.”
- For example, If you are sending account notifications and OTP you must have two separate statements such as:
- The opt-in must be “explicit” this means that any checkboxes, radio buttons, etc. must be left unchecked or at least not defaulted to SMS if you have options. If it is a verbal script then there must be a verbal consent given and you should track the date of that consent. If it is written then the recipient must sign and date the consent.
- You must supply a secondary channel such as email. SMS must be optional and another option must be provided. This is mandated by Verizon in the US.
- Link to a publicly accessible Terms & Conditions page
- We will detail what needs to be included later in this guide
- Link to a publicly accessible Privacy Policy page
- We will detail what needs to be included later in this guide
- Message frequency disclosure
- Same as stated earlier in this application
- Customer care contact information
- Email address, phone number, Text “Help”, are all valid
- Opt-out information
- You must support the “Stop” keyword along with this list of keywords that can be found here
- “Message and data rates may apply” disclosure.
- This must be verbatim
This must be explained for each process that you checked in the “How the user will opt-in” section. If you are using a keyword and also have the ability to opt-in from your website or mobile app for example, then both of those processes need to be documented here.
If you are using a paper form or a verbal opt-in all of the required components must still be present. If verbal, components such as the Privacy Policy location must be read back to the person opting in. If written, then the full URL needs to be present. Regardless of your process you must include all of the components for you to be approved.
Opt-In Mockup
This is where you can supply screenshots if the opt-in location is online. You can also provide the verbal script or written opt-in form here as well. Make sure that the Opt-in mockup exactly matches the above requirements and that you explain the process.
Example of an online form

Terms and Conditions URL
This is the URL where your SMS-specific Terms and Conditions document resides, or where it will reside. You can also include a link to your standard Terms and Conditions page, as long as it includes a section dedicated to SMS messaging. If those terms and conditions aren’t live yet, or are not available online, you must include a copy of the Terms and Conditions along with your completed application. There are boilerplate items that MUST be included here with no exceptions, see here for more detail and below for those items:
- {Program name}
- {Insert program description here; this is simply a brief description of the kinds of messages users can expect to receive when they opt-in.}
- You can cancel the SMS service at any time. Just text “STOP” to the short code. After you send the SMS message “STOP” to us, we will send you an SMS message to confirm that you have been unsubscribed. After this, you will no longer receive SMS messages from us. If you want to join again, just sign up as you did the first time and we will start sending SMS messages to you again.
- If you are experiencing issues with the messaging program you can reply with the keyword HELP for more assistance, or you can get help directly at {support email address or toll-free number}.
- Carriers are not liable for delayed or undelivered messages
- As always, message and data rates may apply for any messages sent to you from us and to us from you. You will receive {message frequency}. If you have any questions about your text plan or data plan, it is best to contact your wireless provider.
- If you have any questions regarding privacy, please read our privacy policy: {link to privacy policy}
Privacy Policy URL
Message Senders are responsible for protecting the privacy of Consumers’ information and must comply with applicable privacy law. Message Senders should maintain a privacy policy for all programs and make it accessible from the initial call-to-action. The privacy policy should be labeled clearly and privacy policy disclosures must provide up-to-date, accurate information about program details and functionality. For verbal scripts, a URL must be read off to the end-user enrolling in the SMS program, or the comprehensive terms or link to those terms must be directly included in the script.
- One of the key items Carriers look for in a Privacy Policy is the sharing of end-user information with third-parties. If your privacy policy mentions data sharing or selling to non-affiliated third parties, there is a concern that customer data will be shared with third parties for marketing purposes and your registration could be rejected at worst or delayed while you explain or update your Privacy Policy.
- Express consent is required for SMS; therefore, sharing data is prohibited. Privacy policies must specify that this data sharing excludes SMS opt-in data and consent. Privacy policies can be updated (or draft versions provided) where the practice of sharing personal data to third parties is expressly omitted from the number registration. You can include an SMS specific section within your privacy policy if your company or business model requires data sharing. This part is non-negotiable and Carriers are incredibly strict about this requirement
- Example: “The above excludes text messaging originator opt-in data and consent; this information will not be shared with any third parties.”
Confirmation SMS / Double Opt-In
A confirmation message is the message sent when someone opts into your program. It is required you send your customers an opt-in confirmation message. It is optional, but a best practice, to include a “Double Opt-In,” such as the example below, asking the recipient to text back a confirmation to prove “humanness” and also validates your end user provided you with their correct phone number
There is one exception to the above if your use case is an OTP/2FA. In this one instance, the OTP code that you send to your recipients is considered a confirmation. You MUST however, still opt them in initially, adhering to all of the prior requirements we have detailed in the above sections.
This message must include the following in 160 characters or less:
- The service name that you specified earlier in the application
- The phrase “message and data rates may apply”
- Information about how often recipients will receive messages from you (such as “up to 30 messages per month” or “message frequency varies”)
- Information about getting help (typically, something similar to “Text HELP for more info”)
- Information about opting out (typically, something similar to “Text STOP to opt out”).
Example Message:
- “Welcome to AnyCo! Reply “YES” to confirm your subscription and get special offers once a month. Msg & data rates may apply. Text ‘STOP’ to opt out.”
- It is best practice, but not required, to do a “double opt-in” as seen in the example where the recipient will text back “YES” to confirm that they did want to register.
HELP Response
The “Help message” is the response that is required to be sent to end-users when they text the keyword “HELP” (or similar keywords). The purpose is to provide information to the end-user related to how they can get support or opt-out of the messaging program.
- The message must include:
- Program (brand) name OR product description
- A method of contacting your support organization. Email addresses, websites, and phone numbers are all acceptable methods of communication. We recommend that you include two contact methods in your response (such as a phone number and a website).
- The following is an example of a HELP response that complies with the requirements of the US mobile carriers:
- ExampleCorp Account Alerts: For help call 1-888-555-0142 or go to example.com. Msg&data rates may apply. Text STOP to cancel.
STOP Response
The “Stop message” is the response that is required to be sent to end-users when they text the keyword “STOP” (or similar keywords). End-users are required to be opted out of further messages when they text the STOP (or equivalent) keyword to your number and confirms with them that they will no longer receive messages for the program.
- The message must include:
- Program (brand) name OR product description
- Confirmation that no further messages will be delivered
- The following is an example of a compliant STOP response:
- You are unsubscribed from ExampleCorp Account Alerts. No more messages will be sent. Reply HELP for help or call 1-888-555-0142.
Step 3: Submit the Application and Supporting Documents
Attach your completed application to your AWS Support case. Make sure to monitor this case daily as there can be clarifications that are needed or additional information and any delay can cause substantial delays in receiving your short code.
NOTE: Billing for short codes starts at the time the application is submitted to be reviewed, which is before the short code is registered for use. We will let you know when that review period begins.
Step 4: Documentation Pre-Review
Your documentation will be reviewed prior to submitting it to the Carriers. This does not guarantee that there will be no questions/revisions but it does make step 6 more efficient as there should be less potential questions from the Carriers. Once your documentation is considered compliant your company will be submitted for vetting.
Step 5: Vetting
This is similar to a credit check process where your data will be validated by a third-party and you will need to prove you are a member of your company through a domain validation email.
Example email for vetting

Step 6: Resolve Follow-up Issues
Respond promptly to any questions or concerns raised during the review process. Make sure to monitor this case daily as there can be clarifications that are needed or additional information and any delay can cause substantial delays in receiving your short code.
The Provisioning Process – Post Approval
After approval, Carriers begin setting up your short code on their networks. This process typically takes 6+ weeks to complete across all US carrier networks. This is a part of the overall timeline given.
Expected sequence of events for Carrier Review
- The Carriers will review your application. We’ll answer any questions/corrections requested by the aggregator or the Carriers for your application. You may need to provide additional information.
- The Carriers will connect the short code to their network for testing. Each carrier will approve your application and provision on their network.
- We will send you a confirmation that your short code is ready and activated in the End User Messaging service once all Carriers finish their approval and provisioning process. This process is only as fast as the slowest carrier approval.
What happens if I don’t complete these steps or if I need to change something?
Customers sometimes ask what would happen if they didn’t implement all of the requirements that are discussed in the preceding sections. If your application for a new short code doesn’t meet these requirements, the answer is simple: the Carriers will reject your request for a short code. These carrier-imposed requirements are not optional.
If you submit an application that meets all of the carrier requirements and you are approved but your real-world production use case doesn’t meet those requirements, there could also be consequences. The Carriers periodically perform audits of short codes to ensure that they are being used in a compliant manner. You can review the process here in the CTIA Short Code Monitoring Handbook If they find that your opt-in process differs greatly from what you showed in your short code application, or your use case is different than what you registered for they could pause your short code’s ability to send messages on their networks. Remember, one advantage of using a short code compared to other originator types is that, because of the increased scrutiny for being approved, when this happens, the Carriers typically provide some time to remedy the issue, rather than just block your messages without warning.
We will alert you if there is an audit of your short code and advise you on what changes/additions need to be made in order to remain within compliance and continue sending via your short code.
What do I do if I need to make edits to my registration after it is approved?
It’s OK to make minor edits such as correcting typos, clarifying text, or using a variation of a message template that was already approved after you receive your short code. Remember it is critical that you do not deviate from the use case that you registered for, short codes are periodically audited, and deviating from the use case in your application could lead to your short code being suspended if you do not respond and comply with the requests. When in doubt, open a case and request that support reviews your change, prior to making it, to determine whether you can launch the new template/process without risking an audit.
If you need to make substantial changes to these templates after you receive the short code, you may need to submit your updated message templates to the carriers. Substantial changes could include the following:
- Changes to the brand name that appears on your messages (for example, if your company rebrands under a new name, or is acquired by another company).
- Changes to the use case (for example, if your application specified a one-time password use case, but you start sending account notifications through the same short code). This type of change might require you to re-collect consent from your customers before you start sending the new type of messages.
In these situations, you should open a case with AWS Support. We will work with the Carriers to have your short code registration information updated or depending on the change, you may need to register for another short code.
Conclusion
Obtaining and utilizing SMS short codes in the United States is a complex and highly regulated process that requires meticulous attention to detail. However, the benefits that short codes offer – such as high throughput, enhanced deliverability, and strong brand recognition – make them a valuable communication tool for businesses that need to engage customers at scale through SMS.
The key to successfully navigating the short code application and provisioning journey lies in proactively planning and preparing. By thoroughly understanding the carrier requirements upfront, companies can avoid common pitfalls and delays that often plague short code implementations. This includes thoughtfully designing compliant opt-in workflows, crafting robust terms of service and privacy policies, and developing a comprehensive set of message templates that align with approved use cases.
While the investment of time and resources may seem daunting, the long-term advantages of leveraging a short code make it a worthwhile endeavor. Short codes instill a sense of trust and familiarity with customers, allowing businesses to stand out in a crowded messaging landscape. Moreover, the rigorous vetting process ensures that only legitimate players gain access to this high-value communication channel, protecting consumers from spam and fostering a healthy ecosystem.
Ultimately, the decision to pursue a short code should be made with a clear understanding of the commitment required. However, by leveraging the guidance and best practices outlined in this comprehensive guide, companies can navigate the complexities with confidence and position themselves for success in delivering impactful, high-performing SMS campaigns that drive meaningful engagement and business outcomes.
ASRock Rack 4U8G-TURIN2 A Fresh Take on a Classic AI Server Design
Post Syndicated from Patrick Kennedy original https://www.servethehome.com/asrock-rack-4u8g-turin2-amd-nvidia-broadcom-classic-ai-8-gpu/
The ASRock Rack 4U8G-TURIN2 uses two AMD EPYC processors to provide the most unique spin on the 8x GPU AI server we have seen in years
The post ASRock Rack 4U8G-TURIN2 A Fresh Take on a Classic AI Server Design appeared first on ServeTheHome.
Manage authorization within a containerized workload using Amazon Verified Permissions
Post Syndicated from Manuel Heinkel original https://aws.amazon.com/blogs/security/manage-authorization-within-a-containerized-workload-using-amazon-verified-permissions/
Containerization offers organizations significant benefits such as portability, scalability, and efficient resource utilization. However, managing access control and authorization for containerized workloads across diverse environments—from on-premises to multi-cloud setups—can be challenging.
This blog post explores four architectural patterns that use Amazon Verified Permissions for application authorization in Kubernetes environments. Verified Permissions is a scalable permissions management and fine-grained authorization service for your applications.
In this blog post, we cover the following patterns and discuss their trade-offs:
- Calling Verified Permissions from an Amazon API Gateway API fronting your application in Kubernetes
- Calling Verified Permissions from a Kubernetes Ingress controller component
- Calling Verified Permissions from a sidecar container running in the same pod as the application container
- Calling Verified Permissions from the application container
Understanding these patterns and their implications can help you implement secure and consistent authorization mechanisms across your entire infrastructure without compromising the scalability, portability, and resource efficiency of your containerized workloads.
Consistent authorization through centralized policy management
Access to application resources can be secured more effectively with a centralized and consistent approach to authorization. Especially in containerized environments with distributed architectures and shared resources, traditional access control methods, like embedding authorization logic within individual application code or relying on local access control policies, can become difficult to manage and prone to errors. This becomes even more challenging when you have a combination of on-premises and cloud setups.
A centralized authorization solution empowers developers to implement consistent access control across individual components of an application efficiently. Benefits include reduced duplicate work, an improved security posture, and lower complexity in managing and enforcing access control policies.
Verified Permissions benefits in a containerized environment
Amazon Verified Permissions provides several key benefits as an external authorization service:
- Benefits for the platform engineering team – Centralized authorization enables platform engineering teams to implement, maintain, and govern authorization policies across the organization without requiring changes to individual applications. This aligns with modern platform engineering practices, where platform engineering teams can provide authorization as a service to application teams, promoting consistent security standards while reducing the operational burden on development teams.
- Consistent authorization across environments – With Verified Permissions, you can define and manage access control policies in a centralized location. This makes it easier to apply consistent authorization rules across your entire infrastructure, including on-premises deployments and different cloud environments.
- Simplified application development – Externalizing authorization logic from applications reduces development complexity. Developers can focus on core application functionality without having to implement and maintain authorization mechanisms within each service or component. This separation of concerns promotes code modularity, reusability, and faster iteration cycles.
- Scalable and highly available – Verified Permissions is a managed service, designed to be scalable and highly available out of the box. As your containerized workloads grow in scale and complexity, Verified Permissions can handle increasing authorization request volumes while maintaining performance and availability.
- Fine-grained access control – Verified Permissions supports attribute-based access control (ABAC) and role-based access control (RBAC). This allows you to define granular policies in the open source Cedar language based on various attributes like user roles, resource properties, environmental factors, and more.
Integration patterns for authorization
Kubernetes provides many options for architecting applications. Therefore, there are multiple locations in a typical architecture where authorization decisions can be enforced, as shown in Figure 1.

Figure 1: Integration points for authorization in containerized workloads
The workflow is as follows:
- API Gateway. Organizations can use entry points to the application outside of the Kubernetes cluster, such as an API gateway, to obtain an authorization decision. In AWS, Amazon API Gateway enables customers to use authorizer Lambda functions to send an authorization request to Verified Permissions.
- Ingress controller. The Kubernetes API defines Ingress objects, which provide load balancing and routing functions on layer 7. Common Ingress controllers like Traefik offer the option to integrate external authorization services.
- Sidecar proxy container. You can intercept every request routed to the application by using a sidecar container running in the same pod as the application container. This sidecar container calls Verified Permissions for authorization decisions.
- Application container. Developers can use the Amazon SDK to communicate with Verified Permissions from inside the application when an authorization decision is needed.
In the following sections, we explore each of these patterns in detail, examining their implementation, use cases, and specific considerations. At the end of our discussion, we provide a comprehensive comparison table to help you choose the most appropriate pattern based on factors such as scalability, performance, maintenance overhead, and specific use case requirements. This will help you make an informed decision about which pattern best suits your application’s needs.
Authorization workflow
Independent of which of the four mentioned options for authorization you choose, the overall authorization workflow, shown in Figure 2, will stay the same.

Figure 2: Authorization workflow with Amazon Verified Permissions
The workflow is as follows:
- Authentication. The user first authenticates with an identity provider to obtain a JSON Web Token (JWT). You can configure the identity provider to write relevant information like user roles, tenant ID, or other needed user attributes into the JWT. You can then use this information later to make an authorization decision.
- API request. The user makes a request to your application that includes the JWT.
- Authorization information. Your application extracts the relevant information that is needed to make an authorization decision from the request. This can include principal information from the JWT, information about the resource that the user requests, and what action the user wants to perform.
- (Optional) Policy information point lookup. Depending on your policies, you might need additional information in order for Verified Permissions to make an authorization decision. For example, you can query ownership details for a document from a database.
- Authorization decision. You then send the relevant information to Verified Permissions, which returns a decision stating whether the request is permitted or forbidden.
- Authorization enforcement. You then enforce the decision from Verified Permissions in your application by allowing or denying an action. For a REST API, this would result in sending back an
HTTP 403 forbiddenstatus if the request was denied, or processing the request if it was allowed and sending anHTTP 200 OKstatus.
Authorization outside of the cluster by using Amazon API Gateway
In this pattern, authorization decisions are made at the API gateway layer before requests reach the Kubernetes cluster. When a request arrives at the API gateway, it triggers an authorization check with Verified Permissions to evaluate the request against defined policies. Based on the Verified Permissions response, the gateway either forwards the request to the containerized application or denies access.
This pattern excels in scenarios where you need coarse-grained access control that can be enforced with information accessible at the API level (such as an HTTP header or ID or access token) and that supports RBAC and ABAC. Consider a document management application where different users have access to different documents based on group membership or identity attribute.
This approach to authorization works consistently regardless of whether your application runs in containers, virtual machines, or serverless environments. The API gateway acts as a unified control point for enforcing access policies across backend services.
For implementations that use Amazon API Gateway specifically, you can use Lambda authorizers to integrate with Verified Permissions. For each incoming API request, API Gateway invokes the authorizer Lambda function, which makes a call to Verified Permissions to evaluate the request against the defined authorization policies, as shown in Figure 3.

Figure 3: Integration of Amazon Verified Permissions in Amazon API Gateway
AWS provides a quick-start solution that demonstrates this integration by using Amazon API Gateway and Amazon Cognito, making it easier to implement this pattern. The setup process is detailed in the blog post Authorize API Gateway APIs using Amazon Verified Permissions and Amazon Cognito or bring your own identity provider.
Authorization in a Kubernetes Ingress
Another option to implement coarse-grained access control in use cases as described in the previous section is to use a Kubernetes Ingress layer. Some customers prefer Kubernetes-native solutions, especially if they need to run Kubernetes clusters within and outside of AWS.
Kubernetes provides an API to create and maintain Ingress objects, operating at layer 7 (the application layer), which enables routing decisions based on HTTP attributes. This layer 7 capability makes Ingress controllers ideal for implementing authorization checks.
One Kubernetes Ingress controller that supports external authorization is Traefik Proxy. With this feature, you can delegate authorization decisions to an external service like Verified Permissions before routing requests to the application container.
Assuming that the authorization endpoint is backed by a service in the same Kubernetes cluster, the architecture looks as shown in Figure 4.

Figure 4: Integration of Amazon Verified Permissions in a Kubernetes Ingress
The workflow is as follows:
- Authenticated users access the service through an Elastic Load Balancer of type Network Load Balancer (NLB).
- The NLB—operating at layer 4—exposes a Kubernetes Ingress inside the cluster that provides layer 7 capabilities. The Ingress object is implemented by an Ingress controller that supports external authorization, as described earlier.
- The Ingress forwards the request—or parts of it—that needs authorization to a local authorization service in the cluster. We use a dedicated authorization service in this architecture because the Ingress backend service allows an external endpoint to be called for authorization.
- The authorization service is deployed into its own Kubernetes namespace with a dedicated Kubernetes service account. EKS Pod Identity provides the ability to link the service account in this namespace to an AWS Identity and Access Management (IAM) role that grants access to Verified Permissions by injecting temporary AWS access credentials into the pod at runtime.
- The authorization service extracts relevant information from the request and sends it to Verified Permissions for an authorization decision.
- The Ingress for the backend service awaits the response of the authorization service and forwards it to the backend service, if access is granted. The Ingress expects the authorization service to respond with
HTTP status code 200for authorized requests. If the Ingress receivesHTTP status code 403, the requester is not allowed to access the requested resource, and the Ingress will block the request at this stage. - Only authorized requests are forwarded to registered backend pods.
Because integration with external authorization services is not part of the Kubernetes Ingress API, you need to consult the documentation of the Ingress controller that you decide to use to determine the availability of this feature and its implementation details. Forward authentication of the Traefik Kubernetes Ingress supports this pattern and can be configured with the vendor-specific annotations described in the Traefik documentation.
Authorization in sidecar containers
Not all Ingress controllers support integration with an external authorization service. Amazon Elastic Kubernetes Service (Amazon EKS) customers might prefer the AWS Load Balancer Controller to manage the lifecycle of NLBs and ALBs for their services. Customers can continue using their existing Ingress controller, even if it does not support calling external authorization services today. You can move the authorization of requests behind the Ingress layer with the sidecar container pattern.
Sidecar containers are a common pattern for extending an application’s functionality in Kubernetes. A sidecar is a container running in the same pod as the application it relates to. This means that the sidecar and application follow the same lifecycle and share resources, such as the network ID. This pattern is a good fit when the authorization logic is service-specific. Because the authorization service is deployed alongside the application, this pattern also provides better support in situations where changes to the application demand changes in the authorization logic.
Consider a document management system where access control depends on document metadata and team structures. When a user attempts to edit a document, the sidecar queries the document’s metadata, such as the classification level, tags, and department ownership. The sidecar can also check the organizational team hierarchy to understand reporting relationships and access privileges. This context enables fine-grained authorization decisions that consider not just who the user is, but also, for example, their organizational context or the individual document’s metadata.
Although it’s possible to configure sidecar proxies such as Envoy for individual pods manually, the more convenient option is to introduce a service mesh. A service mesh provides a control plane to manage proxies, including centralized configuration, automated injection of sidecars, and an Ingress layer for traffic routing. Istio is a popular option for a service mesh in Kubernetes.
The diagram in Figure 5 shows the deployment architecture to implement authorization with Verified Permissions in a service mesh.

Figure 5: Integration of Amazon Verified Permissions in a Kubernetes Ingress
The workflow is as follows:
- Authenticated users access the application through an NLB.
- The request is routed through an Ingress in the Kubernetes cluster.
- The Ingress forwards the request directly to the backend service.
- Pods of the backend service consist of multiple containers. Each request is routed through an Envoy proxy first.
- The Envoy proxy forwards the request to a co-located container running the authorization service.
- Pod Identity is used to map an IAM role to a Kubernetes service account bound to the pod, which enables the authorization sidecar to invoke Verified Permissions for an authorization decision. Note that each container in this pod has access to the IAM credentials that are mapped to the service account.
- The Envoy proxy awaits the response of the authorization sidecar and blocks or forwards the request to the backend container, depending on the Verified Permissions authorization decision.
When Istio is deployed into a Kubernetes cluster, it introduces Custom Resource Definitions (CRDs) for managing the service mesh. The authorization workflow can be implemented using the ServiceEntry CRD and an Istio Authorization Policy. The authorization service running as a local container in the application pod becomes a registered service entry in the mesh. This service entry can then be configured in an authorization policy as the target for request authorization in the proxy. For more details, see the External Authorization section in the Istio documentation.
Application container
When it comes to integrating Verified Permissions directly within your application container, you have the advantage of fine-grained control over authorization decisions at the application level. This approach allows for more context-aware authorization checks and can be useful when you need to make authorization decisions based on application-specific data that you can query from a policy information point.
Unlike the sidecar pattern, where authorization happens before the request reaches your application code, this approach lets you gather the necessary context from your application state, databases, or other services before making the authorization call. This is particularly valuable when the authorization logic is deeply intertwined with business logic or requires data that’s only available within the application context. This pattern also supports minimizing the number of authorization requests, if, for example, only a subset of requests processed by a monolithic service require authorization.
However, it’s important to note that this tight coupling between authorization and business logic makes the system more brittle and susceptible to breakage when functional or business logic changes occur. This means that modifications to your application code might require careful consideration of their impact on the authorization logic, potentially increasing maintenance complexity.
The architecture for authorization requests from the application container is shown in Figure 6.

Figure 6: Integration of Amazon Verified Permissions in the application container
The workflow is as follows:
- Authenticated users access the application through an Elastic Load Balancer—either Application Load Balancer (ALB) or NLB depending on workload requirements.
- The Kubernetes service or Ingress for the backend application is directly registered at the ALB or NLB by the AWS Load Balancer Controller.
- Requests are directly routed to a pod that is backing the service.
- The backend application’s logic is responsible for identifying whether a request needs authorization. The backend uses an IAM role injected at runtime through Pod Identity, when an authorization decision from Verified Permission is needed. The backend application returns HTTP status code 403 if the decision is a deny; otherwise it will continue processing the request.
See the Simplify fine-grained authorization with Amazon Verified Permissions and Amazon Cognito blog post for details on calling Verified Permissions within an application.
Choosing the right pattern for your app
You now have a set of patterns to introduce authorization into your containerized workloads. You need to consider multiple factors and understand the trade-offs that come with each pattern to identify the best option for a given scenario. In the following table, we list certain areas with influence on your architectural decisions.
| Granularity of authorization decisions | |
| API gateway |
|
| Ingress controller |
|
| Sidecar proxy |
|
| Application container |
|
| Resource overhead | |
| API gateway |
|
| Ingress controller |
|
| Sidecar proxy |
|
| Application container |
|
| Scalability | |
| API gateway |
|
| Ingress controller |
|
| Sidecar proxy |
|
| Application container |
|
| Performance | |
| API gateway |
|
| Ingress controller |
|
| Sidecar proxy |
|
| Application container |
|
| Cost | |
| API gateway |
|
| Ingress controller |
|
| Sidecar proxy |
|
| Application container |
|
| Portability | |
| API gateway |
|
| Ingress controller |
|
| Sidecar proxy |
|
| Application container |
|
| Complexity | |
| API gateway |
|
| Ingress controller |
|
| Sidecar proxy |
|
| Application container |
|
Not all services have the same requirements for authorization. You can also combine the patterns discussed in this post. You can, for example, put a basic authorization workflow with coarse-grained access control in front of the majority of your services. You can then rely on sidecar proxies with policy information points to inject additional, dynamic context into authorization decisions for specific services. Lastly, if certain use cases of a service demand complex authorization decisions, you can fall back to application-level authorization for specific parts of your code base.
Conclusion
In this blog post, we explored four patterns for integrating Verified Permissions into a containerized environment. We discussed the benefits and considerations of implementing Verified Permissions at different levels: from an API gateway outside of Kubernetes clusters, by means of Ingress controllers and sidecar proxies as network components inside the Kubernetes cluster, to authorization within the application itself. We saw how each pattern offers unique advantages. We also discussed considerations for finding a suitable option for your situation and when to combine patterns.
By using Verified Permissions, organizations can implement consistent, fine-grained authorization across their containerized workloads, whether they’re running on-premises, in the cloud, or in hybrid environments. This centralized approach to authorization can enhance security and simplify policy management and application development.
To learn more about implementing these patterns and best practices, visit the Amazon Verified Permissions User Guide. For hands-on experience, we recommend exploring the Verified Permissions workshop, which provides practical examples and guided exercises.
If you have feedback about this post, submit comments in the Comments section below. If you have questions about this post, contact AWS Support.
GOP Town Halls
Post Syndicated from LastWeekTonight original https://www.youtube.com/watch?v=FYxxERgQSn0
Choi: announcing Casual Make
Post Syndicated from jzb original https://lwn.net/Articles/1014065/
Charles Choi has announced
the release of the Casual
Make: a menu-driven interface, implemented as part of the Casual
suite of tools, for Makefile
Mode in GNU Emacs.
Emacs supports makefile editing with make-mode which has a mix of
useful and half-baked (though thankfully obsoleted in 30.1)
commands. It is from this substrate that I’m happy to announce the
next Casual user interface: Casual Make.Of particular note to Casual Make is its attention to authoring and
identifying automatic variables whose arcane syntax is
un-memorizable. Want to know what $> means? Just select it in the
makefile and use the . binding in the Casual Make menu to identify
what it does in the mini-buffer.
Casual Make is part of Casual
2.4.0, released on March 12 and is available from MELPA. The 2.4.0 update to
Casual also includes documentation in the Info format for the first time.
The Shocking Truth About the 1930s Chinese Floods
Post Syndicated from Geographics original https://www.youtube.com/watch?v=e-SNG2DYZog
RIP Mark Klein
Post Syndicated from Bruce Schneier original https://www.schneier.com/blog/archives/2025/03/rip-mark-klein.html
2006 AT&T whistleblower Mark Klein has died.
[$] Warming up to frozen pages for networking
Post Syndicated from corbet original https://lwn.net/Articles/1013408/
When the 6.14 kernel is released later this month, it will include the
usual set of internal changes that users should never notice, with the
possible exception of changes that bring performance improvements. One of
those changes is frozen pages, a
memory-management optimization that should fly mostly under the radar.
When Hannes Reinecke reported a
crash in 6.14, though, frozen pages suddenly came into view. There is a
workaround for this problem, but it seems there is a fair
amount of work to be done that nobody had counted on to solve the problem
properly.
Seven new stable kernels
Security updates for Thursday
Post Syndicated from jake original https://lwn.net/Articles/1014042/
Security updates have been issued by Debian (chromium), Fedora (ffmpeg, qt6-qtwebengine, tigervnc, and xorg-x11-server-Xwayland), Red Hat (fence-agents and libxml2), SUSE (amazon-ssm-agent, ark, chromium, fake-gcs-server, gerbera, google-guest-agent, google-osconfig-agent, grafana, kernel, libtinyxml2-10, podman, python311, python312, restic, ruby3.4-rubygem-rack, and thunderbird), and Ubuntu (jinja2, linux-azure, linux-azure-4.15, linux-lts-xenial, linux-nvidia, linux-nvidia-6.8, linux-nvidia-lowlatency, netatalk, python3.5, python3.8, rar, unrar-nonfree, and xorg-server, xwayland).
Americans Need to Party More
Post Syndicated from The Atlantic original https://www.youtube.com/watch?v=N8vhtbw-dZY