Post Syndicated from The History Guy: History Deserves to Be Remembered original https://www.youtube.com/watch?v=y5PSqricp-U
Fake CAPTCHA Scams
Post Syndicated from Bruce Schneier original https://www.schneier.com/blog/archives/2026/09/fake-captcha-scams.html
New variant of an old scam: Use the framing of a CAPTCHA to get an unsuspecting user to download and run a malicious program.
Summer
Post Syndicated from xkcd.com original https://xkcd.com/3299/

AWS STS simplifies session token size limits and adds session token size monitoring
Post Syndicated from Rishi Tripathy original https://aws.amazon.com/blogs/security/aws-sts-simplifies-session-token-size-limits-and-adds-session-token-size-monitoring/
AWS Security Token Service (AWS STS) has simplified session token size limits, giving you more room for your session policies and session tags. STS has replaced the packed policy size and the overall session token size limits with a single token size limit of 4,096 bytes. STS now reports session token size in API responses, Amazon CloudWatch metrics, and AWS CloudTrail events. By using STS, you can also generate session tokens of different sizes, so you can find the maximum token size that your infrastructure can support.
The 4,096-byte limit is the current maximum, not a permanent ceiling. AWS might increase the limit as new capabilities are added that require session tokens to carry more information.
In this post, you learn what has changed, what this change means for you, and what to do next.
What has changed
AWS STS session-vending APIs, such as AssumeRole, AssumeRoleWithSAML, AssumeRoleWithWebIdentity, GetSessionToken, and GetFederationToken, return temporary security credentials: an access key ID, a secret access key, and a session token. This change governs the session token, the opaque string that STS creates from the session policies and tags you pass plus the context that AWS adds.
Three things have changed.
- A single limit: Previously, STS enforced two size limits on the session token. It serialized and compressed your session policies and tags into a form called the packed policy, which had its own limit. The assembled token, which included the packed policy, had a separate overall limit. A request could fail against either limit, and both failures returned the same
PackedPolicyTooLargeException, so you couldn’t tell which one you exceeded. STS now enforces a single limit: the assembled session token must fit within 4,096 bytes. The separate packed policy limit, which made failures hard to predict, has been removed. When a token exceeds the assembled session token limit, STS returnsPackedPolicyTooLargeException. STS continues to use the same exception, so existing error-handling code works without an SDK update. - Session token size is now reported. Every successful response from an STS session-vending API includes
SessionTokenSize(which reports the session token size in bytes) andSessionTokenUtilization(which reports the percentage of the 4,096-byte limit consumed). STS also returnsPackedPolicySizein every successful response for backward compatibility.PackedPolicySizenow reports the same value asSessionTokenUtilization, enabling applications that use older AWS SDK versions to monitor utilization through this field. These response fields are also recorded in CloudTrail events. In CloudWatch,SessionTokenSizeandSessionTokenMaxSize(the enforced limit) are published in the AWS/STS namespace. - Testing is more straightforward:
MinimumSessionTokenSizeis a new optional parameter on the STS session-vending APIs. You can use it to increase a session token to at least the size you specify, up to 4,096 bytes. Use the parameter to find the maximum token size your infrastructure can handle.
| Behavior | Previously | Now |
| Limits enforced | Two: Packed policy size and assembled token size | One: Assembled session token size (4096 bytes) |
| Error on failure | PackedPolicyTooLargeException: The error message didn’t identify which of the two limits was exceeded. |
PackedPolicyTooLargeException: The updated message reports your session token size and the maximum allowed size, both in bytes. |
| Session token size visibility | Not reported |
API Response and AWS CloudTrail:
Amazon CloudWatch:
|
| Infrastructure testing | No mechanism | MinimumSessionTokenSize: Parameter on sesssion-vending APIs |
What this change means for you?
How this affects you depends on your situation. The following scenarios cover the most common cases.
- If you have never hit a token size error: You’re unlikely to notice a change. Your tokens stay their current size and gain headroom. Over time they could become larger than your systems have handled before. We recommend you use
MinimumSessionTokenSizeto find the maximum token size your systems can handle. See the What to do next section for more details. - If you’ve hit
PackedPolicyTooLargeExceptionbefore: Some requests that previously failed now succeed under the single limit. Review any workarounds you put in place specifically to avoid token size errors and decide whether you still need them. General best practices still apply: consistent tag casing and reused tag values compress more efficiently, and concise session policies keep the assembled token smaller. No code change is required for error handling. AWS STS still returnsPackedPolicyTooLargeExceptionwhen the assembled session token exceeds the limit, the same exception STS returned before this change. - If your systems enforce their own size limits on credentials: If your application uses an AWS SDK to obtain temporary credentials and make AWS API calls, the SDK handles the session token internally, so token size doesn’t affect your code. Focus instead on systems that store or forward session tokens, such as load balancers, proxies, caches, and databases. These systems might have size limits that smaller tokens didn’t reach. For example, a database column defined as
varchar(2048)can’t hold a 4,096-byte token. Review where you persist or pass session tokens, and identify the maximum token size each system supports. The next section shows how to test this.
What to do next
We recommend the following three steps to prepare your systems for this change.
- Validate the maximum token size your systems can handle. Use
MinimumSessionTokenSizeto find the maximum session token size each system in your infrastructure can handle. Knowing these limits helps you identify systems that might reject or truncate larger tokens. The 4,096-byte limit reflects today’s needs, not a permanent ceiling. It might grow as AWS introduces new capabilities such as additional context keys for new services, richer audit metadata, and larger cryptographic signatures as the industry transitions to post-quantum algorithms. Avoid hard-coding the current maximum into your systems and revisit any fixed size assumptions if the limit changes.
Tip: AWS STS serializes and compresses your session policies and tags when assembling the token. Compression results vary based on the actual content, not just its length. Two sets of tags with identical character counts can produce different token sizes. This is why
MinimumSessionTokenSizeis a more reliable way to test your infrastructure than estimating from input length.Start at 4,096 bytes to test against the largest possible token. If a system truncates or rejects it, lower the value to find the size your infrastructure supports, then raise that limit where you can.
MinimumSessionTokenSizeis available in the latest AWS SDK, AWS Command Line Interface (AWS CLI), and Tools for PowerShell versions. See the STS API Reference for details. If your AWS SDK or AWS CLI predates the parameter, update it to use this feature. - Monitor your session token size (recommended). If your infrastructure has size constraints, you can use monitoring to see tokens that are approaching your limit and act before a request fails. AWS STS reports size through three channels, each suited to a different need.
- In the API response: Reading
SessionTokenUtilizationandSessionTokenSizefrom the response requires the latest AWS SDK version. You can also monitor token size through CloudWatch and CloudTrail without updating your SDK.
- In CloudWatch: STS publishes
SessionTokenSizeandSessionTokenMaxSizein theAWS/STSnamespace. Use them to build dashboards and set alarms. Set your alarm against the size limit you found during testing, not the 4,096-byte maximum. The maximum is the same for every account, so your own infrastructure limit is the one that matters.
The following figure shows the
SessionTokenMaxSizeandSessionTokenSizemetrics graphed in the CloudWatch console.
Figure 1: SessionTokenMaxSize and SessionTokenSizemetrics in the CloudWatch console
- In CloudTrail: Each STS session-vending event records
SessionTokenUtilizationandSessionTokenSizefor successful calls.
- In the API response: Reading
- Use appropriate fields for monitoring session token utilization. AWS STS still returns
PackedPolicySizein session-vending API responses and CloudTrail records for backward compatibility. The field now reports the same value asSessionTokenUtilization: the percentage of the 4,096-byte session token size limit consumed by the token. As a result,PackedPolicySizevalues might appear lower even when your token content has not changed.If your SDK exposes
SessionTokenUtilization, use that field because its name reflects the value’s current meaning. If an earlier SDK does not exposeSessionTokenUtilization, usePackedPolicySizeto monitor the same utilization percentage without updating the SDK. We recommend you monitorSessionTokenSizefor the token size in bytes.

Conclusion
You now have more room for session tags, tag values, and session policies in your AWS sessions. AWS STS enforces a single 4,096-byte session token limit, returns a clearer error message when a token exceeds it, and reports token size so you can track growth proactively. Validate your token-handling systems with MinimumSessionTokenSize, and watch SessionTokenUtilization and SessionTokenSize for ongoing visibility.
References
- AWS STS API Reference
- Request temporary security credentials
- Session policies
- Pass session tags in AWS STS
If you have feedback about this post, submit comments in the Comments section below.
Connect Amazon SageMaker Unified Studio to Microsoft Power BI – Part 1: IAM Identity Center (IDC)-based domains
Post Syndicated from Ramesh H Singh original https://aws.amazon.com/blogs/big-data/connect-amazon-sagemaker-unified-studio-to-microsoft-power-bi-part-1-iam-identity-center-idc-based-domains/
Connecting Power BI to your Amazon SageMaker Unified Studio data catalogs typically required third-party bridges. These bridges added complexity and licensing costs. In this post, you create a direct connection using new authentication modes in the Amazon Athena ODBC driver, removing those dependencies entirely. If your organization uses Power BI as its business intelligence (BI) tool, your analysts can configure access to governed data in Amazon SageMaker Unified Studio without changing their tools or workflows. As an AWS alternative, Amazon Quick Sight provides serverless BI integration with Amazon SageMaker Unified Studio at pay-per-session pricing.
A previous post showed the connection method using a third-party ODBC-JDBC bridge. The Amazon Athena ODBC driver (version 2.2.0 and later) now supports Amazon SageMaker Unified Studio authentication directly, eliminating the need for customers to configure third-party bridge components previously required for this connection. This bridge also created additional components and required ongoing maintenance. The native connection simplifies the architecture by reducing these requirements.
UC Irvine, a top-ten U.S. public research university, consolidates student data from systems across multiple departments into a single governed repository that supports reporting, research, and analytics for decision-making at the strategic, tactical, and operational levels. Many of their analysts rely on Power BI to explore and visualize this governed data.
“Our users rely on Power BI for data visualization and reporting, but connecting to governed data in AWS previously required workarounds. The ODBC connection feature gives a direct path from Power BI into our SageMaker Unified Studio projects—no bridge software, no extra licensing, just a connection string and we’re ready to go.”
— Bernadette Theologidy, Manager, Student Analytics, UC Irvine
The Athena ODBC driver introduces two new authentication modes for SageMaker Unified Studio:
- SageMakerBrowserIdc (for IDC-based domains): The driver opens a browser window and authenticates through AWS IAM Identity Center (and your external identity provider, if configured). No local AWS credentials are needed.
- SageMakerIam (for AWS Identity and Access Management (IAM)-based and IDC-based domains): The driver uses AWS credentials from the default credential provider chain. For this walkthrough, we use AWS IAM Identity Center to provide those credentials.
You connect Microsoft Power BI to Amazon SageMaker Unified Studio through Athena. The Athena ODBC driver supports using two connection methods that use these authentication modes:
Method 1: DSN-based (Athena Power BI connector): You configure an ODBC Data Source Name (DSN) and use the Athena connector in Power BI. This method supports DirectQuery and Import mode with both SageMakerBrowserIdc and SageMakerIam authentication.
Method 2: DSN-less (Power BI ODBC connector): You use the Power BI ODBC connector with a connection string, requiring no DSN configuration. This method supports Import mode only with SageMakerIam authentication. DirectQuery isn’t available because the Power BI ODBC connector doesn’t support it. The connection string in Power BI Desktop must match exactly the one on Power BI Service. Because the gateway runs as a Windows service without interactive browser access, both ends must use SageMakerIam.
| Feature | Method 1: DSN-based | Method 2: DSN-less |
| Power BI Connector | Amazon Athena connector | ODBC connector |
| Data connectivity mode | DirectQuery and Import | Import only |
| Requires DSN configuration | Yes | No |
| Data freshness | Real-time (DirectQuery) or scheduled (Import) | Scheduled refresh only |
| Authentication types | SageMakerIam and SageMakerBrowserIdc | SageMakerIam only |
| Domain types supported | IAM-based and IDC-based | IAM-based and IDC-based |
| Best for | Dashboards requiring live data | Scenarios where DSN management is not possible or scheduled refresh is acceptable |
This is Part 1 of a two-part series. This post covers IDC-based domains using both connection methods. Part 2 covers IAM-based domains.
Solution overview
In this walkthrough, you take the role of a data analyst at an energy company. You need to understand the current state and future direction of the U.S. power generation fleet using the Public Utility Data Liberation Project, available on the Registry of Open Data on AWS. Our goal is to analyze generation capacity and identify where new investment is flowing. We connect Power BI to Athena through Amazon SageMaker Unified Studio and query the EIA-860 generators dataset directly from our data catalog. The result is a single visualization that reveals the energy transition.
The following diagram illustrates the solution architecture for connecting Power BI to Amazon SageMaker Unified Studio through Amazon Athena.
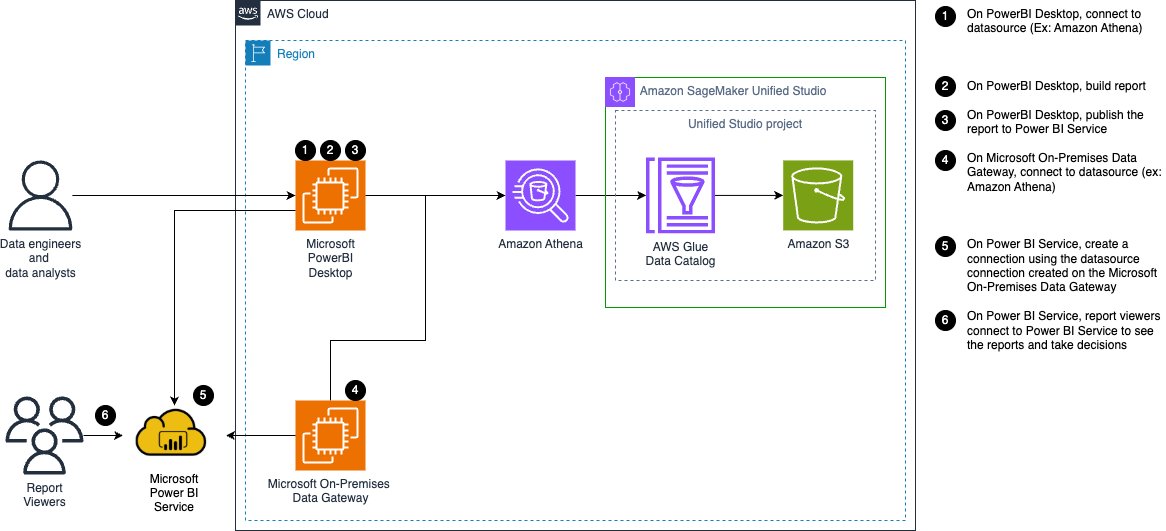
Figure 1: Architecture diagram
The following architecture demonstrates a six-step workflow.
- Data engineers and analysts connect Power BI Desktop to Athena as a data source.
- They build their reports locally.
- They then publish them to the Power BI Service.
- Microsoft On-Premises Data Gateway on an Amazon Elastic Compute Cloud (Amazon EC2) instance connects to Athena using the instance’s attached IAM role.
- The Power BI Service then uses this gateway connection.
- Report viewers access the published reports through Power BI Service to make data-driven decisions.
On the AWS side, Athena queries the data catalog managed by AWS Glue Data Catalog. The catalog references data stored in Amazon Simple Storage Service (Amazon S3). An Amazon SageMaker Unified Studio project governs all access.
In an IDC-based domain (covered in this post), Power BI Desktop uses SageMakerBrowserIdc for Method 1 and SageMakerIam for Method 2. Power BI Desktop can run on-premises or on an EC2 instance. The gateway always uses SageMakerIam (it runs as a Windows service without browser access) and authenticates using instance profile credentials, which rotate automatically. The gateway can only query data within projects where its IAM role has been added as a member. For IAM-based domains, see Part 2.
Prerequisites
Before connecting Power BI to Amazon SageMaker Unified Studio, verify that your environment meets these requirements:
- Athena ODBC driver – The latest Amazon Athena ODBC driver (version 2.2.0 or more recent) for Windows 64-bit.
- Microsoft Power BI Desktop – The latest version installed on your Windows machine.
- Microsoft Power BI Pro License – Required for publishing reports and configuring the on-premises data gateway.
- Microsoft Power BI on-premises data gateway – The latest version installed on the EC2 instance.
- Amazon SageMaker Unified Studio – An Amazon SageMaker Unified Studio IDC-based domain.
You need an Amazon SageMaker Unified Studio project with data assets. For detailed instructions, refer to the Amazon SageMaker Unified Studio User Guide.
The following screenshot shows the Amazon SageMaker Unified Studio project Query Editor interface, which runs a preview query against the EIA-860 generators dataset.
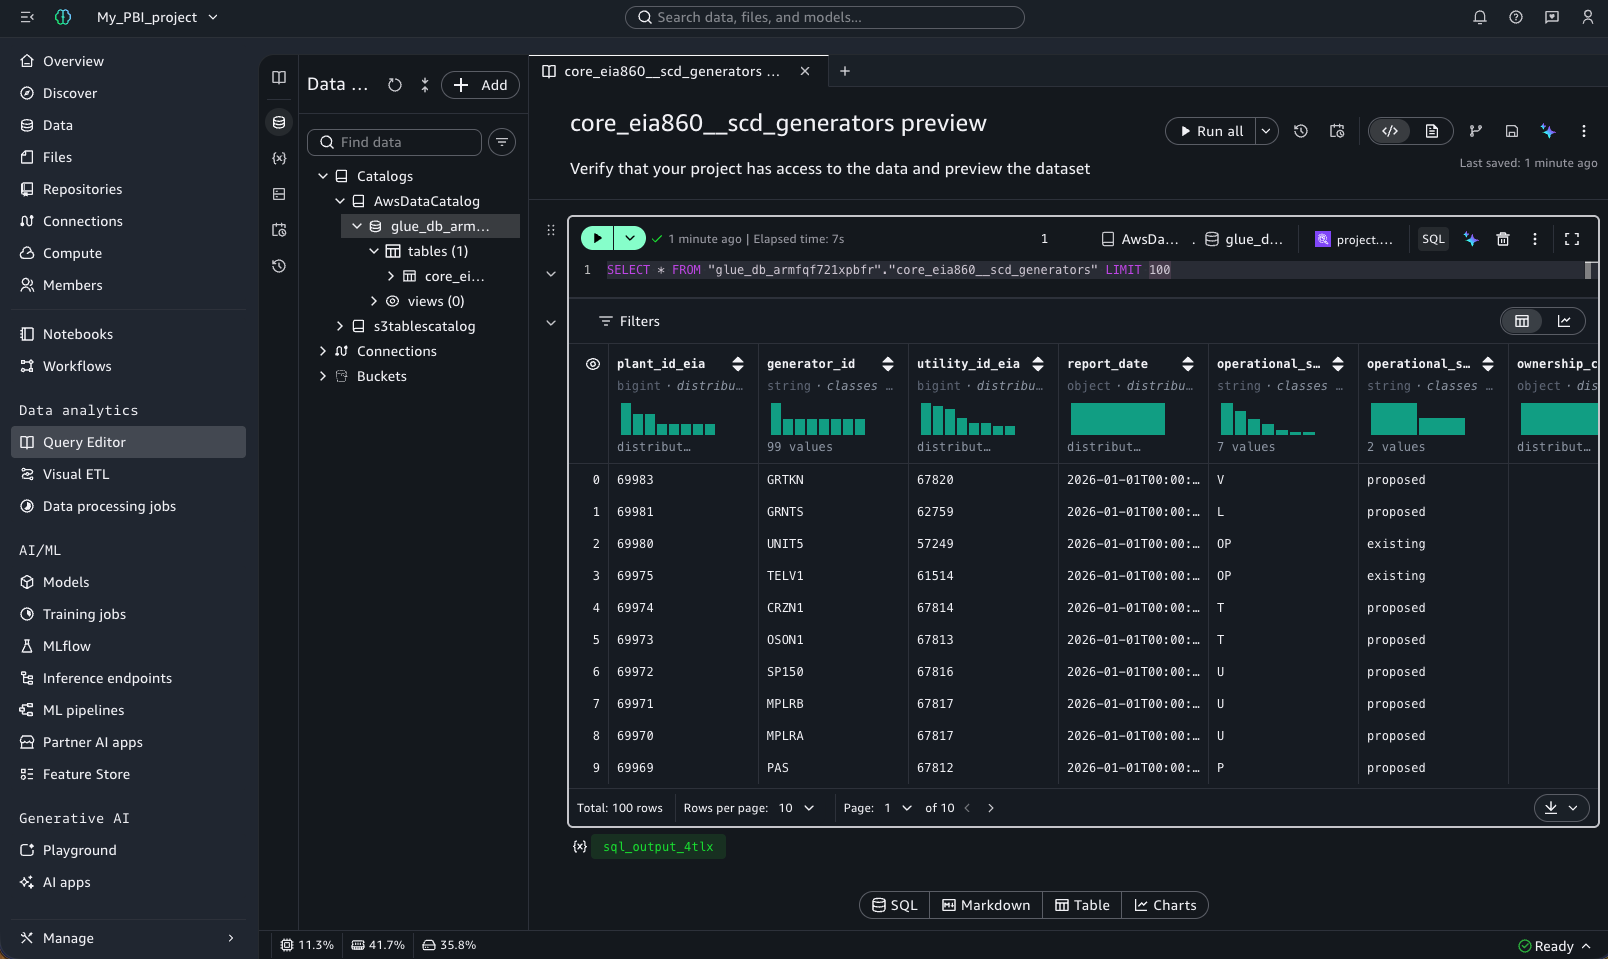
Figure 2: SageMaker Unified Studio project with the EIA-860 generators dataset available in the data catalog
Method 1: DSN-based connection (Athena Power BI connector)
This method uses the Amazon Athena Power BI connector with an ODBC Data Source Name (DSN), supporting DirectQuery and Import mode.
You configure Power BI Desktop to connect to your data assets in Amazon SageMaker Unified Studio using the SageMakerBrowserIdc authentication mode. The driver opens a browser window and authenticates through IAM Identity Center (and your external identity provider, if configured).
Add your SSO user as a member of your SageMaker Unified Studio project
Your single sign-on (SSO) user needs project-level access to query data with Athena. Verify your user is listed as a project member or add it by following Add project members in the Amazon SageMaker Unified Studio User Guide.
The following screenshot shows the SageMaker Unified Studio project user management page, where project owners can add or remove project users and roles.
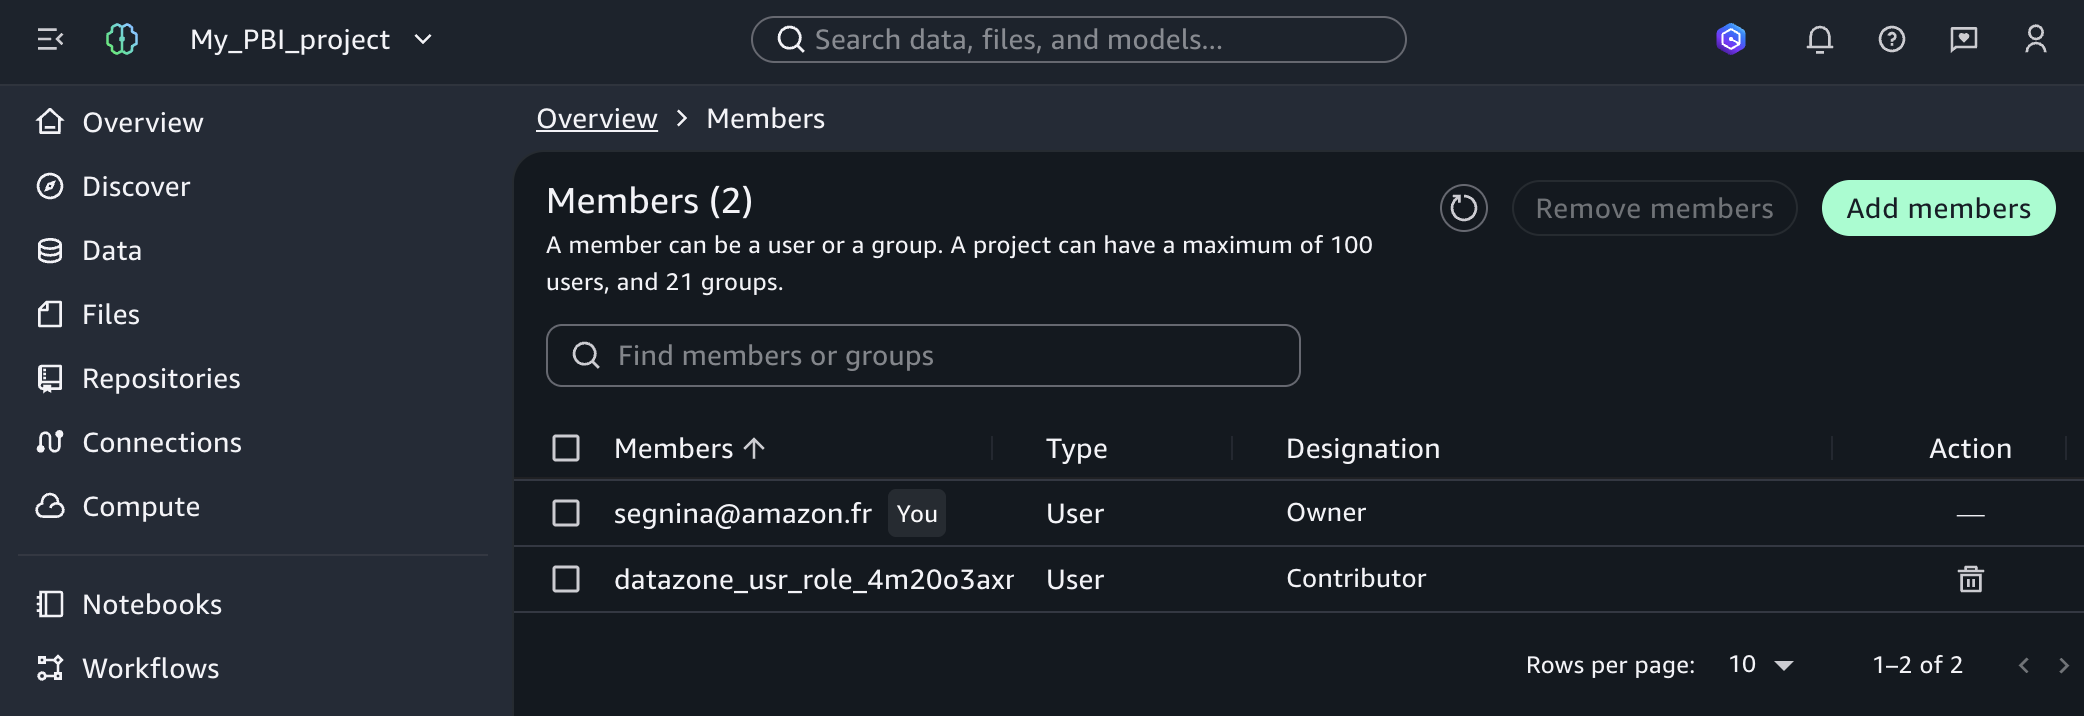
Figure 3: Members of a SageMaker Unified Studio project
Gather configuration values to configure your Amazon Athena ODBC DSN
Gather the following values from your Amazon SageMaker Unified Studio project:
- Open your Amazon SageMaker Unified Studio project.
- In the top right, select the three dots.
- Choose Project details.
- Select JDBC and ODBC details.
- Under ODBC connection details copy the following information: IDC issuer URL, domain ID, project ID, Athena workgroup name and AWS Region.
The following screenshot shows the Amazon SageMaker Unified Studio project overview page, where you can copy these details.
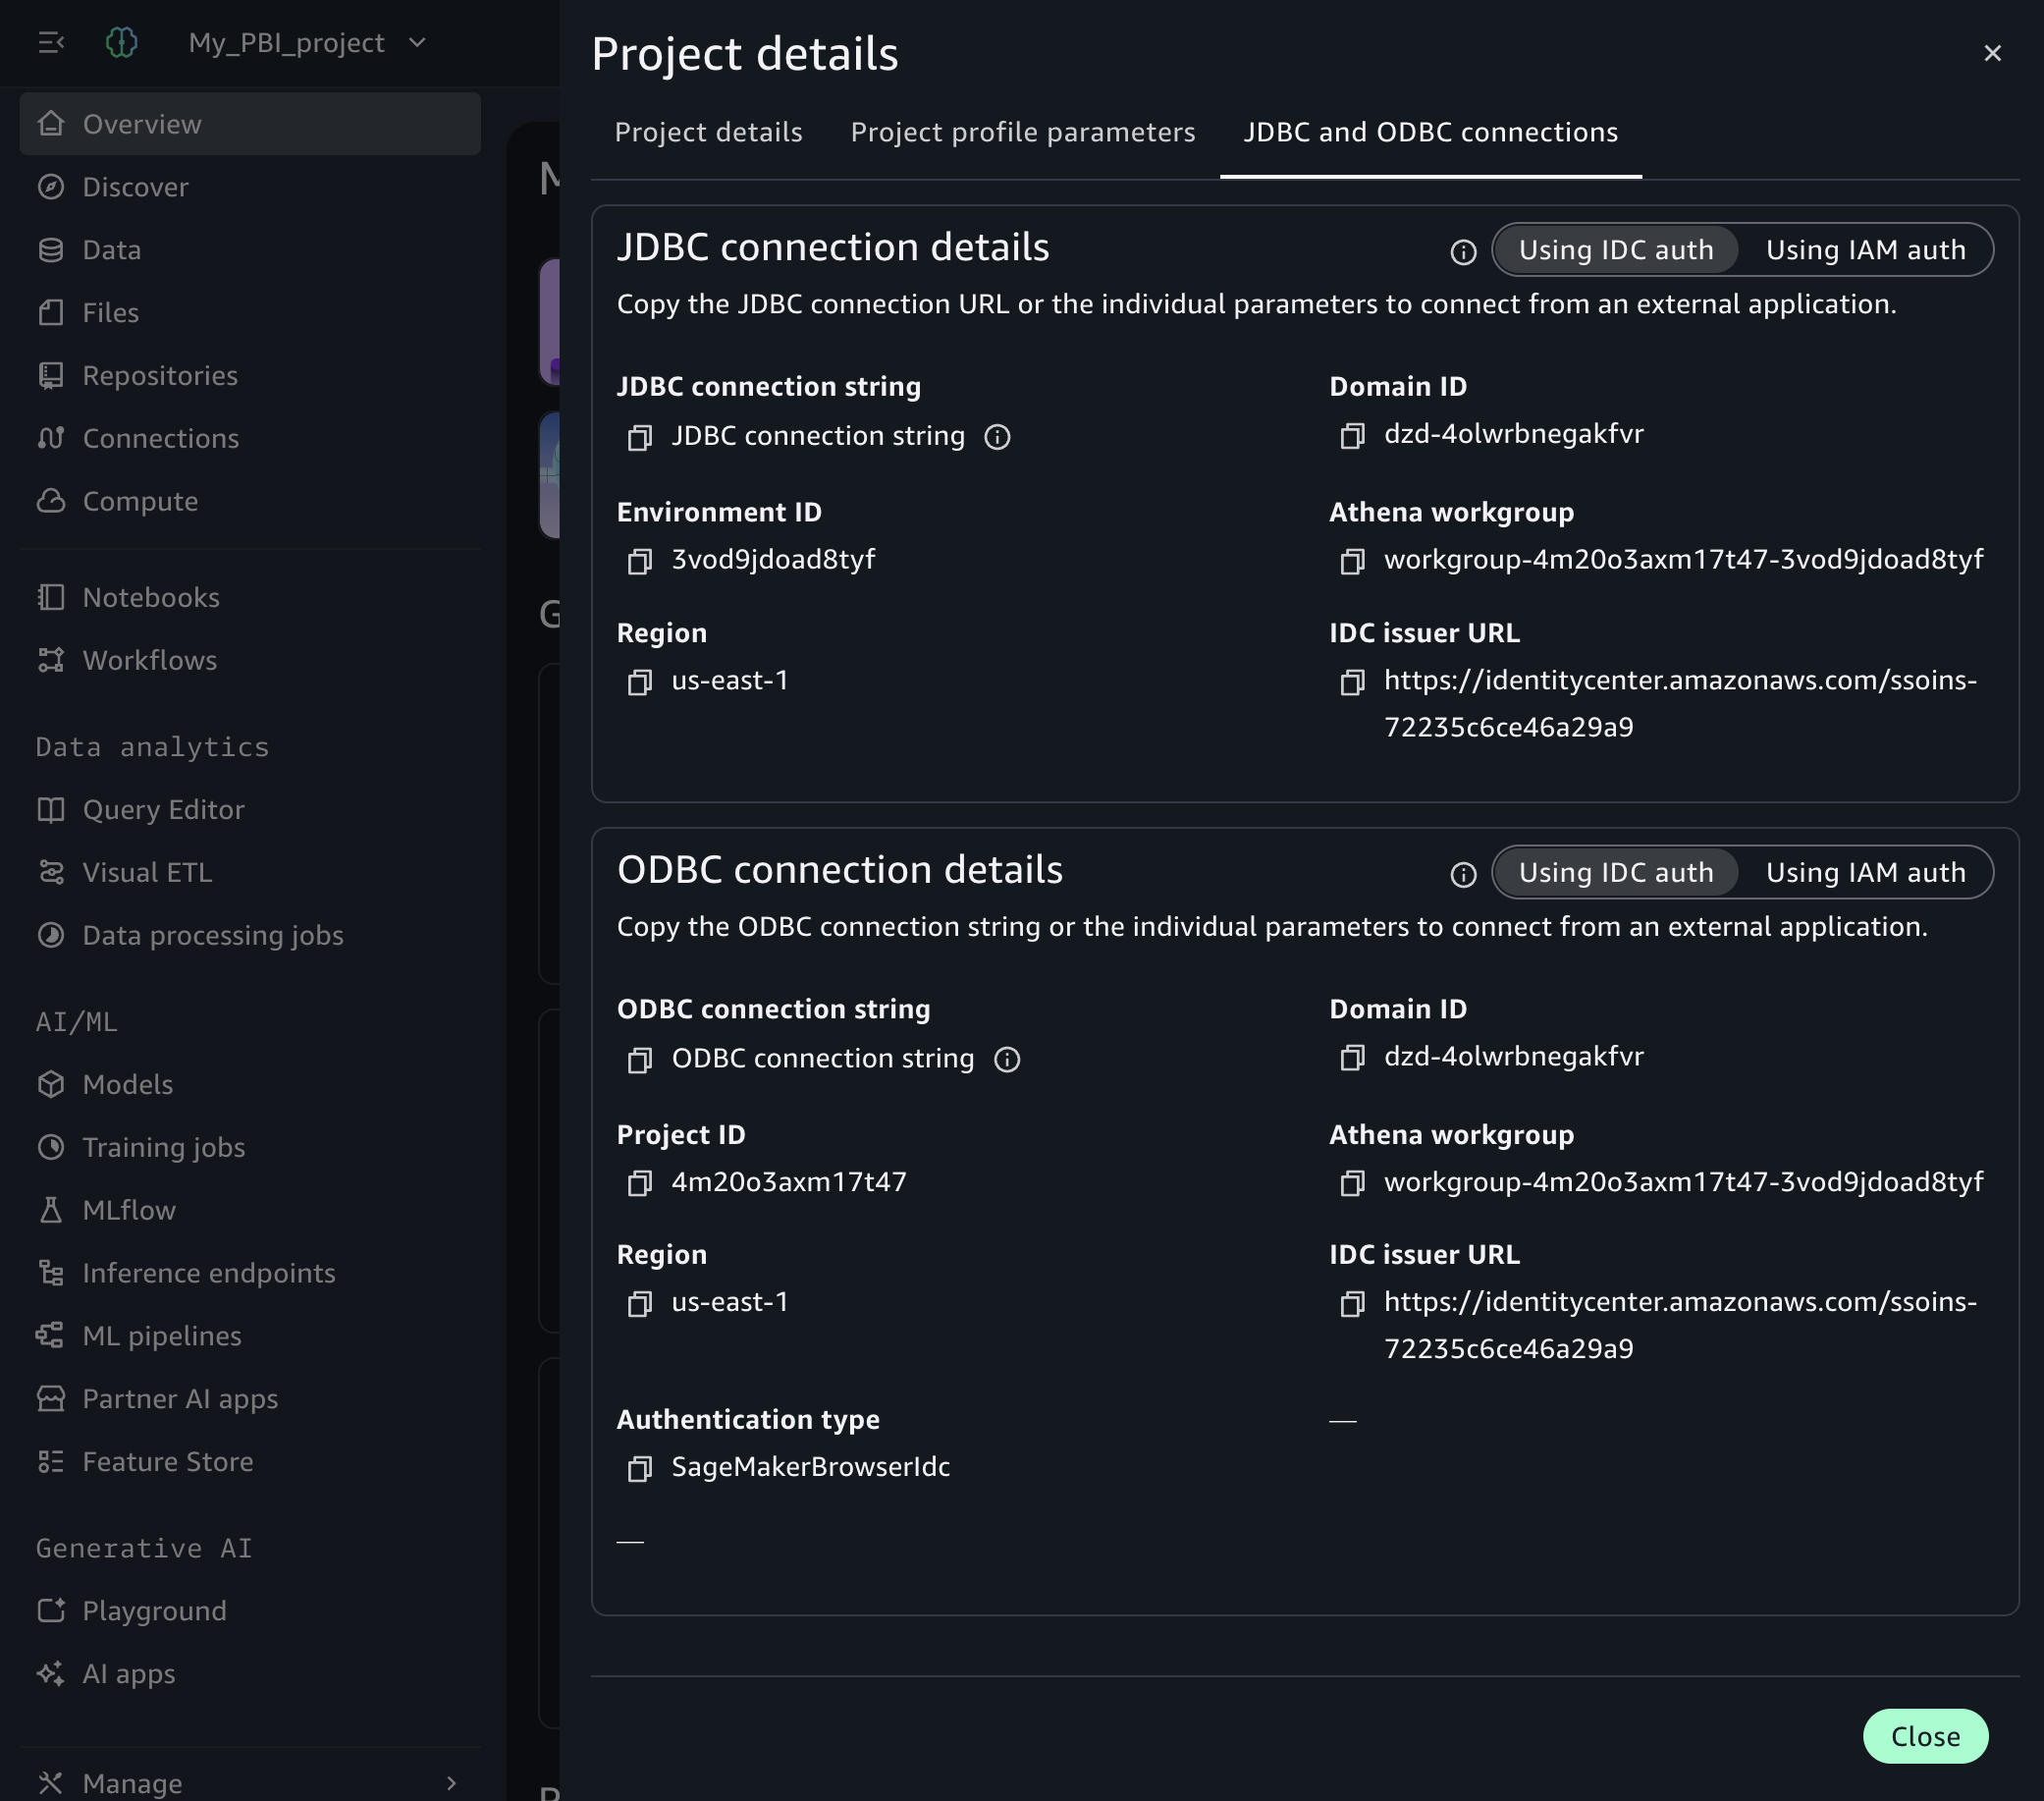
Figure 4: ODBC connection details
Configure the ODBC DSN
Create a System DSN using the Amazon Athena ODBC driver. For the general DSN creation steps, see Configuring a data source name on Windows in the Amazon Athena User Guide.
Enter the following values:
| Field | Value |
| Data Source Name | Name your datasource (for example, pbi-idcdomain) |
| Region | The AWS Region where your Amazon SageMaker domain is provisioned (for example, us-east-1) |
| Catalog | AwsDataCatalog |
| Database | default |
| Workgroup | Your Athena workgroup name (for example, workgroup-abcdefghij-klmexample) |
In the Authentication Options, configure the following values:
| Field | Value |
| Authentication Type | SageMakerBrowserIdc |
| SSO Start URL | IAM Identity Center entry point (for example, https://identitycenter.amazonaws.com/ssoins-0example) |
| SSO Region | Region of IAM Identity Center (for example, us-east-1) |
| SageMaker Domain ID | dzd-123456example |
| SageMaker Project ID | abcd12example |
| SageMaker Domain Region | Region of your Amazon SageMaker Unified Studio project (for example, us-east-1) |
Choose OK, then Test to verify the connection. Choose Allow Access when prompted by the browser.
The following screenshot shows the consent prompt.
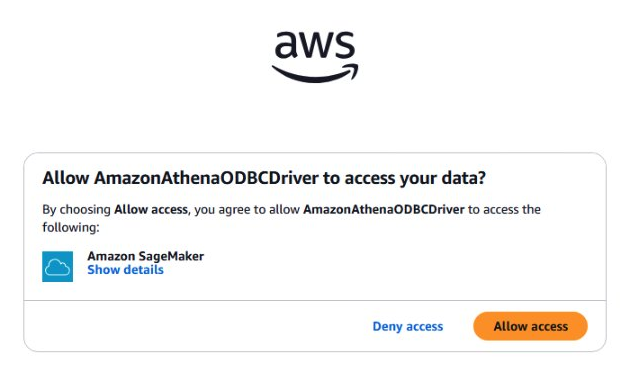
Figure 5: Browser consent prompt
The following screenshot shows the successful connection test.
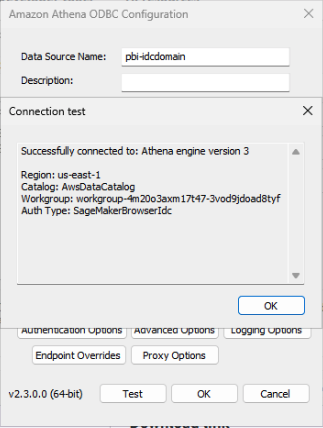
Figure 6: Successful connection test in the ODBC DSN configuration with SageMakerBrowserIdc authentication
Connect Power BI Desktop to your data
With the DSN configured, you can connect Power BI Desktop to your data catalog and load the generators dataset.
- Open Power BI Desktop.
- Open the Get Data menu and select More.
- Search for and select Amazon Athena and choose Connect.
- For Data Source Name (DSN), enter
pbi-idcdomain. - Select DirectQuery.
- Choose OK.
- Choose Use Data Source Configuration and then Connect.
- In the AwsDataCatalog folder, navigate to your database.
- Select the core_eia860__scd_generators table.
- Choose Load.
The following screenshot shows Power BI Desktop successfully connected to the AWS data catalog.
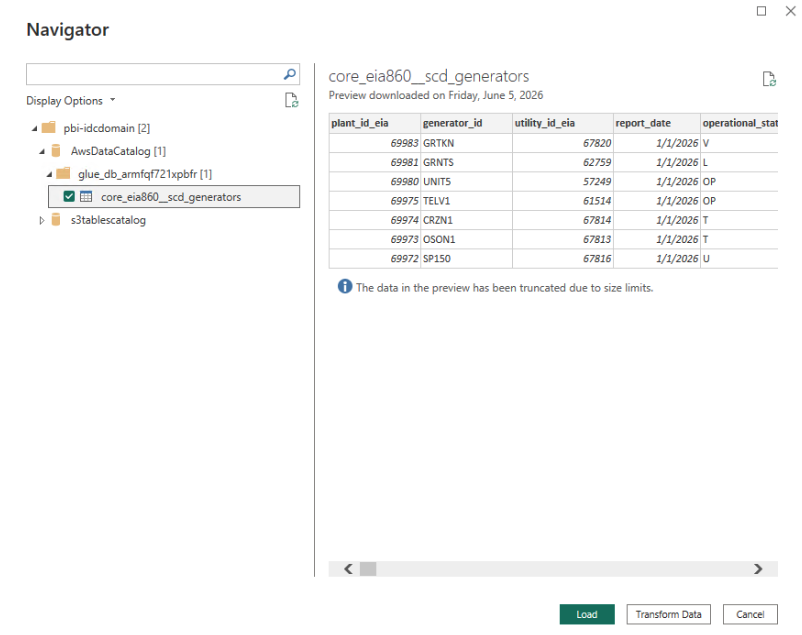
Figure 7: Power BI Desktop connected to the data catalog with the generators table loaded using SageMakerBrowserIdc authentication
Create your dashboard and publish it
You can create a dashboard to visualize U.S. power generation data. To create a visualization, complete the following steps:
- In the Visualizations pane, choose the Stacked bar chart.
- Assign the Y-Axis: Drag
technology_descriptionto the Y-Axis. - Assign the X-Axis (Values): Drag
capacity_mwto the X-Axis (automatically summed). - Assign the Legend (Stack): Drag
operational_statusto the Legend field. - Choose Publish.
- Give your report a name (for example,
generation-idcdomain) and choose Save. - Sign in and choose a destination workspace.
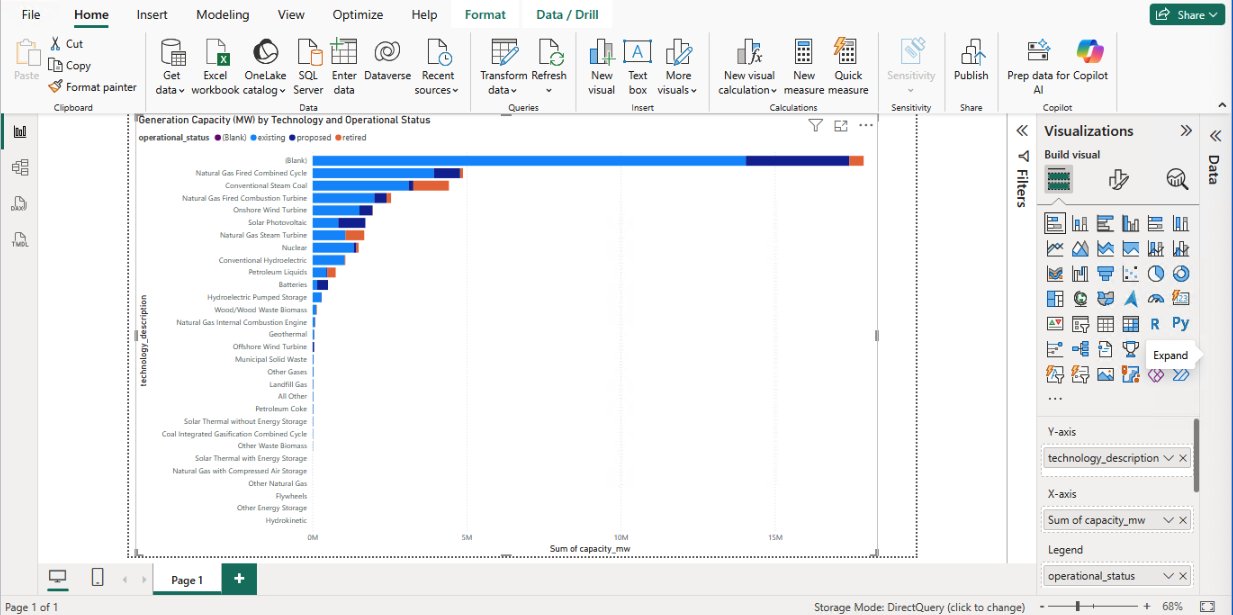
Figure 8: Power BI Desktop report using the EIA-860 generators dataset
After publishing, the report structure is available on Power BI Service.
Method 2: DSN-less connection (Power BI ODBC connector)
In this method, you use the Power BI ODBC connector with a connection string (no DSN required). This method supports Import mode only and SageMakerIam authentication. Because the gateway cannot perform browser authentication, both Desktop and gateway must use SageMakerIam. If your workflow requires SageMakerBrowserIdc, use Method 1.
If your machine already has AWS credentials through another method in the default credential provider chain, skip the following setup.
Administrator setup
Create a custom permission set named SageMakerDataAnalyst in IAM Identity Center with the following inline policy. For detailed steps, see Create a permission set in the AWS IAM Identity Center User Guide.
Assign your user to this permission set for the AWS account containing your SageMaker Unified Studio domain. Then configure your AWS Command Line Interface (AWS CLI) SSO profile by running aws configure sso. For the full CLI configuration walkthrough with detailed steps, see Part 2. After your profile is configured, run aws sso login to authenticate.
Add the IAM identity as a member of SageMaker Unified Studio project
The IAM identity providing credentials needs both domain-level and project-level access to query data through Athena.
- Add AWSReservedSSO_SageMakerDataAnalyst_1234example as a domain IAM user: see Managing users in the Amazon SageMaker Unified Studio Admin Guide. Choose Current account.
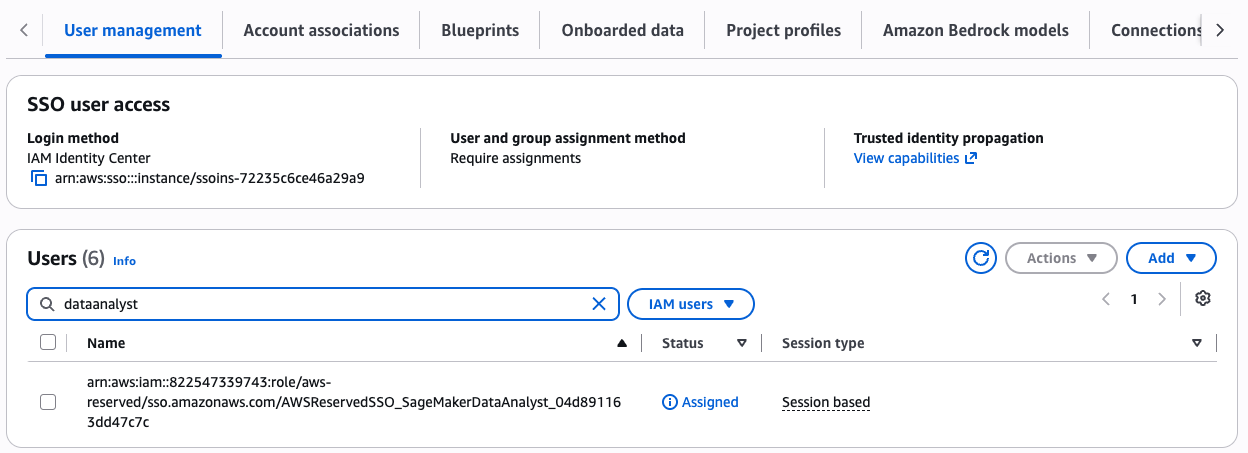
Figure 9: List of users of your SageMaker Unified Studio domain including the IAM identity
- Add AWSReservedSSO_SageMakerDataAnalyst_1234example as a project member: see Add project members in the Amazon SageMaker Unified Studio User Guide.
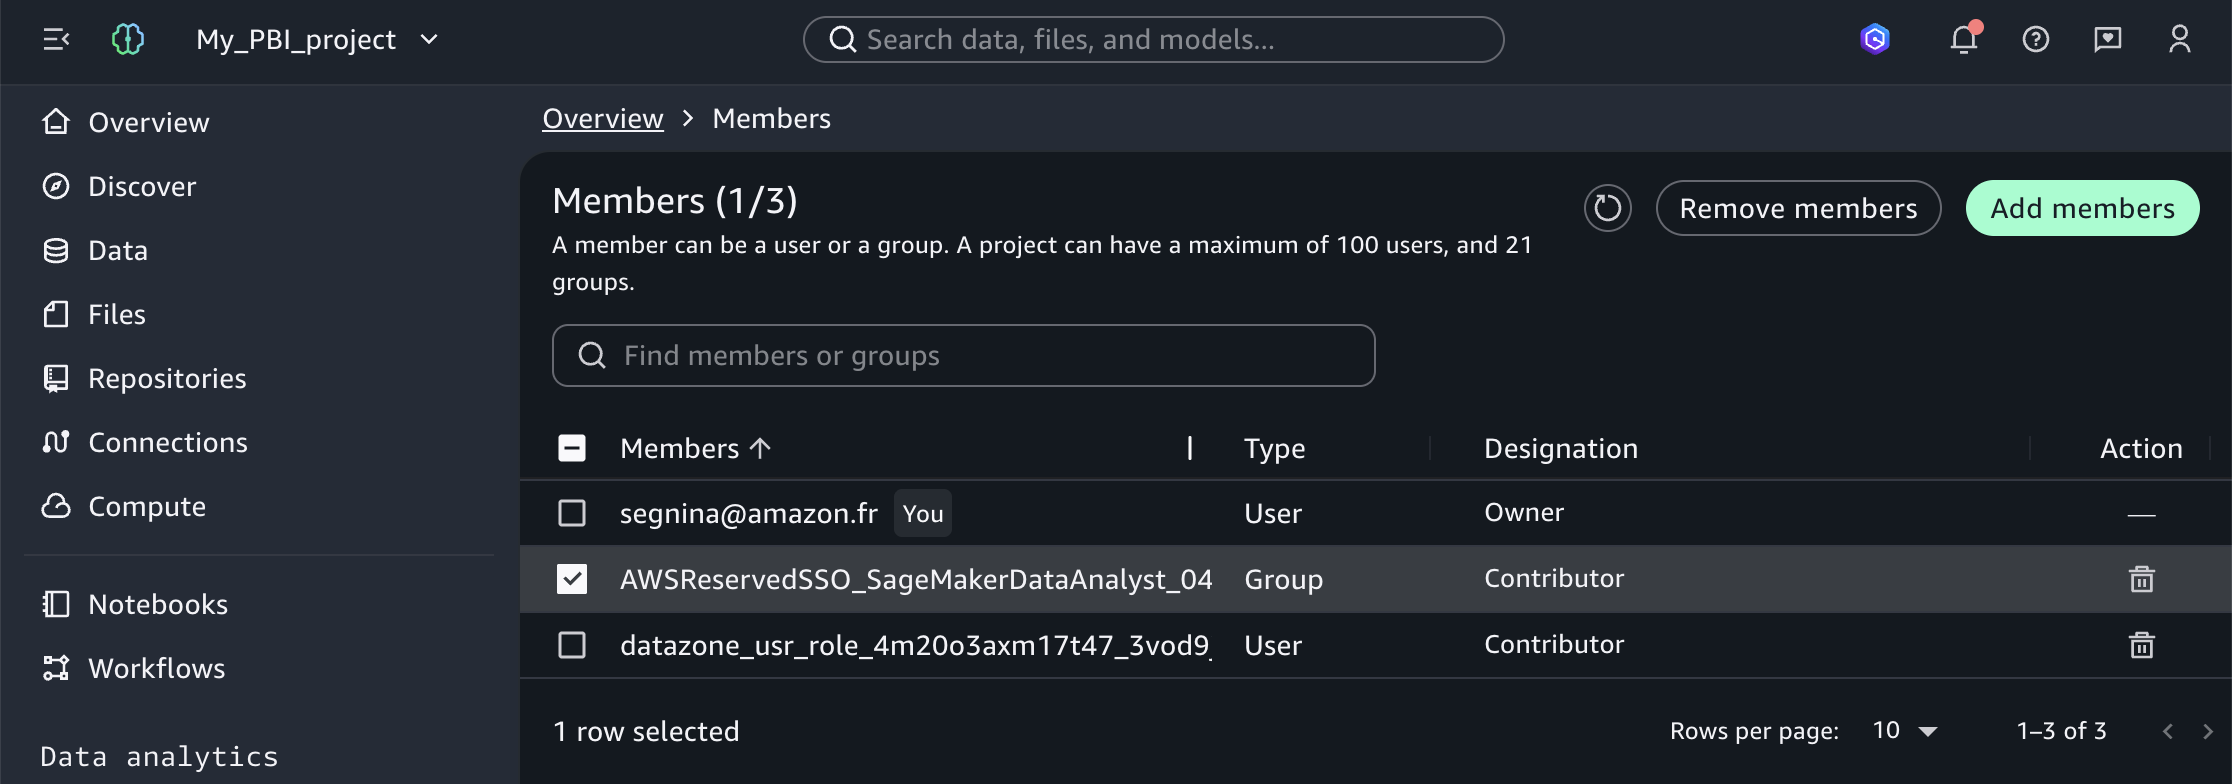
Figure 10: Members of a SageMaker Unified Studio project including the IAM identity
Gather configuration values
Gather the following connection values from your Amazon SageMaker Unified Studio project:
- Open your Amazon SageMaker Unified Studio Project.
- On the navigation pane, choose Overview.
- Select JDBC and ODBC details.
- Select the Using IAM auth toggle.
- Copy the ODBC connection string.
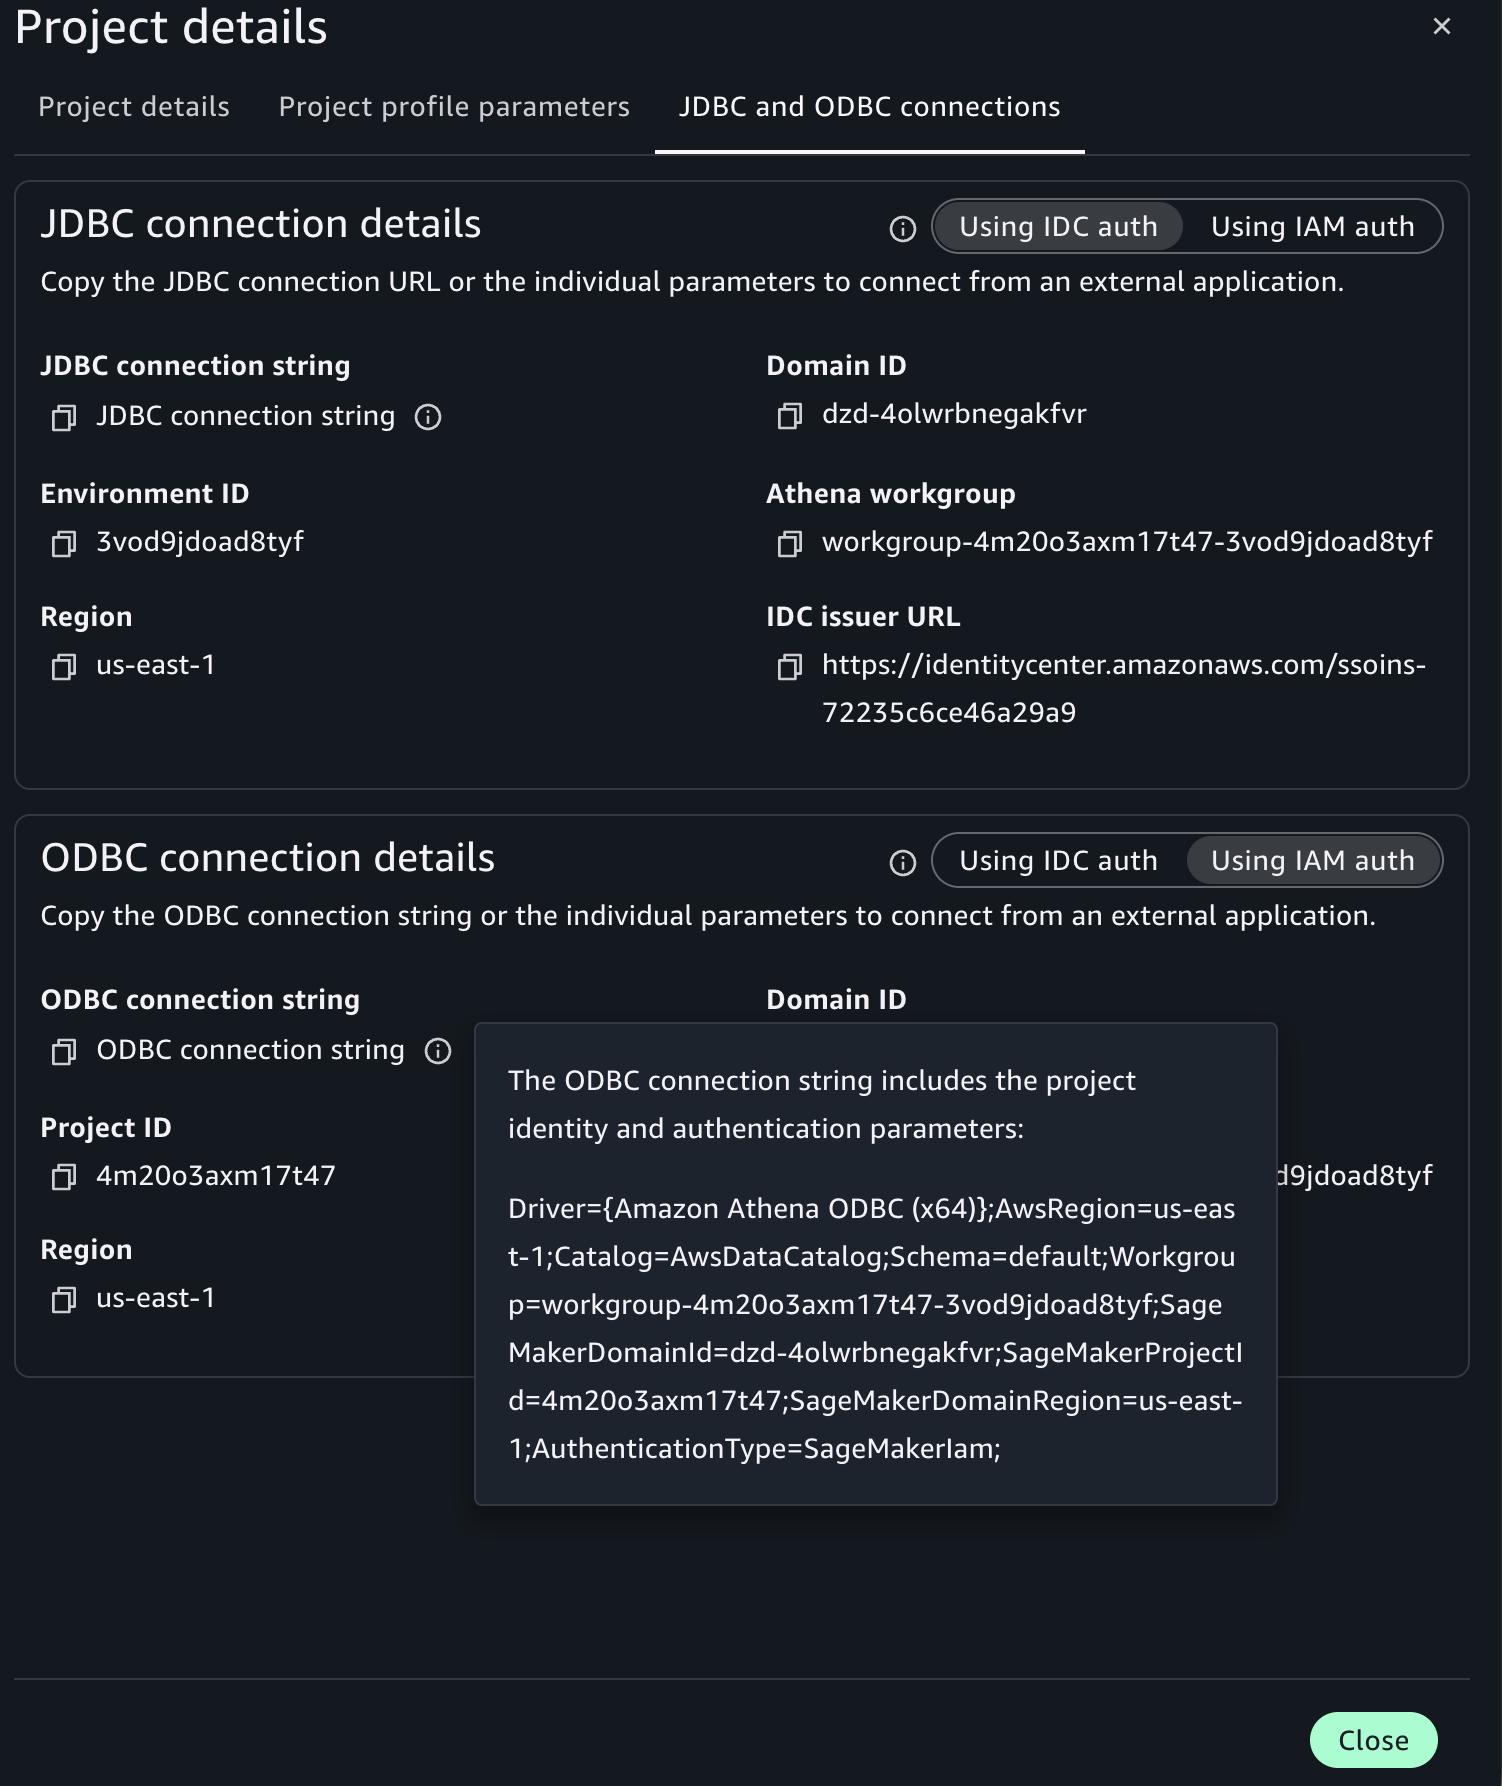
Figure 11: ODBC connection string on the SageMaker Unified Studio project overview
Connect Power BI Desktop to your data and publish
With the configuration parameters of your project, you can connect Power BI Desktop to your data catalog and load the generators dataset.
- Open Power BI Desktop.
- Open the Get Data menu and select More.
- Search for and select ODBC and choose Connect.
- For Data Source Name (DSN), select (None).
- Expand Advanced Options.
- In the Connection string field, enter your connection string. For example,
Driver={Amazon Athena ODBC (x64)};AwsRegion=us-east-1;Catalog=AwsDataCatalog;Schema=default;Workgroup=workgroup-abcdefghij-klmexample;SageMakerDomainId= dzd-123456example;SageMakerProjectId= abcd12example;SageMakerDomainRegion=us-east-1;AuthenticationType=SageMakerIam; - Choose OK.
- Choose Default or Custom and then Connect.
- In the AwsDataCatalog folder, navigate to your database.
- Select the core_eia860__scd_generators table.
- Choose Load.
When publishing, name your report generation-idcdomain-dsnless.
Configure the on-premises data gateway and view your report on Power BI Service
After creating your reports in Power BI Desktop, configure the on-premises data gateway to view your report on Power BI Service.
You can configure the gateway using either a DSN or a DSN-less connection string, matching the method you used in Power BI Desktop.
Create and attach an IAM role to the Power BI Gateway EC2 instance
Create an IAM role for the EC2 instance that will host your Power BI gateway. Name the role pbi-gateway-role (or a name of your choice). The role must use EC2 as the trusted entity and include the following inline policy:
Attach this role to your Power BI Gateway EC2 instance. For detailed steps on creating and attaching an IAM role to an EC2 instance, refer to IAM roles for Amazon EC2 in the Amazon EC2 User Guide.
Add the Power BI Gateway IAM role as a member of SageMaker Unified Studio project
The gateway IAM role needs project-level access to query data through Athena.
- Add the IAM pbi-gateway-role role as a domain IAM user: see Managing users in the Amazon SageMaker Unified Studio Admin Guide. Choose Current account (or Associated account if your gateway is deployed in a different account).
The following screenshot, from the Amazon SageMaker page of the AWS Management Console, shows the list of users of your Amazon SageMaker Unified Studio domain, including the IAM gateway role.
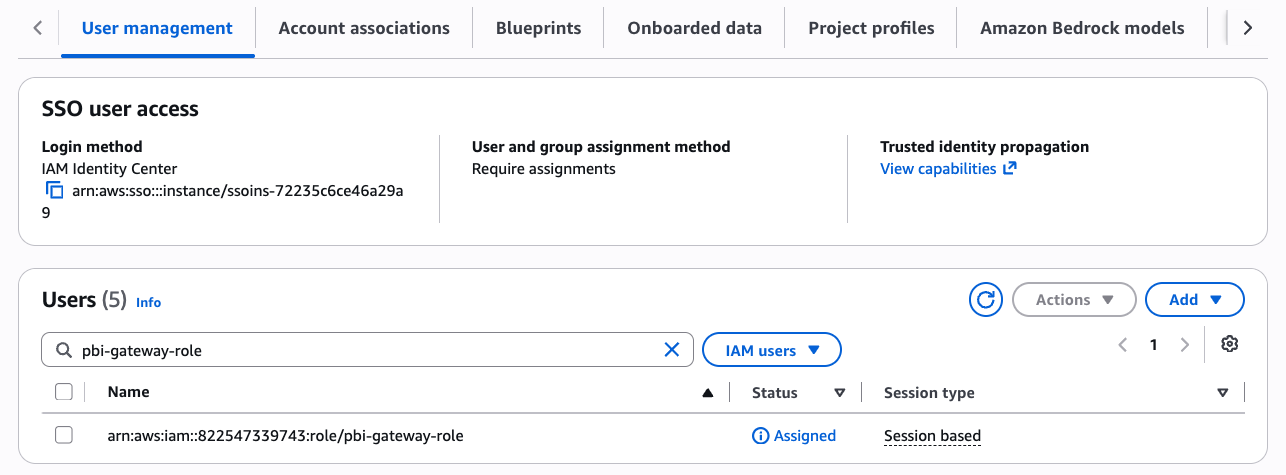
Figure 12: List of users of your SageMaker Unified Studio domain including the IAM gateway role
Add the IAM pbi-gateway-role role as a project member: see Add project members in the Amazon SageMaker Unified Studio User Guide.
The following screenshot shows the Amazon SageMaker Unified Studio project user management page listing the project members.
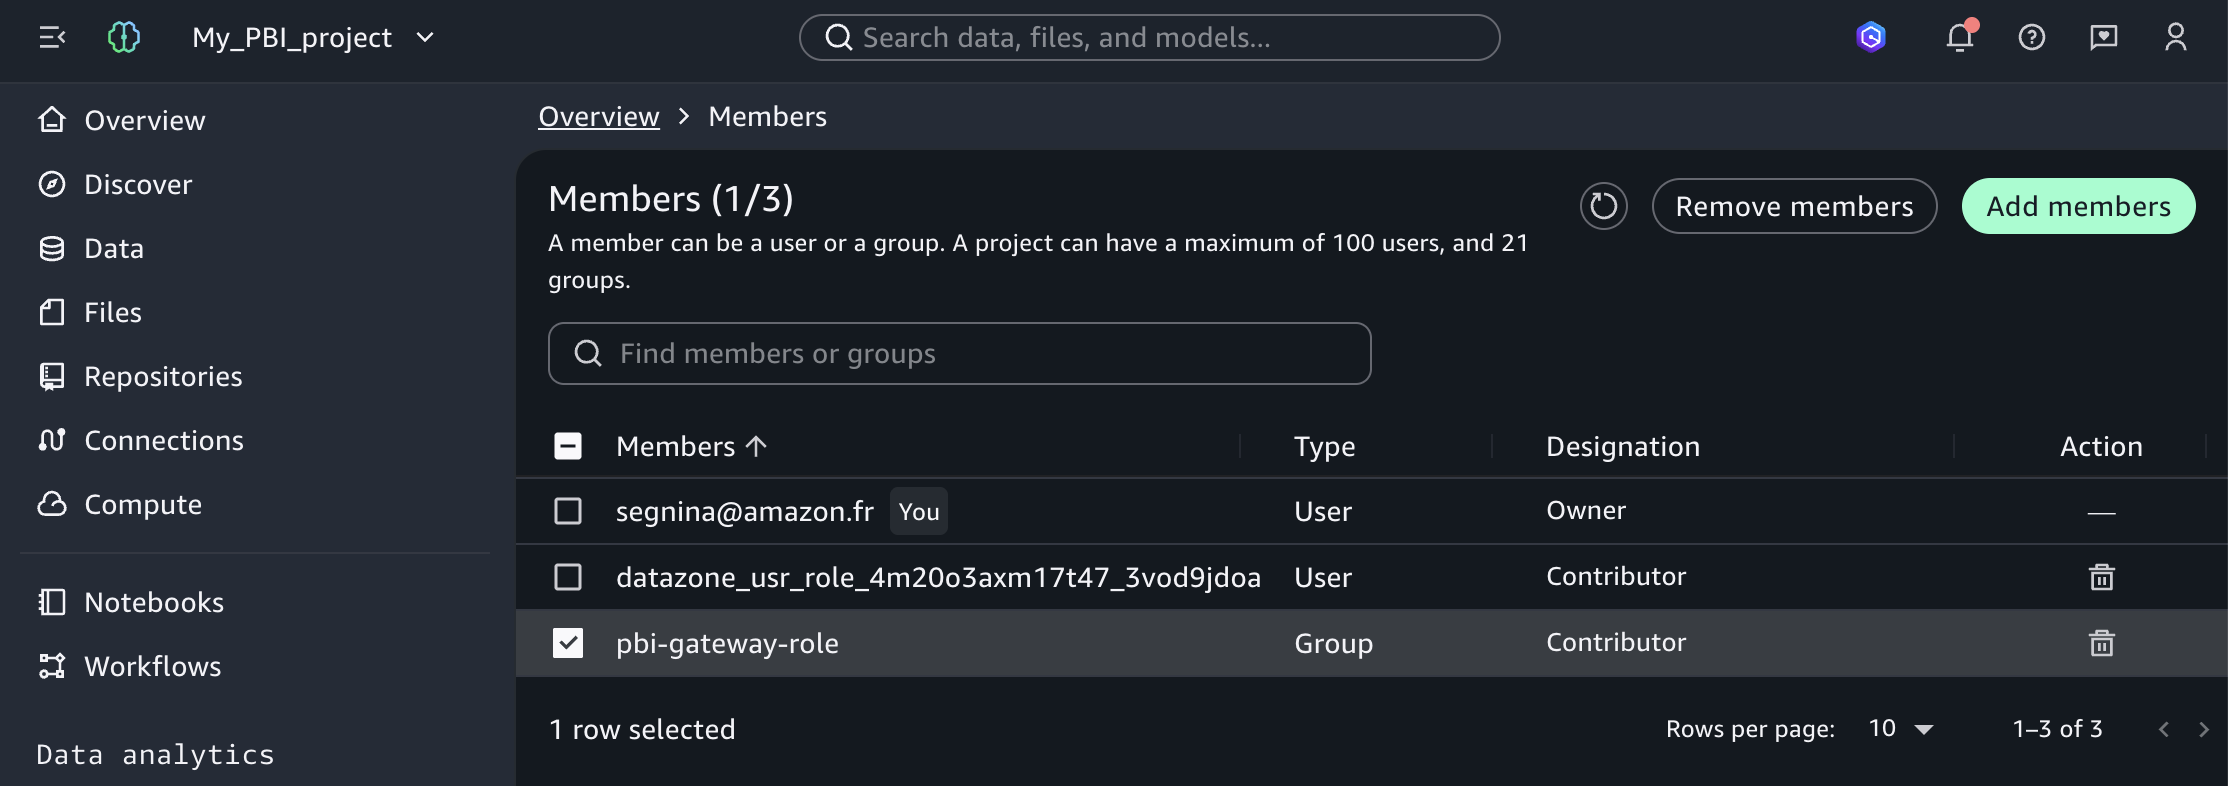
Figure 13: Members of a SageMaker Unified Studio project including the IAM gateway role
Configure the data source on Power BI Gateway
How you configure the data source depends on the method you used in Power BI Desktop.
Method 1 (DSN-based)
Configure a System DSN on the gateway EC2 instance following the same ODBC DSN steps described in Method 1. When configuring, make sure that:
- You use the System DSN tab (not User DSN) because the gateway runs as a Windows service under a separate account.
- The authentication type is set to SageMakerIam regardless of what you used on Desktop.
- The DSN name matches exactly the one configured on Power BI Desktop (for example,
pbi-idcdomain)
Method 2 (DSN-less)
No configuration is needed on the gateway machine itself. You configure the data source directly in Power BI Service.
Configure the data source and view your report on Power BI Service
To view your report, complete the following steps:
- Open the workspace where you saved your report.
- Search the Semantic Model which has the same name as your report (for example,
generation-idcdomain) and choose the More options icon (three dots). - Choose Settings.
- Expand Gateway and Cloud Connection.
- Choose View Datasources (play icon) on your gateway.
- Choose Manually add to gateway.
- Add a connection name (for example,
pbi-idcdomain).
The next step depends on the method that you chose:
Method 1 (DSN-based)
- Add the DSN (for example,
pbi-idcdomain) that matches exactly the one configured on Power BI Desktop.
Method 2 (DSN-less)
- In the Connection string field, enter the connection string that matches exactly the one used in Power BI Desktop.
Next, continue with the configuration:
- Select Anonymous as Authentication Method.
- Choose Create.
- Expand again Gateway and Cloud Connection.
- For Maps to, choose the connection that you created (for example,
pbi-idcdomain). - Choose Apply.
- Return to the workspace where you saved your report.
- On the Content section, choose your report (for example,
generation-idcdomain).
The following screenshot shows a Power BI report on Power BI Service.
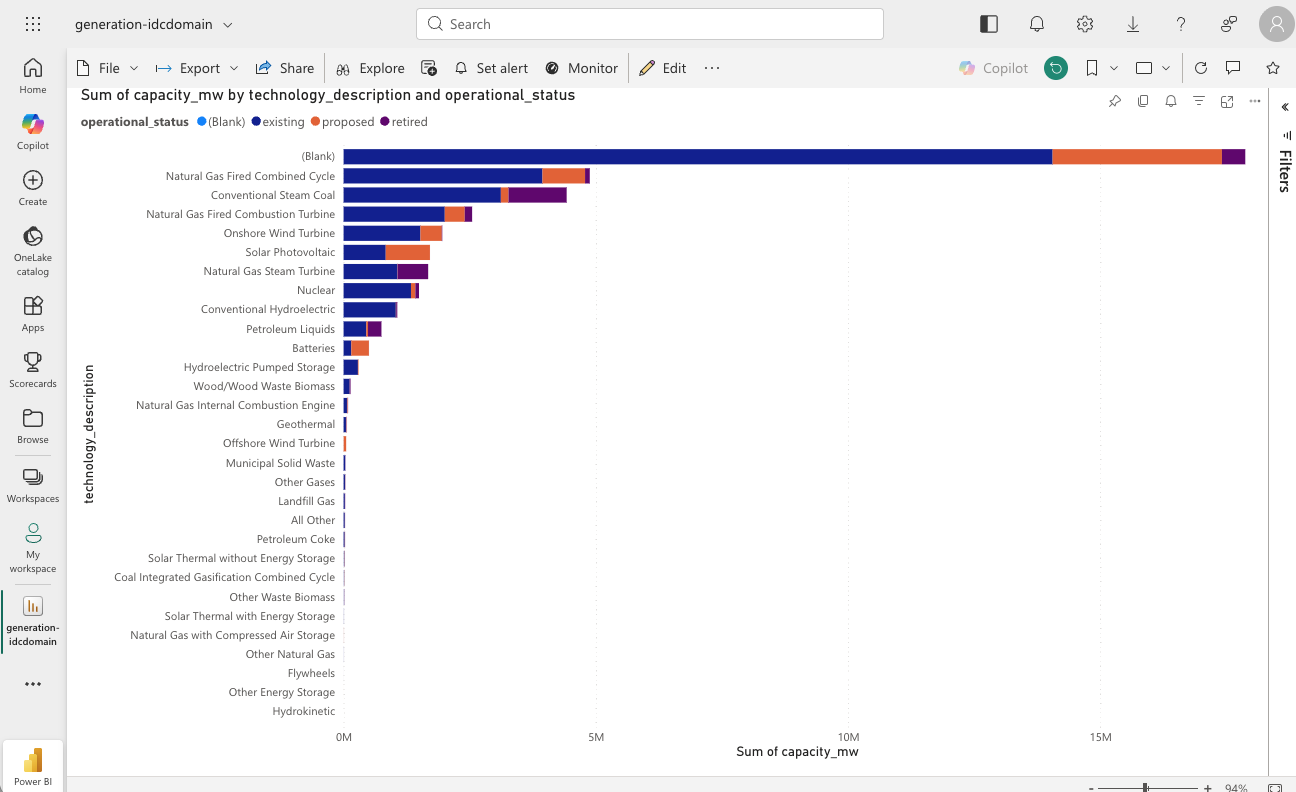
Figure 14: Power BI report on Power BI Service
You can now see your report online with the data from your Amazon SageMaker Unified Studio project.
Clean up
To avoid additional charges after testing, delete the Amazon SageMaker Unified Studio domain and EC2 instances. Refer to Delete domains and Terminate Instances for instructions.
Conclusion
In this post, you connected Microsoft Power BI to Amazon SageMaker Unified Studio using an IDC-based domain with both DSN-based and DSN-less methods. This provides a direct connection, with no third-party licensing, that maintains data governance. In Part 2, we cover IAM-based domains.
You can automate many steps of this process. For information about automating DSN creation on the Power BI Gateway or Service, refer to How ENGIE automates the deployment of Amazon Athena data sources on Microsoft Power BI. If you don’t want users adding the gateway IAM role directly, you can create a custom blueprint as a self-service tool for gateway role addition. The blueprint uses a ProjectMembership resource with a configurable parameter that project owners can activate at project creation, automatically adding the gateway role as a project contributor.
For additional best practices, refer to the Using Microsoft Power BI with the AWS Cloud Whitepaper. To learn more, visit Amazon SageMaker Unified Studio and Amazon Athena.
About the authors
Connect Amazon SageMaker Unified Studio to Microsoft Power BI – Part 2: IAM-based domains
Post Syndicated from Ramesh H Singh original https://aws.amazon.com/blogs/big-data/connect-amazon-sagemaker-unified-studio-to-microsoft-power-bi-part-2-iam-based-domains/
In Part 1 of this series, we connected Microsoft Power BI to Amazon SageMaker Unified Studio using an IAM Identity Center (IDC)-based domain. The Amazon Athena ODBC driver (version 2.2.0 and later) supports Amazon SageMaker Unified Studio authentication natively, removing the third-party ODBC-JDBC bridge previously required. We walked through both the DSN-based connection and the DSN-less connection, from Power BI Desktop through the on-premises data gateway to Power BI Service, where report viewers access published dashboards.
In this post, you create the same direct connection using an AWS Identity and Access Management (IAM)-based domain. The walkthrough covers the same two connection methods. The differences are the Amazon SageMaker Unified Studio console navigation paths, the configuration values, and an additional administrator setup that provides AWS credentials through AWS IAM Identity Center. This is Part 2 of a two-part series. For a detailed comparison of the two connection methods, see Part 1.
Solution overview
The architecture is the same as the previous post (see the architecture diagram and walkthrough scenario in Part 1). Power BI Desktop connects to Amazon Athena through the ODBC driver and the Amazon SageMaker Unified Studio project governs all data access. At the same time, the on-premises data gateway on an Amazon Elastic Compute Cloud (Amazon EC2) instance bridges the connection to Power BI Service so report viewers can access published dashboards.
The difference is in authentication: An IAM-based domain uses SageMakerIam authentication for both connection methods. The driver retrieves credentials from the AWS default credential provider chain. For this walkthrough, AWS IAM Identity Center provides those credentials through a custom permission set. Power BI Desktop can run on-premises or on an EC2 instance in the AWS Cloud. The gateway EC2 instance authenticates using its attached IAM role.
Prerequisites
Complete the prerequisites from Part 1. Additionally, you need:
- AWS Command Line Interface (AWS CLI) – The latest version of the AWS CLI installed on your Windows machine. In this post series, the ODBC driver uses the AWS IAM Identity Center profile configured through the CLI for authentication.
- Amazon SageMaker Unified Studio – An Amazon SageMaker Unified Studio IAM-based domain with AWS IAM Identity Center single sign-on (SSO) enabled.
The following screenshot shows the Amazon SageMaker Unified Studio (IAM-based domain) project Query Editor interface. It runs a preview query on the EIA-860 generators dataset.
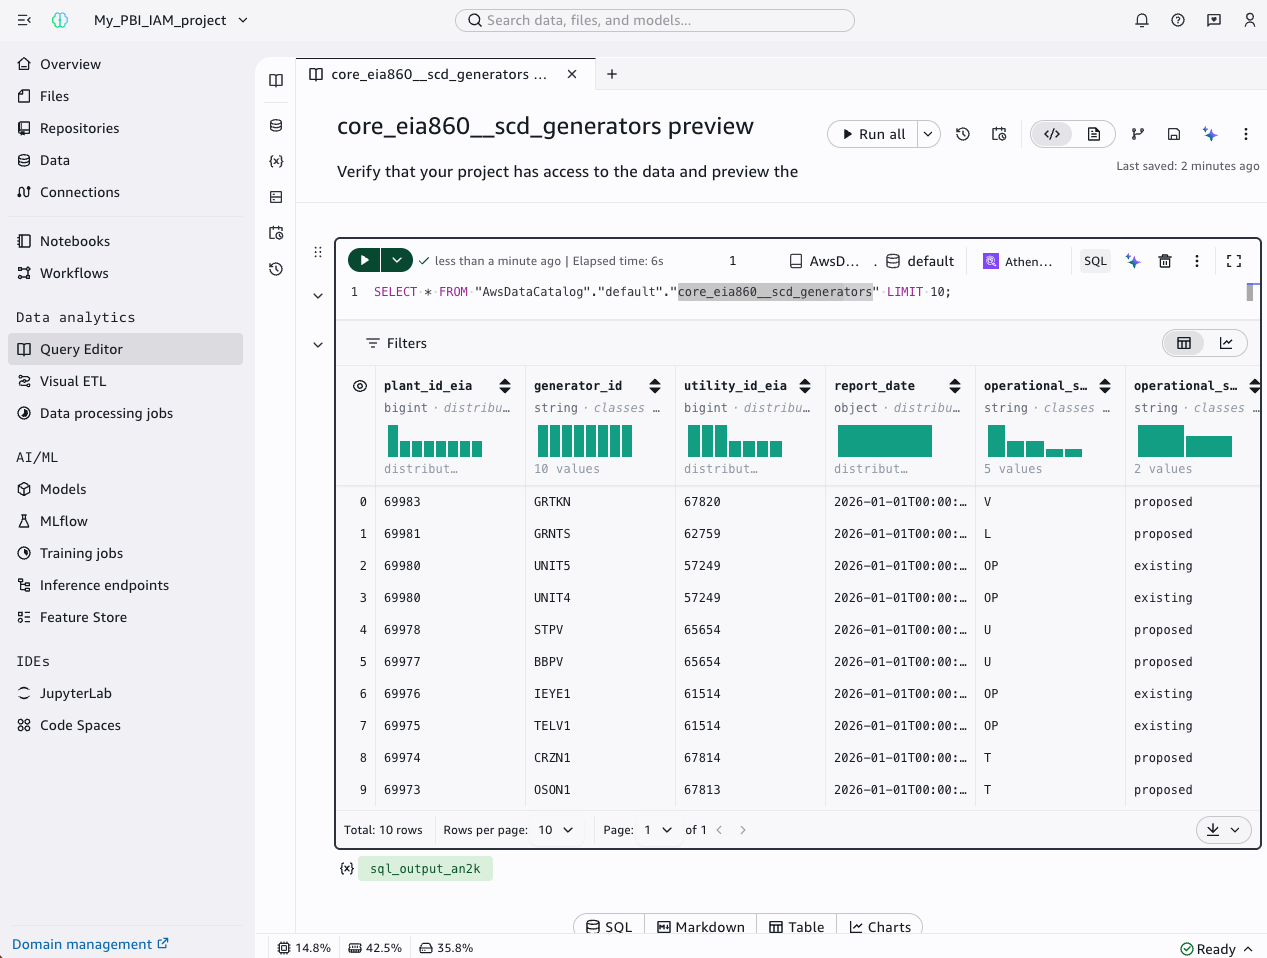
Figure 1: SageMaker Unified Studio (IAM-based domain) project with the EIA-860 generators dataset available in the data catalog
Administrator setup
This section configures AWS IAM Identity Center to provide credentials for the SageMakerIam authentication mode. It applies to Method 1 (IAM-based domain) and Method 2 (both domain types). If your machine already has AWS credentials available through another method in the default credential provider chain, you can skip this section and proceed directly to the method of your choice. For the full list of credential sources, refer to Credential providers in the AWS SDKs and Tools Reference Guide.
Create a permission set in IAM Identity Center
Create a custom permission set named SageMakerDataAnalyst in IAM Identity Center with the following inline policy. For detailed steps, see Create a permission set in the AWS IAM Identity Center User Guide.
The "Resource": "*" is required because these API actions do not support resource-level permissions. For more information, see Actions, resources, and condition keys for Amazon DataZone.
This doesn’t grant broad access to your data. These are read-only metadata actions that allow the ODBC driver to discover connection details and retrieve temporary Athena credentials. The actual data access is governed by Amazon SageMaker Unified Studio project membership: Users can only query data within projects where they have been explicitly added as members. The Amazon SageMaker Unified Studio project IAM role provides Athena and Amazon S3 permissions separately.
Assign users to the permission set
To assign users or groups to the target AWS account, complete the following steps:
- In the IAM Identity Center console, choose AWS accounts.
- Select the target account where your Amazon SageMaker Unified Studio IAM-based domain is deployed.
- Choose Assign users or groups.
- Select the SSO users or groups that need access.
- Select the SageMakerDataAnalyst permission set.
- Choose Submit.
Configure AWS IAM Identity Center profile
To configure the AWS IAM Identity Center profile, run the following command in your terminal on Windows:
When prompted, enter the following values:
| Prompt | Value |
| SSO session name | For example, smus |
| SSO start URL | The IDC issuer URL. For example, https://identitycenter.amazonaws.com/ssoins-0example |
| SSO region | The SSO Region. For example, us-east-1 |
| SSO registration scopes | sso:account:access |
A browser window opens for authentication. After authentication, select your account and the SageMakerDataAnalyst role.
The following screenshots show the consent window and the successful authentication message.
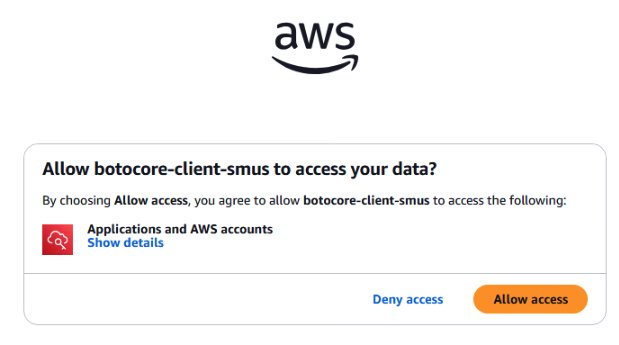
Figure 2: Browser consent prompt
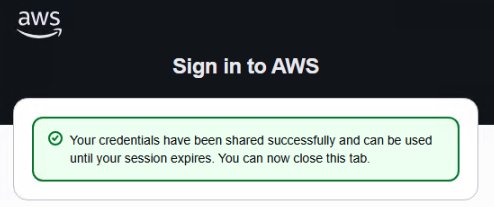
Figure 3: Browser authentication successful message
When prompted, enter the following values:
| Prompt | Value |
| Default client Region | None |
| CLI default output format | None |
| Profile Name | Change value by default |
The resulting ~/.aws/config file should look like the following:
Verify authentication and daily use
To verify that your SSO profile is working correctly, run the following command:
You should receive a response like the following:
For daily use, no passwords or EC2 instance roles are required. When your SSO session expires, run the following command to quickly refresh it:
Add your IAM identity as a member of your Amazon SageMaker Unified Studio project
The IAM identity providing credentials to the ODBC driver needs project-level access to query data through Athena. If you completed the administrator setup, this is the SSO role associated with your permission set (for example, AWSReservedSSO_SageMakerDataAnalyst_1234example). If you’re using another credential source, add the IAM role or user that provides those credentials. For detailed steps, see Managing users for IAM-based domains in the Amazon SageMaker Unified Studio Administrator Guide.
The following screenshot shows the Amazon SageMaker Unified Studio domain management page, which lists the members in a project.
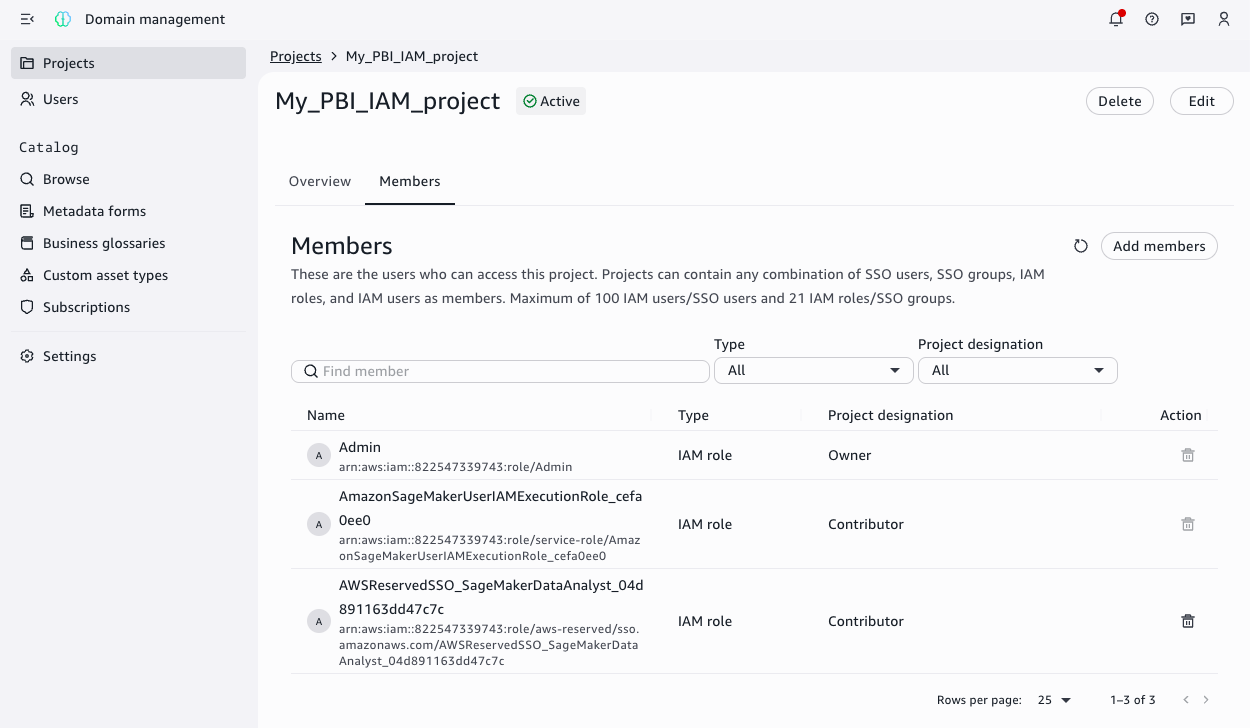
Figure 4: List of members of your SageMaker Unified Studio project
Gather the information to authenticate
To get the parameters that you need to authenticate, complete these steps:
- Open your Amazon SageMaker Unified Studio Project.
- Open Domain Management.
- Choose Users.
- Choose View SSO connection.
- Copy the end of the Instance ARN, so we can build the Instance URL like
https://identitycenter.amazonaws.com/ssoins-0example
The following screenshot shows the Amazon SageMaker Unified Studio domain management page with SSO connection details.
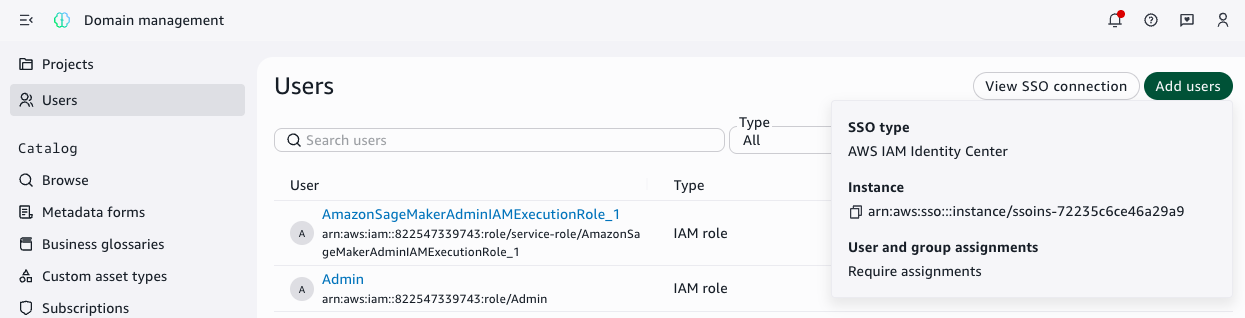
Figure 5: AWS IAM Identity Center information
- Choose the user icon and copy the Region as shown in the following screenshot.

Figure 6: User icon with the Region information
Method 1: DSN-based connection (Athena Power BI connector)
In this method, you configure an ODBC Data Source Name (DSN) and use the Amazon Athena connector in Power BI. This method uses SageMakerIam authentication mode and supports both DirectQuery and Import mode.
This section covers IAM-based domains. For IDC-based domains, see Part 1.
Gather configuration values to configure your Amazon Athena ODBC DSN
Before configuring the ODBC DSN, gather the following connection values from your Amazon SageMaker Unified Studio project:
- Open your Amazon SageMaker Unified Studio Project.
- Top right, select the three dots.
- Choose Project details.
- Select JDBC and ODBC details.
- Copy the following values: domain ID, Amazon SageMaker project ID, AWS Region, and Athena workgroup.
The following screenshot shows the Amazon SageMaker Unified Studio project overview page, which provides the project details to copy.
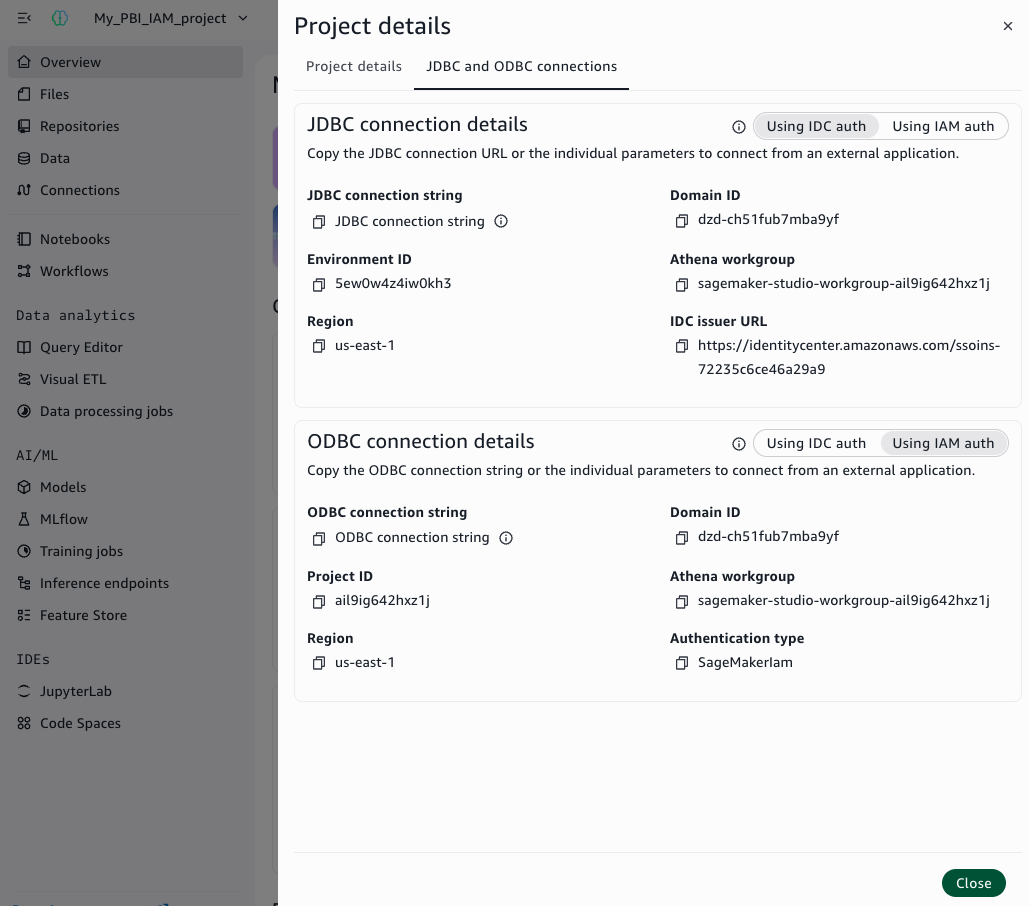
Figure 7: Project details with SageMaker domain ID, SageMaker project ID, Region, and Athena workgroup
Configure the ODBC DSN
Create a System DSN using the Amazon Athena ODBC driver. For the general DSN creation steps, see Configuring a data source name on Windows in the Amazon Athena User Guide. Enter the following values:
| Field | Value |
| Data Source Name | Name your datasource (for example, pbi-iamdomain) |
| Region | The AWS Region where your Amazon SageMaker domain is provisioned (for example, us-east-1) |
| Catalog | AwsDataCatalog |
| Database | default |
| Workgroup | Your Athena workgroup name (for example, workgroup-abcdefghij-klmexample) |
In the Authentication Options, configure the following values:
| Field | Value |
| Authentication Type | SageMakerIam |
| SageMaker Domain ID | dzd-123456example |
| SageMaker Project ID | abcd12example |
| SageMaker Region | Region of your SageMaker Unified Studio project (for example, us-east-1) |
Choose OK, then Test to verify the connection. Choose Allow Access when prompted by the browser.
The following screenshot shows the successful connection test.
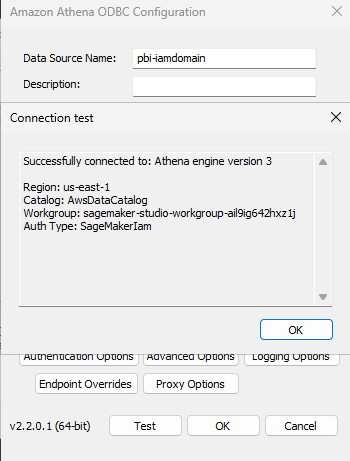
Figure 8: Successful connection test in the ODBC DSN configuration with SageMakerIam authentication
Connect Power BI Desktop to your data
With the DSN configured, you can connect Power BI Desktop to your data catalog and load the generators dataset.
- Open Microsoft Power BI Desktop.
- Open the Get Data menu and select More.
- Search for and select Amazon Athena and choose Connect.
- For Data Source Name (DSN), enter
pbi-iamdomain. - Select DirectQuery.
- Choose OK.
- Choose Use Data Source Configuration and then Connect.
- In the AwsDataCatalog folder, navigate to your database.
- Select the core_eia860__scd_generators table.
- Choose Load.
The following screenshot shows Power BI Desktop successfully connected to the data catalog.
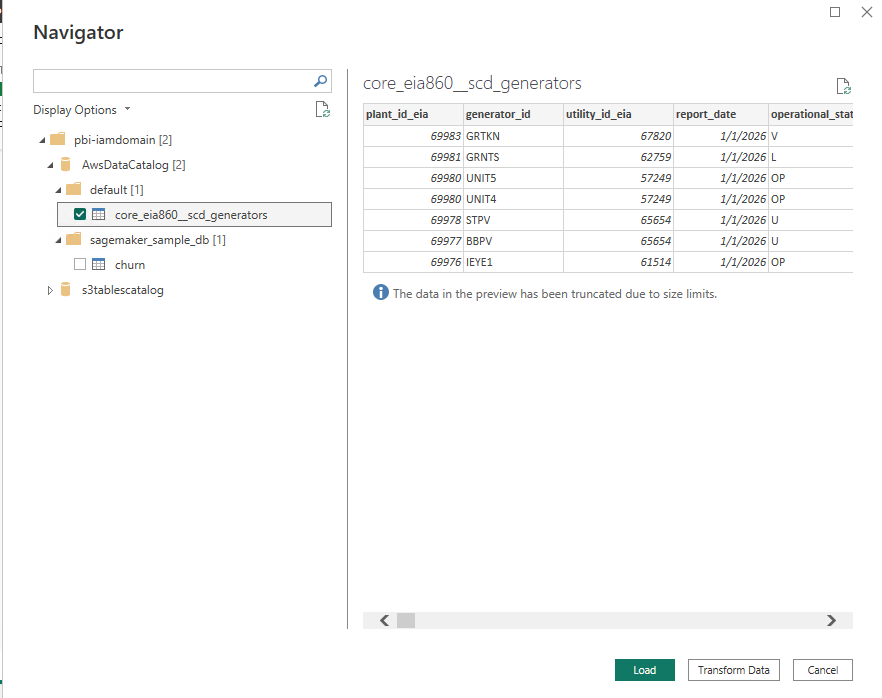
Figure 9: Power BI Desktop connected to the data catalog with the generators table loaded using SageMakerIam authentication
Create your dashboard and publish it
You can create a dashboard to visualize U.S. power generation data. To create a visualization, complete the following steps:
- In the Visualizations pane, choose the Stacked bar chart.
- Assign the Y-Axis: Drag
technology_descriptionto the Y-Axis. - Assign the X-Axis (Values): Drag
capacity_mwto the X-Axis (automatically summed). - Assign the Legend (Stack): Drag
operational_statusto the Legend field. - Choose Publish.
- Give your report a name (for example,
generation-iamdomain) and choose Save. - Sign in and choose a destination workspace.
The following screenshot shows the Power BI dashboard with U.S. power generation data.
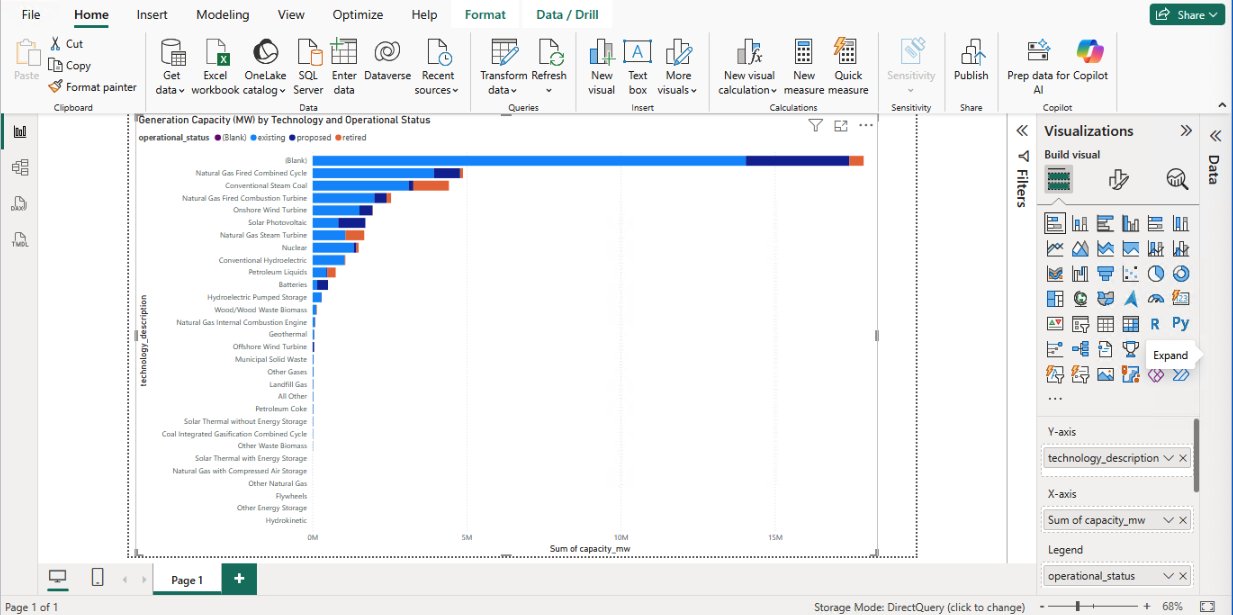
Figure 10: Power BI dashboard with U.S. power generation data
After you publish, the report structure becomes available on Microsoft Power BI Service.
Method 2: DSN-less connection (Power BI ODBC connector)
In this method, you use the Power BI ODBC connector with a connection string (no DSN required). This method supports Import mode only and SageMakerIam authentication. Because the gateway can’t perform browser authentication and connection strings need to match, both Desktop and gateway must use SageMakerIam.
This section covers IAM-based domains. For IDC-based domains, see Part 1.
Gather configuration values to configure your DSN-less connection
Gather the following connection values from your Amazon SageMaker Unified Studio project:
- Open your Amazon SageMaker Unified Studio Project.
- Top right, select the three dots.
- Choose Project details.
- Select JDBC and ODBC details.
- Copy the ODBC connection string.
The following screenshot shows the Amazon SageMaker Unified Studio project overview page with the ODBC connection string to copy.
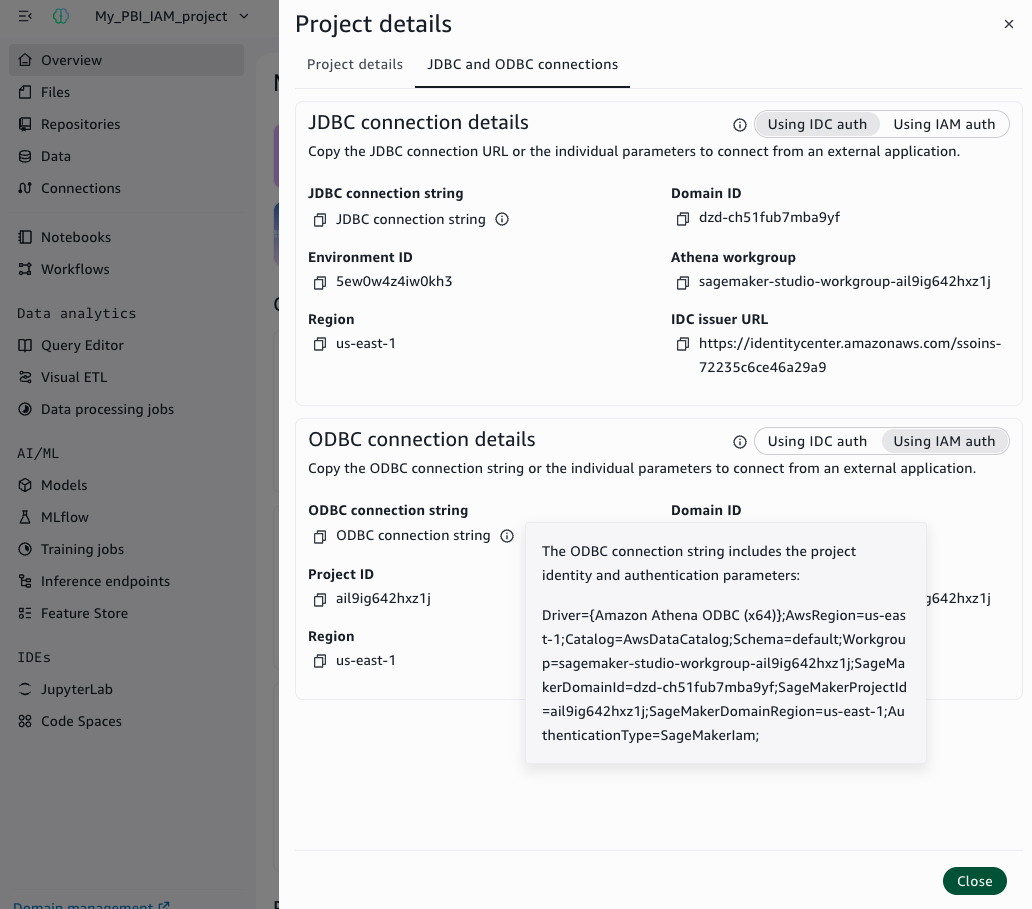
Figure 11: Project details with ODBC connection string
Connect Power BI Desktop to your data and publish
With the configuration parameters of your project, you can connect Power BI Desktop to your data catalog and load the generators dataset.
- Open Power BI Desktop.
- Open the Get Data menu and select More.
- Search for and select ODBC and choose Connect.
- For Data Source Name (DSN), select (None).
- Expand Advanced Options.
- In the Connection string field, enter your connection string. For example,
Driver={Amazon Athena ODBC (x64)};AwsRegion=us-east-1;Catalog=AwsDataCatalog;Schema=default;Workgroup=workgroup-abcdefghij-klmexample;SageMakerDomainId= dzd-123456example;SageMakerProjectId= abcd12example;SageMakerDomainRegion=us-east-1;AuthenticationType=SageMakerIam; - Choose OK.
- Choose Default or Custom and then Connect.
- In the AwsDataCatalog folder, navigate to your database.
- Select the core_eia860__scd_generators table.
- Choose Load.
When publishing, name your report generation-iamdomain-dsnless.
Configure the gateway and view your report on Power BI Service
After creating your reports in Power BI Desktop, configure the on-premises data gateway to view your report on Power BI Service.
You can configure the gateway using either a DSN or a DSN-less connection string, matching the method you used in Power BI Desktop.
Create and attach an IAM role to the Power BI Gateway EC2 instance
Create an IAM role for the EC2 instance that will host your Power BI gateway. Name the role pbi-gateway-role (or a name of your choice). The role must use EC2 as the trusted entity and include the following inline policy:
Attach this role to your Power BI Gateway EC2 instance. For detailed steps on creating and attaching an IAM role to an EC2 instance, refer to IAM roles for Amazon EC2 in the Amazon EC2 User Guide.
Add the Power BI Gateway IAM role as a member of SageMaker Unified Studio project
The gateway IAM role needs project-level access to query data through Athena. The steps to add the role differ depending on your domain type.
IAM-based domain
- Open your Amazon SageMaker Unified Studio Project.
- Open Domain Management.
- Choose your Project Name.
- Choose Members.
- Choose Add members.
- Select the IAM role of your Power BI gateway (for example,
pbi-gateway-role). - Choose Add.
The following screenshot shows the Amazon SageMaker Unified Studio project domain management page with options to add members to a project.
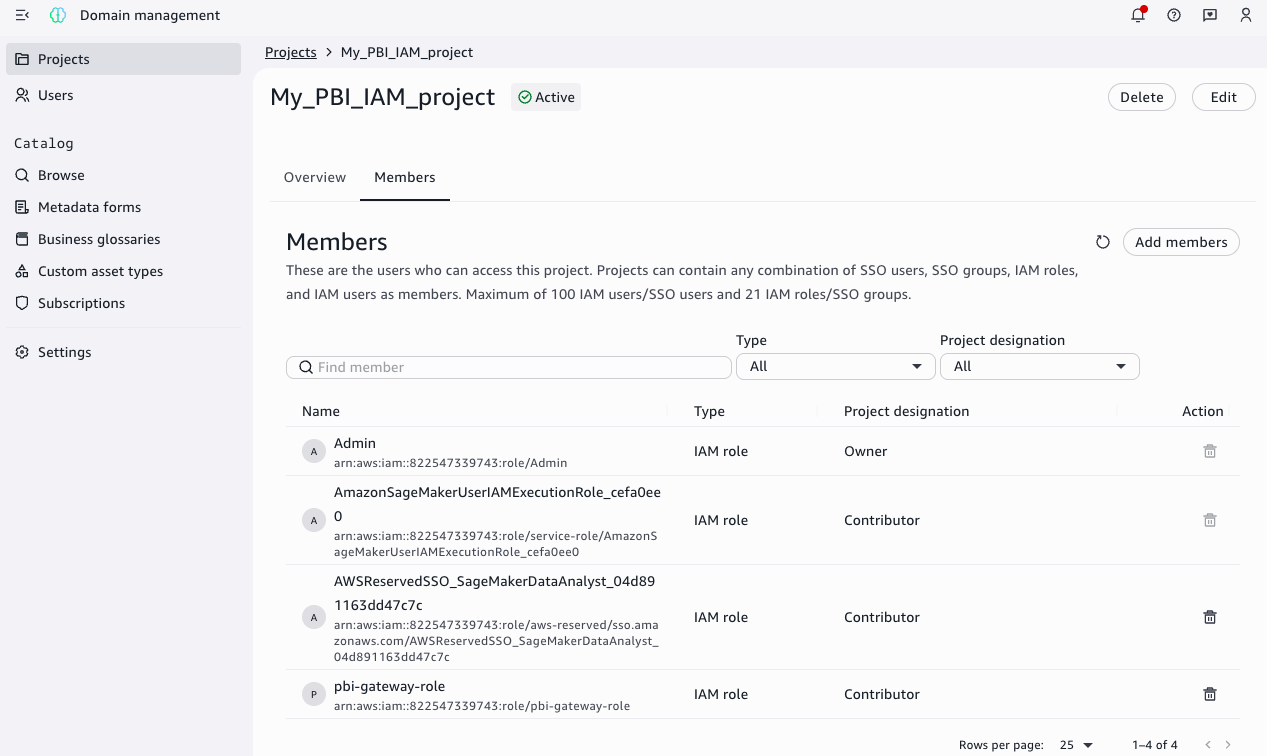
Figure 12: List of members of a SageMaker Unified Studio project with the IAM gateway role
Configure the data source on Power BI Gateway
How you configure the data source depends on the method you used in Power BI Desktop.
Method 1 (DSN-based)
Configure a System DSN on the gateway EC2 instance following the same ODBC DSN steps described in Method 1. When configuring, make sure that:
- You use the System DSN tab (not User DSN) because the gateway runs as a Windows service under a separate account.
- The authentication type is set to SageMakerIam.
- The DSN name matches exactly the one configured on Power BI Desktop (for example,
pbi-iamdomain).
Method 2 (DSN-less)
No configuration is needed on the gateway machine itself. You configure the data source directly in Power BI Service.
Configure the data source and view your report on Power BI Service
To view your report, complete the following steps:
- Open the workspace where you saved your report.
- Search the Semantic Model which has the same name as your report (for example,
generation-iamdomain) and choose the More options icon (three dots). - Choose Settings.
- Expand Gateway and Cloud Connection.
- Choose View Datasources (play icon) on your gateway.
- Choose Manually add to gateway.
- Add a connection name (for example,
pbi-iamdomain).
The next step depends on the method that you chose:
Method 1 (DSN-based)
- Add the DSN (for example,
pbi-iamdomain) that matches exactly the one configured on Power BI Desktop.
Method 2 (DSN-less)
- In the Connection string field, enter the connection string that matches exactly the one used in Power BI Desktop.
Next, continue with the configuration:
- Select Anonymous as Authentication Method.
- Choose Create.
- Expand again Gateway and Cloud Connection.
- For Maps to, choose the connection that you created (for example,
pbi-iamdomain). - Choose Apply.
- Return to the workspace where you saved your report.
- On the Content section, choose your report (for example,
generation-iamdomain).
The following screenshot shows a report on Power BI Service.
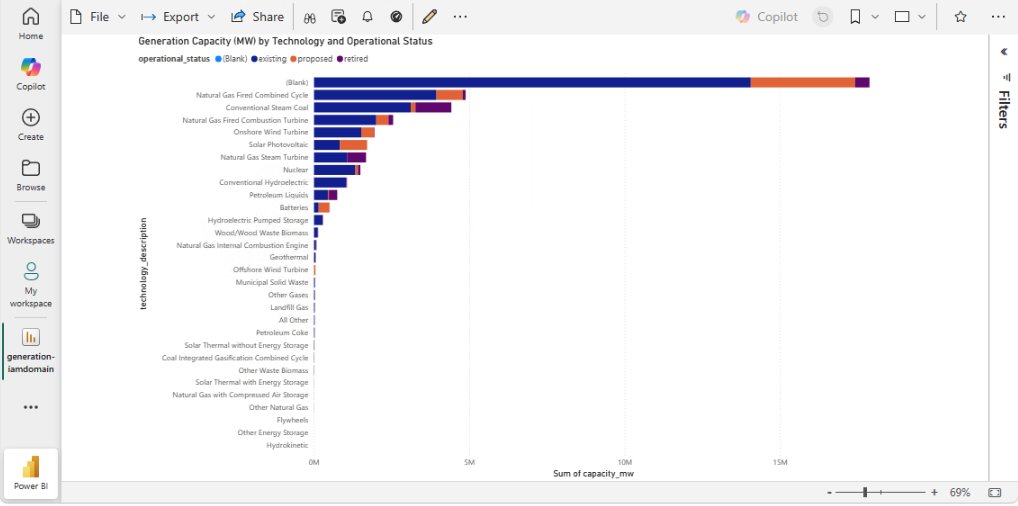
Figure 13: Power BI report on Power BI Service
You can now see your report online with the data from your Amazon SageMaker Unified Studio project.
Clean up
To avoid additional charges after testing, delete the Amazon SageMaker Unified Studio domain and EC2 instances. Refer to Delete domains and Terminate Instances for instructions.
Conclusion
In this two-part series, you connected Power BI to Amazon SageMaker Unified Studio through Amazon Athena. Part 1 covered IDC-based domains. This post covered IAM-based domains using SageMakerIam authentication. This provides a direct connection path, with no third-party licensing, while maintaining data governance and security.
You can automate many steps of this process. For information about automating DSN creation on the Power BI Gateway or Service, refer to How ENGIE automates the deployment of Amazon Athena data sources on Microsoft Power BI. If you don’t want users adding the gateway IAM role directly, you can create a custom blueprint as a self-service tool for gateway role addition. The blueprint uses a ProjectMembership resource with a configurable parameter that project owners can activate at project creation, automatically adding the gateway role as a project contributor.
For additional best practices, refer to the Using Microsoft Power BI with the AWS Cloud Whitepaper. To learn more, visit Amazon SageMaker Unified Studio and Amazon Athena.
About the authors
What Are the Dangers of the U.S.’s AI Acceleration?
Post Syndicated from The Atlantic original https://www.youtube.com/shorts/SNX5BrDS2CI
Architecting resilient authentication with Amazon Cognito multi-Region replication
Post Syndicated from Abrom Douglas original https://aws.amazon.com/blogs/security/architecting-resilient-authentication-with-amazon-cognito-multi-region-replication/
Your consumer identity and access management (CIAM) system is the foundation of your customer experience. It’s how users sign in, access services, and engage with your applications. As your business scales across geographies, ensuring authentication is always available becomes a core architectural requirement. However, building multi-Region authentication has traditionally required complex custom replication solutions that synchronize user data, manage consistency, and handle failover, all adding significant operational overhead. Amazon Cognito simplifies this with multi-Region replication (MRR), which automatically replicates user pools across AWS Regions with near-real-time synchronization, built-in failover, and seamless sign-in, while keeping operational complexity and costs optimized.
In this post, we show you how to prepare your user pool for MRR, provide architectural decisions and reference architectures for business to consumer (B2C), business to business (B2B), and machine to machine (M2M) use cases, and practical guidance on implementing failover strategies.
Amazon Cognito MRR at a glance
Amazon Cognito MRR creates a replica user pool in another AWS Region (a replica Region) that shares the same user pool ID as your primary user pool. The primary user pool (the user pool in your primary Region) remains authoritative, and its configurations (app client IDs, client secrets), user data (attributes, hashed credentials, group memberships), and external identity provider (IdP) settings are replicated to the replica with eventual consistency.
The user pool in the replica Region (replica user pool) supports user authentication operations (such as sign-in, token generation and revocation) and read-only operations towards user pool configurations and user attributes (such as list users and groups and describe user pool configurations). Write operations against user pool configurations and updating user attributes aren’t enabled in the replica user pool and can only be made in the primary user pool. Amazon Cognito returns an Action temporarily unavailable error when using managed login, or an OperationNotEnabledException when using an AWS SDK for those operations. See Supported API operations in secondary Regions for a list of API operations supported in replica Regions.
JSON web tokens (JWTs) and active sessions are interoperable between Regions; for example, a refresh token issued by the primary Region is accepted in the replica Region to retrieve new ID and access tokens.
While this post primarily focuses on MRR architecture patterns and considerations, you can visit the following posts to learn more about MRR basics and the next-generation infrastructure behind it:
- Improve your application resilience with Amazon Cognito multi-Region replication
- Amazon Cognito unlocks advanced capabilities with next-generation infrastructure
Prepare for multi-Region replication
In this section, we show you architectural decisions and preparation work for a successful MRR deployment.
Apply a multi-Region customer managed key
Without MRR enabled, data is encrypted at rest with an AWS owned AWS Key Management Service (AWS KMS) key and encrypted in transit with TLS 1.2 and TLS 1.3 with hybrid post-quantum key exchange. Before enabling MRR, you must configure your user pool to use a customer managed key. This must be a symmetric multi-Region AWS KMS customer managed key.
Architectural considerations for your KMS key:
- You only need to set up one replica multi-Region key for your customer managed key because Amazon Cognito MRR supports only one additional replica Region.
- You own the administration of the customer managed key, including key policies, rotation, and deletion. You can also consider a key rotation strategy before enabling MRR or enable automatic key rotation.
- Follow least-privilege principles in KMS key policy and scope the KMS key to your user pool only. You can do so by applying a condition statement:
kms:EncryptionContext:aws:cognito-idp:<userpool-arn>. See the data encryption section in the Amazon Cognito developer guide for a full example key policy.
Choose a multi-Region OIDC issuer
In each ID and access tokens, Amazon Cognito includes a default Issuer claim in the JWT payload, referred as iss, to represent the identity provider that issued the token. The OpenID Connect (OIDC) specification dictates that the iss format must be a URL that uses https scheme and publishes a JSON metadata document about the identity provider available at the <iss>/.well-known/openid-configuration path. The metadata document must also include the JSON Web Key (JWK) document in the <iss>/.well-known/jwks.json path, which contains the signing keys to validate the token signatures for its integrity.
The original issuer type follows the format as https://cognito-idp.<region>.amazonaws.com/<userpool_id>. However, this issuer URL format and the OIDC well-known metadata are regional resources. As part of the MRR capability, Cognito introduces a new multi-Region OIDC issuer type, the updated issuer, and follows the format as https://issuer-cognito-idp.<region>.amazonaws.com/<userpool_id>. This new updated issuer type replaces the original single Region type and maintains availability of the issuer endpoint regardless of the state of primary or replica Region.
Based on the issuer URL format you select, your OpenID Connect discovery endpoint is hosted at <iss>/.well-known/openid-configuration and your JSON Web Key Set (JWKS) endpoint at <iss>/.well-known/jwks.json. Both original type and updated type are supported with the Amazon Cognito MRR capability. You can change the issuer type at any stage in your MRR journey, and the newly issued tokens, including those generated by refresh tokens, will reflect the most current issuer type configurations.
We recommend adopting the updated issuer type. With the updated issuer type, the OpenID Connect discovery document and JWKS endpoint remain consistent and available regardless of which Region is servicing requests. This means your applications can always fetch signing keys for token verification, even during a regional impairment.
To adopt the updated issuer type, update your applications and downstream dependencies to validate against the new updated iss value. If you use the aws-jwt-verify library, update to v5.2.1 or later that supports updated issuer type. Plan this as a coordinated deployment; existing ID and access tokens with the original issuer type remain valid and accepted by Amazon Cognito endpoints until they expire. When using an existing refresh token to exchange for a new set of ID and access tokens, new tokens always carry the current issuer format configuration at the time of token refresh operation, providing interoperability across two issuer formats.
If you can’t immediately adopt the multi-Region issuer—for example, because downstream services or third-party integrations validate the iss claim against a hard-coded original format pattern—you can enable MRR while continuing to use the original issuer type. However, in this configuration the OIDC discovery endpoint and JWKS endpoint are tied to a single Region and might be unavailable during a regional impairment. Your multi-Region application might not be able to fetch public keys dynamically and validate token signatures. To mitigate this, it’s a good practice to implement a JWKS caching strategy in your token verification layer. Cache the signing keys locally (respecting the Cache-Control headers) so your applications can continue to validate tokens using cached keys when the JWKS endpoint is unreachable. This approach lets you benefit from MRR for user authentication while maintaining token verification continuity until you’re ready to complete the issuer migration. To learn more about the original and updated issuer types, see the Amazon Cognito user pools as an OIDC issuer section of the developer guide.
Configure regional service dependencies
Amazon Cognito user pools support several integrations with AWS services for extended customization functionalities. Those AWS services are regional services and must be configured independently in the replica Region, including:
- AWS Lambda – Lambda triggers (for example, pre-authentication, pre-token generation, and others) are invoked in different authentication stages and should be deployed in the replica Region and attached to the replica user pool to match customized behaviors in the primary user pool. When deploying Lambda triggers, you can adopt the same logic for both primary and replica user pools and access to downstream resources or set up a different logic to characterize different behaviors when requests are served in the replica Region.
- AWS WAF – WAF web access control lists (web ACLs) are associated to protect the user pool from unwanted requests. When accepting traffic to the replica user pool, create matching WAF web ACLs in the replica Region.
- Amazon Simple Notification Service (Amazon SNS) – If you send text messages (for example, SMS-based multi-factor authentication (MFA), passwordless authentication, or SMS notifications), configure Amazon SNS in the replica Region. SNS requires additional set up (origination identities, spending limits) in each Region, and sender ID registration time depends on several factors.
- Amazon Simple Email Service (Amazon SES) – If you use Amazon SES for email delivery, verify sending domains and email addresses in the replica Region and configure your replica user pool accordingly.
- Amazon CloudWatch – If you export user activity logs from Amazon Cognito to a CloudWatch log group, or monitor service quotas in CloudWatch, configure alarms and analytics accordingly.
Use infrastructure-as-code tools like AWS CloudFormation or AWS Cloud Development Kit (AWS CDK) to maintain consistent configurations and deployments across Regions and environments. You should also monitor for any configuration drifts between assets.
Consider automatic domain failover
For authentication use cases that rely on managed login and OAuth 2.0 endpoints—including federated authentication and M2M authorization—Amazon Cognito supports automatic failover to the replica Region with an Amazon Route 53 health check. Cognito uses the health status of Route 53 health check to control whether traffic routes to the primary or replica user pool. The health check can be set up to monitor the health of an endpoint, a CloudWatch alarm, or a calculated number of other health checks, so you determine what triggers a healthy or unhealthy state and can adjust traffic routing as needed.
Both the Amazon Cognito prefix domain (for example, auth.us-east-1.amazoncognito.com) and custom domain (for example, auth.example.com) support automatic domain failover. Your domain serves as the single entry point for the user pool OAuth 2.0 endpoints and directs traffic to the managed login pages. Cognito automatically fails over domain traffic to the replica Region when a Route 53 health check becomes unhealthy and fails back to the primary Region when the check is healthy. You don’t need to create another prefix domain in the replica user pool for failover use cases.
With the automatic failover capability, you can use a single domain to serve external IdP configurations, including redirect URIs and SAML assertion consumer URLs. For example, use https://auth.example.com/saml2/logout to send SAML 2.0 sign-out responses. Because the domain can serve traffic to both the primary and replica Regions and remains unchanged across Regions, your external IdP configurations stay consistent across Regions, and existing federated users continue to authenticate without disruption. This means that you can enable MRR without having to contact external IdP admins to update configurations; all existing configurations will continue to work.
For SDK-based authentication use cases without managed login, a custom domain isn’t strictly required. We recommend configuring a custom endpoint for SDK requests to simplify failover orchestration, so you don’t have to modify the Region parameter in the SDK configuration. Behind your custom endpoint, you can use the same Route 53 health check or a custom load balancing strategy to proxy API requests to primary or replica Region endpoints. You might also consider load balancing user authentication traffic, by referring to an X-Amz-Target HTTP header (for example, X-Amz-Target: AWSCognitoIdentityProviderService.InitiateAuth), to both the primary and replica Regions, while keeping user sign-up operations in the primary Region. If you use both managed login and SDK authentication in the same user pool, you can consider using the custom domain as the custom endpoint of the SDK for a streamlined operation, where Route 53 health check initiates failover and failback between the primary and replica Regions.
Plan for TOTP MFA alternatives
Time-Based One-Time Password (TOTP) MFA isn’t supported in replica user pools. Users configured to use TOTP MFA must authenticate through the primary Region. If your application relies on TOTP as a second factor, this limitation requires careful planning because you want to enable an alternative MFA for your users, such as SMS OTP, email OTP, or passkey.
Review quotas
When you activate a replica user pool, you gain a separate set of default quotas in the replica Region. Previously reserved higher quotas for your user pool in the primary Region aren’t carried over to the replica Region.
Data sovereignty
When selecting a replica Region for your user pool, consider your organization’s data sovereignty and residency requirements, as user identity data will be replicated to and stored in that Region. For guidance on navigating compliance, continuity, and control obligations that may influence your Region selection, see Practical digital sovereignty: Navigating the pillars of compliance, continuity, and control.
Reference architectures
In this section, we show you reference architectures for common authentication patterns using the Amazon Cognito MRR capability. Each architecture demonstrates how Cognito MRR works with different authentication use cases.
Managed login and federation
Amazon Cognito managed login provides a fully managed authentication UI that handles sign-in, sign-up, and federation flows. With MRR, managed login endpoints are served from the healthy user pool based on your Route 53 health check configuration. Managed login also includes OAuth 2.0 endpoints and can be used with local Cognito accounts and federated users. Figure 1 depicts a reference architecture for using managed login to authenticate Cognito users.
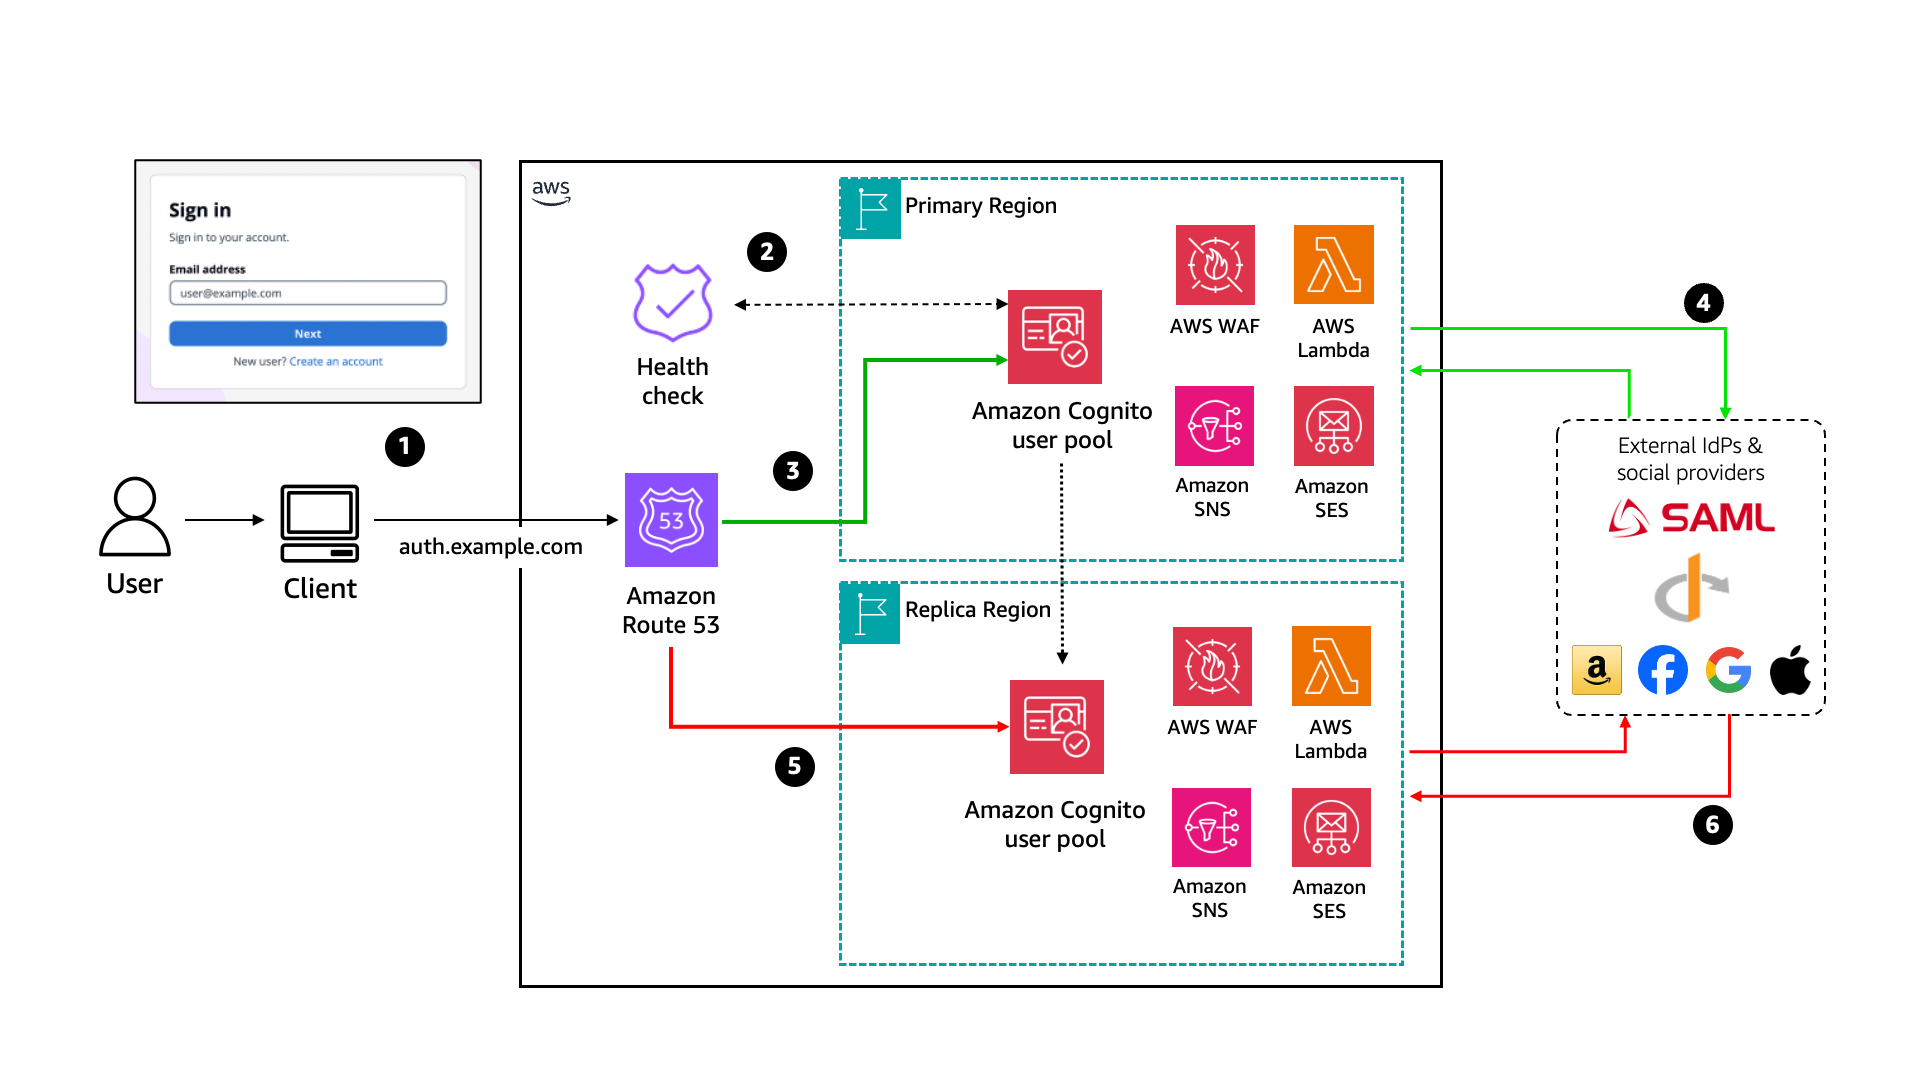
Figure 1: Cognito MRR reference architecture for managed login and federation use cases
When using Amazon Cognito with managed login, the process flow is:
- The user visits the application and is redirected to the managed login to begin the authentication flow.
- Managed login uses the Route 53 health check to control traffic routing.
- If the health check returns a healthy status, all traffic to the managed login flows to the primary Region user pool for user authentication.
- For a federated user, the primary Region user pool redirects the user to a federated IdP or social IdP for authentication. After successful authentication, Amazon Cognito creates or updates user attributes depending on whether it’s a new user signing in for first time or an existing user.
- If the health check returns an unhealthy status, all traffic to the managed login flows to the replica Region user pool. Cognito users will authenticate against the replica user pool.
- The replica Region user pool endpoint redirects federated users to external IdPs. However, any user creation or attribute update against replica user pool will fail until the health check returns healthy and traffic routes back to the primary Region.
M2M architecture
In an M2M architecture, services authenticate using the OAuth 2.0 client credentials grant. This flow doesn’t involve users; instead, backend services exchange client credentials for access tokens.
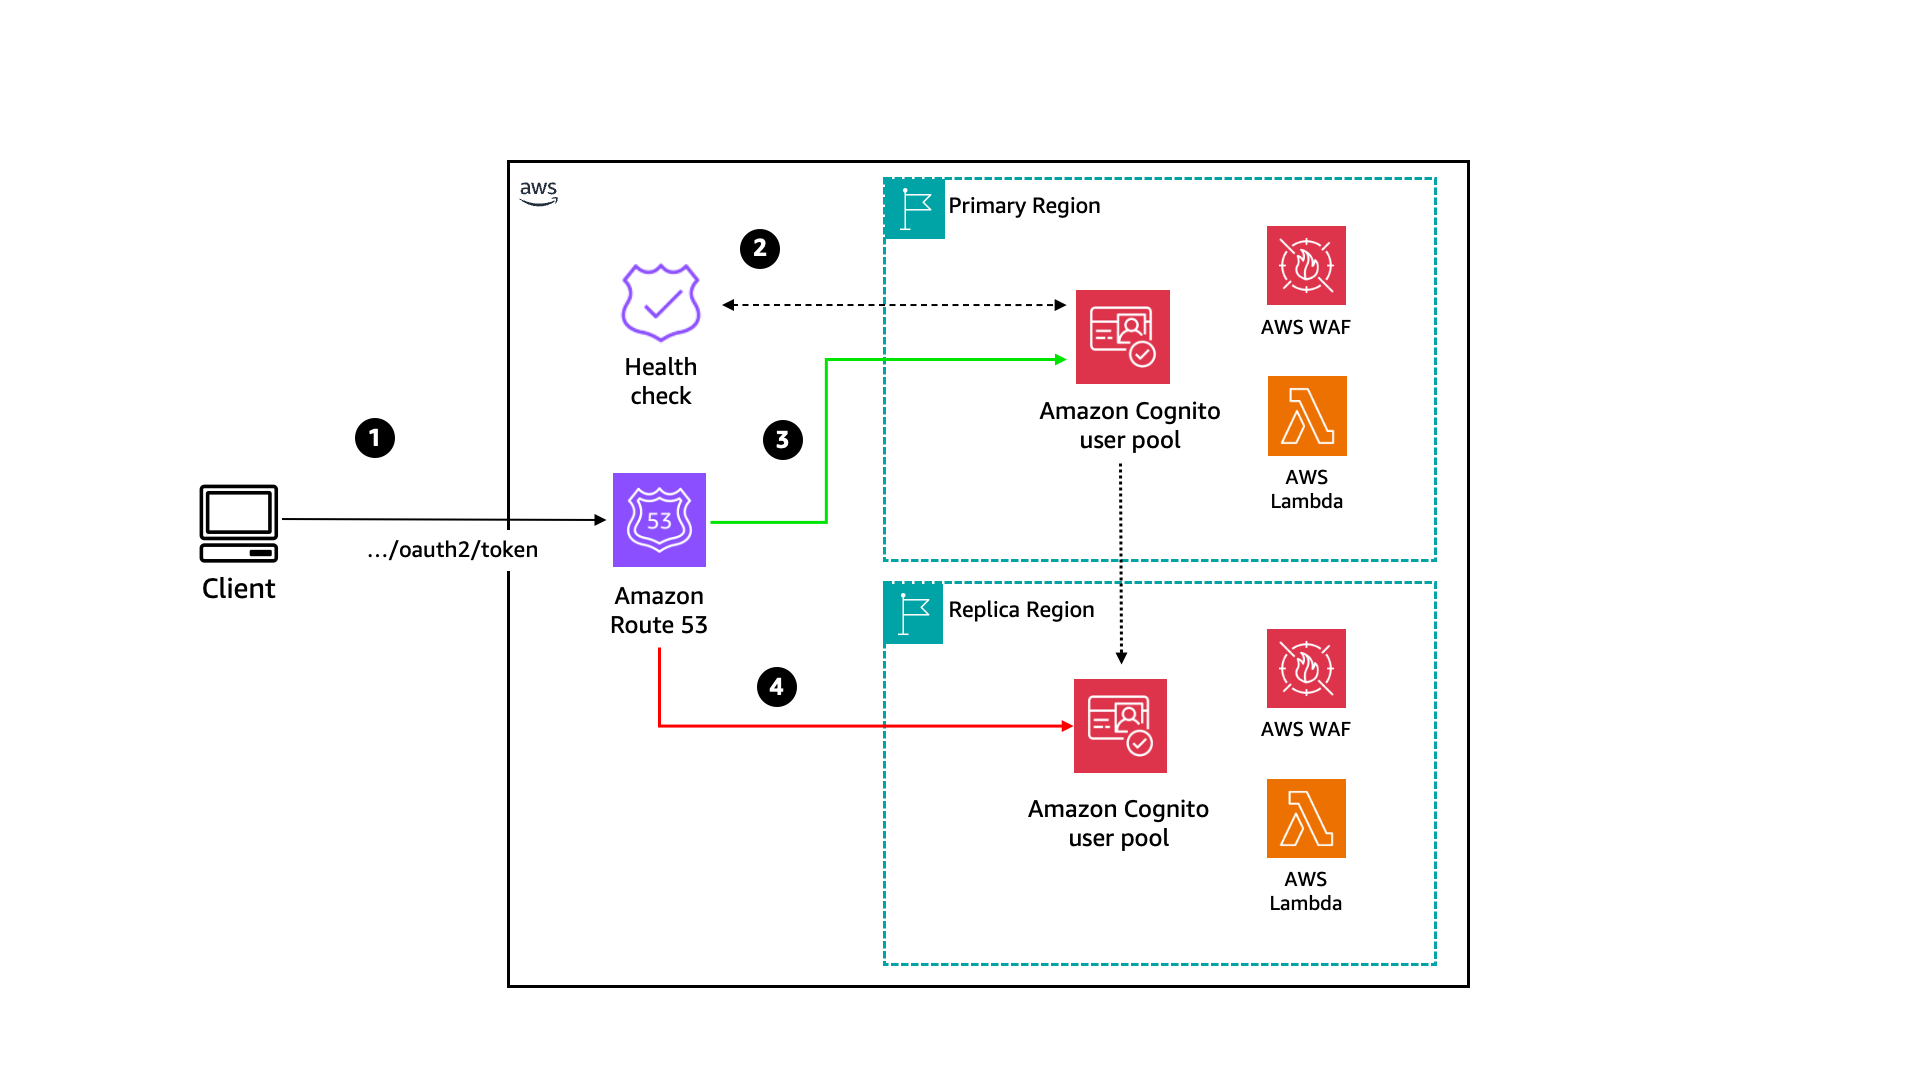
Figure 2: Cognito MRR reference architecture for machine-to-machine use case
The authentication flow is:
- Application clients send a POST request to the Amazon Cognito
/tokenendpoint with client credentials. - Managed login uses the Route 53 health check to determine whether traffic should flow to the primary or replica user pool.
- If the health check returns a healthy status, traffic to the
/tokenendpoint will flow to the primary Region user pool. - If the health check returns an unhealthy status, traffic to the
/tokenendpoint will flow to the replica Region user pool. After the health check returns to a healthy status, traffic will return to routing to the primary user pool.
SDK-based architecture
For applications that use AWS SDK or Amazon Cognito APIs directly (rather than through managed login), the authentication flow is embedded in your application code. This gives you more control over the user experience but requires additional considerations for failover.
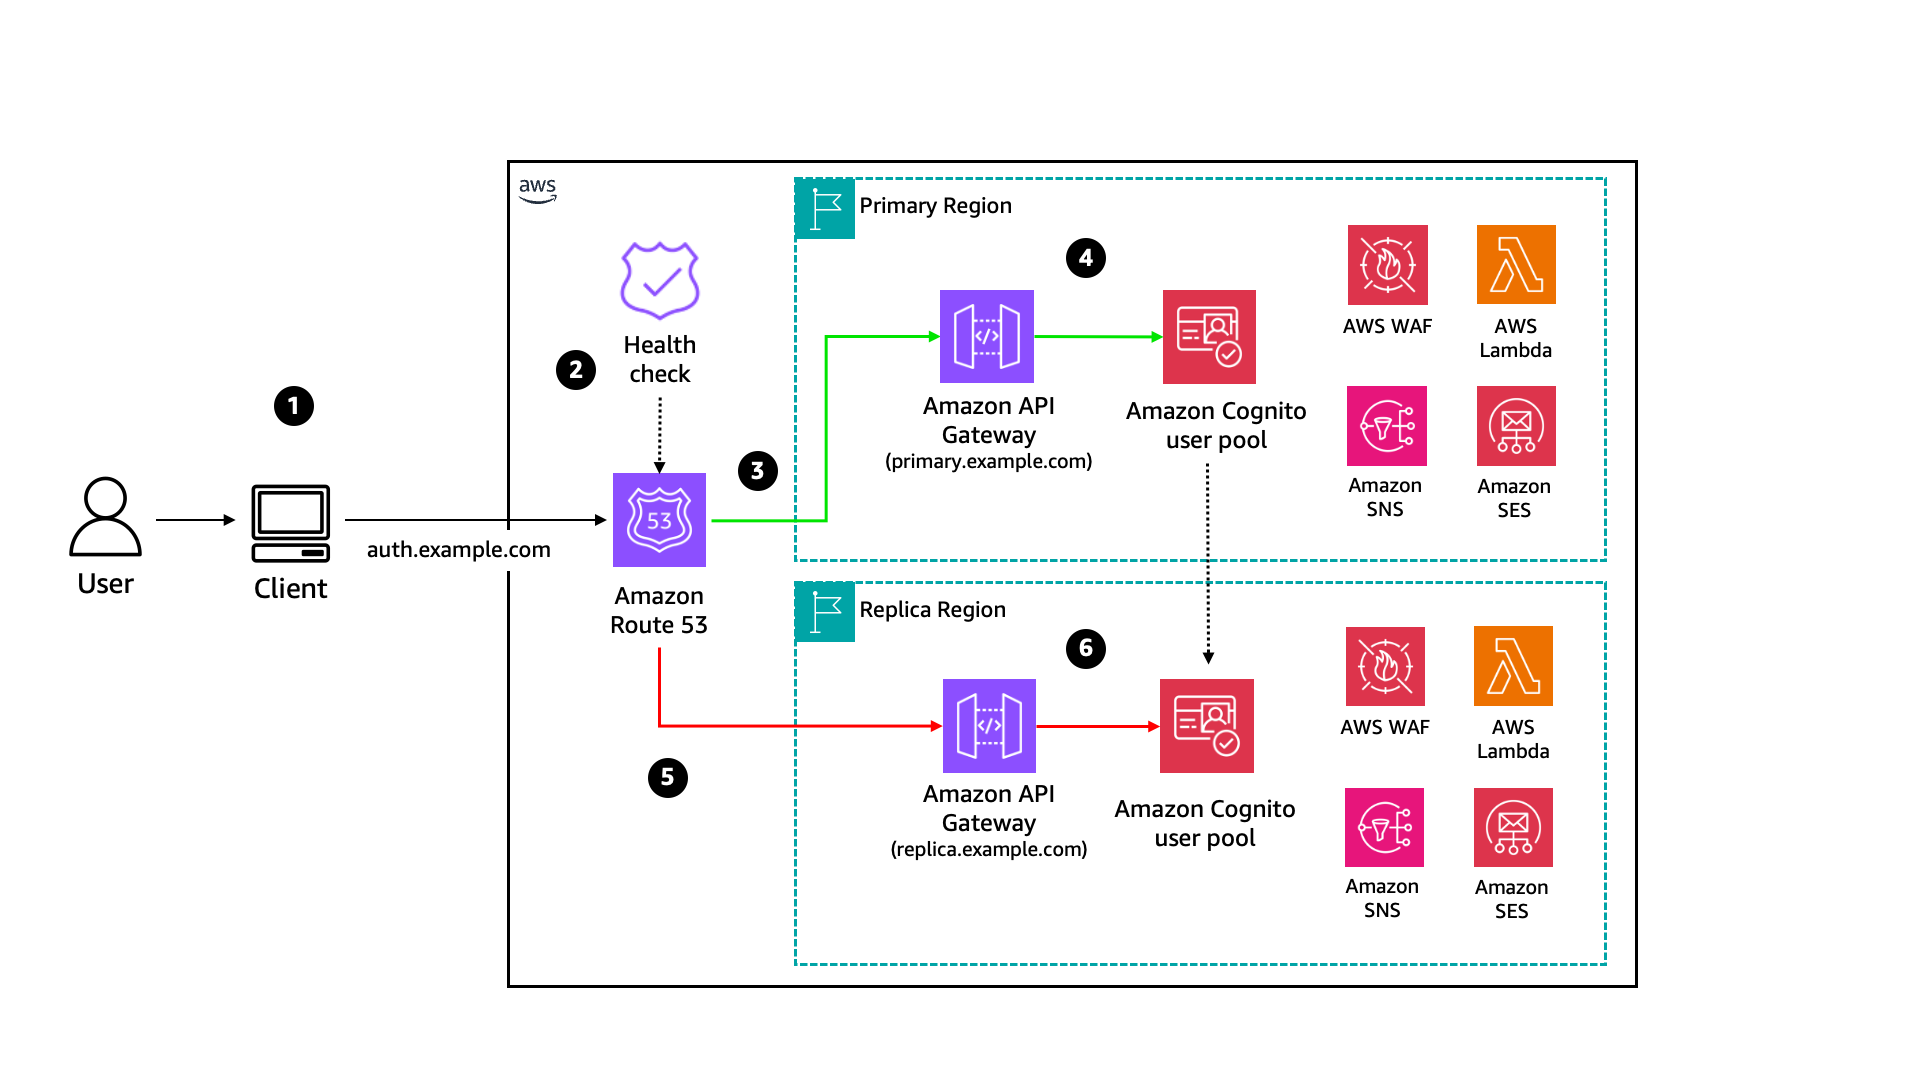
Figure 3: Cognito MRR reference architecture for SDK use cases
The process shown in Figure 3 is:
- The user visits the application and signs in through a custom UI (using APIs or SDKs).
- (Optional) An Amazon Route 53 health check is configured to perform a health check against regional proxy endpoints and determine traffic routing. You can also use a custom health check or your DNS resolver to make traffic routing determinations.
- If the health check returns a healthy status, all traffic to the proxy endpoints will flow to the primary Region proxy for user authentication. You can also choose to load balance user authentication traffic across both the primary and backup Regions.
- The primary Region Amazon API Gateway proxy forwards user requests to the Amazon Cognito regional endpoint.
- If the health check returns an unhealthy status, all traffic will flow to the replica Region proxy.
- The replica Region API Gateway proxy begins forwarding user requests to the Amazon Cognito regional endpoint until the health check returns to healthy status.
In an SDK-based architecture, Amazon Cognito regional endpoints can also be called directly. You can also set up custom routing to use replica Region endpoints to load balance user authentication requests by routing read-only requests to both the primary and replica Region endpoints while keeping write requests in the primary Region.
Failover strategies
Now that you’ve set up multi-Region replication with Amazon Cognito, the next step is to test and monitor your multi-Region configuration. In this section, we walk through strategies for monitoring your endpoints, determining when to trigger failover, and testing your failover readiness.
Monitor with Route 53 health checks
Failover for Managed Login and all OAuth 2.0 flows is driven by Amazon Route 53 health checks associated with your Amazon Cognito prefix or custom domain. You’re responsible for what determines the state of this health check. The health check isn’t tied to your DNS CNAME record but is the signal that tells Amazon Cognito whether to route traffic to the primary or replica Region for all managed login endpoints. When the health check fails, Amazon Cognito routes traffic to the replica user pool. When the health check recovers, traffic is restored to the primary user pool.
A practical approach to get started to build a health check:
- Create a synthetic canary – Use Amazon CloudWatch Synthetics to run a canary that periodically exercises an actual authentication flow against your primary Region. For example, the canary can perform a client credentials token request against your Amazon Cognito domain’s
/oauth2/tokenendpoint or execute a full AdminInitiateAuth API call with test credentials. This validates that the end-to-end authentication path is functional, not just that an endpoint is responding. - Tie the canary to a CloudWatch alarm – Configure a CloudWatch alarm on the canary’s
SuccessPercentCloudWatch metric. Set a threshold that accounts for transient errors (for example, alarm when success drops below 90% for three consecutive evaluation periods). - Connect the alarm to your Route 53 health check (optional) – Create a Route 53 health check that monitors the CloudWatch alarm. When the alarm enters the ALARM state, the health check fails, and Amazon Cognito routes traffic to the replica user pool. If you prefer to rely on human intervention, skip this step and instead configure the CloudWatch alarm alert your operations team to manually invert the health check.
After you have your health check, associate it with your Amazon Cognito domain using the UpdateUserPoolDomain API or the Amazon Cognito console.
Authentication-only compared to full-stack failover
Before implementing failover, consider how your authentication layer relates to the rest of your application stack. There are two common patterns:
- Authentication-only failover – Your application remains in a single Region, but authentication traffic fails over to the Amazon Cognito replica if only the primary Region’s authentication service is impaired. This works when your application can continue operating with tokens already issued (for example, cached JWTs, active sessions) and when downstream APIs don’t depend on the same Region as your user pool. Consider this option when the rest of your stack has its own availability model.
- Full-stack failover – Your entire application—compute, data stores, APIs, and authentication—fails over to a replica Region. In this model, Amazon Cognito MRR is one component of a broader multi-Region architecture where authentication flows have tight dependencies on regional resources (such as Lambda triggers calling regional Amazon DynamoDB tables, or post-authentication logic writing to a regional event bus) that must be co-located with the user pool.
Use Amazon Application Recovery Controller (ARC) to coordinate failover across all components with a single action. ARC provides three capabilities that are particularly relevant for multi-Region authentication architectures:
- Routing controls – Extremely reliable data plane controls that let you shift DNS traffic across Regions, with safety rules that prevent partial or unintended failovers (for example, preventing you from failing over authentication without also failing over the dependent API layer).
- Readiness checks – Continuous monitoring of resource quotas, capacity, and network routing policies in your secondary Region, so you have confidence that the replica environment—including your Amazon Cognito replica user pool and its regional dependencies—can handle production traffic before you failover.
- Region switch – Centralized, automated, and observable multi-Region recovery orchestration across multiple AWS accounts and resources, so you can execute a coordinated failover of your Cognito user pool alongside databases, compute, and APIs in a single recovery plan.
ARC is particularly valuable when your Amazon Cognito Lambda triggers, WAF rules, SNS and SES configurations, and downstream services all need to switch Regions in lockstep. Rather than managing failover for each component independently, you can use ARC to define a single recovery group that treats your authentication stack and application stack as one unit. To learn more about the capabilities and use cases of ARC, see Introducing Amazon Route 53 Application Recovery Controller.
The right choice depends on your recovery scope. Map the dependencies in your authentication flow: if your Lambda triggers call regional DynamoDB tables or your post-authentication logic writes to a regional event bus, those tight couplings point to full-stack failover. If your application validates tokens independently and doesn’t make real-time calls back to Amazon Cognito after token issuance, authentication-only failover keeps both your blast radius and operational overhead smaller.
Determine when to failover
Triggering failover too aggressively risks unnecessary disruptions; too conservatively risks a drop in desired availability. Here are the factors to balance:
- Monitor authentication flow health – Validate that critical flows are functioning, including managed login endpoint availability and token endpoint responses.
- Use composite health checks – Combine multiple signals. For example, require both the managed login and token endpoints to be healthy.
- Set appropriate thresholds – Configure failure thresholds (for example, three consecutive failures) to distinguish transient errors from genuine impairments.
- Consider downstream dependencies – Factor in Lambda triggers, external IdPs, and other regional services.
- Client side retry logic – For SDK-based single-page application (SPA) architectures, consider implementing client-side retry logic with Region failover. When the primary Region is unavailable, your application should detect the failure and redirect authentication of API calls to the replica Region’s Amazon Cognito endpoint.
Understanding and determining the recovery time objective (RTO) and recovery point objective (RPO) should also be the key factor in determining when and why to failover. See the Establishing RPO and RTO Targets for Cloud Applications blog post to learn more.
Test failover readiness
If using Route 53 health check, start by manually inverting your Route 53 health check during a maintenance window. In the Route 53 console, enable Invert health check status to force the health check into a failed state; this triggers failover to the replica Region without requiring any infrastructure changes. While traffic is routing to the replica Region, validate that your critical authentication flows (sign-in, token refresh, federation) work correctly, then disable the inversion to restore traffic to the primary. This test confirms your end-to-end failover path is functional.
When you’re confident in the basic failover path, graduate to more realistic failure simulations with AWS Fault Injection Service (FIS). Create FIS experiment templates that disrupt your primary Region’s Amazon Cognito dependencies; for example, block network access to a dependent resource or inject latency into downstream API calls. Use FIS stop conditions (guardrails) to automatically halt experiments if unexpected impacts are detected. These experiments validate not just that failover triggers correctly, but that your replica Region handles real authentication load under degraded conditions.
We recommend conducting failover tests on a predefined and regular cadence and after any significant changes to your authentication architecture. Document your runbooks and make sure your operations team is familiar with both the failover and recovery procedures.
Conclusion
In this post, we built on the foundational knowledge of the Amazon Cognito MRR capability and showed you how to architect resilient authentication for real-world use cases:
- Preparation considerations – Multi-Region KMS keys, OIDC issuer transitions, regional dependencies, and TOTP MFA considerations
- Reference architectures – B2C, B2B, and M2M patterns using managed login, plus SDK-based approaches
- Failover strategies – Route 53 health checks, ARC integration, and testing with health check inversion and AWS FIS
To get started, make sure your user pool is on the Essentials or Plus feature plan, configure your multi-Region KMS key and OIDC issuer, and create your first replica. For step-by-step setup instructions, see Multi-Region replication for user pools
If you have feedback or thoughts about this post, submit comments below. If you have questions, start a new thread on Amazon Cognito re:Post or contact AWS Support.
Astera Labs Releases Leo 2 CXL Memory Controllers and Leo X Controller for Rackscale Fabric-Attached Memory
Post Syndicated from Ryan Smith original https://www.servethehome.com/astera-labs-releases-leo-2-cxl-memory-controllers-and-leo-x-controller-for-rackscale-fabric-attached-memory/
Astera Labs is launching a new generation of Leo smart memory controllers. The Leo 2 series adds support for CXL 3.2 and PCIe Gen6, while the ambitious Leo X brings the ability to attach memory expanders directly to the fabric networks of AI accelerators
The post Astera Labs Releases Leo 2 CXL Memory Controllers and Leo X Controller for Rackscale Fabric-Attached Memory appeared first on ServeTheHome.
How United Airlines uses Amazon Redshift and AWS Glue Data Catalog federation to query Databricks-managed data
Post Syndicated from Vaibhav Agrawal original https://aws.amazon.com/blogs/big-data/how-united-airlines-uses-amazon-redshift-and-aws-glue-data-catalog-federation-to-query-databricks-managed-data/
This post was co-written with Ankit Aggarwal and Raja Kalluri from United Airlines.
United Airlines processes billions of events daily across its data platform, which spans Amazon Redshift and Databricks with Unity Catalog. To bridge these platforms without duplicating data, the team turned to AWS Glue Data Catalog federation.
In this post, we walk through how to configure AWS Glue Data Catalog federation to connect with Databricks Unity Catalog, so you can run live SQL queries from Amazon Redshift without moving or duplicating data.
Why United Airlines needed catalog federation
United Airlines curates petabytes of data through a medallion architecture (bronze to silver to gold) on Amazon Simple Storage Service (Amazon S3). The airline user interaction data layer alone is several double-digit terabytes of near real-time streamed data. Teams use it to measure customer engagement patterns, feature adoption, and conversion behavior across web and mobile touchpoints. Analysts need to query this curated data through Amazon Redshift Serverless. As part of the existing data platform architecture these data tables are cataloged in Databricks Unity Catalog, not in the AWS Glue Data Catalog. As a result, Amazon Redshift has no native visibility into them. Without catalog federation, the only way to make this data queryable from Amazon Redshift would have been to duplicate it into Amazon Redshift Managed Storage (RMS) and build pipelines to keep it in sync.
AWS Glue Data Catalog federation removed this need. Amazon Redshift users now query the gold layer stored in Amazon S3 directly, with Iceberg metadata resolved from Unity Catalog at query time and no data movement. AWS Glue Data Catalog federation connects Amazon Redshift to external catalogs like Unity Catalog, so analysts query cross-platform data without building sync pipelines or duplicating storage.
Amazon Redshift Serverless is powered by the same Graviton-based query engine used in the new RG instance family, which delivers up to 2x faster data lake query performance compared to prior generations. This engine is purpose-built for reading Apache Iceberg tables directly from Amazon S3, making it well-suited for such federated query workloads.
United Airlines is taking a phased approach to adopting AWS Glue Data Catalog federation across its data platform. The initial focus is the most heavily used user interaction data tables, with 30 tables currently federated in production and 70 more in active rollout. Several hundred additional tables across different business domains are planned for production in the coming months.
Solution overview
AWS Glue Data Catalog federation bridges these platforms at the metadata layer. Here’s how the architecture works.
The architecture follows a four-layer federation chain:
- Databricks Unity Catalog exposes tables through its Iceberg REST API endpoint. For Delta tables, you can turn on UniForm format to make them Iceberg compatible.
- AWS Glue Data Catalog creates a federated catalog that connects to Databricks Unity Catalog, making metadata visible within AWS without data movement.
- A resource link database in the default AWS Glue catalog acts as a bridge, pointing to the federated catalog database. This is required for Amazon Redshift compute.
- Amazon Redshift Serverless references the resource link database through an external schema. When a query runs, Amazon Redshift traverses the link, calls AWS Glue Federation, and reads the Iceberg data through the Databricks Unity Catalog REST API. AWS Lake Formation governs permissions throughout this chain.
Key services or service features used in this solution:
- AWS Glue Data Catalog – Federated catalog and resource link in the default catalog.
- AWS Lake Formation – Permission vending and fine-grained access control.
- Amazon Redshift Serverless – Queries through external schema.
- AWS Identity and Access Management (IAM) – Role-based permissions for Amazon Redshift namespace and SAML-authenticated users.
- Databricks Unity Catalog – Source catalog exposing Iceberg tables through a REST API.

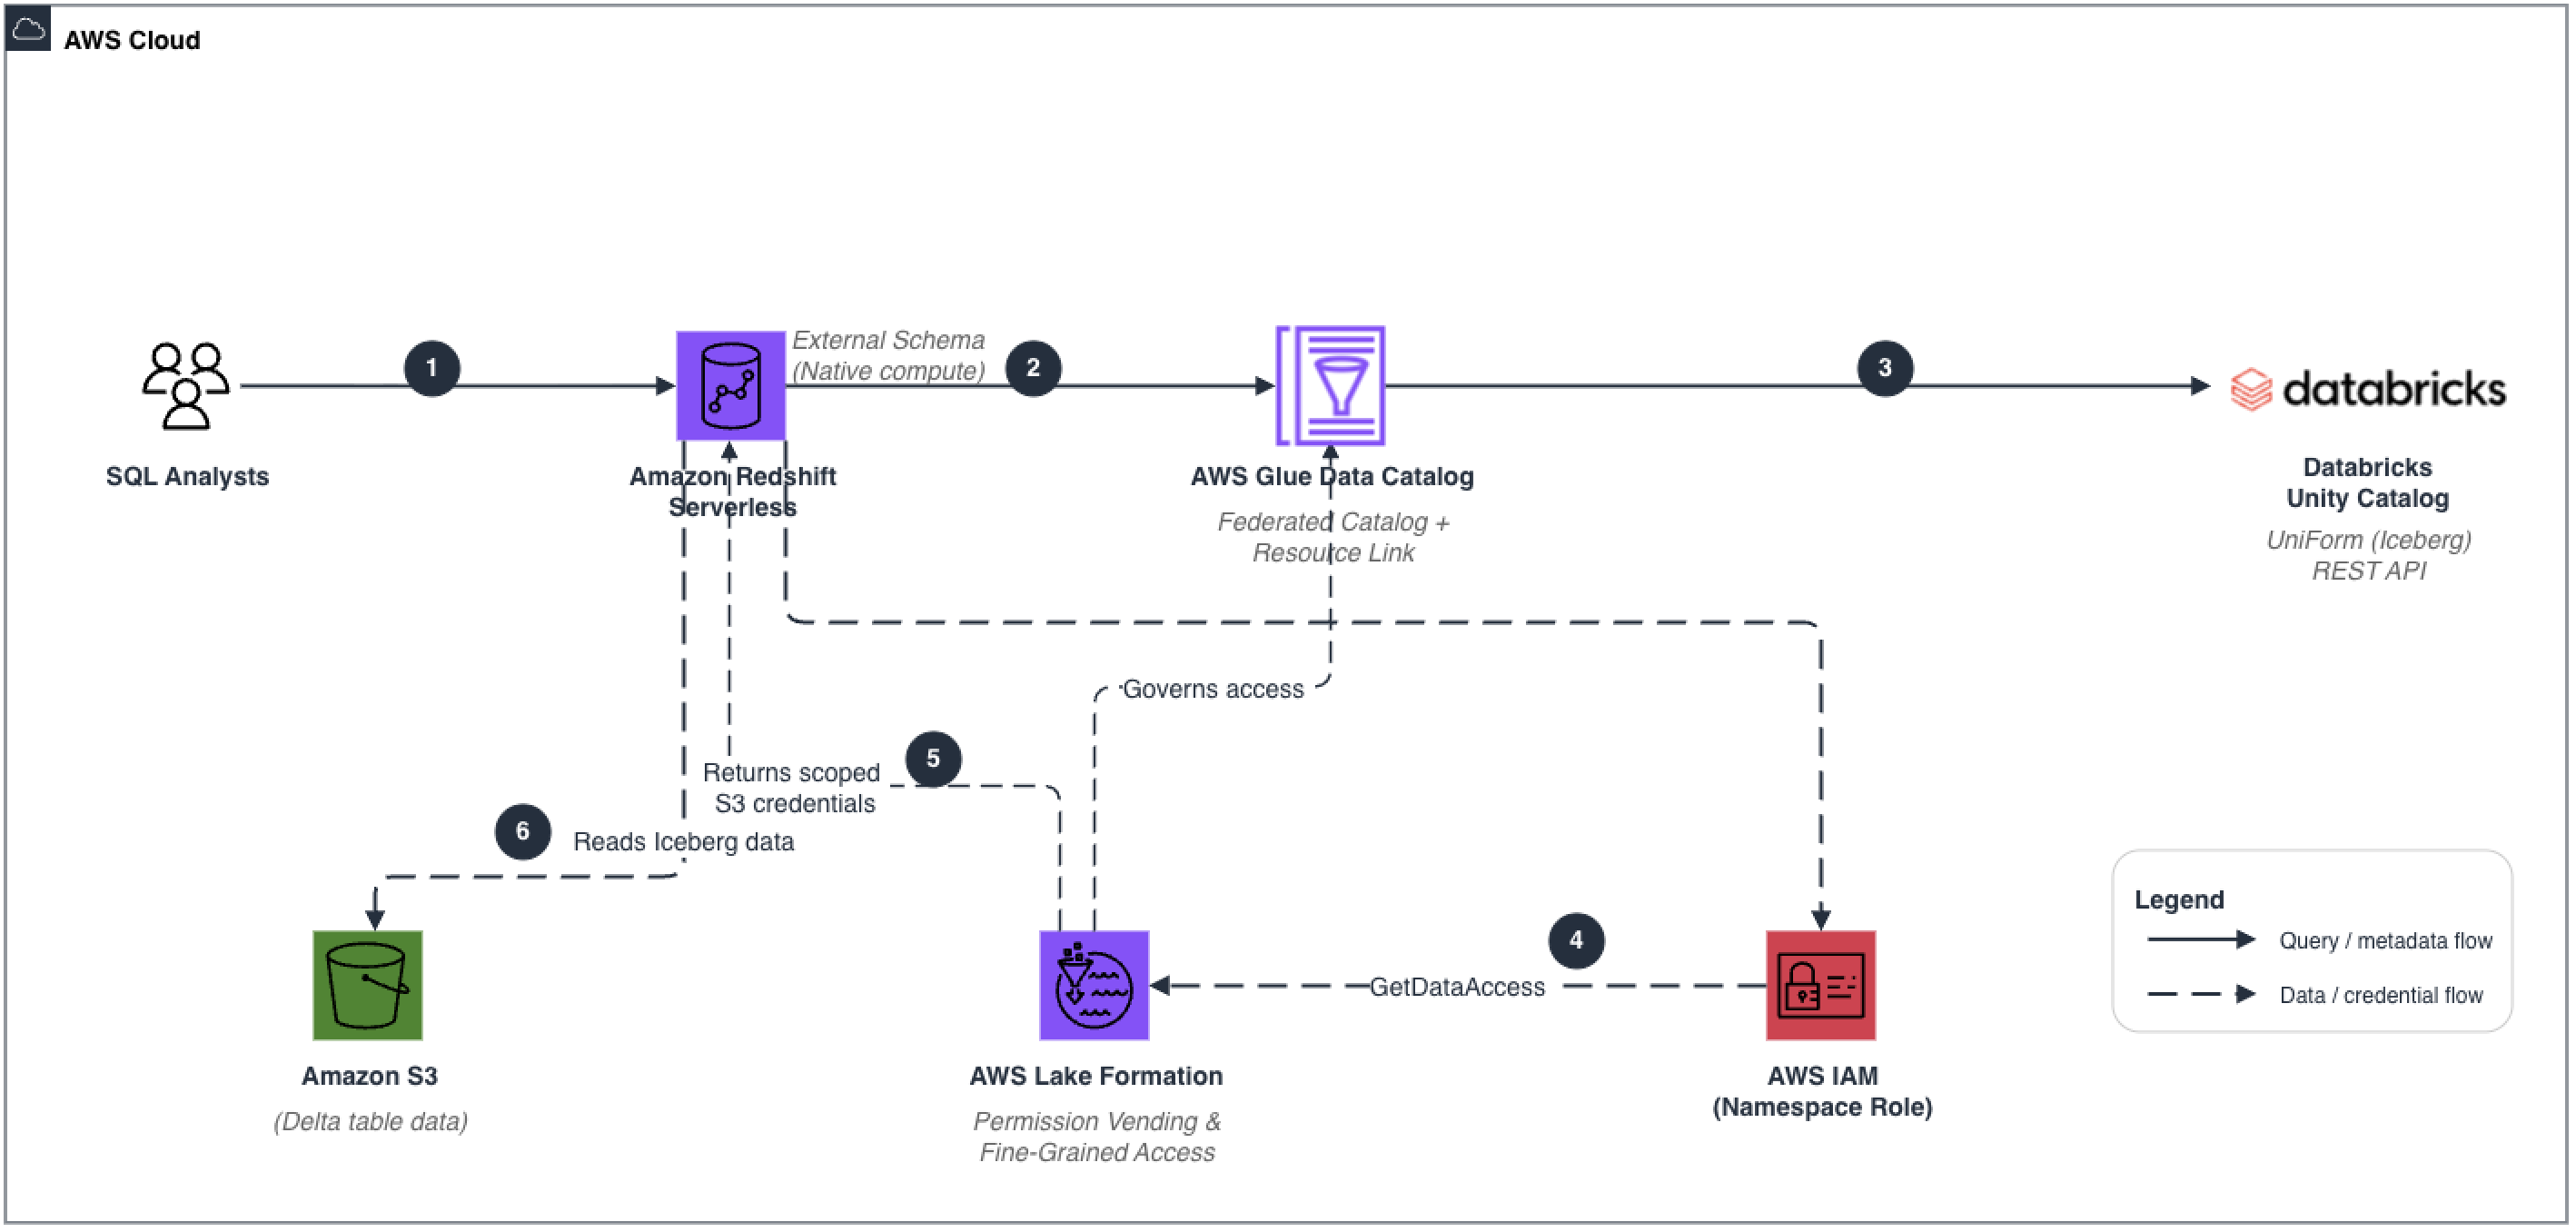
Figure 1: Federation chain from Databricks Unity Catalog to Amazon Redshift Serverless through AWS Glue and Lake Formation
The architecture follows a six-step flow:
- A SQL analyst submits a query to Amazon Redshift Serverless.
- Amazon Redshift resolves the external schema through the AWS Glue Data Catalog (resource link to federated catalog).
- The AWS Glue federated catalog calls the Databricks Unity Catalog Iceberg REST API to retrieve current table metadata.
- The namespace IAM role calls AWS Lake Formation GetDataAccess to obtain scoped, temporary S3 credentials.
- Lake Formation evaluates fine-grained access policies and vends credentials for the authorized data files.
- Amazon Redshift Serverless reads the Iceberg data files directly from S3 and returns results to the analyst.
Prerequisites
Before you begin, make sure the following are in place:
- A Databricks workspace with Unity Catalog enabled and at least one catalog, schema, and table. Databricks uses UniForm to generate Iceberg metadata on Delta Lake tables on Amazon S3.
- An AWS account with permissions to manage AWS Glue, AWS Lake Formation, Amazon Redshift Serverless, and IAM.
- An Amazon Redshift Serverless workgroup and namespace already provisioned.
- AWS Lake Formation set up with a data lake administrator.
- AWS Command Line Interface (AWS CLI) configured with appropriate credentials.
- Familiarity with Amazon Redshift Query Editor v2 or a SQL client.
Note: For setting up the Databricks Unity Catalog side (Phase 1), follow the steps in the AWS blog post Access Databricks Unity Catalog data using catalog federation in the AWS Glue Data Catalog. This walkthrough picks up after the federated catalog has been created in AWS Glue.
Solution walkthrough
The walkthrough is organized into six steps covering Lake Formation configuration, the resource link pattern, IAM role setup, and querying Databricks tables from Amazon Redshift.
Step 1: Configure AWS Lake Formation
1a. Add a data lake administrator
- In Lake Formation, choose Administration, then choose Administrators and add your admin IAM user or role.
1b. Confirm the federated catalog is registered
- Choose Data Catalog, then Catalogs and verify that databricks-federated-catalog is visible and registered.
Step 2: Create a resource link in the default AWS Glue catalog
This step is the key architectural detail in the walkthrough. Amazon Redshift resolves CREATE EXTERNAL SCHEMA only against the default AWS Glue Data Catalog. The federated catalog (databricks-federated-catalog) is a separate, non-default catalog object. To give Amazon Redshift a path to the federated data, you create a resource link database in the default catalog that points to the federated catalog’s database.
A resource link does not copy data or metadata. It’s a pointer that Lake Formation resolves at query time.
To create the resource link in the Lake Formation console:
- Choose Data Catalog, Databases, Create database. Then select Resource link.
- For Resource link name, enter databricks_federated_db_link.
- For Target catalog, enter databricks-federated-catalog.
- For Target database, enter the database name that was discovered by the AWS Glue crawler (for example, databricks_federated_db).
Alternatively, use the AWS CLI:
Step 3: Configure the Amazon Redshift Serverless namespace IAM role
When Amazon Redshift queries through the resource link, it uses the IAM role attached to the Amazon Redshift Serverless namespace to call the Lake Formation GetDataAccess API. Lake Formation permissions must be granted to this namespace role.
Choose one of these two approaches:
- Option A – Update your existing namespace role by adding the following policy inline.
- Option B – Create a new dedicated role (named RedshiftServerlessNamespaceRole) and attach it to the namespace alongside existing roles.
Attach the following IAM policy to the role:
Note: The Resource: “*” in this policy is shown for simplicity. In production, scope resources to specific AWS Glue catalog ARNs, database ARNs, and table ARNs based on your use case.*
After creating or updating the role, associate it with your Amazon Redshift Serverless namespace:
- In the Amazon Redshift Serverless console, choose Namespaces, select [your namespace], then choose Security and encryption, then Manage IAM roles.
- If you use Option A, the existing role already has the new permissions, so no change is needed.
- If you use Option B, add the new role alongside the existing roles.
Step 4: Grant Lake Formation permissions to the Amazon Redshift namespace role
4a. Grant DESCRIBE on the resource link database (default catalog)
- In Lake Formation, choose Permissions, Data lake permissions, then Grant.
- Principal: RedshiftServerlessNamespaceRole.
- Resources: Named Data Catalog resources, Default catalog, databricks_federated_db_link (resouce link).
- Database permissions: DESCRIBE.
4b. Grant SELECT and DESCRIBE on the target tables (Grant on Target)
Resource links permit only DESCRIBE and DROP permissions on the link itself. To allow Amazon Redshift to actually read data, you must separately grant SELECT on the target tables in the federated catalog. This is the Lake Formation Grant on Target pattern.
- Principal: RedshiftServerlessNamespaceRole.
- Resources: Named Data Catalog resources, databricks-federated-catalog, databricks_federated_db, then Tables.
- Table permissions: SELECT, DESCRIBE.
- Catalog permission: DESCRIBE.
Important: SELECT must be granted on the TARGET tables in the federated catalog, not on the resource link. Granting SELECT only on the resource link won’t work. This is a common configuration error.
Step 5: Create an external schema in Amazon Redshift
With the resource link in place and permissions granted, you can now create an external schema in Amazon Redshift that points to the resource link database. The external schema is the query interface. When a user runs SQL against it, Amazon Redshift traverses the link to the federated catalog and retrieves metadata and data from Databricks Unity Catalog.
The DATABASE parameter must reference the resource link database name in the default AWS Glue catalog (databricks_federated_db_link), not the federated catalog name directly. The CATALOG_ARN parameter isn’t required here because the resource link lives in the default catalog and Amazon Redshift resolves it automatically.
Connect to your Amazon Redshift cluster as a superuser (for example, using Amazon Redshift Query Editor v2) and run:
A key design principle in this architecture is the clear separation between data physically stored in Amazon Redshift and data accessed externally through federation. External schemas provide a transparent abstraction layer, so Amazon Redshift users can query data stored in S3 without ingestion. For consistency and clarity, United Airlines follows a standard naming convention for all federated schemas in Amazon Redshift: {domain}_iceberg. This convention makes it immediately clear that the data isn’t natively stored within Amazon Redshift but is accessed by using federation through AWS Glue and Lake Formation. This distinction is critical for analysts and engineers, because it improves discoverability, avoids ambiguity between storage layers, and reinforces architectural discipline when working across hybrid data environments.
The User Interactions domain exposes curated datasets representing customer interaction activity, engagement behavior, and channel usage patterns. Operational datasets follow the same pattern, providing governed access to supporting business events and reference information through a common federation framework.
You create a view layer over each external schema using WITH NO SCHEMA BINDING, so that analysts always resolve the freshest schema on each query execution. For example:
Step 6: Verify and query Databricks tables from Amazon Redshift
After creating the external schema, verify that the Databricks tables are visible and run a test query.
Verify table visibility
Query a Databricks Unity Catalog table
When a query runs, Amazon Redshift calls Lake Formation GetDataAccess using the namespace IAM role to obtain temporary credentials. It then contacts the AWS Glue federated catalog, which in turn calls the Databricks Unity Catalog Iceberg REST API to retrieve metadata and read table data. The result is returned to the Amazon Redshift user transparently.
For SAML-authenticated users, connect using your IdP JDBC plugin:
The Amazon Redshift JDBC driver handles authentication automatically. It authenticates with your IdP, receives a SAML assertion, and calls sts:AssumeRoleWithSAML for temporary IAM credentials. It then calls redshift-serverless:GetCredentials to connect as the mapped database user.
Business impact
AWS Glue Data Catalog federation delivered measurable architectural and operational improvements for United Airlines:
| Area | Before | After | Impact |
| Data access | Delta Lake and Amazon Redshift data were completely siloed, so Amazon Redshift users had no access to curated datasets on Databricks-managed S3 data | Amazon Redshift users get real-time access to Databricks-managed data through AWS Glue Data Catalog federation | ~100 analysts gained access to user interaction data tables in the first phase without adding new pipelines. |
| Disaster recovery | Cross-Region DR relied on Amazon Redshift snapshots every 3 hours (recovery point objective, or RPO, of 3 hours or more) | Amazon S3 cross-Region replication on the Delta Lake provides a near-continuous RPO. A new Amazon Redshift Serverless workgroup in the DR Region can federate to the same S3 data | More resilient architecture. Reduces cost for Amazon Redshift snapshot and copy maintenance across Regions |
| Architecture simplification | Data processing happened in both Databricks and Amazon Redshift, requiring manual catalog synchronization between the two platforms which was operationally expensive and prone to drift | With the federated architecture, data processing is consolidated in Databricks, and Amazon Redshift acts solely as a query engine powering user queries and dashboards through catalog federation | Single processing platform, zero sync pipelines, single source of truth |
| Infrastructure cost | Running dedicated Amazon Redshift ETL cluster with RMS storage, snapshots, and compute for data processing | For this use case with federation, Amazon Redshift is not needed for ETL but only as a query engine. No RMS storage duplication, no snapshot replication required | ~$30K/month in redundant ETL infrastructure cost reduced |
Security considerations
At United Airlines, identity governance is unified through Azure Active Directory groups. On the AWS consumption side, users authenticate to Amazon Redshift Serverless through SAML federation. AD group membership determines database-level access to federated schemas. On the Databricks side, the same AD groups govern access to Unity Catalog schemas. This single-identity model provides consistent access control across both platforms without requiring separate user provisioning. Lake Formation handles credential vending for S3 data access during federated queries, while schema-level access decisions are managed through the AD group mappings on each platform.
The architecture also provides multiple layers of security controls built into the federation chain:
- AWS Lake Formation governs fine-grained access control throughout the federation chain, so that principals can only access authorized databases, tables, and columns.
- IAM roles follow least-privilege principles. The Amazon Redshift namespace role is scoped only to AWS Glue metadata operations and Lake Formation GetDataAccess.
- SAML-based authentication integrates enterprise identity providers, so that users authenticate through existing SSO infrastructure before accessing federated data.
- All Amazon Redshift connections enforce TLS encryption (ssl=true), protecting data in transit between clients and the Amazon Redshift endpoint.
- Lake Formation permission vending issues short-lived, scoped credentials for each query execution rather than long-lived static credentials.
Other considerations
Review the catalog federation service limitations before deploying. Key requirements:
- Delta Lake tables must have UniForm enabled to expose Iceberg-compatible metadata.
- We recommend that source tables be well-partitioned and regularly compacted, because the federated query performance reflects how efficiently the data is organized at write time.
Clean up
To avoid ongoing charges for resources created in this walkthrough, remove them in the following order. This teardown doesn’t affect Databricks metadata or your underlying data stored in Amazon S3.
- Drop the external schema in Amazon Redshift:
DROP SCHEMA databricks_schema;. - Delete the resource link database in the default AWS Glue catalog (databricks_federated_db_link).
- Revoke Lake Formation permissions granted to the Amazon Redshift namespace role on both the resource link database and the target tables in the federated catalog.
- Delete the federated catalog in AWS Glue (databricks-federated-catalog).
- Deregister the AWS Glue connection for the Databricks Unity Catalog if no longer needed.
- Optionally, remove the IAM role (RedshiftServerlessNamespaceRole) if it was created solely for this walkthrough.
Conclusion
In this post, we showed how United Airlines uses AWS Glue Data Catalog federation to give Amazon Redshift Serverless analysts real-time access to double-digit terabytes of curated user interaction data on Amazon S3, without duplicating a single byte or building sync pipelines.
The architecture uses the Iceberg REST API, resource link databases, and Lake Formation credential vending to create a governed query path between Amazon Redshift and Unity Catalog. For United Airlines, this eliminated redundant ETL infrastructure costs, removed the need for catalog synchronization, and turned Amazon Redshift Serverless into a dedicated high-performance query engine for analysts and dashboards.
For questions or feedback, leave a comment on this post.
About the authors
Operationalizing least privilege: Automate IAM remediation through your CI/CD pipeline
Post Syndicated from Luis Pastor original https://aws.amazon.com/blogs/security/operationalizing-least-privilege-automate-iam-remediation-through-your-ci-cd-pipeline/
The principle of least privilege is straightforward to articulate but challenging to maintain at scale. When teams first deploy applications to AWS, they often grant broader permissions than strictly necessary; it’s faster to get things working, and the plan is always to tighten permissions later. But later rarely comes. Permissions accumulate, AWS Identity and Access Management (IAM) principals that once needed broad access for initial deployment retain those permissions long after they’re necessary, and some principals stop being used entirely. Even small teams face this challenge—permission reviews aren’t a one-time task but an ongoing operational burden that demands automation.
AWS IAM Access Analyzer addresses detection and recommendation. It identifies unused permissions across IAM roles and users: actions that haven’t been exercised, services that haven’t been accessed, and principals that aren’t being assumed at all. For each finding, it generates a recommended policy with the excess permissions removed. Security teams can see exactly what to fix, but manual remediation doesn’t persist. A security engineer can right-size a role today, but if that role is defined in an AWS CloudFormation template or AWS Cloud Development Kit (AWS CDK) stack, the next deployment restores the original permissions. The fix must live where the role is defined, and not every role starts in the same place. Some are managed through infrastructure-as-code (IaC), where remediation means updating source code and deploying through a pipeline. Others were created manually through the AWS Management Console and have no code representation. And some principals aren’t being used at all and need a controlled decommission path. Each scenario requires a different remediation strategy.
This post walks through an automated remediation workflow that bridges the gap between detection and action. Instead of findings accumulating in a dashboard waiting for someone to investigate, the automation classifies each role by how it was created and produces a ready-to-review remediation artifact: a pull request with production-ready CDK code and a plain-English explanation for IaC-managed roles, an issue with the recommended policy and step-by-step IaC migration guidance for manually created roles, or a soft-disable issue with a monitored decommission plan for unused principals. Each output flows through your existing code review and issue tracking processes—the same workflows your teams already follow. By the end of this post, you’ll have a pattern that converts IAM Access Analyzer findings into tested, deployable code changes rather than a growing backlog of security tickets.
Understanding the problem
Unused IAM permissions increase the attack surface. Removing unused permissions limits the actions available to any compromised credentials, reducing potential impact. Roles that aren’t being assumed represent unused resources; removing them simplifies your IAM inventory and reduces potential access paths that aren’t actively monitored.
The challenge isn’t knowing what to fix. As we said earlier, Access Analyzer provides both the findings and the recommended policies. The challenge is acting on that knowledge consistently across your environment. Each finding requires context:
- What the role does
- Who created the role
- Determining if the permission is unused or used infrequently
- If the role is managed in a CloudFormation stack, or was created through the console
Multiply this by hundreds of roles and security teams face a backlog that grows faster than they can address it.
Manual remediation compounds the problem. A security engineer can right-size a role directly in the console, but that fix is fragile. If the role is defined in an IaC template, the next deployment restores the original permissions. If it was created manually, there’s no record of what changed or why, and no easy way to revert if the change causes issues.
This is where IaC changes the equation. When roles are defined in code, remediation means updating that code. Changes flow through pull requests, are reviewed by the team that owns the role, and deploy consistently across environments. The fix becomes permanent, not a point-in-time correction that drifts back on the next deployment. And because every change is tracked in version control, teams can confidently remove permissions knowing they can revert if something breaks. That safety net matters; it’s often the difference between a team acting on a finding and leaving it in the backlog.
Solution overview
The solution automates remediation by connecting four capabilities: IAM Access Analyzer for detection and policy recommendations, CloudTrail for role attribution, Amazon Bedrock for CDK code generation and plain-English explanations, and your existing continuous integration and delivery (CI/CD) pipeline for remediation execution. The workflow operates on a core principle: every IAM role has an origin, and that origin determines the remediation path.
Figure 1 shows the solution architecture: Amazon EventBridge triggers an AWS Lambda orchestrator on a daily schedule. The Lambda orchestrator integrates with IAM Access Analyzer, CloudTrail, Amazon Bedrock, and Amazon CloudWatch. Each finding is routed to one of three remediation paths: a pull request for IaC-managed roles, an issue for manually created roles, and a soft-disable issue for unused roles.
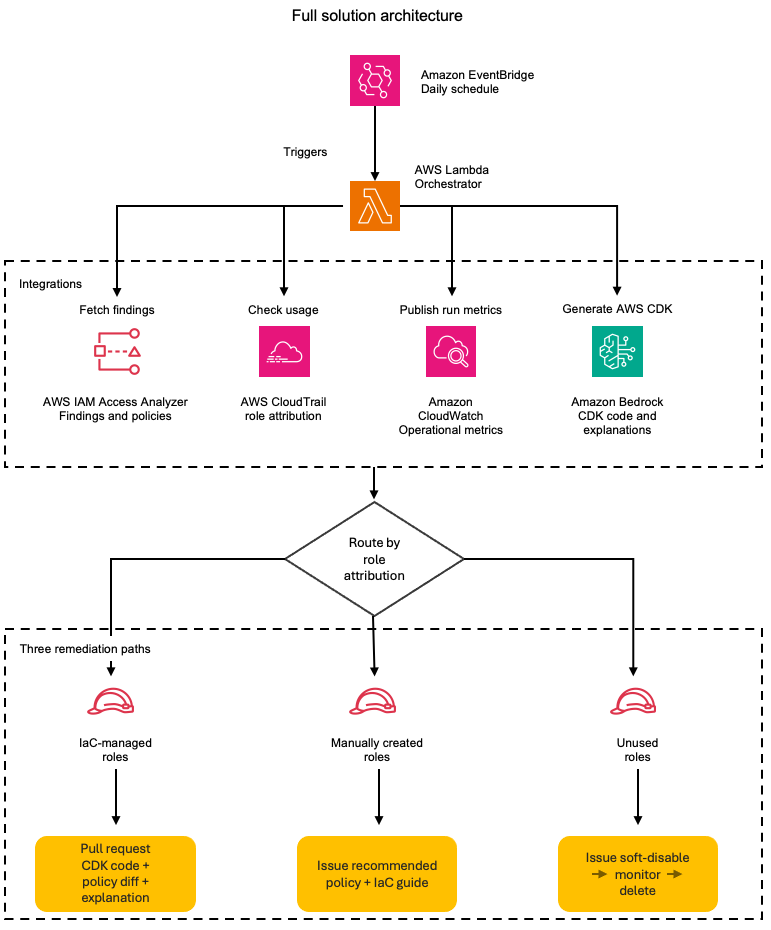
Figure 1: The daily remediation workflow; from scheduled trigger to the three role-based remediation paths
On each scheduled run, the automation retrieves active findings from IAM Access Analyzer and queries CloudTrail to determine how each role was created. Roles created through CloudFormation or AWS CDK have a traceable origin: the service principal, stack name, and originating repository. Roles created manually through the console have a different origin: the IAM user who created them and the timestamp. This distinction drives the remediation strategy.
For IaC-managed roles, the automation retrieves the IAM Access Analyzer-recommended policy and uses Amazon Bedrock to wrap it in production-ready CDK code that includes the role definition and policy statements and imports what your CI/CD pipeline needs to deploy the update. It then creates a pull request in the originating repository. The pull request (PR) includes the updated CDK code, a policy diff showing exactly which permissions are being removed, and a plain-English explanation of the changes, for example, “This change removes write access to S3, keeping only read and list permissions.” Your existing code review process evaluates the change, and after being merged, the fix deploys consistently across environments.
For manually created roles, the automation creates an issue that includes the IAM Access Analyzer-recommended policy with unused permissions removed, a diff highlighting the changes, and an Amazon Bedrock-generated explanation of what the permission changes accomplish. The issue also provides guidance on importing the role into your IaC codebase. This gives teams an immediate remediation path while encouraging long-term governance through IaC adoption.
For roles that aren’t being assumed at all, the automation takes a more cautious approach. Instead of taking direct action, it creates an issue recommending a soft-disable workflow: attach a deny-all policy to the role, monitor for 30 days to confirm no workload depends on it, then delete. The issue provides the steps and context, the team executes the decommission through their preferred process, whether that’s a console change, an AWS Command Line Interface (AWS CLI) script, or a PR removing the role from the IaC. This controlled decommission path reduces the risk of removing a role that’s used infrequently or seasonally.
The solution supports both single-account and organization-wide deployment. In single-account mode, it uses an ACCOUNT_UNUSED_ACCESS analyzer to process findings for one account. In organization mode, it uses an ORGANIZATION_UNUSED_ACCESS analyzer deployed in a delegated administrator account, which generates findings across all member accounts from a single vantage point. The Lambda function automatically detects which analyzer type is available and extracts the account ID from each finding’s resource Amazon Resource Name (ARN), so role attribution and remediation routing work the same way regardless of scope.
This three-path strategy acknowledges operational reality. Not all roles start in IaC, not all unused roles are safe to delete immediately, and forcing immediate migration isn’t always practical. The solution provides a clear path forward for each scenario: remediate IaC roles through code, give teams actionable recommendations for manually created roles, and safely decommission what’s no longer needed. Over time, your infrastructure becomes increasingly code-driven, and remediation becomes a routine part of your CI/CD process rather than a manual security task.
Technical details
Consider a company—call them AnyCompany—running 200 IAM roles across three AWS accounts. Some roles were created through AWS CDK stacks during initial deployment. Others were created manually through the console by engineers who needed quick access during incident response or prototyping. A handful haven’t been assumed in over 6 months. AnyCompany’s security team wants to act on their IAM Access Analyzer findings, but each role requires different handling. The solution’s architecture addresses this by routing each finding through a classification and remediation pipeline.
Figure 2 shows how each IAM Access Analyzer finding is processed:
- The finding is first checked against exclusions and excluded findings are skipped.
- Remaining findings are split by type:
UnusedPermissionfindings retrieve a recommended policy from IAM Access Analyzer and then query CloudTrail for role origin, whileUnusedIAMRolefindings follow the unused role path. - By origin, IaC-managed roles generate AWS CDK code using Amazon Bedrock and create a pull request.
- Manually created or unknown-origin roles create an issue with the recommended policy and IaC migration guidance.
- Unused roles create a soft-disable issue to deny-all, monitor for 30 days, then delete.
- All paths publish CloudWatch metrics.
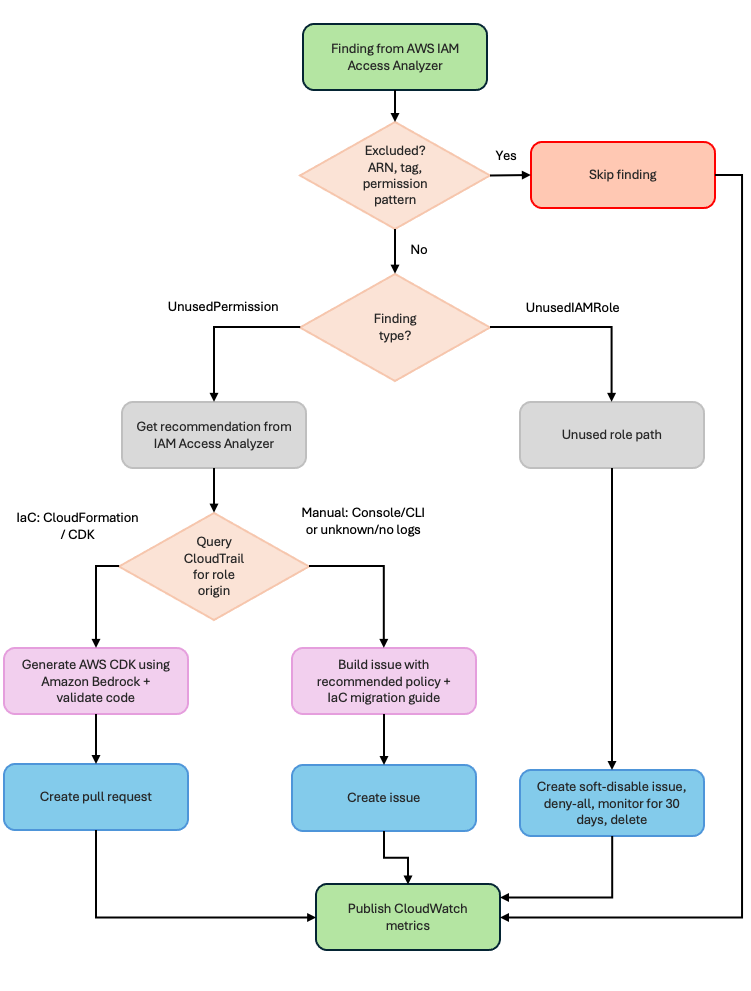
Figure 2: Detailed component interactions—the orchestrator’s five steps, its four service integrations, and the three remediation paths
The rest of this section walks through each component using AnyCompany’s roles as examples.
Exclusion filtering
Before processing any finding, the Lambda function loads an exclusion configuration and checks whether the role should be skipped. This prevents the automation from creating remediation items for roles that legitimately need broad permissions.
AnyCompany excludes their break-glass role (used only during incidents), any service-linked roles, and roles tagged CriticalService. The min_unused_days threshold prevents false positives from seasonal workloads; a role that ran a quarterly batch job 25 days ago won’t generate a finding.
Detection and analysis
IAM Access Analyzer generates two types of findings relevant to this solution. UnusedPermission findings identify roles with permissions that haven’t been exercised within the analysis period. UnusedIAMRole findings identify roles that haven’t been assumed at all. The Lambda function queries both finding types separately because they follow different remediation paths.
The Lambda function auto-detects the analyzer type at startup. When ANALYZER_SCOPE is set to organization, it checks for an ORGANIZATION_UNUSED_ACCESS analyzer first and falls back to ACCOUNT_UNUSED_ACCESS if none exists. If multiple analyzers of the same type exist in the account, the Lambda function selects the first active analyzer returned by the API. To target a specific analyzer, set the ANALYZER_ARN environment variable explicitly. With an organization-level analyzer, findings include roles from all member accounts. The Lambda function extracts the account ID from each finding’s resource ARN (for example, account 111122223333 from arn:aws:iam::111122223333:role/MyRole) and carries that context through the entire pipeline: attribution, remediation, and issue or PR creation all include the originating account.
For UnusedPermission findings, the Lambda function calls GenerateFindingRecommendation to initiate policy generation, then retrieves the IAM Access Analyzer-recommended policy through the GetFindingRecommendation API. This is a key integration point: IAM Access Analyzer provides the right-sized policy with unused permissions removed, so the automation doesn’t need to generate policies itself.
Here’s what a typical finding looks like for one of AnyCompany’s application roles:
The OrderProcessorRole has write and delete permissions for Amazon Simple Storage Service (Amazon S3) and Amazon DynamoDB, but only uses read operations. The IAM Access Analyzer recommendation removes the four unused actions while preserving the three active ones.
For UnusedIAMRole findings, no recommendation is needed: the role isn’t being assumed at all, so the remediation is to disable or delete it. The Lambda function caps the number of unused role issues per run (configurable using MAX_UNUSED_ROLE_ISSUES, default 10) to avoid overwhelming teams with a flood of issues on the first execution.
Role attribution using CloudTrail
For each finding, the Lambda function queries CloudTrail to determine how the role was created. The CreateRole event contains the information needed to classify the role’s origin.
An IaC-created role looks like this in CloudTrail:
The cloudformation.amazonaws.com service principal and user agent tell the automation this role was created through a CloudFormation or AWS CDK deployment. The Lambda function then looks up the role’s tags to find the originating repository (stored in a Repository tag set during deployment).
A manually-created role looks different:
Here, the IAMUser type and console.amazonaws.com user agent indicate someone created this role through the console. Roles created through the AWS CLI show a similar pattern: the IAMUser type with a user agent like aws-cli/2.x.x. The automation classifies both console and AWS CLI-created roles as manually created, because neither has an IaC origin that can be updated programmatically. The automation captures the username and timestamp for the remediation issue.
Cross-account role attribution
When the Lambda function processes findings from an organization-level analyzer, the role might live in a different account than the one running the function. The automation handles this by assuming a cross-account role (configurable using CROSS_ACCOUNT_ROLE_NAME, defaulting to OrganizationAccountAccessRole) in the member account, then querying that account’s CloudTrail and IAM APIs for the CreateRole event. If the cross-account assume fails—because the role doesn’t exist in that account or permissions aren’t configured—the automation falls back gracefully, classifying the role as unknown origin and creating an issue with the account ID and available context. This approach helps the automation produce an actionable output for findings even when attribution is incomplete.
Policy recommendations and AWS CDK code generation
For IaC-managed roles with UnusedPermission findings, the Lambda function retrieves the IAM Access Analyzer-recommended policy and sends it to Amazon Bedrock to generate production-ready AWS CDK code. This is an important distinction: IAM Access Analyzer decides what the policy should be, and Amazon Bedrock wraps that policy in the AWS CDK constructs, imports, and resource definitions that the CI/CD pipeline needs to deploy the update.
The prompt instructs Amazon Bedrock to convert the recommended policy to AWS CDK code exactly as provided, with no modifications:
IAM Access Analyzer generates recommendations for both inline policies and customer managed policies. When a managed policy has partially unused permissions, the recommendation contains the full right-sized policy. The automation wraps this in AWS CDK code as an iam.ManagedPolicy construct. Note that if a managed policy is shared across multiple roles, the recommendation applies to the specific role’s usage pattern. In this case, the automation generates an issue for manual review rather than a PR, because modifying a shared policy could affect other roles.
The generated code goes through a validation step before inclusion in any PR. The Lambda function compiles the Python code to check for syntax errors and verifies that required AWS CDK patterns (iam, PolicyStatement) are present. If validation fails, the finding is logged as an error rather than creating a broken PR.
The solution doesn’t currently invoke the IAM Access Analyzer ValidatePolicy API to check the generated policy for errors or overly permissive statements. However, this is a natural extension point. Teams can add a validation step that calls ValidatePolicy on the Amazon Bedrock-generated policy before including it in a PR, detecting issues like missing resource constraints or invalid action names.
Amazon Bedrock also generates a plain-English explanation of the policy changes. For AnyCompany’s OrderProcessorRole, the explanation might read:
“The role currently has full S3 write access and DynamoDB delete permissions, but only uses read operations. Removing s3:PutObject, s3:DeleteObject, s3:PutBucketPolicy, and dynamodb:DeleteItem reduces the scope of impact if credentials are compromised, while preserving the s3:GetObject, s3:ListBucket, and dynamodb:Query permissions the application needs.”
The solution uses the Anthropic Claude Sonnet model on Amazon Bedrock for CDK code generation (where accuracy matters) and Claude Haiku on Amazon Bedrock for explanations (where speed and cost efficiency matter more).
Three-path remediation
The Lambda function evaluates each finding’s origin and routes it to one of three remediation paths.
Path 1: IaC-managed roles (pull request) – For AnyCompany’s OrderProcessorRole, the automation creates a PR in the originating repository. The PR includes:
- The Amazon Bedrock-generated AWS CDK code implementing the IAM Access Analyzer-recommended policy
- A policy diff showing exactly which permissions are being removed
- The plain-English explanation of what the changes accomplish
- Labels (
security,iam-remediation,automated) for filtering and tracking
The team that owns the role reviews the PR through their normal code review process. Once merged, the fix deploys consistently across environments through the existing CI/CD pipeline.
Path 2: Manually-created roles (issue) – For AnyCompany’s IncidentResponseRole, the automation creates an issue that includes the Access Analyzer-recommended policy with unused permissions removed, a diff highlighting the changes, an Amazon Bedrock-generated explanation, and step-by-step guidance on importing the role into IaC. This gives the team an immediate remediation path (apply the recommended policy) while encouraging long-term governance through IaC adoption.
Path 3: Unused roles (soft-disable issue) – For roles that haven’t been assumed at all, the automation creates an issue recommending a three-stage decommission workflow: attach a deny-all policy to the role, monitor for 30 days to confirm no workload depends on it, then delete. This controlled approach reduces the risk of removing a role that’s used infrequently or seasonally – if something breaks during the monitoring period, removing the deny-all policy restores access immediately.
Dry-run mode
Before creating real PRs and issues, you can run the automation in dry-run mode by setting “dry_run": true in the CI/CD configuration or setting the CI_CD_PLATFORM environment variable to dryrun. In this mode, the Lambda function processes findings, classifies roles, and generates remediation data, but logs what it would create instead of making actual API calls to your repository platform. You can use the log to validate the automation’s behavior, review the classification accuracy, and tune exclusions before going live.
Operational metrics
The Lambda function publishes CloudWatch metrics after each run:
| findings_processed | Total UnusedPermission findings evaluated |
| iac_roles_found | Roles classified as IaC-managed |
| manual_roles_found | Roles classified as manually created |
| unused_roles_found | Roles with no assume activity (UnusedIAMRole findings) |
| prs_created | Pull requests created for IaC roles |
| issues_created | Issues created (manual roles and unused roles) |
| errors | Processing errors (failed classifications, API failures) |
These metrics feed into dashboards and alarms. AnyCompany sets an alarm on errors > 5 to catch API throttling or configuration issues, and tracks prs_created + issues_created over time to measure remediation velocity.
Implementation
The solution ships as two AWS CDK stacks and deploys in minutes. The accompanying GitHub repository contains the complete source code, AWS CDK stacks, configuration templates, and step-by-step deployment instructions.
At a high level, deployment involves:
- Prerequisites: An AWS account with an
ACCOUNT_UNUSED_ACCESSorORGANIZATION_UNUSED_ACCESSanalyzer enabled, Python 3.11 or later, AWS CDK v2, a CI/CD platform API token stored in AWS Secrets Manager, and Amazon Bedrock model access for the Anthropic Claude models you plan to use. The model IDs are configurable environment variables (BEDROCK_CODEGEN_MODELandBEDROCK_EXPLANATION_MODEL); Amazon Bedrock retires older foundation models over time, so if the shipped defaults stop working, set these variables to current models you have enabled and redeploy. The repository README documents this. - Configuration: Two files in the
config/directory control behavior.exclusions.jsondefines which roles and permissions to skip (break-glass roles, service-linked roles, tagged exceptions), andci_cd_config.jsonconfigures your repository platform integration (GitLab or GitHub), labels, and throttling limits. - Deploy: Run
cdk deploy --allto create the Lambda function, EventBridge schedule, IAM roles, and CloudWatch alarms. - Validate in dry-run mode: Start with
“dry_run": trueto see how the automation classifies your roles without creating real PRs or issues. Review the CloudWatch logs to confirm attribution accuracy and tune exclusions. - Go live: Set
“dry_run": falseand redeploy. The Lambda function runs on schedule (daily by default) and begins creating PRs and issues.
The repository README covers each step in detail, including organization-wide deployment, cross-account configuration, and platform-specific setup for GitLab and GitHub.
Operational considerations
Deploying the automation is only the starting point. Running it in production means making decisions about how roles are retired, how the volume of findings is managed at scale, which roles warrant human review before any change is proposed, and how you measure the automation’s impact over time. The following practices keep remediation sustainable as your IAM footprint grows, so the automation reduces operational burden rather than adding to it.
Unused role lifecycle
Unused roles follow a three-stage decommission workflow. When the automation identifies a role that hasn’t been assumed within the analysis period, it creates an issue with the recommended decommission steps; the automation doesn’t modify the role directly. The team then follows the soft-disable approach:
- Attach a deny-all inline policy to the role. This blocks all actions without deleting the role or its existing policies.
- Monitor for 30 days. If a workload depends on the role (seasonal jobs, infrequent batch processes), the deny-all policy surfaces the dependency quickly. Removing the deny-all policy restores full access immediately; no need to recreate the role or reattach policies.
- Delete the role after the monitoring period confirms no impact.
This approach is deliberately conservative. Deleting a role is irreversible; you lose the trust policy, attached policies, and any resource-based policies that reference it. The soft-disable step gives teams a safety net while still making progress on reducing their unused role inventory.
Scaling and throttling
On AnyCompany’s first run, the automation found 47 unused permission findings and 4 unused roles. That’s manageable. But organizations with hundreds of accounts and thousands of roles might see significantly more findings on initial deployment.
This is especially true with an organization-level analyzer. A single-account deployment might surface dozens of findings; an organization-level analyzer across multiple accounts could surface hundreds or thousands on the first run. The throttling controls become critical at this scale.
Two throttling controls prevent the automation from overwhelming teams:
max_findings_per_run(default 50): Caps the totalUnusedPermissionfindings processed per Lambda function execution. Remaining findings are picked up on the next scheduled run.MAX_UNUSED_ROLE_ISSUES(default 10): Caps unused role issues per run. This is especially important during initial deployment when you might have a large backlog of roles that haven’t been assumed in months.
Start with conservative limits and increase them as your team builds confidence in the review process. A team that can review 10 PRs per week shouldn’t receive 50 on Monday morning.
Approval workflows for sensitive roles
Not every role should receive automated PRs. Roles with administrative permissions or access to sensitive data might warrant manual review before any remediation is created. The exclusion configuration supports this through the approval_required_for_tags field:
Roles matching these tags generate issues for manual review instead of automated PRs, regardless of whether they’re IaC-managed. This gives security teams a checkpoint for high-risk roles while still automating remediation for standard application roles.
Monitoring and alerting
The metrics published after each Lambda function run (covered in the Technical details section) feed into CloudWatch dashboards and alarms. A few patterns worth setting up:
- Alert on
errors > 5per run to catch API throttling, expired CI/CD tokens, or Amazon Bedrock availability issues. - Track
prs_created + issues_createdover time. A healthy trend shows this number decreasing as your environment converges toward least privilege. - Monitor
unused_roles_foundas a leading indicator. A sudden increase might signal a team spinning up roles for a project and not cleaning up afterward. - Compare
iac_roles_foundtomanual_roles_foundover time. As teams adopt IaC, the ratio should shift toward IaC-managed roles, which means more automated remediation and less manual work.
Cost
The solution uses Lambda (minimal cost at daily execution), CloudTrail (typically already enabled), IAM Access Analyzer (charges per IAM role or user analyzed per month for the unused access analyzer), and Amazon Bedrock (pay-per-token for AWS CDK code generation and explanations). For most organizations the ongoing cost is low, and Amazon Bedrock token usage is the largest variable, scaling with the number of findings processed per day and the complexity of each policy. Review the pricing pages for each service for current rates.
For organization-level deployments, the IAM Access Analyzer cost scales with the number of IAM roles analyzed across all member accounts. The ORGANIZATION_UNUSED_ACCESS analyzer charges per role per month across the organization, so an organization with 500 roles across 20 accounts will see higher analyzer costs than a single account with 50 roles. Review the IAM Access Analyzer pricing page for current rates.
Cleanup
To remove the solution, run cdk destroy --all from the infrastructure/ directory. This removes the Lambda function, EventBridge rule, CloudWatch alarms, and IAM roles created by the stacks.
If you stored a CI/CD platform API token in Secrets Manager as part of deployment, delete it with aws secretsmanager delete-secret --secret-id <your-secret-name> --recovery-window-in-days 7. The 7-day recovery window lets you restore the secret if the deletion was accidental. After 7 days, the secret is permanently deleted and can’t be recovered. To delete immediately without a recovery window, add --force-delete-without-recovery.
Lambda automatically creates a CloudWatch Logs log group at /aws/lambda/<function-name> that persists after cdk destroy --all and continues to incur log storage charges. To remove it, run aws logs delete-log-group --log-group-name /aws/lambda/<function-name>. WARNING: This permanently deletes all execution logs.
The IAM Access Analyzer isn’t created by the AWS CDK stacks. WARNING: Deleting the analyzer permanently removes all findings, analysis history, and unused permission data. Export any findings you need to retain before deletion. After exporting, run aws accessanalyzer delete-analyzer --analyzer-name <your-analyzer-name> to delete it. The ACCOUNT_UNUSED_ACCESS and ORGANIZATION_UNUSED_ACCESS analyzer types incur charges based on the number of IAM roles and users analyzed per month.
If you deployed in organization mode and created cross-account roles (default name: OrganizationAccountAccessRole) in member accounts solely for this solution, remove them from those accounts.
Any PRs or issues already created in your CI/CD platform remain after stack deletion; they’re artifacts in your repository, not AWS resources. See the repository README for detailed cleanup instructions.,
Conclusion
Automating IAM permission remediation turns least privilege from a periodic compliance exercise into an operational practice. By connecting IAM Access Analyzer findings and recommendations to your CI/CD pipeline, remediation shifts from manual security tasks to code review processes that your teams already follow.
The three-path strategy acknowledges how infrastructure evolves. IaC-managed roles receive pull requests with production-ready AWS CDK code and plain-English explanations. Manually created roles receive actionable issues with recommended policies and IaC migration guidance. Unused roles are put on a controlled decommission path that protects against accidental disruption. Over time, the manual role count decreases as teams adopt IaC, and remediation becomes a routine part of your deployment pipeline.
Start with a pilot. Choose 10–20 non-production roles, deploy in dry-run mode, and review the classification results. Tune your exclusions, confirm the CloudTrail attribution is accurate for your environment, and then enable live remediation. Expand to production roles after your team is comfortable with the review cadence.
When you’re ready to scale beyond a single account, switch to an organization-level analyzer and the same Lambda function will process findings across all member accounts with no architectural changes required, only a configuration toggle.
The complete source code, AWS CDK stacks, and configuration templates are available in the accompanying GitHub repository.
If you have feedback about this post, submit comments in the Comments section below.
[$] Adding BPF to blk-iocost
Post Syndicated from corbet original https://lwn.net/Articles/1093661/
The scheduling of block I/O requests has long
been a challenge for operating-system kernels. For many years, the
performance characteristics of rotating drives meant that putting
considerable resources into request ordering was worthwhile. In a world
with fast, solid-state drives, scheduling is more concerned with enforcing
fairness between competing users while being fast enough to keep up with
drives that can perform millions of I/O
operations per second. The blk-iocost I/O
controller was designed for the solid-state world and generally performs
well, but there is always a desire to do better. This patch
series from Tao Cui aims to make blk-iocost more flexible by enabling
the loading of a BPF program to make cost decisions.
Vondra: PostgreSQL development activity
Post Syndicated from jzb original https://lwn.net/Articles/1094470/
PostgreSQL contributor Tomas Vondra has published a blog
post looking at development activity in the project, with data from the late
1990s to today.
We’re doing ~50 commits per week, give or take. In ~2010 we were doing maybe
25/week, and the trend seems to be a slow and consistent growth. The monthly
average makes the trend a bit easier to spot. Which is good, although there’s a
lot of other important details (size of commits, are they new features or fixes,
…).It however nicely aligns with the number of active committers, which also
grew ~2x between 2010 and today. So maybe that’s working as expected.
Security updates for Tuesday
Post Syndicated from jzb original https://lwn.net/Articles/1094469/
Security updates have been issued by Debian (network-manager-l2tp and urwid), Fedora (perl-Dancer2, perl-Data-Entropy, perl-DBI, perl-Protocol-HTTP2, podman-tui, rust-lru, and rust-lru0.16), Mageia (bzip2, cups-filters, libcupsfilters, libssh2, perl-Authen-SASL, perl-HTML-FormFu, tar, unzip, and zip), Red Hat (grafana and image-builder), SUSE (389-ds, acl, attr, apache2-mod_auth_openidc, apr-util, aws-nitro-enclaves-cli, bzip2, c-ares, clamav, cpio, curl, dhcpcd, dovecot23, dovecot24, dracut, emacs, fuse-overlayfs, go1.25-openssl, go1.26-openssl, google-cloud-sap-agent, google-osconfig-agent, govulncheck-vulndb, gstreamer-devtools, gzip, helm, java-17-openjdk, java-21-openjdk, java-25-openjdk, jq, libBasicUsageEnvironment2, libgpg-error, libidn, librest, libusb-1_0, libvirt, LibVNCServer, libzypp, zypper, lkl, mcphost, MozillaFirefox, mozilla-nspr, mozilla-nss, rust-cbindgen, MozillaFirefox, mozilla-nss, mozilla-nspr, rust-cbindgen, MozillaFirefox, MozillaFirefox-branding-SLE, mozilla-nspr, mozilla-nss, rust-cbindgen, msgpack-c, multipath-tools, NetworkManager, openexr, openssl-3, perl-Protocol-HTTP2, perl-URI, php-composer2, postgresql14, postgresql15, postgresql16, postgresql17, postgresql18, python-aiohttp, python-cryptography, python-h2, python-ruff, python-sqlparse, python311, python312, python39.SUSE_SLE-15-SP3_Update, rav1e, rpcbind, sssd, systemd, tomcat, tomcat11, ucode-intel, udisks2, vim, and wicked2nm), and Ubuntu (cgit, dracut, freeciv, konsole, libinput, linux-azure, linux-nvidia-7.0, nginx, vips, and yelp).
Have it both ways: stay discoverable in search while disallowing AI training
Post Syndicated from Bryan Becker original https://blog.cloudflare.com/accountable-mixed-use-ai-crawlers/
Without proper controls, website owners have long faced a difficult tradeoff: allow your content to be used for AI training, or risk losing discoverability in search. That tradeoff exists because some of the largest organizations on the Internet use mixed-use crawlers: a single crawler serving both search and AI training. Refuse one, and you refuse the other.
Today, Cloudflare is announcing a new Disallow AI Training setting that lets you easily stay indexed for search while refusing to let that same crawler train on your content. Apple, Google, and Microsoft honor or have committed (in a specified time frame) to honor this setting.
Mixed-use crawlers were the hard part of the training question. AI Summaries are next. A site-wide yes or no is too blunt: how much of your content appears in a summary matters as much as whether it appears at all. An opt-out for AI summaries is already one of the requirements we've set for mixed-use crawler operators. By early next year, our goal is to let you control how much of your content is included — set once on Cloudflare, rather than with each operator separately.
Why asking isn’t enough
Most site owners want to be found: by humans, agents, and (good) bots. But a significant portion of the open Internet is funded by advertising, subscriptions, or direct relationships with visitors, and those models only pay when someone actually arrives.
Almost every site owner considers Search beneficial: less than 1% of Cloudflare sites choose to block Search bots. Training, however, is a different story: 17% of sites choose to enable some mechanism to block training. This is exactly why we decided site owners needed more granular controls, rather than a one-size-fits-all “Block AI.”
A robots.txt directive alone cannot solve this problem. Anyone can publish one, but it cannot identify who is crawling, determine why they are crawling, or stop a crawler that ignores it.
A network can solve it, however: we publish the preference, identify who is crawling, classify why they are crawling, and block the ones that ignore it – then report what each operator actually does on Radar.
But blocking removes a crawler. It doesn't change how crawlers behave. The better outcome is operators that don't make you choose at all. So since July, we've been talking to them directly. The response has been encouraging: almost all agreed that site owners should have control and transparency into how their content is used, and reassurance that their choices will be respected. To help site owners understand that, we created a designation: Accountable.
The Accountable designation recognizes both capabilities available today and concrete commitments to deliver them. To qualify, a bot operator must meet or commit to meeting the following requirements:
- A mechanism for site owners to opt out of AI training, through robots.txt or a similar standard.
- A mechanism for site owners to opt out of AI summaries set with the operator directly, and next year through Cloudflare (see section below for more detail).
- URL-level visibility into which pages were made available for training, along with metrics showing how content appeared in search.
- Assurance that opting out of AI training will not affect traditional search results.
Apple, Google, and Microsoft all demonstrate that they meet the qualifications to be Accountable. Each combines capabilities available today with time-bound commitments for those still in development. The details of each of these companies’ crawlers are shared below.
New security setting options
Cloudflare classifies bots by behavior, and a single bot can exhibit more than one behavior. Three behaviors are available as controls:
- Search – crawling to build a search index.
- Training – crawling to train or fine-tune a model.
- Agent – user-directed agents visiting a page on behalf of a human, such as chat fetch bots and browser-use agents.
A mixed-use crawler is a single crawler doing both Search and Training. Without controls, that combination creates the tradeoff described above: site owners cannot refuse one use without refusing the other.
To avoid blocking Accountable mixed-use crawlers — the ones that don't force that tradeoff on website owners — we are introducing a new setting: Disallow AI Training. Disallow AI Training is named for the Disallow: directive it publishes in your robots.txt.
“Block” setting now means something different
Block and “Block on pages with ads” previously did not apply to mixed-use crawlers because blocking them could also affect search discoverability. Now that we have the new Disallow AI Training setting, Block and “Block on pages with ads” apply to all training crawlers, including mixed-use crawlers.
Training, Search, and Agent controls are applied at the domain level. With the addition of Disallow AI Training, the available settings are:
- Allow: All crawlers are allowed, unless blocked by another setting or a WAF rule.
- Disallow AI Training: Bot Preference Sync publishes the applicable no-training preference in robots.txt. Accountable mixed-use crawlers remain allowed for search. Every other training crawler is blocked, including the training-only crawlers run by Amazon, Anthropic, Meta, and OpenAI — blocking those does not affect search. Disallow AI Training is only available as a setting for Training, not Search or Agent.
- Block on pages with ads: Crawlers, including mixed-use crawlers, are blocked only on pages detected to be serving an ad.
- Block: All crawlers, including mixed-use crawlers, are blocked.
Disallow AI Training works by publishing a preference in robots.txt. An ads-only preference cannot be expressed that way: Cloudflare can detect which pages serve ads, but that list is too large and changes too frequently to enumerate in robots.txt. That's why there's no Disallow AI Training on pages with ads.
Agents do not create the same search-discoverability tradeoff as mixed-use crawlers, and the Internet does not yet have a well-established directive for expressing Disallow preferences to agents. For now, we’re not including a Disallow setting for Agents. As standards such as ai-prefs mature, we will revisit this approach.
What changes on September 15?
We are making the following changes to Bot Management and AI Crawl Control:
- Block and Block on pages with ads now apply to mixed-use crawlers, including Applebot, Bingbot, and Googlebot, so either setting impacts search as well as training. To stop training and keep search, use Disallow AI Training.
- “Block AI Bots” will be deprecated in favor of the more granular Search, Training, and Agent controls.
- Managed Robots.txt will be deprecated in favor of Bot Preference Sync. Customers who enabled Managed Robots.txt will migrate to the new system.
- Disallow AI Training will become part of the recommended configuration for certain new domains.
- Existing customers will have their preferences migrated to the new controls as described below.
What you need to do
Nothing, in almost every case. Your current settings carry over on their own.
If you want mixed-use crawlers gone entirely, you now have to say so. Select Block. It will stop Applebot, Bingbot, and Googlebot from reaching your site — search included.
Existing domains that never used the Search/Training/Agent controls
Site owners that never configured the more granular controls will be migrated to the new settings based on their legacy Block AI Bots setting:
Existing domains that previously configured the Search/Training/Agent controls
For domains that previously configured the granular controls, we will preserve the practical effect of their selections under the new definitions. Previous Training selections of Block or Block on pages with ads will migrate to Disallow AI Training.
Recommendations for new domains
Beginning September 15, customers onboarding a new domain will be offered one of two preset configurations, depending on whether the site earns money from advertising. Ad revenue depends on a human actually seeing the page. Training replaces that visit with an answer; agents fetch the page with nobody there to see the ads. So the presets for ad-supported sites are more restrictive. You can change any of these settings during onboarding, or at any time afterward.
Recommended settings for new domains.
What does this mean for specific mixed-use crawlers?
Applebot, Bingbot, and Googlebot are Accountable. Apple, Google, and Microsoft are committed to the same principles of publisher choice and transparency. Under Disallow AI Training they can keep crawling your site for search. Selecting Block stops them entirely.
We also categorize the relevant crawlers from Amazon, Anthropic, Meta, and OpenAI as Accountable. These organizations separate their Search and Training crawlers, so Cloudflare can block the Training crawler without affecting search.
Applebot
Applebot allows site owners to opt out of training by adding a Disallow rule to robots.txt for “Applebot-Extended”. Site owners can also currently express preferences for AI Summaries via their nosnippet directive in the page HTML. Content can also be labeled as paywalled content to exclude it from generative output. Applebot does not yet provide a tool for URL-level inspection. However, we have met with their team, and they have shared details of their in-progress solution for next year. Apple has also stated that disallowing training does not impact search ranking.
Googlebot
Googlebot allows site owners to opt out of training by adding a Disallow rule to robots.txt for “Google-Extended”, and they provide a toggle inside their webmaster portal to exclude a site’s content from generative search results. Googlebot also provides site owners with metrics and reporting regarding search results and AI summary results. Google shared information about their existing and recently launched controls, as well as information about what they're already working on, including additional URL-level transparency tools for site-owners related to Google-Extended, which they expect to launch in the weeks to come. Google has also stated that disallowing Google-Extended does not impact search ranking.
Bingbot
Bingbot provides granular controls and transparency in their Webmaster Tools. Site owners can currently express AI training preferences through Bing’s NOARCHIVE meta tag. Microsoft is extending these capabilities and currently building the mechanism to also respect a “no training” preference in robots.txt at the domain/site level, targeted for early 2027. For Cloudflare Customers who wish to opt out of training in Bing today, in addition to using the NOARCHIVE tag, site owners can use the Block URLs or Content Removal tool. Microsoft has also stated that using NOARCHIVE will not impact search ranking.
Until that support launches, selecting Disallow AI Training will not automatically convey a no-training preference to Bing through robots.txt. This is the same practical behavior as the previous Training Block setting, which did not apply to mixed-use crawlers such as Bingbot.
Continuing progress
We will continue to reach out and engage with all operators of AI crawlers as these capabilities evolve. Cloudflare Radar publicly tracks the controls, transparency, and reporting provided by Accountable crawler operators.
Making the Internet better requires both sides to have agency: crawlers need access to the open web, and the people who create that web need meaningful control over how their work is used. Today’s announcement represents concrete progress toward that balance.
Progress requires infrastructure providers, content creators, technology companies, and standards bodies such as the Internet Engineering Task Force (IETF) working together to translate these principles into open, interoperable standards.
What’s next: AI Summaries
Training and AI Summaries raise different questions for site owners. Training concerns whether content can be used to build AI models. Summaries affect how people discover, evaluate, and ultimately visit a business. Both matter, but they affect businesses in different ways.
Controls to opt out of AI summaries are the first step. The operators identified as Accountable either provide or are completing work to provide that capability, establishing an important baseline: site owners can say no.
But a site-wide choice between allowing and prohibiting summaries is still a blunt instrument. The right decision depends on the site, the content, and the business outcome. For publishers, training raises foundational questions about control, compensation, and the sustainability of original content. Summaries create a separate and often more immediate distribution question: does someone visit the publisher’s site, or consume the answer within a search or AI experience? For many other businesses, AI summaries increasingly sit between a potential customer and a website. They may answer a question, compare alternatives, recommend a product, or help someone decide whether to visit at all.
The data illustrates mixed impact. More than half of consumers read summaries in Search, and those consumers are over 40% more likely to end their search after reading one. This can reduce the number of visits a website receives. But consumers referred by AI Search convert at between three times and over five times the rate of those referred by traditional search. AI may produce fewer visits while sending customers with much greater intent.
That is not inherently good or bad. A publisher funded by advertising may optimize for audience volume. A retailer may prefer fewer visitors who are more likely to purchase. Cloudflare’s role is not to choose for them, but to provide the visibility and control needed to make an informed decision.
Summary opt-outs are a strong start, but they are not the end state. Our next focus is helping site owners understand how summaries affect their businesses and giving them more control over how much of their content can be used. Open standards such as ai-prefs will be an important part of making that possible.
If you would like to have a voice in this conversation, or provide feedback, please reach out to [email protected].
These new controls are available to all customers, on all plans, and can be configured at the domain (zone) Security Settings. Not on Cloudflare yet? Start for free to set the traffic controls that you want today.
Give every teammate and agent the right level of access to your Workers
Post Syndicated from Dina Kozlov original https://blog.cloudflare.com/workers-granular-authorization/
As more teams — and now agents — build applications on Cloudflare's Developer Platform, having the right access controls is crucial to allow you to ship safely. After all, the last thing you want is for an agent to make a change in production, just because it was granted more access than it needs.
Now, you can give a teammate or agent access to a specific Worker, so that they can only make changes to that application and no other resources in your account. Moreover, we’re giving you four new roles, so you can limit exactly what they can do:
The new roles are available today, for all customers. You can assign them to a specific user, so when they log into the dashboard, they will only see the Worker you have given them access to. Or, you can create an API token with the scoped access, which you can give to your agent to ensure they only have access to that one application.
Here’s an example of how to create an API token with permissions per Worker:
Roles designed for how teams build
When defining these roles, we wanted to strike the right balance. Overly broad roles force you to grant more access than intended, undermining the principle of least privilege, while providing too many individual permissions makes it difficult to know which ones to grant. We landed on four roles that reflect the levels of access you may want to give a person or agent: enough to debug a resource without exposing its content, read the content without changing it, make changes without being able to delete the resource, or fully manage it.
We plan to use these same roles as we bring resource-level access controls to other Developer Platform products, including D1, R2, and KV. Each role can be applied at one of three scopes. For example, if you set the “metadata read-only” control, here’s what that would look like at different levels:
- Developer Platform level: Access to metadata for all Developer Platform resources.
- Product level: Access to metadata for every resource of one product, such as every Worker.
- Resource level: Access to metadata for one specific resource, such as one Worker.
The role and scope determine what someone can do and which resources they can do it to. Let’s take a look at how this would look in some common Workers workflows.
Debug without exposing source code
To debug an issue, an engineer or agent might need to look at a Worker’s settings, metrics, logs, and traces to understand what went wrong. But they do not need to see the Worker’s code or make changes to it.
Metadata Read-Only gives them access to that information without exposing the Worker’s source code. They can query analytics through the GraphQL API, access logs, and inspect traces and other observability data. Those requests only return data for the Workers they have access to. If an agent is scoped to one Worker, it can use the Cloudflare APIs to investigate an issue without seeing data from any other Worker in the account.
As we bring these roles to more Developer Platform products, we plan to preserve that separation. Someone could inspect settings and observability data for a D1 database or R2 bucket without being able to read the values in the database or the files in the bucket.
Review code without changing it
A teammate or code review agent may need to read the code running in a Worker to understand how it works, investigate a bug, or review a proposed change. But that does not mean they should be able to deploy new code or update the Worker’s settings.
Content Read-Only provides that separation. It lets them retrieve and review the Worker’s code without being able to modify or deploy it. When scoped to an individual Worker, they can read only that Worker’s code, rather than the code for every Worker in the account.
Once supported for other Developer Platform products, Content Read-Only will work the same way: someone could read the data stored in a D1 database, KV namespace, or R2 bucket without being able to modify it.
Let CI deploy without giving it full control
A CI/CD workflow only needs access to the application it deploys. It should not be able to change another Worker or delete its own and take the application offline.
With Worker-level access controls, each workflow can have its own API token with the Editor role, scoped to one Worker. If the workflow is misconfigured or its token is exposed, the impact remains contained: it can deploy changes to that Worker, but it cannot delete it or touch any other application in your account.
Delete a Worker with Admin access
Admin is the highest level of access you can grant. It allows you to delete an application. You can still scope the role to an individual Worker, so that access does not extend to every Worker in the account.
Routes & Custom Domains
You can add routes or Custom Domains to a Worker to specify which hostnames are routed to that application. For example, this configuration in your Wrangler file sends traffic for example.com to the Worker:
Because changing that route could redirect production traffic or take the application offline, access to the Worker alone is not enough. To add, change, or remove a route or Custom Domain, you need both Editor access to the Worker and Workers Routes permission for the zone.
Requiring Workers Routes permission, rather than broader access to the zone, means someone can manage how traffic reaches a Worker without being able to change unrelated settings for the domain.
However, once a route is configured, you can continue deploying new versions of the Worker without access to the connected zone or resource, as long as the deployment does not change that connection. This allows your CI/CD system to deploy the application without also giving it access to your domains, databases, or storage.
Workers permissions extend to Durable Objects
Durable Objects do not have their own roles or permissions. Instead, access to a Durable Object is determined by your access to the Worker that implements it. To give someone access to a Durable Object, grant them the appropriate role for that Worker.
Metadata Read-Only gives them access to Durable Object metrics, logs, and traces, but not the data stored in the object. Because Durable Objects Data Studio can query and modify that stored data directly, accessing it requires the Editor role.
Better errors that tell you and your agents which permissions you need
When you give someone narrowly scoped permissions, they may eventually try to perform an operation they do not have access to. When that happens, the error should tell them what permission they need, so they don’t get stuck.
Instead of returning only a generic 403 Forbidden response, our APIs now include a link to the relevant API documentation, where you can see exactly which permissions are required to make the request. This way, you and your agent can figure out exactly the right level of access that’s needed without granting broader permissions than necessary.
Available now
Worker-level access controls are available today for all customers. You can configure them in the Cloudflare dashboard, through the API, or with Terraform.
To give a team member access to a specific Worker, go to Manage Account > Members, select the member, and create a policy with the role and Worker scope they need.
Manage team access with user groups
If several people on the same team or project need the same access, you can create a User Group instead of assigning permissions to each person individually. Assign the policy to the group, then add the relevant members. Everyone in that group will automatically inherit that policy.
Replacing legacy permissions for Workers
Previously, we used the following roles and permissions to manage access to Workers. Now that we are rolling out a consistent set of roles across the Developer Platform, we recommend using the new roles going forward.
There is no deprecation date for the legacy roles and permissions. Existing assignments will continue to work, and we will provide advance notice before any deprecation. That said, we recommend starting to move to the new roles, since they're the ones that support granular, resource-level access.
What’s next?
Worker-level access is the first step toward a more consistent authorization model across Cloudflare's Developer Platform.
Next, we are bringing the same resource-level access controls to more Developer Platform products, including resources like KV namespaces and D1 databases. Instead of granting someone access to every bucket or every database in an account, you will be able to scope access to the specific resource they need and pair that scope with the right role.
The same roles introduced for Workers will apply across these resources.
Check out our developer docs to get started.
Bring AI literacy into every classroom with our new themed resources
Post Syndicated from Emma Staves original https://www.raspberrypi.org/blog/bring-ai-literacy-into-every-classroom-with-our-new-themed-resources/
Artificial intelligence (AI) is already part of young people’s everyday lives, from the content recommended to them on social media to the generative AI tools they increasingly encounter. But AI technologies are also being used to tackle challenges in the wider world, from forecasting floods to monitoring our environment.
That’s why we believe AI literacy shouldn’t sit within a single subject. Young people need opportunities to explore how AI works, where it is used, and the questions it raises across the curriculum.
To address this, we created a new collection of free themed Experience AI resources, designed to make it easier for educators to bring AI literacy into the subjects and topics they already teach. The resources include those co-developed by the Raspberry Pi Foundation and Google DeepMind, alongside those developed independently by the Raspberry Pi Foundation, including two units created with support from our partner, Digital Moment.
Explore AI through the issues that matter
When we began developing these resources, we initially explored creating materials specifically for individual curriculum subjects. But through conversations with educators and our partners around the world, we learnt that a more flexible approach could be much more useful.
Curricula differ between countries, schools, and age groups, and AI technologies rarely fit neatly within traditional subject boundaries. The same technology can raise scientific, geographical, social, creative, and ethical questions.
So rather than assigning each resource to a particular subject, our new resources are organised around broad themes, including the environment, critical thinking, and ethics.
The resources include:
- Flood forecasting, a lesson that explores how AI tools can be used to predict flooding
- AI and social media, a unit that helps young people investigate how their online behaviour influences the content they are shown
- AI detectives: The case of the clever claim, an activity that develops critical thinking about AI tools and the claims made about them
Designed for learners aged 8 to 16, the resources can be used in different subjects and adapted by educators to suit their own classroom context.
That flexibility is important. We want educators to be able to introduce meaningful AI literacy without feeling that they need to become AI specialists or find space for an entirely new subject in an already busy curriculum.
AI literacy across the curriculum
The need for this approach is increasingly recognised by subject experts.
Dr Becky Kitchen, Head of Professional Development at the Geographical Association, highlighted the importance of giving young people opportunities to engage critically with AI technologies as part of their wider learning:

“Pupils are increasingly coming into contact with AI and so it’s vital that they are taught how to harness its power in an effective and critical way. Developing resources across the curriculum to embed this knowledge, understanding, and use is critical.”
After reviewing the new resources, she added:
“These resources are outstanding. They develop pupils’ geographical knowledge while simultaneously exploring the role that AI can have in a meaningful and concrete way.”
The connections extend well beyond geography.
Professor Geoff Cox, Professor of Art and Computational Culture at London South Bank University, emphasised the role that arts and humanities subjects can play in developing a richer understanding of AI technologies:
“If AI literacy is left solely to STEM subjects or computer science, we lose the opportunity to ask deeper human, cultural, and ethical questions — questions that art is uniquely equipped to explore.”
He also highlighted the value of combining different ways of learning:
“The resources move between visual analysis, practical activity, and critical reflection, recognising that only in combination can AI literacy be developed effectively.”
These perspectives reflect an important principle behind the collection. AI literacy isn’t simply about knowing how a technology works. It is also about being able to question it, understand its applications and limitations, and consider its impact on people, communities, and the world.
Tested in real classrooms
Before launching the resources more widely, earlier this year we collaborated with our partner, Digital Moment, to give educators in Canada the opportunity to test some of them with their students. Their experiences helped us understand not only how the resources worked in practice, but also where they could fit naturally into existing teaching.
As Indra Kubicek, CEO of Digital Moment, explains:
“Educators play a critical role in helping students understand and think critically about the use of AI and its implications across a wide range of subjects. Building the next generation of creators, builders, and innovators who will shape the future of AI starts with AI education in the classroom.”
One of the educators who took part was Grade 8 teacher Sandra Theobald, who tested our AI and social media activity. Before the lesson, she expected her students, who were already regular social media users, to be familiar with many of the ideas.

While they did have a good background knowledge, the activity prompted them to make new connections between their own behaviour, the data they generate, and the content they are shown as a result of the algorithms presented to them.
Students were able to explore the ideas themselves, with Sandra taking more of a supporting role. She found that they came away feeling more confident about understanding how their interactions with social media affect what they see, and keen to share what they had discovered with their families.
For educators who may feel unsure about introducing AI tools in their classroom, Sandra’s advice is to simply give it a go, rather than waiting until feeling like an expert:
“My advice is to start small and seek out trusted resources and experts in AI education. Partner with another educator so you can explore and learn together. There is so much information available that it can feel overwhelming, so take it one step at a time. Learn alongside your students and build your confidence as you go.”
A powerful and easy resource for teachers
Canadian educator Colin McKenzie also used the AI and social media unit with his Grade 7 and 8 classes.

Using Somekone, a closed social media simulation for the classroom, his students created accounts and explored how their behaviour affected the content the system recommended.
The experience felt familiar enough to capture their attention, but gave them an opportunity they wouldn’t normally have when using a real social media platform: to examine what was happening behind the scenes.
Students reflected on their interests and choices and then used data on their own behaviour to understand how that behaviour affected what they were shown. Colin found that students were eager to return to the activity each day to discover what would happen next.
Crucially, he also found it straightforward to incorporate the activity into his existing teaching rather than having to significantly change his plans.
“I think this is a powerful and easy resource for teachers to use in the classroom. It is easy to set up and navigate, and it ties in well with curriculum areas around online usage, especially with how prominent AI is becoming in our educational lives.”
For Colin, the activity provided a practical way to connect AI literacy with what his students had already learnt about online safety and evaluating information. It also helped students recognise that the content they encounter online isn’t simply appearing by chance: their own actions can influence the content recommended to them by AI-driven systems.
The experience was valuable enough that Colin plans to make the unit part of his teaching each year.
Giving educators flexibility
Feedback like this has reinforced why flexibility is central to our approach.
A lesson about flood forecasting might support learning in geography or science. Exploring AI-generated content could lead to discussions in art, media literacy, humanities, or computing. An activity investigating social media algorithms can connect AI literacy with online safety, critical thinking, and digital citizenship.

Most importantly, these things provide opportunities for students to encounter AI literacy in different contexts and recognise that understanding AI is relevant far beyond the computing classroom.
AI literacy belongs in every classroom
AI technologies will continue to change. The contexts in which young people encounter them will change too.
Our aim isn’t to prepare students for one particular AI tool or moment in time. It’s to help them develop the knowledge and critical thinking skills they need to understand all kinds of AI technologies, question them, and make informed decisions about them.
Educators shouldn’t need to be computer science teachers, or AI experts, to do that.
By creating flexible resources that connect AI with subjects and issues young people are already exploring, we hope to make it easier for more educators to bring AI literacy into their classrooms.
Explore the new themed Experience AI resources and discover a starting point for your learners.
We’d like to say a big thank you to our global partner, Digital Moment, for their support in trialling these new resources with educators and learners in Canada.
The post Bring AI literacy into every classroom with our new themed resources appeared first on Raspberry Pi Foundation.
CVE-2026-76461: Critical Cisco Secure Email Gateway Vulnerability Exploited in the Wild
Post Syndicated from Rapid7 original https://www.rapid7.com/blog/post/etr-cve-2026-76461-critical-cisco-secure-email-gateway-vulnerability-exploited-in-the-wild
Overview
On September 14, 2026, Cisco published a security advisory for CVE-2026-76461, a critical SQL injection vulnerability affecting Cisco AsyncOS Software for Cisco Secure Email Gateway. The vulnerability has a reported CVSS v3.1 base score of 9.8 and could allow an unauthenticated, remote attacker to execute arbitrary commands with root privileges on an affected appliance.
Cisco Secure Email Gateway, formerly known as IronPort Email Security Appliance, is an enterprise email security product that inspects inbound and outbound email for threats including phishing, malware, spam, and business email compromise. Because affected gateways process externally delivered email as part of their normal operation, exploitation does not require access to an administrative interface or authentication. An attacker can reportedly trigger the vulnerability by sending a specially crafted email through a vulnerable gateway.
CVE-2026-76461 was added to CISA’s Known Exploited Vulnerabilities (KEV) catalog on the same day as the vendor disclosed the vulnerability, indicating that CVE-2026-76461 was exploited as a zero-day prior to disclosure. Cisco noted that their PSIRT became aware of active exploitation in September 2026. At the time of publication, there is no public proof-of-concept exploit code available, and no attribution for the current threat actor activity.
Mitigation guidance
Organizations running Cisco Secure Email Gateway should prioritize upgrading to a vendor-supplied fixed version on an emergency basis, outside of normal patching cycles.
|
Affected Version |
Fixed Version |
|
15.5 and earlier |
15.5.5-014 |
|
16.0 |
16.0.4-302 |
|
16.5 |
16.5.0-780 |
Given the reported active exploitation and the ability to achieve unauthenticated root-level command execution through malicious email processing, organizations should prioritize patching rather than relying solely on network controls or monitoring. Cisco also strongly recommends that customers migrate to the latest product version, 16.5.0-780.
For the latest remediation guidance, see the vendor advisory.
Indicators of compromise
The following indicators of compromise for CVE-2026-76461 were reported within the Cisco security advisory.
To confirm any attempted exploitation of this vulnerability, review the mail_logs and look for suspicious SQL statements. If the device is part of a cluster, review the logs of each cluster device. The following is a non-exhaustive example of how a malicious SQL statement could be detected in the logs:
cisco-esa> grep -i “COPY.*TO PROGRAM” [IronPort Text Mail Logs Log name – Default: mail_logs]
The presence of any entry in the output may indicate malicious activity.
Rapid7 customers
Exposure Command, InsightVM, and Nexpose
Exposure Command, InsightVM, and Nexpose customers can assess exposure to CVE-2026-76461 with a vulnerability check expected to be available in the September 16 content release.
Updates
-
September 15, 2026: Initial publication.
THG Podcast: Counterfactuals – A Churchill and Roosevelt Christmas, 1941
Post Syndicated from The History Guy: History Deserves to Be Remembered original https://www.youtube.com/watch?v=RTBqCQKpgI8
25 Years of Mass Surveillance Is Enough
Post Syndicated from Bruce Schneier original https://www.schneier.com/blog/archives/2026/09/25-years-of-mass-surveillance-is-enough.html
This essay was written with Cindy Cohn, and originally appeared in Lawfare.
One of the many legacies of the terrorist attacks of Sept. 11 is the government-wide shift from targeted surveillance—such as individual wiretaps or pen register/trap and trace orders—to mass surveillance techniques—such as tapping into the internet backbone or mass collection of telephone or internet metadata. The legal and technical architecture of modern mass surveillance, initially framed as a necessary defense against terrorist threats, has grown far beyond that justification and national security in general. Mass surveillance is now a routine tool used by law enforcement. ICE uses it in immigration actions and against people exercising their First Amendment rights to protest. It’s also increasingly part of private security systems, such as facial recognition at venues such as Madison Square Garden and networked Flock license plate capture systems on roads and in parking lots.
The interrelation between private and governmental mass surveillance is worth examining. Surveillance is the business model of the internet; companies like Google and Facebook constantly spy on their users’ behavior. From the National Security Agency relying on data collected by telecommunication and internet companies, to local sheriffs and ICE agents relying on cellphone location data and privately managed automatic license plate readers, governments primarily obtain the mass surveillance information through private companies. Increasingly, access doesn’t just come through legal processes, either. FBI Director Kash Patel recently confirmed in congressional testimony that the agency is purchasing information on Americans from data brokers and intends to continue to do so.
This pipeline from private collection to governmental collection means that as companies collect more information for surveillance capitalism purposes, more is available to law enforcement as well. And as the technology for mass surveillance and analysis improves, especially with the increased use of AI technologies, the problems attendant to mass surveillance grow as well.
After 9/11, the idea that the government could surveil the population to safety took hold. In 2001, the fear of terrorism reached a frequency and intensity never before seen. Along with that came the fear that the enemy could be anyone, anywhere. As a result, the government’s response was to watch everyone, everywhere. This line of reasoning underpinned the shift from targeted to mass surveillance. Or, in the words of an internal National Security Agency (NSA) presentation that was made public as part of Edward Snowden’s 2013 disclosures, a government that can “Collect it All,” “Process it All,” “Exploit it All,” “Partner it All,” and “Sniff it All,” will ultimately, “Know it All.” Similar rationales support the rise of domestic mass surveillance: if law enforcement could see and hear everything, it could more effectively interdict and solve serious crimes.
The national security community has never provided a full analysis of the costs and benefits of these mass surveillance programs, either in terms of taxpayer dollars or diversion of resources from other efforts—or any demonstration that those techniques stopped attacks that otherwise they would not have been able to prevent. While the NSA occasionally presents examples of the successes due to its mass surveillance programs, especially when those techniques are under public pressure, the examples also regularly fall apart upon serious scrutiny. And even if some utility exists, it must be seriously weighed against the costs.
Similarly, there has never been any comprehensive analysis about whether domestic immigration or law enforcement’s use of these techniques actually makes people safer, or whether other techniques could produce the same results. Instead, both the police and the companies selling these tools float anecdotes and dubious data. For example, Flock’s data equates the number of law enforcement hits in their database with actually solving crimes.
Twenty-five years after 9/11, it seems reasonable to step back and evaluate the costs of this shift to mass surveillance, especially in terms of Americans’ rights and freedoms.
The Shift
The easiest place to see a shift to mass surveillance was in the government’s decision immediately after 9/11 to collect Americans’ telephone records. The program started under an argument of pure executive power as the “President’s Surveillance Program.” But in 2006, that argument secretly shifted to a novel interpretation of Section 215 of the Patriot. Act which had only previously authorized more targeted access to record. While some media and public interest organizations struggled to force the government to reveal the program as early as late 2005, the government only officially confirmed it after the 2013 Snowden disclosures. In 2015, the Second Circuit Court of Appeals rejected the government’s interpretation of Section 215 as allowing mass collection of telephone records. Later the same year, Congress passed the USA Freedom Act. While this new law still allows collection of a tremendous amount of domestic telephone records, it ended the indiscriminate mass collection that had occurred for nearly fourteen years.
Other shifts to mass surveillance continue through today. The NSA launched its Upstream program, which involved intercepting both metadata and content from key telecommunications junctures inside the U.S., soon after 9/11. It was also initially conducted under a claim of purely presidential authority. This program was brought under marginal congressional and programmatic (not targeted) Foreign Intelligence Surveillance Act (FISA) court review via Section 702 of the 2008 FISA Amendments Act. In 2017, more than15 years after its inception, the NSA ended content searches due to FISA court pressure, but the mass collection continues.
Despite the stated goal of conducting mass spying only on people outside the U.S.—which itself is problematic given international law’s requirement that surveillance be both necessary and proportionate—mass surveillance collects a tremendous amount of U.S. persons’ communications. This can happen because people communicate with people abroad, or because of overcollection—when government agencies gather far more personal data on non-targeted US persons than authorized by law. The concerns about collecting Americans’ data on U.S. soil led Congress to allow the program to officially expire in 2026, although the previously-approved mass surveillance itself continues until at least Spring of 2027.
The shift to mass surveillance would be notable enough even if it remained only a strategy of the intelligence community. It has not. Americans are awash in mass surveillance. Networks of automated license plate readers such as those offered by Flock and Vigilant Solutions blanket both public and private roadways and parking lots. These networks often allow searches by law enforcement, including across jurisdictions. They are, for example, being used to track people seeking abortions across state lines. Facial recognition tools, once the province of only the more elite parts of federal law enforcement, are increasingly used by Immigration and Customs Enforcement agents on immigrants and protesters, in airports by the Transportation Security Administration, as well as by private entities. And, of course, modern phones track users’ locations constantly—and that information is readily available to law enforcement, often with only minimal process protections.
Constitutional Costs
Regardless of the murkiness of its actual usefulness, the shift from targeted to mass surveillance has profound implications for Americans’rights. It has created risks that have become increasingly evident, especially under the Trump administration.
At a basic level, the Fourth Amendment guarantees that citizens can be secure in their “persons, houses, papers and effects” from unreasonable searches. Warrants breaching that security should be supported by probable cause and particular descriptions of the place to be searched and items to be seized. Mass surveillance turns that promise on its head, allowing access to our “papers and effects” by the government without individualized suspicion or a particularized description of what data is being seized, much less probable cause. This protection was in response to colonial British misuse of writs of assistance, which authorized indiscriminate searches rather than targeted ones.
The justifications for exempting mass surveillance from constitutional protection vary. For Section 702, the government has taken the position that U.S. persons’ communications caught up in the dragnet, either due to overcollection or because they were communicating with someone outside the United States, do not require a warrant prior to initial collection or secondary access by the FBI and several other agencies. The argument is that if the initial collection was not aimed at Americans, the information is free from constitutional protection for any later uses, even for reasons far afield from the initial rationale for collection.
Other arguments rest on the claim that metadata is outside the Fourth Amendment, despite its demonstrated ability to reveal intimate details of all of our lives. Still others rest on the Supreme Court-created Third Party Doctrine, which holds that the Fourth Amendment does not apply to data shared with companies that provide us with services. Some turn on whether analysis by machine counts, claiming that only “human eyes” matter—a particularly troubling argument with the rise of artificial intelligence. What’s more, the government has used doctrines like standing to limit the ability of those subjected to mass surveillance to seek constitutional protection. No matter the argument, the goal is the same: to place the mechanisms and fruits of mass surveillance outside the protections of the Fourth Amendment.
The overarching truth is that, due to the concerted efforts by the government since 9/11, and the rise of technologies in recent years, the slice of Americans’ lives and data that are actually protected by the Fourth Amendment has shrunk significantly in the past 25 years. Together, with the technical capabilities of mass surveillance and the increased ability for that data to be analyzed using AI tools, the “security in our papers and effects” that the constitution promises seems increasingly illusory.
In addition to the Fourth Amendment, mass surveillance creates tensions with the First Amendment. The Constitution has long recognized that the right to freedom of speech requires a zone of privacy against governmental surveillance. The right to anonymous speech as well as the right of association both recognize the chilling effect that surveillance creates for people saying unpopular things or attempting to organize for political or other societal change. Mass surveillance grants the authorities the ability to track those people, both in real time and historically, that is inconsistent with actual techniques of freedom of speech and assembly.
That is why the recently released 2026 U.S. Counterterrorism Strategy is so troubling. On page seven, the White House expressly states that it intends to target domestic activists with its heretofore foreign-targeted powers. It says that the government “will prioritize the rapid identification and neutralization of violent secular political groups whose ideology is anti-American, radically pro-transgender and anarchist” and “will use all the tools constitutionally available to us to map them at home, identify their membership, map their ties to international organizations like Antifa.” While framed as targeting “violent” groups, it’s clear that the government intends to use its national security tools, presumably including the tools of mass surveillance, against Americans in ways that will create profound tensions with the First Amendment rights of people to organize and communicate privately.
Costs Due to Mistakes and Abuse
Even assuming some utility from mass surveillance—a fact we do not dispute, even if the public record is shaky and conclusory—the history of both the national security and domestic uses of mass surveillance confirms that these tools are inevitably misused, and that mistakes have impacted huge numbers of Americans. The past twenty-five years have demonstrated that it is not possible to surveil the entire US population while staying within the bounds of even a very generous legal framework like Section 702.
As Rep. Zoe Lofgren (D-Calif.) recently stated in discussion of Section 702 in an interview with Tech Policy Press: “backdoor searches have been used improperly for protestors, 19,000 campaign donors, members of Congress, journalists, government officials, a state court judge who had complained to the FBI about police misconduct. It has been abused substantially in the past.” The NSA experienced so much abuse of its mass surveillance tools by actual or aspiring romantic partners and ex-spouses that an internal name emerged for it: “LOVEINT,” or Love Intelligence.
That same pattern of abuse is now emerging at the domestic law enforcement level. A Texas police officer misused, and then lied about, using license plate readers to track a woman suspected of seeking an abortion. Multiple law enforcement officials have been accused of tracking people they either wished to have a relationship with or who were their exes. And mass surveillance technologies have been used to track both immigration targets and citizens engaging in their First Amendment-protected right to track and record the police.
Mistakes are inevitable with collections of data of this size and scope. The history of the FISA court’s reviews of Section 702 is littered with examples of the NSA not being able to follow its own rules limiting the scope of what it collects and analyzes, even after having been given multiple chances by the court. On the local level, the technical protections that Flock, for example, put in place have repeatedly been insufficient to stop “accidental” sharing its data with out-of-state law enforcement. These mistakes have fueled growing efforts by local communities across the country to remove license plate readers. Those efforts should be the first step in a broader reconsideration of mass surveillance.
More generally, ubiquitous surveillance carries a real societal cost. The chilling effects are real and pervasive, and they tend to fall hardest on the most marginalized members of society. Moreover, social progress requires the ability to experiment in secret. It’s hard to imagine a society progressing morally to the point of accepting and legalizing things like marijuana use or gay marriage if the earliest signs of that shift are snuffed out because of overzealous surveillance.
Reversing Course
While a cost-benefit analysis is not the best frame for deciding constitutional rights, it is a place to start to evaluate government policies. If the costs are too high and the benefits too small, what should the public do? While the policy and legal frameworks can be individually complex, mass surveillance is a problem in all of its applications. So too should solutions be comprehensive rather than piecemeal.
One comprehensive strategy is to reset the promise of the Fourth Amendment and recognize that a warrant is required prior to collection, access or use of information gathered through mass surveillance. This would apply to collections that include U.S. persons, whether done for national security or domestic purposes. This protection would apply regardless of whether the information is in the form of metadata. It would apply regardless of whether the information is held in homes or by services people rely on, such as telephones, internet or social network providers, or by private entities utilizing mass surveillance for their own purposes. By passing this legislation, Congress could ensure this rejection of mass surveillance, and include real enforcement such as a private right of action and an automatic exclusionary remedy in criminal prosecutions. The courts could also recognize this protection of “papers and effects” directly as a plain language interpretation of the Fourth Amendment.
There are already a number of efforts that take on pieces of mass surveillance. Section 702 has expired and should remain so. This was due largely to efforts to block the “back door” access to Section 702-collected data without warrants. The bipartisan “Fourth Amendment is Not for Sale Act” would prevent the government from purchasing data that it would otherwise need a warrant to obtain. The Supreme Court itself has already been chipping away at the Third Party Doctrine, with a recent step in the rejection of mass geofence warrants—warrants seeking the identities of individuals based upon their proximity to a crime—in Chatrie v. United States. Now, such warrants fall, at least initially, under the Fourth Amendment.
A more comprehensive approach would also address mass surveillance carried out by private companies, and to ensure that Americans have the right to encrypt and secure their data. There are many reasons the United States would benefit from a comprehensive privacy law—and curbing mass surveillance is one of them. Addressing mass surveillance is certainly one of them. Ideas such as the banning of secondary uses of data—with roots in the Fair Information Practice Principles from the 1970s—are worth pushing forward. So are moves such as creating fiduciary duties for mass data collectors. There are many more ways to curtail private companies’ mass surveillance while staying within constitutional boundaries. But addressing the costs of mass surveillance by both companies and governments is even more important in a world where AI agents are making decisions both about the public and on their behalf based on their data and observed behavior.
Twenty-five years after the U.S. government embraced mass surveillance, it’s time to evaluate it as a whole, and consider responses that address the problem as a whole. Americans must ask: Is it consistent with a self-governing democracy to have systems that watch everyone everywhere? Is the public comfortable with governments—federal, state, local—that seek to “know it all” about its citizens? Is the public comfortable with private mass surveillance in its own right and as it’s being increasingly used to fuel government surveillance? These questions have long needed serious consideration. But as it becomes increasingly evident that the Trump administration is using mass surveillance to keep itself in power, stifle dissent, and undermine political opponents, these questions are now more urgent than ever.