Today, AWS is announcing support for logging with EventBridge Pipes.Amazon EventBridge Pipes is a point to point integration solution that connects event producers and consumers with optional filter, transform, and enrichment steps. EventBridge Pipes reduces the amount of integration code builders must write and maintain when building event-driven applications. Popular integrations include connecting Amazon Kinesis streams together with filtering, Amazon DynamoDB direct integrations with Amazon EventBridge, and Amazon SQS integrations with AWS Step Functions.
Amazon EventBridge Pipes
EventBridge Pipes logging introduces insights into different stages of the pipe execution. It expands on the Amazon CloudWatch metrics support, and provides you with additional methods for troubleshooting and debugging.
You can now gain insights into various successful and failure scenarios within the pipe execution steps. When event transformation or enrichment succeeds or fails, you can use logs to delve deeper and initiate troubleshooting for any issues with their configured pipes.
EventBridge Pipes execution steps
Understanding pipes execution steps can assist you in selecting the appropriate log level, which determines how much information is logged.
A pipe execution consists of two main stages: the enrichment and target. Both of these stages encompass transformation and invocation steps.
You can use input transformers, enabling modification to the payload of the event before the events undergo enrichment or get dispatched to the downstream target. This gives you fine-grained control over the manipulation of event data during the execution of their configured pipes.
When the pipe execution starts, the execution enters the enrichment stage. If you don’t configure an enrichment stage, the execution proceeds to the target stage.
At the pipe execution, transformation, enrichment, and target phases EventBridge can log information to help debug or troubleshoot. Pipes logs can include payloads, errors, transformations, AWS requests, and AWS responses.
When logging is enabled for your pipe, EventBridge produces a log entry for every execution step and sends these logs to the specified log destinations.
EventBridge Pipes supports three log destinations: Amazon CloudWatch Logs, Amazon Kinesis Data Firehose stream, and Amazon S3. The records sent can be customized by configuring the log level of the pipe (OFF, ERROR, INFO, TRACE).
OFF – EventBridge does not send any records.
ERROR – EventBridge sends records related to errors generated during the pipe execution. Examples include Execution Failed, Execution Timeout and Enrichment Failures.
INFO – EventBridge sends records related to errors and selected information performed during pipe execution. Examples include Execution Started, Execution Succeeded and Enrichment Stage Succeeded.
TRACE – EventBridge sends any record generated during any step in the pipe execution.
The ERROR log level proves beneficial in gaining insights into the reasons behind a failed pipe execution. Pipe executions may encounter failure due to various reasons, such as timeouts, enrichment failure, transformation failure, or target invocation failure. Enabling ERROR logging allows you to learn more about the specific cause of the pipe error, facilitating the resolution of the issue.
The INFO log level supplements ERROR information with additional details. It not only informs about errors but also provides insights into the commencement of the pipe execution, entry into the enrichment phase, progression into the transformation phase, and the initiation and successful completion of the target stage.
For a more in-depth analysis, you can use the TRACE log level to obtain comprehensive insights into a pipe execution. This encompasses all supported pipe logs, offering a detailed view beyond the INFO and ERROR logs. The TRACE log level reveals crucial information, such as skipped pipe execution stages and the initiation of transformation and enrichment processes.
Including execution data with EventBridge Pipes logging
To help with further debugging, you can choose to include execution data within the pipe logs. This data comprises event payloads, AWS requests, and responses sent to and received from configured enrichment and target components.
You can also use the execution data to gain further insights into the payloads, requests, and responses sent to AWS services during the execution of the pipe.
Incorporating execution data can enhance understanding of the pipe execution, providing deeper insights and aiding in the debugging of any encountered issues.
Execution data within a log contains three parts:
payload: The content of the event itself. The payload of the event may contain sensitive information and EventBridge makes no attempt to redact the contents. Including execution data is optional and can be turned off.
awsRequest: The request sent to the enrichment or target in serialized JSON format. For API destinations this includes the HTTP request sent to that endpoint.
awsResponse: The response returned by the enrichment or target in JSON format. For API Destinations, this is the response returned from the configured endpoint.
The payload of the event is populated when the event itself can be updated. These stages include the initial pipe execution, enrichment phase, and target phase. The awsRequest and awsResponse are both generated at the final steps of enrichment and targeting.
This example creates a pipe with logging enabled and includes execution data. The pipe connects two Amazon SQS queues using an input transformer on the target with no enrichment step. The input transformer customizes the payload of the event before reaching the target.
Creating the source and target queues
# Create a queue for the source
aws sqs create-queue --queue-name pipe-source

# Create a queue for the target
aws sqs create-queue --queue-name pipe-target
2. Navigate to EventBridge Pipes and choose Create pipe.
3. Select SQS as the Source and select pipe-source as the SQS Queue.
4. Skip the filter and enrichment phase and add a new Target. Select SQS as the Target service and pipe-target as the Queue.
5. Open Target Input Transformer section and enter the transformer code into the Transformer field.
{

  "body": "Favorite food is <$.body>"

}
6. Choose Pipe settings to configure the log group for the new pipe.
7. Verify that CloudWatch Logs is set as the log destination, and select Trace as the log level. Check the “Include execution data” check box. This logs all traces to the new CloudWatch log group and includes the SQS messages that are sent on the pipe.
8. Choose Create Pipe.
9. Send an SQS message to the source queue.
# Get the Queue URL

aws sqs get-queue-url --queue-name pipe-source

# Send a message to the queue using the URL

aws sqs send-message --queue-url {QUEUE_URL} --message-body "pizza"
10. All trace logs are shown in the monitoring tab, use CloudWatch Logs section for more information.
Conclusion
EventBridge Pipes enables point-to-point integration between event producers and consumers. With logging support for EventBridge Pipes, you can now gain insights into various stages of the pipe execution. Pipe log destinations can be configured to CloudWatch Logs, Kinesis Data Firehose, and Amazon S3.
EventBridge Pipes supports three log levels. The ERROR log level configures EventBridge to send records related to errors to the log destination. The INFO log level configures EventBridge to send records related to errors and selected information during the pipe execution. The TRACE log level sends any record generated to the log destination, useful for debugging and gaining further insights.
You can include execution data in the logs, which includes the event itself, and AWS requests and responses made to AWS services configured in the pipe. This can help you gain further insights into the pipe execution. Read the documentation to learn more about EventBridge Pipes Logs.
For more serverless learning resources, visit Serverless Land.
It takes just a few minutes to turn on and configure Resource Explorer for an entire organization or a specific organizational unit (OU) and use simple free-form text and filtered searches to find relevant AWS resources across accounts and Regions.
When operating in a well-architected manner, multiple AWS accounts are used to help isolate and manage business applications and data. You can now use Resource Explorer to simplify how you explore your resources across accounts and act on them at scale. For example, Resource Explorer can help you locate impacted resources across your entire organization when investigating increased operational costs, troubleshooting a performance issue, or remediating a security alert.
Let’s see how this works in practice.
Setting up multi-account search You can set up multi-account search for your organization in four steps:
Configure Resource Explorer in every account in the organization or in the OU you want to search through. You can do that in just a few clicks using AWS Systems Manager Quick Setup. Optionally, you can use AWS CloudFormation, or other management tools you are comfortable with.
It is not mandatory, but we suggest creating a delegated admin account for AWS Account Management. Then, to centralize all the required permissions for multi-account creation, we recommend using the delegated admin account to create Resource Explorer multi-account views.
Finally, you can create a multi-account view to start searching across the organization.
Create a multi-account view I already implemented the first three steps in the previous list. Using the delegated admin account, I go to the Resource Explorer console. There, I choose Views in the Explore resources section and create a view.
I enter a name for the view and select Organization-wide resources visibility. In this way, I can allow visibility of resources located in accounts across my entire organization or in specific OUs. For this view, I select the whole organization.
For the Region, I select the one where I have the aggregator index. The aggregator index contains a replicated copy of the local index in every other Region where Resource Explorer has been turned on. Optionally, I can use a filter to limit which resources should be included in this view. I choose to include all resources and additional resource attributes such as tags.
Then, I complete the creation of the view. Now, by granting access to the view, I can control who can access what resource information in Resource Explorer.
Using multi-account search To try the new multi-account view, I choose Resource search from the Explore resources section of the navigation pane. In my query, I want to see if there are Amazon ElastiCache resources for an old version of Redis. I type elasticache:* redis3.2 in the Query field.
In the results, I see the different AWS accounts and Regions where these resources are based. For resources in my account, there is a link in the first column that opens that resource in the console. For resources in other accounts, I can use the console with the appropriate account and service to get more information or take action.
Things to know Multi-account search is available in the following AWS Regions: [[ Regions ]].
There is no additional charge for using AWS Resource Explorer, including for multi-account searches.
To share views with other accounts in an organization, we suggest you use the delegated admin account to create the view with the necessary visibility in terms of resources, Regions, and accounts within the organization and then use AWS Resource Access Manager to share access to the view. For example, you can create a view for a specific OU and then share the view with an account in that OU.
Auditing is a continuous and ongoing process, and every audit includes the collection of evidence. The evidence gathered helps confirm the state of resources and it’s used to demonstrate that the customer’s policies, procedures, and activities (controls), are in place, and that the control has been operational for a specified period of time. AWS Audit Manager already automates this evidence collection for AWS usage. However, large enterprise organizations who deploy their workloads across a range of locations such as cloud, on-premises, or a combination of both, manage this evidence data using a combination of third-party or homegrown tools, spreadsheets, and emails.
Today we’re excited to announce the integration of AWS Audit Manager with third party Governance, Risk, and Compliance (GRC) provider, MetricStream CyberGRC, an AWS Partner with GRC capabilities. This integration allows enterprises to manage compliance across AWS, on-premises, and other cloud environments in a centralized GRC environment.
Before this announcement, Audit Manager operated only in the AWS context, allowing customers to collect compliance evidence for resources in AWS. They would then relay that information to their GRC systems external to AWS for additional aggregation and analysis. This process left customers without an automated way to monitor and evaluate all compliance data in one centralized location, resulting in delays to compliance outcomes.
The GRC integration with Audit Manager allows you to use audit evidence collected by Audit Manager directly in MetricStream CyberGRC. Audit Manager now receives the controls in scope from MetricStream CyberGRC, collects evidence around these controls, and exports the data related to the audit into MetricStream CyberGRC for aggregation and analysis. You will now have aggregated compliance, real-time monitoring and centralized reporting. This will reduce compliance fatigue and improve stakeholder collaboration.
How It Works Using Amazon Cognito User Pools, you’ll be onboarded into the multi-tenant instance of MetricStream CyberGRC.
Amazon Cognito User Pools
Once onboarded, you’ll be able to view AWS assets and frameworks inside MetricStream CyberGRC. You can then begin by choosing the suitable Audit Manager framework to define the relationships between your existing enterprise controls and AWS controls. After creating this one-time control mapping, you can define the accounts in scope to create an assessment that MetricStream CyberGRC will manage in AWS Audit Manager on your behalf. This assessment triggers AWS Audit Manager to collect evidence in context of the mapped controls. As a result, you get a unified view of compliance evidence inside your GRC application. Any standard controls that you have in Audit Manager will be provided to MetricStream CyberGRC by using the GetControl API to facilitate manual mapping process wherever automated mapping fails or does not suffice. The EvidenceFinderAPI will send bulk evidence from Audit Manager to MetricStream CyberGRC.
Available Now This feature is available today where Audit Manager (AWS Regions) and MetricStream CyberGRC are both available. There are no additional AWS Audit Manager charges for using this integration. To use this integration, please reach out to MetricStream for information about access and purchase of MetricStream CyberGRC software.
As part of the AWS Free Tier, AWS Audit Manager offers a free tier for first-time customers. The free tier will expire in two calendar months after the first subscription. For more information, see AWS Audit Manager pricing. To learn more about AWS Audit Manager integration with MetricStream CyberGRC, see Audit Manager documentation.
In the AWS Security Profile series, we feature the people who work in Amazon Web Services (AWS) Security and help keep our customers safe and secure. This interview is with Tom Scholl, VP and Distinguished Engineer for AWS.
What do you do in your current role and how long have you been at AWS?
I’m currently a vice president and distinguished engineer in the infrastructure organization at AWS. My role includes working on the AWS global network backbone, as well as focusing on denial-of-service detection and mitigation systems. I’ve been with AWS for over 12 years.
What initially got you interested in networking and how did that lead you to the anti-abuse and distributed denial of service (DDoS) space?
My interest in large global network infrastructure started when I was a teenager in the 1990s. I remember reading a magazine at the time that cataloged all the large IP transit providers on the internet, complete with network topology maps and sizes of links. It inspired me to want to work on the engineering teams that supported that. Over time, I was fortunate enough to move from working at a small ISP to a telecom carrier where I was able to work on their POP and backbone designs. It was there that I learned about the internet peering ecosystem and started collaborating with network operators from around the globe.
For the last 20-plus years, DDoS was always something I had to deal with to some extent. Namely, from the networking lens of preventing network congestion through traffic-engineering and capacity planning, as well as supporting the integration of DDoS traffic scrubbers into network infrastructure.
About three years ago, I became especially intrigued by the network abuse and DDoS space after using AWS network telemetry to observe the size of malicious events in the wild. I started to be interested in how mitigation could be improved, and how to break down the problem into smaller pieces to better understand the true sources of attack traffic. Instead of merely being an observer, I wanted to be a part of the solution and make it better. This required me to immerse myself into the domain, both from the perspective of learning the technical details and by getting hands-on and understanding the DDoS industry and environment as a whole. Part of how I did this was by engaging with my peers in the industry at other companies and absorbing years of knowledge from them.
How do you explain your job to your non-technical friends and family?
I try to explain both areas that I work on. First, that I help build the global network infrastructure that connects AWS and its customers to the rest of the world. I explain that for a home user to reach popular destinations hosted on AWS, data has to traverse a series of networks and physical cables that are interconnected so that the user’s home computer or mobile phone can send packets to another part of the world in less than a second. All that requires coordination with external networks, which have their own practices and policies on how they handle traffic. AWS has to navigate that complexity and build and operate our infrastructure with customer availability and security in mind. Second, when it comes to DDoS and network abuse, I explain that there are bad actors on the internet that use DDoS to cause impairment for a variety of reasons. It could be someone wanting to disrupt online gaming, video conferencing, or regular business operations for any given website or company. I work to prevent those events from causing any sort of impairment and trace back the source to disrupt that infrastructure launching them to prevent it from being effective in the future.
Recently, you were awarded the J.D. Falk Award by the Messaging Malware Mobile Anti-Abuse Working Group (M3AAWG) for IP Spoofing Mitigation. Congratulations! Please tell us more about the efforts that led to this.
Basically, there are three main types of DDoS attacks we observe: botnet-based unicast floods, spoofed amplification/reflection attacks, and proxy-driven HTTP request floods. The amplification/reflection aspect is interesting because it requires DDoS infrastructure providers to acquire compute resources behind providers that permit IP spoofing. IP spoofing itself has a long history on the internet, with a request for comment/best current practice (RFC/BCP) first written back in 2000 recommending that providers prevent this from occurring. However, adoption of this practice is still spotty on the internet.
At NANOG76, there was a proposal that these sorts of spoofed attacks could be traced by network operators in the path of the pre-amplification/reflection traffic (before it bounced off the reflectors). I personally started getting involved in this effort about two years ago. AWS operates a large global network and has network telemetry data that would help me identify pre-amplification/reflection traffic entering our network. This would allow me to triangulate the source network generating this. I then started engaging various networks directly that we connect to and provided them timestamps, spoofed source IP addresses, and specific protocols and ports involved with the traffic, hoping they could use their network telemetry to identify the customer generating it. From there, they’d engage with their customer to get the source shutdown or, failing that, implement packet filters on their customer to prevent spoofing.
Initially, only a few networks were capable of doing this well. This meant I had to spend a fair amount of energy in educating various networks around the globe on what spoofed traffic is, how to use their network telemetry to find it, and how to handle it. This was the most complicated and challenging part because this wasn’t on the radar of many networks out there. Up to this time, frontline network operations and abuse teams at various networks, including some very large ones, were not proficient in dealing with this.
The education I did included a variety of engagements, including sharing drawings with the day-in-the-life of a spoofed packet in a reflection attack, providing instructions on how to use their network telemetry tools, connecting them with their network telemetry vendors to help them, and even going so far as using other more exotic methods to identify which of their customers were spoofing and pointing out who they needed to analyze more deeply. In the end, it’s about getting other networks to be responsive and take action and, in the best cases, find spoofing on their own and act upon it.
Incredible! How did it feel accepting the award at the M3AAWG General Meeting in Brooklyn?
It was an honor to accept it and see some acknowledgement for the behind-the-scenes work that goes on to make the internet a better place.
What’s next for you in your work to suppress IP spoofing?
Continue tracing exercises and engaging with external providers. In particular, some of the network providers that experience challenges in dealing with spoofing and how we can improve their operations. Also, determining more effective ways to educate the hosting providers where IP spoofing is a common issue and making them implement proper default controls to not allow this behavior. Another aspect is being a force multiplier to enable others to spread the word and be part of the education process.
Looking ahead, what are some of your other goals for improving users’ online experiences and security?
Continually focusing on improving our DDoS defense strategies and working with customers to build tailored solutions that address some of their unique requirements. Across AWS, we have many services that are architected in different ways, so a key part of this is how do we raise the bar from a DDoS defense perspective across each of them. AWS customers also have their own unique architecture and protocols that can require developing new solutions to address their specific needs. On the disruption front, we will continue to focus on disrupting DDoS-as-a-service provider infrastructure beyond disrupting spoofing to disrupting botnets and the infrastructure associated with HTTP request floods.
With HTTP request floods being much more popular than byte-heavy and packet-heavy threat methods, it’s important to highlight the risks open proxies on the internet pose. Some of this emphasizes why there need to be some defaults in software packages to prevent misuse, in addition to network operators proactively identifying open proxies and taking appropriate action. Hosting providers should also recognize when their customer resources are communicating with large fleets of proxies and consider taking appropriate mitigations.
What are the most critical skills you would advise people need to be successful in network security?
I’m a huge proponent of being hands-on and diving into problems to truly understand how things are operating. Putting yourself outside your comfort zone, diving deep into the data to understand something, and translating that into outcomes and actions is something I highly encourage. After you immerse yourself in a particular domain, you can be much more effective at developing strategies and rapid prototyping to move forward. You can make incremental progress with small actions. You don’t have to wait for the perfect and complete solution to make some progress. I also encourage collaboration with others because there is incredible value in seeking out diverse opinions. There are resources out there to engage with, provided you’re willing to put in the work to learn and determine how you want to give back. The best people I’ve worked with don’t do it for public attention, blog posts, or social media status. They work in the background and don’t expect anything in return. They do it because of their desire to protect their customers and, where possible, the internet at large.
Lastly, if you had to pick an industry outside of security for your career, what would you be doing?
I’m over the maximum age allowed to start as an air traffic controller, so I suppose an air transport pilot or a locomotive engineer would be pretty neat.
If you have feedback about this post, submit comments in the Comments section below. If you have questions about this post, contact AWS Support.
Want more AWS Security news? Follow us on Twitter.
Microsoft is addressing 64 vulnerabilities this November Patch Tuesday, including five zero-day vulnerabilities as well as one critical remote code execution (RCE) vulnerability. Overall, this month sees significantly fewer vulnerabilities addressed across a smaller number of products than has been typical of Patch Tuesday over the past year or two. Browser vulnerabilities account for 20 of the 64 vulnerabilities patched, and 14 of those are republished third-party vulnerabilities in Chromium.
CVE-2023-36025 describes a Windows SmartScreen security feature bypass. An attacker who convinces a user to open a specially crafted malicious Internet Shortcut file could bypass the anti-phishing and anti-malware protection provided by Windows SmartScreen. This could be abused as an early stage in a more complex attack chain.
Windows DWM: zero-day EoP
Originally introduced in Windows Vista, the Windows Dynamic Window Manager (DWM) enables many of the modern UI features which users have come to expect from a Windows OS. This month, the DWM Core Library receives a patch for CVE-2023-36033, an elevation of privilege (EoP) vulnerability which Microsoft notes is both publicly disclosed and exploited in the wild. Exploitation leads to SYSTEM privileges, but Microsoft does not provide any further guidance on the attack mechanism.
Windows Cloud Files mini driver: zero-day EoP
Microsoft is patching CVE-2023-36036, an EoP vulnerability in the Windows Cloud Files Mini Filter Driver. No details of the attack mechanism are provided in the advisory, but exploitation leads to SYSTEM privileges.
Office Protected View: zero-day bypass
CVE-2023-36413 describes a publicly disclosed Microsoft Office security feature bypass. A user who opens a specially crafted malicious file would find themselves in Editing mode, rather than Protected View, and would thus lose out on warning banners and other defenses designed to detect and quarantine malicious code in Office documents.
ASP.NET Core: zero-day DoS
CVE-2023-36038 describes an ASP.NET Core denial of service (DoS) attack, which affects only .NET 8 RC 1 running on the IIS InProcess hosting model. The mechanism of the attack is resource exhaustion on the web server via cancellation of requests; this sounds very similar to last month’s CVE-2023-44487, dubbed “Rapid Reset”. However, there’s no mention of HTTP/2 in the advisory for CVE-2023-36038.
Fewer critical vulns this month
Only three vulnerabilities patched this month qualify as Critical under Microsoft’s proprietary severity ranking scale: one each in Windows Pragmatic General Multicast (PGM), the Azure CLI, and Windows HMAC Key Derivation.
Windows PGM: critical RCE via MSMQ
CVE-2023-36397 describes an RCE vulnerability in Windows PGM. As with other similar previous vulnerabilities, an attacker can send a specially-crafted file over the network to attempt malicious code execution on the target asset. Only systems where Windows Message Queueing Service (MSMQ) is enabled are exploitable, and it isn’t added to a default Windows installation. However, as Rapid7 has noted previously, administrators should be aware that a number of applications — including Microsoft Exchange — quietly introduce MSMQ as part of their own installation routine.
Hyper-V: critical VM escape
Attackers looking to escape from a low privilege Hyper-V guest OS and execute code as SYSTEM on the Hyper-V host system will take note of CVE-2023-36400. Successful exploitation requires running a specially crafted application in the context of the guest OS to exploit a weakness in Windows HMAC Key Derivation, so some prior access is required.
Azure CLI: critical credential leak via log files
The Azure CLI tool prior to version 2.53.1 does not sufficiently redact information published to log files in certain contexts, allowing recovery of plaintext(!) usernames and passwords. The advisory for CVE-2023-36052 notes that log files stored in open-source repositories are a potential avenue for credential leaks in this context. Although Microsoft understandably hasn’t provided any specific examples, it’s unlikely that they would mention this if they weren’t aware of one or more real world examples.
Exchange: RCE, spoofing, and ZDI disclosures
Patch Tuesday typically sees at least one Exchange remote code execution vulnerability fixed, and this month is no exception. Exploitation of CVE-2023-36439 requires that the attacker have valid credentials for an Exchange user, and be present on the local network, but grants execution as NT AUTHORITY\SYSTEM on Exchange server host; this is a built-in account with extensive privileges, including the ability to act as the computer on the network.
A trio of Exchange server spoofing vulnerabilities — CVE-2023-36035CVE-2023-36039 and CVE-2023-36050 — are also patched today. Successful exploitation requires that an attacker be present on the local network with valid Exchange credentials, but can lead to exposure of credentials or an NTLM hash for other users. Two of these vulnerabilities are exploited via PowerShell remoting.
Somewhat conspicuous by their absence: four flaws in Exchange published by Trend Micro’s Zero Day Initiative (ZDI) on 2023-11-02 do not appear to have received patches today. Microsoft had previously told ZDI that these vulnerabilities did not require immediate servicing. Since Microsoft is the CVE Numbering Authority (CNA) for its own products, there are no publicly available CVE numbers for these vulnerabilities yet.
cURL: patch for much-anticipated vuln
Microsoft admins who have been waiting for a patch for last month’s cURL SOCKS5 vulnerability CVE-2023-38545 will be pleased to see that Microsoft has included curl.exe 8.4.0 as part of the November updates for current versions of Windows. Many observers ultimately concluded that this vulnerability was perhaps of more limited scope and attacker value than the pre-publication buzz may have suggested, but a patch is always appreciated.
Is it 23H2 already?
A new arrival: Windows 11 23H2 was released on 2023-10-31 across all editions, and receives its first patches today.
Summary Charts
All those Edge vulns make the Exchange bar look smaller.A big month for Elevation of Privilege!Very few Critical vulns this month, but more Moderate than we often see.A cluster of Microsoft Dynamics spoofing and XSS vulns.
2023-11-14: Shortly after initial publication, some Microsoft advisory web pages were not listing any patches, although patches did exist. Microsoft appears to have remediated the issue with the advisory web pages. Removed a paragraph from the blog which mentioned this.
Today, we’re making available a new capability of AWS GlueData Catalog to allow automatic compaction of transactional tables in the Apache Iceberg format. This allows you to keep your transactional data lake tables always performant.
Data lakes were initially designed primarily for storing vast amounts of raw, unstructured, or semi structured data at a low cost, and they were commonly associated with big data and analytics use cases. Over time, the number of possible use cases for data lakes has evolved as organizations have recognized the potential to use data lakes for more than just reporting, requiring the inclusion of transactional capabilities to ensure data consistency.
Data lakes also play a pivotal role in data quality, governance, and compliance, particularly as data lakes store increasing volumes of critical business data, which often requires updates or deletion. Data-driven organizations also need to keep their back end analytics systems in near real-time sync with customer applications. This scenario requires transactional capabilities on your data lake to support concurrent writes and reads without data integrity compromise. Finally, data lakes now serve as integration points, necessitating transactions for safe and reliable data movement between various sources.
To support transactional semantics on data lake tables, organizations adopted an open table format (OTF), such as Apache Iceberg. Adopting OTF formats comes with its own set of challenges: transforming existing data lake tables from Parquet or Avro formats to an OTF format, managing a large number of small files as each transaction generates a new file on Amazon Simple Storage Service (Amazon S3), or managing object and meta-data versioning at scale, just to name a few. Organizations are typically building and managing their own data pipelines to address these challenges, leading to additional undifferentiated work on infrastructure. You need to write code, deploy Spark clusters to run your code, scale the cluster, manage errors, and so on.
When talking with our customers, we learned that the most challenging aspect is the compaction of individual small files produced by each transactional write on tables into a few large files. Large files are faster to read and scan, making your analytics jobs and queries faster to execute. Compaction optimizes the table storage with larger-sized files. It changes the storage for the table from a large number of small files to a small number of larger files. It reduces metadata overhead, lowers network round trips to S3, and improves performance. When you use engines that charge for the compute, the performance improvement is also beneficial to the cost of usage as the queries require less compute capacity to run.
But building custom pipelines to compact and optimize Iceberg tables is time-consuming and expensive. You have to manage the planning, provision infrastructure, and schedule and monitor the compaction jobs. This is why we launch automatic compaction today.
Let’s see how it works To show you how to enable and monitor automatic compaction on Iceberg tables, I start from the AWS Lake Formation page or the AWS Glue page of the AWS Management Console. I have an existing database with tables in the Iceberg format. I execute transactions on this table over the course of a couple of days, and the table starts to fragment into small files on the underlying S3 bucket.
I select the table on which I want to enable compaction, and then I select Enable compaction.
An IAM role is required to pass permissions to the Lake Formation service to access my AWS Glue tables, S3 buckets, and CloudWatch log streams. Either I choose to create a new IAM role, or I select an existing one. Your existing role must have lakeformation:GetDataAccess and glue:UpdateTable permissions on the table. The role also needs logs:CreateLogGroup, logs:CreateLogStream, logs:PutLogEvents, to “arn:aws:logs:*:your_account_id:log-group:/aws-lakeformation-acceleration/compaction/logs:*“. The role trusted permission service name must be set to glue.amazonaws.com.
Then, I select Turn on compaction. Et voilà! Compaction is automatic; there is nothing to manage on your side.
The service starts to measure the table’s rate of change. As Iceberg tables can have multiple partitions, the service calculates this change rate for each partition and schedules managed jobs to compact the partitions where this rate of change breaches a threshold value.
When the table accumulates a high number of changes, you will be able to view the Compaction history under the Optimization tab in the console.
You can also monitor the whole process either by observing the number of files on your S3 bucket (use the NumberOfObjects metric) or one of the two new Lake Formation metrics: numberOfBytesCompacted or numberOfFilesCompacted.
In addition to the AWS console, there are six new APIs that expose this new capability:CreateTableOptimizer, BatchGetTableOptimizer , UpdateTableOptimizer, DeleteTableOptimizer, GetTableOptimizer, and ListTableOptimizerRuns. These APIs are available in the AWS SDKs and AWS Command Line Interface (AWS CLI). As usual, don’t forget to update the SDK or the CLI to their latest versions to get access to these new APIs.
Things to know As we launched this new capability today, there are a couple of additional points I’d like to share with you:
Compaction will not merge delete files. Tables with deleted data will be compacted, but data files that have delete files associated with them will be skipped.
S3 buckets configured for exclusive access from a VPC through VPC endpoints are not supported.
Apache Iceberg tables using Apache Parquet to store the data can be compacted.
Availability This new capability is available starting today in all AWS Regions where AWS Glue Data Catalog is available.
The pricing metric is the data processing unit (DPU), a relative measure of processing power that consists of 4 vCPUs of compute capacity and 16 GB of memory. There is a charge per DPU/hours metered by second, with a minimum of one minute.
Now it’s time to decommission your existing compaction data pipeline and switch to this new, entirely managed capability today.
As 2023 comes to an end, we’re celebrating our final Heroes cohort launch of the year! These technical experts are passionate about helping their local communities build faster on AWS—they’re focused on sharing best practices, solving problems, and even more. We’re thrilled to have them join the AWS Heroes program, and recognizing them for their contributions to the greater AWS community.
Please meet our newest Heroes!
Emin Alemdar – Izmir, Turkey
Container Hero Emin Alemdar is a Solutions Architect at Spacelift where he produces solutions related to Kubernetes, Cloud technologies, and Cloud Native Transformation. In general, his work focuses on these services and technologies, and he shares best practices with the AWS community. Additionally, Emin is a CNCF Ambassador and is part of the HashiCorp Ambassador Program within the open source community.
Richard Fan – Hong Kong
Security Hero Richard Fan is a Security Engineer at ExpressVPN. He is dedicated to helping builders easily adopt AWS, and shares best practices around streamlines for cloud governance. Richard has also developed different tools to simplify the experience with AWS security services, such as his nitro-enclave-python-demo project, which helps builders get started on AWS Nitro Enclaves and has been adopted by some AWS workshops. Furthermore, Richard promotes the concept and use cases of enclave technology by partnering with multiple companies to review their AWS Nitro Enclaves offering.
Takuya Tachibana – Misawa, Japan
Community Hero Takuya Tachibana is the CEO of Heptagon inc. and Director of DigitalCube Co. Ltd. Since 2012, he has been contributing to the Japan AWS User Group (JAWS-UG), and he was the leader from 2016-2017 for all of the JAWS-UGs, representing and overseeing every chapter in Japan. Tachibana has been a speaker at over 100 community and cloud events throughout all of Japan, including AWS Summit Seoul, AWS Summit Beijing, and AWS Community Day APAC.
Learn More
To learn more about the AWS Heroes program or to connect with a Hero near you, please visit the AWS Heroes website.
November 14, 2023: We’ve updated this post to use IAM Identity Center and follow updated IAM best practices.
In this post, we discuss the concept of folders in Amazon Simple Storage Service (Amazon S3) and how to use policies to restrict access to these folders. The idea is that by properly managing permissions, you can allow federated users to have full access to their respective folders and no access to the rest of the folders.
Overview
Imagine you have a team of developers named Adele, Bob, and David. Each of them has a dedicated folder in a shared S3 bucket, and they should only have access to their respective folders. These users are authenticated through AWS IAM Identity Center (successor to AWS Single Sign-On).
In this post, you’ll focus on David. You’ll walk through the process of setting up these permissions for David using IAM Identity Center and Amazon S3. Before you get started, let’s first discuss what is meant by folders in Amazon S3, because it’s not as straightforward as it might seem. To learn how to create a policy with folder-level permissions, you’ll walk through a scenario similar to what many people have done on existing files shares, where every IAM Identity Center user has access to only their own home folder. With folder-level permissions, you can granularly control who has access to which objects in a specific bucket.
You’ll be shown a policy that grants IAM Identity Center users access to the same Amazon S3 bucket so that they can use the AWS Management Console to store their information. The policy allows users in the company to upload or download files from their department’s folder, but not to access any other department’s folder in the bucket.
After the policy is explained, you’ll see how to create an individual policy for each IAM Identity Center user.
Throughout the rest of this post, you will use a policy, which will be associated with an IAM Identity Center user named David. Also, you must have already created an S3 bucket.
Note: S3 buckets have a global namespace and you must change the bucket name to a unique name.
For this blog post, you will need an S3 bucket with the following structure (the example bucket name for the rest of the blog is “my-new-company-123456789”):
Figure 1: Screenshot of the root of the my-new-company-123456789 bucket
Your S3 bucket structure should have two folders, home and confidential, with a file root-file.txt in the main bucket directory. Inside confidential you will have no items or folders. Inside home there should be three sub-folders: Adele, Bob, and David.
Figure 2: Screenshot of the home/ directory of the my-new-company-123456789 bucket
A brief lesson about Amazon S3 objects
Before explaining the policy, it’s important to review how Amazon S3 objects are named. This brief description isn’t comprehensive, but will help you understand how the policy works. If you already know about Amazon S3 objects and prefixes, skip ahead to Creating David in Identity Center.
Amazon S3 stores data in a flat structure; you create a bucket, and the bucket stores objects. S3 doesn’t have a hierarchy of sub-buckets or folders; however, tools like the console can emulate a folder hierarchy to present folders in a bucket by using the names of objects (also known as keys). When you create a folder in S3, S3 creates a 0-byte object with a key that references the folder name that you provided. For example, if you create a folder named photos in your bucket, the S3 console creates a 0-byte object with the key photos/. The console creates this object to support the idea of folders. The S3 console treats all objects that have a forward slash (/) character as the last (trailing) character in the key name as a folder (for example, examplekeyname/)
To give you an example, for an object that’s named home/common/shared.txt, the console will show the shared.txt file in the common folder in the home folder. The names of these folders (such as home/ or home/common/) are called prefixes, and prefixes like these are what you use to specify David’s department folder in his policy. By the way, the slash (/) in a prefix like home/ isn’t a reserved character — you could name an object (using the Amazon S3 API) with prefixes such as home:common:shared.txt or home-common-shared.txt. However, the convention is to use a slash as the delimiter, and the Amazon S3 console (but not S3 itself) treats the slash as a special character for showing objects in folders. For more information on organizing objects in the S3 console using folders, see Organizing objects in the Amazon S3 console by using folders.
Creating David in Identity Center
IAM Identity Center helps you securely create or connect your workforce identities and manage their access centrally across AWS accounts and applications. Identity Center is the recommended approach for workforce authentication and authorization on AWS for organizations of any size and type. Using Identity Center, you can create and manage user identities in AWS, or connect your existing identity source, including Microsoft Active Directory, Okta, Ping Identity, JumpCloud, Google Workspace, and Azure Active Directory (Azure AD). For further reading on IAM Identity Center, see the Identity Center getting started page.
Begin by setting up David as an IAM Identity Center user. To start, open the AWS Management Console and go to IAM Identity Center and create a user.
Note: The following steps are for Identity Center without System for Cross-domain Identity Management (SCIM) turned on, the add user option won’t be available if SCIM is turned on.
From the left pane of the Identity Center console, select Users, and then choose Add user.
Figure 3: Screenshot of IAM Identity Center Users page.
Enter David as the Username, enter an email address that you have access to as you will need this later to confirm your user, and then enter a First name, Last name, and Display name.
Leave the rest as default and choose Add user.
Select Users from the left navigation pane and verify you’ve created the user David.
Figure 4: Screenshot of adding users to group in Identity Center.
Now that you’re verified the user David has been created, use the left pane to navigate to Permission sets, then choose Create permission set.
Figure 5: Screenshot of permission sets in Identity Center.
Select Custom permission set as your Permission set type, then choose Next.
Figure 6: Screenshot of permission set types in Identity Center.
David’s policy
This is David’s complete policy, which will be associated with an IAM Identity Center federated user named David by using the console. This policy grants David full console access to only his folder (/home/David) and no one else’s. While you could grant each user access to their own bucket, keep in mind that an AWS account can have up to 100 buckets by default. By creating home folders and granting the appropriate permissions, you can instead allow thousands of users to share a single bucket.
Now, copy and paste the preceding IAM Policy into the inline policy editor. In this case, you use the JSON editor. For information on creating policies, see Creating IAM policies.
Figure 7: Screenshot of the inline policy inside the permissions set in Identity Center.
Give your permission set a name and a description, then leave the rest at the default settings and choose Next.
Verify that you modify the policies to have the bucket name you created earlier.
After your permission set has been created, navigate to AWS accounts on the left navigation pane, then select Assign users or groups.
Figure 8: Screenshot of the AWS accounts in Identity Center.
Select the user David and choose Next.
Figure 9: Screenshot of the AWS accounts in Identity Center.
Select the permission set you created earlier, choose Next, leave the rest at the default settings and choose Submit.
Figure 10: Screenshot of the permission sets in Identity Center.
You’ve now created and attached the permissions required for David to view his S3 bucket folder, but not to view the objects in other users’ folders. You can verify this by signing in as David through the AWS access portal.
Figure 11: Screenshot of the settings summary in Identity Center.
Navigate to the dashboard in IAM Identity Center and go to the Settings summary, then choose the AWS access portal URL.
Figure 12: Screenshot of David signing into the console via the Identity Center dashboard URL.
Sign in as the user David with the one-time password you received earlier when creating David.
Figure 13: Second screenshot of David signing into the console through the Identity Center dashboard URL.
Open the Amazon S3 console.
Search for the bucket you created earlier.
Figure 14: Screenshot of my-new-company-123456789 bucket in the AWS console.
Navigate to David’s folder and verify that you have read and write access to the folder. If you navigate to other users’ folders, you’ll find that you don’t have access to the objects inside their folders.
David’s policy consists of four blocks; let’s look at each individually.
Before you begin identifying the specific folders David can have access to, you must give him two permissions that are required for Amazon S3 console access: ListAllMyBuckets and GetBucketLocation.
The ListAllMyBuckets action grants David permission to list all the buckets in the AWS account, which is required for navigating to buckets in the Amazon S3 console (and as an aside, you currently can’t selectively filter out certain buckets, so users must have permission to list all buckets for console access). The console also does a GetBucketLocation call when users initially navigate to the Amazon S3 console, which is why David also requires permission for that action. Without these two actions, David will get an access denied error in the console.
Block 2: Allow listing objects in root and home folders
Although David should have access to only his home folder, he requires additional permissions so that he can navigate to his folder in the Amazon S3 console. David needs permission to list objects at the root level of the my-new-company-123456789 bucket and to the home/ folder. The following policy grants these permissions to David:
Without the ListBucket permission, David can’t navigate to his folder because he won’t have permissions to view the contents of the root and home folders. When David tries to use the console to view the contents of the my-new-company-123456789 bucket, the console will return an access denied error. Although this policy grants David permission to list all objects in the root and home folders, he won’t be able to view the contents of any files or folders except his own (you specify these permissions in the next block).
This block includes conditions, which let you limit under what conditions a request to AWS is valid. In this case, David can list objects in the my-new-company-123456789 bucket only when he requests objects without a prefix (objects at the root level) and objects with the home/ prefix (objects in the home folder). If David tries to navigate to other folders, such as confidential/, David is denied access. Additionally, David needs permissions to list prefix home/David to be able to use the search functionality of the console instead of scrolling down the list of users’ folders.
To set these root and home folder permissions, I used two conditions: s3:prefix and s3:delimiter. The s3:prefix condition specifies the folders that David has ListBucket permissions for. For example, David can list the following files and folders in the my-new-company-123456789 bucket:
But David cannot list files or subfolders in the confidential/, home/Adele, or home/Bob folders.
Although the s3:delimiter condition isn’t required for console access, it’s still a good practice to include it in case David makes requests by using the API. As previously noted, the delimiter is a character—such as a slash (/)—that identifies the folder that an object is in. The delimiter is useful when you want to list objects as if they were in a file system. For example, let’s assume the my-new-company-123456789 bucket stored thousands of objects. If David includes the delimiter in his requests, he can limit the number of returned objects to just the names of files and subfolders in the folder he specified. Without the delimiter, in addition to every file in the folder he specified, David would get a list of all files in any subfolders.
Block 3: Allow listing objects in David’s folder
In addition to the root and home folders, David requires access to all objects in the home/David/ folder and any subfolders that he might create. Here’s a policy that allows this:
In the condition above, you use a StringLike expression in combination with the asterisk (*) to represent an object in David’s folder, where the asterisk acts as a wildcard. That way, David can list files and folders in his folder (home/David/). You couldn’t include this condition in the previous block (AllowRootAndHomeListingOfCompanyBucket) because it used the StringEquals expression, which would interpret the asterisk (*) as an asterisk, not as a wildcard.
In the next section, the AllowAllS3ActionsInUserFolder block, you’ll see that the Resource element specifies my-new-company/home/David/*, which looks like the condition that I specified in this section. You might think that you can similarly use the Resource element to specify David’s folder in this block. However, the ListBucket action is a bucket-level operation, meaning the Resource element for the ListBucket action applies only to bucket names and doesn’t take folder names into account. So, to limit actions at the object level (files and folders), you must use conditions.
Block 4: Allow all Amazon S3 actions in David’s folder
Finally, you specify David’s actions (such as read, write, and delete permissions) and limit them to just his home folder, as shown in the following policy:
For the Action element, you specified s3:*, which means David has permission to do all Amazon S3 actions. In the Resource element, you specified David’s folder with an asterisk (*) (a wildcard) so that David can perform actions on the folder and inside the folder. For example, David has permission to change his folder’s storage class. David also has permission to upload files, delete files, and create subfolders in his folder (perform actions in the folder).
An easier way to manage policies with policy variables
In David’s folder-level policy you specified David’s home folder. If you wanted a similar policy for users like Bob and Adele, you’d have to create separate policies that specify their home folders. Instead of creating individual policies for each IAM Identity Center user, you can use policy variables and create a single policy that applies to multiple users (a group policy). Policy variables act as placeholders. When you make a request to a service in AWS, the placeholder is replaced by a value from the request when the policy is evaluated.
For example, you can use the previous policy and replace David’s user name with a variable that uses the requester’s user name through attributes and PrincipalTag as shown in the following policy (copy this policy to use in the procedure that follows):
To implement this policy with variables, begin by opening the IAM Identity Center console using the main AWS admin account (ensuring you’re not signed in as David).
Select Settings on the left-hand side, then select the Attributes for access control tab.
Figure 15: Screenshot of Settings inside Identity Center.
Create a new attribute for access control, entering userName as the Key and ${path:userName} as the Value, then choose Save changes. This will add a session tag to your Identity Center user and allow you to use that tag in an IAM policy.
Figure 16: Screenshot of managing attributes inside Identity Center settings.
To edit David’s permissions, go back to the IAM Identity Center console and select Permission sets.
Figure 17: Screenshot of permission sets inside Identity Center with Davids-Permissions selected.
Select David’s permission set that you created previously.
Select Inline policy and then choose Edit to update David’s policy by replacing it with the modified policy that you copied at the beginning of this section, which will resolve to David’s username.
Figure 18: Screenshot of David’s policy inside his permission set inside Identity Center.
You can validate that this is set up correctly by signing in to David’s user through the Identity Center dashboard as you did before and verifying you have access to the David folder and not the Bob or Adele folder.
Figure 19: Screenshot of David’s S3 folder with access to a .jpg file inside.
Whenever a user makes a request to AWS, the variable is replaced by the user name of whoever made the request. For example, when David makes a request, ${aws:PrincipalTag/userName} resolves to David; when Adele makes the request, ${aws:PrincipalTag/userName} resolves to Adele.
It’s important to note that, if this is the route you use to grant access, you must control and limit who can set this username tag on an IAM principal. Anyone who can set this tag can effectively read/write to any of these bucket prefixes. It’s important that you limit access and protect the bucket prefixes and who can set the tags. For more information, see What is ABAC for AWS, and the Attribute-based access control User Guide.
Conclusion
By using Amazon S3 folders, you can follow the principle of least privilege and verify that the right users have access to what they need, and only to what they need.
See the following example policy that only allows API access to the buckets, and only allows for adding, deleting, restoring, and listing objects inside the folders:
This post is written by Savitha Swaminathan, AWS Sr. Product Marketing Manager
AWS re:Invent 2023 starts on Nov 27th in Las Vegas, Nevada. The event brings technology business leaders, AWS partners, developers, and IT practitioners together to learn about the latest innovations, meet AWS experts, and network among their peer attendees.
This year, AWS re:Invent will once again have a dedicated track for hybrid cloud and edge computing. The sessions in this track will feature the latest innovations from AWS to help you build and run applications securely in the cloud, on premises, and at the edge – wherever you need to. You will hear how AWS customers are using our cloud services to innovate on premises and at the edge. You will also be able to immerse yourself in hands-on experiences with AWS hybrid and edge services through innovative demos and workshops.
At re:Invent there are several session types, each designed to provide you with a way to learn however fits you best:
Innovation Talks provide a comprehensive overview of how AWS is working with customers to solve their most important problems.
Breakout sessions are lecture style presentations focused on a topic or area of interest and are well liked by business leaders and IT practitioners, alike.
Chalk talks deep dive on customer reference architectures and invite audience members to actively participate in the white boarding exercise.
Workshops and builder sessions popular with developers and architects, provide the most hands-on experience where attendees can build real-time solutions with AWS experts.
The hybrid edge track will include one leadership overview session and 15 other sessions (4 breakouts, 6 chalk talks, and 5 workshops). The sessions are organized around 4 key themes: Low latency, Data residency, Migration and modernization, and AWS at the far edge.
Join Jan Hofmeyr, Vice President, Amazon EC2, in this leadership session where he presents a comprehensive overview of AWS hybrid cloud and edge computing services, and how we are helping customers innovate on AWS wherever they need it – from Regions, to metro centers, 5G networks, on premises, and at the far edge. Jun Shi, CEO and President of Accton, will also join Jan on stage to discuss how Accton enables smart manufacturing across its global manufacturing sites using AWS hybrid, IoT, and machine learning (ML) services.
Low latency
Many customer workloads require single-digit millisecond latencies for optimal performance. Customers in every industry are looking for ways to run these latency sensitive portions of their applications in the cloud while simplifying operations and optimizing for costs. You will hear about customer use cases and how AWS edge infrastructure is helping companies like Riot Games meet their application performance goals and innovate at the edge.
As cloud has become main stream, governments and standards bodies continue to develop security, data protection, and privacy regulations. Having control over digital assets and meeting data residency regulations is becoming increasingly important for public sector customers and organizations operating in regulated industries. The data residency sessions deep dive into the challenges, solutions, and innovations that customers are addressing with AWS to meet their data residency requirements.
Migration and modernization in industries that have traditionally operated with on-premises infrastructure or self-managed data centers is helping customers achieve scale, flexibility, cost savings, and performance. We will dive into customer stories and real-world deployments, and share best practices for hybrid cloud migrations.
Some customers operate in what we call the far edge: remote oil rigs, military and defense territories, and even space! In these sessions we cover customer use cases and explore how AWS brings cloud services to the far edge and helps customers gain the benefits of the cloud regardless of where they operate.
In addition to the sessions across the 4 themes listed above, the track includes two additional chalk talks covering topics that are applicable more broadly to customers operating hybrid workloads. These chalk talks were chosen based on customer interest and will have repeat sessions, due to high customer demand.
In addition to breakout sessions, chalk talks, and workshops, make sure you check out our interactive demos to see the benefits of hybrid cloud and edge in action:
Drone Inspector: Generative AI at the Edge
Location: AWS Village | Venetian Level 2, Expo Hall, Booth 852 | AWS for Every App activation
Embark on a competitive adventure where generative artificial intelligence (AI) intersects with edge computing. Experience how drones can swiftly respond to chat instructions for a time-sensitive object detection mission. Learn how you can deploy foundation models and computer vision (CV) models at the edge using AWS hybrid and edge services for real-time insights and actions.
Stop by and chat with our experts about AWS Local Zones, AWS Outposts, AWS Snow Family, AWS Wavelength, AWS Private 5G, AWS Telco Network Builder, and Integrated Private Wireless on AWS. Check out the hardware innovations inside an AWS Outposts rack up close and in person. Learn how you can set up a reliable private 5G network within days and live stream video content with minimal latency.
Check out demos across Global Infrastructure, AWS for Hybrid Cloud & Edge, Compute, Storage, and Networking kiosks, share on social, and win prizes!
The Future of Connected Mobility
Location: Venetian Level 4, EBC Lounge, wall outside of Lando 4201B
Step into the driver’s seat and experience high fidelity 3D terrain driving simulation with AWS Local Zones. Gain real-time insights from vehicle telemetry with AWS IoT Greengrass running on AWS Snowcone and a broader set of AWS IoT services and Amazon Managed Grafana in the Region. Learn how to combine local data processing with cloud analytics for enhanced safety, performance, and operational efficiency. Explore how you can rapidly deliver the same experience to global users in 75+ countries with minimal application changes using AWS Outposts.
Immersive tourism experience powered by 5G and AR/VR
Location: Venetian, Level 2 | Expo Hall | Telco demo area
Explore and travel to Chichen Itza with an augmented reality (AR) application running on a private network fully built on AWS, which includes the Radio Access Network (RAN), the core, security, and applications, combined with services for deployment and operations. This demo features AWS Outposts.
AWS unplugged: A real time remote music collaboration session using 5G and MEC
Location: Venetian, Level 2 | Expo Hall | Telco demo area
We will demonstrate how musicians in Los Angeles and Las Vegas can collaborate in real time with AWS Wavelength. You will witness songwriters and musicians in Los Angeles and Las Vegas in a live jam session.
Disaster relief with AWS Snowball Edge and AWS Wickr
Location: AWS for National Security & Defense | Venetian, Casanova 606
The hurricane has passed leaving you with no cell coverage and you have a slim chance of getting on the internet. You need to set up a situational awareness and communications network for your team, fast. Using Wickr on Snowball Edge Compute, you can rapidly deploy a platform that provides both secure communications with rich collaboration functionality, as well as real time situational awareness with the Wickr ATAK integration. Allowing you to get on with what’s important.
We hope this guide to the Hybrid Cloud and Edge track at AWS re:Invent 2023 helps you plan for the event and we hope to see you there!
Data is a key strategic asset for every organization, and every company is a data business at its core. However, in many organizations, data is typically spread across a number of different systems such as software as a service (SaaS) applications, operational databases, and data warehouses. Such data silos make it difficult to get unified views of the data in an organization and act in real time to derive the most value.
Ten years ago, we launched Amazon Kinesis Data Streams, the first cloud-native serverless streaming data service, to serve as the backbone for companies, to move data across system boundaries, breaking data silos. With data streaming, you can power data lakes running on Amazon Simple Storage Service (Amazon S3), enrich customer experiences via personalization, improve operational efficiency with predictive maintenance of machinery in your factories, and achieve better insights with more accurate machine learning (ML) models. Amazon Kinesis Data Streams is a foundational data strategy pillar for tens of thousands of customers. As streams of raw data come together, they unlock capabilities to continuously transform, enrich, and query data in real time via seamless integration with stream processing engines such as Amazon Managed Service for Apache Flink.
As an example, the National Hockey League (NHL) reimagined the fan experience by streaming live NHL EDGE game data and stats to offer hockey fans valuable insights to keep fans at the edge of their seats. NHL EDGE technology in the puck and players’ sweaters (jerseys) generate thousands of data points every second for the NHL, which can be analyzed by AWS to predict likely outcomes for key events like face-offs. To process and analyze thousands of signals, the NHL built a real-time streaming data foundation with Kinesis Data Streams and Amazon Managed Service for Apache Flink to stream, prepare, and feed data into ML models, helping inform face-off predictions in seconds and expanding new ways to engage viewers.
Building on such streaming data foundations, many customers are currently thinking about how to deliver transformative new products and services with generative AI. Streaming allows companies to connect the data available within data stores to large language models (LLMs) securely and in real time. Although LLMs are capable of working with billions of parameters, in order to deliver an engaging experience that is tailored to a company’s customers, LLMs require personalization data for the company’s users and proprietary knowledge stores within the company’s data stores. A data strategy that incorporates streaming is necessary to deliver personalization and proprietary data that is available for querying in real time.
Customers with real-time streaming data strategy are at the cutting edge of providing innovative products with generative AI. One customer adopted Kinesis Data Streams for their data strategy, and they stream billions of events from their digital products to derive real-time insights. With a combination of low-latency data streaming and analytics, they are able to understand and personalize the user experience via a seamlessly integrated, self-reliant system for experimentation and automated feedback. Earlier this year, building on their already strong data foundation, they launched an innovative digital media generative AI product. The same data foundation built on Kinesis Data Streams is used to continuously analyze how users interact with the generated content and helps the product team fine-tune the application.
“Real-time streaming data technologies are essential for digital transformation. These services help customers bring data to their applications and models, making them smarter. Real-time data gives companies an advantage in data-driven decisions, predictions, and insights by using the data at the very moment it is generated, providing an unparalleled edge in a world where timing is the key to success. Bring the data in once, use it across your organization, and act before the value of that data diminishes.”
– Mindy Ferguson, VP of AWS Streaming and Messaging.
As we celebrate the tenth anniversary of Kinesis Data Streams, customers have shared four key reasons they continue to value this revolutionary service. They love how they can easily stream data with no underlying servers to provision or manage, operate at a massive scale with consistent performance, achieve high resiliency and durability, and benefit from broad integration with myriad sources and sinks to ingest and process data respectively.
Ease of use
Getting started with Kinesis Data Streams is straightforward: developers can create a data stream with a few clicks on the Kinesis Data Streams console or with a single API call. Changing the size or configuration is also a single API call, and each data stream comes with a default 24-hour data retention period. Developers don’t have to worry about clusters, version upgrades, or storage capacity planning. They just turn on a data stream and start ingesting data.
The needs of our customers have evolved in the past 10 years. As more events get captured and streamed, customers want their data streams to scale elastically without any operational overhead. In response, we launched On-Demand streams in 2021 to provide a simple and automatic scaling experience. With On-Demand streams, you let the service handle scaling up a stream’s capacity proactively, and you’re only charged for the actual data ingested, retrieved, and stored. As our customers continued to ask for more capabilities, we increased the ingestion throughput limit of each On-Demand stream from 200MB/s to 1GB/s in March 2023, and then to 2GB/s in October 2023, to accommodate higher throughput workloads. To continue innovating to be the easiest streaming data service to use, we actively listen to our customer use cases.
Canva is an online design and visual communication platform. As it has rapidly grown from 30 million to 135 million monthly users, it has built a streaming data platform at scale that is effortless to operate for driving product innovations and personalizing the user experience.
“Amazon Kinesis Data Streams and AWS Lambda are used throughout Canva’s logging platform, ingesting and processing over 60 billion log events per day. The combination of Kinesis Data Streams and Lambda has abstracted plenty of work that’s often required in managing a massive data pipeline, such as deploying and managing a fleet of servers, whilst also providing a highly scalable and reliable service. It has allowed us to focus on delivering a world-class product by building highly requested features rather than spending time on operational work.”
– Phoebe Zhou, Software Engineer at Canva.
Operate at massive scale with consistent performance
A fundamental requirement of a streaming data strategy is ingesting and processing large volumes of data with low latency. Kinesis Data Streams processes trillions of records per day across tens of thousands of customers. Customers run more than 3.5 million unique streams and process over 45 PB of data per day. Our largest customers ingest more than 15 GB per second of real-time data with individual streams. That’s equivalent to streaming multiple data points for every person on earth, every second! Even at this scale, all our customers still retrieve data within milliseconds of availability.
Customers also want to process the same data with multiple applications, with each deriving a different value, without worrying about one application impacting the read throughput of another. Enhanced Fan-out offers dedicated read throughput and low latency for each data consumer. This has enabled enterprise platform teams to provide real-time data to more teams and applications.
VMware Carbon Black uses Kinesis Data Streams to ingest petabytes of data every day to secure millions of customer endpoints. The team focuses on its expertise while AWS manages data streaming to meet growing customer traffic and needs in real time.
“When an individual customer’s data increases or decreases, we can use the elasticity of Amazon Kinesis Data Streams to scale compute up or down to process data reliably while effectively managing our cost. This is why Kinesis Data Streams is a good fit. The biggest advantage is the managed nature of our solution on AWS. This has shaped our architecture and helped us shift complexity elsewhere.”
– Stoyan Dimkov, Staff Engineer and Software Architect at VMware Carbon Black.
Provide resiliency and durability for data streaming
With burgeoning data, customers want more flexibility in processing and reprocessing data. For example, if an application that is consuming data goes offline for a period, teams want to ensure that they resume processing at a later time without data loss. Kinesis Data Streams provides a default 24-hour retention period, enabling you to select a specific timestamp from which to start processing records. With the extended retention feature, you can configure the data retention period to be up to 7 days.
Some industries like financial services and healthcare have stricter compliance requirements, so customers asked for even longer data retention periods to support these requirements. Therefore, we followed up with long-term storage that supports data retention for up to 1 year. Now, thousands of Kinesis Data Streams customers use these features to make their streaming applications more resilient and durable.
Mercado Libre, a leading ecommerce and payments platform in Latin America, relies on Kinesis Data Streams to power its streaming data strategy around payment processing, customer experience, and operations.
“With Amazon Kinesis Data Streams at the core, we process approximately 70 billion daily messages distributed across thousands of data producers. By leveraging Kinesis Data Streams and Amazon DynamoDB Streams, we’ve embraced an event-driven architecture and are able to swiftly respond to data changes.”
– Joaquin Fernandez, Senior Software Expert at Mercado Libre.
Access your data no matter where it lives
Our customers use a wide variety of tools and applications, and an organization’s data often resides in many places. Therefore, the ability to easily integrate data across an organization is crucial to derive timely insights. Developers use the Kinesis Producer Library, Kinesis Client Library, and AWS SDK to quickly build custom data producer and data consumer applications. Customers have expanded their data producers ranging from microservices to smart TVs and even cars. We have over 40 integrations with AWS services and third-party applications like Adobe Experience Platform and Databricks. As detailed in our whitepaper on building a modern data streaming architecture on AWS, Kinesis Data Streams serves as the backbone to serverless and real-time use cases such as personalization, real-time insights, Internet of Things (IoT), and event-driven architecture. Our recent integration with Amazon Redshift enables you to ingest hundreds of megabytes of data from Kinesis Data Streams into data warehouses in seconds. To learn more about how to use this integration to detect fraud in near-real time, refer to Near-real-time fraud detection using Amazon Redshift Streaming Ingestion with Amazon Kinesis Data Streams and Amazon Redshift ML.
Next, let’s go back to the NHL use case where they combine IoT, data streaming, and machine learning.
The NHL Edge IQ powered by AWS is helping bring fans closer to the action with advanced analytics and new ML stats such as Face-off Probability and Opportunity Analysis.
“We use Amazon Kinesis Data Streams to process NHL EDGE data on puck and Player positions, face-off location, and the current game situation to decouple data producers from consuming applications. Amazon Managed Service for Apache Flink is used to run Flink applications and consumes data from Kinesis Data Streams to call the prediction model in Amazon SageMaker to deliver the real-time Face-off Probability metric. The probability results are also stored in Amazon S3 to continuously retrain the model in SageMaker. The success of this project led us to build the next metric, Opportunity Analysis, which delivers over 25 insights into the quality of the scoring opportunity presented by each shot on goal. Kinesis Data Streams and Amazon Managed Service for Apache Flink applications were critical to making live, in-game predictions, enabling the system to perform opportunity analysis calculations for up to 16 live NHL games simultaneously.”
– Eric Schneider, SVP, Software Engineering at National Hockey League.
The fusion of real-time data streaming and generative AI promises to be the cornerstone of our digitally connected world. Generative AI, empowered by a constant influx of real-time information from IoT devices, sensors, social media, and beyond, is becoming ubiquitous. From autonomous vehicles navigating dynamically changing traffic conditions to smart cities optimizing energy consumption based on real-time demand, the combination of AI and real-time data will underpin efficiency and innovation across industries. Ubiquitous, adaptive, and deeply integrated into our lives, these AI-driven applications will enhance convenience and address critical challenges such as climate change, healthcare, and disaster response by using the wealth of real-time insights at their disposal. With Kinesis Data Streams, organizations can build a solid data foundation, positioning you to quickly adopt new technologies and unlock new opportunities sooner—which we anticipate will be enormous.
Roy (KDS) Wang is a Senior Product Manager with Amazon Kinesis Data Streams. He is passionate about learning from and collaborating with customers to help organizations run faster and smarter. Outside of work, Roy strives to be a good dad to his new son and builds plastic model kits.
Amazon Redshift is a fast, fully managed cloud data warehouse that makes it straightforward and cost-effective to analyze all your data at petabyte scale, using standard SQL and your existing business intelligence (BI) tools. Today, tens of thousands of customers run business-critical workloads on Amazon Redshift.
Amazon Redshift Serverless makes it effortless to run and scale analytics workloads without having to manage any data warehouse infrastructure.
Redshift Serverless automatically provisions and intelligently scales data warehouse capacity to deliver fast performance for even the most demanding and unpredictable workloads, and you pay only for what you use.
This is ideal when it’s difficult to predict compute needs such as variable workloads, periodic workloads with idle time, and steady-state workloads with spikes. As your demand evolves with new workloads and more concurrent users, Redshift Serverless automatically provisions the right compute resources, and your data warehouse scales seamlessly and automatically.
Amazon Redshift data sharing allows you to securely share live, transactionally consistent data in one Redshift data warehouse with another Redshift data warehouse (provisioned or serverless) across accounts and Regions without needing to copy, replicate, or move data from one data warehouse to another.
Amazon Redshift data sharing enables you to evolve your Amazon Redshift deployment architectures into a hub-and-spoke or data mesh model to better meet performance SLAs, provide workload isolation, perform cross-group analytics, and onboard new use cases, all without the complexity of data movement and data copies.
In this post, we show how Wallapop adopted Redshift Serverless and data sharing to modernize their data warehouse architecture.
Wallapop’s initial data architecture platform
Wallapop is a Spanish ecommerce marketplace company focused on second-hand items, founded in 2013. Every day, they receive around 300,000 new items from buyers to be added to their catalog. The marketplace can be accessed via mobile app or website.
The average monthly traffic is around 15 million active users. Since its creation in 2013, it has reached more than 40 million downloads and more than 700 million products have been listed.
Amazon Redshift plays a central role in their data platform on AWS for ingestion, ETL (extract, transform, and load), machine learning (ML), and consumption workloads that run their insight consumption to drive decision-making.
The initial architecture is composed of one main Redshift provisioned cluster that handled all the workloads, as illustrated in the following diagram. Their cluster was deployed with 8 nodes ra3.4xlarge and concurrency scaling enabled.
Wallapop had three main areas to improve in their initial data architecture platform:
Workload isolation challenges with growing data volumes and new workloads running in parallel
Administrative burden on data engineering teams to manage the concurrent workloads, especially at peak times
Cost-performance ratio while scaling during peak periods
The areas of improvement mainly focused on performance of data consumption workloads along with the BI and analytics consumption tool, where high query concurrency was impacting the final analytics preparation and its insights consumption.
Solution overview
To improve their data platform architecture, Wallapop designed and built a new distributed approach with Amazon Redshift with the support of AWS.
Their cluster size of the provisioned data warehouse didn’t change. What changed was lowering the usage concurrency scaling to 1 hour, which is in the Free Tier usage for every 24 hours of using the main cluster. The following diagram illustrates the target architecture.
Solution details
The new data platform architecture combines Redshift Serverless and provisioned data warehouses with Amazon Redshift data sharing, helping Wallapop improve their overall Amazon Redshift experience with improved ease of use, performance, and optimized costs.
Redshift Serverless measures data warehouse capacity in Redshift Processing Units (RPUs). RPUs are resources used to handle workloads. You can adjust the base capacity setting from 8 RPUs to 512 RPUs in units of 8 (8, 16, 24, and so on).
The new architecture uses a Redshift provisioned cluster with RA3 nodes to run their constant and write workloads (data ingestion and transformation jobs). For cost-efficiency, Wallapop is also benefiting from Redshift reserved instances to optimize on costs for these known, predictable, and steady workloads. This cluster acts as the producer cluster in their distributed architecture using data sharing, meaning the data is ingested into the storage layer of Amazon Redshift—Redshift Managed Storage (RMS).
For the consumption part of the data platform architecture, the data is shared with different Redshift Serverless endpoints to meet the needs for different consumption workloads.
Data sharing provides workloads isolation. With this architecture, Wallapop achieves better workload isolation and ensures that only the right data is shared with the different consumption applications. Additionally, this approach avoids data duplication in their consumer part, which optimizes costs and allows better governance processes, because they only have to manage a single version of the data warehouse data instead of different copies or versions of it.
Redshift Serverless is used as a consumer part of the data platform architecture to meet those predictable and unpredictable, non-steady, and often demanding analytics workloads, such as their CI/CD jobs and BI and analytics consumption workloads coming from their data visualization application. Redshift Serverless also helps them achieve better workload isolation due to its managed auto scaling feature that makes sure performance is consistently good for these unpredictable workloads, even at peak times. It also provides a better user experience for the Wallapop data platform team, thanks to the autonomics capabilities that Redshift Serverless provides.
The new solution combining Redshift Serverless and data sharing allowed Wallapop to achieve better performance, cost, and ease of use.
Eduard Lopez, Wallapop Data Engineering Manager, shared the improved experience of analytics users: “Our analyst users are telling us that now ‘Looker flies.’ Insights consumption went up as a result of it without increasing costs.”
Evaluation of outcome
Wallapop started this re-architecture effort by first testing the isolation of their BI consumption workload with Amazon Redshift data sharing and Redshift Serverless with the support of AWS. The workload was tested using different base RPU configurations to measure the base capacity and resources in Redshift Serverless. Base RPU ranges for Redshift Serverless range from 8–512. Wallapop tested their BI workload with two configurations: 32 base RPU and 64 base RPU, after enabling data sharing from their Redshift provisioned cluster to ensure the serverless endpoints have access to the necessary datasets.
Based on the results measured 1 week before testing, the main area for improvement was the queries that took longer than 10 seconds to complete (52%), represented by the yellow, orange, and red areas of the following chart, as well as the long-running queries represented by the red area (over 600 seconds, 9%).
The first test of this workload with Redshift Serverless using a 64 base RPU configuration immediately showed performance improvement results: the queries running longer than 10 seconds were reduced by 38% and the long-running queries (over 120 seconds) were almost completely eliminated.
Javier Carbajo, Wallapop Data Engineer, says, “Providing a service without downtime or loading times that are too long was one of our main requirements since we couldn’t have analysts or stakeholders without being able to consult the data.”
Following the first set of results, Wallapop also tested with a Redshift Serverless configuration using 32 base RPU to compare the results and select the configuration that could offer them the best price-performance for this workload. With this configuration, the results were similar to the previously test run on Redshift Serverless with 64 base RPU (still showing significant performance improvement from the original results). Based on the tests, this configuration was selected for the new architecture.
Gergely Kajtár, Wallapop Data Engineer, says, “We noticed a significant increase in the daily workflows’ stability after the change to the new Redshift architecture.”
Following this first workload, Wallapop has continued expanding their Amazon Redshift distributed architecture with CI/CD workloads running on a separated Redshift Serverless endpoint using data sharing with their Redshift provisioned (RA3) cluster.
“With the new Redshift architecture, we have noticed remarkable improvements both in speed and stability. That has translated into an increase of 2 times in analytical queries, not only by analysts and data scientists but from other roles as well such as marketing, engineering, C-level, etc. That proves that investing in a scalable architecture like Redshift Serverless has a direct consequence on accelerating the adoption of data as decision-making driver in the organization.”
– Nicolás Herrero, Wallapop Director of Data & Analytics.
Conclusion
In this post, we showed you how this platform can help Wallapop to scale in the future by adding new consumers when new needs or applications require to access data.
If you’re new to Amazon Redshift, you can explore demos, other customer stories, and the latest features at Amazon Redshift. If you’re already using Amazon Redshift, reach out to your AWS account team for support, and learn more about what’s new with Amazon Redshift.
About the Authors
Eduard Lopez is the Data Engineer Manager at Wallapop. He is a software engineer with over 6 years of experience in data engineering, machine learning, and data science.
Daniel Martinez is a Solutions Architect in Iberia Digital Native Businesses (DNB), part of the worldwide commercial sales organization (WWCS) at AWS.
Jordi Montoliu is a Sr. Redshift Specialist in EMEA, part of the worldwide specialist organization (WWSO) at AWS.
Ziad Wali is an Acceleration Lab Solutions Architect at Amazon Web Services. He has over 10 years of experience in databases and data warehousing, where he enjoys building reliable, scalable, and efficient solutions. Outside of work, he enjoys sports and spending time in nature.
Semir Naffati is a Sr. Redshift Specialist Solutions Architect in EMEA, part of the worldwide specialist organization (WWSO) at AWS.
With Amazon Cognito user pools, you can add user sign-up and sign-in features and control access to your web and mobile applications. You can enable your users who already have accounts with other identity providers (IdPs) to skip the sign-up step and sign in to your application by using an existing account through SAML 2.0 or OpenID Connect (OIDC). In this blog post, you will learn how to extend the authorization code grant between Cognito and an external OIDC IdP with private key JSON Web Token (JWT) client authentication.
For OIDC, Cognito uses the OAuth 2.0 authorization code grant flow as defined by the IETF in RFC 6749 Section 1.3.1. This flow can be broken down into two steps: user authentication and token request. When a user needs to authenticate through an external IdP, the Cognito user pool forwards the user to the IdP’s login endpoint. After successful authentication, the IdP sends back a response that includes an authorization code, which concludes the authentication step. The Cognito user pool now uses this code, together with a client secret for client authentication, to retrieve a JWT from the IdP. The JWT consists of an access token and an identity token. Cognito ingests that JWT, creates or updates the user in the user pool, and returns a JWT it has created for the client’s session, to the client. You can find a more detailed description of this flow in the Amazon Cognito documentation.
Although this flow sufficiently secures the requests between Cognito and the IdP for most customers, those in the public sector, healthcare, and finance sometimes need to integrate with IdPs that enforce additional security measures as part of their security requirements. In the past, this has come up in conversations at AWS when our customers needed to integrate Cognito with, for example, the HelseID (healthcare sector, Norway), login.gov (public sector, USA), or GOV.UK One Login (public sector, UK) IdPs. Customers who are using Okta, PingFederate, or similar IdPs and want additional security measures as part of their internal security requirements, might also find adding further security requirements desirable as part of their own policies.
The most common additional requirement is to replace the client secret with an assertion that consists of a private key JWT as a means of client authentication during token requests. This method is defined through a combination of RFC 7521 and RFC 7523. Instead of a symmetric key (the client secret), this method uses an asymmetric key-pair to sign a JWT with a private key. The IdP can then verify the token request by validating the signature of that JWT using the corresponding public key. This helps to eliminate the exposure of the client secret with every request, thereby reducing the risk of request forgery, depending on the quality of the key material that was used and how access to the private key is secured. Additionally, the JWT has an expiry time, which further constrains the risk of replay attacks to a narrow time window.
A Cognito user pool does not natively support private key JWT client authentication when integrating with an external IdP. However, you can still integrate Cognito user pools with IdPs that support or require private key JWT authentication by using Amazon API Gateway and AWS Lambda.
This blog post presents a high-level overview of how you can implement this solution. To learn more about the underlying code, how to configure the included services, and what the detailed request flow looks like, check out the Deploy a demo section later in this post. Keep in mind that this solution does not cover the request flow between your own application and a Cognito user pool, but only the communication between Cognito and the IdP.
Solution overview
Following the technical implementation details of the previously mentioned RFCs, the required request flow between a Cognito user pool and the external OIDC IdP can be broken down into four simplified steps, shown in Figure 1.
Figure 1: Simplified UML diagram of the target implementation for using a private key JWT during the authorization code grant
In this example, we’re using the Cognito user pool hosted UI—because it already provides OAuth 2.0-aligned IdP integration—and extending it with the private key JWT. Figure 1 illustrates the following steps:
The hosted UI forwards the user client to the /authorize endpoint of the external OIDC IdP with an HTTP GET request.
After the user successfully logs into the IdP, the IdP‘s response includes an authorization code.
The hosted UI sends this code in an HTTP POST request to the IdP’s /token endpoint. By default, the hosted UI also adds a client secret for client authentication. To align with the private key JWT authentication method, you need to replace the client secret with a client assertion and specify the client assertion type, as highlighted in the diagram and further described later.
The IdP validates the client assertion by using a pre-shared public key.
The IdP issues the user’s JWT, which Cognito ingests to create or update the user in the user pool.
As mentioned earlier, token requests between a Cognito user pool and an external IdP do not natively support the required client assertion. However, you can redirect the token requests to, for example, an Amazon API Gateway, which invokes a Lambda function to extend the request with the new parameters. Because you need to sign the client assertion with a private key, you also need a secure location to store this key. For this, you can use AWS Secrets Manager, which helps you to secure the key from unauthorized use. With the required flow and additional services in mind, you can create the following architecture.
Figure 2: Architecture diagram with Amazon API Gateway and Lambda to process token requests between Cognito and the OIDC identity provider
Let’s have a closer look at the individual components and the request flow that are shown in Figure 2.
When adding an OIDC IdP to a Cognito user pool, you configure endpoints for Authorization, UserInfo, Jwks_uri, and Token. Because the private key is required only for the token request flow, you can configure resources to redirect and process requests, as follows (the step numbers correspond to the step numbering in Figure 2):
Configure the endpoints for Authorization, UserInfo, and Jwks_Uri with the ones from the IdP.
Create an API Gateway with a dedicated route for token requests (for example, /token) and add it as the Token endpoint in the IdP configuration in Cognito.
Modify the original body and make the token request, including the original parameters for grant_type, code, and client_id, with added client_assertion_type and the client_assertion. (The following example HTTP request has line breaks and placeholders in angle brackets for better readability.)
Note that there is no client secret needed in this request. Instead, you add a client assertion type as urn:ietf:params:oauth:client-assertion-type:jwt-bearer, and the client assertion with the signed JWT.
If the request is successful, the IdP’s response includes a JWT with the access token and identity token. On returning the response via the Lambda function, Cognito ingests the JWT and creates or updates the user in the user pool. It then responds to the original authorize request of the user client by sending its own authorization code, which can be exchanged for a Cognito issued JWT in your own application.
Deploy a demo
To deploy an example of this solution, see our GitHub repository. You will find the prerequisites and deployment steps there, as well as additional in-depth information.
Additional considerations
To further optimize this solution, you should consider checking the event details in the Lambda function before fully processing the requests. This way, you can, for example, check that all required parameters are present and valid. One option to do that, is to define a client secret when you create the IdP integration for the user pool. When Cognito sends the token request, it adds the client secret in the encoded body, so you can retrieve it and validate its value. If the validation fails, requests can be dropped early to improve exception handling and to prevent invalid requests from causing unnecessary function charges.
By redirecting the IdP token endpoint in the Cognito user pool’s external OIDC IdP configuration to a route in an API Gateway, you can use Lambda functions to customize the request flow between Cognito and the IdP. In the example in this post, we showed how to change the client authentication mechanism during the token request from a client secret to a client assertion with a signed JWT (private key JWT). You can also apply the same proxy-like approach to customize the request flow even further—for example, by adding a Proof Key for Code Exchange (PKCE), for which you can find an example in the aws-samples GitHub repository.
Lisp
is one of the oldest programming languages still in use today, but it has
evolved in multiple directions over its more than 60-year history. Two of
the more prominent descendants, Common Lisp and Emacs Lisp (or Elisp),
are fairly closely related at some level, but there is still something of a
divide between them. Some recent discussion in the emacs-devel mailing
list have shown that some elements from Common Lisp are not completely
welcome in
Elisp—at least in the code that is maintained by the Emacs project itself.
Корупцията е опредялана като основната пречка пред развтието на България през последните поне 30 години. Има ли как да се изкорени “навика” да искаме и даваме подкуп, да назначаваме свои…
Workers AI is our serverless GPU-powered inference platform running on top of Cloudflare’s global network. It provides a growing catalog of off-the-shelf models that run seamlessly with Workers and enable developers to build powerful and scalable AI applications in minutes. We’ve already seen developers doing amazing things with Workers AI, and we can’t wait to see what they do as we continue to expand the platform. To that end, today we’re excited to announce some of our most-requested new features: streaming responses for all Large Language Models (LLMs) on Workers AI, larger context and sequence windows, and a full-precision Llama-2 model variant.
If you’ve used ChatGPT before, then you’re familiar with the benefits of response streaming, where responses flow in token by token. LLMs work internally by generating responses sequentially using a process of repeated inference — the full output of a LLM model is essentially a sequence of hundreds or thousands of individual prediction tasks. For this reason, while it only takes a few milliseconds to generate a single token, generating the full response takes longer, on the order of seconds. The good news is we can start displaying the response as soon as the first tokens are generated, and append each additional token until the response is complete. This yields a much better experience for the end user — displaying text incrementally as it’s generated not only provides instant responsiveness, but also gives the end-user time to read and interpret the text.
As of today, you can now use response streaming for any LLM model in our catalog, including the very popular Llama-2 model. Here’s how it works.
Server-sent events: a little gem in the browser API
Server-sent events are easy to use, simple to implement on the server side, standardized, and broadly available across many platforms natively or as a polyfill. Server-sent events fill a niche of handling a stream of updates from the server, removing the need for the boilerplate code that would otherwise be necessary to handle the event stream.
Easy-to-use
Streaming
Bidirectional
fetch
✅
Server-sent events
✅
✅
Websockets
✅
✅
Comparing fetch, server-sent events, and websockets
To get started using streaming on Workers AI’s text generation models with server-sent events, set the “stream” parameter to true in the input of request. This will change the response format and mime-type to text/event-stream.
Here’s an example of using streaming with the REST API:
import { Ai } from "@cloudflare/ai";
export default {
    async fetch(request, env, ctx) {
        const ai = new Ai(env.AI, { sessionOptions: { ctx: ctx } });
        const stream = await ai.run(
            "@cf/meta/llama-2-7b-chat-int8",
            { prompt: "where is new york?", stream: true  }
        );
        return new Response(stream,
            { headers: { "content-type": "text/event-stream" } }
        );
    }
}
If you want to consume the output event-stream from this Worker in a browser page, the client-side JavaScript is something like:
const source = new EventSource("/worker-endpoint");
source.onmessage = (event) => {
    if(event.data=="[DONE]") {
        // SSE spec says the connection is restarted
        // if we don't explicitly close it
        source.close();
        return;
    }
    const data = JSON.parse(event.data);
    el.innerHTML += data.response;
}
You can use this simple code with any simple HTML page, complex SPAs using React or other Web frameworks.
This creates a much more interactive experience for the user, who now sees the page update as the response is incrementally created, instead of waiting with a spinner until the entire response sequence has been generated. Try it out streaming on ai.cloudflare.com.
Workers AI supports streaming text responses for the Llama-2 model and any future LLM models we are adding to our catalog.
But this is not all.
Higher precision, longer context and sequence lengths
Another top request we heard from our community after the launch of Workers AI was for longer questions and answers in our Llama-2 model. In LLM terminology, this translates to higher context length (the number of tokens the model takes as input before making the prediction) and higher sequence length (the number of tokens the model generates in the response.)
We’re listening, and in conjunction with streaming, today we are adding a higher 16-bit full-precision Llama-2 variant to the catalog, and increasing the context and sequence lengths for the existing 8-bit version.
Model
Context length (in)
Sequence length (out)
@cf/meta/llama-2-7b-chat-int8
2048 (768 before)
1800 (256 before)
@cf/meta/llama-2-7b-chat-fp16
3072
2500
Streaming, higher precision, and longer context and sequence lengths provide a better user experience and enable new, richer applications using large language models in Workers AI.
Check the Workers AI developer documentation for more information and options. If you have any questions or feedback about Workers AI, please come see us in the Cloudflare Community and the Cloudflare Discord. If you are interested in machine learning and serverless AI, the Cloudflare Workers AI team is building a global-scale platform and tools that enable our customers to run fast, low-latency inference tasks on top of our network. Check our jobs page for opportunities.
The collective thoughts of the interwebz
Manage Consent
To provide the best experiences, we use technologies like cookies to store and/or access device information. Consenting to these technologies will allow us to process data such as browsing behavior or unique IDs on this site. Not consenting or withdrawing consent, may adversely affect certain features and functions.
Functional
Always active
The technical storage or access is strictly necessary for the legitimate purpose of enabling the use of a specific service explicitly requested by the subscriber or user, or for the sole purpose of carrying out the transmission of a communication over an electronic communications network.
Preferences
The technical storage or access is necessary for the legitimate purpose of storing preferences that are not requested by the subscriber or user.
Statistics
The technical storage or access that is used exclusively for statistical purposes.The technical storage or access that is used exclusively for anonymous statistical purposes. Without a subpoena, voluntary compliance on the part of your Internet Service Provider, or additional records from a third party, information stored or retrieved for this purpose alone cannot usually be used to identify you.
Marketing
The technical storage or access is required to create user profiles to send advertising, or to track the user on a website or across several websites for similar marketing purposes.


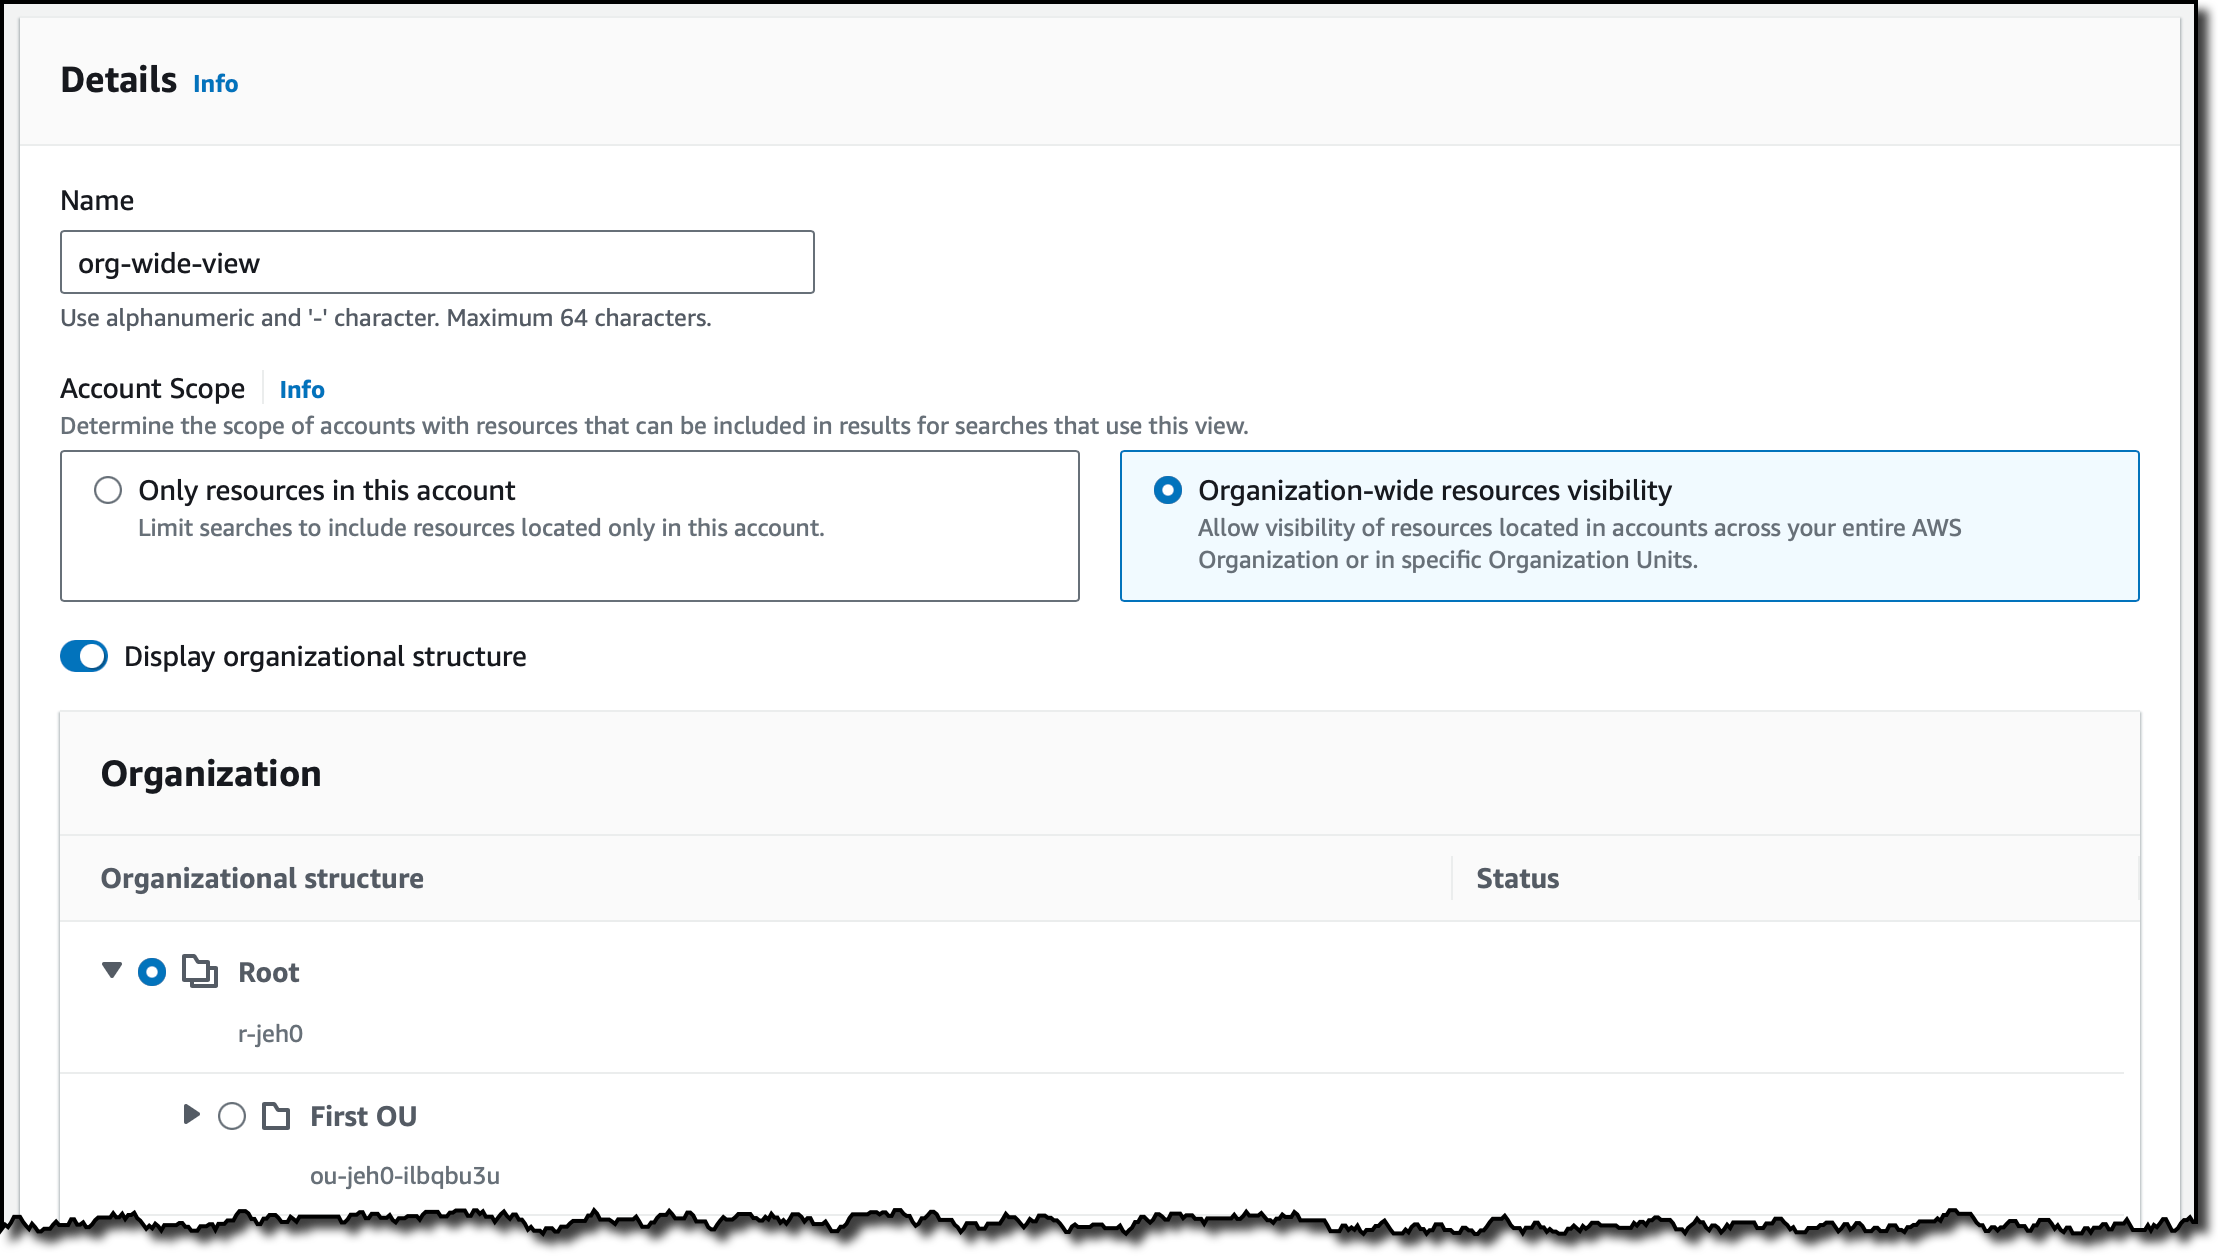
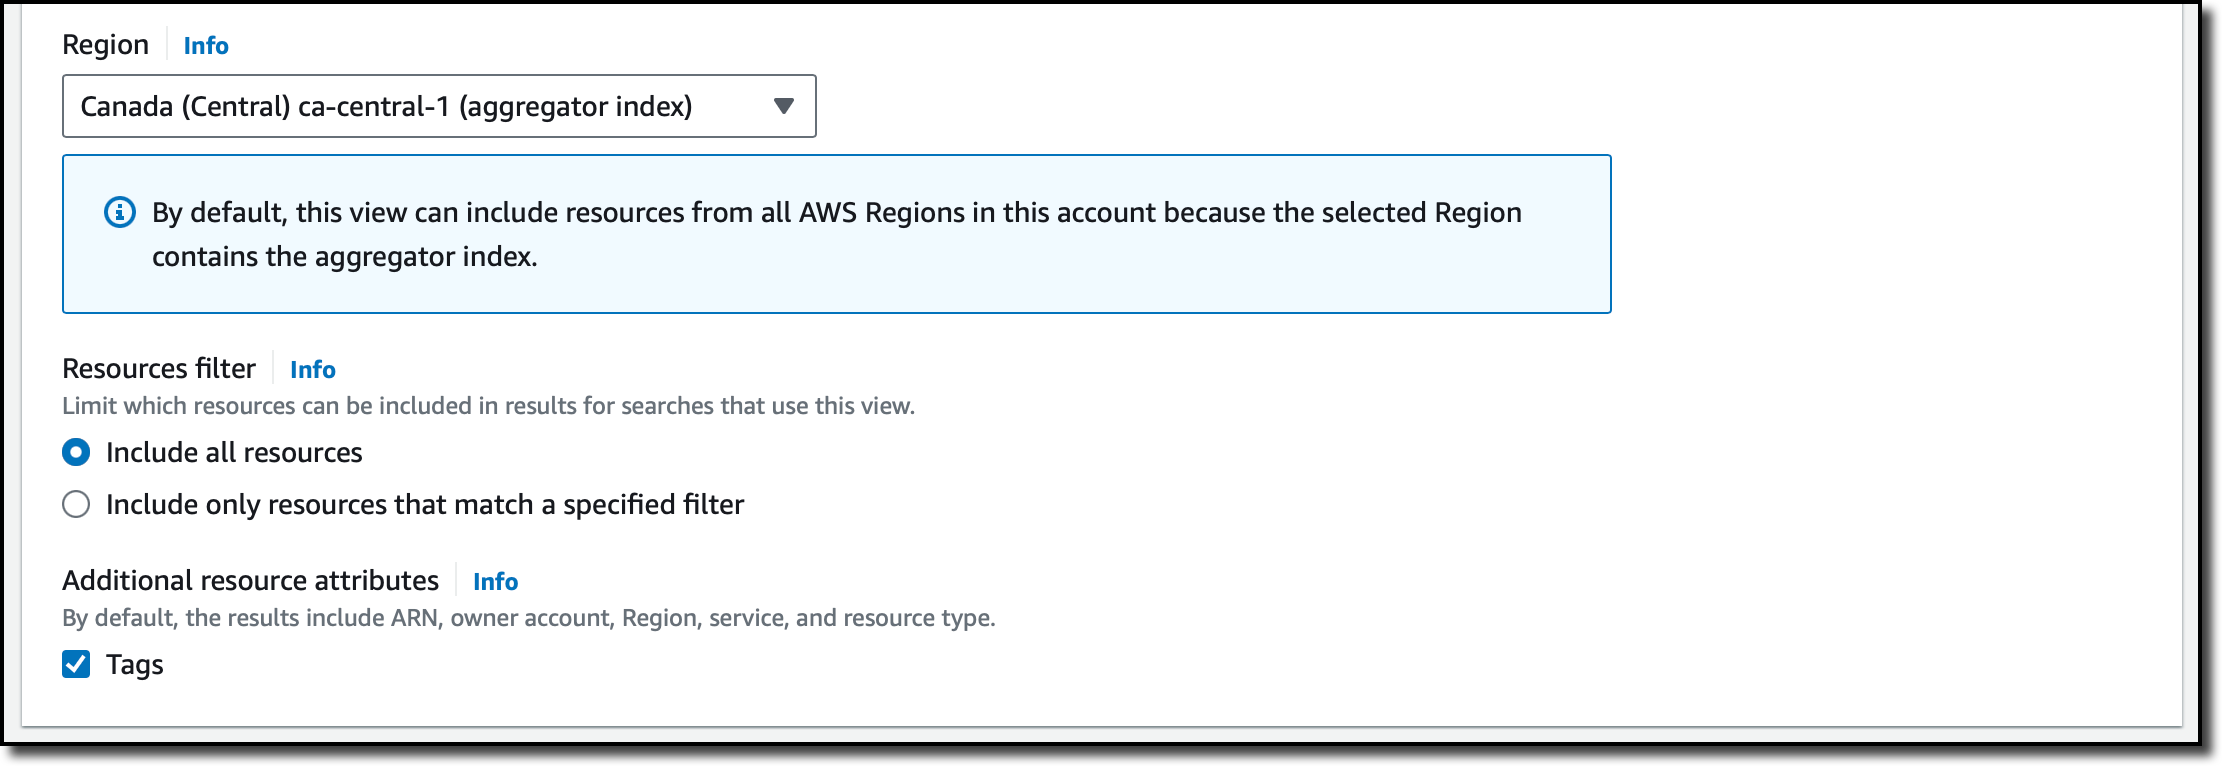


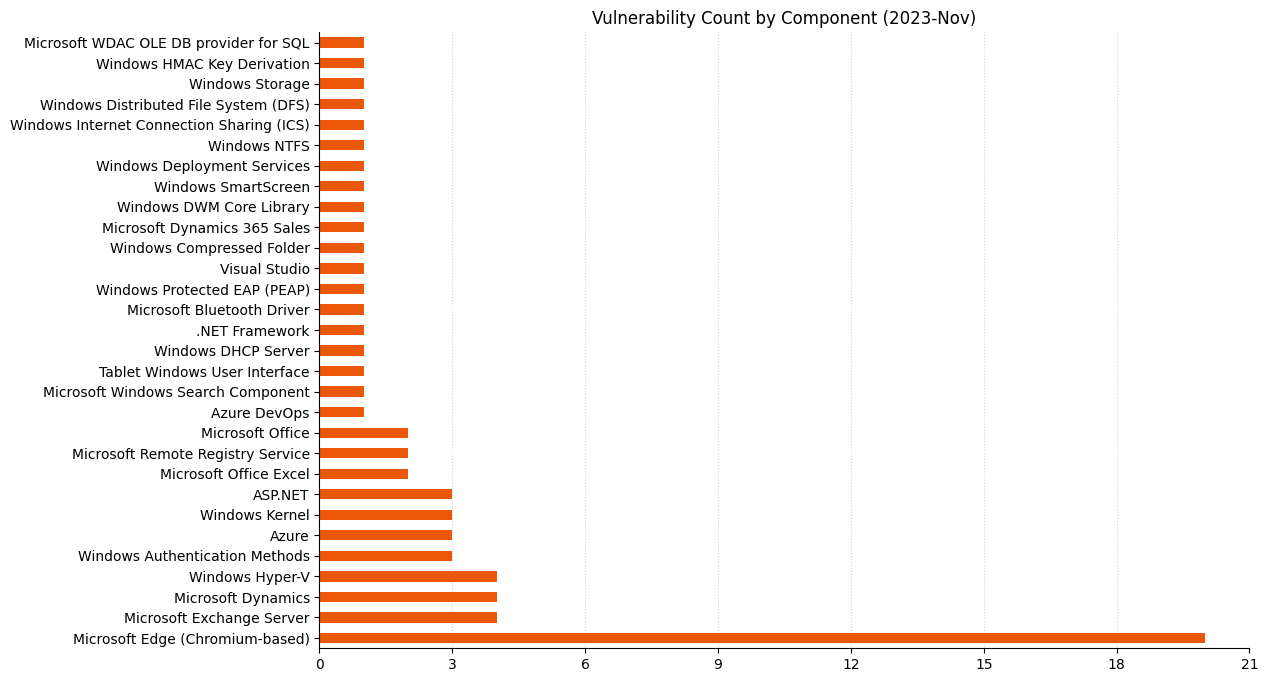
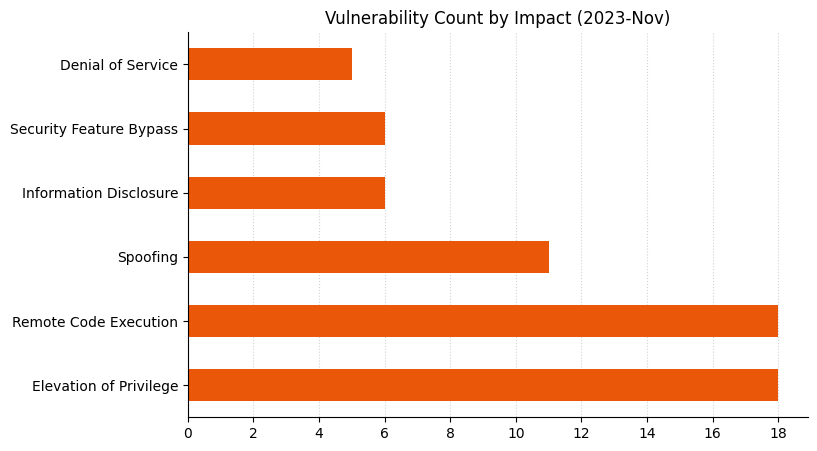
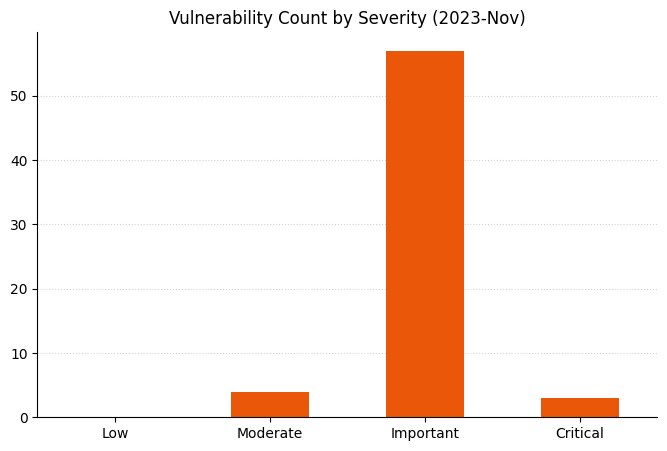
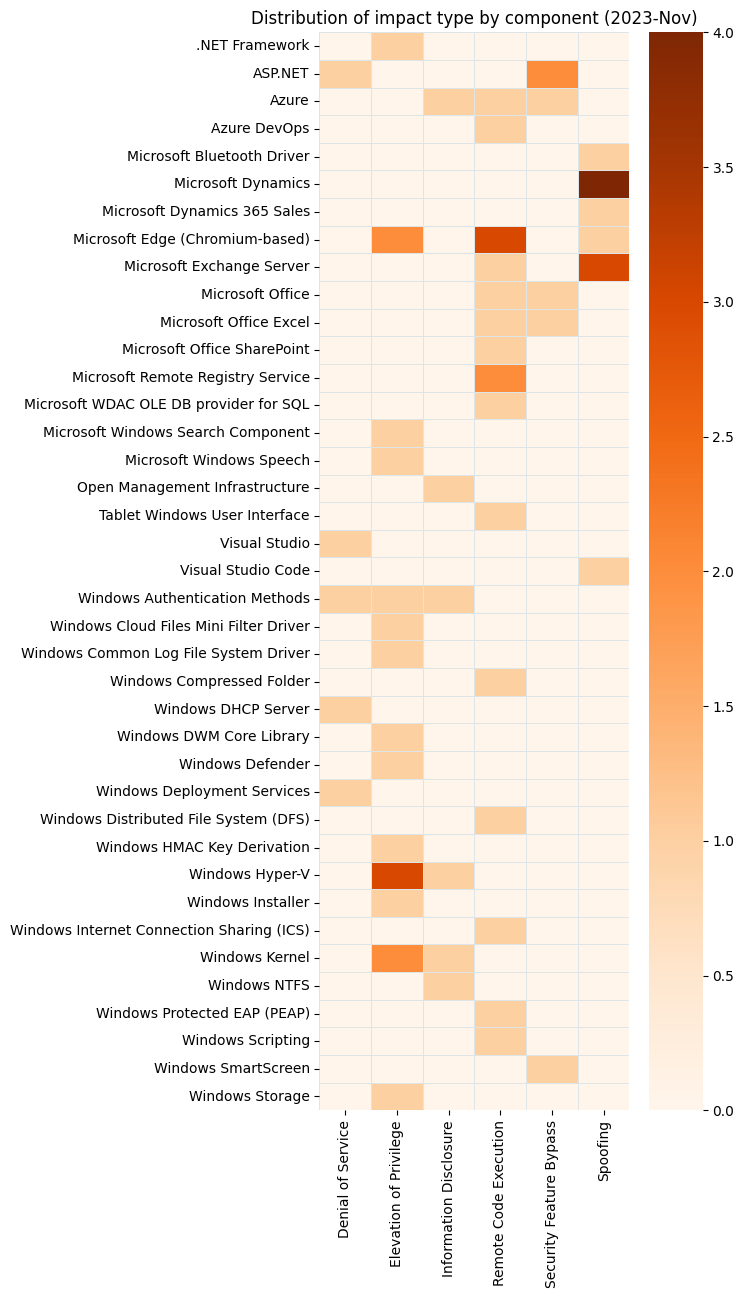

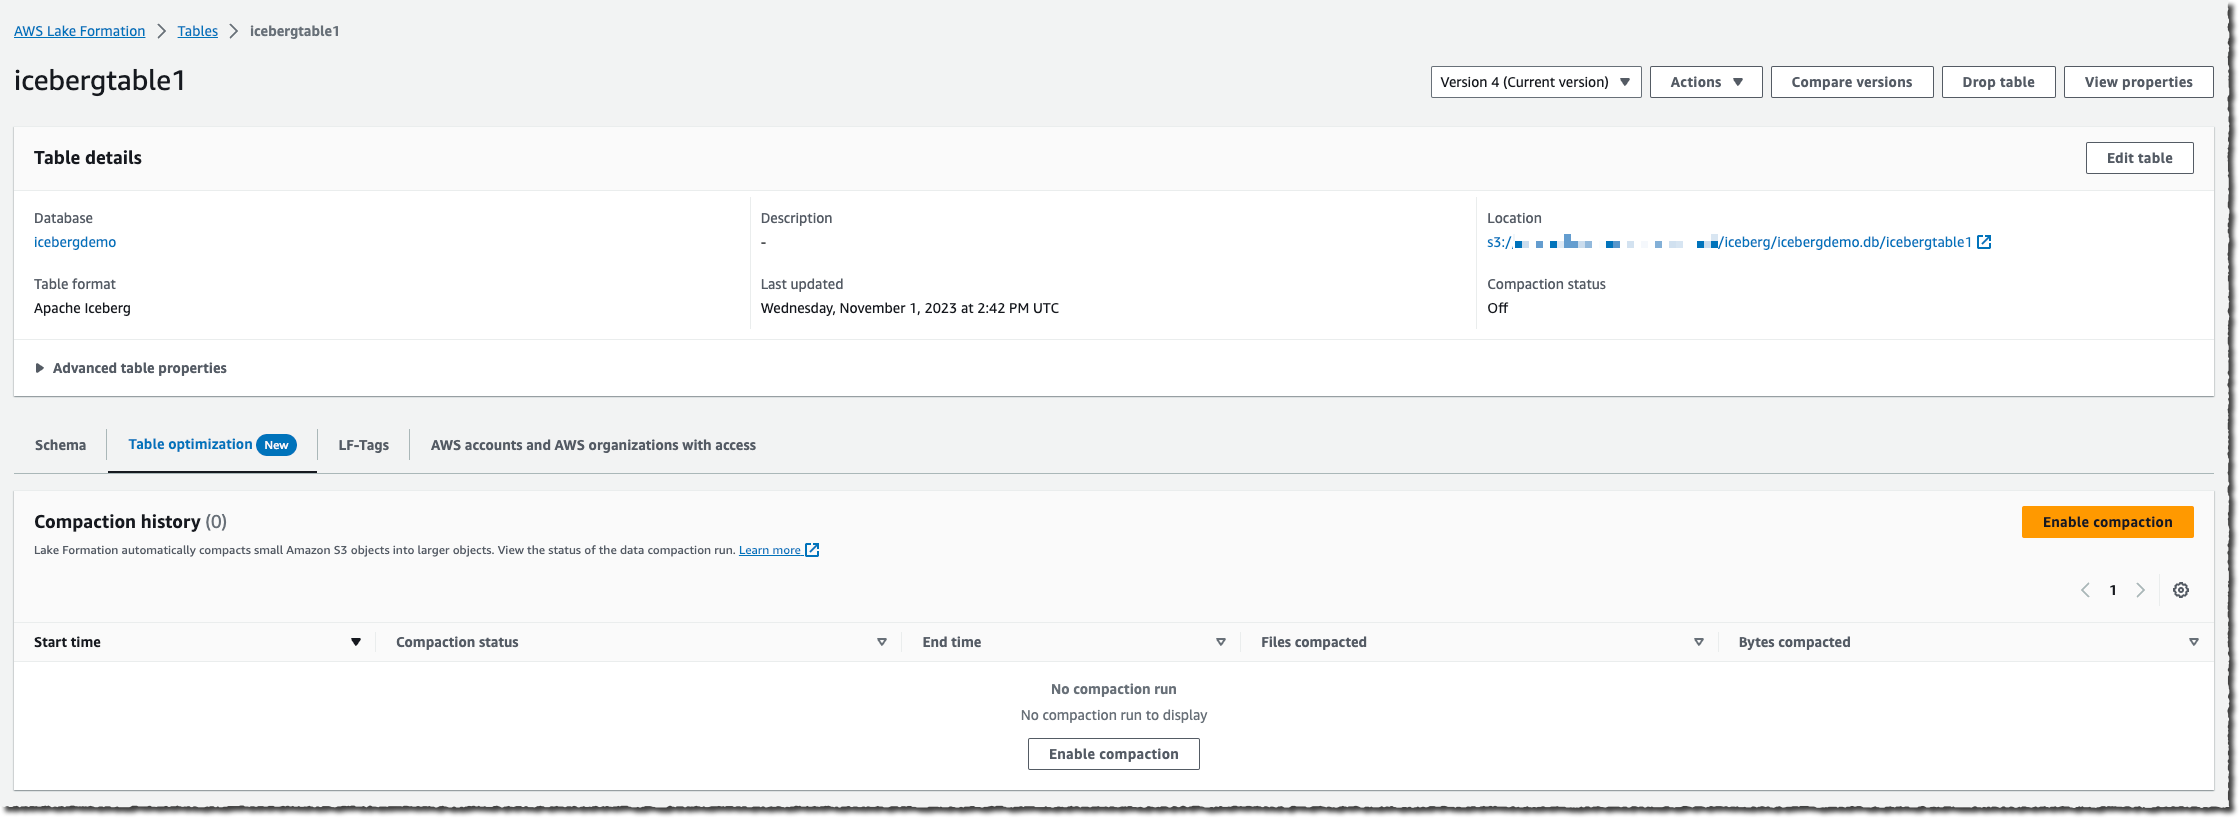
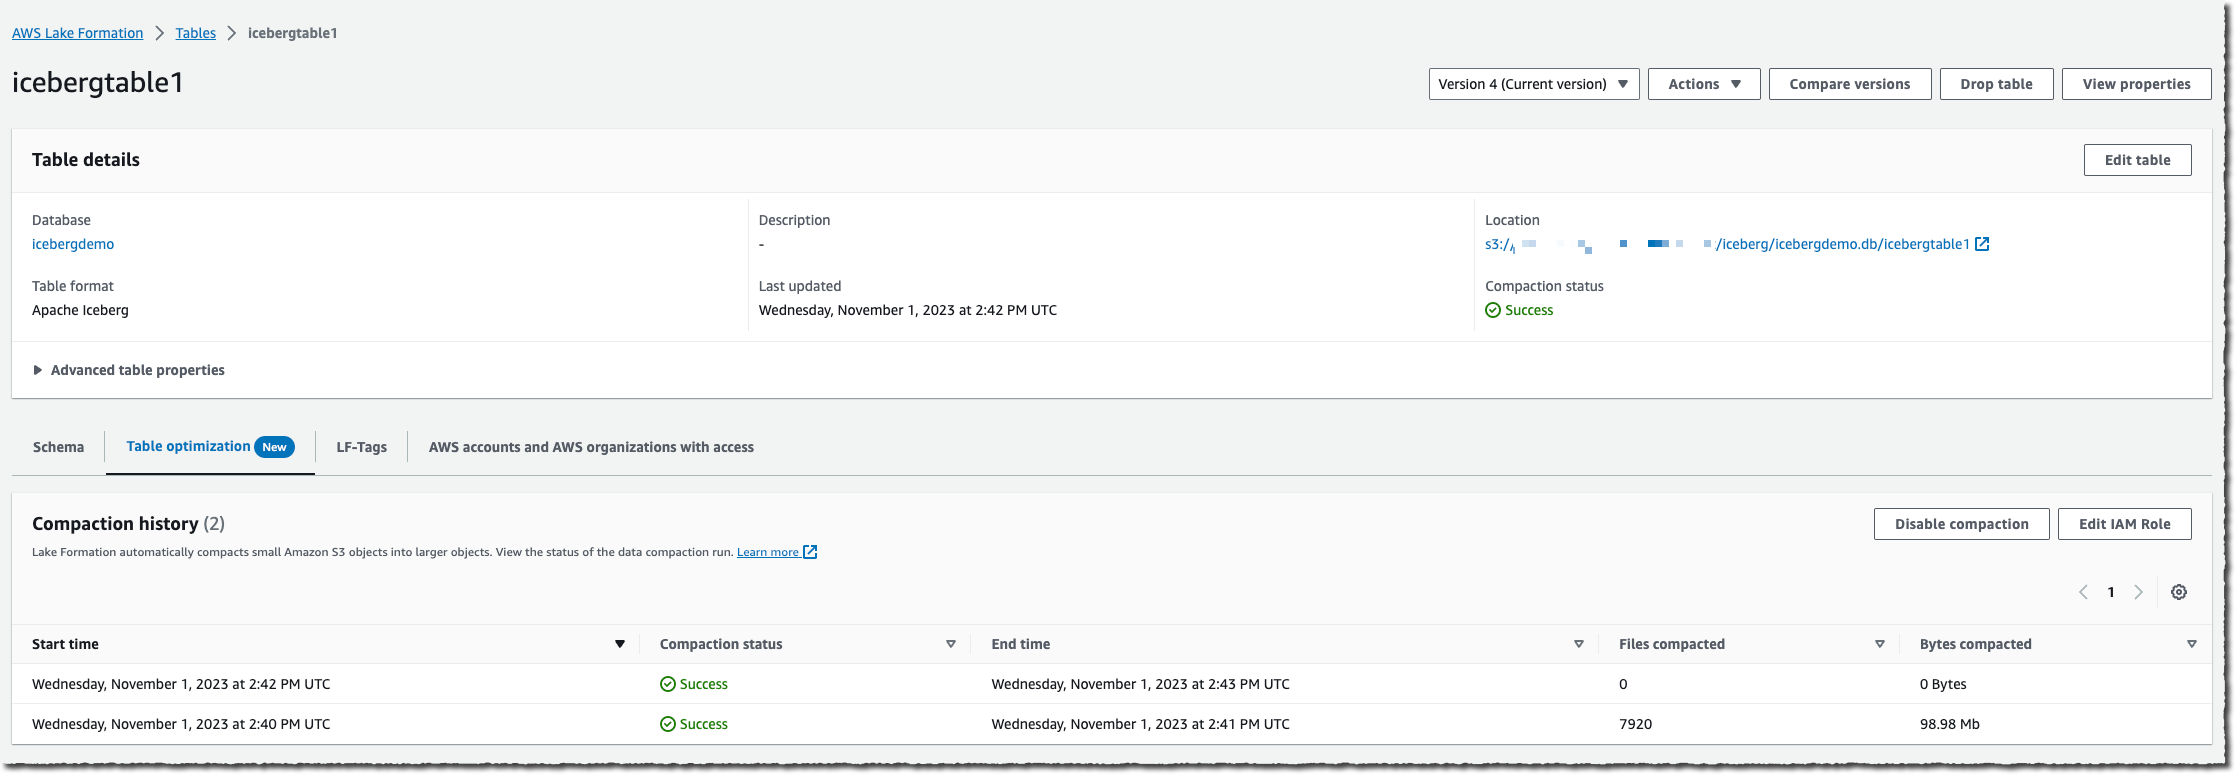
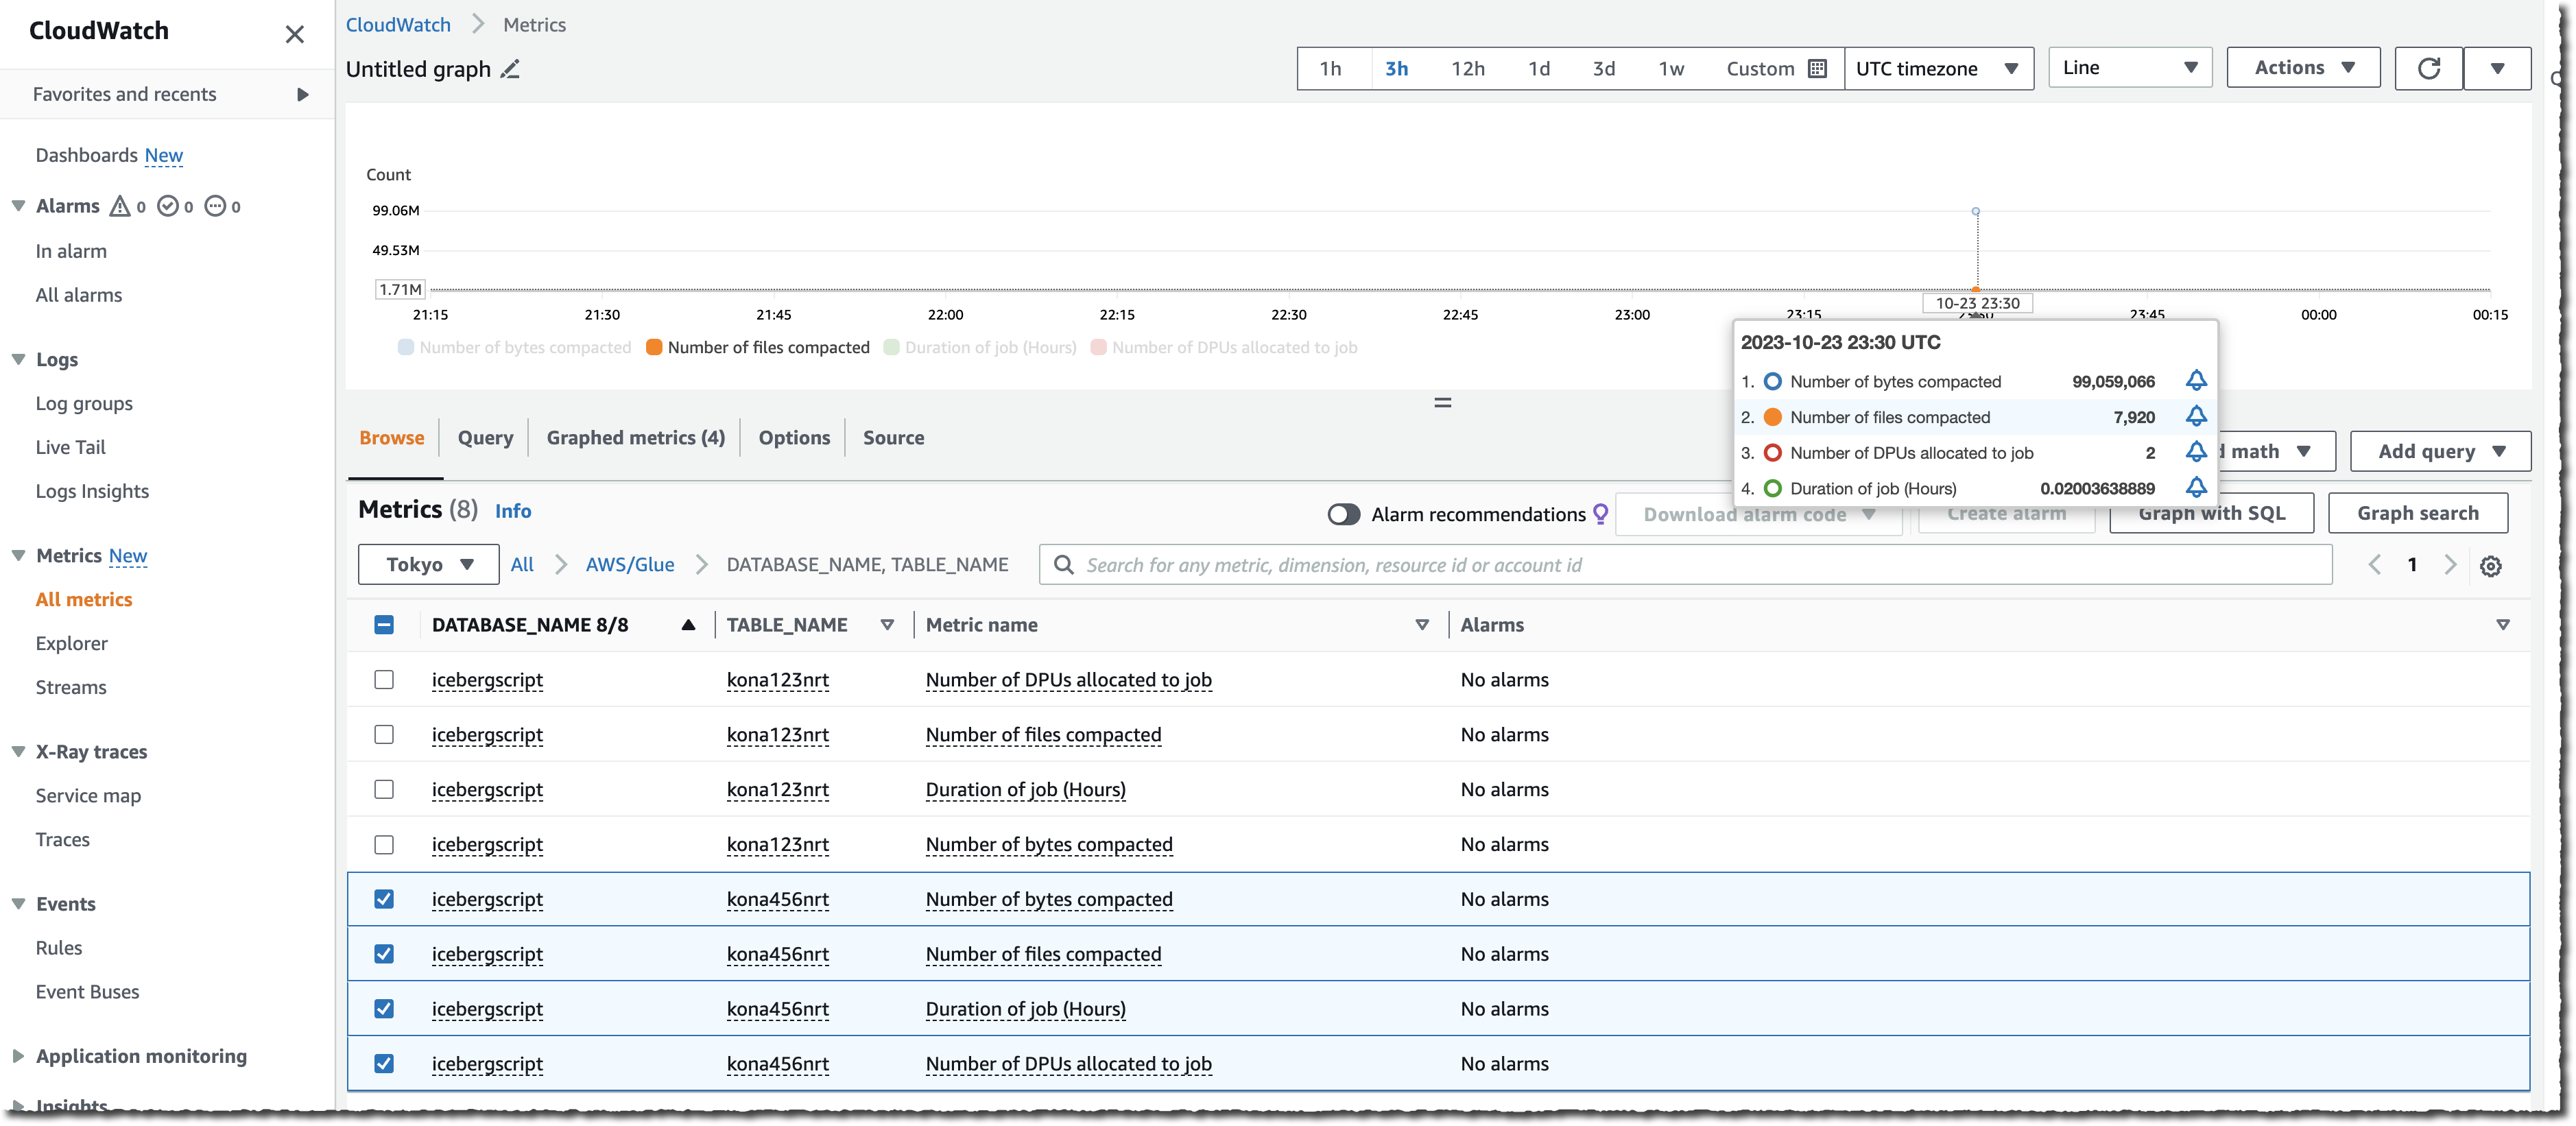


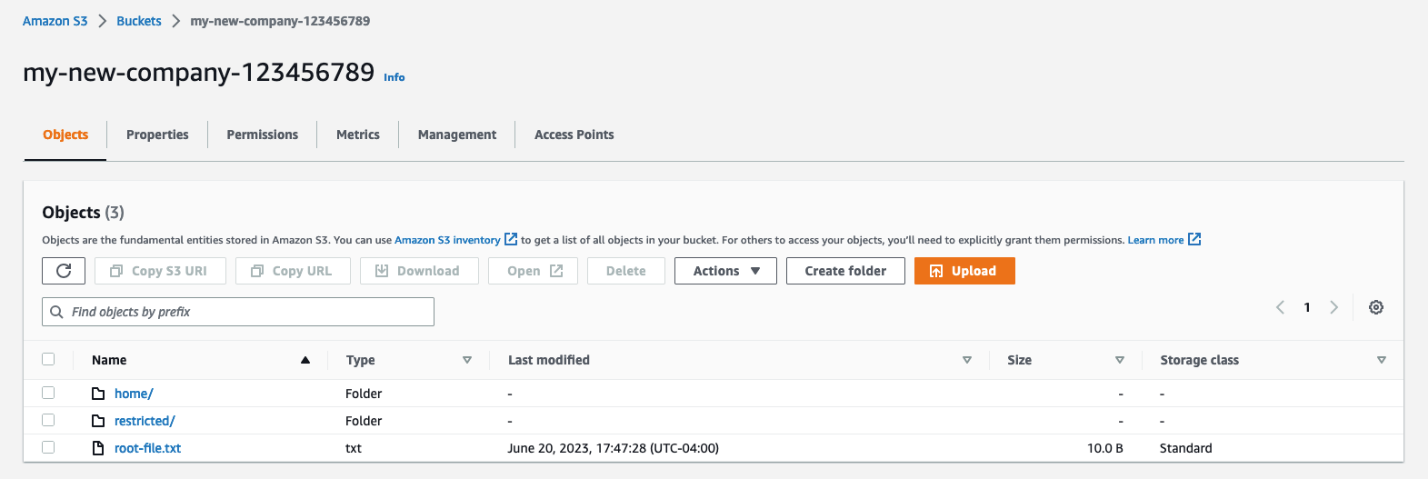


 Roy (KDS) Wang is a Senior Product Manager with Amazon Kinesis Data Streams. He is passionate about learning from and collaborating with customers to help organizations run faster and smarter. Outside of work, Roy strives to be a good dad to his new son and builds plastic model kits.
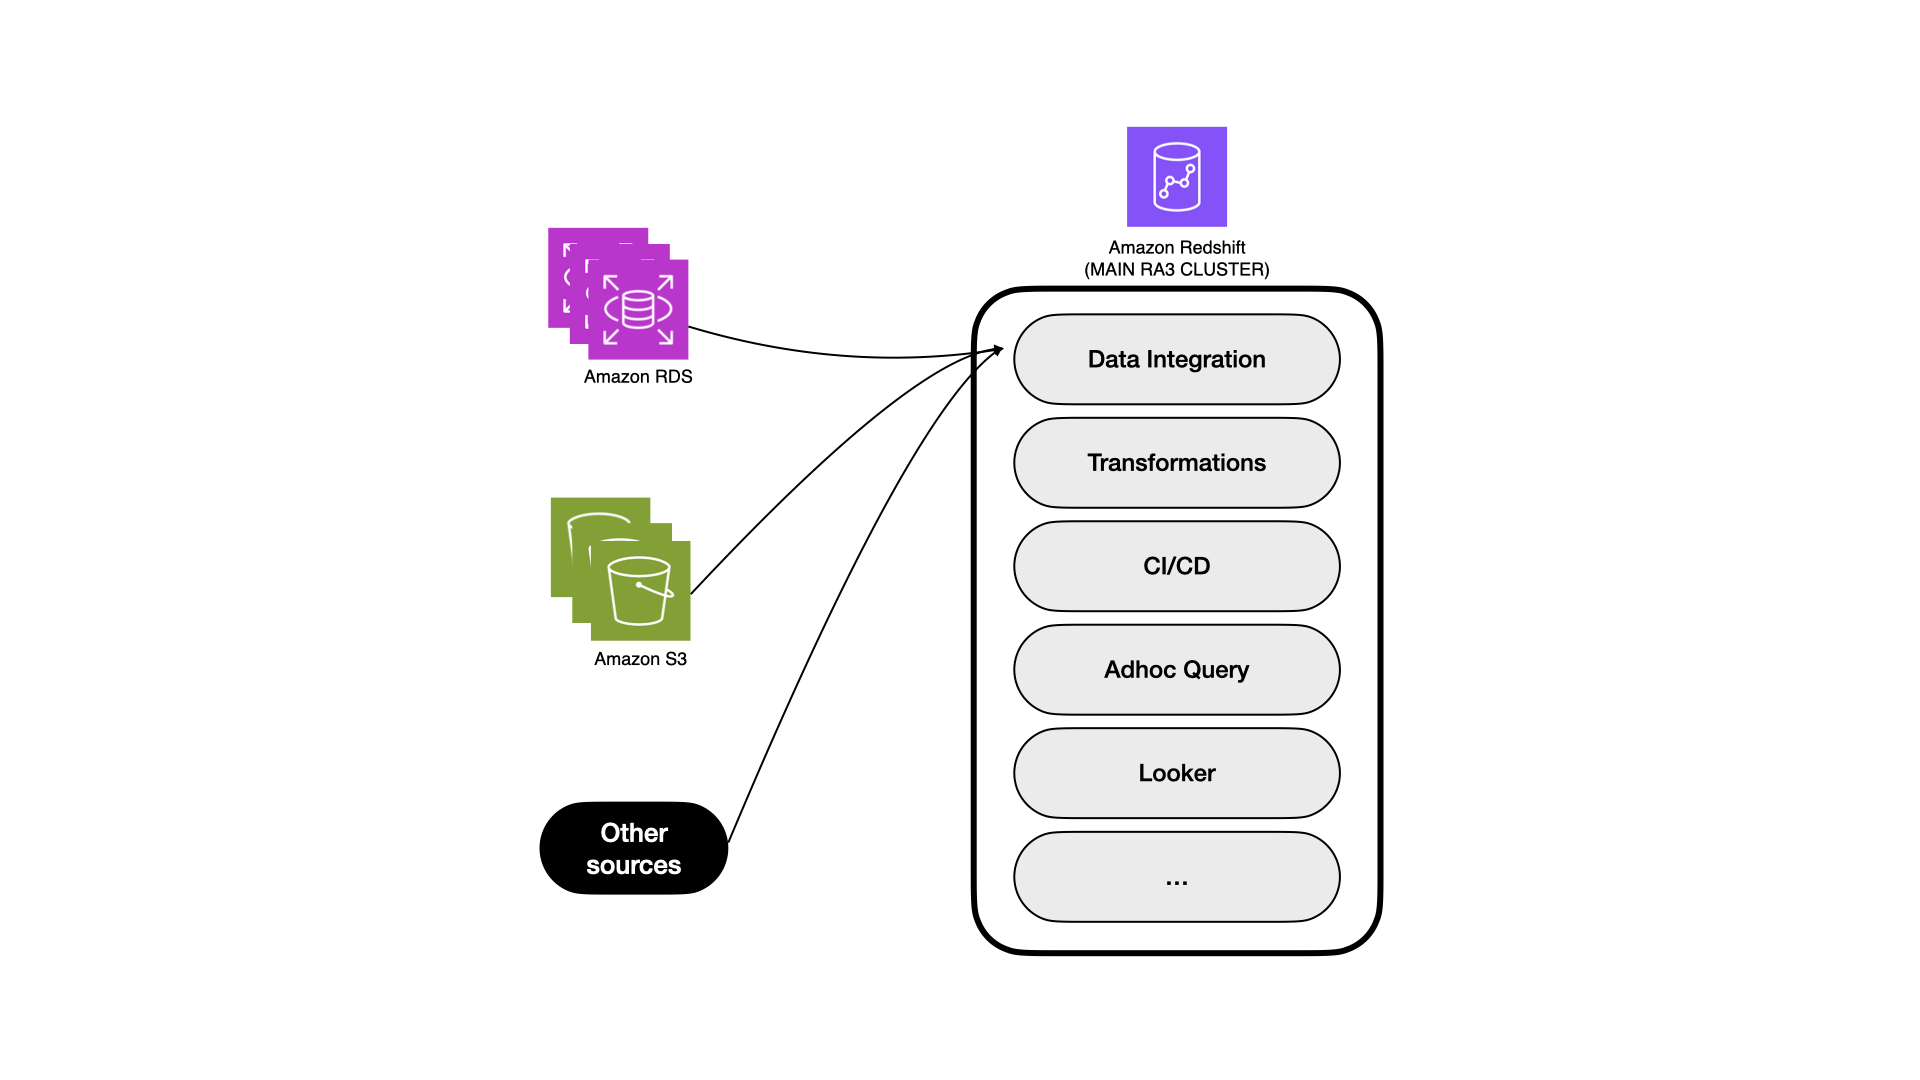

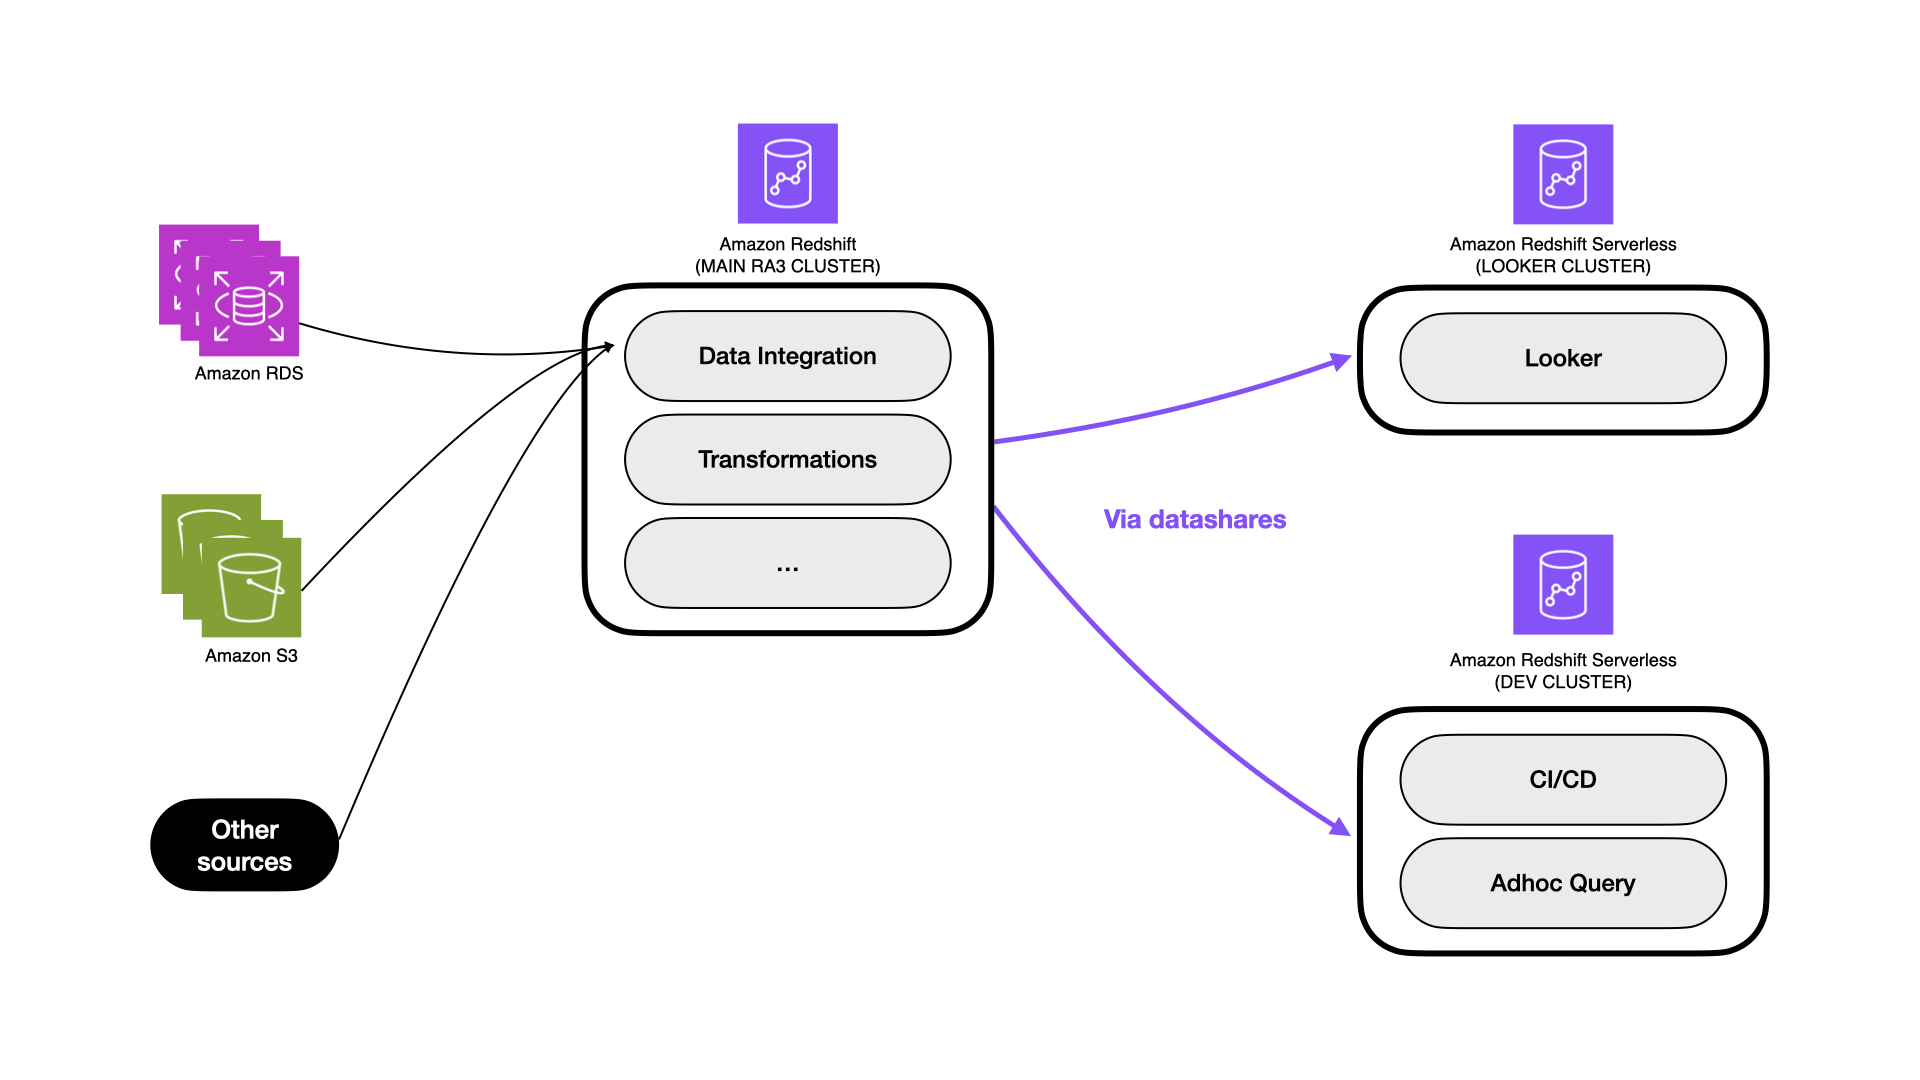

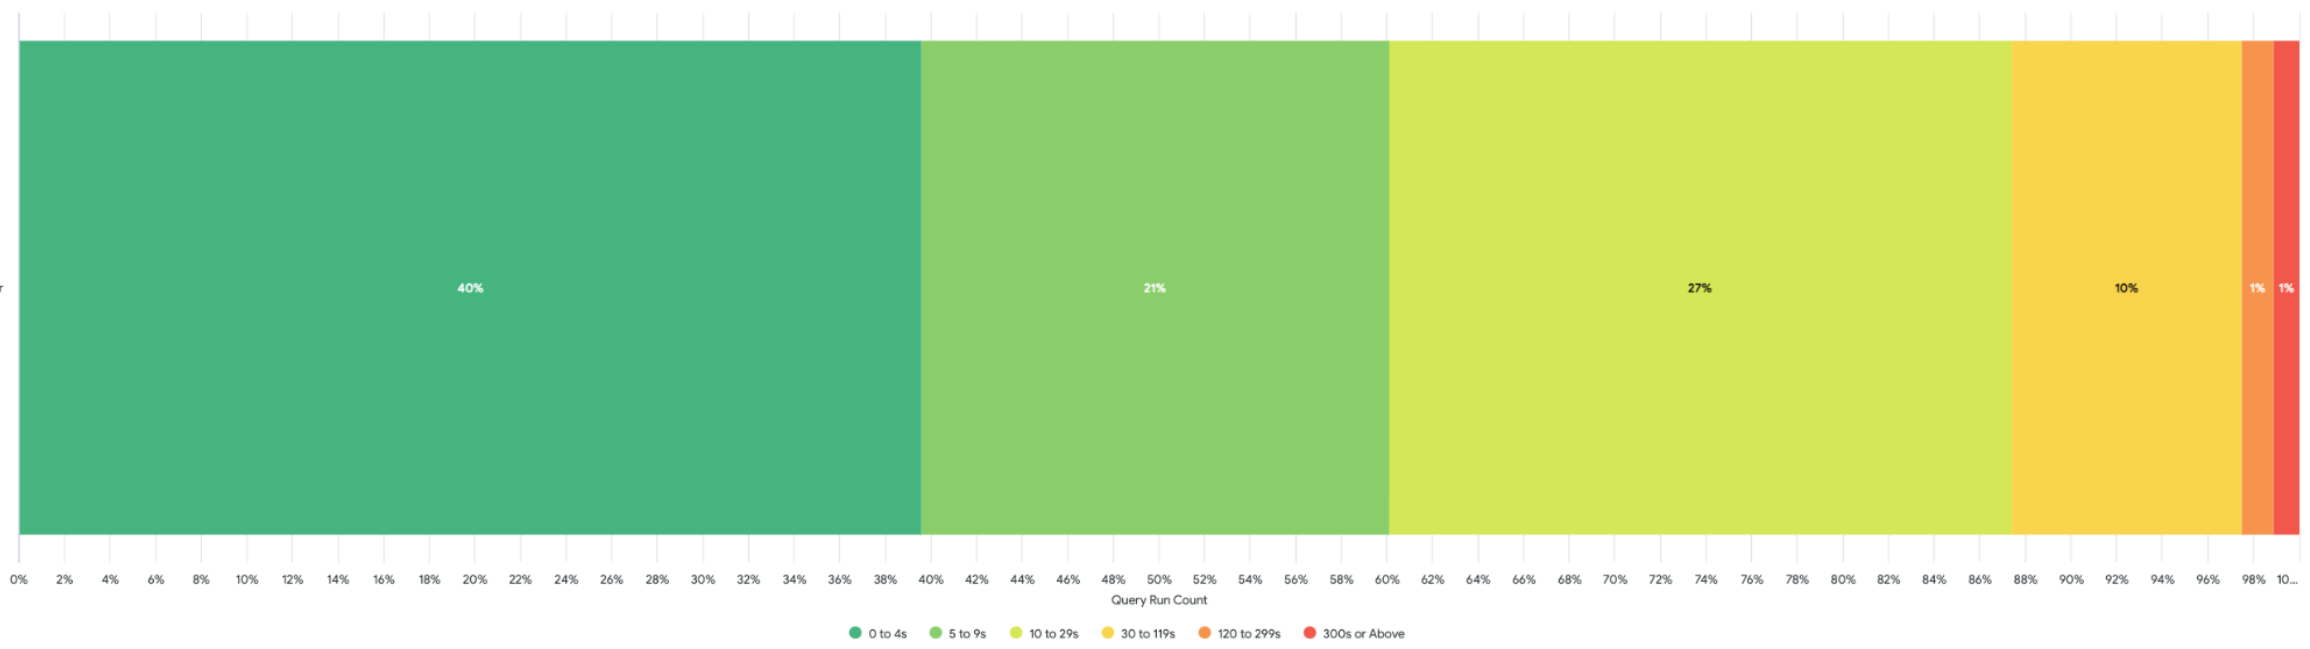
 Eduard Lopez is the Data Engineer Manager at Wallapop. He is a software engineer with over 6 years of experience in data engineering, machine learning, and data science.
 Daniel Martinez is a Solutions Architect in Iberia Digital Native Businesses (DNB), part of the worldwide commercial sales organization (WWCS) at AWS.
 Jordi Montoliu is a Sr. Redshift Specialist in EMEA, part of the worldwide specialist organization (WWSO) at AWS.
 Ziad Wali is an Acceleration Lab Solutions Architect at Amazon Web Services. He has over 10 years of experience in databases and data warehousing, where he enjoys building reliable, scalable, and efficient solutions. Outside of work, he enjoys sports and spending time in nature.
 Semir Naffati is a Sr. Redshift Specialist Solutions Architect in EMEA, part of the worldwide specialist organization (WWSO) at AWS.