Post Syndicated from digiblurDIY original https://www.youtube.com/watch?v=BDwR_Hb6ads
Using a 𝐍𝐄𝐖 VHS-C Camcorder! JVC SXM250 from 2003
Post Syndicated from LGR original https://www.youtube.com/watch?v=38altPBT_zk
GNOME supported by the Sovereign Tech Fund
Post Syndicated from corbet original https://lwn.net/Articles/951068/
The GNOME Foundation has announced
the receipt of a €1 million award from the German Sovereign Tech Fund. The
funding will support work on accessibility, privacy, hardware support, and more.
Security updates for Friday
Post Syndicated from jake original https://lwn.net/Articles/951066/
Security updates have been issued by Fedora (community-mysql, matrix-synapse, and xorg-x11-server-Xwayland), Mageia (squid and vim), Oracle (dnsmasq, python3, squid, squid:4, and xorg-x11-server), Red Hat (fence-agents, insights-client, kernel, kpatch-patch, mariadb:10.5, python3, squid, squid:4, tigervnc, and xorg-x11-server), Scientific Linux (bind, firefox, java-1.8.0-openjdk, java-11-openjdk, kernel, libssh2, python-reportlab, python3, squid, thunderbird, and xorg-x11-server), SUSE (go1.21), and Ubuntu (linux-gke and linux-iot).
The Battle of Coronel, 1914
Post Syndicated from The History Guy: History Deserves to Be Remembered original https://www.youtube.com/watch?v=3HeBBf8vdo4
След местните избори – нищо не е както преди, но всичко е същото
Post Syndicated from Емилия Милчева original https://www.toest.bg/sled-mestnite-izbori-nishto-ne-e-kakto-predi-no-vsichko-e-sushtoto/

Какво показва политическата реалност след изборите за местна власт? Котерии и контролирани трусове, слабо лидерство, непреходни коалиции, „наши ’ора“ и липса на политическа алтернатива.
След пет месеца управление, в което правителството с мандат на втората политическа сила – ПП–ДБ, се подкрепя от първата – ГЕРБ, лидерът ѝ Бойко Борисов настойчиво иска смени на министри преди договорената ротация през март. Тогава настоящата вицепремиерка Мария Габриел ще оглави кабинета. Бабаитлъкът на Борисов е игра за пред избирателите на ГЕРБ, недоволни от подкрепата за т.нар. сглобка, която не се монетизира за тях. „Продължаваме промяната“ се възпротивяват категорично на каквито и да било промени – нито сега, нито непосредствено преди ротацията.
И за двете страни това напрежение е удобно и имиджово – демонстрира борбеност и непримиримост и потвърждава публичните изявления на лидерите колко трудни са политическите компромиси. В ГЕРБ са наясно, че министърът на финансите Асен Василев няма да бъде оттеглен, защото това означава разпадане на правителството, в ПП–ДБ – че ще отстъпят по ключови предложения при гласуване на данъчните закони и бюджета, тъй като не могат да си осигурят мнозинство, ако ГЕРБ и ДПС откажат подкрепа.
Приоритетите не се променят: Шенген, еврозоната, правосъдната реформа. Развръзката за Шенген ще е известна след близо четири седмици – на последното заседание на Европейския съвет за тази година. Вече има спекулации, че Румъния може да бъде разделена от България и да получи шанс за присъединяване. Обвързани с Шенген са и конституционните промени, с които са се заели ПП–ДБ, ГЕРБ–СДС и ДПС. Въпреки заявената цел – 1 януари 2025 г., еврозоната се отдалечава с попадането на България в т.нар. сив списък на държави, в които прането на пари е на високо ниво според оценката на специалната група за финансови действия (FATF).
Съпредседателят на „Демократична България“ Христо Иванов заяви тази седмица, че сегашното управление няма алтернатива, макар и участието в него да носи негативи и за ГЕРБ, и за ПП–ДБ. Ще трябва да се научим да се договаряме, в добрия смисъл на думата, каза той, но не беше разговорлив ще има ли коалиционно споразумение. Няма алтернатива и предвид нуждата от политическа стабилност заради войната в Украйна – индулгенция за слабостите и грешките на властта.
На фона на тази безалтернативност ДПС се оказа без председател, тъй като Мустафа Карадайъ подаде предизвестена оставка. Почетният председател на ДПС Ахмед Доган съобщи, че лично се заема с управлението, след като досега дърпаше конците от Сараите и оранжерията си за биозеленчуци в парк „Росенец“. Близки до Движението коментатори тутакси обявиха, че партията поема курс към „модернизация“. Предвид известното – че ДПС, въпреки либералното семейство на АЛДЕ, в което членува, е като Китайската комунистическа партия – модернизация може да означава и повече авторитарност.
Никой от застрашилите или оспорили неограничената власт на Доган със свои решения не е останал в ДПС – като се почне от първите години и фигурата на Яшар Шабан, после Гюнер Тахир, Касим Дал, Корман Исмаилов, Мехмед Дикме, Лютви Местан, а сега и Карадайъ и свързаните с него. Модернизация на ДПС, която е контролирана от Доган и от санкционирания заради корупция по закона „Магнитски“ олигарх Делян Пеевски, е евфемизъм, но показва здравината на бизнес отношенията между двамата.
Картината след местния вот
Не всичко, ненавсякъде и ненаведнъж – ГЕРБ вече не са толкова големи. „Възраждане“ не са така страшни – секна досегашният им възход. ДПС печелят повече съветници, но се свиват като подкрепа. ПП–ДБ за малко да изгубят София, което щеше да означава обратно броене за управляващата коалиция. След „кръвопреливането“, наречено Ваня Григорова, БСП показа признаци на живот. „Има такъв народ“ успя да се запише с кмет и по няколко съветници тук-там – същата ИТН, която преди две години се опитваше да направи свой кабинет.
Общините ще се управляват от множество местни съюзи, сглобени от две-три-пет политически сили не поради геополитическа необходимост, а на база местни бизнес интереси. Разликата с предишни мандати е в броя на формациите, които ще търсят общото си кратно.
Изборите бяха оцапани от манипулации, някои от които се видяха чрез камерите в секциите – дописване, задраскване и нагло подправяне на вота на избирателите от членове на комисии, които не показаха угризения, нито срам. Кандидати за общински съветници присъстваха в изборни секции, а членове на комисии фалшифицираха протоколи в тяхна полза. Самите протоколи заприличаха на халваджийски тефтери с вересии, но пък нали затова квичаха партиите от „хартиената коалиция“, успели да изхвърлят машините от първия тур на изборите със скалъпения от ДАНС „Кодгейт“. Накратко, който гласувал – гласувал, други му „избират“. Дали активните борци от ДАНС и прокуратурата ще видят нарушения на политическите права на гражданите и избирателното право, иначе инкриминирани в Наказателния кодекс?
Ние сме си наши ’ора. Да помогнем на Мартин, примерно – има 1 и му е празно, да се попълни 102… Чичо Цено, кой номер си?
Ако числата бяха политика
Статистически погледнато, победители са ГЕРБ със своите 1499 общински съветници, но са загубили други триста (и осем областни центъра). Следва ДПС – единствена от старите партии, която увеличава броя на съветниците си с още 48 спрямо 2019 г., и те ще са 964. БСП също сваля от 1020 на 740 избраните общински съветници, макар лидерката Корнелия Нинова да оцени представянето на социалистите като „изключителен успех“. Четвърти се оказаха управляващите от ПП–ДБ, спечелили 396 места в общинските съвети.
От 265 кметове 136 взеха ГЕРБ. Техни кандидати ще управляват в 14 области срещу четири на ПП–ДБ с трудни победи в София, Благоевград, Пазарджик и Варна. В последните два областни центъра гласуването беше „всички срещу ГЕРБ“, след като в Пазарджик партията на Борисов подкрепи управлявалия четири мандата кмет Тодор Попов, а във Варна не се отказа от съпартиеца си Иван Портних, номиниран за четвърти мандат. Срещу Портних бяха дори и варненски икономически групировки, и стартиралата от Варна русофилско-националистическа „Възраждане“, което обяснява и факта, че на втория тур конкурентът му от ПП–ДБ Благомир Коцев удвои резултата си от първия до 45 000 гласа.
Въпреки това ГЕРБ и ПП–ДБ имат по четирима съветници в Общинския съвет на Пазарджик, а са равни по брой и в местния варненски парламент, където имат по 8.
„Възраждане“ с негативен тренд
Резултатите от местните избори пресякоха амбициите на „Възраждане“ да стане втора политическа сила, въпреки че се сдоби с общински съветници на много места: във Варна например са седем, в София – осем. Избирателите на „Възраждане“ не подкрепиха Ваня Григорова в София – малка част от тях гласуваха за нея на втория тур, докато над 60% от електората на ГЕРБ избраха Григорова на балотажа.
Всъщност най-големият губещ от Григорова не е Васил Терзиев, който успя да я задмине с по-малко от 5000 гласа, а Костадин Костадинов и формацията му. Двамата се конкурират за един и същи електорат, но Григорова има потенциал да привлече по-широк кръг избиратели. „Профайлърите“, уцелили с кандидатурата на Румен Радев за президент, са преценили добре качествата и възможностите на синдикалистката, зад която се наредиха същите проруски и националистически сили – освен БСП, и свързаната с бившия президент Георги Първанов АБВ, Мая Манолова и „Изправи се БГ“, „Атака“ на Волен Сидеров и „Нова зора“, както и русофилите на санкционирания по „Магнитски“ Николай Малинов.
Жена – тоест уязвимост и нежност, без партийна принадлежност – също като Румен Радев, с обикновено потекло като на голяма част от българите – също като Радев, синдикалистка не от казионния КНСБ. Фигурата на боркинята за социална справедливост, тръгнала от низините, беше удачно активирана – никога досега неравенството в България не е било изваждано на преден план като актив за избори. Григорова бележи началото на края за Костадинов. А самата тя спечели, че не спечели – позицията на кмет в община, в която подкрепящите я политически нямат мнозинство в Столичния общинския съвет (СОС), щеше да я натовари с повече негативи.
За Терзиев перспективата за политическа кариера не е така розова. Изборите показаха, че потенциалът му да печели гласове е ограничен, въпреки сериозните ресурси, вложени в кампанията. Пред камерите Васил Терзиев сподели нещо любопитно – че през 2019 г. е бил поканен от Христо Иванов за кмет на София, което означава, че няма как родословното му дърво да не е било известно на ДБ и ПП при подновената покана. В понеделник, 13 ноември, му предстои да положи клетва като кмет на София и да се изправи пред първото препятствие – избор на председател на СОС. Никоя политическа сила няма мнозинство в съвета, а ПП–ДБ е пред избора да се колаборира с ГЕРБ или с БСП, за да си осигури мнозинство от минимум 31 гласа за избора на Борис Бонев от „Спаси София“ за председател на СОС.
Пред клетвата на Васил Терзиев има и едно препятствие – загубилата балотажа Григорова обжалва в Административния съд на София-град резултатите от вота и иска спиране на предварителното изпълнение на решението за избора му. Жалбата означава, че едва ли ПП–ДБ ще търсят подкрепа за избор на председател на СОС от съветниците на БСП, сред които е и Григорова – остава партньорът от сглобката ГЕРБ.
Очевидно и този пост ще се договаря през уикенда, в който Бойко Борисов и активът на партията му ще решават дали да останат в същата тази сглобка.
Или по-скоро – срещу какво.
The Privacy Disaster of Modern Smart Cars
Post Syndicated from Bruce Schneier original https://www.schneier.com/blog/archives/2023/11/the-privacy-disaster-of-modern-smart-cars.html
Article based on a Mozilla report.
Капиталът (не по Маркс)
Post Syndicated from Александър Нуцов original https://www.toest.bg/kapitalut-ne-po-marks/

В предишния текст от серията, посветена на предизвикателствата пред бизнеса в България, обърнахме внимание на тромавата администрация и закостенялата законодателна рамка. Говорихме и за спъващата реформите бездна между министрите и хората по веригата под тях в съответните дирекции и агенции. Освен това посочихме няколко положителни промени, които очертават правилната посока за развитие.
Във втория материал ще разгледаме заключения потенциал на България по отношение на капиталовите ресурси, необходими за развитието на бизнес средата. Ще си поговорим за трудностите, които стартиращите компании срещат при набиране на инвестиции у нас, както и защо понякога им се налага да погледнат на Запад в търсене на средства за осъществяване на идеите си. Ще обсъдим и проблемите в законодателството на макрониво и вече закъснелите реформи, от които зависи бъдещето на българската икономика.
Поглед от бизнеса
От разговорите ни с предприемачи научаваме за несъвършенствата на бизнес средата у нас. Разбираме най-вече и колко точно стартъп инфраструктурата в България изостава в сравнение с условията на Запад. Това изоставане се дължи и на тромавите административни процедури по одобряване и отпускане на инвестиции. Изискванията към компаниите кандидати за финансиране са твърде усложнени. Сложна е и оперативната структура на Фонда на фондовете и фондовете под неговата шапка, които боравят предимно с публичен ресурс и инвестират в по-ранна фаза. В допълнение, сроковете за отпускане на инвестицията са доста дълги. Това създава рискове за компаниите в критичен за тях в момент, когато имат нужда от свежи средства и повече време, което да инвестират в развитието си.
Предприемачите споделят за добрия си опит с бизнес ангелите в страната. Ангелските инвеститори са частни инвеститори, които осигуряват финансови средства, а често и менторство на компании в тяхната най-ранна и рискова фаза на развитие. Правят го срещу дял от компанията. Опасенията са, че засега бизнес ангелите тук са твърде малко, а средата усложнява възможностите им да инвестират поради липсата на стимули.
Като положителен пример от чужбина може да посочим един добре работещ и прозрачен начин за набиране на капитал в САЩ – през т.нар. сейфове (от SAFE – Simple Agreement for Future Equity). Той дава възможност за влагане на средства, срещу които инвеститорът получава собственост (equity) от компанията в бъдещ момент – обикновено при следващия рунд за набиране на капитал.
Западните инвеститори пък гледат с недоверие на компании в българската юрисдикция преди всичко заради асоциациите с корупция и заради липсващата дигитализация на национално ниво. Към това се добавят и още административни трудности – например усложненото откриване на банкова сметка от чуждестранен гражданин.
Тези фактори принуждават част от българските предприемачи да потърсят финансиране в чужбина, регистрирайки дружества в САЩ или в Западна Европа. Същите фактори понякога правят българския капитал в пъти по-скъп, отколкото компаниите могат да понесат, и ограничават възможностите им за експанзия.
Разковничето е в законите
Какво трябва да стане на макрониво, за да се улесни и стимулира предприемачеството в България? На пръв поглед отговорът е прост – да се отключат повече капиталови ресурси и да се подобри инвестиционната среда. За това обаче са необходими дълбоки реформи, които закъсняват, а когато дойдат, едва ли ще минат лесно през Народното събрание, защото ще срещнат съпротива и опити за изкривяването им в полза на различни интереси. Нека обаче започнем с един добър пример в по-малък мащаб.
BEAM
През 2018 г. Българската фондова борса получава разрешение от Комисията за финансов надзор (КФН) да създаде т.нар. BEAM – Bulgarian Enterprise Accelerator Market. Основното му предназначение е да подпомогне растежа на малките и средните предприятия. BEAM съществува отвъд основния фондов пазар с идеята да улесни набирането на капитал.
Най-важното облекчение при BEAM пазара е отпадналото изискване за проспект. Проспектът е правен документ, описващ основната дейност, финансирането и акционерната структура на дадено дружество. Потенциалните инвеститори го използват, за да решат дали да купят ценните книжа, които дружеството предлага. Преди всичко обаче той трябва да бъде одобрен от КФН. Изключително детайлен и тромав за изготвяне, проспектът често бива отхвърлен от КФН със или без адекватни аргументи. Това лишава много предприятия от възможността да се регистрират на фондовия пазар – проблем, който BEAM пазарът решава.
През годините прагът за набиране на капитал без нужда от такъв документ беше увеличен в две стъпки – от 1 на 3 млн., а впоследствие и на 8 млн. евро (максималния за Европейския съюз). Така BEAM служи и като мост за компаниите към основния фондов пазар.
Ангелски инвестиции
Бизнес ангелите са ключови играчи в предприемаческата екосистема, защото инвестират в най-ранен етап и при най-висок риск. Често това става още в идейната фаза от развитието на компаниите. Инвестираните суми за българските стандарти обикновено са от порядъка на няколко десетки хиляди лева. В сравнение със страните от ЕС бизнес ангелите в България са по-малко и по-слабо активни, а главната причина за това е липсата на подходящи стимули.
Какво е възможното решение? Например механизъм за директен кешбек от държавата към бизнес ангелите, в случай че бенефициерът фалира. Като се имат предвид иновативният характер на компаниите, търсещи такъв тип финансиране, и високият им потенциал за растеж, може обосновано да се предположи, че ползата за държавата от събраните данъци, високоплатените работни места и мултиплициращия ефект върху веригата ще надхвърли многократно разходите по бюджета за стимулиране на ангелите.
Голямата картина
Междувременно два изключително важни за българската икономика законопроекта са на път да влязат в дневния ред на парламента. За тях говорим с Добромир Иванов, изпълнителен директор в Българската предприемаческа асоциация (BESCO), която се застъпва за промените.
Промени в Закона за насърчаване на инвестициите
Добромир споделя резултатите от проучване на асоциацията, според което страната ни отсъства от европейската карта за привличане на големи инвеститори.
Изтънените данъци, няколкото работещи индустриални зони и обещанията за изграждане на пътна и електрическа инфраструктура отдавна не са конкурентни предимства, които биха изкушили инвеститорите да изберат България.
Особено при липсата на квалифицирани кадри и адекватна държавна помощ, каквато предлагат например Унгария, Словакия, Румъния, та дори страни извън ЕС, като Сърбия и Северна Македония.
Според Добромир държавната помощ в квазипазарна ситуация трябва да бъде „умна“ – тоест да се възвърне за период от около седем години и да подобри средата в слаборазвитите региони у нас. Фокусът на реформата е насочен именно към привличане на средно- и високотехнологични инвестиции извън София, идващи от компании, които да осигурят заплати от порядъка на поне 50% над средните за съответната община.
С оглед на това Добромир изтъква голямата цел на промените – да се достигне европейският таван от 60% държавна помощ за инвестиции в слаборазвити региони, така че да няма българин без избор къде да работи.
За да има истинска демокрация, хората трябва да са свободни да избират къде да работят. В момента има много феодални райони, където хората са лишени от този „лукс“. Така се създават зависимостите, от които страда демократичната ни система.
Идеята е да се привличат инвеститори, които създават иновативни продукти с висока добавена стойност, плащат високи възнаграждения и постоянно развиват уменията и потенциала на служителите си. Това според Добромир са ключовите моменти, които ще направят България по-богата държава.
Пенсионни фондове
Знаете ли, че частните пенсионни фондове в България могат да инвестират до 1% от капитала си в алтернативни фондове (например фондове за рисков капитал)? Този праг е изключително нисък за европейските стандарти и затруднява пенсионните фондове, които страдат от липса на възвръщаемост. Едновременно с това се възпира и потенциалът за развитие на предприемаческата среда.
В общо писмо до парламента Асоциацията на пенсионните фондове, инвестиционният фонд на Endeavor, Асоциацията на индустриалния капитал в България и BESCO изразиха подкрепата си за нормативни промени, които увеличават прага на пенсионните фондове от втори и трети стълб за инвестиране в алтернативни фондове до 5%. Целта на мярката е да повиши възвръщаемостта им и да отключи капитал, който да бъде пренасочен към предприемачите, търсещи инвестиране от порядъка на над 5 млн. лв. (т.нар. Series B инвестиционни рундове).
Реформата също трябва да позволи на пенсионните фондове да „къмитват“ пари (committed capital). С други думи, да обещават определена сума на алтернативните фондове, която впоследствие да бъде използвана за инвестиране от самите фондове. Сумата не се осигурява незабавно, каквото е условието сега, а само се декларира на съответния инвестиционен фонд, който ще я потърси, когато реши да направи инвестиция.
Поправките целят още да се премахнат ежедневните проверки на КФН на активите на пенсионните фондове. Освен че създава излишна бюрократична тежест, КФН не признава нематериални активи (например репутация, качество на управлението, продукти в развойна дейност, интелектуална собственост, търговски марки, патенти и т.н.), което ограничава инвестиционния потенциал на пенсионните фондове.
Според Добромир Иванов промените биха могли да отключат над 1 млрд. лв. в екосистемата, което ще удвои наличните ресурси. Това ще позволи на бизнесите да набират повече капитал, за да се разрастват и да остават по-дълго в България – с произтичащите от това икономически ползи за цялата страна.
Съвкупността от изброените промени трябва да подобри и модернизира инвестиционния климат у нас. България обаче няма време, а реформите вече закъсняват. Кога ще се приемат и как ще се прилагат, зависи най-вече от натиска на гражданското общество и предприемачите върху институциите, отговорни за тяхното реализиране.
Традиции в образованието, или урок в минало време
Post Syndicated from original https://www.toest.bg/traditsii-v-obrazovanieto-ili-urok-v-minalo-vreme/

Представете си, че сега сте на 9 години и е 15 септември. В днешно време това би означавало, че сте на прага на трети клас. Предстои ви да учите за частите на речта, видове морфеми, трицифрени числа, умножение и деление. Започвате да трупате първоначални знания по география, история, гражданско образование, нищо че още не ги наричате така. Ще чуете за живата и неживата природа, за здравословното хранене, ще работите с дигитални устройства, файлове, ще прохождате в програмирането.
А сега да се върнем към спомените: какво учеше всеки от нас в трети клас? Със сигурност учехме същата математика и същия български език, но не в трети, а в по-горен клас. Предметът човекът и обществото не съществуваше. Никога не е намирала място в учебната ми програма в начален и в прогимназиален етап и една от настоящите му основни „компетентности като очаквани резултати от обучението“, според която ученикът
разбира, че обществото се състои от различни по състав групи от хора.
За файлове или здравословно хранене в днешния му вид не бяхме чували.
Може да се върнем още 30 години назад и да сравним, после още 50, после още и още. Ще вървим по все по-изтъняваща нишка, която ще ни води до предшественика на днешен предмет, урок, факт. Колкото и да изтънява, тази нишка няма да се скъса, защото ученето е в основата на човешката природа и то ни съпътства от първия ден на човечеството.
Ако изключим най-очевидните разлики, като тези в наименованията на предметите и допълването на съвременни технологии и факти, не знам дали ще намерим значителни промени. Стандартният учебен час все още масово е с продължителност 40 или 45 минути. Оценките все още са единственият критерий за приемане на даден учебен материал за научен. Въпреки модерните помагала рецитирането на уроците е търсената форма за изразяване на напредъка. Да не говорим за тъжната действителност, с която се сблъсках само преди няколко месеца в едно от най-желаните държавни училища в Пловдив – в повечето стаи стояха същите разбити и грозни чинове и столове, на които са учили моите връстници от това училище преди повече от 20 години.
Изобщо – традицията е жива.
Законът за предучилищно и училищно образование твърди в отделни алинеи на чл. 3, че образованието се реализира в съответствие с (ал. 5) „принципите на запазване на българската образователна традиция“ и (ал. 8) „иновативност и ефективност в педагогическите практики и в организацията на образователния процес“. Българската образователна традиция може и да не е строго дефинирана в методики или структура, но е видима дори за неучастващите в нея.
Образователната ни система, останала в далечното минало и правеща плахи опити за преминаване към модерност, които са по-скоро по задължение, все още не обръща внимание на единствения си продукт – собствените си ученици. И въпреки че в правилниците на повечето училища може да прочетем, че учителят е свободен сам да прецени и приложи методите и средствата за провеждане на образователния процес, стига крайният резултат да покрива изискванията, поставени от Министерството на образованието, традиционно се подкрепят твърдата ръка, класическото писмено/устно изпитване и морално остарелият подход към учениците като към послушници.
Всеки има право на (задължително) образование
Чл. 53 [от Конституцията на Република България]
(1) Всеки има право на образование.
(2) Училищното обучение до 16-годишна възраст е задължително.
Времето, което прекарват децата в образователната система в България, възлиза на около 15 години, включва предучилищно и училищно образование и обхваща периода от 4-годишна до 19-годишна възраст. Това са 12 училищни учебни години, всяка от които средно по 10 месеца, или 40 седмици, по 5 учебни дни, по 7 учебни часа на ден. Това прави близо 17 000 учебни часа, без да броим извънкласните форми или заниманията по интереси.
Въпросът, който си задаваме най-рядко като родители, е какво очакваме да получи един ученик през това време. Или другояче: кое в моето собствено образование беше толкова полезно, че е запазило непреходната си стойност и трябва да е част от обучението на децата в наши дни?
Когато заговорим за „традиционно образование“, имаме предвид начина на преподаване и учебното съдържание, конструкцията на учебния ден, йерархията и дори материалната среда, в която се намира учещият. Традиция, в чиято основа стоят дидактическите принципи, формулирани през XVII век от Ян Амос Коменски.
Традиционно децата:
- започват училище между шестата и седмата си година;
- са разделени стриктно по възраст в групи, наричани класове, от приблизително 26 деца;
- посещават часове, имат учебници и помагала;
- седят на чинове, а учителят е пред тях;
- биват изпитвани устно и писмено;
- получават част от възпитанието си точно в училище, развиват характера си и се подготвят за самостоятелно съществуване като членове на обществото.
Коменски си е представял образованието по подобен начин преди четири века. Днес на много места в българските класни стаи то продължава да изглежда горе-долу в рамките на неговите представи. Може би е време да помислим за промяна.
Културно наследство
Аналогично и почти автоматично се замисляме за опазване на културното наследство, когато говорим за традиции в образованието. Да предадем на децата знанието за собствената ни култура е изключително важно, но какво можем да постигнем, ако всяка година в часа по изобразително изкуство подготовката за Деня на будителите включва задачата „Нарисувайте картина за празника на будителите“. И в първи, и във втори, та дори и в пети клас!
Колко по-удачно, запомнящо се и полезно би било този час да е извън класната стая – в музей, галерия, та дори и на улицата, наречена на някой заслужил мястото си в празника. Няма как да очакваме различен резултат, когато действието ни е едно и също. Винаги ще получаваме от децата опит за портрет на някой будител, вместо да ги запознаем с човешката страна на будителите и да ги потърсим в наши дни.
Мястото на обучение
Излизането извън класната стая е наложително. Независимо по кой предмет. Отдавна учителят не стои само на подиум и не е единственият, който притежава книга. Затвореното и подредено класически помещение с учителя най-отпред не предполага свободна дискусия, взаимодействие и комуникация, а чисто психологически създава дистанцираност и контрапродуктивност.
Приложение на предметите във всекидневието
Математиката не свършва със звънеца за междучасие, защото в него отиваме до закусвалнята, където трябва да си платим, и е добре да можем да преценим дали имаме пари за всичко, което искаме. Ако сме по-големи, може би ще е полезно, освен в урока в шести клас за изчисляване на ДДС, да сме чували от кого и за какви цели се дължи то. Ето как лесно се прави връзката между гражданско, математическо и икономическо образование.
Изучаването на чужд език отдавна не включва само безкрайни граматически текстове. На фона на всички модерни учебници не е адекватно на някои места децата да получават лошо ксерокопиран лист от поне 30-годишен учебник. Културата, нравите и порядките в чуждото общество, чийто език изучаваме, ще ни улеснят да запомним падеж или склонение. При наличието на толкова много заселили се по една или друга причина тук чужденци защо да не проведем часа по немски или френски при някого от тях или заедно с него?
Учебници и изпити
И като говорим за учебници – колко точно адекватен в днешно време е възпроизвеждащият характер на традиционния учебен процес? Факти и информация, които се преподават и после трябва да бъдат предадени от изпитвания в писмена или устна форма.
С малки изключения ученикът изобщо няма възможността да оформи критична мисъл, да бъде предизвикан да намери собствено решение или да сътвори нещо самостоятелно. Ако имате късмет да сте с добре развита визуална памет, ще се справите отлично, дори и да не разбирате добре какво точно учите. Но то сигурно и не е толкова важно, щом няма досег до реалния живот.
Минало незабравимо
Образованието е изцяло фиксирано в миналото. История, предания, творци, традиции – изучаваме само това, което е било. При скоростните промени, които съпътстват живота ни и засягат модела на модерното семейство, видовете професии, структурата на целия свят, а и самите деца, които не са същите, каквито са били преди, е абсолютно необясним отказът на образователната система да погледне отвъд вчерашния ден.
Ако искаме да имаме подготвени за бъдещето специалисти, които са конкурентоспособни, и им гласуваме доверието си отсега, трябва спешно да актуализираме образователните си стандарти. Няма значение дали децата ни ще са работодатели, или служители, те ще се нуждаят от адаптивност, за да се справят с неизвестни за нас предизвикателства, ще трябва да са креативни, ще трябва да могат да работят в екип. Нито едно от тези качества не може да бъде придобито, ако теорията продължи да е по-важна от практиката, ако все така се поощряват конформизмът и конкуренцията за оценки, нито пък ако миналото продължи да е по-важно от настоящето и бъдещето.
Никога в историята на човечеството не е имало толкова много образовани хора, колкото има сега. Образованието днес е широко достъпно и обхваща почти всички групи на обществото. Това, за съжаление, не го прави по-качествено и по-градивно. Традициите могат да са корен на сигурност и стабилност, който да бъде подхранен с нуждите и интересите на разнородни по възраст и интереси деца. Така те ще могат да минат сигурно по пътя си в училище и да се развият като неповторимите хора, които знаем, че имат потенциала да бъдат. А това би било възможно само ако започнем да мислим какво е важно и според тях.
Светът се променя с бясна скорост. Професиите, в които ще се развиват поколенията, започващи днес образователния си път, все още не са измислени. Подготвена ли е нашата образователна система, за да отговори на тези предизвикателства? Какво може и трябва да се промени? А как?
Веднъж месечно в рубриката „Възможното образование“ ще говорим за промяната – такава, каквато искаме да я видим, за добрите примери и за посоките, в които може би е добре да обърне поглед българската образователна система.
Redshift
Post Syndicated from xkcd.com original https://xkcd.com/2853/

Scaling improvements when processing Apache Kafka with AWS Lambda
Post Syndicated from Julian Wood original https://aws.amazon.com/blogs/compute/scaling-improvements-when-processing-apache-kafka-with-aws-lambda/
AWS Lambda is improving the automatic scaling behavior when processing data from Apache Kafka event-sources. Lambda is increasing the default number of initial consumers, improving how quickly consumers scale up, and helping to ensure that consumers don’t scale down too quickly. There is no additional action that you must take, and there is no additional cost.
Running Kafka on AWS
Apache Kafka is a popular open-source platform for building real-time streaming data pipelines and applications. You can deploy and manage your own Kafka solution on-premises or in the cloud on Amazon EC2.
Amazon Managed Streaming for Apache Kafka (MSK) is a fully managed service that makes it easier to build and run applications that use Kafka to process streaming data. MSK Serverless is a cluster type for Amazon MSK that allows you to run Kafka without having to manage and scale cluster capacity. It automatically provisions and scales capacity while managing the partitions in your topic, so you can stream data without thinking about right-sizing or scaling clusters. MSK Serverless offers a throughput-based pricing model, so you pay only for what you use. For more information, see Using Kafka to build your streaming application.
Using Lambda to consume records from Kafka
Processing streaming data can be complex in traditional, server-based architectures, especially if you must react in real-time. Many organizations spend significant time and cost managing and scaling their streaming platforms. In order to react fast, they must provision for peak capacity, which adds complexity.
Lambda and serverless architectures remove the undifferentiated heavy lifting when processing Kafka streams. You don’t have to manage infrastructure, can reduce operational overhead, lower costs, and scale on-demand. This helps you focus more on building streaming applications. You can write Lambda functions in a number of programming languages, which provide flexibility when processing streaming data.
Lambda event source mapping
Lambda can integrate natively with your Kafka environments as a consumer to process stream data as soon as it’s generated.
To consume streaming data from Kafka, you configure an event source mapping (ESM) on your Lambda functions. This is a resource managed by the Lambda service, which is separate from your function. It continually polls records from the topics in the Kafka cluster. The ESM optionally filters records and batches them into a payload. Then, it calls the Lambda Invoke API to deliver the payload to your Lambda function synchronously for processing.
As Lambda manages the pollers, you don’t need to manage a fleet of consumers across multiple teams. Each team can create and configure their own ESM with Lambda handling the polling.

AWS Lambda event source mapping
For more information on using Lambda to process Kafka streams, see the learning guide.
Scaling and throughput
Kafka uses partitions to increase throughput and spread the load of records to all brokers in a cluster.
The Lambda event source mapping resource includes pollers and processors. Pollers have consumers that read records from Kafka partitions. The poller assigners send them to processors which batch the records and invoke your function.
When you create a Kafka event source mapping, Lambda allocates consumers to process all partitions in the Kafka topic. Previously, Lambda allocated a minimum of one processor for a consumer.

Lambda previous initial scaling
With these scaling improvements, Lambda allocates multiple processors to improve processing. This reduces the possibility of a single invoke slowing down the entire processing stream.

Lambda updated initial scaling
Each consumer sends records to multiple processors running in parallel to handle increased workloads. Records in each partition are only assigned to a single processor to maintain order.
Lambda automatically scales up or down the number of consumers and processors based on workload. Lambda samples the consumer offset lag of all the partitions in the topic every minute. If the lag is increasing, this means Lambda can’t keep up with processing the records from the partition.
The scaling algorithm accounts for the current offset lag, and also the rate of new messages added to the topic. Lambda can reach the maximum number of consumers within three minutes to lower the offset lag as quickly as possible. Lambda is also reducing the scale down behavior to ensure records are processed more quickly and latency is reduced, particularly for bursty workloads.
Total processors for all pollers can only scale up to the total number of partitions in the topic.
After successful invokes, the poller periodically commits offsets to the respective brokers.

Lambda further scaling
You can monitor the throughput of your Kafka topic using consumer metrics consumer_lag and consumer_offset.
To check how many function invocations occur in parallel, you can also monitor the concurrency metrics for your function. The concurrency is approximately equal to the total number of processors across all pollers, depending on processor activity. For example, if three pollers have five processors running for a given ESM, the function concurrency would be approximately 15 (5 + 5 + 5).
Seeing the improved scaling in action
There are a number of Serverless Patterns that you can use to process Kafka streams using Lambda. To set up Amazon MSK Serverless, follow the instructions in the GitHub repo:
- Create an example Amazon MSK Serverless topic with 1000 partitions.
- Add records to the topic using a UUID as a key to distribute records evenly across partitions. This example adds 13 million records.
- Create a Python function based on this pattern, which logs the processed records.
- Amend the function code to insert a delay of 0.1 seconds to simulate record processing.
- Configure the ESM to point to the previously created cluster and topic.
- Use the default batch size of 100. Set the
StartingPositiontoTRIM_HORIZONto process from the beginning of the stream. - Deploy the function, which also adds and configures the ESM.
- View the Amazon CloudWatch
ConcurrentExecutionsandOffsetLagmetrics to view the processing.
./kafka-topics.sh --create --bootstrap-server "{bootstrap-server}" --command-config client.properties --replication-factor 3 --partitions 1000 --topic msk-1000pfor x in {1..13000000}; do echo $(uuidgen -r),message_$x; done | ./kafka-console-producer.sh --broker-list "{bootstrap-server}" --topic msk-1000p --producer.config client.properties --property parse.key=true --property key.separator=, --producer-property acks=allimport json
import base64
import time
def lambda_handler(event, context):
# Define a variable to keep track of the number of the message in the batch of messages
i=1
# Looping through the map for each key (combination of topic and partition)
for record in event['records']:
for messages in event['records'][record]:
print("********************")
print("Record number: " + str(i))
print("Topic: " + str(messages['topic']))
print("Partition: " + str(messages['partition']))
print("Offset: " + str(messages['offset']))
print("Timestamp: " + str(messages['timestamp']))
print("TimestampType: " + str(messages['timestampType']))
if None is not messages.get('key'):
b64decodedKey=base64.b64decode(messages['key'])
decodedKey=b64decodedKey.decode('ascii')
else:
decodedKey="null"
if None is not messages.get('value'):
b64decodedValue=base64.b64decode(messages['value'])
decodedValue=b64decodedValue.decode('ascii')
else:
decodedValue="null"
print("Key = " + str(decodedKey))
print("Value = " + str(decodedValue))
i=i+1
time.sleep(0.1)
return {
'statusCode': 200,
}
With the scaling improvements, once the ESM is configured, the ESM and function scale up to handle the number of partitions.

Lambda automatic scaling improvement graph
Increasing data processing throughput
It is important that your function can keep pace with the rate of traffic. A growing offset lag means that the function processing cannot keep up. If the age is high in relation to the stream’s retention period, you can lose data as records expire from the stream.
This value should generally not exceed 50% of the stream’s retention period. When the value reaches 100% of the stream retention period, data is lost. One temporary solution is to increase the retention time of the stream. This gives you more time to resolve the issue before losing data.
There are several ways to improve processing throughput.
- Avoid processing unnecessary records by using content filtering to control which records Lambda sends to your function. This helps reduce traffic to your function, simplifies code, and reduces overall cost.
- Lambda allocates processors across all pollers based on the number of partitions up to a maximum of one concurrent Lambda function per partition. You can increase the number of processing Lambda functions by increasing the number of partitions.
- For compute intensive functions, you can increase the memory allocated to your function, which also increases the amount of virtual CPU available. This can help reduce the duration of a processing function.
- Lambda polls Kafka with a configurable batch size of records. You can increase the batch size to process more records in a single invocation. This can improve processing time and reduce costs, particularly if your function has an increased init time. A larger batch size increases the latency to process the first record in the batch, but potentially decreases the latency to process the last record in the batch. There is a tradeoff between cost and latency when optimizing a partition’s capacity and the decision depends on the needs of your workload.
- Ensure that your producers evenly distribute records across partitions using an effective partition key strategy. A workload is unbalanced when a single key dominates other keys, creating a hot partition, which impacts throughput.
See Increasing data processing throughput for some additional guidance.
Conclusion
Today, AWS Lambda is improving the automatic scaling behavior when processing data from Apache Kafka event-sources. Lambda is increasing the default number of initial consumers, improving how quickly they scale up, and ensuring they don’t scale down too quickly. There is no additional action that you must take, and there is no additional cost.
You can explore the scaling improvements with your existing workloads or deploy an Amazon MSK cluster and try one of the patterns to measure processing time.
To explore using Lambda to process Kafka streams, see the learning guide.
For more serverless learning resources, visit Serverless Land.
New for Amazon SQS – Update the AWS SDK to reduce latency
Post Syndicated from Danilo Poccia original https://aws.amazon.com/blogs/aws/new-for-amazon-sqs-update-the-aws-sdk-to-reduce-latency/
With Amazon SQS, you can send and receive messages between software components at any scale. It was one of the first AWS services I used and as a Solutions Architect, I helped many customers take advantage of asynchronous communications using message queues. In fact, Amazon SQS has been generally available since July 2006 and, under the hood, has always used the same wire protocol based on XML that we call AWS Query protocol.
Today, I am happy to announce that Amazon SQS now supports a JSON-based wire protocol for all APIs. The AWS JSON protocol avoids many of the shortcomings of AWS Query protocol.
AWS JSON is more efficient than the previous XML-based protocol and can reduce both latency and client-side CPU usage when sending and receiving SQS messages. For example, for a request that sends a simple “hello world” message, the response body size using the old AWS Query protocol is about 400 bytes. The content length of the same SendMessage response using the new AWS JSON protocol is less than 1/3 of the previous size.
Using the New JSON-Based Protocol with Amazon SQS
This is the nicest part of this launch! To benefit from the AWS JSON protocol, you just need to update the AWS SDK to the latest version. While building this new capability, the SQS team was careful so that no code changes are needed to use the new JSON-based wire protocol.
For example, we ran a benchmark using the AWS SDK for Java to compare the old and new wire protocols. We expect similar results from the other AWS SDKs. Based on AWS performance tests for a 5KB message payload, JSON protocol for Amazon SQS reduces end-to-end message processing latency by up to 23 percent and reduces application client side CPU and memory usage. These numbers depend on the actual implementation and can differ from what you’ll see for your own applications.
Availability and Pricing
Amazon SQS support for the new JSON protocol is available today in all AWS Regions where SQS is offered. All generally available AWS SDKs now support AWS JSON for SQS APIs. To get the benefits of this optimization, you just need to update the AWS SDK to the latest version available.
There is no change in pricing when using the AWS JSON protocol. For more information, see Amazon SQS pricing.
If you’re interested in more details on how AWS protocols work, you can have a look at Smithy, the language we use at AWS for defining services and SDKs.
After almost 17 years of being generally available, we’re improving and innovating around our oldest service. Just a few months back, we introduced server-side encryption with Amazon SQS-managed encryption keys (SSE-SQS) by default for newly created queues, increased the default quota for high throughput mode for FIFO queues, and announced support for attribute-based access control (ABAC) using queue tags. More recently, Amazon SQS added new APIs to manage dead-letter queue (DLQ) redrive programmatically. At AWS, it’s always day 1!
Update the AWS SDK to improve CPU and memory usage and reduce latency when using Amazon SQS.
— Danilo
New – Block Public Sharing of Amazon EBS Snapshots
Post Syndicated from Jeff Barr original https://aws.amazon.com/blogs/aws/new-block-public-sharing-of-amazon-ebs-snapshots/
You now have the ability to disable public sharing of new, and optionally existing, Amazon Elastic Block Store (Amazon EBS) snapshots on a per-region, per-account basis. This provides you with another level of protection against accidental or inadvertent data leakage.
EBS Snapshot Review
You have had the power to create EBS snapshots since the launch of EBS in 2008, and have been able to share them privately or publicly since 2009. The vast majority of snapshots are kept private and are used for periodic backups, data migration, and disaster recovery. Software vendors use public snapshots to share trial-use software and test data.
Block Public Sharing
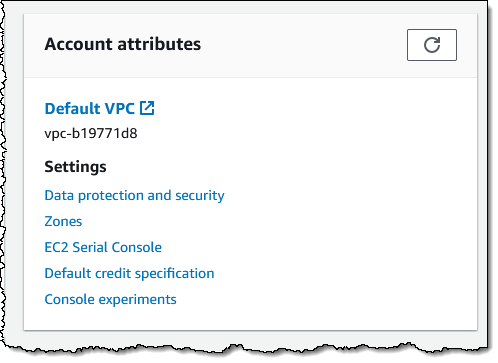
EBS snapshots have always been private by default, with the option to make individual snaps public as needed. If you do not currently use and do not plan to use public snapshots, you can now disable public sharing using the AWS Management Console, AWS Command Line Interface (AWS CLI), or the new EnableSnapshotBlockPublicAccess function. Using the Console, I visit the EC2 Dashboard and click Data protection and security in the Account attributes box:
Then I scroll down to the new Block public access for EBS snapshots section, review the current status, and click Manage:

I click Block public access, choose Block all public sharing, and click Update:
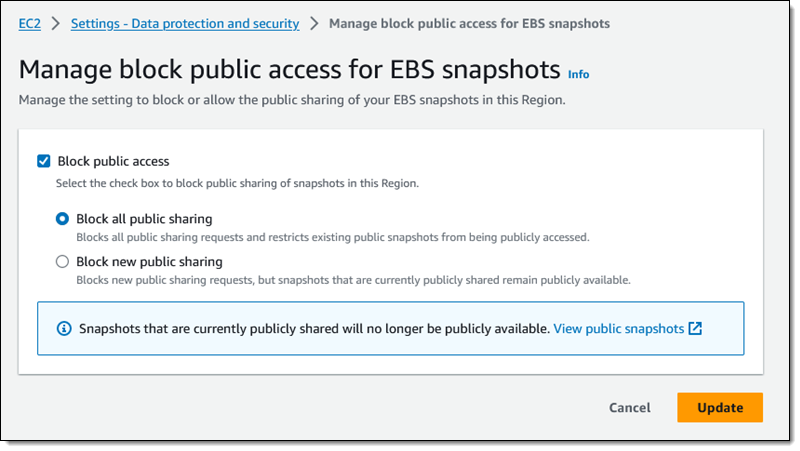
This is a per-region setting, and it takes effect within minutes. I can see the updated status in the console:

I inspect one of my snapshots in the region, and see that I cannot share it publicly:
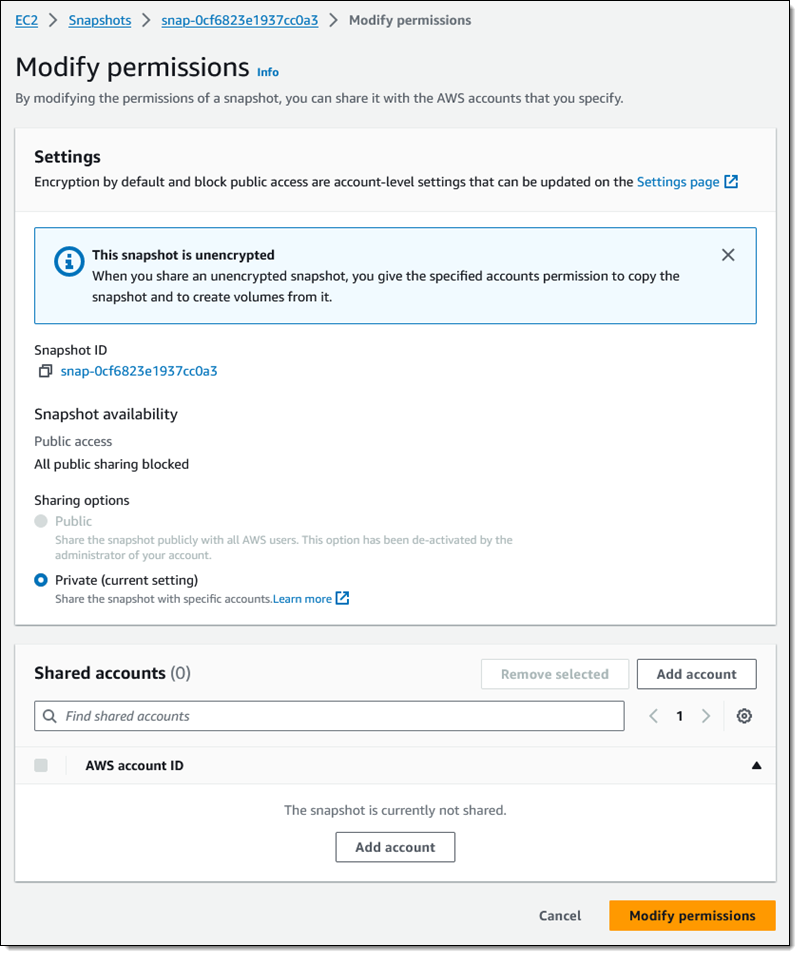
As you can see, I still have the ability to share the snapshot with specific AWS accounts.
If I have chosen Block all public sharing, any snapshots that I have previously shared will no longer be listed when another AWS customer calls DescribeSnapshots in pursuit of publicly accessible snapshots.
Things to Know
Here are a couple of really important things to know about this new feature:
Region-Level – This is a regional setting, and must be applied in each region where you want to block the ability to share snapshots publicly.
API Functions & IAM Permissions – In addition to EnableSnapshotBlockPublicAccess, other functions for managing this feature include DisableSnapshotBlockPublicAccess and GetSnapshotBlockPublicAccessState. To use these functions (or their console/CLI equivalents) you must have the ec2:EnableSnapshotBlockPublicAccess, ec2:DisableSnapshotBlockPublicAccess, and ec2:GetSnapshotBlockPublicAccessState IAM permissions.
AMIs – This does not affect the ability to share Amazon Machine Images (AMIs) publicly. To learn how to manage public sharing of AMIs, visit Block public access to your AMIs.
— Jeff;
An Overview of Bulk Sender Changes at Yahoo/Gmail
Post Syndicated from Dustin Taylor original https://aws.amazon.com/blogs/messaging-and-targeting/an-overview-of-bulk-sender-changes-at-yahoo-gmail/
In a move to safeguard user inboxes, Gmail and Yahoo Mail announced a new set of requirements for senders effective from February 2024. Let’s delve into the specifics and what Amazon Simple Email Service (Amazon SES) customers need to do to comply with these requirements.
What are the new email sender requirements?
The new requirements include long-standing best practices that all email senders should adhere to in order to achieve good deliverability with mailbox providers. What’s new is that Gmail, Yahoo Mail, and other mailbox providers will require alignment with these best practices for those who send bulk messages over 5000 per day or if a significant number of recipients indicate the mail as spam.
The requirements can be distilled into 3 categories: 1) stricter adherence to domain authentication, 2) give recipients an easy way to unsubscribe from bulk mail, and 3) monitoring spam complaint rates and keeping them under a 0.3% threshold.
* This blog was originally published in November 2023, and updated on January 12, 2024 to clarify timelines, and to provide links to additional resources.
1. Domain authentication
Mailbox providers will require domain-aligned authentication with DKIM and SPF, and they will be enforcing DMARC policies for the domain used in the From header of messages. For example, gmail.com will be publishing a quarantine DMARC policy, which means that unauthorized messages claiming to be from Gmail will be sent to Junk folders.
Read Amazon SES: Email Authentication and Getting Value out of Your DMARC Policy to gain a deeper understanding of SPF and DKIM domain-alignment and maximize the value from your domain’s DMARC policy.
The following steps outline how Amazon SES customers can adhere to the domain authentication requirements:
Adopt domain identities: Amazon SES customers who currently rely primarily on email address identities will need to adopt verified domain identities to achieve better deliverability with mailbox providers. By using a verified domain identity with SES, your messages will have a domain-aligned DKIM signature.
Not sure what domain to use? Read Choosing the Right Domain for Optimal Deliverability with Amazon SES for additional best practice guidance regarding sending authenticated email.
Configure a Custom MAIL FROM domain: To further align with best practices, SES customers should also configure a custom MAIL FROM domain so that SPF is domain-aligned.
The table below illustrates the three scenarios based on the type of identity you use with Amazon SES
| Scenarios using example.com in the From header | DKIM authenticated identifier | SPF authenticated identifier | DMARC authentication results |
| [email protected] as a verified email address identity | amazonses.com | email.amazonses.com | Fail – DMARC analysis fails as the sending domain does not have a DKIM signature or SPF record that matches. |
| example.com as a verified domain identity | example.com | email.amazonses.com | Success – DKIM signature aligns with sending domain which will cause DMARC checks to pass. |
| example.com as a verified domain identity, and bounce.example.com as a custom MAIL FROM domain | example.com | bounce.example.com | Success – DKIM and SPF are aligned with sending domain. |
Figure 1: Three scenarios based on the type of identity used with Amazon SES. Using a verified domain identity and configuring a custom MAIL FROM domain will result in both DKIM and SPF being aligned to the From header domain’s DMARC policy.
Be strategic with subdomains: Amazon SES customers should consider a strategic approach to the domains and subdomains used in the From header for different email sending use cases. For example, use the marketing.example.com verified domain identity for sending marketing mail, and use the receipts.example.com verified domain identity to send transactional mail.
Why? Marketing messages may have higher spam complaint rates and would need to adhere to the bulk sender requirements, but transactional mail, such as purchase receipts, would not necessarily have spam complaints high enough to be classified as bulk mail.
Publish DMARC policies: Publish a DMARC policy for your domain(s). The domain you use in the From header of messages needs to have a policy by setting the p= tag in the domain’s DMARC policy in DNS. The policy can be set to “p=none” to adhere to the bulk sending requirements and can later be changed to quarantine or reject when you have ensured all email using the domain is authenticated with DKIM or SPF domain-aligned authenticated identifiers.
2. Set up an easy unsubscribe for email recipients
Bulk senders are expected to include a mechanism to unsubscribe by adding an easy to find link within the message. The February 2024 mailbox provider rules will require senders to additionally add one-click unsubscribe headers as defined by RFC 2369 and RFC 8058. These headers make it easier for recipients to unsubscribe, which reduces the rate at which recipients will complain by marking messages as spam.
There are many factors that could result in your messages being classified as bulk by any mailbox provider. Volume over 5000 per day is one factor, but the primary factor that mailbox providers use is in whether the recipient actually wants to receive the mail.
If you aren’t sure if your mail is considered bulk, monitor your spam complaint rates. If the complaint rates are high or growing, it is a sign that you should offer an easy way for recipients to unsubscribe.
How to adhere to the easy unsubscribe requirement
The following steps outline how Amazon SES customers can adhere to the easy unsubscribe requirement:
Add one-click unsubscribe headers to the messages you send: Amazon SES customers sending bulk or potentially unwanted messages will need to implement an easy way for recipients to unsubscribe, which they can do using the SES subscription management feature.
Mailbox providers are requiring that large senders give recipients the ability to unsubscribe from bulk email in one click using the one-click unsubscribe header, however it is acceptable for the unsubscribe link in the message to direct the recipient to a landing page for the recipient to confirm their opt-out preferences.
To set up one-click unsubscribe without using the SES subscription management feature, include both of these headers in outgoing messages:
- List-Unsubscribe-Post: List-Unsubscribe=One-Click
- List-Unsubscribe: <https://example.com/unsubscribe/example>
When a recipient unsubscribes using one-click, you receive this POST request:
If you adopt the SES subscription management feature, make sure you integrate the recipient opt-out preferences with the source of your email sending lists. If you implement your own one-click unsubscribe (for example, using Amazon API Gateway and an AWS Lambda function), make sure it designed to suppress sending to email addresses in your source email lists.
Review your email list building practices: Ensure responsible email practices by refraining from purchasing email lists, safeguarding opt-in forms from bot abuse, verifying recipients’ preferences through confirmation messages, and abstaining from automatically enrolling recipients in categories that were not requested.
Having good list opt-in hygiene is the best way to ensure that you don’t have high spam complaint rates before you adhere to the new required best practices. To learn more, read What is a Spam Trap, and Why You Should Care.
3. Monitor spam rates
Mailbox providers will require that all senders keep spam complaint rates below 0.3% to avoid having their email treated as spam by the mailbox provider. The following steps outline how Amazon SES customers can meet the spam complaint rate requirement:
Enroll with Google Postmaster Tools: Amazon SES customers should enroll with Google Postmaster Tools to monitor their spam complaint rates for Gmail recipients.
Gmail recommends spam complaint rates stay below 0.1%. If you send to a mix of Gmail recipients and recipients on other mailbox providers, the spam complaint rates reported by Gmail’s Postmaster Tools are a good indicator of your spam complaint rates at mailbox providers who don’t let you view metrics.
Enable Amazon SES Virtual Deliverability Manager: Enable Virtual Deliverability Manager (VDM) in your Amazon SES account. Customers can use VDM to monitor bounce and complaint rates for many mailbox providers. Amazon SES recommends customers to monitor reputation metrics and stay below a 0.1% complaint rate.
Segregate and secure your sending using configuration sets: In addition to segregating sending use cases by domain, Amazon SES customers should use configuration sets for each sending use case.
Using configuration sets will allow you to monitor your sending activity and implement restrictions with more granularity. You can even pause the sending of a configuration set automatically if spam complaint rates exceed your tolerance threshold.
Conclusion
These changes are planned for February 2024, but be aware that the exact timing and methods used by each mailbox provider may vary. If you experience any deliverability issues with any mailbox provider prior to February, it is in your best interest to adhere to these required best practices as a first step.
We hope that this blog clarifies any areas of confusion on this change and provides you with the information you need to be prepared for February 2024. Happy sending!
Helpful links:
- Gmail Announcement: https://blog.google/products/gmail/gmail-security-authentication-spam-protection/
- Yahoo Announcement: https://blog.postmaster.yahooinc.com/post/730172167494483968/more-secure-less-spam
- DMARC Policy Blog: Amazon SES: Email Authentication and Getting Value out of Your DMARC Policy
- Choosing the Right Domain Blog: Choosing the Right Domain for Optimal Deliverability with Amazon SES
New for Amazon Comprehend – Toxicity Detection
Post Syndicated from Danilo Poccia original https://aws.amazon.com/blogs/aws/new-for-amazon-comprehend-toxicity-detection/
With Amazon Comprehend, you can extract insights from text without being a machine learning expert. Using its built-in models, Comprehend can analyze the syntax of your input documents and find entities, events, key phrases, personally identifiable information (PII), and the overall sentiment or sentiments associated with specific entities (such as brands or products).
Today, we are adding the capability to detect toxic content. This new capability helps you build safer environments for your end users. For example, you can use toxicity detection to improve the safety of applications open to external contributions such as comments. When using generative AI, toxicity detection can be used to check the input prompts and the output responses from large language models (LLMs).
You can use toxicity detection with the AWS Command Line Interface (AWS CLI) and AWS SDKs. Let’s see how this works in practice with a few examples using the AWS CLI, an AWS SDK, and to check the use of an LLM.
Using Amazon Comprehend Toxicity Detection with AWS CLI
The new detect-toxic-content subcommand in the AWS CLI detects toxicity in text. The output contains a list of labels, one for each text segment in input. For each text segment, a list is provided with the labels and a score (between 0 and 1).

For example, this AWS CLI command analyzes one text segment and returns one Labels section and an overall Toxicity score for the segment between o and 1:
{
    "ResultList": [
        {
            "Labels": [
                {
                    "Name": "PROFANITY",
                    "Score": 0.00039999998989515007
                },
                {
                    "Name": "HATE_SPEECH",
                    "Score": 0.01510000042617321
                },
                {
                    "Name": "INSULT",
                    "Score": 0.004699999932199717
                },
                {
                    "Name": "GRAPHIC",
                    "Score": 9.999999747378752e-05
                },
                {
                    "Name": "HARASSMENT_OR_ABUSE",
                    "Score": 0.0006000000284984708
                },
                {
                    "Name": "SEXUAL",
                    "Score": 0.03889999911189079
                },
                {
                    "Name": "VIOLENCE_OR_THREAT",
                    "Score": 0.016899999231100082
                }
            ],
            "Toxicity": 0.012299999594688416
        }
    ]
}
As expected, all scores are close to zero, and no toxicity was detected in this text.
To pass input as a file, I first use the AWS CLI --generate-cli-skeleton option to generate a skeleton of the JSON syntax used by the detect-toxic-content command:
{
    "TextSegments": [
        {
            "Text": ""
        }
    ],
    "LanguageCode": "en"
}
I write the output to a file and add three text segments (I will not show here the text used to show what happens with toxic content). This time, different levels of toxicity content has been found. Each Labels section is related to the corresponding input text segment.
{
    "ResultList": [
        {
            "Labels": [
                {
                    "Name": "PROFANITY",
                    "Score": 0.03020000085234642
                },
                {
                    "Name": "HATE_SPEECH",
                    "Score": 0.12549999356269836
                },
                {
                    "Name": "INSULT",
                    "Score": 0.0738999992609024
                },
                {
                    "Name": "GRAPHIC",
                    "Score": 0.024399999529123306
                },
                {
                    "Name": "HARASSMENT_OR_ABUSE",
                    "Score": 0.09510000050067902
                },
                {
                    "Name": "SEXUAL",
                    "Score": 0.023900000378489494
                },
                {
                    "Name": "VIOLENCE_OR_THREAT",
                    "Score": 0.15549999475479126
                }
            ],
            "Toxicity": 0.06650000065565109
        },
        {
            "Labels": [
                {
                    "Name": "PROFANITY",
                    "Score": 0.03400000184774399
                },
                {
                    "Name": "HATE_SPEECH",
                    "Score": 0.2676999866962433
                },
                {
                    "Name": "INSULT",
                    "Score": 0.1981000006198883
                },
                {
                    "Name": "GRAPHIC",
                    "Score": 0.03139999881386757
                },
                {
                    "Name": "HARASSMENT_OR_ABUSE",
                    "Score": 0.1777999997138977
                },
                {
                    "Name": "SEXUAL",
                    "Score": 0.013000000268220901
                },
                {
                    "Name": "VIOLENCE_OR_THREAT",
                    "Score": 0.8395000100135803
                }
            ],
            "Toxicity": 0.41280001401901245
        },
        {
            "Labels": [
                {
                    "Name": "PROFANITY",
                    "Score": 0.9997000098228455
                },
                {
                    "Name": "HATE_SPEECH",
                    "Score": 0.39469999074935913
                },
                {
                    "Name": "INSULT",
                    "Score": 0.9265999794006348
                },
                {
                    "Name": "GRAPHIC",
                    "Score": 0.04650000110268593
                },
                {
                    "Name": "HARASSMENT_OR_ABUSE",
                    "Score": 0.4203999936580658
                },
                {
                    "Name": "SEXUAL",
                    "Score": 0.3353999853134155
                },
                {
                    "Name": "VIOLENCE_OR_THREAT",
                    "Score": 0.12409999966621399
                }
            ],
            "Toxicity": 0.8180999755859375
        }
    ]
}
Using Amazon Comprehend Toxicity Detection with AWS SDKs
Similar to what I did with the AWS CLI, I can use an AWS SDK to programmatically detect toxicity in my applications. The following Python script uses the AWS SDK for Python (Boto3) to detect toxicity in the text segments and print the labels if the score is greater than a specified threshold. In the code, I redacted the content of the second and third text segments and replaced it with ***.
import boto3

comprehend = boto3.client('comprehend')

THRESHOLD = 0.2
response = comprehend.detect_toxic_content(
    TextSegments=[
        {
            "Text": "You can go through the door go, he's waiting for you on the right."
        },
        {
            "Text": "***"
        },
        {
            "Text": "***"
        }
    ],
    LanguageCode='en'
)

result_list = response['ResultList']

for i, result in enumerate(result_list):
    labels = result['Labels']
    detected = [ l for l in labels if l['Score'] > THRESHOLD ]
    if len(detected) > 0:
        print("Text segment {}".format(i + 1))
        for d in detected:
            print("{} score {:.2f}".format(d['Name'], d['Score']))
I run the Python script. The output contains the labels and the scores detected in the second and third text segments. No toxicity is detected in the first text segment.
Using Amazon Comprehend Toxicity Detection with LLMs
I deployed the Mistral 7B model using Amazon SageMaker JumpStart as described in this blog post.
To avoid toxicity in the responses of the model, I built a Python script with three functions:
query_endpointinvokes the Mistral 7B model using the endpoint deployed by SageMaker JumpStart.check_toxicityuses Comprehend to detect toxicity in a text and return a list of the detected labels.avoid_toxicitytakes in input a list of the detected labels and returns a message describing what to do to avoid toxicity.
The query to the LLM goes through only if no toxicity is detected in the input prompt. Then, the response from the LLM is printed only if no toxicity is detected in output. In case toxicity is detected, the script provides suggestions on how to fix the input prompt.
Here’s the code of the Python script:
import json
import boto3

comprehend = boto3.client('comprehend')
sagemaker_runtime = boto3.client("runtime.sagemaker")

ENDPOINT_NAME = "<REPLACE_WITH_YOUR_SAGEMAKER_JUMPSTART_ENDPOINT>"
THRESHOLD = 0.2


def query_endpoint(prompt):
    payload = {
        "inputs": prompt,
        "parameters": {
            "max_new_tokens": 68,
            "no_repeat_ngram_size": 3,
        },
    }
    response = sagemaker_runtime.invoke_endpoint(
        EndpointName=ENDPOINT_NAME, ContentType="application/json", Body=json.dumps(payload).encode("utf-8")
    )
    model_predictions = json.loads(response["Body"].read())
    generated_text = model_predictions[0]["generated_text"]
    return generated_text


def check_toxicity(text):
    response = comprehend.detect_toxic_content(
        TextSegments=[
            {
                "Text":  text
            }
        ],
        LanguageCode='en'
    )

    labels = response['ResultList'][0]['Labels']
    detected = [ l['Name'] for l in labels if l['Score'] > THRESHOLD ]

    return detected


def avoid_toxicity(detected):
    formatted = [ d.lower().replace("_", " ") for d in detected ]
    message = (
        "Avoid content that is toxic and is " +
        ", ".join(formatted) + ".\n"
    )
    return message


prompt = "Building a website can be done in 10 simple steps:"

detected_labels = check_toxicity(prompt)

if len(detected_labels) > 0:
    # Toxicity detected in the input prompt
    print("Please fix the prompt.")
    print(avoid_toxicity(detected_labels))
else:
    response = query_endpoint(prompt)

    detected_labels = check_toxicity(response)

    if len(detected_labels) > 0:
        # Toxicity detected in the output response
        print("Here's an improved prompt:")
        prompt = avoid_toxicity(detected_labels) + prompt
        print(prompt)
    else:
        print(response)
You’ll not get a toxic response with the sample prompt in the script, but it’s safe to know that you can set up an automatic process to check and mitigate if that happens.
Availability and Pricing
Toxicity detection for Amazon Comprehend is available today in the following AWS Regions: US East (N. Virginia), US West (Oregon), Europe (Ireland), and Asia Pacific (Sydney).
When using toxicity detection, there are no long-term commitments, and you pay based on the number of input characters in units of 100 characters (1 unit = 100 characters), with a minimum charge of 3 units (300 character) per request. For more information, see Amazon Comprehend pricing.
— Danilo
New – Manage Planned Lifecycle Events on AWS Health
Post Syndicated from Veliswa Boya original https://aws.amazon.com/blogs/aws/new-manage-planned-lifecycle-events-on-aws-health/
We are announcing new features in AWS Health to help you manage planned lifecycle events for your AWS resources and dynamically track the completion of actions that your team takes at the resource-level to ensure continued smooth operations of your applications. Some examples of planned lifecycle events are an Amazon Elastic Kubernetes Service (Amazon EKS) Kubernetes version end of standard support, Amazon Relational Database Service (Amazon RDS) certificate rotations, and end of support for other open source software, to name a few.
These features include:
- The ability to dynamically track the completion of actions at the resource level where possible, to minimize disruption to applications.
- Timely visibility into upcoming planned lifecycle events, using notifications at least 90 days in advance for minor changes, and 180 days in advance for major changes, whenever possible.
- A standardized data format that helps you prepare and take actions. It integrates AWS Health events programmatically with your preferred operational tools, using AWS Health API.
- An organization-wide visibility into planned lifecycle events for teams that manage workloads across the company with delegated administrator. This means that central teams such as Cloud Center of Excellence (CCoE) teams, no longer need to use the management account to access the organizational view.
- A single feed of AWS Health events from all accounts in your organization on Amazon EventBridge. This provides a centralized way to automate the management of AWS Health events across your organization by creating rules on EventBridge to take actions. Depending on the type of event, you can capture event information, initiate additional events, send notifications, take corrective action, or perform other actions. For example, you can use AWS Health to receive email, AWS Chatbot, or push notifications to the AWS Console Mobile Application if you have AWS resources in your AWS account that are scheduled for updates, such as Amazon Elastic Compute Cloud (Amazon EC2) instances.
How it Works
Planned lifecycle events are available through the AWS Health Dashboard, AWS Health API, and EventBridge. You can automate the management of AWS Health events across your organization by creating rules on EventBridge that includes the “source”: [“aws.health”] value to receive AWS Health notifications or initiate actions based on the rules created. For example, if AWS Health publishes an event about your EC2 instances, then you can use these notifications to take action and update or replace your resources as needed. You can view the planned lifecycle events for your AWS resources in the Scheduled changes tab.

Table View – Organizational level
To prioritize events, you can now see scheduled changes in a calendar view. The event has a start time to indicate when the change commences. The status remains as Upcoming until the change occurs or all of the affected resources have been actioned. The event status changes to Completed when all of the affected resources have been actioned. You can also deselect event statuses that you don’t want to focus on. To show more specific event details, select an event to open the split panel view to the right or the bottom of the screen.

Calendar event selected – Organizational level (Affected resources)
When selecting the Affected resources tab on the detailed view of an event, customers can see relevant account information that can help you reach out to the right people to resolve impaired resources.

Affected resources view – Account level
Integration with Other AWS Services
Using EventBridge integrations that already exist in AWS Health, you can send change events, and their fully managed lifecycles to other tools such as JIRA, ServiceNow, and AWS Systems Manager OpsCenter. EventBridge sends all updates to events (for example, timestamps, resource status, and more) to these tools, allowing you to track the status of events in your preferred tooling.

EventBridge integrations
Now Available
Planned lifecycle events for AWS Health are available in all AWS Regions where AWS Health is available except China and GovCloud Regions.
To learn more, visit the AWS Health user guide. You can submit your questions to AWS re:Post for AWS Health, or through your usual AWS Support contacts.
— Veliswa
Over a Decade Later Powerline Networking Still Sucks
Post Syndicated from Patrick Kennedy original https://www.servethehome.com/over-a-decade-later-powerline-av-networking-still-sucks-tp-link-netgear/
We replaced a Powerline network segment with 14+-year-old Netgear adapters with brand new Powerline networking and the results were very poor
The post Over a Decade Later Powerline Networking Still Sucks appeared first on ServeTheHome.
AI 101: Training vs. Inference
Post Syndicated from Stephanie Doyle original https://www.backblaze.com/blog/ai-101-training-vs-inference/

What do Sherlock Holmes and ChatGPT have in common? Inference, my dear Watson!
“We approached the case, you remember, with an absolutely blank mind, which is always an advantage. We had formed no theories. We were simply there to observe and to draw inferences from our observations.”
—Sir Arthur Conan Doyle, The Adventures of the Cardboard Box
As we all continue to refine our thinking around artificial intelligence (AI), it’s useful to define terminology that describes the various stages of building and using AI algorithms—namely, the AI training stage and the AI inference stage. As we see in the quote above, these are not new concepts: they’re based on ideas and methodologies that have been around since before Sherlock Holmes’ time.
If you’re using AI, building AI, or just curious about AI, it’s important to understand the difference between these two stages so you understand how data moves through an AI workflow. That’s what I’ll explain today.
The TL:DR
The difference between these two terms can be summed up fairly simply: first you train an AI algorithm, then your algorithm uses that training to make inferences from data. To create a whimsical analogy, when an algorithm is training, you can think of it like Watson—still learning how to observe and draw conclusions through inference. Once it’s trained, it’s an inferring machine, a.k.a. Sherlock Holmes.
Whimsy aside, let’s dig a little deeper into the tech behind AI training and AI inference, the differences between them, and why the distinction is important.
Obligatory Neural Network Recap
Neural networks have emerged as the brainpower behind AI, and a basic understanding of how they work is foundational when it comes to understanding AI.
Complex decisions, in theory, can be broken down into a series of yeses and nos, which means that they can be encoded in binary. Neural networks have the ability to combine enough of those smaller decisions, weigh how they affect each other, and then use that information to solve complex problems. And, because more complex decisions require more points of information to come to a final decision, they require more processing power. Neural networks are one of the most widely used approaches to AI and machine learning (ML).

What Is AI Training?: Understanding Hyperparameters and Parameters
In simple terms, training an AI algorithm is the process through which you take a base algorithm and then teach it how to make the correct decision. This process requires large amounts of data, and can include various degrees of human oversight. How much data you need has a relationship to the number of parameters you set for your algorithm as well as the complexity of a problem.
We made this handy dandy diagram to show you how data moves through the training process:

And hey—we’re leaving out a lot of nuance in that conversation because dataset size, parameter choice, etc. is a graduate-level topic on its own, and usually is considered proprietary information by the companies who are training an AI algorithm. It suffices to say that dataset size and number of parameters are both significant and have a relationship to each other, though it’s not a direct cause/effect relationship. And, both the number of parameters and the size of the dataset affect things like processing resources—but that conversation is outside of scope for this article (not to mention a hot topic in research).
As with everything, your use case determines your execution. Some types of tasks actually see excellent results with smaller datasets and more parameters, whereas others require more data and fewer parameters. Bringing it back to the real world, here’s a very cool graph showing how many parameters different AI systems have. Note that they very helpfully identified what type of task each system is designed to solve:
So, let’s talk about what parameters are with an example. Back in our very first AI 101 post, we talked about ways to frame an algorithm in simple terms:
Machine learning does not specify how much knowledge the bot you’re training starts with—any task can have more or fewer instructions. You could ask your friend to order dinner, or you could ask your friend to order you pasta from your favorite Italian place to be delivered at 7:30 p.m.
Both of those tasks you just asked your friend to complete are algorithms. The first algorithm requires your friend to make more decisions to execute the task at hand to your satisfaction, and they’ll do that by relying on their past experience of ordering dinner with you—remembering your preferences about restaurants, dishes, cost, and so on.
The factors that help your friend make a decision about dinner are called hyperparameters and parameters. Hyperparameters are those that frame the algorithm—they are set outside the training process, but can influence the training of the algorithms. In the example above, a hyperparameter would be how you structure your dinner feedback. Do you thumbs up or down each dish? Do you write a short review? You get the idea.
Parameters are factors that the algorithm derives through training. In the example above, that’s what time you prefer to eat dinner, which restaurants you enjoy after eating, and so on.
When you’ve trained a neural network, there will be heavier weights between various nodes. That’s a shorthand of saying that an algorithm will prefer a path it knows is significant, and if you want to really get nerdy with it, this article is well-researched, has a ton of math explainers for various training methods, and includes some fantastic visuals. For our purposes, here’s one way people visualize a “trained” algorithm:

The “dropout method” is essentially adding weight to the relationships an AI algorithm has found to be significant for the dataset it’s working on. It can then de-prioritize (or sometimes even eliminate) the other relationships.
Once you have a trained algorithm, then you can use it with a reasonable degree of certainty that it will give you good results, and that leads us to inference.
What Is AI Inference?
Once you’ve trained your algorithm, you can send it out in the world to do its job (and make yours easier). When you present a trained AI algorithm with a problem and it gives you an answer, that’s called inference. It’s using the way it was trained to draw conclusions or make predictions, depending on how it was built, and once an algorithm is in the “inference stage”, it’s no longer learning (usually).
Here’s our diagram for how data might move through an inference process:

As we’ve seen in the real world, this does not mean that the AI model will give you a perfect answer every time—depending on, for example, the AI’s access to new or current information, the complexity of training, etc., the algorithm might give you a better or worse (more or less accurate) answer. But, it will be able to look at a new piece of information or dataset, and return a response.
When I asked our friend ChatGPT about this, it broke down inference and defined it in relation to the logical underpinnings of different types of algorithms. (As a mere human, how could I resist using inference while writing about inference?) Sure, ChatGPT may be merely mimicking human-like dialogue based on its ingestion of the whole internet, then giving me the most likely answer based on its specialized neural network that predicts the likelihood of the next word in response to my conversational query and without access to data after January 2022, but here’s what our AI friend had to say for itself:
- Machine Learning Inference: In machine learning, after a model has been trained on a dataset, it is deployed to make predictions or classifications on new, unseen data. During inference, the model takes the input data, processes it, and produces an output or a prediction based on the patterns and relationships it learned during training. For example, a trained machine learning model might be used to classify images, predict stock prices, or identify spam emails.
- Deep Learning Inference: Deep learning, a subfield of machine learning, involves neural networks with multiple layers. In deep learning, inference means feeding an input through a trained deep neural network and obtaining an output. This is commonly used in applications like image recognition, natural language processing, and speech recognition. Inference in deep learning can be computationally intensive, and specialized hardware, such as GPUs and TPUs, are often used to accelerate the process.
- Rule-Based Systems Inference: In rule-based AI systems, inference is the process of applying logical rules to make decisions or draw conclusions. These systems use a set of predefined rules and facts to reason and infer new information. For example, in an expert system for medical diagnosis, inference involves applying a set of rules to patient symptoms and medical knowledge to arrive at a diagnosis.
- Probabilistic Inference: In probabilistic AI, inference is used to estimate probabilities and uncertainty. Bayesian networks and Markov decision processes are examples of probabilistic models that perform inference to compute probabilities of events or make decisions based on probabilities.
You’ll notice that each of these are saying basically the same thing: the AI algorithm applies its decision-making paradigm to a problem.
Why Stop Learning During the Inference Stage?
In general, it’s important to keep these two stages—training and inference—of an AI algorithm separate for a few reasons:
- Efficiency: Training is typically a computationally intensive process, whereas inference is usually faster and less resource-intensive. Separating them allows for efficient use of computational resources.
- Generalization: The model’s ability to generalize from training data to unseen data is a key feature. It should not learn from every new piece of data it encounters during inference to maintain this generalization ability.
- Reproducibility: When using trained models in production or applications, it’s important to have consistency and reproducibility in the results. If models were allowed to learn during inference, it would introduce variability and unpredictability in their behavior.
There are some specialized AI algorithms that want to continue learning during the inference stage—your Netflix algorithm is a good example, as are self-driving cars, or dynamic pricing models used to set airfare pricing. On the other hand, the majority of problems we’re trying to solve with AI algorithms deliver better decisions by separating these two phases—think of things like image recognition, language translation, or medical diagnosis, for example.
Training vs. Inference (But, Really: Training Then Inference)
To recap: the AI training stage is when you feed data into your learning algorithm to produce a model, and the AI inference stage is when your algorithm uses that training to make inferences from data. Here’s a chart for quick reference:
| Training | Inference |
|---|---|
| Feed training data into a learning algorithm. | Apply the model to inference data. |
| Produces a model comprising code and data. | Produces output data. |
| One time(ish). Retraining is sometimes necessary. | Often continuous. |
The difference may seem inconsequential at first glance, but defining these two stages helps to show implications for AI adoption particularly with businesses. That is, given that it’s much less resource intensive (and therefore, less expensive), it’s likely to be much easier for businesses to integrate already-trained AI algorithms with their existing systems.
And, as always, we’re big believers in demystifying terminology for discussion purposes. Let us know what you think in the comments, and feel free to let us know what you’re interested in learning about next.
The post AI 101: Training vs. Inference appeared first on Backblaze Blog | Cloud Storage & Cloud Backup.
Create a modern data platform using the Data Build Tool (dbt) in the AWS Cloud
Post Syndicated from Prantik Gachhayat original https://aws.amazon.com/blogs/big-data/create-a-modern-data-platform-using-the-data-build-tool-dbt-in-the-aws-cloud/
Building a data platform involves various approaches, each with its unique blend of complexities and solutions. A modern data platform entails maintaining data across multiple layers, targeting diverse platform capabilities like high performance, ease of development, cost-effectiveness, and DataOps features such as CI/CD, lineage, and unit testing. In this post, we delve into a case study for a retail use case, exploring how the Data Build Tool (dbt) was used effectively within an AWS environment to build a high-performing, efficient, and modern data platform.
dbt is an open-source command line tool that enables data analysts and engineers to transform data in their warehouses more effectively. It does this by helping teams handle the T in ETL (extract, transform, and load) processes. It allows users to write data transformation code, run it, and test the output, all within the framework it provides. dbt enables you to write SQL select statements, and then it manages turning these select statements into tables or views in Amazon Redshift.
Use case
The Enterprise Data Analytics group of a large jewelry retailer embarked on their cloud journey with AWS in 2021. As part of their cloud modernization initiative, they sought to migrate and modernize their legacy data platform. The aim was to bolster their analytical capabilities and improve data accessibility while ensuring a quick time to market and high data quality, all with low total cost of ownership (TCO) and no need for additional tools or licenses.
dbt emerged as the perfect choice for this transformation within their existing AWS environment. This popular open-source tool for data warehouse transformations won out over other ETL tools for several reasons. dbt’s SQL-based framework made it straightforward to learn and allowed the existing development team to scale up quickly. The tool also offered desirable out-of-the-box features like data lineage, documentation, and unit testing. A crucial advantage of dbt over stored procedures was the separation of code from data—unlike stored procedures, dbt doesn’t store the code in the database itself. This separation further simplifies data management and enhances the system’s overall performance.
Let’s explore the architecture and learn how to build this use case using AWS Cloud services.
Solution overview
The following architecture demonstrates the data pipeline built on dbt to manage the Redshift data warehouse ETL process.

Figure 1 : Modern data platform using AWS Data Services and dbt
This architecture consists of the following key services and tools:
- Amazon Redshift was utilized as the data warehouse for the data platform, storing and processing vast amounts of structured and semi-structured data
- Amazon QuickSight served as the business intelligence (BI) tool, allowing the business team to create analytical reports and dashboards for various business insights
- AWS Database Migration Service (AWS DMS) was employed to perform change data capture (CDC) replication from various source transactional databases
- AWS Glue was put to work, loading files from the SFTP location to the Amazon Simple Storage Service (Amazon S3) landing bucket and subsequently to the Redshift landing schema
- AWS Lambda functioned as a client program, calling third-party APIs and loading the data into Redshift tables
- AWS Fargate, a serverless container management service, was used to deploy the consumer application for source queues and topics
- Amazon Managed Workflows for Apache Airflow (Amazon MWAA) was used to orchestrate different tasks of dbt pipelines
- dbt, an open-source tool, was employed to write SQL-based data pipelines for data stored in Amazon Redshift, facilitating complex transformations and enhancing data modeling capabilities
Let’s take a closer look at each component and how they interact in the overall architecture to transform raw data into insightful information.
Data sources
As part of this data platform, we are ingesting data from diverse and varied data sources, including:
- Transactional databases – These are active databases that store real-time data from various applications. The data typically encompasses all transactions and operations that the business engages in.
- Queues and topics – Queues and topics come from various integration applications that generate data in real time. They represent an instantaneous stream of information that can be used for real-time analytics and decision-making.
- Third-party APIs – These provide analytics and survey data related to ecommerce websites. This could include details like traffic metrics, user behavior, conversion rates, customer feedback, and more.
- Flat files – Other systems supply data in the form of flat files of different formats. These files, stored in an SFTP location, might contain records, reports, logs, or other kinds of raw data that can be further processed and analyzed.
Data ingestion
Data from various sources are grouped into two major categories: real-time ingestion and batch ingestion.
Real-time ingestion uses the following services:
- AWS DMS – AWS DMS is used to create CDC replication pipelines from OLTP (Online Transaction Processing) databases. The data is loaded into Amazon Redshift in near-real time to ensure that the most recent information is available for analysis. You can also use Amazon Aurora zero-ETL integration with Amazon Redshift to ingest data directly from OLTP databases to Amazon Redshift.
- Fargate –Fargate is used to deploy Java consumer applications that ingest data from source topics and queues in real time. This real-time data consumption can help the business make immediate and data-informed decisions. You can also use Amazon Redshift Streaming Ingestion to ingest data from streaming engines like Amazon Kinesis Data Streams or Amazon Managed Streaming for Apache Kafka (Amazon MSK) into Amazon Redshift.
Batch ingestion uses the following services:
- Lambda – Lambda is used as a client for calling third-party APIs and loading the resultant data into Redshift tables. This process has been scheduled to run daily, ensuring a consistent batch of fresh data for analysis.
- AWS Glue – AWS Glue is used to load files into Amazon Redshift through the S3 data lake. You can also use features like auto-copy from Amazon S3 (feature under preview) to ingest data from Amazon S3 to Amazon Redshift. However, the focus of this post is more on data processing within Amazon Redshift, rather than on the data loading process. Data ingestion, whether real time or batch, forms the basis of any effective data analysis, enabling organizations to gather information from diverse sources and use it for insightful decision-making.
Data warehousing using Amazon Redshift
In Amazon Redshift, we’ve established three schemas, each serving as a different layer in the data architecture:
- Landing layer – This is where all data ingested by our services initially lands. It’s raw, unprocessed data straight from the source.
- Certified dataset (CDS) layer – This is the next stage, where data from the landing layer undergoes cleaning, normalization, and aggregation. The cleansed and processed data is stored in this certified dataset schema. It serves as a reliable, organized source for downstream data analysis.
- User-friendly data mart (UFDM) layer – This final layer uses data from the CDS layer to create data mart tables. These are specifically tailored to support BI reports and dashboards as per the business requirements. The goal of this layer is to present the data in a way that is most useful and accessible for end-users.
This layered approach to data management allows for efficient and organized data processing, leading to more accurate and meaningful insights.
Data pipeline
dbt, an open-source tool, can be installed in the AWS environment and set up to work with Amazon MWAA. We store our code in an S3 bucket and orchestrate it using Airflow’s Directed Acyclic Graphs (DAGs). This setup facilitates our data transformation processes in Amazon Redshift after the data is ingested into the landing schema.
To maintain modularity and handle specific domains, we create individual dbt projects. The nature of the data reporting—real-time or batch—affects how we define our dbt materialization. For real-time reporting, we define materialization as a view, loading data into the landing schema using AWS DMS from database updates or from topic or queue consumers. For batch pipelines, we define materialization as a table, allowing data to be loaded from various types of sources.
In some instances, we have had to build data pipelines that extend from the source system all the way to the UFDM layer. This can be accomplished using Airflow DAGs, which we discuss further in the next section.
To wrap up, it’s worth mentioning that we deploy a dbt webpage using a Lambda function and enable a URL for this function. This webpage serves as a hub for documentation and data lineage, further bolstering the transparency and understanding of our data processes.
ETL job orchestration
In our data pipeline, we follow these steps for job orchestration:
- Establish a new Amazon MWAA environment. This environment serves as the central hub for orchestrating our data pipelines.
- Install dbt in the new Airflow environment by adding the following dependency to your
requirements.txt: - Develop DAGs with specific tasks that call upon dbt commands to carry out the necessary transformations. This step involves structuring our workflows in a way that captures dependencies among tasks and ensures that tasks run in the correct order. The following code shows how to define the tasks in the DAG:
- Create DAGs that solely focus on dbt transformation. These DAGs handle the transformation process within our data pipelines, harnessing the power of dbt to convert raw data into valuable insights.
The following image shows how this workflow would be seen on the Airflow UI . 
- Create DAGs with AWS Glue for ingestion. These DAGs use AWS Glue for data ingestion tasks. AWS Glue is a fully managed ETL service that makes it easy to prepare and load data for analysis. We create DAGs that orchestrate AWS Glue jobs for extracting data from various sources, transforming it, and loading it into our data warehouse.
The following image shows how this workflow would be seen on the Airflow UI.

- Create DAGs with Lambda for ingestion. Lambda lets us run code without provisioning or managing servers. These DAGs use Lambda functions to call third-party APIs and load data into our Redshift tables, which can be scheduled to run at certain intervals or in response to specific events.
The following image shows how this workflow would be seen on the Airflow UI.

We now have a comprehensive, well-orchestrated process that uses a variety of AWS services to handle different stages of our data pipeline, from ingestion to transformation.
Conclusion
The combination of AWS services and the dbt open-source project provides a powerful, flexible, and scalable solution for building modern data platforms. It’s a perfect blend of manageability and functionality, with its easy-to-use, SQL-based framework and features like data quality checks, configurable load types, and detailed documentation and lineage. Its principles of “code separate from data” and reusability make it a convenient and efficient tool for a wide range of users. This practical use case of building a data platform for a retail organization demonstrates the immense potential of AWS and dbt for transforming data management and analytics, paving the way for faster insights and informed business decisions.
For more information about using dbt with Amazon Redshift, see Manage data transformations with dbt in Amazon Redshift.
About the Authors
 Prantik Gachhayat is an Enterprise Architect at Infosys having experience in various technology fields and business domains. He has a proven track record helping large enterprises modernize digital platforms and delivering complex transformation programs. Prantik specializes in architecting modern data and analytics platforms in AWS. Prantik loves exploring new tech trends and enjoys cooking.
 Ashutosh Dubey is a Senior Partner Solutions Architect and Global Tech leader at Amazon Web Services based out of New Jersey, USA. He has extensive experience specializing in the Data and Analytics and AIML field including generative AI, contributed to the community by writing various tech contents, and has helped Fortune 500 companies in their cloud journey to AWS.
Sharon Salzberg on how embracing our experiences can be transformative #shorts
Post Syndicated from Talks at Google original https://www.youtube.com/watch?v=4xSxosCpayM