At the 2026 Linux Security Summit North America, Eric Biggers spoke about
some of the problems with the kernel’s cryptography framework, as well
as the recent progress in adding library APIs to allow developers to
use cryptographic functions without using the traditional crypto
API. He walked through a couple of examples to demonstrate the
frailty of the original API and showed how the new library API made
life easier for developers and kernel maintainers.
Many internal services at Cloudflare need to read and modify the same control-plane state from across our 330+ global data centers. They need guarantees that different readers never see inconsistent state, and that the system remains available for writes even when some data centers or links fail.
But Cloudflare’s network runs across the entire Internet, and the Internet is an unpredictable place. Servers and data centers go down. Queues fill up. Links and cables get cut. These conditions make it difficult to run a globally available data system that guarantees strong consistency (e.g., that all readers are guaranteed to read all prior writes) because hostile conditions hinder distributed system replicas’ ability to reliably synchronize data with one another.
One way to synchronize data safely despite adverse network conditions is via a consensus algorithm, whichallows a set of machines to agree on the same sequence of values, such as key-value store put and get operations, as long as a majority remains alive and able to communicate.
Unfortunately, commonly deployed consensus algorithms like Raft suffer in wide-area networks like Cloudflare’s because they rely on leaders and timeouts. The leader is the only replica allowed to make writes, and if it fails due to a crash or network degradation, the system becomes unavailable until some other replica times out and a new leader is elected. And these timeout values are hard to configure in networks with unpredictable latencies.
We have experienced multiple incidents caused by unavailable leaders in consensus-driven systems.
And so, for the past year, Cloudflare’s Research team has been building a new distributed consensus service called Meerkat powered by a consensus algorithm called QuePaxa, published in 2023 by researchers at EPFL. QuePaxa differs from Raft in that all replicas can perform writes at all times, and progress is never halted due to a timeout, which makes it well suited for Cloudflare’s network. We layer applications, like a transactional key-value store and leasing system, atop Meerkat’s consensus log. To our knowledge, this will be the first industrial deployment of QuePaxa at global scale.
Meerkat is an experimental consensus service that is still in development. It’s being designed initially to manage small pieces of control plane state (e.g., leadership for replicated databases) and so it will be kept internal-only for the immediate future. This post introduces Meerkat and lays the groundwork for the Meerkat-related blog posts to come.
What we need from a global control-plane data system
Many Cloudflare services read and write control-plane data, data that helps those services operate correctly, from multiple machines distributed all over the world. One example of control-plane data is placement information: where certain resources (like an AI model instance) are stored. Another example is leadership information: which machine is currently allowed to perform writes to a database.
Control-plane data must be both stronglyconsistent and accessible despite particular kinds of faults.
In this section we precisely describe our consistency and fault tolerance requirements for a Cloudflare consensus service. We use a key-value store for a running example of an application running atop our consensus service, though other applications (e.g., distributed leases/locks) are possible.
Strong consistency
A distributed data system’s consistency level describes what kinds of weird behavior the system is allowed to exhibit when it receives concurrent reads and writes. Consider a distributed key-value store that stores a single numeric value x = 6 across multiple nodes. Also consider the following sequence of writes. These writes are submitted to different nodes on a best-effort basis, and could arrive in any order:
x = x + 1
x = x / 2
A system’s consistency level tells you what values of x a client might see when reading x after these writes. Consider the following sequence of operations and the possible execution orders under different consistency levels:
In a weak consistency level, writes can be re-ordered. In a stronger consistency model, writes can’t be reordered, but reads can. In the strongest possible consistency level, the operations are ordered exactly as they occurred in real time. This property is called linearizability.
At Cloudflare, many services want linearizability. Unlike weaker forms of consistency, linearizability relieves programmers from thinking about all the weird behaviors the data systems might exhibit. Instead, they can reason about the distributed system like they reason about local memory on a single-threaded machine: all reads after a write will see that write. For additional reading material on the dangers of weak consistency, check out this post by Marc Brooker.
(If you’re wondering, Meerkat’s key-value store also provides serializability, which we’ll write about in a future post.)
Fault tolerance
A system’s level of fault tolerance describes what kinds of faults the system can handle before catastrophes happen. Catastrophes are typically violations of properties the system aims to uphold, e.g., that two consecutive reads without an intervening write for the same key never see different values, or that the system remains available for writes. The faults include network failures or delays, machine crashes, and machine restarts. A system will typically explicitly handle some faults but not others (you can’t handle all faults, as the universe could always reach heat-death). For example, some key-value stores might guarantee to remain available for writes as long as two-thirds of the machines in the system can communicate and don’t crash, but make no promises if a machine is compromised and starts sending malicious messages.
Our desired fault tolerance properties are as follows:
First, the data system should remain available for writes and reads from a client located in any of our data centers as long as the following are true:
A majority of the machines in our system are alive and can communicate with one another. (Formally, we tolerate f faults in a system of 2f + 1 machines).
The client can contact any machine in the system that is connected to a majority of live machines.
This means that a single failed machine, or network degradation on a single link, does not affect availability of the system. This property is not provided by Raft-based systems, as we’ll see later.
Second, the data system remains correct as long as no actor in the system is actively malicious (and, of course, there are no bugs). We define correctness in terms of consensus safety later, but loosely speaking this means no two up-to-date machines will ever disagree about the world (e.g., one thinks that key1=1 while another thinks that key1=2).
To summarize, the system must remain correct even if machines crash, machines restart, networks fail or degrade, data centers go down, and more (though we, like Raft-based systems, do not handle Byzantine faults).
Introducing Meerkat
Meerkat is a consensus service upon which we can build applications that exhibit the above properties (strong consistency and fault tolerance) like a key-value (KV) store. To understand how Meerkat works, we first outline Meerkat’s general architecture, and then describe how Meerkat’s choice of consensus algorithm helps provide strong consistency and fault tolerance.
Developers of services using Meerkat request a cluster of Meerkat replicas. Each replica is connected to every other replica. Each replica participates in the consensus algorithm and can receive both reads and writes. The developer can specify which data centers are allowed to host their replicas, and Meerkat places them automatically.
To interact with their cluster, a developer’s client sends an application-specific request to any replica in the cluster. A single replica may host many kinds of applications, but the simplest one is a key-value store, so the simplest application-specific request type is a KV get or put. The replica responds to the request with an application-specific response (e.g., the records requested with the get). Note that KV reads (gets) are guaranteed to read up-to-date information.
Meerkat’s log
Under the hood, the replica translates application requests (e.g., get and put) into log events. hat replica distributes each log event to all other replicas using a consensus algorithm such that all replicas maintain the exact same log of events (in reality, a replica may lag behind, but shall never record different entries). These events are arbitrary — Meerkat’s core doesn’t care what’s in them. Meerkat applications care about log event contents. Each Meerkat replica “hosts” many Meerkat applications (e.g., key-value store) that read the log events and construct state. (Note that each replica belongs to exactly one cluster.)
For instance, the KV Meerkat application constructs an in-memory key-value store from the log events. So when a client sends a write like put k1 v1, the receiving replica places that write into a log event and distributes it to all replicas. If someone else subsequently writes put k1 v11 to a different replica, this event is also distributed to all replicas. Since all functioning replicas have the same log, those replicas can apply the operations in the log in sequence to construct the exact same state. Note that get requests also create distributed log events (for linearizability, as explained in the next section).
Here is an example of how a replica’s KV store is updated as it receives log events:
How Meerkat’s log enables strong consistency
Meerkat guarantees that if one client executes put k1 v1, a second client subsequently executes put k1 v11, and a third client subsequently executes get k1 (with a consistent read), they will always read v11. It guarantees this even if each request is submitted to a different replica, and those replicas are distributed randomly across the world. This is linearizability. To see how Meerkat guarantees this, we must examine Meerkat’s log in more detail.
The Meerkat log is a sequence of slots. A slot is a box that can contain an event or not. A slot that contains an event is called a decided slot. All slots in the log are decided except the last slot, which is currently being decided. One of Meerkat’s invariants is that if any two replicas decide on the value for a slot, those values are the same. In other words, no two replicas will ever disagree on the value of a decided slot (though one replica may think the last slot is empty while another does not). This property helps guarantee the desired properties we described in the previous section.
To decide on the value of the last (empty) slot in the log, Meerkat replicas run a distributed consensus algorithm. A consensus algorithm allows a set of machines communicating over a network to agree on a decided slot value. Our consensus algorithm works as long as a majority of replicas (more than half) are alive.
So if the log currently contains two entries, and a client submits put k1 v11 to a replica, that replica triggers a consensus algorithm for slot 3. But another client might have submitted put k1 v111 to a different replica for slot 3. The consensus algorithm ensures that only one such proposal for slot 3 wins out. Specifically, it ensures that at least a majority of replicas agree on the same proposal, deciding it for slot 3. The non-majority can never decide a different proposal, but might miss the fact that slot 3 has been decided at all.
To see how this provides linearizability for our key-value store, consider a write followed by a read. One replica Z proposes put k1 v11 and this proposal is decided at slot 3 by a majority of replicas, but NOT replica Y. Subsequently, a reader executes get k1 on replica Y. Replica Y believes slot 3 is empty, so proposes get k1 at slot 3. Critically, a majority of replicas will not agree to place that event at slot 3, because that slot has already been decided. They will force replica Y to decide (by receiving older decisions) put k1 v11 in slot 3, and to propose get k1 for slot 4, thus linearizing the read after the write in the log. (And if that replica can’t contact a majority, it will be unable to complete the read.)
How Meerkat’s consensus algorithm provides higher availability than Raft
Deciding on log entries requires a distributed consensus algorithm. But which one? All valid consensus algorithms would provide the required consistency and correctness guarantees, but not all provide the same availability guarantees.
Specifically, many algorithms that rely on authoritative leaders do not provide our desired availability guarantees, because they can become unavailable when a single machine experiences issues. Consider Raft, one of the most well-known and probably the most implemented consensus algorithm. Raft relies on an authoritative leader: the only replica in the cluster that can drive consensus. As a result, all writes get forwarded to the leader. This design choice helps make Raft “understandable” and, coupled with leases, can make leader-served reads automatically linearizable (since they’re guaranteed to be up-to-date). But it also adds a single point of (temporary) failure.
In general, there are two problems with authoritative leaders. First, if the leader goes down, the system becomes unavailable (all writes block) until a new leader is elected. This is unacceptable for Meerkat. Second, if the leader stays up but slows down, either because it is overloaded or there are network delays, then performance degrades. The leader is a bottleneck because there is no alternative way to perform writes.
The first problem is exacerbated in wide-area networks. Consider that when a leader goes down, most algorithms choose a new leader using timeouts: if a non-leader replica hasn’t heard from the leader in some amount of time, they propose themselves as the leader. At that point, the old leader has been deposed, and the system cannot accept writes until a new leader has been elected. The problem is that when the timeout is shorter than the network delay between the original leader and that replica, replicas will constantly be timing out and thus blocking writes. And when the timeout is too long, the system reacts slowly to a failed leader, during which writes are also blocked. Plus, if multiple replicas propose themselves as leader at the same time, their “campaigns” can interfere with each other, causing them to constantly re-propose themselves as leader — all the while blocking writes. We have seen these exact issues with Cloudflare’s systems that use Raft because our wide-area network delays can and do vary wildly, making tuning timeouts especially difficult.
We chose a different consensus algorithm for Meerkat, called QuePaxa, that aims to avoid the “tyranny of timeouts” imposed by protocols like Raft. QuePaxa is a subtle protocol, but here are the highlights. A client can contact any replica, and that replica can drive consensus for the latest slot. There is a leader, but it is not required — its only advantage is that it can drive consensus with fewer round trips (one) than other replicas (3+). Critically, clients are free to contact multiple replicas concurrently for the same proposal, to increase the chance of the proposal being successful. Concurrent proposals do not destructively interfere: replicas work together to decide one of the proposed values.
In short, QuePaxa has three advantages over Raft for our purposes:
Because there is no required leader, the system never becomes unavailable or degraded due to a single replica (the leader) being down, unavailable, or degraded. Clients can perform writes as long as they can contact some healthy replica (anywhere in the world).
Because there is no leader, there are no leader elections that degrade the system. And concurrent proposals made by different replicas constructively interfere, unlike Raft’s leadership elections. This is ideal for Cloudflare’s network, in which latencies can vary wildly.
QuePaxa was designed for a less reliable network environment (“asynchrony”), and for networks in which an imaginary adversary can launch targeted attacks on replica connections. The authors found that it maintains much higher (~10x) throughput than Raft and Multi-Paxos during such conditions. These conditions more accurately resemble our own network than the conditions other algorithms assume.
We will save the full description of QuePaxa for another post. Major shoutout to the authors of the QuePaxa paper from EPFL for being available for feedback and questions about their work.
Assessing Meerkat’s performance
Meerkat has limitations. It is not designed to create general-purpose data systems like databases.
All consensus algorithms come with a cost: lots of round-trips. QuePaxa in particular takes one to three round trips (usually, although it can take more) between the initial proposer and a majority of replicas to decide on a proposal and add an event to the log. The difference is with the leader. It takes one if the leader is proposing (+ an extra broadcast to notify replicas of the decision) and three if a non-leader is proposing (+ extra broadcast). If multiple replicas make proposals at the same time, it can take more. These communication costs point to the important performance limitation of consensus algorithms in general: proposal decision latency is proportional to the latency between some majority of replicas. So if your replicas are far from one another, latency will increase — there’s no getting around that.
At first glance, it seems Meerkat’s write and read latency will be quite poor. Especially if all writes andreads(for consistency) must go through the log, and thus require so many round trips.
But there are a few ways to squeeze better performance out of Meerkat:
Because developers have control over where their replicas live, they can choose to move replicas closer together, reducing round-trip latency (only applicable for services that don’t need truly global distribution).
Writes can be batched. So if a replica receives 10 writes in a span of 10ms, it can place all of those in a single proposal, improving throughput.
Not all reads must trigger a consensus round. If a developer is OK with reading stale (but never inconsistent) data, they can read from any replica’s local data.
Multiple operations can be bundled into a single consensus round. For instance, our key-value store supports compare-and-swap-style writes in which writes execute only if a value has not changed since it was read. (In fact, it supports general transactions.)
Still, Meerkat’s fundamental latency limitations remain, especially when it is run at global scale, as it was designed to do. These limitations make it perfect, in the short term, for control plane information that is written infrequently but must remain consistent.
What’s next
Meerkat is not deployed to production, but we have run multiple proofs-of-concept with up to 50 replicas distributed around the world, to great success. Leaders in our proof-of-concept clusters constantly fail, and the cluster keeps operating with no increase in error-rate.
We have a lot more to say about Meerkat. Over the course of the next year we’ll be writing Meerkat posts that discuss how QuePaxa really works, how we’re formally verifying some of our Rust implementation, how bootstrapping and cluster management works, how we find optimal replica placement, how we use deterministic simulation testing to find bugs, and more. We’ll also be preparing a manuscript for peer-review!
Follow along on the Cloudflare Blog as Meerkat progresses, and check out more of our projects at Cloudflare Research.
The shift toward preemptive security is underway, but most organizations are still navigating the realities of limited resources, fragmented tools, and emerging AI risk. At Rapid7’s recent Global Security Summit, we surveyed attendees to better understand where security leaders and practitioners stand today, what is shaping their priorities, and what they need to move forward. Their responses offer a candid view into the current state of security operations: ambitious, increasingly AI-aware, and ready for change, but still working through the practical challenges of getting there.
For many teams, the direction is clear: security needs to become more proactive, more connected, and more resilient. Attackers are moving quickly, environments are expanding, and teams are under pressure to reduce risk before it turns into business disruption. But the survey results show that most organizations are still somewhere in the middle of that journey.
Where organizations are today
One of the clearest findings is that security operations are increasingly collaborative. According to the survey, 57% of respondents operate in a hybrid internal and MDR model. That reflects a reality many teams know well: internal expertise remains essential, but external support can help extend coverage, add specialist knowledge, and support faster response when internal resources are stretched.
This hybrid model also speaks to the complexity security teams are managing. Modern environments span cloud, identity, endpoints, applications, third parties, and expanding attack surfaces. Keeping watch across all of it requires more than tooling alone. It requires the right mix of people, process, visibility, and support.
At the same time, many organizations are still working to connect the dots across their security ecosystem. Two-thirds of respondents said their security capabilities are only partially integrated. For analysts, partial integration often means more manual work: switching between tools, stitching together context, and making decisions with an incomplete picture. When teams are jumping between systems, manually stitching together context, or working from incomplete data, it becomes harder to act at the speed modern threats demand.
The survey also showed that only 10% of respondents describe their organization as “highly proactive” in predicting and preventing threats, which points to the reality of where many teams are today. The ambition is there, but becoming truly preemptive takes time, integration, and operational maturity. Most organizations are still balancing the day-to-day demands of reactive response with the longer-term work of building a more proactive security model.
Confidence levels tell a similar story. 59% of respondents said they are only somewhat confident in their organization’s ability to prevent attacks before impact. Security teams understand what is at stake, but many still lack full confidence that they can consistently stop threats before they affect the business.
AI is a priority, but trust matters
AI was, of course, another major theme in the survey. Interest is high, especially when it comes to improving efficiency, accelerating triage, and helping teams manage growing volumes of data and alerts, but adoption is still developing. 52% of respondents said AI is in early-stage exploration within their security operations.
AI has clear potential in the SOC and across security operations, from summarizing investigations to enriching alerts, supporting prioritization, and helping analysts move faster. But security teams have to be deliberate about how they apply it. In high-pressure environments where accuracy, context, and accountability matter, AI needs to earn trust.
The survey results show that trust is still a key consideration. 57% of respondents cited securing AI usage as a top AI and security concern, while 44% cited lack of transparency or trust. These responses reflect a practical mindset. Security leaders are thinking about both sides of AI: how it can help defenders move faster, and how to manage the new risks it introduces. Internally, for AI to become operationally valuable, it has to fit into existing workflows, provide explainable outputs, and support human expertise.
What security teams want next
When respondents were asked what is preventing them from becoming more proactive, the top challenges were practical and familiar. 54% cited limited staff or expertise, making capacity one of the biggest barriers to progress. Teams may have the ambition to become more preemptive, but many are already balancing daily alert queues, incident response, vulnerability backlogs, compliance pressure, and business-as-usual security demands.
Visibility is another major factor. 31% of respondents cited lack of visibility across the environment as a barrier to becoming more proactive. Without a clear view of assets, identities, exposures, and attacker activity, teams struggle to prioritize what matters most. This is especially important as organizations look to move from broad detection toward more risk-aware, preemptive action.
The priorities respondents selected show where they want to go next. 41% selected preemptive security as a top security leadership priority, while improving resilience, strengthening incident response, reducing complexity, and improving risk visibility also appeared as recurring themes.
The findings from our Global Security Summit make one thing clear: security teams are ready to move toward more proactive, integrated, and AI-enabled operations, but they need the right visibility, expertise, and confidence to do it well.
To hear more from the experts and practitioners who joined us at the summit, catch up on the on-demand sessions. And to learn how Rapid7 is helping organizations move toward preemptive security, explore Rapid7 Managed Detection and Response, built to disrupt attackers earlier with broad ecosystem coverage, risk visibility, expert guidance, and an AI-powered SOC.
Last week, national security agencies from the Five Eyes—that’s the rich, English-language-speaking countries club—jointly released a statement warning of the increasing cyber risks of AI models: in particular, their ability to autonomously hack into systems and networks. The statement was more measured than some of the breathless headlines about it, and the advice they gave is pretty much the standard advice everyone gives—albeit with newfound urgency.
Internet risks are nothing new, and cyberattacks—both large and small—have been a significant issue since long before the current crop of generative AI models.
What’s been changing over the decades, and what AI is changing even faster, is the gap between skill and ability. For most of human history, the two terms were synonymous—but computers have decoupled them. As the gap between the two expands, humans empowered with these AI tools can do more: more writing, more research, more analysis and also more damage than ever before. These models can, with little detailed direction, autonomously hack into networks, steal data, deploy ransomware and destroy systems. And to the extent there is a solution, it’s going to involve harnessing AI for the defense.
In 1998, seven people from the hacker group L0pht testifiedbeforeCongress. They told a mostly clueless Senate committee that they could take down the internet in 30 minutes. That was partly real and partly bravado, but it illustrates an important point: hacking into systems, stealing data and causing damage all required skill.
Contrast the L0pht hackers with hackers derided as “script kiddies.” They didn’t understand computers, or security. Instead, they used hacker tools written by others. Their actions required minimal skill and even less knowledge. But once those hacking tools became widespread, the number of potential attackers increased.
That number has continued to increase, as quality and availability of prewritten attack tools has grown. And it is growing dramatically with AI. Today’s AI systems—not just the frontier models, but most of them—are capable of carrying out cyberattacks automatically. They all do better in the hands of skilled attackers, but increasingly they are able to act autonomously with only minimal prompting.
The thing about people with ability but no skill is that they are often outsiders, not part of any professional community, and not bound by any rules or norms. This phenomenon is much more general than in cybersecurity. Any doctor can tell you how to untraceably poison someone, and many virus researchers know how to create a bioweapon. Any bridge engineer can tell you how to place explosives to blow a bridge up. The reason that murderous doctors and terrorist engineers are so rare is that the lengthy process of acquiring those skills also instills a moral and ethical code. If every random person has access to good poisoning advice, that puts us all in danger.
Modern AI systems are, in effect, a universal adviser to help people do harmful things. And while the current AI megacorporations are trying to build guardrails to prevent people from asking questions whose answers will enable the questioner to do harm, that’s not going to work in the long term. Smaller, cheaper, open-source models, including models that can run on people’s computers, and especially groups of models that run in concert with each other, are just as good as the frontier models from companies like OpenAI and Anthropic. And they continue to get better. These models will be passed around from person to person, like script kiddie hacker tools, and they won’t have any such guardrails.
Instructing AI models to spy on people and report any malicious prompts to the authorities fails for similar reasons. The megacorporations can do that, but the locally run open source models won’t. This could buy us a few months at best.
A third possibility is to somehow make the models themselves unable to hack into computers, create bioweapons or do anything else that might harm people or society. That won’t work, for the same reason we can’t teach doctors how to treat poisonings without also teaching them how to poison. It’s the same knowledge. It’s the same with construction and demolition. And it’s the same with cybersecurity. We want these AI models to be able to review computer code, find vulnerabilities and automatically fix them. The benefit to our collective security will be enormous. Unfortunately, the same knowledge can be used for attacks.
Where this leaves us is in a world of increased volatility. Super-powered humans with AI assistants will be able to do both wonderful and horrible things.
This brings us back to the Five Eyes statement. Everything they recommend is something security professionals have been recommending for years, if not decades. They are things talked about at that congressional hearing back in 1998, titled “Weak computer security in government: Is the public at risk?” Even the Five Eyes admitted that their security advice is not new, only more urgent.
What’s new is how fast things are changing: “The rapid pace of frontier AI development means cyber risk assumptions can become outdated in months, not years. We must act before and be prepared to adapt and withstand evolving threats.” The Five Eyes point to AI technology—not necessarily chatbots, but AI more generally—being used to strengthen every aspect of defense, to “detect vulnerabilities earlier, improve software quality, monitor unusual behavior, and respond faster to incidents—reducing both the cost and impact of incidents.”
Excellent advice from the Five Eyes security agencies. We need to do this with every risk that AI heightens, not just cybersecurity.
This essay was originally published in The Guardian.
With the introduction of models that require data sharing with third-party providers—such as Claude Fable 5—organizations need a way to centrally enforce data retention policies. Amazon Bedrock gives you control over whether your prompts and model outputs are retained after an inference request completes. You might need a way to enforce your retention settings across all accounts and have granular control of project data retention when compatible with the selected model.
In this blog post, I walk you through how Amazon Bedrock data retention modes work, the tools available for managing retention—including Amazon Bedrock Projects and service control policies (SCPs)—and how to verify your policy settings are working correctly.
In this post, you will learn:
How Amazon Bedrock data retention modes work and what each mode means for your data
How to use Amazon Bedrock Projects with compatible models to isolate workloads with different retention needs
How to write and deploy an SCP that prevents anyone in your organization from enabling data sharing
How data retention modes interact with cross-Region inference profiles
How to verify your configuration is working correctly
Understanding data retention modes
You can use Amazon Bedrock to control data retention through a mode setting on your account. This determines what happens to your prompts and outputs after each inference request, which is important to understand as you assess your compliance needs. Not all models require data retention or data sharing, and you might continue to use Amazon Bedrock with models that don’t require data retention or data sharing. See the Amazon Bedrock documentation for the current list of models that require data retention or data sharing. Ultimately, it’s your responsibility as the customer to select models that align with your compliance needs.
The following modes govern how Amazon Bedrock handles your data:
Mode
Behavior
Data shared with provider
none
Zero data retention. Prompts and responses are processed and immediately discarded.
No
default
No data is shared with model providers. Some models might require data retention for trust and safety checks for up to 30 days. Consult the model’s terms for specifics. This mode also allows APIs that inherently require retention (for example, Batch API, Responses API with store=true). Models that support zero retention will still operate with zero retention.
No
inherit
No explicit setting applied, defers to the next higher scope (project defers to account defers to service default). This is the default for new accounts.
No
provider_data_share
Data is shared with the model provider and retained for up to 30 days for trust and safety.
Yes
Understanding mode as a ceiling, not a floor
The most important concept to understand: your configured mode is the upper limit of retention you’re willing to accept; it is not what every request will use. Setting your account to provider_data_share doesn’t mean all your requests suddenly start retaining and sharing data. Models that support zero data retention will still operate with zero retention regardless of your account-level setting.
Think of it as a permissions ceiling:
Your account mode
Model you invoke
What happens
provider_data_share
Claude Sonnet (supports none)
Zero retention, Sonnet doesn’t require data sharing or data retention
provider_data_share
Claude Fable 5 (requires provider_data_share)
Data retained for up to 30 days and might be shared with provider, Fable 5 requires data sharing and data retention
none
Claude Sonnet (supports none)
Zero retention, no data sharing
none
Claude Fable 5 (requires provider_data_share)
Blocked, your ceiling is below what the model requires, calls to this model will be denied
default
Claude Sonnet (supports none)
Zero retention, Sonnet supports it, no data retention or data sharing
default
A model requiring retention for safety checks
Data is retained, model requires it and your ceiling allows it
Key takeaway: Your mode setting declares the maximum level of data retention you will accept. Models that support zero retention will continue to operate that way regardless of your account setting. Amazon Bedrock is designed so that you do not get more retention than necessary just because your account mode allows it.
Important: provider_data_share isn’t inherited from a model—it’s an explicit opt-in at the account or project level. If your account is set to inherit or default, no model will trigger provider data sharing unless you configure it within your account or project.
Note on inherit behavior: The inherit mode defers to the next scope up in the hierarchy (project defers to account defers to service default). If a project is set to inherit and the account above it is set to provider_data_share, the project will inherit provider_data_share. You will not inherit provider_data_share from a model—that requires an explicit setting at the account or project level.
Note on APIs that require retention: Some Amazon Bedrock APIs require data retention to function regardless of model support, for example, the Batch API and the Responses API with store=true. Setting your mode to none will block these APIs. This is expected behavior: your ceiling of none means you require no retention, so APIs that can’t operate without retention are unavailable.
Why does provider_data_share exist?
Some foundation models require the provider_data_share mode to function. As AI models evolve, so must the mechanism to protect customers and the safety of their use. Models that require provider_data_share have allowed_modes: ["provider_data_share"], meaning they will appear as unavailable unless the account has explicitly opted in. This is by design: AWS requires you to make a conscious decision to share data before you as a customer can use these models. See the current list of models available through Amazon Bedrock and their retention requirements, which can change as new models are released.
If your regulatory requirements, internal policies, or customer commitments prohibit data sharing with third-party model providers, you can enforce this at multiple levels. Amazon Bedrock provides several tools for managing data retention, from fine-grained project-level settings to organization-wide enforcement.
Tools for managing data retention
Amazon Bedrock gives you multiple layers of control over data retention. You can use them independently or combine them for defense-in-depth:
Tool
Scope
Use case
Amazon Bedrock console
Per-account, per-AWS Region
Quick configuration and visibility; view and change your retention mode directly in the AWS Management Console.
Amazon Bedrock Projects
Per-project within an account
Isolate workloads with different retention needs within the same account for compatible models
SCPs
Organization-wide
Use to prevent any account from opting in to data sharing
IAM policies
Per-account or per-principal
Fine-grained control, including the management account (which SCPs don’t cover)
Using Amazon Bedrock Projects for granular control
Not every workload in an account has the same data retention requirements. If you’re using the bedrock-mantle endpoint (OpenAI-compatible APIs), you can use Amazon Bedrock Projects to isolate traffic that can accept data retention from traffic that must not be retained—even within the same account.
For example, you might have:
A research project where your team needs access to the latest models (including those requiring provider_data_share) for experimentation
A production project handling customer data where zero retention is mandatory
With Amazon Bedrock Projects, you can set provider_data_share on the research project while keeping the production project locked to none. Each project enforces its own retention ceiling independently.
How project-level retention works:
Each project can have its own data retention mode setting.
A project set to inherit will inherit its mode from the account level.
A project set to none enforces zero retention regardless of the account setting. Traffic routed through that project can’t trigger data sharing.
A project set to provider_data_share allows models requiring data sharing, but only for requests within that project.
This gives organizations the flexibility to adopt new models incrementally while maintaining strict data governance on sensitive workloads. You can manage project settings using the Amazon Bedrock console or the bedrock-mantle API.
Important: Amazon Bedrock Projects are only available on the bedrock-mantle endpoint. They work with models accessed using the OpenAI-compatible APIs (Responses, Chat Completions) and the Anthropic Messages API on the mantle endpoint. Not all models are available on bedrock-mantle; check the endpoint availability by models page for current support.
Workload isolation on the bedrock-runtime endpoint
If you’re using the bedrock-runtime endpoint (Invoke, Converse APIs), project-level data retention isn’t available. The account-level retention mode applies to all requests made through bedrock-runtime.
To achieve workload-level isolation on bedrock-runtime, use separate AWS accounts:
Place workloads that need provider_data_share in one account (or OU) without the SCP
Place workloads that require zero retention in a separate account (or OU) with the SCP applied
You can use AWS Organizations OUs to group accounts by retention policy and apply SCPs selectively:
Combining projects with SCPs: If you use an SCP to enforce none at the organization level, it overrides all project-level settings on bedrock-mantle. For accounts where you want project-level flexibility, don’t apply the SCP—use project-level isolation instead. For accounts that must never have data sharing under any circumstances, the SCP provides an unbypassable guarantee across both endpoints.
Using SCPs for organization-wide enforcement
For organizations that need an absolute guarantee that no account can enable data sharing—regardless of who has admin access or which endpoint they use—SCPs provide the strongest enforcement mechanism. SCPs apply to both the Amazon Bedrock control plane (bedrock:PutAccountDataRetention) and the mantle endpoint (bedrock-mantle:PutAccountDataRetention, bedrock-mantle:CreateProject, bedrock-mantle:UpdateProject).
Enforcing zero data retention with an SCP
In this section, I cover how you can use SCPs to manage your data retention policy. I introduce what an SCP is and provide some policies that you can use in your organization.
What is an SCP?
A service control policy (SCP) is a guardrail set at the organization level. It overrides every principal in the organization, including account administrators and root users. Even if someone has full admin permissions, an SCP deny can’t be overridden by an AWS Identity and Access Management (IAM) policy.
SCPs are managed in AWS Organizations and can be attached at different levels:
Root – Applies to every account in the organization
Organizational unit (OU) – Applies to all accounts in that OU
Individual account – Applies only to that specific account
Important: The SCP must be attached to the root OU to cover all accounts. If attached to a child OU, accounts outside that OU will not be protected. Organization admin accounts don’t inherit SCP controls.
The SCP policy
The following policy prevents anyone in the organization from changing the Amazon Bedrock data retention mode to anything other than none.
Important: New accounts default to inherit (not none). Before attaching this SCP, you must explicitly set each account to none. Start by running the following in each account:
The Condition block uses StringNotEquals, meaning the deny fires for any value that isn’t none. This ensures:
Action
Result
Setting mode to none
Allowed
Setting mode to provider_data_share
Denied by SCP
Setting mode to default
Denied by SCP
Setting mode to inherit
Denied by SCP
With all the preceding in place you might be wondering what this means for your organization:
No one can enable data sharing with model providers – Even account administrators receive Access Denied
Models requiring provider_data_share become permanently unavailable – Models that require data sharing (such as Claude Fable 5 and Claude Mythos 5, among others) will not work across the organization
All other models continue to work normally – Models that support none mode are unaffected
The setting cannot be bypassed – no IAM policy can override an SCP deny
Optional: Block project-level overrides
The bedrock-mantle endpoint supports project-level data retention settings. Without additional SCP coverage, someone could create or update a project with provider_data_share, bypassing the account-level restriction. To prevent this, extend your SCP to include the bedrock-mantle project actions:
Why doesn’t bedrock-runtime need project-level blocking? Projects don’t exist on the bedrock-runtime endpoint. The only way to change retention for bedrock-runtime traffic is the account-level bedrock:PutAccountDataRetention action, which the base SCP already blocks. The extra CreateProject and UpdateProject actions are only needed because bedrock-mantle allows per-project retention overrides; the project level control iisn’t required on bedrock-runtime.
Data retention and cross-Region inference
When using cross-Region inference profiles, it’s important to understand how data retention mode is evaluated: the mode is evaluated in the source AWS Region of your request, the Region where you make the API call. You don’t need to set the retention mode in every destination Region.
However, there’s an important caveat: while the mode check happens in your source Region, the data itself might be retained in the destination Region where the inference is processed. This is relevant for organizations tracking where retained data resides geographically.
What this means in practice
The following describes how this work in practice with data retention and inference.
If your source Region (for example, us-east-1) is set to provider_data_share, requests using a cross-Region inference profile will be permitted, regardless of the retention setting in the destination Region
If your source Region is set to none, requests to models requiring provider_data_share will be blocked at the source, before the request is ever routed to a destination Region
SCPs continue to apply globally, a single SCP at the root OU blocks provider_data_share in every Region automatically
SCPs are global
While data retention settings are helpful for granular control of data retention settings itself, SCPs can be used to apply data retention settings globally across all Regions automatically. A single SCP attached to the root OU blocks provider_data_share in every Region without needing to configure anything per-region. This is one of the key advantages of using an SCP for enforcement rather than relying on manual configuration.
Verify your configuration
You can verify your data retention settings and SCP enforcement using the AWS Software Development Kit, AWS Command Line Interface (AWS CLI), or the Amazon Bedrock console.
Check your current retention mode
The following provides are options that you can use for checking your current retention mode.
Using the Amazon Bedrock console:
In the AWS Management Console, go to Amazon Bedrock and choose Settings, and then choose Data retention. Here, you can see the current account-level retention mode and change it directly.
If the SCP is working, you’ll receive an Access Denied error:
An error occurred (AccessDeniedException) when calling the PutAccountDataRetention operation:
User: arn:aws:iam::123456789012:user/admin is not authorized to perform:
bedrock:PutAccountDataRetention with an explicit deny in a service control policy
If the SCP is not working, the request will succeed. If this happens, immediately revert:
Verify the SCP is attached to the root OU, not a child OU
Check the SCP policy syntax and condition keys
Remember: the AWS Organizations management account is exempt from SCPs—use an IAM policy to enforce policies on that account
Enable data retention for models that require it
For accounts where you want to use models requiring provider_data_share (accounts where the SCP isn’t applied), set the mode using AWS CLI, the API, or the console:
You can set data retention at the project level to allow different workloads within the same account to have different retention policies. Update a project’s data retention mode using the bedrock-mantle API:
# Set a project to provider_data_share
curl -X POST https://bedrock-mantle.us-east-1.api.aws/v1/organization/projects/proj_abc123 \
  -H "x-api-key: $BEDROCK_API_KEY" \
  -H "Content-Type: application/json" \
  -d '{ "data_retention": { "mode": "provider_data_share" } }'

# Set a project to none (zero retention)
curl -X POST https://bedrock-mantle.us-east-1.api.aws/v1/organization/projects/proj_abc123 \
  -H "x-api-key: $BEDROCK_API_KEY" \
  -H "Content-Type: application/json" \
  -d '{ "data_retention": { "mode": "none" } }'

# Check a project's current setting
curl -X POST https://bedrock-mantle.us-east-1.api.aws/v1/organization/projects/proj_abc123 \
  -H "x-api-key: $BEDROCK_API_KEY"
How project-level retention resolves: The effective mode for any request is determined by taking the first non-inherit value in the project, account, model default hierarchy. If your project is set to none, it enforces zero retention regardless of the account setting. If your project is set to inherit, it defers to the account-level setting.
Note: Project-level data retention is managed exclusively through the bedrock-mantle API. There is no AWS CLI command for project-level settings. The preceding AWS CLI commands only manage the account-level setting through the Amazon Bedrock control plane.
Conclusion
In this post, I showed you the various methods for managing data retention within Amazon Bedrock, including project-level data retention and organization wide control you can implement using SCPs. Choose the combination that matches your requirements and consult the Amazon Bedrock documentation to confirm each model’s mode requirements before deployment.
Снощи от публикация на д-р Александър Атанасов научих, че има целева имунизация на на бременни жени срещу респираторно-синцитиален вирус (RSV). Апокрифно съобщение за това намираме на страницата на СРЗИ. РСВ е опасен вирус, който засяга особено тежко бебета и възрастни хора. Ваксината е ефективна и безопасна са всички и я има от скоро в България. Беше обаче особено скъпа – няколко стотин евро, а в тази програма се поема от бюджета. Препоръчва се между 24 и 36-та гестационна седмица от бременността. Заболяването се среща все по-често и протича по-тежко. Според НЦЗПБ 9.5% от потвърдените респираторни вируси от септември насам са RSV.
Къде да се ваксинираме срещу RSV?
В съобщението на СРЗИ имаше таблица с лечебните заведения извършващи такава имунизация безплатно. Както с имунизационните центрове срещу коронавирус обаче, липсва единен списък за страната или лесен начин да се открият. Снощи прегледах сайтовете на всички РЗИ-та и открих информация за това само в седем – София, Кюстендил, Монтана, Хасково, Търговище, Смолян и Разград. На поне още 5 не им работиха сайтовете, а останалите не бяха публикували нищо.
На база информацията от тези седем РЗИ-та направих карта подобна на тази на имунизационните центрове срещу коронавирус. При натискане на някоя от иконите се вижда наличната информация и връзка към източника. Където са налични са посочени контакти и работно време. Препоръчвам да се свържете предварително, особено когато не е упоменато работно време. Ако изберете бутона за сегашното ви местоположение горе вляво, ще покаже най-близкото лечебно заведение до вас.
Днес ме насочиха към публикация на Център по репродуктивно здраве „Д-р Васил Даскалов“ в Пловдив, които са пуснали целият списък от заповед РД-01-441/03.07.2026 на Министерство на здравеопазването. Там се виждат всички 89 лечебни заведения. В таблицата има всъщност 94 адреса и затова ще видите толкова на картата към този момент. Някои от центровете са в една и съща сграда и съм ги събрал на едно място та прозвънете и двата. На тези взети от заповедта липсва работно време, тъй като изглежда това се въвежда допълнително от РЗИ-тата. Когато останалите 21 пуснат някаква информация ще я обновя на картата. Данните са актуални към 7-ми юли 2026.
Защо въобще е нужно това?
Тук възниква обаче въпросът защо е нужно въобще това. Защо трябва заповед и строго определени клиники, в които да се имунизират бременни? Не е логично това да се прави от собствените им гинеколози, които проследяват бременността? Или дори личните лекари или който и да е лекар? В Германия, например, противогрипни ваксини и такива срещу коклюш се слагат именно от гинеколозите. Препоръката за ваксина срещу коклюш за бременни е също между 24 и 36-та гестационна седмица.
Отговорът е остаряло мислене и недостатъчна квалификация на много лекари, бюрократичен подход и проблеми в проследяването в здравната система като цяло. Когато питах лекари се оказа, че много гинеколози и АГ специалисти всъщност съветват пациентките си не само срещу препоръчителните иначе ваксини преди и по време на бременност, а в някои случаи срещу всякакви такива. Не бих нарекъл това непременно антиваксърство, макар че сме били свидетели на лекари, които залитат в тази посока. По-скоро става въпрос за криворазбрана предпазливост. Често липсва допълнителна квалификация, разчитат на остарели методи и мислене, както и на откровено неразбиране на вероятностите и риска. Това е една от причините у нас да витаят толкова митове за ваксините и бременността, включително да има сериозни проблеми и дори загуба на плода заради предотвратими инфекциозни болести.
Вторият проблем е бюрократичното мислене. Има принципно добра идея, намират се пари и веднага се започва с ограничения, списъци и разрешителни режими. Не се прави стъпка назад и не се мисли какво всъщност е сбъркано административно и логистично, а се правят пресложни схеми за заобикаляне на проблемите. В случая следва всеки лекар, който желае, да поръча подобни ваксини и да може да ги постави. Според лекари не е нужно да си АГ специалист или инфекционист. Бременността не е болест и макар да има специфики при ясни препоръки и разписани съображения всеки лекар би могъл да постави тази или другите препоръчани ваксини.
Не на последно място проблемът е във въвеждането в системата на НЗИС. По някаква причина единствено личният лекар може да въвежда данни за поставени ваксини както и такива с направление или лекари в имунизационните центрове. Би следвало да може всеки да въвежда информация сканирайки кода на ваксината. Това е медицинска манипулация като всяка друга. Разбира се, съображението тук е, че така може корумпирани лекари да въвеждат проформа ваксини и да ги изхвърлят. В миналото съм писал за това как по антивакс групите се разпространяват имена и номера на такива „лекари“. Този проблем съществува и сега обаче и отварянето на системата за всички лекари не виждам как ще влоши положението. Може дори да помогне да се залавят такива измамници с разпознаване на модели във въведените от тях данни и съмнителни практики.
Изброените ограничения обаче са бюрократичния подход към всичко – или забраняваме, или правим регистър. Резултатът често е, че иначе добрите идеи и програми достигат по-трудно до тези, за които са насочени. Не може да се каже и че особено помага на доверието в системата. Картата, която направих, е опит да подобри видимостта на програмата и местата, където бременни жени могат да се възползват от превенция срещу RSV. В същността си обаче е оптимизация на процес, който не следва да съществува въобще.
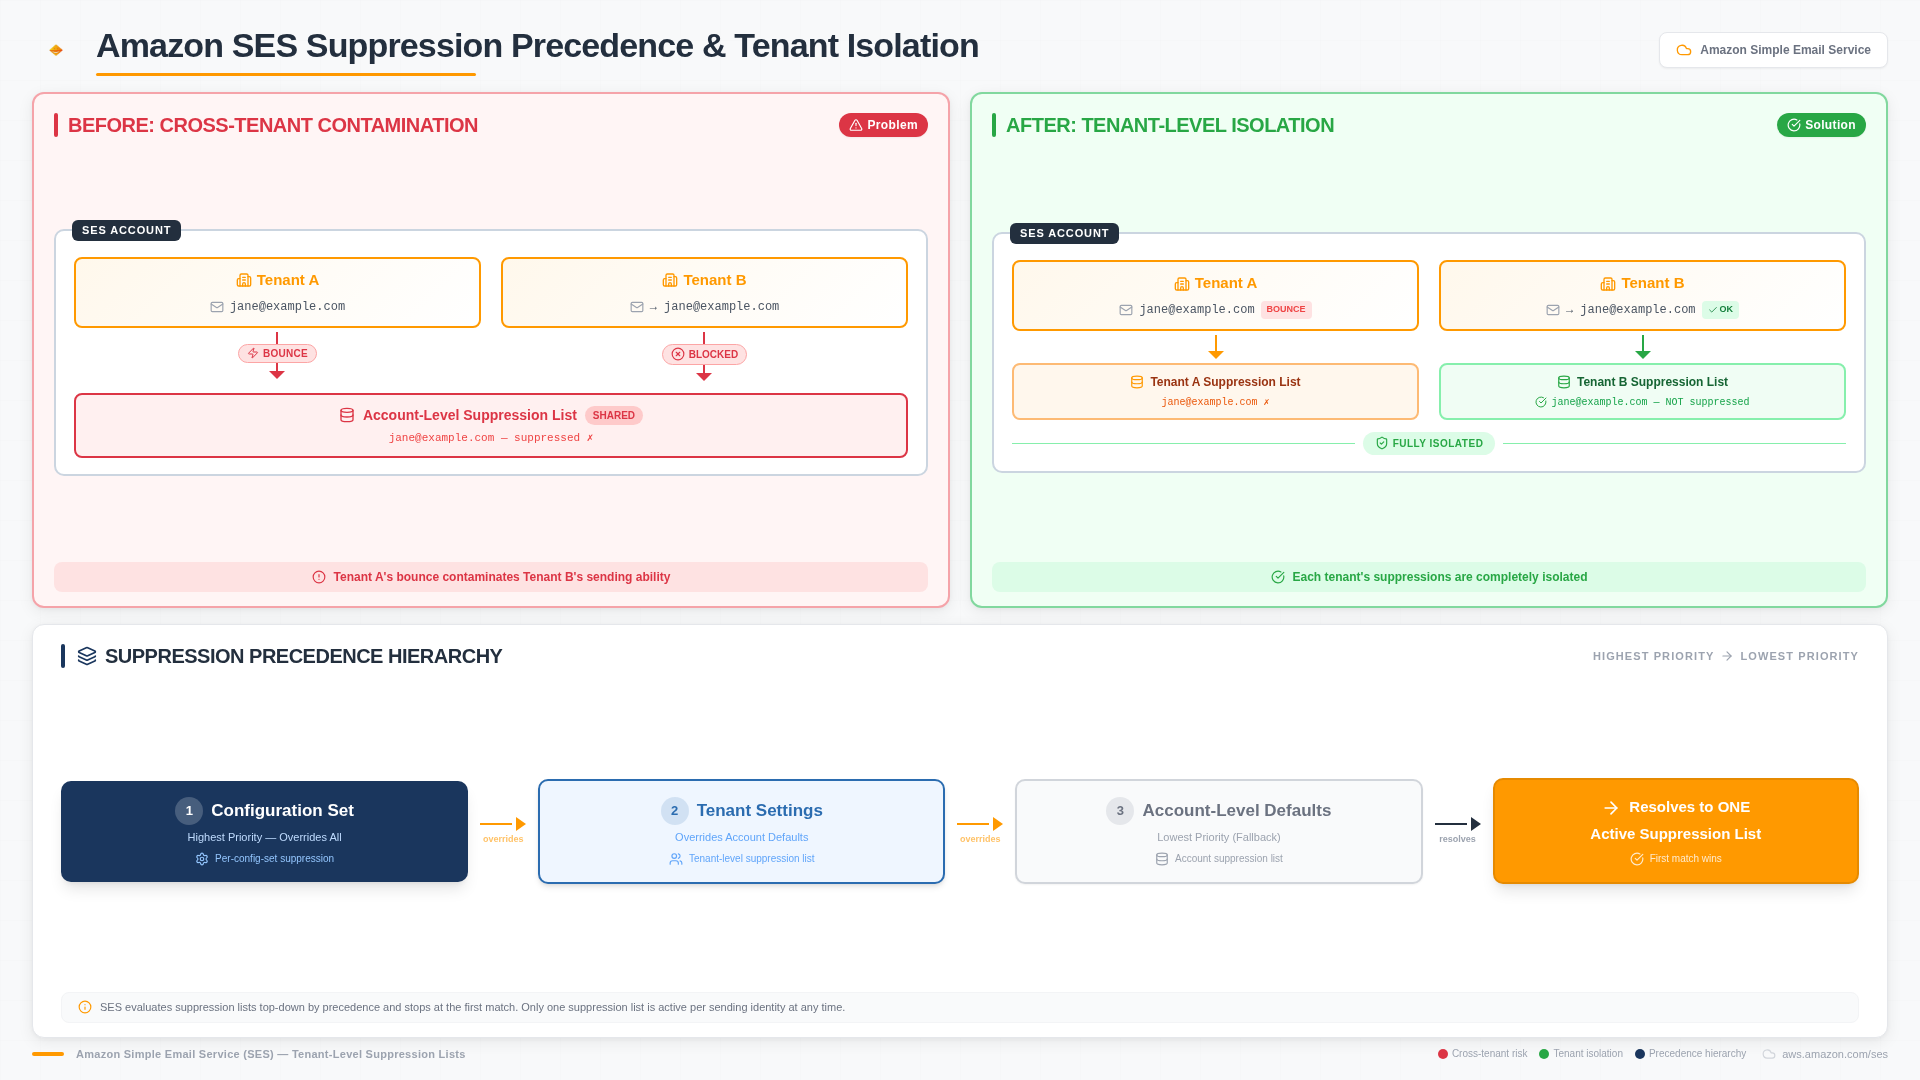
If you operate a multi-tenant email platform on Amazon Simple Email Service (Amazon SES), you know that managing email reputation across your tenants is a constant balancing act. Until now, all tenants in an Amazon SES account shared a single account-level suppression list. Suppose an email from Tenant 1 to Recipient A results in a hard bounce or a spam complaint. Amazon SES then places Recipient A’s email address on the account-level suppression list. As a result, none of your other tenants can send email to Recipient A. The block applies even when they have a valid, opted-in relationship with that recipient.
Tenant-level suppression lists solve this by allowing you to isolate bounce and complaint data per tenant, which eliminates cross-tenant contamination. With tenant-level suppression enabled, Amazon SES maintains a separate suppression list per tenant. Bounces and complaints affect only the sending tenant’s list. Other tenants can still attempt delivery to the same recipients.
In this post, you learn about the business problem this feature solves, how the new suppression precedence works, and how to implement tenant-level suppression for your multi-tenant email platform.
Amazon SES evaluates exactly one suppression list per SendEmail call
Precedence order
Configuration Set → Tenant → Account
Automatic recording
Bounces → tenant list + global list. Complaints → tenant list only
Backward compatible
Yes — opt-in per tenant, existing behavior unchanged
The cross-tenant suppression contamination problem in Amazon SES
Consider the following scenario. Imagine you run a SaaS marketing automation platform called “AnyCompany-SaaS.” You use Amazon SES multi-tenancy to send email on behalf of your customers (your tenants). For this example, consider Tenant A (a fast-growing fitness brand) and Tenant B (a conservative financial services company).
One day, Tenant A runs an aggressive, poorly targeted email campaign. Recipient A reports the email as spam, and that email address ([email protected]) gets added to your Amazon SES account-level suppression list to protect your sender reputation.
The problem? Tenant B has a perfectly valid, opted-in relationship with [email protected] and needs to send her a critical financial receipt. Before tenant-level suppression became available, AnyCompany-SaaS relied on the Amazon SES shared account-level suppression list. In this scenario, when Tenant B attempts to send email to [email protected], Amazon SES accepts the message but does not send it. The address is suppressed for every tenant in the account. Tenant B loses access to a valid recipient simply because of their neighbor’s poor email hygiene.
This is cross-tenant suppression contamination, and it creates several downstream problems:
Unfair deliverability outcomes — One tenant’s poor list hygiene affects all other tenants.
Increased support burden — Tenants ask “why is my email being suppressed?” and you have no clear answer.
Eroded trust — Your customers (the tenants) lose confidence in your platform’s email delivery capabilities.
Scaling challenges — The more tenants you add, the worse the contamination problem becomes.
Before today, the only workarounds were managing separate Amazon SES accounts per tenant (operationally expensive), or building custom suppression logic in your application layer (complex and error-prone). With Amazon SES tenant-level suppression lists, this shared-fate scenario is a thing of the past.
What is new: Tenant-level suppression lists
Each tenant in your account can now maintain its own isolated suppression list. When a hard bounce or complaint occurs for a tenant, Amazon SES records the suppressed address only on that tenant’s list. It does not add the address to other tenants’ lists.
Here is what this means in practice:
Isolation — Tenant A’s bounces and complaints affect only Tenant A’s suppression list.
Autonomy — Each tenant owns its own deliverability without impact from neighboring tenants.
Automatic management — Amazon SES automatically records entries based on hard bounces and complaints, and removes entries when recipients submit not-spam feedback.
Backward compatibility — Existing account-level suppression continues to work unchanged. Tenant-level suppression is opt-in per tenant.
Who benefits from tenant-level suppression?
This feature is designed for any organization that uses Amazon SES multi-tenancy to send email on behalf of multiple entities. Common use cases include:
SaaS platforms — Send transactional or marketing email for multiple customers, each with isolated suppression.
Marketing automation providers — Manage campaigns for different clients without cross-client contamination.
Enterprise multi-brand organizations — A corporation with multiple brands (for example, separate product lines or regional divisions) that need suppression isolation between brands.
Digital agencies — Manage email programs for dozens of clients under one Amazon SES account.
ISVs and resellers — Independent software vendors offering email capabilities as part of their platform.
When to use tenant-level vs. account-level suppression
Scenario
Recommended scope
Why
Single-tenant account (one brand, one sender)
ACCOUNT
No isolation needed — account-level works fine
Multi-tenant SaaS sending on behalf of customers
TENANT
Prevents cross-tenant contamination
Enterprise with multiple business units
TENANT
Each BU owns its deliverability independently
Per-workflow control within a single tenant
Configuration set override
Granular suppression at sub-tenant level
Migrating from separate Amazon SES accounts per tenant
TENANT
Consolidate into one account with isolation preserved
How Amazon SES tenant-level suppression precedence works
When you start mixing account-level lists, configuration sets, and tenant-level lists, it is important to understand how Amazon SES determines which list to check before sending an email. Amazon SES evaluates suppression rules in the following hierarchy (resolving to exactly one list).
Configuring suppression scope and suppressed reasons
Tenant-level suppression is controlled by two settings that you configure together:
Suppression scope — Determines which suppression list Amazon SES checks at send time:
TENANT — Use the tenant’s own suppression list.
ACCOUNT — Use the account-level suppression list (this is the default).
Suppressed reasons — Determines which events cause Amazon SES to automatically add addresses to the suppression list:
BOUNCE — Add addresses that produce hard bounces.
COMPLAINT — Add addresses that produce complaints.
Both BOUNCE and COMPLAINT — Add addresses for either event.
You configure both settings together using the PutTenantSuppressionAttributes API operation or by specifying SuppressionAttributes when creating a new tenant with CreateTenant.
Suppression precedence order
Behavior: Amazon SES evaluates exactly one suppression list per SendEmail call. The precedence is: Configuration Set > Tenant > Account. It does not check multiple lists in sequence.
Amazon SES resolves suppression settings using the following precedence order:
Configuration set overrides (highest priority) — If the email is sent using a configuration set with a defined SuppressionOptions scope, Amazon SES uses that setting first.
Tenant-level settings — If no configuration set override exists, and the email includes a TenantName, Amazon SES checks the isolated suppression list for that specific tenant.
Account-level defaults (lowest priority) — If neither the configuration set nor the tenant specifies suppression settings, Amazon SES uses account-level defaults.
Important: An address that is on the account-level suppression list but not on the tenant’s list will not be suppressed when the scope is TENANT. Conversely, an address on the tenant’s list will not affect sends when the scope resolves to ACCOUNT.
Automatic suppression recording behavior
When the suppression scope is TENANT, Amazon SES automatically manages entries:
Hard bounces — Amazon SES adds the address to the tenant’s suppression list and the global suppression list. Amazon SES does not add the address to the account-level suppression list.
Complaints — Amazon SES adds the address to the tenant’s suppression list only.
Not-spam feedback — When a recipient marks a previously reported message as not spam, Amazon SES automatically removes COMPLAINT-reason entries from the tenant’s suppression list.
Prerequisites
Before implementing tenant-level suppression, make sure you have the following:
Required resources:
An AWS account with Amazon SES configured.
Multi-tenancy enabled with at least one tenant in your Amazon SES account.
AWS Command Line Interface (AWS CLI) version 2 installed and configured with appropriate permissions.
Production access (required for PutSuppressedDestination operations — sandbox accounts cannot manually add suppression entries).
Knowledge prerequisites: You should be familiar with Amazon SES account-level suppression concepts and multi-tenancy configuration.
Minimal example: Enable and send with tenant suppression
The following is the shortest path to enabling tenant-level suppression and sending an email that uses it:
# 1. Enable tenant suppression (bounces + complaints)
aws sesv2 put-tenant-suppression-attributes \
    --tenant-name MyTenant \
    --suppression-scope TENANT \
    --suppressed-reasons BOUNCE COMPLAINT

# 2. Send email with tenant context — SES checks MyTenant's suppression list
aws sesv2 send-email \
    --from-email-address [email protected] \
    --destination '{"ToAddresses":["[email protected]"]}' \
    --content '{"Simple":{"Subject":{"Data":"Hello"},"Body":{"Text":{"Data":"Test message"}}}}' \
    --tenant-name MyTenant

# 3. Verify — list entries on the tenant's suppression list
aws sesv2 list-suppressed-destinations \
    --tenant-name MyTenant
Implementation walkthrough
Implementing tenant-level suppression requires configuring your tenants and updating your sending API calls. Here is how to get started using the AWS CLI.
Step 1: Enable tenant-level suppression for an existing tenant
First, you need to configure the suppression attributes for a specific tenant. In this example, you enable suppression for both bounces and complaints for MyTenant:
You can manually add or remove entries from a tenant’s suppression list. This is useful for pre-loading known bad addresses or removing addresses that have been re-validated.
Advanced: Configuration set overrides for per-workflow suppression control
For scenarios where you need per-workflow suppression control within a tenant, you can override tenant suppression settings at the configuration set level:
Keep the following points in mind as you implement tenant-level suppression:
Sandbox restrictions — You cannot call PutSuppressedDestination while your account is in the Amazon SES sandbox. Request production access first. Note that this restriction only applies to manually adding entries. Automatic suppression from bounces and complaints works in sandbox mode.
Entries persist — Disabling tenant-level suppression does not delete existing entries from the tenant’s suppression list. If you re-enable tenant-level suppression later, those entries are still active.
Fail-close behavior — If the tenant suppression service is unavailable, Amazon SES suppresses the message rather than allowing it through.
The “no tenant” fallback — If you enable tenant-level suppression across your architecture but inadvertently miss updating a legacy microservice, any SendEmail call made without a TenantName parameter automatically falls back to evaluating your shared account-level suppression list.
Migration strategy — We recommend a phased migration. Start by configuring tenant-level suppression for new tenants or low-volume tenants first. Monitor their isolated lists using the ListSuppressedDestinations API before updating the SendEmail calls for your highest-volume legacy tenants.
When you omit both --suppression-scope and --suppressed-reasons, Amazon SES clears the tenant’s suppression settings, and the tenant falls back to account-level suppression behavior.
Cleaning up
If you followed along with this walkthrough and want to remove the resources you created, take the following steps:
Important: Disabling tenant-level suppression does not delete existing suppression entries. If you plan to re-enable this feature later, be aware that previously suppressed addresses remain on the tenant’s list.
Clear tenant suppression settings (returns the tenant to account-level behavior):
Q: Does tenant-level suppression replace account-level suppression?
A: No. Account-level suppression continues to work unchanged. Tenant-level suppression is opt-in. You enable it per tenant by setting the suppression scope to TENANT. Tenants without this configuration continue using the account-level suppression list.
Q: What happens if I send an email without a TenantName parameter after enabling tenant-level suppression?
A: The email falls back to account-level suppression evaluation. Amazon SES only checks a tenant’s isolated suppression list when the SendEmail call includes the TenantName parameter and that tenant has SuppressionScope set to TENANT.
Q: Are existing suppression entries deleted when I disable tenant-level suppression for a tenant?
A: No. Entries persist on the tenant’s suppression list. If you re-enable tenant-level suppression later, those entries become active again. To remove entries, you must explicitly call DeleteSuppressedDestination for each address.
Q: Can a single email address appear on both the account-level and a tenant-level suppression list?
A: Yes. The same address can exist on multiple lists. However, Amazon SES only checks the list that the resolved scope points to. If the scope is TENANT, only the tenant’s list is evaluated. The account-level list is not consulted.
Q: Does tenant-level suppression work in the Amazon SES sandbox?
A: Automatic suppression recording (from bounces and complaints) works in sandbox mode. However, you cannot manually add entries using PutSuppressedDestination until you request production access.
Q: How do I migrate from separate Amazon SES accounts per tenant to a single account with tenant-level suppression?
A: We recommend a phased approach: (1) Create tenants in your consolidated account, (2) Enable tenant-level suppression for each, (3) Export suppression entries from the old accounts using ListSuppressedDestinations, (4) Import them into the new tenant lists using PutSuppressedDestination, (5) Update your sending logic to include TenantName in all SendEmail calls.
Q: What is the maximum number of entries on a tenant’s suppression list?
A: Tenant-level suppression lists follow the same limits as account-level suppression lists. Check the Amazon SES quotas page for current limits.
Conclusion
Tenant-level suppression lists give ISVs, SaaS platforms, and large enterprises the granular control they need to manage email deliverability fairly and effectively. No more shared suppression lists causing cross-tenant contamination, and no more tenants losing access to valid recipients because of a neighbor’s email hygiene problems. Each tenant now owns their reputation data independently.
You can also configure and manage tenant-level suppression directly from the Amazon SES console.
If you have questions or feedback, reach out to us on AWS re:Post or through your AWS account team. We look forward to hearing how you are using tenant-level suppression to improve your multi-tenant email platform.
When we built AWS Glue interactive sessions, our goal was to make AWS Glue as interactive as running local Python from a notebook. We mostly succeeded. With a straightforward Python package and a Jupyter notebook, you could execute remotely against the AWS Glue ephemeral Spark backend. The Livy-based approach was ahead of its time, but it had limitations from its REST-based protocol. Running local PySpark unlocked powerful integrated development environment (IDE) features such as debugging and linting, so your environment could understand the code and help you develop Spark applications more quickly. Customers would often split their development work. They used local Spark (or Docker containers) to develop in an IDE on a small amount of data, then switched to AWS Glue interactive sessions to validate scaling and tuning against the full dataset.
With modern PySpark releases came a new protocol: Apache Spark Connect. Spark Connect bridges the gap between these two worlds: you develop in local Python, but execute on AWS Glue against actual data. Today, AWS Glue interactive sessions support Spark Connect natively. You can connect from any environment that supports the PySpark remote() API, including VS Code, PyCharm, Amazon SageMaker Unified Studio notebooks, and standalone Python applications. You don’t need to install specialized kernels or manage cluster infrastructure.
What Spark Connect changes
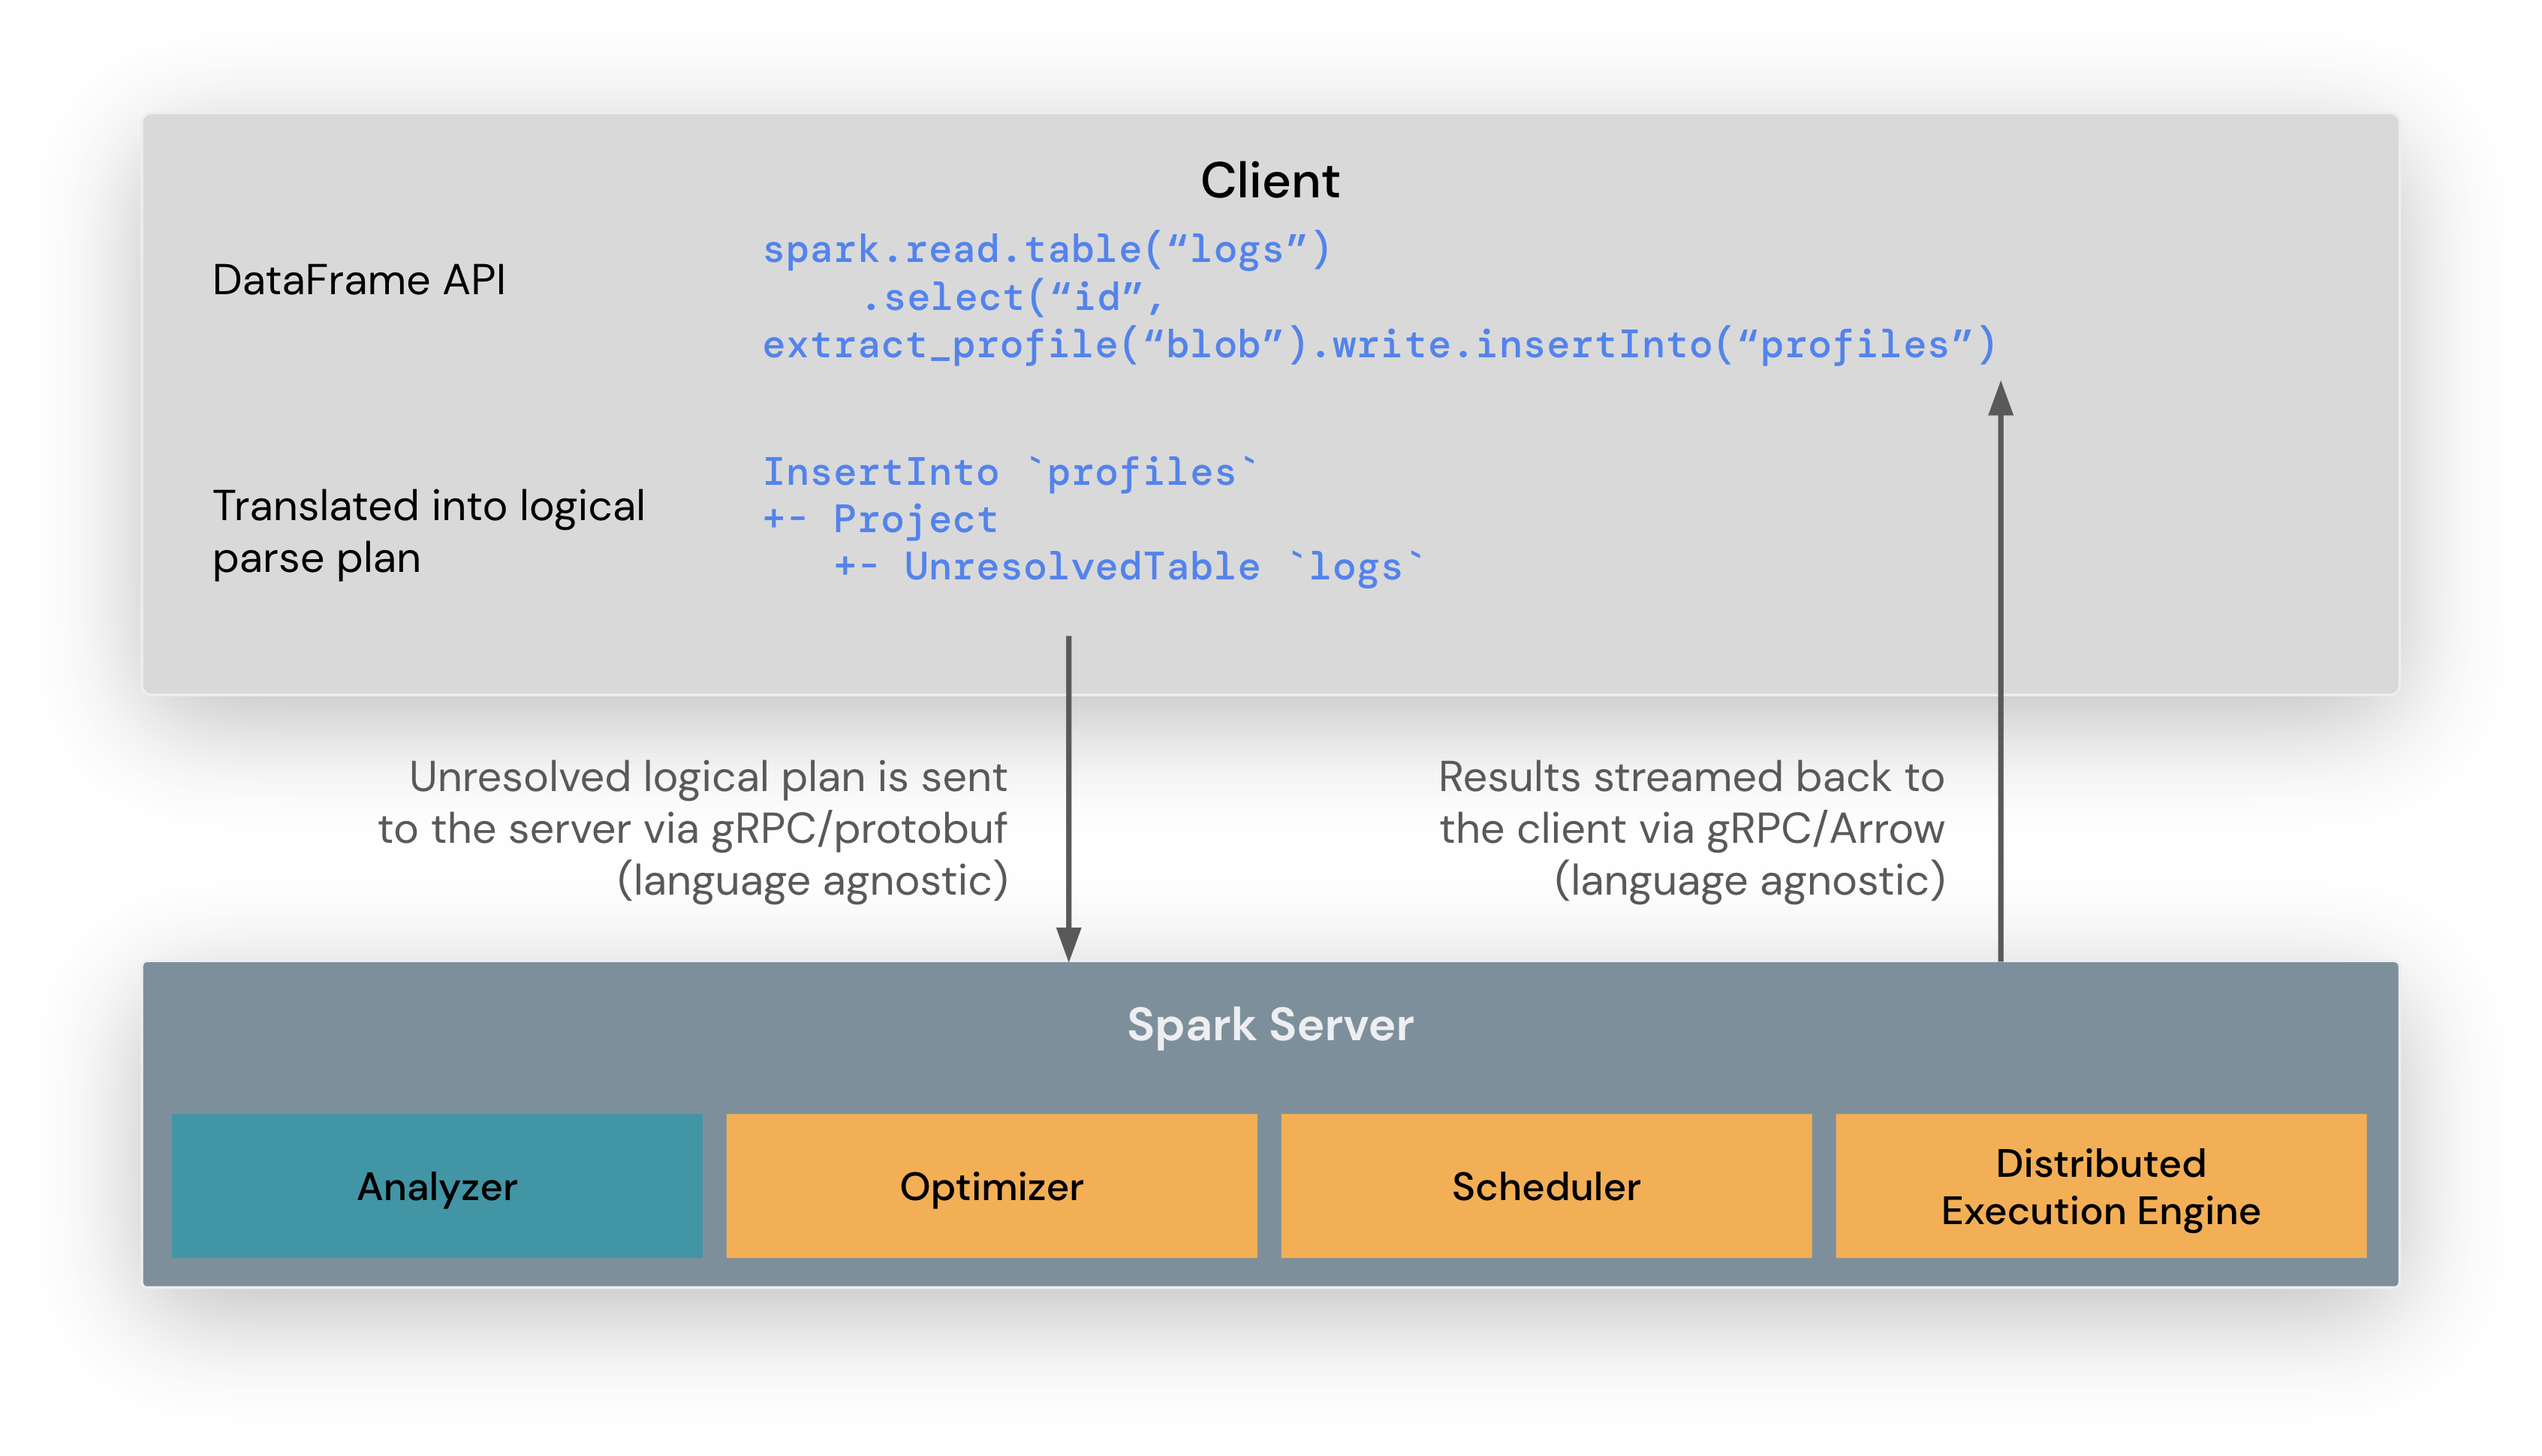
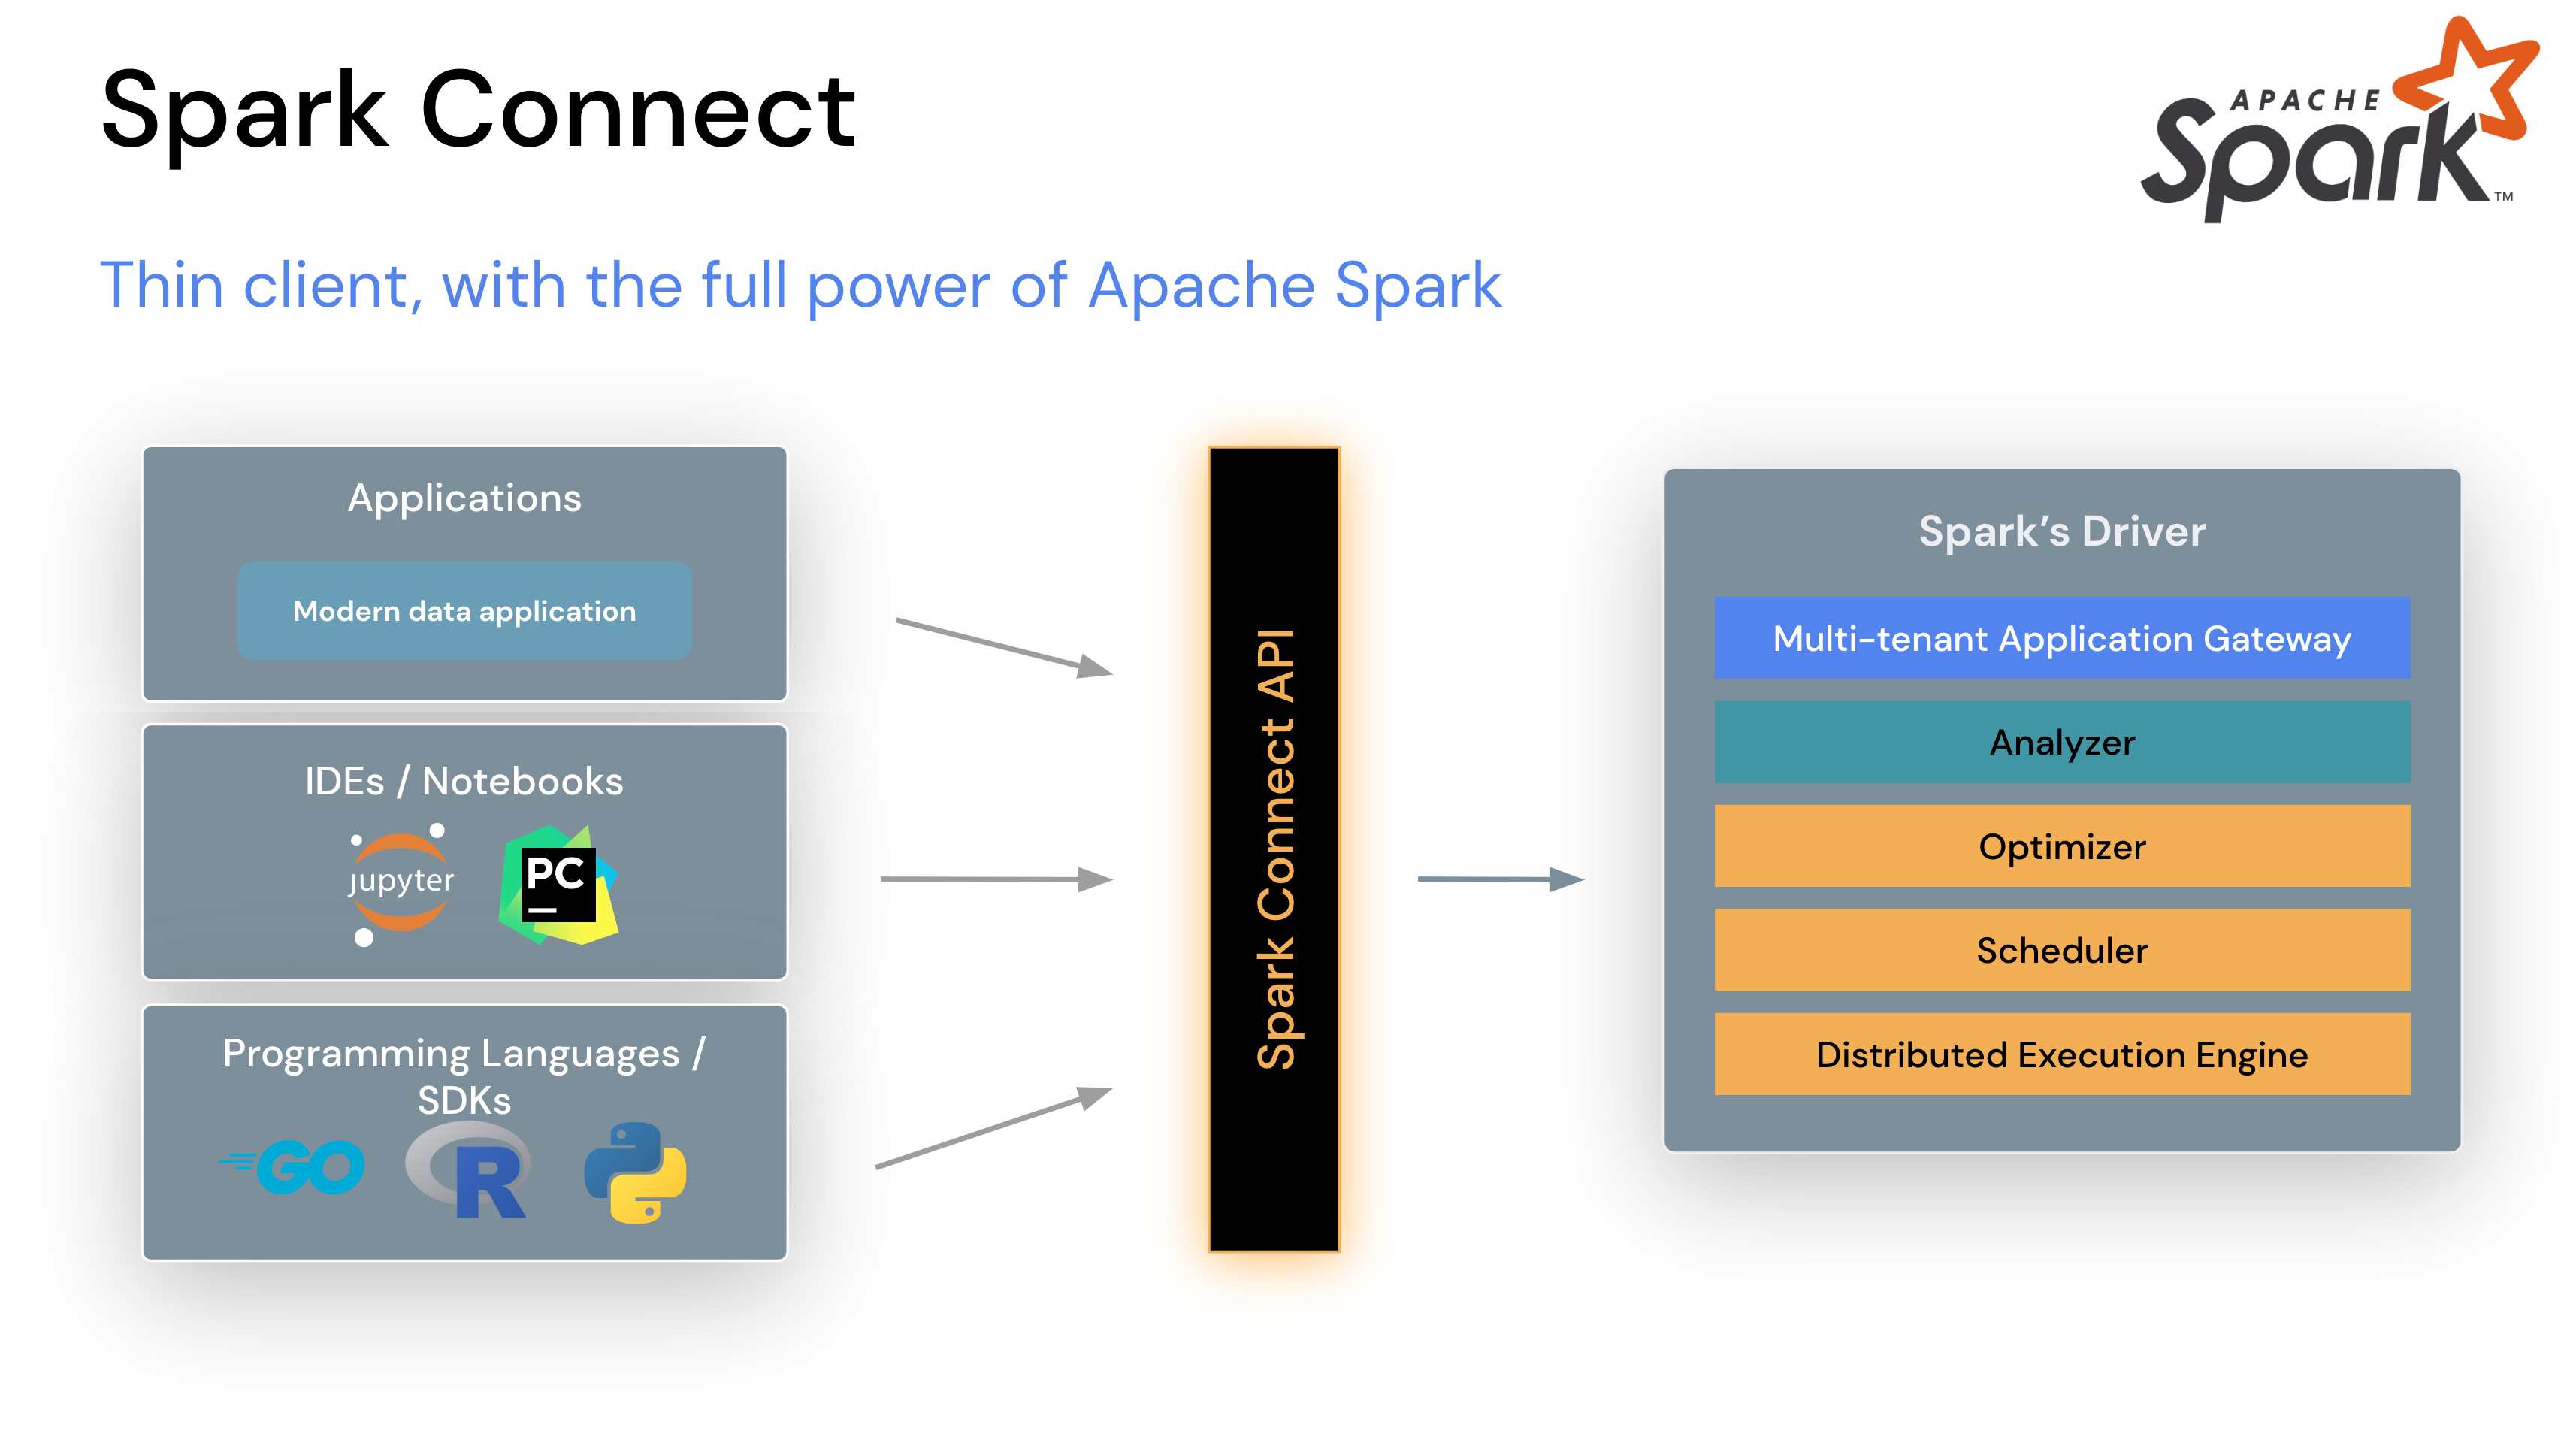
Spark Connect, introduced in Spark 3.4, decouples the Spark client from the server through a lightweight gRPC protocol. Instead of running your driver program on the cluster, your IDE communicates with a remote Spark server through a thin client layer. This architecture unlocks the key workflow improvement: you develop locally and execute remotely.
Spark Connect architecture — thin client with the full power of Apache Spark
With Spark Connect support in AWS Glue interactive sessions, you get:
IDE freedom – Use VS Code, PyCharm, JupyterLab, or any Python environment. No kernel installation required.
Programmatic access – Build Spark into your Python applications and automation scripts with a standard SparkSession.builder.remote() call.
Serverless execution – AWS Glue provisions and manages the Spark cluster. You pay only for the data processing units (DPUs) consumed while your session is active.
Spark Connect monitoring – The Spark Live UI now includes a dedicated Connect tab showing active Spark Connect sessions and operations alongside the existing Jobs, Stages, and Executors views.
Getting started with SageMaker Unified Studio
Amazon SageMaker Unified Studio provides the most direct path to Spark Connect on AWS Glue. The notebook environment handles session creation, endpoint retrieval, and token refresh automatically, so no connection boilerplate is required.
Prerequisite: You need an Amazon SageMaker Unified Studio project to use this workflow. If you don’t have one, create a project in your SageMaker Unified Studio domain first.
To connect to an AWS Glue Spark Connect session:
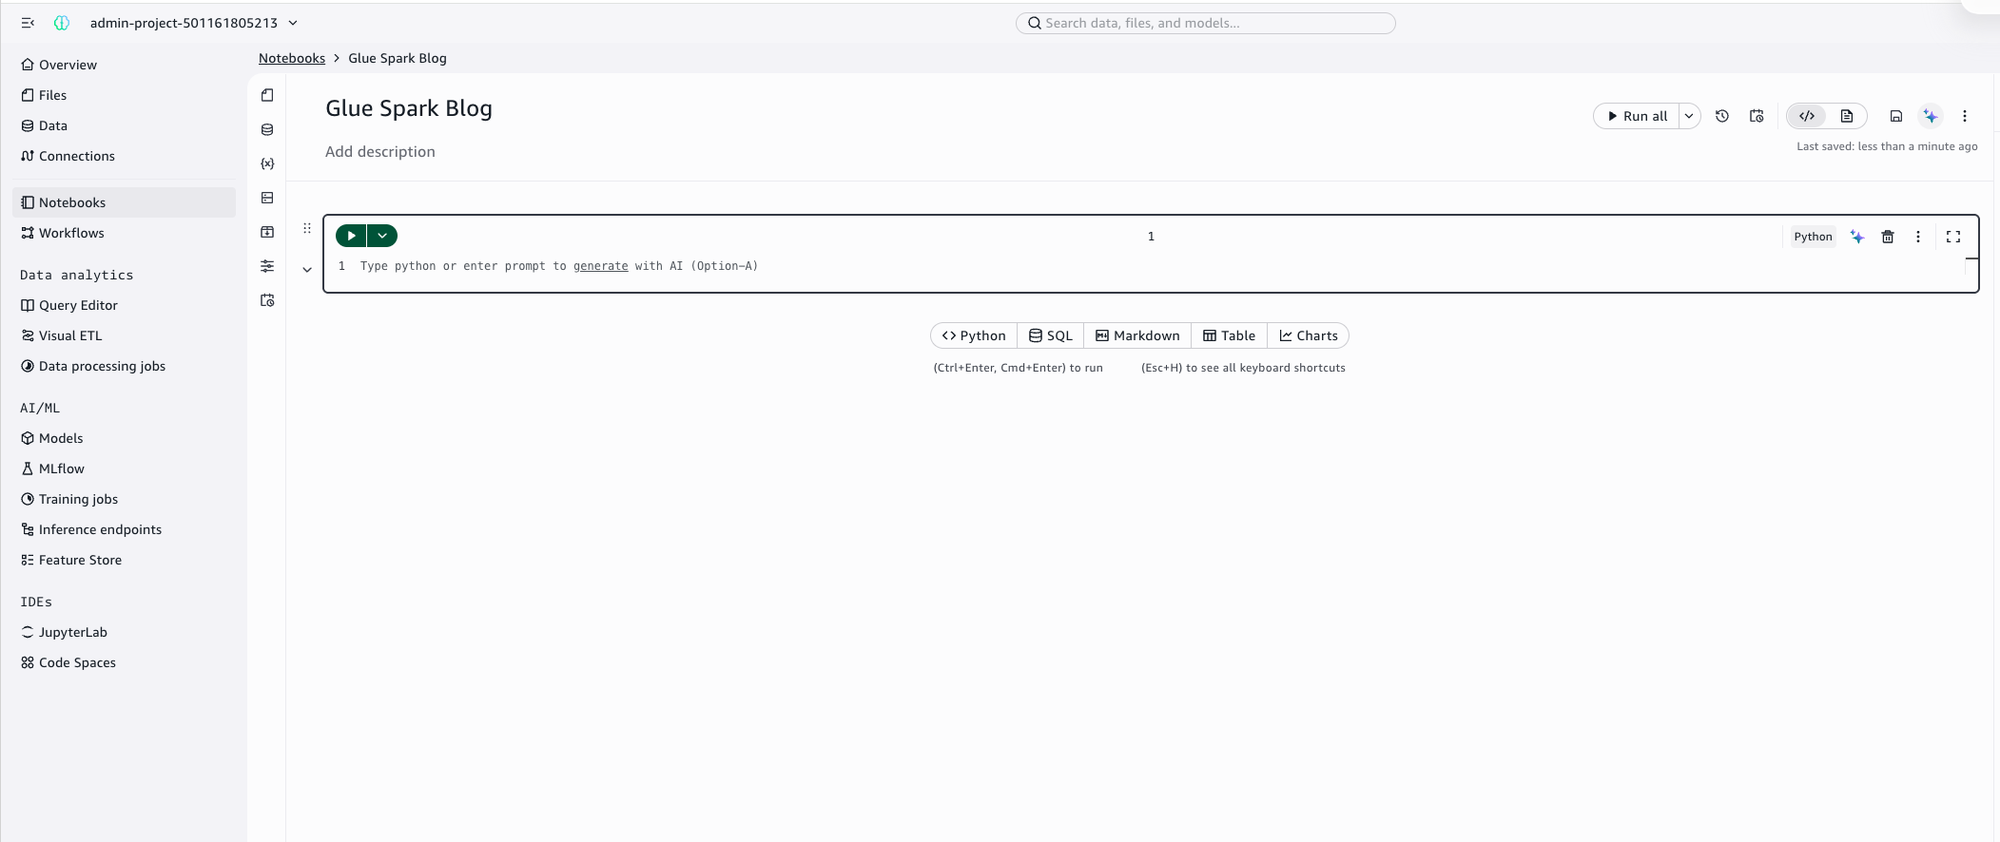
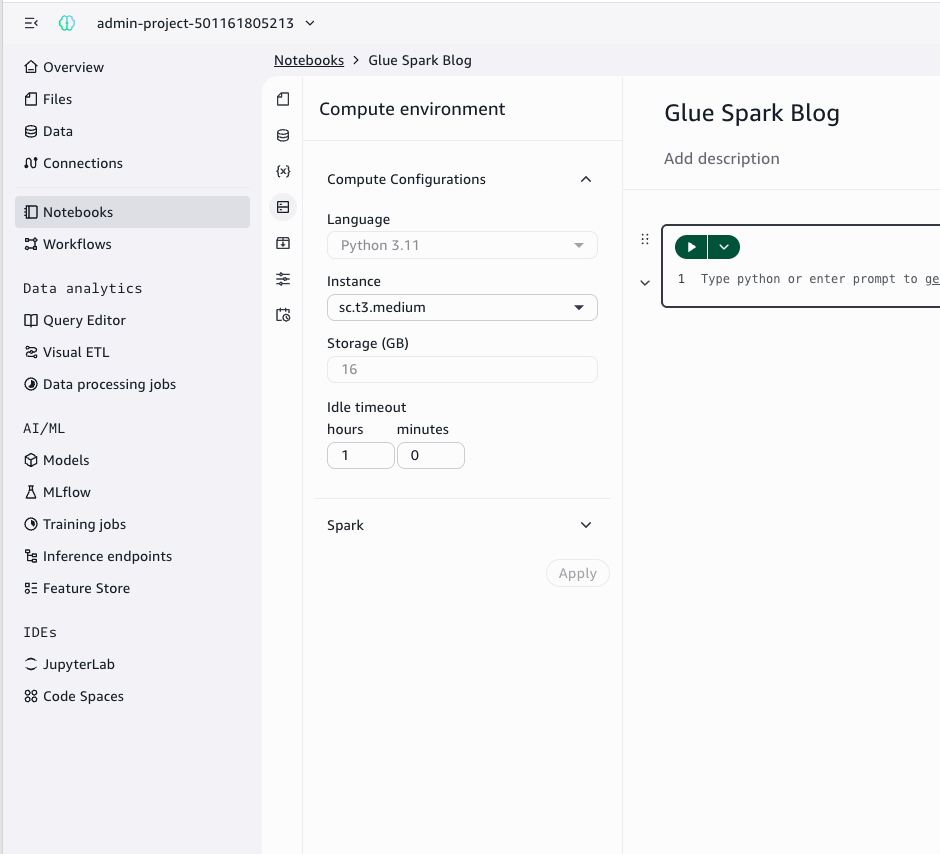
Sign in to SageMaker Unified Studio, choose your project, and create or open a Notebook.
A notebook open in SageMaker Unified Studio
Choose the compute icon in the left toolbar to open the Compute environment panel. Expand the Spark section.
The Compute environment panel with the Spark dropdown list
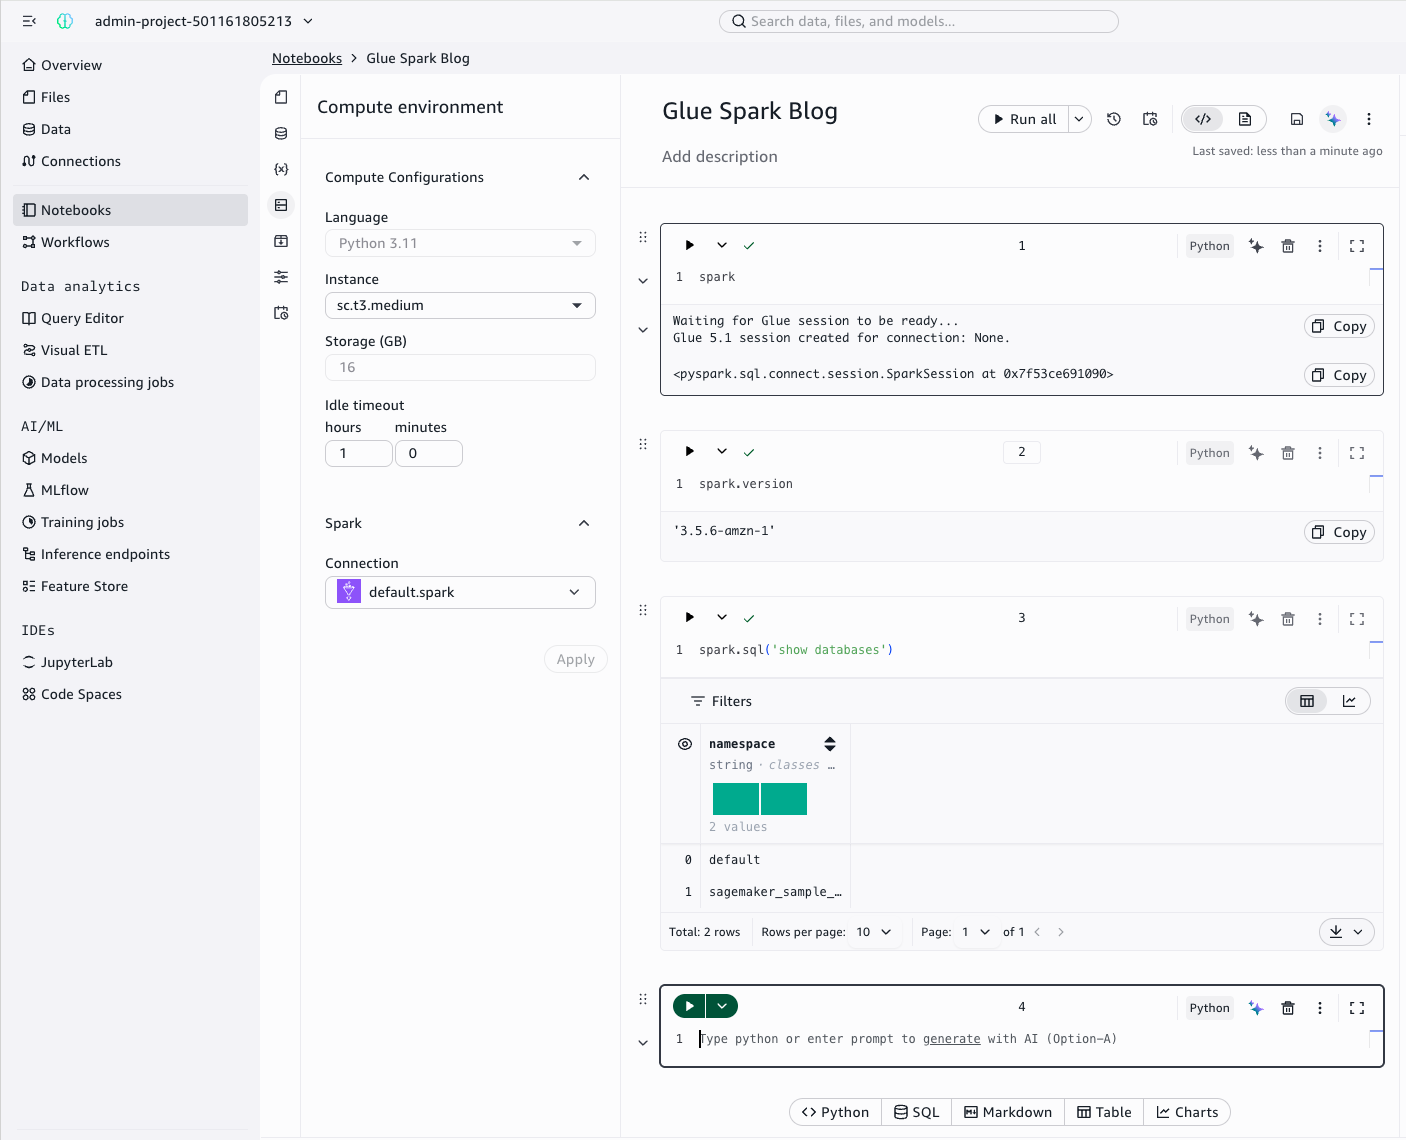
Select a Glue Spark connection. Depending on your SageMaker domain configuration, you will see either default.spark or named connections such as project.spark.compatibility. Select the appropriate Glue (Spark) connection and choose Apply.
Connected to Glue Spark Connect — running spark.version returns ‘3.5.6-amzn-1’
After you make your selection, you’re connected. The spark session object is available natively. No imports or configuration are needed. Start running PySpark immediately:
spark.sql("SHOW DATABASES").show()
The session manages itself in the background, including automatic token refresh.
Using the sagemaker_studio SDK
The sagemaker-studio Python package extends the Spark Connect experience beyond SageMaker Unified Studio notebooks into local IDEs, continuous integration and continuous delivery (CI/CD) pipelines, and any Python environment. The sparkutils module handles session initialization and connection configuration in a single call. You get the same streamlined experience as in the notebook, anywhere you run Python:
from sagemaker_studio import sparkutils

# Initialize a Glue Spark Connect session using your project connection
spark = sparkutils.init(connection_name="default.spark")

# Run queries immediately
spark.sql("SHOW DATABASES").show()
You can also use sparkutils.get_spark_options() to retrieve pre-configured Java Database Connectivity (JDBC) options for reading and writing to data sources through your project connections. Supported sources include Amazon Redshift, Amazon Aurora, and Amazon DocumentDB (with MongoDB compatibility):
# Get connection options for a Redshift connection in your project
options = sparkutils.get_spark_options("my_redshift_connection")

# Read from Redshift via Spark Connect
df = spark.read.format("jdbc").options(**options).option("dbtable", "analytics.orders").load()
df.show()
Within SageMaker Unified Studio, the sagemaker-studio SDK is native to the environment. The spark session and sparkutils are available without installation. For local IDE use, install it with pip install sagemaker-studio and configure credentials through an AWS named profile or boto3 session.
How it works
Spark Connect sessions in AWS Glue use a three-step workflow:
Create a session – Call the CreateSession API with SessionType set to SPARK_CONNECT. The session provisions in approximately 30 seconds.
Retrieve the endpoint – Call GetSessionEndpoint to receive a sc:// gRPC endpoint URL and a time-limited authentication token.
Connect with PySpark – Pass the endpoint and token to SparkSession.builder.remote() and start running Spark operations.
Spark Connect protocol flow — DataFrame API translated to logical plan, sent via gRPC/protobuf, results streamed back via gRPC/Arrow
Connecting with the low-level API
Some environments don’t have the sagemaker-studio SDK, such as custom containers, AWS Lambda functions, or non-Python toolchains. In these environments, or if you’re not using SageMaker Unified Studio, you can use the AWS SDK (Boto3) to manage sessions directly. The following example demonstrates the full workflow:
import time, boto3, urllib.parse
from pyspark.sql import SparkSession

glue = boto3.client("glue", region_name="us-east-1")

# 1. Create a Spark Connect session
session_id = "my-spark-connect-session"
glue.create_session(
    Id=session_id,
    Role="arn:aws:iam::123456789012:role/GlueServiceRole",
    Command={"Name": "glueetl"},
    GlueVersion="5.1",
    SessionType="SPARK_CONNECT",
    DefaultArguments={"--enable-spark-live-ui": "true"},
)

# 2. Wait for the session to reach READY
while True:
    status = glue.get_session(Id=session_id)["Session"]["Status"]
    if status == "READY":
        break
    time.sleep(5)

# 3. Get the Spark Connect endpoint
sc = glue.get_session_endpoint(SessionId=session_id)["SparkConnect"]
endpoint_url = sc["Url"]
auth_token = sc["AuthToken"]

# 4. Connect with PySpark
encoded_token = urllib.parse.quote(auth_token, safe="")
connection_string = f"{endpoint_url}:443/;use_ssl=true;x-aws-proxy-auth={encoded_token}"
spark = SparkSession.builder.remote(connection_string).getOrCreate()
spark.sql("SELECT 1 + 1 AS result").show()
Monitoring with Spark Live UI
When you enable the Spark Live UI at session creation, you gain access to a real-time dashboard showing:
Jobs and Stages – Track active, completed, and failed jobs with stage-level metrics.
Executors – Monitor memory usage, shuffle data, and executor health.
SQL – Inspect query plans and execution details.
Connect tab – View active Spark Connect sessions and operations (specific to Spark Connect).
Access the dashboard through the GetDashboardUrl API or directly from the AWS Glue console.
In SageMaker Unified Studio, no API call is needed. Choose Ready in the notebook status bar to open the kernel info popover. From there, open the Spark UI link for the live dashboard or Spark Driver Logs for real-time log output.
Image showing “Ready” in the status bar to access Spark UI and Driver Logs directly from the notebook
Token refresh
Authentication tokens expire after 30 minutes. In SageMaker Unified Studio, this is handled automatically. For programmatic use, you can use a background thread to keep the connection alive. The following helper reconnects transparently before the token expires:
import threading, time, boto3, urllib.parse
from pyspark.sql import SparkSession

class GlueSparkConnect:
    """Maintains a SparkSession with automatic token refresh."""

    def __init__(self, session_id, region="us-east-1", refresh_margin=300):
        self.session_id = session_id
        self.glue = boto3.client("glue", region_name=region)
        self.refresh_margin = refresh_margin  # seconds before expiry to refresh
        self._lock = threading.Lock()
        self.spark = self._connect()
        self._start_refresh_loop()

    def _connect(self):
        sc = self.glue.get_session_endpoint(SessionId=self.session_id)["SparkConnect"]
        encoded_token = urllib.parse.quote(sc["AuthToken"], safe="")
        remote_url = f"{sc['Url']}:443/;use_ssl=true;x-aws-proxy-auth={encoded_token}"
        self._token_expiry = sc["AuthTokenExpirationTime"].timestamp()
        return SparkSession.builder.remote(remote_url).getOrCreate()

    def _start_refresh_loop(self):
        def _loop():
            while True:
                sleep_for = max(self._token_expiry - time.time() - self.refresh_margin, 30)
                time.sleep(sleep_for)
                with self._lock:
                    self.spark = self._connect()
        t = threading.Thread(target=_loop, daemon=True)
        t.start()

# Usage
session = GlueSparkConnect("my-spark-connect-session")
session.spark.sql("SELECT 1 + 1 AS result").show()
The background thread sleeps until 5 minutes before token expiry, then transparently reconnects. Because the daemon thread exits when your script ends, there is no cleanup required.
Getting started
To start using Spark Connect with AWS Glue interactive sessions:
Grant your AWS Identity and Access Management (IAM) identity permissions for glue:CreateSession, glue:GetSession, and glue:GetSessionEndpoint.
Create a session with --session-type SPARK_CONNECT and connect from your preferred environment.
VPC note: If you connect to AWS Glue interactive sessions through a virtual private cloud (VPC) endpoint, add the new Spark Connect endpoint (com.amazonaws.{region}.glue.sessions) to your VPC configuration. Existing AWS Glue VPC endpoints don’t cover Spark Connect traffic.
For detailed instructions, see Connecting to a Spark Connect session in the AWS Glue Developer Guide.
On April 7, 2026, Anthropic announced a model so capable they refused to release it publicly. Claude Mythos, their most advanced frontier AI, was deemed too dangerous for open access because of one thing: it can hack.
Anthropic locked Claude Mythos behind Project Glasswing, a vetted partner program initially restricted to roughly 50 organizations—AWS, Microsoft, Google, Apple, Cisco, CrowdStrike, and others—to use the model for defensive work before adversaries could develop equivalent capability. By June, that program had expanded to more than 200 organizations across 15 countries, including operators of power grids, water systems, hospitals, and telecommunications infrastructure.
Then, on June 9, Anthropic released Fable 5—the first public version of a Mythos-class model—equipped with safeguards that reroute higher-risk queries to less-capable models. The same day, it released Claude Mythos 5 directly to vetted Glasswing partners. Later in June, after a brief US government export review, the Commerce Department confirmed that “appropriate safeguards are in place” and permitted Anthropic to redeploy Mythos 5 to trusted cyber defenders.
But here’s the part that should be on every IT leader’s radar: Anthropic itself now projects that other AI companies will have Mythos-class models within six to 12 months, and those companies may not ship with equivalent safeguards.
GPT-5.5, released three weeks later, didn’t wait. OpenAI shipped it with expanded cybersecurity capabilities and its own controlled-access program—also designed for defense, also eventually available to people with different intentions.
The AI arms race in cybersecurity isn’t coming. It’s here.
Ransomware 5.0 Doesn’t Need a Skilled Operator
For most of its history, ransomware required a human being at the keyboard: someone doing reconnaissance, identifying targets, crafting phishing lures, moving laterally through a network. Skilled attackers commanded significant ransoms. Amateur operators made rookie mistakes.
That dynamic is collapsing.
Ransomware now appears in 48% of all breach chains, according to the Verizon 2026 Data Breach Investigations Report—up from 44% the year prior. Active ransomware groups jumped 49% year over year. Over 250 new operators entered the market in just the last six months, many of them low-skill actors using generative AI to craft personalized phishing campaigns 60% faster than was possible before. AI-assisted lateral movement was present in over 65% of recent cases.
The Verizon 2026 DBIR also marks a shift in how attackers get in the door: for the first time, exploiting unpatched software vulnerabilities has overtaken stolen credentials as the number one initial access vector, now responsible for 31% of breaches. That’s not a coincidence in a world where AI can scan codebases for exploitable flaws at machine speed.
IBM’s 2026 X-Force Threat Index confirmed that “collapsing barriers to entry” are letting even low-volume operators run campaigns that overwhelm defenders. The average cost of a data breach in the US hit $10.22 million—an all-time record.
Trend Micro’s 2026 security predictions describe what they call “Ransomware 5.0”: a model where AI handles reconnaissance, vulnerability scanning, lateral movement, and even ransom negotiation autonomously, without a human operator directing any of it.
If you’re still designing your security posture around slowing down a skilled human attacker, you’re fighting the last war.
The Thing Nobody Wants to Say Out Loud
Here’s where I’m going to say something a little uncomfortable: the cybersecurity industry has been selling you detection for years when what you actually needed was recovery.
Detection is important. Don’t get me wrong. But detection-centric security assumes you catch the attack before it fully executes. In an era where AI compresses the attack timeline, exploit chains run at machine speed, and hundreds of new ransomware groups just showed up with AI-powered toolkits, detection alone isn’t a resilience strategy. It’s a bet.
The UK Government’s AI Security Institute tested Claude Mythos extensively and confirmed it cannot reliably execute attacks against organizations with well-hardened defenses. That’s genuinely good news. But it raises an obvious follow-up question: how many organizations actually have well-hardened defenses? A 2025 report found that over 45% of discovered security vulnerabilities in large organizations go unpatched after 12 months. Many critical infrastructure operators still run end-of-life software.
The honest answer is: most organizations are not that hardened. And even the ones that are will face a more capable threat next year than they face today.
This is why immutable backups aren’t just a box to check; they’re the safeguard that functions even when everything else fails. If an attacker encrypts your production environment before detection fires, the question isn’t “how did that happen?” It’s “how fast can you recover?”
What Claude Mythos Actually Changes (And What It Doesn’t)
It’s worth separating signal from noise here, because the coverage of Claude Mythos has ranged from measured to apocalyptic.
What Mythos changes: the technical barrier for sophisticated attacks. Vulnerabilities that previously required elite researchers to discover and weaponize can now be found and chained faster. Anthropic’s own red team found that Mythos could identify and exploit a previously unknown FreeBSD remote code execution vulnerability—fully autonomously, no human involved after the initial prompt. Across all Project Glasswing partners, Mythos has now surfaced more than 10,000 high- or critical-severity security flaws in production codebases. That means the window between vulnerability disclosure and active exploitation, already dangerously short, gets shorter. It also means less-skilled threat actors get access to capabilities that used to require significant expertise.
What Mythos doesn’t change: the fundamental anatomy of a ransomware attack. Attackers still need initial access. The Verizon 2026 DBIR confirms they’re still relying on unpatched software, stolen credentials, and phishing as entry points just finding and exploiting them faster. Once inside, they still need to move laterally, identify high-value data, and execute the encryption sequence. The Centre for Emerging Technology and Security at the Alan Turing Institute made this point clearly: more sophisticated ransomware attacks that rely on stolen credentials, social engineering, or already-compromised accounts are “far less likely to be affected” by Mythos-class models on either side.
That matters for how you defend. Hardening access controls, enforcing MFA, patching aggressively, segmenting your environment, and maintaining clean, immutable backups are not glamorous. They are not AI-powered. But they address the attack anatomy that AI tools, offensive or defensive, haven’t fundamentally changed.
The Recovery Imperative
Strengthening cyber fundamentals, in practice, means one thing above all else: knowing that when something gets through, you can recover without paying a ransom.
Immutability. Backups that can’t be encrypted or deleted by ransomware, even by a compromised admin credential. This isn’t optional anymore. If your backups live in the same environment as your production data and share the same access credentials, they aren’t backups; they’re part of your blast radius. Backblaze B2 Object Lock is S3-compatible, so if your team is already running Veeam, Commvault, MSP360, or Nutanix, you’re not replacing your backup stack. You’re giving it an immutable target that ransomware can’t touch.
Air-gap or off-site isolation. Object Lock, WORM storage, and geographically separate backup targets all put meaningful distance between your recovery point and an active attack. When AI tools can chain dozens of steps in a corporate network attack simulation autonomously, “isolated backups” means genuinely isolated, not just a separate folder. Version history matters here too: the ability to roll back to a known pre-attack state, not just the most recent snapshot, is what separates a clean recovery from discovering your restore point was already compromised.
Recovery time that matches the threat. AI-accelerated attacks mean recovery has to be fast. A backup strategy built around 72-hour RTOs made sense in a different threat environment. In 2026, breach costs approaching $10.22 million in the US, the question your leadership should be asking is: how long does it actually take us to restore from a clean state? Cold storage tiers that require hours of retrieval before a restore can even begin are a liability when the clock is running. Backblaze B2 is hot storage: your data is available immediately after detection, with no retrieval queue to wait on.
A Practical Checklist for IT Leaders Right Now
The Claude Mythos announcement, the Fable 5 public release, and GPT-5.5’s expanded cybersecurity capabilities are a forcing function. Not because Mythos-class capability is in attackers’ hands today, but because the direction of travel is confirmed, the timeline is compressed, and the question is no longer whether equivalent offensive tools will proliferate, only when.
A few things worth doing before that happens:
Audit your backup environment’s blast radius. Can ransomware that has compromised your production environment also reach your backups? If yes, fix that first.
Test your recovery time. Not just that backups exist, but how long an actual restore takes from your most recent clean snapshot. If you don’t know the number, you don’t have a recovery plan. You have a filing system. Backblaze gives you 3x your stored data in free egress each month, which removes the cost barrier that causes most teams to skip DR testing entirely. Run the restore. Know the number.
Pressure-test your identity controls. Credential abuse and phishing remain the dominant entry vectors. MFA, compromised credential monitoring, and least-privilege access aren’t new ideas, but they’re still the fastest path to closing the doors AI-powered attacks walk through.
Patch faster. The Verizon 2026 DBIR found exploited vulnerabilities are now the leading breach entry point. The median time organizations take to fix a known flaw is 55 days. AI-assisted attackers don’t wait 55 days.
Layer your defenses, but anchor to recovery. Perimeter protection, endpoint detection, vulnerability scanning: these all matter. But they’re all designed to catch something before it executes. Immutable backups are what you rely on when something executes anyway.
Revisit your RTO and RPO against today’s breach costs. The math has changed. A $10.22 million average US breach cost changes the calculus on what it’s worth spending on faster, more resilient recovery infrastructure.
The Last Thing
Anthropic made a decision that deserves credit: they looked at what Claude Mythos could do and chose not to hand it to the world on day one. Project Glasswing is a serious attempt to use the model’s capabilities on the right side of this fight, and the coordinated disclosure of thousands of vulnerabilities to the organizations responsible for patching them is meaningful defensive work.
But the history of powerful technology is not “we invented it and kept it safe.” It’s “we invented it, others reproduced it, and everyone had to adapt.” The 6-to-12-month window for equivalent capability to reach adversarial hands isn’t fearmongering; it’s Anthropic’s own forecast. Other AI companies are building toward the same capability threshold right now, and not all of them will ship with the same safeguards.
The organizations that come through this transition will be the ones that took recovery seriously before they needed it. Not because detection failed, but because recovery is the one safeguard that works regardless of what the attacker is running.
Backblaze B2 with Object Lock puts immutable, air-gapped backup storage within reach of organizations that can’t afford hyperscaler pricing (which, as it turns out, is most of them). Start a free trial or talk to our team about building a ransomware-resilient backup architecture before the threat landscape shifts again.
This post is co-written by Nishanth Charlakola from S&P Global.
Organizations have a requirement to build high availability and disaster recovery (HA/DR) solutions for their complex SQL Server infrastructure to maintain data availability and integrity. With the rapid pace of cloud adoption, businesses across different industries have realized the value of a successful proof of concept (POC) for any technical project that migrates existing environments to the cloud. For companies of any size, it is important to set standards, minimize risks, and conduct business and technical validation while maintaining speed.
In this post, we explain how S&P Global Market Intelligence implemented an innovative disaster recovery solution for their Capital IQ platform using Amazon FSx for NetApp ONTAP. This solution enables immediate failover to read-only mode in a secondary region within 15 minutes, followed by full read-write recovery when needed. This approach achieves reduction in failover time while maintaining data consistency for global financial operations.
S&P Global Market Intelligence has been providing essential intelligence that unlocks opportunity, fosters growth, and accelerates progress for more than 160 years. The company offers Environmental, Social, and Governance (ESG) solutions, deep data, and insights on critical economic, market, and business factors.
Business challenge
S&P Global Market Intelligence must maintain uninterrupted access to information, even during regional outages. The Capital IQ platform supports global clients who rely on timely and accurate data for decision-making, with business requirements mandating strict Recovery Time Objectives (RTO) and Recovery Point Objectives (RPO).The primary business challenge was making sure that once the decision to fail over has been made, the DR read-only system becomes operational and accessible within 15 minutes. This rapid failover window makes sure you can continue accessing essential financial information with minimal disruption during failover events.
Key challenges addressed
Facilitating sub-15-minute access to critical financial data during regional service disruptions
Maintaining data consistency for financial reporting
Supporting system availability during production code releases
Optimizing cross-region data replication costs without compromising performance
Meeting regulatory requirements for business continuity in financial services
Solution overview
S&P Global’s DR strategy for the Capital IQ platform follows a two-pronged approach that balances immediate availability with complete recovery capabilities:
Immediate failover to DR in read-only mode – using ONTAP snapshots and FlexClone technology for sub-15-minute recovery
Conversion of DR system from read-only to read-write mode – following established geo-cluster design with SnapMirror replication
This approach helps you continue accessing essential financial data during disaster scenarios, even while the full recovery process is underway, facilitating business continuity without compromising data integrity.
Prerequisites
To implement this solution, you need the following:
Amazon FSx for NetApp ONTAP supports encryption of data at rest and in transit, helping you meet security and compliance requirements. Data at rest is encrypted using AWS Key Management Service (AWS KMS) keys, and data in transit can be encrypted using SMB Kerberos encryption or NFS Kerberos. For SnapMirror replication, data transferred between file systems is encrypted in transit using AES-256-GCM encryption. For more information about security capabilities, see Security in Amazon FSx for NetApp ONTAP.
Architecture components
The solution architecture includes four key layers:
Compute layer: A four-node geo-distributed Windows Server Failover Cluster (WSFC) spanning two AWS Regions
Storage layer: Two Amazon FSx for NetApp ONTAP file systems, one in the primary region (US-East-1) and another in the DR region (US-West-2)
Data replication: SnapMirror replication from US-East-1 to US-West-2 with 15-minute intervals
Rapid recovery: FlexClone volumes created from existing SnapMirror snapshots in the DR region
Figure 1. Cross-region disaster recovery architecture using Amazon FSx for NetApp ONTAP with SnapMirror replication and FlexClone-based rapid recovery.
Technical implementation
Cross-Region data replication
The Capital IQ team established SnapMirror replication between their production Amazon FSx for NetApp ONTAP file system in US-East-1 (N. Virginia) and their DR file system in US-West-2 (Oregon), making sure the DR region maintains a consistent copy of production data.The SnapMirror replication is configured with a 15-minute schedule between primary and DR Amazon FSx for NetApp ONTAP file systems. This frequent replication makes sure the DR region stays closely synchronized with production, minimizing potential data loss during failover events. The actual Recovery Point Objective (RPO) varies based on production environment activity. During lower activity periods, the RPO can be just a few minutes, while higher transaction volumes may result in a slightly increased RPO within the 15-minute window.
Using FlexClone for rapid recovery
A key element of S&P Global’s disaster recovery strategy is the use of NetApp FlexClone technology in conjunction with SnapMirror snapshots. A scheduled automation process refreshes the DR environment daily by identifying the most recent SnapMirror snapshot available in the DR region and creating a FlexClone volume from that point-in-time image. With this read-only DR instance pre-provisioned in advance, initiating failover is primarily an application cutover step — redirecting traffic to the ready instance in the DR region.This approach is highly efficient and non-intrusive. By using snapshots for FlexClone creation, the solution maintains the integrity of ongoing SnapMirror replication between production and DR environments. The FlexClone volume operates independently of the active SnapMirror relationship, meaning it does not interrupt or interfere with data replication processes. This separation allows continuous data protection and synchronization, even while the DR environment serves live read-only traffic.
FlexClone creation process
Identify the latest SnapMirror snapshot in the DR region
Create a FlexClone volume from this snapshot using the NetApp ONTAP CLI:
Note: The following example demonstrates a typical FlexClone creation command. Actual parameters should be adjusted for your environment.
Present the FlexClone volume and its LUNs to the read-only SQL Server instance in the DR region
Direct application traffic to the read-only instance
Key advantages
Sub-15-minute recovery: FlexClone creation completes in under 2 minutes
Storage efficiency: FlexClones consume minimal additional storage as they share data blocks with the parent volume
Data consistency: The clone represents a point-in-time snapshot of production data
Operational isolation: The clone operates independently from ongoing SnapMirror replication
Full read-write recovery process
While read-only recovery provides immediate business continuity, transitioning to full read-write capability in the DR region follows these orchestrated steps:
Stop SQL Server and freeze writes in the primary region
Apply the final SnapMirror update to the DR region
Break the SnapMirror relationship to make the DR volume read-write
Reverse the replication direction (DR to primary)
Fail over SQL Server resources to the DR nodes
Resume normal operations in the DR region
Business benefits
This approach to disaster recovery has delivered significant benefits:
Enhanced business resilience: The solution maintained established RTO and RPO standards while transitioning to cloud infrastructure, successfully extending proven on-premises DR capabilities to the cloud.
Continuous access during outages: Clients experience minimal disruption during regional disaster scenarios. The pre-provisioned read-only instance means failover is a redirect, not a rebuild.
Resilience beyond disasters: Read-only instances also support application availability during production code releases extending the solution’s value beyond its original DR scope.
Lower infrastructure costs: FlexClone technology’s efficient data block sharing minimizes storage overhead in the DR region, reducing costs while maintaining comprehensive data protection.
Cloud-native without compromise: By moving from on-premises infrastructure to Amazon FSx for NetApp ONTAP, S&P Global gained cloud agility and elasticity while preserving the mature data management capabilities that financial services operations require.
Regulatory compliance: The solution meets stringent financial services requirements for business continuity and data availability.
Conclusion
S&P Global Market Intelligence’s implementation demonstrates that organizations can achieve both rapid disaster recovery and cost efficiency using Amazon FSx for NetApp ONTAP. By combining SnapMirror replication with FlexClone technology, they built a DR strategy that is faster, leaner, and more flexible than its on-premises predecessor while maintaining the reliability standards that 160 years of client trust demand.For financial services organizations navigating similar migrations, this approach offers a proven blueprint: replicate what works, modernize how it runs, and maintain the same level of data protection clients expect.
“Adopting Amazon FSx for NetApp ONTAP has helped us extend our proven disaster recovery strategy into the cloud. The ability to use native ONTAP snapshots and FlexClone technology on AWS enables us to deliver the same level of data protection and business continuity that our clients expect, without compromise. This solution bridges the gap between on-premises reliability and cloud agility.”
— Nishanth Charlakola, Director, S&P Global Market Intelligence
If you need guidance on implementing Amazon FSx for NetApp ONTAP or architecting disaster recovery solutions for financial services, contact your AWS account team.
William Woodruff, better known online as “yossarian”, has published
a blog post to make the case that users should not place their trust
in trusted
publishing:
Trusted Publishing is a mechanism for establishing trust between an
external machine identity (like a CI/CD workflow) and one or more
projects on a package index/registry. The “trust” in “Trusted
Publishing” refers to that trust relationship, and not to anything
else.
It is not, and cannot be, a signal for package trust or
quality. You cannot use it to determine whether a package is safe or
“good,” and PyPI consciously stymies attempts to misuse it for that
purpose by not rendering it as a “green checkmark” or anything else of
the sort.
Or as another framing: Trusted Publishing is just a form of
authentication. It doesn’t tell you anything other than that an upload
was authenticated, which all uploads to PyPI are.
To provide the best experiences, we use technologies like cookies to store and/or access device information. Consenting to these technologies will allow us to process data such as browsing behavior or unique IDs on this site. Not consenting or withdrawing consent, may adversely affect certain features and functions.
Functional
Always active
The technical storage or access is strictly necessary for the legitimate purpose of enabling the use of a specific service explicitly requested by the subscriber or user, or for the sole purpose of carrying out the transmission of a communication over an electronic communications network.
Preferences
The technical storage or access is necessary for the legitimate purpose of storing preferences that are not requested by the subscriber or user.
Statistics
The technical storage or access that is used exclusively for statistical purposes.The technical storage or access that is used exclusively for anonymous statistical purposes. Without a subpoena, voluntary compliance on the part of your Internet Service Provider, or additional records from a third party, information stored or retrieved for this purpose alone cannot usually be used to identify you.
Marketing
The technical storage or access is required to create user profiles to send advertising, or to track the user on a website or across several websites for similar marketing purposes.