Post Syndicated from Explosm.net original https://explosm.net/comics/dinner-plans
New Cyanide and Happiness Comic
Post Syndicated from Explosm.net original https://explosm.net/comics/dinner-plans
New Cyanide and Happiness Comic
Post Syndicated from Antje Barth original https://aws.amazon.com/blogs/aws/aws-week-in-review-aws-glue-crawlers-now-supports-apache-iceberg-amazon-rds-updates-and-more-july-10-2023/
The US celebrated Independence Day last week on July 4 with fireworks and barbecues across the country. But fireworks weren’t the only thing that launched last week. Let’s have a look!
Last Week’s Launches
Here are some launches that got my attention:
AWS Glue – AWS Glue Crawlers now supports Apache Iceberg tables. Apache Iceberg is an open-source table format for data stored in data lakes. You can now automatically register Apache Iceberg tables into AWS Glue Data Catalog by running the Glue Crawler. You can then query Glue Catalog Iceberg tables across various analytics engines and apply AWS Lake Formation fine-grained permissions when querying from Amazon Athena. Check out the AWS Glue Crawler documentation to learn more.
Amazon Relational Database Service (Amazon RDS) for PostgreSQL – PostgreSQL 16 Beta 2 is now available in the Amazon RDS Database Preview Environment. The PostgreSQL community released PostgreSQL 16 Beta 2 on June 29, 2023, which enables logical replication from standbys and includes numerous performance improvements. You can deploy PostgreSQL 16 Beta 2 in the preview environment and start evaluating the pre-release of PostgreSQL 16 on Amazon RDS for PostgreSQL.
In addition, Amazon RDS for PostgreSQL Multi-AZ Deployments with two readable standbys now supports logical replication. With logical replication, you can stream data changes from Amazon RDS for PostgreSQL to other databases for use cases such as data consolidation for analytical applications, change data capture (CDC), replicating select tables rather than the entire database, or for replicating data between different major versions of PostgreSQL. Check out the Amazon RDS User Guide for more details.
Amazon CloudWatch – Amazon CloudWatch now supports Service Quotas in cross-account observability. With this, you can track and visualize resource utilization and limits across various AWS services from multiple AWS accounts within a region using a central monitoring account. You no longer have to track the quotas by logging in to individual accounts, instead from a central monitoring account, you can create dashboards and alarms for the AWS service quota usage across all your source accounts from a central monitoring account. Setup CloudWatch cross-account observability to get started.
Amazon SageMaker – You can now associate a SageMaker Model Card with a specific model version in SageMaker Model Registry. This lets you establish a single source of truth for your registered model versions, with comprehensive, centralized, and standardized documentation across all stages of the model’s journey on SageMaker, facilitating discoverability and promoting governance, compliance, and accountability throughout the model lifecycle. Learn more about SageMaker Model Cards in the developer guide.
For a full list of AWS announcements, be sure to keep an eye on the What’s New at AWS page.
Other AWS News
Here are some additional blog posts and news items that you might find interesting:
Building generative AI applications for your startup – In this AWS Startups Blog post, Hrushikesh explains various approaches to build generative AI applications, and reviews their key component. Read the full post for the details.

Components of the generative AI landscape.
How Alexa learned to speak with an Irish accent – If you’re curious how Amazon researchers used voice conversation to generate Irish-accented training data in Alexa’s own voice, check out this Amazon Science Blog post.
AWS open-source news and updates – My colleague Ricardo writes this weekly open-source newsletter in which he highlights new open-source projects, tools, and demos from the AWS Community.
Upcoming AWS Events
Check your calendars and sign up for these AWS events:
 AWS Global Summits – Check your calendars and sign up for the AWS Summit close to where you live or work: Hong Kong (July 20), New York City (July 26), Taiwan (August 2-3), São Paulo (August 3), and Mexico City (August 30).
![]() AWS Community Days – Join a community-led conference run by AWS user group leaders in your region: Malaysia (July 22), Philippines (July 29-30), Colombia (August 12), and West Africa (August 19).
AWS Community Days – Join a community-led conference run by AWS user group leaders in your region: Malaysia (July 22), Philippines (July 29-30), Colombia (August 12), and West Africa (August 19).
![]() AWS re:Invent (November 27 – December 1) – Join us to hear the latest from AWS, learn from experts, and connect with the global cloud community. Registration is now open.
AWS re:Invent (November 27 – December 1) – Join us to hear the latest from AWS, learn from experts, and connect with the global cloud community. Registration is now open.
You can browse all upcoming in-person and virtual events.
That’s all for this week. Check back next Monday for another Week in Review!
— Antje
This post is part of our Week in Review series. Check back each week for a quick roundup of interesting news and announcements from AWS!
Post Syndicated from Patrick Kennedy original https://www.servethehome.com/three-new-amd-epyc-genoa-x-skus-with-up-to-48mb-l3-cache-per-core-or-1-1gb-total/
The AMD EPYC Genoa-X has three SKUs ranging from a massive 96 core, 1.1GB L3 cache part to a crazy 16-core 48MB L3 cache per core CPU
The post Three New AMD EPYC Genoa-X SKUs with up to 48MB L3 cache per Core or 1.1GB Total appeared first on ServeTheHome.
Post Syndicated from Franklin Aguinaldo original https://aws.amazon.com/blogs/architecture/designing-a-hybrid-ai-ml-data-access-strategy-with-amazon-sagemaker/
Over time, many enterprises have built an on-premises cluster of servers, accumulating data, and then procuring more servers and storage. They often begin their ML journey by experimenting locally on their laptops. Investment in artificial intelligence (AI) is at a different stage in every business organization. Some remain completely on-premises, others are hybrid (both on-premises and cloud), and the remaining have moved completely into the cloud for their AI and machine learning (ML) workloads.
These enterprises are also researching or have started using the cloud to augment their on-premises systems for several reasons. As technology improves, both the size and quantity of data increases over time. The amount of data captured and the number of datapoints continues to expand, which presents a challenge to manage on-premises. Many enterprises are distributed, with offices in different geographic regions, continents, and time zones. While it is possible to increase the on-premises footprint and network pipes, there are still hidden costs to consider for maintenance and upkeep. These organizations are looking to the cloud to shift some of that effort and enable them to burst and use the rich AI and ML features on the cloud.
Moving ML workloads into the cloud calls for a robust hybrid data strategy describing how and when you will connect your on-premises data stores to the cloud. For most, it makes sense to make the cloud the source of truth, while still permitting your teams to use and curate datasets on-premises. Defining the cloud as source of truth for your datasets means the primary copy will be in the cloud and any dataset generated will be stored in the same location in the cloud. This ensures that requests for data is served from the primary copy and any derived copies.
A hybrid data access strategy should address the following:
Understand your current and future storage footprint for ML on-premises. Create a map of your ML workloads, along with performance and access requirements for testing and training.
Define connectivity across on-premises locations and the cloud. This includes east-west and north-south traffic to support interconnectivity between sites, required bandwidth, and throughput for the data movement workload requirements.
Define your single source of truth (SSOT)[1] and where the ML datasets will primarily live. Consider how dated, new, hot, and cold data will be stored.
Define your storage performance requirements, mapping them to the appropriate cloud storage services. This will give you the ability to take advantage of cloud-native ML with Amazon SageMaker.
To help address these challenges, we worked on outlining an end-to-end system architecture in Figure 1 that defines: 1) connectivity between on-premises data centers and AWS Regions; 2) mappings for on-premises data to the cloud; and 3) Aligning Amazon SageMaker to appropriate storage, based on ML requirements.

Figure 1. AI/ML hybrid data access strategy reference architecture
Let’s explore this architecture step by step.
Let’s go deeper into how SageMaker can help you with your ML workloads.
To start mapping ML workloads to the cloud, consider which AWS storage services work with Amazon SageMaker. Amazon S3 typically serves as the central storage location for both structured and unstructured data that is used for ML. This includes raw data coming from upstream applications, and also curated datasets that are organized and stored as part of a Feature Store.
In the initial phases of development, a SageMaker Studio user will leverage S3 APIs to download data from S3 to their private home directory. This home directory is backed by a SageMaker-managed EFS file system. Studio users then point their notebook code (also stored in the home directory) to the local dataset and begin their development tasks.
To scale up and automate model training, SageMaker users can launch training jobs that run outside of the SageMaker Studio notebook environment. There are several options for making data available to a SageMaker training job.
hsm_restore commands.With this reference architecture, you can develop and deliver ML workloads that run either on-premises or in the cloud. Your enterprise can continue using its on-premises storage and compute for particular ML workloads, while also taking advantage of the cloud, using Amazon SageMaker. The scale available on the cloud allows your enterprise to conduct experiments without worrying about capacity. Start defining your hybrid data strategy on AWS today!
Additional resources:
[1] The practice of aggregating data from many sources to a single source or location.
Post Syndicated from original https://lwn.net/Articles/937006/
Linus Torvalds released
6.5-rc1 and closed the merge window for this development cycle on
July 9. By that point, 11,730 non-merge changesets had been pulled
into the mainline for 6.5; over 7,700 of those were pulled after
the first-half merge-window summary was
written. The second half of the merge window saw a lot of code coming into
the mainline and a long list of significant changes.
Post Syndicated from original https://lwn.net/Articles/937803/
Security updates have been issued by Debian (firefox-esr, fusiondirectory, ocsinventory-server, php-cas, and thunderbird), Fedora (dav1d, perl-CPAN, and yt-dlp), Red Hat (python39:3.9 and python39-devel:3.9), Slackware (mozilla), SUSE (prometheus-ha_cluster_exporter and prometheus-sap_host_exporter), and Ubuntu (ghostscript, linux-azure, linux-intel-iotg, linux-intel-iotg-5.15, and ruby-doorkeeper).
Post Syndicated from Bonnie Sheppard original https://www.raspberrypi.org/blog/free-uk-teacher-places-wipsce-conference-2023/
From 27 to 29 September 2023, we and the University of Cambridge are hosting the WiPSCE International Workshop on Primary and Secondary Computing Education Research for educators and researchers. This year, this annual conference will take place at Robinson College in Cambridge. We’re inviting all UK-based teachers of computing subjects to apply for one of five ‘all expenses paid’ places at this well-regarded annual event.

WiPSCE is where teachers and researchers discuss research that’s relevant to teaching and learning in primary and secondary computing education, to teacher training, and to related topics. You can find more information about the conference, including the preliminary programme, at wipsce.org.


As a teacher at the conference, you will:
We are delighted that, thanks to generous funding from a funder, we can offer five free places to UK computing teachers, covering:
The application deadline is Wednesday 19 July.
To be eligible to apply:
The application form will ask your for:
After the 19 July deadline, we’re aiming to inform you of the outcome of your application on Friday 21 July.


Your application will be reviewed by the 2023 WiPSCE Chairs:
Sue and Mareen will:
We’d be delighted to receive your application. Being able to facilitate teachers’ attendance at the conference is very much aligned with our approach to research. Both at the Foundation and the Raspberry Pi Computing Education Research Centre, we’re committed to conducting research that’s directly relevant to schools and teachers, and to working in close collaboration with teachers.
We hope you are interested in attending WiPSCE and becoming an advocate for research-informed computing education practice. If your application is unsuccessful, we hope you consider coming along anyway. We’re looking forward to meeting you there. In the meantime, you can keep up with WiPSCE news on Twitter.
The post Apply for a free UK teacher’s place at the WiPSCE conference appeared first on Raspberry Pi Foundation.
Post Syndicated from Nicholas Skehin original http://blog.cloudflare.com/how-cloudflare-images-addressed-the-acropalypse-vulnerability/


Acropalypse (CVE-2023-21036) is a vulnerability caused by image editing tools failing to truncate images when editing has made them smaller, most often seen when images are cropped. This leaves remnants of the cropped contents written in the file after the image has finished. The remnants (written in a ‘trailer’ after the end-of-image marker) are ignored by most software when reading the image, but can be used to partially reconstruct the original image by an attacker.
The general class of vulnerability can, in theory, affect any image format if it ignores data written after the end of the image. In this case the applications affected were the ‘Markup’ screenshot editor that shipped with Google Pixel phones from the Pixel 3 (saving its images in the PNG format) and the Windows Snipping tool (with both PNG and JPEG formats).
Our customers deliver their images using Cloudflare Images products and may have images that are affected. We would like to ensure their images are protected from this vulnerability if they have been edited using a vulnerable editor.
As a concrete example, imagine a Cloudflare customer running a social network, delivering images using Cloudflare Images. A user of the social network might take a screenshot of an invoice containing their address after ordering a product, crop their address out and share the cropped image on the social network. If the image was cropped using an editor affected by aCropalypse an attacker would be able to recover their address, violating their expectation of privacy.
Cloudflare Images and Image Resizing use a proxy as the upstream for requests. This proxy fetches the original image (from either Cloudflare Images storage or the customer’s upstream), applies any transformations (from the variant definition for Cloudflare Images, or from the URL/worker parameters for Image Resizing) and then responds with the transformed image.
This naturally provides protection against aCropalypse for our customers: the proxy will ignore any trailing data in the input, so it won’t be present in the re-encoded image.
However, for certain requests, the proxy might respond with the original. This occurs when two conditions hold: the original can satisfy the request and the re-encoded image has a larger file size. The original satisfies the request if we can guarantee that if the requested format is supported the original format will be supported, it has the same dimensions, it doesn’t have any metadata that needs stripping and it doesn’t have any other transformations such as sharpening or overlays.
Even if the original can satisfy the request, it is fairly unlikely the original will be smaller for images affected by aCropalypse as the leaked information in the trailer will increase the file size. So Cloudflare Images and Image Resizing should provide protection against aCropalypse without adding any additional mitigations.
That being said, we couldn’t guarantee that images affected by aCropalypse would always be re-encoded. We wanted to be able to offer this guarantee for customers of Cloudflare Images and Image Resizing.
To ensure that no images with a trailer will ever be passed through, we can add another requirement to reply with the original image — if the original image is a PNG or a JPEG (so might have been affected by aCropalypse), it must not have a trailer. Then we just need to be able to detect trailers for both formats.
As a first idea we might consider simply checking that the image ends with the correct end-of-image marker, which for JPEG is the byte sequence [0xFF 0xD9] and for PNG is the byte sequence [0x00 0x00 0x00 0x00 0x49 0x45 0x4E 0x44 0xAE 0x42 0x60 0x82]. But this won’t work for images affected by aCropalypse: because the original image was a valid image, the trailer that results from overwriting the start of the file will be the end of a valid image. We also can’t check whether there is more than one end-of-image marker in the file; both formats have chunks of variable-length bytestrings in which the end-of-image marker could appear. We need to do it properly by parsing the image’s structure and checking there is no data after its end.
For JPEGs, we use a Rust wrapper of the library libjpeg-turbo for decoding. Libjpeg-turbo allows fine control of resource usage; for example it allows decompressing and re-compressing a JPEG file a scanline at a time. This flexibility allows us to easily detect trailers using the library’s API: we just have to check that once we have consumed the end-of-image marker all of the input has been consumed. In our proxy we use an in-memory buffer as input, so we can check that there are no bytes left in the buffer:
pub fn consume_eoi_marker(&mut self) -> bool {
    // Try to consume the EOI marker of the image
    unsafe {
        (ffi::jpeg_input_complete(&self.dec.cinfo) == 1) || {
            ffi::jpeg_consume_input(&mut self.dec.cinfo);
            ffi::jpeg_input_complete(&self.dec.cinfo) == 1
        }
    }
}

pub fn has_trailer(&mut self) -> io::Result<bool> {
    if self.consume_eoi_marker() {
        let src = unsafe {
            NonNull::new(self.dec.cinfo.src)
                .ok_or_else(|| {
                    io::Error::new(
                        io::ErrorKind::Other,
                        "source manager not set".to_string()
                    )
                })?
                .as_ref()
        };

        // We have a trailer if we have any bytes left over in the buffer
        Ok(src.bytes_in_buffer != 0)
    } else {
        // We didn't consume the EOI - we can't say if there is a trailer
        Err(io::Error::new(
            io::ErrorKind::Other,
            "EOI not reached".to_string(),
        ))
    }
}
For PNGs, we use the lodepng library. This has a much simpler API surface that decodes an image in one shot when you call lodepng_decode. This doesn’t tell us how many bytes were read or provide an interface to detect if we have a trailer.
Luckily the PNG format has a very consistent and simple internal structure:
The file is terminated by a chunk of type IEND with no data.
As the format is so regular, it’s easy to write a separate parser that just reads the prelude, loops through the chunks until we see IEND, and then checks if we have any bytes left. We can perform this check after decoding the image with lodepng, as this allows us to skip validating the checksums as lodepng has already checked them for us:
const PNG_PRELUDE: &[u8] = &[0x89, 0x50, 0x4e, 0x47, 0x0d, 0x0a, 0x1a, 0x0a];

enum ChunkStatus {
    SeenEnd { has_trailer: bool },
    MoreChunks,
}

fn consume_chunks_until_iend(buf: &[u8]) -> Result<(ChunkStatus, &[u8]), &'static str> {
    let (length_bytes, buf) = consume(buf, 4)?;
    let (chunk_type, buf) = consume(buf, 4)?;

    // Infallible: We've definitely consumed 4 bytes
    let length = u32::from_be_bytes(length_bytes.try_into().unwrap());

    let (_data, buf) = consume(buf, length as usize)?;

    let (_checksum, buf) = consume(buf, 4)?;

    if chunk_type == b"IEND" && buf.is_empty() {
        Ok((ChunkStatus::SeenEnd { has_trailer: false }, buf))
    } else if chunk_type == b"IEND" && !buf.is_empty() {
        Ok((ChunkStatus::SeenEnd { has_trailer: true }, buf))
    } else {
        Ok((ChunkStatus::MoreChunks, buf))
    }
}

pub(crate) fn has_trailer(png_data: &[u8]) -> Result<bool, &'static str> {
    let (magic, mut buf) = consume(png_data, PNG_PRELUDE.len())?;

    if magic != PNG_PRELUDE {
        return Err("expected prelude");
    }

    loop {
        let (status, tmp_buf) = consume_chunks_until_iend(buf)?;
        buf = tmp_buf;
        if let ChunkStatus::SeenEnd { has_trailer } = status {
            return Ok(has_trailer)
        }
    }
}
Customers using Cloudflare Images or Image Resizing products are protected against the aCropalypse vulnerability. The Images team addressed the vulnerability in a way that didn’t require any changes to the original images or cause any increased latency or regressions for customers.
Post Syndicated from The History Guy: History Deserves to Be Remembered original https://www.youtube.com/watch?v=lcu7WVMsSF8
Post Syndicated from Bruce Schneier original https://www.schneier.com/blog/archives/2023/07/wisconsin-governor-hacks-the-veto-process.html
In my latest book, A Hacker’s Mind, I wrote about hacks as loophole exploiting. This is a great example: The Wisconsin governor used his line-item veto powers—supposedly unique in their specificity—to change a one-year funding increase into a 400-year funding increase.
He took this wording:
Section 402. 121.905 (3) (c) 9. of the statues is created to read: 121.903 (3) (c) 9. For the limit for the 2023-24 school year and the 2024-25 school year, add $325 to the result under par. (b).
And he deleted these words, numbers, and punctuation marks:
Section 402. 121.905 (3) (c) 9. of the statues is created to read: 121.903 (3) (c) 9. For the limit for
the2023-24 school year and the 2024–25school year, add $325 to the result under par. (b).
Seems to be legal:
Rick Champagne, director and general counsel of the nonpartisan Legislative Reference Bureau, said Evers’ 400-year veto is lawful in terms of its form because the governor vetoed words and digits.
“Both are allowable under the constitution and court decisions on partial veto. The hyphen seems to be new, but the courts have allowed partial veto of punctuation,” Champagne said.
Definitely a hack. This is not what anyone thinks about when they imagine using a line-item veto.
And it’s not the first time. I don’t know the details, but this was certainly the same sort of character-by-character editing:
Mr Evers’ Republican predecessor once deploying it to extend a state programme’s deadline by one thousand years.
A couple of other things:
One, this isn’t really a 400-year change. Yes, that’s what the law says. But it can be repealed. And who knows that a dollar will be worth—or if they will even be used—that many decades from now.
And two, from now all Wisconsin lawmakers will have to be on the alert for this sort of thing. All contentious bills will be examined for the possibility of this sort of delete-only rewriting. This sentence could have been reworded, for example:
For the 2023-2025 school years, add $325 to the result under par. (b).
The problem is, of course, that legalese developed over the centuries to be extra wordy in order to limit disputes. If lawmakers need to state things in the minimal viable language, that will increase court battles later. And that’s not even enough. Bills can be thousands of words long. If any arbitrary characters can be glued together by deleting enough other characters, bills can say anything the governor wants.
The real solution is to return the line-item veto to what we all think it is: the ability to remove individual whole provisions from a law before signing it.
Post Syndicated from original https://aws.amazon.com/blogs/devops/running-github-actions-in-a-private-subnet-with-aws-codebuild/
Last week the Developer Tools team announced that AWS CodeBuild now supports GitHub Actions. AWS CodeBuild is a fully managed continuous integration service that allows you to build and test code. CodeBuild builds are defined as a collection of build commands and related settings, in YAML format, called a BuildSpec. You can now define GitHub Actions steps directly in the BuildSpec and run them alongside CodeBuild commands. In this post, I will use the Liquibase GitHub Action to deploy changes to an Amazon Aurora database in a private subnet.
The GitHub Marketplace includes a large catalog of actions developed by third-parties and the open-source community. At the time of writing, there are nearly 20,000 actions available in the marketplace. Using an action from the marketplace can save you time and effort that would be spent scripting the installation and configuration of various tools required in the build process.
While I love GitHub actions, I often what to run my build in AWS. For example, I might want to access a resource in a private VPC or simply reduce the latency between the build service and my resources. I could accomplish this by hosting a GitHub Action Runner on Amazon Elastic Compute Cloud (Amazon EC2). However, hosting a GitHub Action runner requires additional effort to configure and maintain the environment that hosts the runner.
AWS CodeBuild is a fully managed continuous integration service. CodeBuild does not require ongoing maintenance and it can access resources in a private subnet. You can now use GitHub Actions in AWS CodeBuild. This feature provides the simplified configuration and management of CodeBuild with the rich marketplace of GitHub Actions. In the following section, I will explain how to configure CodeBuild to run a GitHub Action.
In this walkthrough, I will configure AWS CodeBuild to use the Liquibase GitHub Action to deploy changelogs to a PostgreSQL database hosted on Amazon Aurora in a private subnet. As shown in the following image, AWS CodeBuild will be configured to run in a private subnet along with my Aurora instance. First, CodeBuild will download the GitHub action using a NAT Gateway to access the internet. Second, CodeBuild will apply the changelog to the Aurora instance in the private subnet.

I already have a GitHub repository with the Liquibase configuration properties and changelogs shown in the following image. Liquibase configuration is not the focus of this blog post, but you can read more in Getting Started with Liquibase. My source also includes the buildspec.yaml file which I will explain later in this post.

To create my build project, I open CodeBuild in the AWS Console and select Create build project. Then I provide a name and optional description for the build. My project is named liquibase-blog-post.
If you are note already connected to GitHub, you can connect using a personal access token as shown in the following image.

Once I have successfully connected to GitHub, I can paste the URL to my repository as shown in the following image.
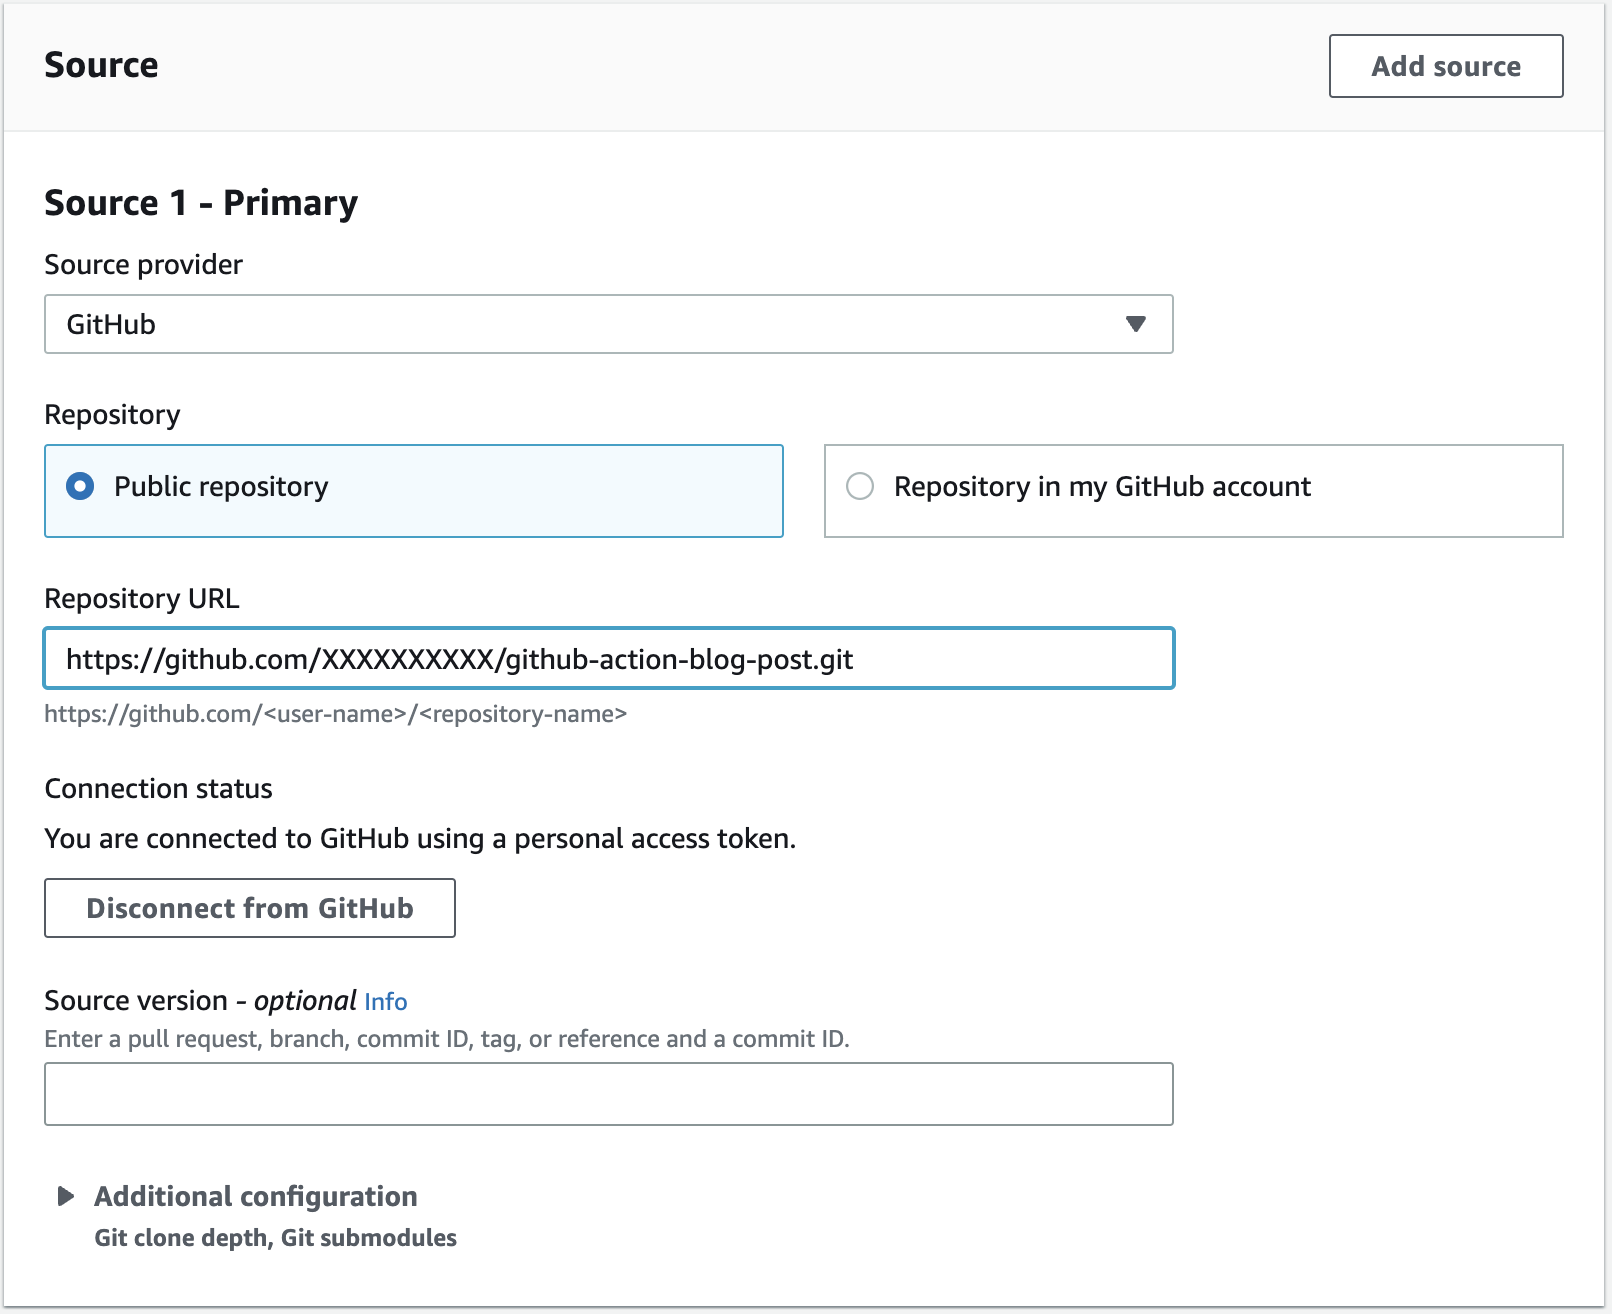
I configure my build environment to use the standard build environment on Amazon Linux 2. GitHub actions are built using either JavaScript or a Docker container. If the action uses a Docker container, you must enable the Privileged flag. The Liquibase image is using a Docker container, therefore, I check the box to enabled privileged mode.

For the VPC configuration, I select the VPC and private subnet where my Aurora instance is hosted and then click Validate VPC Settings to ensure my configuration is correct.

My Buildspec file is included I the source. Therefore, I select Use a buildspec file and enter the path to the buildspec file in the repository.

My buildspec.yaml file includes the following content. Notice that the pre_build phase incudes a series of commands. Commands have always been supported in CodeBuild and include a series of command line commands to run. In this case, I am simply logging a few environment variables for later debugging.
version: 0.2
phases:
  pre_build:
    commands:
      - echo $AWS_DEFAULT_REGION
      - echo $URL
  build:
    steps:
      - uses: liquibase-github-actions/[email protected]
        with:
          changelogFile: changelog-root.xml
          url: ${{ env.URL }}
          username: postgres
          password: ${{ $env.PASSWORD }}
          headless: true
Also notice that the build phase incudes a series of steps. Steps are new, and are used to run GitHub Actions. Each build phase supports either a list of commands, or a list of steps, but not both. In this example, I am specifying the Liquibase Update Action (liquibase-github-actions/update) with a few configuration parameters. You can see a full list of parameters in the Liquibase Update Action repository on GitHub.
I want to call you attention to the environment variables used in my buildspec.yml. Note that I pass the URL and PASSWORD for my database as environment variables. This allows me easily change these values from one environment to another. I have configured these environment variables in the CodeBuild project definition as shown in the following image. The URL is configured as Plaintext and the PASSWORD is configured as Secrets Manager. Running the GitHub Action in CodeBuild has the added advantage that I easily access secrets stored in AWS Secrets Manager and configuration data stored in AWS Systems Manager Parameter Store.

It is also important to note that the syntax use to access environment variables in the buildspec.yaml is different when using a GitHub Action. GitHub Actions access environment variables using the environment context. Therefore, in the pre_build phase, I am using CodeBuild syntax, in the format $NAME. However, the in the build phase, I am using GitHub syntax, in the format ${{ env:NAME}}.
With the configuration complete, I select Create build project and then manually start a build to test the configuration. In the following example you can see the logs from the Liquibase update. Notice that two changesets have been successfully applied to the database.
####################################################
##   _     _             _ _                      ##
##  | |   (_)           (_) |                     ##
##  | |    _  __ _ _   _ _| |__   __ _ ___  ___   ##
##  | |   | |/ _` | | | | | '_ \ / _` / __|/ _ \  ##
##  | |___| | (_| | |_| | | |_) | (_| \__ \  __/  ##
##  \_____/_|\__, |\__,_|_|_.__/ \__,_|___/\___|  ##
##              | |                               ##
##              |_|                               ##
##                                                ##
##  Get documentation at docs.liquibase.com       ##
##  Get certified courses at learn.liquibase.com  ##
##  Free schema change activity reports at        ##
##      https://hub.liquibase.com                 ##
##                                                ##
####################################################
Starting Liquibase at 18:33:23 (version 4.21.1 #9070)
Liquibase Version: 4.21.1
Liquibase Open Source 4.21.1 by Liquibase
Running Changeset: changelogs/changelog-1.0.0.xml::1::BobR
Running Changeset: changelogs/changelog-1.0.1.xml::2::BobR

UPDATE SUMMARY
Run: 2
Previously run: 0
Filtered out: 0
-------------------------------
Total change sets: 2

Liquibase: Update has been successful.
Liquibase command 'update' was executed successfully.

Phase complete: BUILD State: SUCCEEDED
Phase context status code: Message:
Entering phase POST_BUILD
If I connect to the Aurora database and describe the tables you can see that Liquibase has created the actor table (as defined in the Liquibase Quick Start) along with the Liquibase audit tables databasechangelog and databasechangeloglock. Everything is working just as I expected, and I did not have to install and configure Liquibase!
mydatabase=> \dt
List of relations
Schema  |         Name          | Type  |  Owner
--------+-----------------------+-------+----------
public  | actor                 | table | postgres
public  | databasechangelog     | table | postgres
public  | databasechangeloglock | table | postgres
(3 rows)
In this example, I showed you how to update an Aurora database in a private subnet using a the Liquibase GitHub Action running in CodeBuild. GitHub Actions provide a rich catalog of preconfigured actions simplifying the configuration. CodeBuild provides a managed service that simplifies the configuration and maintenance of my build environment. Used together I can get the best features of both CodeBuild and GitHub Actions.
In this walkthrough I showed you how to create a CodeBuild project. If you no longer need the project, you can simply delete it in the console. If you created other resources, for example an Aurora database, that were not explained in this post, you should delete those as well.
The GitHub Marketplace includes a catalog of nearly 20,000 actions developed by third-parties and the open-source community. AWS CodeBuild is a fully managed continuous integration service that integrates tightly with other AWS services. In this post I used the GitHub Action for Liquibase to deploy an update to a database in a private subnet. I am excited to see what you will do with support for GitHub Actions in CodeBuild. You can read more about this exciting new feature in GitHub Action runner in AWS CodeBuild.
Post Syndicated from Verinder Singh original https://aws.amazon.com/blogs/devops/automated-code-review-on-pull-requests-using-aws-codecommit-and-aws-codebuild/
Pull Requests play a critical part in the software development process. They ensure that a developer’s proposed code changes are reviewed by relevant parties before code is merged into the main codebase. This is a standard procedure that is followed across the globe in different organisations today. However, pull requests often require code reviewers to read through a great deal of code and manually check it against quality and security standards. These manual reviews can lead to problematic code being merged into the main codebase if the reviewer overlooks any problems.
To help solve this problem, we recommend using Amazon CodeGuru Reviewer to assist in the review process. CodeGuru Reviewer identifies critical defects and deviation from best practices in your code. It provides recommendations to remediate its findings as comments in your pull requests, helping reviewers miss fewer problems that may have otherwise made into production. You can easily integrate your repositories in AWS CodeCommit with Amazon CodeGuru Reviewer following these steps.
The purpose of this post isn’t, however, to show you CodeGuru Reviewer. Instead, our aim is to help you achieve automated code reviews with your pull requests if you already have a code scanning tool and need to continue using it. In this post, we will show you step-by-step how to add automation to the pull request review process using your code scanning tool with AWS CodeCommit (as source code repository) and AWS CodeBuild (to automatically review code using your code reviewer). After following this guide, you should be able to give developers automatic feedback on their code changes and augment manual code reviews so fewer problems make it into your main codebase.
The solution comprises of the following components:
pullRequestCreated and pullRequestSourceBranchUpdated events and trigger Amazon EventBridge rule.The following diagram illustrates the architecture:

Figure 1. Architecture Diagram of the proposed solution in the blog
pullRequestCreated event is received by the default event bus.pullRequestCreated and pullRequestSourceBranchUpdated events.The following steps provide a high-level overview of the walkthrough:
pullRequestCreated and pullRequestSourceBranchUpdated events for the repository created in step 1 and set its target to AWS CodeBuild project created in step 3.Create an empty test repository in AWS CodeCommit by following these steps. Once the repository is created you can add files to your repository following these steps. If you create or upload the first file for your repository in the console, a branch is created for you named main. This branch is the default branch for your repository. If you are using a Git client instead, consider configuring your Git client to use main as the name for the initial branch. This blog post assumes the default branch is named as main.
Create an AWS CodeCommit approval rule template and associate it with the code repository created in step 1 following these steps.
This blog post is based on the assumption that the source code repository has JavaScript code in it, so it uses jshint as a code analysis tool to review the code quality of those files. However, users can choose a different tool as per their use case and choice of programming language.
Create an AWS CodeBuild project from AWS Management Console following these steps and using below configuration:
Once the AWS CodeBuild project has been created successfully, modify its IAM service role by following the below steps:
Follow these steps to create an Amazon EventBridge rule that gets triggered whenever a pull request is created or updated using the following event pattern. Replace the <REGION>, <ACCOUNT_ID> and <REPOSITORY_NAME> placeholders with the actual values. Select target of the event rule as AWS CodeBuild project created in step 3.
Event Pattern
Follow these steps to configure the target input using the below input path and input template.
Input transformer – Input path
Input transformer – Input template
Create a feature branch following these steps. Push a new file called “index.js” to the root of the repository with the below content.
Now raise a pull request using the feature branch as source and main branch as destination following these steps.
As soon as the pull request is created, the AWS CodeBuild project created in step 3 above will be triggered which will run the code quality check and post the results as a pull request comment. Navigate to the AWS CodeCommit repository pull request page in AWS Management Console and check under the Activity tab to confirm the automated code review result being displayed as the latest comment.
The pull request comment submitted by AWS CodeBuild highlights 6 errors in the JavaScript code. The errors on lines first and third are based on the jshint rule “eqeqeq”. It recommends to use strict equality operator (“===”) instead of the loose equality operator (“==”) to avoid type coercion. The errors on lines second, fourth and fifth are based on jshint rule “quotmark” which recommends to use single quotes with strings instead of double quotes for better readability. These jshint rules are defined in AWS CodeBuild project’s buildspec in step 3 above.

Figure 2. Pull Request comments updated with automated code review results.
In this blog post we’ve shown how using AWS CodeCommit and AWS CodeBuild services customers can automate their pull request review process by utilising Amazon EventBridge events and using their own choice of code quality tool. This simple solution also makes it easier for the human reviewers by providing them with automated code quality results as input and enabling them to focus their code review more on business logic code changes rather than static code quality issues.
Post Syndicated from The Atlantic original https://www.youtube.com/watch?v=vfLx_vb1yRc
Post Syndicated from Let's Encrypt original https://letsencrypt.org/2023/07/10/cross-sign-expiration.html
When Let’s Encrypt first launched, we needed to ensure that our certificates were widely trusted. To that end, we arranged to have our intermediate certificates cross-signed by IdenTrust’s DST Root CA X3. This meant that all certificates issued by those intermediates would be trusted, even while our own ISRG Root X1 wasn’t yet. During subsequent years, our Root X1 became widely trusted on its own.
Come late 2021, our cross-signed intermediates and DST Root CA X3 itself were expiring. And while all up-to-date browsers at that time trusted our root, over a third of Android devices were still running old versions of the OS which would suddenly stop trusting websites using our certificates. That breakage would have been too widespread, so we arranged for a new cross-sign – this time directly onto our root rather than our intermediates – which would outlive DST Root CA X3 itself. This stopgap allowed those old Android devices to continue trusting our certificates for three more years.
On September 30th, 2024, that cross-sign too will expire.
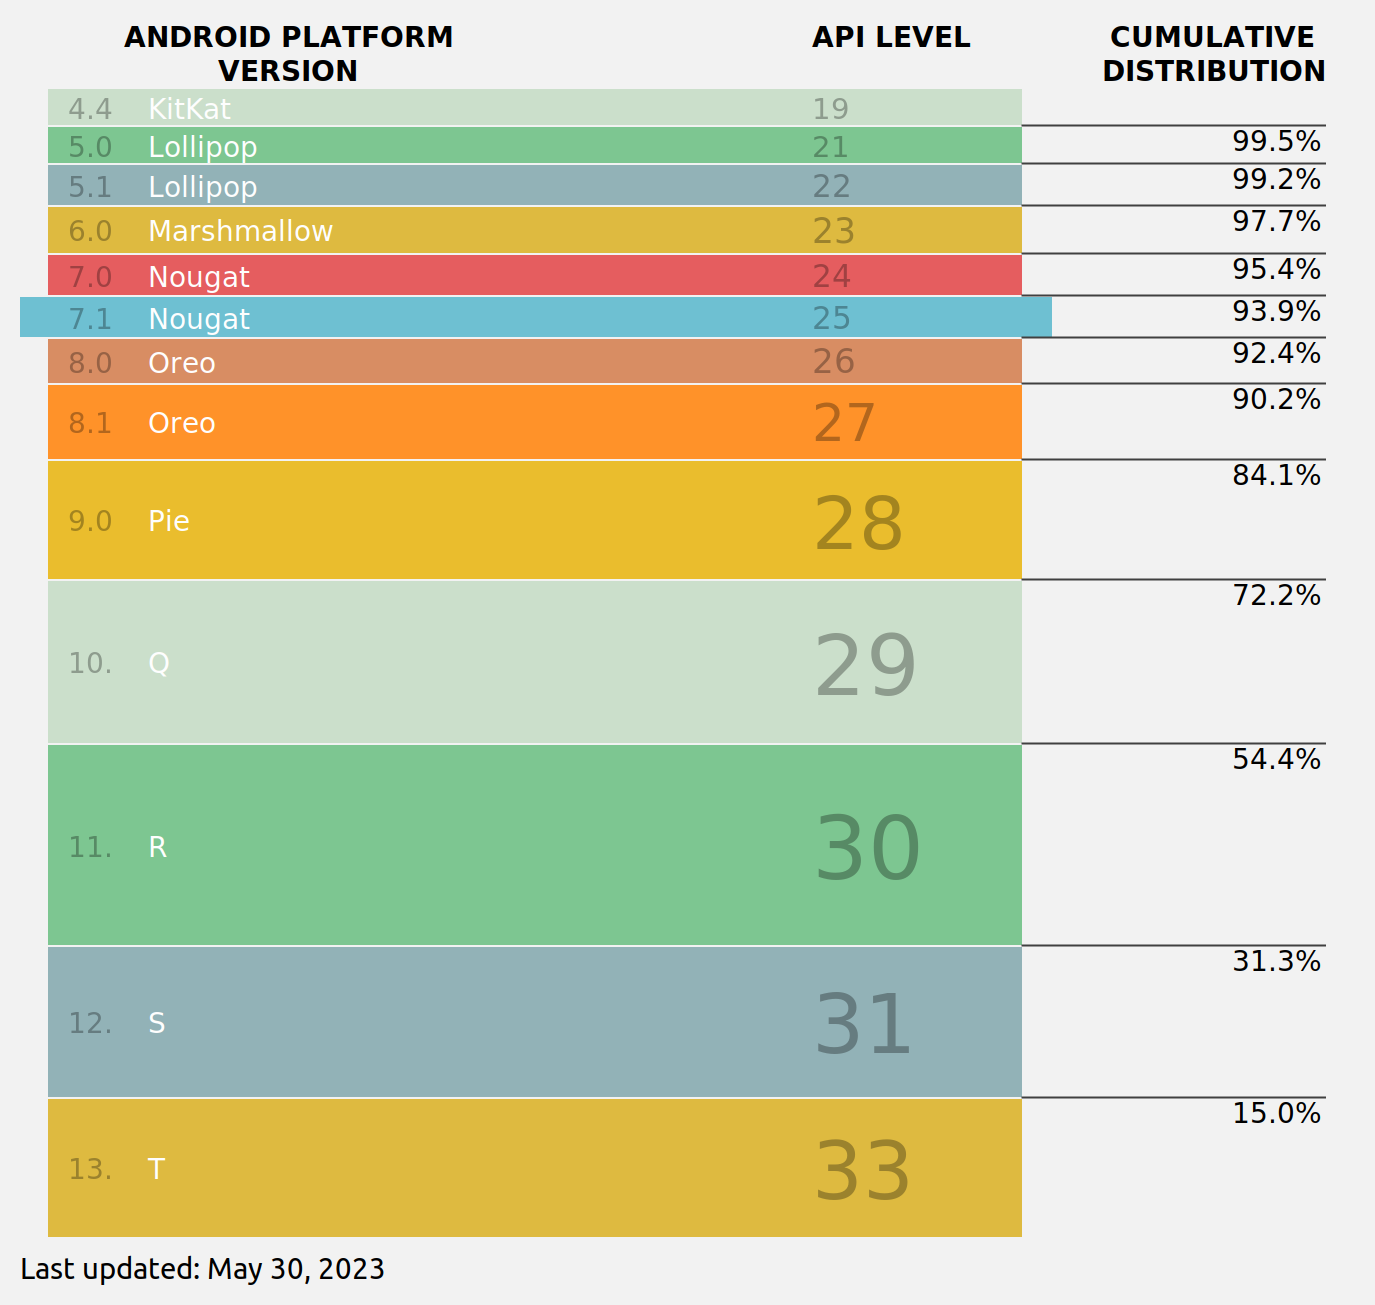
In the last three years, the percentage of Android devices which trust our ISRG Root X1 has risen from 66% to 93.9%. That percentage will increase further over the next year, especially as Android releases version 14, which has the ability to update its trust store without a full OS update. In addition, dropping the cross-sign will reduce the number of certificate bytes sent in a TLS handshake by over 40%. Finally, it will significantly reduce our operating costs, allowing us to focus our funding on continuing to improve your privacy and security.
For these reasons, we will not be getting a new cross-sign to extend compatibility any further.
The transition will roll out as follows:
On Thursday, Feb 8th, 2024, we will stop providing the cross-sign by default in requests made to our /acme/certificate API endpoint. For most Subscribers, this means that your ACME client will configure a chain which terminates at ISRG Root X1, and your webserver will begin providing this shorter chain in all TLS handshakes. The longer chain, terminating at the soon-to-expire cross-sign, will still be available as an alternate chain which you can configure your client to request.
On Thursday, June 6th, 2024, we will stop providing the longer cross-signed chain entirely. This is just over 90 days (the lifetime of one certificate) before the cross-sign expires, and we need to make sure subscribers have had at least one full issuance cycle to migrate off of the cross-signed chain.
On Monday, September 30th, 2024, the cross-signed certificate will expire. This should be a non-event for most people, as any client breakages should have occurred over the preceding six months.
If you use Android 7.0 or earlier, you may need to take action to ensure you can still access websites secured by Let’s Encrypt certificates. We recommend installing and using Firefox Mobile, which uses its own trust store instead of the Android OS trust store, and therefore trusts ISRG Root X1.
If you are a site operator, you should keep an eye on your website usage statistics and active user-agent strings during Q2 and Q3 of 2024. If you see a sudden drop in visits from Android, it is likely because you have a significant population of users on Android 7.0 or earlier. We encourage you to provide the same advice to them as we provided above.
If you are an ACME client author, please make sure that your client correctly downloads and installs the certificate chain provided by our API during every certificate issuance, including renewals. Failure modes we have seen in the past include a) never downloading the chain at all and only serving the end-entity certificate; b) never downloading the chain and instead serving a hard-coded chain; and c) only downloading the chain at first issuance and not re-downloading during renewals. Please ensure that your client does not fall into any of these buckets.
We appreciate your understanding and support, both now and in the years to come as we provide safe and secure communication to everyone who uses the web. If you have any questions about this transition or any of the other work we do, please ask on our community forum.
We’d like to thank IdenTrust for their years of partnership. They played an important role in helping Let’s Encrypt get to where we are today and their willingness to arrange a stopgap cross sign in 2021 demonstrated a true commitment to creating a secure Web.
We depend on contributions from our supporters in order to provide our services. If your company or organization can help our work by becoming a sponsor of Let’s Encrypt please email us at [email protected]. We ask that you make an individual contribution if it is within your means.
Post Syndicated from original https://xkcd.com/2800/

Post Syndicated from original https://lwn.net/Articles/937732/
Linus has released 6.5-rc1 and closed the
merge window for this release.
Anyway, none of it looks hugely unusual. The biggest single mention
probably goes to what wasn’t merged, with the bcachefs pull request
resulting in a long thread (we didn’t hit a hundred emails yet, but
it’s not far away).
The curious can read that long
thread in the list archives.
Post Syndicated from Eric Smith original https://www.servethehome.com/iosafe-1522-nas-review-fireproof-waterproof-powered-by-synology/
In our ioSafe 1522+ review, we see what goes into this 5-bay 1GbE and 10GbE fireproof and waterproof NAS unit
The post ioSafe 1522+ NAS Review Synology Powered Fireproof and Waterproof NAS appeared first on ServeTheHome.
Post Syndicated from The Hook Up original https://www.youtube.com/watch?v=TjgXfRMtmSU
Post Syndicated from The History Guy: History Deserves to Be Remembered original https://www.youtube.com/watch?v=IGt5Qitanh8
Post Syndicated from Explosm.net original https://explosm.net/comics/atomic-bomb
New Cyanide and Happiness Comic