Победа за Биволъ и Природата в България Съюзила се с Биволъ кметица спечели тежка битка срещу дървената мафия

Post Syndicated from Екип на Биволъ original https://bivol.bg/vas_resenie_darvenamafia.html

понеделник 27 февруари 2023


Сериозна победа в борбата срещу незаконната сеч и дървената мафия в България отбеляза кметският наместник на село Зелено дърво (Област Габрово) Тодорка Мирчева, станала известна след статиите на „Биволъ“ и…

Седмицата (20–25 февруари)

Post Syndicated from Надежда Радулова original https://www.toest.bg/sedmitsata-20-25-fevruari/

Седмицата (20–25 февруари)

В своите „Марсиански хроники“ (1950) Рей Бредбъри описва следния възможен свят: между 1999 и 2026 г. Марс е колонизиран, а на Земята се разразява световна война, която завършва с ядрен апокалипсис.

Изминаващата седмица във вече достигналия гореспоменатата възраст свят, засега разминал се и с Марс, и с апокалипсиса, ни върна

няколко крачки назад.

По-близо до времето на Бредбъри, бих казала. Без това да ни отдалечава ни най-малко от възможността за апокалипсис.

До голяма степен очаквано, в двучасовата си реч, произнесена на 21 февруари, Владимир Путин се отметна от Договора със САЩ за съкращаване на стратегическите нападателни оръжия и обясни, че възнамерява да осигури готовност за изпитания на ядрени оръжия.

У нас пък, недотам очаквано, но безобразно скандално, ВКС гласува (с 28:21) край на съществувалата десетилетия наред възможност за юридическа смяна на пола. С нелепи аргументи, според които нашият пол е единствено биологичен и нищичко не може да го поклати, докато смъртта ни раздели от него, амин.

Макар и без пряка връзка, двете събития влизат в особено мрачна синергия помежду си и навяват екстремни мисли. За Марс най-вече. (Преди такива като Путин и почитаемите 28 съдии да ни пратят вкупом „на Сатурн“).

Извън кондензацията на мрак, която двете събития сами по себе си извършват, те се случват в знакова седмица –

седмица, която отбелязва зловеща годишнина.

Съвсем логично настоящият брой на „Тоест“ отразява реалностите на войната, която Русия води срещу Украйна и срещу целия демократичен свят. Война, разгръщаща се не само на бойното поле, но и на идеологически миниран терен, където се сблъскват два противоположни цивилизационни избора, две несводими визии за съвременния човек и неговата ситуация.

Посветен на тази военна годишнина е разтърсващият шести епизод „Отложен живот“ от подкаста на Николета Атанасова „Украйна не е загубена“. През тембъра на пет преплитащи се гласа журналистката връща на забързан кадър последните 365 дни и ни потапя в три военновременни контекста – на Украйна, на Русия и на България.

Вторият текст в броя, свързан с годишнината – „Как Радев постави България на картата“ на Емилия Милчева – се занимава със срамните вътрешни и международни изяви на президента, който си играе на самодържец, продължава да подрива парламентарната демокрация и еднолично да представлява позицията на България по темата за войната в Украйна, формулирайки руските интереси като национални.

Съдбата на друг един самодържец, но не пишман като нашия, а доказал се с годините, също е тема в броя. За евентуалния провал на Ердоган на предстоящите президентски и парламентарни избори и за положителните последствия от него четете в (хипо)тезисния текст на Александър Нуцов – „Турция – външна политика по Рихтер“.

На пръв поглед далеч от високата политика и дипломация ни отвежда разказът по преживяно на Йовко Ламбрев „Съжители по неволя“. Как да реагираме, ако изведнъж се окажем „окупирани“ в собствения си дом от нежелани съквартиранти, които, макар и невидими, ни стоварват „мръсните си ризи“ и тежкия си биографичен и кредитен багаж. За разлика от окупацията на годината, от тази има лесен изход и Йовко Ламбрев го описва стъпка по стъпка.

В обзорната си рубрика „По буквите“ Зорница Христова този път се обръща изцяло към поезията и ни разказва за три книги. И трите поетически – „Възхвала на тъмнината“ на Борхес в превод на Рада Панчовска, „Зрящият е хляб“ на Биньо Иванов в съставителството на Яна Букова и „Въображаеми градини“ на Галина Николова.

Стихотворенията на Борхес са сравнени от Зорница с танго, при което се носим в ритъма на образите, за да се връщаме стъпка назад към онези от тях, врязали се в паметта ни. Антологията „Зрящият е хляб“ ни изправя пред „сблъсъците в езика“ (Я. Букова), характерни за късния Биньо Иванов, които Зорница асоциира с поезията на Дилън Томас и Къмингс. Третата стихосбирка – на Галина Николова – е представена като „терапевтична“ и „саморефлексивна“, книга, която ни учи да слушаме вътрешния си език и да разговаряме със себе си – безценни умения в днешната акустична среда на врява и безумство.

Завършваме тази седмица с

нова рубрика – „Стихотворение на месеца“.

Откриваме я с „Тихо ще вали“ на не особено известната у нас американска поетеса Сара Тисдейл в превод на Димитър Кенаров. Стихотворението е публикувано към края на Първата световна война и в началото на грипната пандемия от 1918 г. Добива голяма популярност, когато Рей Бредбъри го включва в едноименния си разказ „Ще паднат тихи дъждове“ (превод Никола Милев), всъщност предпоследния разказ в „Марсиански хроники“. На фона на една „умна къща“, полуоцеляла от ядрения апокалипсис през 2026 г., която зациклено продължава да пече филии, да бълва палачинки и да пълни вечерната вана, гласът на домашния „робот“ рецитира любимото стихотворение на вече несъществуващата стопанка на дома:

… и нито птиците, ни дърветата ще заплачат,
ако човекът напълно изчезне в здрача;
и самата Пролет, щом се събуди в зори,
едва ли и тя ще узнае, че някога сме били.

Една година след началото на войната в Украйна, когато думите ни вече не стигат да опишат ужаса на случващото се и цивилизационния срив, пред който сме изправени, публикуваме това стихотворение в нов превод. В знак на съпротива. И с убедеността, че независимо от смутните времена, в които живеем, доброто стихотворение винаги е добра новина за човека, за човешкото.

Securely validate business application resilience with AWS FIS and IAM

Post Syndicated from Dr. Rudolf Potucek original https://aws.amazon.com/blogs/devops/securely-validate-business-application-resilience-with-aws-fis-and-iam/

To avoid high costs of downtime, mission critical applications in the cloud need to achieve resilience against degradation of cloud provider APIs and services.

In 2021, AWS launched AWS Fault Injection Simulator (FIS), a fully managed service to perform fault injection experiments on workloads in AWS to improve their reliability and resilience. At the time of writing, FIS allows to simulate degradation of Amazon Elastic Compute Cloud (EC2) APIs using API fault injection actions and thus explore the resilience of workflows where EC2 APIs act as a fault boundary. 

In this post we show you how to explore additional fault boundaries in your applications by selectively denying access to any AWS API. This technique is particularly useful for fully managed, “black box” services like Amazon Simple Storage Service (S3) or Amazon Simple Queue Service (SQS) where a failure of read or write operations is sufficient to simulate problems in the service. This technique is also useful for injecting failures in serverless applications without needing to modify code. While similar results could be achieved with network disruption or modifying code with feature flags, this approach provides a fine granular degradation of an AWS API without the need to re-deploy and re-validate code.

Overview

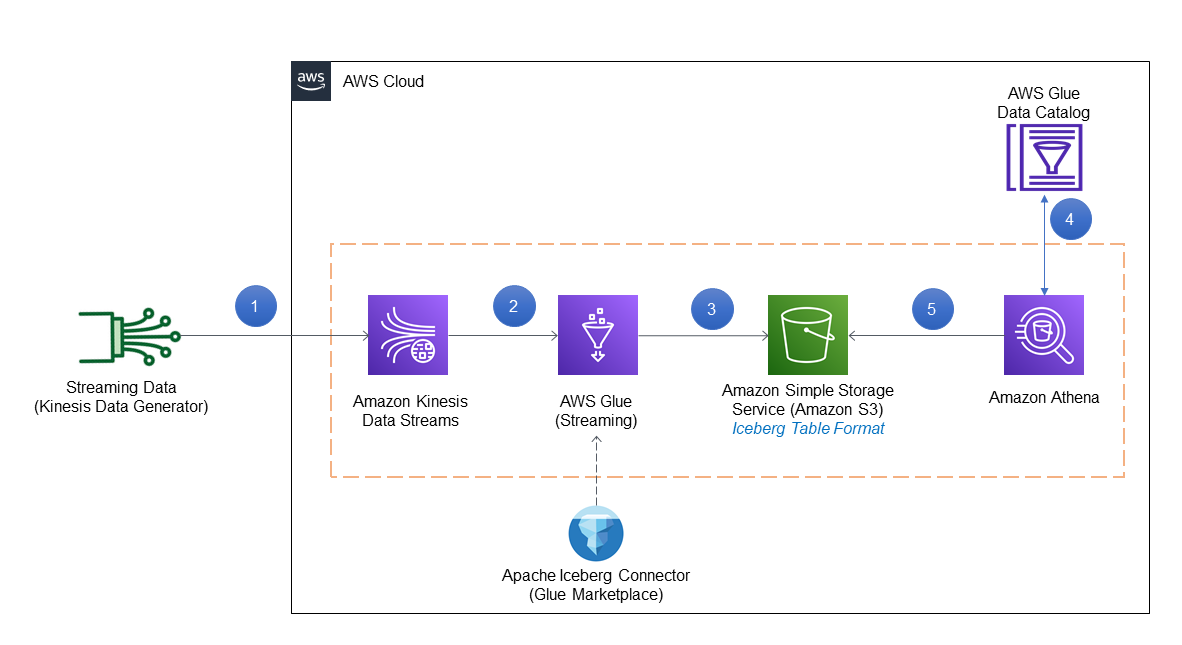
We will explore a common application pattern: user uploads a file, S3 triggers an AWS Lambda function, Lambda transforms the file to a new location and deletes the original:

S3 upload and transform logical workflow: User uploads file to S3, upload triggers AWS Lambda execution, Lambda writes transformed file to a new bucket and deletes original. Workflow can be disrupted at file deletion.

Figure 1. S3 upload and transform logical workflow: User uploads file to S3, upload triggers AWS Lambda execution, Lambda writes transformed file to a new bucket and deletes original. Workflow can be disrupted at file deletion.

We will simulate the user upload with an Amazon EventBridge rate expression triggering an AWS Lambda function which creates a file in S3:

S3 upload and transform implemented demo workflow: Amazon EventBridge triggers a creator Lambda function, Lambda function creates a file in S3, file creation triggers AWS Lambda execution on transformer function, Lambda writes transformed file to a new bucket and deletes original. Workflow can be disrupted at file deletion.

Figure 2. S3 upload and transform implemented demo workflow: Amazon EventBridge triggers a creator Lambda function, Lambda function creates a file in S3, file creation triggers AWS Lambda execution on transformer function, Lambda writes transformed file to a new bucket and deletes original. Workflow can be disrupted at file deletion.

Using this architecture we can explore the effect of S3 API degradation during file creation and deletion. As shown, the API call to delete a file from S3 is an application fault boundary. The failure could occur, with identical effect, because of S3 degradation or because the AWS IAM role of the Lambda function denies access to the API.

To inject failures we use AWS Systems Manager (AWS SSM) automation documents to attach and detach IAM policies at the API fault boundary and FIS to orchestrate the workflow.

Each Lambda function has an IAM execution role that allows S3 write and delete access, respectively. If the processor Lambda fails, the S3 file will remain in the bucket, indicating a failure. Similarly, if the IAM execution role for the processor function is denied the ability to delete a file after processing, that file will remain in the S3 bucket.

Prerequisites

Following this blog posts will incur some costs for AWS services. To explore this test application you will need an AWS account. We will also assume that you are using AWS CloudShell or have the AWS CLI installed and have configured a profile with administrator permissions. With that in place you can create the demo application in your AWS account by downloading this template and deploying an AWS CloudFormation stack:

git clone https://github.com/aws-samples/fis-api-failure-injection-using-iam.git
cd fis-api-failure-injection-using-iam
aws cloudformation deploy --stack-name test-fis-api-faults --template-file template.yaml --capabilities CAPABILITY_NAMED_IAM

Fault injection using IAM

Once the stack has been created, navigate to the Amazon CloudWatch Logs console and filter for /aws/lambda/test-fis-api-faults. Under the EventBridgeTimerHandler log group you should find log events once a minute writing a timestamped file to an S3 bucket named fis-api-failure-ACCOUNT_ID. Under the S3TriggerHandler log group you should find matching deletion events for those files.

Once you have confirmed object creation/deletion, let’s take away the permission of the S3 trigger handler lambda to delete files. To do this you will attach the FISAPI-DenyS3DeleteObject  policy that was created with the template:

ROLE_NAME=FISAPI-TARGET-S3TriggerHandlerRole
ROLE_ARN=$( aws iam list-roles --query "Roles[?RoleName=='${ROLE_NAME}'].Arn" --output text )
echo Target Role ARN: $ROLE_ARN

POLICY_NAME=FISAPI-DenyS3DeleteObject
POLICY_ARN=$( aws iam list-policies --query "Policies[?PolicyName=='${POLICY_NAME}'].Arn" --output text )
echo Impact Policy ARN: $POLICY_ARN

aws iam attach-role-policy \
  --role-name ${ROLE_NAME}\
  --policy-arn ${POLICY_ARN}

With the deny policy in place you should now see object deletion fail and objects should start showing up in the S3 bucket. Navigate to the S3 console and find the bucket starting with fis-api-failure. You should see a new object appearing in this bucket once a minute:

S3 bucket listing showing files not being deleted because IAM permissions DENY file deletion during FIS experiment.

Figure 3. S3 bucket listing showing files not being deleted because IAM permissions DENY file deletion during FIS experiment.

If you would like to graph the results you can navigate to AWS CloudWatch, select “Logs Insights“, select the log group starting with /aws/lambda/test-fis-api-faults-S3CountObjectsHandler, and run this query:

fields @timestamp, @message
| filter NumObjects >= 0
| sort @timestamp desc
| stats max(NumObjects) by bin(1m)
| limit 20

This will show the number of files in the S3 bucket over time:

AWS CloudWatch Logs Insights graph showing the increase in the number of retained files in S3 bucket over time, demonstrating the effect of the introduced failure.

Figure 4. AWS CloudWatch Logs Insights graph showing the increase in the number of retained files in S3 bucket over time, demonstrating the effect of the introduced failure.

You can now detach the policy:

ROLE_NAME=FISAPI-TARGET-S3TriggerHandlerRole
ROLE_ARN=$( aws iam list-roles --query "Roles[?RoleName=='${ROLE_NAME}'].Arn" --output text )
echo Target Role ARN: $ROLE_ARN

POLICY_NAME=FISAPI-DenyS3DeleteObject
POLICY_ARN=$( aws iam list-policies --query "Policies[?PolicyName=='${POLICY_NAME}'].Arn" --output text )
echo Impact Policy ARN: $POLICY_ARN

aws iam detach-role-policy \
  --role-name ${ROLE_NAME}\
  --policy-arn ${POLICY_ARN}

We see that newly written files will once again be deleted but the un-processed files will remain in the S3 bucket. From the fault injection we learned that our system does not tolerate request failures when deleting files from S3. To address this, we should add a dead letter queue or some other retry mechanism.

Note: if the Lambda function does not return a success state on invocation, EventBridge will retry. In our Lambda functions we are cost conscious and explicitly capture the failure states to avoid excessive retries.

Fault injection using SSM

To use this approach from FIS and to always remove the policy at the end of the experiment, we first create an SSM document to automate adding a policy to a role. To inspect this document, open the SSM console, navigate to the “Documents” section, find the FISAPI-IamAttachDetach document under “Owned by me”, and examine the “Content” tab (make sure to select the correct region). This document takes the name of the Role you want to impact and the Policy you want to attach as parameters. It also requires an IAM execution role that grants it the power to list, attach, and detach specific policies to specific roles.

Let’s run the SSM automation document from the console by selecting “Execute Automation”. Determine the ARN of the FISAPI-SSM-Automation-Role from CloudFormation or by running:

POLICY_NAME=FISAPI-DenyS3DeleteObject
POLICY_ARN=$( aws iam list-policies --query "Policies[?PolicyName=='${POLICY_NAME}'].Arn" --output text )
echo Impact Policy ARN: $POLICY_ARN

Use FISAPI-SSM-Automation-Role, a duration of 2 minutes expressed in ISO8601 format as PT2M, the ARN of the deny policy, and the name of the target role FISAPI-TARGET-S3TriggerHandlerRole:

Image of parameter input field reflecting the instructions in blog text.

Figure 5. Image of parameter input field reflecting the instructions in blog text.

Alternatively execute this from a shell:

ASSUME_ROLE_NAME=FISAPI-SSM-Automation-Role
ASSUME_ROLE_ARN=$( aws iam list-roles --query "Roles[?RoleName=='${ASSUME_ROLE_NAME}'].Arn" --output text )
echo Assume Role ARN: $ASSUME_ROLE_ARN

ROLE_NAME=FISAPI-TARGET-S3TriggerHandlerRole
ROLE_ARN=$( aws iam list-roles --query "Roles[?RoleName=='${ROLE_NAME}'].Arn" --output text )
echo Target Role ARN: $ROLE_ARN

POLICY_NAME=FISAPI-DenyS3DeleteObject
POLICY_ARN=$( aws iam list-policies --query "Policies[?PolicyName=='${POLICY_NAME}'].Arn" --output text )
echo Impact Policy ARN: $POLICY_ARN

aws ssm start-automation-execution \
  --document-name FISAPI-IamAttachDetach \
  --parameters "{
      \"AutomationAssumeRole\": [ \"${ASSUME_ROLE_ARN}\" ],
      \"Duration\": [ \"PT2M\" ],
      \"TargetResourceDenyPolicyArn\": [\"${POLICY_ARN}\" ],
      \"TargetApplicationRoleName\": [ \"${ROLE_NAME}\" ]
    }"

Wait two minutes and then examine the content of the S3 bucket starting with fis-api-failure again. You should now see two additional files in the bucket, showing that the policy was attached for 2 minutes during which files could not be deleted, and confirming that our application is not resilient to S3 API degradation.

Permissions for injecting failures with SSM

Fault injection with SSM is controlled by IAM, which is why you had to specify the FISAPI-SSM-Automation-Role:

Visual representation of IAM permission used for fault injections with SSM. It shows the SSM execution role permitting access to use SSM automation documents as well as modify IAM roles and policies via the SSM document. It also shows the SSM user needing to have a pass-role permission to grant the SSM execution role to the SSM service.

Figure 6. Visual representation of IAM permission used for fault injections with SSM.

This role needs to contain an assume role policy statement for SSM to allow assuming the role:

      AssumeRolePolicyDocument:
        Statement:
          - Action:
             - 'sts:AssumeRole'
            Effect: Allow
            Principal:
              Service:
                - "ssm.amazonaws.com"

The role also needs to contain permissions to describe roles and their attached policies with an optional constraint on which roles and policies are visible:

          - Sid: GetRoleAndPolicyDetails
            Effect: Allow
            Action:
              - 'iam:GetRole'
              - 'iam:GetPolicy'
              - 'iam:ListAttachedRolePolicies'
            Resource:
              # Roles
              - !GetAtt EventBridgeTimerHandlerRole.Arn
              - !GetAtt S3TriggerHandlerRole.Arn
              # Policies
              - !Ref AwsFisApiPolicyDenyS3DeleteObject

Finally the SSM role needs to allow attaching and detaching a policy document. This requires

  1. an ALLOW statement
  2. a constraint on the policies that can be attached
  3. a constraint on the roles that can be attached to

In the role we collapse the first two requirements into an ALLOW statement with a condition constraint for the Policy ARN. We then express the third requirement in a DENY statement that will limit the '*' resource to only the explicit role ARNs we want to modify:

          - Sid: AllowOnlyTargetResourcePolicies
            Effect: Allow
            Action:  
              - 'iam:DetachRolePolicy'
              - 'iam:AttachRolePolicy'
            Resource: '*'
            Condition:
              ArnEquals:
                'iam:PolicyARN':
                  # Policies that can be attached
                  - !Ref AwsFisApiPolicyDenyS3DeleteObject
          - Sid: DenyAttachDetachAllRolesExceptApplicationRole
            Effect: Deny
            Action: 
              - 'iam:DetachRolePolicy'
              - 'iam:AttachRolePolicy'
            NotResource: 
              # Roles that can be attached to
              - !GetAtt EventBridgeTimerHandlerRole.Arn
              - !GetAtt S3TriggerHandlerRole.Arn

We will discuss security considerations in more detail at the end of this post.

Fault injection using FIS

With the SSM document in place you can now create an FIS template that calls the SSM document. Navigate to the FIS console and filter for FISAPI-DENY-S3PutObject. You should see that the experiment template passes the same parameters that you previously used with SSM:

Image of FIS experiment template action summary. This shows the SSM document ARN to be used for fault injection and the JSON parameters passed to the SSM document specifying the IAM Role to modify and the IAM Policy to use.

Figure 7. Image of FIS experiment template action summary. This shows the SSM document ARN to be used for fault injection and the JSON parameters passed to the SSM document specifying the IAM Role to modify and the IAM Policy to use.

You can now run the FIS experiment and after a couple minutes once again see new files in the S3 bucket.

Permissions for injecting failures with FIS and SSM

Fault injection with FIS is controlled by IAM, which is why you had to specify the FISAPI-FIS-Injection-EperimentRole:

Visual representation of IAM permission used for fault injections with FIS and SSM. It shows the SSM execution role permitting access to use SSM automation documents as well as modify IAM roles and policies via the SSM document. It also shows the FIS execution role permitting access to use FIS templates, as well as the pass-role permission to grant the SSM execution role to the SSM service. Finally it shows the FIS user needing to have a pass-role permission to grant the FIS execution role to the FIS service.

Figure 8. Visual representation of IAM permission used for fault injections with FIS and SSM. It shows the SSM execution role permitting access to use SSM automation documents as well as modify IAM roles and policies via the SSM document. It also shows the FIS execution role permitting access to use FIS templates, as well as the pass-role permission to grant the SSM execution role to the SSM service. Finally it shows the FIS user needing to have a pass-role permission to grant the FIS execution role to the FIS service.

This role needs to contain an assume role policy statement for FIS to allow assuming the role:

      AssumeRolePolicyDocument:
        Statement:
          - Action:
              - 'sts:AssumeRole'
            Effect: Allow
            Principal:
              Service:
                - "fis.amazonaws.com"

The role also needs permissions to list and execute SSM documents:

            - Sid: RequiredReadActionsforAWSFIS
              Effect: Allow
              Action:
                - 'cloudwatch:DescribeAlarms'
                - 'ssm:GetAutomationExecution'
                - 'ssm:ListCommands'
                - 'iam:ListRoles'
              Resource: '*'
            - Sid: RequiredSSMStopActionforAWSFIS
              Effect: Allow
              Action:
                - 'ssm:CancelCommand'
              Resource: '*'
            - Sid: RequiredSSMWriteActionsforAWSFIS
              Effect: Allow
              Action:
                - 'ssm:StartAutomationExecution'
                - 'ssm:StopAutomationExecution'
              Resource: 
                - !Sub 'arn:aws:ssm:${AWS::Region}:${AWS::AccountId}:automation-definition/${SsmAutomationIamAttachDetachDocument}:$DEFAULT'

Finally, remember that the SSM document needs to use a Role of its own to execute the fault injection actions. Because that Role is different from the Role under which we started the FIS experiment, we need to explicitly allow SSM to assume that role with a PassRole statement which will expand to FISAPI-SSM-Automation-Role:

            - Sid: RequiredIAMPassRoleforSSMADocuments
              Effect: Allow
              Action: 'iam:PassRole'
              Resource: !Sub 'arn:aws:iam::${AWS::AccountId}:role/${SsmAutomationRole}'

Secure and flexible permissions

So far, we have used explicit ARNs for our guardrails. To expand flexibility, we can use wildcards in our resource matching. For example, we might change the Policy matching from:

            Condition:
              ArnEquals:
                'iam:PolicyARN':
                  # Explicitly listed policies - secure but inflexible
                  - !Ref AwsFisApiPolicyDenyS3DeleteObject

or the equivalent:

            Condition:
              ArnEquals:
                'iam:PolicyARN':
                  # Explicitly listed policies - secure but inflexible
                  - !Sub 'arn:${AWS::Partition}:iam::${AWS::AccountId}:policy/${FullPolicyName}

to a wildcard notation like this:

            Condition:
              ArnEquals:
                'iam:PolicyARN':
                  # Wildcard policies - secure and flexible
                  - !Sub 'arn:${AWS::Partition}:iam::${AWS::AccountId}:policy/${PolicyNamePrefix}*'

If we set PolicyNamePrefix to FISAPI-DenyS3 this would now allow invoking FISAPI-DenyS3PutObject and FISAPI-DenyS3DeleteObject but would not allow using a policy named FISAPI-DenyEc2DescribeInstances.

Similarly, we could change the Resource matching from:

            NotResource: 
              # Explicitly listed roles - secure but inflexible
              - !GetAtt EventBridgeTimerHandlerRole.Arn
              - !GetAtt S3TriggerHandlerRole.Arn

to a wildcard equivalent like this:

            NotResource: 
              # Wildcard policies - secure and flexible
              - !Sub 'arn:${AWS::Partition}:iam::${AWS::AccountId}:role/${RoleNamePrefixEventBridge}*'
              - !Sub 'arn:${AWS::Partition}:iam::${AWS::AccountId}:role/${RoleNamePrefixS3}*'
and setting RoleNamePrefixEventBridge to FISAPI-TARGET-EventBridge and RoleNamePrefixS3 to FISAPI-TARGET-S3.

Finally, we would also change the FIS experiment role to allow SSM documents based on a name prefix by changing the constraint on automation execution from:

            - Sid: RequiredSSMWriteActionsforAWSFIS
              Effect: Allow
              Action:
                - 'ssm:StartAutomationExecution'
                - 'ssm:StopAutomationExecution'
              Resource: 
                # Explicitly listed resource - secure but inflexible
                # Note: the $DEFAULT at the end could also be an explicit version number
                # Note: the 'automation-definition' is automatically created from 'document' on invocation
                - !Sub 'arn:aws:ssm:${AWS::Region}:${AWS::AccountId}:automation-definition/${SsmAutomationIamAttachDetachDocument}:$DEFAULT'

to

            - Sid: RequiredSSMWriteActionsforAWSFIS
              Effect: Allow
              Action:
                - 'ssm:StartAutomationExecution'
                - 'ssm:StopAutomationExecution'
              Resource: 
                # Wildcard resources - secure and flexible
                # 
                # Note: the 'automation-definition' is automatically created from 'document' on invocation
                - !Sub 'arn:aws:ssm:${AWS::Region}:${AWS::AccountId}:automation-definition/${SsmAutomationDocumentPrefix}*'

and setting SsmAutomationDocumentPrefix to FISAPI-. Test this by updating the CloudFormation stack with a modified template:

aws cloudformation deploy --stack-name test-fis-api-faults --template-file template2.yaml --capabilities CAPABILITY_NAMED_IAM

Permissions governing users

In production you should not be using administrator access to use FIS. Instead we create two roles FISAPI-AssumableRoleWithCreation and FISAPI-AssumableRoleWithoutCreation for you (see this template). These roles require all FIS and SSM resources to have a Name tag that starts with FISAPI-. Try assuming the role without creation privileges and running an experiment. You will notice that you can only start an experiment if you add a Name tag, e.g. FISAPI-secure-1, and you will only be able to get details of experiments and templates that have proper Name tags.

If you are working with AWS Organizations, you can add further guard rails by defining SCPs that control the use of the FISAPI-* tags similar to this blog post.

Caveats

For this solution we are choosing to attach policies instead of permission boundaries. The benefit of this is that you can attach multiple independent policies and thus simulate multi-step service degradation. However, this means that it is possible to increase the permission level of a role. While there are situations where this might be of interest, e.g. to simulate security breaches, please implement a thorough security review of any fault injection IAM policies you create. Note that modifying IAM Roles may trigger events in your security monitoring tools.

The AttachRolePolicy and DetachRolePolicy calls from AWS IAM are eventually consistent, meaning that in some cases permission propagation when starting and stopping fault injection may take up to 5 minutes each.

Cleanup

To avoid additional cost, delete the content of the S3 bucket and delete the CloudFormation stack:

# Clean up policy attachments just in case
CLEANUP_ROLES=$(aws iam list-roles --query "Roles[?starts_with(RoleName,'FISAPI-')].RoleName" --output text)
for role in $CLEANUP_ROLES; do
  CLEANUP_POLICIES=$(aws iam list-attached-role-policies --role-name $role --query "AttachedPolicies[?starts_with(PolicyName,'FISAPI-')].PolicyName" --output text)
  for policy in $CLEANUP_POLICIES; do
    echo Detaching policy $policy from role $role
    aws iam detach-role-policy --role-name $role --policy-arn $policy
  done
done
# Delete S3 bucket content
ACCOUNT_ID=$( aws sts get-caller-identity --query Account --output text )
S3_BUCKET_NAME=fis-api-failure-${ACCOUNT_ID}
aws s3 rm --recursive s3://${S3_BUCKET_NAME}
aws s3 rb s3://${S3_BUCKET_NAME}
# Delete cloudformation stack
aws cloudformation delete-stack --stack-name test-fis-api-faults
aws cloudformation wait stack-delete-complete --stack-name test-fis-api-faults

Conclusion 

AWS Fault Injection Simulator provides the ability to simulate various external impacts to your application to validate and improve resilience. We’ve shown how combining FIS with IAM to selectively deny access to AWS APIs provides a generic path to explore fault boundaries across all AWS services. We’ve shown how this can be used to identify and improve a resilience problem in a common S3 upload workflow. To learn about more ways to use FIS, see this workshop.

About the authors:

Dr. Rudolf Potucek

Dr. Rudolf Potucek is Startup Solutions Architect at Amazon Web Services. Over the past 30 years he gained a PhD and worked in different roles including leading teams in academia and industry, as well as consulting. He brings experience from working with academia, startups, and large enterprises to his current role of guiding startup customers to succeed in the cloud.

Rudolph Wagner

Rudolph Wagner is a Premium Support Engineer at Amazon Web Services who holds the CISSP and OSCP security certifications, in addition to being a certified AWS Solutions Architect Professional. He assists internal and external Customers with multiple AWS services by using his diverse background in SAP, IT, and construction.

Metasploit Wrap-Up

Post Syndicated from Spencer McIntyre original https://blog.rapid7.com/2023/02/24/metasploit-wrap-up-194/

Basic discover script improvements

Metasploit Wrap-Up

This week two improvements were made to the script/resource/basic_discovery.rc resource script. The first update from community member samsepi0x0 allowed commas in the RHOSTS value, making it easier to target multiple hosts. Additionally, adfoster-r7 improved the script by adding better handling for error output. This continues our trend of trying to provide more useful diagnostic information to our end users.

Google Summer of Code

The Metasploit Framework has been accepted to participate in Google’s Summer of Code program again for 2023. This event pairs new contributors with an experienced mentor as they work on an open source project (Metasploit in our case). We will soon be soliciting project proposals from the community for anyone interested in getting involved. Some project ideas are on the docs site, but folks are welcome to submit entirely new ideas for something they think would benefit the Metasploit community.

Web Based Module Counts

This week, adfoster-r7 improved our docs site with a running count of all the published modules. This information is kept up to date automatically and is a great resource for anyone looking for how many modules Metasploit has included without needing to install and start the framework. The page even allows users to dive deeper into types of modules and platforms in the same way as msfconsole.

New module content (2)

Froxlor Log Path RCE

Authors: Askar and jheysel-r7
Type: Exploit
Pull request: #17640 contributed by jheysel-r7
AttackerKB reference: CVE-2023-0315

Description: This module exploits a vulnerability in versions of Froxlor prior to 2.0.8 that allows an authenticated user to change the default log file to an arbitrary path on the system. Using this, an authenticated user can write a Twig template, that when rendered, will execute arbitrary code and grant a shell or Meterpreter session as the www-data user.

pyLoad js2py Python Execution

Authors: Spencer McIntyre and bAu
Type: Exploit
Pull request: #17652 contributed by zeroSteiner
AttackerKB reference: CVE-2023-0297

Description: This adds an exploit for CVE-2023-0297 which is an unauthenticated Javascript injection in pyLoad’s Click ‘N’ Load service.

Enhancements and features (1)

  • #17674 from adfoster-r7 – Updates the script/resource/basic_discovery.rc script to better detect when the Metasploit database is not connected as well as improving error output.

Bugs fixed (2)

  • #17650 from samsepi0x0 – Updates the script/resource/basic_discovery.rc script to support commas in RHOSTS values.
  • #17660 from bugch3ck – This updates the location of where registry hives are temporarily stored by the windows_secrets_dump module.
  • #17663 from manishkumarr1017 – This fixes an issue where action names were being treated as case sensitive.

Documentation added (2)

  • #17637 from adfoster-r7 – This PR adds the latest module information to docs.metasploit.com as a quick way to explore Metasploit’s available modules.
  • #17685 from samsepi0x0 – Fixes a broken link within Metasploit’s Google Summer of Code 2023 Project Ideas.

You can always find more documentation on our docsite at docs.metasploit.com.

Get it

As always, you can update to the latest Metasploit Framework with msfupdate
and you can get more details on the changes since the last blog post from
GitHub:

If you are a git user, you can clone the Metasploit Framework repo (master branch) for the latest.
To install fresh without using git, you can use the open-source-only Nightly Installers or the
binary installers (which also include the commercial edition).

3 ways to meet compliance needs without slowing down agility

Post Syndicated from Mark Paulsen original https://github.blog/2023-02-24-3-ways-to-meet-compliance-needs-without-slowing-down-agility/

In the previous blog, Setting the foundations for compliance, we set the groundwork for developer-enabled compliance that will keep your teams happy, in the flow, secure, compliant, and auditable.

Today, we’ll walk through three practical ways that you can start meeting your compliance requirements without having to revolutionize or transform the culture in your company—all while enabling your developers to be more productive and happy.

1. Do the basics well and often

The first way to start meeting your compliance requirements is often overlooked because it’s so simple. No matter what industry you are in, whether it’s finance, automotive, government, or tech, there are some basic quick compliance wins that may be part of your existing developer workflows and culture.

Code review

A key part of writing clean code is code review. But having a repeatable and traceable code review process is also a foundational component of your compliance program. This ensures risks within software delivery are found and mitigated early—and are also auditable for future reviews.

GitHub makes code review easy, since pull requests are part of the existing workflow that millions of developers use every day. GitHub also makes it easy for compliance testers and auditors to review pull requests with access to immutable audit logs in a central location.

Separation of duties

In some enterprises, separation of duties has been defined as a person having too much manual control over transactions or processes. This can lead to apprehension when modern cloud native practices are introduced.

Thankfully, there is guidance from the Industry that supports a more modern approach to separation of duties. The PCI-DSS requirements guide avoids the term person and provides a more cloud native friendly approach by focusing on functions and accounts:

“The purpose of this requirement is to separate the development and test functions from the production functions. For example, a developer can use an administrator-level account with elevated privileges in the development environment and have a separate account with user-level access to the production environment.”

This approach aligns well with the 12 factor application methodology for cloud native. The Build, release, run factor explanation states, “Each release must enforce a strict separation across the build, release, and run stages. Each should be tagged with a unique ID and support the ability to roll back.” Teams can fully automate their delivery to production, without having to worry about a person manually exceeding too much control, as long as there is separation of functions and traceability back to unique IDs. With the added assurance that they are aligned to industry best practices and requirements, such as PCI-DSS.

To enable separation of duties, you have to have a clear identity and access management strategy. Thankfully, we don’t have to reinvent the wheel. GitHub Enterprise has several options to help you manage access to your overall development environment:

  • You can configure SAML single sign-on for your enterprise. This is an additional check, allowing you to confirm the authenticity of your users against your own identity provider (while still using your own GitHub account).
  • You can then synchronize team memberships with groups in your identity provider. As a result, group membership changes in your identity provider update the team membership (and therefore associated access) in GitHub.
  • Alternatively, you could adopt GitHub Enterprise Managed Users (EMUs). This is a flavor of GitHub Enterprise where you can only log in with an account that is centrally managed through your identity provider. The user does not have to log in to GitHub with a personal account and use single sign on to access company resources. (For more information on this, check out this blog post on exploring EMUs and the benefits they can bring.)

AI-powered compliance

In our last blog we briefly covered AI-enabled compliance and some of the existing opportunities for security, manufacturing, and banks. There are also several other opportunities on the horizon that could further optimize the basics of compliance.

It is entirely possible that a generative AI tool could soon be leveraged to help ensure that separation of duties is enforced in a declarative DevOps workflow by creating unit tests on its own. Because of the non-deterministic nature of generative AI, each time it runs it may have a different result and the unit tests may include risk scenarios that nobody has thought of yet. This can add an amazing level of true risk-based compliance.

One of the major benefits of addressing compliance often in your delivery is an increased level of trust. But quantifying trust can be extremely difficult—especially within a regulated industry that wants to leverage deep learning solutions. There is work being driven by AI results to help provide trust quantification for these types of solutions, which will not only enable continuous compliance but will also help enterprises implement new technologies that can increase business value.

Dependency management

Companies are increasing their reliance on open source software in their supply chain. As a result, optimized, repeatable, and audible controls for dependency management are becoming a cornerstone of compliance programs across industries.

From a GitHub perspective, Dependabot can provide confidence that your supply chain is secure. When Dependabot is configured, developers are alerted as soon as a security threat is found and gives them the ability to take action in their normal workflows.

By leveraging Dependabot, you will receive an immutable and auditable alert when a repository uses a software dependency with a known vulnerability. Pull requests can be triggered by either your developers or security teams, which give you another set of auditable artifacts for future review.

Approvals

While most organizations have approval processes, they can be slow and occur too late in the process. Google explains that peer reviews can help to streamline the change approval process, based on results from the DORA 2019 state of DevOps report.

There could be many control points in your delivery pipeline that may require approval, such as sign-off of requirements, testing results, security reviews, or production operational readiness confirmations before a release.

Depending on your internal structure and alignment, you may require teams to provide sign-off at different stages throughout the process. In your build and test stage, you can use manual approvals in a pull request to gather the needed reviews.

Once your builds and tests are complete, it’s time to release your code into your infrastructure. Talking about deployment patterns and strategies is beyond the scope of this post. However, you may require approvals as part of the deployment process.

To obtain these approvals, you should use environments for your deployments. Environments are used to describe a deployment target (such as staging, testing, and production). By using environments, you can require a manual approval to take place before GitHub Actions begins the deployment job.

In both instances, remember that there is a tradeoff when deciding the number of approvals required. Setting the number of required reviews too high means that you may impact your pace of delivery, as manual intervention is required. Where possible, consider automating checks to reduce the manual overhead, thereby optimizing your overall agility.

2. Have a common understanding of concepts and terms

Again, this may be overlooked since it sounds so obvious. But there are probably many concepts and terms that developers, DevOps and cloud native practitioners use on a daily basis that may be totally incomprehensible to compliance testers and auditors.

Back in 2015, the author of The Phoenix Project, Gene Kim, and several other authors, created the DevOps Audit Defense Toolkit. As we mentioned in our first blog, the goal of this document was to “educate IT management and practitioners on the audit process so they can demonstrate to auditors they understand the business risks and are properly mitigating those risks.” But where do you start?

Below is a basic cheat-sheet of terms for GitHub related control objectives and a mapping to the world of compliance, regulations, risk, and audit. This could be a good place to start building a common understanding between developers and your compliance and audit friends.

Objective Control Financial Reporting Industry Frameworks
The Code Review Control ensures that security requirements have been addressed and that the code is understandable, maintainable, and properly formatted. Pull requests let you tell others about changes you’ve pushed to a branch in a repository on GitHub.Once a pull request is opened, you can discuss and review the potential changes with collaborators and add follow-up commits before your changes are merged into the base branch. SOX: Change Management

COSO: Control Activities—Conduct application change management.

NIST Cyber: DE.CM-4 —Malicious code is detected.

PCI-DSS: 6.3.2: Review all custom code for vulnerabilities, manually or via automation.

SLSA: Two-person review is an industry best practice for catching mistakes and deterring bad behavior.

Controls and processes should be in place to scan code repositories for passwords and security tokens. Prevention measures should be enforced to ensure secrets do not reach production. Secret scanning will scan your entire Git history on all branches present in your GitHub repository for secrets. GitHub push protection will check for high-confidence secrets as developers push code and block the push if a secret is identified. SOX: IT Security

COSO: Control Activities—Improve security

NIST Cyber: PR.DS-5: Protections against data leaks are implemented.

PCI-DSS: 6.5.3: Protect against all insufficiently secure cryptographic key storage.

To help bring this together, there is a great example of the benefits of a common understanding between developers and compliance testers and auditors in the latest Forrester report on the economic impact of GitHub Enterprise Cloud and Advanced Security. The report highlights one of the benefits of an automated documentation process that both helps developers and auditors:

“These new, standardized documentation structures made it easier for auditors to find and compile the documentation necessary to be compliant. This helped the interviewees’ organizations save time preparing for industry compliance and security audits.”

3. Helping developers understand where they fit into the three lines of defense

The three lines of defense is a model used for risk management and governance. It helps clarify the roles and responsibilities of teams involved in addressing risk.

Think of the engineering team and engineering leads as the first line of defense, as they continue shipping software to their end-users. Making sure this team has the appropriate level of skills to identify risk within their solution is crucial.

The second line of defense is typically achieved at scale through frameworks, policies, and tools at an organizational level. This acts as oversight for the first line of defense on how well they are implementing risk mitigation techniques and consistently measuring and defining risk across the organization.

Internal audit is the third line of defense. Just like a red team and blue team compliment each other, you can think of internal audit as the final puzzle piece in the three lines of defense. They evaluate the effectiveness of risk management and governance, working with senior management and external regulators to raise awareness of the controls being executed.

Let’s use an analogy. A hockey team is not just structured to score goals but also prevent goals being scored against them.

  • Forwards: they are there to score and assist on goals. But they can be called on to work with the other positions in defense. Think of them as the first line of defense. Their job is to create solutions which provide business value, but are also secure.
  • Defenders: their main role is clearly preventing goals. But they partner with the forwards on the current priority (offense or defense). They are like the second line of defense, providing risk oversight and collaborating with the engineering teams.
  • Goaltender: the last line of defense. They can be thought of as the equivalent of an internal audit. They are independent of the forwards and defenders with different responsibilities, tools, and perspective.

Hockey teams that have very strong forwards but weak defenders and goalkeepers are rarely successful. Teams with a strong defense but weak offense are rarely successful, either. It takes all three aspects working in harmony to be successful.

This applies in business, too. If your solutions meet your customers’ requirements but are insecure, your business will fail. If your solutions are secure but aren’t user friendly or providing value, it will result in failure. Success is achieved by finding the right balance of value and risk management.

Developers can see that they are there to score goals for their team; creating the software that runs our world. But they need to support the defensive capabilities of the team, ensuring their software is secure. Their success is dependent on the success of the wider team, without having to take on additional responsibilities.

Next steps

We’ve taken a whistle-stop tour on how you can bring compliance into your development flow. From branch protection rules and pull requests to CODEOWNERS and environment approvals, there are several GitHub capabilities that can help you naturally focus on compliance.

This is only one step in solving the problem. A common language between compliance and DevOps practitioners is crucial in demonstrating the implemented measures. With that common language, it is clear that everyone must think about compliance; engineering teams are a part of the three lines of defense.

Next up in the series, we’ll be talking about how to ensure compliance in developer workflows.

Ready to increase developer velocity and collaboration while remaining secure and compliant? See how GitHub Enterprise can help.

Build a real-time GDPR-aligned Apache Iceberg data lake

Post Syndicated from Dhiraj Thakur original https://aws.amazon.com/blogs/big-data/build-a-real-time-gdpr-aligned-apache-iceberg-data-lake/

Data lakes are a popular choice for today’s organizations to store their data around their business activities. As a best practice of a data lake design, data should be immutable once stored. But regulations such as the General Data Protection Regulation (GDPR) have created obligations for data operators who must be able to erase or update personal data from their data lake when requested.

A data lake built on AWS uses Amazon Simple Storage Service (Amazon S3) as its primary storage environment. When a customer asks to erase or update private data, the data lake operator needs to find the required objects in Amazon S3 that contain the required data and take steps to erase or update that data. This activity can be a complex process for the following reasons:

  • Data lakes may contain many S3 objects (each may contain multiple rows), and often it’s difficult to find the object containing the exact data that needs to be erased or personally identifiable information (PII) to be updated as per the request
  • By nature, S3 objects are immutable and therefore applying direct row-based transactions like DELETE or UPDATE isn’t possible

To handle these situations, a transactional feature on S3 objects is required, and frameworks such as Apache Hudi or Apache Iceberg provide you the transactional feature for upserts in Amazon S3.

AWS contributed the Apache Iceberg integration with the AWS Glue Data Catalog, which enables you to use open-source data computation engines like Apache Spark with Iceberg on AWS Glue. In 2022, Amazon Athena announced support of Iceberg, enabling transaction queries on S3 objects.

In this post, we show you how to stream real-time data to an Iceberg table in Amazon S3 using AWS Glue streaming and perform transactions using Amazon Athena for deletes and updates. We use a serverless mechanism for this implementation, which requires minimum operational overhead to manage and fine-tune various configuration parameters, and enables you to extend your use case to ACID operations beyond the GDPR.

Solution overview

We used the Amazon Kinesis Data Generator (KDG) to produce synthetic streaming data in Amazon Kinesis Data Streams and then processed the streaming input data using AWS Glue streaming to store the data in Amazon S3 in Iceberg table format. As part of the customer’s request, we ran delete and update statements using Athena with Iceberg support.

The following diagram illustrates the solution architecture.

The solution workflow consists of the following steps:

  1. Streaming data is generated in JSON format using the KDG template and inserted into Kinesis Data Streams.
  2. An AWS Glue streaming job is connected to Kinesis Data Streams to process the data using the Iceberg connector.
  3. The streaming job output is stored in Amazon S3 in Iceberg table format.
  4. Athena uses the AWS Glue Data Catalog to store and retrieve table metadata for the Amazon S3 data in Iceberg format.
  5. Athena interacts with the Data Catalog tables in Iceberg format for transactional queries required for GDPR.

The codebase required for this post is available in the GitHub repository.

Prerequisites

Before starting the implementation, make sure the following prerequisites are met:

Deploy resources using AWS CloudFormation

Complete the following steps to deploy your solution resources:

  1. After you sign in to your AWS account, launch the CloudFormation template by choosing Launch Stack:
  2. For Stack name, enter a name.
  3. For Username, enter the user name for the KDG.
  4. For Password, enter the password for the KDG (this must be at least six alphanumeric characters, and contain at least one number).
  5. For IAMGlueStreamingJobRoleName, enter a name for the IAM role used for the AWS Glue streaming job.
  6. Choose Next and create your stack.

This CloudFormation template configures the following resources in your account:

  • An S3 bucket named streamingicebergdemo-XX (note that the XX part is a random unique number to make the S3 bucket name unique)
  • An IAM policy and role
  • The KDG URL used for creating synthetic data
  1. After you complete the setup, go to the Outputs tab of the CloudFormation stack to get the S3 bucket name, AWS Glue job execution role (as per your input), and KDG URL.
  2. Before proceeding with the demo, create a folder named custdata under the created S3 bucket.

Create a Kinesis data stream

We use Kinesis Data Streams to create a serverless streaming data service that is built to handle millions of events with low latency. The following steps guide you on how to create the data stream in the us-east-1 Region:

  1. Log in to the AWS Management Console.
  2. Navigate to Kinesis console (make sure the Region is us-east-1).
  3. Select Kinesis Data Streams and choose Create data stream.
  4. For Data stream name, enter demo-data-stream.
  5. For this post, we select On-demand as the Kinesis data stream capacity mode.

On-demand mode works to eliminate the need for provisioning and managing the capacity for streaming data. However, you can implement this solution with Kinesis Data Streams in provisioned mode as well.

  1. Choose Create data stream.
  2. Wait for successful creation of demo-data-stream and for it to be in Active status.

Set up the Kinesis Data Generator

To create a sample streaming dataset, we use the KDG URL generated on the CloudFormation stack Outputs tab and log in with the credentials used in the parameters for the CloudFormation template. For this post, we use the following template to generate sample data in the demo-data-stream Kinesis data stream.

  1. Log in to the KDG URL with the user name and password you supplied during stack creation.
  2. Change the Region to us-east-1.
  3. Select the Kinesis data stream demo-data-stream.
  4. For Records per second, choose Constant and enter 100 (it can be another number, depending on the rate of record creation).
  5. On the Template 1 tab, enter the KDG data generation template:
{
"year": "{{random.number({"min":2000,"max":2022})}}",
"month": "{{random.number({"min":1,"max":12})}}",
"day": "{{random.number({"min":1,"max":30})}}",
"hour": "{{random.number({"min":0,"max":24})}}",
"minute": "{{random.number({"min":0,"max":60})}}",
"customerid": {{random.number({"min":5023,"max":59874})}},
"firstname" : "{{name.firstName}}",
"lastname" : "{{name.lastName}}",
"dateofbirth" : "{{date.past(70)}}",
"city" : "{{address.city}}",
"buildingnumber" : {{random.number({"min":63,"max":947})}},
"streetaddress" : "{{address.streetAddress}}",
"state" : "{{address.state}}",
"zipcode" : "{{address.zipCode}}",
"country" : "{{address.country}}",
"countrycode" : "{{address.countryCode}}",
"phonenumber" : "{{phone.phoneNumber}}",
"productname" : "{{commerce.productName}}",
"transactionamount": {{random.number(
{
"min":10,
"max":150
}
)}}
}
  1. Choose Test template to test the sample records.
  2. When the testing is correct, choose Send data.

This will start sending 100 records per second in the Kinesis data stream. (To stop sending data, choose Stop Sending Data to Kinesis.)

Integrate Iceberg with AWS Glue

To add the Apache Iceberg Connector for AWS Glue, complete the following steps. The connector is free to use and supports AWS Glue 1.0, 2.0, and 3.0.

  1. On the AWS Glue console, choose AWS Glue Studio in the navigation pane.
  2. In the navigation pane, navigate to AWS Marketplace.
  3. Search for and choose Apache Iceberg Connector for AWS Glue.
  4. Choose Accept Terms and Continue to Subscribe.
  5. Choose Continue to Configuration.
  6. For Fulfillment option, choose your AWS Glue version.
  7. For Software version, choose the latest software version.
  8. Choose Continue to Launch.
  9. Under Usage Instructions, choose the link to activate the connector.
  10. Enter a name for the connection, then choose Create connection and activate the connector.
  11. Verify the new connector on the AWS Glue Studio Connectors.

Create the AWS Glue Data Catalog database

The AWS Glue Data Catalog contains references to data that is used as sources and targets of your extract, transform, and load (ETL) jobs in AWS Glue. To create your data warehouse or data lake, you must catalog this data. The AWS Glue Data Catalog is an index to the location and schema of your data. You use the information in the Data Catalog to create and monitor your ETL jobs.

For this post, we create a Data Catalog database named icebergdemodb containing the metadata information of a table named customer, which will be queried through Athena.

  1. On the AWS Glue console, choose Databases in the navigation pane.
  2. Choose Add database.
  3. For Database name, enter icebergdemodb.

This creates an AWS Glue database for metadata storage.

Create a Data Catalog table in Iceberg format

In this step, we create a Data Catalog table in Iceberg table format.

  1. On the Athena console, create an Athena workgroup named demoworkgroup for SQL queries.
  2. Choose Athena engine version 3 for Query engine version.

For more information about Athena versions, refer to Changing Athena engine versions.

  1. Enter the S3 bucket location for Query result configuration under Additional configurations.
  2. Open the Athena query editor and choose demoworkgroup.
  3. Choose the database icebergdemodb.
  4. Enter and run the following DDL to create a table pointing to the Data Catalog database icerbergdemodb. Note that the TBLPROPERTIES section mentions ICEBERG as the table type and LOCATION points to the S3 folder (custdata) URI created in earlier steps. This DDL command is available on the GitHub repo.
CREATE TABLE icebergdemodb.customer(
year string,
month string,
day string,
hour string,
minute string,
customerid string,
firstname string,
lastname string,
dateofbirth string,
city string,
buildingnumber string,
streetaddress string,
state string,
zipcode string,
country string,
countrycode string,
phonenumber string,
productname string,
transactionamount int)
LOCATION '<S3 Location URI>'
TBLPROPERTIES (
'table_type'='ICEBERG',
'format'='parquet',
'write_target_data_file_size_bytes'='536870912',
'optimize_rewrite_delete_file_threshold'='10'
);

After you run the command successfully, you can see the table customer in the Data Catalog.

Create an AWS Glue streaming job

In this section, we create the AWS Glue streaming job, which fetches the record from the Kinesis data stream using the Spark script editor.

  1. On the AWS Glue console, choose Jobs (new) in the navigation pane.
  2. For Create job¸ select Spark script editor.
  3. For Options¸ select Create a new script with boilerplate code.
  4. Choose Create.
  5. Enter the code available in the GitHub repo in the editor.

The sample code keeps appending data in the target location by fetching records from the Kinesis data stream.

  1. Choose the Job details tab in the query editor.
  2. For Name, enter Demo_Job.
  3. For IAM role¸ choose demojobrole.
  4. For Type, choose Spark Streaming.
  5. For Glue Version, choose Glue 3.0.
  6. For Language, choose Python 3.
  7. For Worker type, choose G 0.25X.
  8. Select Automatically scale the number of workers.
  9. For Maximum number of workers, enter 5.
  10. Under Advanced properties, select Use Glue Data Catalog as the Hive metastore.
  11. For Connections, choose the connector you created.
  12. For Job parameters, enter the following key pairs (provide your S3 bucket and account ID):
Key Value
--iceberg_job_catalog_warehouse s3://streamingicebergdemo-XX/custdata/
--output_path s3://streamingicebergdemo-XX
--kinesis_arn arn:aws:kinesis:us-east-1:<AWS Account ID>:stream/demo-data-stream
--user-jars-first True

  1. Choose Run to start the AWS Glue streaming job.
  2. To monitor the job, choose Monitoring in the navigation pane.
  3. Select Demo_Job and choose View run details to check the job run details and Amazon CloudWatch logs.

Run GDPR use cases on Athena

In this section, we demonstrate a few use cases that are relevant to GDPR alignment with the user data that’s stored in Iceberg format in the Amazon S3-based data lake as implemented in the previous steps. For this, let’s consider that the following requests are being initiated in the workflow to comply with the regulations:

  • Delete the records for the input customerid (for example, 59289)
  • Update phonenumber for the customerid (for example, 51842)

The IDs used in this example are samples only because they were created through the KDG template used earlier, which creates sample data. You can search for IDs in your implementation by querying through the Athena query editor. The steps remain the same.

Delete data by customer ID

Complete the following steps to fulfill the first use case:

  1. On the Athena console, and make sure icebergdemodb is chosen as the database.
  2. Open the query editor.
  3. Enter the following query using a customer ID and choose Run:
SELECT count(*)
FROM icebergdemodb.customer
WHERE customerid = '59289';

This query gives the count of records for the input customerid before delete.

  1. Enter the following query with the same customer ID and choose Run:
MERGE INTO icebergdemodb.customer trg
USING (SELECT customerid
FROM icebergdemodb.customer
WHERE customerid = '59289') src
ON (trg.customerid = src.customerid)
WHEN MATCHED
THEN DELETE;

This query deletes the data for the input customerid as per the workflow generated.

  1. Test if there is data with the customer ID using a count query.

The count should be 0.

Update data by customer ID

Complete the following steps to test the second use case:

  1. On the Athena console, make sure icebergdemodb is chosen as the database.
  2. Open the query editor.
  3. Enter the following query with a customer ID and choose Run.
SELECT customerid, phonenumber
FROM icebergdemodb.customer
WHERE customerid = '51936';

This query gives the value for phonenumber before update.

  1. Run the following query to update the required columns:
MERGE INTO icebergdemodb.customer trg
USING (SELECT customerid
FROM icebergdemodb.customer
WHERE customerid = '51936') src
ON (trg.customerid = src.customerid)
WHEN MATCHED
THEN UPDATE SET phonenumber = '000';

This query updates the data to a dummy value.

  1. Run the SELECT query to check the update.

You can see the data is updated correctly.

Vacuum table

A good practice is to run the VACUUM command periodically on the table because operations like INSERT, UPDATE, DELETE, and MERGE will take place on the Iceberg table. See the following code:

VACUUM icebergdemodb.customer;

Considerations

The following are a few considerations to keep in mind for this implementation:

Clean up

Complete the following steps to clean up the resources you created for this post:

    1. Delete the custdata folder in the S3 bucket.
    2. Delete the CloudFormation stack.
    3. Delete the Kinesis data stream.
    4. Delete the S3 bucket storing the data.
    5. Delete the AWS Glue job and Iceberg connector.
    6. Delete the AWS Glue Data Catalog database and table.
    7. Delete the Athena workgroup.
    8. Delete the IAM roles and policies.

Conclusion

This post explained how you can use the Iceberg table format on Athena to implement GDPR use cases like data deletion and data upserts as required, when streaming data is being generated and ingested through AWS Glue streaming jobs in Amazon S3.

The operations for the Iceberg table that we demonstrated in this post aren’t all of the data operations that Iceberg supports. Refer to the Apache Iceberg documentation for details on various operations.


About the Authors

Dhiraj Thakur is a Solutions Architect with Amazon Web Services. He works with AWS customers and partners to provide guidance on enterprise cloud adoption, migration, and strategy. He is passionate about technology and enjoys building and experimenting in the analytics and AI/ML space.

Rajdip Chaudhuri is Solutions Architect with Amazon Web Services specializing in data and analytics. He enjoys working with AWS customers and partners on data and analytics requirements. In his spare time, he enjoys soccer.

Architecting for Sustainability at AWS re:Invent 2022

Post Syndicated from Thomas Burns original https://aws.amazon.com/blogs/architecture/architecting-for-sustainability-at-aws-reinvent-2022/

AWS re:Invent 2022 featured 24 breakout sessions, chalk talks, and workshops on sustainability. In this blog post, we’ll highlight the sessions and announcements and discuss their relevance to the sustainability of, in, and through the cloud.

First, we’ll look at AWS’ initiatives and progress toward delivering efficient, shared infrastructure, water stewardship, and sourcing renewable power.

We’ll then summarize breakout sessions featuring AWS customers who are demonstrating the best practices from the AWS Well-Architected Framework Sustainability Pillar.

Lastly, we’ll highlight use cases presented by customers who are solving sustainability challenges through the cloud.

Sustainability of the cloud

The re:Invent 2022 Sustainability in AWS global infrastructure (SUS204) session is a deep dive on AWS’ initiatives to optimize data centers to minimize their environmental impact. These increases in efficiency provide carbon reduction opportunities to customers who migrate workloads to the cloud. Amazon’s progress includes:

  • Amazon is on path to power its operations with 100% renewable energy by 2025, five years ahead of the original target of 2030.
  • Amazon is the largest corporate purchaser of renewable energy with more than 400 projects globally, including recently announced projects in India, Canada, and Singapore. Once operational, the global renewable energy projects are expected to generate 56,881 gigawatt-hours (GWh) of clean energy each year.

At re:Invent, AWS announced that it will become water positive (Water+) by 2030. This means that AWS will return more water to communities than it uses in direct operations. This Water stewardship and renewable energy at scale (SUS211) session provides an excellent overview of our commitment. For more details, explore the Water Positive Methodology that governs implementation of AWS’ water positive goal, including the approach and measuring of progress.

Sustainability in the cloud

Independent of AWS efforts to make the cloud more sustainable, customers continue to influence the environmental impact of their workloads through the architectural choices they make. This is what we call sustainability in the cloud.

At re:Invent 2021, AWS launched the sixth pillar of the AWS Well-Architected Framework to explain the concepts, architectural patterns, and best practices to architect sustainably. In 2022, we extended the Sustainability Pillar best practices with a more comprehensive structure of anti-patterns to avoid, expected benefits, and implementation guidance.

Let’s explore sessions that show the Sustainability Pillar in practice. In the session Architecting sustainably and reducing your AWS carbon footprint (SUS205), Elliot Nash, Senior Manager of Software Development at Amazon Prime Video, dives deep on the exclusive streaming of Thursday Night Football on Prime Video. The teams followed the Sustainability Pillar’s improvement process from setting goals to replicating the successes to other teams. Implemented improvements include:

  • Automation of contingency switches that turn off non-critical customer features under stress to flatten demand peaks
  • Pre-caching content shown to the whole audience at the end of the game

Amazon Prime Video uses the AWS Customer Carbon Footprint Tool along with sustainability proxy metrics and key performance indicators (KPIs) to quantify and track the effectiveness of optimizations. Example KPIs are normalized Amazon Elastic Compute Cloud (Amazon EC2) instance hours per page impression or infrastructure cost per concurrent stream.

Another example of sustainability KPIs was presented in the Build a cost-, energy-, and resource-efficient compute environment (CMP204) session by Troy Gasaway, Vice President of Infrastructure and Engineering at Arm—a global semiconductor industry leader. Troy’s team wanted to measure, track, and reduce the impact of Electronic Design Automation (EDA) jobs. They used Amazon EC2 instances’ vCPU hours to calculate KPIs for Amazon EC2 Spot adoption, AWS Graviton adoption, and the resources needed per job.

The Sustainability Pillar recommends selecting Amazon EC2 instance types with the least impact and taking advantage of those designed to support specific workloads. The Sustainability and AWS silicon (SUS206) session gives an overview of the embodied carbon and energy consumption of silicon devices. The session highlights examples in which AWS silicon reduced the power consumption for machine learning (ML) inference with AWS Inferentia by 92 percent, and model training with AWS Trainium by 52 percent. Two effects contributed to the reduction in power consumption:

  • Purpose-built processors use less energy for the job
  • Due to better performance fewer instances are needed

David Chaiken, Chief Architect at Pinterest, shared Pinterest’s sustainability journey and how they complemented a rigid cost and usage management for ML workloads with data from the AWS Customer Carbon Footprint Tool, as in the figure below.

David Chaiken, Chief Architect at Pinterest, describes Pinterest’s sustainability journey with AWS

Figure 1. David Chaiken, Chief Architect at Pinterest, describes Pinterest’s sustainability journey with AWS

AWS announced the preview of a new generation of AWS Inferentia with the Inf2 instances, and C7gn instances. C7gn instances utilize the fifth generation of AWS Nitro cards. AWS Nitro offloads the host CPU to specialized hardware for a more consistent performance with lower CPU utilization. The new Nitro cards offer 40 percent better performance per watt than the previous generation.

Another best practice from the Sustainability Pillar is to use managed services. AWS is responsible for a large share of the optimization for resource efficiency for AWS managed services. We want to highlight the launch of AWS Verified Access. Traditionally, customers protect internal services from unauthorized access by placing resources into private subnets accessible through a Virtual Private Network (VPN). This often involves dedicated on-premises infrastructure that is provisioned to handle peak network usage of the staff. AWS Verified Access removes the need for a VPN. It shifts the responsibility for managing the hardware to securely access corporate applications to AWS and even improves your security posture. The service is built on AWS Zero Trust guiding principles and validates each application request before granting access. Explore the Introducing AWS Verified Access: Secure connections to your apps (NET214) session for demos and more.

In the session Provision and scale OpenSearch resources with serverless (ANT221) we announced the availability of Amazon OpenSearch Serverless. By decoupling compute and storage, OpenSearch Serverless scales resources in and out for both indexing and searching independently. This feature supports two key sustainability in the cloud design principles from the Sustainability Pillar out of the box:

  1. Maximizing utilization
  2. Scaling the infrastructure with user load

Sustainability through the cloud

Sustainability challenges are data problems that can be solved through the cloud with big data, analytics, and ML.

According to one study by PEDCA research, data centers in the EU consume approximately 3 percent of the EU’s energy generated. While it’s important to optimize IT for sustainability, we must also pay attention to reducing the other 97 percent of energy usage.

The session Serve your customers better with AWS Supply Chain (BIZ213) introduces AWS Supply Chain that generates insights into the data from your suppliers and your network to forecast and mitigate inventory risks. This service provides recommendations for stock rebalancing scored by distance to move inventory, risks, and also an estimation of the carbon emission impact.

The Easily build, train, and deploy ML models using geospatial data (AIM218) session introduces new Amazon SageMaker geospatial capabilities to analyze satellite images for forest density and land use changes and observe supply chain impacts. The AWS Solutions Library contains dedicated Guidance for Geospatial Insights for Sustainability on AWS with example code.

Some other examples for driving sustainability through the cloud as covered at re:Invent 2022 include these sessions:

Conclusion

We recommend revisiting the talks highlighted in this post to learn how you can utilize AWS to enhance your sustainability strategy. You can find all videos from the AWS re:Invent 2022 sustainability track in the Customer Enablement playlist. If you’d like to optimize your workloads on AWS for sustainability, visit the AWS Well-Architected Sustainability Pillar.

Dynatron L32 SP5 1U Liquid Cooling for AMD EPYC Genoa and Bergamo

Post Syndicated from John Lee original https://www.servethehome.com/dynatron-l32-sp5-1u-liquid-cooling-for-amd-epyc-genoa-and-bergamo/

We take a look at the Dynatron L32, an AMD SP5 AIO liquid cooler designed to cool the AMD EPYC Genoa, Bergamo, and upcoming parts in 1U

The post Dynatron L32 SP5 1U Liquid Cooling for AMD EPYC Genoa and Bergamo appeared first on ServeTheHome.

The collective thoughts of the interwebz