Tag Archives: AWS Graviton

Mixing AWS Graviton with x86 CPUs to optimize cost and resiliency using Amazon EKS

Post Syndicated from Macey Neff original https://aws.amazon.com/blogs/compute/mixing-aws-graviton-with-x86-cpus-to-optimize-cost-and-resilience-using-amazon-eks/

This post is written by Yahav Biran, Principal SA, and Yuval Dovrat, Israel Head Compute SA.

This post shows you how to integrate AWS Graviton-based Amazon EC2 instances into an existing Amazon Elastic Kubernetes Service (Amazon EKS) environment running on x86-based Amazon EC2 instances. Customers use mixed-CPU architectures to enable their application to utilize a wide selection of Amazon EC2 instance types and improve overall application resilience. In order to successfully run a mixed-CPU application, it is strongly recommended that you test application performance in a test environment before running production applications on Graviton-based instances. You can follow AWS’ transition guide to learn more about porting your application to AWS Graviton.

This example shows how you can use KEDA for controlling application capacity across CPU types in EKS. KEDA will trigger a deployment based on the application’s response latency as measured by the Application Load Balancer (ALB). To simplify resource provisioning, Karpenter, an open-source Kubernetes node provisioning software, and AWS Load Balancer Controller, are shown as well.

Solution Overview

There are two solutions that this post covers to test a mixed-CPU application. The first configuration (shown in Figure 1 below) is the “A/B Configuration”. It uses an Application Load Balancer (ALB)-based Ingress to control traffic flowing to x86-based and Graviton-based node pools. You use this configuration to gradually migrate a live application from x86-based instances to Graviton-based instances, while validating the response time with Amazon CloudWatch.

A/B Configuration, with ALB ingress for gradual transition between CPU types

Figure 1, config 1: A/B Configuration

In the second configuration, the “Karpenter Controlled Configuration” (shown in Figure 2 below as Config 2), Karpenter automatically controls the instance blend. Karpenter is configured to use weighted provisioners with values that prioritize AWS Graviton-based Amazon EC2 instances over x86-based Amazon EC2 instances.

Karpenter Controlled Configuration, with Weighting provisioners topology

Figure 2, config II:  Karpenter Controlled Configuration, with Weighting provisioners topology

It is recommended that you start with the “A/B” configuration to measure the response time of live requests. Once your workload is validated on Graviton-based instances, you can build the second configuration to simplify the deployment configuration and increase resiliency. This enables your application to automatically utilize x86-based instances if needed, for example, during an unplanned large-scale event.

You can find the step-by-step guide on GitHub to help you to examine and try the example app deployment described in this post. The following provides an overview of the step-by-step guide.

Code Migration to AWS Graviton

The first step is migrating your code from x86-based instances to Graviton-based instances. AWS has multiple resources to help you migrate your code. These include AWS Graviton Fast Start Program, AWS Graviton Technical Guide GitHub Repository, AWS Graviton Transition Guide, and Porting Advisor for Graviton.

After making any required changes, you might need to recompile your application for the Arm64 architecture. This is necessary if your application is written in a language that compiles to machine code, such as Golang and C/C++, or if you need to rebuild native-code libraries for interpreted/JIT compiled languages such as the Python/C API or Java Native Interface (JNI).

To allow your containerized application to run on both x86 and Graviton-based nodes, you must build OCI images for both the x86 and Arm64 architectures, push them to your image repository (such as Amazon ECR), and stitch them together by creating and pushing an OCI multi-architecture manifest list. You can find an overview of these steps in this AWS blog post. You can also find the AWS Cloud Development Kit (CDK) construct on GitHub to help get you started.

To simplify the process, you can use a Linux distribution package manager that supports cross-platform packages and avoid platform-specific software package names in the Linux distribution wherever possible. For example, use:

RUN pip install httpd

instead of:

ARG ARCH=aarch64 or amd64
RUN yum install httpd.${ARCH}

This blog post shows you how to automate multi-arch OCI image building in greater depth.

Application Deployment

Config 1 – A/B controlled topology

This topology allows you to migrate to Graviton while validating the application’s response time (approximately 300ms) on both x86 and Graviton-based instances. As shown in Figure 1, this design has a single Listener that forwards incoming requests to two Target Groups. One Target Group is associated with Graviton-based instances, while the other Target Group is associated with x86-based instances. The traffic ratio associated with each target group is defined in the Ingress configuration.

Here are the steps to create Config 1:

  1. Create two KEDA ScaledObjects that scale the number of pods based on the latency metric (AWS/ApplicationELB-TargetResponseTime) that matches the target group (triggers.metadata.dimensionValue). Declare the maximum acceptable latency in targetMetricValue:0.3.
    Below is the Graviton deployment scaledObject (spec.scaleTargetRef), note the comments that denote the value of the x86 deployment scaledObject
apiVersion: keda.sh/v1alpha1
kind: ScaledObject
…
spec:
  scaleTargetRef:
    apiVersion: apps/v1
    kind: Deployment
    name: armsimplemultiarchapp #amdsimplemultiarchapp
…
  triggers:                 
    - type: aws-cloudwatch
      metadata:
        namespace: "AWS/ApplicationELB"
        dimensionName: "LoadBalancer"
        dimensionValue: "app/simplemultiarchapp/xxxxxx"
        metricName: "TargetResponseTime"
        targetMetricValue: "0.3"
  1. Once the topology has been created, add Amazon CloudWatch Container Insights to measure CPU, network throughput, and instance performance.
  2. To simplify testing and control for potential performance differences in instance generations, create two dedicated Karpenter provisioners and Kubernetes Deployments (replica sets) and specify the instance generation, CPU count, and CPU architecture for each one. This example uses c7g (Graviton3) and c6i (Intel) . You will remove these constraints in the next topology to allow more allocation flexibility.

The x86-based instances Karpenter provisioner:

apiVersion: karpenter.sh/v1alpha5
kind: Provisioner
metadata:
  name: x86provisioner
spec:
  requirements:
  - key: karpenter.k8s.aws/instance-generation
    operator: In
    values:
    - "6"
  - key: karpenter.k8s.aws/instance-cpu
    operator: In 
    values:
    - "2"
  - key: kubernetes.io/arch
    operator: In
    values:
    - amd64

The Graviton-based instances Karpenter provisioner:

apiVersion: karpenter.sh/v1alpha5
kind: Provisioner
metadata:
  name: arm64provisioner
spec:
  requirements:
  - key: karpenter.k8s.aws/instance-generation
    operator: In
    values:
    - "7"
  - key: karpenter.k8s.aws/instance-cpu
    operator: In
    values:
    - "2"
  - key: kubernetes.io/arch
    operator: In
    values:
    - arm64
  1. Create two Kubernetes Deployment resources—one per CPU architecture—that use nodeSelector to schedule one Deployment on Graviton-based instances, and another Deployment on x86-based instances. Similarly, create two NodePort Service resources, where each Service points to its architecture-specific ReplicaSet.
  2. Create an Application Load Balancer using the AWS Load Balancer Controller to distribute incoming requests among the different pods. Control the traffic routing in the ingress by adding an ingress.kubernetes.io/actions.weighted-routing annotation. You can adjust the weight in the example below to meet your needs. This migration example started with a 100%-to-0% x86-to-Graviton ratio, adjusting over time by 10% increments until it reached a 0%-to-100% x86-to-Graviton ratio.
…
alb.ingress.kubernetes.io/actions.weighted-routing: | 
{
…
  "targetGroups":[
    {
      "serviceName":"armsimplemultiarchapp-svc",
      "servicePort":"80","weight":50
    },
    {
      "serviceName":"amdsimplemultiarchapp-svc",
      "servicePort":"80","weight":50}]
    }
 }

spec:
  ingressClassName: alb
  rules:
    - http:
        paths:
          - path: /
            pathType: Prefix
            backend:
              service:
                name: weighted-routing

You can simulate live user requests to an example application ALB endpoint. Amazon CloudWatch populates ALB Target Group request/second metrics, dimensioned by HTTP response code, to help assess the application throughput and CPU usage.

During the simulation, you will need to verify the following:

  • Both Graviton-based instances and x86-based instances pods process a variable amount of traffic.
  • The application response time (p99) meets the performance requirements (300ms).

The orange (Graviton) and blue (x86) curves of HTTP 2xx responses (figure 4) show the application throughput (HTTP requests/seconds) for each CPU architecture during the migration.

Gradual transition from x86 to Graviton using ALB ingress

Figure 3 HTTP 2XX per CPU architecture

Figure 4 shows an example of application response time during the transition from x86-based instances to Graviton-based instances. The latency associated with each instance family grows and shrinks as the live request simulation changes the load on the application. In this example, the latency on x86 instances (until 07:00) grew up to 300ms because most of the request load was directed at to x86-based pods. It began to converge at around 08:00 when more pods were powered by Graviton-based instances. Finally, after 15:00, the request load was processed by Graviton-based instances entirely.

Two curves with different colors indicate p99 application targets response time. Graviton-based pods have a response time (between 150 and 300ms) similar to x86-based pods.

Figure 4: Target Response Time p99

Config 2 – Karpenter Controlled Configuration

After fully testing the application on Graviton-based EC2 instances, you are ready to simplify the deployment topology with weighted provisioners while preserving the ability to launch x86-based instances as needed.

Here are the steps to create Config 2:

  1. Reuse the CPU-based provisioners from the previous topology, but assign a higher .spec.weight to Graviton-based instances provisioner. The x86 provisioner is still deployed in case x86-based instances are required. The karpenter.k8s.aws/instance-family can be expanded beyond those set in Config 1 or excluded by switching the operator to NotIn.

The x86-based Amazon EC2 instances Karpenter provisioner:

apiVersion: karpenter.sh/v1alpha5
kind: Provisioner
metadata:
  name: x86provisioner
spec:
  requirements:
  - key: kubernetes.io/arch
    operator: In
    values: [amd64]

The Graviton-based Amazon EC2 instances Karpenter provisioner:

apiVersion: karpenter.sh/v1alpha5
kind: Provisioner
metadata:
  name: priority-arm64provisioner
spec:
  weight: 10
  requirements:
  - key: kubernetes.io/arch
    operator: In
    values: [arm64]
  1. Next, merge the two Kubernetes deployments into one deployment similar to the original before migration (i.e., no specific nodeSelector that points to a CPU-specific provisioner).

The two services are also combined into a single Kubernetes service and the actions.weighted-routing annotation is removed from the ingress resources:

spec:
  rules:
    - http:
        paths:
          - path: /app
            pathType: Prefix
            backend:
              service:
                name: simplemultiarchapp-svc
  1. Unite the two KEDA ScaledObject resources from the first configuration and point them to a single deployment, e.g., simplemultiarchapp. The new KEDA ScaledObject will be:
apiVersion: keda.sh/v1alpha1
kind: ScaledObject
metadata:
  name: simplemultiarchapp-hpa
  namespace: default
spec:
  scaleTargetRef:
    apiVersion: apps/v1
    kind: Deployment
    name: simplemultiarchapp
…

Two curves with different colors to indicate HTTP request/sec count. The curves show Graviton (Blue) as baseline and bursting with x86 (Orange).

Figure 5 Config 2 – Weighting provisioners results

A synthetic limit on Graviton CPU capacity is set to illustrate the scaling to x86_64 CPUs (Provisioner.limits.resources.cpu). The total application throughput (figure 6) is shown by aarch64_200 (blue) and x86_64_200 (orange). Mixing CPUs did not impact the target response time (Figure 6). Karpenter behaved as expected: prioritizing Graviton-based instances, and bursting to x86-based Amazon EC2 instances when CPU limits were crossed.

Mixing CPU did not impact the application latency when x86 instances where added

Figure 6 Config 2 -HTTP response time p99 with mixed-CPU provisioner

Conclusion

The use of a mixed-CPU architecture enables your application to utilize a wide selection of Amazon EC2 instance types and improves your applications’ resilience while meeting your service-level objectives. Application metrics can be used to control the migration with AWS ALB Ingress, Karpenter, and KEDA. Moreover, AWS Graviton-based Amazon EC2 instances can deliver up to 40% better price performance than x86-based Amazon EC2 instances. Learn more about this example on GitHub and more announcements about Gravtion.

Using Porting Advisor for Graviton

Post Syndicated from Sheila Busser original https://aws.amazon.com/blogs/compute/using-porting-advisor-for-graviton/

This blog post is written by Ryan Doty Solutions Architect , AWS and Vishal Manan Sr. SSA, EC2 Graviton , AWS.

Introduction

AWS customers recognize that Graviton-based EC2 instances deliver price-performance benefits but many are concerned about the effort to port existing applications. Porting code from one architecture to another can result in a substantial investment in time and effort. AWS has worked continuously to improve the migration process for customers. We recently introduced the Porting Advisor for Graviton as a tool to further simplify the migration process. In this blog, we’ll walk you through how to use Porting Advisor for Graviton so that you can learn how to use it.

Porting Advisor for Graviton is an open-source, command-line tool that analyzes source code and generates a report highlighting missing or outdated libraries and code constructs that may require modification and provides a user with alternative recommendations. It helps customers and developers accelerate their transition to Graviton-based Amazon EC2 instances by reducing the iterative process of identifying and resolving source code and library dependencies. This blog post will provide you with a step-by-step implementation on how to use Porting Advisor for Graviton. At the end of the blog, you will be able to run Porting Advisor for Graviton on your source code tree, generating findings that will help simplify the effort required to port your application.

Porting Advisor for Graviton scans for potentially unsupported or non-portable arm64 code in source code trees. The tool only scans source code files for the programming languages C/C++, Fortran, Go 1.11+, Java 8+, Python 3+, and dependency files such as project/requirements.txt file(s). Most importantly the Porting Advisor doesn’t make any code modifications, API-level recommendations, or send data back to AWS.

You can utilize Porting Advisor for Graviton either as a Python script or compiled into a binary and run on x86-64 or arm64 systems. Therefore, it can be easily implemented as part of your build processes.

Expected Results

Porting Advisor for Graviton reports the following issues:

  1. Inline assembly with no corresponding arm64 inline assembly.
  2. Assembly source files with no corresponding arm64 assembly source files.
  3. Missing arm64 architecture detection in autoconf config.guess scripts.
  4. Linking against libraries that aren’t available on the arm64 architecture.
  5. Use  architecture specific intrinsics.
  6. Preprocessor errors that trigger when compiling on arm64.
  7. Usages of old Visual C++ runtime (Windows specific).

Compiler specific code guarded by compiler specific pre-defined macros is detected, but not reported by default. The following cross-compile specific issues are detected, but not reported by default:

  • Architecture detection that depends on the host rather than the target.
  • Use of build artifacts in the build process.

Skillsets needed for using the tool

Porting Advisor for Graviton is designed to be easy to use. Users though should be versed in the following skills in order to take advantage of the recommendations the tool provides:

  • An understanding of the build system – project requirements and dependencies, versioning, etc.
  • Basic scripting language skills around Python, PowerShell/Bash.
  • Understanding hardware (inline assembly for C/C++) or compiler specific (intrinsic for C/C++) constructs when applicable.
  • The ability to follow best practices in the AWS Graviton Technical Guide for code optimization.

How to use Porting Advisor for Graviton

Prerequisites

The tool requires a minimum version of Python 3.10 and Java (8+ to be installed). The installation of Java is also optional and only required if you want to scan JAR files for native method calls. You can run the tool on a Windows/Linux/MacOS machine, or in an EC2 instance. I will show case usage on Windows and Amazon Linux 2(AL2) running on an EC2 instance. It supports both arm64 and x86-64 processors.

You don’t need to be on an arm64-based processor to run the tool.

The tool doesn't need a lot of CPU Horsepower and even a system with few processors will do

You can run the tool as a Python script or an executable. The executable requires extra steps to build. However, it can be used on another machine without the need to install Python packages.

You must copy the complete “dist” folder for it to work, as there are libraries that are present in that folder along with the executable.

Porting Advisor for Graviton can be run as a binary or as a script. You must run the script to generate the binaries

./porting-advisor-linux-x86_64 ~/my/path/to/my/repo --output report.html 
./porting-advisor-linux-x86_64.exe ../test/CppCode/inline_assembly --output report.html

Running Porting Advisor for Graviton as an executable

The first step is to build the executable.

Building the executable

The first step is to set up the Python Environment. If you run into any errors building the binary, see the Troubleshooting section for more details.

Building the binary on Windows

Building Porting Advisor using Powershell

Building Porting Advisor binary

Building the binary on Linux/Mac

Using shell script to build on Linux or macOS

Porting Advisor binary saved in dist folder

Running the binary

Here you can see how you can run the tool on Linux as a binary for a C++ project.

Porting advisor binary run on a C++ codebase with 350 files

The “dist” folder will have the executable.

Running Porting Advisor for Graviton as a script

Enable the Python environment for the following:

Linux/Mac:

$. python3 -m venv .venv
$. source .venv/bin/activate

PowerShell:

PS> python -m venv .venv
PS> .\.venv\Scripts\Activate.ps1

The following shows how the tool would work on Windows when run as a script:

Running Porting Advisor on Windows as a powershell script

Running the Porting Advisor for Graviton on Linux as a Script

Setting up Python environment to run the Porting Advisor as a script

Running Porting Advisor on Linux as a script

Output of the Porting Advisor for Graviton

The Porting Advisor for Graviton requires the directory parameter to point to the folder where your source code lives. If there are multiple locations, then you can run the tool as part of the script.

If no output file is supplied only standard output will be produced. The following is the output of the tool in HTML format. The first line shows the total files scanned.

  1. If no issues are found, then you’ll see an output like the following:

Results of Porting Advisor run on C++ code with 2836 files with no issues found

  1. With x86-64 specific intrinsics, such as _bswap64, you’ll see it flagged. arm64 specific intrinsics won’t be flagged. Therefore, if your code has arm64 specific intrinsics, then the porting advisor will only flag x86-64 to arm64 and not vice versa. The primary goal of the tool is determining the arm64 readiness of your code.

Porting Advisor reporting inline assembly files in C++ code

  1. The scanner typically looks for source code files only, but it can also look for assembly files with *.s extensions. An example of a file with the C++ code with inline assembly code is as follows:

Porting Advisor reporting use of intrinsics in C++ code

  1. The tool has pointed out errors such as a preprocessor error and architecture-specific intrinsic usage errors.

Porting Advisor results run on C++ code pointing out missing preprocessor macros for arm64 and x86-64 specific intrinsics

Next steps

If you don’t see any issues reported by the tool, then you are in good shape for doing the port. If no issues are reported it does not guarantee that it will work as port. Porting Advisor for Graviton is a tool used best as a helper. Regardless of the issues reported by the tool, we still highly suggest testing the application thoroughly.

As a good practice, we recommend that you use the latest version of your libraries.

Based on the issue, you can consider further actions. For Compiler intrinsic errors, we recommend studying Intel and arm64 intrinsics.

Once you’ve migrated your code and are using Gravition, you can start to look at taking steps to optimize your performance. If you’re interested in doing that please look at our Getting Started Guide.

If you run into any issues, then see our CONTRIBUTING file.

FAQs

  1. How fast is the tool? The tool is able to scan 4048 files in 1.18 seconds.

On an arm64 Based Instance:

Porting Advisor scans 4048 files in 1.18 seconds

  1. False Positives?

This tool scans all files in a source tree, regardless of whether they are included by the build system or not. Therefore, it may misreport issues in files that appear in the source tree but are excluded by the build system. Currently, the tool supports the following languages/dependencies: C/C++, Fortran, Go 1.11+, Java 8+, and Python 3+.

For example: You may have legacy code using Python version 2.7 that is in the source tree but isn’t being used. The tool will scan the code base and point out issues in that particular codebase even though you may not be using that piece of code.  To mitigate, either  remove that folder from the source code or ignore the error pointed by the tool.

  1. I see mention of Ruby and .Net in the Open source tool, but they don’t work on my tool.

Ruby and .Net haven’t been implemented yet, but please consider contributing to it and open an issue requesting support. If you need support then see our CONTRIBUTING file.

Troubleshooting

Errors that you may encounter while building the tool binary:

PyInstaller needs a shared version of libraries.

  1. Python 3.10+ not having shared libraries for use by the PyInstaller tool.

Building Porting Advisor binaries

Pyinstaller failed at building binary and suggesting building Python configure script with --enable-shared on Linux or --enable-framework on macOS

The fix for this is to build your version of Python(3.10+) with the right flags:

./configure --enable-optimizations --enable-shared

If the two flags don’t work together, try doing the build with each flag enabled sequentially.

pyinstaller tool needs python configure script with --enable-shared and enable-optimizations flag

  1. Incorrect Python version (version less than 3.10).If you aren’t on the correct version of Python:

You will get errors similar to the ones here:

Python version on host is 3.7.15 which is less than the recommended version

If you want to run the tool in an EC2 instance on Amazon Linux 2(AL2), then you could try upgrading/installing Python 3.10 as pointed out here.

If you run into any issues, then see our CONTRIBUTING file.

Trying to run Porting Advisor as script will result in Syntax errors on Python version less than 3.10

Conclusion

Porting Advisor for Graviton helps customers quantify the amount of work that is required to port an application. It accelerates your ability to transition to Graviton-based Amazon EC2 instances by reducing the iterative process of identifying and resolving source code and library dependencies.

Resources

To learn how to migrate your workloads to Graviton-based instances, see the AWS Graviton Technical Guide GitHub Repository and AWS Graviton Transition Guide. To get started with Graviton-based Amazon EC2 instances, see the AWS Management Console, AWS Command Line Interface (AWS CLI), and AWS SDKs.

Some other resources include:

Simplifying Amazon EC2 instance type flexibility with new attribute-based instance type selection features

Post Syndicated from Sheila Busser original https://aws.amazon.com/blogs/compute/simplifying-amazon-ec2-instance-type-flexibility-with-new-attribute-based-instance-type-selection-features/

This blog is written by Rajesh Kesaraju, Sr. Solution Architect, EC2-Flexible Compute and Peter Manastyrny, Sr. Product Manager, EC2.

Today AWS is adding two new attributes for the attribute-based instance type selection (ABS) feature to make it even easier to create and manage instance type flexible configurations on Amazon EC2. The new network bandwidth attribute allows customers to request instances based on the network requirements of their workload. The new allowed instance types attribute is useful for workloads that have some instance type flexibility but still need more granular control over which instance types to run on.

The two new attributes are supported in EC2 Auto Scaling Groups (ASG), EC2 Fleet, Spot Fleet, and Spot Placement Score.

Before exploring the new attributes in detail, let us review the core ABS capability.

ABS refresher

ABS lets you express your instance type requirements as a set of attributes, such as vCPU, memory, and storage when provisioning EC2 instances with ASG, EC2 Fleet, or Spot Fleet. Your requirements are translated by ABS to all matching EC2 instance types, simplifying the creation and maintenance of instance type flexible configurations. ABS identifies the instance types based on attributes that you set in ASG, EC2 Fleet, or Spot Fleet configurations. When Amazon EC2 releases new instance types, ABS will automatically consider them for provisioning if they match the selected attributes, removing the need to update configurations to include new instance types.

ABS helps you to shift from an infrastructure-first to an application-first paradigm. ABS is ideal for workloads that need generic compute resources and do not necessarily require the hardware differentiation that the Amazon EC2 instance type portfolio delivers. By defining a set of compute attributes instead of specific instance types, you allow ABS to always consider the broadest and newest set of instance types that qualify for your workload. When you use EC2 Spot Instances to optimize your costs and save up to 90% compared to On-Demand prices, instance type diversification is the key to access the highest amount of Spot capacity. ABS provides an easy way to configure and maintain instance type flexible configurations to run fault-tolerant workloads on Spot Instances.

We recommend ABS as the default compute provisioning method for instance type flexible workloads including containerized apps, microservices, web applications, big data, and CI/CD.

Now, let us dive deep on the two new attributes: network bandwidth and allowed instance types.

How network bandwidth attribute for ABS works

Network bandwidth attribute allows customers with network-sensitive workloads to specify their network bandwidth requirements for compute infrastructure. Some of the workloads that depend on network bandwidth include video streaming, networking appliances (e.g., firewalls), and data processing workloads that require faster inter-node communication and high-volume data handling.

The network bandwidth attribute uses the same min/max format as other ABS attributes (e.g., vCPU count or memory) that assume a numeric value or range (e.g., min: ‘10’ or min: ‘15’; max: ‘40’). Note that setting the minimum network bandwidth does not guarantee that your instance will achieve that network bandwidth. ABS will identify instance types that support the specified minimum bandwidth, but the actual bandwidth of your instance might go below the specified minimum at times.

Two important things to remember when using the network bandwidth attribute are:

  • ABS will only take burst bandwidth values into account when evaluating maximum values. When evaluating minimum values, only the baseline bandwidth will be considered.
    • For example, if you specify the minimum bandwidth as 10 Gbps, instances that have burst bandwidth of “up to 10 Gbps” will not be considered, as their baseline bandwidth is lower than the minimum requested value (e.g., m5.4xlarge is burstable up to 10 Gbps with a baseline bandwidth of 5 Gbps).
    • Alternatively, c5n.2xlarge, which is burstable up to 25 Gbps with a baseline bandwidth of 10 Gbps will be considered because its baseline bandwidth meets the minimum requested value.
  • Our recommendation is to only set a value for maximum network bandwidth if you have specific requirements to restrict instances with higher bandwidth. That would help to ensure that ABS considers the broadest possible set of instance types to choose from.

Using the network bandwidth attribute in ASG

In this example, let us look at a high-performance computing (HPC) workload or similar network bandwidth sensitive workload that requires a high volume of inter-node communications. We use ABS to select instances that have at minimum 10 Gpbs of network bandwidth and at least 32 vCPUs and 64 GiB of memory.

To get started, you can create or update an ASG or EC2 Fleet set up with ABS configuration and specify the network bandwidth attribute.

The following example shows an ABS configuration with network bandwidth attribute set to a minimum of 10 Gbps. In this example, we do not set a maximum limit for network bandwidth. This is done to remain flexible and avoid restricting available instance type choices that meet our minimum network bandwidth requirement.

Create the following configuration file and name it: my_asg_network_bandwidth_configuration.json

{
    "AutoScalingGroupName": "network-bandwidth-based-instances-asg",
    "DesiredCapacityType": "units",
    "MixedInstancesPolicy": {
        "LaunchTemplate": {
            "LaunchTemplateSpecification": {
                "LaunchTemplateName": "LaunchTemplate-x86",
                "Version": "$Latest"
            },
            "Overrides": [
                {
                "InstanceRequirements": {
                    "VCpuCount": {"Min": 32},
                    "MemoryMiB": {"Min": 65536},
                    "NetworkBandwidthGbps": {"Min": 10} }
                 }
            ]
        },
        "InstancesDistribution": {
            "OnDemandPercentageAboveBaseCapacity": 30,
            "SpotAllocationStrategy": "capacity-optimized"
        }
    },
    "MinSize": 1,
    "MaxSize": 10,
    "DesiredCapacity":10,
    "VPCZoneIdentifier": "subnet-f76e208a, subnet-f76e208b, subnet-f76e208c"
}

Next, let us create an ASG using the following command:

my_asg_network_bandwidth_configuration.json file

aws autoscaling create-auto-scaling-group --cli-input-json file://my_asg_network_bandwidth_configuration.json

As a result, you have created an ASG that may include instance types m5.8xlarge, m5.12xlarge, m5.16xlarge, m5n.8xlarge, and c5.9xlarge, among others. The actual selection at the time of the request is made by capacity optimized Spot allocation strategy. If EC2 releases an instance type in the future that would satisfy the attributes provided in the request, that instance will also be automatically considered for provisioning.

Considered Instances (not an exhaustive list)


Instance Type        Network Bandwidth
m5.8xlarge             “10 Gbps”

m5.12xlarge           “12 Gbps”

m5.16xlarge           “20 Gbps”

m5n.8xlarge          “25 Gbps”

c5.9xlarge               “10 Gbps”

c5.12xlarge             “12 Gbps”

c5.18xlarge             “25 Gbps”

c5n.9xlarge            “50 Gbps”

c5n.18xlarge          “100 Gbps”

Now let us focus our attention on another new attribute – allowed instance types.

How allowed instance types attribute works in ABS

As discussed earlier, ABS lets us provision compute infrastructure based on our application requirements instead of selecting specific EC2 instance types. Although this infrastructure agnostic approach is suitable for many workloads, some workloads, while having some instance type flexibility, still need to limit the selection to specific instance families, and/or generations due to reasons like licensing or compliance requirements, application performance benchmarking, and others. Furthermore, customers have asked us to provide the ability to restrict the auto-consideration of newly released instances types in their ABS configurations to meet their specific hardware qualification requirements before considering them for their workload. To provide this functionality, we added a new allowed instance types attribute to ABS.

The allowed instance types attribute allows ABS customers to narrow down the list of instance types that ABS considers for selection to a specific list of instances, families, or generations. It takes a comma separated list of specific instance types, instance families, and wildcard (*) patterns. Please note, that it does not use the full regular expression syntax.

For example, consider container-based web application that can only run on any 5th generation instances from compute optimized (c), general purpose (m), or memory optimized (r) families. It can be specified as “AllowedInstanceTypes”: [“c5*”, “m5*”,”r5*”].

Another example could be to limit the ABS selection to only memory-optimized instances for big data Spark workloads. It can be specified as “AllowedInstanceTypes”: [“r6*”, “r5*”, “r4*”].

Note that you cannot use both the existing exclude instance types and the new allowed instance types attributes together, because it would lead to a validation error.

Using allowed instance types attribute in ASG

Let us look at the InstanceRequirements section of an ASG configuration file for a sample web application. The AllowedInstanceTypes attribute is configured as [“c5.*”, “m5.*”,”c4.*”, “m4.*”] which means that ABS will limit the instance type consideration set to any instance from 4th and 5th generation of c or m families. Additional attributes are defined to a minimum of 4 vCPUs and 16 GiB RAM and allow both Intel and AMD processors.

Create the following configuration file and name it: my_asg_allow_instance_types_configuration.json

{
    "AutoScalingGroupName": "allow-instance-types-based-instances-asg",
    "DesiredCapacityType": "units",
    "MixedInstancesPolicy": {
        "LaunchTemplate": {
            "LaunchTemplateSpecification": {
                "LaunchTemplateName": "LaunchTemplate-x86",
                "Version": "$Latest"
            },
            "Overrides": [
                {
                "InstanceRequirements": {
                    "VCpuCount": {"Min": 4},
                    "MemoryMiB": {"Min": 16384},
                    "CpuManufacturers": ["intel","amd"],
                    "AllowedInstanceTypes": ["c5.*", "m5.*","c4.*", "m4.*"] }
            }
            ]
        },
        "InstancesDistribution": {
            "OnDemandPercentageAboveBaseCapacity": 30,
            "SpotAllocationStrategy": "capacity-optimized"
        }
    },
    "MinSize": 1,
    "MaxSize": 10,
    "DesiredCapacity":10,
    "VPCZoneIdentifier": "subnet-f76e208a, subnet-f76e208b, subnet-f76e208c"
}

As a result, you have created an ASG that may include instance types like m5.xlarge, m5.2xlarge, c5.xlarge, and c5.2xlarge, among others. The actual selection at the time of the request is made by capacity optimized Spot allocation strategy. Please note that if EC2 will in the future release a new instance type which will satisfy the other attributes provided in the request, but will not be a member of 4th or 5th generation of m or c families specified in the allowed instance types attribute, the instance type will not be considered for provisioning.

Selected Instances (not an exhaustive list)

m5.xlarge

m5.2xlarge

m5.4xlarge

c5.xlarge

c5.2xlarge

m4.xlarge

m4.2xlarge

m4.4xlarge

c4.xlarge

c4.2xlarge

As you can see, ABS considers a broad set of instance types for provisioning, however they all meet the compute attributes that are required for your workload.

Cleanup

To delete both ASGs and terminate all the instances, execute the following commands:

aws autoscaling delete-auto-scaling-group --auto-scaling-group-name network-bandwidth-based-instances-asg --force-delete

aws autoscaling delete-auto-scaling-group --auto-scaling-group-name allow-instance-types-based-instances-asg --force-delete

Conclusion

In this post, we explored the two new ABS attributes – network bandwidth and allowed instance types. Customers can use these attributes to select instances based on network bandwidth and to limit the set of instances that ABS selects from. The two new attributes, as well as the existing set of ABS attributes enable you to save time on creating and maintaining instance type flexible configurations and make it even easier to express the compute requirements of your workload.

ABS represents the paradigm shift in the way that our customers interact with compute, making it easier than ever to request diversified compute resources at scale. We recommend ABS as a tool to help you identify and access the largest amount of EC2 compute capacity for your instance type flexible workloads.

Making your Go workloads up to 20% faster with Go 1.18 and AWS Graviton

Post Syndicated from Sheila Busser original https://aws.amazon.com/blogs/compute/making-your-go-workloads-up-to-20-faster-with-go-1-18-and-aws-graviton/

This blog post was written by Syl Taylor, Professional Services Consultant.

In March 2022, the highly anticipated Go 1.18 was released. Go 1.18 brings to the language some long-awaited features and additions, such as generics. It also brings significant performance improvements for Arm’s 64-bit architecture used in AWS Graviton server processors. In this post, we show how migrating Go workloads from Go 1.17.8 to Go 1.18 can help you run your applications up to 20% faster and more cost-effectively. To achieve this goal, we selected a series of realistic and relatable workloads to showcase how they perform when compiled with Go 1.18.

Overview

Go is an open-source programming language which can be used to create a wide range of applications. It’s developer-friendly and suitable for designing production-grade workloads in areas such as web development, distributed systems, and cloud-native software.

AWS Graviton2 processors are custom-built by AWS using 64-bit Arm Neoverse cores to deliver the best price-performance for your cloud workloads running in Amazon Elastic Compute Cloud (Amazon EC2). They provide up to 40% better price/performance over comparable x86-based instances for a wide variety of workloads and they can run numerous applications, including those written in Go.

Web service throughput

For web applications, the number of HTTP requests that a server can process in a window of time is an important measurement to determine scalability needs and reduce costs.

To demonstrate the performance improvements for a Go-based web service, we selected the popular Caddy web server. To perform the load testing, we selected the hey application, which was also written in Go. We deployed these packages in a client/server scenario on m6g Graviton instances.

Relative performance comparison for requesting a static webpage

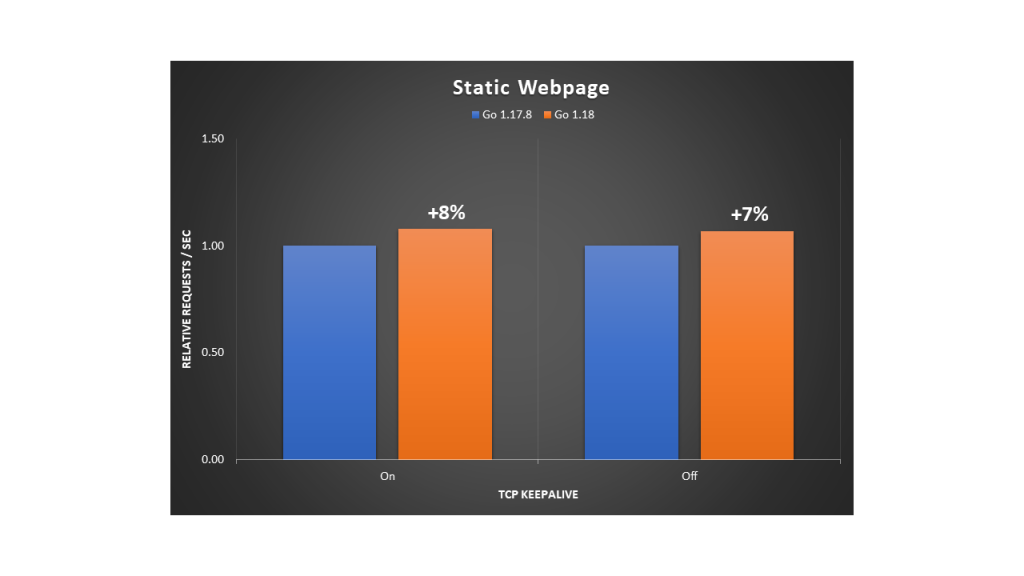
The Caddy web server compiled with Go 1.18 brings a 7-8% throughput improvement as compared with the variant compiled with Go 1.17.8.

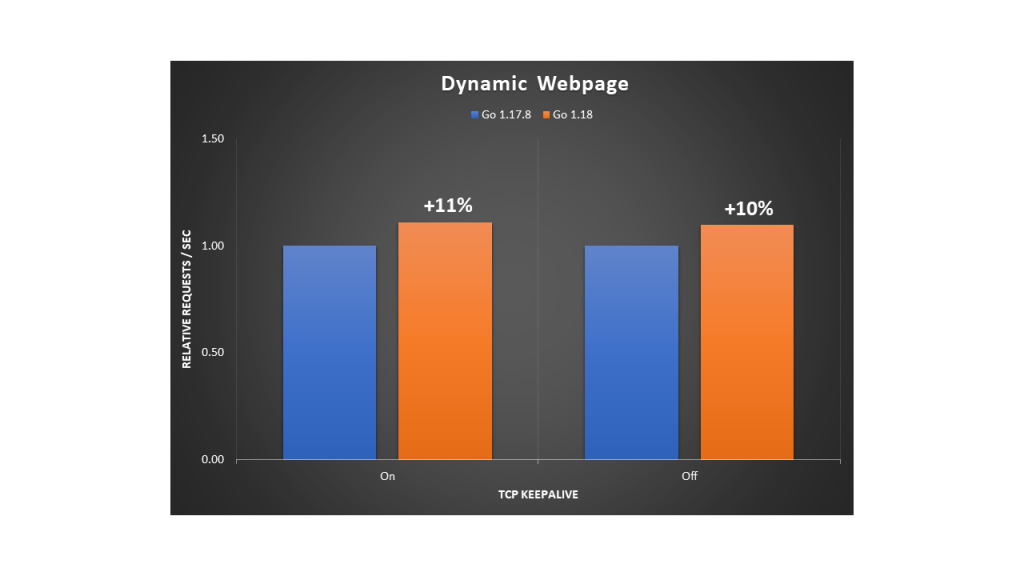
We conducted a second test where the client downloads a dynamic page on which the request handler performs some additional processing to write the HTTP response content. The performance gains were also noticeable at 10-11%.

Relative performance comparison for requesting a dynamic webpage

Regular expression searches

Searching through large amounts of text is where regular expression patterns excel. They can be used for many use cases, such as:

  • Checking if a string has a valid format (e.g., email address, domain name, IP address),
  • Finding all of the occurrences of a string (e.g., date) in a text document,
  • Identifying a string and replacing it with another.

However, despite their efficiency in search engines, text editors, or log parsers, regular expression evaluation is an expensive operation to run. We recommend identifying optimizations to reduce search time and compute costs.

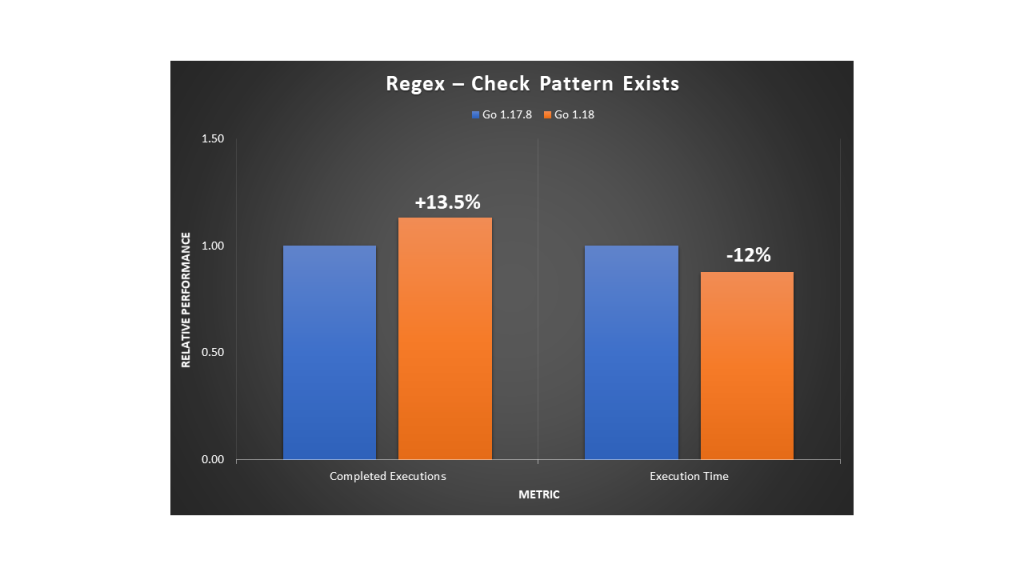
The following example uses the Go regexp package to compile a pattern and search for the presence of a standard date format in a large generated string. We observed a 13.5% increase in completed executions with a 12% reduction in execution time.

Relative performance comparison for using regular expressions to check that a pattern exists

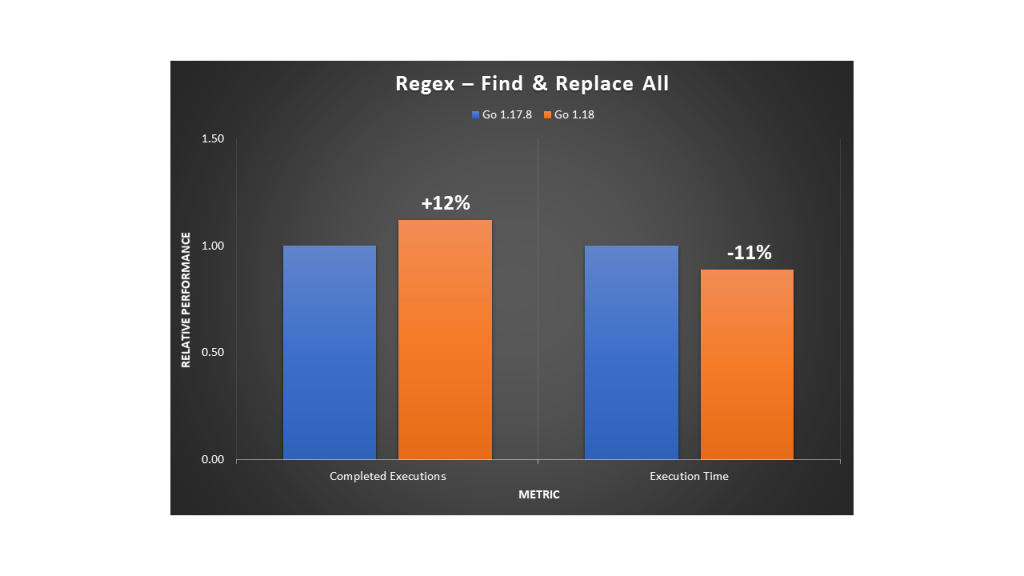
In a second example, we used the Go regexp package to find all of the occurrences of a pattern for character sequences in a string, and then replace them with a single character. We observed a 12% increase in evaluation rate with an 11% reduction in execution time.

Relative performance comparison for using regular expressions to find and replace all of the occurrences of a pattern

As with most workloads, the improvements will vary depending on the input data, the hardware selected, and the software stack installed. Furthermore, with this use case, the regular expression usage will have an impact on the overall performance. Given the importance of regex patterns in modern applications, as well as the scale at which they’re used, we recommend upgrading to Go 1.18 for any software that relies heavily on regular expression operations.

Database storage engines

Many database storage engines use a key-value store design to benefit from simplicity of use, faster speed, and improved horizontal scalability. Two implementations commonly used are B-trees and LSM (log-structured merge) trees. In the age of cloud technology, building distributed applications that leverage a suitable database service is important to make sure that you maximize your business outcomes.

B-trees are seen in many database management systems (DBMS), and they’re used to efficiently perform queries using indexes. When we tested a sample program for inserting and deleting in a large B-tree structure, we observed a 10.5% throughput increase with a 10% reduction in execution time.

Relative performance comparison for inserting and deleting in a B-Tree structure

On the other hand, LSM trees can achieve high rates of write throughput, thus making them useful for big data or time series events, such as metrics and real-time analytics. They’re used in modern applications due to their ability to handle large write workloads in a time of rapid data growth. The following are examples of databases that use LSM trees:

  • InfluxDB is a powerful database used for high-speed read and writes on time series data. It’s written in Go and its storage engine uses a variation of LSM called the Time-Structured Merge Tree (TSM).
  • CockroachDB is a popular distributed SQL database written in Go with its own LSM tree implementation.
  • Badger is written in Go and is the engine behind Dgraph, a graph database. Its design leverages LSM trees.

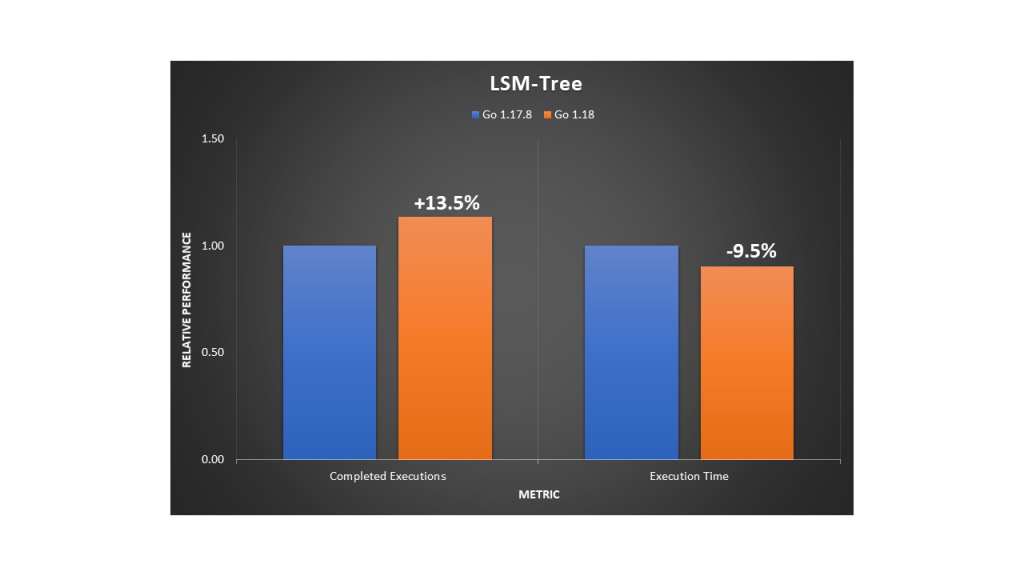
When we tested an LSM tree sample program, we observed a 13.5% throughput increase with a 9.5% reduction in execution time.

We also tested InfluxDB using comparison benchmarks to analyze writes and reads to the database server. On the load stress test, we saw a 10% increase of insertion throughput and a 14.5% faster rate when querying at a large scale.

Relative performance comparison for inserting to and querying from an InfluxDB database

In summary, for databases with an engine written in Go, you’ll likely observe better performance when upgrading to a version that has been compiled with Go 1.18.

Machine learning training

A popular unsupervised machine learning (ML) algorithm is K-Means clustering. It aims to group similar data points into k clusters. We used a dataset of 2D coordinates to train K-Means and obtain the cluster distribution in a deterministic manner. The example program uses an OOP design. We noticed an 18% improvement in execution throughput and a 15% reduction in execution time.

Relative performance comparison for training a K-means model

A widely-used and supervised ML algorithm for both classification and regression is Random Forest. It’s composed of numerous individual decision trees, and it uses a voting mechanism to determine which prediction to use. It’s a powerful method for optimizing ML models.

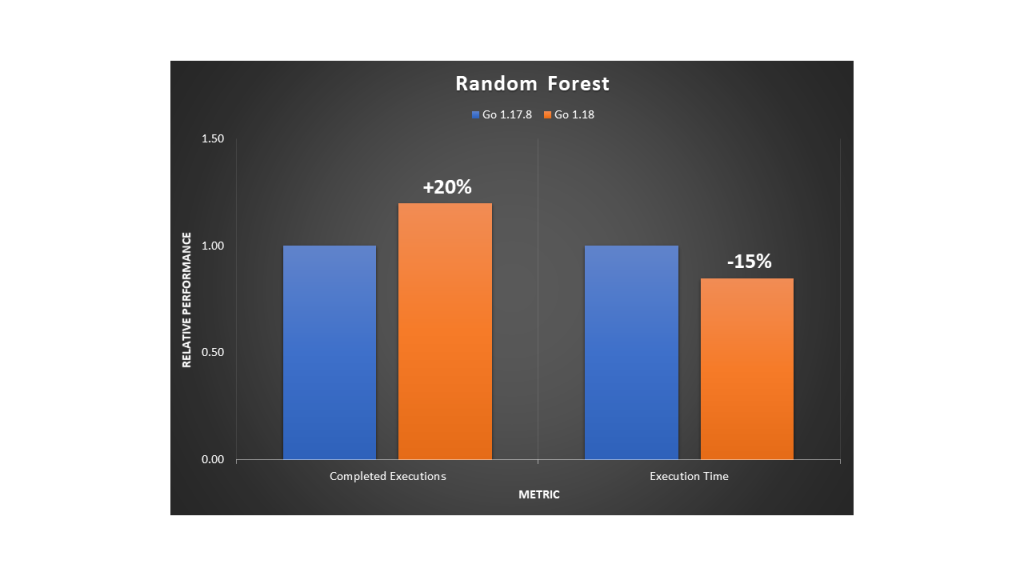
We ran a deterministic example to train a dense Random Forest. The program uses an OOP design and we noted a 20% improvement in execution throughput and a 15% reduction in execution time.

Relative performance comparison for training a Random Forest model

Recursion

An efficient, general-purpose method for sorting data is the merge sort algorithm. It works by repeatedly breaking down the data into parts until it can compare single units to each other. Then, it decides their order in the intermediary steps that will merge repeatedly until the final sorted result. To implement this divide-and-conquer approach, merge sort must use recursion. We ran the program using a large dataset of numbers and observed a 7% improvement in execution throughput and a 4.5% reduction in execution time.

Relative performance comparison for running a merge sort algorithm

Depth-first search (DFS) is a fundamental recursive algorithm for traversing tree or graph data structures. Many complex applications rely on DFS variants to solve or optimize hard problems in various areas, such as path finding, scheduling, or circuit design. We implemented a standard DFS traversal in a fully-connected graph. Then we observed a 14.5% improvement in execution throughput and a 13% reduction in execution time.

Relative performance comparison for running a DFS algorithm

Conclusion

In this post, we’ve shown that a variety of applications, not just those primarily compute-bound, can benefit from the 64-bit Arm CPU performance improvements released in Go 1.18. Programs with an object-oriented design, recursion, or that have many function calls in their implementation will likely benefit more from the new register ABI calling convention.

By using AWS Graviton EC2 instances, you can benefit from up to a 40% price/performance improvement over other instance types. Furthermore, you can save even more with Graviton through the additional performance improvements by simply recompiling your Go applications with Go 1.18.

To learn more about Graviton, see the Getting started with AWS Graviton guide.

AWS Compute Optimizer supports AWS Graviton migration guidance

Post Syndicated from Pranaya Anshu original https://aws.amazon.com/blogs/compute/aws-compute-optimizer-supports-aws-graviton-migration-guidance/

This post is written by Letian Feng, Principal Product Manager for AWS Compute Optimizer, and Steve Cole, Senior EC2 Spot Specialist Solutions Architect.

Today, AWS Compute Optimizer is launching a new capability that makes it easier for you to optimize your EC2 instances by leveraging multiple CPU architectures, including x86-based and AWS Graviton-based instances. Compute Optimizer is an opt-in service that recommends optimal AWS resources for your workloads to reduce costs and improve performance by analyzing historical utilization metrics. AWS Graviton processors are custom-built by Amazon Web Services using 64-bit Arm cores to deliver the best price performance for your cloud workloads running in Amazon EC2, with the potential to realize up to 40% better price performance over comparable current generation x86-based instances. As a result, customers interested in Graviton have been asking for a scalable way to understand which EC2 instances they should prioritize in their Graviton migration journey. Starting today, you can use Compute Optimizer to find the workloads that will deliver the biggest return for the smallest migration effort.

How it works

Compute Optimizer helps you find the workloads with the biggest return for the smallest migration effort by providing a migration effort rating. The migration effort rating, ranging from very low to high, reflects the level of effort that might be required to migrate from the current instance type to the recommended instance type, based on the differences in instance architecture and whether the workloads are compatible with the recommended instance type.

Clues about the type of workload running are useful for estimating the migration effort to Graviton. For some workloads, transitioning to Graviton is as simple as updating the instance types and associated Amazon Machine Images (AMIs) directly or in various launch or CloudFormation templates. For other workloads, you might need to use different software versions or change source codes. The quickest and easiest workloads to transition are Linux-based open-source applications. Many open source projects already support Arm64, and by extension Graviton. Therefore, many customers start their Graviton migration journey by checking whether their workloads are among the list of Graviton-compatible applications. They then combine this information with estimated savings from Compute Optimizer to build a list of Graviton migration opportunities.

Because Compute Optimizer cannot see into an instance, it looks to instance attributes for clues about the workload type running on the EC2 instance. The clues Compute Optimizer uses are based on the instance attributes customers provide, such as instance tags, AWS Marketplace product names, AMI names, and CloudFormation templates names. For example, when an instance is tagged with “key:application-type” and “value:hadoop”, Compute Optimizer will identify the application –Apache Hadoop in this example. Then, because we know that major frameworks, such as Apache Hadoop, Apache Spark, and many others, run on Graviton, Compute Optimizer will indicate that there is low migration effort to Graviton, and point customers to documentation that outlines the required steps for migrating a Hadoop application to Graviton.

As another example, when Compute Optimizer sees an instance is using a Microsoft Windows SQL Server AMI, Compute Optimizer will infer that SQL Server is running. Then, because it takes a lot of effort to modernize and migrate a SQL Server workload to Arm, Compute Optimizer will indicate that there is a high migration effort to Graviton. The most effective way to give Compute Optimizer clues about what application is running is by putting an “application-type” tag onto each instance. If Compute Optimizer doesn’t have enough clues, it will indicate that it doesn’t have enough information to offer migration guidance.

The following shows the different levels of migration effort:

  • Very Low – The recommended instance type has the same CPU architecture as the current instance type. Often, customers can just modify instance types directly, or do a simple re-deployment onto the new instance type. So, this is just an optimization, not a migration.
  • Low – The recommended instance type has different CPU architecture from the current instance type, but there’s a low-effort migration path. For example, migrating Apache Hadoop or Redis from x86 to Graviton falls under this category as both Hadoop and Redis have Graviton-compatible versions.
  • Medium – The recommended instance type has different CPU architecture from the current instance type, but Compute Optimizer doesn’t have enough information to offer migration guidance.
  • High – The recommended instance type has different CPU architecture from the current instance type, and the workload has no known compatible version on the recommended CPU architecture. Therefore, customers may need to re-compile their applications or re-platform their workloads (like moving from SQL Server to MySQL).

More and more applications support Graviton every day. If you’re running an application that you know has low migration effort, but Compute Optimizer isn’t yet aware, please tell us! Shoot us an email at [email protected] with the application type, and we’ll update our migration guidance mappings as quickly as we can. You can also put an “application-type” tag on your instances so that Compute Optimizer can infer your application type with high confidence.

Customers who have already opted into Compute Optimizer recommendations will have immediate access to this new capability. Customers who haven’t can opt-in with a single console click or API, enabling all Compute Optimizer features.

Walk through

Now, let’s take a look at how to get started with Graviton recommendation on Compute Optimizer. When you open the Compute Optimizer console, you will see the dashboard page that provides you with a summary of all optimization opportunities in your account. Graviton recommendation is available for EC2 instances and Auto Scaling groups.

Screenshot of Compute Optimizer dashboard page, which shows the number of EC2 instance and Auto Scaling group recommendations by findings in your AWS account.

After you click on View recommendations for EC2 instances, you will come to the EC2 recommendation list view. Here is where you can see a list of your EC2 instances, their current instance type, our finding (over-provisioned, under-provisioned, or optimized), the recommended optimal instance type, and the estimated savings if there is a downsizing opportunity. By default, we will show you the best-fit instance type for the price regardless of CPU architecture. In many cases this means that Graviton will be recommended because EC2 offers a wide selection of Graviton instances with comparatively high price/performance ratio. If you’d like to only look at recommendations with your current architecture, you can use the CPU architecture preference dropdown to tell Compute Optimizer to show recommendations with only the current CPU architecture.

Compute Optimizer EC2 Recommendation List Page. Here you can select both current and Graviton as the preferred CPU architectures. The recommendation list contains two new columns -- migration effort, and inferred workload types.

Here you can see two new columns — Migration effort and Inferred workload types. The Inferred workload types field shows the type of workload Compute Optimizer has inferred your instance is running. The Migration effort field shows how much effort you might need to spend if you migrate from your current instance type to recommended instance type based on the inferred workload type. When there is no change in CPU architecture (i.e. moving from an x86-instance type to another x86-instance type, like in the third row), the migration effort will be Very low. For x86-instances that are running Graviton-compatible applications, such as Apache Hadoop, NGINX, Memcached, etc., when you migrate the instance to Graviton, the effort will be Low. If Compute Optimizer cannot identify the applications, the migration effort from x86 to Graviton will be Medium, and you can provide application type data by putting an application-type tag key onto the instance. You can click on each row to see more detailed recommendation. Let’s click on the first row.

Compute Optimizer EC2 Recommendation Detail Page. The current instance type is r5.large. Recommended option 1 is r6g.large, with low migration effort. Recommended option 2 is t4g.xlarge, with low migration effort. Recommended option 3 is m6g.xlarge, with low migration effort.

Compute Optimizer identifies this instance to be running Apache Hadoop workloads because there’s Amazon EMR system tag associated with it. It shows a banner that details why Compute Optimizer considers this as a low-effort Graviton migration candidate, and offers a migration guide when you click on Learn more.

Github screenshot of AWS Graviton migration guide. The migration guide details steps to transition workloads from x86-based instances to Graviton-based instances.

The same Graviton recommendation can also be retrieved through Compute Optimizer API or CLI. Here’s a sample CLI that retrieves the same recommendation as discussed above:

aws compute-optimizer get-ec2-instance-recommendations --instance-arns arn:aws:ec2:us-west-2:020796573343:instance/i-0b5ec1bb9daabf0f3 --recommendation-preferences "{\"cpuVendorArchitectures\": [\"CURRENT\" , \"AWS_ARM64\"]}"
{
    "instanceRecommendations": [
        {
            "instanceArn": "arn:aws:ec2:us-west-2:000000000000:instance/i-0b5ec1bb9daabf0f3",
            "accountId": "000000000000",
            "instanceName": "Compute Intensive",
            "currentInstanceType": "r5.large",
            "finding": "UNDER_PROVISIONED",
            "findingReasonCodes": [
                "CPUUnderprovisioned",
                "EBSIOPSOverprovisioned"
            ],
            "inferredWorkloadTypes": [
                "ApacheHadoop"
            ],
            "utilizationMetrics": [
                {
                    "name": "CPU",
                    "statistic": "MAXIMUM",
                    "value": 100.0
                },
                {
                    "name": "EBS_READ_OPS_PER_SECOND",
                    "statistic": "MAXIMUM",
                    "value": 0.0
                },
                {
                    "name": "EBS_WRITE_OPS_PER_SECOND",
                    "statistic": "MAXIMUM",
                    "value": 4.943333333333333
                },
                {
                    "name": "EBS_READ_BYTES_PER_SECOND",
                    "statistic": "MAXIMUM",
                    "value": 0.0
                },
                {
                    "name": "EBS_WRITE_BYTES_PER_SECOND",
                    "statistic": "MAXIMUM",
                    "value": 880541.9921875
                },
                {
                    "name": "NETWORK_IN_BYTES_PER_SECOND",
                    "statistic": "MAXIMUM",
                    "value": 18113.96638888889
                },
                {
                    "name": "NETWORK_OUT_BYTES_PER_SECOND",
                    "statistic": "MAXIMUM",
                    "value": 90.37638888888888
                },
                {
                    "name": "NETWORK_PACKETS_IN_PER_SECOND",
                    "statistic": "MAXIMUM",
                    "value": 2.484055555555556
                },
                {
                    "name": "NETWORK_PACKETS_OUT_PER_SECOND",
                    "statistic": "MAXIMUM",
                    "value": 0.3302777777777778
                }
            ],
            "lookBackPeriodInDays": 14.0,
            "recommendationOptions": [
                {
                    "instanceType": "r6g.large",
                    "projectedUtilizationMetrics": [
                        {
                            "name": "CPU",
                            "statistic": "MAXIMUM",
                            "value": 70.76923076923076
                        }
                    ],
                    "platformDifferences": [
                        "Architecture"
                    ],
                    "migrationEffort": "Low",
                    "performanceRisk": 1.0,
                    "rank": 1
                },
                {
                    "instanceType": "t4g.xlarge",
                    "projectedUtilizationMetrics": [
                        {
                            "name": "CPU",
                            "statistic": "MAXIMUM",
                            "value": 33.33333333333333
                        }
                    ],
                    "platformDifferences": [
                        "Hypervisor",
                        "Architecture"
                    ],
                    "migrationEffort": "Low",
                    "performanceRisk": 3.0,
                    "rank": 2
                },
                {
                    "instanceType": "m6g.xlarge",
                    "projectedUtilizationMetrics": [
                        {
                            "name": "CPU",
                            "statistic": "MAXIMUM",
                            "value": 33.33333333333333
                        }
                    ],
                    "platformDifferences": [
                        "Architecture"
                    ],
                    "migrationEffort": "Low",
                    "performanceRisk": 1.0,
                    "rank": 3
                }
            ],
            "recommendationSources": [
                {
                    "recommendationSourceArn": "arn:aws:ec2:us-west-2:000000000000:instance/i-0b5ec1bb9daabf0f3",
                    "recommendationSourceType": "Ec2Instance"
                }
            ],
            "lastRefreshTimestamp": "2021-12-28T11:00:03.576000-08:00",
            "currentPerformanceRisk": "High",
            "effectiveRecommendationPreferences": {
                "cpuVendorArchitectures": [
                    "CURRENT", 
                    "AWS_ARM64"
                ],
                "enhancedInfrastructureMetrics": "Inactive"
            }
        }
    ],
    "errors": []
}

Conclusion

Compute Optimizer Graviton recommendations are available in in US East (Ohio), US East (N. Virginia), US West (N. California), US West (Oregon), Asia Pacific (Mumbai), Asia Pacific (Seoul), Asia Pacific (Singapore), Asia Pacific (Sydney), Asia Pacific (Tokyo), Canada (Central), Europe (Frankfurt), Europe (Ireland), Europe (London), Europe (Paris), Europe (Stockholm), and South America (São Paulo) Regions at no additional charge. To get started with Compute Optimizer, visit the Compute Optimizer webpage.

Announcing winners of the AWS Graviton Challenge Contest and Hackathon

Post Syndicated from Neelay Thaker original https://aws.amazon.com/blogs/compute/announcing-winners-of-the-aws-graviton-challenge-contest-and-hackathon/

At AWS, we are constantly innovating on behalf of our customers so they can run virtually any workload, with optimal price and performance. Amazon EC2 now includes more than 475 instance types that offer a choice of compute, memory, networking, and storage to suit your workload needs. While we work closely with our silicon partners to offer instances based on their latest processors and accelerators, we also drive more choice for our customers by building our own silicon.

The AWS Graviton family of processors were built as part of that silicon innovation initiative with the goal of pushing the price performance envelope for a wide variety of customer workloads in EC2. We now have 12 EC2 instance families powered by AWS Graviton2 processors – general purpose (M6g, M6gd), burstable (T4g), compute optimized (C6g, C6gd, C6gn), memory optimized (R6g, R6gd, X2gd), storage optimized (Im4gn, Is4gen), and accelerated computing (G5g) available globally across 23 AWS Regions. We also announced the preview of Amazon EC2 C7g instances powered by the latest generation AWS Graviton3 processors that will provide the best price performance for compute-intensive workloads in EC2. Thousands of customers, including Discovery, DIRECTV, Epic Games, and Formula 1, have realized significant price performance benefits with AWS Graviton-based instances for a broad range of workloads. This year, AWS Graviton-based instances also powered much of Amazon Prime Day 2021 and supported 12 core retail services during the massive 2-day online shopping event.

To make it easy for customers to adopt Graviton-based instances, we launched a program called the Graviton Challenge. Working with customers, we saw that many successful adoptions of Graviton-based instances were the result of one or two developers taking a single workload and spending a few days to benchmark the price performance gains with Graviton2-based instances, before scaling it to more workloads. The Graviton Challenge provides a step-by-step plan that developers can follow to move their first workload to Graviton-based instances. With the Graviton Challenge, we also launched a Contest (US-only), and then a Hackathon (global), where developers could compete for prizes by building new applications or moving existing applications to run on Graviton2-based instances. More than a thousand participants, including enterprises, startups, individual developers, open-source developers, and Arm developers, registered and ran a variety of applications on Graviton-based instances with significant price performance benefits. We saw some fantastic entries and usage of Graviton2-based instances across a variety of use cases and want to highlight a few.

The Graviton Challenge Contest winners:

  • Best Adoption – Enterprise and Most Impactful Adoption: VMware vRealize SRE team, who migrated 60 micro-services written in Java, Rust, and Golang to Graviton2-based general purpose and compute optimized instances and realized up to 48% latency reduction and 22% cost savings.
  • Best Adoption – Startup: Kasm Technologies, who realized up to 48% better performance and 25% potential cost savings for its container streaming platform built on C/C++ and Python.
  • Best New Workload adoption: Dustin Wilson, who built a dynamic tile server based on Golang and running on Graviton2-based memory-optimized instances that helps analysts query large geospatial datasets and benchmarked up to 1.8x performance gains over comparable x86-based instances.
  • Most Innovative Adoption: Loroa, an application that translates any given text into spoken words from one language into multiple other languages using Graviton2-based instances, Amazon Polly, and Amazon Translate.

If you are attending AWS re:Invent 2021 in person, you can hear more details on their Graviton adoption experience by attending the CMP213: Lessons learned from customers who have adopted AWS Graviton chalk talk.

Winners for the Graviton Challenge Hackathon:

  • Best New App: PickYourPlace, an open-source based data analytics platform to help users select a place to live based on property value, safety, and accessibility.
  • Best Migrated App: Genie, an image credibility checker based on deep learning that makes predictions on photographic and tampered confidence of an image.
  • Highest Potential Impact: Welly Tambunan, who’s also an AWS Community Builder, for porting big data platforms Spark, Dremio, and AirByte to Graviton2 instances so developers can leverage it to build big data capabilities into their applications.
  • Most Creative Use Case: OXY, a low-cost custom Oximeter with mobile and web apps that enables continuous and remote monitoring to prevent deaths due to Silent Hypoxia.
  • Best Technical Implementation: Apollonia Bot that plays songs, playlists, or podcasts on a Discord voice channel, so users can listen to it together.

It’s been incredibly exciting to see the enthusiasm and benefits realized by our customers. We are also thankful to our judges – Patrick Moorhead from Moor Insights, James Governor from RedMonk, and Jason Andrews from Arm, for their time and effort.

In addition to EC2, several AWS services for databases, analytics, and even serverless support options to run on Graviton-based instances. These include Amazon Aurora, Amazon RDS, Amazon MemoryDB, Amazon DocumentDB, Amazon Neptune, Amazon ElastiCache, Amazon OpenSearch, Amazon EMR, AWS Lambda, and most recently, AWS Fargate. By using these managed services on Graviton2-based instances, customers can get significant price performance gains with minimal or no code changes. We also added support for Graviton to key AWS infrastructure services such as Elastic Beanstalk, Amazon EKS, Amazon ECS, and Amazon CloudWatch to help customers build, run, and scale their applications on Graviton-based instances. Additionally, a large number of Linux and BSD-based operating systems, and partner software for security, monitoring, containers, CI/CD, and other use cases now support Graviton-based instances and we recently launched the AWS Graviton Ready program as part of the AWS Service Ready program to offer Graviton-certified and validated solutions to customers.

Congrats to all of our Contest and Hackathon winners! Full list of the Contest and Hackathon winners is available on the Graviton Challenge page.

P.S.: Even though the Contest and Hackathon have ended, developers can still access the step-by-step plan on the Graviton Challenge page to move their first workload to Graviton-based instances.

15 years of silicon innovation with Amazon EC2

Post Syndicated from Neelay Thaker original https://aws.amazon.com/blogs/compute/15-years-of-silicon-innovation-with-amazon-ec2/

The Graviton Hackathon is now available to developers globally to build and migrate apps to run on AWS Graviton2

This week we are celebrating 15 years of Amazon EC2 live on Twitch August 23rd – 24th with keynotes and sessions from AWS leaders and experts. You can watch all the sessions on-demand later this week to learn more about innovation at Amazon EC2.

As Jeff Barr noted in his blog, EC2 started as a single instance back in 2006 with the idea of providing developers on demand access to compute infrastructure and have them pay only for what they use. Today, EC2 has over 400 instance types with the broadest and deepest portfolio of instances in the cloud. As we strive to be the best cloud for every workload, customers consistently ask us for higher performance, and lower costs for their workloads. One way we deliver on this is by building silicon specifically optimized for the cloud. Our journey with custom silicon started in 2012 when we began looking into ways to improve the performance of EC2 instances by offloading virtualization functionality that is traditionally run on underlying servers to a dedicated offload card. Today, the AWS Nitro System is the foundation upon which our modern EC2 instances are built, delivering better performance and enhanced security. The Nitro System has also enabled us to innovate faster and deliver new instances and unique capabilities including Mac Instances, AWS Outposts, AWS Wavelength, VMware Cloud on AWS, and AWS Nitro Enclaves. We also have strong collaboration with partners to build custom silicon optimized for the AWS cloud with their latest generation processors to continue to deliver better performance and better price performance for our joint customers. Additionally, we’ve also designed AWS Inferentia and AWS Trainium chips to drive down the cost and boost performance for deep learning workloads.

One of the biggest innovations that help us deliver higher performance at lower cost for customer workloads are the AWS Graviton2 processors, which are the second generation of Arm-based processors custom-built by AWS. Instances powered by the latest generation AWS Graviton2 processors deliver up to 40% better performance at 20% lower per-instance cost over comparable x86-based instances in EC2. Additionally, Graviton2 is our most power efficient processor. In fact, Graviton2 delivers 2 to 3.5 times better performance per Watt of energy use versus any other processor in AWS.

Customers from startups to large enterprises including Intuit, Snap, Lyft, SmugMug, and Nextroll have realized significant price performance benefits for their production workloads on AWS Graviton2-based instances. Recently, EPIC Games added support for Graviton2 in Unreal Engine to help its developers build high performance games. What’s even more interesting is that AWS Graviton2-based instances supported 12 core retail services during Amazon Prime Day this year.

Most customers get started with AWS Graviton2-based instances by identifying and moving one or two workloads that are easy to migrate, and after realizing the price performance benefits, they move more workloads to Graviton2. In her blog, Liz Fong-Jones, Principal Developer Advocate at Honeycomb.io, details her journey of adopting Graviton2 and realizing significant price performance improvements. Using experience from working with thousands of customers like Liz who have adopted Graviton2, we built a program called the Graviton Challenge that provides a step-by-step plan to help you move your first workload to Graviton2-based instances.

Today, to further incentivize developers to get started with Graviton2, we are launching the Graviton Hackathon, where you can build a new app or migrate an app to run on Graviton2-based instances. Whether you are an existing EC2 user looking to optimize price performance for your workload, an Arm developer looking to leverage Arm-based instances in the cloud, or an open source developer adding support for Arm, you can participate in the Graviton Hackathon for a chance to win prizes for your project, including up to $10,000 in prize money. We look forward to the new applications which will be able to take advantage of the price performance benefits of Graviton. To learn more about Graviton2, watch the EC2 15th Birthday event sessions on-demand later this week, register to the attend the Graviton workshop at the upcoming AWS Summit Online, or register for the Graviton Challenge.

Cloud computing has made cutting edge, cost effective infrastructure available to everyday developers. Startups can use a credit card to spin up instances in minutes and scale up and scale down easily based on demand. Enterprises can leverage compute infrastructure and services to drive improved operational efficiency and customer experience. The last 15 years of EC2 innovation have been at the forefront of this shift, and we are looking forward to the next 15 years.

Evaluating effort to port a container-based application from x86 to Graviton2

Post Syndicated from Emma White original https://aws.amazon.com/blogs/compute/evaluating-effort-to-port-a-container-based-application-from-x86-to-graviton2/

This post is written by Kevin Jung, a Solution Architect with Global Accounts at Amazon Web Services.

AWS Graviton2 processors are custom designed by AWS using 64-bit Arm Neoverse cores. AWS offers the AWS Graviton2 processor in five new instance types – M6g, T4g, C6g, R6g, and X2gd. These instances are 20% lower cost and lead up to 40% better price performance versus comparable x86 based instances. This enables AWS to provide a number of options for customers to balance the need for instance flexibility and cost savings.

You may already be running your workload on x86 instances and looking to quickly experiment running your workload on Arm64 Graviton2. To help with the migration process, AWS provides the ability to quickly set up to build multiple architectures based Docker images using AWS Cloud9 and Amazon ECR and test your workloads on Graviton2. With multiple-architecture (multi-arch) image support in Amazon ECR, it’s now easy for you to build different images to support both on x86 and Arm64 from the same source and refer to them all by the same abstract manifest name.

This blog post demonstrates how to quickly set up an environment and experiment running your workload on Graviton2 instances to optimize compute cost.

Solution Overview

The goal of this solution is to build an environment to create multi-arch Docker images and validate them on both x86 and Arm64 Graviton2 based instances before going to production. The following diagram illustrates the proposed solution.

The steps in this solution are as follows:

  1. Create an AWS Cloud9
  2. Create a sample Node.js
  3. Create an Amazon ECR repository.
  4. Create a multi-arch image
  5. Create multi-arch images for x86 and Arm64 and  push them to Amazon ECR repository.
  6. Test by running containers on x86 and Arm64 instances.

Creating an AWS Cloud9 IDE environment

We use the AWS Cloud9 IDE to build a Node.js application image. It is a convenient way to get access to a full development and build environment.

  1. Log into the AWS Management Console through your AWS account.
  2. Select AWS Region that is closest to you. We use us-west-2Region for this post.
  3. Search and select AWS Cloud9.
  4. Select Create environment. Name your environment mycloud9.
  5. Choose a small instance on Amazon Linux2 platform. These configuration steps are depicted in the following image.

  1. Review the settings and create the environment. AWS Cloud9 automatically creates and sets up a new Amazon EC2 instance in your account, and then automatically connects that new instance to the environment for you.
  2. When it comes up, customize the environment by closing the Welcome tab.
  3. Open a new terminal tab in the main work area, as shown in the following image.

  1. By default, your account has read and write access to the repositories in your Amazon ECR registry. However, your Cloud9 IDE requires permissions to make calls to the Amazon ECR API operations and to push images to your ECR repositories. Create an IAM role that has a permission to access Amazon ECR then attach it to your Cloud9 EC2 instance. For detail instructions, see IAM roles for Amazon EC2.

Creating a sample Node.js application and associated Dockerfile

Now that your AWS Cloud9 IDE environment is set up, you can proceed with the next step. You create a sample “Hello World” Node.js application that self-reports the processor architecture.

  1. In your Cloud9 IDE environment, create a new directory and name it multiarch. Save all files to this directory that you create in this section.
  2. On the menu bar, choose File, New File.
  3. Add the following content to the new file that describes application and dependencies.
{
  "name": "multi-arch-app",
  "version": "1.0.0",
  "description": "Node.js on Docker"
}
  1. Choose File, Save As, Choose multiarch directory, and then save the file as json.
  2. On the menu bar (at the top of the AWS Cloud9 IDE), choose Window, New Terminal.

  1. In the terminal window, change directory to multiarch .
  2. Run npm install. It creates package-lock.json file, which is copied to your Docker image.
npm install
  1. Create a new file and add the following Node.js code that includes {process.arch} variable that self-reports the processor architecture. Save the file as js.
// Copyright Amazon.com, Inc. or its affiliates. All Rights Reserved. SPDX-License-Identifier: MIT-0

const http = require('http');
const port = 3000;
const server = http.createServer((req, res) => {
      res.statusCode = 200;
      res.setHeader('Content-Type', 'text/plain');
      res.end(`Hello World! This web app is running on ${process.arch} processor architecture` );
});
server.listen(port, () => {
      console.log(`Server running on ${process.arch} architecture.`);
});
  1. Create a Dockerfile in the same directory that instructs Docker how to build the Docker images.
FROM public.ecr.aws/amazonlinux/amazonlinux:2
WORKDIR /usr/src/app
COPY package*.json app.js ./
RUN curl -sL https://rpm.nodesource.com/setup_14.x | bash -
RUN yum -y install nodejs
RUN npm install
EXPOSE 3000
CMD ["node", "app.js"]
  1. Create .dockerignore. This prevents your local modules and debug logs from being copied onto your Docker image and possibly overwriting modules installed within your image.
node_modules
npm-debug.log
  1. You should now have the following 5 files created in your multiarch.
  • .dockerignore
  • app.js
  • Dockerfile
  • package-lock.json
  • package.json

Creating an Amazon ECR repository

Next, create a private Amazon ECR repository where you push and store multi-arch images. Amazon ECR supports multi-architecture images including x86 and Arm64 that allows Docker to pull an image without needing to specify the correct architecture.

  1. Navigate to the Amazon ECR console.
  2. In the navigation pane, choose Repositories.
  3. On the Repositories page, choose Create repository.
  4. For Repository name, enter myrepo for your repository.
  5. Choose create repository.

Creating a multi-arch image builder

You can use the Docker Buildx CLI plug-in that extends the Docker command to transparently build multi-arch images, link them together with a manifest file, and push them all to Amazon ECR repository using a single command.

There are few ways to create multi-architecture images. I use the QEMU emulation to quickly create multi-arch images.

  1. Cloud9 environment has Docker installed by default and therefore you don’t need to install Docker. In your Cloud9 terminal, enter the following commands to download the latest Buildx binary release.
export DOCKER_BUILDKIT=1
docker build --platform=local -o . git://github.com/docker/buildx
mkdir -p ~/.docker/cli-plugins
mv buildx ~/.docker/cli-plugins/docker-buildx
chmod a+x ~/.docker/cli-plugins/docker-buildx
  1. Enter the following command to configure Buildx binary for different architecture. The following command installs emulators so that you can run and build containers for x86 and Arm64.
docker run --privileged --rm tonistiigi/binfmt --install all
  1. Check to see a list of build environment. If this is first time, you should only see the default builder.
docker buildx ls
  1. I recommend using new builder. Enter the following command to create a new builder named mybuild and switch to it to use it as default. The bootstrap flag ensures that the driver is running.
docker buildx create --name mybuild --use
docker buildx inspect --bootstrap

Creating multi-arch images for x86 and Arm64 and push them to Amazon ECR repository

Interpreted and bytecode-compiled languages such as Node.js tend to work without any code modification, unless they are pulling in binary extensions. In order to run a Node.js docker image on both x86 and Arm64, you must build images for those two architectures. Using Docker Buildx, you can build images for both x86 and Arm64 then push those container images to Amazon ECR at the same time.

  1. Login to your AWS Cloud9 terminal.
  2. Change directory to your multiarch.
  3. Enter the following command and set your AWS Region and AWS Account ID as environment variables to refer to your numeric AWS Account ID and the AWS Region where your registry endpoint is located.
AWS_ACCOUNT_ID=aws-account-id
AWS_REGION=us-west-2
  1. Authenticate your Docker client to your Amazon ECR registry so that you can use the docker push commands to push images to the repositories. Enter the following command to retrieve an authentication token and authenticate your Docker client to your Amazon ECR registry. For more information, see Private registry authentication.
aws ecr get-login-password --region ${AWS_REGION} | docker login --username AWS --password-stdin ${AWS_ACCOUNT_ID}.dkr.ecr.${AWS_REGION}.amazonaws.com
  1. Validate your Docker client is authenticated to Amazon ECR successfully.

  1. Create your multi-arch images with the docker buildx. On your terminal window, enter the following command. This single command instructs Buildx to create images for x86 and Arm64 architecture, generate a multi-arch manifest and push all images to your myrepo Amazon ECR registry.
docker buildx build --platform linux/amd64,linux/arm64 --tag ${AWS_ACCOUNT_ID}.dkr.ecr.${AWS_REGION}.amazonaws.com/myrepo:latest --push .
  1. Inspect the manifest and images created using docker buildx imagetools command.
docker buildx imagetools inspect ${AWS_ACCOUNT_ID}.dkr.ecr.${AWS_REGION}.amazonaws.com/myrepo:latest

The multi-arch Docker images and manifest file are available on your Amazon ECR repository myrepo. You can use these images to test running your containerized workload on x86 and Arm64 Graviton2 instances.

Test by running containers on x86 and Arm64 Graviton2 instances

You can now test by running your Node.js application on x86 and Arm64 Graviton2 instances. The Docker engine on EC2 instances automatically detects the presence of the multi-arch Docker images on Amazon ECR and selects the right variant for the underlying architecture.

  1. Launch two EC2 instances. For more information on launching instances, see the Amazon EC2 documentation.
    a. x86 – t3a.micro
    b. Arm64 – t4g.micro
  2. Your EC2 instances require permissions to make calls to the Amazon ECR API operations and to pull images from your Amazon ECR repositories. I recommend that you use an AWS role to allow the EC2 service to access Amazon ECR on your behalf. Use the same IAM role created for your Cloud9 and attach the role to both x86 and Arm64 instances.
  3. First, run the application on x86 instance followed by Arm64 Graviton instance. Connect to your x86 instance via SSH or EC2 Instance Connect.
  4. Update installed packages and install Docker with the following commands.
sudo yum update -y
sudo amazon-linux-extras install docker
sudo service docker start
sudo usermod -a -G docker ec2-user
  1. Log out and log back in again to pick up the new Docker group permissions. Enter docker info command and verify that the ec2-user can run Docker commands without sudo.
docker info
  1. Enter the following command and set your AWS Region and AWS Account ID as environment variables to refer to your numeric AWS Account ID and the AWS Region where your registry endpoint is located.
AWS_ACCOUNT_ID=aws-account-id
AWS_REGION=us-west-2
  1. Authenticate your Docker client to your ECR registry so that you can use the docker pull command to pull images from the repositories. Enter the following command to authenticate to your ECR repository. For more information, see Private registry authentication.
aws ecr get-login-password --region ${AWS_REGION} | docker login --username AWS --password-stdin ${AWS_ACCOUNT_ID}.dkr.ecr.${AWS_REGION}.amazonaws.com
  1. Validate your Docker client is authenticated to Amazon ECR successfully.
  1. Pull the latest image using the docker pull command. Docker will automatically selects the correct platform version based on the CPU architecture.
docker pull ${AWS_ACCOUNT_ID}.dkr.ecr.${AWS_REGION}.amazonaws.com/myrepo:latest
  1. Run the image in detached mode with the docker run command with -dp flag.
docker run -dp 80:3000 ${AWS_ACCOUNT_ID}.dkr.ecr.${AWS_REGION}.amazonaws.com/myrepo:latest
  1. Open your browser to public IP address of your x86 instance and validate your application is running. {process.arch} variable in the application shows the processor architecture the container is running on. This step validates that the docker image runs successfully on x86 instance.

  1. Next, connect to your Arm64 Graviton2 instance and repeat steps 2 to 9 to install Docker, authenticate to Amazon ECR, and pull the latest image.
  2. Run the image in detached mode with the docker run command with -dp flag.
docker run -dp 80:3000 ${AWS_ACCOUNT_ID}.dkr.ecr.${AWS_REGION}.amazonaws.com/myrepo:latest
  1. Open your browser to public IP address of your Arm64 Graviton2 instance and validate your application is running. This step validates that the Docker image runs successfully on Arm64 Graviton2 instance.

  1. We now create an Application Load Balancer. This allows you to control the distribution of traffic to your application between x86 and Arm64 instances.
  2. Refer to this document to create ALB and register both x86 and Arm64 as target instances. Enter my-alb for your Application Load Balancer name.
  3. Open your browser and point to your Load Balancer DNS name. Refresh to see the output switches between x86 and Graviton2 instances.

Cleaning up

To avoid incurring future charges, clean up the resources created as part of this post.

First, we delete Application Load Balancer.

  1. Open the Amazon EC2 Console.
  2. On the navigation pane, under Load Balancing, choose Load Balancers.
  3. Select your Load Balancer my-alb, and choose ActionsDelete.
  4. When prompted for confirmation, choose Yes, Delete.

Next, we delete x86 and Arm64 EC2 instances used for testing multi-arch Docker images.

  1. Open the Amazon EC2 Console.
  2. On the instance page, locate your x86 and Arm64 instances.
  3. Check both instances and choose Instance StateTerminate instance.
  4. When prompted for confirmation, choose Terminate.

Next, we delete the Amazon ECR repository and multi-arch Docker images.

  1. Open the Amazon ECR Console.
  2. From the navigation pane, choose Repositories.
  3. Select the repository myrepo and choose Delete.
  4. When prompted, enter delete, and choose Delete. All images in the repository are also deleted.

Finally, we delete the AWS Cloud9 IDE environment.

  1. Open your Cloud9 Environment.
  2. Select the environment named mycloud9and choose Delete. AWS Cloud9 also terminates the Amazon EC2 instance that was connected to that environment.

Conclusion

With Graviton2 instances, you can take advantage of 20% lower cost and up to 40% better price-performance over comparable x86-based instances. The container orchestration services on AWS, ECR and EKS, support Graviton2 instances, including mixed x86 and Arm64 clusters. Amazon ECR supports multi-arch images and Docker itself supports a full multiple architecture toolchain through its new Docker Buildx command.

To summarize, we created a simple environment to build multi-arch Docker images to run on x86 and Arm64. We stored them in Amazon ECR and then tested running on both x86 and Arm64 Graviton2 instances. We invite you to experiment with your own containerized workload on Graviton2 instances to optimize your cost and take advantage better price-performance.


Supporting AWS Graviton2 and x86 instance types in the same Auto Scaling group

Post Syndicated from Emma White original https://aws.amazon.com/blogs/compute/supporting-aws-graviton2-and-x86-instance-types-in-the-same-auto-scaling-group/

This post is written by Tyler Lynch, Sr. Solutions Architect – EdTech, and Praneeth Tekula, Technical Account Manager.

As customers seek performance improvements and to cost optimize their workloads, they are evaluating and adopting AWS Graviton2 based instances. This post provides instructions on how to configure your Amazon EC2 Auto Scaling group (ASG) to use both Graviton2 and x86 based Amazon EC2 Instances in the same Auto Scaling group with different AMIs. This allows you to introduce Graviton2 based instances as part of a multiple instance type strategy.

For example, a customer may want to use the same Auto Scaling group definition across multiple Regions, but an instance type might not available in that region yet. Implementing instance and architecture diversity allow those Auto Scaling group definitions to be portable.

Solution Overview

The Amazon EC2 Auto Scaling console currently doesn’t support the selection of multiple launch templates, so I use the AWS Command Line Interface (AWS CLI) throughout this post. First, you create your launch templates that specify AMIs for use on x86 and arm64 based instances. Then you create your Auto Scaling group using a mixed instance policy with instance level overrides to specify the launch template to use for that instance.

Finally, you extend the launch templates to use architecture-specific EC2 user data to download architecture-specific binaries. Putting it all together, here are the high-level steps to follow:

  1. Create the launch templates:
    1. Launch template for x86– Creates a launch template for x86 instances, specifying the AMI but not the instance sizes.
    2. Launch template for arm64– Creates a launch template for arm64 instances, specifying the AMI but not the instance sizes.
  2. Create the Auto Scaling group that references the launch templates in a mixed instance policy override.
  3. Create a sample Node.js application.
  4. Create the architecture-specific user data scripts.
  5. Modify the launch templates to use architecture-specific user data scripts.

Prerequisites

The prerequisites for this solution are as follows:

  • The AWS CLI installed locally. I use AWS CLI version 2 for this post.
    • For AWS CLI v2, you must use 2.1.3+
    • For AWS CLI v1, you must use 1.18.182+
  • The correct AWS Identity and Access Management(IAM) role permissions for your account allowing for the creation and execution of the launch templates, Auto Scaling groups, and launching EC2 instances.
  • A source control service such as AWS CodeCommit or GitHub that your user data script can interact with to git clone the Hello World Node.js application.
  • The source code repository initialized and cloned locally.

Create the Launch Templates

You start with creating the launch template for x86 instances, and then the launch template for arm64 instances. These are simple launch templates where you only specify the AMI for Amazon Linux 2 in US-EAST-1 (architecture dependent). You use the AWS CLI cli-input-json feature to make things more readable and repeatable.

You first must add the lt-x86-cli-input.json file to your local working for reference by the AWS CLI.

  1. In your preferred text editor, add a new file, and copy paste the following JSON into the file.

{
    "LaunchTemplateName": "lt-x86",
    "VersionDescription": "LaunchTemplate for x86 instance types using Amazon Linux 2 x86 AMI in US-EAST-1",
    "LaunchTemplateData": {
        "ImageId": "ami-04bf6dcdc9ab498ca"
    }
}
  1. Save the file in your local working directory and name it lt-x86-cli-input.json.

Now, add the lt-arm64-cli-input.json file into your local working directory.

  1. In a text editor, add a new file, and copy paste the following JSON into the file.

{
    "LaunchTemplateName": "lt-arm64",
    "VersionDescription": "LaunchTemplate for Graviton2 instance types using Amazon Linux 2 Arm64 AMI in US-EAST-1",
    "LaunchTemplateData": {
        "ImageId": "ami-09e7aedfda734b173"
    }
}
  1. Save the file in your local working directory and name it lt-arm64-cli-input.json.

Now that your CLI input files are ready, create your launch templates using the CLI.

From your terminal, run the following commands:


aws ec2 create-launch-template \
            --cli-input-json file://./lt-x86-cli-input.json \
            --region us-east-1

aws ec2 create-launch-template \
            --cli-input-json file://./lt-arm64-cli-input.json \
            --region us-east-1

After you run each command, you should see the command output similar to this:


{
	"LaunchTemplate": {
		"LaunchTemplateId": "lt-07ab8c76f8e021b0c",
		"LaunchTemplateName": "lt-x86",
		"CreateTime": "2020-11-20T16:08:08+00:00",
		"CreatedBy": "arn:aws:sts::111111111111:assumed-role/Admin/myusername",
		"DefaultVersionNumber": 1,
		"LatestVersionNumber": 1
	}
}

{
	"LaunchTemplate": {
		"LaunchTemplateId": "lt-0c65656a2c75c0f76",
		"LaunchTemplateName": "lt-arm64",
		"CreateTime": "2020-11-20T16:08:37+00:00",
		"CreatedBy": "arn:aws:sts::111111111111:assumed-role/Admin/myusername",
		"DefaultVersionNumber": 1,
		"LatestVersionNumber": 1
	}
}

Create the Auto Scaling Group

Moving on to creating your Auto Scaling group, start with creating another JSON file to use the cli-input-json feature. Then, create the Auto Scaling group via the CLI.

I want to call special attention to the LaunchTemplateSpecification under the MixedInstancePolicy Overrides property. This Auto Scaling group is being created with a default launch template, the one you created for arm64 based instances. You override that at the instance level for x86 instances.

Now, add the asg-mixed-arch-cli-input.json file into your local working directory.

  1. In a text editor, add a new file, and copy paste the following JSON into the file.
  2. You need to change the subnet IDs specified in the VPCZoneIdentifier to your own subnet IDs.

{
    "AutoScalingGroupName": "asg-mixed-arch",
    "MixedInstancesPolicy": {
        "LaunchTemplate": {
            "LaunchTemplateSpecification": {
                "LaunchTemplateName": "lt-arm64",
                "Version": "$Default"
            },
            "Overrides": [
                {
                    "InstanceType": "t4g.micro"
                },
                {
                    "InstanceType": "t3.micro",
                    "LaunchTemplateSpecification": {
                        "LaunchTemplateName": "lt-x86",
                        "Version": "$Default"
                    }
                },
                {
                    "InstanceType": "t3a.micro",
                    "LaunchTemplateSpecification": {
                        "LaunchTemplateName": "lt-x86",
                        "Version": "$Default"
                    }
                }
            ]
        }
    },    
    "MinSize": 1,
    "MaxSize": 5,
    "DesiredCapacity": 3,
    "VPCZoneIdentifier": "subnet-e92485b6, subnet-07fe637b44fd23c31, subnet-828622e4, subnet-9bd6a2d6"
}
  1. Save the file in your local working directory and name it asg-mixed-arch-cli-input.json.

Now that your CLI input file is ready, create your Auto Scaling group using the CLI.

  1. From your terminal, run the following command:

aws autoscaling create-auto-scaling-group \
            --cli-input-json file://./asg-mixed-arch-cli-input.json \
            --region us-east-1

After you run the command, there isn’t any immediate output. Describe the Auto Scaling group to review the configuration.

  1. From your terminal, run the following command:

aws autoscaling describe-auto-scaling-groups \
            --auto-scaling-group-names asg-mixed-arch \
            --region us-east-1

Let’s evaluate the output. I removed some of the output for brevity. It shows that you have an Auto Scaling group with a mixed instance policy, which specifies a default launch template named lt-arm64. In the Overrides property, you can see the instances types that you specified and the values that define the lt-x86 launch template to be used for specific instance types (t3.micro, t3a.micro).


{
    "AutoScalingGroups": [
        {
            "AutoScalingGroupName": "asg-mixed-arch",
            "AutoScalingGroupARN": "arn:aws:autoscaling:us-east-1:111111111111:autoScalingGroup:a1a1a1a1-a1a1-a1a1-a1a1-a1a1a1a1a1a1:autoScalingGroupName/asg-mixed-arch",
            "MixedInstancesPolicy": {
                "LaunchTemplate": {
                    "LaunchTemplateSpecification": {
                        "LaunchTemplateId": "lt-0cc7dae79a397d663",
                        "LaunchTemplateName": "lt-arm64",
                        "Version": "$Default"
                    },
                    "Overrides": [
                        {
                            "InstanceType": "t4g.micro"
                        },
                        {
                            "InstanceType": "t3.micro",
                            "LaunchTemplateSpecification": {
                                "LaunchTemplateId": "lt-04b525bfbde0dcebb",
                                "LaunchTemplateName": "lt-x86",
                                "Version": "$Default"
                            }
                        },
                        {
                            "InstanceType": "t3a.micro",
                            "LaunchTemplateSpecification": {
                                "LaunchTemplateId": "lt-04b525bfbde0dcebb",
                                "LaunchTemplateName": "lt-x86",
                                "Version": "$Default"
                            }
                        }
                    ]
                },
                ...
            },
            ...
            "Instances": [
                {
                    "InstanceId": "i-00377a23630a5e107",
                    "InstanceType": "t4g.micro",
                    "AvailabilityZone": "us-east-1b",
                    "LifecycleState": "InService",
                    "HealthStatus": "Healthy",
                    "LaunchTemplate": {
                        "LaunchTemplateId": "lt-0cc7dae79a397d663",
                        "LaunchTemplateName": "lt-arm64",
                        "Version": "1"
                    },
                    "ProtectedFromScaleIn": false
                },
                {
                    "InstanceId": "i-07c2d4f875f1f457e",
                    "InstanceType": "t4g.micro",
                    "AvailabilityZone": "us-east-1a",
                    "LifecycleState": "InService",
                    "HealthStatus": "Healthy",
                    "LaunchTemplate": {
                        "LaunchTemplateId": "lt-0cc7dae79a397d663",
                        "LaunchTemplateName": "lt-arm64",
                        "Version": "1"
                    },
                    "ProtectedFromScaleIn": false
                },
                {
                    "InstanceId": "i-09e61e95cdf705ade",
                    "InstanceType": "t4g.micro",
                    "AvailabilityZone": "us-east-1c",
                    "LifecycleState": "InService",
                    "HealthStatus": "Healthy",
                    "LaunchTemplate": {
                        "LaunchTemplateId": "lt-0cc7dae79a397d663",
                        "LaunchTemplateName": "lt-arm64",
                        "Version": "1"
                    },
                    "ProtectedFromScaleIn": false
                }
            ],
            ...
        }
    ]
}

Create Hello World Node.js App

Now that you have created the launch templates and the Auto Scaling group you are ready to create the “hello world” application that self-reports the processor architecture. You work in the local directory that is cloned from your source repository as specified in the prerequisites. This doesn’t have to be the local working directory where you are creating architecture-specific files.

  1. In a text editor, add a new file with the following Node.js code:

// Hello World sample app.
const http = require('http');

const port = 3000;

const server = http.createServer((req, res) => {
  res.statusCode = 200;
  res.setHeader('Content-Type', 'text/plain');
  res.end(`Hello World. This processor architecture is ${process.arch}`);
});

server.listen(port, () => {
  console.log(`Server running on processor architecture ${process.arch}`);
});
  1. Save the file in the root of your source repository and name it app.js.
  2. Commit the changes to Git and push the changes to your source repository. See the following commands:

git add .
git commit -m "Adding Node.js sample application."
git push

Create user data scripts

Moving on to your creating architecture-specific user data scripts that will define the version of Node.js and the distribution that matches the processor architecture. It will download and extract the binary and add the binary path to the environment PATH. Then it will clone the Hello World app, and then run that app with the binary of Node.js that was installed.

Now, you must add the ud-x86-cli-input.txt file to your local working directory.

  1. In your text editor, add a new file, and copy paste the following text into the file.
  2. Update the git clone command to use the repo URL where you created the Hello World app previously.
  3. Update the cd command to use the repo name.

sudo yum update -y
sudo yum install git -y
VERSION=v14.15.3
DISTRO=linux-x64
wget https://nodejs.org/dist/$VERSION/node-$VERSION-$DISTRO.tar.xz
sudo mkdir -p /usr/local/lib/nodejs
sudo tar -xJvf node-$VERSION-$DISTRO.tar.xz -C /usr/local/lib/nodejs 
export PATH=/usr/local/lib/nodejs/node-$VERSION-$DISTRO/bin:$PATH
git clone https://github.com/<<githubuser>>/<<repo>>.git
cd <<repo>>
node app.js
  1. Save the file in your local working directory and name it ud-x86-cli-input.txt.

Now, add the ud-arm64-cli-input.txt file into your local working directory.

  1. In a text editor, add a new file, and copy paste the following text into the file.
  2. Update the git clone command to use the repo URL where you created the Hello World app previously.
  3. Update the cd command to use the repo name.

sudo yum update -y
sudo yum install git -y
VERSION=v14.15.3
DISTRO=linux-arm64
wget https://nodejs.org/dist/$VERSION/node-$VERSION-$DISTRO.tar.xz
sudo mkdir -p /usr/local/lib/nodejs
sudo tar -xJvf node-$VERSION-$DISTRO.tar.xz -C /usr/local/lib/nodejs 
export PATH=/usr/local/lib/nodejs/node-$VERSION-$DISTRO/bin:$PATH
git clone https://github.com/<<githubuser>>/<<repo>>.git
cd <<repo>>
node app.js
  1. Save the file in your local working directory and name it ud-arm64-cli-input.txt.

Now that your user data scripts are ready, you need to base64 encode them as the AWS CLI does not perform base64-encoding of the user data for you.

  • On a Linux computer, from your terminal use the base64 command to encode the user data scripts.

base64 ud-x86-cli-input.txt > ud-x86-cli-input-base64.txt
base64 ud-arm64-cli-input.txt > ud-arm64-cli-input-base64.txt
  • On a Windows computer, from your command line use the certutil command to encode the user data. Before you can use this file with the AWS CLI, you must remove the first (BEGIN CERTIFICATE) and last (END CERTIFICATE) lines.

certutil -encode ud-x86-cli-input.txt ud-x86-cli-input-base64.txt
certutil -encode ud-arm64-cli-input.txt ud-arm64-cli-input-base64.txt
notepad ud-x86-cli-input-base64.txt
notepad ud-arm64-cli-input-base64.txt

Modify the Launch Templates

Now, you modify the launch templates to use architecture-specific user data scripts.

Please note that the contents of your ud-x86-cli-input-base64.txt and ud-arm64-cli-input-base64.txt files are different from the samples here because you referenced your own GitHub repository. These base64 encoded user data scripts below will not work as is, they contain placeholder references for the git clone and cd commands.

Next, update the lt-x86-cli-input.json file to include your base64 encoded user data script for x86 based instances.

  1. In your preferred text editor, open the ud-x86-cli-input-base64.txt file.
  2. Open the lt-x86-cli-input.json file, and add in the text from the ud-x86-cli-input-base64.txt file into the UserData property of the LaunchTemplateData object. It should look similar to this:

{
    "LaunchTemplateName": "lt-x86",
    "VersionDescription": "LaunchTemplate for x86 instance types using Amazon Linux 2 x86 AMI in US-EAST-1",
    "LaunchTemplateData": {
        "ImageId": "ami-04bf6dcdc9ab498ca",
        "UserData": "IyEvYmluL2Jhc2gKeXVtIHVwZGF0ZSAteQoKVkVSU0lPTj12MTQuMTUuMwpESVNUUk89bGludXgteDY0CndnZXQgaHR0cHM6Ly9ub2RlanMub3JnL2Rpc3QvJFZFUlNJT04vbm9kZS0kVkVSU0lPTi0kRElTVFJPLnRhci54egpzdWRvIG1rZGlyIC1wIC91c3IvbG9jYWwvbGliL25vZGVqcwpzdWRvIHRhciAteEp2ZiBub2RlLSRWRVJTSU9OLSRESVNUUk8udGFyLnh6IC1DIC91c3IvbG9jYWwvbGliL25vZGVqcyAKZXhwb3J0IFBBVEg9L3Vzci9sb2NhbC9saWIvbm9kZWpzL25vZGUtJFZFUlNJT04tJERJU1RSTy9iaW46JFBBVEgKZ2l0IGNsb25lIGh0dHBzOi8vZ2l0aHViLmNvbS88PGdpdGh1YnVzZXI+Pi88PHJlcG8+Pi5naXQKY2QgPDxyZXBvPj4Kbm9kZSBhcHAuanMK"
    }
}
  1. Save the file.

Next, update the lt-arm64-cli-input.json file to include your base64 encoded user data script for arm64 based instances.

  1. In your text editor, open the ud-arm64-cli-input-base64.txt file.
  2. Open the lt-arm64-cli-input.json file, and add in the text from the ud-arm64-cli-input-base64.txt file into the UserData property of the LaunchTemplateData It should look similar to this:

{
    "LaunchTemplateName": "lt-arm64",
    "VersionDescription": "LaunchTemplate for Graviton2 instance types using Amazon Linux 2 Arm64 AMI in US-EAST-1",
    "LaunchTemplateData": {
        "ImageId": "ami-09e7aedfda734b173",
        "UserData": "IyEvYmluL2Jhc2gKeXVtIHVwZGF0ZSAteQoKVkVSU0lPTj12MTQuMTUuMwpESVNUUk89bGludXgtYXJtNjQKd2dldCBodHRwczovL25vZGVqcy5vcmcvZGlzdC8kVkVSU0lPTi9ub2RlLSRWRVJTSU9OLSRESVNUUk8udGFyLnh6CnN1ZG8gbWtkaXIgLXAgL3Vzci9sb2NhbC9saWIvbm9kZWpzCnN1ZG8gdGFyIC14SnZmIG5vZGUtJFZFUlNJT04tJERJU1RSTy50YXIueHogLUMgL3Vzci9sb2NhbC9saWIvbm9kZWpzIApleHBvcnQgUEFUSD0vdXNyL2xvY2FsL2xpYi9ub2RlanMvbm9kZS0kVkVSU0lPTi0kRElTVFJPL2JpbjokUEFUSApnaXQgY2xvbmUgaHR0cHM6Ly9naXRodWIuY29tLzw8Z2l0aHVidXNlcj4+Lzw8cmVwbz4+LmdpdApjZCA8PHJlcG8+Pgpub2RlIGFwcC5qcwoKCg=="
    }
}
  1. Save the file.

Now, your CLI input files are ready. Next, create a new version of your launch templates and then set the newest version as the default.

From your terminal, run the following commands:


aws ec2 create-launch-template-version \
            --cli-input-json file://./lt-x86-cli-input.json \
            --region us-east-1

aws ec2 create-launch-template-version \
            --cli-input-json file://./lt-arm64-cli-input.json \
            --region us-east-1

aws ec2 modify-launch-template \
            --launch-template-name lt-x86 \
            --default-version 2
			
aws ec2 modify-launch-template \
            --launch-template-name lt-arm64 \
            --default-version 2

After you run each command, you should see the command output similar to this:


{
    "LaunchTemplate": {
        "LaunchTemplateId": "lt-08ff3d03d4cf0038d",
        "LaunchTemplateName": "lt-x86",
        "CreateTime": "1970-01-01T00:00:00+00:00",
        "CreatedBy": "arn:aws:sts::111111111111:assumed-role/Admin/myusername",
        "DefaultVersionNumber": 2,
        "LatestVersionNumber": 2
    }
}

{
    "LaunchTemplate": {
        "LaunchTemplateId": "lt-0c5e1eb862a02f8e0",
        "LaunchTemplateName": "lt-arm64",
        "CreateTime": "1970-01-01T00:00:00+00:00",
        "CreatedBy": "arn:aws:sts::111111111111:assumed-role/Admin/myusername",
        "DefaultVersionNumber": 2,
        "LatestVersionNumber": 2
    }
}

Now, refresh the instances in the Auto Scaling group so that the newest version of the launch template is used.

From your terminal, run the following command:


aws autoscaling start-instance-refresh \
            --auto-scaling-group-name asg-mixed-arch

Verify Instances

The sample Node.js application self reports the process architecture in two ways: when the application is started, and when the application receives a HTTP request on port 3000. Retrieve the last five lines of the instance console output via the AWS CLI.

First, you need to get an instance ID from the autoscaling group.

  1. From your terminal, run the following commands:

aws autoscaling describe-auto-scaling-groups \
            --auto-scaling-group-name asg-mixed-arch \
            --region us-east-1
  1. Evaluate the output. I removed some of the output for brevity. You need to use the InstanceID from the output.

{
    "AutoScalingGroups": [
        {
            "AutoScalingGroupName": "asg-mixed-arch",
            "AutoScalingGroupARN": "arn:aws:autoscaling:us-east-1:111111111111:autoScalingGroup:a1a1a1a1-a1a1-a1a1-a1a1-a1a1a1a1a1a1:autoScalingGroupName/asg-mixed-arch",
            "MixedInstancesPolicy": {
                ...
            },
            ...
            "Instances": [
                {
                    "InstanceId": "i-0eeadb140405cc09b",
                    "InstanceType": "t4g.micro",
                    "AvailabilityZone": "us-east-1a",
                    "LifecycleState": "InService",
                    "HealthStatus": "Healthy",
                    "LaunchTemplate": {
                        "LaunchTemplateId": "lt-0c5e1eb862a02f8e0",
                        "LaunchTemplateName": "lt-arm64",
                        "Version": "2"
                    },
                    "ProtectedFromScaleIn": false
                }
            ],
          ....
        }
    ]
}

Now, retrieve the last five lines of console output from the instance.

From your terminal, run the following command:


aws ec2 get-console-output –instance-id d i-0eeadb140405cc09b \
            --output text | tail -n 5

Evaluate the output, you should see Server running on processor architecture arm64. This confirms that you have successfully utilized an architecture-specific user data script.


[  58.798184] cloud-init[1257]: node-v14.15.3-linux-arm64/share/systemtap/tapset/node.stp
[  58.798293] cloud-init[1257]: node-v14.15.3-linux-arm64/LICENSE
[  58.798402] cloud-init[1257]: Cloning into 'node-helloworld'...
[  58.798510] cloud-init[1257]: Server running on processor architecture arm64
2021-01-14T21:14:32+00:00

Cleaning Up

Delete the Auto Scaling group and use the force-delete option. The force-delete option specifies that the group is to be deleted along with all instances associated with the group, without waiting for all instances to be terminated.


aws autoscaling delete-auto-scaling-group \
            --auto-scaling-group-name asg-mixed-arch --force-delete \
            --region us-east-1

Now, delete your launch templates.


aws ec2 delete-launch-template --launch-template-name lt-x86
aws ec2 delete-launch-template --launch-template-name lt-arm64

Conclusion

You walked through creating and using architecture-specific user data scripts that were processor architecture-specific. This same method could be applied to fleets where you have different configurations needed for different instance types. Variability such as disk sizes, networking configurations, placement groups, and tagging can now be accomplished in the same Auto Scaling group.

Powering .NET 5 with AWS Graviton2: Benchmarks

Post Syndicated from Emma White original https://aws.amazon.com/blogs/compute/powering-net-5-with-aws-graviton2-benchmark-results/

This post was authored by Kirk Davis, Developer Advocate for App Modernization 

In 2019, AWS announced new Amazon EC2 instance types powered by the AWS Graviton2 processor. The AWS Graviton2 processor is based on the ARM64 architecture leveraging 64-bit ARM Neoverse N1 cores. Since 2019, AWS has launched many new EC2 instances built on Graviton2, including general-purpose (M6g), compute-optimized (C6g), memory-optimized (R6g), and general-purpose burstable (T4g) types. These Graviton2 based instances provide up to 40% better price performance over their comparable generation x86-64 instances. These instance types use the same naming convention as other types, but with a “g” appended to the family. For example, a t4g.large, or a c6g.2xlarge. Many customers are already running workloads on these Graviton2 instances, including .NET Core applications. Note that I refer to these 64-bit processors as “x86” for this blog post.

Organizations like AnandTech have done in-depth benchmarking of Graviton2 against x86-architecture EC2 instances and found that Graviton2 has a significant performance and cost advantage. Comparing similar instance families, the Graviton2 instances are about 20% less expensive per hour than Intel x86 instances with up to 40% better performance. With .NET 5 officially released in November, I thought it would be interesting to see what advantages Graviton2 has for .NET 5 web applications as a follow-up to the .NET 5 on AWS blog AWS published earlier. Follow along this blog to learn how I ran the benchmarking tests, the applications I chose to benchmark, and to see the results.

Overview

I decided to run some straight-forward .NET 5 benchmarks that tested ASP.NET Core under load for both x86-based and Graviton2 instances. ASP.NET Core runs application code in thread-pool threads, so it takes advantage of multiple cores to handle multiple requests concurrently. One thing to keep in mind is that x86-based EC2 instance types use simultaneous multi-threading, and a vCPU maps to a logical core. However, for Graviton2 instances a vCPU maps to a physical core. So, for these benchmarks, I used x86 and ARM64 instance types with 4 x vCPUs: m5.xlarge instance types, which have four logical (two physical) x86 cores, and m6g.xlarge instances, which have four physical ARM cores. I wanted to compare the latency and requests/second performance for different scenarios, and then compare the performance adjusted for the instances’ cost per hour. I used the per-hour pricing from the us-east-2 (Ohio) Region:

m5.xlarge m6g.xlarge
Cost $0.192 $0.154
vCPU 4 4
RAM 16 16

Benchmarks and testing framework

I used the open-source Crank software to run the benchmarks and gather results. Crank abstracts away many of the messy details in running benchmarks and delivers consistent results. From the GitHub page:

“Crank is the benchmarking infrastructure used by the .NET team to run benchmarks including (but not limited to) scenarios from the TechEmpower Web Framework Benchmarks.

Crank uses a controller (crank-controller), which communicates to one or more agents (crank-agent). The agents download, compile, and run the code, then report the results back to the controller. In this case, I used three agents: one each on the instances to be tested, and one on a test-runner instance (an m5.xlarge) that ran bombardier, a common load-testing tool that is already integrated into Crank. You can also choose wrk2, or other tools if you prefer (Crank’s readme files provide examples for both). I ran all the instances in the same Availability Zone (AZ) to minimize any other sources of latency. The setup looked like this:

benchmark environment setup

Note:    In order to use Crank’s agent with the .NET 5 release version, I made minor changes to its Startup.cs class. These changes forced Crank to pull down the correct .NET 5 SDK version, and fixed an issue where it wasn’t appending the correct build parameters for arm64 when compiling code on the m6g.xlarge instance. It’s possible the Microsoft.Crank.Agent project has been updated since I used it. I also updated all projects to .NET 5.

Benchmark tests

Since many of the .NET Core workloads customers are running in AWS are ASP.NET Core websites or APIs, I focused only these types of applications. I selected the Mvc project from the ASP.NET Benchmarks GitHub repository. The controller in this project defines an “Entry” class, and then creates and returns them as List<Entry> (which gets serialized to JSON by ASP.NET Core). For the source code for these methods, please refer to the preceding GitHub links. In the project, the Crank configuration YAML file defines three scenarios (note that I used these scenarios but swapped out wrk for bombardier).

  • MvcJsonNet2k: calls JsonController’s Json2k() method (returns eight Entries)
  • MvcJsonOutput60k: calls JsonController’s JsonNk() method for 60,000 bytes
  • MvcJsonOutput2M: calls JsonController’s JsonNk() method for 221 bytes

Additionally, I created another ASP.NET Core Web API application based on the boilerplate ASP.NET Web API project and added EF Core. I did this because many ASP.NET Core applications use Entity Framework Core (EF Core), and do more computationally expensive work than only serializing JSON. To isolate the performance of the two instances, I used the in-memory provider for EF Core, and populated a DbSet with weather summaries at startup. I modified the WeatherForecastController to encrypt each WeatherForecast’s Summary property using .NET’s RSACryptoServiceProvider class, and then added another controller that queries forecasts from the DbSet, and serializes them to strings. For that method, I added an asynchronous delay (using Task.Delay) to simulate querying a relational database. To run the tests, I created a Crank configuration YAML file that defines three scenarios:

  • AsyncParallelJson100: returns 100 forecasts from EF Core serialized to string using Text.Json
  • AsyncParallelJson500: returns 500 forecasts from EF Core serialized to string using Text.Json
  • ParallelEncryptWeather100: encrypts summaries for 100 forecasts and returns the forecasts as IEnumerable<WeatherForecast>

This application uses the 5.0.0 version of the Microsoft.EntityFrameworkCore and Microsoft.EntityFrameworkCore.InMemory NuGet packages. The following is the source code for the two methods I used in the tests:

JsonSerializeController’s Get method:

[HttpGet]
public async Task<IEnumerable<string>> Get(int count = 100)
{
    List<WeatherForecast> forecasts;
    List<string> jsons = new List<string>();

    using (var context = new WeatherContext())
    {
        forecasts = context.WeatherForecasts.Take(count).ToList();
    }
    await Task.Delay(5);
    Parallel.ForEach(forecasts, x => jsons.Add(JsonSerializer.Serialize(x)));

    return jsons;
}

WeatherForecastController’s Get method:

[HttpGet]
public IEnumerable<WeatherForecast> Get(int count = 100)
{
    List<WeatherForecast> forecasts;

    using (var context = new WeatherContext())
    {
        forecasts = context.WeatherForecasts.Take(count).ToList();
    }
    UnicodeEncoding ByteConverter = new UnicodeEncoding();

    using (RSACryptoServiceProvider RSA = new RSACryptoServiceProvider())
    {
        Parallel.ForEach(forecasts, x => x.EncryptedSummary = RSAEncrypt(ByteConverter.GetBytes(x.Summary), RSA.ExportParameters(false), false));
    }
    return forecasts;
}

Note:    The RSAEncrypt method was copied from the sample code in the RSACryptoServiceProvider’s docs.

Setting up the instances

For running the benchmarks, I selected the Amazon Machine Image (AMI) for Ubuntu Server 20.04 LTS, and chose “64-bit (x86)” for the m5.xlarge and “64-bit (Arm)” for the m6g.xlarge. I gave them both 20GB of Amazon Elastic Block Store (EBS) storage, and chose a security group with port 22 open to my home IP address, so that I could SSH into them. While it’s possible to install and use .NET 5 on Amazon Linux 2 (AL2), that’s not currently a supported Linux distribution for .NET 5 on ARM, and I wanted the same distribution for both x86 and ARM64. For details on launching Graviton2 instances from the AWS Management Console, please refer to the .NET 5 on AWS blog post from November 10, 2020.

Ubuntu 20.04 is a supported release for installing .NET 5 using apt-get, but ARM architectures are not yet supported. So instead – and to use the same method on both instances – I manually installed the .NET 5 SDK using the following commands, specifying the architecture-appropriate download link for the binaries*. Instructions for manually installing are also available at the prior “installing .NET 5” link.

curl -SL -o dotnet.tar.gz <link to architecture-specific binary file*>
sudo mkdir -p /usr/share/dotnet
sudo tar -zxf dotnet.tar.gz -C /usr/share/dotnet
sudo ln -s /usr/share/dotnet/dotnet /usr/bin/dotnet
echo "export DOTNET_SYSTEM_GLOBALIZATION_INVARIANT=true" >> ~/.bash_profile

Then, I used SCP to upload the source code for my benchmarking solution to the instances, and SSH’d onto both, using two tabs in the new Windows Terminal.

*At the time this blog was written, the binaries used were:
dotnet-sdk-5.0.100-linux-arm64.tar.gz
dotnet-sdk-5.0.100-linux-x64.tar.gz

Benchmark results

Benchmark runs and units

I used Crank to perform two runs of each of the six benchmarks on each of the two instances and took the average of the two runs for each. There was minimal variation between runs. For each test, I charted the latency in microseconds (μs), with the bars for MvcJsonOutput2M and ParallelEncryptWeather100 scaled by plotting μs/100, and bars for AsyncParallelJson100 and AsyncParallelJson500 scaled with μs/10. For latency, shorter bars are better.

I also charted the performance in requests/second, and the overall value as performance/dollar, where the performance is the requests/second, and dollars is the cost/hour of the given instance type. In order to have the bars legible on the same chart, some values were scaled as shown below the chart (the same scaling was applied to all values for a given benchmark). For both raw performance and performance/price, longer bars are better.

Note that I didn’t do any specific optimization for ARM64 or x86.

Summary of results

The Graviton2 instance had lower latency across the board for the tests I ran, with the m6g.xlarge (Graviton2) instance having up to 24.7% lower latency (for MvcJsonOutput2M) than the m5.xlarge (x86-64). It’s notable that in general, the more work the test method was doing, the bigger the advantage of Graviton2.

The results were broadly similar for requests/second, with Graviton2 delivering up to 31.6% better performance (for MvcJsonOutput2M). For the most computationally-expensive test – ParallelEncryptWeather100 – the Graviton2 instance churned out 16.6% more requests per second. And all of this is without considering the price difference. Also, not reflected in the charts is that the x86 instance had twice as many bad requests (average of 16) as the Graviton2 instance (average of 8) for the ParallelEncryptWeather100 test. ParallelEncryptWeather100 was the only test where there were any bad responses across all the tests.

When scaling the performance for the hourly price of each instance type, the differences are starker. The Graviton2 offers up to 64% more requests/second per hourly cost of the instance (for MvcJsonOutput2M). Even on the test with the least advantage (MvcJsonNet2k), the Graviton2 provided 30.8% better performance/cost, where performance is requests/second. These types of results can translate into significant savings for even modestly sized workloads.

Charts

chart showing mean latency for the benchmark

In the preceding chart, the mean latency is shown in micro-seconds (μs), with the values for some tests divided by either 10 or 100 in order to make all the bars visible in the chart. The Graviton2 instance had 24.7% lower latency for the MvcJsonOutput2M test, and had lower latency across all the tests.

chart showing raw performance for the benchmark

This second chart shows how the m6g.xlarge Graviton2 instance handled more requests for every test. The bars represent the raw requests/second for each test. For the MvcJsonOutput2M test, which serializes two megabytes to JSON, it handled 31.6% more requests per second, and was faster for every test I ran.

chart showing price/performance for benchmark test

This third chart uses the same performance values as the preceding one, but the m5.xlarge values are divided by its hourly cost ($0.192 in the Ohio Region), and the m6g.xlarge bars are divided by $0.154 (also for the Ohio Region). The Graviton2 instance handled 64% more requests per dollar for the MvcJsonOutput2M test, and provides much better performance per dollar across all the tests.

Conclusion

If you’re adopting .NET 5 for your applications, you have a variety of choices for deploying them in AWS. You can run them in containers in Amazon Elastic Container Service (ECS) or Amazon Elastic Kubernetes Service (EKS) with or without AWS Fargate, you can deploy them as serverless functions in AWS Lambda, or deploy them onto EC2 using either x86-based or Graviton2-based instances.

For running scalable web applications built on ASP.NET Core 5.0, the new Graviton2 instance families offer significant performance advantages, and even more compelling performance/price advantages of up to 64% over the equivalent Intel x86 instance families without making any code changes. Coupled with the ARM64 performance improvements in .NET 5, moving from .NET Core 3.1 on x86 to .NET 5 on Graviton2 promises significant cost savings. It also allows developers to code and locally test on their x86-based development machines (or even new ARM-based macOS laptops), and to use their existing deployment mechanisms. If your application is still based on .NET Framework, consider using the AWS Porting Assistant for .NET to begin porting to .NET Core.

Learn more about AWS Graviton2 based instances.