Post Syndicated from turnoff.us original http://turnoff.us/geek/code-style-2/

Post Syndicated from turnoff.us original http://turnoff.us/geek/code-style-2/
Post Syndicated from Michael Kammer original https://blog.zabbix.com/keeping-remote-teams-connected-the-zabbix-advantage/27551/
The popularity of remote teams may have exploded in popularity during the COVID-19 pandemic, but it’s not a phenomenon that’s likely to trend downward anytime soon. High-profile organizations like 3M, Dropbox, Shopify, and LinkedIn are continuing to enthusiastically embrace remote working, essentially making it the “default setting” for their employees.
The shift toward remote working is not without its challenges, however. Organizations of all sizes often have little time to set up the kind of networking infrastructure and efficient processes that make sure remote workers are just as connected and productive as their on-site counterparts. In this article, we’ll take a quick look at some of the most important network monitoring challenges that remote teams face and show how Zabbix can help you tackle them as efficiently as possible.
Table of Contents
A remote network is essentially a grouping of multiple smaller network setups, each with their own set of variables that can affect performance. The differences between network system and infrastructure quality at different remote destinations can often lead to low overall network performance, which in turn makes it a challenge to provide the kind of high-speed communication needed to run the remote automation tools and software applications used by remote employees and teams.
By providing straightforward and easy-to-understand visibility into a network’s connected devices and how data moves between them, Zabbix makes it easy to automatically compare data and identify any drop in network performance.
With Zabbix, you can easily keep an eye on network routers and switches, especially internet provider and uplink ports up/down. You can also monitor network latency, the error rate on ports, the packet loss to important devices, and network utilization on important ports with net.if.in/net.if.out. Here are some example triggers:
High Network Utilization: avg(/Router ABC/net.if.in[eth0],5m)>80MB
High Packet Loss: avg(/Router ABC/icmppingloss,5m)>5
High Latency: avg(/Router ABC/icmppingsec,5m)>0.1
What’s more, Zabbix allows you to create network maps with important network devices and real-time data, as well as dashboards with maps and single item/gauge widgets, all of which makes it far easier to achieve the uninterrupted connectivity that remote teams depend on.


Remote locations aren’t islands that can be completely isolated from external traffic. Staying vigilant and doing everything possible to eliminate data breaches is important, and taking advantage of strong encryption methods, network scanning tools, and firewalls to protect your systems is a good start. However, using a whole suite of tools to protect security can add more difficulty when it comes to integrating and monitoring them.
With Zabbix, you can count on enterprise-grade security, including encrypted communication between components, a flexible user permission schema that can be easily applied to a distributed environment, and custom user roles with a granular set of permissions for different types of users.
Zabbix also provides native support for HTTP, LDAP, and SAML authentication (which gives you an additional layer of security and improves your user experience while working with Zabbix), the ability to restrict access to sensitive information by limiting which metrics can be collected in your environment, and the ability to track changes in your environment by utilizing the Audit log. It’s all designed to make sure that there are no compromises on the security of your data when you decide to go remote.
As a remote organization grows and its distributed systems expand, a good monitoring solution needs to be able to grow along with it in order to prevent gaps in coverage while maintaining performance and reliability. Zabbix gives you limitless scalability in the form of Zabbix proxies, which act as independent intermediaries that collect performance and availability data on behalf of a Zabbix server. You can roll out new proxies as fast as you need them, and because Zabbix is free and open source, you don’t have to worry about additional licensing costs.
Zabbix proxies allow you to see at a glance what resources are being used on your network at any given moment, which is especially handy if, like most remote teams, you have tens or even hundreds of servers and network appliances to monitor. You can also execute remote commands in remote locations – either on the proxies themselves or on the agents monitored by the proxy, and multiple frontends can be deployed for load balancing as well as for improved security and connectivity. Proxy docker containers and cloud options are available as well, enhancing flexibility and making Zabbix ideal for any organization that spans the globe (or aspires to).
The legacy software and systems you use were most likely designed to work in a traditional networking model. Remote working, as we’ve seen, presents a whole new range of challenges when it comes to compatibility and support.
We’ve created Zabbix to be as easy as possible to integrate with existing systems. You can easily monitor any operating system, cloud service, IP telephony service, docker container, or web server/database backend. We provide out-of-the-box monitoring for the world’s leading hardware and software vendors, and our extensively documented API makes it easy to create workflows and integrate with other systems. In addition, you can also integrate Zabbix with the most popular helpdesk, messaging, and ITSM systems, such as Slack, Jira, MS Teams, and many others.

Not only that, Zabbix is designed to serve as the ideal monitoring solution for multi-tenant environments. It serves as a single pane of glass for your entire infrastructure, and it’s easy to visualize everything that’s happening with your network with unique maps, dashboards, and templates.
The days of large teams all working together under the same roof are a thing of the past – the remote working trend will only accelerate as technology improves and employees get more accustomed to working with colleagues across multiple locations. That’s why it’s of paramount importance to make sure your monitoring solution has the built-in flexibility and scalability to grow with your team and your business.
If you want to see for yourself how Zabbix can help you effectively monitor a globally distributed network, contact us.
The post Keeping Remote Teams Connected: The Zabbix Advantage appeared first on Zabbix Blog.
Post Syndicated from Kevin Johnson original https://www.raspberrypi.org/blog/black-history-month-2024/
It’s the last week of Black History Month 2024 in the USA, but by no means is the celebration over. The beautiful thing about history is that it’s not an isolated narrative about the past, but an ongoing dialogue in which we talk about how our collective past informs our present, and what more can be achieved in the future. The fact is this: we make history every single day. That’s why it’s so important for everyone to actively engage with history, and for us to celebrate the achievements of all.

When we talk about the history of STEM and computing, it’s necessary to highlight the achievements of people from groups that are still underrepresented in these fields: communities of colour, female and gender non-conforming people, people with disabilities, and underresourced communities. When we highlight their achievements, everyone can gain a fuller understanding of this history, and more young people from these groups can see they have a place in these fields and in moving them forward.
[When young kids of colour help inform the technology they use,] we end up with technology that is more inclusive to diverse communities […], and we help the kids become creators instead of just consumers.
Qumisha Goss
So to keep the conversation going about Black history in STEM and computing and how people make it every day, today we’re highlighting stories of Black community members. You’ll find out how they got involved in coding and creating with technology, and who their Black role models in tech are — past and present.
Meet Qumisha Goss, a brilliant source of inspiration and a shining light for youth in the ‘Motor City’ of Detroit, Michigan, USA.

Growing up, Qumisha always had an interest in tech, often tinkering and putting projects together, and her interest quickly transformed into a dream of becoming an engineer one day. Fast forward to now, and Qumisha has done exactly that and so much more.
She’s the Interim Executive Director of Peer 2 Peer University, the Digital Literacy Subject Matter Expert for Connect 313, the Creator and Lead Instructor of Code Grow, and a Raspberry Pi Certified Educator. Talk about impact! We asked Qumisha a few questions to explore her incredible story and to learn how she’s giving back to her community today:
Qumisha: “When I was a kid, my grandmas, Gloria and Cassandra, helped my brother and I make a shrinking machine out of a cardboard box, some batteries, and some lights. There was a minimum of science used, but my grandma swapped out our test ear of corn for a baby corn and my curiosity was rewarded with success. In elementary school, my ‘hero’ was Mae Carol Jemison, engineer, doctor, and astronaut. She was the first African American woman to go to space, in 1992 on the Endeavor. I found someone who looked like me who was doing something that I wanted to do, and that was encouraging.”

Qumisha: “It’s important that young kids of colour help inform the technology that they use. The benefits are twofold: we end up with technology that is more inclusive to diverse communities because it is informed by them, and we help the kids become creators instead of just consumers.”
Qumisha: “I eventually went to college to study engineering. I ended up switching majors and studying history and classical languages, but later returned to the tech world when I joined the Python and Raspberry Pi communities. I learned how to code outside of a traditional classroom and have been running physical computing classes and workshops for kids in my hometown of Detroit.”

Qumisha: “Even if kids don’t stick with it, they learn that coding — and lots of things — are not beyond them. The next Bill Gates might be sitting on the library stoop. The difference between them being able to make it or not is: ‘Did they ever get the opportunity to touch the thing that really sparks their genius?’ And for me, I want to help as many kids as possible interact with tech in a fun and engaging way so that they know that they can be technologists too.”
The difference between [kids] being able to make it or not is: ‘Did they ever get the opportunity to touch the thing that really sparks their genius?’
Qumisha Goss
To connect with Qumisha and learn how you can support the incredible, history-making work that she’s doing, follow her on X at @QatalystGoss.
Keep reading to meet more Black history makers across the USA, and to find resources to learn how you can help increase diversity in the technology sector in your community.
Explore our research seminars for educators who want to learn how to make computer science more accessible to all.
Listen to the stories of other Black community members who are making history all over the US. Siblings Sophia and Sebastian, researcher Randi Williams, and aspiring filmmaker Jordan chatted to us about their interest in coding, tech, and getting creative with digital tools.

Try out one of our guided projects for young people to get creative with tech. Check out Coolest Projects, our free online showcase for young tech creators, and how you can get young people involved.
And if you want to share the story of how you got into tech and how you’re inspiring kids to do the same, reach out to us on social media so we can amplify your voice.
Happy Black History Month!
The post Black role models in tech are making history every day appeared first on Raspberry Pi Foundation.
Post Syndicated from Explosm.net original https://explosm.net/comics/help
New Cyanide and Happiness Comic
Post Syndicated from Mun Hossain original https://aws.amazon.com/blogs/security/enable-multi-admin-support-to-manage-security-policies-at-scale-with-aws-firewall-manager/
The management of security services across organizations has evolved over the years, and can vary depending on the size of your organization, the type of industry, the number of services to be administered, and compliance regulations and legislation. When compliance standards require you to set up scoped administrative control of event monitoring and auditing, we find that single administrator support on management consoles can present several challenges for large enterprises. In this blog post, I’ll dive deep into these security policy management challenges and show how you can optimize your security operations at scale by using AWS Firewall Manager to support multiple administrators.
These are some of the use cases and challenges faced by large enterprise organizations when scaling their security operations:
Large organizations tend to be divided into multiple organizational units, each of which represents a function within the organization. Risk appetite, and therefore security policy, can vary dramatically between organizational units. For example, organizations may support two types of users: central administrators and app developers, both of whom can administer security policy but might do so at different levels of granularity. The central admin applies a baseline and relatively generic policy for all accounts, while the app developer can be made an admin for specific accounts and be allowed to create custom rules for the overall policy. A single administrator interface limits the ability for multiple administrators to enforce differing policies for the organizational unit to which they are assigned.
The benefit of centralized management is that you can enforce a centralized policy across multiple services that the management console supports. However, organizations might have different administrators for each service. For example, the team that manages the firewall could be different than the team that manages a web application firewall solution. Aggregating administrative access that is confined to a single administrator might not adequately conform to the way organizations have services mapped to administrators.
Most security frameworks call for auditing procedures, to gain visibility into user access, types of modifications to configurations, timestamps of incremental changes, and logs for periods of downtime. An organization might want only specific administrators to have access to certain functions. For example, each administrator might have specific compliance scope boundaries based on their knowledge of a particular compliance standard, thereby distributing the responsibility for implementation of compliance measures. Single administrator access greatly reduces the ability to discern the actions of different administrators in that single account, making auditing unnecessarily complex.
Redundancy and resiliency are regarded as baseline requirements for security operations. Organizations want to ensure that if a primary administrator is locked out of a single account for any reason, other legitimate users are not affected in the same way. Single administrator access, in contrast, can lock out legitimate users from performing critical and time-sensitive actions on the management console.
In a single administrator setting, the ability to enforce the policy of least privilege is not possible. This is because there are multiple operators who might share the same levels of access to the administrator account. This means that there are certain administrators who could be granted broader access than what is required for their function in the organization.
Multi-admin support for Firewall Manager allows customers with multiple organizational units (OUs) and accounts to create up to 10 Firewall Manager administrator accounts from AWS Organizations to manage their firewall policies. You can delegate responsibility for firewall administration at a granular scope by restricting access based on OU, account, policy type, and AWS Region, thereby enabling policy management tasks to be implemented more effectively.
Multi-admin support provides you the ability to use different administrator accounts to create administrative scopes for different parameters. Examples of these administrative scopes are included in the following table.
| Administrator | Scope |
| Default Administrator | Full Scope (Default) |
| Administrator 1 | OU = “Test 1” |
| Administrator 2 | Account IDs = “123456789, 987654321” |
| Administrator 3 | Policy-Type = “Security Group” |
| Administrator 4 | Region = “us-east-2” |
Multi-admin support helps alleviate many of the challenges just discussed by allowing administrators the flexibility to implement custom configurations based on job functions, while enforcing the principle of least privilege to help ensure that corporate policy and compliance requirements are followed. The following are some of the key benefits of multi-admin support:
Security is enhanced, given that the principle of least privilege can be enforced in a multi-administrator access environment. This is because the different administrators using Firewall Manager will be using delegated privileges that are appropriate for the level of access they are permitted. The result is that the scope for user errors, intentional errors, and unauthorized changes can be significantly reduced. Additionally, you attain an added level of accountability for administrators.
Companies with organizational units that have separate administrators are afforded greater levels of autonomy within their AWS Organizations accounts. The result is an increase in flexibility, where concurrent users can perform very different security functions.
It is easier to meet auditing requirements based on compliance standards in multi-admin accounts, because there is a greater level of visibility into user access and the functions performed on the services when compared to a multi-eyes approval workflow and approval of all policies by one omnipotent admin. This can simplify routine audits through the generation of reports that detail the chronology of security changes that are implemented by specific admins over time.
Multi-admin management support helps avoid the limitations of having a single point of access and enhances availability by providing multiple administrators with their own levels of access. This can result in fewer disruptions, especially during periods that require time-sensitive changes to be made to security configurations.
You can enable trusted access using either the Firewall Manager console or the AWS Organizations console. To do this, you sign in with your AWS Organizations management account and configure an account allocated for security tooling within the organization as the Firewall Manager administrator account. After this is done, subsequent multi-admin Firewall Manager operations can also be performed using AWS APIs. With accounts in an organization, you can quickly allocate resources, group multiple accounts, and apply governance policies to accounts or groups. This simplifies operational overhead for services that require cross-account management.
Multi-admin support in Firewall Manager unlocks several use cases pertaining to admin role-based access. The key use cases are summarized here.
Multi-admin support allows for different admin roles to be defined based on the job function of the administrator, relative to the service being managed. For example, an administrator could be tasked to manage network firewalls to protect their VPCs, and a different administrator could be tasked to manage web application firewalls (AWS WAF), both using Firewall Manager.
In a multi-admin configuration environment, each Firewall Manager administrator’s activities are logged and recorded according to corporate compliance standards. This is useful when dealing with the troubleshooting of security incidents, and for compliance with auditing standards.
Regulations specific to a particular industry, such as Payment Card Industry (PCI), and industry-specific legislation, such as HIPAA, require restricted access, control, and separation of tasks for different job functions. Failure to adhere to such standards could result in penalties. With administrative scope extending to policy types, customers can assign responsibility for managing particular firewall policies according to user role guidelines, as specified in compliance frameworks.
Many state or federal frameworks, such as the California Consumer Privacy Act (CCPA), require that admins adhere to customized regional requirements, such as data sovereignty or privacy requirements. Multi-admin Firewall Manager support helps organizations to adopt these frameworks by making it easier to assign admins who are familiar with the regulations of a particular region to that region.

Figure 1: Use cases for multi-admin support on AWS Firewall Manager
To configure multi-admin support on Firewall Manager, use the following steps:

Figure 2: Overview of the AWS Organizations console

Figure 3: AWS Firewall Manager settings to update policy types

Figure 4: Select AWS Network Firewall as a policy type that can be managed by this administration account
The results of your selection are shown in Figure 5. The admin has been granted privileges to set AWS Network Firewall policy across all Regions and all accounts.

Figure 5: The admin has been granted privileges to set Network Firewall policy across all Regions and all accounts

Figure 6: The administrative scope details for the admin
In order to achieve this second use case, you choose Edit, and then add multiple sub-accounts or an OU that you need the admin restricted to, as shown in Figure 7.

Figure 7: Add multiple sub-accounts or an OU that you need the admin restricted to

Figure 8: Restricting admin privileges only to the US West (N California) Region
Large enterprises need strategies for operationalizing security policy management so that they can enforce policy across organizational boundaries, deal with policy changes across security services, and adhere to auditing and compliance requirements. Multi-admin support in Firewall Manager provides a framework that admins can use to organize their workflow across job roles, to help maintain appropriate levels of security while providing the autonomy that admins desire.
You can get started using the multi-admin feature with Firewall Manager using the AWS Management Console. To learn more, refer to the service documentation.
If you have feedback about this post, submit comments in the Comments section below. If you have questions about this post, contact AWS Support.
Post Syndicated from Rohit Kumar original https://www.servethehome.com/the-most-feature-packed-2-5gbe-and-10gbe-mini-switch-to-date-hasivo-s600wp-4gt-1sx-1xgt-se-review/
In our Hasivo S600WP-4GT-1SX-1XGT-SE review, we find the most feature-packed cheap mini switch to date with 2.5GbE, 10Gbase-T, SFP+, PoE, and
The post The Most Feature Packed 2.5GbE and 10GbE Mini-Switch to Date Hasivo S600WP-4GT-1SX-1XGT-SE Review appeared first on ServeTheHome.
Post Syndicated from Rajesh Kantamani original https://aws.amazon.com/blogs/big-data/enable-advanced-search-capabilities-for-amazon-keyspaces-data-by-integrating-with-amazon-opensearch-service/
Amazon Keyspaces (for Apache Cassandra) is a fully managed, serverless, and Apache Cassandra-compatible database service offered by AWS. It caters to developers in need of a highly available, durable, and fast NoSQL database backend. When you start the process of designing your data model for Amazon Keyspaces, it’s essential to possess a comprehensive understanding of your access patterns, similar to the approach used in other NoSQL databases. This allows for the uniform distribution of data across all partitions within your table, thereby enabling your applications to achieve optimal read and write throughput. In cases where your application demands supplementary query features, such as conducting full-text searches on the data stored in a table, you may explore the utilization of alternative services like Amazon OpenSearch Service to meet these particular needs.
Amazon OpenSearch Service is a powerful and fully managed search and analytics service. It empowers businesses to explore and gain insights from large volumes of data quickly. OpenSearch Service is versatile, allowing you to perform text and geospatial searches. Amazon OpenSearch Ingestion is a fully managed, serverless data collection solution that efficiently routes data to your OpenSearch Service domains and Amazon OpenSearch Serverless collections. It eliminates the need for third-party tools to ingest data into your OpenSearch service setup. You simply configure your data sources to send information to OpenSearch Ingestion, which then automatically delivers the data to your specified destination. Additionally, you can configure OpenSearch Ingestion to apply data transformations before delivery.
In this post, we explore the process of integrating Amazon Keyspaces and Amazon OpenSearch Service using AWS Lambda and Amazon OpenSearch Ingestion to enable advanced search capabilities. The content includes a reference architecture, a step-by-step guide on infrastructure setup, sample code for implementing the solution within a use case, and an AWS Cloud Development Kit (AWS CDK) application for deployment.
AnyCompany, a rapidly growing eCommerce platform, faces a critical challenge in efficiently managing its extensive product and item catalog while enhancing the shopping experience for its customers. Currently, customers struggle to find specific products quickly due to limited search capabilities. AnyCompany aims to address this issue by implementing advanced search functionality that enables customers to easily search for the products. This enhancement is expected to significantly improve customer satisfaction and streamline the shopping process, ultimately boosting sales and retention rates.
The following diagram illustrates the solution architecture.

The workflow includes the following steps:
Complete the following prerequisite steps:
The solution is detailed in an AWS CDK project. You don’t need any prior knowledge of AWS CDK. Complete the following steps to deploy the solution:
(.venv) $ cdk bootstrap aws://<aws_account_id>/<aws_region>After the bootstrap process completes, you’ll see a CDKToolkit AWS CloudFormation stack on the AWS CloudFormation console. AWS CDK is now ready for use.
cdk deploy command to create the stack:
When the deployment process is complete, you’ll see the following CloudFormation stacks on the AWS CloudFormation console:
OpsApigwLambdaStackOpsServerlessIngestionStackOpsServerlessStackOpsKeyspacesStackOpsCollectionPipelineRoleStackThe CloudFormation template deploys the following components:
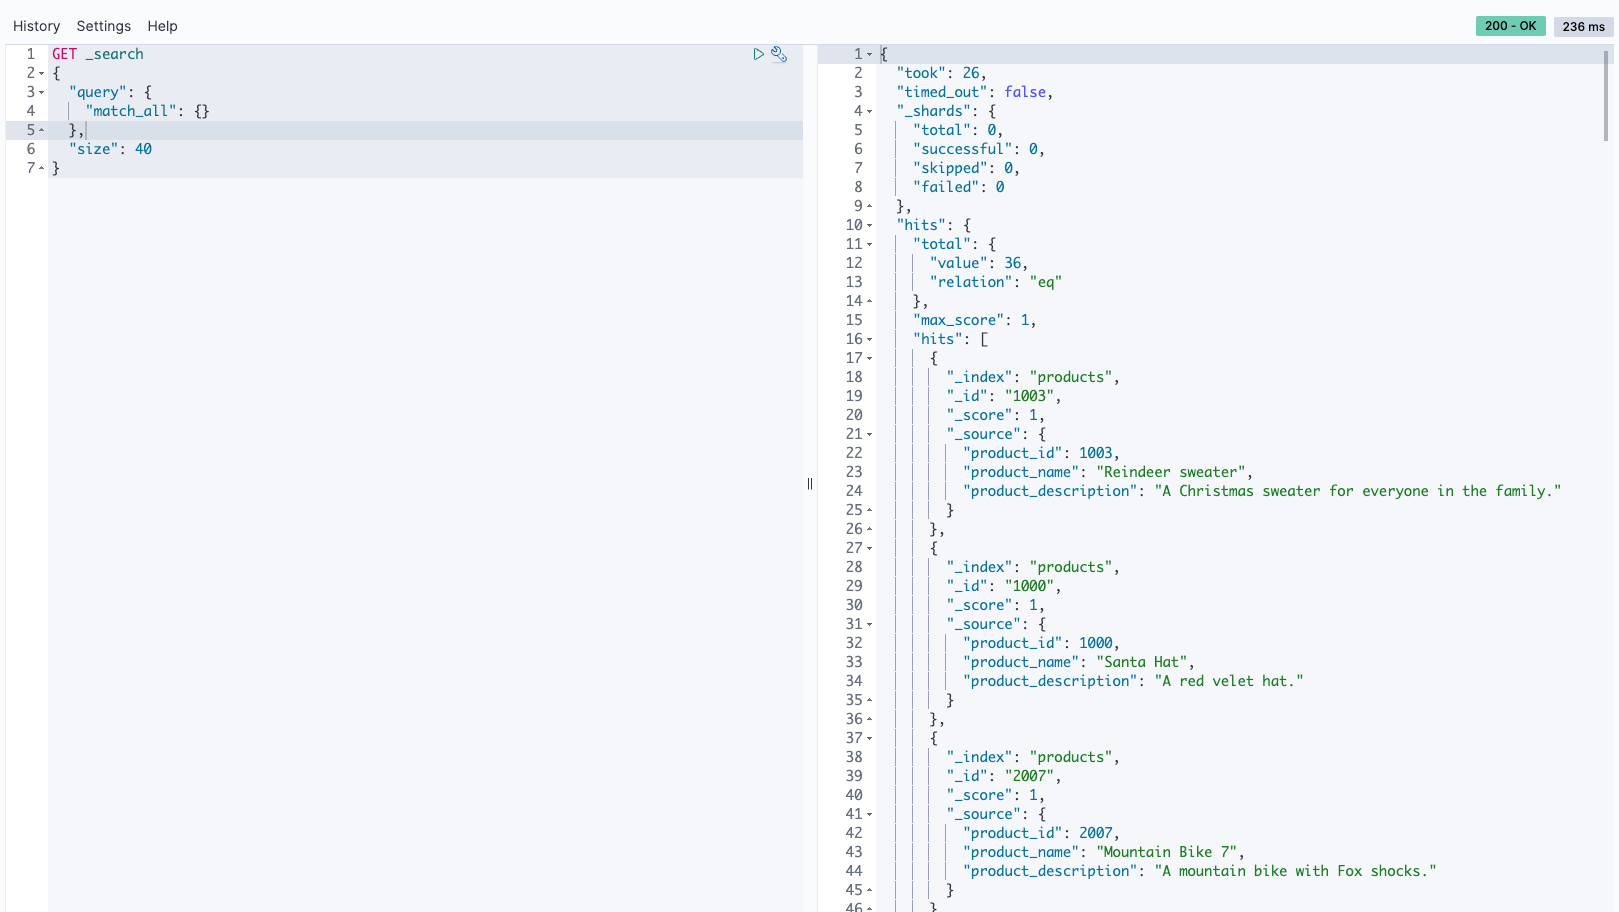
keyspaces-OpenSearch-Endpoint in API Gateway, which handles mutations (inserts, updates, and deletes) via the POST method to Lambda, compatible with OpenSearch Ingestion.productsearch, along with a table called product_by_item. The chosen partition key for this table is product_id. The following screenshot shows an example of the table’s attributes and data provided for reference using the CQL editor.
OpsApigwLambdaStack-ApiHandler* that will forward the transaction to Amazon Keyspaces. After the transaction is committed in keyspaces, we send a response code of 200 to the client as well as asynchronously send the transaction to the OpenSearch Ingestion pipeline.serverless-ingestion. This pipeline publishes records to an OpenSearch Serverless collection under an index named products. The key for this collection is product_id. Additionally, the pipeline specifies the actions it can handle. The delete action supports delete operations; the index action is the default action, which supports insert and update operations.We have chosen an OpenSearch Serverless collection as our target, so we included serverless: true in our configuration file. To keep things simple, we haven’t altered the network_policy_name settings, but you have the option to specify a different network policy name if needed. For additional details on how to set up network access for OpenSearch Serverless collections, refer to Creating network policies (console).
You can incorporate a dead-letter queue (DLQ) into your pipeline to handle and store events that fail to process. This allows for easy access and analysis of these events. If your sinks refuse data due to mapping errors or other problems, redirecting this data to the DLQ will facilitate troubleshooting and resolving the issue. For detailed instructions on configuring DLQs, refer to Dead-letter queues. To reduce complexity, we don’t configure the DLQs in this post.
Now that all components have been deployed, we can test the solution and conduct various searches on the OpenSearch Service index.
Complete the following steps to test the solution:

This is the only supported method by OpenSearch Ingestion for any inserts, deletes, or updates.

The following are some of the sample requests:
If the test is successful, you should see a return code of 200 in API Gateway. The following is a sample response:
{"message": "Ingestion completed successfully for {'operation': 'insert', 'item': {'product_id': 100, 'product_name': 'Reindeer sweater', 'product_description': 'A Christmas sweater for everyone in the family.'}}."}
If the test is successful, you should see the updated records in the Amazon Keyspaces table.

product_name = sweater:


You can use Amazon CloudWatch to monitor the pipeline metrics. The following graph shows the number of documents successfully sent to OpenSearch Service.

There are several methods to run search queries against an OpenSearch Service collection, with the most popular being through awscurl or the dev tools in the OpenSearch Dashboards. For this post, we will be utilizing the dev tools in the OpenSearch Dashboards.
To access the dev tools, Navigate to the OpenSearch collection dashboards and select the dashboard radio button, which is highlighted in the screenshot adjacent to the ingestion-collection.
Once on the OpenSearch Dashboards page, click on the Dev Tools radio button as highlighted

This action brings up the Dev Tools console, enabling you to run various search queries, either to validate the data or simply to query it.
Type in your query and use the size parameter to determine how many records you want to be displayed. Click the play icon to execute the query. Results will appear in the right pane.
The following are some of the different search queries that you can run against the ingestion-collection for different search needs. For more search methods and examples, refer to Searching data in Amazon OpenSearch Service.
In a search for Bluetooth headphones, we adopted an exacting full-text search approach. Our strategy involved formulating a query to align precisely with the term “Bluetooth Headphones,” searching through an extensive product database. This method allowed us to thoroughly examine and evaluate a broad range of Bluetooth headphones, concentrating on those that best met our search parameters. See the following code:

We used a fuzzy search query to navigate through product descriptions, even when they contain variations or misspellings of our search term. For instance, by setting the value to “chrismas” and the fuzziness to AUTO, our search could accommodate common misspellings or close approximations in the product descriptions. This approach is particularly useful in making sure that we capture a wider range of relevant results, especially when dealing with terms that are often misspelled or have multiple variations. See the following code:
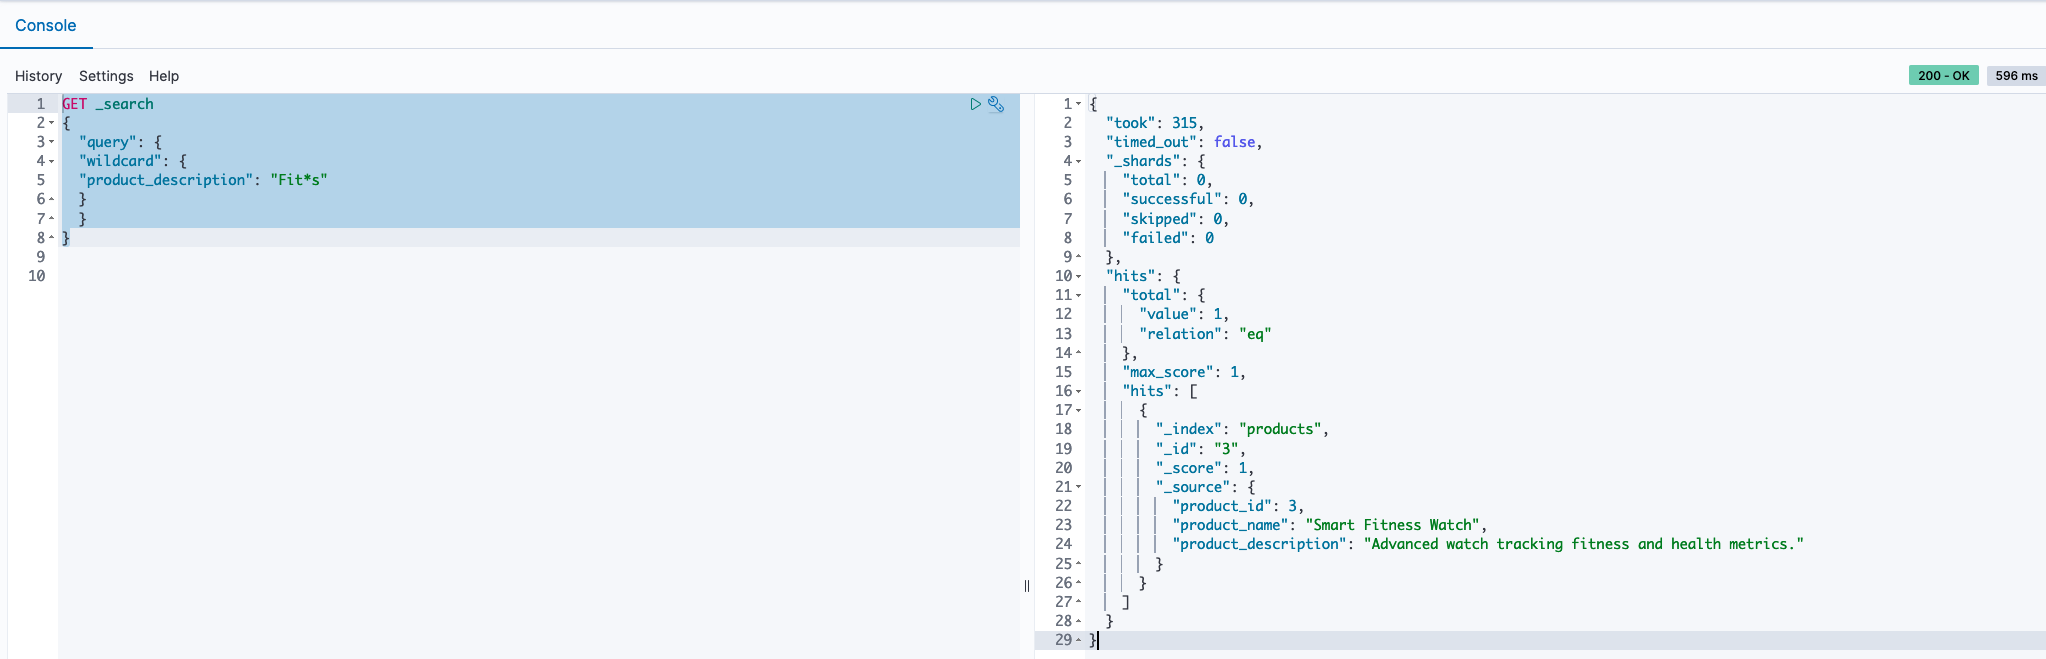
In our approach to discovering a variety of products, we employed a wildcard search technique within the product descriptions. By using the query Fit*s, we signaled our search tool to look for any product descriptions that begin with “Fit” and end with “s,” allowing for any characters to appear in between. This method is effective for capturing a range of products that have similar naming patterns or attributes, making sure that we don’t miss out on relevant items that fit within a certain category but may have slightly different names or features. See the following code:
A status code other than 200 indicates a problem either in the Amazon Keyspaces operation or the OpenSearch Ingestion operation. View the CloudWatch logs of the Lambda function OpsApigwLambdaStack-ApiHandler* and the OpenSearch Ingestion pipeline logs to troubleshoot the failure.
You will see the following errors in the ingestion pipeline logs. This is because the pipeline endpoint is publicly accessible, and not accessible via VPC. They are harmless. As a best practice you can enable VPC access for the serverless collection, which provides an inherent layer of security.
2024-01-23T13:47:42.326 [armeria-common-worker-epoll-3-1] ERROR com.amazon.osis.HttpAuthorization - Unauthenticated request: Missing Authentication Token2024-01-23T13:47:42.327 [armeria-common-worker-epoll-3-1] ERROR com.amazon.osis.HttpAuthorization - Authentication status: 401To prevent additional charges and to effectively remove resources, delete the CloudFormation stacks by running the following command:
Verify the following CloudFormation stacks are deleted from the CloudFormation console:
Finally, delete the CDKToolkit CloudFormation stack to remove the AWS CDK resources.
In this post, we delved into enabling diverse search scenarios on data stored in Amazon Keyspaces by using the capabilities of OpenSearch Service. Through the use of Lambda and OpenSearch Ingestion, we managed the data movement seamlessly. Furthermore, we provided insights into testing the deployed solution using a CloudFormation template, ensuring a thorough grasp of its practical application and effectiveness.
Test the procedure that is outlined in this post by deploying the sample code provided and share your feedback in the comments section.
 Rajesh, a Senior Database Solution Architect. He specializes in assisting customers with designing, migrating, and optimizing database solutions on Amazon Web Services, ensuring scalability, security, and performance. In his spare time, he loves spending time outdoors with family and friends.
 Sylvia, a Senior DevOps Architect, specializes in designing and automating DevOps processes to guide clients through their DevOps transformation journey. During her leisure time, she finds joy in activities such as biking, swimming, practicing yoga, and photography.
Post Syndicated from Darius Januskis original https://aws.amazon.com/blogs/security/how-to-use-regional-aws-sts-endpoints/
This blog post provides recommendations that you can use to help improve resiliency in the unlikely event of disrupted availability of the global (now legacy) AWS Security Token Service (AWS STS) endpoint. Although the global (legacy) AWS STS endpoint https://sts.amazonaws.com is highly available, it’s hosted in a single AWS Region—US East (N. Virginia)—and like other endpoints, it doesn’t provide automatic failover to endpoints in other Regions. In this post I will show you how to use Regional AWS STS endpoints in your configurations to improve the performance and resiliency of your workloads.
For authentication, it’s best to use temporary credentials instead of long-term credentials to help reduce risks, such as inadvertent disclosure, sharing, or theft of credentials. With AWS STS, trusted users can request temporary, limited-privilege credentials to access AWS resources.
Temporary credentials include an access key pair and a session token. The access key pair consists of an access key ID and a secret key. AWS STS generates temporary security credentials dynamically and provides them to the user when requested, which eliminates the need for long-term storage. Temporary security credentials have a limited lifetime so you don’t have to manage or rotate them.
To get these credentials, you can use several different methods:

Figure 1: Methods to request credentials from AWS STS
To connect programmatically to an AWS service, you use an endpoint. An endpoint is the URL of the entry point for AWS STS.
AWS STS provides Regional endpoints in every Region. AWS initially built AWS STS with a global endpoint (now legacy) https://sts.amazonaws.com, which is hosted in the US East (N. Virginia) Region (us-east-1). Regional AWS STS endpoints are activated by default for Regions that are enabled by default in your AWS account. For example, https://sts.us-east-2.amazonaws.com is the US East (Ohio) Regional endpoint. By default, AWS services use Regional AWS STS endpoints. For example, IAM Roles Anywhere uses the Regional STS endpoint that corresponds to the trust anchor. For a complete list of AWS STS endpoints for each Region, see AWS Security Token Service endpoints and quotas. You can’t activate an AWS STS endpoint in a Region that is disabled. For more information on which AWS STS endpoints are activated by default and which endpoints you can activate or deactivate, see Regions and endpoints.
As noted previously, the global (legacy) AWS STS endpoint https://sts.amazonaws.com is hosted in a single Region — US East (N. Virginia) — and like other endpoints, it doesn’t provide automatic failover to endpoints in other Regions. If your workloads on AWS or outside of AWS are configured to use the global (legacy) AWS STS endpoint https://sts.amazonaws.com, you introduce a dependency on a single Region: US East (N. Virginia). In the unlikely event that the endpoint becomes unavailable in that Region or connectivity between your resources and that Region is lost, your workloads won’t be able to use AWS STS to retrieve temporary credentials, which poses an availability risk to your workloads.
AWS recommends that you use Regional AWS STS endpoints (https://sts.<region-name>.amazonaws.com) instead of the global (legacy) AWS STS endpoint.
In addition to improved resiliency, Regional endpoints have other benefits:
Figure 2 illustrates the process for using an AWS principal to assume an AWS Identity and Access Management (IAM) role through the AWS STS AssumeRole API, which returns a set of temporary security credentials:

Figure 2: Assume an IAM role by using an API call to a Regional AWS STS endpoint
You should configure your workloads within a specific Region to use only the Regional AWS STS endpoint for that Region. By using a Regional endpoint, you can use AWS STS in the same Region as your workloads, removing cross-Region dependency. For example, workloads in the US East (Ohio) Region should use only the Regional endpoint https://sts.us-east-2.amazonaws.com to call AWS STS. If a Regional AWS STS endpoint becomes unreachable, your workloads shouldn’t call AWS STS endpoints outside of the operating Region. If your workload has a multi-Region resiliency requirement, your other active or standby Region should use a Regional AWS STS endpoint for that Region and should be deployed such that the application can function despite a Regional failure. You should direct STS traffic to the STS endpoint within the same Region, isolated and independent from other Regions, and remove dependencies on the global (legacy) endpoint.
You should configure your workloads outside of AWS to call the appropriate Regional AWS STS endpoints that offer the lowest latency to your workload located outside of AWS. If your workload has a multi-Region resiliency requirement, build failover logic for AWS STS calls to other Regions in the event that Regional AWS STS endpoints become unreachable. Temporary security credentials obtained from Regional AWS STS endpoints are valid globally for the default session duration or duration that you specify.
I recommend that you use the latest major versions of the AWS Command Line Interface (CLI) or AWS SDK to call AWS STS APIs.
By default, the AWS CLI version 2 sends AWS STS API requests to the Regional AWS STS endpoint for the currently configured Region. If you are using AWS CLI v2, you don’t need to make additional changes.
By default, the AWS CLI v1 sends AWS STS requests to the global (legacy) AWS STS endpoint. To check the version of the AWS CLI that you are using, run the following command: $ aws –version.
When you run AWS CLI commands, the AWS CLI looks for credential configuration in a specific order—first in shell environment variables and then in the local AWS configuration file (~/.aws/config).
AWS SDKs are available for a variety of programming languages and environments. Since July 2022, major new versions of the AWS SDK default to Regional AWS STS endpoints and use the endpoint corresponding to the currently configured Region. If you use a major version of the AWS SDK that was released after July 2022, you don’t need to make additional changes.
An AWS SDK looks at various configuration locations until it finds credential configuration values. For example, the AWS SDK for Python (Boto3) adheres to the following lookup order when it searches through sources for configuration values:
~/.aws/configIf you still use AWS CLI v1, or your AWS SDK version doesn’t default to a Regional AWS STS endpoint, you have the following options to set the Regional AWS STS endpoint:
The configuration file is located at ~/.aws/config on Linux or macOS, and at C:\Users\USERNAME\.aws\config on Windows. To use the Regional endpoint, add the sts_regional_endpoints parameter.
The following example shows how you can set the value for the Regional AWS STS endpoint in the US East (Ohio) Region (us-east-2), by using the default profile in the AWS configuration file:
The valid values for the AWS STS endpoint parameter (sts_regional_endpoints) are:
Note: Since July 2022, major new versions of the AWS SDK default to Regional AWS STS endpoints and use the endpoint corresponding to the currently configured Region. If you are using AWS CLI v1, you must use version 1.16.266 or later to use the AWS STS endpoint parameter.
You can use the --debug option with the AWS CLI command to receive the debug log and validate which AWS STS endpoint was used.
If you search for UseGlobalEndpoint in your debug log, you’ll find that the UseGlobalEndpoint parameter is set to False, and you’ll see the Regional endpoint provider fully qualified domain name (FQDN) when the Regional AWS STS endpoint is configured in a shared AWS configuration file or environment variables:
For a list of AWS SDKs that support shared AWS configuration file settings for Regional AWS STS endpoints, see Compatibility with AWS SDKS.
Environment variables provide another way to specify configuration options. They are global and affect calls to AWS services. Most SDKs support environment variables. When you set the environment variable, the SDK uses that value until the end of your shell session or until you set the variable to a different value. To make the variables persist across future sessions, set them in your shell’s startup script.
The following example shows how you can set the value for the Regional AWS STS endpoint in the US East (Ohio) Region (us-east-2) by using environment variables:
You can run the command $ (echo $AWS_DEFAULT_REGION; echo $AWS_STS_REGIONAL_ENDPOINTS) to validate the variables. The output should look similar to the following:
The following example shows how you can configure an STS client with the AWS SDK for Python (Boto3) to use a Regional AWS STS endpoint by setting the environment variable:
You can use the metadata attribute sts_client.meta.endpoint_url to inspect and validate how an STS client is configured. The output should look similar to the following:
For a list of AWS SDKs that support environment variable settings for Regional AWS STS endpoints, see Compatibility with AWS SDKs.
You can also manually construct an endpoint URL for a specific Regional AWS STS endpoint.
The following example shows how you can configure the STS client with AWS SDK for Python (Boto3) to use a Regional AWS STS endpoint by setting a specific endpoint URL:
You can create a private connection to AWS STS from the resources that you deployed in your Amazon VPCs. AWS STS integrates with AWS PrivateLink by using interface VPC endpoints. The network traffic on AWS PrivateLink stays on the global AWS network backbone and doesn’t traverse the public internet. When you configure a VPC endpoint for AWS STS, the traffic for the Regional AWS STS endpoint traverses to that endpoint.
By default, the DNS in your VPC will update the entry for the Regional AWS STS endpoint to resolve to the private IP address of the VPC endpoint for AWS STS in your VPC. The following output from an Amazon Elastic Compute Cloud (Amazon EC2) instance shows the DNS name for the AWS STS endpoint resolving to the private IP address of the VPC endpoint for AWS STS:
After you create an interface VPC endpoint for AWS STS in your Region, set the value for the respective Regional AWS STS endpoint by using environment variables to access AWS STS in the same Region.
The output of the following log shows that an AWS STS call was made to the Regional AWS STS endpoint:
You can use AWS CloudTrail events to get information about the request and endpoint that was used for AWS STS. This information can help you identify AWS STS request patterns and validate if you are still using the global (legacy) STS endpoint.
An event in CloudTrail is the record of an activity in an AWS account. CloudTrail events provide a history of both API and non-API account activity made through the AWS Management Console, AWS SDKs, command line tools, and other AWS services.
sts.<region-name>.amazonaws.com are logged in CloudTrail within their respective Region.sts.amazonaws.com are logged within the US East (N. Virginia) Region (us-east-1). The following example shows a CloudTrail event for an STS request to a Regional AWS STS endpoint with a VPC endpoint.
The following example shows a CloudTrail event for an STS request to the global (legacy) AWS STS endpoint.
To interactively search and analyze your AWS STS log data, use AWS CloudWatch Logs Insights or Amazon Athena.
The following example shows how to run a CloudWatch Logs Insights query to look for API calls made to the global (legacy) AWS STS endpoint. Before you can query CloudTrail events, you must configure a CloudTrail trail to send events to CloudWatch Logs.
The query output shows event details for an AWS STS call made to the global (legacy) AWS STS endpoint https://sts.amazonaws.com.

Figure 3: Use a CloudWatch Log Insights query to look for STS API calls
The following example shows how to query CloudTrail events with Amazon Athena and search for API calls made to the global (legacy) AWS STS endpoint.
The query output shows STS calls made to the global (legacy) AWS STS endpoint https://sts.amazonaws.com.

Figure 4: Use Athena to search for STS API calls and identify STS endpoints
In this post, you learned how to use Regional AWS STS endpoints to help improve resiliency, reduce latency, and increase session token usage for the operating Regions in your AWS environment.
AWS recommends that you check the configuration and usage of AWS STS endpoints in your environment, validate AWS STS activity in your CloudTrail logs, and confirm that Regional AWS STS endpoints are used.
If you have questions, post them in the Security Identity and Compliance re:Post topic or reach out to AWS Support.
Want more AWS Security news? Follow us on X.
Post Syndicated from Veliswa Boya original https://aws.amazon.com/blogs/aws/aws-weekly-roundup-net-runtime-for-aws-lambda-partyrock-hackathon-and-more-february-26-2024/
The Community AWS re:invent 2023 re:caps continue! Recently, I was invited to participate in one of these events hosted by the AWS User Group Kenya, and was able to learn and spend time with this amazing community.

AWS User Group Kenya
Last week’s launches
Here are some launches that got my attention during the previous week.
.NET 8 runtime for AWS Lambda – AWS Lambda now supports .NET 8 as both a managed runtime and container base image. This support provides you with .NET 8 features that include API enhancements, improved Native Ahead of Time (Native AOT) support, and improved performance. .NET 8 supports C# 12, F# 8, and PowerShell 7.4. You can develop Lambda functions in .NET 8 using the AWS Toolkit for Visual Studio, the AWS Extensions for .NET CLI, AWS Serverless Application Model (AWS SAM), AWS CDK, and other infrastructure as code tools.
For a full list of AWS announcements, be sure to keep an eye on the What’s New at AWS page.
Other AWS news
Here are some additional projects, programs, and news items that you might find interesting:
Earlier this month, I used this image to call attention to the PartyRock Hackathon that’s currently in progress. The deadline to join the hackathon is fast approaching so be sure to signup before time runs out.

Amazon API Gateway – Amazon API Gateway processed over 100 trillion API requests in 2023, and we continue to see growing demand for API-driven applications. API Gateway is a fully-managed service that enables you to create, publish, maintain, monitor, and secure APIs at any scale. Customers that onboarded large workloads on API Gateway in 2023 told us they chose the service for its availability, security, and serverless architecture. Those in regulated industries value API Gateway’s private endpoints, which are isolated from the public internet and only accessible from your Amazon Virtual Private Cloud (VPC).
AWS open source news and updates – My colleague Ricardo writes this weekly open source newsletter in which he highlights new open source projects, tools, and demos from the AWS Community.
Upcoming AWS events
Season 3 of the Build on Generative AI Twitch show has kicked off. Join every Monday on Twitch at 9AM PST/Noon EST/18h CET to learn among others, how you can build generative AI-enabled applications.

If you’re in the EMEA timezone, there is still time to register and watch the AWS Innovate Online Generative AI & Data Edition taking place on February 29. Innovate Online events are free, online, and designed to inspire and educate you about building on AWS. Whether you’re in the Americas, Asia Pacific & Japan, or EMEA region, learn here about future AWS Innovate Online events happening in your timezone.
AWS Community re:Invent re:Caps – Join a Community re:Cap event organized by volunteers from AWS User Groups and AWS Cloud Clubs around the world to learn about the latest announcements from AWS re:Invent.
You can browse all upcoming in-person and virtual events here.
That’s all for this week. Check back next Monday for another Weekly Roundup!
– Veliswa
This post is part of our Weekly Roundup series. Check back each week for a quick roundup of interesting news and announcements from AWS.
Post Syndicated from corbet original https://lwn.net/Articles/963281/
In a recent episode, “Pitchforks for RDSEED“,
we learned that there was some uncertainty around whether hardware-based
random-number generators on x86 CPUs could fail. Since the consequences of
failure in some situations (confidential-computing applications in
particular) can be catastrophic, there was some concern about this prospect
and what to do about it. Since then, the situation has come a bit more
into focus, and there would appear to be an agreed-upon plan for changes to
be made to the kernel.
Post Syndicated from jzb original https://lwn.net/Articles/963730/
Version 0.6 of Incus, a fork of LXD, has been released. This release includes a number of changes, including a new storage driver called lvmcluster, improvements for Open Virtual Network (OVN) users, improvements to migration tooling, a number of new security features, and storage bucket backup and re-import. See the release announcement for detailed release notes and complete list of changes. The announcement notes that a Long Term Support (LTS) release of Incus is planned in a few months “to coincide with the LTS releases of LXC and LXCFS
“.
Post Syndicated from Netflix Technology Blog original https://netflixtechblog.com/announcing-bpftop-streamlining-ebpf-performance-optimization-6a727c1ae2e5
Today, we are thrilled to announce the release of bpftop, a command-line tool designed to streamline the performance optimization and monitoring of eBPF applications. As Netflix increasingly adopts eBPF [1, 2], applying the same rigor to these applications as we do to other managed services is imperative. Striking a balance between eBPF’s benefits and system load is crucial, ensuring it enhances rather than hinders our operational efficiency. This tool enables Netflix to embrace eBPF’s potential.

bpftop provides a dynamic real-time view of running eBPF programs. It displays the average execution runtime, events per second, and estimated total CPU % for each program. This tool minimizes overhead by enabling performance statistics only while it is active.

bpftop simplifies the performance optimization process for eBPF programs by enabling an efficient cycle of benchmarking, code refinement, and immediate feedback. Without bpftop, optimization efforts would require manual calculations, adding unnecessary complexity to the process. With bpftop, users can quickly establish a baseline, implement improvements, and verify enhancements, streamlining the process.
A standout feature of this tool is its ability to display the statistics in time series graphs. This approach can uncover patterns and trends that could be missed otherwise.
bpftop uses the BPF_ENABLE_STATS syscall command to enable global eBPF runtime statistics gathering, which is disabled by default to reduce performance overhead. It collects these statistics every second, calculating the average runtime, events per second, and estimated CPU utilization for each eBPF program within that sample period. This information is displayed in a top-like tabular format or a time series graph over a 10s moving window. Once bpftop terminates, it turns off the statistics-gathering function. The tool is written in Rust, leveraging the libbpf-rs and ratatui crates.
Visit the project’s GitHub page to learn more about using the tool. We’ve open-sourced bpftop under the Apache 2 license and look forward to contributions from the community.
![]()
Announcing bpftop: Streamlining eBPF performance optimization was originally published in Netflix TechBlog on Medium, where people are continuing the conversation by highlighting and responding to this story.
Post Syndicated from jake original https://lwn.net/Articles/963037/
At FOSDEM 2024,
the “Tool
the docs” devroom hosted several talks about free and open-source tools
for writing, managing, testing, and rendering documentation. The central
concept was to treat documentation as code, which makes it possible to
incorporate various tools into documentation workflows in order to maintain
high
quality.
Post Syndicated from The Atlantic original https://www.youtube.com/watch?v=A5p4LNWmriQ
Post Syndicated from Cliff Robinson original https://www.servethehome.com/micron-hbm3e-in-production-set-for-nvidia-h200-use-in-q2-2024/
Micron HBM3E is in production and set to be used in the NVIDIA H200 in Q2 2024 providing up to 141GB/ 144GB per accelerator
The post Micron HBM3E in Production Set for NVIDIA H200 Use in Q2 2024 appeared first on ServeTheHome.
Post Syndicated from jzb original https://lwn.net/Articles/963725/
Security updates have been issued by Debian (gnutls28, iwd, libjwt, and thunderbird), Fedora (chromium, expat, mingw-expat, mingw-openexr, mingw-python3, mingw-qt5-qt3d, mingw-qt5-qtactiveqt, mingw-qt5-qtbase, mingw-qt5-qtcharts, mingw-qt5-qtdeclarative, mingw-qt5-qtgraphicaleffects, mingw-qt5-qtimageformats, mingw-qt5-qtlocation, mingw-qt5-qtmultimedia, mingw-qt5-qtquickcontrols, mingw-qt5-qtquickcontrols2, mingw-qt5-qtscript, mingw-qt5-qtsensors, mingw-qt5-qtserialport, mingw-qt5-qtsvg, mingw-qt5-qttools, mingw-qt5-qttranslations, mingw-qt5-qtwebchannel, mingw-qt5-qtwebsockets, mingw-qt5-qtwinextras, mingw-qt5-qtxmlpatterns, and thunderbird), Gentoo (btrbk, Glances, and GNU Aspell), Mageia (clamav and xen, qemu and libvirt), Oracle (firefox and postgresql), Red Hat (firefox, opensc, postgresql:10, postgresql:12, postgresql:13, postgresql:15, thunderbird, and unbound), SUSE (firefox, java-1_8_0-ibm, libxml2, and thunderbird), and Ubuntu (binutils, linux, linux-aws, linux-gcp, linux-hwe-6.5, linux-laptop, linux-oracle,
linux-raspi, linux-starfive, linux, linux-azure, linux-azure-5.15, linux-azure-fde, linux-gcp,
linux-gcp-5.15, linux-gkeop, linux-gkeop-5.15, linux-hwe-5.15, linux-ibm,
linux-ibm-5.15, linux-intel-iotg, linux-intel-iotg-5.15, linux-kvm,
linux-lowlatency-hwe-5.15, linux-nvidia, linux-oracle, linux-oracle-5.15,
linux-raspi, linux-azure, linux-oem-6.1, and roundcube).
Post Syndicated from Brownell Combs original https://aws.amazon.com/blogs/security/winter-2023-soc-1-report-now-available-for-the-first-time/
We continue to expand the scope of our assurance programs at Amazon Web Services (AWS) and are pleased to announce the first ever Winter 2023 AWS System and Organization Controls (SOC) 1 report. The new Winter SOC report demonstrates our continuous commitment to adhere to the heightened expectations for cloud service providers.
The report covers the period January 1–December 31, 2023, and specifically addresses requests from customers that require coverage over the fourth quarter, but have a fiscal year-end that necessitates obtaining a SOC 1 report before the issuance of the Spring AWS SOC 1 report, which is typically published in mid-May.
Customers can download the Winter 2023 SOC 1 report through AWS Artifact, a self-service portal for on-demand access to AWS compliance reports. Sign in to AWS Artifact in the AWS Management Console, or learn more at Getting Started with AWS Artifact.
The Winter 2023 SOC 1 report includes a total of 171 services in scope. For up-to-date information, including when additional services are added, see the AWS Services in Scope by Compliance Program and choose SOC.
AWS strives to continuously bring services into the scope of its compliance programs to help you meet your architectural and regulatory needs. If you have questions or feedback about SOC compliance, reach out to your AWS account team.
To learn more about our compliance and security programs, see AWS Compliance Programs. As always, we value your feedback and questions; reach out to the AWS Compliance team through the Contact Us page.
If you have feedback about this post, submit comments in the Comments section below.
Post Syndicated from Irshad Buchh original https://aws.amazon.com/blogs/aws/new-aws-region-in-mexico-is-in-the-works/
Today, I am happy to announce that we are working on an AWS Region in Mexico. This AWS Mexico (Central) Region will be the second Region in Latin America joining the AWS South America (São Paulo) Region and will give AWS customers the ability to run workloads and store data that must remain in-country.
Mexico in the works
The Region will include three Availability Zones, each one physically independent of the others in the Region yet far enough apart to minimize the risk that an event in one Availability Zone will have impact on business continuity. The Availability Zones will be connected to each other by high-bandwidth, low-latency network connections over dedicated, fully redundant fiber.
With this announcement, AWS now has five new Regions in the works (Germany, Malaysia, Mexico, New Zealand, and Thailand) and 15 upcoming new Availability Zones.
AWS investment in Mexico
The upcoming AWS Mexico Region is the latest in ongoing investments by AWS in Mexico to provide customers with advanced and secure cloud technologies. Since 2020, AWS has launched seven Amazon CloudFront edge locations in Mexico. Amazon CloudFront is a highly secure and programmable content delivery network (CDN) that accelerates the delivery of data, videos, applications, and APIs to users worldwide with low latency and high transfer speeds.
In 2020, AWS launched AWS Outposts in Mexico. AWS Outposts is a family of fully managed solutions delivering AWS infrastructure and services to virtually any on-premises or edge location for a truly consistent hybrid experience. AWS expanded its infrastructure footprint in Mexico again in 2023 with the launch of AWS Local Zones in Queretaro. AWS Local Zones are a type of AWS infrastructure deployment that places compute, storage, database, and other select services closer to large population, industry, and IT centers, enabling customers to deliver applications that require single-digit millisecond latency to end users. In 2023, AWS established an AWS Direct Connect location in Queretaro, allowing customers to establish private connectivity between AWS and their data center, office, or colocation environment.
Here is a glimpse into our customers in Mexico and the exciting, innovative work they’re undertaking:
Banco Santander Mexico is one of the leading financial groups in the country, focused on commercial banking and securities financing, serving more than 20.5 million customers. “AWS has been a strategic partner for our digital transformation,” said Juan Pablo Chiappari, head of IT Infrastructure for North America. “Thanks to their wide range of services, we have been able to innovate faster, improve our customer experience and reduce our operating costs.”
SkyAlert is an innovative technology company that quickly alerts millions of people living in earthquake-prone areas, promoting a culture of prevention against natural disasters. In order to provide customers—both businesses and individuals—with the right tools to protect themselves during earthquakes, SkyAlert migrated its infrastructure to AWS. After implementing its Internet of Things (IoT) solution to run on AWS and its efficient alert service, SkyAlert scales quickly and can send millions of messages in a few seconds, helping to save lives in the event of earthquakes.
Kueski is an online lender for the middle class of Mexico and Latin America. The company uses big data and advanced analytics to approve and deliver loans in a matter of minutes. The company has become the fastest-growing platform of its kind in the region and has already granted thousands of loans. They were born with AWS.
Bolsa Institucional de Valores (BIVA) is a stock exchange based in Mexico, backed by Nasdaq. BIVA provides local and global investors with cutting-edge technology for trading and market solutions and companies with listing and maintenance services. As part of its vision of innovation, BIVA started its journey to the cloud in 2023 by migrating its disaster recovery site, including its trading and market surveillance systems, to AWS, using edge compute capabilities available in both the AWS Local Zones in Queretaro, Mexico, to achieve their low latency needs.
Stay Tuned
The AWS Region in Mexico will open in early 2025. As usual, subscribe to this blog so that you will be among the first to know when the new Region is open!
To learn more about AWS Global Cloud Infrastructure, see the Global Infrastructure page.
— Irshad
Post Syndicated from Matt Granger original https://www.youtube.com/watch?v=Z4GWNsmt4Gk
Post Syndicated from The History Guy: History Deserves to Be Remembered original https://www.youtube.com/watch?v=PNklE4oIEtM
