Announcing AWS CDK Mixins: Composable Abstractions for AWS Resources

Post Syndicated from Michael Kaiser original https://aws.amazon.com/blogs/devops/announcing-aws-cdk-mixins-composable-abstractions-for-aws-resources/

We are excited to announce CDK Mixins, a feature of the AWS Cloud Development Kit (CDK) that fundamentally changes how you compose and reuse infrastructure abstractions. In this post, you will learn how to use CDK Mixins to apply sophisticated features to any construct – whether L1, L2, or custom – without being locked into specific implementations.

Background

The AWS Cloud Development Kit (CDK) is an open-source software development framework for defining cloud infrastructure in code and provisioning it through AWS CloudFormation. It contains pre-written, modular, and reusable cloud components known as constructs. Constructs are the basic building blocks representing one or more AWS CloudFormation resources and their configuration.

Traditionally, we organize CDK constructs into three levels. L1 constructs map directly to CloudFormation resources. L2 constructs offer higher-level abstractions with convenience methods, security defaults, and helper functions. L3 constructs (also known as patterns) combine multiple resources to solve specific use cases. However, this architecture creates a fundamental trade-off: you must choose between immediate access to new AWS features (L1) and sophisticated abstractions (L2/L3). Teams often need to customize L2 constructs, rebuilding entire construct libraries to meet their specific requirements.

CDK Mixins solve this problem by decoupling abstractions from construct implementations. Instead of bundling all features into monolithic L2 constructs, Mixins allow you to compose exactly the capabilities you need, apply them to any construct type, and maintain full access to underlying CloudFormation properties.

What are CDK Mixins?

CDK Mixins let you compose reusable abstractions and apply them to constructs after creation. You mix and match modular capabilities to build exactly the infrastructure you need. Unlike traditional L2 constructs that bundle all features together, Mixins give you fine-grained control over which abstractions apply.

Key benefits include:

  • Universal Compatibility: Apply the same abstractions to L1 constructs, L2 constructs, or custom constructs
  • Composable Design: Mix and match features without inheriting unwanted behaviors
  • Cross-Service Abstractions: Create custom mixins that work across different AWS services
  • Day-One Coverage: Access new AWS features immediately while keeping existing L2 or L3 constructs
  • Type Safety: Maintain compile-time guarantees and IDE support

Mixins and Aspects

CDK Aspects are a way to apply an operation to all constructs in a given scope, commonly used for validation, compliance, and tagging. Mixins and Aspects are complementary. Mixins apply features immediately to specific constructs, while Aspects enforce rules broadly across a scope during synthesis. A common pattern is to use Mixins to configure resources and Aspects to validate that the configuration is correct.

Using CDK Mixins

CDK Mixins ship with aws-cdk-lib, and you access service-specific mixins through the same imports you already use. They work across L1, L2, and L3 constructs:

import * as cdk from 'aws-cdk-lib/core';
import * as s3 from 'aws-cdk-lib/aws-s3';
import { CfnBucketPropsMixin } from '@aws-cdk/cfn-property-mixins/aws-s3';

// CDK Mixins can be used with L1s
new s3.CfnBucket(stack, "MixinsL1DemoBucket")
  // Use the fluent .with() syntax (available in JavaScript/TypeScript)
  // .with() silently skips unsupported constructs
  .with(new s3.mixins.BucketVersioning());

// ... or with L2s
new s3.Bucket(stack, "MixinsL2DemoBucket")
  // Cfn Property Mixins provide type-safe fallbacks for L2s
  // and configuration after initial creation
  .with(new CfnBucketPropsMixin({
    objectLockEnabled: true,
    objectLockConfiguration: {
      objectLockEnabled: "Enabled",
      rule: {
        defaultRetention: {
          mode: "COMPLIANCE",
          days: 30,
        },
      },
    },
  }));

You can also use Mixins.of() to apply Mixins in other languages or with more control over which constructs receive the mixin:

// Use Mixins.of() to apply Mixins in other languages
// This also gives you more options to apply only to certain constructs
cdk.Mixins.of(stack, cdk.ConstructSelector.byId('MixinsL1DemoBucket'))
  .apply(new s3.mixins.BucketAutoDeleteObjects());

Apply mixins at scale to entire construct trees or specific resource types:

// Apply your Mixins to the whole app
cdk.Mixins.of(app).apply(new MyDataRecovery());
// ... or only to some constructs
cdk.Mixins.of(app, cdk.ConstructSelector.resourcesOfType(s3.CfnBucket.CFN_RESOURCE_TYPE_NAME)).apply(new MyDataRecovery());

Creating Custom Mixins

Creating your own Mixins is straightforward; they are simple classes extending cdk.Mixin and implementing the IMixin interface. The supports() method determines which constructs the mixin can apply to, and applyTo() modifies the construct in place. Here’s a custom mixin that enables data recovery features across both Amazon Simple Storage Service (Amazon S3) buckets and Amazon DynamoDB tables:

// It's easy to develop your own Mixins
class MyDataRecovery extends cdk.Mixin implements IMixin {
  public supports(construct: any): construct is s3.CfnBucket | dynamodb.CfnTable {
    // Mixins can be cross-service and support different resources at once
    return s3.CfnBucket.isCfnBucket(construct) || dynamodb.CfnTable.isCfnTable(construct);
  }

  // applyTo modifies the construct in place (returns void)
  public applyTo(construct: IConstruct): void {
    if (s3.CfnBucket.isCfnBucket(construct)) {
      construct.versioningConfiguration = {
        status: 'Enabled',
      };
    }

    if (dynamodb.CfnTable.isCfnTable(construct)) {
      construct.pointInTimeRecoverySpecification = {
        pointInTimeRecoveryEnabled: true,
      };
    }
  }
}

Once defined, you can apply your custom mixin to resources:

// ... and to use them:
new s3.Bucket(stack, 'AcmeBucket');
new dynamodb.TableV2(stack, 'AcmeTable', {
  partitionKey: { name: 'id', type: dynamodb.AttributeType.STRING },
});

// Apply your Mixins to the whole app
cdk.Mixins.of(app).apply(new MyDataRecovery());
// ... or only to some constructs
cdk.Mixins.of(app, cdk.ConstructSelector.resourcesOfType(s3.CfnBucket.CFN_RESOURCE_TYPE_NAME)).apply(new MyDataRecovery());

This pattern enables organizations to create reusable abstractions that work across any construct type, ensuring consistent security and compliance policies throughout their infrastructure.

Mixin Behavior Control

Control how to apply Mixins with three distinct modes: graceful application, requireAll, and requireAny. The report getter lets you inspect which constructs were successfully modified and add custom assertions:

// Graceful: apply() silently skips unsupported constructs
const logGroup = new logs.CfnLogGroup(stack, 'LogGroup');
cdk.Mixins.of(logGroup).apply(new s3.mixins.BucketAutoDeleteObjects());

// requireAll: Throws if ANY selected construct is not supported by the mixin
cdk.Mixins.of(logGroup).apply(new s3.mixins.BucketAutoDeleteObjects()).requireAll();

// requireAny: Throws if NO selected construct is supported by the mixin
cdk.Mixins.of(stack).apply(new s3.mixins.BucketVersioning()).requireAny();

Use the report getter to inspect application results and the selectedConstructs getter to see which constructs matched the selector:

const applicator = cdk.Mixins.of(app, cdk.ConstructSelector.resourcesOfType(s3.CfnBucket.CFN_RESOURCE_TYPE_NAME));
const result = applicator.apply(new s3.mixins.BucketVersioning());

// See which constructs were matched by the selector
console.table(applicator.selectedConstructs.map(c => c.node.path));

// Inspect which constructs were successfully modified, grouped by construct
console.table(result.report.map(r => ({ construct: r.construct.node.path, mixin: util.inspect(r.mixin) })));

This flexibility allows you to choose the right behavior for your use case, whether you want to apply Mixins opportunistically, enforce that at least one construct matches, or require that every selected construct is supported.

ECS ClusterSettings mixin

The ClusterSettings mixin enables you to apply Amazon ECS cluster settings like enhanced Container Insights to both L1 and L2 clusters. It handles array merging intelligently, updating existing settings by name or appending new ones:

import * as ecs from 'aws-cdk-lib/aws-ecs';
import * as ec2 from 'aws-cdk-lib/aws-ec2';

// Works with L1 constructs
new ecs.CfnCluster(stack, 'L1Cluster', { clusterName: 'my-cluster' })
  .with(new ecs.mixins.ClusterSettings([
    { name: 'containerInsights', value: 'enhanced' },
  ]));

// Works with L2 constructs too
new ecs.Cluster(stack, 'L2Cluster', { vpc, clusterName: 'my-cluster' })
  .with(new ecs.mixins.ClusterSettings([
    { name: 'containerInsights', value: 'enhanced' },
  ]));

S3 mixins: PublicAccessBlock and BucketPolicyStatements

New S3 mixins provide fine-grained controls. The PublicAccessBlockMixin configures public access settings, and the BucketPolicyStatements lets you add bucket policy statements declaratively:

import * as s3 from 'aws-cdk-lib/aws-s3';

// Block all public access on S3 buckets
new s3.CfnBucket(stack, 'SecureBucket')
  .with(new s3.mixins.BucketBlockPublicAccess());

// Apply public access block across all S3 buckets in the app
cdk.Mixins.of(app, cdk.ConstructSelector.resourcesOfType(s3.CfnBucket.CFN_RESOURCE_TYPE_NAME))
  .apply(new s3.mixins.BucketBlockPublicAccess())
  .requireAll();

Vended logs and log delivery

Setting up vended log delivery in CloudFormation typically requires coordinating multiple resources – AWS::Logs::DeliverySource, AWS::Logs::DeliveryDestination, and AWS::Logs::Delivery to connect them – along with the correct IAM permissions for each destination type. You must repeat this boilerplate for every resource you want to deliver logs from, and it varies by service.

CDK Mixins collapse this complexity into a single .with() call. Because Mixins decouple the log delivery abstraction from any specific construct, the same pattern works across all 47 supported AWS resources – whether you’re using L1 or L2 constructs. While still in preview, this is one of the most compelling examples of why Mixins matter: you get a sophisticated, cross-service abstraction that would traditionally require dedicated L2 construct support for each of those 47 resources.

// NOTE: Vended log delivery mixins are still in @aws-cdk/mixins-preview
import * as wafv2Mixins from '@aws-cdk/mixins-preview/aws-wafv2/mixins';

// Set up vended log delivery to an S3 bucket
const bucket = new s3.Bucket(stack, 'LogBucket');
new wafv2.CfnWebACL(stack, 'WebAcl', { /* ... */ })
  .with(new wafv2Mixins.CfnWebACLAccessLogs().toS3(bucket));

// Same pattern, different destination - works identically
const logGroup = new logs.LogGroup(stack, 'LogGroup');
new wafv2.CfnWebACL(stack, 'WebAcl2', { /* ... */ })
  .with(new wafv2Mixins.CfnWebACLAccessLogs().toLogGroup(logGroup));

Without Mixins, adding vended log delivery to an L1 construct would mean either waiting for L2 support or manually wiring up the three CloudFormation resources and permissions yourself. Mixins let you bring this L2-quality abstraction to any construct immediately.

For cross-account centralized logging, the toDestination() method sends logs to a pre-created delivery destination, so you can aggregate logs in a shared account without granting direct access to the destination resource:

const destination = logs.CfnDeliveryDestination.fromDeliveryDestinationName(
  stack, 'Dest', 'my-cross-account-destination'
);
new wafv2.CfnWebACL(stack, 'WebAcl3', { /* ... */ })
  .with(new wafv2Mixins.CfnWebACLAccessLogs().toDestination(destination));

Getting Started

CDK Mixins core functionality – including cdk.Mixins, cdk.ConstructSelector, and the .with() syntax – is included in aws-cdk-lib. You access service mixins through standard service imports (e.g. s3.mixins, ecs.mixins). CloudFormation property mixins for type-safe L1 property overrides come from the separate @aws-cdk/cfn-property-mixins package.

  1. Install the packages:
    npm install aws-cdk-lib @aws-cdk/cfn-property-mixins
  2. Import core classes from aws-cdk-lib/core:
    import * as cdk from 'aws-cdk-lib/core';
    // e.g. cdk.Mixins, cdk.ConstructSelector, cdk.Mixin
  3. Service-specific mixins are namespaced under mixins in each aws-cdk-lib service module:
    import * as s3 from 'aws-cdk-lib/aws-s3';
    import * as ecs from 'aws-cdk-lib/aws-ecs';
    // e.g. s3.mixins.BucketVersioning, ecs.mixins.ClusterSettings
  4. For Cfn Property Mixins, import from the separate package:
    import { CfnBucketPropsMixin } from '@aws-cdk/cfn-property-mixins/aws-s3';
  5. For log delivery mixins (preview), install the preview package:
    npm install @aws-cdk/mixins-preview
    import * as wafv2Mixins from '@aws-cdk/mixins-preview/aws-wafv2/mixins';
  6. Explore the CDK Mixins package README for detailed examples and API references.

Conclusion

CDK Mixins represent a fundamental shift in how we think about infrastructure abstractions. By decoupling capabilities from construct implementations, Mixins give you the freedom to compose exactly the infrastructure you need whether you are using L1 constructs for access to new CloudFormation resources, L2 constructs for convenience, or custom constructs for enterprise requirements.

Since the initial developer preview, the ecosystem has grown rapidly: log delivery mixins for 47 resources, EventBridge event pattern helpers for 26 services, ECS cluster settings, S3 security mixins, and resource policy traits that bring L2-style permissions to L1 constructs. We refined the API with requireAll/requireAny for precise behavior control and application reporting.

We are excited to see what the community builds with CDK Mixins. Share your feedback, create custom Mixins, and help shape the future of infrastructure as code with AWS CDK.

For more information, check out:


Michael Kaiser portrait

Momo Kornher

Momo is a Senior Software Development Engineer on the AWS CDK team. A CDK user since its public preview, he joined AWS to tackle infrastructure-as-code problems at large scale from the inside. He is passionate about open source and building abstractions that help teams manage complex cloud environments with less effort.

Michael Kaiser portrait

Michael Kaiser

Michael is a Solution Architect as AWS. He works with State and Local Public Sector customers to help modernize their business processes. He is the CDK Champion for the AWS TFC, owner of the CDK workshop, and maintainer for the CDK Examples Repo on GitHub

Building Self-Extending CLI Tools with Strands Agent

Post Syndicated from Ragib Ahsan original https://aws.amazon.com/blogs/devops/building-self-extending-cli-tools-with-aws-strands/

I. Introduction

Engineering teams build internal command-line interface (CLI) tools because repetitive operational tasks such as generating reports, auditing infrastructure, and checking service health are faster and more reliable when automated behind a consistent interface. A well-built CLI replaces ad-hoc scripts with structured commands, standardized error handling, and composable workflows that any team member can run. However, building these tools follows a predictable development lifecycle. The developer sets up a package, writes commands, handles errors, and ships it, then spends the next six months as its sole maintainer. Meanwhile, requests for new commands, custom report formats, and one-off integrations pile up as other teams across the organization discover the tool is useful for their workflows too. Frameworks like Click and Typer reduce the friction, but every new command still needs to be written, tested, and deployed manually.

Tools that generate their own capabilities on demand offer a different approach. Instead of writing each command manually, users can describe what is needed in natural language, and the tool writes the code, loads it, and makes it available at runtime without requiring a restart or redeployment. This is called meta-tooling, a repeatable pattern for giving applications the ability to create their own tools dynamically. For teams that maintain growing collections of internal utilities, this eliminates the bottleneck of having a single developer write every new feature.

In this post, we will walk through one implementation of this pattern, a CLI generator called CLI Creator. CLI Creator combines three technologies into a mechanism that organizations can adapt for their own use cases:

  • Amazon Bedrock, a fully managed service for building generative AI applications with foundation models, with Anthropic’s Claude Opus 4.6 for AI-powered code generation.
  • Strands Agents SDK, an open-source Python framework for building AI agents with tool use, for dynamic tool creation, loading, and execution at runtime.
  • Model Context Protocol (MCP), an open standard for connecting AI applications to external data sources and tools, for automatically discovering API servers that give generated tools additional knowledge.

The result is a development workflow where new CLI capabilities go from request to working command in minutes instead of days, without manual coding. By the end of this post, a single natural language prompt will have produced a complete, installable CLI. That CLI can extend itself with new tools, refine them iteratively, and discover relevant MCP servers through an interactive selection workflow.

II. Solution Overview

The Challenge

As an example, consider a platform engineering team that produces weekly operations reports for leadership. Every Monday morning, stakeholders expect a summary of their AWS footprint, including which Amazon DynamoDB tables are running hot, which Amazon Simple Storage Service (Amazon S3) buckets are growing fastest, and who made significant infrastructure changes last week. The AWS CLI can list tables and buckets, but it cannot produce these reports.

Each report is a multi-step workflow that involves calling several APIs, joining the data, computing derived metrics like estimated monthly cost or growth rate, and formatting the output for a specific audience. The team ends up writing Python scripts for each report, and every new report request means another script by a developer.These are each their own small project, often requiring a hundred lines of Python to pull multiple APIs, compute derived metrics, and format output before you even think about error handling. Requirements shift weekly, so each change means modifying source code, testing, and redeploying. The tooling never converges; the team ends up with a folder of disconnected scripts, each with its own argument parsing, error handling, and output formatting. Any team that builds small, purpose-built utilities faces the same friction, and operations reporting is the example we use to illustrate the meta-tooling pattern.

The Solution

Prerequisites

To follow along with this post, you will need:

  • Python 3.12 or later
  • An AWS account with Amazon Bedrock access enabled for Anthropic Claude models in us-west-2
  • AWS credentials configured locally (via `aws configure` or environment variables)
  • Git installed (for tool version tracking)
The source code is available on GitHub. Installation instructions are in the repository README.

Walkthrough

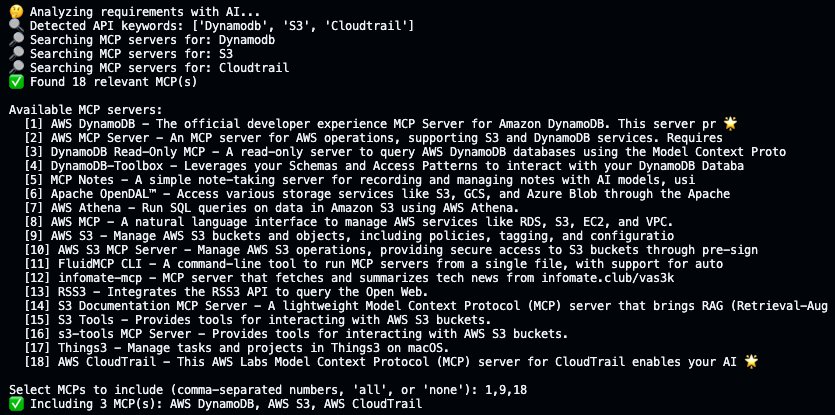
Instead of writing report scripts manually, organizations describe what they need in natural language.Terminal screenshot of a CLI Creator tool generating an AWS operations reporting CLI called "aws-ops-reporter." The tool analyzes requirements, detects API keywords (DynamoDB, S3, CloudTrail), and displays 18 available MCP servers. The user selects servers 1, 9, and 18 (AWS DynamoDB, AWS S3, AWS CloudTrail). A planned CLI structure shows four commands: dynamo-capacity, unused-s3, audit-cloudtrail, and cost-summary. A confirmation prompt reads "Proceed with generation? [Y/n].

The system then does the following:

  1. Claude Opus 4.6 on Amazon Bedrock analyzes the description and extracts a structured list of commands, arguments, and options.
  2. MCP servers are discovered automatically, wherein the system detects keywords like “DynamoDB”, “S3”, and “CloudTrail” in the description, searches the MCP registry for relevant API servers, and presents an interactive selection prompt for choosing which servers to include.
  3. Once the user confirms, the system generates complete Python code for each command. These are not stubs or placeholders that users may typically see within generated code, but working implementations with validated AWS SDK for Python (Boto3) calls, error handling, and type hints.
  4. Finally, the output is packaged as an installable Python project with a pyproject.toml file and entry points configured.

Most importantly, the generated CLI includes a tool command group that enables self-extension at runtime. After installation, users can ask the CLI to create entirely new reporting tools and iteratively refine them without touching source code. This is the repeatable part of the pattern because any generated tool inherits the ability to extend itself. This mechanism is built into every generated CLI, so each one is immediately capable of growing beyond its original scope.

III. Technical Implementation

Strands Agents SDK Integration

The Strands Agents SDK is the backbone of the meta-tooling pattern. It provides three features that make self-extending tools possible, and these features are not specific to CLI generation. Any Python application can use them to dynamically create and manage capabilities at runtime.

The @tool Decorator

When a user asks a generated CLI to create a new tool, Claude Opus 4.6 on Amazon Bedrock produces Python code that uses the Strands @tool decorator. This decorator registers the function with Strands’ tool system, making it immediately discoverable and executable:

from strands import tool

@tool 
def list_s3_buckets_with_costs() -> List[Dict[str, Any]]:

The @tool decorator registers the function’s signature, type hints, and docstring as a tool specification that the Strands Agent can reason about and invoke.

Runtime Tool Loading

The Strands Agents SDK includes a tool loading system that can discover and import @tool-decorated functions from Python files at runtime. Tools do not need to be registered at application startup. They can be created, saved to a directory, and made available to the agent dynamically.In our implementation, generated tools are saved as standalone Python files in a directory called `tools/`. Each time a CLI command runs, the application scans this directory, loads any @tool-decorated functions it finds, and adds them to the agent’s tool collection without requiring a restart.The self-extending pattern works because of this scan-on-invocation approach. A user can create a tool, execute it, decide it needs changes, update it, and execute again without any rebuild or reinstall step since each CLI invocation discovers and loads whatever tools exist on disk.

Agent Orchestration with BedrockModel

The Strands Agent class ties everything together. It connects to Amazon Bedrock via BedrockModel and manages a collection of tools:

from strands import Agent
from strands.models import BedrockModel

agent = Agent(
    model=BedrockModel(
        model_id=""
    ),
    tools=[shell_tool, editor_tool] + loaded_tools,
    system_prompt="You are a tool creation assistant..."
)

When the agent receives a tool creation request, it calls Amazon Bedrock to generate the implementation and saves it as a Python file in the tools/ directory. The next CLI command automatically discovers and loads the new tool.

Amazon Bedrock Integration

CLI Creator connects to Anthropic’s Claude through Amazon Bedrock’s cross-region inference profile. Amazon Bedrock serves two distinct roles in the system.

Role 1: CLI Requirements Analysis with Structured Output

When you run cli-creator create, the first step is analyzing the natural language description and extracting a structured specification. Instead of parsing raw text from the model, we use the Strands Agents SDK’s structured output feature with Pydantic models to guarantee the response conforms to our schema:

from pydantic import BaseModel, Field
from strands import Agent
from strands.models import BedrockModel

class CommandSpec(BaseModel):
    name: str = Field(description="Command name in kebab-case")
    description: str = Field(description="What this command does")
    arguments: Optional[List[str]] = Field(default_factory=list)
    options: Optional[List[CommandOption]] = Field(default_factory=list)

class CLIRequirements(BaseModel):
    cli_name: str = Field(description="CLI name in kebab-case")
    description: str = Field(description="One-line description")
    commands: List[CommandSpec] = Field(description="Commands to generate")
    dependencies: List[str] = Field(default_factory=list)

# Create agent and invoke with structured output
agent = Agent(
    model=BedrockModel(model_id="us.anthropic.claude-opus-4-6-v1"),
    system_prompt="You are an expert CLI designer..."
)

result = agent(
    f"Analyze this CLI description: {description}",
    structured_output_model=CLIRequirements
)

# Access the validated Pydantic model — no JSON parsing needed
requirements: CLIRequirements = result.structured_output

By passing the structured_output_model, the Strands Agent constrains the model’s response to match the Pydantic schema. The result is a validated Python object where if the model’s first attempt does not conform to the schema, Strands automatically sends the validation errors back to the model and retries, producing a correct response without manual intervention. This approach eliminates malformed JSON, missing fields, wrong types, and hallucinated structure.

Role 2: Complete Command Generation with AI Functions

The second Amazon Bedrock role is generating complete command implementations. Direct integration of AI agents in code generation workflows is often avoided because of the model’s non-deterministic nature. There is no guarantee that generated code will compile, follow the expected structure, or avoid common pitfalls like empty error handlers. Strands AI Functions addresses this through runtime post-condition checking. AI Functions is a Python library for building reliable AI-powered applications through a new abstraction of functions that behave like standard Python functions but are evaluated by reasoning AI Agents. You decorate a function with @ai_function, write its prompt as a docstring with curly-brace placeholders, and attach post-conditions that the output must satisfy. If any post-condition fails, AI Functions automatically initiates a self-correcting loop, sending the specific error back to the model and retrying until all conditions pass or the maximum attempts are reached.

We use AI Functions to build a self-correcting code generation pipeline. Each generated command must pass three post-conditions before it is accepted:

from ai_functions import ai_function, PostConditionResult

def check_syntax(response: str) -> PostConditionResult:
    try:
        compile(response, '<generated>', 'exec')
        return PostConditionResult(passed=True)
    except SyntaxError as e:
        return PostConditionResult(
            passed=False,
            message=f"Python syntax error on line {e.lineno}: {e.msg}. Fix: {e.text}"
        )

def check_has_decorator(response: str) -> PostConditionResult:
    if '@cli.command' in response:
        return PostConditionResult(passed=True)
    return PostConditionResult(
        passed=False,
        message="Missing @cli.command() decorator."
    )

@ai_function(
    post_conditions=[check_syntax, check_has_decorator, check_no_empty_try],
    max_attempts=3
)
def generate_click_command(command_name: str, description: str, ...) -> str:
    """
    Generate a complete Click CLI command function in Python.

    Use @cli.command() decorator. Include needed imports using 'from X import Y' style.
    Always use 'import click' and reference as click.echo(), click.style().

    Command: {command_name}
    Description: {description}
    """

The @ai_function decorator turns the function’s docstring into a prompt template. Curly-brace placeholders like {command_name} are filled from the function arguments at call time. Each post-condition receives the model’s response and returns a PostConditionResult. When a condition fails, AI Functions sends the error message back to the model and retries automatically, up to max_attempts. The model sees the specific failure (“syntax error on line 42”, “missing @cli.command decorator”, “empty try/except block detected”) and corrects it on the next attempt.

The prompt embedded in the docstring still enforces coding conventions (use import click rather than from click import, use from X import Y for all other imports) to prevent import conflicts. Post-conditions catch what the prompt misses, making the pipeline significantly more reliable than prompt engineering alone.

MCP Server Discovery and Integration

The Model Context Protocol adds automatic discovery of external API knowledge to the pattern. When your tool description mentions AWS services, the system searches for MCP servers that can provide domain-specific tooling. Generated tools can tap into live, structured API knowledge beyond what Amazon Bedrock knows at generation time.

How Discovery Works

The system uses Amazon Bedrock to extract API keywords dynamically. The api_keywords field is part of the same CLIRequirements Pydantic model used for structured output, so keyword detection happens in the same call that extracts commands and dependencies at zero additional cost:

class CLIRequirements(BaseModel):
    cli_name: str = ...
    commands: List[CommandSpec] = ...
    dependencies: List[str] = ...
    api_keywords: List[str] = Field(
        default_factory=list,
        description="API/service keywords to search for MCP servers"
    )

When the model returns keywords like ["dynamodb", "s3", "cloudtrail"], the system uses a Strands Agent with the http_request tool from Strands Agents Tools to search the MCP registry for each keyword. Results are merged and deduplicated.

Interactive MCP Selection

After discovering relevant MCPs, the system presents them to the user for selection:

Terminal screenshot showing an AI-powered MCP server discovery process. The tool analyzes requirements, detects API keywords (DynamoDB, S3, CloudTrail), searches for relevant servers, and displays 18 available MCP servers in a numbered list. The user selects servers 1, 9, and 18 at a prompt, confirming the inclusion of AWS DynamoDB, AWS S3, and AWS CloudTrail.

Selected MCPs are configured in the generated CLI’s .mcp.json file, and a bridge module is copied to the output project. This bridge connects to MCP servers at runtime, extracts their tool metadata, and converts them into Strands @tool functions that the Agent can invoke.

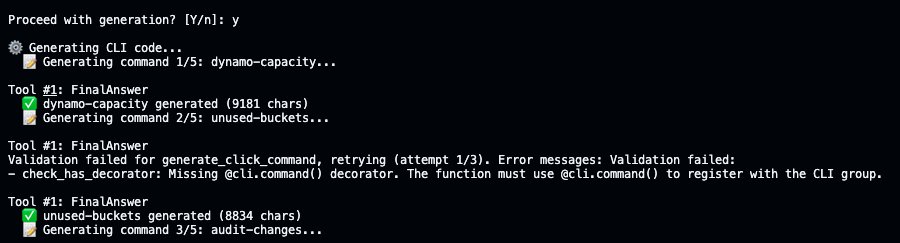
Terminal screenshot showing CLI code generation in progress. The user confirms generation with "y." Command 1/5 (dynamo-capacity) succeeds with 9,181 characters generated. Command 2/5 (unused-buckets) fails validation due to a missing @cli.command() decorator, retries (attempt 1/3), and ultimately succeeds with 8,834 characters. Command 3/5 (audit-changes) begins generating.

After MCP selection, CLI Creator generates each command sequentially using AI Functions. Here, the unused-buckets command initially fails the check_has_decorator post-condition for missing the @cli.command decorator, and AI Functions automatically retries generation with the error fed back to the model, producing valid code on the second attempt. All commands go through this process before having an installable CLI.

The Meta-Tooling Workflow: Create, Update, Revert

The most distinctive feature of the pattern is the iterative tool refinement workflow. This is where meta-tooling becomes practical, and it is the part most easily adapted to domains beyond CLI generation.

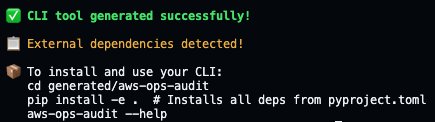
Step 1: Install and verify the generated CLI

Terminal screenshot showing successful CLI tool generation. A green checkmark with green text confirms "CLI tool generated successfully!" A yellow warning notes "External dependencies detected!" followed by installation instructions: navigate to the generated/aws-ops-audit directory, install dependencies with pip, and verify with the --help command.

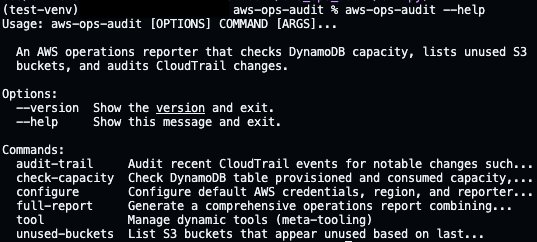
After generation completes, install the CLI and verify it works:

Terminal screenshot showing the help output for the "aws-ops-audit" CLI tool, run inside a Python virtual environment (test-venv). The tool is described as "An AWS operations reporter that checks DynamoDB capacity, lists unused S3 buckets, and audits CloudTrail changes." Two options (--version, --help) and six commands (audit-trail, check-capacity, configure, full-report, tool, unused-buckets) are listed.

Each command is fully implemented. Here is unused-buckets pulling live S3 data:

Terminal screenshot showing the output of the "aws-ops-audit unused-buckets" command run in a Python virtual environment. An "Unused S3 Buckets Report" lists four S3 buckets with metadata including name, region, object count, size, last modified date, creation date, and reason for being flagged — either "no activity since [date]" or "empty bucket."

After installation, the CLI is ready to use. Each subcommand supports --help for detailed parameter information.

Step 2: Create a new reporting tool at runtime

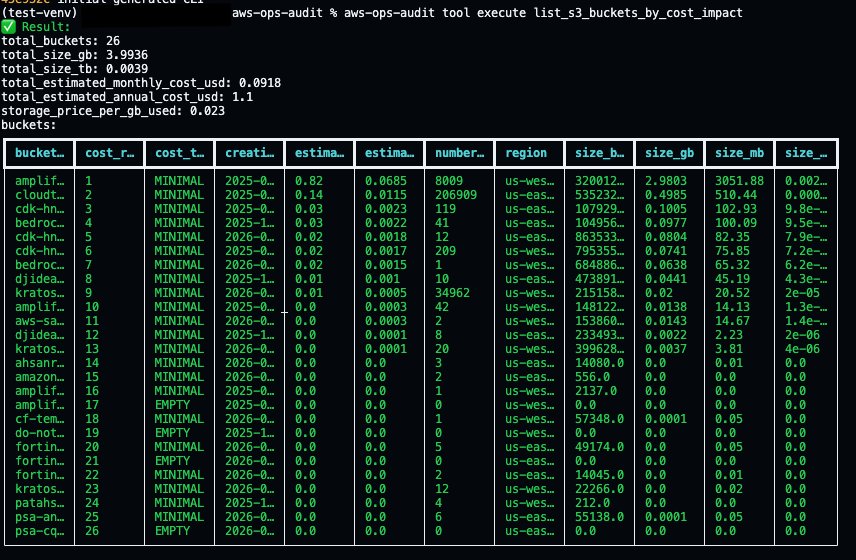
Consider a scenario where leadership requests a new report that was not part of the original CLI, such as a summary of all Amazon S3 buckets with their sizes, sorted by cost impact. Instead of modifying source code, use the built-in tool create command:

Terminal screenshot showing the output of the "aws-ops-audit unused-buckets" command run in a Python virtual environment. An "Unused S3 Buckets Report" lists four S3 buckets with metadata including name, region, object count, size, last modified date, creation date, and reason for being flagged — either "no activity since [date]" or "empty bucket."

Amazon Bedrock generates a complete Strands tool, saves it to `tools/`, and commits it to git. The next CLI command automatically discovers and loads the new tool from disk, so you can execute it right away:

Terminal screenshot showing the output of "aws-ops-audit tool execute list_s3_buckets_by_cost_impact." A summary section displays aggregate statistics for 26 S3 buckets totaling 3.99 GB and $1.10/year in estimated costs. Below, a detailed data table ranks all 26 buckets by cost impact, showing columns for bucket name, cost rank, cost tier (MINIMAL or EMPTY), creation date, estimated monthly/annual costs, object count, region, and size metrics.

Output is automatically formatted based on data type, so lists of dictionaries render as tables, single dictionaries display as key-value pairs, and everything else falls back to JSON.

Step 3: Update and review changes

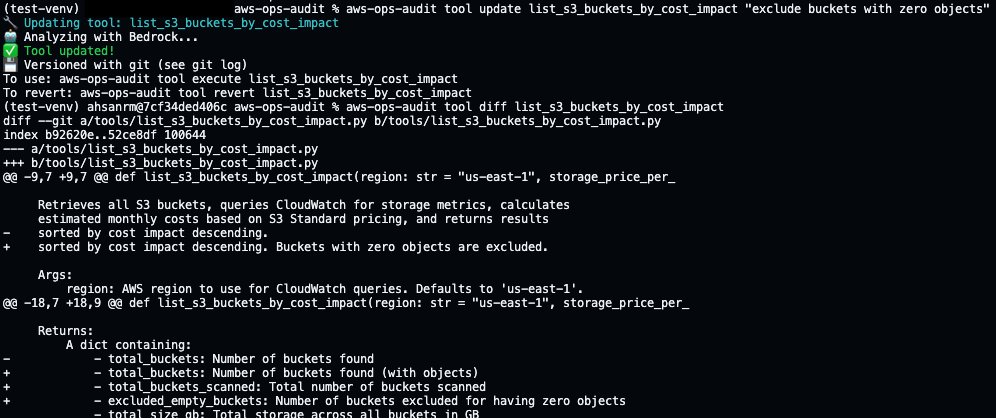
Suppose the initial output needs adjustment. Leadership wants the report to exclude buckets with an object count of zero. The user describes this change in natural language using the tool update command.

Terminal screenshot showing the update of the "list_s3_buckets_by_cost_impact" tool using the aws-ops-audit CLI with the instruction to "exclude buckets with zero objects." The tool is updated via Bedrock AI analysis, versioned with git, and a git diff displays changes to the function's docstring — adding exclusion behavior documentation and new return fields (total_buckets_scanned, excluded_empty_buckets).

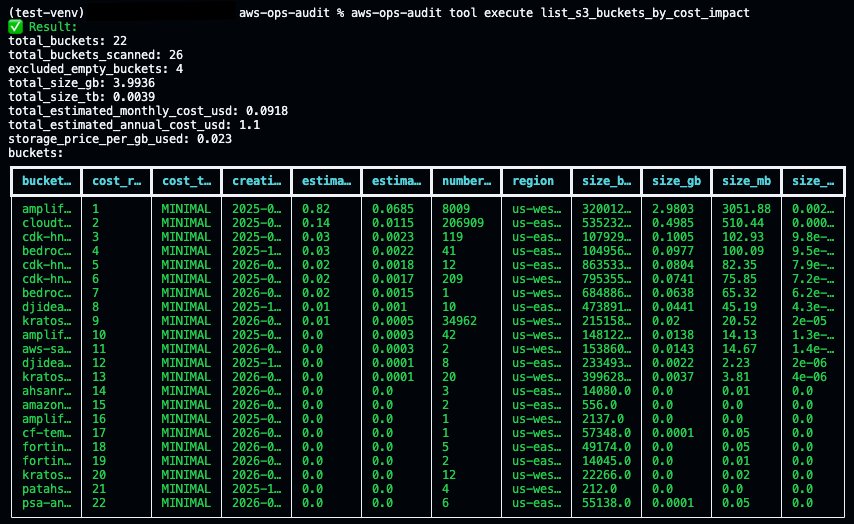
CLI Creator commits the current version to git before overwriting, then generates a new version. The tool diff command shows exactly what changed. Now execute the updated tool to see the improvements:

Terminal screenshot showing the updated output of "aws-ops-audit tool execute list_s3_buckets_by_cost_impact" after the zero-object exclusion update. Summary statistics now show 22 active buckets out of 26 scanned, with 4 empty buckets excluded. The data table lists only 22 rows, all classified as MINIMAL — confirming the empty bucket exclusion is working correctly.

The same update workflow applies regardless of what the tool does, whether it is an Amazon S3 cost report, an Amazon DynamoDB capacity analyzer, or a Salesforce data exporter.

Step 4: Revert if needed

If the update didn’t work as expected, tool revert restores the previous version from git:

Terminal screenshot showing the revert of the "list_s3_buckets_by_cost_impact" tool using the aws-ops-audit CLI. A confirmation prompt asks "Revert 'list_s3_buckets_by_cost_impact' to previous backup? [Y/n]:" and the user enters "y." A green checkmark confirms "Tool reverted!" followed by a note: "Restored from git history."

The git log shows the full history of create, update, and revert operations, all tracked automatically.

Terminal screenshot showing a two-line git log output. The most recent commit (ef4a65e, HEAD → main) reverts the list_s3_buckets_by_cost_impact tool. The previous commit (3640bde) updated the same tool to "exclude buckets with zero objects and add a total."

Under the hood, tool create, tool update, and tool revert are convenience wrappers around git. Each operation commits to the repository, so the version history is standard git and works with any existing workflow. The tool diff and tool revert commands exist so that someone iterating conversationally can see changes and undo them without switching context to git commands, but git log, git diff, and git revert work just as well. Git-based versioning and one-command reverts make it safe to experiment.

Step 5: Output formats

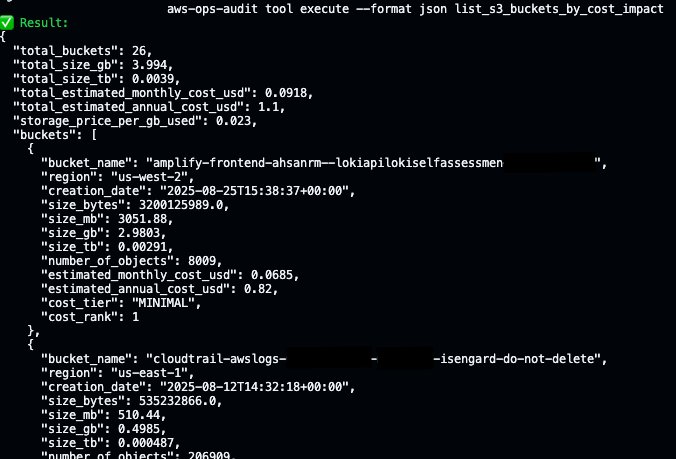
Reports often need to be consumed in different ways. The --format flag lets you control how output is rendered:

Terminal screenshot showing a two-line git log output. The most recent commit (ef4a65e, HEAD → main) reverts the list_s3_buckets_by_cost_impact tool. The previous commit (3640bde) updated the same tool to "exclude buckets with zero objects and add a total."

The formatter attempts to use the Rich library for colored tables when available and falls back to an ASCII table implementation when it is not installed. Here is a new AWS Lambda tool stored in `tools/`, rendering as a table by default:

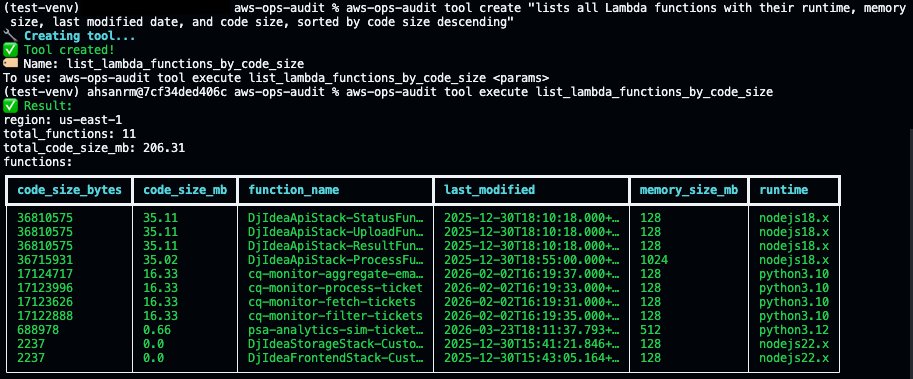
Terminal screenshot showing the creation and immediate execution of a new "list_lambda_functions_by_code_size" tool using the aws-ops-audit CLI. The tool is created from a natural language description, then executed to produce a Lambda functions report for us-east-1 showing 11 functions with a total code size of 206.31 MB, displayed in a table sorted by code size descending.

IV. Conclusion

The meta-tooling pattern demonstrated here combines Amazon Bedrock for code generation, the Strands Agents SDK for runtime tool management, and Model Context Protocol for external API discovery into a system where CLIs extend themselves through natural language. The implementation has clear limitations today. Generated code still requires human review before production use; post-conditions catch structural errors but cannot verify business logic correctness, and the MCP ecosystem is young enough that server coverage is uneven across domains.

V. Next Steps

CLI tools are a natural starting point because they have a well-defined structure and fast feedback loops, but the same mechanism applies to any software that could benefit from generating and refining small, composable units of functionality at runtime. Infrastructure-as-code modules, data pipeline transformations, API integration adapters, and compliance policy checks are all domains where the creation pattern is repetitive, and the validation criteria are expressible as post-conditions. To explore the pattern:

– Start with Amazon Bedrock for foundation model access.

– Use the Strands Agents SDK for tool orchestration.

– Browse the MCP ecosystem at mcpservers.org.

– Fork the CLI Creator source code on GitHub.


About the authors

Ragib Ahsan

Ahsan is an AI Acceleration Architect at Amazon Web Services (AWS), where he helps organizations build and implement AI/ML solutions. Specializing in computer vision and industrial manufacturing, he works with AWS partners and engineering teams to create practical applications using cloud technologies.

Modernizing Excel VBA to Python at Scale with AWS Transform custom

Post Syndicated from Somnath Chatterjee original https://aws.amazon.com/blogs/devops/modernizing-excel-vba-to-python-at-scale-with-aws-transform-custom/

Learn how AWS Transform custom can help migrate Excel VBA applications to modern Python code while overcoming context window limitations, preserving functional equivalence, and enabling cloud-native deployment—turning weeks of manual rewriting into hours of AI-guided transformation.

Introduction

Many organizations maintain dozens of Excel VBA applications built over decades, containing business-critical logic trapped in workbooks—budget planning tools, demand planning, inventory management, financial modeling, and engineering calculations. Manual migration typically costs thousands of dollars per workbook and takes weeks, while traditional AI tools fail on large codebases that exceed context windows.

This post demonstrates how you can migrate VBA to Python using AWS Transform custom, addressing three key challenges: processing large codebases through intelligent chunking, converting legacy code to maintainable Python while preserving functionality, and validating equivalence through automated testing. You can reuse the transformation across similar projects or apply it to entire portfolios.

With AWS Transform custom, you can accelerate migration timelines, eliminate transcription errors, and scale from single applications to enterprise portfolios.

Solution Overview

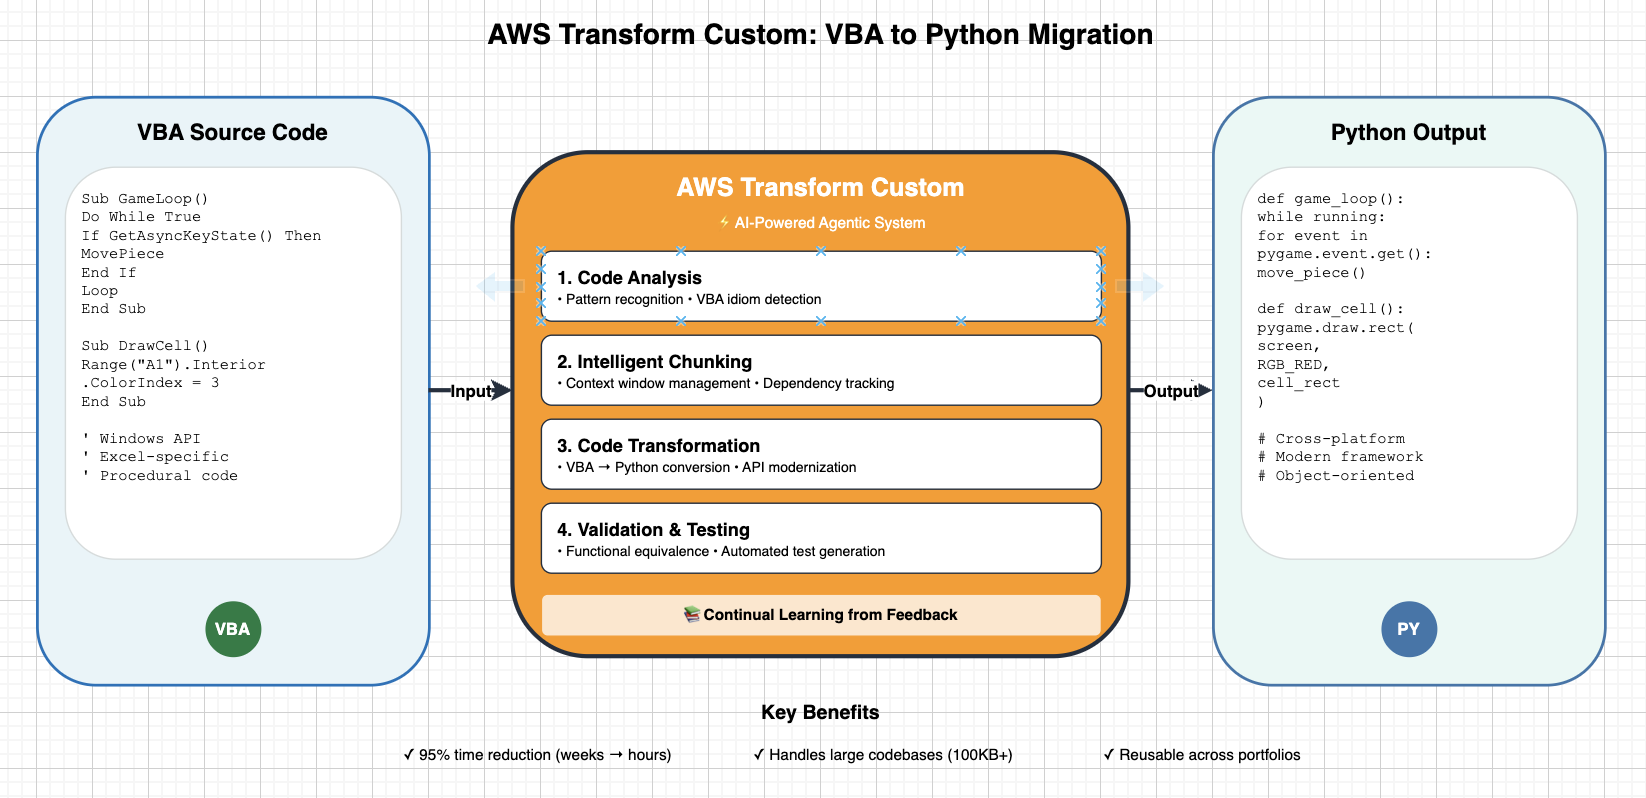
The following diagram illustrates how AWS Transform custom migrates VBA source code to Python output through a four-step process powered by an AI agentic system.

Architecture diagram showing how AWS Transform custom migrates VBA source code to Python output through a four-step process powered by an AI agentic system

Figure1:AWS Transform custom VBA to Python migration architecture

AWS Transform custom provides an interactive workflow where you describe your migration requirements. The system interprets your intent and iteratively refines the transformation definition until it meets your specifications. As the system processes your code, it improves the quality of each subsequent run. Once you finalize a transformation, you can publish it to a registry so your team can reuse it across multiple projects without starting from scratch.

Migration Approach

The migration follows a three-phase process that takes you from defining your transformation through execution and validation and finally scaling across your portfolio.

In the first phase, transformation definition creation, you start an interactive session with AWS Transform custom to describe your migration requirements. You can reference your VBA code, API documentation, and target framework guides as context. The system uses these inputs to automatically generate transformation rules and patterns, which you can iteratively refine through build validation until the definition accurately captures your migration logic.

In the second phase, execution and validation, AWS Transform custom applies the transformation to your codebase. It intelligently chunks large codebases into logical modules and processes them in dependency-aware order, so cross-module references remain intact. Throughout execution, the system continuously validates builds and tests, automatically detecting and correcting errors as they arise.

In the third phase, scale and reuse, you publish your finalized transformation to the registry, making it available for your team to apply across similar projects. You can run campaign-based bulk executions across multiple repositories, extract knowledge items for continuous improvement, and integrate the transformation into your CI/CD pipelines.

Key capabilities

AWS Transform custom addresses the core challenges you face when migrating large VBA codebases to Python.

For context window management, the system automatically segments your codebase into logical modules, tracks cross-module dependencies, preserves interface contracts across chunks, and maintains state throughout the transformation. This means you can process codebases that far exceed standard AI context window limits without losing coherence between modules.

For intelligent code restructuring, AWS Transform custom recognizes VBA idioms and maps them to Python equivalents. It refactors procedural code into object-oriented designs, replaces Windows-specific APIs with cross-platform libraries, and applies proper encapsulation and separation of concerns. The result is a clean, maintainable Python that follows modern coding standards.

For functional equivalence preservation, the system generates automated tests based on the original VBA behavior and runs regression testing after each transformation step. It benchmarks performance metrics such as timing and resource usage and validates edge cases to confirm that your transformed Python code produces the same results as the original VBA application.

Prerequisites

Before you begin, you need an AWS account with the appropriate permissions to use AWS Transform custom. Start by configuring authentication and setting up the AWS CLI for your environment.

To create an IAM user for AWS Transform, follow the step-by-step instructions for creating an IAM user and managing IAM policies in the IAM User Guide.

Setup using AWS CLI:

# Create policy
cat > transform-policy.json << 'EOF'
{
  "Version": "2012-10-17",
  "Statement": [
    {
      "Effect": "Allow",
      "Action": ["transform-custom:*"],
      "Resource": "*"
    }
  ]
}
EOF

aws iam create-policy \
  --policy-name AWSTransformCustomPolicy \
  --policy-document file://transform-policy.json

# Attach to your IAM user (replace with your username and account ID)
aws iam attach-user-policy \
  --user-name YOUR_USERNAME \
  --policy-arn arn:aws:iam::YOUR_ACCOUNT_ID:policy/AWSTransformCustomPolicy

Local Environment Setup

  • Operating System: Linux, macOS, or WSL (Windows Subsystem for Linux)
  • Node.js: Version 20 or higher (required for AWS Transform CLI installation via npm)
  • Git: Required for all target repositories
  • Internet Access: Required for AWS Transform service communication

AWS Transform CLI Installation

Follow the official AWS Transform Custom Getting Started Guide for complete installation and setup instructions, including:

  • Platform requirements (Linux, macOS, or WSL)
  • Installation script usage
  • Authentication configuration
  • Network requirements and firewall rules

Source Code Repository

  • VBA application source code (Excel workbook with macros or exported .bas files)
  • Git repository initialized in source directory
  • Build/test commands defined (if applicable)

Target Environment Setup (for Python migration)

  • Python 3.8 or higher installed
  • Virtual environment tool (venv or virtualenv)
  • Target framework dependencies (e.g., pygame for game applications, tkinter/PyQt6 for GUI, pandas for data processing, openpyxl for spreadsheet operations)

Walkthrough: VBA to Python Migration

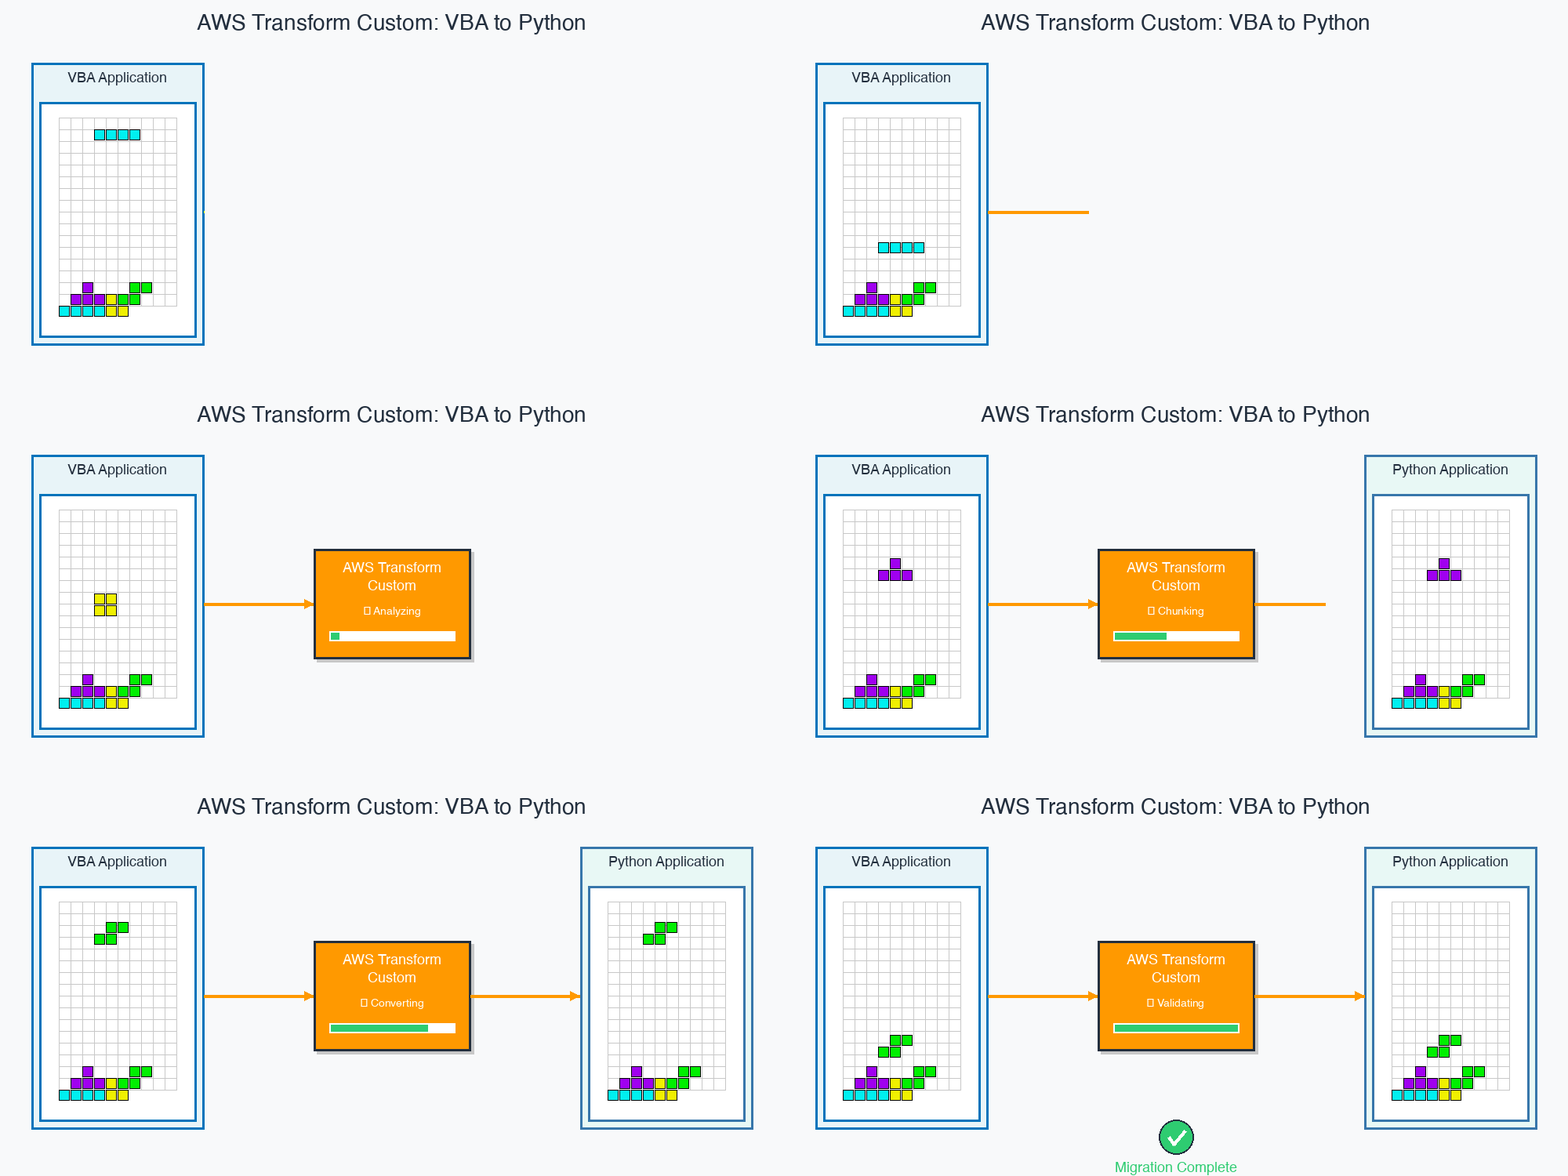
Animated demonstration of the VBA to Python migration workflow using AWS Transform custom

Figure2:AWS Transform custom CLI executing a VBA to Python transformation

Step 1: Prepare Your VBA Application

Initialize Git Repository

AWS Transform Custom requires your code to be in a Git repository. If your code isn’t already in Git:

cd your-vba-project
git init
git add .
git commit -m "Initial VBA code"

Step 2: Create Transformation Definition

Start AWS Transform Interactive Session

Provide Migration Context

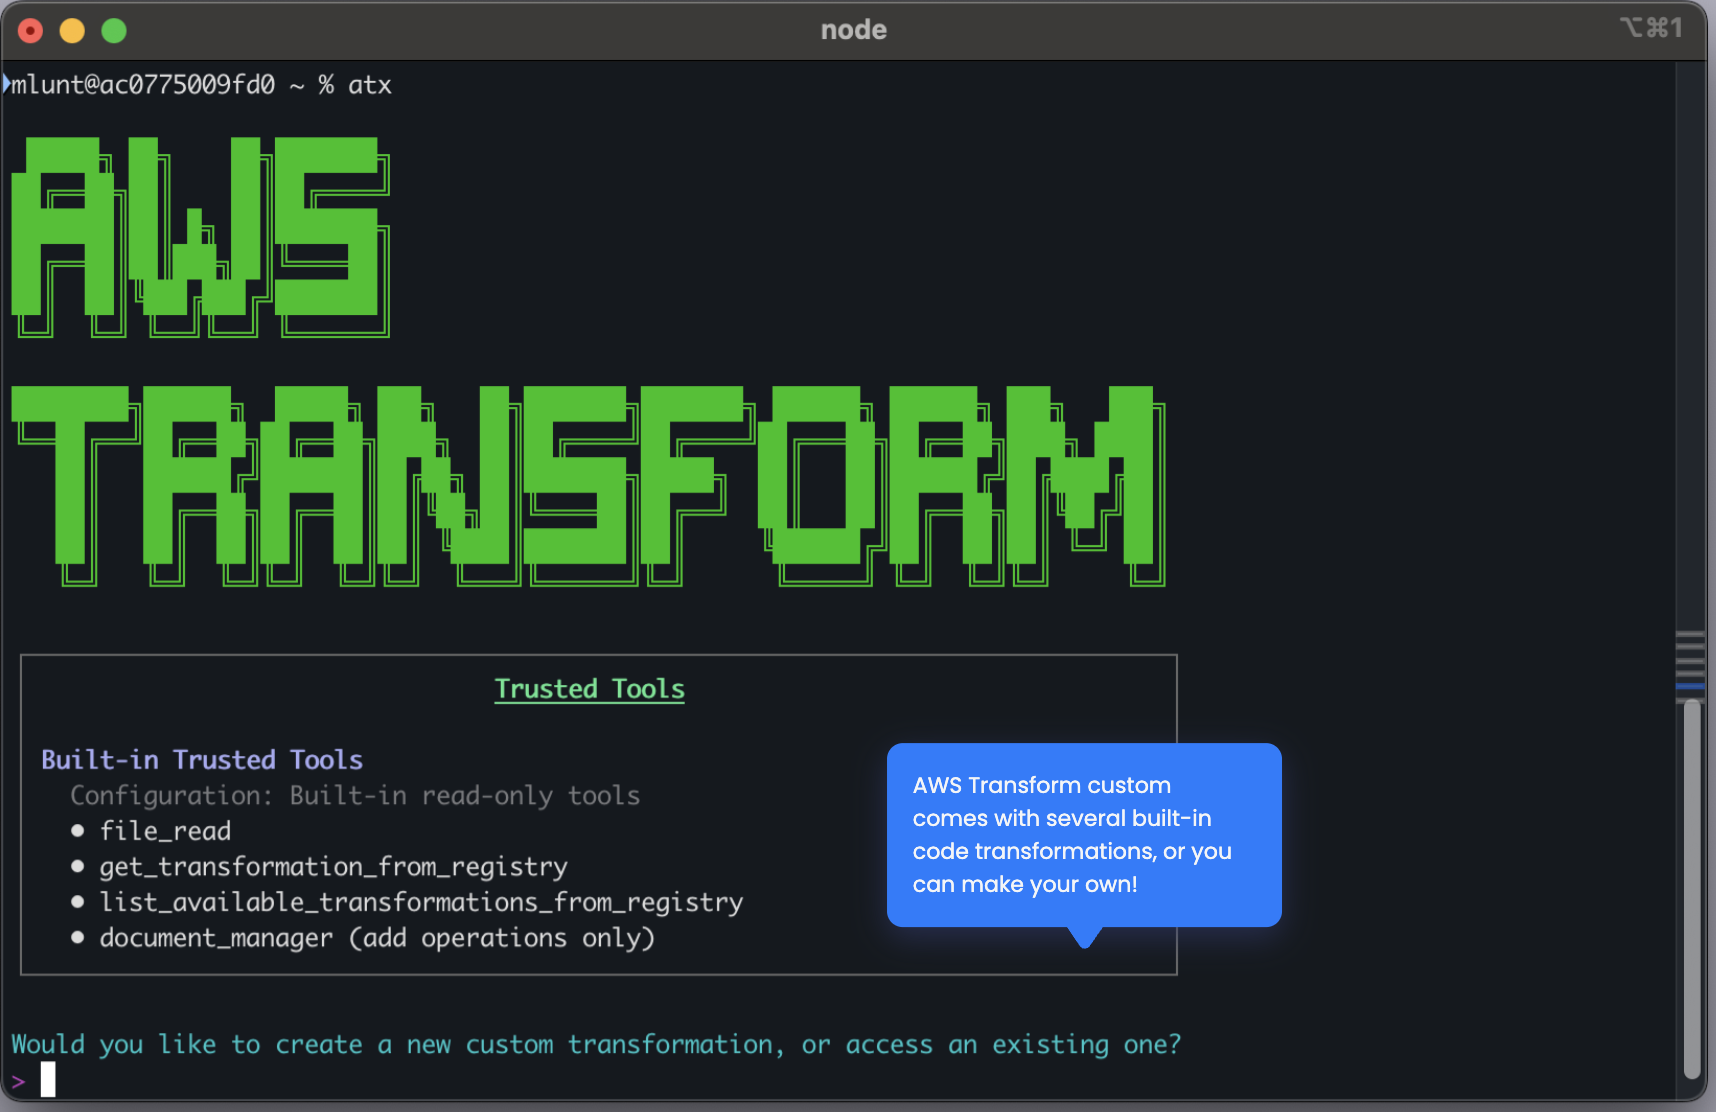
Screenshot showing the AWS Transform custom interactive session interface for providing migration context

Figure3:AWS Transform custom interactive session with migration context

When you start the interactive session, provide a natural language description of your migration goal, such as “Migrate VBA application to Python.” Specify the target framework you want to use, for example, pygame for GUI applications or pandas for data processing. You should also include document references to give the system the context it needs — this includes your VBA code files, Python framework documentation, and any API migration guides relevant to your project.

Example conversation:

User: I want to migrate a VBA application to Python.
AWS Transform: I’ll help you create a transformation definition. Let me analyze the VBA patterns and generate Python equivalents…

Define Scope and Entry Criteria

Before creating your transformation, review your existing codebase to understand its structure, patterns, and dependencies. Identify the code type and technology stack you are working with, such as an Excel VBA game that uses Windows API calls. Check the transformation registry for existing similar transformations to avoid duplicating work. From there, define a clear objective and scope for your transformation, and document the entry criteria that determine what code qualifies. Outline detailed implementation steps with specific technical mappings, establish validation and exit criteria for measuring success, and name your transformation appropriately so your team can discover and reuse it.

Iterative Refinement

After you provide your migration context, AWS Transform custom generates an initial transformation definition.You can review this definition at: ~/.aws/atx/custom/<session-id>/artifacts/tp-staging/transformation_definition.md.

Examine the generated rules and provide feedback on patterns, edge cases, or missing scenarios. AWS Transform custom incorporates your feedback and regenerates the definition, allowing you to iterate until the transformation accurately captures your migration logic.

Key Patterns to Address

During the transformation definition process, you should account for the common patterns that differ between VBA and Python. AWS Transform custom maps VBA ColorIndex values to standard RGB tuples and converts Range objects to Python data structures such as lists and arrays. Do While loops in VBA translate to event-driven loops in Python. The transformation replaces Windows API calls with cross-platform libraries that provide portable alternatives. VBA UserForms map to Python GUI frameworks like tkinter or PyQt6, where form controls become Python widgets. VBA Property Get/Let constructs convert to Python @property and @setter decorators. Finally, VBA’s 1-based array indexing must be adjusted to Python’s 0-based indexing throughout your codebase.

Step 3: Execute Transformation

Apply Transformation to Codebase

# Execute transformation interactively
atx custom def exec \
  --transformation-name "VBA-to-Python-Migration" \
  --code-repository-path "./your-vba-project" \
  --build-command "python3 -m py_compile **/*.py"

# Execute transformation non-interactively
atx custom def exec \
  --transformation-name "VBA-to-Python-Migration" \
  --code-repository-path "./your-vba-project" \
  --build-command "python3 -m py_compile **/*.py" \
  --trust-all-tools \
  --non-interactive

What Happens During Execution

When you run the transformation, AWS Transform custom begins with agent planning. It analyzes your codebase structure, identifies all VBA components and their dependencies, and generates a step-by-step transformation plan with logical ordering — for example, data models first, then business logic, then UI. Each step in the plan has a clear scope and validation criteria.

Next, the system performs automatic code chunking. It analyzes your codebase size and complexity, then segments the code into logical modules such as constants, game logic, rendering, and controller. These chunks are processed in dependency order based on the plan, and the system manages the context window by focusing on one module at a time.

Throughout execution, AWS Transform custom tracks dependencies by mapping relationships between VBA subroutines, verifying that dependent code references remain valid, and maintaining interface contracts across modules.

The transformation proceeds incrementally, converting one module at a time. After each module is transformed, the system validates the build. If a failure occurs, it automatically rolls back and retries the transformation for that module before moving on.

Sample Output:

Analyzing codebase structure...
Identified 4 logical modules: constants, core_logic, rendering, main_controller
Transforming module 1/4: constants
 - Converting VBA Enums to Python IntEnum
 - Mapping ColorIndex values to RGB tuples
 - Generating color constants
 ✓ Build validation passed
Transforming module 2/4: core_logic
 - Converting collision detection subroutines
 - Refactoring global variables to class attributes
 - Translating VBA arrays to Python lists
 ✓ Build validation passed
Transforming module 3/4: rendering
 - Replacing Range object manipulation with pygame rendering
 - Converting cell-based drawing to pixel-based graphics
 - Implementing screen update logic
 ✓ Build validation passed
Transforming module 4/4: main_controller
 - Converting Do While loop to pygame event loop
 - Replacing GetAsyncKeyState with pygame.event.get()
 - Implementing game state management
 ✓ Build validation passed
Transformation complete! Generated 5 Python modules.

Review Transformed Code

After the transformation completes, check the generated Python files to verify the output. You can review the transformation logs at ~/.aws/atx/custom/<conversation-id>/logs/ to understand the decisions the system made during each step. Examine the build validation results to confirm that the transformed code compiles and passes all checks.

Step 4: Validate Functional Equivalence

Automated Test Generation

AWS Transform generates validation tests based on original VBA behavior:

test_validation.py – Verifies core logic:

# Example generated test (conceptual)
def test_collision_detection():
 """Verify collision logic matches VBA behavior"""
 # Test cases extracted from VBA code analysis

def test_scoring_calculation():
 """Ensure scoring algorithm is preserved"""

def test_state_transitions():
 """Validate game state changes"""

test_performance.py – Benchmarks non-functional requirements:

def test_frame_rate():
 """Verify rendering meets 60 FPS target"""

def test_response_time():
 """Ensure input handling latency matches VBA"""

Run Validation Suite

# Execute all tests
python3 -m pytest tests/

# Run with coverage
python3 -m pytest --cov=. tests/

Manual Validation Checklist

  • Application launches without errors
  • UI renders correctly (layout, colors, sizing)
  • User interactions work as expected (keyboard, mouse)
  • Core functionality produces correct results
  • Performance meets requirements (no lag, smooth rendering)
  • Edge cases handled properly (boundary conditions, invalid inputs)

Step 5: Refine and Iterate

As you refine your transformation, you may encounter a few common issues. Here is how you can address them and provide feedback to AWS Transform custom.

Timing and performance differences can occur when the Python application runs faster or slower than the VBA original. To fix this, adjust timing constants and frame rate limiters. For example, if you notice the game runs too fast because VBA used Sleep(500) for piece drops, you can provide that feedback. AWS Transform custom corrects this by replacing time.sleep() with pygame.time.Clock.tick(60).

Color rendering mismatches happen when colors in the Python output don’t match the VBA version. This is typically caused by incorrect RGB mappings for VBA ColorIndex values. If you notice that ColorIndex 3 should be pure red (255,0,0) but is showing as dark red, provide that feedback. AWS Transform custom updates the COLOR_MAP dictionary with accurate RGB values.

Collision detection bugs may appear when pieces move through walls or other pieces. This requires refining boundary checking and collision logic. For instance, if rotation near walls allows pieces to go out of bounds, you can report this issue. AWS Transform custom adds boundary validation before rotation commits to resolve it.

Continual learning in action

Each time you provide a correction, AWS Transform custom captures it as a knowledge item. Future transformations automatically incorporate these fixes, so the same issues don’t recur. With each execution, the system improves quality for similar migrations across your portfolio.

Step 6: Publish and Scale

Save Transformation as Draft (for testing)

atx custom def save-draft \
  --name "VBA-to-Python-Migration" \
  --source-directory "~/.aws/atx/custom/<session-id>/artifacts/tp-staging"

Publish to Registry (for team-wide use)

atx custom def publish \
  --name "VBA-to-Python-Migration" \
  --description "Migrate Excel VBA applications to Python with pygame rendering" \
  --source-directory "~/.aws/atx/custom/<session-id>/artifacts/tp-staging"

Apply to Multiple Projects

# Apply to each project individually
atx custom def exec -n "VBA-to-Python-Migration" -p ./project1 -c "python3 -m py_compile **/*.py" --trust-all-tools --non-interactive
atx custom def exec -n "VBA-to-Python-Migration" -p ./project2 -c "python3 -m py_compile **/*.py" --trust-all-tools --non-interactive

CI/CD Integration

# Example GitHub Actions workflow
name: VBA Modernization
on:
  push:
    branches: [main]
jobs:
  transform:
    runs-on: ubuntu-latest
    steps:
      - uses: actions/checkout@v2
      - name: Run VBA to Python transformation
        run: |
          atx custom def exec \
            --transformation-name "VBA-to-Python-Migration" \
            --code-repository-path "." \
            --build-command "python3 -m py_compile **/*.py" \
            --non-interactive \
            --trust-all-tools

Benefits

By using AWS Transform custom, you can reduce tech debt and accelerate enterprise modernization at scale. The service supports diverse transformation use cases beyond VBA to Python, adapting to the specific needs of your codebase and target platform. With continual learning and improvement, each transformation builds on the corrections and knowledge items from previous runs, delivering higher quality results over time. Once you define a transformation, you can apply it everywhere — across similar projects, teams, and entire application portfolios — without recreating the migration logic from scratch.

Architecture Evolution

Before migration, your legacy VBA application is constrained to a Windows-only execution environment, tightly coupled to the Excel runtime. The code follows a procedural style with a global state, and testing and deployment are manual processes.

After migration with AWS Transform custom, your application follows a modular architecture with clean separation of concerns across constants, logic, rendering, and controller layers. The code uses object-oriented design with proper encapsulation and runs cross-platform on Windows, macOS, and Linux. The transformed application is cloud-ready, with a structure that supports containerization through Dockerfile generation, serverless adaptation with decoupled logic and rendering, and standard Python packaging through requirements.txt and setup.py. It also integrates with modern DevOps workflows, including automated testing with pytest, CI/CD pipeline compatibility, and version control through Git.

You can deploy the transformed application in several ways: containerized with Docker and Kubernetes for scalable web applications, serverless with AWS Lambda for event-driven processing, as a standalone desktop executable with PyInstaller, or as a web application with FastAPI or Flask wrappers for browser access.

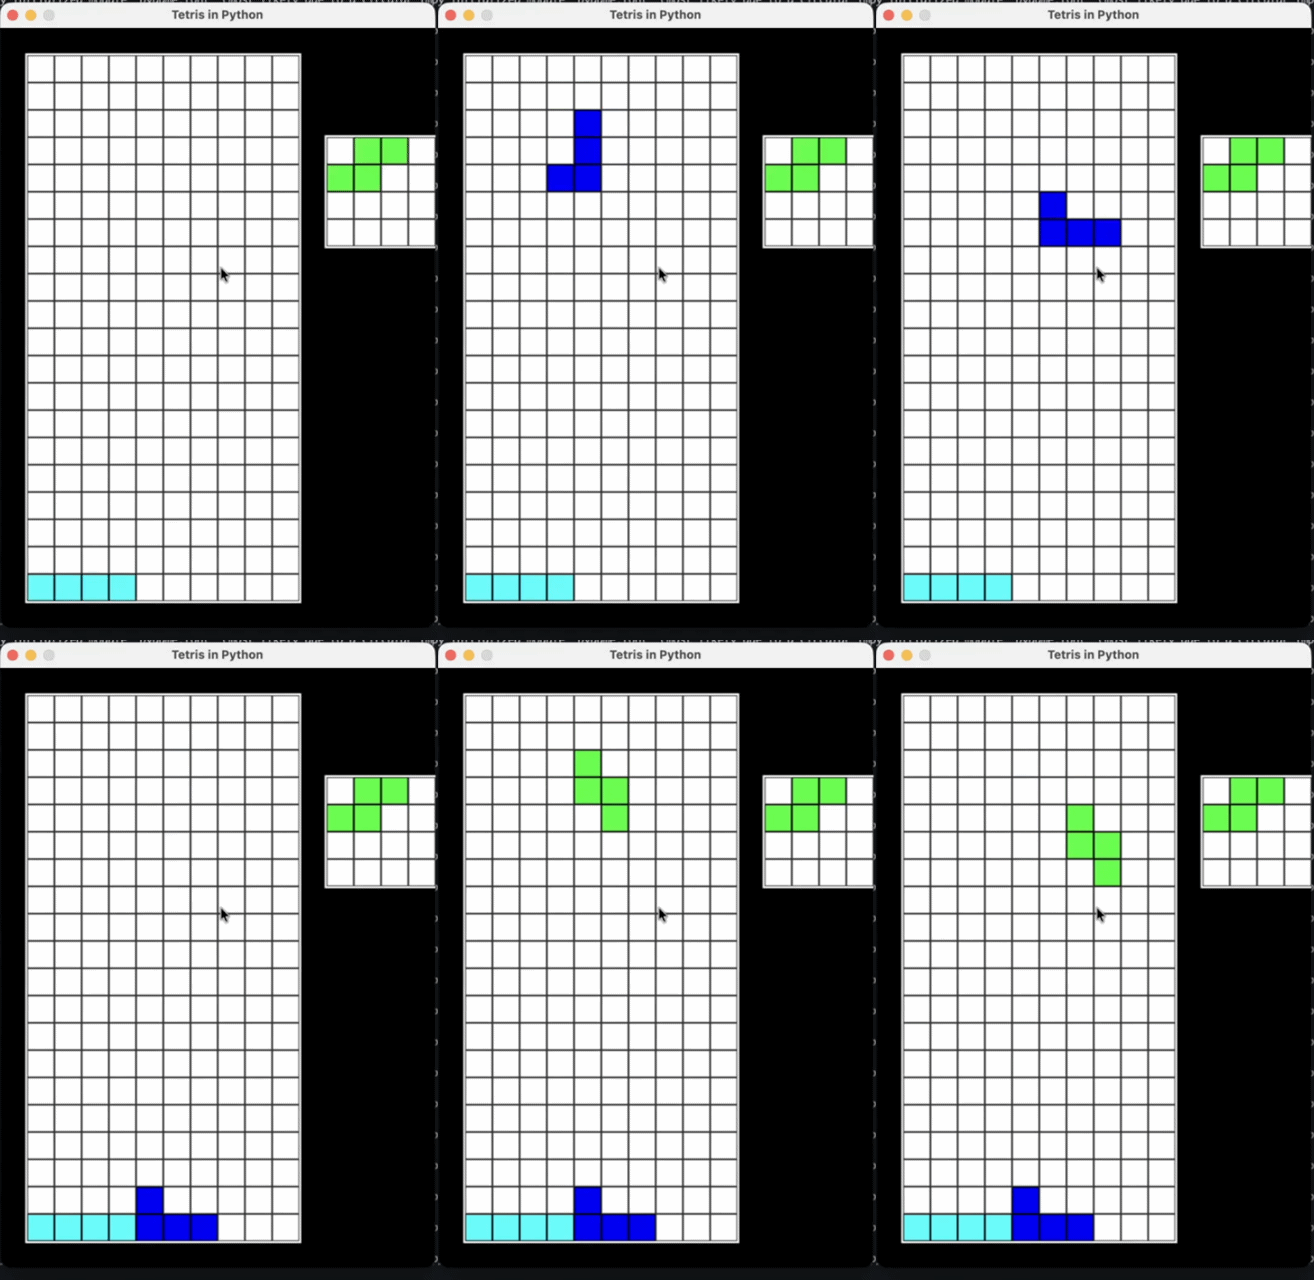
The following screenshot shows the transformed Tetris application running as a Python pygame application.

Screenshot of the transformed Tetris application running as a Python pygame application

Figure4:Transformed Tetris game running as a Python pygame application

Transformation definition creation

When creating your transformation definition, provide comprehensive context by including your VBA code, target framework documentation, and migration guides. Focus on documenting application behavior by describing what the application does functionally, not just its code structure. Identify platform-specific dependencies such as Windows APIs, Excel features, and ActiveX controls that require special handling during migration. Define clear success criteria including performance targets, functional requirements, and test coverage expectations. Be explicit about construct mappings in your transformation definition — the more specific you are, the more consistent the output.

Execution strategy

Start with a pilot project by testing your transformation on a smaller, representative application before applying it broadly. Validate incrementally by reviewing each module transformation before proceeding to the next. Capture corrections as feedback by documenting issues and fixes so the system can incorporate them through continual learning. Iterate on edge cases to refine the transformation for corner cases and error conditions that may not surface during initial runs.

Quality assurance

Generate comprehensive automated test suites from the original VBA behavior to verify functional equivalence. Run performance benchmarking to confirm that non-functional requirements match the original application. Conduct manual validation through user acceptance testing to verify UI and UX consistency. After any refinements, run the full test suite for regression prevention to ensure that fixes in one area haven’t introduced issues elsewhere.

Scaling across your portfolio

When you are ready to scale, categorize your applications by similarity — for example, data processing, UI-heavy, or calculation-focused workbooks. Create transformation variants with customized definitions for each category. Use campaigns for bulk execution to process multiple applications in parallel. Monitor and aggregate results across your portfolio to track success rates, identify common issues, and measure time savings.

Cleanup

Archive Conversation Logs

# Conversation logs are in ~/.aws/atx/custom/<conversation-id>/
# Archive for future reference before cleanup
tar -czf vba-migration-logs.tar.gz ~/.aws/atx/custom/<conversation-id>/

Remove Temporary Files

# Remove conversation data and transformation session artifacts (kept for 30 days automatically)
rm -rf ~/.aws/atx/custom/<conversation-id>

# Remove draft transformations (if not needed)
atx custom def delete --name "VBA-to-Python-Migration-Draft"

Manage Published Transformations

# List your transformations
atx custom def list

# Delete transformations no longer needed
atx custom def delete --name "VBA-to-Python-Migration-Old-Version"

# Update transformation tags for organization
atx custom def tag --transformation-name "VBA-to-Python-Migration" \
  --tags "team:platform-engineering,language:python,status:production"

Knowledge Items Management

# List knowledge items for transformation
atx custom def list-ki --transformation-name "VBA-to-Python-Migration"

# Review and approve valuable knowledge items
atx custom def get-ki --transformation-name "VBA-to-Python-Migration" --id <ki-id>

# Enable approved knowledge items
atx custom def update-ki-status \
  --transformation-name "VBA-to-Python-Migration" \
  --id <ki-id> \
  --status ENABLED

# Delete low-quality knowledge items
atx custom def delete-ki --transformation-name "VBA-to-Python-Migration" --id <ki-id>

Conclusion

In this post, you learned how AWS Transform custom can help you migrate Excel VBA applications to Python at scale. With AWS Transform custom, you can reduce weeks of manual migration work to hours. Intelligent chunking handles large codebases that exceed standard AI context window limits, while continuous validation and automated testing preserve functional equivalence throughout the process. Because transformations are reusable, and the system learns from each execution, you gain compound efficiency with every subsequent migration. The transformed applications are cloud-ready, supporting containerization, serverless deployment, and modern DevOps workflows.

AWS Transform custom is a strong fit when you are modernizing a portfolio of dozens or hundreds of similar legacy applications, when functional equivalence must be guaranteed for quality-critical migrations, or when you have repeatable migration patterns across multiple projects.

Next Steps

The transformation demonstrated in this post — VBA to Python migration with context window management, automated restructuring, and functional validation — is a template you can apply to other modernization challenges, such as mainframe COBOL to Java, Progress ABL to Spring Boot, or .NET Framework to .NET Core. The principles remain consistent: intelligent code analysis, dependency-aware processing, continuous validation, and transformation reuse.

Call to Action

Get Started with AWS Transform Custom

Documentation and Resources:

Explore AWS-Managed Transformations: Access pre-built transformations for common migration patterns:

  • AWS SDK Java v1 to v2: AWS/java-aws-sdk-v1-to-v2
  • Python Version Upgrades: AWS/python-version-upgrade
  • Node.js Version Upgrades: AWS/nodejs-version-upgrade
  • Java Version Upgrades: AWS/java-version-upgrade

Estimate Your Migration: Use the AWS Pricing Calculator to estimate costs for your specific modernization project.


Ankit Srivastava

is a Strategic Technical Account Manager at Amazon Web Services (AWS), where he serves as a trusted advisor to global enterprise customers. With over 15 years of experience in cloud architecture, DevOps and distributed systems, Ankit helps organizations navigate cloud transformation, architecture modernization, and harness the power of Generative AI on AWS.

Somnath Chatterjee

is an accomplished Senior Technical Account Manager at Amazon Web Services (AWS), Somnath is dedicated to guiding customers in crafting and implementing their cloud solutions on AWS. He collaborates strategically with customers to help them run cost-optimized and resilient workloads in the cloud. Beyond his primary role, Somnath holds specialization in the compute, SAP and Developer Experience technical field community. With over 14 years of experience in the information technology industry, he excels in cloud architecture and helps customers achieve their desired outcomes on AWS.

Ensure Code Integrity for AWS Lambda Functions with Automated Code Signing Using Terraform

Post Syndicated from Sourav Kundu original https://aws.amazon.com/blogs/devops/ensure-code-integrity-for-aws-lambda-functions-with-automated-code-signing-using-terraform/

Authors: Sourav Kundu and Joyson Neville Lewis.

In today’s cloud-native landscape, ensuring the integrity and authenticity of your serverless functions is critical for maintaining security and compliance. Organizations face increasing challenges in preventing the execution of tampered or malicious code in their AWS Lambda functions. These challenges intensify as deployment pipelines become more complex and distributed.

AWS Lambda code signing provides a robust security mechanism that guarantees only trusted, unmodified code executes in your Lambda functions. By implementing digital signatures, you can verify code integrity and authenticate the source, creating a secure foundation for your serverless applications.

This post shows you how to implement AWS Lambda code signing using Terraform, creating an automated, end-to-end security framework that prevents unauthorized code execution while maintaining operational efficiency.

Solution overview

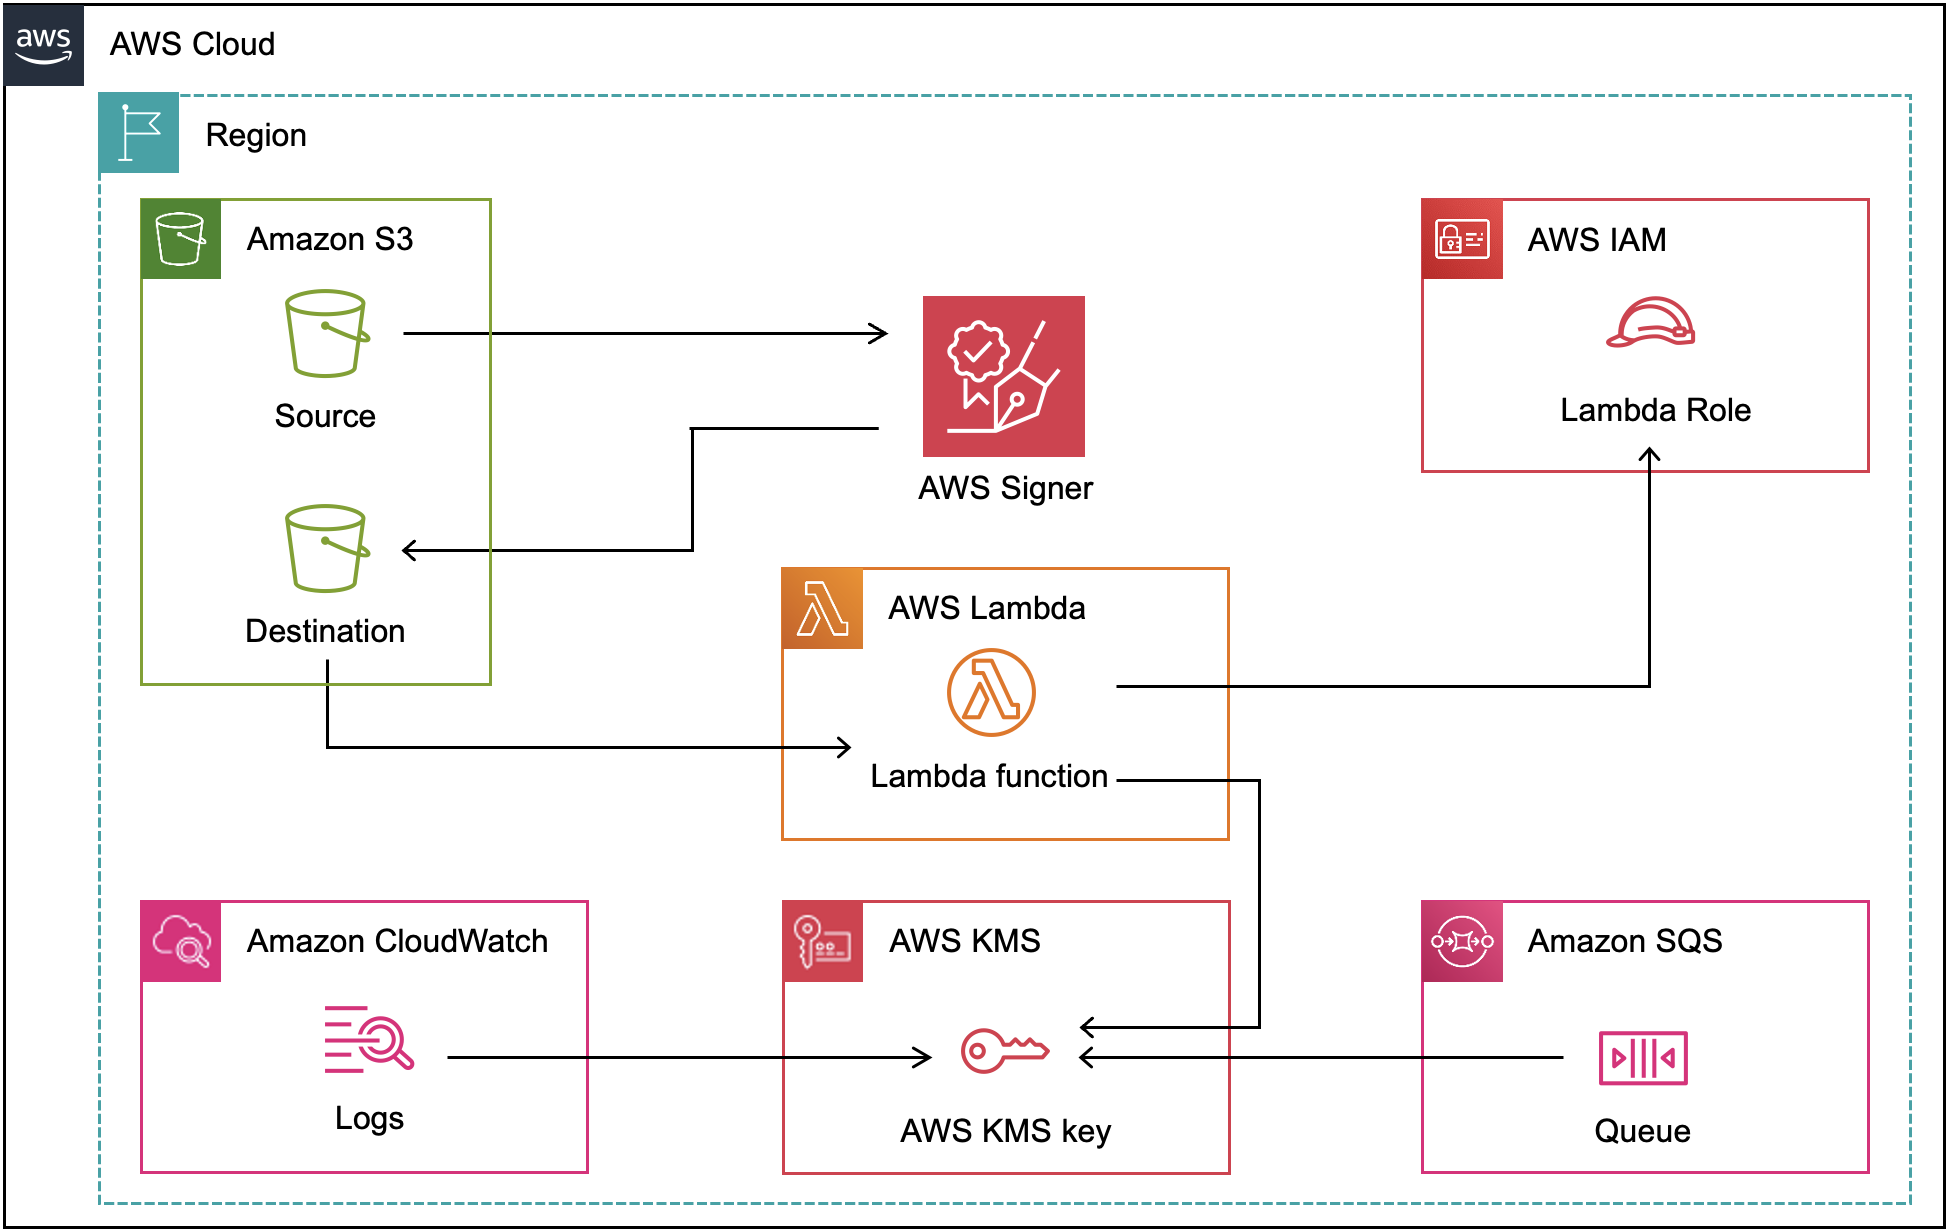
This solution creates a comprehensive code signing pipeline that automatically signs Lambda deployment packages and enforces signature validation at runtime. The implementation uses AWS Signer with the SHA384-ECDSA algorithm for cryptographic security, combined with Terraform automation for consistent deployments across environments.

Figure 1: Architecture diagram of AWS Lambda signing with AWS Signer

Figure 1: Architecture diagram of AWS Lambda signing with AWS Signer

The architecture includes:

AWS Signer: Creates signing profiles and jobs with strong cryptographic algorithms

Amazon S3: Stores original and signed Lambda code with versioning enabled

AWS Lambda: Deployed with code signing enforcement in a VPC environment

AWS KMS: Provides encryption for CloudWatch logs and SQS dead letter queue

VPC Configuration: Isolates Lambda execution in private subnets with VPC endpoints

Walkthrough

This walkthrough demonstrates how to deploy a secure Lambda function with code signing enabled using Terraform, a popular infrastructure as code.

The deployment process includes these key steps:

  1. Set up AWS Signer signing profile with cryptographic configuration
  2. Create S3 bucket with versioning for code storage
  3. Configure automated code signing jobs
  4. Secure Lambda deployment
  5. Implement security best practices including KMS encryption and VPC isolation
  6. Deploy the infrastructure with Terraform

Link to GitHub repository: AWS Lambda Code Signing with Terraform.

Prerequisites

For this walkthrough, you should have the following prerequisites:

– An AWS account with appropriate permissions for AWS Signer, Lambda, S3, and VPC services

Terraform >= 1.0 installed on your local machine

AWS CLI configured with credentials that have necessary service permissions

– Basic understanding of AWS Lambda, Terraform, and infrastructure as code concepts

1. Setup AWS Signer Signing Profile

The foundation of our code signing implementation starts with creating an AWS Signer signing profile. This profile is the identity that defines the cryptographic algorithm and signature validity period.

1.1 Define the signing profile resource in your Terraform configuration:

   resource "aws_signer_signing_profile" "lambda_signing_profile" {
     platform_id = "AWSLambda-SHA384-ECDSA"
     name        = "${replace(var.name, "-", "_")}_lambda_signing_profile_${random_string.suffix.result}"
     signature_validity_period {
       value = 135
       type  = "MONTHS"
     }
   }

We use the AWSLambda-SHA384-ECDSA platform, which provides strong cryptographic security with SHA-384 hashing and ECDSA (Elliptic Curve Digital Signature Algorithm).

1.2 Configure the code signing configuration that enforces security policies:

   resource "aws_lambda_code_signing_config" "configuration" {
     allowed_publishers {
       signing_profile_version_arns = [aws_signer_signing_profile.lambda_signing_profile.version_arn]
     }
     policies {
       untrusted_artifact_on_deployment = "Enforce"
     }
     description = "Code signing configuration for ${var.name} Lambda function."
   }

The untrusted_artifact_on_deployment = "Enforce" policy ensures that Lambda rejects any unsigned or improperly signed code.

2. Create S3 bucket with versioning for code storage

Before the code can be signed, it needs to be packaged and stored in a versioned S3 bucket. AWS Signer requires S3 versioning to uniquely identify the source artifact for each signing job.

2.1 Create the S3 bucket with versioning enabled:

resource "aws_s3_bucket" "lambda_source" {
  bucket        = "${var.name}-lambda-source-${data.aws_caller_identity.current.account_id}"
  force_destroy = true
}

resource "aws_s3_bucket_versioning" "lambda_source" {
  bucket = aws_s3_bucket.lambda_source.id
  versioning_configuration {
    status = "Enabled"
  }
}

Versioning is not optional here — AWS Signer uses the S3 object version_id to reference the exact artifact to sign.

2.2 Package the Lambda function code and upload it to the bucket:

data "archive_file" "python_file" {
  type        = "zip"
  source_dir  = "${path.module}/lambda_function/"
  output_path = "${path.module}/lambda_function/lambda_function.zip"
}

resource "aws_s3_object" "lambda_zip" {
  bucket     = aws_s3_bucket.lambda_source.bucket
  key        = "lambda_function.zip"
  source     = data.archive_file.python_file.output_path
  etag       = filemd5(data.archive_file.python_file.output_path)
  depends_on = [aws_s3_bucket_versioning.lambda_source]
}

The archive_file data source zips the contents of the lambda_function/ directory, and the aws_s3_object uploads it to the versioned bucket. The depends_on ensures versioning is active before the upload, so the object gets a version_id that the signing job can reference.

3. Configure automated Code Signing jobs

The next step creates an automated signing job that processes your Lambda code and generates signed artifacts.

3.1 Upload your Lambda code and configure the signing job:

   resource "aws_signer_signing_job" "build_signing_job" {
     profile_name = aws_signer_signing_profile.lambda_signing_profile.name

     source {
       s3 {
         bucket  = aws_s3_bucket.lambda_source.bucket
         key     = aws_s3_object.lambda_zip.key
         version = aws_s3_object.lambda_zip.version_id
       }
     }

     destination {
       s3 {
         bucket = aws_s3_bucket.lambda_source.bucket
         prefix = "signed/"
       }
     }
   }

This signing job automatically processes the uploaded Lambda code, creating a signed version stored in the signed/ prefix of your S3 bucket.

4. Secure Lambda Deployment

The Lambda function is configured to use the signed code and enforce code signing.

4.1 Deploy the Lambda function using the signed artifact:

resource "aws_lambda_function" "lambda_run" {
  s3_bucket        = aws_signer_signing_job.build_signing_job.signed_object[0].s3[0].bucket
  s3_key           = aws_signer_signing_job.build_signing_job.signed_object[0].s3[0].key
  source_code_hash = data.archive_file.python_file.output_base64sha256
  function_name    = var.name
  role             = aws_iam_role.lambda_role.arn
  handler          = "handler.lambda_handler"
  runtime          = "python3.12"
  
  code_signing_config_arn = aws_lambda_code_signing_config.configuration.arn
  
  kms_key_arn = aws_kms_key.encryption.arn
  vpc_config {
    subnet_ids         = aws_subnet.private[*].id
    security_group_ids = [aws_security_group.lambda.id]
  }
  tracing_config {
    mode = "Active"
  }
  dead_letter_config {
    target_arn = aws_sqs_queue.dlq.arn
  }
}

The s3_bucket and s3_key reference the signed artifact produced by the signing job. Terraform resolves aws_signer_signing_job.build_signing_job.signed_object[0].s3[0] to the output location where AWS Signer wrote the signed package in step 3. This ensures Lambda always deploys the signed version, never the unsigned source.

The code_signing_config_arn ties the Lambda function to the code signing configuration from step 1. At deploy time, Lambda validates the artifact’s signature against the allowed publishers in that configuration. If the signature is missing, expired, or from an untrusted profile, the deployment is rejected.

5. Implement Security Best Practices

This implementation includes additional security layers beyond code signing to create a comprehensive security framework.

5.1 Create a KMS key with automatic key rotation and a least-privilege policy:

resource "aws_kms_key" "encryption" {
  enable_key_rotation     = true
  description             = "Key to encrypt all the cloud resources in ${var.name}."
  deletion_window_in_days = var.deletion_window_in_days
}

data "aws_iam_policy_document" "encryption_policy" {
  statement {
    sid    = "Enable IAM User Permissions"
    effect = "Allow"
    principals {
      type        = "AWS"
      identifiers = ["arn:aws:iam::${data.aws_caller_identity.current.account_id}:root"]
    }
    actions = [
      "kms:Encrypt", "kms:Decrypt", "kms:ReEncrypt*",
      "kms:GenerateDataKey*", "kms:DescribeKey",
      "kms:Create*", "kms:Enable*", "kms:List*",
      "kms:Put*", "kms:Update*", "kms:Revoke*",
      "kms:Disable*", "kms:Get*", "kms:Delete*",
      "kms:ScheduleKeyDeletion", "kms:CancelKeyDeletion",
      "kms:TagResource", "kms:UntagResource"
    ]
    resources = [aws_kms_key.encryption.arn]
  }
  statement {
    sid    = "Allow CloudWatch to use the key"
    effect = "Allow"
    principals {
      type        = "Service"
      identifiers = ["logs.amazonaws.com"]
    }
    actions = [
      "kms:Encrypt", "kms:Decrypt", "kms:ReEncrypt*",
      "kms:GenerateDataKey*", "kms:DescribeKey", "kms:CreateGrant"
    ]
    resources = [aws_kms_key.encryption.arn]
    condition {
      test     = "ArnEquals"
      variable = "kms:EncryptionContext:aws:logs:arn"
      values   = [local.cloudwatch_log_group_arn]
    }
  }
  statement {
    sid    = "Allow Lambda to use the key"
    effect = "Allow"
    principals {
      type        = "Service"
      identifiers = ["lambda.amazonaws.com"]
    }
    actions = [
      "kms:Encrypt", "kms:Decrypt", "kms:ReEncrypt*",
      "kms:GenerateDataKey*", "kms:DescribeKey", "kms:CreateGrant"
    ]
    resources = [aws_kms_key.encryption.arn]
    condition {
      test     = "StringEquals"
      variable = "kms:EncryptionContext:LambdaFunctionName"
      values   = [var.name]
    }
    condition {
      test     = "StringEquals"
      variable = "aws:RequestedRegion"
      values   = [var.region]
    }
  }
}

resource "aws_kms_key_policy" "encryption" {
  key_id = aws_kms_key.encryption.id
  policy = data.aws_iam_policy_document.encryption_policy.json
}

The enable_key_rotation = true setting enables automatic annual key rotation, a recommended security practice. The policy uses aws_iam_policy_document instead of inline JSON for better readability and validation. Each statement is scoped to a specific principal: the root account gets administrative access with enumerated actions (not kms:*), CloudWatch Logs can only use the key for the specific log group via the kms:EncryptionContext:aws:logs:arn condition, and Lambda access is constrained to the specific function name and region. This ensures no service can use the key beyond its intended scope.

5.2 Configure VPC with private subnets for Lambda isolation:

resource "aws_vpc" "main" {
  cidr_block           = var.vpc_cidr
  enable_dns_hostnames = true
  enable_dns_support   = true
}

resource "aws_subnet" "private" {
  count             = length(var.subnet_cidr_private)
  vpc_id            = aws_vpc.main.id
  cidr_block        = var.subnet_cidr_private[count.index]
  availability_zone = data.aws_availability_zones.available.names[count.index]
}

The enable_dns_hostnames and enable_dns_support settings are required for VPC endpoints to resolve via private DNS.

5.3 Add VPC endpoints so the Lambda function can reach CloudWatch Logs and SQS from the private subnets without internet access:

resource "aws_vpc_endpoint" "logs" {
  vpc_id              = aws_vpc.main.id
  service_name        = "com.amazonaws.${var.region}.logs"
  vpc_endpoint_type   = "Interface"
  subnet_ids          = aws_subnet.private[*].id
  security_group_ids  = [aws_security_group.endpoint_sg.id]
  private_dns_enabled = true
}

resource "aws_vpc_endpoint" "sqs" {
  vpc_id              = aws_vpc.main.id
  service_name        = "com.amazonaws.${var.region}.sqs"
  vpc_endpoint_type   = "Interface"
  subnet_ids          = aws_subnet.private[*].id
  security_group_ids  = [aws_security_group.endpoint_sg.id]
  private_dns_enabled = true
}

The Lambda function uses an SQS dead letter queue and hence requires the SQS endpoint. The private_dns_enabled setting allows the Lambda function to reach these services using their standard endpoints without any code changes. For the complete networking configuration including security groups and route tables, see the GitHub repository.

These security measures create defense in depth, combining code signing with encryption, network isolation, and secure communication channels.

6. Deploy the Infrastructure

With all the resources defined, initialize and deploy the complete infrastructure:

terraform init
terraform plan
terraform apply

The terraform init command downloads the required providers. The terraform plan command previews all the resources that will be created, and terraform apply provisions the entire stack — signing profile, S3 bucket, signing job, Lambda function, and all supporting infrastructure — in the correct dependency order.

Verification

After the deployment completes, verify that the signing profile, signing job, and Lambda code signing configuration are correctly set up.

Verify the signing profile is active:

aws signer list-signing-profiles --query "profiles[].{Name:profileName,Status:status}" --output table

Confirm the signing job completed successfully:

aws signer list-signing-jobs --status Succeeded --query "jobs[0].{JobId:jobId,Status:status,SignedObject:signedObject}" --output table

Verify the Lambda function has code signing enforced:

aws lambda get-function-code-signing-config --function-name <YOUR-FUNCTION-NAME> --query "{CodeSigningConfigArn:CodeSigningConfigArn}" --output table

Each command should return results confirming the resources are active and properly configured. If any command returns empty results, review the Terraform output for errors during deployment.

Cleaning Up

To avoid incurring future charges, delete the resources created in this walkthrough using the command:

terraform destroy

This command removes all resources including the Lambda function, S3 bucket, VPC components, and KMS keys. This command also deletes the signing profile and code signing configuration.

Conclusion

In this post, you learned how to implement AWS Lambda code signing using Terraform to create a secure, automated deployment pipeline. This solution ensures code integrity, prevents unauthorized modifications, and helps meet compliance requirements while maintaining operational efficiency through infrastructure as code.

The implementation demonstrates defense-in-depth security practices including cryptographic signing, encryption at rest, network isolation, and comprehensive monitoring. By automating the entire process with Terraform, you can consistently deploy secure Lambda functions across multiple environments and maintain security standards at scale.

For more information about AWS Lambda security best practices, see the AWS Lambda Developer Guide. To learn more about AWS Signer, visit the AWS Signer Developer Guide.


About the authors

Sourav Kundu

Sourav is a seasoned DevOps Consultant who specializes in helping organizations securely migrate to and efficiently build on the AWS cloud using modern software engineering practices. He believes that democratizing cloud knowledge is essential for driving innovation and is committed to helping others succeed in their cloud journey.

Joyson Neville Lewis

Joyson is a Sr. Conversational AI Architect with AWS Professional Services. Joyson worked as a Software/Data engineer before diving into the Conversational AI and Industrial IoT space. He assists AWS customers to materialize AI outcomes using Voice Assistant/Chatbot and IoT solutions.

Zero-Day Exploit Against Windows BitLocker

Post Syndicated from Bruce Schneier original https://www.schneier.com/blog/archives/2026/05/zero-day-exploit-against-windows-bitlocker.html

It’s nasty, but it requires physical access to the computer:

The exploit, named YellowKey, was published earlier this week by a researcher who goes by the alias Nightmare-Eclipse. It reliably bypasses default Windows 11 deployments of BitLocker, the full-volume encryption protection Microsoft provides to make disk contents off-limits to anyone without the decryption key, which is stored in a secured piece of hardware known as a trusted platform module (TPM). BitLocker is a mandatory protection for many organizations, including those that contract with governments.

Slashdot thread. And here’s Nightmare-Eclipse’s GitHub account.

Кирил Златков между крехкостта на рисунката и овладяната форма

Post Syndicated from Стефан Иванов original https://www.toest.bg/kiril-zlatkov-mezhdu-krehkostta-na-risunkata-i-ovladyanata-forma/

Кирил Златков между крехкостта на рисунката и овладяната форма

Поводът за разговора е изложбата „Кирил Златков. Рисунки“ в СБХ на „Шипка“ 6, в която за първи път се показват непознати досега рисунки на художника. Изложбата, създадена от кураторския тандем Свобода Цекова и Антон Стайков (студио формат.бг), обхваща впечатляващо разнообразие от техники и материали, а единственият превод на образите е музиката, избрана и предоставена специално за събитието от норвежкия тромпетист и композитор Нилс Петер Молвер. По време на срещата ни Кирил говори за рисуването като узнаване, процес, при който конкретни лица, спомени и впечатления изплуват на листа, без художникът да ги е търсил съзнателно. Той разсъждава и за бездарието на съвременната реалност, за защитата на буквата като антропологична кауза и за възпитанието чрез личен пример. Изложбата може да бъде видяна до 28 май с произведения и на допълнителни места в София – в Софийския университет, книжарница „Махала“, „Център 24“ и „Дюкян Меломан“.

Георги Господинов пише, че Вашите картини имат „тихо и деликатно излъчване и спотаени истории“. Възможно ли е днес именно тихото изкуство да се окаже най-радикално, защото отказва да крещи, да продава себе си и да се превръща в шум?

Не само е възможно, а силно се надявам да е така. Това е най-шумното време от всички до момента. Всеки личен глас се появява паралелно със задължението да се изяви и шумът идва от само себе си. Дори понякога наистина ни пречи да чуем нещо стойностно. Тишината е избор, но не може да е самоцелна, трябва да е част от материята. А това се овладява с възрастта, с последователни, често ежедневни усилия. В един момент тишината започва да се прокрадва като част от естественото излъчване на работите.

В много от рисунките човешкото лице е едновременно маска, рана и пейзаж. Какво може да разкаже едно лице, което думите вече не успяват да изрекат?

Всичко може да внуши човешкото лице. Не непременно с портрет, който търси конкретна прилика, но със сигурност с богатството на излъчването си. Особено напоследък то ми се струва ключов материал, който до голяма степен е като музиката, защото не се нуждае от преводи, не се нуждае от обяснения и има силата да приковава и да отваря по-дълбоки пространства.

В текстовете за изложбата се говори за „изкуство без обяснения“. Живеем обаче във време, което непрекъснато настоява всичко да бъде обяснено и позиционирано. Може ли мълчанието на една рисунка да бъде форма на съпротива?

В моите рисунки мълчанието вероятно се е получило от само себе си. Рисунката е най-непосредственото общуване на художника с всичко около него. Когато е вглъбен и изолиран от средата, той е потопен в тишина, но тя не е формална. В главата му бушува, напира нещо, което трябва да добие форма. Тишината е обертон, елемент от амалгамата на всичко, което представлява едно произведение. А хубавото на рисунката е, че не е затворена, всяка може да даде начало на нещо следващо, на по-голям формат, на произведение с друга техника. Тя маркира нещо съществено.

Тоест във всяка рисунка по презумпция има нещо обнадеждаващо?

Точно така. Може да изглежда завършена, но маркира етап. Дори изложена в рамка и фиксирана, тя е нещо много повече от физическото си присъствие.

Работите Ви носят усещане за вътрешна тревога, но и за деликатност към човека. Как се рисува човешкото, без да се изпадне нито в цинизъм, нито в сантименталност?

Циничното ме изкушава, по-точно казано красноречивото и оригиналното, защото имам опит в изкуството на плаката, където сарказмът е добре дошъл. Но в тези рисунки съм се старал да не мисля. Няма формулиран замисъл, това е пренасяне на образи, които изплуват в съзнанието. Рисуването е точно това.

Нещо дълбинно, интуитивно?

Да. В работите няма хумор, няма цинизъм. Те отнякъде са се появили, но не знам откъде. Имат най-различни влияния, често съвсем конкретни лица, които остават из мозъка. Седнеш да рисуваш – и си кажеш впоследствие, че това прилича на дадена актриса, че тук има черти на едно момиче, че това прилича на спомените ми за един приятел. Но докато съм рисувал, не съм си мислил за него…

Рисуването като узнаване?

Да. Това е красотата на материята. Върху чертите се отразяват неща, които са направили впечатление на художника, а той си дава сметка едва когато завърши рисунката. Или доста време след това. Понякога дори животни, които рисувам, приличат на хора. А ако седнеш да засилиш някоя прилика нарочно, най-често не се получава. Както казва Пикасо, „аз не рисувам жена, аз рисувам картина“.

Кирил Златков между крехкостта на рисунката и овладяната форма
Кипариси II (Патра), 2024

Ако трябваше да нарисувате духа на 2026-та само с един образ, как би изглеждал той?

Това е задача за плакатист, какъвто безспорно бях, но такова обобщение ми е трудно дори за осмисляне. Предпочитам някой куратор да отговори с работи на съвременни художници. Цялото Венецианско биенале като сбор от образи вероятно е нещо такова.

Работил сте върху корици на книги на Марин Бодаков, Хармс, Бруно Шулц, Кржижановски – все автори, при които реалността винаги е тревожна и сънувана. Имате ли чувството, че самата реалност днес прилича на литература от ХХ век, която някога сме смятали за алегория?

Да. Но литературните произведения са нещо сериозно, а образът на реалността днес, за да е адекватен, трябва да бъде нещо несериозно, неталантливо, грубо, нелепо, бездарно даже. Ако възложите на човек, който владее изкуството си, да пресъздаде реалността, той ще поеме по пътя на изкуството и ще сбърка. Изкуството е осмисляне, не констатация, трябва дистанция. А реалността е все по-нелепа и все по-тъжна. Бяхме достатъчно красиво оглупели през последните десетилетия, а през последните пет-шест години абсурдът се намести на мястото на разума. Но изкуството има нужда от пауза, ако ще произведе трайни стойности. Виждам художници и музиканти да реагират на всичко, но не съм сигурен, че това е най-полезното за хората.

Вие мислите едновременно за образа, буквата и шрифта. Какво се случва с човешкото внимание в епоха, в която и образите, и думите се консумират с такава скорост?

По-важна за мен е не скалата бързо–бавно, а внимателно–невнимателно. Сега сме затънали в невнимателното, в повърхностното. Но не искам да слагам етикет на това – наши близки, а и самите ние сме част от същата тенденция.

В изложбата музиката на Нилс Петер Молвер е своеобразен превод на рисунките. Какво може музиката да отключи в образа, което рисунката не може да понесе сама?

Молвер има излъчване, което винаги ми е било близко – хладен, не особено комуникативен, но пропит с вътрешна топлина от емоции и чувства. Звукът му е много богат и ангажира вниманието. Помага и за потапянето в една благородна атмосфера, което в залите понякога е трудно да бъде усетено. Най-добре е в тишина, но понякога тишината резонира твърде силно и затова музиката настройва, опъва струни, подобни на моите визуални структури.

Вие сте и родител. Какво е да отглеждаш дете във време на постоянна тревожност, войни и климатична несигурност? На какво най-много Ви се иска да научите едно дете?

Най-устойчивите неща, които децата запомнят, не са онези, които успяваме вербално да формулираме. Възпитаваме с личен пример, с поведение, с вкус, с нещата, които четем и слушаме, с местата, които посещаваме, с времето и вниманието, което отделяме за музеи и църкви, за разходки в природата. В това виждам единствената надежда за някакви хармонични същества, които да дойдат след нас.

Има ли етична отговорност в самия акт на рисуване; важно ли е не само какво изобразяваш, а и как гледаш към света, към другия човек?

Със сигурност, но това е базова предпоставка за каквото и да е изкуство. Материята на произведението трябва да е убедителна, а това се учи и овладява. Не е достатъчен наивен флирт с изкуството. Без сериозно владеене на формата произведението не може да бъде убедително. Във всяко изкуство е така.

Част от рисунките изглеждат, сякаш са намерени в междинен свят, между съня и документа, между личното и общочовешкото. Интересува ли Ви рисунката като свидетелство?

Рисунката би могла да е като щракване на снимка или хайку, но за мен е малко по-бавна и по-устойчива. Много ми харесва как го определихте – „междинен свят“. Определено е така. Тя притежава една крехкост, която при по-сериозни техники и по-дълго работене понякога се губи. Старал съм се да не бягам от тази крехкост.

Все едно, ако се дръпне една нишка от рисунката, всичките линии ще се разпилеят.

Всяка линия си има роля, която не се поддава на конкретно описание, но е част от ансамбъл. Един да сгреши – и веднага се чува.

Кои са любимите Ви рисувачи?

Пикасо, най-необятният рисувач, рисувал постоянно и по много. Всичките, които харесвам, са рисували така, художникът трябва да рисува постоянно. И Кете Колвиц ми е особено любима. Нейните неща са пример за единство между крехкостта на рисунката и овладяната форма. Това единство е първата крачка, която привлича вниманието на зрителя. След нея той може да бъде убеден във всичко друго, което иска да каже художникът.

Вие сте свързан с каузата за българската кирилица. Какво означава за Вас защитата на буквата, културна кауза ли е, или вече и антропологична?

Определено и антропологична. Отдалечаваме се от буквата с всеки изминал ден. Пишем все по-малко и все по-малко разбираме смисъла на красивия знак, нуждата от него. Влиянието на писмеността върху духа на човека е от най-сложните неща, затова тя е много консервативна област, но и много сложна. Старая се това знание да не стане жертва на ентропията. Всяка добре направена буква е стъпка в тази посока на устояване.

Има ли нещо, което сте искали да нарисувате, но поради една или друга причина никога не сте?

Има много такива неща. Трудно рисувам архитектура, а понякога много ми се иска. Това е черта на специфичния талант. Но човек не знае, може в следващия момент да се появи и нещо такова на листа.

Кирил Златков между крехкостта на рисунката и овладяната форма
Банер за изложбата © Филип Попов. Рисунка: Кирил Златков, Мъж, поглед нагоре II, 2025

Project Glasswing: what Mythos showed us

Post Syndicated from Grant Bourzikas original https://blog.cloudflare.com/cyber-frontier-models/

For the last few months, we’ve been testing a range of security-focused LLMs on our own infrastructure. These LLMs help identify potential vulnerabilities in our own systems, so we can fix them – and they also show us what attackers are going to be able to do with the latest models.

None of these LLMs has captured more attention than Mythos Preview, from Anthropic. A few weeks ago, we were invited to use Mythos Preview as part of Project Glasswing. We soon pointed it at more than fifty of our own repositories – to see what it would find, and to see how it works.

This post shares what we observed, what the models did well and what they didn’t, and how the architecture and process around them needs to change, so they can be used at scale.

What changed with Mythos Preview

Mythos Preview is a real step forward, and it’s worth saying that plainly before getting into anything else. We’ve been running models against our code for a while now, and the jump from what was possible with previous general-purpose frontier models to what Mythos Preview does today is not just a refinement of what came before.

It’s a different kind of tool doing a different kind of work, and that makes a clean apples-to-apples comparison to earlier models difficult. So rather than trying to benchmark Mythos Preview against general-purpose frontier models, it’s more useful to describe what it can actually do, and two features that stood out across the work we did with Mythos Preview:

  • Exploit chain construction – A real attack rarely uses one bug. It chains several small attack primitives together into a working exploit. For instance, it might turn a use-after-free bug into an arbitrary read and write primitive, hijack the control flow, and use return-oriented programming (ROP) chains to take full control over a system. Mythos Preview can take several of these primitives and reason about how to combine them into a working proof. The reasoning it shows along the way looks like the work of a senior researcher rather than the output of an automated scanner.

  • Proof generation – Finding a bug and proving it’s exploitable are two different things, and Mythos Preview can do both. It writes code that would trigger the suspected bug, compiles that code in a scratch environment, and runs it. If the program does what the model expected, that’s the proof. If it doesn’t, the model reads the failure, adjusts its hypothesis, and tries again. The loop matters as much as the bugs it finds, because a suspected flaw without a working proof is speculation, and Mythos Preview closes that gap on its own.

Some of what we describe above is not entirely unique to Mythos Preview. When we ran other frontier models through the same harness, they found a fair number of the same underlying bugs, and in some cases they got further than we expected on the reasoning side too. Where they fell short was at the point of stitching the pieces together. A model would identify an interesting bug, write a thoughtful description of why it mattered, and then stop, leaving the actual chain unfinished and the question of exploitability open. What changed with Mythos Preview is that a model can now take those low-severity bugs (which would traditionally sit invisible in a backlog) and chain them into a single, more severe exploit. 

Model refusals in legitimate vulnerability research

The Mythos Preview model provided by Anthropic, as part of Project Glasswing, did not have the additional safeguards that are present in generally available models (like Opus 4.7 or GPT-5.5).

Despite this, the model organically pushes back on certain requests – much like the cyber capabilities that made it useful for vulnerability hunting, the model has its own emergent guardrails that sometimes cause it to push back on legitimate security research requests. But as we found, these organic refusals aren’t consistent – the same task, framed differently or presented in a different context, could produce completely different outcomes as illustrated in the examples below.


Example of Mythos Preview pushing back on building a working proof of concept 

For example, the model initially refused to do vulnerability research on a project, then agreed to perform the same research on the same code after an unrelated change to the project’s environment. Nothing about the code being analyzed had changed.

In another case, the model found and confirmed several serious memory bugs in a codebase, and then refused to write a demonstration exploit. The same request, framed differently, got a different answer, and even the same request can produce different outcomes across runs due to the probabilistic nature of the model. Semantically equivalent tasks can produce opposite outcomes depending on how and when they’re presented to the model.

This matters because while the model’s organic refusals/guardrails are real, they aren’t consistent enough to serve as a complete safety boundary on their own. That’s precisely why any capable cyber frontier model made generally available in the future must include additional safeguards on top of this baseline behavior – making it appropriate for broader use outside of a controlled research context like Project Glasswing.

The signal-to-noise problem

One of the hardest parts of triaging security vulnerabilities is deciding which bugs are real, which are exploitable, and which need fixing now. This was a hard problem even in the pre-AI world. AI vulnerability scanners and AI-generated code have made it worse, and at Cloudflare we’ve built multiple post-validation stages to deal with it.

Two factors dominate the noise rate:

  • Programming language – C and C++ give you direct memory control and, with it, bug classes – buffer overflows, out-of-bounds reads and writes – that memory-safe languages like Rust eliminate at compile time. We saw consistently more false positives from projects written in memory-unsafe languages.

  • Model bias – A good human researcher tells you what they found and how confident they are. Models don’t. Ask a model to find bugs, and it will find them, whether the code has any or not. Findings come back hedged with “possibly,” “potentially,” “could in theory,” and the hedged findings vastly outnumber the solid ones. That’s a reasonable bias for an exploratory tool. It’s a ruinous one for a triage queue, where every speculative finding spends human attention and tokens to dismiss, and that cost compounds across thousands of findings.

Mythos Preview represents a clear improvement here, particularly in its ability to chain primitives – combining multiple vulnerabilities into a working proof of concept rather than reporting them in isolation. A finding that arrives with a PoC is a finding you can act on, and it means far less time spent asking “is this even real?”

Our harnesses are deliberately tuned to over-report, so we see more (and miss less), which comes with a lot more noise. But at triage time, Mythos Preview’s output has noticeably higher quality: fewer hedged findings, clearer reproduction steps, and less work to reach a fix-or-dismiss decision.

Why pointing a generic coding agent at a repo doesn’t work

When we first started AI-assisted vulnerability research last year, our instinct was the obvious one: point a generic coding agent at an arbitrary repository and ask it to discover vulnerabilities. This approach works, in the sense that the model will produce findings, but it doesn’t work in producing meaningful coverage of a real codebase and identifying findings of value. There are two main reasons for this:

  • Context – Coding agents are tuned for one focused stream of work: building a feature, fixing a bug, writing a refactor. They ingest a lot of source code, hold a single hypothesis at a time, and iterate against it. That’s exactly the wrong shape for vulnerability research, which is narrow and parallel by nature. A human researcher picks one specific thing to look at and investigates it thoroughly. That one thing might be a single complex feature, transitions across security boundaries, or a specific vulnerability class like command injections, where attacker input ends up being run as a shell command. Then they do it again, for a different feature, security boundary, or vulnerability class, several thousand times across the codebase. A single agent session (even with subagents) against a hundred-thousand-line repository can cover maybe a tenth of a percent of the surface in a useful way before the model’s context window fills up and compaction kicks in – potentially discarding earlier findings that would have mattered.

  • Throughput – A single-stream agent does one thing at a time, but real codebases need many hypotheses against many components at once, with the ability to fan out further when something interesting turns up. You can drive a single agent harder, but at some point you stop being limited by the model and start being limited by the shape of the interaction itself. Using the model directly in a coding agent turns out to be fine for manual investigation when a researcher already has a lead and wants a second pair of eyes. However, it’s the wrong tool for achieving high coverage. Once we accepted that, we stopped trying to make Mythos Preview do the wrong job and started building the harness around it instead.

What a harness actually fixes

Four lessons came out of running the work at scale, and each one pointed to the need for a harness that manages the overall execution:

  • Narrow scope produces better findings – Telling the model “Find vulnerabilities in this repository” makes it wander. Telling it “Look for command injection in this specific function, with this trust boundary above it, here’s the architecture document and here’s prior coverage of this area” makes it do something much closer to what a researcher would actually do.

  • Adversarial review reduces noise – Adding a second agent between the initial finding and the queue – one with a different prompt, a different model, and no ability to generate its own findings – catches a lot of the noise that the first agent would miss if it just checked its own work. It turns out that putting two agents in deliberate disagreement is way more effective than just telling one agent to be careful.

  • Splitting the chain across agents produces better reasoning – Asking “Is this code buggy?” and “Can an attacker actually reach this bug from outside the system?” are two different questions, and the model is better at each one when you ask them separately, because each question is narrower than the combined version.

  • Parallel narrow tasks beat one exhaustive agent – Coverage improves when many agents work on tightly scoped questions and we deduplicate the results afterward, rather than asking one agent to be exhaustive.

Each of those observations is about model behavior, and put together they describe something that isn’t a chat interface anymore. It’s a harness that helps you achieve the final outcomes. The first steps to building a harness are simple, as you can ask the model to help, which is what we did. We used Mythos Preview to build on, tailor, and improve our original harnesses to suit its strengths.

An example of what a harness looks like in practice is described below.

Our vulnerability discovery harness

Here’s what our vulnerability discovery harness looks like, stage by stage. It was used to scan live code across our runtime, edge data path, protocol stack, control plane, and the open-source projects we depend on.


Stage What it does Why it matters

Recon
An agent reads the repository from the top down, fans out to subagents responsible for each subsystem, and produces an architecture document covering build commands, trust boundaries, entry points, and likely attack surface. It also generates the initial queue of tasks for the next stage.   Gives every downstream agent shared context. Cuts the wander problem.
 
Hunt
Each task is one attack class paired with a scope hint. Hunters (the agents that actually look for bugs) run concurrently, typically around fifty at once, each fanning out to a handful of exploration subagents. Each hunter has access to tools that compile and run proof-of-concept code in a per-task scratch directory. This is where most of the work happens. Many narrow tasks in parallel, not one exhaustive agent.

Validate
An independent agent re-reads the code and tries to disprove the original finding. It uses a different prompt and has no ability to emit new findings of its own. Catches a meaningful fraction of the noise the hunter wouldn’t catch when reviewing its own work.

Gapfill
Hunters flag areas they touched but didn’t cover thoroughly. Those areas get re-queued for another pass. Counteracts the model’s tendency to drift toward attack classes it has already had success with.

Dedupe
Findings that share the same root cause collapse into a single record. Variant analysis is a feature, not a way to inflate the queue with duplicates.

Trace
For each confirmed finding in a shared library, a tracer agent fans out (one instance per consumer repository), uses a cross-repo symbol index, and decides whether attacker-controlled input actually reaches the bug from outside the system. Turns “there is a flaw” into “there is a reachable vulnerability.” This is the stage that matters most.

Feedback
Reachable traces become new hunt tasks in the consumer repositories where the bug is actually exposed. Closes the loop. The pipeline gets better as it runs.

Report
An agent writes a structured report against a predefined schema, fixes any validation errors against that schema itself, and submits the report to an ingest API. Output is queryable data, not free-form prose.

What this means for security teams

The loudest reaction to Mythos Preview from other security leaders has been about speed – scan faster, patch faster, compress the response cycle. More than one team we have spoken with is now operating under a two-hour SLA from CVE release to patch in production. The instinct is understandable: when the attacker timeline shortens, the defender timeline has to shorten with it. Faster is not going to be enough, and we think a lot of teams are about to spend a lot of time, effort, and money learning that the hard way.

Patching faster does not change the shape of the pipeline that produces the patch. If regression testing takes a day, you cannot get to a two-hour SLA without skipping it, and the bugs you ship when you skip regression testing tend to be worse than the bugs you were trying to patch. We learned a version of this when we tried letting the model write its own patches and watched a few go out that fixed the original bug while quietly breaking something else the code depended on.

The harder question is what the architecture around the vulnerability should look like. The principle is to make exploitation harder for an attacker even when a bug exists, so that the gap between when a vulnerability is disclosed and when it is patched matters less. That means defenses that sit in front of the application and block the bug from being reached. It means designing the application so that a flaw in one part of the code cannot give an attacker access to other parts. It means being able to roll out a fix to every place the code is running at the same moment, rather than waiting on individual teams to deploy it. 

We also recognize this topic cuts both ways. The same capabilities that helped us find bugs in our own code will, in the wrong hands, accelerate the attack side against every application on the Internet. Cloudflare sits in front of millions of those applications, and the architectural principles described above are exactly the ones our products are built to apply on behalf of customers. We will share more on what that means for customers in the weeks ahead.

If your team is doing similar work and would like to compare notes, reach out to us at [email protected].

Our research with Mythos Preview was conducted in a controlled environment against our own code; every vulnerability surfaced through this work was triaged, validated, and remediated where action was needed under Cloudflare’s formal vulnerability management process.

This work was a team effort. Thanks to Albert Pedersen, Craig Strubhart, Dan Jones, Irtefa Fairuz, Martin Schwarzl, and Rohit Chenna Reddy for their contributions to the research, engineering, and analysis behind this blog post.

Kernel prepatch 7.1-rc4

Post Syndicated from corbet original https://lwn.net/Articles/1073193/

The 7.1-rc4 kernel prepatch is out for
testing.

Some of the documentation updates might be worth highlighting: the
continued flood of AI reports has basically made the security list
almost entirely unmanageable, with enormous duplication due to
different people finding the same things with the same
tools. People spend all their time just forwarding things to the
right people or saying “that was already fixed a week/month ago”
and pointing to the public discussion.

Which is all entirely pointless churn, and we’re making it clear
that AI detected bugs are pretty much by definition not secret, and
treating them on some private list is a waste of time for everybody
involved – and only makes that duplication worse because the
reporters can’t even see each other’s reports.

(He is referring to this
pull request
with patches from Willy Tarreau defining what constitutes a security
bug
and responsible
ways to use AI to find bugs
).

Dell XPS 14 2026 Review Thin and Light Done Right

Post Syndicated from Ryan Smith original https://www.servethehome.com/dell-xps-14-2026-review-thin-and-light-done-right-intel/

Dell’s XPS 14 marks a return to form for the company. After stumbling in 2025 with its premium laptops, the thin and light XPS 14 is a fantastic entry in the XPS line thanks to its new chassis and powerful Intel Panther Lake processor

The post Dell XPS 14 2026 Review Thin and Light Done Right appeared first on ServeTheHome.

2026-05-17 TuxCon 2026

Post Syndicated from Vasil Kolev original https://vasil.ludost.net/blog/?p=3526

(да, да, имам да пиша по-често)

Този уикенд ходих на TuxCon 2026, да помагам с видеото, и на практика да тестваме новия FOSDEM setup в production.

(Новият setup е една кутия, наша собствена камера, и видео миксер на самата кутия. Супер забавно е, ще го доразкажа някой път.)

Събитието беше доста приятно, с технически лекции, прилична посещаемост, и забавни събирания преди и след, на бира, да си говорим. Не съм особен фен на Пловдив (на няколко пъти там съм щял да умра от жега), но сега дори и времето беше сравнително ок.

Та, открихме сезона тази година, надявам се да мога да отида на още няколко събития и да видим новия setup как се справя. За сега основният резултат от този тест беше този commit да си форсираме на каква разделителна способност ни е изхода, че има проблем с fazantix, когато двата изхода (stream и проектор) са на различна разделителна способност.

(also, обявихме OpenFest 2026 за 7-8 ноември в Интерпред, ама може би ще го напиша допълнително отделно)

Напън за блокаж на журналистически разследвания и какво виждаме три месеца по-късно

Post Syndicated from Боян Юруков original https://yurukov.net/blog/2026/georgiev-laje-2/

В края на 2025-та отиващото си скоро правителство на Желязков промени правилника за вписванията. Това се готвеше от месеци, а тогавашния министър на правосъдието Георги Валентинов Георгиев още по-отдавна разораваше почвата с твърдения, че се бори срещу имотните измами. Даже се снима с няколко баби за пред медиите.

Много журналисти и организации се обявиха срещу промяната, защото не беше доказан какъвто и да е възпиращ ефект срещу имотните измами, но за сметка на това съвсем ясно затрудняваше значително журналистическите разследвания. Това, всъщност, пролича като най-ярката цел на тази промяна, особено предвид историята и работата на бившия общински съветник от ГЕРБ, няколкото разследвания за корупция сред съпартийците му и данните за възможното разпродаване на 4400 държавни имота, за което писах. Именно, защото ми беше полезен инструмент за няколко материала поместени тук, описах моите резерви спрямо текста и заедно с препратка към критичните становища на юристи. Общественото обсъждане и с какви аргументи са излезли вносителите все още може да се намери на страницата на кабинета.

Проба, 1, 2, 3… месеца

Все пак, промяната беше подписана и влезе в сила на 15-ти януари. Реших да пробвам как работи „новия режим“ месец по-късно. Не го направих веднага, защото исках да дам време на и без това претоварената Агенция по вписванията да намери начин да приложи новите правила, особено предвид, че създават много повече работа на съдиите по вписванията. Междувременно журналисти се оплакаха, че изпитват трудности да получават информация.

На 13-ти февруари исках незаверен препис на нотариалният акт, с който министърът в оставка Георгиев е дарил апартамент на съпругата си. Трябваше ми за друг материал, който пиша. Именно това писах в причините да търся препис – за журналистическо разследване. Доколкото няколко елемента като имена, дати и от скоро – оценка на имота са достъпни през портала на Имотния регистър, в нотариалните актове има много детайли, които са важни и в отделни случаи сочат към потенциална корупция, укриване на доходи, фиктивни прехвърляния и прочие. Платих таксата от 2.5 лв. и зачаках.

Още на следващия ден получих отговор, че имат нужда от повече информация. Първо – трябва да уточня точно за кое лице упоменато в акта имам интерес в разследването си, второ – повече подробности за самото разследване, както и доказателство, че съм журналист. Предоставих информацията както бяха инструкциите, описах, че не работя в никоя медия, но имам блог и статии се поместват в други медии. Отговор не последва. Питах няколко пъти за състоянието и след месец се сетих да звънна. Оказа се, че преписката е затворена и пряко на инструкциите просто да им пиша, трябвало да подам ново заявление.

Подадох ново заявление със същата информация и платих пак 2.5 лв. за преписката. Още на следващия ден ми казаха, че задължително трябва да предоставя журналистическа карта. Такава нямам. Всъщност, такъв официален документ не съществува по принцип. Затова си направих собствена с ChatGPT. Би била фалшификат, ако се представях за журналист от Капитал или БТА или член на някой съюз, но не това правя аз. Съвсем оригинална си е за проекта ми GovAlert. Няма нормативна дефиниция какво е журналистическа карта или изискване да е обвързана с организация с определена дейност или въобще регистрирана организация. В този смисъл журналистическата карта е толкова валидна, колко институциите решат да я припознаят.

И да, на картата пише „Репулика Българи“. Според ChatGPT така се изписва на печат и реших да го оставя да видя дали някой ще забележи от агенцията. Този път вече знаех, че трябва да подам ново заявление, а не да чакам. Копирах всичко до тук, добавих картата и след няколко часа получих преписката.

В миналото не се е налагало да предоставям такава информация, особено не и да обяснявам в кое лице или фирма се вглеждам и каква е целта на разследването ми. Към момента, в който получих нотариалният акт, Георгиев вече не беше министър. Дори преди това не мога да твърдя, че е упражнявал натиск да не бъде предоставена информация или че е бил изрично уведомен. С промените обаче има такава възможност от ръководната си позиция, но нямам причини да смятам, че се възползвал.

Това в известен смисъл е дори по-лошо – този утежнен процес е вече новият „нормален“ и по дизайн е направен да работи точно така. Той и други в кабинета се оправдаваха, че нямало всъщност да се пречи на журналистическите разследвания. Оказва се, че съвсем не е така и станах свидетел. Съдиите по вписванията са натоварени с нелеката задача да преценяват дали журналисти могат да разследват министри и магистрати, както и да бъдат между чука и наковалнята между общественото мнение и нужда от прозрачност и схемите на политици и икономически интереси.

С други думи, тестът ми на „новия режим“ не откри нарочното вмешателство станало възможно с новия текст на правилника, а новото базовото ниво на влошена прозрачност и затруднено разследване на корупция.

Впрочем, както е по същия правилник можех да си върна таксите за неизпълнените заявления. Попълва се този формуляр с извлечение от плащането. Пратих го през ССЕВ на 13-ти март отново като проба дали работи процесът. Едната такса получих месец по-късно – на 17-ти април, а другата преди седмица на 8-ми май.

Исканията и отказите за преписки

Междувременно, исках по ЗДОИ от Агенцията по вписванията данните за всички заявки по преписки по чл. 51 за последните 16 години. Тъй като е имало промени в правилата междувременно, особено обсъжданото тук, исках справката е по новия смисъл на правилника, т.е. предоставиха ми отделно заверени по ал. 1 и незаверени по ал. 3 и отделно незаверени по ал. 1. Общо данните показват 4.8 милиона заявки за цялата страна от 2010 г. до март 2026-та. 85% от тях или 4 милиона са незаверени преписи по чл. 51, ал. 1. На 2.14% от тях е отказано. 25% от всички искания за страната или 1.15 млн. са били в София

На графиката долу виждате как се увеличават през времето. От разговори с адвокати, най-общо казано може да се каже, че в синьо виждате справките поискани по служебен път от институции, както и в последните два месеца от журналисти. В червено са исканията за преписки от бъдещи купувачи и други лица чрез адвокати, брокери и частни съдебни изпълнители. Вижда се, че заверените остават почти константа през последните две години и почти няма промяна в последните два месеца.

Тук интересна е разбивката по брой одобрени, т.е. кога териториалните звена на Агенцията по вписванията е преценявала, че може да предостави документи. Тук виждате в синьо границите, в които са се движили одобренията между 2010 и 2024 включително – 97 до 100%. В жълто показвам 2025-та, която минава през същата зона, макар след изказванията на Георгиев да се вижда отчетливо намаление. В началото на 2026-та виждаме обаче драстичен спад до под 95%. Графиката отбелязва нивото преди 15-ти януари, когато влизат в сила промените, както и след него.

Незаверените преписи по ал. 1, които са значително повече, показва аналогичен спад. В червено се вижда как след въвеждането на промените одобрените преписи намаляват с почти 4 процентни точки средно за страната и остават под миниума за последните 15 години.

Показвам тези графики с 94 до 100% във вертикалната скала, за да се виждат по-ясно разликите. В действителност, ефектът е доста малък, както се вижда на коригираната графика долу. Това е защото журналистите търсещи такива данни са сравнително малко и както показах в началото, дори да не откажат информация, процесът е много затруднен и се разкрива на институциите и понякога самите разследвани лица информация за разследването докато още тече.

Разглеждайки данните по териториални дирекции забелязвам някои аномалии. Има доста ниски нива на одобрение като в Асеновград, Монтана, Трън, Елин Пелин и Плевен. Някои от тях имат по 94% одобрение, а други – под 80%. При някои като Елин Пелин одобренията спадат наполовина през летните месеци, а други като Хасково и Разлог и Монтана – в началото на годината. При повечето от тях обаче причините са, че имат твърде малко заявления по принцип и дори няколко отказа се отразяват значително

Най-голяма аномалия има обаче в Благоевград. Споменах ги изрично покрай данните на НСИ за застрояването, защото имаше аномалия и там. При преписките на нотариални актове се забелязва огромен брой откази – в пъти повече като дял от цялата страна. При това не виждаме това в определени месеци, а изглежда става дума за редовна практика.

Тук виждате, че вече съм сложил вертикалната скала от 0 до 100%, защото за разлика от горната, диапазонът на одобрения през последните 15 години се движи от 65 до 100% при първата хипотеза. Към края на 2025-та са одобрявали едва едно от четири заявления на моменти. В началото на тази интересно, но има скок в одобренията след 15-ти януари. След това обаче пак пада под 50%.

При незаверените преписи по ал. 1 – мнозинството от исканията, положението е една идея по-добре, макар отново значително по-зле от цялата страна. Особено през август виждаме спад до 50-65% одобрение. Интересното е, че отново обратно на останалата част от страната, в първите месеци на тази година няма драстичен спад и нивата на одобрение се движат в рамките на нормалното конкретно за Благоевград.

Не виждам нищо, което дори се доближава до този тип на работа в която и да е териториална дирекция в страната. Нямам представа на какво се дължи това и не смея да спекулирам. Може да отговорят единствено служителите.

Предупрежденията бяха точни

В публичното пространство като единствена причина за тези промени се тиражираше желанието на бившия вече министър Георгиев да пресече имотните измами. Доколкото съществуваше теоретична възможност това да се случи с искане наслуки на извадки от нотариални актове с цел откриване на уязвими жертви, аз и много други предупредихме, че тезата на министъра е абсурдна. Първо не бяха показани доказателства това да се е случвало някога, а още повече да се е превръщало в системен проблем, второ за да сработи трябва масово искане на извадки, което би следвало да се засече в съответната служба, ако изпълняват задълженията си по наредба, трето, собствениците ще знаят, че някой е искал извадка и четвърто и най-важно – нищо от това и фактическата измама не е възможна без участието на адвокати и корумпирани нотариуси. Именно това видяхме при няколко такива схеми, особено тази от последната седмица. Нищо от промените не пречи на тази категория хора да имат неограничен достъп до същите документи.

Като контрааргумент посочихме, че свободният достъп сега се използва масово за сверяване на предоставени документи от продавачи на имоти и строителни компании. Това предотвратява имотни измами, особено когато става дума за тежести или особени клаузи в нотариалните актове. Сравнително чести са тези при инвеститорите в нови сгради и продажбата на стари къщи и апартаменти. Виждаме от данните колко често се искат незаверени преписи. Промените ефективно влошават този важен за купувачите инструмент и всъщност така Георгиев помага на имотната мафия

В аргументацията на промените се посочва още нещо – правото на неприкосновеност на хората. Т.е. да не се разкриват детайли от частния им живот и конкретно какво пише като условия и детайли в актовете. Този аргумент има повече смисъл и засяга баланса между личните данни като договори и собственост и публичния интерес като предотвратяване на имотни и журналистически разследвания за корупция и пране на пари. Този баланс е уреден на редица места в закона, включително в Закона за достъп до обществена информация. В стария режим на вписванията има допълнителни защити за това, че се документира кой е имал достъп до преписките, има задължение да не се разпространяват личните данни отвъд целите на разследването и прочие.

В този смисъл в опита ми да взема препис на нотариалния акт на бившия министър, данните от самата агенция и същността на аргументите за промените прозира ясно това, за което предупреждавахме преди година – целта винаги е била блокиране или най-малкото затрудняване възможността за разследване на имотното състояние и подкупите в натура на политици, магистрати и свързани с тях лица.

Затова призовавам да бъде върната старата версия на правилника. Подобрение би било дори да се включи, че данните за собствеността и оценката на прехвърлянето, както и история на актовете към имот се публикуват като отворени данни по подобие на това, което прави кадастъра. Разбира се, това следва да става с кодирани лични данни също както се прави сега от кадастъра и търговския регистър. Дори следва да използват същия алгоритъм и кодове, за да може да се свързват уникалните хешове заместващи ЕГН-тата.

Това би помогнало на прозрачността и разследванията както за имотни измами, така и за корупция – нещо, за което този кабинет неспирно повтаря, че ще започне да бори. Ще е възможност също да докажат, че ще възпират лобизма и схемите от управлението на ГЕРБ и всичко това само с една министерска заповед.

The collective thoughts of the interwebz