New — Introducing Support for Real-Time and Batch Inference in Amazon SageMaker Data Wrangler

Post Syndicated from Donnie Prakoso original https://aws.amazon.com/blogs/aws/new-introducing-support-for-real-time-and-batch-inference-in-amazon-sagemaker-data-wrangler/

To build machine learning models, machine learning engineers need to develop a data transformation pipeline to prepare the data. The process of designing this pipeline is time-consuming and requires a cross-team collaboration between machine learning engineers, data engineers, and data scientists to implement the data preparation pipeline into a production environment.

The main objective of Amazon SageMaker Data Wrangler is to make it easy to do data preparation and data processing workloads. With SageMaker Data Wrangler, customers can simplify the process of data preparation and all of the necessary steps of data preparation workflow on a single visual interface. SageMaker Data Wrangler reduces the time to rapidly prototype and deploy data processing workloads to production, so customers can easily integrate with MLOps production environments.

However, the transformations applied to the customer data for model training need to be applied to new data during real-time inference. Without support for SageMaker Data Wrangler in a real-time inference endpoint, customers need to write code to replicate the transformations from their flow in a preprocessing script.

Introducing Support for Real-Time and Batch Inference in Amazon SageMaker Data Wrangler
I’m pleased to share that you can now deploy data preparation flows from SageMaker Data Wrangler for real-time and batch inference. This feature allows you to reuse the data transformation flow which you created in SageMaker Data Wrangler as a step in Amazon SageMaker inference pipelines.

SageMaker Data Wrangler support for real-time and batch inference speeds up your production deployment because there is no need to repeat the implementation of the data transformation flow. You can now integrate SageMaker Data Wrangler with SageMaker inference. The same data transformation flows created with the easy-to-use, point-and-click interface of SageMaker Data Wrangler, containing operations such as Principal Component Analysis and one-hot encoding, will be used to process your data during inference. This means that you don’t have to rebuild the data pipeline for a real-time and batch inference application, and you can get to production faster.

Get Started with Real-Time and Batch Inference
Let’s see how to use the deployment supports of SageMaker Data Wrangler. In this scenario, I have a flow inside SageMaker Data Wrangler. What I need to do is to integrate this flow into real-time and batch inference using the SageMaker inference pipeline.

First, I will apply some transformations to the dataset to prepare it for training.
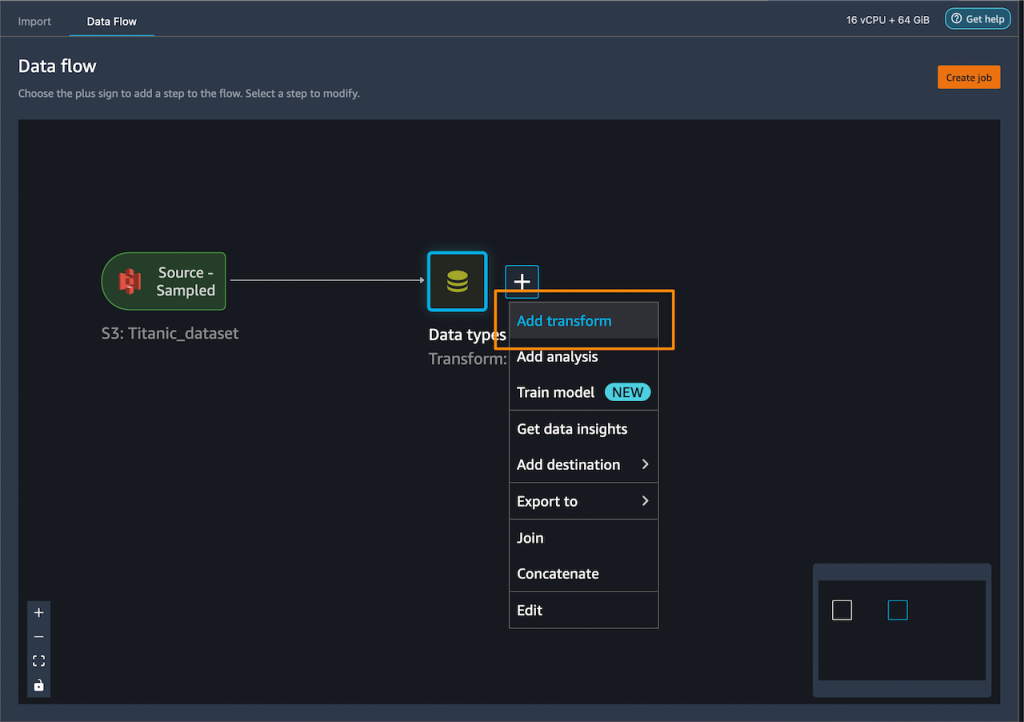
I add one-hot encoding on the categorical columns to create new features.
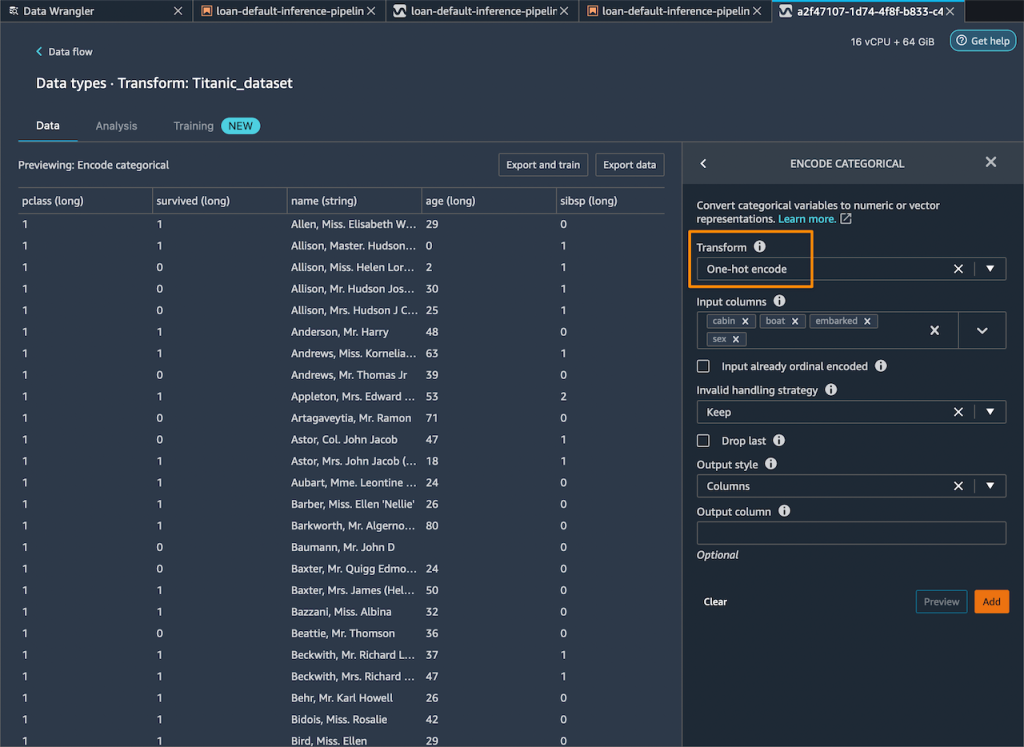
Then, I drop any remaining string columns that cannot be used during training.

My resulting flow now has these two transform steps in it.
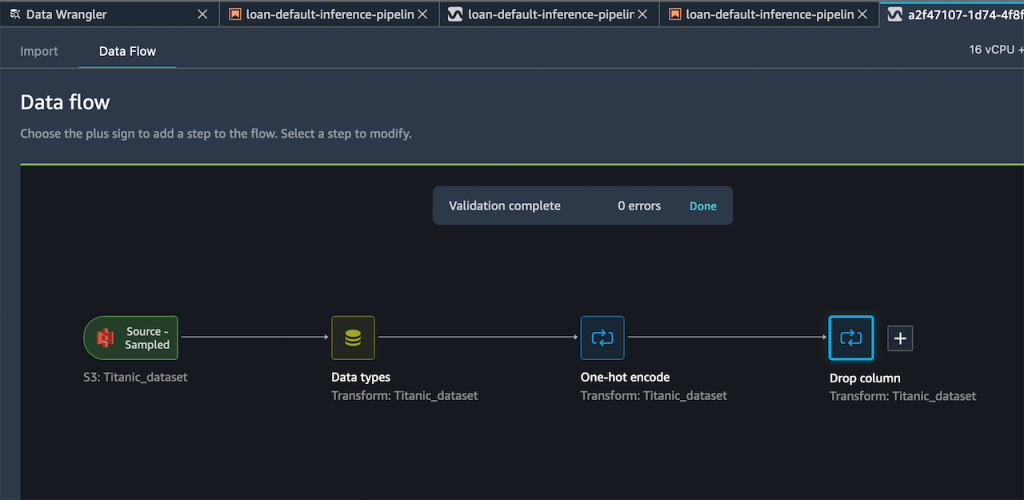
After I’m satisfied with the steps I have added, I can expand the Export to menu, and I have the option to export to SageMaker Inference Pipeline (via Jupyter Notebook).

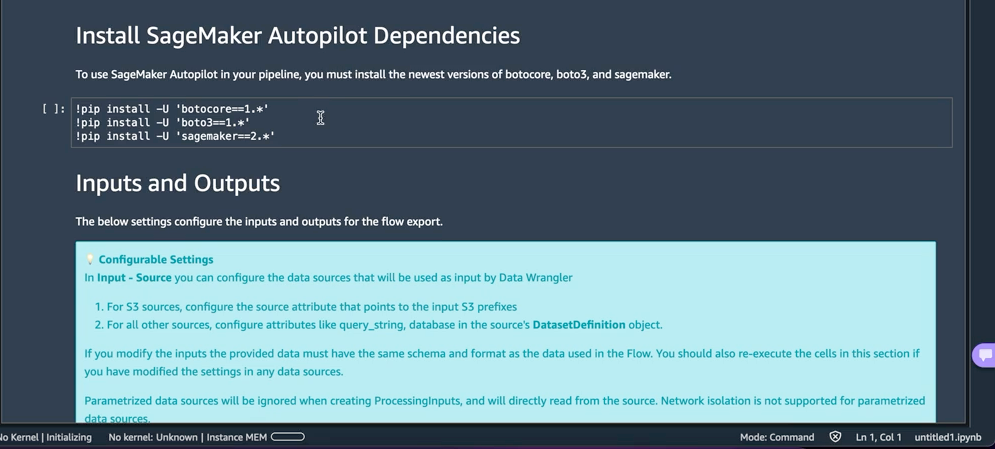
I select Export to SageMaker Inference Pipeline, and SageMaker Data Wrangler will prepare a fully customized Jupyter notebook to integrate the SageMaker Data Wrangler flow with inference. This generated Jupyter notebook performs a few important actions. First, define data processing and model training steps in a SageMaker pipeline. The next step is to run the pipeline to process my data with Data Wrangler and use the processed data to train a model that will be used to generate real-time predictions. Then, deploy my Data Wrangler flow and trained model to a real-time endpoint as an inference pipeline. Last, invoke my endpoint to make a prediction.

This feature uses Amazon SageMaker Autopilot, which makes it easy for me to build ML models. I just need to provide the transformed dataset which is the output of the SageMaker Data Wrangler step and select the target column to predict. The rest will be handled by Amazon SageMaker Autopilot to explore various solutions to find the best model.
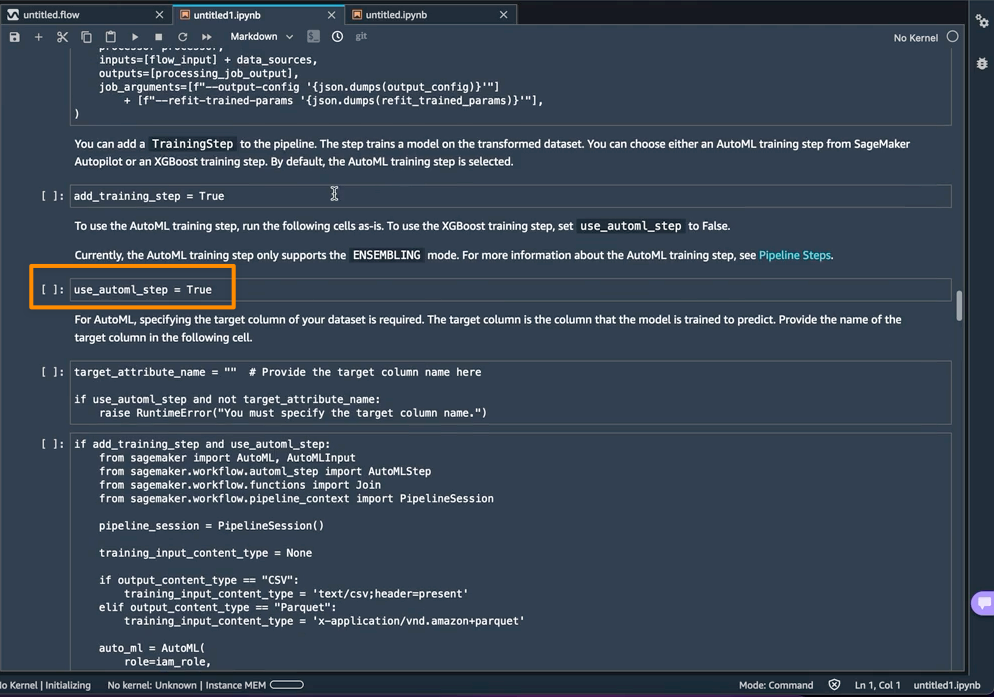
Using AutoML as a training step from SageMaker Autopilot is enabled by default in the notebook with the use_automl_step variable. When using the AutoML step, I need to define the value of target_attribute_name, which is the column of my data I want to predict during inference. Alternatively, I can set use_automl_step to False if I want to use the XGBoost algorithm to train a model instead.
On the other hand, if I would like to instead use a model I trained outside of this notebook, then I can skip directly to the Create SageMaker Inference Pipeline section of the notebook. Here, I would need to set the value of the byo_model variable to True. I also need to provide the value of algo_model_uri, which is the Amazon Simple Storage Service (Amazon S3) URI where my model is located. When training a model with the notebook, these values will be auto-populated.
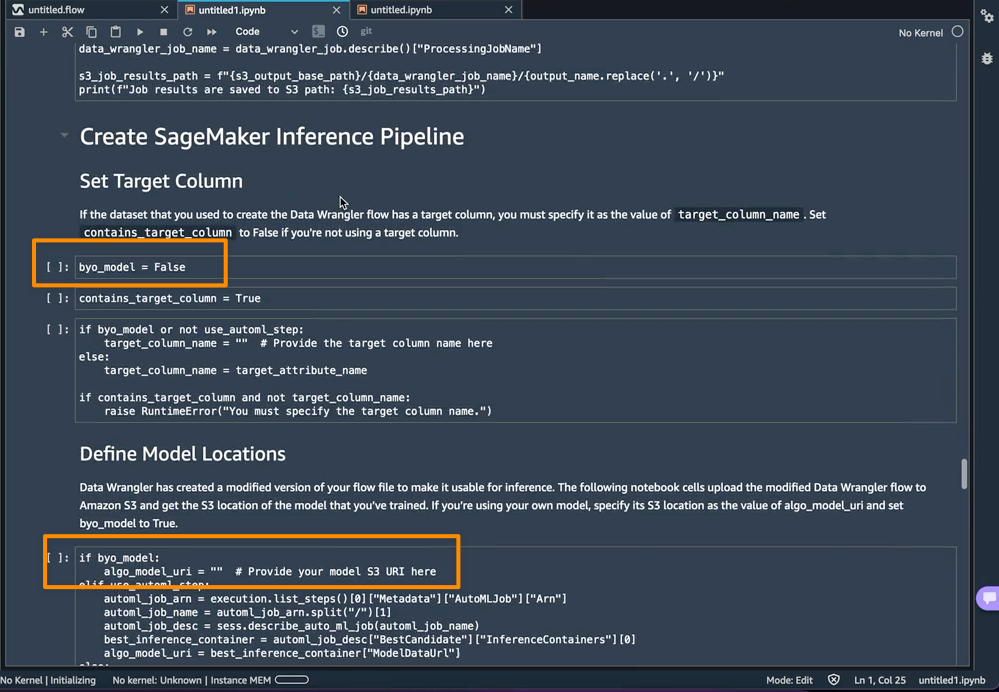
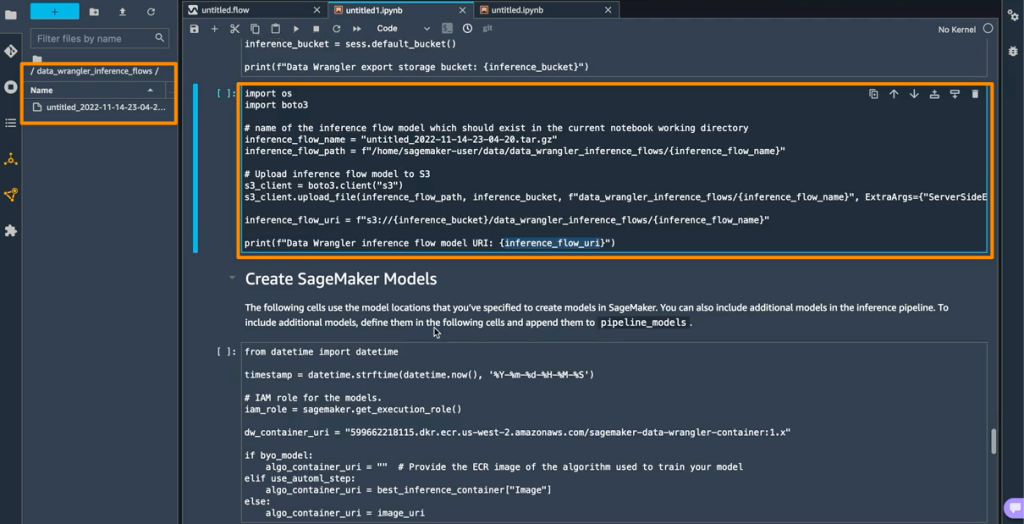
In addition, this feature also saves a tarball inside the data_wrangler_inference_flows folder on my SageMaker Studio instance. This file is a modified version of the SageMaker Data Wrangler flow, containing the data transformation steps to be applied at the time of inference. It will be uploaded to S3 from the notebook so that it can be used to create a SageMaker Data Wrangler preprocessing step in the inference pipeline.
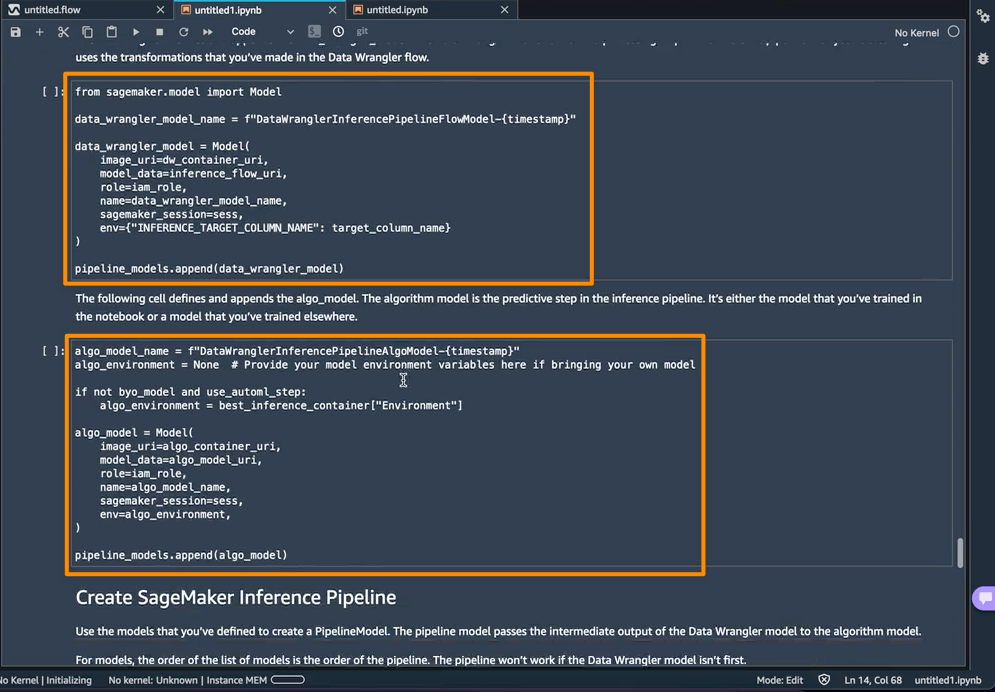
The next step is that this notebook will create two SageMaker model objects. The first object model is the SageMaker Data Wrangler model object with the variable data_wrangler_model, and the second is the model object for the algorithm, with the variable algo_model. Object data_wrangler_model will be used to provide input in the form of data that has been processed into algo_model for prediction.
The final step inside this notebook is to create a SageMaker inference pipeline model, and deploy it to an endpoint.
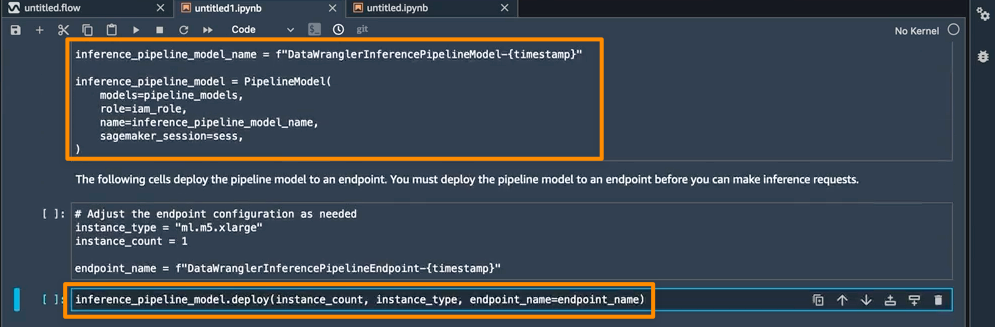
Once the deployment is complete, I will get an inference endpoint that I can use for prediction. With this feature, the inference pipeline uses the SageMaker Data Wrangler flow to transform the data from your inference request into a format that the trained model can use.

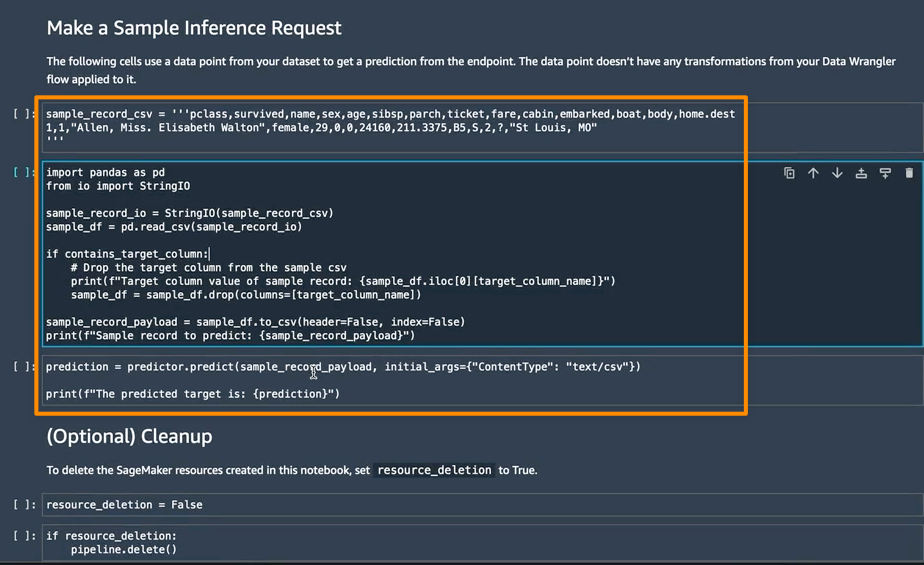
In the next section, I can run individual notebook cells in Make a Sample Inference Request. This is helpful if I need to do a quick check to see if the endpoint is working by invoking the endpoint with a single data point from my unprocessed data. Data Wrangler automatically places this data point into the notebook, so I don’t have to provide one manually.
Things to Know
Enhanced Apache Spark configuration — In this release of SageMaker Data Wrangler, you can now easily configure how Apache Spark partitions the output of your SageMaker Data Wrangler jobs when saving data to Amazon S3. When adding a destination node, you can set the number of partitions, corresponding to the number of files that will be written to Amazon S3, and you can specify column names to partition by, to write records with different values of those columns to different subdirectories in Amazon S3. Moreover, you can also define the configuration in the provided notebook.

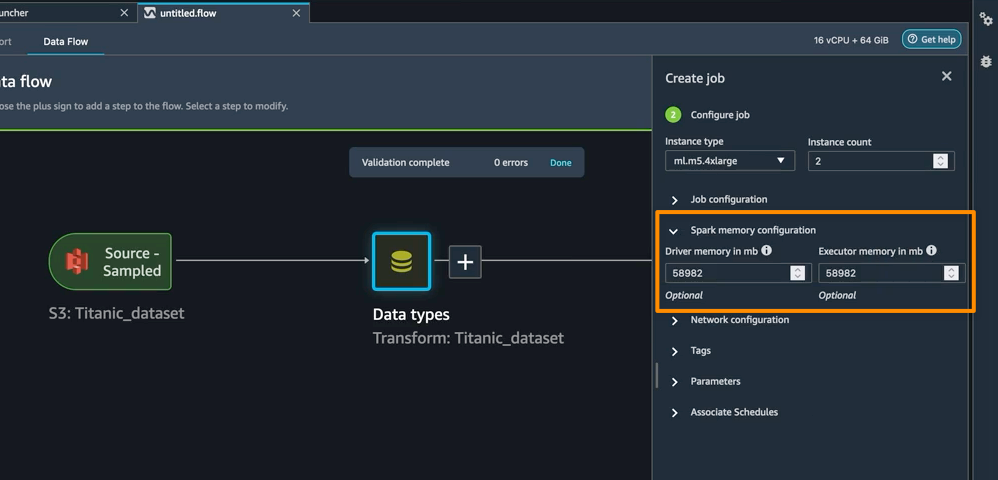
You can also define memory configurations for SageMaker Data Wrangler processing jobs as part of the Create job workflow. You will find similar configuration as part of your notebook.
Availability — SageMaker Data Wrangler supports for real-time and batch inference as well as enhanced Apache Spark configuration for data processing workloads are generally available in all AWS Regions that Data Wrangler currently supports.

To get started with Amazon SageMaker Data Wrangler supports for real-time and batch inference deployment, visit AWS documentation.

Happy building
— Donnie

New — Amazon SageMaker Data Wrangler Supports SaaS Applications as Data Sources

Post Syndicated from Donnie Prakoso original https://aws.amazon.com/blogs/aws/new-amazon-sagemaker-data-wrangler-supports-saas-applications-as-data-sources/

Data fuels machine learning. In machine learning, data preparation is the process of transforming raw data into a format that is suitable for further processing and analysis. The common process for data preparation starts with collecting data, then cleaning it, labeling it, and finally validating and visualizing it. Getting the data right with high quality can often be a complex and time-consuming process.

This is why customers who build machine learning (ML) workloads on AWS appreciate the ability of Amazon SageMaker Data Wrangler. With SageMaker Data Wrangler, customers can simplify the process of data preparation and complete the required processes of the data preparation workflow on a single visual interface. Amazon SageMaker Data Wrangler helps to reduce the time it takes to aggregate and prepare data for ML.

However, due to the proliferation of data, customers generally have data spread out into multiple systems, including external software-as-a-service (SaaS) applications like SAP OData for manufacturing data, Salesforce for customer pipeline, and Google Analytics for web application data. To solve business problems using ML, customers have to bring all of these data sources together. They currently have to build their own solution or use third-party solutions to ingest data into Amazon S3 or Amazon Redshift. These solutions can be complex to set up and not cost-effective.

Introducing Amazon SageMaker Data Wrangler Supports SaaS Applications as Data Sources
I’m happy to share that starting today, you can aggregate external SaaS application data for ML in Amazon SageMaker Data Wrangler to prepare data for ML. With this feature, you can use more than 40 SaaS applications as data sources via Amazon AppFlow and have these data available on Amazon SageMaker Data Wrangler. Once the data sources are registered in AWS Glue Data Catalog by AppFlow, you can browse tables and schemas from these data sources using Data Wrangler SQL explorer. This feature provides seamless data integration between SaaS applications and SageMaker Data Wrangler using Amazon AppFlow.

Here is a quick preview of this new feature:

This new feature of Amazon SageMaker Data Wrangler works by using integration with Amazon AppFlow, a fully managed integration service that enables you to securely exchange data between SaaS applications and AWS services. With Amazon AppFlow, you can establish bidirectional data integration between SaaS applications, such as Salesforce, SAP, and Amplitude and all supported services, into your Amazon S3 or Amazon Redshift.

Then, with Amazon AppFlow, you can catalog the data in AWS Glue Data Catalog. This is a new feature where with Amazon AppFlow, you can create an integration with AWS Glue Data Catalog for Amazon S3 destination connector. With this new integration, customers can catalog SaaS data applications into AWS Glue Data Catalog with a few clicks, directly from the Amazon AppFlow Flow configuration, without the need to run any crawlers.

Once you’ve established a flow and inserted it into the AWS Glue Data Catalog, you can use this data inside the Amazon SageMaker Data Wrangler. Then, you can do the data preparation as you usually do. You can write Amazon Athena queries to preview data, join data from multiple sources, or import data to prepare for ML model training.

With this feature, you need to do a few simple steps to perform seamless data integration between SaaS applications into Amazon SageMaker Data Wrangler via Amazon AppFlow. This integration supports more than 40 SaaS applications, and for a complete list of supported applications, please check the Supported source and destination applications documentation.

Get Started with Amazon SageMaker Data Wrangler Support for Amazon AppFlow
Let’s see how this feature works in detail. In my scenario, I need to get data from Salesforce, and do the data preparation using Amazon SageMaker Data Wrangler.

To start using this feature, the first thing I need to do is to create a flow in Amazon AppFlow that registers the data source into the AWS Glue Data Catalog. I already have an existing connection with my Salesforce account, and all I need now is to create a flow.

One important thing to note is that to make SaaS application data available in Amazon SageMaker Data Wrangler, I need to create a flow with Amazon S3 as the destination. Then, I need to enable Create a Data Catalog table in the AWS Glue Data Catalog settings. This option will automatically catalog my Salesforce data into AWS Glue Data Catalog.

On this page, I need to select a user role with the required AWS Glue Data Catalog permissions and define the database name and the table name prefix. In addition, in this section, I can define the data format preference, be it in JSON, CSV, or Apache Parquet formats, and filename preference if I want to add a timestamp into the file name section.

To learn more about how to register SaaS data in Amazon AppFlow and AWS Glue Data Catalog, you can read Cataloging the data output from an Amazon AppFlow flow documentation page.

Once I’ve finished registering SaaS data, I need to make sure the IAM role can view the data sources in Data Wrangler from AppFlow. Here is an example of a policy in the IAM role:

{
    "Version": "2012-10-17",
    "Statement": [
        {
            "Effect": "Allow",
            "Action": "glue:SearchTables",
            "Resource": [
                "arn:aws:glue:*:*:table/*/*",
                "arn:aws:glue:*:*:database/*",
                "arn:aws:glue:*:*:catalog"
            ]
        }
    ]
} 

By enabling data cataloging with AWS Glue Data Catalog, from this point on, Amazon SageMaker Data Wrangler will be able to automatically discover this new data source and I can browse tables and schema using the Data Wrangler SQL Explorer.

Now it’s time to switch to the Amazon SageMaker Data Wrangler dashboard then select Connect to data sources.

On the following page, I need to Create connection and select the data source I want to import. In this section, I can see all the available connections for me to use. Here I see the Salesforce connection is already available for me to use.

If I would like to add additional data sources, I can see a list of external SaaS applications that I can integrate into the Set up new data sources section. To learn how to recognize external SaaS applications as data sources, I can learn more with the select How to enable access.

Now I will import datasets and select the Salesforce connection.

On the next page, I can define connection settings and import data from Salesforce. When I’m done with this configuration, I select Connect.

On the following page, I see my Salesforce data that I already configured with Amazon AppFlow and AWS Glue Data Catalog called appflowdatasourcedb. I can also see a table preview and schema for me to review if this is the data I need.

Then, I start building my dataset using this data by performing SQL queries inside the SageMaker Data Wrangler SQL Explorer. Then, I select Import query.

Then, I define a name for my dataset.

At this point, I can start doing the data preparation process. I can navigate to the Analysis tab to run the data insight report. The analysis will provide me with a report on the data quality issues and what transform I need to use next to fix the issues based on the ML problem I want to predict. To learn more about how to use the data analysis feature, see Accelerate data preparation with data quality and insights in the Amazon SageMaker Data Wrangler blog post.

In my case, there are several columns I don’t need, and I need to drop these columns. I select Add step.

One feature I like is that Amazon SageMaker Data Wrangler provides numerous ML data transforms. It helps me to streamline the process of cleaning, transforming and feature engineering my data in one dashboard. For more about what SageMaker Data Wrangler provides for transformation data, please read this Transform Data documentation page.

In this list, I select Manage columns.

Then, in the Transform section, I select the Drop column option. Then, I select a few columns that I don’t need.

Once I’m done, the columns I don’t need are removed and the Drop column data preparation step I just created is listed in the Add step section.

I can also see the visual of my data flow inside the Amazon SageMaker Data Wrangler. In this example, my data flow is quite basic. But when my data preparation process becomes complex, this visual view makes it easy for me to see all the data preparation steps.

From this point on, I can do what I require with my Salesforce data. For example, I can export data directly to Amazon S3 by selecting Export to and choosing Amazon S3 from the Add destination menu. In my case, I specify Data Wrangler to store the data in Amazon S3 after it has processed it by selecting Add destination and then Amazon S3.

Amazon SageMaker Data Wrangler provides me flexibility to automate the same data preparation flow using scheduled jobs. I can also automate feature engineering with SageMaker Pipelines (via Jupyter Notebook) and SageMaker Feature Store (via Jupyter Notebook), and deploy to Inference end point with SageMaker Inference Pipeline (via Jupyter Notebook).

Things to Know
Related news – This feature will make it easy for you to do data aggregation and preparation with Amazon SageMaker Data Wrangler. As this feature is an integration with Amazon AppFlow and also AWS Glue Data Catalog, you might want to learn more on Amazon AppFlow now supports AWS Glue Data Catalog integration and provides enhanced data preparation page.

Availability – Amazon SageMaker Data Wrangler supports SaaS applications as data sources available in all the Regions currently supported by Amazon AppFlow.

Pricing – There is no additional cost to use SaaS applications supports in Amazon SageMaker Data Wrangler, but there is a cost to running Amazon AppFlow to get the data in Amazon SageMaker Data Wrangler.

Visit Import Data From Software as a Service (SaaS) Platforms documentation page to learn more about this feature, and follow the getting started guide to start data aggregating and preparing SaaS applications data with Amazon SageMaker Data Wrangler.

Happy building!
— Donnie
Announcing Additional Data Connectors for Amazon AppFlow

Post Syndicated from Steve Roberts original https://aws.amazon.com/blogs/aws/announcing-additional-data-connectors-for-amazon-appflow/

Gathering insights from data is a more effective process if that data isn’t fragmented across multiple systems and data stores, whether on premises or in the cloud. Amazon AppFlow provides bidirectional data integration between on-premises systems and applications, SaaS applications, and AWS services. It helps customers break down data silos using a low- or no-code, cost-effective solution that’s easy to reconfigure in minutes as business needs change.

Today, we’re pleased to announce the addition of 22 new data connectors for Amazon AppFlow, including:

  • Marketing connectors (e.g., Facebook Ads, Google Ads, Instagram Ads, LinkedIn Ads).
  • Connectors for customer service and engagement (e.g., MailChimp, Sendgrid, Zendesk Sell or Chat, and more).
  • Business operations (Stripe, QuickBooks Online, and GitHub).

In total, Amazon AppFlow now supports over 50 integrations with various different SaaS applications and AWS services. This growing set of connectors can be combined to enable you to achieve 360 visibility across the data your organization generates. For instance, you could combine CRM (Salesforce), e-commerce (Stripe), and customer service (ServiceNow, Zendesk) data to build integrated analytics and predictive modeling that can guide your next best offer decisions and more. Using web (Google Analytics v4) and social surfaces (Facebook Ads, Instagram Ads) allows you to build comprehensive reporting for your marketing investments, helping you understand how customers are engaging with your brand. Or, sync ERP data (SAP S/4HANA) with custom order management applications running on AWS. For more information on the current range of connectors and integrations, visit the Amazon AppFlow integrations page.

Datasource connectors for Amazon AppFlow

Amazon AppFlow and AWS Glue Data Catalog
Amazon AppFlow has also recently announced integration with the AWS Glue Data Catalog to automate the preparation and registration of your SaaS data into the AWS Glue Data Catalog. Previously, customers using Amazon AppFlow to store data from supported SaaS applications into Amazon Simple Storage Service (Amazon S3) had to manually create and run AWS Glue Crawlers to make their data available to other AWS services such as Amazon Athena, Amazon SageMaker, or Amazon QuickSight. With this new integration, you can populate AWS Glue Data Catalog with a few clicks directly from the Amazon AppFlow configuration without the need to run any crawlers.

To simplify data preparation and improve query performance when using analytics engines such as Amazon Athena, Amazon AppFlow also now enables you to organize your data into partitioned folders in Amazon S3. Amazon AppFlow also automates the aggregation of records into files that are optimized to the size you specify. This increases performance by reducing processing overhead and improving parallelism.

You can find more information on the AWS Glue Data Catalog integration in the recent What’s New post.

Getting Started with Amazon AppFlow
Visit the Amazon AppFlow product page to learn more about the service and view all the available integrations. To help you get started, there’s also a variety of videos and demos available and some sample integrations available on GitHub. And finally, should you need a custom integration, try the Amazon AppFlow Connector SDK, detailed in the Amazon AppFlow documentation. The SDK enables you to build your own connectors to securely transfer data between your custom endpoint, application, or other cloud service to and from Amazon AppFlow‘s library of managed SaaS and AWS connectors.

— Steve

New ML Governance Tools for Amazon SageMaker – Simplify Access Control and Enhance Transparency Over Your ML Projects

Post Syndicated from Antje Barth original https://aws.amazon.com/blogs/aws/new-ml-governance-tools-for-amazon-sagemaker-simplify-access-control-and-enhance-transparency-over-your-ml-projects/

As companies increasingly adopt machine learning (ML) for their business applications, they are looking for ways to improve governance of their ML projects with simplified access control and enhanced visibility across the ML lifecycle. A common challenge in that effort is managing the right set of user permissions across different groups and ML activities. For example, a data scientist in your team that builds and trains models usually requires different permissions than an MLOps engineer that manages ML pipelines. Another challenge is improving visibility over ML projects. For example, model information, such as intended use, out-of-scope use cases, risk rating, and evaluation results, is often captured and shared via emails or documents. In addition, there is often no simple mechanism to monitor and report on your deployed model behavior.

That’s why I’m excited to announce a new set of ML governance tools for Amazon SageMaker.

As an ML system or platform administrator, you can now use Amazon SageMaker Role Manager to define custom permissions for SageMaker users in minutes, so you can onboard users faster. As an ML practitioner, business owner, or model risk and compliance officer, you can now use Amazon SageMaker Model Cards to document model information from conception to deployment and Amazon SageMaker Model Dashboard to monitor all your deployed models through a unified dashboard.

Let’s dive deeper into each tool, and I’ll show you how to get started.

Introducing Amazon SageMaker Role Manager
SageMaker Role Manager lets you define custom permissions for SageMaker users in minutes. It comes with a set of predefined policy templates for different personas and ML activities. Personas represent the different types of users that need permissions to perform ML activities in SageMaker, such as data scientists or MLOps engineers. ML activities are a set of permissions to accomplish a common ML task, such as running SageMaker Studio applications or managing experiments, models, or pipelines. You can also define additional personas, add ML activities, and your managed policies to match your specific needs. Once you have selected the persona type and the set of ML activities, SageMaker Role Manager automatically creates the required AWS Identity and Access Management (IAM) role and policies that you can assign to SageMaker users.

A Primer on SageMaker and IAM Roles
A role is an IAM identity that has permissions to perform actions with AWS services. Besides user roles that are assumed by a user via federation from an Identity Provider (IdP) or the AWS Console, Amazon SageMaker requires service roles (also known as execution roles) to perform actions on behalf of the user. SageMaker Role Manager helps you create these service roles:

  • SageMaker Compute Role – Gives SageMaker compute resources the ability to perform tasks such as training and inference, typically used via PassRole. You can select the SageMaker Compute Role persona in SageMaker Role Manager to create this role. Depending on the ML activities you select in your SageMaker service roles, you will need to create this compute role first.
  • SageMaker Service Role – Some AWS services, including SageMaker, require a service role to perform actions on your behalf. You can select the Data Scientist, MLOps, or Custom persona in SageMaker Role Manager to start creating service roles with custom permissions for your ML practitioners.

Now, let me show you how this works in practice.

There are two ways to get to SageMaker Role Manager, either through Getting started in the SageMaker console or when you select Add user in the SageMaker Studio Domain control panel.

I start in the SageMaker console. Under Configure role, select Create a role. This opens a workflow that guides you through all required steps.

Amazon SageMaker Admin Hub - Getting Started

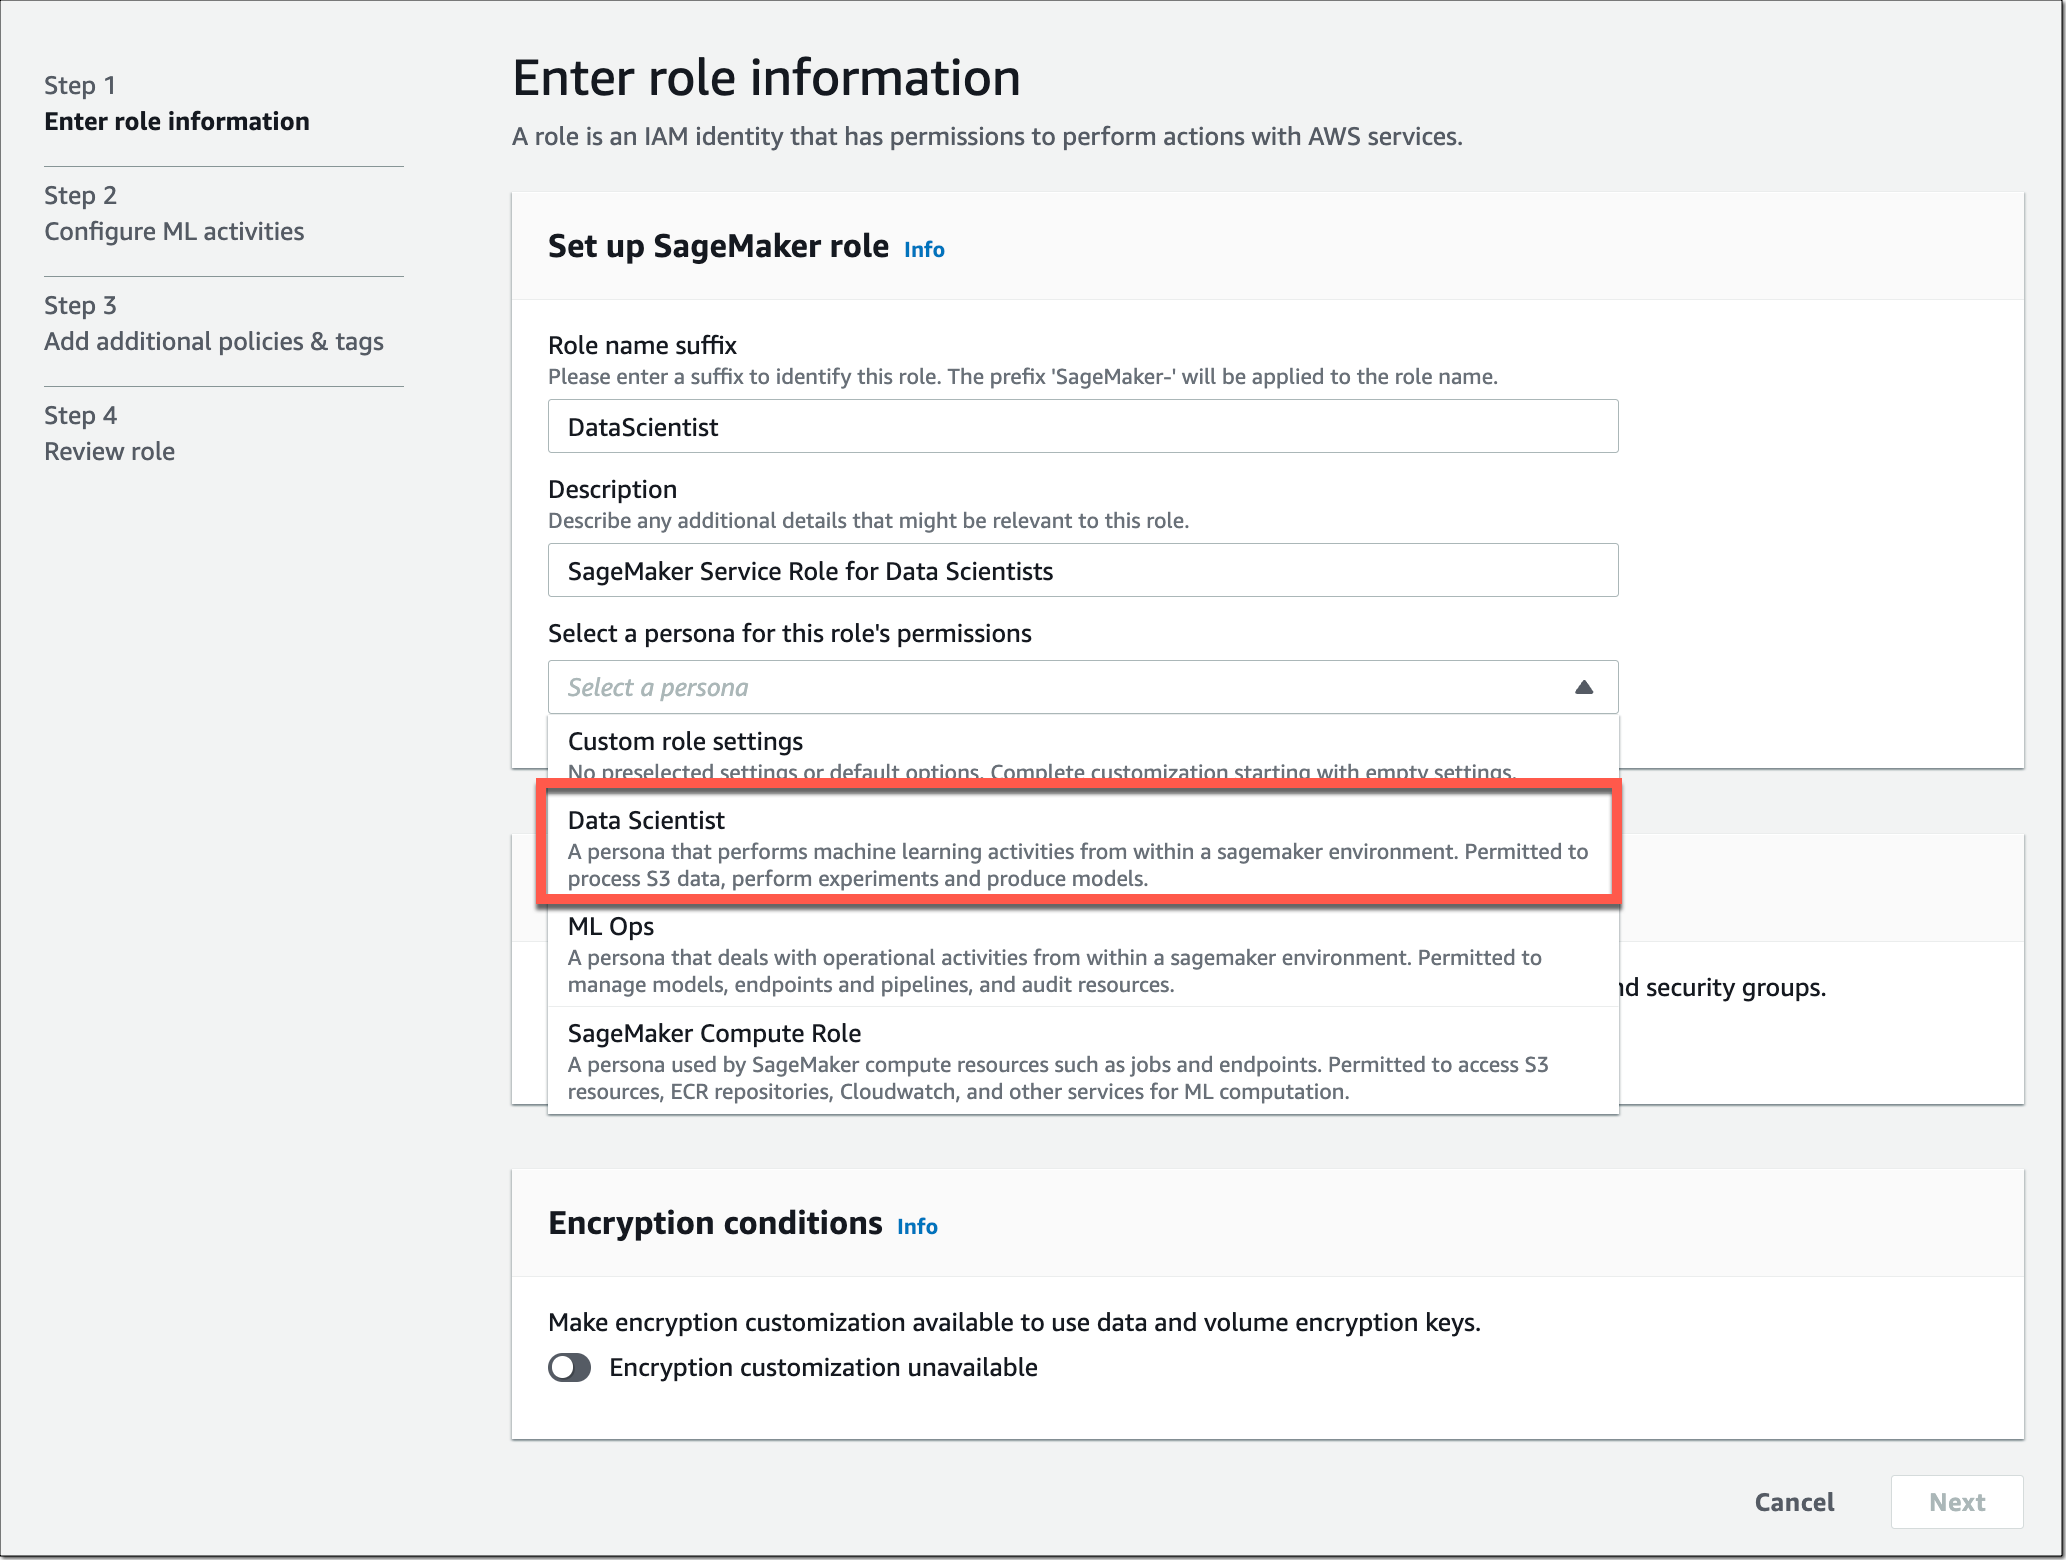
Let’s assume I want to create a SageMaker service role with a specific set of permissions for my team of data scientists. In Step 1, I select the predefined policy template for the Data Scientist persona.

Amazon SageMaker Role Manager - Select persona

I can also define the network and encryption settings in this step by selecting Amazon Virtual Private Cloud (Amazon VPC) subnets, security groups, and encryption keys.

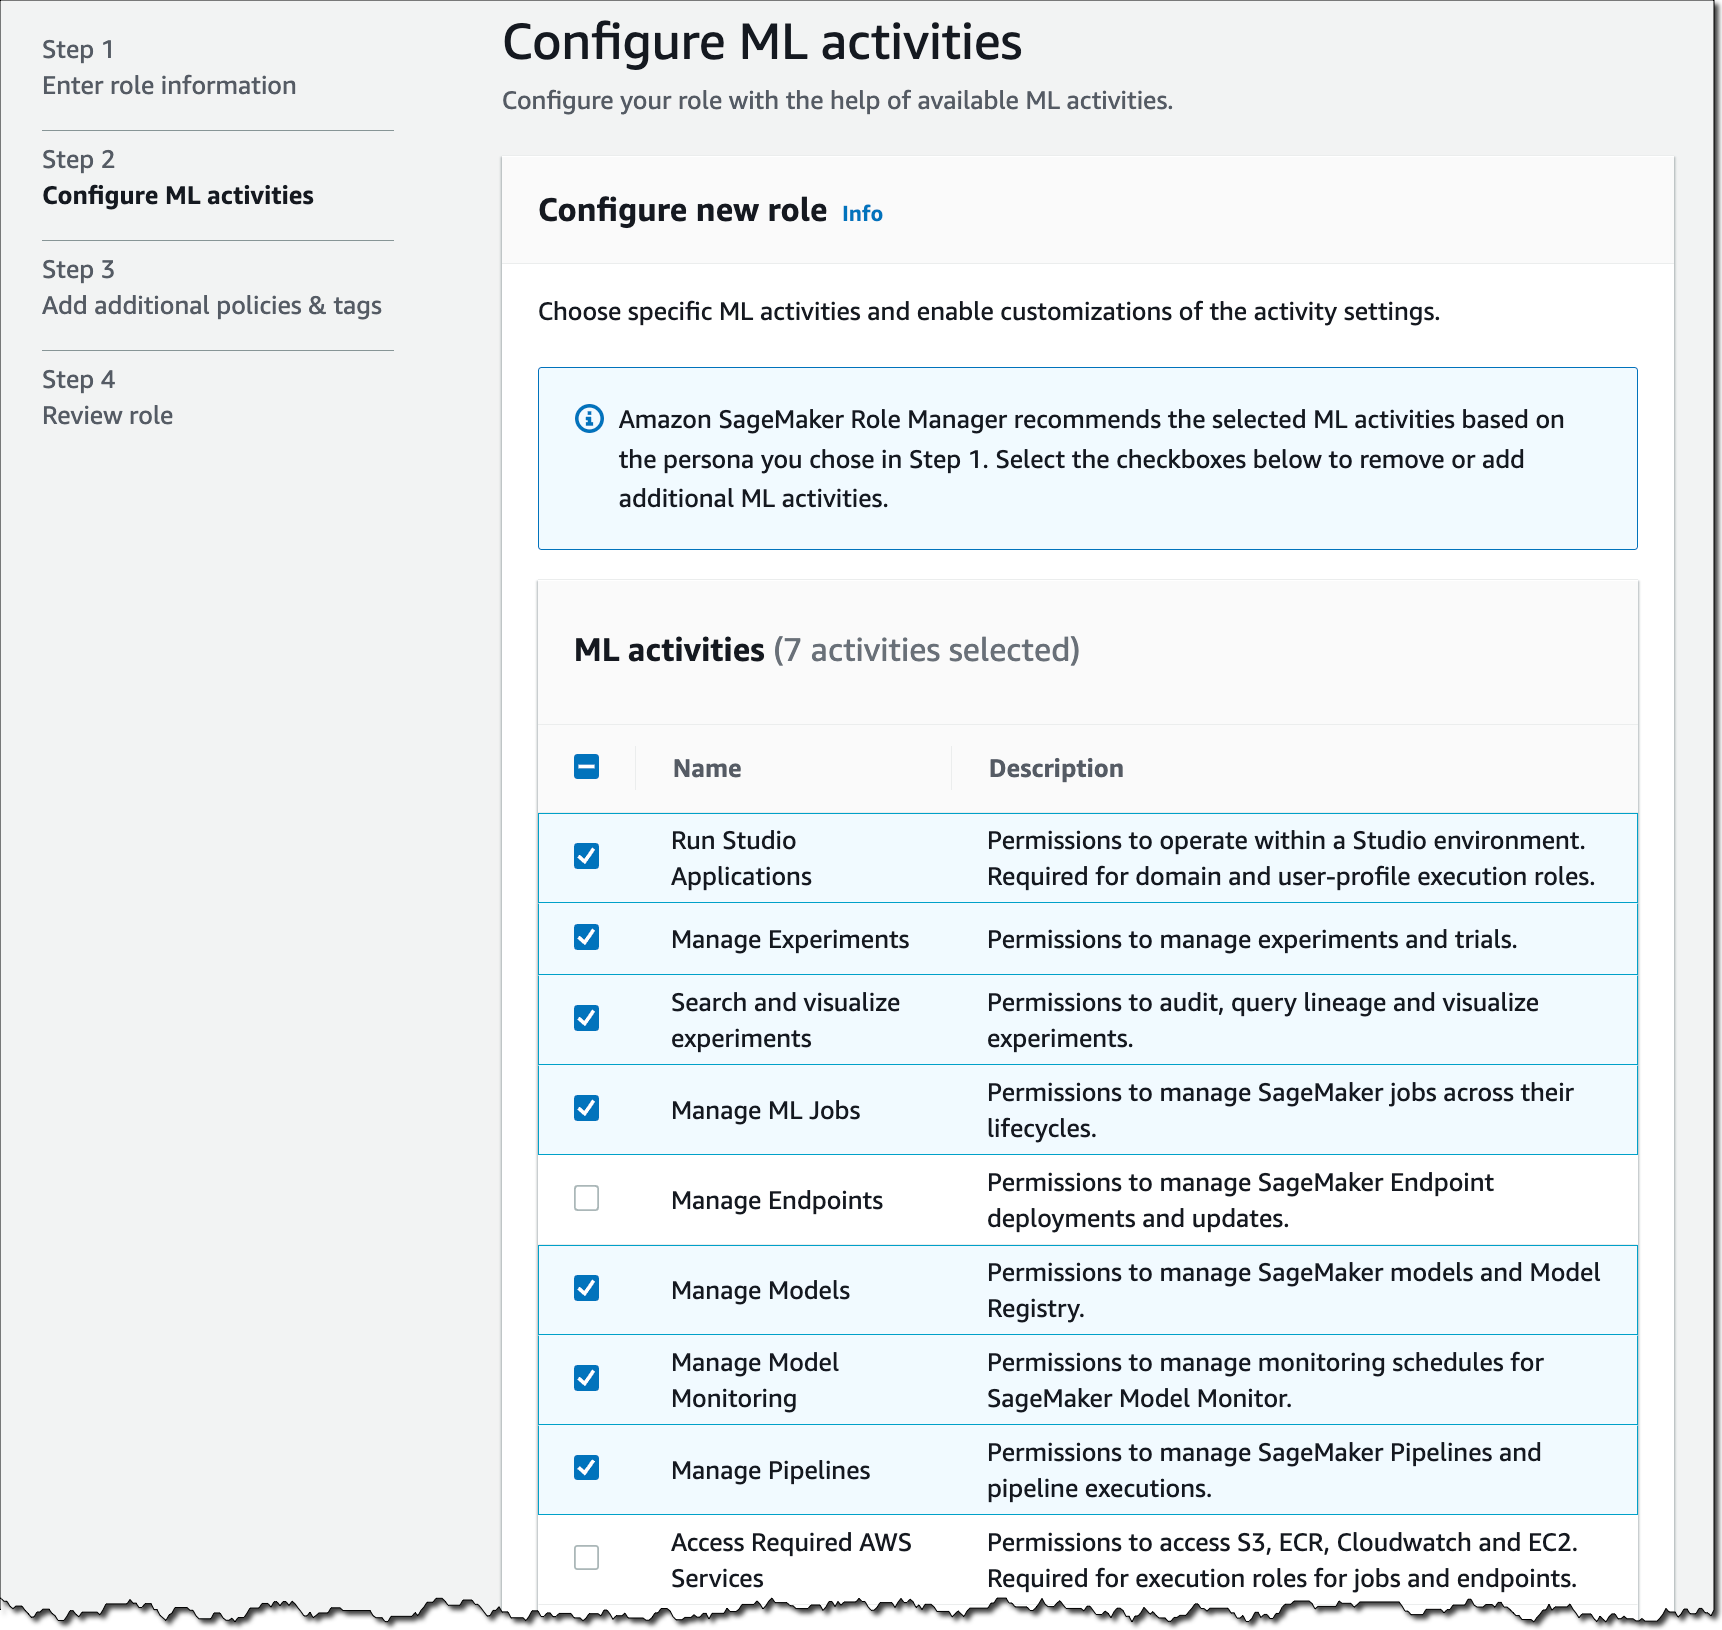
In Step 2, I select what ML activities data scientists in my team need to perform.

Amazon SageMaker Admin Hub - Configure ML activities

Some of the selected ML activities might require you to specify the Amazon Resource Name (ARN) of the SageMaker Compute Role so SageMaker compute resources have the ability to perform the tasks.

In Step 3, you can attach additional IAM policies and add tags to the role if needed. Tags help you identify and organize your AWS resources. You can use tags to add attributes such as project name, cost center, or location information to a role. After a final review of the settings in Step 4, select Submit, and the role is created.

In just a few minutes, I set up a SageMaker service role, and I’m now ready to onboard data scientists in SageMaker with custom permissions in place.

Introducing Amazon SageMaker Model Cards
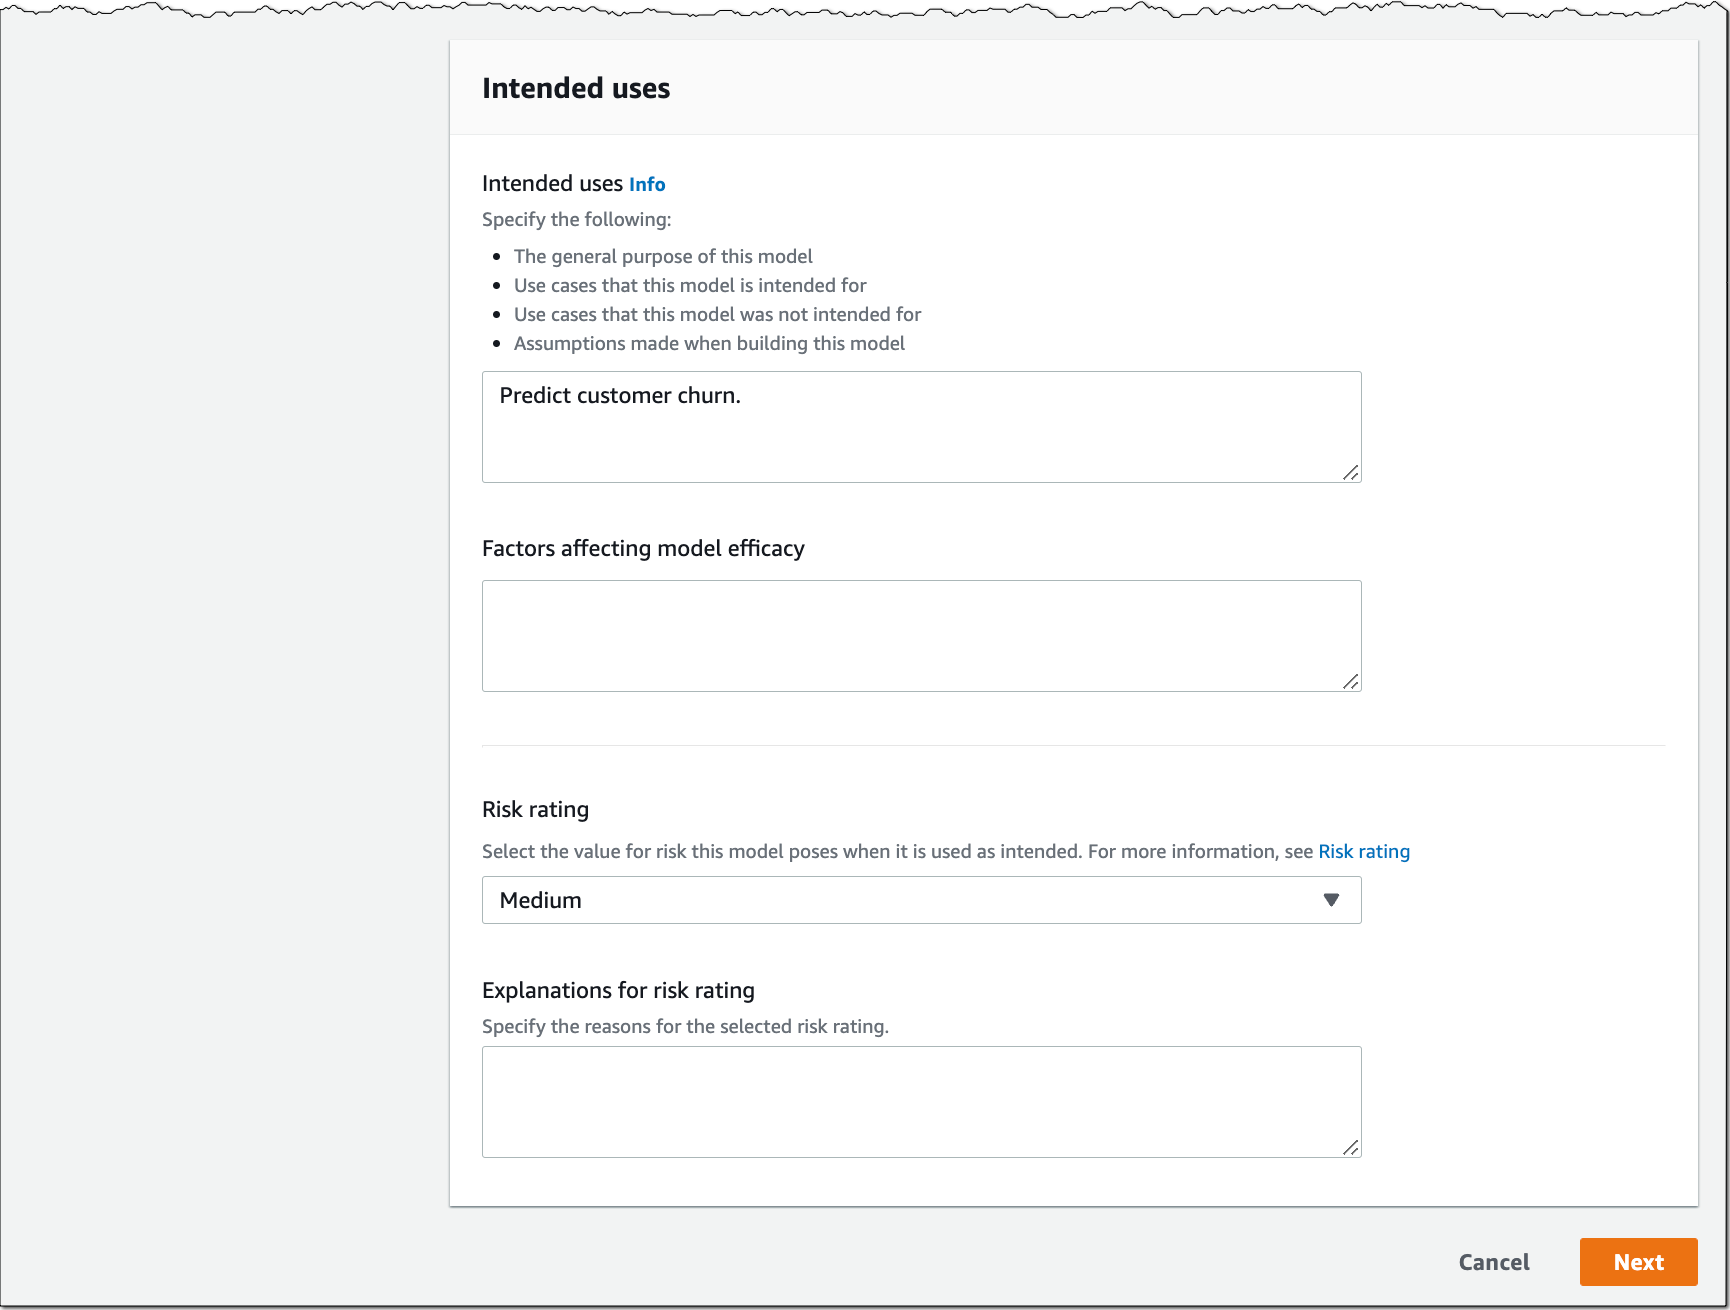
SageMaker Model Cards helps you streamline model documentation throughout the ML lifecycle by creating a single source of truth for model information. For models trained on SageMaker, SageMaker Model Cards discovers and autopopulates details such as training jobs, training datasets, model artifacts, and inference environment. You can also record model details such as the model’s intended use, risk rating, and evaluation results. For compliance documentation and model evidence reporting, you can export your model cards to a PDF file and easily share them with your customers or regulators.

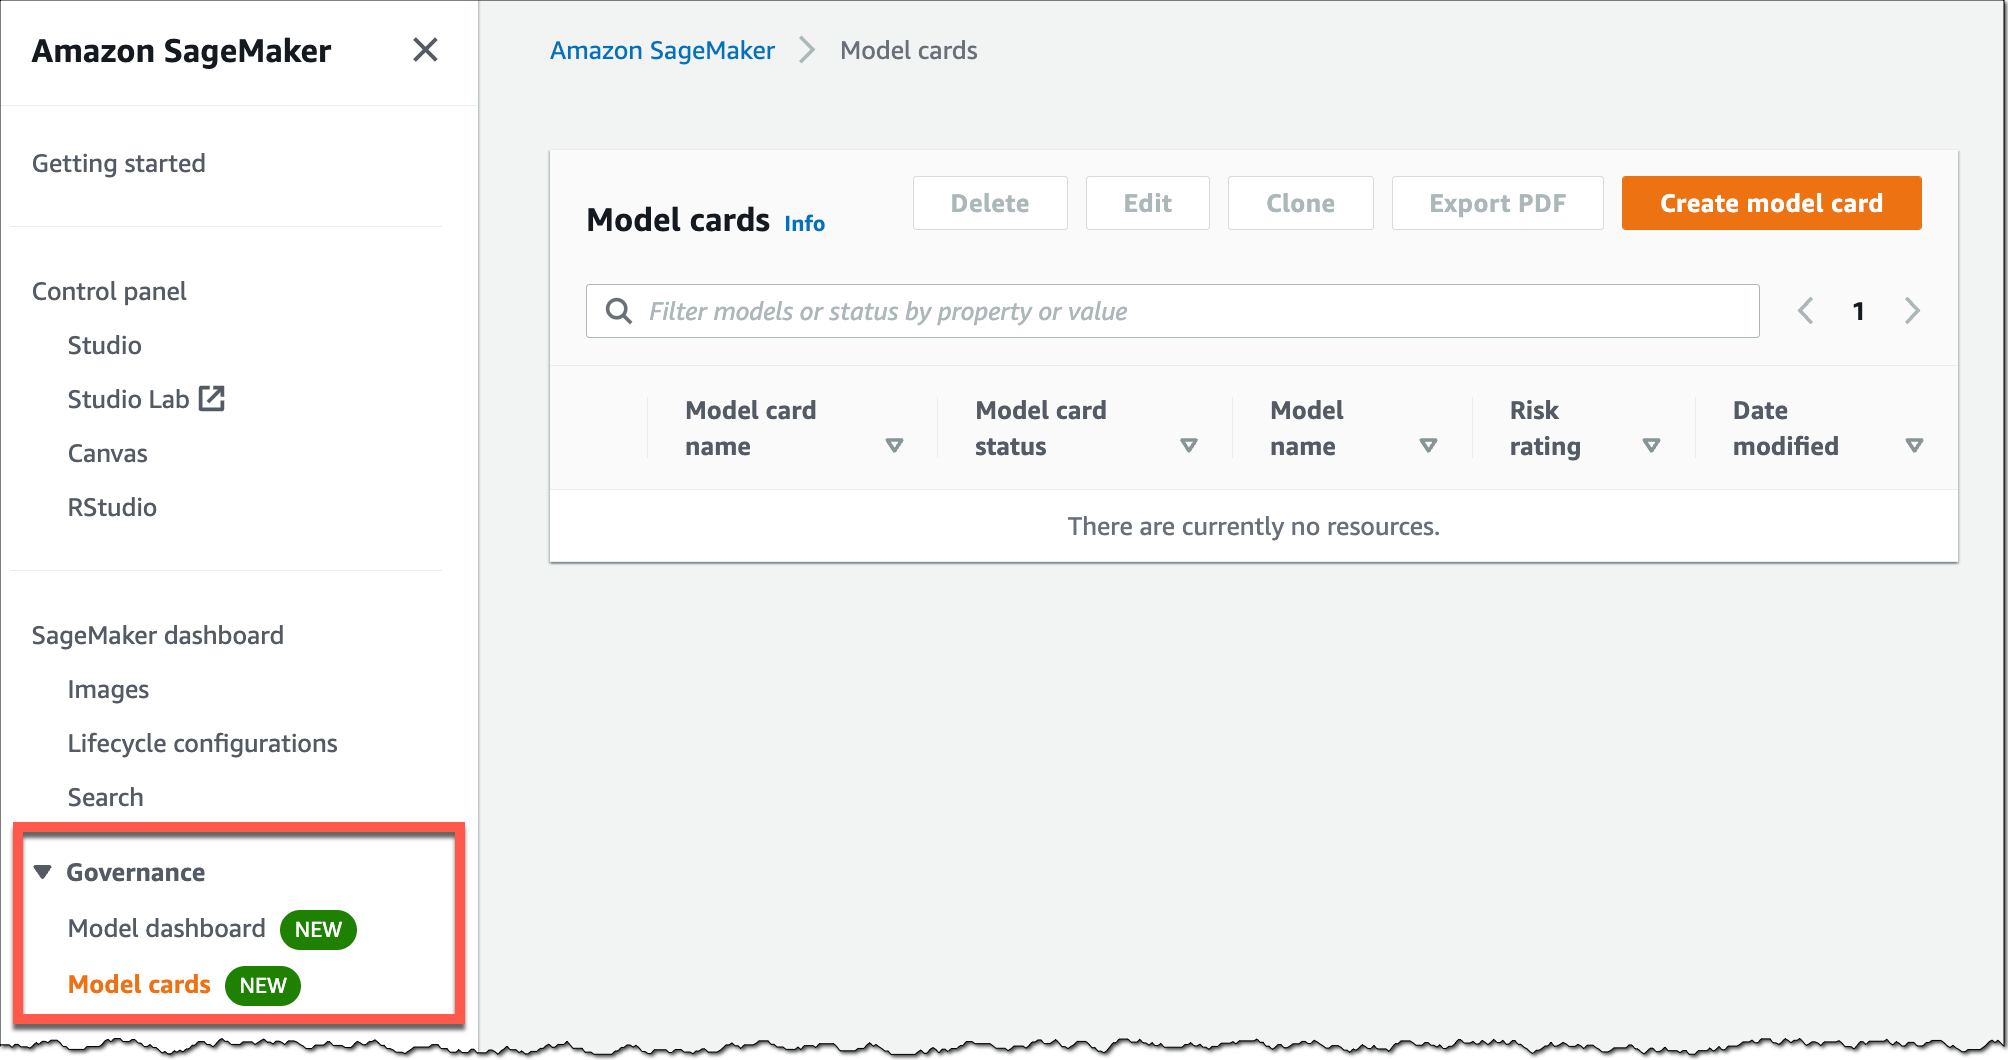
To start creating SageMaker Model Cards, go to the SageMaker console, select Governance in the left navigation menu, and select Model cards.

Amazon SageMaker Model Cards

Select Create model card to document your model information.

Amazon SageMaker Model Card

Amazon SageMaker Model Cards

Introducing Amazon SageMaker Model Dashboard
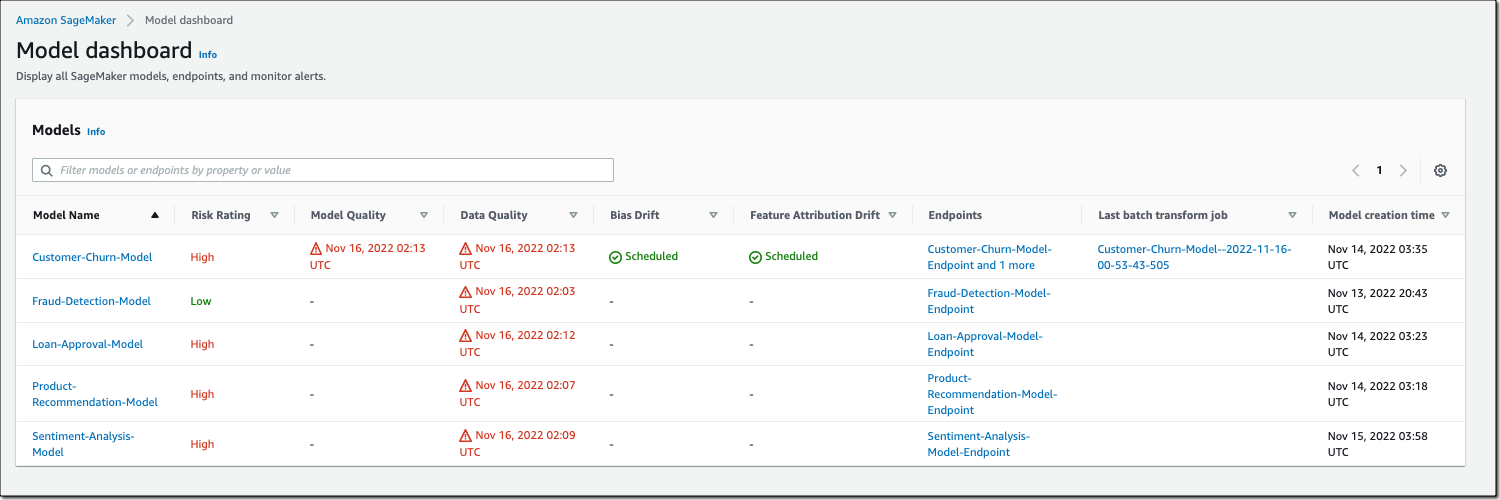
SageMaker Model Dashboard lets you monitor all your models in one place. With this bird’s-eye view, you can now see which models are used in production, view model cards, visualize model lineage, track resources, and monitor model behavior through an integration with SageMaker Model Monitor and SageMaker Clarify. The dashboard automatically alerts you when models are not being monitored or deviate from expected behavior. You can also drill deeper into individual models to troubleshoot issues.

To access SageMaker Model Dashboard, go to the SageMaker console, select Governance in the left navigation menu, and select Model dashboard.

Amazon SageMaker Model Dashboard

Note: The risk rating shown above is for illustrative purposes only and may vary based on input provided by you.

Now Available
Amazon SageMaker Role Manager, SageMaker Model Cards, and SageMaker Model Dashboard are available today at no additional charge in all the AWS Regions where Amazon SageMaker is available except for the AWS GovCloud and AWS China Regions.

To learn more, visit ML governance with Amazon SageMaker and check the developer guide.

Start building your ML projects with our new governance tools for Amazon SageMaker today. 

— Antje

Join the Preview – AWS Glue Data Quality

Post Syndicated from Jeff Barr original https://aws.amazon.com/blogs/aws/join-the-preview-aws-glue-data-quality/

Back in 1980, at my second professional programming job, I was working on a project that analyzed driver’s license data from a bunch of US states. At that time data of that type was generally stored in fixed-length records, with values carefully (or not) encoded into each field. Although we were given schemas for the data, we would invariably find that the developers had to resort to tricks in order to represent values that were not anticipated up front. For example, coding for someone with heterochromia, eyes of different colors. We ended up doing a full scan of the data ahead of our actual time-consuming and expensive analytics run in order to make sure that we were dealing with known data. This was my introduction to data quality, or the lack thereof.

AWS makes it easier for you to build data lakes and data warehouses at any scale. We want to make it easier than ever before for you to measure and maintain the desired quality level of the data that you ingest, process, and share.

Introducing AWS Glue Data Quality
Today I would like to tell you about AWS Glue Data Quality, a new set of features for AWS Glue that we are launching in preview form. It can analyze your tables and recommend a set of rules automatically based on what it finds. You can fine-tune those rules if necessary and you can also write your own rules. In this blog post I will show you a few highlights, and will save the details for a full post when these features progress from preview to generally available.

Each data quality rule references a Glue table or selected columns in a Glue table and checks for specific types of properties: timeliness, accuracy, integrity, and so forth. For example, a rule can indicate that a table must have the expected number of columns, that the column names match a desired pattern, and that a specific column is usable as a primary key.

Getting Started
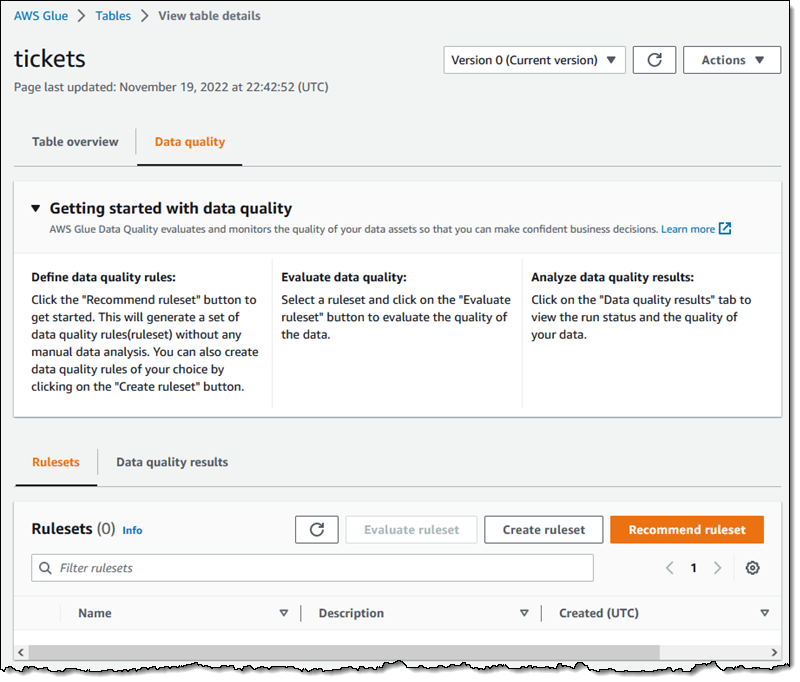
I can open the new Data quality tab on one of my Glue tables to get started. From there I can create a ruleset manually, or I can click Recommend ruleset to get started:

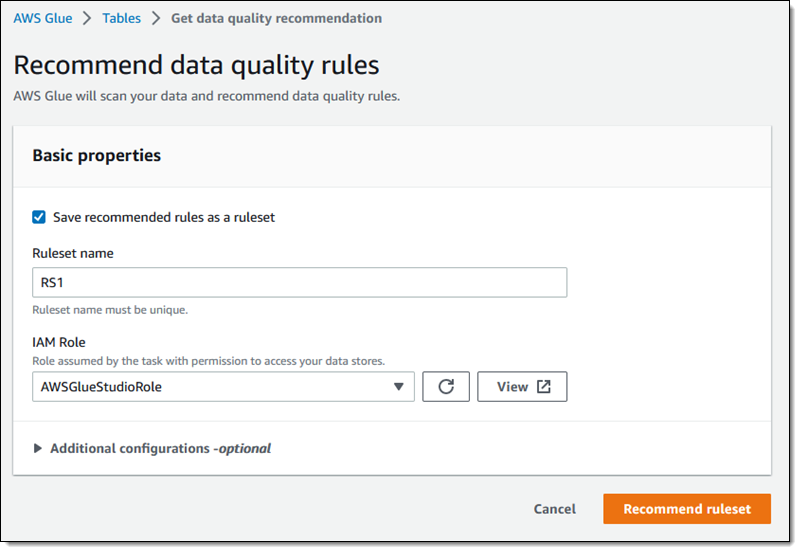
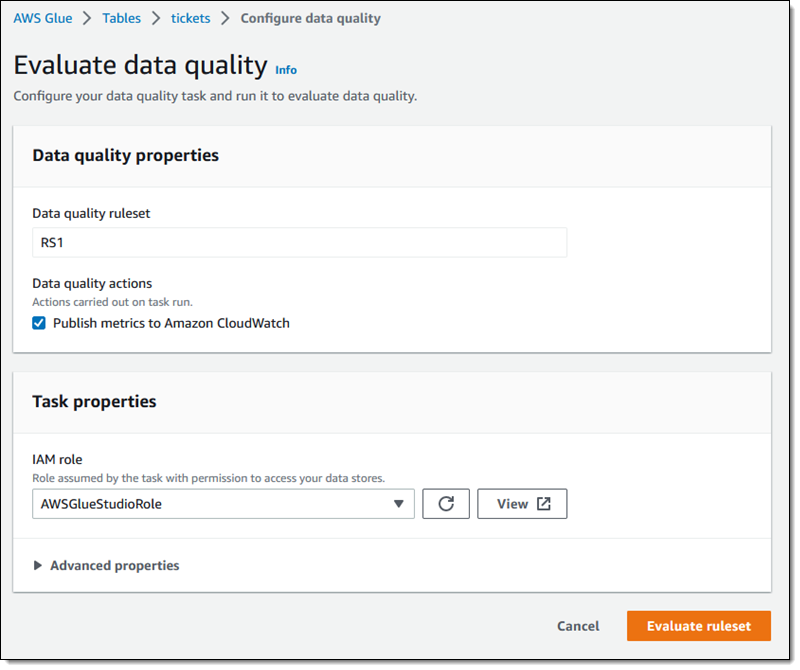
Then I enter a name for my Ruleset (RS1), choose an IAM Role that has permission to access it, and click Recommend ruleset:

My click initiates a Glue Recommendation task (a specialized type of Glue job) that scans the data and makes recommendations. Once the task has run to completion I can examine the recommendations:

I click Evaluate ruleset to check on the quality of my data.

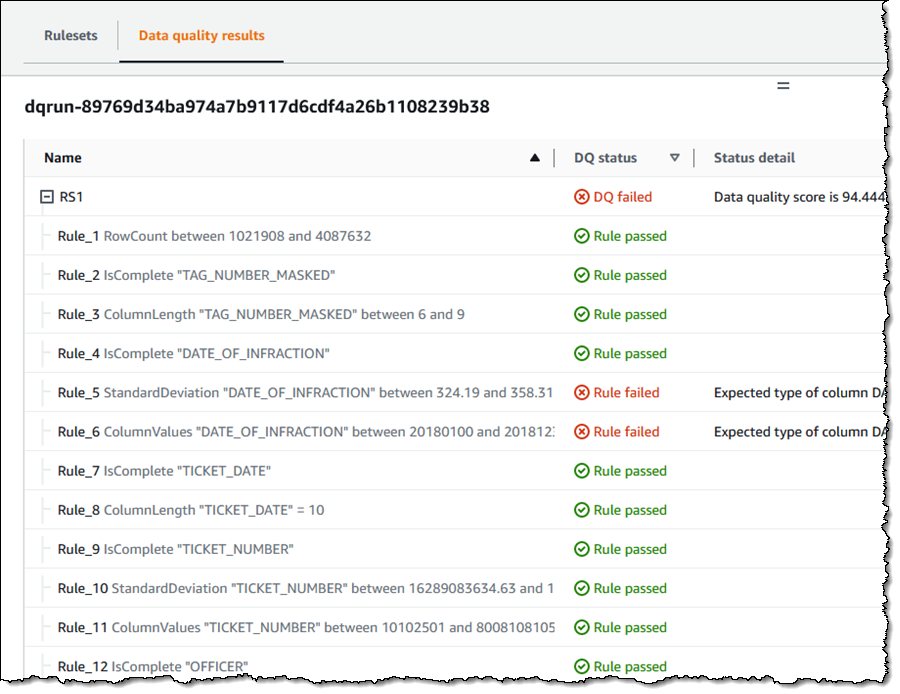
The data quality task runs and I can examine the results:

In addition to creating Rulesets that are attached to tables, I can use them as part of a Glue job. I create my job as usual and then add an Evaluate Data Quality node:

Then I use the Data Quality Definition Language (DDQL) builder to create my rules. I can choose between 20 different rule types:

For this blog post, I made these rules more strict than necessary so that I could show you what happens when the data quality evaluation fails.

I can set the job options, and choose the original data or the data quality results as the output of the transform. I can also write the data quality results to an S3 bucket:

After I have created my Ruleset, I set any other desired options for the job, save it, and then run it. After the job completes I can find the results in the Data quality tab. Because I made some overly strict rules, the evaluation correctly flagged my data with a 0% score:

There’s a lot more, but I will save that for the next blog post!

Things to Know
Preview Regions – This is an open preview and you can access it today the US East (Ohio, N. Virginia), US West (Oregon), Asia Pacific (Tokyo), and Europe (Ireland) AWS Regions.

Pricing – Evaluating data quality consumes Glue Data Processing Units (DPU) in the same manner and at the same per-DPU pricing as any other Glue job.

— Jeff;

New – Trusted Language Extensions for PostgreSQL on Amazon Aurora and Amazon RDS

Post Syndicated from Channy Yun original https://aws.amazon.com/blogs/aws/new-trusted-language-extensions-for-postgresql-on-amazon-aurora-and-amazon-rds/

PostgreSQL has become the preferred open-source relational database for many enterprises and start-ups with its extensible design for developers. One of the reasons developers use PostgreSQL is it allows them to add database functionality by building extensions with their preferred programming languages.

You can already install and use PostgreSQL extensions in Amazon Aurora PostgreSQL-Compatible Edition and Amazon Relational Database Service for PostgreSQL. We support more than 85 PostgreSQL extensions in Amazon Aurora and Amazon RDS, such as the pgAudit extension for logging your database activity. While many workloads use these extensions, we heard our customers asking for flexibility to build and run the extensions of their choosing for their PostgreSQL database instances.

Today, we are announcing the general availability of Trusted Language Extensions for PostgreSQL (pg_tle), a new open-source development kit for building PostgreSQL extensions. With Trusted Language Extensions for PostgreSQL, developers can build high-performance extensions that run safely on PostgreSQL.

Trusted Language Extensions for PostgreSQL provides database administrators control over who can install extensions and a permissions model for running them, letting application developers deliver new functionality as soon as they determine an extension meets their needs.

To start building with Trusted Language Extensions, you can use trusted languages such as JavaScript, Perl, and PL/pgSQL. These trusted languages have safety attributes, including restricting direct access to the file system and preventing unwanted privilege escalations. You can easily install extensions written in a trusted language on Amazon Aurora PostgreSQL-Compatible Edition 14.5 and Amazon RDS for PostgreSQL 14.5 or a newer version.

Trusted Language Extensions for PostgreSQL is an open-source project licensed under Apache License 2.0 on GitHub. You can comment or suggest items on the Trusted Language Extensions for PostgreSQL roadmap and help us support this project across multiple programming languages, and more. Doing this as a community will help us make it easier for developers to use the best parts of PostgreSQL to build extensions.

Let’s explore how we can use Trusted Language Extensions for PostgreSQL to build a new PostgreSQL extension for Amazon Aurora and Amazon RDS.

Setting up Trusted Language Extensions for PostgreSQL
To use pg_tle with Amazon Aurora or Amazon RDS for PostgreSQL, you need to set up a parameter group that loads pg_tle in the PostgreSQL shared_preload_libraries setting. Choose Parameter groups in the left navigation pane in the Amazon RDS console and Create parameter group to make a new parameter group.

Choose Create after you select postgres14 with Amazon RDS for PostgreSQL in the Parameter group family and pg_tle in the Group Name. You can select aurora-postgresql14 for an Amazon Aurora PostgreSQL-Compatible cluster.

Choose a created pgtle parameter group and Edit in the Parameter group actions dropbox menu. You can search shared_preload_library in the search box and choose Edit parameter. You can add your preferred values, including pg_tle, and choose Save changes.

You can also do the same job in the AWS Command Line Interface (AWS CLI).

$ aws rds create-db-parameter-group \
  --region us-east-1 \
  --db-parameter-group-name pgtle \
  --db-parameter-group-family aurora-postgresql14 \
  --description "pgtle group"

$ aws rds modify-db-parameter-group \
  --region us-east-1 \
  --db-parameter-group-name pgtle \
  --parameters "ParameterName=shared_preload_libraries,ParameterValue=pg_tle,ApplyMethod=pending-reboot"

Now, you can add the pgtle parameter group to your Amazon Aurora or Amazon RDS for PostgreSQL database. If you have a database instance called testing-pgtle, you can add the pgtle parameter group to the database instance using the command below. Please note that this will cause an active instance to reboot.

$ aws rds modify-db-instance \
  --region us-east-1 \
  --db-instance-identifier testing-pgtle \
  --db-parameter-group-name pgtle-pg \
  --apply-immediately

Verify that the pg_tle library is available on your Amazon Aurora or Amazon RDS for PostgreSQL instance. Run the following command on your PostgreSQL instance:

SHOW shared_preload_libraries;

pg_tle should appear in the output.

Now, we need to create the pg_tle extension in your current database to run the command:

 CREATE EXTENSION pg_tle;

You can now create and install Trusted Language Extensions for PostgreSQL in your current database. If you create a new extension, you should grant the pgtle_admin role to your primary user (e.g., postgres) with the following command:

GRANT pgtle_admin TO postgres;

Let’s now see how to create our first pg_tle extension!

Building a Trusted Language Extension for PostgreSQL
For this example, we are going to build a pg_tle extension to validate that a user is not setting a password that’s found in a common password dictionary. Many teams have rules around the complexity of passwords, particularly for database users. PostgreSQL allows developers to help enforce password complexity using the check_password_hook.

In this example, you will build a password check hook using PL/pgSQL. In the hook, you can check to see if the user-supplied password is in a dictionary of 10 of the most common password values:

SELECT pgtle.install_extension (
  'my_password_check_rules',
  '1.0',
  'Do not let users use the 10 most commonly used passwords',
$_pgtle_$
  CREATE SCHEMA password_check;
  REVOKE ALL ON SCHEMA password_check FROM PUBLIC;
  GRANT USAGE ON SCHEMA password_check TO PUBLIC;

  CREATE TABLE password_check.bad_passwords (plaintext) AS
  VALUES
    ('123456'),
    ('password'),
    ('12345678'),
    ('qwerty'),
    ('123456789'),
    ('12345'),
    ('1234'),
    ('111111'),
    ('1234567'),
    ('dragon');
  CREATE UNIQUE INDEX ON password_check.bad_passwords (plaintext);

  CREATE FUNCTION password_check.passcheck_hook(username text, password text, password_type pgtle.password_types, valid_until timestamptz, valid_null boolean)
  RETURNS void AS $$
    DECLARE
      invalid bool := false;
    BEGIN
      IF password_type = 'PASSWORD_TYPE_MD5' THEN
        SELECT EXISTS(
          SELECT 1
          FROM password_check.bad_passwords bp
          WHERE ('md5' || md5(bp.plaintext || username)) = password
        ) INTO invalid;
        IF invalid THEN
          RAISE EXCEPTION 'password must not be found on a common password dictionary';
        END IF;
      ELSIF password_type = 'PASSWORD_TYPE_PLAINTEXT' THEN
        SELECT EXISTS(
          SELECT 1
          FROM password_check.bad_passwords bp
          WHERE bp.plaintext = password
        ) INTO invalid;
        IF invalid THEN
          RAISE EXCEPTION 'password must not be found on a common password dictionary';
        END IF;
      END IF;
    END
  $$ LANGUAGE plpgsql SECURITY DEFINER;

  GRANT EXECUTE ON FUNCTION password_check.passcheck_hook TO PUBLIC;

  SELECT pgtle.register_feature('password_check.passcheck_hook', 'passcheck');
$_pgtle_$
);

You need to enable the hook through the pgtle.enable_password_check configuration parameter. On Amazon Aurora and Amazon RDS for PostgreSQL, you can do so with the following command:

$ aws rds modify-db-parameter-group \
    --region us-east-1 \
    --db-parameter-group-name pgtle \
    --parameters "ParameterName=pgtle.enable_password_check,ParameterValue=on,ApplyMethod=immediate"

It may take several minutes for these changes to propagate. You can check that the value is set using the SHOW command:

SHOW pgtle.enable_password_check;

If the value is on, you will see the following output:

 pgtle.enable_password_check
-----------------------------
 on

Now you can create this extension in your current database and try setting your password to one of the dictionary passwords and observe how the hook rejects it:

CREATE EXTENSION my_password_check_rules;

CREATE ROLE test_role PASSWORD '123456';
ERROR:  password must not be found on a common password dictionary

CREATE ROLE test_role;
SET SESSION AUTHORIZATION test_role;
SET password_encryption TO 'md5';
\password
-- set to "password"
ERROR:  password must not be found on a common password dictionary

To disable the hook, set the value of pgtle.enable_password_check to off:

$ aws rds modify-db-parameter-group \
    --region us-east-1 \
    --db-parameter-group-name pgtle \
    --parameters "ParameterName=pgtle.enable_password_check,ParameterValue=off,ApplyMethod=immediate"

You can uninstall this pg_tle extension from your database and prevent anyone else from running CREATE EXTENSION on my_password_check_rules with the following command:

DROP EXTENSION my_password_check_rules;
SELECT pgtle.uninstall_extension('my_password_check_rules');

You can find more sample extensions and give them a try. To build and test your Trusted Language Extensions in your local PostgreSQL database, you can build from our source code after cloning the repository.

Join Our Community!
The Trusted Language Extensions for PostgreSQL community is open to everyone. Give it a try, and give us feedback on what you would like to see in future releases. We welcome any contributions, such as new features, example extensions, additional documentation, or any bug reports in GitHub.

To learn more about using Trusted Language Extensions for PostgreSQL in the AWS Cloud, see the Amazon Aurora PostgreSQL-Compatible Edition and Amazon RDS for PostgreSQL documentation.

Give it a try, and please send feedback to AWS re:Post for PostgreSQL or through your usual AWS support contacts.

– Channy

Preview: Use Amazon SageMaker to Build, Train, and Deploy ML Models Using Geospatial Data

Post Syndicated from Channy Yun original https://aws.amazon.com/blogs/aws/preview-use-amazon-sagemaker-to-build-train-and-deploy-ml-models-using-geospatial-data/

You use map apps every day to find your favorite restaurant or travel the fastest route using geospatial data. There are two types of geospatial data: vector data that uses two-dimensional geometries such as a building location (points), roads (lines), or land boundary (polygons), and raster data such as satellite and aerial images.

Last year, we introduced Amazon Location Service, which makes it easy for developers to add location functionality to their applications. With Amazon Location Service, you can visualize a map, search points of interest, optimize delivery routes, track assets, and use geofencing to detect entry and exit events in your defined geographical boundary.

However, if you want to make predictions from geospatial data using machine learning (ML), there are lots of challenges. When I studied geographic information systems (GIS) in graduate school, I was limited to a small data set that covered only a narrow area and had to contend with limited storage and only the computing power of my laptop at the time.

These challenges include 1) acquiring and accessing high-quality geospatial datasets is complex as it requires working with multiple data sources and vendors, 2) preparing massive geospatial data for training and inference can be time-consuming and expensive, and 3) specialized tools are needed to visualize geospatial data and integrate with ML operation infrastructure

Today I’m excited to announce the preview release of Amazon SageMaker‘s new geospatial capabilities that make it easy to build, train, and deploy ML models using geospatial data. This collection of features offers pre-trained deep neural network (DNN) models and geospatial operators that make it easy to access and prepare large geospatial datasets. All generated predictions can be visualized and explored on the map.

Also, you can use the new geospatial image to transform and visualize data inside geospatial notebooks using open-source libraries such as NumPy, GDAL, GeoPandas, and Rasterio, as well as SageMaker-specific libraries.

With a few clicks in the SageMaker Studio console, a fully integrated development environment (IDE) for ML, you can run an Earth Observation job, such as a land cover segmentation or launch notebooks. You can bring various geospatial data, for example, your own Planet Labs satellite data from Amazon S3, or US Geological Survey LANDSAT and Sentinel-2 images from Open Data on AWS, Amazon Location Service, or bring your own data, such as location data generated from GPS devices, connected vehicles or internet of things (IoT) sensors, retail store foot traffic, geo-marketing and census data.

The Amazon SageMaker geospatial capabilities support use cases across any industry. For example, insurance companies can use satellite images to analyze the damage impact from natural disasters on local economies, and agriculture companies can track the health of crops, predict harvest yield, and forecast regional demand for agricultural produce. Retailers can combine location and map data with competitive intelligence to optimize new store locations worldwide. These are just a few of the example use cases. You can turn your own ideas into reality!

Introducing Amazon SageMaker Geospatial Capabilities
In the preview, you can use SageMaker Studio initialized in the US West (Oregon) Region. Make sure to set the default Jupyter Lab 3 as the version when you create a new user in the Studio. To learn more about setting up SageMaker Studio, see Onboard to Amazon SageMaker Domain Using Quick setup in the AWS documentation.

Now you can find the Geospatial section by navigating to the homepage and scrolling down in SageMaker Studio’s new Launcher tab.

Here is an overview of three key Amazon SageMaker geospatial capabilities:

  • Earth Observation jobs – Acquire, transform, and visualize satellite imagery data to make predictions and get useful insights.
  • Vector Enrichment jobs – Enrich your data with operations, such as converting geographical coordinates to readable addresses from CSV files.
  • Map Visualization – Visualize satellite images or map data uploaded from a CSV, JSON, or GeoJSON file.

Let’s dive deep into each component!

Get Started with an Earth Observation Job
To get started with Earth Observation jobs, select Create Earth Observation job on the front page.

You can select one of the geospatial operations or ML models based on your use case.

  • Spectral Index – Obtain a combination of spectral bands that indicate the abundance of features of interest.
  • Cloud Masking – Identify cloud and cloud-free pixels to get clear and accurate satellite imagery.
  • Land Cover Segmentation – Identify land cover types such as vegetation and water in satellite imagery.

The SageMaker provides a combination of geospatial functionalities that include built-in operations for data transformations along with pretrained ML models. You can use these models to understand the impact of environmental changes and human activities over time, identify cloud and cloud-free pixels, and perform semantic segmentation.

Define a Job name, choose a model to be used, and click the bottom-right Next button to move to the second configuration step.

Next, you can define an area of interest (AOI), the satellite image data set you want to use, and filters for your job. The left screen shows the Area of Interest map to visualize for your Earth Observation Job selection, and the right screen contains satellite images and filter options for your AOI.

You can choose the satellite image collection, either USGS LANDSAT or Sentinel-2 images, the date span for your Earth Observation job, and filters on properties of your images in the filter section.

I uploaded GeoJSON format to define my AOI as the Mountain Halla area in Jeju island, South Korea. I select all job properties and options and choose Create.

Once the Earth Observation job is successfully created, a flashbar will appear where I can view my job details by pressing the View job details button.

Once the job is finished, I can Visualize job output.

This image is a job output on rendering process to detect land usage from input satellite images. You can see either input images, output images, or the AOI from data layers in the left pane.

It shows automatic mapping results of land cover for natural resource management. For example, the yellow area is the sea, green is cloud, dark orange is forest, and orange is land.

You can also execute the same job with SageMaker notebook using the geospatial image with geospatial SDKs.

From the File and New, choose Notebook and select the Image dropdown menu in the Setup notebook environment and choose Geospatial 1.0. Let the other settings be set to the default values.

Let’s look at Python sample code! First, set up SageMaker geospatial libraries.

import boto3
import botocore
import sagemaker
import sagemaker_geospatial_map

region = boto3.Session().region_name
session = botocore.session.get_session()
execution_role = sagemaker.get_execution_role()

sg_client= session.create_client(
    service_name='sagemaker-geospatial',
    region_name=region
)

Start an Earth Observation Job to identify the land cover types in the area of Jeju island.

# Perform land cover segmentation on images returned from the sentinel dataset.
eoj_input_config = {
    "RasterDataCollectionQuery": {
        "RasterDataCollectionArn": <ArnDataCollection,
        "AreaOfInterest": {
            "AreaOfInterestGeometry": {
                "PolygonGeometry": {
                    "Coordinates": [
                        [[126.647226, 33.47014], [126.406116, 33.47014], [126.406116, 33.307529], [126.647226, 33.307529], [126.647226, 33.47014]]
                    ]
                }
            }
        },
        "TimeRangeFilter": {
            "StartTime": "2022-11-01T00:00:00Z",
            "EndTime": "2022-11-22T23:59:59Z"
        },
        "PropertyFilters": {
            "Properties": [
                {
                    "Property": {
                        "EoCloudCover": {
                            "LowerBound": 0,
                            "UpperBound": 20
                        }
                    }
                }
            ],
            "LogicalOperator": "AND"
        }
    }
}
eoj_config = {"LandCoverSegmentationConfig": {}}

response = sg_client.start_earth_observation_job(
    Name =  "jeju-island-landcover", 
    InputConfig = eoj_input_config,
    JobConfig = eoj_config, 
    ExecutionRoleArn = execution_role
)
# Monitor the EOJ status
sg_client.get_earth_observation_job(Arn = response['Arn'])

After your EOJ is created, the Arn is returned to you. You use the Arn to identify a job and perform further operations. After finishing the job, visualize Earth Observation inputs and outputs in the visualization tool.

# Creates an instance of the map to add EOJ input/ouput layer
map = sagemaker_geospatial_map.create_map({
    'is_raster': True
})
map.set_sagemaker_geospatial_client(sg_client)
# render the map
map.render()

# Visualize input, you can see EOJ is not be completed.
time_range_filter={
    "start_date": "2022-11-01T00:00:00Z",
    "end_date": "2022-11-22T23:59:59Z"
}
arn_to_visualize = response['Arn']
config = {
    'label': 'Jeju island'
}
input_layer=map.visualize_eoj_input(Arn=arn_to_visualize, config=config , time_range_filter=time_range_filter)

# Visualize output, EOJ needs to be in completed status
time_range_filter={
    "start_date": "2022-11-01T00:00:00Z",
    "snd_date": "2022-11-22T23:59:59Z"
}

config = {
   'preset': 'singleBand',
   'band_name': 'mask'
}
output_layer = map.visualize_eoj_output(Arn=arn_to_visualize, config=config, time_range_filter=time_range_filter)

You can also execute the StartEarthObservationJob API using the AWS Command Line Interface (AWS CLI).

When you create an Earth Observation Job in notebooks, you can use additional geospatial functionalities. Here is a list of some of the other geospatial operations that are supported by Amazon SageMaker:

  • Band Stacking – Combine multiple spectral properties to create a single image.
  • Cloud Removal – Remove pixels containing parts of a cloud from satellite imagery.
  • Geomosaic – Combine multiple images for greater fidelity.
  • Resampling – Scale images to different resolutions.
  • Temporal Statistics – Calculate statistics through time for multiple GeoTIFFs in the same area.
  • Zonal Statistics – Calculate statistics on user-defined regions.

To learn more, see Amazon SageMaker geospatial notebook SDK and Amazon SageMaker geospatial capability Service APIs in the AWS documentation and geospatial sample codes in the GitHub repository.

Perform a Vector Enrichment Job and Map Visualization
A Vector Enrichment Job (VEJ) performs operations on your vector data, such as reverse geocoding or map matching.

  • Reverse Geocoding – Convert map coordinates to human-readable addresses powered by Amazon Location Service.
  • Map Matching – Match GPS coordinates to road segments.

While you need to use an Amazon SageMaker Studio notebook to execute a VEJ, you can view all the jobs you create.

With the StartVectorEnrichmentJob API, you can create a VEJ for the supplied two job types.

{
  "Name":"vej-reverse", 
  "InputConfig":{
       "DocumentType":"csv", //
       "DataSourceConfig":{
       "S3Data":{
            "S3Uri":"s3://channy-geospatial/sample/vej.csv",
        } 
   }
  }, 
  "JobConfig": {
      "MapMatchingConfig": { 
          "YAttributeName":"string", // Latitude 
          "XAttributeName":"string", // Longitude 
          "TimestampAttributeName":"string", 
          "IdAttributeName":"string"
       }
   },
   "ExecutionRoleArn":"string" 
}

You can visualize the output of VEJ in the notebook or use the Map Visualization feature after you export VEJ jobs output to your S3 bucket. With the map visualization feature, you can easily show your geospatial data on the map.

This sample visualization includes Seattle City Council districts and public-school locations in GeoJSON format. Select Add data to upload data files or select S3 bucket.

{
  "type": "FeatureCollection",
  "crs": { "type": "name", "properties": { 
            "name":   "urn:ogc:def:crs:OGC:1.3:CRS84" } },
                                                                                
  "features": [
            { "type": "Feature", "id": 1, "properties": { "PROPERTY_L": "Jane Addams", "Status": "MS" }, "geometry": { "type": "Point", "coordinates": [ -122.293009024934037, 47.709944862769468 ] } },
            { "type": "Feature", "id": 2, "properties": { "PROPERTY_L": "Rainier View", "Status": "ELEM" }, "geometry": { "type": "Point", "coordinates": [ -122.263172064204767, 47.498863322205558 ] } },
            { "type": "Feature", "id": 3, "properties": { "PROPERTY_L": "Emerson", "Status": "ELEM" }, "geometry": { "type": "Point", "coordinates": [ -122.258636146463658, 47.514820466363943 ] } }
            ]
}

That’s all! For more information about each component, see Amazon SageMaker geospatial Developer Guide.

Join the Preview
The preview release of Amazon SageMaker geospatial capability is now available in the US West (Oregon) Region.

We want to hear more feedback during the preview. Give it a try, and please send feedback to AWS re:Post for Amazon SageMaker or through your usual AWS support contacts.

– Channy

New – Redesigned UI for Amazon SageMaker Studio

Post Syndicated from Antje Barth original https://aws.amazon.com/blogs/aws/new-redesigned-ui-for-amazon-sagemaker-studio/

Today, I’m excited to announce a new, redesigned user interface (UI) for Amazon SageMaker Studio.

SageMaker Studio provides a single, web-based visual interface where you can perform all machine learning (ML) development steps with a comprehensive set of ML tools. For example, you can prepare data using SageMaker Data Wrangler, build ML models with fully managed Jupyter notebooks, and deploy models using SageMaker’s multi-model endpoints.

Introducing the Redesigned UI for Amazon SageMaker Studio
The redesigned UI makes it easier for you to discover and get started with the ML tools in SageMaker Studio. One highlight of the new UI includes a redesigned navigation menu with links to SageMaker capabilities that follow the typical ML development workflow from preparing data to building, training, and deploying ML models.

We also added new dynamic landing pages for each of the navigation menu items. These landing pages will refresh automatically to show the ML resources relevant for the tool, such as clusters, feature groups, experiments, and model endpoints, as you create or update them. On each of these pages, you can also find links to videos, tutorials, blogs, or additional documentation, to help you get started with the corresponding ML tool in SageMaker Studio.

The new SageMaker Studio Home page gives you one-click access to common tasks and workflows. From here, you can also open the redesigned Launcher with quick links to some of the most frequent tasks, such as creating a new notebook, opening a code console, or opening an image terminal.

Let me give you a whirlwind tour of the redesigned UI.

New Navigation Menu
The new left navigation menu in SageMaker Studio now helps you discover and navigate to the right tools for each step in your ML development workflow. The menu offers clear entry points to key ML tasks, such as data preparation, experimentation, model building, and deployments. The menu also provides shortcuts to quick start solutions and helpful content to accelerate your work in SageMaker Studio.

Amazon SageMaker Studio - New Navigation Menu

New Landing Pages for SageMaker Features and Capabilities
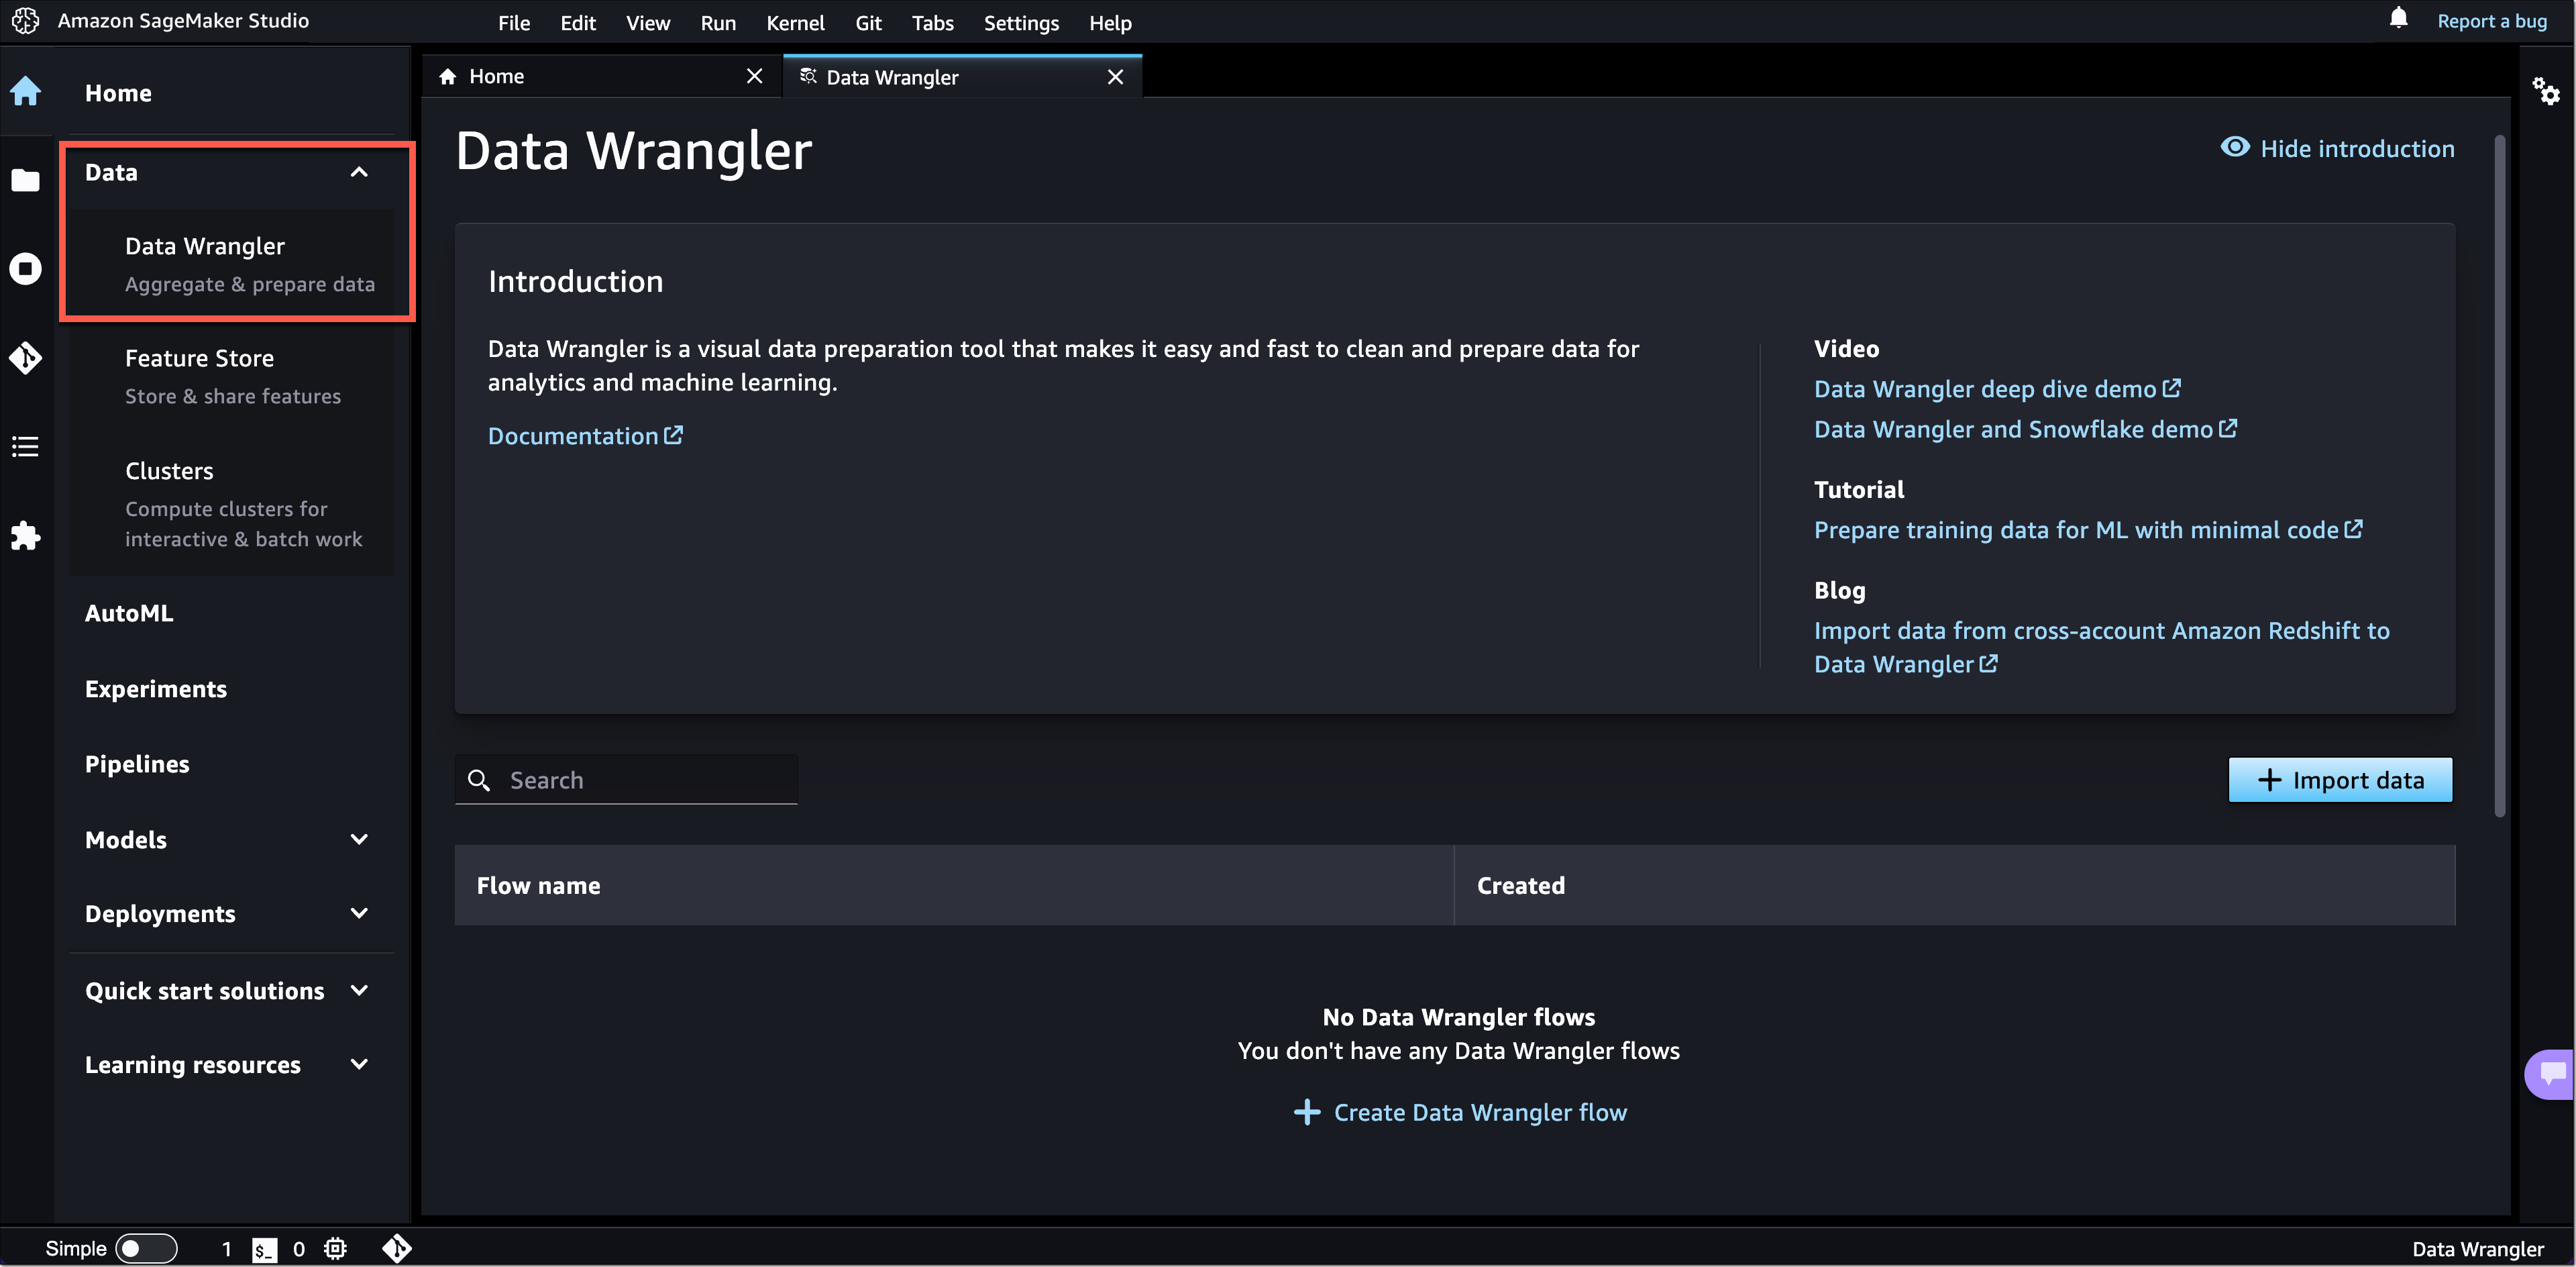
The new left navigation menu groups relevant tools together. For example, if you click on Data, you can now see the relevant SageMaker capabilities for your data preparation tasks. From here, you can prepare your data with SageMaker Data Wrangler, create and store ML features with SageMaker Feature Store, or manage Amazon EMR clusters for large-scale data processing.

If you click on Data Wrangler, the new landing page opens. These landing pages are designed to help you get started more easily. You can find a brief introduction to the tool and links to additional resources, such as videos, tutorials, or blogs.

Amazon SageMaker Studio - New Feature Landing Pages

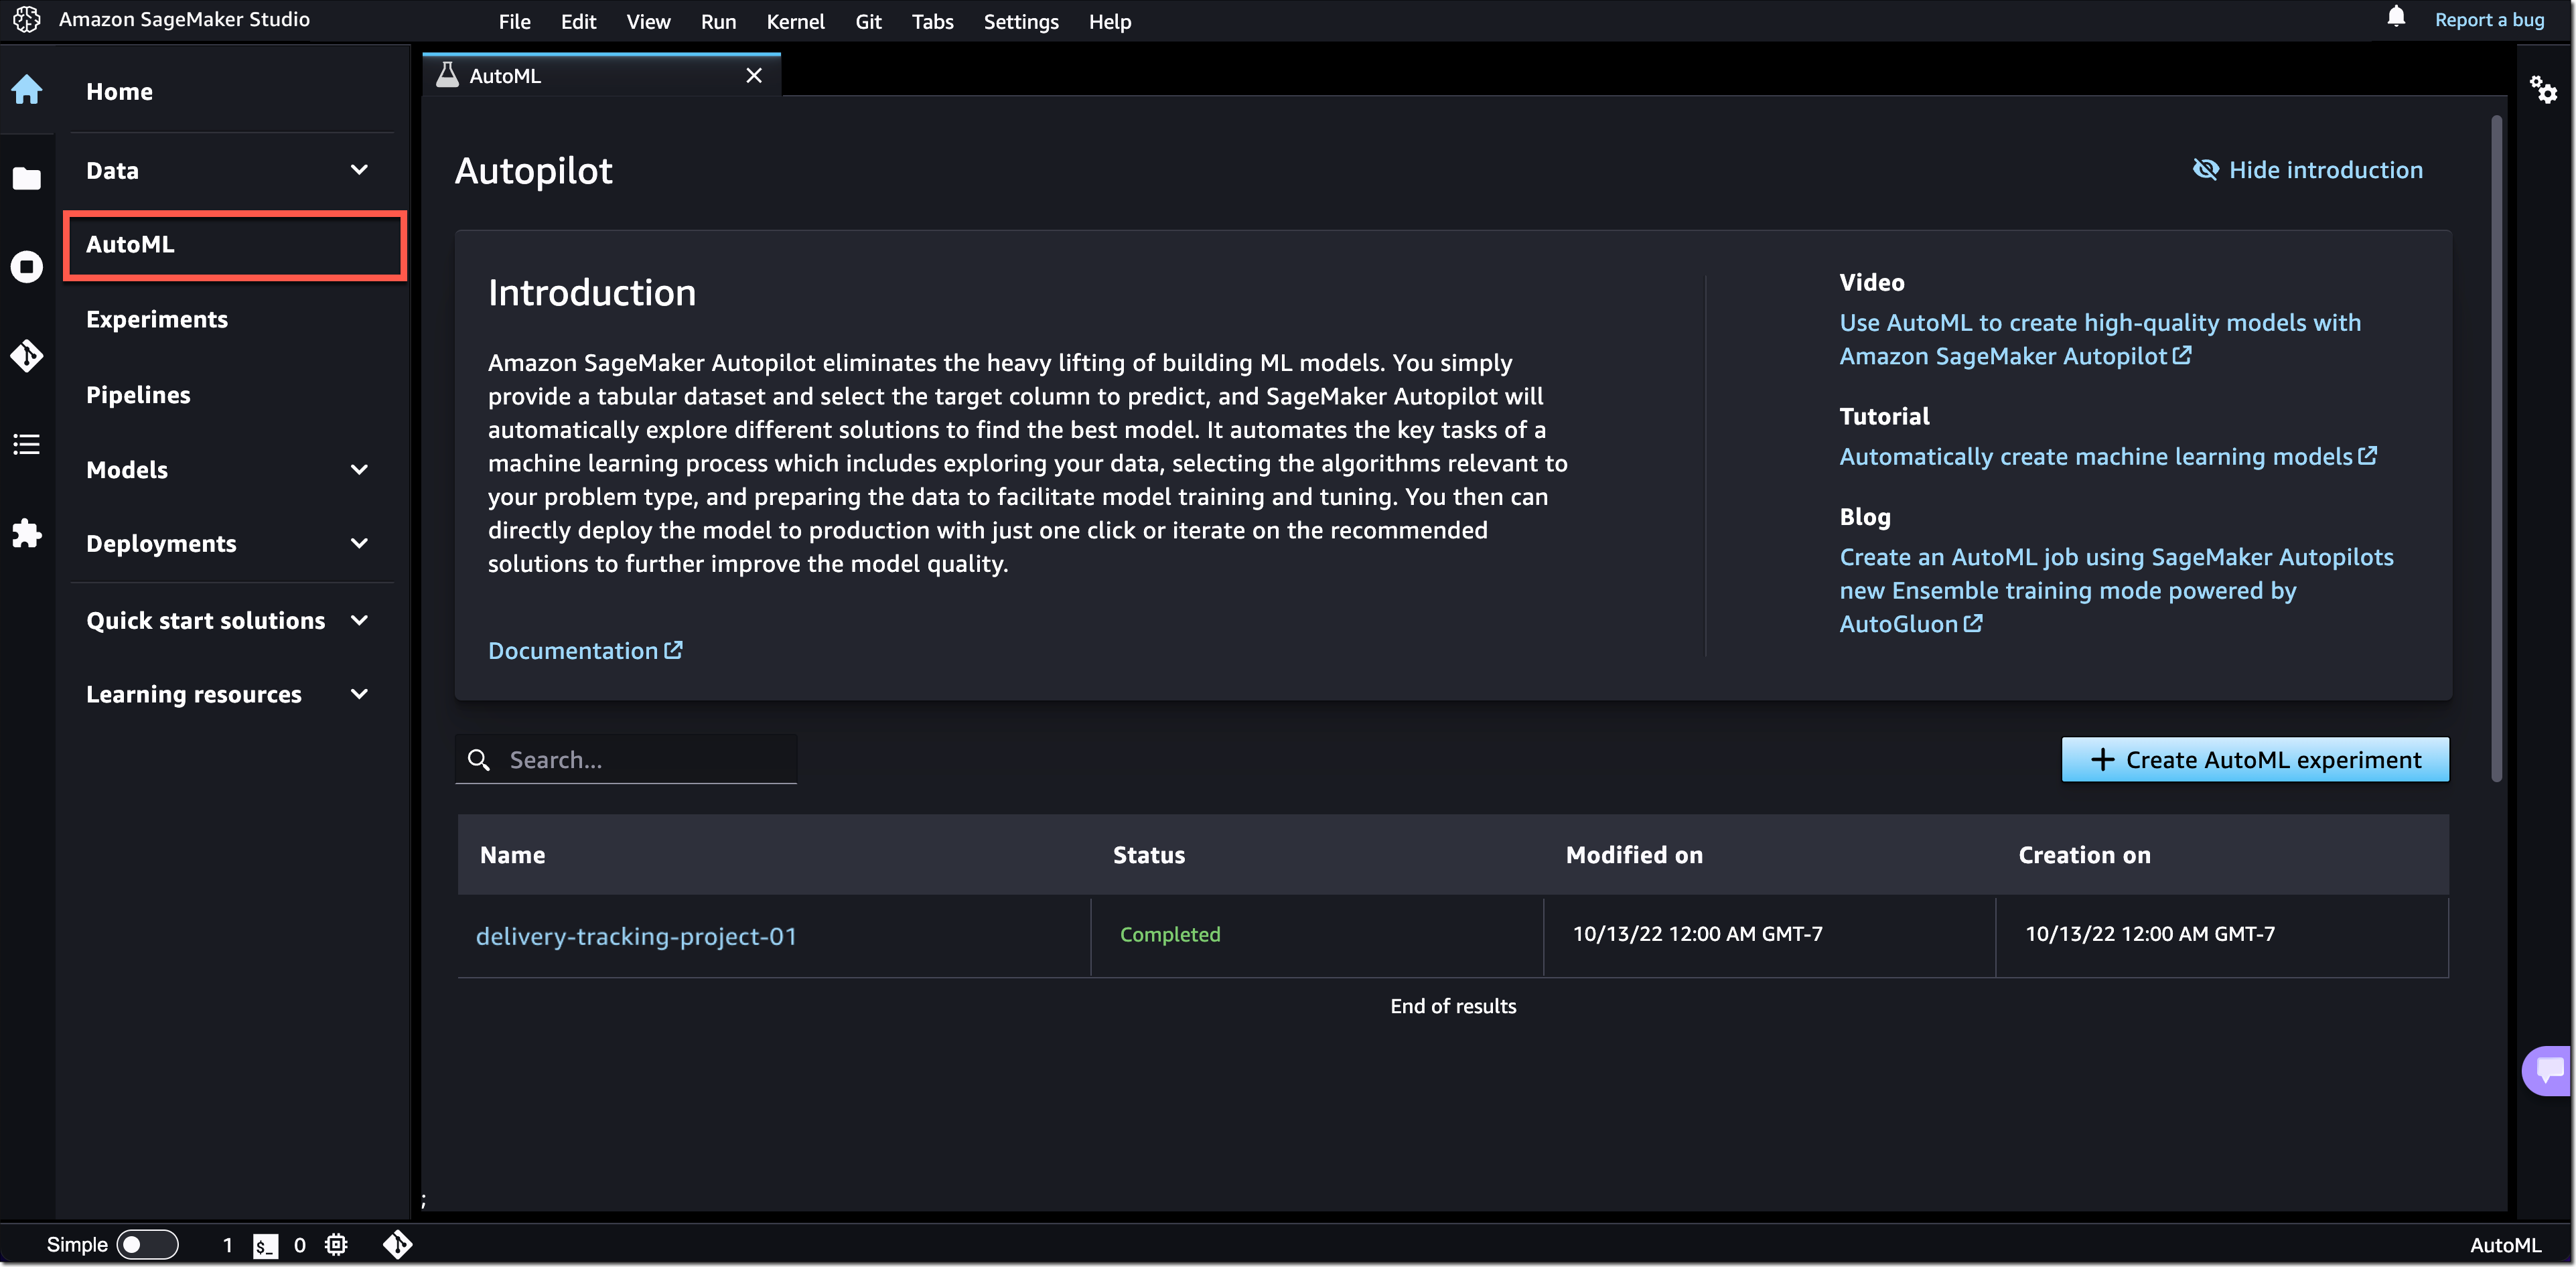
Similar landing pages exist for the other navigation menu items. For example, with one click on AutoML, you can now see your existing SageMaker Autopilot experiments or get started by creating a new one.

Amazon SageMaker Studio - New AutoML Landing Page

New SageMaker Studio Home Page
We also added a new SageMaker Studio Home page with tooltips on key controls in the UI.

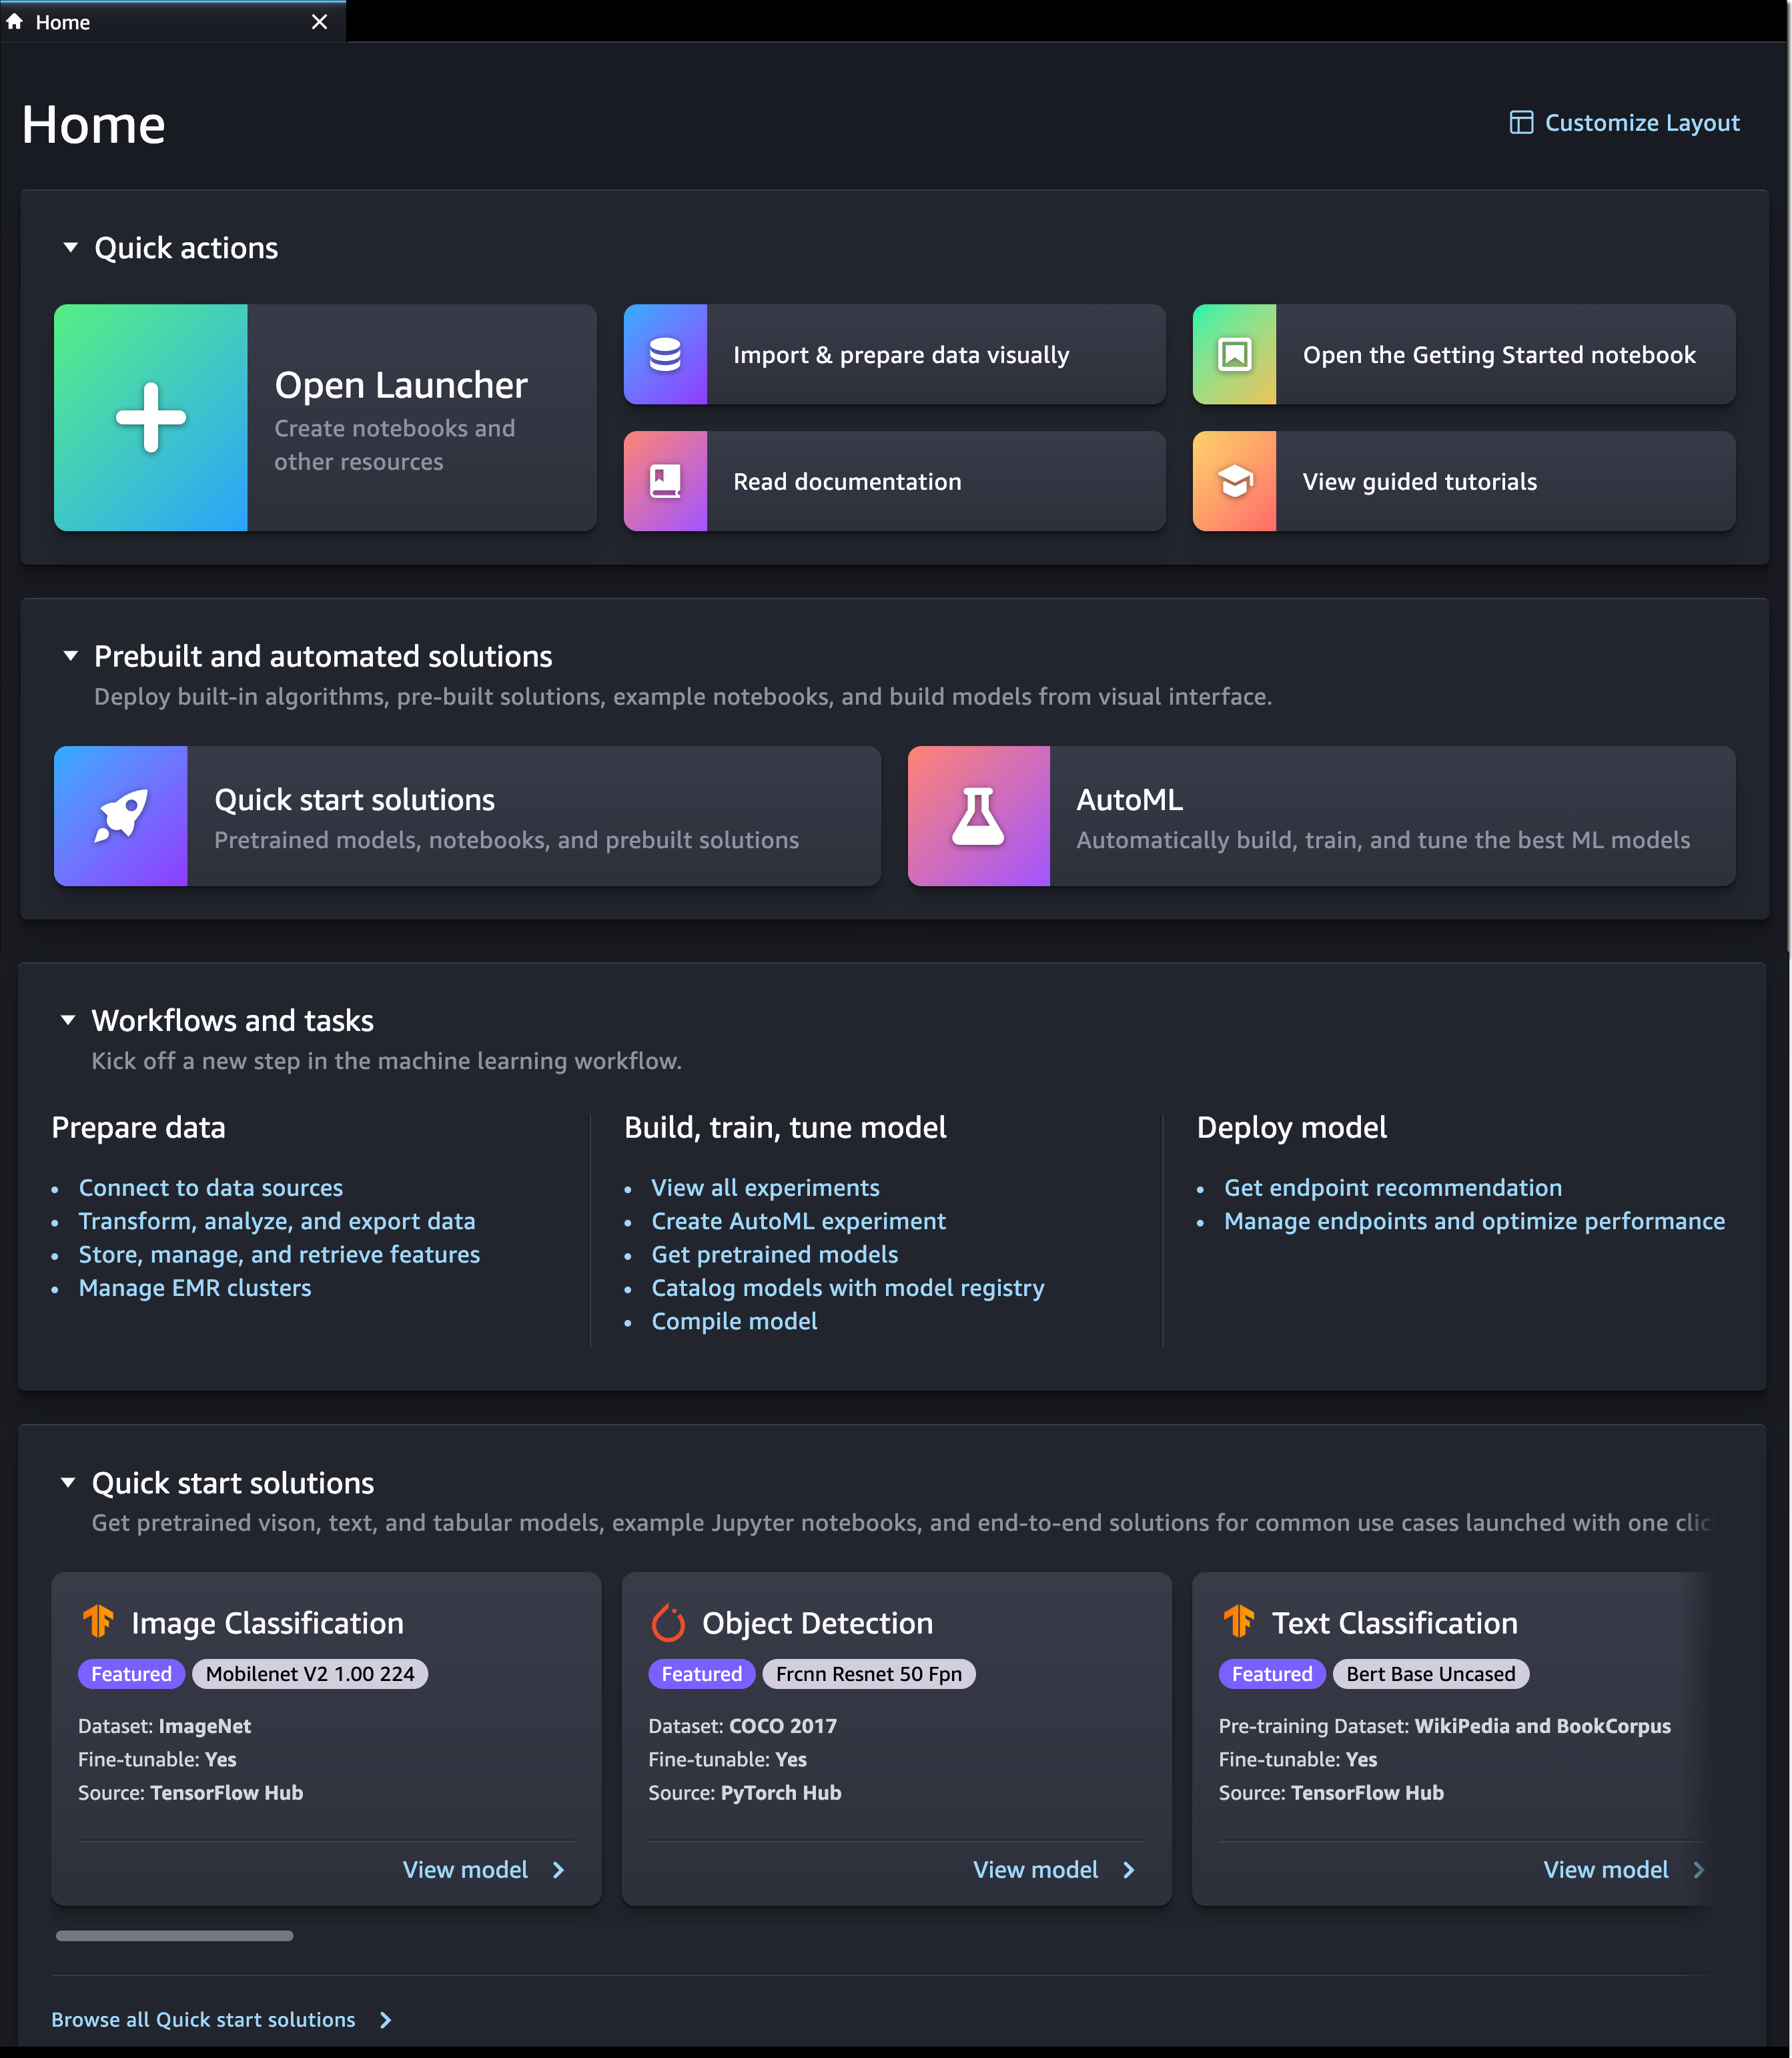
The Home page includes a list of Quick actions for common tasks, such as Open Launcher to create notebooks and other resources. Import & prepare data visually takes you to SageMaker Data Wrangler and helps you get started with your data preparation tasks. You can open the new Getting Started notebook or find additional resources, such as documentation and tutorials.

The Prebuilt and automated solutions help you get started quickly with prebuilt solutions, pretrained open-source models, and AutoML.

In Workflows and tasks, you find a list of relevant tasks for each step in your ML development workflow that take you to the right tool for the job. For example, Store, manage, and retrieve features takes you to SageMaker Feature Store and opens the feature catalog. Similarly, View all experiments takes you to SageMaker Experiments and opens the experiments list view.

In Quick start solutions, you can find pretrained vision, text, and tabular models, notebooks, and end-to-end solutions for common use cases.

Amazon SageMaker Studio - New Home Page

New Getting Started Notebook
SageMaker Studio now includes a new Getting Started notebook that walks you through the basics of how to use SageMaker Studio. If you are a first-time user of SageMaker Studio, this is the perfect starting place. The notebook covers everything from the fundamentals of JupyterLab to a practical walkthrough of training an ML model. The notebook also provides detailed insight into SageMaker-specific functionality, resources, and tools.

New SageMaker Studio Launcher
The Launcher is designed to help you invoke JupyterLab actions and has been optimized to give you quick access to the most frequent tasks, such as creating a notebook, opening a code console, or opening an image terminal. In the same step, you can also choose the image, kernel, instance type, or startup script as needed. 

Amazon SageMaker Studio - New Launcher

Now Available
The redesigned Amazon SageMaker Studio UI is now available in all AWS Regions where SageMaker Studio is available. The redesigned UI is supported by SageMaker Studio domains running on JupyterLab 3. For instructions on how to update the JupyterLab version, see View and update the JupyterLab version of an app from the console.

Give the new user experience a try, and let us know what you think through the purple Feedback widget in SageMaker Studio, or through your usual AWS support contacts.

Start building your ML projects with Amazon SageMaker Studio today!

— Antje

Announcing Amazon DocumentDB Elastic Clusters

Post Syndicated from Veliswa Boya original https://aws.amazon.com/blogs/aws/announcing-amazon-documentdb-elastic-clusters/

Amazon DocumentDB (with MongoDB compatibility) is a scalable, highly durable, and fully managed database service for operating mission-critical JSON workloads. It is one of AWS fast-growing services with customers including BBC, Dow Jones, and Samsung relying on Amazon DocumentDB to run their JSON workloads at scale.

Today I am excited to announce the general availability of Amazon DocumentDB Elastic Clusters. Elastic Clusters enables you to elastically scale your document database to handle virtually any number of writes and reads, with petabytes of storage capacity. Elastic Clusters simplifies how customers interact with Amazon DocumentDB by automatically managing the underlying infrastructure and removing the need to create, remove, upgrade, or scale instances.

A Few Concepts about Elastic Clusters
Sharding – A popular database concept also known as partitioning, sharding splits large data sets into smaller data sets across multiple nodes enabling customers to scale out their database beyond vertical scaling limits. Elastic Clusters uses sharding to partition data across Amazon DocumentDB’s distributed storage system. 

Elastic Clusters – Elastic Clusters is Amazon DocumentDB clusters that allow you to scale your workload’s throughput to millions of writes/reads per second and storage to petabytes. Elastic Clusters comprises one or more shards each of which has its own compute and storage volume. It is highly available across three Availability Zones (AZs) by default, with six copies of your data replicated across these three AZs. You can create Elastic Clusters using the Amazon DocumentDB API, AWS SDK, AWS CLI, AWS CloudFormation, or the AWS console.

Scale Workloads with Little to No Impact – With Elastic Clusters, your database can scale to millions of operations with little to no downtime or performance impact.

Integration with Other AWS Services – Elastic Clusters integrates with other AWS services in the same way Amazon DocumentDB does today. First, you can monitor the health and performance of your Elastic Clusters using Amazon CloudWatch. Second, you can set up authentication and authorization for resources such as clusters through AWS Identity and Access Management (IAM) users and roles and use Amazon Virtual Private Cloud (Amazon VPC) for secure VPC-only connections. Last, you can use AWS Glue to import and export data from and to other AWS services such as Amazon Simple Storage Service (Amazon S3), Amazon Redshift, and Amazon OpenSearch Service.

Getting Started with Elastic Clusters
Previously, I mentioned that you can use either the AWS console, AWS CLI, or AWS SDK to create Elastic Clusters. In the examples below, we will look at how you can create a cluster, scale up or out, and scale in or down using the AWS CLI:

Create a Cluster
When creating a cluster, you will specify the vCPUs that you want for your Elastic Clusters at provisioning. With the size of vCPUs that you provision, you will also get a proportionate amount of memory, expressed in vCPUs. Elastic Clusters automatically provisions the necessary infrastructure (shards and instances) on your behalf.
aws docdb-elastic create-cluster
--cluster-name foo
--shard-capacity 2
--shard-count 4
--auth-type PLAIN_TEXT
--admin-user-name docdbelasticadmin
--admin-user-password password

Scale Up or Out
If you need more compute and storage to handle an increase in traffic, modify the shard-count parameter. Elastic Clusters scales the underlying infrastructure up or out to give you additional compute and storage capacity.
aws docdb-elastic update-cluster
--cluster-arn foo-arn
--shard-count 8

Scale In or Down
If you no longer need the compute and storage that you currently have provisioned, either due to a decline in database traffic or the fact that you originally over-provisioned, modify the shard-count parameter. Elastic Clusters scales the underlying infrastructure in or down.
aws docdb-elastic update-cluster
--cluster-arn foo-arn
--shard-count 4

General Availability of Elastic Clusters for Amazon DocumentDB
Amazon DocumentDB Elastic Clusters is now available in all AWS Regions where Amazon DocumentDB is available, except China and AWS GovCloud. To learn more, visit the Amazon DocumentDB page.

– Veliswa x

New — Amazon Athena for Apache Spark

Post Syndicated from Donnie Prakoso original https://aws.amazon.com/blogs/aws/new-amazon-athena-for-apache-spark/

When Jeff Barr first announced Amazon Athena in 2016, it changed my perspective on interacting with data. With Amazon Athena, I can interact with my data in just a few steps—starting from creating a table in Athena, loading data using connectors, and querying using the ANSI SQL standard.

Over time, various industries, such as financial services, healthcare, and retail, have needed to run more complex analyses for a variety of formats and sizes of data. To facilitate complex data analysis, organizations adopted Apache Spark. Apache Spark is a popular, open-source, distributed processing system designed to run fast analytics workloads for data of any size.

However, building the infrastructure to run Apache Spark for interactive applications is not easy. Customers need to provision, configure, and maintain the infrastructure on top of the applications. Not to mention performing optimal tuning resources to avoid slow application starts and suffering from idle costs.

Introducing Amazon Athena for Apache Spark
Today, I’m pleased to announce Amazon Athena for Apache Spark. With this feature, we can run Apache Spark workloads, use Jupyter Notebook as the interface to perform data processing on Athena, and programmatically interact with Spark applications using Athena APIs. We can start Apache Spark in under a second without having to manually provision the infrastructure.

Here’s a quick preview:

Quick preview of Amazon Athena for Apache Spark

How It Works
Since Amazon Athena for Apache Spark runs serverless, this benefits customers in performing interactive data exploration to gain insights without the need to provision and maintain resources to run Apache Spark. With this feature, customers can now build Apache Spark applications using the notebook experience directly from the Athena console or programmatically using APIs.

The following figure explains how this feature works:

How Amazon Athena for Apache Spark works

On the Athena console, you can now run notebooks and run Spark applications with Python using Jupyter notebooks. In this Jupyter notebook, customers can query data from various sources and perform multiple calculations and data visualizations using Spark applications without context switching.

Amazon Athena integrates with AWS Glue Data Catalog, which helps customers to work with any data source in AWS Glue Data Catalog, including data in Amazon S3. This opens possibilities for customers in building applications to analyze and visualize data to explore data to prepare data sets for machine learning pipelines.

As I demonstrated in the demo preview section, the initialization for the workgroup running the Apache Spark engine takes under a second to run resources for interactive workloads. To make this possible, Amazon Athena for Apache Spark uses Firecracker, a lightweight micro-virtual machine, which allows for instant startup time and eliminates the need to maintain warm pools of resources. This benefits customers who want to perform interactive data exploration to get insights without having to prepare resources to run Apache Spark.

Get Started with Amazon Athena for Apache Spark
Let’s see how we can use Amazon Athena for Apache Spark. In this post, I will explain step-by-step how to get started with this feature.

The first step is to create a workgroup. In the context of Athena, a workgroup helps us to separate workloads between users and applications.

To create a workgroup, from the Athena dashboard, select Create Workgroup.

Select Create Workgroup

On the next page, I give the name and description for this workgroup.

Creating a workgroup

On the same page, I can choose Apache Spark as the engine for Athena. In addition, I also need to specify a service role with appropriate permissions to be used inside a Jupyter notebook. Then, I check Turn on example notebook, which makes it easy for me to get started with Apache Spark inside Athena. I also have the option to encrypt Jupyter notebooks managed by Athena or use the key I have configured in AWS Key Management Service (AWS KMS).

After that, I need to define an Amazon Simple Storage Service (Amazon S3) bucket to store calculation results from the Jupyter notebook. Once I’m sure of all the configurations for this workgroup, I just have to select Create workgroup.

Configure Calculation Results Settings

Now, I can see the workgroup already created in Athena.

Select newly created workgroup

To see the details of this workgroup, I can select the link from the workgroup. Since I also checked the Turn on example notebook when creating this workgroup, I have a Jupyter notebook to help me get started. Amazon Athena also provides flexibility for me to import existing notebooks that I can upload from my laptop with Import file or create new notebooks from scratch by selecting Create notebook.

Example notebook is available in the workgroup

When I select the Jupyter notebook example, I can start building my Apache Spark application.

When I run a Jupyter notebook, it automatically creates a session in the workgroup. Subsequently, each time I run a calculation inside the Jupyter notebook, all results will be recorded in the session. This way, Athena provides me with full information to review each calculation by selecting Calculation ID, which took me to the Calculation details page. Here, I can review the Code and also Results for the calculation.

Review code and results of a calculation

In the session, I can adjust the Coordinator size and Executor size, with 1 data processing unit (DPU) by default. A DPU consists of 4 vCPU and 16 GB of RAM. Changing to a larger DPU allows me to process tasks faster if I have complex calculations.

Configuring session parameters

Programmatic API Access
In addition to using the Athena console, I can also use programmatic access to interact with the Spark application inside Athena. For example, I can create a workgroup with the create-work-group command, start a notebook with create-notebook, and run a notebook session with start-session.

Using programmatic access is useful when I need to execute commands such as building reports or computing data without having to open the Jupyter notebook.

With my Jupyter notebook that I’ve created before, I can start a session by running the following command with the AWS CLI:

$> aws athena start-session \
    --work-group <WORKGROUP_NAME>\
    --engine-configuration '{"CoordinatorDpuSize": 1, "MaxConcurrentDpus":20, "DefaultExecutorDpuSize": 1, "AdditionalConfigs":{"NotebookId":"<NOTEBOOK_ID>"}}'
    --notebook-version "Jupyter 1"
    --description "Starting session from CLI"

{
    "SessionId":"<SESSION_ID>",
    "State":"CREATED"
}

Then, I can run a calculation using the start-calculation-execution API.

$ aws athena start-calculation-execution \
    --session-id "<SESSION_ID>"
    --description "Demo"
    --code-block "print(5+6)"

{
    "CalculationExecutionId":"<CALCULATION_EXECUTION_ID>",
    "State":"CREATING"
}

In addition to using code inline, with the --code-block flag, I can also pass input from a Python file using the following command:

$ aws athena start-calculation-execution \
    --session-id "<SESSION_ID>"
    --description "Demo"
    --code-block file://<PYTHON FILE>

{
    "CalculationExecutionId":"<CALCULATION_EXECUTION_ID>",
    "State":"CREATING"
}

Pricing and Availability
Amazon Athena for Apache Spark is available today in the following AWS Regions: US East (Ohio), US East (N. Virginia), US West (Oregon), Asia Pacific (Tokyo), and Europe (Ireland). To use this feature, you are charged based on the amount of compute usage defined by the data processing unit or DPU per hour. For more information see our pricing page here.

To get started with this feature, see Amazon Athena for Apache Spark to learn more from the documentation, understand the pricing, and follow the step-by-step walkthrough.

Happy building,

— Donnie
Rapid7 Integration For AWS Verified Access

Post Syndicated from Aaron Sawitsky original https://blog.rapid7.com/2022/11/30/rapid7-integration-for-aws-verified-access/

Rapid7 Integration For AWS Verified Access

Today at re:invent, Amazon Web Services (AWS) unveiled its new AWS Verified Access service, and we are thrilled to announce that InsightIDR — Rapid7’s next-gen SIEM and XDR — will support log ingestion from this new service when it is made generally available.

What Is AWS Verified Access?

AWS Verified Access is a new service that allows AWS customers to simplify secure access to private applications running on AWS, without requiring the use of a VPN. Verified Access also lets customers easily implement Zero Trust policies for each application reached via the service. The data needed for these policies is provided by integrations between Verified Access and third-party solutions like IdPs and device management tools. For example:

  • Access to a low-risk application might be granted to any employee who is logged into the organization’s IdP solution
  • Access to a highly sensitive application might only be granted to employees who are logged into the organization’s IdP solution, are part of a specific team at the company, are accessing from a company-managed computer that is fully updated, and have an IP address coming from a country on an allowlist

For customers who already have IdP and device management solutions, Verified Access can integrate with many of these vendors, allowing the customer to use their existing provider to define policies while still getting the convenience of VPN-less access to their private applications through Verified Access.

Unlock a Complete Picture of Your Cloud Security with InsightIDR

Verified Access generates detailed logs for every authorization attempt. InsightIDR will be able to ingest these logs from AWS’s just-announced Amazon Security Lake. InsightIDR customers will be able to see ingress activity from Verified Access alongside ingress events from sources like AWS Identity Access Management (IAM), VPNs, productivity apps, and more — not to mention telemetry from their broader cloud and on-premises environments. Like all ingress activity logs sent to InsightIDR, logs from Verified Access will be able to be used to detect suspicious activity, as well as be brought into investigations to help establish a complete timeline and blast radius of an incident. In addition, customers will have the ability to create custom alerts off of Verified Access logs to further scrutinize and monitor access to sensitive applications.

InsightIDR’s support for Verified Access is just the latest capability to come out of our never-ending dedication to support our customers as they adopt the newest cloud technologies. To learn more about how InsightIDR helps organizations using AWS, click here.

The BPF extensible scheduler class

Post Syndicated from original https://lwn.net/Articles/916291/

It was only a matter of time before somebody found a way to inject BPF into
the CPU scheduler. This patch
series
, posted by Tejun Heo and containing work by David Vernet, Josh
Don, and Barret Rhoden, does exactly that. The cover letter covers the
motivation behind this work in detail:

One of our main goals was to lower the barrier to entry for
experimenting with the scheduler. sched_ext provides ergonomic
callbacks and helpers to ease common operations such as managing
idle CPUs, scheduling tasks on arbitrary CPUs, handling preemptions
from other scheduling classes, and more. While sched_ext does
require some ramp-up, the complexity is self-contained, and the
learning curve gradual. Developers can ramp up by first
implementing simple policies such as global FIFO in only tens of
lines of code, and then continue to learn the APIs and building
blocks available with sched_ext as they build more featureful and
complex schedulers.

There is a bit more documentation in this
patch
.

Security updates for Wednesday

Post Syndicated from original https://lwn.net/Articles/916346/

Security updates have been issued by Debian (krb5), Fedora (galera, mariadb, and mingw-python3), Red Hat (389-ds:1.4, kernel, kernel-rt, kpatch-patch, krb5, and usbguard), Scientific Linux (krb5), Slackware (kernel), SUSE (binutils, dbus-1, exiv2, freerdp, git, java-1_8_0-ibm, kernel, libarchive, libdb-4_8, libmspack, nginx, opencc, python, python3, rxvt-unicode, sudo, supportutils, systemd, vim, and webkit2gtk3), and Ubuntu (bind9, gnutls28, libsamplerate, linux-gcp-5.4, perl, pixman, shadow, and sysstat).

Facebook Fined $276M under GDPR

Post Syndicated from Bruce Schneier original https://www.schneier.com/blog/archives/2022/11/facebook-fined-276m-under-gdpr.html

Facebook—Meta—was just fined $276 million (USD) for a data leak that included full names, birth dates, phone numbers, and location.

Meta’s total fine by the Data Protection Commission is over $700 million. Total GDPR fines are over €2 billion (EUR) since 2018.

Кривият портрет на украинския бежанец

Post Syndicated from Петър Георгиев original https://toest.bg/kriviyat-portret-na-ukrainskiya-bezhanets/

Това не са бежанците, с които сме свикнали.

На 25 февруари, ден след като руската армия нахлу в Украйна, бившият министър-председател Кирил Петков се обърна към българския народ след извънредно заседание на Европейския съвет. В опита си да внесе яснота за изхода от конфликта Петков погрешно предрече, че съпротивата на Киев вероятно ще падне до дни. Междувременно само през първото денонощие от войната над 82 000 украинци вече търсеха спасение извън страната. А премиерът призова българите за гостоприемност в очакване на бежанската криза:

Това са европейци, интелигентни, образовани хора. Ние, както и всички други, сме готови да ги посрещнем. Това не е обичайната бежанска вълна от хора с неясно минало. Никоя от европейските страни не се притеснява от тях.

Вместо да стопли сърцата на българите, сравнението на Петков с мигрантите от Близкия изток му донесе обвинения в расизъм. И ако в първите седмици на войната страните от Централна и Източна Европа приветстваха бежанците с оптимизъм, то следващите месеци постепенно опровергаха втората неточна прогноза на Петков. Грижата за милионите новодошли предизвика разногласия между България и европейските ѝ партньори, а криворазбраната стратегия на четворната коалиция рязко промени публичния им образ. Някои украинци откриха кирка, забита в автомобила си, а други – бележка с обиди. През това време буря от фалшиви новини и дезинформация в социалните мрежи превърна търсещите закрила във врагове на обществото.

Митът за богатите украинци

Правителството на Петков отвърна на бежанската криза с програма за хуманитарна помощ в синхрон с Европейския съюз. Но подвеждащо изказване на тогавашната началничка на кабинета Лена Бориславова при представянето на мерките за социално подпомагане сложи началото на продължителна атака срещу властите. На брифинг през март Бориславова съобщи, че в рамките на три месеца на украински граждани ще се предоставя помощ „в размер на до 40 лв. на ден“. Тези средства не се раздаваха в брой на самите бежанци, а трябваше да осигурят тяхното изхранване и настаняване в хотели. Важната подробност обаче остана изгубена в превода. Журналисти се опитаха да поправят комуникационната грешка на правителството, но това не предотврати острата реакция на обществото.

За украинец – 1200 лв. на месец. За български пенсионер – 400 лв. Това заблуждаващо сравнение започна да очертава демоничния образ на разселените от войната. Бежанците наистина може да кандидатстват за помощ на стойност 375 лв., но тя е еднократна, и то на семейство, а не на човек. Публикации в интернет разпалиха несъществуващо противопоставяне между грижата за гражданите със статут на временна закрила и тази за бедните жители на България. Първата до голяма степен беше осигурена благодарение на средства от кохезионните фондове на ЕС, от които се възползваха и други европейски държави. Подкрепата за украинците не спира повишаването на пенсиите у нас.

Междувременно от началото на руската инвазия в Украйна се разпространяват слухове, че бежанците всъщност изобщо нямат нужда от подкрепа, защото масово карат скъпи автомобили, тъпчат с тях плажовете ни и даже не си плащат за гориво. В очите на обществото подобни единични примери неоснователно прераснаха в представителна извадка на десетките хиляди украинци у нас.

В несъответствие с първоначалния си призив за съпричастност, в края на май самият премиер Петков подхрани вече популярния образ на твърде обгрижвания бежанец, като се обяви против „луксозното пребиваване в България“. Думите му дойдоха в защита на бившата вицепремиерка по ефективно управление Калина Константинова, която беше разкритикувана за назидателния тон в противоречивото си видеообръщение предишния ден. Впоследствие Константинова се извини на бежанците, но този епизод затвърди пропастта между търсещите убежище и част от българското население.

Застрашеното българско общество

Освен като неудобна тежест, украинските бежанци многократно бяха обрисувани и като заплаха за обществото. Миналата седмица новината за въоръжен грабеж от инкасо автомобил окупира заглавията в пресата. Извършителите са управлявали коли с украински регистрационни табели. Въпреки че табелите се оказаха фалшиви, инцидентът беше използван, за да подсили тезата, че у нас тайно влизат престъпници, прикрити като бежанци.

Наративът за опасните мигранти от Украйна започна да набира скорост още през април с публикации като зле направения, но доста споделян колаж на измислено оскверняване на Паметника на свободата на Шипка. Вандалският стереотип обаче не изглежда толкова популярен в България, колкото в други държави от Централна и Източна Европа. Мащабно разследване на украинската медия „Детектор“ разкрива, че в социалните мрежи на 11 страни бежанците най-често са обвинявани в корупция, неблагодарност и дестабилизиране на обществото.

През април полското издание за проверка на факти „Демагог“ публикува задълбочен анализ на основните типове дезинформация в Полша, Словакия, Унгария и Румъния. Тези държави са приели общо над 1,7 млн. бежанци. В анализа централно място заемат примери за фалшиви новини от Полша и Унгария за агресивни украинци, които нападат местното население и повишават нивата на насилие. Проучването на „Демагог“ показва, че източници на подобни слухове основно са анонимни потребители в Twitter, сайтове с псевдонаучно съдържание, крайнодесни политици или профили, имитиращи реални личности. Чрез тях в полското интернет пространство се разпространяват и разкази за предполагаеми случаи на кражби или изнасилвания, извършени от мигранти от Африка или Близкия изток, пресекли границата с Украйна. Междувременно украинският народ често е представян и като враждебен спрямо малцинства.

Според анализ на Factcheck.bg над един милион потребители в България вероятно са попаднали на неверни твърдения, че българите в Украйна са системно тормозени и дори убивани. Антимигрантската реторика обаче не се изчерпва със заплахата от насилие. Като продължение на дезинформационната вълна от времето на пандемията сред потребители във Facebook и в сайтове с неясна собственост се заговори за наплив от ХИВ-позитивни украински бежанци. Тази теория беше отречена от Factcheck.bg и БНР. Общественото радио изобличи и друго невярно твърдение в сферата на здравеопазването, а именно че Специализираната болница в Панчарево е спряла животоспасяващи рехабилитации, за да настани украинци.

Опасен чар

Атмосферата на безпокойство от бежанския наплив у нас беше подплатена и с митове за покваряващото влияние на неустоимата украинска красота. Седмици преди началото на летния сезон мрежата се напълни с предупреждения за млади разкрепостени украинки, които предлагат „масаж с освобождаване“ по Черноморието. Статията е публикувана в Lupa.bg и препечатана в други сайтове, търсещи сензация, като Bradva.bg и Skafeto.com. В нея няма нито един конкретен източник или легитимни данни. Анализ с платформата Crowdtangle показва, че над половин милион потребители във Facebook са попаднали на този текст.

Друг материал в сайта „Флагман“ предупреждава, че „горещите украинки“ са подбили цените на българските еротични танцьорки в Слънчев бряг. Статията се позовава на разказ на анонимно „разгневено момиче от балет на водеща дискотека по морето“. Този текст също намира място и в други медии с подобен профил, като например сайта „Втори фронт“. Двете публикации са генерирали общо почти 10 000 реакции във Facebook. Страховете на българските жени пък бяха разпалени от статия на вестник „Стандарт“, че родните ергени са „пощурели по украинките“. Публикацията се позовава на „статистиката на сключените граждански бракове с украински граждани у нас от началото на войната“. В същото време цитираната статистика в самата статия не дава категорични доказателства в подкрепа на тази теория.

Разследване на киевската медия „Детектор“ показва, че стереотипът за украинските сексуални работнички също изобщо не се ограничава до България, а се превръща в основа на дезинформационни кампании в Централна и Източна Европа. Според изданието проруски източници се опитват да дискредитират украинските бежанки, като твърдят, че масово предават полови болести и се интересуват само от пари.

Кампания за очерняне на украински жени имаше и в Полша. В чат приложението Signal някои потребители получиха линк към статия, която предупреждава, че повечето бежанки са „в детеродна възраст“ и ще бъдат щастливи да получат „постоянен статут на полски съпруги“. Митът за крадящите мъже украинки беше подсилен от история за британец, напуснал семейството си заради млада жена, избягала от Лвов. Разказ на полски за тази афера предизвика хиляди реакции във Facebook.

В сянката на войната

Разнообразието от слухове и конспиративни теории за злите намерения на бежанците не спря множеството граждански инициативи за подкрепа на пострадалите от войната на Русия в Украйна. Доброволци съдействаха на търсещи закрила да намерят работа и събираха средства за медицинска помощ. Но съпричастността може да отстъпи на агресията в дългосрочен план под натиска на продължаващата война и вълната от дезинформация.

В по-широк план насаждането на омраза срещу украинските бежанци е още един инструмент за оправдаване на руската агресия и за влияние върху обществените нагласи в България спрямо инвазията на Владимир Путин в Украйна. Медии и публични фигури насърчават умишленото демонизиране на бежанците с цел да ограничат подкрепата за Киев, а предстоящият скъп отоплителен сезон допълнително подхранва опитите за характеризиране на украинските граждани като нацисти, терористи или неблагодарни гости. В ситуация на продължаваща политическа криза с неясен изход потърсилите убежище в България може да се окажат жертви не само на войната, но и на борбата за власт.

Заглавна илюстрация: © Пеню Кирацов
„Тоест“ е официален партньор за публикуването на материалите от поредицата „Хроники на инфодемията“, реализирана от АЕЖ-България съвместно с Фондация „Фридрих Науман“.

Източник

Кривият портрет на украинския бежанец

Post Syndicated from Петър Георгиев original https://www.toest.bg/kriviyat-portret-na-ukrainskiya-bezhanets/

Това не са бежанците, с които сме свикнали.

Кривият портрет на украинския бежанец

На 25 февруари, ден след като руската армия нахлу в Украйна, бившият министър-председател Кирил Петков се обърна към българския народ след извънредно заседание на Европейския съвет. В опита си да внесе яснота за изхода от конфликта Петков погрешно предрече, че съпротивата на Киев вероятно ще падне до дни. Междувременно само през първото денонощие от войната над 82 000 украинци вече търсеха спасение извън страната. А премиерът призова българите за гостоприемност в очакване на бежанската криза:

Това са европейци, интелигентни, образовани хора. Ние, както и всички други, сме готови да ги посрещнем. Това не е обичайната бежанска вълна от хора с неясно минало. Никоя от европейските страни не се притеснява от тях.

Вместо да стопли сърцата на българите, сравнението на Петков с мигрантите от Близкия изток му донесе обвинения в расизъм. И ако в първите седмици на войната страните от Централна и Източна Европа приветстваха бежанците с оптимизъм, то следващите месеци постепенно опровергаха втората неточна прогноза на Петков. Грижата за милионите новодошли предизвика разногласия между България и европейските ѝ партньори, а криворазбраната стратегия на четворната коалиция рязко промени публичния им образ. Някои украинци откриха кирка, забита в автомобила си, а други – бележка с обиди. През това време буря от фалшиви новини и дезинформация в социалните мрежи превърна търсещите закрила във врагове на обществото.

Митът за богатите украинци

Правителството на Петков отвърна на бежанската криза с програма за хуманитарна помощ в синхрон с Европейския съюз. Но подвеждащо изказване на тогавашната началничка на кабинета Лена Бориславова при представянето на мерките за социално подпомагане сложи началото на продължителна атака срещу властите. На брифинг през март Бориславова съобщи, че в рамките на три месеца на украински граждани ще се предоставя помощ „в размер на до 40 лв. на ден“. Тези средства не се раздаваха в брой на самите бежанци, а трябваше да осигурят тяхното изхранване и настаняване в хотели. Важната подробност обаче остана изгубена в превода. Журналисти се опитаха да поправят комуникационната грешка на правителството, но това не предотврати острата реакция на обществото.

За украинец – 1200 лв. на месец. За български пенсионер – 400 лв. Това заблуждаващо сравнение започна да очертава демоничния образ на разселените от войната. Бежанците наистина може да кандидатстват за помощ на стойност 375 лв., но тя е еднократна, и то на семейство, а не на човек. Публикации в интернет разпалиха несъществуващо противопоставяне между грижата за гражданите със статут на временна закрила и тази за бедните жители на България. Първата до голяма степен беше осигурена благодарение на средства от кохезионните фондове на ЕС, от които се възползваха и други европейски държави. Подкрепата за украинците не спира повишаването на пенсиите у нас.

Междувременно от началото на руската инвазия в Украйна се разпространяват слухове, че бежанците всъщност изобщо нямат нужда от подкрепа, защото масово карат скъпи автомобили, тъпчат с тях плажовете ни и даже не си плащат за гориво. В очите на обществото подобни единични примери неоснователно прераснаха в представителна извадка на десетките хиляди украинци у нас.

В несъответствие с първоначалния си призив за съпричастност, в края на май самият премиер Петков подхрани вече популярния образ на твърде обгрижвания бежанец, като се обяви против „луксозното пребиваване в България“. Думите му дойдоха в защита на бившата вицепремиерка по ефективно управление Калина Константинова, която беше разкритикувана за назидателния тон в противоречивото си видеообръщение предишния ден. Впоследствие Константинова се извини на бежанците, но този епизод затвърди пропастта между търсещите убежище и част от българското население.

Застрашеното българско общество

Освен като неудобна тежест, украинските бежанци многократно бяха обрисувани и като заплаха за обществото. Миналата седмица новината за въоръжен грабеж от инкасо автомобил окупира заглавията в пресата. Извършителите са управлявали коли с украински регистрационни табели. Въпреки че табелите се оказаха фалшиви, инцидентът беше използван, за да подсили тезата, че у нас тайно влизат престъпници, прикрити като бежанци.

Наративът за опасните мигранти от Украйна започна да набира скорост още през април с публикации като зле направения, но доста споделян колаж на измислено оскверняване на Паметника на свободата на Шипка. Вандалският стереотип обаче не изглежда толкова популярен в България, колкото в други държави от Централна и Източна Европа. Мащабно разследване на украинската медия „Детектор“ разкрива, че в социалните мрежи на 11 страни бежанците най-често са обвинявани в корупция, неблагодарност и дестабилизиране на обществото.

През април полското издание за проверка на факти „Демагог“ публикува задълбочен анализ на основните типове дезинформация в Полша, Словакия, Унгария и Румъния. Тези държави са приели общо над 1,7 млн. бежанци. В анализа централно място заемат примери за фалшиви новини от Полша и Унгария за агресивни украинци, които нападат местното население и повишават нивата на насилие. Проучването на „Демагог“ показва, че източници на подобни слухове основно са анонимни потребители в Twitter, сайтове с псевдонаучно съдържание, крайнодесни политици или профили, имитиращи реални личности. Чрез тях в полското интернет пространство се разпространяват и разкази за предполагаеми случаи на кражби или изнасилвания, извършени от мигранти от Африка или Близкия изток, пресекли границата с Украйна. Междувременно украинският народ често е представян и като враждебен спрямо малцинства.

Според анализ на Factcheck.bg над един милион потребители в България вероятно са попаднали на неверни твърдения, че българите в Украйна са системно тормозени и дори убивани. Антимигрантската реторика обаче не се изчерпва със заплахата от насилие. Като продължение на дезинформационната вълна от времето на пандемията сред потребители във Facebook и в сайтове с неясна собственост се заговори за наплив от ХИВ-позитивни украински бежанци. Тази теория беше отречена от Factcheck.bg и БНР. Общественото радио изобличи и друго невярно твърдение в сферата на здравеопазването, а именно че Специализираната болница в Панчарево е спряла животоспасяващи рехабилитации, за да настани украинци.

Опасен чар

Атмосферата на безпокойство от бежанския наплив у нас беше подплатена и с митове за покваряващото влияние на неустоимата украинска красота. Седмици преди началото на летния сезон мрежата се напълни с предупреждения за млади разкрепостени украинки, които предлагат „масаж с освобождаване“ по Черноморието. Статията е публикувана в Lupa.bg и препечатана в други сайтове, търсещи сензация, като Bradva.bg и Skafeto.com. В нея няма нито един конкретен източник или легитимни данни. Анализ с платформата Crowdtangle показва, че над половин милион потребители във Facebook са попаднали на този текст.

Друг материал в сайта „Флагман“ предупреждава, че „горещите украинки“ са подбили цените на българските еротични танцьорки в Слънчев бряг. Статията се позовава на разказ на анонимно „разгневено момиче от балет на водеща дискотека по морето“. Този текст също намира място и в други медии с подобен профил, като например сайта „Втори фронт“. Двете публикации са генерирали общо почти 10 000 реакции във Facebook. Страховете на българските жени пък бяха разпалени от статия на вестник „Стандарт“, че родните ергени са „пощурели по украинките“. Публикацията се позовава на „статистиката на сключените граждански бракове с украински граждани у нас от началото на войната“. В същото време цитираната статистика в самата статия не дава категорични доказателства в подкрепа на тази теория.

Разследване на киевската медия „Детектор“ показва, че стереотипът за украинските сексуални работнички също изобщо не се ограничава до България, а се превръща в основа на дезинформационни кампании в Централна и Източна Европа. Според изданието проруски източници се опитват да дискредитират украинските бежанки, като твърдят, че масово предават полови болести и се интересуват само от пари.

Кампания за очерняне на украински жени имаше и в Полша. В чат приложението Signal някои потребители получиха линк към статия, която предупреждава, че повечето бежанки са „в детеродна възраст“ и ще бъдат щастливи да получат „постоянен статут на полски съпруги“. Митът за крадящите мъже украинки беше подсилен от история за британец, напуснал семейството си заради млада жена, избягала от Лвов. Разказ на полски за тази афера предизвика хиляди реакции във Facebook.

В сянката на войната

Разнообразието от слухове и конспиративни теории за злите намерения на бежанците не спря множеството граждански инициативи за подкрепа на пострадалите от войната на Русия в Украйна. Доброволци съдействаха на търсещи закрила да намерят работа и събираха средства за медицинска помощ. Но съпричастността може да отстъпи на агресията в дългосрочен план под натиска на продължаващата война и вълната от дезинформация.

В по-широк план насаждането на омраза срещу украинските бежанци е още един инструмент за оправдаване на руската агресия и за влияние върху обществените нагласи в България спрямо инвазията на Владимир Путин в Украйна. Медии и публични фигури насърчават умишленото демонизиране на бежанците с цел да ограничат подкрепата за Киев, а предстоящият скъп отоплителен сезон допълнително подхранва опитите за характеризиране на украинските граждани като нацисти, терористи или неблагодарни гости. В ситуация на продължаваща политическа криза с неясен изход потърсилите убежище в България може да се окажат жертви не само на войната, но и на борбата за власт.

Заглавна илюстрация: © Пеню Кирацов

„Тоест“ е официален партньор за публикуването на материалите от поредицата „Хроники на инфодемията“, реализирана от АЕЖ-България съвместно с Фондация „Фридрих Науман“.

Кривият портрет на украинския бежанец

Post Syndicated from Петър Георгиев original https://www.toest.bg/kriviyat-portret-na-ukrainskiya-bezhanets/

Това не са бежанците, с които сме свикнали.

Кривият портрет на украинския бежанец

На 25 февруари, ден след като руската армия нахлу в Украйна, бившият министър-председател Кирил Петков се обърна към българския народ след извънредно заседание на Европейския съвет. В опита си да внесе яснота за изхода от конфликта Петков погрешно предрече, че съпротивата на Киев вероятно ще падне до дни. Междувременно само през първото денонощие от войната над 82 000 украинци вече търсеха спасение извън страната. А премиерът призова българите за гостоприемност в очакване на бежанската криза:

Това са европейци, интелигентни, образовани хора. Ние, както и всички други, сме готови да ги посрещнем. Това не е обичайната бежанска вълна от хора с неясно минало. Никоя от европейските страни не се притеснява от тях.

Вместо да стопли сърцата на българите, сравнението на Петков с мигрантите от Близкия изток му донесе обвинения в расизъм. И ако в първите седмици на войната страните от Централна и Източна Европа приветстваха бежанците с оптимизъм, то следващите месеци постепенно опровергаха втората неточна прогноза на Петков. Грижата за милионите новодошли предизвика разногласия между България и европейските ѝ партньори, а криворазбраната стратегия на четворната коалиция рязко промени публичния им образ. Някои украинци откриха кирка, забита в автомобила си, а други – бележка с обиди. През това време буря от фалшиви новини и дезинформация в социалните мрежи превърна търсещите закрила във врагове на обществото.

Митът за богатите украинци

Правителството на Петков отвърна на бежанската криза с програма за хуманитарна помощ в синхрон с Европейския съюз. Но подвеждащо изказване на тогавашната началничка на кабинета Лена Бориславова при представянето на мерките за социално подпомагане сложи началото на продължителна атака срещу властите. На брифинг през март Бориславова съобщи, че в рамките на три месеца на украински граждани ще се предоставя помощ „в размер на до 40 лв. на ден“. Тези средства не се раздаваха в брой на самите бежанци, а трябваше да осигурят тяхното изхранване и настаняване в хотели. Важната подробност обаче остана изгубена в превода. Журналисти се опитаха да поправят комуникационната грешка на правителството, но това не предотврати острата реакция на обществото.

За украинец – 1200 лв. на месец. За български пенсионер – 400 лв. Това заблуждаващо сравнение започна да очертава демоничния образ на разселените от войната. Бежанците наистина може да кандидатстват за помощ на стойност 375 лв., но тя е еднократна, и то на семейство, а не на човек. Публикации в интернет разпалиха несъществуващо противопоставяне между грижата за гражданите със статут на временна закрила и тази за бедните жители на България. Първата до голяма степен беше осигурена благодарение на средства от кохезионните фондове на ЕС, от които се възползваха и други европейски държави. Подкрепата за украинците не спира повишаването на пенсиите у нас.

Междувременно от началото на руската инвазия в Украйна се разпространяват слухове, че бежанците всъщност изобщо нямат нужда от подкрепа, защото масово карат скъпи автомобили, тъпчат с тях плажовете ни и даже не си плащат за гориво. В очите на обществото подобни единични примери неоснователно прераснаха в представителна извадка на десетките хиляди украинци у нас.

В несъответствие с първоначалния си призив за съпричастност, в края на май самият премиер Петков подхрани вече популярния образ на твърде обгрижвания бежанец, като се обяви против „луксозното пребиваване в България“. Думите му дойдоха в защита на бившата вицепремиерка по ефективно управление Калина Константинова, която беше разкритикувана за назидателния тон в противоречивото си видеообръщение предишния ден. Впоследствие Константинова се извини на бежанците, но този епизод затвърди пропастта между търсещите убежище и част от българското население.

Застрашеното българско общество

Освен като неудобна тежест, украинските бежанци многократно бяха обрисувани и като заплаха за обществото. Миналата седмица новината за въоръжен грабеж от инкасо автомобил окупира заглавията в пресата. Извършителите са управлявали коли с украински регистрационни табели. Въпреки че табелите се оказаха фалшиви, инцидентът беше използван, за да подсили тезата, че у нас тайно влизат престъпници, прикрити като бежанци.

Наративът за опасните мигранти от Украйна започна да набира скорост още през април с публикации като зле направения, но доста споделян колаж на измислено оскверняване на Паметника на свободата на Шипка. Вандалският стереотип обаче не изглежда толкова популярен в България, колкото в други държави от Централна и Източна Европа. Мащабно разследване на украинската медия „Детектор“ разкрива, че в социалните мрежи на 11 страни бежанците най-често са обвинявани в корупция, неблагодарност и дестабилизиране на обществото.

През април полското издание за проверка на факти „Демагог“ публикува задълбочен анализ на основните типове дезинформация в Полша, Словакия, Унгария и Румъния. Тези държави са приели общо над 1,7 млн. бежанци. В анализа централно място заемат примери за фалшиви новини от Полша и Унгария за агресивни украинци, които нападат местното население и повишават нивата на насилие. Проучването на „Демагог“ показва, че източници на подобни слухове основно са анонимни потребители в Twitter, сайтове с псевдонаучно съдържание, крайнодесни политици или профили, имитиращи реални личности. Чрез тях в полското интернет пространство се разпространяват и разкази за предполагаеми случаи на кражби или изнасилвания, извършени от мигранти от Африка или Близкия изток, пресекли границата с Украйна. Междувременно украинският народ често е представян и като враждебен спрямо малцинства.

Според анализ на Factcheck.bg над един милион потребители в България вероятно са попаднали на неверни твърдения, че българите в Украйна са системно тормозени и дори убивани. Антимигрантската реторика обаче не се изчерпва със заплахата от насилие. Като продължение на дезинформационната вълна от времето на пандемията сред потребители във Facebook и в сайтове с неясна собственост се заговори за наплив от ХИВ-позитивни украински бежанци. Тази теория беше отречена от Factcheck.bg и БНР. Общественото радио изобличи и друго невярно твърдение в сферата на здравеопазването, а именно че Специализираната болница в Панчарево е спряла животоспасяващи рехабилитации, за да настани украинци.

Опасен чар

Атмосферата на безпокойство от бежанския наплив у нас беше подплатена и с митове за покваряващото влияние на неустоимата украинска красота. Седмици преди началото на летния сезон мрежата се напълни с предупреждения за млади разкрепостени украинки, които предлагат „масаж с освобождаване“ по Черноморието. Статията е публикувана в Lupa.bg и препечатана в други сайтове, търсещи сензация, като Bradva.bg и Skafeto.com. В нея няма нито един конкретен източник или легитимни данни. Анализ с платформата Crowdtangle показва, че над половин милион потребители във Facebook са попаднали на този текст.

Друг материал в сайта „Флагман“ предупреждава, че „горещите украинки“ са подбили цените на българските еротични танцьорки в Слънчев бряг. Статията се позовава на разказ на анонимно „разгневено момиче от балет на водеща дискотека по морето“. Този текст също намира място и в други медии с подобен профил, като например сайта „Втори фронт“. Двете публикации са генерирали общо почти 10 000 реакции във Facebook. Страховете на българските жени пък бяха разпалени от статия на вестник „Стандарт“, че родните ергени са „пощурели по украинките“. Публикацията се позовава на „статистиката на сключените граждански бракове с украински граждани у нас от началото на войната“. В същото време цитираната статистика в самата статия не дава категорични доказателства в подкрепа на тази теория.

Разследване на киевската медия „Детектор“ показва, че стереотипът за украинските сексуални работнички също изобщо не се ограничава до България, а се превръща в основа на дезинформационни кампании в Централна и Източна Европа. Според изданието проруски източници се опитват да дискредитират украинските бежанки, като твърдят, че масово предават полови болести и се интересуват само от пари.

Кампания за очерняне на украински жени имаше и в Полша. В чат приложението Signal някои потребители получиха линк към статия, която предупреждава, че повечето бежанки са „в детеродна възраст“ и ще бъдат щастливи да получат „постоянен статут на полски съпруги“. Митът за крадящите мъже украинки беше подсилен от история за британец, напуснал семейството си заради млада жена, избягала от Лвов. Разказ на полски за тази афера предизвика хиляди реакции във Facebook.

В сянката на войната

Разнообразието от слухове и конспиративни теории за злите намерения на бежанците не спря множеството граждански инициативи за подкрепа на пострадалите от войната на Русия в Украйна. Доброволци съдействаха на търсещи закрила да намерят работа и събираха средства за медицинска помощ. Но съпричастността може да отстъпи на агресията в дългосрочен план под натиска на продължаващата война и вълната от дезинформация.

В по-широк план насаждането на омраза срещу украинските бежанци е още един инструмент за оправдаване на руската агресия и за влияние върху обществените нагласи в България спрямо инвазията на Владимир Путин в Украйна. Медии и публични фигури насърчават умишленото демонизиране на бежанците с цел да ограничат подкрепата за Киев, а предстоящият скъп отоплителен сезон допълнително подхранва опитите за характеризиране на украинските граждани като нацисти, терористи или неблагодарни гости. В ситуация на продължаваща политическа криза с неясен изход потърсилите убежище в България може да се окажат жертви не само на войната, но и на борбата за власт.

Заглавна илюстрация: © Пеню Кирацов

„Тоест“ е официален партньор за публикуването на материалите от поредицата „Хроники на инфодемията“, реализирана от АЕЖ-България съвместно с Фондация „Фридрих Науман“.

768 teams of young people have entered Astro Pi Mission Space Lab 2022/23

Post Syndicated from Sam Duffy original https://www.raspberrypi.org/blog/768-teams-entered-astro-pi-mission-space-lab-2022-23/

This year, 768 teams made up of 3086 young people from 23 countries sent us their ideas for experiments to run on board the International Space Station (ISS) for Astro Pi Mission Space Lab.

alt=""

Mission Space Lab is part of the European Astro Pi Challenge, an ESA Education programme run in collaboration with us at the Raspberry Pi Foundation. Mission Space Lab teams can choose between ‘Life on Earth’ and ‘Life in space’ for their experiment idea. As in previous years, ‘Life on Earth’ was the most popular experiment theme: three quarters of the teams chose to submit an idea with this theme, for experiments using one of the Astro Pi’s High Quality Cameras. Half of these experiments involved using the near-infrared sensitive camera to investigate topics such as deforestation. Across both themes, over 40% of teams expressed an interest in using machine learning in their experiment.

Mission Space Lab teams are now getting ready to write and test their code

A panel of 25 judges from the Raspberry Pi Foundation and ESA Education assessed the submitted ideas. We are restricted in how many teams we can accommodate, as time to run experiments on board the ISS is limited, especially for ‘Life on Earth’ experiments which need time in a nadir window. The standard of the submitted ideas was higher than ever, making this the toughest judging yet. We are delighted to announce that 486 teams will move on to Phase 2 of Mission Space Lab: writing the code for their experiments.

An Astro Pi unit at a window on board the International Space Station.
A Mark II Astro Pi in the NODE window on the ISS. Credit: ESA/NASA

If your experiment idea was unsuccessful this time, we understand that this will be disappointing news for your team. We encourage them to submit a new experiment idea in next year’s Mission Space Lab. We will let you know when Mission Space Lab 23/24 will be launching.

All the teams whose experiment ideas we’ve selected will receive a special Astro Pi hardware kit, customised to their idea, to help them write and test the Python programs to execute their experiments. Once the teams of young people have received their kits, they can familiarise themselves with the Astro Pi hardware and then create and test (and re-test!) their programs.

Young people’s Mission Space Lab code will run in space next year

The deadline for Mission Space Lab teams to submit the code for their experiments to us is Thursday 24 February 2023. Once their program code has been through our rigorous checks and tests, it will be ready to run on the Astro Pis on board the ISS during April/May 2023.

Astro Pi computers on the ISS.
The Mark I and Mark II Astro Pi computers on board the ISS earlier this year. Credit: ESA/NASA

Congratulations to the successful teams, and thank you to everyone who sent us their ideas for Mission Space Lab this year. And a special thank you to all the teachers, educators, club volunteers, and other wonderful people who are acting as mentors for Mission Space Lab teams. You are helping your young people do something remarkable that they will remember for the rest of their lives, and the Astro Pi Challenge would not happen without you.

Welcome back, Ed and Izzy! 

Every year since 2015, thanks to our annual Astro Pi Challenge, teams of young people have written computer programs to run scientific experiments on two Astro Pi computers on the ISS.

Mark I Astro Pi computers Ed and Izzy back on Earth on a desk, after 5 years on board the International Space Station.
Mark I Astro Pi computers Ed and Izzy back on Earth after five years on board the International Space Station. Credit: ESA

This is the second year that experiments will run on the Mark II Astro Pi computers, named after Nikola Tesla and Marie Curie, but lots of people have been wondering what would happen to their predecessors. After running over 50,000 young people’s computer programs, the Mark I Astro Pi computers, Ed and Izzy, have safely returned to Earth for a well-earned rest.

Young people can take part in Astro Pi Mission Zero

Astro Pi Mission Zero is a one-hour beginners’ programming activity. In Mission Zero, young people, in teams or as individuals, write a program to display an image or series of images of their own design on one of the Astro Pi computers, to remind the astronauts on the ISS of home.

In their Mission Zero programs, young people get to use a reading from the Astro Pi’s colour and luminosity sensor to set the colour of their image background. Young people up to age 19 from eligible countries can take part in Mission Zero 2022/23 until 17 March. Visit the Astro Pi website for more details.

The post 768 teams of young people have entered Astro Pi Mission Space Lab 2022/23 appeared first on Raspberry Pi.

The collective thoughts of the interwebz