Top 5: Featured Architecture Content for September

Post Syndicated from Elyse Lopez original https://aws.amazon.com/blogs/architecture/top-5-featured-architecture-content-for-september/

The AWS Architecture Center provides new and notable reference architecture diagrams, vetted architecture solutions, AWS Well-Architected best practices, whitepapers, and more. This blog post features some of our best picks from the new and newly updated content we released in the past month.

1. AWS Best Practices for DDoS Resiliency

Prioritizing the availability and responsiveness of your application helps you maintain customer trust. That’s why it’s crucial to protect your business from the impact of distributed denial of service (DDoS) and other cyberattacks. This whitepaper provides you prescriptive guidance to improve the resiliency of your applications and best practices for how to manage different attack types.

2. Predictive Modeling for Automotive Retail

Automotive retailers use data to better understand how their incentives are helping to sell cars. This new reference architecture diagram shows you how to design a modeling system that provides granular return on investment (ROI) predictions for automotive sales incentives.

3. AWS Graviton Performance Testing – Tips for Independent Software Vendors

If you’re deciding whether to phase in AWS Graviton processors for your workload, this whitepaper covers best practices and common pitfalls for defining test approaches to evaluate Amazon Elastic Compute Cloud (Amazon EC2) instance performance and how to set success factors and compare different test methods and their implementation.

4. Text Analysis with Amazon OpenSearch Service and Amazon Comprehend

This AWS Solutions Implementation was recently updated with new guidance related to Amazon OpenSearch Service, the successor to Amazon Elasticsearch Service. Learn how Amazon OpenSearch Service and Amazon Comprehend work together to deploy a cost-effective, end-to-end solution to extract meaningful insights from unstructured text-based data such as customer calls, support tickets, and online customer feedback.

5. Back to Basics: Hosting a Static Website on AWS

In this episode of Back to Basics, join SA Readiness Specialist Even Zhang as he breaks down the AWS services you can use to host and scale your static website without a single server. You’ll also learn how to use additional functionalities to enhance your observability and security posture or run A/B tests.

 CloudFront Edge Locations and Caches from Back to Basics video

Figure 1. CloudFront Edge Locations and Caches from Back to Basics video


How to set up a two-way integration between AWS Security Hub and Jira Service Management

Post Syndicated from Ramesh Venkataraman original https://aws.amazon.com/blogs/security/how-to-set-up-a-two-way-integration-between-aws-security-hub-and-jira-service-management/

If you use both AWS Security Hub and Jira Service Management, you can use the new AWS Service Management Connector for Jira Service Management to create an automated, bidirectional integration between these two products that keeps your Security Hub findings and Jira issues in sync. In this blog post, I’ll show you how to set up this integration.

As a Jira administrator, you’ll then be able to create Jira issues from Security Hub findings automatically, and when you update those issues in Jira, the changes are automatically replicated back into the original Security Hub findings. For example, if you resolve an issue in Jira, the workflow status of the finding in Security Hub will also be resolved. This way, Security Hub always has up-to-date status about your security posture.

Watch a demonstration of the integration.

Prerequisites

To complete this walkthrough, you’ll need a Jira instance with the connector configured. For more information on how to set this up, see AWS Service Management Connector for Jira Service Management in the AWS Service Catalog Administrator Guide. At the moment, this connector can be used with Atlassian Data Center.

On the AWS side, you need Security Hub enabled in your AWS account. For more information, see Enabling Security Hub manually.

This walkthrough uses an AWS CloudFormation template to create the necessary AWS resources for this integration. In this template, I use the AWS Region us-east-1, but you can use any of the supported Regions for Security Hub.

Deploy the solution

In this solution, you will first deploy an AWS CloudFormation stack that sets up the necessary AWS resources that are needed to set up the integration in Jira.

To download and run the CloudFormation template

  1. Download the sample template for this walkthrough.
  2. In the AWS CloudFormation console, choose Create stack, choose With new resources (standard), and then select Template is ready.
  3. For Specify template, choose Upload a template file and select the template that you downloaded in step 1.

To create the CloudFormation stack

  1. In the CloudFormation console, choose Specify stack details, and enter a Stack name (in the example, I named mine SecurityHub-Jira-Integration).
  2. Keep the other default values as shown in Figure 1, and then choose Next.
     
    Figure 1: Creating a CloudFormation stack

    Figure 1: Creating a CloudFormation stack

  3. On the Configure stack options page, choose Next.
  4. On the Review page, select the check box I acknowledge that AWS CloudFormation might create IAM resources with custom names. (Optional) If you would like more information about this acknowledgement, choose Learn more.
  5. Choose Create stack.
     
    Figure 2: Acknowledge creation of IAM resources

    Figure 2: Acknowledge creation of IAM resources

  6. After the CloudFormation stack status is CREATE_COMPLETE, you can see the list of resources that are created, as shown in Figure 3.
     
    Figure 3: Resources created from the CloudFormation template

    Figure 3: Resources created from the CloudFormation template

Next, you’ll integrate Jira with Security Hub.

To integrate Jira with Security Hub

  1. In the Jira dashboard, choose the gear icon to open the JIRA ADMINISTRATION menu, and then choose Manage apps. 
      
    Figure 4: Jira Manage apps

    Figure 4: Jira Manage apps

  2. On the Administration screen, under AWS SERVICE MANAGEMENT CONNECTOR in the left navigation menu, choose AWS accounts. 
     
    Figure 5: Choose AWS accounts

    Figure 5: Choose AWS accounts

  3. Choose Connect new account to open a page where you can configure Jira to access an AWS account. 
     
    Figure 6: Connect new account

    Figure 6: Connect new account

  4. Enter values for the account alias and user credentials. For the account alias, I’ve named my account SHJiraIntegrationAccount. In the SecurityHub-Jira-Integration CloudFormation stack that you created previously, see the Outputs section to get the values for SCSyncUserAccessKey, SCSyncUserSecretAccessKey, SCEndUserAccessKey, and SCEndUserSecretAccessKey, as shown in Figure 7.
     
    Figure 7: CloudFormation Outputs details

    Figure 7: CloudFormation Outputs details

    Important: Because this is an example walkthrough, I show the access key and secret key generated as CloudFormation outputs. However, if you’re using the AWS Service Management Connector for Jira in a production workload, see How do I create an AWS access key? to understand the connectivity and to create the access key and secret key for users. Visit that link to create an IAM user and access key. For the permissions that are required for the IAM user, you can review the permissions and policies outlined in the template.

  5. In Jira, on the Connect new account page, enter all the values from the CloudFormation Outputs that you saw in step 4, and choose the Region you used to launch your CloudFormation resources. I chose the Region US East (N.Virginia)/us-east-1.
  6. Choose Connect, and you should see a success message for the test connection. You can also choose Test connectivity after connecting the account, as shown in figure 8. 
     
    Figure 8: Test connectivity

    Figure 8: Test connectivity

The connector is preconfigured to automatically create Jira incidents for Security Hub findings. The findings will have the same information in both the AWS Security Hub console and the Jira console.

Test the integration

Finally, you can test the integration between Security Hub and Jira Service Management.

To test the integration

  1. For this walkthrough, I’ve created a new project from the Projects console in Jira. If you have an existing project, you can link the AWS account to the project.
  2. In the left navigation menu, under AWS SERVICE MANAGEMENT CONNECTOR, choose Connector settings.
  3. On the AWS Service Management Connector settings page, under Projects enabled for Connector, choose Add Jira project, and select the project you want to connect to the AWS account. 
     
    Figure 9: Add the Jira project

    Figure 9: Add the Jira project

  4. On the same page, under OpsCenter Configuration, choose the project to associate with the AWS accounts. Under Security Hub Configuration, associate the Jira project with the AWS account. Choose Save after you’ve configured the project.
  5. On the AWS accounts page, choose Sync now. 
     
    Figure 10: Sync now

    Figure 10: Sync now

  6. In the top pane, under Issues, choose Search for issues.
  7. Choose the project that you added in step 3. You will see a screen like the one shown in Figure 11.

    To further filter just the Security Hub findings, you can also choose AWS Security Hub Finding under Type. 
     

    Figure 11: A Security Hub finding in the Jira console

    Figure 11: A Security Hub finding in the Jira console

  8. You can review the same finding from Security Hub in the AWS console, as shown in Figure 12, to verify that it’s the same as the finding you saw in step 7. 
     
    Figure 12: A Security Hub finding in the AWS console

    Figure 12: A Security Hub finding in the AWS console

  9. On the Jira page for the Security Hub finding (the same page discussed in step 7), you can update the workflow status to Notified, after which the issue status changes to NOTIFIED, as shown in Figure 13. 
     
    Figure 13: Update the finding status to NOTIFIED

    Figure 13: Update the finding status to NOTIFIED

    You can navigate to the AWS Security Hub console and look at the finding’s workflow, as shown in Figure 14. The workflow should say NOTIFIED, as you updated it in the Jira console.
     

    Figure 14: The Security Hub finding workflow updated to NOTIFIED

    Figure 14: The Security Hub finding workflow updated to NOTIFIED

  10. You can now fix the issue from the Security Hub console. When you resolve the finding from Security Hub, it will also show up as resolved in the Jira console.
  11. (Optional) In the AWS Service Management Connector in the Jira console, you can configure several settings, such as Sync Interval, SQS Queue Name, and Number of messages to pull from SQS, as shown in Figure 15. You can also synchronize Security Hub findings according to their Severity value.
     
    Figure 15: Jira settings for Security Hub

    Figure 15: Jira settings for Security Hub

Conclusion

In this blog post, I showed you how to set up the new two-way integration of AWS Security Hub and Jira by using the AWS Service Management Connector for Jira Service Management. To learn more about Jira’s integration with Security Hub, watch the video AWS Security Hub – Bidirectional integration with Jira Service Management Center, and see AWS Service Management Connector for Jira Service Management in the AWS Service Catalog Administrator Guide. To download the free AWS Service Management Connector for Jira, see the Atlassian Marketplace. If you have additional questions, you can post them to the AWS Security Hub forum.

If you have feedback about this post, submit comments in the Comments section below.

Want more AWS Security how-to content, news, and feature announcements? Follow us on Twitter.

Author

Ramesh Venkataraman

Ramesh is a Solutions Architect who enjoys working with customers to solve their technical challenges using AWS services. Outside of work, Ramesh enjoys following stack overflow questions and answers them in any way he can.

[$] Rust and GCC, two different ways

Post Syndicated from original https://lwn.net/Articles/871283/rss

Developers working in languages like C or C++ have access to
two competing compilers — GCC and LLVM — either of which can usually get
the job done. Rust developers, though, are currently limited to the
LLVM-based rustc compiler. While rustc works well, there
are legitimate reasons for developers to wish for an alternative. As it
turns out, there are two different ways to compile Rust using GCC under
development, though neither is ready at the moment. Developers of both
approaches came to the 2021 Linux
Plumbers Conference
to present the status of their work.

Security updates for Monday

Post Syndicated from original https://lwn.net/Articles/871841/rss

Security updates have been issued by Debian (apache2, fig2dev, mediawiki, plib, and qemu), Fedora (chromium, curl, kernel, kernel-headers, kernel-tools, openssh, rust-addr2line, rust-backtrace, rust-cranelift-bforest, rust-cranelift-codegen, rust-cranelift-codegen-meta, rust-cranelift-codegen-shared, rust-cranelift-entity, rust-cranelift-frontend, rust-cranelift-native, rust-cranelift-wasm, rust-gimli, rust-object, rust-wasmparser, rust-wasmtime-cache, rust-wasmtime-environ, rust-wasmtime-fiber, rust-wasmtime-types, rust-wast, rust-wat, and webkit2gtk3), Mageia (apache-mod_auth_openidc, c-ares, chromium-browser-stable, icu, libspf2, perl-DBI, python, and python-rsa), openSUSE (haproxy and opera), Oracle (kernel), SUSE (firefox and libvirt), and Ubuntu (python3.8).

Cheating on Tests

Post Syndicated from Bruce Schneier original https://www.schneier.com/blog/archives/2021/10/cheating-on-tests.html

Interesting story of test-takers in India using Bluetooth-connected flip-flops to communicate with accomplices while taking a test.

What’s interesting is how this cheating was discovered. It’s not that someone noticed the communication devices. It’s that the proctors noticed that cheating test takers were acting hinky.

Simplifying B2B integrations with AWS Step Functions Workflow Studio

Post Syndicated from James Beswick original https://aws.amazon.com/blogs/compute/simplifying-b2b-integrations-with-aws-step-functions-workflow-studio/

This post is written by Patrick Guha, Associate Solutions Architect, WWPS, Hamdi Hmimy, Associate Solutions Architect, WWPS, and Madhu Bussa, Senior Solutions Architect, WWPS.

B2B integration helps organizations with disparate technologies communicate and exchange business-critical information. However, organizations typically have few options in building their B2B pipeline infrastructure. Often, they use an out-of-the-box SaaS integration platform that may not meet all of their technical requirements. Other times, they code an entire pipeline from scratch.

AWS Step Functions offers a solution to this challenge. It provides both the code customizability of AWS Lambda with the low-code, visual building experience of Workflow Studio.

This post introduces a customizable serverless architecture for B2B integrations. It explains how the solution works and how it can save you time in building B2B integrations.

Overview

The following diagram illustrates components and interactions of the example application architecture:

Example architecture

This section describes building a configurable B2B integration pipeline with AWS serverless technologies. It walks through the components and discusses the flow of transactions from trading partners to a consolidated database.

Communication

The B2B integration pipeline accepts transactions both in batch (a single file with many transactions) and in real-time (a single transaction) modes. Batch communication is over open standard SFTP protocol, and real-time communication is over the REST/HTTPS protocol.

For batch communication needs, AWS Transfer Family provides managed support for file transfers directly between Amazon Simple Storage Service (S3) or Amazon Elastic File System (EFS). EFS provides a serverless, elastic file system that lets you share file data without provisioning or managing storage.

Amazon EventBridge provides serverless event bus functionality to automate specific actions in the B2B pipeline. In this case, batch transaction uploads from a partner trigger the B2B pipeline. When a file is put in S3 from the Transfer SFTP server, EventBridge captures the event and routes to a target Lambda function.

As batch transactions are saved via AWS Transfer SFTP to Amazon S3, AWS CloudTrail captures the events. It provides the underlying API requests as files are PUT into S3, which triggers the EventBridge rule created previously.

For real-time communication needs, Amazon API Gateway provides an API management layer, allowing you to manage the lifecycle of APIs. Trading partners can send their transactions to this API over the ubiquitous REST API protocol.

Processing

Amazon Simple Queue Service (SQS) is a fully managed queuing service that allows you to decouple applications. In this solution, SQS manages and stores messages to be processed individually.

Lambda is a fully managed serverless compute service that allows you to create business logic functions as needed. In this example, Lambda functions process the data from the pipeline to clean, format, and upload the transactions from SQS.

Step Functions manages the workflow of a B2B transaction. Step Functions is a low-code visual workflow service used to orchestrate AWS services, automate business processes, and build serverless applications. Workflows manage failures, retries, parallelization, service integrations, and observability so developers can focus on higher-value business logic.

API Gateway is used in the processing pipeline of the solution to enrich the transactions coming through the pipeline.

Amazon DynamoDB serves as the database for the solution. DynamoDB is a key-value and document database that can scale to virtually any number of requests. As the pipeline experiences a wide range of transaction throughputs, DynamoDB is a good solution to store processed transactions as they arrive.

Batch transaction flow

  1. A trading partner logs in to AWS Transfer SFTP and uploads a batch transaction file.
  2. An S3 bucket is populated with the batch transaction file.
  3. A CloudTrail data event captures the batch transaction file being PUT into S3.
  4. An EventBridge rule is triggered from the CloudTrail data event.
  5. Lambda is triggered from the EventBridge rule. It processes each message from the batch transaction file and sends individual messages to SQS.
  6. SQS stores each message from the file as it is passed through from Lambda.
  7. Lambda is triggered from each SQS incoming message, then invokes Step Functions to run through the following steps for each transaction.
  8. Lambda accepts and formats the transaction payload.
  9. API Gateway enriches the transaction.
  10. DynamoDB stores the transaction.

Single/real-time transaction flow

  1. A trading partner uploads a single transaction via an API Gateway REST API.
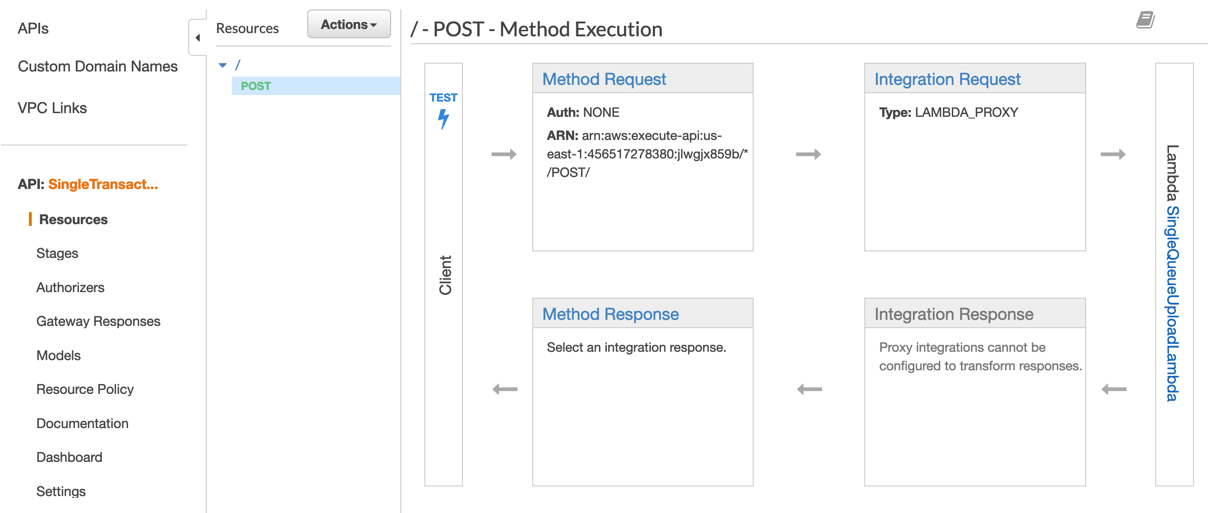
  2. API Gateway sends a single transaction to Lambda SQS writer function via proxy integration.
  3. SQS stores each message from the API POSTs.
  4. Lambda is triggered from each SQS incoming message. It invokes Step Functions to run through the workflow for each transaction.
  5. Lambda accepts and formats the transaction payload.
  6. API Gateway enriches the transaction.
  7. DynamoDB stores the transaction.

Exploring and testing the architecture

To explore and test the architecture, there is an AWS Serverless Application Model (AWS SAM) template. The AWS SAM template creates an AWS CloudFormation stack for you. This can help you save time building your own B2B pipeline, as you can deploy and customize the example application.

To deploy in your own AWS account:

  1. To install AWS SAM, visit the installation page.
  2. To deploy the AWS SAM template, navigate to the directory where the template is located. Run the following bash commands in the terminal:
    git clone https://github.com/aws-samples/simplified-serverless-b2b-application
    cd simplified-serverless-b2b-application
    sam build
    sam deploy --guided --capabilities CAPABILITY_NAMED_IAM

Prerequisites

  1. Create an SSH key pair. To authenticate to the AWS Transfer SFTP server and upload files, you must generate an SSH key pair. Once created, you must copy the contents of the public key to the SshPublicKeyParameter displayed after running the sam deploy command. Follow the instructions to create an SSH key pair for Transfer.
  2. Copy batch and real-time input. The following XML content contains multiple example transactions to be processed in the batch workflow. Create an XML file on your machine with the following content:
    <?xml version="1.0" encoding="UTF-8"?>
    <Transactions>
      <Transaction TransactionID="1">
        <Notes>Transaction made between user 57 and user 732.</Notes>
      </Transaction>
      <Transaction TransactionID="2">
        <Notes>Transaction made between user 9824 and user 2739.</Notes>
      </Transaction>
      <Transaction TransactionID="3">
        <Notes>Transaction made between user 126 and user 543.</Notes>
      </Transaction>
      <Transaction TransactionID="4">
        <Notes>Transaction made between user 5785 and user 839.</Notes>
      </Transaction>
      <Transaction TransactionID="5">
        <Notes>Transaction made between user 83782 and user 547.</Notes>
      </Transaction>
      <Transaction TransactionID="6">
        <Notes>Transaction made between user 64783 and user 1638.</Notes>
      </Transaction>
      <Transaction TransactionID="7">
        <Notes>Transaction made between user 785 and user 7493.</Notes>
      </Transaction>
      <Transaction TransactionID="8">
        <Notes>Transaction made between user 5473 and user 3829.</Notes>
      </Transaction>
      <Transaction TransactionID="9">
        <Notes>Transaction made between user 3474 and user 9372.</Notes>
      </Transaction>
      <Transaction TransactionID="10">
        <Notes>Transaction made between user 1537 and user 9473.</Notes>
      </Transaction>
      <Transaction TransactionID="11">
        <Notes>Transaction made between user 2837 and user 7383.</Notes>
      </Transaction>
    </Transactions>
    

    Similarly, the following content contains a single transaction to be processed in the real-time workflow.

    transactionId=12&transactionMessage= Transaction made between user 687 and user 329.

  3. Download Cyberduck, an SFTP client, to upload the batch transaction file to the B2B pipeline.

Uploading the XML file to Transfer and POST to API Gateway

Use Cyberduck to upload the batch transaction file to the B2B pipeline. Follow the instructions here to upload the preceding transactions XML file. You can find the Transfer server endpoint in both the Transfer console and the Outputs section of the AWS SAM template.

Use the API Gateway console to test the POST method for the single transaction workflow. Navigate to API Gateway in the AWS Management Console and choose the REST API created by the AWS SAM template called SingleTransactionAPI.

In the Resources pane, view the methods. Choose the POST method. Next, choose the client Test bar on the left.

API Gateway console

Copy the single real-time transaction into the Query Strings text box then choose Test. This sends the single transaction and starts the real-time workflow of the B2B pipeline.

Testing in the console

Viewing Step Functions executions

Navigate to the Step Functions console. Choose the state machine created by the AWS SAM template called StepFunctionsStateMachine.

In the Executions tab, you see a number of successful executions. Each transaction represents a Step Functions state machine execution. This means that every time a transaction is submitted by a trading partner to SQS, it is individually processed as a unique Step Functions state machine execution. This granularity is useful for tracking transactions.

Step Functions console

Viewing Workflow Studio

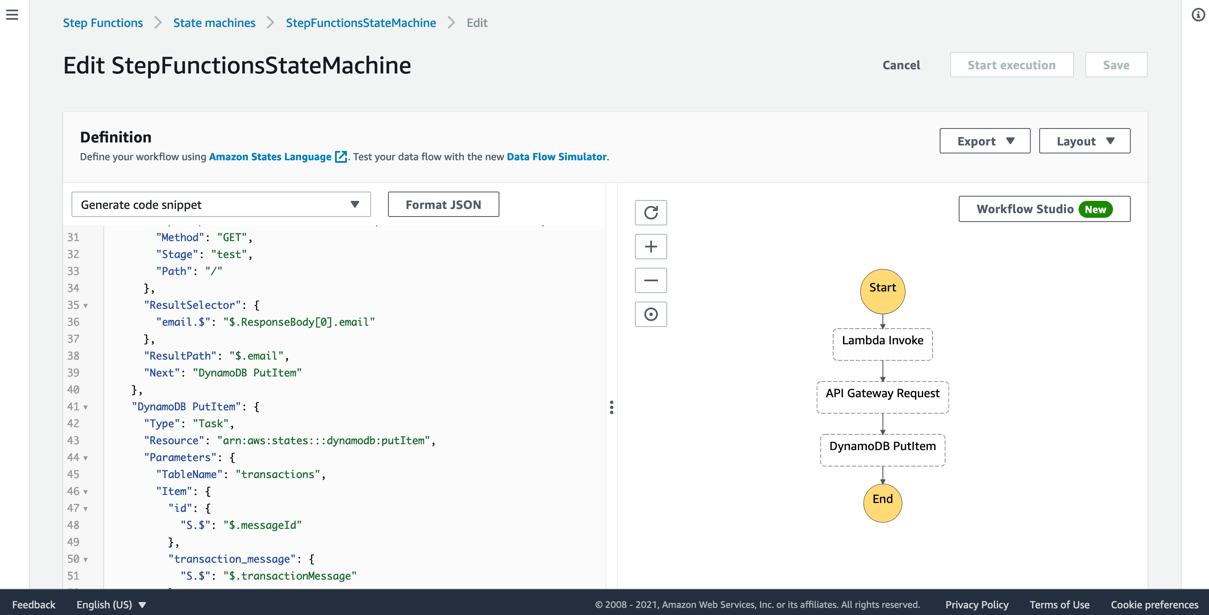
Next, view the Step Functions state machine definition. On the StepFunctionsStateMachine page, choose Edit. You see a code and visual representation of your workflow.

The code version uses Amazon States Language, allowing you to modify the state machine as needed. Choose the Workflow Studio button to get a visual representation of the services and integrations in the workflow.

ASL in Workflow Studio

The Workflow Studio helps you to save time while building a B2B pipeline. There are over 40 different actions you can take on various AWS services and flow states that can provide additional logic to the workflow.

Step Functions Workflow Studio

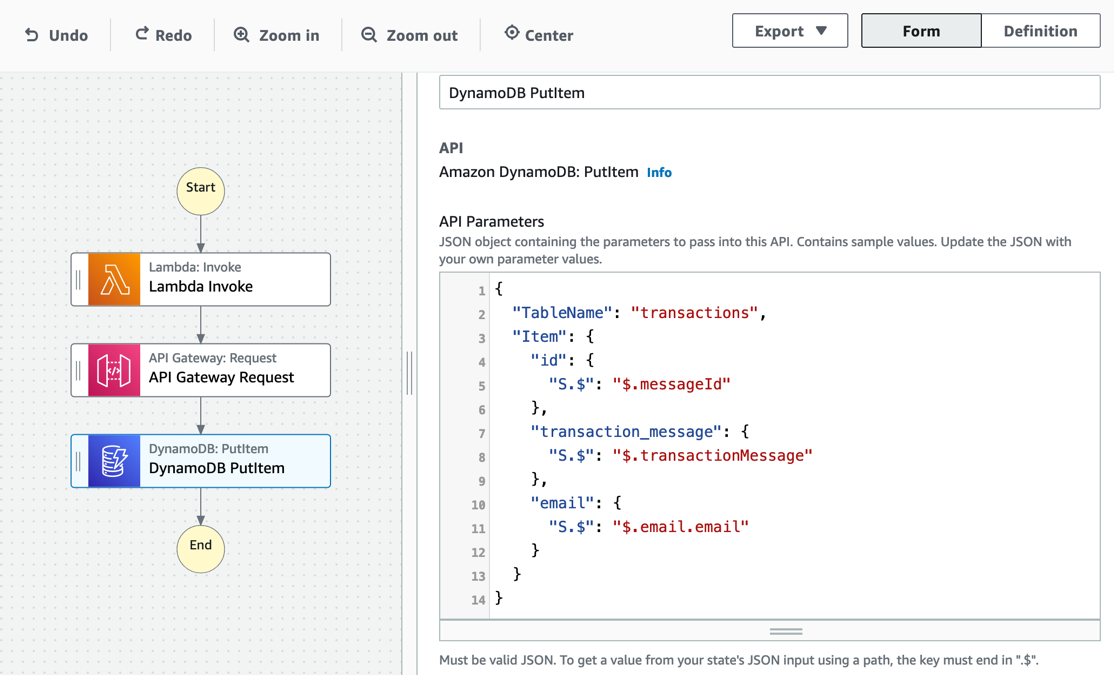
One of the largest benefits of Workflow Studio are the time-savings possible through built-in integrations to AWS services. This architecture includes two integrations: API Gateway request and DynamoDB PutItem.

Choose the API Gateway request state in the diagram. To make a request to the API Gateway REST API, you update the API Parameters section in Configuration. Previously, you may have used a Lambda function to perform this action, adding extra code to maintain a B2B pipeline.

Updating parameters

The same is true for DynamoDB. Choose the DynamoDB PutItem state to view more. The configuration to put the item is made in the API Parameters section. To connect to any other AWS services via Actions, add Identity and Access Manager (IAM) permissions for Step Functions to access them. These examples include the necessary IAM permissions for Step Functions to both API Gateway and DynamoDB in the AWS SAM template.

PutItem workflow

Cleaning up

To avoid ongoing charges to your AWS account, remove the created resources:

  • Use the CloudFormation console to delete the stack created as part of this demo. Choose the stack, choose Delete, and then choose Delete stack.
  • Navigate to the S3 console and both Empty then Delete S3 buckets created from the stack: [stackName]-cloudtrails3bucket-[uniqueId] and [stackName]-sftpservers3bucket-[uniqueId]
  • Navigate to the CloudWatch console and delete the following log groups created from the stack: /aws/lambda/IntakeSingleTransactionLambdaFunction, /aws/lambda/SingleQueueUploadLambda, and /aws/lambda/TriggerStepFunctionsLambdaFunction.

Conclusion

This post shows an architecture to share your business data with your trading partners using API Gateway, AWS Transfer for SFTP, Lambda, and Step Functions. This architecture enables organizations to quickly on-board partners, build event-driven pipelines, and streamline business processes.

To learn more about B2B pipelines on AWS, read: https://aws.amazon.com/blogs/compute/integrating-b2b-using-event-notifications-with-amazon-sns/.

For more serverless learning resources, visit Serverless Land.

[The Lost Bots] Episode 6: D&R + VM = WINNING!

Post Syndicated from Rapid7 original https://blog.rapid7.com/2021/10/04/the-lost-bots-episode-6-d-r-vm-winning/

[The Lost Bots] Episode 6: D&R + VM = WINNING!

Welcome back to The Lost Bots, a vlog series where Rapid7 Detection and Response Practice Advisor Jeffrey Gardner talks all things security with fellow industry experts. In this episode, we’re joined by fellow Practice Advisor Devin Krugly to discuss how Detection and Response + Vulnerability Management = a winning combination. Often viewed as two separate and distinct entities, Jeffrey and Devin explore how the combination can greatly improve your response efforts and the ways in which you can set up a successful vulnerability management program.

[The Lost Bots] Episode 6: D&R + VM = WINNING!

Stay tuned for future episodes of The Lost Bots! Coming soon: Jeffrey discusses veterans in cybersecurity with fellow security professionals who are vets themselves.

Announcing Access Temporary Authentication

Post Syndicated from Kenny Johnson original https://blog.cloudflare.com/announcing-access-temporary-authentication/

Announcing Access Temporary Authentication

Zero Trust rules by default block attempts to reach a resource. To obtain access, users need to prove they should be allowed to connect using signals like their identity, their device health, and other factors.

However, some workflows need a second opinion. Starting today, you can add new policies in Cloudflare Access that grant temporary access to specific users based on approvals for a set of predefined administrators. You can decide that some applications need second-party approval in addition to other Zero Trust signals. We’re excited to give your team another layer of Zero Trust control for any application — whether it’s a popular SaaS tool or you host it yourself.

Why temporary authentication?

Configuring appropriate user access is a challenge. Most companies start granting employee-specific application access based on username or email. This requires manual provisioning and deprovisioning when an employee joins or leaves.

When this becomes unwieldy, security teams generally use identity provider groups to set access levels by employee role. Which allows better provisioning and deprovisioning, but again starts to get clunky when application access requirements do not conform around roles. If a specific support rep needs access, then they need to be added to an existing group (for example, engineering) or a new group needs to be created (for example, specfic_support_reps). Even if that new team member only needed temporary access, it is unlikely they were ever removed from the identity group they were added to. This leads to overprovisioned and unnecessary groups in your identity provider.

In most cases, there are two sets of application users — those that access every day to do their jobs and those that need specific access periodically. We wanted to make it possible to give these periodic users temporary access to applications. Additionally, some services are so sensitive that every user should only have temporary access, for example in the case of production database access.

Starting with Purpose Justification

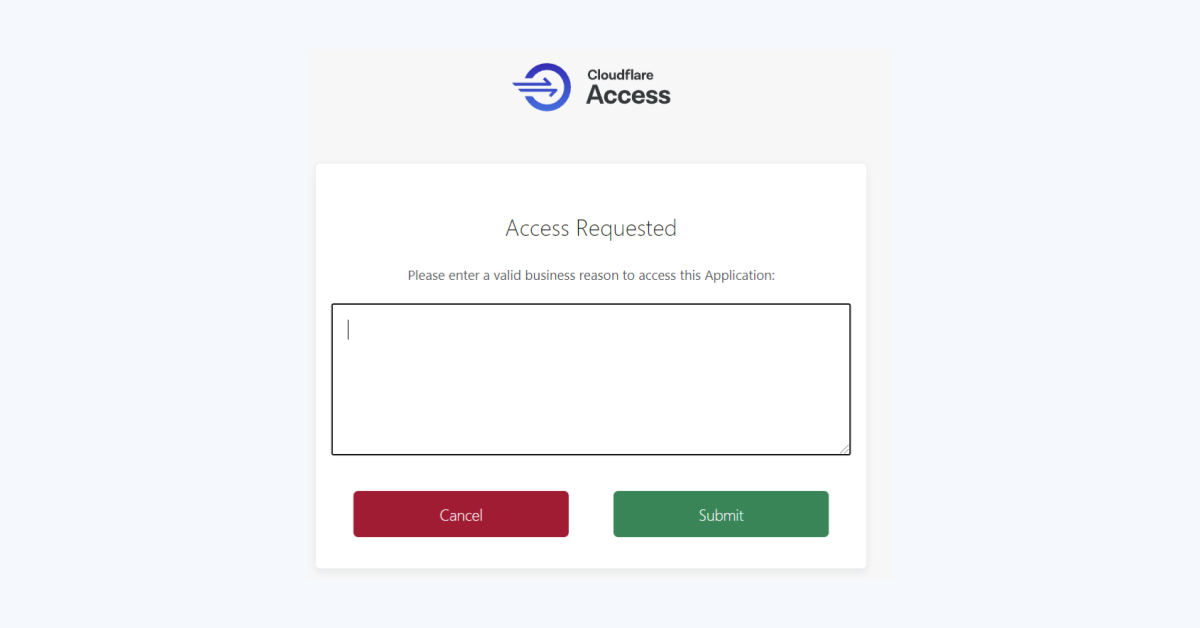
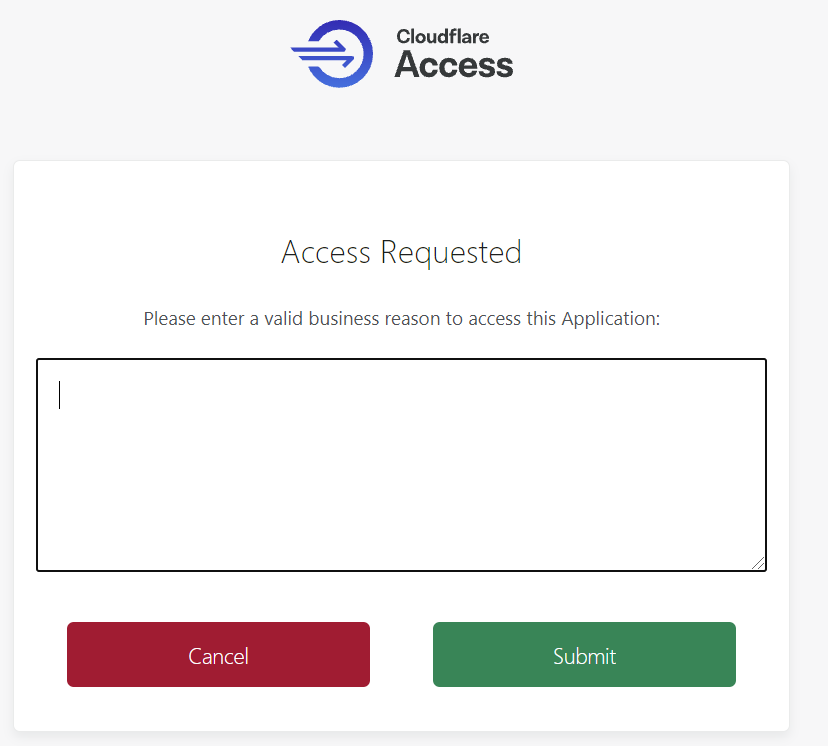
Cloudflare Access starts solving this problem by allowing security administrators to collect a business reason for accessing a specific application. This provides an audit trail and a prompt to remind users that they should only connect to the resource with a good reason. However, the feature does actively stop a user from accessing something.

Announcing Access Temporary Authentication

Added control with Temporary Authentication

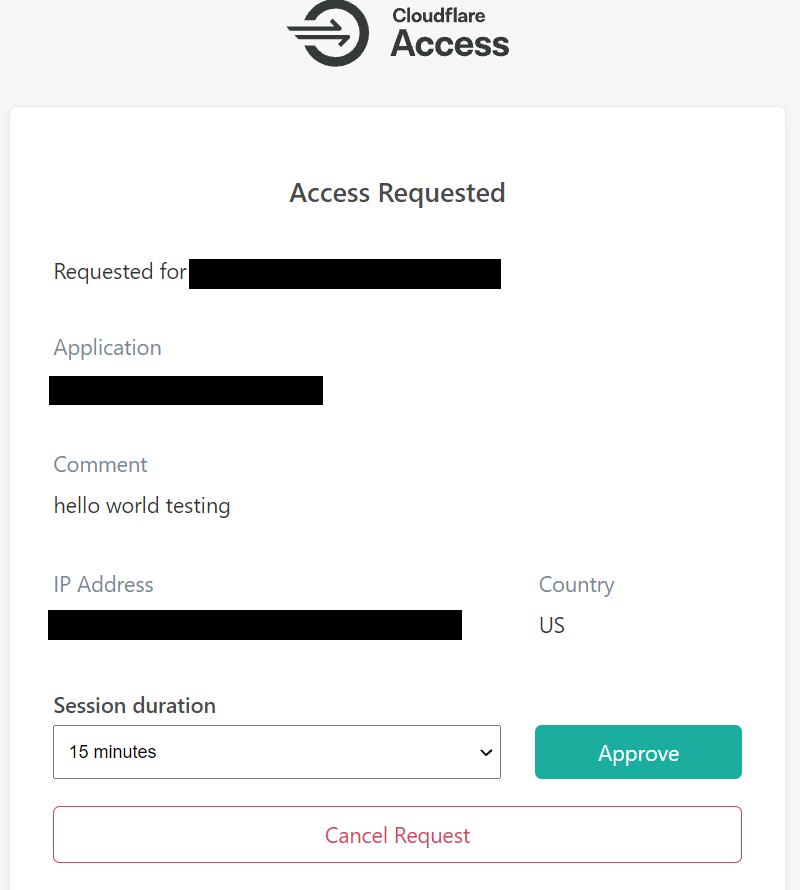
As part of this release, we have extended Purpose Justification with Temporary Access to introduce scoped permissions and second approval requirements. Now a user’s Purpose Justification, along with location and IP address, will be sent to a preconfigured list of approvers who can then either approve or deny a user’s access request, or grant access for a set amount of time.

This allows security teams to avoid over-provisioning sensitive applications without also creating bottlenecks on a few key individuals in their organization with access to sensitive tools. Better yet, all of these requests and approvals are logged for regulatory and investigative purposes.

Announcing Access Temporary Authentication

When the user’s session expires, they need to repeat the process if they need access again. If you have a group of users who should always be allowed to reach a resource, without second approval, you can define groups that are allowed to skip this step.

Purpose Justification and Temporary Access were both built using Cloudflare Workers. This means both user access requests and administrator access reviews are rendered from the closest data center to the user. You could request access to an application from an approver across the world with virtually no latency.

Workers also allowed us to be very flexible when Temporary Authentication is required. As an example, the same user who normally has persistent access to an application can be required to request access when connecting from a personal device or when visiting a high-risk country.


How to get started

To get started with Temporary Authentication in Cloudflare Access, go to the Teams Dashboard and create an Access application. Within the Application’s Zero Trust policy, you can configure when you want to allow for temporary authentication with human approval. For more detailed information, you can refer to our developer docs.

30-second blood analysis with Raspberry Pi

Post Syndicated from Ashley Whittaker original https://www.raspberrypi.org/blog/30-second-blood-analysis-with-raspberry-pi/

A portable, affordable Raspberry Pi-powered blood analyser is helping to “establish a robust healthcare ecosystem” in remote parts of India. Samples can be tested in just 30 seconds, and the cost and size of the parts make it an attractive solution for rural and resource-strapped areas.

It is the work of researchers Sangeeta Palekar and Jayu Kalambe from the Department of Electronics Engineering at Shri Ramdeobaba College of Engineering and Management.

blood analyser
(Image credit: Shri Ramdeobaba / College of Engineering And Management)

Tiny computer — massive processing power

Regular blood tests are vital in the tracking and elimination of many diseases, but there is a huge time and monetary cost currently tied to this type of laboratory work.

The researchers’s device measures light absorbance through a blood sample, a common type of analysis, and they harnessed the processing capability of Raspberry Pi 4 Model B to analyse the absorbance data. Their Raspberry Pi-powered solution was found to perform on a par with the kind of expensive lab-based blood test typically used.

Quick and easy

Sangeeta and Jayu’s analyser is not only cheaper to build and maintain than the lab-based version, it also does the job better. Using the lab-based method means that samples from patients in rural areas must be sent away for analysis, with results communicated back to patients at a much later date. In contrast, Sangeeta and Jayu’s device can process blood samples there and then. All you need is an electricity source. Patients get their results immediately, and there is no need to transport delicate samples across rural terrain.

Shri Ramdeobaba College of Engineering and Management

Incorporating an IoT element into their design, which would allow for remote monitoring, is the next step for the researchers. They also intend to develop their invention to allow it to carry out different types of blood analyses.

Read more about the science behind the creation

The full research paper is behind a paywall, but the abstract does a great job succinctly explaining all the science. Sangeeta herself also explains a lot of the magic behind her creation in this interview with IEEE Spectrum.

The post 30-second blood analysis with Raspberry Pi appeared first on Raspberry Pi.

Kernel prepatch 5.15-rc4

Post Syndicated from original https://lwn.net/Articles/871737/rss

The 5.15-rc4 kernel prepatch is out for
testing.

One thing standing out in the diffs might be the m68k ‘set_fs()’
removal – not really a regression fix, but it has been pending for
a while, and it turned out that the problems attributed to it were
due to an entirely unrelated m68k signal handling issue. So with
that fixed, we could get rid of set_fs from another architecture.


See this article for information on
set_fs() and its removal.

McKenney: So You Want to Rust the Linux Kernel?

Post Syndicated from original https://lwn.net/Articles/871726/rss

Paul McKenney has started a blog series on Rust for the Linux kernel. He has posted six of a planned 11 articles, though several are labeled as “under construction”.

This series focuses mostly on use cases and opportunities, rather than on any non-trivial solutions. Please note that I am not in any way attempting to dictate or limit Rust’s level of ambition. I am instead noting the memory-model consequences of a few potential levels of ambition, ranging from “portions of a few drivers”, “a few drivers”, “some core code” and up to and including “the entire kernel”. Greater levels of ambition will require greater willingness to accommodate a wider variety of LKMM [Linux-kernel memory model] requirements.

[…]
These blog posts will therefore present approaches ranging upwards from trivial workarounds. But be warned that some of the high-quality approaches require profound reworking of compiler backends that have thus far failed to spark joy in the hearts of compiler writers. In addition, Rust enjoys considerable use outside of the Linux kernel, for example, as something into which to rewrite inefficient Python scripts. (A megawatt here, a megawatt there, and pretty soon you are talking about real power consumption!) Therefore, there are probably sharp limits beyond which the core Rust developers are unwilling to go.

The secret to Cloudflare’s pace of Innovation

Post Syndicated from Jen Taylor original https://blog.cloudflare.com/the-secret-to-cloudflare-pace-of-innovation/

The secret to Cloudflare’s pace of Innovation

The secret to Cloudflare’s pace of Innovation

We are 11! And we also may be a little bleary-eyed and giddy from a week of shipping.

The secret to Cloudflare’s pace of Innovation

Our Birthday Weeks are one of my favorite Cloudflare traditions — where we release innovations that help to build a better Internet. Just this week we tackled email security, expanded our network into office buildings, and entered into the Web3 world.

The secret to Cloudflare’s pace of Innovation

But these weeks also precipitate the most common questions I’m asked from my product and engineering peers across the industry: how do we do it? How do we get so much stuff out so quickly? That we are able to innovate — and innovate so quickly — is no happy accident. In fact, this capability has been very deliberately built into the DNA of Cloudflare. I want to touch on three of the reasons unique to us: one relates to our people, one relates to our technology, and one relates to our customers.

Cultivating curiosity

The seeds of innovative ideas start with our team. One of the core things we look for when hiring in every role at Cloudflare — be it engineering and product or sales or account — is curiosity. We seek people who approach a situation with curiosity — who seek to understand the what, the how, and perhaps most importantly, the why of the world around them. Innovation at its core is finding new ways to solve existing problems, and this curiosity is jet fuel for innovation. It pushes us to challenge the status quo. It is through this inquiry that we identify assumptions and unnecessary points of friction.

The secret to Cloudflare’s pace of Innovation

We turn our curiosity towards the world in front of us, the problems that “bug” us about our workflows and the business of the Internet. This is as much about innovating with code as it is about upending business models that don’t make sense to us. It frustrated us that hackers used DDoS attacks to perpetrate financial terrorism by driving up the cost of their victim’s web hosting and delivery bills, so as part of Birthday week in 2017 we made our DDoS protection free and accessible to all. Interestingly, we also have seen a correlating drop in DDoS attacks against many types of sites since then. This year we turned our attention to the egregious egress fees charged by cloud providers and delivered R2, our object storage solution which offers the ability to store large amounts of data — both expanding what developers can build on Cloudflare while slashing the egress bandwidth fees associated with cloud provider storage to zero. We also continue to expand our at-cost registrar service to more TLDs.

The secret to Cloudflare’s pace of Innovation

There’s an important attribute that partners with curiosity, however. To innovate, we listen. One of the things I screen for when we hire product managers is their ability to listen and synthesize the information they are hearing and then their ability to distill it into actionable problems for us to tackle. We ship early and often with initial concepts. We must listen closely to the feedback from customers — both what they tell us through community forums, support tickets, and meetings and through what they show us in how they adopt and use a feature — and quickly fold this back into the roadmap and the next stage of development. Like some of what you saw this week? Watch our blog for updates and new features as we round out and mature the products.

The best dog food

We like to say Cloudflare was built on Cloudflare and for Cloudflare. This means we eat our own dog food with a glass of our own champagne on the side. We wanted a way to connect with our customers and the community, so we built ourselves a real-time streaming service and launched CloudflareTV. Over the past 18 months we ironed out the kinks and this week we made that available to all of you to stand up your own network. We care deeply not only about the capabilities we deliver but how they look and feel. This focus leads to big innovations, but also leads to smaller improvements in how our tools look and feel, like Dark Mode, which was a passion project of a few of our front-end developers and one of the most requested features of all time by our own team.

The secret to Cloudflare’s pace of Innovation

So that’s an example of what happens. But how were we able to do this?

It’s driven by our Workers platform. This isn’t just something that’s making our customers’ lives easier. No containers to manage; no scaling to handle. We use it, too. It’s a layer of abstraction on top of our network that enables a massive amount of development velocity. Our unified architecture provides a single, scalable platform on which to innovate and allows us to roll things out in a matter of seconds across our entire network (and roll them back even more quickly if things don’t go to plan, which also sometimes happens). We’re constantly striving to make this network faster, safer, and more reliable. We’re constantly evolving our network to make it better. A couple of weeks ago we announced we’d expanded to 250 cities and are now within 50 milliseconds of 95% of the Internet-connected population. This week we expanded the footprint of our network into office buildings, getting even closer to end users.

The secret to Cloudflare’s pace of Innovation

This abstraction enables us to have smaller teams to build any new product or service. While others in the industry talk about building “pizza box” teams — teams small enough that they can all share a pizza together — many of our innovation efforts start with teams even smaller. At Cloudflare, it is not unusual for an initial product idea to start with a team small enough to split a pack of Twinkies and for the initial proof of concept to go from whiteboard to rolled out in days. We intentionally staff and structure our teams and our backlogs so that we have flexibility to pivot and innovate. Our Emerging Technology and Incubation team is a small group of product managers and engineers solely dedicated to exploring new products for new markets. Our Research team is dedicated to thinking deeply and partnering with organizations across the globe to define new standards and new ways to tackle some of the hardest challenges. These efforts drove our Web3 announcements and I could not be more excited to see where you all take them.

The secret to Cloudflare’s pace of Innovation

We ship software for businesses like a consumer software company. Traditional B2B software development typically follows longer development cycles and focuses on delivering more fully featured and deeply integrated offerings out of the gate. This cautious approach yields fewer more fully featured offerings shipped less frequently. Consumer software, on the other hand, is typically built in a highly iterative process — where teams develop initial concepts quickly and roll them out frequently in small pieces to subsets of users to test and understand how people use them and then use these observations to guide development. Many of the seeds that shaped the email security offerings this week started as small experiments by the DNS team, Emerging Technology, and our Customer Support team.

There’s one more aspect to all of this — because we’ve innovated in the way we’ve built our network — making it highly scalable and cost-effective — we’re able to pass these savings on to our customers. In a lot of instances, these savings amount to a pretty good price for our products and services: nothing at all.

Born to be free

Typically, in B2B enterprise software companies, the big customers and the multi-million dollar contracts get 99.99% of the focus. Here’s what I would say: our free customers are the secret sauce to our innovation. Today, millions of websites and applications  across the globe use our service for free. Free is invaluable to innovation.

One of the most difficult parts of building B2B software is getting the first 100 users. These early users are critical to assess the quality, scale, and capabilities of a product. But B2B folks are notoriously risk averse: their application or users are their lifeblood, and they aren’t necessarily willing to make them guinea pigs. They would rather sit on the sidelines and wait for someone else to go first. So when you are building B2B software, you are stuck in a conundrum — how do you get the users you need to prove out the capabilities?  We’re fortunate to have millions of free sites and applications on our network. Like a consumer app developer, we typically roll out new capabilities to pods of these users first. These users give us the volume and scale to get confident in what we’ve delivered. The more confident we get, the more broadly we roll out, such that by the time it hits broad rollout, our customers can feel confident in the quality and stability.

The large and diverse free customer base also helps fuel innovation. Through servicing a large and diverse base — from a personal blog in Bolivia to a small business in Chennai to a start-up in Munich — we observe unique traffic and threat patterns. We take these learning and fold the insights back into our product to dynamically route traffic across the fastest route and stop emerging threats before they scale.

The other thing I love about Birthday Week? It is the place critical innovations start that will ultimately transform the way we work. Universal SSL in 2014 made SSL free and available to all customers, doubling the number of active sites that use encryption within 24 hours of launch.   Seedling ideas, such as Workers, which we launched in 2017, have become the foundation of a whole new generation of applications.

I mentioned earlier that two of the most common questions I’m asked about Cloudflare relate to how we do it. Well, there’s often a third, and that too comes up quite a lot during Birthday Week. And that question is: “are you hiring?!” The answer is a resounding yes! We have opportunities across a variety of roles in Cloudflare: Legal, Product, Engineering, Sales, IT. Good ideas come from everywhere. I’d love nothing more than to engage your curiosity to help us build a better Internet.

The secret to Cloudflare’s pace of Innovation

Продължаваме промяната или Продължаваме подмяната?

Post Syndicated from original https://bivol.bg/prodalzhavame-promyanata.html

неделя 3 октомври 2021


Възпитаници на престижни университети. Млади, успели, богати. Свежи, усмихнати, непринудени, симпатични. Доказали се не само като мениджъри на компании, а и като държавни администратори, успявайки за някакви си четири месеца…

The collective thoughts of the interwebz