AWS IQ launched in 2019 and has been helping customers worldwide engage thousands of AWS Certified third-party experts and consulting firms for on-demand project work. Whether you need to learn about AWS, plan your project, setup new services, migrate existing applications, or optimize your spend, AWS IQ connects you with experts and consulting firms who can help. You can share your project objectives with a description, receive responses within the AWS IQ application, approve permissions and budget, and will be charged directly through AWS billing.
Until yesterday, experts had to reside in the United States to offer their hands-on help on AWS IQ. Today, I’m happy to announce that AWS Certified experts and consulting firms based in the UK and France can participate in AWS IQ.
If you are an AWS customer based in the UK or France and need to connect with local AWS experts, now you can reach out to a wider pool of experts and consulting firms during European business hours. When creating a new project, you can now indicate a preferred expert location.
As an AWS Certified expert you can now view the buyer’s preferred expert location to ensure the right fit. AWS IQ simplifies finding relevant opportunities and it helps you access a customer’s AWS environment securely. It also takes care of billing so more time is spent on solving customer problems, instead of administrative tasks. Your payments will be disbursed by AWS Marketplace in USD towards a US bank account. If you don’t already have a US bank account, you may be able to obtain one through third-party services such as Hyperwallet.
AWS IQ User Interface Update When you create a new project request, you can select a Preferred expert or firm location: Anywhere, France, UK, or US.
You can also work on the same project with multiple experts from different locations.
When browsing experts and firms, you will find their location under the company name and reviews.
Available Today AWS IQ is available for customers anywhere in the world (except China) for all sorts of project work, delivered by AWS experts in the United States, the United Kingdom, and France. Get started by creating your project request on iq.aws.amazon.com. Here you can discover featured experts or browse experts for a specific service such as Amazon Elastic Compute Cloud (EC2) or DynamoDB.
If you’re interested in getting started as an expert, check out AWS IQ for Experts. Your profile will showcase your AWS Certifications as well as the ratings and reviews from completed projects.
I’m excited about the expansion of AWS IQ for experts based in the UK and France, and I’m looking forward to further expansions in the future.
This is a guest post co-written by Rahul Monga, Principal Software Engineer at Rapid7.
Rapid7 InsightVM is a vulnerability assessment and management product that provides visibility into the risks present across an organization. It equips you with the reporting, automation, and integrations needed to prioritize and fix those vulnerabilities in a fast and efficient manner. InsightVM has more than 5,000 customers across the globe, runs exclusively on AWS, and is available for purchase on AWS Marketplace.
To provide near-real-time insights to InsightVM customers, Rapid7 has recently undertaken a project to enhance the dashboards in their multi-tenant software as a service (SaaS) portal with metrics, trends, and aggregated statistics on vulnerability information identified in their customer assets. They chose Amazon Redshift as the data warehouse to power these dashboards due to its ability to deliver fast query performance on gigabytes to petabytes of data.
In this post, we discuss the design options that Rapid7 evaluated to build a multi-tenant data warehouse and analytics platform for InsightVM. We will deep dive into the challenges and solutions related to ingesting near-real-time datasets and how to create a scalable reporting solution that can efficiently run queries across more than 3 trillion rows. This post also discusses an option to address the scenario where a particular customer outgrows the average data access needs.
This post uses the terms customers, tenants, and organizations interchangeably to represent Rapid7 InsightVM customers.
Background
To collect data for InsightVM, customers can use scan engines or Rapid7’s Insight Agent. Scan engines allow you to collect vulnerability data on every asset connected to a network. This data is only collected when a scan is run. Alternatively, you can install the Insight Agent on individual assets to collect and send asset change information to InsightVM numerous times each day. The agent also ensures that asset data is sent to InsightVM regardless of whether or not the asset is connected to your network.
Data from scans and agents is sent in the form of packed documents, in micro-batches of hundreds of events. Around 500 documents per second are received across customers, and each document is around 2 MB in size. On a typical day, InsightVM processes 2–3 trillion rows of vulnerability data, which translates to around 56 GB of compressed data for a large customer. This data is normalized and processed by InsightVM’s vulnerability management engine and streamed to the data warehouse system for near-real-time availability of data for analytical insights to customers.
Architecture overview
In this section, we discuss the overall architectural setup for the InsightVM system.
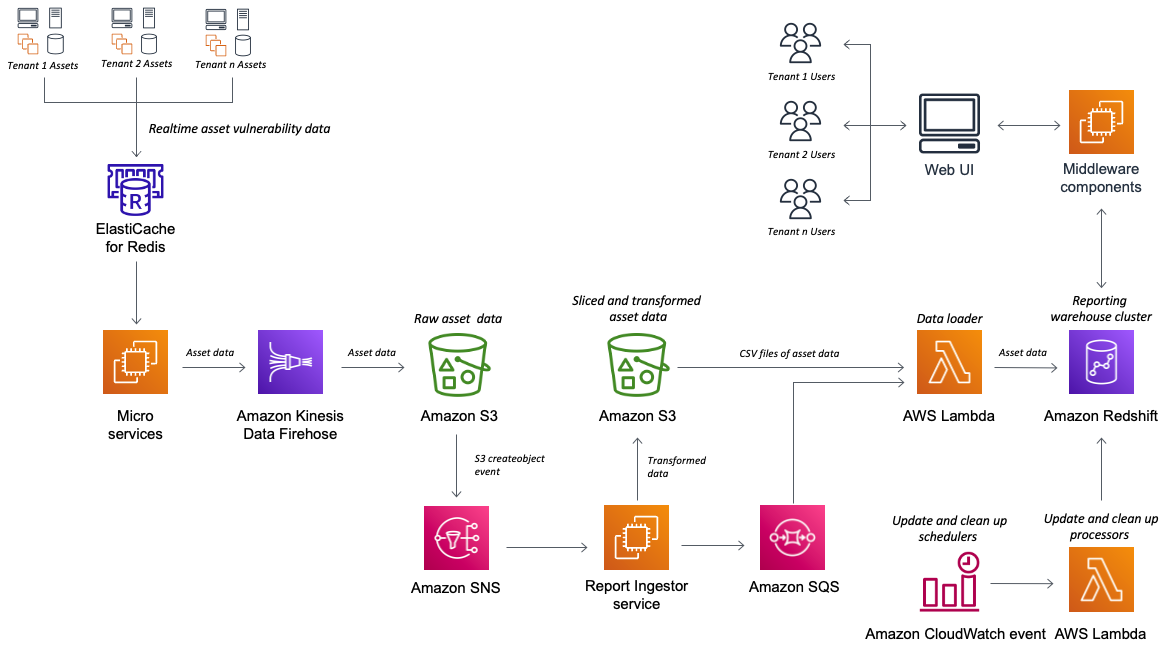
Scan engines and agents collect and send asset information to the InsightVM cloud. Asset data is pooled, normalized, and processed to identify vulnerabilities. This is stored in an Amazon ElastiCache for Redis cluster and also pushed to Amazon Kinesis Data Firehouse for use in near-real time by InsightVM’s analytics dashboards. Kinesis Data Firehose delivers raw asset data to an Amazon Simple Storage Service (Amazon S3) bucket. The data is transformed using a custom developed ingestor service and stored in a new S3 bucket. The transformed data is then loaded into the Redshift data warehouse. Amazon Simple Notification Service (Amazon SNS), Amazon Simple Queue Service (Amazon SQS), and AWS Lambda are used to orchestrate this data flow. In addition, to identify the latest timestamp of vulnerability data for assets, an auxiliary table is maintained and updated periodically with the update logic in the Lambda function, which is triggered through an Amazon CloudWatch event rule. Custom-built middleware components interface between the web user interface (UI) and the Amazon Redshift cluster to fetch asset information for display in dashboards.
The following diagram shows the implementation architecture of InsightVM, including the data warehouse system:
The architecture has built-in tenant isolation because data access is abstracted through the API. The application uses a dimensional model to support low-latency queries and extensibility for future enhancements.
Amazon Redshift data warehouse design: Options evaluated and selection
Considering Rapid7’s need for near-real-time analytics at any scale, the InsightVM data warehouse system is designed to meet the following requirements:
Ability to view asset vulnerability data at near-real time, within 5–10 minutes of ingest
Less than 5 seconds’ latency when measured at 95 percentiles (p95) for reporting queries
Ability to support 15 concurrent queries per second, with the option to support more in the future
Simple and easy-to-manage data warehouse infrastructure
Data isolation for each customer or tenant
Rapid7 evaluated Amazon Redshift RA3 instances to support these requirements. When designing the Amazon Redshift schema to support these goals, they evaluated the following strategies:
Bridge model – Storage and access to data for each tenant is controlled at the individual schema level in the same database. In this approach, multiple schemas are set up, where each schema is associated with a tenant, with the same exact structure of the dimensional model.
Pool model – Data is stored in a single database schema for all tenants, and a new column (tenant_id) is used to scope and control access to individual tenant data. Access to the multi-tenant data is controlled using API-level access to the tables. Tenants aren’t aware of the underlying implementation of the analytical system and can’t query them directly.
Initially when evaluating the bridge model, it provided an advantage for tenant-only data for queries, plus the ability to decouple a tenant to an independent cluster if they outgrow the resources that are available in the single cluster. Also, when the p95 metrics were evaluated in this setup, the query response times were less than 5 seconds, because each tenant data is isolated into smaller tables. However, the major concern with this approach was with the near-real-time data ingestion into over 50,000 tables (5,000 customer schemas x approximately 10 tables per schema) every 5 minutes. Having thousands of commits every minute into an online analytical processing (OLAP) system like Amazon Redshift can lead to most resources being exhausted in the ingestion process. As a result, the application suffers query latencies as data grows.
The pool model provides a simpler setup, but the concern was with query latencies when multiple tenants access the application from the same tables. Rapid7 hoped that these concerns would be addressed by using Amazon Redshift’s support for massively parallel processing (MPP) to enable fast execution of most complex queries operating on large amounts of data. With the right table design using the right sort and distribution keys, it’s possible to optimize the setup. Furthermore, with automatic table optimization, the Amazon Redshift cluster can automatically make these determinations without any manual input.
Rapid7 evaluated both the pool and bridge model designs, and decided to implement the pool model. This model provides simplified data ingestion and can support query latencies of under 5 seconds at p95 with the right table design. The following table summarizes the results of p95 tests conducted with the pool model setup.
Query
P95
Large customer: Query with multiple joins, which list assets, their vulnerabilities, and all their related attributes, with aggregated metrics for each asset, and filters to scope assets by attributes like location, names, and addresses
Less than 4 seconds
Large customer: Query to return vulnerability content information given a list of vulnerability identifiers
Less than 4 seconds
Tenet isolation and security
Tenant isolation is fundamental to the design and development of SaaS systems. It enables SaaS providers to reassure customers that, even in a multi-tenant environment, their resources can’t be accessed by other tenants.
With the Amazon Redshift table design using the pool model, Rapid7 built a separate data access layer in the middleware that templatized queries, augmented with runtime parameter substitution to uniquely filter specific tenant and organization data.
The following is a sample of templatized query:
<#if useDefaultVersion()>
currentAssetInstances AS (
SELECT tablename.*
FROM tablename
<#if (applyTags())>
JOIN dim_asset_tag USING (organization_id, attribute2, attribute3)
</#if>
WHERE organization_id ${getOrgIdFilter()}
<#if (applyTags())>
AND tag_id IN ($(tagIds))
</#if>
),
</#if>
The following is a Java interface snippet to populate the template:
Every query uses organization_id and additional parameters to uniquely access tenant data. During runtime, organization_id and other metadata are extracted from the secured JWT token that is passed to middleware components after the user is authenticated in the Rapid7 cloud platform.
Best practices and lessons learned
To fully realize the benefits of the Amazon Redshift architecture and design for the multiple tenants & near real-time ingestion, considerations on the table design allow you to take full advantage of the massively parallel processing and columnar data storage. In this section, we discuss the best practices and lessons learned from building this solution.
Sort key for effective data pruning
Sorting a table on an appropriate sort key can accelerate query performance, especially queries with range-restricted predicates, by requiring fewer table blocks to be read from disk. To have Amazon Redshift choose the appropriate sort order, the AUTO option was utilized. Automatic table optimization continuously observes how queries interact with tables and discovers the right sort key for the table. To effectively prune the data by the tenant, organization_id is identified as the sort key to perform the restricted scans. Furthermore, because all queries are routed through the data access layer, organization_id is automatically added in the predicate conditions to ensure effective use of the sort keys.
Micro-batches for data ingestion
Amazon Redshift is designed for large data ingestion, rather than transaction processing. The cost of commits is relatively high, and excessive use of commits can result in queries waiting for access to the commit queue. Data is micro-batched during ingestion as it arrives for multiple organizations. This results in fewer transactions and commits when ingesting the data.
Load data in bulk
If you use multiple concurrent COPY commands to load one table from multiple files, Amazon Redshift is forced to perform a serialized load, and this type of load is much slower.
The Amazon Redshift manifest file is used to ingest the datasets that span multiple files in a single COPY command, which allows fast ingestion of data in each micro-batch.
RA3 instances for data sharing
Rapid 7 uses Amazon Redshift RA3 instances, which enable data sharing to allow you to securely and easily share live data across Amazon Redshift clusters for reads. In this multi-tenant architecture when a tenant outgrows the average data access needs, it can be isolated to a separate cluster easily and independently scaled using the data sharing. This is accomplished by monitoring the STL_SCAN table to identify different tenants and isolate them to allow for independent scalability as needed.
Concurrency scaling for consistently fast query performance
When concurrency scaling is enabled, Amazon Redshift automatically adds additional cluster capacity when you need it to process an increase in concurrent read queries. To meet the uptick in user requests, the concurrency scaling feature is enabled to dynamically bring up additional capacity to provide consistent p95 values that meet Rapid7’s defined requirements for the InsightVM application.
Results and benefits
Rapid7 saw the following results from this architecture:
The new architecture has reduced the time required to make data accessible to customers to less than 5 minutes on average. The previous architecture had higher level of processing time variance, and could sometimes exceed 45 minutes
Dashboards load faster and have enhanced drill-down functionality, improving the end-user experience
With all data in a single warehouse, InsightVM has a single source of truth, compared to the previous solution where InsightVM had copies of data maintained in different databases and domains, which could occasionally get out of sync
The new architecture lowers InsightVM’s reporting infrastructure cost by almost three times, as compared to the previous architecture
Conclusion
With Amazon Redshift, the Rapid7 team has been able to centralize asset and vulnerability information for InsightVM customers. The team has simultaneously met its performance and management objectives with the use of a multi-tenant pool model and optimized table design. In addition, data ingestion via Kinesis Data Firehose and custom-built microservices to load data into Amazon Redshift in near-real time enabled Rapid7 to deliver asset vulnerability information to customers more than nine times faster than before, improving the InsightVM customer experience.
About the Authors
Rahul Monga is a Principal Software Engineer at Rapid7, currently working on the next iteration of InsightVM. Rahul’s focus areas are highly distributed cloud architectures and big data processing. Originally from the Washington DC area, Rahul now resides in Austin, TX with his wife, daughter, and adopted pup.
Sujatha Kuppuraju is a Senior Solutions Architect at Amazon Web Services (AWS). She works with ISV customers to help design secured, scalable and well-architected solutions on the AWS Cloud. She is passionate about solving complex business problems with the ever-growing capabilities of technology.
Thiyagarajan Arumugam is a Principal Solutions Architect at Amazon Web Services and designs customer architectures to process data at scale. Prior to AWS, he built data warehouse solutions at Amazon.com. In his free time, he enjoys all outdoor sports and practices the Indian classical drum mridangam.
Back in January 2020, we looked at some
oddities in Python’s handling of Not a Number (NaN) values in
its statistics
module. The conversation went quiet after that, but it has been
revived recently with an eye toward fixing the problems that were reported.
As detailed in that earlier article, NaNs are rather strange beasts in the
floating-point universe, so figuring out how best to deal with their
presence is less straightforward than it might seem.
Securing the storage and flow of data is increasingly critical to the healthcare industry. More stringent security and compliance needs, along with mandates like HIPAA, help the industry mitigate risk but navigating multiple frameworks makes the process complex.
The Health Information Trust Alliance Common Security Framework (HITRUST CSF) reduces complexity for organizations by providing a single framework to create a comprehensive set of baseline security and privacy controls. HITRUST CSF leverages nationally and international standards: GDPR, ISO, NIST, PCI, and HIPAA. As a result, many healthcare networks and hospitals view HITRUST as a widely accepted framework to reduce risk.
Today, we’re announcing that Amazon Pinpoint has achieved HITRUST CSF v9.4, helping our customers in the healthcare industry, such as Care Connectors, continue to engage with their constituents at scale—securely.
Using HITRUST certified services means you can take a consistent approach to managing compliance as well as assessing and reporting against multiple sets of requirements. This can also help in getting your own HITRUST certification.
In this episode of Security Nation, Jen and Tod chat with Craig Williams, recently of Cisco Talos, about proxyware and integrating security acquisitions the right way. Along the way, they touch on the challenges of being a security communicator with an audience that extends beyond practitioners – and a few real-life stories of people who didn’t realize their cameras were spying on them.
Stick around for our Rapid Rundown, where Tod and Jen talk about the REvilware ransomware gang’s return from “retirement” and how lagging adoption of EMV is leading to high-profile cases of ATM fraud.
Craig Williams
Craig Williams has always had a passion for learning how things operate – and circumventing security measures. His deep interest in security technology began with research into vulnerabilities, threats, and network detection techniques. His research over the past decade has included running global threat intelligence teams, malware labs, and trying to outwit the very security products he has helped design.
Show notes
Interview Links
Craig is on Twitter, but his OpSec is pretty tight so good luck getting that follow back.
You can read up on Cisco Talos, and check their most recent on proxyware here.
Rapid Rundown Links
Check out the Bleeping Computer story on the ATM robbers.
Back in 2016, Rapid7’s Weston Hecker demonstrated some EMV attacks.
Many organizations are using an external identity provider to manage user identities. With an identity provider (IdP), customers can manage their user identities outside of AWS and give these external user identities permissions to use AWS resources in customer AWS accounts. The most common requirement when setting up an external identity provider is sending outgoing emails, such as verification e-mails using a link or code, welcome e-mails, MFA enrollment, password changes and blocked account e-mails. This said, most external identity providers’ existing e-mail infrastructure is limited to testing e-mails only and customers need to set up an external SMTP provider for outgoing e-mails.
Managing and running e-mail servers on-premises or deploying an EC2 instance dedicated to run a SMTP server is costly and complex. Customers have to manage operational issues such as hardware, software installation, configuration, patching, and backups.
In this blog post, we will provide step-by-step guidance showing how you can set up Amazon SES as an external SMTP provider with Auth0 to take advantage of Amazon SES capabilities like sending email securely, globally, and at scale.
Amazon Simple Email Service (SES) is a cost-effective, flexible, and scalable email service that enables developers to send email from within any application. You can configure Amazon SES quickly to support several email use cases, including transactional, marketing, or mass email communications.
Auth0 is an identity provider that provides flexible, drop-in solution to add authentication and authorization services (Identity as a Service, or IDaaS) to customer applications. Auth0’s built-in email infrastructure should be used for testing emails only. Auth0 allows you to configure your own SMTP email provider so you can more completely manage, monitor, and troubleshoot your email communications.
Overview of solution
In this blog post, we’ll show you how to perform the below steps to complete the integration between Amazon SES and Auth0
Amazon SES setup for sending emails with SMTP credentials and API credentials
Auth0 setup to configure Amazon SES as an external SMTP provider
Testing the Configuration
The following diagram shows the architecture of the solution.
Prerequisites
You must have an Auth0 account.
To ensure that emails can be sent from Auth0 to your Amazon SES SMTP, open ports and allow inbound connections from specific IP addresses. To update the list of Ips and ports , navigate to Dashboard > Branding > Email Provider. See Add IP Addresses to Allow list for details.
Amazon SES Setup
As first step, you must configure a “Sandbox” account within Amazon SES and verify a sender email address for initial testing. Once all the setup steps are successful, you can convert this account into Production and the SES service will be accepting all emails and for more details on this topic, please see the Amazon SES documentation.
1. Log in to the Amazon SES console and choose the Verify a New Email Address button.
2. Once the verification is completed, the Verification Status will change to green under Verification Status
3. You need to create SMTP credentials which will be used by Auth0 for sending emails. To create the credentials, click on SMTP settings from left menu and press the Create My SMTP Credentials button.
Please note down the Server Name as it will be required during Auth0 setup.
4. Enter a meaningful username like autho-ses-user and click on Create bottom in the bottom-right page
5. You can see the SMTP username and password on the screen and also, you can download SMTP credentials into a csv file as shown below.
Please note the SMTP User name and SMTP Password as it will be required during Auth0 setup.
6. You need Access key ID and Secret access key of the SES IAM user autho-ses-user as created in step 3 for configuring Amazon SES with API credentials in Auth0.
Navigate to the AWS IAM console and click on Users in left menu
Double click on autho-ses-user IAM user and then, click on Security credentials
Choose on Create access key button to create new Access key ID and Secret access key. You can see the Access key ID and Secret access key on the screen and also, you can download them into a csv file as shown below.
Please note down the Access key ID and Secret access key as it will be required during Auth0 setup.
Auth0 Setup
To ensure that emails can be sent from Auth0 to your Amazon SES SMTP, you need to configure Amazon SES details into Auth0. There are two ways you can use Amazon SES credentials with Auth0, one with SMTP and the other with API credentials.
1. Navigate to auth0 Dashboard, Select Branding and then, Email Provider from left menu. Enable Use my own email provider button as shown below.
2. Let us start with Auth0 configuration with Amazon SES SMTP credentials.
Click on SMTP Provider option as shown below
Provide below SMTP Provider settings as shown below and then, click on Save button complete the setup.
From: Your from email address.
Host: Your Amazon SES Server name as created in step 2 of Amazon SES setup. For this example, it is email-smtp.us-west-1.amazonaws.com
Port: 465
User Name: Your Amazon SES SMTP user name as created in step 4 of Amazon SES setup.
Password: Your Amazon SES SMTP password as created in step 4 of Amazon SES setup.
Choose on Send test email button to test Auth0 configuration with Amazon SES SMTP credentials.
You can look at Autho logs to validate your test as shown below.
If you have configured it successfully, you should receive an email from auth0 as shown below.
3. Now, complete Auth0 configuration with Amazon SES API credentials.
Click on Amazon SES as shown below
Provide Amazon SES settings as shown below and then, click on Save button complete the setup.
From: Your from email address.
KeyKey Id: Your autho-ses-user IAM user’s Access key ID as created in step 5 of Amazon SES setup.
Secret access key: Your autho-ses-user IAM user’s Secret access key as created in step 5 of Amazon SES setup.
Region: For this example, choose us-west-1.
Click on the Send test email button to test Auth0 configuration with Amazon SES API credentials.
You can look at Auth0 logs and If you have configured successfully, you should receive an email from auth0 as illustrated in Auth0 configuration with Amazon SES SMTP credentials section.
Conclusion
In this blog post, we have demonstrated how to setup Amazon SES as an external SMTP email provider with Auth0 as Auth0’s built-in email infrastructure is limited for testing emails. We have also demonstrated how quickly and easily you can setup Amazon SES with SMTP credentials and API credentials. With this solution you can setup your own Amazon SES with Auth0 as an email provider. You can also get a JumpStart by checking the Amazon SES Developer guide, which provides guidance on Amazon SES that provides an easy, cost-effective way for you to send and receive email using your own email addresses and domains.
AWS Disaster Response Team volunteer Paul Fries runs cable to provide connectivity in a police station that has been converted into a supply distribution center and housing for National Guard troops and FEMA.
During the crisis that has resulted in the aftermath of Hurricane Ida, the AWS Disaster Response Team is providing personnel and resources to support our customers, including the Information Technology Disaster Resource Center (ITDRC), St. Bernard Parish government, and Crisis Cleanup.
In 2018, Amazon Web Services launched the AWS Disaster Response Program to support governments and nonprofits actively responding to natural disasters. Guided by the belief that technology has the power to solve the world’s most pressing issues, the AWS Disaster Response Team has been working around the clock to provide pro bono assistance to public sector organizations responding to Hurricane Ida’s widespread damage.
The team brings in technical expertise in the form of solutions architects, machine learning practitioners, experts in edge computing, and others across AWS. This allows AWS to support organizations responding to disasters and help them overcome the unique challenges they face.
Establishing Connectivity
When Hurricane Ida hit the United States on August 29th, 2021, it caused power outages and major disruptions to infrastructures for water, power, cellular, and commercial communications. In the South, many were left homeless or without electricity, gas, or water by Ida’s winds and flooding. In New York and New Jersey, hundreds of thousands of people lost power. The AWS Disaster Response team activated its response protocol, including technical volunteer support on the ground and financial support to disaster relief nonprofit ITDRC for its efforts to establish local internet connectivity and cell phone charging stations. This critical support – including almost 100 sites in New Orleans, Houma, and other heavily impacted areas of Louisiana – is enabling public safety agencies, responding relief organizations, social services, and community members to communicate and coordinate as they respond to and recover from Ida.
Increasing Capacity
AWS volunteers supported disaster relief nonprofit Crisis Cleanup by providing technical AWS service architecture guidance, enabling them to increase their capacity to provide call-backs to community members requesting assistance with tasks like cutting fallen trees and tarping roofs that were damaged by the storm. AWS volunteers are also helping Crisis Cleanup by conducting call-backs, bolstering their volunteer base to reach a greater number of people more quickly than otherwise would have been possible.
Building Resiliency
To support the St. Bernard Parish government, located just outside of New Orleans, AWS assisted with the deployment of Amazon WorkMail to facilitate more resilient communication across teams when their email server was knocked offline when the power went out. Using Amazon WorkMail helped enable government personnel to more effectively communicate by utilizing the cloud instead of traditional infrastructures.
The AWS Disaster Response Team continues to field requests for support following Hurricane Ida, and is also working with other organizations to support their resilience planning and disaster preparedness efforts.
Learn More
Check out the AWS Disaster Response page for more information. To donate cash and supplies to organizations such as Feeding America and Save the Children, visit the Amazon page on Hurricane Ida or just say, “Alexa, I want to donate to Hurricane Ida relief.”
Like other industries, translation and localization companies face the challenge of providing fast delivery at a low cost. To address this challenge, organizations use Machine Translation (MT) to complement their translator teams. MT is the use of automated software that translates text without the need of human involvement.
One of the most recent advancements is Active Custom Translation (ACT). ACT helps tailor translated text to a specific language style or terminology, per customer specifications. In the past, organizations built custom models to include ACT in their translation system. Amazon Translate has an Active Custom Translation feature, which helps customers integrate configurable MT capabilities into their translation systems, without needing to build it themselves.
This blog describes an end-to-end automated translation flow, including guidelines to manage the data involved in the ACT process. The solution combines Amazon Translate with other Amazon Web Services (AWS) such as AWS DataSync and AWS Lambda. Before exploring this architecture, let’s explain a few basic concepts specific to the translation and localization industry.
Standard translation concepts
Translation Memory. It is common to reuse previously generated outputs as components for machine translation systems. This data is commonly called Translation Memory, and is stored and exchanged according to standardized formats (TMX, TSV, or CSV).
Source Text. Translation input data is commonly exchanged as XML Localization Interchange File Format (XLIFF) documents. Amazon Translate recently added the support of XLIFF documents for batch processing.
Figure 1 illustrates a standard translation flow involving machine translation and translation memory. Once the output has been reviewed and finalized, it is part of the company’s intellectual property (IP). It can then be reincorporated into the flywheel as an input to future translation jobs.
Figure 1: Translation workflow using machine translation
Translation assistant solution walkthrough
When using Amazon Translate in batch mode, you must:
Gather together and make translation input data available to the Translation job
Monitor the processing and retrieval of the output
Implement improvised processes to integrate your Translation Management System (TMS) with AWS, as needed
As you can see, this can involve many manual steps. You must download huge files, upload them into Amazon Simple Storage Service (S3), and configure jobs. The solution shown in Figure 2 illustrates these automation activities.
Copy the Translation output into the output bucket.
Publish an Amazon SNS notification to inform on job completion status.
Download translated files back into customer environment.
In this scenario, translators are operating from their company’s internal infrastructure, although their TMS can also be hosted on the cloud. They first collect the translation input data from their TMS and drop the files onto a shared file server. These files can be XLIFF, TMX, or CSV. We use AWS DataSync to orchestrate and initiate the data transfer from on-premises into an Amazon S3 staging bucket. AWS DataSync provides a few advantages:
A low code solution that manages the upload/download of translation data from/to AWS
The ability to schedule the synchronization for both upstream and downstream and control the frequency. This allows for batching translation jobs and optimizes usage and cost for Amazon Translate
A single point of access to translation data, which reduces the need to manage user accounts and grants access to the data
Once the files are uploaded into the input bucket, DataSync generates an event through Amazon EventBridge. This notification invokes an AWS Lambda function that pushes a message into an Amazon SQS queue. The message contains the list of files to be translated in the current batch. SQS decouples the data upload from the actual processing. Using this workflow provides scalability, service quota limit control, and better error handling.
The queue initiates another Lambda function that creates a file hierarchy in S3 for each translation job. File-naming conventions can be used as a key to separate jobs from each other. The function also prepares translation memory and custom terminology when required. Lastly, it creates and submits the translation job.
The post-processing AWS Step Functions workflow
Amazon Translate is able to generate events into EventBridge upon job completion or failure. We use this capability to invoke a post-processing AWS Step Functions workflow. For instance, some customers must flag machine translated segments within an XLIFF file, so their translators can quickly identify them for manual review.
The flow implemented in the state machine does the following (shown in Figure 3):
Verifies output of Amazon Translate. Checks for completeness, confirms all segments successfully translated
Enriches the translation data. Flags machine translated segments by comparing input and output
Copies output to staging bucket. Prepares for final upload
Sends SNS notifications to alert operators. Notifies that the batch is complete
Figure 3: Post-processing Step Functions workflow
This solution is entirely serverless, which frees you from maintaining the infrastructure or software platform. You can focus on the core business logic, and what really differentiates you from your competitors.
As the number of translation projects grow overtime, you can also take advantage of Amazon S3 storage classes to optimize document archiving. A translation service provider can define specific rules per customer or per project. These rules can be configured automatically as the data is copied into S3. The result is that files can be transferred to cheaper storage tiers with predefined retention periods.
Conclusion
In this blog, we’ve described a solution that helps you automate the collection and transfer of translation data. It also assists in the scheduling and orchestration of translation jobs. This leads to greater productivity, reduction in cost, and faster time-to-market. Using AWS, you can decrease maintenance, and create a highly scalable and cost-effective solution. Because of the AWS pay-as-you-go model, you can assess the price per project. This information can be used in your pricing model, and be passed along as service options to your own customers.
To get started with Amazon Translate or read more, check out these blogs:
Security updates have been issued by Arch Linux (chromium, element-desktop, element-web, firefox, ghostscript, and hedgedoc), Fedora (kernel and openssl), openSUSE (ghostscript, htmldoc, and openssl-1_0_0), Oracle (libtirpc), Red Hat (cyrus-imapd, kernel, and kernel-rt), SUSE (ghostscript), and Ubuntu (apport, curl, and squashfs-tools).
The researchers note that in many cases, users can simply zoom in on the eyes of a person they suspect may not be real to spot the pupil irregularities. They also note that it would not be difficult to write software to spot such errors and for social media sites to use it to remove such content. Unfortunately, they also note that now that such irregularities have been identified, the people creating the fake pictures can simply add a feature to ensure the roundness of pupils.
In our previous post, we discussed how we utilize FieldMask as a solution when designing our APIs so that consumers can request the data they need when fetched via gRPC. In this blog post we will continue to cover how Netflix Studio Engineering uses FieldMask for mutation operations such as update and remove.
Example: Netflix Studio Production
Money Heist (La casa de papel) / Netflix
Previously we outlined what a Production is and how the Production Service makes gRPC calls to other microservices such as the Schedule Service and Script Service to retrieve schedules and scripts (aka screenplay) for a particular production such as La Casa De Papel. We can take that model and showcase how we can mutate particular fields on a production.
Mutating Production Details
Let’s say we want to update the format field from LIVE_ACTION to HYBRID as our production has added some animated elements. A naive way for us to solve this is to add an updateProductionFormatRequest method and gRPC endpoint just to update the productionFormat:
This allows us to update the production format for a particular production but what if we then want to update other fields such as titleor even multiple fields such as productionFormat, schedule, etc? Building on top of this we could just implement an update method for every field: one for Production format, another for title and so on:
This can become unmanageable when maintaining our APIs due to the number of fields on the Production. What if we want to update more than one field and do it atomically in a single RPC? Creating additional methods for various combinations of fields will lead to an explosion of mutation APIs. This solution is not scalable.
Instead of trying to create every single combination possible, another solution could be to have an UpdateProduction endpoint that requires all fields from the consumer:
The issue with this solution is two-fold as the consumer must know and provide every single required field in a Production even if they just want to update one field such as the format. The other issue is that since a Production has many fields the request payload can become quite large particularly if the production has schedule or scripts information.
What if, instead of all the fields, we send only the fields we actually want to update, and leave all other fields unset? In our example, we would only set the production format field (and ID to reference the production):
This could work if we never need to remove or blank out any fields. But what if we want to remove the value of the title field? Again, we can introduce one-off methods like RemoveProductionTitle, but as discussed above, this solution does not scale well. What if we want to remove a value of a nested field such as the planned launch date field from the schedule? We would end up adding remove RPCs for every individual nullable sub-field.
Utilizing FieldMask for Mutations
Instead of numerous RPCs or requiring a large payload, we can utilize a FieldMask for all our mutations. The FieldMask will list all of the fields we would like to explicitly update. First, let’s update our proto file to add in the UpdateProductionRequest, which will contain the data we want to update from a production, and a FieldMask of what should be updated:
Now, we can use a FieldMask to make mutations. We can update the format by creating a FieldMask for the format field by using the FieldMaskUtil.fromStringList() utility method which constructs a FieldMask for a list of field paths in a certain type. In this case, we will have one type, but will build upon this example later:
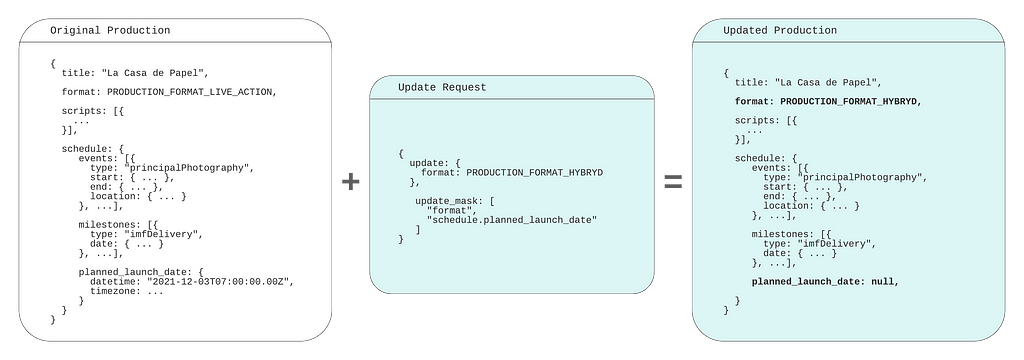
Since our FieldMask only specifies the format field that will be the only field that is updated even if we provide more data in ProductionUpdateOperation. It becomes easier to add or remove more fields to our FieldMask by modifying the paths. Data that is provided in the payload but not added in a path of a FieldMask will not be updated and simply ignored in the operation. But, if we omit a value it will perform a remove mutation on that field. Let’s modify our example above to showcase this and update the format but remove the planned launch date, which is a nested field on the ProductionSchedule as “schedule.planned_launch_date”:
In this example, we are performing both update and remove mutations as we have added “format” and “schedule.planned_launch_date” paths to our FieldMask. When we provide this in our payload these fields will be updated to the new values, but when building our payload we are only providing the format and omitting the schedule.planned_launch_date. Omitting this from the payload but having it defined in our FieldMask will function as a remove mutation:
Empty / Missing Field Mask
When a field mask is unset or has no paths, the update operation applies to all the payload fields. This means the caller must send the whole payload or, as mentioned above, any unset fields will be removed.
This convention has an implication on schema evolution: when a new field is added to the message, all the consumers must start sending its value on the update operation or it will get removed.
Suppose we want to add a new field: production budget. We will extend both the Production message, and ProductionUpdateOperation:
If there is a consumer that doesn’t know about this new field or hasn’t updated client stubs yet, it can accidentally null the budget field out by not sending the FieldMask in the update request.
To avoid this issue, the producer should consider requiring the field mask for all the update operations. Another option would be to implement a versioning protocol: force all callers to send their version numbers and implement custom logic to skip fields not present in the old version.
Bella Ciao
In this blog post series, we have gone over how we use FieldMask at Netflix and how it can be a practical and scalable solution when designing your APIs.
API designers should aim for simplicity, but make their APIs open for extension and evolution. It’s often not easy to keep APIs simple and future-proof. Utilizing FieldMask in APIs helps us achieve both simplicity and flexibility.
On September 14, 2021, security researchers disclosed new vulnerabilities in Microsoft Azure’s implementation of Open Management Interface (OMI), with one critical unauthorized remote code execution vulnerability ranked 9.8 (CVSS 3.0).
OMI is pre-installed into Azure Linux VM instances as the byproduct of enabling certain logging, reporting, and host management options from the cloud provider’s user interface and APIs. OMI is most commonly used to manage desired-state configuration and is the Linux/Unix equivalent of Windows Management Instrumentation and Remote Management (WMI/WinRM). It normally allows administrators to remotely manage the state of systems including logging and configuration settings.
The specific remote code execution OMI vulnerability, nicknamed “OMIGOD,” could allow an attacker to gain remote access to Linux machines hosted on Azure via TCP ports 1270, 5985, and 5986. Once they have remote access, the attacker could theoretically escalate privileges, move laterally across the environment, and remotely execute code as root, allowing them to locate and exfiltrate sensitive data within the Azure environment.
Notably, while the vulnerability does allow for remote code execution (RCE) in the most severe cases, by default these services are firewalled off. Proof-of-concept exploit code is readily available, and exploitation in the wild is likely. As of publication, Shodan shows nearly 2.5 million hosts with the affected ports open to the public internet and at risk, including hosts in the IP space for most cloud providers.
As soon as the vulnerability was announced, our customer success and engineering teams quickly came together to understand how InsightCloudSec— which provides continuous monitoring, reporting, and automated remediation of security issues in public cloud environments — could help our customers identify signs of this vulnerability in their Azure environments and quickly remediate the potential risk.
Identifying Azure’s OMI vulnerability
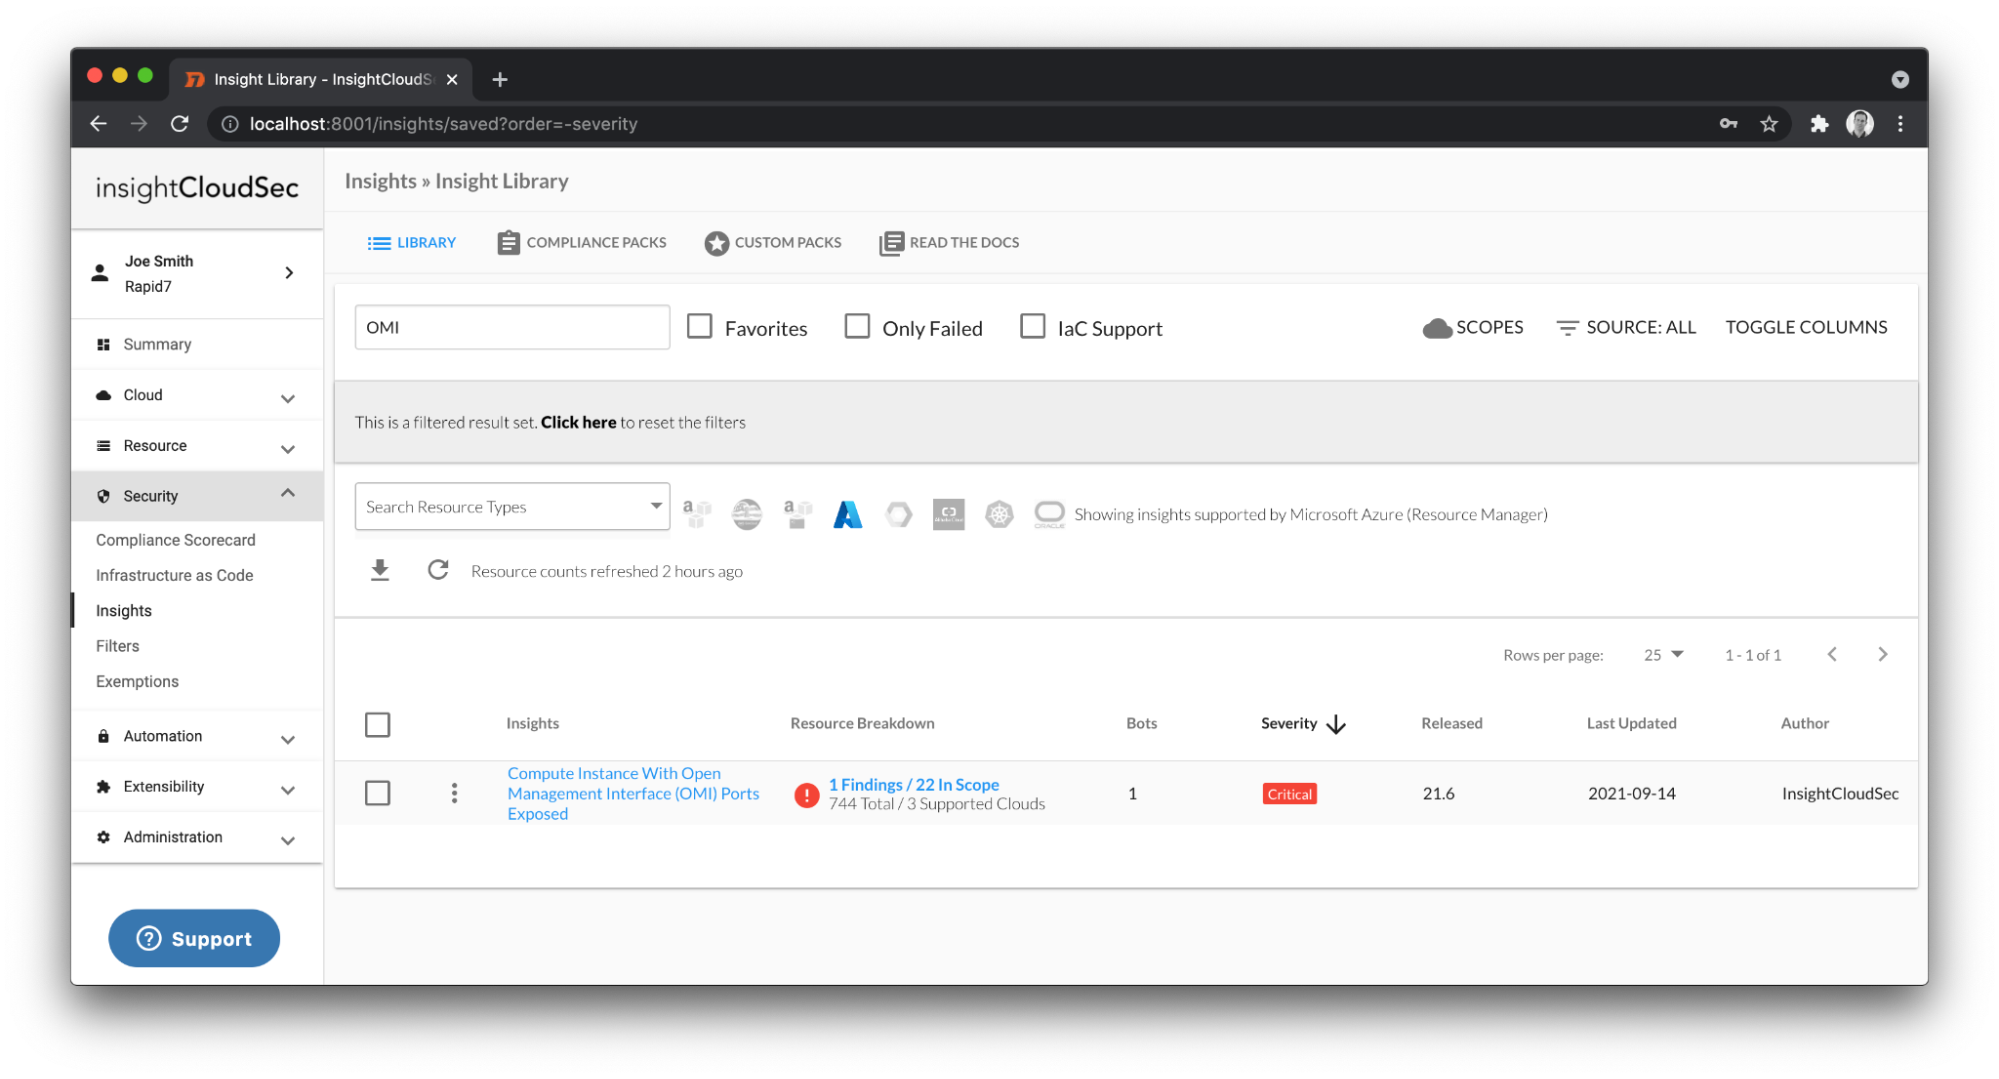
This morning, just one day after the disclosure of this vulnerability, InsightCloudSec released an update (version 21.6.4) to all customers that includes a pre-built Insight that automatically identifies any Azure Virtual Machines in a running state that have the aforementioned TCP ports exposed to the public internet along with an associated public IP.
While native Microsoft Azure Firewall services should provide a layer of protection against this vulnerability, we strongly encourage customers to leverage this Insight to identify potential attack vectors and remediate accordingly.
As you can see in the screenshot above, InsightCloudSec is now able to easily identify virtual machines across all of your Azure subscriptions from a single view. You can build notification workflows around the findings that this Insight identifies and take corrective action to close this attack vector.
Remediating Azure’s OMI vulnerability
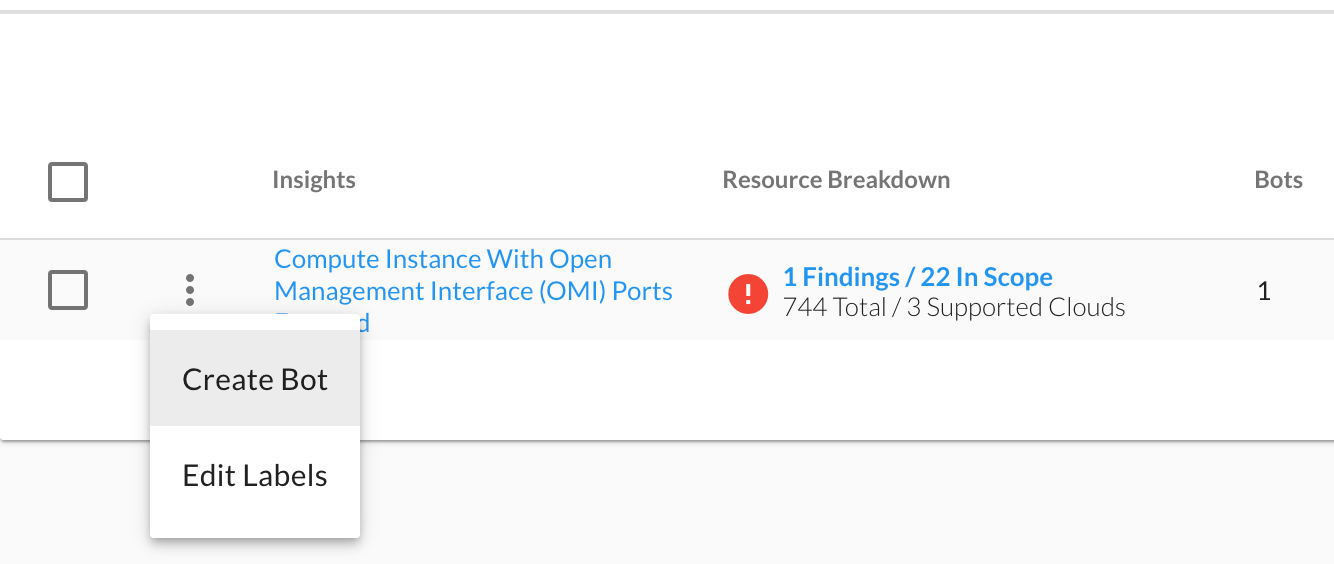
All of our Insights include the ability to enable remediation workflows. This capability is extremely powerful and provides customers with choices of how to remediate across different areas of their cloud footprint. With a few clicks, an automation workflow can be put in place to not only remediate the current findings but also prevent misconfigurations that could be introduced in the future. It does all of this using our near real-time data collection capabilities.
Leveraging the Create Bot option above allows the user to define the scope and desired remediation steps. For this particular issue we recommend that customers use the following workflow:
Flagging the resource as non-compliant
Creating a ticket to have the vulnerability addressed (JIRA, ServiceNow, etc.)
Sending a notification to the resource owner or technical point of contact that manages the Azure subscription (Slack, MS Teams, Email, etc.)
Optional: cleaning up offending security groups by removing the affected ports from their rules
Looking ahead
Misconfigurations and vulnerabilities such as these continue to be one of the most prevalent attack vectors for malicious users to take advantage of. We recently released a Cloud Misconfiguration Report that highlights the risk that cloud misconfigurations pose to organizations.
The rapid innovation of public clouds will continue to require both cloud security vendors and independent security researchers to collaborate and to proactively hunt for security issues and attack vectors across the Cloud Service Provider (CSP) landscape. This won’t be the last issue we see, and it’s a joint effort across all vendors that participate in this exciting space to help our customers consume these public cloud providers with peace of mind.
As these cloud security disclosures continue to increase in frequency, the speed and efficiency at which security teams can remediate the associated vulnerabilities will become absolutely critical to minimizing risk in complex cloud environments. We’re excited that our customers can quickly gain visibility to the parts of their Azure footprint that are susceptible to this vulnerability, and also have the power to continuously remediate the presence of the misconfiguration both now and in the future.
NEVER MISS A BLOG
Get the latest stories, expertise, and news about security today.
Web Analytics is Cloudflare’s privacy-focused real user measurement solution. It leverages a lightweight JavaScript beacon and does not use any client-side state, such as cookies or localStorage, to collect usage metrics. Nor does it “fingerprint” individuals via their IP address, User Agent string, or any other data.
Cloudflare Web Analytics makes essential web analytics, such as the top-performing pages on your website and top referrers, available to everyone for free, and it’s becoming more powerful than ever.
Focusing on Performance
Earlier this year we merged Web Analytics with our Browser Insights product, which enabled customers proxying their websites through Cloudflare to evaluate visitors’ experience on their web properties through Core Web Vitals such as Largest Contentful Paint (LCP) and First Input Delay (FID).
It was important to bring the Core Web Vitals performance measurements into Web Analytics given the outsized impact that page load times have on bounce rates. A page load time increase from 1s to 3s increases bounce rates by 32% and from 1s to 6s increases it by 106% (source).
Now that you know the impact a slow-loading web page can have on your visitors, it’s time for us to make it a no-brainer to take action. Read on.
Becoming Action-Oriented
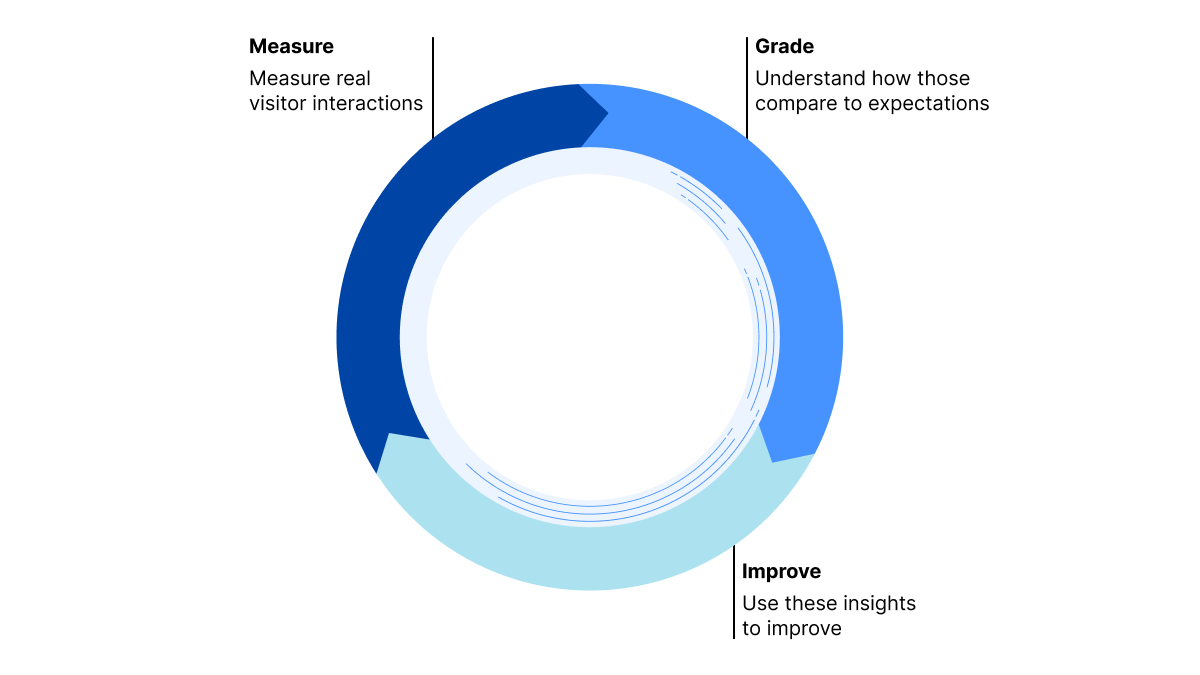
We believe that, to deliver the most value to our users, the product should facilitate the following process:
Measure the real user experience
Grade this experience — is it satisfactory or in need of improvement?
Provide actionable insights — what part of the web page should be tweaked to improve the user experience?
Repeat
And it all starts with Web Analytics Vitals Explorer, which started rolling out today.
Introducing Web Analytics Vitals Explorer
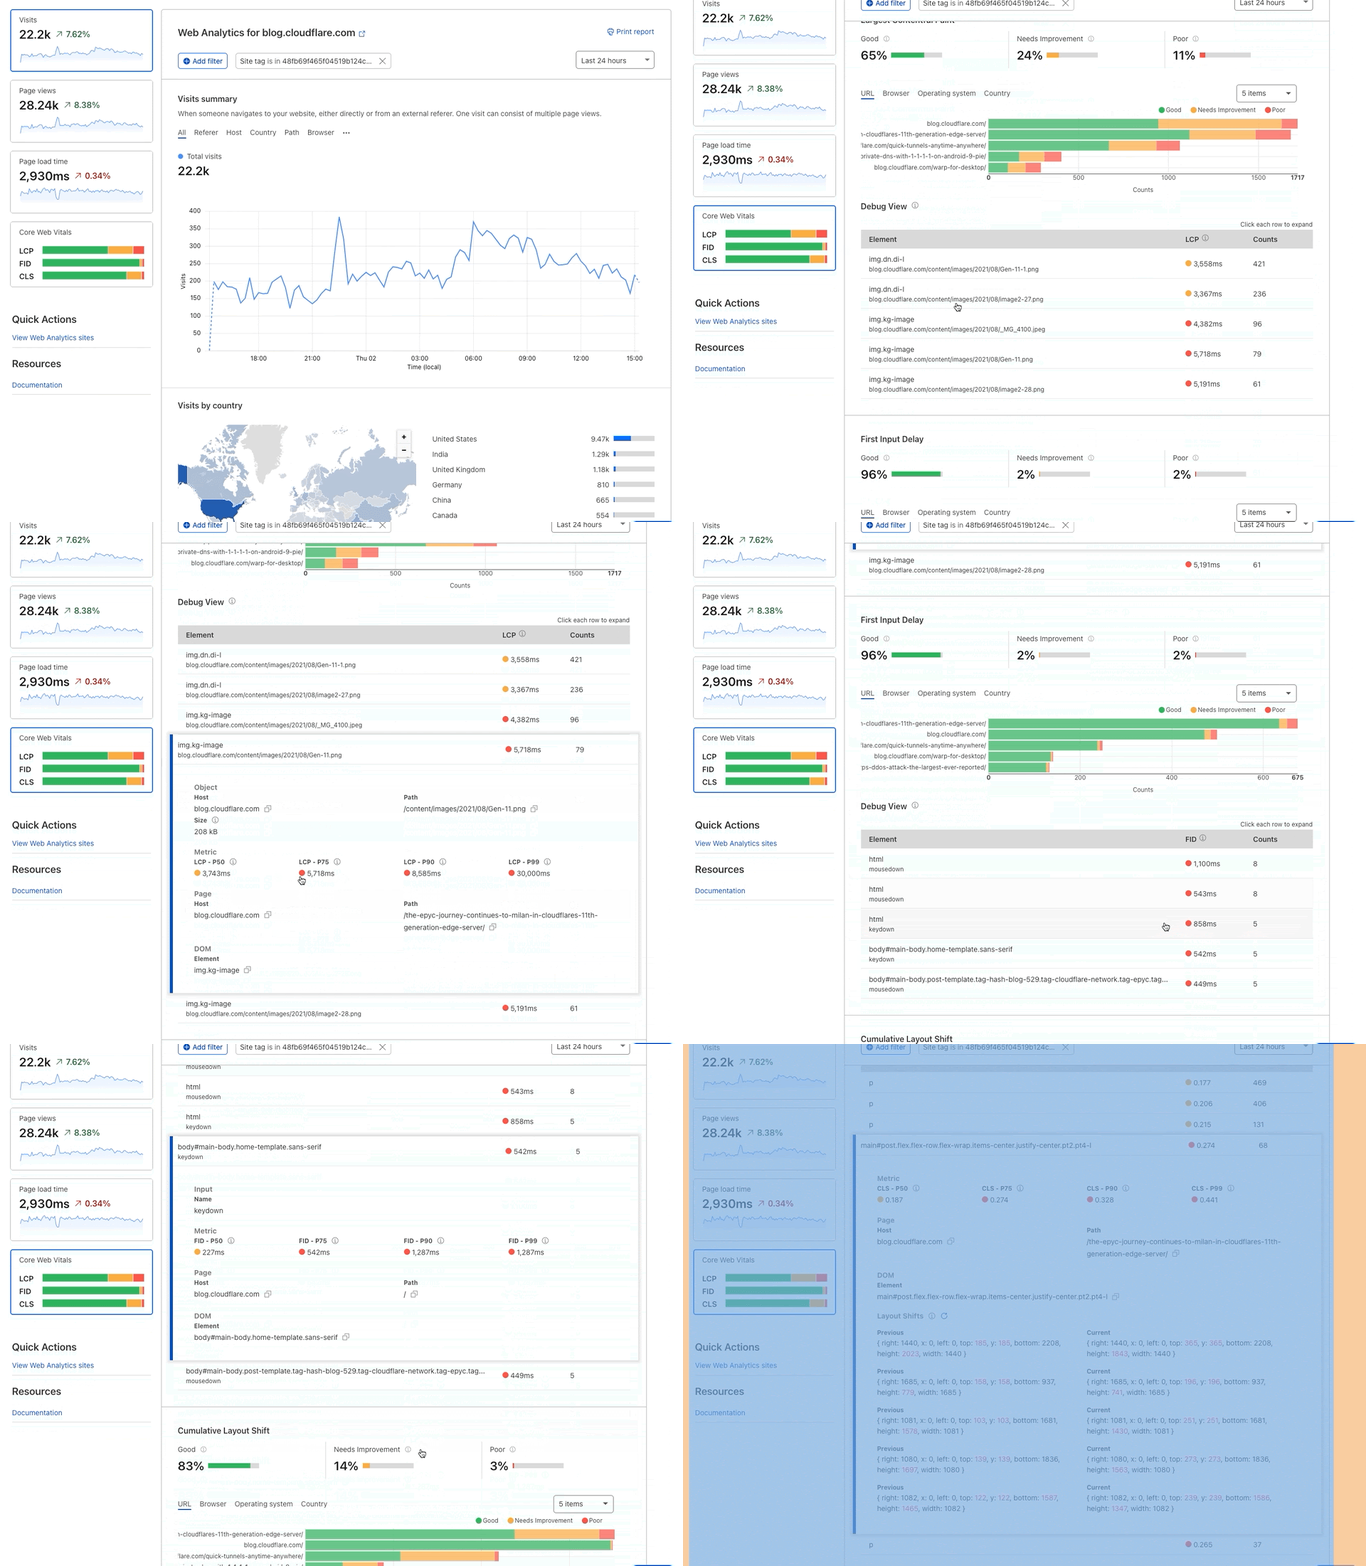
Vitals Explorer enables you to easily pinpoint which elements on your pages are affecting users the most, with accurate measurements from the visitors perspective and an easy-to-read impact grading.
To do that, we have automatically updated the Web Analytics JavaScript beacon so that it collects the relevant vital measurements from the browser. As always, we are not collecting any information that would invade your visitors’ privacy.
Usage
Once this new beacon is updated on your sites — and again the update will happen transparently to you — you can then navigate to the Core Web Vitals page on Web Analytics. When entering that page, you will see three graphs grading the user experience for Largest Contentful Paint (LCP), First Input Delay (FID), and Cumulative Layout Shift (CLS). Below each graph you can see the debug section with the top five elements with a negative impact on the metric. Lastly, when clicking on either of these elements shown in the data table, you will be presented with its impact and exact paths so that you can easily decide whether this is worth keeping on your website in its current format.
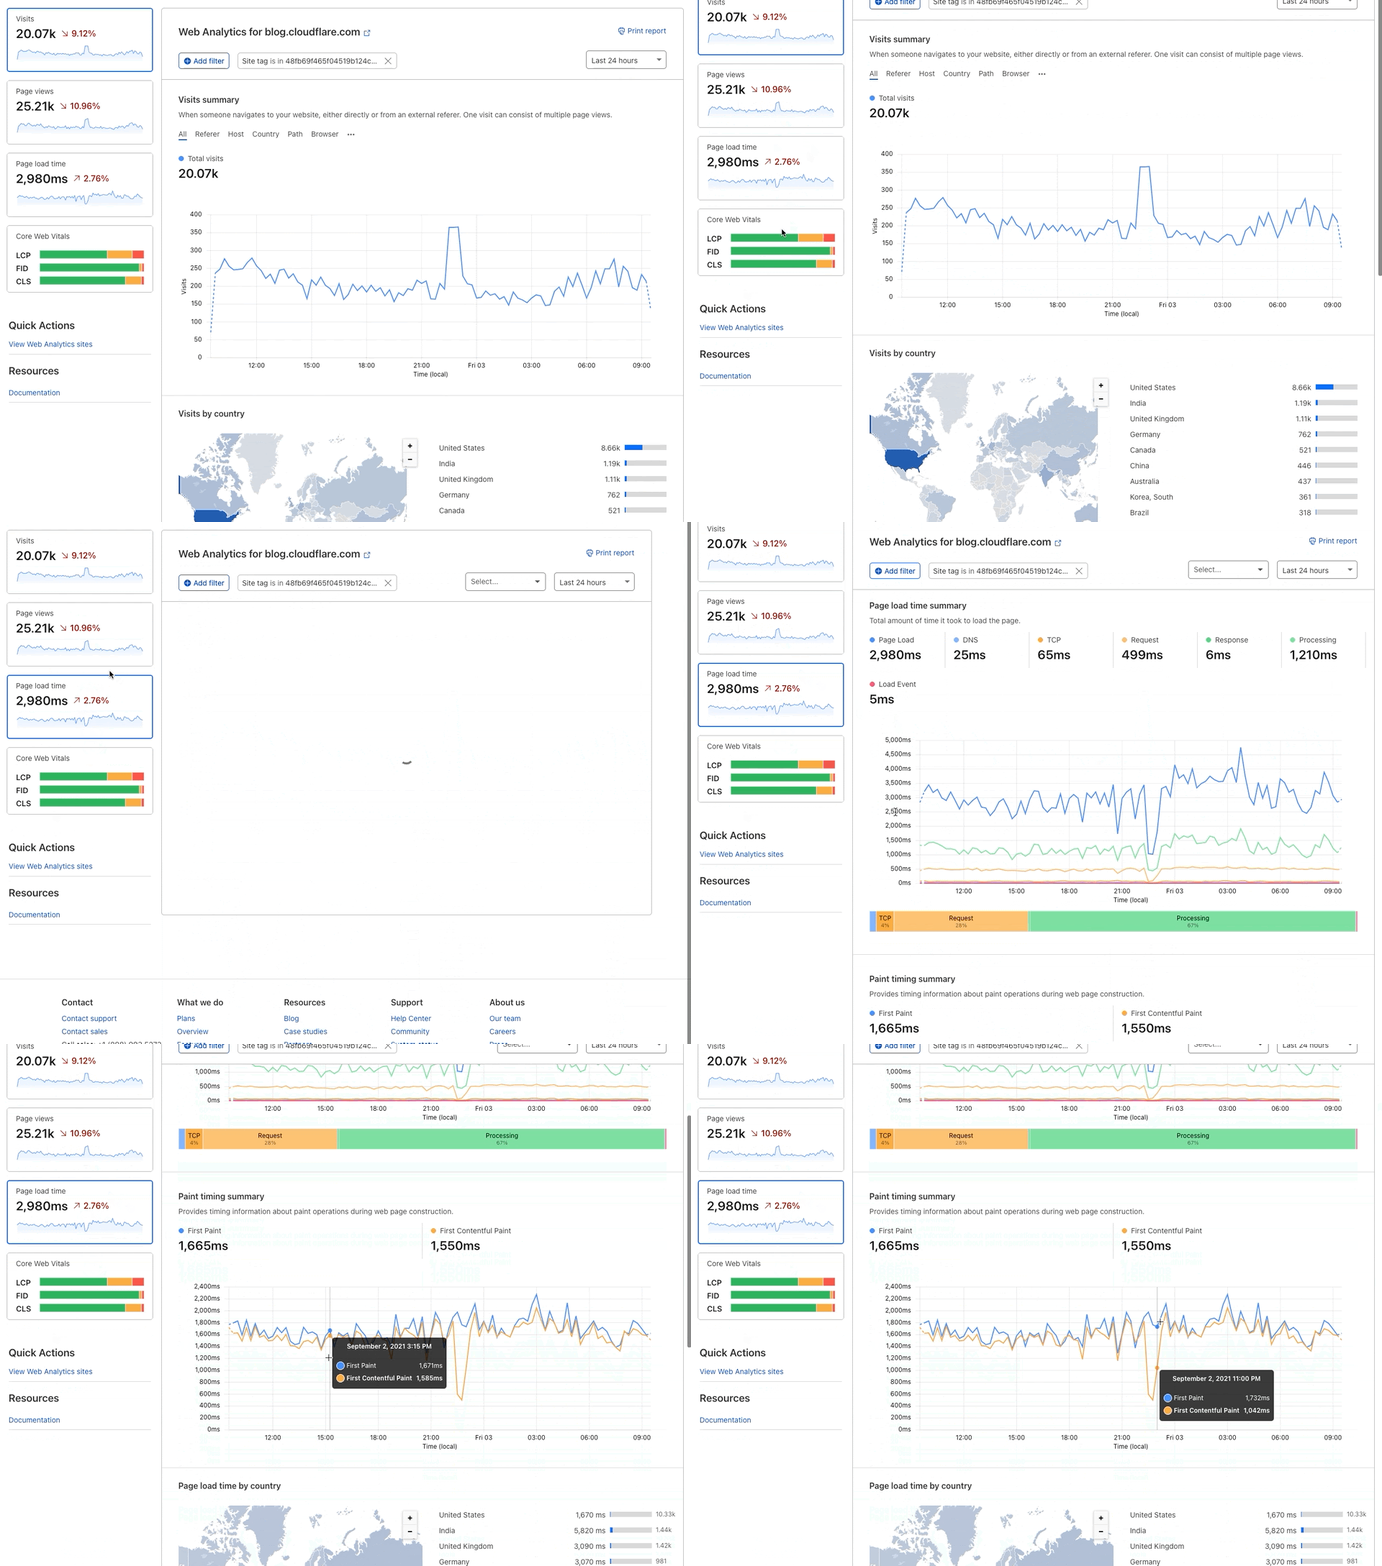
In addition to this new Core Web Vitals content, we have also added First Paint and First Contentful Paint to the Page Load Time page. When you navigate to this page you will now see the page load summary and a graph representing page load timing. These will allow you to quickly identify any regressions to these important performance metrics.
Measurement details
This additional debugging information for Core Web Vitals is measured during the lifespan of the page (until the user leaves the tab or closes the browser window, which updates visibilityState to a hidden state).
Here’s what we collect:
Common for all Core Web Vitals
Element is a CSS selector representing the DOM node. With this string, the developer can use `document.querySelector(<element_name>)` in their browser’s dev console to find out which DOM node has a negative impact on your scores/values.
Path is the URL path at the time the Core Web Vitals are captured.
Value is the metric value for each Core Web Vitals. This value is in milliseconds for LCP or FID and a score for CLS (Cumulative Layout Shift).
Largest Contentful Paint
URL is the source URL (such as image, text, web fonts).
Size is the source object’s size in bytes.
First Input Delay
Name is the type of event (such as mousedown, keydown, pointerdown).
Cumulative Layout Shift
Layout information is a JSON value that includes width, height, x axis position, y axis position, left, right, top, and bottom. You are able to observe layout shifts that happen on the page by observing these values.
CurrentRect is the largest source element’s layout information after the shift. This JSON value is shown as Current under Layout Shifts section in the Web Analytics UI.
PreviousRect is the largest source element’s layout information before the shift. This JSON value is shown as Previous under Layout Shifts section in the Web Analytics UI.
Paint Timings
Additionally, we have added two important paint timings
First Paint is the time between navigation and when the browser renders the first pixels to the screen.
First Contentful Paint is the time when the browser renders the first bit of content from the DOM.
A lot of this is based on standard browser measurements, which you can read about in detail on this blog post from Google.
Moving forward
And we are by no means done. Moving forward, we will bring this structured approach with grading and actionable insights into as Web Analytics measurements as possible, and keep guiding you through how to improve your visitors’ experience. So stay tuned. And in the meantime, do let us know what you think about this feature and ask questions on the community forums.
Today, we are launching Cloudflare Images for all customers. Images is a single product that stores, resizes, optimizes and serves images. We built Cloudflare Images so customers of all sizes can build a scalable and affordable image pipeline in minutes.
Store images efficiently
Many legacy image pipelines are architected to take an image and create multiple copies of it to account for different sizes and formats. These copies are then stored in a storage bucket and delivered using a CDN. This architecture can be hard to maintain and adds infrastructure cost in unpredictable ways.
With Cloudflare Images, you don’t need to worry about creating and storing multiple versions of the same image in different sizes and formats. Cloudflare Images makes a clear distinction between your stored images and the variants. Once you upload an image, you can apply any defined variant to the uploaded image. The variants and different formats don’t count towards your stored images quota.
This means that when a user uploads a picture that you need to resize in three different ways and serve in two different formats, you pay for one stored image instead of seven different images (the original, plus three variants for each of the two formats.)
Built-in access control
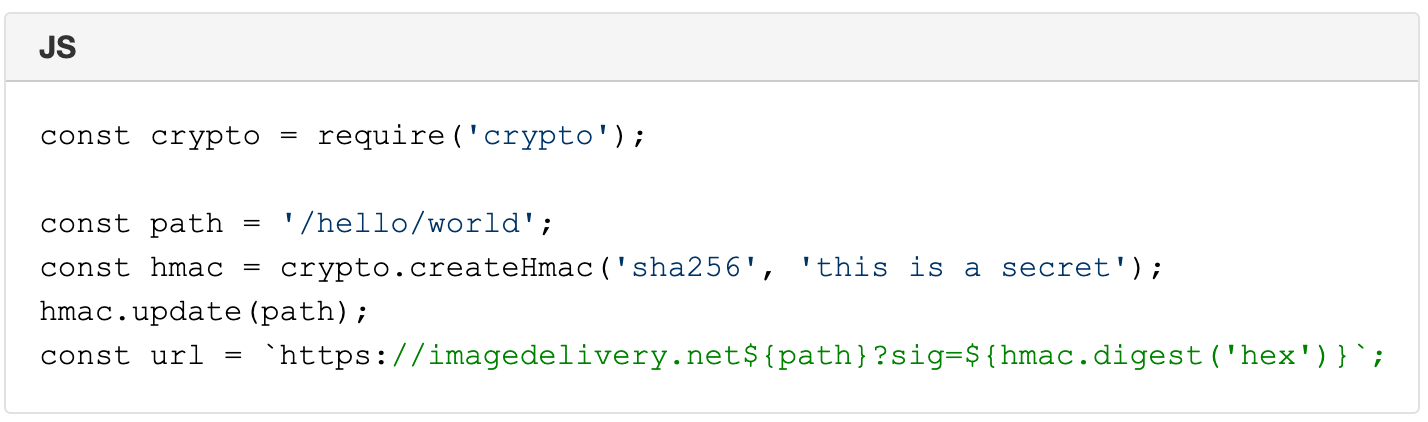
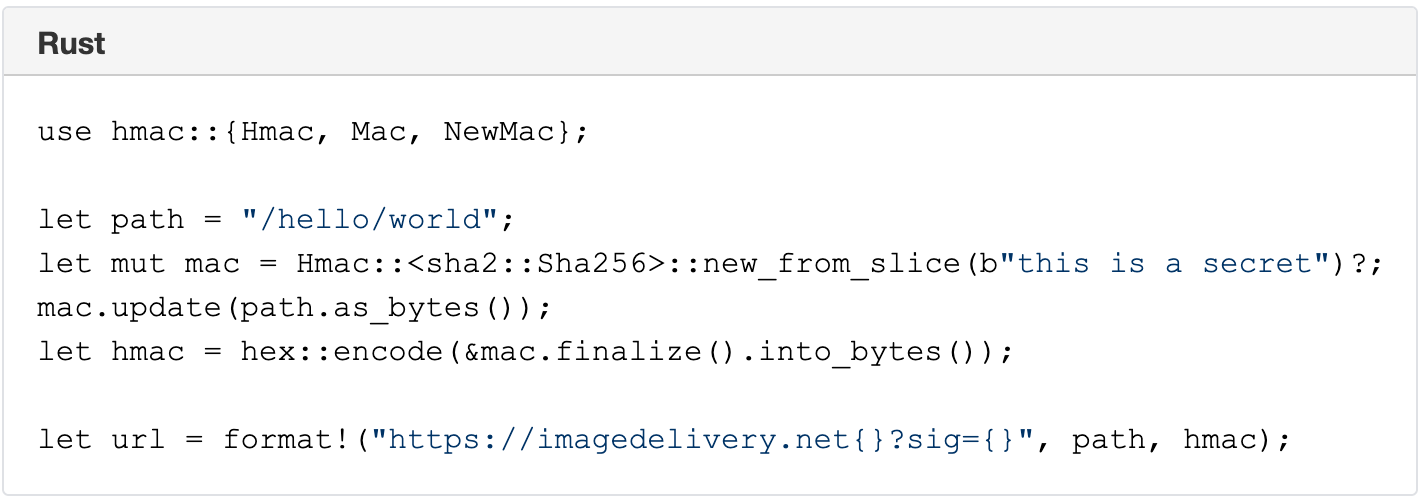
Every image that is uploaded to Cloudflare Images can be marked private, so it can only be accessed using an expiring signed URL token. This is ideal for use cases like membership sites that sell premium content.
Signed URLs give you the flexibility to validate if someone is a paying member using your custom logic and only give them access to the set of images they have paid for.
Eliminate egress costs
Egress cost is the cost of getting your data out of a storage provider. The most common case being when you serve an image from storage you pay for the bits transmitted. And you end up paying every, single time that same image is displayed. It is easy to not account for this cost when you are doing cost-benefit analysis between different solutions. But egress costs add up rapidly, and it is not uncommon for customers to pay their storage provider a very large multiple of their total storage cost in egress.
When you use a multi-vendor solution for your image pipeline, you might use vendor A for storage, vendor B for resizing the images and vendor C for delivering the images. At face value, this solution might appear cheaper because you think “we’ve picked the most affordable option for each piece of our image pipeline.” But in this setup, the resizing service (vendor B) and the CDN (vendor C) still need to request images from vendor A.
With Cloudflare Images, you never have to worry about egress costs because the images are stored, optimized and delivered by a single product. And you will see only two line items on your bill for Cloudflare Images. You pay \$5/month for every 100,000 stored images and \$1 per 100,000 delivered images. There are no additional resizing, compute or egress costs.
Uploading Images
Cloudflare Images offers multiple ways to upload your images. We accept all the common file formats including JPEG, GIF and WEBP. Each image uploaded to Images can be up to 10 MB.
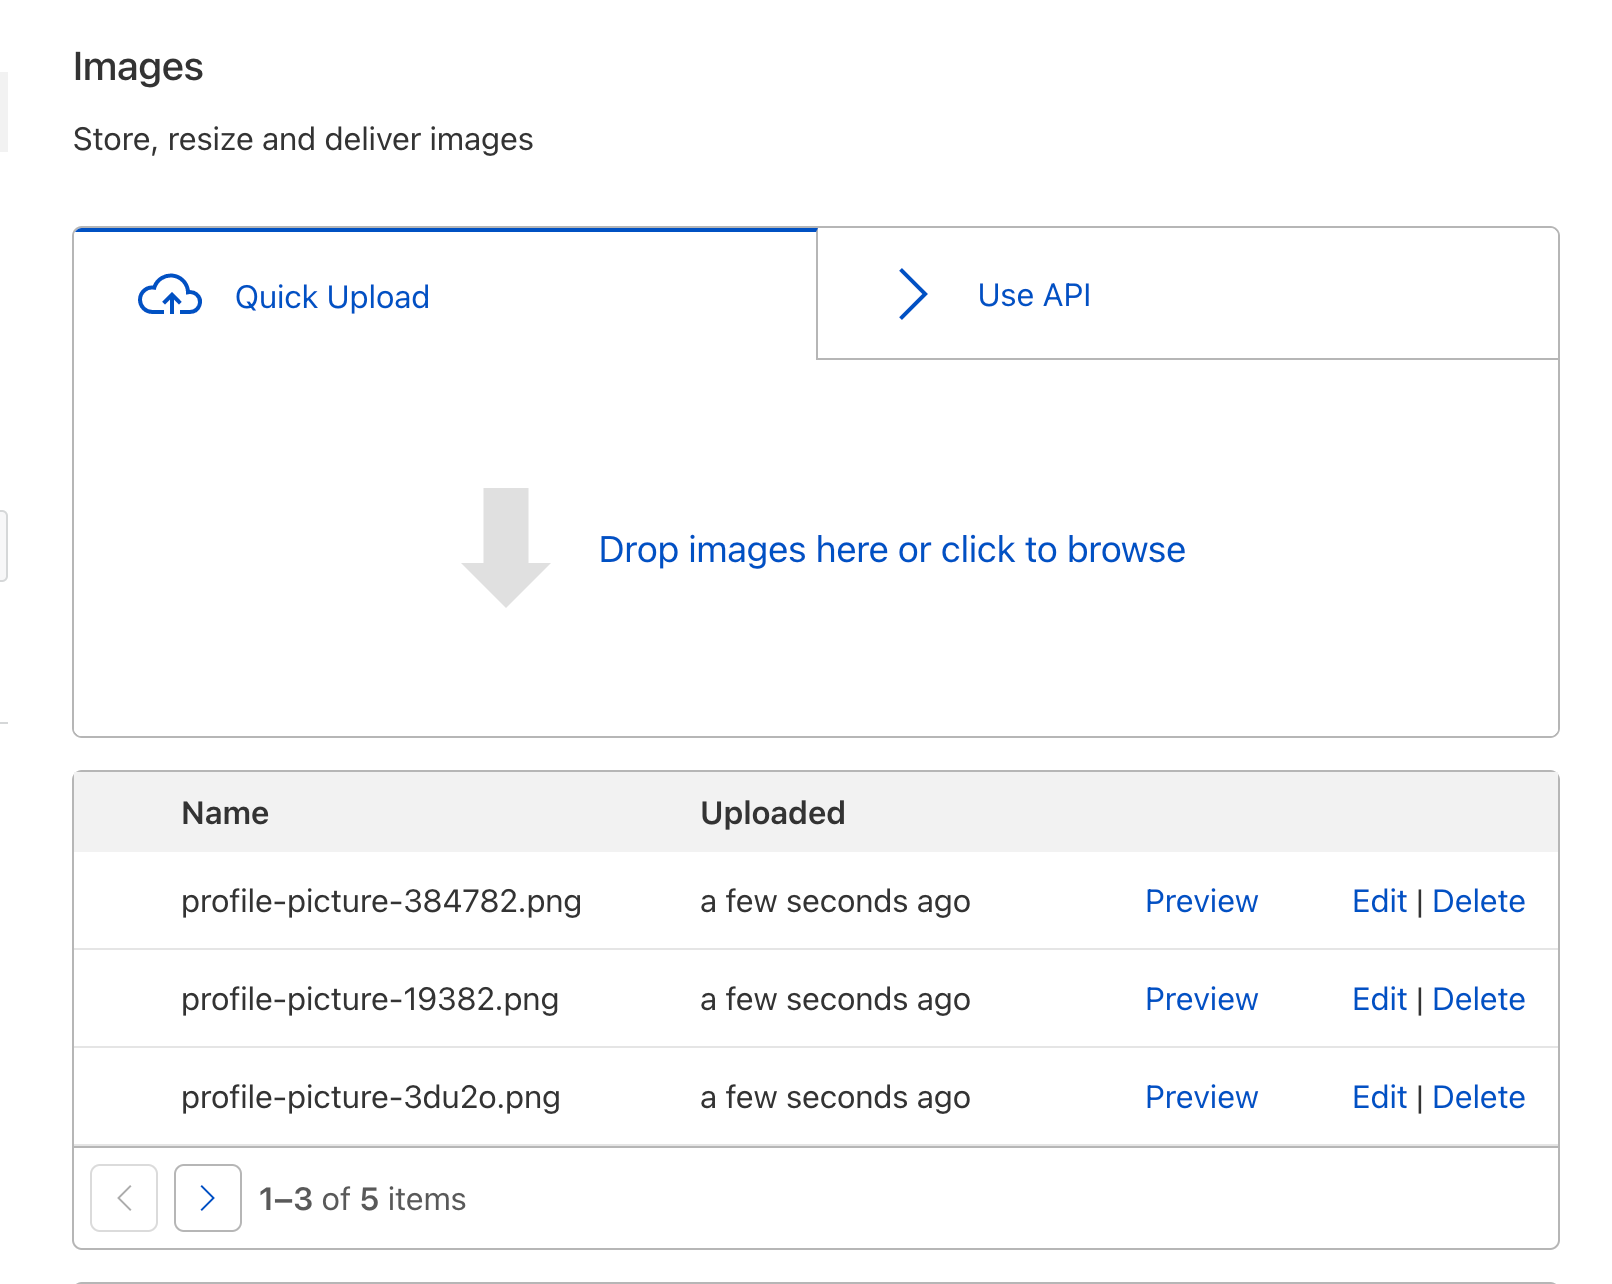
If you only have a few images or simply want a taste of the product, you can use the Images Dashboard. Simply drag and drop one or more images:
Cloudflare Images Dashboard
If you have an app that lets your users upload images, you can use the Direct Creator Uploads feature of Cloudflare Images.
The Direct Creator Uploads API lets you request single-use tokens. These one-time upload URLs can be used by your app to upload your user’s submissions without exposing your API Key or Token. Here is an example cURL that returns a one-use upload url:
Your client-side app can now upload the image directly to the uploadURL without exposing your account credentials to the client.
Resizing with Variants
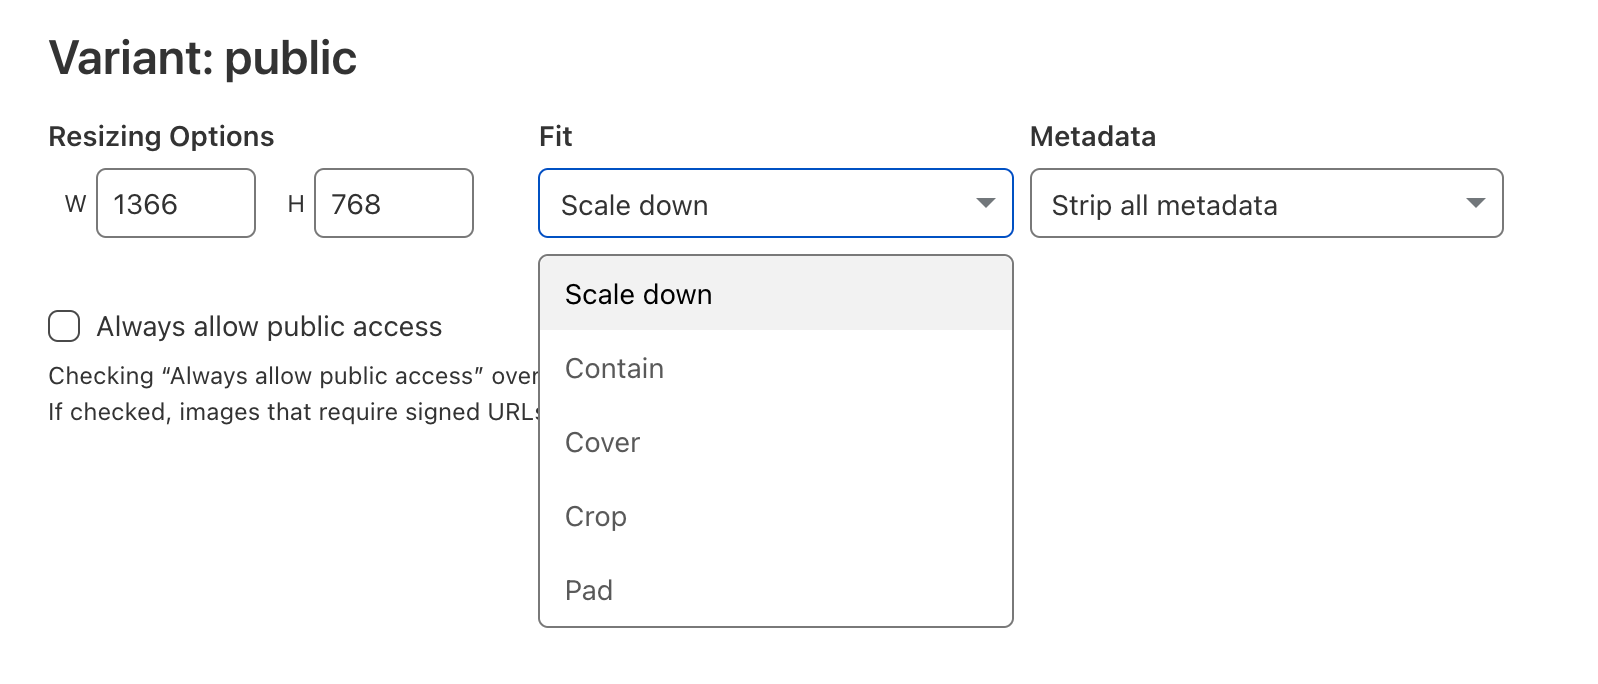
Cloudflare Images lets you define variants and apply them to your uploaded images. You can define up to 20 different variants to support different use cases. Each variant has properties including the width and height of resized images.
Configure variants in Cloudflare Images
You can also configure the fit property to describe how the width and height dimensions should be interpreted.
Fit Option
Behavior
Scale Down
Image will be shrunk in size to fully fit within the given width or height, but won’t be enlarged.
Contain
Image will be resized (shrunk or enlarged) to be as large as possible within the given width or height while preserving the aspect ratio.
Cover
Image will be resized to exactly fill the entire area specified by width and height, and will be cropped if necessary.
Crop
Image will be shrunk and cropped to fit within the area specified by width and height. The image won’t be enlarged. For images smaller than the given dimensions it’s the same as scale-down. For images larger than the given dimensions, it’s the same as cover.
Pad
Image will be resized (shrunk or enlarged) to be as large as possible within the given width or height while preserving the aspect ratio, and the extra area will be filled with a background color (white by default)
We plan to add more properties to give you maximum flexibility. If there is a particular property you’d love to see, let us know.
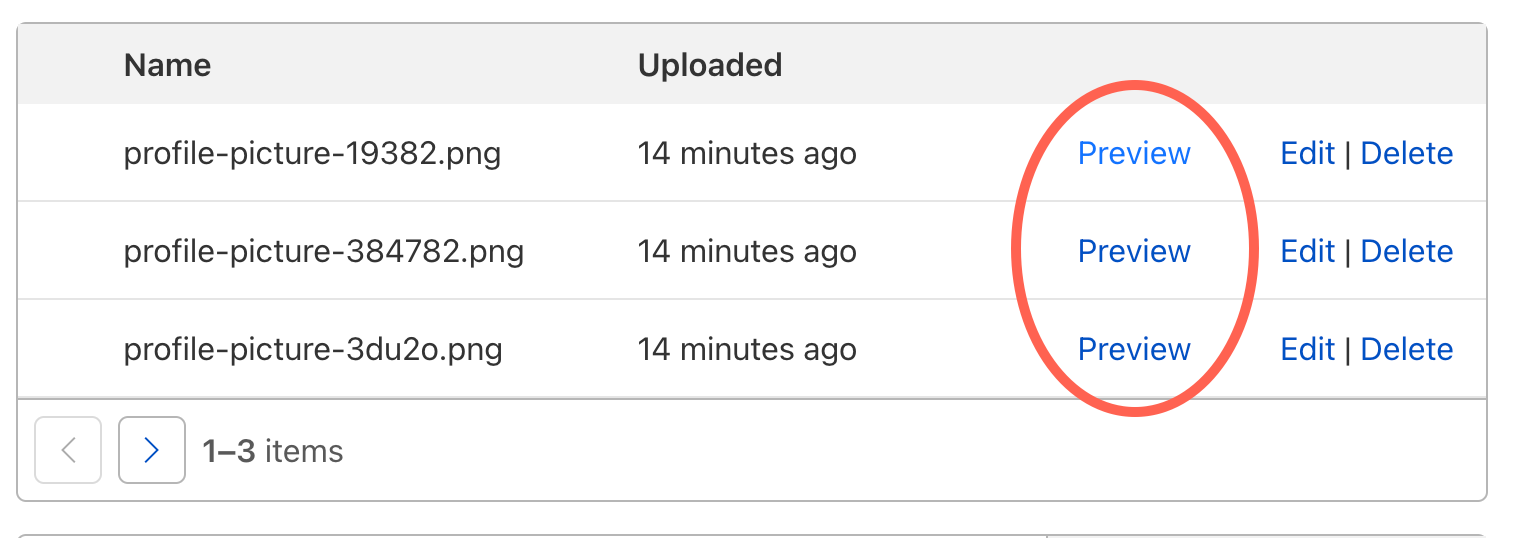
Once you define your variants, you can begin using them with any image. From the Dashboard, simply click on Variants to quickly preview how any image would be rendered using each of your variants.
Previewing variants in Cloudflare Images
Optimized image delivery
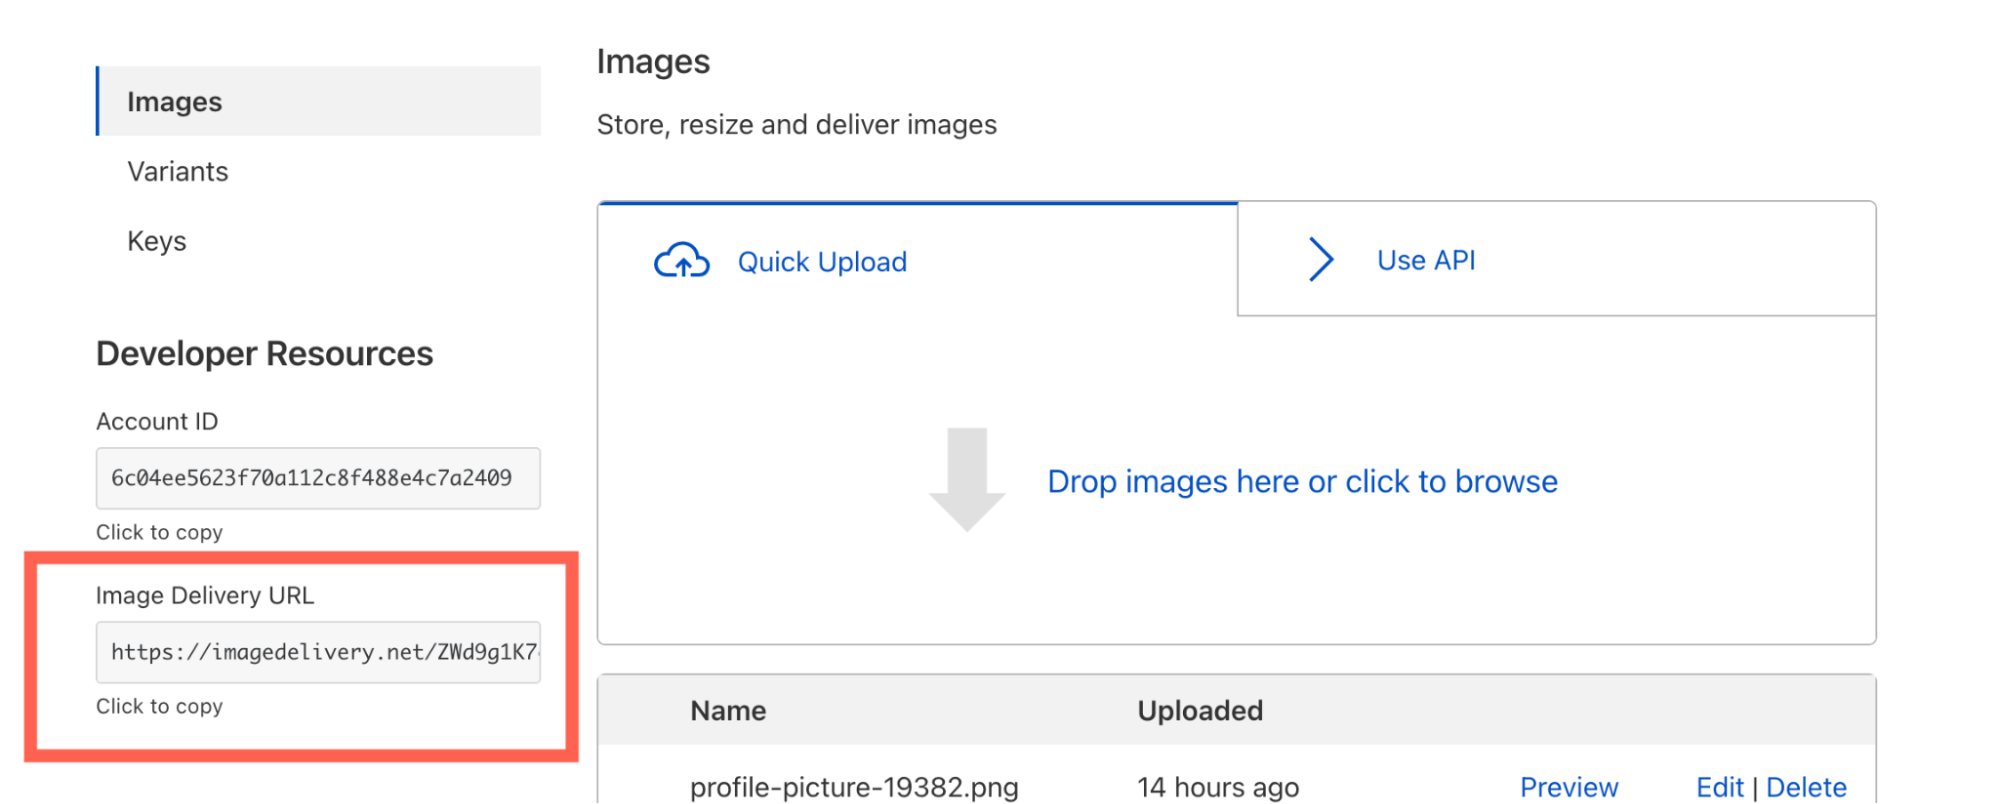
Once you’ve uploaded your first image, you will see the Image Delivery URL in your Images Dashboard:
You can use this url template to form the final URL that returns any image and variant combination.
When a client requests an image, Cloudflare Images will pick the optimal format between WebP, PNG, JPEG and GIF. The format served to the eyeball is determined by client headers and the image type. Cloudflare Images will soon support AVIF, offering further compression. One of the best parts of using Cloudflare Images is that when we add support for newer formats such as AVIF, you will get the upside without needing to make any changes to your codebase.
What’s next
All Cloudflare customers can sign up to use Cloudflare Images this week. We built Cloudflare Images for developers. Check out the Cloudflare Images developer docs for examples of implementing common use-cases such as letting your users upload images directly to Images and using signed URLs to implement access control.
We’re just getting started with Cloudflare Images. Here are some of the features we plan to support soon:
AVIF support for even smaller file sizes and faster load times.
Variants that add a blur effect to your images.
Analytics to better understand your use of Images.
Images are a massive part of the Internet. On the median web page, images account for 51% of the bytes loaded, so any improvement made to their speed or their size has a significant impact on performance.
Today, we are excited to announce Cloudflare’s Image Optimization Testing Tool. Simply enter your website’s URL, and we’ll run a series of automated tests to determine if there are any possible improvements you could make in delivering optimal images to visitors.
How users experience speed
Everyone who has ever browsed the web has experienced a website that was slow to load. Often, this is a result of poorly optimized images on that webpage that are either too large for purpose or that were embedded on the page with insufficient information.
Images on a page might take painfully long to load as pixels agonizingly fill in from top-to-bottom; or worse still, they might cause massive shifts of the page layout as the browser learns about their dimensions. These problems are a serious annoyance to users and as of August 2021, search engines punish pages accordingly.
Understandably, slow page loads have an adverse effect on a page’s “bounce rate” which is the percentage of visitors which quickly move off of the page. On e-commerce sites in particular, the bounce rate typically has a direct monetary impact and pages are usually very image-heavy. It is critically important to optimize all the images on your webpages to reduce load on and egress from your origin, to improve your performance in search engine rankings and, ultimately, to provide a great experience for your users.
CLS and LCP are the two metrics we can improve by optimizing images. When CLS is high, this indicates that large amounts of the page layout is shifting as it loads. LCP measures the time it takes for the single largest image or text block in the viewport to render.
One of the most impactful performance improvements a website author can make is ensuring they deliver images with appropriate dimensions. Images taken on a modern camera can be truly massive, and some recent flagship phones have gigantic sensors. The Samsung Galaxy S21 Ultra, for example, has a 108 MP sensor which captures a 12,000 by 9,000 pixel image. That same phone has a screen width of only 1440 pixels. It is physically impossible to show every pixel of the photo on that device: for a landscape photo, only 12% of pixel columns can be displayed.
Embedding this image on a webpage presents the same problem, but this time, that image and all of its unused pixels are sent over the Internet. Ultimately, this creates unnecessary load on the server, higher egress costs, and longer loading times for visitors.. This is exacerbated even further for visitors on mobile since they are often using a slower connection and have limits on their data usage. On a fast 3G connection, that 108 MP photo might consume 26 MB of both the visitor’s data plan and the website’s egress bandwidth, and take more than two minutes to load!
It might be tempting to always deliver images with the highest possible resolution to avoid “blocky” or pixelated images, but when resizing is done correctly, this is not a problem. “Blocky” artifacts typically occur when an image is processed multiple times (for example, an image is repeatedly uploaded and downloaded by users on a platform which compresses that image). Pixelated images occur when an image has been shrunk to a size smaller than the screen it is rendered on.
So, how can website authors avoid these pitfalls and ensure a correctly sized image is delivered to visitors’ devices? There are two main approaches:
Media conditions with srcset and sizes
When embedding an image on a webpage, traditionally the author would simply pass a src attribute on an img tag:
Here, with the srcset attribute, we’re informing the browser that there are three variants of the image, each with a different intrinsic width: 1,500 pixels, 2,000 pixels and the original 12,000 pixels. The browser then evaluates the media conditions in the sizes attribute ( (max-width: 1500px) and (max-width: 2000px)) in order to select the appropriate image variant from the srcset attribute. If the browser’s viewport width is less than 1500px, the hello_world_1500.jpg image variant will be loaded; if the browser’s viewport width is between 1500px and 2000px, the hello_world_2000.jpg image variant will be loaded; and finally, if the browser’s viewport width is larger than 2000px, the browser will fallback to loading the hello_world_12000.jpg image variant.
Similar behavior is also possible with a picture element, using the source child element which supports a variety of other selectors.
Client Hints
Client Hints are a standard that some browsers are choosing to implement, and some not. They are a set of HTTP request headers which tell the server about the client’s device. For example, the browser can attach a Viewport-Width header when requesting an image which informs the server of the width of that particular browser’s viewport (note this header is currently in the process of being renamed to Sec-CH-Viewport-Width).
This simplifies the markup in the previous example greatly — in fact, no changes are required from the original simple HTML:
If Client Hints are supported, when the browser makes a request for hello_world_12000.jpg, it might attach the following header:
Viewport-Width: 1440
The server could then automatically serve a smaller image variant (e.g. hello_world_1500.jpg), despite the request originally asking for hello_world_12000.jpg image.
By enabling browsers to request an image with appropriate dimensions, we save bandwidth and time for both your server and for your visitors.
Format
JPEG, PNG, GIF, WebP, and now, AVIF. AVIF is the latest image format with widespread industry support, and it often outperforms its preceding formats. AVIF supports transparency with an alpha channel, it supports animations, and it is typically 50% smaller than comparable JPEGs (vs. WebP’s reduction of only 30%).
We added the AVIF format to Cloudflare’s Image Resizing product last year as soon as Google Chrome added support. Firefox 93 (scheduled for release on October 5, 2021) will be Firefox’s first stable release, and with both Microsoft and Apple as members of AVIF’s Alliance for Open Media, we hope to see support in Edge and Safari soon. Before these modern formats, we also saw innovative approaches to improving how an image loads on a webpage. BlurHash is a technique of embedding a very small representation of the image inside the HTML markup which can be immediately rendered and acts as a placeholder until the final image loads. This small representation (hash) produced a blurry mix of colors similar to that of the final image and so eased the loading experience for users.
Progressive JPEGs are similar in effect, but are a built-in feature of the image format itself. Instead of encoding the image bytes from top-to-bottom, bytes are ordered in increasing levels of image detail. This again produces a more subtle loading experience, where the user first sees a low quality image which progressively “enhances” as more bytes are loaded.
Quality
The newer image formats (WebP and AVIF) support lossless compression, unlike their predecessor, JPEG. For some uses, lossless compression might be appropriate, but for the majority of websites, speed is prioritized and this minor loss in quality is worth the time and bytes saved.
Optimizing where to set the quality is a balancing act: too aggressive and artifacts become visible on your image; too little and the image is unnecessarily large. Butteraugli and SSIM are examples of algorithms which approximate our perception of image quality, but this is currently difficult to automate and is therefore best set manually. In general, however, we find that around 85% in most compression libraries is a sensible default.
Markup
All of the previous techniques reduce the number of bytes an image uses. This is great for improving the loading speed of those images and the Largest Contentful Paint (LCP) metric. However, to improve the Cumulative Layout Shift (CLS) metric, we must minimize changes to the page layout. This can be done by informing the browser of the image size ahead of time.
On a poorly optimized webpage, images will be embedded without their dimensions in the markup. The browser fetches those images, and only once it has received the header bytes of the image can it know about the dimensions of that image. The effect is that the browser first renders the page where the image takes up zero pixels, and then suddenly redraws with the dimensions of that image before actually loading the image pixels themselves. This is jarring to users and has a serious impact on usability.
It is important to include dimensions of the image inside HTML markup to allow the browser to allocate space for that image before it even begins loading. This prevents unnecessary redraws and reduces layout shift. It is even possible to set dimensions when dynamically loading responsive images: by informing the browser of the height and width of the original image, assuming the aspect ratio is constant, it will automatically calculate the correct height, even when using a width selector.
Finally, lazy-loading is a technique which reduces the work that the browser has to perform right at the onset of page loading. By deferring image loads to only just before they’re needed, the browser can prioritize more critical assets such as fonts, styles and JavaScript. By setting the loading property on an image to lazy, you instruct the browser to only load the image as it enters the viewport. For example, on an e-commerce site which renders a grid of products, this would mean that the page loads faster for visitors, and seamlessly fetches images below the fold, as a user scrolls down. This is supported by all major browsers except Safari which currently has this feature hidden behind an experimental flag.
<img loading="lazy" … />
Hosting
Finally, you can improve image loading by hosting all of a page’s images together on the same first-party domain. If each image was hosted on a different domain, the browser would have to perform a DNS lookup, create a TCP connection and perform the TLS handshake for every single image. When they are all co-located on a single domain (especially so if that is the same domain as the page itself), the browser can re-use the connection which improves the speed it can load those images.
Test your website
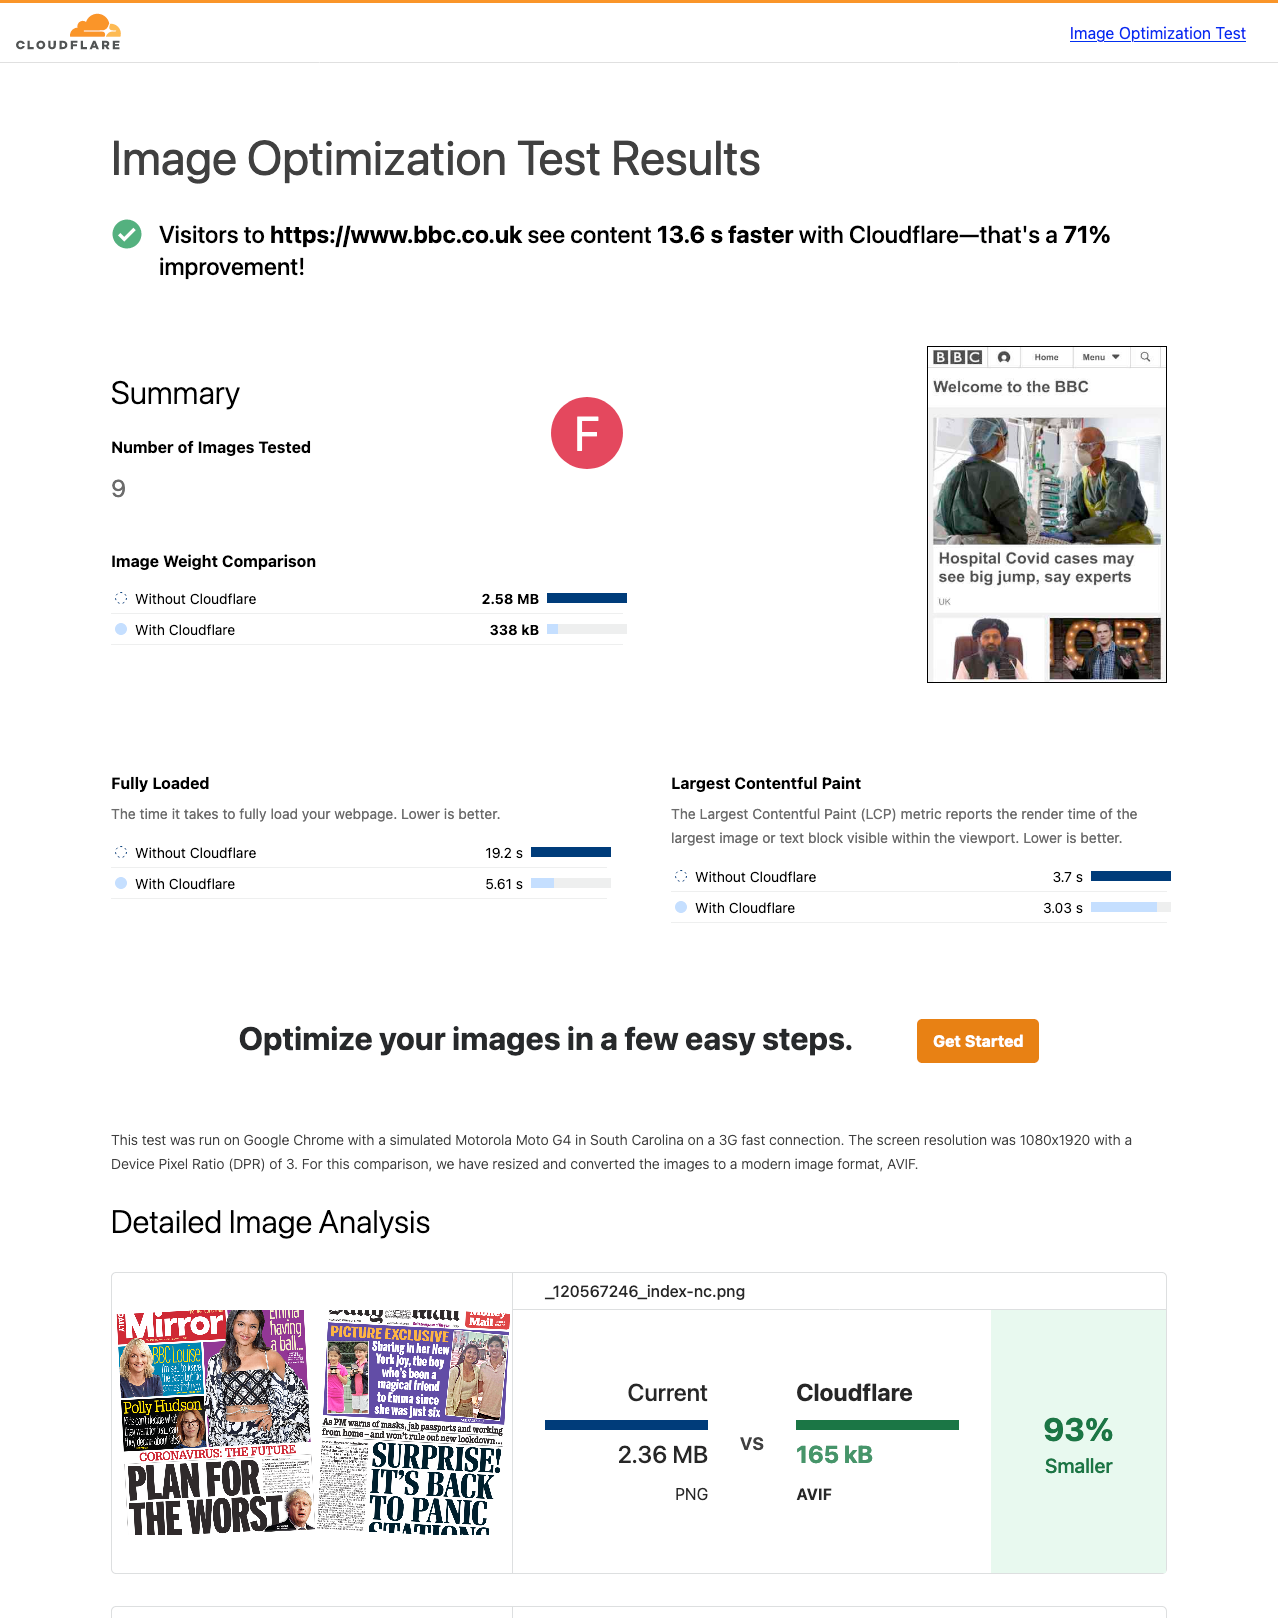
Today, we’re excited to announce the launch of Cloudflare’s Image Optimization Testing Tool. Simply enter your website URL, and we’ll run a series of automated tests to determine if there are any possible improvements you could make in delivering optimal images to visitors.
We use WebPageTest and Lighthouse to calculate the Core Web Vitals on two versions of your page: one as the original, and one with Cloudflare’s best-effort automatic optimizations. These optimizations are performed using a Cloudflare Worker in combination with our Image Resizing product, and will transform an image’s format, quality, and dimensions.
We report key summary metrics about your webpage’s performance, including the aforementioned Cumulative Layout Shift (CLS) and Largest Contentful Page (LCP), as well as a detailed breakdown of each image on your page and the optimizations that can be made.
Cloudflare Images
Cloudflare Images can help you to solve a number of the problems outlined in this post. By storing your images with Cloudflare and configuring a set of variants, we can deliver optimized images from our edge to your website or app. We automatically set the optimal image format and allow you to customize the dimensions and fit for your use-cases.
We’re excited to see what you build with Cloudflare Images, and you can expect additional features and integrations in the near future. Get started with Images today from $6/month.
This post explains how we implemented the Cloudflare Images product with reusable Rust libraries and Cloudflare Workers. It covers the technical design of Cloudflare Image Resizing and Cloudflare Images. Using Rust and Cloudflare Workers helps us quickly iterate and deliver product improvements over the coming weeks and months.
Reuse of code in Rusty image projects
We developed Image Resizing in Rust. It’s a web server that receives HTTP requests for images along with resizing options, fetches the full-size images from the origin, applies resizing and other image processing operations, compresses, and returns the HTTP response with the optimized image.
Rust makes it easy to split projects into libraries (called crates). The image processing and compression parts of Image Resizing are usable as libraries.
We also have a product called Polish, which is a Golang-based service that recompresses images in our cache. Polish was initially designed to run command-line programs like jpegtran and pngcrush. We took the core of Image Resizing and wrapped it in a command-line executable. This way, when Polish needs to apply lossy compression or generate WebP images or animations, it can use Image Resizing via a command-line tool instead of a third-party tool.
Reusing libraries has allowed us to easily unify processing between Image Resizing and Polish (for example, to ensure that both handle metadata and color profiles in the same way).
Cloudflare Images is another product we’ve built in Rust. It added support for a custom storage back-end, variants (size presets), support for signing URLs and more. We made it as a collection of Rust crates, so we can reuse pieces of it in other services running anywhere in our network. Image Resizing provides image processing for Cloudflare Images and shares libraries with Images to understand the new URL scheme, access the storage back-end, and database for variants.
How Image Resizing works
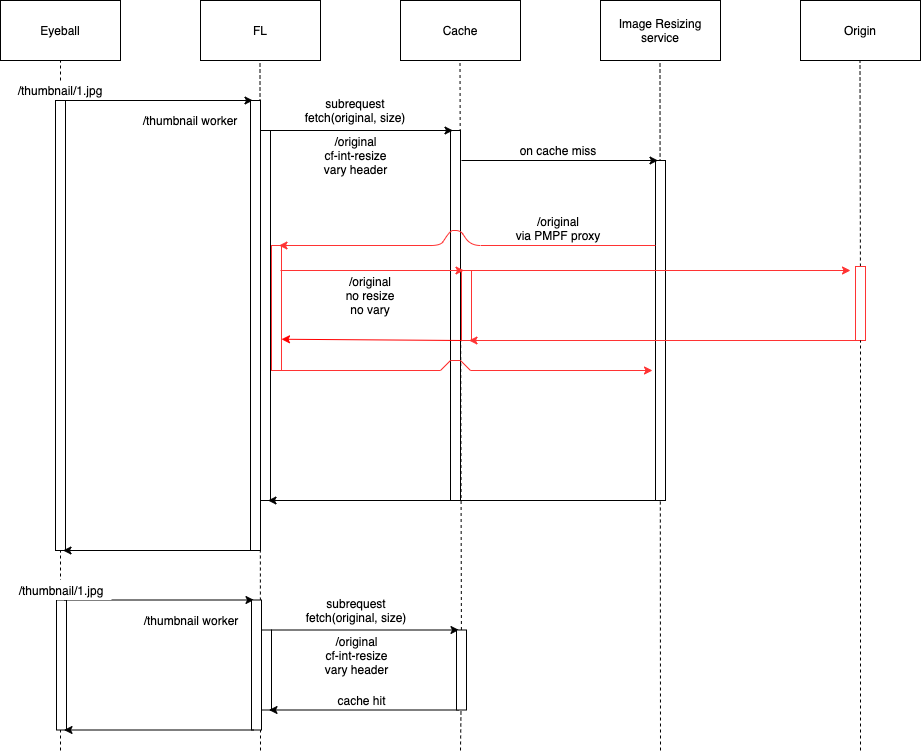
The Image Resizing service runs at the edge and is deployed on every server of the Cloudflare global network. Thanks to Cloudflare’s global Anycast network, the closest Cloudflare data center will handle eyeball image resizing requests. Image Resizing is tightly integrated with the Cloudflare cache and handles eyeball requests only on a cache miss.
There are two ways to use Image Resizing. The default URL scheme provides an easy, declarative way of specifying image dimensions and other options. The other way is to use a JavaScript API in a Worker. Cloudflare Workers give powerful programmatic control over every image resizing request.
How Cloudflare Images work
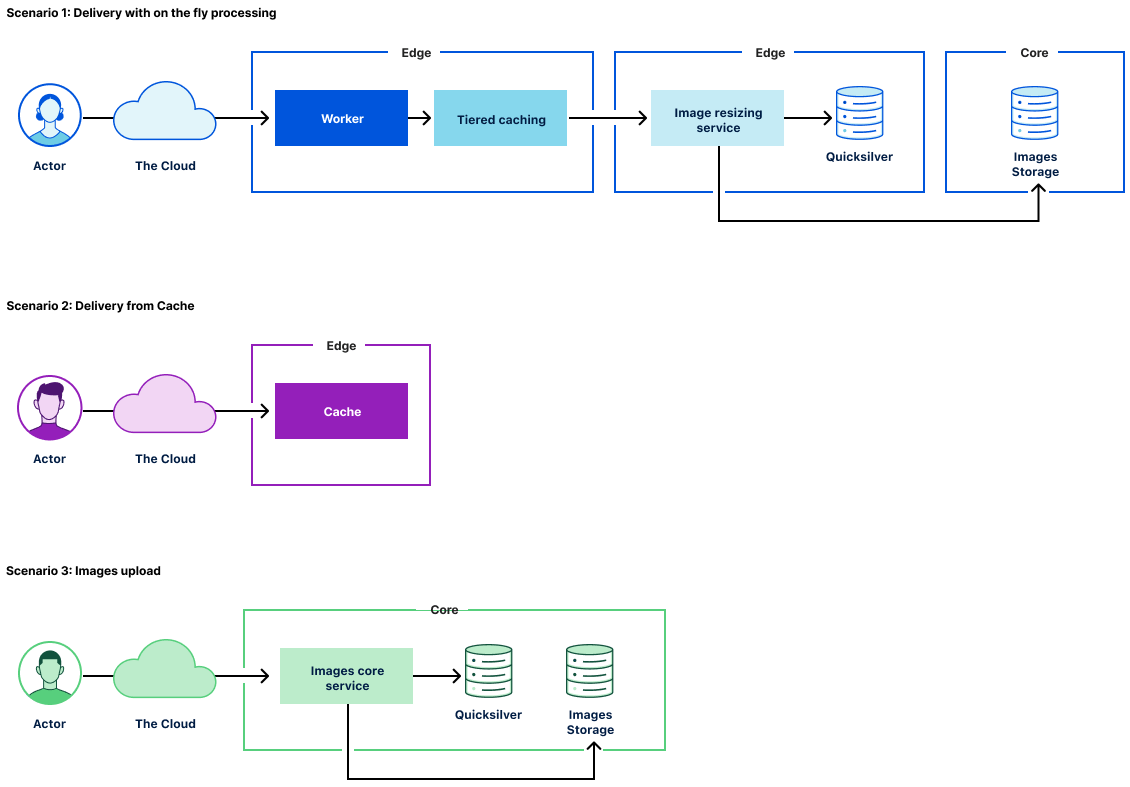
Cloudflare Images consists of the following components:
The Images core service that powers the public API to manage images assets.
The Image Resizing service responsible for image transformations and caching.
The Image delivery Cloudflare Worker responsible for serving images and passing corresponding parameters through to the Imaging Resizing service.
Image storage that provides access and storage for original image assets.
To support Cloudflare Images scenarios for image transformations, we made several changes to the Image Resizing service:
Added access to Cloudflare storage with original image assets.
Added access to variant definitions (size presets).
Added support for signing URLs.
Image delivery
The primary use case for Cloudflare Images is to provide a simple and easy-to-use way of managing images assets. To cover egress costs, we provide image delivery through the Cloudflare managed imagedelivery.net domain. It is configured with Tiered Caching to maximize the cache hit ratio for image assets. imagedelivery.net provides image hosting without a need to configure a custom domain to proxy through Cloudflare.
A Cloudflare Worker powers image delivery. It parses image URLs and passes the corresponding parameters to the image resizing service.
How we store Cloudflare Images
There are several places we store information on Cloudflare Images:
image metadata in Cloudflare’s core data centers
variant definitions in Cloudflare’s edge data centers
original images in core data centers
optimized images in Cloudflare cache, physically close to eyeballs.
Image variant definitions are stored and delivered to the edge using Cloudflare’s distributed key-value store called Quicksilver. We use a single source of truth for variants. The Images core service makes calls to Quicksilver to read and update variant definitions.
The rest of the information about the image is stored in the image URL itself: https://imagedelivery.net/<encoded account id>/<image id>/<variant name>
<image id> contains a flag, whether it’s publicly available or requires access verification. It’s not feasible to store any image metadata in Quicksilver as the data volume would increase linearly with the number of images we host. Instead, we only allow a finite number of variants per account, so we responsibly utilize available disk space on the edge. The downside of storing image metadata as part of <image id> is that <image id> will change on access change.
How we keep Cloudflare Images up to date
The only way to access images is through the use of variants. Each variant is a named image resizing configuration. Once the image asset is fetched, we cache the transformed image in the Cloudflare cache. The critical question is how we keep processed images up to date. The answer is by purging the Cloudflare cache when necessary. There are two use cases:
access to the image is changed
the variant definition is updated
In the first instance, we purge the cache by calling a URL: https://imagedelivery.net/<encoded account id>/<image id>
Then, the customer updates the variant we issue a cache purge request by tag: account-id/variant-name
To support cache purge by tag, the image resizing service adds the necessary tags for all transformed images.
How we restrict access to Cloudflare Images
The Image resizing service supports restricted access to images by using URL signatures with expiration. URLs are signed with an SHA-256 HMAC key. The steps to produce valid signatures are:
Take the path and query string (the path starts with /).
Compute the path’s SHA-256 HMAC with the query string, using the Images’ URL signing key as the secret. The key is configured in the Dashboard.
If the URL is meant to expire, compute the Unix timestamp (number of seconds since 1970) of the expiration time, and append ?exp= and the timestamp as an integer to the URL.
Append ? or & to the URL as appropriate (? if it had no query string; & if it had a query string).
Append sig= and the HMAC as hex-encoded 64 characters.
A signed URL looks like this:
A signed URL with an expiration timestamp looks like this:
Signature of /hello/world URL with a secret ‘this is a secret’ is 6293f9144b4e9adc83416d1b059abcac750bf05b2c5c99ea72fd47cc9c2ace34.
Direct creator uploads with Cloudflare Worker and KV
Similar to Cloudflare Stream, Images supports direct creator uploads. That allow users to upload images without API tokens. Everyday use of direct creator uploads is by web apps, client-side applications, or mobile apps where users upload content directly to Cloudflare Images.
Once again, we used our serverless platform to support direct creator uploads. The successful API call stores the account’s information in Workers KV with the specified expiration date. A simple Cloudflare Worker handles the upload URL, which reads the KV value and grants upload access only on a successful call to KV.
Future Work
Cloudflare Images product has an exciting product roadmap. Let’s review what’s possible with the current architecture of Cloudflare Images.
Resizing hints on upload
At the moment, no image transformations happen on upload. That means we can serve the image globally once it is uploaded to Image storage. We are considering adding resizing hints on image upload. That won’t necessarily schedule image processing in all cases but could provide a valuable signal to resize the most critical image variants. An example could be to generate an AVIF variant for the most vital image assets.
Serving images from custom domains
We think serving images from a domain we manage (with Tiered Caching) is a great default option for many customers. The downside is that loading Cloudflare images requires additional TLS negotiations on the client-side, adding latency and impacting loading performance. On the other hand, serving Cloudflare Images from custom domains will be a viable option for customers who set up a website through Cloudflare. The good news is that we can support such functionality with the current architecture without radical changes in the architecture.
Conclusion
The Cloudflare Images product runs on top of the Cloudflare global network. We built Cloudflare Images in Rust and Cloudflare Workers. This way, we use Rust reusable libraries in several products such as Cloudflare Images, Image Resizing, and Polish. Cloudflare’s serverless platform is an indispensable tool to build Cloudflare products internally. If you are interested in building innovative products in Rust and Cloudflare Workers, we’re hiring.
Imagine how a customer would feel if they get to your website, and it takes forever to load all the images you serve. This would become a negative user experience that might lead to lower overall site traffic and high bounce rates.
The good news is that regardless of whether you need to store and serve 100,000 or one million images, Cloudflare Images gives you the tools you need to build an entire image pipeline from scratch.
Customer pains
After speaking with many of Cloudflare customers, we quickly understood that whether you are an e-commerce retailer, a blogger or have a platform for creators, everyone shares the same problems:
Egress fees. Each time an image needs to go from Product A (storage) to Product B (optimize) and to Product C (delivery) there’s a fee. If you multiply this by the millions of images clients serve per day it’s easy to understand why their bills are so high.
Buckets everywhere. Our customers’ current pipelines involve uploading images to and from services like AWS, then using open source products to optimize images, and finally to serve the images they need to store them in another cloud bucket since CDN don’t have long-term storage. This means that there is a dependency on buckets at each step of the pipeline.
Load times. When an image is not correctly optimized the image can be much larger than needed resulting in an unnecessarily long download time. This can lead to a bad end user experience that might result in loss of overall site traffic.
High Maintenance. To maintain an image pipeline companies need to rely on several AWS and open source products, plus an engineering team to build and maintain that pipeline. This takes the focus away from engineering on the product itself.
How can Cloudflare Images help?
Zero Egress Costs
The majority of cloud providers allow you to store images for a small price, but the bill starts to grow every time you need to retrieve that image to optimize and deliver. The good news is that with Cloudflare Images customers don’t need to worry about egress costs, since all storage, optimization and delivery are part of the same tool.
The buckets stop with Cloudflare Images
One small step for humankind, one giant leap for image enthusiasts!
With Cloudflare Images the bucket pain stops now, and customers have two options:
One image upload can generate up to 100 variants, which allows developers to stop placing image sizes in URLs. This way, if a site gets redesigned there isn’t a need to change all the image sizes because you already have all the variants you need stored in Cloudflare Images.
Give your users a one-time permission to upload one file to your server. This way developers don’t need to write additional code to move files from users into a bucket — they will be automatically uploaded into your Cloudflare storage.
Minimal engineering effort
Have you ever dreamed about your team focusing entirely on product development instead of maintaining infrastructure? We understand, and this is why we created a straightforward set of APIs as well as a UI in the Cloudflare Dashboard. This allows your team to serve and optimize images without the need to set up and maintain a pipeline from scratch.
Once you get access to Cloudflare Images your team can start:
Uploading, deleting and updating images via API.
Setting up preferred variants.
Editing with Image Resizing both with the UI and API.
Serving an image with one click.
Process images on the fly
We all know that Google and many other search engines use the loading speed as one of their ranking factors; Cloudflare Images helps you be on the top of that list. We automatically detect what browser your clients are using and serve the most optimized version of the image, so that you don’t need to worry about file extensions, configuring origins for your image sets or even cache hit rates.
Curious to have a sneak peek at Cloudflare Images? Sign up now!
The collective thoughts of the interwebz
Manage Consent
To provide the best experiences, we use technologies like cookies to store and/or access device information. Consenting to these technologies will allow us to process data such as browsing behavior or unique IDs on this site. Not consenting or withdrawing consent, may adversely affect certain features and functions.
Functional
Always active
The technical storage or access is strictly necessary for the legitimate purpose of enabling the use of a specific service explicitly requested by the subscriber or user, or for the sole purpose of carrying out the transmission of a communication over an electronic communications network.
Preferences
The technical storage or access is necessary for the legitimate purpose of storing preferences that are not requested by the subscriber or user.
Statistics
The technical storage or access that is used exclusively for statistical purposes.The technical storage or access that is used exclusively for anonymous statistical purposes. Without a subpoena, voluntary compliance on the part of your Internet Service Provider, or additional records from a third party, information stored or retrieved for this purpose alone cannot usually be used to identify you.
Marketing
The technical storage or access is required to create user profiles to send advertising, or to track the user on a website or across several websites for similar marketing purposes.