Post Syndicated from The History Guy: History Deserves to Be Remembered original https://www.youtube.com/watch?v=37o1rYTesMQ
Anne-Laure Le Cunff | Tiny Experiments | Talks at Google
Post Syndicated from Talks at Google original https://www.youtube.com/watch?v=amV0j7R0yJc
Anachronym Challenge
Post Syndicated from xkcd.com original https://xkcd.com/3075/

Announcing up to 85% price reductions for Amazon S3 Express One Zone
Post Syndicated from Channy Yun (윤석찬) original https://aws.amazon.com/blogs/aws/up-to-85-price-reductions-for-amazon-s3-express-one-zone/
At re:Invent 2023, we introduced Amazon S3 Express One Zone, a high-performance, single-Availability Zone (AZ) storage class purpose-built to deliver consistent single-digit millisecond data access for your most frequently accessed data and latency-sensitive applications.
S3 Express One Zone delivers data access speed up to 10 times faster than S3 Standard, and it can support up to 2 million GET transactions per second (TPS) and up to 200,000 PUT TPS per directory bucket. This makes it ideal for performance-intensive workloads such as interactive data analytics, data streaming, media rendering and transcoding, high performance computing (HPC), and AI/ML trainings. Using S3 Express One Zone, customers like Fundrise, Aura, Lyrebird, Vivian Health, and Fetch improved the performance and reduced the costs of their data-intensive workloads.
Since launch, we’ve introduced a number of features for our customers using S3 Express One Zone. For example, S3 Express One Zone started to support object expiration using S3 Lifecycle to expire objects based on age to help you automatically optimize storage costs. In addition, your log-processing or media-broadcasting applications can directly append new data to the end of existing objects and then immediately read the object, all within S3 Express One Zone.
Today we’re announcing that, effective April 10, 2025, S3 Express One Zone has reduced storage prices by 31 percent, PUT request prices by 55 percent, and GET request prices by 85 percent. In addition, S3 Express One Zone has reduced the per-GB charges for data uploads and retrievals by 60 percent, and these charges now apply to all bytes transferred rather than just portions of requests greater than 512 KB.
Here is a price reduction table in the US East (N. Virginia) Region:
| Price | Previous | New | Price reduction |
| Storage (per GB-Month) |
$0.16 | $0.11 | 31% |
| Writes ( PUT requests) |
$0.0025 per 1,000 requests up to 512 KB | $0.00113 per 1,000 requests | 55% |
| Reads ( GET requests) |
$0.0002 per 1,000 requests up to 512 KB | $0.00003 per 1,000 requests | 85% |
| Data upload (per GB) |
$0.008 | $0.0032 | 60% |
| Data retrievals (per GB) |
$0.0015 | $0.0006 | 60% |
For S3 Express One Zone pricing examples, go to the S3 billing FAQs or use the AWS Pricing Calculator.
These pricing reductions apply to S3 Express One Zone in all AWS Regions where the storage class is available: US East (N. Virginia), US East (Ohio), US West (Oregon), Asia Pacific (Mumbai), Asia Pacific (Tokyo), Europe (Ireland), and Europe (Stockholm) Regions. To learn more, visit the Amazon S3 pricing page and S3 Express One Zone in the AWS Documentation.
Give S3 Express One Zone a try in the S3 console today and send feedback to AWS re:Post for Amazon S3 or through your usual AWS Support contacts.
— Channy
[$] Atomic writes for ext4
Post Syndicated from jake original https://lwn.net/Articles/1016879/
Building on the discussion in the two previous sessions on untorn (or
atomic) writes, for buffered I/O and for XFS using direct I/O, Ojaswin Mujoo
remotely led a
session on support for the feature on ext4. That took place in the combined storage and
filesystem track at the
2025 Linux Storage, Filesystem, Memory Management, and BPF Summit. Part of
the support for the feature is already in the upstream kernel, with more
coming. But
there are still some challenges that Mujoo wanted to discuss.
Malcolm: 6 usability improvements in GCC 15
Post Syndicated from jake original https://lwn.net/Articles/1017132/
Over on the Red Hat Developer site, David Malcolm has an article
about improvements in GCC 15, specifically focusing on the diagnostic
information that the compiler emits. This includes ASCII art with a “⚠️”
warning emoji to display the execution path when it detects a problem (like
an infinite loop in one of his examples), better C++ template errors,
machine-readable diagnostics using Static
Analysis Results Interchange Format (SARIF), better messages regarding
C23 compatibility since that is the default C version for GCC 15, and more.
Since the changes are focused on messages, there is the inevitable color
scheme update as well:
GCC will use color when emitting its text messages on stderr at a suitably modern terminal, using a few colors that seem to work well in a number of different terminal themes—but the exact rules for choosing which color to use for each aspect of the output have been rather arbitrary.
For GCC 15, I’ve gone through C and C++’s errors, looking for places where two different things in the source are being contrasted, such as type mismatches. These diagnostics now use color to visually highlight and distinguish the differences.
Build unified pipelines spanning multiple AWS accounts and Regions with Amazon MWAA
Post Syndicated from Anubhav Gupta original https://aws.amazon.com/blogs/big-data/build-unified-pipelines-spanning-multiple-aws-accounts-and-regions-with-amazon-mwaa/
As organizations scale their Amazon Web Services (AWS) infrastructure, they frequently encounter challenges in orchestrating data and analytics workloads across multiple AWS accounts and AWS Regions. While multi-account strategy is essential for organizational separation and governance, it creates complexity in maintaining secure data pipelines and managing fine-grained permissions particularly when different teams manage resources in separate accounts.
Amazon Managed Workflows for Apache Airflow (Amazon MWAA) is a managed orchestration service for Apache Airflow that you can use to set up and operate data pipelines in the Amazon Cloud at scale. Apache Airflow is an open source tool used to programmatically author, schedule, and monitor sequences of processes and tasks, referred to as workflows. With Amazon MWAA, you can use Apache Airflow to create workflows without having to manage the underlying infrastructure for scalability, availability, and security.
In this blog post, we demonstrate how to use Amazon MWAA for centralized orchestration, while distributing data processing and machine learning tasks across different AWS accounts and Regions for optimal performance and compliance.
Solution overview
Let’s consider an example of a global enterprise with distributed teams spread across different AWS regions. Each team generates and processes valuable data that is often required by other teams for comprehensive insights and streamlined operations. In this post, we consider a scenario where the data processing team sits in one region and the machine learning (ML) team sits in another region and there is a central team that manages the tasks between the two teams.
To address this complex challenge of orchestrating dependent teams across geographic regions, we’ve designed a data pipeline that spans multiple AWS accounts across different AWS Regions and is centrally orchestrated using Amazon MWAA. This design enables seamless data flow between teams, making sure that each team has access to the necessary data from other AWS accounts and Regions while maintaining compliance and operational efficiency.
Here’s a high-level overview of the architecture:
- Centralized orchestration hub (Account A, us-east-1)
- Amazon MWAA serves as the central orchestrator, coordinating operations across all regional data pipelines.
- Regional data pipelines (Account B, two Regions)
- Region 1 (for example, us-east-1)
- Wait for users to upload raw data to an Amazon Simple Storage Service (Amazon S3) bucket
- AWS Glue transforms the data
- Processed data is saved in an S3 bucket (data processing)
- Region 2 (for example, us-west-2)
- Receives processed data from Region 1 through Amazon S3 Cross-Region replication
- Amazon SageMaker performs ML tasks on the replicated data in the S3 bucket (ML)
- Region 1 (for example, us-east-1)
This architecture maintains the concept of separate regional operations within Account B, with data processing in AWS Region 1 and ML in AWS Region 2. The central Amazon MWAA instance in Account A orchestrates these operations across AWS Regions, enabling different teams to work with the data they need. It enables scalability, automation, and streamlined data processing and ML workflows across multiple AWS environments.

Prerequisites
This solution requires two AWS accounts:
- Account A: Central managed account for the Amazon MWAA environment.
- Account B: Data processing and ML operations
- Primary Region: US East (N. Virginia) [us-east-1]: Data processing workloads
- Secondary Region: US West (Oregon) [us-west-2]: ML workloads
Step 1: Set up Account B (data processing and ML tasks)
![]() in us-east-1 and provide Account A as input. This template creates the following three stacks:
in us-east-1 and provide Account A as input. This template creates the following three stacks:
- Stack in us-east-1: Creates the required roles for stackset execution.
- Second stack in us-east-1: Creates an S3 bucket, S3 folders, and AWS Glue job.
- Stack in us-west-2: Creates a S3 bucket, S3 folders, Amazon SageMaker Config file, cross-account-role, and AWS Lambda function.
Collect stack outputs: After successful deployment, gather the following output values from the created stacks. These outputs will be used in subsequent steps of the setup process.
- From the us-east-1 stack:
- The value of
SourceBucketName
- The value of
- From the us-west-2 stack:
- The value of
DestinationBucketName - The value of
CrossAccountRoleArn
- The value of
Step 2: Set up Account A (central orchestration)
![]() in us-east-1. Provide value of
in us-east-1. Provide value of CrossAccountRoleArn from Account B setup as input. This template does the following:
- Deploys an Amazon MWAA environment
- Sets up an Amazon MWAA Execution role with a cross-account trust policy.
Step 3: Setting up S3 CRR and bucket policies in Account B
![]() in us-east-1 for cross-Region replication of the S3 data-processing bucket in us-east-1 and the ML pipeline bucket in us-west-1. Provide values of
in us-east-1 for cross-Region replication of the S3 data-processing bucket in us-east-1 and the ML pipeline bucket in us-west-1. Provide values of SourceBucketName, DestinationBucketName, and AccountAId as input parameters.
This stack should be deployed after completing the Amazon MWAA setup. This sequence is necessary because you need to grant the Amazon MWAA execution role appropriate permissions to access both the source and destination buckets.
Step 4: Implement cross-account, cross-Region orchestration
IAM cross-account role in Account B
The stack in Step 2 created an AWS Identity and Access Management (IAM) role in Account B with a trust relationship that allows the Amazon MWAA execution role from Account A (the central orchestration account) to assume it. Additionally, this role is granted the necessary permissions to access AWS resources in both Regions of Account B.
This setup enables the Amazon MWAA environment in Account A to securely perform actions and access resources across different Regions in Account B, maintaining the principle of least privilege while allowing for flexible, cross-account orchestration.
Airflow connection in Account A
To establish cross-account connections in Amazon MWAA:
Create a connection for us-east-1. Open the Airflow UI and navigate to Admin and then to Connections. Choose the plus (+) icon to add a new connection and enter the following details:
- Connection ID: Enter
aws_crossaccount_role_conn_east1 - Connection type: Select Amazon Web Services.
- Extras: Add the cross-account-role and Region name using the following code. Replace
<CrossAccountRoleArn>with the cross-account role Amazon Resource Name (ARN) created while setting Account B in Step 1, in Region 2 (us-west-2):
Create a second connection for us-west-2.
- Connection ID: Enter
aws_crossaccount_role_conn_west2 - Connecton type: Select Amazon Web Services.
- Extras: Add a
CrossAccountRoleArnand Region name using the following code:
By setting up these Airflow connections, Amazon MWAA can securely access resources in both us-east-1 and us-west-2, helping to ensure seamless workflow execution.
Implement cross-account workflows in Account A
Now that your environment is set up with the necessary IAM roles and Airflow connections, you can create data processing and ML workflows that span across accounts and Regions.
DAG 1: Cross-account data processing

The directed acyclic graph (DAG) depicted in the preceding figure demonstrates a cross-account data processing workflow using Amazon MWAA and AWS services.
To implement this DAG:
- Download the cross_account_data_processing_dag.py file.
- Replace
<INSERT-DATA-PROCESSING-BUCKET-NAME-US-EAST-1>with the value ofSourceBucketNamefrom Account B.
Here’s a description of its key operators:
- S3KeySensor: This sensor monitors a specified S3 bucket for the presence of a raw data file (raw/ml_train_data.csv). It uses a cross-account AWS connection (
aws_crossaccount_role_conn_east1) to access the S3 bucket in a different AWS account. The sensor checks every 60 seconds and times out after 1 hour if the file is not detected. - GlueJobOperator: This operator triggers an AWS Glue job (
mwaa_glue_raw_to_transform) for data preprocessing. It passes the bucket name as a script argument to the AWS Glue job. Like the S3KeySensor, it uses the cross-account AWS connection to execute the AWS Glue job in the target account.
DAG 2: Cross-account and cross-Region ML

The DAG in the preceding figure demonstrates a cross-account machine learning workflow using Amazon MWAA and AWS services. It shows Airflow’s flexibility in enabling users to write custom operators for specific use cases, particularly for cross-account operations.
To implement this DAG:
- Download cross_account_machine_learning_dag.py
- Replace
<INSERT-MACHINE-LEARNING-BUCKET-NAME-US-WEST-2>with the value ofDestinationBucketNamefrom Account B.
Here’s a description of the custom operators and key components:
- CrossAccountSageMakerHook: This custom hook extends the
SageMakerHookto enable cross-account access. It uses AWS Security Token Service (AWS STS) to assume a role in the target account, enabling seamless interaction with SageMaker across account boundaries. - CrossAccountSageMakerTrainingOperator: Building on the
CrossAccountSageMakerHook, this operator enables SageMaker training jobs to be executed in a different AWS account. It overrides the default SageMakerTrainingOperator to use the cross-account hook. - S3KeySensor: Used to monitor the presence of training data in a specified S3 bucket. These sensors verify that the required data is available before proceeding with the machine learning workflow. It uses a cross-account AWS connection (
aws_crossaccount_role_conn_west2) to access the S3 bucket in a different AWS account. - SageMakerTrainingOperator: Uses the custom
CrossAccountSageMakerTrainingOperatorto initiate a SageMaker training job in the target account. The configuration for this job is dynamically loaded from an S3 bucket. - LambdaInvokeFunctionOperator: Invokes a Lambda function named
dagcleanupafter the SageMaker training job completes. This can be used for post-processing or cleanup tasks.
Step 5: Schedule and verify the Airflow DAGs
- To schedule the DAGs, copy the Python scripts cross_account_data_processing_dag.py and cross_account_machine_learning_dag.py to the S3 location associated with Amazon MWAA in central Account A. Go to the Airflow environment created in Account A, us-east-1, and locate the S3 bucket link and upload them to the dags folder.
- Download data file to the source bucket created in Account B, us-east-1, under raw folder.
- Navigate to the Airflow UI.
- Locate your DAG in the DAGs tab. The DAG automatically syncs from Amazon S3 to the Airflow UI. Choose the toggle button to enable the DAGs.
- Trigger the DAG runs.

Best practices for cross-account integration
When implementing cross-account, cross-Region workflows with Amazon MWAA, consider the following best practices to help ensure security, efficiency, and maintainability.
- Secrets management: Use AWS Secrets Manager to securely store and manage sensitive information such as database credentials, API keys, or cross-account role ARNs. Rotate secrets regularly using Secrets Manager automatic rotation. For more information, see Using a secret key in AWS Secrets Manager for an Apache Airflow connection.
- Networking: Choose the appropriate networking solution (AWS Transit Gateway, VPC Peering, AWS PrivateLink) based on your specific requirements, considering factors such as the number of VPCs, security needs, and scalability requirements. Implement appropriate security groups and network ACLs to control traffic flow between connected networks.
- IAM role management: Follow the principle of least privilege when creating IAM roles for cross-account access.
- Error handling and retries: Implement robust error handling in your DAGs to manage cross-account access issues. Use Airflow’s retry mechanisms to handle transient failures in cross-account operations.
- Managing Python dependencies: Use a requirements.txt file to specify exact versions of required packages. Test your dependencies locally using the Amazon MWAA local runner before deploying to production. For more information, see Amazon MWAA best practices for managing Python dependencies
Clean up
To avoid future charges, remove any resources you created for this solution.
- Empty the S3 buckets: Manually delete all objects within each bucket, verify they are empty, then delete the buckets themselves.
- Delete the CloudFormation stacks: Identify and delete the stacks associated with the architecture.
- Verify resource cleanup: Make sure that Amazon MWAA, AWS Glue, SageMaker, Lambda, and other services are terminated.
- Remove remaining resources: Delete any manually created IAM roles, policies, or security groups.
Conclusion
By using Airflow connections, custom operators, and features such as Amazon S3 cross-Region replication, you can create a sophisticated workflow that seamlessly operates across multiple AWS accounts and Regions. This approach allows for complex, distributed data processing and machine learning pipelines that can take advantage of resources spread across your entire AWS infrastructure. The combination of cross-account access, cross-Region replication, and custom operators provides a powerful toolkit for building scalable and flexible data workflows. As always, careful planning and adherence to security best practices are crucial when implementing these advanced multi-account, multi-Region architectures.
Ready to tackle your own cross-account orchestration challenges? Test this approach and share your experience in the comments section.
About the authors
 Suba Palanisamy is a Senior Technical Account Manager helping customers achieve operational excellence using AWS. Suba is passionate about all things data and analytics. She enjoys traveling with her family and playing board games
 Anubhav Gupta is a Solutions Architect at AWS supporting enterprise greenfield customers, focusing on the financial services industry. He has worked with hundreds of customers worldwide building their cloud foundational environments and platforms, architecting new workloads, and creating governance strategy for their cloud environments. In his free time, he enjoys traveling and spending time outdoors
 Anusha Pininti is a Solutions Architect guiding enterprise greenfield customers through every stage of their cloud transformation, specializing in data analytics. She supports customers across various industries, helping them achieve their business objectives through cloud-based solutions. In her free time, Anusha loves to travel, spend time with family, and experiment with new dishes
 Sriharsh Adari is a Senior Solutions Architect at AWS, where he helps customers work backward from business outcomes to develop innovative solutions on AWS. Over the years, he has helped multiple customers on data platform transformations across industry verticals. His core area of expertise includes technology strategy, data analytics, and data science. In his spare time, he enjoys playing sports, watching TV shows, and playing Tabla
 Geetha Penmatsa is a Solutions Architect supporting enterprise greenfield customers through their cloud journey. She helps customers across various industries transform their business with the AWS Cloud. She has a background in data analytics and is specializing in Amazon Connect Cloud contact center to help transform customer experience at scale. Outside work, Geetha loves to travel, ski, hike, and spend time with friends and family
[$] Management of volatile CXL devices
Post Syndicated from corbet original https://lwn.net/Articles/1016718/
Compute
Express Link (CXL) memory is not like the ordinary RAM that one might
install into a computer; it can come and go at any time and is often not
present when the kernel is booting. That complicates the management of
this memory. During the memory-management track of the 2025 Linux Storage,
Filesystem, Memory-Management, and BPF Summit, Gregory Price ran a session
on the challenges posed by CXL and how they might be addressed.
Announcing inline chat in Eclipse with Amazon Q Developer
Post Syndicated from Brian Beach original https://aws.amazon.com/blogs/devops/announcing-inline-chat-in-eclipse-with-amazon-q-developer/
Earlier today Amazon Q Developer launched inline chat in the Eclipse IDE (in preview). In this post, I’ll walk you through how I’ve been using this powerful new capability to streamline my Java development workflow, from refactoring existing code to optimizing performance-critical methods. Whether you’re a seasoned Eclipse veteran or just getting started, you’ll see how Amazon Q Developer’s advanced AI-driven tools can supercharge your productivity across the entire software development lifecycle.
Background
As a long-time Java developer, I was thrilled when Amazon Q Developer was integrated in Eclipse last year. I’ve been using Amazon Q Developer for a while now, and it has completely transformed my development workflow. When Amazon Q Developer first launched its inline suggestions feature back in 2022, I was blown away by how much it could accelerate my coding tasks. But the addition of a full chat interface in 2023 took things to the next level. Then in 2024 the new inline chat capability allowed me to edit and refactor my code in place. However, inline chat was not available in Eclipse, until today!
The chat interfacein Amazon Q Developer is where I turn when I’m not quite sure how to accomplish a particular task. I love being able to explain the problem I’m trying to solve, or the concept I’m trying to understand, and getting detailed, contextual responses that help point me in the right direction. The AI-generated code snippets and explanations are invaluable when I’m learning something new or tackling a complex challenge. However, when I know how to accomplish a task, I don’t need the explanation I just want the code.
On the other hand, when I’m workingon a well-understood task, I much prefer to use Amazon Q Developer’s inline suggestions. The way it analyzes my existing code and comments to provide relevant, customized completions is just incredible. It lets me work at faster, creating new functionality without having to constantly switch context or hunt for the right syntax. However, while inline suggestions are great for generating new code, I cannot use it to edit existing code.
Now, with the new inline chat feature in Eclipse (in preview), I can easily edit my code in place using Amazon Q Developer. Instead of having to copy/paste code from a separate chat window, I can describe the changes I want to make right in the editor, and Amazon Q Developer will seamlessly integrate the suggested updates into my code base as a diff. It’s great for for refactoring, bug fixing, and maintaining well-documented, easily-readable code. Let’s look at a couple of examples to see how inline chat works in Eclipse.
Refactoring
Imagine that I am the newest member of a development team, and I was tasked with adding unit tests to the OrderProcessor class. However, as I dug into the code base, I realized that the OrderProcessor was tightly coupled to the OrderRepository implementation. Notice the instantiation of the OrderRepository on line 2 in the following image. This made it difficult to write unit tests, as I couldn’t easily swap in a mock repository. I knew I needed to refactor the code to use dependency injection, but the thought of making all of those changes manually was daunting.

Fortunately, with Amazon Q Developer’s inline chat in my Eclipse IDE, I didn’t have to tackle this refactor alone. I selected the OrderProcessor class, invoked the inline chat using the keyboard shortcut (CMD + SHIFT + I for macOS, and CTRL + SHIFT + I for Windows). Then I described the change I want: “Refactor this class to use dependency injection so I can mock the OrderRepository in unit tests.” Note that I could have also asked Amazon Q Developer to leverage a specific DI framework, like Hibernate. However, I am going to keep this simple for the blog post.

Amazon Q Developer quickly analyzed the code and presented me with a suggested change shown in the following image. The change is presented as a diff so I can see what Amazon Q Developer is removing (in red) and adding (in green). After reviewing the changes, I was pleased to see that Amazon Q Developer had introduced a constructor that took an IOrderRepository interface, allowing me to pass in either the concrete implementation or a test double. This would make it a breeze to write comprehensive unit tests for the OrderProcessor. With a quick click to accept the changes, Amazon Q Developer updated my code, saving me valuable time and ensuring the new feature would be built on a solid, testable foundation.

In this example, I selected the entire class. However, I can also ask Q Developer to work on a specific portion of the code.
Optimization
While working on the Order class, I noticed that the containsItem method seemed to be running slowly, especially on orders with a large number of line items. I decided to profile the code and sure enough, that method was a hot spot, consuming a disproportionate amount of CPU cycles. I selected the containsItem method, brought up the inline chat, and asked Amazon Q Developer: “This code is running slow, please optimize it.”

Amazon Q Developer quickly analyzed the existing code, which was using a simple for loop to iterate through the list of items, and provided an improved implementation. As shown in the diff, Amazon Q Developer suggested replacing the for loop with a more efficient stream-based approach, using the anyMatch method to determine if the item is present in the order. This change has improved performance, especially for orders with a large number of line items. I reviewed the changes and accepted Amazon Q Developer’s suggestions.

Amazon Q Developer’s optimization not only improved the performance of the containsItem method, but also made the code more readable and maintainable going forward.
Conclusion
The integration of Amazon Q Developer into the Eclipse IDE (in-preview) has improved my Java development workflow. Whether I’m learning a new concept, generating boilerplate code, or optimizing a performance bottleneck, Amazon Q Developer’s suite of AI-powered tools has become an indispensable part of my development process. The addition of inline chat, in particular, has streamlined my ability to directly interact with the assistant, seamlessly updating my code base without breaking my concentration. If you’re an Eclipse user looking to supercharge your productivity, I highly recommend installing the Amazon Q Developer plugin today.
Comic for 2025.04.10 – Terminally Online
Post Syndicated from Explosm.net original https://explosm.net/comics/terminally-online-2
New Cyanide and Happiness Comic
Integrate ThoughtSpot with Amazon Redshift using AWS IAM Identity Center
Post Syndicated from Maneesh Sharma original https://aws.amazon.com/blogs/big-data/integrate-thoughtspot-with-amazon-redshift-using-aws-iam-identity-center/
Amazon Redshift is a fast, scalable, and fully managed cloud data warehouse that allows you to process and run your complex SQL analytics workloads on structured and semi-structured data. Tens of thousands of customers use Amazon Redshift to process large amounts of data, modernize their data analytics workloads, and provide insights for their business users.
The combination of Amazon Redshift and ThoughtSpot’s AI-powered analytics service enables organizations to transform their raw data into actionable insights with unprecedented speed and efficiency. Through this collaboration, Amazon Redshift now supports AWS IAM Identity Center integration with ThoughtSpot, enabling seamless and secure data access with streamlined authentication and authorization workflows. This single sign-on (SSO) integration is available across ThoughtSpot’s cloud landscape and can be used for both embedded and standalone analytics implementations.
Prior to the IAM Identity Center integration, ThoughtSpot users didn’t have native connectivity to integrate Amazon Redshift with their identity providers (IdPs), which can provide unified governance and identity propagation across multiple AWS services like AWS Lake Formation and Amazon Simple Storage Service (Amazon S3).
Now, ThoughtSpot users can natively connect to Amazon Redshift using the IAM Identity Center integration, which streamlines data analytics access management while maintaining robust security. By configuring Amazon Redshift as an AWS managed application, organizations benefit from SSO capabilities with trusted identity propagation and a trusted token issuer (TTI). The IAM Identity Center integration with Amazon Redshift provides centralized user management, automatically synchronizing access permissions with organizational changes—whether employees join, transition roles, or leave the organization. The solution uses Amazon Redshift role-based access control features that align with IdP groups synced in IAM Identity Center. Organizations can further enhance their security posture by using Lake Formation to define granular access control permissions on catalog resources for IdP identities. From a compliance and security standpoint, the integration offers comprehensive audit trails by logging end-user identities both in Amazon Redshift and AWS CloudTrail, providing visibility into data access patterns and user activities.
Dime Dimovski, a Data Warehousing Architect at Merck, shares:
“The recent integration of Amazon Redshift with our identity access management center will significantly enhance our data access management because we can propagate user identities across various tools. By using OAuth authentication from ThoughtSpot to Amazon Redshift, we will benefit from a seamless single sign-on experience—giving us granular access controls as well as the security and efficiency we need.”
In this post, we walk you through the process of setting up ThoughtSpot integration with Amazon Redshift using IAM Identity Center authentication. The solution provides a secure, streamlined analytics environment that empowers your team to focus on what matters most: discovering and sharing valuable business insights.
Solution overview
The following diagram illustrates the architecture of the ThoughtSpot SSO integration with Amazon Redshift, IAM Identity Center, and your IdP.

The solution includes the following steps:
- The user configures ThoughtSpot to access Amazon Redshift using IAM Identity Center.
- When a user attempts to sign in, ThoughtSpot initiates a browser-based OAuth flow and redirects the user to their preferred IdP (such as Okta or Microsoft EntraID) sign-in page to enter their credentials.
- Following successful authentication, IdP issues authentication tokens (ID and access token) to ThoughtSpot.
- The Amazon Redshift driver then makes a call to the Amazon Redshift enabled AWS Identity Center application and forwards the access token.
- Amazon Redshift passes the token to IAM Identity Center for validation.
- IAM Identity Center first validates the token using the OpenID Connect (OIDC) discovery connection to the TTI and returns an IAM Identity Center generated access token for the same user. The TTI enables you to use trusted identity propagation with applications that authenticate outside of AWS. In the preceding figure, the IdP authorization server is the TTI.
- Amazon Redshift uses IAM Identity Center APIs to obtain the user and group membership information from AWS Identity Center.
- The ThoughtSpot user can now connect with Amazon Redshift and access data based on the user and group membership returned from IAM Identity Center.
In this post, you will use the following steps to build the solution:
- Set up an OIDC application.
- Set up a TTI in IAM Identity Center.
- Set up client connections and TTIs in Amazon Redshift.
- Federate to Amazon Redshift from ThoughtSpot using IAM Identity Center.
Prerequisites
Before you begin implementing the solution, you must have the following in place:
- Set up IAM Identity Center and Amazon Redshift integration by following the steps in Integrate Identity Provider (IdP) with Amazon Redshift Query Editor V2 using AWS IAM Identity Center for seamless Single Sign-On
- Have a ThoughtSpot paid account with admin access. IAM Identity Center authentication only works with a ThoughtSpot paid account.
- Have an Okta account that has an active subscription. You need an admin role to set up the application on Okta. If you’re new to Okta, you can sign up for a free trial or for a developer account.
- Alternatively, have an EntraID account that has an active subscription. You need an admin role to set up the application on EntraID. If you don’t have an EntraID account, you can create an account for free.
Set up an OIDC application
In this section, we’ll show you the step-by-step process to set up an OIDC application using both Okta and EntraID as the identity providers.
Set up an Okta OIDC application
Complete the following steps to set up an Okta OIDC application:
- Sign in to your Okta organization as a user with administrative privileges.
- On the admin console, under Applications in the navigation pane, choose Applications.
- Choose Create App Integration.
- Select OIDC – OpenID Connect for Sign-in method and Web Application for Application type.
- Choose Next.

- On the General tab, provide the following information:
- For App integration name, enter a name for your app integration. For example,
ThoughtSpot_Redshift_App. - For Grant type, select Authorization Code and Refresh Token.
- For Sign-in redirect URIs, choose Add URI and along with the default URI, add the URI
https://<your_okta_instance_name>/callosum/v1/connection/generateTokens. The sign-in redirect URI is where Okta sends the authentication response and ID token for the sign-in request. The URIs must be absolute URIs. - For Sign-out redirect URIs, keep the default value as
http://localhost:8080. - Skip the Trusted Origins section and for Assignments, select Skip group assignment for now.
- Choose Save.
- For App integration name, enter a name for your app integration. For example,
- Choose the Assignments tab and then choose Assign to Groups. In this example, we’re assigning
awssso-financeandawssso-sales. - Choose Done.


Set up an EntraID OIDC application
To create your EntraID application, follow these steps:
- Sign in to the Microsoft Entra admin center as Cloud Application Administrator (or higher level of access).
- Browse to App registrations under Manage, and choose New registration.
- Enter a name for the application. For example,
ThoughtSpot-OIDC-App. - Select a supported account type, which determines who can use the application. For this example, select the first option in the list.
- Under Redirect URI, choose Web for the type of application you want to create. Enter the URI where the access token is sent to. Your redirect URL will be in the format
https://<your_instance_name>/callosum/v1/connection/generateTokens. - Choose Register.

- In the navigation pane, choose Certificates & secrets.
- Choose New client secret.
- Enter a description and select an expiration for the secret or specify a custom lifetime. For this example, keep the Microsoft recommended default expiration value of 6 months.
- Choose Add.
- Copy the secret value.

The secret value will only be presented one time; after that you can’t read it. Make sure to copy it now. If you fail to save it, you must generate a new client secret.
- In the navigation pane, under Manage, choose Expose an API.
If you’re setting up for the first time, you can see Add to the right of the application ID URI.
- Choose Save.
- After the application ID URI is set up, choose Add a scope.
- For Scope name, enter a name. For example,
redshift_login. - For Admin consent display name, enter a display name. For example,
redshift_login. - For Admin consent description, enter a description of the scope.
- Choose Add scope.

- In the navigation pane, choose API permissions.
- Choose Add a permission and choose Microsoft Graph.
- Choose Delegated Permission.
- Under OpenId permissions, choose
email,offlines_access,openid, andprofile, and choose Add permissions.


Set up a TTI in IAM Identity Center
Assuming you have completed the prerequisites, you will establish your IdP as a TTI in your delegated administration account. To create a TTI, refer to How to add a trusted token issuer to the IAM Identity Center console. In this post, we walk through the steps to set up a TTI for both Okta and EntraID.
Set up a TTI for Okta
To get the issuer URL from Okta, complete the following steps:
- Sign in as an admin to Okta and navigate to Security and then to API.
- Choose Default on the Authorization Servers tab and copy the Issuer
url.

- In the Map attributes section, choose which IdP attributes correspond to Identity Center attributes. For example, in the following screenshot, we mapped Okta’s
Subjectattribute to theEmailattribute in IAM Identity Center. - Choose Create trusted token issuer.


Set up a TTI for EntraID
Complete the following steps to set up a TTI for EntraID:
- To find out which token your application is using, under Manage, choose Manifest.
- Locate the
accessTokenAcceptedVersionparameter:nullor1indicate v1.0 tokens, and2indicates v2.0 tokens.


Next, you need to find the tenant ID value from EntraID.
- Go to the EntraID application, choose Overview, and a new page will appear containing the Essentials
- You can find the tenant ID value as shown in the following screenshot. If you’re using the v1.0 token, the issuer URL will be
https://sts.windows.net/<Directory (tenant) ID>/. If you’re using the v2.0 token, the issuer URL will behttps://login.microsoftonline.com/<Directory (tenantid) ID>/v2.0.

- For Map attributes, the following example uses Other, where we’re specifying the user principal name (
upn) as the IdP attribute to map with Email from the IAM identity Center attribute. - Choose Create trusted token issuer.


Set up client connections and TTIs in Amazon Redshift
In this step, you configure the Amazon Redshift applications that exchange externally generated tokens to use the TTI you created in the previous step. Also, the audience claim (or aud claim) from your IdP must be specified. You need to collect the audience value from the respective IdP.
Acquire the audience value from Okta
To acquire the audience value from Okta, complete the following steps:
- Sign in as an admin to Okta and navigate to Security and then to API.
- Choose Default on the Authorization Servers tab and copy the Audience value.

Acquire the audience value from EntraID
Similarly, to get the audience value EntraID, complete the following steps:
- Go to the EntraID application, choose Overview, and a new page will appear containing the Essentials
- You can find the audience value (Application ID URI) as shown in the following screenshot.

Configure the application
After you collect the audience value from the respective IdP, you need to configure the Amazon Redshift application in the member account where the Amazon Redshift cluster or serverless instance exists.
- Choose IAM Identity Center connection in the navigation pane on the Amazon Redshift console.
- Choose the Amazon Redshift application that you created as part of the prerequisites.
- Choose the Client connections tab and choose Edit.
- Choose Yes under Configure client connections that use third-party IdPs.
- Select the check box for Trusted token issuer that you created in the previous section.
- For Aud claim, enter the audience claim value under Configure selected trusted token issuers.
- Choose Save.
Your IAM Identity Center, Amazon Redshift, and IdP configuration is complete. Next, you need to configure ThoughtSpot.
Federate to Amazon Redshift from ThoughtSpot using IAM Identity Center
Complete the following steps in ThoughtSpot to federate with Amazon Redshift using IAM Identity Center authentication:
- Sign in to ThoughtSpot cloud.
- Choose Data in the top navigation bar.
- Open the Connections tab in the navigation pane, and select the Redshift
Alternatively, you can choose Create new in the navigation pane, choose Connection, and select the Redshift tile.
- Create a name for your connection and a description (optional), then choose Continue.
- Under Authentication Type, choose AWS IDC OAuth and enter following details:
- For Host, enter the Redshift endpoint. For example,
test-cluster.ab6yejheyhgf.us-east-1.redshift.amazonaws.com. - For Port, enter 5439.
- For OAuth Client ID, enter the client ID from the IdP OIDC application.
- For OAuth Client Secret, enter the client secret from the IdP OIDC application.
- For Scope, enter the scope from the IdP application:
- For Okta, use
openid offline_access openidprofile. You can use the Okta scope values shared earlier as is on ThoughtSpot. You can modify the scope according to your requirements. - For EntraID, use the API scope and API permissions. For example,
api://1230a234-b456-7890-99c9-a12345bcc123/redshift_login offline_access.
- For Okta, use
- For API scope value, go to the OIDC application, and under Manage, choose Expose an API to acquire the value.
- For API permissions, go to the OIDC application, and under Manage, choose API permissions to acquire the permissions.
- For Auth Url, enter the authorization endpoint URI:
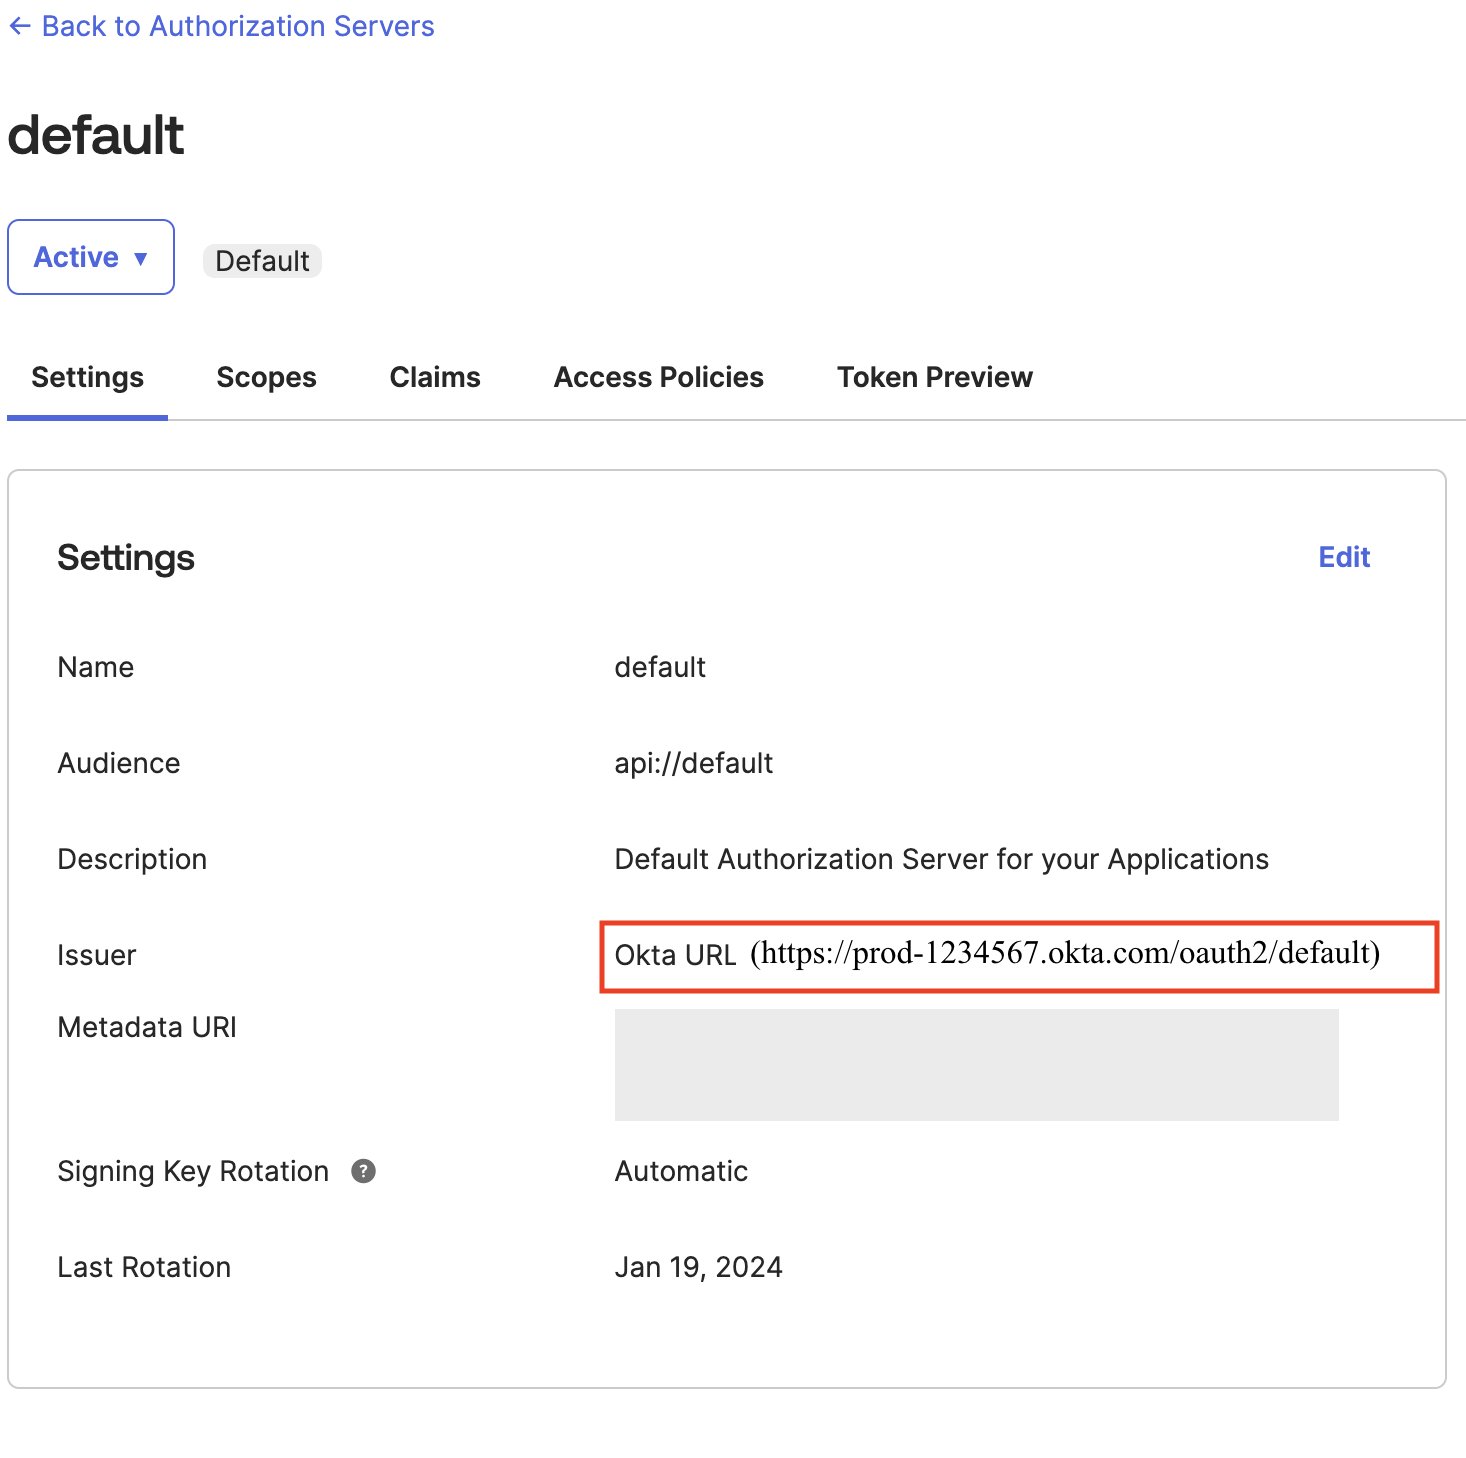
- For Okta use
https:// <okta-hostname>/oauth2/default/v1/authorize. For example,https://prod-1234567.okta.com/oauth2/default/v1/authorize. - For EntraID, use
https://login.microsoftonline.com/<Directory (tenantid) ID>/oauth2/v2.0/authorize. For example,https://login.microsoftonline.com/e12a1ab3-1234-12ab-12b3-1a5012221d12/oauth2/v2.0/authorize.
- For Okta use
- For Access token Url, enter the token endpoint URI:
- For Okta, use
https://<okta-hostname>/oauth2/default/v1/token. For example,https://prod-1234567.okta.com/oauth2/default/v1/token. - For EntraID, use
https://login.microsoftonline.com/<Directory (tenantid) ID>/oauth2/v2.0/token. For example,https://login.microsoftonline.com/e12a1ab3-1234-12ab-12b3-1a5012221d12/oauth2/v2.0/token.
- For Okta, use
- For AWS Identity Namespace, enter the namespace configured in your Amazon Redshift IAM Identity Center application. The default value is
AWSIDCunless previously customized. For this example, we useawsidc. - For Database, enter the database name you want to connect. For example, dev.
- For Host, enter the Redshift endpoint. For example,
- Choose Continue.
- Enter your IdP user credentials in the browser pop-up window.
The following screenshot illustrates the ThoughtSpot integration with Amazon Redshift using Okta as the IdP.

The following screenshot shows the ThoughtSpot integration with Amazon Redshift using EntraID as the IdP.

Upon a successful authentication, you will be redirected back to ThoughtSpot and logged in as an IAM Identity Center authenticated user.
Congratulations! You’ve logged in through IAM Identity Center and Amazon Redshift, and you’re ready to dive into your data analysis with ThoughtSpot.
Clean up
Complete the following steps to clean up your resources:
- Delete the IdP applications that you created to integrate with IAM Identity Center.
- Delete the IAM Identity Center configuration.
- Delete the Amazon Redshift application and the Amazon Redshift provisioned cluster or serverless instance that you created for testing.
- Delete the IAM role and IAM policy that you created for IAM Identity Center and Amazon Redshift integration.
- Delete the permission set from IAM Identity Center that you created for Amazon Redshift Query Editor V2 in the management account.
- Delete the ThoughtSpot connection to integrate with Amazon Redshift using AWS IDC OAuth.
Conclusion
In this post, we explored how to integrate ThoughtSpot with Amazon Redshift using IAM Identity Center. The process consisted of registering an OIDC application, setting up an IAM Identity Center TTI, and finally configuring ThoughtSpot for IAM Identity Center authentication. This setup creates a robust and secure analytics environment that streamlines data access for business users.
For additional guidance and detailed documentation, refer to the following key resources:
- Connect Redshift with AWS IAM Identity Center for a single sign-on experience
- Integrate Identity Provider (IdP) with Amazon Redshift Query Editor V2 and SQL Client using AWS IAM Identity Center for seamless Single Sign-On
- Simplify access management with Amazon Redshift and AWS Lake Formation for users in an External Identity Provider
- Set up cross-account AWS Glue Data Catalog access using AWS Lake Formation and AWS IAM Identity Center with Amazon Redshift and Amazon QuickSight
About the authors
 Maneesh Sharma is a Senior Database Engineer at AWS with more than a decade of experience designing and implementing large-scale data warehouse and analytics solutions. He collaborates with various Amazon Redshift Partners and customers to drive better integration.
 BP Yau is a Sr Partner Solutions Architect at AWS. His role is to help customers architect big data solutions to process data at scale. Before AWS, he helped Amazon.com Supply Chain Optimization Technologies migrate its Oracle data warehouse to Amazon Redshift and build its next generation big data analytics platform using AWS technologies.
 Ali Alladin is the Senior Director of Product Management and Partner Solutions at ThoughtSpot. In this role, Ali oversees Cloud Engineering and Operations, ensuring seamless integration and optimal performance of ThoughtSpot’s cloud-based services. Additionally, Ali spearheads the development of AI-powered solutions in augmented and embedded analytics, collaborating closely with technology partners to drive innovation and deliver cutting-edge analytics capabilities. With a robust background in product management and a keen understanding of AI technologies, Ali is dedicated to pushing the boundaries of what’s possible in the analytics space, helping organizations harness the full potential of their data.
 Debu Panda is a Senior Manager, Product Management at AWS. He is an industry leader in analytics, application platform, and database technologies, and has more than 25 years of experience in the IT world.
R2 Data Catalog: Managed Apache Iceberg tables with zero egress fees
Post Syndicated from Phillip Jones original https://blog.cloudflare.com/r2-data-catalog-public-beta/
Apache Iceberg is quickly becoming the standard table format for querying large analytic datasets in object storage. We’re seeing this trend firsthand as more and more developers and data teams adopt Iceberg on Cloudflare R2. But until now, using Iceberg with R2 meant managing additional infrastructure or relying on external data catalogs.
So we’re fixing this. Today, we’re launching the R2 Data Catalog in open beta, a managed Apache Iceberg catalog built directly into your Cloudflare R2 bucket.
If you’re not already familiar with it, Iceberg is an open table format built for large-scale analytics on datasets stored in object storage. With R2 Data Catalog, you get the database-like capabilities Iceberg is known for – ACID transactions, schema evolution, and efficient querying – without the overhead of managing your own external catalog.
R2 Data Catalog exposes a standard Iceberg REST catalog interface, so you can connect the engines you already use, like PyIceberg, Snowflake, and Spark. And, as always with R2, there are no egress fees, meaning that no matter which cloud or region your data is consumed from, you won’t have to worry about growing data transfer costs.
Ready to query data in R2 right now? Jump into the developer docs and enable a data catalog on your R2 bucket in just a few clicks. Or keep reading to learn more about Iceberg, data catalogs, how metadata files work under the hood, and how to create your first Iceberg table.
Apache Iceberg is an open table format for analyzing large datasets in object storage. It brings database-like features – ACID transactions, time travel, and schema evolution – to files stored in formats like Parquet or ORC.
Historically, data lakes were just collections of raw files in object storage. However, without a unified metadata layer, datasets could easily become corrupted, were difficult to evolve, and queries often required expensive full-table scans.
Iceberg solves these problems by:
-
Providing ACID transactions for reliable, concurrent reads and writes.
-
Maintaining optimized metadata, so engines can skip irrelevant files and avoid unnecessary full-table scans.
-
Supporting schema evolution, allowing columns to be added, renamed, or dropped without rewriting existing data.
Iceberg is already widely supported by engines like Apache Spark, Trino, Snowflake, DuckDB, and ClickHouse, with a fast-growing community behind it.
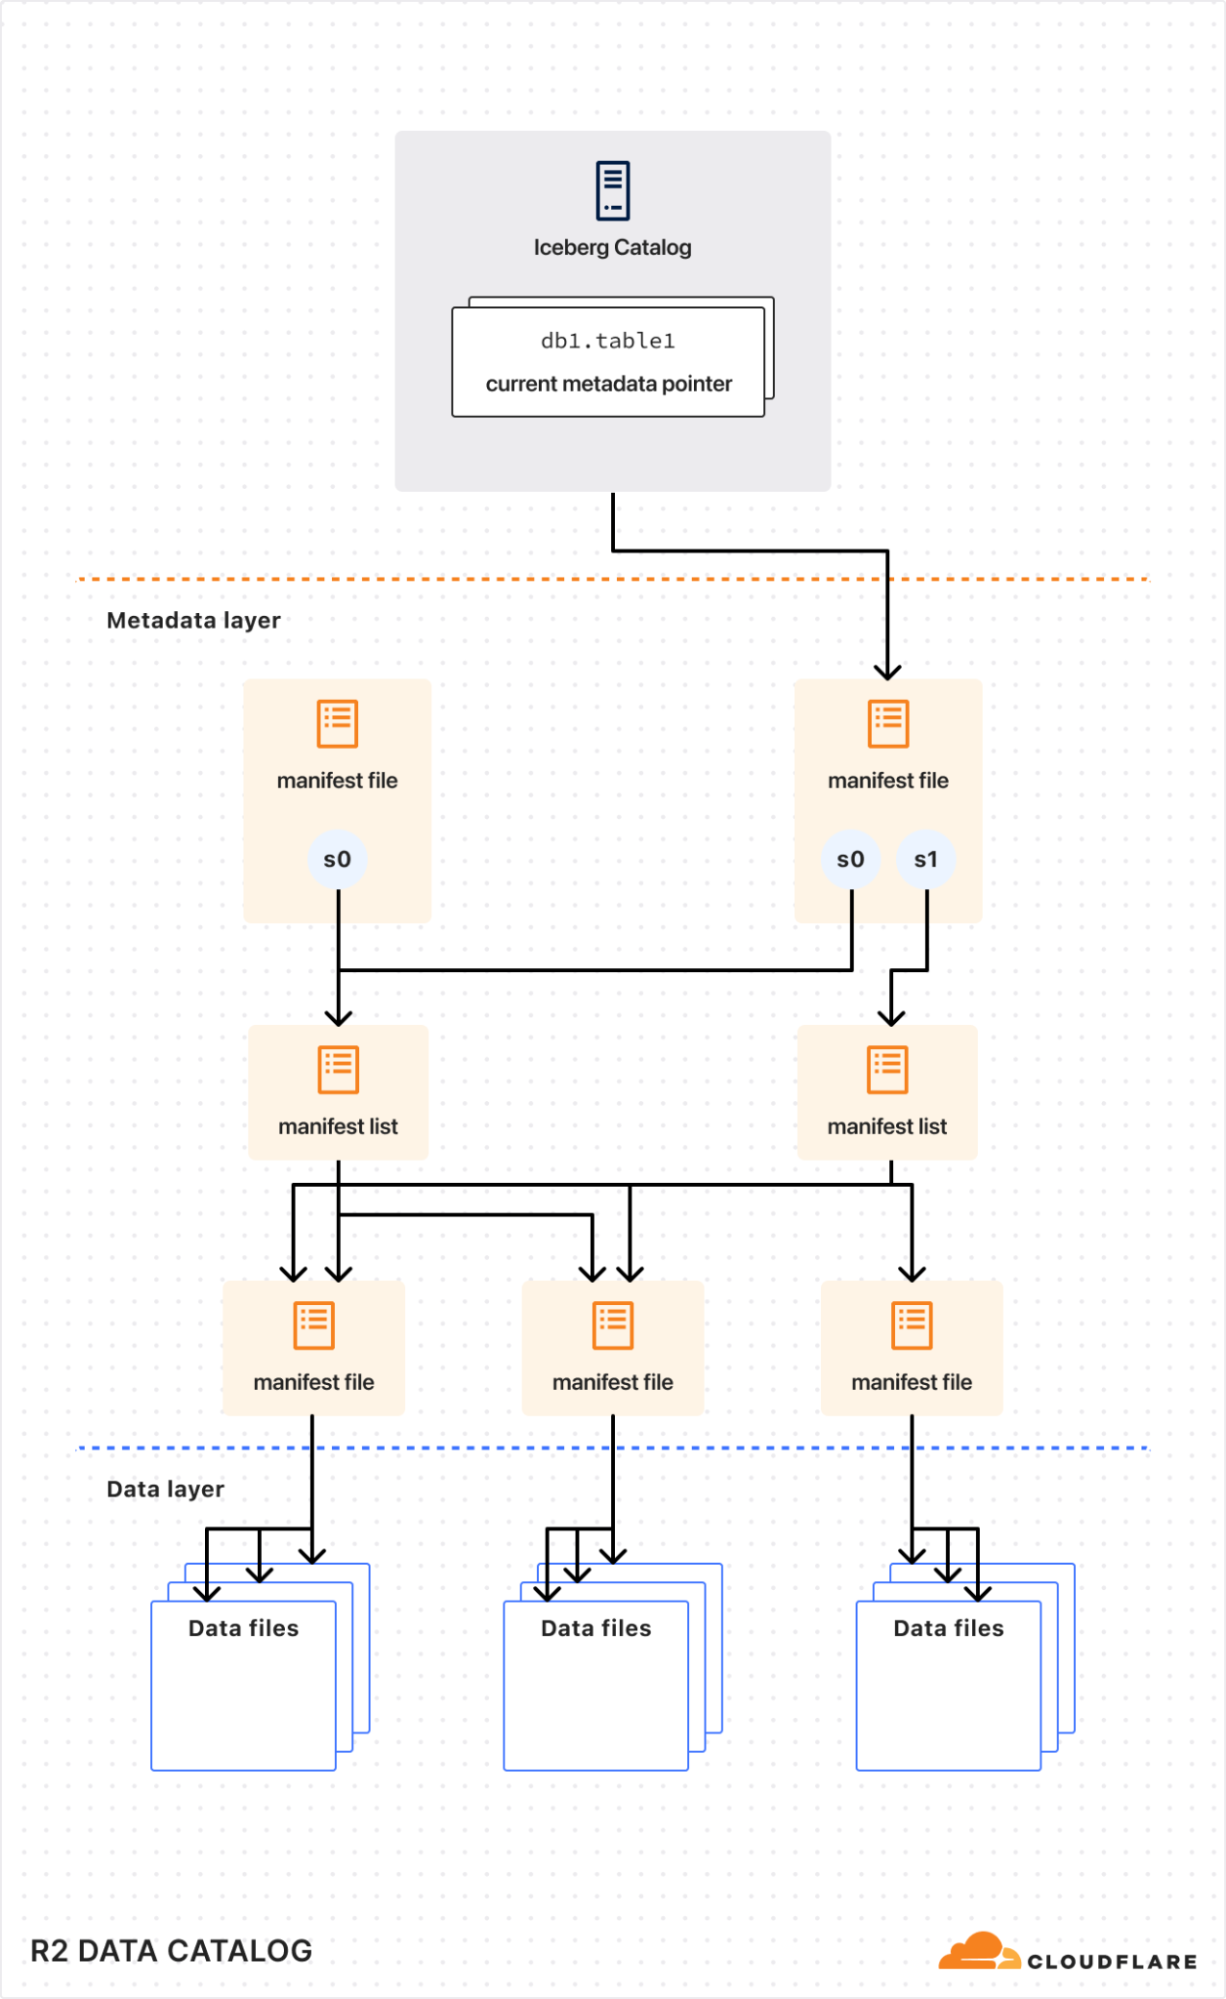
Internally, an Iceberg table is a collection of data files (typically stored in columnar formats like Parquet or ORC) and metadata files (typically stored in JSON or Avro) that describe table snapshots, schemas, and partition layouts.
To understand how query engines interact efficiently with Iceberg tables, it helps to look at an Iceberg metadata file (simplified):
{
  "format-version": 2,
  "table-uuid": "0195e49b-8f7c-7933-8b43-d2902c72720a",
  "location": "s3://my-bucket/warehouse/0195e49b-79ca/table",
  "current-schema-id": 0,
  "schemas": [
    {
      "schema-id": 0,
      "type": "struct",
      "fields": [
        { "id": 1, "name": "id", "required": false, "type": "long" },
        { "id": 2, "name": "data", "required": false, "type": "string" }
      ]
    }
  ],
  "current-snapshot-id": 3567362634015106507,
  "snapshots": [
    {
      "snapshot-id": 3567362634015106507,
      "sequence-number": 1,
      "timestamp-ms": 1743297158403,
      "manifest-list": "s3://my-bucket/warehouse/0195e49b-79ca/table/metadata/snap-3567362634015106507-0.avro",
      "summary": {},
      "schema-id": 0
    }
  ],
  "partition-specs": [{ "spec-id": 0, "fields": [] }]
}
A few of the important components are:
-
schemas: Iceberg tracks schema changes over time. Engines use schema information to safely read and write data without needing to rewrite underlying files. -
snapshots: Each snapshot references a specific set of data files that represent the state of the table at a point in time. This enables features like time travel. -
partition-specs: These define how the table is logically partitioned. Query engines leverage this information during planning to skip unnecessary partitions, greatly improving query performance.
By reading Iceberg metadata, query engines can efficiently prune partitions, load only the relevant snapshots, and fetch only the data files it needs, resulting in faster queries.
Although the Iceberg data and metadata files themselves live directly in object storage (like R2), the list of tables and pointers to the current metadata need to be tracked centrally by a data catalog.
Think of a data catalog as a library’s index system. While books (your data) are physically distributed across shelves (object storage), the index provides a single source of truth about what books exist, their locations, and their latest editions. Without this index, readers (query engines) would waste time searching for books, might access outdated versions, or could accidentally shelve new books in ways that make them unfindable.
Similarly, data catalogs ensure consistent, coordinated access, allowing multiple query engines to safely read from and write to the same tables without conflicts or data corruption.
Ready to try it out? Here’s a quick example using PyIceberg and Python to get you started. For a detailed step-by-step guide, check out our developer docs.
1. Enable R2 Data Catalog on your bucket:
npx wrangler r2 bucket catalog enable my-bucketOr use the Cloudflare dashboard: Navigate to R2 Object Storage > Settings > R2 Data Catalog and click Enable.
2. Create a Cloudflare API token with permissions for both R2 storage and the data catalog.
3. Install PyIceberg and PyArrow, then open a Python shell or notebook:
pip install pyiceberg pyarrow4. Connect to the catalog and create a table:
import pyarrow as pa
from pyiceberg.catalog.rest import RestCatalog

# Define catalog connection details (replace variables)
WAREHOUSE = "<WAREHOUSE>"
TOKEN = "<TOKEN>"
CATALOG_URI = "<CATALOG_URI>"

# Connect to R2 Data Catalog
catalog = RestCatalog(
    name="my_catalog",
    warehouse=WAREHOUSE,
    uri=CATALOG_URI,
    token=TOKEN,
)

# Create default namespace
catalog.create_namespace("default")

# Create simple PyArrow table
df = pa.table({
    "id": [1, 2, 3],
    "name": ["Alice", "Bob", "Charlie"],
})

# Create an Iceberg table
table = catalog.create_table(
    ("default", "my_table"),
    schema=df.schema,
)
You can now append more data or run queries, just as you would with any Apache Iceberg table.
While R2 Data Catalog is in open beta, there will be no additional charges beyond standard R2 storage and operations costs incurred by query engines accessing data. Storage pricing for buckets with R2 Data Catalog enabled remains the same as standard R2 buckets – \$0.015 per GB-month. As always, egress directly from R2 buckets remains \$0.
In the future, we plan to introduce pricing for catalog operations (e.g., creating tables, retrieving table metadata, etc.) and data compaction.
Below is our current thinking on future pricing. We’ll communicate more details around timing well before billing begins, so you can confidently plan your workloads.
|
Pricing |
|
|
R2 storage For standard storage class |
$0.015 per GB-month (no change) |
|
R2 Class A operations |
$4.50 per million operations (no change) |
|
R2 Class B operations |
$0.36 per million operations (no change) |
|
Data Catalog operations e.g., create table, get table metadata, update table properties |
$9.00 per million catalog operations |
|
Data Catalog compaction data processed |
$0.05 per GB processed $4.00 per million objects processed |
|
Data egress |
$0 (no change, always free) |
We’re excited to see how you use R2 Data Catalog! If you’ve never worked with Iceberg – or even analytics data – before, we think this is the easiest way to get started.
Next on our roadmap is tackling compaction and table optimization. Query engines typically perform better when dealing with fewer, but larger data files. We will automatically re-write collections of small data files into larger files to deliver even faster query performance.
We’re also collaborating with the broad Apache Iceberg community to expand query-engine compatibility with the Iceberg REST Catalog spec.
We’d love your feedback. Join the Cloudflare Developer Discord to ask questions and share your thoughts during the public beta. For more details, examples, and guides, visit our developer documentation.
Making Super Slurper 5x faster with Workers, Durable Objects, and Queues
Post Syndicated from Connor Maddox original https://blog.cloudflare.com/making-super-slurper-five-times-faster/
Super Slurper is Cloudflare’s data migration tool that is designed to make large-scale data transfers between cloud object storage providers and Cloudflare R2 easy. Since its launch, thousands of developers have used Super Slurper to move petabytes of data from AWS S3, Google Cloud Storage, and other S3-compatible services to R2.
But we saw an opportunity to make it even faster. We rearchitected Super Slurper from the ground up using our Developer Platform — building on Cloudflare Workers, Durable Objects, and Queues — and improved transfer speeds by up to 5x. In this post, we’ll dive into the original architecture, the performance bottlenecks we identified, how we solved them, and the real-world impact of these improvements.
Super Slurper originally shared its architecture with SourcingKit, a tool built to bulk import images from AWS S3 into Cloudflare Images. SourcingKit was deployed on Kubernetes and ran alongside the Images service. When we started building Super Slurper, we split it into its own Kubernetes namespace and introduced a few new APIs to make it easier to use for the object storage use case. This setup worked well and helped thousands of developers move data to R2.
However, it wasn’t without its challenges. SourcingKit wasn’t designed to handle the scale required for large, petabytes-scale transfers. SourcingKit, and by extension Super Slurper, operated on Kubernetes clusters located in one of our core data centers, meaning it had to share compute resources and bandwidth with Cloudflare’s control plane, analytics, and other services. As the number of migrations grew, these resource constraints became a clear bottleneck.
For a service transferring data between object storage providers, the job is simple: list objects from the source, copy them to the destination, and repeat. This is exactly how the original Super Slurper worked. We listed objects from the source bucket, pushed that list to a Postgres-based queue (pg_queue), and then pulled from this queue at a steady pace to copy objects over. Given the scale of object storage migrations, bandwidth usage was inevitably going to be high. This made it challenging to scale.
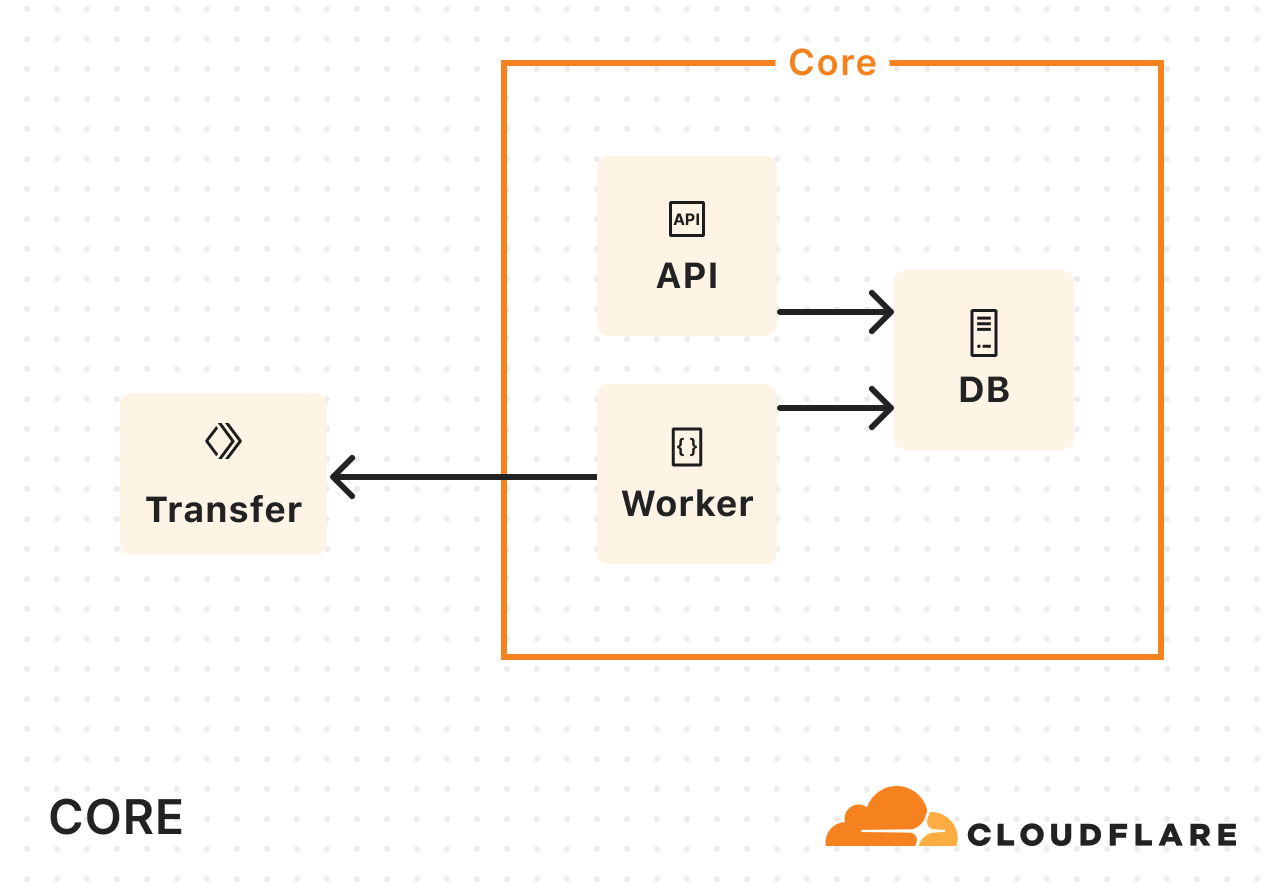
To address the bandwidth constraints operating solely in our core data center, we introduced Cloudflare Workers into the mix. Instead of handling the copying of data in our core data center, we started calling out to a Worker to do the actual copying:
As Super Slurper’s usage grew, so did our Kubernetes resource consumption. A significant amount of time during data transfers was spent waiting on network I/O or storage, and not actually doing compute-intensive tasks. So we didn’t need more memory or more CPU, we needed more concurrency.
To keep up with demand, we kept increasing the replica count. But eventually, we hit a wall. We were dealing with scalability challenges when running on the order of tens of pods when we wanted multiple orders of magnitude more.
We decided to rethink the entire approach from first principles, instead of leaning on the architecture we had inherited. In about a week, we built a rough proof of concept using Cloudflare Workers, Durable Objects, and Queues. We listed objects from the source bucket, pushed them into a queue, and then consumed messages from the queue to initiate transfers. Although this sounds very similar to what we did in the original implementation, building on our Developer Platform allowed us to automatically scale an order of magnitude higher than before.
-
Cloudflare Queues: Enables asynchronous object transfers and auto-scales to meet the number of objects being migrated.
-
Cloudflare Workers: Runs lightweight compute tasks without the overhead of Kubernetes and optimizes where in the world each part of the process runs for lower latency and better performance.
-
SQLite-backed Durable Objects (DOs): Acts as a fully distributed database, eliminating the limitations of a single PostgreSQL instance.
-
Hyperdrive: Provides fast access to historical job data from the original PostgreSQL database, keeping it as an archive store.
We ran a few tests and found that our proof of concept was slower than the original implementation for small transfers (a few hundred objects), but it matched and eventually exceeded the performance of the original as transfers scaled into the millions of objects. That was the signal we needed to invest the time to take our proof of concept to production.
We removed our proof of concept hacks, worked on stability, and found new ways to make transfers scale to even higher concurrency. After a few iterations, we landed on something we were happy with.
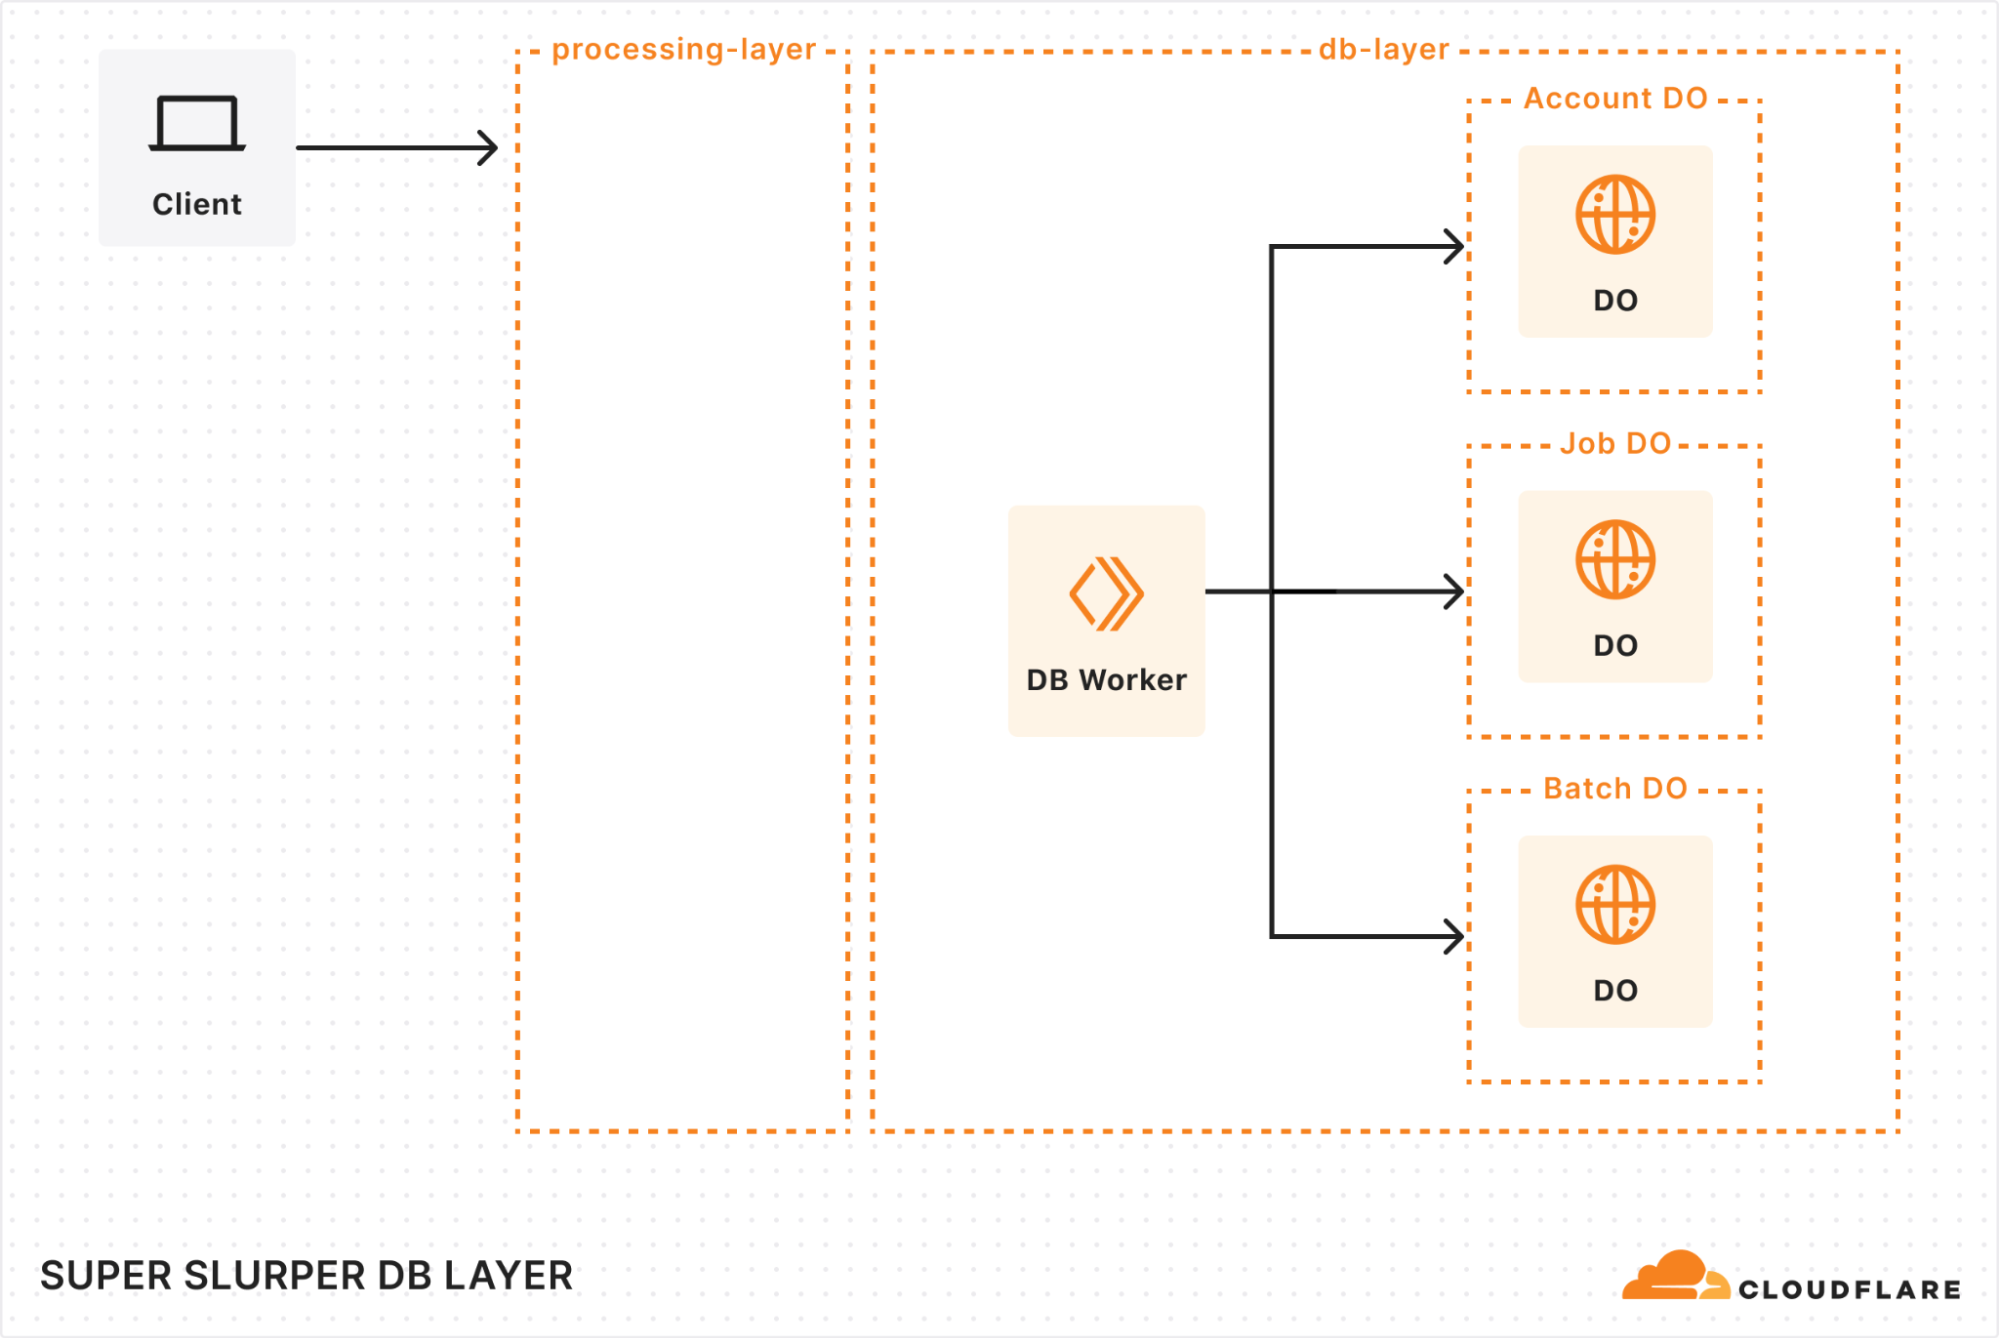
Processing layer: managing the flow of migration
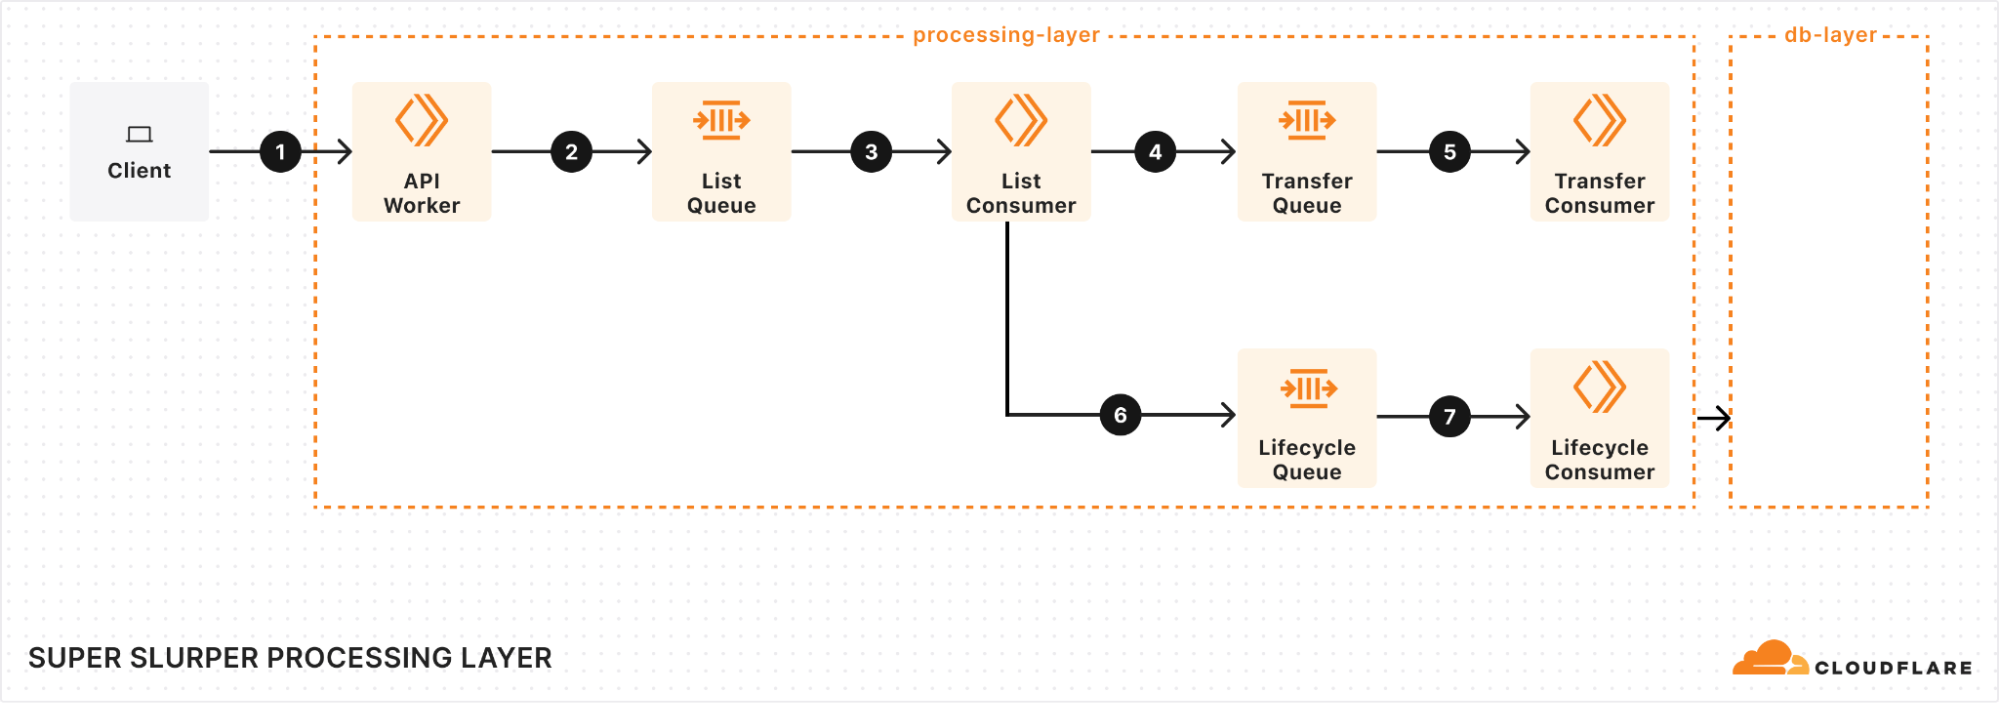
At the heart of our processing layer are queues, consumers, and workers. Here’s what the process looks like:
Kicking off a migration
When a client triggers a migration, it starts with a request sent to our API Worker. This worker takes the details of the migration, stores them in the database, and adds a message to the List Queue to start the process.
Listing source bucket objects
The List Queue Consumer is where things start to pick up. It pulls messages from the queue, retrieves object listings from the source bucket, applies any necessary filters, and stores important metadata in the database. Then, it creates new tasks by enqueuing object transfer messages into the Transfer Queue.
We immediately queue new batches of work, maximizing concurrency. A built-in throttling mechanism prevents us from adding more messages to our queues when unexpected failures occur, such as dependent systems going down. This helps maintain stability and prevents overload during disruptions.
Efficient object transfers
The Transfer Queue Consumer Workers pull object transfer messages from the queue, ensuring that each object is processed only once by locking the object key in the database. When the transfer finishes, the object is unlocked. For larger objects, we break them into manageable chunks and transfer them as multipart uploads.
Handling failures gracefully
Failures are inevitable in any distributed system, and we had to make sure we accounted for that. We implemented automatic retries for transient failures, so issues don’t interrupt the flow of the migration. But if something can’t be resolved with retries, the message goes into the Dead Letter Queue (DLQ), where it is logged for later review and resolution.
Job completion & lifecycle management
Once all the objects are listed and the transfers are in progress, the Lifecycle Queue Consumer keeps an eye on everything. It monitors the ongoing transfers, ensuring that no object is left behind. When all the transfers are complete, the job is marked as finished and the migration process wraps up.
When building our new architecture, we knew we needed a robust solution to handle massive datasets while ensuring retrieval of historical job data. That’s where our combination of Durable Objects (DOs) and Hyperdrive came in.
Durable Objects
We gave each account a dedicated Durable Object to track migration jobs. Each job’s DO stores vital details, such as bucket names, user options, and job state. This ensured everything stayed organized and easy to manage. To support large migrations, we also added a Batch DO that manages all the objects queued for transfer, storing their transfer state, object keys, and any extra metadata.
As migrations scaled up to billions of objects, we had to get creative with storage. We implemented a sharding strategy to distribute request loads, preventing bottlenecks and working around SQLite DO’s 10 GB storage limit. As objects are transferred, we clean up their details, optimizing storage space along the way. It’s surprising how much storage a billion object keys can require!
Hyperdrive
Since we were rebuilding a system with years of migration history, we needed a way to preserve and access every past migration detail. Hyperdrive serves as a bridge to our legacy systems, enabling seamless retrieval of historical job data from our core PostgreSQL database. It’s not just a data retrieval mechanism, but an archive for complex migration scenarios.
So, after all of that, did we actually achieve our goal of making transfers faster?
We ran a test migration of 75,000 objects from AWS S3 to R2. With the original implementation, the transfer took 15 minutes and 30 seconds. After our performance improvements, the same migration completed in just 3 minutes and 25 seconds.
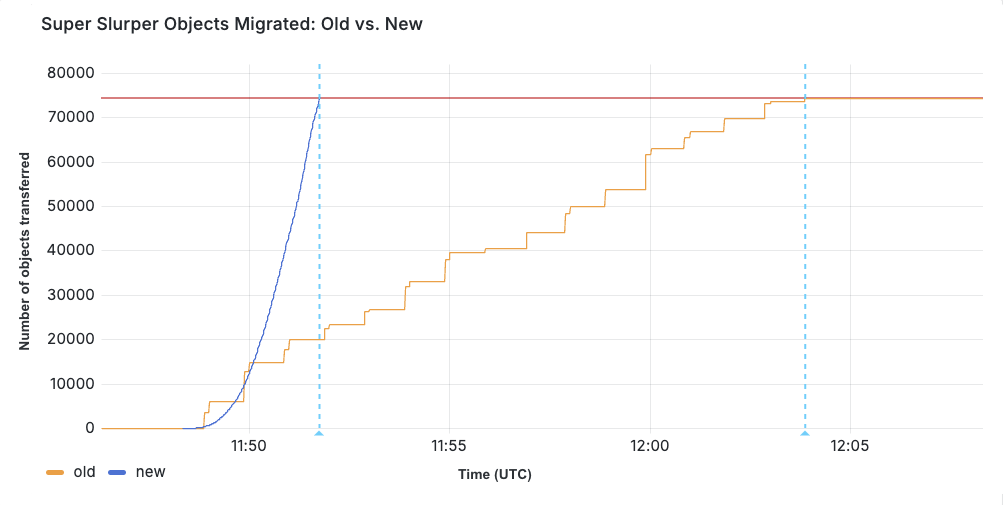
When production migrations started using the new service in February, we saw even greater improvements in some cases, especially depending on the distribution of object sizes. Super Slurper has been around for about two years. But the improved performance has led to it being able to move much more data — 35% of all objects copied by Super Slurper happened just in the last two months.
One of the biggest challenges we faced with the new architecture was handling duplicate messages. There were a couple of ways duplicates could occur:
-
Queues provides at-least-once delivery, which means consumers may receive the same message more than once to guarantee delivery.
-
Failures and retries could also create apparent duplicates. For example, if a request to a Durable Object fails after the object has already been transferred, the retry could reprocess the same object.
If not handled correctly, this could result in the same object being transferred multiple times. To solve this, we implemented several strategies to ensure each object was accurately accounted for and only transferred once:
-
Since listing is sequential (e.g., to get object 2, you need the continuation token from listing object 1), we assign a sequence ID to each listing operation. This allows us to detect duplicate listings and prevent multiple processes from starting simultaneously. This is particularly useful because we don’t wait for database and queue operations to complete before listing the next batch. If listing 2 fails, we can retry it, and if listing 3 has already started, we can short-circuit unnecessary retries.
-
Each object is locked when its transfer begins, preventing parallel transfers of the same object. Once successfully transferred, the object is unlocked by deleting its key from the database. If a message for that object reappears later, we can safely assume it has already been transferred if the key no longer exists.
-
We rely on database transactions to keep our counts accurate. If an object fails to unlock, its count remains unchanged. Similarly, if an object key fails to be added to the database, the count isn’t updated, and the operation will be retried later.
-
As a last failsafe, we check whether the object already exists in the target bucket and was published after the start of our migration. If so, we assume it was transferred by our process (or another) and safely skip it.

We’re always exploring ways to make Super Slurper faster, more scalable, and even easier to use — this is just the beginning.
-
We recently launched the ability to migrate from any S3 compatible storage provider!
-
Data migrations are still currently limited to 3 concurrent migrations per account, but we want to increase that limit. This will allow object prefixes to be split up into separate migrations and run in parallel, drastically increasing the speed at which a bucket can be migrated. For more information on Super Slurper and how to migrate data from existing object storage to R2, refer to our documentation.
P.S. As part of this update, we made the API much simpler to interact with, so migrations can now be managed programmatically!
Sequential consistency without borders: how D1 implements global read replication
Post Syndicated from Justin Mazzola Paluska original https://blog.cloudflare.com/d1-read-replication-beta/
Read replication of D1 databases is in public beta!
D1 read replication makes read-only copies of your database available in multiple regions across Cloudflare’s network. For busy, read-heavy applications like e-commerce websites, content management tools, and mobile apps:
-
D1 read replication lowers average latency by routing user requests to read replicas in nearby regions.
-
D1 read replication increases overall throughput by offloading read queries to read replicas, allowing the primary database to handle more write queries.
The main copy of your database is called the primary database and the read-only copies are called read replicas. When you enable replication for a D1 database, the D1 service automatically creates and maintains read replicas of your primary database. As your users make requests, D1 routes those requests to an appropriate copy of the database (either the primary or a replica) based on performance heuristics, the type of queries made in those requests, and the query consistency needs as expressed by your application.
All of this global replica creation and request routing is handled by Cloudflare at no additional cost.
To take advantage of read replication, your Worker needs to use the new D1 Sessions API. Click the button below to run a Worker using D1 read replication with this code example to see for yourself!

D1’s read replication feature is built around the concept of database sessions. A session encapsulates all the queries representing one logical session for your application. For example, a session might represent all requests coming from a particular web browser or all requests coming from a mobile app used by one of your users. If you use sessions, your queries will use the appropriate copy of the D1 database that makes the most sense for your request, be that the primary database or a nearby replica.
The sessions implementation ensures sequential consistency for all queries in the session, no matter what copy of the database each query is routed to. The sequential consistency model has important properties like “read my own writes” and “writes follow reads,” as well as a total ordering of writes. The total ordering of writes means that every replica will see transactions committed in the same order, which is exactly the behavior we want in a transactional system. Said another way, sequential consistency guarantees that the reads and writes are executed in the order in which you write them in your code.
Some examples of consistency implications in real-world applications:
-
You are using an online store and just placed an order (write query), followed by a visit to the account page to list all your orders (read query handled by a replica). You want the newly placed order to be listed there as well.
-
You are using your bank’s web application and make a transfer to your electricity provider (write query), and then immediately navigate to the account balance page (read query handled by a replica) to check the latest balance of your account, including that last payment.
Why do we need the Sessions API? Why can we not just query replicas directly?
Applications using D1 read replication need the Sessions API because D1 runs on Cloudflare’s global network and there’s no way to ensure that requests from the same client get routed to the same replica for every request. For example, the client may switch from WiFi to a mobile network in a way that changes how their requests are routed to Cloudflare. Or the data center that handled previous requests could be down because of an outage or maintenance.
D1’s read replication is asynchronous, so it’s possible that when you switch between replicas, the replica you switch to lags behind the replica you were using. This could mean that, for example, the new replica hasn’t learned of the writes you just completed. We could no longer guarantee useful properties like “read your own writes”. In fact, in the presence of shifty routing, the only consistency property we could guarantee is that what you read had been committed at some point in the past (read committed consistency), which isn’t very useful at all!
Since we can’t guarantee routing to the same replica, we flip the script and use the information we get from the Sessions API to make sure whatever replica we land on can handle the request in a sequentially-consistent manner.
Here’s what the Sessions API looks like in a Worker:
export default {
  async fetch(request: Request, env: Env) {
    // A. Create the session.
    // When we create a D1 session, we can continue where we left off from a previous
    // session if we have that session's last bookmark or use a constraint.
    const bookmark = request.headers.get('x-d1-bookmark') ?? 'first-unconstrained'
    const session = env.DB.withSession(bookmark)

    // Use this session for all our Workers' routes.
    const response = await handleRequest(request, session)

    // B. Return the bookmark so we can continue the session in another request.
    response.headers.set('x-d1-bookmark', session.getBookmark())

    return response
  }
}

async function handleRequest(request: Request, session: D1DatabaseSession) {
  const { pathname } = new URL(request.url)

  if (request.method === "GET" && pathname === '/api/orders') {
    // C. Session read query.
    const { results } = await session.prepare('SELECT * FROM Orders').all()
    return Response.json(results)

  } else if (request.method === "POST" && pathname === '/api/orders') {
    const order = await request.json<Order>()

    // D. Session write query.
    // Since this is a write query, D1 will transparently forward it to the primary.
    await session
      .prepare('INSERT INTO Orders VALUES (?, ?, ?)')
      .bind(order.orderId, order.customerId, order.quantity)
      .run()

    // E. Session read-after-write query.
    // In order for the application to be correct, this SELECT statement must see
    // the results of the INSERT statement above.
    const { results } = await session
      .prepare('SELECT * FROM Orders')
      .all()

    return Response.json(results)
  }

  return new Response('Not found', { status: 404 })
}
To use the Session API, you first need to create a session using the withSession method (step A). The withSession method takes a bookmark as a parameter, or a constraint. The provided constraint instructs D1 where to forward the first query of the session. Using first-unconstrained allows the first query to be processed by any replica without any restriction on how up-to-date it is. Using first-primary ensures that the first query of the session will be forwarded to the primary.
// A. Create the session.
const bookmark = request.headers.get('x-d1-bookmark') ?? 'first-unconstrained'
const session = env.DB.withSession(bookmark)
Providing an explicit bookmark instructs D1 that whichever database instance processes the query has to be at least as up-to-date as the provided bookmark (in case of a replica; the primary database is always up-to-date by definition). Explicit bookmarks are how we can continue from previously-created sessions and maintain sequential consistency across user requests.
Once you’ve created the session, make queries like you normally would with D1. The session object ensures that the queries you make are sequentially consistent with regards to each other.
// C. Session read query.
const { results } = await session.prepare('SELECT * FROM Orders').all()
For example, in the code example above, the session read query for listing the orders (step C) will return results that are at least as up-to-date as the bookmark used to create the session (step A).
More interesting is the write query to add a new order (step D) followed by the read query to list all orders (step E). Because both queries are executed on the same session, it is guaranteed that the read query will observe a database copy that includes the write query, thus maintaining sequential consistency.
// D. Session write query.
await session
  .prepare('INSERT INTO Orders VALUES (?, ?, ?)')
  .bind(order.orderId, order.customerId, order.quantity)
  .run()

// E. Session read-after-write query.
const { results } = await session
  .prepare('SELECT * FROM Orders')
  .all()
Note that we could make a single batch query to the primary including both the write and the list, but the benefit of using the new Sessions API is that you can use the extra read replica databases for your read queries and allow the primary database to handle more write queries.
The session object does the necessary bookkeeping to maintain the latest bookmark observed across all queries executed using that specific session, and always includes that latest bookmark in requests to D1. Note that any query executed without using the session object is not guaranteed to be sequentially consistent with the queries executed in the session.
When possible, we suggest continuing sessions across requests by including bookmarks in your responses to clients (step B), and having clients passing previously received bookmarks in their future requests.
// B. Return the bookmark so we can continue the session in another request.
response.headers.set('x-d1-bookmark', session.getBookmark())
This allows all of a client’s requests to be in the same session. You can do this by grabbing the session’s current bookmark at the end of the request (session.getBookmark()) and sending the bookmark in the response back to the client in HTTP headers, in HTTP cookies, or in the response body itself.
In this section, we will explore the classic scenario of a read-after-write query to showcase how using the new D1 Sessions API ensures that we get sequential consistency and avoid any issues with inconsistent results in our application.
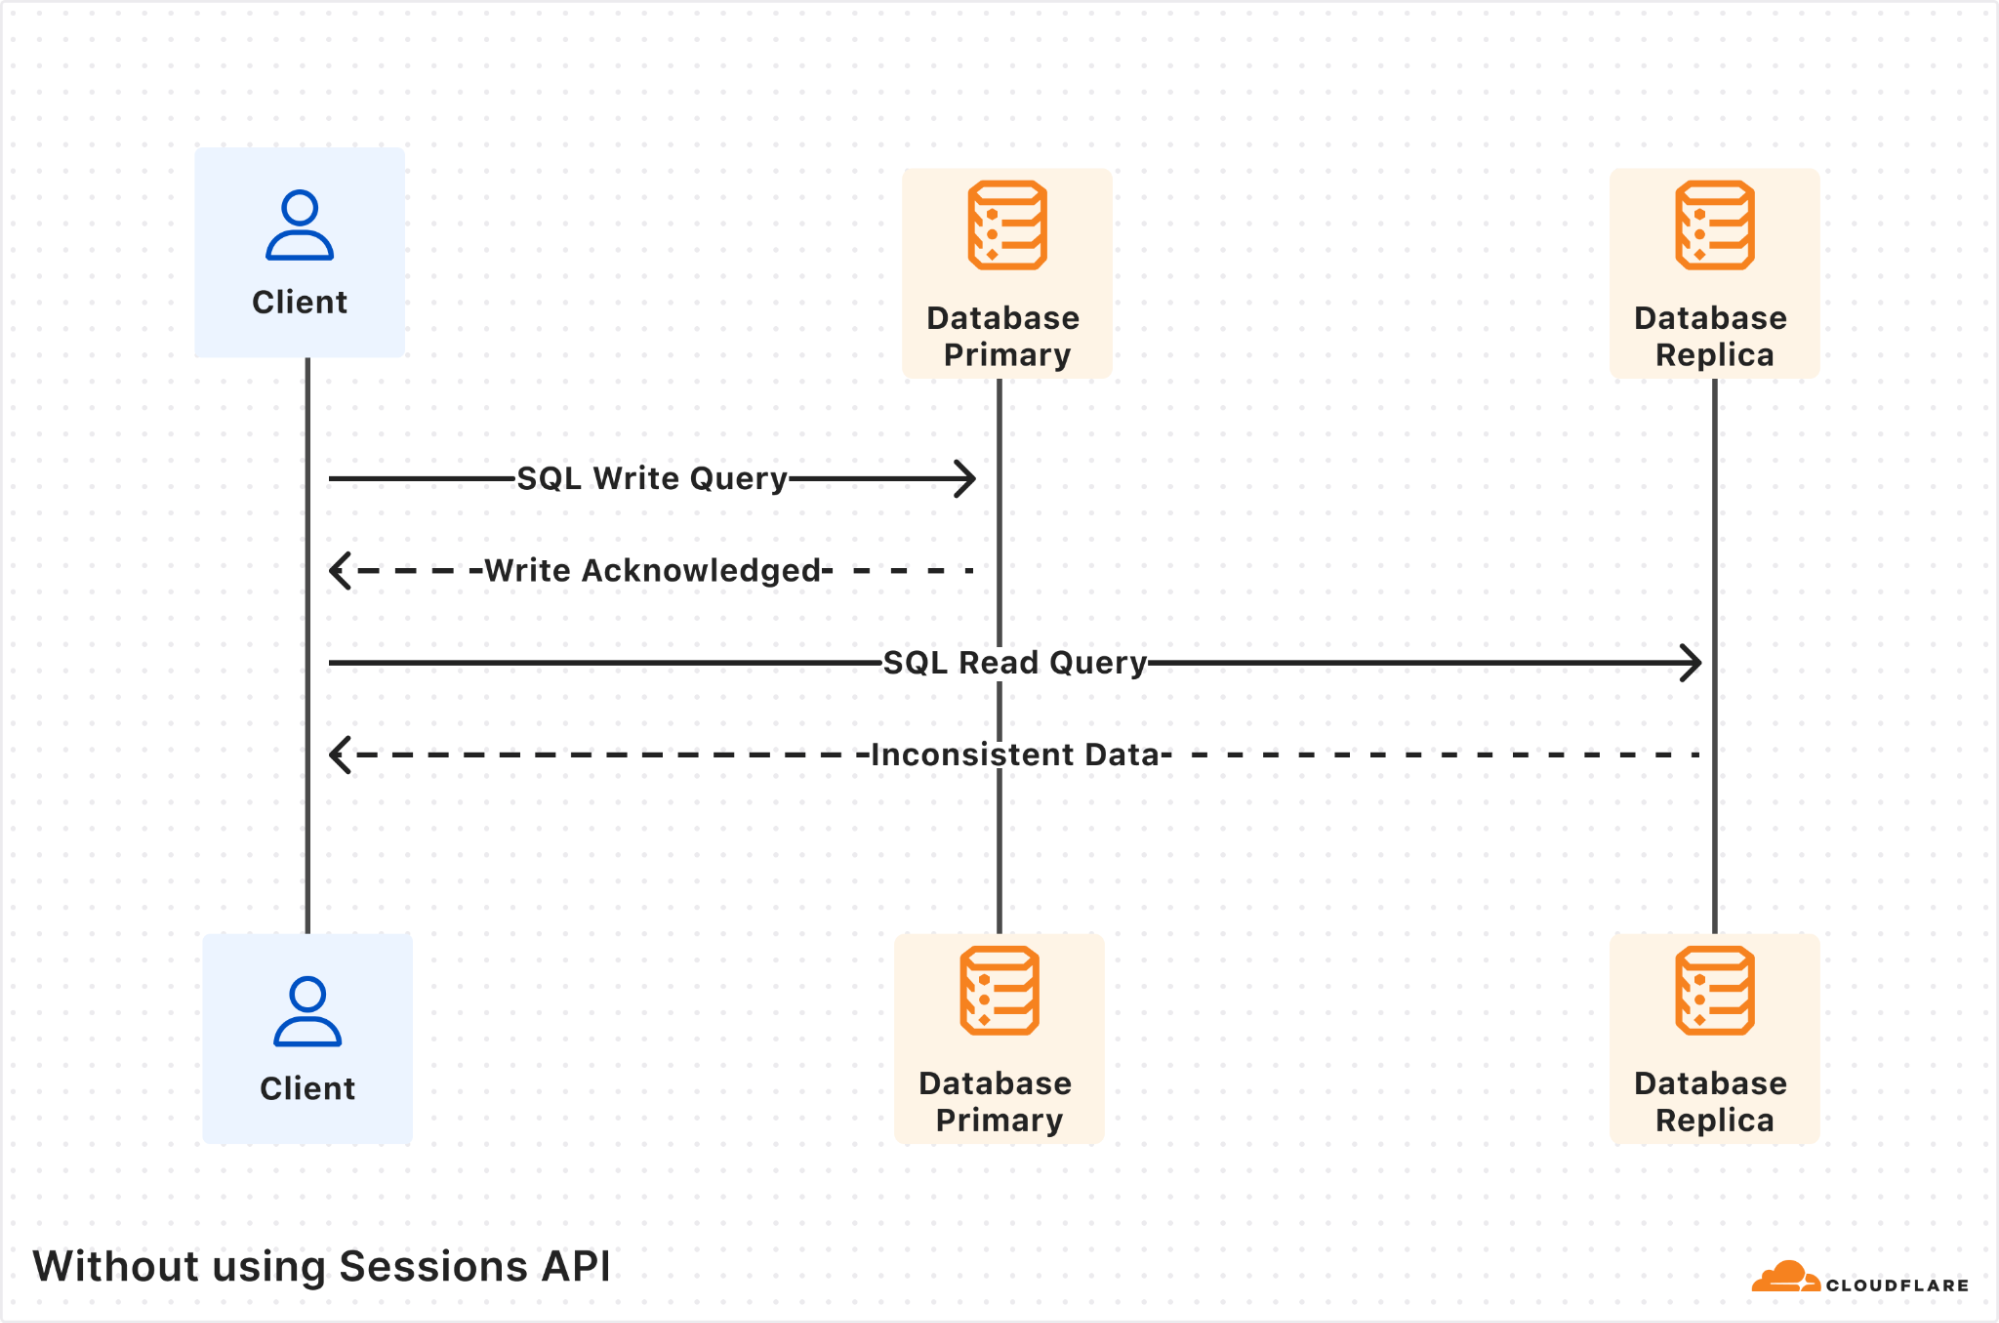
The Client, a user Worker, sends a D1 write query that gets processed by the database primary and gets the results back. However, the subsequent read query ends up being processed by a database replica. If the database replica is lagging far enough behind the database primary, such that it does not yet include the first write query, then the returned results will be inconsistent, and probably incorrect for your application business logic.
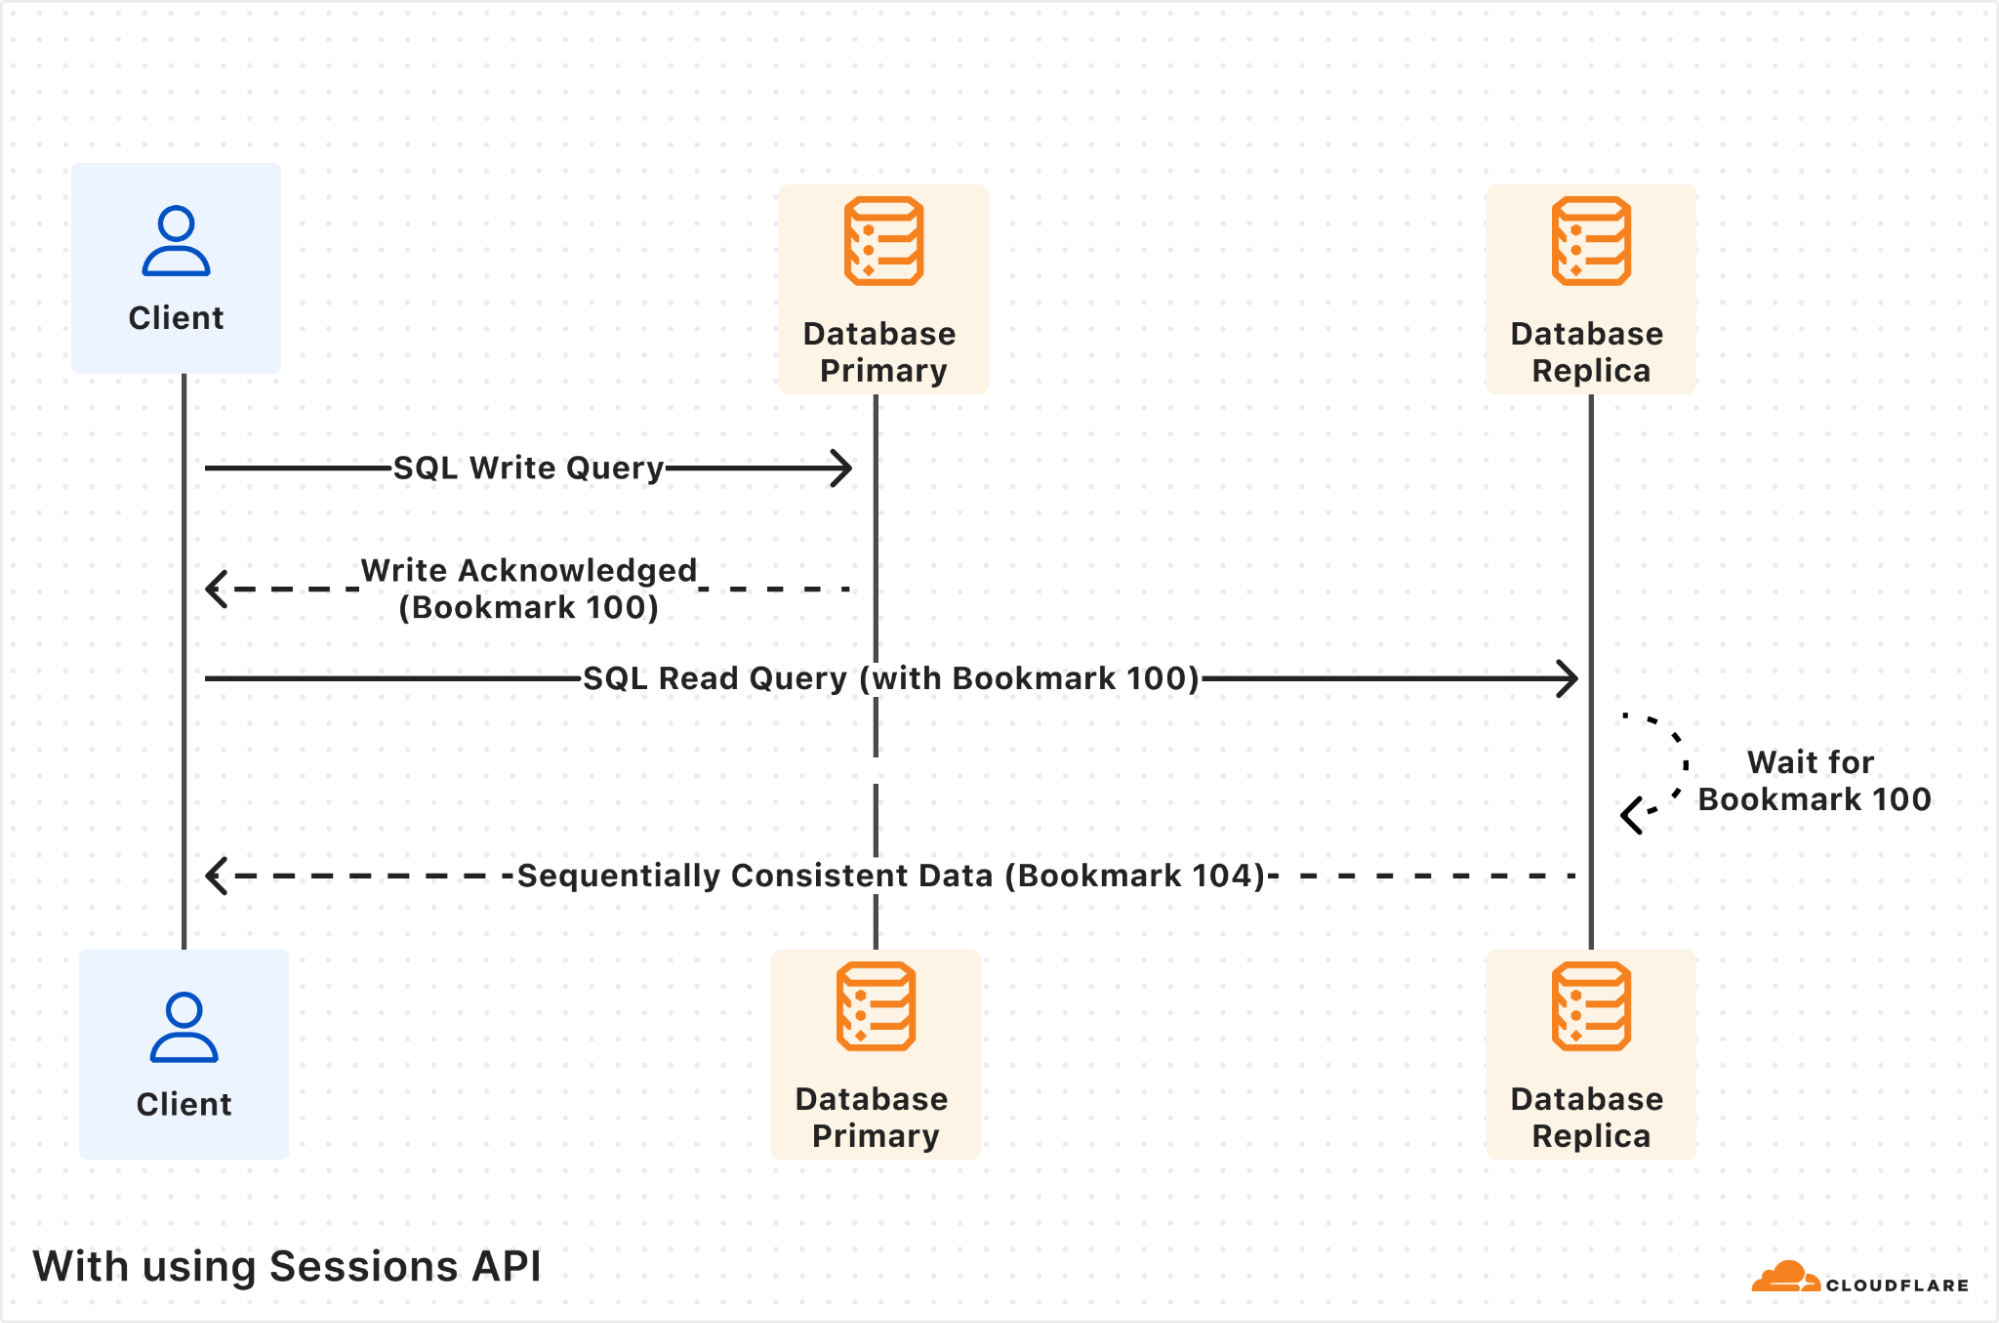
Using the Sessions API fixes the inconsistency issue. The first write query is again processed by the database primary, and this time the response includes “Bookmark 100”. The session object will store this bookmark for you transparently.
The subsequent read query is processed by database replica as before, but now since the query includes the previously received “Bookmark 100”, the database replica will wait until its database copy is at least up-to-date as “Bookmark 100”. Only once it’s up-to-date, the read query will be processed and the results returned, including the replica’s latest bookmark “Bookmark 104”.
Notice that the returned bookmark for the read query is “Bookmark 104”, which is different from the one passed in the query request. This can happen if there were other writes from other client requests that also got replicated to the database replica in-between the two queries our own client executed.
To start using D1 read replication:
-
Update your Worker to use the D1 Sessions API to tell D1 what queries are part of the same database session. The Sessions API works with databases that do not have read replication enabled as well, so it’s safe to ship this code even before you enable replicas. Here’s an example.
-
Enable replicas for your database via Cloudflare dashboard > Select D1 database > Settings.
D1 read replication is built into D1, and you don’t pay extra storage or compute costs for replicas. You incur the exact same D1 usage with or without replicas, based on rows_read and rows_written by your queries. Unlike other traditional database systems with replication, you don’t have to manually create replicas, including where they run, or decide how to route requests between the primary database and read replicas. Cloudflare handles this when using the Sessions API while ensuring sequential consistency.
Since D1 read replication is in beta, we recommend trying D1 read replication on a non-production database first, and migrate to your production workloads after validating read replication works for your use case.
If you don’t have a D1 database and want to try out D1 read replication, create a test database in the Cloudflare dashboard.
Once you’ve enabled D1 read replication, read queries will start to be processed by replica database instances. The response of each query includes information in the nested meta object relevant to read replication, like served_by_region and served_by_primary. The first denotes the region of the database instance that processed the query, and the latter will be true if-and-only-if your query was processed by the primary database instance.
In addition, the D1 dashboard overview for a database now includes information about the database instances handling your queries. You can see how many queries are handled by the primary instance or by a replica, and a breakdown of the queries processed by region. The example screenshots below show graphs displaying the number of queries executed and number of rows read by each region.
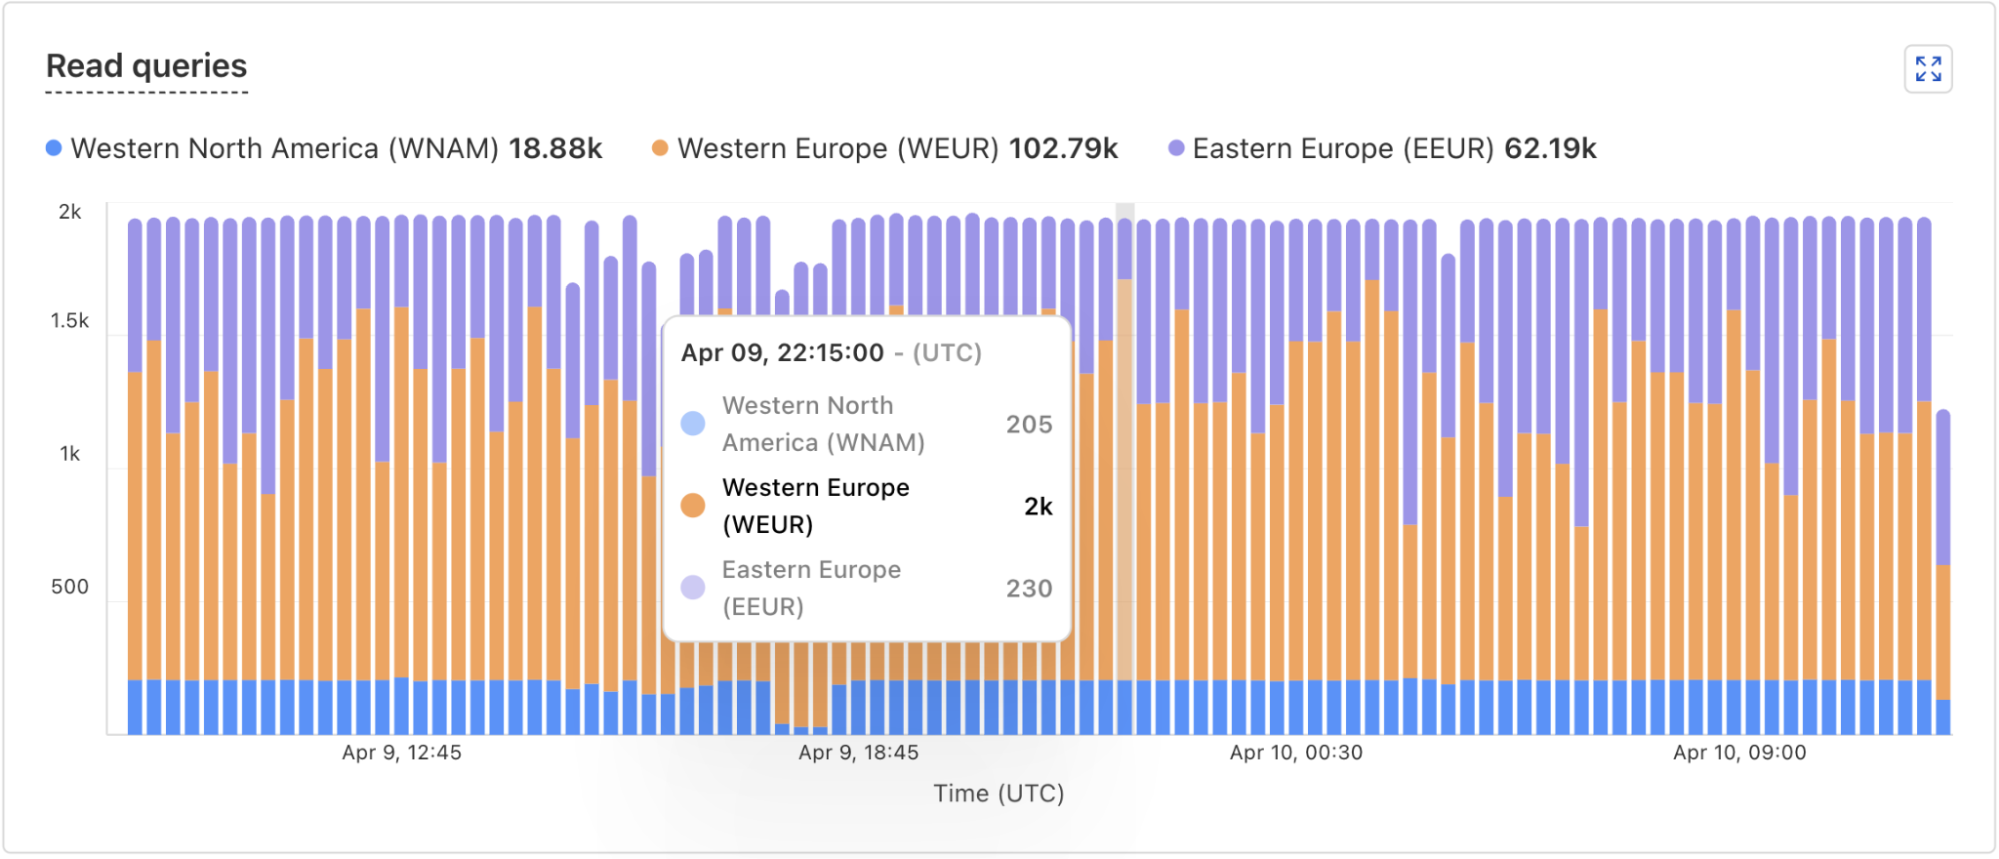
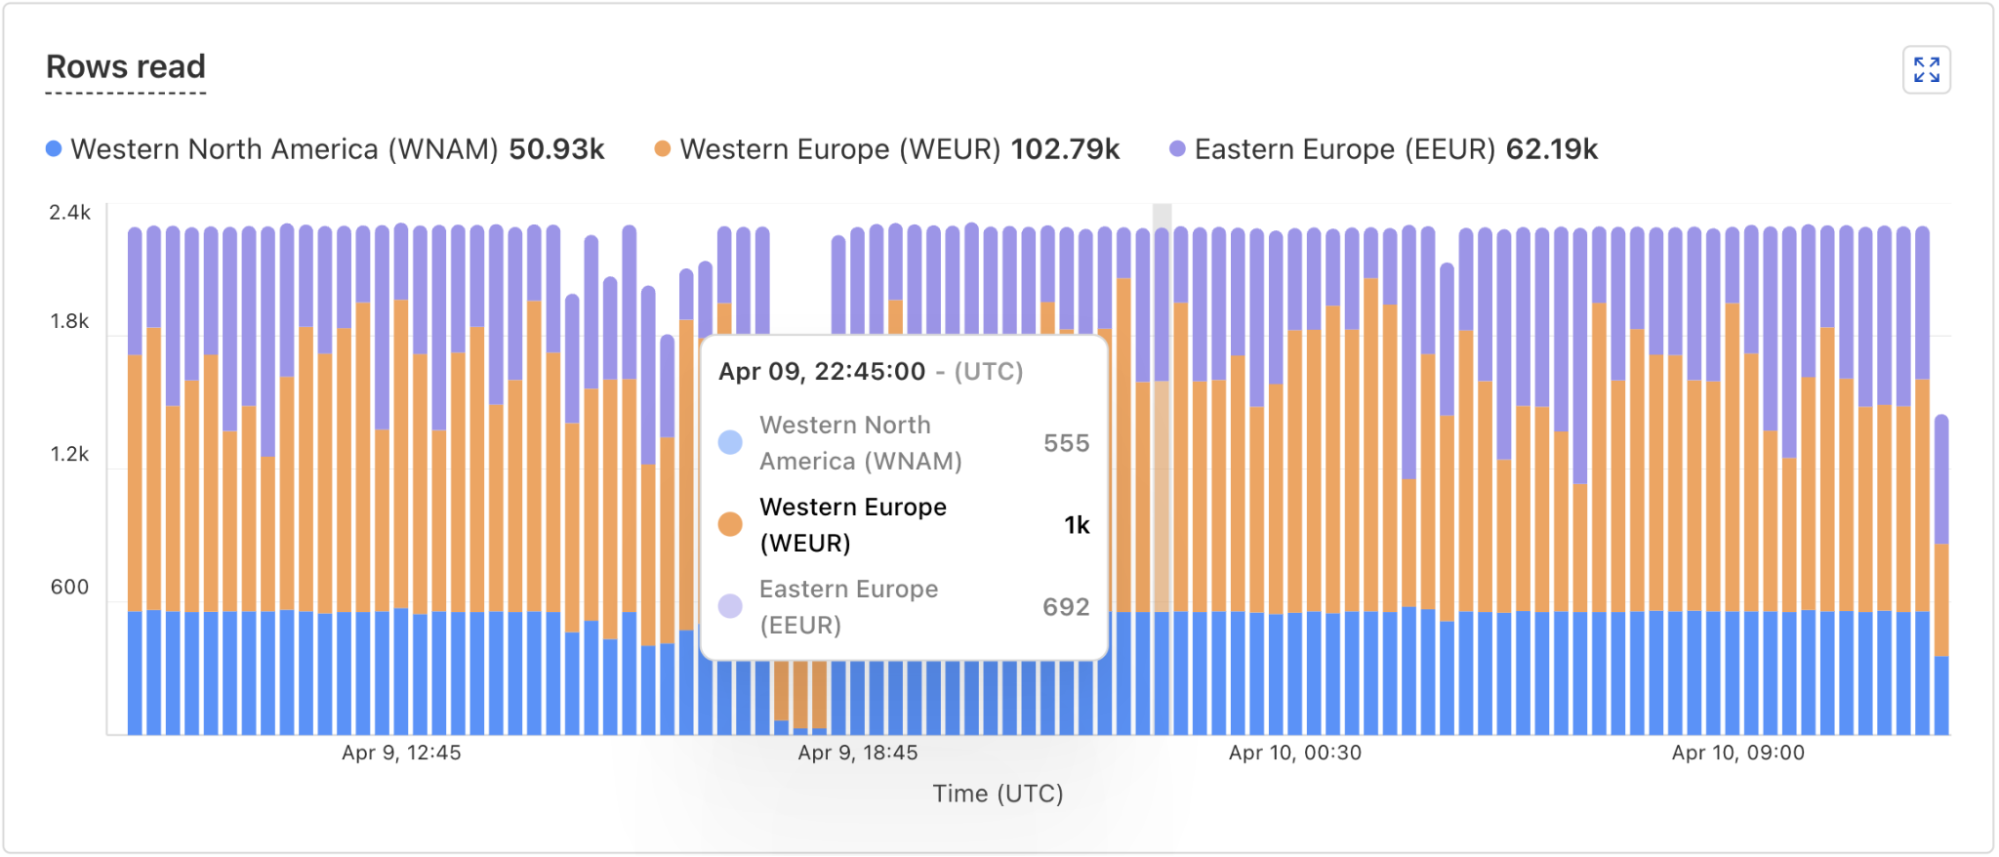
D1 is implemented on top of SQLite-backed Durable Objects running on top of Cloudflare’s Storage Relay Service.
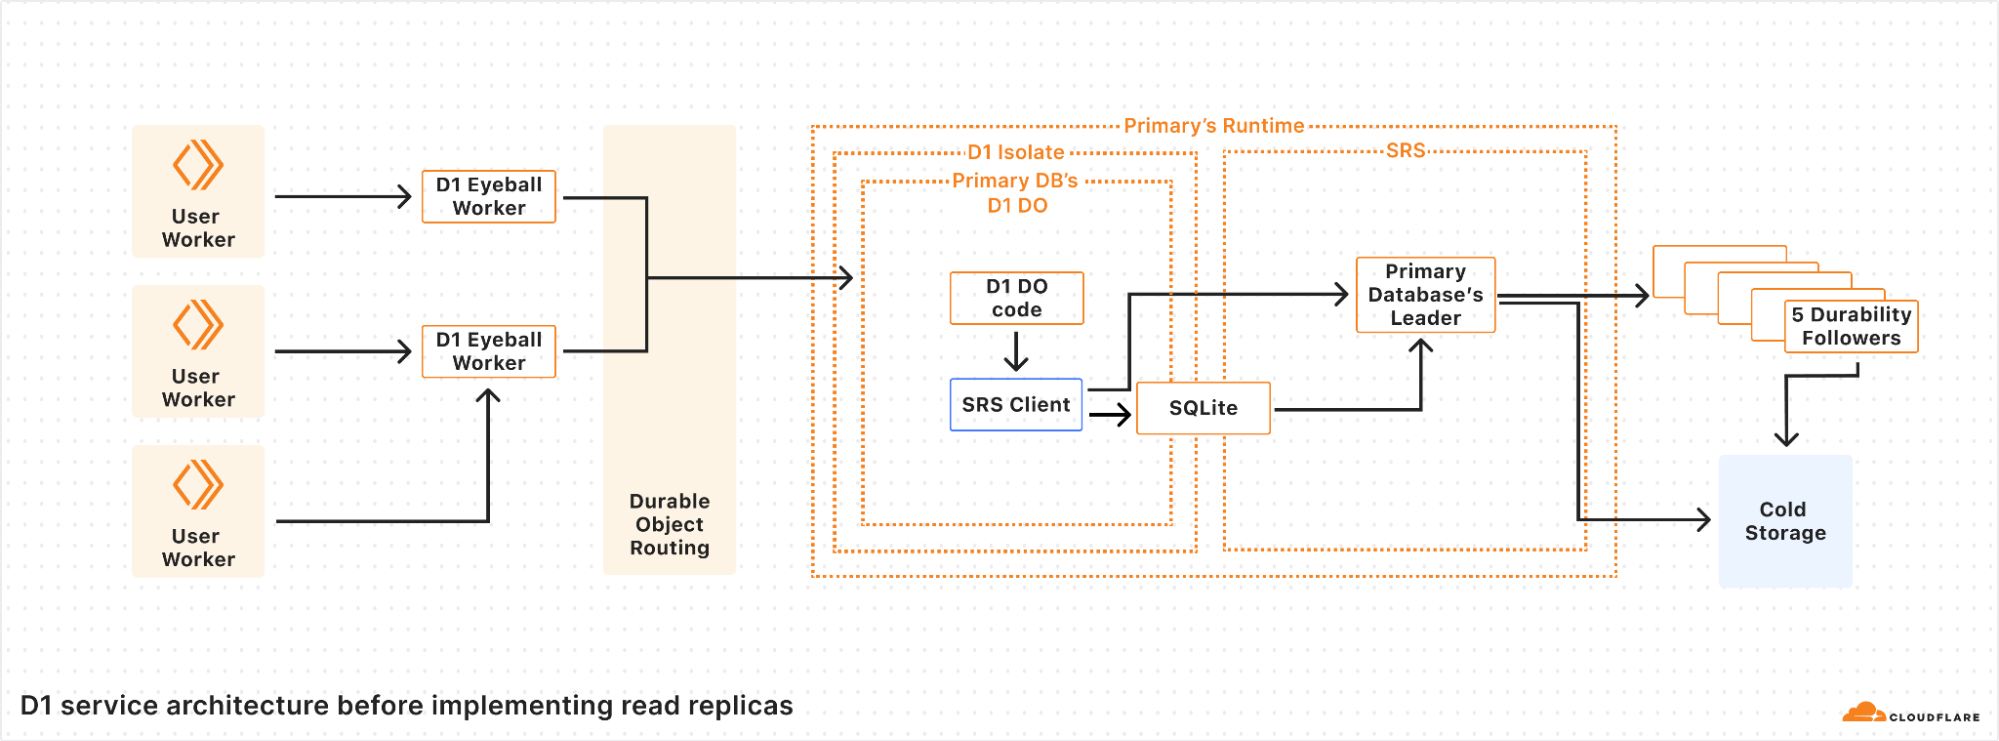
D1 is structured with a 3-layer architecture. First is the binding API layer that runs in the customer’s Worker. Next is a stateless Worker layer that routes requests based on database ID to a layer of Durable Objects that handle the actual SQL operations behind D1. This is similar to how most applications using Cloudflare Workers and Durable Objects are structured.
For a non-replicated database, there is exactly one Durable Object per database. When a user’s Worker makes a request with the D1 binding for the database, that request is first routed to a D1 Worker running in the same location as the user’s Worker. The D1 Worker figures out which D1 Durable Object backs the user’s D1 database and fetches an RPC stub to that Durable Object. The Durable Objects routing layer figures out where the Durable Object is located, and opens an RPC connection to it. Finally, the D1 Durable Object then handles the query on behalf of the user’s Worker using the Durable Objects SQL API.
In the Durable Objects SQL API, all queries go to a SQLite database on the local disk of the server where the Durable Object is running. Durable Objects run SQLite in WAL mode. In WAL mode, every write query appends to a write-ahead log (the WAL). As SQLite appends entries to the end of the WAL file, a database-specific component called the Storage Relay Service leader synchronously replicates the entries to 5 durability followers on servers in different datacenters. When a quorum (at least 3 out of 5) of the durability followers acknowledge that they have safely stored the data, the leader allows SQLite’s write queries to commit and opens the Durable Object’s output gate, so that the Durable Object can respond to requests.
Our implementation of WAL mode allows us to have a complete log of all of the committed changes to the database. This enables a couple of important features in SQLite-backed Durable Objects and D1:
-
We identify each write with a Lamport timestamp we call a bookmark.
-
We construct databases anywhere in the world by downloading all of the WAL entries from cold storage and replaying each WAL entry in order.
-
We implement Point-in-time recovery (PITR) by replaying WAL entries up to a specific bookmark rather than to the end of the log.
Unfortunately, having the main data structure of the database be a log is not ideal. WAL entries are in write order, which is often neither convenient nor fast. In order to cut down on the overheads of the log, SQLite checkpoints the log by copying the WAL entries back into the main database file. Read queries are serviced directly by SQLite using files on disk — either the main database file for checkpointed queries, or the WAL file for writes more recent than the last checkpoint. Similarly, the Storage Relay Service snapshots the database to cold storage so that we can replay a database by downloading the most recent snapshot and replaying the WAL from there, rather than having to download an enormous number of individual WAL entries.
WAL mode is the foundation for implementing read replication, since we can stream writes to locations other than cold storage in real time.
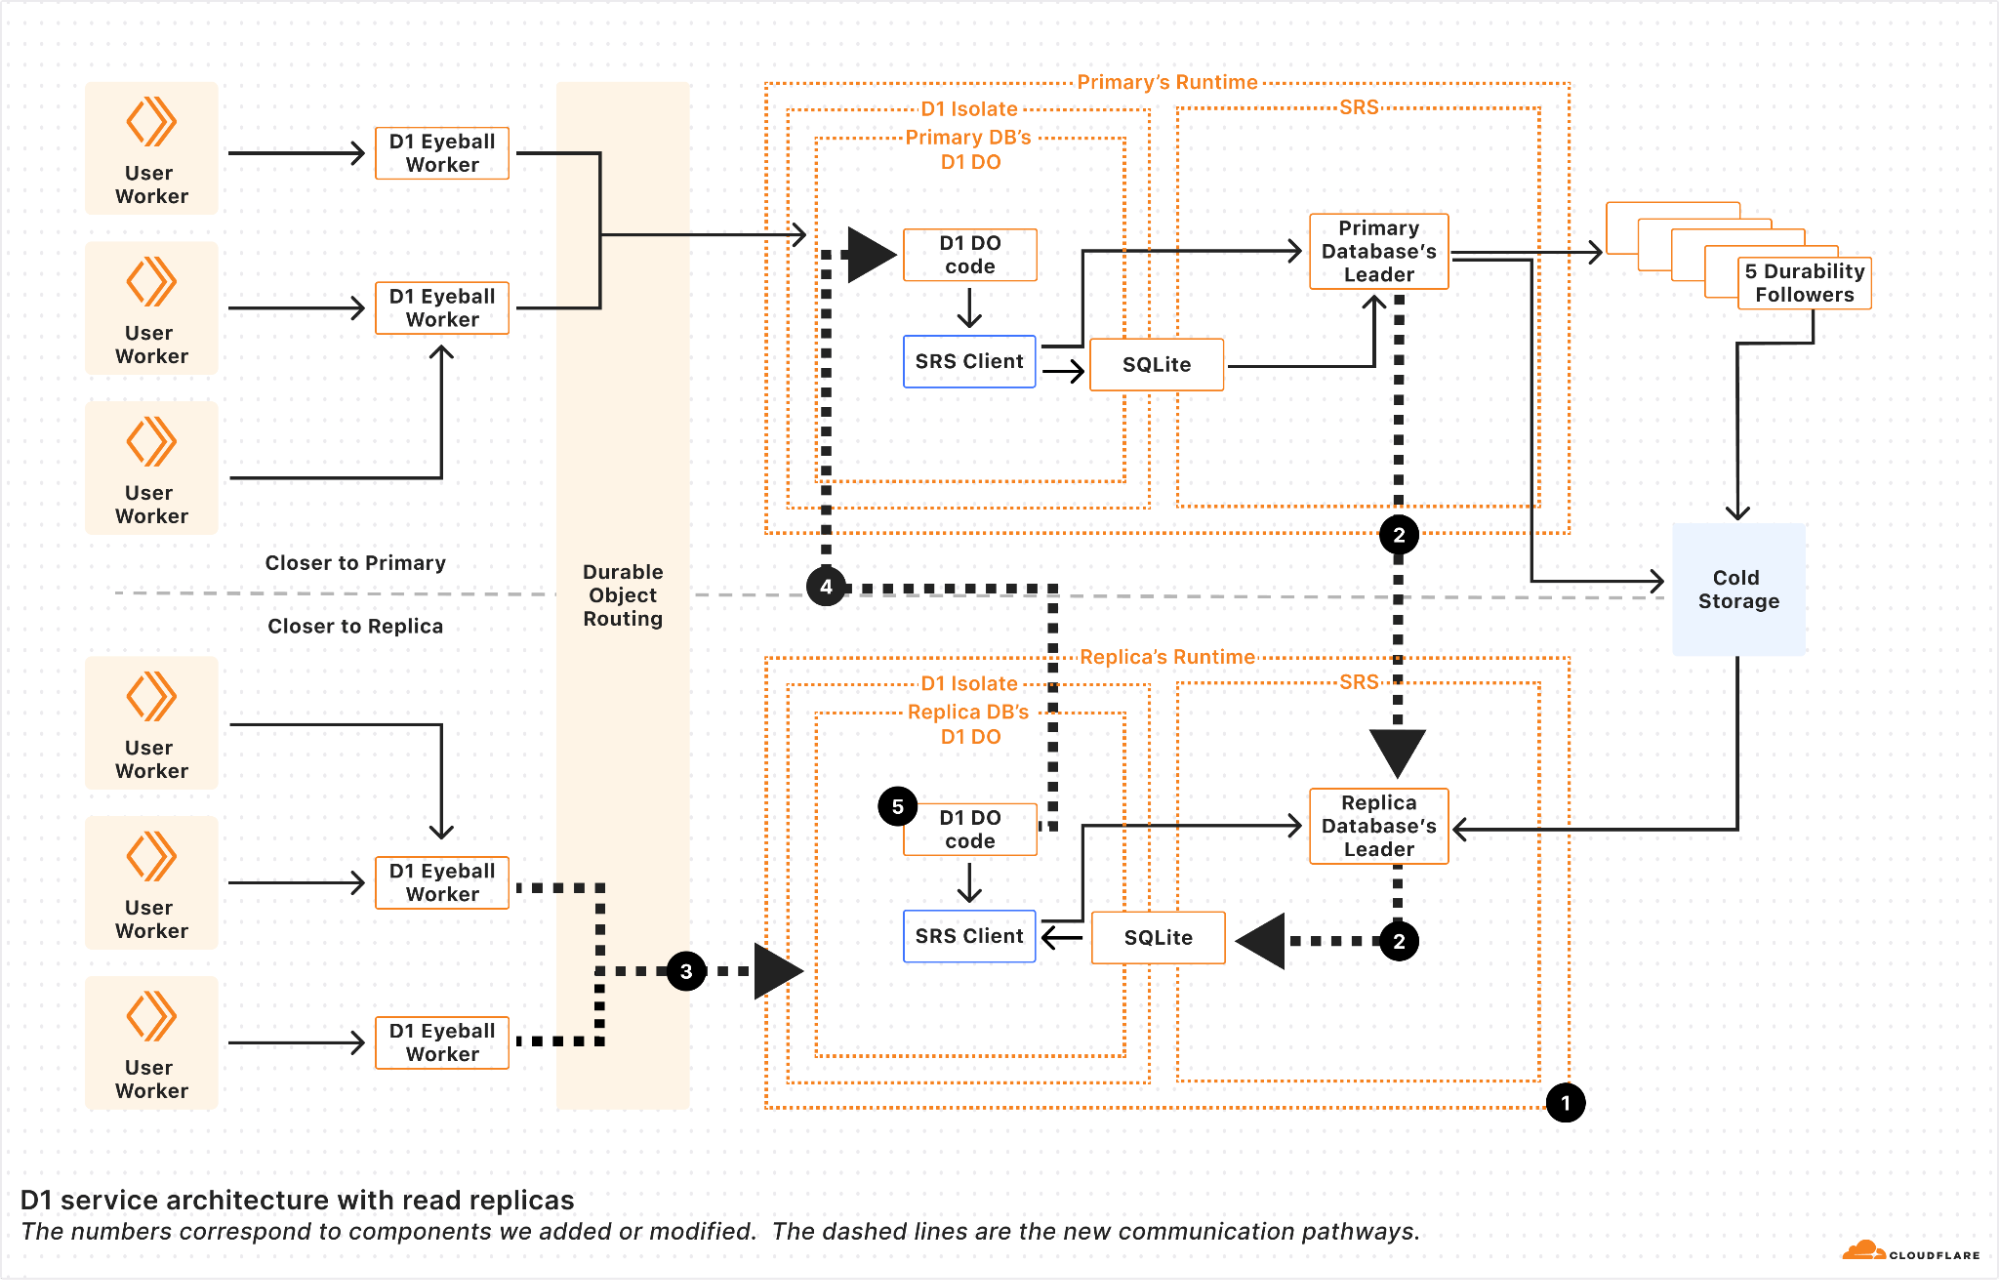
We implemented read replication in 5 major steps.
First, we made it possible to make replica Durable Objects with a read-only copy of the database. These replica objects boot by fetching the latest snapshot and replaying the log from cold storage to whatever bookmark primary database’s leader last committed. This basically gave us point-in-time replicas, since without continuous updates, the replicas never updated until the Durable Object restarted.
Second, we registered the replica leader with the primary’s leader so that the primary leader sends the replicas every entry written to the WAL at the same time that it sends the WAL entries to the durability followers. Each of the WAL entries is marked with a bookmark that uniquely identifies the WAL entry in the sequence of WAL entries. We’ll use the bookmark later.
Note that since these writes are sent to the replicas before a quorum of durability followers have confirmed them, the writes are actually unconfirmed writes, and the replica leader must be careful to keep the writes hidden from the replica Durable Object until they are confirmed. The replica leader in the Storage Relay Service does this by implementing enough of SQLite’s WAL-index protocol, so that the unconfirmed writes coming from the primary leader look to SQLite as though it’s just another SQLite client doing unconfirmed writes. SQLite knows to ignore the writes until they are confirmed in the log. The upshot of this is that the replica leader can write WAL entries to the SQLite WAL immediately, and then “commit” them when the primary leader tells the replica that the entries have been confirmed by durability followers.
One neat thing about this approach is that writes are sent from the primary to the replica as quickly as they are generated by the primary, helping to minimize lag between replicas. In theory, if the write query was proxied through a replica to the primary, the response back to the replica will arrive at almost the same time as the message that updates the replica. In such a case, it looks like there’s no replica lag at all!
In practice, we find that replication is really fast. Internally, we measure confirm lag, defined as the time from when a primary confirms a change to when the replica confirms a change. The table below shows the confirm lag for two D1 databases whose primaries are in different regions.
|
Replica Region |
Database A (Primary region: ENAM) |
Database B |
|
ENAM |
N/A |
30 ms |
|
WNAM |
45 ms |
N/A |
|
WEUR |
55 ms |
75 ms |
|
EEUR |
67 ms |
75 ms |
Confirm lag for 2 replicated databases. N/A means that we have no data for this combination. The region abbreviations are the same ones used for Durable Object location hints.
The table shows that confirm lag is correlated with the network round-trip time between the data centers hosting the primary databases and their replicas. This is clearly visible in the difference between the confirm lag for the European replicas of the two databases. As airline route planners know, EEUR is appreciably further away from ENAM than WNAM, but from WNAM, both European regions (WEUR and EEUR) are about equally as far away. We see that in our replication numbers.
The exact placement of the D1 database in the region matters too. Regions like ENAM and WNAM are quite large in themselves. Database A’s placement in ENAM happens to be further away from most data centers in WNAM compared to database B’s placement in WNAM relative to the ENAM data centers. As such, database B sees slightly lower confirm lag.
Try as we might, we can’t beat the speed of light!
Third, we updated the Durable Object routing system to be aware of Durable Object replicas. When read replication is enabled on a Durable Object, two things happen. First, we create a set of replicas according to a replication policy. The current replication policy that D1 uses is simple: a static set of replicas in every region that D1 supports. Second, we turn on a routing policy for the Durable Object. The current policy that D1 uses is also simple: route to the Durable Object replica in the region close to where the user request is. With this step, we have updateable read-only replicas, and can route requests to them!
Fourth, we updated D1’s Durable Object code to handle write queries on replicas. D1 uses SQLite to figure out whether a request is a write query or a read query. This means that the determination of whether something is a read or write query happens after the request is routed. Read replicas will have to handle write requests! We solve this by instantiating each replica D1 Durable Object with a reference to its primary. If the D1 Durable Object determines that the query is a write query, it forwards the request to the primary for the primary to handle. This happens transparently, keeping the user code simple.
As of this fourth step, we can handle read and write queries at every copy of the D1 Durable Object, whether it’s a primary or not. Unfortunately, as outlined above, if a user’s requests get routed to different read replicas, they may see different views of the database, leading to a very weak consistency model. So the last step is to implement the Sessions API across the D1 Worker and D1 Durable Object. Recall that every WAL entry is marked with a bookmark. These bookmarks uniquely identify a point in (logical) time in the database. Our bookmarks are strictly monotonically increasing; every write to a database makes a new bookmark with a value greater than any other bookmark for that database.
Using bookmarks, we implement the Sessions API with the following algorithm split across the D1 binding implementation, the D1 Worker, and D1 Durable Object.
First up in the D1 binding, we have code that creates the D1DatabaseSession object and code within the D1DatabaseSession object to keep track of the latest bookmark.
// D1Binding is the binding code running within the user's Worker
// that provides the existing D1 Workers API and the new withSession method.
class D1Binding {
  // Injected by the runtime to the D1 Binding.
  d1Service: D1ServiceBinding

  function withSession(initialBookmark) {
    return D1DatabaseSession(this.d1Service, this.databaseId, initialBookmark);
  }
}

// D1DatabaseSession holds metadata about the session, most importantly the
// latest bookmark we know about for this session.
class D1DatabaseSession {
  constructor(d1Service, databaseId, initialBookmark) {
    this.d1Service = d1Service;
    this.databaseId = databaseId;
    this.bookmark = initialBookmark;
  }

  async exec(query) {
    // The exec method in the binding sends the query to the D1 Worker
    // and waits for the the response, updating the bookmark as
    // necessary so that future calls to exec use the updated bookmark.
    var resp = await this.d1Service.handleUserQuery(databaseId, query, bookmark);
    if (isNewerBookmark(this.bookmark, resp.bookmark)) {
      this.bookmark = resp.bookmark;
    }
    return resp;
  }

  // batch and other SQL APIs are implemented similarly.
}
The binding code calls into the D1 stateless Worker (d1Service in the snippet above), which figures out which Durable Object to use, and proxies the request to the Durable Object.
class D1Worker {
  async handleUserQuery(databaseId, query) {
    var doId = /* look up Durable Object for databaseId */;
    return await this.D1_DO.get(doId).handleWorkerQuery(query, bookmark)
  }
}
Finally, we reach the Durable Objects layer, which figures out how to actually handle the request.
class D1DurableObject {
  async handleWorkerQuery(queries, bookmark) {
    var bookmark = bookmark ?? "first-primary";
    var results = {};

    if (this.isPrimaryDatabase()) {
      // The primary always has the latest data so we can run the
      // query without checking the bookmark.
      var result = /* execute query directly */;
      bookmark = getCurrentBookmark();
      results = result;
    } else {
      // This is running on a replica.
      if (bookmark === "first-primary" || isWriteQuery(query)) {
        // The primary must handle this request, so we'll proxy the
        // request to the primary.
        var resp = await this.primary.handleWorkerQuery(query, bookmark);
        bookmark = resp.bookmark;
        results = resp.results;
      } else {
        // The replica can handle this request, but only after the
        // database is up-to-date with the bookmark.
        if (bookmark !== "first-unconstrained") {
          await waitForBookmark(bookmark);
        }
        var result = /* execute query locally */;
        bookmark = getCurrentBookmark();
        results = result;
      }
    }
    return { results: results, bookmark: bookmark };
  }
}
The D1 Durable Object first figures out if this instance can handle the query, or if the query needs to be sent to the primary. If the Durable Object can execute the query, it ensures that we execute the query with a bookmark at least as up-to-date as the bookmark requested by the binding.
The upshot is that the three pieces of code work together to ensure that all of the queries in the session see the database in a sequentially consistent order, because each new query will be blocked until it has seen the results of previous queries within the same session.
D1’s new read replication feature is a significant step towards making globally distributed databases easier to use without sacrificing consistency. With automatically provisioned replicas in every region, your applications can now serve read queries faster while maintaining strong sequential consistency across requests, and keeping your application Worker code simple.
We’re excited for developers to explore this feature and see how it improves the performance of your applications. The public beta is just the beginning—we’re actively refining and expanding D1’s capabilities, including evolving replica placement policies, and your feedback will help shape what’s next.
Note that the Sessions API is only available through the D1 Worker Binding for now, and support for the HTTP REST API will follow soon.
Try out D1 read replication today by clicking the “Deploy to Cloudflare” button, check out documentation and examples, and let us know what you build in the D1 Discord channel!
Just landed: streaming ingestion on Cloudflare with Arroyo and Pipelines
Post Syndicated from Micah Wylde original https://blog.cloudflare.com/cloudflare-acquires-arroyo-pipelines-streaming-ingestion-beta/
Today, we’re launching the open beta of Pipelines, our streaming ingestion product. Pipelines allows you to ingest high volumes of structured, real-time data, and load it into our object storage service, R2. You don’t have to manage any of the underlying infrastructure, worry about scaling shards or metadata services, and you pay for the data processed (and not by the hour). Anyone on a Workers paid plan can start using it to ingest and batch data — at tens of thousands of requests per second (RPS) — directly into R2.
But this is just the tip of the iceberg: you often want to transform the data you’re ingesting, hydrate it on-the-fly from other sources, and write it to an open table format (such as Apache Iceberg), so that you can efficiently query that data once you’ve landed it in object storage.
The good news is that we’ve thought about that too, and we’re excited to announce that we’ve acquired Arroyo, a cloud-native, distributed stream processing engine, to make that happen.
With Arroyo and our just announced R2 Data Catalog, we’re getting increasingly serious about building a data platform that allows you to ingest data across the planet, store it at scale, and run compute over it.
To get started, you can dive into the Pipelines developer docs or just run this Wrangler command to create your first pipeline:
$ npx wrangler@latest pipelines create my-clickstream-pipeline --r2-bucket my-bucket

...
✅ Successfully created Pipeline my-clickstream-pipeline with ID 0e00c5ff09b34d018152af98d06f5a1xv
… and then write your first record(s):
$ curl -d '[{"payload": [],"id":"abc-def"}]'
"https://0e00c5ff09b34d018152af98d06f5a1xvc.pipelines.cloudflarestorage.com/"
However, the true power comes from the processing of data streams between ingestion and when they’re written to sinks like R2. Being able to write SQL that acts on windows of data as it’s being ingested, that can transform & aggregate it, and even extract insights from the data in real-time, turns out to be extremely powerful.
This is where Arroyo comes in, and we’re going to be bringing the best parts of Arroyo into Pipelines and deeply integrate it with Workers, R2, and the rest of our Developer Platform.
(By Micah Wylde, founder of Arroyo)
We started Arroyo in 2023 to bring real-time (stream) processing to everyone who works with data. Modern companies rely on data pipelines to power their applications and businesses — from user customization, recommendations, and anti-fraud, to the emerging world of AI agents.
But today, most of these pipelines operate in batch, running once per hour, day, or even month. After spending many years working on stream processing at companies like Lyft and Splunk, it was no mystery why: it was just too hard for developers and data scientists to build correct, performant, and reliable pipelines. Large tech companies hire streaming experts to build and operate these systems, but everyone else is stuck waiting for batches to arrive.
When we started, the dominant solution for streaming pipelines — and what we ran at Lyft and Splunk — was Apache Flink. Flink was the first system that successfully combined a fault-tolerant (able to recover consistently from failures), distributed (across multiple machines), stateful (and remember data about past events) dataflow with a graph-construction API. This combination of features meant that we could finally build powerful real-time data applications, with capabilities like windows, aggregations, and joins. But while Flink had the necessary power, in practice the API proved too hard and low-level for non-expert users, and the stateful nature of the resulting services required endless operations.
We realized we would need to build a new streaming engine — one with the power of Flink, but designed for product engineers and data scientists and to run on modern cloud infrastructure. We started with SQL as our API because it’s easy to use, widely known, and declarative. We built it in Rust for speed and operational simplicity (no JVM tuning required!). We constructed an object-storage-native state backend, simplifying the challenge of running stateful pipelines — which each are like a weird, specialized database. And then in the summer of 2023, we open-sourced it. Today, dozens of companies are running Arroyo pipelines with use cases including data ingestion, anti-fraud, IoT observability, and financial trading.
But we always knew that the engine was just one piece of the puzzle. To make streaming as easy as batch, users need to be able to develop and test query logic, backfill on historical data, and deploy serverlessly without having to worry about cluster sizing or ongoing operations. Democratizing streaming ultimately meant building a complete data platform. And when we started talking with Cloudflare, we realized they already had all of the pieces in place: R2 provides object storage for state and data at rest, Cloudflare Queues for data in transit, and Workers to safely and efficiently run user code. And Cloudflare, uniquely, allows us to push these systems all the way to the edge, enabling a new paradigm of local stream processing that will be key for a future of data sovereignty and AI.
That’s why we’re incredibly excited to join with the Cloudflare team to make this vision a reality.
While transformations and a streaming SQL API are on the way for Pipelines, it already solves two critical parts of the data journey: globally distributed, high-throughput ingestion and efficient loading into object storage.
Creating a pipeline is as simple as running one command:
$ npx wrangler@latest pipelines create my-clickstream-pipeline --r2-bucket my-bucket

🌀 Creating pipeline named "my-clickstream-pipeline"
✅ Successfully created pipeline my-clickstream-pipeline with ID
0e00c5ff09b34d018152af98d06f5a1xvc

Id:    0e00c5ff09b34d018152af98d06f5a1xvc
Name:  my-clickstream-pipeline
Sources:
  HTTP:
    Endpoint:        https://0e00c5ff09b34d018152af98d06f5a1xvc.pipelines.cloudflare.com/
    Authentication:  off
    Format:          JSON
  Worker:
    Format:  JSON
Destination:
  Type:         R2
  Bucket:       my-bucket
  Format:       newline-delimited JSON
  Compression:  GZIP
Batch hints:
  Max bytes:     100 MB
  Max duration:  300 seconds
  Max records:   100,000

🎉 You can now send data to your pipeline!

Send data to your pipeline's HTTP endpoint:
curl "https://0e00c5ff09b34d018152af98d06f5a1xvc.pipelines.cloudflare.com/" -d '[{ ...JSON_DATA... }]'
By default, a pipeline can ingest data from two sources – Workers and an HTTP endpoint – and load batched events into an R2 bucket. This gives you an out-of-the-box solution for streaming raw event data into object storage. If the defaults don’t work, you can configure pipelines during creation or anytime after. Options include: adding authentication to the HTTP endpoint, configuring CORS to allow browsers to make cross-origin requests, and specifying output file compression and batch settings.
We’ve built Pipelines for high ingestion volumes from day 1. Each pipeline can scale to ~100,000 records per second (and we’re just getting started here). Once records are written to a Pipeline, they are then durably stored, batched, and written out as files in an R2 bucket. Batching is critical here: if you’re going to act on and query that data, you don’t want your query engine querying millions (or tens of millions) of tiny files. It’s slow (per-file & request overheads), inefficient (more files to read), and costly (more operations). Instead, you want to find the right balance between batch size for your query engine and latency (not waiting too long for a batch): Pipelines allows you to configure this.
To further optimize queries, output files are partitioned by date and time, using the standard Hive partitioning scheme. This can optimize queries even further, because your query engine can just skip data that is irrelevant to the query you’re running. The output in your R2 bucket might look like this:
Hive-partioned files from Pipelines in an R2 bucket
Output files are stored as new-line delimited JSON (NDJSON) — which makes it easy to materialize a stream from these files (hint: in the future you’ll be able to use R2 as a pipeline source too). Finally, the file names are ULIDs – so they’re sorted by time by default.
What makes Pipelines so horizontally scalable and able to acknowledge writes quickly is how we built it: we use Durable Objects and the embedded, zero-latency SQLite storage within each Durable Object to immediately persist data as it’s written, before then processing it and writing it to R2.
For example: imagine you’re an e-commerce or SaaS site and need to ingest website usage data (known as clickstream data), and make it available to your data science team to query. The infrastructure which handles this workload has to be resilient to several failure scenarios. The ingestion service needs to maintain high availability in the face of bursts in traffic. Once ingested, the data needs to be buffered, to minimize downstream invocations and thus downstream cost. Finally, the buffered data needs to be delivered to a sink, with appropriate retry & failure handling if the sink is unavailable. Each step of this process needs to signal backpressure upstream when overloaded. It also needs to scale: up during major sales or events, and down during the quieter periods of the day.
Data engineers reading this post might be familiar with the status quo of using Kafka and the associated ecosystem to handle this. But if you’re an application engineer: you use Pipelines to build an ingestion service without learning about Kafka, Zookeeper, and Kafka streams.
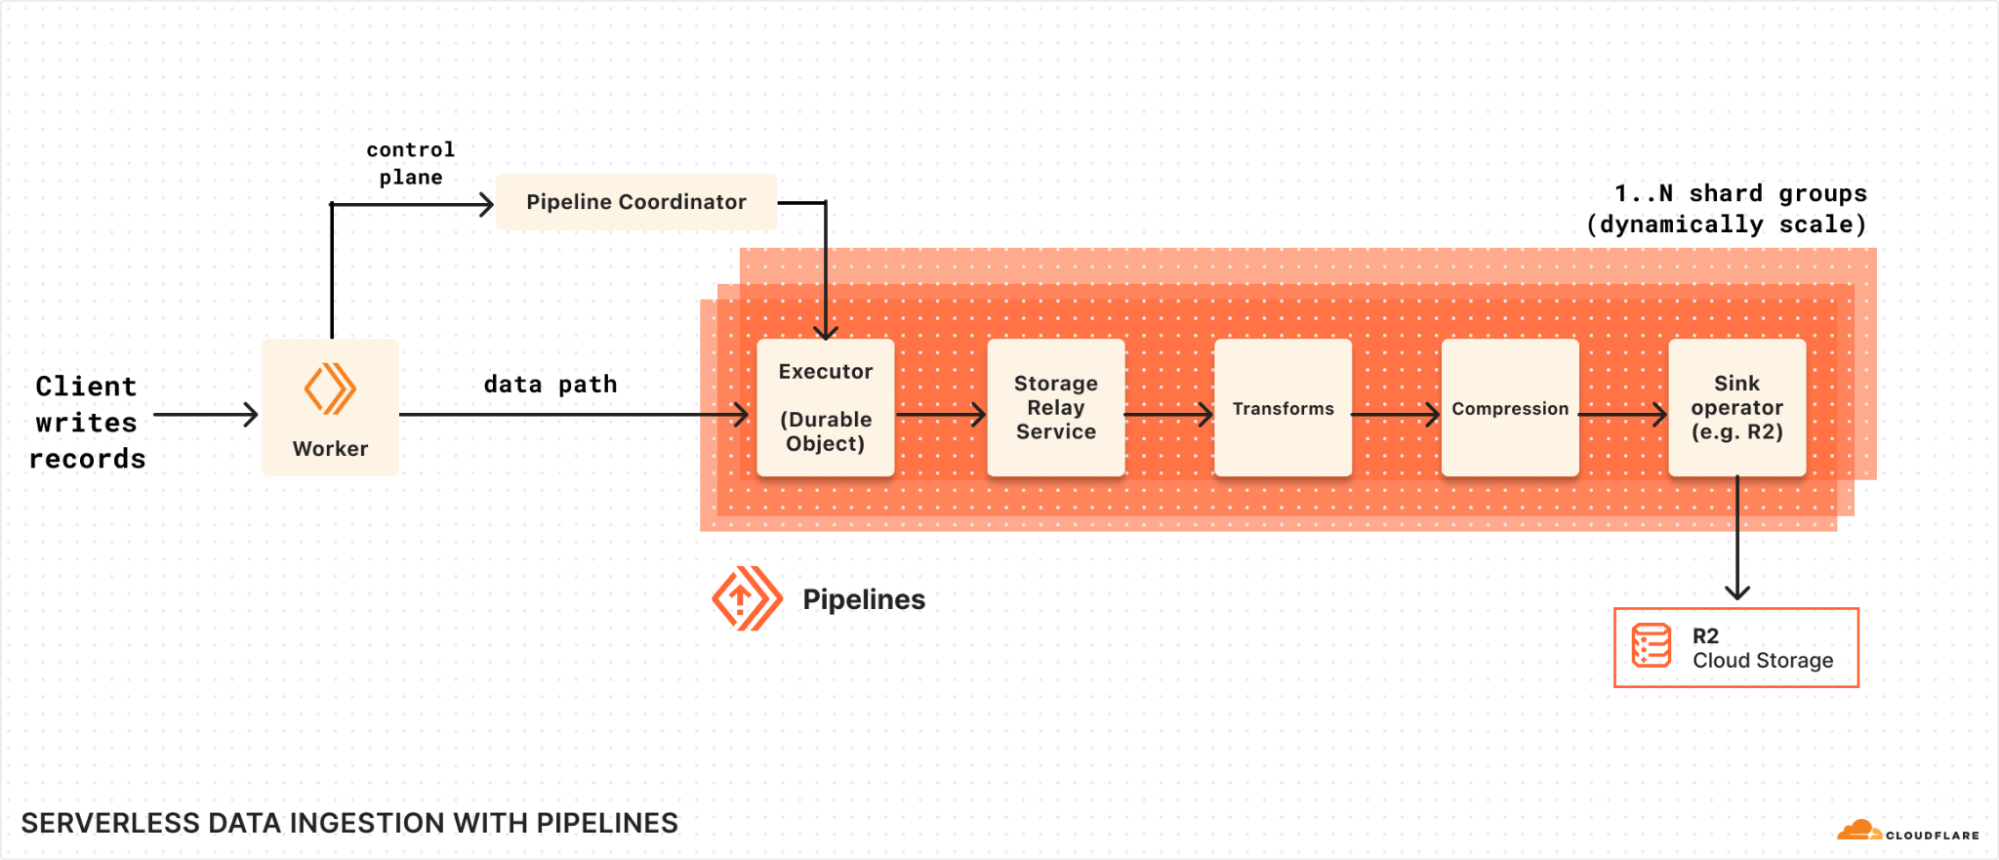
Pipelines horizontal sharding
The diagram above shows how Pipelines splits the control plane, which is responsible for accounting, tracking shards, and Pipelines lifecycle events, and the data path, which is a scalable group of Durable Objects shards.
When a record (or batch of records) is written to Pipelines:
-
The Pipelines Worker receives the records either through the fetch handler or worker binding.
-
Contacts the Coordinator, based upon the
pipeline_idto get the execution plan: subsequent reads are cached to reduce pressure on the coordinator. -
Executes the plan, which first shards to a set of Executors, while are primarily serving to scale read request handling
-
These then re-shard to another set of executors that are actually handling the writes, beginning with persisting to Durable Object storage, which will be replicated for durability and availability by the Storage Relay Service (SRS).
-
After SRS, we pass to any configured Transform Workers to customize the data.
-
The data is batched, written to output files, and compressed (if applicable).
-
The files are compressed, data is packaged into the final batches, and written to the configured R2 bucket.
Each step of this pipeline can signal backpressure upstream. We do this by leveraging ReadableStreams and responding with 429s when the total number of bytes awaiting write exceeds a threshold. Each ReadableStream is able to cross Durable Object boundaries by using JSRPC calls between Durable Objects. To improve performance, we use RPC stubs for connection reuse between Durable Objects. Each step is also able to retry operations, to handle any temporary unavailability in the Durable Objects or R2.
We also guarantee delivery even while updating an existing pipeline. When you update an existing pipeline, we create a new deployment, including all the shards and Durable Objects described above. Requests are gracefully re-routed to the new pipeline. The old pipeline continues to write data into R2, until all the Durable Object storage is drained. We spin down the old pipeline only after all the data has been written out. This way, you won’t lose data even while updating a pipeline.
You’ll notice there’s one interesting part in here — the Transform Workers — which we haven’t yet exposed. As we work to integrate Arroyo’s streaming engine with Pipelines, this will be a key part of how we hand over data for Arroyo to process.
During the first phase of the open beta, there will be no additional charges beyond standard R2 storage and operation costs incurred when loading and accessing data. And as always, egress directly from R2 buckets is free, so you can process and query your data from any cloud or region without worrying about data transfer costs adding up.
In the future, we plan to introduce pricing based on volume of data ingested into Pipelines and delivered from Pipelines:
|
Workers Paid ($5 / month) |
|
|
Ingestion |
First 50 GB per month included \$0.02 per additional GB |
|
Delivery to R2 |
First 50 GB per month included \$0.02 per additional GB |
We’re also planning to make Pipelines available on the Workers Free plan as the beta progresses.
We’ll be sharing more as we bring transformations and additional sinks to Pipelines. We’ll provide at least 30 days notice before we make any changes or start charging for usage, which we expect to do by September 15, 2025.
There’s a lot to build here, and we’re keen to build on a lot of the powerful components that Arroyo has built: integrating Workers as UDFs (User-Defined Functions), adding new sources like Kafka clients, and extending Pipelines with new sinks (beyond R2).
We’ll also be integrating Pipelines with our just-launched R2 Data Catalog: enabling you ingest streams of data directly into Iceberg tables and immediately query them, without needing to rely on other systems.
In the meantime, you can:
-
Get started and create your first Pipeline
-
Join the
#pipelines-betachannel on our Developer Discord
… or deploy the example project directly:
$ npm create cloudflare@latest -- pipelines-starter
--template="cloudflare/pipelines-starter"Eight new stable kernels
[$] Preparing DAMON for future memory-management problems
Post Syndicated from corbet original https://lwn.net/Articles/1016525/
The Data Access
MONitor (DAMON) subsystem provides access to detailed memory-management
statistics, along with a set of tools for implementing policies based on
those statistics. An update on DAMON by its primary author, SeongJae Park,
has been a fixture of the Linux Storage, Filesystem, Memory-Management, and
BPF Summit for some years. The 2025 Summit was no exception; Park led two
sessions on recent and future DAMON developments, and how DAMON might
evolve to facilitate a more access-aware memory-management subsystem in the
future.
Security updates for Thursday
Post Syndicated from jake original https://lwn.net/Articles/1017043/
Security updates have been issued by AlmaLinux (tomcat and webkit2gtk3), Debian (chromium), Fedora (ghostscript), Mageia (atop, docker-containerd, and xz), Red Hat (go-toolset:rhel8), SUSE (apache2-mod_auth_openidc, apparmor, etcd, expat, firefox, kernel, libmozjs-128-0, and libpoppler-cpp2), and Ubuntu (dino-im, linux, linux-aws, linux-aws-hwe, linux-azure, linux-azure-4.15, linux-gcp,
linux-gcp-4.15, linux-hwe, linux-kvm, linux-oracle, linux, linux-aws, linux-kvm, linux-lts-xenial, linux-fips, linux-fips, linux-aws-fips, linux-azure-fips, linux-gcp-fips, opensc, and poppler).
Password Spray Attacks Taking Advantage of Lax MFA
Post Syndicated from Chris Boyd original https://blog.rapid7.com/2025/04/10/password-spray-attacks-taking-advantage-of-lax-mfa/

In the first quarter of 2025, Rapid7’s Managed Threat Hunting team observed a significant volume of brute-force password attempts leveraging FastHTTP, a high-performance HTTP server and client library for Go, to automate unauthorized logins via HTTP requests.
This rapid volume of credential spraying was primarily designed to discover and compromise accounts not properly secured by multi-factor authentication (MFA). Out of just over a million unauthorized login attempts we observed, the distribution of originating traffic sources is similar to that previously seen in January 2025. Some of the most prominent nations serving as points of origin for these attempts are as follows:
- Brazil: 70%
- Venezuela: 3%
- Turkey: 3%
- Russia: 2%
- Argentina: 2%
- Mexico: 2%
Analysis of attempted initial access via compromised or absent MFA revealed a significant success rate for defenders’ security controls. Overwhelmingly, 73% of attempts resulted in account lockouts, with an additional 26% failing due to incorrect passwords. Account disabling accounted for 1% of failures. Critically, fewer than 1% of accounts were successfully compromised through brute-force attacks, highlighting the robust effectiveness of implemented credential brute-forcing prevention measures.
There is a heavy emphasis here on rapid-fire, repeated attempts to log in resulting in accounts eventually being locked. The small number of accounts being disabled could be an additional security step after too many attempts to log in, or simply that the person associated with the account has left the organization.
The misuse of FastHTTP to automate unauthorized logins at speed is just one aspect of a much broader problem: namely, the popularity of initial access to networks aided by a persistent lack of MFA for VPN, SaaS, and VDI products. Rapid7 expects to see this type of rapid-fire, brute force attack become more common as cloud authentication becomes more prevalent. It’s entirely possible threat actors will look to try similar account compromising attempts with other tools and libraries, and commonly abused user agent strings.
Incident Response Facts and Figures: Handing Attackers an Easy Victory
Rapid7 has consistently highlighted MFA as a primary concern across several threat research reports. By the midpoint of 2023, data for the first half of the year showed that 39% of incidents our managed services teams responded to had arisen from lax or lacking MFA. Our 2024 Threat Landscape blog highlighted that remote access to systems without MFA was responsible for 56% of incidents as an initial access vector, the largest driver of incidents overall.
The third quarter of 2024 saw 67% of incident responses involving abuse of valid accounts and missing or lax enforcement of MFA. This total sits at 57% for Q4 2024, in part because of a 22% increase in social engineering. Even without pausing to consider user agent-centric password spraying, this is a potentially dangerous combination for organizations not making the most of MFA-centric protection. If the brute forcing doesn’t get you, a social engineering campaign might just do the trick.
Why MFA Matters: The Consequences of “We’ll Set It up Later”
MFA is a key component of an overall Identity Access Management (IAM) strategy. If you’re not making use of it, then your overall defense is weakened against many of the most common threats out there, including:
- Phishing: The very best password you can muster is made entirely redundant if your employee hands it over to a phisher, whether via a forged website or a social engineering attack. One way to mitigate against this is to use a password manager, which will only automatically enter your details on a valid website. But what happens if your password manager’s master password is compromised, and all the logins contained within are exposed? One of the best ways to address this additional headache is MFA for all your accounts, including your password manager.
- Malware: Do you know what malware, password stealers, and keyloggers, love more than anything else? Grabbing all of those passwords stored in web browsers, or (in more serious cases) plain text files on the desktop and email drafts. Do you know what they don’t like? Having all of those perilous passwords protected with an additional layer of security. MFA could make the difference between compromise and data exfiltration versus, a last-minute save and a security training refresher.
Credential stuffing: An unfortunate by-product of years of data breaches (often with phishing as the launchpad), roll-ups of new and ancient login details published online are a constant threat. It’s worth noting that it isn’t just your current employees who could be on these lists—ex-employees with valid credentials are a cause for concern too.
Recommendations from Rapid7’s MDR and IR Experts
Here are some steps you can take now to improve your security posture and mitigate risk from attacks like these, courtesy of Rapid7’s MDR and IR experts:
- Implement multi-factor authentication (MFA) across all account types, including default, local, domain, and cloud accounts, to prevent unauthorized access, even if credentials are compromised.
- Use conditional access policies to block logins from non-compliant devices or from outside defined organization IP ranges.
- Ensure that applications do not store sensitive data or credentials insecurely. (e.g. plaintext credentials in code, published credentials in repositories, or credentials in public cloud storage).
- Audit domain and local accounts as well as their permission levels routinely to look for situations that could allow an adversary to gain wide access by obtaining credentials of a privileged account. These audits should also include if default accounts have been enabled, or if new local accounts are created that have not been authorized. Follow best practices for design and administration of an enterprise network to limit privileged account use across administrative tiers.
- Regularly audit user accounts for activity and deactivate or remove any that are no longer needed.
- Whenever possible and aligned with business requirements, disable legacy authentication for non-service accounts and users relying on it. Legacy authentication, which does not support MFA, should be replaced with modern authentication protocols.
- Applications may send push notifications to verify a login as a form of multi-factor authentication (MFA). Train users to only accept valid push notifications and to report suspicious push notifications.
You can’t go wrong with MFA
Imagine a scenario where your network is under fire from a worryingly high number of brute force attempts from across the globe, targeting your insecure accounts until just one is compromised. Now imagine that same scenario where everything is blocked by default, regional restrictions are applied, logins from user agents aren’t allowed, and all of your VPNs, your RDP, VDIs, and SaaS tools are secured with MFA.
This may feel like an overreaction to what you may view as an attack that looks like an edge case; however, consider that ransomware groups, alongside more commonly found malware authors and phishers, will also find you a significantly harder target to break as a result of these countermeasures being put in place. Please don’t end up in the inevitable percentage of organizations compromised due to missing MFA in our next threat research report; there’s no better time than now to think about building out a stronger security posture.
Мръсна дума ли е лобизмът? Или кога играта загрубява
Post Syndicated from Анахит Хачикян original https://www.toest.bg/mrusna-duma-li-e-lobizmut-ili-koga-igrata-zagrubyava/

От 2022 г. досега няколко скандала, свързани с лобизъм, разклатиха Европейския парламент и принудиха евродепутатите и администрацията да предприемат по-сериозни мерки относно етичното поведение на депутати и служители.
Какво беше свършено досега и къде институцията удря на камък?
Когато в началото на декември 2022 г. бащата на заместник-председателката на Европейския парламент (ЕП) Ева Каили, беше задържан от белгийската полиция на излизане от хотел в Брюксел с куфарче, пълно със стотици хиляди евро, случилото се приличаше повече на сцена от комедиен филм от 70-те, отколкото на реалност. Впоследствие белгийската полиция конфискува над 1,5 млн. евро кеш от евродепутати и служители, замесени в скандала, и вече на никого не му беше до смях.
Оказа се, че властите в Катар са подкупвали с години различни евродепутати с пари в брой, подаръци и луксозни пътувания, за да напудрят имиджа на страната си на европейската сцена и да заглушат критиките към неспазването на човешките права. В периода преди и по време на домакинството на Световното първенство по футбол в края на 2022 г. катарците стават още по-щедри и схемата е разкрита. Добил известност в медиите като „Катаргейт“, този корупционен скандал беше като студен душ за Европарламента, който се зае да засили контрола и прозрачността на институцията, за да предотврати бъдещи скандали.
Въпреки това преди по-малко от месец нови разкрития, този път свързани с търговско лобиране от страна на китайската компания Huawei от 2021 г. досега, доведоха до повдигането на осем обвинения към бивши и настоящи евродепутати и служители на ЕП и отново станаха повод да се констатира, че мерките, взети през изминалите две години, може би не са достатъчни, щом скандалите продължават. Обвиненията този път са, че евродепутати и техни сътрудници са получавали пари и луксозни подаръци, за да защитават чрез законодателни инициативи позициите на китайската компания на европейския пазар. Разследването все още тече и за момента няма потвърдени присъди. В аферата има и индиректна българска връзка: единият от офисите в ЕП, запечатани от белгийските власти, е на Адам Мухтар, асистент на българския евродепутат Никола Минчев (Renew Europe, ПП–ДБ) – засега не се знае дали и в какво е обвинен Мухтар, а името на Валентин Тончев, бивш асистент на Илхан Кючюк (Renew Europe, ДПС), също беше споменато в някои медии във връзка със скандала, но самият Тончев опроверга тази информация.
Не е новина, че ЕП е арена на ожесточени битки между най-различни национални, регионални, търговски и дипломатически интереси, на която представителите на определени държави или фирми не се свенят да използват луксозен асортимент от примамки в своя полза. Шокиращи в тези случаи са мащабът и продължителността на операциите. Разследвания на брюкселския Politico установиха, че за четири години Мароко, Мавритания и Катар са похарчили 4 млн. евро за подкупи за европарламентарна дейност в тяхна полза. Освен за прикриване на нарушенията на човешките права, тези пари са послужили за лобиране за отпадане на визите между Катар и ЕС, за ограничаване на критиките към Мароко по време на мигрантската хуманитарна криза и за „обезвреждането“ на един мавритански дисидент. Тепърва ще се разбере какви хватки е прилагал китайският Huawei. И това е само върхът на айсберга…
Къде лобистите се срещат с евродепутатите и какво не е разрешено?
Всяка организация, която работи за дадена кауза и цели да повлияе в процеса на вземане на политически решения, е вид лобистка организация и в това само по себе си няма нищо лошо. В това число влизат неправителствени организации, синдикати, професионални и търговски дружества, предприятия и фирми, изследователски и академични институции. Всяка от тези организации защитава определени интереси и евродепутатите се срещат с техни представители, когато работят по съответните доклади, за да включат после в законодателните текстове гледните точки на всички засегнати страни. Например депутатите, работещи по въпросите на околната среда, се срещат с еколози, но също и с лобисти по земеделските и транспортните въпроси, тъй като всички тези теми са взаимносвързани и трябва да се търсят законови решения с максимален обхват на положително действие.
За да имат достъп до ЕП, лобистите трябва да бъдат записани в Регистъра за прозрачност на европейските институции. Създадена през 2011 г. като общ регистър на Европейската комисия и Европарламента (Европейският съвет също се присъедини през 2021 г.), тази база данни, в която до момента са регистрирани над 14 000 организации, регулира взаимоотношенията между европейските законотворци, техните сътрудници и всички други заинтересовани страни и цели да осигури прозрачност и отчетност.
За да бъде регистрирана, всяка организация трябва да декларира правния си статут, участващите лица, годишния си бюджет, както и източниците си на финансиране. Регистрацията позволява на представители на тези организации да имат входни баджове, да се срещат с евродепутати – с предварителна уговорка или спонтанно по коридорите на сградата, както и да участват в конференции и вътрешни събрания. Установяването на неформални контакти със служители и парламентарни асистенти също е много по-лесно за регистрираните лобисти, защото могат да се движат свободно в сградата. Дипломатите също имат входни баджове за ЕП, но те ги получават чрез посолствата и представителствата на страните, за които работят.
Към днешна дата в Регистъра за прозрачност има 80 регистрирани български организации, сред които Камарата на автомобилните превозвачи, Българската стопанска камара и Националната асоциация на зърнопроизводителите, но също и по-малки организации, фондации и търговски дружества. От евродепутатите се очаква да проверят дали една организация е регистрирана, преди да приемат покана за среща, както и да декларират самата среща на личната си страница на сайта на ЕП. Задължението всички евродепутати да декларират своите срещи с лобисти и дипломати беше въведено именно след „Катаргейт“ като една от 14-те точки, предложени от председателката на ЕП Роберта Мецола в плана „Укрепване на почтеността, независимостта и отчетността“. Освен това депутатите трябва да декларират получени подаръци на стойност над 150 евро и пътувания, платени от трети страни.

Критиците на етичните реформи смятат, че тези мерки са недостатъчни, тъй като разчитат на добрата воля на депутатите и няма външен механизъм за контрол. Показателно е, че самата Мецола не срещна подкрепа в собствената си група (ЕНП), когато някои от промените се гласуваха в Комисията по конституционни въпроси през юли 2023 г. Предложението за забрана депутати да заемат позиции в организации, записани в Регистъра за прозрачност, беше подкрепено от групата на социалистите, на левите и на зелените и отхвърлено от групата на ЕНП и на либералите Renew Europe. Понастоящем депутатите могат да заемат позиции в тези организации, често като консултанти или като членове на управителни съвети, и трябва да го декларират само ако годишните приходи от тези дейности надхвърлят 5000 евро.

Според проучване на Transparency International от края на 2024 г. три четвърти от евродепутатите имат допълнителни дейности, а една трета са декларирали външна дейност, от която получават приходи. В същото проучване са отбелязани десетте евродепутати, които получават най-много приходи от външни дейности, и от този списък става ясно защо десницата блокира предложението външните дейности да са забранени по време на парламентарния мандат: половината в топ десет са членове на ЕНП (включително председателят на групата Манфред Вебер), а останалите членуват в крайната десница на Европейските консерватори и реформатори и в „Патриоти за Европа“; има и един либерал от Renew Europe.
Къде сме ние?
Бърза справка на индивидуалните страници на българските евродепутати на сайта на ЕП показва, че почти всички, с изключение на Елена Йончева (ДПС – Ново начало) и Ева Майдел (ГЕРБ), регистрират (поне някои от) срещите, които провеждат с външни организации. Платформата Integrity Watch на Transparency International позволява филтриране на лобистките срещи на депутатите по теми, държави и действащи лица. Така например става ясно, че българските евродепутати са на първо място от всички евродепутати по срещи, свързани с Русия или с представители на Руската федерация (23,5% от българската делегация). Това включва тримата евродепутати от „Възраждане“, които са се срещали с лица от Постоянното представителство на Русия към ЕС и на Руското посолство в България, както и Никола Минчев от ПП–ДБ, който се е срещнал с представители на опозиционния „Форум Свободна Русия“.
Израел и Китай също са много популярни сред българските евродепутати. Една трета от тях са провеждали срещи с представители на Израел и една четвърт – с представители на Китай. Разбира се, статистиката обхваща само декларираните срещи и няма механизъм за сверяване на информацията, нито конкретни санкции, ако се разкрие, че дадени срещи не са били обявени. Процесът по промяна на етичната култура в политиката е бавен, особено за тези, които идват от държави без регулация на лобистките дейности, каквато е България.
На 15 май 2024 г. европейските институции подписаха споразумение за създаването на междуинституционален орган по етика, който да наложи еднакви етични стандарти за всички институции. За момента обаче преговорите по прилагането на споразумението продължават заради вътрешни блокажи и отпор. Дотогава остава да разчитаме на добрата воля на евродепутатите, както и на евентуалния им страх, че разкрития от мащаба на „Катаргейт“ завинаги сриват политическата кариера на замесените лица. Ева Кайли прекара почти пет месеца в белгийски затвор, разделена от двегодишното си дете, и скоро след като беше освободена, напусна Белгия, а Европарламентът все ще търси работещи механизми да разубеди изкушените, преди куфарчето да се е озовало и в техните ръце.