Version
146.0 of the Firefox web browser has been released. One feature of
particular interest to Linux users is that Firefox now natively
supports fractional scaled displays on Wayland. Firefox Labs has also
been made available to all users even if they opt out of telemetry or
participating in studies. “This means more experimental features
are now available to more people.“
This release also adds support for Module-Lattice-Based
Key-Encapsulation Mechanism (ML-KEM) for WebRTC. ML-KEM is
“believed to be secure against attackers with large quantum
computers“. See the release notes for all changes.
Security updates have been issued by AlmaLinux (kernel, kernel-rt, and webkit2gtk3), Fedora (abrt and mingw-libpng), Mageia (apache and libpng), Oracle (abrt, go-toolset:rhel8, kernel, sssd, and webkit2gtk3), Red Hat (kernel and kernel-rt), SUSE (gimp, gnutls, kubevirt, virt-api-container, virt-controller-container, virt-exportproxy-container, virt-exportserver-container, virt-handler-container, virt-launcher-container, virt-libguestfs-t, and postgresql13), and Ubuntu (gnupg2, python-apt, radare2, and webkit2gtk).
Two competing arguments are making the rounds. The first is by a neurosurgeon in the New York Times. In an op-ed that honestly sounds like it was paid for by Waymo, the author calls driverless cars a “public health breakthrough”:
In medical research, there’s a practice of ending a study early when the results are too striking to ignore. We stop when there is unexpected harm. We also stop for overwhelming benefit, when a treatment is working so well that it would be unethical to continue giving anyone a placebo. When an intervention works this clearly, you change what you do.
There’s a public health imperative to quickly expand the adoption of autonomous vehicles. More than 39,000 Americans died in motor vehicle crashes last year, more than homicide, plane crashes and natural disasters combined. Crashes are the No. 2 cause of death for children and young adults. But death is only part of the story. These crashes are also the leading cause of spinal cord injury. We surgeons see the aftermath of the 10,000 crash victims who come to emergency rooms every day.
The other is a soon-to-be-published book: Driving Intelligence: The Green Book. The authors, a computer scientist and a management consultant with experience in the industry, make the opposite argument. Here’s one of the authors:
There is something very disturbing going on around trials with autonomous vehicles worldwide, where, sadly, there have now been many deaths and injuries both to other road users and pedestrians. Although I am well aware that there is not, senso stricto, a legal and functional parallel between a “drug trial” and “AV testing,” it seems odd to me that if a trial of a new drug had resulted in so many deaths, it would surely have been halted and major forensic investigations carried out and yet, AV manufacturers continue to test their products on public roads unabated.
I am not convinced that it is good enough to argue from statistics that, to a greater or lesser degree, fatalities and injuries would have occurred anyway had the AVs had been replaced by human-driven cars: a pharmaceutical company, following death or injury, cannot simply sidestep regulations around the trial of, say, a new cancer drug, by arguing that, whilst the trial is underway, people would die from cancer anyway….
Both arguments are compelling, and it’s going to be hard to figure out what public policy should be.
Abstract: How safe are autonomous vehicles? The answer is critical for determining how autonomous vehicles may shape motor vehicle safety and public health, and for developing sound policies to govern their deployment. One proposed way to assess safety is to test drive autonomous vehicles in real traffic, observe their performance, and make statistical comparisons to human driver performance. This approach is logical, but it is practical? In this paper, we calculate the number of miles of driving that would be needed to provide clear statistical evidence of autonomous vehicle safety. Given that current traffic fatalities and injuries are rare events compared to vehicle miles traveled, we show that fully autonomous vehicles would have to be driven hundreds of millions of miles and sometimes hundreds of billions of miles to demonstrate their reliability in terms of fatalities and injuries. Under even aggressive testing assumptions, existing fleets would take tens and sometimes hundreds of years to drive these miles—an impossible proposition if the aim is to demonstrate their performance prior to releasing them on the roads for consumer use. These findings demonstrate that developers of this technology and third-party testers cannot simply drive their way to safety. Instead, they will need to develop innovative methods of demonstrating safety and reliability. And yet, the possibility remains that it will not be possible to establish with certainty the safety of autonomous vehicles. Uncertainty will remain. Therefore, it is imperative that autonomous vehicle regulations are adaptive—designed from the outset to evolve with the technology so that society can better harness the benefits and manage the risks of these rapidly evolving and potentially transformative technologies.
One problem, of course, is that we treat death by human driver differently than we do death by autonomous computer driver. This is likely to change as we get more experience with AI accidents—and AI-caused deaths.
Вероятно щях да подмина думата мършляк като поредната илюстрация на словесните низини, до които е стигнала част от депутатския ни елит, ако не беше един въпрос към мен, изпратен по имейла:
Виждам, че се разгаря спор как се пише: „мършляк“ или „мръшляк“? Бихте ли дали пояснения, ако нямате проблем с политизираната тема?
Това, естествено, ме накара да се замисля. Отговорих накратко, но веднага ми стана ясно, че думата има доста езикови особености – правописни, етимологични, исторически, словообразувателни, а освен това е диалектна.
В дълбините на езика
Да започнем с правописа, който вероятно интересува най-много четящите тази статия. Той не е нормиран и можем само да приложим правилото за групата ръ/ър в многосрични думи: когато следва една съгласна, се пише ър (мърша, поддържам, пържола), а когато следват две или повече съгласни, се пише ръ (мръшляк, поддръжник, пръжка). Следователно,
ако думата трябва да съответства на съвременните книжовни правила, коректната форма е мръшляк.
Някак хората са усетили, че има нещо нередно в мършляк – не защото знаят наизуст горното правило и го прилагат, а защото не съответства на езиковия модел в съзнанието им. Тук обаче има няколко „обаче“, които могат да променят правилата на играта:
1.Думата е диалектна и точно с формата мършляк е включена в Речника на българския език. Все пак трябва да имаме предвид, че този източник не е меродавен за правописа. Според Българския етимологичен речник мършляк със значение „мърша“ се среща в Софийско и Видин, а в Годечко означава „лошо месо“. В Самоков пак се употребява за месо – много лошо и постно, но формата вече е мръшляк¹. В Речника на Найден Геров също имаме мръшляк, при това с три значения: „мърша“, „мършав човек“ и „орел картал“².
2. Депутатът Байрам Байрам изрече думата точно така – мършляк, и в тази форма тя придоби известност.
3.От правописното правило за групата ръ/ърима много изключения. Например гръмовен, мръсен би трябвало да са гърмовен, мърсен, защото следва една съгласна, а повърхнина, мъртво – повръхнина, мрътво, защото следват две съгласни. Имаме дори едно почти последователно изключение (извинете ме за оксиморона): когато даден глагол е образуван с наставката -ва-, групата -ър- се запазва, макар че след нея има две съгласни и трябва да стане -ръ-: развързвам, нагърбвам се, завършвам.
Дали думата мръшляк има потенциала един ден да се утвърди в езика ни и да бъде включена в платформата БЕРОН, не се наемам да кажа. От една страна, явно арсеналът от обидни думи се нуждае от обновяване с оглед на повишеното ниво на агресия – и ето, оказва се, че диалектите все още имат някакъв потенциал, не бива да ги зачеркваме! От друга страна, сигурно десетки, дори стотици думи, вече широко употребявани, чакат на опашката за БЕРОН, така че мръшлякът, освен ако не е много нахален, трудно ще се дореди.
Възможно е да сте се запитали защо тази група ръ/ър ни създава правописни, а и правоговорни затруднения. В такъв случай ще трябва да се обърнем към далечното минало. Да, голяма част от проблемите ни са исторически обусловени и е добре поне да сме информирани за техните корени.
В старобългарския език на мястото на днешната група ръ/ър е имало сричкотворно р,
което ще рече, че звукът р е можел да образува сричка, подобно на гласните. Същото важи и за групата лъ/ъл, на чието място е имало сричкотворно л. В някои славянски езици (чешки, словашки, сръбски, хърватски, книжовния македонски) и днес тези фонетични особености (отчасти) се пазят. Тук може да чуете няколко думи със сричкотворно р от съвремието, за да придобиете представа как е звучало то преди повече от хилядолетие в нашия език – с еров призвук.
Към ХI век р и л са престанали да се правят на гласни и са започнали да се изговарят като ръ/рь и лъ/ль, тоест в съчетание с нормални по дължина ерови гласни³. Някои български говори обаче (ботевградски, елинпелински, тетевенски) са се оказали консервативни и днес все още съхраняват сричкотворното р и в по-малка степен сричкотворното л:грне, влк. В други (панагюрски) се срещат само съчетанията ър, ъл:гърне, гърнчар, вълк. В трети (софийски, пирдопски) – само съчетанията ръ, лъ: гръне, грънчар, влък. Най-голяма е групата говори (основно източни), в които съчетанията се изговарят ръ/ър и лъ/ъл – както в съвременния книжовен език.⁴
Вече и сами може да заключите, че правописът и правоговорът на групата ръ/ър в многосричните думи – в зависимост от броя на следващите съгласни – се основават на преобладаващото състояние в българските диалекти, и това е разбираемо и логично.
Не по-малко интересни особености се крият в словообразуването на мършляка и последващото ровене в етимологията. Наставката -ак/-як не е твърде продуктивна в българския език, тоест с нея не се образуват кой знае колко думи, но все пак имаме словак, хлапак, близнак, здравеняк, добряк, моряк, просяк и др.⁵ За съжаление, нямам обяснение за разширения вариант -ляк, с който наставката се появява в мършляк. Възможно е това да е станало по аналогия със земляк и диалектното прошляк например.
Несъмнено е обаче, че словообразувателната основа на нашата дума е мърша. Да, значението ѝ е неприятно, знам, но пък е повод да обясним откъде се е взела, и да научим още нещо за старобългарския език.
От студентските си години помня, че това съществително име произхожда от т.нар. минало деятелно причастие първо, образувано от глагола мрѣти (‘умирам’), чиито форми са мьръшь, мьръша, мьръшо, мьръши (съответно за м.р., ж.р., ср.р. ед.ч. и за мн.ч.). Вече се ориентирате, че днешната дума всъщност е някогашната форма на причастието за женски род след някои звукови промени и както в миналото, така и сега означава най-общо „нещо, което е умряло“. Разликата е, че в съвременния български език има статус на съществително име.
Миналото деятелно причастие първо вече не съществува в езика ни. Пазят се само някои единични форми, които днес са прилагателни имена: бивш, печеливш, преждеговоривш, потърпевш. В старобългарския език обаче е имало и друго минало деятелно причастие – да, правилно предположихте, след като едното е първо, другото е второ. То не само се е запазило, но с течение на времето е завладяло нови територии. Днес си служим именно с него и го наричаме минало свършено деятелно причастие (дал, казал, ходил).
Нека обаче да се върнем на нашето съществително име. Обяснението за произхода му е дадено от авторитетния езиковед Владимир Георгиев. Колкото и логично да изглежда, то се оспорва и като достоверна се лансира друга версия: думата *mьršā e по-стара, праславянска, и е образувана от *mьrхā (‘мърша’) и наставката -jā6.
На повърхността на политическото говорене
Може би трябваше да напиша още едно-две заключителни изречения и да сложа точка на тази статия. В миналото, което вече е свършено, има някаква безопасност, доколкото е непроменяемо и можем да правим всякакви опити да го обясним. В съвремието обаче има динамика, скорост, дори турбулентност и това се отнася и за езика, с който говорим за ставащото пред очите ни.
Можем ли да дадем адекватна оценка на думите, изстрелвани в публичната реч от хора с всякакво ниво на образование, възпитание, езикова подготовка, социален и политически опит? Аз не бих се наела, но не бих и подминала мълчаливо откровените обиди и агресивната реч на немалка част от политиците. То не бяха мършляци, боклуци,папуняци, запъртъци,безмозъчни глави, еничари, прасета, тикви, то не беше пиене на мазно турско кафе, седене в скутове и оправяне по пеньоар (pardon my French, както биха казали изисканите англичани). Тревожна е тенденцията представители на все повече политически сили да се изкушават от използването на подобна лексика, която е само на половин крачка от откровените вулгаризми.
Доста наивно би било от моя страна в условията на такова остро противопоставяне, на каквото сме свидетели в момента, да очаквам изтънчен изказ от родните ни политици, но мисля, че всички ние заслужаваме някаква въздържаност от тях, а от пиарите им – да се опитват поне да обуздават речта им. За друго не знам дали биха били способни.
1 Български етимологичен речник. Т. 4. Ред. Вл. Георгиев, И. Дуриданов. София: Академично издателство „Проф. Марин Дринов“, 2012, с. 429.
2 Геров, Найден. Речник на българския език. Т. 3. Фототипно издание. София: Български писател, 1977, с. 89. Точната форма на думата в речника е мрьшлꙗкъ.
3 Харалампиев, Иван. Историческа граматика на българския език. Велико Търново: Фабер, 2001, с. 56.
4 Стойков, Стойко. Българска диалектология. София: Издателство на БАН, 1993, с. 220.
5 Граматика на съвременни български книжовен език. Т. 2. Морфология. София: Издателство на БАН, 1983, с. 47–48, 65. С тази наставка освен имена на лица се образуват и съществителни събирателни – буренак, храсталак, но и други нарицателни имена – черпак, гръбнак, похлупак и т.н.
6 Български етимологичен речник…, с. 430.
Езикът може да е вкусен и извън блюдото – онзи, българският език, на който говорим от малки и на който около 24 май се кълнем в обич. А той в същността си е средство за общуване и за да ни служи добре, непрекъснато се променя. Да го погледнем в неговата динамика и да се опитаме да разберем какво става и защо, кои са движещите механизми и как те са свързани с обществените процеси. И тъй като задачата не е лека, ще го правим постепенно – на порции.
It’s a familiar story for many IT operations teams: a critical server went down overnight, but the alert was buried in someone’s inbox. By the time anyone noticed, valuable time was lost, SLAs were breached, and the team spent the next morning explaining why an email hadn’t been seen. Email (or even SMS text) alone simply wasn’t reliable enough for something as urgent as incident alerts.
The turning point came when the team decided to integrate SIGNL4 with Zabbix. Setup was fast – within minutes, alerts that once hid in crowded inboxes were now reaching the right on-call engineer – loud, clear, and actionable. Instead of reacting late, the team was responding in real time and the night shifts suddenly felt a lot less stressful.
Integration overview and two-way communication
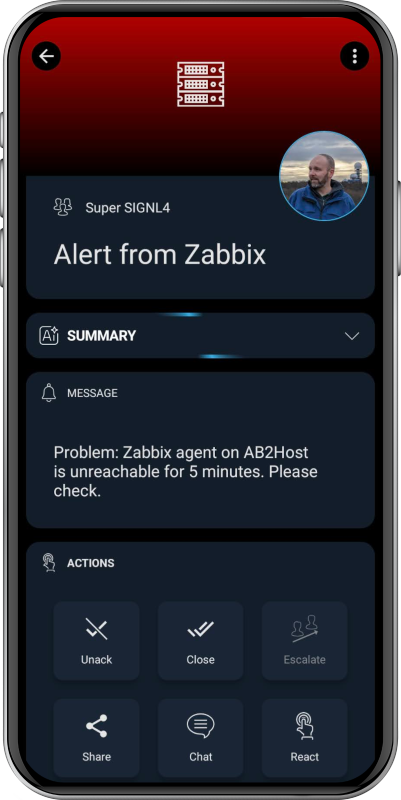
The SIGNL4 integration leverages a Zabbix media type to seamlessly send event data from Zabbix to SIGNL4. Once configured, Zabbix alerts are instantly transformed into mobile push notifications, ensuring rapid delivery and clear visibility for on-call teams.
Beyond alerting, the integration also supports bidirectional status updates between the two systems – including acknowledgements, closures, and annotations. When an on-call engineer acknowledges an alert in the SIGNL4 mobile app, the status is automatically reflected in the Zabbix dashboard.
Likewise, when Zabbix detects recovery (status UP), it triggers an automatic update to close the corresponding alert in SIGNL4. This real-time synchronization keeps both platforms perfectly aligned, maintaining consistent alert and recovery states without any manual effort.
Configuration steps
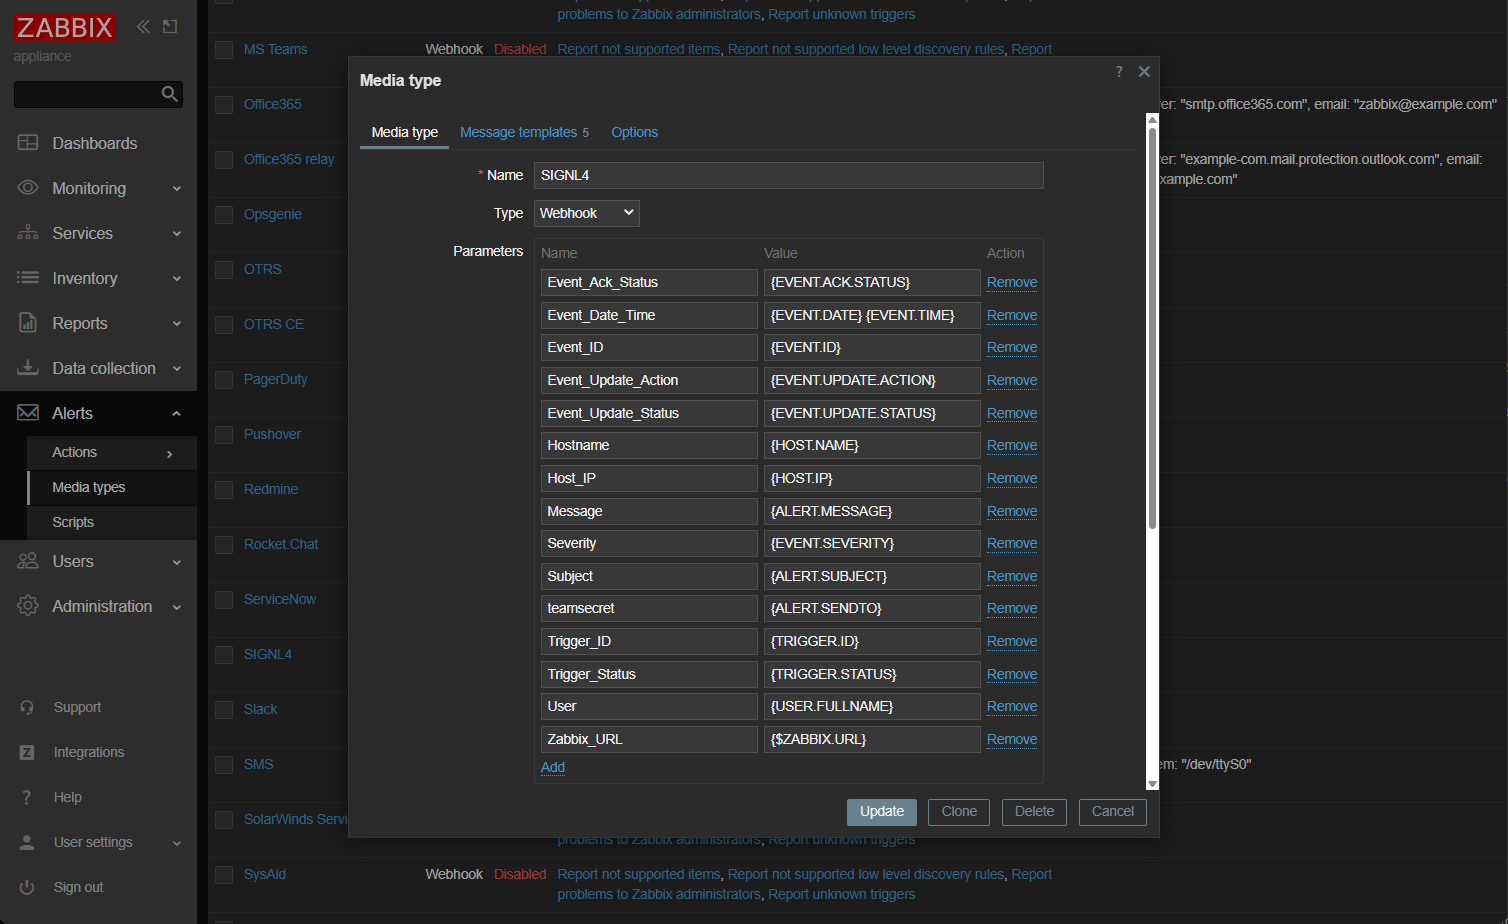
In the Zabbix web portal go to “Alerts” -> “Media types.”
Find the SIGNL4 media type, enable it, and enter your SIGNL4 team or integration secret in the parameter “teamsecret.” Alternatively, you can leave the default ({ALERT.SENDTO}) and enter the SIGNL4 team secret into the “Send to” parameter of your user.
Update the settings:
In the media type list click the button “Test” for the SIGNL4 media type to send a test alert. You will receive an alert in your SIGNL4 mobile app.
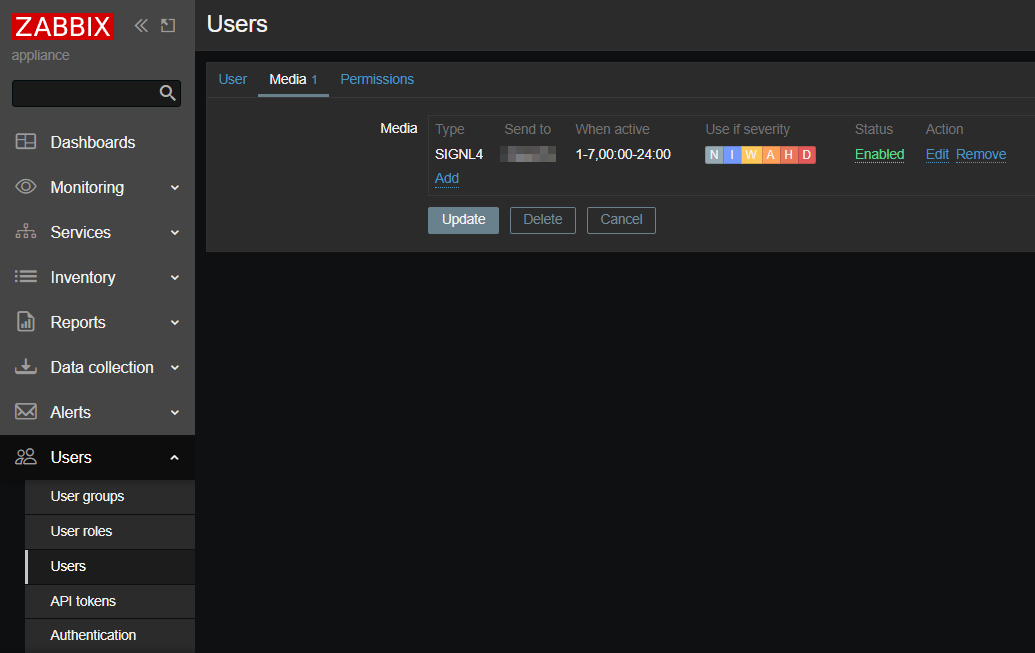
Under “User settings” -> “Profile” go to “Media” and add the SIGNL4 media type here. Adapt the alerting settings according to your needs.
That’s it! Now a SIGNL4 alert is triggered every time Zabbix sends an alert to your Zabbix user.
Back-channel configuration for status updates
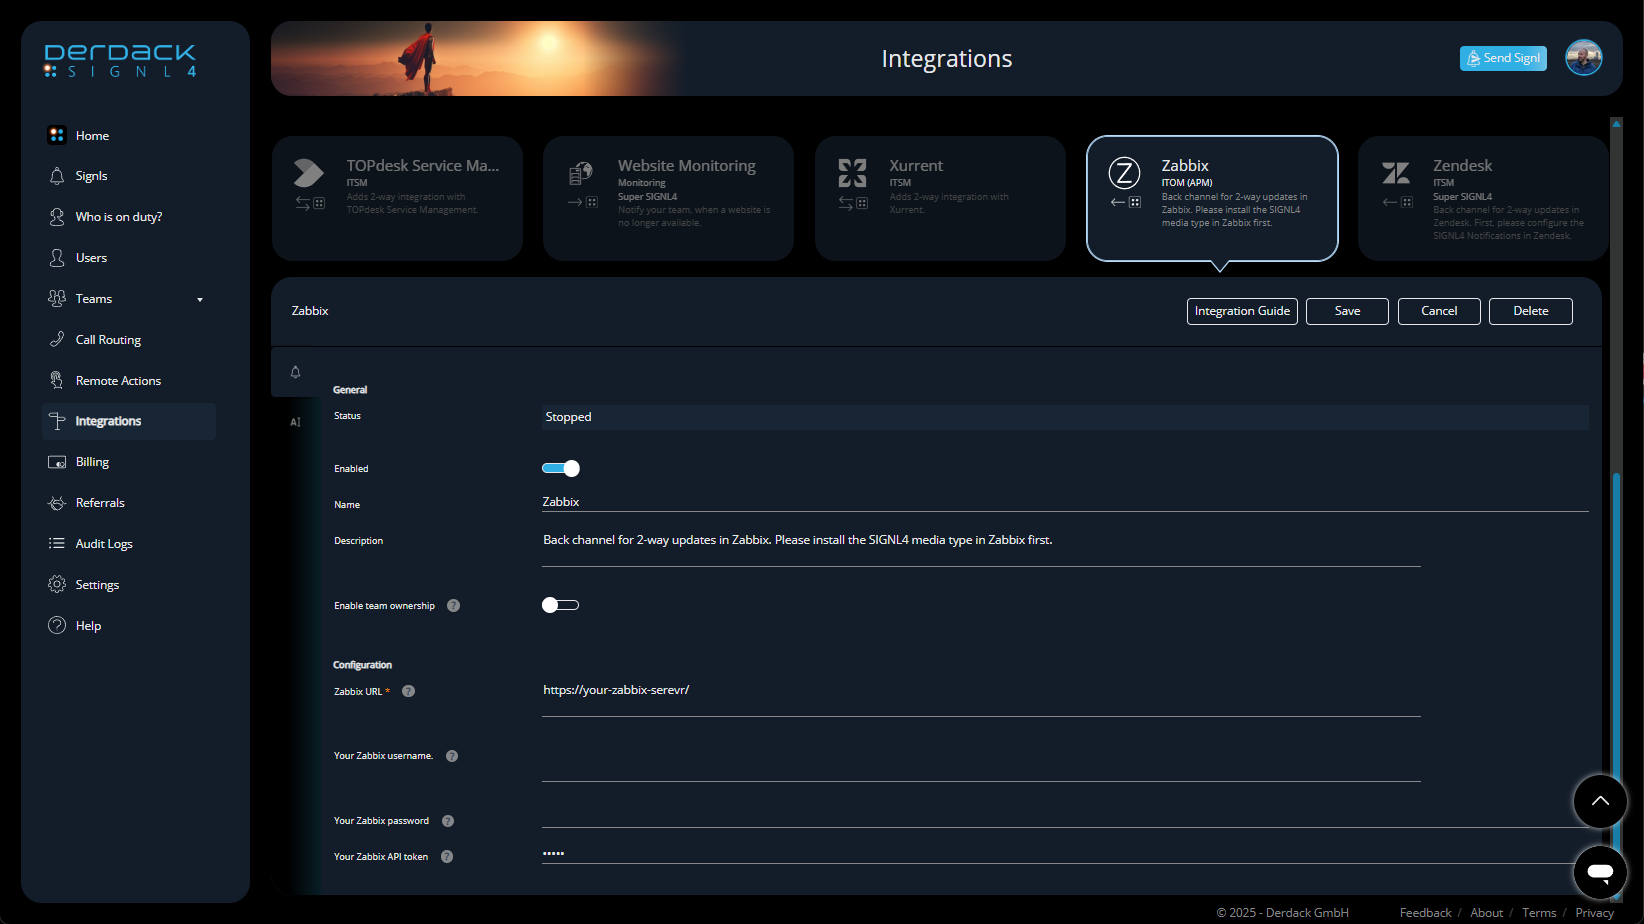
In the SIGNL4 web portal go to “Integrations” -> “Gallery” and look for the “Zabbix ()” integration. Note the arrow pointing to the left.
As “Zabbix URL” enter your Zabbix URL, e.g. https://your-zabbix-server/
Next, enter “Your Zabbix API token.” You can find this one as described here.
There’s no need for a username and password – just use the API token.
Enable the integration and click “Install.”
That’s it! Status updates are now sent from SIGNL4 to Zabbix.
24/7 Alerting and escalation – Critical Zabbix alerts reach the right people instantly via mobile app, push, SMS, or voice call. This includes escalation, ensuring nothing slips through the cracks.
On-call duty management – Calendar-based on-call scheduling and automated routing replaces manual escalation, helping teams sleep better and respond smarter.
Rich, mobile-first notifications – Alerts include key incident details, so engineers can act quickly without logging into dashboards first.
Team collaboration and acknowledgment tracking – Everyone sees who has picked up an alert, for full transparency and structures response.
Reduced MTTA/MTTR – Faster acknowledgment and resolution mean less downtime, fewer escalations, and more stable operations.
What once felt like a constant struggle with missed notifications has turned into a structured, reliable alerting process. By connecting Zabbix with SIGNL4, the team not only strengthened their incident response but also made on-call duty a lot less of a burden – and that might be the biggest win of all.
The Cloudflare platform is a critical system for Cloudflare itself. We are our own Customer Zero – using our products to secure and optimize our own services.
Within our security division, a dedicated Customer Zero team uses its unique position to provide a constant, high-fidelity feedback loop to product and engineering that drives continuous improvement of our products. And we do this at a global scale — where a single misconfiguration can propagate across our edge in seconds and lead to unintended consequences. If you’ve ever hesitated before pushing a change to production, sweating because you know one small mistake could lock every employee out of critical application or take down a production service, you know the feeling. The risk of unintended consequences is real, and it keeps us up at night.
This presents an interesting challenge: How do we ensure hundreds of internal production Cloudflare accounts are secured consistently while minimizing human error?
While the Cloudflare dashboard is excellent for observability and analytics, manually clicking through hundreds of accounts to ensure security settings are identical is a recipe for mistakes. To keep our sanity and our security intact, we stopped treating our configurations as manual point-and-click tasks and started treating them like code. We adopted “shift left” principles to move security checks to the earliest stages of development.
This wasn’t an abstract corporate goal for us. It was a survival mechanism to catch errors before they caused an incident, and it required a fundamental change in our governance architecture.
What Shift Left means to us
“Shifting left” refers to moving validation steps earlier in the software development lifecycle (SDLC). In practice, this means integrating testing, security audits, and policy compliance checks directly into the continuous integration and continuous deployment (CI/CD) pipeline. By catching issues or misconfigurations at the merge request stage, we identify issues when the cost of remediation is lowest, rather than discovering them after deployment.
When we think about applying shift left principles at Cloudflare, four key principles stand out:
Consistency: Configurations must be easily copied and reused across accounts.
Scalability: Large changes can be applied rapidly across multiple accounts.
Observability: Configurations must be auditable by anyone for current state, accuracy, and security.
Governance: Guardrails must be proactive — enforced before deployment to avoid incidents.
A production IaC operating model
To support this model, we transitioned all production accounts to being managed with Infrastructure as Code (IaC). Every modification is tracked, tied to a user, commit, and an internal ticket. Teams still use the dashboard for analytics and insights, but critical production changes are all done in code.
This model ensures every change is peer-reviewed, and policies, though set by the security team, are implemented by the owning engineering teams themselves.
This setup is grounded in two major technologies: Terraform and a custom CI/CD pipeline.
Our enterprise IaC stack
We chose Terraform for its mature open-source ecosystem, strong community support, and deep integration with Policy as Code tooling. Furthermore, using the Cloudflare Terraform Provider internally allows us to actively dogfood the experience and improve it for our customers.
To manage the scale of hundreds of accounts and around 30 merge requests per day, our CI/CD pipeline runs on Atlantis, integrated with GitLab. We also use a custom go program, tfstate-butler, that acts as a broker to securely store state files.
tfstate-butler operates as an HTTP backend for Terraform. The primary design driver was security: It ensures unique encryption keys per state file to limit the blast radius of any potential compromise.
All internal account configurations are defined in a centralized monorepo. Individual teams own and deploy their specific configurations and are the designated code owners for their sections of this centralized repository, ensuring accountability. To read more about this configuration, check out How Cloudflare uses Terraform to manage Cloudflare.
Infrastructure as Code Data Flow Diagram
Baselines and Policy as Code
The entire shift left strategy hinges on establishing a strong security baseline for all internal production Cloudflare accounts. The baseline is a collection of security policies that are defined in code (Policy as Code). This baseline is not merely a set of guidelines but rather a required security configuration we enforce across the platform — e.g., maximum session length, required logs, specific WAF configurations, etc.
This setup is where policy enforcement shifts from manual audits to automated gates. We use the Open Policy Agent (OPA) framework and its policy language, Rego, via the Atlantis Conftest Policy Checking feature.
Defining policies as code
Rego policies define the specific security requirements that make up the baseline for all Cloudflare provider resources. We currently maintain approximately 50 policies.
For example, here is a Rego policy that validates only @cloudflare.com emails are allowed to be used in an access policy:
# validate no use of non-cloudflare email
warn contains reason if {
    r := tfplan.resource_changes[_]
    r.mode == "managed"
    r.type == "cloudflare_access_policy"

    include := r.change.after.include[_]
    email_address := include.email[_]
    not endswith(email_address, "@cloudflare.com")

    reason := sprintf("%-40s :: only @cloudflare.com emails are allowed", [r.address])
}
warn contains reason if {
    r := tfplan.resource_changes[_]
    r.mode == "managed"
    r.type == "cloudflare_access_policy"

    require := r.change.after.require[_]
    email_address := require.email[_]
    not endswith(email_address, "@cloudflare.com")

    reason := sprintf("%-40s :: only @cloudflare.com emails are allowed", [r.address])
}
Enforcing the baseline
The policy check runs on every merge request (MR), ensuring configurations are compliant before deployment. Policy check output is shown directly in the GitLab MR comment thread.
Policy enforcement operates in two modes:
Warning: Leaves a comment on the MR, but allows the merge.
Deny: Blocks the deployment outright.
If the policy check determines the configuration being applied in the MR deviates from the baseline, the output will return which resources are out of compliance.
The example below shows an output from a policy check identifying 3 discrepancies in a merge request:
WARN - cloudflare_zero_trust_access_application.app_saas_xxx :: "session_duration" must be less than or equal to 10h

WARN - cloudflare_zero_trust_access_application.app_saas_xxx_pay_per_crawl :: "session_duration" must be less than or equal to 10h

WARN - cloudflare_zero_trust_access_application.app_saas_ms :: you must have at least one require statement of auth_method = "swk"

41 tests, 38 passed, 3 warnings, 0 failures, 0 exception
Handling policy exceptions
We understand that exceptions are necessary, but they must be managed with the same rigor as the policy itself. When a team requires an exception, they submit a request via Jira.
Once approved by the Customer Zero team, the exception is formalized by submitting a pull request to the central exceptions.rego repository. Exceptions can be made at various levels:
Account: Exclude account_x from policy_y.
Resource Category: Exclude all resource_a’s in account_x from policy_y.
Specific Resource: Exclude resource_a_1 in account_x from policy_y.
This example shows a session length exception for five specific applications under two separate Cloudflare accounts:
Our journey wasn’t without obstacles. We had years of clickops (manual changes made directly in the dashboard) scattered across hundreds of accounts. Trying to import the existing chaos into a strict infrastructure as code system felt like trying to change the tires on a moving car. To this day, importing resources continues to be an ongoing process.
We also ran into limitations of our own tools. We found edge cases in the Cloudflare Terraform provider that only appear when you try to manage infrastructure at this scale. These weren’t just minor speed bumps. They were hard lessons on the necessity of eating our own dogfood, so we could build even better solutions.
That friction clarified exactly what we were up against, leading us to three hard-earned lessons.
Lesson 1: high barriers to entry stall adoption
The first hurdle for any large-scale IaC rollout is onboarding existing, manually configured resources. We gave teams two options: manually creating Terraform resources and import blocks, or using cf-terraforming.
We quickly discovered that Terraform fluency varies across teams, and the learning curve for manually importing existing resources proved to be much steeper than we anticipated.
Luckily the cf-terraforming command-line utility uses the Cloudflare API to automatically generate the necessary Terraform code and import statements, significantly accelerating the migration process.
We also formed an internal community where experienced engineers could guide teams through the nuances of the provider and help unblock complex imports.
Lesson 2: drift happens
We also had to tackle configuration drift, which occurs when the IaC process is bypassed to expedite urgent changes. While making edits directly in the dashboard is faster during an incident, it leaves the Terraform state out of sync with reality.
We implemented a custom drift detection service that constantly compares the state defined by Terraform with the actual deployed state via the Cloudflare API. When drift is detected, an automated system creates an internal ticket and assigns it to the owning team with varying Service Level Agreements (SLAs) for remediation.
Lesson 3: automation is key
Cloudflare innovates quickly, so our set of products and APIs is ever-growing. Unfortunately, that meant that our Terraform provider was often behind in terms of feature parity with the product.
We solved that issue with the release of our v5 provider, which automatically generates the Terraform provider based on the OpenAPI specification. This transition wasn’t without bumps as we hardened our approach to code generation, but this approach ensures that the API and Terraform stay in sync, reducing the chance of capability drift.
The core lesson: proactive > reactive
By centralizing our security baselines, mandating peer reviews, and enforcing policies before any change hits production, we minimize the possibility of configuration errors, accidental deletions, or policy violations. The architecture not only helps to prevent manual mistakes, but actually increases engineering velocity because teams are confident their changes are compliant.
The key lesson from our work with Customer Zero is this: While the Cloudflare dashboard is excellent for day-to-day operations, achieving enterprise-level scale and consistent governance requires a different approach. When you treat your Cloudflare configurations as living code, you can scale securely and confidently.
Have thoughts on Infrastructure as Code? Keep the conversation going and share your experiences over at community.cloudflare.com.
On September 14, 2015, our first publicly-trusted certificate went live. We were proud that we had issued a certificate that a significant majority of clients could accept, and had done it using automated software. Of course, in retrospect this was just the first of billions of certificates. Today, Let’s Encrypt is the largest certificate authority in the world in terms of certificates issued, the ACME protocol we helped create and standardize is integrated throughout the server ecosystem, and we’ve become a household name among system administrators. We’re closing in on protecting one billion web sites.
In 2023, we marked the tenth anniversary of the creation of our nonprofit, Internet Security Research Group, which continues to host Let’s Encrypt and other public benefit infrastructure projects. Now, in honor of the tenth anniversary of Let’s Encrypt’s public certificate issuance and the start of the general availability of our services, we’re looking back at a few milestones and factors that contributed to our success.
Growth
A conspicuous part of Let’s Encrypt’s history is how thoroughly our vision of scalability through automation has succeeded.
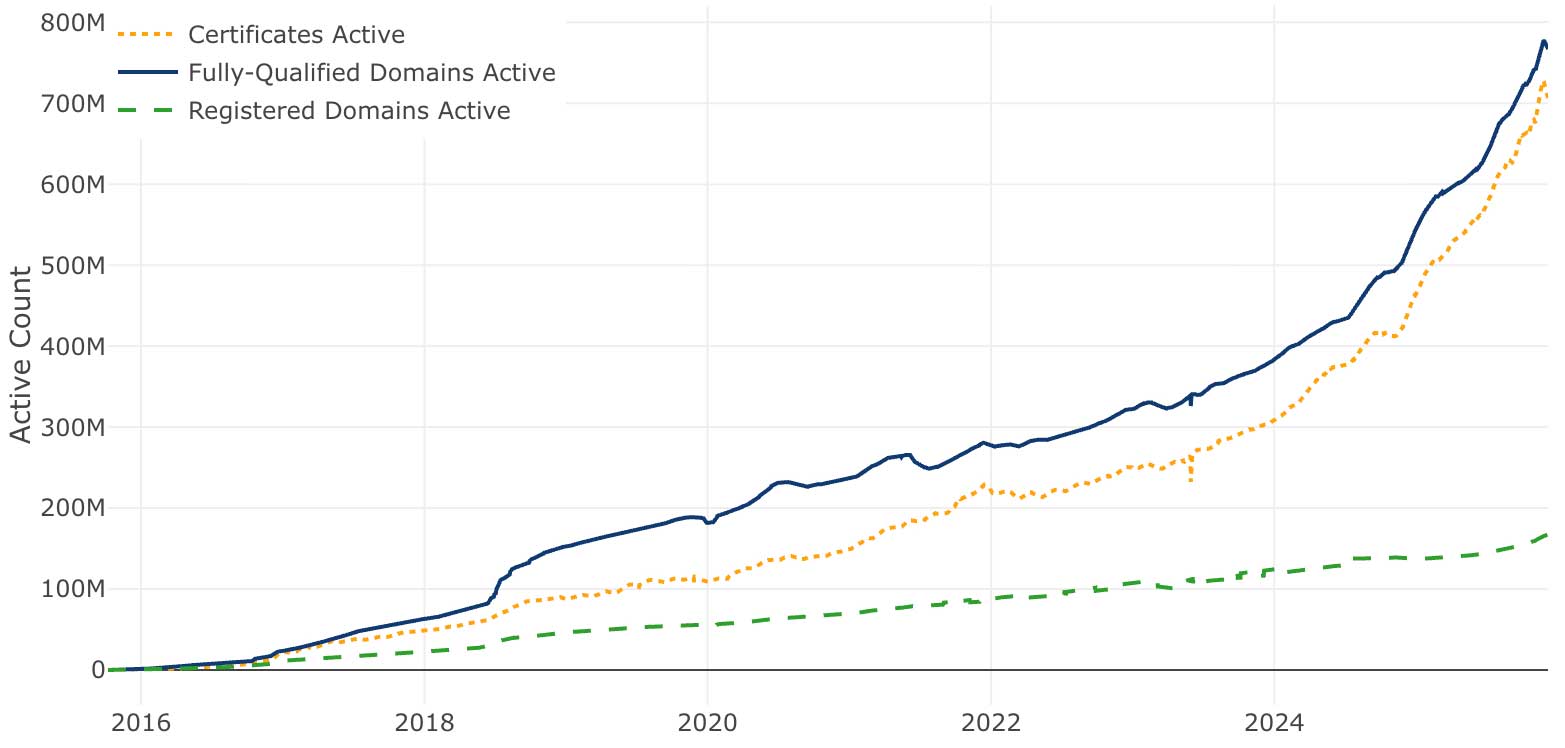
In March 2016, we issued our one millionth certificate. Just two years later, in September 2018, we were issuing a million certificates every day. In 2020 we reached a billion total certificates issued and as of late 2025 we’re frequently issuing ten million certificates per day. We’re now on track to reach a billion active sites, probably sometime in the coming year. (The “certificates issued” and “certificates active” metrics are quite different because our certificates regularly expire and get replaced.)
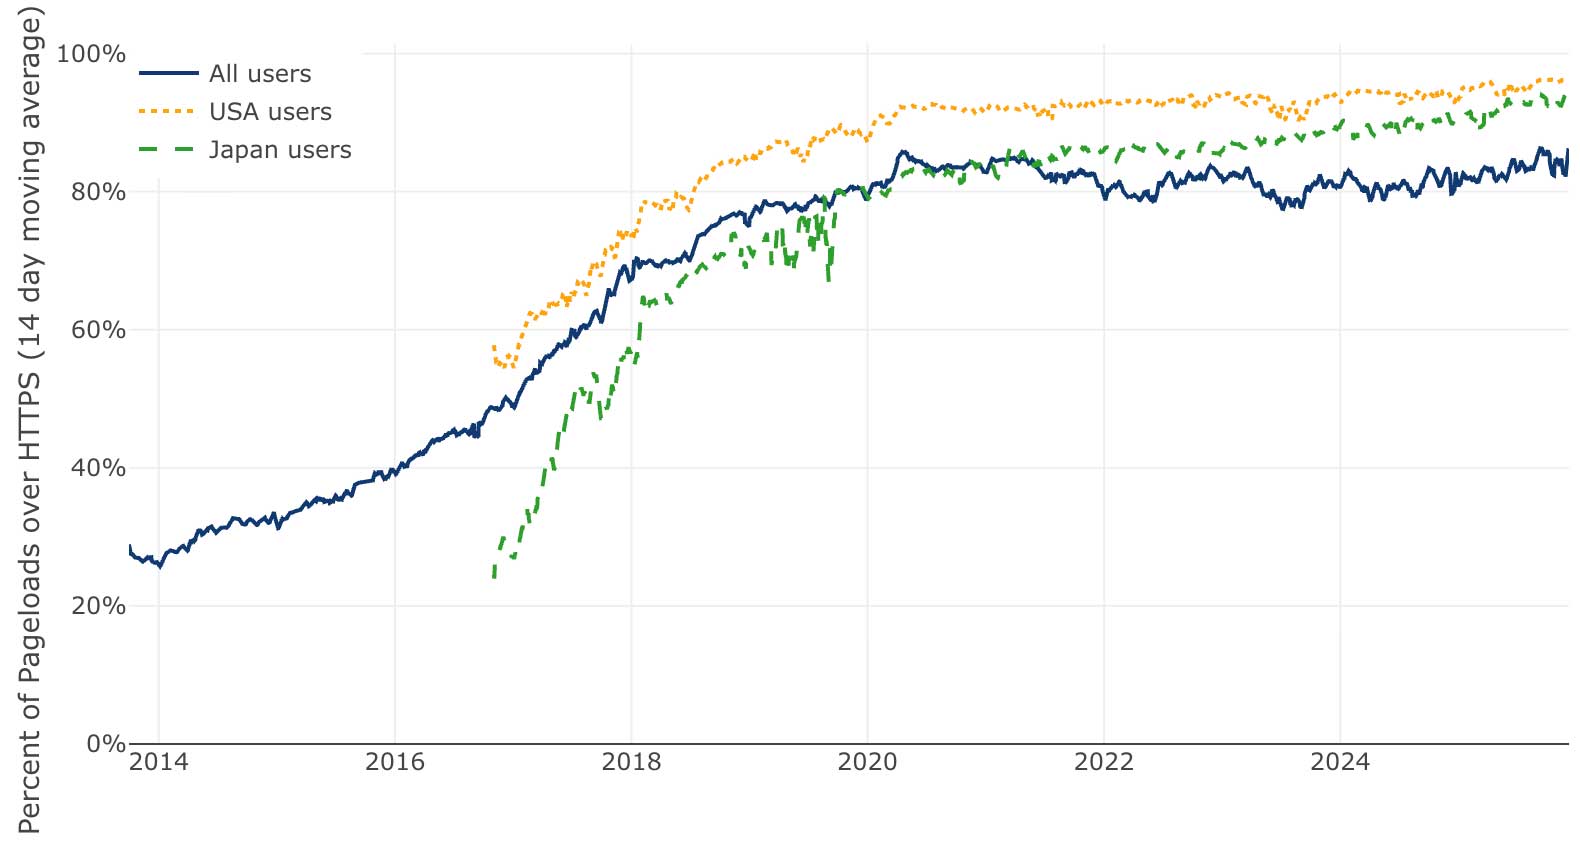
The steady growth of our issuance volume shows the strength of our architecture, the validity of our vision, and the great efforts of our engineering team to scale up our own infrastructure. It also reminds us of the confidence that the Internet community is placing in us, making the use of a Let’s Encrypt certificate a normal and, dare we say, boring choice. But I often point out that our ever-growing issuance volumes are only an indirect measure of value. What ultimately matters is improving the security of people’s use of the web, which, as far as Let’s Encrypt’s contribution goes, is not measured by issuance volumes so much as by the prevalence of HTTPS encryption. For that reason, we’ve always emphasized the graph of the percentage of encrypted connections that web users make (here represented by statistics from Firefox).
(These graphs are snapshots as of the date of this post; a dynamically updated version is found on our stats page.) Our biggest goal was to make a concrete, measurable security impact on the web by getting HTTPS connection prevalence to increase—and it’s worked. It took five years or so to get the global percentage from below 30% to around 80%, where it’s remained ever since. In the U.S. it has been close to 95% for a while now.
A good amount of the remaining unencrypted traffic probably comes from internal or private organizational sites (intranets), but other than that we don’t know much about it; this would be a great topic for Internet security researchers to look into.
We believe our present growth in certificate issuance volume is essentially coming from growth in the web as a whole. In other words, if we protect 20% more sites over some time period, it’s because the web itself grew by 20%.
Along the way, first issuing one million certificates in a single day (in September 2018), significantly contributed to by the SquareSpace and Shopify Let’s Encrypt integrations
Just at the end of September 2025, we issued more than ten million certificates in a day for the first time.
There are many technical milestones like our database server upgrades in 2021, where we found we needed a serious server infrastructure boost because of the tremendous volumes of data we were dealing with. Similarly, our original infrastructure was using Gigabit Ethernet internally, and, with the growth of our issuance volume and logging, we found that our Gigabit Ethernet network eventually became too slow to synchronize database instances! (Today we’re using 25-gig Ethernet.) More recently, we’ve experimented with architectural upgrades to our ever-growing Certificate Transparency logs, and decided to go ahead with deploying those upgrades—to help us not just keep up with, but get ahead of, our continuing growth.
These kinds of growing pains and successful responses to them are nice to remember because they point to the inexorable increase in demands on our infrastructure as we’ve become a more and more essential part of the Internet. I’m proud of our technical teams which have handled those increased demands capably and professionally.
I also recall the ongoing work involved in making sure our certificates would be as widely accepted as possible, which has meant managing the original cross-signature from IdenTrust, and subsequently creating and propagating our own root CA certificates. This process has required PKI engineering, key ceremonies, root program interactions, documentation, and community support associated with certificate migrations. Most users never have reason to look behind the scenes at our chains of trust, but our engineers update it as root and intermediate certificates have been replaced. We’ve engaged at the CA/B Forum, IETF, and in other venues with the browser root programs to help shape the web PKI as a technical leader.
As I wrote in 2020, our ideal of complete automation of the web PKI aims at a world where most site owners wouldn’t even need to think about certificates at all. We continue to get closer and closer to that world, which creates a risk that people will take us and our services for granted, as the details of certificate renewal occupy less of site operators’ mental energy. As I said at the time,
When your strategy as a nonprofit is to get out of the way, to offer services that people don’t need to think about, you’re running a real risk that you’ll eventually be taken for granted. There is a tension between wanting your work to be invisible and the need for recognition of its value. If people aren’t aware of how valuable our services are then we may not get the support we need to continue providing them.
I’m also grateful to our communications and fundraising staff who help make clear what we’re doing every day and how we’re making the Internet safer.
Recognition of Let’s Encrypt
Our community continually recognizes our work in tangible ways by using our certificates—now by the tens of millions per day—and by sponsoring us.
Ten years later, I’m still deeply grateful to the five initial sponsors that got Let’s Encrypt off the ground – Mozilla, EFF, Cisco, Akamai, and IdenTrust. When they committed significant resources to the project, it was just an ambitious idea. They saw the potential and believed in our team, and because of that we were able to build the service we operate today.
IdenTrust: A critical technical partner
I’d like to particularly recognize IdenTrust, a PKI company that worked as a partner from the outset and enabled us to issue publicly-trusted certificates via a cross-signature from one of their roots. We would simply not have been able to launch our publicly-trusted certificate service without them. Back when I first told them that we were starting a new nonprofit certificate authority that would give away millions of certificates for free, there wasn’t any precedent for this arrangement, and there wasn’t necessarily much reason for IdenTrust to pay attention to our proposal. But the company really understood what we were trying to do and was willing to engage from the beginning. Ultimately, IdenTrust’s support made our original issuance model a reality.
Conclusion
I’m proud of what we have achieved with our staff, partners, and donors over the past ten years. I hope to be even more proud of the next ten years, as we use our strong footing to continue to pursue our mission to protect Internet users by lowering monetary, technological, and informational barriers to a more secure and privacy-respecting Internet.
Let’s Encrypt is a project of the nonprofit Internet Security Research Group, a 501(c)(3) nonprofit. You can help us make the next ten years great as well by donating or becoming a sponsor.
AWS recently announced the general availability of auto-optimize for the Amazon OpenSearch Service vector engine. This feature streamlines vector index optimization by automatically evaluating configuration trade-offs across search quality, speed, and cost savings. You can then run a vector ingestion pipeline to build an optimized index on your desired collection or domain. Previously, optimizing index configurations—including algorithm, compression, and engine settings—required experts and weeks of testing. This process must be repeated because optimizations are unique to specific data characteristics and requirements. You can now auto-optimize vector databases in under an hour without managing infrastructure and acquiring expertise in index tuning.
In this post, we discuss how the auto-optimize feature works, its benefits, and share examples of auto-optimized results.
Overview of vector search and vector indexes
Vector search is a technique that improves search quality and is a cornerstone of generative AI applications. It involves using a type of AI model to convert content into numerical encodings (vectors), enabling content matching by semantic similarity instead of just keywords. You build vector databases by ingesting vectors into OpenSearch to build indexes that enable searches across billions of vectors in milliseconds.
Benefits of optimizing vector indexes and how it works
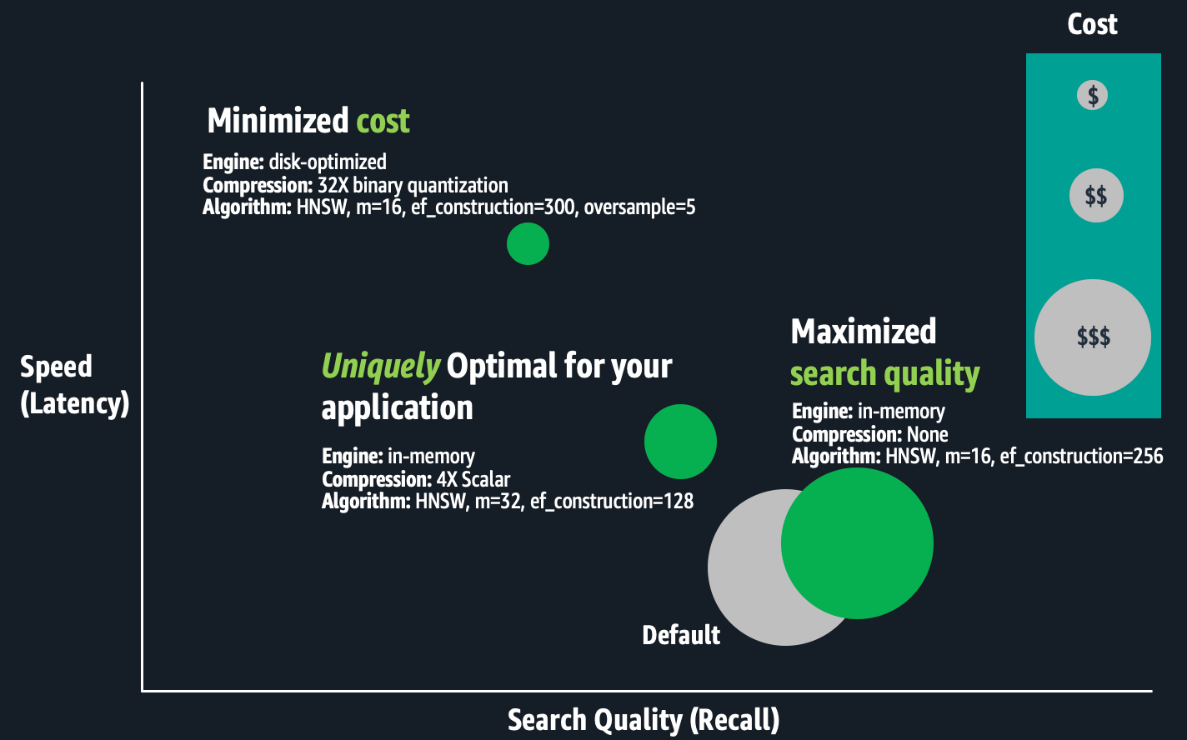
The OpenSearch vector engine provides a variety of index configurations that help you make favorable trade-offs between search quality (recall), speed (latency), and cost (RAM requirements). There isn’t a universally optimal configuration. Experts must evaluate combinations of index settings such as Hierarchal Navigable Small Worlds (HNSW) algorithm parameters (such as m or ef_construction), quantization techniques (such as scalar, binary, or product), and engine parameters (such as memory-optimized, disk-optimized, or warm-cold storage). The difference between configurations could be a 10% or more difference in search quality, hundreds of milliseconds in search latency, or up to three times in cost savings. For large-scale deployments, cost-optimizations can make or break your budget.
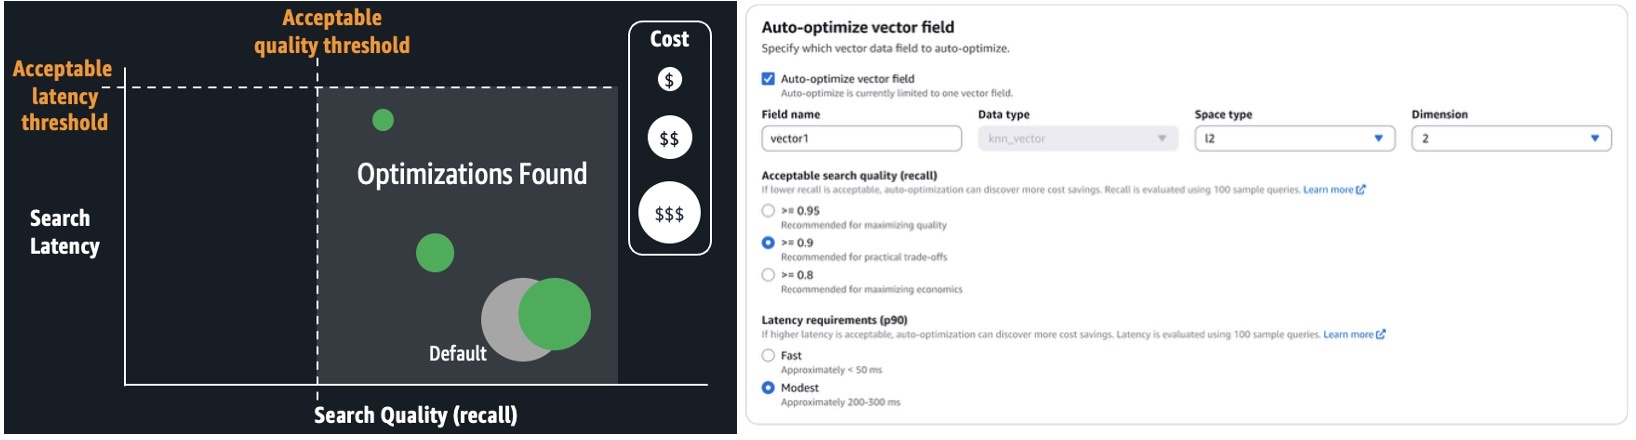
The following figure is a conceptual illustration of trade-offs between index configurations.
Optimizing vector indexes is time-consuming. Experts must build an index; evaluate its speed, quality, and cost; and make appropriate configuration adjustments before repeating this process. Running these experiments at scale can take weeks because building and evaluating large-scale index requires substantial compute power, resulting in hours to days of processing for just one index. Optimizations are unique to specific business requirements and each dataset, and trade-off decisions are subjective. The best trade-offs depend on the use case, such as search for an internal wiki or an e-commerce site. Therefore, this process must be repeated for each index. Lastly, if your application data changes continuously, your vector search quality might degrade, requiring you to rebuild and re-optimize your vector indexes regularly.
Solution overview
With auto-optimize, you can run jobs to produce optimization recommendations, consisting of reports that detail performance measurements and explanations of the recommended configurations. You can configure auto-optimize jobs by simply providing your application’s acceptable search latency and quality requirements. Expertise in k-NN algorithms, quantization techniques, and engine settings aren’t required. It avoids the one-size-fits-all limitations of solutions based on a few pre-configured deployment types, offering a tailored fit for your workloads. It automates the manual labor previously described. You simply run serverless, auto-optimize jobs at a flat rate per job. These jobs don’t consume your collection or domain resources. OpenSearch Service manages a separate multi-tenant warm pool of servers, and parallelizes index evaluations across secure, single-tenant workers to deliver results quickly. Auto-optimize is also integrated with vector ingestion pipelines, so you can quickly build an optimized vector index on a collection or domain from an Amazon Simple Storage Service (Amazon S3) data source.
The following screenshot illustrates how to configure an auto-optimize job on the OpenSearch Service console.
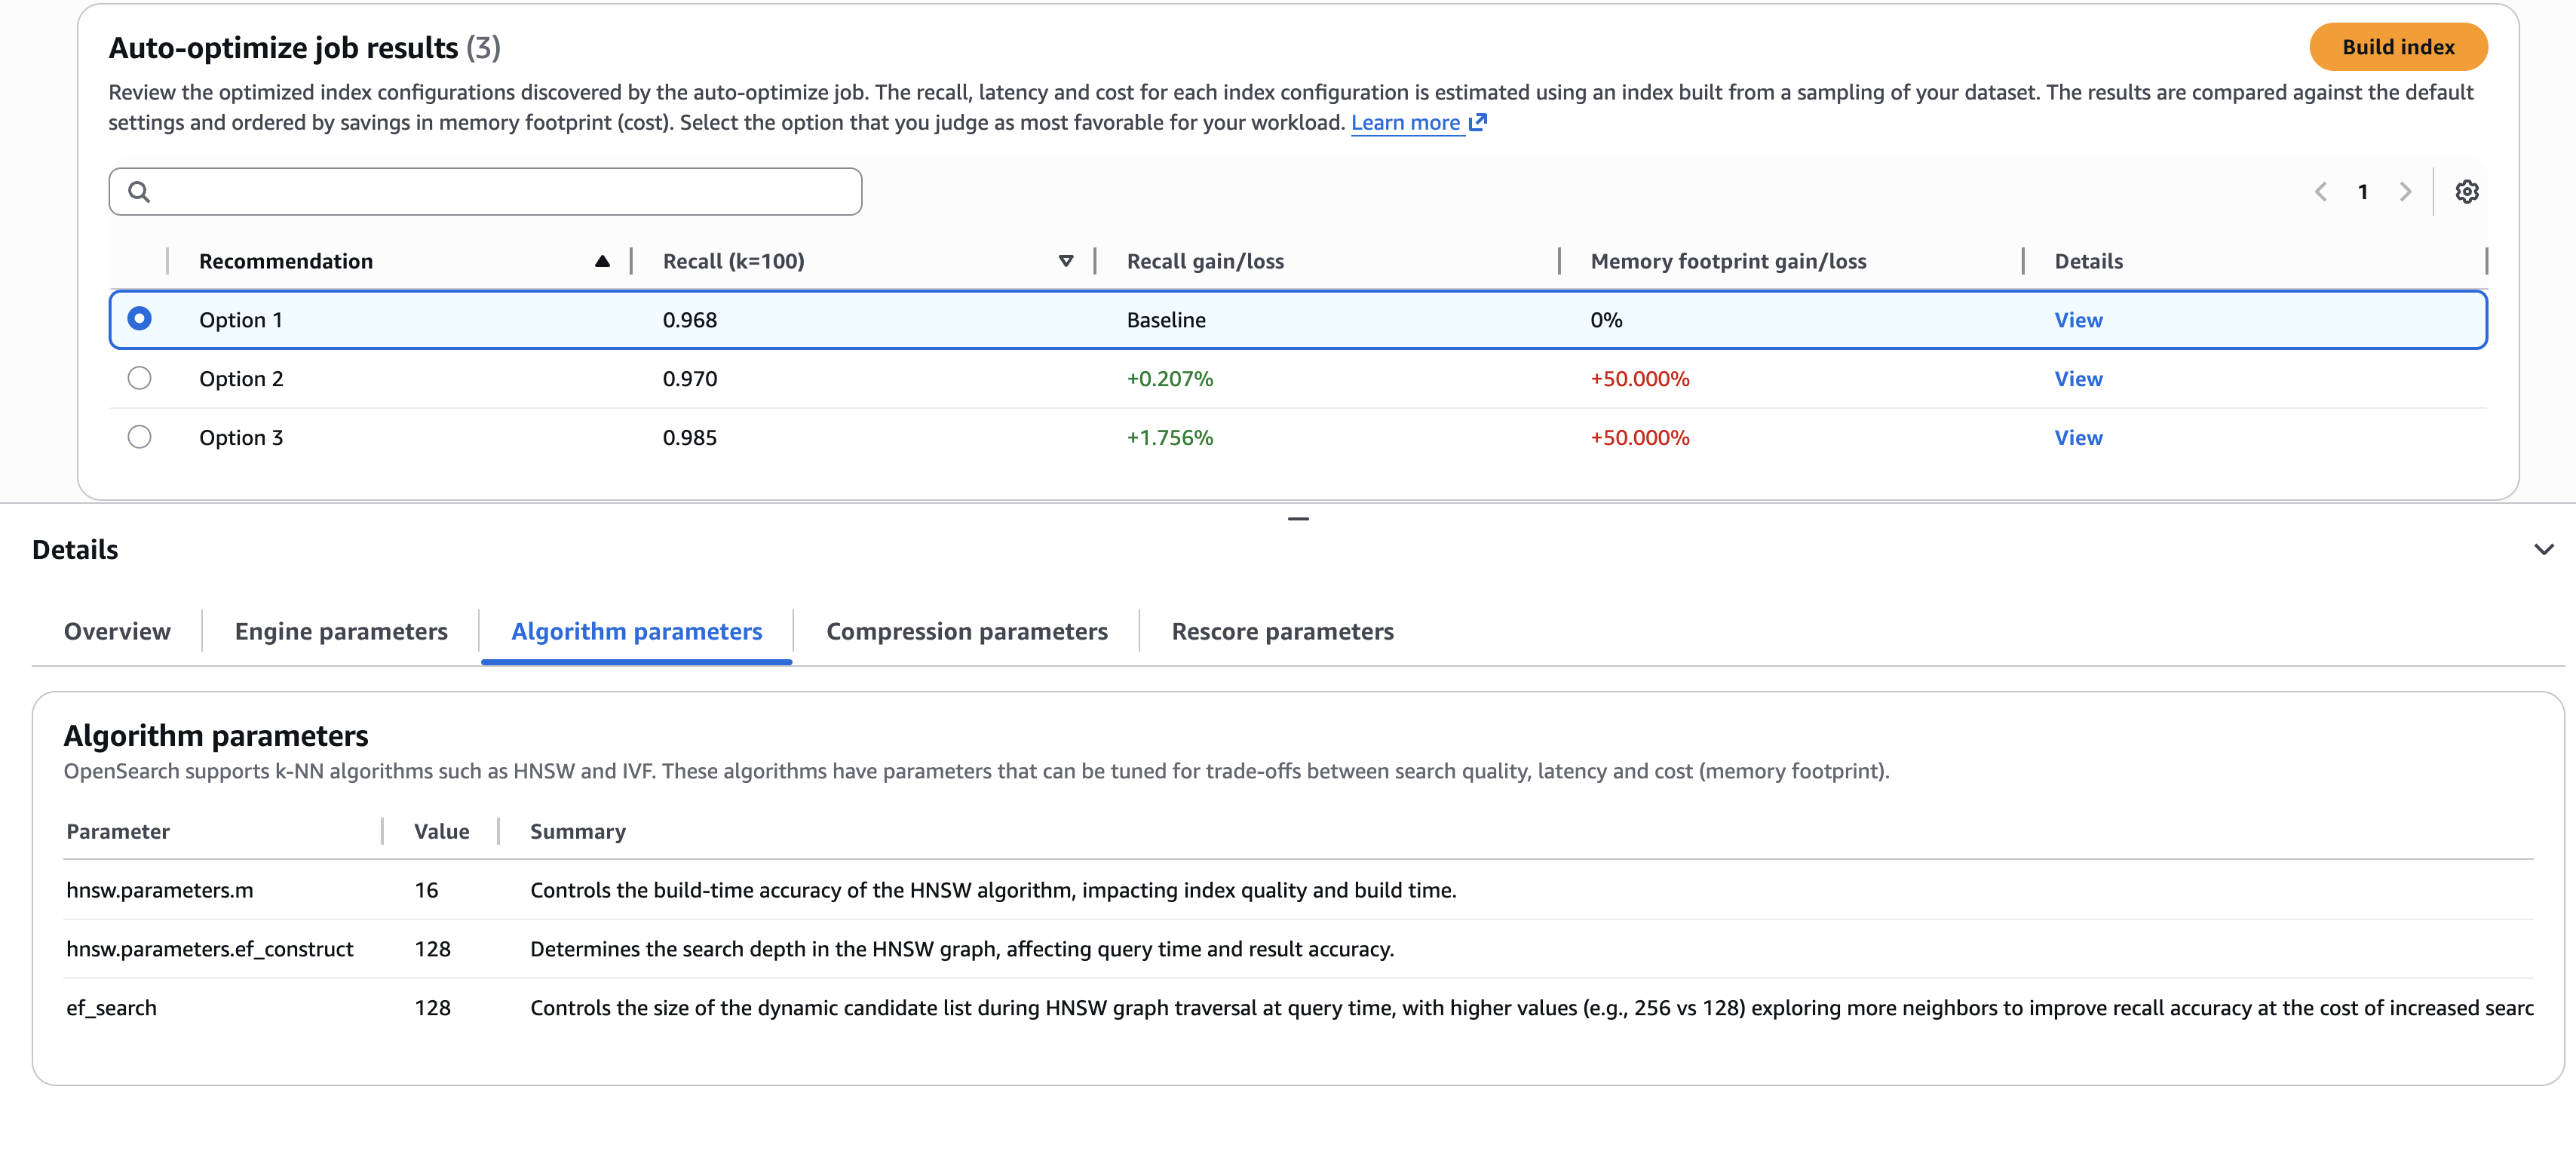
When the job is complete (typically, within 30–60 minutes for million-plus-size datasets), you can review the recommendations and reports, as shown in the following screenshot.
The screenshot illustrates an example where you need to choose the best trade-offs. Do you select the first option, which delivers the highest cost savings (through lower memory requirements)? Or do you select the third option, which delivers a 1.76% search quality improvement, but at higher cost? If you want to understand the details of the configurations used to deliver these results, you can view the sub-tabs on the Details pane, such as the Algorithm parameters tab shown in the preceding screenshot.
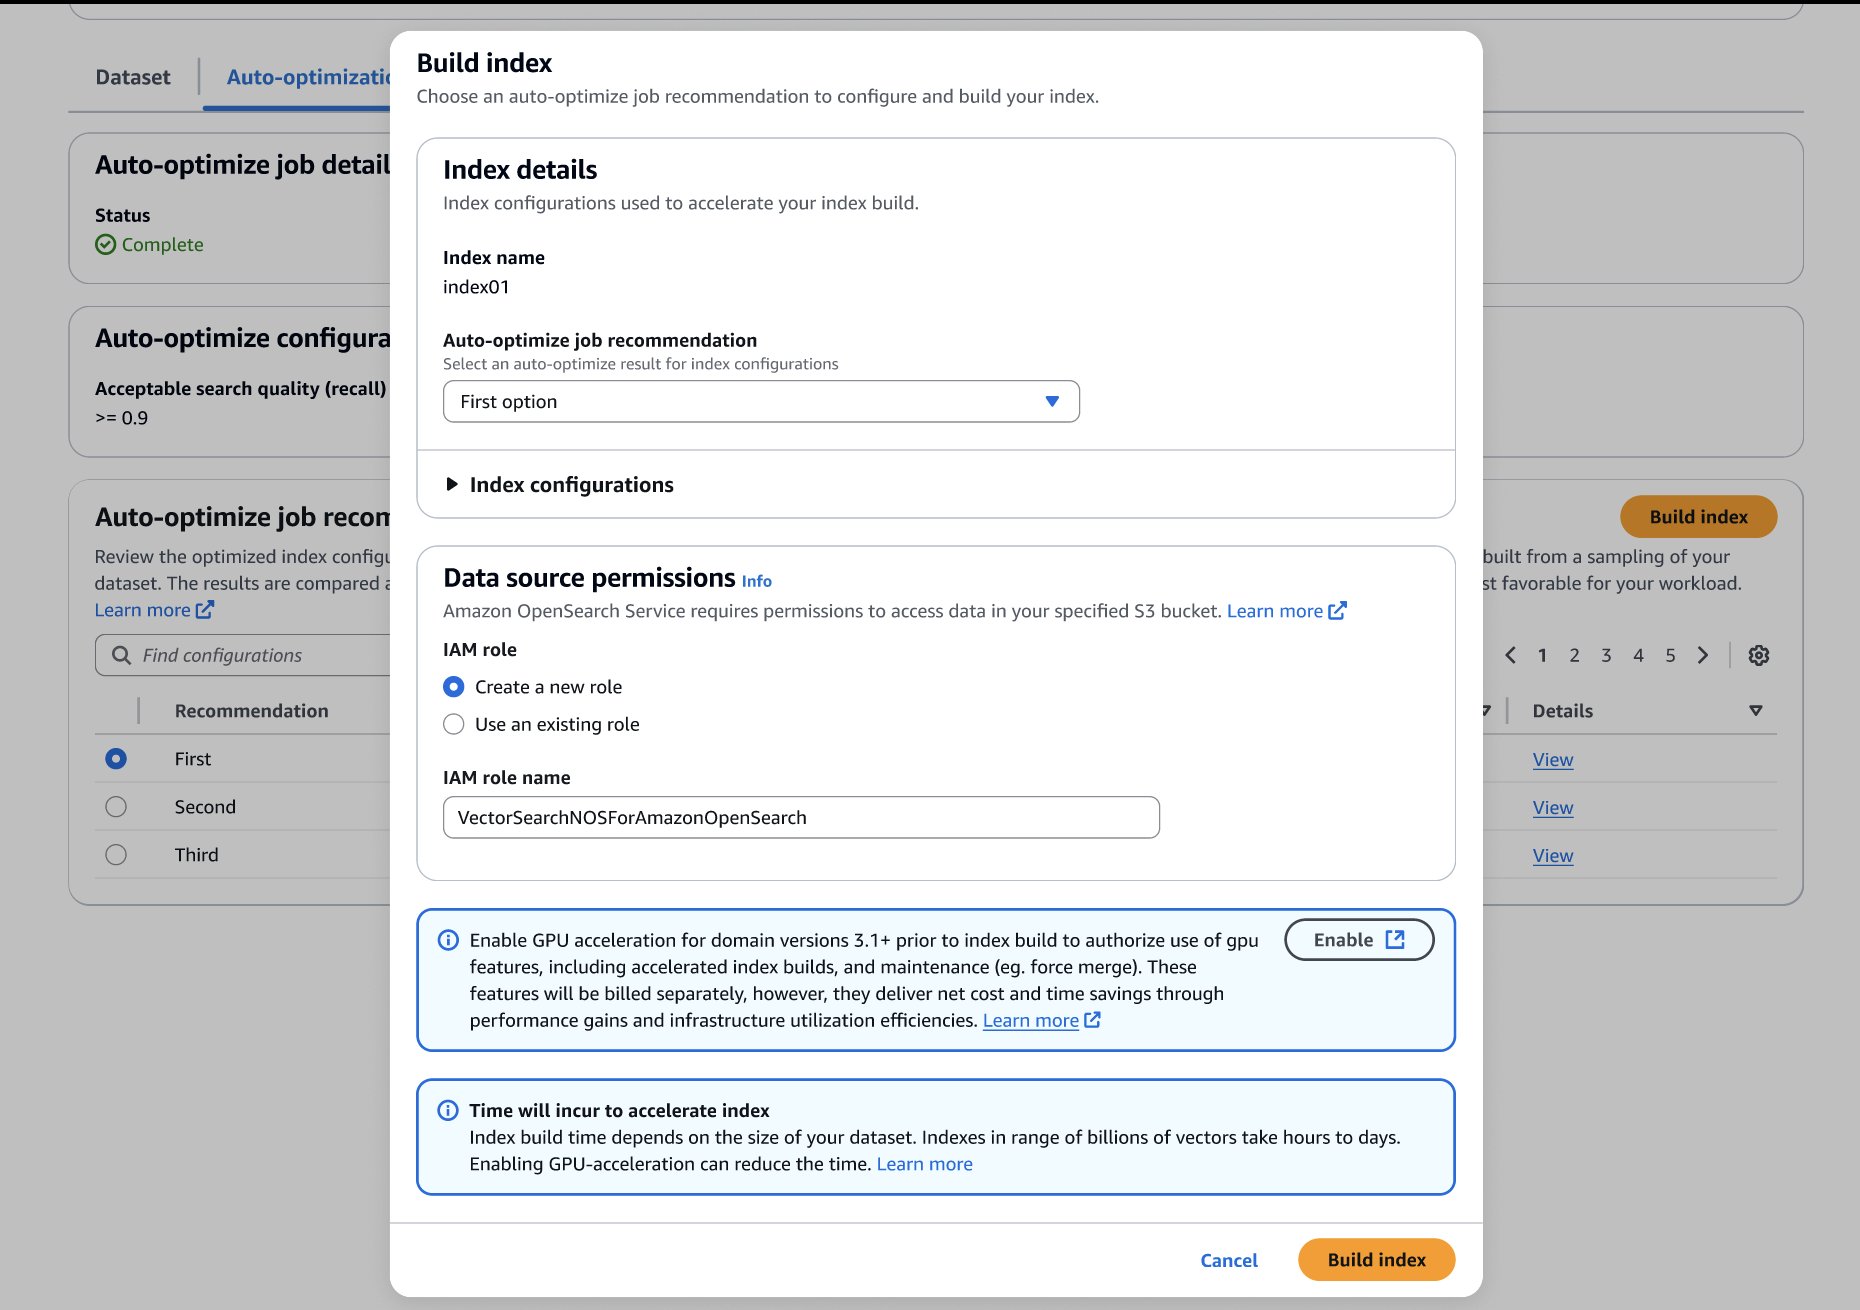
After you’ve made your choice, you can build your optimized index on your target OpenSearch Service domain or collection, as shown in the following screenshot. If you’re building the index on a collection or a domain running OpenSearch 3.1+, you can enable GPU-acceleration to increase the build speed up to 10 times faster at a quarter of the indexing cost.
Auto-optimize results
The following table presents a few examples of auto-optimize results. To quantify the value of running auto-optimize, we present gains compared to default settings. The estimated RAM requirements are based on standard domain sizing estimates:
Required RAM = 1.1 x (bytes per dimension x dimensions + hnsw.parameters.m x 8) x vector count
We estimate cost savings by comparing the minimal infrastructure (has just enough RAM) to host an index with the default compared to optimized settings.
Dataset
Auto-Optimize Job Configurations
Recommended Changes to Defaults
Required RAM)
(% reduced)
Estimated Cost Savings
(Required data nodes for default configuration vs. optimized)
(6 x r8g.4xlarge.search vs. 6 x r8g.8xlarge.search)
0.997 (+8.4%)
Conclusion
You can start building auto-optimized vector databases on the Vector ingestion page of the OpenSearch Service console. Use this feature with GPU-accelerated vector indexes to build optimized, billion-scale vector databases within hours.
Auto-optimize is available for OpenSearch Service vector collections and OpenSearch 2.17+ domains in the US East (N. Virginia, Ohio), US West (Oregon), Asia Pacific (Mumbai, Singapore, Sydney, Tokyo), and Europe (Frankfurt, Ireland, Stockholm) AWS Regions.
AWS recently announced the general availability of GPU-accelerated vector (k-NN) indexing on Amazon OpenSearch Service. You can now build billion-scale vector databases in under an hour and index vectors up to 10 times faster at a quarter of the cost. This feature dynamically attaches serverless GPUs to boost domains and collections running CPU-based instances. With this feature, you can scale AI apps quickly, innovate faster, and run vector workloads leaner.
In this post, we discuss the benefits of GPU-accelerated vector indexing, explore key use cases, and share performance benchmarks.
Overview of vector search and vector indexes
Vector search is a technique that improves search relevance, and is a cornerstone of generative AI applications. It involves using an embeddings model to convert content into numerical encodings (vectors), enabling content matching by semantic similarity instead of just keywords. You can build vector databases by ingesting vectors into OpenSearch Service to build indexes that enable searches across billions of vectors in milliseconds.
Challenges with scaling vector databases
Customers are increasingly scaling vector databases to multi-billion-scale on OpenSearch Service to power generative AI applications, product catalogs, knowledge bases, and more. Applications are becoming increasingly agentic, integrating AI agents that rely on vector databases for high-quality search results across enterprise data sources to enable chat-based interactions and automation.
However, there are challenges on the way to billion-scale. First, multi-million to billion-scale vector indexes take hours to days to build. These indexes use algorithms like Hierarchal Navigable Small Worlds (HNSW) to enable high-quality, millisecond searches at scale. However, they require more compute power than traditional indexes to build. Furthermore, you have to rebuild your indexes whenever your model changes, such as switching between vendors, versions, or after fine-tuning. Some use cases such as personalized search require models to be fine-tuned daily and adapt to evolving user behaviors. All vectors must be regenerated when the model changes, so the index must be rebuilt. HNSW can also degrade following significant updates and deletes, so indexes must be rebuilt to regain accuracy.
Lastly, as your agentic applications become more dynamic, your vector database must scale for heavy streaming ingestion, updates, and deletes while maintaining low search latency. If search and indexing use the same infrastructure, these intensive processes will compete for limited compute and RAM, so search latency can degrade.
Solution overview
You can overcome these challenges by enabling GPU-accelerated indexing on OpenSearch Service 3.1+ domains or collections. GPU acceleration will dynamically activate, for instance, in response to a reindex command on a million-plus-size index. During activation, index tasks are offloaded to GPU servers that run NVIDIA cuVS to build HNSW graphs. Superior speed and efficiency are achieved through parallelization of vector operations. Inverted indexes will continue using your cluster’s CPU for indexing and search on non-vector data. These indexes operate alongside HNSW to support keyword, hybrid, and filtered vector search. The resources required to build inverted indexes is low compared to HNSW.
GPU acceleration is enabled as a cluster-level configuration, but it can be disabled on individual indexes. This feature is serverless, so you don’t need to manage GPU instances. You simply pay-per-use through OpenSearch Compute Units (OCUs).
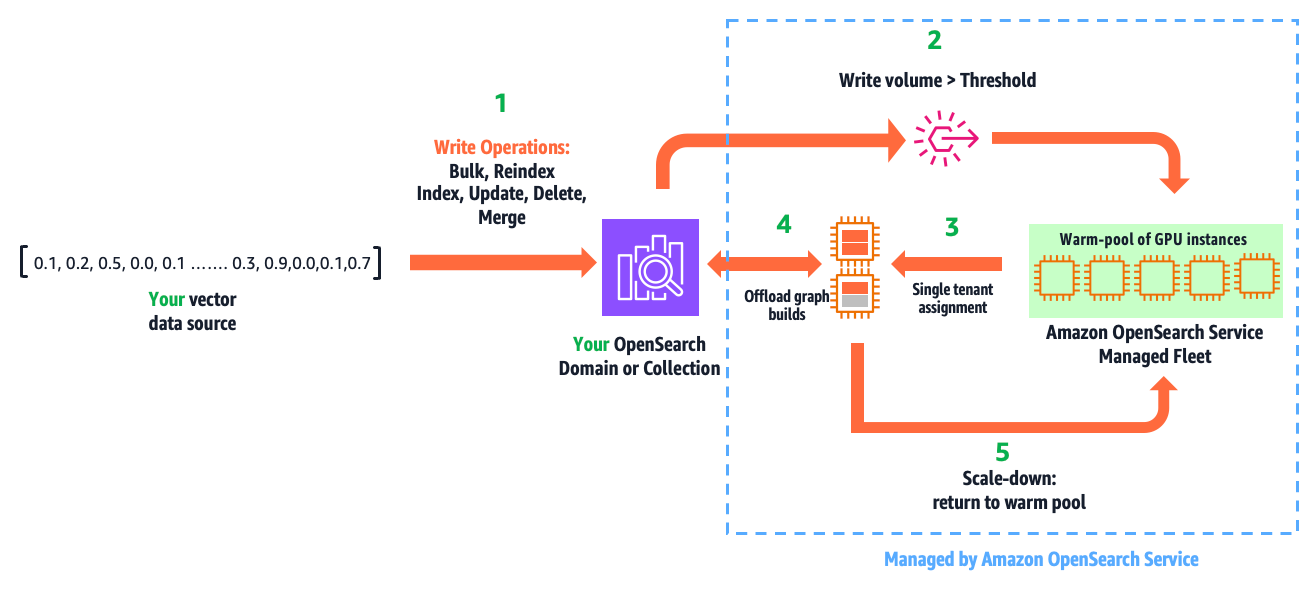
The following diagram illustrates how this feature works.
This leads to a secure, single-tenant assignment of GPU servers to your cluster from a multi-tenant warm pool of GPUs managed by OpenSearch Service.
Within milliseconds, OpenSearch Service initiates and offloads HNSW operations.
When the write volume falls below the threshold, GPU servers are scaled down and returned to the warm pool.
This automation is fully managed. You only pay for acceleration time, which you can monitor from Amazon CloudWatch.
This feature isn’t just designed for ease of use. It enables GPU acceleration benefits without economic challenges. For example, a domain sized to host 1 billion (1,024 dimension) vectors compressed 32 times (using binary quantization) takes three r8g.12xlarge.search instances to provide the required 1.15 TBs of RAM. A design that requires running a domain on GPU instances, would need six g6.12xlarge instances to do the same, resulting in 2.4 times higher cost and excessive GPUs. This solution delivers efficiency by providing the right amount of GPUs only when you need them, so you gain speed with cost savings.
Use cases and benefits
This feature has three primary uses and benefits:
Build large-scale indexes faster, increasing productivity and innovation velocity
Reduce cost by lowering Amazon OpenSearch Serverless indexing OCU usage, or downsizing domains with write-heavy vector workloads
Accelerate writes, lower search latency, and improve user experience on your dynamic AI applications
In the following sections, we discuss these use cases in more detail.
Build large-scale indexes faster
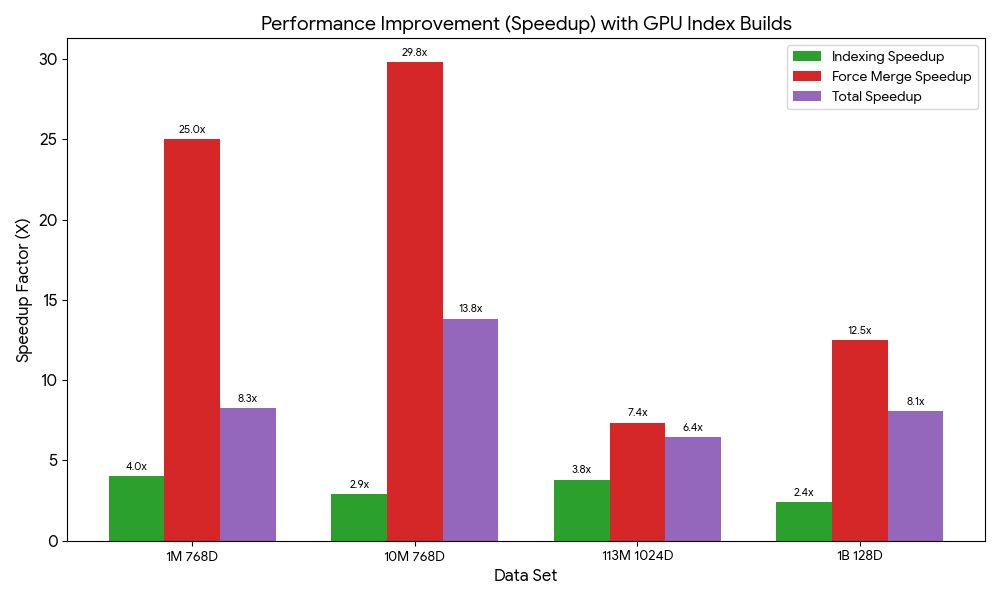
We benchmarked index builds for 1M, 10M, 113M, and 1B vector test cases to demonstrate speed gains on both domains and collections. Speed gains ranged from 6.4 to 13.8 times faster. These tests were performed with production configurations (Multi-AZ with replication) and default GPU service limits. All tests were run on right-sized search clusters, and the CPU-only tests had CPU utilization maxed exclusively for indexing. The following chart illustrates the relative speed gains from GPU acceleration on managed domains.
The total index build time on domains includes a force merge to optimize the underlying storage engine for search performance. During normal operation, merges are automatic. However, when benchmarking domains, we perform a manual merge after indexing to make sure merging impact is consistent across tests. The following table summarizes the index build benchmarks and dataset references for domains.
We ran the same performance tests on collections. The performance is different on OpenSearch Serverless because its serverless architecture involves performance trade-offs such as automatic scaling, which introduces a ramp-up to reach peak performance. The following table summarizes these results.
OpenSearch Serverless doesn’t support force merge, so the full benefit from GPU acceleration might be delayed until the automatic background merges complete. The default minimum OCUs had to be increased for tests beyond 1 million vectors to handle higher indexing throughput.
Reduce cost
Our serverless GPU design uniquely delivers speed gains and cost savings. With OpenSearch Serverless, your net indexing costs will be reduced if you have indexing workloads that are significant enough to activate GPU acceleration. The following table presents the OCU usage and cost consumption usage from the previous index build tests.
The vector acceleration OCUs offload and reduce indexing OCUs. The total OCU usage is less with GPU because the index is built more efficiently, resulting in cost savings.
With managed domains, cost savings are situational because search and indexing infrastructure isn’t decoupled like on OpenSearch Serverless. However, if you have a write-heavy, compute-bound vector search application (that is, your domain is sized for vCPUs to sustain write throughput), you could downsize your domain.
The following benchmarks demonstrate the efficiency gains from GPU acceleration. We measure the infrastructure costs during the indexing tasks. GPU acceleration has the additional cost of GPUs at $0.24 per OCU/hour. However, because indexes are built faster and more efficiently, it’s more economical to use GPU to reduce CPU utilization on your domain and downsize it.
*Domains are running a high-availability configuration without any cost-optimizations
Accelerate writes, lower search latency
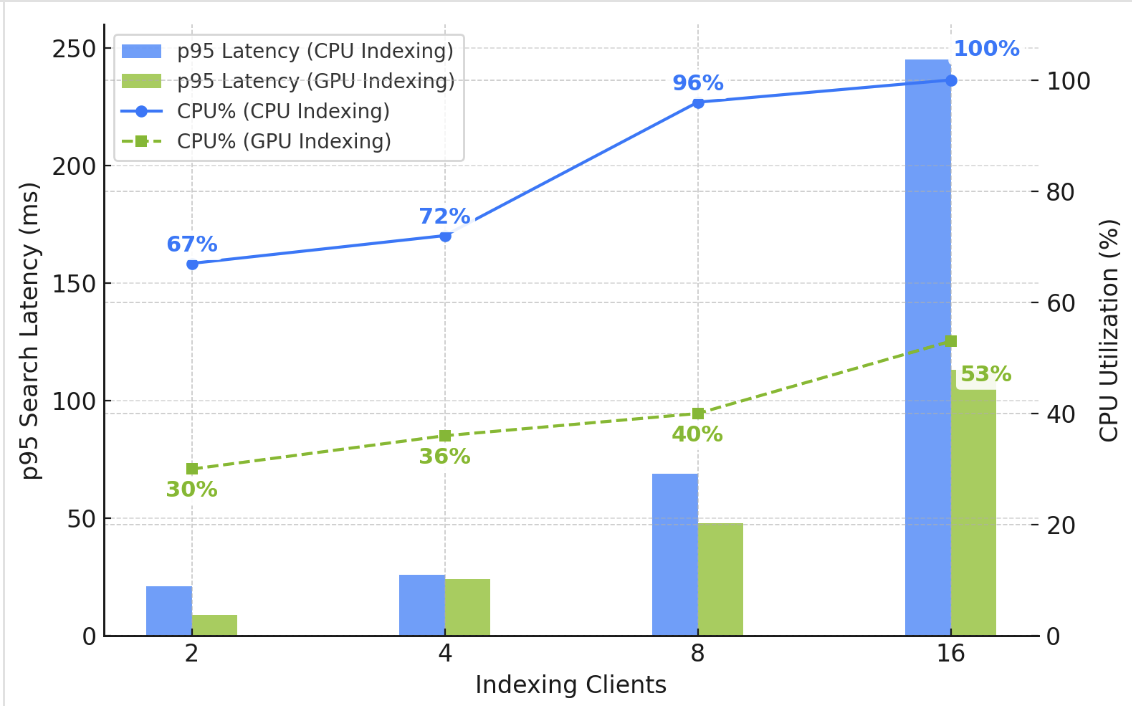
In experienced hands, domains offer operational control and the ability to achieve great scalability, performance, and cost optimizations. However, operational responsibilities include managing indexing and search workloads on shared infrastructure. If your vector deployment involves heavy, sustained streaming ingestion, updates, and deletes, you might observe higher search times on your domain. As illustrated in the following chart, as you increase vector writes, the CPU utilization increases to support HNSW graph building. Concurrent search latency also increases because of competition for compute and RAM resources.
You could solve the problem by adding data nodes to increase your domain’s compute capacity. However, enabling GPU acceleration is simpler and cheaper. As illustrated in the chart, GPU frees up CPU and RAM on your domain, helping you sustain low and stable search latency under high write throughput.
The authors would like to thank Manas Singh, Nathan Stephens, Jiahong Liu, Ben Gardner, and Zack Meeks from NVIDIA, and Yigit Kiran and Jay Deng from AWS for their contributions to this post.
About the authors
Authors would like to add special thanks to Manas Singh, Nathan Stephens, Jiahong Liu, Ben Gardner, Zack Meeks NVIDIA and Yigit Kiran and Jay Deng from AWS.
Today, we’re excited to announce IAM Policy Autopilot, an open-source static analysis tool that helps your AI coding assistants quickly create baseline AWS Identity and Access Management (IAM) policies that you can review and refine as your application evolves. IAM Policy Autopilot is available as a command-line tool and Model Context Protocol (MCP) server, and it analyzes application code locally to create identity-based policies to control access for application roles. By adopting IAM Policy Autopilot, builders focus on writing application code, accelerating development on Amazon Web Service (AWS) and saving time spent on writing IAM policies and troubleshooting access issues.
Builders developing on AWS want to accelerate development and deliver value faster to their businesses, and they are increasingly using AI coding assistants like Kiro, Claude Code, Cursor, and Cline to do so. There are three aspects related to IAM permissions where builders can use some help. First, builders might want to focus on developing applications instead of spending time understanding permissions, writing IAM policies, or troubleshooting permission-related errors. Second, AI coding assistants, while excelling at generating application code, struggle with the nuances of IAM and need tools to help them produce reliable policies that capture complex cross-service permission requirements. Third, both builders and their AI assistants need to stay current with the latest IAM requirements and integration approaches without going through AWS documentation manually, ideally through a single tool that stays up-to-date with IAM expertise.
IAM Policy Autopilot addresses these challenges in three ways. First, it performs deterministic code analysis of your application, generating the necessary identity-based IAM policies based on actual AWS SDK calls in your codebase. This speeds up the initial policy creation process and reduces troubleshooting time. Second, IAM Policy Autopilot provides AI coding assistants with accurate, reliable IAM configurations through the MCP, preventing AI hallucinations that often lead to policy errors and verifying that generated policies are syntactically correct and valid. Third, IAM Policy Autopilot stays current with the expanding AWS service catalog by regularly updating its expertise with new services, permissions, and integration patterns, so both builders and their AI assistants have access to current IAM requirements without manual research.
This post demonstrates IAM Policy Autopilot in action, showing how it analyzes your code to generate IAM identity-based policies during development. You’ll see how IAM Policy Autopilot seamlessly integrates with AI coding assistants to create the necessary baseline policies during deployment, and how builders can also use IAM Policy Autopilot directly through its command line interface (CLI) tool. We’ll also provide guidance on best practices and considerations for incorporating IAM Policy Autopilot into your development workflow.
How IAM Policy Autopilot works
IAM Policy Autopilot analyzes application code and generates identity-based IAM policies based on AWS SDK calls in your application. During testing, if permissions are still missing, IAM Policy Autopilot detects these errors and adds the necessary policies to get you unblocked. IAM Policy Autopilot supports applications that are written in three languages: Python, Go, and Typescript.
Policy creation
The core capability of IAM Policy Autopilot is deterministic code analysis that generates IAM identity-based policies with consistent, reliable results. On top of SDK-to-IAM mappings, IAM Policy Autopilot understands complex dependency relationships across AWS services. To call s3.putObject(), IAM Policy Autopilot generates not only the Amazon Simple Storage Service (Amazon S3) permission (s3:PutObject) but also includes AWS Key Management Server (AWS KMS) permission (kms:GenerateDataKey) that might be required for encryption scenarios. IAM Policy Autopilot understands cross-service dependencies and common usage patterns, and intentionally adds these permissions related to the PutObject API in this initial pass, so that your application can function correctly regardless of encryption configuration from the first deployment.
Access denied troubleshooting
After permissions are created, if you still encounter Access Denied errors during testing, IAM Policy Autopilot detects these errors and provides instant troubleshooting. When enabled, the AI coding assistant invokes IAM Policy Autopilot to analyze the denial and propose targeted IAM policy fixes. After you review and approve the analysis and suggested changes, IAM Policy Autopilot updates the permissions.
MCP and CLI support
IAM Policy Autopilot operates in two modes to fit different development workflows. As an MCP server, it integrates with MCP-compatible coding assistants, including Kiro, Amazon Q Developer, Cursor, Cline, and Claude Code. You can also use IAM Policy Autopilot as a standalone CLI tool to generate policies directly or fix missing permissions. Both approaches provide the same policy creation and troubleshooting capabilities, so you can choose the integration that best fits your workflow.
Demonstrating IAM Policy Autopilot capabilities
This walkthrough demonstrates the MCP server capabilities of IAM Policy Autopilot through a practical example: creating a file upload application that stores documents in Amazon S3 with server-side encryption using a customer-managed KMS key. This demonstration uses Cline, though IAM Policy Autopilot works with MCP-compatible coding assistants.
Prerequisites and setup
Before getting started, you need to install uvx or pip, and configure the IAM Policy Autopilot MCP server with your AI coding assistant. If you’re using pip, add the following to your MCP client configuration file. Note that uvx uses a slightly different configuration:
In this section, we walk you through creating an application from scratch. We demonstrate the interaction between the developer, Cline, and IAM Policy Autopilot to showcase how you provide guidance to Cline and how Cline invokes IAM Policy Autopilot behind the scenes to generate IAM policies and deploy your application.
1. The builder describes their requirements User: I need to create a Lambda function for uploading files to S3. The files should be encrypted using a customer-managed KMS key. Can you help me build this?
2. Cline starts planning the solution Cline: I’ll help you create a secure file upload Lambda function. Let me break this down:
Create a Lambda function to handle file uploads
Set up S3 integration with customer-managed KMS encryption
Create the necessary IAM permissions
Build the infrastructure using CDK Let me start by writing the Lambda function code.
3. Cline writes the AWS Lambda function code Cline will also prompt for credential inputs required for deployment, such as partition, AWS Region, and AWS account ID.
4. Cline needs to create IAM policies and will discover IAM Policy Autopilot Cline: Now I need to create the IAM role with the correct permissions for this Lambda function. Let me check what tools are available to help with IAM policy creation.
Cline discovers the IAM Policy Autopilot MCP server has policy creation capabilities and invokes it:
5. IAM Policy Autopilot analyzes the code and generates the policy IAM Policy Autopilot scans the code and identifies PutObjectCommand in the application code, which it recognizes to be an Amazon S3 API call. Based on typical usage patterns of AWS customers, IAM Policy Autopilot also suggests encryption permissions and CloudWatch log permissions.
IAM Policy Autopilot generates an IAM identity policy that includes permissions potentially needed for Amazon S3 PutObject, including AWS KMS permissions that might be required for encryption scenarios:
6. Cline creates the complete CloudFormation infrastructure Cline: Perfect! IAM Policy Autopilot generated comprehensive permissions for your Lambda function including S3 PutObject permissions, KMS permissions for potential encryption scenarios, and CloudWatch Logs permissions for function execution. I’ll now create the complete CloudFormation template.
Cline generates the AWS CloudFormation template with the permissions provided by IAM Policy Autopilot:
This demonstrates how IAM Policy Autopilot seamlessly integrates into the development workflow, providing the coding assistant with current and accurate IAM configurations when invoked, while requiring minimum user intervention.
In this example, you’re passing a single file to IAM Policy Autopilot to analyze, but it can take in multiple files when conducting static code analysis and creating IAM policies.
Direct CLI use: Simplified policy creation
If you prefer direct command-line interaction, the CLI provides the same analysis capabilities without requiring an AI coding assistant.
1. Builder has existing code and needs policies In this example, you have the same uploadHandler.js file and want to generate identity-based IAM policies for deployment: $ iam-policy-autopilot generate-policy --region us-west-2 --account 123456789012 --pretty Users/user/workspace/uploadHandler.js
2. IAM Policy Autopilot analyzes and outputs the policy
3. Builder uses the generated policy You can now copy this policy directly into your CloudFormation template, AWS Cloud Development Kit (AWS CDK) stack, or Terraform configuration.
This CLI approach provides the same code analysis and cross-service permission detection as the MCP server but fits naturally into command-line workflows and automated deployment pipelines.
Best practices and considerations
When using IAM Policy Autopilot in your development workflow, following these practices will help you maximize its benefits while maintaining security best practices.
Start with IAM Policy Autopilot-generated policies, then refine
IAM Policy Autopilot generates policies that prioritize functionality over minimal permissions, helping your applications run successfully from the first deployment. These policies provide a starting point that you can refine as your application matures. Review the generated policies so that they align with your security requirements before deploying them.
Understand the IAM Policy Autopilot analysis scope
IAM Policy Autopilot excels at identifying direct AWS SDK calls in your code, providing comprehensive policy coverage for most development scenarios, but has some limitations to keep in mind. For example, if your code calls s3.getObject(bucketName) where bucketName is determined at runtime, IAM Policy Autopilot currently doesn’t predict which bucket will be accessed. For applications using third-party libraries that wrap AWS SDKs, you might need to supplement the analysis produced by IAM Policy Autopilot with manual policy review. Currently, IAM Policy Autopilot focuses on identity-based policies for IAM roles and users but does not create resource-based policies such as S3 bucket policies or KMS key policies.
Integrate with existing IAM workflows
IAM Policy Autopilot works best as part of a comprehensive IAM strategy. Use IAM Policy Autopilot to generate functional policies quickly, then use other AWS tools for ongoing refinement. For example, AWS IAM Access Analyzer can help identify unused permissions over time. This combination creates a workflow from rapid deployment to least-privilege optimization.
Understand the boundary between IAM Policy Autopilot and your coding assistant
IAM Policy Autopilot generates policies with specific actions based on deterministic analysis of your code. When you use the MCP server integration, your AI coding assistant receives this policy and might modify it when creating infrastructure-as-code templates. For example, you might see the assistant add specific resource Amazon Resource Names (ARNs) or include KMS key IDs based on additional context from your code. These changes come from your coding assistant’s interpretation of your broader code context, not from the static analysis provided by IAM Policy Autopilot. Always review content generated by your coding assistant before deployment to verify that it meets your security requirements.
Choose the right integration approach
Use the MCP server integration when working with AI coding assistants for seamless policy creation during development conversations. The CLI tool works well for batch processing or when you prefer direct command-line interaction. Both approaches provide the same analysis capabilities, so choose based on your development workflow preferences.
Conclusion
IAM Policy Autopilot transforms IAM policy management from a development challenge into an automated capability that works seamlessly within existing workflows. By using the deterministic code analysis and policy creation capabilities of IAM Policy Autopilot, builders can focus on creating applications knowing they have the necessary permissions to run successfully on AWS.
Whether you prefer working with AI coding assistants through the MCP server integration or using the direct CLI approach, IAM Policy Autopilot provides the same analysis capabilities. The tool identifies common cross-service dependencies such as S3 operations with AWS KMS encryption, generates syntactically correct policies, and stays current with the expanding catalog of services provided by AWS, reducing the burden on both builders and their AI assistants.
Rather than requiring builders to become IAM experts or struggle with cryptic permission errors, IAM Policy Autopilot makes AWS development more accessible and efficient. The result is faster deployment cycles, fewer permission-related failures, and more time spent on creating business value instead of debugging access issues.
Ready to reduce IAM friction in your development workflow? IAM Policy Autopilot is available now at no additional cost. Get started with IAM Policy Autopilot by downloading it from the GitHub repository and experience how automated policy creation can accelerate your AWS development. We welcome your feedback and contributions as we continue to expand the capabilities and coverage of IAM Policy Autopilot.
If you have feedback about this post, submit comments in the Comments section below.
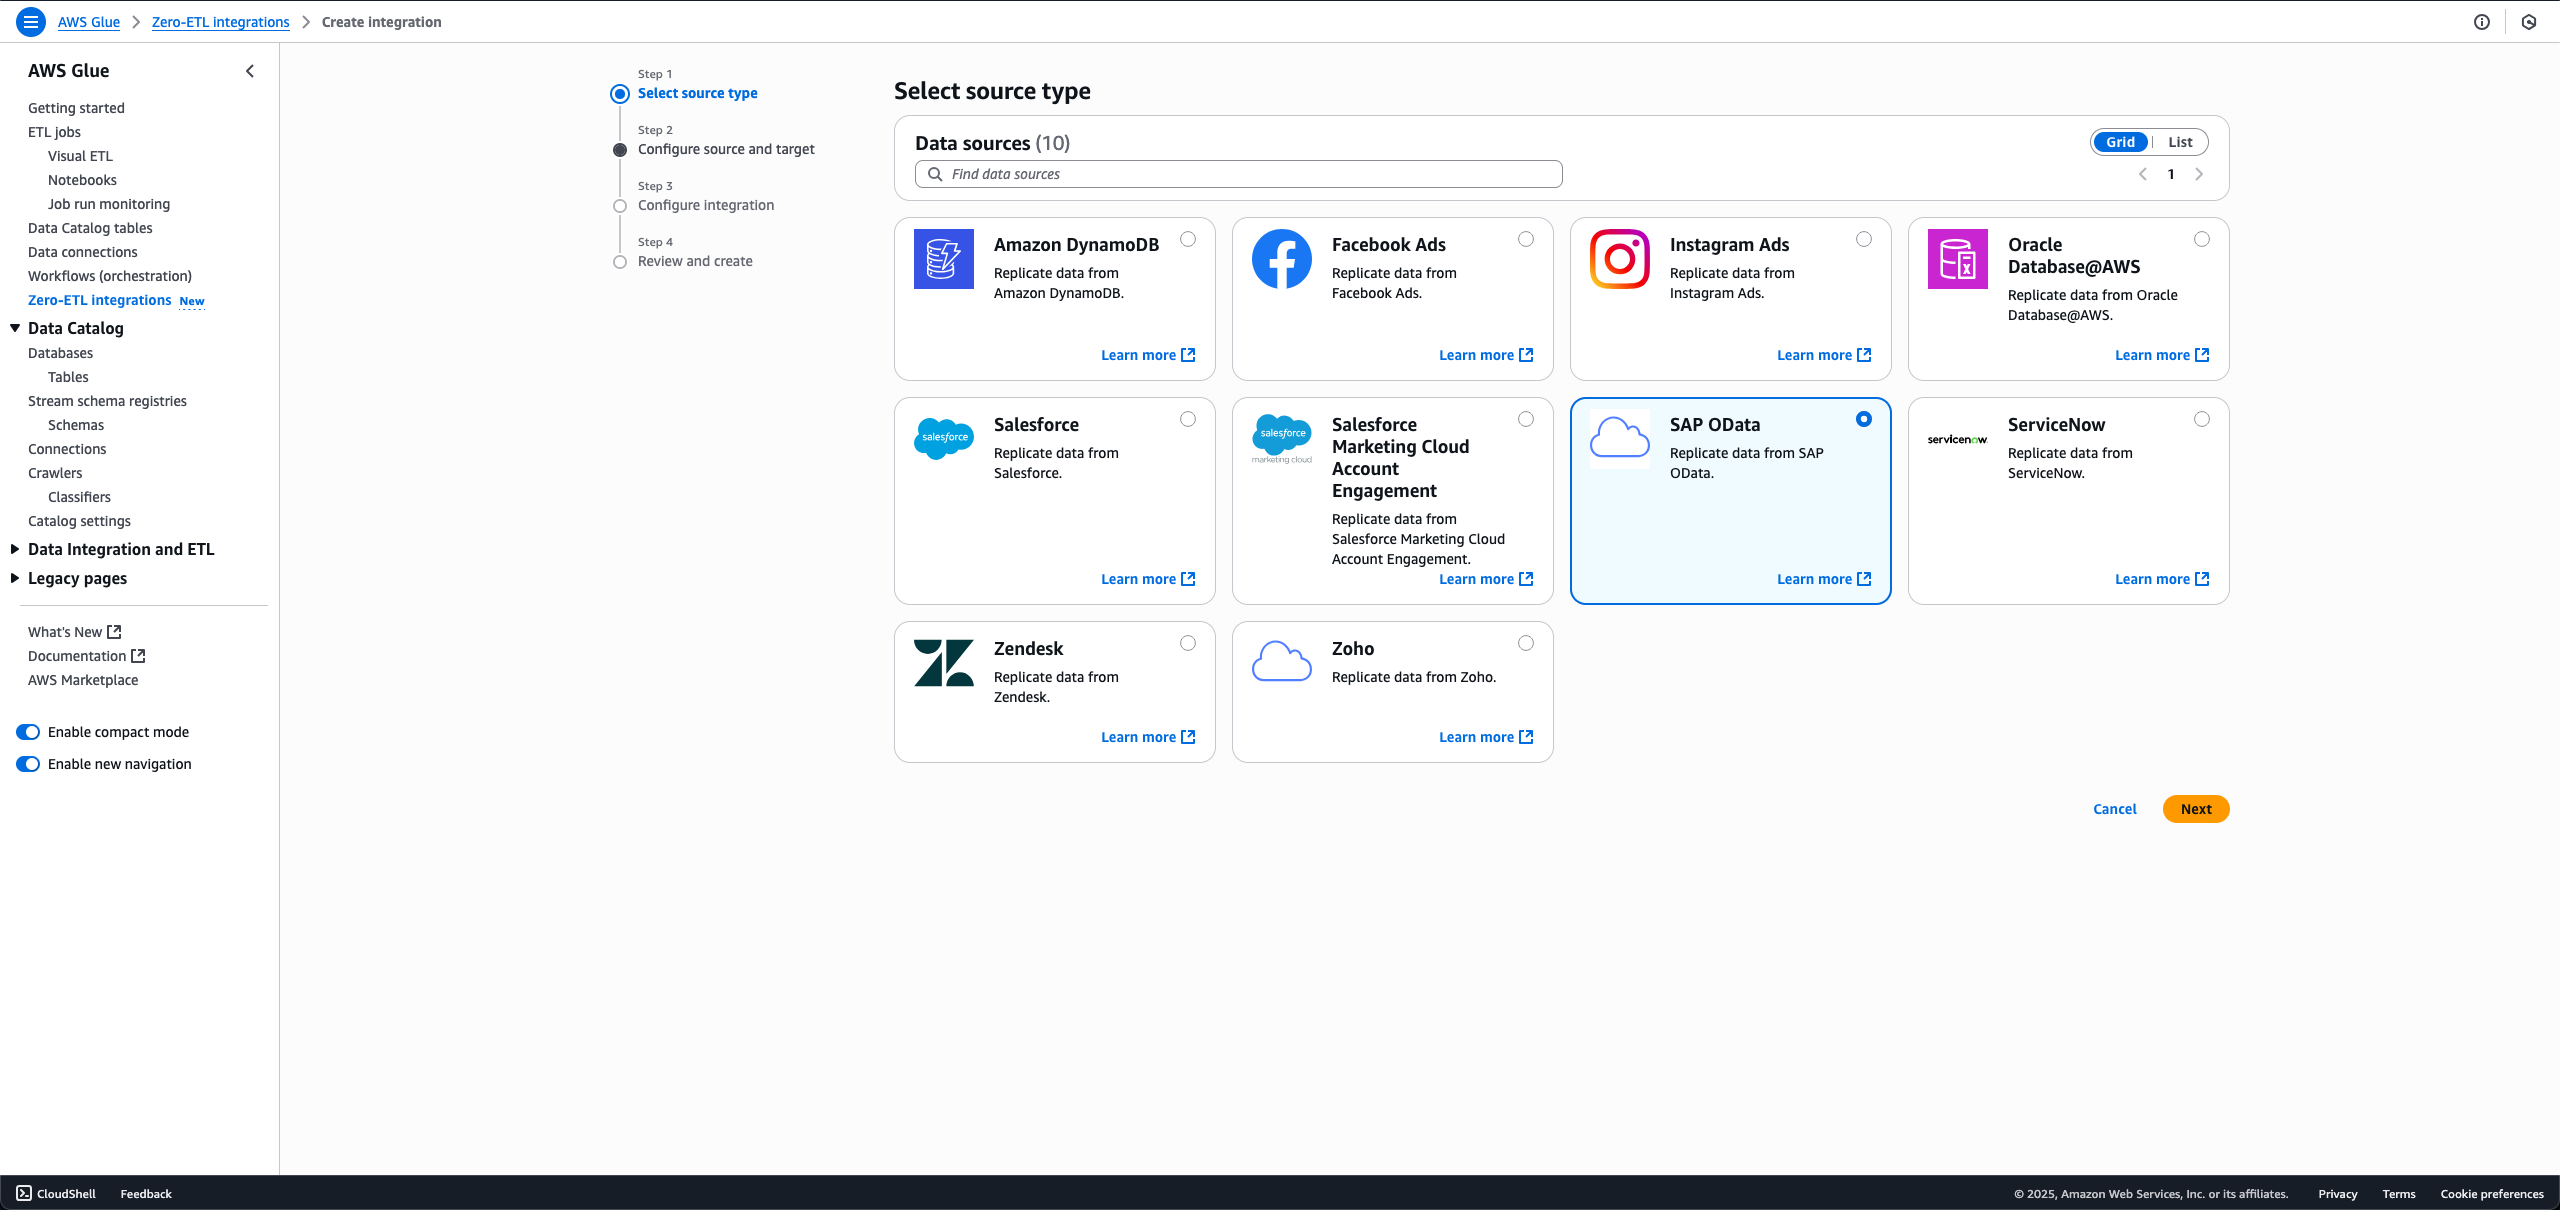
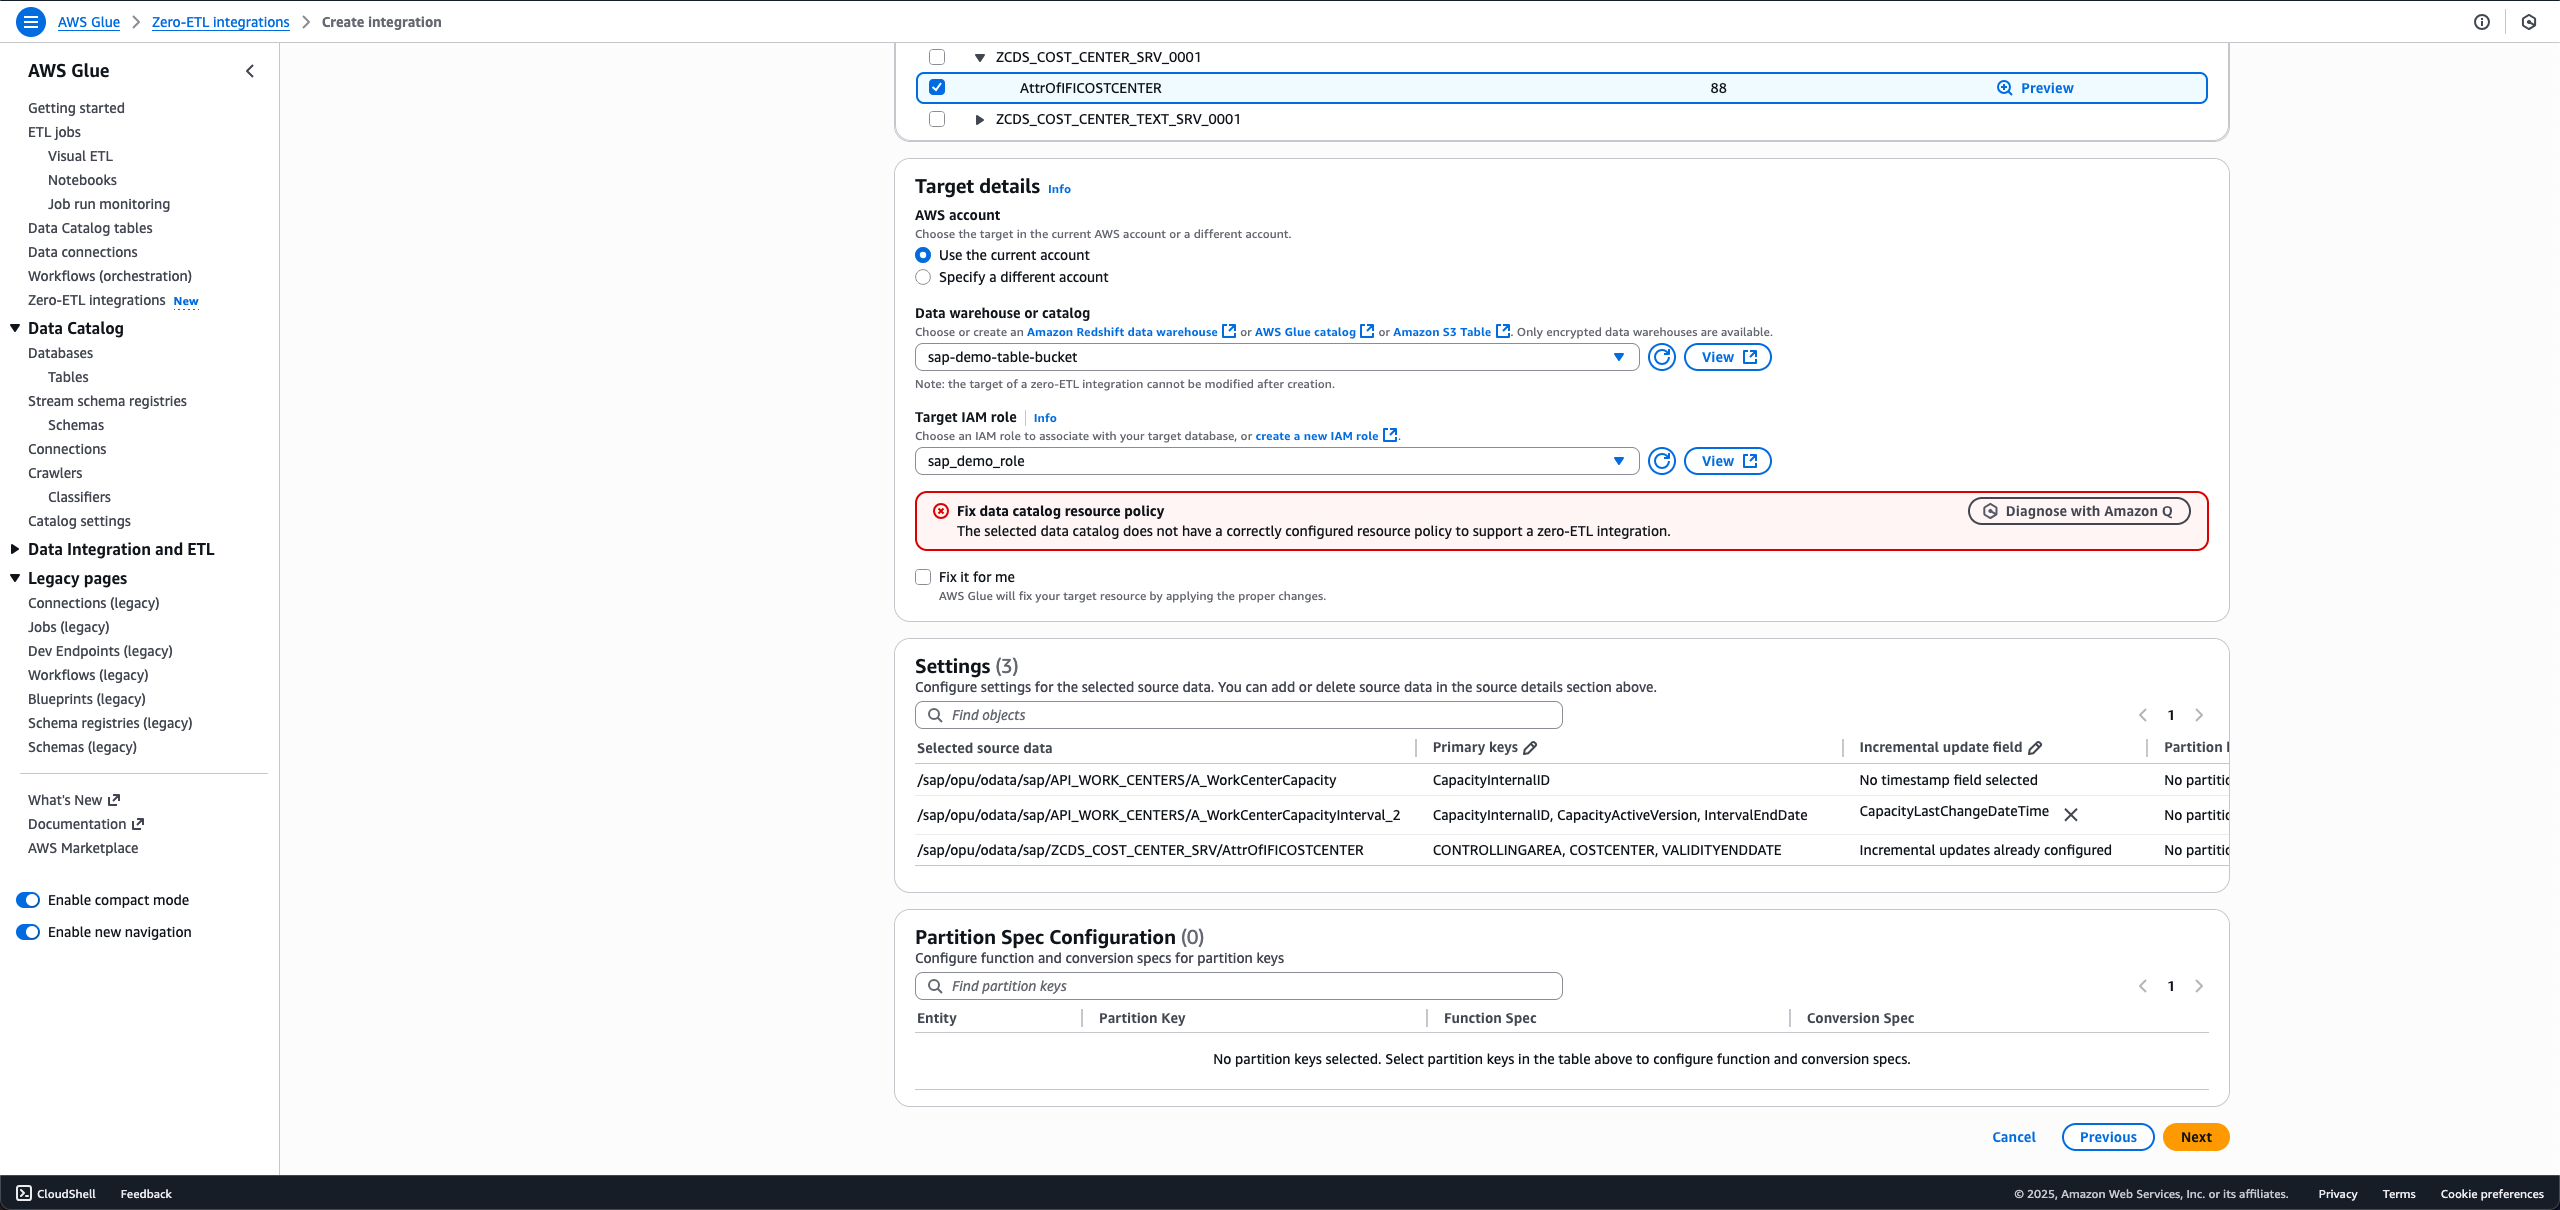
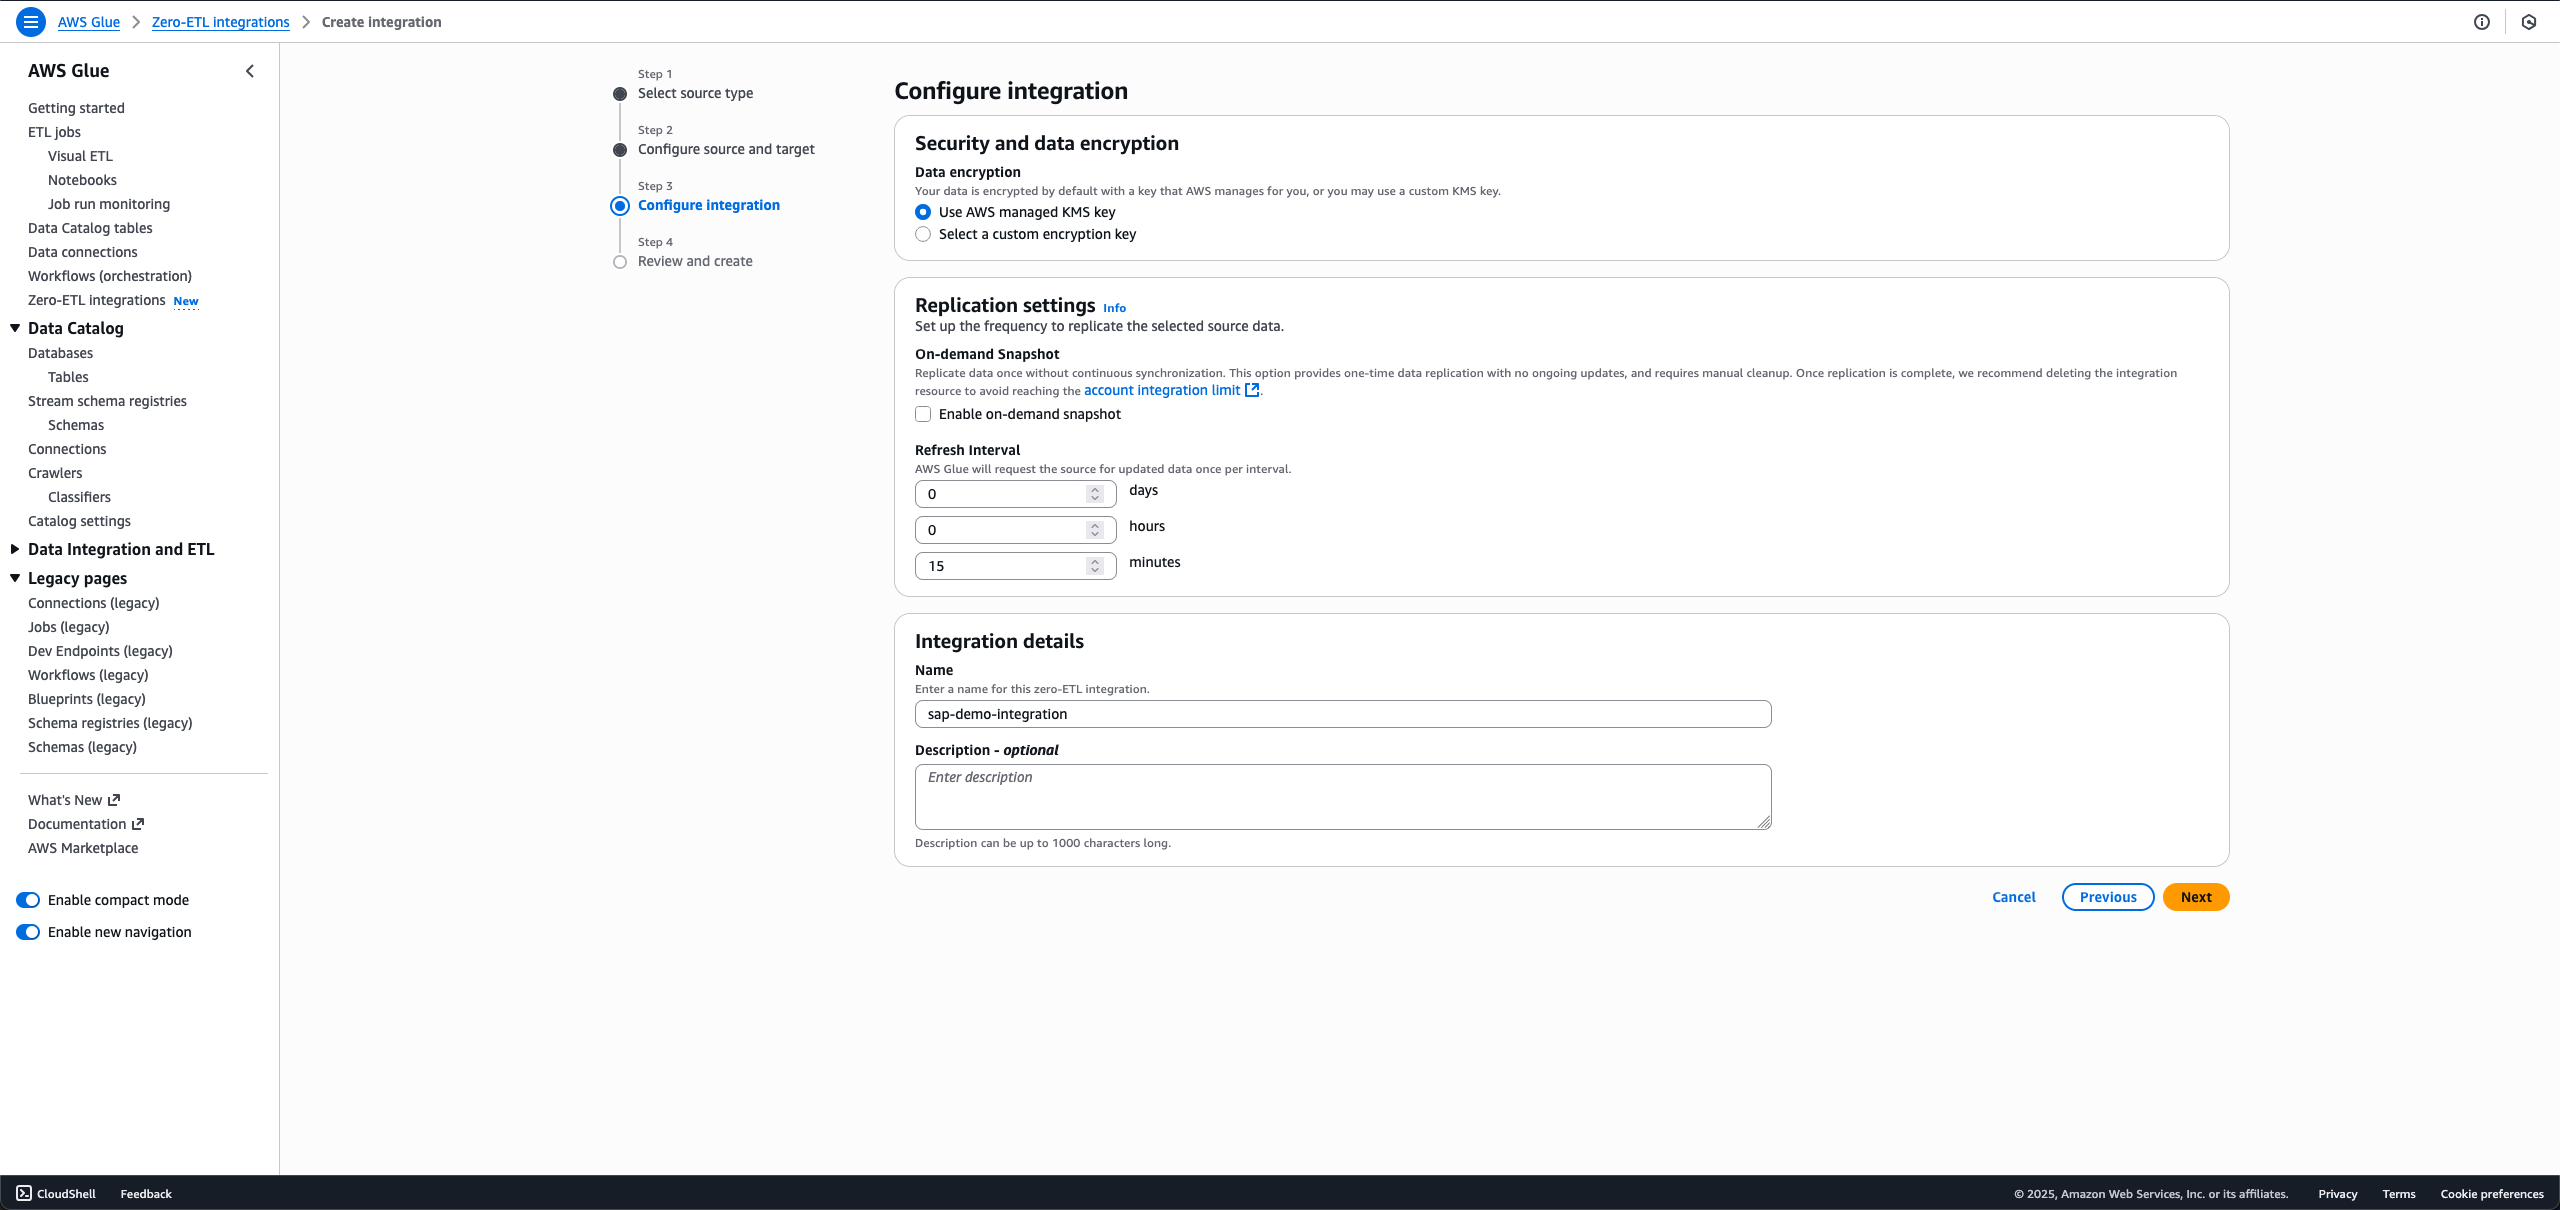
Organizations increasingly want to ingest and gain faster access to insights from SAP systems without maintaining complex data pipelines. AWS Glue zero-ETL with SAP now supports data ingestion and replication from SAP data sources such as Operational Data Provisioning (ODP) managed SAP Business Warehouse (BW) extractors, Advanced Business Application Programming (ABAP), Core Data Services (CDS) views, and other non-ODP data sources. Zero-ETL data replication and schema synchronization writes extracted data to AWS services like Amazon Redshift, Amazon SageMaker lakehouse, and Amazon S3 Tables, alleviating the need for manual pipeline development. This creates a foundation for AI-driven insights when used with AWS services such as Amazon Q and Amazon Quick Suite, where you can use natural language queries to analyze SAP data, create AI agents for automation, and generate contextual insights across your enterprise data landscape.
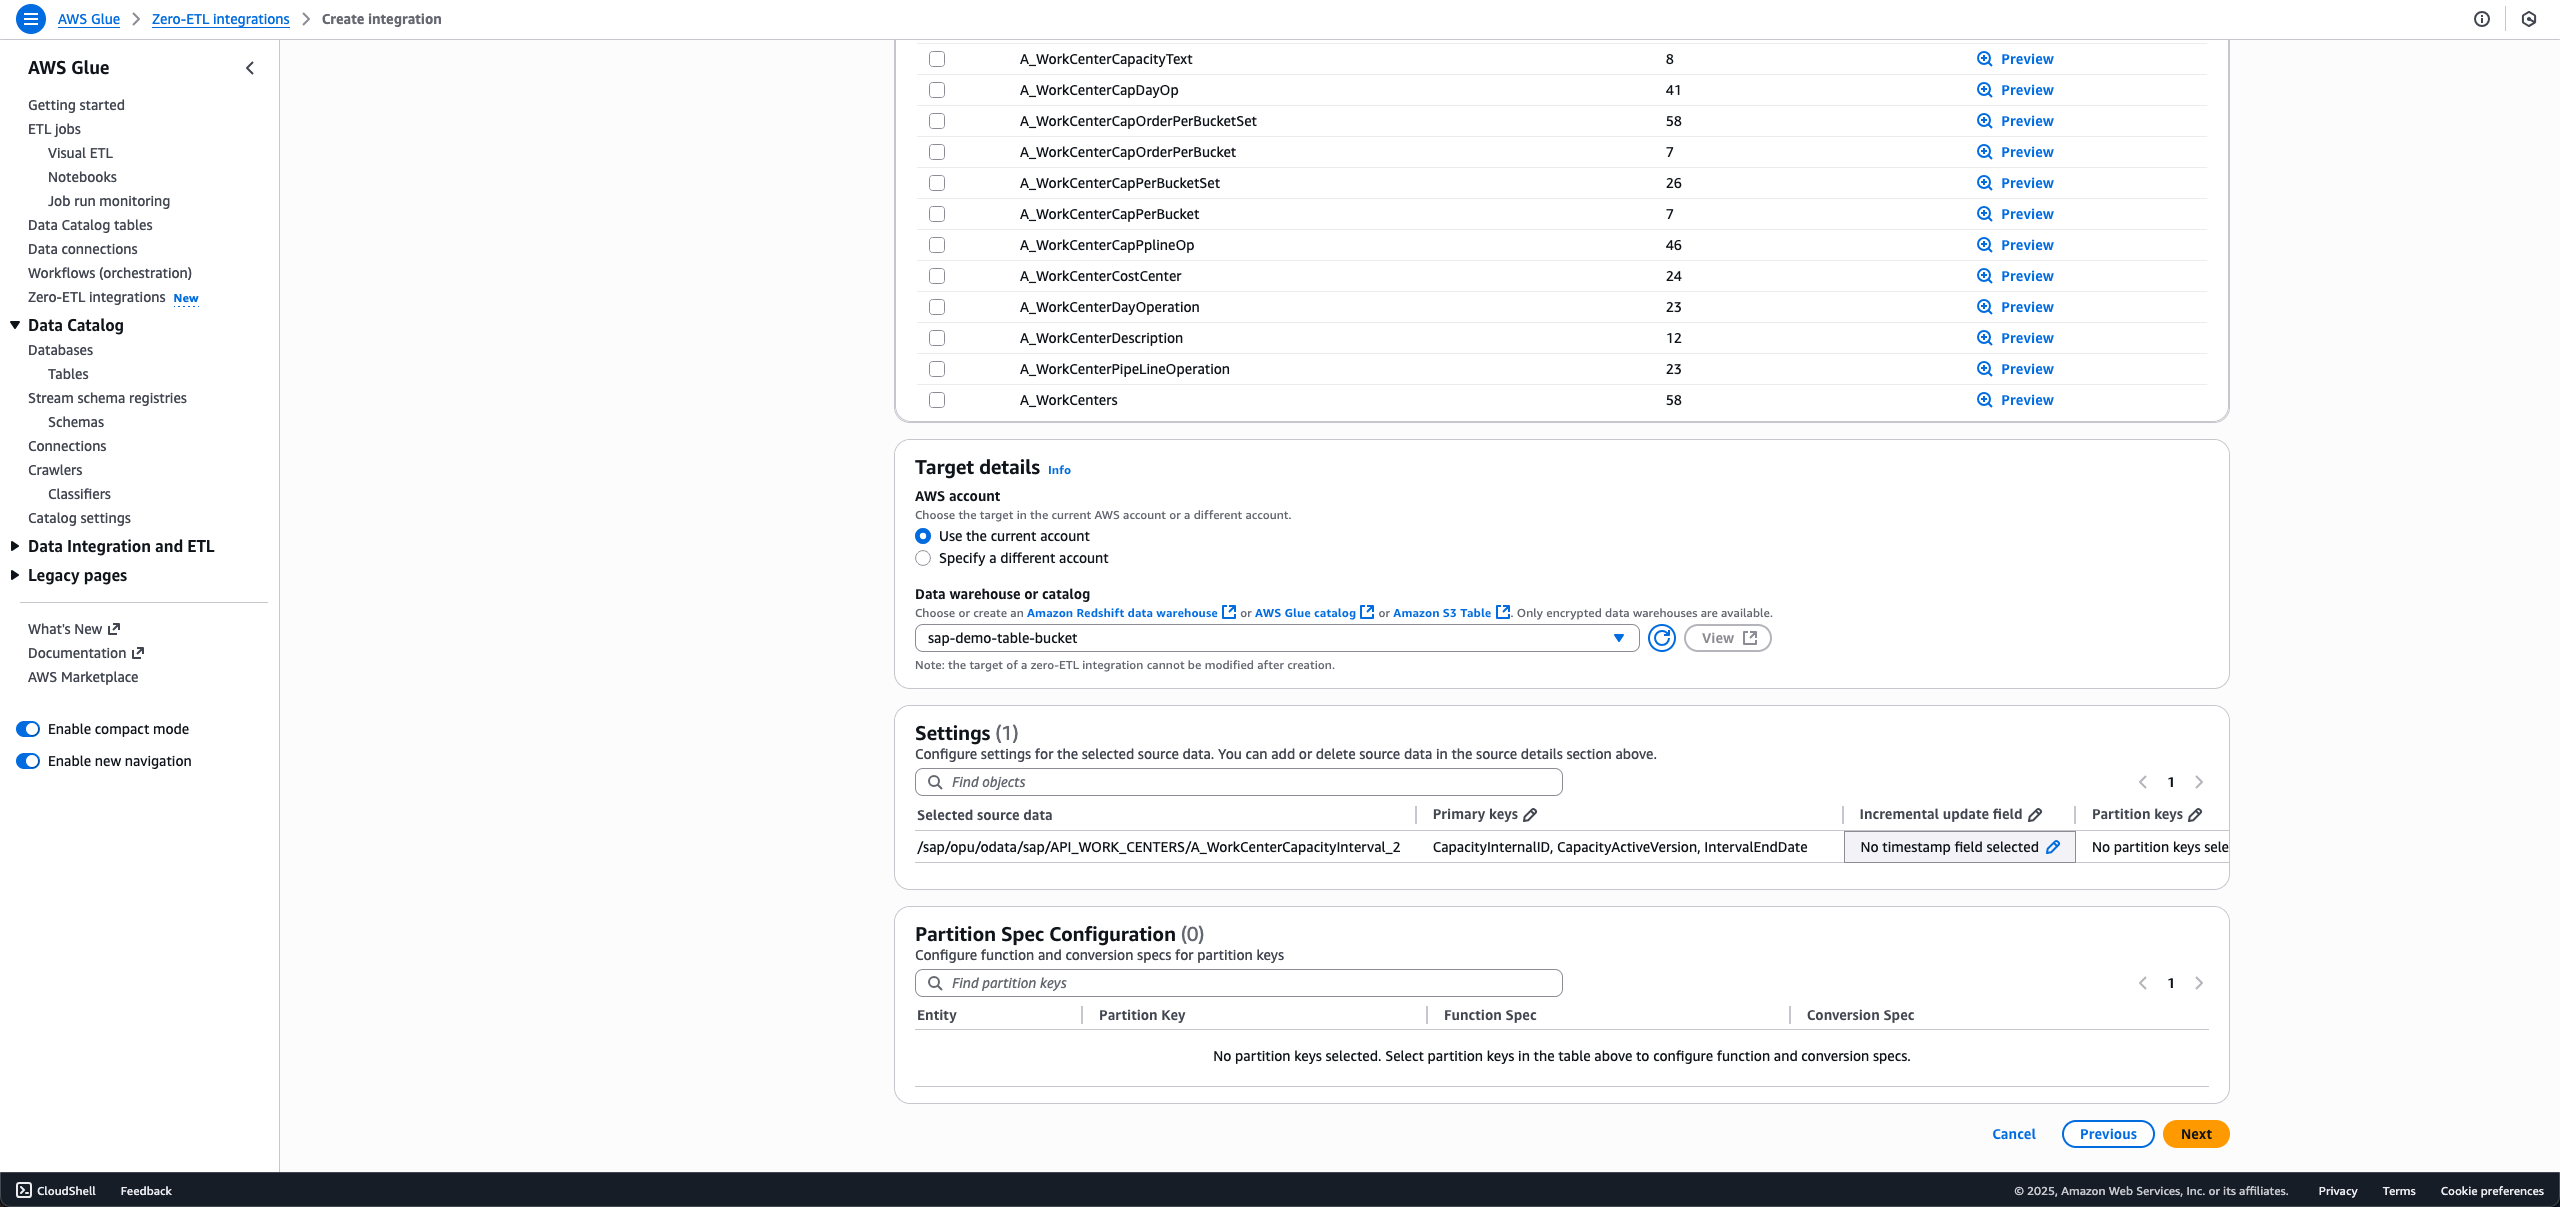
In this post, we show how to create and monitor a zero-ETL integration with various ODP and non-ODP SAP sources.
Solution overview
The key component of SAP integration is the AWS Glue SAP OData connector, which is designed to work with the SAP data structures and protocols. The connector provides connectivity to ABAP-based SAP systems and adheres to the SAP security and governance frameworks. Key features of the AWS SAP connector include:
Uses OData protocol for data extraction from various SAP NetWeaver systems
Managed replication for complex SAP data models such as BW extractors (such as 2LIS_02_ITM) and CDS views (such as C_PURCHASEORDERITEMDEX)
Handles both ODP and non-ODP entities using the SAP change data capture (CDC) technology
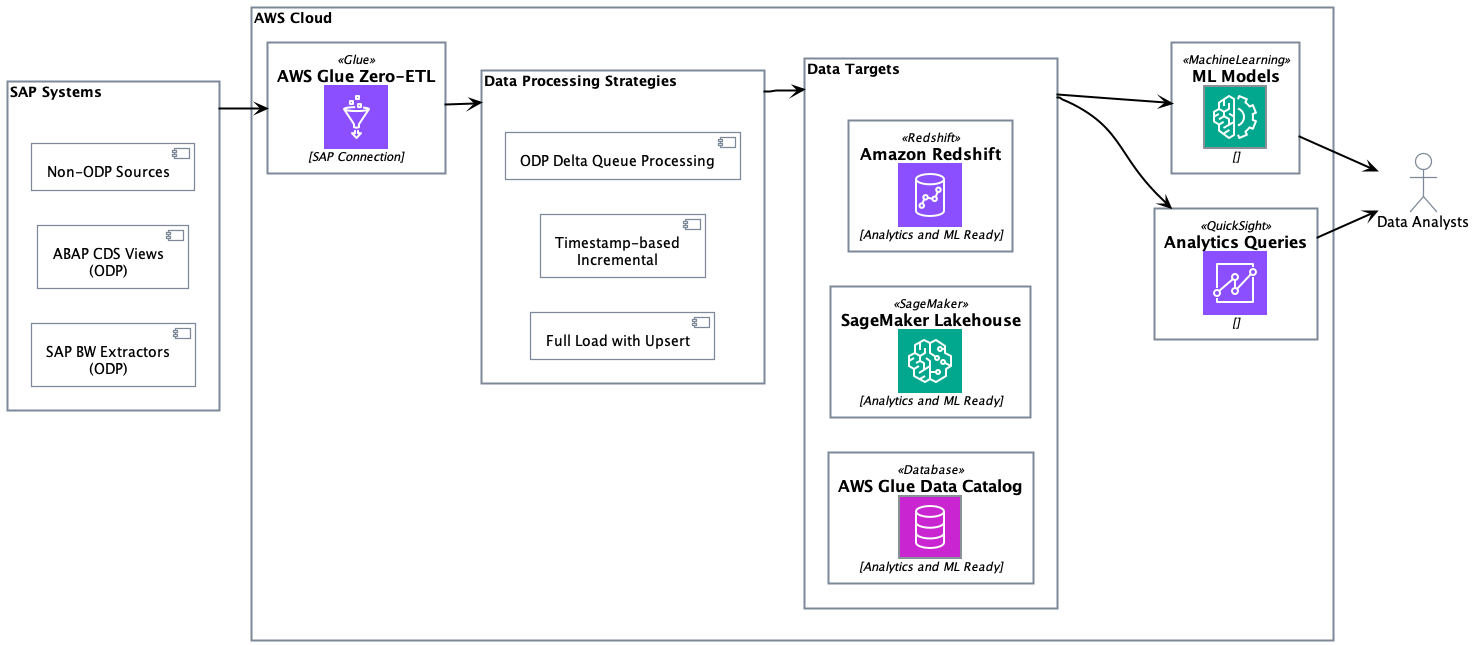
The SAP connector works with both AWS Glue Studio or AWS managed replication with zero-ETL. Self-managed replication in AWS Glue Studio provides full control over data processing units, replication frequencies, adjusting price-performance, page size, data filters, destinations, file formats, data transformation, and writing your own code with selected runtime. AWS managed data replication in zero-ETL removes burden of custom configurations and provides an AWS managed alternative, allowing replication frequencies between 15 minutes to 6 days. The following solution architecture demonstrates the approaches of ingesting ODP and non-ODP SAP data using zero-ETL from various SAP sources and writing to Amazon Redshift, SageMaker lakehouse, and S3 Tables.
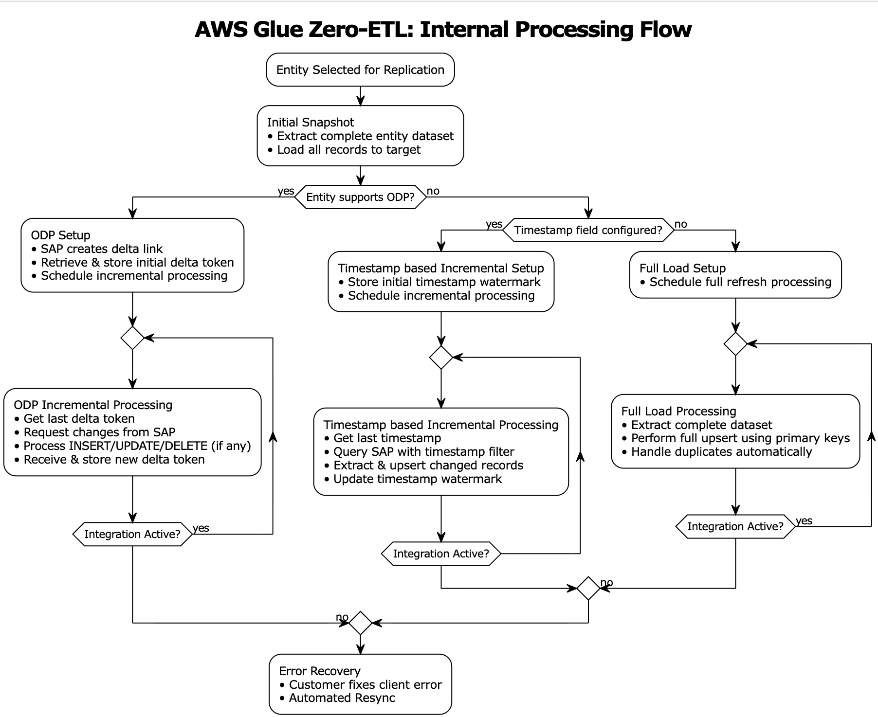
Change data capture for ODP sources
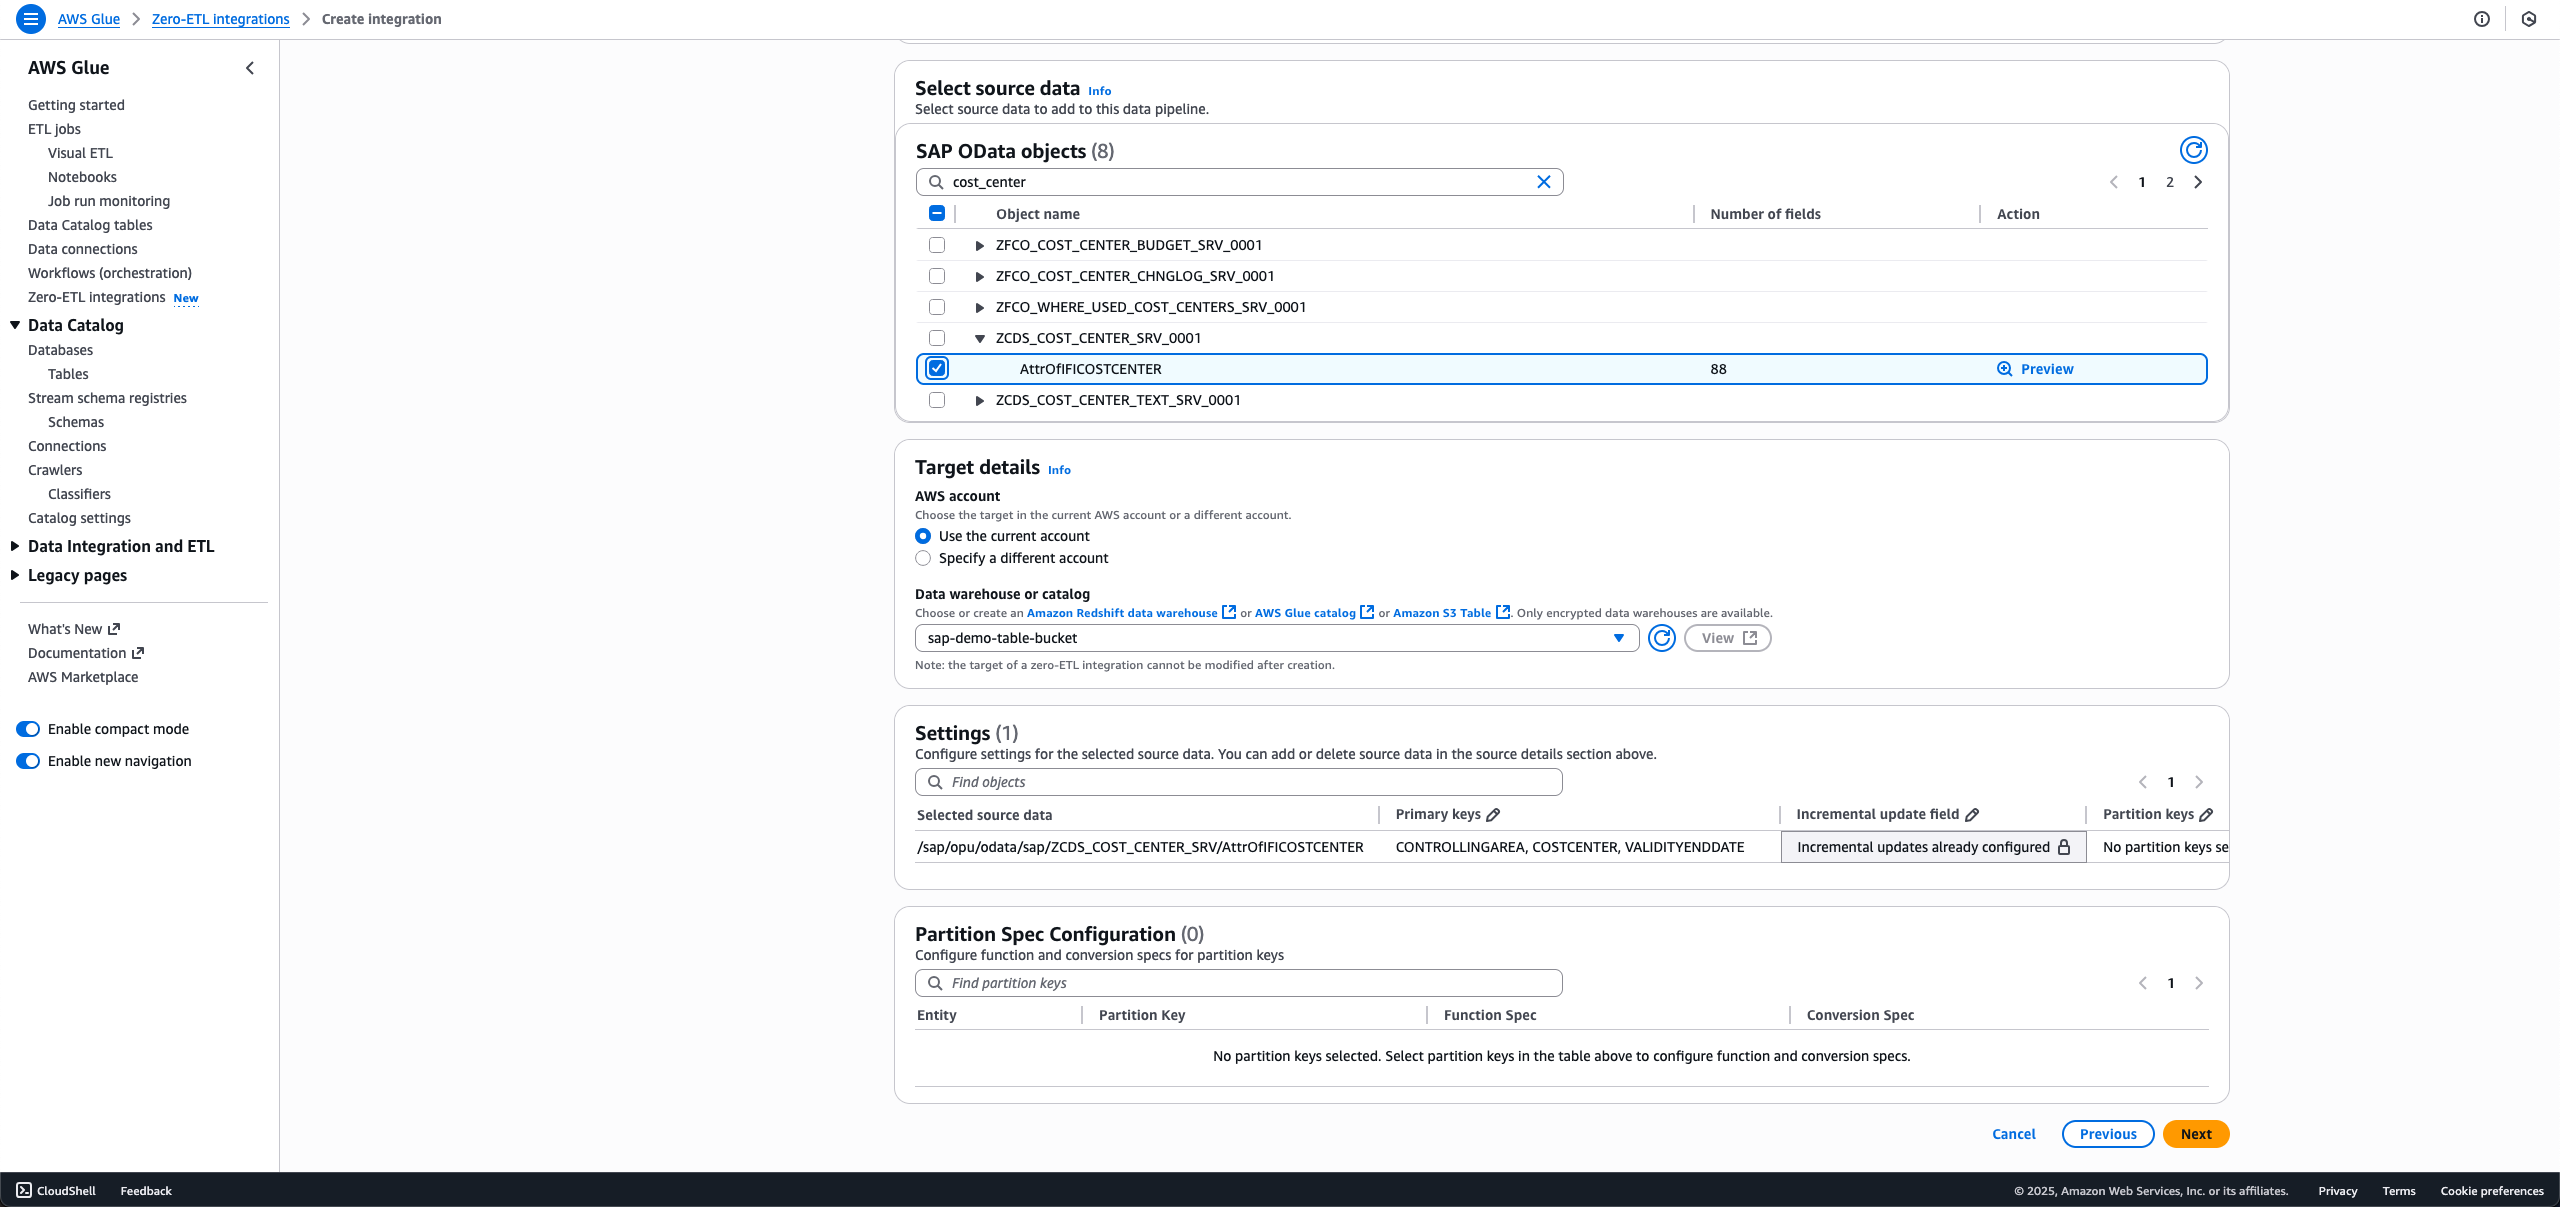
SAP ODP is a data extraction framework that enables incremental and data replication from SAP source systems to target systems. The ODP framework provides applications (subscribers) to request data from supported objects, such as BW extractors, CDS views, and BW objects, in an incremental manner.
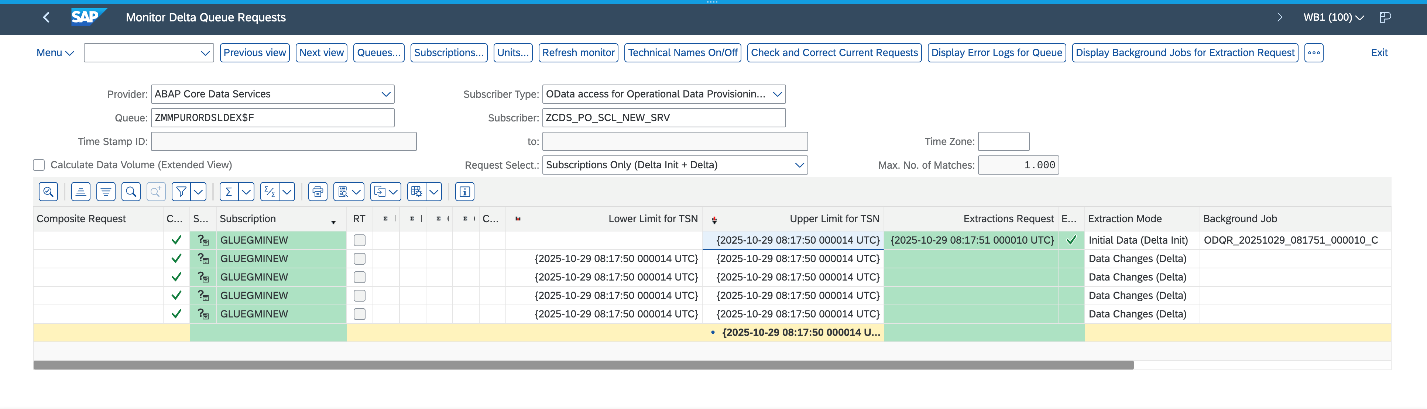
AWS Glue zero-ETL data ingestion begins with executing a full initial load of entity data to establish the baseline dataset in the target system. After the initial full load is complete, SAP provisions a delta queue known as Operational Delta Queue (ODQ), which captures data changes, including deletions. The delta token is sent to the subscriber during the initial load and persisted within the zero-ETL internal state management system.
The incremental processing retrieves the last stored delta token from the state store, then sends a delta change request to SAP using this token using the OData protocol. The system processes returned INSERT/UPDATE/DELETE operations through the SAP ODQ mechanism and receives a new delta token from SAP even in scenarios where no records were modified. This new token is persisted in the state management system after successful ingestion. In error scenarios, the system preserves the existing delta token state, enabling retry mechanics without data loss.
The following screenshot illustrates a successful initial load followed by four incremental data ingestions on the SAP system.
Change data capture for non-ODP sources
Non-ODP structures are OData services that are not ODP enabled. These are APIs, functions, views, or CDS views that are exposed directly without the ODP framework. Data is extracted using this mechanism; however, incremental data extraction depends on the nature of the object. If the object, for example, contains a “last modified date” field, it is used to track changes and provide incremental data extraction.
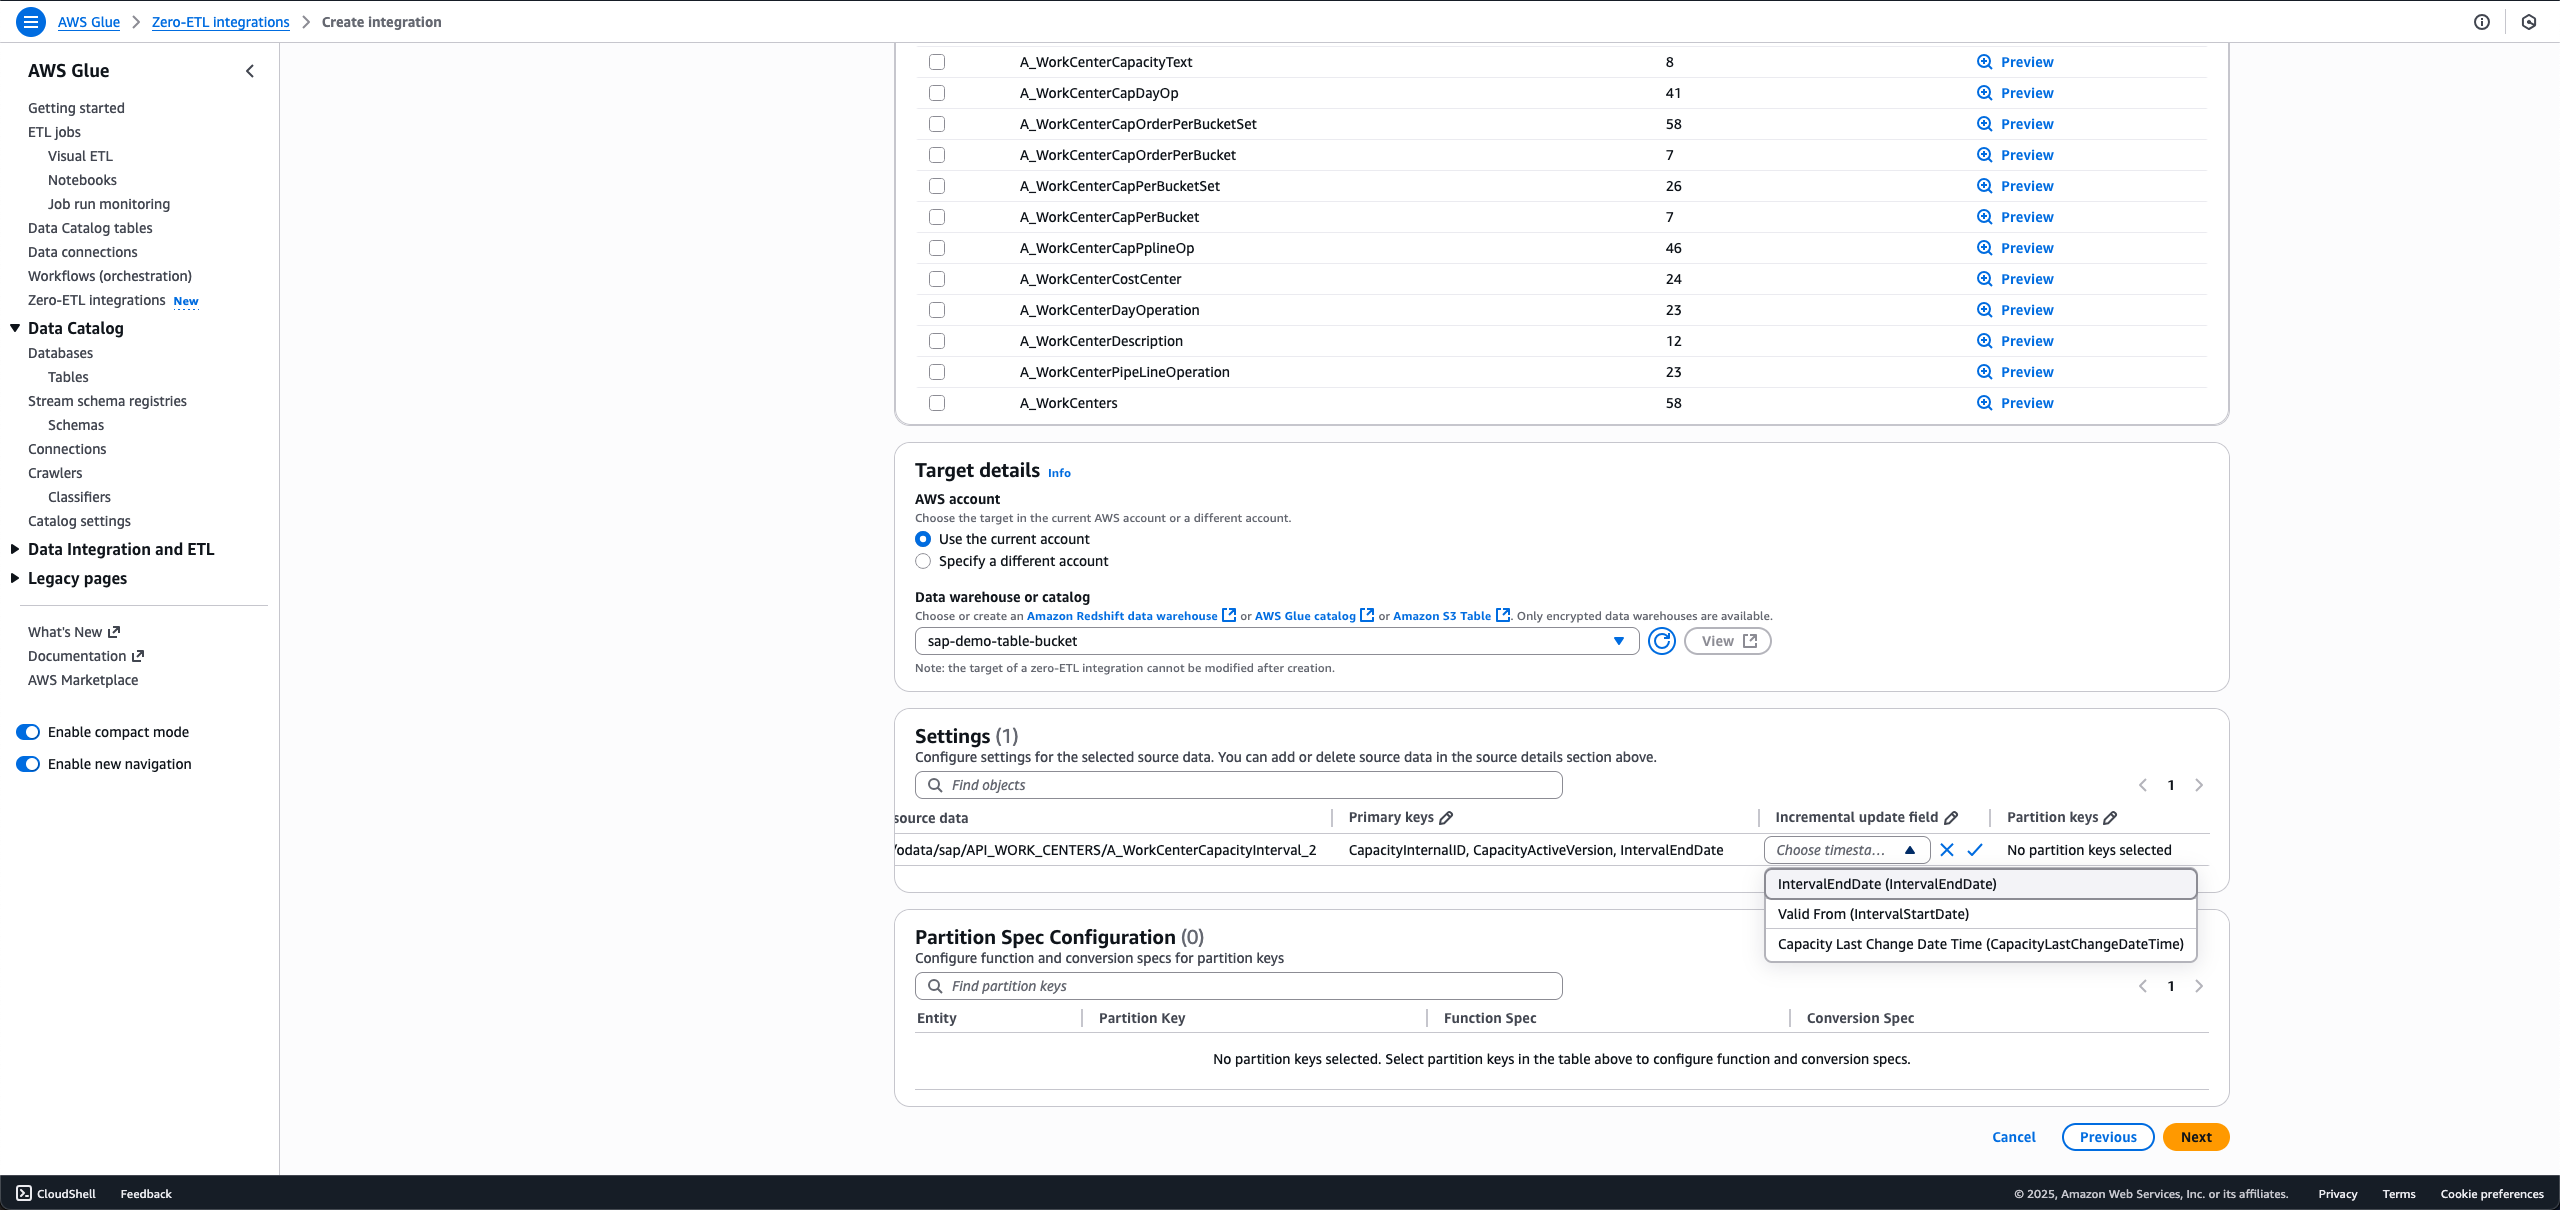
AWS Glue zero-ETL provides out-of-the-box incremental data extraction for non-ODP OData services, provided the entity includes a field to track changes (last modified date or time). For such SAP services, zero-ETL provides two approaches for data ingestion: timestamp-based incremental processing and full load.
Timestamp-based incremental processing
Timestamp-based incremental processing uses customers’ configured timestamp fields in zero-ETL to optimize the data extraction process. The zero-ETL system establishes a starting timestamp that serves as the foundation for subsequent incremental processing operations. This timestamp, known as the watermark, is crucial for facilitating data consistency. The query construction mechanism builds OData filters based on timestamp comparisons. These queries extract records that are created or modified since the last successful processing execution. The system’s watermark management functionality maintains tracking of the highest timestamp value from each processing cycle and uses this information as the starting point for subsequent executions. The zero-ETL system performs an upsert on the target using the configured primary keys. This approach facilitates proper handling of updates while maintaining data integrity. After each successful target system update, the watermark timestamp is advanced, creating a reliable checkpoint for future processing cycles.
However, the timestamp-based approach has a limitation: it can’t track physical deletions because SAP systems don’t maintain deletion timestamps. In scenarios where timestamp fields are either unavailable or not configured, the system transitions to a full load with upsert processing.
Full load
The full load approach serves as both a standalone approach and a fallback mechanism when timestamp-based processing is not feasible. This method involves extracting the complete entity dataset during each processing cycle, making it suitable for scenarios where change tracking is not available or required. The extracted dataset is upserted in the target system. The upsert processing logic handles both new record insertions and updates to existing records.
When to choose incremental or full load
The timestamp-based incremental processing approach offers optimal performance and resource utilization for large datasets with frequent updates. Data transfer volumes are reduced through the selective transfer of only modified records, resulting in reductions in network traffic. This optimization directly translates into lower operational costs. The full load with upsert facilitates data synchronization in scenarios where incremental processing is not feasible.
Together, these approaches form a complete solution for zero-ETL integration with non-ODP SAP structures, addressing the diverse requirements of enterprise data integration scenarios. Organizations using these approaches should evaluate their specific use cases, data volumes, and performance requirements when choosing between the two approaches.The following diagram illustrates the SAP data ingestion workflow.
Observing SAP zero-ETL integrations
AWS Glue maintains state management, logs, and metrics using Amazon CloudWatch logs. For instructions to configure observability, refer to Monitoring an integration. Make sure AWS Identity and Access Management (IAM) roles are configured for log delivery. The integration is monitored from both source ingestion and writing to the chosen target.
Monitoring source ingestion
The integration of AWS Glue zero-ETL with CloudWatch provides monitoring capabilities to track and troubleshoot the data integration processes. Through CloudWatch, you can access detailed logs, metrics, and events that help identify issues, monitor performance, and maintain operational health of your SAP data integrations. Let’s look at a few instances of success and error scenarios.
Scenario 1: Missing permissions on your role
This error occurred during a data integration process in AWS Glue when attempting to access SAP data. The connection encountered a CLIENT_ERROR with a 400 Bad Request status code, indicating that the role has missing permissions:
{
    "eventTimestamp": 1755031897157,
    "integrationArn": "arn:aws:glue:us-east-2:012345678901:integration:1da4dccd-96ce-4661-8ef1-bf216623d65f",
    "sourceArn": "arn:aws:glue:us-east-2:012345678901:connection/SAPOData-sap-glue-dev",
    "level": "ERROR",
    "messageType": "IngestionFailed",
    "details": {
        "loadType": "",
        "errorMessage": "You do not have the necessary permissions to access the glue connection. make sure that you have the correct IAM permissions to access AWS Glue resources.",
        "errorCode": "CLIENT_ERROR"
    }
}
Scenario 2: Broken delta links
The CloudWatch log indicates an issue with missing delta tokens during data synchronization from SAP to AWS Glue. The error occurs when attempting to access the SAP sales document item table FactsOfCSDSLSDOCITMDX through the OData service. The absence of delta tokens, which are needed for incremental data loading and tracking changes, has resulted in a CLIENT_ERROR (400 Bad Request) when the system tried to open the data extraction API RODPS_REPL_ODP_OPEN:
{
    "eventTimestamp": 1760700305466,
    "integrationArn": "arn:aws:glue:us-east-1:012345678901:integration:f62e1971-092c-46a3-ba88-d32f4c6cd649",
    "sourceArn": "arn:aws:glue:us-east-1:012345678901:connection/SAPOData-sap-glue-dev",
    "level": "ERROR",
    "messageType": "IngestionFailed",
    "details": {
        "tableName": "/sap/opu/odata/sap/Z_C_SALESDOCUMENTITEMDEX_SRV/FactsOfCSDSLSDOCITMDX",
        "loadType": "",
        "errorMessage": "Received an error from SAPOData: Could not open data access via extraction API RODPS_REPL_ODP_OPEN. Status code 400 (Bad Request).",
        "errorCode": "CLIENT_ERROR"
    }
Scenario 3: Client errors on SAP data ingestion
This CloudWatch log reveals a client exception scenario where the SAP entity EntityOf0VENDOR_ATTR is not located or accessed through the OData service. This CLIENT_ERROR occurs when the AWS Glue connector attempts to parse the response from the SAP system but fails, due to either the entity being non-existent in the source SAP system or the SAP instance being temporarily unavailable:
{
    "eventTimestamp": 1752676327649,
    "integrationArn": "arn:aws:glue:us-east-1:012345678901:integration:9f1acbc0-599f-47d2-8e84-e9779976af59",
    "sourceArn": "arn:aws:glue:us-east-1:012345678901:connection/SAPOData-sap-glue-dev",
    "level": "ERROR",
    "messageType": "IngestionFailed",
    "details": {
        "tableName": "/sap/opu/odata/sap/ZVENDOR_ATTR_SRV/EntityOf0VENDOR_ATTR",
        "loadType": "",
        "errorMessage": "Data read from source failed for entity /sap/opu/odata/sap/ZVENDOR_ATTR_SRV/EntityOf0VENDOR_ATTR using connector SAPOData; ErrorMessage: Glue connector returned client exception. The response from the connector application couldn't be parsed.",
        "errorCode": "CLIENT_ERROR"
    }
}
Monitoring target write
Zero-ETL employs monitoring mechanisms depending on the target system. For Amazon Redshift targets, it uses the svv_integration system view, which provides detailed information about integration status, job execution, and data movement statistics. When working with SageMaker lakehouse targets, zero-ETL tracks integration states through the zetl_integration_table_state table, which maintains metadata about synchronization status, timestamps, and execution details. Additionally, you can use CloudWatch logs to monitor the integration progress, capturing information about successful commits, metadata updates, and potential issues during the data writing process.
Scenario 1: Successful processing on SageMaker lakehouse target
The CloudWatch logs show successful data synchronization activity for the plant table using CDC mode. The first log entry (IngestionCompleted) confirms the successful completion of the ingestion process at timestamp 1757221555568, with a last sync timestamp of 1757220991999. The second log (IngestionTableStatistics) provides detailed statistics of the data modifications, showing that during this CDC sync 300 new records were inserted, 8 records were updated, and 2 records were deleted from the target database gluezetl. This level of detail helps in monitoring the volume and types of changes being propagated to the target system.
Scenario 2: Metrics on Amazon SageMaker lakehouse target
The zetl_integration_table_state table in SageMaker lakehouse provides a view of integration status and data modification metrics. In this example, the table shows a successful integration for an SAP CDS view table with integration ID 62b1164f-5b85-45e4-b8db-9aa7ab841e98 in the testdb database. The record indicates that at timestamp 1733000485999, there were 10 insertion records processed (recent_insert_record_count: 10), with no updates or deletions (both counts at 0). This table serves as a monitoring tool, providing a centralized view of integration states and detailed statistics about data modifications, making it straightforward to track and verify data synchronization activities in the lakehouse.
Scenario 3: Redshift monitoring system uses two views to track zero-ETL integration status
svv_integration provides a high-level overview of the integration status, showing that integration ID 03218b8a-9c95-4ec2-81ad-dd4d5398e42a has successfully replicated 18 tables with no failures, and the last checkpoint was at transaction sequence 1761289852999.
svv_integration_table_state offers table-level monitoring details, showing the status of individual tables within the integration. In this case, the SAP material group text entity table is in Synced state, with its last replication checkpoint matching the integration checkpoint (1761289852999). The table currently shows 0 rows and 0 size, suggesting it’s newly created.
These views together provide a comprehensive monitoring solution for tracking both overall integration health and individual table synchronization status in Amazon Redshift.
Prerequisites
In the following sections, we walk through the steps required to set up an SAP connection and using that connection to create a zero-ETL integration. Before implementing this solution, you must have the following in place:
An SAP account
An AWS account with administrator access
Create an S3 Tables target and associate the S3 bucket sap_demo_table_bucket as a location of the database
Create an IAM role named zero_etl_bulk_demo_role, to be used by zero-ETL to access data from your SAP account
Create the secret zero_etl_bulk_demo_secret in AWS Secrets Manager to store SAP credentials
Create connection to SAP instance
To set up a connection to your SAP instance and provide data to access, complete the following steps:
On the AWS Glue console, in the navigation pane under Data catalog, choose Connections, then choose Create Connection.
For Data sources, select SAP OData, then choose Next.
Enter the SAP instance URL.
For IAM service role, choose the role zero_etl_bulk_demo_role (created as a prerequisite).
For Authentication Type, choose the authentication type that you’re using for SAP.
For AWS Secret, choose the secret zero_etl_bulk_demo_secret (created as a prerequisite).
Choose Next.
For Name, enter a name, such as sap_demo_conn.
Choose Next.
Create zero-ETL integration
To create the zero-ETL integration, complete the following steps:
On the AWS Glue console, in the navigation pane under Data catalog, choose Zero-ETL integrations, then choose Create zero-ETL integration.
For Data source, select SAP OData, then choose Next.
Choose the connection name and IAM role that you created in the previous step.
Choose the SAP objects you want in your integration. The non-ODP objects are either configured for full load or incremental load, and ODP objects are automatically configured for incremental ingestion.
For full load, leave Incremental update field set as No timestamp field selected.
For incremental load, choose the edit icon for Incremental update field and choose a timestamp field.
For ODP entities that offer delta token, the incremental update field is pre-selected, and no customer action is necessary. When making a new integration using the same SAP connection and entity in the data filter, you will not be able to select a different incremental update field from the first integration.
For Target details, choose sap_demo_table_bucket (created as a prerequisite).
For Target IAM role, choose sap_demo_role (created as a prerequisite).
Choose Next.
In the Integration details section, for Name, enter sap-demo-integration.
Choose Next.
Review the details and choose Create and launch integration.
The newly created integration is shown as Active in about a minute.
Clean up
To clean up your resources, complete the following steps. This process will permanently delete the resources created in this post; back up important data before proceeding.
Delete the zero-ETL integration sap-demo-integration.
Delete the S3 Tables target bucket sap_demo_table_bucket.
Delete the Data Catalog connection sap_demo_conn.
Delete the Secrets Manager secret zero_etl_bulk_demo_secret.
Conclusion
You can now transform your SAP data analytics without the complexity of traditional ETL processes. With AWS Glue zero-ETL, you can gain immediate access to your SAP data while maintaining its structure across S3 Tables, SageMaker lakehouse, and Amazon Redshift. Your teams can use ACID-compliant storage with time travel capabilities, schema evolution, and concurrent reads/writes at scale, while keeping data in cost-effective cloud storage. The solution’s AI capabilities through Amazon Q and SageMaker can help your business create on-demand data products, run text-to-SQL queries, and deploy AI agents using Amazon Bedrock and Quick Suite.
At re:Invent 2025, AWS unveiled its latest AI- and automation-enabled innovations to strengthen cloud security for customers to grow their business. Organizations are likely to increase security spending from $213 billion in 2025 to $377 billion by 2028 as they adopt generative AI. This 77% increase highlights the importance organizations place on securing their AI investments as they expand their digital footprints.
AWS uses artificial intelligence, machine learning, and automation to help you secure your environments proactively. These advancements include AI security agents, machine-learning and automation-driven threat detection, and agent-centric identity and access management. Together, they unify defense-in-depth across the application, infrastructure, network, and data layers to protect organizations from a wide spectrum of threats, vulnerabilities, and misconfigurations that could disrupt business operations.
AI security agents
AWS is embedding AI agents directly into security workflows to perform code reviews, collate incident response signals, and secure agentic access.
AWS Security Agentis a frontier agent that proactively secures applications throughout the development lifecycle. It conducts automated security reviews tailored to organizational requirements and delivers context-aware penetration testing on demand. By continuously validating security from design to deployment, it helps prevent vulnerabilities early in development.
AWS Security Incident Response delivers agentic AI-powered investigation capabilities designed to help enhance and accelerate security event response and recovery.
AgentCore Identitynow offers authentication that provides enhanced access controls for AI agents, which restricts their interactions to authorized services and data based on specific user permissions and attributes. Enabling granular boundaries for how AI agents interact with enterprise applications reduces the risk of unauthorized access or data exposure.
ML and automation-driven threat detection
Machine learning models and automation now accelerate threat detection across more AWS environments, surfacing otherwise hard to see correlations, such as for sophisticated multistage attacks, at scale. These latest advancements save time by automatically correlating signals into consolidated sequences.
GuardDuty extended threat detection for EC2 and ECSuses advanced AI and ML algorithms to identify sophisticated, multi-stage attacks targeting AWS accounts, workloads, and data in virtual machine, container, and serverless workloads.
GuardDuty malware protection for AWS Backup automatically scans EC2, EBS, and S3 backups for malware. It helps you identify your last known clean backup to minimize business disruption during recovery and supports incremental scanning of net new data in between backups.
Intelligent access controls are redefining how organizations manage identities and permissions. These controls automate policy generation and improve your zero trust maturity level, making it easier for you to use AWS services.
IAM policy autopilot helps AI coding assistants quickly create baseline IAM policies that teams can refine as the application evolves, so organizations can build faster.
Outbound identity Federation helps IAM customers to securely federate their AWS identities to external services, making it easy to authenticate AWS workloads with cloud providers, SaaS platforms, and self-hosted applications.
Private access sign-in routes 100% of console traffic through VPC endpoints instead of public internet, using intelligent routing to maintain security without compromising performance.
These AI and ML advancements transform security from reactive manual processes to proactive, scalable protection. You can use them to operationalize threat hunting and advance your security posture, even as you grow your digital real estate.
The confidence organizations place in cloud-native security validates this approach. The AWS-sponsored report of 2,800 IT and security decision makers and practitioners revealed that 81% agree that their primary cloud provider’s native security and compliance capabilities exceed what their team could deliver independently. Additionally, 56% responded that the public cloud was better positioned to deliver security as opposed to 37% that selected on-premises, and 51% believe the public cloud is better positioned to meet regulations versus 41% that responded on-premises.
Cloud is the foundation on which customers build their businesses, and AWS continues to deliver security innovations that reinforce that foundation.
If you have feedback about this post, submit comments in the Comments section below.
The
Internet Engineering Task Force (IETF) is the standards body responsible
for the TLS encryption standard — which your browser is using right now
to allow you to read LWN.net. As part of its work to keep TLS secure, the IETF
has been entertaining
proposals to adopt “post-quantum” cryptography (that is,
cryptography that is not known to be easily broken by a quantum computer) for TLS
version 1.3. Discussion of the proposal has exposed a large disagreement between
participants who worried about weakened security and others who worried about
weakened marketability.
Jon Seager, VP of engineering for Canonical, has announced
a plan to develop a universal Public Key Infrastructure tool called
upki:
Earlier this year, LWN featured an excellent article titled
“Linux’s missing CRL
infrastructure“. The article highlighted a number
of key issues surrounding traditional Public Key Infrastructure (PKI),
but critically noted how even the available measures are effectively
ignored by the majority of system-level software on Linux.
One of the motivators for the discussion is that the Online
Certificate Status Protocol (OCSP) will cease to be supported by Let’s
Encrypt. The remaining alternative is to use Certificate Revocation
Lists (CRLs), yet there is little or no support for managing (or even
querying) these lists in most Linux system utilities.
To solve this, I’m happy to share that in partnership with rustls
maintainers Dirkjan Ochtman
and Joe Birr-Pixton, we’re starting the
development of upki: a universal PKI tool. This project initially aims
to close the revocation gap through the combination of a new system
utility and eventual library support for common TLS/SSL libraries such
as OpenSSL, GnuTLS and rustls.
No code is available as of yet, but the announcement indicates that
upki will be available as an opt-in preview for
Ubuntu 26.04 LTS. Thanks to Dirjan Ochtman for the tip.
The week after AWS re:Invent builds on the excitement and energy of the event and is a good time to learn more and understand how the recent announcements can help you solve your challenges and unlock new opportunities. As usual, we have you covered with our top announcements of AWS re:Invent 2025 that you can learn all about here.
For me, one moment stood out above all the technical announcements: watching Rafi (Raphael Francis Quisumbing) from the Philippines receive the Now Go Build Award from Werner Vogels. Rafi has been an AWS Hero since 2015 and co-lead of AWS User Group Philippines since 2013. His dedication to building communities and empowering developers across the region embodies what this award represents. You can read more about Rafi on The Kernel. Congrats, Rafi!
The keynote recap: Agents, renaissance, and the developer’s role This year’s AWS re:Invent keynotes painted a clear picture of where we’re headed.
Matt Garmanemphasized that developers are “the heart of AWS” and that “freedom to invent” remains AWS’s core mission after 20 years. He focused on AI agents as the next inflection point: “AI assistants are starting to give way to AI agents that can perform tasks and automate on your behalf. This is where we’re starting to see material business returns from your AI investments.”
Swami Sivasubramanian highlighted the transformative moment we’re in: “For the first time in history, we can describe what we want to accomplish in natural language, and agents generate the plan. They write the code, call the necessary tools, and execute the complete solution.” AWS is building production-ready infrastructure that’s secure, reliable, and scalable—purpose-built for the non-deterministic nature of agents.
Peter DeSantis and Dave Brown reinforced that the core attributes AWS has obsessed over for 20 years—security, availability, performance, elasticity, cost, and agility—are more important than ever in the AI era. Dave Brown showcased Graviton and AWS’s custom silicon innovations that deliver these attributes at scale.
Werner Vogels delivered his final keynote after 14 years, introducing the concept of the “renaissance developer”—someone who is curious, thinks in systems, and communicates effectively. His message about AI and developer evolution resonated: “Will AI take my job? Maybe. Will AI make me obsolete? Absolutely not… if you evolve.” He emphasized that developers must be owners: “The work is yours, not that of the tools. You build it, you own it.”
You can also watch from keynotes, innovation talks to breakout sessions and more in the on-demand video page.
Kiro Autonomous Agent – Building on Kiro’s general availability in November with team features, AWS introduced an autonomous agent that maintains awareness across sessions, learns from pull requests and feedback, and handles bug triage and code coverage improvements spanning multiple repositories. “Orders of magnitude more efficient” than first-generation AI coding tools, Matt Garman said. Kiro is now Amazon’s standard AI development environment company-wide.
Multimodal Retrieval for Bedrock Knowledge Bases (GA) – Build AI-powered search and question-answering applications that work across text, images, audio, and video files. Developers can now ingest multimodal content with full control of parsing, chunking, embedding, and vector storage options, then send text or image queries to retrieve relevant segments across all media types.
AWS Interconnect – Multicloud (Preview) – Quickly establish private, secure, high-speed network connections with dedicated bandwidth and built-in resiliency between Amazon VPCs and other cloud environments. Starting in preview with Google Cloud as the first launch partner, with Microsoft Azure support coming in 2026.
See AWS What’s New for more launch news that I haven’t covered here. That’s all for this week. Check back next Monday for another Weekly Roundup!
Have you ever wondered what it is really like to be a woman in tech at one of the world’s leading cloud companies? Or maybe you are curious about how diverse perspectives drive innovation beyond the buzzwords? Today, we are providing an insider’s perspective on the role of a solutions architect (SA) at Amazon Web Services (AWS). However, this is not a typical corporate success story. We are three women who have navigated challenges, celebrated wins, and found our unique paths in the world of cloud architecture, and we want to share our real stories with you.
What exactly does a solutions architect do?
Solutions architects are the bridge between a customer’s biggest business challenges and the latest technology solutions. Bridging that gap is what we do as SAs at AWS every single day. Here’s what that looks like in practice:
We work backwards from customer challenges – Instead of pushing technology for technology’s sake, we start with what customers are trying to achieve by embedding ourselves directly with their teams at their office premises, collaborating side-by-side to understand their unique needs
We design the blueprint – Think of us as architects, but instead of buildings, we create system architecture diagrams and define the software services that power customers’ businesses
We guide through every stage – From initial concept to full implementation, we provide the technical roadmap that fits customers’ project’s lifecycle
AWS SAs serve as trusted technical advisors across industries – whether it is a scrappy startup, a traditional financial institution, or a global enterprise. We help them align their technology choices with their business goals while minimizing risks and supporting a smooth, standardized journey to the cloud.
Why does representation matter in tech?
Diverse teams are not just a nice-to-have—they are proven innovation engines that drive productivity and results. When organizations lack diversity, they risk stifling creativity and limiting their ability to tackle complex challenges.
Research conducted by Gartner, a leading global research and advisory firm that specializes in business and technology, substantiates this connection, showing that organizations with stronger women representation achieve better financial performance. For more information, review Culture of Value for Women in Technology Drives Business Performance.
The research findings prove that gender diversity isn’t just the right thing to do; it is a competitive advantage that directly impacts an organization’s ability to innovate and succeed.
AWS is committed to equal opportunities and career advancement regardless of gender. However, the broader industry faces a significant gender gap in technical roles. Gartner reports that women make up just 26% of information technology (IT) employees, with even lower representation in senior leadership positions. For more information, review How Women in IT Are Championing Change.
Here is how we are working to change this:
Women’s Networking Circles connects women with peers facing similar challenges
Project Inclusion initiatives increase women’s participation in technical interviews
AWS Women in SA affinity group offers mentorship, certification guidance, and career progression support
AWS SheBuilds is an initiative by AWS with the mission to build diverse tech communities and empower women to build on AWS and develop their skills
Amazon rekindle is a return-to-work program for women who have taken a break in their careers
Our stories: real challenges, real solutions, real impact
Whether you are taking your first steps in technology, considering a career change, or climbing the ladder in your current role, representation creates possibility. When you see someone who looks like you thriving in a space, that path transforms from aspirational to achievable. We are here to share our authentic journeys and insights—because your success story matters too.
Kayalvizhi: From senior to principal SA — How I did it
What does it look like to advance in a technical role while raising two teenagers?
For me, joining AWS India as a senior SA in late 2020 opened the door to working with cloud-native leaders like OLA, Zepto, redBus, and Azira. These organizations, built from the ground up in the cloud and known for pushing AWS capabilities to new boundaries, have provided me with invaluable learning opportunities across diverse technologies while I have supported their cloud journeys.
With my background in application development prior to AWS, I sought to enhance my containerization expertise by joining the Technical Field Community (TFC)— the AWS internal expert network that connects SAs with domain specialists. Think of TFC as the technical support system where mentors guide your professional development in specific technology areas.
When we need deep expertise in artificial intelligence (AI)/machine learning (ML), databases, or other technology or industry domain, the TFC connects us with the right experts globally. For more details, watch AWS re:Invent 2022 – AWS knowledge network: Building & managing expert communities at scale. I started with the Containers TFC, then expanded to Database TFC. This was not just about learning – it opened doors to support customers not only in India, but globally.
What sets me apart is my passion for sharing the knowledge I have gained from supporting customer business needs with the broader technical community through multiple channels.
AWS Blogs: I authored seven architectural posts, five of which captured remarkable customer outcomes:
AWS Summits: I regularly present at AWS events like AWS Summits, with my most rewarding experiences being customer co-presentations that showcase their success stories. Notable examples include “Zepto’s growth story powered by AWS,” “Accelerate generative AI deployment with Amazon SageMaker JumpStart” featuring OLA Krutrim’s transformation, and “How Koo used Amazon DynamoDB connect millions of voices globally.”
AWS code samples: As a software engineer at heart, I have built solutions to address real-world customer challenges through hands-on development. One example is when a customer needed to stream their Internet of Things (IoT) sensor data from their Apache Kafka clusters to Amazon Timestream table. It presented an opportunity for me to build the Timestream – Kafka Sink Connector which enabled streaming data between services. Realizing the connector could be helpful to other customers, I published it on GitHub: AWS Samples; watch this video Streaming data from your Kafka clusters to Amazon Timestream for more details.
Mentor: Diversity in technology is a passion that drives my active participation in Amazon rekindle, where I have the privilege of guiding and empowering women who are returning to the technology sector after career breaks.
By consistently applying the Amazon Leadership Principles – like Customer Obsession, Invent and Simplify, and Dive Deep – I progressed to principal SA, proving that technical excellence combined with customer focus creates unstoppable career momentum.
Personal balance: How do I manage all this while raising two teenage daughters? I found my answer in chess – a lifelong passion I have shared with my daughters. Recently, my elder daughter secured first place in her age group at a national tournament. To me, it is about finding what energizes you outside of work.
To learn more about my professional journey, see my LinkedIn Profile: Kayalvizhi Kandasamy
Smita: How I turned a global transition into career growth
Ever wondered if you can successfully pivot your career path, even during a pandemic?
My story began in Australia as a professional services consultant, AWS experts who work directly with customers to implement cloud solutions. When the global pandemic hit, I faced a difficult choice: stay in Australia or move closer to family in India.
AWS didn’t just support my decision – it facilitated my transition from Australia to India and helped me shift from Professional Services to Solution Architecture. This career pivot meant learning new skills while adapting to a new country and role.
The Innovation: My diverse background has become my superpower, enabling me to tackle innovative projects with the latest technologies. I am just as enthusiastic about knowledge dissemination, with my go-to services being the AWS YouTube channel and GitHub: AWS-Samples repository.
Swiggy’s Text2SQL Challenge: When India’s leading food delivery system, Swiggy, faced challenges with converting natural language queries into SQL commands, I supported them by integrating Amazon Bedrock to create a faster, more accurate solution
Video editing: It can be a time-consuming task, but with Amazon Rekognition, it becomes much more efficient. Watch the video linked to at the start of this bullet point and check out the code for additional details
Security:
To help protect applications from common web exploits, I have authored this code for deploying AWS WAF rules using AWS Firewall Manager
To create a more secure and efficient authorization mechanism for REST APIs authored using Amazon API Gateway and AWS Lambda, I have authored this code that implements a Lambda authorizer with a third-party identity provider to manage access control effectively
Personal balance: As a mother to an energetic 8-year-old, I had to get creative with work-life integration. My strategy is to complete work by 6 pm and avoid late-night calls unless absolutely necessary. My daughter and I take music classes together – it is our bonding time and my way of staying present in her life.
To learn more about my professional journey, see my LinkedIn Profile: Smita Srivastava.
Archana: Six years, multiple roles, one constant – growth
What does it look like to build deep expertise while continuously expanding your impact?
My journey with AWS spans over six years, starting as a cloud support engineer. This foundation helped me develop deep expertise in serverless and security services, where I am now a subject matter expert in Amazon API Gateway, AWS Lambda, and Amazon Cognito.
As a member of the Serverless TFC, I collaborate with fellow experts to provide architectural guidance to customers facing complex challenges. I have had the opportunity to share my experiences at AWS re:Invent, where I conducted hands-on workshops on event-driven architectures and API Gateway implementations.
The mentorship mission: Fostering diversity in technology is a passion of mine, and I actively participate in AWS SheBuilds, where I mentor aspiring women both within and outside Amazon who are pursuing careers in tech.
The content creation: My technical contributions extend beyond direct customer engagements. I have authored close to 12 AWS code samples and AWS Knowledge Center articles, sharing my expertise with the broader AWS community. Some of them include:
I built a solution based on a customer need to transcribe and generate subtitles for audio and video content at scale, using Amazon Transcribe and AWS Lambda. By publishing this on GitHub – AWS Samples, I made sure other customers could benefit from my work
While assisting a customer with Amazon Cognito password reset functionality where the users weren’t receiving verification codes via email or SMS, I created this comprehensive troubleshooting guide
While collaborating with a customer that needed to build an AI-powered image generation service for their e-commerce system, I developed this serverless solution using the Amazon Nova Canvas model. This solution allowed their team to generate professional product images on-demand through a simple API call
Personal balance: Beyond my professional achievements, I maintain a balanced personal life as an avid reader, fitness enthusiast, and traveler. My husband and I volunteer at animal shelters, finding fulfillment in being a voice for the voiceless.
To learn more about my professional journey, see my LinkedIn Profile: Archana Venkat.
Frequently asked questions
As you can see, our journeys as women SAs at AWS are diverse and filled with both professional and personal accomplishments. We hope our stories have inspired you and given you a glimpse into the rewarding experiences that AWS can offer. Here are some of the questions that we frequently get about how AWS is supporting us with structured programs.
1. How do you keep up with all the new technologies without burning out?
Take advantage of Purpose Day: AWS India gives us a monthly “Purpose Day” specifically for professional development. It is not just encouraged—it is expected.
2. How do you develop expertise across so many different technologies?
The TFC secret: The TFC is not just a program—it is your network of domain experts. You don’t need to know everything; you need to know who knows everything.
Combine broad and deep: Develop broad knowledge across AWS services but find your specialty areas where you can go deep. Then connect with others who complement your expertise.
3. How do you build confidence and overcome imposter syndrome?
This one hit close to home for many of us. Here is what works:
Use Amazon leadership principles as your guide: These are not just corporate speak—they are practical frameworks for decision-making and growth. Learn and Be Curious, and Dive Deep have been game-changers for us.
Certification as confidence building: There is something powerful about passing that exam and having external validation of your knowledge. Get started with AWS Training and Certification.
Take ownership: Do not wait for the perfect opportunity. Create it. Volunteer for that challenging project. Write that blog post. Give that presentation.
Conclusion
Here is what we hope you will take away from our stories:
Your background is your superpower: Kayalvizhi’s customer focus, Smita’s global perspective, and Archana’s journey from support to expertise—each brought something unique that led to innovative solutions
Support systems matter: The inclusive policies and programs at AWS are not just nice-to-haves. They are the foundation that allows us to demonstrate our technical excellence and leadership potential
Balance is personal: There is no one-size-fits-all approach to work-life balance. Find what works for you, set boundaries, and don’t apologize for them
Community amplifies individual success: Whether it is TFC, Women in SA, or SheBuilds, being part of a community that shares knowledge and supports growth makes the journey not just possible, but enjoyable
Ready to write your own story? The cloud industry needs your perspective. It needs your questions, your approach to problem-solving, and your unique way of seeing challenges. Every expert was once a beginner, every leader was once a follower, and every innovation started with someone asking, “What if we tried it differently?”
We would love to hear your experiences and perspectives in the comments below. Consider joining our tech community where we embrace the spirit of “Work Hard, Have Fun, and Make History!” together!
Security updates have been issued by Debian (ffmpeg, krita, lasso, and libpng1.6), Fedora (abrt, cef, chromium, tinygltf, webkitgtk, and xkbcomp), Oracle (buildah, delve and golang, expat, python-kdcproxy, qt6-qtquick3d, qt6-qtsvg, sssd, thunderbird, and valkey), Red Hat (webkit2gtk3), and SUSE (git-bug, go1, and libpng12-0).
The collective thoughts of the interwebz
Manage Consent
To provide the best experiences, we use technologies like cookies to store and/or access device information. Consenting to these technologies will allow us to process data such as browsing behavior or unique IDs on this site. Not consenting or withdrawing consent, may adversely affect certain features and functions.
Functional
Always active
The technical storage or access is strictly necessary for the legitimate purpose of enabling the use of a specific service explicitly requested by the subscriber or user, or for the sole purpose of carrying out the transmission of a communication over an electronic communications network.
Preferences
The technical storage or access is necessary for the legitimate purpose of storing preferences that are not requested by the subscriber or user.
Statistics
The technical storage or access that is used exclusively for statistical purposes.The technical storage or access that is used exclusively for anonymous statistical purposes. Without a subpoena, voluntary compliance on the part of your Internet Service Provider, or additional records from a third party, information stored or retrieved for this purpose alone cannot usually be used to identify you.
Marketing
The technical storage or access is required to create user profiles to send advertising, or to track the user on a website or across several websites for similar marketing purposes.