Netflix was thrilled to be the premier sponsor for the 2nd year in a row at the 2023 Conference on Digital Experimentation (CODE@MIT) in Cambridge, MA. The conference features a balanced blend of academic and industry research from some wicked smart folks, and we’re proud to have contributed a number of talks and posters along with a plenary session.
Our contributions kicked off with a concept that is crucial to our understanding of A/B tests: surrogates!
Our first talk was given by Aurelien Bibaut (with co-authors Nathan Kallus, Simon Ejdemyr and Michael Zhao) in which we discussed how to confidently measure long-term outcomes using short term surrogates in the presence of bias. For example, how do we estimate the effects of innovations on retention a year later without running all our experiments for a year? We proposed an estimation method using cross-fold procedures, and construct valid confidence intervals for long term effects before that effect is fully observed.
Later on, Michael Zhao (with Vickie Zhang, Anh Le and Nathan Kallus) spoke about the evaluation of surrogate index models for product decision making. Using 200 real A/B tests performed at Netflix, we showed that surrogate-index models, constructed using only 2 weeks of data, lead to the same product ship decisions ~95% of the time when compared to making a call based on 2 months of data. This means we can reliably run shorter tests with confidence without needing to wait months for results!
Our next topic focused on how to understand and balance competing engagement metrics; for example, should 1 hour of gaming equal 1 hour of streaming? Michael Zhao and Jordan Schafer shared a poster on how they built an Overall Evaluation Criterion (OEC) metric that provides holistic evaluation for A/B tests, appropriately weighting different engagement metrics to serve a single overall objective. This new framework has enabled fast and confident decision making in tests, and is being actively adapted as our business continues to expand into new areas.
In the second plenary session of the day, Martin Tingley took us on a compelling and fun journey of complexity, exploring key challenges in digital experimentation and how they differ from the challenges faced by agricultural researchers a century ago. He highlighted different areas of complexity and provided perspectives on how to tackle the right challenges based on business objectives.
Our final talk was given by Apoorva Lal (with co-authors Samir Khan and Johan Ugander) in which we show how partial identification of the dose-response function (DRF) under non-parametric assumptions can be used to provide more insightful analyses of experimental data than the standard ATE analysis does. We revisited a study that reduced like-minded content algorithmically, and showed how we could extend the binary ATE learning to answer how the amount of like-minded content a user sees affects their political attitudes.
We had a blast connecting with the CODE@MIT community and bonding over our shared enthusiasm for not only rigorous measurement in experimentation, but also stats-themed stickers and swag!
One of our stickers this year, can you guess what this is showing?!
We look forward to next year’s iteration of the conference and hope to see you there!
Psst! We’re hiring Data Scientists across a variety of domains at Netflix — check out our open roles.
Amazon Managed Streaming for Apache Kafka (Amazon MSK) is a fully managed service that enables you to build and run applications that use Apache Kafka to process streaming data.
Today, we’re excited to bring the benefits of Graviton3 to Kafka workloads, with Amazon MSK now offering M7g instances for new MSK provisioned clusters. AWS Graviton processors are custom Arm-based processors built by AWS to deliver the best price-performance for your cloud workloads. For example, when running an MSK provisioned cluster using M7g.4xlarge instances, you can achieve up to 27% reduction in CPU usage and up to 29% higher write and read throughput compared to M5.4xlarge instances. These performance improvements, along with M7g’s lower prices provide up to 24% in compute cost savings over M5 instances.
In February 2023, AWS launched new Graviton3-based M7g instances. M7g instances are equipped with DDR5 memory, which provides up to 50% higher memory bandwidth than the DDR4 memory used in previous generations. M7g instances also deliver up to 25% higher storage throughput and up to 88% increase in network throughput compared to similar sized M5 instances to deliver price-performance benefits for Kafka workloads. You can read more about M7g features in New Graviton3-Based General Purpose (m7g) and Memory-Optimized (r7g) Amazon EC2 Instances.
Here are the specs for the M7g instances on MSK:
Name
vCPUs
Memory
Network Bandwidth
Storage Bandwidth
M7g.large
2
8 GiB
up to 12.5 Gbps
up to 10 Gbps
M7g.xlarge
4
16 GiB
up to 12.5 Gbps
up to 10 Gbps
M7g.2xlarge
8
32 GiB
up to 15 Gbps
up to 10 Gbps
M7g.4xlarge
16
64 GiB
up to 15 Gbps
up to 10 Gbps
M7g.8xlarge
32
128 GiB
15 Gbps
10 Gbps
M7g.12xlarge
48
192 GiB
22.5 Gbps
15 Gbps
M7g.16xlarge
64
256 GiB
30 Gbps
20 Gbps
M7g instances on Amazon MSK
Organizations are adopting Amazon MSK to capture and analyze data in real time, run machine learning (ML) workflows, and build event-driven architectures. Amazon MSK enables you to reduce operational overhead and run your applications with higher availability and durability. It also offers a consistent reduction in price-performance with capabilities such as Tiered Storage. With compute making up a large portion of Kafka costs, customers wanted a way to optimize them further and see Graviton instances providing them the quickest path. Amazon MSK has fully tested and validated M7g on all Kafka versions starting with version 2.8.2, making it to run critical workloads and benefit from Gravition3 cost savings.
You can get started by provisioning new clusters with the Graviton3-based M7g instances as the broker type using the AWS Management Console, APIs via the AWS SDK, and the AWS Command Line Interface (AWS CLI). M7g instances support all Amazon MSK and Kafka features, making it straightforward for you to run all your existing Kafka workloads with minimal changes. Amazon MSK supports Graviton3-based M7g instances from large through 16xlarge sizes to run all Kafka workloads.
Let’s take the M7g instances on MSK provisioned clusters for a test drive and see how it compares with Amazon MSK M5 instances.
M7g instances in action
Customers run a wide variety of workloads on Amazon MSK; some are latency sensitive, and some are throughput bound. In this post, we focus on M7g performance impact on throughput-bound workloads. M7g comes with an increase in network and storage throughput, providing a higher throughput per broker compared to an M5-based cluster.
To understand the implications, let’s look at how Kafka uses available throughput for writing or reading data. Every broker in the MSK cluster comes with a bounded storage and network throughput entitlement. Predominantly, writes in Kafka consume both storage and network throughput, whereas reads consume mostly network throughput. This is because a Kafka consumer is typically reading real-time data from a page cache and occasionally goes to disk to process old data. Therefore, the overall throughput gains also change based on the workload’s write to read throughput ratios.
Let’s look at the throughput gains based on an example. Our setup includes an MSK cluster with M7g.4xlarge instances and another with M5.4xlarge instances, with three nodes in three different Availability Zones. We also enabled TLS encryption, AWS Identity and Access Management (IAM) authentication, and a replication factor of 3 across both M7g and M5 MSK clusters. We also applied Amazon MSK best practices for broker configurations, including num.network.threads = 8 and num.io.threads = 16. On the client side for writes, we optimized the batch size with appropriate linger.ms and batch.size configurations. For the workload, we assumed 6 topics each with 64 partitions (384 per broker). For ingestion, we generated load with an average message size of 512 bytes and with one consumer group per topic. The amount of load sent to the clusters was identical.
As we ingest more data into the MSK cluster, the M7g.4xlarge instance supports higher throughput per broker, as shown in the following graph. After an hour of consistent writes, M7g.4xlarge brokers support up to 54 MB/s of write throughput vs. 40 MB/s with M5-based brokers, which represents a 29% increase.
We also see another important observation: M7g-based brokers consume much fewer CPU resources than M5s, even though they support 29% higher throughput. As seen in the following chart, CPU utilization of an M7g-based broker is on average 40%, whereas on an M5-based broker, it’s 47%.
As covered previously, customers may see different performance improvements based on the number of consumer group, batch sizes, and instance size. We recommend referring to MSK Sizing and Pricing to calculate M7g performance gains for your use case or creating a cluster based on M7g instances and benchmark the gains on your own.
Lower costs, with lesser operational burden, and higher resiliency
Since its launch, Amazon MSK has made it cost-effective to run your Kafka workloads, while still improving overall resiliency. Since day 1, you have been able to run brokers in multiple Availability Zones without worrying about additional networking costs. In October 2022, we launched Tiered Storage, which provides virtually unlimited storage at up to 50% lower costs. When you use Tiered Storage, you not only save on overall storage cost but also improve the overall availability and elasticity of your cluster.
Continuing down this path, we are now reducing compute costs for customers while still providing performance improvements. With M7g instances, Amazon MSK provides 24% savings on compute costs compared to similar sized M5 instances. When you move to Amazon MSK, you can not only lower your operational overhead using features such as Amazon MSK Connect, Amazon MSK Replicator, and automatic Kafka version upgrades, but also improve over resiliency and reduce their infrastructure costs.
Pricing and Regions
M7g instances on Amazon MSK are available today in the US (Ohio, N. Virginia, N. California, Oregon), Asia Pacific (Hyderabad, Mumbai, Seoul, Singapore, Sydney, Tokyo), Canada (Central), and EU (Ireland, London, Spain, Stockholm) Regions.
Refer to Amazon MSK pricing to learn about Graivton3-based instances with Amazon MSK pricing.
Summary
In this post, we discussed the performance gains achieved while using Graviton-based M7g instances. These instances can provide significant improvement in read and write throughput compared to similar sized M5 instances for Amazon MSK workloads. To get started, create a new cluster with M7g brokers using the AWS Management Console, and read our documentation for more information.
About the Authors
Sai Maddali is a Senior Manager Product Management at AWS who leads the product team for Amazon MSK. He is passionate about understanding customer needs, and using technology to deliver services that empowers customers to build innovative applications. Besides work, he enjoys traveling, cooking, and running.
Umesh is a Streaming Solutions Architect at AWS. He works with AWS customers to design and build real time data processing systems. He has 13 years of working experience in software engineering including architecting, designing, and developing data analytics systems.
Lanre Afod is a Solutions Architect focused with Global Financial Services at AWS, passionate about helping customers with deploying secure, scalable, high available and resilient architectures within the AWS Cloud.
As cloud environments—and security risks associated with them—become more complex, it becomes increasingly critical to understand your cloud security posture so that you can quickly and efficiently mitigate security gaps. AWS Security Hub offers close to 300 automated controls that continuously check whether the configuration of your cloud resources aligns with the best practices identified by Amazon Web Services (AWS) security experts and with industry standards. Furthermore, you can manage your cloud security posture at scale by using a single action to enable Security Hub across your organization with the default settings, and by aggregating findings across your organization accounts and Regions to a single account and Region of your choice.
With the release of the new central configuration feature of Security Hub, the setup and management of control and policy configurations is simplified and centralized to the same account you have already been using to aggregate findings. In this blog post, we will explain the benefits of the new feature and describe how you can quickly onboard to it.
Central configuration overview
With the release of the new central configuration capabilities in Security Hub, you are now able to use your delegated administrator (DA) account (an AWS Organizations account designated to manage Security Hub throughout your organization) to centrally manage Security Hub controls and standards and to view your Security Hub configuration throughout your organization from a single place. To facilitate this functionality, central configuration allows you to set up policies that specify whether or not Security Hub should be enabled and which standards and controls should be turned on. You can then choose to associate your policies with your entire organization or with specific accounts or organizational units (OUs), with your policies applying automatically across linked Regions. Policies applied to specific OUs (or to the entire organization) are inherited by child accounts. This not only applies to existing accounts, but also to new accounts added to those OUs (or to the entire organization) after you created the policy. Furthermore, when you add a new linked Region to Security Hub, your existing policies will be applied to that Region immediately. This allows you to stop maintaining manual lists of accounts and Regions to which you’d like to apply your custom configurations; instead, you can maintain several policies for your organization, with each one being associated to a different set of accounts in your organization. As a result, by using the central configuration capabilities, you can significantly reduce the time spent on configuring Security Hub and switch your focus to remediating its findings.
After applying your policies, Security Hub also provides you with a view of your organization that shows the policy status per OU and account while also preventing drift. This means that after you set up your organization by using central configuration, account owners will not be able to deviate from your chosen settings—your policies will serve as the source of truth for your organizational configuration, and you can use them to understand how Security Hub is configured for your organization.
The use of the new central configuration feature is now the recommended approach to configuring Security Hub, and its standards and controls, across some or all AWS accounts in your AWS Organizations structure.
Prerequisites
To get started with central configuration, you need to complete three prerequisites:
Enable AWS Config in the accounts and Regions where you plan to enable Security Hub. (For more information on how to optimize AWS Config configuration for Security Hub usage, see this blog post.)
Turn on Security Hub in your AWS Organizations management account at least in one Region where you plan to use Security Hub.
Use your Organizations management account to delegate an administrator account for Security Hub.
If you are new to Security Hub, simply navigate to it in the AWS Management Console from your organization management account, and the console will walk you through setting the last two prerequisites listed here. If you already use Security Hub, these can be configured from the Settings page in Security Hub. In both cases, upon completing these three prerequisites, you can proceed with the central configuration setup from the account you set as the DA.
Recommended setup
To begin the setup, open the Security Hub console from your AWS Organizations management account or from your Security Hub delegated administrator account. In the left navigation menu, choose Configuration to open the new Configuration page, shown in Figure 1. Choose Start central configuration.
Figure 1: The new Configuration page, where you can see your current organizational configuration and start using the new capabilities
If you signed in to Security Hub using the AWS Organizations management account, you will be brought to step 1, Designate delegated administrator, where you will be able to designate a new delegated administrator or confirm your existing selection before continuing the setup. If you signed in to Security Hub using your existing delegated administrator account, you will be brought directly to step 2, Centralize organization, which is shown in Figure 2. In step 2, you are first asked to choose your home Region, which is the AWS Region you will use to create your configuration policies. By default, the current Region is selected as your home Region, unless you already use cross-Region finding aggregation — in which case, your existing aggregation Region is pre-selected as your home Region.
You are then prompted to select your linked Regions, which are the Regions you will configure by using central configuration. Regions that were already linked as part of your cross-Region aggregation settings will be pre-selected. You will also be able to add additional Regions or choose to include all AWS Regions, including future Regions. If your selection includes opt-in Regions, note that Security Hub will not be enabled in them until you enable those Regions directly.
Figure 2: The Centralize organization page
Step 3, Configure organization, is shown in Figure 3. You will see a recommendation that you use the AWS recommended Security Hub configuration policy (SHCP) across your entire organization. This includes enabling the AWS Foundational Security Best Practices (FSBP) v1.0.0 standard and enabling new and existing FSBP controls in accounts in your AWS Organizations structure. This is the recommended configuration for most customers, because the AWS FSBP have been carefully curated by AWS security experts and represent trusted security practices for customers to build on.
Alternatively, if you already have a custom configuration in Security Hub and would like to import it into the new capabilities, choose Customize my Security Hub configuration and then choose Pre-populate configuration.
Figure 3: Step 3 – creating your first policy
Step 4, Review and apply, is where you can review the policy you just created. Until you complete this step, your organization’s configuration will not be changed. This step will override previous account configurations and create and apply your new policy. After you choose Create policy and apply, you will be taken to the new Configuration page, which was previously shown in Figure 1. The user interface will now be updated to include three tabs — Organization, Policies, and Invitation account — where you can do the following:
On the Organization tab, which serves as a single pane of glass for your organization configuration in Security Hub, you can see the policy status for each account and OU and verify that your desired configuration is in effect.
On the Policies tab, you can view your policies, update them, and create new ones.
On the Invitation accounts tab, you can view and update findings for invitation accounts, which do not belong to your AWS Organizations structure. These accounts cannot be configured using the new central configuration capabilities.
Together, those tabs serve as a single pane of glass for your organization configuration in Security Hub. To that end, the organization chart you now see shows which of your accounts have already been affected by the policy you just created and which are still pending. Normally, an account will show as pending only for a few minutes after you create new policies or update existing ones. However, an account can stay in pending status for up to 24 hours. During this time, Security Hub will try to configure the account with your chosen policy settings.
If Security Hub determines that a policy cannot be successfully propagated to an account, it will show its status as failed (see Figure 4). This is most likely to happen when you missed completing the prerequisites in the account where the failure is showing. For example, if AWS Config is not yet enabled in an account, the policy will have a failed status. When you hover your pointer over the word “Failed”, Security Hub will show an error message with details about the issue. After you fix the error, you can try again to apply the policy by selecting the failed account and choosing the Re-apply policy button.
Figure 4: The Organization tab on the Configuration page shows all your organization accounts, if they are being managed by a policy, and the policy status for each account and OU
Flexibility in onboarding to central configuration
As mentioned earlier, central configuration makes it significantly more accessible for you to centrally manage Security Hub and its controls and standards. This feature also gives you the granularity to choose the specific accounts to which your chosen settings will be applied. Even though we recommend to use central configuration to configure all your accounts, one advantage of the feature is that you can initially create a test configuration and then apply it across your organization. This is especially useful when you have already configured Security Hub using previously available methods and you would like to check that you have successfully imported your existing configuration.
When you onboard to central configuration, accounts in the organization are self-managed by default, which means that they still maintain their previous configuration until you apply a policy to them, to one of their parent OUs, or to the entire organization. This gives you the option to create a test policy when you onboard, apply it only to a test account or OU, and check that you achieved your desired outcome before applying it to other accounts in the organization.
Configure and deploy different policies per OU
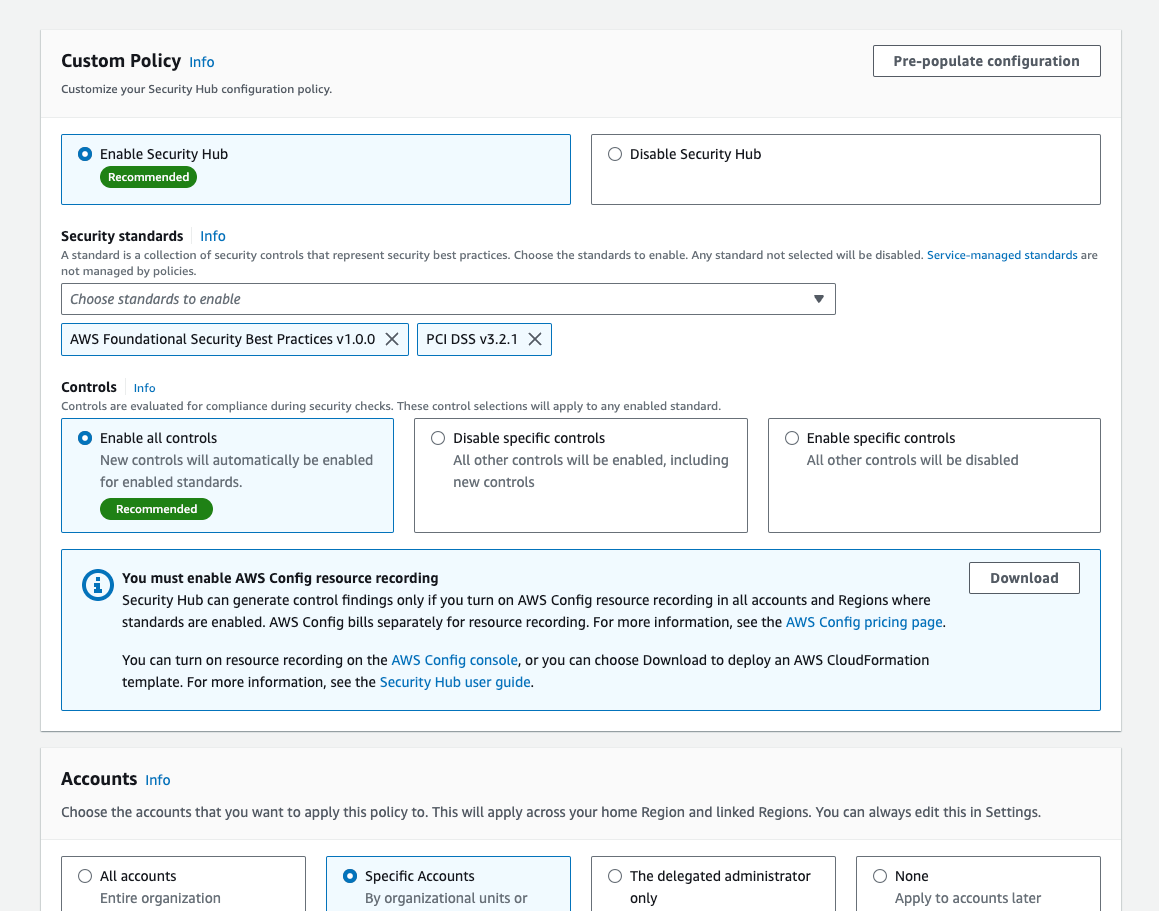
Although we recommend that you use the policy recommended by Security Hub whenever possible, every customer has a different environment and some customization might be required. Central configuration does not require you to use the recommended policy, and you can instead create your own custom policies that specify how Security Hub is used across organization accounts and Regions. You can create one configuration policy for your entire organization, or multiple policies to customize Security Hub settings in different accounts.
In addition, you might need to implement different policies per OU. For example, you might need to do that when you have a finance account or OU in which you want to use Payment Card Industry Data Security Standard (PCI DSS) v3.2.1. In this case, you can go to the Policies tab, choose Create policy, specify the configuration you’d like to have, and apply it to those specific OUs or accounts, as shown in Figure 5. Note that each policy must be complete — which means that it must contain the full configuration settings you would like to apply to the chosen set of accounts or OUs. In particular, an account cannot inherit part of its settings from a policy associated with a parent OU, and the other part from its own policy. The benefit of this requirement is that each policy serves as the source of truth for the configuration of the accounts it is applied to. For more information on this behavior or on how to create new policies, see the Security Hub documentation.
Figure 5: Creation of a new policy with the FSBP and the PCI DSS standards
You might find it necessary to exempt accounts from being centrally configured. You have the option to set an account or OU to self-managed status. Then only the account owner can configure the settings for that account. This is useful if your organization has teams that need to be able to set their own security coverage. Unless you disassociate self-managed accounts from your Security Hub organization, you will still see findings from self-managed accounts, giving you organization-wide visibility into your security posture. However, you won’t be able to view the configuration of those accounts, because they are not centrally managed.
Understand and manage where controls are applied
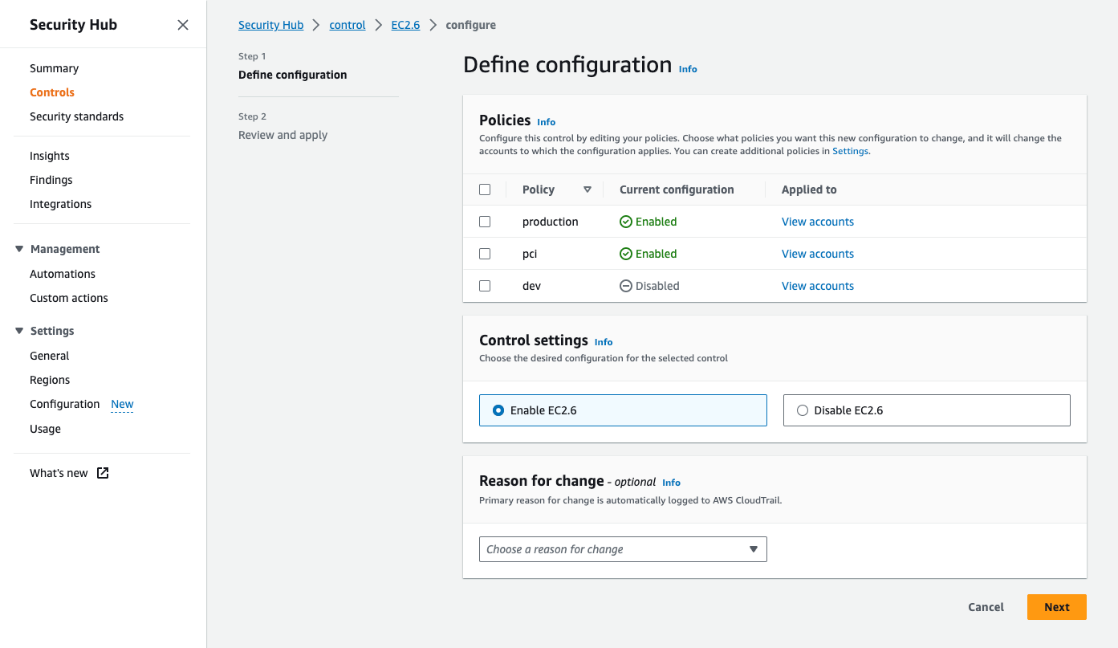
In addition to being able to centrally create and view your policies, you can use the control details page to define, review, and apply how policies are configured at a control level. To access the control details page, go to the left navigation menu in Security Hub, choose Controls, and then choose any individual control.
The control details page allows you to review the findings of a control in accounts where it is already enabled. Then, if you decide that these findings are not relevant to specific accounts and OUs, or if you decide that you want to use the control in additional accounts where it is not currently enabled, you can choose Configure, view the policies to which the control currently applies, and update the configuration accordingly as shown in Figure 6.
Figure 6: Configuring a control from the control details page
Organizational visibility
As you might already have noticed in the earlier screenshot of the Organization view (Figure 4), the new central configuration capability gives you a new view of the policies applied (and by extension, the controls and standards deployed) to each account and OU. If you need to customize this configuration, you can modify an existing policy or create a new policy to quickly apply to all or a subset of your accounts. At a glance, you can also see which accounts are self-managed or don’t have Security Hub turned on.
Conclusion
Security Hub central configuration helps you to seamlessly configure Security Hub and its controls and standards across your accounts and Regions so that your organization’s accounts have the level of security controls coverage that you want. AWS recommends that you use this feature when configuring, deploying, and managing controls in Security Hub across your organization’s accounts and Regions. Central configuration is now available in all commercial AWS Regions. Try it out today by visiting the new Configuration page in Security Hub from your DA. You can benefit from the Security Hub 30-day free trial even if you use central configuration, and the trial offer will be automatically applied to organization accounts in which you didn’t use Security Hub before.
If you have feedback about this post, submit comments in the Comments section below. If you have questions about this post, contact AWS Support.
Want more AWS Security news? Follow us on Twitter.
I am pleased to announce that IBM and AWS have come together to offer Amazon Relational Database Service (Amazon RDS) for Db2, a fully managed Db2 database engine running on AWS infrastructure.
IBM Db2 is an enterprise-grade relational database management system (RDBMS) developed by IBM. It offers a comprehensive set of features, including strong data processing capabilities, robust security mechanisms, scalability, and support for diverse data types. Db2 is a well-established choice among organizations for effectively managing data in various applications and handling data-intensive workloads due to its reliability and performance. Db2 has its roots in the pioneering work around data storage and structured query language (SQL) IBM has done since the 1970s. It has been commercially available since 1983, initially just for mainframes, and was later ported to Linux, Unix, and Windows platforms (LUW). Today, Db2 powers thousands of business-critical applications in all verticals.
With Amazon RDS for Db2, you can now create a Db2 database with just a few clicks in the AWS Management Console, one command to type with the AWS Command Line Interface (AWS CLI), or a few lines of code with the AWS SDKs. AWS takes care of the infrastructure heavy lifting, freeing your time for higher-level tasks such as schema and query optimizations for your applications.
If you are new to Amazon RDS or coming from an on-premises Db2 background, let me quickly recap the benefits of Amazon RDS.
Amazon RDS offers the same Db2 database as the one you use on-premises today. Your existing applications will reconnect to RDS for Db2 without changing their code.
The database runs on a fully managed infrastructure. You don’t have to provision servers, install the packages, install patches, or maintain the infrastructure in an operational state.
The database is also fully managed. We take care of the installation, minor version upgrades, daily backup, scaling, and high availability.
The infrastructure can scale up and down as required. You can simply stop and then restart the database to change the underlying hardware and meet changing performance requirements or benefit from last-generation hardware.
Amazon RDS offers a choice of storage types designed to deliver fast, predictable, and consistent I/O performance. For new or unpredictable workloads, you can configure the system to automatically scale your storage.
Amazon RDS automatically takes care of your backups, and you can restore them to a new database with just a few clicks.
Amazon RDS helps to deploy highly available architectures. Amazon RDS synchronously replicates data to a standby database in a different Availability Zone (an Availability Zone is a group of distinct data centers). When a failure is detected with a Multi-AZ deployment, Amazon RDS automatically fails over to the standby instance and routes requests without changing the database endpoint DNS name. This switch happens with minimal downtime and zero data loss.
You can migrate your existing on-premises Db2 database to Amazon RDS using native Db2 tools, such as restore and import, or AWS Database Migration Service (AWS DMS). AWS DMS allows you to migrate databases in a single operation or continuously, while your applications continue to update the data on the source database, until you decide on the cut off.
Let’s see how it works I always like to get my hands on a new service to learn how it works. Let’s create a Db2 database and connect to it using the standard tool provided by IBM. I assume most of you reading this post come from an IBM Db2 background and don’t know much about Amazon RDS.
First, I create a Db2 database. To do this, I navigate to the Amazon RDS page of the AWS Management Console and select Create database. For this demo, I’ll accept most of the default values. I’ll show you, however, all the sections and will comment on the important configuration points you have to think about.
I select Db2 from among the multiple database engines Amazon RDS offers.
I select Production. Amazon RDS will deploy a default configuration tuned for high availability and fast, consistent performance.
Under Settings, I give a name to my RDS instance (this is not the Db2 catalog name!), and I select the master username and password.
Under Instance configuration, I choose the type of node to run my database. This will define the hardware characteristics of the virtual server: the number of vCPUs, quantity of memory, and so on. Depending on the requirements of your application, you can allocate instances offering up to 32 vCPUs and 128 GiB of RAM for IBM Db2 Standard instances. When you select IBM Db2 Advanced instances, you can allocate instances offering up to 128 vCPUs and 1 TiB of RAM. This parameter has a direct impact on the price.
Under Storage, I choose the type of Amazon Elastic Block Store (Amazon EBS) volumes, their size, and their IOPS and throughput. For this demo, I accept the values proposed by default. This is also a set of parameters that directly impact the price.
Under Connectivity, I select the VPC (in AWS terms, a VPC is a private network) where the database will be deployed. Under Public access, I select No to make sure the database instance is only accessible from my private network. I can’t think of a (good) use case where you want to select Yes for this option.
This is also where you select the VPC security group. A security group is a network filter that defines what IP addresses or networks can access your database instance and on what TCP port. Be sure to select or create a security group with TCP 50000 open to allow applications to connect to your Db2 database.
I leave all other options with their default value. It is important to open the Additional configuration section at the very bottom of the page. This is where you can give an Initial database name. If you don’t name your Db2 database here, your only option will be to restore an existing Db2 database backup on that instance.
This section also contains the parameters for the Amazon RDS automatic backup. You can choose a time window and how long we will retain the backups.
I accept all the defaults and select Create database.
After a few minutes, you can see your database is available.
I select the DNS name of the database instance Endpoint, and I connect to a Linux machine running in the same network. After installing the Db2 client package that I downloaded from the IBM website, I type the following commands to connect to the database. There is nothing specific to Amazon RDS here.
db2 catalog TCPIP node blognode remote awsnewsblog-demo.abcdef.us-east-2.rds-preview.amazonaws.com server 50000
db2 catalog database NEWSBLOG as blogdb2 at node blognode authentication server_encrypt
db2 connect to blogdb2 user admin using MySuperPassword
Once connected, I download a sample dataset and script from the popular Db2Tutorial website. I run the scripts against the database I just created.
As you can see, there is nothing specific to Amazon RDS when it comes to connecting and using the database. I use standard Db2 tools and scripts.
One more thing Amazon RDS for Db2 requires you to bring your own Db2 license. You must enter your IBM customer ID and site number before starting a Db2 instance.
To do so, create a custom DB parameter group and attach it to your database instance at launch time. A DB parameter group acts as a container for engine configuration values that are applied to one or more DB instances. In a Db2 parameter group, there are two parameters specific to IBM Db2 licenses: your IBM Customer Number (rds.ibm_customer_id) and your IBM site number (rds.ibm_site_id).
If you do not know your site number, reach out to your IBM sales organization for a copy of a recent Proof-of-Entitlement (PoE), invoice, or sales order. All these documents should include your site number.
Pricing and availability Amazon RDS for Db2 is available in all AWS Regions except China and GovCloud.
Amazon RDS pricing is on demand, and there are no upfront costs or subscriptions. You only pay by the hour when the database is running, plus the GB per month of database storage provisioned and backup storage you use and the number of IOPS you provision. The Amazon RDS for Db2 pricing page has the details of pricing per Region. As I mentioned earlier, Amazon RDS for Db2 requires you to bring your own Db2 license.
If you already know Amazon RDS, you’ll be delighted to have a new database engine available for your application developers. If you’re coming from an on-premises world, you will love the simplicity and automation that Amazon RDS offers.
With Amazon Simple Queue Service (Amazon SQS), you can send, store, and receive messages between software components at any volume. Today, Amazon SQS has introduced two new capabilities for first-in, first-out (FIFO) queues:
Maximum throughput has been increased up to 70,000 transactions per second (TPS) per API action in selected AWS Regions, supporting sending or receiving up to 700,000 messages per second with batching.
Dead letter queue (DLQ) redrive support to handle messages that are not consumed after a specific number of retries in a way similar to what was already available for standard queues.
Let’s take a more in-depth look at how these work in practice.
FIFO queues throughput increase up to 70K TPS FIFO queues are designed for applications that require messages to be processed exactly once and in the order in which they are sent. While standard queues have an unlimited throughput, FIFO queues have an upper quota in the number of TPS per API action.
Standard and FIFO queues support batch actions that can send and receive up to 10 messages with a single API call (up to a maximum total payload of 256 KB). This means that a FIFO queue can process up to 10 times more messages per second than its maximum throughput.
At launch in 2016, FIFO queues supported up to 300 TPS per API action (3,000 messages per second with batching). This was enough for many use cases, but some customers asked for more throughput.
This year, Amazon SQS has already increased FIFO queue throughput quota two times, to up to 9,000 TPS per API action in August and up to 18,000 TPS per API action in October (depending on the Region).
Today, the Amazon SQS team has been able to increase the FIFO queue throughput quota again, allowing you to process up to 70,000 TPS per API action (up to 700,000 messages per second with batching) in the US East (N. Virginia), US West (Oregon), and Europe (Ireland) Regions. This is more than two hundred times the maximum throughput at launch.
DLQ redrive support for FIFO queues With Amazon SQS, messages that are not consumed after a specific number of retries can automatically be moved to a DLQ. There, messages can be analyzed to understand the reason why they have not been processed correctly. Sometimes there is a bug or a misconfiguration in the consumer application. Other times the messages contain invalid data from the source applications that needs to be fixed to allow the messages to be processed again.
Either way, you can define a plan to reprocess these messages. For example, you can fix the consumer application and redrive all messages to the source queue. Or you can create a dedicated queue where a custom application receives the messages, fixes their content, and then sends them to the source queue.
To simplify moving the messages back to the source queue or to a different queue, Amazon SQS allows you to create a redrive task. Redrive tasks are already available for standard queues. Starting today, you can also start a redrive task for FIFO queues.
Using the Amazon SQS console, I create a first queue (my-dlq.fifo) to be used as a DLQ. To redrive messages back to the source FIFO queue, the queue type must match, so this is also a FIFO queue.
Then, I create a source FIFO queue (my-source-queue.fifo) to handle messages as usual. When I create the source queue, I configure the first queue (my-dlq.fifo) as the DLQ and specify 3 as the Maximum receives condition under which messages are moved from the source queue to the DLQ.
When a message has been received by a consumer for more than the number of times specified by this condition, Amazon SQS moves the message to the DLQ. The original message ID is retained and can be used to uniquely track the message.
To test this setup, I use the console to send a message to the source queue. Then, I use the AWS Command Line Interface (AWS CLI) to receive the message multiple times without deleting it.
{
    "Messages": [
        {
            "MessageId": "ef2f1c72-4bfe-4093-a451-03fe2dbd4d0f",
            "ReceiptHandle": "...",
            "MD5OfBody": "0f445a578fbcb0c06ca8aeb90a36fcfb",
            "Body": "My important message."
        }
    ]
}
To receive the same message more than once, I wait for the time specified in the queue visibility timeout to pass (30 seconds by default).
After the third time, the message is not in the source queue because it has been moved to the DLQ. When I try to receive messages from the source queue, the list is empty.
In Redrive configuration, I choose to redrive the messages to the source queue. Optionally, I can specify another FIFO queue as a custom destination. I use System optimized in Velocity control settings to redrive messages with the maximum number of messages per second optimized by Amazon SQS. Optionally, if there is a large number of messages in the DLQ, I can configure a custom maximum rate of messages per second to avoid overloading consumers.
Before starting the redrive task, I can use the Inspect messages section to poll and check messages. I already decided what to do, so I choose DLQ redrive to start the task. I have only one message to process, so the redrive task completes very quickly.
As expected, the message is back in the source queue and is ready to be processed again.
Things to know Dead letter queue (DLQ) support for FIFO queues is available today in all AWS Regions where Amazon SQS is offered with the exception of GovCloud Regions and those based in China.
In the DLQ configuration, the maximum number of receives should be between 1 and 1,000.
There is no additional cost for using high throughput mode or a DLQ. Every Amazon SQS action counts as a request. A single request can send or receive from 1 to 10 messages, up to a maximum total payload of 256 KB. You pay based on the number of requests, and requests are priced differently between standard and FIFO queues.
As part of the AWS Free Tier, there is no cost for the first million requests per month for standard queues and for the first million requests per month for FIFO queues. For more information, see Amazon SQS pricing.
With these updates and the increased throughput, you can cover the vast majority of use cases with FIFO queues.
Amazon EBS Snapshots Archive in the AWS Backup console Snapshots Archive with AWS Backup is only available for snapshots with a backup frequency of one month or longer (28-day cron expression) and a retention of more than 90 days. This is a protective measure to ensure that you don’t archive snapshots, such as hourly snapshots that wouldn’t benefit from the transition to the cold tier.
The ability to archive Amazon EBS Snapshots is a new parameter of the Lifecycle section of the AWS Backup Plans. You must explicitly opt into moving your Amazon EBS Snapshots to cold storage, because this has different properties of our existing cold storage including:
Always converting an incremental backup to a full backup.
Longer recovery time objective (RTO) (up to 72 hours).
Limitations on the frequency of backups that can be transitioned to cold storage (monthly or greater).
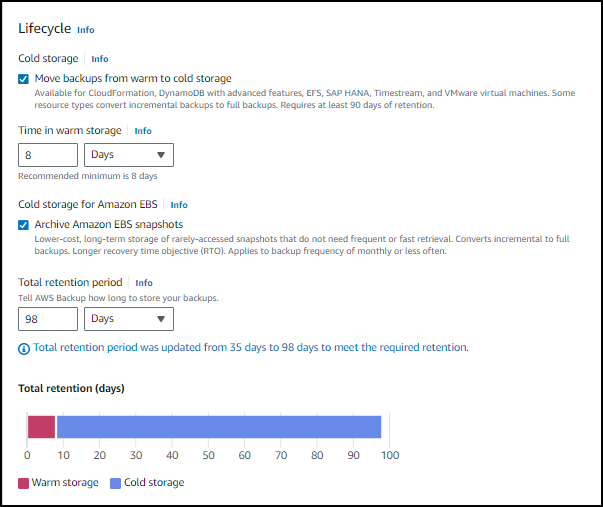
Time in warm storage indicates how long the backups will remain in warm storage before they are transitioned to cold storage. Total retention period is the total time the backups will be retained by AWS Backup, and its value is the sum of both warm and cold storage. For backups in cold storage, the minimum retention period is 90 days. This is why the default total retention is 98 days (8 days in warm + 90 days in cold). The bar graph shows the total retention of your backups and where the backups will reside during that time. In the example shown in this graph, 8 days is in warm storage (red bar), and 90 days is in cold storage (blue bar).
To restore or use the archived Amazon EBS snapshot today (outside of AWS Backup), you have to follow a two-step process:
Temporarily or permanently restore the snapshot from archive to standard tier.
Once it’s in standard tier, call the CreateVolumeAPI from the standard tier.
With this announcement, using either the AWS Backup console or the API to restore the archived Amazon EBS snapshot in AWS Backup, the following restore workflow applies:
Enter the number of days you want to temporarily restore your snapshot from cold to standard tier.
Choose your volume configuration.
The end result will be a restored EBS volume. You will not have to manually move the snapshot from cold to standard tier, then restore the volume, this will be done automatically for you.
Now available Amazon EBS Snapshots Archive with AWS Backup is available for you today in all AWS Regions except China and AWS GovCloud (US).
As usual, you pay as you go, with no minimum or fixed fees. There are two metrics that influence Amazon EBS Snapshots Archive billing: data storage and data retrieval. You are charged for a 90-day period at minimum. This means that if you delete a snapshot archive or permanently restore it less than 90 days after creation, then we charge for the full 90-day period. The AWS Backup pricing page has the details.
Replication failback – Failback support for EFS replication makes it easier and more cost-effective to synchronize changes between EFS file systems when performing disaster recovery (DR) workflows. You can now quickly replicate incremental changes from your secondary back to your primary file system after disaster events and other DR-related activities.
Increased IOPS – Amazon EFS now supports up to 250,000 read IOPS and up to 50,000 write IOPS per file system, making it easier to run more IOPS-heavy workloads at any scale for virtual servers, containers, and serverless functions that require shared storage.
Let’s see more in depth how these work in practice.
Introducing Amazon EFS replication failback With Amazon EFS replication, you can create a replica of your file system in the same or in another AWS Region. When replication is enabled, Amazon EFS automatically keeps the primary (source) and secondary (destination) file systems synchronized. To help you meet your compliance and business continuity goals, EFS replication is designed to provide a recovery point objective (RPO) and a recovery time objective (RTO) measured in minutes.
Now, with failback support, you can respond to disaster recovery (DR) events, conduct planned business continuity tests, and manage other DR-related activities with greater speed and cost efficiency. Failback support allows you to switch the direction of replication between the primary and secondary file systems. EFS replication keeps the two file systems in sync by copying only incremental changes, eliminating the need to make full copies of your data or use a self-managed, custom solution to complete a recovery workflow.
Using Amazon EFS replication failback I have a file system replicated to another Region. As part of a periodic DR test, I want to switch to using the secondary file system and then revert back to the primary file system, preserving all the changes made on the secondary file system. To do so, I can use EFS Replication failback in just a few steps.
First, I delete the replication from the primary (source) to the secondary (destination) file system. After this, the secondary file system becomes writable. To do so, in the Amazon EFS console, I check I am in the correct Region and select the secondary file system. In the Replication tab, I choose Delete replication and confirm deletion. I can also start from the primary file system. In that case, the Delete replication link in the Replication tab opens a new browser tab and asks to confirm deletion like before.
I can now use the secondary file system and change its data as needed.
To go back to using the primary file system, I create a “reverse replication” from the secondary to the primary file system. To do so, I check I am in the correct Region and select the secondary file system. In the Replication tab, I choose Create replication and the new option Replicate to existing file system. Then, I select the Region of the primary file system and use the console to browse the EFS file systems in that Region and choose the primary one.
The console warns me that Replication overwrite protection is enabled for the primary file system. I follow the Disable protection link to open a new browser tab and edit the primary file system to disable replication overwrite protection.
Now, I go back to the browser tab where I am creating the failback replication from the secondary to the primary file system. I refresh the protection check and choose to create the replication.
In the following dialog, I confirm that I want Amazon EFS to write to the primary file system.
To know when the primary file system is back in sync, I check the Last synced timestamp in the Replication tab, which indicates that all changes made to the source file system before that time are replicated to the destination. Optionally, I can look at the TimeSinceLastSync metric (expressed in minutes) in Amazon CloudWatch to understand how data is being replicated.
When the primary file system is back in sync, I delete the replication from the secondary to the primary file system. To complete the restore of the original configuration, I again create the replication from the primary to the secondary file system.
Increased IOPS per file system The Amazon EFS team has been able to increase IOPS again! The last time they did it was just a few months back. Starting today, an EFS file system can handle up to 50,000 write IOPS (a 2x improvement) and up to 250,000 read IOPS (a 4.5x improvement) when working with frequently-accessed data from a high-performance cache managed by Amazon EFS.
You can monitor the percentage utilization of your file system’s available IOPS using the PercentIOLimit CloudWatch metric. This metric considers the maximum IOPS for writes and uncached reads, including combinations of the two. Reads from the cache are not included in the PercentIOLimit metric.
With these performance improvements, you can run even more IOPS-demanding workloads on Amazon EFS, such as machine learning (ML) training, fine-tuning, and inference. Other use cases that can benefit from the increased IOPS are data science user shares, SaaS applications, and media processing.
Things to know EFS replication failback is available in all AWS Regions where EFS is available. There are no additional costs for using replication failback. You pay for the usual replication and file system changes as described in Amazon EFS pricing.
The increased IOPS limits are immediately available for all file systems using the Elastic Throughput mode in all Regions where EFS is available. You don’t need to do anything to benefit from these performance improvements. To achieve the maximum IOPS, your application needs sufficient parallelization. For example, using multiple clients and distributing the load across a large number of files. For more information, see the performance tips in the user guide.
Today, we added to AWS Control Tower a set of 65 purpose-built controls to help you meet your digital sovereignty requirements.
Digital sovereignty is the control of your digital assets: where the data resides, where it flows, and who has control over it. Since the creation of the AWS Cloud 17 years ago, we have been committed to giving you control over your data.
In November last year, we launched the AWS Digital Sovereignty Pledge, our commitment to offering all AWS customers the most advanced set of sovereignty controls and features available in the cloud. Since then, we have announced several steps in that direction. The AWS Nitro Systemhas been validated by an independent third party to confirm that it contains no mechanism that allows anyone at AWS to access your data on AWS hosts. We launched AWS Dedicated Local Zones, a piece of infrastructure that is fully managed by AWS and built for exclusive use by a customer or community and placed in a customer-specified location or data center. And more recently, we announced the construction of a new independent sovereign Region in Europe.
The introduction of AWS Control Tower controls that support digital sovereignty is an additional step in our roadmap of capabilities for data residency, granular access restriction, encryption, and resilience.
AWS Control Tower offers a simple and efficient way to set up and govern a secure, multi-account AWS environment. It establishes a landing zone that is based on best-practices blueprints, and it enables governance using controls you can choose from a prepackaged list. The landing zone is a well-architected, multi-account baseline that follows AWS best practices. Controls implement governance rules for security, compliance, and operations.
The level of control required for digital assets greatly varies across industries and countries. Customers operating in highly regulated sectors might have the obligation to keep their data in a specific country or region, such as the European Union. Others might have obligations related to data encryption and where the encryption keys are kept, and so on. Furthermore, digital sovereignty requirements evolve rapidly, making it challenging to define and implement all the required controls. Many customers have told us they are concerned that they will have to choose between the full power of AWS and a feature-limited sovereign cloud solution that could hamper their ability to innovate, transform, and grow. We firmly believe that you shouldn’t have to make this choice.
AWS Control Tower helps reduce the time it takes to define, implement, and manage controls required to govern where your data is stored, transferred, and processed at scale.
AWS Control Tower offers you a consolidated view of the controls enabled, your compliance status, and controls evidence across your multiple accounts. This information is available on the console and by calling our APIs. As requirements and AWS services evolve, AWS Control Tower provides you with updated controls to help you continually manage your digital sovereignty needs.
Here are a couple of examples of the controls we added:
Encryption at rest and in transit, including advanced key management strategies – Require an EC2 instance to use an AWS Nitro instance type that supports encryption in-transit between instances when created using the AWS::EC2::Instance resource type. It also requires that an Amazon Relational Database Service (Amazon RDS) database instance has encryption at rest configured to use an AWS KMS key that you specify for supported engine types.
One of the technical mechanisms AWS Control Tower uses to prevent accidental data storage or flow in a Region is the Region deny control. This parameter allows system administrators to deny access to AWS services and operations in selected AWS Regions. Until today, Region deny control could only be applied for an entire landing zone and all its organizational units (OUs) and accounts. With this launch, you can configure a new Region deny control at the organizational unit level and select the services and IAM principals to allow based on your unique business needs.
Let’s see how to get started For this demo, let’s imagine that I want to restrict access to AWS services in a set of Regions.
I locate and select the control I want to enable: Deny access to AWS based on the requested AWS Region for an organizational unit. There is a description of the control and a list of frameworks it applies to (NIST 800 and PCI DSS). I select Enable control.
On the next page, I select the Organizational units (OU) for which I want to enable this control.
I select the AWS Regions where I will allow access. All Regions left unchecked will have their access denied once the control is enforced.
Then, I review the service control policy (SCP). It contains a Deny statement to prevent access to the services or APIs listed. Optionally, I can add NotActions. This is a list of exceptions. The services or APIs listed under NotActions are authorized. In this example, I deny everything excepted three APIs: sqs:SendMessage, ec2:StartInstances, and s3:GetObject.
On the last page, I add a list of IAM principals (users or roles) that will be exempted from the control. This is an exception list. I also tag my control as usual with AWS resources.
On the last screen (not shown here), I review all my parameters and select Enable control.
I can verify the list of OU for which the control is enabled under the OUs enabled tab.
The summary page shows all Regions, APIs, and IAM principals enabled for this OU. All the rest is denied. I can update the parameters at any time.
Pricing and availability AWS Control Tower is available in all commercial Regions and in US GovCloud.
There is no additional charge to use AWS Control Tower. However, when you set up AWS Control Tower, you will begin to incur costs for AWS services configured to set up your landing zone and mandatory controls.
The new AWS Control Tower controls alleviate the burden of identifying and deploying safeguards to meet your digital sovereignty requirements. This set of controls is fully managed, and we will update them as AWS services and digital sovereignty requirements evolve over time.
We have added a set of diagnostic tools that will give participants in the AWS Partner-Led Support program access to diagnostic tools that will empower them to do an even better job of supporting their customers.
Intro to AWS Partner-Led Support This AWS Partner Network (APN) program enables AWS Partners to act as the customer’s sole point of contact for technical support. Customers contact their support partner for technical assistance instead of directly contacting AWS. In many cases the partner can resolve the issue directly. If the partner cannot do this, they get guidance from AWS via their AWS Support plan.
Diagnostic tools These are the same tools that AWS Support Engineers use to assist AWS customers.
When a customer contacts their partner for support, the partner will federate into the customer’s AWS account. Then they will use the new diagnostic tools to access the customer metadata that will help them to identify and diagnose the issue.
The tools are enabled by a set of IAM roles set up by the customer. The tools can access and organize metadata and CloudWatch metrics, but they cannot access customer data and they cannot make any changes to any of the customer’s AWS resources. Here is a small sample of the types of information that partners will be able to access:
EC2 Capacity Reservations
Lambda Functions List
GuardDuty Findings
Load Balancer Responses
RDS and Redshift Clusters
Each tool operates on a list of regions selected when the tool is run, all invocations of each tool are logged and are easily accessible for review, and the output from each invocation can be directed to one of several different regions.
The tools can be invoked from the AWS Management Console, with API access available in order to support in-house tools, automation, and integration.
Learn more
The service is available today for partners that have joined the Partner-Led Support program. For more information, see the AWS Partner Led Support page.
If you are a current AWS Partner and would like to learn more about this program with an eye toward qualifying and participating, please visit AWS Partner Central.
Today we’re launching AWS B2B Data Interchange, a fully managed service allowing organizations to automate and monitor the transformation of EDI-based business-critical transactions at cloud scale. With this launch, AWS brings automation, monitoring, elasticity, and pay-as-you-go pricing to the world of B2B document exchange.
Electronic data interchange (EDI) is the electronic exchange of business documents in a standard electronic format between business partners. While email is also an electronic approach, the documents exchanged via email must still be handled by people rather than computer systems. Having people involved slows down the processing of the documents and also introduces errors. Instead, EDI documents can flow straight through to the appropriate application on the receiver’s system, and processing can begin immediately. Electronic documents exchanged between computer systems help businesses reduce cost, accelerate transactional workflows, reduce errors, and improve relationships with business partners.
Work on EDI started in the 1970s. I remember reading a thesis about EDIFACT, a set of standards defining the structure of business documents, back in 1994. But despite being a more than 50-year-old technology, traditional self-managed EDI solutions deployed to parse, validate, map, and translate data from business applications to EDI data formats are difficult to scale as the volume of business changes. They typically do not provide much operational visibility into communication and content errors. These challenges often oblige businesses to fall back to error-prone email document exchanges, leading to high manual work, increased difficulty controlling compliance, and ultimately constraining growth and agility.
AWS B2B Data Interchange is a fully managed, easy-to-use, and cost-effective service for accelerating your data transformations and integrations. It eliminates the heavy lifting of establishing connections with your business partners and mapping the documents to your system’s data-formats and gives visibility on documents that can’t be processed.
It provides a low-code interface for business partner onboarding and EDI data transformation to easily import the processed data to your business applications and analytics solutions. B2B Data Interchange gives you easy access to monitoring data, allowing you to build dashboards to monitor the volume of documents exchanged and the status of each document transformation. For example, it is easy to create alarms when incorrectly formatted documents can’t be transformed or imported into your business applications.
It is common for large enterprises to have thousands of business partners and hundreds of types of documents exchanged with each partner, leading to millions of combinations to manage. AWS B2B Data Interchange is not only available through the AWS Management Console, it is also accessible with the AWS Command Line Interface (AWS CLI) and AWS SDKs. This allows you to write applications or scripts to onboard new business partners and their specific data transformations and to programmatically add alarms and monitoring logic to new or existing dashboards.
B2B Data Interchange supports the X12 EDI data format. It makes it easier to validate and transform EDI documents to the formats expected by your business applications, such as JSON or XML. The raw documents and the transformed JSON or XML files are stored on Amazon Simple Storage Service (Amazon S3). This allows you to build event-driven applications for real-time business data processing or to integrate business documents with your existing analytics or AI/ML solutions.
For example, when you receive a new EDI business document, you can trigger additional routing, processing, and transformation logic using AWS Step Functions or Amazon EventBridge. When an error is detected in an incoming document, you can configure the sending of alarm messages by email or SMS or trigger an API call or additional processing logic using AWS Lambda.
Let’s see how it works As usual on this blog, let me show you how it works. Let’s imagine I am in charge of the supply chain for a large retail company, and I have hundreds of business partners to exchange documents such as bills of lading, customs documents, advanced shipment notices, invoices, or receiving advice certificates.
In this demo, I use the AWS Management Console to onboard a new business partner. By onboarding, I mean defining the contact details of the business partner, the type of documents I will exchange with them, the technical data transformation to the JSON formats expected by my existing business apps, and where to receive the documents.
With this launch, the configuration of the transport mechanism for the EDI document is managed outside B2B Data Interchange. Typically, you will configure a transfer gateway and propose that your business partner transfer the document using SFTP or AS2.
There are no servers to manage or application packages to install and configure. I can get started in just four steps.
First, I create a profile for my business partner.
Second, I create a transformer. A transformer defines the source document format and the mapping to my existing business application data format: JSON or XML. I can use the graphical editor to validate a sample document and see the result of the transformation directly from the console. We use the standard JSONATA query and transformation language to define the transformation logic to JSON documents and standard XSLT when transforming to XML documents.
I activate the transformer once created.
Third, I create a trading capability. This defines which Amazon Simple Storage Service (Amazon S3) buckets will receive the documents from a specific business partner and where the transformed data will be stored.
There is a one-time additional configuration to make sure proper permissions are defined on the S3 bucket policy. I select Copy policy and navigate to the Amazon S3 page of the console to apply the policies to the S3 bucket. One policy allows B2B Data Interchange to read from the incoming bucket, and one policy allows it to write to your outgoing bucket.
While I am configuring the S3 bucket, it is also important to turn on Amazon EventBridge on the S3 bucket. This is the mechanism we use to trigger the data transformation upon the arrival of a new business document.
Finally, back at the B2B Data Interchange configuration, I create a partnership. Partnerships are dedicated resources that establish a relationship between you and your individual trading partners. Partnerships contain details about a specific trading partner, the types of EDI documents you receive from them, and how those documents should be transformed into custom JSON or XML formats. A partnership links the business profile I created in the first step with one or multiple document types and transformations I defined in step two.
This is also where I can monitor the status of the last set of documents I received and the status of their transformation. For more historical data, you can navigate to Amazon CloudWatch using the links provided in the console.
To test my setup, I upload an EDI 214 document to the incoming bucket and a few seconds later, I can see the transformed JSON document appearing in the destination bucket.
I can observe the status of document processing and transformation using Invocations and TriggeredRules CloudWatch metrics from EventBridge. From there, together with the CloudWatch Logs, I can build dashboards and configure alarms as usual. I can also configure additional enrichment, routing, and processing of the incoming or transformed business documents by writing an AWS Lambda function or a workflow using AWS Step Functions.
Pricing and availability AWS B2B Data Interchange is available today in three of the AWS Regions: US East (Ohio, N. Virginia) and US West (Oregon).
There is no one-time setup fee or recurring monthly subscription. AWS charges you on demand based on your real usage. There is a price per partnership per month and a price per document transformed. The B2B Data Interchange pricing page has the details.
AWS B2B Data Interchange makes it easy to manage your trading partner relationships so you can automatically exchange, transform, and monitor EDI workflows at cloud scale. It doesn’t require you to install or manage any infrastructure and makes it easy for you to integrate with your existing business applications and systems. You can use the AWS B2B Data Interchange API or the AWS SDK to automate the onboarding of your partners. Combined with a fully managed and scalable infrastructure, AWS B2B Data Interchange helps your business to be more agile and scale your operations.
Performing automatic game day testing of all your critical resources is an important step in determining that you are prepared to respond to ransomware or any data loss event. This gives you the opportunity to take appropriate corrective actions based on the results and monitor results such as success or failure from these tests. Ultimately, you will be able to ascertain if the restore times meet your expected organization’s recovery time objective (RTO) goals, helping you develop improved recovery strategies.
Today, we’re announcing restore testing, a new capability in AWS Backup that allows you to perform restore testing of your AWS resources across storage, compute, and databases. With this feature, you can automate the entire restore testing process and avoid surprises later by determining now whether you can successfully recover using your backups in the event of a data loss such as ransomware. As an additional option, to demonstrate compliance with your organizational and regulatory data governance requirements, you can use the restore job results.
Earlier, I created EC2 instances and a backup of these instances. Then, I created my restore testing plan in the AWS Backup console.
In this General section, I enter the name of the plan, a test frequency, a Start time, and a Start within. Start time sets the time for the test to begin, for example, if you have a daily test frequency set, you specify what time the plan will run each day. Start within is the period of time in which the restore test is designated to begin. AWS Backup makes a best effort to commence all designated restore jobs during the Start within time window. You have a choice to keep this very minimal or very large based on your preference.
In the Recovery point selection section, I specify the vaults that the recovery points should come from, and a timeframe of eligible recovery points as part of this restore testing plan. I left the criteria for a recovery point at the default selection. I also didn’t opt to include recovery points generated by point-in-time recovery (PITR) in this restore testing plan.
Tagging is optional so for the purposes of this test I didn’t add a tag. I was then finished with setup, and it was time for me to choose Create restore testing plan to proceed with creating this restore testing plan.
Once the restore testing plan has been created, it is time to assign resources. I start by specifying the IAM role that AWS Backup will assume when running the restore test. In terms of retention period before cleanup, I kept the default selection of deleting the restored resources immediately, to optimize costs. Alternatively, by specifying a retention period I could have also configured to integrate my own tests (for example, AWS Lambda) using Amazon EventBridge (CloudWatch Events) and send back validation status using the new PutRestoreValidationResultAPI so that it is reported in the restore job.
I have EC2 instances that I created and backed up earlier, and I specify that this plan is for Amazon EC2 resource types. I include all protected resources of this EC2 resource type in the selection scope. I have very few resources, so I didn’t add the optional tags.
I opted to use the default instance type for the restore. I also didn’t specify any additional parameters. It’s then time to choose Assign resources.
Once the resources have been assigned, all information related to the restore testing plan will be presented in a summarized form where you’ll be able to see when the restore testing jobs have executed.
Once I have enough restores performed over time, I can also view the Restore time history for every resource restored from the Protectedresources tab.
Now available Restore testing in AWS Backup is available in all AWS Regions where AWS Backup is available except AWS China Regions, AWS GovCloud (US), and Israel (Tel Aviv). To learn more, visit the AWS Backup user guide. You can submit your questions to AWS re:Post for AWS Backup or through your usual AWS Support contacts.
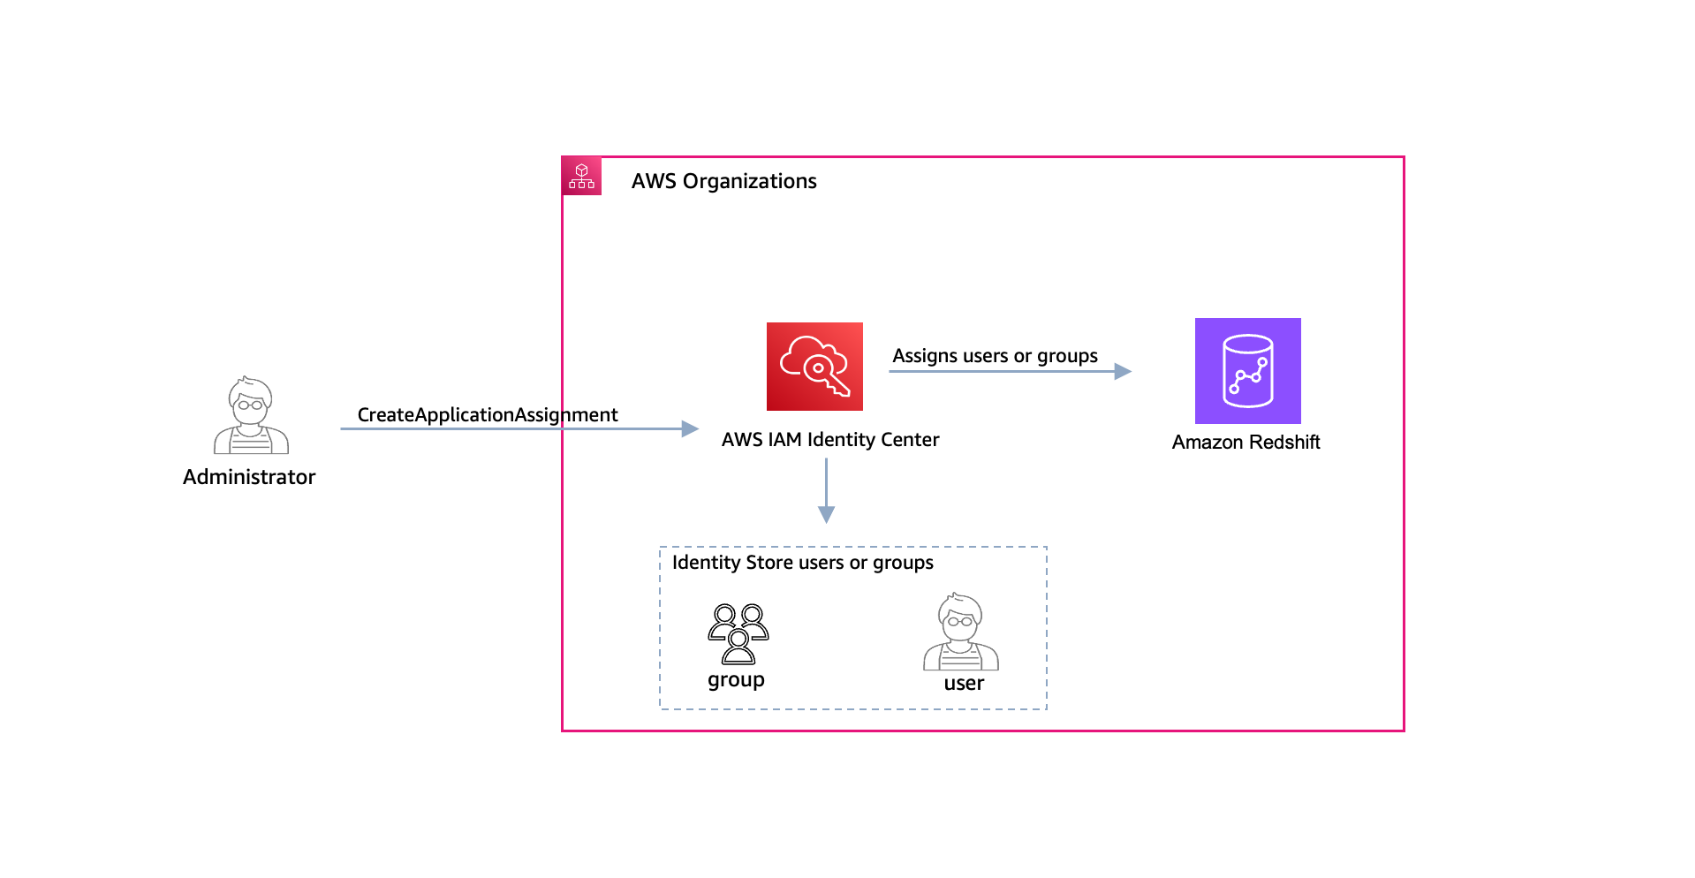
You can now use AWS IAM Identity Center application assignment APIs to programmatically manage and audit user and group access to AWS managed applications. Previously, you had to use the IAM Identity Center console to manually assign users and groups to an application. Now, you can automate this task so that you scale more effectively as your organization grows.
In this post, we will show you how to use IAM Identity Center APIs to programmatically manage and audit user and group access to applications. The procedures that we share apply to both organization instances and account instances of IAM Identity Center.
Automate management of user and group assignment to applications
IAM Identity Center is where you create, or connect, your workforce users one time and centrally manage their access to multiple AWS accounts and applications. You configure AWS managed applications to work with IAM Identity Center directly from within the relevant application console, and then manage which users or groups need permissions to the application.
AWS managed applications access user and group information directly from IAM Identity Center. One example of an AWS managed application is Amazon Redshift. When you configure Amazon Redshift as an AWS managed application with IAM Identity Center, and a user from your organization accesses the database, their group memberships defined in IAM Identity Center can map to Amazon Redshift database roles that grant them specific permissions. This makes it simpler for you to manage users because you don’t have to set database-object permissions for each individual. For more information, see The benefits of Redshift integration with AWS IAM Identity Center.
After you configure the integration between IAM Identity Center and Amazon Redshift, you can automate the assignment or removal of users and groups by using the DeleteApplicationAssignment and CreateApplicationAssignment APIs, as shown in Figure 1.
Figure 1: Use the CreateApplicationAssignment API to assign users and groups to Amazon Redshift
In this section, you will learn how to use Identity Center APIs to assign a group to your Amazon Redshift application. You will also learn how to delete the group assignment.
Prerequisites
To follow along with this walkthrough, make sure that you’ve completed the following prerequisites:
Configure Amazon Redshift to use IAM Identity Center as its identity source. When you configure Amazon Redshift to use IAM Identity Center as its identity source, the application requires explicit assignment by default. This means that you must explicitly assign users to the application in the Identity Center console or APIs.
Take note of the IdentityStoreId and the InstanceArn — you will use both in the following steps.
Step 2: Create user and group in your Identity Store
The next step is to create a user and group in your Identity Store.
Note: If you already have a group in your Identity Center instance, get its GroupId and then proceed to Step 3. To get your GroupId, run the following command:
If you have more than one application in your environment, use the filter flag to specify the application account or the application provider. To learn more about the filter option, see the ListApplications API documentation.
In this case, we have only one application: Amazon Redshift. The response should look similar to the following. Take note of the ApplicationArn — you will need it in the next step.
Step 4: Add your group to the Amazon Redshift application
Now you can add your new group to the Amazon Redshift application managed by IAM Identity Center. The principal-id is the GroupId that you created in Step 2.
The group now has access to Amazon Redshift, but with the default permissions in Amazon Redshift. To grant access to databases, you can create roles that control the permissions available on a set of tables or views.
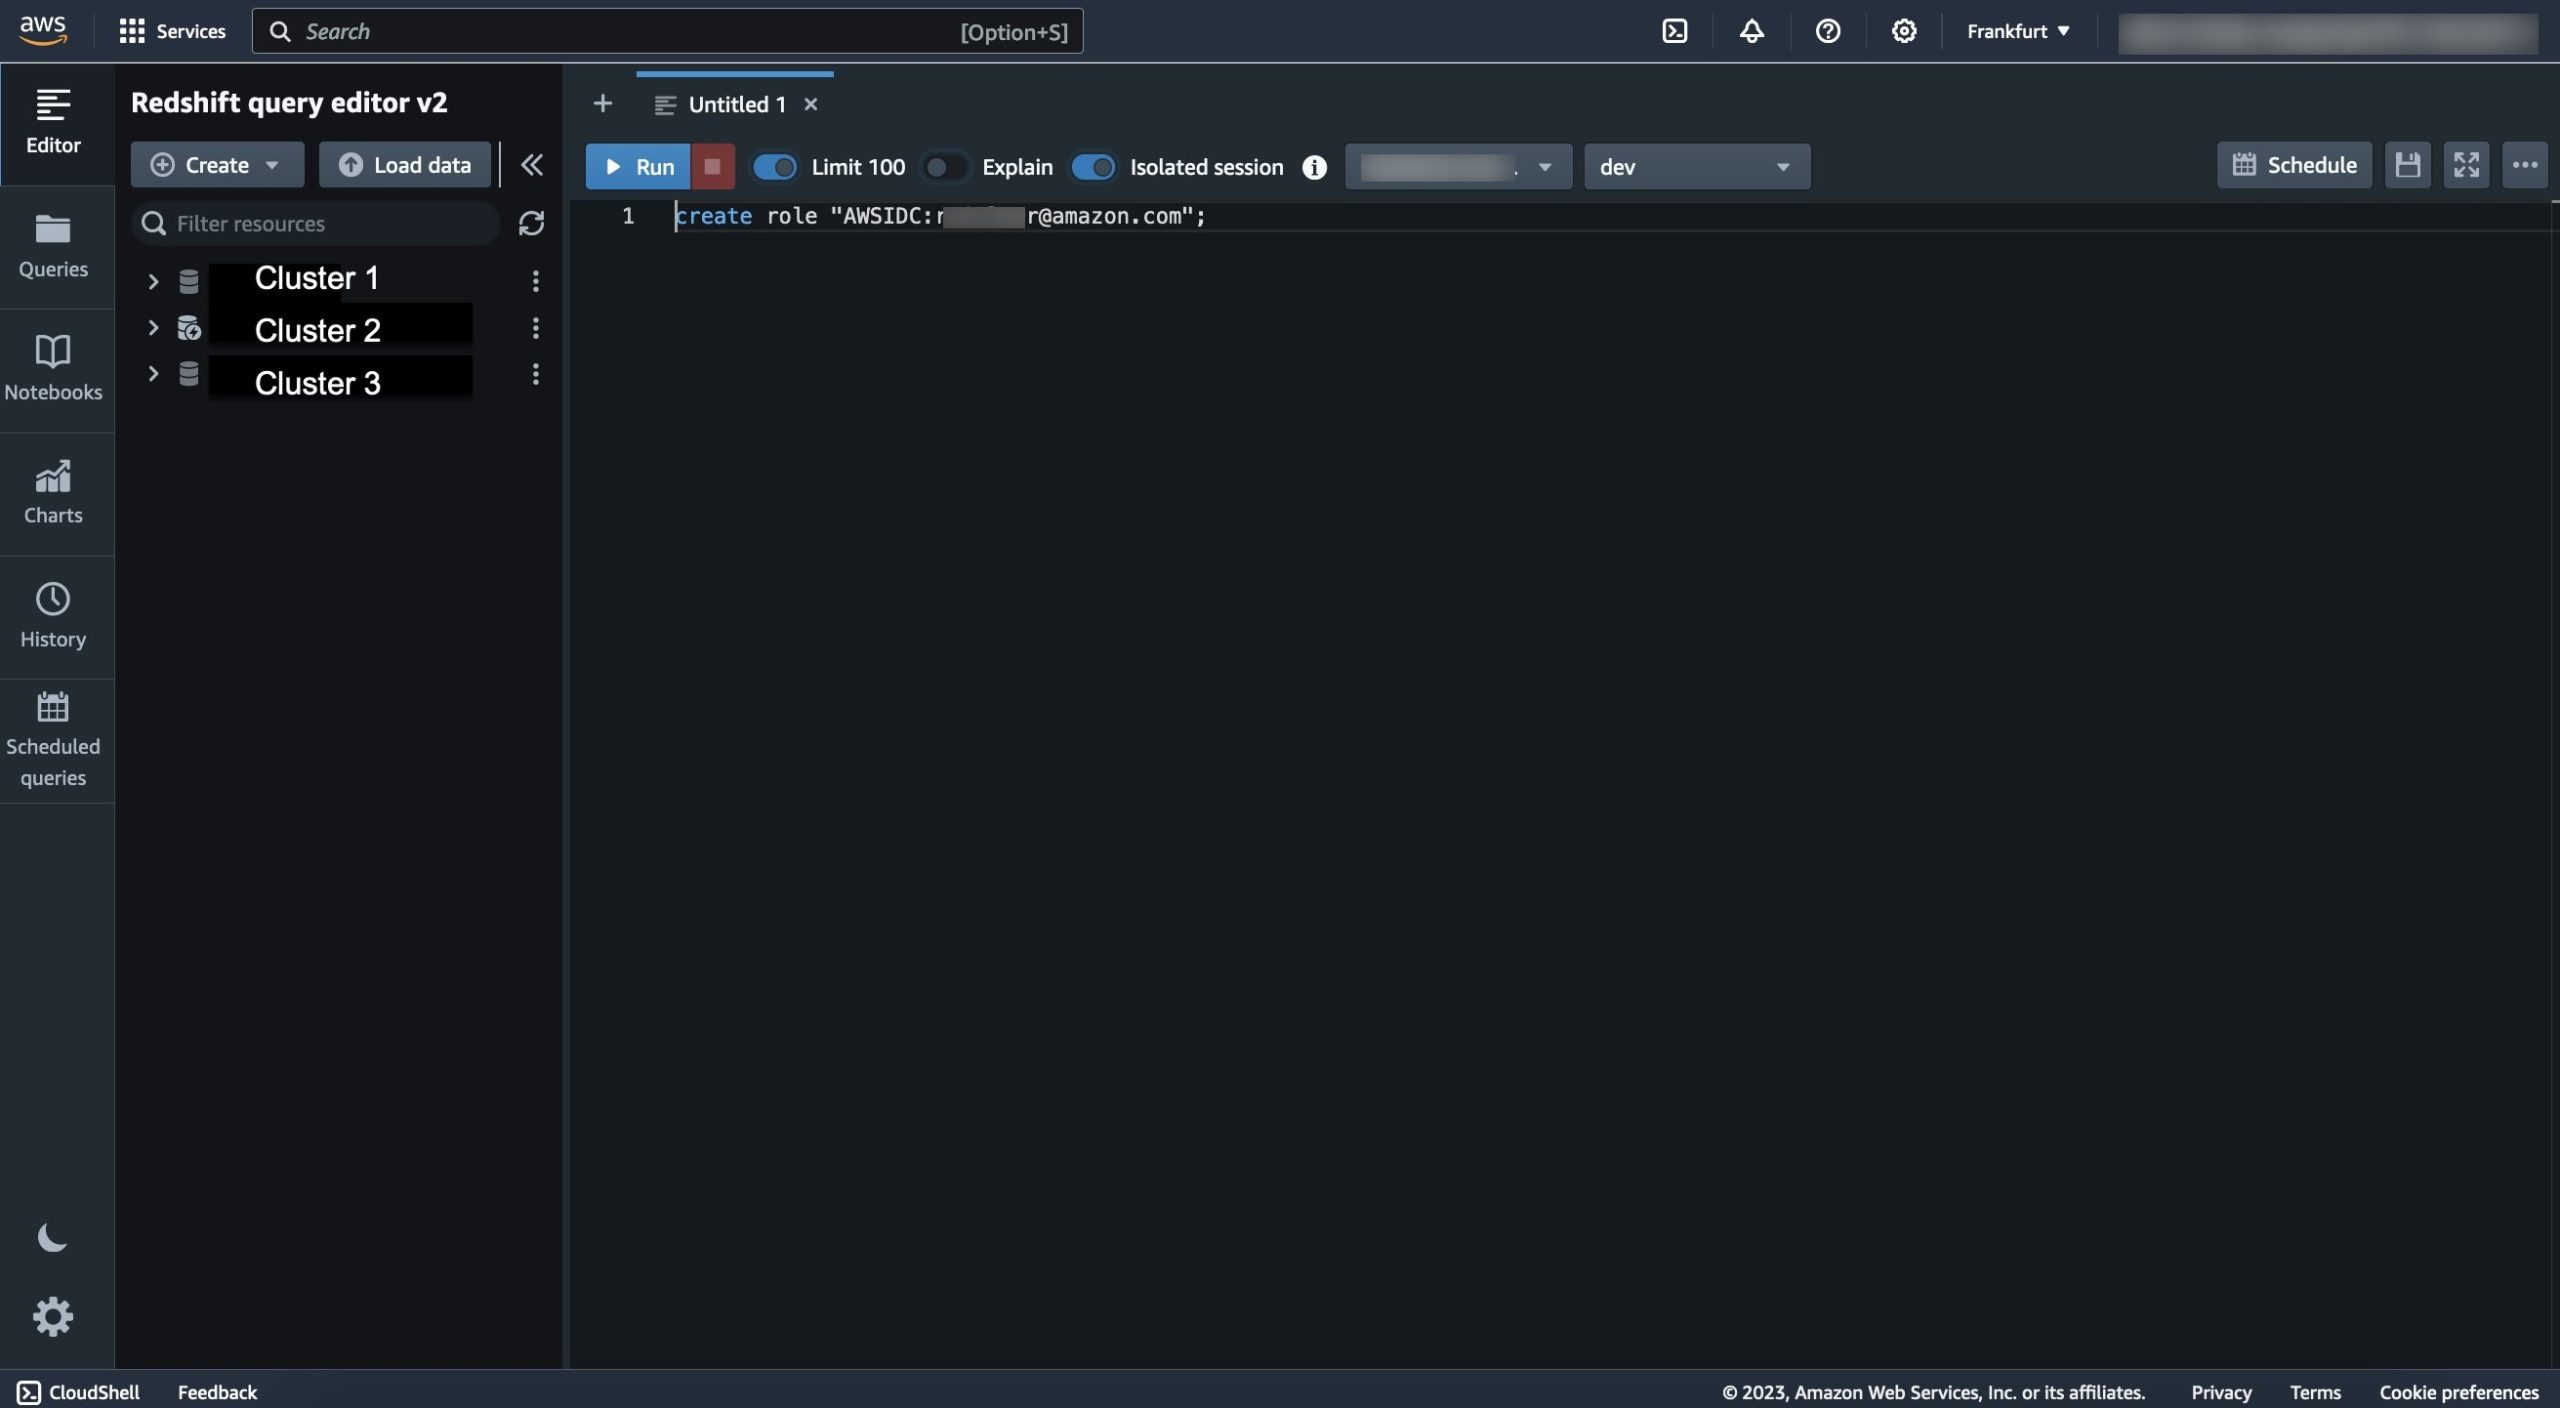
To create these roles in Amazon Redshift, you need to connect to your cluster and run SQL commands. To connect to your cluster, use one of the following options:
Figure 2 shows a connection to Amazon Redshift through the query editor v2.
Figure 2: Query editor v2
By default, all users have CREATE and USAGE permissions on the PUBLIC schema of a database. To disallow users from creating objects in the PUBLIC schema of a database, use the REVOKE command to remove that permission. For more information, see Default database user permissions.
As the Amazon Redshift database administrator, you can create roles where the role name contains the identity provider namespace prefix and the group or user name. To do this, use the following syntax:
CREATE ROLE <identitycenternamespace:rolename>;
The rolename needs to match the group name in IAM Identity Center. Amazon Redshift automatically maps the IAM Identity Center group or user to the role created previously. To expand the permissions of a user, use the GRANT command.
The identityprovidernamespace is assigned when you create the integration between Amazon Redshift and IAM Identity Center. It represents your organization’s name and is added as a prefix to your IAM Identity Center managed users and roles in the Redshift database.
Your syntax should look like the following:
CREATE ROLE <AWSIdentityCenter:MyGroup>;
Step 5: Remove application assignment
If you decide that the new group no longer needs access to the Amazon Redshift application but should remain within the IAM Identity Center instance, run the following command:
Note: Removing an application assignment for a group doesn’t remove the group from your Identity Center instance.
When you remove or add user assignments, we recommend that you review the application’s documentation because you might need to take additional steps to completely onboard or offboard a given user or group. For example, when you remove a user or group assignment, you must also remove the corresponding roles in Amazon Redshift. You can do this by using the DROP ROLE command. For more information, see Managing database security.
Audit user and group access to applications
Let’s consider how you can use the new APIs to help you audit application assignments. In the preceding example, you used the AWS CLI to create and delete assignments to Amazon Redshift. Now, we will show you how to use the new ListApplicationAssignments API to list the groups that are currently assigned to your Amazon Redshift application.
To see the group membership, use the PrincipalId information to query Identity Store and get information on the users assigned to the group with a combination of the ListGroupMemberships and DescribeGroupMembership APIs.
If you have several applications that IAM Identity Center manages, you can also create a script to automatically audit those applications. You can run this script periodically in an AWS Lambda function in your environment to maintain oversight of the members that are added to each application.
To get the script for this use case, see the multiple-instance-management-iam-identity-center GitHub repository. The repository includes instructions to deploy the script using Lambda within the AWS Organizations delegated administrator account. After deployment, you can invoke the Lambda function to get .csv files of every IAM Identity Center instance in your organization, the applications assigned to each instance, and the users that have access to those applications.
Conclusion
In this post, you learned how to use the IAM Identity Center application assignment APIs to assign users to Amazon Redshift and remove them from the application when they are no longer part of the organization. You also learned to list which applications are deployed in each account, and which users are assigned to each of those applications.
If you have feedback about this post, submit comments in the Comments section below. If you have questions about this post, start a new thread on AWS IAM Identity Center re:Post or contact AWS Support.
Want more AWS Security news? Follow us on Twitter.
Forrester has recognized Cloudflare as a leader in The Forrester Wave™: Edge Development Platforms, Q4 2023 with the top score in the current offering category.
According to the report by Principal Analyst, Devin Dickerson, “Cloudflare’s edge development platform provides the building blocks enterprises need to create full stack distributed applications and enables developers to take advantage of a globally distributed network of compute, storage and programmable security without being experts on CAP theorem.“
Over one million developers are building applications using the Developer Platform products including Workers, Pages, R2, KV, Queues, Durable Objects, D1, Stream, Images, and more. Developers can easily deploy highly distributed, full-stack applications using Cloudflare’s full suite of compute, storage, and developer services.
Workers make Cloudflare’s network programmable
“ A key strength of the platform is the interoperability with Cloudflare’s programmable global CDN combined with a deployment model that leverages intelligent workload placement.” – The Forrester Wave™: Edge Development Platforms, Q4 2023
Workers run across Cloudflare’s global network, provide APIs to read from and write directly to the local cache, and expose context from Cloudflare’s CDN directly on the request object that a Worker receives.
This close integration with Cloudflare’s network allows developers to build, protect, and connect globally distributed applications, without deploying to specific regions. Smart Placement optimizes Workers to run in the location that yields the fastest overall performance, whether it’s the location closest to the data, or closest to the user. Hyperdrive automatically pools database connections, allowing Workers running all over the world to reuse them when querying PostgreSQL databases, avoiding the scaling challenges that make it hard to use traditional databases with a serverless architecture. Cron Triggers allow for up to 15 minutes of CPU time, allowing for compute intensive background work.
Cloudflare is beyond edge computing — it’s everywhere computing. We use our network to make your application perform best, shaped by real-world data and tailored to access patterns and programming paradigms.
Deploy distributed systems, without being a distributed systems expert
“ Reference customers consistently call out the ease of onboarding, which sees developers with no prior background delivering workloads across the globe in minutes, and production quality applications within a week. “ – The Forrester Wave™: Edge Development Platforms, Q4 2023
Workers empower any developer to deploy globally distributed applications, without needing to become distributed systems experts or experts in configuring cloud infrastructure.
When you deploy a Worker, behind the scenes Cloudflare distributes it across the globe. But to you, it’s a single application that you can run and test locally, using the same open-source JavaScript runtime that your Workers run on in production.
When you deploy a Durable Object to coordinate real-time state, you’ve built a distributed application, but instead of having to learn RPC protocols and scale infrastructure, you’ve programmed the whole thing in JavaScript using web standard APIs that front-end developers know and rely on daily.
Enqueuing and processing batches of messages with Cloudflare Queues takes adding just a few more lines of JavaScript to an existing Worker.
When you create a web application with Cloudflare Pages, you’ve set up a complete continuous build and deployment pipeline with preview URLs, just by connecting to a GitHub repository.
Developers who previously only wrote front-end code are able to build the back end, and make their app real-time and reactive. Teams stuck waiting for infrastructure experts to provision resources are able to start prototyping today rather than next week. Writing and deploying a Worker is familiar and accessible, and this lets engineering teams move faster, with less overhead.
Why are teams able to get started so quickly?
Workers use web standard APIs that front-end developers and anyone building web applications already use every day. Cloudflare was a founding member of the Web-interoperable Runtimes Community Group (WinterCG) and is committed to interoperability across runtimes.
The tools developers already use every day are native to our platform. We publish TypeScript types for all APIs, and support compiling TypeScript when authoring and deploying via the Wrangler CLI or via the code editor in the Cloudflare dashboard — which itself is powered by the popular VSCode editor.
The open-source frameworks that developers prefer to build with are supported. A growing set of APIs from Node.js are available natively in the Workers runtime, allowing existing open source libraries to work on Workers. And increasingly, new open source projects that developers depend on are designed from day one to work across all WinterCG runtimes. Every day, more of the JavaScript ecosystem works on Workers.
Expanding into AI with GPUs, LLMs, and more
“Its superior vision refuses to limit the future footprint to the edge, and their purposeful approach to building out capabilities on the roadmap suggests that it will be increasingly well positioned to take on public cloud hyperscalers for workloads. “ – The Forrester Wave™: Edge Development Platforms, Q4 2023
We are building a complete compute platform for production applications at scale. And as every company and every developer is now building or experimenting with AI, Cloudflare has made GPUs an integrated part of our developer platform. We’ve made it just as easy to get started with AI as we have to deliver a global workload. In mid-November, we hit our goal to have Workers AI Inference running in over 100 cities around the world, and by the end of the 2024 Workers AI will be running in nearly every city Cloudflare has a presence in.
Workers AI allows developers to build applications using the latest open-source AI models, without provisioning any infrastructure or paying for costly unused capacity. We’re extending this to support deploying models directly from Hugging Face to Workers AI, for an even wider set of AI models. And unlike provisioning a VM with a GPU in a specific data center, we’re building this such that we can treat our whole network as one giant compute resource, running models in the right place at the right time to serve developers’ needs.
Beyond model inference, we’re doubling down on supporting web standard APIs and making the WebGPU API available from within the Workers platform. While we’re proud to be recognized as a leading edge platform, we’re not just that —we are a platform for developing full-stack applications, even those that require compute power that just one year ago very few used or needed.
We’re excited to show you what’s next, including a new way to manage secrets across Cloudflare products, improved observability, and better tools for releasing changes. Every day we see more advanced applications built on our platform, and we’re committed to matching that with tools to serve the most mission-critical workloads — the same ones we use ourselves to build our products on our own platform.
From developing driver-assistance software for a luxury car brand to jumping on board an NFT startup, Martin Votruba, Lead Software Engineer, is not one to shy away from a challenge. In September of 2023, joined Rapid7 as the first hire in its new Prague office. Martin is leveraging Rapid7’s excitement and energy of a startup while having the resources and support of an established organization to build a new team in Prague. He sat down to share his experience as one of the first employees in Prague, and discuss how Rapid7’s culture of collaboration and continuous learning helped him build a successful foundation on which to grow his team.
How have your past experiences contributed to how you approach your role today?
At Rapid7, my team’s job is to search for reported vulnerabilities and communicate those within our product (InsightVM) so that our customers can determine whether or not they are at risk. With different software vulnerabilities, each case is unique. This makes our job different from traditional engineering where you follow one recipe or code path and deploy it. I’m constantly drawing inspiration from past challenges and experiences to think about how to approach each new case here. I enjoy the opportunity to be creative in identifying solutions and helping our product deliver the best outcomes to our customers.
What was it that initially attracted you to Rapid7?
To be honest, I had never heard of the company before. It was exciting to see that it was starting a new office in Prague, while also having an established team globally to collaborate and partner with. I was looking for an opportunity to grow and learn from others and was interested in a global company. Being able to maintain the excitement and energy of a startup environment by being part of a new office is a unique opportunity. It also is a really fun environment building its own organic culture as new people are excited about working for Rapid7 and joining us every week.
What is something you didn’t realize or expect about Rapid7’s culture?
As far as culture, it was a nice surprise to see that even though Rapid7 is a global company and has larger structures in place, it isn’t so rigid that you are bogged down by processes or unable to feel you are making an impact. For example, right after I joined I had an opportunity to be a part of the interview team for some new roles. I was given that trust automatically to help shape what the office looks like and who we are bringing on board.
Another thing that may be surprising to a lot of people is that even though we are a cybersecurity company, you don’t have to be a cybersecurity expert to have a successful career here. I’m still a software engineer – not a cybersecurity expert (although I’ve learned a lot). What I’m responsible for is still core to my expertise as an engineer, I’m just working within a domain and product that happens to be cybersecurity.
How have you been able to build relationships as a new employee?
We have a really interesting program called “Insight Coffee” that encourages people from around the company to set up 1:1s and get to know one another. There’s no agenda, and it’s truly just to learn about another person’s background, experience, or role. The program opens the door for you to reach out and form relationships in a way that is really approachable and encouraged. If I know I’m going to be working closely with someone on a different team, I’ll set up a quick Insight Coffee to get to know them before diving into a project. That way, when we are working together, it helps open up that avenue of communication and understanding, making the entire process or project run more smoothly.
What was your interview experience like?
After talking with the recruiter about the opportunity, my interview consisted of a call with the Hiring Manager, an interview where we talked about the role and Rapid7’s culture, and a technical challenge. The technical challenge was interesting, and is designed to see how you approach solving a specific problem. Even though I was being assessed on my skills, I felt I was supported and encouraged to ask questions if I was stuck or unsure of something. Now that I am on the other side of this process and helping others with their technical challenge, I know it’s important to understand how someone thinks, what questions they ask, and how they approach the challenge. Of course, getting to the right answer or resolution is the goal, but how they get there and how they approach it is equally important when assessing if someone is the right person for the job. As a manager, I want to bring that same level of support to my team, so they know no matter what challenge they are up against, we are all here to work together and find the best solution as a team.
To learn more about Rapid7’s new office in Prague, click here. View and apply to Rapid7 jobs in Prague here.
A regular feature of the Kernel Maintainers Summit is a session where Linus
Torvalds discusses the problems that he has been encountering. In recent
years, though, there have been relatively few of those problems, so this
year he turned things around a bit by asking
the community what problems it was seeing instead. He then addressed
them at the Summit in a session covering aspects of the development
community, including feedback to maintainers, diversity (or the
lack thereof), and more.
PipeWire is an IPC mechanism for multimedia. The most interesting
stuff will happen in the session manager, the modules, the
applications and the tools around all this. I hope to see more cool
tools to route video and set up video filters etc.
The collective thoughts of the interwebz
Manage Consent
To provide the best experiences, we use technologies like cookies to store and/or access device information. Consenting to these technologies will allow us to process data such as browsing behavior or unique IDs on this site. Not consenting or withdrawing consent, may adversely affect certain features and functions.
Functional
Always active
The technical storage or access is strictly necessary for the legitimate purpose of enabling the use of a specific service explicitly requested by the subscriber or user, or for the sole purpose of carrying out the transmission of a communication over an electronic communications network.
Preferences
The technical storage or access is necessary for the legitimate purpose of storing preferences that are not requested by the subscriber or user.
Statistics
The technical storage or access that is used exclusively for statistical purposes.The technical storage or access that is used exclusively for anonymous statistical purposes. Without a subpoena, voluntary compliance on the part of your Internet Service Provider, or additional records from a third party, information stored or retrieved for this purpose alone cannot usually be used to identify you.
Marketing
The technical storage or access is required to create user profiles to send advertising, or to track the user on a website or across several websites for similar marketing purposes.
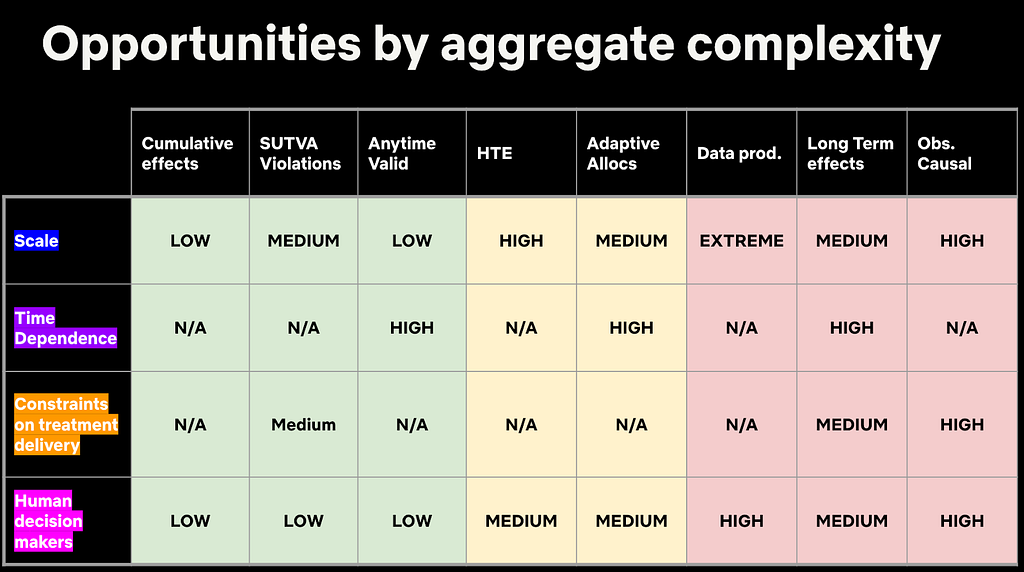


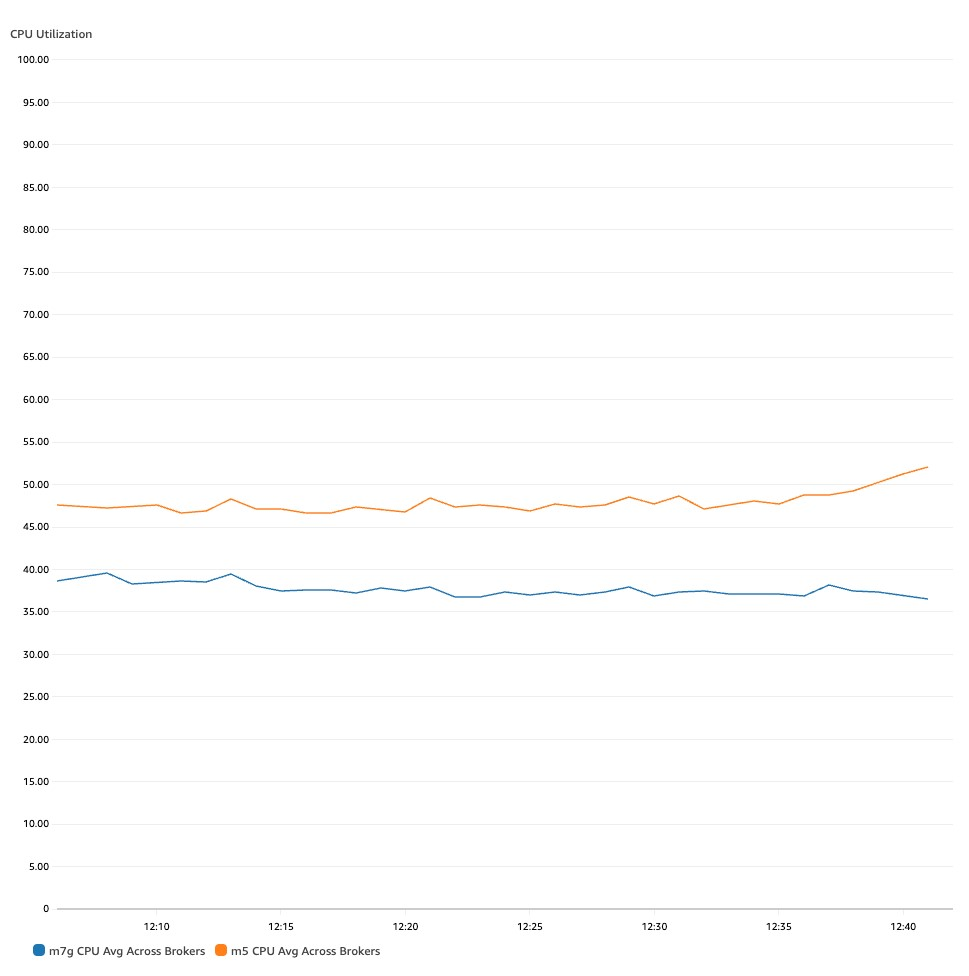
 Sai Maddali is a Senior Manager Product Management at AWS who leads the product team for Amazon MSK. He is passionate about understanding customer needs, and using technology to deliver services that empowers customers to build innovative applications. Besides work, he enjoys traveling, cooking, and running.
 Umesh is a Streaming Solutions Architect at AWS. He works with AWS customers to design and build real time data processing systems. He has 13 years of working experience in software engineering including architecting, designing, and developing data analytics systems.
 Lanre Afod is a Solutions Architect focused with Global Financial Services at AWS, passionate about helping customers with deploying secure, scalable, high available and resilient architectures within the AWS Cloud.
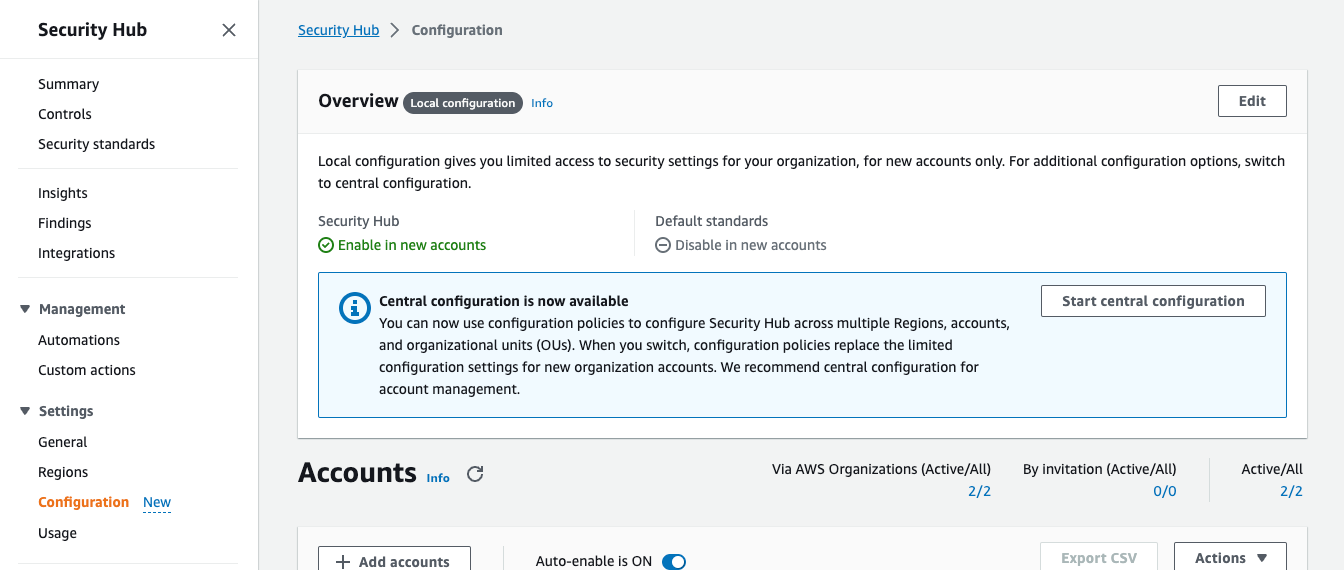
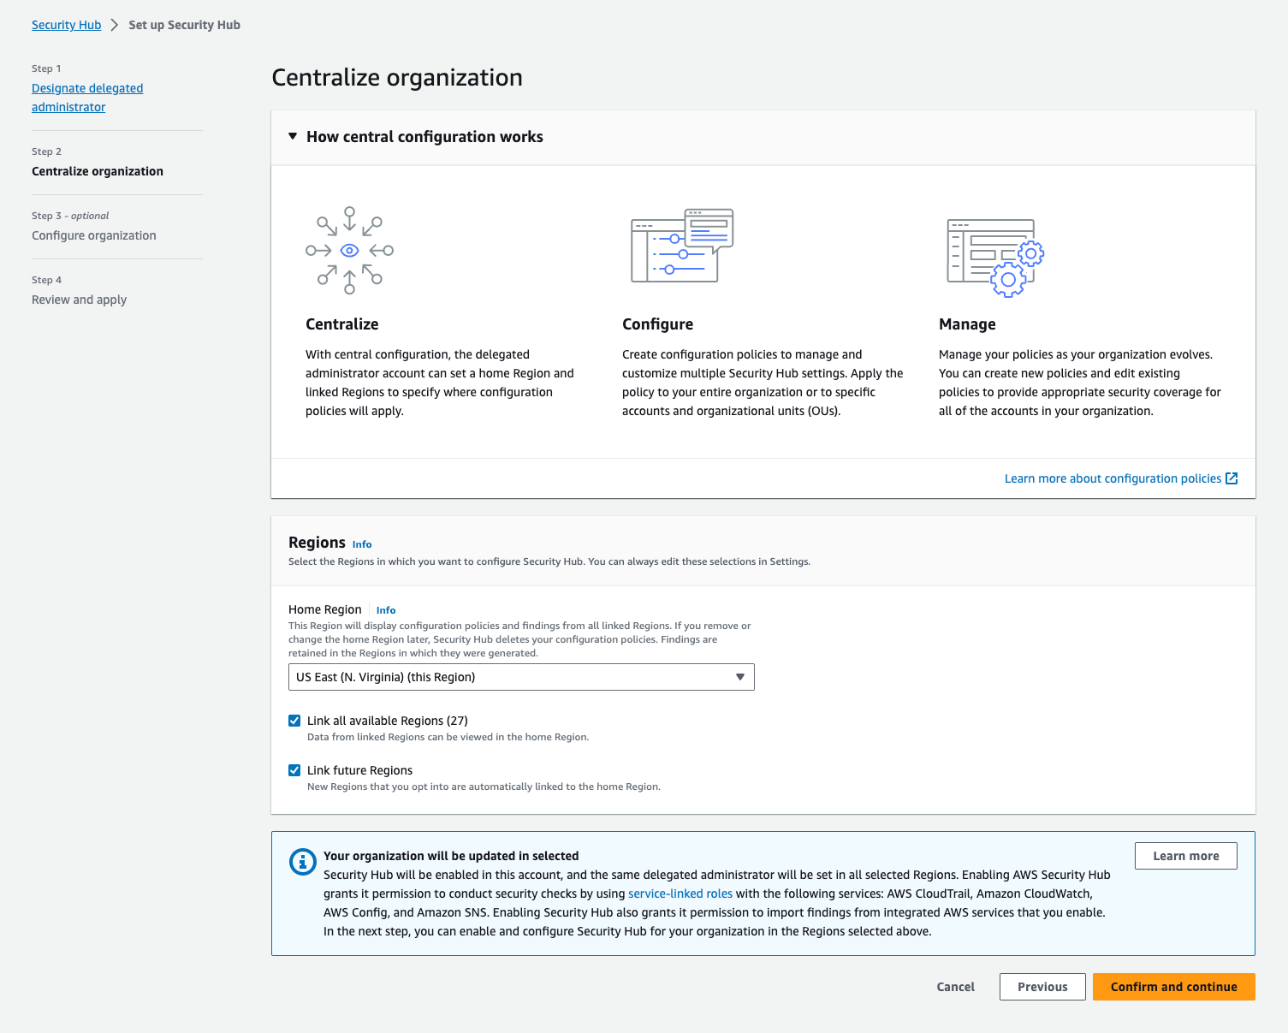
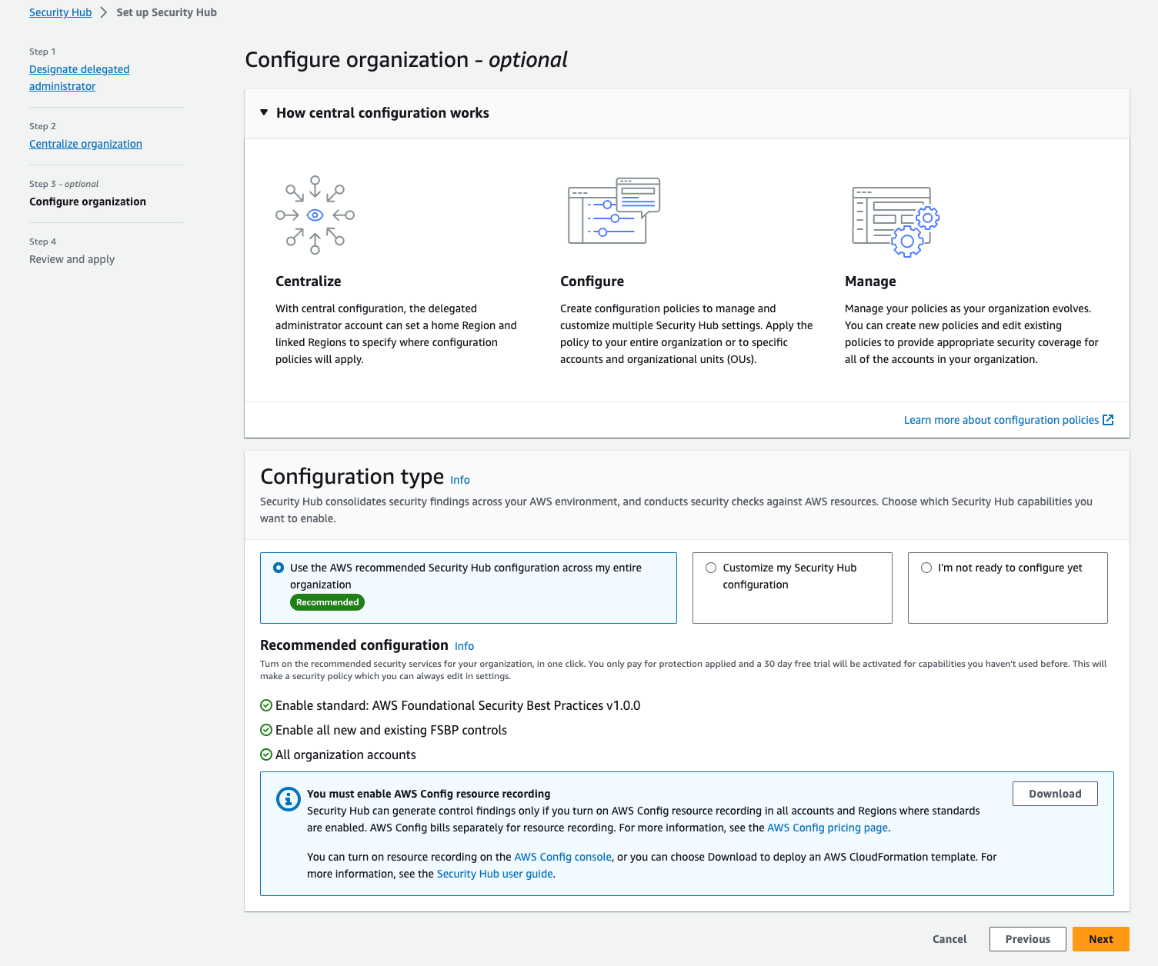
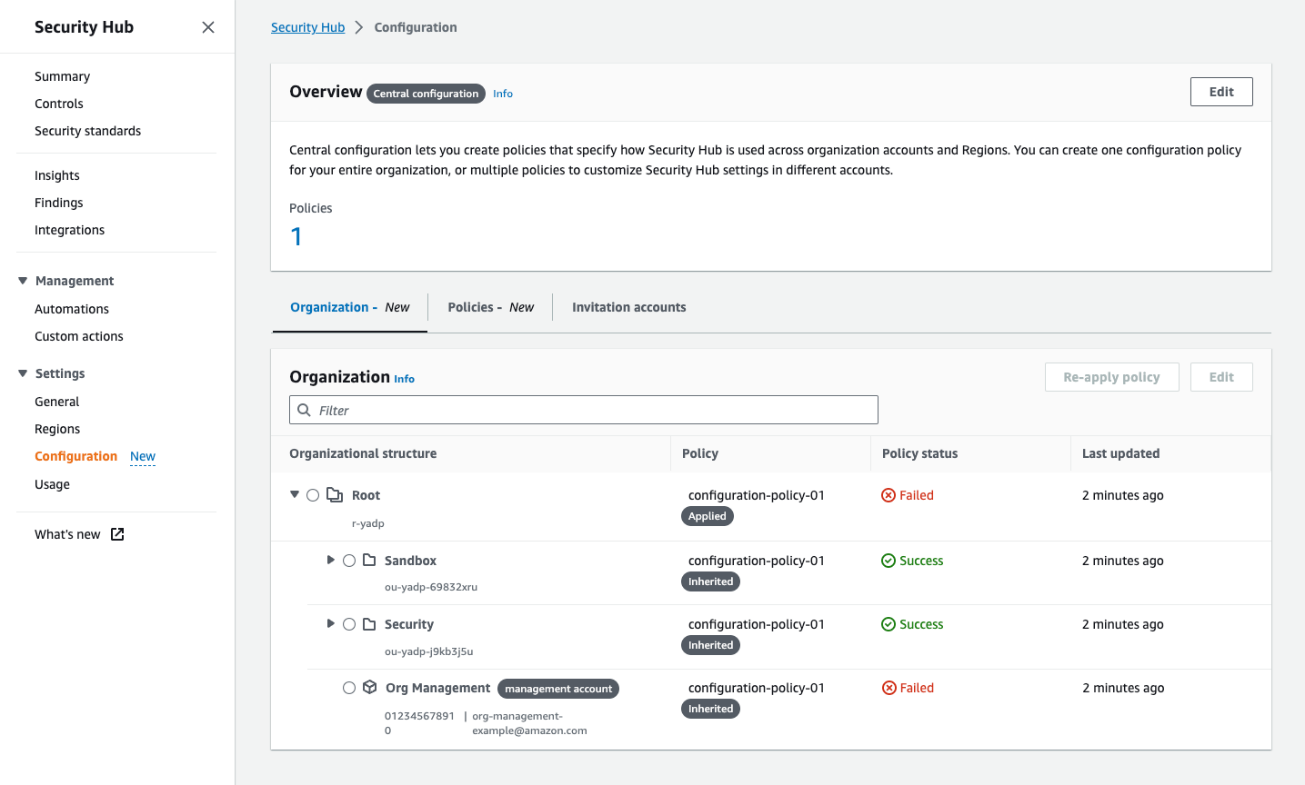 Figure 4: The Organization tab on the Configuration page shows all your organization accounts, if they are being managed by a policy, and the policy status for each account and OU