A regular feature of the Kernel Maintainers Summit is a session where Linus
Torvalds discusses the problems that he has been encountering. In recent
years, though, there have been relatively few of those problems, so this
year he turned things around a bit by asking
the community what problems it was seeing instead. He then addressed
them at the Summit in a session covering aspects of the development
community, including feedback to maintainers, diversity (or the
lack thereof), and more.
PipeWire is an IPC mechanism for multimedia. The most interesting
stuff will happen in the session manager, the modules, the
applications and the tools around all this. I hope to see more cool
tools to route video and set up video filters etc.
PipeWire is an IPC mechanism for multimedia. The most interesting
stuff will happen in the session manager, the modules, the
applications and the tools around all this. I hope to see more cool
tools to route video and set up video filters etc.
Linus has released 6.7-rc3 for testing.
“The diffstat here is dominated by a couple of reverts of some Realtek
phy code (accounting for almost a third of the diff).
But ignoring that, it’s mostly fairly small, and all over the place.”
AWS Identity and Access Management (IAM)Access Analyzer was launched in late 2019. Access Analyzer guides customers toward least-privilege permissions across Amazon Web Services (AWS) by using analysis techniques, such as automated reasoning, to make it simpler for customers to set, verify, and refine IAM permissions. Today, we are excited to announce the general availability of IAM Access Analyzer custom policy checks, a new IAM Access Analyzer feature that helps customers accurately and proactively check IAM policies for critical permissions and increases in policy permissiveness.
In this post, we’ll show how you can integrate custom policy checks into builder workflows to automate the identification of overly permissive IAM policies and IAM policies that contain permissions that you decide are sensitive or critical.
What is the problem?
Although security teams are responsible for the overall security posture of the organization, developers are the ones creating the applications that require permissions. To enable developers to move fast while maintaining high levels of security, organizations look for ways to safely delegate the ability of developers to author IAM policies. Many AWS customers implement manual IAM policy reviews before deploying developer-authored policies to production environments. Customers follow this practice to try to prevent excessive or unwanted permissions finding their way into production. Depending on the volume and complexity of the policies that need to be reviewed; these reviews can be intensive and take time. The result is a slowdown in development and potential delay in deployment of applications and services. Some customers write custom tooling to remove the manual burden of policy reviews, but this can be costly to build and maintain.
How do custom policy checks solve that problem?
Custom policy checks are a new IAM Access Analyzer capability that helps security teams accurately and proactively identify critical permissions in their policies. Custom policy checks can also tell you if a new version of a policy is more permissive than the previous version. Custom policy checks use automated reasoning, a form of static analysis, to provide a higher level of security assurance in the cloud. For more information, see Formal Reasoning About the Security of Amazon Web Services.
Custom policy checks can be embedded in a continuous integration and continuous delivery (CI/CD) pipeline so that checks can be run against policies without having to deploy the policies. In addition, developers can run custom policy checks from their local development environments and get fast feedback about whether or not the policies they are authoring are in line with your organization’s security standards.
How to analyze IAM policies with custom policy checks
In this section, we provide step-by-step instructions for using custom policy checks to analyze IAM policies.
Prerequisites
To complete the examples in our walkthrough, you will need the following:
An AWS account, and an identity that has permissions to use the AWS services, and create the resources, used in the following examples. For more information, see the full sample code used in this blog post on GitHub.
An installed and configured AWS CLI. For more information, see Configure the AWS CLI.
Example 1: Use custom policy checks to compare two IAM policies and check that one does not grant more access than the other
In this example, you will create two IAM identity policy documents, NewPolicyDocument and ExistingPolicyDocument. You will use the new CheckNoNewAccess API to compare these two policies and check that NewPolicyDocument does not grant more access than ExistingPolicyDocument.
Step 1: Create two IAM identity policy documents
Use the following command to create ExistingPolicyDocument.
Notice that ExistingPolicyDocument grants access to the ec2:StartInstances and ec2:StopInstances actions if the condition key aws:ResourceTag/Owner resolves to true. In other words, the value of the tag matches the policy variable aws:username. NewPolicyDocument grants access to the same actions, but does not include a condition key.
Step 2: Check the policies by using the AWS CLI
Use the following command to call the CheckNoNewAccess API to check whether NewPolicyDocument grants more access than ExistingPolicyDocument.
After a moment, you will see a response from Access Analyzer. The response will look similar to the following.
{
    "result": "FAIL",
    "message": "The modified permissions grant new access compared to your existing policy.",
    "reasons": [
        {
            "description": "New access in the statement with index: 1.",
            "statementIndex": 1
        }
    ]
}
In this example, the validation returned a result of FAIL. This is because NewPolicyDocument is missing the condition key, potentially granting any principal with this identity policy attached more access than intended or needed.
Example 2: Use custom policy checks to check that an IAM policy does not contain sensitive permissions
In this example, you will create an IAM identity-based policy that contains a set of permissions. You will use the CheckAccessNotGranted API to check that the new policy does not give permissions to disable AWS CloudTrail or delete any associated trails.
Step 1: Create a new IAM identity policy document
Use the following command to create IamPolicyDocument.
Use the following command to call the CheckAccessNotGranted API to check if the new policy grants permission to the set of sensitive actions. In this example, you are asking Access Analyzer to check that IamPolicyDocument does not contain the actions cloudtrail:StopLogging or cloudtrail:DeleteTrail (passed as a list to the access parameter).
Because the policy that you created contains both cloudtrail:StopLogging and cloudtrail:DeleteTrail actions, Access Analyzer returns a FAIL.
{
    "result": "FAIL",
    "message": "The policy document grants access to perform one or more of the listed actions.",
    "reasons": [
        {
            "description": "One or more of the listed actions in the statement with index: 0.",
            "statementIndex": 0
        }
    ]
}
Example 3: Integrate custom policy checks into the developer workflow
Building on the previous two examples, in this example, you will automate the analysis of the IAM policies defined in an AWS CloudFormation template. Figure 1 shows the workflow that will be used. The workflow will initiate each time a pull request is created against the main branch of an AWS CodeCommit repository called my-iam-policy (the commit stage in Figure 1). The first check uses the CheckNoNewAccess API to determine if the updated policy is more permissive than a reference IAM policy. The second check uses the CheckAccessNotGranted API to automatically check for critical permissions within the policy (the validation stage in Figure 1). In both cases, if the updated policy is more permissive, or contains critical permissions, a comment with the results of the validation is posted to the pull request. This information can then be used to decide whether the pull request is merged into the main branch for deployment (the deploy stage is shown in Figure 1).
Figure 1: Diagram of the pipeline that will check policies
Step 1: Deploy the infrastructure and set up the pipeline
Use the following command to download and unzip the Cloud Development Kit (CDK) project associated with this blog post.
git clone https://github.com/aws-samples/access-analyzer-automated-policy-analysis-blog.git
cd ./access-analyzer-automated-policy-analysis-blog
Create a virtual Python environment to contain the project dependencies by using the following command.
python3 -m venv .venv
Activate the virtual environment with the following command.
source .venv/bin/activate
Install the project requirements by using the following command.
pip install -r requirements.txt
Use the following command to update the CDK CLI to the latest major version.
npm install -g aws-cdk@2 --force
Before you can deploy the CDK project, use the following command to bootstrap your AWS environment. Bootstrapping is the process of creating resources needed for deploying CDK projects. These resources include an Amazon Simple Storage Service (Amazon S3) bucket for storing files and IAM roles that grant permissions needed to perform deployments.
cdk bootstrap
Finally, use the following command to deploy the pipeline infrastructure.
cdk deploy --require-approval never
The deployment will take a few minutes to complete. Feel free to grab a coffee and check back shortly.
When the deployment completes, there will be two stack outputs listed: one with a name that contains CodeCommitRepo and another with a name that contains ConfigBucket. Make a note of the values of these outputs, because you will need them later.
The deployed pipeline is displayed in the AWS CodePipeline console and should look similar to the pipeline shown in Figure 2.
Figure 2: AWS CodePipeline and CodeBuild Management Console view
In addition to initiating when a pull request is created, the newly deployed pipeline can also be initiated when changes to the main branch of the AWS CodeCommit repository are detected. The pipeline has three stages, CheckoutSources, IAMPolicyAnalysis, and deploy. The CheckoutSource stage checks out the contents of the my-iam-policy repository when the pipeline is triggered due to a change in the main branch.
The IAMPolicyAnalysis stage, which runs after the CheckoutSource stage or when a pull request has been created against the main branch, has two actions. The first action, Check no new access, verifies that changes to the IAM policies in the CloudFormation template do not grant more access than a pre-defined reference policy. The second action, Check access not granted, verifies that those same updates do not grant access to API actions that are deemed sensitive or critical. Finally, the Deploy stage will deploy the resources defined in the CloudFormation template, if the actions in the IAMPolicyAnalysis stage are successful.
To analyze the IAM policies, the Check no new access and Check access not granted actions depend on a reference policy and a predefined list of API actions, respectively.
Use the following command to create the reference policy.
This reference policy sets out the maximum permissions for policies that you plan to validate with custom policy checks. The iam:PassRole permission is a permission that allows an IAM principal to pass an IAM role to an AWS service, like Amazon Elastic Compute Cloud (Amazon EC2) or AWS Lambda. The reference policy says that the only way that a policy is more permissive is if it allows iam:PassRole on this group of sensitive resources: arn:aws:iam::*:role/my-sensitive-roles/*”.
Why might a reference policy be useful? A reference policy helps ensure that a particular combination of actions, resources, and conditions is not allowed in your environment. Reference policies typically allow actions and resources in one statement, then deny the problematic permissions in a second statement. This means that a policy that is more permissive than the reference policy allows access to a permission that the reference policy has denied.
In this example, a developer who is authorized to create IAM roles could, intentionally or unintentionally, create an IAM role for an AWS service (like EC2 for AWS Lambda) that has permission to pass a privileged role to another service or principal, leading to an escalation of privilege.
Use the following command to create a list of sensitive actions. This list will be parsed during the build pipeline and passed to the CheckAccessNotGranted API. If the policy grants access to one or more of the sensitive actions in this list, a result of FAIL will be returned. To keep this example simple, add a single API action, as follows.
So that the CodeBuild projects can access the dependencies, use the following command to copy the cnna-reference-policy.file and sensitive-actions.file to an S3 bucket. Refer to the stack outputs you noted earlier and replace <ConfigBucket> with the name of the S3 bucket created in your environment.
Step 2: Create a new CloudFormation template that defines an IAM policy
With the pipeline deployed, the next step is to clone the repository that was created and populate it with a CloudFormation template that defines an IAM policy.
Install git-remote-codecommit by using the following command.
pip install git-remote-codecommit
For more information on installing and configuring git-remote-codecommit, see the AWS CodeCommit User Guide.
With git-remote-codecommit installed, use the following command to clone the my-iam-policy repository from AWS CodeCommit.
git clone codecommit://my-iam-policy && cd ./my-iam-policy
If you’ve configured a named profile for use with the AWS CLI, use the following command, replacing <profile> with the name of your named profile.
git clone codecommit://<profile>@my-iam-policy && cd ./my-iam-policy
Use the following command to create the CloudFormation template in the local clone of the repository.
The actions in the IAMPolicyValidation stage are run by a CodeBuild project. CodeBuild environments run arbitrary commands that are passed to the project using a buildspec file. Each project has already been configured to use an inline buildspec file.
You can inspect the buildspec file for each project by opening the project’s Build details page as shown in Figure 3.
Figure 3: AWS CodeBuild console and build details
Step 3: Run analysis on the IAM policy
The next step involves checking in the first version of the CloudFormation template to the repository and checking two things. First, that the policy does not grant more access than the reference policy. Second, that the policy does not contain any of the sensitive actions defined in the sensitive-actions.file.
To begin tracking the CloudFormation template created earlier, use the following command.
git add ec2-instance-role.yaml
Commit the changes you have made to the repository.
git commit -m 'committing a new CFN template with IAM policy'
Finally, push these changes to the remote repository.
git push
Pushing these changes will initiate the pipeline. After a few minutes the pipeline should complete successfully. To view the status of the pipeline, do the following:
Navigate to https://<region>.console.aws.amazon.com/codesuite/codepipeline/pipelines (replacing <region> with your AWS Region).
Choose the pipeline called accessanalyzer-pipeline.
Scroll down to the IAMPolicyValidation stage of the pipeline.
For both the check no new access and check access not granted actions, choose View Logs to inspect the log output.
If you inspect the build logs for both the check no new access and check access not granted actions within the pipeline, you should see that there were no blocking or non-blocking findings, similar to what is shown in Figure 4. This indicates that the policy was validated successfully. In other words, the policy was not more permissive than the reference policy, and it did not include any of the critical permissions.
Figure 4: CodeBuild log entry confirming that the IAM policy was successfully validated
Step 4: Create a pull request to merge a new update to the CloudFormation template
In this step, you will make a change to the IAM policy in the CloudFormation template. The change deliberately makes the policy grant more access than the reference policy. The change also includes a critical permission.
Use the following command to create a new branch called add-new-permissions in the local clone of the repository.
git checkout -b add-new-permissions
Next, edit the IAM policy in ec2-instance-role.yaml to include an additional API action, dynamodb:Delete* and update the resource property of the inline policy to use an IAM role in the /my-sensitive-roles/*” path. You can copy the following example, if you’re unsure of how to do this.
Commit the policy change and push the updated policy document to the repo by using the following commands.
git add ec2-instance-role.yaml
git commit -m "adding new permission and allowing my ec2 instance to assume a pass sensitive IAM role"
The add-new-permissions branch is currently a local branch. Use the following command to push the branch to the remote repository. This action will not initiate the pipeline, because the pipeline only runs when changes are made to the repository’s main branch.
git push -u origin add-new-permissions
With the new branch and changes pushed to the repository, follow these steps to create a pull request:
Navigate to https://console.aws.amazon.com/codesuite/codecommit/repositories (don’t forget to the switch to the correct Region).
Choose the repository called my-iam-policy.
Choose the branch add-new-permissions from the drop-down list at the top of the repository screen.
Figure 5: my-iam-policy repository with new branch available
Choose Create pull request.
Enter a title and description for the pull request.
(Optional) Scroll down to see the differences between the current version and new version of the CloudFormation template highlighted.
Choose Create pull request.
The creation of the pull request will Initiate the pipeline to fetch the CloudFormation template from the repository and run the check no new access and check access not granted analysis actions.
After a few minutes, choose the Activity tab for the pull request. You should see a comment from the pipeline that contains the results of the failed validation.
Figure 6: Results from the failed validation posted as a comment to the pull request
Why did the validations fail?
The updated IAM role and inline policy failed validation for two reasons. First, the reference policy said that no one should have more permissions than the reference policy does. The reference policy in this example included a deny statement for the iam:PassRole permission with a resource of /my-sensitive-role/*. The new created inline policy included an allow statement for the iam:PassRole permission with a resource of arn:aws:iam::*:role/my-sensitive-roles/my-custom-admin-role. In other words, the new policy had more permissions than the reference policy.
Second, the list of critical permissions included the dynamodb:DeleteTable permission. The inline policy included a statement that would allow the EC2 instance to perform the dynamodb:DeleteTable action.
Cleanup
Use the following command to delete the infrastructure that was provisioned as part of the examples in this blog post.
cdk destroy
Conclusion
In this post, I introduced you to two new IAM Access Analyzer APIs: CheckNoNewAccess and CheckAccessNotGranted. The main example in the post demonstrated one way in which you can use these APIs to automate security testing throughout the development lifecycle. The example did this by integrating both APIs into the developer workflow and validating the developer-authored IAM policy when the developer created a pull request to merge changes into the repository’s main branch. The automation helped the developer to get feedback about the problems with the IAM policy quickly, allowing the developer to take action in a timely way. This is often referred to as shifting security left — identifying misconfigurations early and automatically supporting an iterative, fail-fast model of continuous development and testing. Ultimately, this enables teams to make security an inherent part of a system’s design and architecture and can speed up product development workflow.
You can find the full sample code used in this blog post on GitHub.
According to the letter, a surveillance program now known as Data Analytical Services (DAS) has for more than a decade allowed federal, state, and local law enforcement agencies to mine the details of Americans’ calls, analyzing the phone records of countless people who are not suspected of any crime, including victims. Using a technique known as chain analysis, the program targets not only those in direct phone contact with a criminal suspect but anyone with whom those individuals have been in contact as well.
The DAS program, formerly known as Hemisphere, is run in coordination with the telecom giant AT&T, which captures and conducts analysis of US call records for law enforcement agencies, from local police and sheriffs’ departments to US customs offices and postal inspectors across the country, according to a White House memo reviewed by WIRED. Records show that the White House has, for the past decade, provided more than $6 million to the program, which allows the targeting of the records of any calls that use AT&T’s infrastructure—a maze of routers and switches that crisscross the United States.
„Един обикновен живот на една обикновена жена в една обикновена държава.“ Косата ѝ е вдигната високо, в скута ѝ си почива малко кученце, а тя се усмихва на камерата. Това е Веска Недева, треньорка по аеробика, която и на 72 години не спира да работи. Историята на живота ѝ не звучи никак обикновено: развежда се рано и остава с две деца на две и три години, без работа. Родителите ѝ са толкова ужасени от решението ѝ да се раздели със съпруга си, че отказват да ѝ помагат. Работи тежък физически труд десет дни, боядисва сама детската градина, за да приемат децата ѝ. „Аз бях майка и баща“, казва тя. А след това става нещо още по-страшно: пребита е в собствения си дом. И то от много близък човек.
Това ли е „обикновената“ история на българската жена? И какво всъщност означава да си жена в България? Няколко жени решават да зададат този въпрос на други жени. „От реакциите им стана ясно, че това е въпрос, който за пръв път чуват и си задават. Бяха изненадани и им трябваше време да се замислят – какво всъщност е да си жена в България?“
Именно това е и ядрото на проекта „Пазителки на истории“, който събира непознатите истории на възрастни жени в България. Идеята е на Кристина Сантана, Полин Донахю, Диляна Симеонова и Катерина Василева и получава подкрепата на Българския фонд за жените. Защо обаче женските истории? Какво по-специално има в тях? Готово ли е обществото да ги чуе? Да ги осмисли? И да ги продължи през своята история…
Историята на Веска Недева
Неразказаната жена
Това е представата за нашия род като за женски, като за върволица силни, възправяли се поотделно (като пътни знаци по течението на столетието) жени: техните съдби бяха представени в особено едър план, те – ръка за ръка и преливайки една в друга – стояха начело на общата многоглава снимка. Като се замислиш обаче, странно, че всички те са имали съпрузи – върху мъжете от това семейство кой знае защо падаше по-малко светлина, сякаш историята е имала само героини, а героите са ѝ се досвидели. Поколенческата матрьошка май е предопределила приемствеността на единствените дъщери: щом се е получило така, че едната е излизала от другата, освен всичко друго на нея са се падали дарбата и възможността да бъде единственият разказвач.
„В памет на паметта“, Мария Степанова, превод от руски Здравка Петрова
През последната година чета и препрочитам няколко автори, които се занимават с паметта и историята – както индивидуална, така и колективна. Всички са жени, всички са носителки на големи литературни награди, всички са от Източна Европа и при всички писането се отличава с особена дълбочина и многопластовост, липса на сладникава сантименталност, дори стенографски суров поглед към субекта на писане, който често е плод на някаква травма, независимо дали става въпрос за лична, семейна, или колективна травма, например войната.
Освен това съвсем наскоро за пореден път ми се случи да чуя, че българската авторка Х била написала много хубав роман, много „мъжки“. Замислих се, че българското четящо око все още очаква от женския разказ сантименталност, „чувствителност“ или „чувственост“. Или нещо друго, което прави един роман „женски“ – не познавам сериозен литературовед, историк или читател, който може да даде аргументи какво означава това. От разговори и рецензии обаче става ясно, че мъжете пишат и разказват като всички хора, те имат право на многогласие. Но когато една жена си позволява многогласие, това означава, че тя пише… като мъж. При това положение как историята, разказана от жена, намира легитимност и поле в общество, където дори в културната сфера преобладава такова мислене? Как подобна история може да избяга от етикета „женска история“? Може ли женската история изобщо да бъде взета „на сериозно“? И какво изобщо означава това? И най-накрая, трябва ли женската история да обяснява защо говори именно тя, може би дори само тя, без мъжката?
Зад кадър по време на снимките на Лиляна, бабата на Полин Донахю
„Дядовците, мъжете не са лишени от истории и способност да ги разказват, но те винаги са били човекът, който прави историята и я разказва, а жената винаги е била изолирана от нея“, казва Катерина Василева, една от продуцентките на проекта, журналистка и студентка по политически науки в Софийския университет. Катерина посочва като пример проучване на Красимира Даскалова за изграждането на женския образ в българските учебници по история, където жените са описвани основно в ролята си на съпруги, дъщери и родственици на други мъже, понякога дори без да се споменават поименно. Ето какво четем в проучването:
„За първи път жените са представени като обществени фигури в уроците за Българското възраждане […] Те са споменати само като създателки и членки на женските образователни общества. Няма споменаване на учителки, които са изключително активни участнички в обществения живот по онова време, въпреки че съществуват достатъчно публикации по този проблем. Учудващо е също отсъствието на всякакъв коментар за участието на жените (като производителки) в домашните индустрии, въпреки че то също е добре документирано. Жените не се появяват дори в урока за всекидневния живот по време на Националното възраждане. Историческият актьор, описан там, е деперсонифицираният и безполов „българин“.“
Катерина Василева подчертава, че именно този социално-исторически поглед (или липсата му) върху жената е определящ нейната позиция като разказвач. „Поради тази традиция много жени са стояли в ъгъла, не са били действащата фигура, но това пък създава възможност за наблюдение, анализиране, защото жената продължава да е част от процесите, просто по-встрани, всъщност по-добрата роля за човека, който иска да събере историята, а после да я разкаже.“
Полин Донахю, също продуцентка на проекта и психоложка, е съгласна: „Разбира се, че има мъже, които нямат гласност, но и днес общите тенденции са, че те имат повече поле да говорят.“ Патриархалните традиции в България водят и до полови норми, които ограничават самите мъже от по-емоционални или дълбоки разговори в публичното пространство. Донахю спекулира, че и тази отстраненост от същественото и болезненото позволява на мъжете повече свобода, но в разговор от съвсем друг характер.
Разбиването на стереотипите и половите роли е в основата на превръщането на разговора от мъжки или женски в общочовешки. „Стереотипите са такива, защото продължава да се мълчи“, казва Катерина. Чрез изговарянето на „женската“ история се приближаваме към неразказаното и неизказаното, а това е важно, тъй като „ние сме направени от тези истории, историите на нашите близки жени“. „В историите на Цветана и Веска виждам дълбока свързаност. Това са истории за всички, защото не са просто истории за политически репресии или за насилие в дома, а истории за справедливост, любов, търсене, непримиримост и смелост“, добавя Катерина.
Не пренаписвайте след това без нас
Аз съм учител по история… Пред мен учебника по история го пренаписваха три пъти. Учила съм децата по три различни учебника… Питайте ни, докато сме живи. Не пренаписвайте след това без нас. Питайте…
„Войната не е с лице на жена“, Светлана Алексиевич, превод от руски Боян Станков
Литературата на Светлана Алексиевич (Беларус), Мария Степанова (Русия), Олга Токарчук (Полша) и Оксана Забужко (Украйна) е ключ към паметта на цели поколения източноевропейци, а може би и средство за справяне с травмите на тоталитаризма, патриархата, както и с обърканото съвремие. България още няма своя литературен магнум опус на тази колективна памет и травма. Но проекти, движещи се по ръба на литературата, журналистиката, документалистиката и визуалните изкуства, като „Пазителки на истории“, „Славки приказки“ и „Съседите. Форми на травмата“ сигнализират за ясна тенденция сред младото поколение (и в частност младите жени) не просто да се обръщат назад към миналото, а да търсят неразказаните истории и дори да предлагат своя интерпретация. И да питат онези, които дълго време са мълчали.
Първата интервюирана „пазителка на историята“ е Цветана Джерманова, която е на двайсет години, когато е изпратена в комунистически лагер. „Не сме героини, но не сме победени“, казва тя и добавя, че са били арестувани, защото са се осмелили да кажат, че с диктатура не се строи свобода. Сред кадрите на режисьорката Маргарита Русева и операторката Валентина Николова има и снимки от Белене. Празните стаи, белите стени и природата биха могли да принадлежат на всяко едно изоставено място. Контрастът между стерилността на пространството и ужаса, за който разказва Цветана, напомня, че когато липсват места на памет, хората остават единствената възможност за съхраняване на историята.
Историята на Цветана Джерманова
С Цветана в лагера са затворени над 200 други жени. Една от тях изчезва – забременява от управителя. Не ги наказват, но ги оставят без хляб. „Ако си гладен, ще работиш. Така сам се принуждаваш да работиш“, обяснява тя. На изолираните жени се отказва всякаква храна. Цветана и друга лагеристка ги хранят тайно, но ги хващат и понасят наказание. В лагера тя се разболява и едва не умира – жените я носят на ръце повече от километър. По-късно е затворена в помещение с лагеристки, които боледуват от сифилис. Другите протестират срещу събирането на болни и здрави заедно, което е равносилно на умишлено заразяване. Ръководството на лагера не изпраща писмата на Цветана до мъжа ѝ, а на него казва, че тя не иска да говори с него. И още, и още… Понякога, след като завърши такава история, Цветана се засмива леко, премества тялото си, поклаща глава. Надсмиване над живота по неволя, което ми е познато от разказите на собствената ми баба. Защото само така човек може да надживее ужаса.
„Най-силното ми впечатление е моментът на пречупването – разказва Полин, която е присъствала на терен по време на снимките. – Когато видят, че са ни интересни неща, които те приемат за скучни, дори казват, че това няма нужда да го разказват. Тогава изведнъж се отварят за много по-дълбоки разговори, на всички очите ни се насълзяват зад камерите, трудно ни е да не се разплачем. В тези моменти се чувствах, сякаш наистина жената срещу мен е свързана с мен, близка е. Когато например разказва как е загубила детето си, между нас се изгражда интимност, така си говорим и се обръщаме едни към други. Те не получават нищо от нас, разкриват се безвъзмездно. И ти дават нова гледна точка към собствените ти проблеми.“
Това напомняне за устойчивостта на човешката природа е все по-важно във време на поп психология, дигитална изолация, свръхиндивидуализъм, уелнес диагнози и болезнена чувствителност. Време, в което младите хора се чувстват много, много крехки. Докато разговарям с Катерина и Полин, ми хрумва, че може би характерната ни поколенческа самота се дължи и на отдалечаването от историите на близките, на по-възрастните – дали защото живеем в напълно различни светове, или защото често помежду ни има физически бариери, защото свързаността през екрана не е същата като свързаността на общия дом, на споделения живот.
„Причината тези истории да не се разказват се дължи и на изолацията на възрастните жени, най-самотната социална група в България – съгласна е Катерина. – Самите млади поколения нямат интерес към този тип истории и така се създава култура на мълчанието, просто не си говорим за нещата, които са важни – както в личния ни емоционален свят, така и в социалното, политическото, публичното пространство.“
#ПитайБабаСи
Сега Йенте вижда всичко от птичи поглед […] Странно – мислите ѝ духат из целия регион. Вятър, казва някакъв глас в ума ѝ, който следва да е нейният. Вятърът е погледът на мъртвите, който се спуска над света, от който са дошли.
„Книгите на Яков“, Олга Токарчук*
В опит да изградят отново мост между миналото на бабите си и своето бъдеще, „Пазителките на историята“ отправят предизвикателство към последователите си – да се обърнат към собствената си семейна история, може би дори да я споделят онлайн, използвайки хаштага #ПитайБабаСи. Идеята, че си отива цяло едно поколение, което е преживяло и помни едни от най-страшните години в българската история, намира подобно изражение не за пръв път. От такава мотивация се ръководи например и проектът на Фондация „Софийска платформа“ за истории от Белене. В неговите рамки може да се говори онлайн с оцелели от лагера, сред които е и Цветана Джерманова.
Едва ли има някой в България, който да не е попаднал в мрежата на историята на възрастен човек – дали във влака, докато чака на опашката, или на спирката на градския транспорт. Дори пред блока, където, ако не ни познаят, винаги ни питат „Чия си? На кого си?“, защото всеки човек се разполага според координатните системи на рода, на съседите, на селото, на града. Дали съвременният начин на живот ще пренапише тези закони? И какви ще са последствията?
Интервюираните приемат младите хора у дома си като свои. Изпращат ги с подаръци – терлици, домашно сладко. Ефектът на близостта се разпростира и в личния живот на Полин и Катерина. Първата успява да убеди собствената си баба да се включи в проекта, а втората черпи вдъхновение от сближаването с баба си, която ѝ показва дневника си, дори ѝ дава да го прочете и ѝ разказва за голяма любов, която не е дядо ѝ. „Това са истории, които дори майка ми не знае. Кътаме тези истории, от време на време ги споделяме с другите, но недостатъчно. Създава се памет, която може да ни помага, но само ако се предава.“ Може би е възможно да се възползваме от птичия поглед на годините. Или поне това е надеждата на „пазителките“.
Зад кадър по време на снимките на Веска Недева. Полин, Веска, Маргарита, Валентина.
Бъдеще, но не без минало
Откъде идва, това бих искала да знам, тази неизкоренима надменност спрямо миналото? Това тъпо и упорито, неизкоренимо убеждение, че ние, сегашните, критично и категорично знаем по-добре от тях, миналите. Дали не е от простичкия факт, че познаваме тяхното бъдеще, какво следва? (Нищо добро.) По такъв начин се държим с децата – едновременно взискателно и снизходително. И винаги мислим за хората в миналото – точно както и за децата – като за наивници във всяко едно отношение, от дрехите и косите им до мислите и чувствата им.
„Музеят на изоставените тайни“, Оксана Забужко*
Бабата на Полин започва да учи английски език на 75 години. „Тези жени намират начин. Това е вдъхновението, което си взимам от тях“, казва Полин. Историята на Цветана Джерманова, на която комунистическата власт забранява да учи, също напомня на момичетата как онова, което днес приемаме за даденост, вчера е било привилегия. Монтажистите Естела Попова и Никола Димов са включили и кадри от досието на Цветана, в което е описано как Държавна сигурност е влизала в дома на жената, как тя, съпругът ѝ и децата ѝ са били системно следени от властта. В трудни и сложни години, в които носталгията и непознаването на историята са взривоопасна комбинация, разказването на тези истории е по-важно от всякога.
„Пазителките“ се надяват разговорите да продължат. Предстои да излязат всички видеоистории, а на 29 ноември в Столичната библиотека ще има прожекции на откъсите и дискусия по темата с участието на част от интервюираните жени. Катерина Василева споделя, че имат желание да събират още истории, и приканва всеки, който се е почувствал провокиран от проекта, да се свърже с тях. Сред другите им цели е да достигнат и до маргинализираните истории – за т.нар. Възродителен процес, за живота на българските турци, малцинствата. Надяват се да имат възможността да покажат видеата в училища и домове за възрастни.
„Ние подаваме ръка, от една страна, към самите жени да разкажат историите си, а от друга, към хората на нашата възраст – да се поинтересуват какво се е случило в живота на онези, които идват преди тях – казва Катерина. – Но дори тези истории да приключат само с личния разговор вкъщи, за нас това пак е победа.“
* Последните два цитата са преведени от Йоанна Елми от английските издания на „Книгите на Яков“ (прев. Дженифър Крофт) и „Музеят на изоставените тайни“ (прев. Нина Шевчук-Мъри).
How do you best teach programming in school? It’s one of the core questions for primary and secondary computing teachers. That’s why we’re making it the focus of our free online seminars in 2024. You’re invited to attend and hear about the newest research about the teaching and learning of programming, with or without AI tools.
Building on the success and the friendly, accessible session format of our previous seminars, this coming year we will delve into the latest trends and innovative approaches to programming education in school.
Our online seminars are for everyone interested in computing education
Our monthly online seminars are not only for computing educators but also for everyone else who is passionate about teaching young people to program computers. The seminar participants are a diverse community of teachers, technology enthusiasts, industry professionals, coding club volunteers, and researchers.
With the seminars we aim to bridge the gap between the newest research and practical teaching. Whether you are an educator in a traditional classroom setting or a mentor guiding learners in a CoderDojo or Code Club, you will gain insights from leading researchers about how school-age learners engage with programming.
What to expect from the seminars
Each online seminar begins with an expert presenter delivering their latest research findings in an accessible way. We then move into small groups to encourage discussion and idea exchange. Finally, we come back together for a Q&A session with the presenter.
Here’s what attendees had to say about our previous seminars:
“As a first-time attendee of your seminars, I was impressed by the welcoming atmosphere.”
“[…] several seminars (including this one) provided valuable insights into different approaches to teaching computing and technology.”
“I plan to use what I have learned in the creation of curriculum […] and will pass on what I learned to my team.”
“I enjoyed the fact that there were people from different countries and we had a chance to see what happens elsewhere and how that may be similar and different to what we do here.”
January seminar: AI-generated Parson’s Problems
Computing teachers know that, for some students, learning about the syntax of programming languages is very challenging. Working through Parson’s Problem activities can be a way for students to learn to make sense of the order of lines of code and how syntax is organised. But for teachers it can be hard to precisely diagnose their students’ misunderstandings, which in turn makes it hard to create activities that address these misunderstandings.
At our first 2024 seminar on 9 January, Dr Barbara Ericson and Xinying Hou (University of Michigan) will present a promising new approach to helping teachers solve this difficulty. In one of their studies, they combined Parsons Problems and generative AI to create targeted activities for students based on the errors students had made in previous tasks. Thus they were able to provide personalised activities that directly addressed gaps in the students’ learning.
Sign up now to join our seminars
All our seminars start at 17:00 UK time (18:00 CET / 12:00 noon ET / 9:00 PT) and are held online on Zoom. To ensure you don’t miss out, sign up now to receive calendar invitations, and access links for each seminar on the day.
Показват ли данните, че украинците мразят Зеленски? Събужда ли се опасен вирус, който ще ни погуби? Виновен ли е човекът за климатичните промени? Ще навлезе ли страната ни в нова ледникова епоха? Каква е червената светлина в небето над България? Всички тези въпроси гъделичкат човешкия ни интерес – дали защото засягат актуални новини, защото се страхуваме за здравето си или бъдещето на България, или защото не всеки ден се случва небето да почервенее. Отговорите ни зависят до голяма степен от това какви медии четем.
Тук се появяват редица съвети: проверявайте източниците, не четете само заглавието, проверете автора. От коя дата е статията? Сатирична ли е? Позовава ли се на експерти? Пространството е наситено с всякакви заглавия, като „Х начина да разпознавате фалшиви новини“ – има ли я новината и другаде, какви са доказателствата… Вече всички говорят за дезинформация: експерти и граждански активисти, компетентни и недотам компетентни лица, а дори и самите източници на дезинформация, които обвиняват мишените на своята пропаганда в разпространение на манипулативно съдържание.
Може ли обаче дадено съдържание да отговаря на всички критерии за „добри практики“ и все пак да бъде невярно? А възможно ли е нещо повече – да се позовава на съвсем легитимни медии, статистики и научни източници и пак да не представя информацията такава, каквато е?
Качествен анализ на съдържанието на конкретни статии в български медии показва именно такива тенденции. Реални данни и истинска информация от надеждни източници са използвани или в комбинация с невярна информация, или са представени с умишлено превратно тълкуване.
В рамките на анализа бяха откроени конкретни начини, по които изначално вярно съдържание може да бъде манипулирано, за да се постигне определено внушение.
Черипикинг. Посочват се определени случаи и данни, които се стремят да потвърдят дадена теза (например украинците са причина за престъпността в Полша), но се игнорира цялостната картина (украинците са много малко парченце от пъзела на престъпността в Полша). Тази техника включва и препубликуването само на определен тип проучвания или статии – например такива, които по някакъв начин представят държави от Европейския съюз в негативна светлина. Съдържанието на материалите не се променя, но се публикува, без да се спомене, да речем, какви са мерките, които се вземат за справяне с описаните проблеми, или какъв е по-широкият контекст.
Превратно тълкуване/цитиране на реномирани източници. Цитират се легитимни източници и такива, познати на широката аудитория (например списание „Форбс“ относно използването на дронове от руската и украинската армия), но съдържанието на техните материали се представя или се тълкува превратно (за да се изтъкне предимството на Русия, какъвто акцент липсва в оригиналната статия).
Абстрактно позоваване на авторитети. Използват се ключови думи и фрази като „учените казаха“, „експерти посочват“, „официалните данни“, „доказателствата сочат“, но без конкретно да се назовават имена, позиции, учреждения и без да се дават линкове към оригиналните източници.
Директно позоваване на авторитети. Споменават се истински фондации, медии, изследователски институции, университети и дори учени без директна връзка към оригиналния източник и без широк контекст на информацията, която се представя. Често се комбинира с черипикинг и превратно тълкуване.
Позоваване на фалшиви авторитети. Представя сепревод, цитиране и публикации от мними институти, нелегитимни организации за работа с данни и информация, псевдоексперти, задкулисно политически обвързани лица и хора, които се представят за изследователи, без да са част от научни институти или академични структури.
Използване на емоционален език и ключови емоционални формули. Залага се напровокативен език, който често намеква за нещо скрито или скандално, за някаква ексклузивна тайна, до която ще получите достъп само вие („подозират САЩ“, „Форбс“ разкри“). Често се ползват и конкретни думи, които вдъхват страх или гняв („опасен вирус“, „учените бият тревога“, „разгневиха Запада“, „вулканът чудовище“, „смразяващи данни“).
„Вилнее“, „тежка пневмония“, „ужасяваща епидемиологична ситуация“ – типични примери за използване на ключови емоционални формули
Представяне за алтернатива. Редица източници на манипулативно съдържание се позиционират като „алтернатива“ на традиционните медии. Но нашият анализ показва, че в повечето случаи „алтернативните“ медии цитират същия „мейнстрийм“, за който иначе твърдят, че уж лъже читателите и крие нещо от тях. Чрез директното позоваване на тези медийни авторитети те придават тежест на твърденията си, а чрез използването на други изброени тук похвати постигат определено внушение в рамките на достоверната информация. В крайна сметка обаче се оказва, че „алтернативата“ е просто превратно тълкуване на легитимна информация, което не издържа критически прочит, анализ и проверка на фактите.
Комплекс на героя. Тази стратегия използва ключови провокативни фрази, които създават усещане за лична отговорност и мисия – „разберете истината сами“, „но това ли е цялата истина“, „те няма да ви кажат всичко“. Така на читателя се внушава не само че не трябва да има доверие на никого, но и че не е необходимо да е специалист в определена сфера или да присъства на терен, за да разбере дадена информация – може просто да прави „собствени проучвания“. Това, разбира се, означава да чете поднесената му от някой друг информация в „алтернативни“ платформи, представящи себе си като носители на цялата истина. Читателят също не трябва да вярва на реномирани институции и учени – само на онези, които му препоръчва конспиративният източник. Той може да си „прецени сам“ – разбира се, чрез информацията и мненията на „алтернативните“.
Бомбардиране с информация. Изреждат се множество данни, източници, имена и информация, често дори без привидна логическа свързаност. Читателят често няма нито времето, нито познанията да провери цялата информация. Така например в материал в pogled.info, за който не е обявено, че е препечатка от медия – собственост на руския политик и член на „Единна Русия“ Константин Риков, четем за посещение на президента на Парагвай в САЩ, за британска биокомпания, американски агенции, генно модифициране, „европейски учени от Института за еволюционна биология Макс Планк в Пльон (Германия) и Университета в Монпелие (Франция)“, както и за „юристи от Университета във Фрайбург“, „Университета на Пенсилвания“ и „испанския „Ел Пайс“*… Всички те са използвани и цитирани избирателно, за да се постигне финално внушение, че светът е застрашен от „военна употреба на комари мутанти“, което не отговаря на истината. Страхът от чума или насекоми е пропаганден троп още от времето на СССР, а дезинформацията, свързана с генномодифицирани продукти, е феномен от поне десетилетие.
Допълване на разказа. Актуални новини, официални данни, доклади могат да бъдат използвани и разтълкувани предубедено, за да допълнят вече съществуващи неверни обяснения на събитията. Можем да си представим човешката мисъл като верига от понятия, спомени и вярвания – рационални и емоционални, – на които разчитаме, за да си създаваме нова информация за света и да се оправяме в него. Тактиката с допълване на разказа се възползва именно от тази особеност на човешкото мислене. В повечето изследвани статии фигурират ключови думи, свързани със системно опровергавани или откровено конспиративни твърдения, като „зеления дневен ред“, „генетично модифицирани същества“, „ХААРП контролира времето“ и т.н. Срещат се и други, свързани с експлоатирането на наболели проблеми от недоброжелатели: „продажните елити“ около теми като неравенствата и икономическата криза, „цензурата“ около борбата с манипулативното съдържание и езика на омразата. Така ако читателят има съмнения относно безопасността на ГМО храните или изпитва недоверие към институциите, или пък ако преди това е повярвал на друго манипулативно съдържание, такъв тип статии го въвличат още по-надълбоко в лесните черно-бели обяснения, които водят до цяла алтернативна реалност.
Криво огледало. Използват се легитимни термини като „разобличител“ (whistleblower), „дезинформация“, „проверители на факти“ или „пропаганда“ от източници, които произвеждат дезинформация и пропаганда. Пример е представянето на анонимно видео в YouTube като легитимен акт на „разобличител“.
Изброените техники се използват в различни комбинации и степени, за да се постигне крайният резултат – напълно легитимно изглеждаща статия или пост в социалните мрежи, които незапознатият потребител трудно би могъл да различи от вярна и коректно поднесена информация.
Сайтът pogled.info препубликува основно руски източници, които добавят свои коментари към реални данни на информационни агенции от калибъра на „Ройтерс“. Никъде не се посочва, че информацията е преводна от руски. Често парчета от тези статии се публикуват и в социалните мрежи или се „рециклират“ в други публикации.
Други сайтове, като epicenter.bg, пък препубликуват резюмета на проучвания, като повечето материали са посветени на съвсем легитимни проблеми в Германия или Великобритания – например расизма и безработицата. Така „Западът“ се обрисува като лошо място, в което върлуват бедност, беззаконие и всякакви проблеми. Главен редактор на „Епицентър“ е Валерия Велева – дългогодишна журналистка, приближена до ДПС, която често присъства в медийното пространство с политически анализи и коментари в подкрепа на партията.
Някои от изброените примери може да илюстрираме, разглеждайки подробно статия, разказваща как украинските бежанци „са съсипали“ Полша.
Полша – криминален център на Европа?
На пръв поглед – чуждестранна медия с притеснителни данни
На 12 ноември 2023 г. българското онлайн издание NewsFront пише, че Полша се е превърнала в „криминален център за пране на пари, трафик на деца и наркотици, както и черен пазар за оръжия“. За това са обвинени украинските бежанци. Материалът е препубликуван и в друг български сайт – classa.bg. За първоизточник е посочен полският новинарски уебсайт Dziennik Polityczny (цитиран и с абревиатурата NDP).
В статията са публикувани статистически „официални“ данни, както и сведения за полицейски операции, описани по дати и места. Материалът завършва с история за „френския репортер Робърт Шмид“ и неговото „журналистическо разследване“, което е разкрило информация за фондацията на съпругата на Володимир Зеленски – Олена. За разследването се уточнява, че са предоставени „десетки писма, маршрути, адреси и други вътрешни документи на фондацията“.
Източникът – руска фондация с множество дезинформационни сайтове
Средностатистическият читател надали ще знае, че NewsFront всъщност е част от руската фондация ООО „МедиаГрупп Ньюс Фронт“, регистрирана в Симферопол, Крим. Сайтът предлага т.нар. infinite scroll, или безкрайно зареждане на статия след статия, което прави трудно достигането до секция „За нас“, в която така или иначе няма информация за конкретни лица и автори.
Онова, което вижда читателят в статията, са цитати от чуждестранна медия, данни и описания на привидно конкретни случки и действия на полицията. В допълнение му е разказано и за разследване, уж подкрепено с редица автентични документи и доказателства. Ако той следва съветите за проверка на съдържание, които изредихме в началото на текста, статията би трябвало да му се стори напълно достоверна.
Но текстът на NewsFront използва амалгама от реални факти, фабрикувани твърдения и превратно тълкуване, за да насажда негативно отношение спрямо украинските бежанци, които са представени като престъпници.
Dziennik Polityczny е източник, на който се позовават доста хора в българските социални мрежи
Да изфабрикуваш реалност
Манипулативно твърдение: „мощна вълна от бежанци“, която омаломощава страната
NewsFront не конкретизира и не посочва данни във връзка с това твърдение. Действително Полша е на второ място сред държавите, приели най-много украински бежанци. Актуалните данни сочат, че в страната пребивават 958 935 украинци. В Германия, която е на първо място, живеят малко над милион украинци. Населението в градове като Жешов, в югоизточната част на Полша, е нараснало с близо 55%. Други градове, като Лодз, споменат по-нататък в статията, са увеличили населението си с едва 13%.
Голяма част от украинските бежанци напускат Полша, ориентирайки се към Германия. На 12 септември тази година в интервю за „Асошиейтед Прес“ Михалина Шиелевич, която проучва икономическите измерения на миграцията на украинци в Полша, заявява, че напускането им е по-скоро тревожна за поляците тенденция, поне от икономическа гледна точка, макар и те сами по себе си да не могат да запълнят липсата на кадри в страната. В допълнение, броят на украинските бежанци в Полша е намалял с 350 000 от август 2022 г. насам. Страната получава и подкрепа от Европа по механизмите за облекчаване на товара от приема на украински бежанци.
Истина: Полша е сред страните от ЕС, приели най-много украински бежанци, и съвсем естествено, изпитва затруднения, но вижда и положителните страни в наплива на хора от сходна културна среда в работоспособна възраст. Бежанците не са еднакво разпределени в цялата страна, а Полша получава помощ от ЕС за по-лесното им интегриране.
Техники: черипикинг, използване на емоционален език, допълване на разказа (в случая по-широките тенденции са антибежанските настроения като цяло, както и ксенофобията).
Манипулативно твърдение: „броят на престъпленията в Полша днес се е увеличил с 46% в сравнение със статистиката от 2021 г.“
Официално публикувани от полските власти статистически данни за нивата на престъпността са налични до 2021 г. Полският Business Insider съобщава, че през първата половина на 2023 г. е регистрирано увеличение с 39,1% на кражбите в магазините и с 22% на кражбите от друг характер. Обяснението на експерти е, че скокът се дължи на инфлацията и обедняването на населението. Най-често става дума за кражби на храна и луксозни стоки – скъп алкохол, парфюми и електроника. Данни на Statistaпоказват, че делът на поляците, които се страхуват, че биха могли да станат жертва на престъпление, е намалял в сравнение с 2022 и 2021 г.
След щателно проучване не става ясно откъде авторите са получили стойността 46%. Нито в материалите, препечатани на български и руски, нито в оригинала на полски е посочен източник на данните. Към момента на писане на настоящия текст не е открита актуална статистика, в която да фигурира това число.
Истина: Не е ясно за какъв тип престъпления става въпрос. Официалните данни говорят за увеличение на кражбите, но не в тези стойности. Оригиналният източник не посочва откъде са данните.
Техники: абстрактно позоваване на авторитети, допълване на разказа (страх от престъпност; внушение, че престъпността се увеличава).
Манипулативно твърдение: „Националността на престъпниците от Украйна се крие или премълчава, което им създава усещане за безнаказаност.“
На 17 юли 2023 г. сайтът Rzeczpospolita („Жечпосполита“), една от най-четените и цитирани полски медии, публикува материал за престъпленията, извършени от чужденци, който се позовава на официални данни от полските власти, поискани от медията. Статистиката сочи, че от всички групи чужденци украинците действително са на първо място по извършени престъпления. Но това далеч не е цялата история.
Трябва да се има предвид, че в Полша украинците формират една от най-големите групи с националност или принадлежност, различна от полската. А украинците, за които се подозира, че са извършили престъпление, са 2288 души, което прави по-малко от процент, или 0,24% от общия брой на пребиваващите украинци в страната, дори 0,15%, ако се позоваваме на данните, предоставени през юли от Rzeczpospolita.
Полските журналисти посочват, че за последното десетилетие броят на престъпления, извършени от чужденци, е нараснал, но това е свързано с увеличилата се миграция към страната от най-различни държави, не само от Украйна. Сред криминално проявените чужденци са отчетени хора от Грузия, Беларус, Молдова, Русия, Румъния, Германия, България и Чехия. В повечето случаи става дума за кражби, шофиране в нетрезво състояние, както и за притежание на наркотици (включително марихуана, която е нелегална в Полша, но легална например в Германия). Материалът на Rzeczpospolita разказва основно за грузински банди, които обират жилища. Най-честото провинение на украинците е, че карат пили, коментират журналистите от полската медия.
Истина: Има множество статии за престъпленията, извършени от чуждестранни лица в Полша. Украинците са най-голямата общност сред криминално проявените от чуждестранен произход, но това се дължи и на пропорционалност, тъй като в момента в Полша има близо един милион украинци. Извършилите престъпление украинци са по-малко от процент от общия брой на пребиваващите в страната. Най-честото провинение е каране в нетрезво състояние.
Техники: черипикинг, комплекс на героя, представяне за алтернатива
Статията продължава с няколко разказа: за трима задържани мъже и иззети 110 кг марихуана, както и за задържан за трафик на мигранти украинец. И двете истории са истински и са отразени в полски новинарски източници. Но подобни случаи с криминално проявени има и с участието на българи например, както и с много други националности, както вече обяснихме със статистиката. Уплътняването на подобен материал с действителни криминални случаи е класически пример за черипикинг.
Манипулативно твърдение:фондацията на Олена Зеленска е „замесена в трафик на деца“
Финалът на статията в NewsFront лансира твърдението, че съпругата на украинския президент „е била замесена в трафик на деца“. Изданието се позовава на „френския репортер Робърт Шмид“, без да посочи източник на статията. В други източници историята е описана като разказ на „разобличител“, без да се споменава френски репортер. Макар френски репортер Робърт Шмид да съществува, не се открива негова статия по темата.
Твърденията за Зеленска, изглежда, са базирани на един-единствен френски видеоклип в YouTube с непотвърден източник с маска и качулка, който показва непроверена информация, заснета с лошо качество. В канала с име Robert Schmidt няма публикувани други клипове. Към момента на написване на този материал твърденията за Зеленска се споделят в маргинални сайтове, форуми и групи, за които има данни, че разпространяват дезинформация.
Истина:Robert Schmidt се оказва просто име на канал в YouTube, на който анонимен човек с маска разказва твърдения без легитимни доказателства.
Техники: представяне за алтернатива, криво огледало, абстрактно позоваване на авторитети, допълване на разказа (в този случай с внушението, че съществуват световни мрежи от педофили, експлоатиращи деца – идея, която намира отражение в много конспирации и има дълга история на рециклиране).
Как се разпространява информацията от източници като NDP в социалните мрежи.
Неслучайни хора
През 2017 г. Балтийският център за разследваща журналистика Re:Balticaрешава да издири настоящия редактор на полския сайт Dziennik Polityczny Адам Камински. Опитите да се срещнат с него лице в лице или да осъществят видеовръзка не се увенчават с успех. Оказва се, че профилната му снимка във Facebook всъщност е на известен литовски ортопед. Още тогава полският сайт публикува манипулативно съдържание относно „геноцида на латвийското правителство над руски или полски малцинства“, както и за това, че „присъствието на американски войници в региона е ненужно и вредно“ – все познати от руското информационно пространство рефрени, актуални и днес.
Материали от Dziennik Polityczny (или NDP) са широко споделяни в българските социални мрежи. Конкретно анализираната тук статия откриваме и в редица руски сайтове, както и четена от изкуствен интелект на фона на най-различни апокалиптични снимки в YouTube канала „Бързи новини“, в който се публикува съдържание със заглавия от рода на „По-страшно от ядрената бомба: Русия вади основния си коз“, „Западът е ужасен от това“, „Безстрашният Ким започна да праща ракети на Русия, Вашингтон е объркан“.
Те ви лъжат и цензурират, ние ги цитираме
„Европейски учени от Института за еволюционна биология Макс Планк в Пльон (Германия) и Университета в Монпелие (Франция)“, „Университета във Фрайбург“, „Университета на Пенсилвания“, „Университета Кеймбридж“, Жозеп Борел, „Форбс“, „британско проучване“… Това са само част от цитираните източници в статии, които съдържат ключови думи като „проучване“ или „данни“ и са публикувани в сайтове, за които е известно, че системно разпространяват манипулативно съдържание.
БЛИЦ например можеда пише срещу „западната цензура“ в медиите и как „се свалят неподходящи новини за войната в Украйна“, но това не пречи да цитира „Ню Йорк Таймс“, когато американските журналисти пишат за… конфликт в ръководството на Украйна. Нито пък да цитират Би Би Си по темата COVID-19. Преразказът става избирателно, по гореописаните методи.
„Епицентър“ пък публикува статии с проучвания и данни от БНР, БТА, Си Ен Ен и др., но прави впечатление, че системно се появяват онези проучвания и данни от западни държави, които говорят за безработица, изоставане в образованието, настроения против подкрепа за Украйна във войната и др. Това е пример как легитимни проблеми като инфлацията, доверието в демократичните институции, различните мнения по международни въпроси и образователните реформи се представят като тежки, хронични проблеми без решение или се извъртат в полза на определена държава, в случая Русия.
Изгубени в превода
Понякога внушението може да се постигне и чрез една грешно преведена дума. Такъв е примерът с материал в Bnews със заглавие „80% от украинците смятат Зеленски за най-виновен за ендемичната корупция в Украйна“. В статията се цитират украински източници – Фондацията за демократични инициативи и Киевският международен социологически институт.
В първоизточниците обаче се казва, че „77,6% от гражданите смятат, че президентът носи пряка отговорност за корупцията в правителството и военната администрация“. Отговорността на президента не означава вина, а че от него зависи да се справи с този проблем, за да не се урони вярата на хората в способността на Украйна да води войната и в самия президент, пишат от украинската фондация. Подмяната на само една дума – „отговорност“ с „вина“, както и закръглянето на данните, променя целия смисъл на текста.
Накрая – самопризнания
„Алтернативните“ медии често разчитат на рециклирано и превратно тълкувано съдържание, защото много от тях нямат репортери на терен, а често в тях не работят и професионални журналисти. Обикновено става въпрос за лидери на мнение или блогъри и инфлуенсъри, които препечатват съдържание от други хора, а когато се нуждаят от плънка, като солидни данни, репортерски очерци или проучвания, включват и легитимни източници, стига резултатите и информацията да са в тяхна полза.
Сайтове като informiran.net директно заявяват, че „екипът… не разполага с ресурсите да проверява информацията, която достига до редакцията и не гарантира за истинността ѝ“. Друг случай пък е материал в pogled.info, препечатка от РИА „Новости“, в който се поставя под съмнение човешката роля в климатичните промени с позоваване на „данни“ от „изследователи“ в Арктика и „водещото геоложко списание „Геосайънс“. След като статията развива цяла „алтернативна теория“ за климатичните промени, към края става ясно, че теорията е… просто теория, която дори не е „идентифицирана“. Причината за липса на доказателства? Заговор, разбира се – всички пари отивали за легитимна наука.
Решението
Такива случаи не са рядкост, напротив. Колкото и труден и хаотичен да става пейзажът на манипулативното съдържание и дезинформацията, критичният читател може действително сам да достигне до истината, като следва някои правила:
Да гледа голямата картина. В наши дни всеки може да си направи проучване или да твърди, че е направил, но наистина добрите изследвания се придържат към научни правила и методи, за да постигнат максимална обективност. За да бъде едно проучване легитимно, тези методи трябва да са прозрачно описани, да са валидни и надеждни – което се оценява от други специалисти в сферата. Какво казват други проучвания по същата тема? Съвпадат ли данните, или има разминаване? Ако четем за бедността в Германия, как се сравняват тези стойности с останалата част от света? Ако става въпрос за общественото мнение по даден въпрос, какво казват други репортажи и проучвания по темата?
Да търси първоизточника. Ако в една статия се цитират разследване на „Ню Йорк Таймс“ или данни на „Ройтерс“, винаги е по-добре да се прочете първоизточникът. Ако оригиналният език е проблем, може да се ползва Google Translate, колкото да се добие обща представа за написаното. Често в първоизточника се открива и важен контекст, който не се препечатва и обикновено добавя нюанси към данните и информацията.
Да не разчита единични истории като тенденции. Даден случай с криминално проявен от определена националност не означава, че всички хора от съответната националност са престъпници. При интерес по темата е добре да се потърси актуална статистика за нивата на престъпност и да се сравнят с други държави.
Да не гласува доверие на мнима експертност. Всички данни си имат източници, всички учени и институции – имена. Но и не всяка организация с името „институт“ е легитимно научно пространство. Често едно търсене в Google е достатъчно, за да се разбере повече за дадено лице или институция – има ли политически обвързаности, има ли зависимости вследствие на тези обвързаности, има ли история с неверни публикации и т.н.
Да не се поддава на емоционалния език. Ако една статия използва силно емоционален език, демонизира цели групи хора или говори с конспиративни твърдения, то вероятно източникът на информация не е надежден и има някаква користна цел – да ни провокира, разгневи или настрои срещу определени социални групи.
Да познава собствените си предразсъдъци. Това, че дадена статия предлага негативна информация за политически партии или хора, които не харесваме, не означава, че информацията в нея е вярна, дори да съвпада с вижданията ни. И обратното – понякога наличните данни могат да ни провокират, защото поставят под въпрос нещо, в което вярваме.
Да поставя под въпрос понятието „алтернатива“. Познавате ли журналистите, работещи в медиите, които следите? Може ли да се свържете с тях и да ги попитате за източници например? Виждали ли сте ги на живо? Публикува ли медията свои собствени разследвания и журналистически материали, или цитира други медии, мнения, клипове от социалните мрежи и преразкази на проучвания? „Алтернативата“ би следвало да означава още журналисти на терен, спазващи етични стандарти и предоставящи онзи медиен продукт, който според тях липсва, а не пропаганда, политически активизъм или клипчета от YouTube.
Ако преди под „дезинформация“ или „фалшиви новини“ се разбираше откровено невярна информация, то днес все по-често сме свидетели на по-сложен феномен, в който реални случки, данни и репортажи умишлено се използват по неетичен или зловреден начин.
В допълнение, растящото недоверие към институциите, както и към медиите, ни прави много по-уязвими за манипулацията, която често се представя като алтернатива на реалността.
Решенията обаче не са в измислянето на паралелна реалност, нито в тълкуването на данни и наука, както ни е угодно. Напротив – първата стъпка е именно в скептицизма, който и дезинформацията експлоатира така добре. Но докато тя го превръща в цинизъм, според който „няма една истина“ и „всички са маскари“, то критичното мислене като здравословна форма на цинизма ни дава възможност винаги да имаме едно наум какво четем. И именно там е разковничето.
* В цитатите в статията са запазени оригиналният правопис и пунктуация.
Today, we’re announcing the general availability of artificial intelligence (AI)-powered code remediation and infrastructure as code (IaC) support for Amazon CodeWhisperer, an AI-powered productivity tool for the IDE and command line. Amazon CodeWhisperer is also now available in Visual Studio, in preview. These new enhancements to Amazon CodeWhisperer help to enable faster and more efficient software development by offloading undifferentiated work and delivering more automation, security, efficiency, and accelerated code delivery for customers, and provides this support in more places where developers love to work.
AI-powered code remediation – Since its launch, Amazon CodeWhisperer has identified hard-to-find security vulnerabilities with built-in security scans. It now provides generative AI-powered code suggestions to help remediate identified security and code quality issues. Built-in security scanning is designed to detect issues such as exposed credentials and log injection. Generative AI-powered code suggestions are designed to remediate the identified vulnerabilities, and are tailored to your application code so that you can quickly accept fixes with confidence. When a security scan is completed in CodeWhisperer, you are presented with code suggestions that you can simply accept to close the identified vulnerabilities quickly. Generative AI-powered code suggestions speed up the process of addressing security issues, so you can focus on higher-value work instead of manually reviewing code line by line to find the correct solution. You do not need to perform any additional setup in Amazon CodeWhisperer to start using this capability.
Security scanning is available for Java, Python, JavaScript, and now available for TypeScript, C#, AWS CloudFormation (YAML, JSON), AWS CDK (TypeScript, Python), and HashiCorp Terraform (HCL). Code suggestions to remediate vulnerabilities are currently available for code written in Java, Python, and JavaScript.
Infrastructure as code (IaC) – Amazon CodeWhisperer announces support for IaC, now encompassing AWS CloudFormation (YAML, JSON), AWS CDK (Typescript, Python), and HashiCorp Terraform (HCL). This update enhances the efficiency of IaC script development, allowing developers and DevOps teams to write infrastructure code seamlessly. With support for multiple IaC languages, CodeWhisperer promotes collaboration and consistency across diverse teams. This marks a significant advancement in cloud infrastructure development, offering a more streamlined and productive coding experience for users.
Visual Studio – Amazon CodeWhisperer is now available in Visual Studio 2022 (preview). Developers can build applications faster with real-time code suggestions for C#. Get started with the Individual Tier for free by installing the AWS Toolkit extension and signing in with an AWS Builder ID.
CodeWhisperer also helps developers code responsibly by flagging code suggestions that may resemble publicly available code. CodeWhisperer will provide the repository URL and license when code similar to public code.
Finally, Amazon CodeWhisperer recently previewed (11/20) a new time-saving capability for the command line interface. Now, Amazon CodeWhisperer adds typeahead code completions and inline documentation for hundreds of popular CLIs like Git, npm, AWS CLI, and Docker. It also adds the ability for you to translate natural language to shell code. For more details, read Introducing Amazon CodeWhisperer for command line.
Amazon EMR is pleased to announce integration with Amazon Simple Storage Service (Amazon S3) Access Grants that simplifies Amazon S3 permission management and allows you to enforce granular access at scale. With this integration, you can scale job-based Amazon S3 access for Apache Spark jobs across all Amazon EMR deployment options and enforce granular Amazon S3 access for better security posture.
In this post, we’ll walk through a few different scenarios of how to use Amazon S3 Access Grants. Before we get started on walking through the Amazon EMR and Amazon S3 Access Grants integration, we’ll set up and configure S3 Access Grants. Then, we’ll use the AWS CloudFormation template below to create an Amazon EMR on Amazon Elastic Compute Cloud (Amazon EC2) Cluster, an EMR Serverless application and two different job roles.
After the setup, we’ll run a few scenarios of how you can use Amazon EMR with S3 Access Grants. First, we’ll run a batch job on EMR on Amazon EC2 to import CSV data and convert to Parquet. Second, we’ll use Amazon EMR Studio with an interactive EMR Serverless application to analyze the data. Finally, we’ll show how to set up cross-account access for Amazon S3 Access Grants. Many customers use different accounts across their organization and even outside their organization to share data. Amazon S3 Access Grants make it easy to grant cross-account access to your data even when filtering by different prefixes.
Before you launch the AWS CloudFormation stack, ensure you have the following:
An AWS account that provides access to AWS services
The latest version of the AWS Command Line Interface (AWS CLI)
An AWS Identity and Access Management (AWS IAM) user with an access key and secret key to configure the AWS CLI, and permissions to create an IAM role, IAM policies, and stacks in AWS CloudFormation
A second AWS account if you wish to test the cross-account functionality
Walkthrough
Create resources with AWS CloudFormation
In order to use Amazon S3 Access Grants, you’ll need a cluster with Amazon EMR 6.15.0 or later. For more information, see the documentation for using Amazon S3 Access Grants with an Amazon EMR cluster, an Amazon EMR on EKS cluster, and an Amazon EMR Serverless application. For the purpose of this post, we’ll assume that you have two different types of data access users in your organization—analytics engineers with read and write access to the data in the bucket and business analysts with read-only access. We’ll utilize two different AWS IAM roles, but you can also connect your own identity provider directly to IAM Identity Center if you like.
Here’s the architecture for this first portion. The AWS CloudFormation stack creates the following AWS resources:
A Virtual Private Cloud (VPC) stack with private and public subnets to use with EMR Studio, route tables, and Network Address Translation (NAT) gateway.
An Amazon S3 bucket for EMR artifacts like log files, Spark code, and Jupyter notebooks.
An Amazon S3 bucket with sample data to use with S3 Access Grants.
An Amazon EMR cluster configured to use runtime roles and S3 Access Grants.
An Amazon EMR Serverless application configured to use S3 Access Grants.
An Amazon EMR Studio where users can login and create workspace notebooks with the EMR Serverless application.
Two AWS IAM roles we’ll use for our EMR job runs: one for Amazon EC2 with write access and another for Serverless with read access.
One AWS IAM role that will be used by S3 Access Grants to access bucket data (i.e., the Role to use when registering a location with S3 Access Grants. S3 Access Grants use this role to create temporary credentials).
To get started, complete the following steps:
Choose Launch Stack:
Accept the defaults and select I acknowledge that this template may create IAM resources.
The AWS CloudFormation stack takes approximately 10–15 minutes to complete. Once the stack is finished, go to the outputs tab where you will find information necessary for the following steps.
Create Amazon S3 Access Grants resources
First, we’re going to create an Amazon S3 Access Grants resources in our account. We create an S3 Access Grants instance, an S3 Access Grants location that refers to our data bucket created by the AWS CloudFormation stack that is only accessible by our data bucket AWS IAM role, and grant different levels of access to our reader and writer roles.
To create the necessary S3 Access Grants resources, use the following AWS CLI commands as an administrative user and replace any of the fields between the arrows with the output from your CloudFormation stack.
Next, we create a new S3 Access Grants location. What is a Location? Amazon S3 Access Grants works by vending AWS IAM credentials with access scoped to a particular S3 prefix. An S3 Access Grants location will be associated with an AWS IAM Role from which these temporary sessions will be created.
In our case, we’re going to scope the AWS IAM Role to the bucket created with our AWS CloudFormation stack and give access to the data bucket role created by the stack. Go to the outputs tab to find the values to replace with the following code snippet:
Note the AccessGrantsLocationId value in the response. We’ll need that for the next steps where we’ll walk through creating the necessary S3 Access Grants to limit read and write access to your bucket.
For the read/write user, use s3-control create-access-grant to allow READWRITE access to the “output/*” prefix:
Demo Scenario 1: Amazon EMR on EC2 Spark Job to generate Parquet data
Now that we’ve got our Amazon EMR environments set up and granted access to our roles via S3 Access Grants, it’s important to note that the two AWS IAM roles for our EMR cluster and EMR Serverless application have an IAM policy that only allow access to our EMR artifacts bucket. They have no IAM access to our S3 data bucket and instead use S3 Access Grants to fetch short-lived credentials scoped to the bucket and prefix. Specifically, the roles are granted s3:GetDataAccess and s3:GetDataAccessGrantsInstanceForPrefix permissions to request access via the specific S3 Access Grants instance created in our region. This allows you to easily manage your S3 access in one place in a highly scoped and granular fashion that enhances your security posture. By combining S3 Access Grants with job roles on EMR on Amazon Elastic Kubernetes Service (Amazon EKS) and EMR Serverless as well as runtime roles for Amazon EMR steps beginning with EMR 6.7.0, you can easily manage access control for individual jobs or queries. S3 Access Grants are available on EMR 6.15.0 and later. Let’s first run a Spark job on EMR on EC2 as our analytics engineer to convert some sample data into Parquet.
For this, use the sample code provided in converter.py. Download the file and copy it to the EMR_ARTIFACTS_BUCKET created by the AWS CloudFormation stack. We’ll submit our job with the ReadWrite AWS IAM role. Note that for the EMR cluster, we configured S3 Access Grants to fall back to the IAM role if access is not provided by S3 Access Grants. The DATA_WRITER_ROLE has read access to the EMR artifacts bucket through an IAM policy so it can read our script. As before, replace all the values with the <> symbols from the Outputs tab of your CloudFormation stack.
Once the job finishes, we should see some Parquet data in s3://<DATA_BUCKET>/output/weather-data/. You can see the status of the job in the Steps tab of the EMR console.
Demo Scenario 2: EMR Studio with an interactive EMR Serverless application to analyze data
Now let’s go ahead and login to EMR Studio and connect to your EMR Serverless application with the ReadOnly runtime role to analyze the data from scenario 1. First we need to enable the interactive endpoint on your Serverless application.
Select the EMRStudioURL in the Outputs tab of your AWS CloudFormation stack.
Select Applications under the Serverless section on the left-hand side.
Select the EMRBlog application, then the Action dropdown, and Configure.
Expand the Interactive endpoint section and make sure that Enable interactive endpoint is checked.
Scroll down and click Configure application to save your changes.
Back on the Applications page, select EMRBlog application, then the Start application button.
Next, create a new workspace in our Studio.
Choose Workspaces on the left-hand side, then the Create workspace button.
Enter a Workspace name, leave the remaining defaults, and choose Create Workspace.
After creating the workspace, it should launch in a new tab in a few seconds.
Now connect your Workspace to your EMR Serverless application.
Select the EMR Compute button on the left-hand side as shown in the following code.
Choose EMR Serverless as the compute type.
Choose the EMRBlog application and the runtime role that starts with EMRBlog.
Choose Attach. The window will refresh and you can open a new PySpark notebook and follow along below. To execute the code yourself, download the AccessGrantsReadOnly.ipynb notebook and upload it into your workspace using the Upload Files button in the file browser.
While you can also grant similar access via AWS IAM policies, Amazon S3 Access Grants can be useful for situations where your organization has outgrown managing access via IAM, wants to map S3 Access Grants to IAM Identity Center principals or roles, or has previously used EMR File System (EMRFS) Role Mappings. S3 Access Grants credentials are also temporary providing more secure access to your data. In addition, as shown below, cross-account access also benefits from the simplicity of S3 Access Grants.
Demo Scenario 3 – Cross-account access
One of the other more common access patterns is accessing data across accounts. This pattern has become increasingly common with the emergence of data mesh, where data producers and consumers are decentralized across different AWS accounts.
Previously, cross-account access required setting up complex cross-account assume role actions and custom credentials providers when configuring your Spark job. With S3 Access Grants, we only need to do the following:
Create an Amazon EMR job role and cluster in a second data consumer account
The data producer account grants access to the data consumer account with a new instance resource policy
The data producer account creates an access grant for the data consumer job role
And that’s it! If you have a second account handy, go ahead and deploy this AWS CloudFormation stack in the data consumer account, to create a new EMR Serverless application and job role. If not, just follow along below. The AWS CloudFormation stack should finish creating in under a minute. Next, let’s go ahead and grant our data consumer access to the S3 Access Grants instance in our data producer account.
Replace <DATA_PRODUCER_ACCOUNT_ID> and <DATA_CONSUMER_ACCOUNT_ID> with the relevant 12-digit AWS account IDs.
You may also need to change the region in the command and policy.
Now that we’ve done that, we can read data in the data consumer account from the bucket in the data producer account. We’ll just run a simple COUNT(*) again. Replace the <APPLICATION_ID>, <DATA_CONSUMER_JOB_ROLE>, and <DATA_CONSUMER_LOG_BUCKET> with the values from the Outputs tab on the AWS CloudFormation stack created in your second account.
And replace <DATA_PRODUCER_BUCKET> with the bucket from your first account.
Wait for the job to reach a completed state, and then fetch the stdout log from your bucket, replacing the <APPLICATION_ID>, <JOB_RUN_ID> from the job above, and <DATA_CONSUMER_LOG_BUCKET>.
If you are on a unix-based machine and have gunzip installed, then you can use the following command as your administrative user.
Note that this command only uses AWS IAM Role Policies, not Amazon S3 Access Grants.
aws s3 ls s3:// <DATA_CONSUMER_LOG_BUCKET>/logs/applications/<APPLICATION_ID>/jobs/<JOB_RUN_ID>/SPARK_DRIVER/stdout.gz - | gunzip
Otherwise, you can use the get-dashboard-for-job-run command and open the resulting URL in your browser to view the Driver stdout logs in the Executors tab of the Spark UI.
In order to avoid incurring future costs for examples resources in your AWS accounts, be sure to take the following steps:
You must manually delete the Amazon EMR Studio workspace created in the first part of the post
Empty the Amazon S3 buckets created by the AWS CloudFormation stacks
Make sure you delete the Amazon S3 Access Grants, resource policies, and S3 Access Grants location created in the steps above using the delete-access-grant, delete-access-grants-instance-resource-policy, delete-access-grants-location, and delete-access-grants-instance commands.
Delete the AWS CloudFormation Stacks created in each account
Comparison to AWS IAM Role Mapping
In 2018, EMR introduced EMRFS role mapping as a way to provide storage-level authorization by configuring EMRFS with multiple IAM roles. While effective, role mapping required managing users or groups locally on your EMR cluster in addition to maintaining the mappings between those identities and their corresponding IAM roles. In combination with runtime roles on EMR on EC2 and job roles for EMR on EKS and EMR Serverless, it is now easier to grant access to your data on S3 directly to the relevant principal on a per-job basis.
Conclusion
In this post, we showed you how to set up and use Amazon S3 Access Grants with Amazon EMR in order to easily manage data access for your Amazon EMR workloads. With S3 Access Grants and EMR, you can easily configure access to data on S3 for IAM identities or using your corporate directory in IAM Identity Center as your identity source. S3 Access Grants is supported across EMR on EC2, EMR on EKS, and EMR Serverless starting in EMR release 6.15.0.
Damon Cortesi is a Principal Developer Advocate with Amazon Web Services. He builds tools and content to help make the lives of data engineers easier. When not hard at work, he still builds data pipelines and splits logs in his spare time.
You can now create, manage, and back up your Amazon FSx for NetApp ONTAP FlexGroup volumes using the AWS Management Console, the Amazon FSx CLI, and the AWS SDK. FlexGroups can be as large as 20 petabytes and offer greater performance for demanding workloads. Before this launch you could only create them using the ONTAP CLI and the ONTAP REST API (these options remain available). Also new to this launch is the ability to create Amazon FSx backups of your FlexGroup volumes.
FlexVol and FlexGroup FSx for ONTAP supports two volume styles:
FlexVol – Support for up to 300 TiB of storage, making these volumes a good fit for general-purpose workloads.
FlexGroup – Support for up to 20 PiB of storage and billions of files per volume, making these volumes a good fit for more demanding electronic design automation (EDA), seismic analysis, and software build/test workloads.
Using FlexGroups I will use the AWS Management Console to create a new file system. I select Amazon FSx for NetApp ONTAP, and click Next:
I select Standard create, enter a name for my file system (FS-Jeff-1), and select Single-AZ as the deployment type:
I can use the recommended throughput capacity, or I can specify it explicitly:
As you can surmise from the values above, the throughput is determined by the number of high availability (HA) pairs that will be used to host your file system. A single-AZ file system can be hosted on up to 6 such pairs; a multi-AZ file system must reside on a single pair. To learn more about these options visit New – Scale-out file systems for Amazon FSx for NetApp ONTAP.
After making my selections for Network & security, Encryption, and Default storage virtual machine configuration, I select the FlexGroup volume style, assign a name to the initial volume, and either accept the recommended number of constituents or specify it myself:
On the next page I review my choices and click Create file system:
The creation process is a good time for a lunch break. When I return the initial volume (Vol1) of my file system is ready to use. I can create additional FlexVol or FlexGroup volumes as needed:
Things to Know Here are a couple of things to keep in mind about FlexGroup volumes:
Constituents – Although each FlexGroup volume can have as many as 200 constituents, we recommend 8 per HA pair. Given the 300 TiB per-constituent size limit, this allows you to create volumes with up to 2.4 PiB of storage per HA pair. ONTAP will balance your files across constituents automatically.
File Counts – If you are using NFSv3 and expect to store many billions of files on a FlexGroup volume, be sure to enable 64-bit identifiers on the storage virtual machine associated with the file system.
Backups – Starting today you can also create backups of FlexGroup volumes, giving you the same fully-managed built-in options that you already have for FlexVol volumes.
NetApp System Manager – You can use the ONTAP CLI and the browser-based NetApp System Manager to perform advanced operations on your ONTAP file systems, storage virtual machines, and volumes. The management endpoint and administrator credentials are available on the File system details page:
Regions – Both volume styles are available in all AWS Regions where Amazon FSx for NetApp ONTAP is supported.
Pricing – You pay for the SSD storage, SSD IOPS, and throughput capacity that you provision, with separate charges for capacity pool usage, backups, and SnapLock licensing; see the Amazon FSx for NetApp ONTAP Pricing page to learn more.
You can now create Amazon FSx for NetApp ONTAP file systems that are up to 9x faster than even before. As is already the case with this service, the file systems are fully managed, with latency to primary storage at the sub-millisecond level and latency to the capacity pool in the tens of milliseconds. This new level of performance will allow you to bring even more of your most demanding electronic design automation (EDA), visual effects (VFX), and statistical computing workloads (to name just a few) to the cloud.
Existing FSx for ONTAP scale-up file systems are powered by a single pair of servers in an active/passive high availability (HA) configuration, and can support a maximum of 4 GBps of throughput and 192 TiB of SSD storage. The server pair can be deployed across distinct fault domains of a single Availability Zone, or in two separate Availability Zones to provide continuous availability even when an Availability Zone is unavailable.
With today’s launch you can now create scale-out FSx for ONTAP file systems that are powered by two to six HA pairs. Here are the specs for the scale-up and scale-out file systems (these are all listed as “up to” since you can specify your desired values for each one when you create your file system):
Deployment Type
Read Throughput
Write Throughput
SSD IOPS
SSD Storage
Availability Zones
Scale-up
Up to 4 GBps
Up to 1.8 GBps
Up to 160K
Up to 192 TiB
Single or Multiple
Scale-out
Up to 36 GBps
Up to 6.6 GBps
Up to 1.2M
Up to 1 PiB
Single
The amount of throughput that you specify for your file system will determine the actual server configuration as follows:
Specified Throughput
Deployment Type
HA Pairs
Throughput (Per Server)
SSD Storage (Per Server)
SSD IOPS (Per Server)
4 GBps or less
Scale-up
Single
Up to 4 GBps Read Up to 1.1 GBps Write (Single-AZ) Up to 1.8 GBps Write (Multi-AZ)
I choose Standard create, enter a name, select a Single-AZ deployment, and enter my desired SSD storage capacity. I can accepted the recommended throughput capacity, choose a value from the dropdown, or enter a value and see my options (more on that in a sec):
The dropdown has a helpful magical feature. If I type my desired throughput capacity it will show me one or more options:
The console will sometimes show me several options for the same amount of desired throughput capacity. Here are some guidelines to help you make a choice that will be a good fit for your workload:
Low Throughput – If you choose an option that provides 4 GBps or less, you will be running on a single HA pair. This is the simplest option to choose if you don’t need a high degree of throughput.
High Throughput and/or High Storage – Maximum throughput scales with the number of HA pairs that you provision. Also, choosing an option with more pairs will maximize your headroom for future growth in provisioned storage.
I make selections and enter values for the remaining options as usual, and click Next to review my settings. I check to make sure that I have made good choices for any of the attributes that can’t be edited after creation, and click Create file system.
I take a break to see what’s happening upstairs, feed my dog, and when I return my new 2 TB file system is ready to go:
I can increase the storage capacity and I can change provisioned IOPS as frequently as every 6 hours:
At the moment, the provisioned throughput capacity cannot be changed after creation if the file system uses more than one HA pair.
Available Now Scale-out file systems are available in the US East (Ohio, N. Virginia), US West (Oregon), Asia Pacific (Sydney), and Europe (Ireland) Regions and you can start to create and use them today.
You can now create Multi-AZ FSx for ONTAP file systems in VPCs that have been shared with you by other accounts in the same AWS Organization. This highly requested feature enables a clean separation of duties between network administrators and storage administrators, and makes it possible to create storage that’s durable, highly available, and accessible from multiple VPCs.
Shared VPC support Before today’s launch, you had the ability to create Single-AZ FSx for ONTAP file systems in subnets that were shared with you by another AWS account, as well as both Single – and Multi-AZ file systems in subnets that you own.
With today’s launch you can now do the same for file systems in multiple Availability Zones. Multi-AZ FSx for ONTAP file systems offer even higher availability than Single-AZ file systems, and are a great way to address and support large-scale enterprise storage needs. This new support for shared VPCs gives enterprises, many of which make use of multiple VPCs for technical and organizational reasons, to use FSx for ONTAP in Multi-AZ deployments, while allowing network administrators and storage administrators to work independently.
This is easy to set up, but you do need to make sure that there are no IP address conflicts between subnets that are not shared between VPCs. I don’t have an AWS Organization set up, so I will hand-wave through part of this process. As a network administrator (the owner account), I use the AWS Resource Access Manager (RAM) to share the appropriate subnets of my VPC with the desired participant accounts in my Organization:
Then I (or the administrators for those accounts) accept the resource shares.
Next, I use the new FSx for ONTAP Settings to enable route table updates from participant accounts, and click Submit (this gives the FSx ONTAP service permission to modify route table entries in shared subnets on behalf of participant accounts):
At this point, the storage administrators for the participant accounts can create Multi-AZ FSx for ONTAP file systems in the subnets that have been shared with them by the owner accounts.
There is no additional charge for this feature and it is available in all AWS Regions where FSx for ONTAP is supported.
Today we’re adding to Amazon FSx for OpenZFS the capability to send a snapshot from a file system to another file system in your account.
You can trigger the copy with one single API call or CLI command, and we take care of the rest. You don’t need to use commands like rsync and monitor the state of the transfer. The service takes care of the copy on your behalf. It manages potential network interruptions and retries automatically until the transfer completes. It transfers data incrementally at block level using OpenZFS’s native send and receive capabilities.
This new capability helps you to maintain agility by, for example, allowing quicker and easier creation of testing and development environments, and performance improvements by simplifying the management of read replicas to provide scale-out performance.
Amazon FSx for OpenZFS is a fully managed file storage service that lets you launch, run, and scale fully managed file systems built on the open source OpenZFS file system. FSx for OpenZFS makes it easy to migrate your on-premises ZFS file servers without changing your applications or how you manage data and to build new high-performance, data-intensive applications on the cloud.
Snapshots are one of the most powerful features of ZFS file systems. A snapshot is a read-only copy of a file system or volume. Snapshots can be created almost instantly and initially consume no additional disk space within the storage pool. When a snapshot is created, its space is initially shared between the snapshot and the file system and possibly with previous snapshots. As the file system changes, space that was previously shared becomes unique to the snapshot. The snapshot consumes incremental disk space by continuing to reference the old data and so prevents the space from being freed. Snapshots can be rolled back on-demand and almost instantly, even on very large file systems. Snapshots can also be cloned to form new volumes.
Snapshots are block-level copies. They are more efficient to transfer than traditional file-level copies, where the system must sometimes traverse millions of files to detect the ones that changed. Transferring an incremental snapshot is also more efficient than transferring an incremental file-based copy because snapshots are incremental at block level. They only contain blocks modified since the last snapshot.
On-demand replication of ZFS snapshots allows the transfer of terabytes of data using the native send and receive capability of OpenZFS without having to worry about the underlying infrastructure. We detect and manage network interruptions and other types of errors for you, making it easier for you to replicate data across file systems.
There are two main use cases where you might want to use this new capability.
Developers and quality assurance (QA) engineers might send on-demand snapshots to development and testing environments. It allows them to work with production data, ensuring accurate testing and development outcomes. The use of recent snapshots as consistent starting points for testing enhances the efficiency of the development and testing processes.
Data engineers might use on-demand replication to run parallel experiments on a dataset. Imagine your application processes a large dataset. You want to run multiple versions of your data processing algorithm on the same base dataset to find the best tuning for your use case. With on-demand data replication, you can create multiple identical copies of your file system and run each experiment in parallel.
Let’s see how it works To prepare this demo, I use the FSx for OpenZFS section of the AWS Management Console. First, I create two Amazon FSx for OpenZFS volumes. Then, I mount the two file systems on one Amazon Linux instance (/zfs-filesystem1 and /zfs-filesystem2). I prepare a file on the first volume, and I expect to find the same file on the second volume after an on-demand replication.
To synchronize data between my two volumes, I navigate to the snapshot section of the console. Then I select Copy snapshot and update volume. I also have the option to copy the snapshot to a new ZFS volume.
On the Copy snapshot and update volume page, I select the destination File system and Volume. I also confirm the source snapshot. I choose the Source snapshot copy strategy, either requesting a full copy or an incremental copy. When ready, I select Update.
After a while—how long depends on the amount of data to transfer—I observe a new snapshot listed on the destination volume. In my demo scenario, it just takes a few seconds.
I return to my Linux instance and list the content available in my second mount point /zfs-snapshot. I am happy to see my cow ASCII art on the second file system .
Alternatively, I can automate on-demand transfers using the new FSx APIs: CopySnapshotAndUpdateVolume and CopySnapshotAndCreateVolume.
To set up an ongoing periodic replication, I use the provided CloudFormation template to create an automated replication schedule. When deployed, the system periodically takes a snapshot of the volume on the source file system and performs an incremental replication to a volume on the destination file system. For example, I could schedule replication to a development file system to happen once every 15 minutes for testing purposes.
Pricing and availability This new capability is available in all AWS Regions where FSx for OpenZFS is available.
It comes at no additional cost. AWS charges the usual fees for network data transfer between Availability Zones.
You pay standard FSx for OpenZFS charges for the amount of storage used by the remote file system.
The new on-demand replication for Amazon FSx for OpenZFS allows you to efficiently transfer incremental file system snapshots to a new volume on your account. It allows developers and QA engineers to work with copies of production data and data engineers to run parallel experiments on datases.
Now AWS Lambda scales up to 12 times faster. Each synchronously invoked Lambda function now scales by 1,000 concurrent executions every 10 seconds until the aggregate concurrency across all functions reaches the account’s concurrency limit. In addition, each function within an account now scales independently from each other, no matter how the functions are invoked. These improvements come at no additional cost, and you don’t need to do any configuration in your existing functions.
Building scalable and high-performing applications can be challenging with traditional architectures, often requiring over-provisioning of compute resources or complex caching solutions for peak demands and unpredictable traffic. Many developers choose Lambda because it scales on-demand when applications face unpredictable traffic.
Before this update, Lambda functions could initially scale at the account level by 500–3,000 concurrent executions (depending on the Region) in the first minute, followed by 500 concurrent executions every minute until the account’s concurrency limit is reached. Because this scaling limit was shared between all the functions in the same account and Region, if one function experienced an influx of traffic, it could affect the throughput of other functions in the same account. This increased engineering efforts to monitor a few functions that could burst beyond the account limits, causing a noisy neighbor scenario and reducing the overall concurrency of other functions in the same account.
Now, with these scaling improvements, customers with highly variable traffic can reach concurrency targets faster than before. For instance, a news site publishing a breaking news story or an online store running a flash sale would experience a significant influx of visitors. Thanks to these improvements, they can now scale 12 times faster than before.
In addition, customers that use services such as Amazon Athena and Amazon Redshift with scalar Lambda-based UDFs to perform data enrichment or data transformations will see benefits from these improvements. These services rely on batching data and passing it in chunks to Lambda, simultaneously invoking multiple parallel functions. The enhanced concurrency scaling behavior ensures Lambda can rapidly scale and service level agreement (SLA) requirements are met.
How does this work in practice? The following graph shows a function receiving requests and processing them every 10 seconds. The account concurrency limit is set to 7,000 concurrent requests and is shared between all the functions in the same account. Each function scaling-up rate is fixed to 1,000 concurrent executions every 10 seconds. This rate is independent from other functions in the same account, making it easier for you to predict how this function will scale and throttle the requests if needed.
09:00:00 – The function has been running for a while, and there are already 1,000 concurrent executions that are being processed.
09:00:10 – Ten seconds later, there is a new burst of 1,000 new requests. This function can process them with no problem because the function can scale up to 1,000 concurrent executions every 10 seconds.
09:00:20 – The same happens here: a thousand new requests.
09:00:30 – The function now receives 1,500 new requests. Because the maximum scale-up capacity for a function is 1,000 requests per 10 seconds, 500 of those requests will get throttled.
09:01:00 – At this time, the function is already processing 4,500 concurrent requests. But there is a burst of 3,000 new requests. Lambda processes 1,000 of the new requests and throttles 2,000 because the function can scale up to 1,000 requests every 10 seconds.
09:01:10 – After 10 seconds, there is another burst of 2,000 requests, and the function can now process 1,000 more requests. However, the remaining 1,000 requests get throttled because the function can scale to 1,000 requests every 10 seconds.
09:01:20 – Now the function is processing 6,500 concurrent requests, and there are 1,000 incoming requests. The first 500 of those requests get processed, but the other 500 get throttled because the function reached the account concurrency limit of 7,000 requests. It’s important to remember that you can raise the account concurrency limit by creating a support ticket in the AWS Management Console.
In the case of having more than one function in your account, the functions scale independently until the total account concurrency limit is reached. After that, all new invocations will be throttled.
Availability These scaling improvements will be enabled by default for all functions. Starting on November 26 through mid-December, AWS is gradually rolling out these scaling improvements to all AWS Regions except China and GovCloud Regions.
To provide the best experiences, we use technologies like cookies to store and/or access device information. Consenting to these technologies will allow us to process data such as browsing behavior or unique IDs on this site. Not consenting or withdrawing consent, may adversely affect certain features and functions.
Functional
Always active
The technical storage or access is strictly necessary for the legitimate purpose of enabling the use of a specific service explicitly requested by the subscriber or user, or for the sole purpose of carrying out the transmission of a communication over an electronic communications network.
Preferences
The technical storage or access is necessary for the legitimate purpose of storing preferences that are not requested by the subscriber or user.
Statistics
The technical storage or access that is used exclusively for statistical purposes.The technical storage or access that is used exclusively for anonymous statistical purposes. Without a subpoena, voluntary compliance on the part of your Internet Service Provider, or additional records from a third party, information stored or retrieved for this purpose alone cannot usually be used to identify you.
Marketing
The technical storage or access is required to create user profiles to send advertising, or to track the user on a website or across several websites for similar marketing purposes.
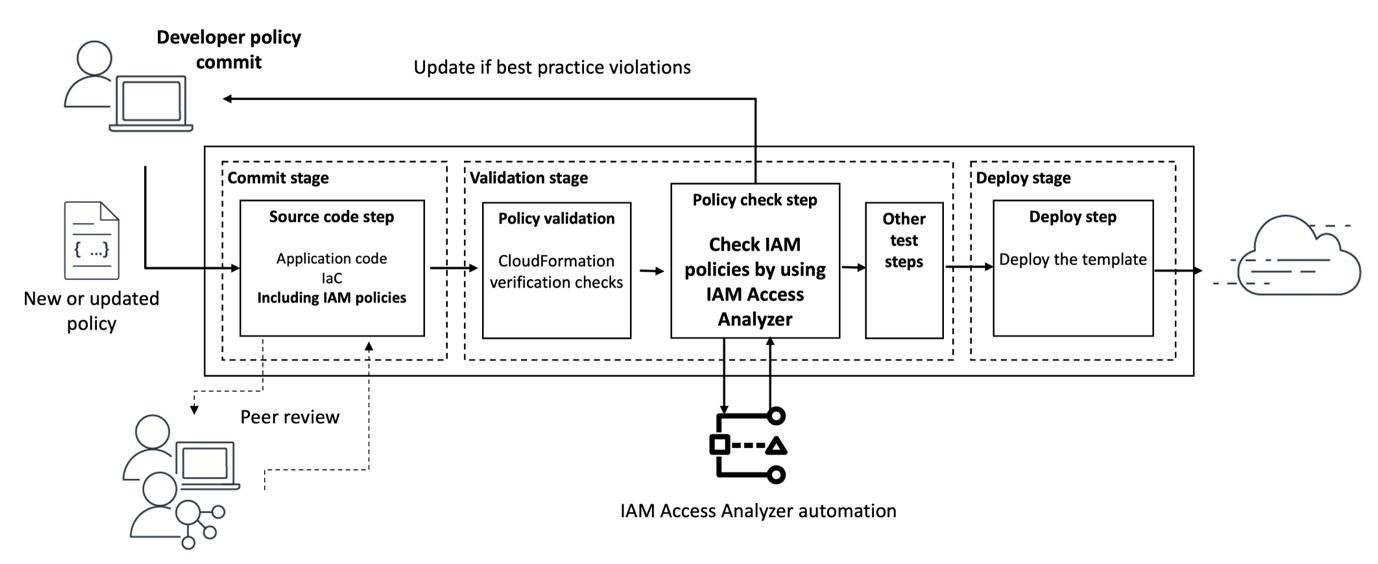

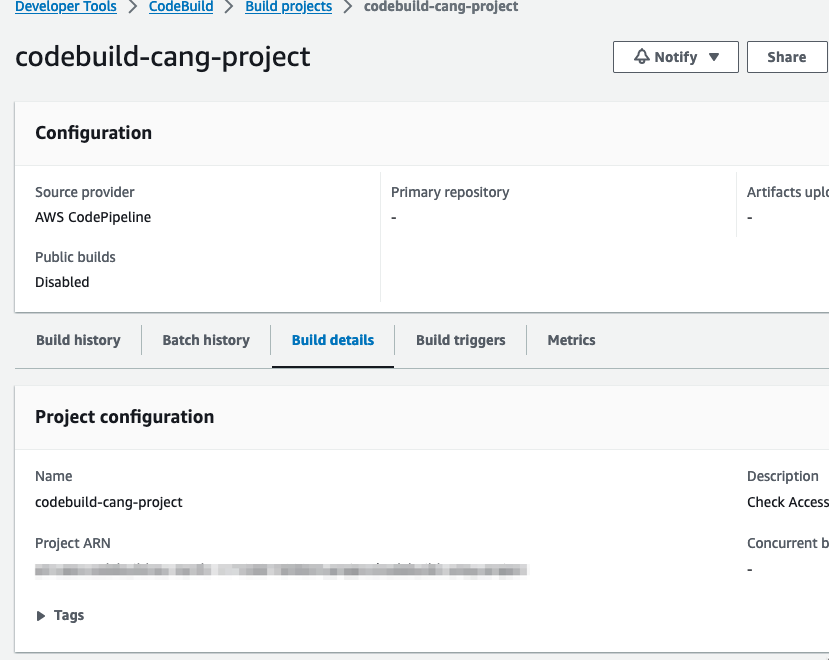


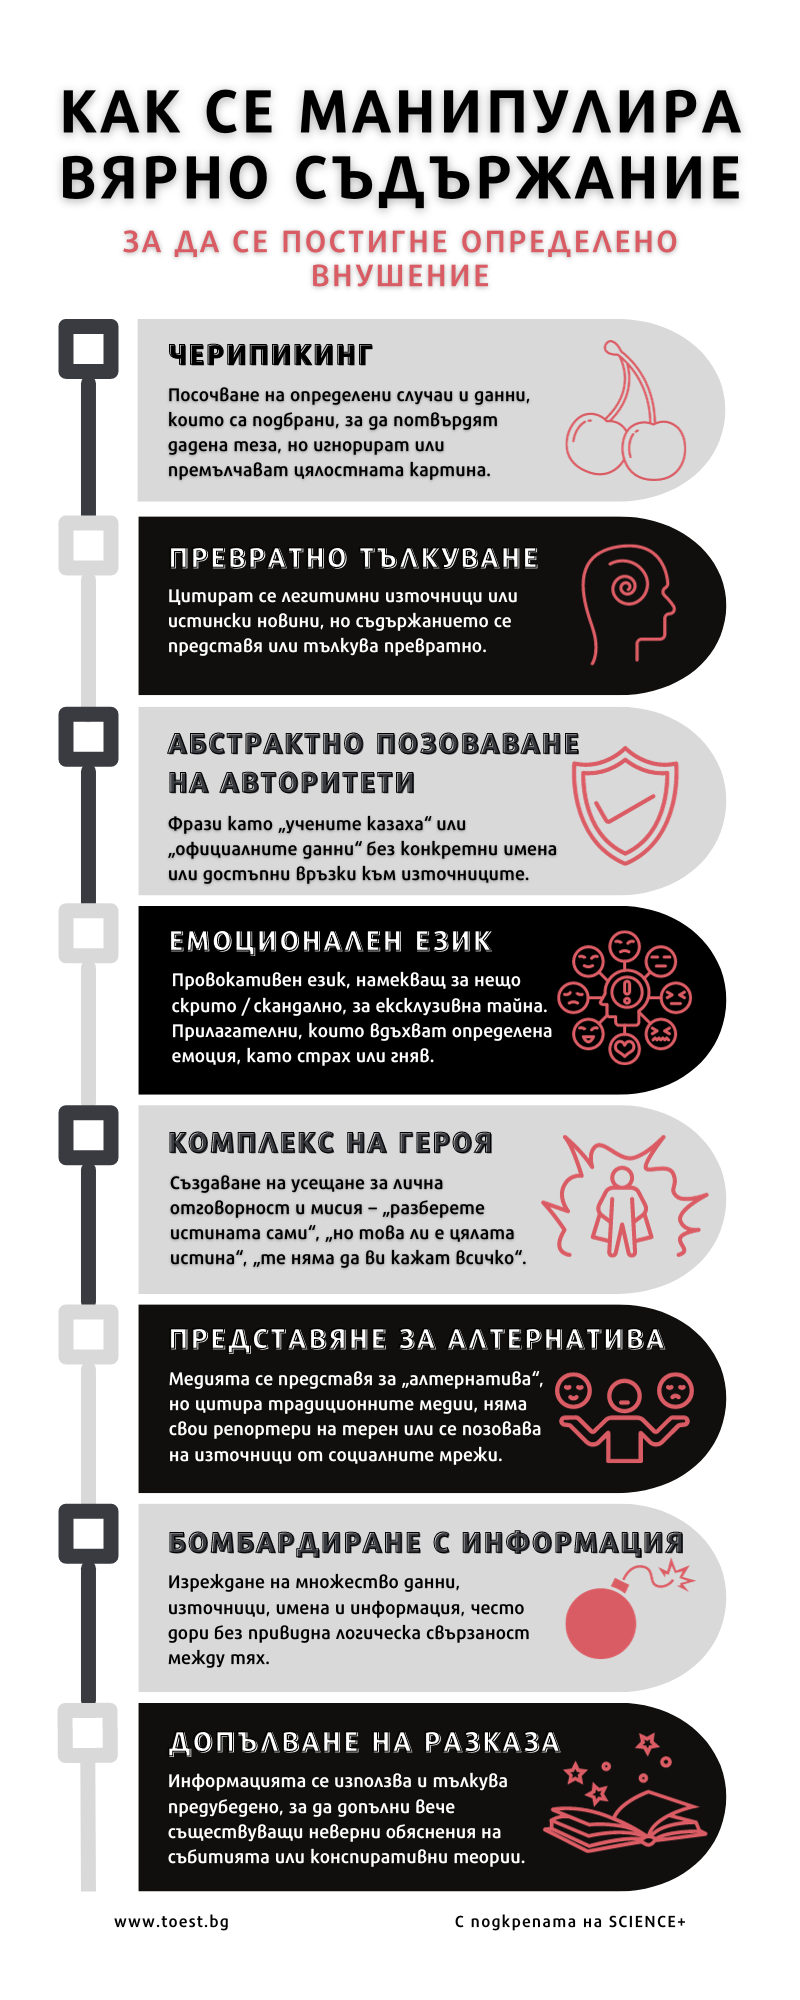


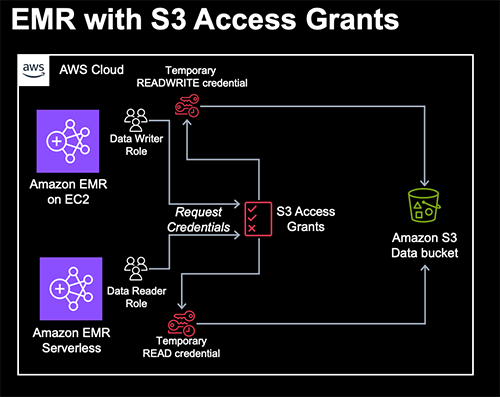


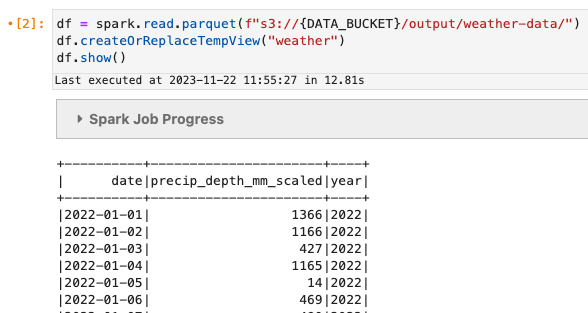
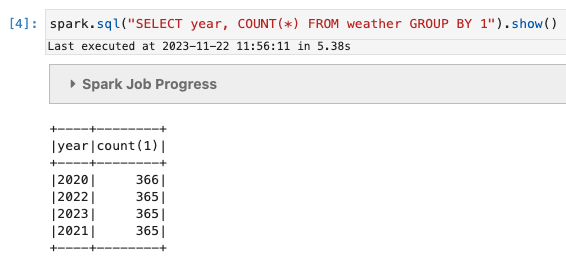

 Damon Cortesi is a Principal Developer Advocate with Amazon Web Services. He builds tools and content to help make the lives of data engineers easier. When not hard at work, he still builds data pipelines and splits logs in his spare time.


 Low Throughput – If you choose an option that provides 4 GBps or less, you will be running on a single HA pair. This is the simplest option to choose if you don’t need a high degree of throughput.


 .
.
