Post Syndicated from original https://lwn.net/Articles/926300/
The LWN.net Weekly Edition for March 23, 2023 is available.
Post Syndicated from original https://lwn.net/Articles/926300/
The LWN.net Weekly Edition for March 23, 2023 is available.
Post Syndicated from Let's Encrypt original https://letsencrypt.org/2023/03/23/improving-resliiency-and-reliability-with-ari.html
The Let’s Encrypt team is excited to announce that ACME Renewal Information (ARI) is live in production! ARI makes it possible for our subscribers to handle certificate revocation and renewal as easily and automatically as the process of getting a certificate in the first place.
With ARI, Let’s Encrypt can signal to ACME clients when they should renew certificates. In the normal case of a certificate with a 90 day lifetime, ARI might signal for renewal at 60 days. If Let’s Encrypted needs to revoke a certificate for some reason, ARI can signal that renewal needs to happen prior to the revocation. This means that even in extenuating circumstances, renewal can happen in an entirely automated way without disrupting subscriber services.
Without ARI, an unexpected revocation event might mean that Let’s Encrypt would have to send emails to affected subscribers, maybe those emails are read in time to avoid a service disruption, maybe they aren’t, and engineers have to manually take action to trigger early renewals, possibly in the middle of the night. We can’t wait for ARI to make this scenario a thing of the past.
ARI has a couple of additional benefits for Let’s Encrypt and our subscribers. First, we can use ARI to help modulate renewals as needed to avoid load spikes on the Let’s Encrypt infrastructure (of course subscribers can still renew whenever they want or need, as ARI is merely a signal or suggestion). Second, ARI can be used to set subscribers up for success in terms of ideal renewal times in the event that Let’s Encrypt offers even shorter-lived certificates in the future.
ARI has been standardized in the IETF, a process that started with an email from Let’s Encrypt engineer Roland Shoemaker in March of 2020. In September of 2021 Let’s Encrypt engineer Aaron Gable submitted the first draft to the IETF’s ACME working group, and now ARI is in production. The next step is for ACME clients to start supporting ARI, a process we plan to help with as best we can in the coming months.
ARI is a huge step forward for agility and resiliency in the TLS certificate ecosystem and we’re excited to see it gain widespread adoption!
As a project of the Internet Security Research Group (ISRG), 100% of our funding comes from contributions from our community of users and supporters. We depend on their support in order to provide our public benefit services. If your company or organization would like to sponsor Let’s Encrypt please email us at [email protected]. If you can support us with a donation, we ask that you make an individual contribution.
Post Syndicated from original https://lwn.net/Articles/926788/
The concept of copyleft is
compelling in a lot of ways, at least for those who want to promote
software freedom in the world. Bradley Kuhn is certainly one of those
people and has long been working on various aspects of copyleft licensing
and compliance, along with software freedom. He came to Everything Open 2023 to talk
about copyleft, some of its history—and flaws—and to look toward the future
of copyleft.
Post Syndicated from Kevin Hakanson original https://aws.amazon.com/blogs/devops/unit-testing-aws-lambda-with-python-and-mock-aws-services/
When building serverless event-driven applications using AWS Lambda, it is best practice to validate individual components. Unit testing can quickly identify and isolate issues in AWS Lambda function code. The techniques outlined in this blog demonstrates unit test techniques for Python-based AWS Lambda functions and interactions with AWS Services.
The full code for this blog is available in the GitHub project as a demonstrative example.
Let’s consider unit testing a serverless application which provides an API endpoint to generate a document. When the API endpoint is called with a customer identifier and document type, the Lambda function retrieves the customer’s name from DynamoDB, then retrieves the document text from DynamoDB for the given document type, finally generating and writing the resulting document to S3.
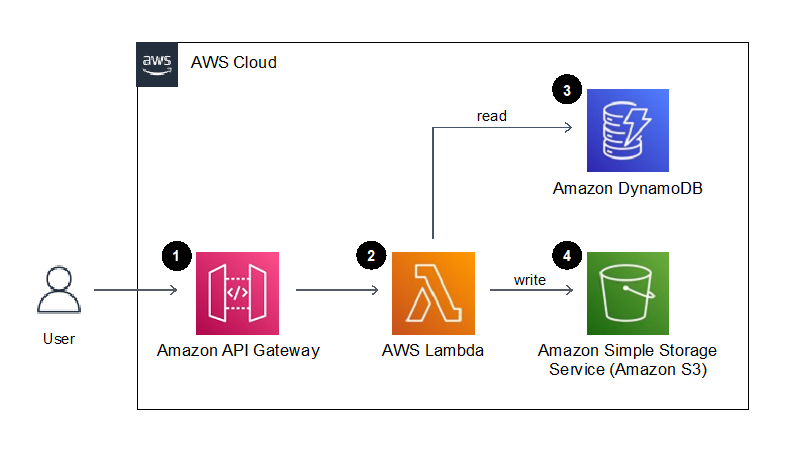
Figure 1. Example application architecture
Our testing goal is to determine if an isolated “unit” of code works as intended. In this blog, we will be writing tests to provide confidence that the logic written in the above AWS Lambda function behaves as we expect. We will mock the service integrations to Amazon DynamoDB and S3 to isolate and focus our tests on the Lambda function code, and not on the behavior of the AWS Services.
Before writing our first unit test, let’s look at the Lambda function that contains the behavior we wish to test. The full code for the Lambda function is available in the GitHub repository as src/sample_lambda/app.py.
As part of our Best practices for working AWS Lambda functions, we recommend initializing AWS service resource connections outside of the handler function and in the global scope. Additionally, we can retrieve any relevant environment variables in the global scope so that subsequent invocations of the Lambda function do not repeatedly need to retrieve them. For organization, we can put the resource and variables in a dictionary:
_LAMBDA_DYNAMODB_RESOURCE = { "resource" : resource('dynamodb'),
                              "table_name" : environ.get("DYNAMODB_TABLE_NAME","NONE") }
However, globally scoped code and global variables are challenging to test in Python, as global statements are executed on import, and outside of the controlled test flow. To facilitate testing, we define classes for supporting AWS resource connections that we can override (patch) during testing. These classes will accept a dictionary containing the boto3 resource and relevant environment variables.
For example, we create a DynamoDB resource class with a parameter “boto3_dynamodb_resource” that accepts a boto3 resource connected to DynamoDB:
class LambdaDynamoDBClass:
    def __init__(self, lambda_dynamodb_resource):
        self.resource = lambda_dynamodb_resource["resource"]
        self.table_name = lambda_dynamodb_resource["table_name"]
self.table = self.resource.Table(self.table_name)The Lambda function handler is the method in the AWS Lambda function code that processes events. When the function is invoked, Lambda runs the handler method. When the handler exits or returns a response, it becomes available to process another event.
To facilitate unit test of the handler function, move as much of logic as possible to other functions that are then called by the Lambda hander entry point. Also, pass the AWS resource global variables to these subsequent function calls. This approach enables us to mock and intercept all resources and calls during test.
In our example, the handler references the global variables, and instantiates the resource classes to setup the connections to specific AWS resources. (We will be able to override and mock these connections during unit test.)
Then the handler calls the create_letter_in_s3 function to perform the steps of creating the document, passing the resource classes. This downstream function avoids directly referencing the global context or any AWS resource connections directly.
def lambda_handler(event: APIGatewayProxyEvent, context: LambdaContext) -> Dict[str, Any]:

    global _LAMBDA_DYNAMODB_RESOURCE
    global _LAMBDA_S3_RESOURCE

    dynamodb_resource_class = LambdaDynamoDBClass(_LAMBDA_DYNAMODB_RESOURCE)
    s3_resource_class = LambdaS3Class(_LAMBDA_S3_RESOURCE)

    return create_letter_in_s3(
            dynamo_db = dynamodb_resource_class,
            s3 = s3_resource_class,
            doc_type = event["pathParameters"]["docType"],
cust_id = event["pathParameters"]["customerId"])Our Lambda function code has now been written and is ready to be tested, let’s take a look at the unit test code! The full code for the unit test is available in the GitHub repository as tests/unit/src/test_sample_lambda.py.
In production, our Lambda function code will directly access the AWS resources we defined in our function handler; however, in our unit tests we want to isolate our code and replace the AWS resources with simulations. This isolation facilitates running unit tests in an isolated environment to prevent accidental access to actual cloud resources.
Moto is a python library for Mocking AWS Services that we will be using to simulate AWS resource our tests. Moto supports many AWS resources, and it allows you to test your code with little or no modification by emulating functionality of these services.
Moto uses decorators to intercept and simulate responses to and from AWS resources. By adding a decorator for a given AWS service, subsequent calls from the module to that service will be re-directed to the mock.
@moto.mock_dynamodb
@moto.mock_s3The mocked AWS resources will be used during the unit test suite. Using the setUp() method allows you to define and configure the mocked global AWS Resources before the tests are run.
We define the test class and a setUp() method and initialize the mock AWS resource. This includes configuring the resource to prepare it for testing, such as defining a mock DynamoDB table or creating a mock S3 Bucket.
class TestSampleLambda(TestCase):
    def setUp(self) -> None:
        dynamodb = boto3.resource("dynamodb", region_name="us-east-1")
        dynamodb.create_table(
            TableName = self.test_ddb_table_name,
            KeySchema = [{"AttributeName": "PK", "KeyType": "HASH"}],
            AttributeDefinitions = [{"AttributeName": "PK",
                                     "AttributeType": "S"}],
            BillingMode = 'PAY_PER_REQUEST'

        s3_client = boto3.client('s3', region_name="us-east-1")
        s3_client.create_bucket(Bucket = self.test_s3_bucket_name )
After creating the mocked resources, the setup function creates resource class object referencing those mocked resources, which will be used during testing.
        mocked_dynamodb_resource = resource("dynamodb")
        mocked_s3_resource = resource("s3")
        mocked_dynamodb_resource = { "resource" : resource('dynamodb'),
                                     "table_name" : self.test_ddb_table_name  }
        mocked_s3_resource = { "resource" : resource('s3'),
                               "bucket_name" : self.test_s3_bucket_name }
        self.mocked_dynamodb_class = LambdaDynamoDBClass(mocked_dynamodb_resource)
self.mocked_s3_class = LambdaS3Class(mocked_s3_resource)Our first test will validate our Lambda function writes the customer letter to an S3 bucket in the correct manner. We will follow the standard test format of arrange, act, assert when writing this unit test.
Arrange the data we need in the DynamoDB table:
def test_create_letter_in_s3(self) -> None:

    self.mocked_dynamodb_class.table.put_item(Item={"PK":"D#UnitTestDoc",
                                                        "data":"Unit Test Doc Corpi"})
    self.mocked_dynamodb_class.table.put_item(Item={"PK":"C#UnitTestCust",
                                                        "data":"Unit Test Customer"})
Act by calling the create_letter_in_s3 function. During these act calls, the test passes the AWS resources as created in the setUp().
    test_return_value = create_letter_in_s3(
                        dynamo_db = self.mocked_dynamodb_class,
                        s3=self.mocked_s3_class,
                        doc_type = "UnitTestDoc",
                        cust_id = "UnitTestCust"
                        )
Assert by reading the data written to the mock S3 bucket, and testing conformity to what we are expecting:
bucket_key = "UnitTestCust/UnitTestDoc.txt"
    body = self.mocked_s3_class.bucket.Object(bucket_key).get()['Body'].read()

    self.assertEqual(test_return_value["statusCode"], 200)
    self.assertIn("UnitTestCust/UnitTestDoc.txt", test_return_value["body"])
self.assertEqual(body.decode('ascii'),"Dear Unit Test Customer;\nUnit Test Doc Corpi")We can also test error conditions and handling, such as keys not found in the database. For example, if a customer identifier is submitted, but does not exist in the database lookup, does the logic handle this and return a “Not Found” code of 404?
To test this in test #2, we add data to the mocked DynamoDB table, but then submit a customer identifier that is not in the database.
This test, and a similar test #3 for “Document Types not found”, are implemented in the example test code on GitHub.
As the application logic resides in independently tested functions, the Lambda handler function provides only interface validation and function call orchestration. Therefore, the test for the handler validates that the event is parsed correctly, any functions are invoked as expected, and the return value is passed back.
To emulate the global resource variables and other functions, patch both the global resource classes and logic functions.
    @patch("src.sample_lambda.app.LambdaDynamoDBClass")
    @patch("src.sample_lambda.app.LambdaS3Class")
    @patch("src.sample_lambda.app.create_letter_in_s3")
    def test_lambda_handler_valid_event_returns_200(self,
                            patch_create_letter_in_s3 : MagicMock,
                            patch_lambda_s3_class : MagicMock,
                            patch_lambda_dynamodb_class : MagicMock
                            ):
Arrange for the test by setting return values for the patched objects.
patch_lambda_dynamodb_class.return_value = self.mocked_dynamodb_class
        patch_lambda_s3_class.return_value = self.mocked_s3_class

        return_value_200 = {"statusCode" : 200, "body":"OK"}
        patch_create_letter_in_s3.return_value = return_value_200
We need to provide event data when invoking the Lambda handler. A good practice is to save test events as separate JSON files, rather than placing them inline as code. In the example project, test events are located in the folder “tests/events/”. During test execution, the event object is created from the JSON file using the utility function named load_sample_event_from_file.
Act by calling the lambda_handler function.
test_return_value = lambda_handler(event=test_event, context=None)Assert by ensuring the create_letter_in_s3 function is called with the expected parameters based on the event, and a create_letter_in_s3 function return value is passed back to the caller. In our example, this value is simply passed with no alterations.
patch_create_letter_in_s3.assert_called_once_with(
                                        dynamo_db=self.mocked_dynamodb_class,
                                        s3=self.mocked_s3_class,
                                        doc_type=test_event["pathParameters"]["docType"],
                                        cust_id=test_event["pathParameters"]["customerId"])

self.assertEqual(test_return_value, return_value_200)The tearDown() method is called immediately after the test method has been run and the result is recorded. In our example tearDown() method, we clean up any data or state created so the next test won’t be impacted.
The unittest Unit testing framework can be run using the Python pytest utility. To ensure network isolation and verify the unit tests are not accidently connecting to AWS resources, the pytest-socket project provides the ability to disable network communication during a test.
The pytest command results in a PASSED or FAILED status for each test. A PASSED status verifies that your unit tests, as written, did not encounter errors or issues,

Unit testing is a software development process in which different parts of an application, called units, are individually and independently tested. Tests validate the quality of the code and confirm that it functions as expected. Other developers can gain familiarity with your code base by consulting the tests. Unit tests reduce future refactoring time, help engineers get up to speed on your code base more quickly, and provide confidence in the expected behaviour.
We’ve seen in this blog how to unit test AWS Lambda functions and mock AWS Services to isolate and test individual logic within our code.
AWS Lambda Powertools for Python has been used in the project to validate hander events. Powertools provide a suite of utilities for AWS Lambda functions to ease adopting best practices such as tracing, structured logging, custom metrics, idempotency, batching, and more.
Learn more about AWS Lambda testing in our prescriptive test guidance, and find additional test examples on GitHub. For more serverless learning resources, visit Serverless Land.
About the authors:
Post Syndicated from Jason Hurst original https://aws.amazon.com/blogs/security/use-backups-to-recover-from-security-incidents/
Greetings from the AWS Customer Incident Response Team (CIRT)! AWS CIRT is dedicated to supporting customers during active security events on the customer side of the AWS Shared Responsibility Model.
Over the past three years, AWS CIRT has supported customers with security events in their AWS accounts. These include the unauthorized use of AWS Identity and Access Management (IAM) credentials, ransomware, and data deletion in an AWS account.
In this post, I will walk you through key AWS services and features that provide backup and recovery solutions to restore your data based upon the lessons our team has learned when supporting customers experiencing security events.
Security is a shared responsibility between AWS and the customer. Customers are responsible for protecting their data IN the cloud. For Amazon Elastic Compute Cloud (Amazon EC2), this includes the guest operating system, installed applications, and data stored within the instance and associated Amazon Elastic Block Store (Amazon EBS) volumes. For Amazon Simple Storage Service (Amazon S3) and Amazon DynamoDB, AWS operates the infrastructure layer, the operating system, and service resources, and customers access the endpoints to store and retrieve data.
Backup and recovery configuration are a part of the customer’s side of the shared responsibility model. AWS doesn’t have the ability to recover a deleted resource. It doesn’t matter how quickly the event is reported to AWS. The inability to recover resources includes actions by the AWS account root user or an IAM principal in the account.
Customers are also responsible for managing their data (including encryption options), classifying their assets, and using IAM tools to apply the appropriate permissions. AWS strives to make it simple for customers to back up and restore their data. We recommend that you compare the risk and costs associated with losing data to the available solutions to make the best decision for your data and business use cases.
The National Institute of Technology (NIST) Computer Security Incident Handling Guide SP 800-61 Rev. 2 defines a computer security incident as “a violation or imminent threat of violation of computer security policies, acceptable use policies, or standard security practices.” AWS recently updated the AWS Security Incident Response Guide as a resource to help customers throughout the incident response life cycle.
Backup and restore processes help you restore data to a point in time before unauthorized actions. Unauthorized actions can be accidental or part of a security event. Implementing backup and restore processes can help you reduce costs by limiting the number of resources that need backups, associated storage, and overall timelines associated with acceptable Recovery Time Objectives (RTOs) and Recovery Point Objectives (RPOs). For additional guidance on backup solutions and programs, see Top 10 security best practices for securing backups in AWS
AWS provides several solutions for backups to integrate with your operational and security incident recovery procedures which I describe in more detail in this section. For additional information, see AWS Backup & Restore.
Amazon EC2 provides scalable computing capacity in the AWS Cloud. Using Amazon EC2 can help eliminate your need to invest in hardware up front, helping you to develop and deploy applications faster.
In cloud computing, the ideal scenario is to keep persistent transactional states in databases so that those resources are the only things that actively require backups. When used in conjunction with AWS compute services, this minimizes the volume of data that you need to back up. Everything else is restored from a golden image or equivalent through auto scaling or a continuous integration and continuous delivery (CI/CD) pipeline. To estimate costs associated with service usage and the use of backup storage, use the AWS Pricing Calculator. Work backwards from your critical data that requires backups to help limit costs associated with your overall backup solution.
Amazon Elastic File System (Amazon EFS) provides serverless, fully elastic file storage to help you share file data without provisioning or managing storage capacity and performance. The service manages the file storage infrastructure for you to avoid the complexity of deploying, patching, and maintaining complex file system configurations.
The EFS-to-EFS Backup solution is suitable for Amazon EFS file systems in each AWS Region. It includes an AWS CloudFormation template that launches, configures, and runs the AWS services required to deploy the solution. This solution follows AWS best practices for security and availability.
Amazon S3 is an object storage service that offers industry-leading scalability, data availability, security, and performance designed for 99.999999999% (11 9’s) of durability. When using Amazon S3, you should configure the security of the S3 buckets and objects that are part of your backup solution. For more information on security best practices for Amazon S3, see Top 10 security best practices for securing data in Amazon S3 and The anatomy of ransomware event targeting data residing in Amazon S3.
If you need a backup strategy for multiple services or to manage backups from a single solution, consider using AWS Backup. AWS Backup is a fully-managed service that makes it simple to centralize and automate data protection across AWS services in the cloud, and on premises. For a list of supported services and resource feature availability, see the AWS Backup Developer Guide.
AWS Backup provides for centralized, policy-based data protection. Your backup data is encrypted using encryption keys managed by AWS Key Management Service (KMS), reducing your need to build and maintain a key management infrastructure. With AWS Backup, you can do the following:
AWS Backup can help you align with your data protection needs with real-time analytics and insights, as follows:
To estimate costs for individual services and features, use the AWS Pricing Calculator. For additional cost information, see the feature page for each service at AWS Cloud Products.
In this blog post, you learned about several AWS services and features to help you back up and restore your data. By analyzing and configuring backup and restore capabilities, you can enable resilience from an accidental deletion or security event.
Post Syndicated from Rapid7 original https://blog.rapid7.com/2023/03/22/celebrating-womens-history-month-at-rapid7/

Each March, we reflect on the historical accomplishments and ongoing need to support women. This, of course, should be embraced all 12 months of the year, but Women’s History Month gives us a special opportunity to learn from, celebrate, and amplify the voices of women.
At Rapid7, we’re shining a light on women’s voices all month long with special events and panel discussions, while recommitting to the ongoing efforts that last all year long. Below you’ll find some highlights from our International Women’s Day panel, which focused equity, inclusion, and advocacy in the workplace.
This year’s panel focused on the difference between equity and equality. While historically the focus has been on creating equal opportunities, it’s argued that focusing instead on equitable policies is more effective, as it takes into account the advantages and disadvantages of each individual’s circumstance.
“If we want to drive equitable processes to create an EQUAL playing field, we need to recognize the advantages and disadvantages that are out there today, and address them,” said Laura Ellis, Rapid7 Vice President of Data Engineering and Platform Analytics.
Creating equitable processes requires a dedicated effort and requires us to lean into hard conversations to address common stigmas. If organizations are committed to creating equitable policies and practices, having a culture that supports safe spaces is essential in getting to the most impactful solutions.
“Safety comes easy for a lot of our dominant groups or leaders with a certain title—but we should be aware that it’s not always there for our non-dominant groups,” said Nancy Li, Rapid7 Director of Engineering. “Be open to trying different forums where people can speak. Your loudest voices aren’t always representative of the whole population.”
So, what are some practices that we can take into the workplace to help create more equitable workplaces? Here are a few additional takeaways from the discussion.
This panel discussion took place on March 8th, and through the month our Women Impact Group will continue to partner with the business to host open and honest conversations and opportunities for reflection and education. This includes an allyship training session hosted by both our Women’s Impact Group and our PRIDE Impact Group, with guests from PFLAG.
In our internal communication channels, we’re spotlighting women in our organization who are making a considerable impact on our business and customers, shining an extra spotlight on the work and accomplishments of our own women at Rapid7. In a fireside chat, “Celebrating Women’s Voices”, leaders shared their own experiences in the workplace and the importance of sharing our journeys and building each other up. From parenting challenges to advocating for yourself and others, to moments of self doubt, these personal stories are shared to emphasize the importance of hard conversations and navigating challenges.
While we remain committed to uplifting the voices and representation of women in our industry throughout the year, we’re proud to have our Rapid Impact Groups driving these events in March that spark important conversations and provide real resources and opportunities for connection and community for our people.
Click here to learn more about our Rapid Impact Groups, and our ongoing commitment to diversity at Rapid7.
Post Syndicated from Wakana Vilquin-Sakashita original https://aws.amazon.com/blogs/big-data/manage-users-and-group-memberships-on-amazon-quicksight-using-scim-events-generated-in-iam-identity-center-with-azure-ad/
Amazon QuickSight is cloud-native, scalable business intelligence (BI) service that supports identity federation. AWS Identity and Access Management (IAM) allows organizations to use the identities managed in their enterprise identity provider (IdP) and federate single sign-on (SSO) to QuickSight. As more organizations are building centralized user identity stores with all their applications, including on-premises apps, third-party apps, and applications on AWS, they need a solution to automate user provisioning into these applications and keep their attributes in sync with their centralized user identity store.
When architecting a user repository, some organizations decide to organize their users in groups or use attributes (such as department name), or a combination of both. If your organization uses Microsoft Azure Active Directory (Azure AD) for centralized authentication and utilizes its user attributes to organize the users, you can enable federation across all QuickSight accounts as well as manage users and their group membership in QuickSight using events generated in the AWS platform. This allows system administrators to centrally manage user permissions from Azure AD. Provisioning, updating, and de-provisioning users and groups in QuickSight no longer requires management in two places with this solution. This makes sure that users and groups in QuickSight stay consistent with information in Azure AD through automatic synchronization.
In this post, we walk you through the steps required to configure federated SSO between QuickSight and Azure AD via AWS IAM Identity Center (Successor to AWS Single Sign-On) where automatic provisioning is enabled for Azure AD. We also demonstrate automatic user and group membership update using a System for Cross-domain Identity Management (SCIM) event.
The following diagram illustrates the solution architecture and user flow.

In this post, IAM Identity Center provides a central place to bring together administration of users and their access to AWS accounts and cloud applications. Azure AD is the user repository and configured as the external IdP in IAM Identity Center. In this solution, we demonstrate the use of two user attributes (department, jobTitle) specifically in Azure AD. IAM Identity Center supports automatic provisioning (synchronization) of user and group information from Azure AD into IAM Identity Center using the SCIM v2.0 protocol. With this protocol, the attributes from Azure AD are passed along to IAM Identity Center, which inherits the defined attribute for the user’s profile in IAM Identity Center. IAM Identity Center also supports identity federation with SAML (Security Assertion Markup Language) 2.0. This allows IAM Identity Center to authenticate identities using Azure AD. Users can then SSO into applications that support SAML, including QuickSight. The first half of this post focuses on how to configure this end to end (see Sign-In Flow in the diagram).
Next, user information starts to get synchronized between Azure AD and IAM Identity Center via SCIM protocol. You can automate creating a user in QuickSight using an AWS Lambda function triggered by the CreateUser SCIM event originated from IAM Identity Center, which was captured in Amazon EventBridge. In the same Lambda function, you can subsequently update the user’s membership by adding into the specified group (whose name is comprised of two user attributes: department-jobTitle, otherwise create the group if it doesn’t exist yet, prior to adding the membership.
In this post, this automation part is omitted because it would be redundant with the content discussed in the following sections.
This post explores and demonstrates an UpdateUser SCIM event triggered by the user profile update on Azure AD. The event is captured in EventBridge, which invokes a Lambda function to update the group membership in QuickSight (see Update Flow in the diagram). Because a given user is supposed to belong to only one group at a time in this example, the function will replace the user’s current group membership with the new one.
In Part I, you set up SSO to QuickSight from Azure AD via IAM Identity Center (the sign-in flow):
In Part II, you set up automation to change group membership upon an SCIM event (the update flow):
For this walkthrough, you should have the following prerequisites:
This section presents the steps to set up the sign-in flow.
To configure your external IdP, complete the following steps:
The IdP metadata is displayed. Keep this browser tab open.
To set up your IAM Identity Center application, complete the following steps:

IIC-QuickSight) and choose Create.The configuration should look like the following screenshot.


You’re all set with Azure AD SSO configuration at this moment. Later on, you’ll return to this page to configure automated provisioning, so keep this browser tab open.
Complete your IAM Identity Center configuration with the following steps:
IIC-QuickSight.xml).IIC-QuickSight.cer).Your provisioning method is still set as Manual (non-SCIM). In this step, we enable automatic provisioning so that IAM Identity Center becomes aware of the users, which allows identity federation to QuickSight.


IIC-QuickSight, then choose Provisioning.
When provisioning is complete, it will result in propagating one or more users from Azure AD to IAM Identity Center. The following screenshot shows the users that were provisioned in IAM Identity Center.

Note that upon this SCIM provisioning, the users in QuickSight should be created using the Lambda function triggered by the event originated from IAM Identity Center. In this post, we create a user and group membership via the AWS CLI (Step 8).
In this step, we create a QuickSight application in IAM Identity Center. You also configure an IAM SAML provider, role, and policy for the application to work. Complete the following steps:
quicksight.Amazon QuickSight.The users provisioned via SCIM earlier will be listed.
To set up your IAM SAML IdP for IAM Identity Center and IAM role, complete the following steps:
Azure-IIC-QS as Provider name.In this post, we create QuickSight users via an AWS CLI command, therefore we’re not creating any permission policy. However, if the self-provisioning feature in QuickSight is required, the permission policy for the CreateReader, CreateUser, and CreateAdmin actions (depending on the role of the QuickSight users) is required.
qs-reader-azure for the role.You use the ARN to configure attributes in your IAM Identity Center application.
To associate the IAM SAML IdP and IAM role to the QuickSight application in IAM Identity Center, complete the following steps:
Amazon QuickSight application, and on the Actions menu, choose Edit attribute mappings.| User attribute in the application | Maps to this string value or user attribute in IAM Identity Center |
| Subject | ${user:email} |
| https://aws.amazon.com/SAML/Attributes/RoleSessionName | ${user:email} |
| https://aws.amazon.com/SAML/Attributes/Role | arn:aws:iam::<ACCOUNTID>:role/qs-reader-azure,arn:aws:iam::<ACCOUNTID>:saml-provider/Azure-IIC-QS |
| https://aws.amazon.com/SAML/Attributes/PrincipalTag:Email | ${user:email} |
Note the following values:
PrincipalTag:Email is for the email syncing feature for self-provisioning users that need to be enabled on the QuickSight admin page. In this post, don’t enable this feature because we register the user with an AWS CLI command.As described earlier, users and groups in QuickSight are being created manually in this solution. We create them via the following AWS CLI commands.
The first step is to create a user in QuickSight specifying the IAM role created earlier and email address registered in Azure AD. The second step is to create a group with the group name as combined attribute values from Azure AD for the user created in the first step. The third step is to add the user into the group created earlier; member-name indicates the user name created in QuickSight that is comprised of <IAM Role name>/<session name>. See the following code:
At this point, the end-to-end configuration of Azure AD, IAM Identity Center, IAM, and QuickSight is complete.
Now you’re ready to log in to QuickSight using the IdP-initiated SSO flow:
https://d-xxxxxxxxxx.awsapps.com/start).You’re redirected to the Azure AD login prompt.
You’re redirected back to the IAM Identity Center portal.

You’re automatically redirected to your QuickSight home.

In this section, we configure the update flow.
When an Azure AD administrator makes any changes to the attributes on the particular user profile, the change will be synced with the user profile in IAM Identity Center via SCIM protocol, and the activity is recorded in an AWS CloudTrail event called UpdateUser by sso-directory.amazonaws.com (IAM Identity Center) as the event source. Similarly, the CreateUser event is recorded when a user is created on Azure AD, and the DisableUser event is for when a user is disabled.
The following screenshot on the Event history page shows two CreateUser events: one is recorded by IAM Identity Center, and the other one is by QuickSight. In this post, we use the one from IAM Identity Center.

In order for EventBridge to be able to handle the flow properly, each event must specify the fields of an event that you want the event pattern to match. The following event pattern is an example of the UpdateUser event generated in IAM Identity Center upon SCIM synchronization:
In this post, we demonstrate an automatic update of group membership in QuickSight that is triggered by the UpdateUser SCIM event.
In order for the Lambda function to manage group membership in QuickSight, it must obtain the two user attributes (department and jobTitle). To make the process simpler, we’re combining two attributes in Azure AD (department, jobTitle) into one attribute in IAM Identity Center (title), using the attribute mappings feature in Azure AD. IAM Identity Center then uses the title attribute as a designated group name for this user.
IIC-QuickSight, and Provisioning.
jobTitle from the list of Azure Active Directory Attributes.ExpressionJoin("-", [department], [jobTitle])title
The attribute is automatically updated in IAM Identity Center. The updated user profile looks like the following screenshots (Azure AD on the left, IAM Identity Center on the right).


Now we create a Lambda function to update QuickSight group membership upon the SCIM event. The core part of the function is to obtain the user’s title attribute value in IAM Identity Center based on the triggered event information, and then to ensure that the user exists in QuickSight. If the group name doesn’t exist yet, it creates the group in QuickSight and then adds the user into the group. Complete the following steps:
UpdateQuickSightUserUponSCIMEvent.lambda.amazonaws.com):
Note that this Lambda function requires Boto3 1.24.64 or later. If the Boto3 included in the Lambda runtime is older than this, use a Lambda layer to use the latest version of Boto3. For more details, refer to How do I resolve “unknown service”, “parameter validation failed”, and “object has no attribute” errors from a Python (Boto 3) Lambda function.
To create an EventBridge rule to invoke the previously created Lambda function, complete the following steps:
updateQuickSightUponSCIMEvent.UpdateQuickSightUserUponSCIMEvent).Let’s modify a user’s attribute at Azure AD, and then check if the new group is created and that the user is added into the new one.

In Azure AD, the SCIM provisioning interval is fixed to 40 minutes. To get immediate results, we manually stop and start the provisioning.

Now you should find that the new group is created and the user is assigned to this group.

When you’re finished with the solution, clean up your environment to minimize cost impact. You may want to delete the following resources:
This post provided step-by-step instructions to configure IAM Identity Center SCIM provisioning and SAML 2.0 federation from Azure AD for centralized management of QuickSight users. We also demonstrated automated group membership updates in QuickSight based on user attributes in Azure AD, by using SCIM events generated in IAM Identity Center and setting up automation with EventBridge and Lambda.
With this event-driven approach to provision users and groups in QuickSight, system administrators can have full flexibility in where the various different ways of user management could be expected depending on the organization. It also ensures the consistency of users and groups between QuickSight and Azure AD whenever a user accesses QuickSight.
We are looking forward to hearing any questions or feedback.
 Takeshi Nakatani is a Principal Bigdata Consultant on Professional Services team in Tokyo. He has 25 years of experience in IT industry, expertised in architecting data infrastructure. On his days off, he can be a rock drummer or a motorcyclyst.
 Wakana Vilquin-Sakashita is Specialist Solution Architect for Amazon QuickSight. She works closely with customers to help making sense of the data through visualization. Previously Wakana worked for S&P Global assisting customers to access data, insights and researches relevant for their business.
Post Syndicated from Mahesh Biradar original https://aws.amazon.com/blogs/devops/integrating-with-github-actions-amazon-codeguru-in-your-devsecops-pipeline/
Many organizations have adopted DevOps practices to streamline and automate software delivery and IT operations. A DevOps model can be adopted without sacrificing security by using automated compliance policies, fine-grained controls, and configuration management techniques. However, one of the key challenges customers face is analyzing code and detecting any vulnerabilities in the code pipeline due to a lack of access to the right tool. Amazon CodeGuru addresses this challenge by using machine learning and automated reasoning to identify critical issues and hard-to-find bugs during application development and deployment, thus improving code quality.
We discussed how you can build a CI/CD pipeline to deploy a web application in our previous post “Integrating with GitHub Actions – CI/CD pipeline to deploy a Web App to Amazon EC2”. In this post, we will use that pipeline to include security checks and integrate it with Amazon CodeGuru Reviewer to analyze and detect potential security vulnerabilities in the code before deploying it.
Amazon CodeGuru Reviewer helps you improve code security and provides recommendations based on common vulnerabilities (OWASP Top 10) and AWS security best practices. CodeGuru analyzes Java and Python code and provides recommendations for remediation. CodeGuru Reviewer detects a deviation from best practices when using AWS APIs and SDKs, and also identifies concurrency issues, resource leaks, security vulnerabilities and validates input parameters. For every workflow run, CodeGuru Reviewer’s GitHub Action copies your code and build artifacts into an S3 bucket and calls CodeGuru Reviewer APIs to analyze the artifacts and provide recommendations. Refer to the code detector library here for more information about CodeGuru Reviewer’s security and code quality detectors.
With GitHub Actions, developers can easily integrate CodeGuru Reviewer into their CI workflows, conducting code quality and security analysis. They can view CodeGuru Reviewer recommendations directly within the GitHub user interface to quickly identify and fix code issues and security vulnerabilities. Any pull request or push to the master branch will trigger a scan of the changed lines of code, and scheduled pipeline runs will trigger a full scan of the entire repository, ensuring comprehensive analysis and continuous improvement.
The solution comprises of the following components:
The following diagram illustrates the architecture:

Figure 1. Architecture Diagram of the proposed solution in the blog
This blog post is a continuation of our previous post – Integrating with GitHub Actions – CI/CD pipeline to deploy a Web App to Amazon EC2. You will need to setup your pipeline by following instructions in that blog.
After completing the steps, you should have a local repository with the below directory structure, and one completed Actions run.

Figure 2. Directory structure
To enable automated deployment upon git push, you will need to make a change to your .github/workflow/deploy.yml file. Specifically, you can activate the automation by modifying the following line of code in the deploy.yml file:
From:
To:
The following steps provide a high-level overview of the walkthrough:
Note that CodeGuru Reviewer expects the S3 bucket name to begin with codeguru-reviewer-.

Figure 3. Associate the repository
At this point, you will have completed your initial full analysis run. However, since this is a simple “helloWorld” program, you may not receive any recommendations. In the following steps, you will incorporate vulnerable code and trigger the analysis again, allowing CodeGuru to identify and provide recommendations for potential issues.
Your code has been pushed to the repository and will trigger the workflow as per the configuration in GitHub Actions.

Figure 4. GitHub Actions pipeline

Figure 5. Codescan actions logs
Once you have run the CodeGuru Reviewer Action, any security findings and recommendations will be displayed on the Security tab within the GitHub user interface. This will provide you with a clear and convenient way to view and address any issues that were identified during the analysis.

Figure 6. Security tab with results
To avoid incurring future charges, you should clean up the resources that you created.
Amazon CodeGuru is a valuable tool for software development teams looking to improve the quality and efficiency of their code. With its advanced AI capabilities, CodeGuru automates the manual parts of code review and helps identify performance, cost, security, and maintainability issues. CodeGuru also integrates with popular development tools and provides customizable recommendations, making it easy to use within existing workflows. By using Amazon CodeGuru, teams can improve code quality, increase development speed, lower costs, and enhance security, ultimately leading to better software and a more successful overall development process.
In this post, we explained how to integrate Amazon CodeGuru Reviewer into your code build pipeline using GitHub actions. This integration serves as a quality gate by performing code analysis and identifying challenges in your code. Now you can access the CodeGuru Reviewer recommendations directly within the GitHub user interface for guidance on resolving identified issues.
About the author:
Post Syndicated from Cliff Robinson original https://www.servethehome.com/giga-computing-goes-full-amd-ryzen-server/
Giga Computing has four new 1U AMD Ryzen servers continuing a theme we have seen in the low-cost single socket server space
The post Giga Computing Goes Full AMD Ryzen Server appeared first on ServeTheHome.
Post Syndicated from BeardedTinker original https://www.youtube.com/watch?v=HQj0WHkfqRY
Post Syndicated from original https://lwn.net/Articles/926856/
Version
44 of the GNOME desktop environment has been released. “This
“. See the release
release brings a grid view in the file chooser, improved settings panels
for Device Security, Accessibility, etc, and refined quick settings in the
shell. The Software and Files apps have seen improvements, and a whole slew
of new apps has joined the GNOME
Circle
notes for details.
Post Syndicated from Geographics original https://www.youtube.com/watch?v=UAm96_LF_40
Post Syndicated from original https://lwn.net/Articles/926843/
Security updates have been issued by Fedora (firefox), Oracle (kernel, kernel-container, and nss), and SUSE (curl, dpdk, drbd, go1.18, kernel, openstack-cinder, openstack-glance, openstack-neutron-gbp,, oracleasm, python3, slirp4netns, and xen).
Post Syndicated from Cliff Robinson original https://www.servethehome.com/nvidia-h100-nvl-for-high-end-ai-inference-launched/
The NVIDIA H100 NVL is the company’s fastest and most power efficient H100 series GPU at its launch boasting an updated memory subsystem
The post NVIDIA H100 NVL for High-End AI Inference Launched appeared first on ServeTheHome.
Post Syndicated from The Hook Up original https://www.youtube.com/watch?v=VeSa4Txg7fs
Post Syndicated from The History Guy: History Deserves to Be Remembered original https://www.youtube.com/watch?v=oF1iwk7vigE
Post Syndicated from Bruce Schneier original https://www.schneier.com/blog/archives/2023/03/chatgpt-privacy-flaw.html
OpenAI has disabled ChatGPT’s privacy history, almost certainly because they had a security flaw where users were seeing each others’ histories.
Post Syndicated from Bozho original https://blog.bozho.net/blog/4039
Чадър на трупчета. Така метафорично може да бъде описана прокуратурата. Заради чадърите, които се опъват над определени разследвания. И заради делата, които се държат „на трупчета“, за да бъдат държани хора в зависимост.
Защо искаме реформа на прокуратурата? Защото е важно не какви пресконференции дава прокуратурата, и дори не колко процента осъдителни присъди има, а колко обвинения и какви са повдигнати в един конкретен сегмент – висши публични длъжности (министри, зам-министри, председатели на агенции, кметове и др.).
Кого НЕ е обвинила прокуратурата? Ако знаеш, че всяка схема ще ти се размине, защото „имаш човек/чадър в прокуратурата“, корупцията е неизбежна.
Кого са обвинили със съзнателни пропуски в обвинението, за да падне в съда?
Кого са обвинили без доказателства, за назидание, че не се е подчинил (да, тези дела се разпадат в съда, но на човека му се лепи етикета „обвиняем“)
И най-важното: за кого главният прокурор има „папки“, които чакат „на трупчета“ да бъдат отворени – когато си на властова позиция и ти покажат папката в прокуратурата, за да не се отклоняваш от „правия път“.
Какво общо има главния прокурор с това? Че то се случва с негово формално или неформално искане. И че всички прокурори зависят кариерно от него.
В Конституцията има чл. 126, ал. 2: „Главният прокурор осъществява надзор за законност и методическо ръководство върху дейността на всички прокурори“.
Заради тази алинея и заради няколко други структурни предпоставки няма как да има съдебна реформа без изменение в Конституцията. И затова настояваме за такава от години. За да няма чадъри и трупчета по решение на един свръховластен и безконтролен човек, който и да е той. Защото това е основна пречка пред нормалното функциониране на държавата във всички нейни части.
Материалът Чадър на трупчета: как прокуратурата има безконтролна власт е публикуван за пръв път на БЛОГодаря.
Post Syndicated from Светла Енчева original https://www.toest.bg/zhenskoto-litse-na-bednostta-v-bulgariya/

В статията „Женска приказка за стълбата към стъкления таван“, която се основава на доклада „Гласовете на жените в България“ към проекта „Изследване на нуждите и проблемите на жените в България”, разказах за неравното третиране на жените на пазара на труда. Тази тема има логично продължение. Защото ако жените често не са наемани в по-високо платени, типично „мъжки“ професии или получават по-малко от мъжете за една и съща работа, те са в по-голям риск от изпадане в бедност. Рискът се засилва и поради обстоятелството, че е разпространена практика жени, които имат малки деца или дори само се предполага, че скоро може да имат, изобщо да не бъдат наемани на работа.
По данни на НСИ от 2021 г. жените в риск от бедност, с материални и социални лишения, както и тези, които живеят в домакинства на безработни или с нисък интензитет на икономическа активност, са с 4,5 процентни пункта повече от мъжете. И дори с годините и мъжете, и жените в риск от бедност да намаляват, тази разлика между тях остава постоянна. В най-голям риск са ромите – 78,7% от тях могат да изпаднат в бедност. За сравнение, рискът за българското етническо мнозинство е 25,1%, а за етническите турци – 34,6%.
Ще представя няколко лица на бедността през личните истории на някои от 42-те жени, за които се разказва в доклада. Ще добавя и информация от биографичните интервюта, която не е намерила място в него. Този път обаче ще се концентрирам по-подробно върху историята на една жена – не защото в интервютата няма много други примери за бедност, дори по-шокиращи, а защото тя най-подробно изговаря какво означава да нямаш пари.
Ще разкажа и за три от четирите ромски жени, които участват в изследването. Макар то да не е представително, три четвърти от ромките в него споделят, че парите не им стигат, което отговаря на статистическите данни за жените от този етнос, които са в риск от бедност.
Историята на 29-годишната Ани (имената са измислени) онагледява една зависимост, която се откроява в много от интервютата – ако едно момиче е отраснало в бедност, голяма е вероятността да се бори с бедността и като пораснала жена. Независимо от образованието и квалификацията си.
От проблемна тийнейджърка до социална работничка
В гимназията Ани преживява „тъжен, депресивен период, бунтарски“ и развива проблемно поведение. Една от предпоставките за това е постоянният тормоз – включително сексуален – от страна на момчетата в преобладаващо „мъжкото“ ѝ училище. Според нея отговорност носят и родителите ѝ, които са я възпитавали „безгранично“, тоест са я оставяли да прави каквото си иска – било защото са искали да са либерални с децата си, било поради борбата си с бедността: „Моите родители, те пък бяха по-скоро заети с това да оцеляваме, отколкото да се занимават с моето емоционално благосъстояние. […] Всъщност те имаха много дълги периоди, в които не им се изплащаха редовно заплатите, задлъжняха към приятели и близки.“
Ани започва да се държи агресивно и се забърква „с всякакви неблагоприятни хора“. В опит да се справят с нея, от училището търсят помощ от неправителствена организация, която ѝ подава ръка. И не само ѝ помага да преодолее тежкия си период, а и я вдъхновява да се посвети на социалната работа. Още в гимназията момичето става доброволка към организацията, после и социална работничка в нея. Завършва магистратура по психология. След това работи и за други неправителствени организации.
Защо Ани обмисля да напусне работа
Въпреки квалификацията си Ани едва оцелява финансово: „Предполагам, знаете, че социалната работа е изключително слабо платена. […] Изискването е хората да са магистри по психология, с минимум две години стаж в сферата и всякакви такива допълнителни неща, и в същия момент чисто вземаме по 5,80 лв. на час.“ Тя не успява да спестява пари – и малкото ѝ средства биват „изгълтани“ от двете кучета, които е прибрала от улицата.
Ани е имала две връзки с мъже програмисти, с които е съжителствала. Те са покривали основните разходи на домакинството, защото са носили основния доход – „и двамата за един месец са вземали толкова, колкото аз вземам за 3–4 месеца“. Днес живее сама на квартира и се срамува, че се налага да иска пари от родителите си: „Не е като да съм мързелива, не е като да съм неграмотна, напротив!“
Споделя, че обмисля да смени професионалното си поприще, което обича: „Сега, като започне отоплителният сезон […], с моите приходи […] как бих могла да си плащам тока? […] В момента обмислям да напусна, за да си намеря някаква по-обикновена работа, която просто ще я върша буквално за пари. […] Мен лично ми е гадно от това – искам това, което правя, да ми носи удоволствие, а не само за да плащам тока.“
Какво е да си на дъното на пирамидата на Маслоу
Парите не са най-важното в живота на Ани, но хроничната им липса я кара да се чувства стресирана и непълноценна: „Не се имам за човек материалист по никакъв начин, но когато ми се налага да правя избори „или–или“ на ежедневна база, само и само за да мога да скътам някой лев, това товари, това напряга. Иска ми се […] абе, дори на масаж да отида. Мисля, че всеки един човек на този свят заслужава да има едни заделени 100 лв. на месечна база за лично удоволствие.“
За Ани начинът, по който тя преживява перманентната си борба с бедността, не е въпрос на личен характер, а е закономерен. За да онагледи тази закономерност, тя се позовава на пирамидата на Маслоу: „Наистина, ако са ти задоволени първичните нужди, човек има спокойствието да мисли и да се развива. Това като не ти е осигурено, и ти стоиш един разстроен, тревожен, почваш да нервничиш, защото това ти е ежедневна мисъл.“
Представям ви Моника, Сара и Стояна. За друг аспект от живота им вече разказах в статия в „Свободна Европа“ за отпадането на ромските момичета от училище. За разлика от Ани, те не са без партньор, а са омъжени, с деца. Но не отговарят на клишето за многодетните ромски майки – Моника и Сара са с по две деца, в интервюто Стояна споменава за двама сина и внуци. Освен това и трите работят.
Моника, която мечтае за самостоятелен дом
Моника е на 25 години. Напуснала е училище след шести клас, защото приятелките ѝ от ромската махала са се оженили и се е чувствала самотна сред българските си съученици. Животът ѝ се върти около децата – освен за своите две се грижи и за други деца към неправителствената организация, за която работи.
В отглеждането на собствените ѝ деца помага свекървата, която ги води на детска градина, когато Моника е на работа. Родителите ѝ работят в Германия, затова не могат да се включат в грижите. Допреди няколко години е помагал и съпругът ѝ: „… той е доста отговорен и доста се грижи за тях […]. Работеше по чистотата, от 3–4 години пътува доста. Ходи в Германия, по чужбина, такива работи.“ В момента мъжът ѝ работи в Англия.
Самата Моника, преди да постъпи в неправителствената организация, е поработила малко в Нидерландия. Причината тя и членове на семейството ѝ да търсят препитание в чужбина е една – липсата на пари. „Като имаш деца, имаш разходи доста, плащаш ток, на тях им се искат дрехи, такива работи, и […] все не стигат [парите].“
Моника не мечтае за свобода и развлечение. „В нашата среда е недопустимо да излезеш някъде сама, където ти скимне, ако си жена“, казва тя. Камо ли да отидеш на кафе извън ромската махала. В тази среда не можеш „да бъдеш самостоятелен, ти да си решаваш какво искаш да правиш“. Защото „произходът, произходът го налага“.
Това, от което Моника има нужда, е дом за семейството ѝ, тъй като живее при родителите на мъжа си: „Самостоятелен дом, в който да си живееш с децата, да имаш свое място, където да е само твое.“ Ала засега не може да си го позволи.
Сара, която е жертвала мечтата си за висше образование
35-годишната Сара е единствената от интервюираните ромски жени, завършила средно образование, без да прекъсва. Дипломира се с профил „Счетоводство“ и планира да кандидатства в университет. Но… настъпва хиперинфлацията от 1996–1997 г., известна като „Виденовата зима“. Семейството ѝ изпада в затруднение и затова Сара жертва мечтите си за университет: „Имаше период, мисля, че година и повече, в който татко не работеше, само майка работеше. Имахме и заем. И това изключително много ги натоварваше. Аз знаех, че когато тръгна да уча, те трябва да имат някакви пари, докато си стъпя на крака, докато започна работа – семестри, които трябва да се плащат. Затова предпочетох да не ги въвличам пак в някои нови заеми и такива неща. И казах, че не искам, а те знаеха, че аз искам.“
Днес Сара работи в обувна фабрика – едно от основните поприща за ромските жени в нейния град. Съпругът ѝ е строител. Въпреки че и двамата работят, Сара смята, че семейството ѝ не е добре финансово. Затова се е записала на курс за офис секретар, който също ѝ се заплаща, и така получава пари от две места.
„Ако днес можех да избирам, бих продължила ученето. Аз и тогава исках да продължа ученето. Желанието ми беше огромно и родителите ми виждаха това“, казва Сара със съжаление и се размечтава: „Ако можех, сега бих станала някакъв дизайнер.“
Сара се притеснява за бъдещето на дъщеря си, защото знае, че не е лесно да си жена в ромско гето. За сина си няма такива тревоги – мъжете от квартала се оправят. И тя, както и Моника, мечтае за собствена къща, но „извън квартала, да не сме в махалата. Искам къща на село. Това ми е мечтата, за това мечтаем и говорим постоянно с моя съпруг. Искаме къща, за да не сме в гетото“.
Стояна, която знае, че и възрастните хора имат потребности
56-годишната Стояна работи в неправителствена организация и смята, че парите не ѝ стигат. В рода ѝ бедността се предава през поколенията – родителите ѝ са от семейства на бедни работници. Тя напуска училище в осми клас, за да се ожени. Била е и чистачка, но се посвещава на работа, в която може да помага на други ромски жени. Затова и завършва гимназия – на 43-годишна възраст.
Мечтата на Моника и Сара за самостоятелен дом е станала реалност за Стояна, но не по лесния начин. „От мама и тате – директно при чужди хора, непознати. В началото беше много трудно – при свекърва и свекър. Те [децата им] бяха трима братя, аз съм най-голямата снаха. Трудно беше, дванайсет години живях при свекърва, с две етърви, трите с по две деца, знаете, шумна къща, проблеми навсякъде.“
Липсата на пари е била един от малкото поводи за конфликти между Стояна и мъжа ѝ: „Сериозни караници сме нямали. Предимно кавгите идват, когато човек остане например без пари […], но трябва да има компромис и отстъпка, за да продължи човек напред.“
След 12-те трудни години в къщата на свекъра и свекървата Стояна и мъжът ѝ, който междувременно работи в чужбина, успяват да заделят пари за собствена къща наблизо в махалата. Голяма, на три етажа – един за тях двамата и по един за синовете, снахите и децата им.
„Голяма къща, обаче хората липсват“, споделя Стояна. Днес мъжът ѝ работи из курортите по Черноморието. Бедността е принудила синовете и снахите да търсят препитание в Англия, с тях са и внуците. Защото „всички знаем, че тук парите не стигат, малко пари, животът стана толкова скъп! […] Само едното момиче остана, но и то ще замине скоро“.
Стояна обяснява емиграцията на децата си с интересите на внуците, които растат, а „нали знаете, младите искат всичко да им е точно, всеки иска“. После се замисля: „И стар да си, ти си имаш своите неща, които ежедневно искаш. Парите са важни.“
Личните истории на Ани, Моника, Сара и Стояна са уникални, но зад тях можем да разчетем някои структурни проблеми. За един от тях стана дума по-горе – бедността има свойството да се възпроизвежда. Единици са тези от интервюираните 42 жени, които са успели да превъзмогнат финансово недоимъка, в който са отраснали.
Структурен проблем е и че силно феминизираните професии по правило са по-нископлатени от смятаните за „мъжки“ поприща. Социалната работа – и в публичния, и в неправителствения сектор – е силно феминизирана и закономерно, зле платена. Да, в тази област се случва да работят и мъже, но те са по-скоро изключения.
Равните шансове намаляват още повече за жените от ромските гета. Възможностите им за работа са в ограничен брой поприща, и то в зависимост от населеното място – някъде има обувни фабрики, другаде метенето на улици е почти единственият шанс. На ромските мъже също не им е лесно. Но те могат да станат и строители и да печелят в пъти повече от една жена в обувна фабрика. За тях е по-лесно сами да отидат да работят в друг град или в чужбина.
Ето защо бедността не може да се преодолее само с повишаване на доходите. Колкото по-силни са стереотипите и дискриминацията и колкото по-неравни са шансовете, толкова повече ще се възпроизвежда тя.