Post Syndicated from Talks at Google original https://www.youtube.com/watch?v=K9DBseqBLok
Unlocking new use cases with 17 new models in Workers AI, including new LLMs, image generation models, and more
Post Syndicated from Michelle Chen original https://blog.cloudflare.com/february-28-2024-workersai-catalog-update

On February 6th, 2024 we announced eight new models that we added to our catalog for text generation, classification, and code generation use cases. Today, we’re back with seventeen (17!) more models, focused on enabling new types of tasks and use cases with Workers AI. Our catalog is now nearing almost 40 models, so we also decided to introduce a revamp of our developer documentation that enables users to easily search and discover new models.
The new models are listed below, and the full Workers AI catalog can be found on our new developer documentation.
Text generation
- @cf/deepseek-ai/deepseek-math-7b-instruct
- @cf/openchat/openchat-3.5-0106
- @cf/microsoft/phi-2
- @cf/tinyllama/tinyllama-1.1b-chat-v1.0
- @cf/thebloke/discolm-german-7b-v1-awq
- @cf/qwen/qwen1.5-0.5b-chat
- @cf/qwen/qwen1.5-1.8b-chat
- @cf/qwen/qwen1.5-7b-chat-awq
- @cf/qwen/qwen1.5-14b-chat-awq
- @cf/tiiuae/falcon-7b-instruct
- @cf/defog/sqlcoder-7b-2
Summarization
- @cf/facebook/bart-large-cnn
Text-to-image
- @cf/lykon/dreamshaper-8-lcm
- @cf/runwayml/stable-diffusion-v1-5-inpainting
- @cf/runwayml/stable-diffusion-v1-5-img2img
- @cf/bytedance/stable-diffusion-xl-lightning
Image-to-text
- @cf/unum/uform-gen2-qwen-500m
New language models, fine-tunes, and quantizations
Today’s catalog update includes a number of new language models so that developers can pick and choose the best LLMs for their use cases. Although most LLMs can be generalized to work in any instance, there are many benefits to choosing models that are tailored for a specific use case. We are excited to bring you some new large language models (LLMs), small language models (SLMs), and multi-language support, as well as some fine-tuned and quantized models.
Our latest LLM additions include falcon-7b-instruct, which is particularly exciting because of its innovative use of multi-query attention to generate high-precision responses. There’s also better language support with discolm_german_7b and the qwen1.5 models, which are trained on multilingual data and boast impressive LLM outputs not only in English, but also in German (discolm) and Chinese (qwen1.5). The Qwen models range from 0.5B to 14B parameters and have shown particularly impressive accuracy in our testing. We’re also releasing a few new SLMs, which are growing in popularity because of their ability to do inference faster and cheaper without sacrificing accuracy. For SLMs, we’re introducing small but performant models like a 1.1B parameter version of Llama (tinyllama-1.1b-chat-v1.0) and a 1.3B parameter model from Microsoft (phi-2).
As the AI industry continues to accelerate, talented people have found ways to improve and optimize the performance and accuracy of models. We’ve added a fine-tuned model (openchat-3.5) which implements Conditioned Reinforcement Learning Fine-Tuning (C-RLFT), a technique that enables open-source language model development through the use of easily collectable mixed quality data.
We’re really excited to be bringing all these new text generation models onto our platform today. The open-source community has been incredible at developing new AI breakthroughs, and we’re grateful for everyone’s contributions to training, fine-tuning, and quantizing these models. We’re thrilled to be able to host these models and make them accessible to all so that developers can quickly and easily build new applications with AI. You can check out the new models and their API schemas on our developer docs.
New image generation models
We are adding new Stable Diffusion pipelines and optimizations to enable powerful new image editing and generation use cases. We’ve added support for Stable Diffusion XL Lightning which generates high quality images in just two inference steps. Text-to-image is a really popular task for folks who want to take a text prompt and have the model generate an image based on the input, but Stable Diffusion is actually capable of much more. With this new Workers AI release, we’ve unlocked new pipelines so that you can experiment with different modalities of input and tasks with Stable Diffusion.
You can now use Stable Diffusion on Workers AI for image-to-image and inpainting use cases. Image-to-image allows you to transform an input image into a different image – for example, you can ask Stable Diffusion to generate a cartoon version of a portrait. Inpainting allows users to upload an image and transform the same image into something new – examples of inpainting include “expanding” the background of photos or colorizing black-and-white photos.
To use inpainting, you’ll need to input an image, a mask, and a prompt. The image is the original picture that you want modified, the mask is a monochrome screen that highlights the area that you want to be painted over, and the prompt tells the model what to generate in that space. Below is an example of the inputs and the request template to perform inpainting.

import { Ai } from '@cloudflare/ai';

export default {
    async fetch(request, env) {
        const formData = await request.formData();
        const prompt = formData.get("prompt")
        const imageFile = formData.get("image")
        const maskFile = formData.get("mask")

        const imageArrayBuffer = await imageFile.arrayBuffer();
        const maskArrayBuffer = await maskFile.arrayBuffer();

        const ai = new Ai(env.AI);
        const inputs = {
            prompt,
            image: [...new Uint8Array(imageArrayBuffer)],
            mask: [...new Uint8Array(maskArrayBuffer)],
            strength: 0.8, // Adjust the strength of the transformation
            num_steps: 10, // Number of inference steps for the diffusion process
        };

        const response = await ai.run("@cf/runwayml/stable-diffusion-v1-5-inpainting", inputs);

        return new Response(response, {
            headers: {
                "content-type": "image/png",
            },
        });
    }
}
New use cases
We’ve also added new models to Workers AI that allow for various specialized tasks and use cases, such as LLMs specialized in solving math problems (deepseek-math-7b-instruct), generating SQL code (sqlcoder-7b-2), summarizing text (bart-large-cnn), and image captioning (uform-gen2-qwen-500m).
We wanted to release these to the public, so you can start building with them, but we’ll be releasing more demos and tutorial content over the next few weeks. Stay tuned to our X account and Developer Documentation for more information on how to use these new models.
Optimizing our model catalog
AI model innovation is advancing rapidly, and so are the tools and techniques for fast and efficient inference. We’re excited to be incorporating new tools that help us optimize our models so that we can offer the best inference platform for everyone. Typically, when optimizing AI inference it is useful to serialize the model into a format such as ONNX, one of the most generally applicable options for this use case with broad hardware and model architecture support. An ONNX model can be further optimized by being converted to a TensorRT engine. This format, designed specifically for Nvidia GPUs, can result in faster inference latency and higher total throughput from LLMs. Choosing the right format usually comes down to what is best supported by specific model architectures and the hardware available for inference. We decided to leverage both TensorRT and ONNX formats for our new Stable Diffusion pipelines, which represent a series of models applied for a specific task.
Explore more on our new developer docs
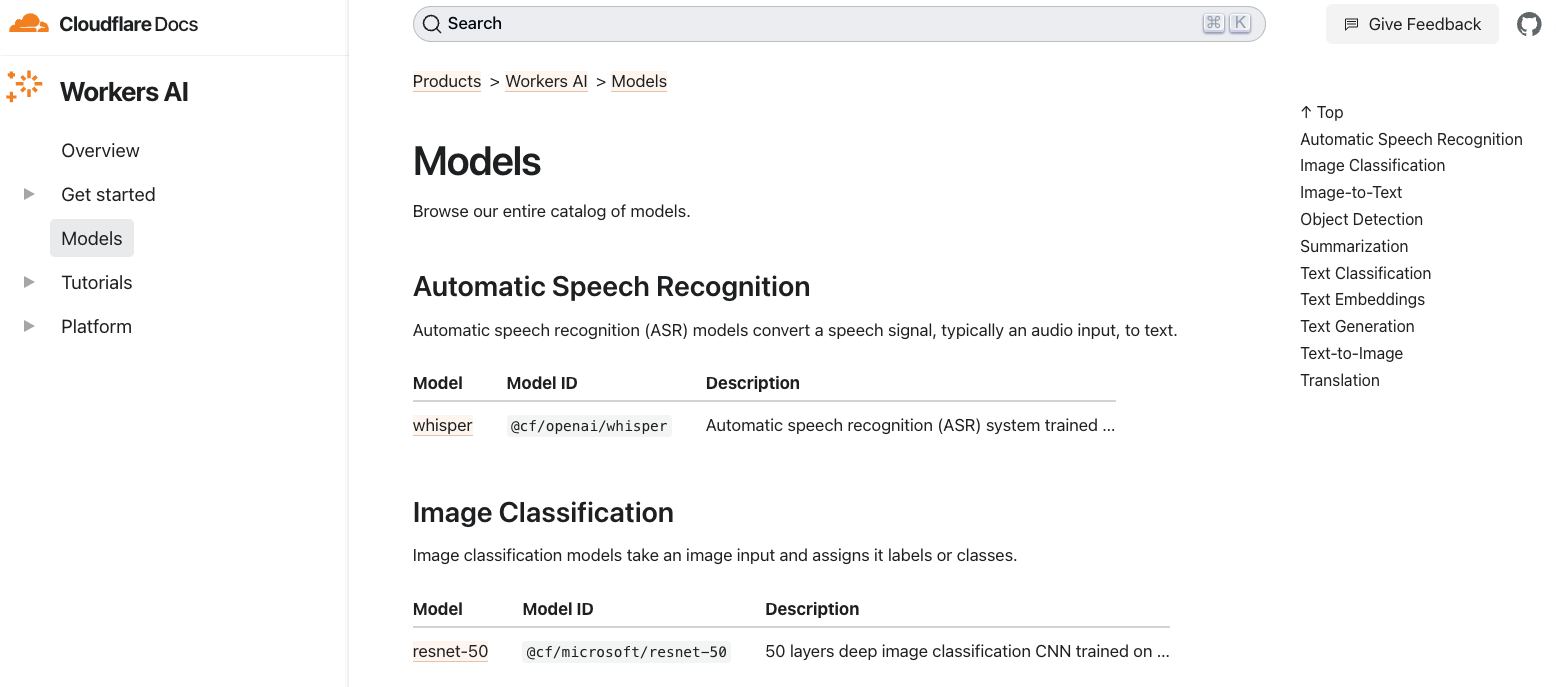
You can explore all these new models in our new developer docs, where you can learn more about individual models, their prompt templates, as well as properties like context token limits. We’ve redesigned the model page to be simpler for developers to explore new models and learn how to use them. You’ll now see all the models on one page for searchability, with the task type on the right-hand side. Then, you can click into individual model pages to see code examples on how to use those models.
We hope you try out these new models and build something new on Workers AI! We have more updates coming soon, including more demos, tutorials, and Workers AI pricing. Let us know what you’re working on and other models you’d like to see on our Discord.
Tails 6.0 released
Post Syndicated from jzb original https://lwn.net/Articles/963986/
Tails 6.0 is now available. Based on Debian, Tails is a portable operating system designed to run from a USB stick and help users avoid surveillance and censorship. This release updates most Tails applications, and includes important security and usability improvements.
One major new feature in 6.0 is to provide warnings to users about
errors when reading or
writing to persistent storage. This release now ignores USB devices plugged in while the screen is locked, and removes some file and disk-wiping features from the Files application that are “not reliable enough
” on USB sticks and SSDs to continue offering to users.
Users of Tails prior to 6.0~rc1 will need to do a manual
upgrade to retain persistent storage. New users can download Tails for
USB, or as
an ISO
to create a DVD or run Tails in a virtual machine.
WERACLE | We Are Miracle | Talks at Google
Post Syndicated from Talks at Google original https://www.youtube.com/watch?v=dWJKtssInJA
[$] The KDE desktop gets an overhaul with Plasma 6
Post Syndicated from jzb original https://lwn.net/Articles/963851/
It’s been nearly 10 years since
KDE Plasma 5,
which is the last major release of the desktop.
On February 28 the project announced its “mega release” of KDE
Plasma 6, KDE Frameworks 6, and KDE Gear 24.02 — all based on the Qt 6 development framework. This
release focuses heavily on migrating to Wayland, and aspires to be a seamless
upgrade for the user while improving performance, security, and support
for newer hardware. For developers, a lot of work has gone into removing
deprecated frameworks and decreasing dependencies to make it easier to write
applications targeting KDE.
Enhance container software supply chain visibility through SBOM export with Amazon Inspector and QuickSight
Post Syndicated from Jason Ng original https://aws.amazon.com/blogs/security/enhance-container-software-supply-chain-visibility-through-sbom-export-with-amazon-inspector-and-quicksight/
In this post, I’ll show how you can export software bills of materials (SBOMs) for your containers by using an AWS native service, Amazon Inspector, and visualize the SBOMs through Amazon QuickSight, providing a single-pane-of-glass view of your organization’s software supply chain.
The concept of a bill of materials (BOM) originated in the manufacturing industry in the early 1960s. It was used to keep track of the quantities of each material used to manufacture a completed product. If parts were found to be defective, engineers could then use the BOM to identify products that contained those parts. An SBOM extends this concept to software development, allowing engineers to keep track of vulnerable software packages and quickly remediate the vulnerabilities.
Today, most software includes open source components. A Synopsys study, Walking the Line: GitOps and Shift Left Security, shows that 8 in 10 organizations reported using open source software in their applications. Consider a scenario in which you specify an open source base image in your Dockerfile but don’t know what packages it contains. Although this practice can significantly improve developer productivity and efficiency, the decreased visibility makes it more difficult for your organization to manage risk effectively.
It’s important to track the software components and their versions that you use in your applications, because a single affected component used across multiple organizations could result in a major security impact. According to a Gartner report titled Gartner Report for SBOMs: Key Takeaways You Should know, by 2025, 60 percent of organizations building or procuring critical infrastructure software will mandate and standardize SBOMs in their software engineering practice, up from less than 20 percent in 2022. This will help provide much-needed visibility into software supply chain security.
Integrating SBOM workflows into the software development life cycle is just the first step—visualizing SBOMs and being able to search through them quickly is the next step. This post describes how to process the generated SBOMs and visualize them with Amazon QuickSight. AWS also recently added SBOM export capability in Amazon Inspector, which offers the ability to export SBOMs for Amazon Inspector monitored resources, including container images.
Why is vulnerability scanning not enough?
Scanning and monitoring vulnerable components that pose cybersecurity risks is known as vulnerability scanning, and is fundamental to organizations for ensuring a strong and solid security posture. Scanners usually rely on a database of known vulnerabilities, the most common being the Common Vulnerabilities and Exposures (CVE) database.
Identifying vulnerable components with a scanner can prevent an engineer from deploying affected applications into production. You can embed scanning into your continuous integration and continuous delivery (CI/CD) pipelines so that images with known vulnerabilities don’t get pushed into your image repository. However, what if a new vulnerability is discovered but has not been added to the CVE records yet? A good example of this is the Apache Log4j vulnerability, which was first disclosed on Nov 24, 2021 and only added as a CVE on Dec 1, 2021. This means that for 7 days, scanners that relied on the CVE system weren’t able to identify affected components within their organizations. This issue is known as a zero-day vulnerability. Being able to quickly identify vulnerable software components in your applications in such situations would allow you to assess the risk and come up with a mitigation plan without waiting for a vendor or supplier to provide a patch.
In addition, it’s also good hygiene for your organization to track usage of software packages, which provides visibility into your software supply chain. This can improve collaboration between developers, operations, and security teams, because they’ll have a common view of every software component and can collaborate effectively to address security threats.
In this post, I present a solution that uses the new Amazon Inspector feature to export SBOMs from container images, process them, and visualize the data in QuickSight. This gives you the ability to search through your software inventory on a dashboard and to use natural language queries through QuickSight Q, in order to look for vulnerabilities.
Solution overview
Figure 1 shows the architecture of the solution. It is fully serverless, meaning there is no underlying infrastructure you need to manage. This post uses a newly released feature within Amazon Inspector that provides the ability to export a consolidated SBOM for Amazon Inspector monitored resources across your organization in commonly used formats, including CycloneDx and SPDX.
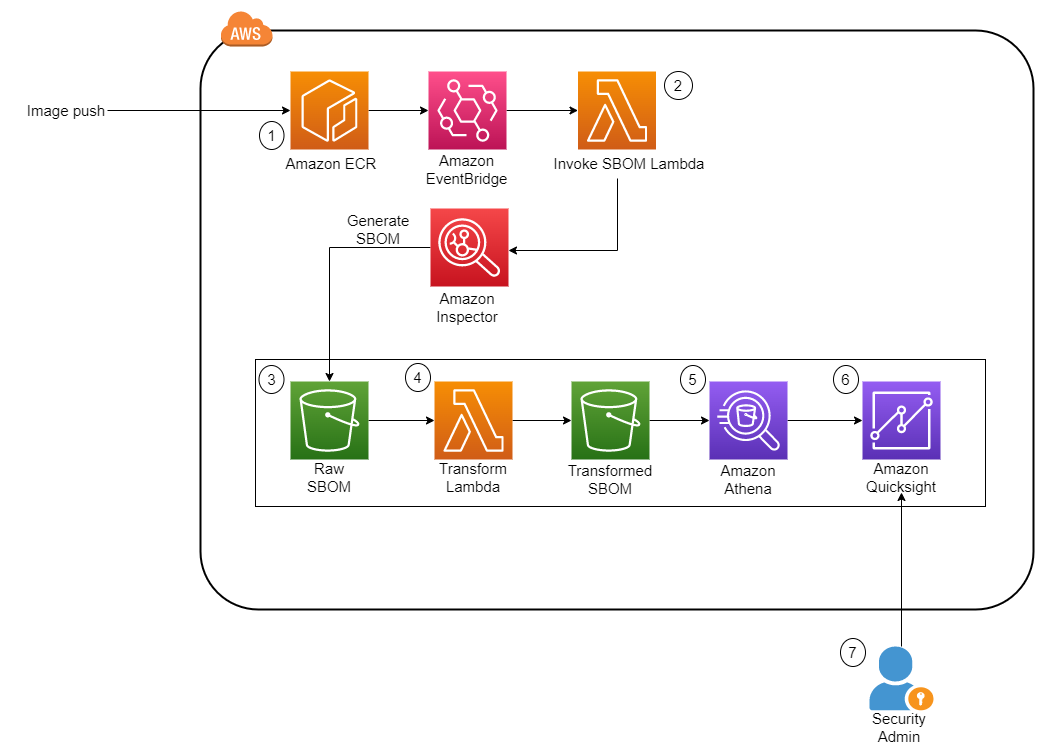
Figure 1: Solution architecture diagram
The workflow in Figure 1 is as follows:
- The image is pushed into Amazon Elastic Container Registry (Amazon ECR), which sends an Amazon EventBridge event.
- This invokes an AWS Lambda function, which starts the SBOM generation job for the specific image.
- When the job completes, Amazon Inspector deposits the SBOM file in an Amazon Simple Storage Service (Amazon S3) bucket.
- Another Lambda function is invoked whenever a new JSON file is deposited. The function performs the data transformation steps and uploads the new file into a new S3 bucket.
- Amazon Athena is then used to perform preliminary data exploration.
- A dashboard on Amazon QuickSight displays SBOM data.
Implement the solution
This section describes how to deploy the solution architecture.
In this post, you’ll perform the following tasks:
- Create S3 buckets and AWS KMS keys to store the SBOMs
- Create an Amazon Elastic Container Registry (Amazon ECR) repository
- Deploy two AWS Lambda functions to initiate the SBOM generation and transformation
- Set up Amazon EventBridge rules to invoke Lambda functions upon image push into Amazon ECR
- Run AWS Glue crawlers to crawl the transformed SBOM S3 bucket
- Run Amazon Athena queries to review SBOM data
- Create QuickSight dashboards to identify libraries and packages
- Use QuickSight Q to identify libraries and packages by using natural language queries
Deploy the CloudFormation stack
The AWS CloudFormation template we’ve provided provisions the S3 buckets that are required for the storage of raw SBOMs and transformed SBOMs, the Lambda functions necessary to initiate and process the SBOMs, and EventBridge rules to run the Lambda functions based on certain events. An empty repository is provisioned as part of the stack, but you can also use your own repository.
To deploy the CloudFormation stack
- Download the CloudFormation template.
- Browse to the CloudFormation service in your AWS account and choose Create Stack.
- Upload the CloudFormation template you downloaded earlier.
- For the next step, Specify stack details, enter a stack name.
- You can keep the default value of sbom-inspector for EnvironmentName.
- Specify the Amazon Resource Name (ARN) of the user or role to be the admin for the KMS key.
- Deploy the stack.
Set up Amazon Inspector
If this is the first time you’re using Amazon Inspector, you need to activate the service. In the Getting started with Amazon Inspector topic in the Amazon Inspector User Guide, follow Step 1 to activate the service. This will take some time to complete.
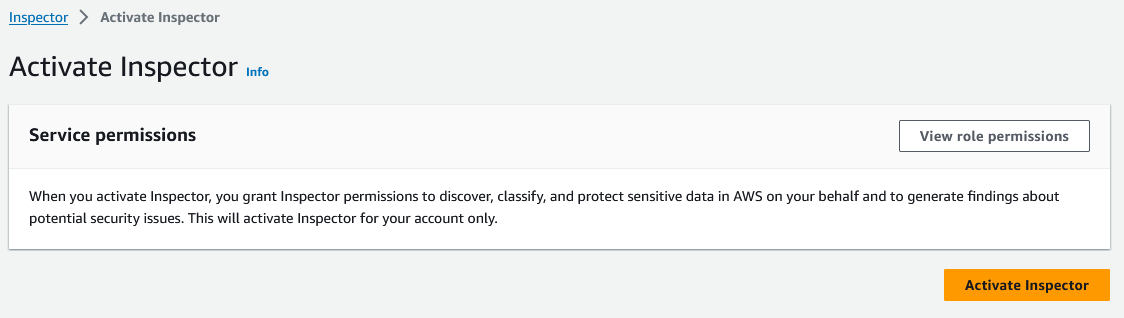
Figure 2: Activate Amazon Inspector
SBOM invocation and processing Lambda functions
This solution uses two Lambda functions written in Python to perform the invocation task and the transformation task.
- Invocation task — This function is run whenever a new image is pushed into Amazon ECR. It takes in the repository name and image tag variables and passes those into the create_sbom_export function in the SPDX format. This prevents duplicated SBOMs, which helps to keep the S3 data size small.
- Transformation task — This function is run whenever a new file with the suffix .json is added to the raw S3 bucket. It creates two files, as follows:
- It extracts information such as image ARN, account number, package, package version, operating system, and SHA from the SBOM and exports this data to the transformed S3 bucket under a folder named sbom/.
- Because each package can have more than one CVE, this function also extracts the CVE from each package and stores it in the same bucket in a directory named cve/. Both files are exported in Apache Parquet so that the file is in a format that is optimized for queries by Amazon Athena.
Populate the AWS Glue Data Catalog
To populate the AWS Glue Data Catalog, you need to generate the SBOM files by using the Lambda functions that were created earlier.
To populate the AWS Glue Data Catalog
- You can use an existing image, or you can continue on to create a sample image.
- Open an AWS Cloudshell terminal.
- Run the follow commands
- An image is pushed into the Amazon ECR repository in your account. This invokes the Lambda functions that perform the SBOM export by using Amazon Inspector and converts the SBOM file to Parquet.
- Verify that the Parquet files are in the transformed S3 bucket:
- Browse to the S3 console and choose the bucket named sbom-inspector-<ACCOUNT-ID>-transformed. You can also track the invocation of each Lambda function in the Amazon CloudWatch log console.
- After the transformation step is complete, you will see two folders (cve/ and sbom/)in the transformed S3 bucket. Choose the sbom folder. You will see the transformed Parquet file in it. If there are CVEs present, a similar file will appear in the cve folder.
The next step is to run an AWS Glue crawler to determine the format, schema, and associated properties of the raw data. You will need to crawl both folders in the transformed S3 bucket and store the schema in separate tables in the AWS Glue Data Catalog.
- On the AWS Glue Service console, on the left navigation menu, choose Crawlers.
- On the Crawlers page, choose Create crawler. This starts a series of pages that prompt you for the crawler details.
- In the Crawler name field, enter sbom-crawler, and then choose Next.
- Under Data sources, select Add a data source.
- Now you need to point the crawler to your data. On the Add data source page, choose the Amazon S3 data store. This solution in this post doesn’t use a connection, so leave the Connection field blank if it’s visible.
- For the option Location of S3 data, choose In this account. Then, for S3 path, enter the path where the crawler can find the sbom and cve data, which is s3://sbom-inspector-<ACCOUNT-ID>-transformed/sbom/ and s3://sbom-inspector-<ACCOUNT-ID>-transformed/cve/. Leave the rest as default and select Add an S3 data source.

Figure 3: Data source for AWS Glue crawler
- The crawler needs permissions to access the data store and create objects in the Data Catalog. To configure these permissions, choose Create an IAM role. The AWS Identity and Access Management (IAM) role name starts with AWSGlueServiceRole-, and in the field, you enter the last part of the role name. Enter sbomcrawler, and then choose Next.
- Crawlers create tables in your Data Catalog. Tables are contained in a database in the Data Catalog. To create a database, choose Add database. In the pop-up window, enter sbom-db for the database name, and then choose Create.
- Verify the choices you made in the Add crawler wizard. If you see any mistakes, you can choose Back to return to previous pages and make changes. After you’ve reviewed the information, choose Finish to create the crawler.
Figure 4: Creation of the AWS Glue crawler
- Select the newly created crawler and choose Run.
- After the crawler runs successfully, verify that the table is created and the data schema is populated.
Figure 5: Table populated from the AWS Glue crawler


Set up Amazon Athena
Amazon Athena performs the initial data exploration and validation. Athena is a serverless interactive analytics service built on open source frameworks that supports open-table and file formats. Athena provides a simplified, flexible way to analyze data in sources like Amazon S3 by using standard SQL queries. If you are SQL proficient, you can query the data source directly; however, not everyone is familiar with SQL. In this section, you run a sample query and initialize the service so that it can used in QuickSight later on.
To start using Amazon Athena
- In the AWS Management Console, navigate to the Athena console.
- For Database, select sbom-db (or select the database you created earlier in the crawler).
- Navigate to the Settings tab located at the top right corner of the console. For Query result location, select the Athena S3 bucket created from the CloudFormation template, sbom-inspector-<ACCOUNT-ID>-athena.
- Keep the defaults for the rest of the settings. You can now return to the Query Editor and start writing and running your queries on the sbom-db database.
You can use the following sample query.
Your Athena console should look similar to the screenshot in Figure 6.
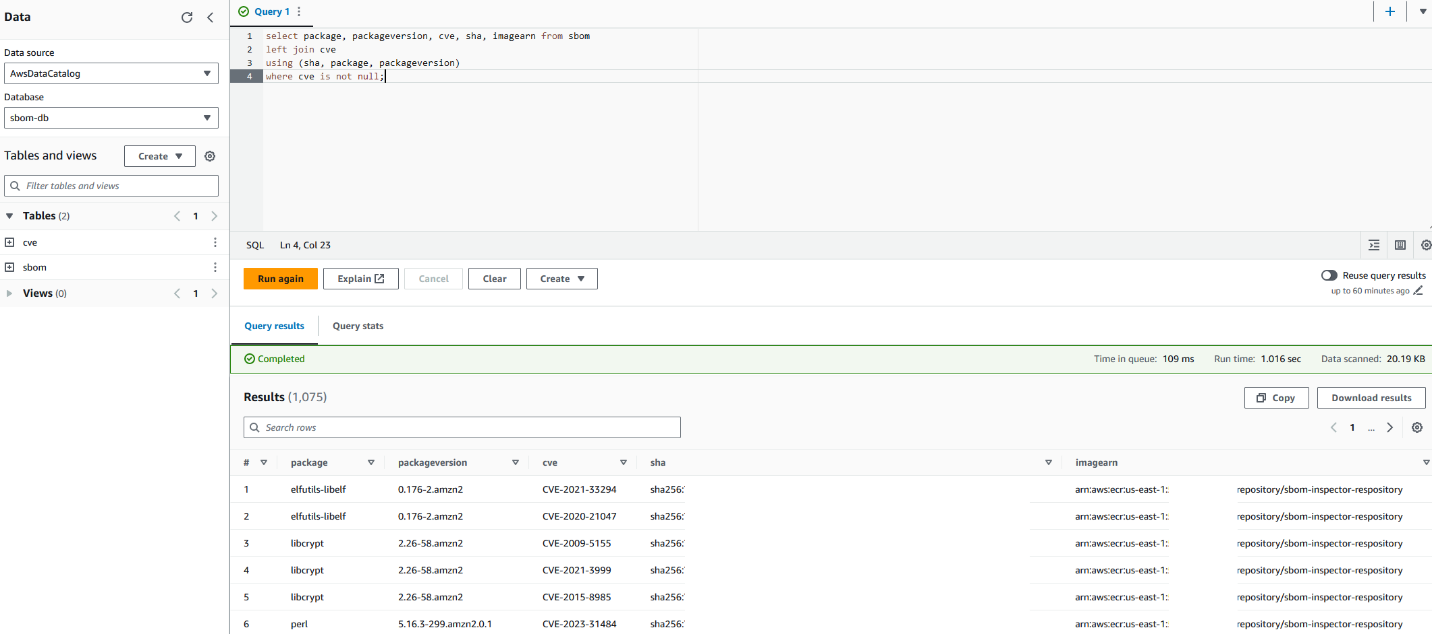
Figure 6: Sample query with Amazon Athena
This query joins the two tables and selects only the packages with CVEs identified. Alternatively, you can choose to query for specific packages or identify the most common package used in your organization.
Sample output:
Visualize data with Amazon QuickSight
Amazon QuickSight is a serverless business intelligence service that is designed for the cloud. In this post, it serves as a dashboard that allows business users who are unfamiliar with SQL to identify zero-day vulnerabilities. This can also reduce the operational effort and time of having to look through several JSON documents to identify a single package across your image repositories. You can then share the dashboard across teams without having to share the underlying data.
QuickSight SPICE (Super-fast, Parallel, In-memory Calculation Engine) is an in-memory engine that QuickSight uses to perform advanced calculations. In a large organization where you could have millions of SBOM records stored in S3, importing your data into SPICE helps to reduce the time to process and serve the data. You can also use the feature to perform a scheduled refresh to obtain the latest data from S3.
QuickSight also has a feature called QuickSight Q. With QuickSightQ, you can use natural language to interact with your data. If this is the first time you are initializing QuickSight, subscribe to QuickSight and select Enterprise + Q. It will take roughly 20–30 minutes to initialize for the first time. Otherwise, if you are already using QuickSight, you will need to enable QuickSight Q by subscribing to it in the QuickSight console.
Finally, in QuickSight you can select different data sources, such as Amazon S3 and Athena, to create custom visualizations. In this post, we will use the two Athena tables as the data source to create a dashboard to keep track of the packages used in your organization and the resulting CVEs that come with them.
Prerequisites for setting up the QuickSight dashboard
This process will be used to create the QuickSight dashboard from a template already pre-provisioned through the command line interface (CLI). It also grants the necessary permissions for QuickSight to access the data source. You will need the following:
- AWS Command Line Interface (AWS CLI) programmatic access with read and write permissions to QuickSight.
- A QuickSight + Q subscription (only if you want to use the Q feature).
- QuickSight permissions to Amazon S3 and Athena (enable these through the QuickSight security and permissions interface).
- Set the default AWS Region where you want to deploy the QuickSight dashboard. This post assumes that you’re using the us-east-1 Region.
Create datasets
In QuickSight, create two datasets, one for the sbom table and another for the cve table.
- In the QuickSight console, select the Dataset tab.
- Choose Create dataset, and then select the Athena data source.
- Name the data source sbom and choose Create data source.
- Select the sbom table.
- Choose Visualize to complete the dataset creation. (Delete the analyses automatically created for you because you will create your own analyses afterwards.)
- Navigate back to the main QuickSight page and repeat steps 1–4 for the cve dataset.
Merge datasets
Next, merge the two datasets to create the combined dataset that you will use for the dashboard.
- On the Datasets tab, edit the sbom dataset and add the cve dataset.
- Set three join clauses, as follows:
- Sha : Sha
- Package : Package
- Packageversion : Packageversion
- Perform a left merge, which will append the cve ID to the package and package version in the sbom dataset.

Figure 7: Combining the sbom and cve datasets

Next, you will create a dashboard based on the combined sbom dataset.
Prepare configuration files
In your terminal, export the following variables. Substitute <QuickSight username> in the QS_USER_ARN variable with your own username, which can be found in the Amazon QuickSight console.
Validate that the variables are set properly. This is required for you to move on to the next step; otherwise you will run into errors.
Next, use the following commands to create the dashboard from a predefined template and create the IAM permissions needed for the user to view the QuickSight dashboard.
Run the following commands to create the dashboard in your QuickSight console.
Note: Run the following describe-dashboard command, and confirm that the response contains a status code of 200. The 200-status code means that the dashboard exists.
Use the following update-dashboard-permissions AWS CLI command to grant the appropriate permissions to QuickSight users.
You should now be able to see the dashboard in your QuickSight console, similar to the one in Figure 8. It’s an interactive dashboard that shows you the number of vulnerable packages you have in your repositories and the specific CVEs that come with them. You can navigate to the specific image by selecting the CVE (middle right bar chart) or list images with a specific vulnerable package (bottom right bar chart).
Note: You won’t see the exact same graph as in Figure 8. It will change according to the image you pushed in.
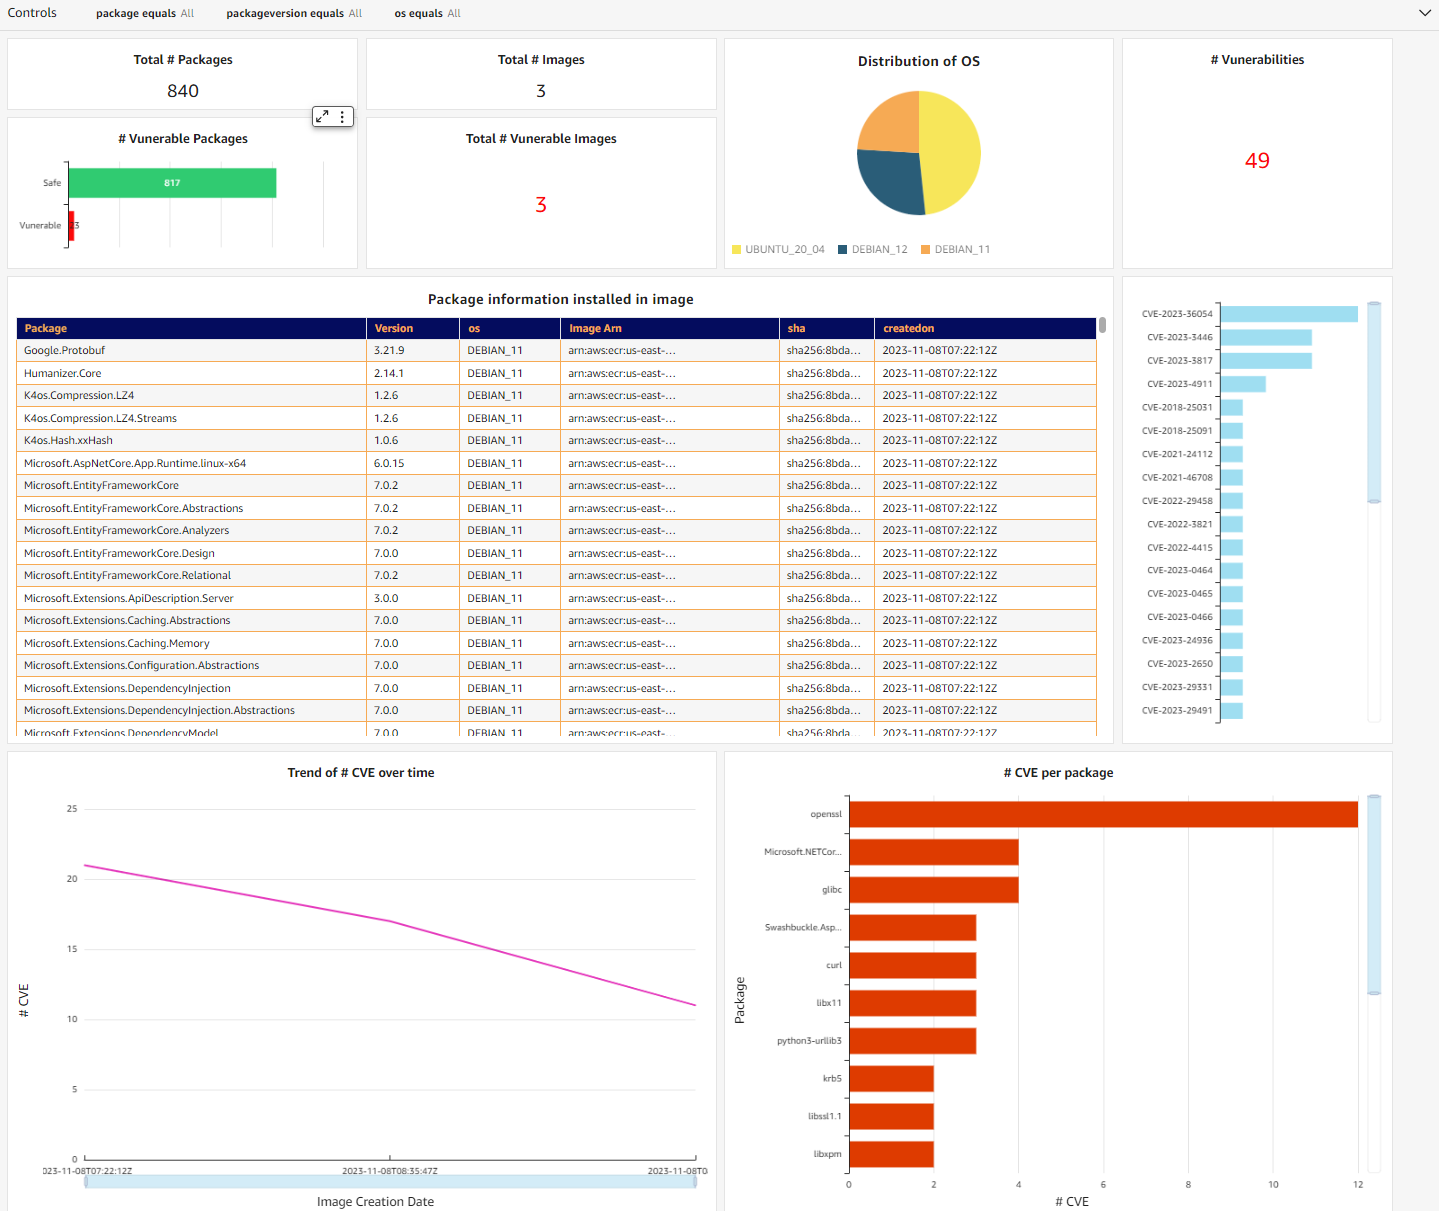
Figure 8: QuickSight dashboard containing SBOM information
Alternatively, you can use QuickSight Q to extract the same information from your dataset through natural language. You will need to create a topic and add the dataset you added earlier. For detailed information on how to create a topic, see the Amazon QuickSight User Guide. After QuickSight Q has completed indexing the dataset, you can start to ask questions about your data.

Figure 9: Natural language query with QuickSight Q
Conclusion
This post discussed how you can use Amazon Inspector to export SBOMs to improve software supply chain transparency. Container SBOM export should be part of your supply chain mitigation strategy and monitored in an automated manner at scale.
Although it is a good practice to generate SBOMs, it would provide little value if there was no further analysis being done on them. This solution enables you to visualize your SBOM data through a dashboard and natural language, providing better visibility into your security posture. Additionally, this solution is also entirely serverless, meaning there are no agents or sidecars to set up.
To learn more about exporting SBOMs with Amazon Inspector, see the Amazon Inspector User Guide.
If you have feedback about this post, submit comments in the Comments section below. If you have questions about this post, contact AWS Support.
Introducing Amazon MWAA support for Apache Airflow version 2.8.1
Post Syndicated from Mansi Bhutada original https://aws.amazon.com/blogs/big-data/introducing-amazon-mwaa-support-for-apache-airflow-version-2-8-1/
Amazon Managed Workflows for Apache Airflow (Amazon MWAA) is a managed orchestration service for Apache Airflow that makes it straightforward to set up and operate end-to-end data pipelines in the cloud.
Organizations use Amazon MWAA to enhance their business workflows. For example, C2i Genomics uses Amazon MWAA in their data platform to orchestrate the validation of algorithms processing cancer genomics data in billions of records. Twitch, a live streaming platform, manages and orchestrates the training and deployment of its recommendation models for over 140 million active users. They use Amazon MWAA to scale, while significantly improving security and reducing infrastructure management overhead.
Today, we are announcing the availability of Apache Airflow version 2.8.1 environments on Amazon MWAA. In this post, we walk you through some of the new features and capabilities of Airflow now available in Amazon MWAA, and how you can set up or upgrade your Amazon MWAA environment to version 2.8.1.
Object storage
As data pipelines scale, engineers struggle to manage storage across multiple systems with unique APIs, authentication methods, and conventions for accessing data, requiring custom logic and storage-specific operators. Airflow now offers a unified object storage abstraction layer that handles these details, letting engineers focus on their data pipelines. Airflow object storage uses fsspec to enable consistent data access code across different object storage systems, thereby streamlining infrastructure complexity.
The following are some of the feature’s key benefits:
- Portable workflows – You can switch storage services with minimal changes in your Directed Acyclic Graphs (DAGs)
- Efficient data transfers – You can stream data instead of loading into memory
- Reduced maintenance – You don’t need separate operators, making your pipelines straightforward to maintain
- Familiar programming experience – You can use Python modules, like shutil, for file operations
To use object storage with Amazon Simple Storage Service (Amazon S3), you need to install the package extra s3fs with the Amazon provider (apache-airflow-providers-amazon[s3fs]==x.x.x).
In the sample code below, you can see how to move data directly from Google Cloud Storage to Amazon S3. Because Airflow’s object storage uses shutil.copyfileobj, the objects’ data is read in chunks from gcs_data_source and streamed to amazon_s3_data_target.
For more information on Airflow object storage, refer to Object Storage.
XCom UI
XCom (cross-communications) allows for the passing of data between tasks, facilitating communication and coordination between them. Previously, developers had to switch to a diffferent view to see XComs related to a task. With Airflow 2.8, XCom key-values are rendered directly on a tab within the Airflow Grid view, as shown in the following screenshot.

The new XCom tab provides the following benefits:
- Improved XCom visibility – A dedicated tab in the UI provides a convenient and user-friendly way to see all XComs associated with a DAG or task.
- Improved debugging – Being able to see XCom values directly in the UI is helpful for debugging DAGs. You can quickly see the output of upstream tasks without needing to manually pull and inspect them using Python code.
Task context logger
Managing task lifecycles is crucial for the smooth operation of data pipelines in Airflow. However, certain challenges have persisted, particularly in scenarios where tasks are unexpectedly stopped. This can occur due to various reasons, including scheduler timeouts, zombie tasks (tasks that remain in a running state without sending heartbeats), or instances where the worker runs out of memory.
Traditionally, such failures, particularly those triggered by core Airflow components like the scheduler or executor, weren’t recorded within the task logs. This limitation required users to troubleshoot outside the Airflow UI, complicating the process of pinpointing and resolving issues.
Airflow 2.8 introduced a significant improvement that addresses this problem. Airflow components, including the scheduler and executor, can now use the new TaskContextLogger to forward error messages directly to the task logs. This feature allows you to see all the relevant error messages related to a task’s run in one place. This simplifies the process of figuring out why a task failed, offering a complete perspective of what went wrong within a single log view.
The following screenshot shows how the task is detected as zombie, and the scheduler log is being included as part of the task log.

You need to set the environment configuration parameter enable_task_context_logger to True, to enable the feature. Once it’s enabled, Airflow can ship logs from the scheduler, the executor, or callback run context to the task logs, and make them available in the Airflow UI.
Listener hooks for datasets
Datasets were introduced in Airflow 2.4 as a logical grouping of data sources to create data-aware scheduling and dependencies between DAGs. For example, you can schedule a consumer DAG to run when a producer DAG updates a dataset. Listeners enable Airflow users to create subscriptions to certain events happening in the environment. In Airflow 2.8, listeners are added for two datasets events: on_dataset_created and on_dataset_changed, effectively allowing Airflow users to write custom code to react to dataset management operations. For example, you can trigger an external system, or send a notification.
Using listener hooks for datasets is straightforward. Complete the following steps to create a listener for on_dataset_changed:
- Create the listener (
dataset_listener.py): - Create a plugin to register the listener in your Airflow environment (
dataset_listener_plugin.py):
For more information on how to install plugins in Amazon MWAA, refer to Installing custom plugins.
Set up a new Airflow 2.8.1 environment in Amazon MWAA
You can initiate the setup in your account and preferred Region using the AWS Management Console, API, or AWS Command Line Interface (AWS CLI). If you’re adopting infrastructure as code (IaC), you can automate the setup using AWS CloudFormation, the AWS Cloud Development Kit (AWS CDK), or Terraform scripts.
Upon successful creation of an Airflow version 2.8.1 environment in Amazon MWAA, certain packages are automatically installed on the scheduler and worker nodes. For a complete list of installed packages and their versions, refer to Apache Airflow provider packages installed on Amazon MWAA environments. You can install additional packages using a requirements file.
Upgrade from older versions of Airflow to version 2.8.1
You can take advantage of these latest capabilities by upgrading your older Airflow version 2.x-based environments to version 2.8.1 using in-place version upgrades. To learn more about in-place version upgrades, refer to Upgrading the Apache Airflow version or Introducing in-place version upgrades with Amazon MWAA.
Conclusion
In this post, we discussed some important features introduced in Airflow version 2.8, such as object storage, the new XCom tab added to the grid view, task context logging, listener hooks for datasets, and how you can start using them. We also provided some sample code to show implementations in Amazon MWAA. For the complete list of changes, refer to Airflow’s release notes.
For additional details and code examples on Amazon MWAA, visit the Amazon MWAA User Guide and the Amazon MWAA examples GitHub repo.
Apache, Apache Airflow, and Airflow are either registered trademarks or trademarks of the Apache Software Foundation in the United States and/or other countries.
About the Authors
 Mansi Bhutada is an ISV Solutions Architect based in the Netherlands. She helps customers design and implement well-architected solutions in AWS that address their business problems. She is passionate about data analytics and networking. Beyond work, she enjoys experimenting with food, playing pickleball, and diving into fun board games.
 Hernan Garcia is a Senior Solutions Architect at AWS based in the Netherlands. He works in the financial services industry, supporting enterprises in their cloud adoption. He is passionate about serverless technologies, security, and compliance. He enjoys spending time with family and friends, and trying out new dishes from different cuisines.
The Open Collective Foundation is shutting down
Post Syndicated from corbet original https://lwn.net/Articles/963958/
The Open Collective
Foundation is an organization created to provide legal and financial
services for non-profit projects, many of which are associated with free
software. Projects hosted there are now beginning
to report that the Open Collective Foundation will be shutting down at
the end of the year, with an unwinding process over that time.
Unfortunately, over the past year, we have learned that Open
Collective Foundation’s business model is not sustainable with the
number of complex services we have offered and the fees we pay to
the Open Collective Inc. tech platform.In late 2023, we made the decision to pause accepting new
collectives in order to create space for us to address the
issues. Unfortunately, it became clear that it would not be
financially feasible to make the necessary corrections, and we
determined that OCF is not viable.
Some more information can be found in the Dissolution FAQ. Note
that the Open Collective Foundation is distinct from Open Source Collective, which has hastened
to point out that it remains in operation as before, and both are
distinct from the Open Collective
platform.
Open sourcing Pingora: our Rust framework for building programmable network services
Post Syndicated from Yuchen Wu original https://blog.cloudflare.com/pingora-open-source

Today, we are proud to open source Pingora, the Rust framework we have been using to build services that power a significant portion of the traffic on Cloudflare. Pingora is released under the Apache License version 2.0.
As mentioned in our previous blog post, Pingora is a Rust async multithreaded framework that assists us in constructing HTTP proxy services. Since our last blog post, Pingora has handled nearly a quadrillion Internet requests across our global network.
We are open sourcing Pingora to help build a better and more secure Internet beyond our own infrastructure. We want to provide tools, ideas, and inspiration to our customers, users, and others to build their own Internet infrastructure using a memory safe framework. Having such a framework is especially crucial given the increasing awareness of the importance of memory safety across the industry and the US government. Under this common goal, we are collaborating with the Internet Security Research Group (ISRG) Prossimo project to help advance the adoption of Pingora in the Internet’s most critical infrastructure.
In our previous blog post, we discussed why and how we built Pingora. In this one, we will talk about why and how you might use Pingora.
Pingora provides building blocks for not only proxies but also clients and servers. Along with these components, we also provide a few utility libraries that implement common logic such as event counting, error handling, and caching.
What’s in the box
Pingora provides libraries and APIs to build services on top of HTTP/1 and HTTP/2, TLS, or just TCP/UDP. As a proxy, it supports HTTP/1 and HTTP/2 end-to-end, gRPC, and websocket proxying. (HTTP/3 support is on the roadmap.) It also comes with customizable load balancing and failover strategies. For compliance and security, it supports both the commonly used OpenSSL and BoringSSL libraries, which come with FIPS compliance and post-quantum crypto.
Besides providing these features, Pingora provides filters and callbacks to allow its users to fully customize how the service should process, transform and forward the requests. These APIs will be especially familiar to OpenResty and NGINX users, as many map intuitively onto OpenResty’s “*_by_lua” callbacks.
Operationally, Pingora provides zero downtime graceful restarts to upgrade itself without dropping a single incoming request. Syslog, Prometheus, Sentry, OpenTelemetry and other must-have observability tools are also easily integrated with Pingora as well.
Who can benefit from Pingora
You should consider Pingora if:
Security is your top priority: Pingora is a more memory safe alternative for services that are written in C/C++. While some might argue about memory safety among programming languages, from our practical experience, we find ourselves way less likely to make coding mistakes that lead to memory safety issues. Besides, as we spend less time struggling with these issues, we are more productive implementing new features.
Your service is performance-sensitive: Pingora is fast and efficient. As explained in our previous blog post, we saved a lot of CPU and memory resources thanks to Pingora’s multi-threaded architecture. The saving in time and resources could be compelling for workloads that are sensitive to the cost and/or the speed of the system.
Your service requires extensive customization: The APIs that the Pingora proxy framework provides are highly programmable. For users who wish to build a customized and advanced gateway or load balancer, Pingora provides powerful yet simple ways to implement it. We provide examples in the next section.
Let’s build a load balancer
Let’s explore Pingora’s programmable API by building a simple load balancer. The load balancer will select between https://1.1.1.1/ and https://1.0.0.1/ to be the upstream in a round-robin fashion.
First let’s create a blank HTTP proxy.
pub struct LB();

#[async_trait]
impl ProxyHttp for LB {
    async fn upstream_peer(...) -> Result<Box<HttpPeer>> {
        todo!()
    }
}
Any object that implements the ProxyHttp trait (similar to the concept of an interface in C++ or Java) is an HTTP proxy. The only required method there is upstream_peer(), which is called for every request. This function should return an HttpPeer which contains the origin IP to connect to and how to connect to it.
Next let’s implement the round-robin selection. The Pingora framework already provides the LoadBalancer with common selection algorithms such as round robin and hashing, so let’s just use it. If the use case requires more sophisticated or customized server selection logic, users can simply implement it themselves in this function.
pub struct LB(Arc<LoadBalancer<RoundRobin>>);

#[async_trait]
impl ProxyHttp for LB {
    async fn upstream_peer(...) -> Result<Box<HttpPeer>> {
        let upstream = self.0
            .select(b"", 256) // hash doesn't matter for round robin
            .unwrap();

        // Set SNI to one.one.one.one
        let peer = Box::new(HttpPeer::new(upstream, true, "one.one.one.one".to_string()));
        Ok(peer)
    }
}
Since we are connecting to an HTTPS server, the SNI also needs to be set. Certificates, timeouts, and other connection options can also be set here in the HttpPeer object if needed.
Finally, let’s put the service in action. In this example we hardcode the origin server IPs. In real life workloads, the origin server IPs can also be discovered dynamically when the upstream_peer() is called or in the background. After the service is created, we just tell the LB service to listen to 127.0.0.1:6188. In the end we created a Pingora server, and the server will be the process which runs the load balancing service.
fn main() {
    let mut upstreams = LoadBalancer::try_from_iter(["1.1.1.1:443", "1.0.0.1:443"]).unwrap();

    let mut lb = pingora_proxy::http_proxy_service(&my_server.configuration, LB(upstreams));
    lb.add_tcp("127.0.0.1:6188");

    let mut my_server = Server::new(None).unwrap();
    my_server.add_service(lb);
    my_server.run_forever();
}
Let’s try it out:
curl 127.0.0.1:6188 -svo /dev/null
> GET / HTTP/1.1
> Host: 127.0.0.1:6188
> User-Agent: curl/7.88.1
> Accept: */*
>
< HTTP/1.1 403 Forbidden
We can see that the proxy is working, but the origin server rejects us with a 403. This is because our service simply proxies the Host header, 127.0.0.1:6188, set by curl, which upsets the origin server. How do we make the proxy correct that? This can simply be done by adding another filter called upstream_request_filter. This filter runs on every request after the origin server is connected and before any HTTP request is sent. We can add, remove or change http request headers in this filter.
async fn upstream_request_filter(…, upstream_request: &mut RequestHeader, …) -> Result<()> {
    upstream_request.insert_header("Host", "one.one.one.one")
}
Let’s try again:
curl 127.0.0.1:6188 -svo /dev/null
< HTTP/1.1 200 OK
This time it works! The complete example can be found here.
Below is a very simple diagram of how this request flows through the callback and filter we used in this example. The Pingora proxy framework currently provides more filters and callbacks at different stages of a request to allow users to modify, reject, route and/or log the request (and response).
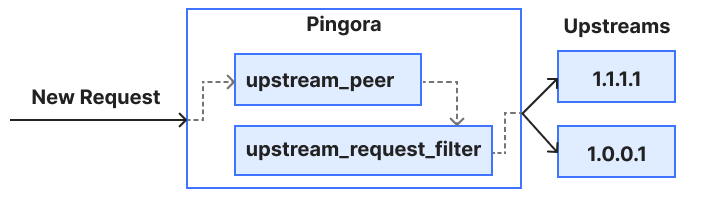
Behind the scenes, the Pingora proxy framework takes care of connection pooling, TLS handshakes, reading, writing, parsing requests and any other common proxy tasks so that users can focus on logic that matters to them.
Open source, present and future
Pingora is a library and toolset, not an executable binary. In other words, Pingora is the engine that powers a car, not the car itself. Although Pingora is production-ready for industry use, we understand a lot of folks want a batteries-included, ready-to-go web service with low or no-code config options. Building that application on top of Pingora will be the focus of our collaboration with the ISRG to expand Pingora’s reach. Stay tuned for future announcements on that project.
Other caveats to keep in mind:
- Today, API stability is not guaranteed. Although we will try to minimize how often we make breaking changes, we still reserve the right to add, remove, or change components such as request and response filters as the library evolves, especially during this pre-1.0 period.
- Support for non-Unix based operating systems is not currently on the roadmap. We have no immediate plans to support these systems, though this could change in the future.
How to contribute
Feel free to raise bug reports, documentation issues, or feature requests in our GitHub issue tracker. Before opening a pull request, we strongly suggest you take a look at our contribution guide.
Conclusion
In this blog we announced the open source of our Pingora framework. We showed that Internet entities and infrastructure can benefit from Pingora’s security, performance and customizability. We also demonstrated how easy it is to use Pingora and how customizable it is.
Whether you’re building production web services or experimenting with network technologies we hope you find value in Pingora. It’s been a long journey, but sharing this project with the open source community has been a goal from the start. We’d like to thank the Rust community as Pingora is built with many great open-sourced Rust crates. Moving to a memory safe Internet may feel like an impossible journey, but it’s one we hope you join us on.
Security updates for Wednesday
Post Syndicated from jzb original https://lwn.net/Articles/963957/
Security updates have been issued by Debian (knot-resolver and wpa), Fedora (chromium, kernel, thunderbird, and yarnpkg), Mageia (c-ares), Oracle (firefox, kernel, opensc, postgresql:13, postgresql:15, and thunderbird), Red Hat (edk2, gimp:2.8, and kernel), SUSE (bind, bluez, container-suseconnect, dnsdist, freerdp, gcc12, gcc7, glib2, gnutls, kernel, kubevirt, virt-api-container, virt-controller-container, virt-exportproxy-container, virt-exportserver-container, virt-handler-container, virt-launcher-container, virt-libguestfs-t, libqt5-qtbase, libqt5-qtsvg, nodejs18, nodejs20, openssl, openssl-1_0_0, poppler, python-crcmod, python-cryptography, python-cryptography- vectors, python-pip, python-requests, python3-requests, python311, python39, rabbitmq-c, samba, sccache, shim, SUSE Manager 4.2, SUSE Manager Server 4.2, the Linux-RT Kernel, and thunderbird), and Ubuntu (less, openssl, php7.0, php7.2, php7.4, and tiff).
How to develop an Amazon Security Lake POC
Post Syndicated from Anna McAbee original https://aws.amazon.com/blogs/security/how-to-develop-an-amazon-security-lake-poc/
You can use Amazon Security Lake to simplify log data collection and retention for Amazon Web Services (AWS) and non-AWS data sources. To make sure that you get the most out of your implementation requires proper planning.
In this post, we will show you how to plan and implement a proof of concept (POC) for Security Lake to help you determine the functionality and value of Security Lake in your environment, so that your team can confidently design and implement in production. We will walk you through the following steps:
- Understand the functionality and value of Security Lake
- Determine success criteria for the POC
- Define your Security Lake configuration
- Prepare for deployment
- Enable Security Lake
- Validate deployment
Understand the functionality of Security Lake
Figure 1 summarizes the main features of Security Lake and the context of how to use it:

Figure 1: Overview of Security Lake functionality
As shown in the figure, Security Lake ingests and normalizes logs from data sources such as AWS services, AWS Partner sources, and custom sources. Security Lake also manages the lifecycle, orchestration, and subscribers. Subscribers can be AWS services, such as Amazon Athena, or AWS Partner subscribers.
There are four primary functions that Security Lake provides:
- Centralize visibility to your data from AWS environments, SaaS providers, on-premises, and other cloud data sources — You can collect log sources from AWS services such as AWS CloudTrail management events, Amazon Simple Storage Service (Amazon S3) data events, AWS Lambda data events, Amazon Route 53 Resolver logs, VPC Flow Logs, and AWS Security Hub findings, in addition to log sources from on-premises, other cloud services, SaaS applications, and custom sources. Security Lake automatically aggregates the security data across AWS Regions and accounts.
- Normalize your security data to an open standard — Security Lake normalizes log sources in a common schema, the Open Security Schema Framework (OCSF), and stores them in compressed parquet files.
- Use your preferred analytics tools to analyze your security data — You can use AWS tools, such as Athena and Amazon OpenSearch Service, or you can utilize external security tools to analyze the data in Security Lake.
- Optimize and manage your security data for more efficient storage and query — Security Lake manages the lifecycle of your data with customizable retention settings with automated storage tiering to help provide more cost-effective storage.
Determine success criteria
By establishing success criteria, you can assess whether Security Lake has helped address the challenges that you are facing. Some example success criteria include:
- I need to centrally set up and store AWS logs across my organization in AWS Organizations for multiple log sources.
- I need to more efficiently collect VPC Flow Logs in my organization and analyze them in my security information and event management (SIEM) solution.
- I want to use OpenSearch Service to replace my on-premises SIEM.
- I want to collect AWS log sources and custom sources for machine learning with Amazon Sagemaker.
- I need to establish a dashboard in Amazon QuickSight to visualize my Security Hub findings and a custom log source data.
Review your success criteria to make sure that your goals are realistic given your timeframe and potential constraints that are specific to your organization. For example, do you have full control over the creation of AWS services that are deployed in an organization? Do you have resources that can dedicate time to implement and test? Is this time convenient for relevant stakeholders to evaluate the service?
The timeframe of your POC will depend on your answers to these questions.
Important: Security Lake has a 15-day free trial per account that you use from the time that you enable Security Lake. This is the best way to estimate the costs for each Region throughout the trial, which is an important consideration when you configure your POC.
Define your Security Lake configuration
After you establish your success criteria, you should define your desired Security Lake configuration. Some important decisions include the following:
- Determine AWS log sources — Decide which AWS log sources to collect. For information about the available options, see Collecting data from AWS services.
- Determine third-party log sources — Decide if you want to include non-AWS service logs as sources in your POC. For more information about your options, see Third-party integrations with Security Lake; the integrations listed as “Source” can send logs to Security Lake.
Note: You can add third-party integrations after the POC or in a second phase of the POC. Pre-planning will be required to make sure that you can get these set up during the 15-day free trial. Third-party integrations usually take more time to set up than AWS service logs.
- Select a delegated administrator – Identify which account will serve as the delegated administrator. Make sure that you have the appropriate permissions from the organization admin account to identify and enable the account that will be your Security Lake delegated administrator. This account will be the location for the S3 buckets with your security data and where you centrally configure Security Lake. The AWS Security Reference Architecture (AWS SRA) recommends that you use the AWS logging account for this purpose. In addition, make sure to review Important considerations for delegated Security Lake administrators.
- Select accounts in scope — Define which accounts to collect data from. To get the most realistic estimate of the cost of Security Lake, enable all accounts across your organization during the free trial.
- Determine analytics tool — Determine if you want to use native AWS analytics tools, such as Athena and OpenSearch Service, or an existing SIEM, where the SIEM is a subscriber to Security Lake.
- Define log retention and Regions — Define your log retention requirements and Regional restrictions or considerations.
Prepare for deployment
After you determine your success criteria and your Security Lake configuration, you should have an idea of your stakeholders, desired state, and timeframe. Now you need to prepare for deployment. In this step, you should complete as much as possible before you deploy Security Lake. The following are some steps to take:
- Create a project plan and timeline so that everyone involved understands what success look like and what the scope and timeline is.
- Define the relevant stakeholders and consumers of the Security Lake data. Some common stakeholders include security operations center (SOC) analysts, incident responders, security engineers, cloud engineers, finance, and others.
- Define who is responsible, accountable, consulted, and informed during the deployment. Make sure that team members understand their roles.
- Make sure that you have access in your management account to delegate and administrator. For further details, see IAM permissions required to designate the delegated administrator.
- Consider other technical prerequisites that you need to accomplish. For example, if you need roles in addition to what Security Lake creates for custom extract, transform, and load (ETL) pipelines for custom sources, can you work with the team in charge of that process before the POC?
Enable Security Lake
The next step is to enable Security Lake in your environment and configure your sources and subscribers.
- Deploy Security Lake across the Regions, accounts, and AWS log sources that you previously defined.
- Configure custom sources that are in scope for your POC.
- Configure analytics tools in scope for your POC.
Validate deployment
The final step is to confirm that you have configured Security Lake and additional components, validate that everything is working as intended, and evaluate the solution against your success criteria.
- Validate log collection — Verify that you are collecting the log sources that you configured. To do this, check the S3 buckets in the delegated administrator account for the logs.
- Validate analytics tool — Verify that you can analyze the log sources in your analytics tool of choice. If you don’t want to configure additional analytics tooling, you can use Athena, which is configured when you set up Security Lake. For sample Athena queries, see Amazon Security Lake Example Queries on GitHub and Security Lake queries in the documentation.
- Obtain a cost estimate — In the Security Lake console, you can review a usage page to verify that the cost of Security Lake in your environment aligns with your expectations and budgets.
- Assess success criteria — Determine if you achieved the success criteria that you defined at the beginning of the project.
Next steps
Next steps will largely depend on whether you decide to move forward with Security Lake.
- Determine if you have the approval and budget to use Security Lake.
- Expand to other data sources that can help you provide more security outcomes for your business.
- Configure S3 lifecycle policies to efficiently store logs long term based on your requirements.
- Let other teams know that they can subscribe to Security Lake to use the log data for their own purposes. For example, a development team that gets access to CloudTrail through Security Lake can analyze the logs to understand the permissions needed for an application.
Conclusion
In this blog post, we showed you how to plan and implement a Security Lake POC. You learned how to do so through phases, including defining success criteria, configuring Security Lake, and validating that Security Lake meets your business needs.
As a customer, this guide will help you run a successful proof of value (POV) with Security Lake. It guides you in assessing the value and factors to consider when deciding to implement the current features.
Further resources
- AWS Samples – SIEM on Amazon OpenSearch Service
- Amazon Security Lake User Guide
- AWS Security Services Best Practices
If you have feedback about this post, submit comments in the Comments section below. If you have questions about this post, contact AWS Support.
What If Your Best Friend Is Your Soulmate?
Post Syndicated from The Atlantic original https://www.youtube.com/watch?v=jxL05RopqZM
CSS Nashville
Post Syndicated from The History Guy: History Deserves to Be Remembered original https://www.youtube.com/watch?v=QYxbSq09lrU
Икони вместо работещи институции
Post Syndicated from Светла Енчева original https://www.toest.bg/ikoni-vmesto-raboteshti-institutsii/

Ако ви предстои да пътувате по автомагистрала, какви мерки за сигурност ще предприемете и на какво ще разчитате, за да пристигнете живи и здрави там, накъдето сте се запътили? Ако шофирате вие, много важно е да сте бодри и с трезв ум, който не е под въздействието на алкохол или други субстанции. Гумите ви трябва да са подходящи за сезона, да карате с указаната скорост и изобщо – да спазвате правилата. Надявате се и другите да ги спазват, както и пътят и маркировката му да са в изправност. Ако минавате през тунел, разчитате той да е построен и поддържан по начин, гарантиращ вашата сигурност. И си мислите, че трябва да има институции, които да се грижат за всички аспекти, свързани с безопасността ви. Институциите обаче може да имат особена визия по въпроса.
Една институционална визия за сигурността на тунелите
Държавната институция, отговаряща за строежа на пътища, тунели и мостове, е Агенция „Пътна инфраструктура“ (АПИ) към Министерството на регионалното развитие и благоустройството. За сигурността на тунелите тя се осланя на… икони. В прессъобщението на АПИ по повод пускането в експлоатация на тунел „Железница“, част от автомагистрала „Струма“, пише (оригиналният правопис е запазен):
При строителството му са вградени и четири икони на Св. „Иван Рилски“, каквито са традициите в тунелното строителство. […] В момента светите изображения не са видими, тъй като са покрити при изграждането на вторичната облицовка на съоръжението. Поверието при вграждането на иконите е, че те пазят работниците при строителството на обекта, а след това и всички пътуващи.
Иконите в тунел „Железница“ впрочем не са нови – чудодейните им свойства вече са популяризирани лично от Бойко Борисов. През 2020 г. част от строежа се срутва и затрупва трима работници, но те оцеляват. Според председателя на ГЕРБ и тогавашен премиер именно иконите на св. Иван Рилски са ги спасили, припомня „Капитал“. От изданието добавят, че пастир, загинал до тунела скоро след това, не е имал същия късмет.
Традициите в тунелното строителство, споменати в прессъобщението, впрочем изглеждат по-хуманни от тези при изграждането на мостове – според преданията в тях се вграждат сенки на невести – с летални последствия за въпросните млади жени. Засега няма яснота дали АПИ разчита на тази древна традиция при изграждането на мостови съоръжения.
Икони и дупки, светци и врачки
Самият св. Иван Рилски впрочем се смята за закрилник не на пътуващите, какъвто е св. Христофор, а на българския народ. А по магистралата, чиято цел е да свързва България и Гърция, пътуват не само българи.
Вграждането на икони в тунели, официално споменато от държавна агенция, може да се разглежда в контекста на все по-малко светската държава, за чието конституционно разделение от религията вече почти никой не се сеща. Но има и нещо друго: подобни актове не са канонична част от православната религия, а проява на суеверие. По-точно – на една специфична сплав от (квази)религия, суеверие, традиционализъм и патриотизъм.
Тази сплав датира още от времето на социализма. Въпреки че тогавашният режим официално е атеистичен и изповядва „научния комунизъм“, в който уж няма място за суеверия, той си има комай официална врачка – Ванга. Способностите ѝ са обект на проучване от Държавния научноизследователски институт по сугестология с благословията лично на диктатора Тодор Живков. СССР също има официална врачка – Джуна.
В началото на 90-те години на ХХ в. с модерните тогава екстрасенси и с Ванга (къде без нея) се забърква Генералният щаб на Българската армия. Става въпрос за известната дупка в село Царичина, в която от Щаба търсят или съкровището на цар Самуил, или първото разумно същество, живяло на Земята, или извънземни. Екстрасенсите, по чийто съвет е изкопана тя, се консултират с Ванга, за да се уверят, че са на прав път. След като от Генералния щаб не намират нищо, дупката е зарита и бетонирана.
Магическо мислене и модерни институции
През 1940 г. Иван Хаджийски публикува студията си „Възстановяване душевността на първобитния български човек“, която по-късно включва в книгата си „Оптимистична теория за нашия народ“. В началото ѝ той уточнява, че под „първобитни“ или „древни“ българи разбира населението по българските земи преди Възраждането. Ако го кажем със съвременни думи, Хаджийски има предвид предмодерните българи, които живеят изцяло в света на традициите, без наука и образование, индустриални технологии или медии.
Единственият метод на познание на тези предмодерни хора е простото наблюдение, а това, което виждат, те уподобяват на човека – придават му човешки качества. Затова се опитват да въздействат на природните стихии с уподобяване, молби, плашене, убеждаване и магии. Примерно, искат да вземат по-голяма част от питката, за да дойде при тях плодородието, карат се на дървото, че не ражда плод, и се заканват да го отсекат, молят се на облаците да пуснат дъжд и плашат болестите.
Вграждането на сенки на невести в мостове е по същество предмодерен вид жертвоприношение – опит да се умилостиви съдбата, като се пожертва „най-скъпото“. Вграждането на икони в мостове пък прилича на някаква смесица между това жертвоприношение и чудотворната изцелителна сила, която се придава на някои икони.
Починалият две десетилетия преди издаването на „Възстановяване душевността на първобитния български човек“ германски социолог Макс Вебер смята, че модерният тип рационалност се отличава от традиционния по „разомагьосването на света“. „Разомагьосаният“ свят е този, в който суеверията и магиите нямат място, а всичко може да бъде пресметнато и да се обясни научно. Всъщност модерният човек знае много по-малко за света си от традиционния човек, защото в света на модерния има много повече неща, отбелязва Вебер. Той може да не знае как точно се движи влакът, но знае, че не е магия, и ако реши, може да схване механизма на локомотива.
Повече от век след смъртта на Макс Вебер пътната агенция на страна членка на Европейския съюз твърди, че иконите могат да пазят строители и пътуващи.
Предложение за реформа на българските институции
Остава само седмица до планираната ротация на правителството „Денков–Габриел“, а една от големите ябълки на раздора е как ще се избират новите ръководства на т.нар. регулатори. Това са държавните институции, които трябва да решават дали правилата във всевъзможни сфери се нарушават. Например дали пътищата, тунелите и мостовете са построени качествено, дали потребителите са защитени от неправомерно повишаване на сметките за телефон, дали ядем здравословна храна, какъв въздух дишаме, дали телевизиите и радиостанциите спазват елементарни стандарти и т.н., и т.н.
Вместо ГЕРБ, подкрепян от ДПС, да се кара с ПП–ДБ кой да овладее регулаторите, с риска да се стигне до предсрочни избори, може тези институции направо да се отменят. А на тяхно място да се сложат икони, които да пазят населението.
Така св. Иван Рилски ще пази пътуващите през тунели, а св. Христофор – пътуващите извън тунелите. Св. Екатерина ще закриля родилките от лекарски грешки, а светиите Лука и Пантелеймон ще помагат на лекарите да не допускат такива. Св. Трифон ще подкрепя лозарския и винарския бизнес, а като покровител на кожарите св. Илия ще бетонира бизнеса с норки на „Градус“. За качеството на образованието ще се грижат светите братя Кирил и Методий, а св. Тодор ще закриля конната езда и ще подобрява нечовешките условия в домовете за психичноболни. За повишените телефонни сметки ще можем да се оплачем на иконата на св. Димитър. И т.н.
По-сложно е положението с правосъдната реформа. За да разчитаме на независимо и некорумпирано правосъдие, май само с икони няма да се мине. За преборването на тайните мрежи на влияние, част от които бяха Петьо Еврото и Мартин Нотариуса, си трябват по-сериозни средства. Например вграждане на сенки на невести. Или за по-сигурно – най-добре би било да се вградят самите невести.
Търсят се родолюбиви български мъже, готови да жертват най-милото си (своите невести, да не помислите друго) в името на едно работещо, справедливо и европейско правосъдие.
A Cyber Insurance Backstop
Post Syndicated from Bruce Schneier original https://www.schneier.com/blog/archives/2024/02/a-cyber-insurance-backstop.html
In the first week of January, the pharmaceutical giant Merck quietly settled its years-long lawsuit over whether or not its property and casualty insurers would cover a $700 million claim filed after the devastating NotPetya cyberattack in 2017. The malware ultimately infected more than 40,000 of Merck’s computers, which significantly disrupted the company’s drug and vaccine production. After Merck filed its $700 million claim, the pharmaceutical giant’s insurers argued that they were not required to cover the malware’s damage because the cyberattack was widely attributed to the Russian government and therefore was excluded from standard property and casualty insurance coverage as a “hostile or warlike act.”
At the heart of the lawsuit was a crucial question: Who should pay for massive, state-sponsored cyberattacks that cause billions of dollars’ worth of damage?
One possible solution, touted by former Department of Homeland Security Secretary Michael Chertoff on a recent podcast, would be for the federal government to step in and help pay for these sorts of attacks by providing a cyber insurance backstop. A cyber insurance backstop would provide a means for insurers to receive financial support from the federal government in the event that there was a catastrophic cyberattack that caused so much financial damage that the insurers could not afford to cover all of it.
In his discussion of a potential backstop, Chertoff specifically references the Terrorism Risk Insurance Act (TRIA) as a model. TRIA was passed in 2002 to provide financial assistance to the insurers who were reeling from covering the costs of the Sept. 11, 2001, terrorist attacks. It also created the Terrorism Risk Insurance Program (TRIP), a public-private system of compensation for some terrorism insurance claims. The 9/11 attacks cost insurers and reinsurers $47 billion. It was one of the most expensive insured events in history and prompted many insurers to stop offering terrorism coverage, while others raised the premiums for such policies significantly, making them prohibitively expensive for many businesses. The government passed TRIA to provide support for insurers in the event of another terrorist attack, so that they would be willing to offer terrorism coverage again at reasonable rates. President Biden’s 2023 National Cybersecurity Strategy tasked the Treasury and Homeland Security Departments with investigating possible ways of implementing something similar for large cyberattacks.
There is a growing (and unsurprising) consensus among insurers in favor of the creation and implementation of a federal cyber insurance backstop. Like terrorist attacks, catastrophic cyberattacks are difficult for insurers to predict or model because there is not very good historical data about them—and even if there were, it’s not clear that past patterns of cyberattacks will dictate future ones. What’s more, cyberattacks could cost insurers astronomic sums of money, especially if all of their policyholders were simultaneously affected by the same attack. However, despite this consensus and the fact that this idea of the government acting as the “insurer of last resort” was first floated more than a decade ago, actually developing a sound, thorough proposal for a backstop has proved to be much more challenging than many insurers and policymakers anticipated.
One major point of issue is determining a threshold for what types of cyberattacks should trigger a backstop. Specific characteristics of cyberattacks—such as who perpetrated the attack, the motive behind it, and total damage it has caused—are often exceedingly difficult to determine. Therefore, even if policymakers could agree on what types of attacks they think the government should pay for based on these characteristics, they likely won’t be able to calculate which incursions actually qualify for assistance.
For instance, NotPetya is estimated to have caused more than $10 billion in damage worldwide, but the quantifiable amount of damage it actually did is unknown. The attack caused such a wide variety of disruptions in so many different industries, many of which likely went unreported since many companies had no incentive to publicize their security failings and were not required to do so. Observers do, however, have a pretty good idea who was behind the NotPetya attack because several governments, including the United States and the United Kingdom, issued coordinated statements blaming the Russian military. As for the motive behind NotPetya, the program was initially transmitted through Ukrainian accounting software, which suggests that it was intended to target Ukrainian critical infrastructure. But notably, this type of coordinated, consensus-based attribution to a specific government is relatively rare when it comes to cyberattacks. Future attacks are not likely to receive the same determination.
In the absence of a government backstop, the insurance industry has begun to carve out larger and larger exceptions to their standard cyber coverage. For example, in a pair of rulings against Merck’s insurers, judges in New Jersey ruled that the insurance exclusions for “hostile or warlike acts” (such as the one in Merck’s property policy that excluded coverage for “loss or damage caused by hostile or warlike action in time of peace or war by any government or sovereign power”) were not sufficiently specific to encompass a cyberattack such as NotPetya that did not involve the use of traditional force.
Accordingly, insurers such as Lloyd’s have begun to change their policy language to explicitly exclude broad swaths of cyberattacks that are perpetrated by nation-states. In an August 2022 bulletin, Lloyd’s instructed its underwriters to exclude from all cyber insurance policies not just losses arising from war but also “losses arising from state backed cyber-attacks that (a) significantly impair the ability of a state to function or (b) that significantly impair the security capabilities of a state.” Other insurers, such as Chubb, have tried to avoid tricky questions about attribution by suggesting a government response-based exclusion for war that only applies if a government responds to a cyberattack by authorizing the use of force. Chubb has also introduced explicit definitions for cyberattacks that pose a “systemic risk” or impact multiple entities simultaneously. But most of this language has not yet been tested by insurers trying to deny claims. No one, including the companies buying the policies with these exclusions written into them, really knows exactly which types of cyberattacks they exclude. It’s not clear what types of cyberattacks courts will recognize as being state-sponsored, or posing systemic risks, or significantly impairing the ability of a state to function. And for the policyholders’ whose insurance exclusions feature this sort of language, it matters a great deal how that language in their exclusions will be parsed and understood by courts adjudicating claim disputes.
These types of recent exclusions leave a large hole in companies’ coverage for cyber risks, placing even more pressure on the government to help. One of the reasons Chertoff gives for why the backstop is important is to help clarify for organizations what cyber risk-related costs they are and are not responsible for. That clarity will require very specific definitions of what types of cyberattacks the government will and will not pay for. And as the insurers know, it can be quite difficult to anticipate what the next catastrophic cyberattack will look like or how to craft a policy that will enable the government to pay only for a narrow slice of cyberattacks in a varied and unpredictable threat landscape. Get this wrong, and the government will end up writing some very large checks.
And in comparison to insurers’ coverage of terrorist attacks, large-scale cyberattacks are much more common and affect far more organizations, which makes it a far more costly risk that no one wants to take on. Organizations don’t want to—that’s why they buy insurance. Insurance companies don’t want to—that’s why they look to the government for assistance. But, so far, the U.S. government doesn’t want to take on the risk, either.
It is safe to assume, however, that regardless of whether a formal backstop is established, the federal government would step in and help pay for a sufficiently catastrophic cyberattack. If the electric grid went down nationwide, for instance, the U.S. government would certainly help cover the resulting costs. It’s possible to imagine any number of catastrophic scenarios in which an ad hoc backstop would be implemented hastily to help address massive costs and catastrophic damage, but that’s not primarily what insurers and their policyholders are looking for. They want some reassurance and clarity up front about what types of incidents the government will help pay for. But to provide that kind of promise in advance, the government likely would have to pair it with some security requirements, such as implementing multifactor authentication, strong encryption, or intrusion detection systems. Otherwise, they create a moral hazard problem, where companies may decide they can invest less in security knowing that the government will bail them out if they are the victims of a really expensive attack.
The U.S. government has been looking into the issue for a while, though, even before the 2023 National Cybersecurity Strategy was released. In 2022, for instance, the Federal Insurance Office in the Treasury Department published a Request for Comment on a “Potential Federal Insurance Response to Catastrophic Cyber Incidents.” The responses recommended a variety of different possible backstop models, ranging from expanding TRIP to encompass certain catastrophic cyber incidents, to creating a new structure similar to the National Flood Insurance Program that helps underwrite flood insurance, to trying a public-private partnership backstop model similar to the United Kingdom’s Pool Re program.
Many of these responses rightly noted that while it might eventually make sense to have some federal backstop, implementing such a program immediately might be premature. University of Edinburgh Professor Daniel Woods, for example, made a compelling case for why it was too soon to institute a backstop in Lawfare last year. Woods wrote,
One might argue similarly that a cyber insurance backstop would subsidize those companies whose security posture creates the potential for cyber catastrophe, such as the NotPetya attack that caused $10 billion in damage. Infection in this instance could have been prevented by basic cyber hygiene. Why should companies that do not employ basic cyber hygiene be subsidized by industry peers? The argument is even less clear for a taxpayer-funded subsidy.
The answer is to ensure that a backstop applies only to companies that follow basic cyber hygiene guidelines, or to insurers who require those hygiene measures of their policyholders. These are the types of controls many are familiar with: complicated passwords, app-based two-factor authentication, antivirus programs, and warning labels on emails. But this is easier said than done. To a surprising extent, it is difficult to know which security controls really work to improve companies’ cybersecurity. Scholars know what they think works: strong encryption, multifactor authentication, regular software updates, and automated backups. But there is not anywhere near as much empirical evidence as there ought to be about how effective these measures are in different implementations, or how much they reduce a company’s exposure to cyber risk.
This is largely due to companies’ reluctance to share detailed, quantitative information about cybersecurity incidents because any such information may be used to criticize their security posture or, even worse, as evidence for a government investigation or class-action lawsuit. And when insurers and regulators alike try to gather that data, they often run into legal roadblocks because these investigations are often run by lawyers who claim that the results are shielded by attorney-client privilege or work product doctrine. In some cases, companies don’t write down their findings at all to avoid the possibility of its being used against them in court. Without this data, it’s difficult for insurers to be confident that what they’re requiring of their policyholders will really work to improve those policyholders’ security and decrease their claims for cybersecurity-related incidents under their policies. Similarly, it’s hard for the federal government to be confident that they can impose requirements for a backstop that will actually raise the level of cybersecurity hygiene nationwide.
The key to managing cyber risks—both large and small—and designing a cyber backstop is determining what security practices can effectively mitigate the impact of these attacks. If there were data showing which controls work, insurers could then require that their policyholders use them, in the same way they require policyholders to install smoke detectors or burglar alarms. Similarly, if the government had better data about which security tools actually work, it could establish a backstop that applied only to victims who have used those tools as safeguards. The goal of this effort, of course, is to improve organizations’ overall cybersecurity in addition to providing financial assistance.
There are a number of ways this data could be collected. Insurers could do it through their claims databases and then aggregate that data across carriers to policymakers. They did this for car safety measures starting in the 1950s, when a group of insurance associations founded the Insurance Institute for Highway Safety. The government could use its increasing reporting authorities, for instance under the Cyber Incident Reporting for Critical Infrastructure Act of 2022, to require that companies report data about cybersecurity incidents, including which countermeasures were in place and the root causes of the incidents. Or the government could establish an entirely new entity in the form of a Bureau for Cyber Statistics that would be devoted to collecting and analyzing this type of data.
Scholars and policymakers can’t design a cyber backstop until this data is collected and studied to determine what works best for cybersecurity. More broadly, organizations’ cybersecurity cannot improve until more is known about the threat landscape and the most effective tools for managing cyber risk.
If the cybersecurity community doesn’t pause to gather that data first, then it will never be able to meaningfully strengthen companies’ security postures against large-scale cyberattacks, and insurers and government officials will just keep passing the buck back and forth, while the victims are left to pay for those attacks themselves.
This essay was written with Josephine Wolff, and was originally published in Lawfare.
security engineer interview
Post Syndicated from turnoff.us original http://turnoff.us/geek/security-engineer-interview/
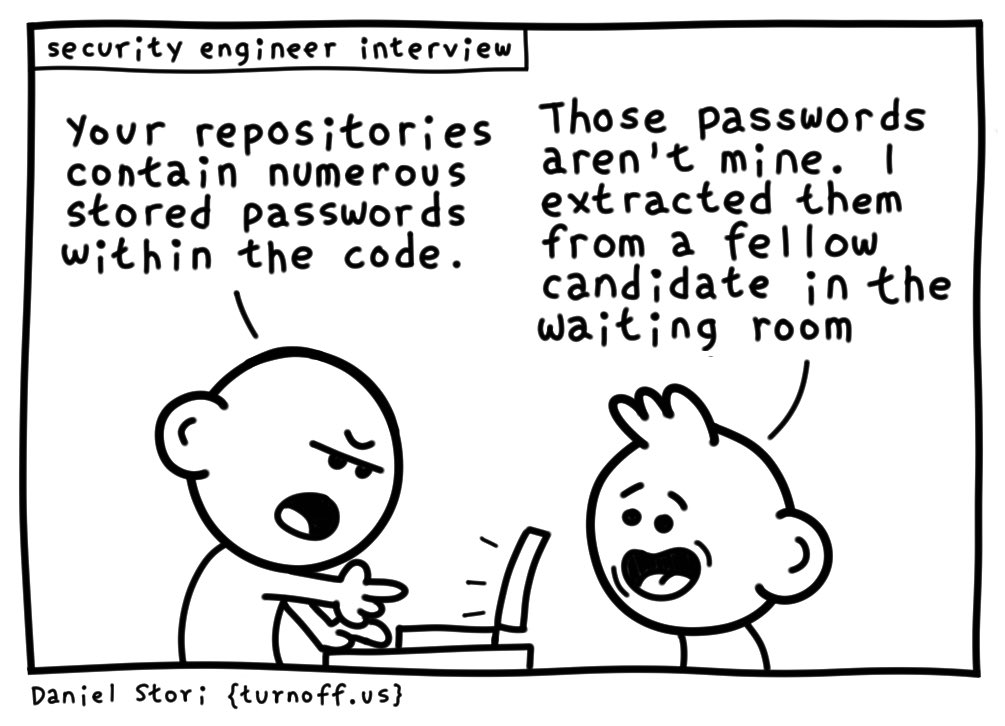
Time Tips From the Universe
Post Syndicated from The Atlantic original https://www.youtube.com/watch?v=_26B8YTEYzU
Samsung HBM3E 12H 36GB In Production Q2 2024
Post Syndicated from Cliff Robinson original https://www.servethehome.com/samsung-hbm3e-12h-36gb-in-production-q2-2024/
Samsung has new HBM slated for Q2 2024 production. Samsung HBM3E 12H will bring 36GB packages to the market in a few months
The post Samsung HBM3E 12H 36GB In Production Q2 2024 appeared first on ServeTheHome.
Comic for 2024.02.28 – Allergies 3
Post Syndicated from Explosm.net original https://explosm.net/comics/allergies-3
New Cyanide and Happiness Comic
Call My Cell
Post Syndicated from xkcd.com original https://xkcd.com/2900/