Tag Archives: AWS Amplify

ICYMI: Serverless Q2 2021

Post Syndicated from James Beswick original https://aws.amazon.com/blogs/compute/icymi-serverless-q2-2021/

Welcome to the 14th edition of the AWS Serverless ICYMI (in case you missed it) quarterly recap. Every quarter, we share all of the most recent product launches, feature enhancements, blog posts, webinars, Twitch live streams, and other interesting things that you might have missed!
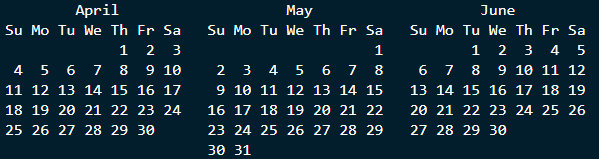
Q2 calendar

In case you missed our last ICYMI, check out what happened last quarter here.

AWS Step Functions

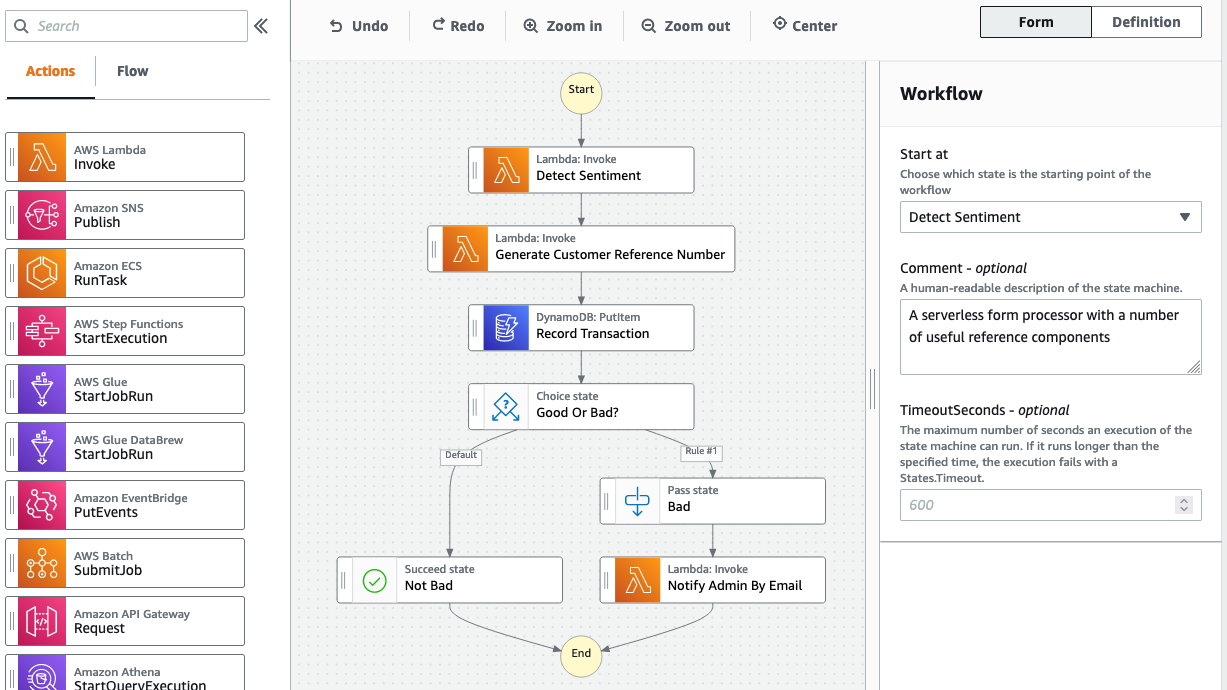
Step Functions launched Workflow Studio, a new visual tool that provides a drag-and-drop user interface to build Step Functions workflows. This exposes all the capabilities of Step Functions that are available in Amazon States Language (ASL). This makes it easier to build and change workflows and build definitions in near-real time.

For more:

Workflow Studio

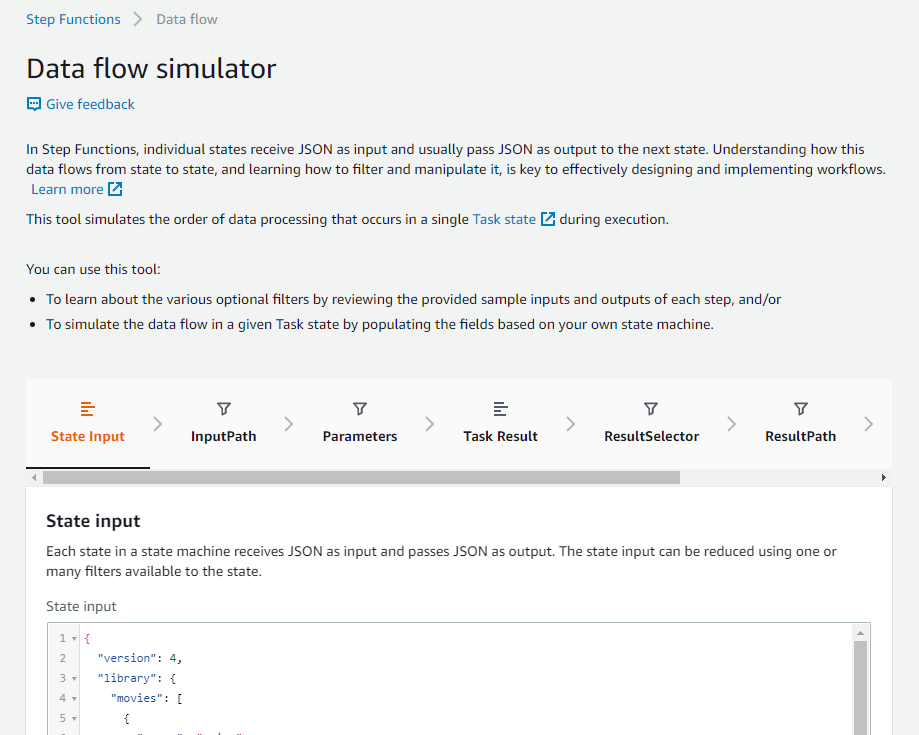
The new data flow simulator in the Step Functions console helps you evaluate the inputs and outputs passed through your state machine. It allows you to simulate each of the fields used to process data and updates in real time. It can help accelerate development with workflows and help visualize JSONPath processing.

For more:

Data flow simulator

Also, Amazon API Gateway can now invoke synchronous Express Workflows using REST APIs.

Amazon EventBridge

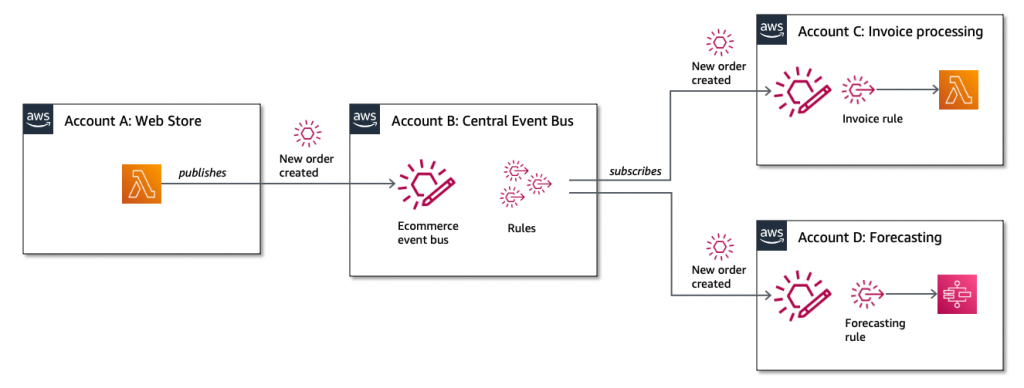
EventBridge now supports cross-Region event routing from any commercial AWS Region to a list of supported Regions. This feature allows you to centralize global events for auditing and monitoring or replicate events across Regions.
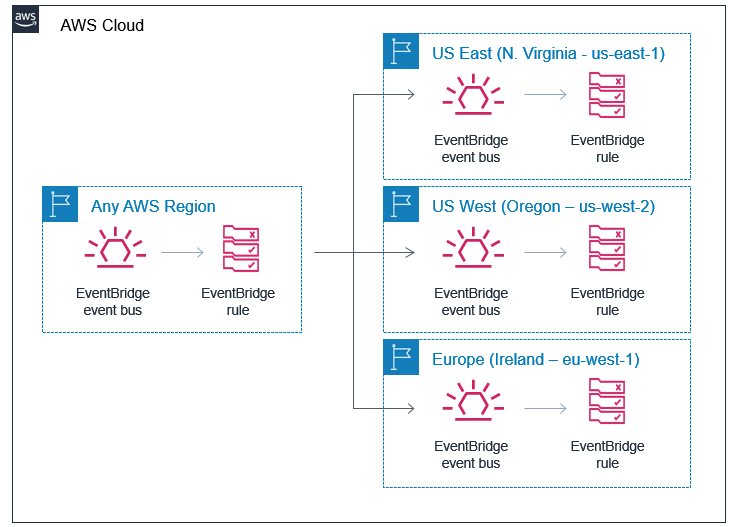
EventBridge cross-Region routing

The service now also supports bus-to-bus event routing in the same Region and in the same AWS account. This can be useful for centralizing events related to a single project, application, or team within your organization.
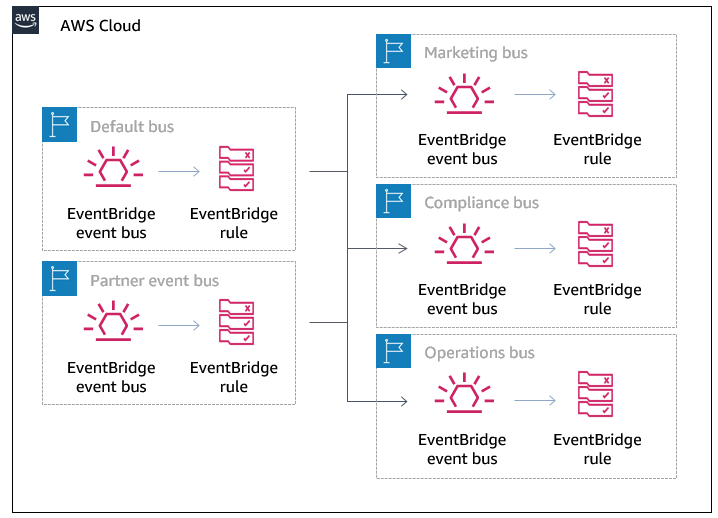
EventBridge bus-to-bus

You can now use EventBridge as a resource within Step Functions workflows. This provides a direct service integration for both standard and Express Workflows. You can publish events directly to a specified event bus using either a request-response or wait-for-callback pattern.

EventBridge added a new target for rules – Amazon SageMaker Pipelines. This allows you to use a rule to trigger a continuous integration and continuous deployment (CI/CD) service for your machine learning workloads.

AWS Lambda

Lambda Extensions

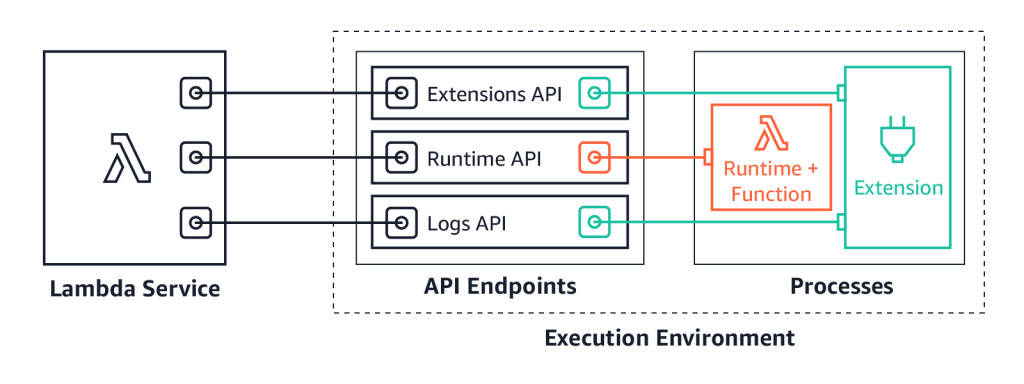
AWS Lambda extensions are now generally available including some performance and functionality improvements. Lambda extensions provide a new way to integrate your chosen monitoring, observability, security, and governance tools with AWS Lambda. These use the Lambda Runtime Extensions API to integrate with the execution environment and provide hooks into the Lambda lifecycle.

To help build your own extensions, there is an updated GitHub repository with example code.

To learn more:

  • Watch a Tech Talk with Julian Wood.
  • Watch the 8-episode Learning Path series covering all aspects of extensions.

Extensions available today

Amazon CloudWatch Lambda Insights support for Lambda container images is now generally available.

Amazon SNS

Amazon SNS has expanded the set of filter operators available to include IP address matching, existence of an attribute key, and “anything-but” matching.

The service has also introduced an SMS sandbox to help developers testing workloads that send text messages.

To learn more:

Amazon DynamoDB

DynamoDB announced CloudFormation support for several features. First, it now supports configuring Kinesis Data Streams using CloudFormation. This allows you to use infrastructure as code to set up Kinesis Data Streams instead of DynamoDB streams.

The service also announced that NoSQL Workbench now supports CloudFormation, so you can build data models and configure table capacity settings directly from the tool. Finally, you can now create and manage global tables with CloudFormation.

Learn how to use the recently launched Serverless Patterns Collection to configure DynamoDB as an event source for Lambda.

AWS Amplify

Amplify Hosting announced support for server-side rendered (SSR) apps built with the Next.js framework. This provides a zero configuration option for developers to deploy and host their Next.js-based applications.

The Amplify GLI now allows developers to make multiple DynamoDB GSI updates in a single deployment. This can help accelerate data model iterations. Additionally, the data management experience in the Amplify Admin UI launched at AWS re:Invent 2020 is now generally available.

AWS Serverless Application Model (AWS SAM)

AWS SAM has a public preview of support for local development and testing of AWS Cloud Development Kit (AWS CDK) projects.

To learn more:

Serverless blog posts

Operating Lambda

The “Operating Lambda” blog series includes the following posts in this quarter:

Streaming data

The “Building serverless applications with streaming data” blog series shows how to use Lambda with Kinesis.

Getting started with serverless for developers

Learn how to build serverless applications from your local integrated development environment (IDE).

April

May

June

Tech Talks & Events

We hold AWS Online Tech Talks covering serverless topics throughout the year. These are listed in the Serverless section of the AWS Online Tech Talks page. We also regularly deliver talks at conferences and events around the world, speak on podcasts, and record videos you can find to learn in bite-sized chunks.

Here are some from Q2:

Serverless Live was a day of talks held on May 19, featuring the serverless developer advocacy team, along with Adrian Cockroft and Jeff Barr. You can watch a replay of all the talks on the AWS Twitch channel.

Videos
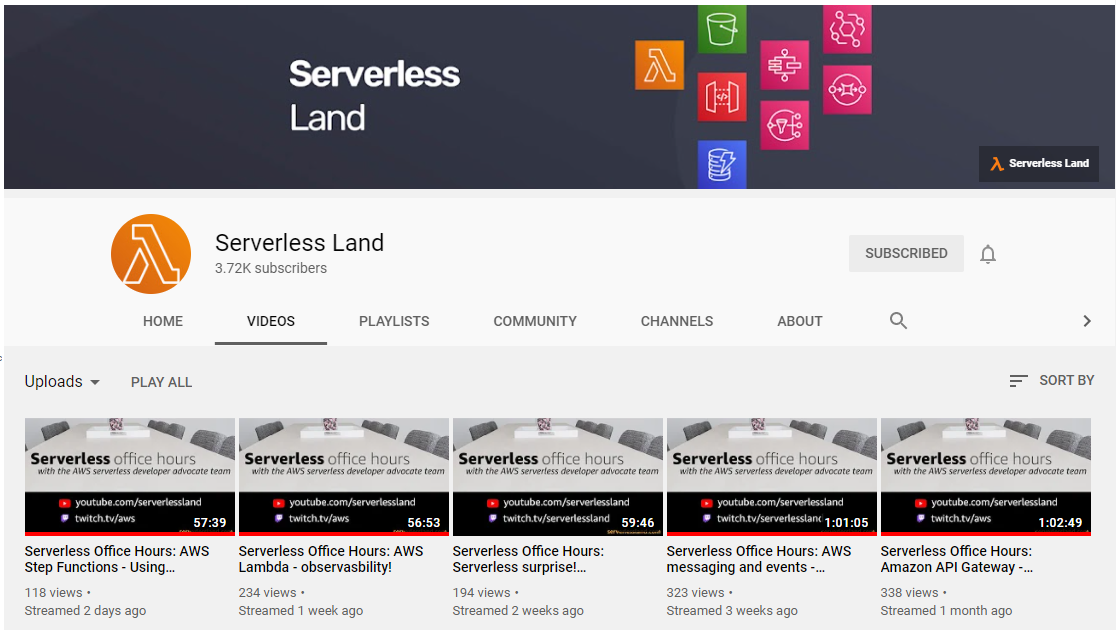
YouTube ServerlessLand channel

Serverless Office Hours – Tues 10 AM PT / 1PM EST

Weekly live virtual office hours. In each session we talk about a specific topic or technology related to serverless and open it up to helping you with your real serverless challenges and issues. Ask us anything you want about serverless technologies and applications.

YouTube: youtube.com/serverlessland
Twitch: twitch.tv/aws

April

May

June

DynamoDB Office Hours

Are you an Amazon DynamoDB customer with a technical question you need answered? If so, join us for weekly Office Hours on the AWS Twitch channel led by Rick Houlihan, AWS principal technologist and Amazon DynamoDB expert. See upcoming and previous shows

Learning Path – AWS Lambda Extensions: The deep dive

Are you looking for a way to more easily integrate AWS Lambda with your favorite monitoring, observability, security, governance, and other tools? Welcome to AWS Lambda extensions: The deep dive, a learning path video series that shows you everything about augmenting Lambda functions using Lambda extensions.

There are also other helpful videos covering serverless available on the Serverless Land YouTube channel.

Still looking for more?

The Serverless landing page has more information. The Lambda resources page contains case studies, webinars, whitepapers, customer stories, reference architectures, and even more Getting Started tutorials.

You can also follow the Serverless Developer Advocacy team on Twitter to see the latest news, follow conversations, and interact with the team.

Amplify Flutter is Now Generally Available: Build Beautiful Cross-Platform Apps

Post Syndicated from Martin Beeby original https://aws.amazon.com/blogs/aws/amplify-flutter-is-now-generally-available-build-beautiful-cross-platform-apps/

AWS Amplify is a set of tools and services for building secure, scalable mobile and web applications. Currently, Amplify supports iOS, Android, and JavaScript (web and React Native) and is the quickest and easiest way to build applications powered by Amazon Web Services (AWS).

Flutter is Google’s UI toolkit for building natively compiled mobile, web, and desktop applications from a single code base and is one of the fastest-growing mobile frameworks.

Amplify Flutter brings together AWS Amplify and Flutter, and we designed it for customers who have invested in the Flutter ecosystem and now want to take advantage of the power of AWS.

In August 2020, we launched the developer preview of Amplify Flutter and asked for feedback. We were delighted with the response. After months of refining the service, today we are happy to announce the general availability of Amplify Flutter.

New Amplify Flutter Features in GA
The GA release makes it easier to build powerful Flutter apps with the addition of three new capabilities:

First, we recently added a GraphQL API backed by AWS AppSync as well as REST APIs and handlers using Amazon API Gateway and AWS Lambda.

Second, Amplify DataStore provides a programming model for leveraging shared and distributed data without writing additional code for offline and online scenarios, which makes working with distributed, cross-user data just as simple as working with local-only data.

Finally, we have Hosted UI which is a great way to implement authentication, and works with Amazon Cognito and other social identity providers such as Facebook, Google and Amazon. Hosted UI is a customizable OAuth 2.0 flow that allows you to launch a login screen without embedding the SDK for Cognito or a social provider in your application.

Digging Deeper Into Amplify DataStore
I have been building an app over the past two weeks using Amplify Flutter, and my favorite feature is Amplify DataStore, primarily because it has saved me so much time.

Working with the REST and GraphQL APIs is great in Amplify. However, when I create a mobile app, I’m often thinking about what happens when the mobile device has intermittent connectivity and can’t connect to the API endpoints. Storing data locally and syncing back to the cloud can become quite complicated. Amplify DataStore solves that problem by providing a persistent on-device data store that handles the offline or online scenario.

When I started developing my app, I used DataStore as a stand-alone local database. However, its power became apparent to me when I connected it to a cloud backend. DataStore uses my AWS AppSync API to sync data when network connectivity is available. If the app is offline, it stores it locally, ready for when a connection becomes available.

Amplify DataStore automatically versions data and implements conflict detection and resolution in the cloud using AppSync. The toolchain also generates object definitions for Dart based on the GraphQL schema that I provide.

Writing to Amplify DataStore
Writing to the DataStore is straightforward. The documentation site shows an example that you can try yourself that uses a schema from a blog site.

Post newPost = Post(
    title: 'New Post being saved', rating: 15, status: PostStatus.DRAFT);
await Amplify.DataStore.save(newPost);

Reading from Amplify DataStore
To read from the DataStore, you can query for all records of a given model type.

try {
   List<Post> posts = await Amplify.DataStore.query(Post.classType);
 } catch (e) {
   print("Query failed: " + e);
 }

Synchronization with Amplify DataStore
If you enable data synchronization, there can be different versions of an object across clients, and multiple clients may have updated their copies of an object. DataStore will converge different object versions by applying conflict detection and resolution strategies. The default resolution is called Auto Merge, but other strategies include optimistic concurrency control and custom Lambda functions.

Additional Amplify Flutter Features
Amplify Flutter allows you to work with AWS in three additional ways:

  • Authentication. Amplify Flutter provides an interface for authenticating a user and enables use cases like Sign-Up, Sign-In, and Multi-Factor Authentication. Behind the scenes, it provides the necessary authorization to the other Amplify categories. It comes with built-in support for Cognito user pools and identity pools.
  • Storage. Amplify Flutter provides an interface for managing user content for your app in public, protected, or private storage buckets. It enables use cases like upload, download, and deleting objects and provides built-in support for Amazon Simple Storage Service (S3) by default.
  • Analytics. Amplify Flutter enables you to collect tracking data for authenticated or unauthenticated users in Amazon Pinpoint. You can easily record events and extend the default functionality for custom metrics or attributes as needed.

Available Now
Amplify Flutter is now available in GA in all regions that support AWS Amplify. There is no additional cost for using Amplify Flutter; you only pay for the backend services your applications use above the free tier; check out the pricing page for more details.

Visit the Amplify Flutter documentation to get started and learn more. Happy coding.

— Martin

New AWS Amplify Admin UI Helps You Develop App Backends, No Cloud Experience Required

Post Syndicated from Marcia Villalba original https://aws.amazon.com/blogs/aws/aws-amplify-admin-ui-helps-you-develop-app-backends-no-cloud-experience-required/

Today AWS Amplify announces new Admin UI to configure an application backend, and manage app users and content outside the AWS console. This new feature makes it easier to use AWS services and accelerates the development and management of full-stack web and mobile apps.

We launched AWS Amplify in November 2018, and since then it has been helping front-end web and mobile developers to quickly develop and deploy cloud-connected web and mobile applications. In order to stay ahead of the curve and deliver innovation to customers, businesses need to ship features fast. However, developers and non-developers who are unfamiliar with AWS fundamentals require training, which slows the entire process down.

AWS Amplify today launches a new Admin UI that enables team members to interface with AWS without requiring an AWS account (only the first deployment requires an AWS account).

The Admin UI provides simple yet powerful tools to model database tables, add authentication and authorization, and manage app content, users, and groups. It also offers the ability to manage the application users and content. The AWS Amplify Admin UI focuses on data types rather than backend infrastructure. All the backend resources generate infrastructure as code (IaC) templates that can be committed in the team repository and integrated with AWS Amplify continuous deployment workflow to manage the different environments.

Let’s Look at an Example Using the New AWS Amplify Admin UI
Imagine that you are a front-end web developer creating a website for a local restaurant. The restaurant owner wants to have a website where they can show their daily menu, and wants a simple way to update the content of the page every day.

There are many ways to solve this problem. You can spin up a server and install a CMS for the restaurant owner to manage the menu. For this particular use case, having a server exclusively to do this is just over-provisioning resources. Or, you can create the CMS yourself using serverless tools; however, this adds a lot of complexity and extra time to the development cycle.

Another option is to use the new AWS Amplify Admin UI that allows you to take advantage of many AWS managed services to create the backend quickly and also provides the ability to manage the application users and content.

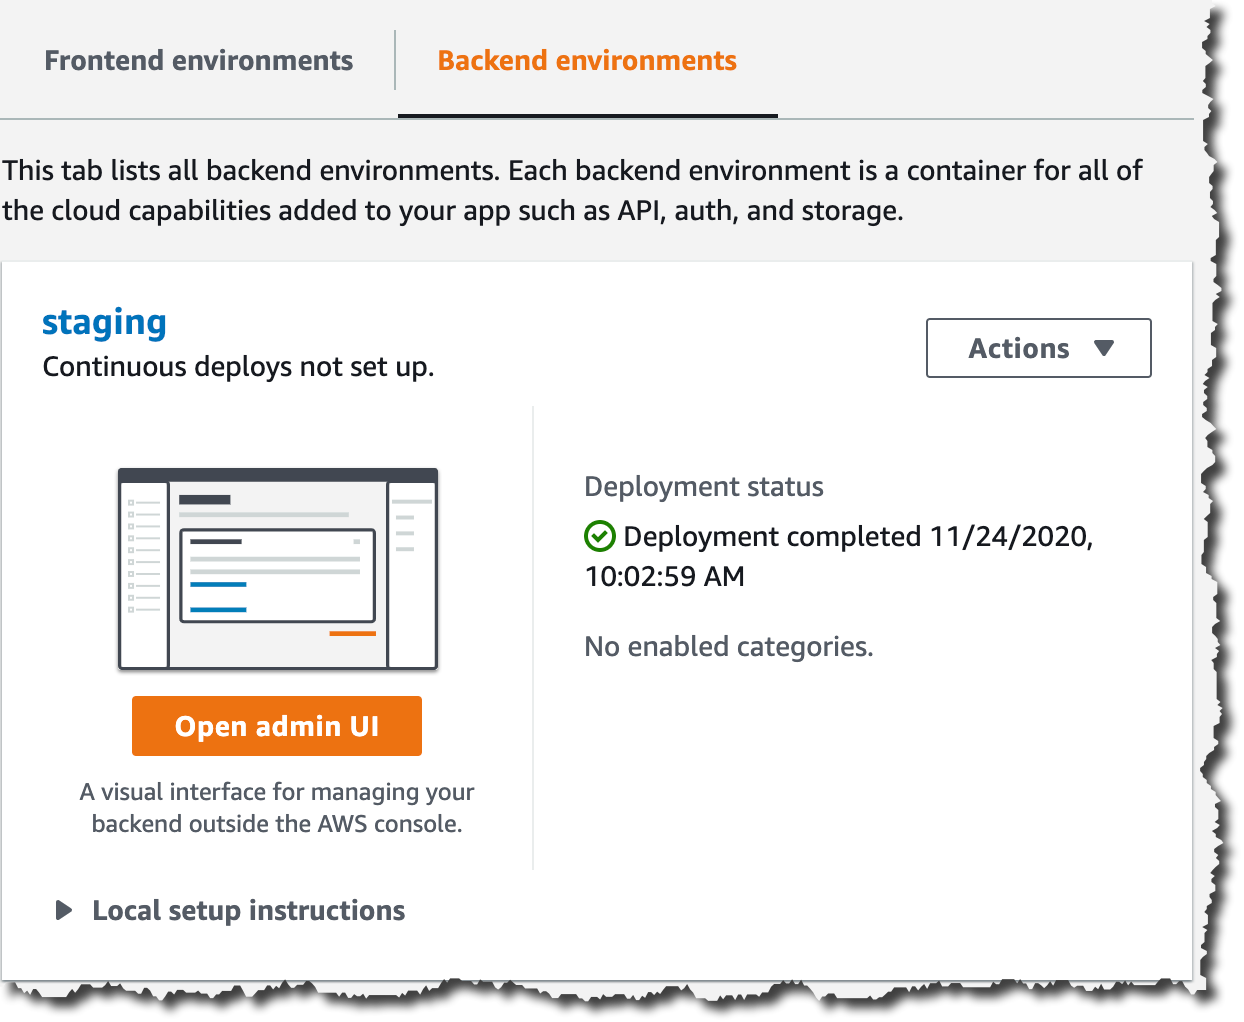
The first thing you need to do is to create a new AWS Amplify app backend in the AWS Console. AWS Amplify will create a backend environment called staging. When, your app backend is ready, open the new Admin UI. If you would like to get another developer working on this application who doesn’t have experience with AWS, nor access to the AWS account, now you can grant access to them so they can continue the work on the UI. But for now, let’s imagine that you are going to do all the development.

Screenshot of opening the admin ui

The Admin UI contains all the tools that application developers need to configure the application backend and that content managers need to update the application content.

In the sidebar of the Admin UI (as shown in the following illustration), you can find all the different options for setting up your application.

To get started with the restaurant website, you need a menu data model. For that, first go to Data (1), then create a new data model call Menu (2), add the necessary fields and Save and deploy (3) the model. Saving and deploying the model will create all the needed AWS resources in the backend, like an AWS AppSync API and a Amazon DynamoDB table to host the menu items. Deploying takes a few minutes.

Screenshot for data modeling

After your model is deployed, you can start working on your website. For this example I will be using React, one of the web frameworks supported by AWS Amplify, but you can do the same example with any of the supported frameworks.

First, you need to install the AWS Amplify CLI:

npm install -g @aws-amplify/cli

Then create a new React application:

npx create-react-app react-amplified
cd react-amplified

When your application is created, you can configure it with the AWS Amplify application we just created. For that, go back to the Admin UI and select Local setup instructions (1), and execute the amplify command (2) in the directory where the web application is stored in your computer.

Screenshot of pulling amplify configuration

When you execute that command, a browser window will open that asks you if you are sure that you want to log in to the AWS Amplify Admin UI. Selecting yes will grant the AWS Amplify CLI access to deploy updates to the backend directly from your local desktop. The CLI will prompt you with a few questions about your local environment, and finally will ask if you plan to modify this backend locally. Choose yes.

When that process ends, you will notice some changes in your web application directory: a couple of new directories were created (amplify and src/models) and also a new file (aws-exports.js). These files and directories hold all the configuration for your AWS Amplify application.

Now it’s time to develop your application. To access the menu data model you created in the first steps, you will use the DataStore library from AWS Amplify. DataStore allows you to connect to your deployed database and perform CRUD, sort and filter operations from your UI to manipulate backend data. In the Admin UI, you can see some examples on how to create, update, delete and query the model.

Screenshot of using the data model

When the website is ready, it’s time to add some content. The restaurant owner is the one adding the menu items. In order for them to be able to add items, they need to have permissions to access the Admin UI for this application.

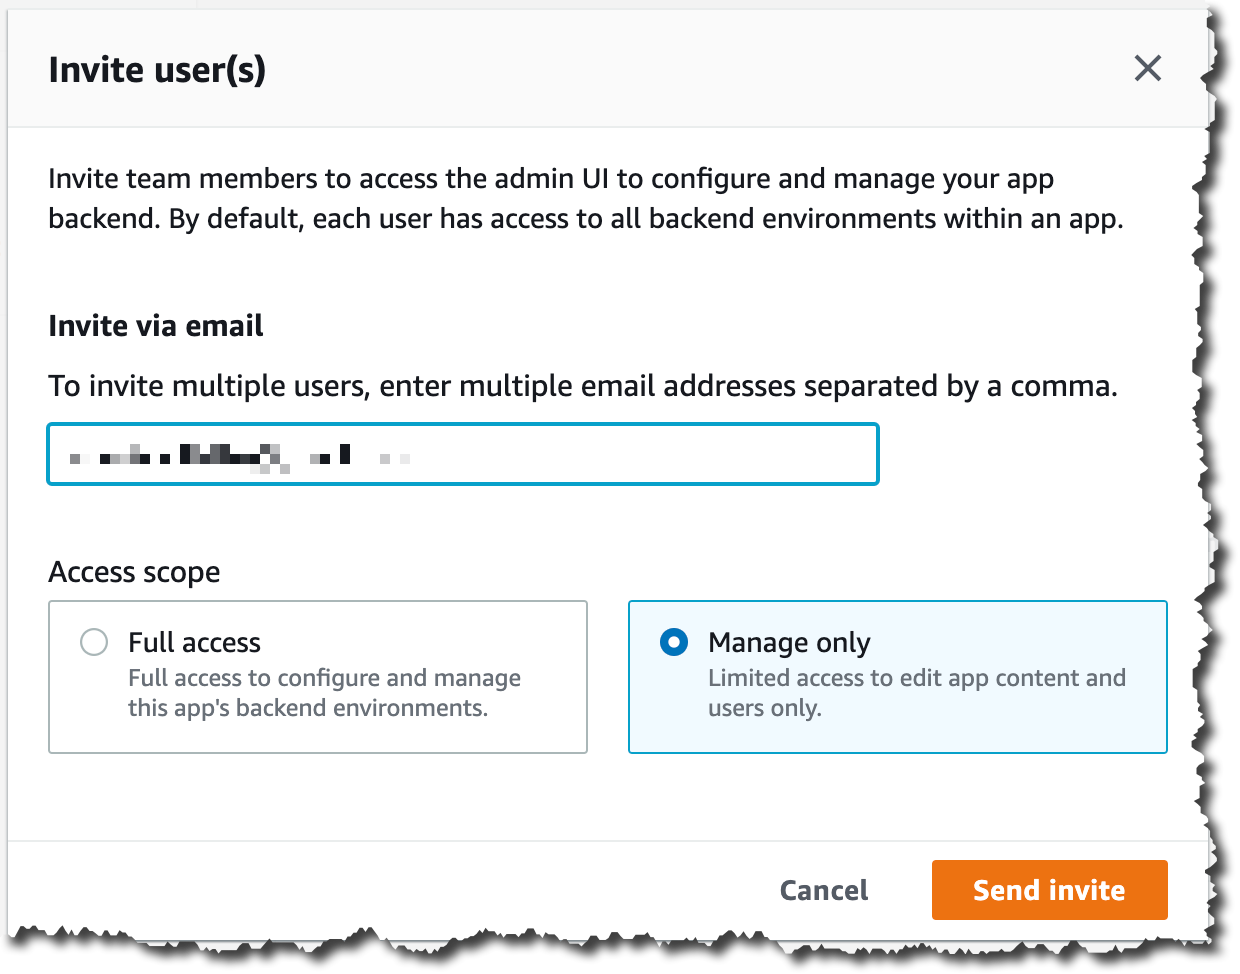
To do this, you need to create a new Admin UI account for the restaurant owner with the correct permissions. Go to the AWS Amplify console for your application and then to the Admin UI management and invite users.

When adding new users to the Admin UI you can define their permission scope. If you want to grant them full access, they will be able to configure and manage the application backend environment, and if you want them just to be able to edit the content, you can give them the manage only access scope. For the restaurant owner grant manage only permissions.

Screenshot for inviting new users to the AdminUI

After sending the invite, the restaurant owner will receive an email with a link to access the Admin UI and a username and password to log in. When they log in, they can go to the Content tab (1) and start adding items in their menu (2) and they can see the items available in the table in the screen (3).

Screenshot adding new content

From this screen, the restaurant owner can add, delete and edit items in their menu whenever they want to. These changes are reflected in the website immediately after they save.

The use cases for Admin UI are endless, such as blogs, e-commerce sites, planning apps, etc. Developers can build complex and feature-rich apps by focusing on their domain-specific data model instead of spending hours deploying and stitching together cloud infrastructure. AWS Amplify gives front-end developers the fastest and easiest way to develop mobile and web apps. And all accessible to developers that are not familiar with the cloud and without the need to give AWS access to everybody in the team.

Availability
AWS Amplify Admin UI is available at launch in: US East (N. Virginia), US East (Ohio), US West (Oregon), Asia Pacific (Mumbai), Asia Pacific (Seoul), Asia Pacific (Singapore), Asia Pacific (Sydney), Asia Pacific (Tokyo), Canada (Central), Europe (Frankfurt), Europe (Ireland), and Europe (London).

For more information, visit the Amplify service page. Get started building a data model without an AWS account in the sandbox experience.

Marcia

ICYMI: Serverless pre:Invent 2020

Post Syndicated from James Beswick original https://aws.amazon.com/blogs/compute/icymi-serverless-preinvent-2020/

During the last few weeks, the AWS serverless team has been releasing a wave of new features in the build-up to AWS re:Invent 2020. This post recaps some of the most important releases for serverless developers.

re:Invent is virtual and free to all attendees in 2020 – register here. See the complete list of serverless sessions planned and join the serverless DA team live on Twitch. Also, follow your DAs on Twitter for live recaps and Q&A during the event.

AWS re:Invent 2020

AWS Lambda

We launched Lambda Extensions in preview, enabling you to more easily integrate monitoring, security, and governance tools into Lambda functions. You can also build your own extensions that run code during Lambda lifecycle events, and there is an example extensions repo for starting development.

You can now send logs from Lambda functions to custom destinations by using Lambda Extensions and the new Lambda Logs API. Previously, you could only forward logs after they were written to Amazon CloudWatch Logs. Now, logging tools can receive log streams directly from the Lambda execution environment. This makes it easier to use your preferred tools for log management and analysis, including Datadog, Lumigo, New Relic, Coralogix, Honeycomb, or Sumo Logic.

Lambda Extensions API

Lambda launched support for Amazon MQ as an event source. Amazon MQ is a managed broker service for Apache ActiveMQ that simplifies deploying and scaling queues. This integration increases the range of messaging services that customers can use to build serverless applications. The event source operates in a similar way to using Amazon SQS or Amazon Kinesis. In all cases, the Lambda service manages an internal poller to invoke the target Lambda function.

We also released a new layer to make it simpler to integrate Amazon CodeGuru Profiler. This service helps identify the most expensive lines of code in a function and provides recommendations to help reduce cost. With this update, you can enable the profiler by adding the new layer and setting environment variables. There are no changes needed to the custom code in the Lambda function.

Lambda announced support for AWS PrivateLink. This allows you to invoke Lambda functions from a VPC without traversing the public internet. It provides private connectivity between your VPCs and AWS services. By using VPC endpoints to access the Lambda API from your VPC, this can replace the need for an Internet Gateway or NAT Gateway.

For developers building machine learning inferencing, media processing, high performance computing (HPC), scientific simulations, and financial modeling in Lambda, you can now use AVX2 support to help reduce duration and lower cost. By using packages compiled for AVX2 or compiling libraries with the appropriate flags, your code can then benefit from using AVX2 instructions to accelerate computation. In the blog post’s example, enabling AVX2 for an image-processing function increased performance by 32-43%.

Lambda now supports batch windows of up to 5 minutes when using SQS as an event source. This is useful for workloads that are not time-sensitive, allowing developers to reduce the number of Lambda invocations from queues. Additionally, the batch size has been increased from 10 to 10,000. This is now the same as the batch size for Kinesis as an event source, helping Lambda-based applications process more data per invocation.

Code signing is now available for Lambda, using AWS Signer. This allows account administrators to ensure that Lambda functions only accept signed code for deployment. Using signing profiles for functions, this provides granular control over code execution within the Lambda service. You can learn more about using this new feature in the developer documentation.

Amazon EventBridge

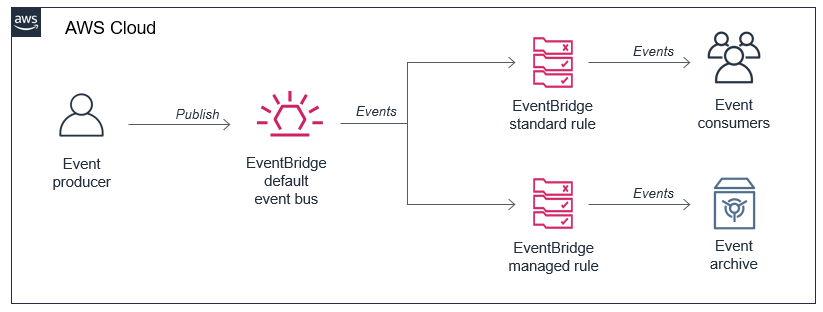
You can now use event replay to archive and replay events with Amazon EventBridge. After configuring an archive, EventBridge automatically stores all events or filtered events, based upon event pattern matching logic. You can configure a retention policy for archives to delete events automatically after a specified number of days. Event replay can help with testing new features or changes in your code, or hydrating development or test environments.

EventBridge archived events

EventBridge also launched resource policies that simplify managing access to events across multiple AWS accounts. This expands the use of a policy associated with event buses to authorize API calls. Resource policies provide a powerful mechanism for modeling event buses across multiple account and providing fine-grained access control to EventBridge API actions.

EventBridge resource policies

EventBridge announced support for Server-Side Encryption (SSE). Events are encrypted using AES-256 at no additional cost for customers. EventBridge also increased PutEvent quotas to 10,000 transactions per second in US East (N. Virginia), US West (Oregon), and Europe (Ireland). This helps support workloads with high throughput.

AWS Step Functions

Synchronous Express Workflows have been launched for AWS Step Functions, providing a new way to run high-throughput Express Workflows. This feature allows developers to receive workflow responses without needing to poll services or build custom solutions. This is useful for high-volume microservice orchestration and fast compute tasks communicating via HTTPS.

The Step Functions service recently added support for other AWS services in workflows. You can now integrate API Gateway REST and HTTP APIs. This enables you to call API Gateway directly from a state machine as an asynchronous service integration.

Step Functions now also supports Amazon EKS service integration. This allows you to build workflows with steps that synchronously launch tasks in EKS and wait for a response. In October, the service also announced support for Amazon Athena, so workflows can now query data in your S3 data lakes.

These new integrations help minimize custom code and provide built-in error handling, parameter passing, and applying recommended security settings.

AWS SAM CLI

The AWS Serverless Application Model (AWS SAM) is an AWS CloudFormation extension that makes it easier to build, manage, and maintains serverless applications. On November 10, the AWS SAM CLI tool released version 1.9.0 with support for cached and parallel builds.

By using sam build --cached, AWS SAM no longer rebuilds functions and layers that have not changed since the last build. Additionally, you can use sam build --parallel to build functions in parallel, instead of sequentially. Both of these new features can substantially reduce the build time of larger applications defined with AWS SAM.

Amazon SNS

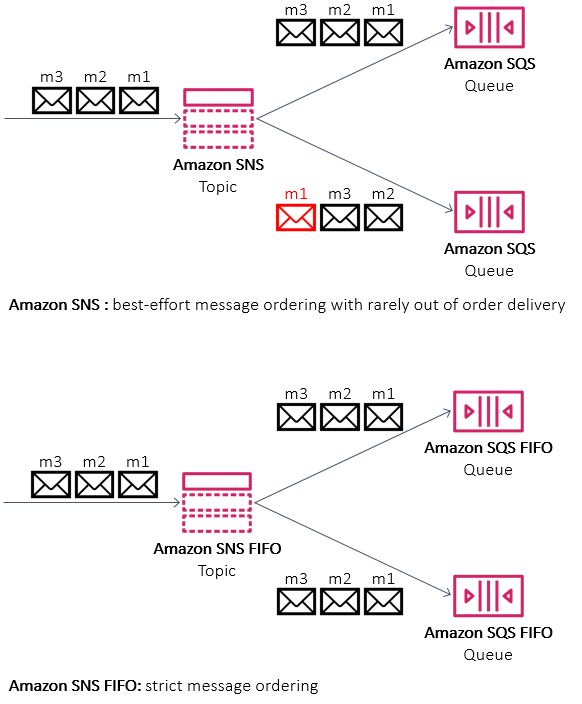
Amazon SNS announced support for First-In-First-Out (FIFO) topics. These are used with SQS FIFO queues for applications that require strict message ordering with exactly once processing and message deduplication. This is designed for workloads that perform tasks like bank transaction logging or inventory management. You can also use message filtering in FIFO topics to publish updates selectively.

SNS FIFO

AWS X-Ray

X-Ray now integrates with Amazon S3 to trace upstream requests. If a Lambda function uses the X-Ray SDK, S3 sends tracing headers to downstream event subscribers. With this, you can use the X-Ray service map to view connections between S3 and other services used to process an application request.

AWS CloudFormation

AWS CloudFormation announced support for nested stacks in change sets. This allows you to preview changes in your application and infrastructure across the entire nested stack hierarchy. You can then review those changes before confirming a deployment. This is available in all Regions supporting CloudFormation at no extra charge.

The new CloudFormation modules feature was released on November 24. This helps you develop building blocks with embedded best practices and common patterns that you can reuse in CloudFormation templates. Modules are available in the CloudFormation registry and can be used in the same way as any native resource.

Amazon DynamoDB

For customers using DynamoDB global tables, you can now use your own encryption keys. While all data in DynamoDB is encrypted by default, this feature enables you to use customer managed keys (CMKs). DynamoDB also announced support for global tables in the Europe (Milan) and Europe (Stockholm) Regions. This feature enables you to scale global applications for local access in workloads running in different Regions and replicate tables for higher availability and disaster recovery (DR).

The DynamoDB service announced the ability to export table data to data lakes in Amazon S3. This enables you to use services like Amazon Athena and AWS Lake Formation to analyze DynamoDB data with no custom code required. This feature does not consume table capacity and does not impact performance and availability. To learn how to use this feature, see this documentation.

AWS Amplify and AWS AppSync

You can now use existing Amazon Cognito user pools and identity pools for Amplify projects, making it easier to build new applications for an existing user base. AWS Amplify Console, which provides a fully managed static web hosting service, is now available in the Europe (Milan), Middle East (Bahrain), and Asia Pacific (Hong Kong) Regions. This service makes it simpler to bring automation to deploying and hosting single-page applications and static sites.

AWS AppSync enabled AWS WAF integration, making it easier to protect GraphQL APIs against common web exploits. You can also implement rate-based rules to help slow down brute force attacks. Using AWS Managed Rules for AWS WAF provides a faster way to configure application protection without creating the rules directly. AWS AppSync also recently expanded service availability to the Asia Pacific (Hong Kong), Middle East (Bahrain), and China (Ningxia) Regions, making the service now available in 21 Regions globally.

Still looking for more?

Join the AWS Serverless Developer Advocates on Twitch throughout re:Invent for live Q&A, session recaps, and more! See this page for the full schedule.

For more serverless learning resources, visit Serverless Land.

Building Serverless Land: Part 2 – An auto-building static site

Post Syndicated from Benjamin Smith original https://aws.amazon.com/blogs/compute/building-serverless-land-part-2-an-auto-building-static-site/

In this two-part blog series, I show how serverlessland.com is built. This is a static website that brings together all the latest blogs, videos, and training for AWS serverless. It automatically aggregates content from a number of sources. The content exists in a static JSON file, which generates a new static site each time it is updated. The result is a low-maintenance, low-latency serverless website, with almost limitless scalability.

A companion blog post explains how to build an automated content aggregation workflow to create and update the site’s content. In this post, you learn how to build a static website with an automated deployment pipeline that re-builds on each GitHub commit. The site content is stored in JSON files in the same repository as the code base. The example code can be found in this GitHub repository.

The growing adoption of serverless technologies generates increasing amounts of helpful and insightful content from the developer community. This content can be difficult to discover. Serverless Land helps channel this into a single searchable location. By collating this into a static website, users can enjoy a browsing experience with fast page load speeds.

The serverless nature of the site means that developers don’t need to manage infrastructure or scalability. The use of AWS Amplify Console to automatically deploy directly from GitHub enables a regular release cadence with a fast transition from prototype to production.

Static websites

A static site is served to the user’s web browser exactly as stored. This contrasts to dynamic webpages, which are generated by a web application. Static websites often provide improved performance for end users and have fewer or no dependant systems, such as databases or application servers. They may also be more cost-effective and secure than dynamic websites by using cloud storage, instead of a hosted environment.

A static site generator is a tool that generates a static website from a website’s configuration and content. Content can come from a headless content management system, through a REST API, or from data referenced within the website’s file system. The output of a static site generator is a set of static files that form the website.

Serverless Land uses a static site generator for Vue.js called Nuxt.js. Each time content is updated, Nuxt.js regenerates the static site, building the HTML for each page route and storing it in a file.

The architecture

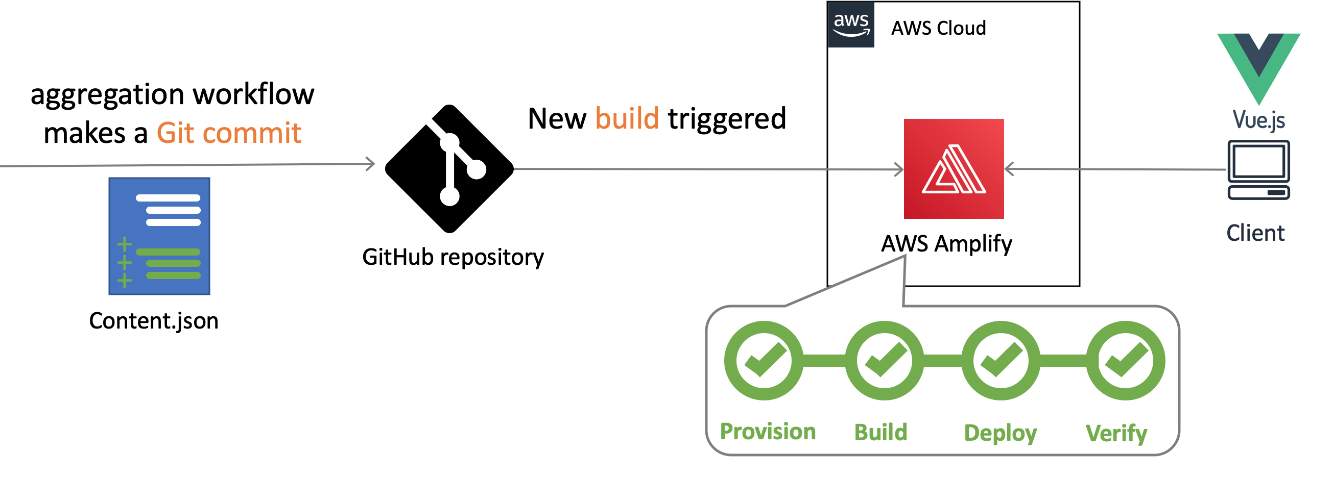
Serverless Land static website architecture

When the content.json file is committed to GitHub, a new build process is triggered in AWS Amplify Console.

Deploying AWS Amplify

AWS Amplify helps developers to build secure and scalable full stack cloud applications. AWS Amplify Console is a tool within Amplify that provides a user interface with a git-based workflow for hosting static sites. Deploy applications by connecting to an existing repository (GitHub, BitBucket Cloud, GitLab, and AWS CodeCommit) to set up a fully managed, nearly continuous deployment pipeline.

This means that any changes committed to the repository trigger the pipeline to build, test, and deploy the changes to the target environment. It also provides instant content delivery network (CDN) cache invalidation, atomic deploys, password protection, and redirects without the need to manage any servers.

Building the static website

  1. To get started, use the Nuxt.js scaffolding tool to deploy a boiler plate application. Make sure you have npx installed (npx is shipped by default with npm version 5.2.0 and above).
    $ npx create-nuxt-app content-aggregator

    The scaffolding tool asks some questions, answer as follows:Nuxt.js scaffolding tool inputs

  2. Navigate to the project directory and launch it with:
    $ cd content-aggregator
    $ npm run dev

    The application is now running on http://localhost:3000.The pages directory contains your application views and routes. Nuxt.js reads the .vue files inside this directory and automatically creates the router configuration.

  3. Create a new file in the /pages directory named blogs.vue:$ touch pages/blogs.vue
  4. Copy the contents of this file into pages/blogs.vue.
  5. Create a new file in /components directory named Post.vue :$ touch components/Post.vue
  6. Copy the contents of this file into components/Post.vue.
  7. Create a new file in /assets named content.json and copy the contents of this file into it.$ touch /assets/content.json

The blogs Vue component

The blogs page is a Vue component with some special attributes and functions added to make development of your application easier. The following code imports the content.json file into the variable blogPosts. This file stores the static website’s array of aggregated blog post content.

import blogPosts from '../assets/content.json'

An array named blogPosts is initialized:

data(){
    return{
      blogPosts: []
    }
  },

The array is then loaded with the contents of content.json.

 mounted(){
    this.blogPosts = blogPosts
  },

In the component template, the v-for directive renders a list of post items based on the blogPosts array. It requires a special syntax in the form of blog in blogPosts, where blogPosts is the source data array and blog is an alias for the array element being iterated on. The Post component is rendered for each iteration. Since components have isolated scopes of their own, a :post prop is used to pass the iterated data into the Post component:

<ul>
  <li v-for="blog in blogPosts" :key="blog">
     <Post :post="blog" />
  </li>
</ul>

The post data is then displayed by the following template in components/Post.vue.

<template>
    <div class="hello">
      <h3>{{ post.title }} </h3>
      <div class="img-holder">
          <img :src="post.image" />
      </div>
      <p>{{ post.intro }} </p>
      <p>Published on {{post.date}}, by {{ post.author }} p>
      <a :href="post.link"> Read article</a>
    </div>
</template>

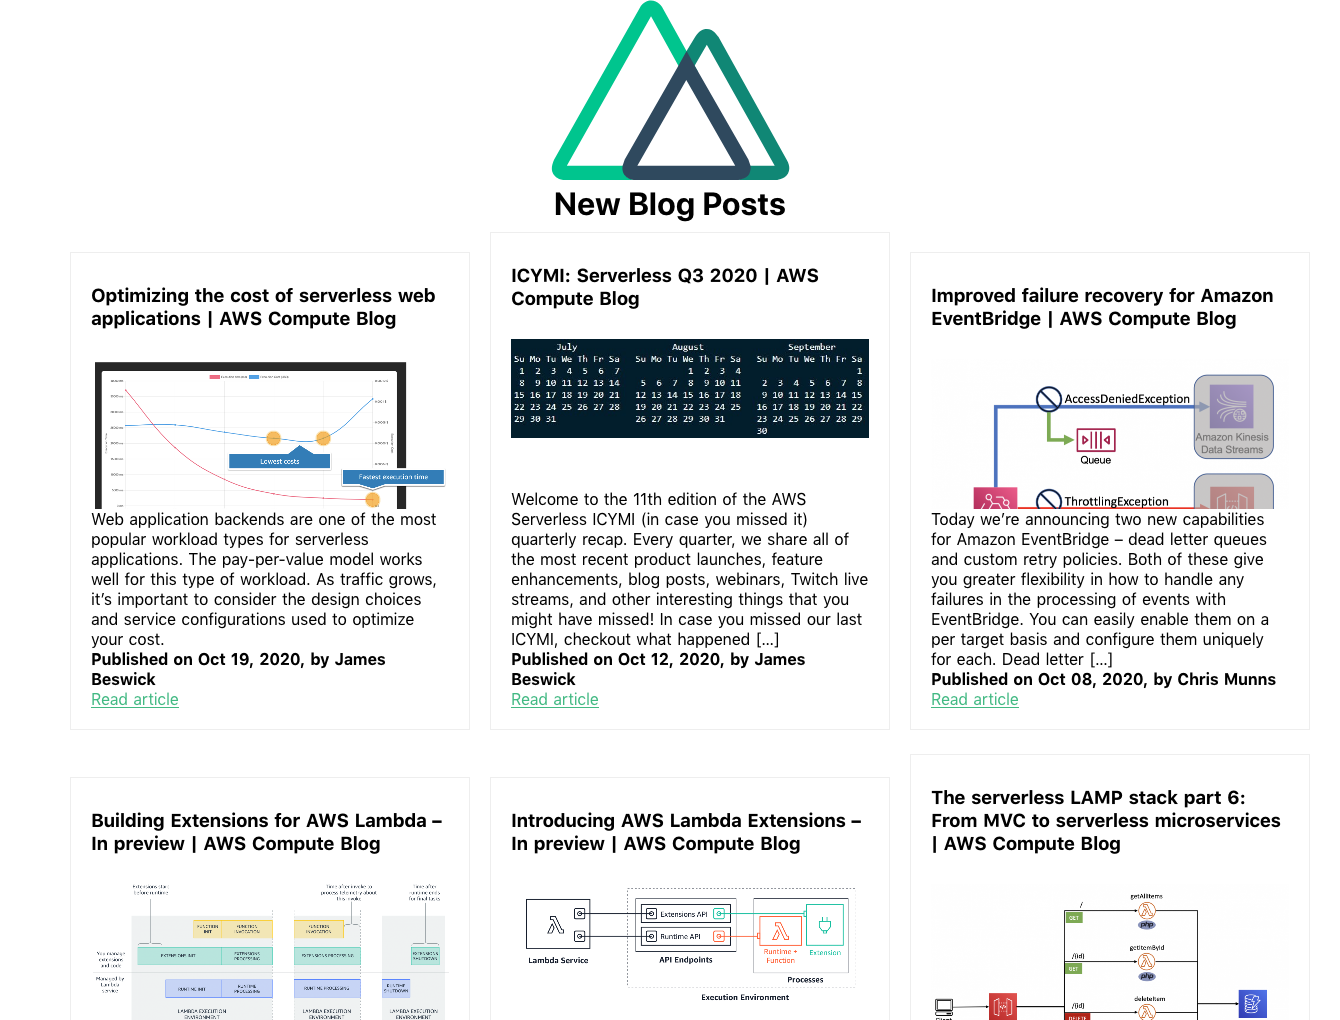
This forms the framework for the static website. The /blogs page displays content from /assets/content.json via the Post component. To view this, go to http://localhost:3000/blogs in your browser:

The /blogs page

Add a new item to the content.json file and rebuild the static website to display new posts on the blogs page. The previous content was generated using the aggregation workflow explained in this companion blog post.

Connect to Amplify Console

Clone the web application to a GitHub repository and connect it to Amplify Console to automate the rebuild and deployment process:

  1. Upload the code to a new GitHub repository named ‘content-aggregator’.
  2. In the AWS Management Console, go to the Amplify Console and choose Connect app.
  3. Choose GitHub then Continue.
  4. Authorize to your GitHub account, then in the Recently updated repositories drop-down select the ‘content-aggregator’ repository.
  5. In the Branch field, leave the default as master and choose Next.
  6. In the Build and test settings choose edit.
  7. Replace - npm run build with – npm run generate.
  8. Replace baseDirectory: / with baseDirectory: dist

    This runs the nuxt generate command each time an application build process is triggered. The nuxt.config.js file has a target property with the value of static set. This generates the web application into static files. Nuxt.js creates a dist directory with everything inside ready to be deployed on a static hosting service.
  9. Choose Save then Next.
  10. Review the Repository details and App settings are correct. Choose Save and deploy.

    Amplify Console deployment

Once the deployment process has completed and is verified, choose the URL generated by Amplify Console. Append /blogs to the URL, to see the static website blogs page.

Any edits pushed to the repository’s content.json file trigger a new deployment in Amplify Console that regenerates the static website. This companion blog post explains how to set up an automated content aggregator to add new items to the content.json file from an RSS feed.

Conclusion

This blog post shows how to create a static website with vue.js using the nuxt.js static site generator. The site’s content is generated from a single JSON file, stored in the site’s assets directory. It is automatically deployed and re-generated by Amplify Console each time a new commit is pushed to the GitHub repository. By automating updates to the content.json file you can create low-maintenance, low-latency static websites with almost limitless scalability.

This application framework is used together with this automated content aggregator to pull together articles for http://serverlessland.com. Serverless Land brings together all the latest blogs, videos, and training for AWS Serverless. Download the code from this GitHub repository to start building your own automated content aggregation platform.

Building Serverless Land: Part 1 – Automating content aggregation

Post Syndicated from Benjamin Smith original https://aws.amazon.com/blogs/compute/building-serverless-land-part-1-automating-content-aggregation/

In this two part blog series, I show how serverlessland.com is built. This is a static website that brings together all the latest blogs, videos, and training for AWS Serverless. It automatically aggregates content from a number of sources. The content exists in static JSON files, which generate a new site build each time they are updated. The result is a low-maintenance, low-latency serverless website, with almost limitless scalability.

This blog post explains how to automate the aggregation of content from multiple RSS feeds into a JSON file stored in GitHub. This workflow uses AWS Lambda and AWS Step Functions, triggered by Amazon EventBridge. The application can be downloaded and deployed from this GitHub repository.

The growing adoption of serverless technologies generates increasing amounts of helpful and insightful content from the developer community. This content can be difficult to discover. Serverless Land helps channel this into a single searchable location. By automating the collection of this content with scheduled serverless workflows, the process robustly scales to near infinite numbers. The Step Functions MAP state allows for dynamic parallel processing of multiple content sources, without the need to alter code. On-boarding a new content source is as fast and simple as making a single CLI command.

The architecture

Automating content aggregation with AWS Step Functions

The application consists of six Lambda functions orchestrated by a Step Functions workflow:

  1. The workflow is triggered every 2 hours by an EventBridge scheduler. The schedule event passes an RSS feed URL to the workflow.
  2. The first task invokes a Lambda function that runs an HTTP GET request to the RSS feed. It returns an array of recent blog URLs. The array of blog URLs is provided as the input to a MAP state. The MAP state type makes it possible to run a set of steps for each element of an input array in parallel. The number of items in the array can be different for each execution. This is referred to as dynamic parallelism.
  3. The next task invokes a Lambda function that uses the GitHub REST API to retrieve the static website’s JSON content file.
  4. The first Lambda function in the MAP state runs an HTTP GET request to the blog post URL provided in the payload. The URL is scraped for content and an object containing detailed metadata about the blog post is returned in the response.
  5. The blog post metadata is compared against the website’s JSON content file in GitHub.
  6. A CHOICE state determines if the blog post metadata has already been committed to the repository.
  7. If the blog post is new, it is added to an array of “content to commit”.
  8. As the workflow exits the MAP state, the results are passed to the final Lambda function. This uses a single git commit to add each blog post object to the website’s JSON content file in GitHub. This triggers an event that rebuilds the static site.

Using Secrets in AWS Lambda

Two of the Lambda functions require a GitHub personal access token to commit files to a repository. Sensitive credentials or secrets such as this should be stored separate to the function code. Use AWS Systems Manager Parameter Store to store the personal access token as an encrypted string. The AWS Serverless Application Model (AWS SAM) template grants each Lambda function permission to access and decrypt the string in order to use it.

  1. Follow these steps to create a personal access token that grants permission to update files to repositories in your GitHub account.
  2. Use the AWS Command Line Interface (AWS CLI) to create a new parameter named GitHubAPIKey:
aws ssm put-parameter \
--name /GitHubAPIKey \
--value ReplaceThisWithYourGitHubAPIKey \
--type SecureString

{
    "Version": 1,
    "Tier": "Standard"
}

Deploying the application

  1. Fork this GitHub repository to your GitHub Account.
  2. Clone the forked repository to your local machine and deploy the application using AWS SAM.
  3. In a terminal, enter:
    git clone https://github.com/aws-samples/content-aggregator-example
    sam deploy -g
  4. Enter the required parameters when prompted.

This deploys the application defined in the AWS SAM template file (template.yaml).

The business logic

Each Lambda function is written in Node.js and is stored inside a directory that contains the package dependencies in a `node_modules` folder. These are defined for each function by its relative package.json file. The function dependencies are bundled and deployed using the sam build && deploy -g command.

The GetRepoContents and WriteToGitHub Lambda functions use the octokit/rest.js library to communicate with GitHub. The library authenticates to GitHub by using the GitHub API key held in Parameter Store. The AWS SDK for Node.js is used to obtain the API key from Parameter Store. With a single synchronous call, it retrieves and decrypts the parameter value. This is then used to authenticate to GitHub.

const AWS = require('aws-sdk');
const SSM = new AWS.SSM();


//get Github API Key and Authenticate
    const singleParam = { Name: '/GitHubAPIKey ',WithDecryption: true };
    const GITHUB_ACCESS_TOKEN = await SSM.getParameter(singleParam).promise();
    const octokit = await  new Octokit({
      auth: GITHUB_ACCESS_TOKEN.Parameter.Value,
    })

Lambda environment variables are used to store non-sensitive key value data such as the repository name and JSON file location. These can be entered when deploying with AWS SAM guided deploy command.

Environment:
        Variables:
          GitHubRepo: !Ref GitHubRepo
          JSONFile: !Ref JSONFile

The GetRepoContents function makes a synchronous HTTP request to the GitHub repository to retrieve the contents of the website’s JSON file. The response SHA and file contents are returned from the Lambda function and acts as the input to the next task in the Step Functions workflow. This SHA is used in final step of the workflow to save all new blog posts in a single commit.

Map state iterations

The MAP state runs concurrently for each element in the input array (each blog post URL).

Each iteration must compare a blog post URL to the existing JSON content file and decide whether to ignore the post. To do this, the MAP state requires both the input array of blog post URLs and the existing JSON file contents. The ItemsPath, ResultPath, and Parameters are used to achieve this:

  • The ItemsPath sets input array path to $.RSSBlogs.body.
  • The ResultPath states that the output of the branches is placed in $.mapResults.
  • The Parameters block replaces the input to the iterations with a JSON node. This contains both the current item data from the context object ($$.Map.Item.Value) and the contents of the GitHub JSON file ($.RepoBlogs).
"Type":"Map",
    "InputPath": "$",
    "ItemsPath": "$.RSSBlogs.body",
    "ResultPath": "$.mapResults",
    "Parameters": {
        "BlogUrl.$": "$$.Map.Item.Value",
        "RepoBlogs.$": "$.RepoBlogs"
     },
    "MaxConcurrency": 0,
    "Iterator": {
       "StartAt": "getMeta",

The Step Functions resource

The AWS SAM template uses the following Step Functions resource definition to create a Step Functions state machine:

  MyStateMachine:
    Type: AWS::Serverless::StateMachine
    Properties:
      DefinitionUri: statemachine/my_state_machine.asl.JSON
      DefinitionSubstitutions:
        GetBlogPostArn: !GetAtt GetBlogPost.Arn
        GetUrlsArn: !GetAtt GetUrls.Arn
        WriteToGitHubArn: !GetAtt WriteToGitHub.Arn
        CompareAgainstRepoArn: !GetAtt CompareAgainstRepo.Arn
        GetRepoContentsArn: !GetAtt GetRepoContents.Arn
        AddToListArn: !GetAtt AddToList.Arn
      Role: !GetAtt StateMachineRole.Arn

The actual workflow definition is defined in a separate file (statemachine/my_state_machine.asl.JSON). The DefinitionSubstitutions property specifies mappings for placeholder variables. This enables the template to inject Lambda function ARNs obtained by the GetAtt intrinsic function during template translation:

Step Functions mappings with placeholder variables

A state machine execution role is defined within the AWS SAM template. It grants the `Lambda invoke function` action. This is tightly scoped to the six Lambda functions that are used in the workflow. It is the minimum set of permissions required for the Step Functions to carry out its task. Additional permissions can be granted as necessary, which follows the zero-trust security model.

Action: lambda:InvokeFunction
Resource:
- !GetAtt GetBlogPost.Arn
- !GetAtt GetUrls.Arn
- !GetAtt CompareAgainstRepo.Arn
- !GetAtt WriteToGitHub.Arn
- !GetAtt AddToList.Arn
- !GetAtt GetRepoContents.Arn

The Step Functions workflow definition is authored using the AWS Toolkit for Visual Studio Code. The Step Functions support allows developers to quickly generate workflow definitions from selectable examples. The render tool and automatic linting can help you debug and understand the workflow during development. Read more about the toolkit in this launch post.

Scheduling events and adding new feeds

The AWS SAM template creates a new EventBridge rule on the default event bus. This rule is scheduled to invoke the Step Functions workflow every 2 hours. A valid JSON string containing an RSS feed URL is sent as the input payload. The feed URL is obtained from a template parameter and can be set on deployment. The AWS Compute Blog is set as the default feed URL. To aggregate additional blog feeds, create a new rule to invoke the Step Functions workflow. Provide the RSS feed URL as valid JSON input string in the following format:

{“feedUrl”:”replace-this-with-your-rss-url”}

ScheduledEventRule:
    Type: "AWS::Events::Rule"
    Properties:
      Description: "Scheduled event to trigger Step Functions state machine"
      ScheduleExpression: rate(2 hours)
      State: "ENABLED"
      Targets:
        -
          Arn: !Ref MyStateMachine
          Id: !GetAtt MyStateMachine.Name
          RoleArn: !GetAtt ScheduledEventIAMRole.Arn
          Input: !Sub
            - >
              {
                "feedUrl" : "${RssFeedUrl}"
              }
            - RssFeedUrl: !Ref RSSFeed

A completed workflow with step output

Conclusion

This blog post shows how to automate the aggregation of content from multiple RSS feeds into a single JSON file using serverless workflows.

The Step Functions MAP state allows for dynamic parallel processing of each item. The recent increase in state payload size limit means that the contents of the static JSON file can be held within the workflow context. The application decision logic is separated from the business logic and events.

Lambda functions are scoped to finite business logic with Step Functions states managing decision logic and iterations. EventBridge is used to manage the inbound business events. The zero-trust security model is followed with minimum permissions granted to each service and Parameter Store used to hold encrypted secrets.

This application is used to pull together articles for http://serverlessland.com. Serverless land brings together all the latest blogs, videos, and training for AWS Serverless. Download the code from this GitHub repository to start building your own automated content aggregation platform.

Agile website delivery with Hugo and AWS Amplify

Post Syndicated from Nigel Harris original https://aws.amazon.com/blogs/devops/agile-website-delivery-with-hugo-and-aws-amplify/

In this post, we show how you can rapidly configure and deploy a website using Hugo (an AWS Cloud9 integrated development environment (IDE) for content editing), AWS CodeCommit for source code control, and AWS Amplify to implement a source code-controlled, automated deployment process.

When hosting a website on AWS, you can choose from several options. One popular option is to use Amazon Simple Storage Service (Amazon S3) to host a static website. If you prefer full access to the infrastructure hosting your website, you can use the NGINX Quick Start to quickly deploy web server infrastructure using AWS CloudFormation.

Static website generators such as Hugo and MkDocs accelerate the website content generation process, and can be a valuable tool when trying to rapidly deliver technical documentation or similar content. Typically, the content creation process requires programming in HTML and CSS.

Hugo is written in Go and available under the Apache 2.0 license. It provides several themes (collections of layouts) that accelerate website creation by drastically reducing the need to focus on format. You can author content in Markdown and output in multiple languages and formats (including ebook formats). Excellent examples of public websites built using Hugo include Digital.gov and Kubernetes.io.


Solution overview

This solution illustrates how to provision a hosted, source code-controlled Hugo generated website using CodeCommit and Amplify Console. The provisioned website is configured with a custom subdomain and an SSL certificate. We use an AWS Cloud9 IDE to enable content creation in the cloud.


Setting up an AWS Cloud9 IDE

Start by provisioning an AWS Cloud9 IDE. AWS Cloud9 environments run using Amazon Elastic Compute Cloud (Amazon EC2). You need to provision your AWS Cloud9 environment into an existing public subnet in an Amazon Virtual Private Cloud (Amazon VPC) within your AWS account. You can complete this in the following steps:

1. Access your AWS account using with an identity with administrative privileges. If you don’t have an AWS account, you can create one.

2. Create a new AWS Cloud9 environment using the wizard on the AWS Cloud9 console.

3. Enter a name for your desktop and an optional description.

4. Choose Next step.

Naming your Cloud 9 environment

5. In the Environment settings section, for Environment type, select Create a new EC2 instance for environment (direct access).

6. For Instance type, select your preferred instance type (the default, t2.micro, works for this use case)

7. Under Network settings, for Network (VPC), choose a VPC that you wish to deploy your AWS Cloud9 instance into. You may wish to use your default VPC, which is suitable for the purpose of this tutorial.

8. Choose a public subnet from this VPC for deployment.

Cloud9 Settings

9. Leave all other settings unchanged and choose Next step.
10. Review your choices and choose Create environment.

Environment creation takes a few minutes to complete. When the environment is ready, you receive access to the AWS Cloud9 IDE in your browser. We return to it shortly to develop content for your Hugo website.

Your Cloud9 Desktop

Configuring a source code repository to track content changes

Static website generators enable rapid changes to website content and layout. Source control management (SCM) systems provide a revision history for your code, and allow you to revert to previous versions of a project when unintended changes are introduced. SCM systems become increasingly important as the velocity of change and the number of team members introducing change increases.

You now create a source code repository to track changes to your content. You use CodeCommit, a fully-managed source control service that hosts secure Git-based repositories.

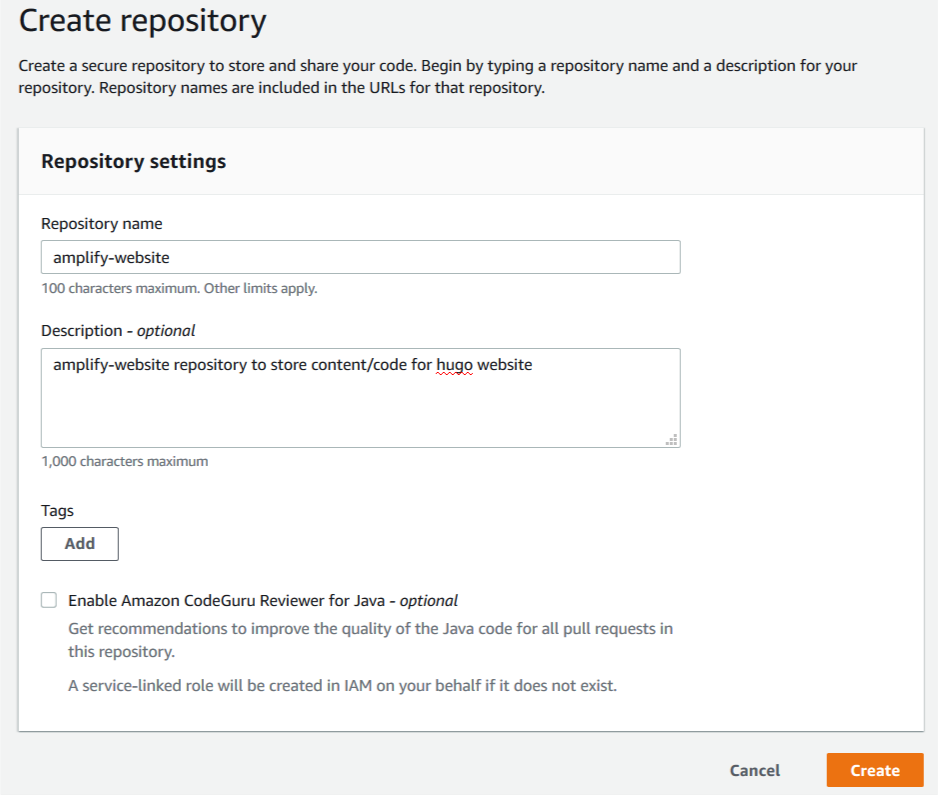
1. In a new browser, sign in to the CodeCommit Console and create a new repository.

2. For Repository name, enter amplify-website.

3. For Description, enter an appropriate description.

4. Choose Create.

Create repository

Repository creation takes just a few moments.

5. In the Connection steps section, choose the appropriate method to connect to your repository based on how you accessed your AWS account.

For this post, I signed in to my AWS account using federated access, so I choose the HTTPS Git Remote CodeCommit (HTTPS-GRC) tab. This is the recommended connection method for this sign-in type. You can also configure a connection to your repository using SSH or Git credentials over HTTPS. SSH and Git credentials over HTTPS are appropriate methods if you have signed in to your AWS account as an AWS Identity and Access Management (IAM) user. The Amazon CodeCommit console provides additional information regarding each of these connection types, including links to supporting documentation.

Connect to Repo


Configuring and deploying an example website

You’re now ready to configure and deploy your website.

1. Return to the browser with your AWS Cloud9 IDE and place your cursor in the lower terminal pane of the IDE.

The terminal pane provides Bash shell access on the EC2 instance running AWS Cloud9.

You now create a Hugo website. The website design is based on Hugo-theme-learn. Themes are collections of Hugo layouts that take all the hassle out of building your website. Learn is a multilingual-ready theme authored by Mathieu Cornic, designed for building technical documentation websites.

Hugo provides a variety of themes on their website. Many of the themes include bundled example website content that you can easily adapt by following the accompanying theme documentation.

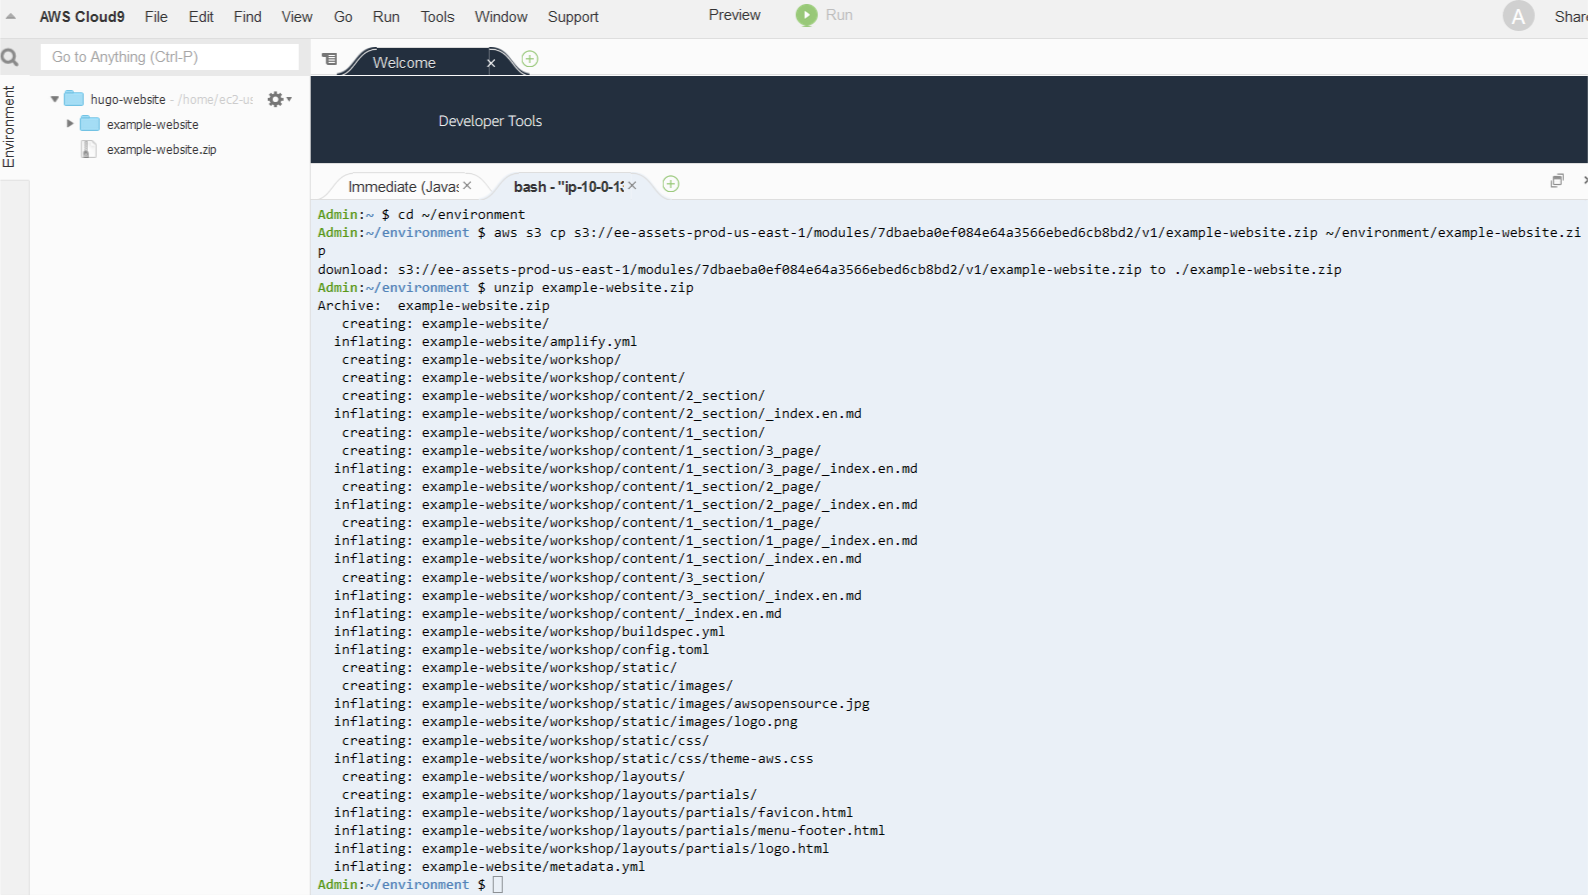
2. Enter the following code to download an existing example website stored as a .zip file, extract it, and commit the contents into CodeCommit from your AWS Cloud9 IDE:
cd ~/environment
aws s3 cp s3://ee-assets-prod-us-east-1/modules/3c5ba9cb6ff44465b96993d210f67147/v1/example-website.zip ~/environment/example-website.zip
unzip example-website.zip
rm example-website.zip

The following screenshot shows your output.

example website copy commands


Next, we run commands to create a directory to host your website and copy files into place from the example website to get started. We then create a new default branch called main (formerly referred to as the master branch), local to our AWS Cloud9 instance. We then copy files into place from the example website. After adding and committing them locally, we push all our changes to the remote Amazon Codecommit repository.

3. Enter the following code:

mkdir ~/environment/amplify-website/
cd ~/environment/amplify-website/
git init
git remote add origin codecommit::us-east-1://amplify-website
git remote -v
git checkout -b main
cp -rp ~/environment/example-website/* ~/environment/amplify-website/
git add *
git commit -am "first commit"
git push -u origin main

Deployment and hosting is achieved by using Amplify Console, a static web hosting service that accelerates your application release cycle by providing a simple CI/CD workflow for building and deploying static web applications.

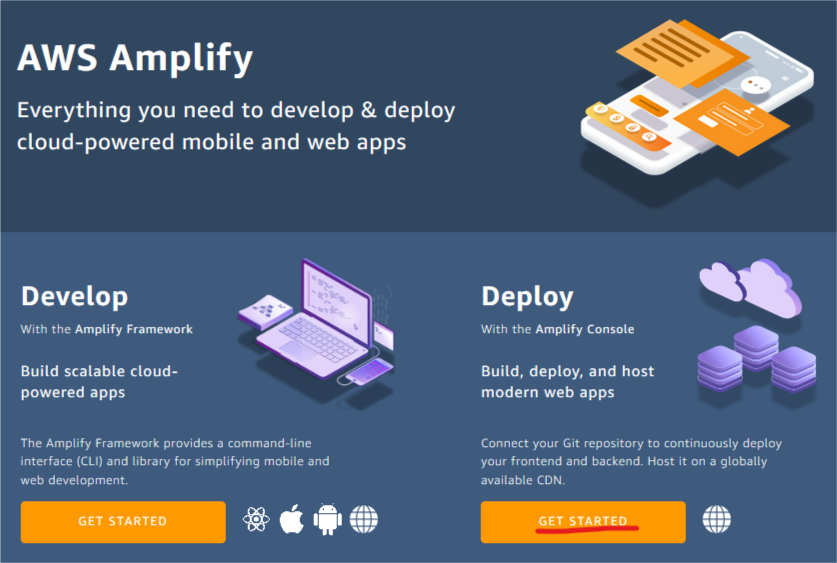
4. On the Amplify console, under Deploy, choose Get Started.

Amplify banner

5. On the Get started with the Amplify Console page, select AWS CodeCommit as your source code repository.

6. Choose Continue.

Amplify get started page

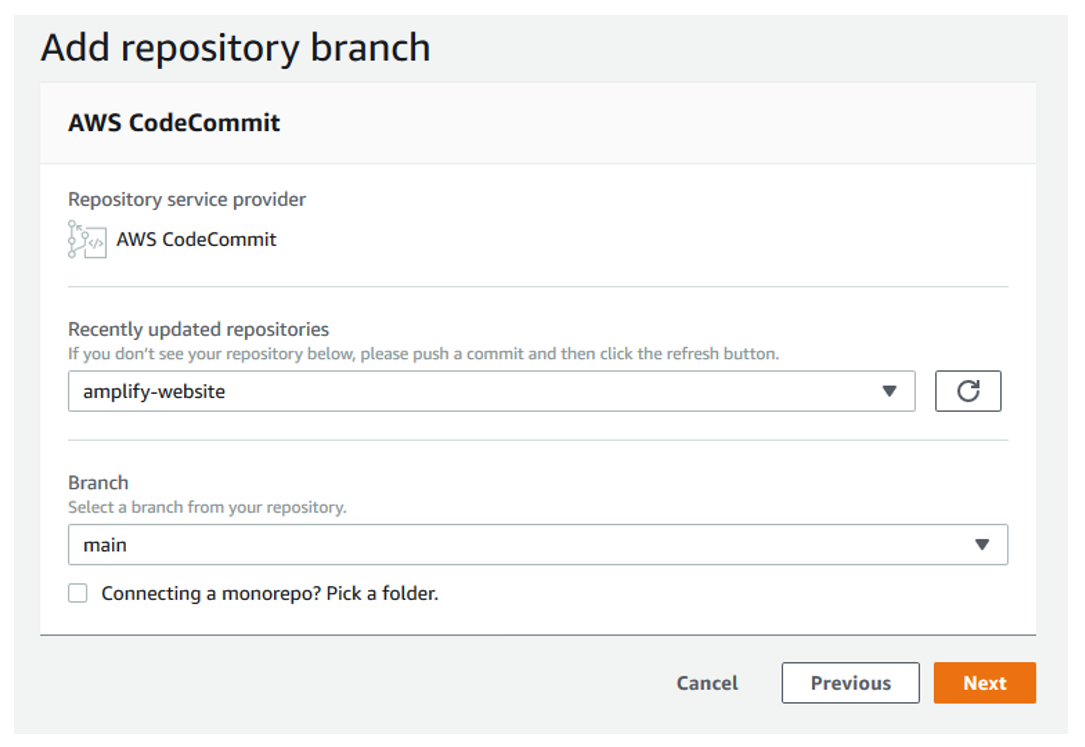
7. On the Add repository branch page, for Recently updated repositories, choose your repository.

8. For Branch, choose main.

9. Choose Next.

add branch

On the Configure build settings page, Amplify automatically uses the amplify.yml file for build settings for your deployment. You committed this into your source code repository in the previous step. The amplify.yml file is detected from the root of your website directory structure.

10. Choose Next.

Amplify configure build settings

11. On the review page, choose Save and deploy.

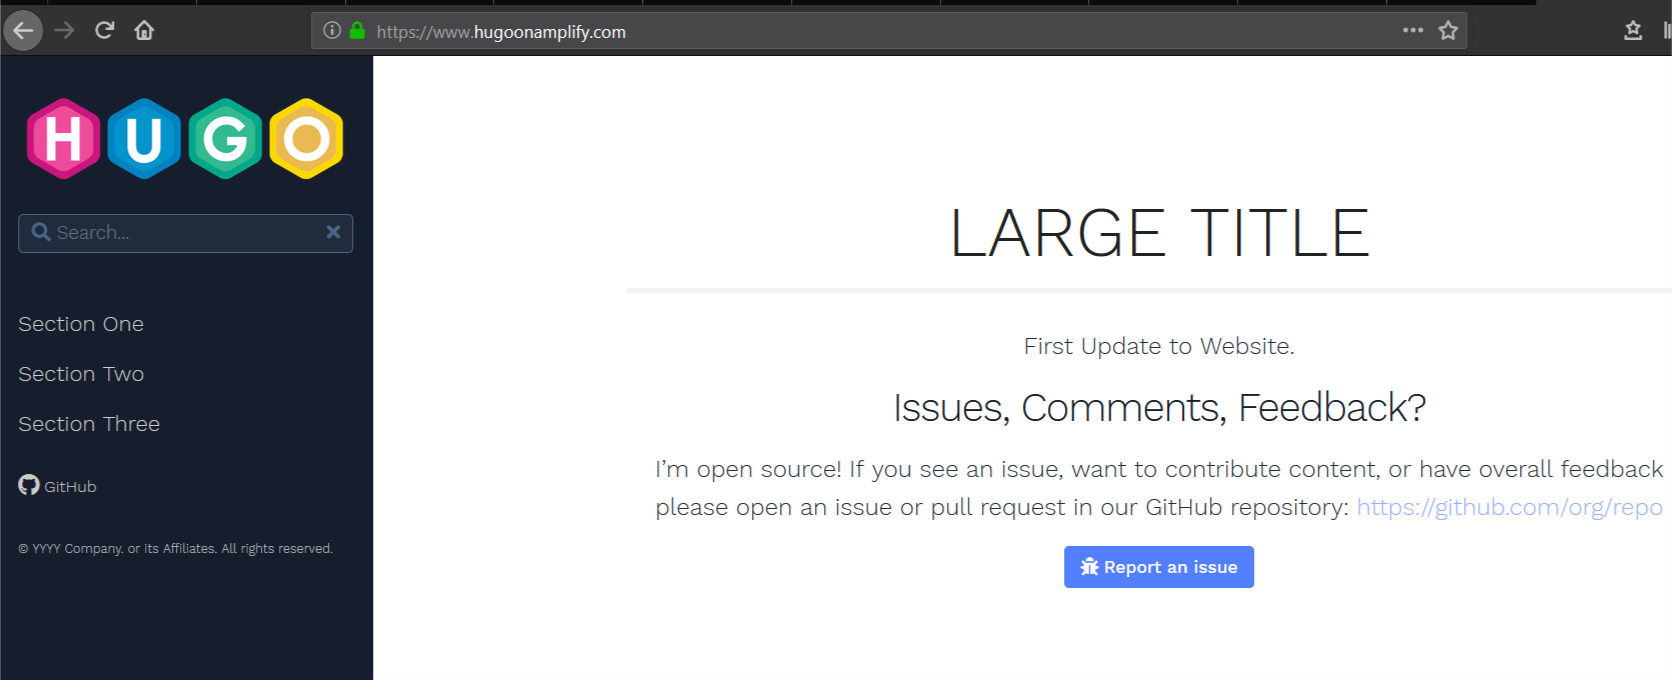
Amplify builds and deploys your Amplify website within minutes, and shows you its progress. When deployment is complete, you can access the website to see the sample content.

amplify website

The following screenshot shows your example website.

sample website


Promoting changes to the website

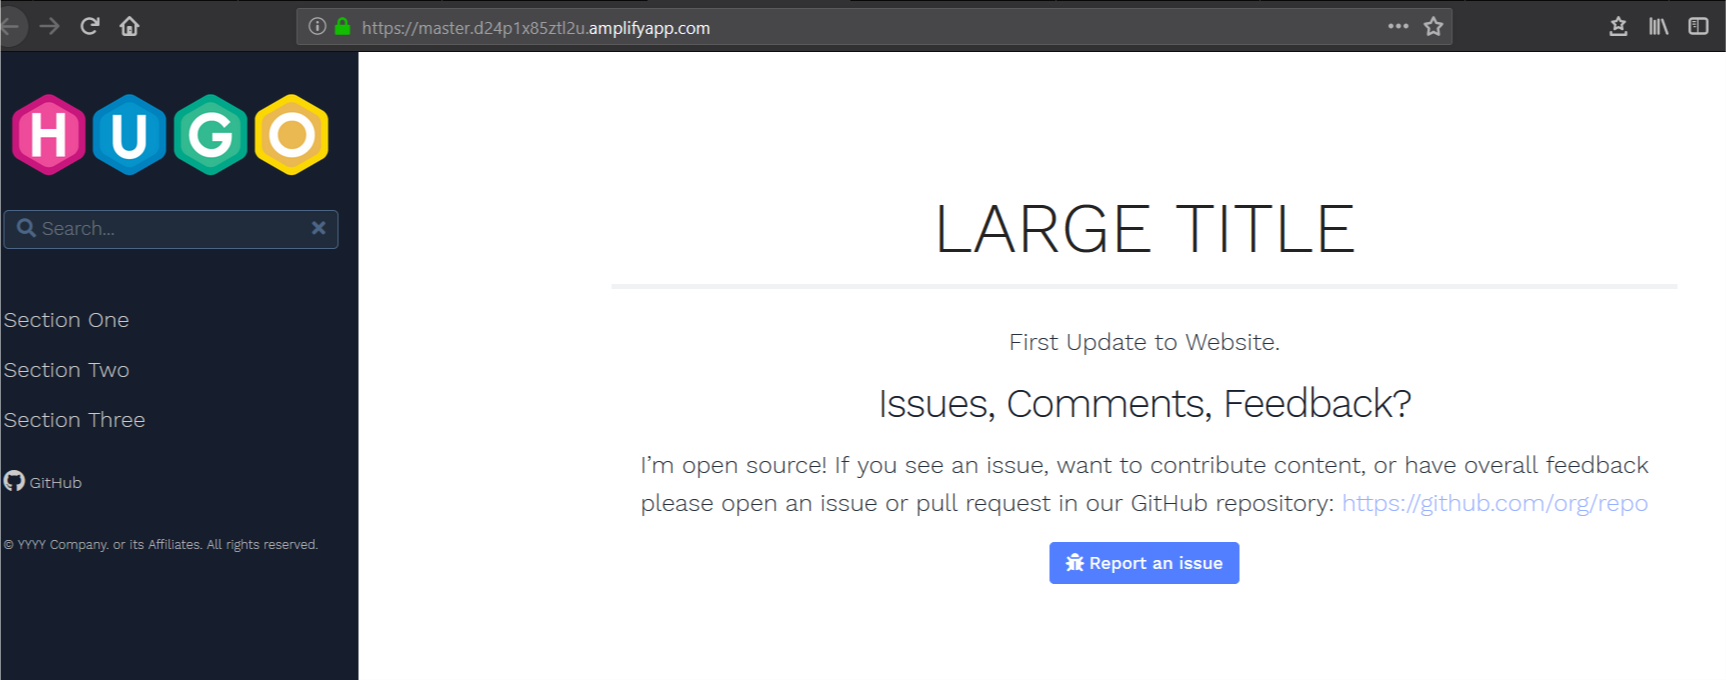
We can now update the line of text in the home page and commit and publish this change.

1. Return to the browser with your AWS Cloud9 IDE and place your cursor in the lower terminal pane of the IDE.

2. On the navigation pane, choose the file ~/environment/amplify-website/workshop/content/_index.en.md.

The contents of the file open under a new tab in the upper pane.

3. Change the string First Line of Text to First Update to Website.

content change

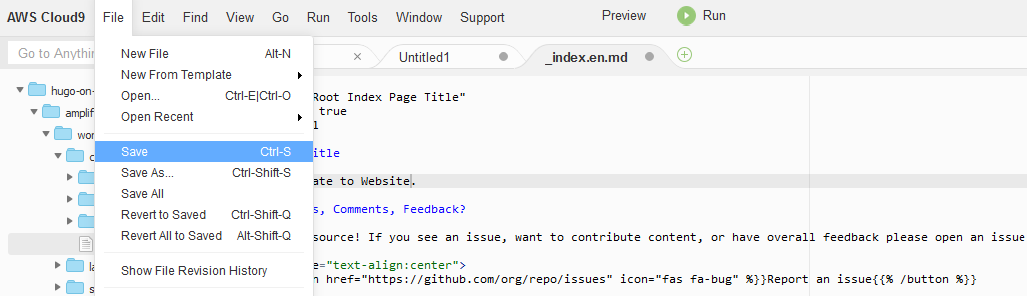
4. From the File menu, choose Save to save the changes you have made to the _index.en.md file.

save content changes

5. Commit the changes and push to CodeCommit by running the following command in the lower terminal pane in AWS Cloud9:

git add *; git commit -am "homepage update"; git push origin main

The output in your AWS Cloud9 terminal should appear similar to the following screenshot.

commit output

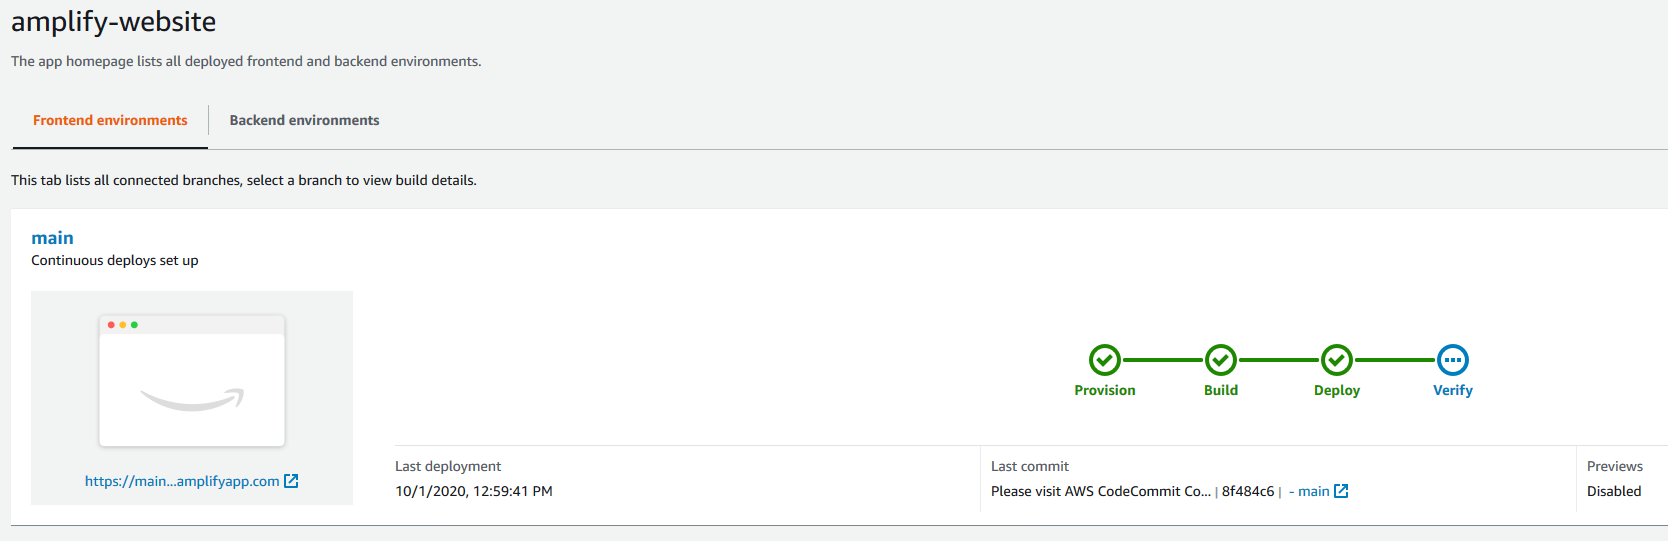
6. Return to the Amplify Console and observe how the committed change in CodeCommit is automatically detected. Amplify runs deployment steps to push your changes to the website.

amplify deploy changes

7. Access the URL of your website after this update is complete to verify that the first line of text on your home page has changed.

updated website

You can repeat this process to make source-code controlled, automated changes to your website.

Adding a custom domain

Adding a custom domain to your Amplify configuration makes it easier for clients to access your content. You can register new domains using Amazon Route 53 or, if you have an existing domain registered outside of AWS, you can integrate it with Route 53 and Amplify. For our use case, the domain www.hugoonamplify.com is a registered a domain name using a third-party registrar (NameCheap). You can manage DNS configurations for domains registered outside of AWS using Route 53.

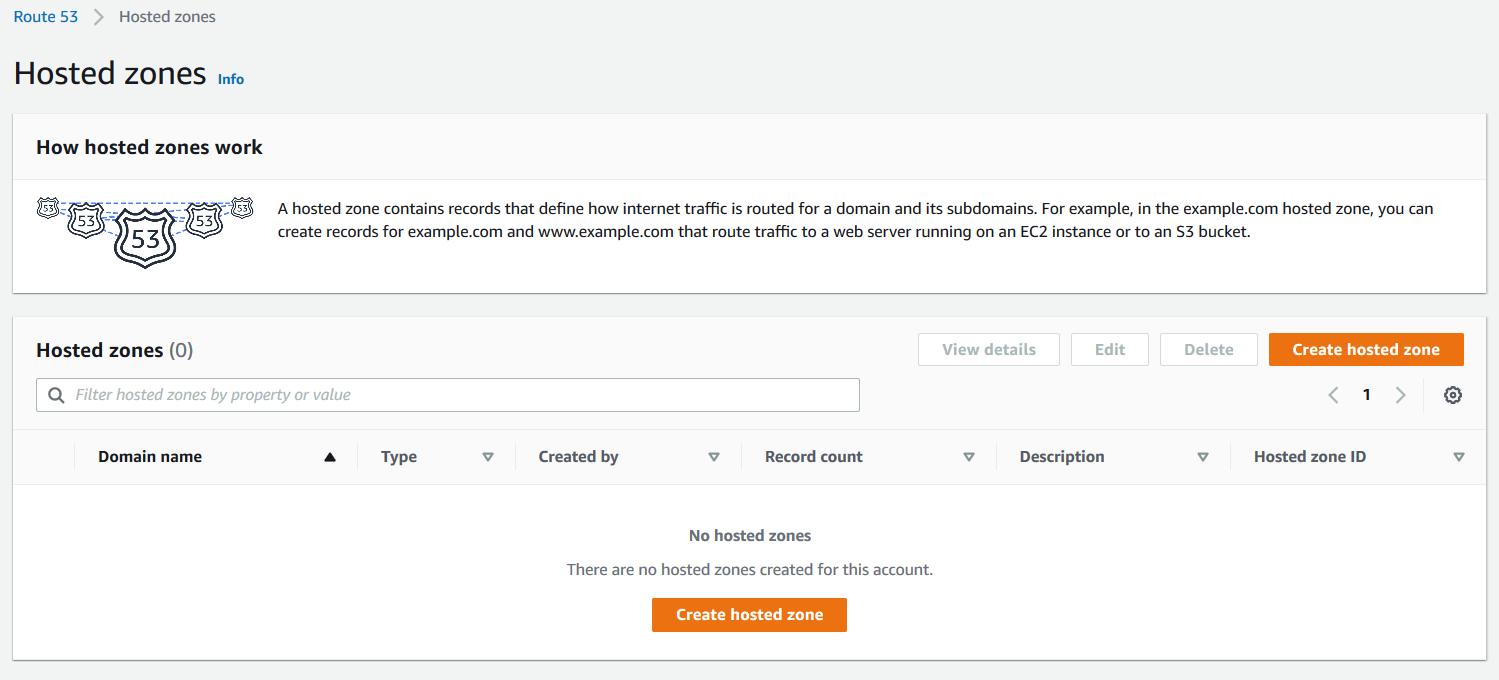
Start by configuring a public hosted zone in Route 53.

1. On the Route 53 console, choose Hosted zones.

2. Choose Create hosted zone.

hosted zones

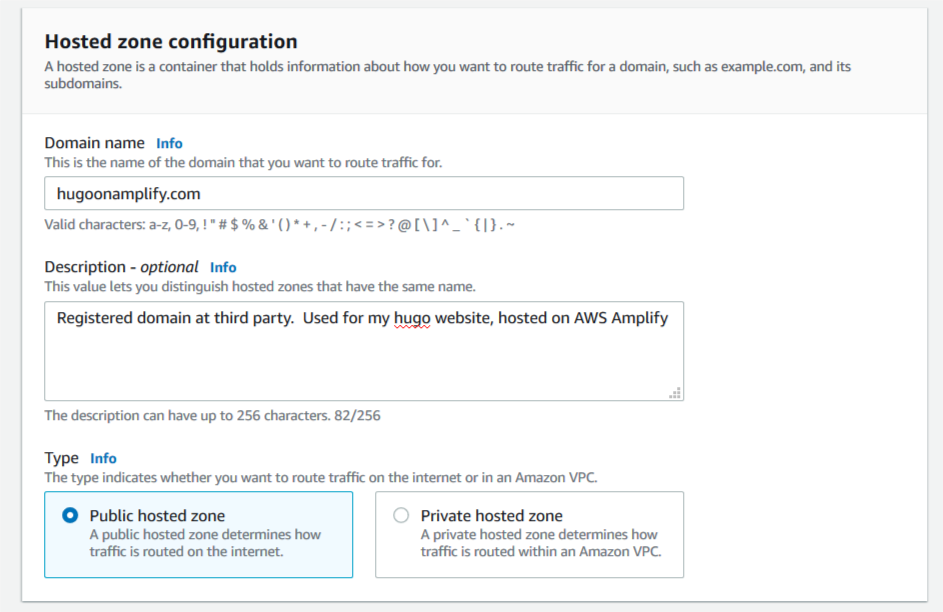
3. For Domain name, enter hugoonamplify.com.

4. For Description, enter an appropriate description.

5. For Type, select Public hosted zone.

hosted zones configuration

6. Choose Create hosted zone.

7. Save the addresses of the name servers that respond to client DNS lookup requests for the custom domain.

create hosted zone

8. In a separate browser, access the console of your DNS registrar.

9. Configure a custom DNS name servers setting on the console of the third-party domain name registrar.

This configuration specifies the Route 53 assigned name servers as authoritative DNS for our custom domain. For this use case, propagation of this change may take up to 48 hours.

namecheap console

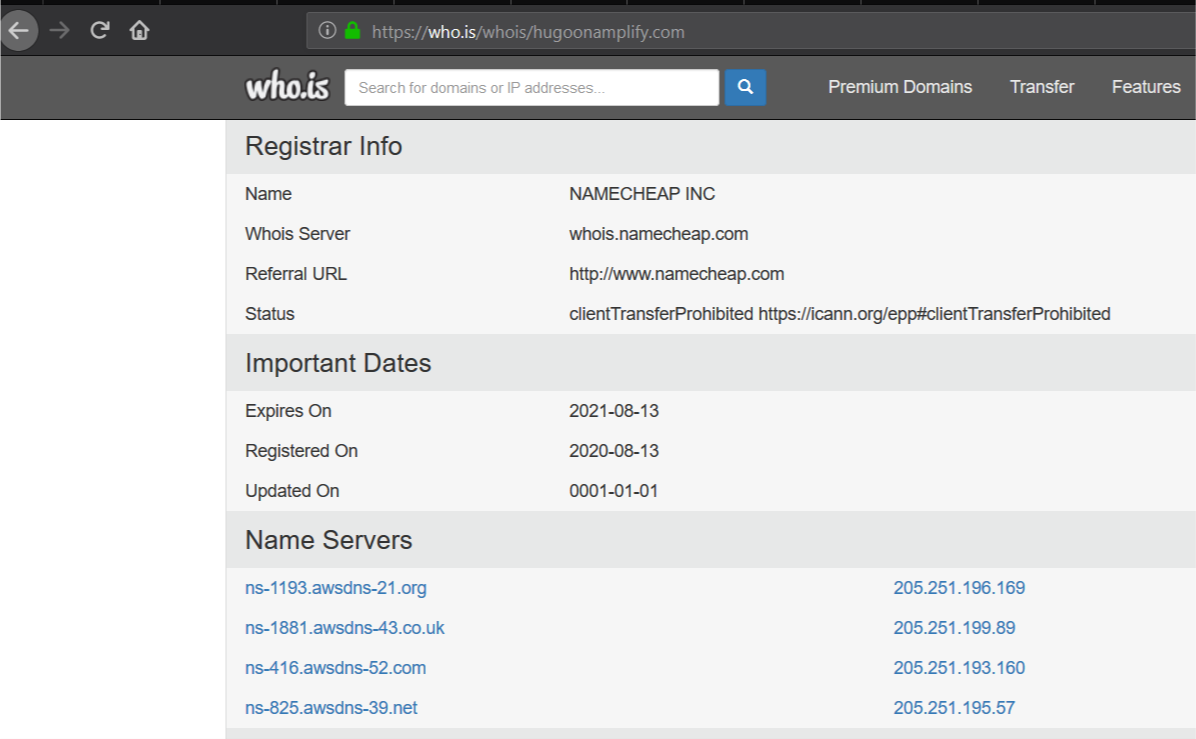
10. Use https://who.is to verify that the AWS name servers are listed correctly for your custom domain to internet clients.

whois lookup

You can now set up your custom domain in Amplify. Amplify helps you configure DNS and set up SSL for your desired custom domain.

domain management

11. On the Amplify Console, under App settings, choose Domain management.

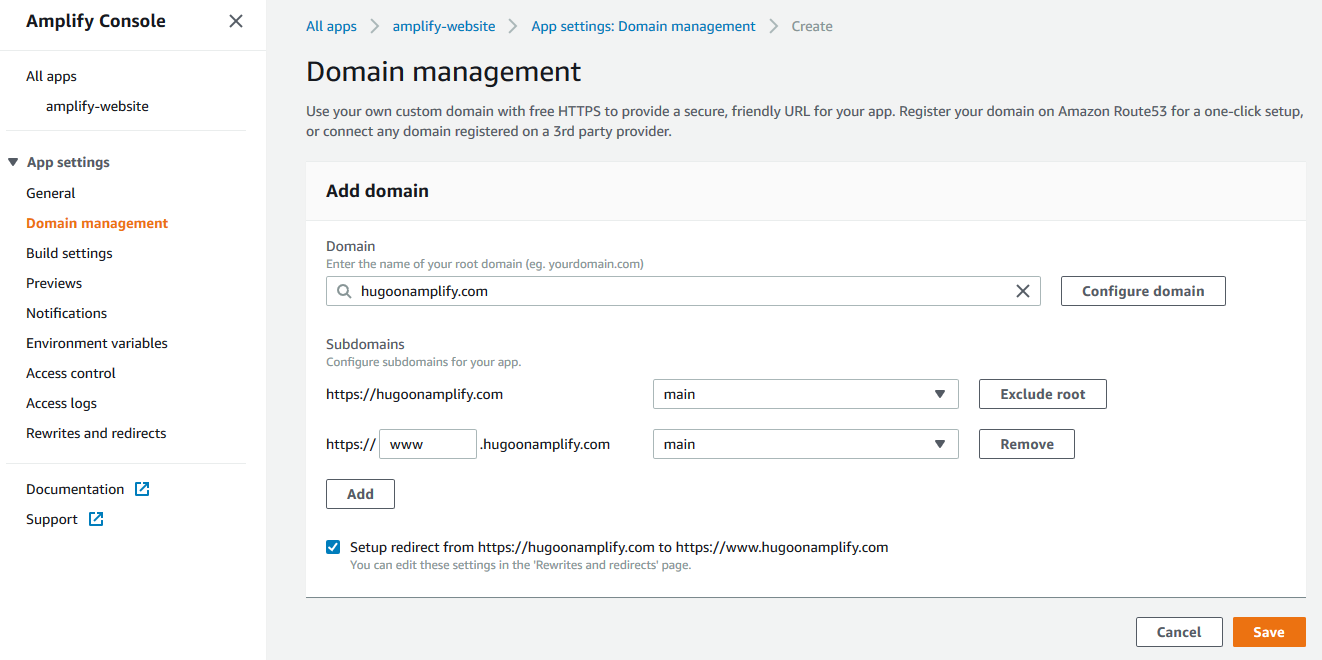
12. Choose Add domain.

13. For Domain, enter your custom domain name (hugoonamplify.com).

14. Choose Configure domain.

15. For Subdomain, I only want to set up www and choose to exclude the root of my custom domain.

16. Choose Save.

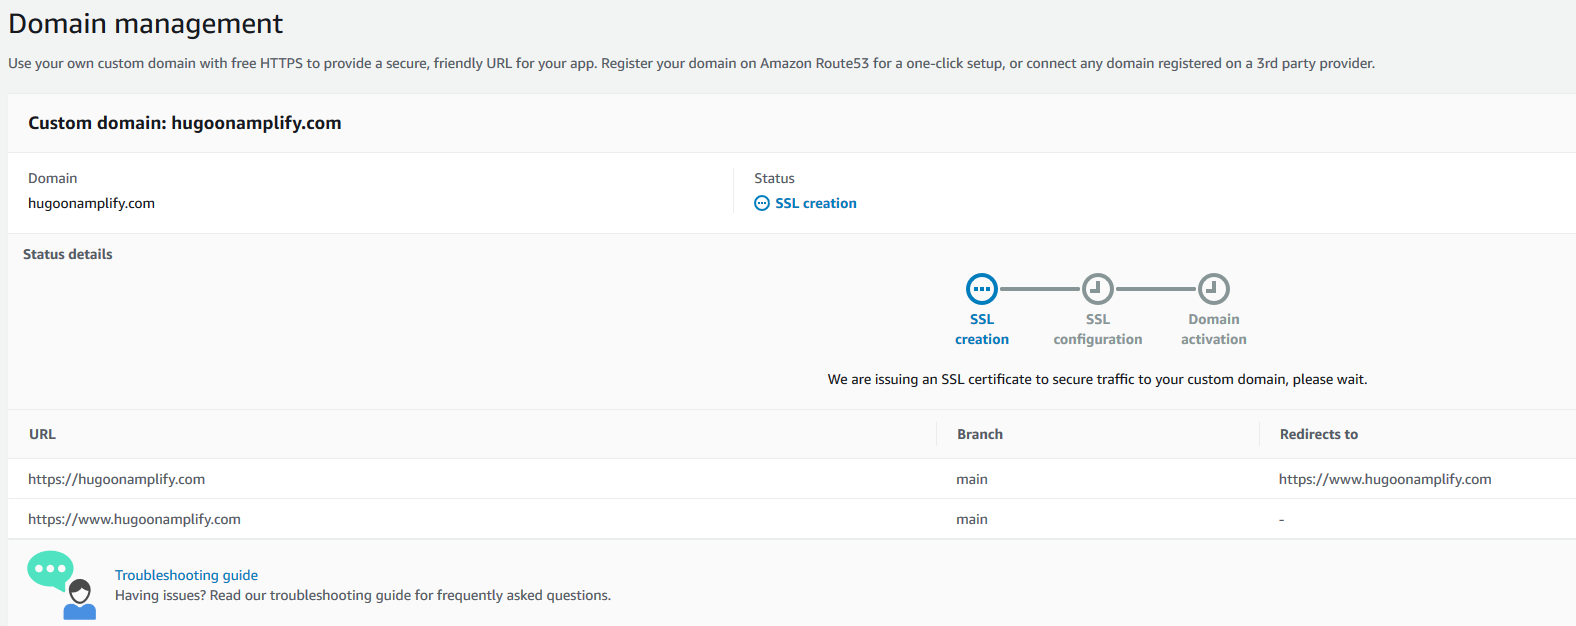
Amplify begins the process of creating the SSL certificates. Amplify sends a notification that it’s issuing an SSL certificate to secure traffic to the custom domain.

ssl domain management

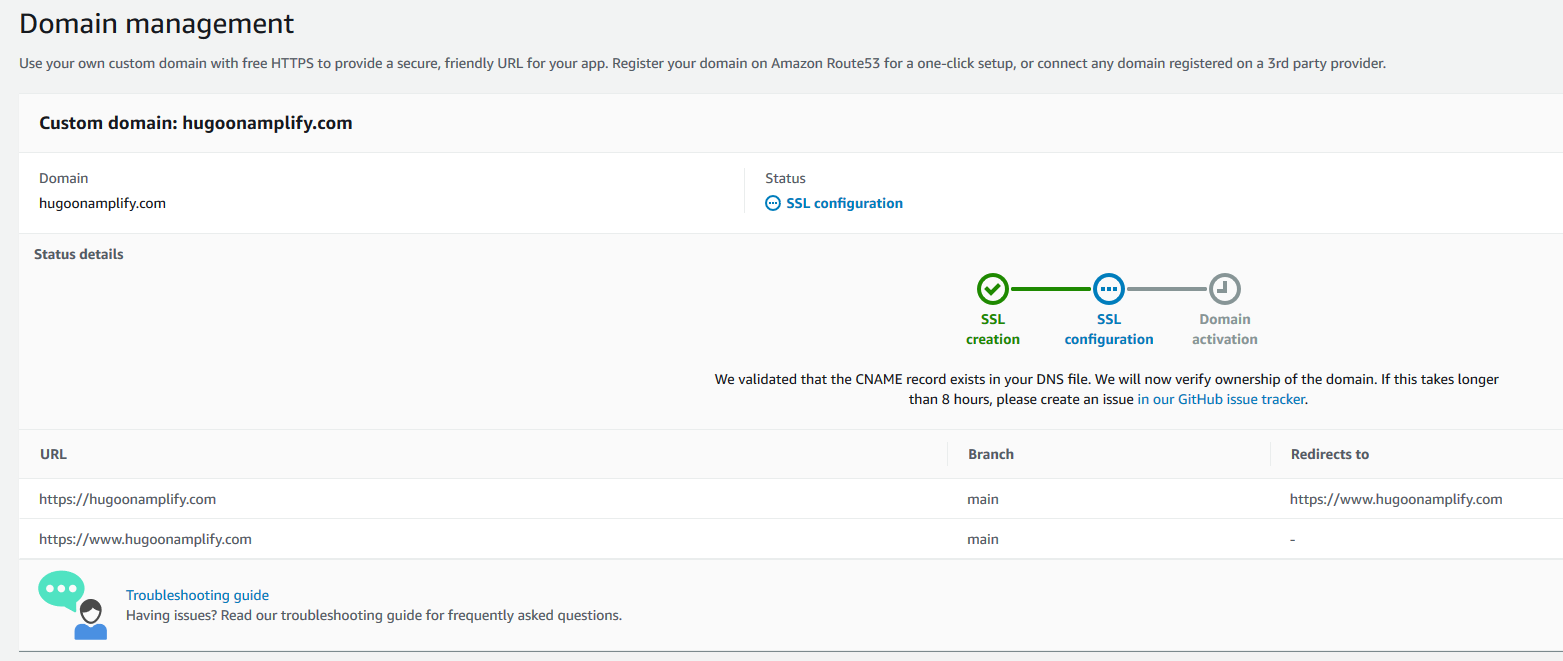
After a few moments, it proceeds to SSL configuration and indicates that ownership of domain is in progress.

ssl domain management configuration

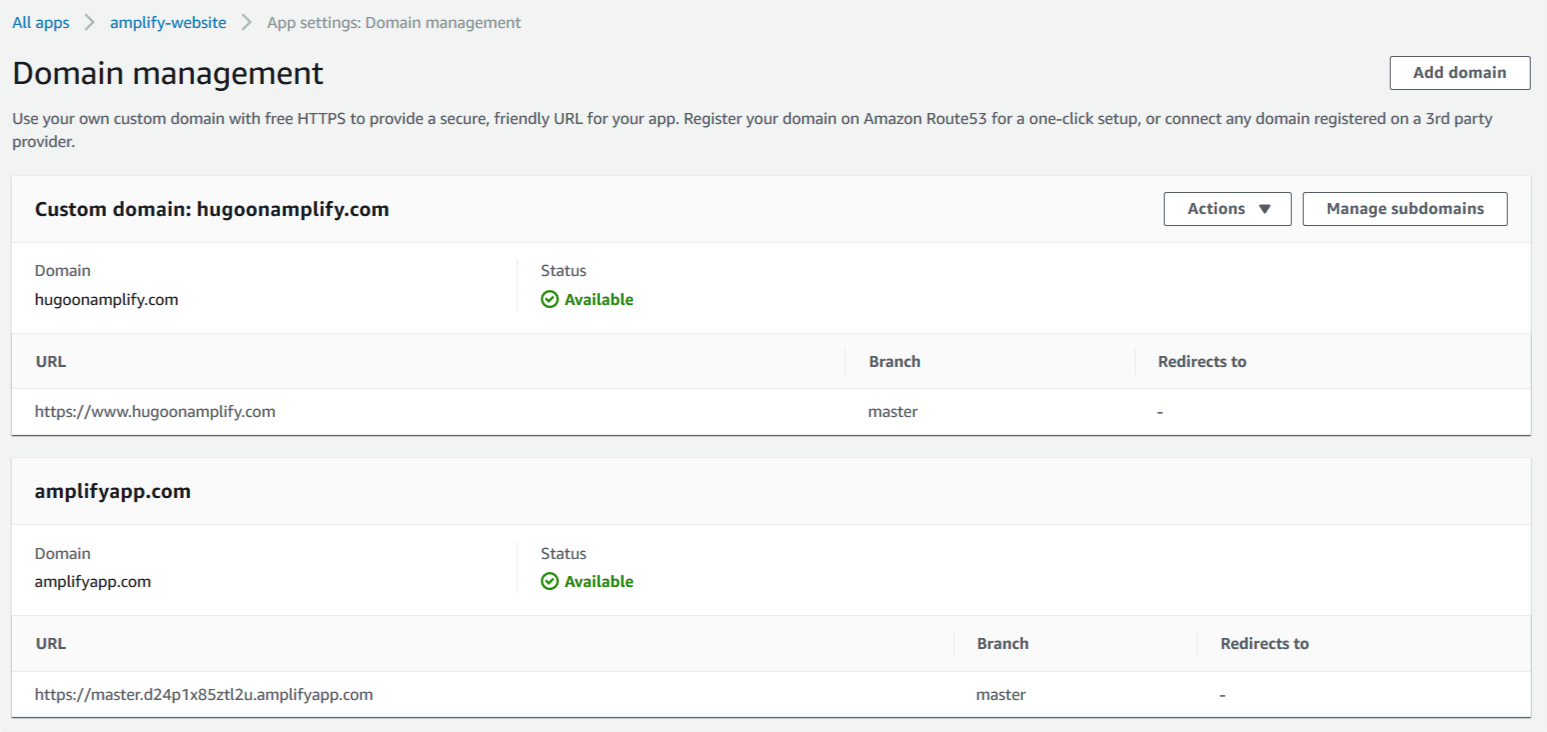
Amplify verifies domain ownership by creating a sample CNAME record in your hosted zone file. When ownership is verified, the domain is propagated onto an Amazon CloudFront distribution managed by the Amplify service, and domain activation is complete.

ssl domain management configured

Clients can now access the website using the custom domain name www.hugoonaplify.com.

access website via custom domain


Establishing a subdomain for development

You can create a development website in Amplify that is aligned to a development code branch in CodeCommit that enables testing changes prior to production release.

1. Access the AWS Cloud9 IDE and use the terminal to enter the following commands to create a development branch and push changes to CodeCommit using the current content from the main branch with a single content change:

git checkout -b development
git branch
git remote -v
git add *; git commit -am "first development commit";
git push -u origin development

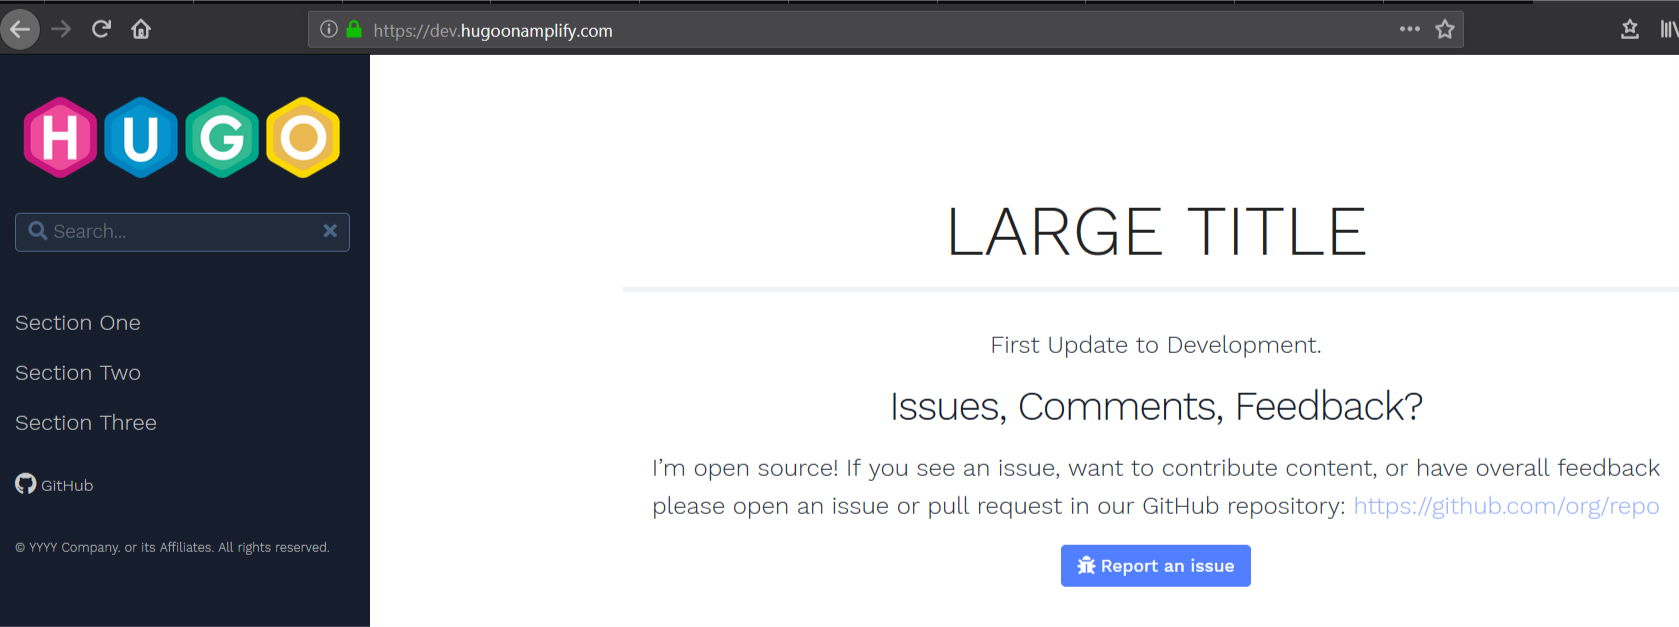
2. Open and edit the file ~/environment/amplify-website/workshop/content/_index.en.md and change the string Update to Website to something else.

Alternatively, run the following Unix sed command from the terminal in AWS Cloud9 to make that content change:

sed -i 's/Update to Website/Update to Development/g' ~/environment/amplify-website/workshop/content/_index.en.md

3. Commit and push your change with the following code:

git add *; git commit -am "second development commit"; git push -u origin development

You now configure a subdomain in Amplify to allow developers to review changes.

4. Return to the amplify-website app.

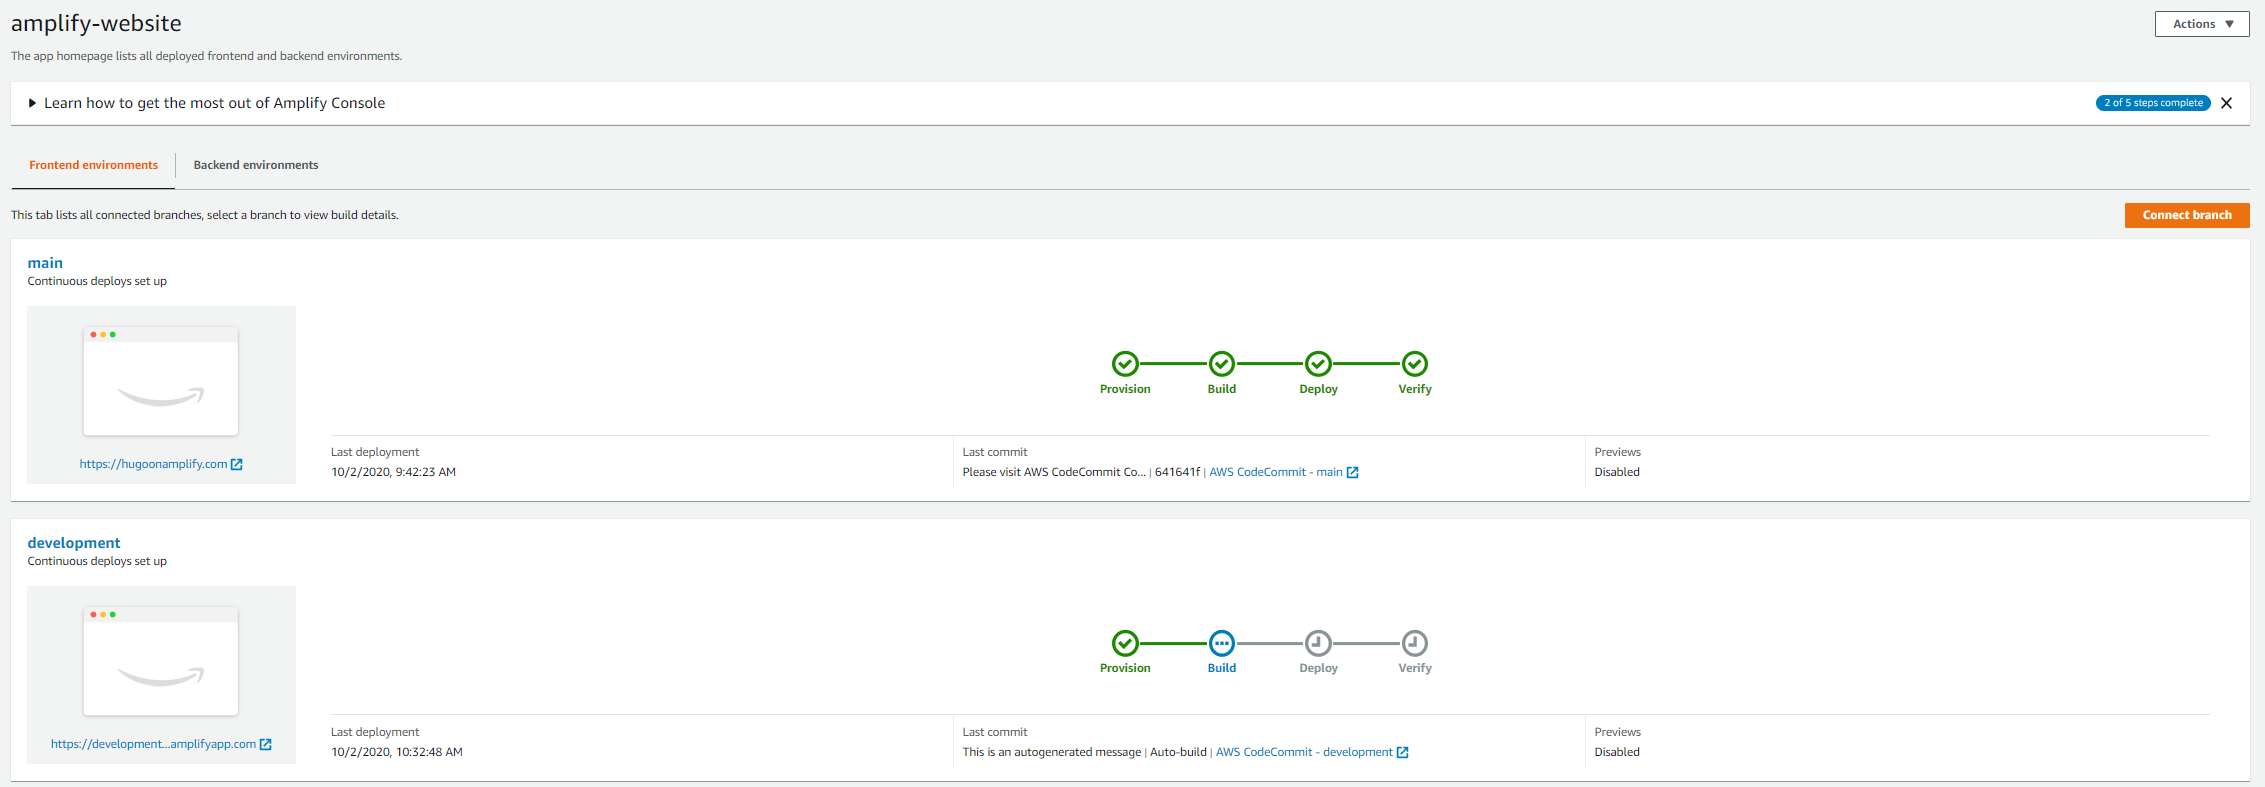
5. Choose Connect branch.

connect branch

6. For Branch, choose the development branch you created and committed code into.

7. Choose Next.

add development branch

Amplify builds a second website based on the contents of the development branch. You can see the instance of your website matched to the development code branch on Amplify Console.

amplify two branches

8. Access the domain management menu item in your Amplify application to add a friendly subdomain.

9. Edit the domain and add a subdomain item with a name of your choice (for example, dev).

10. Associate it to the development branch containing the committed code and content changes.

11. Choose Add.

add dev domain

You can access the subdomain to verify the changes.

verify domain

Controlling access to development

You may wish to restrict access to new content as it’s deployed into the development website.

1. On Amplify Console, choose your application.

2. Choose Access control.

3. Under Access control settings, choose your preferred settings.

You have the option to restrict access globally or on a branch-by-branch basis. For this use case, we create a simple password protection for a user named developer on the development branch and site.

access control settings


Cleaning up

Unless you plan to keep the website you have constructed, you can quickly clean up provisioned assets and avoid any unnecessary costs.

1. On Amplify Console, select the app you created.

2. From the Actions drop-down menu, choose Delete app.

3. In the pop-up window, confirm the deletion.

4. On the CodeCommit dashboard, select the repository you created.

5. Choose Delete.

6. In the pop-up window, confirm the deletion.

7. On the AWS Cloud9 dashboard, select the IDE you created.

8. Choose Delete.

9. In the pop-up window, confirm the deletion.


Conclusion

Hugo is a powerful tool that enables accelerated delivery of content in a variety of formats including image portfolios, online resume presentation, blogging, and technical documentation. Amplify Console provides a convenient, easy-to-use, static web hosting service that can greatly accelerate delivery of static content.

When combining Hugo with Amplify Console, you can rapidly deploy websites in minutes with features such as friendly URLS, environments matched to code branches, and encryption (SSL). Visit gohugo.io to find out more about Hugo. For more information about how Amplify Console can help you rapidly deploy Hugo and other modern web applications, see the AWS Amplify Console User Guide.

Nigel Harris

Nigel Harris

Nigel Harris is an Enterprise Solutions Architect at Amazon Web Services. He works with AWS customers to provide guidance and technical assistance on AWS architectures.

Building a serverless document scanner using Amazon Textract and AWS Amplify

Post Syndicated from Moheeb Zara original https://aws.amazon.com/blogs/compute/building-a-serverless-document-scanner-using-amazon-textract-and-aws-amplify/

This guide demonstrates creating and deploying a production ready document scanning application. It allows users to manage projects, upload images, and generate a PDF from detected text. The sample can be used as a template for building expense tracking applications, handling forms and legal documents, or for digitizing books and notes.

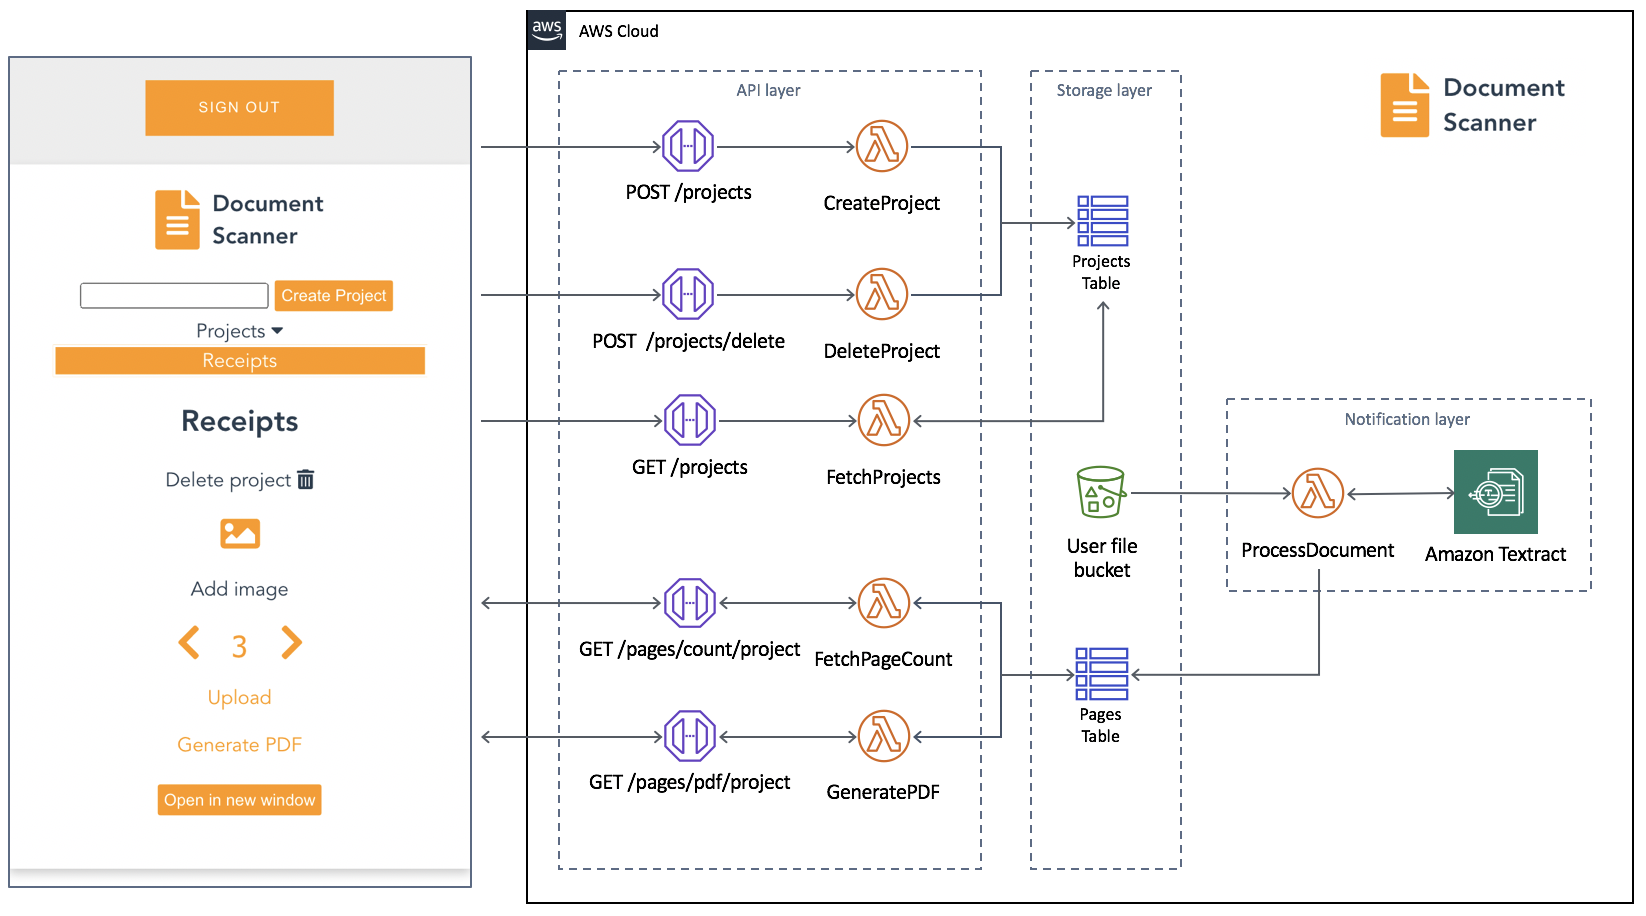
The frontend application is written in Vue.js and uses the Amplify Framework. The backend is built using AWS serverless technologies and consists of an Amazon API Gateway REST API that invokes AWS Lambda functions. Amazon Textract is used to analyze text from uploaded images to an Amazon S3 bucket. Detected text is stored in Amazon DynamoDB.

An architectural diagram of the application.

An architectural diagram of the application.

Prerequisites

You need the following to complete the project:

Deploy the application

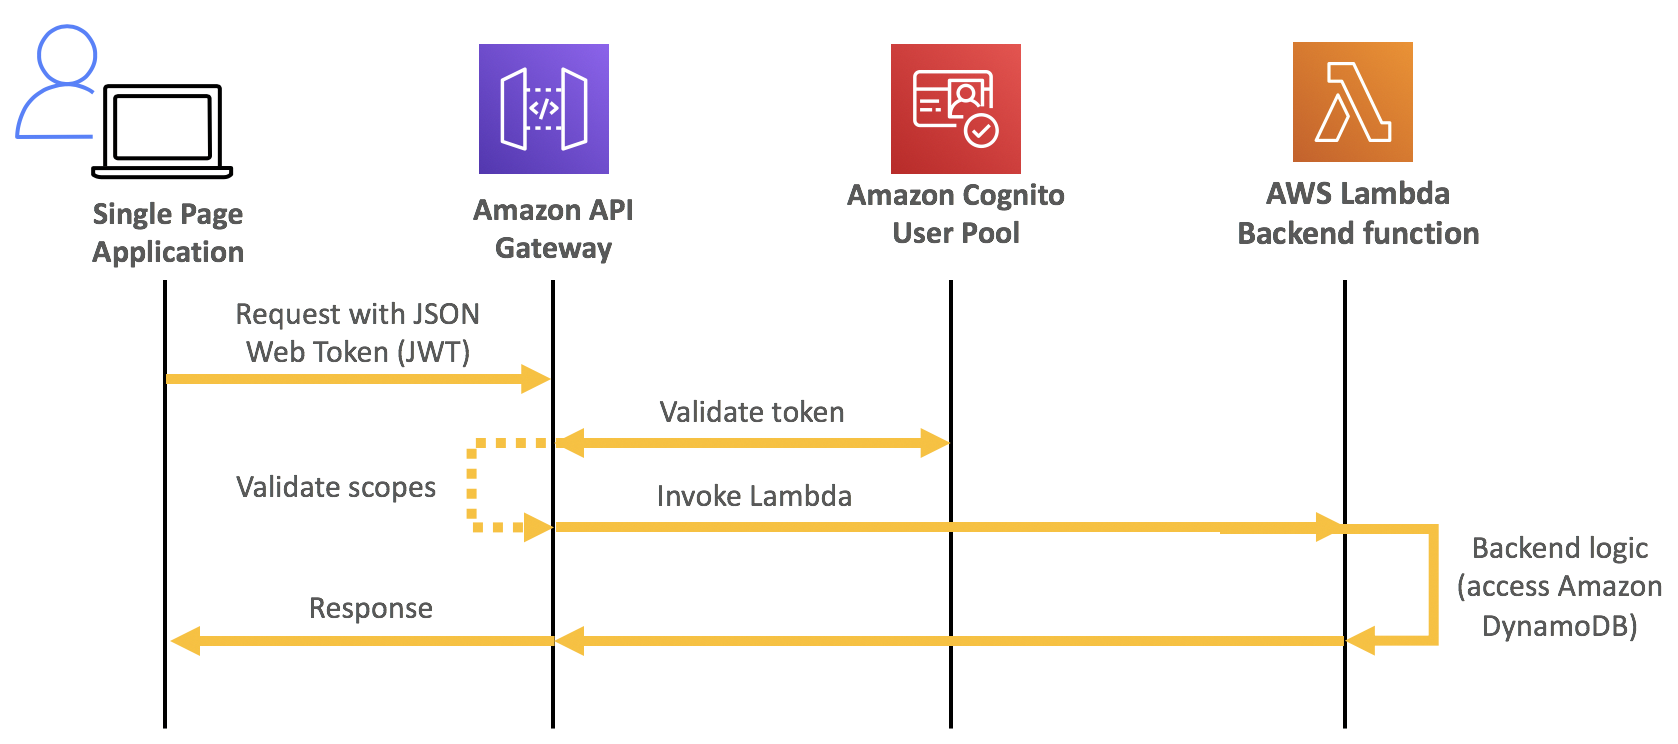
The solution consists of two parts, the frontend application and the serverless backend. The Amplify CLI deploys all the Amazon Cognito authentication, and hosting resources for the frontend. The backend requires the Amazon Cognito user pool identifier to configure an authorizer on the API. This enables an authorization workflow, as shown in the following image.

A diagram showing how an Amazon Cognito authorization workflow works

A diagram showing how an Amazon Cognito authorization workflow works

First, configure the frontend. Complete the following steps using a terminal running on a computer or by using the AWS Cloud9 IDE. If using AWS Cloud9, create an instance using the default options.

From the terminal:

  1. Install the Amplify CLI by running this command.
    npm install -g @aws-amplify/cli
  2. Configure the Amplify CLI using this command. Follow the guided process to completion.
    amplify configure
  3. Clone the project from GitHub.
    git clone https://github.com/aws-samples/aws-serverless-document-scanner.git
  4. Navigate to the amplify-frontend directory and initialize the project using the Amplify CLI command. Follow the guided process to completion.
    cd aws-serverless-document-scanner/amplify-frontend
    
    amplify init
  5. Deploy all the frontend resources to the AWS Cloud using the Amplify CLI command.
    amplify push
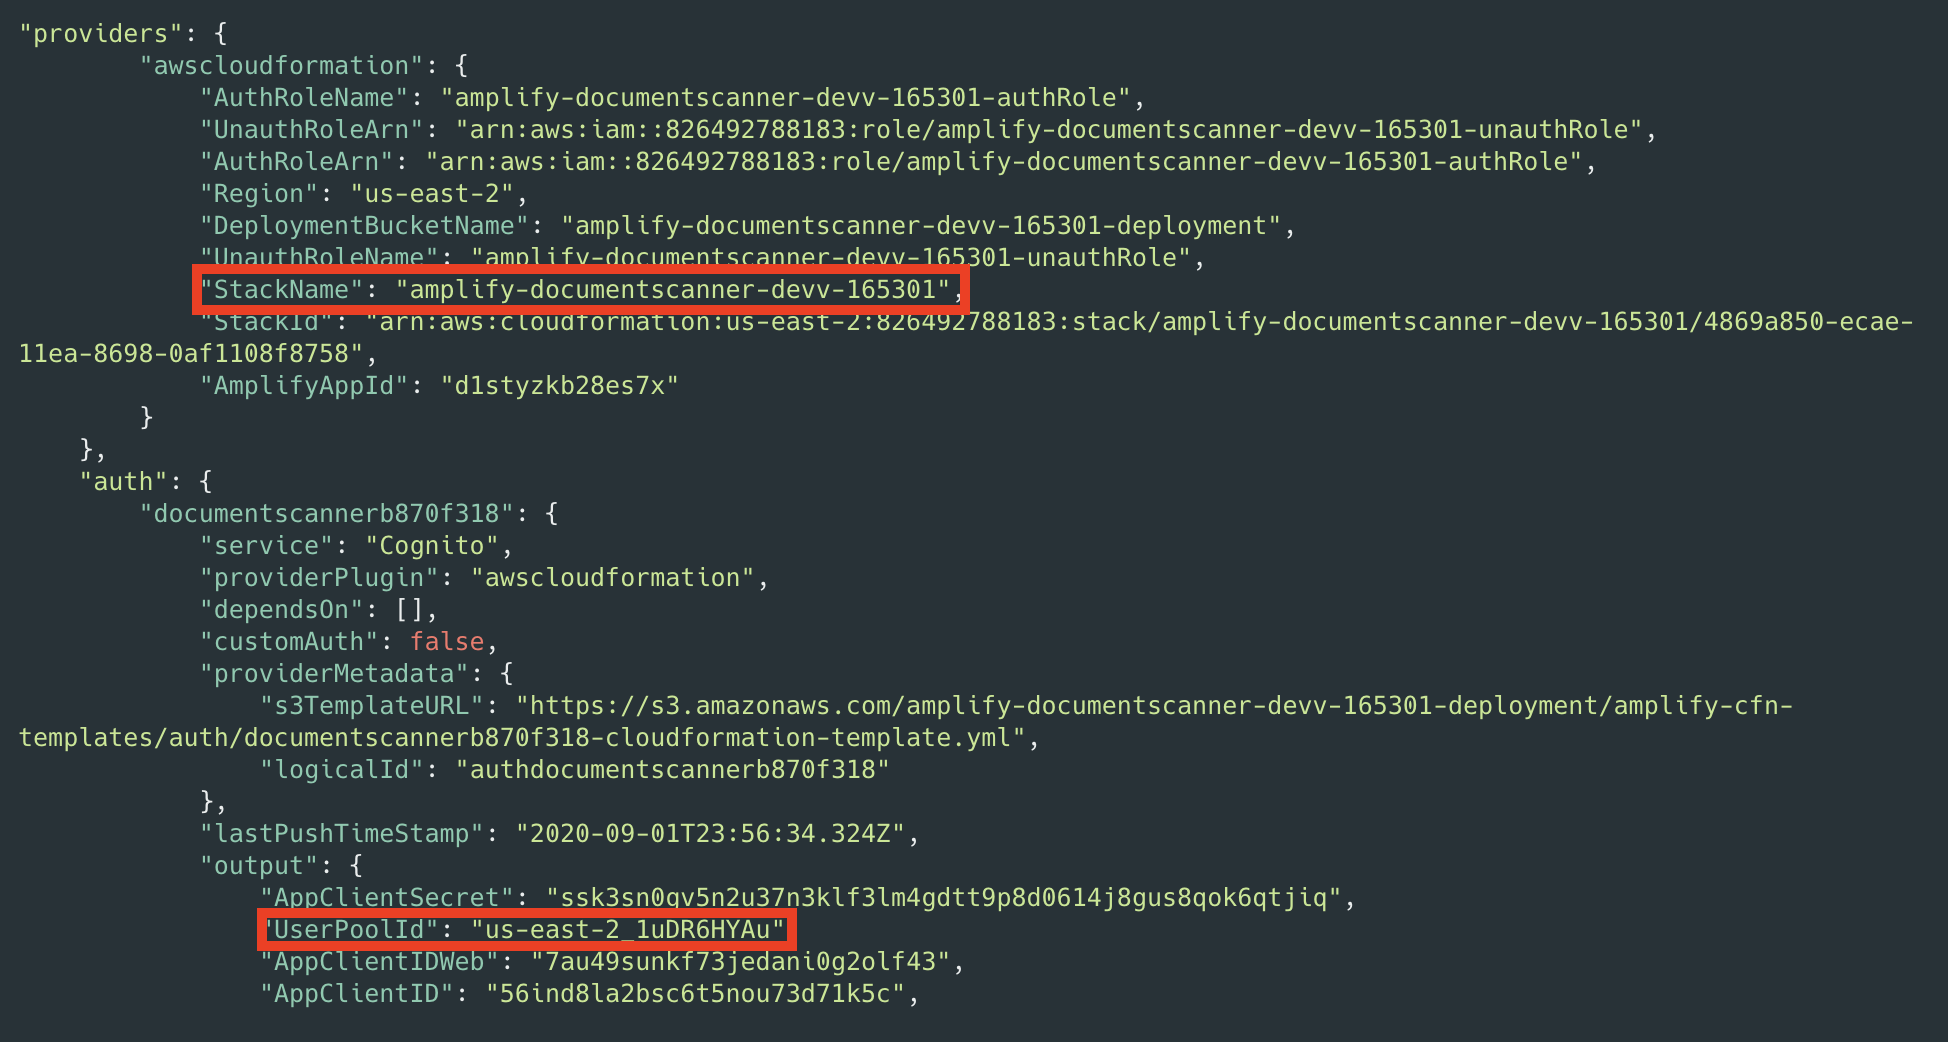
  6. After the resources have finishing deploying, make note of the StackName and UserPoolId properties in the amplify-frontend/amplify/backend/amplify-meta.json file. These are required when deploying the serverless backend.

Next, deploy the serverless backend. While it can be deployed using the AWS SAM CLI, you can also deploy from the AWS Management Console:

  1. Navigate to the document-scanner application in the AWS Serverless Application Repository.
  2. In Application settings, name the application and provide the StackName and UserPoolId from the frontend application for the UserPoolID and AmplifyStackName parameters. Provide a unique name for the BucketName parameter.
  3. Choose Deploy.
  4. Once complete, copy the API endpoint so that it can be configured on the frontend application in the next section.

Configure and run the frontend application

  1. Create a file, amplify-frontend/src/api-config.js, in the frontend application with the following content. Include the API endpoint and the unique BucketName from the previous step. The s3_region value must be the same as the Region where your serverless backend is deployed.
    const apiConfig = {
    	"endpoint": "<API ENDPOINT>",
    	"s3_bucket_name": "<BucketName>",
    	"s3_region": "<Bucket Region>"
    };
    
    export default apiConfig;
  2. In a terminal, navigate to the root directory of the frontend application and run it locally for testing.
    cd aws-serverless-document-scanner/amplify-frontend
    
    npm install
    
    npm run serve

    You should see an output like this:

  3. To publish the frontend application to cloud hosting, run the following command.
    amplify publish

    Once complete, a URL to the hosted application is provided.

Using the frontend application

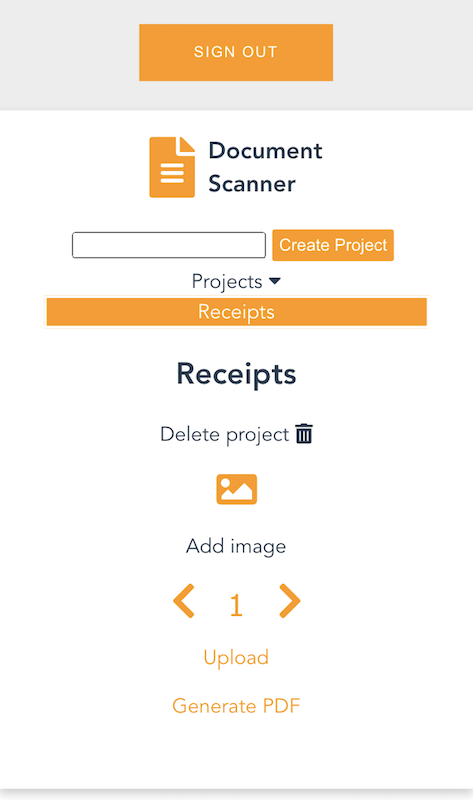
Once the application is running locally or hosted in the cloud, navigating to it presents a user login interface with an option to register. The registration flow requires a code sent to the provided email for verification. Once verified you’re presented with the main application interface.

Once you create a project and choose it from the list, you are presented with an interface for uploading images by page number.

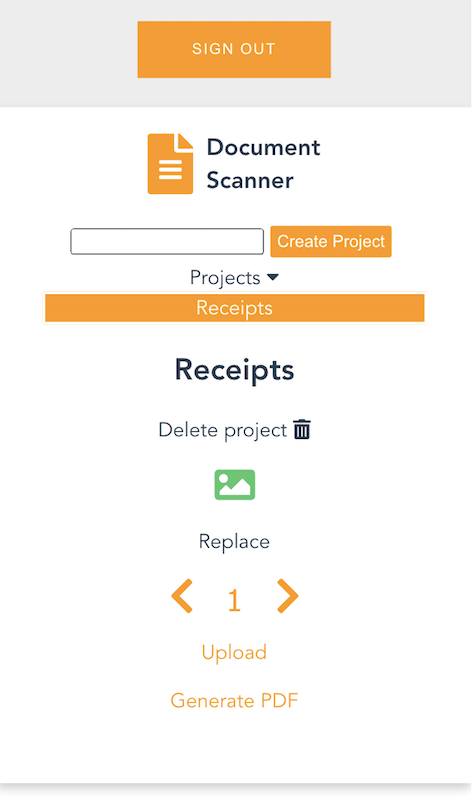
On mobile, it uses the device camera to capture images. On desktop, images are provided by the file system. You can replace an image and the page selector also lets you go back and change an image. The corresponding analyzed text is updated in DynamoDB as well.

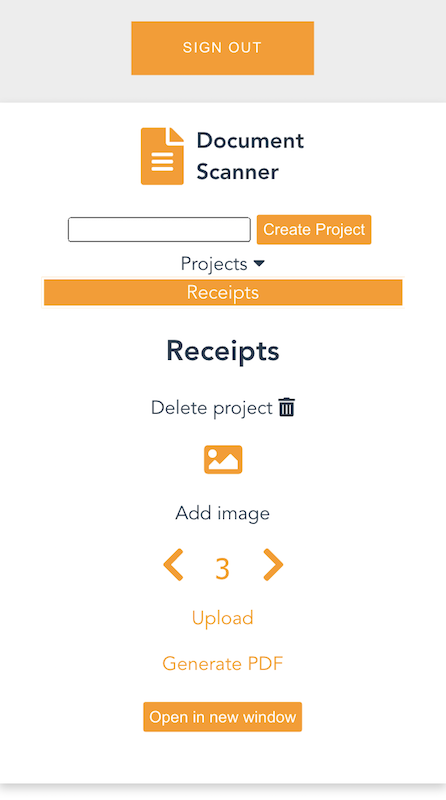
Each time you upload an image, the page is incremented. Choosing “Generate PDF” calls the endpoint for the GeneratePDF Lambda function and returns a PDF in base64 format. The download begins automatically.

You can also open the PDF in another window, if viewing a preview in a desktop browser.

Understanding the serverless backend

An architecture diagram of the serverless backend.

An architecture diagram of the serverless backend.

In the GitHub project, the folder serverless-backend/ contains the AWS SAM template file and the Lambda functions. It creates an API Gateway endpoint, six Lambda functions, an S3 bucket, and two DynamoDB tables. The template also defines an Amazon Cognito authorizer for the API using the UserPoolID passed in as a parameter:

Parameters:
  UserPoolID:
    Type: String
    Description: (Required) The user pool ID created by the Amplify frontend.

  AmplifyStackName:
    Type: String
    Description: (Required) The stack name of the Amplify backend deployment. 

  BucketName:
    Type: String
    Default: "ds-userfilebucket"
    Description: (Required) A unique name for the user file bucket. Must be all lowercase.  


Globals:
  Api:
    Cors:
      AllowMethods: "'*'"
      AllowHeaders: "'*'"
      AllowOrigin: "'*'"

Resources:

  DocumentScannerAPI:
    Type: AWS::Serverless::Api
    Properties:
      StageName: Prod
      Auth:
        DefaultAuthorizer: CognitoAuthorizer
        Authorizers:
          CognitoAuthorizer:
            UserPoolArn: !Sub 'arn:aws:cognito-idp:${AWS::Region}:${AWS::AccountId}:userpool/${UserPoolID}'
            Identity:
              Header: Authorization
        AddDefaultAuthorizerToCorsPreflight: False

This only allows authenticated users of the frontend application to make requests with a JWT token containing their user name and email. The backend uses that information to fetch and store data in DynamoDB that corresponds to the user making the request.

Two DynamoDB tables are created. A Project table, which tracks all the project names by user, and a Pages table, which tracks pages by project and user. The DynamoDB tables are created by the AWS SAM template with the partition key and range key defined for each table. These are used by the Lambda functions to query and sort items. See the documentation to learn more about DynamoDB table key schema.

ProjectsTable:
    Type: AWS::DynamoDB::Table
    Properties: 
      AttributeDefinitions: 
        - 
          AttributeName: "username"
          AttributeType: "S"
        - 
          AttributeName: "project_name"
          AttributeType: "S"
      KeySchema: 
        - AttributeName: username
          KeyType: HASH
        - AttributeName: project_name
          KeyType: RANGE
      ProvisionedThroughput: 
        ReadCapacityUnits: "5"
        WriteCapacityUnits: "5"

  PagesTable:
    Type: AWS::DynamoDB::Table
    Properties: 
      AttributeDefinitions: 
        - 
          AttributeName: "project"
          AttributeType: "S"
        - 
          AttributeName: "page"
          AttributeType: "N"
      KeySchema: 
        - AttributeName: project
          KeyType: HASH
        - AttributeName: page
          KeyType: RANGE
      ProvisionedThroughput: 
        ReadCapacityUnits: "5"
        WriteCapacityUnits: "5"

When an API Gateway endpoint is called, it passes the user credentials in the request context to a Lambda function. This is used by the CreateProject Lambda function, which also receives a project name in the request body, to create an item in the Project Table and associate it with a user.

The endpoint for the FetchProjects Lambda function is called to retrieve the list of projects associated with a user. The DeleteProject Lambda function removes a specific project from the Project table and any associated pages in the Pages table. It also deletes the folder in the S3 bucket containing all images for the project.

When a user enters a Project, the API endpoint calls the FetchPageCount Lambda function. This returns the number of pages for a project to update the current page number in the upload selector. The project is retrieved from the path parameters, as defined in the AWS SAM template:

FetchPageCount:
    Type: AWS::Serverless::Function
    Properties:
      Handler: app.handler
      Runtime: python3.8
      CodeUri: lambda_functions/fetchPageCount/
      Policies:
        - DynamoDBCrudPolicy:
            TableName: !Ref PagesTable
      Environment:
        Variables:
          PAGES_TABLE_NAME: !Ref PagesTable
      Events:
        GetResource:
          Type: Api
          Properties:
            RestApiId: !Ref DocumentScannerAPI
            Path: /pages/count/{project+}
            Method: get  

The template creates an S3 bucket and two AWS IAM managed policies. The policies are applied to the AuthRole and UnauthRole created by Amplify. This allows users to upload images directly to the S3 bucket. To understand how Amplify works with Storage, see the documentation.

The template also sets an S3 event notification on the bucket for all object create events with a “.png” suffix. Whenever the frontend uploads an image to S3, the object create event invokes the ProcessDocument Lambda function.

The function parses the object key to get the project name, user, and page number. Amazon Textract then analyzes the text of the image. The object returned by Amazon Textract contains the detected text and detailed information, such as the positioning of text in the image. Only the raw lines of text are stored in the Pages table.

import os
import json, decimal
import boto3
import urllib.parse
from boto3.dynamodb.conditions import Key, Attr

client = boto3.resource('dynamodb')
textract = boto3.client('textract')

tableName = os.environ.get('PAGES_TABLE_NAME')

def handler(event, context):

  table = client.Table(tableName)

  print(table.table_status)
 
  key = urllib.parse.unquote(event['Records'][0]['s3']['object']['key'])
  bucket = event['Records'][0]['s3']['bucket']['name']
  project = key.split('/')[3]
  page = key.split('/')[4].split('.')[0]
  user = key.split('/')[2]
  
  response = textract.detect_document_text(
    Document={
        'S3Object': {
            'Bucket': bucket,
            'Name': key
        }
    })
    
  fullText = ""
  
  for item in response["Blocks"]:
    if item["BlockType"] == "LINE":
        fullText = fullText + item["Text"] + '\n'
  
  print(fullText)

  table.put_item(Item= {
    'project': user + '/' + project,
    'page': int(page), 
    'text': fullText
    })

  # print(response)
  return

The GeneratePDF Lambda function retrieves the detected text for each page in a project from the Pages table. It combines the text into a PDF and returns it as a base64-encoded string for download. This function can be modified if your document structure differs.

Understanding the frontend

In the GitHub repo, the folder amplify-frontend/src/ contains all the code for the frontend application. In main.js, the Amplify VueJS modules are configured to use the resources defined in aws-exports.js. It also configures the endpoint and S3 bucket of the serverless backend, defined in api-config.js.

In components/DocumentScanner.vue, the API module is imported and the API is defined.

API calls are defined as Vue methods that can be called by various other components and elements of the application.

In components/Project.vue, the frontend uses the Storage module for Amplify to upload images. For more information on how to use S3 in an Amplify project see the documentation.

Conclusion

This blog post shows how to create a multiuser application that can analyze text from images and generate PDF documents. This guide demonstrates how to do so in a secure and scalable way using a serverless approach. The example also shows an event driven pattern for handling high volume image processing using S3, Lambda, and Amazon Textract.

The Amplify Framework simplifies the process of implementing authentication, storage, and backend integration. Explore the full solution on GitHub to modify it for your next project or startup idea.

To learn more about AWS serverless and keep up to date on the latest features, subscribe to the YouTube channel.

#ServerlessForEveryone