The kernel’s CPU scheduler currently offers several preemption modes that
implement a range of tradeoffs between system throughput and response time.
Back in September 2023, a discussion
on scheduling led to the concept of “lazy preemption”, which could
simplify scheduling in the kernel while providing better results. Things
went quiet for a while, but lazy preemption has returned in the form of this patch series
from Peter Zijlstra. While the concept appears to work well, there is
still a fair amount of work to be done.
The Wall Street Journal is reporting that the CEO of a still unnamed company has been indicted for creating a fake auditing company to falsify security certifications in order to win government business.
Security updates have been issued by AlmaLinux (java-1.8.0-openjdk, java-11-openjdk, java-17-openjdk, java-21-openjdk, and webkit2gtk3), Debian (apache2), Red Hat (expat), SUSE (cups-filters, jetty-minimal, OpenIPMI, and python-starlette), and Ubuntu (linux-azure, linux-azure, linux-azure-5.15, linux-azure, linux-azure-5.4, and oath-toolkit).
Ever wonder what it’s like to be an intern at Rapid7 in Belfast?
Software Engineers Orla Magee and Paddy McDermott share what the interview process looked like for them, along with impactful projects and advice for others exploring Rapid7’s Placement Programme.
What was the interview process like for the Placement Programme?
Paddy: The interview process for Rapid7’s Placement Programme was well structured and welcoming. It consisted of two parts, a one-on-one chat focusing on cultural alignment, and a technical interview with programming questions and a puzzle to solve. The interviewers were approachable, which helped me feel at ease. I felt as though they struck a good balance, assessing my skills without overwhelming me with information and questions. It felt like a genuine attempt to get to know me as a person and assess my skills, rather than just ticking boxes.
Orla: From the start, the talent acquisition team was friendly and communicative, keeping me well-informed about each stage. The interviewers seemed genuinely interested in getting to know me as a person, highlighting that being yourself is crucial in this process. Overall, the interview experience reflected positively on Rapid7’s commitment to finding well-rounded individuals who can contribute both technically and culturally to their team, which made me feel at ease and excited for an opportunity to work at Rapid7.
What initially stood out to you about Rapid7?
Paddy:What stood out to me about Rapid7 was the genuine connection I felt with the people I met during the interview process. The interviewers were engaging and approachable, which gave me a strong sense of the company’s collaborative culture. Another thing that caught my attention was Rapid7’s commitment to growing new talent. This became clear when I attended an event specifically for intern applicants, where I got to experience the company’s welcoming atmosphere firsthand. A mix of friendly people, a learning-focused environment and the opportunity for significant professional growth really made Rapid7 stand out as an ideal place to begin my career.
What was the learning curve like coming into Rapid7 as a student, and what resources or tools did you have to navigate that?
Orla:Transitioning from university to working at Rapid7 as a student came with a significant learning curve. In university, I was used to working independently on projects. At Rapid7, I had to adapt to collaborating as part of a team. This shift required developing my communication skills and learning to work effectively with others. Additionally, the codebase was much bigger and more complex than the smaller-scale projects I had worked on in university. To help navigate these challenges, I was paired with a mentor at the start of my internship, who was instrumental in developing my technical abilities and helping me adjust to working in a professional environment. Alongside my mentor, my team members were always willing to offer assistance and guidance, creating a supportive atmosphere that facilitated my learning and growth. This combination of mentorship and team support was crucial in helping me overcome the learning curve and successfully adapt to a new work environment.
Can you share a memorable project or experience?
Paddy:One of my most memorable achievements during my placement was developing a full-stack status page. This project was particularly significant as it served a real, practical purpose within the company. The status page I created was designed to alert on outages and display the health of various components of our team’s pipeline. This tool was used beyond our team, and was shared internally across different parts of the company. This project allowed me to greatly expand my full-stack development skills in a meaningful way. It was rewarding to see something I built from the ground up being actively used to improve monitoring and communication about our pipeline’s status.
What advice would you give someone looking to land a Placement with Rapid7?
Orla: Take advantage of intern nights, held at the office, as these events offer a unique glimpse into Rapid7’s culture and team dynamics. These events are great opportunities to network and build connections with current staff members, potentially giving you an insider’s perspective on the company.
Paddy: My main advice would be to be yourself throughout the whole process as this will really help you connect with the interviewers and showcase your true potential. Also, make sure to demonstrate a strong willingness to learn, as Rapid7 values candidates who are eager to grow and take on new challenges.
What were some of your biggest fears coming in, And how did that compare to reality?
Orla: When I started my internship at Rapid7, my main concern was that my technical skills might not measure up to those of my peers. I worried about potentially struggling to contribute meaningfully to the team, but my real experience showed that these worries were unnecessary. From day one, I was met with a welcoming and supportive environment. My colleagues were not only understanding of my position as an intern but were also genuinely enthusiastic about helping me develop my skills. They took the time to walk me through their current projects, providing valuable context and insights that helped me quickly get up to speed. My initial uncertainty was replaced with excitement for the opportunity to learn and contribute, and the reality of the internship far exceeded my expectations.
How has your placement experience prepared you for a successful career?
Paddy:Overall, the placement has given me a mix of technical growth, hands-on experience and professional development creating a strong foundation for my future in tech. I’ve learned many new programming languages with guidance from experienced colleagues. Working in a live production environment has equipped me with real-world skills and experiences. Presenting demos has boosted my confidence in public speaking and taught me how to communicate technical concepts effectively. I’ve built connections and friendships with coworkers which has made the work environment enjoyable and allowed me to start to form a professional network that will be valuable in my career.
Interested in learning more about the Placement Programme, or additional emerging talent programmes at Rapid7? Click here to explore our offerings and view open jobs.
Multiple popular browsers have announced that they will no longer trust public certificates issued by Entrust later this year. Certificates that are issued by Entrust on dates up to and including October 31, 2024 will continue to be trusted until they expire, according to current information from browser makers. Certificates issued by Entrust after that date will not be trusted.
If you’ve imported Entrust certificates into AWS Certificate Manager (ACM) for use with integrated services such as Amazon CloudFront or Elastic Load Balancing, consider reissuing these certificates through Entrust before October 31, 2024, and re-importing them. This will provide you with a longer timeline to evaluate your alternatives. In this blog post, we discuss how you can determine whether certificates you imported to ACM will be affected, and suggest potential alternatives, including public certificates issued by Amazon Trust Services.
How to tell if you’ve imported Entrust certificates to ACM
If you’re unsure whether you’ve imported certificates to ACM, there are a few different ways to verify. You can use the ACM console to view your certificates for that AWS account. Certificates that are imported to ACM have the type Imported, as shown in Figure 1.
Figure 1: Viewing certificates in AWS Certificate Manager
You can also list the certificates in your AWS account by using the AWS CLI or APIs. You can use the list-certificates command with the AWS CLI:
aws acm list-certificates
You can then filter the response to only show the certificate ARN of certificates that are imported into ACM by using the following command:
After you’ve identified the ARNs of imported certificates, you can use the describe-certificate CLI command to get more information about each of the imported certificates. One of the returned fields is Issuer—this field indicates who originally issued the certificate in question. See the following example command and output, where in this case the issuer is Amazon:
You can use one of these methods to determine whether you’ve imported certificates to ACM, and use the Issuer field of the DescribeCertificate response to check whether any of your imported certificates were issued by Entrust and will be affected by the coming changes in popular browsers.
Lastly, you can also use this sample code from our GitHub repository to discover imported certificates that were issued by a certain CA or issuer. The project evaluates the ACM certificates for a given AWS account, flagging certificates with an Issuer value that matches against a specific, customizable list of CAs. This can be run as a Python script, an AWS Configquery, or a custom rule in AWS Config.
Consider replacing Entrust certificates with public certificates issued through ACM
If you’re using Extended Validation (EV) or Organization Validation (OV) certificates, we recommend that you use Domain Validated (DV) certificates from ACM instead. Popular browsers do not differentiate between EV/OV and DV certificates when indicating whether a site is trusted. Additionally, EV/OV certificate issuance and renewals cannot be automated and require manual effort, unlike DV certificates.
Evaluate use of private certificates for internal-facing use cases
We also recommend that you re-evaluate your use of certificates to reconsider whether you need private or public certificates for your use cases. For internal-facing workloads, you should consider using private certificates. This will allow you to control the certificate parameters, such as the certificate type or the validity period, to align with your specific TLS requirements. For example, ACM issued public certificates are valid for 395 days, but you might have use cases in which certificates with a longer validity period make more sense, and in such cases you can issue private certificates from AWS Private Certificate Authority (AWS Private CA).
Conclusion
In summary, if you are importing Entrust-issued certificates to ACM, evaluate whether you need public or private certificates, especially for internal-facing workloads—for which private certificates are typically better suited. For public certificates, take this opportunity to re-evaluate your usage of EV and OV certificates, and whether they could be replaced with DV certificates. If you want to use public certificates with services such as Amazon CloudFront, Elastic Load Balancing, or Amazon API Gateway, issue the certificates directly from ACM. Lastly, if you need more time to evaluate your options before making a decision, consider re-issuing and re-importing your certificates from Entrust before October 31, 2024. Popular browsers stated their intention to trust certificates issued by Entrust prior to October 31, 2024 until these certificates expire, giving you until the next certificate renewal to make an informed decision. You can learn more about ACM by reviewing the AWS documentation, and get started issuing certificates from ACM in the AWS Management Console.
If you have feedback about this post, submit comments in the Comments section below. If you have questions about this post, contact AWS Support.
По традиция първата обявена награда е в категорията медицина/физиология. Тази година лауреатите са Виктор Амброс и Гари Ръвкън за откриването на микро-РНК и участието ѝ в регулацията на гените след транскрипцията. Този вид РНК е непозната за науката до 1993 г. и с времето се оказва, че е един от ключовите компоненти за нормалното функциониране на процесите в сложните организми.
Централната догма в биологията най-общо указва потока на информация в живите организми като ДНК -> РНК -> протеини. От ДНК в процеса на транскрипция се образува информационна РНК (иРНК). Тя от своя страна е основа за транслацията, при която от множество аминокиселини се образуват протеини – основен градивен елемент на тъканите, както и главните отговорници за протичането на биохимичните процеси в организма ни.
Но както знаем, всяка клетка носи пълния набор от генетична информация, която е нужна за изграждането на тялото ни, без значение къде се намира. Това означава, че за оформянето на специфични тъкани и органи е нужно да бъдат активирани само част от тези гени – регулация на генната активност. Процесът е изключително сложен и динамичен, като по време на съществуването на една клетка са активни различни гени в различна степен. Поддържането на този фин баланс е ключов за нормалното протичане на живота на клетките.
Малко след средата на миналия век стават известни няколко механизма за това. Един от тях се базира на т.нар. транскрипционни фактори – протеини, които имат способността да се свързват с ДНК, като или помагат в процеса на транскрипция, или пречат, регулирайки количеството РНК и съответно количеството протеин, което се произвежда от клетките.
Друг механизъм се основава на промени в начина, по който се съхраняват около 2 метра ДНК в ядрото на всяка клека. За да може да се побере, тя се навива подобно на телефонен кабел. Някои читатели знаят добре колко досадно е да се разплете такъв кабел, когато се пренавие и стане на топка. Поради изключително важната функция на ДНК, ако това се случи в клетките, решението ще бъде по-сложно от досадно разплитане. Ето защо е необходим елегантен подход – нишката се навива около своеобразни „макари“, наречени хистони. Но освен че изпълняват структурна роля, те имат значение и за регулацията на гените. Ако ДНК се навие много плътно около тях, то ензимите, които я разчитат, за да произведат РНК, не могат да изпълняват функцията си и така гените на практика се „изключват“. Това е един от механизмите, на които се базира епигенетиката. Тя обяснява как в организмите може да настъпят промени, които се наследяват, без реално да има промяна в генетичната информация.
Но както често се оказва в биологията, за да се случи дадено нещо, има и още един начин. Откриването му е следствие от работата на Амброс и Ръвкън в лабораторията на Робърт Хорвиц, който по-късно, през 2002 г., получава една трета от Нобеловата награда за медицина за откритията си при програмираната клетъчна смърт (апоптоза). При този процес клетките активират в себе си механизми, водещи до тяхното загиване. Това помага при оформянето на някои органи – например отпадането на ципата между пръстите, или има защитна функция, предпазвайки тялото от образуване на тумори.
Организмът, който изследват учените, е микроскопичен кръгъл червей – нематодата C. elegans. Той често е обект на изследвания, защото е лесен за отглеждане, има сравнително малък и добре проучен геном и дава възможност за прехвърляне на установеното при него към по-висши организми. Двамата учени разглеждат мутанти с променена функция на два специфични гена. Мутациите в гена lin-4, с който работи Амброс, водят до липса на различни специализирани клетки и зависещите от тях тъкани в червеите. Обектът на Ръвкън – lin-14, обикновено е активен в началните стадии на развитие на организма, но при мутации в него C. elegans продължава да образува ембрионални клетки по-дълго от нормалното.
Пъзелът започва да се сглобява, след като Амброс установява, че lin-4 блокира действието на lin-14, а Ръвкън прави интересното откритие, че това се случва след – а не както се очаква – преди да се образува иРНК. Още по-интригуващо е, че някои от мутациите, които променят функцията на lin-14, се намират в част на РНК, която не кодира протеин (т.нар. UTR – нетранслиран регион). Следващият пробив идва от лабораторията на Амброс. Ученият успява да установи местоположението на lin-4 в генома в участък, който не съдържа гени, кодиращи протеин. Вместо това от гена се получават две много къси РНК молекули.
Сравнявайки секвенциите на двете РНК молекули – късата, кодирана от lin-4,и иРНК от lin-14, – учените установяват, че те са комплементарни една с друга (последователностите им се припокриват). Значението на това става ясно веднага – открит е нов механизъм за генно регулиране, и то след като вече е образувана иРНК, още повече не от протеин, а от непознат до момента вид РНК.
За съжаление, дветепубликации не предизвикват очаквания фурор и този тип генна регулация се приема за механизъм, специфичен за нематодата, съответно без особено значение за човека и други по-висши организми. Промяната идва няколко години по-късно, когато групата на Ръвкън открива друга микро-РНК, кодирана от гена let-7. Негови близки разновидности се срещат в цялото животинско царство – от водните гъби до човека, и са пример за много добре запазена секвенция, каквато се наблюдава в гени с изключително важно значение.
След откриването на let-7 са идентифицирани над хиляда различни микро-РНК при човека и е установено, че те сауниверсален механизъм за генна регулация при всички многоклетъчни организми и най-вероятно са еволюирали преди милиони години в общия предшественик на всички организми, населяващи планетата.
Вече се знае повече и за механизма им на действие. След като от ДНК се получи дългата форма на микро-РНК, тя се завива като фуркет за коса в U-форма благодарение на сходни секвенции в двата си края. След това ензим, наречен Dicer, я срязва, давайки късата активна форма на микро-РНК. Тя е свободна да се свърже с целевата си иРНК, като или предизвиква нейното разрушаване, или пречи на ензимите, които я „превеждат“ в протеин. Процесът е изключително сложен и съществуват мрежи на регулация, в които един ген може да бъде модулиран от много микро-РНК или една микро-РНК може да влияе върху множество гени.
Значението на този механизъм е голямо – потвърждава се от присъствието му във всички сложни организми, както и от това, че при нарушаване на нормалната му функция се отключват множество нежелани процеси. При човека са познати редица генетични заболявания, причинени от мутации в гените, отговорни за синтеза на микро-РНК. Знаейки за тези негативни ефекти, учените вече работят по различни терапии, които могат да възстановят нормалното функциониране на генната регулация или да променят нежеланата дейност на определени гени.
Това не е първата Нобелова награда, свързана с малки РНК молекули. През 2006 г. високото отличие е присъдено на Андрю Файър и Крег Мело за откритието на РНК интерференцията отново в нематодата C. elegans. Процесът е много сходен с този при микро-РНК, но за разлика от тях, small interfering RNA (siRNA) са строго специфични за конкретна целева РНК. Благодарение на това те се използват успешно и като терапия срещу различни вирусни заболявания, а също и като инструмент в молекулярната биология.
Въпреки невероятната скорост, с която напредва познанието ни за фундаменталните процеси, протичащи в живите организми, тези награди показват колко сложна е регулацията им и колко изненади могат все още да крият. Понякога любопитството и работата с организми, които изглеждат не особено важни, разкриват цяло ново поле в медицината и генетиката.
Тази година наградата за физика е присъдена на Джон Хопфилд и Джефри Хинтън за тяхната основополагаща работа в полето на машинното обучение с изкуствени невронни мрежи. Наградата предизвика значителен интерес, тъй като изглежда малко необичайно отличието за физика да се даде за разработка в полето на информационните технологии – каквато са невронните мрежи, – и това дори доведе до негативни коментари в социалните мрежи. Също така Хинтън попадна в редица новини миналата година, когато прекрати десетгодишното си участие в подразделението на Google за изкуствен интелект – Google Brain, изразявайки силна тревога от развитието на изкуствения интелект и заплахата му за човечеството.
Според Нобеловия комитет наградата е оправдана, тъй като двамата учени са използвали фундаментални похвати от физиката като статистически модели и с разработките си са помогнали за напредъка на изследванията в много полета, като физика на елементарните частици, астрофизика, материалознание и др.
Кариерата на Хопфилд е дълга и интересна. След като защитава докторат по физика през 1958 г., проявява интерес в развиващото се поле на молекулярната биология, където предлага концепцията за „кинетична корекция“, която дава потенциално обяснение за високата точност при биохимични процеси, като репликацията на ДНК. В статия, публикувана през 1982 г., ученият описва мрежа, в която връзките между отделните звена може да се разглеждат като физични сили. Тази структура, известна като мрежа на Хопфилд, е много сходна с асоциативната памет при хората.
Използвайки познанията си за магнитните материали, в които всеки атом влияе на околните, създавайки зони с еднакво поле, той описва мрежа, в която „невроните“ могат да съдържат 0 или 1 и са свързани помежду си с различни по сила нишки. Така едно изображение може да бъде разделено на отделни пиксели и в зависимост от това дали са черни, или бели, да им се даде стойност – съответно 0 или 1.
При обучението на мрежата силата на връзките между отделните неврони се променя, докато не се постигне възможно най-ниска енергия – оптимална стойност. Когато мрежата се използва, специален алгоритъм преминава през новото изображение и проверява дали промяната в цвета на всеки пиксел ще доведе до стойност, най-близка до оптималната. Така малко по малко е възможно да се пресъздаде оригиналното изображение. Особено полезно в случая е, че в модела може да се запазят няколко изображения, които невронната мрежа да различи. Наред с това моделът може да работи и с частично липсващи данни или с известно количество шум.
Вдъхновен от тази идея, Хинтън решава да опита да я разшири, заемайки идеи от статистическата механика. При нея се разглеждат системи, състоящи се от множество сходни елементи, например молекулите в даден обем газ. Въпреки че самите молекули не могат да бъдат проследени, състоянието им може да се установи приблизително чрез наблюдение на параметрите на цялата система и чрез използване на статистическо моделиране, за да се определи кое е най-вероятно, с помощта на уравнението на Болцман, формулирано от австрийския физик през XIX в.
Усъвършенстваният вид невронни мрежи – „машини на Болцман“ – е публикуван от Хинтън само три години след тези на Хопфилд. Те имат два вида неврони – видими, които получават входната информация, и скрити, които са отделени в друг слой. Между всички неврони отново има връзки с различна тежест, които се оптимизират по време на обучение, така че вероятността да се получи резултат, сходен с началните данни, да е най-висока. Така новите невронни мрежи вече могат да разпознават информация, която не са виждали, но е близка до някоя от познатите им.
След поставянето на това начало е изминат дълъг път и са въведени най-различни иновации. Един пример е откритието, че ако връзките са само между някои неврони, мрежите са по-ефективни. Така от първоначалната невронна мрежа на Хинтън, която се състои от 30 неврона, в момента имаме големи езикови модели с над един трилион. Скромно начало на революция, която тепърва набира скорост.
Най-вероятно повечето от нас вече са използвали новите технологии, приели общото наименование изкуствен интелект. Не само за по-добър машинен превод или препоръки за музика и сериали, а и за разговори с различни чат програми, за генериране на изображения и текст, за решаване на сложни задачи. Полза има и за самите физици, които може да са обидени от наградата тази година, но те често използват подобни алгоритми за обобщаване на големи обеми данни, премахване на шум или при търсенето на екзопланети. В крайна сметка едва ли има поле на съвременната наука, което не е почерпило ползи от технологията, създадена от Хопфилд и Хинтън.
Но бързият напредък крие и своите рискове. Генерирането на фалшиви изображения, неразличими от истинска фотография, вече е факт. Създаването на видео вече достига ниво, при което зрителите лесно може да се заблудят, ако не внимават. Клонирането на гласове е реалност. OpenAI опитаха да наподобят Скарлет Йохансон при озвучаването на гласовия асистент на ChatGPT, а популярният създател на съдържание за Raspberry Pi Джеф Гийрлинг сподели, че китайска компания е използвала гласа му, за да озвучи свои рекламни видеа. Всичко това се случва на фона на сравнително ниска медийна култура, разсеяна и поляризирана публика и целенасочени дезинформационни кампании от актьори, подкрепяни от държавите.
Двамата лауреати независимо един от друг изказват своите тревоги за скоростта и липсата на контрол при създаването на нови модели и инструменти и апелират за по-силни регулации и проучвания, преди моделите да станат общодостъпни. Хинтън е особено притеснен за развитието на т.нар. изкуствен интелект с общо предназначение (силен ИИ), който ще има способности, неразличими от тези на хората, а с развитието си – дори и по-големи. Към момента ние сме най-интелигентните създания в нашия свят и няма еднозначен отговор на въпроса какво ще стане, когато това се промени.
Наградата за химия затвърждава приноса и популярността на изкуствения интелект. Тази година половината е присъдена на Дейвид Бейкър за приноса му в изчислителната химия, а другата половина е разделена между Демис Хасабис и Джон Джъмпър за разработката на софтуер, който може да предсказва структурата на протеините. За разлика от наградата за физика, където връзката може да се определи като сравнително слаба, тук приносът за (био)химията е пряк и определено може да се определи като революционен.
Ако ДНК са инструкциите как може да се построи един жив организъм, то протеините са тухлите, строителната техника, работниците… на практика всичко необходимо за строежа. Учудващото е, че тази критична роля се крепи на едва двайсетина основни елемента, от които са изградени самите те. По шаблона на иРНК в процеса на транслация аминокиселините се подреждат в нишка една след друга – това е тяхната първична структура. В зависимост от последователността, в която са подредени, нишката се нагъва в няколко характерни форми – най-често срещаните са алфа-спирала и бета-лист. Чрез взаимодействия между тези структури протеинът се „нагъва“ триизмерно (възможно е далечни части от веригата да се окажат една до друга), оформяйки своята третична структура, в която може да има активни центрове, участъци за свързване с молекули и други функционални модули.
В началото на 60-те години на миналия век Кристиан Анфинсен открива, че образуването на третичната структура е обратим процес – протеините могат да се „разгъват“, но след това успешно връщат функционалната си форма. Това откритие подсказва на учените, че най-вероятно третичната структура зависи от първичната, и за него Анфинсен е награден с „Нобел“ за химия през 1972 г.
По това време вече е била известна структурата на някои протеини благодарение на приложението на една технология от началото на миналия век – рентгеновата кристалография. При нея кристал от изучаваното вещество се облъчва с рентгенови лъчи и се наблюдава как се променя дифракцията им в зависимост от атомите и химичните връзки между тях в кристала. Това е основа за предходна Нобелова награда за химия – на Джон Кендрю и Макс Перуц през 1962 г. С напредването на технологиите към набора с инструменти се добавят ЯМР спектроскопия и криогенна електронна микроскопия.
Тъй като триизмерната структура на протеините е ключова за тяхната функция, откриването ѝ е много важно, но и изключително трудно дори и с новите технологии. Представете си какво въображение (и познания) трябва да имате, за да познаете спиралната структура на ДНК от популярната Снимка 51 на Розалинд Франклин! Няколко десетилетия по-късно на помощ идва компютър с абстрактно мислене.
Демис Хасабис е един от основателите на DeepMind – компания, поставила си за цел да обучава изкуствен интелект, като му дава да играе стари видеоигри, но с уловката, че не му обясняват правилата. Скоро след придобиването на компанията от Google е създаден AlphaGo Zero – програмата, победила шампион по играта го, което е считано за много високо постижение. След тази победа екипът насочва вниманието си към проблема с разпознаването на триизмерните структури на протеините. В този проект се включва и Джон Джъмпър.
С един от първите си опити софтуерът на учените, наречен AlphaFold, успява да подобри разпознаването на третичните структури от 40% при наличните алгоритми до 60% – впечатляващ успех. За втората версия на програмата екипът подава на изкуствения интелект всички известни към момента структури и техните секвенции. Това допълнително разширява нейните способности, давайки резултат с качество, близко до рентгеновата кристалография. С тази разлика, че експерименти, които са отнемали години, вече се провеждат за минути. Почти като на игра.
Общо с игрите има и другият лауреат – Дейвид Бейкър. Заинтригуван от процеса на оформяне на третичната структура на протеините, Бейкър заедно с екипа си създава софтуер за тяхното предсказване много преди AlphaFold. Любопитното е, че софтуерът Rosetta@home работи дистрибутирано – всеки може да инсталира малко приложение на компютъра си, което в свободното време, когато процесорът не е зает с важни неща, да обработва известно количество входни данни. След като направи изчисленията, то връща резултата до централен сървър, който обобщава данните. Този софтуер беше използван и за разработката на ваксина против SARS-CoV-2 с наночастици, която все още не е достъпна, но клиничните изследвания са изключително обещаващи.
Въпреки успеха на Rosetta@home учените стигат до интересно откритие – геймърите са по-добри в намирането на закономерности и създаване на триизмерни структури. Това води до създаването на играта Foldit, за която е публикувана статия в журнала Nature. Играта постига успехи, но както при шаха и го, в крайна сметка AlphaFold надвива човешките играчи.
На Бейкър обаче му хрумва и друга идея – да обърне работата на програмата и вместо да ѝ даде секвенция, чиято структура да бъде определена, да ѝ посочи желаната триизмерна форма и да получи нужната последователност от аминокиселини. Създаването на протеини de novo е от голям интерес за учените, но до този момент е много сложно и в повечето случаи се правят промени във вече съществуващи структури, за да им се придадат малко по-различни свойства.
Така двама учени от групата на Бейкър създават нов за природата протеин – Top7 – с дотогава нечуваната за de novo синтезиран протеин дължина от 93 аминокиселини. Секвенцията му е „преведена“ в ДНК и вмъкната в бактерия, която произвежда новия протеин, а кристалографски анализ показва, че структурата му е почти неразличима от предсказаната. Това е огромен напредък, който веднага дава отзвук в биохимичните среди. Възможността за създаване на протеини с нови функции, които не са производни на еволюцията и природните процеси, има потенциала да доведе до драстични промени в най-различни аспекти на живота ни – медицина, химичен синтез, хранителна химия, нови материали. Някои може да се използват за създаване на бактерии, които се хранят с пластмаса или с петролни остатъци, други – като своеобразни ваксини, които обвиват вирусните частици и не им позволяват да се намножават. Един от протеините, разработени от групата на Бейкър, действа по сходен начин, свързвайки се с молекулата на фентанила – един от много опасните съвременни опиоиди, което позволява създаването на бързи тестове за веществото.
Ако се върнем към това, че на практика целият живот на планетата е изграден и движен от протеини, става ясно какви промени могат да предизвикат откритията на тези трима учени и екипите им. Въпреки че в повечето медии наградите бяха поставени донякъде под сянката на изкуствения интелект, може да се приеме, че годината е особено силна за биохимията и молекулярната биология. Разработките в двете полета освен фундаментално значение имат и голям приложен потенциал, което прави преценката на Нобеловия комитет напълно валидна.
Толкова нови играчи напъплиха българската политика в последните години, но никой не успя да измести нейните двама титани – Бойко Борисов и Делян Пеевски. Въпреки опитите за реформи старата политическа култура и лобистките мрежи, които те управляват, не само показаха устойчивост на новите влияния, но и оказаха (и оказват) съпротива. Така политическият ландшафт не се промени особено – новото поколение лидери преживя неуспехи, подсилени от саботажите на старото. Тези процеси поставят под съмнение капацитета на демокрациите да обновяват своите елити не само поради незрялост, но и поради закърняване на вътрешнопартийната демокрация и заради омерзението на гражданите от политическото безсилие.
Докато олигархът Пеевски беше в сянка, доминацията на лидера на ГЕРБ Борисов беше безспорна. Негови бяха микрофоните, първите новини в емисиите, първите страници на вестниците, изобщо публичното говорене, издържано в аз-форма. Но управлението, известно като сглобка, извади през лятото на 2023 г. Пеевски под светлините на прожекторите независимо от санкциите му за корупция от САЩ и Великобритания. От ПП–ДБ ги забравиха за деветте месеца, през които лидерите на ГЕРБ–СДС, ПП–ДБ и ДПС се събираха, сговаряха и сглобяваха за едно или друго.
Възходът на Пеевски отслаби доминиращата роля на Борисов, а разцепването на ДПС отслабва Пеевски. Но все така продължава зависимостта на българската политическа система от фигури, които остават на власт твърде дълго.
Една друга фигура – на президента Румен Радев, черпи сили от тяхното отслабване. Недостатъчни, за да наложи президентска форма на управление, но ще стигнат, за да избута една нова партия на сцената сред отломките на БСП и ДПС. А това би означавало още един титан, който ще се бори да съсредоточи в ръцете си повече контрол и по-голяма власт от тази, с която се е сдобил като президент. Макар като такъв да разполага с квоти за назначения в Конституционния съд, Съвета за електронни медии, Българската народна банка, а също и с издаването на указите за назначения на посланици, висши военни, тримата големи в съдебната власт…
Време е този период от политическата история на България да приключи в полза на реалния парламентаризъм.
Битката на силоваците
Борисов беше неоспоримият силовак на българската политическа сцена, който доминираше над всички останали повече от десетилетие с комбинацията си от харизма, популизъм и твърд контрол върху структурите на ГЕРБ. Той успешно балансираше между различни лобита, понякога разграничавайки се от доскорошни съюзници, за да запази контрол над политическия процес.
През 2023 г. символът на задкулисието се превърна в българското политическо динамо. След санкциите по „Магнитски“ изглеждаше, че Пеевски е отслабен, но вместо това се върна по-силен, като ключов играч, включително в преговори по различни теми между ПП–ДБ и ГЕРБ, а влиянието му в прокуратурата, службите и МВР остана непокътнато. Като че ли се налагаше нов политически ред, в който на Борисов бе отредена второстепенна роля.
Но ето че сглобката се разпадна. При повторното завъртане на рулетката с мандатите Борисов и ГЕРБ успешно избегнаха опцията да управляват с ДПС на Пеевски – не без помощта на ДПС на Доган. И на възхода на Пеевски беше сложен край. Или по-скоро началото на края.
Мястото на ДПС – Ново начало и на олигарха в един бъдещ парламент и управление ще определи и неговата тежест и дали ще бъде ограничено влиянието му в съдебната система и в други контролирани от модела „Пеевски“ институции. Дали Бойко Борисов няма да се възползва от тази слабост, за да укрепи своите позиции? Зависи от броя на депутатските мандати, които ще получи, и от търсенето на съуправленци на тази база. Но отслабването на единия ключов играч не прелива мощ на другия. Средата е променена, балансът – все по-труден, тъй като мнозинствата, необходими да крепят едно управление, се увеличават. Следователно ресурсите за разпределение се смаляват.
Без конкуренция няма демокрация
Дълготрайното господстващо положение на определени фигури обаче уврежда сериозно демокрацията и политическата култура в България. Затормозяването и възпирането с всички средства на конкуренцията не работи както за свободния пазар, така и в политиката. Резултатът е уродливостта на една контролирана демокрация, така често срещана в посткомунистическия свят.
Какво прави формалната конкуренция? Същото, което прави „Лукойл“ на пазара на горива на едро. Въпреки наличието на многопартийна система важните решения и насоки се определят от доминиращи партии или от лидери, които контролират политическия процес. Контролираните демокрации също така ограничават действията на неправителствените организации и медиите, които не се подчиняват на статуквото. Така гражданското участие бива игнорирано или омаловажено, както и контролът над властта.
Признак за контролирана демокрация е и незачитането на човешките права и свободи. България има своята срамна история – опитите за асимилация на българските мюсюлмани чрез насилствена смяна на имената и забрана на културните им и религиозни практики. В по-ново време това е продължаващата гетовизация на ромите.
Фактът, че 50-тият парламент позволи одобрението на безсмислена, мракобесна поправка в закона, забраняваща пропаганда на „нетрадиционна сексуална ориентация“ в училищата, е доказателство за липсата на здрави съпротивителни сили срещу хомофобията и дискриминацията, досущ като в Русия. Освен че подкопават основите на демокрацията, промените в Закона за предучилищното и училищното образование са сигнал, че различията се осъждат, вместо да се приемат и уважават.
Изборите на 27 октомври са първите в най-новата история на България, на които партията, произвела Пеевски, ще се яви разцепена. Това означава, че ДПС ще бъде значително затруднено да прокарва влиянието си. Затруднена ще е и тази част от Движението, която Пеевски държи (освен ако не бъде отворена машината за компромати). С отслабването на партията, свързвана с политически клиентелизъм и използване на етническо разделение, се отваря опция за обновление, което да намали зависимостта на политическата система от олигархични кръгове и задкулисни договорки.
Но без установяване на здравословен парламентаризъм българската политика ще продължи да произвежда „титани“, чиято единствена цел е да я монополизират за употреба от „обръчите“ и за лична изгода.
AWS End User Messaging enables customers to send SMS messages to recipients located across the globe. If you are planning on rolling out SMS across multiple countries, we recommend reviewing this blog. When you send SMS or MMS messages using AWS End User Messaging SMS, you must use a specific origination identity that supports the sending of SMS. In the US the originators that are supported are Toll-Free(TFN), 10DLC, and short codes and each of these has its own registration process.
This blog discusses the process of programmatically registering Toll-Free numbers (TFNs), which can be used exclusively within the United States. TFNs have a max throughput of 3 Messages Per Second(MPS) and are typically used for low-volume/throughput use cases. You can learn more about TFNs here.
TFNs have a relatively simple registration process, however, for Independent Software Vendors (ISVs), SaaS providers, or large organizations with many teams or use cases, completing dozens, or hundreds of TFN registrations manually can be time-consuming, tedious, and error-prone. AWS End User Messaging APIs can be used to streamline the TFN registration process by enabling AWS customers to programmatically register TFNs in the USA. You can learn more about the TFN registration requirements and process here.
In this post, we will discuss the AWS End User Messaging APIs required for programmatically registering TFNs. We’ll explore a simple Bash script you can use to automate the registration of a single TFN, as well as a Python script that you can use to bulk register multiple TFNs. Both of these scripts help simplify the TFN registration process and can save both time and effort for businesses looking to leverage AWS End User Messaging for their communication needs.
Outline of the APIs used in the scripts:
There are seven actions that need to be taken in order for a TFN registration to be created and submitted. The two scripts in this post automate these actions:
Retrieves the specified RegistrationType field definitions.
You can use DescribeRegistrationFieldDefinitions to view the requirements for creating, filling out, and submitting each registration type. In this post we have chosen Toll-Free and provided the values.
The carriers require you to provide a mockup that closely resemble the opt-in experience that your customers will complete to ensure end-users have consented to receiving SMS messages from this toll-free number. This should be a screenshot of your website or mobile application’s opt-in workflow.
The maximum file size is 500kb, and valid file extensions are PDF, JPEG, or PNG.
You need to wait until the attachment is uploaded before moving to step 4.
This will submit the specified registration for review and approval
IMPORTANT:
Make sure that all of your data is correct, especially before attempting to submit multiple registrations using the second script option below.
Once your script has submitted the registration, it’s initial status will be “CREATED” and should change to “REVIEWING” within 24 hours.
Once submitted, you will be unable to edit or delete this registration until it is approved or rejected by the third-party registrar that controls the registration process for the type of registration you are submitting (in this blog we’re registering TFNs).
You begin incurring costs for the TFNs as soon as you successfully submit the registration.
No matter which script you decide to use, it’s important to keep a these things in mind:
The registration information you provide will be reviewed by a third-party company. This is standard, no matter which provider you use for SMS
While AWS submits the registration on your behalf, we do not participate in the actual review process, nor can we influence the third-party.
If your toll-free number registration is rejected, the status of your registration will change to “Requires Updates“. We recommend monitoring your registration status frequently to ensure that you do not miss an update and extend the time it takes to complete.
If updates are required, see Editing, discarding and deleting your registration. You can submit a request for information about a rejected toll-free number via the AWS Management Console > Support Center.
Prerequisites for either approach:
Before running either script, you’ll need:
An AWS account with permission to use/provision the AWS End User Messaging service (link) in the target region.
Monthly Message Volume (you must use one of the options below)
“10”
“100”
“1,000”
“10,000”
“100,000”
“250,000”
“500,000”
“750,000”
“1,000,000”
“5,000,000”
“10,000,000+”
Use Case Category (you must use one of the options below)
“Two-factor authentication”
“One-time passcodes”
“Notifications”
“Polling and surveys”
“Info on demand”
“Promotions & marketing”
“Other”
Use Case Details
Opt-In Description – The primary purpose of the Opt-in Description is to demonstrate that the end user explicitly consents to receive text messages and understands the nature of the program. Your application is being reviewed by a 3rd party reviewer, so make sure to provide clear and thorough information about how your end-users opt-in to your SMS service and any associated fees or charges. If the reviewer cannot determine how your opt-in process works then your application will be denied and returned. If your Opt-in process requires a log-in, is not yet published publicly, is a verbal opt-in, or if it occurs on printed sources such as fliers and paper forms then make sure to thoroughly document how this process is completed by the end-user receiving messages. Provide a screenshot and host the screenshot on a publicly accessible website (like OneDrive or Google Drive) and provide the URL in the text as well as in the Opt-In Image below.
Opt-In Image – This is optional, but highly recommended, even if you provide a description above:
If your experience is not publicly available, the carriers will require you to provide one to ensure end-users have consented to receiving SMS messages from this toll-free number.
You are encouraged to provide a screenshot (PDF, JPEG, or PNG) of your website or mobile application’s opt-in workflow. This could also be a screenshot of a paper form, a verbal opt-in script, or an as yet published website experience in development.
The maximum file size is 500Kb.
Message Samples
Message Sample 1
Message Sample 2 (optional)
Message Sample 3 (optional)
Option 1 – Execute a script to register a single TFN
The script requires the additional prerequisites (if you use AWS CloudShell to run the script, the AWS CLI and jq are already installed).
AWS CLI installed and configured with appropriate AWS account credentials and region (link)
jq (a lightweight and flexible command-line JSON processor) installed (link)
Set environment variables for each of the required fields.
Before running the registration script, you must first set the necessary variables, replacing the placeholder values with your company actual data (these values are listed as a prerequisite above). Ensure that the opt-in screenshot image file optInImage.png is in the same directory as the script, or provide the correct path to the image file in the attachment_body variable. Note – the allowed file types for the opt-in screenshot are PNG, JPG, and PDF with a max file size of 500 kb.
Run the environment variable exports:
export AWS_REGION="us-west-2"
export COMPANY_NAME="Your Company Name"
export COMPANY_WEBSITE="www.yourcompany.com"
export COMPANY_ADDRESS1="123 Main Street"
export COMPANY_ADDRESS2="Suite 200"
export COMPANY_CITY="Your City"
export COMPANY_STATE="Your State"
export COMPANY_ZIPCODE="12345"
export COMPANY_COUNTRY_CODE="US"
export CONTACT_FIRSTNAME="John"
export CONTACT_LASTNAME="Doe"
export CONTACT_EMAIL="[email protected]"
export CONTACT_PHONE="+1234567890"
export USECASE_DETAILS="Details about your use case"
export OPTIN_DESCRIPTION="Description of opt-in process"
export MONTHLY_MESSAGE_VOLUME="10"
export USECASE_CATEGORY="Other"
export MESSAGE_SAMPLE1="Sample message"
export ATTACHMENT_BODY="fileb://optInImage.png"
Copy and save the below script as register_us_toll_free_number.sh into your current directory. Adjust the region variable in the script to the one you’re using to register the US TFN.
#!/bin/bash
set -euo pipefail

# Check dependencies
command -v aws >/dev/null 2>&1 || { echo "AWS CLI is required but it's not installed. Aborting."; exit 1; }
command -v jq >/dev/null 2>&1 || { echo "jq is required but it's not installed. Aborting."; exit 1; }

# Initialize variables from environment or use default values
region="${AWS_REGION:-'us-west-2'}"
companyInfo_companyName="${COMPANY_NAME:-"Default Company Name"}"
companyInfo_website="${COMPANY_WEBSITE:-"https://defaultcompany.com"}"
companyInfo_address1="${COMPANY_ADDRESS1:-"123 Default St."}"
companyInfo_address2="${COMPANY_ADDRESS2:-""}"  # Optional
companyInfo_city="${COMPANY_CITY:-"Default City"}"
companyInfo_state="${COMPANY_STATE:-"Default State"}"
companyInfo_zipCode="${COMPANY_ZIPCODE:-"00000"}"
companyInfo_isoCountryCode="${COMPANY_COUNTRY_CODE:-"US"}"
contactInfo_firstName="${CONTACT_FIRSTNAME:-"John"}"
contactInfo_lastName="${CONTACT_LASTNAME:-"Doe"}"
contactInfo_supportEmail="${CONTACT_EMAIL:-"[email protected]"}"
contactInfo_supportPhoneNumber="${CONTACT_PHONE:-"+10000000000"}"
messagingUseCase_useCaseDetails="${USECASE_DETAILS:-"Default use case details"}"
messagingUseCase_optInDescription="${OPTIN_DESCRIPTION:-"Default opt-in process description"}"
messagingUseCase_monthlyMessageVolume="${MONTHLY_MESSAGE_VOLUME:-"10"}"
messagingUseCase_useCaseCategory="${USECASE_CATEGORY:-"Other"}"
messageSamples_messageSample1="${MESSAGE_SAMPLE1:-"This is a sample message."}"
attachment_body="${ATTACHMENT_BODY:-"fileb://optInImage.png"}"  # Path to the image, can be overridden

# Log to file
log_file="registration.log"
echo "Logging to $log_file"
exec > >(tee -a "$log_file") 2>&1

# Retry configuration
max_retries=10
retry_interval=2
retry_count=0
upload_complete=false

# Helper function to put registration field values
put_registration_field_value() {
    local field_path="$1"
    local value="$2"
    aws pinpoint-sms-voice-v2 --region "$region" put-registration-field-value \
         --registration-id "$registration_id" \
         --field-path "$field_path" \
         --text-value "$value" || { echo "Failed to update $field_path"; exit 1; }
}

# Helper function to validate registration field values
validate_input() {
    local required_vars=(
        "AWS_REGION"
        "COMPANY_NAME"
        "COMPANY_WEBSITE"
        "COMPANY_ADDRESS1"
        "COMPANY_CITY"
        "COMPANY_STATE"
        "COMPANY_ZIPCODE"
        "COMPANY_COUNTRY_CODE"
        "CONTACT_FIRSTNAME"
        "CONTACT_LASTNAME"
        "CONTACT_EMAIL"
        "CONTACT_PHONE"
        "USECASE_DETAILS"
        "OPTIN_DESCRIPTION"
        "MONTHLY_MESSAGE_VOLUME"
        "USECASE_CATEGORY"
        "MESSAGE_SAMPLE1"
        "ATTACHMENT_BODY"
    )

    for var in "${required_vars[@]}"; do
        if [ -z "${!var}" ]; then
            echo "Error: $var is missing or empty" >&2
            return 1
        fi
    done

    # Validate zip code
    if [[ ! "$COMPANY_ZIPCODE" =~ ^[0-9]+$ ]]; then
        echo "Error: Invalid or missing zip code" >&2
        return 1
    fi

    # Validate monthly message volume
    local valid_volumes=("10" "100" "1,000" "10,000" "100,000" "250,000" "500,000" "750,000" "1,000,000" "5,000,000" "10,000,000+")
    local volume_valid=false
    for volume in "${valid_volumes[@]}"; do
        if [ "$MONTHLY_MESSAGE_VOLUME" = "$volume" ]; then
            volume_valid=true
            break
        fi
    done
    if [ "$volume_valid" = false ]; then
        echo "Error: Invalid or missing monthly_message_volume" >&2
        return 1
    fi

    # Validate use case category
    local valid_categories=("Two-factor authentication" "One-time passcodes" "Notifications" "Polling and surveys" "Info on demand" "Promotions & marketing" "Other")
    local category_valid=false
    for category in "${valid_categories[@]}"; do
        if [ "$USECASE_CATEGORY" = "$category" ]; then
            category_valid=true
            break
        fi
    done
    if [ "$category_valid" = false ]; then
        echo "Error: Invalid or missing use_case_category" >&2
        return 1
    fi

    # Additional validations (you can add more as needed)
    if [[ ! "$COMPANY_WEBSITE" =~ ^https?:// ]]; then
        echo "Error: COMPANY_WEBSITE must start with http:// or https://" >&2
        return 1
    fi

    if [[ ! "$CONTACT_EMAIL" =~ ^[a-zA-Z0-9._%+-]+@[a-zA-Z0-9.-]+\.[a-zA-Z]{2,}$ ]]; then
        echo "Error: CONTACT_EMAIL is not a valid email address" >&2
        return 1
    fi

    if [[ ! "$CONTACT_PHONE" =~ ^\+[1-9][0-9]{10,14}$ ]]; then
        echo "Error: CONTACT_PHONE must be in E.164 format (e.g., +10000000000)" >&2
        return 1
    fi

    echo "All required variables are set and valid"
    return 0
}


# Step 1: Create registration
echo "Creating registration..."
create_registration_output=$(aws pinpoint-sms-voice-v2 --region "$region" create-registration \
      --registration-type 'US_TOLL_FREE_REGISTRATION' \
      --tags Key=Name,Value='Registration friendly name') || { echo "Failed to create registration"; exit 1; }

# Extract RegistrationId
registration_id=$(echo "$create_registration_output" | jq -r '.RegistrationId')
if [ -z "$registration_id" ]; then
    echo "Error: Registration ID not found!"
    exit 1
fi
echo "Registration ID: $registration_id"

# Step 2: Create registration attachment
echo "Creating registration attachment..."
create_attachment_output=$(aws pinpoint-sms-voice-v2 --region "$region" create-registration-attachment \
      --attachment-body "$attachment_body") || { echo "Failed to create registration attachment"; exit 1; }

# Extract RegistrationAttachmentId
attachment_id=$(echo "$create_attachment_output" | jq -r '.RegistrationAttachmentId')
if [ -z "$attachment_id" ]; then
    echo "Error: Attachment ID not found!"
    exit 1
fi
echo "Attachment ID: $attachment_id"

# Step 3: Wait for the attachment to be fully uploaded
echo "Waiting for attachment upload to complete..."
while [ "$upload_complete" = false ] && [ $retry_count -lt $max_retries ]; do
    # Describe the registration attachment
    describe_attachment_output=$(aws pinpoint-sms-voice-v2 --region "$region" describe-registration-attachments \
        --registration-attachment-ids "$attachment_id")

    # Extract the attachment status
    attachment_status=$(echo "$describe_attachment_output" | jq -r '.RegistrationAttachments[0].AttachmentStatus')

    # Check if the status is 'UPLOAD_COMPLETE'
    if [ "$attachment_status" == "UPLOAD_COMPLETE" ]; then
        echo "Attachment upload complete."
        upload_complete=true
    else
        echo "Attachment status: $attachment_status. Retrying in $retry_interval seconds... (attempt $((retry_count + 1))/$max_retries)"
        sleep "$retry_interval"
        retry_count=$((retry_count + 1))
    fi
done
if [ "$upload_complete" = false ]; then
    echo "Attachment upload did not complete within the retry limit."
    exit 1
fi
echo "Attachment upload complete."

# Step 4a: Put registration field values from environment variables
text_field_paths=(
    "companyInfo_companyName"
    "companyInfo_website"
    "companyInfo_address1"
    "companyInfo_address2"
    "companyInfo_city"
    "companyInfo_state"
    "companyInfo_zipCode"
    "companyInfo_isoCountryCode"
    "contactInfo_firstName"
    "contactInfo_lastName"
    "contactInfo_supportEmail"
    "contactInfo_supportPhoneNumber"
    "messagingUseCase_useCaseDetails"
    "messagingUseCase_optInDescription"
    "messageSamples_messageSample1"
)

for text_field_path in "${text_field_paths[@]}"; do
    echo "Putting registration field value for: $text_field_path"
    value=$(eval "echo \$$text_field_path")
    if [ -z "$value" ]; then
        echo "Error: $text_field_path is empty or not set. Skipping."
        continue
    fi
    echo "Value for $text_field_path is: '$value'"
    put_registration_field_value "${text_field_path//_/.}" "$value"
done

# Step 4b: Put other registration field values (Choice fields)
choice_field_paths=(
    "messagingUseCase_monthlyMessageVolume"
    "messagingUseCase_useCaseCategory"
)

for choice_field_path in "${choice_field_paths[@]}"; do
    echo "Putting registration field value for: $choice_field_path"
    value=$(eval "echo \$$choice_field_path")
    if [ -z "$value" ]; then
        echo "Error: $choice_field_path is empty or not set. Skipping."
        continue
    fi
    echo "Value for $choice_field_path is: '$value'"
    aws pinpoint-sms-voice-v2 --region "$region" put-registration-field-value \
        --registration-id "$registration_id" \
        --field-path "${choice_field_path//_/.}" \
        --select-choices "$value" || { echo "Failed to update $choice_field_path"; exit 1; }
done

# Step 5: Associate registration attachment with registration
echo "Associating registration attachment with registration..."
aws pinpoint-sms-voice-v2 --region "$region" put-registration-field-value \
      --registration-id "$registration_id" \
      --field-path 'messagingUseCase.optInImage' \
      --registration-attachment-id "$attachment_id" || { echo "Failed to associate registration attachment"; exit 1; }

# Step 6: Request phone number
echo "Requesting phone number..."
request_phone_number_output=$(aws pinpoint-sms-voice-v2 --region "$region" request-phone-number \
      --iso-country-code 'US' \
      --number-type 'TOLL_FREE' \
      --number-capabilities 'SMS' 'MMS' 'VOICE' \
      --message-type 'TRANSACTIONAL') || { echo "Failed to request phone number"; exit 1; }

# Extract PhoneNumberId
phone_number_id=$(echo "$request_phone_number_output" | jq -r '.PhoneNumberId')
if [ -z "$phone_number_id" ]; then
    echo "Error: Phone number ID not found!"
    exit 1
fi
echo "Phone Number ID: $phone_number_id"

# Step 7: Associate phone number with registration
echo "Associating phone number with registration..."
aws pinpoint-sms-voice-v2 --region "$region" create-registration-association \
      --registration-id "$registration_id" \
      --resource-id "$phone_number_id" || { echo "Failed to associate phone number with registration"; exit 1; }

# Step 8: Submit registration
echo "Submitting registration..."
aws pinpoint-sms-voice-v2 --region "$region" submit-registration-version \
     --registration-id "$registration_id" || { echo "Failed to submit registration"; exit 1; }

echo "Registration submitted successfully!"
Run chmod command to make it executable. Run the script with the environment variable values you provided in Step 1 above.
Option 2 – Execute a Python script to register more than one Toll-Free number
For ISVs, SaaS providers, or large organizations registering multiple phone numbers on behalf of customers or business units, automating the process can save time and reduce errors. We’ve chosen to use Python because it’s CSV library handles file parsing complexities, and its boto3 library enables seamless interaction with AWS services, making it well-suited for programmatically managing these registrations.
Below is a sample CSV file with the variables for 5 registrations, copy it and replace the sample data with your actual data (these data were listed in the prerequisites above). Save your file as data.csv:
companyInfo_companyName,companyInfo_website,companyInfo_address1,companyInfo_address2,companyInfo_city,companyInfo_state,companyInfo_zipCode,companyInfo_isoCountryCode,contactInfo_firstName,contactInfo_lastName,contactInfo_supportEmail,contactInfo_supportPhoneNumber,messagingUseCase_monthlyMessageVolume,messagingUseCase_useCaseCategory,messagingUseCase_useCaseDetails,messagingUseCase_optInDescription,messageSamples_messageSample1,attachmentFilePath
AnyCompany,https://example.com/example1,123 Any Street,Suite 200,Anytown,WA,98109,US,FirstName,LastName,[email protected],15553331234,10,One-time passcodes,Dev/Demo - Internal testing only,Internal testing only,Your AWS End User Messaging internal testing one time passcode is 123456,./companyA.png
Example Corp,https://example.net/example2,123 Main Street,,Anywhere,WA,98765,US,FirstName2,LastName2,[email protected],15553332222,10,Notifications,Dev/Demo - Internal testing only,Internal testing only,Your AWS End User Messaging internal testing one time passcode is 654321,./companyB.png
AnyDepartment,https://example.org/example3,123 Oak Avenue,Apt B,Nowhere,WA,54321,US,FirstName3,LastName3,[email protected],15553333333,10,Two-factor authentication,Dev/Demo - Internal testing only,Internal testing only,Your AWS End User Messaging internal testing one time passcode is 987654,./companyC.png
AnyOrganization,https://example.com/example4,123 Pine Blvd,,Anywhere Else,WA,12345,US,FirstName4,LastName4,[email protected],15553334444,100,One-time passcodes,Dev/Demo - Internal testing only,Internal testing only,Your AWS End User Messaging internal testing one time passcode is 654789,./companyD.png
AnyGovernment,https://example.org/example5,123 Oak St,,Nowhere Town,WA,67890,US,FirstName5,LastName5,[email protected],15553335555,"100",One-time passcodes,Dev/Demo - Internal testing only,Internal testing only,Your AWS End User Messaging internal testing one time passcode is 987654,./companyE.png
Prepare opt-in screenshot image files for each registration, and upload them in the same directory as you will use for the data.csv and script files. Note: the allowed file types for the opt-in screenshot are PNG, JPG, and PDF with a max file size of 500 kb.
Below is a Python script to create registrations using the data.csv file (above). Save this file as register_phone_numbers_bulk.py into your current directory.
import csv
import boto3
import sys
import argparse
import time

# Parse command line arguments
parser = argparse.ArgumentParser(description="AWS End User Messaging SMS Registration Script")
parser.add_argument("-r", "--region", default="us-west-2", help="AWS region")
parser.add_argument("-c", "--csv_file", default="data.csv", help="Path to the Comma-Separated Values file")
args = parser.parse_args()

# Initialize AWS End User Messaging SMS client
client = boto3.client('pinpoint-sms-voice-v2', region_name=args.region)

def process_csv(csv_file):
    with open(csv_file, newline='', encoding='utf-8') as f:
        reader = csv.DictReader(f)

        # Strip BOM from the first key (header) if it exists
        if '\ufeff' in reader.fieldnames[0]:
            reader.fieldnames[0] = reader.fieldnames[0].replace('\ufeff', '')

        for row in reader:
            process_row(row)

def process_row(row):
    print(f"================================================================================================")

    if 'companyInfo_companyName' not in row:
        print(f"Error: 'companyInfo_companyName' field is missing in the CSV file.")
        return

    print(f"Processing entry for: {row['companyInfo_companyName']}")
    print(f"================================================================================================")

    # Validate required fields
    required_fields = [
        'companyInfo_companyName', 'companyInfo_website', 'companyInfo_isoCountryCode',
        'attachmentFilePath'
    ]
    for field in required_fields:
        if field not in row or not row[field]:
            print(f"Error: Required field '{field}' is missing or empty for entry: {row.get('companyInfo_companyName', 'Unknown Company')}")
            return

    # Validate field values
    if 'companyInfo_zipCode' not in row or not row['companyInfo_zipCode'].isdigit():
        print(f"Error: Invalid or missing zip code for entry: {row['companyInfo_companyName']}")
        return

    valid_volumes = ["10", "100", "1,000", "10,000", "100,000", "250,000", "500,000", "750,000", "1,000,000", "5,000,000", "10,000,000+"]
    if 'messagingUseCase_monthlyMessageVolume' not in row or row['messagingUseCase_monthlyMessageVolume'] not in valid_volumes:
        print(f"Error: Invalid or missing monthly_message_volume for entry: {row['companyInfo_companyName']}")
        return

    valid_categories = ["Two-factor authentication", "One-time passcodes", "Notifications", "Polling and surveys", "Info on demand", "Promotions & marketing", "Other"]
    if 'messagingUseCase_useCaseCategory' not in row or row['messagingUseCase_useCaseCategory'] not in valid_categories:
        print(f"Error: Invalid or missing use_case_category for entry: {row['companyInfo_companyName']}")
        return

    try:
        # Step 1: Create registration
        print("Creating registration...")
        create_registration_output = client.create_registration(
            RegistrationType='US_TOLL_FREE_REGISTRATION'
        )
        registration_id = create_registration_output['RegistrationId']

        # Step 2: Put registration field values from CSV
        print("Putting registration field values...")
        field_mappings = {
            "companyInfo.companyName": {"value": row['companyInfo_companyName'], "type": "text"},
            "companyInfo.website": {"value": row['companyInfo_website'], "type": "text"},
            "companyInfo.address1": {"value": row['companyInfo_address1'], "type": "text"},
            "companyInfo.address2": {"value": row['companyInfo_address2'], "type": "text"},
            "companyInfo.city": {"value": row['companyInfo_city'], "type": "text"},
            "companyInfo.state": {"value": row['companyInfo_state'], "type": "text"},
            "companyInfo.zipCode": {"value": row['companyInfo_zipCode'], "type": "text"},
            "companyInfo.isoCountryCode": {"value": row['companyInfo_isoCountryCode'], "type": "text"},
            "contactInfo.firstName": {"value": row['contactInfo_firstName'], "type": "text"},
            "contactInfo.lastName": {"value": row['contactInfo_lastName'], "type": "text"},
            "contactInfo.supportEmail": {"value": row['contactInfo_supportEmail'], "type": "text"},
            "contactInfo.supportPhoneNumber": {"value": row['contactInfo_supportPhoneNumber'], "type": "text"},
            "messagingUseCase.useCaseDetails": {"value": row['messagingUseCase_useCaseDetails'], "type": "text"},
            "messagingUseCase.optInDescription": {"value": row['messagingUseCase_optInDescription'], "type": "text"},
            "messageSamples.messageSample1": {"value": row['messageSamples_messageSample1'], "type": "text"},
            "messagingUseCase.monthlyMessageVolume": {"value": row['messagingUseCase_monthlyMessageVolume'], "type": "select"},
            "messagingUseCase.useCaseCategory": {"value": row['messagingUseCase_useCaseCategory'], "type": "select"},
        }

        for field, field_data in field_mappings.items():
            if field_data['type'] == 'text' and field_data['value']:
                client.put_registration_field_value(
                    RegistrationId=registration_id,
                    FieldPath=field,
                    TextValue=field_data['value']
                )
            elif field_data['type'] == 'select' and field_data['value']:
                client.put_registration_field_value(
                    RegistrationId=registration_id,
                    FieldPath=field,
                    SelectChoices=[field_data['value']]
                )

        # Step 3: Create registration attachment
        print("Creating registration attachment...")
        with open(row['attachmentFilePath'], 'rb') as attachment_file:
            create_attachment_output = client.create_registration_attachment(
                AttachmentBody=attachment_file.read()
            )
            attachment_id = create_attachment_output['RegistrationAttachmentId']

        # Step 4: Wait for the attachment upload to finish
        print("Verifying attachment upload complete...")
        attachment_id = create_attachment_output['RegistrationAttachmentId']
        upload_complete = False
        max_retries = 10
        retry_count = 0

        while not upload_complete and retry_count < max_retries:
            try:
                describe_attachment_output = client.describe_registration_attachments(
                    RegistrationAttachmentIds=[attachment_id]
                )
                attachment_status = describe_attachment_output['RegistrationAttachments'][0]['AttachmentStatus']
                if attachment_status == 'UPLOAD_COMPLETE':
                    upload_complete = True
                else:
                    print(f"Attachment status: {attachment_status}. Waiting 2 seconds before retrying... (max {max_retries} retries)")
                    time.sleep(2)
                    retry_count += 1
            except Exception as e:
                print(f"Error occurred while checking attachment status: {str(e)}")
                time.sleep(10)
                retry_count += 1

        if not upload_complete:
            print(f"Error: Attachment upload did not complete for {row['companyInfo_companyName']}")
            return

        # Step 5: Associate registration attachment with registration
        print("Associating registration attachment with registration...")
        client.put_registration_field_value(
            RegistrationId=registration_id,
            FieldPath='messagingUseCase.optInImage',
            RegistrationAttachmentId=attachment_id
        )

        # Step 6: Request phone number
        print("Requesting phone number...")
        request_phone_number_output = client.request_phone_number(
            IsoCountryCode='US',
            NumberType='TOLL_FREE',
            NumberCapabilities=['SMS', 'MMS', 'VOICE'],
            MessageType='TRANSACTIONAL'
        )
        phone_number_id = request_phone_number_output['PhoneNumberId']

        # Step 7: Associate phone number with registration
        print("Associating phone number with registration...")
        client.create_registration_association(
            RegistrationId=registration_id,
            ResourceId=phone_number_id
        )

        # Step 8: Submit registration
        print("Submitting registration...")
        client.submit_registration_version(
            RegistrationId=registration_id
        )
        print(f"Processing completed for: {row['companyInfo_companyName']}\n")

    except Exception as e:
        print(f"Error occurred while processing {row['companyInfo_companyName']}: {str(e)}")

if __name__ == "__main__":
    process_csv(args.csv_file)
Run the script: python register_phone_numbers_bulk.py -c data.csv -r us-west-2 The 2 parameters are the name of the CSV file containing your data (shown here as data.csv) and specify the target AWS region (shown here as us-west-2) as parameters. Adjust these parameters as needed to match your environment and data location.
Check status:
Once you have successfully ran the script, you can check the status of your registration requests via AWS End User Messaging Console or with the API using the DescribeRegistrations API. If you want to use the console log in to the AWS End User Messaging Console in the target region and choose Configurations > Registrations from the left navigation. The registration status for each request will initially display “CREATED” and it will change to “REVIEWING” within 24 hours. As noted in the introduction, the actual registration review process is conducted by a third-party company and it can take up to 15 days to receive an acceptance (“COMPLETE”) or request for additional information or corrections (“Requires Update“) for each request.
Registration Status:
Phone Number Status:
Conclusion:
In this post you have learned how to automate the registration process for Toll-Free numbers with a Bash script or Python script and the AWS End User Messaging APIs. Using the API can significantly improve efficiency and reduce manual errors, but keep in mind that you will still need to wait up to 15 business days for the registrations to be approved (or not), and for the numbers to be set to “ACTIVE” status before you can begin sending messages with your TFN(s).
The AWS End User Messaging V2 API for SMS and Voice has other useful actions, and we encourage you to explore how it can further help you simplify and automate your applications.
През изминалия месец и половина, откакто текат главозамайващите събития около разпада на ДПС и раздора между двамата му председатели, в главата ми непрестанно се върти – със същата настойчивост, като да беше песента Gimme! Gimme! Gimme! (A Man After Midnight) на ABBA – една от най-любимите ми шведски думи за всички времена.
И не, това не е думата lagom, която няма точен еквивалент на други езици и означава ‘достатъчно, точно колкото трябва, нито прекалено много, нито прекалено малко’; не е и livspussel, буквално „живот“ + „пъзел“, описваща баланса между работата и личния живот; нито пък е подвеждащият термин semester, който всъщност означава ‘ваканция’, или отдавна придобилият международно приложение ombudsman, понякога шеговито превеждан на български като „арменски поп“.
Въпросната шведска дума, която доста добре обобщава събитията около ДПС, всъщност е… kalabalik.
Когато миналата година я чух – субтитрирана като „хаос“ – от устата на участник в едно шведско телевизионно риалити, първоначално помислих, че халюцинирам. След няколко връщания и повторни слушания обаче се уверих, че думата наистина си е „калабалък“, макар и произнесена по необичаен за моето ухо, но типичен за шведския език напевен начин, който освен това е преобразувал ъ-то в ий.
Въпросното ъ в оригинал всъщност се означава с буквата ı, известна и като „i без точка“, характерна за турския език, откъдето, разбира се, идва и самата дума kalabalık. Там тя преминава от османския турски (قالابالق, kalabalık), като коренът ѝ може да бъде проследен до арабската дума غَلَبَة (ḡalaba), която означава ‘надмощие, преобладаване, триумф, победа’.
Освен в шведския, думата – с малки изменения в последната гласна – се среща както в българския, така и в останалите балкански езици, включително в македонския („калабалак“), сърбохърватския („калабалук“/kalabaluk), албанския (kallaballëk), румънския (calabalâc), гръцкия (καλαμπαλίκι) идажев арменския (կալաբալըղ, kalabaləġ).
Но за разлика от обичайните исторически причини за преминаването на думата от турския в балканските езици и в арменския, поводът за ненадейното ѝ навлизане в шведския е доста по-вълнуващ, при все че той също е свързан с реално историческо събитие, или по-точно с едно също толкова ненадейно изгонване.¹
Въпросното събитие, известно на шведски под наименованието Kalabaliken i Bender (буквално „Калабалъкът в Бендер“), става на 1 февруари 1713 г. Целта му е отстраняването на шведския крал Карл XII от Османската империя, където той се установява през юли 1709 г., след съкрушителния разгром, нанесен му от руската армия в Битката при Полтава.
Настанявайки се край град Бендер (днешна Молдова), шведският крал създава нещо като двор в изгнание, „събирайки около себе си казашки ренегати, полски авантюристи, татари и остатъците от шведската армия, разбита при Полтава“, както цветущо е описано в посветена на Бендерския калабалък публикация в социалните мрежи. С течение на времето растящият антураж на краля налага изграждането на военен лагер във Варница, селище на няколко километра от Бендер, което става известно и като „новия Стокхолм“. Освен едноетажната сграда с дебели стени, където се помещава Карл XII, лагерът включва допълнителни постройки и казарми за кралските придворни и военни, наброяващи няколкостотин души.
По време на продължилия три години и половина престой Карл XII живее на издръжката на османската хазна, а многобройният му антураж натрупва сериозни заеми към местното население. След няколко любезни покани да напусне, които кралят отказва, като заедно с това не спира да кандърдисва султан Ахмед III да предприеме военни действия срещу Русия, множество еничари и тълпи от местни хора нападат лагера, където се помещават кралският двор.
Историческите източници се разминават относно числеността на участниците от двете страни на схватката: броят на османците варира между 8000 и 13 000, а на кралския антураж – между 700 и 1000. Но така или иначе, броят им несъмнено е достатъчен, за да създаде сериозна суматоха и събитието да заслужи наименованието си. Така нареченият калабалък продължава около седем часа, като накрая кралят е заловен и арестуван, а впоследствие получава прозвището Demirbaş Şarl, тоест Карл Желязната глава².
(Всякакви прилики със събитията около изгонването на почетния председател на ДПС от сараите в Росенец и „Бояна“, разбира се, са напълно случайни. А и както казва „великият комбинатор“ – и инцидентно, син на турски поданик, – чието фамилно име е същото като гореспоменатия град Бендер, „с парите човек трябва да се разделя леко, без стонове“.)
Така или иначе, експулсирането на краля от покрайнините на Бендер не слага край на неговото гостуване в Османската империя, нито на разходите по неговата издръжка. След ареста Карл XII е заточен в Димотика (днешна Североизточна Гърция), където прекарва времето си в игра на шах и в изучаване на корабната архитектура на османските галеони.³ Гостуването му продължава до 1715 г., когато той най-накрая напуска Османската империя и след двуседмична езда се завръща в Швеция.
Думата „калабалък“ не е единственото турско нещо, което кралят донася със себе си. Според историческите източници именно
благодарение на Карл XII в Швеция пристигат кафето и кюфтетата, както и зелевите и лозовите сарми –
все неща, които в наши дни се считат за неразделна, даже емблематична част от шведската кулинария и ежедневие⁴.
В случая със сармите шведските им наименования – kåldolmar и vinbladsdolmar – пазят етимологична следа за своя произход, като комбинират шведските думи kål (‘зеле’) и vinblads (‘лозови листа’) с турското понятие dolma, което от своя страна обединява всякакви пълнени ястия, включително и сармите, които пък на турски се наричат просто sarma. В едно чудесно преобръщане на значенията, в Швеция датата 30 ноември, която в недалечното минало се e почитала от носталгично настроени шведски националисти и неонацисти като деня на смъртта на Карл XII през 1718 г., от 2010 г. насам се отбелязва Kåldolmens dag, или Денят на зелевата сарма.
Но за да не бъде обменът съвсем едностранен, тук е мястото да отбележим, че Швеция също е дала нещо на Турция, което може и да не се яде, но поне в контекста на настоящата рубрика е не по-малко апетитно. Когато през второто десетилетие на XX век, като част от реформите на Ататюрк, Турция заменя персийско-арабската писменост със специално адаптирана към фонетичните изисквания на турския език латинска азбука, тя включва няколко „специални“ букви с диакритични знаци, взети „назаем“ от други езици. Редом с ç от албански, ş от румънски и ü от немски, в турската азбука фигурира и буквата ö, заета от изобилстващия от (често непроизносими за българския език) гласни шведски, където, освен че е буква, ö означава и ‘остров’.
С буквата ç пък започва думата çatışma, преведена в речника като ‘стълкновение, конфронтация, конфликт; престрелка, схватка; спор, препирня; пререкания’. За съжаление, тя е заменила чудесната и значително по-колоритна дума kalabalık в наименованието, с което историческото събитие е познато на турски: Bender Çatışması. Под подобни прозаични наименования от рода на „схватка“, „бой“ и „сблъсък“ събитието става известно и на много други езици с изключение на руския, където то е наречено с подобно на шведския название, а именно „Калабалык“.
За финал, имайки предвид, че Швеция в лицето на Карл XII губи не само конкретната битка срещу Османската империя, а впоследствие и цялата Велика северна война срещу Русия, Дания и Полша, в която Османската империя пък е неин съюзник, можем да заключим следното: дори да приемем, че историята винаги се пише от победителите, думите, с които тя се описва, принадлежат не само на тях, а и на победените.
1 Посредством шведския език турската думата kalabalık навлиза и във финския като kalabaliikki. Това създава една доста забавна, макар и въображаема етимологична връзка между приемащия език и първоизточника, тъй като думата за „риба“ на фински е kala, а на турски (както знаем) е balık.
2 Според някои източници популярната интерпретация на прозвището Demirbaş Şarl всъщност е неправилна. Докато demir baş наистина означава „желязна глава“, когато двете думи са изписани заедно, те формират понятие с ново значение, което на български може да се преведе като „актив“, „имущество“ или „инвентар“ и съответно отразява дългия престой на крал Карл XII на издръжка на султанската хазна.
3 Освен в шведската кулинария престоят на Карл XII в Османската империя има отражения и в корабоплаването. След завръщането си кралят скицира и заповядва да се построят два бойни кораба за шведския флот – фрегатите Jarramas и Jilderim, пуснати на вода през 1716 г. Техните наименования всъщност са транскрибираните на шведски турски думи yaramaz (‘палав’) иyıldırım (‘гръмотевица’), които според някои източници са прякори (заедно с Demirbaş Şarl), дадени на Карл от османските му домакини.
4 Шведите от десетилетия са едни от най-големите консуматори на кафе в света, а кюфтенцата са толкова незаменима част от тяхната национална кухня, че замразените köttbullar в IKEA се продават под наименованието HUVUDROLL, или „главна роля“. По всичко изглежда, че основната им роля ще си остане безспорна въпреки откъслечните опити от време на време да се напомни географският им произход. През 2018 г. например в официален туит държавната агенция Svenski institutet, чиято цел е да промотира Швеция по света, напомня, че „шведските кюфтета всъщност са базирани на рецепта, която Карл XII донася от Турция в началото на XVIII в.“, и призовава „да се придържаме към фактите“.
В рубриката „От дума на дума“ Екатерина Петрова търси актуални, интересни или новопоявили се думи от нашето ежедневие и проследява често изненадващия им произход, развитието на значенията им във времето и взаимовръзките им с близки и далечни езици.
Обнових данните за индустриалното замърсяване. Сетих се, че не ги бях обновил тази година. Така графиката ми позволява разглеждане и филтриране на данни по замърсители и индустриални площадки за последните 14 години. На страницата ще видите как изглежда като изключим CO2 емисиите.
Според съобщеното, има намаление на емисиите, особено във въздуха, и почти достигат нивата от 2020-та г. Има увеличение при замърсяването на водите, но е пак под нивата от преди 10 години.
В същото време трябва да се каже, че това са „декларирано“ замърсяване и емисии. Все още над 27% от тях са изчислени, ако изключим CO2. Няколко поредни разкрития показаха, че дори измерените стойности не отговарят на истината. Не става ясно дали това отчитане се контролира и дали е имало някога санкции за грешно съобщаване. Ще питам пак.
We’re excited to announce the general availability (GA) of Amazon DynamoDB zero-ETL integration with Amazon Redshift, which enables you to run high-performance analytics on your DynamoDB data in Amazon Redshift with little to no impact on production workloads running on DynamoDB. As data is written into a DynamoDB table, it’s seamlessly made available in Amazon Redshift, eliminating the need to build and maintain complex data pipelines.
Zero-ETL integrations facilitate point-to-point data movement without the need to create and manage data pipelines. You can create zero-ETL integration on an Amazon Redshift Serverless workgroup or Amazon Redshift provisioned cluster using RA3 instance types. You can then run enhanced analysis on this DynamoDB data with the rich capabilities of Amazon Redshift, such as high-performance SQL, built-in machine learning (ML) and Spark integrations, materialized views (MV) with automatic and incremental refresh, data sharing, and the ability to join data across multiple data stores and data lakes.
The DynamoDB zero-ETL integration with Amazon Redshift has helped our customers simplify their extract, transform, and load (ETL) pipelines. The following is a testimony from Keith McDuffee, Director of DevOps at Verisk Analytics, a customer who used zero-ETL integration with DynamoDB in place of their homegrown solution and benefitted from the seamless replication that it provided:
“We have dashboards built on top of our transactional data in Amazon Redshift. Earlier, we used our homegrown solution to move data from DynamoDB to Amazon Redshift, but those jobs would often time out and lead to a lot of operational burden and missed insights on Amazon Redshift. Using the DynamoDB zero-ETL integration with Amazon Redshift, we no longer run into such issues and the integration seamlessly and continuously replicates data to Amazon Redshift.”
In this post, we showcase how an ecommerce application can use this zero-ETL integration to analyze the distribution of customers by attributes such as location and customer signup date. You can also use the integration for retention and churn analysis by calculating retention rates by comparing the number of active profiles over different time periods.
Solution overview
The zero-ETL integration provides end-to-end fully managed process that allows data to be seamlessly moved from DynamoDB tables to Amazon Redshift without the need for manual ETL processes, ensuring efficient and incremental updates in Amazon Redshift environment. It leverages DynamoDB exports to incrementally replicate data changes from DynamoDB to Amazon Redshift every 15-30 minutes. The initial data load is a full load, which may take longer depending on the data volume. This integration also enables replicating data from multiple DynamoDB tables into a single Amazon Redshift provisioned cluster or serverless workgroup, providing a holistic view of data across various applications.
This replication is done with little to no performance or availability impact to your DynamoDB tables and without consuming DynamoDB read capacity units (RCUs). Your applications will continue to use DynamoDB while data from those tables will be seamlessly replicated to Amazon Redshift for analytics workloads such as reporting and dashboards.
The following diagram illustrates this architecture.
In the following sections, we show how to get started with DynamoDB zero-ETL integration with Amazon Redshift. This general availability release supports creating and managing the zero-ETL integrations using the AWS Command Line Interface (AWS CLI), AWS SDKs, API, and AWS Management Console. In this post, we demonstrate using the console.
Attach the resource-based policies to both DynamoDB and Amazon Redshift as mentioned in here.
Make sure the AWS Identity and Access Management (IAM) user or role creating the integration has an identity-based policy that authorizes actions listed in here.
Create the DynamoDB zero-ETL integration
You can create the integration either on the DynamoDB console or Amazon Redshift console. The following steps use the Amazon Redshift console.
On the Amazon Redshift console, choose Zero-ETL integrations in the navigation pane.
Choose Create DynamoDB integration.
If you choose to create the integration on the DynamoDB console, choose Integrations in the navigation pane and then choose Create integration and Amazon Redshift.
For Integration name, enter a name (for example, ddb-rs-customerprofiles-zetl-integration).
Choose Next.
Choose Browse DynamoDB tables and choose the table that will be the source for this integration.
Choose Next.
You can only choose one table. If you need data from multiple tables in a single Redshift cluster, you need to create a separate integration for each table.
If you don’t have PITR enabled on the source DynamoDB table, an error will pop up while choosing the source. In this case, you can select Fix it for me for DynamoDB to enable the PITR on your source table. Review the changes and choose Continue.
Choose Next.
Choose your target Redshift data warehouse. If it’s in the same account, you can browse and choose the target. If the target resides in a different account, you can provide the Amazon Resource Name (ARN) of the target Redshift cluster.
If you get an error about the resource policy, select Fix it for me for Amazon Redshift to fix policies as part of this creation process. Alternatively, you can add resource policies for Amazon Redshift manually prior to creating zero-ETL integration. Review the changes and choose Reboot and continue.
Choose Next and complete your integration.
The zero-ETL integration creation should show the status Creating. Wait for the status to change to Active.
Create a Redshift database from the integration
Complete the following steps to create a Redshift database:
On the Amazon Redshift console, navigate to the recently created zero-ETL integration.
Choose Create database from integration.
For Destination database name, enter a name (for example, ddb_rs_customerprofiles_zetl_db).
Choose Create database.
After you create the database, the database state should change from Creating to Active. This will start the replication of data in the source DynamoDB tables to the target Redshift tables, which will be created under the public schema of the destination database (ddb_rs_customerprofiles_zetl_db).
Now you can query your data in Amazon Redshift using the integration with DynamoDB.
Understanding your data
Data exported from DynamoDB to Amazon Redshift is stored in the Redshift database that you created from your zero-ETL integration (ddb_rs_customerprofiles_zetl_db). A single table of the same name as the DynamoDB source table is created and is under the default (public) Redshift schema. DynamoDB only enforces schemas for the primary key attributes (partition key and optionally sort key). Because of this, your DynamoDB table structure is replicated to Amazon Redshift in three columns: partition key, sort key, and a SUPER data type column named value that contains all the attributes. The data in this value column is in DynamoDB JSON format. For information about the data format, see DynamoDB table export output format.
The DynamoDB partition key is used as the Redshift table distribution key, and the combination of the DynamoDB partition and sort keys are used as the Redshift table sort keys. Amazon Redshift also allows changing the sort keys on the zero-ETL integration replicated tables using the ALTER SORT KEY command.
The DynamoDB data in Amazon Redshift is read-only data. After the data is available in the Amazon Redshift table, you can query the value column as a SUPER data type using PartiQL SQL or create and query materialized views on the table, which are incrementally refreshed automatically.
To validate the ingested records, you can use the Amazon Redshift Query Editor to query the target table in Amazon Redshift using PartiQL SQL. For example, you can use the following query to select email and unnest the data in the value column to the retrieve the customer name and address:
select email,
       value.custname."S"::text custname,
       value.address."S"::text custaddress,
       value
from "ddb_rs_customerprofiles_zetl_db".public."customerprofiles"
To demonstrate the replication of incremental changes in action, we make the following updates to the source DynamoDB table:
With these changes, the DynamoDB table customerprofiles has four items (three existing, two new, and one delete), as shown in the following screenshot.
Next, you can go to the query editor to validate these changes. At this point, you can expect incremental changes to reflect in the Redshift table (four records in table).
Create materialized views on zero-ETL replicated tables
Common analytics use cases generally involve aggregating data across multiple source tables using complex queries to generate reports and dashboards for downstream applications. Customers usually create late binding views to meet such use cases, which aren’t always optimized to meet the stringent query SLAs due to the long underlying query runtimes. Another option is to create a table that stores the data across multiple source tables, which brings the challenge of incrementally updating and refreshing data based on the changes in the source table.
To serve such use cases and get around the challenges associated with traditional options, you can create materialized views on top of zero-ETL replicated tables in Amazon Redshift, which can get automatically refreshed incrementally as the underlying data changes. Materialized views are also convenient for storing frequently accessed data by unnesting and shredding data stored in the SUPER column value by the zero-ETL integration.
For example, we can use the following query to create a materialized view on the customerprofiles table to analyze customer data:
CREATE MATERIALIZED VIEW dev.public.customer_mv
AUTO REFRESH YES
AS
SELECT value."custname"."S"::varchar(30) as cust_name, value."username"."S"::varchar(100) as user_name, value."email"."S"::varchar(60) as cust_email, value."address"."S"::varchar(100) as cust_addres, value."phone"."S"::varchar(100) as cust_phone_nbr, value."status"."S"::varchar(10) as cust_status,
value."custcreatedt"."S"::varchar(10) as cust_create_dt, value."custupddt"."S"::varchar(10) as cust_update_dt FROM "ddb_rs_customerprofiles_zetl_db"."public"."customerprofiles"
group by 1,2,3,4,5,6,7,8;
This view is set to AUTO REFRESH, which means it will be automatically and incrementally refreshed when the new data arrives in the underlying source table customerprofiles.
Now let’s say you want to understand the distribution of customers across different status categories. You can query the materialized view customer_mv created from the zero-ETL DynamoDB table as follows:
-- Customer count by status
select cust_status,count(distinct user_name) cust_status_count
from dev.public.customer_mv
group by 1;
Next, let’s say you want to compare the number of active customer profiles over different time periods. You can run the following query on customer_mv to get that data:
-- Customer active count by date
select cust_create_dt,count(distinct user_name) cust_count
from dev.public.customer_mv
where cust_status ='active'
group by 1;
Let’s try to make a few incremental changes, which involves two new items and one delete on the source DynamoDB table using following AWS CLI commands.
Validate the incremental refresh of the materialized view
To monitor the history of materialized view refreshes, you can use the SYS_MV_REFRESH_HISTORY system view. As you can see in the following output, the materialized view customer_mv was incrementally refreshed.
Now let’s query the materialized view created from the zero-ETL table. You can see two new records. The changes were propagated into the materialized view with an incremental refresh.
Monitor the zero-ETL integration
There are several options to obtain metrics on the performance and status of the DynamoDB zero-ETL integration with Amazon Redshift.
On the Amazon Redshift console, choose Zero-ETL integrations in the navigation pane. You can choose the zero-ETL integration you want and display Amazon CloudWatch metrics related to the integration. These metrics are also directly available in CloudWatch.
For each integration, there are two tabs with information available:
Integration metrics – Shows metrics such as the lag (in minutes) and data transferred (in KBps)
Table statistics – Shows details about tables replicated from DynamoDB to Amazon Redshift such as status, last updated time, table row count, and table size
After inserting, deleting, and updating rows in the source DynamoDB table, the Table statistics section displays the details, as shown in the following screenshot.
In addition to the CloudWatch metrics, you can query the following system views, which provide information about the integrations:
SVV_INTEGRATION – Provides configuration details for your integrations
AWS does not charge an additional fee for the zero-ETL integration. You pay for existing DynamoDB and Amazon Redshift resources used to create and process the change data created as part of a zero-ETL integration. These include DynamoDB PITR, DynamoDB exports for the initial and ongoing data changes to your DynamoDB data, additional Amazon Redshift storage for storing replicated data, and Amazon Redshift compute on the target. For pricing on DynamoDB PITR and DynamoDB exports, see Amazon DynamoDB pricing. For pricing on Redshift clusters, see Amazon Redshift pricing.
Clean up
When you delete a zero-ETL integration, your data isn’t deleted from the DynamoDB table or Redshift, but data changes happening after that point of time aren’t sent to Amazon Redshift.
To delete a zero-ETL integration, complete the following steps:
On the Amazon Redshift console, choose Zero-ETL integrations in the navigation pane.
Select the zero-ETL integration that you want to delete and on the Actions menu, choose Delete.
To confirm the deletion, enter confirm and choose Delete.
Conclusion
In this post, we explained how you can set up the zero-ETL integration from DynamoDB to Amazon Redshift to derive holistic insights across many applications, break data silos in your organization, and gain significant cost savings and operational efficiencies.
To learn more about zero-ETL integration, refer to documentation.
About the authors
Ekta Ahuja is an Amazon Redshift Specialist Solutions Architect at AWS. She is passionate about helping customers build scalable and robust data and analytics solutions. Before AWS, she worked in several different data engineering and analytics roles. Outside of work, she enjoys landscape photography, traveling, and board games.
Raghu Kuppala is an Analytics Specialist Solutions Architect experienced working in the databases, data warehousing, and analytics space. Outside of work, he enjoys trying different cuisines and spending time with his family and friends.
Veerendra Nayak is a Principal Database Solutions Architect based in the Bay Area, California. He works with customers to share best practices on database migrations, resiliency, and integrating operational data with analytics and AI services.
To provide the best experiences, we use technologies like cookies to store and/or access device information. Consenting to these technologies will allow us to process data such as browsing behavior or unique IDs on this site. Not consenting or withdrawing consent, may adversely affect certain features and functions.
Functional
Always active
The technical storage or access is strictly necessary for the legitimate purpose of enabling the use of a specific service explicitly requested by the subscriber or user, or for the sole purpose of carrying out the transmission of a communication over an electronic communications network.
Preferences
The technical storage or access is necessary for the legitimate purpose of storing preferences that are not requested by the subscriber or user.
Statistics
The technical storage or access that is used exclusively for statistical purposes.The technical storage or access that is used exclusively for anonymous statistical purposes. Without a subpoena, voluntary compliance on the part of your Internet Service Provider, or additional records from a third party, information stored or retrieved for this purpose alone cannot usually be used to identify you.
Marketing
The technical storage or access is required to create user profiles to send advertising, or to track the user on a website or across several websites for similar marketing purposes.


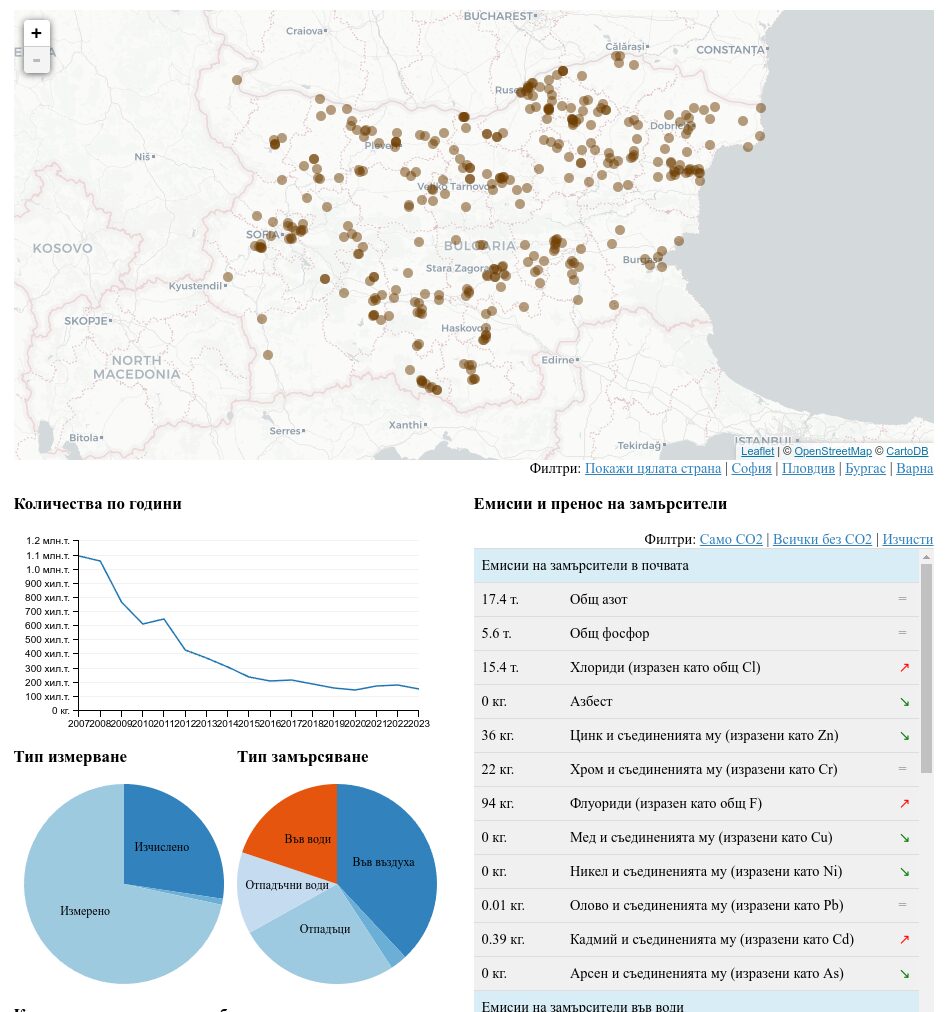


 Raghu Kuppala is an Analytics Specialist Solutions Architect experienced working in the databases, data warehousing, and analytics space. Outside of work, he enjoys trying different cuisines and spending time with his family and friends.