Post Syndicated from xkcd.com original https://xkcd.com/3249/
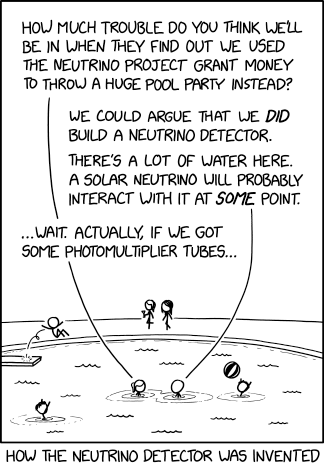
Post Syndicated from xkcd.com original https://xkcd.com/3249/
Post Syndicated from The Atlantic original https://www.youtube.com/shorts/O_71uQ8K9Ms
Post Syndicated from corbet original https://lwn.net/Articles/1073944/
Michael Catanzaro has disclosed a
command-injection vulnerability affecting a number of GTK-based PDF
readers; exploits included:
They contain a script for building malicious polyglot PDFs that are
simultaneously both valid PDF files and also valid ELF
binaries. When the user opens the PDF in the PDF viewer and clicks
on a malicious link embedded in the PDF, the PDF abuses the command
injection vulnerability to load itself as a GTK module using the
`–gtk-module` command line flag. It can then execute arbitrary
code via its library constructor. That flag was removed in GTK 4,
which is why the vulnerability is much less serious for Papers than
it is for Evince, Atril, and Xreader.
Post Syndicated from Vasil Kolev original https://vasil.ludost.net/blog/?p=3527
Та, ще случваме OpenFest 2026. В Интерпред, 7-8 ноември 2026.
И около това има разни въпроси, дето се мотаят, и които не се отговарят толкова лесно по официалните канали, и може би им е тук мястото.
Има въпросът “защо чак ноември” от една група хора, които държат много да е в средата на октомври. Отговорът е сравнително прост – в нашата държава нищо не се случва до края на август, а септември хората полудяват да се занимават с училища и т.н.. Съответно, ако имаме събитие, което искаме да е в средата на октомври и неговата програма да е online поне месец, то тя трябва да е готова в средата на септември. Което значи, че последните предложения за лекции трябва да са дошли до първата седмица на септември, за да може програмния комитет във втората седмица да направи програмата.
Разбира се, и двете не се случват – лекторите се бавят, пращат в последния момент и са заети, програмния комитет не успява да се събере и т.н. и т.н.. Тук дори не обсъждам всичките други неща, дето имат да се подготвят за два месеца и нещо от хора, които това го правят в малкото си свободно време.
Има и въпросът “защо да го правим”. Тези дни трябваше да пиша нещо по темата, основно за да убеждавам малко спонсори, че има смисъл да ни спонсорират, и аз самият се замислих, защо изобщо го правим?
В последните години беше горе-долу ясно – фирмите имаха нужда от хора, хората идваха на OpenFest, виждаха там фирмите и се харесваха по някакъв начин. Сега обаче всички са се скатали по всякакви причини, някои уважителни (фалираха), някои не (“AI-то ще премахне нуждата от хора”), и всякакви по средата.
Това цялото е страничен ефект. Важността на едно такова независимо, общностно, свободно достъпно за всички събитие (и защо аз се занимавам, освен, че има забавни моменти в организирането) е на друго място.
Open-source технологиите всеки може да ги пипне, и да си играе с тях. Те са някакъв основен притегателен център на ентусиасти и хора, дето технологиите и всичко такова им е интересно, които се занимават с това и в свободното си време.
Това е и групата хора, отговорна за повечето пробиви и сериозни разработки. Зад голяма част от интересните неща, направени в България или доразработени тук, и изобщо реализирани стои по един или няколко от тези хора. В много фирми има някой, дето знае повечето неща, или към който се допитват, като нямат идея какво да направят, и поне в нашата държава повечето от тези хора са в тази група – на ентусиастите.
Същата тая група се разширява в общи линии като заразна болест – като има някакво количество от тези хора някъде на публично място (ако ще и да е само един), някакви други хора виждат, че тая нашата област е интересна и забавна, и се захващат и те.
Та, една от целите на OpenFest е била да даде място за срещане и изява на тази група. Като лектори, посетители, доброволци – всеки каквото му е на сърце.
(има около 400-500 човека, минали като доброволци през събитието по годините, и голяма част от тях след това отидоха да организират/правят неща, за които се научиха при нас, което винаги много ме е радвало)
(по същия начин, it турнето, дето се случва и което почнахме едно време, има за идея да направи същото, в по-малък мащаб, но из страната. Защото, като изключим Пловдив с TuxCon и едно време PlovDev, няма някой да се занимава с такива дейности.
Другото такова полезно място са hackerspace-овете, които обаче съвсем намаляха в последно време, и освен init Lab и VarnaLab, донякъде BurgasLab, не са останали. Те също са много важни, но за тях друг път)
Без тези събития и общностите, които се поддържат, съдбата на тая общност не е особено ясна. Няма да се изхвърлям и да казвам, че без нас общността ще умре, но определено няма да помогне. Може би аз съм в някаква такава странна позиция, но аз основно виждам как някакви по-малки групи се затварят и няма как да обменят идеи, няма някакви свестни дори online форми. За сметка на това конференции като FOSDEM (където участвам в организацията) и Chaos Communications Congress нямат възможност да съберат всички желаещи на едно място, и се вижда колко полезно е да се случват.
Та, тази година ще се случи. Не знам за следващата. Може пък да ни е дошло време да отмрем, знае ли човек 🙂
Post Syndicated from Michael Murphy original https://aws.amazon.com/blogs/security/aws-ky3p-report-now-available-for-third-party-supplier-due-diligence/
We’re excited to announce that Amazon Web Services (AWS) has completed the S&P Global Know Your Third Party (KY3P) assessment of its security posture. This assessment demonstrates our continued commitment to meet the heightened expectations of cloud service providers. Customers can now use the AWS KY3P assessment to reduce their supplier due diligence burden.
KY3P, also known as the S&P Global Comprehensive Assessment (formerly TruSight), is a validated, evidence-based assessment designed to support regulatory compliance and efficient, standardized risk data exchange between AWS and our clients. KY3P’s globally recognized methodology provides organizations with enhanced visibility into supply chain risks by validating the actual implementation and operation of controls – not just policies or attestations.
As cloud adoption accelerates across industries, AWS has become a critical component of customers’ third-party environments. Regulated customers, such as those in the financial services sector, are held to high standards by regulators and auditors when it comes to exercising effective due diligence on third parties.
To better manage risks from their evolving third-party environments and drive operational efficiencies, many customers rely on third-party risk management services such as KY3P. In support of these efforts, AWS has completed its annual KY3P security posture assessment, conducted by KY3P security assessors.
KY3P’s risk assessment methodology includes over 200 controls across 26 control categories and nine risk domains. These topics include Privacy, Network Management, Logical Access Management, and Physical and Environmental Security. The assessment criteria were developed by a consortium of leading financial institutions.
Customers can use the KY3P results to map AWS against commonly used industry frameworks and standards, such as NIST CSF v2, PCI DSS 4.0, and ISO 27001:2022 to instantly gain visibility into controls coverage.
For details on how to access the report, see our AWS KY3P assessment page.
If you have feedback about this post, submit comments in the Comments section below. To learn more about our other compliance and security programs, see AWS Compliance Programs.
Post Syndicated from Saurabh Bhutyani original https://aws.amazon.com/blogs/big-data/automate-deployment-of-data-and-ai-applications-with-amazon-sagemaker-unified-studio-ci-cd-cli/
Organizations building data and AI applications in Amazon SageMaker Unified Studio combine multiple AWS services, including AWS Glue, Amazon Athena, Amazon Managed Workflows for Apache Airflow (Amazon MWAA), Amazon SageMaker AI, and Amazon Quick Sight, into single applications. Promoting these applications from development to test and production stages requires substituting service-specific configurations for each stage and provisioning resources in the correct order.
Data teams understand which services their applications need but lack continuous integration and continuous delivery (CI/CD) expertise, while DevOps teams understand deployment automation but must learn each AWS service’s provisioning requirements.
The CI/CD CLI for Amazon SageMaker Unified Studio (aws-smus-cicd-cli) is an open source command line tool that automates deployment of multi-service data and AI applications across pipeline stages. Data teams define their application once in a YAML manifest, DevOps teams deploy with a single command, and the CLI handles configuration substitution, dependency ordering, and resource provisioning automatically. For details, see the CI/CD CLI documentation.
In this post, we walk through how the CI/CD CLI works, show you how to deploy a real application across environments, and demonstrate how it fits into your existing CI/CD workflows.
Bureau Veritas, a global leader in testing, inspection, and certification, operates across multiple SageMaker Unified Studio environments to support its data and AI teams. With their data and DevOps teams working on different parts of the application lifecycle, Bureau Veritas needed a controlled way to promote workloads from development through test to production while preserving clear ownership boundaries between the two teams.
“We need to promote data and AI applications across SageMaker Unified Studio environments in a controlled way that respects the boundaries between our data teams and our DevOps teams. The CI/CD CLI does exactly that — a single manifest from the data team, a single deploy command from DevOps, and full control over what goes to production.”
— Gilles Kempf, Architecture Manager, Bureau Veritas
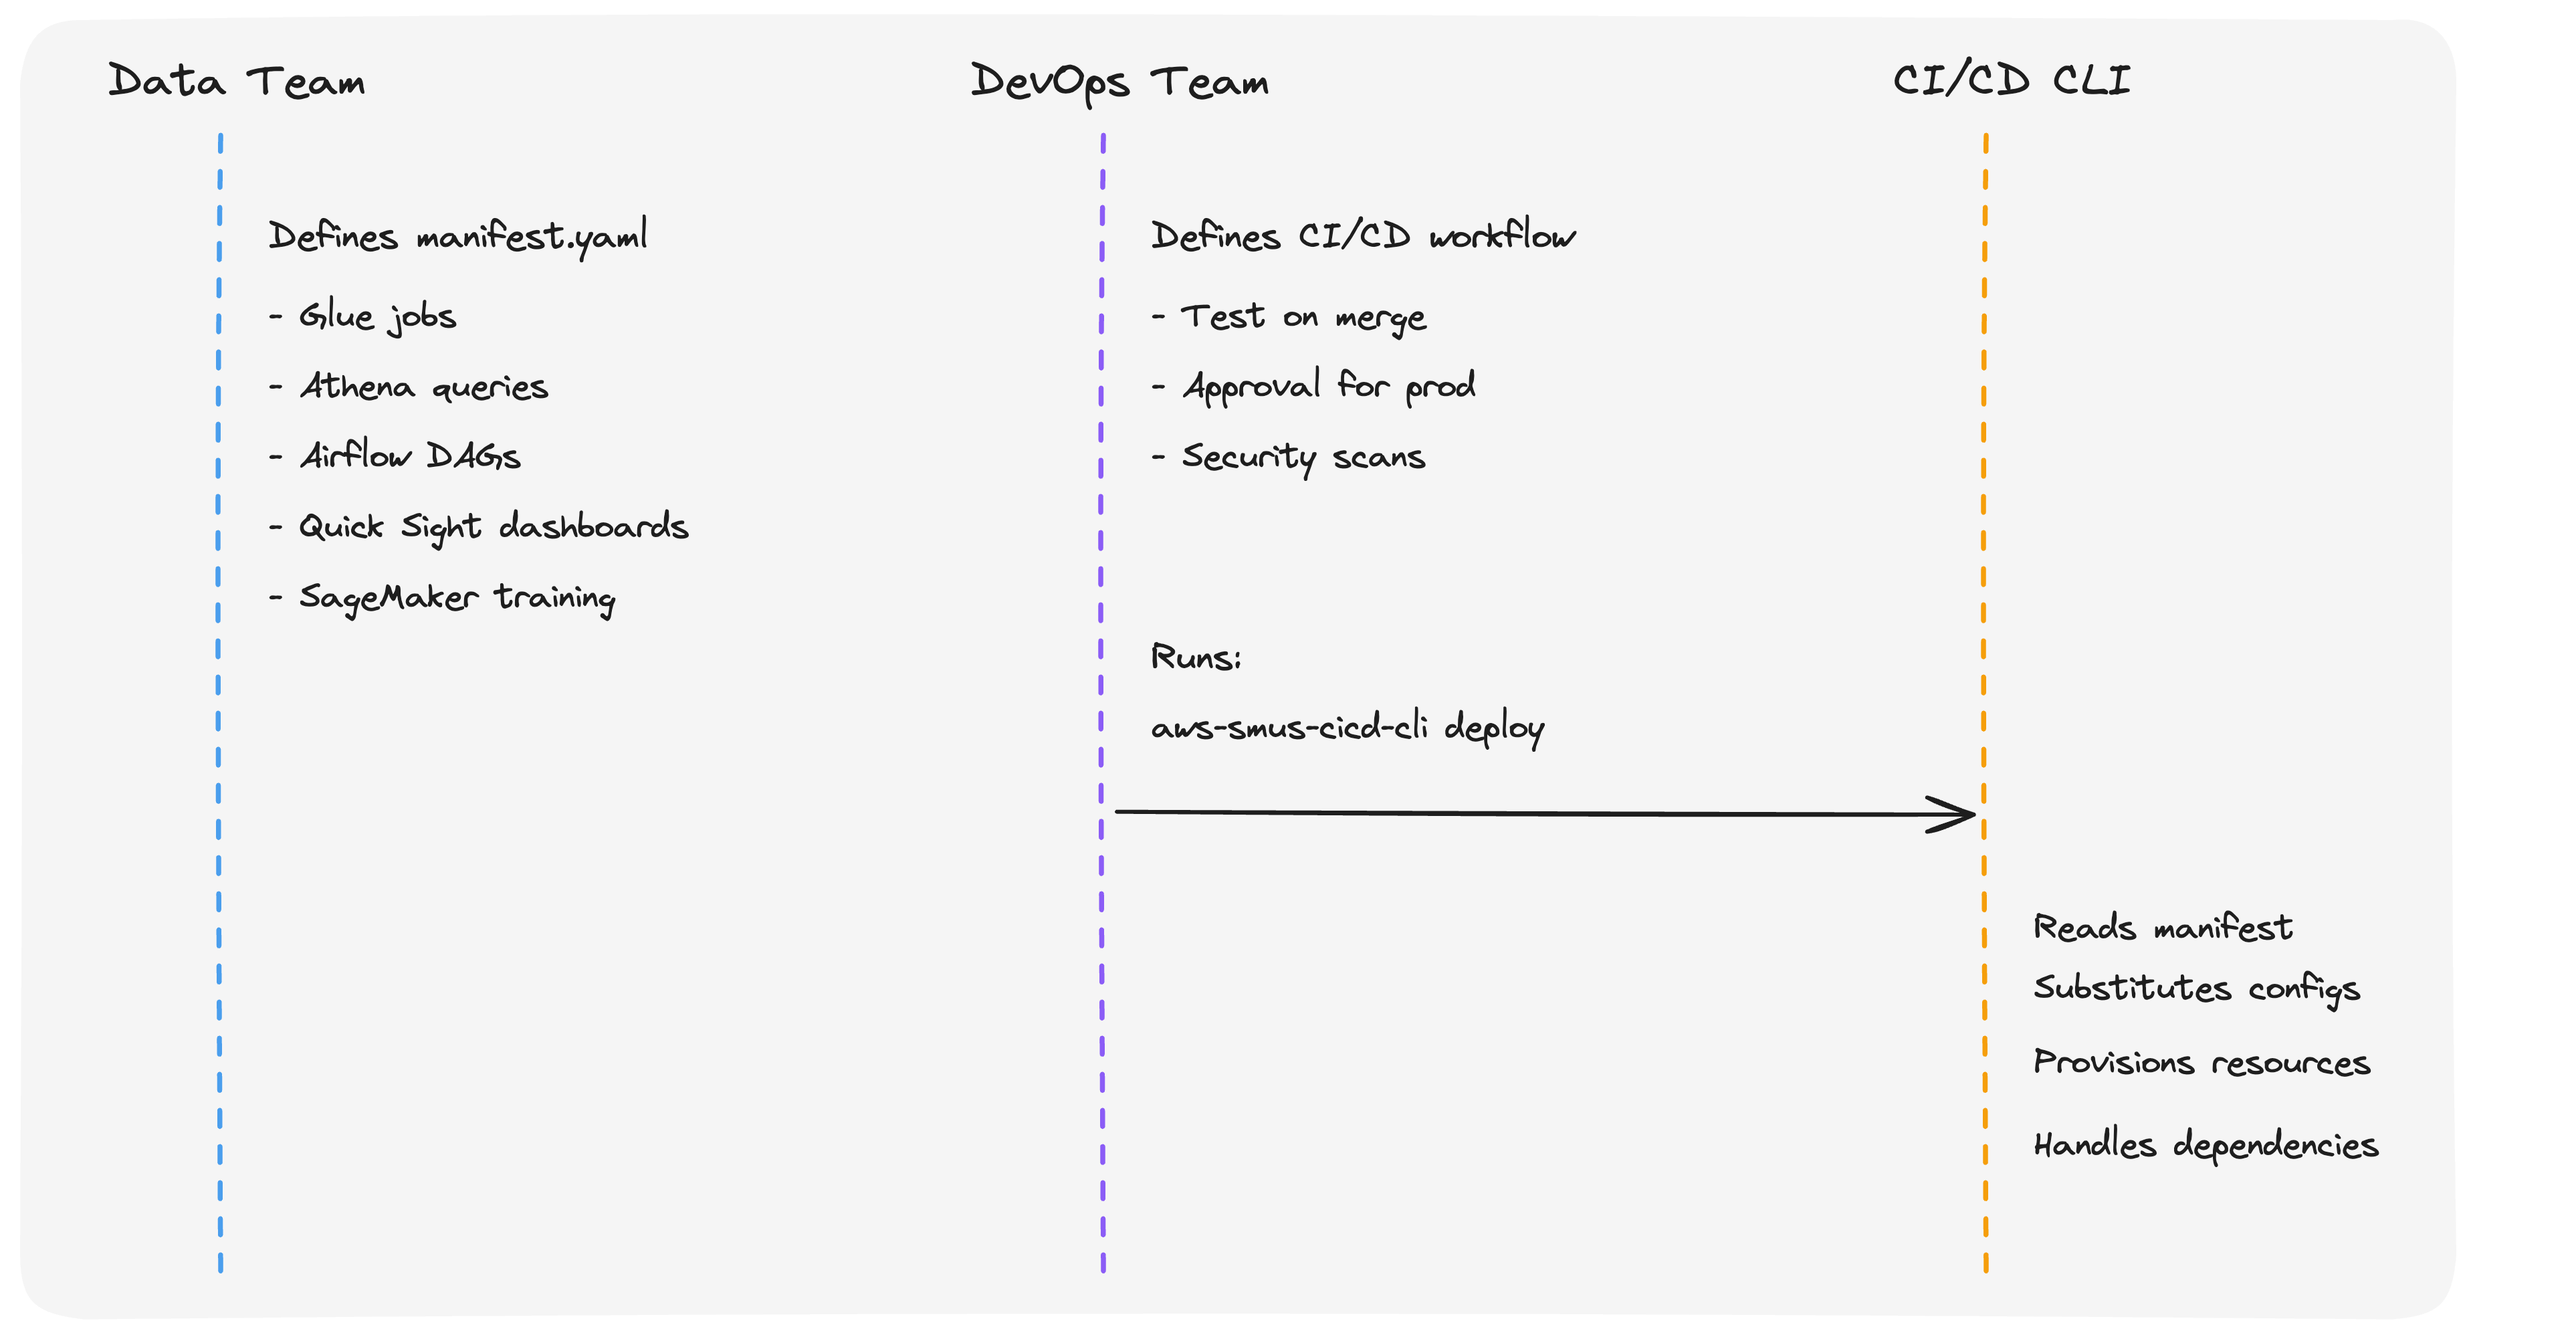
The CI/CD CLI introduces a clean separation of concerns between data teams and DevOps teams.
Data teams define what to deploy in a declarative YAML manifest (manifest.yaml). The manifest describes the application’s resources, including AWS Glue extract, transform, and load (ETL) jobs, Athena queries, Airflow directed acyclic graphs (DAGs), Quick Sight dashboards, and SageMaker training jobs, along with stage-specific configurations for each environment.
DevOps teams define how and when to deploy using their existing CI/CD systems. They retain full control over their deployment methodology. They choose whether to promote content through git branches, a bundle artifactory, or both; they decide the shape of the pipeline, including which stages to include (dev, staging, pre-prod, prod) and which manual approvals or security gates are required. They run aws-smus-cicd-cli deploy inside GitHub Actions, Jenkins, or GitLab CI workflows without needing to understand which AWS services the application uses or how SageMaker Unified Studio projects are structured. The CLI is a utility for AWS analytics service deployment, not a CI/CD methodology. Your team’s existing conventions for branches, approvals, and pipeline shape stay exactly as they are.
The CLI is the abstraction layer between the two. It reads the manifest, substitutes stage-specific configurations (S3 paths, AWS Identity and Access Management (IAM) roles, account IDs, and connection strings), provisions resources in dependency order, and handles all AWS service interactions.The following diagram illustrates this separation:
Each stage maps to a dedicated SageMaker Unified Studio project. This one-stage-to-one-project mapping is the foundation of CI/CD isolation: each project has its own domain, IAM boundaries, connections, and data, so changes in dev can never affect prod. For stronger isolation, projects can span different AWS accounts and AWS Regions. For example, dev in a sandbox account and prod in a production account in a different Region. Because each stage is a real SageMaker Unified Studio project, teams can open it in the console at any time to observe workflows, inspect resources, and troubleshoot deployments. Project membership is managed per project, so you control exactly who has access to each stage. For example, developers in dev and a release team in prod.The manifest file is the single source of truth for your application. It declares:
Here is an example manifest for an analytics application with AWS Glue ETL and Quick Sight:
applicationName: SalesAnalyticsDashboard
Each stage must map to a separate SageMaker Unified Studio project, providing full isolation between environments. The CLI substitutes variables like ${AWS_ACCOUNT_ID} and ${AWS_REGION} at deploy time based on the target environment.
A bundle is an immutable, versioned archive of your application. The bundle command reads from a source stage (typically dev) and packages the application code, workflow definitions, and resolved configurations into a self-contained artifact. The deploy command then applies that artifact to one or more target stages (test or prod).
This stage-to-bundle-to-stage promotion model supports controlled rollout through quality gates:
The same artifact is deployed at every stage without rebuilding, providing audit trails and reproducible deployments for regulated industries.
The CLI manages Amazon SageMaker Catalog resources as part of the deployment process. You can define catalog assets, glossaries, glossary terms, form types, asset types, and metadata forms, in your manifest. During deployment, the CLI searches for assets in the catalog, creates subscription requests for required data access, and waits for approval before proceeding. This automates the data governance workflow that teams previously handled manually.
The CI/CD CLI provides commands that cover the full deployment lifecycle:
| Command | Description |
| describe | Validates the manifest, checks that target projects exist, and confirms the execution role has required permissions. Use –connect to validate against live AWS environments. |
| bundle | Reads from a source stage and packages application code, workflow definitions, and configurations into an immutable, versioned archive. |
| deploy | Applies bundle contents to one or more target stages. Provisions resources in dependency order. |
| test | Runs post-deployment validation to confirm services are running and ready for workloads. |
| create | Generates a starter manifest from an existing SageMaker Unified Studio project. |
| run | Triggers Airflow workflow execution on MWAA or Airflow Serverless connections. |
| monitor | Monitors workflow execution status in real time. |
| logs | Fetches and streams workflow execution logs. |
| destroy | Removes deployed resources and projects for cleanup or failure recovery. |
In this section, we walk through deploying an analytics application that uses AWS Glue for ETL, Athena for queries, and Quick Sight for dashboards. This example is available in the GitHub repository.
An analytics team owns a Sales Analytics Dashboard built on AWS Glue ETL, Athena, and Quick Sight. They want to promote changes from a development environment to production with reproducible builds, automated validation, and a clear approval gate between stages, without writing custom deployment scripts or exposing data engineers to AWS provisioning details.
We use a sample application from the CI/CD CLI GitHub repository that includes AWS Glue ETL scripts, an Airflow workflow definition, a Quick Sight dashboard bundle, and integration tests. A single manifest.yaml describes the application and its dev and prod stages. The CLI handles the full lifecycle: bundle the app from dev, deploy it to test, run validation, and promote the same immutable artifact to prod.
Before you begin, make sure you have the following:
Each stage in the manifest maps to a dedicated SageMaker Unified Studio project (see the separation-of-concerns diagram in “How the CI/CD CLI works” earlier in this post). At deploy time, the CLI uploads ETL scripts and workflow definitions to the project’s S3 storage connection, provisions the Airflow workflow in MWAA Serverless, runs the workflow to create AWS Glue jobs and databases, and imports the Quick Sight dashboard. The same bundle artifact is applied to every downstream stage, ensuring dev, test, and prod stay in sync while remaining fully isolated.
Install the CLI from PyPI:
Clone the repository and start from the analytics example:
The example includes AWS Glue ETL scripts, an Airflow workflow definition, a Quick Sight dashboard bundle, and integration tests. Open manifest.yaml and update the project, domain, and deployment_configuration values under each stage so they match your own SageMaker Unified Studio projects and connection names.Alternatively, generate a manifest from an existing project: aws-smus-cicd-cli create --domain-id <your-domain-id> --dev-project-id <your-project-id>
Run the describe command with --connect to verify your environment is ready. This connects to your AWS environment and validates that target projects exist, the execution role has the required permissions, and connections are reachable. Fix any issues before deploying.
Run the deployment:
Run post-deployment validation to confirm services are running and ready for workloads:
Promote the same bundle artifact that was validated in the test stage to production. This guarantees the exact same artifact runs in prod:
The CLI works with existing CI/CD solutions. The GitHub repository includes reusable workflow templates that DevOps teams can adopt directly.The following is an example of a GitHub Actions workflow that implements a full bundle-based deployment pipeline:
The CLI also works with Jenkins, GitLab CI, and Azure DevOps. See the CI/CD integration guide for additional examples.
In the next section, we cover which AWS services and workload types the CLI supports.
The CLI deploys applications that span the following AWS services through Airflow workflow definitions:
The examples directory includes working applications for each of these patterns, with manifests, workflow definitions, and integration tests.
If a deployment fails, the CLI stops at the point of failure and reports the error with a detailed stack trace. To recover:
aws-smus-cicd-cli describe --connect to check which resources exist and which permissions are missing.aws-smus-cicd-cli deploy.aws-smus-cicd-cli destroy --targets <target> --force to clean up a failed deployment.For detailed rollback procedures, see the Rollback Guide.
In this post, you learned how the Amazon SageMaker Unified Studio CI/CD CLI gives data and DevOps teams a clean separation of concerns: data teams describe their application once in a YAML manifest, and DevOps teams deploy it with a single command through their existing CI/CD pipelines. You saw how stages map to isolated SageMaker Unified Studio projects (optionally spanning AWS accounts and Regions), how bundles provide immutable, reproducible promotion through test and production, and how the CLI integrates with GitHub Actions, Jenkins, GitLab CI, and Azure DevOps. You also walked through deploying a Glue-and-Quick-Sight analytics application from dev through to prod.
The CI/CD CLI is available at no additional cost in all AWS Regions where Amazon SageMaker Unified Studio is available. You pay only for the underlying AWS resources provisioned during deployment.
Use the following steps to try it out:
For feedback and bug reports, open an issue on the GitHub repository.
Post Syndicated from Jose Romero original https://aws.amazon.com/blogs/big-data/capture-data-lineage-of-amazon-emr-spark-jobs-into-amazon-sagemaker-unified-studio/
Data engineers running Apache Spark jobs on Amazon EMR face a persistent challenge: understanding how data moves through Spark pipelines as it’s transformed, joined, and written to downstream tables . Tracking these transformations manually requires examining job logs, reviewing code, and piecing together transformation logic across multiple sources. As pipelines scale, this process becomes complex. The visibility gap affects key business activities: troubleshooting data quality issues takes longer – impact analysis for schema changes requires more effort – and compliance audits need extensive documentation of data provenance.
Amazon SageMaker is the center for all your data and analytics where you can find and access all the data in your organization and act on it using tools across various use case. This unified platform addresses the data visibility challenge by bringing together data governance, collaboration, and discovery into a single interface. At the heart of this platform is Amazon SageMaker Catalog, a centralized hub that enables organizations to catalog, govern, and discover all their data assets with complete visibility into lineage. By capturing data lineage across your entire data ecosystem from raw sources through transformations to final outputs, SageMaker Catalog enables you to track data provenance across your entire platform, enable collaboration with clear visibility into data ownership and quality metrics, build trust through comprehensive data lineage that supports compliance and confident decision-making, and accelerate discovery of trustworthy, governance-ready data assets. You can access and visualize this lineage directly in Amazon SageMaker Unified Studio, which serves as the unified interface to explore data relationships and collaborate across your analytics workflows.
Amazon EMR, starting from version 7.11, now includes native OpenLineage support that automates lineage capture. OpenLineage is an open-source framework for data lineage that automatically emits lineage metadata from your data transformation jobs directly into Amazon SageMaker Catalog, or other data governance solutions, without requiring customizations.
This EMR native support of OpenLineage is part of a growing set of integrations across AWS analytics services including AWS Glue, Amazon EMR Serverless, and Amazon Redshift. The complete list of services with native OpenLineage integration can be found in the data lineage support matrix.
In this post, you’ll walk through a practical, step-by-step example that shows how to capture and track data lineage from Spark jobs running on Amazon EMR directly into Amazon SageMaker Catalog using OpenLineage. You’ll see how lineage metadata flows automatically and explore data relationships and dependencies across your workflows in Amazon SageMaker Unified Studio.
Imagine you’re part of a large enterprise that relies on HR analytics to optimize workforce planning, compensation strategies, and talent retention practices. Your data engineering team owns the delivery of these analytical products by processing raw HR datasets (including employee records, attendance logs, and compensation details), with Spark jobs running on your Amazon EMR infrastructure.
With time, Spark jobs have grown in complexity. Your team now struggles to maintain visibility into how data moves through pipelines, who modified it, and how to map dependencies between datasets and final analytical products.
The following solution demonstrates how you can address these challenges by automatically capturing data lineage end-to-end from Spark jobs running on your EMR infrastructure and visualizing it in Amazon SageMaker Unified Studio so that you and the business understand data provenance of the final analytical products.
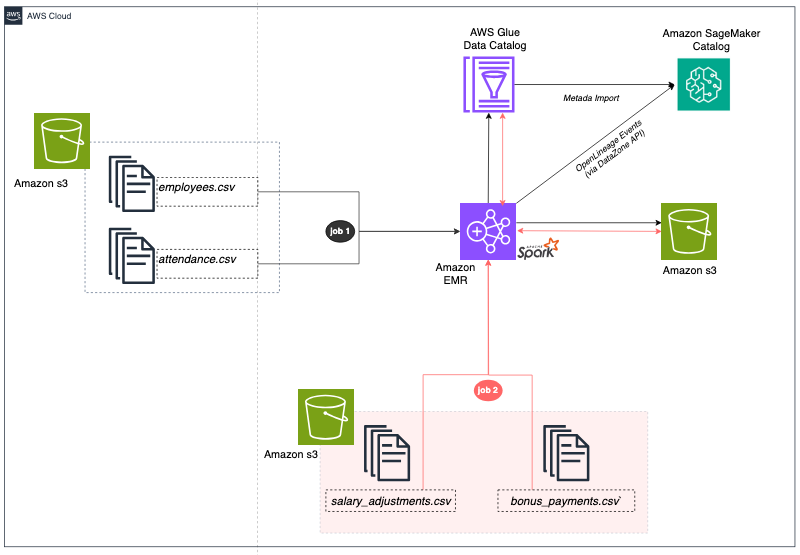
The architecture includes a Data Layer with CSV files containing employee, attendance, salary, and bonus data stored in Amazon S3 (Simple Storage Service), representing typical HR and payroll source systems.
The Processing Layer uses Amazon EMR cluster running Apache Spark jobs that transform raw data into analytical tables. The first Spark job joins employee and attendance data while the second Spark job combines attendance with compensation data. Both jobs use Apache Iceberg table format to provide ACID (Atomic, Consistent, Isolated, and Durable) transactions and time travel capabilities.
The Metadata Layer uses AWS Glue Data Catalog to store Iceberg table metadata, making tables discoverable and accessible across AWS analytics services. A Lineage Layer uses the OpenLineage integration in EMR to automatically track input/output datasets (CSV files and Iceberg tables), transformation logic at column level (joins, filters, aggregations), and job execution metadata.
Finally, the Data Governance Layer uses Amazon SageMaker Catalog to capture and process OpenLineage events posted by the EMR Spark jobs and automatically build a comprehensive lineage graph that shows complete data provenance from CSV source files through Spark transformations to Iceberg analytical tables.
Before you deploy this solution, make sure you have the following resources in place.
For this walkthrough, you should have the following prerequisites:
With these prerequisites in place, let’s examine what the AWS CloudFormation template will deploy to your AWS environment.
The deployment creates several interconnected components that work together to capture and visualize lineage:
With an understanding of what will be deployed, you’re ready to launch the CloudFormation stack.
Note: While this walkthrough uses the AWS EMR console and AWS CLI to verify the cluster and run Spark jobs, you can also perform these steps directly from Amazon SageMaker Unified Studio. SMUS provides a unified interface to create and manage EMR clusters, submit Spark jobs, and monitor execution — all within the same environment where you’ll later explore the lineage captured in Amazon SageMaker Catalog.
Before deploying the CloudFormation stack, clone or download the following git repository.PutHereGitRepo
Upload the CSV files downloaded from git to the input/ prefix and the spark scripts in scripts/ prefix. You can run the following command to upload the files:
aws s3 cp employees.csv s3://YOUR-BUCKET/input/
aws s3 cp attendance.csv s3://YOUR-BUCKET/input/
aws s3 cp salary_adjustments.csv s3://YOUR-BUCKET/input/
aws s3 cp bonus_payments.csv s3://YOUR-BUCKET/input/
aws s3 cp emr-lineage-spark-job.py s3://YOUR-BUCKET/scripts/
aws s3 cp emr-lineage-compensation-job.py s3://YOUR-BUCKET/scripts/
To deploy the solution, complete the following steps in CloudFormation console:
PutHereThe YMLFileNameemr-lineage-demo) and provide the following parameters:

Now that the EMR cluster is running with OpenLineage enabled, let’s examine how the Spark jobs are configured to capture lineage metadata.
When submitting Spark jobs to EMR, specific configurations enable OpenLineage to create and post lineage events to SageMaker Unified Studio as the job runs:
spark.hadoop.hive.metastore.client.factory.class – Configures Spark to use AWS Glue as the Hive metastore.spark.jars – Path to the pre-installed OpenLineage library (available on EMR 7.11+).spark.extraListeners – Registers an OpenLineage listener to capture metadata of input / output datasets and transformations.spark.openlineage.transport.type – Uses the OpenLineage DataZone transport option to send lineage events directly into SageMaker Catalog.spark.openlineage.transport.domainId – The ID of your SageMaker Unified Studio domain, that serves as the target for lineage events.spark.glue.accountId – Your AWS account ID for Glue data catalog operations.Now that you understand the configuration that enables automatic lineage capture, you’re ready to run the data pipeline.
When running this two-step pipeline, you will calculate the total employee compensation by combining salary adjustments, bonuses, and attendance data. The final analytical asset will serve payroll processing and budgeting.
The first job reads employee details (in employees.csv dataset) and attendance records (in attendance.csv dataset), joins the datasets on EmployeeID and creates a unified dataset (employee_attendance Iceberg table) in your Glue database.
Follow the steps below to run this first job:
Job1SubmitCommand output key. Note that this is the command you’ll use to submit the first job in EMR with the right configuration.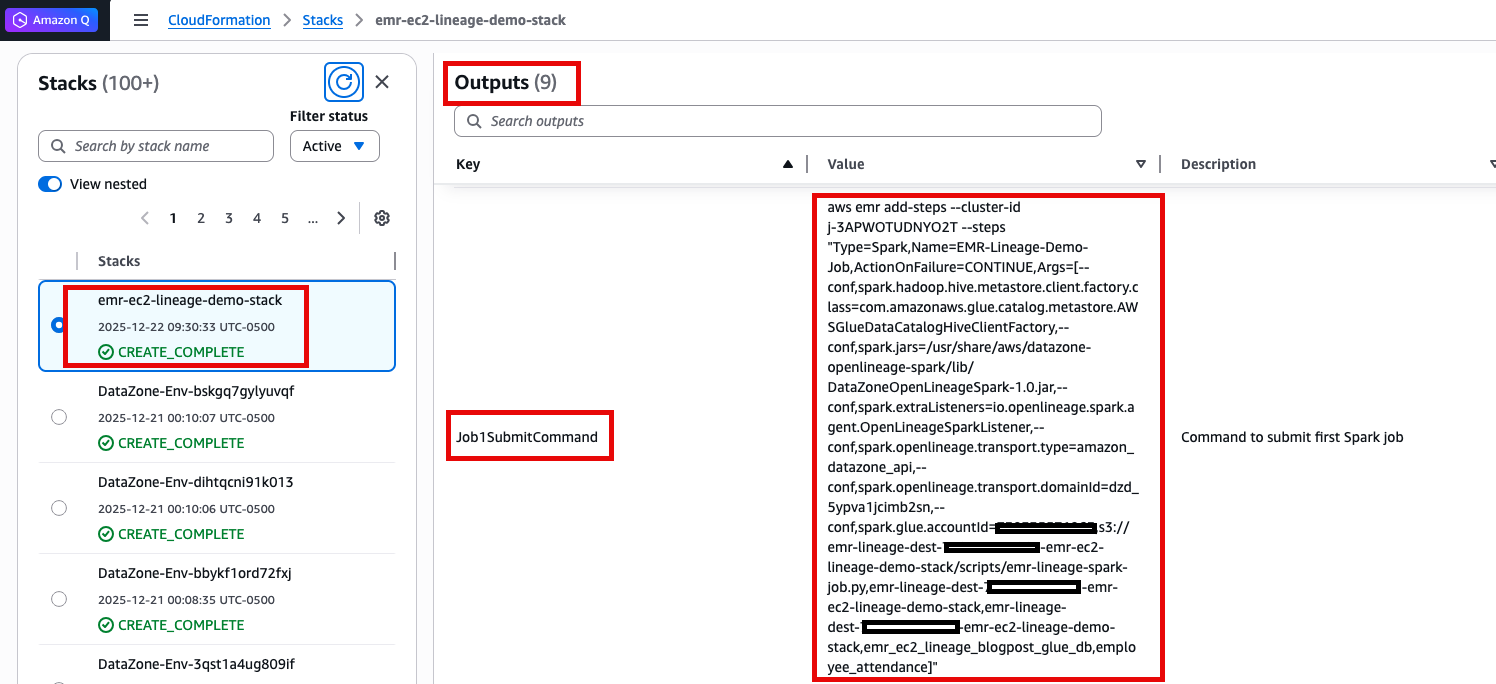
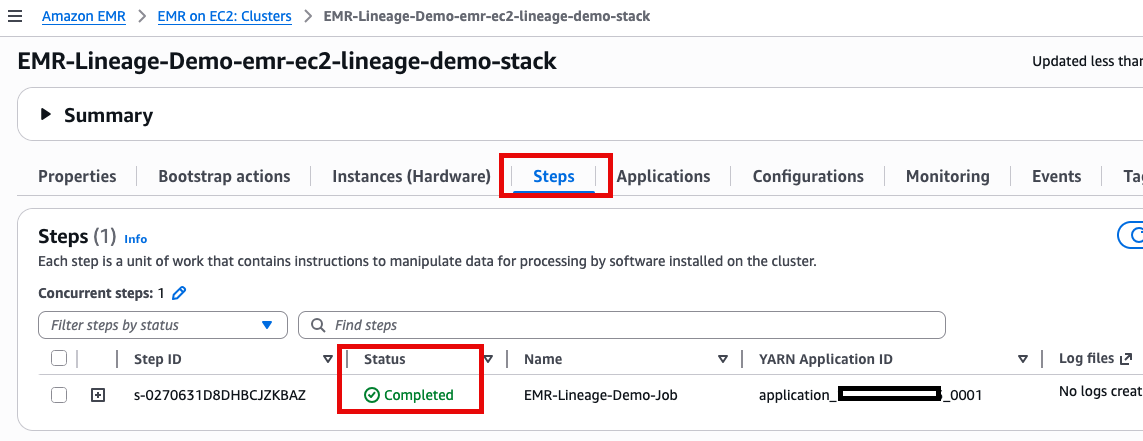
Run employee compensation analysis job
Now, you will calculate the total employee compensation (Iceberg table) by combining salary adjustments (salary_adjustments.csv dataset), bonuses (bonus_payments.csv dataset), and attendance (calculated in the last step):
employee_attendance and employee_compensation tables are listed.With both Spark jobs complete, you can now visualize the complete data lineage graph in Amazon SageMaker Unified Studio.
SageMaker Unified Studio provides a graph-based data lineage visualization that helps data engineers, analysts, and data scientists clearly understand which source datasets (files or tables) feed into each dataset, what transformations and logic are applied at every step, which downstream analytics assets consume the data, and how changes to upstream data or transformations may impact the rest of the data pipeline.
Now that the data pipeline run successfully, let’s review the captured lineage for the HR data in SageMaker Unified Studio:
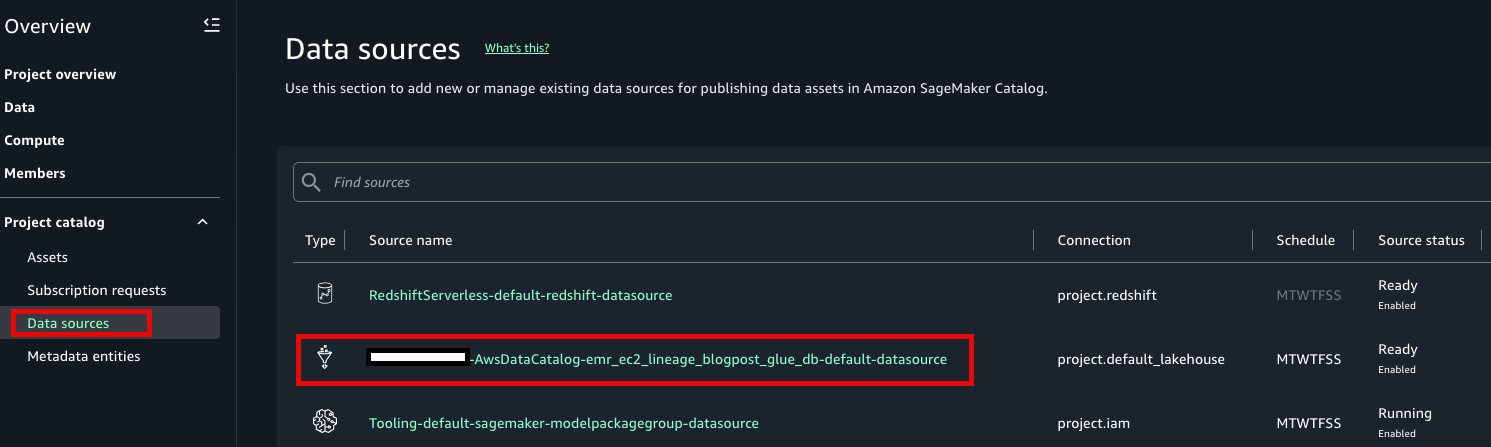
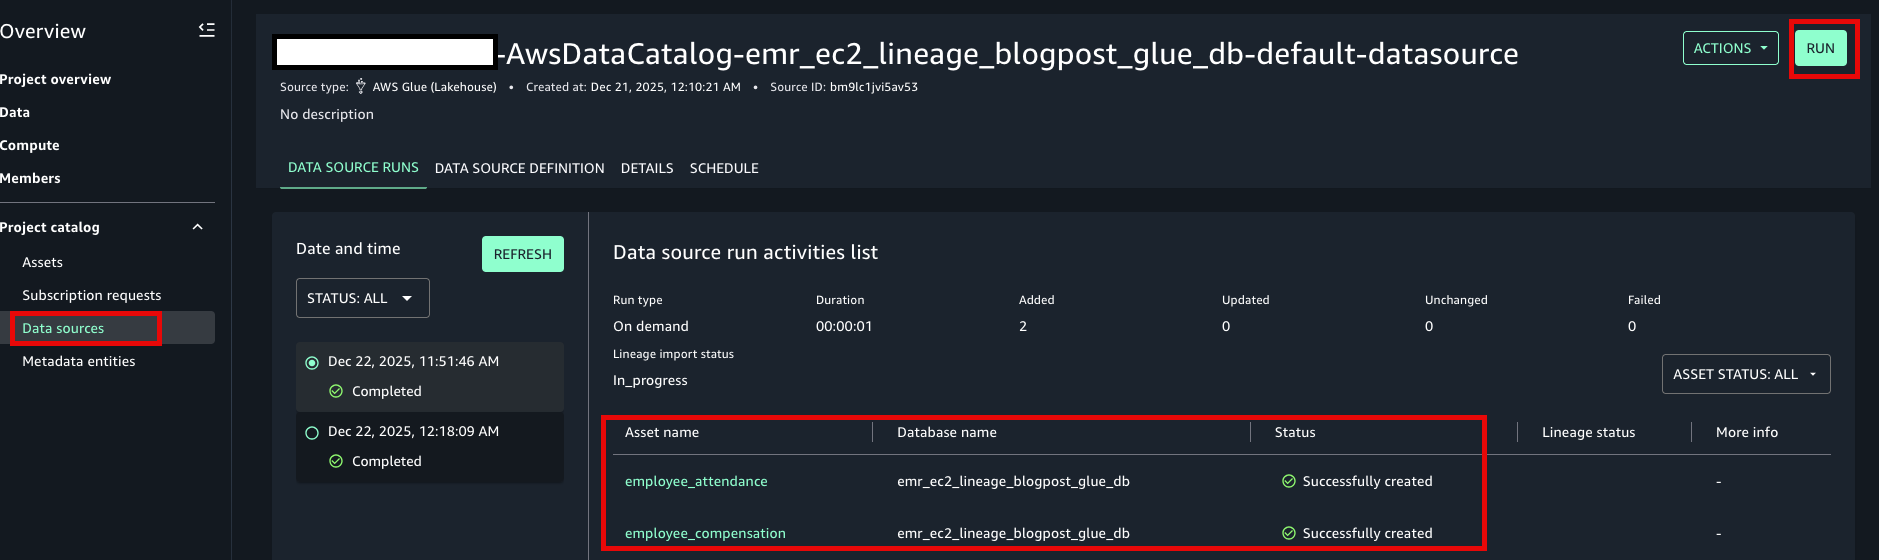
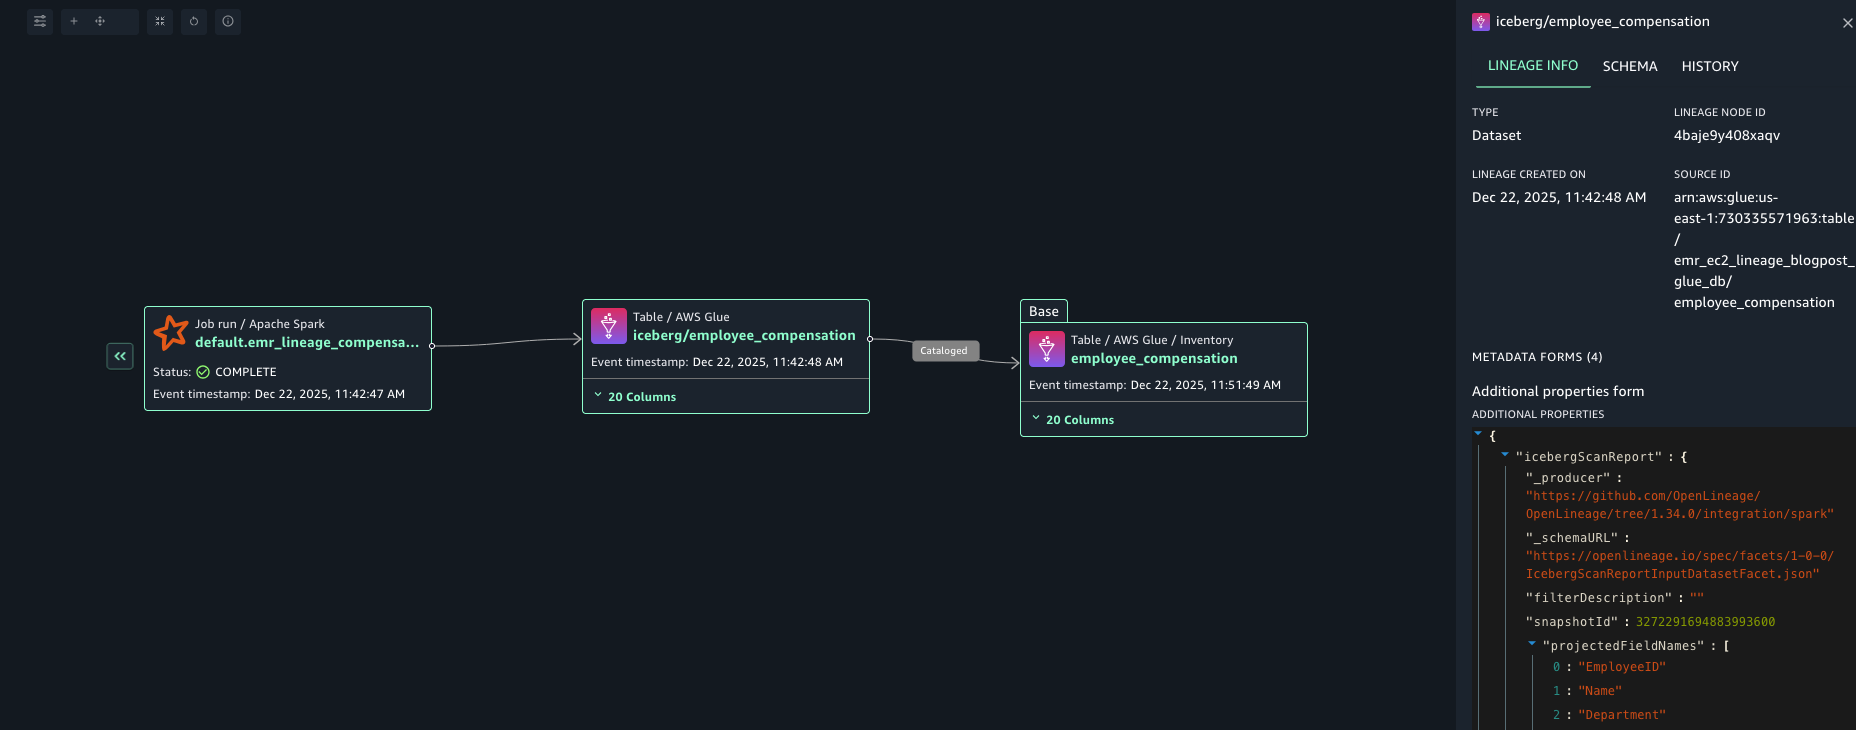
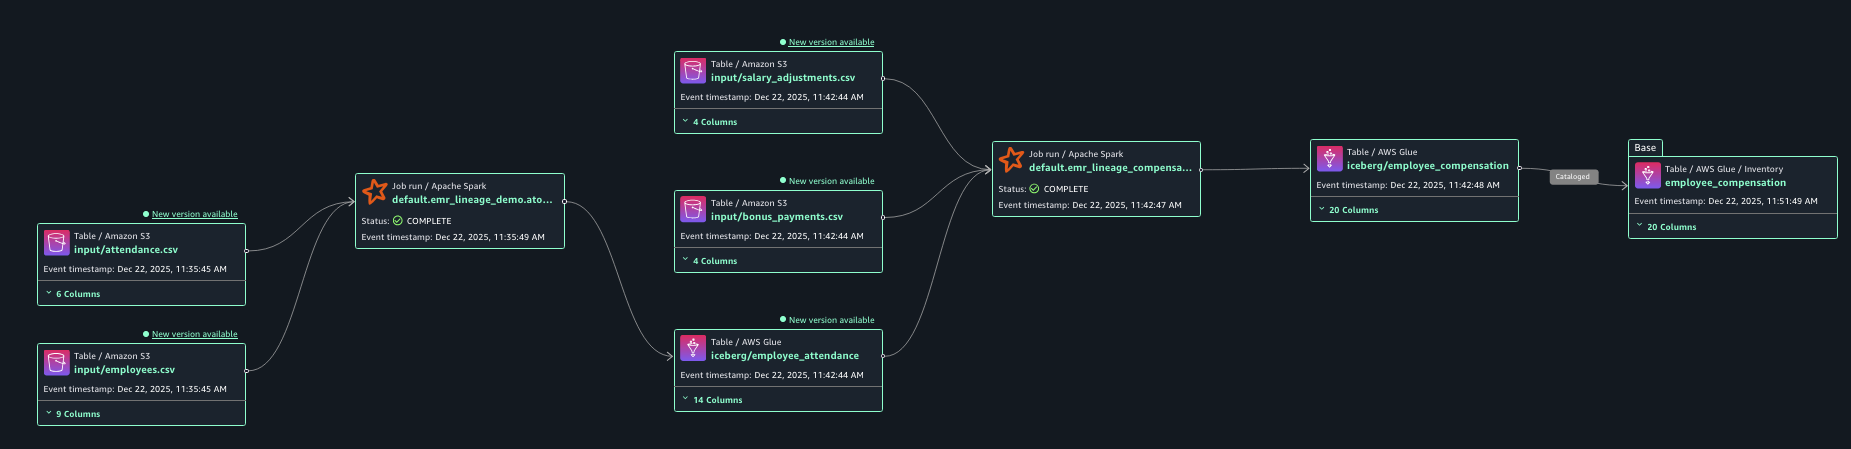
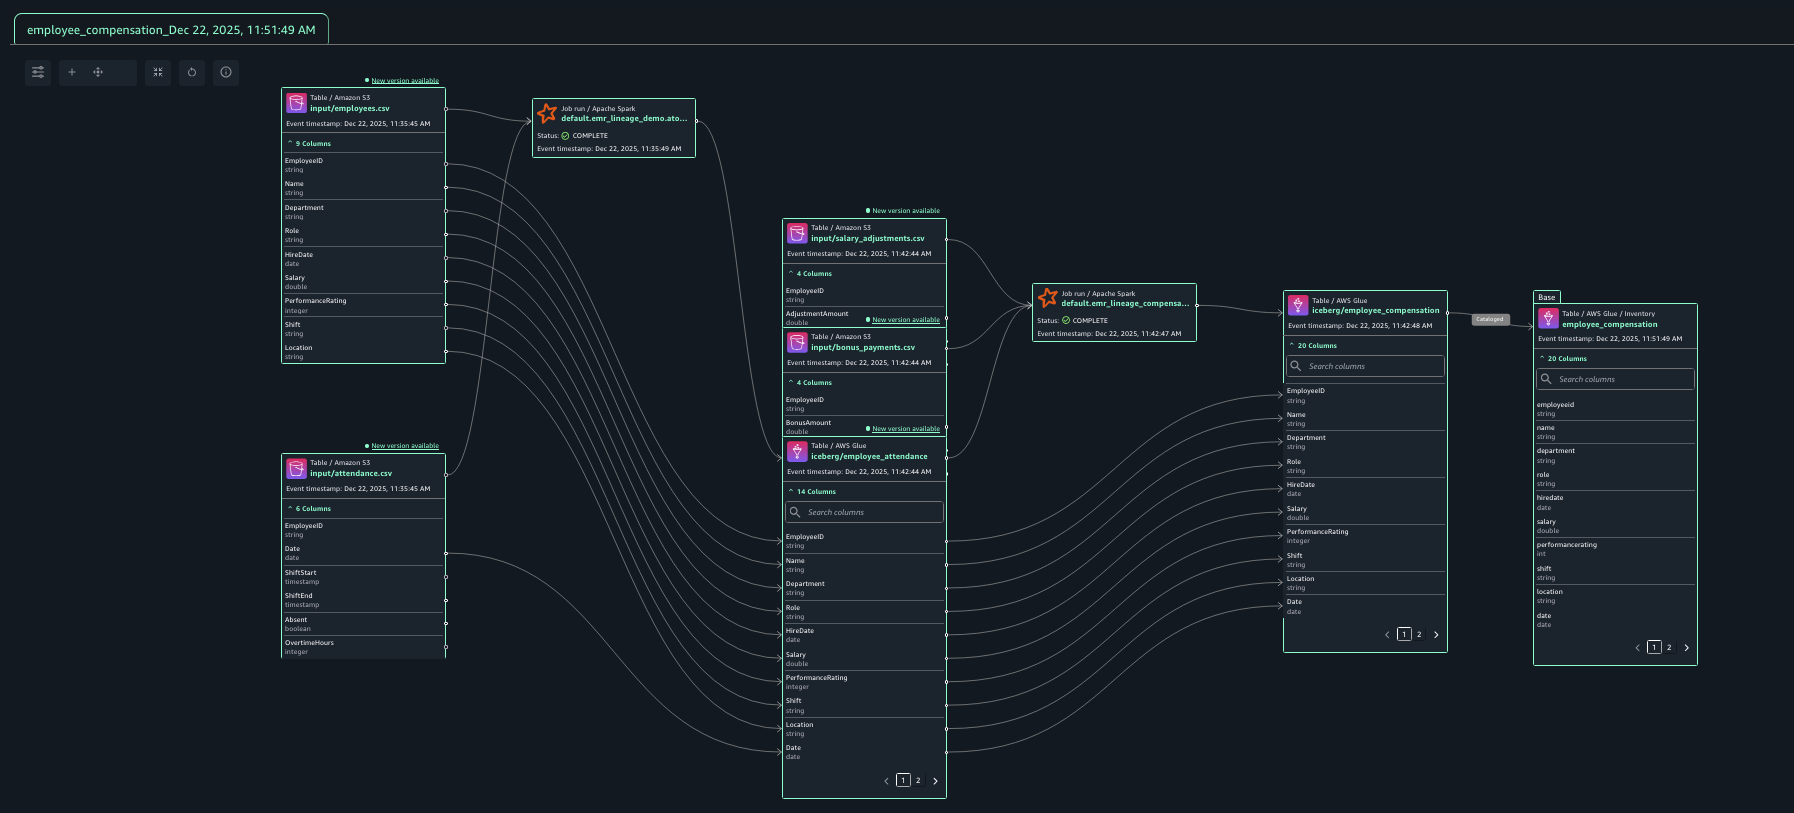
To avoid ongoing charges, clean up the resources:
aws s3 rm s3://${DEST_BUCKET}/ --recursive
In this post, you explore how to capture data lineage from Spark jobs in Amazon EMR (v7.11+) directly into Amazon SageMaker Unified Studio. You learned how to set up an Amazon EMR cluster with native OpenLineage support to automatically track lineage metadata from Spark jobs processing your data. You also configured the integration between EMR and Amazon SageMaker Catalog to ensure lineage information flows seamlessly into your governance platform. Finally, you explored the resulting lineage graph in SageMaker Unified Studio and saw how it provides comprehensive visibility into data transformations, from source CSV files through Spark processing jobs to final analytical tables using Apache Iceberg format.
We encourage you to now test these capabilities with your own data pipelines running on EMR. By implementing automated lineage tracking, many customers have strengthened their governance frameworks while gaining valuable insights into data dependencies, impact analysis, and compliance requirements. This approach enables data teams to build trust in their analytics outputs while maintaining the agility needed to derive business value from their data assets.
Post Syndicated from Abe Carryl original https://blog.cloudflare.com/casb-anthropic-integration/
Today, we are extending Cloudflare’s cloud access security broker (CASB) to support the Claude Compliance API. Security and compliance teams can now monitor Claude usage directly in the Cloudflare dashboard. No endpoint agents required.
Enterprise security teams have long struggled to see how users interact with sanctioned and unsanctioned applications. The rapid adoption of AI applications has made this harder. Employees spend significant time in these new surface areas, and their interactions differ from traditional SaaS: users upload files, share freeform prompts, and providers generate content that may contain sensitive data.
Cloudflare CASB helps solve this problem. One API integration gives you out-of-band visibility and control over the applications your organization uses. This integration builds on our existing support for AI governance, extending coverage over the most common tools security teams now manage.
AI adoption has outpaced security governance. While IT and security teams raced to enable AI tools for productivity, the controls lagged behind. Most organizations today operate with partial visibility: they may block unauthorized AI tools at the network layer, but they cannot see what happens inside sanctioned ones.
This matters because AI tools are not like traditional SaaS applications. They are conversational, persistent, and deeply integrated into workflows through APIs and agent frameworks. An employee might paste customer data into a prompt. A developer might accidentally share an API key and leave it unrotated for months. An AI application might generate content which contains company secrets. Each of these actions creates compliance risks that conventional security tools cannot detect.
Organizations are moving fast to adopt AI, but these tools require a different security model. They do not just read data; they generate it, act on it, and connect to multiple systems of record in a single workflow. Security needs to cover the full lifecycle: from how an application calls an API, to what data it handles, to where that data lives at rest. Cloudflare gives organizations the tools to do this at every point of the workflow:
Cloudflare AI Gateway sits between your applications and AI providers like Anthropic, giving you observability into requests, token spend, and model performance. This allows administrators to enforce rate limits, cache responses, and make fine-grained routing decisions.
Cloudflare Gateway and Data Loss Prevention inspect AI traffic for sensitive data, blocking prompts that contain customer personally identifiable information or confidential material before they reach the model.
Cloudflare Access with MCP server portals centralizes agent connections to corporate tools behind a single protected endpoint. Administrators control which users and agents can reach which systems, and every request is logged for audit.
Cloudflare CASB now extends this same unified approach to data at rest inside Claude, scanning for misconfigurations and sensitive data without endpoint agents.
These capabilities run side by side, on the same metal, making each service both composable and programmable. More importantly, that means traffic never hairpins through multiple vendors or clouds to be secured.
Cloudflare CASB helps organizations connect to, scan, and monitor third-party SaaS applications for misconfigurations, improper data sharing, and other security risks through lightweight API integrations. Organizations can regain visibility and control over their growing investments in SaaS apps.
As enterprises deploy Claude at scale, security and compliance teams need the same visibility into Claude usage that they have for every other enterprise application in their stack. Anthropic recognized this gap and built the Claude Compliance API to give enterprises programmatic access to security-relevant data about their Claude organizations, workspaces, and usage.
Cloudflare CASB now consumes this endpoint to surface actionable security findings without requiring inline traffic inspection or endpoint agents.
With this integration, Cloudflare One customers can monitor Claude Enterprise activity using the detection and remediation workflows they already rely on. Cloudflare CASB connects to Claude via the Compliance API and scans for security findings.
Starting today, Cloudflare supports security findings for the following assets:
Projects: Detect projects shared across the organization or a subset of users and groups
Project attachments: Files and documents added to projects that violate DLP policies
Chat files: User-uploaded and provider-generated files that violate DLP policies
Chat messages: User prompts and provider responses that violate DLP policies
Artifacts: Provider-generated documents and files that violate DLP policies
These findings appear directly in the Cloudflare dashboard alongside posture and content findings from your other SaaS applications. Findings are grouped by category and ordered by severity level. Security teams can triage, assign, and remediate Claude-specific risks using the same workflows they use for Microsoft 365, Google Workspace, or Salesforce.
For Claude Enterprise, CASB surfaces compliance data such as organizations, projects, chats, and roles. It also retrieves conversation content, including messages and uploaded files through dedicated read-only endpoints to prevent data loss.
For Claude Platform, CASB will continue to surface member and workspace changes, API key creation, and file create or download events. In the near future, we will add support for the Activity Feed.
CASB turns findings into action. A detected security finding in Claude, such as a user uploading files containing sensitive data, can become a Gateway policy in minutes. You can use Gateway to block uploads to Claude for specific users, restrict access to the application entirely, or limit functionality until the issue is resolved. This moves security teams from visibility to action by combining CASB findings with Cloudflare’s existing in-line policy engine.
To enable the Claude Compliance API integration:
Ensure you have a Claude Enterprise account.
Request Compliance API access from Claude for your organization.
In the Cloudflare dashboard, go to Zero Trust > Integrations > Cloud & SaaS.
Select Add Integration > Anthropic and enter your Compliance API key.
Configure DLP profiles if you want to scan uploaded files for sensitive data.
The integration begins scanning immediately and surfaces findings in the dashboard within minutes.
For new Cloudflare customers, you can sign up and start with your first two integrations for free. Existing customers can enable the integration directly in the dashboard.
We are continuing to expand CASB coverage for AI tools as providers release new enterprise security APIs. We are also deepening integrations within CASB to allow customers to create custom findings and build workflows which automatically remediate security findings.
The shift to agentic AI is here, and we believe the best way to help organizations safely adopt it is by providing a unified platform to build, deploy, and govern agents. To stay up to date, check our developer documentation or subscribe to get updated automatically.
Post Syndicated from Bruce Schneier original https://www.schneier.com/blog/archives/2026/05/macos-kernel-memory-corruption-exploit.html
A group used Anthropic’s Mythos AI model to help find a kernel memory corruption vulnerability and exploit on Apple’s M5.
News article.
Post Syndicated from Ali Alzand original https://aws.amazon.com/blogs/security/automating-identity-lifecycle-and-security-with-aws-directory-service-apis/
Managing identities and access across complex environments has become more critical than ever. AWS Directory Service for Managed Microsoft Active Directory, also known as AWS Managed Microsoft AD, has added new capabilities to manage users and groups. Now, you can perform create, read, update, and delete (CRUD) operations on users and groups directly through AWS Command Line Interface (AWS CLI), APIs, and the AWS Management Console. You can use this powerful capability to automate identity lifecycle management and enhance security in your AWS environment. By using these APIs, collectively known as the Directory Service Data APIs, you can perform operations such as:
These APIs provide new possibilities for automating identity management tasks and integrating Active Directory management into your existing workflows and applications.
The introduction of these APIs brings several key benefits:
In this post, we explore these new APIs and demonstrate how you can use them to create an automated solution for detecting and responding to unexpected behavior by Active Directory users. We walk through a practical example that combines GuardDuty, AWS Step Functions, Amazon EventBridge, and the new AWS Directory Service APIs to create a robust security automation workflow.
To demonstrate the power of these new APIs, let’s explore a practical solution that automates the detection and response to unexpected behavior by Active Directory users. This solution combines several AWS services to create a robust security automation workflow:
DisableUser API.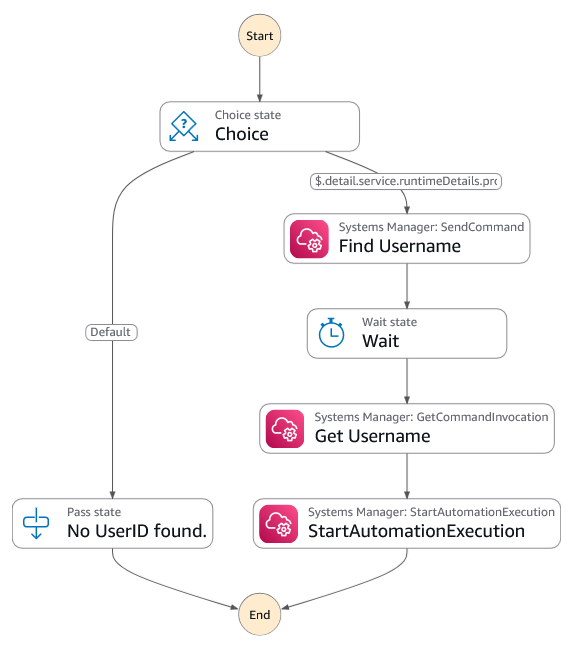
Figure 1: Diagram of the Step Functions workflow showing the process of Systems Manager finding the username and starting the automation to disable the account
DisableUser API call. It will send an email to the user using Amazon Simple Notification Service (Amazon SNS) notifications.
This solution delivers automated, near real-time remediation of potential security threats — significantly reducing exposure windows and containing the impact of unauthorized account access.
The following figure shows a high-level architecture diagram of the solution.
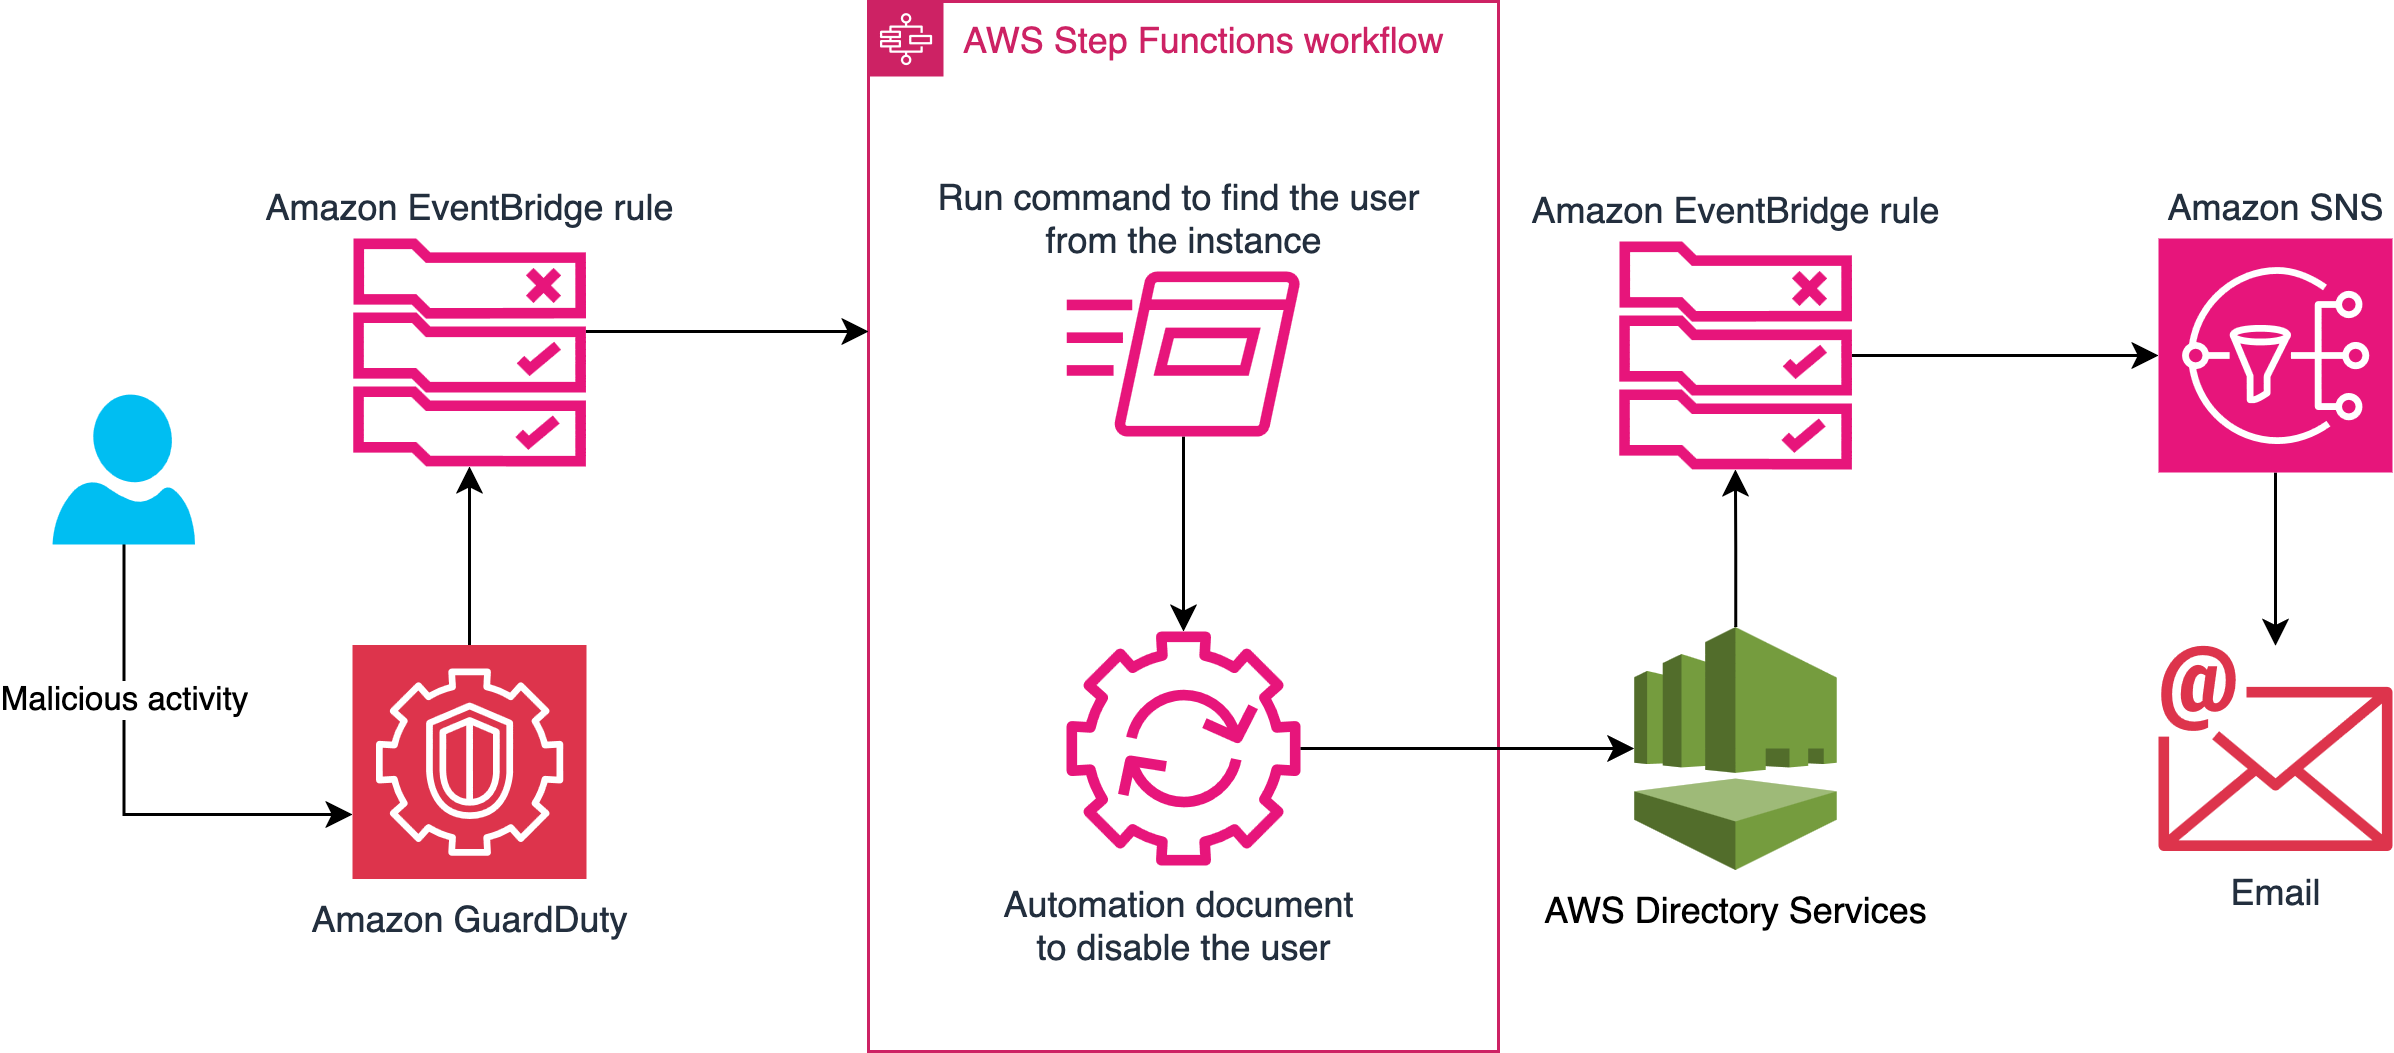
Figure 2: Diagram showing the workflow of what happens when potentially damaging activity is detected
Note: The solution must be deployed in the primary AWS Region of your directory.
To complete the walkthrough in this post, you must have the following prerequisites in place.
GuardDuty is an automated threat detection service that continuously monitors for unexpected activity and unauthorized behavior to protect your AWS accounts, workloads, and data stored in Amazon Simple Storage Service (Amazon S3).
To activate GuardDuty:
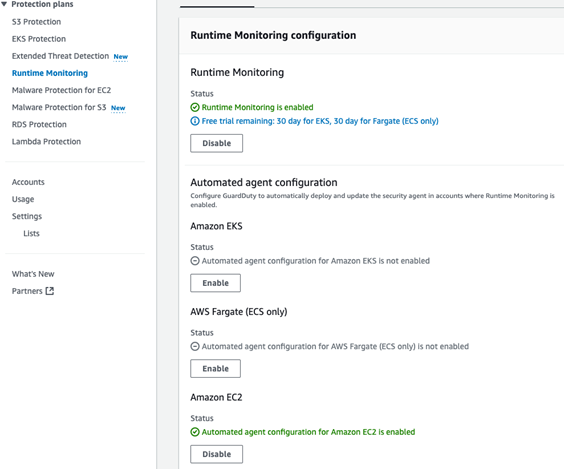
Figure 3: Runtime Monitoring enabled
AWS Managed Microsoft AD provides a fully managed service for Microsoft Active Directory (AD) in the AWS Cloud. When you create your directory, AWS deploys two domain controllers that are exclusively yours in separate Availability Zones for high availability. For use cases that require even higher resilience and performance in a specific AWS Region or during specific hours, you can scale AWS Managed Microsoft AD by deploying additional domain controllers to meet your needs. These domain controllers can help load balance, increase overall performance, or provide additional nodes to protect against temporary availability issues. Using AWS Managed Microsoft AD, you can define the correct number of domain controllers for your directory based on your use case.
To deploy a new AWS Managed Microsoft AD:
You will use this test user account to sign in to an EC2 instance and initiate a command that simulates unexplained activity that results in this account being disabled.
To create the test user, you can use AWS CloudShell or the AWS CLI from your local machine. Run the following commands, replacing the --directory-id value with your own:
Then
In this example, the password is set to YourSecurePassword123!. If you need to replace it with a password that meets your organization’s requirements, see Resetting and enabling an AWS Managed Microsoft AD user’s password. For more information on creating users, see Creating an AWS Managed Microsoft AD user in the AWS Directory Service documentation.
To generate alerts on GuardDuty, you need a domain joined Linux EC2 instance. If you don’t have a domain joined EC2 Linux instance, follow these instructions for joining a Linux instance to an Active Directory domain. This instance will be used to simulate suspicious activity that triggers a GuardDuty finding and initiates the automated remediation workflow.
Let’s walk through the steps to implement this solution in your AWS environment.
CRUD-API-MAD).After the page is refreshed, the status of your stack should be CREATE_IN_PROGRESS. When the status changes to CREATE_COMPLETE, proceed to the next section.
To simulate a threat, use a GuardDuty test domain that GuardDuty will recognize as a command and control server.
su followed by the test user with the domain name that you created earlier. For example su [email protected], then enter the password.curl guarddutyc2activityb.com.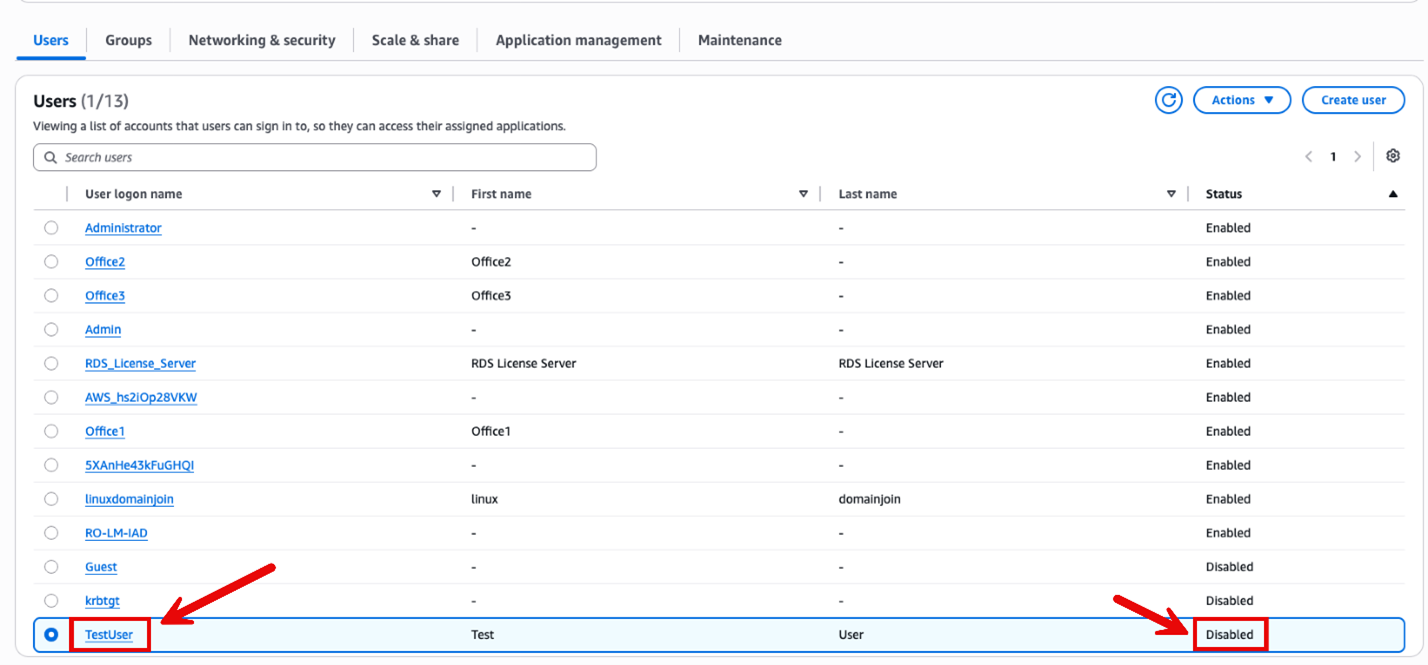
Figure 4: Account successfully disabled
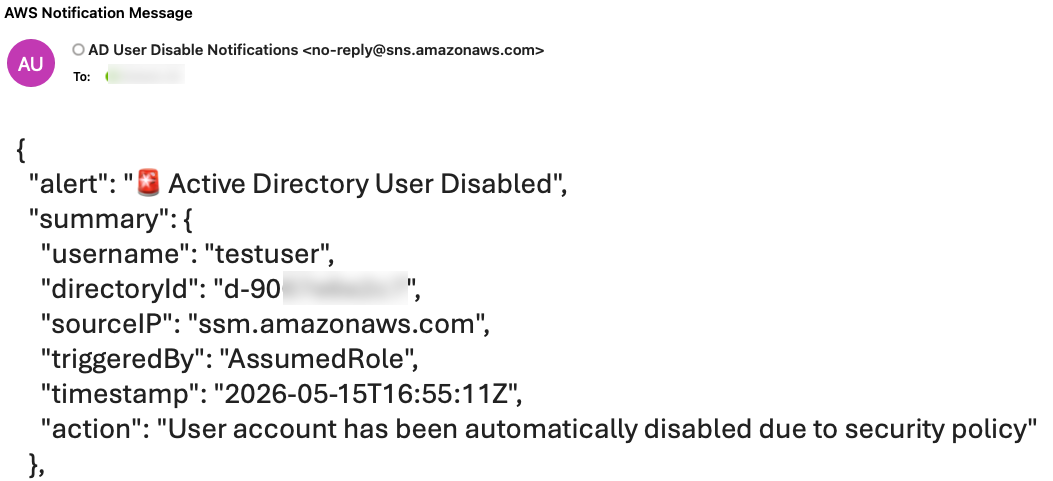
Figure 5: AWS notification message showing the username has been disabled
Note: You must archive the GuardDuty finding before running this test again, because the EventBridge rule only runs once against a GuardDuty finding with the same details. To archive the finding, select the check box next to the Backdoor:Runtime/C&CActivity.B!DNS finding, choose Actions (top right), and select Archive.
The new AWS Directory Service APIs for AWS Managed Microsoft AD provide powerful capabilities for programmatically managing Active Directory users and groups. By using these APIs in conjunction with services such as Amazon GuardDuty and AWS Step Functions, you can create sophisticated automation workflows that enhance your security posture and streamline identity management processes.
The solution we’ve explored in this post demonstrates just one of many possible use cases for these new APIs. As you integrate these capabilities into your own environments, you will probably discover numerous opportunities to improve efficiency, security, and compliance in your identity management practices.
For a solution that uses PowerShell Active Directory cmdlets with AWS Systems Manager Run Command to disable users, see How to automatically disable users in AWS Managed Microsoft AD based on GuardDuty findings.
For more information about AWS Directory Service and its APIs, visit the AWS Directory Service documentation.
We’re excited to see how you’ll use these new APIs to innovate and improve your identity management workflows. If you have any questions or want to share your own use cases, leave a comment below or reach out to AWS Support.
Remember, the cloud journey is all about continuous improvement and innovation. Keep exploring, keep learning, and keep pushing the boundaries of what’s possible with AWS.
Post Syndicated from LastWeekTonight original https://www.youtube.com/watch?v=wkq0cix0GdU
Post Syndicated from The Hook Up original https://www.youtube.com/watch?v=GYn4BVtD7eU
Post Syndicated from daroc original https://lwn.net/Articles/1071973/
José Marchesi and the GCC-BPF developers opened the BPF track at the 2026
Linux Storage,
Filesystem, Memory-management, and BPF Summit
with a 90-minute summary of what has changed for GCC’s BPF support in the past year.
This kind of session has become something of a tradition. There were similar
updates in
2025 and
2024. This time around, GCC seems to be closing in on
feature parity with the LLVM toolchain — as the slides detail.
Post Syndicated from corbet original https://lwn.net/Articles/1073933/
The OpenBSD 7.9 release is
out, right on schedule. There is the usual long list of new features,
including improved architecture support, CPU scheduling on heterogeneous
systems, the ability to hibernate a suspended system after a configurable
delay, socket splicing, a
__pledge_open()
system call giving special access to the C library, and much more. See the
announcement and the full
changelog for details.
Post Syndicated from original https://www.toest.bg/nvo-tragediya-v-3-deystviya/
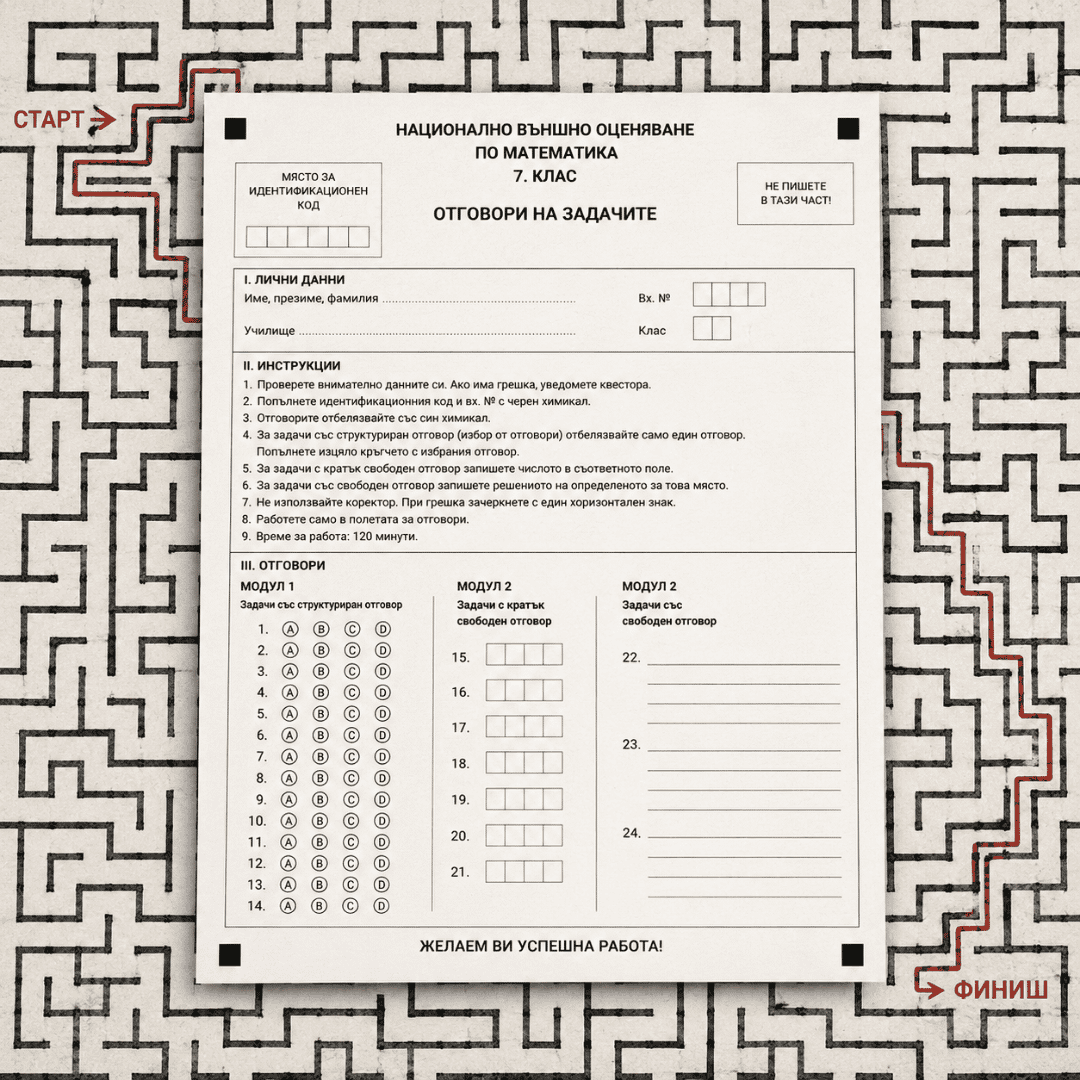
Учениците, които са седмокласници през настоящата учебна 2025/2026 година, определено не са големи късметлии, що се отнася до учебните им условия. Това е поколението, което завърши още първи клас в онлайн среда (2020 г.). Това е и поколението, което цяла година не знае как точно ще бъде изпитвано и оценявано на предстоящото на 19 юни национално външно оценяване (НВО) по математика.
Историята започва на 26 август 2025 г., когато министър Красимир Вълчев издава Заповед №РД09-2073. С нея той заповядва на седмокласниците по неведоми пътища да си набавят знания за междупредметните връзки и да се подготвят без учебници и без много-много време за предстоящия изпит. А изпитът никога не е бил провеждан в този формат, нито пък някой учител е виждал в някоя програма, камо ли в учебник гореспоменатите междупредметни връзки.
 Донка Дойчева-Попова
Министър Красимир Вълчев сложи каруцата пред коня и въведе изпит, за който никой никога не е бил подготвян. Най-тъжното в цялата история беше, че идеята за такъв изпит всъщност изобщо не е лоша. От години в разговорите за реформа на образователната система се прокрадва чудесната (но явно засега твърде авангардна) идея да свържем знанията, придобивани в обучението по отделните предмети, и така да ги направим приложими, близки до реалността и много по-разбираеми за учениците. Уви, досега тези идеи остават на хартия, като добри намерения и изменения в учебните планове и материали няма.
Двама родители на седмокласници подават жалби срещу заповедта – адв. Снежана Стефанова от Пловдив и Иван Радев от София. Причините:
Това е грубо нарушение на основни принципи, като правната сигурност, предвидимостта и защитата на легитимните очаквания и представлява превратно упражняване на власт.
Превъртаме напред: след изключително бавен процес (три месеца Върховният административен съд не може да реши кой е компетентният съд за разглеждане на жалбите), едва през февруари 2026 г., в началото на втория учебен срок, заповедта на министъра е отменена от самия него.
Донка Дойчева-Попова
Със Заповед №РД09-545/11.02.2026 г. е променено наименованието на изпита, а със Заповед №РД09-546/11.02.2026 г. са променени параметрите на самия изпит.
Красимир Вълчев коментира пред БНТ:
Ще има 24 задачи, които ще бъдат изцяло математически, няма да има задачи с елементи от природните науки, така както е било през предходните години. Нищо друго не променяме във формата, в съдържанието, в продължителността на изпита след седми клас.
И всички заживели щастливо…
Уви, не.
На 12 февруари тази година Министерството на образованието и науката (МОН) публикува на сайта си Модел на НВО по математика. Само за сравнение: моделът за изпита по български език и литература е публикуван на 12 септември 2025 г.
Вие след уверение от министъра, че изпитът ще остане в досегашния си формат, бихте ли проверили? Да! Дори е задължително.
И този път МОН не разочарова. Без излишни обосновки или доказателства кое точно налага промяна на досегашния формат, той е променен.
Ето една пътеводна таблица в дебрите на НВО по математика, за да стане по-ясно за какво ще говорим. В нея се вижда от какво точно се е състоял изпитът през последните четири години.
В тазгодишния изпит са въведени 7 задачи с кратък свободен отговор и в модела на изпита, публикуван на сайта на МОН, има посочени примери.
Защо тогава преподаватели в VII клас все още не са наясно как точно да подготвят учениците за предстоящия изпит?
В запитване до настоящия министър на образованието проф. д-р Георги Вълчев депутатът от „Демократична България“ Чило Попов изяснява следното:
За последен път при национално външно оценяване по математика в края на 7. клас е имало задачи със свободен отговор през 2023 г., когато те са били под формата на текстова задача без подусловия. Оценяването на тези задачи е било спорно, тъй като всеки ученик е можел да получи на този тип задача или 0 точки, или 4 точки. Това означава, че независимо от използваните знания и приложен подход за решаване на задачата, ученикът е можел или да получи максималния брой точки, или да не получи никакви точки.
В групи на учителите по математика в социалните мрежи специалистите дискутират темата и подобни задачи не се одобряват масово. Според преподаватели така не се оценяват адекватно знанията на учениците. Преподаватели, с които разговарях, наблюдават в практиката си често случаи, в които децата решават вярно дадена задача, но предвид възрастта си и стреса по време на изпитване допускат грешка по невнимание – често това са чисто изчислителни грешки. В случая с този тип задачи това би означавало пълна загуба на точките, защото крайният резултат въпреки правилния път на решение е грешен.
Донка Дойчева-Попова
От друга страна, се допускат и случаи на налучкване и дочуване на правилния резултат, което отново не би показало реалните умения на учениците. В крайна сметка тези задачи се оказват едно ненужно препятствие и не са подходящ инструмент за изпитване.
Но и това не е всичко!
В публикувания модел въпросните задачи са показани като задачи с две или три подусловия. От МОН са записали със звездичка следното пояснение:
Наличието на подусловия и броят им ще се определя при съставянето на конкретните изпитни варианти.
Ето така учители и ученици са в неизвестност какво предстои, а първите, които ще видят реалния формат на изпита, са самите изпитвани, при това в деня на изпита.
Остава и един последен, но много важен въпрос:
Остава ли оценяването на пълното им решение с четири точки и отнася ли се то за всички подусловия общо? Дали решението на първото подусловие участва в решението на следващите подусловия? Тук отново може да си представим грешка по невнимание, но правилен подход при всички подусловия и резултатът отново ще е ученик, ощетен от начина на оценяване.
Нека погледнем изпитната ситуация.
Учениците, завършващи VII клас, са на възраст между 13 и 14 години. Тази година освен нововъведените, но неразяснени обстоятелства около задачите има и допълнителна промяна: изпитът ще е с по-голямо времетраене – два модула, всеки от които по 90 минути. Общо три астрономически часа работа! До миналата година по правилник учениците нямаха право да напускат стаята в първите 60 минути от изпита. Това остава ли в сила и тази година?
Едно от най-разпространените практически правила в областта на психологията на развитието е: „Възрастта по две е равна на концентрацията в минути.“ Това правило не е доказано научно, а по-скоро е емпирично, но отговаря в голяма степен на откритията в тази област. Например резултатите от следното проучване, които доказват:
Фронталният лоб на мозъка на 12–14-годишните все още не е достатъчно развит и те не са достигнали оптималните си нива на концентрация, каквито са типични за възрастните. Биологичните връзки в мозъка са в процес на изграждане. Тоест мозъкът на 13-годишните изглежда като огромен строителен обект в най-активната си фаза. Нищо не е готово, въпреки че вече е добило приблизителните си окончателни размери и краен вид.
Първо действие на тази трагедия не завършва добре. За учениците. За МОН още не е ясно. Но оттам сме свикнали да има сравнения: „Тази година средният успех на НВО-то по математика се понижи.“ В сравнение с какво, при положение че нямаме повече от две години с един и същ изпит?
Въпросът „Какво измерваме?“ трябва непременно да върви ръка за ръка с въпросите „Защо го измерваме?“ и „Как го измерваме?“.
Post Syndicated from corbet original https://lwn.net/Articles/1072881/
Gregory Price started his session in the memory-management track of the
2026 Linux Storage,
Filesystem, Memory Management, and BPF Summit by saying that, in
current kernels, if a NUMA node has memory, the assumption is that anybody can
make use of it. He is trying to implement the opposite policy — to make
some memory off-limits for all processes except those designed specifically
to use it. The session was used to present his goals and to discuss how
they might be implemented.
Post Syndicated from corbet original https://lwn.net/Articles/1073860/
Security updates have been issued by AlmaLinux (kernel, kernel-rt, and libsndfile), Debian (bind9, evince, firefox-esr, openjpeg2, pdns, and rsync), Fedora (erlang-cowlib, evince, expat, firefox, kernel, mingw-expat, mysql8.0, mysql8.4, nss, opencryptoki, pgadmin4, proftpd, python-django5, python-django6, python-dotenv, rsync, rust-nu, rustup, and strongswan), Oracle (nginx, nginx:1.24, ruby, ruby:3.3, and squid), Slackware (bind and rsync), SUSE (buildah, distribution, distribution-registry, docker, firefox-esr, helm, libpainter0, libsdb2_4_2, postgresql-jdbc, runc, and vim), and Ubuntu (gnutls28, gst-plugins-good1.0, jq, linux-nvidia, linux-nvidia-lowlatency, openvpn, rsync, and unbound).
Post Syndicated from LGR original https://www.youtube.com/watch?v=p9DgpS3DEbk
Post Syndicated from Rapid7 Labs original https://www.rapid7.com/blog/post/tr-q1-2026-threat-landscape-report-geopolitics-ransomware
The first quarter of 2026 reinforced that attackers are moving faster, operating with greater coordination, and exploiting weaknesses before most organizations can respond effectively. From escalating geopolitical tensions to increasingly aggressive ransomware operations, the latest quarterly Threat Landscape Report highlights a security environment where reactive defense strategies are becoming unsustainable.
One of the biggest takeaways is that vulnerability exploitation surpassed social engineering as the largest initial access vector with 38% of the total. This would be interesting on its own, but when coupled with more than 50% of all exploited vulnerabilities actively being zero-click, network facing vulnerabilities, it indicates that, at least in the short term, attackers are finding AI-enabled vulnerability exploitation easier to accomplish than exploiting human behavior. These types of vulnerabilities require no authentication and no user interaction, giving attackers rapid pathways into exposed systems and edge infrastructure. At the same time, exploitation activity was frequently preceded by large spikes in public discussion across forums, blogs, and social media platforms, demonstrating how quickly threat actors operationalize publicly available information once vulnerabilities gain visibility.
Geopolitical instability also continued to shape cyber operations throughout the quarter, particularly in the Middle East, where cyber activity was increasingly synchronized with military escalation. Iranian state-aligned groups targeted government infrastructure, financial services, and industrial systems, while Russian and Chinese campaigns focused heavily on intelligence collection, telecommunications infrastructure, and persistent access operations designed to remain undetected over long periods of time. The result is a threat landscape where organizations must prepare not only for immediate disruption, but also for long-term persistence inside enterprise environments.
Meanwhile, law enforcement operations targeting underground criminal infrastructure disrupted several major ransomware and credential marketplaces during Q1, including the seizure of RAMP and LeakBase. These takedowns have created operational pressure for cybercriminal groups, pushing threat actors toward smaller, decentralized communities and increasing internal distrust.
The report also highlights the continued evolution of ransomware operations, particularly the growing shift toward “pure extortion” tactics focused on rapid data theft rather than traditional encryption-based attacks. Threat actors increasingly leveraged zero-click vulnerabilities to gain initial access, exfiltrate sensitive data, and pressure victims without deploying ransomware payloads that create additional operational risk and visibility.
Taken together, the findings from Q1 2026 show that organizations can no longer rely on periodic assessments and reactive workflows alone. Security teams need continuous visibility into their attack surface, better prioritization around exploitable risk, and the ability to move at a pace that matches modern attackers before small exposures become large-scale incidents.
Post Syndicated from Matt Granger original https://www.youtube.com/watch?v=XnACNV1YNLA