Особености на руската пропаганда в България

Post Syndicated from Зорница Латева original https://www.toest.bg/osobenosti-na-ruskata-propaganda-v-bulgaria/

В тези времена на война думите са от значение. Свидетели сме на масова пропаганда и дезинформация относно тази скандална атака срещу една свободна и независима държава. Няма да позволим на апологетите на Кремъл да сипят токсичните си лъжи, оправдаващи войната на Путин, нито да сеят семената на разделение в нашия Съюз.

Особености на руската пропаганда в България

Думите са на председателката на Европейската комисия Урсула фон дер Лайен по повод решението на ЕС да забрани разпространението и предаването на няколко руски медии, посочени като източници на кремълската пропаганда. Така към момента на територията на ЕС не са достъпни „Русия днес“, „Спутник“, „Русия РТР“/„РТР Планета“, „Русия 24“ и „ТВ Център Интернешънъл“.

Това обаче далеч не ограничава, камо ли да спира руската пропаганда в Европа и в частност в България. Така например инструментът NewsGuard, който оценява дали даден сайт разпространява фалшиви новини, към момента следи 290 домейна, които са част от руската пропагандна машина. Става въпрос за сайтове, които публикуват информация, свързана с войната на Русия срещу Украйна. В списъка са включени официални руски медии като Агенция ТАСС, „Русия днес“ и „Спутник“, но и много страници, които не са забранени или ограничени. Нещо повече, голяма част от съдържанието се разпространява на езици, различни от руски – английски, немски, френски, италиански, а източниците са местни медии, анонимни сайтове, неправителствени организации и изследователски центрове с неясно финансиране.

Технологията на разпространение на руската пропаганда в България, както и в останалата част от Европа, следва доста прост модел. „Информацията“ тръгва от официални руски източници – представители на Кремъл, включително и самия Владимир Путин. Опорните точки, които те вербализират, се цитират от руски медии, след това се превеждат и „препечатват“ в новинарски сайтове в България. По-голямата част от тези сайтове са просто агрегатори, зад които не стоят журналисти. В тях „информацията“ се появява като копи-пейст от друг източник. След това разпространението продължава с публикуването в социалните мрежи, включително в нарочно създадени за тази цел групи.

Основната част от информацията представлява цитати от наратива на официалните власти в Кремъл. Авторски материали рядко се появяват. Фалшиви новини не липсват, но в никакъв случай не доминират в информационния поток. Това поне показва изследването на руската пропаганда у нас на Фондацията за хуманитарни и социални изследвания (ФХСИ).

А целта? Целта е оправдаване на агресията на Путин в Украйна, но и прокарване на разделителни линии в обществото и подкопаване на доверието в демокрацията, в Европейския съюз и в НАТО.

Информационна вълна

В началото на войната на Русия срещу Украйна руските пропагандни материали в българските онлайн медии бележат изключително рязък скок. От средно 39 текста на ден в първите дни на войната броят им скача 10 пъти, казва проф. Димитър Вацов, който е сред авторите на проучването на ФХСИ. В следващите месеци броят на текстовете намалява наполовина, но все пак остава 5 пъти по-висок от предвоенните месеци.

Основните теми са „опорките“ на Кремъл, построени върху геополитическа конспиративна логика. Колективният Запад, в който влизат САЩ, НАТО, а вече и ЕС, чрез своите „марионетки“ („брюкселските еврократи“ и „продажните либерални елити“ в отделните държави) убива суверенитета на народите. Този злодей обгражда и дори води война срещу Русия, която също е жертва – само че тя единствена справедливо се съпротивлява, изплува от пепелта и всъщност е спасителка на Европа и в частност на Украйна. „Целият този разказ тече през минисюжети, но се повтаря“, казва проф. Вацов.

В България същите тези опорни точки се въртят, без да се адаптират към българския културен контекст. Преплитане с местните особености има само покрай политически събития – като изпращането на оръжие на Украйна, спирането на газа, спасяването на българските моряци в Мариупол и др.

Фалшиви новини сред пропагандните материали има, но те са сравнително малък процент. Пример за подобен фейк е „новината“, разпространена дни преди нахлуването на Русия в Украйна, че полски наемници са влезли в Донбас с цел терористични атаки. Информацията е опровергана официално, но въпреки това се тиражира от руски медии, а през тях „влиза“ и в българските новинарски сайтове, които разпространяват руска пропаганда.

Верига на разпространение

Със започването на войната в Украйна изследователите забелязват съществена промяна на източника на информация в обслужващите Кремъл „новини“. Това вече не са медии или говорители извън официалната власт, а представители на Кремъл – Владимир Путин, Сергей Лавров, Дмитрий Песков, Галина Захарова, Елеонора Митрофанова и пр. „Това не бе така преди пет години: тогава руските официални лица говореха все още на дипломатически по-неутрален език, а оставяха провеждането на пропагандата на други медии и говорители. Сега вече цялата руска държава е рупор на пропагандните клишета“, пише в проучването на ФХСИ.

Пропагандните наративи се разпространяват от българските им рупори чрез цитиране или буквален превод на текстове от руски медии. „Има няколко сайта, които въртят руските наративи и влагат душа и сърце в това. Най-отчетливи са сайтовете pogled.info и news-front.info, който е базиран в Крим“, казва проф. Вацов.

Той допълва, че 65% от топ 25 на медиите, които разпространяват руска пропаганда, всъщност са сайтове агрегатори, които само копират текстове от други места и в тях не работят реални хора, още по-малко журналисти. Останалите 35% публикуват съдържание, което страниците ботове препечатват. Освен това въпросните издания се „препечатват“ едно друго.

Ботове и връзки

Част от тези сайтове са свързани. Пример за това е БЛИЦ, около който гравитират още 8 сайта агрегатори. Те са анонимни и са регистрирани на два IP адреса в САЩ, обяснява проф. Вацов. Един руски пропаганден текст се публикува в БЛИЦ и скоро след това се появява без никаква промяна в останалите 8 сайта. За пример: на 10 март БЛИЦ публикува статията на Александър Дугин „Войната в Украйна като сверяване с реалността!“, която е буквално преведена – макар и без позоваване – от izborsk-club.ru. Тя автоматично е препечатана от осемте анонимни сателита, към които, с лека модификация в заглавието, се присъединява и istinata.net.

Според инструмента за анализ на сайтове Similarweb сайтът БЛИЦ е на 4-то място в категорията на медийните сайтове в България, с около 10,7 млн. посещения на месец.

Моделът на разпространение може да се обясни и с това, че вероятно за обслужването на руска пропаганда се плаща на брой статии. А и колкото по-голям е трафикът към страниците, толкова по-голям е шансът за привличане на рекламодатели. „Няма как освен пропагандна информация по веригата да не текат и пари. Те вероятно не са и много, но това е високоефективна инвестиция. Ефектът от тази пропаганда нямаше да е голям, ако имаше противодействие – контрапропаганда, но по смислен и легален начин“, коментира проф. Вацов.

Говорителите намаляват

Според проучването на ФХСИ с увеличаването на броя на руските пропагандни материали в българските онлайн медии всъщност намалява броят на българските говорители и на авторските материали в пропагандния поток. „Вероятно е така, защото, веднъж, по-малко са парите, които руснаците директно могат да инвестират на българска сцена. И втори път, съвсем видимо, защото от повтарянето на тези опорки се оттеглят много хора, които не са съгласни с Путиновата война и искат да се разграничат от нея“, пише в изследването.

Според проучването на фондацията, сред малкото медийни и политически лица, които разпространяват тезите на Кремъл, са бившият дипломат Боян Чуков, журналистите Мартин Карбовски, Кеворк Кеворкян, Явор Дачков, лидерът на „Възраждане“ Костадин Костадинов и др. Те обаче отстъпват като източник пред официалната руска власт, както и пред световно(не)известни „чуждестранни експерти“ – с руски и англоезични имена – като Скот Ритер, Ник Паркър, Валерий Коровин и пр.

Тоест по-малко са авторските материали в българските сайтове, в които се рециклират руските пропагандни клишета, а много повече са статиите, които репортажно и най-често анонимно отразяват руски източници и/или директно превеждат пропагандни материали.

В доклада и президентът Румен Радев се откроява като публичен говорител и разпространител на руската пропаганда, макар да не използва точно думите на официалната руска власт. Авторите аргументират това твърдение с факта, че периодично Радев изразява мнения, които обслужват интересите на Кремъл – за спирането на газа от Русия, срещу изпращането на оръжия на Украйна, което ще вкара и България във войната, и др.

Публични пропагандатори във Facebook

От онлайн изданията пропагандата се прехвърля и в социалните мрежи, и по-специално във Facebook. Разпространението там се осъществява основно чрез препубликуване на съдържание, което вече е пуснато в определени медии. „Това става чрез разнообразни публични профили, страници и групи“, коментира Вероника Димитрова, която е сред авторите на изследването.

Сред най-активните профили, бълващи руска пропаганда, логично, е страницата на Руското посолство у нас. „Това не е прецедент. Подобно изследване показва, че в Германия положението е същото“, коментира Димитрова.

Най-активните публични разпространители на тезите на Кремъл във Facebook са лидерът на „Възраждане“ Костадин Костадинов и журналистът Мартин Карбовски. Влиянието им може да се определи като сериозно, тъй като и двамата имат много последователи в социалната мрежа – тези на Костадинов са 288 000, а на Карбовски – 528 000. В профила на журналиста се публикува много повече съдържание – средно около 11 поста на ден срещу около 4 на стената на политика.

Според анализ на публикациите, направен с инструмента Fanpage Karma, съдържанието в профила на Карбовски представлява основно линкове към страници от определени новинарски сайтове – lentata.com и vtorifront.bg. А сред най-често използваните думи в публикациите, които генерират и реакция от потребителите, са „Русия“, „САЩ“, „Украйна“, „България“.

И в профила на Костадинов сред ключовите думи са „България“, „Украйна“, „война“. Интеракциите, които постовете на лидера на „Възраждане“ предизвикват, са повече от тези на страницата на Карбовски – 2% средно интеракции на пост и на последовател за Костадинов срещу 0,8% за Карбовски. Костадинов разпространява основно „авторско“ съдържание – статуси, снимки и видеа, и много по-малко линкове към информация, създадена от друг.

Освен в тези два профила, много пропагандни материали се разпространяват и в страници на новинарски сайтове като pogled.info, informiran.net, epicenter.bg.

Ефектът на групите

Руската пропаганда таргетира Facebook потребители, недоволни от политически партии и от доскорошни управляващи, също така русофили, хора с носталгия към социализма и привърженици на БСП и на „Възраждане“. Това са изводите от анализа на публичните Facebook групи, които разпространяват пропагандно съдържание.

Най-активните места, в които се публикуват кремълски тези, може да се разделят условно на няколко вида. Първите са Facebook групи с политическа насоченост. „Заглавията им са свързани с протест, недоволство срещу дадени политически лица и формации“, коментира Вероника Димитрова. Според нея в тези „пространства“ се прави опит за манипулация и за канализиране на недоволството през руската пропаганда.

„Много от активните групи са свързани с имената на политици, като президента Румен Радев, лидерката на БСП Корнелия Нинова“, добави Димитрова.

Пропаганда се разпространява и във Facebook групи за хоби и интереси. Така например част от групите срещу ваксините и мерките за ограничаване на COVID-19 се преориентират с началото на войната в Украйна и в тях вече се публикува основно информация, разпространяваща опорните точки на Кремъл.

„Пропагандата се прикачва към недоволството и това води до негативно отношение, виктимизация, загубва се активната гражданска енергия. Има и подривно действие спрямо ангажиментите, които сме поели към ЕС и НАТО“, коментира Вероника Димитрова. Така проруските постове активизират хората във Facebook, карат ги да коментират, харесват и споделят, но същевременно ги правят апатични и граждански неактивни в реалния живот.

Огромният проблем е, че колкото повече реакции от потребителите има даден пост, толкова повече алгоритъмът на Facebook го показва и на други хора със сходни интереси. Така той става още по-популярен и достига до още повече хора. И веднъж харесали, коментирали или споделили такова съдържание, потребителите започват да получават повече от същото.

Заглавна илюстрация: © Пеню Кирацов

„Тоест“ е официален партньор за публикуването на материалите от поредицата „Хроники на инфодемията“, реализирана от АЕЖ-България съвместно с Фондация „Фридрих Науман“.
Query expansion based on user behaviour

Post Syndicated from Grab Tech original https://engineering.grab.com/query-expansion-based-on-user-behaviour

Introduction

Our consumers used to face a few common pain points while searching for food with the Grab app. Sometimes, the results would include merchants that were not yet operational or locations that were out of the delivery radius. Other times, no alternatives were provided. The search system would also have difficulties handling typos, keywords in different languages, synonyms, and even word spacing issues, resulting in a suboptimal user experience.

Over the past few months, our search team has been building a query expansion framework that can solve these issues. When a user query comes in, it expands the query to a few related keywords based on semantic relevance and user intention. These expanded words are then searched with the original query to recall more results that are high-quality and diversified. Now let’s take a deeper look at how it works.

Query expansion framework

Building the query expansion corpus

We used two different approaches to produce query expansion candidates: manual annotation for top keywords and data mining based on user rewrites.

Manual annotation for top keywords

Search has a pronounced fat head phenomenon. The most frequent thousand of keywords account for more than 70% of the total search traffic. Therefore, handling these keywords well can improve the overall search quality a lot. We manually annotated the possible expansion candidates for these common keywords to cover the most popular merchants, items and alternatives. For instance, “McDonald’s” is annotated with {“burger”, “western”}.

Data mining based on user rewrites

We observed that sometimes users tend to rewrite their queries if they are not satisfied with the search result. As a pilot study, we checked the user rewrite records within some user search sessions and found several interesting samples:

{Ya Kun Kaya Toast,Starbucks}
{healthy,Subway}
{Muni,Muji}
{奶茶,koi}
{Roti,Indian}

We can see that besides spelling corrections, users’ rewrite behaviour also reveals deep semantic relations between these pairs that cannot be easily captured by lexical similarity, such as similar merchants, merchant attributes, language differences, cuisine types, and so on. We can leverage the user’s knowledge to build a query expansion corpus to improve the diversity of the search result and user experience. Furthermore, we can use the wisdom of the crowd to find some common patterns with higher confidence.

Based on this intuition, we leveraged the high volume of search click data available in Grab to generate high-quality expansion pairs at the user session level. To augment the original queries, we collected rewrite pairs that happened to multiple users and multiple times in a time period. Specifically, we used the heuristic rules below to collect the rewrite pairs:

  • Select the sessions where there are at least two distinct queries (rewrite session)
  • Collect adjacent query pairs in the search session where the second query leads to a click but the first does not (effective rewrite)
  • Filter out the sample pairs with time interval longer than 30 seconds in between, as users are more likely to change their mind on what to look for in these pairs (single intention)
  • Count the occurrences and filter out the low-frequency pairs (confidence management)

After we have the mining pairs, we categorised and annotated the rewrite types to gain a deeper understanding of the user’s rewrite behaviour. A few samples mined from the Singapore area data are shown in the table below.

Original query Rewrite query Frequency in a month Distinct user count Type
playmade by 丸作 playmade 697 666 Drop keywords
mcdonald’s burger 573 535 Merchant -> Food
Bubble tea koi 293 287 Food -> Merchant
Kfc McDonald’s 238 234 Merchant -> Merchant
cake birthday cake 206 205 Add words
麦当劳 mcdonald’s 205 199 Locale change
4 fingers 4fingers 165 162 Space correction
krc kfc 126 124 Spelling correction
5 guys five guys 120 120 Number synonym
koi the koi thé 45 44 Tone change

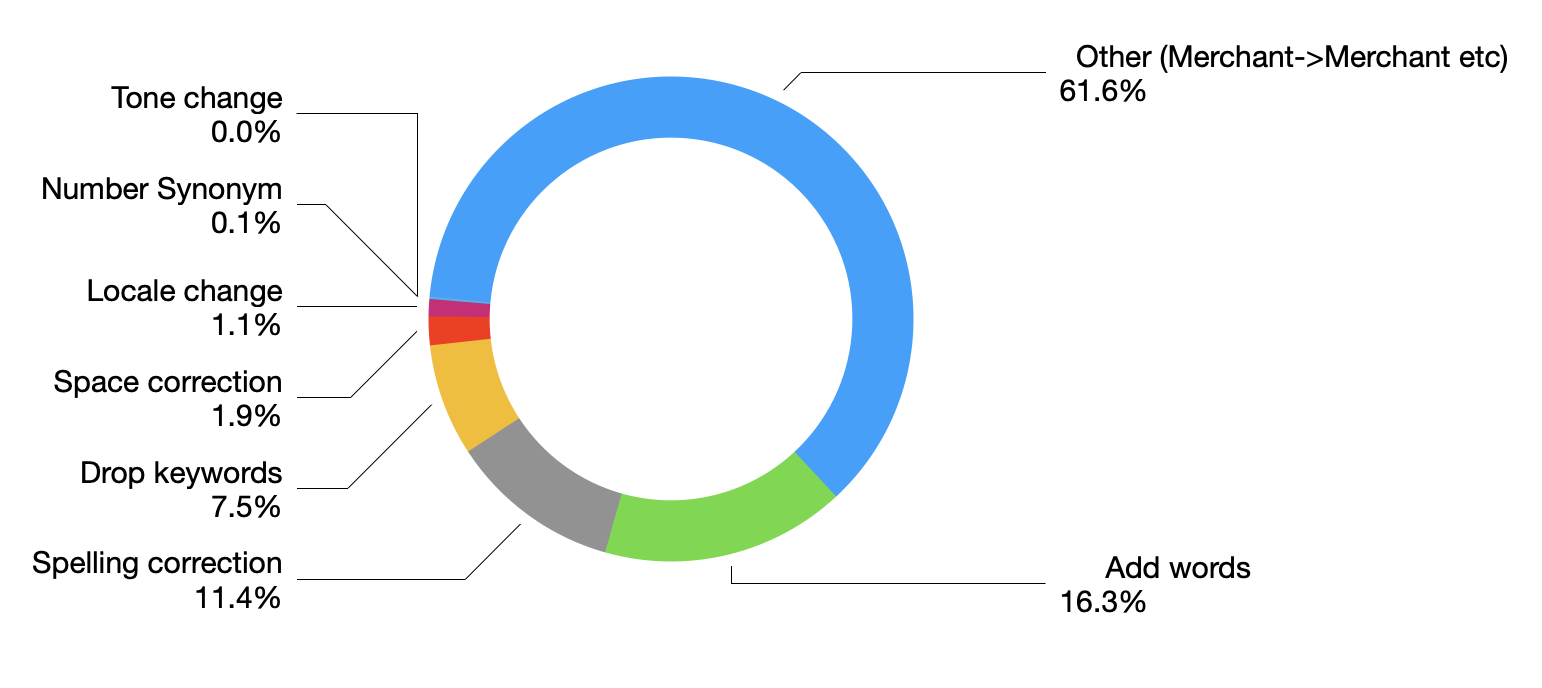
We further computed the percentages of some categories, as shown in the figure below.

Figure 1. The donut chart illustrates the percentages of the distinct user counts for different types of rewrites.

Apart from adding words, dropping words and spelling corrections, a significant portion of the rewrites are in the category of Other. It is more semantic driven, such as merchant to merchant, or merchant to cuisine. Those rewrites are useful for capturing deeper connections between queries and can be a powerful diversifier to query expansion.

Grouping

After all the rewrite pairs were discovered offline through data mining, we grouped the query pairs by the original query to get the expansion candidates of each query. For serving efficiency, we limited the max number of expansion candidates to three.

Query expansion serving

Expansion matching architecture

The expansion matching architecture benefits from the recent search architecture upgrade, where the system flow is changed to a query understanding, multi-recall and result fusion flow. In particular, a query goes through the query understanding module and gets augmented with additional information. In this case, the query understanding module takes in the keyword and expands it to multiple synonyms, for example, KFC will be expanded to fried chicken. The original query together with its expansions are sent together to the search engine under the multi-recall framework. After that, results from multiple recallers with different keywords are fused together.

Continuous monitoring and feedback loop

It’s important to make sure the expansion pairs are relevant and up-to-date. We run the data mining pipeline periodically to capture the new user rewrite behaviours. Meanwhile, we also monitor the expansion pairs’ contribution to the search result by measuring the net contribution of recall or user interaction that the particular query brings, and eliminate the obsolete pairs in an automatic way. This reflects our effort to build an adaptive system.

Results

We conducted online A/B experiments across 6 countries in Southeast Asia to evaluate the expanded queries generated by our system. We set up 3 groups:

  • Control group, where no query is expanded.
  • Treatment group 1, where we expanded the queries based on manual annotations only.
  • Treatment group 2, where we expanded the queries using the data mining approach.

We observed decent uplift in click-through rate and conversion rate from both treatment groups. Furthermore, in treatment group 2, the data mining approach produced even better results.

Future work

Data mining enhancement

Currently, the data mining approach can only identify the pairs from the same search session by one user. This limits the number of linked pairs. Some potential enhancements include:

  • Augment expansion pairs by associating queries from different users who click on the same merchant/item, for example, using a click graph. This can capture relevant queries across user sessions.
  • Build a probabilistic model on top of the current transition pairs. Currently, all the transition pairs are equally weighted but apparently, the transitions that happen more often should carry higher probability/weights.

Ads application

Query expansion can be applied to advertising and would increase ads fill rate. With “KFC” expanded to “fried chicken”, the sponsored merchants who buy the keyword “fried chicken” would be eligible to show up when the user searches “KFC”. This would enable Grab to provide more relevant sponsored content to our users, which helps not only the consumers but also the merchants.

Special thanks to Zhengmin Xu and Daniel Ng for proofreading this article.

Join us

Grab is the leading superapp platform in Southeast Asia, providing everyday services that matter to consumers. More than just a ride-hailing and food delivery app, Grab offers a wide range of on-demand services in the region, including mobility, food, package and grocery delivery services, mobile payments, and financial services across 428 cities in eight countries.

Powered by technology and driven by heart, our mission is to drive Southeast Asia forward by creating economic empowerment for everyone. If this mission speaks to you, join our team today!

Introducing our final AWS Heroes of the year – November 2022

Post Syndicated from Taylor Lacy original https://aws.amazon.com/blogs/aws/introducing-our-final-aws-heroes-of-the-year-november-2022/

The AWS Heroes program celebrates and recognizes builders who are making an impact within the global AWS community. As we come to the end of 2022, the program is recognizing seven individuals who are passionate about AWS, and focused on organizing and speaking at community events, mentoring, authoring content, and even preserving wildlife. Please meet the newest AWS Heroes!

Ed Miller – San Jose, USA

Machine Learning Hero Ed Miller is a Senior Principal Engineer at Arm where he leads technical engagements with strategic partners around machine learning and IoT. He also volunteers with the BearID Project, developing open source, machine learning solutions for non-invasive wildlife monitoring. Ed is working on a human-in-the-loop machine learning application for identifying the famous fat bears on Explore.org’s Brooks Falls Brown Bears webcam. The serverless application, Bearcam Companion, is built using AWS Amplify and various AWS AI services. You can read about it and other projects on Ed’s blogs at dev.to, Hashnode, and the BearID Project.

Jones Zachariah Noel N – Karnataka, India

Serverless Hero Jones Zachariah Noel N is a Senior Developer Advocate in the Developer Relations ecospace at Freshworks, and has previously worked as a Cloud Architect – Serverless where he was focused on designing and architecting solutions built with the AWS Serverless tech stack. Jones is a tech enthusiast who loves to interact with the community, which has helped him learn and share his knowledge, as he also co-organizes AWS User Group Bengaluru. He writes regularly about AWS Serverless and talks about new features and different Serverless services, which can help you level up your Serverless applications’ architecture on dev.to. Additionally, Jones co-runs a YouTube podcast called The Zacs’ Show Talking AWS about DevOps and Serverless practices along with another Zack whom he met through the AWS Community Builder program.

Luciano Mammino – Dublin, Ireland

Serverless Hero Luciano Mammino is a full-stack web developer and a senior cloud architect at fourTheorem. He is a co-author of the book Node.js Design Patterns and co-host of the podcast AWS Bites. Luciano is one of the creators of Middy, one of the most adopted middleware-based Node.js frameworks for AWS Lambda. Through fourTheorem, he also contributes to several other open-source projects in the serverless space, such as SLIC Watch for automated observability. Finally, he is also an eager tech speaker who has evangelized the adoption of serverless from the very early days.

Madhu Kumar – Budapest, Hungary

Container Hero Madhu Kumar is a Principal Cloud Architect and Product Owner (Container Services) working for T-Systems International with over 22 years of IT experience working across multiple regions, including Asia, the Middle East, the US, Europe, and the UK. He is an AWS User Group Leader, DevSecCon Chapter Leader for Hungary, DevOps Institute Brand Ambassador and Chapter Leader, HashiCorp User Group Leader for Hungary, and formally an AWS Community Builder. Madhu is passionate about organizing meetups, driving and assisting global and local communities to come together, and sharing knowledge. He is also a regular speaker at container conferences and AWS events.

Paweł Zubkiewicz – Wroclaw, Poland

Serverless Hero Paweł Zubkiewicz works as a Cloud Architect and Consultant who helps companies build products on AWS. In 2018, Paweł started Serverless Polska, an online community for serverless enthusiasts where he shares his technical knowledge and introduces serverless to a broader audience. Shortly after, he began publishing a newsletter about serverless and AWS cloud. He continuously shares his expertise and insights with the Polish-speaking community to this day, both online and as a conference speaker. Before becoming an AWS Hero, he was an AWS Community Builder since 2020, and shares serverless tutorials on dev.to. He lives in Wroclaw, Poland with his wife and his dog named Pixel. He’s an avid mountain biker and a traveler.

Rossana Suarez – Resistencia, Argentina

Container Hero Rossana Suarez is a DevOps consultant and trainer. She started the ‘295devops’ channel to share her expertise about various DevOps topics, and to help enthusiasts get into the field more easily and with more motivation. She consults with teams of developers and DevOps engineers to help them improve their existing processes for automations, CI/CD, containerization, and orchestration. Rossana presents at Women in Technology’s local meetups to encourage more women to pursue careers in DevOps, is a volunteer with AWS Girls Argentina, and is a frequent speaker about container technologies at AWS Community Days, ContainersDays, and more.

TaeSeong Park – Seoul, Korea

Community Hero TaeSeong Park is a front-end engineer and Unity mobile developer working at IDEASAM. He’s spoken at major AWSKRUG community events, and has led hands-on labs specific to a front-end and mobile app on AWS Amplify. For the past 5 years, TaeSeong has been an organizer of the AWSKRUG Group and was an AWS Community Builder for 2-years. Not only he did he organize the AWSKRUG Gudi meetup, but he’s been a speaker and supporter of other AWSKRUG meetups.

Learn More

If you’d like to learn more about the new Heroes or connect with a Hero near you, please visit the AWS Heroes website or browse the AWS Heroes Content Library.

— Taylor

Your guide to streaming data & real-time analytics at re:Invent 2022

Post Syndicated from Anna Montalat original https://aws.amazon.com/blogs/big-data/your-guide-to-streaming-data-real-time-analytics-at-reinvent-2022/

Mark your calendars for November 28 through December 2, 2022 to attend AWS re:Invent in Las Vegas – a learning conference hosted by AWS for the global cloud computing community.

To maximize the value of your data, you need to act upon it in real time, instead of waiting for hours, days, or week. AWS streaming data services offer unmatched, end to end capabilities to build real-time streaming data pipelines and applications to maximize the value of your data and act upon it in real time. You can leverage Kinesis Data Streams, Kinesis Video Streams and Amazon Managed Streaming for Apache Kafka (MSK) to collect and store data streams at scale; Kinesis Data Firehose to load real-time streams into data lakes, warehouses, and analytics services; and Kinesis Data Analytics to analyze streaming data in real time using Apache Flink. With streaming data architectures, customers can analyze data as soon as it is produced, get timely insights and make real-time decisions to capitalize on opportunities, enhance customer experiences, prevent networking failures, or update critical business metrics in real-time, just to name a few. This post walks you through the key sessions on streaming data and analytics that you cannot miss this year at reInvent to help you plan your conference week accordingly.

To access the session catalog and reserve your seat for one of our streaming data and analytics sessions, you must be registered for re:Invent. Register now!

Keynotes and leadership sessions you cannot miss!

Speakers have always been a key piece of the re:Invent puzzle. This year is no different, and you’ll have the chance to hear from some of the leading voices at AWS.

Adam Selipsky, Chief Executive Officer of Amazon Web Services – Keynote

Tuesday November 29 | 8:30 AM – 10:30 AM PST | The Venetian

Join Adam Selipsky, CEO of Amazon Web Services, as he looks at the ways that forward-thinking builders are transforming industries and even our future, powered by AWS. He highlights innovations in data, infrastructure, security, and more that are helping customers achieve their goals faster, take advantage of untapped potential, and create a better future with AWS.

Reserve your seat now!

Swami Sivasubramanian, Vice President of AWS Data and Machine Learning – Keynote

Wednesday November 30 | 8:30 AM – 10:30 AM PST | The Venetian

Join Swami Sivasubramanian, Vice President of AWS Data and Machine Learning, as he unveils some of the latest AWS innovations, designed to help you transform data into meaningful insights. Hear from leading AWS customers who are using data to bring new experiences to life for their customers.

Reserve your seat now!

AWS storage innovations at exabyte scale – Leadership session

Tuesday November 29 | 11:00 – 12:00 PM PST | The Venetian

Data is the change agent driving digital transformation. In this session, Mai-Lan Tomsen Bukovec, AWS Tech VP, and Andy Warfield, AWS Distinguished Engineer, share the latest AWS storage innovations and an inside look at how customers drive modern business on data lakes and with high-performance data.

Reserve your seat now!

Unlock the value of your data with AWS analytics – Leadership session

Wednesday November 30 | 2:30 – 3:30 PM PST | The Venetian

Data fuels digital transformation and drives effective business decisions. In this session, G2 Krishnamoorthy, VP of AWS Analytics, addresses the current state of analytics on AWS, covers the latest service innovations around data, and highlights customer successes with AWS analytics.

Reserve your seat now!

Customer sessions

Join our customer sessions to learn first-hand how other organizations are maximizing the value of their data with real-time streaming data architectures, enabling them to untap new business opportunities, enhance processes, and deliver delightful customer experiences.

  • How Riot Games processes 20 TB of analytics data daily on AWS – Riot Games ingests about 20 TB of data every day on AWS. This data powers a wide range of services, including game matchmaking, in-game personalization, analytics, security, and player behavior management. Join this session to learn how Riot Games transformed their data ingestion pipeline to query data from 6 hours after it was produced down to just 5 minutes. Reserve your seat now!
  • How Samsung modernized architecture for real-time analytics – In this session, Samsung SmartThings shares how they modernized their streaming data analytics architecture for real-time analytics. Originally, Samsung developers spent most of their time managing infrastructure. After migrating to Amazon Kinesis Data Analytics, developers were able to focus on delivering business value without needing to worry about infrastructure management. Reserve your seat now!
  • Leveling up computer vision and artificial intelligence development – Seeing is believing, and Kami Vision is proof! In this session, Kami Vision speaks to how they utilized Amazon Kinesis Video Streams to do the undifferentiated video lifting so that they could develop KamiCare fall detection—an accurate way to monitor if a person has fallen to the floor and cannot get up. Reserve your seat now!
  • How Sony Orchard accelerated innovation with Amazon MSK – The Orchard, a subsidiary of Sony Music Entertainment, built a high-performing data synchronization solution using Amazon Managed Streaming for Apache Kafka (Amazon MSK). Learn how their data synchronization and search capabilities improved using this solution. Reserve your seat now!
  • How Poshmark accelerates growth via real-time analytics & personalization – Find out how Poshmark designed real-time personalization using real-time event capture to deliver tailored customer experiences, reduce security risks, and enable end-users to more confidently interact with the Poshmark app. Reserve your seat now!
  • Building and operating at scale with feature management (sponsored by LaunchDarkly) – LaunchDarkly customers deliver software applications that support millions of end-users at any given time. They rely on LaunchDarkly to launch, control, and measure those applications in real time without negative customer impact. In this session, we’ll discuss key architecture decisions and LaunchDarkly best practices. Reserve your seat now!

Breakout sessions

AWS re:Invent breakout sessions are lecture-style and one hour long. These sessions take place across the re:Invent campus and cover all topics at all levels.

  • What’s new in AWS streaming – Streaming data and analytics help your business make real-time contextual decisions, deliver personalized customer experiences, and untap new opportunities in real time. Join us to find out about the latest innovations in the AWS streaming portfolio. Reserve your seat now!
  • Build a managed analytics platform for your ecommerce business – With the increase in popularity of online shopping, building an analytics platform for ecommerce is important for any organization because it provides insights about the business, trends, and customer behavior. Join us to learn how to build a complete analytics platform in batch and real-time mode. Reserve your seat now!
  • Publishing real-time financial data feeds using Kafka – This session describes how to offer a real-time financial data feed as a service on AWS. With Amazon MSK, you can use Kafka to allow your customers to subscribe to message topics containing the financial data of interest. We will cover connectivity best practices for scalability, security options for a secure architecture, and lessons learned from customers that are using AWS to distribute financial data on AWS. Reserve your seat now!
  • Interact with streaming data using Amazon Kinesis Data Analytics Studio – Join us in this theater session to learn how analyzing streaming data provides the timely, actionable insights a business needs to grow. Reserve your seat now!

Chalk talks

Chalk talks are a highly interactive content format with a small audience. Each begins with a short lecture delivered by an AWS expert followed by a Q&A session with the audience.

  • Modern data exchange using AWS data streaming – We’ll explore how different systems sync low-latency data changes using Apache Hudi backed by Amazon Simple Storage Service (Amazon S3) in a data mesh architecture. This modern architecture allows developers to build streaming jobs that read, join, and aggregate data from multiple datasets and sync data changes to downstream data stores. Reserve your seat now!
  • Build a serverless streaming workload with Amazon Kinesis – Collecting, processing, and analyzing streaming data is easy with Amazon Kinesis services. Make plans for this chalk talk that will take your streaming capabilities to the next level. Reserve your seat now!

Workshops

Workshops are two-hour hands-on sessions where you work in teams to solve problems using AWS services. Workshops organize attendees into small groups and provide scenarios to encourage interaction, giving you the opportunity to learn from and teach each other. Don’t forget to bring your laptop!

  • Building a serverless Apache Kafka data pipeline – Serverless means “focus on what matters”! In this workshop, we’ll show how you can build a serverless data pipeline using Amazon MSK Serverless, deploy a Kafka client container-based AWS Lambda function, and much more! Reserve your seat now!
  • Event detection with Amazon MSK and Amazon Kinesis Data Analytics – When in Las Vegas, you do as Las Vegans do! In this workshop, you’ll see how casinos use Amazon MSK, Amazon Kinesis Data Analytics Studio, and AWS Lambda to enhance customer experiences. Reserve your seat now!
  • Build smart camera applications using Amazon Kinesis Video Streams WebRTC – Amazon Kinesis Video Streams WebRTC helps users to easily build low-latency video solutions such as smart doorbells, connected vehicles, surveillance cameras, and more. Join this workshop for hands-on experience building a complete real-world video solution, including setting up a device with a camera to transmit video. Reserve your seat now!

Fun, fun, and more fun!

All work and no play … not at re:Invent! Sure, we’ll work hard and learn a lot, but we also plan to have a great time while we’re together. Our gamified learning sessions will give you real-life learning opportunities through interactive events that promise to be fun and entertaining!

The fun continues with AWS Builder Labs, where you’ll have the opportunity to test your skills in sandbox settings while working alongside some of the leading minds from AWS!

And don’t forget to visit the Analytics kiosk within the AWS Village to meet with experts to dive deeper into AWS streaming data services such as Kinesis Data Streams, Kinesis Data Firehose, Kinesis Data Analytics and Amazon MSK. You will be able to ask our experts questions and experience live demos for our newly launched capabilities. Make sure to stop by the swag distribution table to grab free Analytics swag if you have attended either the Analytics kiosk or one of our breakout sessions, chalk talks, or workshops.

Register today

Keep your eyes on this post for more updates and exciting news. It’s going to be a simply amazing event and we can’t wait to see you at re:Invent 2022, the world’s premier tech event! Register now to secure your spot!


About the author

Anna Montalat is a Senior Product Marketing Manager for AWS streaming data services which includes Amazon Managed Streaming for Apache Kafka (MSK), Kinesis Data Streams, Kinesis Video Streams, Kinesis Data Firehose, and Kinesis Data Analytics. She is passionate about bringing new and emerging technologies to market, working closely with service teams and enterprise customers. Outside of work, Anna skis through winter time and sails through summer.

[$] Scaling the KVM community

Post Syndicated from original https://lwn.net/Articles/914638/

The scalability of Linus Torvalds was a
recurring theme during Linux’s early years; these days maintainer struggles
are a recognized problem within open-source
communities in general. It is thus not surprising that Sean Christopherson
gave a talk at Open Source Summit Europe (and KVM Forum) with the title
“Scaling KVM and its community”. The talk mostly focused on KVM for the
x86 architecture—the largest and most mature KVM architecture—which
Christopherson
co-maintains. But it was not a technical talk: most of the content can be
applied to other KVM architectures, or even other Linux subsystems, so that
they can avoid making the same kinds of mistakes.

Building serverless .NET applications on AWS Lambda using .NET 7

Post Syndicated from James Beswick original https://aws.amazon.com/blogs/compute/building-serverless-net-applications-on-aws-lambda-using-net-7/

This post is written by James Eastham, Senior Cloud Architect, Beau Gosse, Senior Software Engineer, and Samiullah Mohammed, Senior Software Engineer

Today, AWS is announcing tooling support to enable applications running .NET 7 to be built and deployed on AWS Lambda. This includes applications compiled using .NET 7 native AOT. .NET 7 is the latest version of .NET and brings many performance improvements and optimizations.

Native AOT enables .NET code to be ahead-of-time compiled to native binaries for up to 86% faster cold starts when compared to the .NET 6 managed runtime. The fast execution and lower memory consumption of native AOT can also result in reduced Lambda costs. This post walks through how to get started running .NET 7 applications on AWS Lambda with native AOT.

Overview

Customers can use .NET 7 with Lambda in two ways. First, Lambda has released a base container image for .NET 7, enabling customers to build and deploy .NET 7 functions as container images. Second, you can use Lambda’s custom runtime support to run functions compiled to native code using .NET 7 native AOT. Lambda has not released a managed runtime for .NET 7, since it is not a long-term support (LTS) release.

Native AOT allows .NET applications to be pre-compiled to a single binary, removing the need for JIT (Just In Time compilation) and the .NET runtime. To use this binary in a custom runtime, it needs to include the Lambda runtime client. The runtime client integrates your application code with the Lambda runtime API, which enables your application code to be invoked by Lambda.

The enhanced tooling announced today streamlines the tasks of building .NET applications using .NET 7 native AOT and deploying them to Lambda using a custom runtime. This tooling comprises three tools. The AWS Lambda extension to the ‘dotnet’ CLI (Amazon.Lambda.Tools) contains the commands to build and deploy Lambda functions using .NET. The dotnet CLI can be used directly, and is also used by the AWS Toolkit for Visual Studio, and the AWS Serverless Application Model (AWS SAM), an open-source framework for building serverless applications.

Native AOT compiles code for a specific OS version. If you run the dotnet publish command on your machine, the compiled code only runs on the OS version and processor architecture of your machine. For your application code to run in Lambda using native AOT, the code must be compiled on the Amazon Linux 2 (AL2) OS. The new tooling supports compiling your Lambda functions within an AL2-based Docker image, with the compiled application stored on your local hard drive.

Develop Lambda functions with .NET 7 native AOT

In this section, we’ll discuss how to develop your Lambda function code to be compatible with .NET 7 native AOT. This is the first GA version of native AOT Microsoft has released. It may not suit all workloads, since it does come with trade-offs. For example, dynamic assembly loading and the System.Reflection.Emit library are not available. Native AOT also trims your application code, resulting in a small binary that contains the essential components for your application to run.

Prerequisites

Getting Started

To get started, create a new Lambda function project using a custom runtime from the .NET CLI.

dotnet new lambda.NativeAOT -n LambdaNativeAot
cd ./LambdaNativeAot/src/LambdaNativeAot/
dotnet add package Amazon.Lambda.APIGatewayEvents
dotnet add package AWSSDK.Core

To review the project settings, open the LambdaNativeAot.csproj file. The target framework in this template is set to net7.0. To enable native AOT, add a new property named PublishAot, with value true. This PublishAot flag is an MSBuild property required by the .NET SDK so that the compiler performs native AOT compilation.

When using Lambda with a custom runtime, the Lambda service looks for an executable file named bootstrap within the packaged ZIP file. To enable this, the OutputType is set to exe and the AssemblyName to bootstrap.

The correctly configured LambdaNativeAot.csproj file looks like this:

<Project Sdk="Microsoft.NET.Sdk">
  <PropertyGroup>
    <OutputType>Exe</OutputType>
    <TargetFramework>net7.0</TargetFramework>
    <ImplicitUsings>enable</ImplicitUsings>
    <Nullable>enable</Nullable>
    <AWSProjectType>Lambda</AWSProjectType>
    <AssemblyName>bootstrap</AssemblyName>
    <PublishAot>true</PublishAot>
  </PropertyGroup> 
  …
</Project>

Function code

Running .NET with a custom runtime uses the executable assembly feature of .NET. To do this, your function code must define a static Main method. Within the Main method, you must initialize the Lambda runtime client, and configure the function handler and the JSON serializer to use when processing Lambda events.

The Amazon.Lambda.RuntimeSupport Nuget package is added to the project to enable this runtime initialization. The LambdaBootstrapBuilder.Create() method is used to configure the handler and the ILambdaSerializer implementation to use for (de)serialization.

private static async Task Main(string[] args)
{
    Func<string, ILambdaContext, string> handler = FunctionHandler;
    await LambdaBootstrapBuilder.Create(handler, new DefaultLambdaJsonSerializer())
        .Build()
        .RunAsync();
}

Assembly trimming

Native AOT trims application code to optimize the compiled binary, which can cause two issues. The first is with de/serialization. Common .NET libraries for working with JSON like Newtonsoft.Json and System.Text.Json rely on reflection. The second is with any third party libraries not yet updated to be trim-friendly. The compiler may trim out parts of the library that are required for the library to function. However, there are solutions for both issues.

Working with JSON

Source generated serialization is a language feature introduced in .NET 6. It allows the code required for de/serialization to be generated at compile time instead of relying on reflection at runtime. One drawback of native AOT is that the ability to use System.Relefection.Emit library is lost. Source generated serialization enables developers to work with JSON while also using native AOT.

To use the source generator, you must define a new empty partial class that inherits from System.Text.Json.JsonSerializerContext. On the empty partial class, add the JsonSerializable attribute for any .NET type that your application must de/serialize.

In this example, the Lambda function needs to receive events from API Gateway. Create a new class in the project named HttpApiJsonSerializerContext and copy the code below:

[JsonSerializable(typeof(APIGatewayHttpApiV2ProxyRequest))]
[JsonSerializable(typeof(APIGatewayHttpApiV2ProxyResponse))]
public partial class HttpApiJsonSerializerContext : JsonSerializerContext
{
}

When the application is compiled, static classes, properties, and methods are generated to perform the de/serialization.

This custom serializer must now also be passed in to the Lambda runtime to ensure that event inputs and outputs are serialized and deserialized correctly. To do this, pass a new instance of the serializer context into the runtime when bootstrapped. Here is an example of a Lambda function using API Gateway as a source:

using System.Text.Json.Serialization;
using Amazon.Lambda.APIGatewayEvents;
using Amazon.Lambda.Core;
using Amazon.Lambda.RuntimeSupport;
using Amazon.Lambda.Serialization.SystemTextJson;
namespace LambdaNativeAot;
public class Function
{
    /// <summary>
    /// The main entry point for the custom runtime.
    /// </summary>
    private static async Task Main()
    {
        Func<APIGatewayHttpApiV2ProxyRequest, ILambdaContext, Task<APIGatewayHttpApiV2ProxyResponse>> handler = FunctionHandler;
        await LambdaBootstrapBuilder.Create(handler, new SourceGeneratorLambdaJsonSerializer<HttpApiJsonSerializerContext>())
            .Build()
            .RunAsync();
    }

    public static async Task<APIGatewayHttpApiV2ProxyResponse> FunctionHandler(APIGatewayHttpApiV2ProxyRequest apigProxyEvent, ILambdaContext context)
    {
        // API Handling logic here
        return new APIGatewayHttpApiV2ProxyResponse()
        {
            StatusCode = 200,
            Body = "OK"
        };
    }
}

Third party libraries

The .NET compiler provides the capability to control how applications are trimmed. For native AOT compilation, this enables us to exclude specific assemblies from trimming. For any libraries used in your applications that may not yet be trim-friendly this is a powerful way to still use native AOT. This is important for any of the Lambda event source NuGet packages like Amazon.Lambda.ApiGatewayEvents. Without controlling this, the C# objects for the Amazon API Gateway event sources are trimmed, leading to serialization errors at runtime.

Currently, the AWSSDK.Core library used by all the .NET AWS SDKs must also be excluded from trimming.

To control the assembly trimming, create a new file in the project root named rd.xml. Full details on the rd.xml format are found in the Microsoft documentation. Adding assemblies to the rd.xml file excludes them from trimming.

The following example contains an example of how to exclude the AWSSDK.Core, API Gateway event and function library from trimming:

<Directives xmlns="http://schemas.microsoft.com/netfx/2013/01/metadata">
	<Application>
		<Assembly Name="AWSSDK.Core" Dynamic="Required All"></Assembly>
		<Assembly Name="Amazon.Lambda.APIGatewayEvents" Dynamic="Required All"></Assembly>
		<Assembly Name="bootstrap" Dynamic="Required All"></Assembly>
	</Application>
</Directives>

Once added, the csproj file must be updated to reference the rd.xml file. Edit the csproj file for the Lambda project and add this ItemGroup:

<ItemGroup>
  <RdXmlFile Include="rd.xml" />
</ItemGroup>

When the function is compiled, assembly trimming skips the three libraries specified. If you are using .NET 7 native AOT with Lambda, we recommend excluding both the AWSSDK.Core library and the specific libraries for any event sources your Lambda function uses. If you are using the AWS X-Ray SDK for .NET to trace your serverless application, this must also be excluded.

Deploying .NET 7 native AOT applications

We’ll now explain how to build and deploy .NET 7 native AOT functions on Lambda, using each of the three deployment tools.

Using the dotnet CLI

Prerequisites

  • Docker (if compiling on a non-Amazon Linux 2 based machine)

Build and deploy

To package and deploy your Native AOT compiled Lambda function, run:

dotnet lambda deploy-function

When compiling and packaging your Lambda function code using the Lambda tools CLI, the tooling checks for the PublishAot flag in your project. If set to true, the tooling pulls an AL2-based Docker image and compiles your code inside. It mounts your local file system to the running container, allowing the compiled binary to be stored back to your local file system ready for deployment. As a default, the generated ZIP file is output to the bin/Release directory.

Once the deployment completes, you can execute the below command to invoke the created function, replacing the FUNCTION_NAME option with the name of the function chosen during deployment.

dotnet lambda invoke-function FUNCTION_NAME

Using the Visual Studio Extension

AWS is also announcing support for compiling and deploying native AOT-based Lambda functions from within Visual Studio using the AWS Toolkit for Visual Studio.

Prerequisites

Getting Started

As part of this release, templates are available in Visual Studio 2022 to get started using native AOT with AWS Lambda. From within Visual Studio, select File -> New Project. Search for Lambda .NET 7 native AOT to start a new project pre-configured for native AOT.

Create a new project

Build and deploy

Once the project is created, right-click the project in Visual Studio and choose Publish to AWS Lambda.

Solution Explorer

Complete the steps in the publish wizard and press upload. The log messages created by Docker appear in the publish window as it compiles your function code for native AOT.

Uploading function

You can now invoke the deployed function from within Visual Studio by setting the Example request dropdown to API Gateway AWS Proxy and pressing the Invoke button.

Invoke example

Using the AWS SAM CLI

Prerequisites

  • Docker (If compiling on a non-AL2 based machine)
  • AWS SAM v1.6.4 or later

Getting started

Support for compiling and deploying .NET 7 native AOT is built into the AWS SAM CLI. To get started, initialize a new AWS SAM project:

sam init

In the new project wizard, choose:

  1. What template source would you like to use? 1 – AWS Quick Start Template
  2. Choose an AWS Quick start application template. 1 – Hello World example
  3. Use the most popular runtime and package type? – N
  4. Which runtime would you like to use? aot.dotnet7 (provided.al2)
  5. Enable X-Ray Tracing? N
  6. Choose a project name

The cloned project includes the configuration to deploy to Lambda.

One new AWS SAM metadata property called ‘BuildMethod’ is required in the AWS SAM template:

HelloWorldFunction:
  Type: AWS::Serverless::Function
  Properties:
    Runtime: 'provided.al2' # // Use provided to deploy to AWS Lambda for .NET 7 native AOT
    Architectures:
      - x86_64
  Metadata:
    BuildMethod: 'dotnet7' # // But build with new build method for .NET 7 that calls into Amazon.Lambda.Tools 

Build and deploy

Build and deploy your serverless application, completing the guided deployment steps:

sam build
sam deploy –-guided

The AWS SAM CLI uses the Amazon.Lambda.Tools CLI to pull an AL2-based Docker image and compile your application code inside a container. You can use AWS SAM accelerate to speed up the update of serverless applications during development. It uses direct API calls instead of deploying changes through AWS CloudFormation, automating updates whenever you change your local code base. Learn more in the AWS SAM development documentation.

Conclusion

AWS now supports .NET 7 native AOT on Lambda. Read the Lambda Developer Guide for more getting started information. For more details on the performance improvements from using .NET 7 native AOT on Lambda, see the serverless-dotnet-demo repository on GitHub.

To provide feedback for .NET on AWS Lambda, contact the AWS .NET team on the .NET Lambda GitHub repository.

For more serverless learning resources, visit Serverless Land.

Introducing the price-capacity-optimized allocation strategy for EC2 Spot Instances

Post Syndicated from Sheila Busser original https://aws.amazon.com/blogs/compute/introducing-price-capacity-optimized-allocation-strategy-for-ec2-spot-instances/

This blog post is written by Jagdeep Phoolkumar, Senior Specialist Solution Architect, Flexible Compute and Peter Manastyrny, Senior Product Manager Tech, EC2 Core.

Amazon EC2 Spot Instances are unused Amazon Elastic Compute Cloud (Amazon EC2) capacity in the AWS Cloud available at up to a 90% discount compared to On-Demand prices. One of the best practices for using EC2 Spot Instances is to be flexible across a wide range of instance types to increase the chances of getting the aggregate compute capacity. Amazon EC2 Auto Scaling and Amazon EC2 Fleet make it easy to configure a request with a flexible set of instance types, as well as use a Spot allocation strategy to determine how to fulfill Spot capacity from the Spot Instance pools that you provide in your request.

The existing allocation strategies available in Amazon EC2 Auto Scaling and Amazon EC2 Fleet are called “lowest-price” and “capacity-optimized”. The lowest-price allocation strategy allocates Spot Instance pools where the Spot price is currently the lowest. Customers told us that in some cases the lowest-price strategy picks the Spot Instance pools that are not optimized for capacity availability and results in more frequent Spot Instance interruptions. As an improvement over lowest-price allocation strategy, in August 2019 AWS launched the capacity-optimized allocation strategy for Spot Instances, which helps customers tap into the deepest Spot Instance pools by analyzing capacity metrics. Since then, customers have seen a significantly lower interruption rate with capacity-optimized strategy when compared to the lowest-price strategy. You can read more about these customer stories in the Capacity-Optimized Spot Instance Allocation in Action at Mobileye and Skyscanner blog post. The capacity-optimized allocation strategy strictly selects the deepest pools. Therefore, sometimes it can pick high-priced pools even when there are low-priced pools available with marginally less capacity. Customers have been telling us that, for an optimal experience, they would like an allocation strategy that balances the best trade-offs between lowest-price and capacity-optimized.

Today, we’re excited to share the new price-capacity-optimized allocation strategy that makes Spot Instance allocation decisions based on both the price and the capacity availability of Spot Instances. The price-capacity-optimized allocation strategy should be the first preference and the default allocation strategy for most Spot workloads.

This post illustrates how the price-capacity-optimized allocation strategy selects Spot Instances in comparison with lowest-price and capacity-optimized. Furthermore, it discusses some common use cases of the price-capacity-optimized allocation strategy.

Overview

The price-capacity-optimized allocation strategy makes Spot allocation decisions based on both capacity availability and Spot prices. In comparison to the lowest-price allocation strategy, the price-capacity-optimized strategy doesn’t always attempt to launch in the absolute lowest priced Spot Instance pool. Instead, price-capacity-optimized attempts to diversify as much as possible across the multiple low-priced pools with high capacity availability. As a result, the price-capacity-optimized strategy in most cases has a higher chance of getting Spot capacity and delivers lower interruption rates when compared to the lowest-price strategy. If you factor in the cost associated with retrying the interrupted requests, then the price-capacity-optimized strategy becomes even more attractive from a savings perspective over the lowest-price strategy.

We recommend the price-capacity-optimized allocation strategy for workloads that require optimization of cost savings, Spot capacity availability, and interruption rates. For existing workloads using lowest-price strategy, we recommend price-capacity-optimized strategy as a replacement. The capacity-optimized allocation strategy is still suitable for workloads that either use similarly priced instances, or ones where the cost of interruption is so significant that any cost saving is inadequate in comparison to a marginal increase in interruptions.

Walkthrough

In this section, we illustrate how the price-capacity-optimized allocation strategy deploys Spot capacity when compared to the other two allocation strategies. The following example configuration shows how Spot capacity could be allocated in an Auto Scaling group using the different allocation strategies:

{
    "AutoScalingGroupName": "myasg ",
    "MixedInstancesPolicy": {
        "LaunchTemplate": {
            "LaunchTemplateSpecification": {
                "LaunchTemplateId": "lt-abcde12345"
            },
            "Overrides": [
                {
                    "InstanceRequirements": {
                        "VCpuCount": {
                            "Min": 4,
                            "Max": 4
                        },
                        "MemoryMiB": {
                            "Min": 0,
                            "Max": 16384
                        },
                        "InstanceGenerations": [
                            "current"
                        ],
                        "BurstablePerformance": "excluded",
                        "AcceleratorCount": {
                            "Max": 0
                        }
                    }
                }
            ]
        },
        "InstancesDistribution": {
            "OnDemandPercentageAboveBaseCapacity": 0,
            "SpotAllocationStrategy": "spot-allocation-strategy"
        }
    },
    "MinSize": 10,
    "MaxSize": 100,
    "DesiredCapacity": 60,
    "VPCZoneIdentifier": "subnet-a12345a,subnet-b12345b,subnet-c12345c"
}

First, Amazon EC2 Auto Scaling attempts to balance capacity evenly across Availability Zones (AZ). Next, Amazon EC2 Auto Scaling applies the Spot allocation strategy using the 30+ instances selected by attribute-based instance type selection, in each Availability Zone. The results after testing different allocation strategies are as follows:

  • Price-capacity-optimized strategy diversifies over multiple low-priced Spot Instance pools that are optimized for capacity availability.
  • Capacity-optimize strategy identifies Spot Instance pools that are only optimized for capacity availability.
  • Lowest-price strategy by default allocates the two lowest priced Spot Instance pools that aren’t optimized for capacity availability

To find out how each allocation strategy fares regarding Spot savings and capacity, we compare ‘Cost of Auto Scaling group’ (number of instances x Spot price/hour for each type of instance) and ‘Spot interruptions rate’ (number of instances interrupted/number of instances launched) for each allocation strategy. We use fictional numbers for the purpose of this post. However, you can use the Cloud Intelligence Dashboards to find the actual Spot Saving, and the Amazon EC2 Spot interruption dashboard to log Spot Instance interruptions. The example results after a 30-day period are as follows:

Allocation strategy

Instance allocation

Cost of Auto Scaling group

Spot interruptions rate

price-capacity-optimized

40 c6i.xlarge

20 c5.xlarge

$4.80/hour 3%

capacity-optimized

60 c5.xlarge

$5.00/hour

2%

lowest-price

30 c5a.xlarge

30 m5n.xlarge

$4.75/hour

20%

As per the above table, with the price-capacity-optimized strategy, the cost of the Auto Scaling group is only 5 cents (1%) higher, whereas the rate of Spot interruptions is six times lower (3% vs 20%) than the lowest-price strategy. In summary, from this exercise you learn that the price-capacity-optimized strategy provides the optimal Spot experience that is the best of both the lowest-price and capacity-optimized allocation strategies.

Common use-cases of price-capacity-optimized allocation strategy

Earlier we mentioned that the price-capacity-optimized allocation strategy is recommended for most Spot workloads. To elaborate further, in this section we explore some of these common workloads.

Stateless and fault-tolerant workloads

Stateless workloads that can complete ongoing requests within two minutes of a Spot interruption notice, and the fault-tolerant workloads that have a low cost of retries, are the best fit for the price-capacity-optimized allocation strategy. This category has workloads such as stateless containerized applications, microservices, web applications, data and analytics jobs, and batch processing.

Workloads with a high cost of interruption

Workloads that have a high cost of interruption associated with an expensive cost of retries should implement checkpointing to lower the cost of interruptions. By using checkpointing, you make the price-capacity-optimized allocation strategy a good fit for these workloads, as it allocates capacity from the low-priced Spot Instance pools that offer a low Spot interruptions rate. This category has workloads such as long Continuous Integration (CI), image and media rendering, Deep Learning, and High Performance Compute (HPC) workloads.

Conclusion

We recommend that customers use the price-capacity-optimized allocation strategy as the default option. The price-capacity-optimized strategy helps Amazon EC2 Auto Scaling groups and Amazon EC2 Fleet provision target capacity with an optimal experience. Updating to the price-capacity-optimized allocation strategy is as simple as updating a single parameter in an Amazon EC2 Auto Scaling group and Amazon EC2 Fleet.

To learn more about allocation strategies for Spot Instances, visit the Spot allocation strategies documentation page.

Running AI-ML Object Detection Model to Process Confidential Data using Nitro Enclaves

Post Syndicated from Sheila Busser original https://aws.amazon.com/blogs/compute/running-ai-ml-object-detection-model-to-process-confidential-data-using-nitro-enclaves/

This blog post was written by, Antoine Awad, Solutions Architect, Kevin Taylor, Senior Solutions Architect and Joel Desaulniers, Senior Solutions Architect.

Machine Learning (ML) models are used for inferencing of highly sensitive data in many industries such as government, healthcare, financial, and pharmaceutical. These industries require tools and services that protect their data in transit, at rest, and isolate data while in use. During processing, threats may originate from the technology stack such as the operating system or programs installed on the host which we need to protect against. Having a process that enforces the separation of roles and responsibilities within an organization minimizes the ability of personnel to access sensitive data. In this post, we walk you through how to run ML inference inside AWS Nitro Enclaves to illustrate how your sensitive data is protected during processing.

We are using a Nitro Enclave to run ML inference on sensitive data which helps reduce the attack surface area when the data is decrypted for processing. Nitro Enclaves enable you to create isolated compute environments within Amazon EC2 instances to protect and securely process highly sensitive data. Enclaves have no persistent storage, no interactive access, and no external networking. Communication between your instance and your enclave is done using a secure local channel called a vsock. By default, even an admin or root user on the parent instance will not be able to access the enclave.

Overview

Our example use-case demonstrates how to deploy an AI/ML workload and run inferencing inside Nitro Enclaves to securely process sensitive data. We use an image to demonstrate the process of how data can be encrypted, stored, transferred, decrypted and processed when necessary, to minimize the risk to your sensitive data. The workload uses an open-source AI/ML model to detect objects in an image, representing the sensitive data, and returns a summary of the type of objects detected. The image below is used for illustration purposes to provide clarity on the inference that occurs inside the Nitro Enclave. It was generated by adding bounding boxes to the original image based on the coordinates returned by the AI/ML model.

Image of airplanes with bounding boxes

Figure 1 – Image of airplanes with bounding boxes

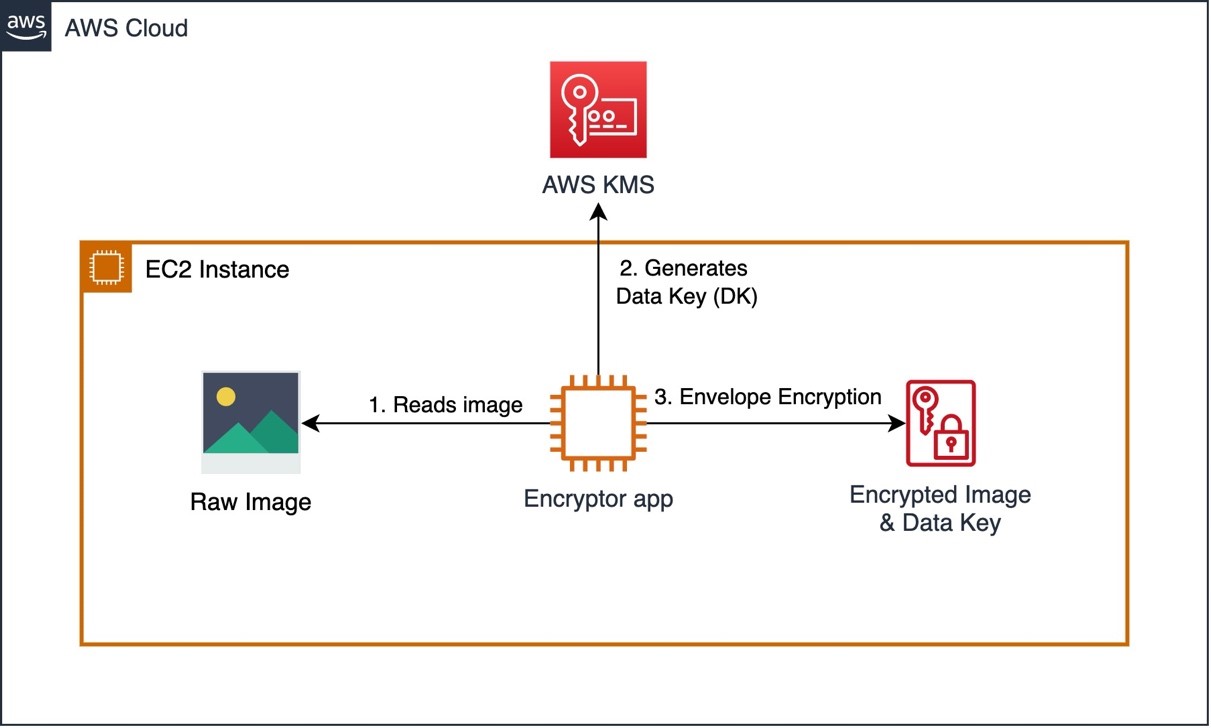
To encrypt this image, we are using a Python script (Encryptor app – see Figure 2) which runs on an EC2 instance, in a real-world scenario this step would be performed in a secure environment like a Nitro Enclave or a secured workstation before transferring the encrypted data. The Encryptor app uses AWS KMS envelope encryption with a symmetrical Customer Master Key (CMK) to encrypt the data.

Image Encryption with AWS KMS using Envelope Encryption

Figure 2 – Image Encryption with AWS KMS using Envelope Encryption

Note, it’s also possible to use asymmetrical keys to perform the encryption/decryption.

Now that the image is encrypted, let’s look at each component and its role in the solution architecture, see Figure 3 below for reference.

  1. The Client app reads the encrypted image file and sends it to the Server app over the vsock (secure local communication channel).
  2. The Server app, running inside a Nitro Enclave, extracts the encrypted data key and sends it to AWS KMS for decryption. Once the data key is decrypted, the Server app uses it to decrypt the image and run inference on it to detect the objects in the image. Once the inference is complete, the results are returned to the Client app without exposing the original image or sensitive data.
  3. To allow the Nitro Enclave to communicate with AWS KMS, we use the KMS Enclave Tool which uses the vsock to connect to AWS KMS and decrypt the encrypted key.
  4. The vsock-proxy (packaged with the Nitro CLI) routes incoming traffic from the KMS Tool to AWS KMS provided that the AWS KMS endpoint is included on the vsock-proxy allowlist. The response from AWS KMS is then sent back to the KMS Enclave Tool over the vsock.

As part of the request to AWS KMS, the KMS Enclave Tool extracts and sends a signed attestation document to AWS KMS containing the enclave’s measurements to prove its identity. AWS KMS will validate the attestation document before decrypting the data key. Once validated, the data key is decrypted and securely returned to the KMS Tool which securely transfers it to the Server app to decrypt the image.

Solution architecture diagram for this blog post

Figure 3 – Solution architecture diagram for this blog post

Environment Setup

Prerequisites

Before we get started, you will need the following prequisites to deploy the solution:

  1. AWS account
  2. AWS Identity and Access Management (IAM) role with appropriate access

AWS CloudFormation Template

We are going to use AWS CloudFormation to provision our infrastructure.

  1. Download the CloudFormation (CFN) template nitro-enclave-demo.yaml. This template orchestrates an EC2 instance with the required networking components such as a VPC, Subnet and NAT Gateway.
  2. Log in to the AWS Management Console and select the AWS Region where you’d like to deploy this stack. In the example, we select Canada (Central).
  3. Open the AWS CloudFormation console at: https://console.aws.amazon.com/cloudformation/
  4. Choose Create Stack, Template is ready, Upload a template file. Choose File to select nitro-enclave-demo.yaml that you saved locally.
  5. Choose Next, enter a stack name such as NitroEnclaveStack, choose Next.
  6. On the subsequent screens, leave the defaults, and continue to select Next until you arrive at the Review step
  7. At the Review step, scroll to the bottom and place a checkmark in “I acknowledge that AWS CloudFormation might create IAM resources with custom names.” and click “Create stack”
  8. The stack status is initially CREATE_IN_PROGRESS. It will take around 5 minutes to complete. Click the Refresh button periodically to refresh the status. Upon completion, the status changes to CREATE_COMPLETE.
  9. Once completed, click on “Resources” tab and search for “NitroEnclaveInstance”, click on its “Physical ID” to navigate to the EC2 instance
  10. On the Amazon EC2 page, select the instance and click “Connect”
  11. Choose “Session Manager” and click “Connect”

EC2 Instance Configuration

Now that the EC2 instance has been provisioned and you are connected to it, follow these steps to configure it:

  1. Install the Nitro Enclaves CLI which will allow you to build and run a Nitro Enclave application:
    sudo amazon-linux-extras install aws-nitro-enclaves-cli -y
    sudo yum install aws-nitro-enclaves-cli-devel -y
    
  2. Verify that the Nitro Enclaves CLI was installed successfully by running the following command:
    nitro-cli --version

    Nitro Enclaves CLI

  3. To download the application from GitHub and build a docker image, you need to first install Docker and Git by executing the following commands:
    sudo yum install git -y
    sudo usermod -aG ne ssm-user
    sudo usermod -aG docker ssm-user
    sudo systemctl start docker && sudo systemctl enable docker
    

Nitro Enclave Configuration

A Nitro Enclave is an isolated environment which runs within the EC2 instance, hence we need to specify the resources (CPU & Memory) that the Nitro Enclaves allocator service dedicates to the enclave.

  1. Enter the following commands to set the CPU and Memory available for the Nitro Enclave allocator service to allocate to your enclave container:
    ALLOCATOR_YAML=/etc/nitro_enclaves/allocator.yaml
    MEM_KEY=memory_mib
    DEFAULT_MEM=20480
    sudo sed -r "s/^(\s*${MEM_KEY}\s*:\s*).*/\1${DEFAULT_MEM}/" -i "${ALLOCATOR_YAML}"
    sudo systemctl start nitro-enclaves-allocator.service && sudo systemctl enable nitro-enclaves-allocator.service
    
  2. To verify the configuration has been applied, run the following command and note the values for memory_mib and cpu_count:
    cat /etc/nitro_enclaves/allocator.yaml

    Enclave Configuration File

Creating a Nitro Enclave Image

Download the Project and Build the Enclave Base Image

Now that the EC2 instance is configured, download the workload code and build the enclave base Docker image. This image contains the Nitro Enclaves Software Development Kit (SDK) which allows an enclave to request a cryptographically signed attestation document from the Nitro Hypervisor. The attestation document includes unique measurements (SHA384 hashes) that are used to prove the enclave’s identity to services such as AWS KMS.

  1. Clone the Github Project
    cd ~/ && git clone https://github.com/aws-samples/aws-nitro-enclaves-ai-ml-object-detection.git
  2. Navigate to the cloned project’s folder and build the “enclave_base” image:
    cd ~/aws-nitro-enclaves-ai-ml-object-detection/enclave-base-image
    sudo docker build ./ -t enclave_base

    Note: The above step will take approximately 8-10 minutes to complete.

Build and Run The Nitro Enclave Image

To build the Nitro Enclave image of the workload, build a docker image of your application and then use the Nitro CLI to build the Nitro Enclave image:

  1. Download TensorFlow pre-trained model:
    cd ~/aws-nitro-enclaves-ai-ml-object-detection/src
    mkdir -p models/faster_rcnn_openimages_v4_inception_resnet_v2_1 && cd models/
    wget -O tensorflow-model.tar.gz https://tfhub.dev/google/faster_rcnn/openimages_v4/inception_resnet_v2/1?tf-hub-format=compressed
    tar -xvf tensorflow-model.tar.gz -C faster_rcnn_openimages_v4_inception_resnet_v2_1
  2. Navigate to the use-case folder and build the docker image for the application:
    cd ~/aws-nitro-enclaves-ai-ml-object-detection/src
    sudo docker build ./ -t nitro-enclave-container-ai-ml:latest
  3. Use the Nitro CLI to build an Enclave Image File (.eif) using the docker image you built in the previous step:
    sudo nitro-cli build-enclave --docker-uri nitro-enclave-container-ai-ml:latest --output-file nitro-enclave-container-ai-ml.eif
  4. The output of the previous step produces the Platform configuration registers or PCR hashes and a nitro enclave image file (.eif). Take note of the PCR0 value, which is a hash of the enclave image file.Example PCR0:
    {
        "Measurements": {
            "PCR0": "7968aee86dc343ace7d35fa1a504f955ee4e53f0d7ad23310e7df535a187364a0e6218b135a8c2f8fe205d39d9321923"
            ...
        }
    }
  5. Launch the Nitro Enclave container using the Enclave Image File (.eif) generated in the previous step and allocate resources to it. You should allocate at least 4 times the EIF file size for enclave memory. This is necessary because the tmpfs filesystem uses half of the memory and the remainder of the memory is used to uncompress the initial initramfs where the application executable resides. For CPU allocation, you should allocate CPU in full cores i.e. 2x vCPU for x86 hyper-threaded instances.
    In our case, we are going to allocate 14GB or 14,366 MB for the enclave:

    sudo nitro-cli run-enclave --cpu-count 2 --memory 14336 --eif-path nitro-enclave-container-ai-ml.eif

    Note: Allow a few seconds for the server to boot up prior to running the Client app in the below section “Object Detection using Nitro Enclaves”.

Update the KMS Key Policy to Include the PCR0 Hash

Now that you have the PCR0 value for your enclave image, update the KMS key policy to only allow your Nitro Enclave container access to the KMS key.

  1. Navigate to AWS KMS in your AWS Console and make sure you are in the same region where your CloudFormation template was deployed
  2. Select “Customer managed keys”
  3. Search for a key with alias “EnclaveKMSKey” and click on it
  4. Click “Edit” on the “Key Policy”
  5. Scroll to the bottom of the key policy and replace the value of “EXAMPLETOBEUPDATED” for the “kms:RecipientAttestation:PCR0” key with the PCR0 hash you noted in the previous section and click “Save changes”

AI/ML Object Detection using a Nitro Enclave

Now that you have an enclave image file, run the components of the solution.

Requirements Installation for Client App

  1. Install the python requirements using the following command:
    cd ~/aws-nitro-enclaves-ai-ml-object-detection/src
    pip3 install -r requirements.txt
  2. Set the region that your CloudFormation stack is deployed in. In our case we selected Canada (Centra)
    CFN_REGION=ca-central-1
  3. Run the following command to encrypt the image using the AWS KMS key “EnclaveKMSKey”, make sure to replace “ca-central-1” with the region where you deployed your CloudFormation template:
    python3 ./envelope-encryption/encryptor.py --filePath ./images/air-show.jpg --cmkId alias/EnclaveKMSkey --region $CFN_REGION
  4. Verify that the output contains: file encrypted? True
    Note: The previous command generates two files: an encrypted image file and an encrypted data key file. The data key file is generated so we can demonstrate an attempt from the parent instance at decrypting the data key.

Launching VSock Proxy

Launch the VSock Proxy which proxies requests from the Nitro Enclave to an external endpoint, in this case, to AWS KMS. Note the file vsock-proxy-config.yaml contains a list of endpoints which allow-lists the endpoints that an enclave can communicate with.

cd ~/aws-nitro-enclaves-ai-ml-object-detection/src
vsock-proxy 8001 "kms.$CFN_REGION.amazonaws.com" 443 --config vsock-proxy-config.yaml &

Object Detection using Nitro Enclaves

Send the encrypted image to the enclave to decrypt the image and use the AI/ML model to detect objects and return a summary of the objects detected:

cd ~/aws-nitro-enclaves-ai-ml-object-detection/src
python3 client.py --filePath ./images/air-show.jpg.encrypted | jq -C '.'

The previous step takes around a minute to complete when first called. Inside the enclave, the server application decrypts the image, runs it through the AI/ML model to generate a list of objects detected and returns that list to the client application.

Parent Instance Credentials

Attempt to Decrypt Data Key using Parent Instance Credentials

To prove that the parent instance is not able to decrypt the content, attempt to decrypt the image using the parent’s credentials:

cd ~/aws-nitro-enclaves-ai-ml-object-detection/src
aws kms decrypt --ciphertext-blob fileb://images/air-show.jpg.data_key.encrypted --region $CFN_REGION

Note: The command is expected to fail with AccessDeniedException, since the parent instance is not allowed to decrypt the data key.

Cleaning up

  1. Open the AWS CloudFormation console at: https://console.aws.amazon.com/cloudformation/.
  2. Select the stack you created earlier, such as NitroEnclaveStack.
  3. Choose Delete, then choose Delete Stack.
  4. The stack status is initially DELETE_IN_PROGRESS. Click the Refresh button periodically to refresh its status. The status changes to DELETE_COMPLETE after it’s finished and the stack name no longer appears in your list of active stacks.

Conclusion

In this post, we showcase how to process sensitive data with Nitro Enclaves using an AI/ML model deployed on Amazon EC2, as well as how to integrate an enclave with AWS KMS to restrict access to an AWS KMS CMK so that only the Nitro Enclave is allowed to use the key and decrypt the image.

We encrypt the sample data with envelope encryption to illustrate how to protect, transfer and securely process highly sensitive data. This process would be similar for any kind of sensitive information such as personally identifiable information (PII), healthcare or intellectual property (IP) which could also be the AI/ML model.

Dig deeper by exploring how to further restrict your AWS KMS CMK using additional PCR hashes such as PCR1 (hash of the Linux kernel and bootstrap), PCR2 (Hash of the application), and other hashes available to you.

Also, try our comprehensive Nitro Enclave workshop which includes use-cases at different complexity levels.

Reducing Your Organization’s Carbon Footprint with Amazon CodeGuru Profiler

Post Syndicated from Isha Dua original https://aws.amazon.com/blogs/devops/reducing-your-organizations-carbon-footprint-with-codeguru-profiler/

It is crucial to examine every functional area when firms reorient their operations toward sustainable practices. Making informed decisions is necessary to reduce the environmental effect of an IT stack when creating, deploying, and maintaining it. To build a sustainable business for our customers and for the world we all share, we have deployed data centers that provide the efficient, resilient service our customers expect while minimizing our environmental footprint—and theirs. While we work to improve the energy efficiency of our datacenters, we also work to help our customers improve their operations on the AWS cloud. This two-pronged approach is based on the concept of the shared responsibility between AWS and AWS’ customers. As shown in the diagram below, AWS focuses on optimizing the sustainability of the cloud, while customers are responsible for sustainability in the cloud, meaning that AWS customers must optimize the workloads they have on the AWS cloud.

Figure 1. Shared responsibility model for sustainability

Figure 1. Shared responsibility model for sustainability

Just by migrating to the cloud, AWS customers become significantly more sustainable in their technology operations. On average, AWS customers use 77% fewer servers, 84% less power, and a 28% cleaner power mix, ultimately reducing their carbon emissions by 88% compared to when they ran workloads in their own data centers. These improvements are attributable to the technological advancements and economies of scale that AWS datacenters bring. However, there are still significant opportunities for AWS customers to make their cloud operations more sustainable. To uncover this, we must first understand how emissions are categorized.

The Greenhouse Gas Protocol organizes carbon emissions into the following scopes, along with relevant emission examples within each scope for a cloud provider such as AWS:

  • Scope 1: All direct emissions from the activities of an organization or under its control. For example, fuel combustion by data center backup generators.
  • Scope 2: Indirect emissions from electricity purchased and used to power data centers and other facilities. For example, emissions from commercial power generation.
  • Scope 3: All other indirect emissions from activities of an organization from sources it doesn’t control. AWS examples include emissions related to data center construction, and the manufacture and transportation of IT hardware deployed in data centers.

From an AWS customer perspective, emissions from customer workloads running on AWS are accounted for as indirect emissions, and part of the customer’s Scope 3 emissions. Each workload deployed generates a fraction of the total AWS emissions from each of the previous scopes. The actual amount varies per workload and depends on several factors including the AWS services used, the energy consumed by those services, the carbon intensity of the electric grids serving the AWS data centers where they run, and the AWS procurement of renewable energy.

At a high level, AWS customers approach optimization initiatives at three levels:

  • Application (Architecture and Design): Using efficient software designs and architectures to minimize the average resources required per unit of work.
  • Resource (Provisioning and Utilization): Monitoring workload activity and modifying the capacity of individual resources to prevent idling due to over-provisioning or under-utilization.
  • Code (Code Optimization): Using code profilers and other tools to identify the areas of code that use up the most time or resources as targets for optimization.

In this blogpost, we will concentrate on code-level sustainability improvements and how they can be realized using Amazon CodeGuru Profiler.

How CodeGuru Profiler improves code sustainability

Amazon CodeGuru Profiler collects runtime performance data from your live applications and provides recommendations that can help you fine-tune your application performance. Using machine learning algorithms, CodeGuru Profiler can help you find your most CPU-intensive lines of code, which contribute the most to your scope 3 emissions. CodeGuru Profiler then suggests ways to improve the code to make it less CPU demanding. CodeGuru Profiler provides different visualizations of profiling data to help you identify what code is running on the CPU, see how much time is consumed, and suggest ways to reduce CPU utilization. Optimizing your code with CodeGuru profiler leads to the following:

  • Improvements in application performance
  • Reduction in cloud cost, and
  • Reduction in the carbon emissions attributable to your cloud workload.

When your code performs the same task with less CPU, your applications run faster, customer experience improves, and your cost reduces alongside your cloud emission. CodeGuru Profiler generates the recommendations that help you make your code faster by using an agent that continuously samples stack traces from your application. The stack traces indicate how much time the CPU spends on each function or method in your code—information that is then transformed into CPU and latency data that is used to detect anomalies. When anomalies are detected, CodeGuru Profiler generates recommendations that clearly outline you should do to remediate the situation. Although CodeGuru Profiler has several visualizations that help you visualize your code, in many cases, customers can implement these recommendations without reviewing the visualizations. Let’s demonstrate this with a simple example.

Demonstration: Using CodeGuru Profiler to optimize a Lambda function

In this demonstration, the inefficiencies in a AWS Lambda function will be identified by CodeGuru Profiler.

Building our Lambda Function (10mins)

To keep this demonstration quick and simple, let’s create a simple lambda function that display’s ‘Hello World’. Before writing the code for this function, let’s review two important concepts. First, when writing Python code that runs on AWS and calls AWS services, two critical steps are required:

The Python code lines (that will be part of our function) that execute these steps listed above are shown below:

import boto3 #this will import AWS SDK library for Python
VariableName = boto3.client('dynamodb’) #this will create the AWS SDK service client

Secondly, functionally, AWS Lambda functions comprise of two sections:

  • Initialization code
  • Handler code

The first time a function is invoked (i.e., a cold start), Lambda downloads the function code, creates the required runtime environment, runs the initialization code, and then runs the handler code. During subsequent invocations (warm starts), to keep execution time low, Lambda bypasses the initialization code and goes straight to the handler code. AWS Lambda is designed such that the SDK service client created during initialization persists into the handler code execution. For this reason, AWS SDK service clients should be created in the initialization code. If the code lines for creating the AWS SDK service client are placed in the handler code, the AWS SDK service client will be recreated every time the Lambda function is invoked, needlessly increasing the duration of the Lambda function during cold and warm starts. This inadvertently increases CPU demand (and cost), which in turn increases the carbon emissions attributable to the customer’s code. Below, you can see the green and brown versions of the same Lambda function.

Now that we understand the importance of structuring our Lambda function code for efficient execution, let’s create a Lambda function that recreates the SDK service client. We will then watch CodeGuru Profiler flag this issue and generate a recommendation.

  1. Open AWS Lambda from the AWS Console and click on Create function.
  2. Select Author from scratch, name the function ‘demo-function’, select Python 3.9 under runtime, select x86_64 under Architecture.
  3. Expand Permissions, then choose whether to create a new execution role or use an existing one.
  4. Expand Advanced settings, and then select Function URL.
  5. For Auth type, choose AWS_IAM or NONE.
  6. Select Configure cross-origin resource sharing (CORS). By selecting this option during function creation, your function URL allows requests from all origins by default. You can edit the CORS settings for your function URL after creating the function.
  7. Choose Create function.
  8. In the code editor tab of the code source window, copy and paste the code below:
#invocation code
import json
import boto3

#handler code
def lambda_handler(event, context):
  client = boto3.client('dynamodb') #create AWS SDK Service client’
  #simple codeblock for demonstration purposes  
  output = ‘Hello World’
  print(output)
  #handler function return

  return output

Ensure that the handler code is properly indented.

  1. Save the code, Deploy, and then Test.
  2. For the first execution of this Lambda function, a test event configuration dialog will appear. On the Configure test event dialog window, leave the selection as the default (Create new event), enter ‘demo-event’ as the Event name, and leave the hello-world template as the Event template.
  3. When you run the code by clicking on Test, the console should return ‘Hello World’.
  4. To simulate actual traffic, let’s run a curl script that will invoke the Lambda function every 0.2 seconds. On a bash terminal, run the following command:
while true; do curl {Lambda Function URL]; sleep 0.06; done

If you do not have git bash installed, you can use AWS Cloud 9 which supports curl commands.

Enabling CodeGuru Profiler for our Lambda function

We will now set up CodeGuru Profiler to monitor our Lambda function. For Lambda functions running on Java 8 (Amazon Corretto), Java 11, and Python 3.8 or 3.9 runtimes, CodeGuru Profiler can be enabled through a single click in the configuration tab in the AWS Lambda console.  Other runtimes can be enabled following a series of steps that can be found in the CodeGuru Profiler documentation for Java and the Python.

Our demo code is written in Python 3.9, so we will enable Profiler from the configuration tab in the AWS Lambda console.

  1. On the AWS Lambda console, select the demo-function that we created.
  2. Navigate to Configuration > Monitoring and operations tools, and click Edit on the right side of the page.

  1.  Scroll down to Amazon CodeGuru Profiler and click the button next to Code profiling to turn it on. After enabling Code profiling, click Save.

Note: CodeGuru Profiler requires 5 minutes of Lambda runtime data to generate results. After your Lambda function provides this runtime data, which may need multiple runs if your lambda has a short runtime, it will display within the Profiling group page in the CodeGuru Profiler console. The profiling group will be given a default name (i.e., aws-lambda-<lambda-function-name>), and it will take approximately 15 minutes after CodeGuru Profiler receives the runtime data for this profiling group to appear. Be patient. Although our function duration is ~33ms, our curl script invokes the application once every 0.06 seconds. This should give profiler sufficient information to profile our function in a couple of hours. After 5 minutes, our profiling group should appear in the list of active profiling groups as shown below.

Depending on how frequently your Lambda function is invoked, it can take up to 15 minutes to aggregate profiles, after which you can see your first visualization in the CodeGuru Profiler console. The granularity of the first visualization depends on how active your function was during those first 5 minutes of profiling—an application that is idle most of the time doesn’t have many data points to plot in the default visualization. However, you can remedy this by looking at a wider time period of profiled data, for example, a day or even up to a week, if your application has very low CPU utilization. For our demo function, a recommendation should appear after about an hour. By this time, the profiling groups list should show that our profiling group now has one recommendation.

Profiler has now flagged the repeated creation of the SDK service client with every invocation.

From the information provided, we can see that our CPU is spending 5x more computing time than expected on the recreation of the SDK service client. The estimated cost impact of this inefficiency is also provided. In production environments, the cost impact of seemingly minor inefficiencies can scale very quickly to several kilograms of CO2 and hundreds of dollars as invocation frequency, and the number of Lambda functions increase.

CodeGuru Profiler integrates with Amazon DevOps Guru, a fully managed service that makes it easy for developers and operators to improve the performance and availability of their applications. Amazon DevOps Guru analyzes operational data and application metrics to identify behaviors that deviate from normal operating patterns. Once these operational anomalies are detected, DevOps Guru presents intelligent recommendations that address current and predicted future operational issues. By integrating with CodeGuru Profiler, customers can now view operational anomalies and code optimization recommendations on the DevOps Guru console. The integration, which is enabled by default, is only applicable to Lambda resources that are supported by CodeGuru Profiler and monitored by both DevOps Guru and CodeGuru.

We can now stop the curl loop (Control+C) so that the Lambda function stops running. Next, we delete the profiling group that was created when we enabled profiling in Lambda, and then delete the Lambda function or repurpose as needed.

Conclusion

Cloud sustainability is a shared responsibility between AWS and our customers. While we work to make our datacenter more sustainable, customers also have to work to make their code, resources, and applications more sustainable, and CodeGuru Profiler can help you improve code sustainability, as demonstrated above. To start Profiling your code today, visit the CodeGuru Profiler documentation page. To start monitoring your applications, head over to the Amazon DevOps Guru documentation page.

About the authors:

Isha Dua

Isha Dua is a Senior Solutions Architect based in San Francisco Bay Area. She helps AWS Enterprise customers grow by understanding their goals and challenges, and guiding them on how they can architect their applications in a cloud native manner while making sure they are resilient and scalable. She’s passionate about machine learning technologies and Environmental Sustainability.

Christian Tomeldan

Christian Tomeldan is a DevOps Engineer turned Solutions Architect. Operating out of San Francisco, he is passionate about technology and conveys that passion to customers ensuring they grow with the right support and best practices. He focuses his technical depth mostly around Containers, Security, and Environmental Sustainability.

Ifeanyi Okafor

Ifeanyi Okafor is a Product Manager with AWS. He enjoys building products that solve customer problems at scale.

How to Develop a SOAR Workflow to Automate a Critical Daily Task

Post Syndicated from Ryan Fried original https://blog.rapid7.com/2022/11/15/how-to-develop-a-soar-workflow-to-automate-a-critical-daily-task/

How to Develop a SOAR Workflow to Automate a Critical Daily Task

As the senior information security engineer at Brooks, an international running shoe and apparel company, I can appreciate the challenge of launching a security orchestration, automation, and response (SOAR) tool for the first time as well as investing your time and budget into making a new security platform your own. I’ve been working with Rapid7 for years now and have become a kind of evangelist for the user-friendly, low-code workflows that make SOAR a joy to manage and an important efficiency driver in our security program.

In this blog post, the third in a series of how-to guides on getting going with SOAR in general and with Rapid7 InsightConnect in particular, I’ll provide an overview of my experience developing a URL Blocking workflow to fit my organization’s specific needs – and perhaps those of your organization as well!

A Workflow to Automatically Block URLs in Multiple Systems

I built this workflow to address two very common use-cases:

  • A user reports receiving a phishing email that does in fact contain a suspicious link
  • We learn about phishing or other scams from threat intelligences sources that leverage external links

Upon learning about this likely malicious link, our team needs to conduct an investigation to decide what to do about it – historically this was a manual three-step process:

  1. Investigate the link and associated domain by pulling in threat intelligence from multiple sources to see what is known about it.
  2. If it is determined to be malicious, block the URL and potentially the whole domain in our email security system (Mimecast), our DNS filter (Cisco Umbrella) and our Palo Alto firewalls.
  3. Figure out who, if anybody, in our organization that had already clicked the link and if anyone, move to further steps in the response

As you can imagine, executing each of these steps manually can take a significant amount of time. Now, imagine conducting this process multiple times a day – especially since time is the enemy. Also, what if your security team is experiencing turnover? On my team, we recently lost an analyst and gained another. We needed a reliable and repeatable processes that any analyst can execute with minimal training.

That’s where a workflow such as this becomes so useful! New analysts don’t need to know all the places to block a URL in our organization. By executing a single workflow from Microsoft Teams, the URL that has been determined to be malicious is guaranteed to be blocked, in all the necessary places, every time. In addition, the workflow can also figure out if someone previously went to that link, and thus whether a given user or endpoint requires further investigation.

This was hard and slow to do manually, which I estimate consumed 30-60 minutes of analyst time, each time. To conduct this investigation manually, you have to go to each log source and look and search for the URL and update the local policies to block it going forward. But with the workflow I built, it becomes an instant process that only requires a minute or two of review after execution. It’s no wonder my security analyst team asked for this workflow specifically.

Want to see it in action? Check out this short video.

How Did I Develop this SOAR Workflow?

The best and easiest place to start for many SOAR workflows is with your Chatapps – I started with Microsoft Teams, but you can use Slack as well, it doesn’t really matter. They both do a great job of facilitating communications with select staff members, initiating SOAR workflows, and presenting the results.

Next, use Rapid7 plugins (how Rapid7 InsightConnect integrates into 3rd-party systems) based on the IT and security systems your organization uses and that are required for your particular automation workflow. And then put your logic and human decision and communication points into the workflow.

Once the workflow is complete, you’ll still need to do some testing to make sure it works as designed. There are always little things – for example, certain plugins like different formats. Cisco Umbrella just requires a domain, whereas for a firewall, you’ll need to use the entire URL when searching logs and updating block lists. The same goes for Mimecast and other email security platforms. But start small! Build out the logic more as you get more comfortable with the whole approach and as you get feedback from your user group.

How long did it take to get this URL blocking workflow up and running?

This URL-blocking workflow has about 20 steps or so. As far as time to develop. I put together the bones of it in a day or two, with just a few hours of total effort. The input validation, the testing part, actually took the longest–but no more than a week from start to finish to get this particular workflow out the door. And donating it to the InsightConnect community also took very little effort.

The key here is to not be afraid to keep testing and iterating. When in doubt, don’t hesitate to reach out to the Community via the Discuss Community to ask for advice.

Now, by leveraging this SOAR-based automation, it takes less than a minute to block a malicious URL everywhere it needs to be blocked. Previously, if you had to block a URL manually, one by one, it could take 40 minutes to an hour from start to finish. We run this workflow 10-20 times in a typical week. So that saves between 7-20 hours of analyst time a week; as much as half an FTE just from this one security automation! And the increased blocking completeness and speed is a further risk reduction bonus.

My Advice for SOAR Workflow Builders?

Rapid7 InsightConnect is one of those tools that does not and should not exist in a vacuum. You actually need the support and involvement of your other IT teams to deliver maximum value. Get that buy-in! It’s a security orchestration tool. So orchestrating multiple people, processes and technology is what it’s there to do!

Education Unplugged: Google Ends Unlimited Storage for Schools

Post Syndicated from Barry Kaufman original https://www.backblaze.com/blog/education-unplugged-google-ends-unlimited-storage-for-schools/

For schools and universities, data storage is paramount. Staff, administrators, and educators, not to mention students, need a secure place to store files. Add to that the legacy accounts of alumni storing irreplaceable files from their education, and you have a massive need for storage.

For a long time, Google was happy to oblige. In 2006, the company launched Google Apps for Education (later G Suite for Education; now Google Workplace for Education), offering free unlimited storage for qualifying schools and districts. But when they’d reached market penetration—somewhere in the neighborhood of 83% of school districts according to EdWeek Research Center—they ended the unlimited storage policy many schools had come to rely on.

If you already know about Google’s policy change and are looking for a solution to save your data and your budget, getting started with Backblaze B2 is easy. Otherwise, read on to learn more about the change, what it may mean for you in the long-term, and a Backblaze partnership with Carahsoft that eases purchasing through local, state, and federal buying programs.

Office Hours Are Over—Google Ends Unlimited Storage for Educational Institutions

Google’s policy change took effect in July 2022, and many schools and universities had to find alternative storage solutions or change their internal storage policies to stay within the new limits. Under the terms of the new policy, Google offers a baseline of 100TB of pooled storage shared across all users.

The policy shift was spurred, Google says, because “as we’ve grown to serve more schools and universities each year, storage consumption has also rapidly accelerated. Storage is not being consumed equitably across—nor within—institutions, and school leaders often don’t have the tools they need to manage this.”

For some school districts, colleges, and universities, this policy shift meant having to reach out to alumni with the request that they back up all their own data. It also hit some already-strapped IT budgets particularly hard. Estimates vary, but depending on the size of the school and their data needs, they could be looking at anywhere up to an extra $70,000 a year in storage costs.

That’s a non-negligible fee for a service that has become increasingly vital for schools. We’ve written about how important cloud storage is for schools, but it’s worth reiterating here.

School is in Session

Not only will a secure cloud storage solution help protect school districts from threats of ransomware, it can also help maintain predictable operating expenses and create opportunities for collaboration through remote learning. In cases like Kansas’ Pittsburg State University, it helped keep data safe from natural disasters that abound in places like Tornado Alley. Pittsburg State implemented Backblaze B2 as their off-site backup in the event of disaster and used Object Lock functionality to safeguard data from ransomware.

Photo Credit: Pittsburg State University

The academic world is still adjusting to Google’s policy change. Stories have emerged of schools simply dropping Google and being forced to move data out of thousands of alumni accounts. A quick-fix solution to avoid Google’s new fee structure, this strategy is being undertaken without a clear answer to the question of how alumni can access their own data after the move. After all, how up to date are those alumni email lists?

A Google Alternative for Schools

School districts, colleges, and universities need to find a new, budget-friendly way forward. If you’re still struggling to find an alternative storage solution now that the bell has rung and Google has dismissed its free storage, Backblaze can help you find a new home on the cloud.

Backblaze B2 offers schools unlimited, pay-as-you-go storage at a fraction of the price of Google, enabling you to continue offering students and alumni the storage space they’ve come to expect. For colleges, universities, and school districts not buying through government purchasing programs, you can sign up for Backblaze B2 directly. We offer 10TB of storage free so that you can see if it works for you, but if you want to do a larger or customized proof of concept, reach out to our Sales team.

Accessing Backblaze Through Your Local, State, or Federal Buying Program

As we revealed during this year’s Educause conference, Backblaze has recently rolled out a partnership with Carahsoft aimed squarely at budget-conscious educational institutions. The partnership brings Backblaze services to educational institutions with a capacity-based pricing model that’s a fraction of the price of traditional cloud providers like Google. And it can be purchased through local, state, or federal buying programs. If you buy IT services for your district through a distributor, this solution could work for you. Visit the partnership announcement to learn more.

The post Education Unplugged: Google Ends Unlimited Storage for Schools appeared first on Backblaze Blog | Cloud Storage & Cloud Backup.

Use an event-driven architecture to build a data mesh on AWS

Post Syndicated from Jan Michael Go Tan original https://aws.amazon.com/blogs/big-data/use-an-event-driven-architecture-to-build-a-data-mesh-on-aws/

In this post, we take the data mesh design discussed in Design a data mesh architecture using AWS Lake Formation and AWS Glue, and demonstrate how to initialize data domain accounts to enable managed sharing; we also go through how we can use an event-driven approach to automate processes between the central governance account and data domain accounts (producers and consumers). We build a data mesh pattern from scratch as Infrastructure as Code (IaC) using AWS CDK and use an open-source self-service data platform UI to share and discover data between business units.

The key advantage of this approach is being able to add actions in response to data mesh events such as permission management, tag propagation, search index management, and to automate different processes.

Before we dive into it, let’s look at AWS Analytics Reference Architecture, an open-source library that we use to build our solution.

AWS Analytics Reference Architecture

AWS Analytics Reference Architecture (ARA) is a set of analytics solutions put together as end-to-end examples. It regroups AWS best practices for designing, implementing, and operating analytics platforms through different purpose-built patterns, handling common requirements, and solving customers’ challenges.

ARA exposes reusable core components in an AWS CDK library, currently available in Typescript and Python. This library contains AWS CDK constructs (L3) that can be used to quickly provision analytics solutions in demos, prototypes, proofs of concept, and end-to-end reference architectures.

The following table lists data mesh specific constructs in the AWS Analytics Reference Architecture library.

Construct Name Purpose
CentralGovernance Creates an Amazon EventBridge event bus for central governance account that is used to communicate with data domain accounts (producer/consumer). Creates workflows to automate data product registration and sharing.
DataDomain Creates an Amazon EventBridge event bus for data domain account (producer/consumer) to communicate with central governance account. It creates data lake storage (Amazon S3), and workflow to automate data product registration. It also creates a workflow to populate AWS Glue Catalog metadata for newly registered data product.

You can find AWS CDK constructs for the AWS Analytics Reference Architecture on Construct Hub.

In addition to ARA constructs, we also use an open-source Self-service data platform (User Interface). It is built using AWS Amplify, Amazon DynamoDB, AWS Step Functions, AWS Lambda, Amazon API Gateway, Amazon EventBridge, Amazon Cognito, and Amazon OpenSearch. The frontend is built with React. Through the self-service data platform you can: 1) manage data domains and data products, and 2) discover and request access to data products.

Central Governance and data sharing

For the governance of our data mesh, we will use AWS Lake Formation. AWS Lake Formation is a fully managed service that simplifies data lake setup, supports centralized security management, and provides transactional access on top of your data lake. Moreover, it enables data sharing across accounts and organizations. This centralized approach has a number of key benefits, such as: centralized audit; centralized permission management; and centralized data discovery. More importantly, this allows organizations to gain the benefits of centralized governance while taking advantage of the inherent scaling characteristics of decentralized data product management.

There are two ways to share data resources in Lake Formation: 1) Named Based Access Control (NRAC), and 2) Tag-Based Access Control (LF-TBAC). NRAC uses AWS Resource Access Manager (AWS RAM) to share data resources across accounts. Those are consumed via resource links that are based on created resource shares. Tag-Based Access Control (LF-TBAC) is another approach to share data resources in AWS Lake Formation, that defines permissions based on attributes. These attributes are called LF-tags. You can read this blog to learn about LF-TBAC in the context of data mesh.

The following diagram shows how NRAC and LF-TBAC data sharing works. In this example, data domain is registered as a node on mesh and therefore we create two databases in the central governance account. NRAC database is shared with data domain via AWS RAM. Access to data products that we register in this database will be handled through NRAC. LF-TBAC database is tagged with data domain N line of business (LOB) LF-tag: <LOB:N>. LOB tag is automatically shared with data domain N account and therefore database is available in that account. Access to Data Products in this database will be handled through LF-TBAC.

BDB-2279-ram-tag-share

In our solution we will demonstrate both NRAC and LF-TBAC approaches. With the NRAC approach, we will build up an event-based workflow that would automatically accept RAM share in the data domain accounts and automate the creation of the necessary metadata objects (eg. local database, resource links, etc). While with the LF-TBAC approach, we rely on permissions associated with the shared LF-Tags to allow producer data domains to manage their data products, and consumer data domains read access to the relevant data products associated with the LF-Tags that they requested access to.

We use CentralGovernance construct from ARA library to build a central governance account. It creates an EventBridge event bus to enable communication with data domain accounts that register as nodes on mesh. For each registered data domain, specific event bus rules are created that route events towards that account. Central governance account has a central metadata catalog that allows for data to be stored in different data domains, as opposed to a single central lake. For each registered data domain, we create two separate databases in central governance catalog to demonstrate both NRAC and LF-TBAC data sharing. CentralGovernance construct creates workflows for data product registration and data product sharing. We also deploy a self-service data platform UI  to enable good user experience to manage data domains, data products, and to simplify data discovery and sharing.

BDB-2279-central-gov

A data domain: producer and consumer

We use DataDomain construct from ARA library to build a data domain account that can be either producer, consumer, or both. Producers manage the lifecycle of their respective data products in their own AWS accounts. Typically, this data is stored in Amazon Simple Storage Service (Amazon S3). DataDomain construct creates a data lake storage with cross-account bucket policy that enables central governance account to access the data. Data is encrypted using AWS KMS, and central governance account has a permission to use the key. Config secret in AWS Secrets Manager contains all the necessary information to register data domain as a node on mesh in central governance. It includes: 1) data domain name, 2) S3 location that holds data products, and 3) encryption key ARN. DataDomain construct also creates data domain and crawler workflows to automate data product registration.

BDB-2279-data-domain

Creating an event-driven data mesh

Data mesh architectures typically require some level of communication and trust policy management to maintain least privileges of the relevant principals between the different accounts (for example, central governance to producer, central governance to consumer). We use event-driven approach via EventBridge to securely forward events from one event bus to event bus in another account while maintaining the least privilege access. When we register data domain to central governance account through the self-service data platform UI, we establish bi-directional communication between the accounts via EventBridge. Domain registration process also creates database in the central governance catalog to hold data products for that particular domain. Registered data domain is now a node on mesh and we can register new data products.

The following diagram shows data product registration process:

BDB-2279-register-dd-small

  1. Starts Register Data Product workflow that creates an empty table (the schema is managed by the producers in their respective producer account). This workflow also grants a cross-account permission to the producer account that allows producer to manage the schema of the table.
  2. When complete, this emits an event into the central event bus.
  3. The central event bus contains a rule that forwards the event to the producer’s event bus. This rule was created during the data domain registration process.
  4. When the producer’s event bus receives the event, it triggers the Data Domain workflow, which creates resource-links and grants permissions.
  5. Still in the producer account, Crawler workflow gets triggered when the Data Domain workflow state changes to Successful. This creates the crawler, runs it, waits and checks if the crawler is done, and deletes the crawler when it’s complete. This workflow is responsible for populating tables’ schemas.

Now other data domains can find newly registered data products using the self-service data platform UI and request access. The sharing process works in the same way as product registration by sending events from the central governance account to consumer data domain, and triggering specific workflows.

Solution Overview

The following high-level solution diagram shows how everything fits together and how event-driven architecture enables multiple accounts to form a data mesh. You can follow the workshop that we released to deploy the solution that we covered in this blog post. You can deploy multiple data domains and test both data registration and data sharing. You can also use self-service data platform UI to search through data products and request access using both LF-TBAC and NRAC approaches.

BDB-2279-arch-diagram

Conclusion

Implementing a data mesh on top of an event-driven architecture provides both flexibility and extensibility. A data mesh by itself has several moving parts to support various functionalities, such as onboarding, search, access management and sharing, and more. With an event-driven architecture, we can implement these functionalities in smaller components to make them easier to test, operate, and maintain. Future requirements and applications can use the event stream to provide their own functionality, making the entire mesh much more valuable to your organization.

To learn more how to design and build applications based on event-driven architecture, see the AWS Event-Driven Architecture page. To dive deeper into data mesh concepts, see the Design a Data Mesh Architecture using AWS Lake Formation and AWS Glue blog.

If you’d like our team to run data mesh workshop with you, please reach out to your AWS team.


About the authors


Jan Michael Go Tan is a Principal Solutions Architect for Amazon Web Services. He helps customers design scalable and innovative solutions with the AWS Cloud.

Dzenan Softic is a Senior Solutions Architect at AWS. He works with startups to help them define and execute their ideas. His main focus is in data engineering and infrastructure.

David Greenshtein is a Specialist Solutions Architect for Analytics at AWS with a passion for ETL and automation. He works with AWS customers to design and build analytics solutions enabling business to make data-driven decisions. In his free time, he likes jogging and riding bikes with his son.
Vincent Gromakowski is an Analytics Specialist Solutions Architect at AWS where he enjoys solving customers’ analytics, NoSQL, and streaming challenges. He has a strong expertise on distributed data processing engines and resource orchestration platform.

Helping VFX studios pave a path to the cloud

Post Syndicated from Netflix Technology Blog original https://netflixtechblog.com/helping-vfx-studios-pave-a-path-to-the-cloud-d308ee43c079

By: Peter Cioni (Netflix), Alex Schworer (Netflix), Mac Moore (Conductor Tech.), Rachel Kelley (AWS), Ranjit Raju (AWS)

Rendering is core to the the VFX process

VFX studios around the world create amazing imagery for Netflix productions. Nearly every show that is produced today includes digital visual effects, from the creatures in Stranger Things, to recreating historic London in Bridgerton.

Netflix production teams work with a global roster of VFX studios (both large and small) and their artists to create this amazing imagery. But it’s not easy: to pull this off, VFX studios need to build and operate serious technical infrastructure (compute, storage, networking, and software licensing), otherwise known as a “render farm.”

Rendering is the final step in the VFX creation process, and processing on a render farm often can take several hours to complete just a single frame of a show, even when this process runs on the latest high-end hardware. Many shows have needs that exceed 100,000 frames, so aggregate rendering time can impact the timely delivery of a show on Netflix.

We’ve found that when VFX teams dedicate more compute capacity to rendering, they are able to handle more projects, iterations, and schedule crunches while maintaining on-time deliveries. This ultimately results in more compelling entertainment for Netflix members.

“Without cloud-based rendering, this ambitious project would not have met its targeted delivery date! Over the last four months, cloud-based rendering has accounted for over 50% of all frames rendered for the show, and has given the VFX vendor the ability to consistently deliver 4K UHD EXRs.” — Glenn Kelly, VFX Producer, Dance Monsters

The infrastructure challenge

For small and mid-sized VFX studios, scaling up and managing infrastructure is a perennial challenge: it takes considerable capital, technical talent, and scale to get the most out of a render farm, especially when building out infrastructure on-premises or in a local datacenter. At the same time, with VFX complexity and scale demands by studios like Netflix reaching new levels, it’s really hard for VFX teams to accurately estimate how much infrastructure is too much (or too little!).

Example rendering workload over a project’s lifespan vs the capability of on-premises infrastructure (in cores required)

Cloud infrastructure providers like AWS offer an attractive option for VFX rendering with pay as you go pricing, especially when combined with cost effective interruptible instances, like Amazon Elastic Compute Cloud (EC2) Spot instances.

But there’s a problem: while the cloud has potential to enable more creativity with enhanced flexibility, VFX studios often have trouble finding the technical resources they need in order to tap into the cloud. Every VFX studio has a slightly different architecture and workflow, and a one-size-fits-all solution often isn’t enough to bridge the gap.

Forging relationships to assist VFX studios

Netflix is proud to announce that we have teamed-up with key partners AWS and Conductor Technologies to provide our diverse roster of VFX studios around the globe with special access to essential resources that simplify the migration path to cloud infrastructure. As a result of these collaborations with AWS and Conductor Technologies, VFX studios working on Netflix projects receive dedicated technical support, hands-on solutions architecture engagement, and streamlined rate cards for both compute pricing and licensing costs. VFX studios of varying sizes and locations can leverage these solutions to meet the unique rendering needs of their productions.

AWS

AWS provides a suite of services that a VFX studio, regardless of size, can use to leverage the cloud, including AWS Thinkbox Deadline, Amazon File Cache, and Render Farm Deployment Kit on AWS (RFDK). Rendering on AWS provides the flexibility to control how quickly a project is completed. Once a rendering pipeline is integrated with AWS, studios can scale rendering workloads to thousands, or even tens of thousands, of cores in minutes. They can also scale down just as quickly as they scale up, providing incredible compute elasticity and cost control. Netflix is collaborating with AWS to help VFX studios by connecting them to the best AWS resources to help get their render workloads up and running on the cloud.

“Cloud technology has introduced new ways for studios and artists across the globe to create incredible content,” said Antony Passemard, general manager of Creative Tools at AWS. “We look forward to working alongside Netflix to enable access for more creators to streamlined infrastructure and high-performance compute power on the world’s leading cloud. This partnership will be compelling for any company that wants to bring the breadth and depth of the AWS portfolio into their workflows, built with the highest standards for security, speed, and resilience.”

Conductor Technologies

Netflix also has a collaboration with Conductor Technologies, a SaaS platform that enables VFX studios to leverage cloud rendering infrastructure by streamlining the transition to cloud-based workflows. Conductor works on three simple principles: ease of use, collaboration, and optimizing turnaround time. It supports the industry’s most widely used software applications — via direct plug-ins, and is available on multi-cloud platform services. Additionally, Conductor supports render management systems — including AWS Thinkbox Deadline and Pixar’s Tractor.

The collaboration is designed to help studios of all sizes within Netflix’s ecosystem tap into near-infinite compute in a matter of minutes, offload their render workloads, and reduce the overhead of compute and licensing costs with the Netflix and Conductor pricing agreement.

“Netflix has repeatedly proven itself a pioneer in the entertainment industry, and embracing the cloud for rendering at scale furthers this pattern. We’re thrilled to help Netflix reduce barriers to digital content production and look forward to seeing what incredible worlds are brought to life as a result,” said Mac Moore, Conductor CEO.

Just the beginning

This announcement is just the start, and we hope to expand the scope of technical solutions that our VFX studios around the globe can access as part of our relationship with these vendor partners and others.

Ultimately, Netflix is committed to supporting a healthy VFX ecosystem. In establishing this initiative, our goal is to ensure that the studios that work on Netflix productions have access to the technical resources they need to create amazing stories for our members to enjoy. This program is just one example of the many ways Netflix strives to entertain the world.


Helping VFX studios pave a path to the cloud was originally published in Netflix TechBlog on Medium, where people are continuing the conversation by highlighting and responding to this story.

CVE-2022-27510: Critical Citrix ADC and Gateway Remote Authentication Bypass Vulnerabilities

Post Syndicated from Rapid7 original https://blog.rapid7.com/2022/11/15/cve-2022-27510-critical-citrix-adc-and-gateway-remote-authentication-bypass-vulnerability/

CVE-2022-27510: Critical Citrix ADC and Gateway Remote Authentication Bypass Vulnerabilities

On November 8, 2022, Citrix published Citrix Gateway and Citrix ADC Security Bulletin for CVE-2022-27510 CVE-2022-27513 and CVE-2022-27516 announcing fixes for three vulnerabilities:

The most notable vulnerability, CVE-2022-27510, is rated a critical 9.8 for “appliances that are operating as a Gateway (SSL VPN, ICA Proxy, CVPN, RDP Proxy),” per Citrix’s advisory, and allows for remote, unauthenticated attackers to take control of a vulnerable system.

Rapid7 has repeatedly observed attacker interest in high-value targets such as Citrix; historically, these appliances become exploited very quickly so organizations that are impacted by CVE-2022-27510 should patch right away. CISA has issued a warning about CVE-2022-27510 here.

Affected products

The following supported versions of Citrix ADC and Citrix Gateway on customer-managed appliances are affected by this vulnerability (Citrix-managed cloud services customers do not need to take any action):

  • Citrix ADC and Citrix Gateway 13.1 before 13.1-33.47
  • Citrix ADC and Citrix Gateway 13.0 before 13.0-88.12
  • Citrix ADC and Citrix Gateway 12.1 before 12.1.65.21
  • Citrix ADC 12.1-FIPS before 12.1-55.289
  • Citrix ADC 12.1-NDcPP before 12.1-55.289

Mitigation guidance

Organizations that are impacted by CVE-2022-27510 should update to one of the versions listed below immediately. Additionally, it is strongly recommended that organizations ensure that gateway devices require multi-factor authentication (MFA) for logins and that all authentication attempts are logged and audited regularly.

  • Citrix ADC and Citrix Gateway 13.1-33.47 and later releases
  • Citrix ADC and Citrix Gateway 13.0-88.12 and later releases of 13.0
  • Citrix ADC and Citrix Gateway 12.1-65.21 and later releases of 12.1
  • Citrix ADC 12.1-FIPS 12.1-55.289 and later releases of 12.1-FIPS
  • Citrix ADC 12.1-NDcPP 12.1-55.289 and later releases of 12.1-NDcPP

Rapid7 customers

InsightVM and Nexpose customers will be able to assess their exposure to all three CVEs with vulnerability checks expected to be available in the November 15, 2022 content release.

Better together: AWS SAM CLI and HashiCorp Terraform

Post Syndicated from Eric Johnson original https://aws.amazon.com/blogs/compute/better-together-aws-sam-cli-and-hashicorp-terraform/

This post is written by Suresh Poopandi, Senior Solutions Architect and Seb Kasprzak, Senior Solutions Architect.

Today, AWS is announcing the public preview of AWS Serverless Application Model CLI (AWS SAM CLI) support for local development, testing, and debugging of serverless applications defined using HashiCorp Terraform configuration.

AWS SAM and Terraform are open-source frameworks for building applications using infrastructure as code (IaC). Both frameworks allow building, changing, and managing cloud infrastructure in a repeatable way by defining resource configurations.

Previously, you could use the AWS SAM CLI to build, test, and debug applications defined by AWS SAM templates or through the AWS Cloud Development Kit (CDK). With this preview release, you can also use AWS SAM CLI to test and debug serverless applications defined using Terraform configurations.

Walkthrough of Terraform support

This blog post contains a sample Terraform template, which shows how developers can use AWS SAM CLI to build locally, test, and debug AWS Lambda functions defined in Terraform. This sample application has a Lambda function that stores a book review score and review text in an Amazon DynamoDB table. An Amazon API Gateway book review API uses Lambda proxy integration to invoke the book review Lambda function.

Demo application architecture

Demo application architecture

Prerequisites

Before running this example:

  • Install the AWS CLI.
    • Configure with valid AWS credentials.
    • Note that AWS CLI now requires Python runtime.
  • Install HashiCorp Terraform.
  • Install the AWS SAM CLI.
  • Install Docker (required to run AWS Lambda function locally).

Since Terraform support is currently in public preview, you must provide a –beta-features flag while executing AWS SAM commands. Alternatively, set this flag in samconfig.toml file by adding beta_features=”true”.

Deploying the example application

This Lambda function interacts with DynamoDB. For the example to work, it requires an existing DynamoDB table in an AWS account. Deploying this creates all the required resources for local testing and debugging of the Lambda function.

To deploy:

  1. Clone the aws-sam-terraform-examples repository locally:
    git clone https://github.com/aws-samples/aws-sam-terraform-examples
  2. Change to the project directory:
    cd aws-sam-terraform-examples/zip_based_lambda_functions/api-lambda-dynamodb-example/

    Terraform must store the state of the infrastructure and configuration it creates. Terraform uses this state to map cloud resources to configuration and track changes. This example uses a local backend to store the state file on the local filesystem.

  3. Open the main.tf file and review its contents. Locate the backend section of the code, updating the region field with the target deployment Region of this sample solution:
    provider “aws” {
        region = “<AWS region>” # e.g. us-east-1
    }
  4. Initialize a working directory containing Terraform configuration files:
    terraform init
  5. Deploy the application using Terraform CLI. When prompted by “Do you want to perform these actions?”, enter Yes.
    terraform apply

Terraform deploys the application, as shown in the terminal output.

Terminal output

Terminal output

After completing the deployment process, the AWS account is ready for use by the Lambda function with all the required resources.

Terraform Configuration for local testing

Lambda functions require application dependencies bundled together with function code as a deployment package (typically a .zip file) to run correctly. Terraform natively does not create the deployment package and a separate build process handles this package creation.

This sample application uses Terraform’s null_resource and local-exec provisioner to trigger a build process script. This installs Python dependencies in a temporary folder and creates a .zip file with dependencies and function code. It contains this logic within the main.tf file of the example application.

To explain each code segment in more detail:

Terraform example

Terraform example

  1. aws_lambda_function: This sample defines a Lambda function resource. It contains properties such as environment variables (in this example, the DynamoDB table_id) and the depends_on argument, which creates the .zip package before deploying the Lambda function.

    Terraform example

    Terraform example

  2. null_resource: When the AWS SAM CLI build command runs, AWS SAM reviews Terraform code for any null_resource starting with sam_metadata_ and uses the information contained within this resource block to gather the location of the Lambda function source code and .zip package. This information allows the AWS SAM CLI to start the local execution of the Lambda function. This special resource should contain the following attributes:
    • resource_name: The Lambda function address as defined in the current module (aws_lambda_function.publish_book_review)
    • resource_type: Packaging type of the Lambda function (ZIP_LAMBDA_FUNCTION)
    • original_source_code: Location of Lambda function code
    • built_output_path: Location of .zip deployment package

Local testing

With the backend services now deployed, run local tests to see if everything is working. The locally running sample Lambda function interacts with the services deployed in the AWS account. Run the sam build to reflect the local sam testing environment with changes after each code update.

  1. Local Build: To create a local build of the Lambda function for testing, use the sam build command:
    sam build --hook-name terraform --beta-features
  2. Local invoke: The first test is to invoke the Lambda function with a mocked event payload from the API Gateway. These events are in the events directory. Run this command, passing in a mocked event:
    AWS_DEFAULT_REGION=<Your Region Name>
    sam local invoke aws_lambda_function.publish_book_review -e events/new-review.json --beta-features

    AWS SAM mounts the Lambda function runtime and code and runs it locally. The function makes a request to the DynamoDB table in the cloud to store the information provided via the API. It returns a 200 response code, signaling the successful completion of the function.

  3. Local invoke from AWS CLI
    Another test is to run a local emulation of the Lambda service using “sam local start-lambda” and invoke the function directly using AWS SDK or the AWS CLI. Start the local emulator with the following command:

    sam local start-lambda
    Terminal output

    Terminal output

    AWS SAM starts the emulator and exposes a local endpoint for the AWS CLI or a software development kit (SDK) to call. With the start-lambda command still running, run the following command to invoke this function locally with the AWS CLI:

    aws lambda invoke --function-name aws_lambda_function.publish_book_review --endpoint-url http://127.0.0.1:3001/ response.json --cli-binary-format raw-in-base64-out --payload file://events/new-review.json

    The AWS CLI invokes the local function and returns a status report of the service to the screen. The response from the function itself is in the response.json file. The window shows the following messages:

    Invocation results

    Invocation results

  4. Debugging the Lambda function

Developers can use AWS SAM with a variety of AWS toolkits and debuggers to test and debug serverless applications locally. For example, developers can perform local step-through debugging of Lambda functions by setting breakpoints, inspecting variables, and running function code one line at a time.

The AWS Toolkit Integrated Development Environment (IDE) plugin provides the ability to perform many common debugging tasks, like setting breakpoints, inspecting variables, and running function code one line at a time. AWS Toolkits make it easier to develop, debug, and deploy serverless applications defined using AWS SAM. They provide an experience for building, testing, debugging, deploying, and invoking Lambda functions integrated into IDE. Refer to this link that lists common IDE/runtime combinations that support step-through debugging of AWS SAM applications.

Visual Studio Code keeps debugging configuration information in a launch.json file in a workspace .vscode folder. Here is a sample launch configuration file to debug Lambda code locally using AWS SAM and Visual Studio Code.

{
    "version": "0.2.0",
    "configurations": [
          {
            "name": "Attach to SAM CLI",
            "type": "python",
            "request": "attach",
            "address": "localhost",
            "port": 9999,
            "localRoot": "${workspaceRoot}/sam-terraform/book-reviews",
            "remoteRoot": "/var/task",
            "protocol": "inspector",
            "stopOnEntry": false
          }
    ]
}

After adding the launch configuration, start a debug session in the Visual Studio Code.

Step 1: Uncomment the following two lines in zip_based_lambda_functions/api-lambda-dynamodb-example/src/index.py

Enable debugging in the Lambda function

Enable debugging in the Lambda function

Step 2: Run the Lambda function in the debug mode and wait for the Visual Studio Code to attach to this debugging session:

sam local invoke aws_lambda_function.publish_book_review -e events/new-review.json -d 9999

Step 3: Select the Run and Debug icon in the Activity Bar on the side of VS Code. In the Run and Debug view, select “Attach to SAM CLI” and choose Run.

For this example, set a breakpoint at the first line of lambda_handler. This breakpoint allows viewing the input data coming into the Lambda function. Also, it helps in debugging code issues before deploying to the AWS Cloud.

Debugging in then IDE

Debugging in then IDE

Lambda Terraform module

A community-supported Terraform module for lambda (terraform-aws-lambda) has added support for SAM metadata null_resource. When using the latest version of this module, AWS SAM CLI will automatically support local invocation of the Lambda function, without additional resource blocks required.

Conclusion

This blog post shows how to use the AWS SAM CLI together with HashiCorp Terraform to develop and test serverless applications in a local environment. With AWS SAM CLI’s support for HashiCorp Terraform, developers can now use the AWS SAM CLI to test their serverless functions locally while choosing their preferred infrastructure as code tooling.

For more information about the features supported by AWS SAM, visit AWS SAM. For more information about the Metadata resource, visit HashiCorp Terraform.

Support for the Terraform configuration is currently in preview, and the team is asking for feedback and feature request submissions. The goal is for both communities to help improve the local development process using AWS SAM CLI. Submit your feedback by creating a GitHub issue here.

For more serverless learning resources, visit Serverless Land.

Fedora 37 released

Post Syndicated from original https://lwn.net/Articles/914960/

Version 37
of the Fedora family of distributions has been released, a few weeks later
than originally intended.

With Fedora Linux 37, we’re adding two new Editions. Fedora CoreOS
is the successor to what you may remember as Atomic Host. Drawing
from Project Atomic and the original CoreOS work, it provides an
automatic update mechanism geared toward hosting container-based
workloads. With atomic updates and easy rollback, it adds peace of
mind to your infrastructure.

Fedora Cloud is also back as an Edition. The Cloud Working Group
has seen a resurgence in activity. Cloud provides a great Fedora
base to run in your favorite public or private cloud.

The collective thoughts of the interwebz