Retain more for less with tiered storage for Amazon MSK

Post Syndicated from Masudur Rahaman Sayem original https://aws.amazon.com/blogs/big-data/retain-more-for-less-with-tiered-storage-for-amazon-msk/

Organizations are adopting Apache Kafka and Amazon Managed Streaming for Apache Kafka (Amazon MSK) to capture and analyze data in real-time. Amazon MSK allows you to build and run production applications on Apache Kafka without needing Kafka infrastructure management expertise or having to deal with the complex overheads associated with running Apache Kafka on your own. With increasing maturity, customers seek to build sophisticated use cases that combine aspects of real time and batch processing. For instance, you may want to train machine learning (ML) models based on historic data and then use these models to do real time inferencing. Or you may want to be able to recompute previous results when the application logic changed, e.g., when a new KPI is added to a streaming analytics application or when a bug was fixed that caused incorrect output. These use cases often require storing data for several weeks, months, or even years.

Apache Kafka is well positioned to support these kind of use cases. Data is retained in the Kafka cluster as long as required by configuring the retention policy. In this way, the most recent data can be processed in real time for low-latency use cases while historic data remains accessible in the cluster and can be processed in a batch fashion.

However, retaining data in a Kafka cluster can become expensive because storage and compute are tightly coupled in a cluster. To scale storage, you need to add more brokers. But adding more brokers with the sole purpose of increasing the storage squanders the rest of the compute resources like CPU and memory. Also, a large cluster with more nodes adds operational complexity with a longer time to recover and rebalance when a broker fails. To avoid that operational complexity and higher cost, you can move your data to Amazon Simple Storage Service (Amazon S3) for long-term access and with cost-effective storage classes in Amazon S3 you can optimize your overall storage cost. This solves cost challenges, but now you have to build and maintain that part of the architecture for data movement to a different data store. You also need to build different data processing logic using different APIs for consuming data (Kafka API for streaming, Amazon S3 API for historic reads).

Today, we’re announcing Amazon MSK tiered storage, which brings a virtually unlimited and low-cost storage tier for Amazon MSK, making it simpler and cost-effective for developers to build streaming data applications. Since the launch of Amazon MSK in 2019, we have enabled capabilities such as vertical scaling and automatic scaling of broker storage so you can operate your Kafka workloads in a cost-effective way. Earlier this year, we launched provisioned throughput which enables seamlessly scaling I/O without having to provision additional brokers. Tiered storage makes it even more cost-effective for you to run Kafka workloads. You can now store data in Apache Kafka without worrying about limits. You can effectively balance your performance and costs by using the performance-optimized primary storage for real-time data and the new low-cost tier for the historical data. With a few clicks, you can move streaming data into a lower-cost tier to store data and only pay for what you use.

Tiered storage frees you from making hard trade-offs between supporting the data retention needs of your application teams and the operational complexity that comes with it. This enables you to use the same code to process both real-time and historical data to minimize redundant workflows and simplify architectures. With Amazon MSK tiered storage, you can implement a Kappa architecture – a streaming-first software architecture deployment pattern – to use the same data processing pipeline for correctness and completeness of data over a much longer time horizon for business analysis.

How Amazon MSK tiered storage works

Let’s look at how tiered storage works for Amazon MSK. Apache Kafka stores data in files called log segments. As each segment completes, based on the segment size configured at cluster or topic level, it’s copied to the low-cost storage tier. Data is held in performance-optimized storage for a specified retention time, or up to a specified size, and then deleted. There is a separate time and size limit setting for the low-cost storage, which must be longer than the performance-optimized storage tier. If clients request data from segments stored in the low-cost tier, the broker reads the data from it and serves the data in the same way as if it were being served from the performance-optimized storage. The APIs and existing clients work with minimal changes. When your application starts reading data from the low-cost tier, you can expect an increase in read latency for the first few bytes. As you start reading the remaining data sequentially from the low-cost tier, you can expect latencies that are similar to the primary storage tier. With tiered storage, you pay for the amount of data you store and the amount of data you retrieve.

For a pricing example, let’s consider a workload where your ingestion rate is 15 MB/s, with a replication factor of 3, and you want to retain data in your Kafka cluster for 7 days. For such a workload, it requires 6x m5.large brokers, with 32.4 TB EBS storage, which costs $4,755. But if you use tiered storage for the same workload with local retention of 4 hours and overall data retention of 7 days, it requires 3x m5.large brokers, with 0.8 TB EBS storage and 9 TB of tiered storage, which costs $1,584. If you want to read all the historic data at once, it costs $13 ($0.0015 per GB retrieval cost). In this example with tiered storage, you save around 66% of your overall cost.

Get started using Amazon MSK tiered storage

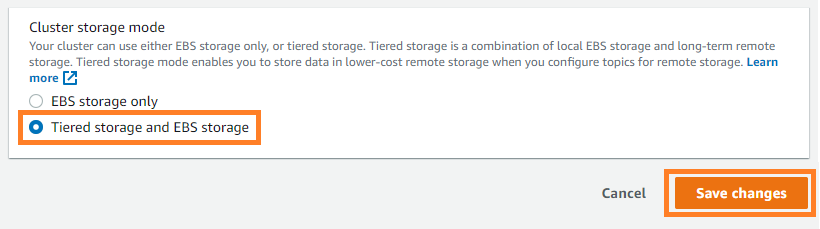
To enable tiered storage on your existing cluster, upgrade your MSK cluster to Kafka version 2.8.2.tiered and then choose Tiered storage and EBS storage as your cluster storage mode on the Amazon MSK console.
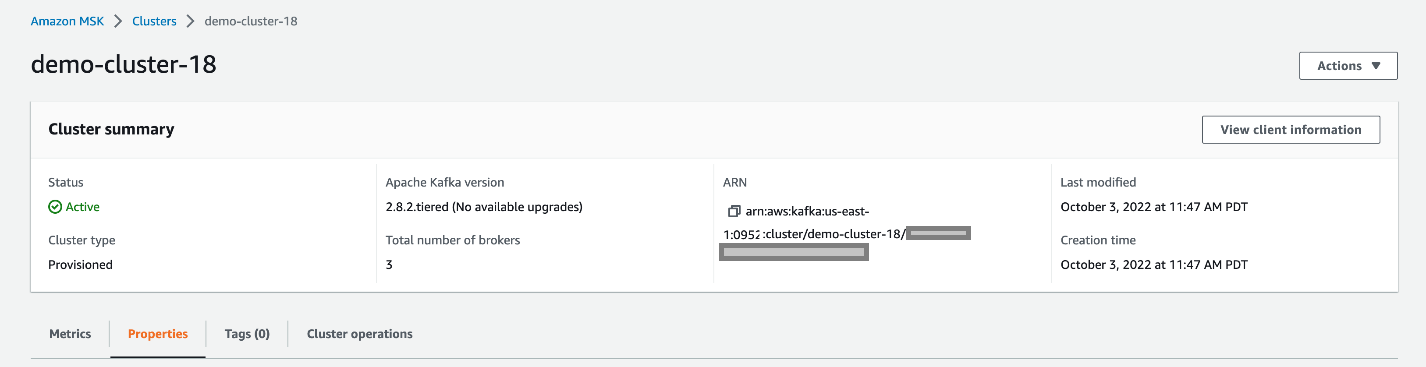

After tiered storage is enabled on the cluster level, run the following command to enable tiered storage on an existing topic. In this example, you’re enabling tiered storage on a topic called msk-ts-topic with 7 days’ retention (local.retention.ms=604800000) for a local high-performance storage tier, setting 180 days’ retention (retention.ms=15550000000) to retain the data in the low-cost storage tier, and updating the log segment size to 48 MB:

bin/kafka-configs.sh --bootstrap-server $bsrv --alter --entity-type topics --entity-name msk-ts-topic --add-config 'remote.storage.enable=true, local.retention.ms=604800000, retention.ms=15550000000, segment.bytes=50331648'

Availability and pricing

Amazon MSK tiered storage is available in all AWS regions where Amazon MSK is available excluding the AWS China, AWS GovCloud regions. This low-cost storage tier scales to virtually unlimited storage and requires no upfront provisioning. You pay only for the volume of data retained and retrieved in the low-cost tier.

For more information about this feature and its pricing, see the Amazon MSK developer guide and Amazon MSK pricing page. For finding the right sizing for your cluster, see the best practices page.

Summary

With Amazon MSK tiered storage you don’t need to provision storage for the low-cost tier or manage the infrastructure. Tiered storage enables you to scale to virtually unlimited storage. You can access data in the low-cost tier using the same clients you currently use to read data from the high-performance primary storage tier. Apache Kafka’s consumer API, streams API, and connectors consume data from both tiers without changes. You can modify the retention limits on the low-cost storage tier similarly as to how you can modify the retention limits on the high-performance storage.

Enable tiered storage on your MSK clusters today to retain data longer at a lower cost.


About the Author

Masudur Rahaman Sayem is a Streaming Architect at AWS. He works with AWS customers globally to design and build data streaming architecture to solve real-world business problems. He is passionate about distributed systems. He also likes to read, especially classic comic books.

Measure the adoption of your Amazon QuickSight dashboards and view your BI portfolio in a single pane of glass

Post Syndicated from Maitri Brahmbhatt original https://aws.amazon.com/blogs/big-data/measure-the-adoption-of-your-amazon-quicksight-dashboards-and-view-your-bi-portfolio-in-a-single-pane-of-glass/

Amazon QuickSight is a fully managed, cloud-native business intelligence (BI) service. If you plan to deploy enterprise-grade QuickSight dashboards, measuring user adoption and usage patterns is an important ingredient for the success of your BI investment. For example, knowing the usage patterns like geo location, department, and job role can help you fine-tune your dashboards to the right audience. Furthermore, to return the investment of your BI portfolio, with dashboard usage, you can reduce license costs by identifying inactive QuickSight authors.

In this post, we introduce the latest Admin Console, an AWS packaged solution that you can easily deploy and use to create a usage and inventory dashboard for your QuickSight assets. The Admin Console helps identify usage patterns of an individual user and dashboards. It can also help you track which dashboards and groups you have or need access to, and what you can do with that access, by providing more details on QuickSight group and user permissions and activities and QuickSight asset (dashboards, analyses, and datasets) permissions. With timely access to interactive usage metrics, the Admin Console can help BI leaders and administrators make a cost-efficient plan for dashboard improvements. Another common use case of this dashboard is to provide a centralized repository of the QuickSight assets. QuickSight artifacts consists of multiple types of assets (dashboards, analyses, datasets, and more) with dependencies between them. Having a single repository to view all assets and their dependencies can be an important element in your enterprise data dictionary.

This post demonstrates how to build the Admin Console using a serverless data pipeline. With basic AWS knowledge, you can create this solution in your own environment within an hour. Alternatively, you can dive deep into the source code to meet your specific needs.

Admin Console dashboard

The following animation displays the contents of our demo dashboard.

The Admin Console dashboard includes six sheets:

  • Landing Page – Provides drill-down into each detailed tabs.
  • User Analysis – Provides detailed analysis of the user behavior and identifies active and inactive users and authors.
  • Dashboard Analysis – Shows the most commonly viewed dashboards.
  • Assets Access Permissions – Provides information on permissions applied to each asset, such as dashboard, analysis, datasets, data source, and themes.
  • Data Dictionary – Provides information on the relationships between each of your assets, such as which analysis was used to build each dashboard, and which datasets and data sources are being used in each analysis. It also provides details on each dataset, including schema name, table name, columns, and more.
  • Overview – Provides instructions on how to use the dashboard.

You can interactively play with the sample dashboard in the following Interactive Dashboard Demo.

Let’s look at Forwood Safety, an innovative, values-driven company with a laser focus on fatality prevention. An early adopter of QuickSight, they collaborated with AWS to deploy this solution to collect BI application usage insights.

“Our engineers love this admin console solution,” says Faye Crompton, Leader of Analytics and Benchmarking at Forwood. “It helps us to understand how users analyze critical control learnings by helping us to quickly identify the most frequently visited dashboards in Forwood’s self-service analytics and reporting tool, FAST.”

Solution overview

The following diagram illustrates the workflow of the solution.

The workflow involves the following steps:

  1. The AWS Lambda function Data_Prepare is scheduled to run hourly. This function calls QuickSight APIs to get the QuickSight namespace, group, user, and asset access permissions information.
  2. The Lambda function Dataset_Info is scheduled to run hourly. This function calls QuickSight APIs to get dashboard, analysis, dataset, and data source information.
  3. Both the functions save the results to an Amazon Simple Storage Service (Amazon S3) bucket.
  4. AWS CloudTrail logs are stored in an S3 bucket.
  5. Based on the file in Amazon S3 that contains user-group information, dataset information, QuickSight assets access permissions information, as well as dashboard views and user login events from the CloudTrail logs, five Amazon Athena tables are created. Optionally, the BI engineer can combine these tables with employee information tables to display human resource information of the users.
  6. Four QuickSight datasets fetch the data from the Athena tables created in Step 5 and import them into SPICE. Then, based on these datasets, a QuickSight dashboard is created.

Prerequisites

For this walkthrough, you should have the following prerequisites:

Create solution resources

We can create all the resources needed for this dashboard using three CloudFormation templates: one for Lambda functions, one for Athena tables, and one for QuickSight objects.

CloudFormation template for Lambda functions

This template creates the Lambda functions data_prepare and dataset_info.

  • Choose Launch Stack and follow the steps to create these resources.

After the stack creation is successful, you have two Lambda functions, data_prepare and dataset_info, and one S3 bucket named admin-console[AWS-account-ID]. You can verify if the Lambda function can run successfully and if the group_membership, object_access, datasets_info, and data_dictionary folders are created in the S3 bucket under admin-console[AWS-account-ID]/monitoring/quicksight/, as shown in the following screenshots.

The Data_Prepare Lambda function is scheduled to run hourly with the CloudWatch Events rule admin-console-every-hour. This function calls the QuickSight Assets APIs to get QuickSight users, assets, and the access permissions information. Finally, this function creates two files, group_membership.csv and object_access.csv, and saves these files to an S3 bucket.

The Dataset_Info Lambda function is scheduled to run hourly and calls the QuickSight Assets APIs to get datasets, schemas, tables, and fields (columns) information. Then this function creates two files, datasets_info.csv and data_dictionary.csv, and saves these files to an S3 bucket.

  •  Create a CloudTrail log if you don’t already have one and note down the S3 bucket name of the log files for future use.
  •  Note down all the resources created from the previous steps. If the S3 bucket name for the CloudTrail log from step 2 is different from the one in step 1’s output, use the S3 bucket from step 2.

The following table summarizes the keys and values you use when creating the Athena tables with the next CloudFormation stack.

Key Value Description
cloudtraillog s3://cloudtrail-awslogs-[aws-account-id]-do-not-delete/AWSLogs/[aws-account-id]/CloudTrail The Amazon S3 location of the CloudTrail log
cloudtraillogtablename cloudtrail_logs The table name of CloudTrail log
groupmembership s3://admin-console[aws-account-id]/monitoring/quicksight/group_membership The Amazon S3 location of group_membership.csv
objectaccess s3://admin-console[aws-account-id]/monitoring/quicksight/object_access The Amazon S3 location of object_access.csv
dataset info s3://admin-console[aws-account-id]/monitoring/quicksight/datsets_info The Amazon S3 location of datsets_info.csv
datadict s3://admin-console[aws-account-id]/monitoring/quicksight/data_dictionary The Amazon S3 location of data_dictionary.csv

CloudFormation template for Athena tables

To create your Athena tables, complete the following steps:

  • Download the following JSON file.
  • Edit the file and replace the corresponding fields with the keys and values you noted in the previous section.

For example, search for the groupmembership keyword.

Then replace the location value with the Amazon S3 location for the groupmembership folder.

  • Create Athena tables by deploying this edited file as a CloudFormation template. For instructions, refer to Get started.

After a successful deployment, you have a database called admin-console created in AwsDataCatalog in Athena and three tables in the database: cloudtrail_logs, group_membership, object_access, datasets_info and data_dict

  • Confirm the tables via the Athena console.

The following screenshot shows sample data of the group_membership table.

The following screenshot shows sample data of the object_access table.

For instructions on building an Athena table with CloudTrail events, see Amazon QuickSight Now Supports Audit Logging with AWS CloudTrail. For this post, we create the table cloudtrail_logs in the default database.

  • After all five tables are created in Athena, go to the security permissions on the QuickSight console to enable bucket access for s3://admin-console[AWS-account-ID] and s3://cloudtrail-awslogs-[aws-account-id]-do-not-delete.
  • Enable Athena access under Security & Permissions.

Now QuickSight can access all five tables through Athena.

CloudFormation template for QuickSight objects

To create the QuickSight objects, complete the following steps:

  • Get the QuickSight admin user’s ARN by running following command in the AWS Command Line Interface (AWS CLI):
    aws quicksight describe-user --aws-account-id [aws-account-id] --namespace default --user-name [admin-user-name]

    For example: arn:aws:quicksight:us-east-1:12345678910:user/default/admin/xyz.

  • Choose Launch Stack to create the QuickSight datasets and dashboard:

  • Provide the ARN you noted earlier.

After a successful deployment, four datasets named Admin-Console-Group-Membership, Admin-Console-dataset-info, Admin-Console-Object-Access, and Admin-Console-CFN-Main are created and you have the dashboard named admin-console-dashboard. If modifying the dashboard is preferred, use the dashboard save-as option, then recreate the analysis, make modifications, and publish a new dashboard.

  • Set your preferred SPICE refresh schedule for the four SPICE datasets, and share the dashboard in your organization as needed.

Dashboard demo

The following screenshot shows the Admin Console Landing page.

The following screenshot shows the User Analysis sheet.

The following screenshot shows the Dashboards Analysis sheet.

The following screenshot shows the Access Permissions sheet.

The following screenshot shows the Data Dictionary sheet.

The following screenshot shows the Overview sheet.

You can interactively play with the sample dashboard in the following Interactive Dashboard Demo.

You can reference the public template of the preceding dashboard in create-template, create-analysis, and create-dashboard API calls to create this dashboard and analysis in your account. The public template of this dashboard with the template ARN is 'TemplateArn': 'arn:aws:quicksight:us-east-1:889399602426:template/admin-console'.

Tips and tricks

Here are some advanced tips and tricks to build the dashboard as the Admin Console to analyze usage metrics. The following steps are based on the dataset admin_console. You can apply the same logic to create the calculated fields to analyze user login activities.

  • Create parameters – For example, we can create a parameter called InActivityMonths, as in the following screenshot. Similarly, we can create other parameters such as InActivityDays, Start Date, and End Date.

  • Create controls based on the parameters – In the following screenshot, we create controls based on the start and end date.

  • Create calculated fields – For instance, we can create a calculated field to detect the active or inactive status of QuickSight authors. If the time span between the latest view dashboard activity and now is larger or equal to the number defined in the Inactivity Months control, the author status is Inactive. The following screenshot shows the relevant code. According to the end-user’s requirements, we can define several calculated fields to perform the analysis.

  • Create visuals – For example, we create an insight to display the top three dashboard views by reader and a visual to display the authors of these dashboards.

  • Add URL actions – You can add an URL action to define some extra features to email inactive authors or check details of users.

The following sample code defines the action to email inactive authors:

mailto:<<email>>?subject=Alert to inactive author! &body=Hi, <<username>>, any author without activity for more than a month will be deleted. Please log in to your QuickSight account to continue accessing and building analyses and dashboards!

Clean up

To avoid incurring future charges, delete all the resources you created with the CloudFormation templates.

Conclusion

This post discussed how BI administrators can use QuickSight, CloudTrail, and other AWS services to create a centralized view to analyze QuickSight usage metrics. We also presented a serverless data pipeline to support the Admin Console dashboard.

If you would like to have a demo, please email us.

Appendix

We can perform some additional sophisticated analysis to collect advanced usage metrics. For example, Forwood Safety raised a unique request to analyze the readers who log in but don’t view any dashboard actions (see the following code). This helps their clients identify and prevent any wasting of reader sessions fees. Leadership teams value the ability to minimize uneconomical user activity.

CREATE OR REPLACE VIEW "loginwithoutviewdashboard" AS
with login as
(SELECT COALESCE("useridentity"."username", "split_part"("useridentity"."arn", '/', 3)) AS "user_name", awsregion,
date_parse(eventtime, '%Y-%m-%dT%H:%i:%sZ') AS event_time
FROM cloudtrail_logs
WHERE
eventname = 'AssumeRoleWithSAML'
GROUP BY  1,2,3),
dashboard as
(SELECT COALESCE("useridentity"."username", "split_part"("useridentity"."arn", '/', 3)) AS "user_name", awsregion,
date_parse(eventtime, '%Y-%m-%dT%H:%i:%sZ') AS event_time
FROM cloudtrail_logs
WHERE
eventsource = 'quicksight.amazonaws.com'
AND
eventname = 'GetDashboard'
GROUP BY  1,2,3),
users as 
(select Namespace,
Group,
User,
(case
when Group in (‘quicksight-fed-bi-developer’, ‘quicksight-fed-bi-admin’)
then ‘Author’
else ‘Reader’
end)
as author_status
from "group_membership" )
select l.* 
from login as l 
join dashboard as d 
join users as u 
on l.user_name=d.user_name 
and 
l.awsregion=d.awsregion 
and 
l.user_name=u.user_name
where d.event_time>(l.event_time + interval '30' minute ) 
and 
d.event_time<l.event_time 
and 
u.author_status='Reader'

About the Authors

Ying Wang is a Manager of Software Development Engineer. She has 12 years of expertise in data analytics and science. She assisted customers with enterprise data architecture solutions to scale their data analytics in the cloud during her time as a data architect. Currently, she helps customer to unlock the power of Data with QuickSight from engineering by delivering new features.

Ian Liao is a Senior Data Visualization Architect at AWS Professional Services. Before AWS, Ian spent years building startups in data and analytics. Now he enjoys helping customer to scale their data application on the cloud.

Maitri Brahmbhatt is a Business Intelligence Engineer at AWS. She helps customers and partners leverage their data to gain insights into their business and make data driven decisions by developing QuickSight dashboards.

How USAA built an Amazon S3 malware scanning solution

Post Syndicated from Jonathan Nguyen original https://aws.amazon.com/blogs/architecture/how-usaa-built-an-amazon-s3-malware-scanning-solution/

United Services Automobile Association (USAA) is a San Antonio-based insurance, financial services, banking, and FinTech company supporting millions of military members and their families. USAA has partnered with Amazon Web Services (AWS) to digitally transform and build multiple USAA solutions that help keep members safe and save members money and time.

Why build a S3 malware scanning solution?

As complex companies’ businesses continue to grow, there may be an increased need for collaboration and interactions with outside vendors. Prior to developing an Amazon Simple Storage Solution (Amazon S3) scanning solution, a security review and approval process for application teams to ingest data into an AWS Organization from external vendors’ AWS accounts may be warranted, to ensure additional threats are not being introduced. This could result in a lengthy review and exception process, and subsequently, could hinder the velocity of application teams’ collaboration with external vendors.

USAA security standards, like those of most companies, require all data from external vendors to be treated as untrusted, and therefore must be scanned by an antivirus or antimalware solution prior to being ingested by downstream processes within the AWS environment. Companies looking to automate the scanning process may want to consider a solution where all incoming external data flow through a demilitarized drop zone to be scanned, and subsequently released to downstream processes if malware and viruses are not detected.

S3 malware scanning solution overview

Dedicated AWS accounts should be provisioned for specific data classifications and used as a demilitarized zone (DMZ) for an untrusted staging area. The solution discussed in this blog uses a dedicated staging AWS account that controls the release of Amazon S3 objects to other AWS accounts within an AWS Organization. AWS accounts within an AWS Organization should follow security best practices in terms of infrastructure, networking, logging, and security. External vendors should explicitly be given limited permissions to appropriate resources in their respective staging S3 bucket.

A staging S3 bucket should have specific resource policies restricting which applications and identity and access management (IAM) principals can interact with S3 objects using object attributes, such as object tags, to determine whether an object has been scanned, and what the results of that scan are. Additional guardrails are implemented using Service Control Policies (SCP) to restrict authorized IAM principals to create or modify S3 object attributes (Figure 1).

Amazon S3 antivirus and antimalware scanning architecture workflow

Figure 1. Amazon S3 antivirus and antimalware scanning architecture workflow

  1. The external vendor copies an object to the staging S3 bucket.
  2. The staging S3 bucket has event notifications configured and generates an event.
  3. The S3 PutObject event is sent to an Object Created Amazon Simple Queue Service (Amazon SQS) queue topic.
  4. An Amazon Elastic Compute Cloud (Amazon EC2) Auto Scaling group is configured to scale based on messages in the Object Created SQS queue.
  5. An antivirus and antimalware scanning service application on the Amazon EC2 instances takes the following actions on objects within the Object Created Amazon SQS queue:
    a. Tag the S3 object with an “In Progress” status.
    b. Get the object from the Staging S3 bucket and stores it in a local ephemeral file system.
    c. Scan the copied object using antivirus or antimalware tool.
    d. Based on the antivirus or antimalware scan results, tag the S3 object with the scan results (for example, No_Malware_Detected vs. Malware_Detected).
    e. Create and publish a payload to the Object Scanned Amazon Simple Notification Service (Amazon SNS) topic, allowing application team filtering.
    f. Delete the message from the Object Created SQS queue.
  6. Application teams are subscribed to the Object Scanned SNS topic with a filter for their application.
  7. For any objects where a virus or malware is detected, a company can use its cyber threat response team to conduct a thorough analysis and take appropriate actions.

USAA built a custom anti-virus and anti-malware scanning application using EC2 instances, using a private, hardened Amazon Machine Image (AMI). For cost-efficacy purposes, the EC2 automatic scaling event can be configured based on Object Created SQS queue depth and Service Level Objective (SLO). A serverless version of an anti-virus and anti-malware solution can be used instead of an EC2 application, depending on your specific use-case and other factors. Some important factors include antivirus and antimalware tool serverless support, resource tuning and configuration requirements, and additional AWS services to manage that could possibly result in a bottleneck. If your enterprise is going with a serverless approach, you can use open-source tools such as ClamAV using Lambda functions.

In the event of an infected object, proper guardrails and response mechanisms need to be in place. USAA teams have developed playbooks to monitor the health and performance of S3 scanning solution, as well as responding to detected virus or malware.

This cloud native, event-driven solution has benefited multiple USAA application teams who have previously requested the ability to ingest data into AWS workloads from teams outside of USAA’s AWS Organization, and allowed additional capabilities and functionality to better serve their members. To enhance this solution even further, USAA’s security team plans to incorporate additional mechanisms to find specific objects that either failed or required additional processing, without having to scan all objects in the buckets. This can be accomplished by including an additional AWS Lambda function and Amazon DynamoDB table to track object metadata as objects get added to the Object Created SQS queue for processing. The metadata could possibly include information such as S3 bucket origin, S3 object key, version ID, scan status, and the original S3 event payload to replay the event into the Object Created SQS queue. The Lambda function primarily ensures the DynamoDB table is kept up to date as objects are processed, as well as handling issues for objects that may need to be reprocessed. The DynamoDB table also has time-to-live (TTL) configured to clear records as they expire from the Staging S3 bucket.

Conclusion

In this post, we reviewed how USAA’s Public Cloud Security team facilitated collaboration and interactions with external vendors and AWS workloads securely by creating a scalable solution to scan S3 objects for virus and malware prior to releasing objects downstream. The solution uses native AWS services and can be utilized for any use-cases requiring antivirus or antimalware capabilities. Because the S3 object scanning solution uses EC2 instances, you can use your existing antivirus or antimalware enterprise tool.

AWS Named as a Leader in the 2022 Gartner Cloud Infrastructure & Platform Services (CIPS) Magic Quadrant for the 12th Consecutive Year

Post Syndicated from Sébastien Stormacq original https://aws.amazon.com/blogs/aws/aws-named-as-a-leader-in-the-2022-gartner-cloud-infrastructure-platform-services-cips-magic-quadrant-for-the-12th-consecutive-year/

This year, and for the twelfth consecutive year, AWS has been named as a Leader in the 2022 Magic Quadrant for Cloud Infrastructure and Platform Services (CIPS). Per Gartner, AWS is the longest-running CIPS Magic Quadrant Leader.

AWS was among the first cloud providers when we launched Amazon Elastic Compute Cloud (Amazon EC2) and Amazon Simple Storage Service (Amazon S3) 16 years ago. Our APIs have been adopted by the whole industry and often copied by others.

We believe this report validates AWS’s ability to innovate and deliver the broadest and deepest set of services for cloud computing. I encourage you to read the full report to appreciate the details.

As Jeff Bezos wrote in his first letter to shareholders in 1997 (reprinted at the end of each annual letter since then), Amazon makes decisions and weighs trade-offs differently than some companies. We focus on the long-term value rather than short-term profits, we make bold rather than timid investment decisions, and most importantly, we relentlessly focus on you: our customers. As a matter of fact, 90 percent of AWS’s roadmap for new services and capabilities is directly driven by your feedback and requests.

I work with AWS service teams every day. These teams work hard to innovate on your behalf. They make bold investments to invent, build, and operate services that help you innovate and build amazing experiences for your customers. The entire team is proud to see these efforts recognized by Gartner.

Our teams closely work with the vibrant AWS Partner Network. AWS has the largest and most dynamic community, with millions of active customers every month and more than 100,000 partners from over 150 countries—with almost 70% headquartered outside the United States. There is a real network effect when you use AWS.

The Magic Quadrant for CIPS, showing Amazon Web Services as a leader.

The full Gartner report has details about the features and factors they reviewed. It explains the methodology used and the results. This report can serve as a guide when choosing a cloud provider that helps you innovate on behalf of your customers.

— seb

Gartner, Magic Quadrant for Cloud Infrastructure and Platform Services, 19 October 2022, Raj Bala, et. al.


The Magic Quadrant graphic was published by Gartner, Inc. as part of a larger research document and should be evaluated in the context of the entire document. The Gartner document is available upon request from AWS.

Gartner does not endorse any vendor, product or service depicted in our research publications, and does not advise technology users to select only those vendors with the highest ratings or other designation. Gartner research publications consist of the opinions of Gartner research organization and should not be construed as statements of fact. Gartner disclaims all warranties, expressed or implied, with respect to this research, including any warranties of merchantability or fitness for a particular purpose.
Gartner and Magic Quadrant are registered trademarks of Gartner, Inc. and/or its affiliates in the U.S. and internationally and is used herein with permission. All rights reserved.


[$] Packaging Rust for Fedora

Post Syndicated from original https://lwn.net/Articles/912202/

Linux distributions were, as a general rule, designed during an era when
most software of interest was written in C; as a result, distributions
are naturally able to efficiently package C applications and the libraries
they depend on. Modern languages, though, tend to be built around their
own package-management systems that are designed with different goals in
mind. The result is that, for years, distributors have struggled to find
the best ways to package and ship applications written in those languages.
A recent discussion in the Fedora community on the packaging of Rust
applications shows that the problems have not yet all been solved.

Security updates for Friday

Post Syndicated from original https://lwn.net/Articles/912873/

Security updates have been issued by Debian (expat, ruby-sinatra, and thunderbird), Fedora (glances), Mageia (cups, firefox, git, heimdal, http-parser, krb5-appl, minidlna, nginx, and thunderbird), Oracle (389-ds:1.4, device-mapper-multipath, firefox, mysql:8.0, postgresql:12, and thunderbird), SUSE (dbus-1, libconfuse0, libtasn1, openjpeg2, qemu, and thunderbird), and Ubuntu (dbus, linux-azure-fde, and tiff).

Critical Vulnerability in Open SSL

Post Syndicated from Bruce Schneier original https://www.schneier.com/blog/archives/2022/10/critical-vulnerability-in-open-ssl.html

There are no details yet, but it’s really important that you patch Open SSL 3.x when the new version comes out on Tuesday.

How bad is “Critical”? According to OpenSSL, an issue of critical severity affects common configurations and is also likely exploitable.

It’s likely to be abused to disclose server memory contents, and potentially reveal user details, and could be easily exploited remotely to compromise server private keys or execute code execute remotely. In other words, pretty much everything you don’t want happening on your production systems.

Slashdot thread.

What’s Up, Home? – The Clock Is Ticking

Post Syndicated from Janne Pikkarainen original https://blog.zabbix.com/whats-up-home-the-clock-is-ticking/24209/

Can you use Zabbix as a countdown timer? Of course, you can! By day, I am a technical monitoring lead in a global cyber security company. By night, I monitor my home with Zabbix & Grafana and do some weird experiments with them. Welcome to my blog about this project.

Note: This post was written a week before the Zabbix Summit 2022 kick-off on October 7-8 in Riga, Latvia. However, the content of this blog post does not lose its value and can be used for many other purposes.

Zabbix Summit 2022 is almost here. Finally, we meet again in person after two years of virtual summits. And this year, I got to be a speaker. YAY!

But can you make Zabbix show you if it’s time for the Summit yet? Yes, easily! Just create a calculated item that calculates the epoch time difference between your desired time and current time, and that’s about it.

Get your epoch time easily

In my case, I consider my Zabbix Summit to be starting when I board the plane at Helsinki Airport.

To get the epoch time, or Unix timestamp, or time in seconds since January 1st, 1970 00:00:00, for my flight departure, I went to the Epoch Converter website and entered the details.

Create a calculated item

With that info, I then created a new calculated item on Zabbix.

In other words, get the time remaining in seconds before my flight takes off.

For my calculated item, I declared the units to be in seconds, after which Zabbix already shows the results in a more convenient days — hours — minutes format.

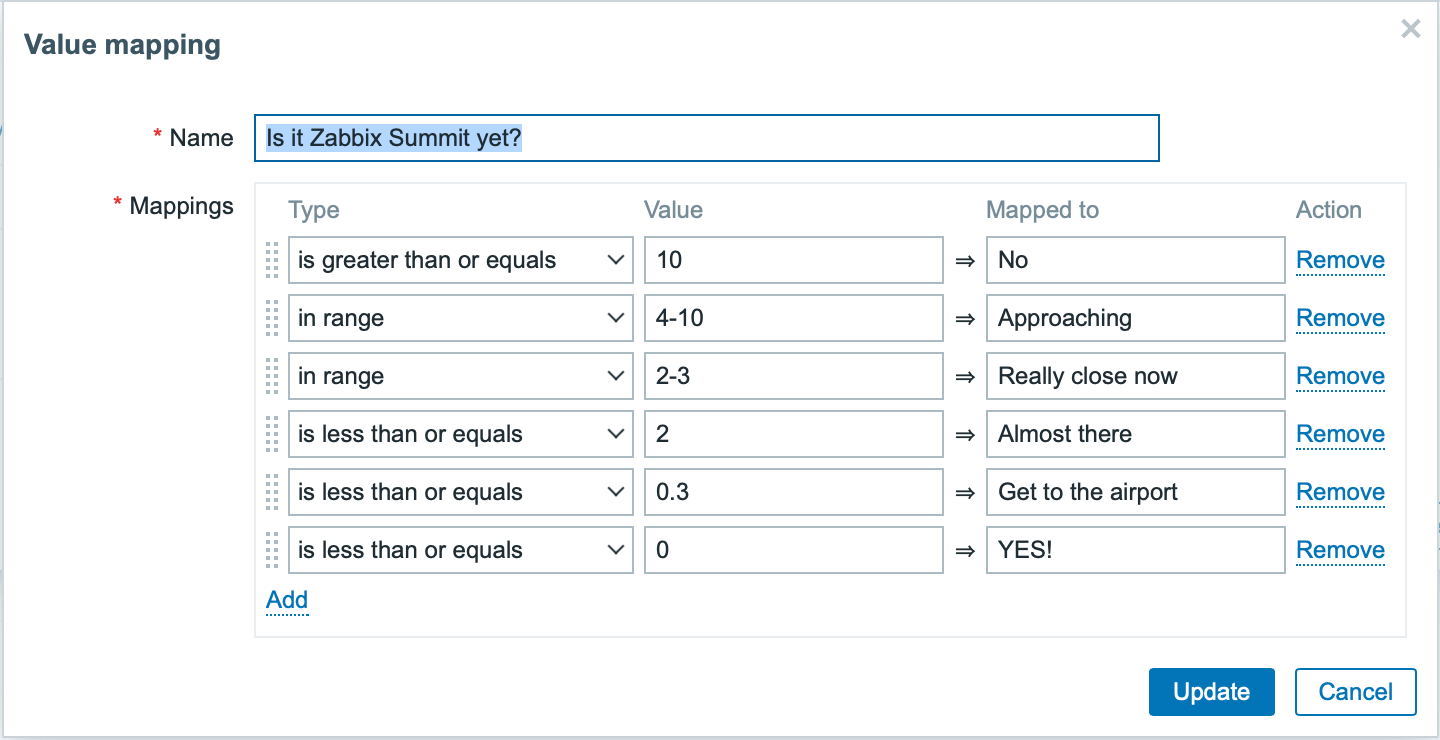
Apply some value mapping

To make this more interesting, let’s apply some value mapping!

Next, when I apply this value mapping on my previously created item, I can then move on and create a separate dashboard for my Zabbix Summit countdown needs.

Create a dashboard

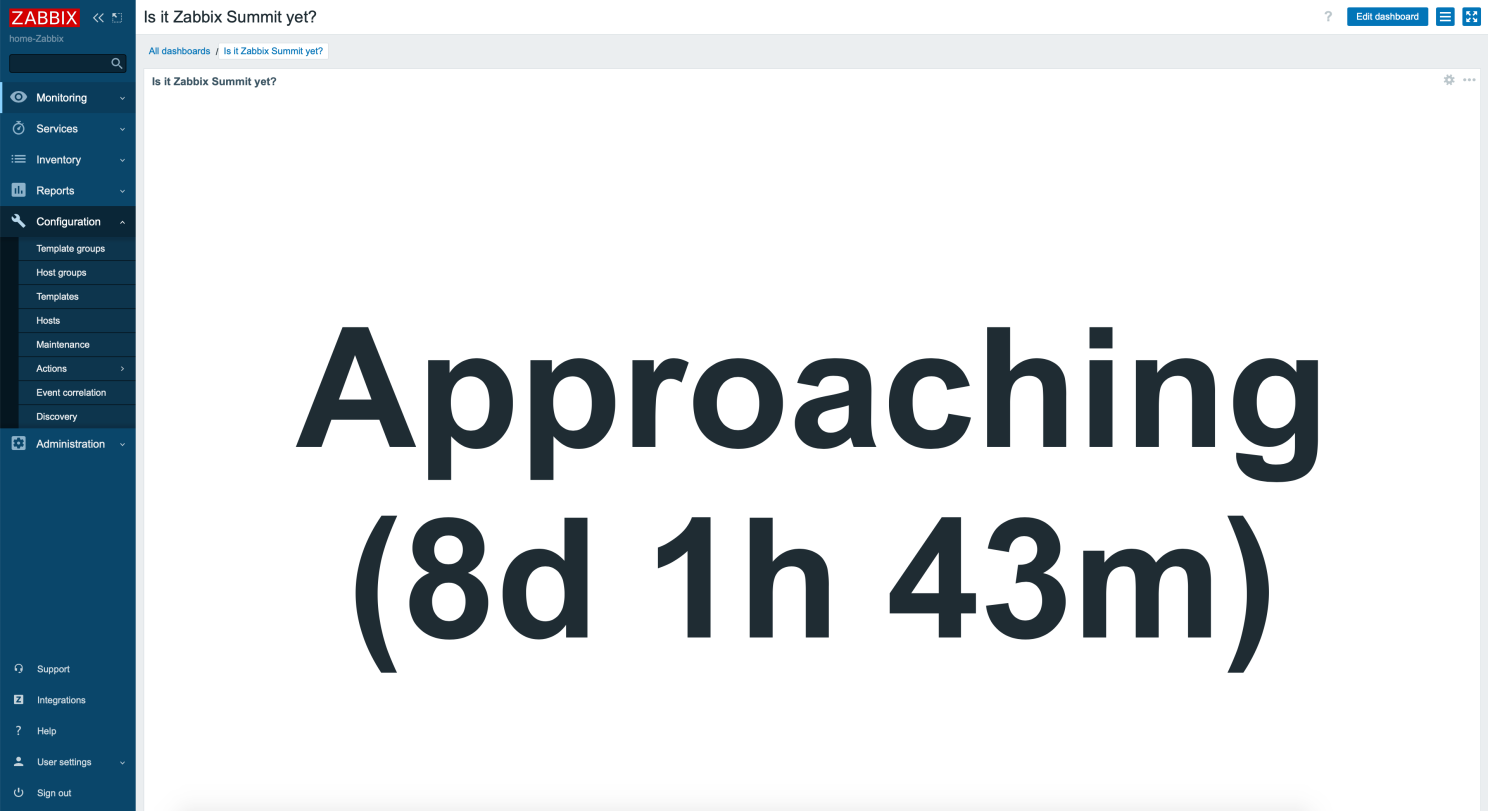
I simply added a new Item value widget to my new dashboard, chose my time until the Zabbix Summit item, adjusted font size, and item positioning, and here it is in all its glory.

I could of course create alert triggers for this to get a notification when I need to go to the airport, but I guess that’s totally unnecessary. Can’t wait to meet y’all!

I have been working at Forcepoint since 2014 and monitoring keeps my internal clock ticking. Hmm, that was a weird sentence. — Janne Pikkarainen

This post was originally published on the author’s LinkedIn account.

The post What’s Up, Home? – The Clock Is Ticking appeared first on Zabbix Blog.

2022-10-28 post-OpenFest 2022

Post Syndicated from original https://vasil.ludost.net/blog/?p=3459

Мислех да пиша recap на OpenFest 2022, но ми е твърде уморено. Направихме един работещ фест след няколко години online и малки събития, получи се с нормалното количество проблеми, съвсем накратко 🙂

Вместо това, за да съм сигурен, че няма да си променя решението, го пиша тук – мисля догодина, ако имам изобщо роля в организацията, да е минимална. Освен, че имам нужда от почивка и че комбинацията от работа, деца и организация на подобно събитие не изглежда поносима за мен, би трябвало да е и крайно време по-нови и млади хора да се заемат 🙂

Така като си погледна архивите, като изключим 2003, 2012 и 2020, съм участвал във всички останали, като в последните 10 години – като един от основните координатори. Ако продължа да се занимавам, вероятно ще тръгна да правя побъркани неща като 10gbps wireless и т.н., а си мисля, че моите идеи за какво е хубаво да се прави/случва може вече да не са съвсем правилни 🙂

Нямам особено притеснение за самия фест – има сериозен екип, който може да се справя с организирането, имаме изградена система за почти всичко, така че съм съвсем спокоен, че всичко може да се случи и без мен.

Все пак, крайно време е да ида един път на OpenFest като обикновен посетител, не ми се е случвало от 2003 🙂

Поредните „последни“ избори в Израел

Post Syndicated from Мирослав Зафиров original https://toest.bg/porednite-posledni-izbori-v-izrael/

Краят на периода на големите еврейски празници в Израел отбеляза началото на финалния етап от предизборната кампания – пета за последните три години и половина. Социологическите агенции все още не са в състояние да предскажат със сигурност кой ще е победителят в това поредно нелеко политическо състезание. Засега се очертава дясноцентристката коалиция да успее да вземе 61 места в Кнесета, което ѝ осигурява крехко мнозинство с един глас. В момента всичко зависи от това какъв ще е процентът на гласуващите граждани и кои ще са последните послания на партиите в дните преди изборите на 1 ноември.

Към момента партиите в Израел могат да разчитат само на своите т.нар. твърди ядра. Процентът на гражданите, които още се колебаят или вече са решили, че няма да гласуват, е значителен. Това по същество означава, че и след изборите политическата криза ще продължи, което само по себе си след периода на управление на правителството „Бенет–Лапид“ и годините на пандемия неминуемо ще окаже влияние върху израелската икономика и политика.

Минималното надмощие на десните партии почти им гарантира съставяне на кабинет начело с Бенямин Нетаняху. За разлика от активната кампания на най-дълго управлявалия министър-председател в историята на Израел, левите и лявоцентристките партии остават в плен на идеологемата „Никога с Нетаняху“, което в настоящите условия в Израел и в региона не им печели повече подкрепа. Както и на предишните избори, цената на победата ще бъде способността на политическите субекти да генерират колкото може повече подкрепа сред колебаещите се, но от значение ще бъде и кои партии няма да успеят да влязат в Кнесета.

До момента изборната кампания не успява да привлече интереса на публиката, а данните за умората в обществото преди петите подред избори от 2019 г. насам, както и за настроенията след големите религиозни празници сочат, че няма преобладаващо мнение относно вота на 1 ноември. Поради това и повечето партии запазват своите най-важни аргументи и послания за последните дни преди тази дата. Какво именно ще кажат партиите и към какво ще насочат вниманието на избирателите, е и най-важното в настоящата кампания.

Дясноцентристите са представени от „Ликуд“ на Бенямин Нетаняху и Религиозната ционистка партия на Безалел Смотрич и Итамар Бен Гвир. Бившият премиер разполагаше с повече време да се подготви за кампанията, която съвпадна с излизането на неговата книга и така допълнително привлече вниманието на медиите. Нетаняху обещава мерки срещу повишаването на цената на живота и безплатно образование за децата до три години. Той обръща специално внимание на сферата на сигурността и критикува споразумението с Ливан, постигнато преди дни от премиера Яир Лапид.

Бенямин Нетаняху е особено активен, работейки за спечелването на подкрепата на гласоподавателите. Той увеличава и броя на своите сътрудници, които директно да разговарят с хората, агитирайки по техните домове. Особено внимание се обръща на възрастните избиратели, които не са така достъпни чрез социалните медии. За бъдещите си планове Нетаняху обяви, че няма да се коалира с Бени Ганц и Яир Лапид и ще се стреми към мнозинство, активизирайки поддръжниците на „Ликуд“ и опитвайки се да убеди подкрепящите партията „Еврейски дом“, че тя няма да премине границата и да влезе в парламента.

От своя страна партията на ционистите на Безалел Смотрич и Бен Гвир, която трудно може да се различи в някои от посланията си от „Ликуд“, се намира в негласна коалиция с формацията на Нетаняху. Итамар Бен Гвир и Бенямин Нетаняху не се атакуват публично, но все пак бившият премиер е внимателен в това да заяви подкрепа за бъдещия си коалиционен партньор. Преди дни той отклони поканата да участва заедно с Бен Гвир в предизборно събитие, което доведе до настойчивата покана крайнодесният политик да слезе от сцената. По-късно Бен Гвир изрази съжаление за случилото се, но посочи, че самият Нетаняху е бил „недобре посъветван от сътрудниците си“.

Другият кандидат на ционистите – Смотрич, обяви кампанията си за законодателна реформа за намаляване на правомощията на съдебната система. Планът включва да отпаднат от израелския наказателен закон обвиненията в злоупотреба с доверие, които са в основата и на две от обвиненията срещу Нетаняху. И докато кандидатите за депутати на „Ликуд“ обещават, че подобни промени няма да важат със задна дата за самия Нетаняху, то представителите на Религиозната ционистка партия твърдят, че ще искат новите правила да бъдат приложени и към делото на бившия премиер.

В кампанията си Смотрич и Бен Гвир насочват атаките си към друг крайнодесен политик – бившата министърка на вътрешните работи Аелет Шакед, като се опитват да привлекат и подкрепа от средите на поддръжниците на Бени Ганц. В основното им послание се подчертават шансовете на тяхната партия да бъде трета политическа сила, като се акцентира, че колкото по-нагоре в стълбицата се изкачи партията, толкова по-малки са шансовете Нетаняху да склони на коалиция с настоящия министър на отбраната Ганц за сметка на ционистите. Сценарий, при който Нетаняху и Ганц „намират общи допирни точки“, не е изключен, ако „Ликуд“ не успее да получи 61 места.

Религиозните партии в лицето на „Шас“ и „Обединена тора юдаизъм“ (ОТЮ) се радват на стабилна подкрепа от страна на поддръжниците си, които, по думите на политически наблюдател в Израел, нарастват с всеки следващи избори на чисто демографски принцип. Така или иначе, и „Шас“, и ОТЮ все пак се сблъскват с агресивната конкуренция на ционистите. Това накара „Шас“ да започне кампания под надслов „Троен Шас“, в която формацията се представя като единствената еврейска, дясна и социална партия. До края на кампанията „Шас“ ще продължи да се фокусира върху социалните проблеми и цената на живота, обещавайки огромни субсидии под формата на купони за храна за нуждаещите се. ОТЮ в своята стратегия обвинява настоящите управляващи в подкопаване на еврейската идентичност на Израел, като също говори за социалната цена, особено сред общността на религиозните евреи харедим.

„Еврейски дом“ на Аелет Шакед е за момента единствената дясна партия, която е на ръба да не успее да влезе в Кнесета. Това заплашва възможността Нетаняху да събере мнозинство от 61 гласа единствено с подкрепата на десните формации. Въпреки това бившият премиер като че ли прави малко, за да укрепи позициите на някогашната си съюзница. Самата Шакед прекрати опитите си да търси път към политически компромис с бившия си премиер. Загубата на доверие в партията „Еврейски дом“ се дължи на непоследователните послания на Шакед дали ще подкрепи, или не коалиция с Нетаняху, както и на решението на Нафтали Бенет да се оттегли от политиката.

Сред лявоцентристките партии челна позиция заема партията на Яир Лапид „Йеш Атид“. По време на кампанията Лапид се възползва максимално от вниманието на медиите и от това, че беше действащ министър-председател. Немалка част от вниманието по време на кампанията е отделена и на успешното споразумение с Ливан, което според мнозина има доста по-голямо значение за Израел от мирните договори с редица арабски държави. Най-сетне стратегическият враг „Хизбулла“ е поставен в контекст на взаимно сдържане и интерес, по думите на наблюдател в Израел. Лапид акцентира и върху успехите си в Газа за запазване на мира, като по този начин подсказа, че именно той има заслуга за успешния край на кризата през август т.г. с „Ислямски джихад“, а не посредниците от ООН и Египет и министърът на отбраната Бени Ганц.

Две седмици преди изборите Яир Лапид драстично намали международните си изяви, като не замина за САЩ, а на срещата в Брюксел на Съвета за асоцииране ЕС–Израел участва онлайн. Основна тактическа задача пред Лапид е да осигури успеха на малките партии в своята коалиция на изборите, което ще му позволи да разчита на техните гласове. От друга страна, премиерът трябва да успее и да намали противоречията си с „Ликуд“, което би му дало възможност да се коалира с Нетаняху, ако това се наложи, без да бъде обвиняван в загуба на политическа идентичност. Той не може да постигне това за сметка на същите тези малки партии, рискувайки тяхната лоялност.

Либералните формации „Мерец“ и „Авода“, както и арабските партии са изправени пред опасността да не влязат в Кнесета. В опит да противодейства Лапид активно работи с арабската общност, като тази седмица посети Назарет, срещна се с местни лидери и говори пред арабските медии. По-рано пред медиите той вече обяви, че няма да допусне еврейски поклонници на „Ал-Акса“ и гарантира правата на мюсюлманите. Яир Лапид обещава да промени и Закона за нацията, който дискриминира гражданите на Израел от арабски произход. Не на последно място, премиерът насочва вниманието си и към украинските бежанци. Той се надява, че подкрепата на правителството му за Украйна ще даде отражение върху украинската еврейска общност, което ще остави негативен отпечатък върху партията на рускоезичните евреи „Наш дом Израел“ на Авигдор Либерман.

Обединението на министъра на отбраната Бени Ганц и министъра на правосъдието Гидеон Саар се стреми на убеди избирателите, че именно Ганц е най-подходящ за премиер и е политикът, който може да победи Нетаняху. С надслова „Бени Ганц – министър-председател на сигурността“ министърът на отбраната подсказва и това, че за разлика от Лапид, той има значителен военен опит. Ганц твърди, че само той би могъл да разбие възможната дясна коалиция. Партията му се стреми към подкрепата на религиозните ционисти, които смятат, че Бен Гвир е твърде краен. Бени Ганц се опитва да извлече полза и от включването на Гади Айзенкот (бивш началник на Генералния щаб на Израелската армия) в политиката, който готви план за обществената сигурност на Йерусалим.

„Наш дом Израел“ на Авигдор Либерман разчита на успешния мандат на своя лидер като министър на финансите. Кампанията на Либерман е под надслов „Свободна икономика – свободна страна“ и се придържа към по-скоро либерален наратив. За разлика от Ганц и Лапид, които са подчертано внимателни, когато стане дума за консервативната еврейска общност на харедим, Либерман открито говори за ясна граница между религията и държавата и подкрепя предложението за работещ обществен транспорт на шабат.

Авигдор Либерман, чиито корени са в бившия СССР, доскоро се ползваше с подкрепата на рускоезичната общност в Израел. Към днешна дата обаче той все по-трудно намира път към сърцата на своите традиционни избиратели, опитвайки се да балансира в изказванията си по отношение на войната на Русия срещу Украйна. Всяка проява на подкрепа за едната или другата страна може да му коства подкрепата на руската или украинската еврейска общност.

Въпреки натиска от страна на лявоцентристките среди и на самия премиер Яир Лапид, „Авода“ и „Мерец“ отказват да се обединят. Лидерката на „Авода“ Мерав Михаели поддържа тезата, че обединението би довело до отслабване на двете партии. От своя страна председателката на „Мерец“ Зехава Галон прави всички възможни опити да убеди своя партньор в обратното. След години на политическа изолация Галон не иска да бъде обвинявана в съпричастност за края на „Мерец“.

„Авода“ планира мащабно събитие три дни преди изборите, на което да отбележи 20-тата годишнина от убийството на бившия премиер Ицхак Рабин. За първи път тази година събитието, което досега винаги се обявяваше като проява на обществена ангажираност и не се свързваше с политически партии, ще бъде част от кампанията на „Авода“ – партията на покойния Рабин. Митингът ще добави някои допълнителни елементи към кампанията на Михаели, която се концентрира върху граждански и обществени свободи (тя също смята, че на шабат общественият транспорт следва да работи). Самата Мерав Михаели често споменава, че се смята за наследница на Рабин.

„Мерец“ ще се опита да убеди своите избиратели, че тяхната подкрепа е и подкрепа за самия Яир Лапид. Най-малката партия в колодата на лявоцентристите се стреми да избегне кампания, подчинена на принципа „Помогнете ни“, и иска да докаже, че е в състояние и сама да генерира подкрепа.

На последно място, кампанията сред арабските партии е не по-малко интензивна. На тези избори те ще бъдат три – „Раам“, „Хадаш-Таал“ и „Балад“. Фактът, че и трите играят поотделно, би трябвало да окуражи избирателите им да излязат и да подкрепят своите партии, като по този начин предотвратят някоя от трите да не влезе в Кнесета. Очаква се „Хадаш-Таал“ на традиционните политици Айман Оде и Ахмад Тиби остро да критикува Лапид заради политиката му спрямо израелската арабска общност и действията на полицията в комплекса на джамията „Ал-Акса“. Оде и Тиби се стремят да привлекат гласове за сметка на „Балад“.

Изборите за Кнесет в Израел този път имат за цел да представят формула за управление на страната, която да бъде значително по-надеждна от тази на отиващото си коалиционно правителство. Докато преди година за съставянето на правителство бе достатъчно да се твърди, че всички средства са позволени, само и само Бенямин Нетаняху да не се върне във властта, сега немалко от неговите противници правят своите сметки, че при определени условия коалиция с „токсичния“ бивш премиер не е изключена. Не само заради нуждата Израел да бъде управляван надеждно в сложната вътрешно- и външнополитическа среда, но и заради все по-трудната за прогнозиране международна обстановка. В крайна сметка за много от онези, на които предстои да влязат в бъдещия Кнесет, подобен шанс може да се окаже и последен, ако не се прояви необходимата доза здрав политически разум и чувство за самосъхранение.

Заглавна снимка: peterspiro / iStock

Източник

A Fedora 37 release-date slip

Post Syndicated from original https://lwn.net/Articles/912776/

Fedora releases have traditionally happened later than their target date,
though the project has done better on that score in recent years. Ben
Cotton has announced in
Fedora Magazine that the upcoming Fedora 37 release, initially planned
for October 25, won’t be happening until November 15. The
immediate cause is an
impending OpenSSL update
which fixes a vulnerability described as
“critical”.

Ironically, Fedora’s openness means we can’t start preparing ahead
of time. All of our build pipelines and artifacts are open. If we
were to start building updates, this would disclose the
vulnerability before the embargo lifts. As a result, we only know
that OpenSSL considers this the highest level of severity and Red
Hat’s Product Security team strongly recommended we wait for a fix
before releasing Fedora Linux 37.

Building highly resilient applications with on-premises interdependencies using AWS Local Zones

Post Syndicated from Sheila Busser original https://aws.amazon.com/blogs/compute/building-highly-resilient-applications-with-on-premises-interdependencies-using-aws-local-zones/

This blog post is written by Rachel Rui Liu, Senior Solutions Architect.

AWS Local Zones are a type of infrastructure deployment that places compute, storage, database, and other select AWS services close to large population and industry centers.

Following the successful launch of the AWS Local Zones in 16 US cities since 2019, in Feb 2022, AWS announced plans to launch new AWS Local Zones in 32 metropolitan areas in 26 countries worldwide.

With Local Zones, we’ve seen use cases in two common categories.

The first category of use cases is for workloads that require extremely low latency between end-user devices and workload servers. For example, let’s consider media content creation and real-time multiplayer gaming. For these use cases, deploying the workload to a Local Zone can help achieve down to single-digit milliseconds latency between end-user devices and the AWS infrastructure, which is ideal for a good end-user experience.

This post will focus on addressing the second category of use cases, which is commonly seen in an enterprise hybrid architecture, where customers must achieve low latency between AWS infrastructure and existing on-premises data centers.  Compared to the first category of use cases, these use cases can tolerate slightly higher latency between the end-user devices and the AWS infrastructure. However, these workloads have dependencies to these on-premises systems, so the lowest possible latency between AWS infrastructure and on-premises data centers is required for better application performance. Here are a few examples of these systems:

  • Financial services sector mainframe workloads hosted on premises serving regional customers.
  • Enterprise Active Directory hosted on premise serving cloud and on-premises workloads.
  • Enterprise applications hosted on premises processing a high volume of locally generated data.

For workloads deployed in AWS, the time taken for each interaction with components still hosted in the on-premises data center is increased by the latency. In turn, this delays responses received by the end-user. The total latency accumulates and results in suboptimal user experiences.

By deploying modernized workloads in Local Zones, you can reduce latency while continuing to access systems hosted in on-premises data centers, thereby reducing the total latency for the end-user. At the same time, you can enjoy the benefits of agility, elasticity, and security offered by AWS, and can apply the same automation, compliance, and security best practices that you’ve been familiar with in the AWS Regions.

Enterprise workload resiliency with Local Zones

While designing hybrid architectures with Local Zones, resiliency is an important consideration. You want to route traffic to the nearest Local Zone for low latency. However, when disasters happen, it’s critical to fail over to the parent Region automatically.

Let’s look at the details of hybrid architecture design based on real world deployments from different angles to understand how the architecture achieves all of the design goals.

Hybrid architecture with resilient network connectivity

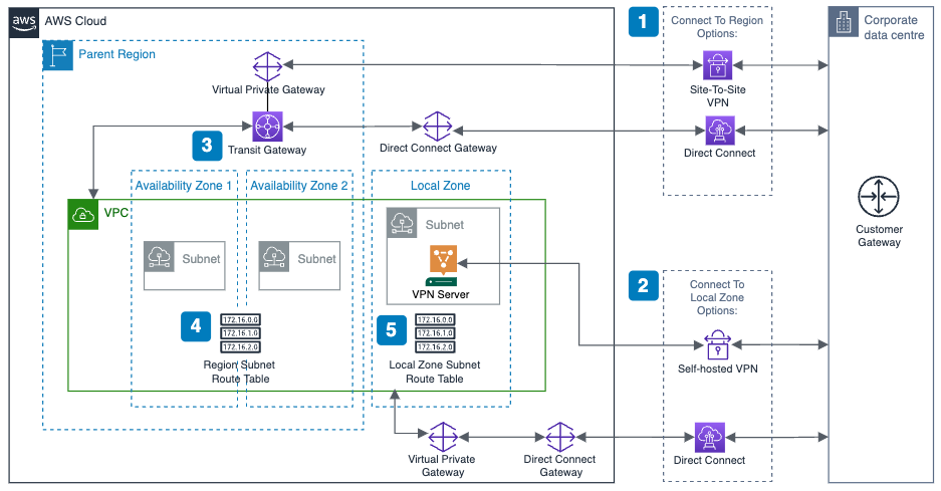
The following diagram shows a high-level overview of a resilient enterprise hybrid architecture with Local Zones, where you have redundant connections between the AWS Region, the Local Zone, and the corporate data center.

resillient network connectivity

Here are a few key points with this network connectivity design:

  1. Use AWS Direct Connect or Site-to-Site VPN to connect the corporate data center and AWS Region.
  2. Use Direct Connect or self-hosted VPN to connect the corporate data center and the Local Zone. This connection will provide dedicated low-latency connectivity between the Local Zone and corporate data center.
  3. Transit Gateway is a regional service. When attaching the VPC to AWS Transit Gateway, you can only add subnets provisioned in the Region. Instances on subnets in the Local Zone can still use Transit Gateway to reach resources in the Region.
  4. For subnets provisioned in the Region, the VPC route table should be configured to route the traffic to the corporate data center via Transit Gateway.
  5. For subnets provisioned in Local Zone, the VPC route table should be configured to route the traffic to the corporate data center via the self-hosted VPN instance or Direct Connect.

Hybrid architecture with resilient workload deployment

The next examples show a public and a private facing workload.

To simplify the diagram and focus on application layer architecture, the following diagrams assume that you are using Direct Connect to connect between AWS and the on-premises data center.

Example 1: Resilient public facing workload

With a public facing workload, end-user traffic will be routed to the Local Zone. If the Local Zone is unavailable, then the traffic will be routed to the Region automatically using an Amazon Route 53 failover policy.

public facing workload resilliency
Here are the key design considerations for this architecture:

  1. Deploy the workload in the Local Zone and put the compute layer in an AWS AutoScaling Group, so that the application can scale up and down depending on volume of requests.
  2. Deploy the workload in both the Local Zone and an AWS Region, and put the compute layer into an autoscaling group. The regional deployment will act as pilot light or warm standby with minimal footprint. But it can scale out when the Local Zone is unavailable.
  3. Two Application Load Balancers (ALBs) are required: one in the Region and one in the Local Zone. Each ALB will dispatch the traffic to each workload cluster inside the autoscaling group local to it.
  4. An internet gateway is required for public facing workloads. When using a Local Zone, there’s no extra configuration needed: define a single internet gateway and attach it to the VPC.

If you want to specify an Elastic IP address to be the workload’s public endpoint, the Local Zone will have a different address pool than the Region. Noting that BYOIP is unsupported for Local Zones.

  1. Create a Route 53 DNS record with “Failover” as the routing policy.
  • For the primary record, point it to the alias of the ALB in the Local Zone. This will set Local Zone as the preferred destination for the application traffic which minimizes latency for end-users.
  • For the secondary record, point it to the alias of the ALB in the AWS Region.
  • Enable health check for the primary record. If health check against the primary record fails, which indicates that the workload deployed in the Local Zone has failed to respond, then Route 53 will automatically point to the secondary record, which is the workload deployed in the AWS Region.

Example 2: Resilient private workload

For a private workload that’s only accessible by internal users, a few extra considerations must be made to keep the traffic inside of the trusted private network.

private workload resilliency

The architecture for resilient private facing workload has the same steps as public facing workload, but with some key differences. These include:

  1. Instead of using a public hosted zone, create private hosted zones in Route 53 to respond to DNS queries for the workload.
  2. Create the primary and secondary records in Route 53 just like the public workload but referencing the private ALBs.
  3. To allow end-users onto the corporate network (within offices or connected via VPN) to resolve the workload, use the Route 53 Resolver with an inbound endpoint. This allows end-users located on-premises to resolve the records in the private hosted zone. Route 53 Resolver is designed to be integrated with an on-premises DNS server.
  4. No internet gateway is required for hosting the private workload. You might need an internet gateway in the Local Zone for other purposes: for example, to host a self-managed VPN solution to connect the Local Zone with the corporate data center.

Hosting multiple workloads

Customers who host multiple workloads in a single VPC generally must consider how to segregate those workloads. As with workloads in the AWS Region, segregation can be implemented at a subnet or VPC level.

If you want to segregate workloads at the subnet level, you can extend your existing VPC architecture by provisioning extra sets of subnets to the Local Zone.

segregate workloads at subnet level

Although not shown in the diagram, for those of you using a self-hosted VPN to connect the Local Zone with an on-premises data center, the VPN solution can be deployed in a centralized subnet.

You can continue to use security groups, network access control lists (NACLs) , and VPC route tables – just as you would in the Region to segregate the workloads.

If you want to segregate workloads at the VPC level, like many of our customers do, within the Region, inter-VPC routing is generally handled by Transit Gateway. However, in this case, it may be undesirable to send traffic to the Region to reach a subnet in another VPC that is also extended to the Local Zone.

segregate workloads at VPC level

Key considerations for this design are as follows:

  1. Direct Connect is deployed to connect the Local Zone with the corporate data center. Therefore, each VPC will have a dedicated Virtual Private Gateway provisioned to allow association with the Direct Connect Gateway.
  2. To enable inter-VPC traffic within the Local Zone, peer the two VPCs together.
  3. Create a VPC route table in VPC A. Add a route for Subnet Y where the destination is the peering link. Assign this route table to Subnet X.
  4. Create a VPC route table in VPC B. Add a route for Subnet X where the destination is the peering link. Assign this route table to Subnet Y.
  5. If necessary, add routes for on-premises networks and the transit gateway to both route tables.

This design allows traffic between subnets X and Y to stay within the Local Zone, thereby avoiding any latency from the Local Zone to the AWS Region while still permitting full connectivity to all other networks.

Conclusion

In this post, we summarized the use cases for enterprise hybrid architecture with Local Zones, and showed you:

  • Reference architectures to host workloads in Local Zones with low-latency connectivity to corporate data centers and resiliency to enable fail over to the AWS Region automatically.
  • Different design considerations for public and private facing workloads utilizing this hybrid architecture.
  • Segregation and connectivity considerations when extending this hybrid architecture to host multiple workloads.

Hopefully you will be able to follow along with these reference architectures to build and run highly resilient applications with local system interdependencies using Local Zones.

From Churn to Cherry on Top: How to Foster Talent in a Cybersecurity Skills Gap

Post Syndicated from Jake Godgart original https://blog.rapid7.com/2022/10/27/from-churn-to-cherry-on-top/

From Churn to Cherry on Top: How to Foster Talent in a Cybersecurity Skills Gap

The mythical (un)icorn pipeline

When it comes to building a cybersecurity talent pipeline that feeds directly into your company, there’s one go-to source for individuals who are perfectly credentialed, know 100% of all the latest technology, and will be a perfect culture-fit: Imaginationland.

Of course we all know that isn’t a real place, and that the sort of talent described above doesn’t really exist. It’s more about thoughtfully building a talent pipeline that benefits your specific organization and moves the needle for the company. The key word in that last sentence? Thoughtfully. Because it takes strategic planning, collaboration, and a thoughtful nature to source from educational institutions, LinkedIn groups, talent-that’s-not-quite-fully-baked-but-soon-could-be, and many other venues that may not be top-of-mind.

Identifying those venues and solidifying a pipeline/network will go a long way in preventing continuous talent churn and finding individuals who bring that special something that makes them the cherry on top of your team.    

The (un)usual places

Do you have a list? A few go-to places for sourcing talent? How old is that list? Do you have a feeling it might be extremely similar to talent-sourcing lists at other companies? It only takes relocating one letter in the word “sourcing” to turn it into “scouring.” As in, scouring the internet to find great talent. Not a word with 100%-negative connotation, but it implies that – after that open analyst req has been sitting on all the job sites for months – maybe now there’s a certain frantic quality to your talent search.

So if you’re going to scour, you may as well make it a smart scour. Targeting specific avenues on and offline is great, but targeting a specific profile for the type of person you hope will join your team…that can turn out to be not so great. Stay open; the person(s) you find may just surprise you. Start online with places like:

  • TryHackMe rooms
  • Comments sections
  • Twitter (yes, Twitter)

And, truly, give some thought to heading offline and scouring/scouting for talent in places like:

  • In-person conferences and events
  • The local CTF event
  • Someone on your IT team that wants to get into cybersecurity
  • Talking to members of your existing team
  • Bespoke recruiting events in talent hotbeds around the world      

And one last place to look: past interviewees. How long has it been since you interviewed that candidate who was almost the right fit? What if that person would now be a great fit? It can be a cyclical journey, so it’s a good idea to keep a list of candidates who impressed you, but didn’t quite make the cut at the time. Better yet, connect with these candidates on social media and periodically check in to see how they are growing their skills.

The (un)familiar fit

You have an idea of what sort of person you would like to see in that open role. But, what if that person never walks through your (real or virtual) door to interview? Will you close the role and just forget about it? Of course you won’t because your SOC likely needs talent – and sooner rather than later. If you don’t allow for some wiggle room in the requirements though, you may be in for an extended process of trying to fill that position.

So, what does that wiggle room look like? Let’s put it this way: If a candidate that matched all criteria on the job description suddenly walked through your door, would you forgo the interview and hire them on the spot? Hopefully not, because there are certain intangibles you should take into account. Yes, that person matches everything on the description, but do they really want to work for your business specifically? Because a bad hire that matches all the requirements on the description, well that can ultimately be more toxic than something who has the potential to live up to those requirements.

Building Diversity, Equity, and Inclusion (DEI) hiring practices into your program, and being thoughtful with the words you use when crafting job descriptions and the requirements listed on them can create the wiggle room that non-ideal candidates might need to feel invited to apply and interview.    

The un becomes the usual

That section header doesn’t refer to any one thing discussed above. It’s a collection of considerations and practices that aren’t “un” because they’re so irregular, rather because none of them are the first thing a hiring manager might think to do when looking to fill a role. One of these considerations may be the second or third thing that comes to mind. But, by making these hiring practices more of the “usual way” to secure talent for open roles, you may experience significantly less churn and find the individuals that become the cherry on top of your SOC.    

You can learn more in our new eBook, 13 Tips for Overcoming the Cybersecurity Talent Shortage. It’s a deeper dive into the current cybersecurity skills gap and features steps you can take to address it within your own organization.

[$] Copyright notices (or the lack thereof) in kernel code

Post Syndicated from original https://lwn.net/Articles/912355/

The practice of requiring copyright assignments for contributions to
free-software projects has been in decline for years; the GNU Binutils
project may be the
latest domino to fall
in that regard. The Linux kernel project,
unlike some others, has always allowed contributors to retain their copyrights,
resulting in a code base that has widely distributed ownership. In such a
project, who owns the copyright to a given piece of code is not always
obvious. Some
developers (or their employers) are insistent about the placement of
copyright notices in the code to document their ownership of parts of the
kernel. A series of recent discussions within the Btrfs subsystem, though,
has made it clear that there is no project-wide policy on when these
notices are warranted — or even acceptable.

The collective thoughts of the interwebz