Version 26.1 of
the pip package installer for Python has been released. Richard Si
has published a blog
post that looks at some of the highlights of 26.1 including
dependency cooldowns, experimental support for pylock (pylock.toml)
files, and resolver
improvements that will move pip closer to the goal of removing its
legacy resolver. The release also includes several security fixes and
drops support for Python 3.9.
Migrating to Apache Flink 2.2 on Amazon Managed Service for Apache Flink gives you access to Java 17 runtime, faster checkpoints and recovery through RocksDB 8.10.0, and SQL-native artificial intelligence and machine learning (AI/ML) inference. If you run Flink 1.x today, you might be dealing with an aging Java 11 runtime that will no longer receive standard support by the end of this year, slower state backend performance, and a fragmented API surface split across DataSet, DataStream, and legacy connector interfaces. Flink 2.2 addresses these gaps in a single major version upgrade.
Apache Flink is an open source distributed processing engine for stream and batch data, with first-class support for stateful processing and event-time semantics. Amazon Managed Service for Apache Flink removes the operational overhead of running Flink. You provide your application code, and the service provisions, scales, checkpoints, and patches the infrastructure for you.
In this post, we explain what’s new in Amazon Managed Service for Apache Flink 2.2, provide a guided migration using CLI commands, console instructions, and code examples, and show you how to monitor the upgrade and roll back if needed.
What’s new in Amazon Managed Service for Apache Flink 2.2
This release spans runtime upgrades, SQL, and Table API capabilities. The following sections break down each area.
Runtime and performance
These changes improve application performance and bring your runtime up to current standards.
Java 17 runtime – Flink 2.2 requires Java 17. Build your application code with JDK 17 for better garbage collection, a more secure runtime, and modern language features like sealed classes and records. Java 11 is no longer supported.
Python 3.12 – Flink 2.2 requires Python 3.9+, with Python 3.12 as the default. Python 3.8 is no longer supported.
RocksDB 8.10.0 – Your stateful applications benefit from improved I/O performance with the upgraded state backend, resulting in faster checkpoints and recovery.
Dedicated collection serializers – Improved serializers for Map, List, and Set types reduce serialization overhead, which lowers checkpoint sizes for applications that use these data structures frequently.
Kryo 5.6 – Kryo upgrades from version 2.24–5.6. This has state compatibility implications covered in the migration section.
SQL and Table API highlights
With Flink 2.2, you can:
Call Machine Leaning (ML) models directly from SQL using ML_PREDICT and CREATE MODEL
Work with semistructured data through the native VARIANT type
You can upgrade a running Flink 1.x application to 2.2 using the UpdateApplication API, the AWS Management Console, AWS CloudFormation, the AWS SDK, and Terraform Modules. The upgrade preserves your application configuration, logs, metrics, tags, and, if your state and binaries are compatible.
Auto-rollback
With auto-rollback turned on, binary incompatibilities detected during job startup trigger an automatic revert to the previous Flink version within minutes, with no manual intervention required. For state incompatibilities that surface as restart loops after a successful upgrade, invoke the Rollback API to return to your previous version and state.
Unsupported open source features
The following Flink 2.2 features aren’t currently supported in Amazon Managed Service for Apache Flink because they’re still considered experimental: Materialized Tables, ForSt State Backend (disaggregated state storage), Java 21, and custom metric reporters/telemetry configurations. We continue to evaluate these features as they mature in the Apache Flink project and will share updates on availability. You can have a closer look to which features are supported in Apache Flink 2.2 features supported
Now that you know what’s changed, the next section walks through the migration process.
Prerequisites
Before starting the migration, confirm that you have the following in place:
An existing Apache Flink 1.x application running on Amazon Managed Service for Apache Flink.
JDK 17 installed in your local build environment.
The AWS Command Line Interface (AWS CLI) installed and configured with permissions to call the kinesisanalyticsv2 APIs (UpdateApplication, CreateApplicationSnapshot, DescribeApplication, RollbackApplication).
An Amazon Simple Storage Service (Amazon S3) bucket to upload your updated application JAR.
We recommend testing each phase on a non-production replica of your application before applying the same steps to production.
Step 1: Update your application code
Start by updating your Flink dependencies to version 2.2.0 and replacing deprecated APIs. The following sections show the most common changes.
Flink 2.2 removes the FlinkKinesisConsumer and FlinkKinesisProducer classes. The following example shows how to migrate to the FLIP-27 based KinesisStreamsSource.Before (Flink 1.x):
FlinkKinesisConsumer<String> consumer = new FlinkKinesisConsumer<>(
    "my-stream",
    new SimpleStringSchema(),
    consumerConfig);
env.addSource(consumer);
Beyond connector updates, make the following code changes:
Replace DataSet API usage with the DataStream API or Table API/SQL.
Replace Scala API usage with the Java API.
Verify that your build targets JDK 17.
Build your updated application JAR and upload it to Amazon S3 with a different file name than your current JAR (for example, my-app-flink-2.2.jar).
Step 2: Check state compatibility
Before upgrading, assess whether your application state is compatible with Flink 2.2. The Kryo upgrade from version 2.24 to 5.6 changes the binary format of serialized state. Applications using POJOs with Java collections (HashMap, ArrayList, HashSet) are the most common source of incompatibility.
Quick compatibility check:
Serialization type
Compatible?
Avro (SpecificRecord, GenericRecord)
Yes
Protobuf
Yes
POJOs without collections
Yes
Custom TypeSerializers (no Kryo delegation)
Yes
POJOs with Java collections
No
Scala case classes
No
Types using Kryo fallback
No
Check your logs for Kryo fallback:
Search your application logs for this pattern, which indicates a type is falling back to Kryo serialization:Class class <className> cannot be used as a POJO type
Step 3: Turn on auto-rollback and automatic snapshots
Turn on auto-rollback so the service automatically reverts to the previous version if the upgrade fails. Also, verify that automatic snapshots are turned on. The service takes a snapshot before the upgrade that serves as your rollback point.
Run the upgrade while the application is in RUNNING or READY (stopped) state. The following example upgrades a running application and points to the new JAR.
Navigate to your application in the Amazon Managed Service for Apache Flink console.
Choose Configure.
Select the Flink 2.2 runtime.
Point to your new application JAR on Amazon S3.
Select the snapshot to restore from (use Latest to start from the most recent snapshot).
Choose Update.
AWS CloudFormation:
Update the RuntimeEnvironment field in your template. AWS CloudFormation now performs an in-place update instead of deleting and recreating the application.
Terraform:
If you manage your Flink application with Terraform, you can perform the same in-place upgrade by updating the runtime_environment and code reference in your aws_kinesisanalyticsv2_application resource. Note: Terraform support for FLINK-2_2 requires AWS provider version 6.40.0 or later (released April 8, 2026). Earlier provider versions don’t recognize this runtime value. First, update your provider version constraint:
Then run terraform init -upgrade to pull the new provider.Next, update your application resource. Change runtime_environment from “FLINK-1_20” to “FLINK-2_2” and point to your new JAR:
terraform plan    # Review the in-place update
terraform apply   # Apply the runtime change
Terraform will perform an in-place update of the application, changing the runtime version and code location. The application will restart with the new Flink 2.2 runtime. To roll back with Terraform, revert runtime_environment to “FLINK-1_20”, point file_key back to your original JAR, and run terraform apply again. Note that you cannot restore a Flink 2.2 snapshot on Flink 1.x, so the rollback will start from the last Flink 1.x snapshot.
Important Terraform considerations:
Auto-rollback and the RollbackApplication API aren’t directly exposed as Terraform resource attributes. If you need auto-rollback during the upgrade, enable it using the AWS CLI (Step 3) before running terraform apply, or use a provisioner/null_resource to call the CLI.
Always take a manual snapshot (Step 4) before running terraform apply for the upgrade. Terraform doesn’t automatically snapshot before updating the runtime.
Step 6: Monitor the upgrade
After initiating the upgrade, monitor the application to verify that it completes successfully.
Check application status:
The application should transition through RUNNING → UPDATING → RUNNING. Confirm the runtime version changed to 2.2:
During rollback, the application stops, reverts to the previous Flink version and application code, and restarts from the snapshot taken before the upgrade.
Important: You can’t restore a Flink 2.2 snapshot on Flink 1.x. Rollback uses the snapshot taken before the upgrade. This is why Steps 3 and 4 are critical.
If you’re evaluating Flink 2.2 features: Launch a new application on the Flink 2.2 runtime to explore SQL/ML capabilities, the VARIANT data type, and the new join operators. See the Amazon Managed Service for Apache Flink sample applications on GitHub for reference architectures.
With Apache Flink 2.2 on Amazon Managed Service for Apache Flink, you get a modern Java 17 runtime, SQL-native AI/ML inference, improved state management performance, and a streamlined API surface. In-place upgrades with state preservation and auto-rollback make the migration straightforward. Test on a replica, follow the steps in this post, and start building on Flink 2.2.
Managing multiple Amazon Elastic Kubernetes Service (Amazon EKS) clusters for development and testing environments can present significant operational and cost challenges for enterprises. Deloitte, a global professional services organization, faced these challenges while provisioning dedicated Amazon EKS clusters for their quality assurance (QA) testing environments. In this post, we explore how Deloitte used Amazon EKS and vCluster to transform their testing infrastructure.
Business challenges
Before implementing vCluster, Deloitte provisioned dedicated Amazon EKS clusters on AWS for each ephemeral testing need. This approach could take up to 45 minutes per cluster. QA engineers required isolated environments to test specific combinations of application components, but they relied heavily on the platform team to provision and manage those clusters. Each environment also carried the overhead of its own ingress controllers, DNS setup, and monitoring agents, creating significant infrastructure duplication and operational load.
Key challenges included:
Slow provisioning times of 30-45 minutes for each new environment, including a dedicated Amazon EKS cluster, Application Load Balancers (ALB), Amazon Route 53 records
High AWS infrastructure costs from running multiple dedicated Amazon EKS clusters
Significant platform team overhead managing multiple environments
Resource duplication across clusters, such as load balancers, Route 53 entries, and monitoring agents
Complex access management across multiple AWS Identity and Access Management (AWS IAM) roles and Kubernetes Role-based access control (RBAC) configurations
These operational inefficiencies not only slowed down QA team development cycles but also increased costs and created bottlenecks that prevented teams from working independently.
Solution overview
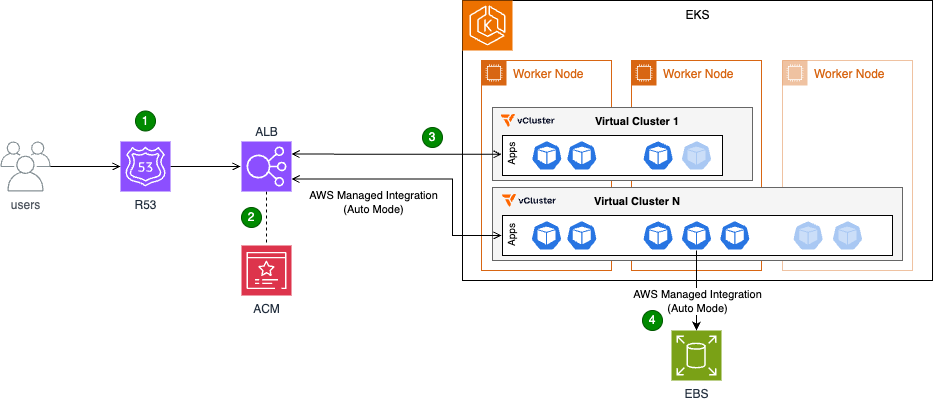
To address these challenges, Deloitte implemented a solution combining Amazon EKS with vCluster. The Amazon EKS host cluster serves as the foundation, providing the underlying compute and networking resources. On top of this infrastructure, vCluster enables the creation of lightweight, fully functional virtual clusters that act like independent Kubernetes environments. This gives QA teams dedicated spaces for their work without the overhead of managing dozens of separate Amazon EKS clusters.
Essential platform services such as Kubernetes controllers and monitoring agents are deployed once on the host cluster and shared across all virtual clusters. This approach reduces resource duplication and streamlines management. With Amazon EKS Auto Mode, the solution also brings dynamic autoscaling, ensuring that compute resources are allocated just in time to meet demand, further optimizing costs.
Users access the applications over the public internet via HTTPS requests.
Their connections are secured via HTTPS, which is terminated at the Application Load Balancer (ALB).
The Application Load Balancer (ALB) directs users to the appropriate application based on predefined rules.
Each application that users deploy runs in its own virtual cluster with dedicated Amazon Elastic Block Store (Amazon EBS) storage.
Key components:
Amazon EKS host cluster with Auto Mode enabled: The foundation of the solution, providing the underlying Kubernetes infrastructure
Virtual clusters (vCluster): Multiple isolated Kubernetes clusters running within the host cluster. Each virtual cluster represents an isolated testing environment for QA validation and application testing.
Shared controllers: These controllers run on the host cluster and are shared across all virtual clusters:
Load Balancer Controller: Manages the creation and configuration of load balancers for applications running in the virtual clusters
Storage Controller: Manages the creation of Amazon EBS volumes or Amazon Elastic File System (Amazon EFS) mount points, providing persistent storage for applications
Application Load Balancer (ALB): Fronts the host cluster nodes, distributing traffic and ensuring high availability
AWS Certificate Manager (ACM): An ACM certificate is attached to the ALB to terminate HTTPS connections and provide secure communication
Outcomes
Deloitte’s implementation of Amazon EKS with vCluster delivered measurable results. Environment provisioning time dropped from 45 minutes to under 5 minutes, representing an 89% reduction that translates to immediate productivity gains. The QA team has reclaimed around 500 hours annually, shifting focus from repetitive setup tasks to higher-value testing work. Infrastructure efficiency improved significantly through resource consolidation. By deploying workloads to a shared host cluster and enabling virtual clusters to share those resources, Deloitte saves over 50 vCPUs and more than 200 GB of memory at peak usage.
On the AWS front, consolidating to fewer Amazon EKS control planes reduced management overhead and costs. Cost optimization improved further, with up to 70% savings by running workloads on Amazon Elastic Compute Cloud (Amazon EC2) Spot Instances, with Amazon EKS Auto Mode providing efficient, automated autoscaling and provisioning. The architecture was further streamlined by implementing a single load balancer capable of serving traffic to applications across multiple virtual clusters. This reduced complexity and simplified monitoring and troubleshooting.
The vCluster itself proved transformative. Deloitte now runs more than 50 virtual clusters efficiently on a single shared Amazon EKS host cluster. Teams can now provision their own testing environments in under 5 minutes without platform team involvement, compared to submitting requests and waiting 30-45 minutes previously. Both QA and application teams now have faster access to the environments they need. Tooling complexity decreased significantly. Instead of managing more than ten separate tool deployments (reverse proxy, monitoring agents, controllers, etc.), teams now rely on a single shared stack that’s easier to maintain and operate. These improvements collectively position Deloitte with a more scalable, cost-effective, and manageable AWS environment that’s ready to grow with evolving business needs.
Walkthrough
This section provides a simplified overview of the solution, preserving the core elements implemented at Deloitte. It covers the deployment of two applications on separate virtual clusters, the ability to access the vCluster platform, and the configuration of both applications to operate under the same domain and load balancer.
Prerequisites
Before beginning the deployment, verify that the following resources are in place:
Amazon Virtual Private Cloud (Amazon VPC) and subnets: An Amazon VPC and the necessary subnets must be created
Amazon EKS Cluster: An Amazon EKS cluster should be set up within the designated Amazon VPC and subnets, with Auto Mode enabled
Service IPv4 range: The Amazon EKS service IPv4 range must be set to 10.96.0.0/12 (the service Classless Inter-Domain Routing (CIDR) range used by vCluster)
IAM roles: The following IAM roles must be created
(For Auto Mode) EKS Auto Mode Node Role with permissions for EC2, EBS, and Auto Scaling operations
Domain name: A domain name, along with the necessary certificate and DNS configuration, must be obtained
kubectl and Helm: Command-line tools for Kubernetes management
Deployment steps
The following walkthrough guides you through deploying the solution. You’ll start by creating and validating the required certificate, then deploy vCluster with Amazon EKS Auto Mode and configure the ALB. Next, you’ll access the vCluster console to create two virtual clusters. Finally, you’ll deploy an application in both virtual clusters and expose it through an Application Load Balancer using path-based routing.
The expected outcome of the preceding commands is the creation and validation of a certificate in AWS Certificate Manager (ACM) within the specified region.
Step 2: Deploy vCluster with Amazon EKS Auto Mode and Application Load Balancer
The following command configures the ingress class for ALB provisioning and the storage class for Amazon EBS persistent volumes.
The expected outcome is the successful deployment of the vCluster platform on the Amazon EKS cluster, accessible via the load balancer and domain provisioned in the previous steps.
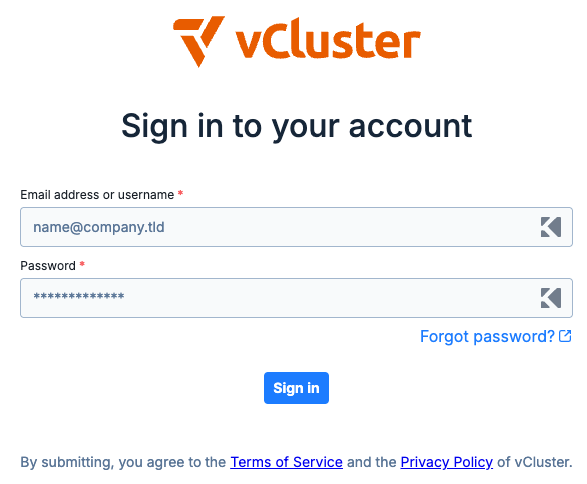
Figure 2: vCluster environment login page.
Step 3: Access the vCluster console and create virtual clusters
Open a web browser and navigate to the vCluster domain set up earlier
Log in with the following credentials:
Username: admin
Password: password
On first login, complete the setup questions to start the 13-day vCluster platform trial by providing:
Name
Email address
Company name
Step 4: Create two virtual clusters through the console
Using the vCluster UI, create a new virtual cluster and select the “Deploy with vCluster platform (default)” option. Replace the content of the vcluster.yaml file with the following configuration:
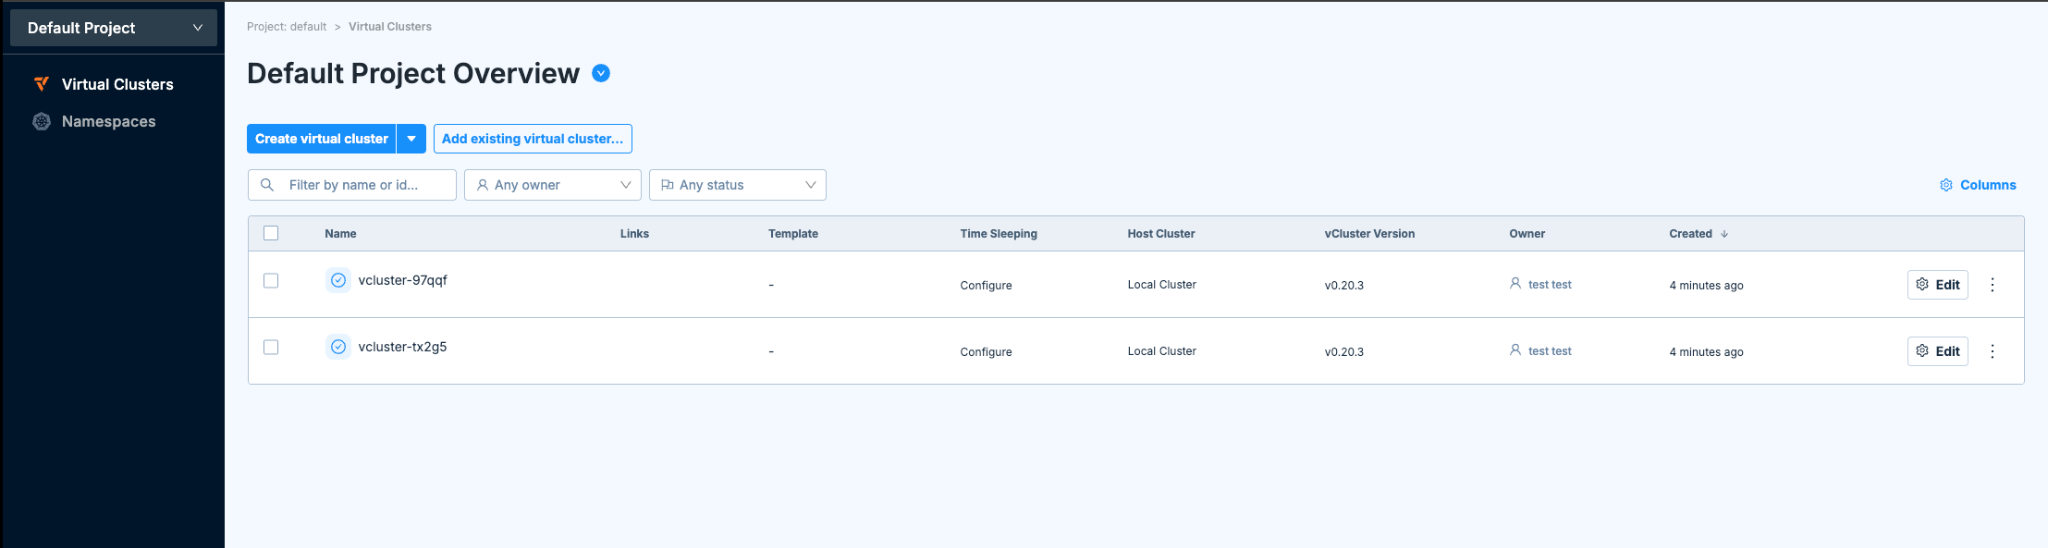
This configuration enables synchronization between the host cluster and the virtual cluster for both ingress classes and storage classes, making host cluster resources available within the virtual cluster. It also synchronizes ingress resources from the virtual cluster back to the host cluster. The coredns section configures the virtual cluster control plane to deploy a DNS management pod, supporting DNS resolution for applications within the virtual cluster. After adding the configuration, create the cluster. After you have created the cluster and it is healthy, repeat the process to create the second cluster.
Figure 3: vCluster environment with two newly created virtual clusters.
Step 5: Deploy applications
After both clusters are up and running:
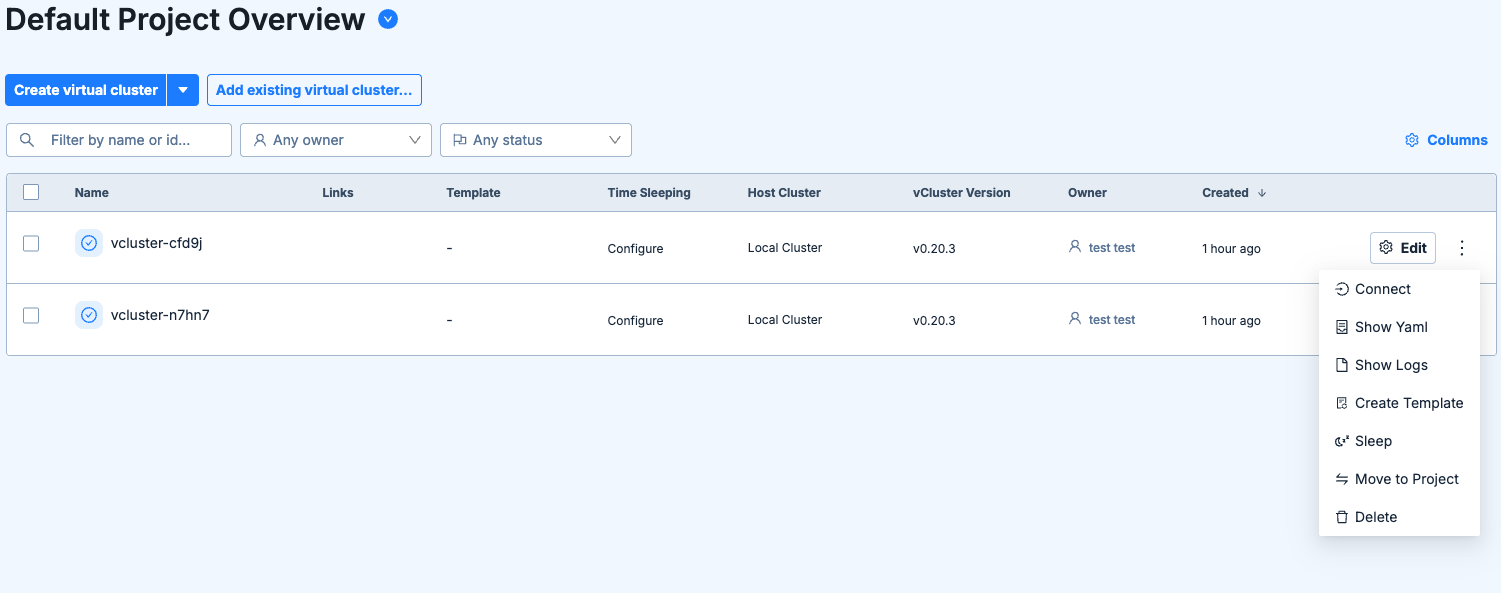
Select and connect to the virtual cluster as shown in the following figure.
Figure 4: vCluster main page and connect option to a single virtual cluster.
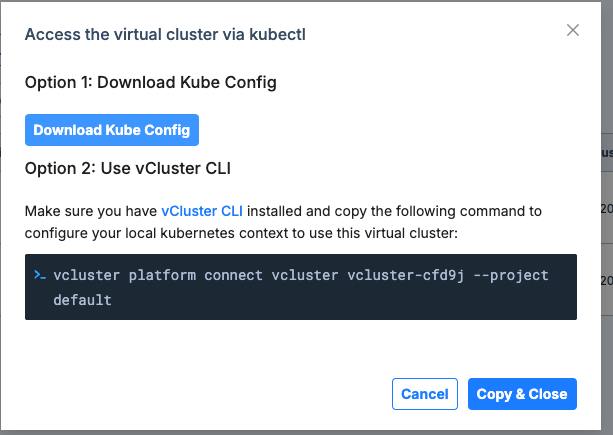
Download the kubeconfig file and use it to connect to the cluster.
Figure 5: Connect to virtual cluster menu.
After you have established access to the newly created virtual cluster via kubectl, run the following command to deploy the application to the cluster.
Namespace: Creates a new namespace called echoserver
Service: Creates a service named echoserver within the echoserver namespace
Deployment: Creates a deployment named echoserver in the echoserver namespace
Ingress: Creates an ingress resource that routes traffic to the echoserver service on port 80 via internet-facing load balancer (for testing purposes)
Persistent Volume Claim (PVC): Requests storage resources for the application
Note: Replace placeholders in the YAML file with the appropriate values.
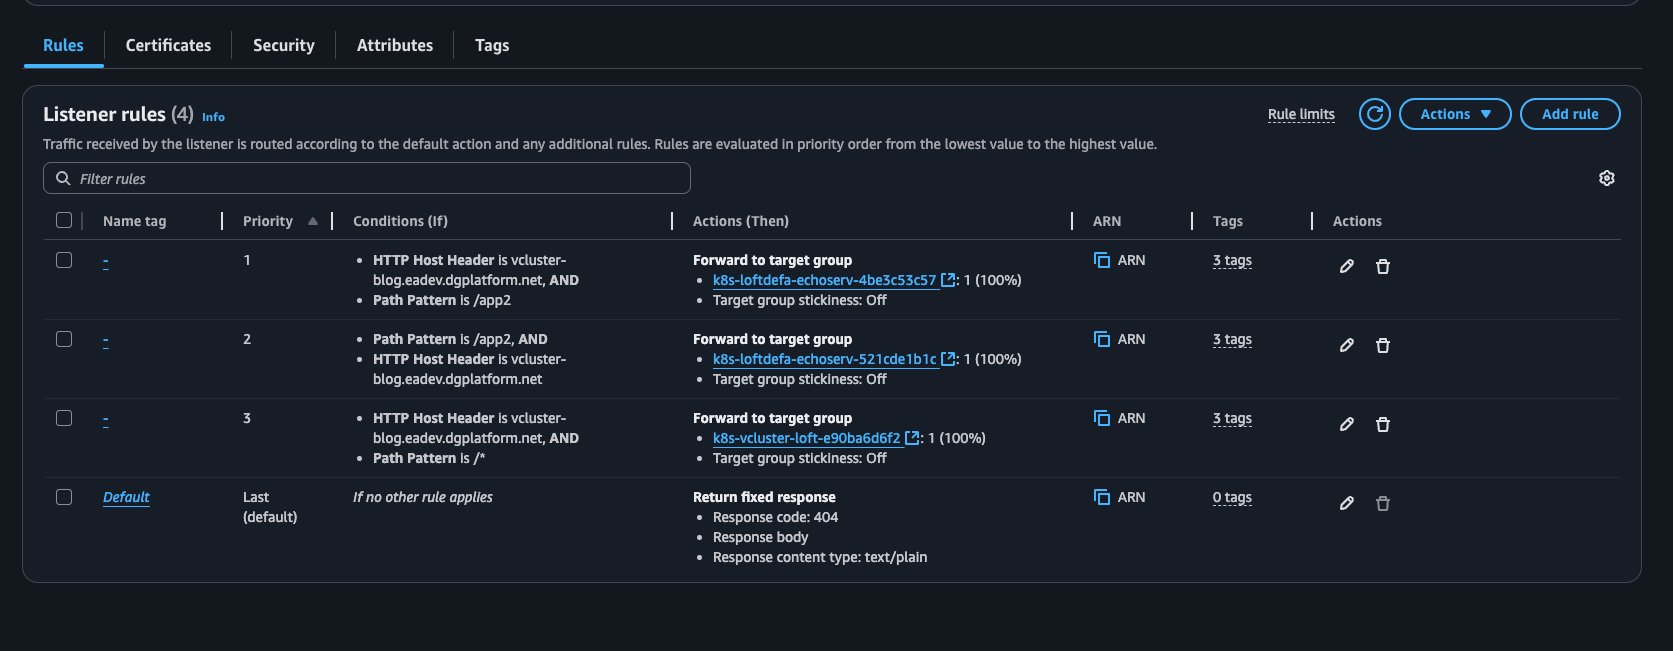
Repeat the preceding steps on the second virtual cluster. Upon resource deployment, Amazon EKS adds new path-based rules to the ALB that match the deployed Ingress objects, exposing the applications.
Figure 6: Application Load Balancer rules illustrating rules from different applications through the ingress object.
Step 6: Validate the implementation
To verify that the virtual cluster setup is working correctly, perform the following validation checks:
Cluster deployment verification: Verify the successful deployment of both App1 and App2 in their respective virtual clusters. Validate pod status and service functionality
Application accessibility testing: Test that both applications are properly exposed through the single Application Load Balancer:
App1: https://<domain-name>/app1
App2: https://<domain-name>/app2
Clean up
To avoid incurring unnecessary charges, remove the deployed resources when they’re no longer needed. Start by uninstalling the vCluster Helm release, then delete the Amazon Route 53 DNS records and AWS Certificate Manager certificate:
In this post, we showed how Deloitte used Amazon EKS with vCluster to reduce environment provisioning time by 89%, reclaim 500 hours annually, and cut infrastructure costs through resource consolidation. Ready to transform your development and testing infrastructure? Start by evaluating your current environment provisioning process and identifying opportunities to consolidate workloads using Amazon EKS with vCluster. Whether you’re looking to reduce setup times from hours to minutes, empower your teams with self-service capabilities, or optimize AWS costs through resource consolidation, this solution provides a proven path forward.
Visit the Amazon EKS documentation to learn more about Auto Mode and explore how virtual clusters can help your organization achieve similar gains in speed, efficiency, and operational agility. If you have questions or feedback about this post, leave a comment in the comments section.
By the time Linus Torvalds released 7.1-rc1
and closed the 7.1 merge window, 12,996 non-merge changesets had been
pulled into the mainline repository; just over 9,000 of those arrived after the first-half summary was written. These
changes were more driver-oriented than those seen earlier, but still also
included many new features across the kernel as a whole.
Understanding what AWS Identity and Access Management (IAM) policies can control helps you build better security controls and avoid spending time on approaches that won’t work. You’ve likely encountered questions like:
Can I use AWS Organizations service control policies (SCPs) to prevent the creation of security groups that allow traffic from 0.0.0.0/0?
Can I block uploads unless objects are encrypted?
Can I prevent functions with more than 512 MB of memory allocated?
Some of these are possible with IAM policies. Others are not. The difference is determined by a fundamental principle of AWS authorization: Policies make decisions based on information available in the authorization context at the time of the API call.
In this blog post, you learn how to use the AWS Service Authorization Reference to determine what’s achievable with IAM policies, recognize scenarios that need alternative solutions, and build more effective security controls in your AWS environment.
Understanding AWS authorization context
When you make an AWS API request through the AWS Management Console, AWS Command Line Interface (AWS CLI), or AWS SDK, the specific AWS service (such as Amazon S3 or Amazon EC2) receiving the request assembles a request context containing information about that request. This context is used for policy evaluation decisions. Request context is structured using the Principal, Action, Resource, Condition (PARC) model, which has four key components.
Principal: Identifies the requester and their attributes (tags, session context)
Action: Specifies the AWS API operation being requested (for example, s3:PutObject, ec2:RunInstances)
Resource: Defines the target AWS resource using Amazon Resource Names (ARNs)
Condition: Provides additional context available at request time, such as IP address, time, encryption parameters, MFA status, and service-specific attributes
The following example shows the typical request context for an Amazon S3 object upload:
IAM policies can evaluate request metadata like encryption method and storage class being specified. However, it cannot evaluate the actual file contents, object size, or specific data patterns. Policy evaluation occurs at the time of the request, using the information present in the authorization context.
An essential resource: The Service Authorization Reference
The Service Authorization Reference is the authoritative documentation for understanding what policies can control. For every AWS service, it documents:
Actions: Every controllable operation
Resources: Resource types that can be targeted
Condition keys: The exact context information available for policy decisions
Condition keys are broadly divided into two categories. Global condition keys, which can be used across AWS services, and service-specific condition keys, which are defined for use with an individual AWS service. Use the Service Authorization Reference to find the global-condition keys or service-specific condition keys for each AWS service.
How to use the Service Authorization Reference
Follow these steps to determine if your requirement can be controlled with IAM policies:
Find the action you want: Find the API operation you want to control. Be precise, different actions have different available condition keys.
Examine available condition keys: The Condition keys column shows what context information AWS makes available for that action.
Make your feasibility determination: If the information you need isn’t listed as a condition key, you will not be able to control it with IAM policies alone.
Let’s take an example from the Amazon Elastic Compute Cloud (Amazon EC2)ec2:RunInstances action to see what you can and can’t control. In the Service Authorization Reference under the Amazon EC2 section, examine the RunInstances action and check the Resource types column. The RunInstances action affects multiple resource types, each with its own set of condition keys.
For the instance* resource type:
ec2:InstanceType: Can restrict instance types
ec2:EbsOptimized: Can require EBS optimization
aws:RequestTag/: Can enforce tagging requirements
For the network-interface* resource type:
ec2:Subnet: Can control subnet placement
ec2:Vpc: Can limit to specific virtual private clouds (VPCs)
ec2:AssociatePublicIpAddress: Can control public IP assignment
Note: These are a few examples from the many condition keys available for each resource type under the RunInstances action. The Service Authorization Reference lists dozens of condition keys across resource types (instance, network interface, security group, subnet, volume, and so on) that RunInstances affects. Consult the complete reference to see the available options for your specific use case.
Access the Service Authorization Reference programmatically
Beyond the human-readable documentation, AWS provides the Service Authorization Reference in machine-readable JSON format to streamline automation of policy management workflows. Use this programmatic access to incorporate authorization metadata into your development and security workflows. For detailed information about the JSON structure and field definitions, see the Simplified AWS service information for programmatic access. Developers can use tools like the IAM MCP Server for AWS IAM operations. This server provides AI assistants with the ability to manage IAM users, roles, policies, and permissions while following security best practices.
Using IAM policies to control specific scenarios
The following examples show how you can use IAM policies to control specific scenarios.
Example 1: Enforce AES256 server-side encryption on S3 objects
In the Amazon S3 Service Authorization Reference, under s3:PutObject action, the s3:x-amz-server-side-encryption condition key is available in the authorization context, which can be used to control the server-side encryption of S3 objects with AES-256. Here is the required policy.
Policy 1: Deny Amazon S3 object upload if the encryption doesn’t use AES-256
Policy 1 is a resource-based policy that can be applied on an S3 bucket to restrict object uploads. It denies a PutObject request when the server-side encryption isn’t using the AES-256 encryption algorithm.
Example 2: Allow different instance types based on the user’s cost center tag.
When checking the Amazon EC2 Service Authorization Reference for ec2:RunInstances, the ec2:InstanceType condition key, which is resource specific, is available. To restrict instance types based on who is launching them (rather than just what is being launched), you can either combine this with a global condition key or attach different policies to different principals. By using aws:PrincipalTag/tag-key alongside ec2:InstanceType, you can identify the user’s cost center from their IAM identity tags and then apply different instance type restrictions accordingly. This allows a single policy to dynamically enforce different permissions based on the requester’s identity.
Policy 2: Restricting EC2 instance types by cost center
This is an identity-based policy that you can attach to IAM users, groups, or roles to control EC2 instance launches based on cost allocation. In the first statement, aws:PrincipalTag, which is a global condition key (tags attached to the IAM user or role), is used to determine which instance types are allowed. Users tagged with CostCenter=Development can only launch cost-effective T3 instance types (t3.micro, t3.small, t3.medium, and so on)with the service specific key ec2:InstanceType.
In the second statement, users tagged with CostCenter=Production can launch more powerful instance types from the M5 (general purpose), C5 (compute optimized), and R5 (memory optimized) families. This approach lets organizations enforce cost controls and allocate resources based on workload requirements. Each cost center maintains flexibility for its specific needs.
Note: Additional resources are required in the IAM policy to successfully launch EC2 instances. For the complete list, see Launch Instances.
Example 3: Users can only access and update DynamoDB items where the partition key matches their username.
You have identified that GetItem, PutItem,and UpdateItem actions are required. Corresponding to these actions, you can use the condition key to expose partition key values in the authorization context as described in the Amazon DynamoDB Service Authorization Reference
The policy allows users to perform read and write actions (GetItem, PutItem, and UpdateItem) on the UserProfiles table, but only for items where the partition key value equals their own username (using the ${aws:username} policy variable). For example, if user alice attempts to access an item with partition key bob, the request will be denied.
Scenarios that need more than policies alone
Some requirements can’t be met using IAM policies. Here are three common scenarios that aren’t achievable with IAM policies alone.
Scenario 1: Block users from creating security group rules that allow traffic from 0.0.0.0/0 on TCP port 22
Upon checking the Amazon EC2 Service Authorization Reference, you will find that the ec2:AuthorizeSecurityGroupIngress action is required in an IAM policy to add an inbound access rules to a security group.
To verify this in the Service Authorization Reference, navigate to the Amazon EC2 Service Authorization Reference and search for the AuthorizeSecurityGroupIngress action, which is the action that creates security group rules. After you locate this action, review the Condition keys column and look for condition keys related to CIDR blocks, IP ranges, ports, or protocols. Available condition keys for ec2:AuthorizeSecurityGroupIngress include:
Notice there are no condition keys for CIDR blocks (such as 0.0.0.0/0), port numbers (such as 22), or protocols (such as TCP). The authorization context doesn’t include information about the specific CIDR blocks, ports, or protocols being added to the security group rule, so IAM policies can’t control these attributes.
Scenario 2: Prevent creation of Lambda functions with more than 512 MB of memory allocated
Following the same verification methodology described in Scenario 1, navigate to the AWS Lambda Service Authorization Reference and examine the CreateFunction action’s condition keys for the function* resource type.
Available condition keys for lambda:CreateFunction with the function* resource type include:
lambda:CodeSigningConfigArn: Filters access by the ARN of the code signing
configuration-lambda:Layer: Filters access by the ARN of a version of an AWS Lambda layer
lambda:VpcIds: Filters access by the ID of the VPC configured for the Lambda function
There is no condition key for memory allocation (MemorySize parameter), timeout settings, storage configuration (EphemeralStorage), or runtime selection. Because memory allocation isn’t exposed in the authorization context, IAM policies can’t restrict this parameter.
Keep these principles in mind when working with IAM policies:
Policies control what’s in the authorization context, not all elements you see in API documentation
The Service Authorization Reference is authoritative; if something isn’t listed as a condition key, you can’t control it with policies
Different actions have different available contexts even within the same service
Alternative approaches exist. AWS Config, EventBridge, and service-specific controls can be used to achieve your goals when policies alone can’t
Layered security is essential; combine preventive, detective, and responsive controls to help ensure that your data is secure
Conclusion
In this post, you learned how to use the AWS Service Authorization Reference to determine what’s achievable with IAM policies and recognize scenarios that require alternative solutions. By understanding that policies can only make decisions based on information available in the authorization context, you can build more effective security controls and avoid spending time on approaches that won’t work.
The Service Authorization Reference is your authoritative source for understanding policy capabilities. When you need to implement a control, start there to see if the required condition keys exist. If they don’t, you will need to layer in detective or responsive controls using services like AWS Config, Amazon EventBridge, or AWS Lambda.
Remember that effective AWS security isn’t about finding one perfect control, it’s about combining preventive, detective, and responsive measures to create defense in depth. IAM policies are powerful tools for prevention and work as part of a comprehensive security strategy.
Greg Kroah-Hartman has announced the release of the 7.0.2, 6.18.25, 6.12.84, and 6.6.136 stable kernels. As usual, each
contains important fixes throughout; users are advised to upgrade.
NAB Show 2026 wrapped up last week in Las Vegas, and we left with something special in hand: the NAB Show Product of the Year Award in the Cloud Computing and Storage category—this time for Backblaze B2 Neo.
It’s a meaningful recognition, and one that reflects where we see the media and AI infrastructure market heading. Here’s a look at what the recognition means, and why B2 Neo matters.
What this recognition means
Winning the NAB Product of the Year Award reflects something we genuinely believe: that storage infrastructure is a foundational capability for modern media and AI platforms, not an afterthought or a separate vendor relationship to manage.
The NAB Show brings together the best of the media and entertainment industry, and having B2 Neo recognized in this context—among platforms solving real, production-scale problems across streaming, OTT, AI-driven media processing, and large-scale content delivery—is meaningful validation that the approach resonates.
B2 Neo launched in February 2026 and is already supporting production workloads including AI training pipelines, high-performance computing environments, and large-scale media delivery. The response from platform providers has reinforced what we know: organizations want to offer integrated, high-performance storage without building it from scratch, and they want the economics to make sense.
What is B2 Neo?
B2 Neo is a high-performance, S3-compatible cloud object storage solution purpose-built for platforms running data-intensive media and AI workloads. But describing it simply as “cloud storage” undersells the point.
The key distinction: B2 Neo is a white-label service. Rather than selling storage directly to end users, B2 Neo enables platform providers—like media workflow vendors—to offer fully integrated storage under their own brand. Partners launch their own storage service with custom endpoints, pricing, and user experiences, without having to build or operate the underlying infrastructure themselves.
The result is that platforms can go from “we don’t offer storage” to “we have a native, high-performance storage tier” in weeks rather than years, with none of the capital investment or engineering overhead that building it in-house would require.
Why it was built
The problem B2 Neo addresses has been growing for years, but it’s become acute as streaming, OTT, and AI-driven media workflows scale up.
Compute has gotten fast, distributed, and relatively affordable. GPU clusters, edge networks, and CDNs can all handle increasingly complex workloads. But storage has often lagged behind—fragmented across providers, expensive to move data in and out of, and either too costly or too operationally burdensome to build in-house.
The consequence is real: GPU clusters sit idle waiting on data. Streaming pipelines bottleneck on access speeds. Media organizations duplicate content across storage systems because no single layer integrates cleanly into the rest of the stack.
B2 Neo was designed to remove that bottleneck. It delivers up to 1Tbps of throughput to ensure that compute resources—GPU clusters, streaming systems, edge delivery networks—are never waiting on storage. It combines that performance with Backblaze’s 17+ years of operational experience at exabyte scale, and wraps it in an API-first architecture that plugs directly into partner platforms.
How it works
From a technical standpoint, B2 Neo delivers high aggregate throughput using cost-efficient, disk-based infrastructure with strategically deployed flash layers—a write-through cache design that captures the performance benefits of flash without the cost and scalability limitations that come with an all-flash architecture at the multi-petabyte scale that media and AI workloads require.
For workloads where throughput matters as much as latency—moving large video files, training AI models, serving content at scale—this approach is particularly effective. It allows platforms to maintain a centralized data repository and efficiently deliver data to compute providers, edge networks, and CDNs without duplicating data across storage systems.
API-driven provisioning lets partners programmatically create and manage storage accounts, permissions, and billing within their existing systems. Whether a partner is running an OTT platform, a media asset management system, or an AI training pipeline, B2 Neo integrates as a native extension of that environment rather than an external dependency to work around.
Included egress and free API calls round out the picture, eliminating the usage-based fees that typically make storage decisions financially complicated.
What’s next
This is a product that will keep evolving alongside the media and AI infrastructure landscape. We’re working closely with early partners to expand B2 Neo’s capabilities—performance, integration depth, provisioning flexibility—and we’ll have more to share as those conversations develop.
If you’re building or operating a platform that would benefit from embedded, high-performance storage, we’d love to talk. Reach out to our team to learn more about what a B2 Neo partnership looks like.
Late March took me to Seattle for the Specialist Tech Conference, one of the most energizing gatherings of AWS specialists from around the world. It was an incredible opportunity to connect with peers, exchange experiences, and go deep on the latest advancements in Generative AI and Amazon Bedrock — and a powerful reminder of something I truly believe in: when specialists come together to challenge each other, explore edge cases, and co-create solutions, the impact goes far beyond the meeting room. In a fast-moving space like AI, having a strong internal community isn’t a nice-to-have — it’s a competitive advantage.
Now, let’s get into this week’s AWS news…
Headlines
Anthropic partnership: Claude on AWS Trainium and Graviton, and Claude Cowork in Amazon Bedrock – This week, AWS and Anthropic deepened their product collaboration in meaningful ways for builders. Anthropic is now training its most advanced foundation models on AWS Trainium and Graviton infrastructure, co-engineering directly at the silicon level with Annapurna Labs to maximize computational efficiency from the hardware up through the full stack.
Claude Cowork is now available in Amazon Bedrock — Claude Cowork brings Anthropic’s collaborative AI capabilities directly to enterprise builders within the AWS ecosystem, enabling teams to work alongside Claude as a true collaborator, not just a tool. You can now deploy Claude Cowork within your existing Amazon Bedrock environment, keeping your data secure within AWS while leveraging the full power of Claude for team-based AI workflows.
Claude Platform on AWS (Coming soon) — A unified developer experience to build, deploy, and scale Claude-powered applications without leaving AWS. If you’re building with Generative AI on AWS, this is a significant step forward in what you’ll be able to do with Claude directly through Amazon Bedrock.
Meta signs agreement with AWS to power agentic AI on Amazon’s Graviton chips — Meta has signed an agreement to deploy AWS Graviton processors at scale, starting with tens of millions of Graviton cores to power CPU-intensive agentic AI workloads — including real-time reasoning, code generation, search, and multi-step task orchestration.
Last week’s launches
Here are some launches and updates from this past week that caught my attention:
AWS Lambda functions can now mount Amazon S3 buckets as file systems with S3 Files — You can now mount Amazon S3 buckets as file systems in AWS Lambda using S3 Files, enabling your functions to perform standard file operations without downloading data for processing. Built on Amazon EFS, S3 Files provides the simplicity of a file system with the scalability, durability, and cost-effectiveness of S3 — and multiple Lambda functions can connect to the same file system simultaneously, sharing data through a common workspace. This is particularly valuable for AI and machine learning workloads where agents need to persist memory and share state across pipeline steps.
Amazon EKS Hybrid Nodes gateway for hybrid Kubernetes networking — Amazon Elastic Kubernetes Service now offers the Amazon EKS Hybrid Nodes gateway, which automates networking between your EKS cluster VPC and Kubernetes Pods running on EKS Hybrid Nodes. You can now eliminate the need to make on-premises pod networks routable or coordinate network infrastructure changes, greatly simplifying hybrid Kubernetes environments. The gateway automatically enables pod-to-pod traffic across cloud and on-premises environments, control plane-to-webhook communication, and connectivity for AWS services like Application Load Balancers, and is available at no additional charge.
Amazon Aurora Serverless: Up to 30% better performance, smarter scaling, and still scales to zero — Amazon Aurora Serverless just got faster and smarter, with up to 30% better performance than the previous version and an enhanced scaling algorithm designed to handle workloads where multiple tasks compete for resources — like busy APIs and agentic AI applications with bursts of activity and long idle windows. You can now run even more demanding workloads serverlessly, paying only for what you use, and automatically scaling to zero when not in use. All improvements are available in platform version 4 at no additional cost.
Amazon Bedrock AgentCore adds new features to help developers build agents faster — Amazon Bedrock AgentCore introduces a managed harness (preview), the AgentCore CLI, and AgentCore skills for coding assistants, helping developers go from idea to working agent prototype faster. The managed harness lets you define an agent by specifying a model, system prompt, and tools and run it immediately with no orchestration code required — and when you’re ready for full control, you can export the harness orchestration as Strands-based code. The AgentCore CLI deploys your agents with the governance and auditability of infrastructure-as-code (AWS CDK today, Terraform coming soon), and is available in 14 AWS Regions at no additional charge.
For a full list of AWS announcements, be sure to keep an eye on the What’s New with AWS page.
Other AWS news
Here are some additional posts and resources that you might find interesting:
Introducing granular cost attribution for Amazon Bedrock — This post walks through how Amazon Bedrock’s granular cost attribution works and covers practical example cost tracking scenarios. You can now tag and track Bedrock usage costs at a finer level of detail — useful for organizations running multiple teams or projects on Bedrock who need precise cost visibility and chargeback capabilities.
Automating Incident Investigation with AWS DevOps Agent and Salesforce MCP Server — This post (co-written with Salesforce) shows how AWS DevOps Agent, integrated with the Salesforce MCP Server, automates the full lifecycle of infrastructure incident investigation — from identifying issues and diagnosing root causes to notifying customers through Salesforce Service Cloud. It’s a compelling real-world example of how AI agents and MCP-based tool connectivity are reshaping DevOps workflows in production, dramatically reducing mean time to resolution.
Microcredentials from AWS are now free — Here’s why that matters — You can now access AWS microcredentials at no cost through AWS Skill Builder in all countries where the platform is offered. Unlike traditional multiple-choice certifications, microcredentials are hands-on assessments that place builders in simulated business scenarios where they configure, troubleshoot, and optimize directly in a live AWS environment — the same way they would on the job. A great opportunity to validate real cloud skills without a cost barrier.
Amazon SageMaker AI now supports optimized generative AI inference recommendations — You can now use Amazon SageMaker AI to automatically identify optimized deployment configurations for your generative AI models, including instance type, container, and inference parameters. This new capability takes the guesswork out of tuning inference infrastructure, helping you reduce costs and improve latency for your AI applications in production.
Upcoming AWS events
Check your calendar and sign up for upcoming AWS events:
What’s Next with AWS — Tune in on April 28 for What’s Next with AWS, a virtual event featuring the latest announcements and product updates directly from AWS teams. A great opportunity to get up to speed on what’s new before diving into the week’s launches.
AWS Summits — AWS Summits are free in-person events where you can explore the latest in cloud and AI innovation, learn best practices, and network with builders and experts. Coming up in May: Singapore (May 6), Tel Aviv (May 6), Warsaw (May 6), Stockholm (May 7), Sydney (May 13–14), Hamburg (May 20), Seoul (May 20), Amsterdam (May 27), Bangkok (May 28), Milan (May 28), and Mumbai (May 28). And in June, join us in Los Angeles (June 10). Check the full schedule and register at the link above.
AWS Community Days — Community-led conferences where content is planned, sourced, and delivered by community leaders, featuring technical discussions, workshops, and hands-on labs. Upcoming events include Athens, Greece (April 28), Vancouver, Canada (May 1), İstanbul, Türkiye (May 9), and Panama City, Panama (May 23). If you’re in Latin America, mark your calendar for the AWS Community Day Belo Horizonte (August 22) — registration is open at awscommunityday.com.br.
Join the AWS Builder Center to connect with builders, share solutions, and access content that supports your development. Browse here for upcoming AWS-led in-person and virtual events and developer-focused events.
That’s all for this week. Check back next Monday for another Weekly Roundup!
— Daniel Abib
This post is part of our Weekly Roundup series. Check back each week for a quick roundup of interesting news and announcements from AWS!
David Steele, maintainer of the popular pgBackRest backup and restore project for
PostgreSQL, has archived
the project and announced that it is no longer being maintained.
After a lot of thought, I have decided to stop working on pgBackRest. I did
not come to this decision lightly. pgBackRest has been my passion project for
the last thirteen years, and I was fortunate to have corporate sponsorship for
much of this time, but there were also many late nights and weekends as I worked
to make pgBackRest the project it is today, aided by numerous
contributors. Every open-source developer knows exactly what I mean and how much
of your life gets devoted to a special project.
Since Crunchy Data was sold, I have been maintaining pgBackRest and looking
for a position that would allow me to continue the work, but so far I have not
been successful. Likewise, my efforts to secure sponsorship have also fallen far
short of what I need to make the project viable.
Version 0.16.0 of the Zig programming language was
recently announced, and with
it an expanded version of the new Io interface that we
covered in December.
The new interface is based on an idea called structured concurrency that makes writing
correct concurrent applications easier. Zig’s implementation of
the idea is more explicit and verbose than other languages, however, which could
offer an opportunity to explore the consequences of different designs.
Jon Seager, VP engineering for Canonical, has posted
an update on “what Canonical and Ubuntu will do (or not) to
incorporate AI” that explains what part AI will play in the future
of the company and its distribution.
The bottom line is that Canonical is ramping up its use of AI tools
in a focused and principled manner that favours open weight models
with license terms that feel most compatible with our values, combined
with open source harnesses. AI features will be landing in Ubuntu
throughout the next year as we feel that they’re of sufficient
maturity and quality, with a bias toward local inference by
default.
AI features in Ubuntu features will come in two forms: first as a
means of enhancing existing OS functionality with AI models in the
background, and latterly in the form of “AI native” features and
workflows for those who want them.
This year Canonical has begun a more deliberate push toward
education and developing competence with AI tools. We are not setting
shallow metrics on token usage, or percentages of code written with
AI, but rather incentivising engineers to experiment and understand
where AI tools add value. Rather than force a single early-choice AI
stack, we’re incentivising teams to each pick ‘something different’
and go deep, so we learn more as an org in the next six months.
Version 26.04
of the niri scrollable-tiling Wayland compositor has been released. The most
notable change in this release, as the “most requested niri feature by far“,
is support for the blur effect using the Wayland protocol’s ext-background-effect. This
release also features optional configuration
includes, screencasting support enhancements, and a number of improvements for
input devices.
In short, background blur turned out to be a massive undertaking. Not because of
the blur algorithm itself (by the way, if you want to learn about different blurs,
including the widely used Dual Kawase, I highly recommend this blog post), but because window
background effects in general required a lot of thinking and additions to the code,
especially to make them as efficient as possible. This is one of the most complex
niri features thus far.
Linus has released 7.1-rc1 and closed the
merge window for this release.
Things look fairly normal, although we do have a few different
projects to cull some old hardware support to help minimize
maintenance burden: phasing out i486 support (configs deleted, code
deletions to follow) and independently starting to remove some
really old networking hardware support, and removing some SoC
support that never went anywhere.
But we’re more than making up for any stale code removal with all
the new features and code added, so the diffstat still shows many
more lines added than removed.
The collective thoughts of the interwebz
Manage Consent
To provide the best experiences, we use technologies like cookies to store and/or access device information. Consenting to these technologies will allow us to process data such as browsing behavior or unique IDs on this site. Not consenting or withdrawing consent, may adversely affect certain features and functions.
Functional
Always active
The technical storage or access is strictly necessary for the legitimate purpose of enabling the use of a specific service explicitly requested by the subscriber or user, or for the sole purpose of carrying out the transmission of a communication over an electronic communications network.
Preferences
The technical storage or access is necessary for the legitimate purpose of storing preferences that are not requested by the subscriber or user.
Statistics
The technical storage or access that is used exclusively for statistical purposes.The technical storage or access that is used exclusively for anonymous statistical purposes. Without a subpoena, voluntary compliance on the part of your Internet Service Provider, or additional records from a third party, information stored or retrieved for this purpose alone cannot usually be used to identify you.
Marketing
The technical storage or access is required to create user profiles to send advertising, or to track the user on a website or across several websites for similar marketing purposes.
 Yes
Yes No
No